

Craftsman 48624629 Owner’s Manual
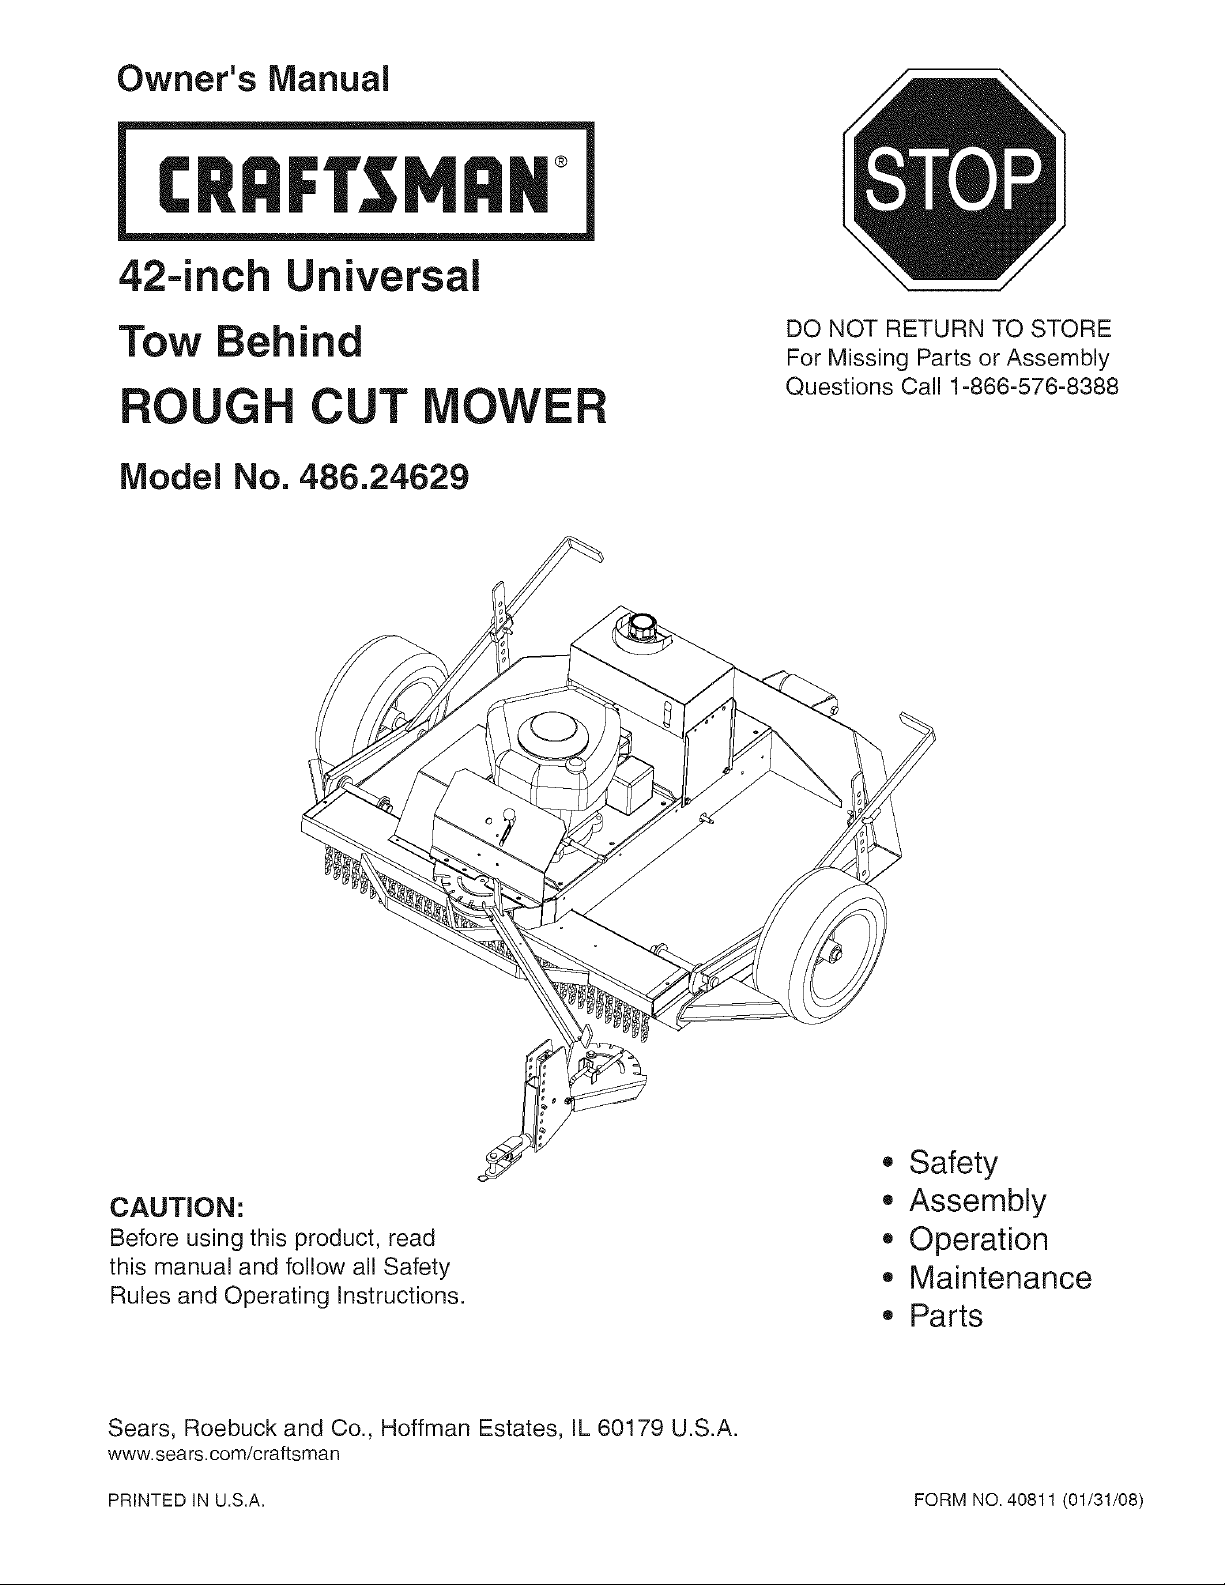
Owner's Manual
CRRFrSMRN
42-inch Universal
Tow Behind
ROUG CUT
Model No. 486.24629
DO NOT RETURN TO STORE
For Missing Parts or Assembly
Questions Call 1-866-576-8388
• Safety
CAUTION:
Before using this product, read
this manual and follow all Safety
Rules and Operating Instructions.
Sears, Roebuck and Co., Hoffman Estates, IL 60179 U.S.A.
www.sears.com/craftsman
PRINTED IN U.S.A. FORM NO. 40811 (01/31/08)
,, Assembly
,, Operation
,, Maintenance
,, Parts
WARRANTY ..................................................... 2
SAFETY RULES ............................................ 3-4
CARTON CONTENTS/PARTS BAG .............. 5-6
ASSEMBLY .................................................. 7-10
WIRING DIAGRAM ........................................ 11
OPERATION .............................................. 12-16
LIMITED WARRANTY ON CRAFTSMAN POWERED TRACTOR ATTACHMENTS
For one (1) year from the date of purchase, if this Craftsman Equipment is maintained,
lubricated and tuned up according to the instructions in the owner's manual, Sears will repair
or replace free of charge any parts found to be defective in material or workmanship. Warranty
service is available free of charge by returning your Craftsman equipment to your nearest Sears
Service Center. In-home warranty service is available but a trip charge will apply. This Warranty
applies only while this product is in the United States.
This Warranty does not cover:
• Expendable items which become worn during normal use, such as spark plugs, air cleaners,
belts, and oil filters.
Tire replacement or repair caused by punctures from outside objects, such as nails, thorns,
stumps, or glass.
Repairs necessary because of operator abuse, including but not limited to, damage caused by
impacting objects that bend the frame or crankshaft, or over-speeding the engine.
Repairs necessary because of operator negligence, including but not limited to, electrical and
mechanical damage caused by improper storage, failure to use the proper grade and amount
of engine oil, or failure to maintain the equipment according to the instructions contained in the
owner's manual.
Engine (fuel system) cleaning or repairs caused by fuel determined to be contaminated or
oxidized (stale). In general, fuel should be used within 30 days of its purchase date.
Equipment used for commercial or rental purposes.
MAINTENANCE ........................................ 17-18
SERVICE AND ADJUSTMENT ................. 19-20
STORAGE ...................................................... 21
REPAIR PARTS LISTS .............................. 22-26
SLOPE GUIDE ............................................... 27
PARTS ORDERING/SERVICE ......... Rear Cover
LIMITED WARRANTY ON BATTERY
For ninety (90) days from date of purchase, if any battery included with the equipment proves
defective in material or workmanship and our testing determines the battery will not hold a
charge, Sears will replace the battery at no charge. Warranty service is available free of charge
by returning your Craftsman equipment to your nearest Sears Service Center. In-home warranty
service is available but a trip charge will apply. This Warranty applies only while this product is in
the United States.
TO LOCATE THE NEAREST SEARS SERVICE CENTER OR TO SCHEDULE SERVICE,
SIMPLY CONTACT SEARS AT 1-800-4-MY-HOME.
This warranty gives you specific legal rights, and you may also have other rights, which vary from
state to state.
WARNING: This cutting machine is capable of amputating hands and feet and throwing objects. Failure to
observe the following safety instructions could result in serious injury or death.
I°
GENERAL OPERATION
®
Read, understand and follow all instructions in the
manual and on the machine before starting.
®
Read this operator's manual carefully. Become
familiar with the controls and know how to operate
your mower properly.
* Only allow responsible adults who are familiar with
the instructions to operate the machine.
* Clear the area of objects such as rocks, toys, wire,
etc., which could be picked up and thrown by the
blade.
* Be sure the area is clear of other people before
mowing. Stop machine if anyone enters the area.
* Never carry passengers.
* Do not mow in reverse unless absolutely necessary.
Always look down and behind before and during
backing.
* Be aware of the mower discharge direction and do
not point it at anyone. Do not operate the mower
without the guard in place.
* Slow down before turning.
* Never leave a running machine unattended. Always
turn off blades and stop engine.
* Turn off blades when not mowing.
* Mow only in daylight or good artificial light.
* Do not operate the machine while under the
influence of alcohol or drugs.
* Watch for traffic when crossing or operating near
roadways.
* Use extra care when loading or unloading the
machine into a trailer or truck.
* Do not attempt to operate your tractor or mower
when not in drivers seat.
* Disengage power to mower and stop engine when
transporting or when not in use.
* Exercise special care when mowing around fixed
objects in order to prevent the blades from striking
them. Never deliberately run tractor or mower onto or
over any foreign object.
* Use mower only as the manufacturer intended and
as described in this manual.
* Do not operate mower if it has been dropped or
damaged in any manner. Always have damage
repaired before using your mower.
* Always wear safety glasses or eye shields when
starting and while using your mower.
* Dress properly. Do not operate mower when barefoot
or wearing open sandals. Wear only solid shoes with
good traction when mowing.
* Always make cutting height adjustments before
starting your mower. Never attempt to do this while
the engine is running.
* Keep your eyes and mind on your mower and the
area being cut. Do not let other interests distract you.
* Do not put hands or feet near or under rotating parts.
Keep clear of the discharge opening at all times.
* Before cleaning, inspecting, or repairing your mower,
stop the engine and make absolutely sure the blade
and all moving parts have stopped. Then disconnect
the spark plug wire and keep it away from the spark
plug to prevent accidental starting.
* Do not operate your mower if it vibrates abnormally.
Excessive vibration is and indication of damage; stop
the engine, safely check for the cause of vibration
and repair as required.
* Never operate your mower without proper guards,
plates or other safety devices in place.
II. SLOPE OPERATION
Slopes are a major factor related to loss-of-control and
tip-over accidents, which can result in severe injury or
death. All slopes require extra caution. If you feel uneasy
on it, do not mow it.
DO:
* Mow up and down slopes, not across.
* Remove obstacles such as rocks, tree limbs, etc.
Watch for holes, ruts or bumps. Uneven terrain could
overturn the machine. Tall grass can hide obstacles.
* Use slow speed. Choose a low gear so that you will
not have to stop or shift while on the slope.
* Follow the manufacturer's recommendations for
wheel weights or counterweights to improve stability.
* Keep all movement on the slopes slow and gradual.
Do not make sudden changes in speed or direction.
* Avoid starting or stopping on a slope. If tires lose
traction, disengage the blades and proceed slowly
straight down the slope.
DO NOT:
* Do not turn on slopes unless necessary, and then
turn slowly and gradually downhill, if possible.
* Do not mow near drop-offs, ditches or
embankments. The mower could suddenly turn over
if a wheel is over the edge of a cliff or ditch, or if an
edge caves in.
* Do not mow on wet grass. Reduced traction could
cause sliding.
3
III.CHILDREN
Tragicaccidentscanoccuriftheoperatorisnotalertto
thepresenceofchildren.Childrenareoftenattractedto
themachineandthemowingactivity.Neverassumethat
childrenwillremainwhereyoulastsawthem.
Keepchildrenoutofthemowingareaandunderthe
watchfulcareofanotherresponsibleadult.
Bealertandturnmachineoffif childrenenterthe
area.
Beforeandwhenbacking,lookbehindanddownfor
smallchildren.
Nevercarrychildren.Theymayfalloffandbe
seriouslyinjuredorinterferewithsafemachine
operation.
Neverallowchildrentooperatethemachine.
Useextracarewhenapproachingblindcorners,
shrubs,treesorotherobjectsthatmayobscure
vision.
IV. SERVICE
Useextracareinhandlinggasolineandotherfuels.
Theyareflammableandvaporsareexplosive.
Useonlyanapprovedcontainer.
Neverremovegascaporaddfuelwiththe
enginerunning.
Allowenginetocoolbeforerefueling.Donot
smokenearorwhileoperatingmower.
• Never refuel the machine indoors.
Never store the machine or fuel container inside
a room where there is an open flame, such as
with a gas water heater.
Never run a machine inside a closed area.
Keep nuts and bolts, especially blade attachment
nuts, tight and keep equipment in good condition.
Never tamper with safety devices. Check their proper
operation regularly.
Keep machine free of grass, leaves or other debris
build-up. Clean oil or fuel spillage. Allow machine to
cool before storing.
Stop and inspect the equipment if you strike an
object. Repair, if necessary, before restarting.
Never make adjustment or repairs with the engine
running.
Mower blades are sharp and can cut. Wrap the
blade(s) or wear gloves, and use extra caution when
servicing them.
Check brake operation frequently. Adjust and service
as required.
Look for this symbol to point out
important safety precautions. It
means CAUTIONH! BECOME
ALERT!!! YOUR SAFETY IS
INVOLVED.
CAUTION: Always disconnect spark
plug wire and place wire where it
cannot contact spark plug in order
to prevent accidental starting when
setting up, transporting, adjusting or
making repairs.
4

PJease read and keep this manual. The instructions
will enabJe you to assembJe and maintain your power
mower properly. AJways observe the "safety rules."
Record serial number and date of purchase in space
provided below.
MODEL NUMBER:
SERIAL NUMBER:
DATE OF PURCHASE:
The model and serial numbers will be found on the
plate attached to the left side of the drive housing.
You should record both serial number and date of
purchase and keep in a safe place for future reference.
486.24629
PRODUCT SPECIFICATIONS
WARNING: This unit is equipped
with an internal combustion engine
and should not be used on or near
any unimproved forest-covered
or grass-covered land unless the engine's
exhaust system is equipped with a spark
arrester and meeting applicable local or state
laws (if any). If a spark arrester is used, it
should be maintained in effective working
order by the operator.
In the state of California the above is required
by law (section 4442 of the California Public
Resources Code). Other states may have
similar laws. Federal laws apply on federal
lands. A spark arrester for the muffler
is available through your nearest sears
authorized service center.
Horsepower: 15.5
Displacement: 31 CU IN.
Gasoline Type: Unleaded Regular
Oil Type SAE 30 (Above 32 F)
(API-SF/SG) SAE 5W-30 (Below 32 F
[Oil Capacity:
_Spark Plug:
[Tire Pressure:
_Width of Cut:
48 oz. (1.42 liters)
(GAP: .030")
14 psi max.
42 Inches
HITCH ASSEMBLY
MOWER DECK
REAR ROLLER
REAR ROLLER
BRACKET
PARTS BAG
(CONTENTS ON PAGE 6)

G
SHOWN FULL SIZE
A
NOT SHOWN FULL SIZE
RER QT_
A 1
B 2
C 2
D 2
E 2
F 1
jF
DESCRIPTION
Hex Bolt, 1/2" x 7"
Hex Bolt, 1/4" x 7-1/2"
Hex Bolt, 5/18" x 3/4"
Hex Bolt, 1/4" x 3/4"
Screw, Self Tapping #10 x 1/2"
Hex Nylock Jam Nut, 1/2"
RER QT_
G 2
H 2
I 2
J 2
K 1
DESCRIPTION
Hex Nylock Nut, 5/16"
Hex Nut (SEMS), 1/4"
Clip, 3/8"
Plastic Nut
Key
TOOLS REQUIRED FOR ASSEMBLY
(1) 5/16" Wrench
(2) 7/16" Wrenches
(2) 1/2" Wrenches
(2) 9/16" Wrenches
(2) 3/4" Wrenches or Adjustable Wrenches
UNPACKING
Enclosed in packing crate are (3) items:
1. Mower Deck
2. Tow Bar Hitch Assembly
3. Box of Parts consisting of:
• Rear Roller
• Rear Roller Bracket
• Bag of Parts (See page 6)
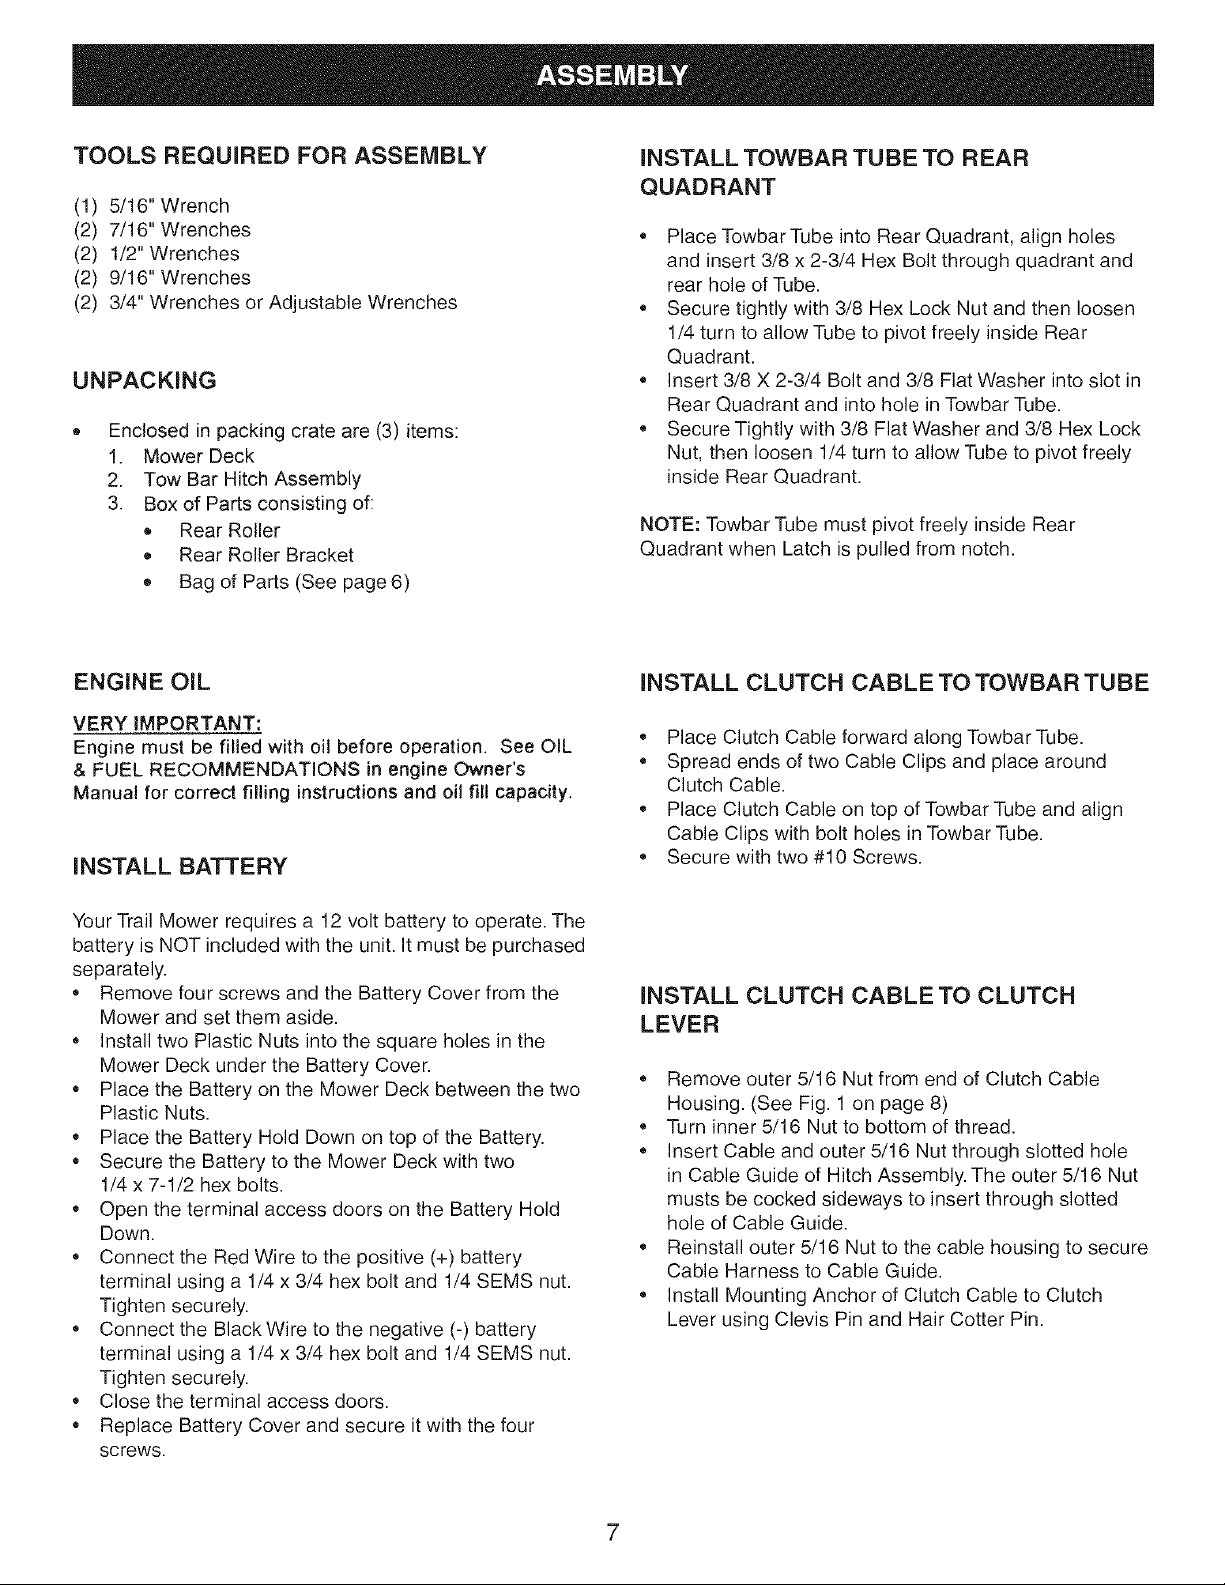
INSTALLTOWBARTUBETO REAR
QUADRANT
Place Towbar Tube into Rear Quadrant, align holes
and insert 3/8 x 2-3/4 Hex Bolt through quadrant and
rear hole of Tube.
Secure tightly with 3/8 Hex Lock Nut and then loosen
1/4 turn to allow Tube to pivot freely inside Rear
Quadrant.
Insert 3/8 X 2-3/4 Bolt and 3/8 Flat Washer into slot in
Rear Quadrant and into hole in Towbar Tube.
Secure Tightly with 3/8 Fiat Washer and 3/8 Hex Lock
Nut, then loosen 1/4 turn to allow Tube to pivot freely
inside Rear Quadrant.
NOTE: Towbar Tube must pivot freely inside Rear
Quadrant when Latch is pulled from notch.
ENGINE OIL
VERY IMPORTANT:
Engine must be filled with oil before operation. See OIL
& FUEL RECOMMENDATIONS in engine Owner's
Manual for correct filling instructions and oil fill capacity.
INSTALL BATTERY
Your Trail Mower requires a 12 volt battery to operate. The
battery is NOT included with the unit. It must be purchased
separately.
Remove four screws and the Battery Cover from the
Mower and set them aside.
Install two Plastic Nuts into the square holes in the
Mower Deck under the Battery Cover.
Place the Battery on the Mower Deck between the two
Plastic Nuts.
Place the Battery Hold Down on top of the Battery.
Secure the Battery to the Mower Deck with two
1/4 x 7-1/2 hex bolts.
Open the terminal access doors on the Battery Hold
Down.
Connect the Red Wire to the positive (+) battery
terminal using a 1/4 x 3/4 hex bolt and 1/4 SEMS nut.
Tighten securely.
Connect the Black Wire to the negative (-) battery
terminal using a 1/4 x 3/4 hex bolt and 1/4 SEMS nut.
Tighten securely.
Close the terminal access doors.
Replace Battery Cover and secure it with the four
screws.
INSTALL CLUTCH CABLE TO TOWBAR TUBE
Place Clutch Cable forward along Towbar Tube.
Spread ends of two Cable Clips and place around
Clutch Cable.
Place Clutch Cable on top of Towbar Tube and align
Cable Clips with bolt holes in Towbar Tube.
Secure with two #10 Screws.
INSTALL CLUTCH CABLE TO CLUTCH
LEVER
Remove outer 5/16 Nut from end of Clutch Cable
Housing. (See Fig. 1 on page 8)
Turn inner 5/16 Nut to bottom of thread.
Insert Cable and outer 5/16 Nut through slotted hole
in Cable Guide of Hitch Assembly. The outer 5/16 Nut
musts be cocked sideways to insert through slotted
hole of Cable Guide.
Reinstall outer 5/16 Nut to the cable housing to secure
Cable Harness to Cable Guide.
Install Mounting Anchor of Clutch Cable to Clutch
Lever using Clevis Pin and Hair Cotter Pin.
7
TERMINAL ACCESS DOORS
1/4 X 3/4 HEX BOLT &
1/4 HEX NUT (SEMS)
BLACK WIRE
BATTERY HOLD DOWN
1/4 X 7-1/2 HEX BOLT
PLASTIC NUT
REAR QUADRANT
3/8 X 2-3/4 HEX BOLT
3/8 FLAT WASHER
BATTERY
SCREW (4)
RED WIRE
1/4 X 7-1/2
HEX BOLT
CLUTCH LEVER
#10 SCREW (2)
CABLE CLIP (2)
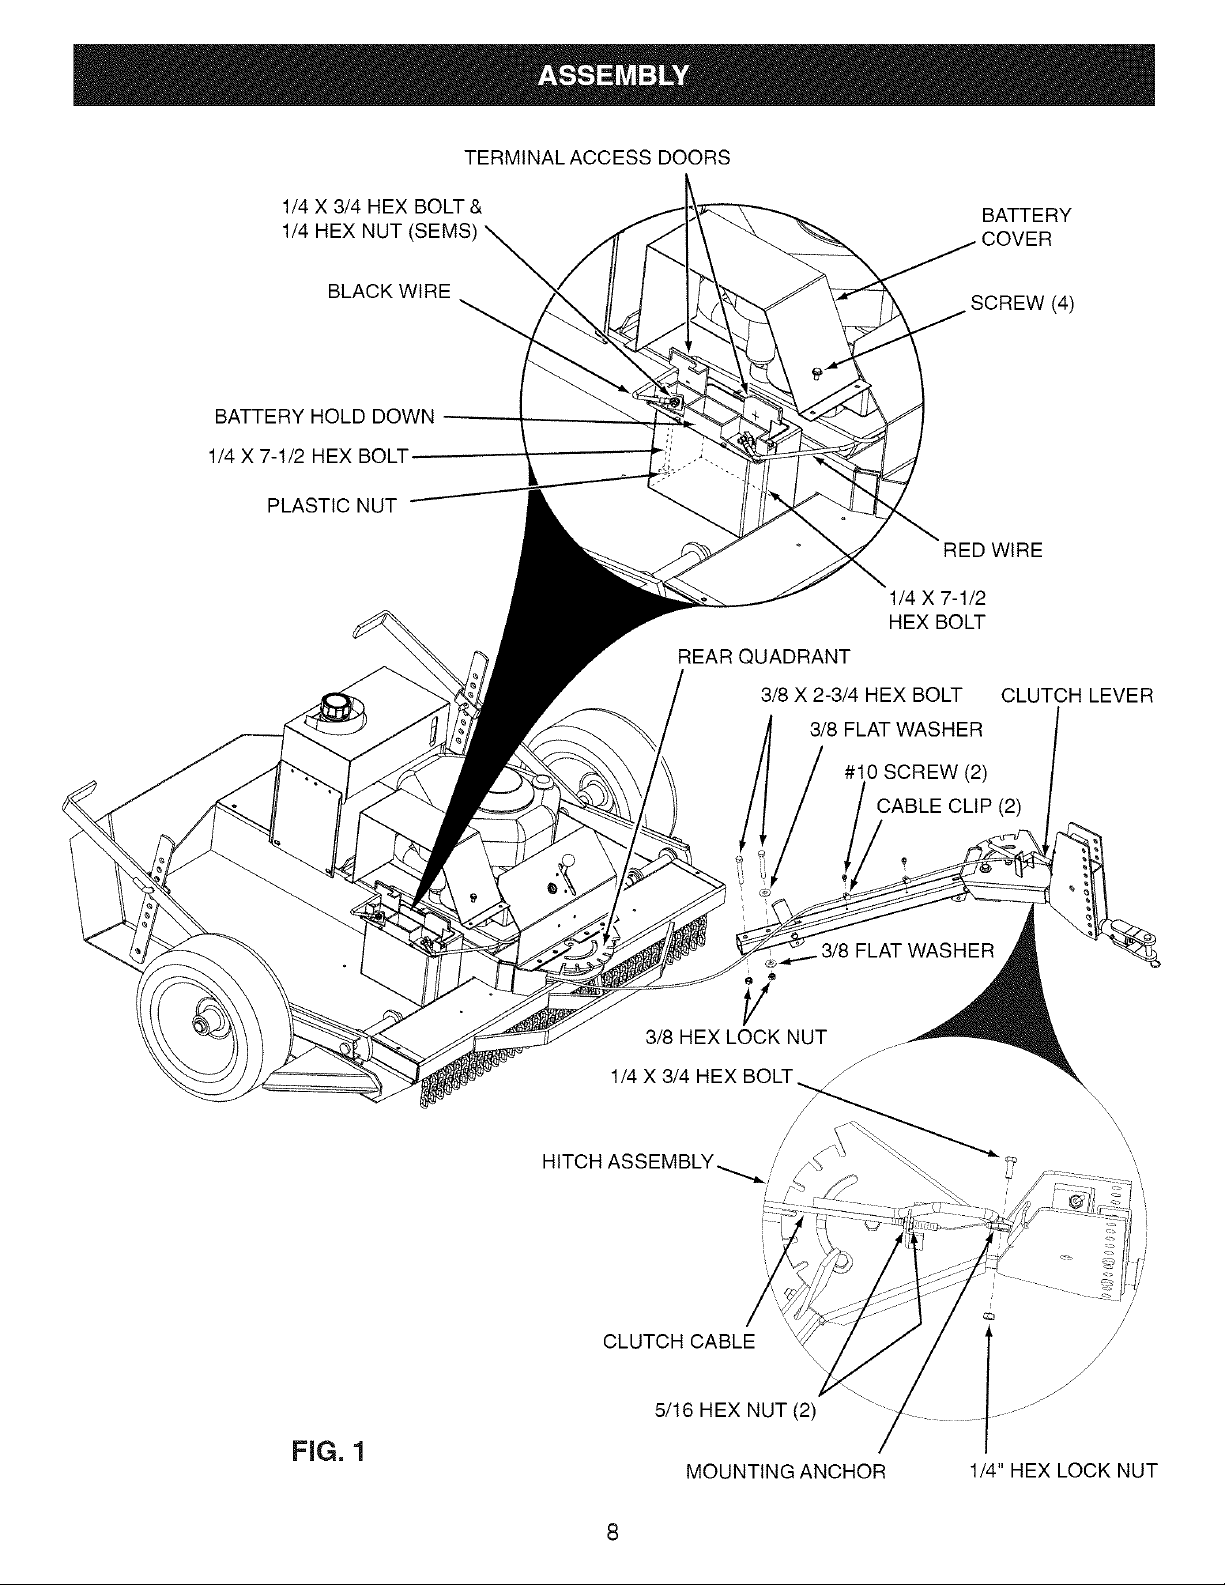
FIG. 1
Y
3/8 HEX LOCK NUT
1/4 X 3/4 HEX BOLT_,_
HITCH ASSEMBLY....._,/ _
i' ,' "
CLUTCH CABLE
5/16 HEX NUT (2)
MOUNTING ANCHOR
3/8 FLAT WASHER
j_
1/4" HEX LOCK NUT
\
\
\
\
\
/
/
/
SWITCH
BODY
INNER NUT
OUTER NUT
/
CLUTCH CABLE ADJUSTMENT
Remove four screws from Rear Drive Cover. Lay aside
cover and screws.
Place Clutch Lever in "DISENGAGED" position
The Cable should be under slight tension but should
not pull the Clutch Lever more than 1/8" away from the
Switch Body.
NOTE: If the Plunger extends more than 1/8" out from
the switch body, the cable tension is too tight and the
Engine will not start.
TO INCREASE CABLE TENSION
Place Blade Clutch Lever in the "DISENGAGED"
position.
Loosen the inner nut on the Clutch Cable.
Tighten the outer nut on the Clutch Cable.
TO DECREASE CABLE TENSION
Place Blade Clutch Lever in the "DISENGAGED"
position.
• Loosen the outer nut on the Clutch Cable.
• Tighten the inner nut on the Clutch Cable.
• Repeat the above procedure until you have the correct
tension.
PLUNGER
CLUTCH LEVER
REAR DRIVE ''''''''''_"
COVER
FIG. 2
FOUR
SCREWS
ENGINE
PULLEY
BLADE
PULLEY
9
© ©
IDLER
PULLEY
©
CLUTCH LEVER
 Loading...