

Craftsman 486243294 Owner’s Manual

Owner's Manual
CRAFTSHRN°
42-inch Universal
Tow Behind
POWER MOWER
Model No. 486.243294
DO NOT RETURN TO STORE
For Missing Parts or Assembly
Questions Call 1-866-576-8388
• Safety
CAUTION:
Before using this product, read
this manual and follow all Safety
Rules and Operating Instructions.
Sears, Roebuck and Co., Hoffman Estates, IL 60179 U.S.A.
www.sears.com/craftsman
PRINTED IN U.S.A. FORM NO. 40369 (6/06)
• Assembly
• Operation
• Maintenance
° Parts
TABLE OF CONTENTS
WARRANTY ................................................................ 2
SAFETY RULES ....................................................... 3-4
CARTON CONTENTS ................................................. 5
ASSEMBLY ............................................................... 6-8
WIRING DIAGRAM ..................................................... 8
OPERATION ........................................................... 9-13
LIMITED WARRANTY ON CRAFTSMAN POWERED TRACTOR ATTACHMENTS
For one (1) year from the date of purchase, if this Craftsman Equipment is maintained, lubricated and tuned up
according to the instructions in the owner's manual, Sears will repair or replace free of charge any parts found to
be defective in material or workmanship. Warranty service is available free of charge by returning your Craftsman
equipment to your nearest Sears Service Center. In-home warranty service is available but a trip charge wi!l apply.
This Warranty applies only while this product is in the United States.
This Warranty does not cover:
• Expendable items which become worn during normal use, such as spark plugs, air cleaners, belts, and oil
filters.
• Tire replacement or repair caused by punctures from outside objects, such as nails, thorns, stumps, or glass.
° Repairs necessary because of operator abuse, including but not limited to, damage caused by impacting
objects that bend the frame or crankshaft, or over-speeding the engine.
• Repairs necessary because of operator negligence, including but not limited to, electrical and mechanical
damage caused by improper storage, failure to use the proper grade and amount of engine oil, or failure to
maintain the equipment according to the instructions contained in the owneCs manual.
° Engine (fuel system) cleaning or repairs caused by fuel determined to be contaminated or oxidized (stale). In
general, fuel should be used within 30 days of its purchase date.
° Equipment used for commercial or rental purposes.
MAINTENANCE ................................................... 14-15
SERVICE AND ADJUSTMENT ............................ 16-17
STORAGE ................................................................. 18
REPAIR PARTS LISTS ......................................... 20-22
SLOPE GUIDE .......................................................... 23
PARTS ORDERING/SERVICE .................... Rear Cover
LIMITED WARRANTY ON BATTERY
For ninety (90) days from date of purchase, if any battery included with the equipment proves defective in material
or workmanship and our testing determines the battery will not hold a charge, Sears will replace the battery at no
charge. Warranty service is available free of charge by returning your Craftsman equipment to your nearest Sears
Service Center. In-home warranty service is available but a trip charge will apply. This Warranty applies only while
this product is in the United States.
TO LOCATE THE NEAREST SEARS SERVICE CENTER OR TO SCHEDULE SERVICE,
SIMPLY CONTACT SEARS AT 1-800-4-MY-HOME.
This warranty gives you specific legal rights, and you may also have other rights, which vary from state to state,
2

SAFETY RULES
Safe Operation Practices for Tow Behind Mowers
&
L GENERAL OPERATION
manual and on the machine before starting.
familiar with the controls and know how to operate
your mower properly.
• Only allow responsible adults who are familiar with
the instructions to operate the machine.
• Clear the area of objects such as rocks, toys, wire,
etc., which could be picked up and thrown by the
blade.
• Be sure the area is clear of other people before
mowing. Stop machine if anyone enters the area.
• Never carry passengers.
• Do not mow in reverse unless absolutely
necessary. Always look down and behind before and
during backing.
• Be aware of the mower discharge direction and do
not point it at anyone. Do not operate the mower
without the guard in place.
• Slow down before turning.
• Never leave a running machine unattended. Always
turn off blades and stop engine.
• Turn off blades when not mowing.
• Mow only in daylight or good artificial light.
• Do not operate the machine while under the
influence of alcohol or drugs.
° Watch for traffic when crossing or operating near
roadways.
• Use extra care when loading or unloading the
machine into a trailer or truck.
• Do not attempt to operate your tractor or mower
when not in drivers seat.
• Disengage power to mower and stop engine when
transporting or when not in use.
° Exercise special care when mowing around fixed
objects in order to prevent the blades from striking
them. Never deliberately run tractor or mower onto
or over any foreign object.
• Use mower only as the manufacturer intended and
as described in this manual.
• Do not operate mower if it has been dropped or
damaged in any manner. Always have damage
repaired before using your mower.
• Always wear safety glasses or eye shields when
starting and while using your mower.
• Dress properly. Do not operate mower when
barefoot or wearing open sandals. Wear only solid
shoes with good traction when mowing.
• Always make cutting height adjustments before
starting your mower. Never attempt to do this while
the engine is running.
WARNING: This cutting machine is capable of amputating hands and feet and throwing objects. Failure to
observe the following safety instructions could result in serious injury or death.
Read, understand and follow all instructions in the
Read this operators manual carefully. Become
• Keep your eyes and mind on your mower and the
area being cut. Do not let other interests distract
you.
• Do not put hands or feet near or under rotating
parts. Keep clear of the discharge opening at all
times.
° Before cleaning, inspecting, or repairing your
mower, stop the engine and make absolutely sure
the blade and all moving parts have stopped. Then
disconnect the spark plug wire and keep it away
from the spark plug to prevent accidental starting.
• Do not operate your mower if it vibrates
abnormally. Excessive vibration is and indication of
damage; stop the engine, safely check for the cause
of vibration and repair as required.
• Never operate your mower without proper guards,
plates or other safety devices in place.
II. SLOPE OPERATION
Slopes are a major factor related to loss-of-control and
tip-over accidents, which can result in severe injury or
death. All slopes require extra caution. If you feel uneasy
on it, do not mow it.
DO:
• Mow up and down slopes, not across.
° Remove obstacles such as rocks, tree limbs, etc,
Watch for holes, ruts or bumps. Uneven terrain could
overturn the machine. Tall grass can hide obstacles.
• Use slow speed. Choose a low gear so that you will
not have to stop or shift while on the slope.
• Follow the manufacturer's recommendations for
wheel weights or counterweights to improve stability.
° Keep all movement on the slopes slow and gradual.
Do not make sudden changes in speed or direction.
• Avoid starting or stopping on a slope. If tires lose
traction, disengage the blades and proceed slowly
straight down the slope.
DO NOT:
• Do not turn on slopes unless necessary, and then
turn slowly and gradually downhill, if possible.
• Do not mow near drop-oils, ditches or
embankments. The mower could suddenly turn over
if a wheel is over the edge of a cliff or ditch, or if an
edge caves in.
• Do not mow on wet grass, Reduced traction could
cause sliding.
3
II!. CHILDREN
Tragic accidents can occur if the operatoris not alert to
the presence of children. Children are often attracted to
the machine and the mowing activity. Never assume that
children will remain where you last saw them.
• Keep children out of the mowing area and under the
watchful care of another responsible adult.
• Be alert and turn machine off if children enter the
area.
• Before and when backing, took behind and down for
small children.
• Never carry children. They may fall off and be
seriously injured or interfere with safe machine
operation.
• Never allow children to operate the machine.
• Use extra care when approaching blind corners,
shrubs, trees or other objects that may obscure
vision.
IV, SERVICE
• Use extra care in handling gasoline and other fuels.
They are flammable and vapors are explosive.
• Use only an approved container.
• Never remove gas cap or add fuel with the
engine running.
• Allow engine to cool before refueling. Do not
smoke near or while operating mower.
• Never refuel the machine indoors.
° Never store the machine or fuel container inside
a room where there is an open flame, such as
with a gas water heater.
, Never run a machine inside a closed area.
° Keep nuts and bofts, especially blade attachment
nuts, tight and keep equipment in good condition.
• Never tamper with safety devices. Check their
proper operation regularly.
• Keep machine free of grass, leaves or other debris
build-up. Clean oil or fuel spillage. Allow machine to
cool before storing.
• Stop and inspect the equipment if you strike an
object. Repair, if necessary, before restarting.
• Never make adjustment or repairs with the engine
running.
• Mower blades are sharp and can cut. Wrap the
blade(s) or wear gloves, and use extra caution when
servicing them.
• Check brake operation frequently. Adjust and
service as required,
&
&
Look for this symbol to point out
important safety precautions. It
means CAUTION!!! BECOME
ALERT!!] YOUR SAFETY IS
INVOLVED.
CAUTION: Always disconnect spark
plug wire and place wire where it
cannot contact spark plug in order
to prevent accidental starting when
setting up, transporting, adjusting or
making repairs.
4

Please read and keep this manual. The instructions will
enable you to assemble and maintain your Power
Mower properly. Always observe the "Safety Rules."
Record serial number and date of purchase in space
provided below.
MODEL
NUMBER: 486.243293
SERIAL
NUMBER:
DATE OF
PURCHASE:
The model and serial numbers will be found on a
plate attached to the right side of the Drive Housing.
You should record both serial number and date of
of purchase and keep in a safe place for future
reference.
WARNING: This unit is equipped with an7
internal combustion engine and should
not be used on or near any unimproved
forest-covered or grass-covered land
unless the engine's exhaust system is equipped
with a spark arrester meeting applicable local or
state laws (if any). If a spark attester is used, it
should be maintained in effective working order by
the operator.
In the state of California the above is required by
law (Section 4442 of the California Public Resources
Code). Other states may have similar laws. Federal
laws apply on federal lands. A spark arrester for the
nuffler is available through your nearest Sears
Authorized Service Center.
PRODUCT SPECIFICATIONS
HORSEPOWER: 10.5
DISPLACEMENT: 21 CU. IN.
GASOLINE TYPE: UNLEADED REGULAR
OIL TYPE (API-SF/SG): SAE 30 (ABOVE 32°F)
SAE 5W-30 (BELOW 32°F)
OIL CAPACITY: 28 OUNCES
SPARK PLUG: (GAP: .030")
V'ALVE CLEARANCE: fNTAKE: .004 - .006 IN.
EXHAUST: .004- ,006 IN.
BLADE BOLT TORQUE 35-40 FT, LBS.
TIRE PRESSURE 10 PSI
i i i i i i ill , | | i iil lll ILl±ll,Jl
CONTENTS OF CARTON
PARTS PACKED SEPARATELY IN CRATE
PARTS BAG
MOWER DECK
WIDTH OF CUT 42 INCHES
PARTS BAG CONTENTS
/ ,i iL ,i ,i ,,,,,, ,,, ,,,,,,,
CABLE GUIDE (2)
OPERATOR PRESENCE SEAT
3/8 CABLE CLIP (3)
112CABLE CLIP (3)
_SCREW (3)
i
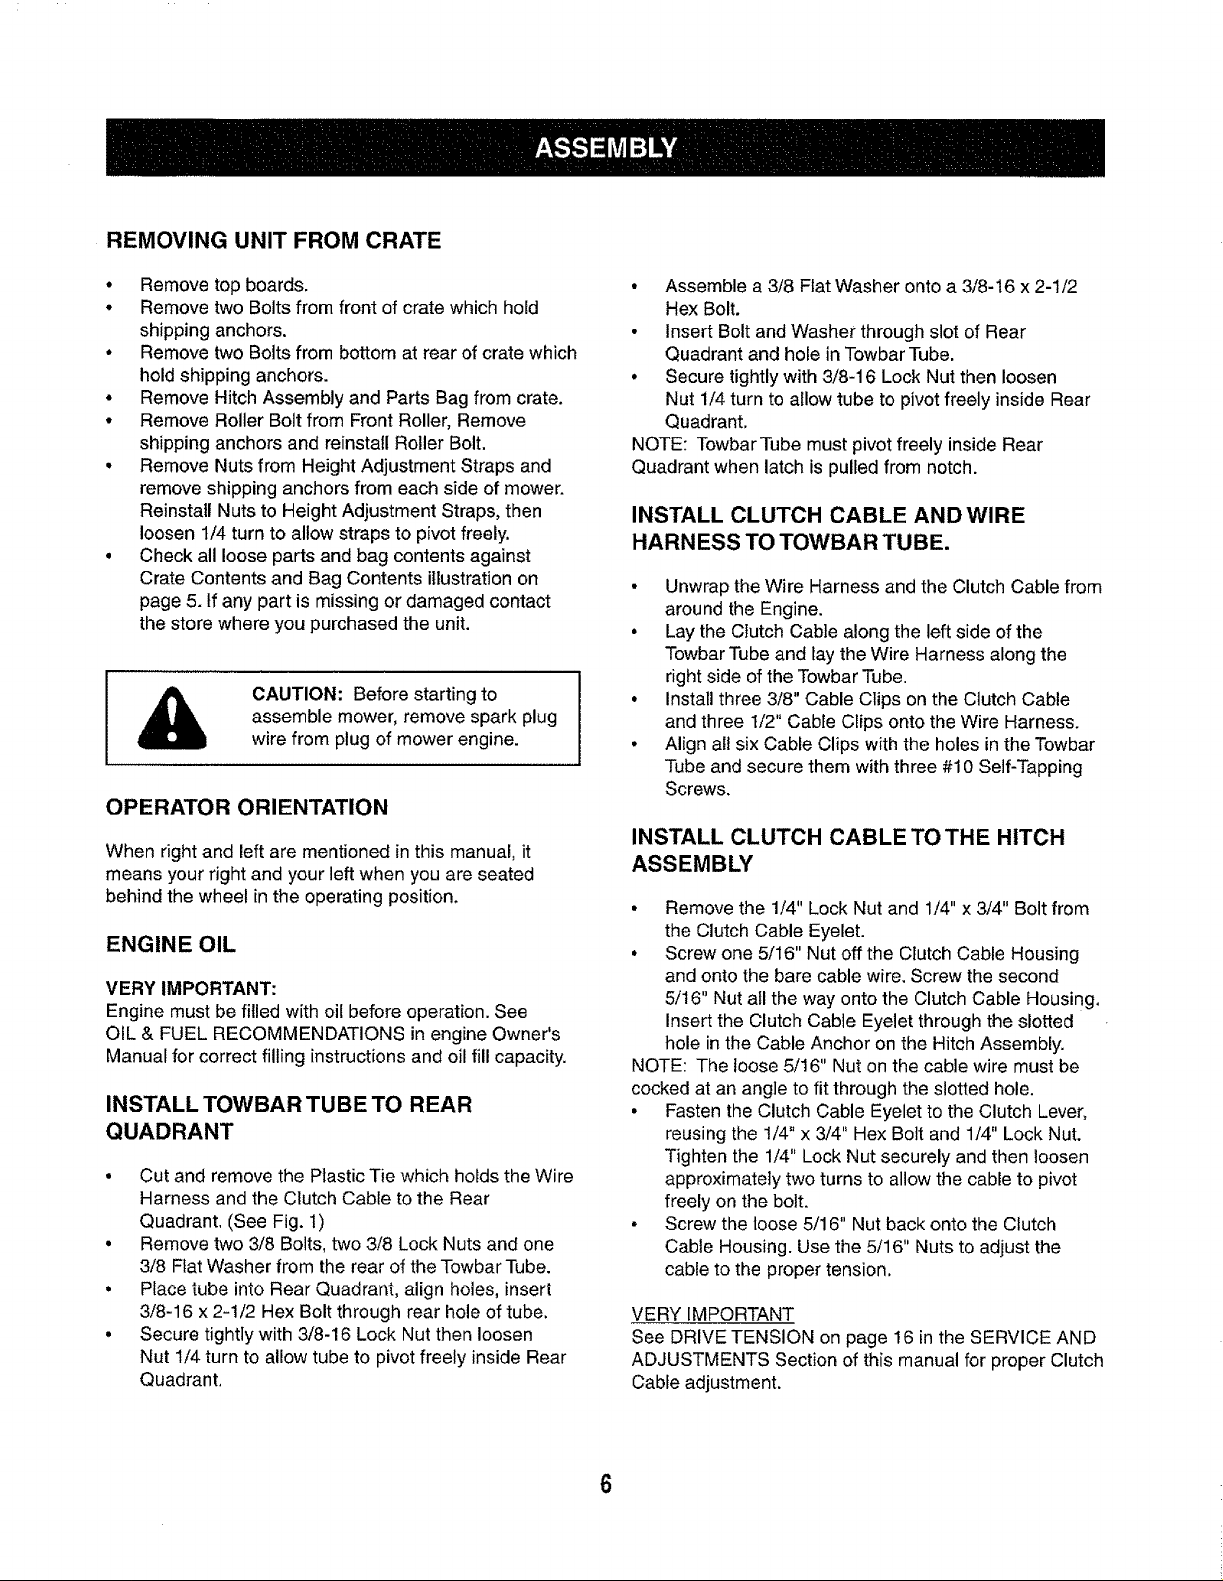
REMOVINGUNITFROMCRATE
• Remove top boards.
• Remove two Bolts from front of crate which hold
shipping anchors.
• Remove two Bolts from bottom at rear of crate which
hold shipping anchors.
• Remove Hitch Assembly and Parts Bag from crate.
• Remove Roller Bolt from Front Roller, Remove
shipping anchors and reinstall Roller Bolt,
• Remove Nuts from Height Adjustment Straps and
remove shipping anchors from each side of mower.
Reinstall Nuts to Height Adjustment Straps, then
loosen 1/4 turn to allow straps to pivot freely,
° Check all loose parts and bag contents against
Crate Contents and Bag Contents illustration on
page 5. tf any part is missing or damaged contact
the store where you purchased the unit.
CAUTION: Before starting to
assemble mower, remove spark plug
wire from plug of mower engine.
OPERATOR ORIENTATION
When right and left are mentioned in this manual, it
means your right and your left when you are seated
behind the wheel in the operating position.
ENGINE OIL
VERY IMPORTANT:
Engine must be filled with oil before operation. See
OIL & FUEL RECOMMENDATIONS in engine Owner's
Manual for correct filling instructions and oil fill capacity.
INSTALL TOWBAR TUBE TO REAR
QUADRANT
• Cut and remove the Plastic Tie which holds the Wire
Harness and the Clutch Cable to the Rear
Quadrant. (See Fig. 1)
• Remove two 3/8 Bolts, two 3/8 Lock Nuts and one
3/8 Flat Washer from the rear of the Towbar Tube.
• Place tube into Rear Quadrant, align holes, insert
3/8-16 x 2-1/2 Hex Bolt through rear hole of tube.
° Secure tightly with 3/8-16 Lock Nut then loosen
Nut 1/4 turn to allow tube to pivot freely inside Rear
Quadrant.
• Assemble a 3/8 Flat Washer onto a 3/8-16 x 2-1/2
Hex Bolt.
• Insert Bolt and Washer through slot of Rear
Quadrant and hole in Towbar Tube.
° Secure tightly with 3/8-16 Lock Nut then loosen
Nut 1/4 turn to allow tube to pivot freely inside Rear
Quadrant.
NOTE: TowbarTube must pivot freely inside Rear
Quadrant when latch is pulled from notch.
INSTALL CLUTCH CABLE AND WIRE
HARNESS TO TOWBAR TUBE.
• Unwrap the Wire Harness and the Clutch Cable from
around the Engine.
° Lay the Clutch Cable along the left side of the
Towbar Tube and lay the Wire Harness along the
right side of the Towbar Tube.
• Install three 3/8" Cable Clips on the Clutch Cable
and three 1/2" Cable Clips onto the Wire Harness.
• Align all six Cable Clips with the holes in the Towbar
Tube and secure them with three #10 Self-Tapping
Screws.
INSTALL CLUTCH CABLE TO THE HITCH
ASSEMBLY
• Remove the 1/4" Lock Nut and 1/4" x 3/4" Bolt from
the Clutch Cable Eyelet.
° Screw one 5/16" Nut off the Clutch Cable Housing
and onto the bare cable wire. Screw the second
5/16" Nut all the way onto the Clutch Cable Housing.
Insert the Clutch Cable Eyelet through the slotted
hole in the Cable Anchor on the Hitch Assembly.
NOTE: The loose 5/16" Nut on the cable wire must be
cocked at an angle to fit through the slotted hole.
• Fasten the Clutch Cable Eyelet to the Clutch Lever,
reusing the 1/4" x 3/4" Hex Bolt and 1/4" Lock Nut.
Tighten the 1/4" Lock Nut securely and then loosen
approximately two turns to allow the cable to pivot
freely on the bolt.
° Screw the loose 5/16" Nut back onto the Clutch
Cable Housing. Use the 5/16" Nuts to adjust the
cable to the proper tension,
VERY IMPORTANT
See DRIVE TENSION on page 16 in the SERVICE AND
ADJUSTMENTS Section of this manual for proper Clutch
Cable adjustment.
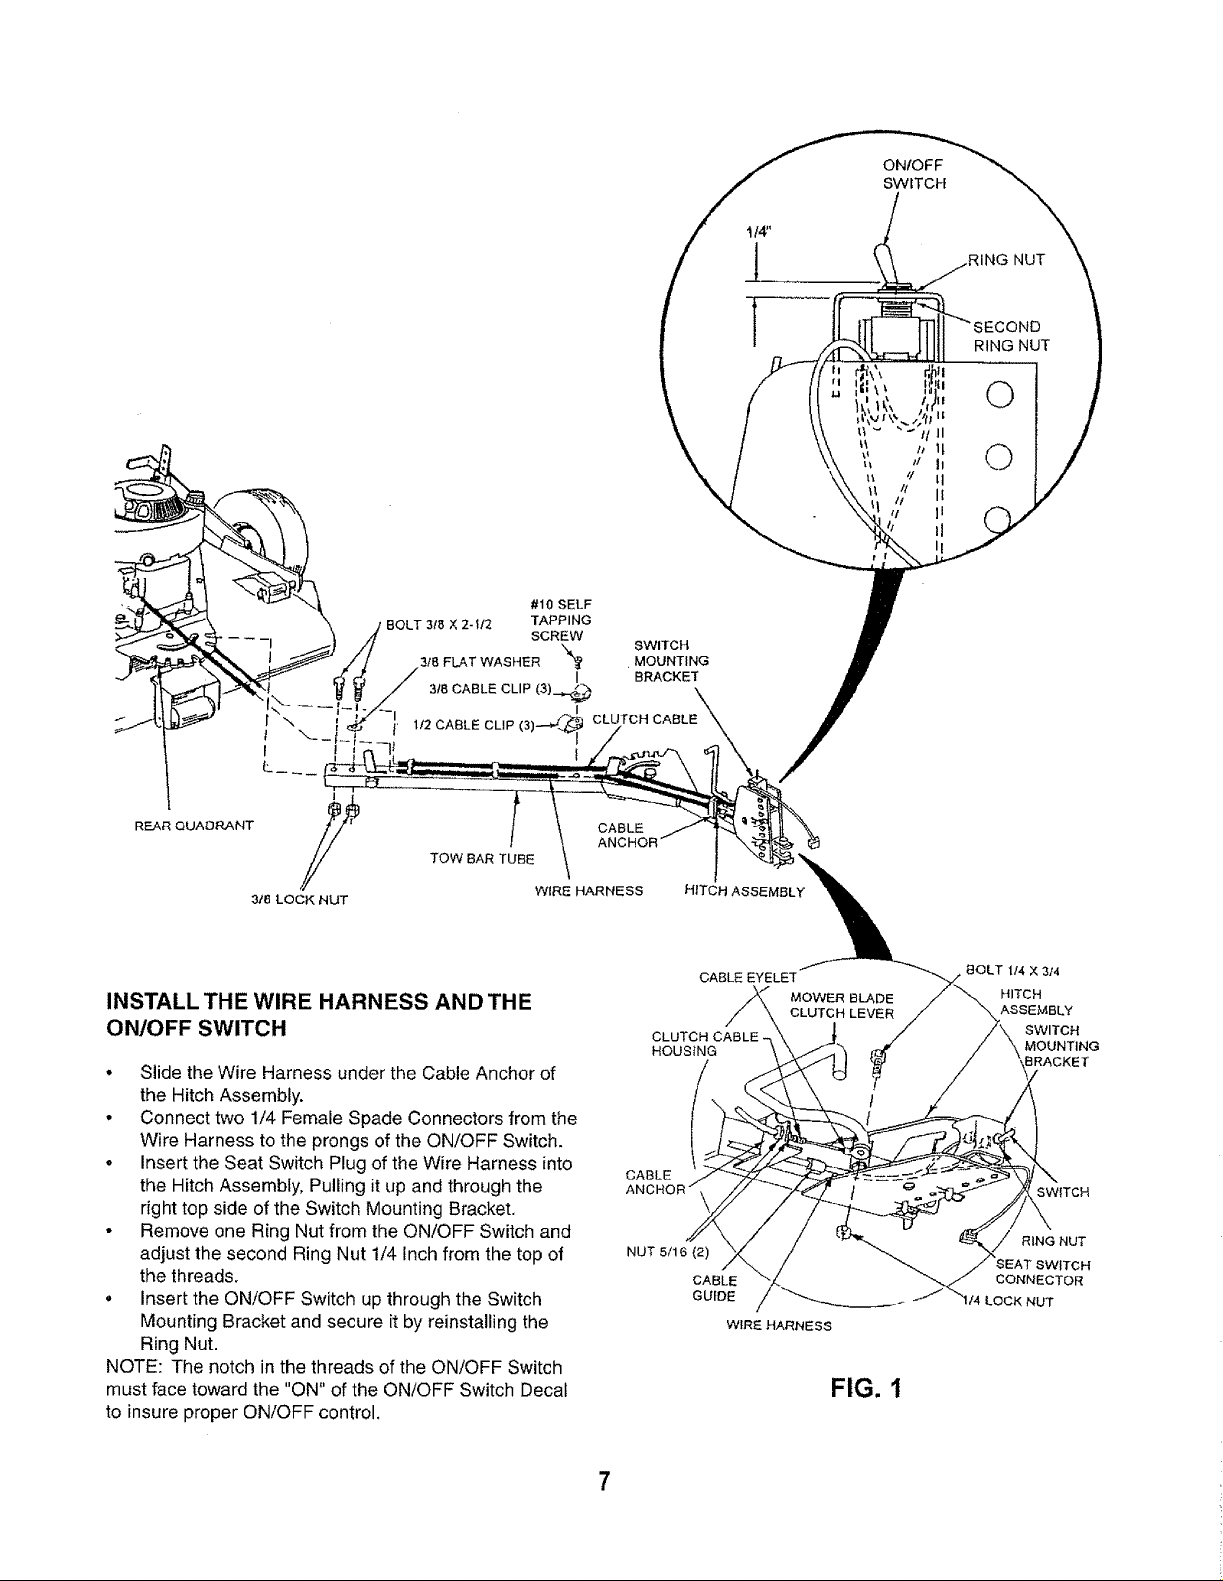
#10 SELF
y BOLT 318 X 2-I/2 TAPPING
3/8 FLAT WASHER '_ MOUNTING
/ 31BCABLE CLIP (3).._ BRACKET
SCREW
% SWITCH
ONfOFF
SWtTCH
_G NUT
;ECOND
RING NUT
©
©
\
f I t
REA,R QUAO_ba, NT #
3t8 LOCK NUT
TOW BAR TUBE
WIRE HARNESS HITCH ASSEMBLY
INSTALL THE WIRE HARNESS AND THE
ON/OFF SWITCH
• Slide the Wire Harness under the Cable Anchor of
the Hitch Assembly.
• Connect two 1/4 Female Spade Connectors from the
Wire Harness to the prongs of the ON/OFF Switch.
o Insert the Seat Switch Plug of the Wire Harness into
the Hitch Assembly, Pulling it up and through the
right top side of the Switch Mounting Bracket.
• Remove one Ring Nut from the ON/OFF Switch and
adjust the second Ring Nut 1/4 Inch from the top of
the threads.
• Insert the ON/OFF Switch up through the Switch
Mounting Bracket and secure it by reinstalling the
Ring Nut.
NOTE: The notch in the threads of the ON/OFF Switch
must face toward the "ON" of the ON/OFF Switch Decal
to insure proper ON/OFF control.
CABLE
CABLE
AN(
NUT 5/16 (2)
HOUStNG
CABLE EYELET
CABLE
GUIDE
WIRE HARNESS
MOWER BLADE
CLUTCH LEVER
FIG. 1
BOLT 1/4 X 3t4
HITCH
ASSEMBLY
SWITCH
MOUNTING
BRACKET
SWITCH
RING NUT
SEAT SWITCH
CONNECTOR
LOCK NUT
7
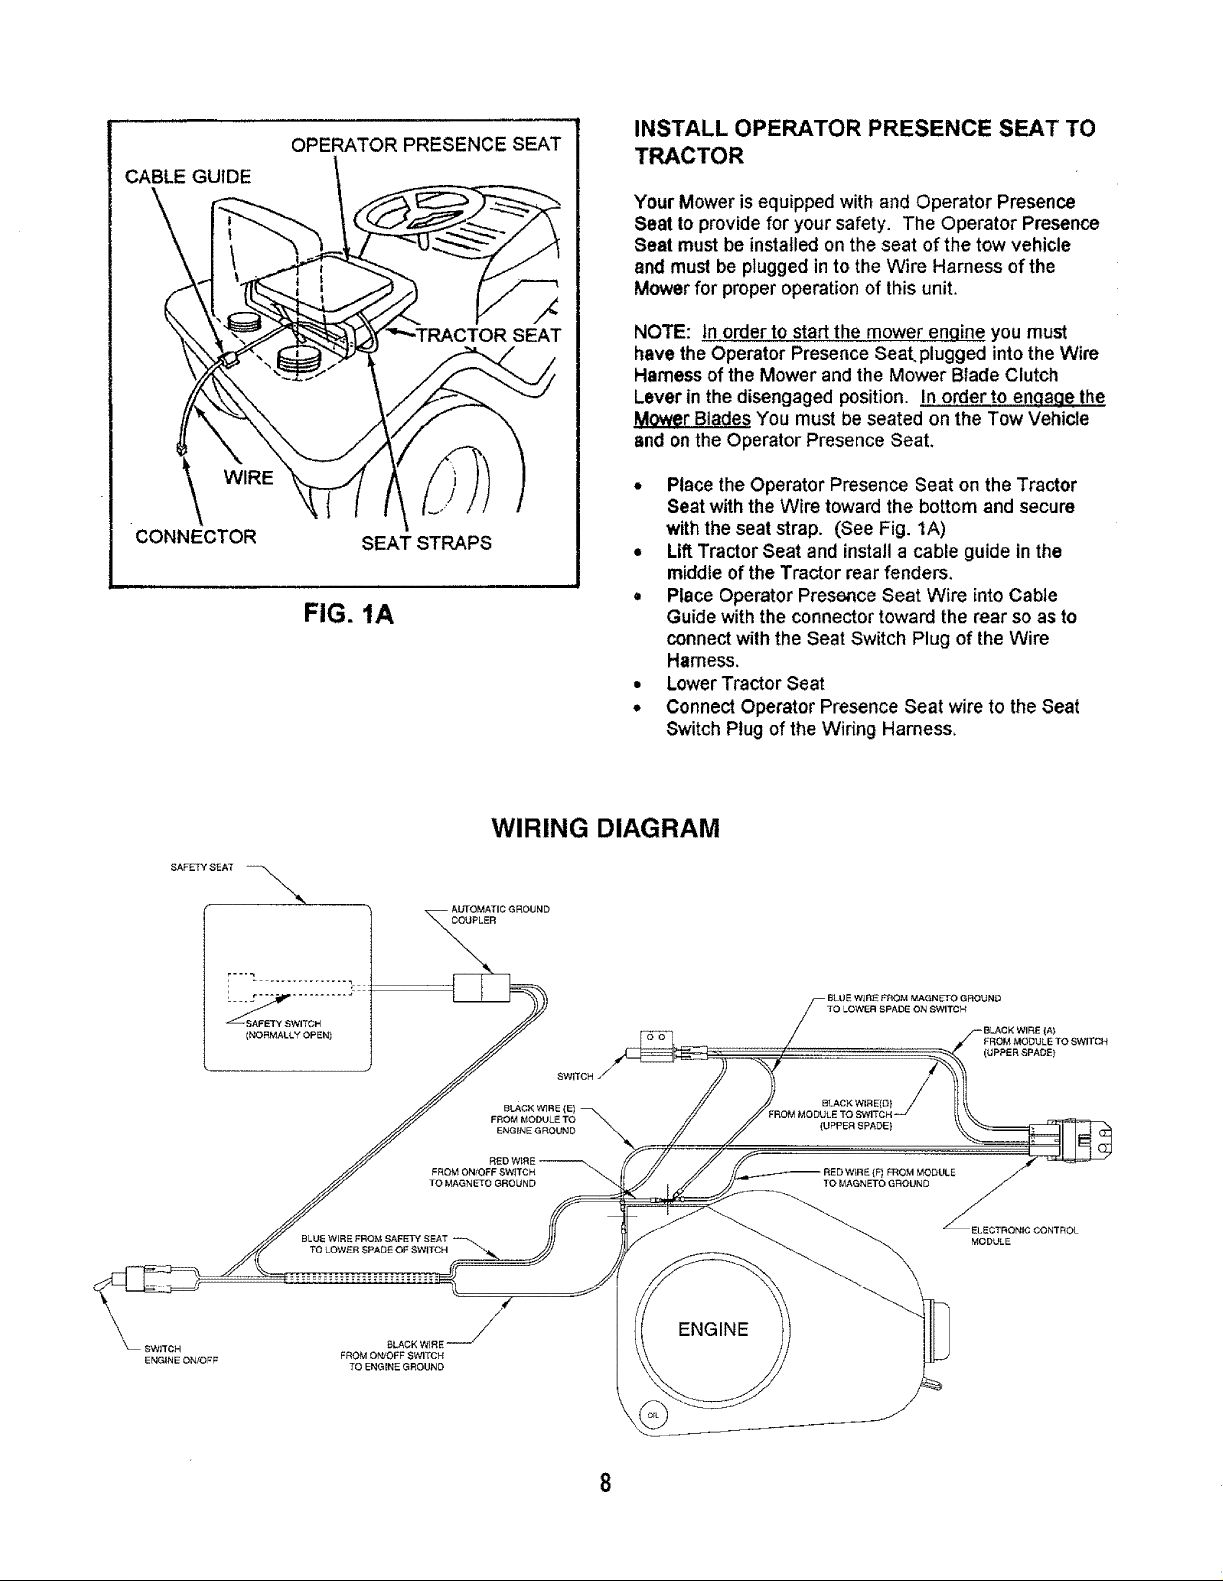
CABLE GUIDE
OPERATOR PRESENCE SEAT
INSTALL OPERATOR PRESENCE SEAT TO
TRACTOR
"four Mower isequipped with and Operator Presence
Seat to provide for your safety, The Operator Presence
Seat must be installedon the seat of the tow vehicle
and must be plugged in to the Wire Harness of the
Mower for proper operation of thisunit.
WIRE
CONNECTOR
SAFETY SEAT
SEAT STRAPS
FIG. 1A
SEAT
NOTE: In order to start the mower engine you must
havethe Operator Presence Seal plugged into the Wire
Harness of the Mower and the Mower Blade Clutch
Lever in the disengaged position. In order to enaaQethe
Mower Blades You must be seated on the Tow Vehicle
and on the Operator Presence Seat.
• Place the Operator Presence Seat on the Tractor
Seat withthe Wire toward the bottom andsecure
with the seat strap. (See Fig. 1A)
• Lift Tractor Seat and installa cable guide in the
middle of the Tractor rear fenders.
• Place Operator Presence Seat Wire into Cable
Guidewith the connector toward the rear so as to
connect with the Seat Switch Plug of the Wire
Harness.
• Lower Tractor Seat
• Connect Operator Presence Seat wire to the Seat
Switch Plug of the Wiring Harness,
WIRING DIAGRAM
SWITCH
ENGINE ONIOFF
_SWITCH
INORMALLY OPEN)
BLUE WiRE
TO LOW£R SPADE OP SWITCH
BLACK WIRE
FROM Ot_OFF SWITCH
TO ENGINE GROUND
ENGINE
TO LOWER SPADE ON SWITCh;
/--BLACK WIRE (A)
_/FROM MODULE TO SWITCH
_(UPPER SPADE)
BLACK WIRE{{3) i_
(UPPER SPADE)
JLE TO SWITCH
RED W_RE {F_ FROM MODULE .f
TO MAGNETO GROUND
_ ELECTFIONIC CONTROL
_\ mOOOLa
-\
)
 Loading...