

Craftsman 358.382000 Owner's Manual

Operator’s Manual
2.8 cu. in./46cc 2-Cycle
GASOLINE CHAIN SAW
Model No.
358.382000 — 20 in. Bar
Safety
Assembly
Operation
Maintenance
Parts List
Español, p.40
WARNING:
Read and follow all Safety Rules and Operating
Instructions before first use of this product.
For answers to your questions about this product:
Call 7 am--7 pm, Mon--Sat; Sun, 10 am--7 pm
(Hours listed are Central Time)
1-800-235-5878
Sears Brands Management Corporation, Homan Estates, IL 60179 U.S.A.
115705449
Rev. A 7/1/14 KAP
P02646MC

2
3
8
9
10
17
18
20
22
26
29
31
32
33
34
40
TABLE OF CONTENTS
WARRANTY STATEMENT
REPAIR PROTECTION AGREEMENTS
KEY TO SYMBOLS
WHAT IS WHAT?
GENERAL SAFETY PRECAUTIONS
ASSEMBLY
FUEL HANDLING
STARTING AND STOPPING
WORKING TECHNIQUES
MAINTENANCE
TROUBLESHOOTING TABLE
TECHNICAL DATA
U.S. EPA / CALIFORNIA / ENVIRONMENT
CANADA EMISSION CONTROL WARRANTY
STATEMENT
AMERICAN STANDARD SAFETY
PRECAUTIONS
REPAIR PARTS
SPANISH
PARTS & ORDERING
Back Cover
The engine exhaust from this product
contains chemicals known to the State
of California to cause cancer, birth
defects or other reproductive harm.
WARRANTY STATEMENT
CRAFTSMAN TWO YEAR FULL WARRANTY
FOR TWO YEARS from the date of purchase, this product is warranted against any defects in material or workmanship.
A defective product will receive free repair or replacement if repair is unavailable.
ADDITIONAL LIMITED WARRANTY ON ENGINE CRANKSHAFT
FOR THE THIRD THROUGH TENTH YEAR from date of purchase, the engine crankshaft in this product is warranted
against any defects in material or workmanship. With proof of purchase, a defective engine crankshaft will be replaced.
This additional warranty covers only the engine crankshaft, and does not apply to any other engine component. You must
pay the labor cost of crankshaft installation.
For warranty coverage details to obtain free repair or replacement, visit the website: www.craftsman.com
This warranty covers ONLY defects in material and workmanship. Warranty coverage does NOT include:
• Expendable items that can wear out from normal use within the warranty period, including but not limited to chain
bar, chain, filters or spark plug.
• Product damage resulting from user attempts at product modification or repair or caused by product accessories.
• Repairs necessary because of accident or failure to operate or maintain the product according to all supplied
instructions.
• Preventive maintenance, or repairs necessary due to improper fuel type, fuel mixture, contaminated or stale fuel.
This warranty is void if this product is ever used while providing commercial services or if rented to another person.
This warranty gives you specific legal rights, and you may also have other rights which vary from state to state.
Sears Brands Management Corporation, Hoffman Estates, IL 60179
2 – English

•
REPAIR PROTECTION AGREEMENTS
Congratulations on making a smart purchase. Your new Craftsman product is designed and manufactured for years of
dependable operation. But like all products, it may require repair from time to time. That’s when having a Repair
Protection Agreement can save you money and aggravation.
Here’s what the Repair Protection Agreement* includes:
Expert service by our 10,000 professional repair specialists.
• Unlimited service and no charge for parts and labor on all covered repairs.
• Product replacement up to $1500 if your covered product can’t be fixed.
• Discount of 10% from regular price of service and related installed parts not covered by the agreement; also, 10%
off regular price of preventive maintenance check.
• Fast help by phone - we call it Rapid Resolution - phone support from a Sears representative. Think of us as a
'talking operator’s manual”.
Once you purchase the Repair Protection Agreement, a simple phone call is all that it takes for you to schedule service.
You can call anytime day or night, or schedule a service appointment online.
The Repair Protection Agreement is a risk--free purchase. If you cancel for any reason during the product warranty
period, we will provide a full refund. Or, a prorated refund anytime after the product warranty period expires. Purchase
your Repair Protection Agreement today!
Some limitations and exclusions apply. For prices and additional information in the U.S.A. call 1-800-827-6655.
*Coverage in Canada varies on some items. For full details call Sears Canada at 1-800-361-6665.
Sears Installation Service
For Sears professional installation of home appliances, garage door openers, water heaters, and other major home
items, in the U.S.A. or Canada call 1-888-331-4569 .
English – 3

4 5
8
6
7
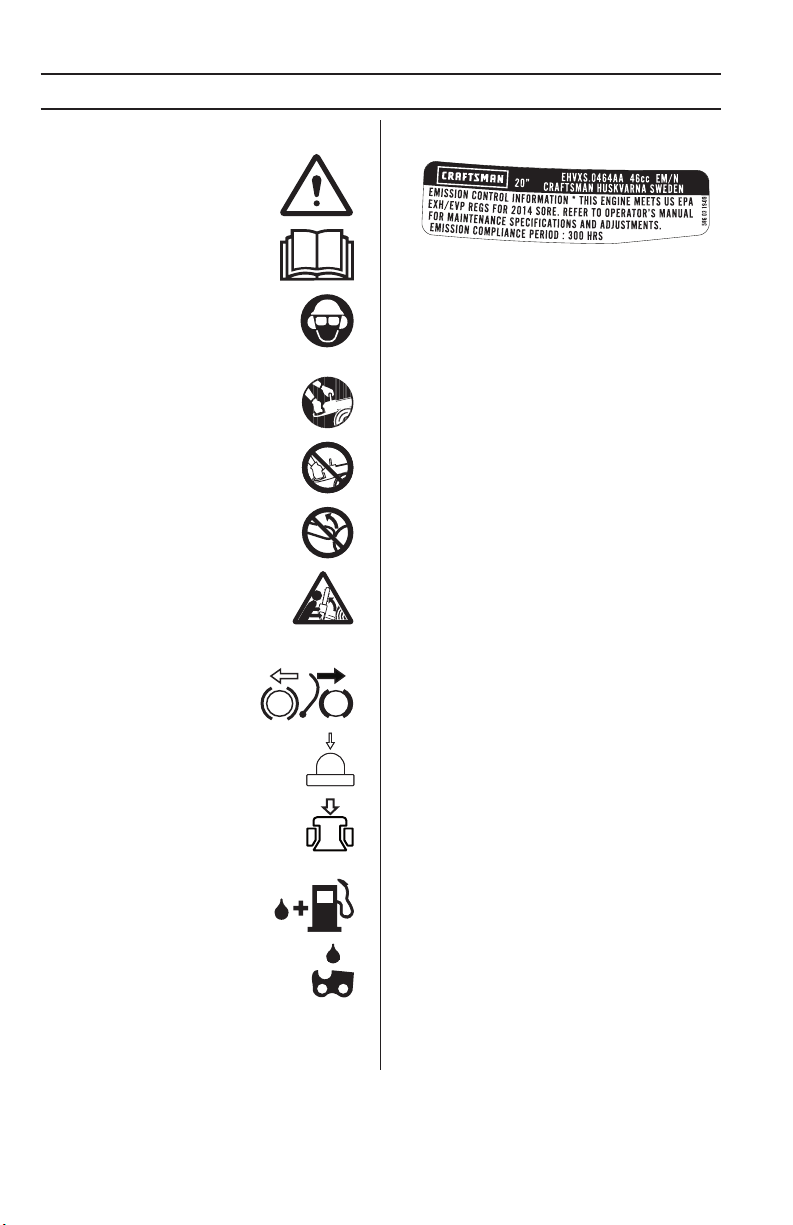
Symbols on the machine:
WARNING! Chain saws can be
dangerous! Careless or improper use
can result in serious or fatal injury to
the operator or others.
Please read the operator’s manual
carefully and make sure you
understand the instructions before
using the machine.
Always wear:
• Approved protective helmet
• Approved hearing protection
• Protective goggles or a visor
Both of the operator ′ s hands must be used
to operate the chain saw.
Never operate a chain saw holding it with
one hand only.
Contact of the guide bar tip with any object
must be avoided.
WARNING! Kickback may occur when
the nose or tip of the guide bar touches
an object, and cause a lightning fast
reverse reaction, kicking the guide bar up
and towards the operator. May cause
serious personal injury.
KEY TO SYMBOLS
You will find the following labels on your chain saw:
EPA III
The Emissions Compliance Period referred to on the
Emission Compliance label indicates the number of
operating hours for which the engine has been shown to
meet Federal emissions requirements.
Maintenance, replacement, or repair of the emission
control devices and system may be performed by any
nonroad engine repair establishment or individual.
Chain brake, activated (right) Chain
brake, not activated (left)
Air purge
Decompression valve: The valve is to
reduce the pressure in the cylinder and
make starting easier. You should always use
the decompression valve when starting the
machine.
Refuelling.
Chain oil fill.
Other symbols/decals on the machine refer to special
certification requirements for certain markets.
8 – English

WHAT IS WHAT?
What is what on the chain saw? (1)
1 Decompression valve
2 Cylinder cover
3 Air purge
4 Combined start and stop switch
5 Rear handle with right hand guard
6 Information and warning decal
7 Fuel tank
8 Adjuster screws carburetor
9 Starter handle
10 Starter housing
11 Chain oil tank
12 Product and serial number plate
13 Throttle lockout (Prevents accidental operation of throttle trigger.)
14 Front handle
15 Front hand guard
16 Muffler
17 Guide bar
18 Bar tip sprocket
19 Saw chain
20 Bumper spike
21 Chain catcher
22 Chain tensioning screw
23 Clutch cover
24 Integrated combi-tool
25 Throttle trigger
26 Combi-tool
27 Operator’s manual
English – 9
!
!
!
!
!
GENERAL SAFETY PRECAUTIONS
Before using a new chain saw
• Please read this manual carefully.
• (1) - (49) refer to figures on p. 4-7.
• Check that the cutting equipment is correctly fitted and
adjusted. See instructions under the heading
Assembly.
• Refuel and start the chain saw. See the instructions
under the headings Fuel Handling and Starting and
Stopping.
• Do not use the chain saw until sufficient chain oil has
reached the chain. See instructions under the heading
Lubricating cutting equipment.
• Long-term exposure to noise can result in permanent
hearing impairment. So always use approved hearing
protection.
WARNING! Under no circumstances may
the design of the machine be modified
!
without the permission of the
manufacturer. Always use genuine
accessories. Non-authorized
modifications and/or accessories can
result in serious personal injury or the
death of the operator or others. Your
warranty may not cover damage or
liability caused by the use of nonauthorized accessories or replacement
parts.
WARNING! A chain saw is a dangerous
tool if used carelessly or incorrectly and
!
can cause serious, even fatal injuries. It
is very important that you read and
understand the contents of this
operator’s manual.
WARNING! Never allow children to use or
be in the vicinity of the machine. As the
machine is equipped with a springloaded stop switch and can be started by
low speed and force on the starter
handle, even small children under some
circumstances can produce the force
necessary to start the machine. This can
mean a risk of serious personal injury.
Therefore remove the spark plug cap
when the machine is not under close
supervision.
WARNING! When using a chain saw, a
fire extinguisher should be available.
WARNING! Keep handles dry, clean and
free of oil.
WARNING! Beware of carbon monoxide
poisoning. Operate the chainsaw in well
ventilated areas only.
WARNING! Do not attempt a pruning or
limbing operation in a standing tree
unless specifically trained to do so.
10 – English
WARNING! The inside of the muffler
contain chemicals that may be
!
carcinogenic. Avoid contact with these
elements in the event of a damaged
muffler.
WARNING! Long term inhalation of the
engine’s exhaust fumes, chain oil mist
!
and dust from sawdust can represent a
health risk.
WARNING! This machine produces an
electromagnetic field during operation.
!
This field may under some
circumstances interfere with active or
passive medical implants. To reduce the
risk of serious or fatal injury, we
recommend persons with medical
implants consult their physician and the
medical implant manufacturer before
operating this machine.
GENERAL SAFETY PRECAUTIONS
!
Important
IMPORTANT!
This chain saw for forest service is designed for forest
work such as felling, limbing and cutting.
National regulation can restrict the use of the machine.
You should only use the saw with the bar and chain
combinations we recommend in the chapter Technical
data.
Never use the machine if you are fatigued, while under
the influence of alcohol or drugs, medication or anything
that could affect your vision, alertness, coordination or
judgement.
Wear personal protective equipment. See instructions
under the heading ”Personal protective equipment”.
Do not modify this product or use it if it appears to have
been modified by others.
Never use a machine that is faulty. Carry out the safety
checks, maintenance and service instructions
described in this manual. Some maintenance and
service measures must be carried out by trained and
qualified specialists. See instructions under the heading
Maintenance.
When not in use, always store the integrated combi-tool
in the tool-holder. Do not use the tool-holder for other
purposes than to hold the supplied combi-tool, since the
tool-holder is exclusively designed for this purpose.
Never use any accessories other than those
recommended in this manual. See instructions under
the headings Cutting equipment and Technical data.
CAUTION! Always wear protective glasses or a face
visor to reduce the risk of injury from thrown objects. A
chain saw is capable of throwing objects, such as wood
chips, small pieces of wood, etc, at great force. This can
result in serious injury, especially to the eyes.
WARNING! Running an engine in a
confined or badly ventilated area can
!
result in death due to asphyxiation or
carbon monoxide poisoning.
WARNING! Faulty cutting equipment or
the wrong combination of bar and saw
!
chain increases the risk of kickback!
Only use the bar/saw chain combinations
we recommend, and follow the filing
instructions. See instructions under the
heading Technical data.
Always use common sense (2)
It is not possible to cover every conceivable situation you
can face when using a chain saw. Always exercise care
and use your common sense. Avoid all situations which
you consider to be beyond your capability. If you still feel
uncertain about operating procedures after reading these
instructions, you should consult an expert before
continuing. Do not hesitate to contact your dealer or us if
you have any questions about the use of the chain saw.
We will willingly be of service and provide you with advice
as well as help you to use your chain saw both efficiently
and safely. Attend a training course in chain saw usage if
possible. Your dealer, forestry school or your library can
provide information about which training materials and
courses are available. Work is constantly in progress to
improve the design and technology - improvements that
increase your safety and efficiency. Visit your dealer
regularly to see whether you can benefit from new
features that have been introduced.
Personal protective equipment
WARNING! Most chain saw accidents
happen when the chain touches the
operator. You must use approved
personal protective equipment whenever
you use the machine. Personal protective
equipment cannot eliminate the risk of
injury but it will reduce the degree of
injury if an accident does happen. Ask
your dealer for help in choosing the right
equipment.
• Approved protective helmet
• Hearing protection
• Protective goggles or a visor
• Gloves with saw protection
• Trousers with saw protection
• Boots with saw protection, steel toe-cap and non-slip
sole
• Always have a first aid kit nearby.
• Fire Extinguisher and Shovel
Generally clothes should be close-fitting without
restricting your freedom of movement.
IMPORTANT! Sparks can come from the muffler, the bar
and chain or other sources. Always have fire
extinguishing tools available if you should need them.
Help prevent forest fires.
Machine ′′
In this section the machine’s safety features and their
function are explained. For inspection and maintenance
see instructions under the heading Checking, maintaining
and servicing chain saw safety equipment. See
instructions under the heading, What is what?, to find
where these parts are located on your machine.
The life span of the machine can be reduced and the risk
of accidents can increase if machine maintenance is not
carried out correctly and if service and/or repairs are not
carried out professionally. If you need further information
please contact your nearest servicing dealer.
′′
s safety equipment
English
11
–

GENERAL SAFETY PRECAUTIONS
WARNING! Never use a machine with
defective safety components. Safety
!
equipment must be inspected and
maintained. See instructions under the
heading Checking, maintaining and
servicing chain saw safety equipment. If
your machine does not pass all the
checks, take the saw to a servicing
dealer for repair.
Chain brake and front hand guard
Your chain saw is equipped with a chain brake that is
designed to stop the chain if you get a kickback. The chain
brake reduces the risk of accidents, but only you can
prevent them.
Take care when using your saw and make sure the
kickback zone of the bar never touches any object.
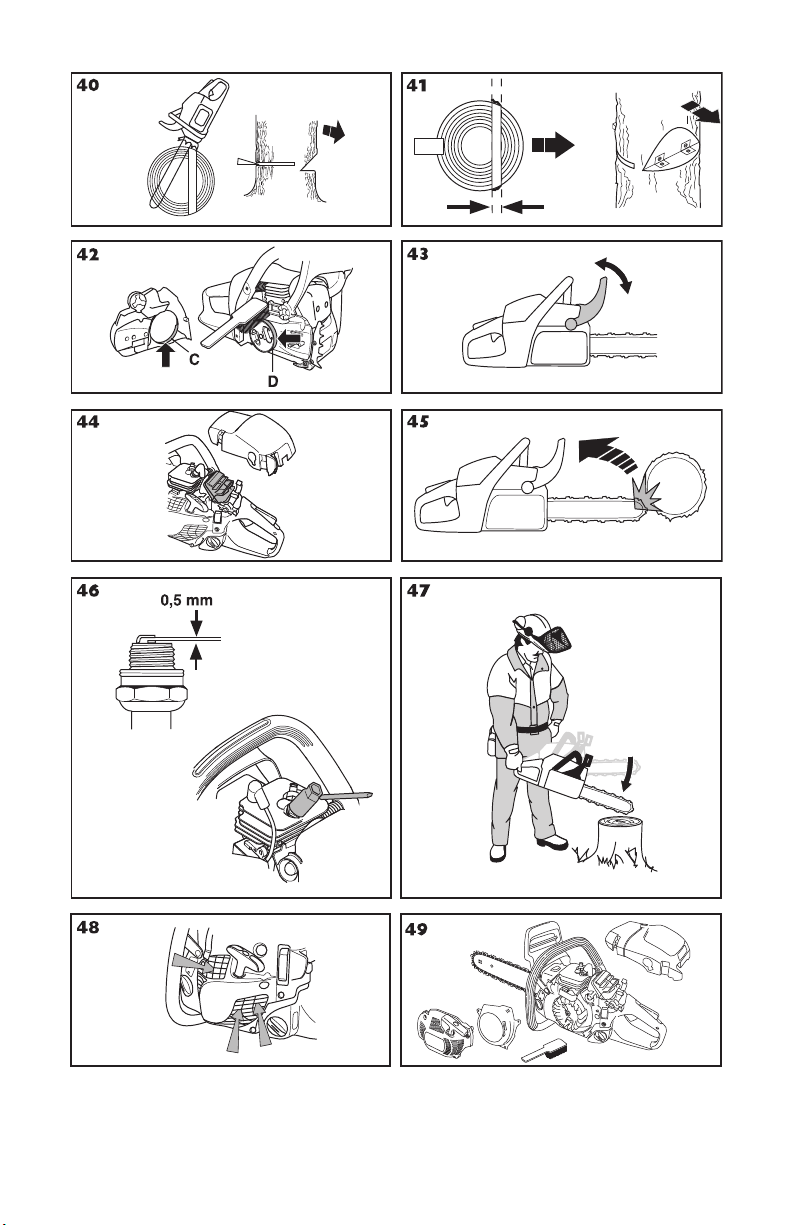
• The chain brake (A) can either be activated manually
(by your left hand) or automatically by the inertia
release mechanism. (3)
• The brake is applied when the front hand guard (B) is
pushed forwards. (3)
• This movement activates a spring-loaded mechanism
that tightens the brake band (C) around the engine
drive system (D) (clutch drum). (4)
• The front hand guard is not designed solely to activate
the chain brake. Another important feature is that it
reduces the risk of your left hand hitting the chain if
you lose grip of the front handle.
• The chain brake must be engaged when the chain
saw is started to prevent the saw chain from rotating.
• Use the chain brake as a ”parking brake” when
starting and when moving over short distances, to
reduce the risk of moving chain accidentally hitting
your leg or anyone or anything close by.
• To release the chain brake pull the front hand guard
backwards, towards the front handle.
• Kickback can be very sudden and violent. Most
kickbacks are minor and do not always activate the
chain brake. If this happens you should hold the chain
saw firmly and not let go.
• The way the chain brake is activated, either manually
or automatically by the inertia release mechanism,
depends on the force of the kickback and the position
of the chain saw in relation to the object that the
kickback zone of the bar strikes.
If you get a violent kickback while the kickback zone of
the bar is farthest away from you the chain brake is
designed to be activated by the inertia in the kickback
direction.
If the kickback is less violent or the kickback zone of
the bar is closer to you the chain brake is designed to
be activated manually by the movement of your left
hand.
• In the felling position the left hand is in a position that
makes manual activation of the chain brake
impossible. With this type of grip, that is when the left
hand is placed so that it cannot affect the movement
of the front hand guard, the chain brake can only be
activated by the inertia action. (8)
Will my hand always activate the chain brake during a kickback?
No. It takes a certain force to move the hand guard
forward. If your hand only lightly touches the front guard
or slips over it, the force may not be enough to trigger the
chain brake. You should also maintain a firm grip of the
chain saw handles while working. If you do and
experience a kickback, your hand may never leave the
front handle and will not activate the chain brake, or the
chain brake will only activate after the saw has swung
around a considerable distance. In such instances, the
chain brake might not have enough time to stop the saw
chain before it touches you.
There are also certain positions in which your hand
cannot reach the front hand guard to activate the chain
brake; for example, when the saw chain is held in felling
position.
Will my inertia activated chain brake always activate during kickback in the event of a kickback?
No. First your brake must be in working order. Testing the
brake is simple, see instructions under the heading
Checking, maintaining and servicing chain saw safety
equipment. We recommend you do before you begin each
work session. Second the kickback must be strong
enough to activate the chain brake. If the chain brake is
too sensitive it would activate all the time which would be
a nuisance.
Will my chain brake always protect me from injury in the event of a kickback?
No. First, the chain brake must be in working order to
provide the intended protection. Second, it must be
activated during the kickback as described above to stop
the saw chain. Third, the chain brake may be activated but
if the bar is too close to you the brake might not have
enough time to slow down and stop the chain before the
chain saw hits you.
Only you and proper working technique can eliminate
kickback and its danger.
Throttle trigger lockout
The throttle lockout is designed to prevent accidental
operation of the throttle control. When you press the lock
(A) (i.e. when you grasp the handle) it releases the throttle
control (B). When you release the handle the throttle
control and the throttle lockout both move back to their
original positions. This arrangement means that the
throttle control is automatically locked at the idle setting.
(5)
12 – English
GENERAL SAFETY PRECAUTIONS
!
Chain catcher
The chain catcher is designed to catch the chain if it snaps
or jumps off. This should not happen if the chain is
properly tensioned (see instructions under the heading
Assembly) and if the bar and chain are properly serviced
and maintained (see instructions under the heading
General working instructions).
Right hand guard
Apart from protecting your hand if the chain jumps or
snaps, the right hand guard stops branches and twigs
from interfering with your grip on the rear handle.
Vibration damping system
Your machine is equipped with a vibration damping
system that is designed to reduce vibration and make
operation easier.
The machine ′ s vibration damping system reduces the
transfer of vibration between the engine unit/cutting
equipment and the machine ′ s handle unit. The body of the
chain saw, including the cutting equipment, is insulated
from the handles by vibration damping units.
Cutting hardwoods (most broadleaf trees) creates more
vibration than cutting softwoods (most conifers). Cutting
with cutting equipment that is blunt or faulty (wrong type
or badly sharpened) will increase the vibration level.
WARNING! Overexposure to vibration
can lead to circulatory damage or nerve
!
damage in people who have impaired
circulation. Contact your doctor if you
experience symptoms of overexposure
to vibration. Such symptoms include
numbness, loss of feeling, tingling,
pricking, pain, loss of strength, changes
in skin colour or condition. These
symptoms normally appear in the
fingers, hands or wrists. These
symptoms may be increased in cold
temperatures.
Stop switch
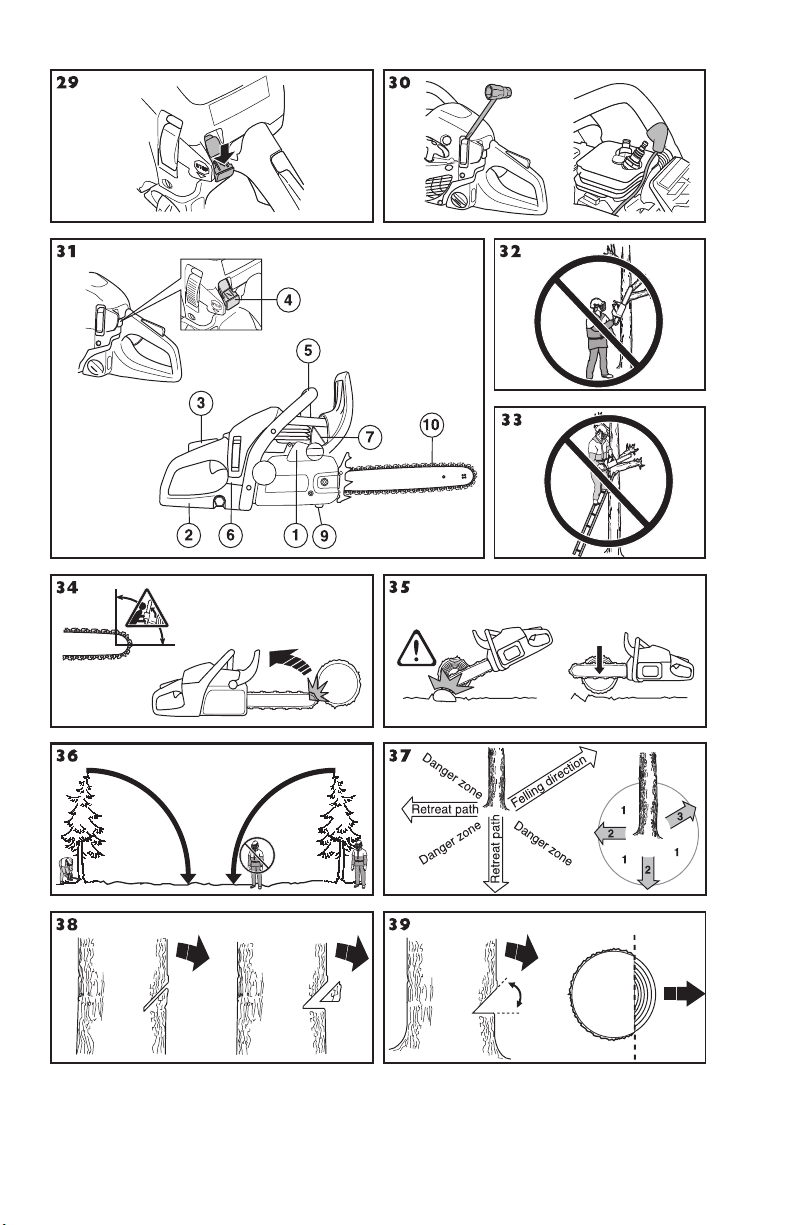
Use the stop switch to switch off the engine. (29)
Muffler
The muffler is designed to reduce noise levels and to
direct exhaust fumes away from the user.
WARNING! The exhaust fumes from the
engine are hot and may contain sparks
!
which can start a fire. Never start the
machine indoors or near combustible
material!
When fitting the mesh, make sure that the mesh is
inserted in the right position. If necessary, use the
combination spanner to insert or remove the mesh.
CAUTION! The muffler gets very hot during and after
use. This also applies during idling. Be aware of the fire
hazard, especially when working near flammable
substances and/or vapours.
WARNING! Never use a saw without a
muffler, or with a damaged muffler. A
damaged muffler may substantially
increase the noise level and the fire
hazard. Keep fire fighting equipment
handy. If a spark arrestor screen is
required in your area, never use the saw
without or with a broken spark arrestor
screen.
Cutting equipment
This section describes how to choose and maintain your
cutting equipment in order to:
• Reduce the risk of kickback.
• Reduce the risk of the saw chain breaking or jumping
off the bar.
• Obtain optimal cutting performance.
• Extend the life of cutting equipment.
• Avoid increasing vibration levels.
General rules
Only use cutting equipment recommended by us!
See instructions under the heading Technical data.
• Keep the chain’s cutting teeth properly
sharpened! Follow our instructions and use the
recommended file gauge. A damaged or badly
sharpened chain increases the risk of accidents.
• Maintain the correct depth gauge setting! Follow
our instructions and use the recommended depth
gauge clearance. Too large a clearance increases
the risk of kickback.
• Keep the chain properly tensioned! If the chain is
slack it is more likely to jump off and lead to increased
wear on the bar, chain and drive sprocket.
• Keep cutting equipment well lubricated and
properly maintained! A poorly lubricated chain is
more likely to break and lead to increased wear on the
bar, chain and drive sprocket.
•
In areas with a hot, dry climate there is a high risk of fires.
These areas are sometimes subject to government rules
requiring among other things the muffler must be
equipped with an approved type of spark arrestor screen
(A). (7)
English
13
–
GENERAL SAFETY PRECAUTIONS
!
!
Cutting equipment designed to reduce kickback
WARNING! Faulty cutting equipment or
the wrong combination of bar and saw
!
chain increases the risk of kickback!
Only use the bar/saw chain combinations
we recommend, and follow the filing
instructions. See instructions under the
heading Technical data.
The only way to avoid kickback is to make sure that the
kickback zone of the bar never touches anything.
By using cutting equipment with ”built-in” kickback
reduction and keeping the chain sharp and wellmaintained you can reduce the effects of kickback.
Guide bar
The smaller the tip radius the lower the chance of
kickback.
Saw chain
A chain is made up of a number of links, which are
available in standard and low-kickback versions.
IMPORTANT! No saw chain design eliminates the
danger of kickback.
WARNING! Any contact with a rotating
saw chain can cause extremely serious
!
injuries.
Some terms that describe the bar and chain
To maintain the safety features of the cutting equipment,
you should replace a worn or damaged bar or chain with
a recommended bar and chain combination. See
instructions under the heading Technical Data for a list of
replacement bar and chain combinations we recommend.
Guide bar
• Length (inches/cm)
• Number of teeth on bar tip sprocket (T).
• Chain pitch (inches). The spacing between the drive
links of the chain must match the spacing of the teeth
on the bar tip sprocket and drive sprocket.
• Number of drive links. The number of drive links is
determined by the length of the bar, the chain pitch
and the number of teeth on the bar tip sprocket.
• Bar groove width (inches/mm). The groove in the bar
must match the width of the chain drive links.
• Chain oil hole and hole for chain tensioner. The bar
must be matched to the chain saw design.
Saw chain
• Chain pitch (inches)
• Drive link width (mm/inches)
• Number of drive links.
Sharpening your chain and adjusting depth gauge setting
WARNING! Always wear gloves, when
working with the chain, in order to
protect your hands from injury.
General information on sharpening cutting teeth
• Never use a blunt chain. When the chain is blunt you
have to exert more pressure to force the bar through
the wood and the chips will be very small. If the chain
is very blunt it will produce wood powder and no chips
or shavings.
• A sharp chain eats its way through the wood and
produces long, thick chips or shavings.
• The cutting part of the chain is called the cutter and
consists of a cutting tooth (A) and the depth gauge
(B). The cutters cutting depth is determined by the
difference in height between the two (depth gauge
setting). (9)
When you sharpen a cutting tooth there are four important
factors to remember.
1 Filing angle
2 Cutting angle
3 File position
4 Round file diameter
It is very difficult to sharpen a chain correctly without the
right equipment. We recommend that you use our file
gauge. This will help you obtain the maximum kickback
reduction and cutting performance from your chain.
See instructions under the heading Technical data for
information about sharpening your chain.
WARNING! Departure from the
sharpening instructions considerably
increases the risk of kickback.
Sharpening cutting teeth
To sharpen cutting teeth you will need a round file and a
file gauge. See instructions under the heading Technical
data for information on the size of file and gauge that are
recommended for the chain fitted to your chain saw.
• Switch the engine off. (29)
• Check that the chain is correctly tensioned. A slack
chain will move sideways, making it more difficult to
sharpen correctly.
• Always file cutting teeth from the inside face. Reduce
the pressure on the return stroke. File all the teeth on
one side first, then turn the chain saw and file the teeth
on the other side.
File all the teeth to the same length. When the length of
the cutting teeth is reduced to 5/32 inch (4 mm) the chain
is worn out and should be replaced. (10)
14 – English
GENERAL SAFETY PRECAUTIONS
!
General advice on adjusting depth gauge setting
• When you sharpen the cutting tooth (A) the depth
gauge setting (C) will decrease. To maintain optimal
cutting performance the depth gauge (B) has to be
filed down to achieve the recommended depth gauge
setting. See instructions under the heading Technical
data to find the correct depth gauge setting for your
particular chain.
WARNING! The risk of kickback is
increased if the depth gauge setting is
!
too large!
Adjustment of depth gauge setting
• The cutting teeth should be newly sharpened before
adjusting the depth gauge setting. We recommend
that you adjust the depth gauge setting every third
time you sharpen the cutting teeth. NOTE! This
recommendation assumes that the length of the
cutting teeth is not reduced excessively.
• You will need a flat file and a depth gauge tool. We
recommend that you use our depth gauge tool to
acheive the correct depth gauge setting and bevel for
the depth gauge.
• Place the depth gauge tool over the chain. Detailed
information regarding the use of the depth gauge tool,
will be found on the package for the depth gauge tool.
Use the flat file to file off the tip of the depth gauge that
protrudes through the depth gauge tool. The depth
gauge setting is correct when you no longer feel
resistance as you draw the file along the depth gauge
tool.
Tensioning the chain
WARNING! A slack chain may jump off
the bar and cause serious or even fatal
!
injury.
WARNING! Always wear approved
protective gloves. Even a non-moving
!
chain can cause serious cuts to yourself
or persons you bump into with an
exposed chain.
The more you use a chain the longer it becomes. It is
therefore important to adjust the chain regularly to take up
the slack.
Check the chain tension every time you refuel. NOTE! A
new chain has a running-in period during which you
should check the tension more frequently.
Tension the chain as tightly as possible, but not so tight
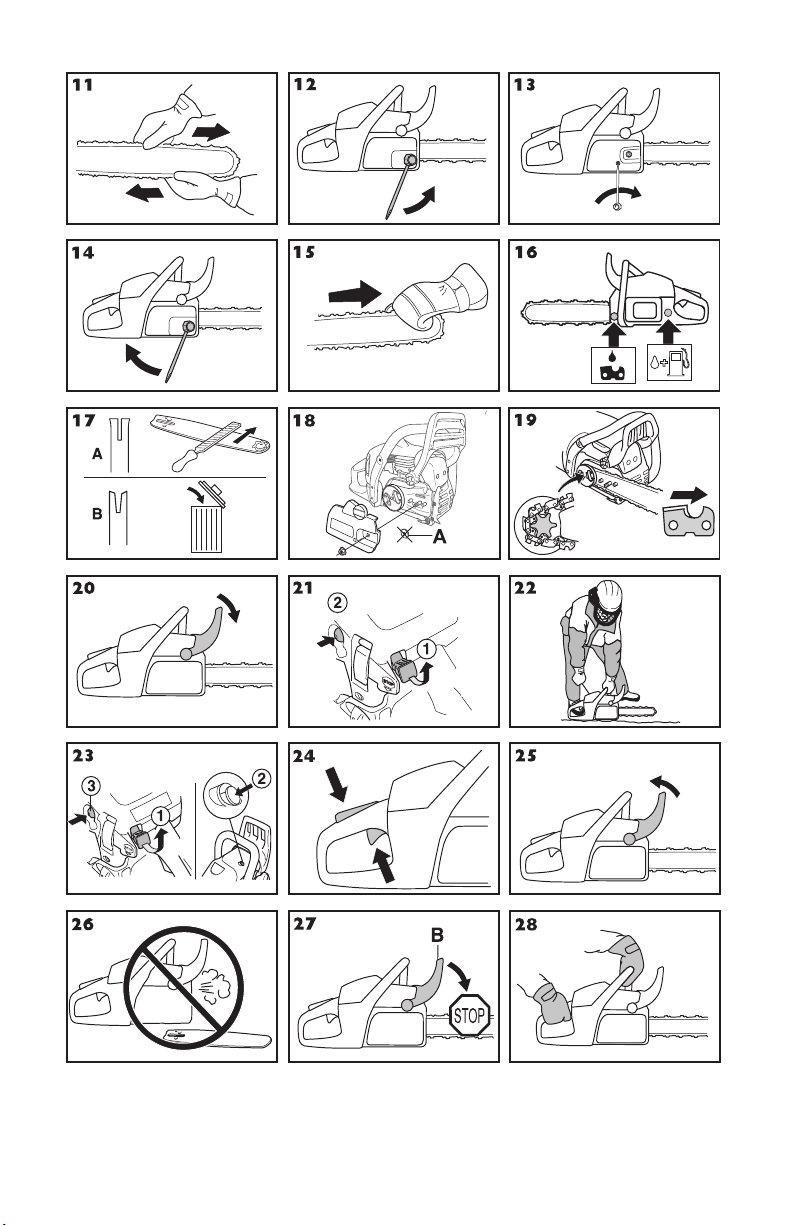
that you cannot pull it round freely by hand. (11)
• Switch the engine off. (29)
• Undo the bar nut that hold the clutch cover/chain
brake. Use the combi-tool integrated in the rear
handguard or one with corresponding dimensions
(contact your servicing dealer (retailer) for a
replacement tool). Then tighten the bar nut by hand as
tight as you can. (12)
• Raise the tip of the bar and stretch the chain by
tightening the chain tensioning screw using the combitool. Tighten the chain until it does not sag from the
underside of the bar. (13)
• Use the combi-tool to tighten the bar nut while lifting
the tip of the bar at the same time. Check that you can
pull the chain round freely by hand and that it does not
sag from the underside of the bar. (14) (15)
Lubricating cutting equipment
WARNING! Poor lubrication of cutting
equipment may cause the chain to snap,
which could lead to serious, even fatal
injuries.
Chain oil
Chain oil must demonstrate good adhesion to the chain
and also maintain its flow characteristics regardless of
whether it is warm summer or cold winter weather.
Never use waste oil! Using waste oil can be dangerous
to you and damage the machine and environment.
IMPORTANT! When using vegetable based saw chain
oil, dismantle and clean the groove in the bar and saw
chain before long-term storage. Otherwise there is a risk
of the saw chain oil oxidizing, which will result in the saw
chain becoming stiff and the bar tip sprocket jamming.
Filling with chain oil
• All our chain saws have an automatic chain lubrication
system. On some models the oil flow is also
adjustable.
• The saw chain oil tank and the fuel tank are designed
so that the fuel runs out before the saw chain oil.
However, this safety feature requires that you use the
right sort of chain oil (if the oil is too thin it will run out
before the fuel), and that you adjust the carburetor as
recommended (a lean mixture may mean that the fuel
lasts longer than the oil) and that you also use the
recommended cutting equipment (a bar that is too
long will use more chain oil).
Checking chain lubrication
• Check the chain lubrication each time you refuel. See
instructions under the heading Lubricating the bar tip
sprocket.
Aim the tip of the bar at a light coloured surface about
20 cm (8 inches) away. After 1 minute running at 3/4
throttle you should see a distinct line of oil on the light
surface.
If the chain lubrication is not working:
• Check that the oil channel in the bar is not obstructed.
Clean if necessary.
English – 15
GENERAL SAFETY PRECAUTIONS
!
• Check that the groove in the edge of the bar is clean.
Clean if necessary.
• Check that the bar tip sprocket turns freely and that
the lubricating hole in the tip sprocket is not blocked.
Clean and lubricate if necessary.
If the chain lubrication system is still not working after
carrying out the above checks and associated measures
you should contact your servicing dealer.
Chain drive sprocket
The clutch drum is fitted with a Spur sprocket (the chain
sprocket is welded on the drum).
Regularly check the degree of wear on the drive sprocket.
Replace if wear is excessive. Replace the drive sprocket
whenever you replace the chain.
Checking wear on cutting equipment
Check the chain daily for:
• Visible cracks in rivets and links.
• Whether the chain is stiff.
• Whether rivets and links are badly worn.
Replace the saw chain if it exhibits any of the points
above.
We recommend you compare the existing chain with a
new chain to decide how badly the existing chain is worn.
When the length of the cutting teeth has worn down to
only 5/32 inch (4 mm) the chain must be replaced. (10)
Guide bar
Check regularly:
• Whether there are burrs on the edges of the bar (A).
Remove these with a file if necessary. (17)
• Whether the groove in the bar has become badly worn
(B). Replace the bar if necessary. (17)
• Whether the tip of the bar is uneven or badly worn. If
a hollow forms on the underside of the bar tip this is
due to running with a slack chain.
• To prolong the life of the bar you should turn it over
daily.
WARNING! Most chain saw accidents
happen when the chain touches the
operator.
Wear personal protective equipment. See
instructions under the heading ”Personal
protective equipment”.
Do not tackle any job that you feel you
are not adequately trained for. See
instructions under the headings
Personal protective equipment, How to
avoid kickback, Cutting equipment and
General working instructions.
Avoid situations where there is a risk of
kickback. See instructions under the
heading Machine′′′′s safety equipment.
Use the recommended protective
equipment and check its condition. See
instructions under the heading General
working instructions.
Check that all the chain saw safety
features are working. See instructions
under the headings General working
instructions and General safety
precautions.
16 – English
ASSEMBLY
Fitting the bar and chain
WARNING! Switch off the engine before
carrying out any checks or maintenance.
!
The stop switch automatically returns to
the start position. In order to prevent
unintentional starting, the spark plug cap
must be removed from the spark plug
when assembling, checking and/or
performing maintenance.
Always wear gloves, when working with
the chain, in order to protect your hands
from injury.
• Check that the chain brake is in disengaged position
by moving the front hand guard towards the front
handle. (25)
• Unscrew the bar nut and remove the clutch cover
(chain brake). Take off the transportation guard (A).
(18)
• Fit the bar over the bar bolts. Place the bar in its
rearmost position. Place the chain over the drive
sprocket locate it in the groove on the bar. Begin on
the top edge of the bar. Make sure that the edges of
the cutting links are facing forward on the top edge of
the bar. (19)
• Fit the clutch cover (chain brake) and locate the chain
adjuster pin in the cut-out in the bar. Check that the
drive links of the chain fit correctly on the drive
sprocket and that the chain is in the groove on the bar.
• Tension the chain by turning the chain tensioning
screw clockwise using the combi-tool. The chain
should be tensioned until it does not sag from the
underside of the bar. (13)
• The chain is correctly tensioned when it does not sag
from the underside of the bar, but can still be turned
easily by hand. Hold up the bar tip and tighten the bar
nuts with the combi-tool. (14)
• When fitting a new chain, the chain tension has to be
checked frequently until the chain is run-in. Check the
chain tension regularly. A correctly tensioned chain
ensures good cutting performance and long life. (11)
WARNING! If received assembled,
ensure your unit is properly assembled
!
and all fasteners are secure.
English – 17
FUEL HANDLING
!
Fuel
Note! The machine is equipped with a two-stroke engine
and must always be run using a mixture of gasoline and
two-stroke oil. It is important to accurately measure the
amount of oil to be mixed to ensure that the correct
mixture is obtained. When mixing small amounts of fuel,
even small inaccuracies can drastically affect the ratio of
the mixture.
WARNING! Always ensure there is
adequate ventilation when handling fuel.
!
Gasoline
• Use good quality unleaded gasoline.
• The lowest recommended octane grade is 87
((RON+MON)/2). If you run the engine on a lower
octane grade than 87 so-called knocking can occur.
This gives rise to a high engine temperature and
increased bearing load, which can result in serious
engine damage.
• When working with continuous high revs (e.g. limbing)
a higher octane is recommended.
Running-in
Avoid running at a too high speed for extended periods
during the first 10 hours.
Two-stroke oil
• For best results and performance use synthetic twostroke engine oil, which is specially formulated for our
air-cooled two stroke-engines.
• Never use two-stroke oil intended for water-cooled
engines, sometimes referred to as outboard oil (rated
TCW).
• Never use oil intended for four-stroke engines.
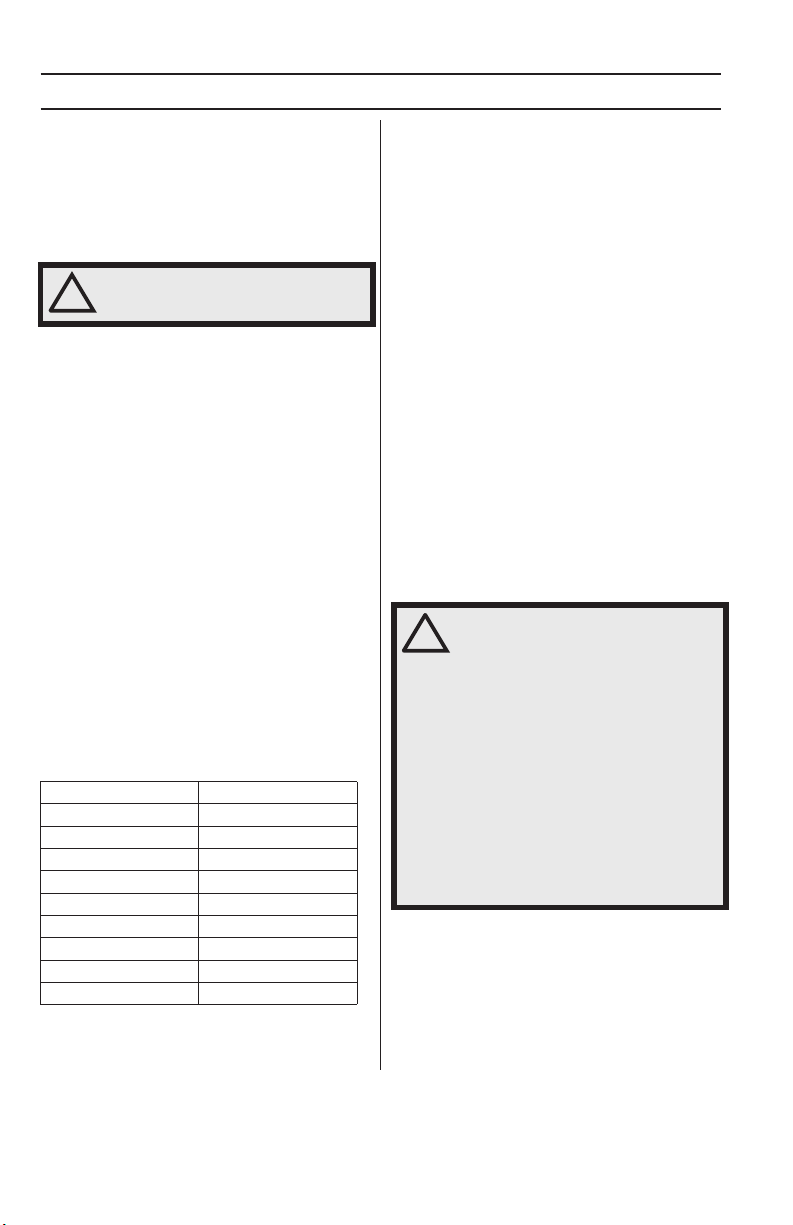
Mixing ratio
50:1 (2%) for all engines.
Gasoline, litre Two-stroke oil, litre
2% (50:1)
5 0,10
10 0,20
15 0,30
20 0,40
US gallon US fl. oz.
1 2 1/2
2 1/2 6 1/2
5 12 7/8
Mixing
• Always mix the gasoline and oil in a clean container
intended for fuel.
• Always start by filling half the amount of the gasoline
to be used. Then add the entire amount of oil. Mix
(shake) the fuel mixture. Add the remaining amount of
gasoline.
• Mix (shake) the fuel mixture thoroughly before filling
the machine’s fuel tank.
• Do not mix more than one month’s supply of fuel at a
time.
• If the machine is not used for some time the fuel tank
should be emptied and cleaned.
Chain oil
• We recommend the use of special oil (chain oil) with
good adhesion characteristics.
• Never use waste oil. This results in damage to the oil
pump, the bar and the chain.
• It is important to use oil of the right grade (suitable
viscosity range) to suit the air temperature.
• In temperatures below 32°F (0°C) some oils become
too viscous. This can overload the oil pump and result
in damage to the oil pump components.
• Contact your service agent when choosing chain oil.
Fueling
WARNING! Taking the following
precautions, will lessen the risk of fire:
Do not smoke and do not place any hot
objects in the vicinity of fuel.
Always stop the engine and let it cool for
a few minutes before refueling.
When refuelling, open the fuel cap slowly
so that any excess pressure is released
gently.
Tighten the fuel cap carefully after
refueling.
Always move the machine away from the
refueling area and source before
starting.
Clean the area around the fuel cap. Clean the fuel and
chain oil tanks regularly. The fuel filter must be replaced
at least once a year. Contamination in the tanks causes
malfunction. Make sure the fuel is well mixed by shaking
the container before refuelling. The capacities of the chain
oil tank and fuel tank are carefully matched. You should
therefore always fill the chain oil tank and fuel tank at the
same time. (16)
18 – English
FUEL HANDLING
WARNING! Fuel and fuel vapor are highly
flammable. Take care when handling fuel
!
and chain oil. Be aware of the risks of
fire, explosion and those associated with
inhalation.
Fuel safety
• Never refuel the machine while the engine is running.
• Make sure there is plenty of ventilation when refuelling
or mixing fuel (gasoline and 2-stroke oil).
• Move the machine at least 10 ft (3 m) from the
refuelling point before starting it.
• Never start the machine:
1 If you have spilled fuel or chain oil on the machine.
Wipe off the spillage and allow remaining fuel to
evaporate.
2 If you have spilled fuel on yourself or your clothes,
change your clothes. Wash any part of your body that
has come in contact with fuel. Use soap and water.
3 If the machine is leaking fuel. Check regularly for leaks
from the fuel cap and fuel lines.
WARNING! Never use a machine with
visible damage to the spark plug guard
!
and ignition cable. A risk of sparking
arises, which can cause a fire.
Transport and storage
• Always store the chain saw and fuel so that there is no
risk of leakages or fumes coming into contact with
sparks or naked flames from electrical equipment,
electric motors, relays/switches, boilers and the like.
• Always store fuel in an approved container designed
for that purpose.
• For longer periods of storage or for transport of the
chain saw, the fuel and chain oil tanks should be
emptied. Ask where you can dispose of waste fuel and
chain oil at your local gas station.
• The guide bar cover must always be fitted to the
cutting attachment when the machine is being
transported or in storage, in order to prevent accident
contact with the sharp chain. Even a non-moving
chain can cause serious cuts to yourself or persons
you bump into with an exposed chain.
• Remove the spark plug cap from the spark plug.
Activate the chain brake.
• Secure the machine during transport.
Long-term storage
Empty the fuel/oil tanks in a well ventilated area. Store the
fuel in approved cans in a safe place. Fit the guide bar
cover. Clean the machine. See instructions under the
heading Maintenance schedule.
Ensure the machine is cleaned and that a complete
service is carried out before long-term storage.
English – 19
STARTING AND STOPPING
!
Starting and stopping
WARNING! Note the following before
starting:
!
The chain brake must be engaged when
the chain saw is started to reduce the
chance of contact with the moving chain
during starting.
Never start a chain saw unless the bar,
chain and all covers are fitted correctly.
Otherwise the clutch can come loose and
cause personal injuries.
Place the machine on firm ground. Make
sure you have a secure footing and that
the chain cannot touch anything.
Keep people and animals well away from
the working area.
Never wrap the starter cord around your
hand.
Starting
The chain brake should be activated when starting the
chain saw. Activate the chain brake by pushing the front
hand guard forwards. (20)
Cold engine
Start position, 1: Set the start/stop switch in the choke
position by pulling the red control outward - upward. (23)
Decompression valve, 2: Press the valve to reduce the
pressure in the cylinder and make starting easier. Once
the machine has started the valve will automatically return
to its original setting. (23)
Air purge, 3: Press the air purge diaphragm repeatedly
until fuel fills the diaphragm (at least 6 times). The
diaphragm need not be completely filled. (23)
Grip the front handle with your left hand. Hold the chain
saw on the ground by placing your right foot through the
rear handle. (22)
Pull the starter handle, 4: Pull the starter handle with
your right hand and pull out the starter cord slowly until
you feel a resistance (as the starter pawls engage) then
pull firmly and rapidly until the engine fires.
Push down the red choke control, 5: As soon as the
engine fires which can be heard through a "puff" sound,
push down on the red choke control.
Pull the starter handle, 6: Keep on pulling the cord
powerfully until the engine starts.
Warm engine
Start position, 1: The correct choke/start throttle setting
for warm starting is obtained by initially moving the choke
control by pulling the red control outward - upwards. (23)
Decompression valve, 2: Press the valve to reduce the
pressure in the cylinder and make starting easier. Once
the machine has started the valve will automatically return
to its original setting. (23)
Air purge (3): Press the air purge diaphragm repeatedly
until fuel fills the diaphragm (at least 6 times). The
diaphragm need not be completely filled. (23)
Push down the red choke control, 5: This inactivates
the choke, which is not needed when starting a warm
chain saw. However the movement of the start/stop switch
will have engaged a high idle, making warm starting
easier.
Pull the starter handle, 6: Grip the front handle with your
left hand. Hold the chain saw on the ground by placing
your right foot through the rear handle. (22)
Pull the starter handle with your right hand and pull out the
starter cord slowly until you feel a resistance (as the
starter pawls engage) then pull firmly and rapidly until the
engine starts.
As the chain brake is still engaged the speed of the engine
must be set to idling as soon as possible, this is achieved
by disengaging the throttle lock. Disengagement is done
by gently touching on the throttle trigger. This prevents
unnecessary wear to the clutch, clutch drum and brake
band. Allow the machine to idle a few seconds before
giving full throttle. (24)
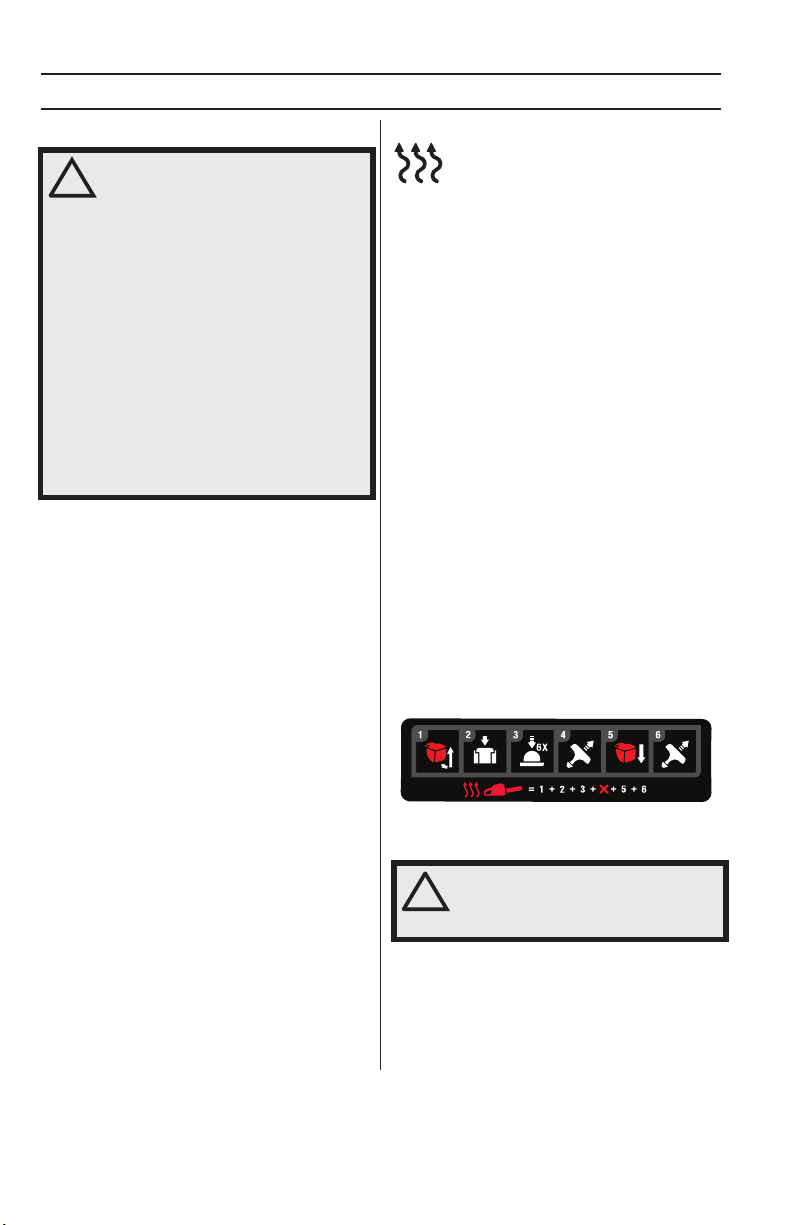
There is a simplified start reminder with illustrations
to describe each step on the rear edge of the saw.
Note! Pull the front hand guard towards the front
handle. The chain brake is now disengaged. Your chain
saw is now ready for use. (25)
WARNING! Long term inhalation of the
engine’s exhaust fumes, chain oil mist
and dust from sawdust can represent a
health risk.
• Never start a chain saw unless the bar, chain and all
covers are fitted correctly. See instructions under the
heading Assembly. Without a bar and chain attached
to the chain saw the clutch can come loose and cause
serious injury. (26)
• The chain brake should be activated when starting. Se
instructions under the heading Start and stop. Do not
20 – English

STARTING AND STOPPING
drop start. This method is very dangerous because
you may lose control of the saw. (27)
• Never start the machine indoors. Exhaust fumes can
be dangerous if inhaled.
• Observe your surroundings and make sure that there
is no risk of people or animals coming into contact with
the cutting equipment.
• Always hold the saw with both hands. The right hand
should be on the rear handle, and the left hand on the
front handle. All people, whether right or left handed,
should use this grip. Use a firm grip with thumbs and
fingers encircling the chain saw handles. (28)
Stopping
Stop the engine by pushing the start/stop switch down.
(29)
CAUTION! The start/stop switch automatically returns to
run position. To avoid involuntary start up, the spark plug
cap must always be removed from the spark plug when
the machine is unsupervised. Use the combi-tool
integrated in the right hand guard to unsnap the cylinder
cover. (6) (30)
DIFFICULT STARTING (or starting a flooded engine)
The engine may be flooded with too much fuel if it has
not started after 10 pulls.
Flooded engines can be cleared of excess fuel by
pushing the choke/fast idle lever in completely (to the
OFF/CHOKE position) and then following the warm
engine starting procedure. Ensure the ON/STOP switch
is in the ON position.
Starting could require pulling the starter rope handle
many times depending on how badly the unit is flooded.
If engine fails to start, refer to the TROUBLESHOOTING
TABLE or call 1-800-235-5878.
English – 21
WORKING TECHNIQUES
!
Before use: (31)
1 Check that the chain brake works correctly and is not
damaged.
2 Check that the rear right hand guard is not damaged.
3 Check that the throttle lockout works correctly and is
not damaged.
4 Check that the stop switch works correctly and is not
damaged.
5 Check that all handles are free from oil.
6 Check that the anti vibration system works and is not
damaged.
7 Check that the muffler is securely attached and not
damaged.
8 Check that all parts of the chain saw are tightened
correctly and that they are not damaged or missing.
9 Check that the chain catcher is in place and not
damaged.
10 Check the chain tension.
General working instructions
IMPORTANT!
This section describes basic safety rules for using a
chain saw. This information is never a substitute for
professional skills and experience. If you get into a
situation where you feel unsafe, stop and seek expert
advice. Contact your chain saw dealer, service agent or
an experienced chain saw user. Do not attempt any task
that you are not sure you can handle!
Before using a chain saw you must understand the
effects of kickback and how to avoid them. See
instructions under the heading How to avoid kickback.
Before using a chain saw you must understand the
difference between cutting with the top and bottom
edges of the bar. See instructions under the headings
How to avoid kickback and Machine’s safety equipment.
Wear personal protective equipment. See instructions
under the heading ”Personal protective equipment”.
Basic safety rules
1 Look around you:
• To ensure that people, animals or other things cannot
affect your control of the machine.
• To make sure that none of the above might come
within reach of your saw or be injured by falling trees.
CAUTION! Follow the instructions above, but do not use a
chain saw in a situation where you cannot call for help in
case of an accident.
2 Do not use the machine in bad weather, such as
dense fog, heavy rain, strong wind, intense cold, etc.
Working in bad weather is tiring and often brings
added risks, such as icy ground, unpredictable felling
direction, etc.
22 – English
3 Take great care when removing small branches and
avoid cutting bushes (i.e. cutting many small branches
at the same time). Small branches can be grabbed by
the chain and thrown back at you, causing serious
injury.
4 Make sure you can move and stand safely. Check the
area around you for possible obstacles (roots, rocks,
branches, ditches, etc.) in case you have to move
suddenly. Take great care when working on sloping
ground.
5 Take great care when cutting a tree that is under
tension. A tree that is under tension may spring back
to its normal position before or after being cut. If you
position yourself incorrectly or make the cut in the
wrong place the tree may hit you or the machine and
cause you to lose control. Both situations can cause
serious personal injury.
6 Before moving your chain saw switch off the engine
and lock the chain using the chain brake. Carry the
chain saw with the bar and chain pointing backwards.
Fit a guard to the bar before transporting the chain
saw or carrying it for any distance.
7 When you put the chain saw on the ground, lock the
saw chain using the chain brake and ensure you have
a constant view of the machine. Switch the engine off
before leaving your chain saw for any length of time.
WARNING! Sometimes chips get stuck in
the clutch cover causing the chain to
jam. Always stop the engine before
cleaning.
General rules
1 If you understand what kickback is and how it happens
then you can reduce or eliminate the element of
surprise. By being prepared you reduce the risk.
Kickback is usually quite mild, but it can sometimes be
very sudden and violent.
2 Always hold the chain saw firmly with your right hand
on the rear handle and your left hand on the front
handle. Wrap your fingers and thumbs around the
handles. You should use this grip whether you are
right-handed or left-handed. This grip minimizes the
effect of kickback and lets you keep the chain saw
under control. Do not let go of the handles! (28)
3 Most kickback accidents happen during limbing. Make
sure you are standing firmly and that there is nothing
in the way that might make you trip or lose your
balance.
Lack of concentration can lead to kickback if the
kickback zone of the bar accidentally touches a
branch, nearby tree or some other object.
Have control over the workpiece. If the pieces you
intend to cut are small and light, they can jam in the
saw chain and be thrown towards you. This is not
necessarily dangerous in itself, but you may be
surprised and lose control of the saw. Never saw
stacked logs or branches without first separating
 Loading...