

Craftsman 351.226711 Owner's Manual

SAVE THIS MANUAL
FOR
FUTURE REFERENCE
OWNER'S
MANUAL
MODEL NO.
351.226711
CAUTION:
READ ALL
INSTRUCTIONS
CAREFULLY!
.A/P /CRR FTSMRN
l"x 6" BELT & DISC SANDER
• safety Instructions
• assembly
• operating instructions
• replacement parts
Sold by SEARS, ROEBUCK AND CO., Chicago, IL 60684 U.S.A. ©
Part NO. 3899.00 May 1991
FULL ONE YEAR WARRANTY ON SEARS/CRAFTSMAN 1" x 6" BELT & 015C SANDER
If Within one full year tom the date of purchase, this Sset_ Cmfleman 1" x 6" Belt & Dlso Sender fells due to
e defect in material or wodunanchlp, Seam will repair It, free of r,hafge,
WARRANTY SERVICE IS AVAILABLE BY SIMPLY CONTACTING THE NEAREST SEARS STORE OR SERVICE
CENTER THROUGHOUT THE UNITED STATES.
This warranty glvm; you specific legal rights, and you my have other rigMs which vary from elate to stats.
BEARS, ROEBUCK AND CO., DEPT. 690/'731A SEARS TOWER, CHICAGO, IL 60684
GENERAL SAFETY INSTRUCTIONS FOR POWER TOOLS
BEFORE ANY WORK IS DONE READ THE CAU-
TIONS LISTED BELOW CAREFULLY. WORKING
SAFELY PREVENTS ACCIDENTS.
OPERATOR SHOULD BE PREPARED FOR JOB:
n. Wear proper IpporeL Do not wear loose clothing,
gloves, neolclles, dngs, mcelsts or other Jewelry
which may get ,-,ught In moving parts el machine.
b. Wear proteoth_ halr layering to contalnlong hair.
c. Wear safety shoes with nOn-slip soles.
d. Wear ealeW glasses. Everyday glasses have only
impact mldstant lenses. They am not safety glass-
as.
e. Wear face mask or dust masklf sanding oberstlon
is dusty.
f. Be alert and Udnk olemty. Never operate power
tools when tired, Immdcm_ or when taking med-
Isatlons that cause drown.
WORK AREA SHOULD BE READY FOR JOB:
S. Keep work area clean. CkJ_.eredwork areas and
workbem:he: _ ecclder_.
=. Do nOt use POWer tools In d-ngeroua em4ron-
menta. Do n_ use power tools In damp or wet
kxmtlona. Do not e:q)oea power toofe to rain.
o, Work am Ihould be ixofxmly llgMed.
d. Proper olectrlccl outlet should be available for
tool Three-prong plug should be plugged directly
Intoprope_f grOUnded,lhrea-p_g re_p_e.
e. Extenefon cords should have • grounding prong
end tha throe wlnm of the e_enelon oord should be
the correc_gauge,
f. Keep vlaimre • safe distance from work area.
g. Keep children out of workplace. Make workshop
chlM-proof. Use padlocks, master switches and
remove starter keyl to prevent any unintanlJonal
useofpo_r ton_.
TOOL SHOULD BE MAINTAINED:
a. Alvmys unplug power tool prior to Inspection.
b. Consult owner'a manual for specific maintaining
end adjusting procedures.
c. Uae clean born end keep me tool clean for safest
operation.
d. Remove adjusting keys end wrenches. Form
I'mblt Of checking to see that keys and adjusting
wrenches ere removed before turning tool on.
e. Keep ell guards In place end In working order.
f, Keep ell parts In woddng order. Check to deter-
mine that the guard or other parts will opamte
propedy end perform their intended fun_on,
g. Check for damaged parts. Check for allgnment of
moving parts, blndlng ofmoving parts, breakage of
parts, mountlng and any other cond#lon that nay
efle¢l a tool's operation.
h, A guard or other pert that [11damaged should be
properly repaked or replaced. Do not perform
makashitt repairs. (Use the part8 list providedto
order replasament parts.)
OPERATOR SHOULD KNOW HOW TO USE TOOL:
e. Use right tool for the Job. Do not force tool or
attachment to do • Job for whk_.hIt was n_ de-
signed,
b. Olsconneot tool when changing ecceseerlal,
such es belt, disc, miter gauge and the like.
0. Avoid accidental start-up. Make sure that the
machine Is In the *off" posItion before plugging In.
d. DO nOt force • tool, Kwe11work most affldently at
the rata for whlch It was designed.
e. Usa rscommended eok-easorlea. Refer to page
1t. Use of improper e_sorles may cause riskof
Inlmytopersons.
I. Handle theworkpleceOorreotly. Use alter gauge
when requlred. Protect hands from passlMe Injury.
g, Dlreotlon of feed. Feed work Into • bar or dlso
against dlro_lon of rotation of the ben or dlso.
h. Turn the ma¢hlne off If It Jams. Disconnect plug
from power _uroe before servicing tool.
I. Never leave • too4 running unattended. Turn the
power offend do not leave sander until itcomes to
e complete atop.
J. Do not overreach. Keep proper footing and
Imlanoe.
k. Never stead on tool. Serious Injury oould occur If
tool Is Upped or If abraslve belt or dlsc Is unlnten-
tlonally contacted,
I. Keep hands away from moving parts and earKllng
surfaces,
m. Know your power tool. team its operation, ap-
plk:ation end specific limitations.
-2-

CONTENTS
Wmmmty ................................ a
Goal 8eloty Immmotkme
for Power Tcolo ...................... 2
Salety InIWmotlene
for Bolt & Disc Sender ................. S
Motor Speclfk:atlone
end Ei$Ctlrlsal Requirements ............ 4
Eieotrk:al ConnecUone .................. 4 & S
Unpaeldng end Checking Contents ........... 8
TOOLSNeeded ............................ $
As_mb_ ............................... s
Operetlon ............................... 0
Malntermr_e .......................... 0 & 0
Trouble Shooting ......................... 9
RepMcament Perta Illustration .............. 10
Roplasement Parts Usl ................... 11
WARNING LABEL
The bolt and d_ sander has beam marked with •
warning lehegma_ seeds to be obs_ved for esfe opera-
floe, The operator should be aware of the locatlon end
contents of this label.
This wemlng label Is placed In • speclflc looatlon so It
Is vislble to the operator when stanlng and operating
the belt and disc sander.
SAFETY INSTRUCTIONS FOR l"x 6" BELT & DISC SANDER
WARNING: IX) NOT ATI"EMPT TO OPERATE BELT
& DISC SANDER UNTIL IT IS COM-
PLETELY ASSEMBLED ACCORDING
TO THE INSTRUCTIONS.
1. Know general power toot sefety. Make sum all
precautlorm am understood end provided to(
Loa0oz).
2. Secure aU Motener$. FmquenW check that nuts
and bo_,4are tight and heve not viaroted Iocoe.
3. _et_mdlonlnwuotl_e. Operateme be_
end dis(: sander eel deserl1>ed In this manual
(r.,0es 6 through 8),
4, Be eure motor rum €lockwise on dllm side.
Abrasiveb_ mu,,t_1 down.
5. Perform dhm eandlng on down ekle (right side).
The dl_ should p_l work towards the table.
6. Support worlq:lece. Use baelmop orwork _t_.
The backstop forthe abrssJve_ isthe bell platen
(Key No. 25) as described In "Oper-sflng Instruc-
tions" (page 7),
7. Do not forse work. Slowing or stallIng the motor
wUloverhset
8. DO not overlmot work. Move metal across the
abmslve end (:xx_Itwhen It becomes hot.
9. DO not wet grind or polish. Never use a steady
stream of water on thewodq_eca. Only quench the
wod(pleca in water to cool It.
10.
11.
12.
Do not grind or polish magnesium, k could catch
on fire.
Koep sender maintained. Follow "Maintenance
Instructions" (Page 9).
Dleconneot IX:.wor. Tum swRch off and discon-
nec_power whenever sender Is not In use.
CAUTION: Be certain to follow proper operating
proeedursa decpfle familiarity gelned
from frequent uso of your lea end disc
sander. Always remember that beklg
careleec for even m fraotlon of • second
IS sufll_ent time to Inflict severe InJu_,.
The operation of any power tool can result in foreign
being thrown into the eyes, whloh can result In
e(wom eys damage.
Always wear safety goggles complying with ANSI Z87.t
(shOwn on package) before commencing power tool
operation. Safety goggles am available at Sears ro_H
or cetslog _ores,
THINK SAFETY: Safety is • combination Of operator
common sense and alertness st ell
times when the belt & disc sander is
being used.
--3-
MOTOR SPECIFICATIONS AND ELECTRICAL REQUIREMENTS
MOTOR
The belt and disc lander Is mmembled with motor 8nd
wiringreadied ,., an _eTal i_t of the tool
The 120 Volt AC permanent epla €_q_c_ motor has
therenewingqx_ncatk_:
M_ Devek¢_ Horsepower................ 1/t
Voltage .................................. 120
Amperes .................... ............... 3
Phase ................................ Single
RPM ................................... 34S0
Rotation (viewed from left side) ......... Clockwise
POWER SOURCE
CAUTION: Do not _nneot the heft and dlso sender
to the power source until ,,11ummmly
steps hsve been completed.
1. The motor b designed for operatton on the voftage
and frequor_y spodfled on motor nsmel_te.
2. Normal loadswll be hendled safeb/on vdtages nof
more than 10% el)ova or below nameplate voltage.
3. Running the unlt on vo#ages whleh 8re not within
range may cause overhaadng and motor bum-out.
4, Heavy loads require thst voltage lit motor ter-
mlr.ds be not less than voltage specified on
nameplate.
GROUNDING INSTRUCTIONS
This tool Io equipped v/_th 8 _€onduc_o_ (x)rd end
7ot_J t_e pl_ w_dd_hee e gu_ncJ_g jx_O 8p-
provedby Unden_ere Labondodu end theCanadian
StandardaA_lodmUon.
Do not remove or _er the grounding prong in any
mmrmer.In.the m_nt of 8 _ o4"Ixmlkclown.
7oond_g IXovldese pethofIse= rudmmcaforqdoc_
sel ¢ummt to reduce the rbk of electrical shock.
The plug mu= be plugged Into e mmddng ouUetth=
• prop_ _ and70undod_ ===xde,x_w=h
nglocal€odes amdordlrmno_
Do nof modifyme plugixovlded,ff = v41not _ Inme
o_let, hero the proper outlet _ by a qualH_l
electtfcbR Improper OOnnectlonOf _.g_)und-
Ing conductor can re_JIt In a risk of dectrkmJ ohock.
The ¢ondu(_x wlh Insu_tlon having an outer surface
whichb omen 18the equipmentgroundingconductor.
If repair or re_(_mlent of the e/octlrk_ cord or i_ug IS
_, rnako m the equipment g_ndlng c,on-
ductor 18no( connected to a line terminal.
WARNING: CHECK WITH A QUALIFIED ELECTRI-
ClAN OR SERVICE PERSONNEL IF THE
GROUNDING INSTRUCTIONS ARE
NOT UNDERSTOOD OR IF IN DOUBT
A8 TO WHETHER TOOL I$ PROPERLY
GROUNDED.
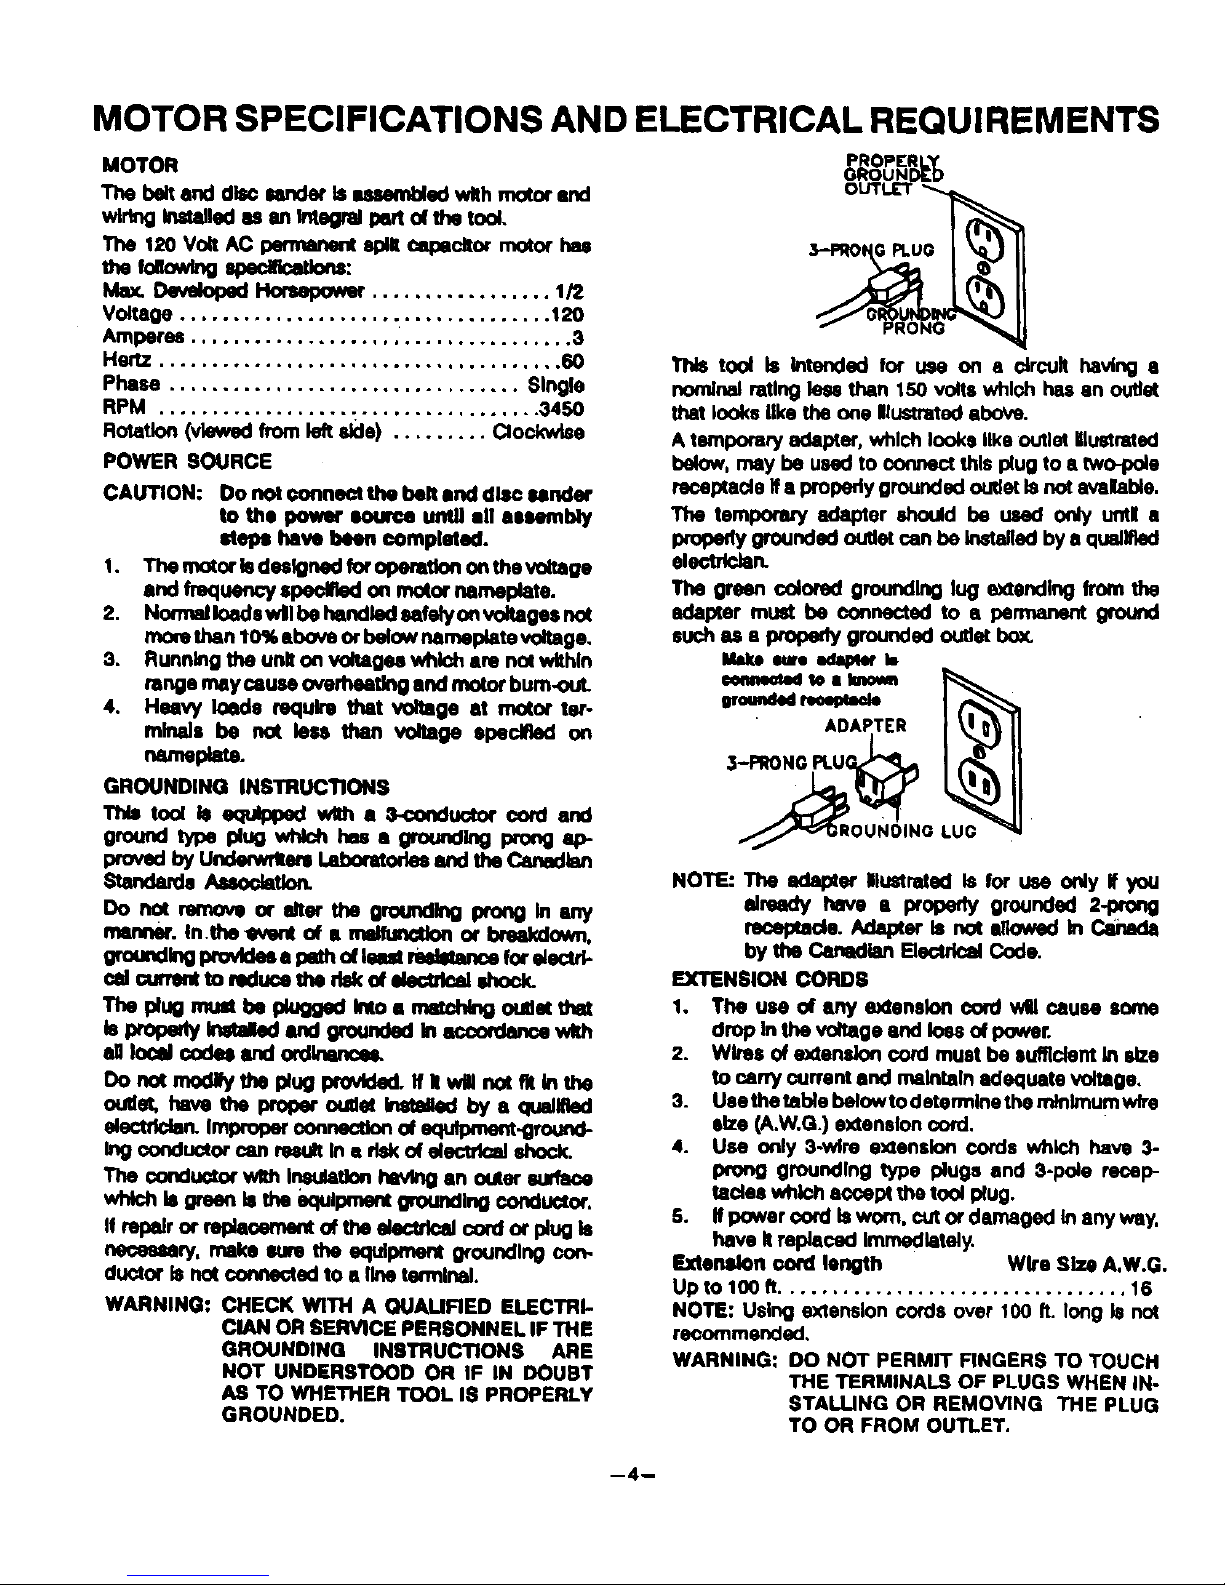
PROPERLY
GROUNDED
This tOOl Is Intended for use on clrcult having e
nominal mtlng lee8 than 150 volts whl,',hhss an outlot
that looks like the one ll=ed above.
A temporary adapter, which looks like outlet lilustr_ed
below, may be used to connect this plug to 8 two-pole
recalXa_le If a propedy grounded outlet ISnot avdable.
The temporary adapter _lould be used only untl a
pmpedy grounded outlet can be Installed by 8 qua,fled
eleofrldan.
The green colored groundlng luo extending from the
edalXer must be connected to a permanent Qfound
such its 8 properly grounded outlet box.
Mslm sine _IN_w Is
NOTE: The adapter llu_nded IS for use only If you
81rcady have • properly grounded 2-Wong
ru=epmde. ,,_la_er IS not ellowed In Cshada
by the Canadian Eleotrlcal Code.
EXTENSION CORD8
1. The use of amy e_enslon cord wRI cause some
drop In the voltage end Io_ of power.
2. Wires of extension cord must be sufficient In idze
to carry current and malnlaln 8dequste voltage,
3. Use the tame belowto determlne the minlmum wlre
she (A.W.G.) extension cord.
4. Use only 3-wire extension cords whlcl_ haw 3-
prong grounding type plugs and 3-po_e recep-
tacles which accept the tool plug.
S. ff power €ord b worn, cut or damaged In any why,
have Itmpk_ced Immediately.
Extonslon oon:l length Wlre Slze A.W.G.
Upto 100 ft................................. 16
NOTE: Using extension cords over 100 ft. long b no_
recommended.
WARNING: DO NOT PERMIT FINGERS TO TOUCH
THE TERMINALS OF PLUG(= WHEN IN-
$TALUNG OR REMOVING THE PLUG
TO OR FROM OUTLET.
--4--
 Loading...