

Page 1

Operator’s Manual
CRflFTSMHÍr
Wall Mount
DUST COLLECTOR
Model No.
351.223140
■■w
CAUTION: Read and follow
all Safety Rules and Operating
Instructions before First Use
of this Product.
s Í I
i
• Safety Rules
• Operation
• Maintenance
• Parts List
Sears, Roebuck and Co., Hoffman Estates, IL 60179 U.S.A.
www.sears.com/craftsman
23962.00 Draft (08/10/05)
• Español
Page 2

TABLE OF CONTENTS
Warranty............................................................................................ 2
Safety Rules
Unpacking..........................................................................................3
Assembly........................................................................................3-5
Installation
Operation...........................................................................................6
Maintenance .....................................................................................6
Troubleshooting.................................................................................7
Parts Illustration and List................................................................8-9
Español
......................................................................................
.........................................................................................
......................................................................................
10-15
• Do not use power tools in dangerous environments. Do not
use power tools in damp or wet locations. Do not expose
power tools to rain.
2
5
• Work area should be properly lighted.
• Proper electrical receptacle should be available for tool.
Three prong plug should be plugged directly into properly
grounded, three-prong receptacle.
• Extension cords should have a grounding prong and the
three wires of the extension cord should be of the correct
gauge.
• Keep visitors at a safe distance from work area.
• Keep children out of workplace. Make workshop childproof.
Use padlocks, master switches or remove switch keys to pre
vent any unintentional use of power tools.
WARRANTY
ONE-YEAR FULL WARRANTY ON CRAFTSMAN TOOL
If this Craftsman tool fails due to a defect in material or
workmanship within one year from the date of purchase CALL
1-800-4-MY-HOME® TO ARRANGE FOR FREE REPAIR.
If this tool is used for commercial or rental purposes, this war
ranty will apply for oniy ninety days from the date of purchase.
This warranty applies oniy while this tool is in the United
States.
This warranty gives you specific legal rights and you may also
have other rights, which vary, from state to state.
Sears, Roebuck and Co., Dept. 817WA, Hoffman Estates,
IL 60179
SAFETY RULES
DANGER; Do not use this dust collector in a flammable or
explosive atmosphere. Do not use to collect metal shavings or
dust. Consult National Fire Protection Association (NFPA)
standards before setting up a dust collection system, espe
cially NFPA 664.
WARNING: For your own safety read all of the instructions
and precautions before operating tool.
CAUTION: Always follow proper operating procedures as
defined in this manual even if you are familiar with use of this
or similar tools. Remember that being careless for even a
fraction of a second can result in severe personal injury
BE PREPARED FOR JOB
• Wear proper apparel. Do not wear loose clothing, gloves,
neckties, rings, bracelets or other jewelry which may get
caught in moving parts of machine.
• Wear protective hair covering to contain long hair.
• Wear safety shoes with non-slip soles.
• Wear safety glasses complying with United States ANSI
Z87.1. Everyday glasses have only impact resistant lens
es. They are NOT safety glasses.
• Wear face mask or dust mask if operation is dusty.
• Be alert and think clearly. Never operate power tools when
tired, intoxicated or when taking medications that cause
drowsiness.
TOOL SHOULD BE MAINTAINED
• Always unplug tool prior to inspection.
• Consult manual for specific maintaining and adjusting
procedures.
• Keep tool lubricated and clean for safest operation.
• Remove adjusting tools. Form habit of checking to see that
adjusting tools are removed before switching machine on.
• Keep all parts in working order. Check to determine that
the guard or other parts will operate properly and perform
their intended function.
• Check for damaged parts. Check for alignment of moving
parts, binding, breakage, mounting and any other condi
tion that may affect a tool’s operation.
• A guard or other part that is damaged should be properly
repaired or replaced. Do not perform makeshift repairs.
(Use parts list provided to order replacement parts.)
KNOW HOW TO USE TOOL
• Use right tool for job. Do not force tool or attachment to do
a job for which it was not designed.
• Disconnect tool when performing service or maintenance.
• Avoid accidental start-up. Make sure that the switch is in
the OFF position before plugging in.
• Do not force tool. It will work most efficiently at the rate for
which it was designed.
• Leave hands free to operate machine. Protect hands from
possible injury.
• Never leave tool running unattended. Turn the power off
and do not leave tool until it comes to a complete stop.
• Do not overreach. Keep proper footing and balance.
• Never stand on tool. Serious injury could occur if tool is
tipped or if blade is unintentionally contacted.
• Keep hands away from moving parts.
• Know your tool. Learn the tool’s operation, application and
specific limitations.
DANGER: The operation of any power tool can result in for
eign objects being thrown into the eyes, which can result in
severe eye damage. Always wear safety glasses complying
with United States ANSI Z87.1 (shown on package) before
commencing power tool operation.
PREPARE WORK AREA FOR JOB
• Keep work area clean. Cluttered work areas invite
accidents.
© Sears, Roebuck and Co.
Page 3
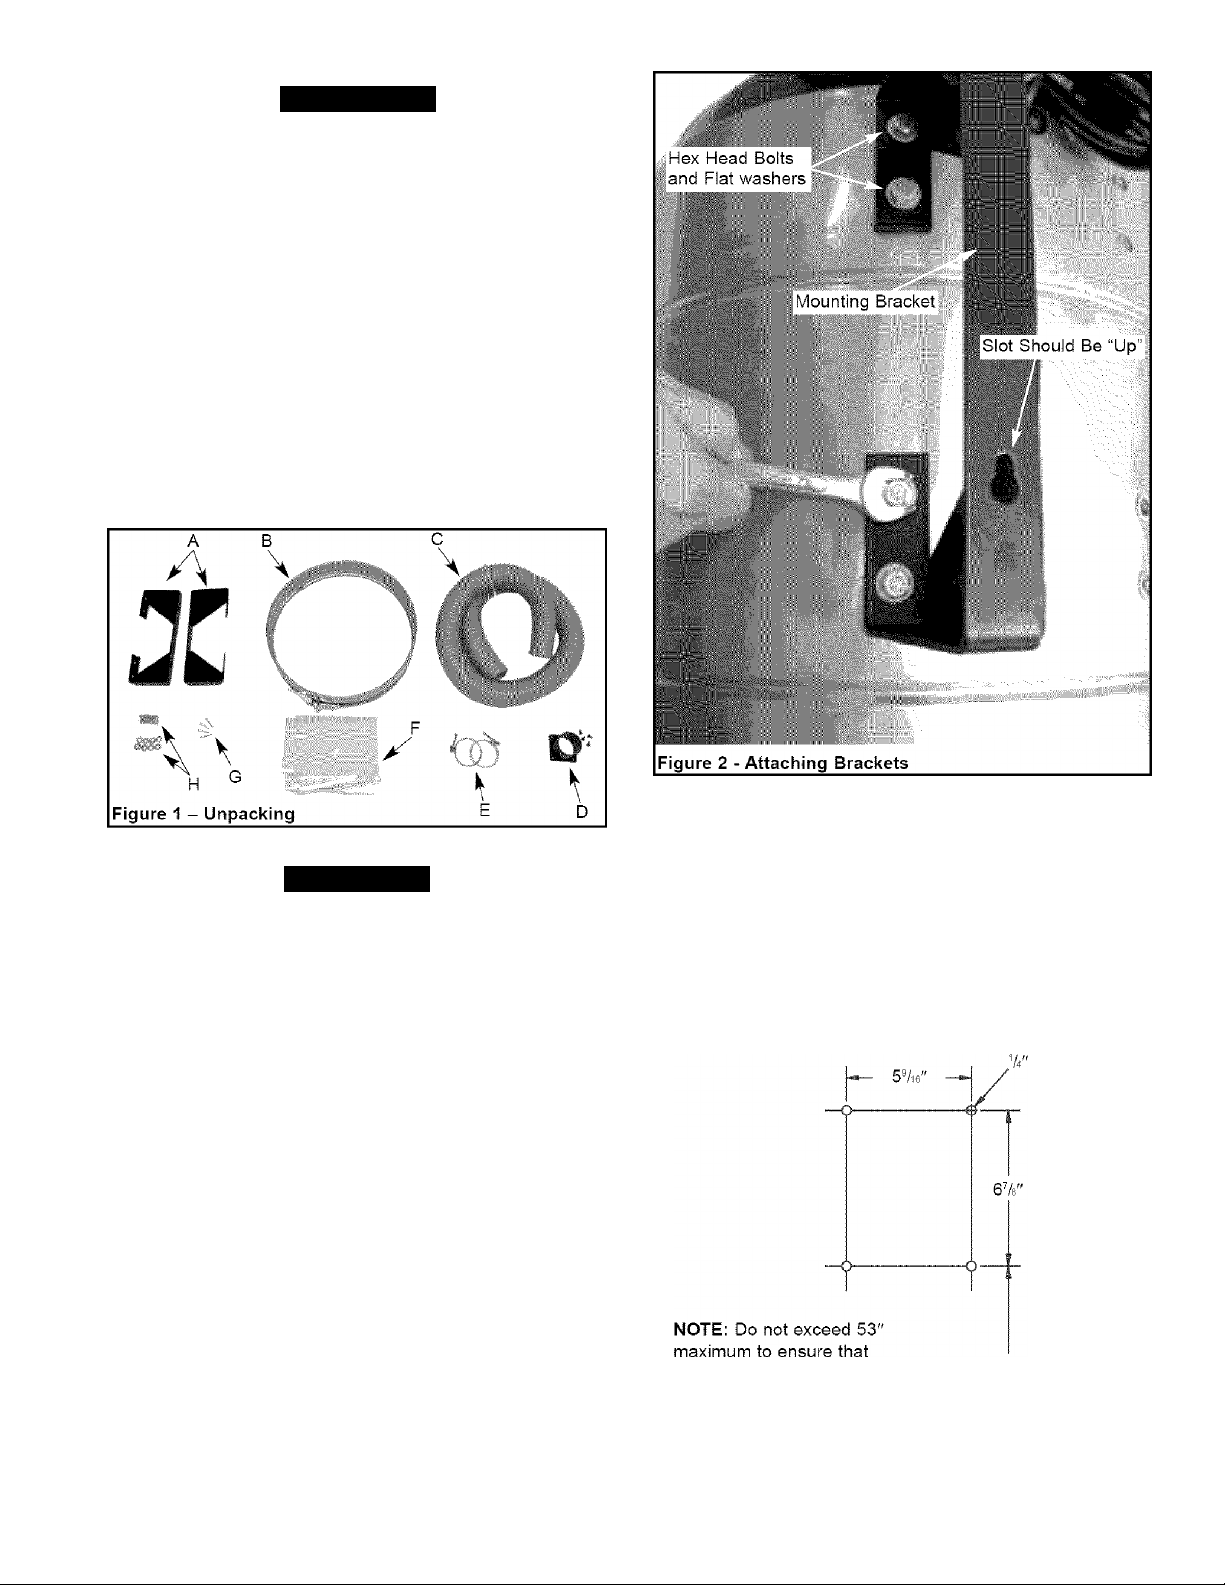
UNPACKING
Check for shipping damage, if damage has occurred, a claim
must be filed with the carrier immediately. Check for complete
ness. Immediately report any missing parts to dealer. Remove
all components of dust collector from shipping carton.
Refer to Figure 1.
The dust collector comes assembled as one unit. Additional
loose parts which need to be fastened to the dust collector
should be located and accounted for before assembly:
A Mounting brackets (2)
B Collar with bag clamp
C Hose
D Inlet and screws (4)
E Hose clamp (2)
F Collector bag (3)
G Mounting screws and anchors (4 each)
H Bolts and washers (8 each)
ASSEMBLY
TOOLS NEEDED
• Vi" Open End Wrench
• Offset or Short Phillips Head Screwdriver
• Portable Drill
• Vt" Drill Bit
• Hammer
NOTE: For masonry walls, use four masonry anchors and
masonry drill bit of proper size for anchors (not supplied).
SELECT SITE FOR DUST COLLECTOR
Site for the dust collector should be located as close to the
woodworking machine(s) as possible. Site should be to the
Left of the machine(s), on the wall.
ATTACH WALL BRACKETS TO DUST COLLECTOR
ASSEMBLY
Refer to Figure 2.
Wall brackets need to be attached to dust collector body. To
attach wall brackets:
• Position wall bracket at set of holes at back of dust
collector body.
• Make sure that the bracket is straight up and down and
that the narrow side of slot is “UP” as shown.
• Secure each wall bracket to dust collector assembly using
four hex head bolts and flat washers.
INSTALL WALL ANCHORS
Refer to Figure 3.
Wall anchors need to be installed at the site selected for the
dust collector. To install wall anchors:
• Mark the location of anchors on the wall according to
Figure 3.
• Drill Va" hole, 1’/4" deep at each of the four marks.
• Hammer anchors into each of four holes so that they are
flush with wall.
• Partially screw in thread-forming screws so that there is
approximately Va" of threads showing.
the collector bag is
supported by the floor
Floor
/77777777777777777"
Figure 3 - Installing Wall Anchors
53" maximum
Page 4
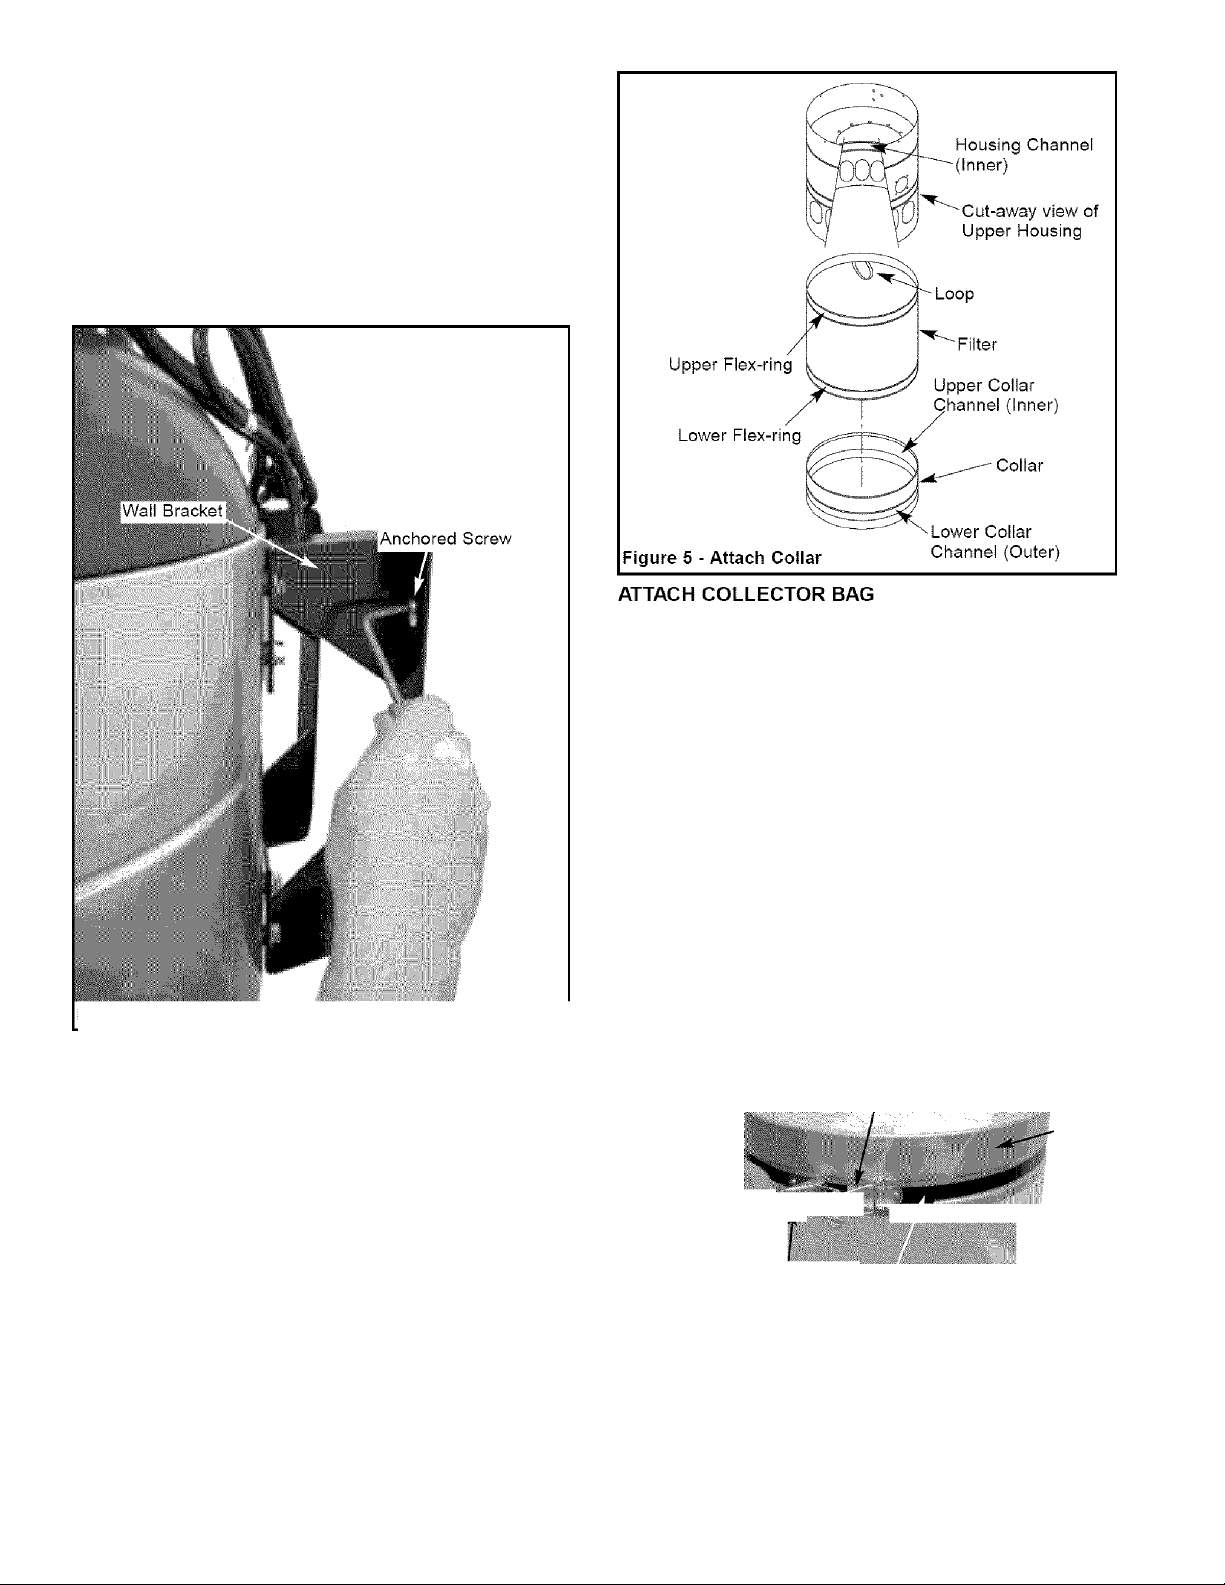
MOUNT DUST COLLECTOR ASSEMBLY TO WALL
Refer to Figure 4,
To mount dust collector assembly:
• Lift dust collector assembly and position slots in wall
brackets over installed anchored screws. Slide dust collec
tor assembly down so that anchored screws rest in narrow
portion of slots.
NOTE: Mounting dust collector will be easier and safer if done
by two people.
• Tighten four screws using offset or short Phillips head
screwdriver.
Refer to Figure 6.
Collector bag needs to be attached to collar using collector
bag clamp. To attach collector bag:
• Remove collector bag clamp from collar.
• Slide collector bag over collar. Position bag approximately
T'h" above lower edge of collar.
NOTE: The bottom of collector bag should rest flat on the
floor, so that the floor supports the weight of wood dust and
chips.
• Position bag clamp in lower channel of collar over bag.
• Position the spring connector into one of the slots on the
latch and lock the clamp handle.
• Make sure collector bag is secure.
NOTE: The top of collector bag should NOT block the filter. If
collector bag does block filter, fold excess bag over bag
clamp.
Figure 4 - Mounting Dust Collector Assembly
ATTACH COLLAR
Refer to Figure 5.
Collar needs to be attached to lower flex-ring of filter. To
attach lower collar:
• Pull filter down from dust collector housing.
• Make sure that filter is straight and there are no folds or
creases.
• Bend and insert lower flex-ring of filter into upper collar
channel.
• Pull down on collar to make sure that flex-ring is entirely in
channel.
Spring Connector
JClamp ,
Collecx Вас
Figure 6 - Attaching Collector Bag
-a"d ■■ -'Otlector Bag Clamp
Filter
Collar
Page 5
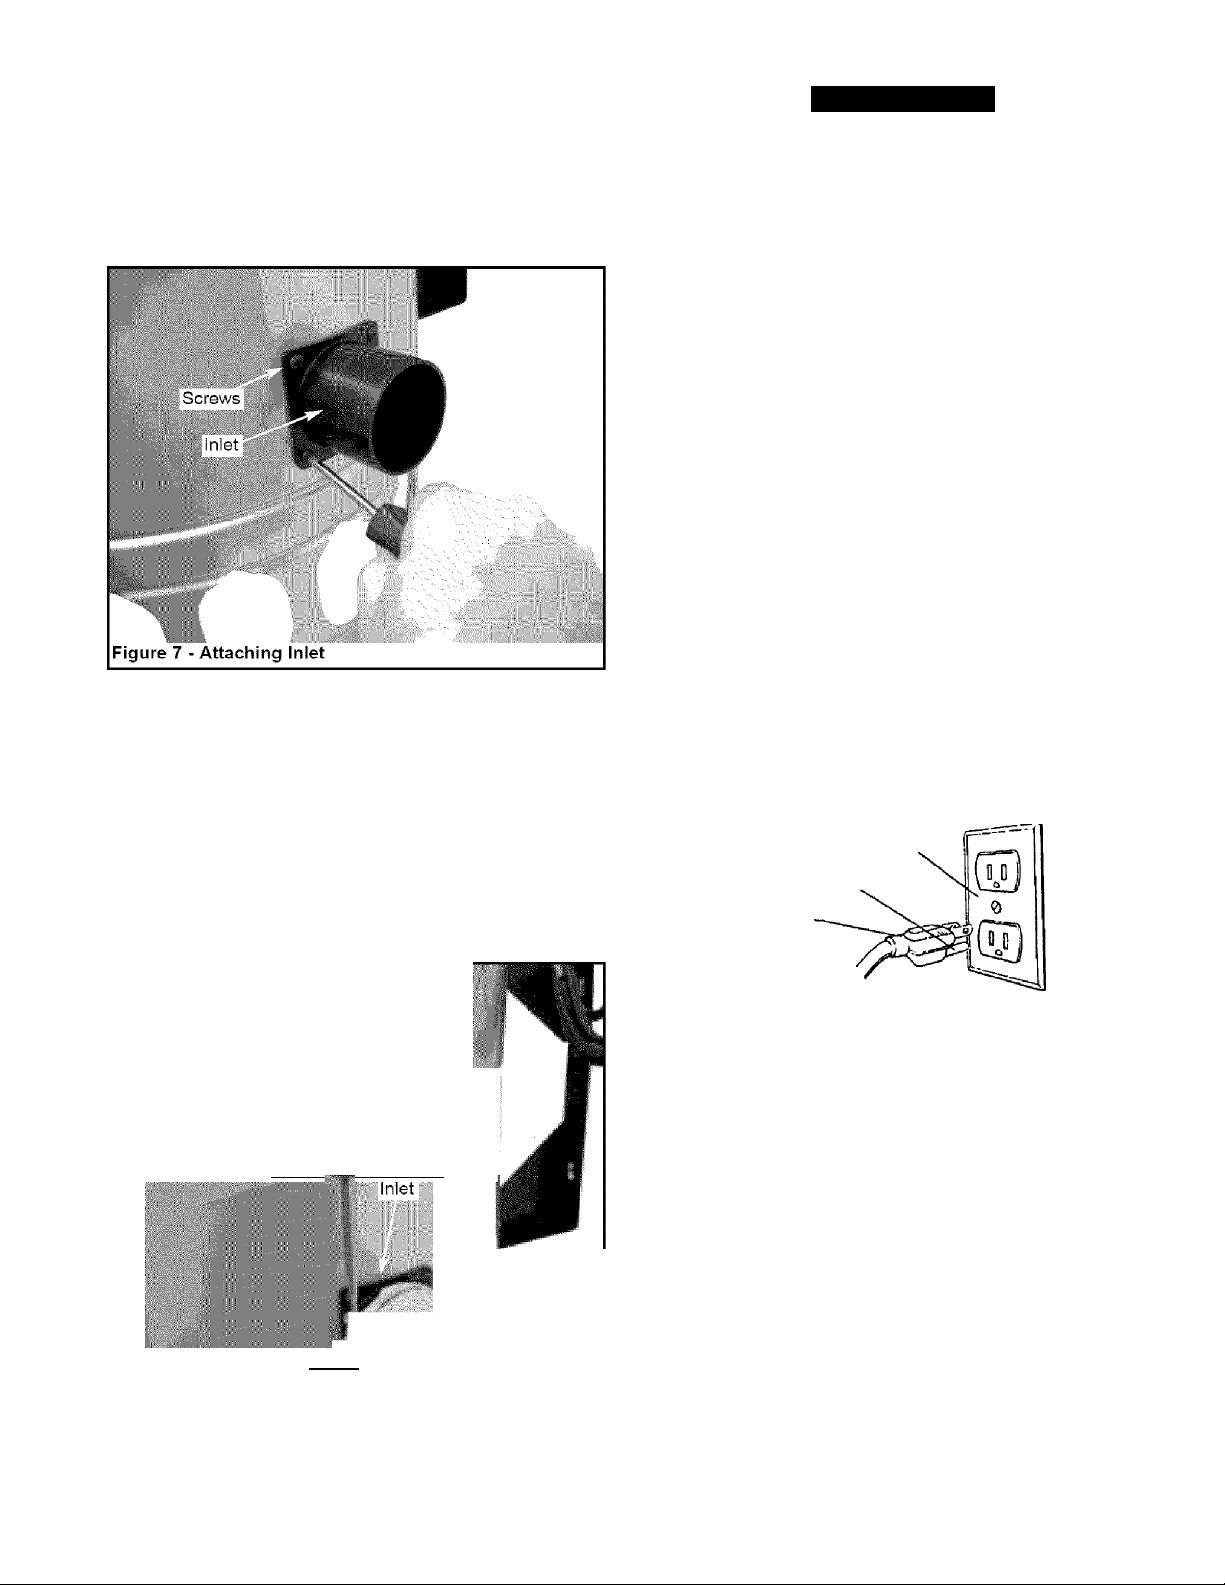
ATTACH INLET
Refer to Figure 7.
Inlet needs to be attached to right side of dust collector
assembly. To attach inlet:
• Position inlet over 2'h" hole on right side of dust collector
assembly.
• Secure inlet using four 4.2-1.4 x 12mm thread-forming
screws.
ATTACH HOSE
Refer to Figure 8.
Hose needs to be attached to the inlet using hose clamp.
To attach hose:
• Slide hose clamp onto one end of hose. Loosen clamp
screw if required to slide hose clamp onto hose.
• Position the hose clamp wires on the hose grooves.
• Slide hose with clamp onto inlet.
• Tighten hose clamp screw to secure hose with inlet.
• Slide other hose clamp onto the opposite hose end. This
end will be connected to the dust producing machine
INSTALLATION
DANGER; Do not permit fingers to touch terminals of plug
when installing or removing the plug to or from the outlet.
WARNING: Do not connect to power source until unit is
completely assembled.
POWER SOURCE
• Motor is designed for operation on the voltage and fre
quency specified on motor nameplate.
• Normal loads will be handled safely on voltages not more
than 10% above or below the specified voltage.
• Running unit on voltages not within range may cause over
heating and motor burnout.
GROUNDING INSTRUCTIONS
Refer to Figure 9.
• This tool is equipped with a 3-conductor cord.
• Do not remove or alter grounding prong in any manner. In
the event of malfunction or breakdown, grounding provides
path of least resistance for electrical current to reduce risk
of electrical shock.
• Plug must be plugged into a matching outlet that is proper
ly installed and grounded in accordance with all local
codes and ordinances.
• The conductor with insulation having an outer surface
which is green is equipment grounding conductor. If repair
or replacement is necessary, make sure equipment
grounding conductor is not connected to line terminal.
• If power cord is worn, cut or damaged in any way, have it
replaced immediately.
Properly Grounded Outlet
Grounding Prong
3-Prong Plug
^^^^^■ClampJ
Hose
■
Figure 8 - Attaching Hose
. Jl,
Ill®
-os:
Figure 9 - 3-Prong Receptacle
CAUTION: Improper connection of the equipment-grounding
conductor can result in a risk of electrical shock.
EXTENSION CORDS
• The use of any extension cord will cause some drop in the
voltage and loss of power.
• Wires of the extension cord must be sufficient in size to
carry the current and maintain adequate voltage.
• Use the table below to determine the minimum wire size
(A.W.G.) extension cord.
• Use only 3-wire extension cords having 3-prong grounding
type plugs and 3-pole receptacles which accept the tool
plug.
• If extension cord is worn, cut or damaged in any way, have
it replaced immediately.
Extension Cord Length
Wire Size A.W.G.
Up to 50 ft
Note; Using extension cords over 50 ft. long is not
recommended.
........................................................................................
16
Page 6

OPERATION MAINTENANCE
DESCRIPTION
The Craftsman Dust Collector is designed to remove and coilect wood dust and wood chips from woodworking machinery.
Collector bag collects dust and chips, and makes disposal of
dust and chips easy. Collector features 2V2 x 72” intake hose.
SPECIFICATIONS
Motor Horsepower (Max. Developed)............................................
Voltage......................................................................................115 V
Amperes..........................................................................................9.0
Hertz................................................................................................60
Phase........................................................................................Single
RPM............................................................................................ 3450
Certification
Air Flow Rate..........................................................................150 CFM
Air Velocity............................................................................4400 FPM
Maximum Static Pressure
Sound Level
Inlet................................................................................................2'H'
Collector Bag Capacity........................................36 gal. (4.9 cu. ft.)
Collector Bag Rating
Weight......................................................................................
Overall Size
.................................................................................
............................
.............................................................................
....................................................... 1 micron
...
............................................... 17% x 19 x 72"
3.75" of water column
1V2
CSA
76 dB A
55 lbs
WARNING; Turn switch off and remove plug from power
source outlet before maintaining your dust collector.
Refer to Figure 10.
• Clean motor of dust, chips or other particles. If operation is
excessively dusty or dirty, frequent inspection of motor is
required. Vacuum any particles that may have entered the
motor.
• Replace worn, cut or damaged line cord.
• Replace worn or damaged collector hose.
• Replace worn or damaged collector bag.
• Clean or replace filter on a regular basis.
• Frequently check that all nuts, bolts, screws, etc. have not
loosened due to collector vibration.
CLEANING OR REPLACING FILTER
DANGER: Turn switch off and remove plug from power
source outlet before maintaining your dust collector.
Refer to Figure 5, Page 4.
• Remove collector bag.
• Remove collar by pushing flex-ring away from collar.
• Reach into collector housing and pull down on loop at top
of filter.
• Clean inside of filter using vacuum.
• Reinstall filter.
• Reinstall collector bag.
DUST COLLECTOR
DANGER: Do not use this dust collector in a flammable or
explosive atmosphere. Do not use to collect metal shavings or
dust Consult National Fire Protection Association (NFPA)
standards before setting up a dust collection system, espe
cially NFPA 664,
• Connect collector hose to dust producing machine using
hose clamp.
NOTE: For installations with more than one machine, it is rec
ommended that Craftsman 22313 Shop Dust Collection
System be used for best performance.
NOTE: A longer hose may be used (maximum length is 40' of
I'll" diameter hose). A larger diameter hose may be used, but
length will be decreased.
• Turn dust collector on before starting dust producing
machine.
EMPTYING COLLECTOR BAG
Refer to Figure 10.
DANGER:Turn switch off and remove plug from power
source outlet before emptying collector bag.
• Empty collector bag by lifting bag clamp handle and
releasing spring connector from latch. Slide bag away from
collar. Dispose of dust properly.
• Mount collector bag by sliding bag over opening on collar.
Position the spring connector into one of the slots on the
latch and lock the clamp handle. Make sure collector bag
is secure and rests flat on floor, so that floor supports the
weight of wood dust and chips.
Page 7

TROUBLESHOOTING
SYMPTOM POSSIBLE CAUSE(S) CORRECTIVE ACTION
Motor will not run 1. Defective plug, cord, switch or motor 1.Check wiring, replace defective parts
2. Blown fuse or circuit breaker 2. Check fuse or breaker, replace
Excessive dust in air 1. Leaking bag or hose connection 1. Check filter and collector bag connections.
Check collector hose connections
2. Filter or collector bag leaks 2. Dust trapped under bag clamp or collector bag not
sealed on collar
Excessive impeller noise 1. Large debris or piece or wood in I.D0 not vacuum metal materials. Turn
impeller housing collector off and let debris settle in
collector bag.
2. Loose impeller 2. Disconnect collector from power source.
Remove four screws holding motor/fan assembly to
upper blower housing. Carefully lift out motor/fan
assembly and lay on workbench. Hold motor shaft from
turning using vise grips and tighten bolt holding impeller.
Excessive motor noise Defective motor Have motor checked by qualified motor
service technician
Motor fails to develop full I.Low voltage to collector caused by 1. Remove other electric machines or
power or motor stalls circuit overload appliances from circuit
2. Low voltage to collector caused by 2. Increase wire gauge size of extension
undersized extension cords cords or shorten extension cords
3.L0W voltage from power source 3. Request voltage check from power
company
4. Defective motor capacitor 4. Replace motor capacitor
Motor slow to start or fails
to reach full speed
Motor overheats 1. Motor overload 1. Reduce lead by slowing dust production
Tripping circuit breaker or 1. Motor overloaded 1. Reduce load by slowing dust production
fuses
1. Burned or defective motor 1. Check motor, replace if necessary
2. Defective motor capacitor switch 2.Check switch, replace if necessary
2. Improper motor cooling 2. Clean sawdust from motor
2. Improper capacity of circuit breaker 2. Use proper capacity circuit breaker or
or fuses fuse
Page 8

Model 351.223140
Figure 10 - Replacement Parts Illustration for Dust Collector
8
Page 9

REPLACEMENT PARTS LIST FOR DUST COLLECTOR
KEY
NO. PART NO. DESCRIPTION QTY.
1 23937.00 Cover 1
2 08066.00 Switch 1
3 23938.00 Motor Cord 1
4 23939.00 Motor 1
5 STD861313 4.2-1.4 X 12mm Threadforming Screw* 16
6 21166.00 Motor Gasket 1
7 23942.00 Blower Cover 1
8 STD523107 =/i6-18 x%" Hex Head Bolt* 13
9 STD551031 Flat Washer* 12
10 21167.00 Impeller 1
11 05662.00 Tie" Flat Washer (wide)* 1
12 23941.00 '/4-20 X "/4" Socket Pan Head Screw* 4
13 STD551025 '/4" Flat Washer* 4
14 23946.00 Strain Relief 1
15 23947.00 Line Cord 1
16 23948.00 Inlet 1
17 23949.00 Upper Blower Housing 1
18 23950.00 Bracket, LH 1
19 23951.00 Bracket, RH 1
20 23943.00 #8-18 X 1’/4” Threadforming Screw* 4
21 23944.00 '/4 X T/4” Wall Anchor* 4
22 23954.00 Filter 1
23 23955.00 Collar 1
24 23956.00 Collector Bag Clamp 1
25 23957.00 Collector Bag 3
26 23958.00 2Vi X 72" Flexible Hose 1
27 23959.00 Hose Clamp 2
A 24010.00 Screwdriver, L-shape 1
A 23962.00 Operator’s Manual 1
* standard hardware item available locally
A Not Shown
Page 10

COLECTOR DE POLVO
de Montaje en Pared
Modelo No.
351.223140
PRECAUCION: Lea y siga todas las Reglas
de Seguridad e Instrucciones de Operación
antes de utilizar este producto por primera vez.
• Use una cubierta protectora para el cabello, para sujetar el
cabello largo.
• Use zapatos de seguridad con suelas antideslizantes.
• Use gafas de seguridad que cumplan con la norma ANSI Z87.1
de los Estados Unidos. Los anteojos comunes tienen lentes
que sólo son resistentes al impacto. NO son anteojos de
seguridad.
• Use una máscara para la cara o una máscara contra el polvo,
si al utilizar la herramienta se produce mucho polvo.
• Esté alerta y piense claramente. Nunca maneje herramientas
mecánicas cuando esté cansado, intoxicado o bajo la influencia
de medicación que produzca somnolencia.
CONTENIDO
Inglés..............................................................................................2-7
Ilustración y Lista de Partes............................................................8-9
Garantía...........................................................................................10
Reglas de Seguridad
Desempaque...................................................................................11
Montaje.......................................................................................11-13
Instalación..................................................................................13-14
Operación........................................................................................14
Mantenimiento.................................................................................14
Identificación de Problemas
.................................................................
............................................................
10-11
15
GARANTIA
GARANTIA COMPLETA DE UN ANO PARA
HERRAMIENTA CRAFTSMAN
Si esta herramienta Craftsman fallara por causa de defectos en el
material o en la mano de obra en un lapso de un año a partir de la
fecha de compra. LLAME al 1-800-4-MY-HOME® PARA SOLICITAR
LA REPARACION GRATUITA DEL PRODUCTO.
Si esta herramienta se usa para fines comerciales o de alquiler, esta
garantía es válida únicamente por noventa días a partir de la fecha
de compra.
Esta garantía aplica únicamente si la herramienta se encuentra
en los Estados Unidos.
Esta garantía le otorga derechos legales específicos y también
puede usted tener otros derechos que varíen de estado a estado.
Sears, Roebuck and Co., Dept. 817WA, Hoffman Estates, !L 60179
REGLAS DE SEGURIDAD
PELIGRO: No utilice este colector de polvo en un ambiente
inflamable o explosivo. No lo utilice para recolectar polvo o virutas
metálicas. Consulte las normativas de la Asociación Nacional de
Protección contra Incendios (National Pire Protection Assooiation,
NFPA) antes de instalar un sistema de recolección de polvo,
especialmente la NFPA 664.
ADVERTENCIA: Por su propia segundad, lea todas las
instrucciones y precauciones antes de manejar la herramienta.
PRECAUCION: Siempre siga los procedimientos de operación
correctos, tal como se definen en este manual, aun cuando esté
familiarizado con el uso de ésta o de otras herramientas similares.
Recuerde que descuidarse aunque sólo sea por una fracción de
segundo puede ocasionarle graves lesiones.
EL OPERADOR DEBE ESTAR PREPARADO PARA
ELTRABAJO
• Use ropa apropiada. No use ropa holgada, guantes, corbatas,
anillos, pulseras ni otras joyas que puedan atascarse en las
piezas móviles de la máquina.
PREPARE EL AREA DE TRABAJO PARA LA TAREA
A REALIZAR
• Mantenga el área de trabajo limpia. Las áreas de trabajo
desordenadas atraen accidentes.
• No use herramientas mecánicas en ambientes peligrosos. No
use herramientas mecánicas en lugares húmedos o mojados.
No exponga las herramientas mecánicas a la lluvia.
• El área de trabajo debe estar iluminada adecuadamente.
• Debe haber disponible una toma de corriente adecuada para
la herramienta. El enchufe de tres puntas debe enchufarse
directamente a un receptáculo para tres puntas puesto a
tierra correctamente.
• Los cordones de extensión deben tener una punta de conexión
a tierra y los tres conductores del cordón de extensión deben
ser del calibre correcto.
• Mantenga a los visitantes a una distancia prudente del área
de trabajo.
• Mantenga a los niños fuera del lugar de trabajo. Haga que
su taller sea a prueba de niños. Use candados, interruptores
maestros y extraiga las llaves del arrancador para impedir
cualquier uso involuntario de las herramientas mecánicas.
SE DEBE DAR MANTENIMIENTO A LA HERRAMIENTA
• Desenchufe siempre la herramienta antes de inspeccionarla.
• Consulte el manual para informarse sobre los procedimientos
de mantenimiento y ajuste específicos.
• Mantenga la herramienta lubricada y limpia de modo que
funcione de la manera más segura.
• Retire las herramientas de ajuste. Desarrolle el hábito de verificar
que hayan sido retiradas las herramientas de ajuste antes de
encender la máquina.
• Mantenga todas las partes listas para funcionar. Revise el protector
u otras piezas para determinar si funcionan correctamente y
hacen el trabajo que deben hacer.
• Revise que no haya partes dañadas. Verifique el alineamiento
de las partes móviles, si hay atascamiento, roturas y montaje o
cualquier otra condición que pudiera afectar el funcionamiento
de la herramienta.
• Si hay una protección o cualquier otra parte dañada, éstas
deberán repararse correctamente o ser reemplazadas. No
haga reparaciones provisionales. (Válgase de la lista de piezas
incluida para solicitar piezas de reemplazo.)
EL OPERADOR DEBE SABER COMO USAR
LA HERRAMIENTA
• Use la herramienta correcta para cada trabajo. No fuerce la
herramienta o el accesorio ni los use para una tarea para la
que no fueron diseñados.
• Desconecte la herramienta cuando le dé servicio o mantenimiento
a la misma.
• Evite que la herramienta se encienda accidentalmente. Asegúrese
que el interruptor esté en la posición OFF (apagado) antes de
enchufar la herramienta.
10
Page 11

• No fuerce la herramienta. Funcionará en la forma más eficiente
a la velocidad para la cuál se diseñó.
• Mantenga las manos libres para poder operar la máquina.
Protéjase las manos de posibles lesiones.
• Nunca deje desatendida una herramienta en funcionamiento.
Desconéctela y no la abandone hasta que se haya detenido
por completo.
• No trate de alcanzar demasiado lejos. Manténgase firme y
equilibrado.
• Nunca se coloque de pie sobre la herramienta. Se pueden
producir lesiones graves si la herramienta se vuelca o se hace
contacto con la hoja sin intención.
• Mantenga las manos alejadas de las partes móviles.
• Conozca su herramienta. Aprenda a manejar la herramienta,
su aplicación y limitaciones específicas.
PELIGRO: La operación de toda herramienta mecánica puede hacer
que salgan arrojados objetos extraños hacia los ojos y les causen
graves heridas. Antes de comenzar a utilizar la herramienta mecánica,
póngase siempre gafas de seguridad {mostradas en el empaque)
que cumplan con la norma ANSI Z87.1 de los Estados Unidos.
DESEMPAQUE
NOTA: Para las paredes de mampostería, utilice cuatro anclas para
mampostería y una broca para mampostería del tamaño adecuado
para las brocas (no suministradas).
SELECCIONE UN LUGAR PARA INSTALAR
EL COLECTOR DE POLVO
El colector de polvo debe situarse lo más cerca posible a la(s)
máquina(s) de carpintería. Se debe seleccionar un lugar en la
pared que esté a la Izquierda de la(s) máquina(s).
INSTALE LOS SOPORTES PARA LA PARED EN
EL CONJUNTO DEL COLECTOR DE POLVO
Consulte la Figura 2.
Los soportes para la pared deben instalarse en el cuerpo del colector
de polvo. Para instalar los soportes para la pared:
• Sitúe el soporte para la pared en la serie de agujeros que están
en la parte posterior del cuerpo del colector de polvo.
• Asegúrese que la pieza de soporte esté en posición vertical
(de arriba hacia abajo) y que el lado angosto de la ranura esté
“ARRIBA”, como se muestra.
• Fije cada soporte para la pared en el conjunto del colector de polvo
usando cuatro pernos de cabeza hexagonal y arandelas planas.
Verifique que no hayan ocurrido daños durante el envío. De ser
así, deberá enviarse de inmediato una reclamación a la compañía
transportista. Verifique que esté completa. Avísele inmediatamente
al distribuidor si faltan partes. Retire de la caja de envío todos los
componentes del colector de polvo.
Consulte la Figura 1.
El colector de polvo viene armado como una unidad. Será necesario
localizar y ver que no falten las partes adicionales que deben
montarse en el colector de polvo, antes de instalarlas:
A Soportes de montaje (2)
B Collar con abrazadera de bolsa
C Manguera
D Entrada y tornilios (4)
E Abrazadera de ¡a manguera (2)
F Bolsa del colector (3)
G Anclas y tornillos de montaje (4 de cada uno)
H Pernos y arandelas (8 de cada uno)
Pernos de
cabeza hexagonal
y ararde as planas
Soporte ae montaje
* •
La ranura debe estar “Arriba”
MONTAJE
HERRAMIENTAS NECESARIAS
Llave de extremo abierto de 'h"
Destornillador con cabeza acodada o Phillips corto
Taladro portátil
Broca de Vn"
Martillo
Figura 2 - Instalación de los Soportes
INSTALE ANCLAS PARA PARED
Consulte la Figura 3. página 12.
Las anclas para pared deben instalarse en el lugar seleccionado para
el colector de polvo. Para instalar las anclas para pared en la pared:
• Marque la posición de las anclas en la pared de acuerdo con la
Figura 3.
• Taladre un agujero de 'U" de diámetro y 1W de profundidad en
cada una de las cuatro posiciones marcadas.
• Con un martillo, clave las anclas en cada uno de los cuatro
agujeros hasta que estén al ras con la pared.
• Atornille parcialmente tornillos autorroscantes hasta que haya
aproximadamente 'W de las roscas visibles.
11
Page 12

MONTE EL CONJUNTO DEL COLECTOR DE POLVO
EN LA PARED
Consulte la Figura 4.
Para montar el conjunto del colector de polvo:
• Levante el conjunto del colector de polvo y coloque las ranuras en
los soportes para la pared sobre los tornillos anclados instalados.
Deslice el conjunto del colector de polvo hacia abajo de manera
que los tornillos anclados descansen en las porciones angostas
de las ranuras.
NOTA: La operación de montaje del colector de polvo será más fácil
y más segura si es realizada por dos personas.
• Apriete los cuatro tornillos usando el destornillador de cabeza
acodada o Phillips.
■
ara a pa^ed ■
Tornillo anclado
INSTALE EL COLLAR
Consulte la Figura 5.
El collar debe instalarse en el aro flexible inferior del filtro. Para
instalar el collar Inferior:
• Tire del filtro hacia abajo para sacarlo de la caja del colector.
• Cerciórese de que el filtro esté recto y no esté doblado ni plegado.
• Doble e inserte el aro flexible inferior del filtro en el canal del
collar superior.
• Tire del collar hacia abajo para asegurarse que el aro flexible
esté totalmente dentro del canal.
INSTALE LA BOLSA DEL COLECTOR
Consulte la Figura 6.
La bolsa del colector debe instalarse en el collar usando la abraza
dera para la bolsa del colector. Para instalar la bolsa del colector:
• Retire del collar la abrazadera de la bolsa del colector.
• Deslice la bolsa del colector sobre el collar. Coloque la bolsa a
aproximadamente 2V2" por encima del borde inferior del collar.
NOTA: La parte inferior de la bolsa del colector deberá descansar
plana sobre el piso, para que el piso soporte el peso del polvo y de
las virutas de madera.
• Coloque la abrazadera de la bolsa en el canal inferior del collar
sobre la bolsa.
Figura 4 - Montaje del Conjunto del Colector de Polvo
12
Page 13

• Coloque el conectar rápido en una de las ranuras del pestillo y
fije la manija de la abrazadera.
• Asegúrese que la bolsa del colector esté fija.
NOTA; La parte superior de la bolsa del colector NO deberá bloquear
el filtro. Si la bolsa del colector bloquea el filtro, doble el exceso de la
bolsa sobre la abrazadera de la bolsa.
INSTALE LA ENTRADA
Consulte la Figura 7.
La entrada debe instalarse en el lado derecho del conjunto del
colector de polvo. Para instalar la entrada:
• Coloque la entrada sobre el agujero de 2V2" que está en
el lado derecho del conjunto del colector de polvo.
• Fije la entrada usando cuatro tornillos autorroscantes de
4.2-1.4 X 12 mm
Figura 7 - Instalación de la Entrada
INSTALE LA MANGUERA
Consulte la Figura 8.
La manguera debe conectarse en la entrada usando la abrazadera
para la manguera.
Para conectar la manguera:
• Deslice la abrazadera de la manguera por un extremo de la
manguera. Afloje el tornillo de la abrazadera si es necesario
para deslizar la abrazadera de la manguera sobre la manguera.
Coloque los cables de la abrazadera de la manguera en las
ranuras de la manguera.
Deslice y monte la manguera con la abrazadera en la entrada.
Apriete el tornillo de la abrazadera de la manguera para fijar la
manguera en la entrada.
Deslice la otra abrazadera de la manguera por el extremo opuesto
de la manguera. Este extremo se conectará a la máquina
productora de polvo.
INSTALACION
PELIGRO: Al conectar o desconectar el enchufe del zócalo, no
permita por ningún motivo que sus dedos toquen las clavijas.
ADVERTENCIA: No conecte la fuente de alimentación hasta que
la unidad esté totalmente armada.
FUENTE DE ALIMENTACION
• El motor ha sido diseñado para funcionar al voltaje y frecuencia
especificados en la placa del fabricante.
• Las cargas normales se pueden manejar con seguridad con
voltajes no mayores de un 10% por encima o por debajo del
voltaje especificado.
• Si se hace funcionar la unidad a un voltaje fuera de este intervalo,
se puede recalentar y quemar el motor.
INSTRUCCIONES PARA LA CONEXION A TIERRA
Consulte la Figura 9.
• La herramienta está equipada con un cable de 3 conductores.
• No retire ni modifique en forma alguna la punta de conexión a
tierra. En caso de un mal funcionamiento o una descompostura, la
conexión a tierra proporciona una ruta de menor resistencia para la
corriente eléctrica a fin de reducir el riesgo de descarga eléctrica.
• El enchufe debe conectarse en el tomacorriente correspondiente
que haya sido instalado y conectado a tierra debidamente, de
acuerdo con todos los códigos y regulaciones locales.
• El conductor con aislamiento cuya superficie exterior es verde es
el conductor a tierra del equipo. Si es necesario llevar a cabo una
reparación o un reemplazo, asegúrese que el conductor a tierra
del equipo no se encuentre conectado al terminal de línea.
• Si el cordón de corriente eléctrica está desgastado, cortado
o dañado en cualquier manera, cámbielo inmediatamente.
Tomacorriente puesto
a tierra adecuadamente
Punta de conexión a tierra
Acrazade^a de : rré';
■'la mangje''a
Figura 8 - Instalación de la Manguera
Entrada
Manquera
Enchufe de 3 puntas
Figura 9 - Receptáculo para 3 Puntas
PRECAUCION: Si no se conecta correctamente el conductor a
tierra del equipo, se corre el riesgo de un electroohoque.
CORDONES DE EXTENSION
• El uso de cualquier tipo de cordón de extensión ocasionará una
caída en el voltaje y una pérdida de potencia.
• Los alambres del cordón de extensión deben tener el tamaño
suficiente para transportar la corriente adecuada y mantener el
voltaje correcto.
• Utilice la tabla que se da abajo para determinar el tamaño mínimo
del alambre (según la norma AWG) del cordón de extensión.
• Utilice únicamente cordones de extensión irifilares que tengan
enchufes tipo conexión a tierra de tres puntas y receptáculos
tripolares que acepten el enchufe de la herramienta.
• Si el cordón de extensión está desgastado, cortado o dañado
en cualquier manera, cámbielo inmediatamente.
13
Page 14

Longitud del cordón de extensión
Tamaño del alambre Norma AWG
Hasta 50 pies....................................................................................16
NOTA: No se recomienda utilizar cordones de extensión de más de
50 pies.
OPERACION
DESCRIPCION
El Colector de Polvo Craftsman ha sido diseñado para extraer y
recolectar las astillas de madera de las máquinas utilizadas para
trabajar maderas. La bolsa del colector recolecta las astillas de
madera y el polvo de la madera y facilita el desecho de los mismos.
El colector tiene una manguera de entrada de 2'h" x 72”.
ESPECIFICACIONES
Caballaje del motor (máximo desarrollado)...................................1V2
Voltaje...........................................................................................115V
Amperaje..........................................................................................9.0
Hertzios.............................................................................................60
Fase
...................................................................................
RPM............................................................................................. 3450
Certificación...................................................................................CSA
Velocidad de flujo de aire.......................................................150 PGM
Velocidad del aire.................................................................4400 PPM
Presión estática máxima
Nivel de sonido.........................................................................76 dB A
Entrada..........................................................................................2V2"
Capacidad de la bolsa del colector.... 36 galones (4.9 pies cúbicos)
Capacidad de la bolsa del colector
Peso.............................................................................................55 Ibs
Tamaño total.................................................................17^4 x 19 x 72”
COLECTOR DE POLVO
PELIGRO: No utilice este colector de polvo en un ambiente
inflamable o explosivo. No lo utilice para recolectar polvo o virutas
metálicas. Consulte las normativas de la Asociación Nacional de
Protección contra Incendios (National Fire Protection Association,
NFPA) antes de instalar un sistema de recolección de polvo,
especialmente la NFPA 664.
• Conecte la manguera del colector a la máquina productora de
polvo usando la abrazadera de la manguera.
NOTA: En las instalaciones donde hay más de una máquina, se
recomienda utilizar el Sistema de Recolección de Polvo para
Talleres 22313 Craftsman para obtener los mejores resultados.
NOTA: Si lo desea, puede utilizar una manguera más larga (la
máxima longitud es 40 pies para una manguera de 2V2" de diámetro).
Se puede utilizar una manguera de mayor diámetro, pero la longitud
será menor.
............................
...........................................
3.75" de columna de agua
Monofásico
1 miera
• Encienda el colector de polvo antes de arrancar la máquina
que produce polvo.
COMO VACIAR LA BOLSA DEL COLECTOR
Consulte la Figura 10, página 8.
PELIGRO: Apague el interruptor y retire el enchufe del tomacorriente de la fuente de alimentación antes de vaciar la bolsa
del colector.
• Vacie la bolsa del colector levantando la manija de la abrazadera
de la bolsa y soltando el conector rápido del pestillo. Deslice la
bolsa y sepárela del collar. Deseche adecuadamente el polvo.
• Monte la bolsa del colector. Para hacer esto, deslice la bolsa
sobre la abertura en el collar. Coloque el conector rápido en
una de las ranuras del pestillo y fije la manija de la abrazadera.
Asegúrese que la bolsa del colector esté bien sujetada y
descanse plana sobre el piso, a fin de que el piso soporte
el peso del polvo y de las astillas de madera.
MANTENIMIENTO
ADVERTENCIA: Apague el Interruptor y retire el enchufe del
tomacorriente de la fuente de alimentación antes de realizar el
mantenimiento del colector.
Consulte la Figura 10, página 8.
• Limpie del motor iodo polvo, astillas u otras partículas. Si
la operación levanta mucho polvo o suciedad, deberá inspec
cionarse el motor con frecuencia. Aspire las partículas que
puedan haber ingresado en el motor.
• Reemplace los cables desgastados, cortados y dañados.
• Reemplace las mangueras del colector desgastadas o dañadas.
• Reemplace las bolsas del colector desgastadas o dañadas.
• Limpie o reemplace el filtro en forma regular.
• Verifique con frecuencia todas las tuercas, pernos, tornillos, etc.
para asegurarse que no se hayan aflojado debido a la vibración
del colector.
LIMPIEZA O REEMPLAZO DEL FILTRO
PELIGRO: Apague el interruptor y retire el enchufe del toma-
corriente de la fuente de alimentación antes de realizar el
mantenimiento del colector.
Consulte la Figura 5, página 12.
• Retire la bolsa del colector.
• Empuje y saque el aro flexible del collar, luego retire el collar.
• Inserte la mano en la caja del colector y tire del bucle, en la
parte superior del filtro, hacia abajo.
• Limpie el interior del filtro con una aspiradora.
• Vuelva a instalar el filtro.
• Vuelva a instalar la bolsa del colector.
14
Page 15

IDENTIFICACION DE PROBLEMAS
SINTOMA CAUSAS{S) POSIBLE(S) MEDIDA CORRECTIVA
El motor no funciona 1. Enchufe, cable, interruptor o motor defectu
oso
2. Fusible 0 interruptor de circuito quemado
1. Revise el cableado, reemplace las partes defectuosas
2. Revise el fusible o el interruptor, reemplácelos
Demasiado polvo
en el aire
El impulsor hace
demasiado ruido
El motor hace
demasiado ruido
El motor no desarrolla
su máxima potencia o
el motor se detiene
El motor arranca
lentamente o no alcanza
su máxima potencia
1. Fuga en la bolsa o conexión de la manguera
2. La bolsa del colector o del filtro tiene
una fuga
1. Restos grandes de material o pedazo
de madera en el alojamiento del impulsor
2. Rueda móvil suelta
Motor defectuoso Haga que un técnico calificado de mantenimiento
1. Bajo voltaje en el colector debido a una
sobrecarga en el circuito
2. Bajo voltaje en el colector debido a
cordones de extensión demasiado cortos
3. Bajo voltaje proveniente de la fuente
de alimentación
4. Capacitor del motor defectuoso
1. Motor quemado o defectuoso
2. Interruptor del capacitor del motor
defectuoso
1. Revise las conexiones de la bolsa del colector y del filtro.
Verifique las conexiones de la manguera del colector
2. Hay polvo atrapado debajo de la abrazadera de la bolsa o
la bolsa del colector no está sellada en el collar
1. No aspire materiales metálicos. Apague el colector y deje
que los residuos se asienten en la bolsa del colector
2. Desconecte el colector de la fuente de alimentación.
Extraiga los cuatro tornillos que sujetan el conjunto del
motor y ventilador en el alojamiento del soplador superior.
Levante cuidadosamente el conjunto del motor y ventilador y
tiéndalo en la mesa de trabajo. Sujete el eje del motor con
una prensa para inmovilizarlo, y apriete el perno que
sujeta el impulsor
de motores revise el motor
1. Desconecte del circuito toda máquina eléctrica
0 electrodoméstico
2. Aumente el calibre del alambre de los cordones
de extensión o acorte los cordones de extensión
3. Solicítele a la compañía de energía eléctrica
que revise el voltaje
4. Reemplace el capacitor del motor
1. Revise el motor, reemplácelo de ser necesario
2. Revise el interruptor, reemplácelo de ser necesario
El motor se recalienta 1. Sobrecarga del motor
2. Enfriamiento inadecuado del motor
Se dispara el
cortocircuito
0 los fusibles
1. Motor sobrecargado
2. Capacidad inadecuada del cortacircuito
0 los fusibles
1. Disminuya la producción de polvo, para reducir
la carga
2. Elimine el aserrín acumulado en el motor
1. Reduzca la carga disminuyendo la producción
de polvo
2. Use cortacircuito o fusibles de la capacidad
adecuada
15
Page 16

Get it fixed, at your home or ours!
Your Home
For repair-in your home-of all major brand appliances,
lawn and garden equipment, or heating and cooling systems,
no matter who made It, no matter who sold It!
For the replacement parts, accessories and
owner’s manuals that you need to do-it-yourself.
For Sears professional installation of home appliances
and items like garage door openers and water heaters.
1-800-4-MY-HOME® (1-800-469-4663)
Call anytime, day or night (U.S.A. and Canada)
www.sears.com www.sears.ca
Our Home
For repair of carry-in items like vacuums, lawn equipment,
and electronics, call or go on-line for the location of your nearest
Sears Parts & Repair Center.
1-800-488-1222
Call anytime, day or night (U.S.A. only)
www.sears.com
To purchase a protection agreement (U.S.A.)
or maintenance agreement (Canada) on a product serviced by Sears:
1-800-827-6655 (U S A ) 1-800-361-6665 (Canada)
Para pedir servicio de reparación
a domicilio, y para ordenar piezas:
1-888-SU-HOGAR®“
(1-888-784-6427)
Au Canada pour service en français:
1-800-LE-FOYER“^
(1-800-533-6937)
www.sears.ca
® Registered Trademark / ™ Trademark / ®’''’ Service Mark of Sears, Roebuck and Co.
® Marca Registrada / ™ Marca de Fábrica / Marca de Servicio de Sears, Roebuck and Co.
Marque de commerce / Marque déposée de Sears. Roebuck and Co.
©Sears, Roebuck and Co.
 Loading...