

Craftsman 351153000 Owner’s Manual
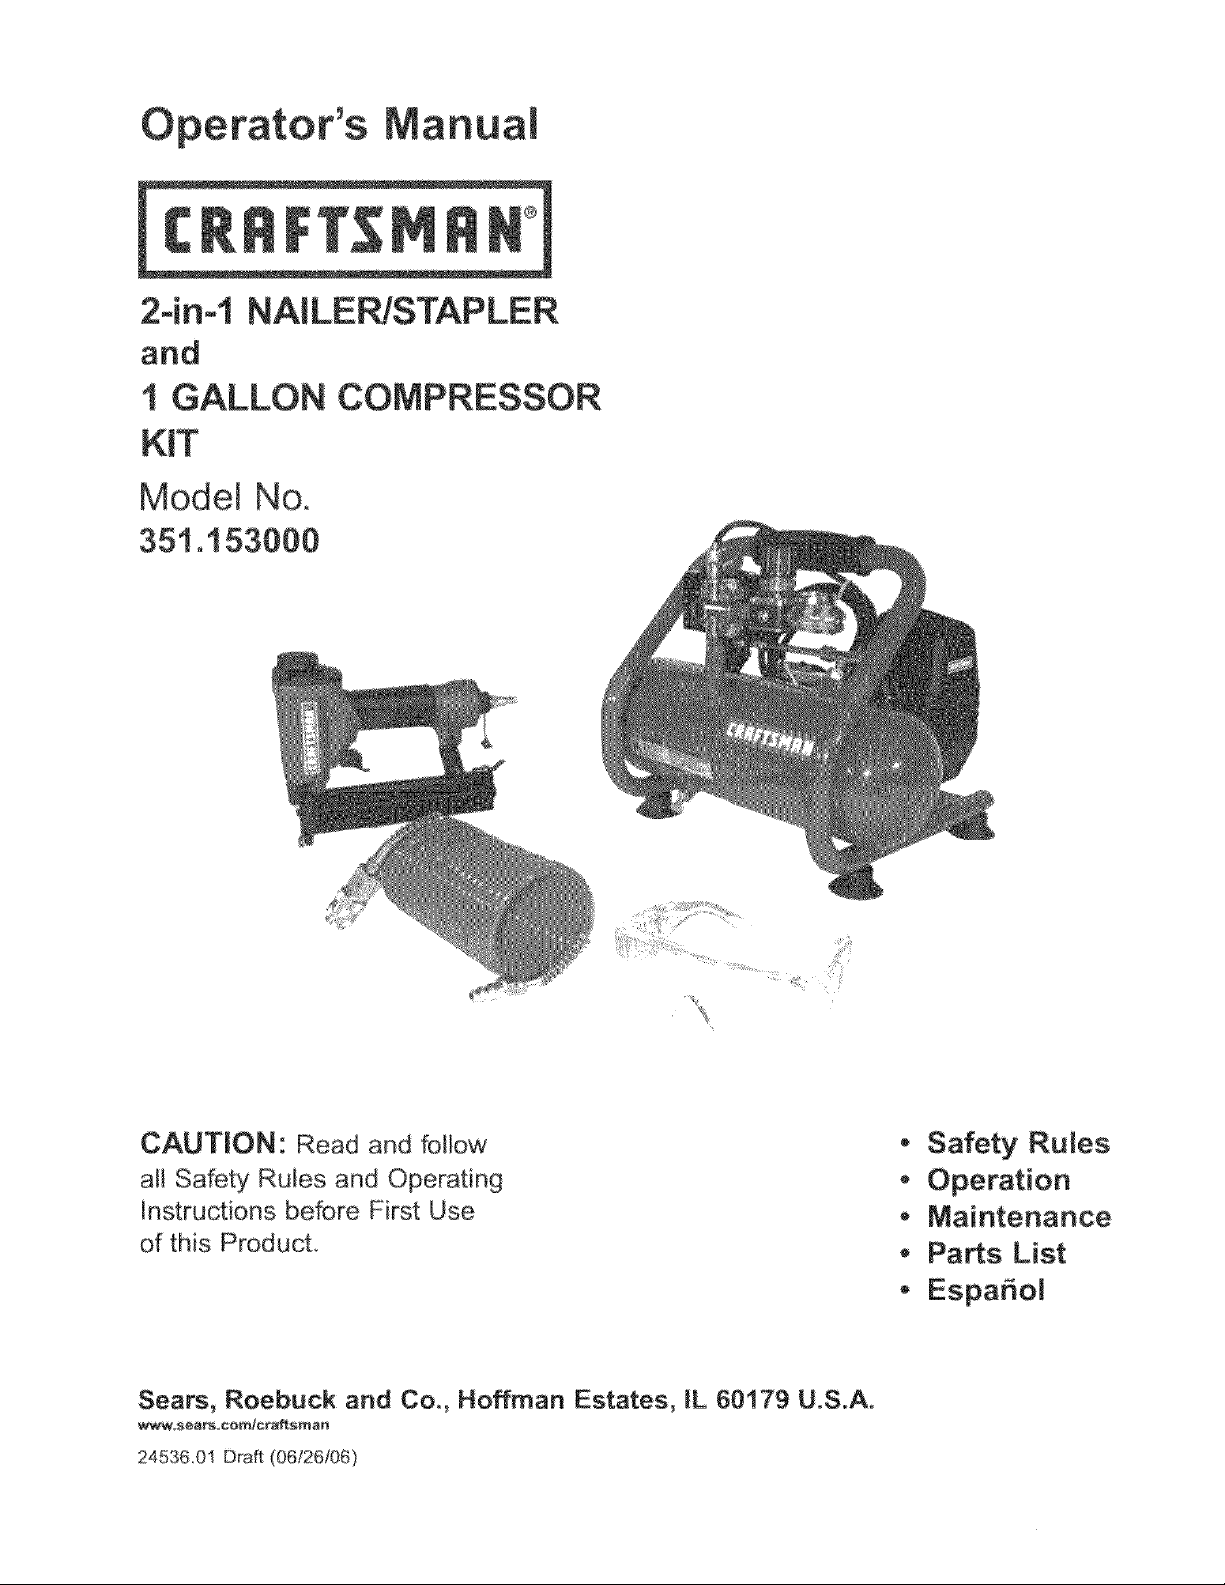
perator's t_lanuaD
2-inol NAILE TAPLER
and
1 GALLON COMPRESSOR
KiT
Model No,
351 °t 53000
CAUTION: Read and follow
all Safebj Rules and Operating
Instructions before First Use
of this Product
Sears, Roebuck and Co,, Hoffman Estates, IL 60179 U.S.A.
24536.01 Draft (06/26/06)
o Safety Rules
- Operation
- Maintenance
. Pa_s List
o EspaSol
Warranty ............................ 2
Safety Rues 23
Gtossary ....................... 3
Unpacking 3
ins aHati_n .......................... 34
Operation ............................ 47
Maintenance 78
Storage 8
Troubleshooting ........................ 9! 1
Parts Il!ust_a]on and List ................ 1215
Espaffot 1627
FULL ONE YEAR WARRANTY ON CRAFTSMAN
AIR COMPRESSOR
if ths Cra_aman tool faiIs to give compete satialaetion within
one year from date d purchase RETURN IT TO ANY SEARS
S]ORE OR PARTS & REPAIR CENTER OR OTHER
CRAFTSMAN OUTLET IN THE UNRED SLATES FOR FREE
REPAIR (or replacement if repair pr_J_as imposs bie),
If this CraRsman trx_ s ned for commercial or rental purpos-
es, this wan_anty applies _r on_y 90 days from the date d pur_
chase
lhis warranty gives you spedfic bgal rights and you may atso
have ather rights_ wMch vary, from s_te to s_te
Sears, Roebuck a_d Co,, HeRman Estates, _L 60179
AiR COMPRESSOR SAFETY RULES
WARNING: For your own _fe, ty read a_ tithe instruchons
and precautions before operating too/
CAUTION; Nways blbw pr_%>eroperating procedures as
defined in #_is manual even if you are fami! ar with use of ths
or similar _ools. Remember that being careless for even a
ffacgon d a second can resuttb severe personal in}ur_
Always operate the compressor n a welt w.mti ated area
free of eombust Me materials_ gasoline or so,vent vapors_
• If spraying flammabie materials, {ocate compressor at least
20 teat away from spray area An additiona teeg_ d hose
may be required. Store flammaNe matedais in a secure
bc_tion _way from compressor.
,_ Never place o_ecls agamst or o_ top of compresson
Operate compressor in an open area at bast 12 inches
away from any wall or obstruction that would restrict the
fl_* d bosh air to the wznWation openings,
- Operate compressor is a clean, dr% we_i ventilated area.
Do not operate unit indoors or in any confined area,
Nways remain n attendance with the product when it is
operating,
,, Drain tank daily or after each use. If tank develops a bake
replace it immediately with a new tank or replace the
entire compressor.
, Never dril_ into, we_d or make any modifications to the b]r}k
or its attachments.
,* ]he tank is designed to wifhs_nd specific open_ting pres
sures Never make adjustments or parts substitutions to
a_ter the factory set operating pressures
d, Sea_ R_buc_, and Co. _
,, For' essential centre of air pressure you must inslal a
pressure regulator and pressure gauge to the air out_et (f
not equipped) d your compressor: Follow the equ pmer_t
rnanu[acturrsrs recommendat on and never exceed the
maximum atiowab e pressure ratng of attachments, N_Jver
use compressor to inflate smaI low-pressure ot_iects such
as children's toys, footballs basketballs, eta,
,_ Nways wear ANSi Z87.1 approved sa#ety g_asses wi_h
side shields when usbg the campresaor.
,, Newer pont a_y nozz!e or sprayer toward any pad d the
body or at other peop!e or animais.
,, Aiways turn the compressor off and Need pressure from
the air hose and tank before attempting maintenance
attaching too_s or accassories
,, Never operate the compressor outdoors when it s raining
or in wet cond t ons.
,, Never operate compressor with protective covers removed
or damaged.
_, Any eiectr ca! wring or repairs ru_quired on this product
shoa{d be pedormed by author zed soP€ice center person
oe_ in accordance with nationa_ and loca e_ectneal codes.
,, Make certan that the electrical circuit to which the com_
presser is connected provides proper e ectrica grounding,
corred w>_tage and adequate fuse pretest on
, A_robtained d rectiy from the compressor should n¢_ver be
used b suppty air for human consumption, In order to use
air produced by this compressor for breathing, suitaNe fit
tots and n-i_ne safety equ pment must be propedy
mstatied In line filters and safety equipment used in con ....
juncbon w_th the compressor must be capable of tre.ating
air ta ai_ applicable toca and feder_l codes prior to human
consumption
,, Work in an area wth good eross-wJ_{ation, Read and foL
k_w the safety instructions prov ded on the labe or safety
data sheets for the materiaf yea ar_; spraying Use a
NIOSH/OSHA approved respirator designed for use with
your specfic applicafon.
Never touch any exposed meta! parts on cornpressor dar_
ing or immediately after operabem Cornpressor wfl remain
hot for sewJa_ minutes after operation,
,, Do not reach around protective shrr, uds or attempt maint_o
nance untii uoit has been dbwed to eoo_
Always operate compressor in a staNe secure position to
p_avent accidertta_ movement d the unit Never operate
compressor on a rod or other eievated position Use addi
tiona! air hose to reach high locat}ons.
NAILERJSTAPLER SAFETY RULES
,, Read and follow al_ salt_ty rules and operating instructions
in this manuai and on warning _abet d too/before} usmg
tMs tc_L Keep this manual with the tool
,, Keep work area dean and property lighted
,, Keep children bystanders and visitors at a safe distance
from work area wNle operating ths tooi
,, Air tool operators and a!l others in work area should
always wear safety goggles complying with United States
ANSI Z871 to prevent eye injury from fasleners and flying
debris when loading operating and unloadin§ this too_
Everyday eyeglasses have on_y impact resistant _enses.
These are N(_! safety glasses. ANSi Z871 safety glasses
have permanently attached rigid, hard p_astic side shields
and wff have _Z8F.1 printed or stamped on them.
AIwaysweaeatprotee_ionTheworkareamayincude
e×posuretoexcessvehesse_ewe_swhichwill_equirenec
essa_yea_p_@ecfionSomeenvre_mee_swi_requre
headpotection;useheadprotectioncontermingtoANS_
Z89_1
,, Dorotafterormodfythstoolinar_ywayDonetusethis
teolforanyapptcationo_er_hanforwhcbit,_,_sdesigned.
,, Do not use o×ygen carbon dioxide, hgh pressure cam
pressed gas or botted gases as the power source _or tbs
tool. _he toot wil_ explode and serious persona i_iury
could result
,, Never connect the _el to air p_'essure which ceuId poten
tiaIIy exceed 200 psi Use oniy dean dry, regulated air
within rated _snge as marked on tool.
- The tool must have a mate, free.flow "ose coupiing so that
a[_air pressure is removed trem the toeI when the coupling
joi_t s discom_ec4ed Faiiure to use proper coapling coud
cause aedden_ai d sd_arge, possiMy causing iniury.
,, Oniy use a}r hose that is rated for ama× mum working
pressure d 158 psi or 150% d the ma×imum system pres_
sure wh}chever is greater,
,, Do not use a hose swive} connector wth ths tool.
,, De not puli trigger o_ depress contact trip while corsnecting
to the air supply, as the too may eyrie, possibly causing
iniury:
,, When loading _ooi: Do not puIi trigger or depress contact
trip Do not point the tool at yourseif or others Do t_ot
p_ace hand or any part of body k the fastener discharge
area of the tool as ascidenla_ actuat on may occur and
cause friary:
,' Disconnect t(£o_from ar suppty beret,s _oading o_ unload
ing, pedorming 1oo_maintenance, c}earin9 a jammed fan.
tenet _eaving work area mevng tool to another _ocatiort or
handing the to@ to another person.
,_ Use Sears recommended fasteners only
,, Do no_ bad [ne k>o until yo_ are ready to use }t
Aiwrays asume that the tool contM_s fasteners. Keep the
too_ poir_ted away from yoursdf and others at all times.
Never engage n horseplays Never put the trigger unless
tbe centaet tnp is in cantaet wth the workpiece_ Keep oth.
ere at a sate distance from the tool while the to@ is i_
operat}on.
,, A_ways remove finger from tdgger when not ddving festen_
ere. Never carry the toe with finger on or under the trigger
as accidental actuation may occur and cause injury
,, A_ways keep hands and body a_'_sy from the Marcher ds
charge area _,sen air supply is connected to the tooi Gap
toot firmly to maintain aontro_ while albwing teol to reco}[
away from work surlace as _astener i driven. If eontacl trfp
is allowed to reeontact work sudaee before _rigger is
re_eased an unwanted fastener may be driven_
,, Check operatio_ d the coned tdp frequently. Never use
the too_ d _be c4ontast tdp, trigger or spdngs have become
inoperaMe missing or damaged Do not a_ter of' remove
con_}ct tdp trigger or spdr_gs Newer use a tee/that is leak-
ing air, has missing or damaged parts, or requires repair.
,, De not ddve fasteners on tep d ether fasteners or with the
too_ at too steep an angte The fasteners can dcochet and
cause _niury. Do not drive fasteners close to the edge of
the workpiece. The workpiece is likely to split, allowing the
fastener to fly flee and cause injury Do rot attempt _e
drve fasteners into hard or bdttle materials such as con °
crete steel or ti_e.
,, De not overreach. AIways_ place yourse f in a firmly ba_....
are_ed pesit on when usng or handling the tool Do nat
attach the hose or tool to your body.
,, Do her operate teo_ without tastenere or damage to too[
may resu!t
,, Do eet ase too without safety war _ing IabeL If _abel s
missing damaged or unreadabIe_ contact SEARS to
ebtai_ a new abe,&
Oniy qualified _epair personne must pederm tool service
,, When servcing a too_, use only ide_t _d repair par_s
,, Store tool out d reach d @_iidren and other untrained
persons_
Become familiar with these terms berate eperating the unit
CF_: CuMc t_et per minute.
SCF_: Standard cubic feet per minute a un[t d measure d
air delivery
PSi6: Pounds per square ff_ch gauge: a unit of measure d
pressure
Code Certff_¢at_o_'_: Products that bear one or niore of the
fotlewir_g marks: UL, CUL_ ETL CEYL have been eva uated
by OSHA _ertified ndepe_sdent safety laboratories and meet
the appi cabte Unde_riters Laboratories Standards tot Safety
C_t4n Pressure: White the motor is off air tank pressure
drops as you corff_r_ e to use your accessory When the tak
pressure drops to a certain tow }oval the motor wilt restart
aatomaticafi_ The @_ pressure at which the motor automab
caity _estarSs is caiied 'eul n" pressure.
Cut-Out P_ess_re: When an a_ compressor is tamed on and
bed}ins te run, air [ tonsure r_ the air _nk begns to buid. it
builds to a aerlain high pressure before the motor automat_ ....
tally shuts off pretectmg year air _nk _rom pressure higher
than iLs capa@ty [_e hgh pressure at which the motor shuts
off is ea_ed "cutoout" pressure
Bra#cb Circ_A; Circuit earryi_g electricity f_om e_eetdca_
pan@ to outlet
The lo!io,#ing _tems are included in this kit, Check for com-
pleteness. Immediately report any missing parts
,, 1 Gallon Air Cerepressor
,, 15 Coil Ar f{ose with Connectors
_, OSHA Approved Safety Gtasses
,, 2ira1 NaiiedStapler
, Air 'Too_ Oil
,, 400 1" Brads
,, 300 laStaplas
LOCATION OF THE AIR CO_PRE$SOR
CAUTION: In order to avoid damaging the air compressor,
do not incline the alr compressor transversely or Iongitudinal}y
more than 10_',
Locate the ar compressa_ ira clean dry and well ventilated
area. The ar compressor should be k_sated at ieast !2" aw-ay
fpom the wal or other obstruct ons tha_ will inte_rre wit the
flow of ar The air compressor pump and shroud are des gned
to arrow for praper cooling The venliiat on openings on the
compressor are ne©assary to maintair proper operating tem-
perature Do not place rags or other containers or' or near
these openings.
POWER SOURCE
]he motor is designed for operation on the voltage and
frequency spec fled Normal loads wdl be handled safey on
voltages nol more than 'I0% above ot below spec lied voltage
Running the unt on voltages Wnleh are not wi{Sfin range may
cause overheating and motor burn-out Heavy loads require
1Dearvoltage at motor terminals be no ass than the voltage
spedfied on nameplate.
,, Air compressor requires a 1t5 vail 60 Ha power source,
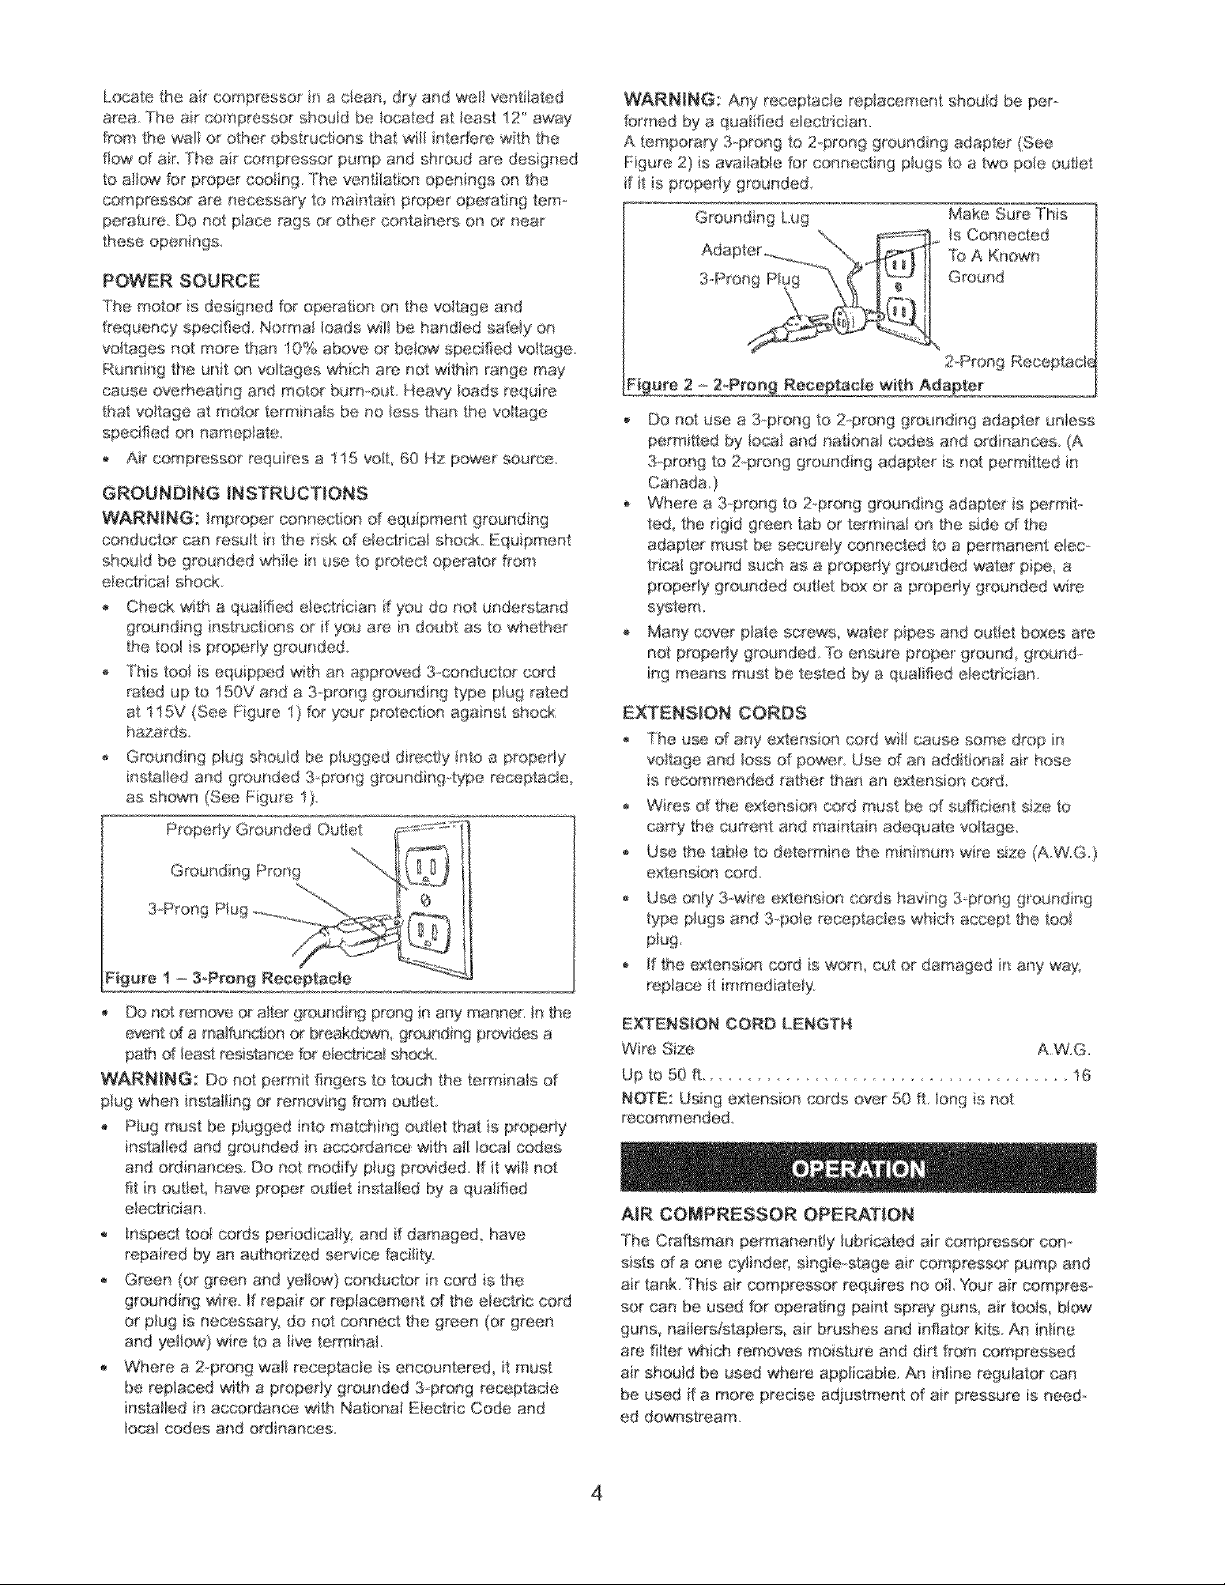
GROUNDING INSTRUCTIONS
WARNING: Improper connect on of equipment groundir_g
conductor can result in the risk af eleclrical shock Equipment
shoukJ be grounded while in use to protec_ operator from
electrical shod<.
Check w}th a qualified etectdc an if you do not undersland
grounding instructions or if you are in doubt as to whether
t.he tool is properly grounded,
_, This tool is equipped wile an appr(:wed 3,,conductor cord
rated up la 150V and a 3pron 9 groandir_g type plug rated
at 115V (See _igure 1) fo_ your prolection against shock
hazai'ds+
Grounding plug should be plugged direct y into a propedy
ins_atied and grounded 3,p_ng ground ng4ype receptacle,
as shown (See Fgare 1}_
Figure 1 _ 3_Prong Recep_cle
Do not _emove or alter gn:_ur din9 prong in any maanor, In _ne
event of a malfun@on or breek(2swn, gr_>andir_g provides a
path d least resistance for e _s4dc_l sh_A
WARNING: Do not permit fingers te touch the terminals d
plug when entailing or removing from outlet
• PIu# must be plugged into matching outlet that is propedy
installed and grounded in ac xsrdance with all kx;af codes
and ordinances+ Do not rnodFy plug provided Ifit w_lt not
fit inoutlet, have proper outlet nstal/ed by a qualified
electrician,
,, Inspect tool cords periodica!fy+ and if damaged, have
repaired by an authorized servic_ facility,
,_ Green (or green and yellow) conduclor in cord is the
grounding wire If repair or replacement d the e/ectdc c_rd
or plug is necessary, do not _nnect the green (or green
and yellow} wre to a live terminal,
Where a 2,@reng wail receptacle is encountered it must
be replaced w_th a properly grounded 3 prong receptacle
installed in accordance with National EIectdc Code and
to_1 codes and ordnances.
WARNING: Any receptacte reptacernent shoud be per
formed by a qua[fled elec#ician.
A temporary 3 prong to 2@tong grounding adapter (]See
Fgure 2) s availabie fur connecting p_ugs loa two pole outlet
ifitis properly grounded
Ground ng Lug Make Sure This
Adapter
3&,_rong Pf Ground
Do no_ use a %prong to 2-prong grounding adapter unless
permitted by Ioca! and natlona codes and ordinances (A
3@tong to 2_,.proag grounding adapter is not permitted in
Canada}
Where a 3.prong to 2 prong groanding adapter s permit,
ted, 1he dgld green tab or termina on lee aide of the
adapler must be securely connected to a permanent e/ec
fricai ground such as a properly grour_ded water pipe, a
propedy grounded auflat box or a properly grounded wire
system,
Many cover plate screws waler pipes and outlet boxes are
not properly grounded, "rY)ensure prope_ ground, ground.-
leg means mua_ be tested by a qua/Fied eferAdcian
EXTENSION CORDS
l?_e u_ d any e×tens on co_d w4tl caase some drop in
voitage and toss d powen Use of an addifonal air hose
s recommended rather than a_ exiension cord
Wires d the extras on cord must be ef sufficient size le
carry the cu_ent and maintain adequate voltage
U_z the #_b/e to determine lee mk_irnum wire size (A.W.G.)
axtenmon cord.
Use only 3-wire extension co_ds having 3 prong grounding
type plugs and 3po_e receptacles which accep_ the too[
plug
* I the extension cord is worn, cat or damaged n any way_
repiaee it immediafety.
EXTENSION CORD LENGTH
Wire Size AWG
Up to 50 ft !6
NOTE: Using e×tension cords over 50 ft long is not
mcammended
_. ,_ /s Connected
.... "% _rbA Known
2 Prong Recopied{:
tacle with Ad ._..._._._
AIR COMPRESSOR OPERATION
The Craftsman permanen_t lubricated air compressor con
sis_s of a one cylinder, sin! lie,stage ar compres_a pump and
air tank. !his air compressor requires no oil Your air compres
sot can be used for operaling paint spray guns, air tools, bf_
gues, nailers/staplers air brushes and infiatot kits An in[ine
are filter wSsich removes moisture and dirt, from compressed
air should be used where app/icaMe, An in/fne regu_at_ ° can
be used f a more precise adjustment d air pressure is treed
ed downstream.
SPECIFICATIONS
HP(Conl_nuoasDuty)................... Y,
Displacement................ 14CFM
VorageSinglePhase 1t5V
Amperes.......................... 40
MotorRPM....................... 3400
DutyCycle......................... t00%
Decibels@5'. 66db
AirTankCapacity 1Galto_
Appro×imateCut@Pressure 95PSI
ApproximateCubOutPressure......... 125PS!
SCFM@40psi 067
SCFM@90psi 0.42
Pumpup'[fme:0._'t25p,s_ 130Seconds
Reeove.ryTime:95.125 psi ............. 35 Seconds
Wefght 20 Ibs
Dimensions (DxWxH) ................ i4 x I3 × 10 _
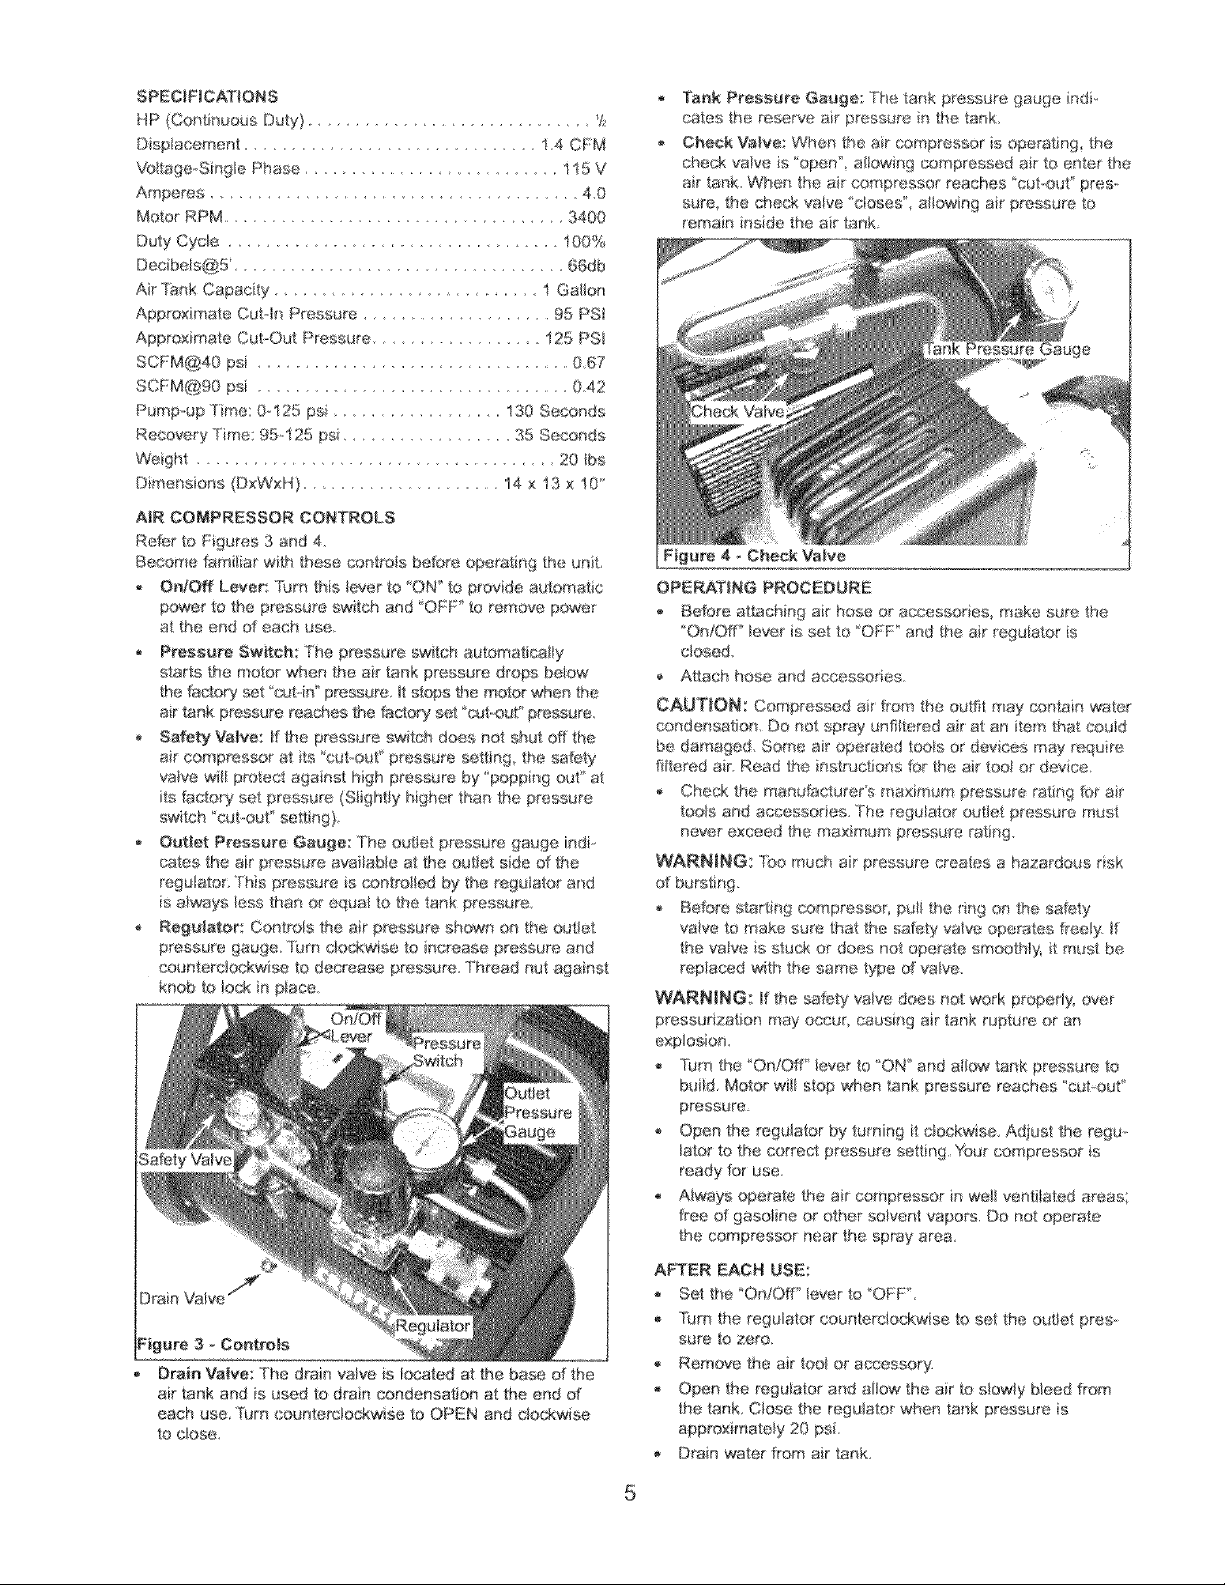
AIR COMPRESSOR CONTROLS
Refer to Figures 3 and 4
Become fam{I{ar with these _ntrofs befe,_e operating the unit
On/Off Lever Turn Ibis lever to '_ON to provide automatic
power to the pressure switch and _'OFF to remove power
at the end d each use.
,, Pressure Swftch: The pressure ewitch automatically
slarts the motor when fee air tank pressure drops below
the factory set cutJn pressUre_ It stops #_e rnot_ when the
air tank pressure reaches the fa[Sory set _'c_&oouPpressu_ss.
Safeby Valve: _fthe pressure switch does not shut off the
air compressor at its 'cutout" pressure setting the safety
vaiw_ w/f protect against high pressure by 'popping out" at
its factory set pressure (Sightly higher than the pressure
Outlet Pressure Gauge: The ou_et pressure gauge indL
cares the air pressure avaiiaNe at the outlet side d the
regulator This pressure is _ntrotted by the regutalor and
is always less thar_ or equal to the tank pressur_e.
Regulator: Centrols the air pr_s ure shown on the outlet
pressure gauge. Turn cto(Awise to increase pressure and
counten;i_kwise to derrease pressure. Thread cut ago ns4
knob te lock n place
Figure 3 _ Controls
,, Draie Valve: i_he drain vane is located at the base of the
air tank and fs used to drain condensation at the end d
each use Tun counterclockwise 1o OPEN and clOck_¢aSe
to close_
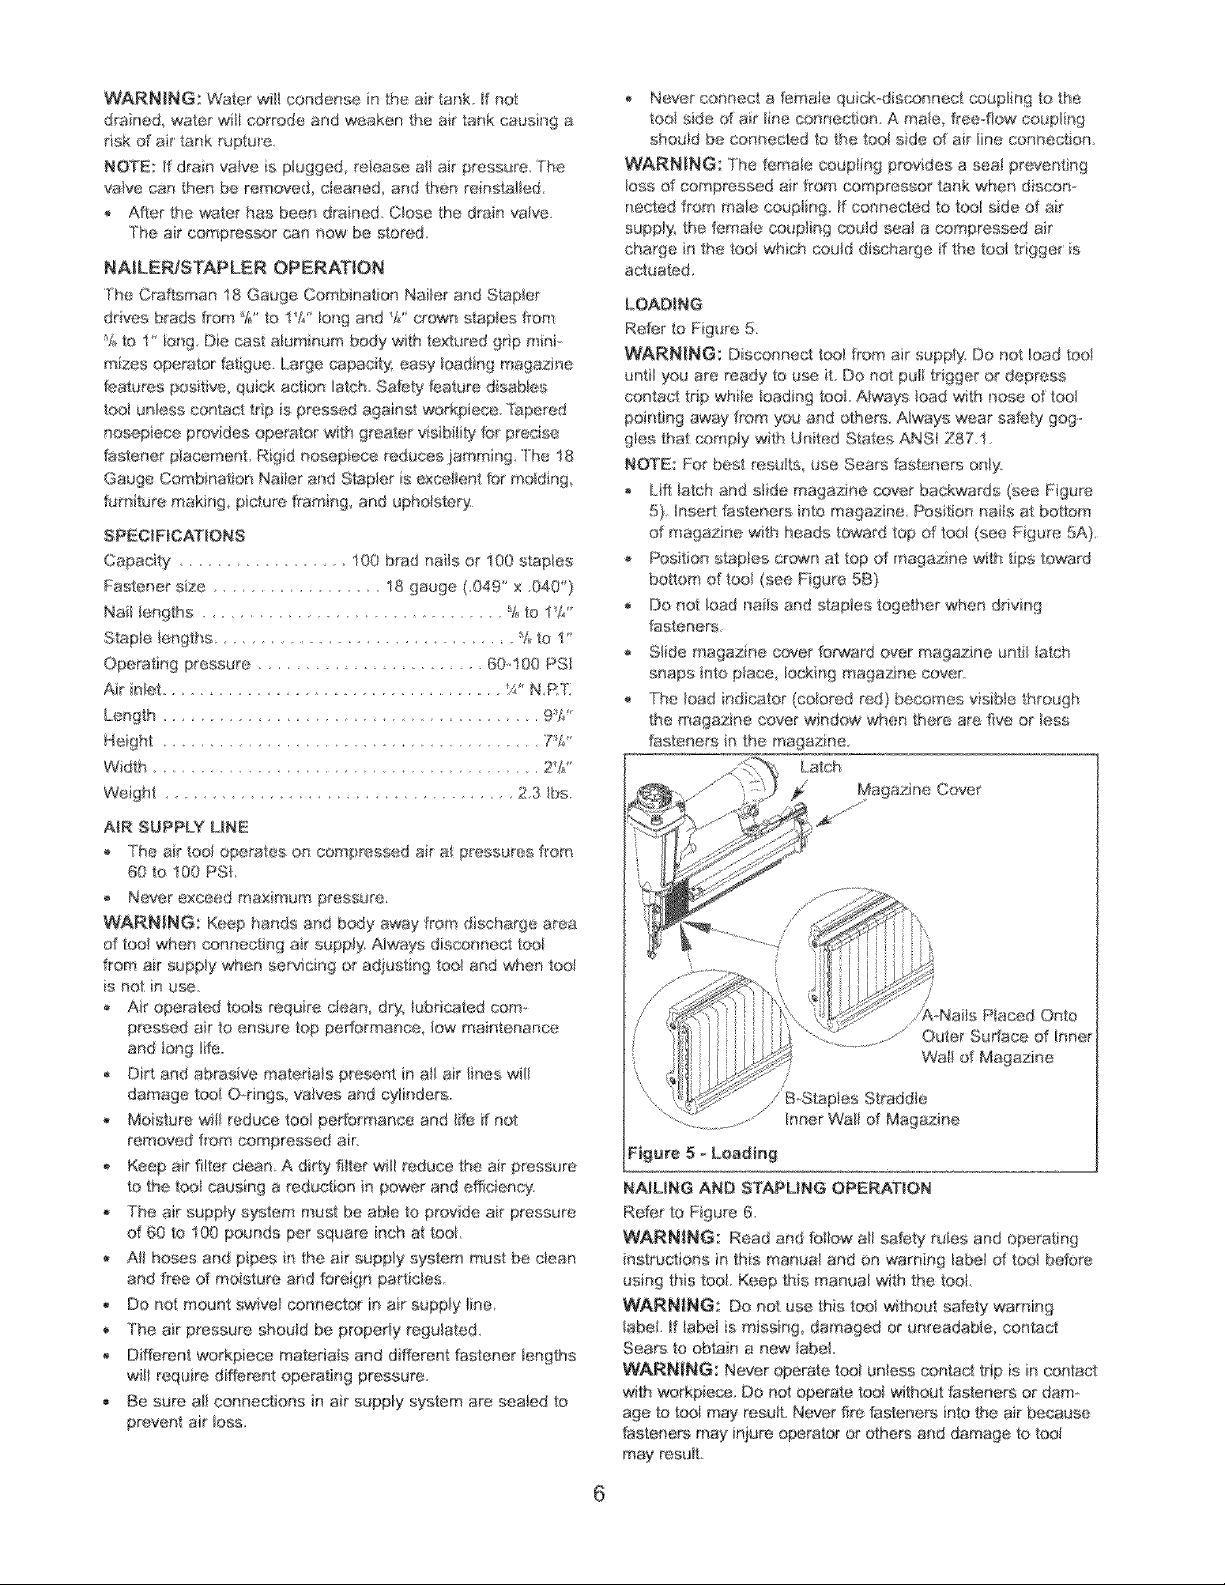
Tank Pressure Gauge: The tank pressure gauge indio
cares the reserce air pressure e the tank
Check Valve: When the air ¢Yampressor is operahng, lee
check valve is _'open", allow eg compressed air to enter the
air tank When the air compressor reaches 'cut o £_ pres
sure_ the check valve "closes' allowing air pressure to
remain inside the air tank
Figure 4 _ Check Valve
OPERATING PROCEDURE
- Beret atlac;Nng air hose or accessories_ make sure the
On/_f' _ever is set to "OFF _ and the air regulator is
closed.
Attach hose and acc_,.*ssodes
CAUTION: Compressed air from the oudit may contair_ wster
condensa#on Do not spray unfiltered air at an item that could
be damaged Some air operated tools or dev ces may requ re
filtered ar Read 1he instruchons far the ar too} or device
, CherA the manufa(xurers ma×imure pressure rating for air
tools and accessories The regulator outtet pressure must
n(_,_erexc'eed the maximum pressure rating.
WARNING: "f'oo much ar press_Jre creates a hazardous rsk
of bursting.
_, Before starting compressor, puli the ring or3 the safety
valve to make sure that the safety valve operates ffeey if
the valve is stu(A or does no_ operate smootht% t must be
replaced with the same type d valve
WARNING; If the safety valve does not work properly, over
pressurization may o_x_ur causing air tank r Jptum or an
e×plos O_}_
Turn the Ore/On' lever to "ON" and allowtank pressure to
build Motor wili slop _dnen tank pressure reaches _cot-ouf'
pressure
Open the regulator by turning it clockwise+ Adjust the regu-
lator to the correct pressure setting Ybur compressor is
ready for use.
,_ Always ope/_te the air compressor in we/ventilated areas
free of gasoline or other s@vent vapors. Do not operate
the compressor near the spray area
A_ER EACH USE:
- Set the "On/@f _lever to'OFF"
-rum the regulahsr counterclockwise to set the outlet pres-
sure to zero
,, Remove the air too or accessory
Open the regulator and allow the air to slowly Need from
the tank. Close the regulator when tank pressure is
approximately 20 ps.
,_ Drain water frem air tank.
WARNING:Waterwiltcondenseintheairtank,ffnot
dranedwaterwiI_corrodeandweakentheairtankcausinga
riskofair'tankrupture
NOTE:/tdrar_vaneispbggedreteaseal_mrpressureThe
vanecar_the_beremoved,cleaned,andthenreinstalled
_,Aftert£sewate_hasbeendrainedCbsethedrainvalve
Thearcompressorsannowbes_ored
NAILEPJSTAPLEROPERATION
TheCraftsman18GaugeCombinationNaibrandSSap_er
drNesbradst_orn%_'to1VJbegand%crownstaplesgem
'£te1'iongDiecasta_uminumbodyw4htenuredgrip sin-
sizes op_rator _atigue Large capacity, easy oading magazine
features positive quick actiof iatch. Saffety ti_,_aturedisaMes
taol unless contact trip s premised against workpiese _ape_d
nosep eee provides op_'ater wilh greater visbility tot predse
fastener placemenL Rigid nosepiece reduces ;!amming The 18
Gauge Combination Naibr and Stapler is excei_ent for me,din%
fl_mitu_e making picture framing and uphe_stery:
SPECIFICATIONS
Capacity 'I(X} br_d nails or !00 stapes
Fastener size .............. 18 gauge (_g49" x g40"}
Nail lengths 'vt_to 1_?_
Staple bngths _'Lto 1"
Operating p'essure .................. 6g.10O PSI
Air n/et "4 NRtt
Length 9V,'
Height ................ 7V_'
W_dth 2%'
Weight ................. 23 tba.
A_R SUPPLY UNE
The air too_@orates on compressed air at pressures from
60 to 100 PSI
News exceed max rt { m pressure_
WARNING: Keep hands and bc_Jy away ff®m discharge area
of tag when connect ng air supply. A}ways disconnect too
from ar supply when servic ny or adjusting too/and w@er toe_
s not in use
A£ operated taob require dean dry, lubricated corn-
pressed air to ensure top pefformance_ low maintenance
and ang Ide
,_ Did and abrasive material p_esent in aH air lines wilt
damage tc_I O-dngs_ vanes and cy_irtders.
, Moisture wit_reduce taol pedermance and _ife if not
removed ftgm compressed air:
- Keep air fi_ter clean A di4y titter wfl! reduce the air pressure
to the t_l causing a reduction in power and eflieieeey.
, The air supply system must be able to provide ar pressure
d 60 te 100 pounds per square inch at tool
,, All hoses and pipes in the air supply system must be clean
and flee d me stura and foreign particles
,, Do not mount swive_ connector in ar supply line,
The air pressure should be prapedy regulated
,, Different warkpiece materials and different fastener lengths
wil! reqa re different operating pressure
,, Be sure al_ connections in air supply system are seabd to
prevent air bs&
_, Never connect afamate quickdiacennect coup_@g to the
too_ ado d air line connection A mate, flee flow coupling
should be connected to the tool sde d air IRe connectiorL
WARNING: The tomato coupling provides a seat preventing
loss of compressed air frc_T_compresso_ tank -whet_ disean
neeted from male coupling. If cermectad to teal side of air
supply, the femab coupling could saal a compressed ar
charge [nthe too_ whk;h could d scharge if the toot trigger is
a_uated_
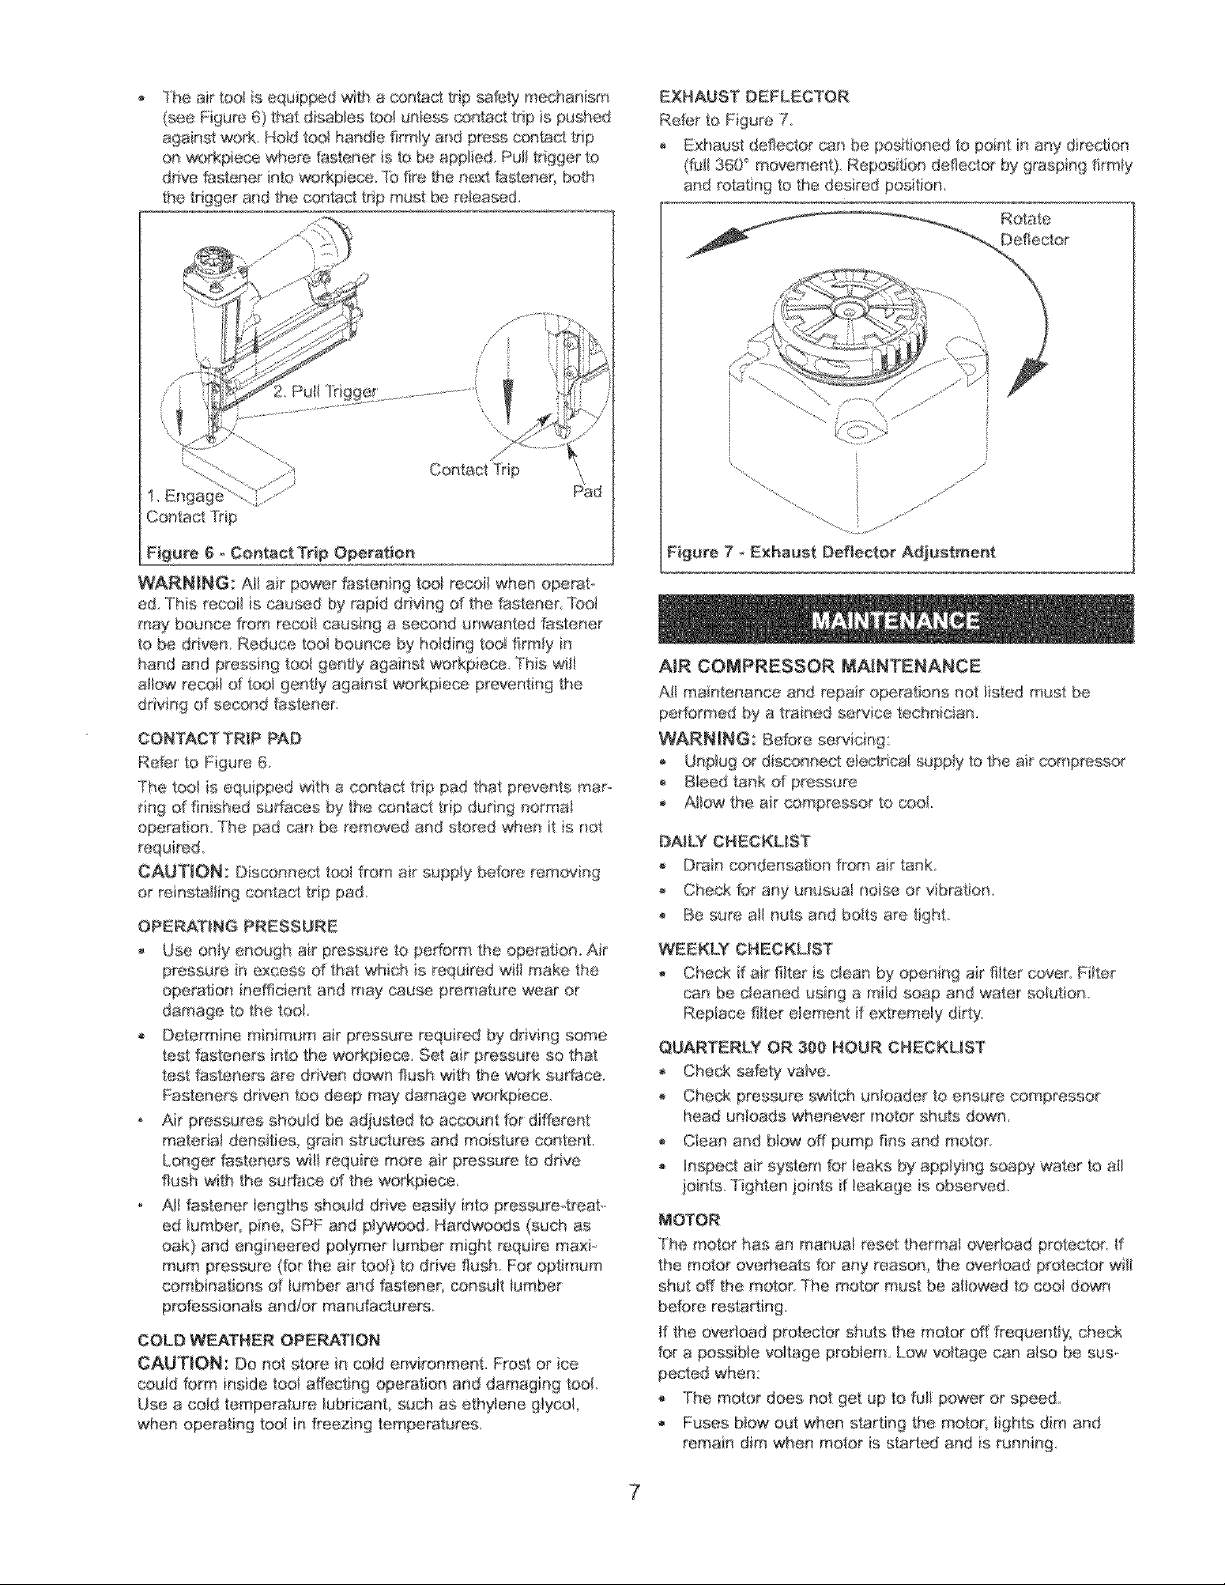
LOADING
Refer _o Figure 5,
WARNING: Disconnect tool from air supply Do net bad too
anti you are _eady to use it Do not pulltrigger or depress
contact trip wM!e toading tool Aways load with _eae of tool
pointing away from you and others A_ways wear safety gog ....
g_ea that comply with United State_ ANS! Z871.
NOTE: For best results, use Sears tasteners on_y
, Eft btch and slide e agazine eowar bacfKwards (see Figure
5) Insert %stoners into magazine Pos tion nails at bot_em
d magazine with heads toward top d too_ (see Figure 5A}_
Position s_@!es crown at top d magazine witt tips toward
b@tor_ of ted (see Figure 5B)
Do not ioad nails and staples tagefser whe_ driving
fasteners
Slide magazine cover farward ove magazme unti_ _atch
snaps nto place, IocMng magazine oever.
The bad ndicator (colored red) becomes visible through
the magazine cover window v_en there are five or Iess
fasteners inthe magazme
Latch
Magazme Cov{_r
/
/A_Naits P!aced Onto
....... " Outer Surtace of hner
Wai! d Magazine
NAILING AND STAPLING OPERATION
Refer to Figure 6.
WARNING: Read and follow aH safety ru_es and operating
instructions in this manual and on warning _abel d toot beft_re
using this tool Keep this manuai oath the toot,
WARNING: Do not use this tool without safety warning
abel. ff _abel is missing, damaged or unreadable, contact
Sears #3 ebtain a new abel
WARNING: Never operate too_ unless c_s_ct trip is in ooetasl
wi_h workpi@se. Do not operate too_ w_thoat fasteners or dam..
age to tool may r_asult. Newar fire fasteners into _qe air because
fasteners may irfiure opera_ _or ethers and damage to to@
may resuR_
6
[he ak too is equipped with a oenS_cq tr_p _aksty mechanism
(see Figure 6) that disables k)M unless contact trip is pugged
against work_ Hold tor_handle firmly and press ctmSJct trip
on _rkpiece _e_ere fastener s to bc_applied Pu_t trigger to
ddve fastener into workpiece_ 7b fire the next faetsner, bo_h
the hgger and the contact trip must be rebased
Coetaet Trp
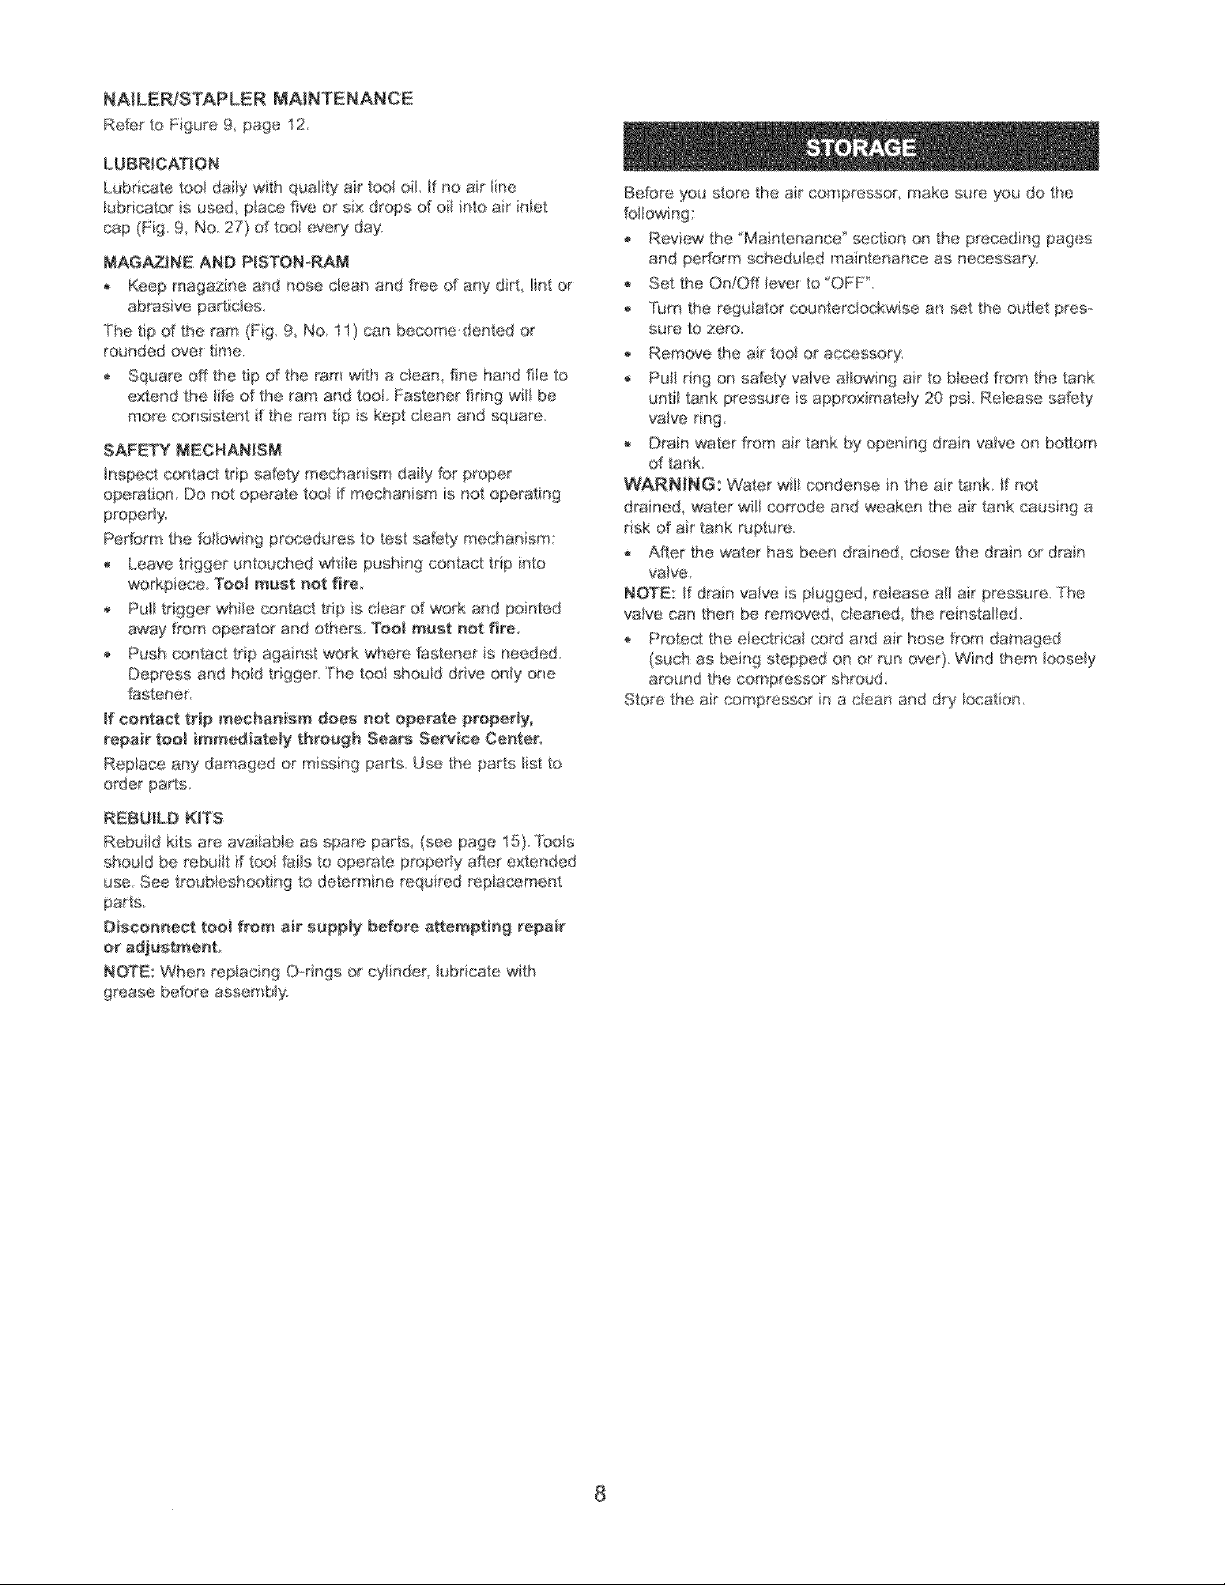
EXHAUST DEFLECTOR
Refer to Figure 7
Exhaust deflector can be poaitioned to point in any dir_ction
(ff,_l 36[P movement) Repositlon defleclor by g_aspinf) firmly
and rotating ta the desired posit[or_
Figure 6 _ Cannot Trip Opera6o_
W_NING: i[ a{r power las_an[ng tool racoi[ when operat _
ed 'This recoil s caused by rapid ddving of the fastener _£o_)I
rnay bounce t_om recoi causing a second unwanted fastener
to be driven Reduce too bounce by holding too_ fitm_y in
harld and press ng toolget,try against workpiece 7hs w[_i
alk}w recoid too gent_y ago nst workpiece preventing the
ddvmg of second fastener;
CONTACT TR_P PAD
Refer to Figure 6
[he too_ is equipped with a <×)ntacttrip pad that prevents ma
rng d finished surfaces by the cor_taet trip during normal
operation 7he pad <_n be removed and stored whe_} t e not
recruited,
CAUTION: D eoenect toelfrom air supply baton? removing
or reinstalling contact trp pad
OPERATING PRESSURE
- Use only enough air pressure to pedorm the operation, Air
pressure inexcess d that wh<Lh }s required will make the
operation ineffident and may cause premature wear or
damage to tt_e too[
Oelermine minimum air pressure required by dr v_ng some
test fast_ners into the workplace. Set air pressure so that
test fasteners are driven down flash with the work surface
Fasteners driven too deep may damage warkpiece.
Air pressures should be adjusted to account for different
material densities, gran structures and moisture content
Longer faateeers wiii require man air pressure _o drive
flush with 8'_e su_ce d the workpiece_
Ali fastener lengths should drive easily rote pressure-treat._
ed lurnbeL pme, SPF and ply'_'_od. Hardwo_% (such as
oak) and engk_eered polymer lumber might requ#e ma×i
mum pressure (for the air tact) to drive flash For optimum
combinations of [umber and tastener; consult lumber
professioeaIs and!or manufacturers
COLD WEATHER OPERATION
CAUTION: Do not store in cold envkonment Frost or ice
could form inside too_ aflecting operation and damaging tool
Use a cord temperatare lubricant such as ethylene @yeol
when operating toot in freexing temperatures
Figure 7 Exhaust Deflector Adj#stmer_t
A{R COMPRESSOR _AINTENANCE
A{imaintenance aed repot o[xarat_ons net/sted must be
pe_arrned by a trained service technician.
WARNING: Before servicktg:
Un#ag _ disoanned etectr[ra_l supply to the air cotr pressr)r
BIeed tank d pressure
AHow the air corr_presso to caol
DALLY CHECKLIST
Oran _)ndensat[on from air tank
,_ Check for any an _saal noise or vbrat_on
Be sure a_ nuts and bolts are l_ght.
WEEKLY CHECKUST
Check f air filter is clean by open ng air filter caw;r Fittc,r
can be ctem_ed using a mid soap and water so,uriah
Replace fi_ter eiemem if extremely drly
QUARTERLY OR 300 HOUR CHECKUST
Check safety valve
. Che_ pressure swi#sh unloader to e_sure cempressor
head unloads whenever motor shuts down
,, Ciean and Mow off pump fins and motor.
• Inspec4 air system for feaks by applymg soapy water to all
ioints Tighten ]oi_ts if _eakage is observed.
_OTOR
"The motor has an manua_ reset thermal ovedoad protectoc _f
the motor oveff_eats fer any reason the ow.,doad protector wire
shut off the motor 7he roe!or mast be alk_wed to cool down
bed,ore restarting
_fthe over,cad protector shuts the motor of[ frequently, check
for a possiMe voltage problem Low voltage can also he sus.-
peered when:
,, The motor does not get up to fall pewer or speed
- Fuses Mow out when startmg the motor, tights dim and
remain dim when motor is started and iSrunning
NAiLER/STAPLER MAINTENANCE
R_#erte Figure 9, page 12
LUBRICATION
Lubn_._te tool dairy with quality air too_ o& if no air line
lubricator s used, pace fiw_ or sx drops af o iete air ielet
cap Fig 9 No 27) of too} every day
MAG_|NE AND PISTON_RAM
Keep magazir_e and nose dean and free of any dirt lir_t or
abrasive padi¢les
The tip d the _am (Fig. 9 No 1I) can become dented or
rounded ove_ _me.
Square off the tip d the ram with a dean, fine hand fiie to
e×tend the _ifeo_ the ram a_'rdtoo Fastener fir}ng wilt be
mo_e eor sistent if 9}e ram tip s kept clean and square,
SAFETY MECHANISM
inspect eentaet _dp safety mechan sm davy for p_oper
operation. Do not opeu_te tool if mechanism is not operati_g
properly.
Perform the to_owing procedures to _est safety mechan}sm:
,, leave tdgget untouched wh_e pushff_g contact trip into
werkpMce_ Tool must sot fire,,
- Pu/i trigger whte contact trip is dear ef work and ponted
away from operator and others. Tool must net fire
,, Push contact trip against work when_ fastener is needed
Depress and ho_d trigger The too should ddve o_ly one
fastener
If eo_tact trip mechanism does sot operate property_
_efair too_ #_med_ate_y through Sea_ Service Center',
Replace any damaged or miss}rig parts, Use the parts sf te
order parts
REBUILD KiTS
Rebuild kitsare avaiiab}e as spar_ _,parts, (see page 15) Toots
shoukJ he rebu it }f tnol fai_s _e operate p_oper_y after extended
use See _roubeshootieg to determine requ red e_placemer_t
pa_ls
Disoooneet too! f_m a_r supply before attempfln_ repair
or adjest_er_t
NOTE: Wbe_ replacing Stags or eytinder k_brioate with
grease before assemb y
Brdore ye{,* store the ar compressor, make sum you do the
f_-_liowm9:
Re,4ew the Ma ntenanse section on the preeeding pages
and pedorm ssheduied maMtenanee as necessary
Set the On/OFF leve_ to *'OFF".
,, Turn the regulator countercockwise an set the outlet pros
sure to zere.
_, Remove the ar _oe_or accessory.
Pull ring on safety valve aI/owmg air to bleed from the tank
uniii tank pressure s appreximatety 20 ps} Retease ss_%ty
valve riegi
. Drain water from air tank by opening drain valve on bottom
of tank
WARNING: Water wil cortdense in the air tank, if net
drained water wi_i corrode and weake_ the air _ank causing a
rsk of air l_nk rupture
*, After the water has been dra ned dose the drain or dran
va)ve,
NOTE: Jf drain va!ve is t:#a,gged reJease all air pressure The
valve (an then be removed, cieaeed the reinstalled,
,* Protect the eiectdca cod and air hose from damaged
(such as beir_g stepped on or run over) Vvff_d them rx)se_y
around the compressor shn:)ud_
Store the air compressor '_ a c}ean and dry iosatiott
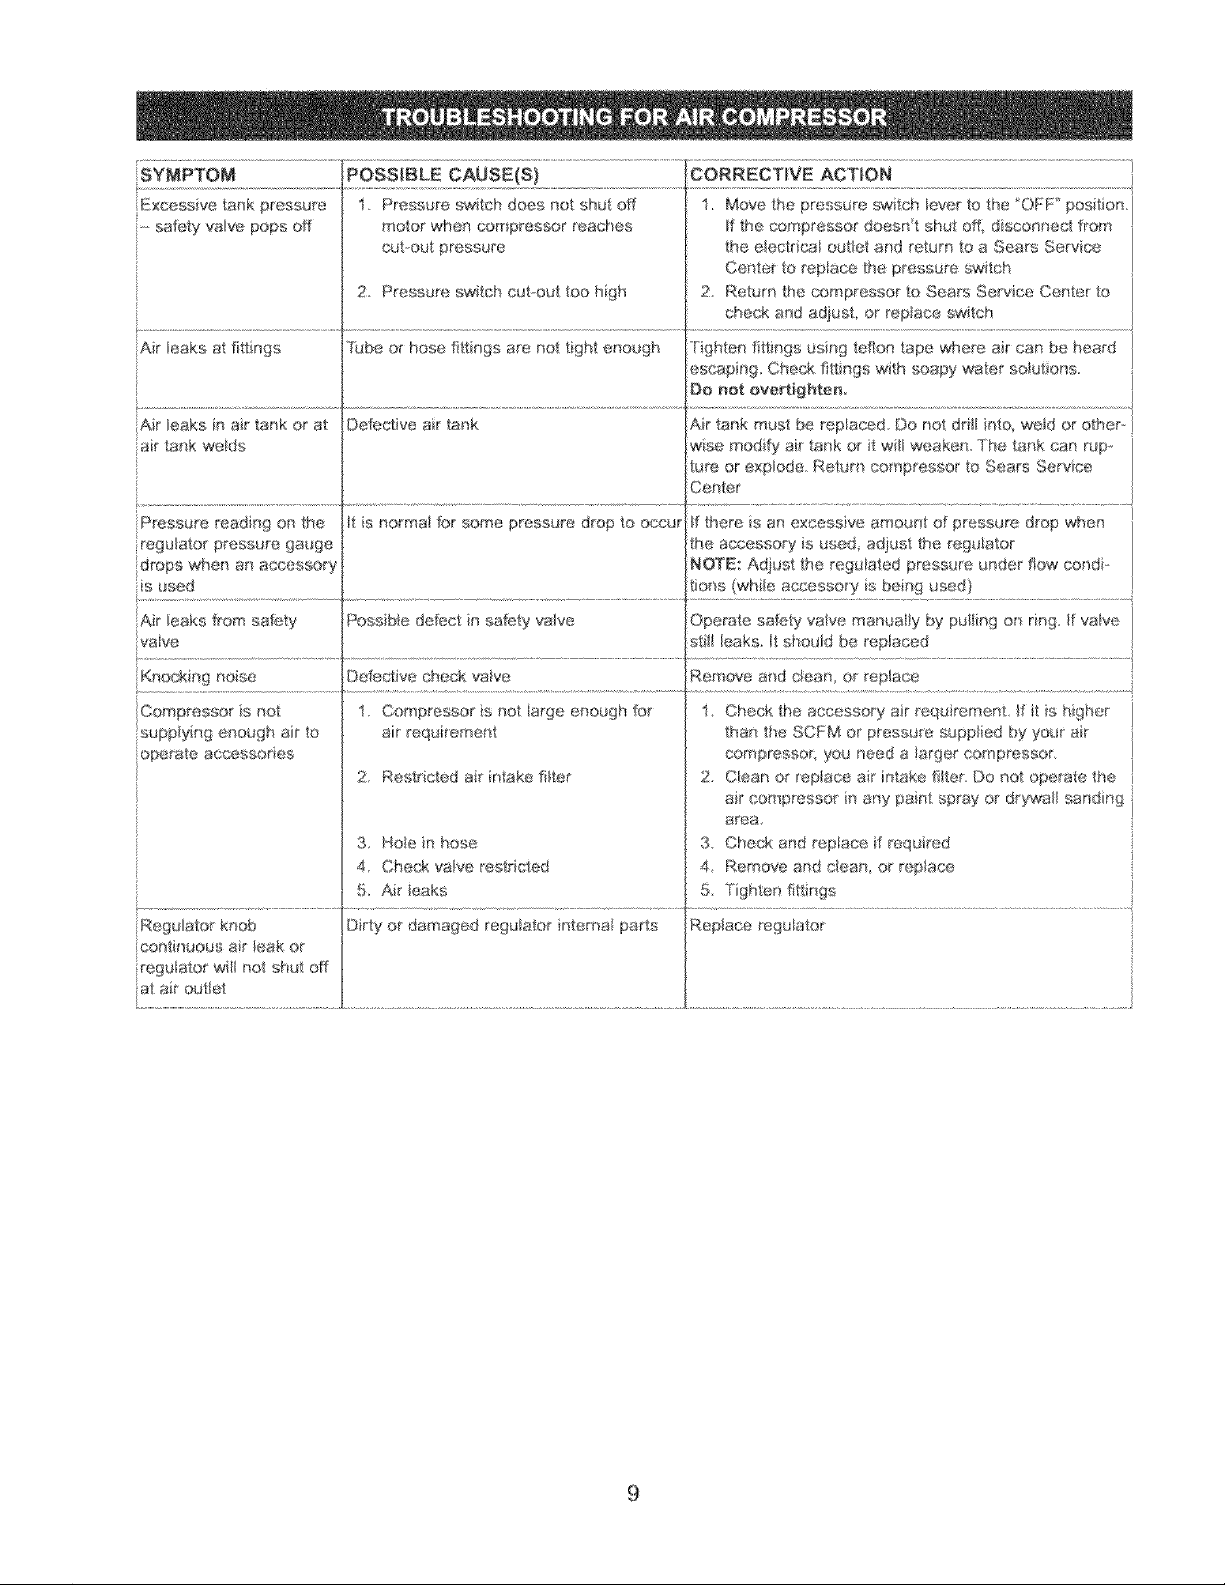
Excessveta_kpressure i Pressureswtchdoesnotshutoff I, Movethepressureswitchevertothe'OFF'position,
9 safetyvalvepopsoff motorwhencomp_esso_reaches ffthecompressordoesntshutoffdisaon"_ee_frorr
cutoutpressure theetectrk_toutletandreturntoaSearsService
Centertorepacehepressureswitch
2 Pressureswtchcat.outtoohigh 2.ReturnthecompressortoSearsServiceCenterto
checkand adjust, or repiace sw_ch
Air leaks at fittings Tube or hose f ttings are not ti_h_ enough tighten fiiti _gs using teflon tape where air can be heard
i escaping, Cheek fittings wth soapy water s(>_i_tons
'Air leaks in air tank or at Defective air bank A_r tank must be replaced Do not drill into we_d or other
air tank weids wise modify ail tank o_ it w_l weaken. The tank can iup-
Pressure readiny on the _t is normaI for some pressure drop to occur _fthere is an excessive amoun_ of pressure drop Wnen
regu!ator pressure garage the accessory is used, adjust the formulator
'drops when an accessory NOTE: Ad}ust the regu ated pressure under flow send-
ts }sod tions (white accessory s being used)
!..........................................................................................................................................................................................................................................................................................................................................................................................................................................................................
Air leaks from safety PossiMe defect in safe_y valve Opelate safety vave n anua y by puiiin 9 on ring. if rave
vaIve stll leaks tl she _d be replaced
Defectwe _heck valve Remove and c{ean, or replace
Compressor s not t. Compressor is not targe enough; for i Check the accessory ai_ requirement, if i:tis hgher
supplying enough air to air requirement than the SCFM or _)ressure suppt ed by yo_ air
' _rate aecessores compressor; you need _ lar!i_er cornp_ssor,
2, Restdc/ed air intake fit;tar 2. Clean or replace ai_ i_take f I:ter. Do not operate the
3. Hate in hose 3, Chela and replace f required
4 Cheek valve restricted 4, Remove and clean, or replace
5. Air _eaks 5. Tghten fittings
Dirty or damaged reguiator intemat parts Repiaee regulator
regWatar will no shut off
at air outlet
Do r_ot overtighten
tare or e×plode Return oornpressor to Sears Servise
Cente_
air ear/pros or n any pant spray or drywal sx_nd n9
area.
 Loading...