

Page 1
Operator’s Manual
Revolution Zero-Turn Riding Mower
42-INCH MULCH KIT
Model No. 33029
For answers to your questions about this product,
call 1-800-659-5917.
CAUTION: BEFORE USING THIS
PRODUCT, READ THIS MANUAL
AND FOLLOW ALL SAFETY RULES
AND OPERATING INSTRUCTIONS.
Sears, Roebuck and Co., Hoffman Estates, IL 60179, U.S.A.
Visit our website: www.sears.com/craftsman
Form No. 769-04770
(February 10, 2009)
Page 2
ASSEMBLY
I
Model 33029 mulch kit Is designed for use with the Craftsman 42Inch cutting deck on the Revolution Zero-Turn Riding Mower.
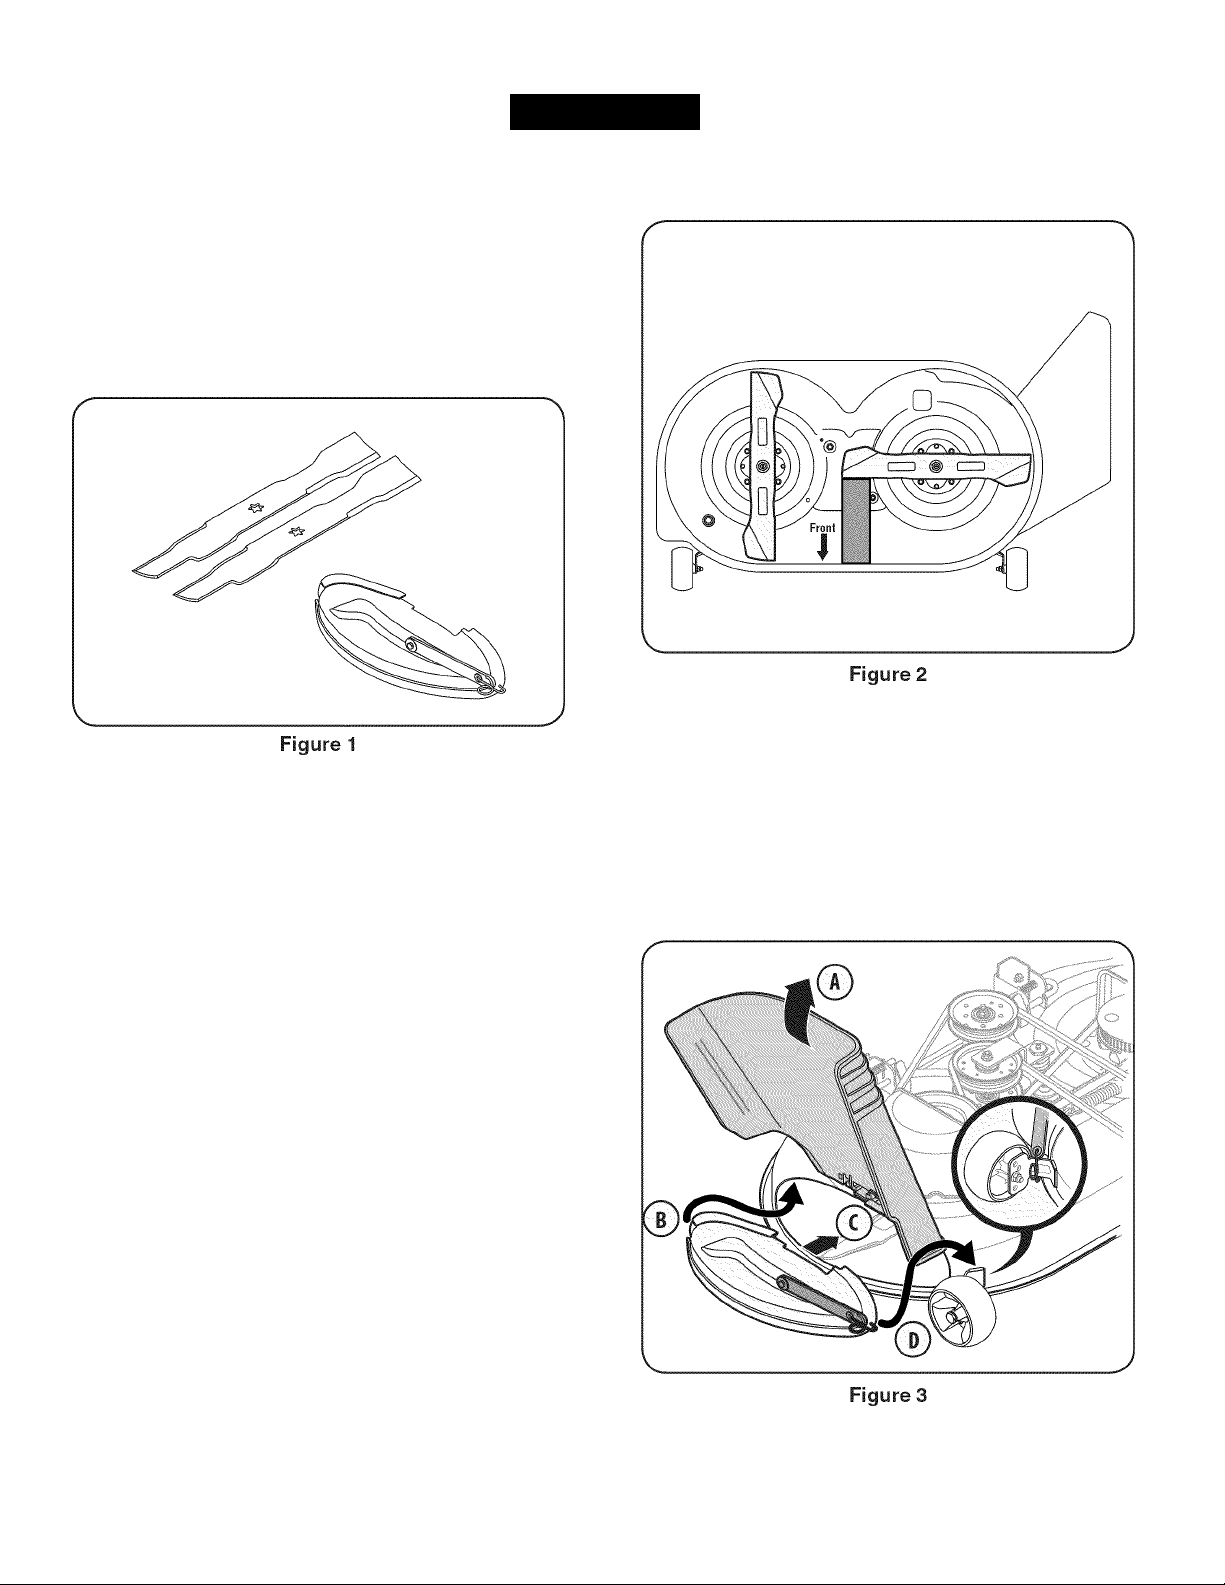
CARTON CONTENTS
Before beginning installation, remove all parts from the carton to
make sure everything is present. Carton contents are listed below
and shown in Figure 1. Part numbers are shown in parentheses.
• Two 22” Mulch Blades (742-04214)
• One 42” Deck Mulch Plug Assembly (631 -04262)
IMPORTANT:
flange nut to between 70 ft-lb and 90 ft-lb.
INSERTING THE MULCH PLUG
Use a torque wrench to tighten each blade spindle’s hex
1. Lift the discharge chute up (A). See Figure 3.
INSTALLATION INSTRUCTIONS
A
WARNING;
on a firm and level surface, set the parking brake, place the
PTO in the disengaged (OFF) position, stop the tractor’s
engine and remove the ignition key to prevent unintended
starting.
WARNING:
hands by wearing heavy leather work gloves to grasp
blades.
Before beginning installation, place the tractor
Cutting blades are sharp. Always protect
2. Insert the mulch plug into the deck discharge opening by
3. Pull and stretch the retaining strap on the mulch plug over
A
1. Remove cutting deck from beneath tractor (refer to Cutting
Deck Removal in Craftsman Revolution Zero-Turn Riding
Mower Operator’s Manual).
2. Gently flip the deck over to expose its underside,
3. Place a block of wood between the deck housing baffle and
the cutting blade to act as a stabilizer, then use a wrench
to remove the hex flange nut that secures each blade to its
spindle assembly.
IMPORTANT:
pattern. Do NOT attempt to force the nuts in the opposite direction. Doing
so may damage the nut.
4. Replace the blades with the blades included in the kit. Be
sure to install each blade with the side marked “Bottom” (or
with a part number stamped in it) facing the ground when the
mower is in the operating position.
The hex flange nuts have a right-handed (normal) thread
fitting the tab on the rear side of the mulch plug inside the
deck(B) and pivoting the mulch plug into place (C).
the deck wheel bracket (D) on the deck and hook onto the
bottom of that bracket as seen in the inset of Figure 3.
IMPORTANT: Blades MUST be Positioned as seen in
Figure 2.
Page 3

OPERATION
J
El kit de abono modelo 33029 está diseñado para ser usado
con la plataforma de corte de 42 pulgadas de Craftsman en
la revolucionaria cortadora de césped con radio de giro cero
{Revolution Zero-Turn Riding Mower).
CONTENIDO DE LA CAJA
Antes de comenzar la instalación, retire todas las piezas de la
caja para asegurarse de que esté todo. El contenido de la caja se
enumera más abajo y se muestra en la Figura 1. Los números de
piezas se muestran entre paréntesis.
IMPORTANTE:
con brida hexagonal del husillo de la cuchilla entre 70 pies-libras y 90
pies-libras.
INSERCION DE LA CLAVIJA DE ABONO
Utilice una llave de torsión para ajustar cada tuerca
• Dos cuchillas de abonadora de 22” (742-04214)
• Un conjunto de clavija de abono de plataforma de 42” (631 -04262)
INSTRUCCIONES DE INSTALACIÓN
ADVERTENCIA:
el tractor sobre una superficie firme y nivelada, coloque el freno
A
A
1. Extraiga la plataforma de corte por debajo del tractor (consulte la
2. Voltee la plataforma con delicadeza para dejar al descubierto la
3. Coloque una tabla de madera entre el deflector del alojamiento
IMPORTANTE:
rosca (normal) en el sentido de la mano derecha. NO intente forzar las
tuercas en la dirección opuesta. Hacerlo dañará la tuerca.
4. Reemplace las cuchillas por las cuchillas incluidas en el kit.
de mano, coloque la potencia de arranque (PTO) en la posición
desconectada, pare el motor del tractor y quite la llave de
encendido para impedir que arranque accidentalmente.
ADVERTENCIA:
Siempre protéjase las manos utilizando guantes de trabajo
de cuero grueso para sujetar las cuchillas.
sección de Extracción de la Plataforma de Corte en el Manual del
Operador de la Revolucionaria Cortadora de Césped con Radio de
Giro Cero).
parte inferior.
de la plataforma y la cuchilla de corte para que actúe como un
estabilizador. Luego utilice una llave para extraer la tuerca bridada
hexagonal que sujeta cada cuchilla a su montaje de husillo.
Las tuercas hexagonales con brida tienen un patrón de
Asegúrese de instalar cada cuchilla con el lado marcado
“Bottom” (inferior) (o con el número de parte estampado en
la misma) mirando hacia el piso cuando la cortadora está en
posición de operación.
IMPORTANTE: Las cuchillas DEBEN estar posicionadas
como se ve en la Figura 2.
Antes de comenzar la instalación, coloque
Las cuchillas de corte son afiladas.
1. Eleve el canal de descarga (A). Vea la Figura 3.
2. Inserte la clavija de abono dentro de la abertura de descarga
3. Tire y estire la tira de retención en clavija de abono sobre la
de la plataforma colocando la aleta sobre el lado posterior
de la clavija de abono dentro de la plataforma (B) y girando
la clavija de abono en su lugar (C).
ménsula de la rueda de la plataforma (D) sobre la plataforma
y enganche en el fondo de esa ménsula como se ve en el
recuadro de la Figura 3.
Page 4

Get it fixed, at your home or ours!
Your Home
For expert troubleshooting and home solutions advice:
II
www.managemyhome.com
I
For repair - in your home - of all major brand appliances,
lawn and garden equipment, or heating and cooling systems,
no matter who made it, no matter who sold it!
For the replacement parts, accessories and
owner’s manuals that you need to do-it-yourself.
For Sears professional installation of home appliances
and items like garage door openers and water heaters.
1-800-4-MY-HOME® (i-8oo-469-4663)
Call anytime, day or night (U.S.A. and Canada)
www.sears.comwww.sears.ca
Our Home
For repair of carry-in items like vacuums, lawn equipment,
and electronics, call anytime for the location of your nearest
Sears Parts & Repair Service Center
1-800-488-1222 (U S A ) 1-800-469-4663 (Canada)
www.sears.com www.sears.ca
To purchase a protection agreement on a product serviced by Sears:
1 -800-827-6655 (USA) 1 -800-361 -6665 (Canada)
Para pedir servicio de reparación
a domicilio, y para ordenar piezas:
1-888-SU-HOGAR®
(1-888-784-6427)
® Registered Trademark / ™ Trademark / ™ Service Mark of Sears Brands, LLC
® Marca Registrada / ™ Marca de Fábrica / ™ Marca de Servicio de Sears Brands, LLC
Marque de commerce / “ Marque déposée de Sears Brands, LLC
Au Canada pour service en français:
1-800-LE-FOYER“''
(1-800-533-6937)
www.sears.ca
© Sears Brands, LLC
 Loading...