

Craftsman 320.48249 Owner's Manual
Owner's Manual
360° Level System
...f_.t...g LAsERTRA¢'"
2-Beam Level, Plumb and Square
Model No.
320.48249
CAUTION: Read, understand and follow
all Safety Rules and Operating Instructions
in this manual before using this product.
, SAFETY
° OPERATION
° MAINTENANCE
Sears, Roebuck and Co., Hoffman Estates, IL 60179 U.S.A.
Warranty ...................................................... Page 2
Safety Instructions .......................................... Page 3
Description ................................................... Page 4
Operation ..................................................... Pages 5-6
Calibration .................................................... Pages 6-7
Applications .................................................. Pages 8 -10
Maintenance ................................................. Page 1'1
Trouble Shooting ........................................... Page 12
Notes ............................................................. Pages 13-14
Service Numbers ........................................... Back Cover
FULL ONE YEAR WARRANTY ON CRAFTSMAN
360° LEVEL SYSTEM featuring LASERTRAC TM
If this CRAFTSMAN Level System fails to give complete satisfaction
within one year from the date of purchase, RETURN ITTOTHE
NEAREST SEARS STORE IN THE UNITED STATES,
and Sears will replace it, free of charge.
If this CRAFTSMAN Level System is used for commercial or rental
purposes, this warrant,] applies for only 90 days from the date
of purchase_
This warranty gives you specific legal rights, and you may also
have other ri_jhts which vary from state to state.
Sears, Roebuck and Co., Dept.817 WA, Hoffman Estates, iL 60179
SAVE THESE INSTRUCTIONS!
READ ALL INSTRUCTIONS!
CONTENTS
Level System, Laser enhancing glasses, carrying bag, laser target
Owner's Manual.
2

ii1,1ull,: ..................::::1,i..-:..¸.::...........
WARNmNG: BE SURE to read and understand all instructions in this
manual before using this Level System_ Failure to follow all instructions may
result in hazardous laser radiation exposure, electric shock, and/or bodily injury°
............... ii ,i ii i,, iiiiii ,i,,11,1,
iii i,
CAUTION: Use of controls or adjustments or performance
of procedures other than those specified herein, may result in hazardous laser
radiation exposure°
i .............................. , ,,, i III/11' I' I/'t
CAUTION: The use of optical instruments with this product will
increase eye hazard°
,_ IMPORTANT: The following labels
are on your Level System
(see fig. 2). They indicate
where the laser light is emitted,
ALWAYS BE AWARE of the emission
point locations when using the Level System.
ALWAYS MAKE SURE that any bystanders
in the vicinity of use are made aware of the dangers of looking directly into the laser.
WARNING! LASER LIGHT. LASER RADIATION.
Avoid Direct Eye Exposure. Do Not Stare into beam
1. DO NOT remove or deface any product labels, Removing product labels
increases the risk of exposure to laser radiation.
2. DO NOT stare directly at the laser beam or project the laser beam directly into
the eyes of others. Serious eye injury could result.
3. DO NOT place the Level System in a position that may cause anyone to stare
into the laser beam intentionally or unintentionally. Serious eye injury could result,
4. DO NOT use any magnifying optical tools such as, but not limited to,
telescopes or transmits to view the laser beam. Serious eye injury could result,
5. DO NOT operate the Level System around children or allow children to operate
the toolo Serious eye injury could result
6. ALWAYS turn the Level System off when not in use_ Leaving the tool on
increases the risk of someone inadvertently staring into the laser beam,
7. DO NOT operate the Level System in combustible areas such as in the presence
of flammable liquids, gases or dust,
8. When using any of the base plates,
ALWAYS check to be sure that the tool is securely mounted on the base when
using other base plates Damage to the tool and/or serious injury to the user
could result if the tool falls.
9. ALWAYS use only the accessories that are recommended by Sears for use
with this product. Use of accessories that have been designed for use with
other laser tools could result in serious injury,
10, DO NOT use this Level System for any purpose other than those outlined
in this manual This could result in serious injuryr
11. DO NOT leave Level System on unattended,,
3
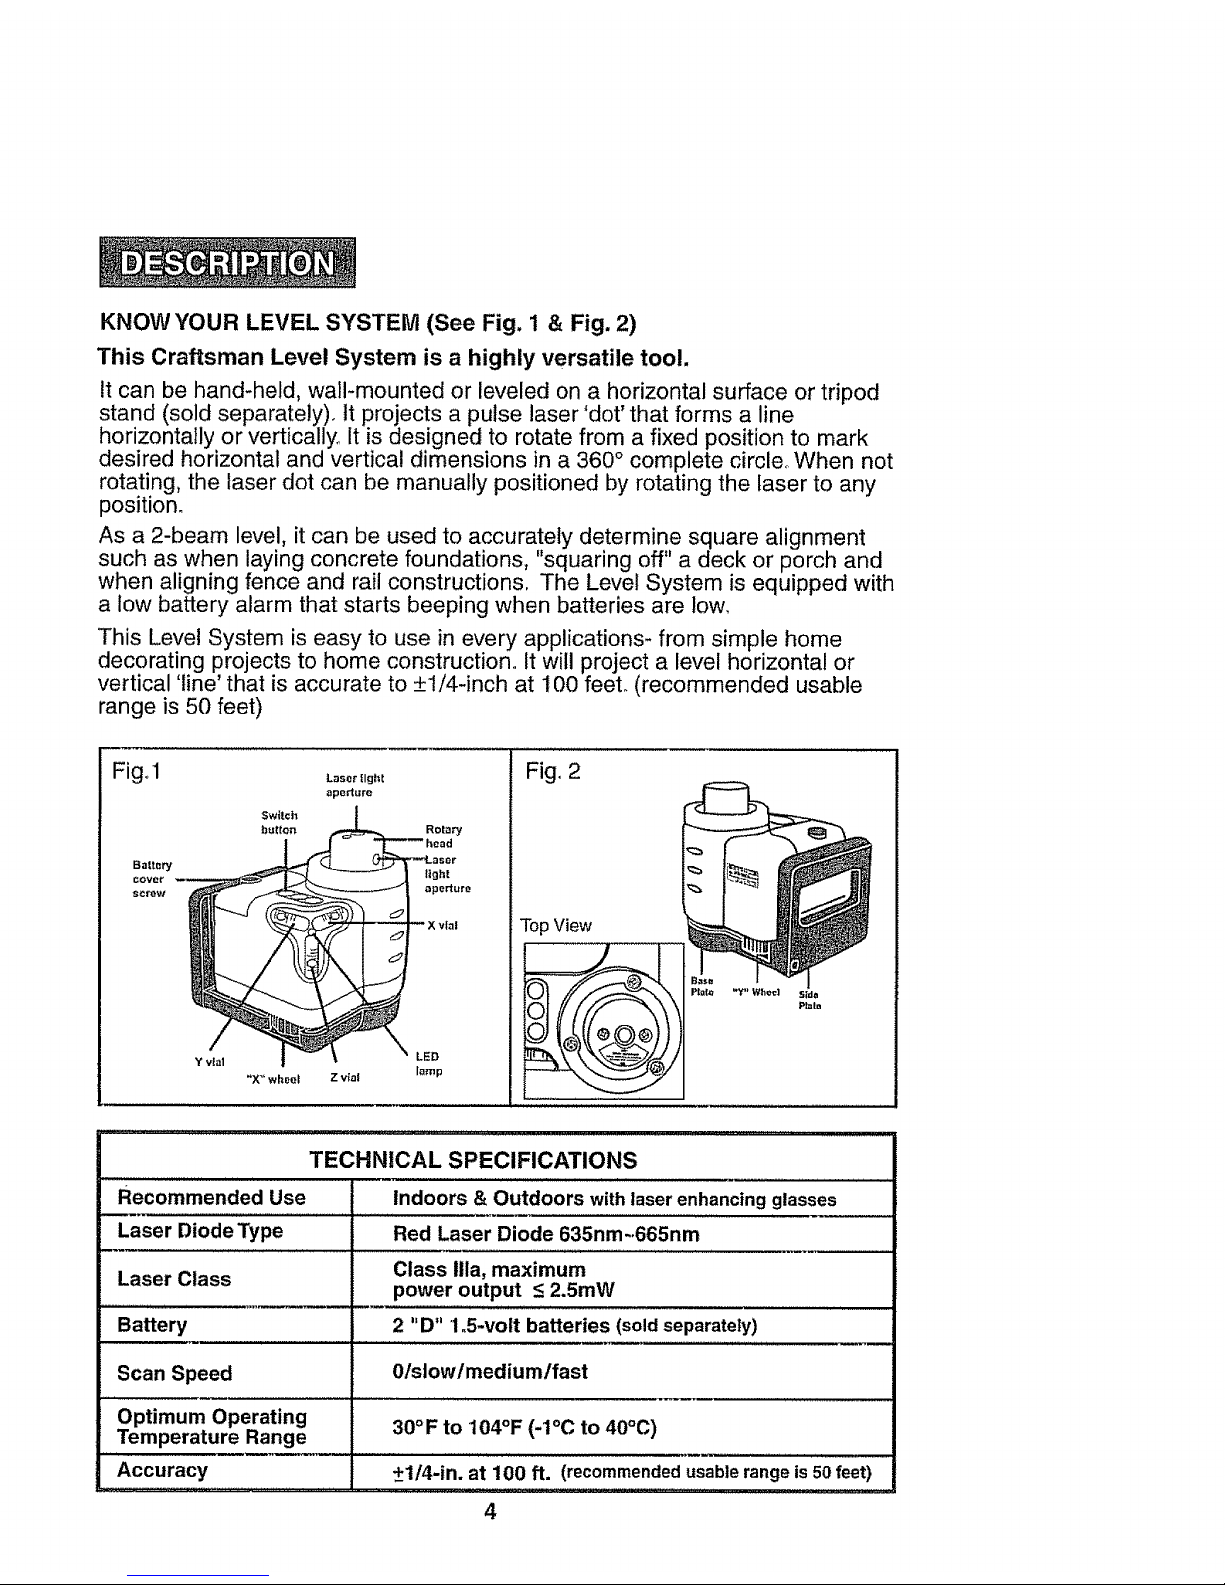
KNOW YOUR LEVEL SYSTEM (See Fig. 1 & Fig. 2)
This Craftsman Level System is a highly versatile tool.
It can be hand-held, wall-mounted or leveled on a horizontal surface or tripod
stand (sold separately). It projects a pulse laser'dot' that forms a line
horizontally or vertically. It is designed to rotate from a fixed position to mark
desired horizontal and vertical dimensions in a 360 ° complete circle° When not
rotating, the laser dot can be manually positioned by rotating the laser to any
position_
As a 2-beam level, it can be used to accurately determine square alignment
such as when laying concrete foundations, "squaring off" a deck or porch and
when aligning fence and rail constructions. The Level System is equipped with
a low battery alarm that starts beeping when batteries are low.
This Level System is easy to use in every applications- from simple home
decorating projects to home construction° It will project a level horizontal or
vertical 'line' that is accurate to +1/4-inch at 100 feet. (recommended usable
range is 50 feet)
Fig.1
Laser Eight
aperture
Top View
i,,11,,,,i,, ,J ,,, ,,,,,,,i,l,,lluu ii .... i,
TECHNICAL SPECIFICATIONS
Recommended Use Indoors & Outdoors withlaser enhancing glasses
Laser DiodeType Red Laser Diode 635nm-,665nm
Laser Class
,,,,,,,,,,,,,, ,, ,, Li J
Battery
Class Ilia, maximum
power output <_2.5roW
,,,,,, ,,,, ,,,,,,, ,,,, , , ,
2 "D" 1.5-volt batteries (sold separately)
Scan Speed Olslowlmediumlfast
Optimum Operating
Temperature Range 30°F to 104°F (-1°C to 40°C)
,,,, ,__ .................
Accuracy +_1/4-in.at 100 ft. (recommendedusablerangeis50feet)
4
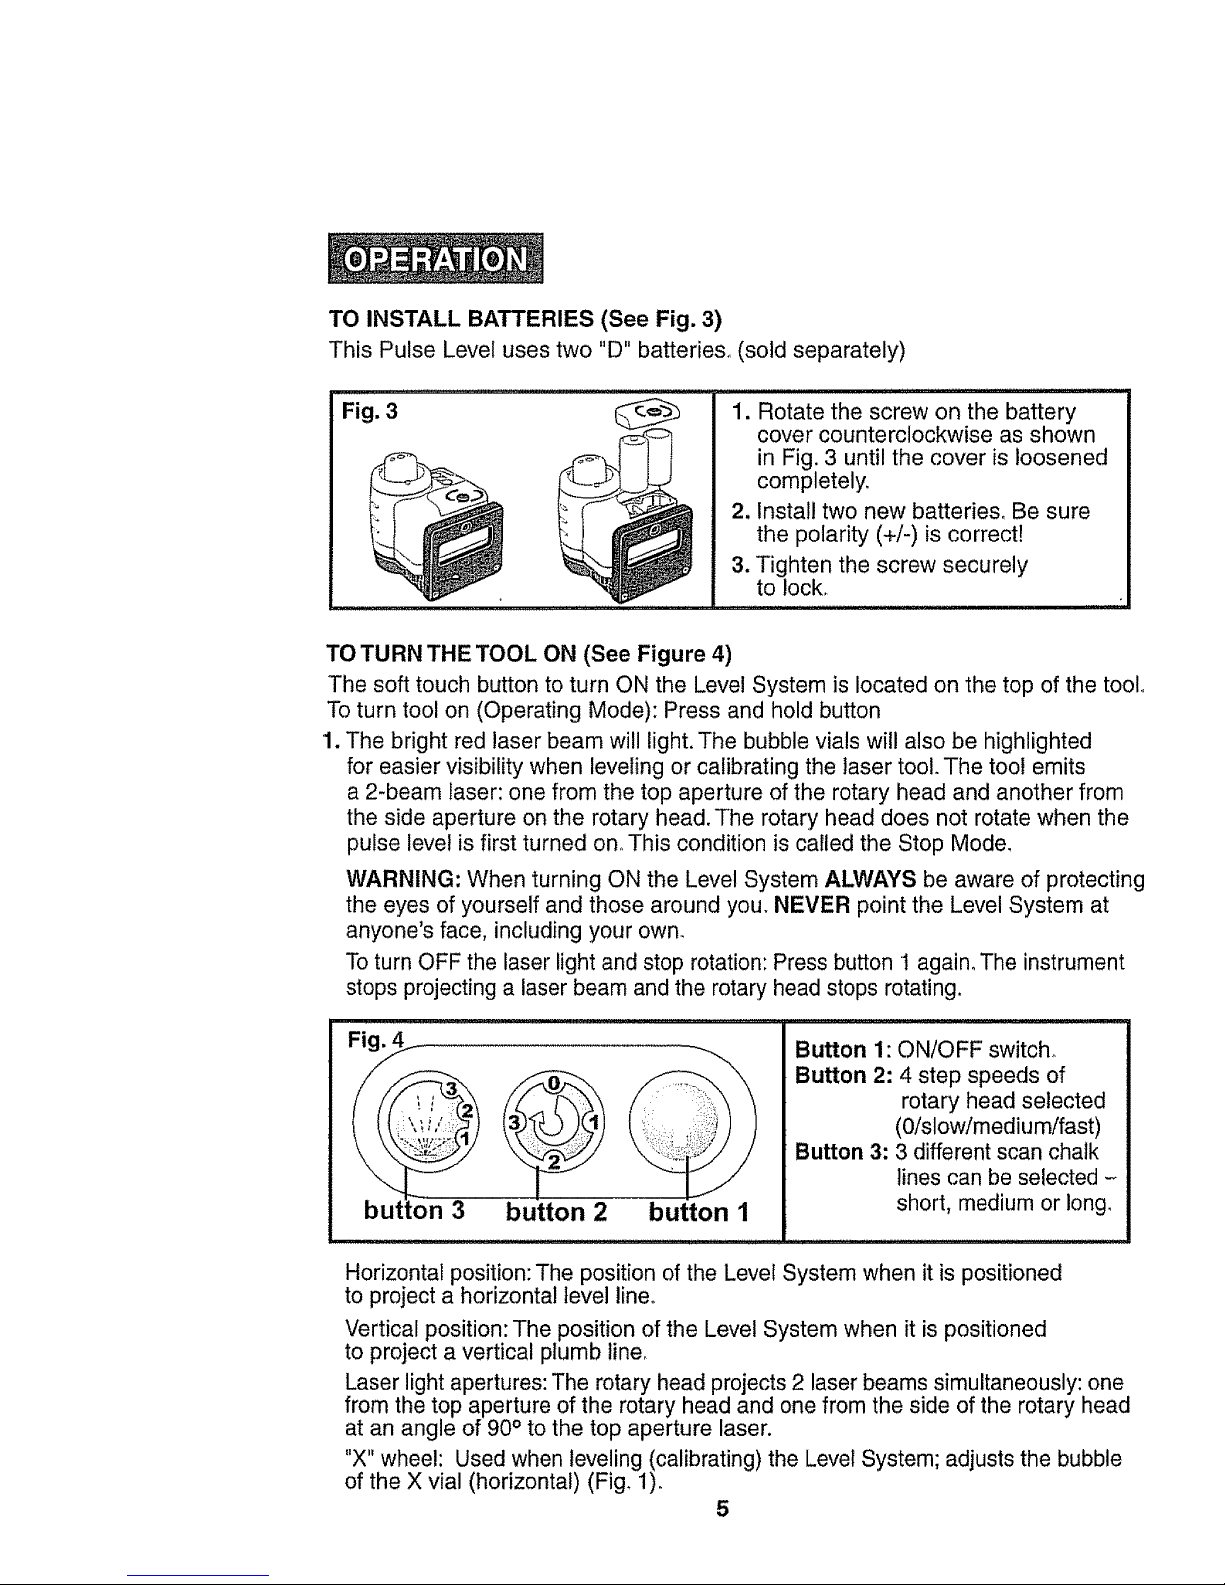
TO INSTALL BATTERIES (See Fig. 3)
This Pulse Level uses two "D" battede& (sold separately)
Fig. 3 1. Rotate the screw on the battery
cover counterclockwise as shown
in Fig. 3 until the cover is loosened
completely,
2, Install two new batteries, Be sure
the polarity (+/-) is correcfl
3. Tighten the screw securely
to lock+
TO TURN THE TOOL ON (See Figure 4)
The soft touch button to turn ON the Level System is located on the top of the tool.
To turn tool on (Operating Mode): Press and hold button
1. The bright red laser beam will light. The bubble vials will also be highlighted
for easier visibility when leveling or calibrating the laser tool+The tool emits
a 2-beam laser: one from the top aperture of the rotary head and another from
the side aperture on the rotary head. The rotary head does not rotate when the
pulse level is first turned on+This condition is called the Stop Mode.
WARNING: When turning ON the Level System ALWAYS be aware of protecting
the eyes of yourself and those around you. NEVER point the Level System at
anyone's face, including your own.
To turn OFF the laser light and stop rotation: Press button t again, The instrument
stops projecting a laser beam and the rotary head stops rotating.
3 button 2 button 1
Button 1:
Button 2:
Button 3:
ON/OFF switch+
4 step speeds of
rotary head selected
(O/slow/medium/fast)
3 different scan chalk
lines can be selected -
short, medium or long.
Horizontal position: The position of the Level System when it is positioned
to project a horizontal level line+
Vertical position: The position of the Level System when it is positioned
to project a vertical plumb line+
Laser light apertures: The rotary head projects 2 laser beams simultaneously: one
from the top aperture of the rotary head and one from the side of the rotary head
at an angle of 90° to the top aperture laser.
"X" wheel: Used when leveling (calibrating) the Level System; adjusts the bubble
of the X vial (horizontal) (Fig+ 1)+
5
"Y"wheel:Usedwhenleveling(calibrating)the LevelSystem;adjuststhebubbles
oftheY vial (in horizontalposition)andZvial (inverticalposition)(Fig.2),
Using the Glasses Included
This LevelSystemincludesapairofstandardsafetyglassesthataremadeof a
laser-lightenhancingmaterial.Theprimarypurposeoftheseglassesisto improve
theuser'svisibilityofthetool'slaserline.
WARNING:TheseglassesWILLNOTprotecttheeyesfrom damagethat could
resultfrom lookingdirectlyintothelaserprojection,
ADJUSTING X & Y LEVELING WHEELS TO LEVEL (CALIBRATE)
THE LEVEL SYSTEM
To level the Level System, follow these instructions:
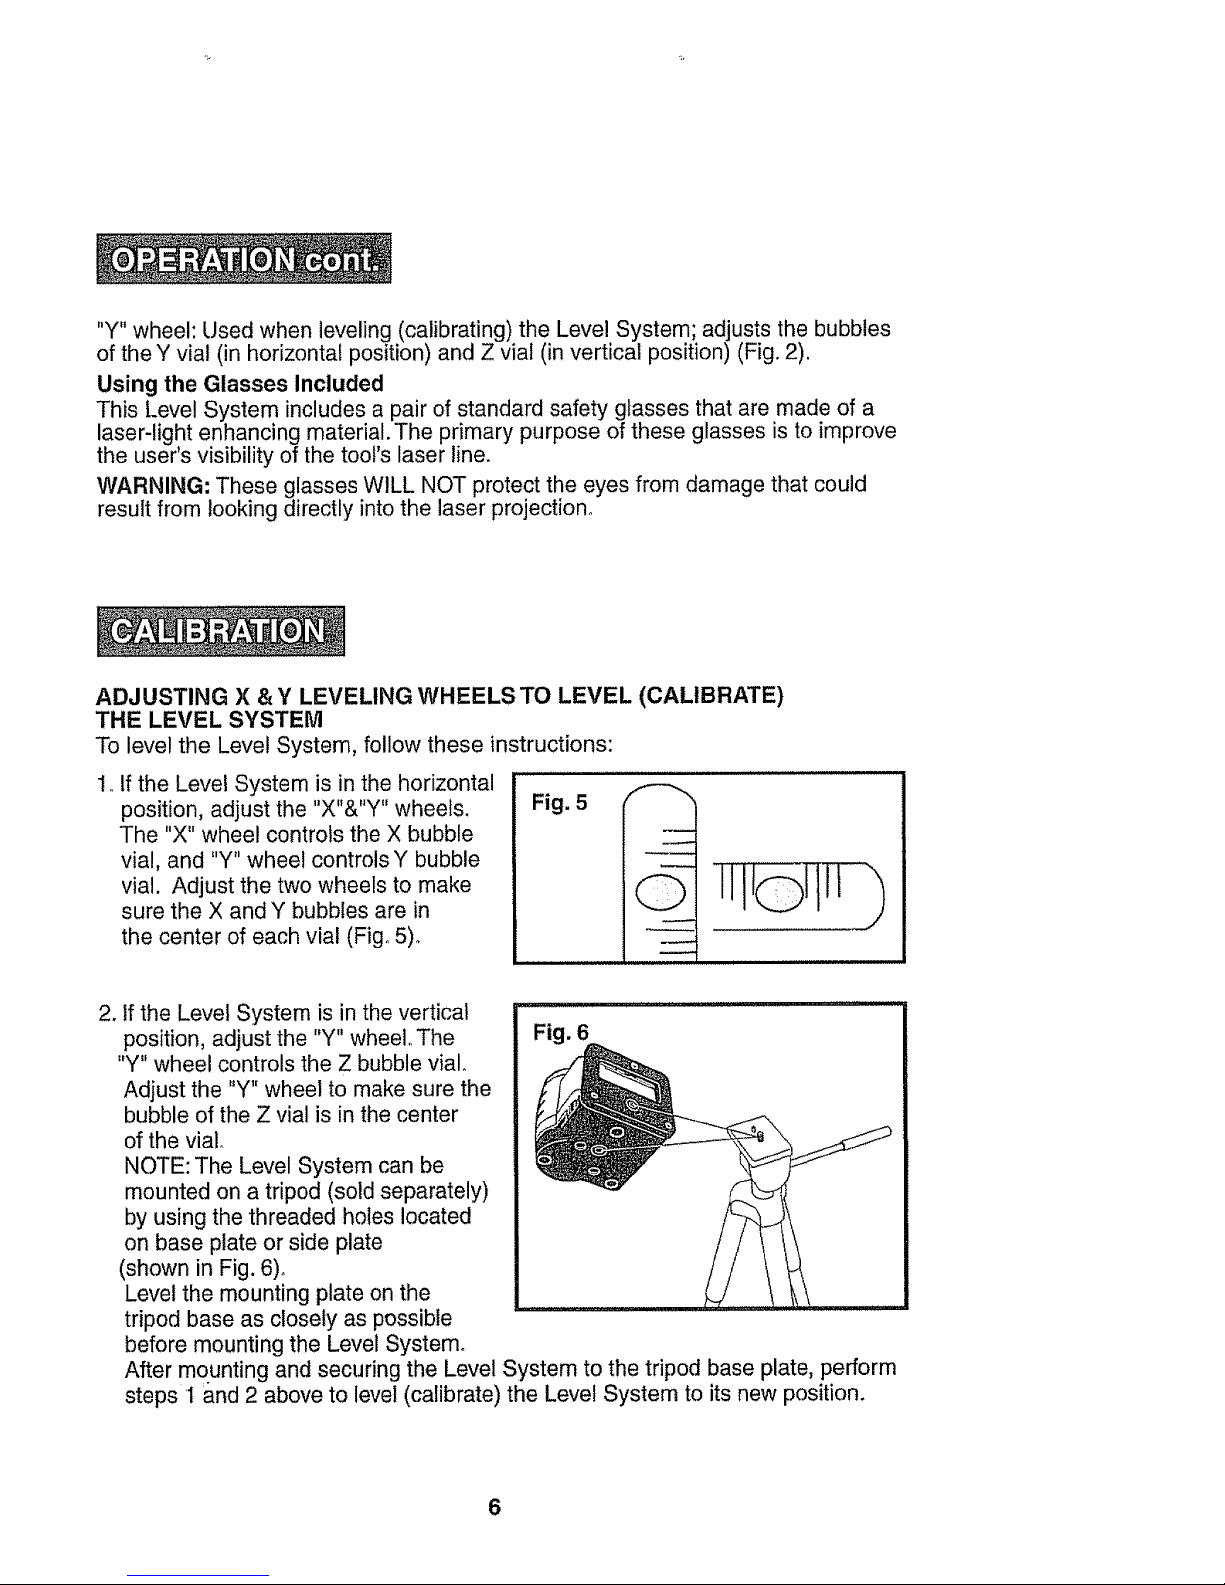
1, if the Level System is in the horizontal
position, adjust the "X"&"Y" wheels.
The "X" wheel controls the X bubble
vial, and "Y" wheel controls Y bubble
vial. Adjust the two wheels to make
sure the X and Y bubbles are in
the center of each vial (Fig, 5)°
Fig. 5
2. tf the Level System is in the vertical -
position, adjust the "Y" wheel, The ,6
"Y" wheel controls the Z bubble vial
Adjust the "Y" wheel to make sure the
bubble of the Z vial is in the center
of the vial,
NOTE: The Level System can be
mounted on a tripod (sold separately)
by using the threaded holes located
on base plate or side plate
(shown in Fig. 6)°
Level the mounting plate on the
tripod base as closely as possible
before mounting the Level System°
After mounting and securing the Level System to the tripod base plate, perform
steps 1 and 2 above to level (calibrate) the Level System to its new position.
6
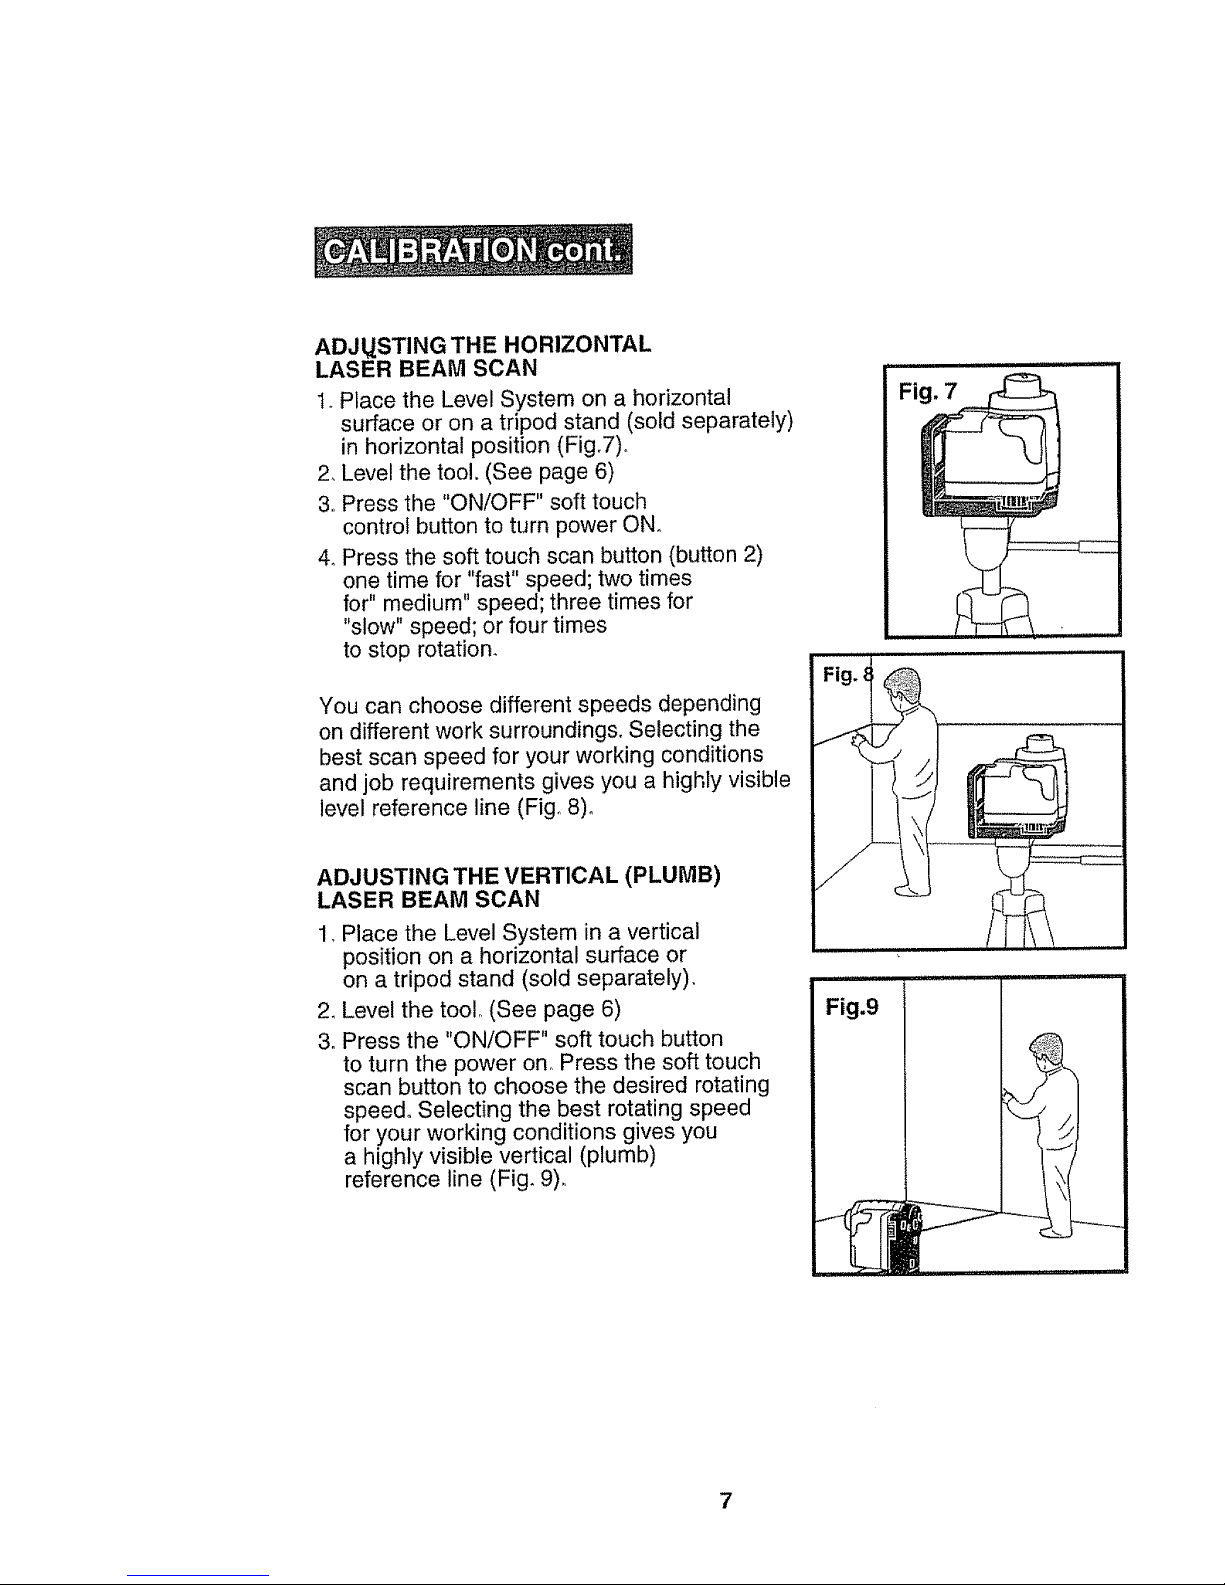
ADJUSTING THE HORIZONTAL
LASER BEAM SCAN
1, Place the Level System on a horizontal
surface or on a tripod stand (sold separately)
in horizontal position (Fig,7)o
2, Level the tool, (See page 6)
3.,Press the "ON/OFF" soft touch
control button to turn power ON,
4_Press the soft touch scan button (button 2)
one time for "fast" speed; two times
for" medium" speed; three times for
"slow" speed; or four times
to stop rotation,
You can choose different speeds depending
on different work surroundings. Selecting the
best scan speed for your working conditions
and job requirements gives you a highly visible
level reference line (Fig,, 8)°
ADJUSTING THE VERTICAL (PLUMB)
LASER BEAM SCAN
1, Place the Level System in a vertical
position on a horizontal surface or
on a tripod stand (sold separately),
2_Level the tool (See page 6)
3. Press the "ON/OFF" soft touch button
to turn the power ono Press the soft touch
scan button to choose the desired rotating
speed, Selecting the best rotating speed
for your working conditions gives you
a highly visible vertical (plumb)
reference line (Fig, 9)_
Fig.9
7
USINGTHE LEVEL SYSTEM
This level can be easily used in several ways, tt can be hand, held for point
marking and simple alignment, placed against a plumb wall or on a level
structure (and re-leveled) or mounted on a tripod (sold separately) to project
a pulsing dot 'chalk line' as a horizontal level line or vertical plumb line, Be
sure to re-level (re-calibrate) the Level System everytime you change its position,
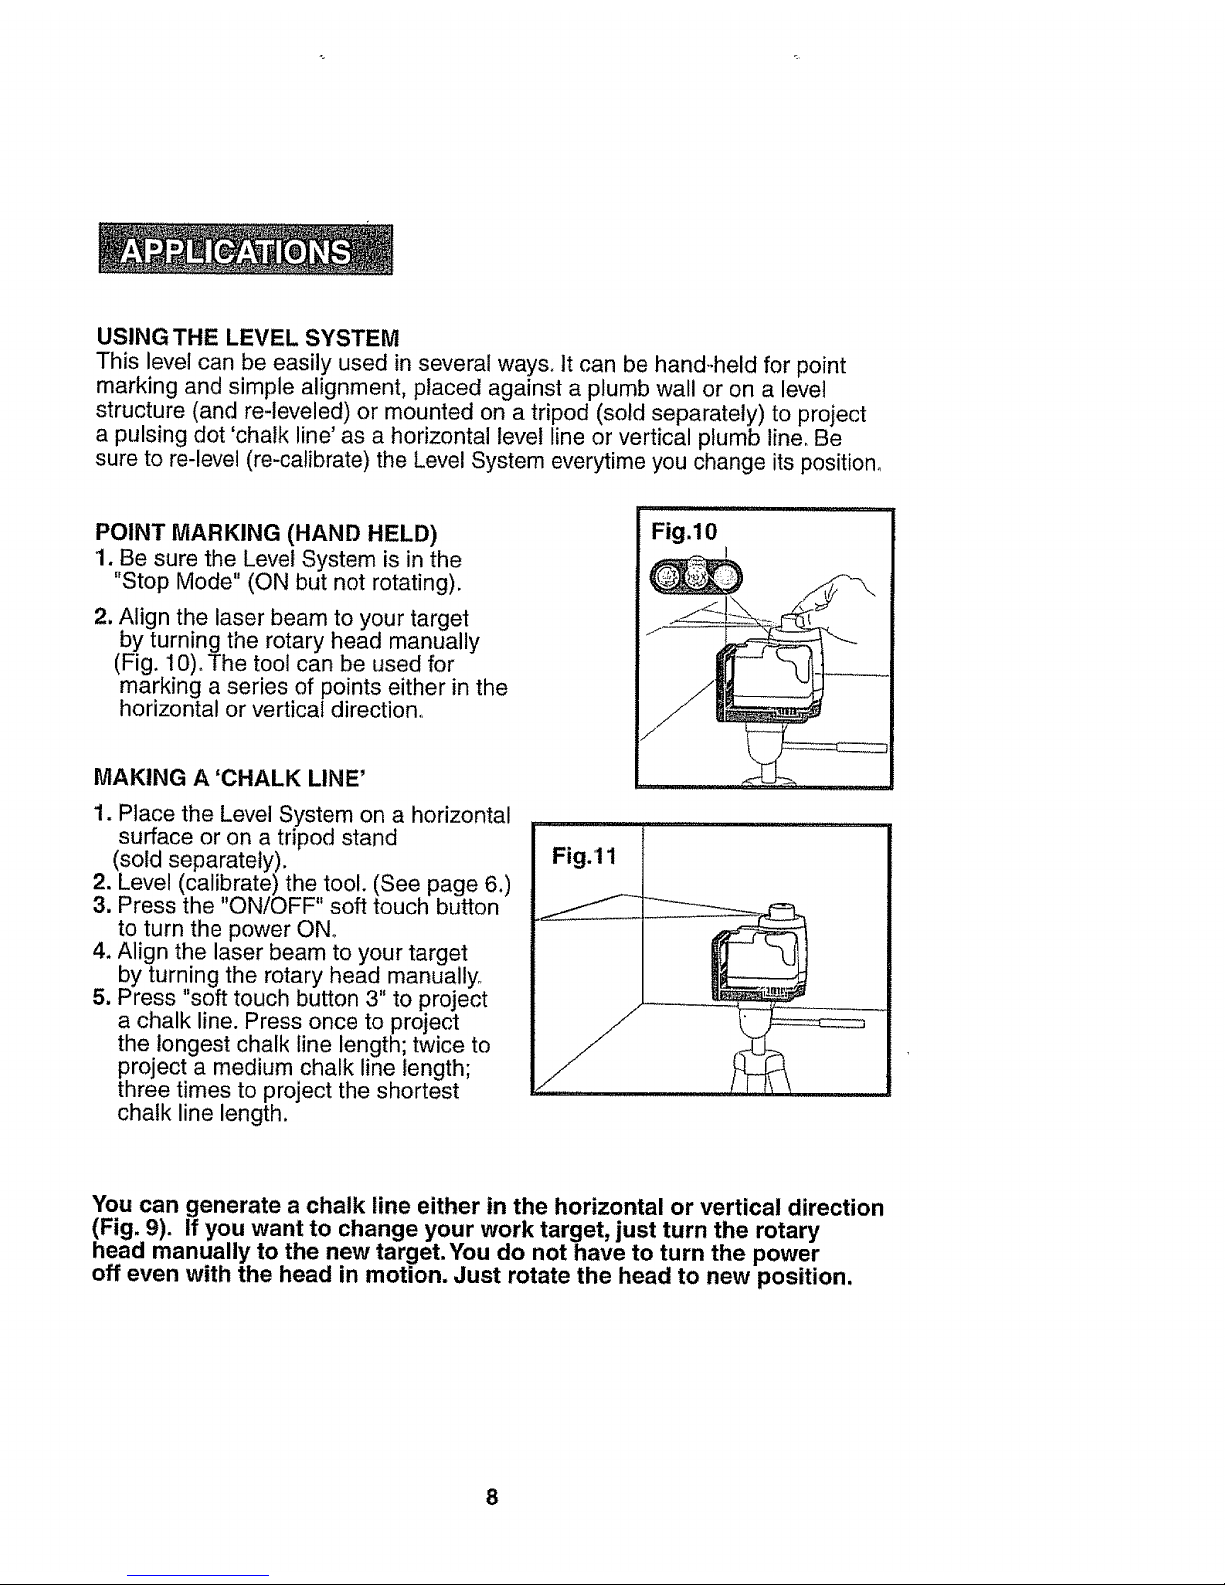
POINT MARKING (HAND HELD)
1, Be sure the Level System is in the
"Stop Mode" (ON but not rotating).
2, Align the laser beam to your target
by turning the rotary head manually
(Fig. 10), The tool can be used for
marking a series of points either in the
horizontal or vertical direction,
MAKING A 'CHALK LINE'
1. Place the Level System on a horizontal
surface or on a tripod stand
(sold separately),
2, Level (calibrate) the tool, (See page 6,)
3. Press the "ON/OFF" soft touch button
to turn the power ON_
4, Align the laser beam to your target
by turning the rotary head manually°
5. Press "soft touch button 3" to project
a chalk line. Press once to project
the longest chalk line length; twice to
project a medium chalk line length;
three times to project the shortest
chalk line length,
Fig.10
You can generate a chalk line either in the horizontal or vertical direction
(Fig. 9). if you want to change your work target, just turn the rotary
head manually to the new target.You do not have to turn the power
off even with the head in motion. Just rotate the head to new position.
8
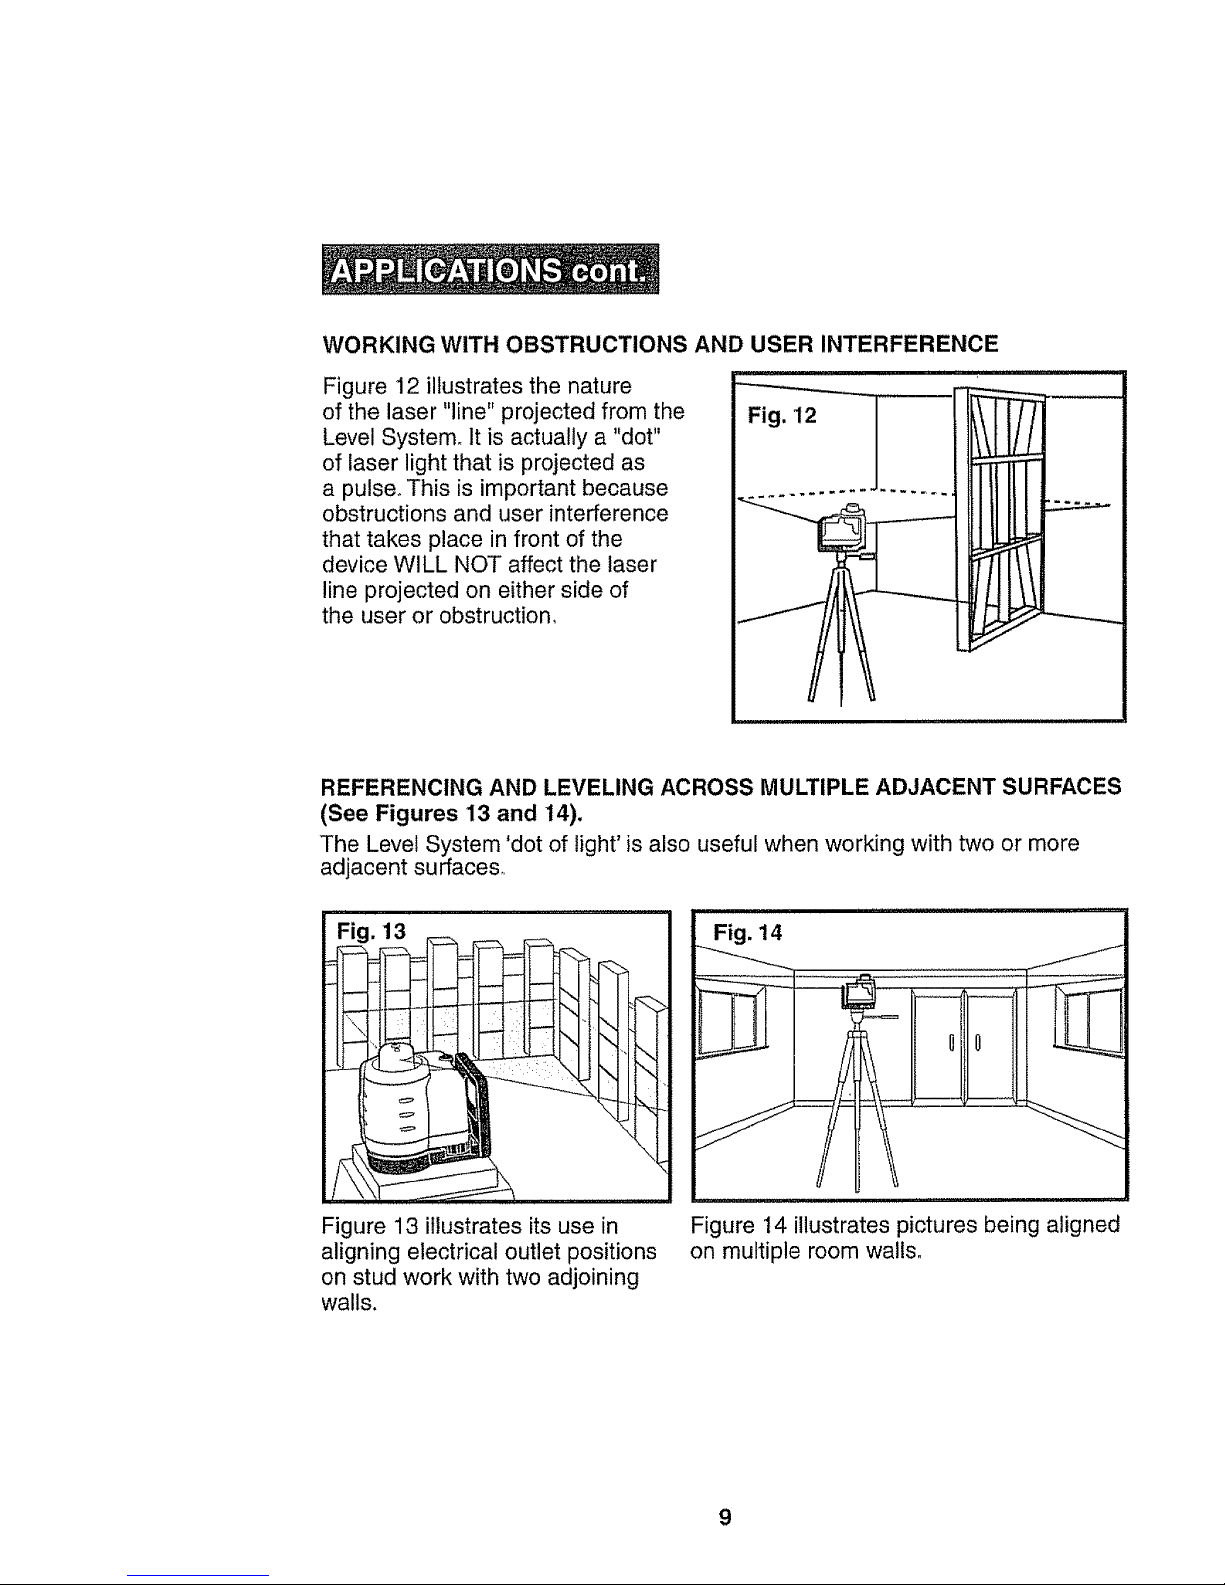
WORKING WITH OBSTRUCTIONS AND USER INTERFERENCE
Figure 12 illustrates the nature
of the laser "line" projected from the
Level System° It is actually a "dot"
of laser light that is projected as
a pulse° This is important because
obstructions and user interference
that takes place in front of the
device WILL NOT affect the laser
line projected on either side of
the user or obstruction,
REFERENCING AND LEVELING ACROSS MULTIPLE ADJACENT SURFACES
(See Figures 13 and 14),
The Level System 'dot of light' is also useful when working with two or more
adjacent surfaces,,
Fig. 13
\
Figure 13 illustrates its use in
aligning electrical outlet positions
on stud work with two adjoining
walls.
Figure 14 illustrates pictures being aligned
on multiple room walls.
9
 Loading...