

Craftsman 32017255 Owner’s Manual

0M-17255
)perator's Manual
.0 Amp
;c i"
Model No.
320.17255
, CAUTION Read, understand and follow
Safety Rules and Operating Instructions
this Manual before using this product.
ars, Roebuck and Co.,
ffman Estates, IL 60179 U.S.A.
;it our Craftsman website: www.craftsman.com
0M-17255
DOUBLE INSULATED
oWARRANTY
° SAFETY
o UNPACKING
° DESCRIPTION
° BLADE INSTALLATION
o OPERATION
° ADJUSTMENTS
° MAINTENANCE

Warranty .......................................................................... Page 2
Safety Symbols ............................................................. Page 3
Safety Instructions .......................................................... Pages 4 - 9
Glossary of Terms .......................................................... Pages 9 - 10
Unpacking .................................................................... Pages 10- 11
Description .................................................................. Pages 11 - 13
Blade Installation ........................................................... Page 13 - 15
Operation .................................................................... Pages 16 - 25
Maintenance ......................................................................... Pages 26
Troubleshooting ..................................................................... Page 27
Accessories .......................................................................... Page 27
Repair Parts .......................................................................... Pages 28 - 31
Sears Repair Parts Phone Numbers ..................................... Back Cover
ONE YEAR FULL WARRANTY ON CRAFTSMAN ® PRODUCT
If this Craftsman product fails due to a defect in material or workmanship
within one year from the date of purchase, RETURN IT TO THE NEAREST
SEARS STORE OR PARTS AND REPAIR CENTER OR OTHER
CRAFTSMAN OUTLET IN THE UNITED STATES FOR FREE
REPLACEMENT.
This warranty does not include expendable parts such as lamps, batteries,
bits or blades.
If this Craftsman product is used for commercial or rental purposes, this
warranty applies for only 90 days from the date of purchase.
This warranty gives you specific legal rights, and you may also have other
rights, which vary from state to state.
Sears, Roebuck and Co., Hoffman Estates, IL 60179
SAVE THESE INSTRUCTIONS!
READ ALL INSTRUCTIONS!
2
The purpose of safety symbols is to attract your attention to possible dangers.
The safety symbols, and the explanations with them, deserve your careful
attention and understanding. The symbol warnings DO NOT by themselves
eliminate any danger. The instructions and warnings they give are no substitutes
for proper accident prevention measures.
Z_ WARNING: BE SURE to read and understand all safety instructions in this
manual, including all safety alert symbols such as "DANGER", "WARNING" and
"CAUTION", BEFORE using this saw. Failure to follow all instructions listed below
may result in electric shock, fire and/or serious personal injury.
SYMBOL MEANING
SAFETY ALERT SYMBOL: indicates DANGER, WARNING, OR
CAUTION. May be used in conjunction with other symbols or pictographs.
DANGER: Failure to obey this safety warning WILL result
in death or serious injury to yourself or to others. Always
follow the safety precautions to reduce the risk of fire,
electric shock and personal injury.
I Z_WARNING I
I z_CAUTION I
DAMAGE PREVENTION AND INFORMATION MESSAGES
These inform user of important information and/or instructions that could lead to equipment
or other property damage if not followed. Each message is preceded by the word
"NOTE:" as in the example below:
NOTE: Equipment and/or property damage may result if these instructions are
not followed.
WEAR YOUR
Failure to obey this safety warning CAN result in death or
serious injury to yourself or to others. Always follow the
safety precautions to reduce the risk of fire, electric shock
and personal injury.
Failure to obey this safety warning MAY result in personal
injury to yourself or others or property damage. Always
follow the safety precautions to reduce the risk of fire,
electric shock and personal injury.
z_WARNING: The operation of any sabre saw can result
in foreign objects being thrown into your eyes, which can
result in severe eye damage. Before beginning power tool
operation, ALWAYS wear safety goggles or safety glasses
with side shield and a full-face shield when needed.
We recommend a Wide Vision Safety Mask for use over
eyeglasses or standard safety glasses with side shield,
available at Sears Stores or other Craftsman Outlets.
3

/ WARNING" BE SURE to read and understand all instructions in this
manual before using this sabre saw. Failure to follow all instructions may
result in hazardous radiation exposure, electric shock, fire and/or serious
personal injury.
WORK AREA SAFETY
1. Keep your work area clean and well lit. Cluttered workbenches and dark areas
invite accidents.
2. DO NOT operate power tools in explosive atmospheres, such as in the presence
of flammable liquids, gases, or dust. Power tools create sparks which may ignite
the dust or fumes.
3. Keep bystanders, children and visitors away while operating a power tool.
Distractions can cause you to lose control.
4. Make your workshop childproof with padlocks and master switches. Lock tools away
when not in use.
5. MAKE SURE the work area has ample lighting so you can see the work and that
there are no obstructions that will interfere with safe operation BEFORE using your saw.
PERSONAL SAFETY
1. KNOW your power tool. Read the operator's manual carefully. Learn the saw's
applications and limitations, as well as the specific potential hazards related to this
tool.
2. STAY ALERT, watch what you are doing and use common sense when operating
a power tool.
3. DO NOT use tool while tired or under the influence of drugs, alcohol or medication.
A moment of inattention while operating power tools may result in serious
personal injury.
4. DRESS properly. DO NOT wear loose clothing or jewelry. Pull back long hair.
Keep your hair, clothing, and gloves away from moving parts. Loose clothing, or long
hair can be caught in moving parts. Air vents often cover moving parts and should
also be avoided.
5. AVOID accidental starting. Be sure switch is in "OFF" position before plugging in.
DO NOT carry tools with your finger on the switch. Carrying tools with your finger
on the switch or plugging in tools that have the switch in the "ON" position invites
accidents.
6. REMOVE adjusting keys or blade wrenches before turning the tool "ON". A wrench
that is left attached to a rotating part of the tool may result in personal injury.
7. Do not overreach. Keep proper footing and balance at all times. Proper footing
and balance enables better control of the tool in unexpected situations.
8. ALWAYS SECURE YOUR WORK. Use clamps or a vise to hold work when practical.
It is safer than using your hand and frees both hands to operate tool.
9. USE SAFETY EQUIPMENT. Always wear eye protection. Dust mask, non-skid safety
shoes, hard hat, or hearing protection must be used for appropriate conditions.
1 0. DO NOT USE ON A LADDER or unstable support. Stable footing on a solid surface
enables better control of the tool in unexpected situations.
4

TOOL USE AND CARE SAFETY
z WARNING- BE SURE to read and understand all instructions before
operating this saw. Failure to follow all instructions listed below may result in
electric shock, fire and/or serious personal injury.
1. ALWAYS use clamps or other practical ways to secure and support the workpiece
to a stable platform. Holding the work by hand or against your body is unstable and may
lead to loss of control.
2. DO NOT force the tool. Use the correct tool and blade for your application.
The correct tool and blade will do the job better and safer at the rate for which
it is designed.
3. DO NOT use the tool if switch does not turn it "On" or "Off". Any tool that cannot be
controlled with the switch is dangerous and must be repaired.
4. DISCONNECT the plug from the power source before making any adjustments,
changing accessories or storing the tool. Such preventive safety measures reduce
the risk of starting the tool accidentally.
5. NEVER leave the tool running. ALWAYS turn it off. DO NOT leave the tool until it
comes to a complete stop.
6. STORE idle tools out of the reach of children and other untrained persons. Tools
are dangerous in the hands of untrained users.
7. MAINTAIN tools with care. Keep cutting tools sharp and clean. Properly maintained
tools with sharp cutting edges are less likely to bind and are easier to control.
8. CHECK for misalignment or binding of moving parts, breakage of parts, and any
other condition that may affect the tool's operation. If damaged, have the tool serviced
before using. Many accidents are caused by poorly maintained tools.
9. USE ONLY accessories that are recommended for this tool. Accessories that may be
suitable for one tool may become hazardous when used on another tool.
ELECTRICAL SAFETY
z WARNING: Do not permit fingers to touch the terminals of plug when
installing or removing the plug from the outlet.
1. Double insulated tools are equipped with a polarized plug (one blade is wider than
the other). This plug will fit in a polarized outlet only one way. If the plug does not fit
fully in the outlet, reverse the plug. If it still does not fit, contact a qualified electrician to
install a polarized outlet. Do not change the plug in any way.
2. Double insulation [] eliminates the need for the three-wire grounded power cord
and grounded power supply system. Applicable only to Class II (double-insulated) tools.
This sabre saw is a double insulated tool.
/ WARNING: Double insulation DOES NOT take the place of normal safety
precautions when operating this tool.
5
• " O •
ELECTRICAL SAFETY cont.
3. BEFORE plugging in the tool, BE SURE that the outlet voltage supplied is within
the voltage marked on the tool's data plate. DO NOT use "AC only" rated tools
with a DO power supply.
4. AVOID body contact with grounded surfaces, such as pipes, radiators, ranges
and refrigerators. There is an increased risk of electric shock if your body
is grounded.
5. DO NOT expose power tools to rain or wet conditions or use power tools
in wet or damp locations. Water entering a power tool will increase the risk
of electric shock.
6. INSPECT tool cords for damage. Have damaged tool cords repaired at a Sears
Service Center. BE SURE to stay constantly aware of the cord location and keep
it well away from the moving blade.
7. DO NOT abuse the cord. NEVER use the cord to carry the tool by or to pull
the plug from the outlet. Keep cord away from heat, oil, sharp edges or moving
parts. Replace damaged cords immediately. Damaged cords increase the risk of
electric shock.
EXTENSION CORDS
Use a proper extension cord. ONLY use cords listed by Underwriters
Laboratories (UL). Other extension cords can cause a drop in line voltage, resulting
in a loss of power and overheating of tool. For this tool an AWG (American Wire
Gauge) size of at least 14-gauge is recommended for an extension cord of 25-ft. or
less in length. Use 12-gauge for an extension cord of 50-ft. Extension cords 100-ft.
or longer are not recommended. Remember, a smaller wire gauge size has
greater capacity than a larger number (14-gauge wire has more capacity than
16-gauge wire; 12-gauge wire has more capacity than 14-gauge). When in doubt
use the smaller number. When operating a power tool outdoors, use an outdoor
extension cord marked "W-A" or "W". These cords are rated for outdoor use and
reduce the risk of electric shock.
Z_ CAUTION: Keep the extension cord clear of the working area. Position
the cord so that it will not get caught on lumber, tools or other obstructions
while you are working with a power tool.
z WARNING: Check extension cords before each use. If damaged replace
immediately. Never use tool with a damaged cord since touching the damaged
area could cause electrical shock, resulting in serious injury.
6
SAFETY SYMBOLS FOR YOUR TOOL
The label on your tool may include the following symbols.
V ....................................................................... Volts
A ...................................................................... Amps
Hz .................................................................... Hertz
W ..................................................................... Watts
min .................................................................. Minutes
,-,,_,.................................................................... Alternating current
................................................................... Direct current
no .................................................................... No-load speed
[] ..................................................................... Class II construction, Double Insulated
.../min .............................................................. Revolutions or Strokes per minute
Z_- .................................................................... Indicates danger, warning or caution.
It means attention! Your safety is involved.
SERVICE SAFETY
1. If any part of this saw is missing or should break, bend, or fail in any way;
or should any electrical component fail to perform properly: SHUT OFF
the power switch and remove the saw plug from the power source and have
the missing, damaged or failed parts replaced BEFORE resuming operation.
2. Tool service must be performed only at a Sears Parts and Repair Center.
Service or maintenance performed by unqualified personnel could result in
a risk of injury.
3. When servicing a tool, use only identical replacement parts. Follow
instructions in the maintenance section of this manual. Use of unauthorized
parts or failure to follow maintenance instructions may create a risk of electric
shock or injury.
SAFETY RULES FOR SABRE SAWS
Keep hands away from cutting area and blade. Keep your second
hand on the auxiliary handle or motor housing. If both hands are holding the saw, the
blade cannot cut them.
z_ CAUTION: Blades coast after saw is switched off
i. KEEP your body positioned to either side of the saw blade and not in direct line
with the saw blade.
_>.DO NOT reach under the workpiece. The blade extends under the workpiece when
saw is cutting.
3. DO NOT touch the blade or the workpiece immediately after operation; they may
be extremely hot and could burn your skin.
L DO NOT cut an oversized workpiece.
_. CHECK for the proper clearance under the workpiece before cutting so that the
blade will not strike the workbench or material under the workpiece.
;. MAKE SURE the blade is not contacting the workpiece before the switch
is turned on.
7
SAFETY RULES FOR SABRE SAWS cont.
7. HOLD TOOL by insulated gripping surfaces (handles) when performing an
operation where the cutting tool may contact hidden wiring or its own cord.
Contact with a "live" wire will make the exposed metal parts of the tool "live" and
shock the operator.
8. SECURE MATERIAL before cutting. Never hold a workpiece in your hand
or across your legs. Small or thin material may flex or vibrate with the blade,
causing loss of control.
9. When ripping, ALWAYS USE a rip fence or straight edge guide. This improves
the accuracy of the cut and reduces the chance of the blade binding.
10. NEVER cut more than one piece at a time. DO NOT STACK more than one
workpiece on the worktable at a time.
11. AVOID awkward operations and hand positions where a sudden slip could
cause your hand to move into the blade.
12. NEVER reach into the cutting path of the blade.
13. BLADE GUIDE ROLLERS must support the blade when cutting. The rollers must
rest against the back edge of blade. THE ONLY cutting operation when rollers DO
NOT support the blade is the scrolling mode. WHEN SCROLLING the blade must
swivel as it is guided to follow scroll patterns. ALWAYS move the base back and
blade guide up and back away from blade in scrolling mode.
WARNING: Use of this tool can generate dust containing chemicals known
to cause cancer, birth defects or other reproductive harm. Some examples of these
chemicals are:
- Lead from lead-based paints.
- Crystalline silica from bricks and cement and other masonry products.
° Arsenic and chromium, from chemically treated lumber.
Your risk from these exposures varies, depending upon how often you do this
type of work. To reduce your exposure to these chemicals:
o Work in a well-ventilated area.
- Work with approved safety equipment, such as those dust masks that are specially
designed to filter out microscopic particles.
Avoid prolonged contact with dust from power sanding, sawing, grinding, drilling
and other construction activities. Wear protective clothing and wash exposed
areas with soap and water.
Allowing dust to get into your mouth, eyes, or lay on the skin may promote absorption
of harmful chemicals.
WARNING: Use of this tool can generate and/or disburse dust, which
may cause serious and permanent respiratory or other injury. Always use
NIOSH/OSHA approved respiratory protection appropriate for the dust
exposure. Direct particles away from face and body.
8

ADDITIONAL RULES FOR SAFE OPERATION
WARNING: BE SURE to read and understand all instructions. Failure
to follow all instructions listed below may result in electric shock, fire and/or
serious personal injury.
1. Know your power tool. Read operator's manual carefully. Learn the applications
and limitations, as well as the specific potential hazards related to this tool. Following
this rule will reduce the risk of electric shock, fire or serious injury.
2. ALWAYS wear safety glasses or eye shields when using this saw. Everyday
eyeglasses have only impact-resistant lenses; they are NOT safety glasses.
3. PROTECT your lungs. Wear a face mask or dust mask if the operation is dusty.
4. PROTECT your hearing. Wear appropriate personal hearing protection during use.
Under some conditions noise from this product may contribute to hearing loss.
5. ALL VISTORS AND BYSTANDERS MUST wear the same safety equipment that the
operator of the saw wears.
6. INSPECT the tool cords periodically and if damaged have them repaired at your
nearest Sears Service Center. BE AWARE of the cord location.
7. ALWAYS check the tool for damaged parts. Before further use of the tool, a guard
or other part that is damaged should be carefully checked to determine if it will operate
properly and perform its intended function. Check for misalignment or binding of moving
parts, breakage of parts, and any other condition that may affect the tool's operation.
A guard or other part that is damaged should be properly repaired or replaced at a
Sears Service Center.
8. INSPECT and remove all nails from lumber before sawing.
9. SAVE THESE INSTRUCTIONS. Refer to them frequently and use them to instruct
others who may use this tool. If someone borrows this tool, make sure they have
these instructions also.
Saw BladePath
The area over, under, behind or in front of the blade, as it applies to the workpiece.
That area which will be or has been cut by the blade.
Set
The distance that the saw blade tooth is bent (or set) outward from the face of the blade.
Strokes per Minute or Stroke Speed
The blade speed of a sabre saw, which can be varied, usually from 0 to 3000 strokes
per minute.
Cross cut
A cutting or shaping operation made against the grain of the work piece.
Bevel Cut
A cutting operation made with the blade at any angle between +45 ° to the base.
9

Ripping or Rip Cut
A cutting operation along the length of the workpiece.
Freehand Cut
Performing a cut without using a fence, miter gauge, fixture, work clamp, or other
proper device to keep the workpiece from twisting or moving during the cut.
Orbital Sawing
In addition to the up and down movement of a sabre saw's blade, there is orbital action
which thrusts the blade forward on the cutting stroke and greatly increases the cutting
speed over conventional sabre saws.
Scrolling
Allows the blade to swivel for intricate pattern cutting.
Through Sawing
Any cutting operation where the blade extends completely through the thickness
of the workpiece.
Kerf
The material removed by the blade in a through cut or the slot produced by the blade
in a non-through or partial cut.
Workpiece or Material
The item on which the cutting operation is being done. The surfaces of a workpiece
are commonly referred to as faces, ends and edges.
Gum
A sticky, sap-based residue from wood products.
Resin
A sticky, sap-based substance that has hardened.
WARNING: Your saw should NEVER be connected to the power source
when you are assembling parts, making adjustments, installing or removing
blades, cleaning or when it is not in use. Disconnecting the saw will prevent
accidental starting, which could cause serious personal injury.
1. The Edge Guide is force-fitted into the top of the storage/carrying case.
2. The Bevel Assist handle with 3 Blades stored inside is also force-fitted into the top
of the case.
3. The Vac Adapter is attached to the saw.
4. Carefully lift the saw out of the case and place on a stable flat surface.
• 5. Inspect the saw carefully to make sure that no breakage or damage has occurred
during shipping. If any of the items mentioned are missing (refer to illustration
on page 11) return the saw to your nearest Sears store or Craftsman outlet to
have the saw replaced.
10
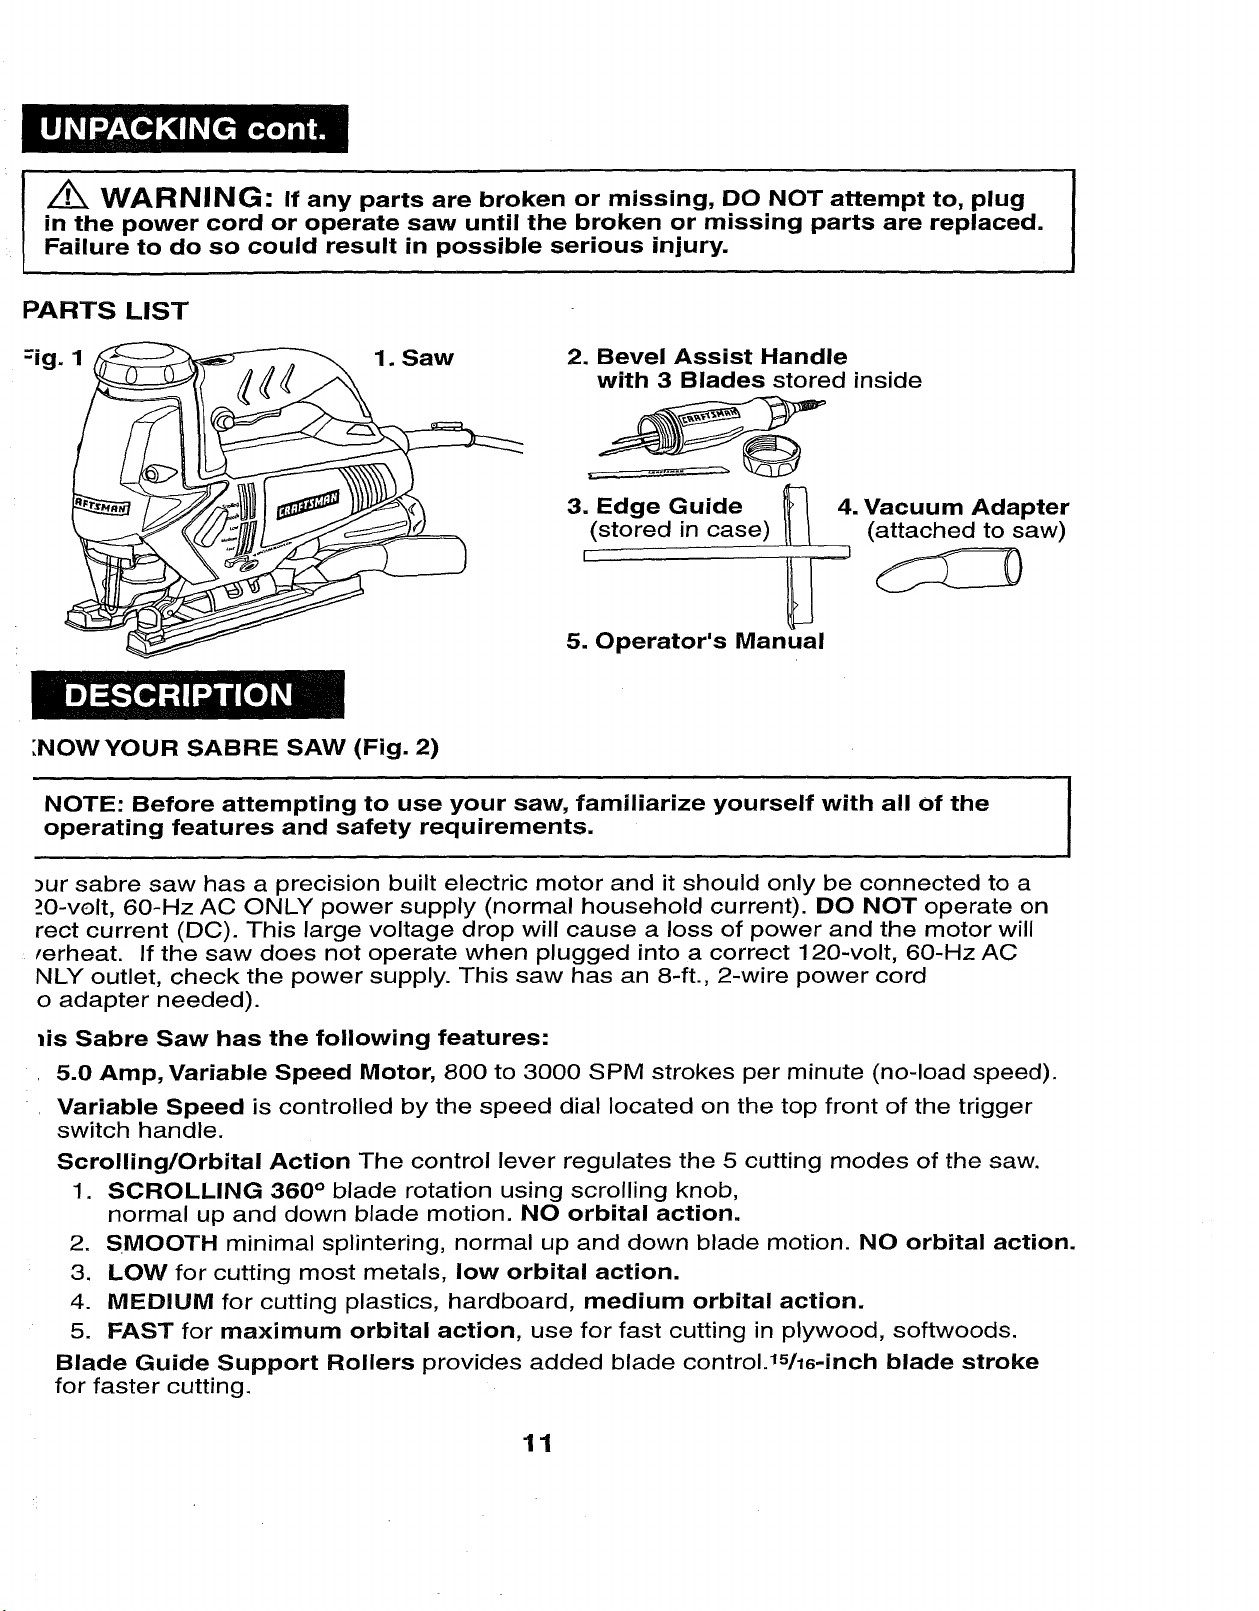
WARNING: If any parts are broken or missing, DO NOT attempt to, plug
in the power cord or operate saw until the broken or missing parts are replaced.
Failure to do so could result in possible serious injury.
PARTS LIST
=ig. 1
2. Bevel Assist Handle
with 3 Blades stored inside
3. Edge Guide l_l
(stored in case)
r- II I = i
5. Operator's Manual
_NOWYOUR SABRE SAW (Fig. 2)
NOTE: Before attempting to use your saw, familiarize yourself with all of the
operating features and safety requirements.
)ur sabre saw has a precision built electric motor and it should only be connected to a
__0-velt, 60-Hz AC ONLY power supply (normal household current). DO NOT operate on
rect current (DC). This large voltage drop will cause a loss of power and the motor will
rerheat. If the saw does not operate when plugged into a correct 120-volt, 60-Hz AC
NLY outlet, check the power supply. This saw has an 8-ft., 2-wire power cord
o adapter needed).
4. Vacuum Adapter
(attached to saw)
1is Sabre Saw has the following features:
5.0 Amp, Variable Speed Motor, 800 to 3000 SPM strokes per minute (no-load speed).
Variable Speed is controlled by the speed dial located on the top front of the trigger
switch handle.
Scrolling/Orbital Action The control lever regulates the 5 cutting modes of the saw.
1. SCROLLING 360 ° blade rotation using scrolling knob,
normal up and down blade motion. NO orbital action.
2. SMOOTH minimal splintering, normal up and down blade motion. NO orbital action.
3. LOW for cutting most metals, low orbital action.
4. MEDIUM for cutting plastics, hardboard, medium orbital action.
5. FAST for maximum orbital action, use for fast cutting in plywood, softwoods.
Blade Guide Support Rollers provides added blade control.15/16-inch blade stroke
for faster cutting.
11

This Sabre Saw has the following features cont.:
5. Durable Base glides smoothly over workpiece. Bevel scale for easy adjustments.
6. Bevel Cutting Capacity 0 ° to 45 ° left and right.
7. Bevel Assist Handle use for maximum control when bevel cutting. Attaches on
either side of the saw. Stores under the saw or in case. Conveniently holds extra
blades, 2 wood and 1 metal cutting blade included. Also has built-in hex key tip to
adjust base for scroll cutting and bevel cutting.
8. Quick blade changes with no tools.
9. LED Worklight illuminates cutting area.
10. "Live Tool Indicator" LED light is green when saw is plugged into power source.
11. Soft-grip ergonomically designed handle for maximum control, balance.
12. Extended length trigger switch with power lock-on button.
13. Clear Front Chip Shield/Blade Guard
14. 2-way sawdust removal: 1. Blower position blows debris away from work cutting line.
2. Vacuum position for hook-up to wet/dry vac, sold separately.
15. Includes edge guide, ideal for fast, straight repetitive cutting.
16. Permanently lubricated 100% ball bearings for smooth operation, long life.
17. Durable machined gearing for longer lasting power transmission.
18. Durable cast aluminum and high-impact resistant housing and handle protect
tool from damage.
19. Includes impact resistant case for easy carrying and storage.
Fig. 2
Scrolling/
Orbit
Control
LED
Workli
Tool-less Change
Blade Holder
Clear Chip
Shield/Blade
Guard
Blade
Blade
Rollers
Locking Knob
for Edge Guide
Scrolling Control Knob
Variable Speed Dial
Power Lock
On Button
12
On/Off
er Switch
"Live Tool Indicator"
Light 8-ft.
,r Cord
Bevel Assist Handle
blades
/ Blower Switch
attaches to either
side of saw
Ejection Chute
Plate
Bevel Assist Handle Mounting Hole
Edge Guide Mounting Slot
Rating
No Load Speed
Input
Bevel Cutting Angle Range
Blade Stroke
Cutting Depth in Wood
Cutting Depth in Steel
5.0 Amps
800-3000 SPM (strokes per minute)
120-volts, 60-Hz AC
0 ° to 45 ° left and right
15/16-in.
3 3/8-in. (85ram)
1/4-in. (6mm)
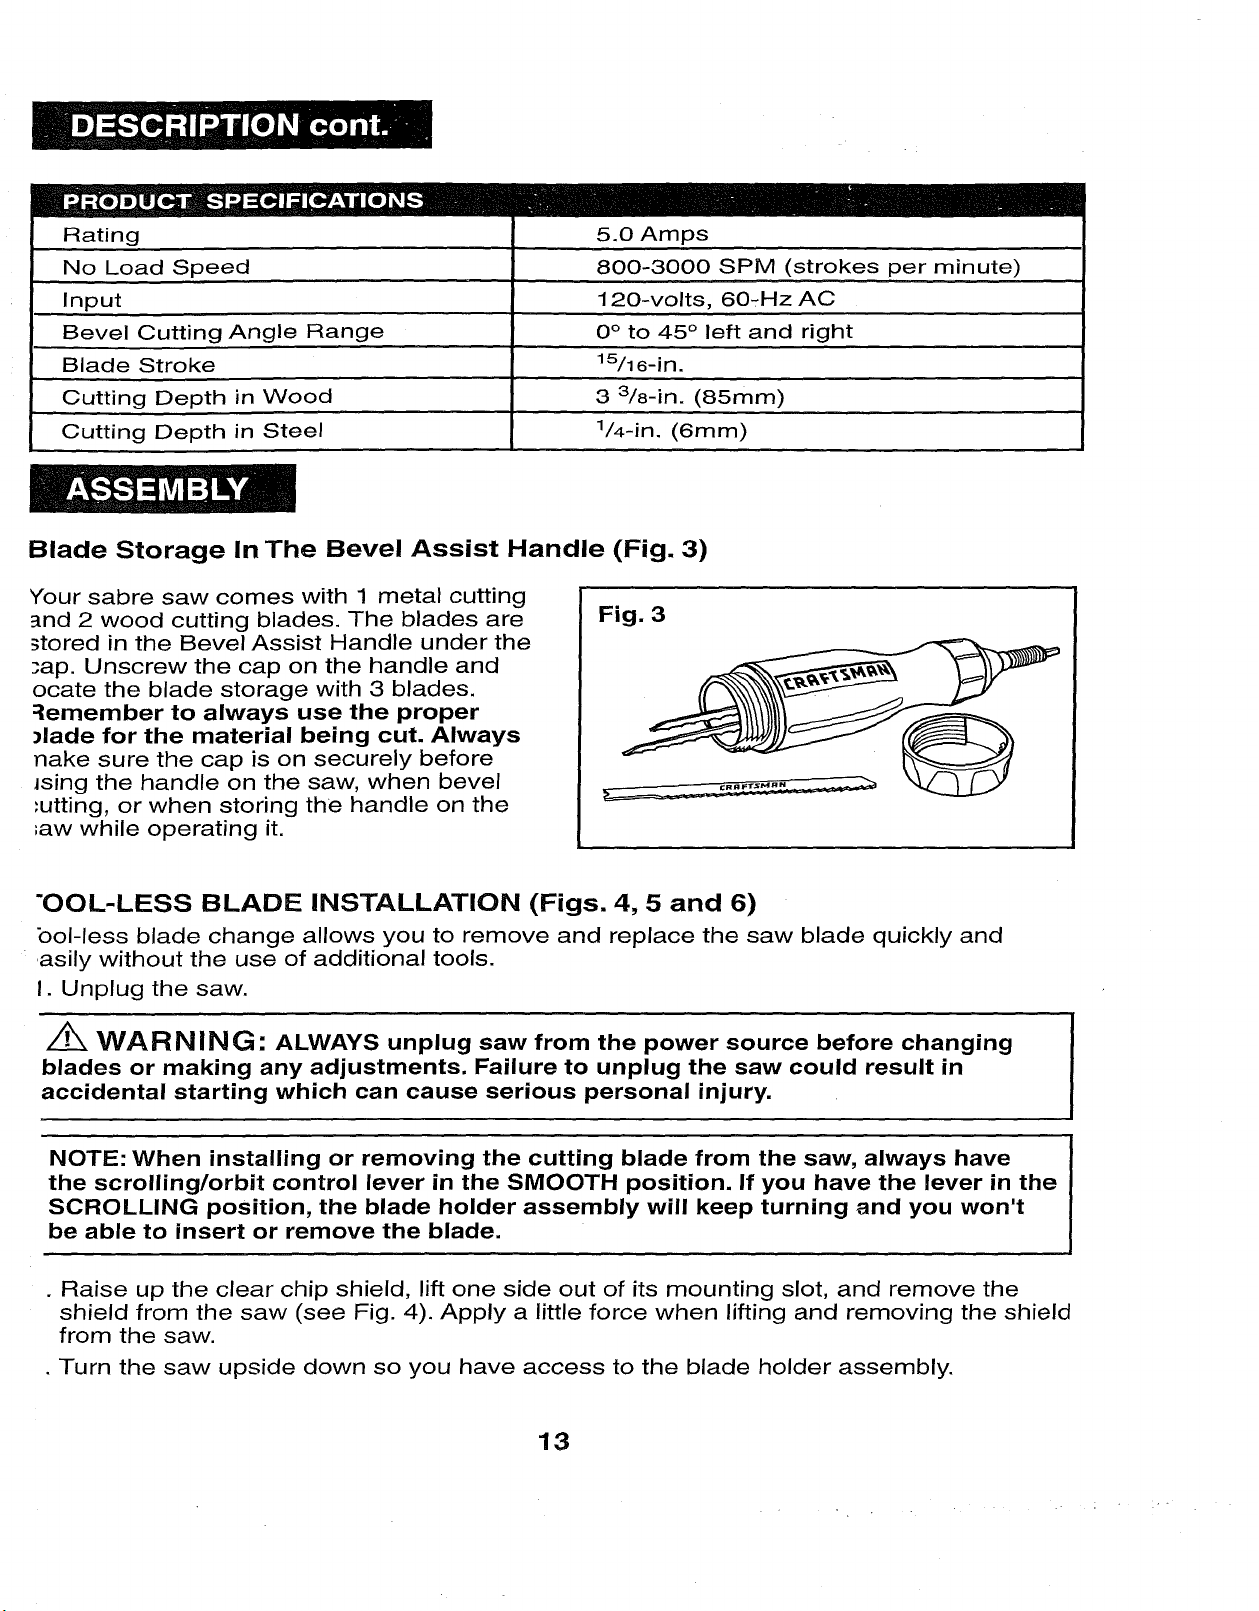
Blade Storage In The Bevel Assist Handle (Fig. 3)
Your sabre saw comes with 1 metal cutting
and 2 wood cutting blades. The blades are
stored in the Bevel Assist Handle under the
_ap. Unscrew the cap on the handle and
ocate the blade storage with 3 blades.
:_emember to always use the proper
dade for the material being cut. Always
hake sure the cap is on securely before
Jsing the handle on the saw, when bevel
'utting, or when storing the handle on the
;aw while operating it.
Fig. 3
"OOL-LESS BLADE INSTALLATION (Figs. 4, 5 and 6)
bol-less blade change allows you to remove and replace the saw blade quickly and
asily without the use of additional tools.
I. Unplug the saw.
WARNING: ALWAYS unplug saw from the power source before changing
blades or making any adjustments. Failure to unplug the saw could result in
accidental starting which can cause serious personal injury.
NOTE: When installing or removing the cutting blade from the saw, always have
the scrolling/orbit control lever in the SMOOTH position. If you have the lever in the
SCROLLING position, the blade holder assembly will keep turning and you won't
be able to insert or remove the blade.
• Raise up the clear chip shield, lift one side out of its mounting slot, and remove the
shield from the saw (see Fig. 4). Apply a little force when lifting and removing the shield
from the saw.
• Turn the saw upside down so you have access to the blade holder assembly.
13
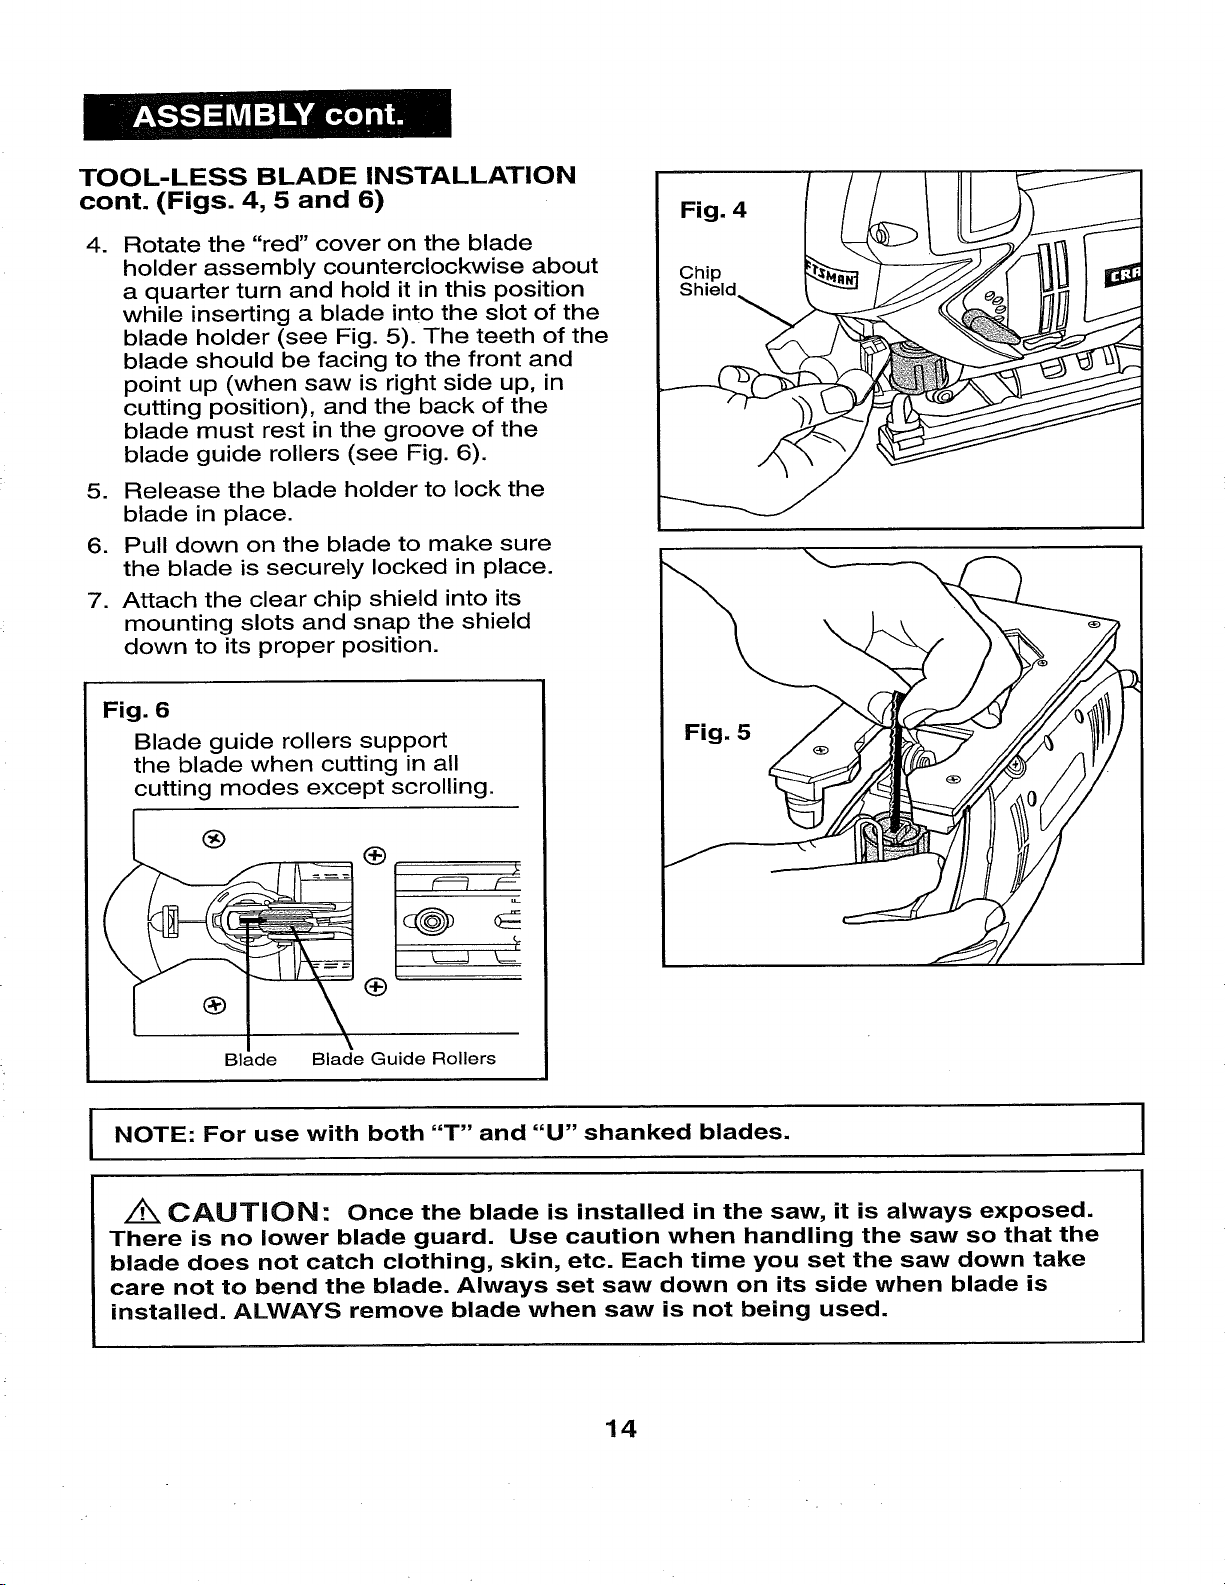
TOOL-LESS BLADE INSTALLATION
cont. (Figs. 4, 5 and 6)
Rotate the "red" cover on the blade
.
holder assembly counterclockwise about
a quarter turn and hold it in this position
while inserting a blade into the slot of the
blade holder (see Fig. 5). The teeth of the
blade should be facing to the front and
point up (when saw is right side up, in
cutting position), and the back of the
blade must rest in the groove of the
blade guide rollers (see Fig. 6).
5. Release the blade holder to lock the
blade in place.
6. Pull down on the blade to make sure
the blade is securely locked in place.
7. Attach the clear chip shield into its
mounting slots and snap the shield
down to its proper position.
Fig. 6
Blade guide rollers support
the blade when cutting in all
cutting modes except scrolling.
Fig. 5
®
®
Blade Blade Guide Rollers
NOTE: For use with both "T" and "U" shanked blades.
/iX, CAUTION" Once the blade is installed in the saw, it is always exposed.
There is no lower blade guard. Use caution when handling the saw so that the
blade does not catch clothing, skin, etc. Each time you set the saw down take
care not to bend the blade. Always set saw down on its side when blade is
installed. ALWAYS remove blade when saw is not being used.
14
=1 I"-)ii'i,..z.] ,I
REMOVING THE BLADE
1. Unplug the saw.
Z_ WARNING" ALWAYS unplug saw from the power source before changing
blades or making any adjustments. Failure to unplug the saw could result in
accidental starting which can cause serious personal injury.
2. Follow steps 1 through 4 on the tool-less blade installation (see pages 13 and 14).
3. Oarefully remove the blade (or change the blade).
4. Reattach the clear chip shield and snap it down to its proper position.
I NOTE: When storing your saw, ALWAYS remove the cutting blade.
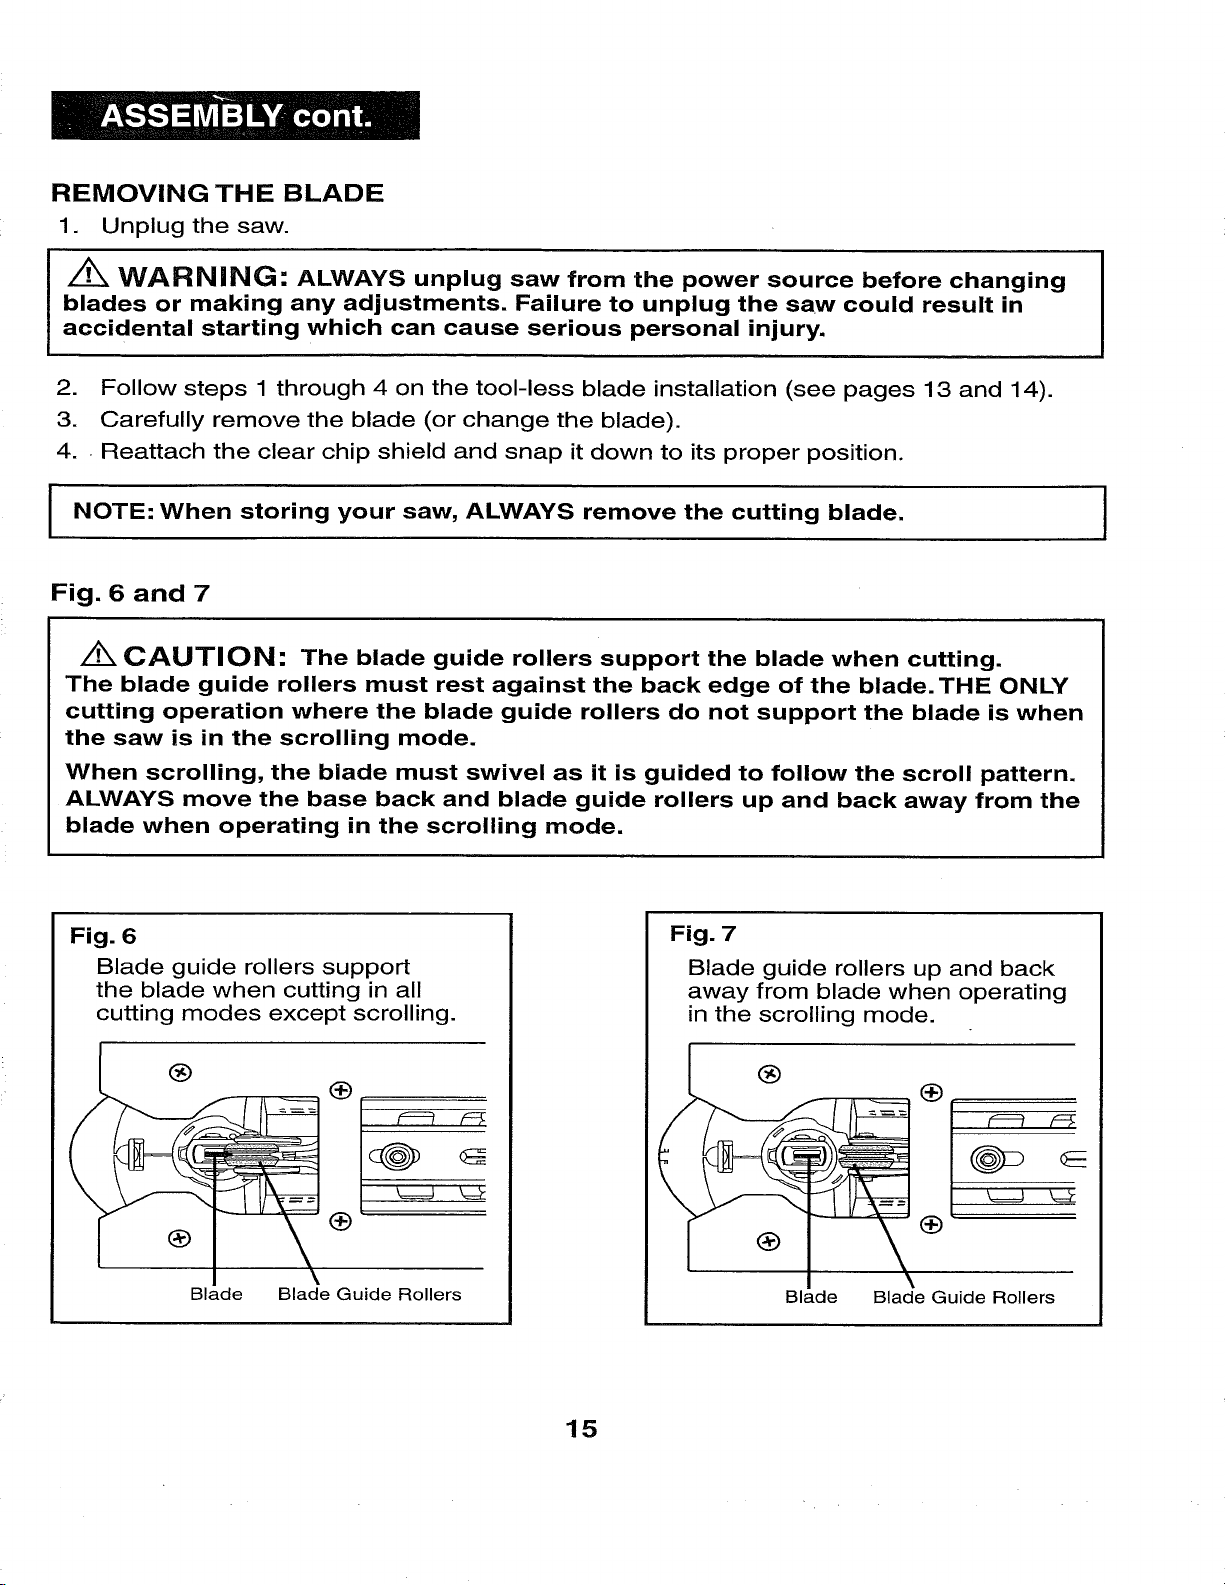
Fig. 6 and 7
/_ CAUTION: The blade guide rollers support the blade when cutting.
The blade guide rollers must rest against the back edge of the blade. THE ONLY
cutting operation where the blade guide rollers do not support the blade is when
the saw is in the scrolling mode.
When scrolling, the blade must swivel as it is guided to follow the scroll pattern.
ALWAYS move the base back and blade guide rollers up and back away from the
blade when operating in the scrolling mode.
Fig. 6
Blade guide rollers support
the blade when cutting in all
cutting modes except scrolling.
®
Fig. 7
Blade guide rollers up and back
away from blade when operating
in the scrolling mode.
I
®
Blade Blade Guide Rollers
t==ff
k====J k=Z
Blade Blade Guide Rollers
15
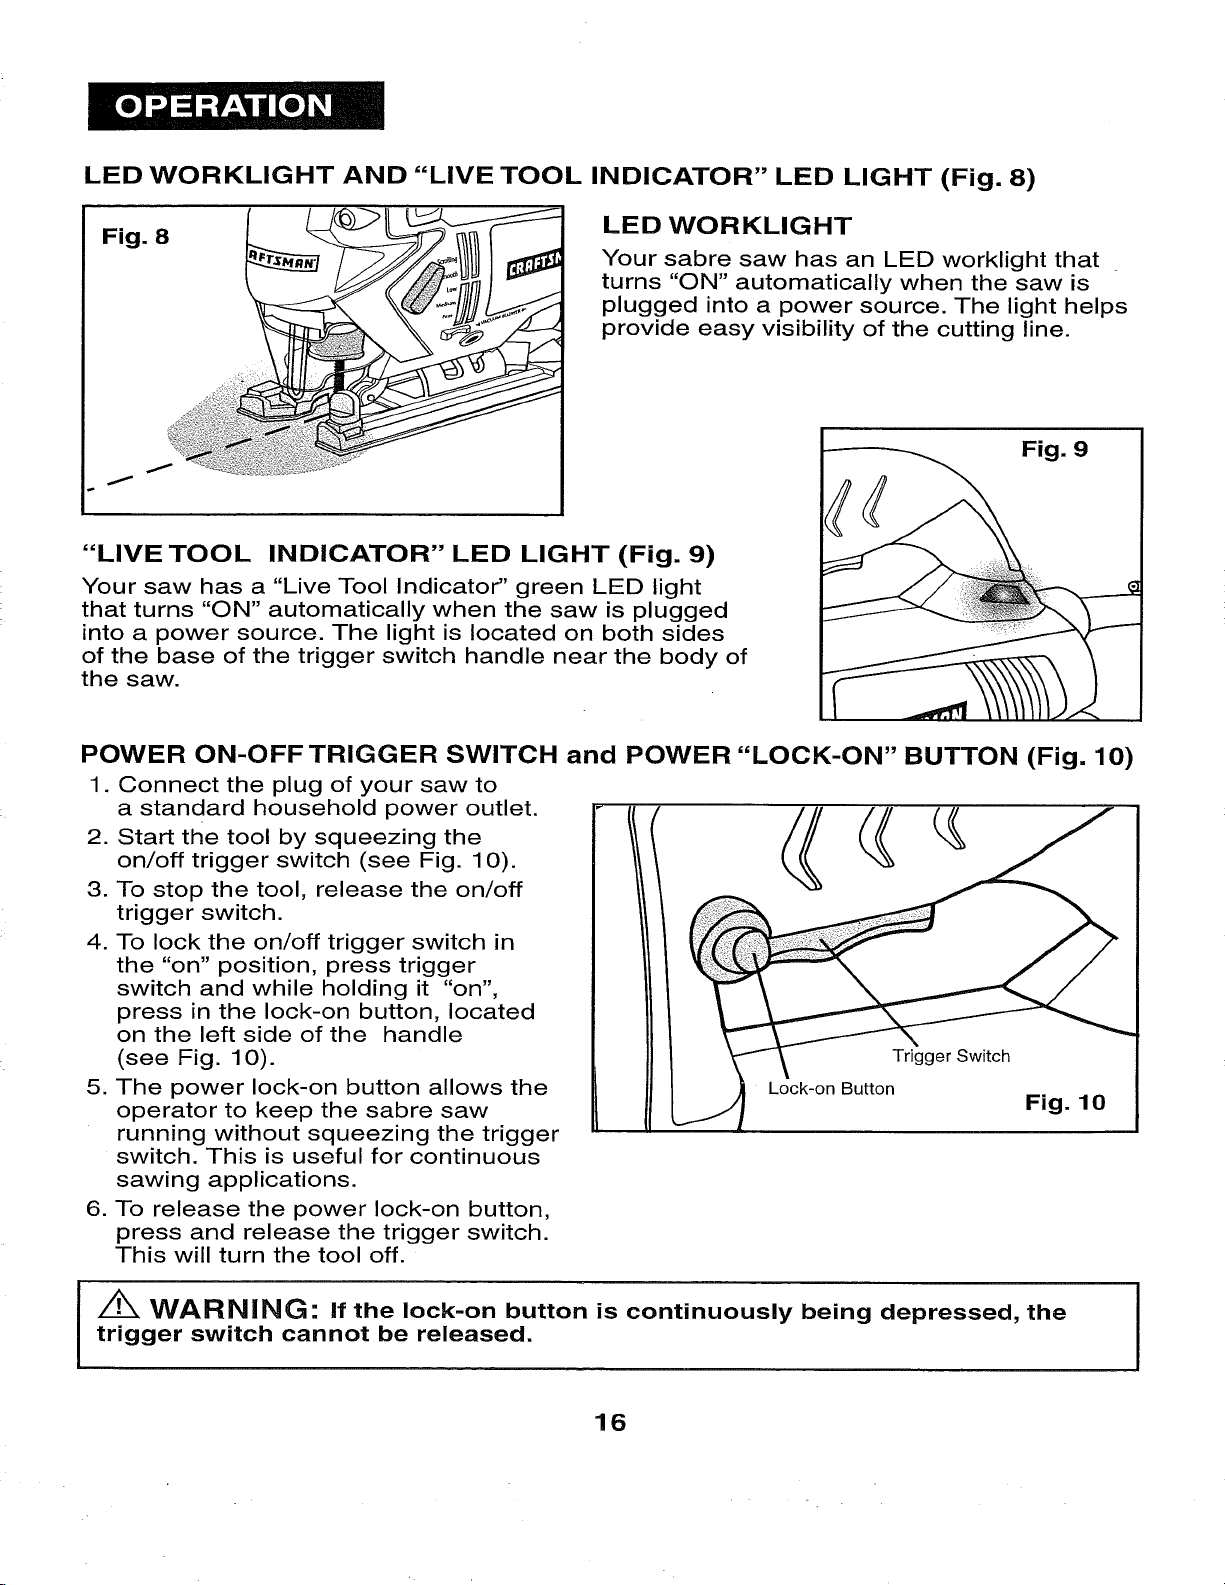
LED WORKLIGHT AND "LIVE TOOL INDICATOR" LED LIGHT (Fig. 8)
LED WORKLIGHT
Your sabre saw has an LED worklight that
turns "ON" automatically when the saw is
plugged into a power source. The light helps
provide easy visibility of the cutting line.
Fig. 9
I
"LIVE TOOL INDICATOR" LED LIGHT (Fig. 9)
Your saw has a "Live Tool Indicator" green LED light
that turns "ON" automatically when the saw is plugged
into a power source. The light is located on both sides
of the base of the trigger switch handle near the body of
the saw.
POWER ON-OFF TRIGGER SWITCH and POWER "LOCK-ON" BUTTON (Fig. 10)
1. Connect the plug of your saw to
a standard household power outlet.
2. Start the tool by squeezing the
on/off trigger switch (see Fig. 10).
3. To stop the tool, release the on/off
trigger switch.
4. To lock the on/off trigger switch in
the "on" position, press trigger
switch and while holding it "on",
press in the lock-on button, located
on the left side of the handle
(see Fig. 10).
5. The power lock-on button allows the
operator to keep the sabre saw
running without squeezing the trigger
switch. This is useful for continuous
sawing applications.
6. To release the power lock-on button,
press and release the trigger switch.
This will turn the tool off.
Lock-on Button
Trigger Switch
Fig. 10
/_ WARNING" If the lock-on button is continuously being depressed, the
trigger switch cannot be released.
16
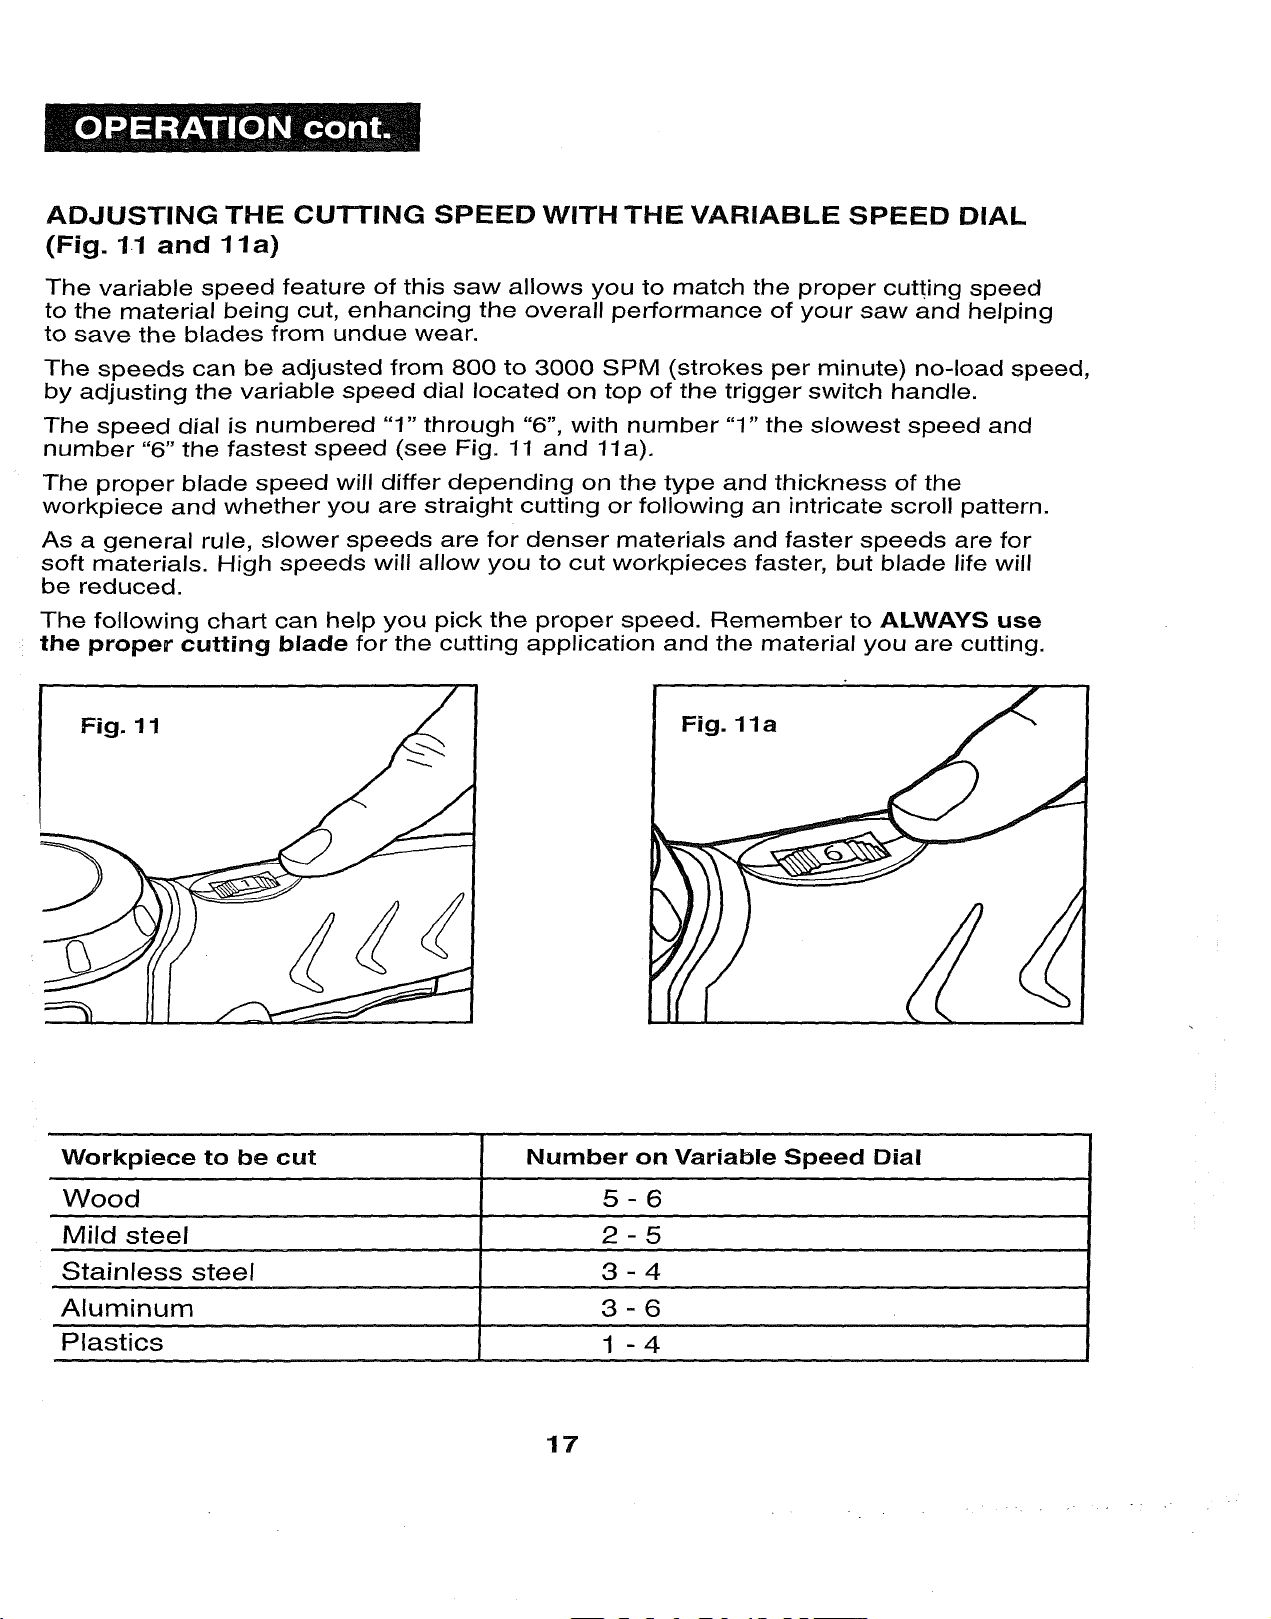
ADJUSTING THE CUTTING SPEED WITH THE VARIABLE SPEED DIAL
(Fig. 1.1 and 1 la)
The variable speed feature of this saw allows you to match the proper cutting speed
to the material being cut, enhancing the overall performance of your saw and helping
to save the blades from undue wear.
The speeds can be adjusted from 800 to 3000 SPM (strokes per minute) no-load speed,
by adjusting the variable speed dial located on top of the trigger switch handle.
The speed dial is numbered "1" through "6", with number "1" the slowest speed and
number "6" the fastest speed (see Fig. 11 and 11 a).
The proper blade speed will differ depending on the type and thickness of the
workpiece and whether you are straight cutting or following an intricate scroll pattern.
As a general rule, slower speeds are for denser materials and faster speeds are for
soft materials. High speeds will allow you to cut workpieces faster, but blade life will
be reduced.
The following chart can help you pick the proper speed. Remember to ALWAYS use
the proper cutting blade for the cutting application and the material you are cutting.
Fig. 1 1
Fig. 11a
Workpiece to be cut Number on Variable Speed Dial
Wood 5 - 6
Mild steel 2 - 5
Stainless steel 3 - 4
Aluminum 3 - 6
Plastics 1 - 4
17
• . • . .
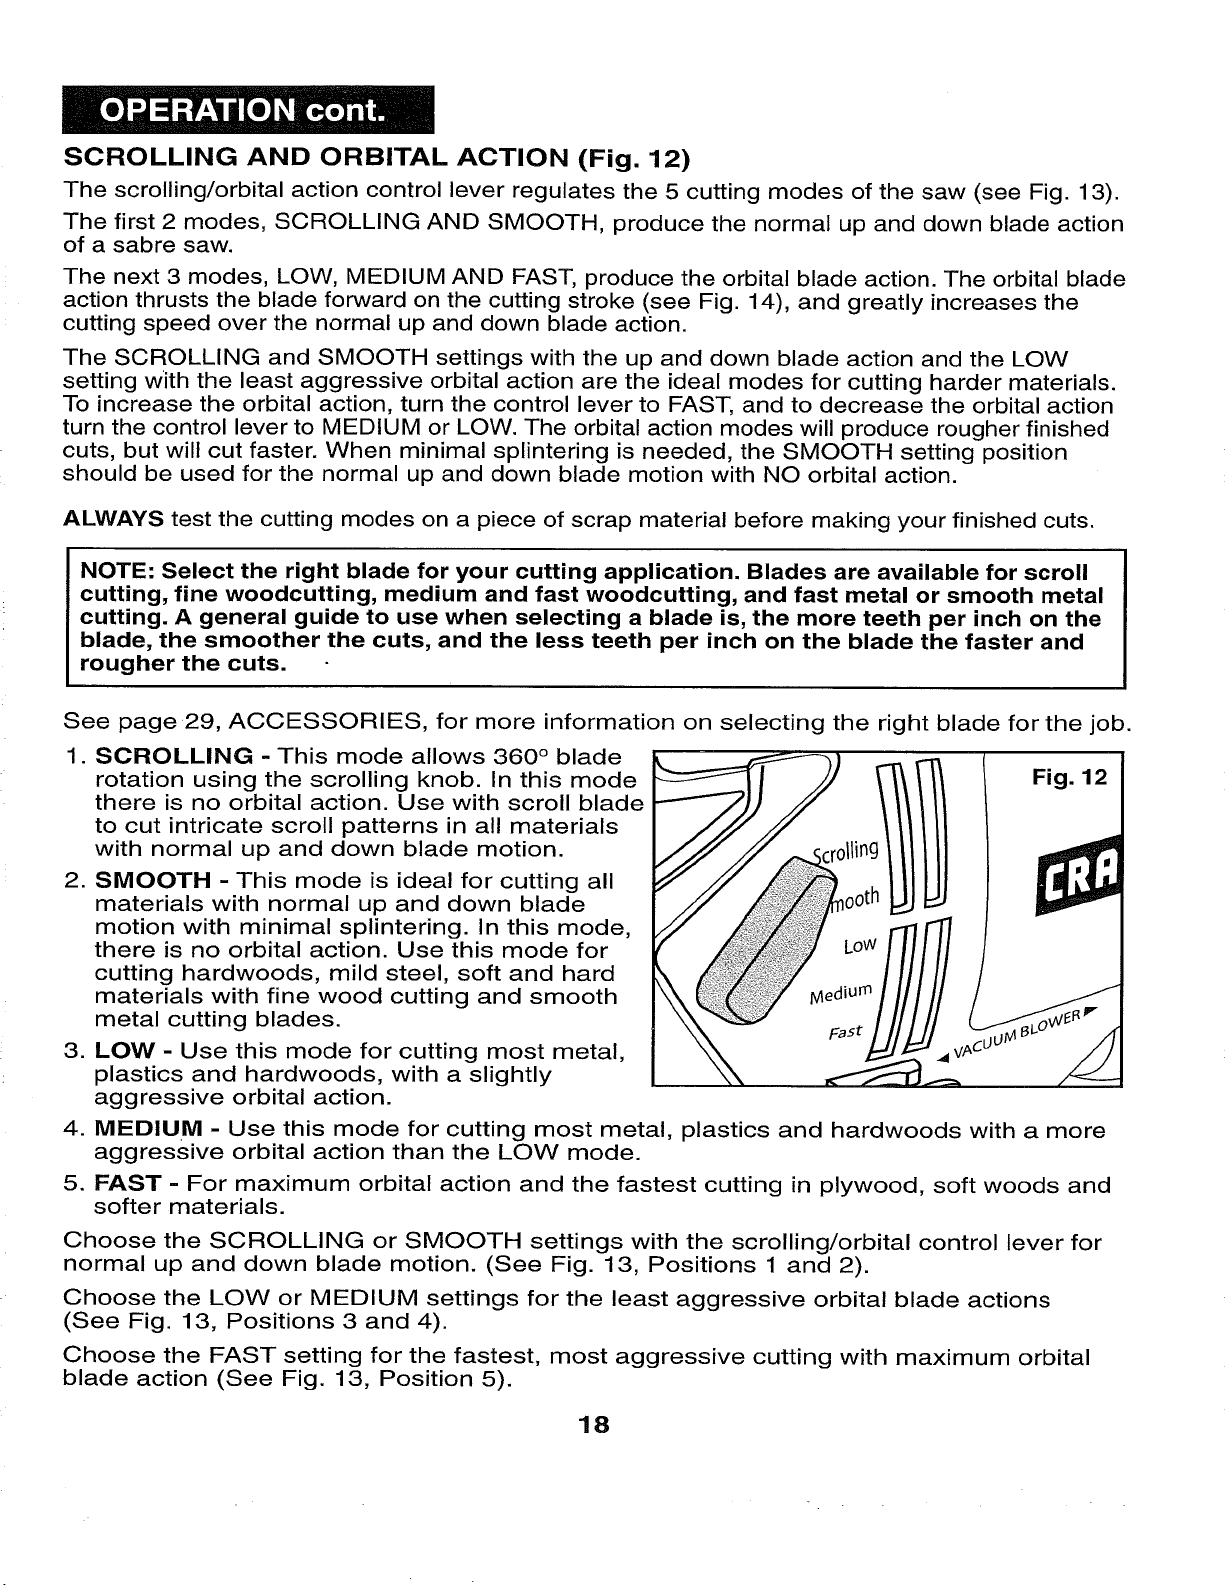
SCROLLING AND ORBITAL ACTION (Fig. 12)
The scrolling/orbital action control lever regulates the 5 cutting modes of the saw (see Fig. 13).
The first 2 modes, SCROLLING AND SMOOTH, produce the normal up and down blade action
of a sabre saw.
The next 3 modes, LOW, MEDIUM AND FAST, produce the orbital blade action. The orbital blade
action thrusts the blade forward on the cutting stroke (see Fig. 14), and greatly increases the
cutting speed over the normal up and down blade action.
The SCROLLING and SMOOTH settings with the up and down blade action and the LOW
setting with the least aggressive orbital action are the ideal modes for cutting harder materials.
To increase the orbital action, turn the control lever to FAST, and to decrease the orbital action
turn the control lever to MEDIUM or LOW. The orbital action modes will produce rougher finished
cuts, but will cut faster. When minimal splintering is needed, the SMOOTH setting position
should be used for the normal up and down blade motion with NO orbital action.
ALWAYS test the cutting modes on a piece of scrap material before making your finished cuts.
NOTE: Select the right blade for your cutting application. Blades are available for scroll
cutting, fine woodcutting, medium and fast woodcutting, and fast metal or smooth metal
cutting. A general guide to use when selecting a blade is, the more teeth per inch on the
blade, the smoother the cuts, and the less teeth per inch on the blade the faster and
rougher the cuts.
See page 29, ACCESSORIES, for more information on selecting the right blade for the job.
1. SCROLLING - This mode allows 360 ° blade
rotation using the scrolling knob. In this mode _" II/ Fig. 12
there is no orbital action. Use with scroll blade
to cut intricate scroll patterns in all materials
with normal up and down blade motion.
2. SMOOTH - This mode is ideal for cutting all
materials with normal up and down blade
motion with minimal splintering. In this mode,
there is no orbital action. Use this mode for
cutting hardwoods, mild steel, soft and hard
materials with fine wood cutting and smooth
metal cutting blades.
3. LOW - Use this mode for cutting most metal,
plastics and hardwoods, with a slightly
aggressive orbital action.
4. MEDIUM - Use this mode for cutting most metal, plastics and hardwoods with a more
aggressive orbital action than the LOW mode.
5. FAST - For maximum orbital action and the fastest cutting in plywood, soft woods and
softer materials.
r'-'lrt
Choose the SCROLLING or SMOOTH settings with the scrolling/orbital control lever for
normal up and down blade motion. (See Fig. 13, Positions 1 and 2).
Choose the LOW or MEDIUM settings for the least aggressive orbital blade actions
(See Fig. 13, Positions 3 and 4).
Choose the FAST setting for the fastest, most aggressive cutting with maximum orbital
blade action (See Fig. 13, Position 5).
18
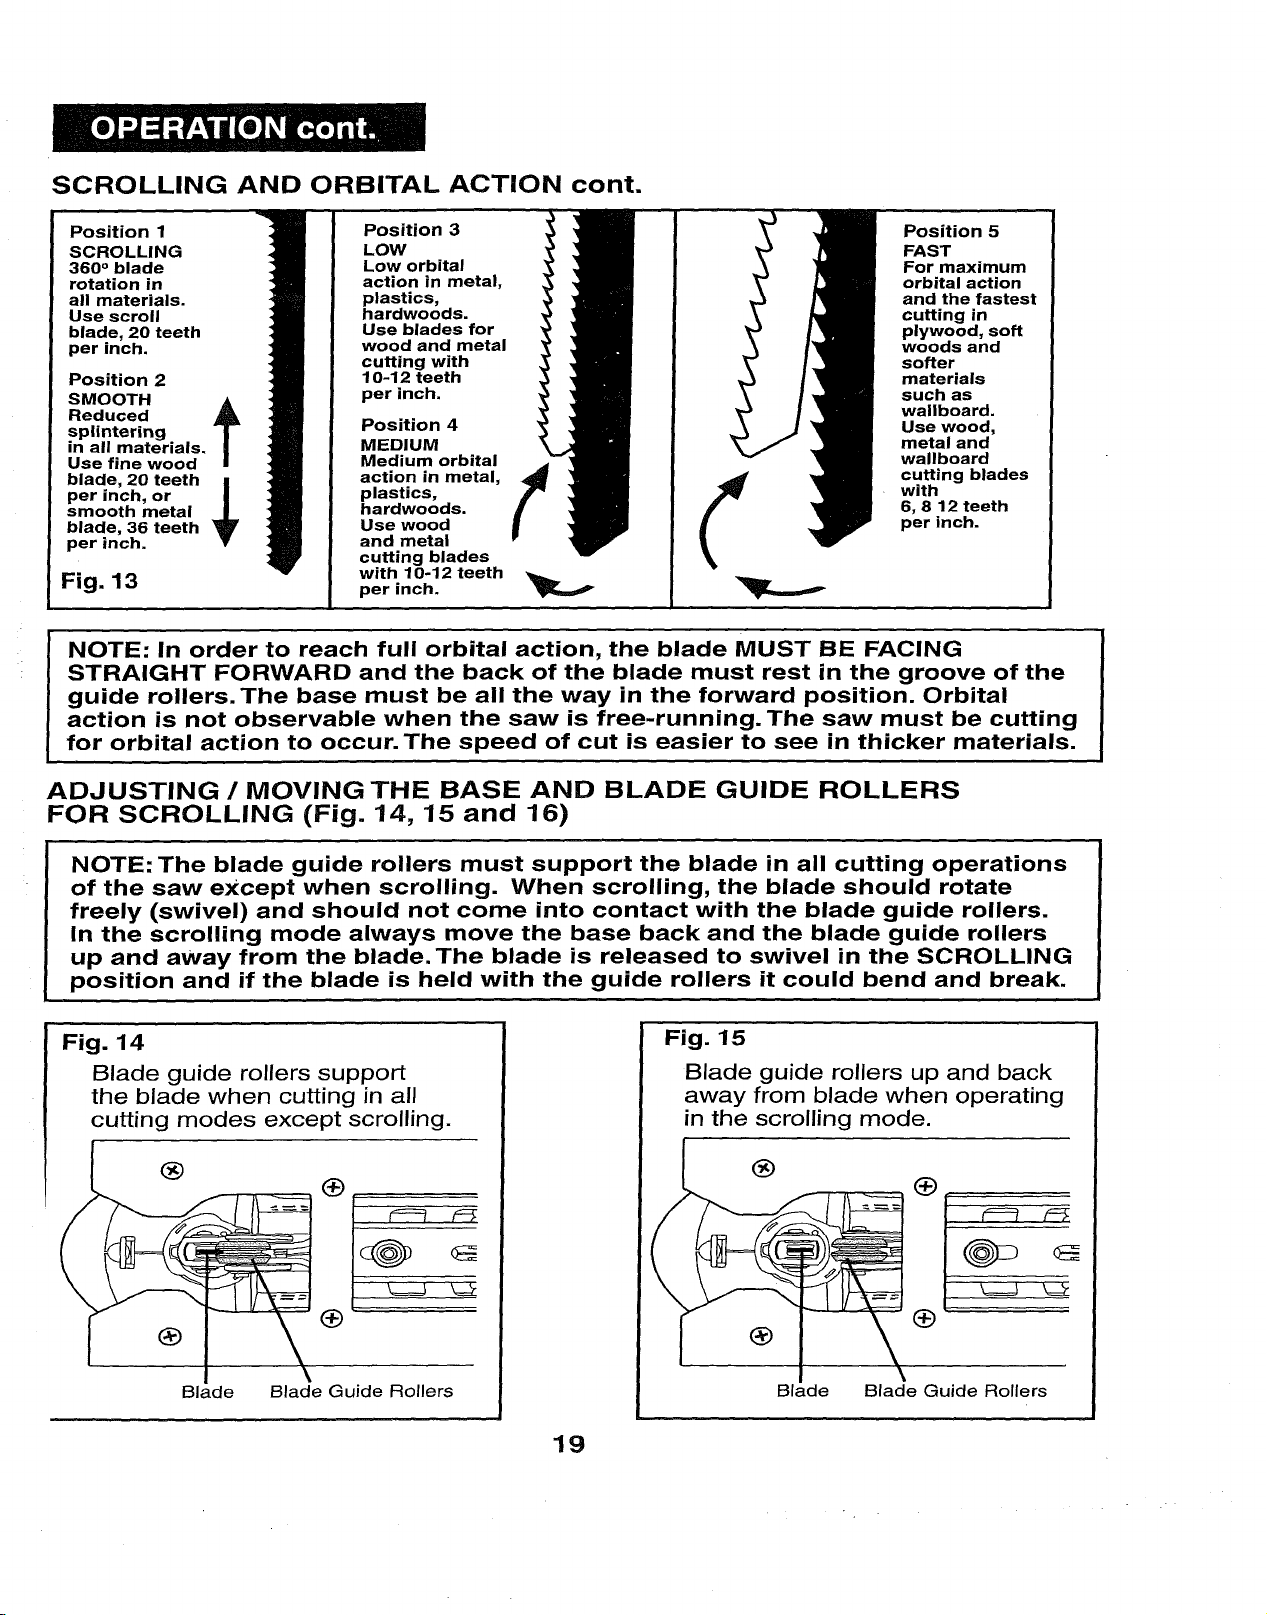
SCROLLING AND ORBITAL ACTION cont.
Position 1
SCROLLING
360 ° blade
rotation in
all materials.
Use scroll
blade, 20 teeth
per inch.
Position 2
Reduced
splintering
SMOOTH f
in all materials.
Use fine wood
blade, 20 teeth !
per inch, or
smooth metal
blade, 36 teeth
per inch.
Fig. 13
Position 3
LOW
Low orbital
action in metal,
plastics,
hardwoods.
Use blades for
wood and metal
cutting with
10-12 teeth
per inch.
Position 4
MEDIUM
Medium orbital
action in metal,
plastics,
hardwoods.
Use wood
and metal
cutting blades
with 10-12 teeth
per inch.
Position 5
FAST
For maximum
orbital action
and the fastest
cutting in
plywood, soft
woods and
softer
materials
such as
wallboard.
Use wood,
metal and
wallboard
cutting blades
with
6, 8 12 teeth
per inch.
NOTE: In order to reach full orbital action, the blade MUST BE FACING
STRAIGHT FORWARD and the back of the blade must rest in the groove of the
guide rollers. The base must be all the way in the forward position. Orbital
action is not observable when the saw is free-running. The saw must be cutting
for orbital action to occur. The speed of cut is easier to see in thicker materials.
ADJUSTING / MOVING THE BASE AND BLADE GUIDE ROLLERS
FOR SCROLLING (Fig. 14, 15 and 16)
NOTE: The blade guide rollers must support the blade in all cutting operations
of the saw except when scrolling. When scrolling, the blade should rotate
freely (swivel) and should not come into contact with the blade guide rollers.
In the scrolling mode always move the base back and the blade guide rollers
up and away from the blade. The blade is released to swivel in the SCROLLING
position and if the blade is held with the guide rollers it could bend and break.
Fig. 14
Blade guide rollers support
the blade when cutting in all
cutting modes except scrolling.
®
Fig. 15
Blade guide rollers up and back
away from blade when operating
in the scrolling mode.
®
¢==ff
®
Blade Blade Guide Rollers
®
Blade Blade Guide Rollers
19
ADJUSTING / MOVING THE BASE AND BLADE GUIDE ROLLERS
FOR SCROLLING cont. (Fig. 14, 15 and 16)
1. Unplug the saw.
//_ WARNING" ALWAYS unplug saw from the power source BEFORE making
any adjustments or attaching accessories.
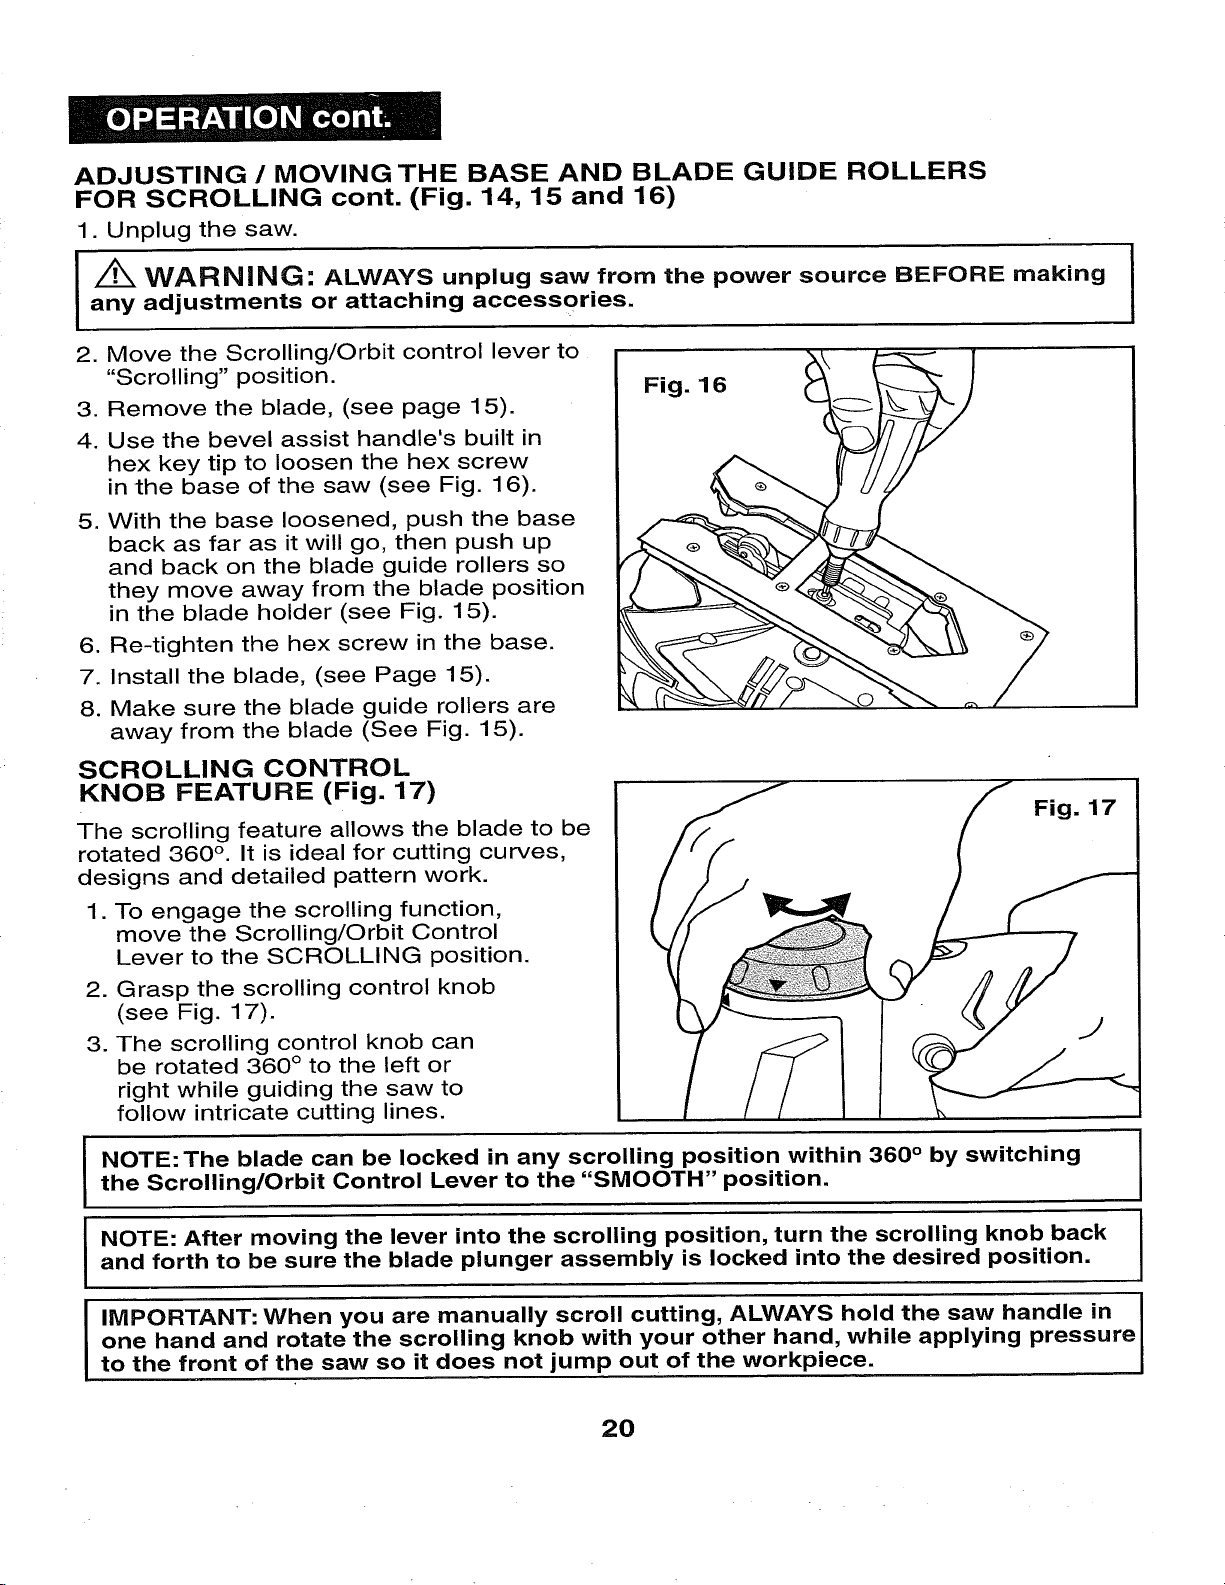
2. Move the Scrolling/Orbit control lever to
"Scrolling" position.
3. Remove the blade, (see page 15).
4. Use the bevel assist handle's built in
hex key tip to loosen the hex screw
in the base of the saw (see Fig. 16).
5. With the base loosened, push the base
back as far as it will go, then push up
and back on the blade guide rollers so
they move away from the blade position
in the blade holder (see Fig. 15).
6. Re-tighten the hex screw in the base.
7. Install the blade, (see Page 15).
8. Make sure the blade guide rollers are
away from the blade (See Fig. 15).
Fig. 16
SCROLLING CONTROL
KNOB FEATURE (Fig. 17)
Fig. 17
The scrolling feature allows the blade to be
rotated 360 ° . It is ideal for cutting curves,
designs and detailed pattern work.
1. To engage the scrolling function,
move the Scrolling/Orbit Control
Lever to the SCROLLING position.
2. Grasp the scrolling control knob
(see Fig. 17).
3. The scrolling control knob can
be rotated 360 ° to the left or
right while guiding the saw to
follow intricate cutting lines.
NOTE: The blade can be locked in any scrolling position within 360 ° by switching
the Scrolling/Orbit Control Lever to the "SMOOTH" position.
NOTE: After moving the lever into the scrolling position, turn the scrolling knob back
and forth to be sure the blade plunger assembly is locked into the desired position.
IMPORTANT: When you are manually scroll cutting, ALWAYS hold the saw handle in
one hand and rotate the scrolling knob with your other hand, while applying pressure
to the front of the saw so it does not jump out of the workpiece.
20
 Loading...