

Page 1
perator s
PROFESSIONAL
nual
33-inch Wide Cut Mower
Model No. 247.88998
CAUTION: Before using this
product, read this manual and
follow all safety rules and operating
instructions.
Sears Brands Management Corporation, Hoffman Estates, IL 60179, U.S.A.
Visit our website: www.craftsman.com FormNo.769-06544A
, SAFETY
, ASSEMBLY
, OPERATION
, MAINTENANCE
, PARTS LIST
, ESPANOL R 51
(December16,2010)
Page 2
Warranty Statement .......................................................... 2
Safety instructions ........................................................ 3-6
Slope Guide ....................................................................... 7
Safety Labels .................................................................... 8
Assembly .................................................................... 10-14
Operation ................................................................... 15-17
CRAFTSMAN PROFESSIONAL TWO YEAR FULL WARRANTY
FORTWOYEARSfromthe dateof purchase,this productiswarrantedagainstanydefectsin materialor workmanship.Defectiveproductwill
receivefreerepairorfree replacementifrepairis unavailable.
Thiswarrantyappliesfor onlyone yearfromthedateof purchaseifthis productiseverusedwhileprovidingcommercialservicesor if rentedto
anotherperson.
Forwarranty coveragedetailsto obtain repairor replacement,visitthe website: www.craftsman.com.
ThiswarrantycoversONLYdefects in materialandworkmanship. Warranty coverage does NOTinclude:
• Expendableitemsthatbecomewornduringnormaluse,includingbutnot limitedtoblades,sparkplugs,aircleaners,belts,andoil filters.
• Standardmaintenanceservicing,oilchanges,or tune-ups.
• Tirereplacementor repaircausedby puncturesfromoutsideobjects,suchasnails,thorns,stumps,orglass.
• Tireor wheelreplacementor repairresultingfromnormalwear,accident,orimproperoperationor maintenance.
• Repairsnecessarybecauseof operatorabuse,includingbutnotlimitedto damagecausedbyimpactingobjectsthat bendtheframeor
crankshaft,orover-speedingtheengine.
• Repairsnecessarybecauseof operatornegligence,includingbutnot limitedto,electricalandmechanicaldamagecausedbyimproper
storage,failureto usethe propergradeandamountofengineoil, failureto keepthe deckclearof flammabledebris,orfailureto maintainthe
equipmentaccordingtotheinstructionscontainedintheoperator'smanual.
• Engine(fuelsystem)cleaningorrepairscausedbyfuel determinedto becontaminatedoroxidized(stale).Ingeneral,fuelshouldbeused
within30 daysof itspurchasedate.
• Normaldeteriorationandwearofthe exteriorfinishes,or productlabelreplacement.
Thiswarrantygivesyouspecificlegalrights,andyou mayalsohaveotherrightswhichvaryfromstatetostate.
Sears Brands ManagementCorporation, Hoffman Estates,IL 60179
GrossHP: 12.5
EngineOil: SAE30
Fuel: UnleadedGasoline
SparkPlug: Champion®RC12YC
Engine: Briggs& StrattonPowerBuiltTM
© SearsBrands,LLC 2
Model Number
Serial Number
Dateof Purchase
Recordthe modelnumber,serialnumber,
anddateof purchaseabove.
Page 3

Thissymbolpointsout importantsafetyinstructionswhich,if not
followed,couldendangerthepersonalsafetyand/orpropertyof
yourselfandothers. Readandfollowall instructionsin thismanual
beforeattemptingtooperatethismachine.Failureto complywith
theseinstructionsmayresultin personalinjury.Whenyouseethis
symbol,HEEDITSWARNING!
Thismachinewasbuiltto beoperatedaccordingtothesafeopera-
tionpracticesinthis manual.Aswithanytypeof powerequipment,
carelessnessorerroron thepartofthe operatorcanresultin serious
injury.Thismachineiscapableofamputatingfingers,hands,toes
andfeetandthrowingdebris.Failuretoobservethefollowingsafety
instructionscouldresultin seriousinjuryor death.
CALIFORNIA PROPOSITION 65
EngineExhaust,someof itsconstituents,andcertainvehicle
componentscontainoremitchemicalsknownto StateofCalifornia
tocausecancerandbirthdefectsorotherreproductiveharm.
Batteryposts,terminals,and relatedaccessoriescontainleadand
leadcompounds,chemicalsknowntotheStateof Californiato
causecancerandreproductiveharm.Washhandsafterhandling.
GENERAL OPERATION
• Readthisoperator'smanualcarefullyinitsentiretybefore
attemptingto assemblethis machine.Read,understand,and
followall instructionsonthemachineandinthe manualsbefore
operation.Keepthismanualina safeplacefor futureand regular
referenceandfor orderingreplacementparts
• Becompletelyfamiliarwiththe controlsandthe properuseof this
machinebeforeoperatingit.
• Thismachineis a precisionpieceofpowerequipment,nota
plaything.Therefore,exerciseextremecautionat alltimes.This
machinehas beendesignedto performonejob:to mowgrass.
Donot useit foranyotherpurpose.
• Neverallowchildrenunder14yearsofageto operatethis
machine.Children14andover shouldreadandunderstandthe
instructionsandsafeoperationpracticesin thismanualandon
themachineandshouldbetrainedandsupervisedbyan adult.
• Onlyresponsibleindividualswhoarefamiliarwiththeserulesof
safeoperationshouldbe allowedtousethis machine.
• Thoroughlyinspecttheareawheretheequipmentistobe used.
Removeallstones,sticks,wire,bones,toysandotherforeign
objects,whichcouldbetrippedoverorpickedupandthrownby
theblade.Thrownobjectscancauseseriouspersonalinjury.
• Planyourmowingpatterntoavoiddischargeof materialtoward
roads,sidewalks,bystandersandthe like.Also,avoiddischarg-
ingmaterialagainstawallorobstruction,whichmaycause
dischargedmaterialto ricochetbacktowardtheoperator.
• Tohelpavoidbladecontactor a thrownobjectinjury,stayin
operatorzonebehindhandlesandkeepchildren,bystanders,
helpersandpetsat least75feetfrommowerwhileit is inopera-
tion.Stopmachineif anyoneentersarea.
Your Responsibility--Restrict the useof this powermachineto
personswhoread,understandandfollowthewarningsand instruc-
tionsin thismanualandon the machine.
SAVE THESE INSTRUCTIONS!
• Alwayswearsafetyglassesorsafetygogglesduringoperation
andwhileperformingan adjustmentor repairto protectyoureyes.
Thrownobjectswhichricochetcancauseseriousinjurytothe
eyes.
Wearsturdy,rough-soledworkshoesandclose-fittingslacks
and shirts.Shirtsand pantsthatcoverthearmsandlegsand
steel-toedshoesare recommended.Neveroperatethis machine
inbarefeet,sandals,slipperyor light-weight(e.g.canvas)shoes.
Donot puthandsor feetnearrotatingpartsor underthecutting
deck.Contactwithbladecan amputatefingers,hands,toesand
feet.
A missingordamageddischargecovercan causebladecontact
or thrownobjectinjuries.
• Manyinjuriesoccurasa resultofthe mowerbeingpulledoverthe
footduringafallcausedby slippingortripping.Do notholdon to
themowerif youarefalling:releasethehandleimmediately.
Neverpullthemowerbacktowardyouwhileyou arewalking.If
youmustbackthemowerawayfroma wallor obstructionfirst
lookdownandbehindtoavoidtrippingandthenfollowthese
steps:
1. Stepbackfrommowerto fullyextendyourarmsforward.
2. Besureyouare wellbalancedwithsurefooting.
3. Pullthemowerbackslowly,nomorethanhalf waytoward
you.
4. Repeatthesestepsasneeded.
Donot operatethemowerwhileunderthe influenceof alcoholor
drugs.
Donot engagetheself-propelledmechanismon machinesso
equippedwhilestartingengine.
3
Page 4
• Thebladecontrolhandleis a safetydevice.Neverattemptto
bypassitsoperation.Doingsomakesthesafetydeviceinopera-
tiveandmayresultin personalinjurythroughcontactwiththe
rotatingblade.Thebladecontrolhandlemustoperateeasily
in bothdirectionsandautomaticallyreturntothedisengaged
positionwhenreleased.
• Neveroperatethemowerinwetgrass.Alwaysbe sureof your
footing.A slip andfallcancauseseriouspersonalinjury.Ifyou
feelyou arelosingyourfooting,releasethebladecontrolhandle
immediatelyandthe bladewillstop rotatingwithinthreeseconds.
• Mowonlyin daylightorgoodartificiallight.Walk,neverrun.
• Stopthe bladewhencrossinggraveldrives,walksorroads.
• Iftheequipmentshouldstartto vibrateabnormally,stopthe
engineandcheckimmediatelyforthe cause.Vibrationis gener-
allya warningoftrouble.
• Shutthe engineoff andwaituntilthe bladecomesto a complete
stopbeforeremovingthegrasscatcheror uncloggingthechute.
Thecuttingbladecontinuesto rotatefor afewsecondsafterthe
bladecontrolisreleased.Neverplaceanypartofthebodyinthe
bladeareauntilyou aresurethe bladehasstoppedrotating.
• Neveroperatemowerwithoutpropertrail shield,dischargecover,
grasscatcher,bladecontrolhandleor othersafetyprotectivede-
vicesin placeandworking.Neveroperatemowerwithdamaged
safetydevices.Failuretodo socan resultinpersonalinjury.
Mufflerandenginebecomehotandcancausea burn.Donot
touch.
• Neverattempttomakea wheelorcuttingheightadjustmentwhile
theengineis running.
• Onlyuse partsand accessoriesmadeforthis machineby the
manufactureras listedin thePartspagesofthisOperator's
Manual.Failuretodosocan resultin personalinjury.
• Whenstartingengine,pullcordslowlyuntil resistanceis felt,then
pullrapidly.Rapidretractionof startercord(kickback)willpull
handandarmtowardenginefasterthanyoucanletgo.Broken
bones,fractures,bruisesor sprainscouldresult.
• If situationsoccurwhicharenot coveredinthismanual,usecare
andgoodjudgement.Contact1-800-4MY-HOME®forinformation
andassistance.
SLOPE OPERATION
Slopesareamajorfactorrelatedto slipandfall accidents,whichcan
resultinsevereinjury.Operationon slopesrequiresextracaution.If
youfeel uneasyona slope,do notmowit. Foryoursafety,usethe
SlopeGuideincludedaspartof thismanualto measureslopesbefore
operatingthis machineon a slopedor hillyarea. Iftheslopeisgreater
than15degrees,donot mowit.
Do:
o
Mowacrossthefaced slopes;neverupanddown.Exercise
extremecautionwhenchangingdirectiononslopes.
• Watchfor holes,ruts,rocks,hiddenobjects,or bumpswhichcan
causeyouto sliportrip.Tallgrasscanhideobstacles.
• Alwaysbesureofyourfooting.A slipandfallcan causeserious
personalinjury.Ifyou feelyou arelosingyourbalance,release
thebladecontrolhandleimmediatelyandthebladewillstop
rotatingwithinthree (3) seconds.
DoNot:
• Donotmowneardrop-offs,ditchesorembankments,because
youcouldloseyourfootingorbalance.
• Donotmowslopesgreaterthan15degreesas shownon the
slopeguide.
• Donotmowon wetgrass.Unstablefootingcouldcauseslipping.
CHILDREN
Tragicaccidentscan occurifthe operatorisnotalerttothe presence
ofchildren.Childrenareoftenattractedto themowerandthe mowing
activity.Theydonotunderstandthedangers.Neverassumethat
childrenwill remainwhereyou lastsawthem.
Keepchildrenoutofthe mowingareaandunderwatchfulcareof
a responsibleadultotherthan theoperator.
• Bealertandturn moweroffif achildentersthearea.
• Beforeandwhilemovingbackwards,lookbehindanddown for
smallchildren.
• Useextremecarewhenapproachingblindcorners,doorways,
shrubs,trees,orotherobjectsthatmayobscureyourvisionofa
childwhomayrunintothe mower.
• Keepchildrenawayfromhot or runningengines.Theycan suffer
burnsfroma hot muffler.
• Neverallowchildrenunder14yearsofageto operatethis
machine.Children14andovershouldreadand understandthe
instructionsandsafeoperationpracticesinthis manualandon
themachineandbetrainedandsupervisedbyan adult.
SERVICE
SafeHandlingOf Gasoline:
• Toavoid personalinjuryor propertydamageuseextremecare
in handlinggasoline.Gasolineisextremelyflammableandthe
vaporsareexplosive.Seriouspersonalinjurycanoccurwhen
gasolineis spilledonyourselfor yourclothes,whichcan ignite.
Washyourskinandchangeclothesimmediately.
• Useonlyanapprovedgasolinecontainer.
• Neverfillcontainersinsidea vehicleoron atruck ortrailerbed
witha plasticliner.Alwaysplacecontainerson thegroundaway
fromyourvehiclebeforefilling.
• Removegas-poweredequipmentfromthetruckortrailerand
refueliton theground.Ifthisis notpossible,thenrefuelsuch
equipmenton atrailer witha portablecontainer,ratherthanfrom
a gasolinedispensernozzle.
• Keepthenozzleincontactwiththe rimof thefueltankor
containeropeningat all timesuntilfuelingis complete.Donot use
a nozzlelock-opendevice.
4
Page 5
• Extinguishall cigarettes,cigars,pipesandothersources
ofignition.
• Neverfuelmachineindoorsbecauseflammablevaporswill
accumulateinthe area.
• Neverremovegas caporaddfuel whileengineis hotor running.
Allowengineto coolat leasttwo minutesbeforerefueling.
• Neverover-fillfuel tank.Toallowfor expansionof thefuel,donot
fillabovethebottomofthe fueltankneck.
• Replacegasolinecapandtightensecurely.
• If gasolineisspilled,wipeit offtheengineandequipment.Move
machineto anotherarea.Wait5 minutesbeforestartingengine.
• Neverstorethemachineorfuel containernearanopenflame,
sparkor pilotlightasona waterheater,spaceheater,furnace,
clothesdryerorothergas appliances.
• Toreducefirehazard,keepmachinefreeof grass,leaves,or
otherdebrisbuild-up.Cleanupoil orfuelspillageand removeany
fuel-soakeddebris.
Allowmachinetocoolat least5 minutesbeforestoring.
GeneralService:
• Neverrunanengineindoorsor ina poorlyventilatedarea.Engine
exhaustcontainscarbonmonoxide,anodorlessanddeadlygas.
• Beforecleaning,repairing,or inspecting,makecertainthe
bladeandall movingpartshavestopped.Disconnectthespark
plugwireandgroundagainstthe enginetopreventunintended
starting.
Checkthebladeandenginemountingboltsat frequentintervals
forpropertightness.Also,visuallyinspectbladefordamage(e.g.,
bent,cracked,worn).Replacebladewiththeoriginalequipment
manufacture's(O.E.M.)bladeonly,listedinthePartspagesofthis
manual.Useofpartswhichdonot meettheoriginalequipment
specificationsmayleadto improperperformanceandcompro-
misesafety!
• Mowerbladesaresharpandcancut. Wrapthe bladeor wear
gloves,anduse extracautionwhenservicingthem.
Keepall nuts,bolts,andscrewstighttobe suretheequipmentis
insafeworkingcondition.
Nevertamperwithsafetydevices.Checktheirproperoperation
regularly.
Afterstrikingaforeignobject,stopthe engine,disconnectthe
sparkplugwireand groundagainsttheengine.Thoroughly
inspectthe mowerforanydamage.Repairthedamagebefore
startingandoperatingthemower.
Neverattempttomakea wheelorcuttingheightadjustmentwhile
theengineisrunning.
• Grasscatchercomponents,dischargecover,and trailshieldare
subjectto wearanddamagewhichcouldexposemovingpartsor
allowobjectstobethrown.Forsafetyprotection,frequentlycheck
componentsand replaceimmediatelywithoriginalequipment
manufacturer's(O.E.M.)partsonly,listedinthePartspages
ofthismanual.Useof partswhichdo notmeetthe original
equipmentspecificationsmayleadto improperperformanceand
compromisesafety!
Donot changetheengine'sgovernorsettingorover-speedthe
engine.Thegovernorcontrolsthe maximumsafeoperatingspeed
ofthe engine.
Checkfuelline,tank,cap,andfittingsfrequentlyforcracksor
leaks.Replaceifnecessary.
Donot crankenginewith sparkplugremoved.
• Maintainor replacesafetyandinstructionlabels,asnecessary.
• Observeproperdisposallawsand regulations.Improperdisposal
offluidsandmaterialscanharmtheenvironment.
Accordingto theConsumerProductsSafetyCommission(CPSC)
andthe U.S.EnvironmentalProtectionAgency(EPA),this product
hasanAverageUsefulLifeof seven(7)years,or 140hoursof
operation.At theendof theAverageUsefulLifehavethemachine
inspectedannuallybya Searsorotherqualifiedservicedealer
toensurethatallmechanicalandsafetysystemsareworking
properlyand notwornexcessively.Failuretodosocan resultin
accidents,injuriesor death.
DO NOT MODIFY ENGINE
Toavoidseriousinjuryor death,do notmodifyengineinanyway.
Tamperingwiththe governorsettingcanleadto a runawayengineand
causeitto operateat unsafespeeds.Nevertamperwithfactorysetting
ofenginegovernor.Doingso willvoidtheproductwarranty.
NOTICE REGARDING EMISSIONS
EngineswhicharecertifiedtocomplywithCaliforniaandfederal
EPAemissionregulationsfor SORE(SmallOff RoadEquipment)are
certifiedto operateonregularunleadedgasoline,and mayinclude
thefollowingemissioncontrolsystems:EngineModification(EM) and
ThreeWayCatalyst(TWC)ifsoequipped.
SPARK ARRESTOR
Thismachineisequippedwithaninternalcombustionengineand
shouldnotbe usedonor nearany unimprovedforest-covered,
brush-coveredorgrass-coveredlandunlessthe engine'sexhaust
systemisequippedwitha sparkarrestormeetingapplicablelocalor
statelaws(if any).
Ifa sparkarrestorisused,itshouldbe maintainedineffectiveworking
orderbytheoperator.Inthe StateofCaliforniatheaboveisrequired
bylaw(Section4442ofthe CaliforniaPublicResourcesCode).Other
statesmayhavesimilarlaws. Federallawsapplyonfederallands.
A sparkarrestor(Part No.398067)for themufflerisavailablethrough
yournearestSearsPartsandRepairServiceCenter.
Page 6
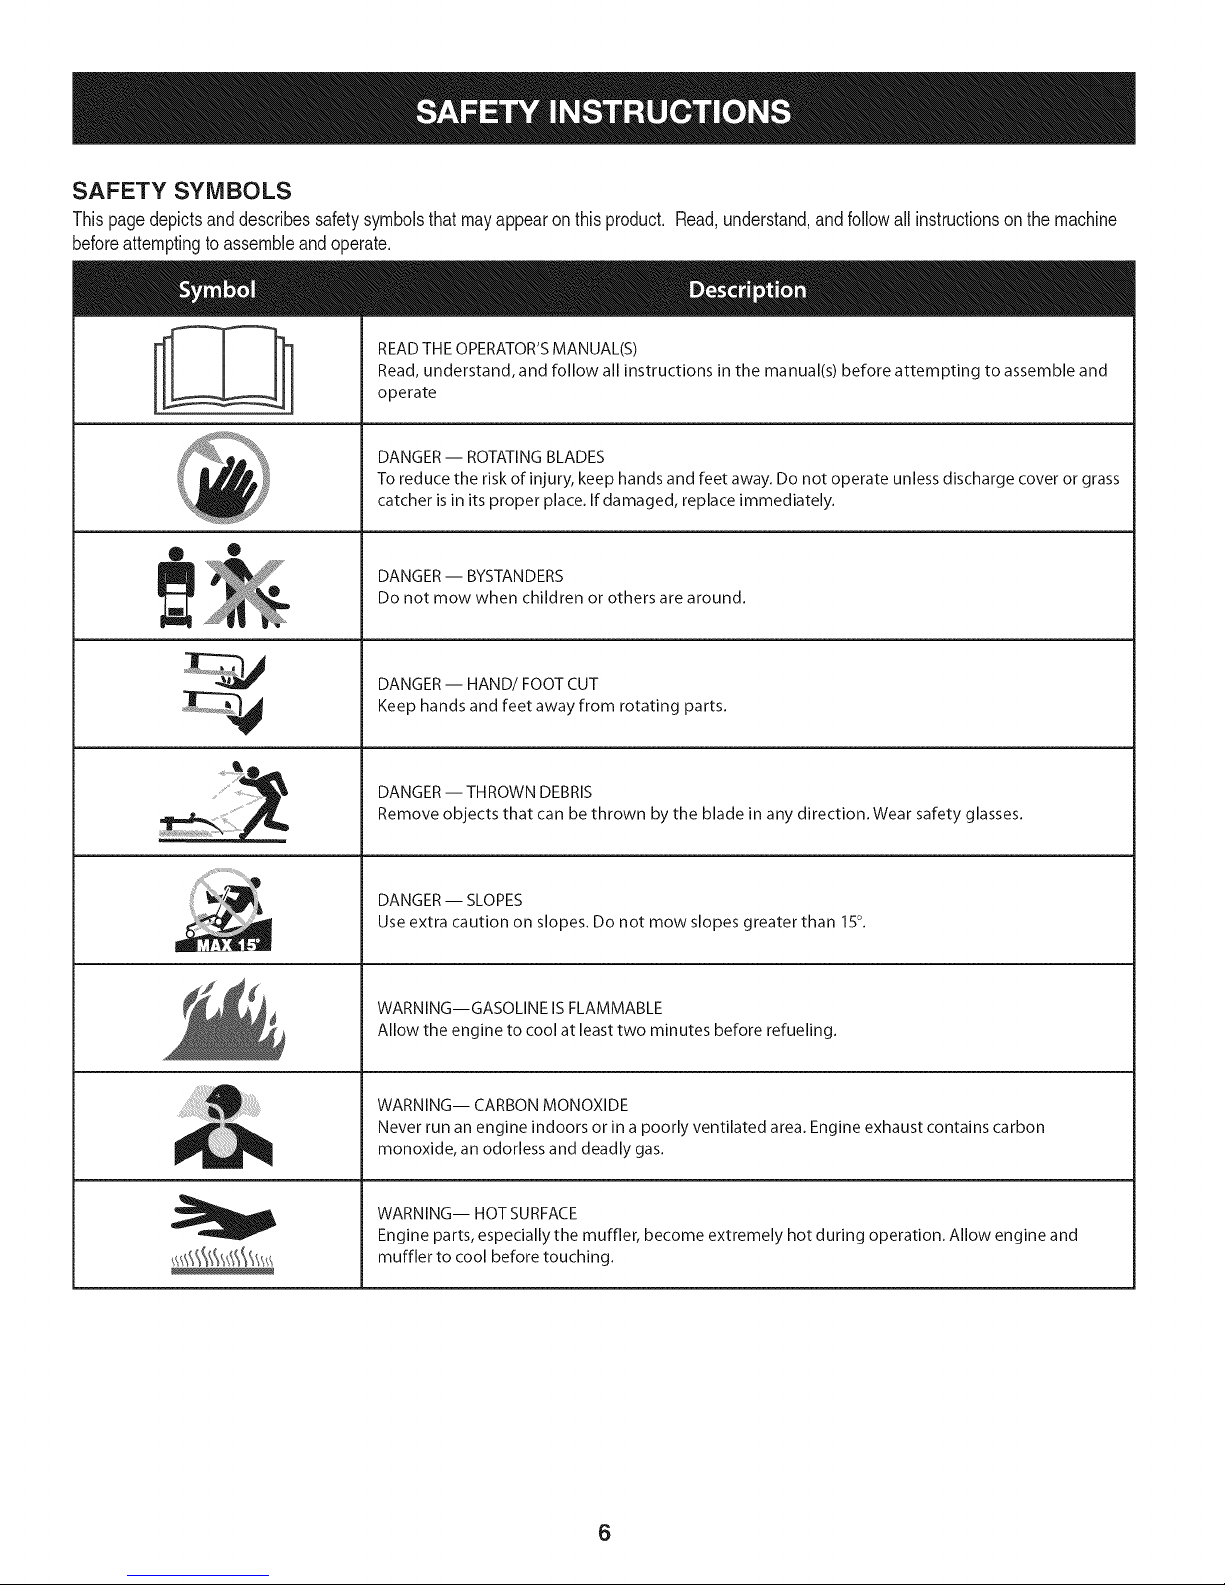
SAFETY SYMBOLS
Thispagedepictsanddescribessafetysymbolsthatmayappearonthisproduct. Read,understand,andfollowall instructionson themachine
beforeattemptingtoassembleandoperate.
READ THE OPERATOR'S MANUAL(S)
i
i
®
Read, understand, and follow all instructions in the manual(s) before attempting to assemble and
operate
DANGER -- ROTATING BLADES
To reduce the risk of injury, keep hands and feet away. Do not operate unless discharge cover or grass
catcher is in its proper place. If damaged, replace immediately.
DANGER -- BYSTANDERS
Do not mow when children or others are around.
J
DANGER-- HAND/FOOT CUT
Keep hands and feet away from rotating parts.
DANGER -- THROWN DEBRIS
Remove objects that can be thrown by the blade in any direction. Wear safety glasses.
DANGER -- SLOPES
Use extra caution on slopes. Do not mow slopes greater than 150.
WARNING--GASOLINE ISFLAMMABLE
Allow the engine to cool at least two minutes before refueling.
WARNING-- CARBON MONOXIDE
Never run an engine indoors or in a poorly ventilated area. Engine exhaust contains carbon
monoxide, an odorless and deadly gas.
WARNING-- HOT SURFACE
Engine parts, especially the muffler, become extremely hot during operation. Allow engine and
muffler to cool before touching.
6
Page 7
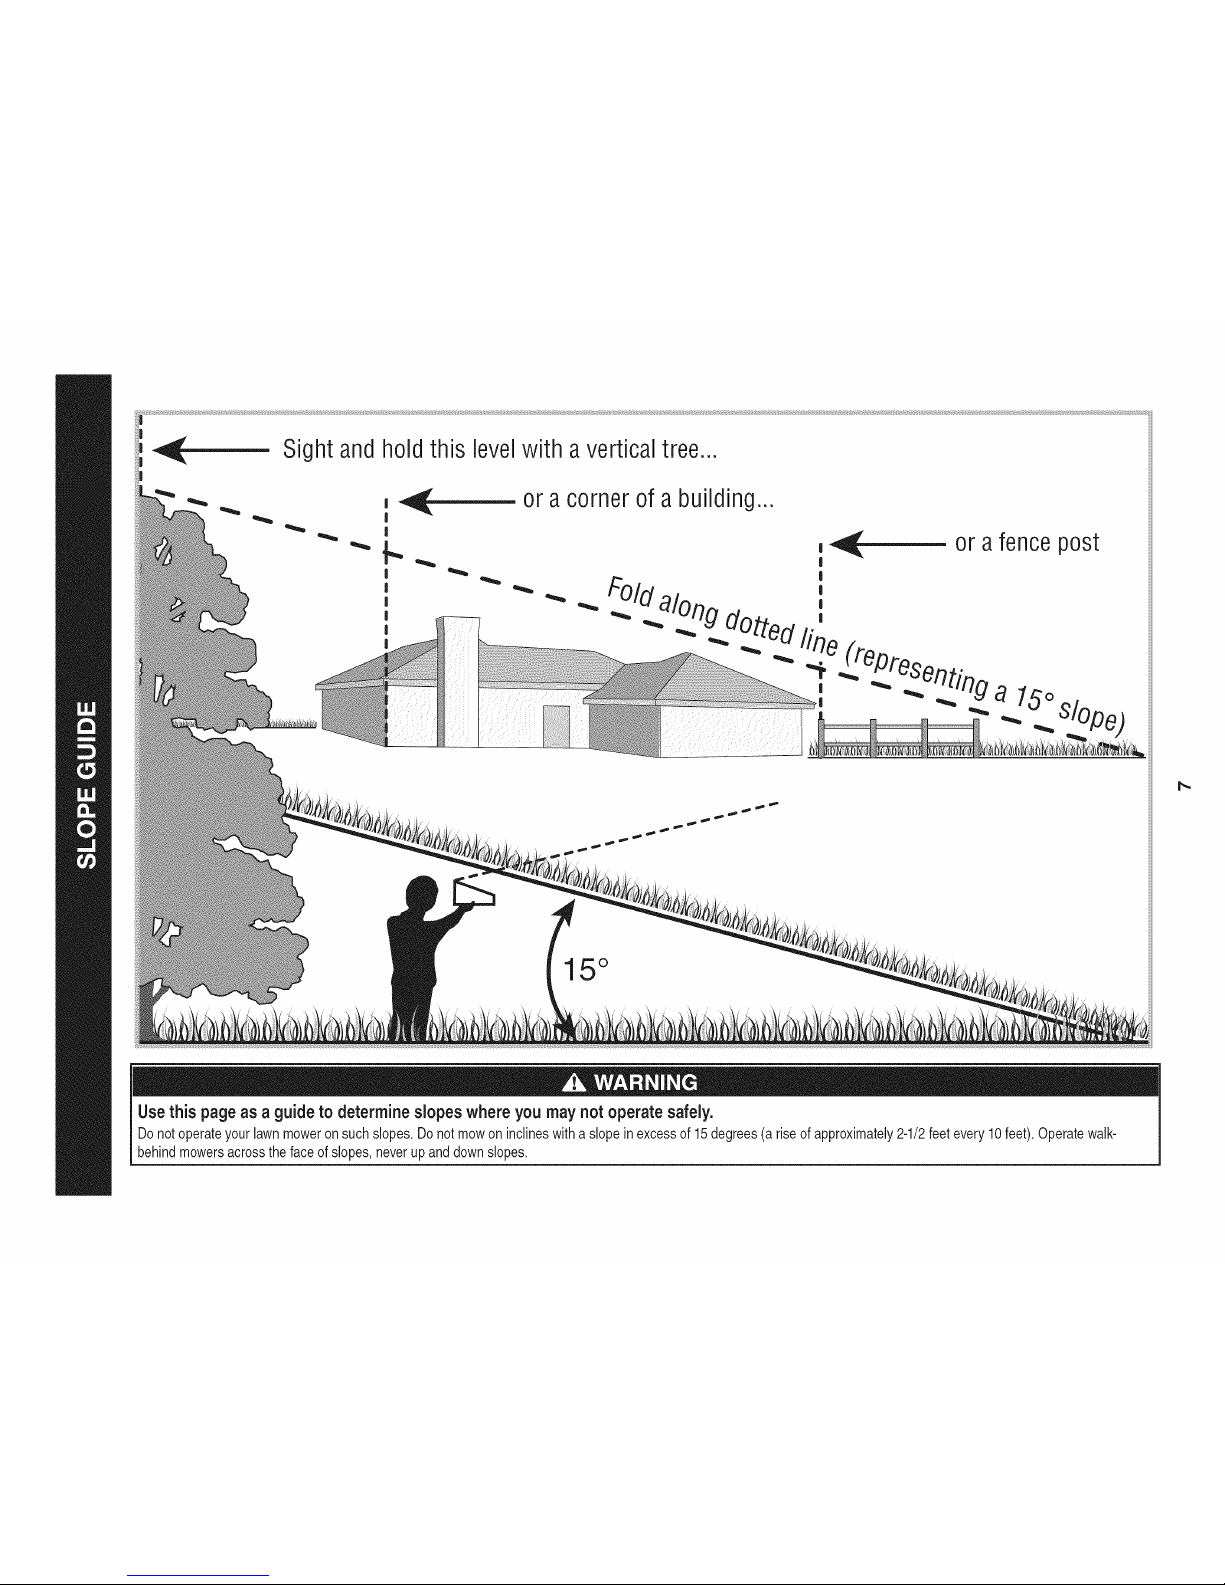
|
|
or acornerof a building...
15°
Use this page as a guide to determine slopes where you may not operatesafely.
Donotoperateyourlawnmoweronsuchslopes.Donotmowon inclineswitha slopeinexcessof 15degrees(a riseof approximately2-1/2feetevery10feet). Operatewalk-
behindmowersacrossthefaceofslopes,neverup anddownslopes.
Page 8

8
Page 9

This pageleft intentionallyblank.
9
Page 10

IMPORTANT:Thisunitis shippedwithoil inthe engine.After
assembly,seepage15for fuelandoil details.
IMPORTANT:Referencetorightor leftsideof themoweris observed
fromtheoperatingposition.
Disconnectthesparkplugwire andgrounditagainstthe engineto
preventunintendedstarting.
LOOSE PARTS IN CARTON
Thefollowingitemsare packagedina bag:
Operator'sManual,Oildrainhose,Waterhosecoupler,EngineManual
TOOLS NEEDED FOR ASSEMBLY
A setofadjustablewrenchesandtiregauge
MOWER SET-UP
Shipping Brace Removal
Makesurethe lawnmower'sengineisoff.Removetheignitionkey
beforeremovingtheshippingbrace.
1. Locatetheshippingbrace,if present,foundon therightsideof
thecuttingdeck.SeeFigure1.
Attaching the Battery Cables
NOTE:The positivebatteryterminalis markedPos.(+).Thenegative
batteryterminalis markedNeg.(-).
Thepositivecable(heavyredwire)issecuredto thepositivebattery
terminal(+)withahexboltandhexnutat thefactory.
Thenegativecable(heavyblackwire)maybe securedtothenegative
batteryterminalat thefactory.If ithasn'tbeenattached,proceedas
follows:
Removethecarriageboltandhexnutfromthe positivecable
(heavyredwire).
.
Removetheredplasticcover,ifpresent,fromthepositivebattery
terminalandattachthe positivecabletothe positivebattery
terminal(+)withtheboltandhexnut.See Figure2.
f
Figure1
.
Whileholdingthe dischargechutewithyour lefthand,removethe
shippingbracewithyourright handbygraspingit betweenyour
thumbandindexfingerandrotatingitclockwise.
Theshippingbraceis usedfor packagingpurposesonly.Remove
anddiscardtheshippingbracebeforeoperatingyourlawnmower.
Themowingdeckis capableofthrowingobjects.Failuretooperate
Ithe mowerwithoutthedischargecoverin the properoperatingposi-
ltion could resultin seriouspersonalinjuryand/orpropertydamage.
Figure2
3. Removethecarriageboltandhexnutfromthe negativecable
(heavyblackwirel
4. Removetheblackplasticcover,if present,fromthe negativebat-
tery terminalandattachthenegativecabletothe negativebattery
terminal(-) withtheboltand hexnut.SeeFigure2.
5. Makecertainthehold-downrodisin positionoverthebattery,
securingit inplaceandmakecertainthattheredrubberbootcov-
ersthe positivebatteryterminaltohelpprotectit fromcorrosion.
NOTE:Ifthe batteryis putinto serviceafterthe dateshown
on top/sided battery,chargethebatteryas instructedinthe
Maintenancesectionof thismanualpriorto operatingthemower.
10
Page 11
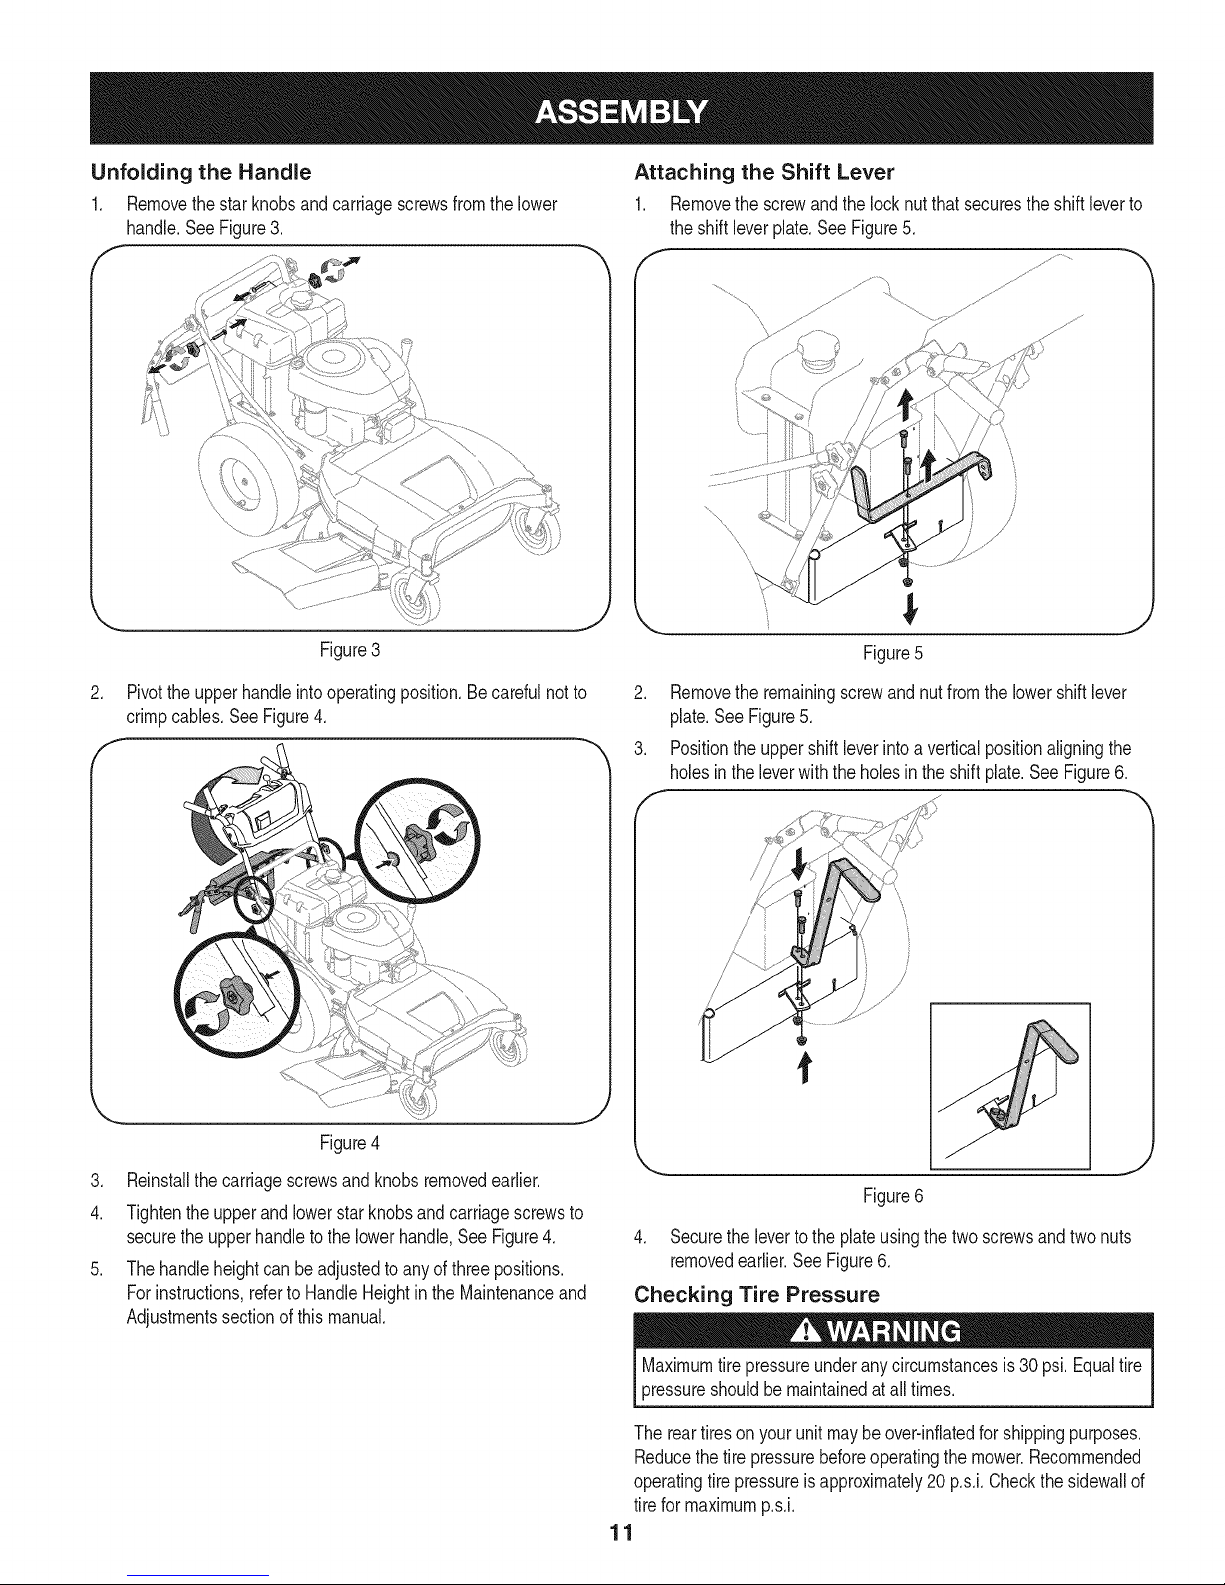
Unfolding the Handle
1. Removethestar knobsandcarriagescrewsfromthelower
handle.SeeFigure3.
Attaching the Shift Lever
1. Removethescrewandthe locknutthatsecurestheshiftleverto
theshift leverplate.SeeFigure5.
f
Figure3
.
Pivottheupperhandleintooperatingposition.Becarefulnotto
crimpcables.SeeFigure4.
Figure4
3. Reinstallthecarriagescrewsandknobsremovedearlier.
4. Tightentheupperandlowerstarknobsandcarriagescrewsto
securetheupperhandleto thelowerhandle,SeeFigure4.
5. Thehandleheightcanbeadjustedto anyof threepositions.
Forinstructions,referto HandleHeightin the Maintenanceand
Adjustmentssectionofthis manual.
Figure5
2. Removetheremainingscrewandnut fromthelowershiftlever
plate.SeeFigure5.
3. Positionthe uppershiftleverintoa verticalpositionaligningthe
holesinthe leverwiththe holesinthe shiftplate.SeeFigure6.
f
Figure6
4. Securethelevertothe plateusingthe two screwsandtwo nuts
removedearlier.SeeFigure6.
Checking Tire Pressure
Maximumtire pressureunderanycircumstancesis 30 psi.Equaltire
pressureshouldbemaintainedatall times.
Thereartireson yourunitmaybeover-inflatedfor shippingpurposes.
Reducethe tirepressurebeforeoperatingthemower.Recommended
operatingtirepressureis approximately20p.s.i.Checkthesidewallof
tirefor maximump.s.i.
11
Page 12
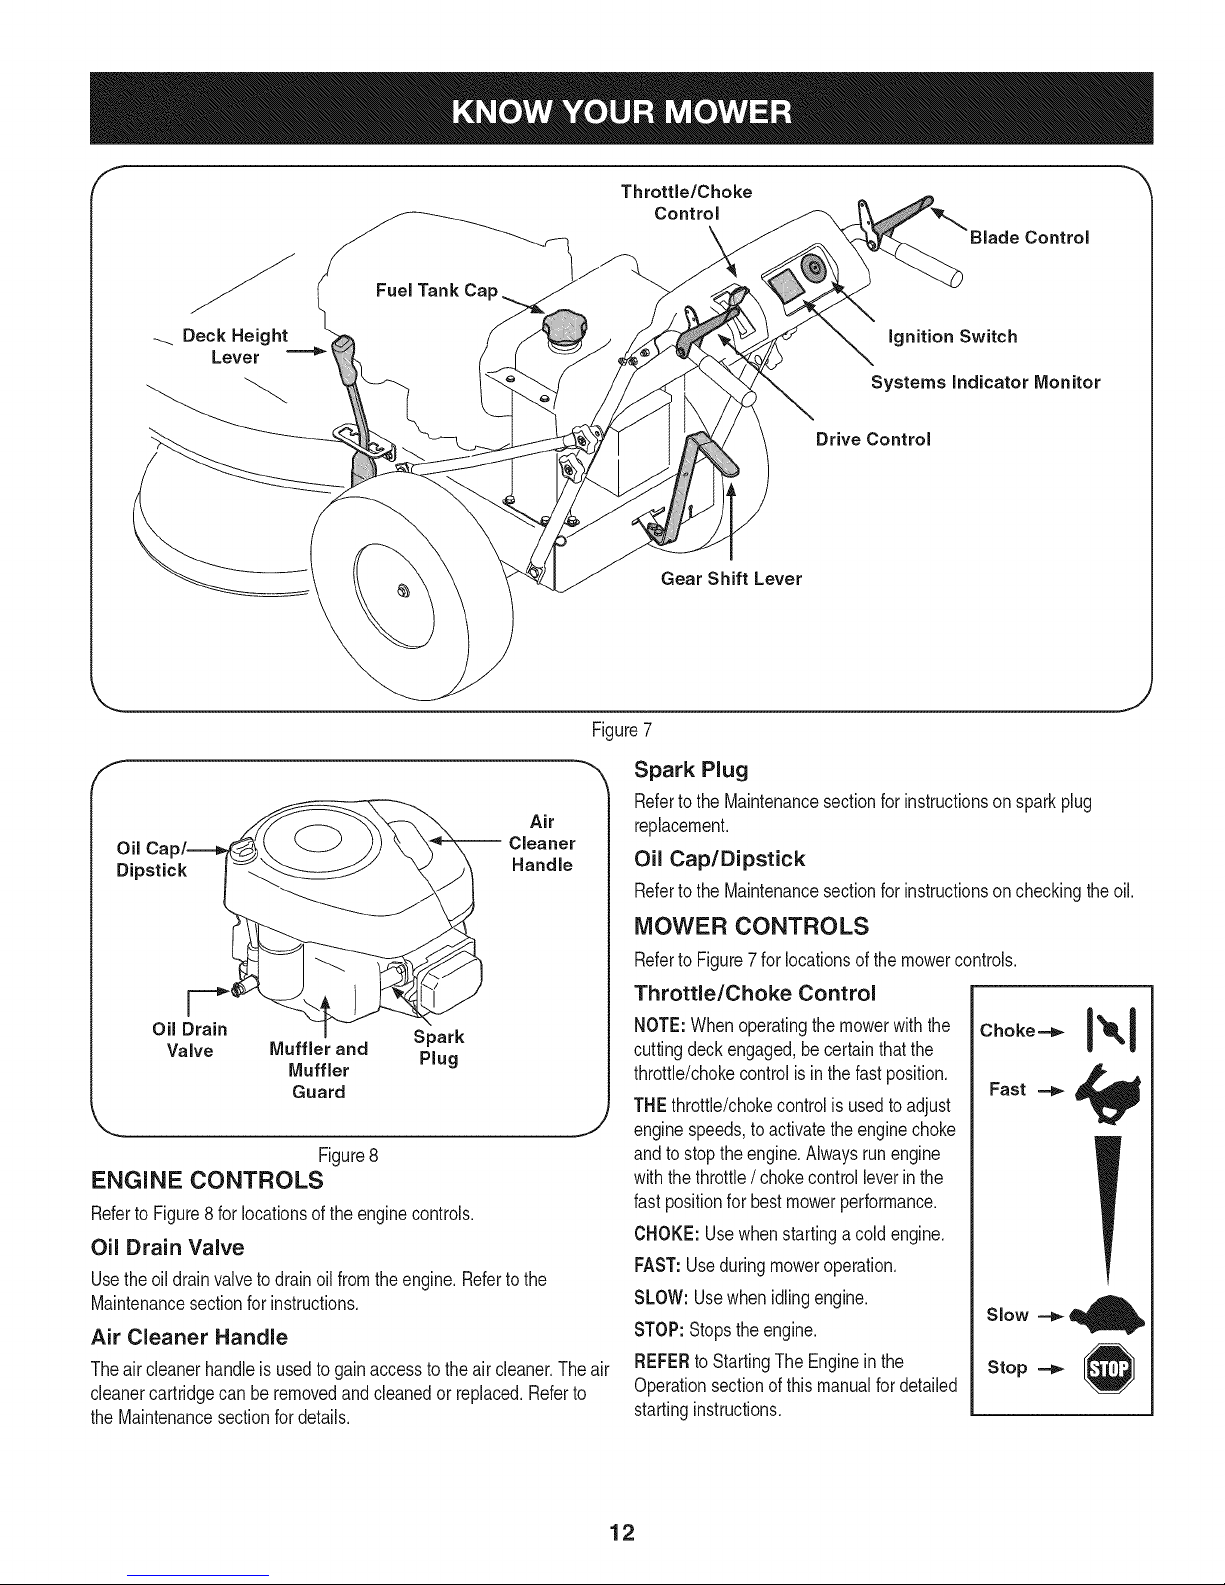
Fuel Tank Ca
f
oil
Dipstick
Deck Height
Lever ===='_
Air
-- Cleaner
Handle
ignition Switch
Systems indicator Monitor
Drive Control
Gear Shift Lever
Figure7
Spark Plug
Referto theMaintenancesectionforinstructionsonsparkplug
replacement.
Oil Cap/Dipstick
Referto theMaintenancesectionforinstructionsoncheckingtheoil.
MOWER CONTROLS
_,, J
Figure8
ENGINE CONTROLS
Referto Figure8forlocationsofthe enginecontrols.
Oil Drain Valve
Usetheoil drainvalvetodrainoilfromthe engine.Refertothe
Maintenancesectionforinstructions.
Air Cleaner Handle
Theair cleanerhandleis usedtogainaccessto theaircleaner.Theair
cleanercartridgecanbe removedandcleanedor replaced.Referto
theMaintenancesectionfordetails.
Referto Figure7for locationsofthemowercontrols.
Throttle/Choke Control
NOTE:Whenoperatingthemowerwiththe
cuttingdeckengaged,becertainthatthe
throttle/chokecontrolis inthefast position.
THEthrottle/chokecontrolis usedto adjust
enginespeeds,toactivatethe enginechoke
andto stopthe engine.Alwaysrunengine
withthethrottle/chokecontrolleverinthe
fastpositionfor bestmowerperformance.
CHOKE:Usewhenstartingacold engine.
FAST:Useduringmoweroperation.
SLOW:Usewhenidlingengine.
STOP:Stopstheengine.
REFERtoStartingTheEngineinthe
Operationsectionof thismanualfordetailed
startinginstructions.
12
Choke==_
Fast
Slow ==_
Stop
Page 13
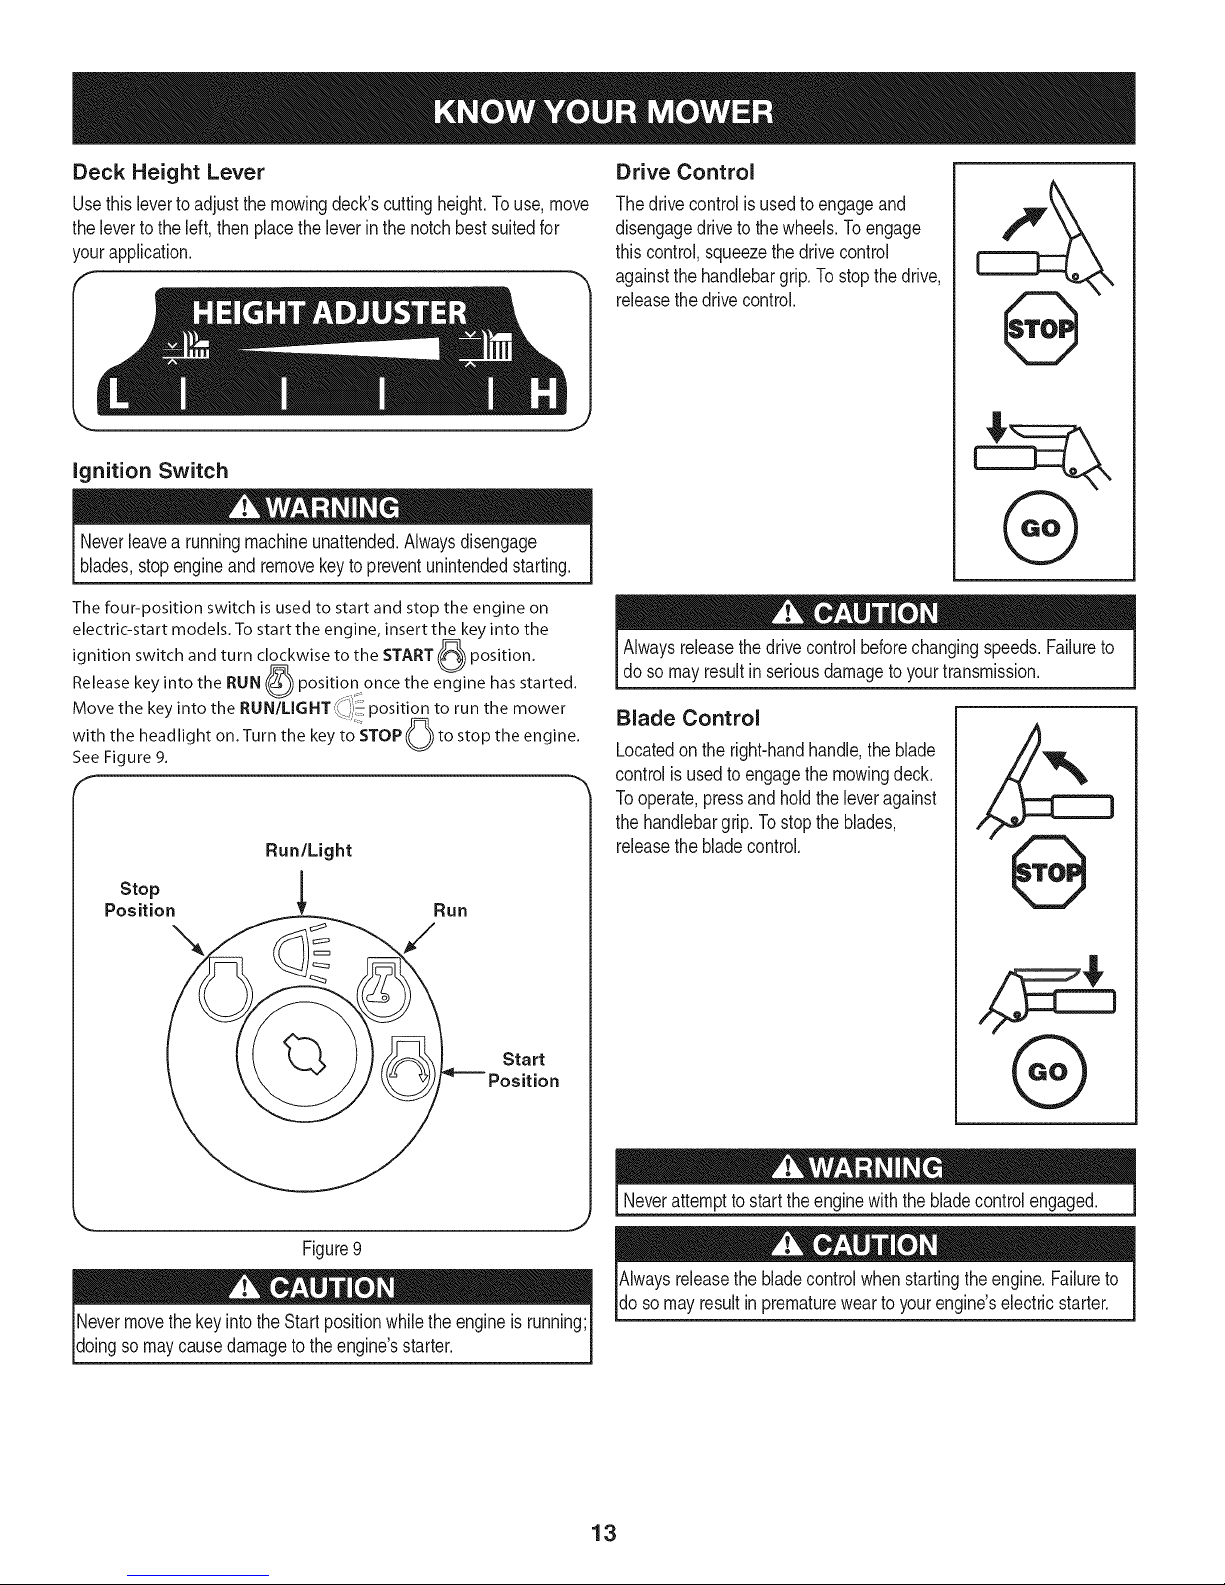
Deck Height Lever
Usethisleverto adjustthemowingdeck'scuttingheight.Touse,move
thelevertothe left,then placetheleverin the notchbestsuitedfor
yourapplication.
ignition Switch
Neverleavea runningmachineunattended.Alwaysdisengage
blades,stopengineandremovekeyto preventunintendedstarting.
The four-position switch is used to start and stop the engine on
electric-start models. To start the engine, insert the key into the
ignition position.
Release key into the RUN _ position once the engine has started.
Move the key nto the RUN/LIGHT,_:'i'_ post on to run the mower
with the headlight on. Turn the key 0 to stop the engine.
See Figure 9.
switch and turn clockwise to the START (J_t_
toSTOP
Run/Light
r_
Drive Control
Thedrivecontrolisusedtoengageand
disengagedrivetothe wheels.Toengage
this control,squeezethedrivecontrol
againstthehandlebargrip.Tostopthe drive,
releasethedrivecontrol.
Alwaysreleasethedrivecontrolbeforechangingspeeds.Failureto
do somayresultin seriousdamagetoyourtransmission.
Blade Control
Locatedonthe right-handhandle,theblade
controlisusedtoengagethe mowingdeck.
Tooperate,pressand holdthe leveragainst
thehandlebargrip.Tostopthe blades,
releasethebladecontrol.
f
,%
Stop 1
Position _ Run
Figure9
NevermovethekeyintotheStartpositionwhiletheengineisrunning;
doingsomaycausedamagetothe engine'sstarter.
Neverattemptto starttheenginewiththe bladecontrolengaged.
Alwaysreleasethe bladecontrolwhenstartingtheengine.Failureto
do somayresultinprematureweartoyourengine'selectricstarter.
13
Page 14
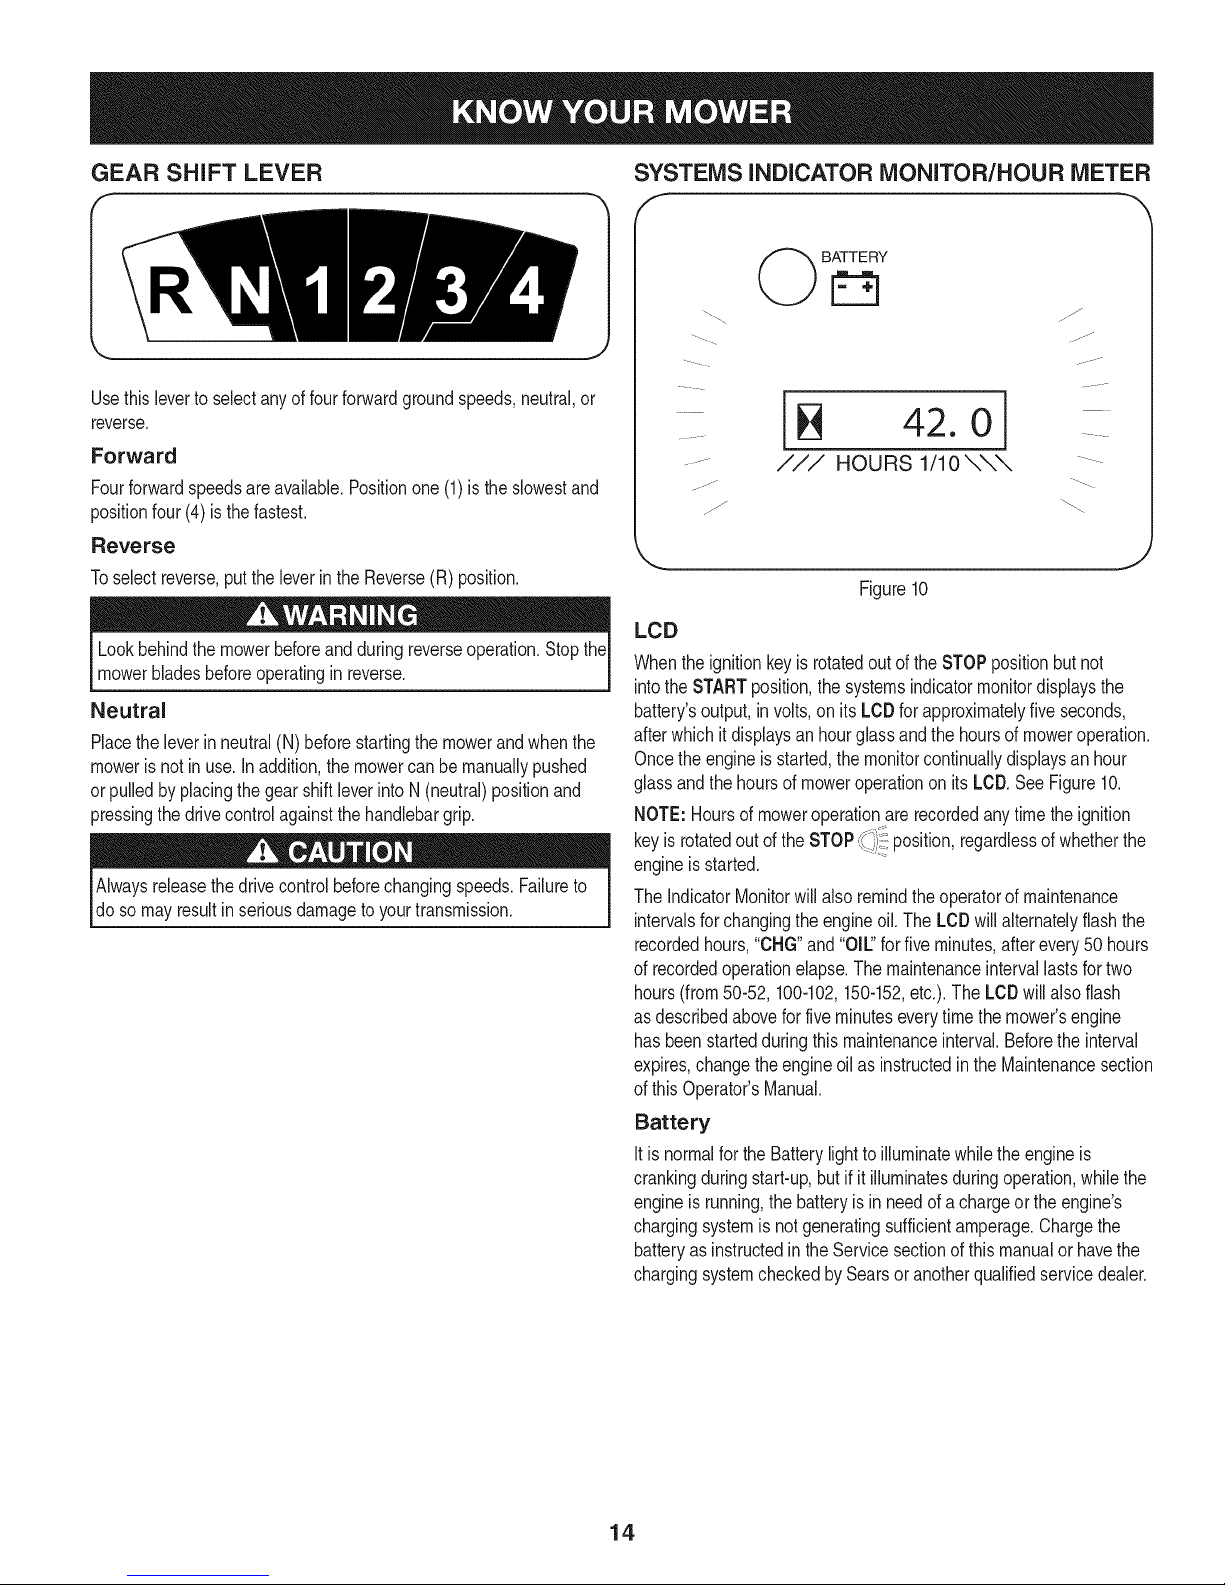
GEAR SHIFT LEVER
Usethisleverto selectanyoffour forwardgroundspeeds,neutral,or
reverse.
Forward
Fourforwardspeedsareavailable.Positionone (1)isthe slowestand
positionfour(4) is thefastest.
Reverse
Toselectreverse,puttheleverin theReverse(R)position.
Lookbehindthe mowerbeforeandduringreverseoperation.Stopthe
mowerbladesbeforeoperatinginreverse.
Neutral
Placethe leverinneutral(N)beforestartingthemowerandwhenthe
mowerisnot inuse.Inaddition,the mowercan be manuallypushed
orpulledbyplacingthegearshiftleverinto N(neutral)positionand
pressingthe drivecontrolagainstthe handlebargrip.
Alwaysreleasethe drivecontrolbeforechangingspeeds.Failureto
dosomayresultin seriousdamagetoyourtransmission.
SYSTEMS INDICATOR MONITOR/HOUR METER
BATTERY
jJ
j j/
42.0
/// HOURS 1/10 \\\
jf
Figure10
LCD
Whenthe ignitionkeyis rotatedout ofthe STOPpositionbut not
intothe STARTposition,the systemsindicatormonitordisplaysthe
battery'soutput,involts,onits LCDfor approximatelyfiveseconds,
afterwhichitdisplaysan hourglassandthehoursofmoweroperation.
Oncetheengineisstarted,the monitorcontinuallydisplaysan hour
glassandthehoursofmoweroperationon its LCD.SeeFigure10.
NOTE:Hoursof moweroperationarerecordedanytimethe ignition
keyis rotatedoutofthe STOP_i _position,regardlessofwhetherthe
engineisstarted.
TheIndicatorMonitorwill alsoremindtheoperatorofmaintenance
intervalsforchangingtheengineoil. TheLCDwill alternatelyflashthe
recordedhours,"CHG"and"OIL' forfiveminutes,afterevery50 hours
of recordedoperationelapse.Themaintenanceintervallastsfortwo
hours(from50-52, 100-102,150-152,etc.).TheLeD willalso flash
asdescribedaboveforfiveminuteseverytimethemower'sengine
hasbeenstartedduringthismaintenanceinterval.Beforetheinterval
expires,changetheengineoilas instructedintheMaintenancesection
ofthis Operator'sManual.
Battery
Itis normalforthe Batterylighttoilluminatewhiletheengineis
crankingduringstart-up,butif it illuminatesduringoperation,whilethe
engineisrunning,thebatteryisin needof a chargeorthe engine's
chargingsystemisnot generatingsufficientamperage.Chargethe
batteryasinstructedin the Servicesectionof thismanualorhavethe
chargingsystemcheckedbySearsor anotherqualifiedservicedealer.
14
Page 15

GAS AND OiL FILL-UP
IMPORTANT:Thisunitis shippedwithoutgasolinebutwithoil inthe
engine.Becertainto serviceenginewithgasolineandchecktheoilas
instructedin thissectionbeforestartingor runningyour machine.
Oil
Use4-strokemotoroilthatmeetsor exceedstherequirementsforAPI
servicecategorySF,SG,SH,SJ or later.AlwayschecktheAPIservice
labelontheoilcontainerto besureit includesthelettersSF,SG,SH,
SJorlater.
* Below40°F(4°C)theuseofSAE30willresultinhardstarting.
** Above80°F(27°C)theuseof 10W-30maycauseincreasedoil
consumption.Checkoil levelmorefrequently.
1. Checktheoil withtheenginestoppedandlevel.
2. Removetheoil filldipstickandwipeitclean.
3. Insertandtightenthe oilfilldipstick.Removeittochecktheoil
level.See Figure11.
4. If theoillevelisnearorbelowthelowerlimitmarkon thedipstick,
removethe oil filldipstick,andfillwiththe recommendedoil tothe
upperlimitmark(J). Donot overfill.
5. Reinstalltheoilfilldipstick.
Gasoline
Donotuseunapprovedgasolines,suchasE85.Donotmixoilin
gasolineormodifyengineto runonalternatefuels.Thiswilldamage
theenginecomponentsandvoid the engine warranty.
Figure11
Refuelina well-ventilatedareawiththe enginestopped.Ifthe engine
hasbeenrunning,allowit tocool first.Neverrefuelthe engineinsidea
buildingwheregasolinefumesmayreachflamesor sparks.
Gasolineis highlyflammableandexplosive,andyoucan be
burnedor seriouslyinjuredwhenrdueling.Stopengineandkeep
heat,sparks,andflameaway.Refuelonlyoutdoors.Wipeupspills
immediately.
ifyour equipmentwill be usedonan infrequentorintermittentbasis,
pleaserefertothe Off SeasonStoragesectionforadditionalinforma-
tionregardingfueldeterioration.
NOTE:Fuelcandamagepaintandsometypes ofplastic.Becareful
notto spillfuel whenfillingyourfueltank.
Neverusestaleorcontaminatedgasolineoroil/gasolinemixture.
Avoidgettingdirtor waterin thefueltank.
1. Removethefueltankcap.
2. Fillthefueltankwith fuel.To allowforexpansionof thefuel,do
notfill abovethe bottomofthefuel tankneck.Do notoverfill.
Wipeupspilledfuelbeforestartingtheengine.
3. Installthefueltankcapandtightenituntil itclicks.
4. Movelawnmowerat least10feetawayfromthefuel container/
sourceandsitebeforestartingtheengine.
Fuelmustmeetthese requirements:
• Clean,fresh,unleadedgasoline.
• A minimumof87 octane/87AKI(91RON).
• Gasolinewithupto 10%ethanol(gasohol)or upto 15%MTBE
(methyltertiarybutylether)is acceptable.
Besurenooneotherthanthe operatorisstandingnearthelawn
mowerwhilestartingengineoroperatingmower.Neverrunengine
indoorsor inenclosed,poorlyventilatedareas.Engineexhaust
containscarbonmonoxide,anodorlessanddeadlygas.Keephands,
feet,hairand looseclothingawayfromanymovingpartson engine
andlawnmower.
15
Page 16
STARTING THE ENGINE
.
Disengageallcontrolsonthemower.
2.
Movethegearshiftleverinto theneutral(N)position.
3.
Insertthe keyintothe ignitionswitch.
4.
If startingacold engine,placethethrottle/chokecontrolallthe
wayforward,intotheCHOKE1_.1position.If restartinga warm
engine,placethethrottle/chokecontrolintotheFast_ position.
.
Turntheignitionkeyclockwisetothe START_ position.After
theenginestarts,releasethekey.it will returntothe RUN(_
position.
.
MovethekeytotheRUN/LGNT positiontooperatethe
mowerusingthe headlight.
DoNOTholdthe keyintheSTARTpositionforlongerthan five
secondsata time.Doingsomaycausedamagetoyourengine's
electricstarter.
7. Movethethrottle/chokecontrolintotheFAST'_ position.
NOTE:Neverleavethethrottle/chokecontrolintheCHOKEI'_!
positionwhileoperatingthemower.Doingsowillresultin a "rich"fuel
mixtureandcausetheengineto runpoorly.
Stopping the Engine
Totravelin REVERSE,
a. Checkthatthe areabehindisclear.
b. PlacethegearshiftleverinReverse(R).
c. SlowlysqueezetheDriveControlagainstthelefthandlegrip
andthemowerwillmove.Releaseitanddrivemotionwillstop.
DoNOTattempttochangethe directionof travelwhenthe moweris
in motion.Alwaysreleasethedrivecontrolandbringthe mowertoa
completestopbeforerepositioningthegearshiftleverfromaforward
gearintoReverse.Failuretodo somayresultin seriousdamageto
rourtransmission.
Donot leavetheoperator'spositionwithoutfirstreleasingtheBlade
Control.Ifleavingthe mowerunattended,also turnthe engineoffand
removethe ignitionkey.
ENGAGING THE BLADES
Tohelpavoidbladecontactora thrownobjectinjury,keepbystand-
lets,helpers,childrenandpetsat least75feetfromthemachinewhile
lit is inoperation.Stopmachineif anyoneentersthearea.
1. Movethethrottle/chokecontroltothe FAST_ position.
e beforerestartingandoperating.
1. Ifthe bladesareengaged,releasethe BladeControl.
2. Movethethrottle/chokecontrolintotheSTOPlI_ position.
3. TurntheignitionkeycounterclockwisetotheSTOPO position.
4. Removethe keyfromtheignitionswitchto preventunintended
starting.
ENGAGING THE DRIVE
Avoidsuddenstarts,excessivespeedandsuddenstops.
Starttheengineas instructedearlierin thissectionandmovethe
throttle/chokecontrolintotheFAST'_ position.
TotravelFORWARD:
a. Placethegearshiftleverin anyof thefourforwardground
speeds.Selecta speedappropriateforthe conditionsanda
paceyou'recomfortablewith.
b. Slowlysqueezethe DriveControlagainstthelefthandlegrip
andthemowerwillmove.Releaseitanddrivemotionwillstop.
2. Slowlysqueezethe BladeControlagainsttherighthandlegrip
andthebladeswillengage.Releaseit andthebladeswillstop.
OPERATING ON SLOPES
Refertothe SLOPEGUIDEon page7 tohelpdetermineslopeswhere
youmayoperatethemowersafely.
Donot mowon inclineswitha slopeinexcessof 15degrees(a rise
ofapproximately2-1/2feetevery 10feet).Themowercouldoverturn
andcauseseriousinjury.
• Mowacrossthefaceof slopes;neverupanddown.
• Exerciseextremecautionwhenchangingdirectiononslopes.
• Watchfor holes,ruts,rocks,hiddenobjects,or bumpswhichcan
causeyouto sliportrip.Tallgrasscanhideobstacles.
• Alwaysbesureofyourfooting.A slipandfallcan causeserious
personalinjury.Ifyou feelyou arelosingyourbalance,release
thebladecontrolhandleimmediatelyandthebladewillstop
rotatingwithinthree (3) seconds.
• Donotmowneardrop-offs,ditchesorembankments,youcould
loseyourfootingor balance.
• Donotmowslopesgreaterthan15degreesas shownon the
slopegauge.
• Donotmowon wetgrass.Unstablefootingcouldcauseslipping.
16
Page 17
USING THE DECK HEIGHT LEVER
Toraiseor lowerthecuttingdeck, movethe deck heightlevertothe
left,then placeit inthenotchbestsuitedforyourapplication.
MOWING
Thefollowinginformationwill behelpfulwhenoperatingyourmower.
Planyourmowingpatterntoavoiddischargeof materialstoward
roads,sidewalks,bystanders.Also,avoiddischargingmaterial
againstawallorobstructionwhichmaycausedischargedmaterialto
ricochetbacktowardtheoperator.
• Donotmowatfastgroundspeeds,especiallyifa mulchkitor
grasscollectoris installed.
• Donotcut thegrasstooshort.Shortgrassisproneto weed
growthandyellowsquicklyin dryweather.
• Alwaysoperatethemowerwiththethrottle/chokecontrolinthe
FAST_ positionwhilemowing.
• Forbestresultsitis recommendedthatthefirsttwolapsbecut
withthedischargethrowntowardsthe center.Afterthefirsttwo
laps,reversethe directiontothrowthe dischargeto theoutside
forthe balanceofcutting.Thiswillgivea betterappearancetothe
lawn.
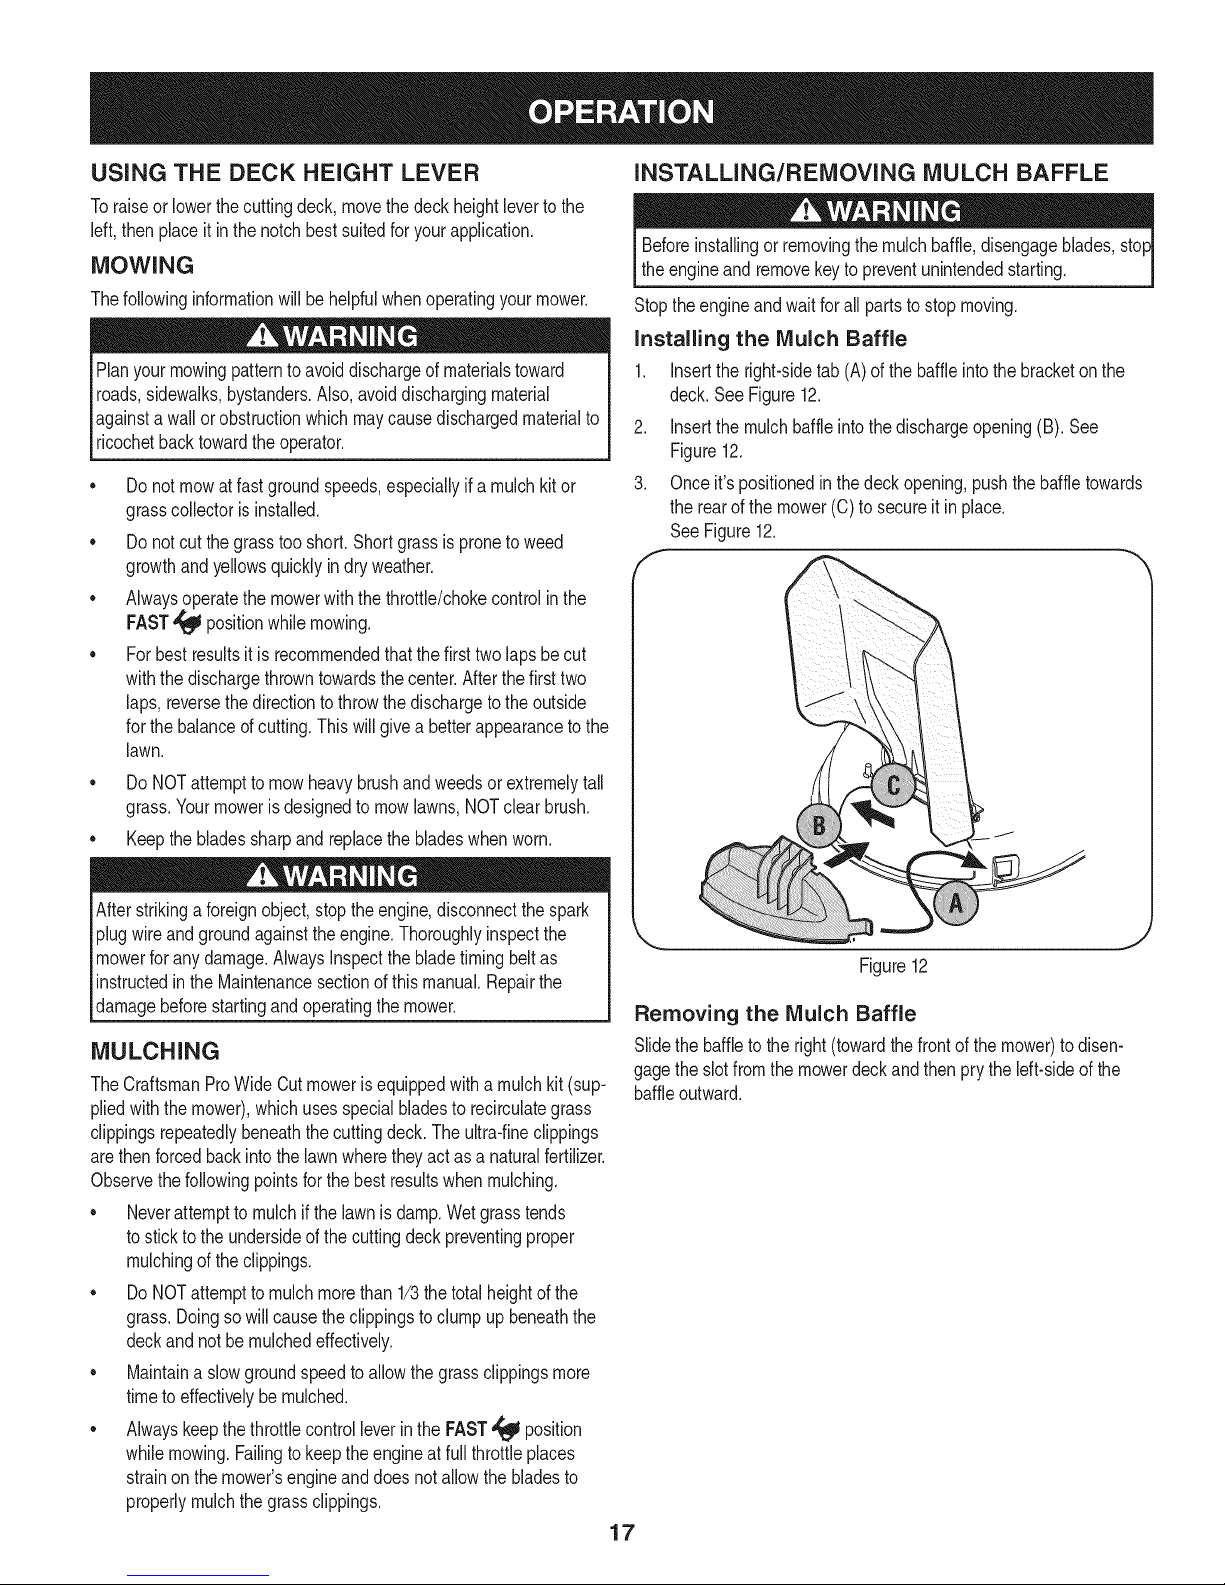
INSTALLING/REMOVING MULCH BAFFLE
Beforeinstallingor removingthe mulchbaffle,disengageblades,sto
theengineand removekeyto preventunintendedstarting.
Stoptheengineandwaitforall partsto stopmoving.
Installing the Mulch Baffle
1. Insertthe right-sidetab(A)of thebaffleinto thebracketonthe
deck.SeeFigure12.
2. Insertthe mulchbaffleintothedischargeopening(B).See
Figure12.
3. Onceit'spositionedin thedeckopening,pushthebaffletowards
therearof themower(C) tosecureit inplace.
SeeFigure12.
DoNOTattemptto mowheavybrushandweedsor extremelytall
grass.Yourmoweris designedtomowlawns,NOTclear brush.
Keepthebladessharpandreplacethebladeswhenworn.
Afterstrikingaforeignobject,stopthe engine,disconnectthespark
plugwireandgroundagainsttheengine.Thoroughlyinspectthe
mowerfor anydamage.AlwaysInspectthe bladetimingbeltas
instructedin the Maintenancesectionof thismanual.Repairthe
damagebeforestartingandoperatingthemower.
MULCHING
TheCraftsmanProWideCutmoweris equippedwitha mulchkit(sup-
pliedwiththemower),whichusesspecialbladesto recirculategrass
clippingsrepeatedlybeneaththecuttingdeck.Theultra-fineclippings
arethenforcedbackinto thelawnwheretheyact asa naturalfertilizer.
Observethe followingpointsforthe bestresultswhenmulching.
• Neverattempttomulchif the lawnisdamp.Wetgrasstends
tostickto theundersideof thecuttingdeckpreventingproper
mulchingof theclippings.
DoNOTattemptto mulchmorethan1/3the totalheightof the
grass.Doingsowill causetheclippingsto clumpupbeneaththe
deckandnotbemulchedeffectively.
• Maintaina slowgroundspeedtoallowthegrassclippingsmore
timetoeffectivelybemulched.
• Alwayskeepthethrottlecontrolleverinthe FAST,_ position
whilemowing.Failingtokeepthe engineatfull throttleplaces
strainon themower'sengineanddoesnotallowthe bladesto
properlymulchthegrassclippings.
Figure12
Removing the Mulch Baffle
Slidethebaffleto theright(towardthe frontofthe mower)to disen-
gagetheslotfromthe mowerdeckandthen prythe left-sideofthe
baffleoutward.
17
Page 18
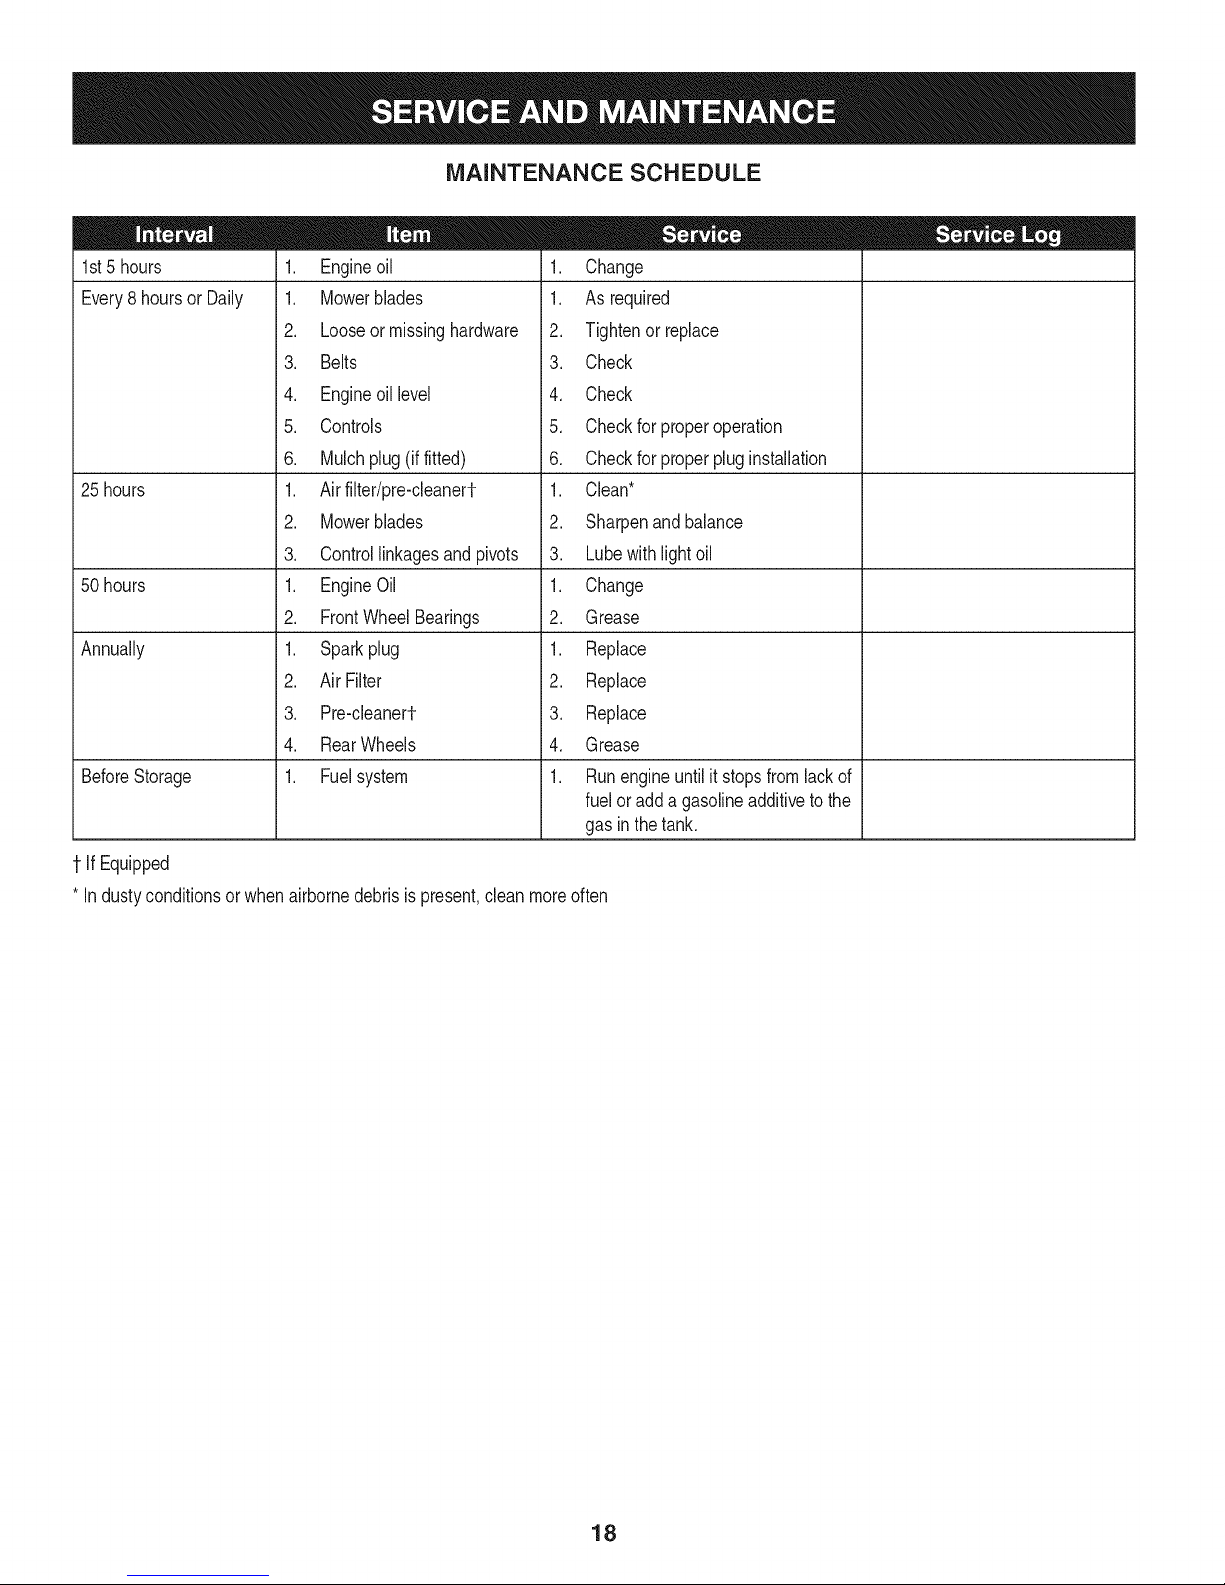
MAINTENANCE SCHEDULE
1st5 hours
Every8 hoursor Daily
25 hours
50 hours
Annually
BeforeStorage
1. Engineoil
1. Mowerblades
2. Looseormissinghardware
3. Belts
4. Engineoillevel
5. Controls
6. Mulchplug(iffitted)
1. Airfilter/pre-cleanerf
2. Mowerblades
3. Controllinkagesand pivots
1. EngineOil
2. FrontWheelBearings
1. Sparkplug
2. Air Filter
3. Pre-cleanerf
4. RearWheels
1. Fuelsystem
1. Change
1. As required
2. Tightenor replace
3. Check
4. Check
5. Checkfor properoperation
6. Checkfor properpluginstallation
1. Clean*
2. Sharpenandbalance
3. Lubewithlightoil
1. Change
2. Grease
1. Replace
2. Replace
3. Replace
4. Grease
1. Runengineuntilit stopsfromlackof
fueloradda gasolineadditivetothe
gasin thetank.
1-IfEquipped
* Industyconditionsor whenairbornedebrisispresent,cleanmoreoften
18
Page 19
MAINTENANCE
Beforeperforminganymaintenanceor repairs,disengageblades,
stopengineandremovekeyto preventunintendedstarting.
GENERAL RECOMMENDATIONS
Alwaysobservesafetyruleswhenperforminganytype of
maintenanceon themower.
Thewarrantyon thislawnmowerdoesnotcoveritemsthathave
beensubjectedtooperatorabuseor negligence.Toreceivefull
valuefromwarranty,operatormustmaintainthelawnmoweras
instructedinthismanual.
• Changingofengine-governedspeedwillvoidenginewarranty.
• Alladjustmentsshouldbecheckedat leastonceeachseason.
• Periodicallycheckall fastenersandmakesuretheyare tight.
ENGINE MAINTENANCE
Checking the Engine Oil
Checkoillevelbeforeeachuse.Stopengineandwaitseveralminutes
beforecheckingoil level.Withengineon levelground,
theoilmust betoFULLmarkondipstick.
1. RemovetheOil Cap/Dipstickandwipewitha
cleancloth.
2. ReplaceandtightenOilCap/Dipstick.Remove
OilCap/Dipstickandcheckoil level.Level
shouldbeat FULLmark.
3. If needed,addoil slowlyintotheengineoilfill. Recheckoil level.
Donotoverfill.
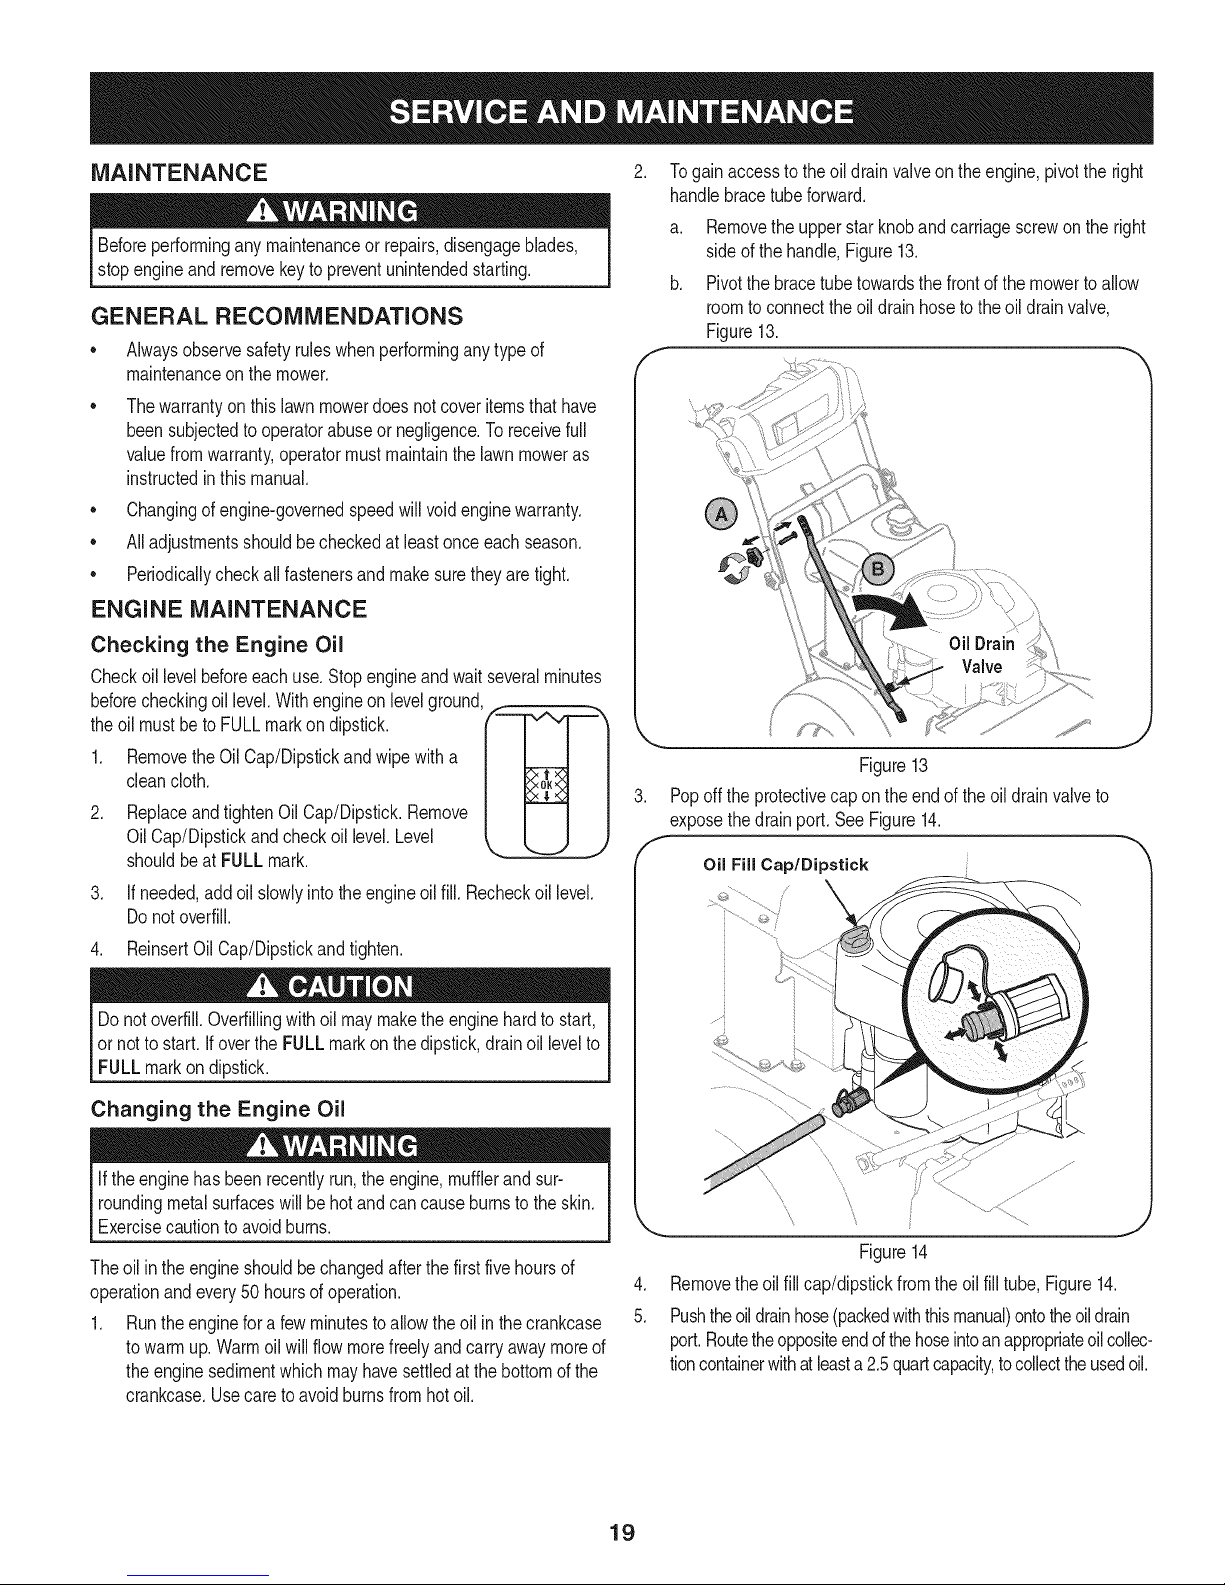
Togainaccessto theoil drainvalveonthe engine,pivotthe right
handlebracetubeforward.
a. Removetheupperstarknobandcarriagescrewontheright
sideof thehandle,Figure13.
b. Pivotthebracetubetowardsthefrontof themowerto allow
roomto connecttheoildrainhoseto theoildrainvalve,
Figure13.
Figure13
Popoff theprotectivecapon theendofthe oil drainvalveto
exposethedrainport.SeeFigure14.
Oil Fiil Cap/Dipstick
4. ReinsertOilCap/Dipstickandtighten.
Donotoverfill.Overfillingwithoilmaymakethe enginehardtostart,
or notto start.If overthe FULLmarkonthedipstick,drainoil levelto
FULLmarkondipstick.
Changing the Engine Oil
Iftheenginehas beenrecentlyrun,theengine,mufflerandsur-
roundingmetalsurfaceswillbe hotandcan causeburnsto theskin.
Exercisecautiontoavoidburns.
Theoil inthe engineshouldbechangedafterthefirst fivehoursof
operationandevery50 hoursofoperation.
1. Runthe enginefora fewminutestoallowtheoil in the crankcase
towarmup. Warmoilwillflowmorefreelyand carryawaymoreof
theenginesedimentwhichmayhavesettledatthebottomofthe
crankcase.Usecareto avoidburnsfromhotoil.
19
_\ j,J"
....."",,, iij ...............................................
Figure14
.
Removetheoilfill cap/dipstickfromtheoil fill tube,Figure14.
5.
Pushtheoildrainhose(packedwiththismanual)ontotheoildrain
port.Routetheoppositeendd thehoseintoanappropriateoilcollec-
tioncontainerwithatleasta2.5quartcapacity,tocollectthe usedoil.
Page 20

6, Releasethevalvebypressingthetwotabsinwardwhilepulling
thevalveout,Theoil willbeginto drainoutof theengine,
7. Aftertheoil hasfinisheddraining,pressthetwotabsinwardand
pushthe oildrainvalvebackin tolockthe valveclosed,Remove
thehose,andre-captheendof theoildrainvalveto keepdebris
fromenteringthedrainport.
8. Refilltheenginewithnew motoroil untilthe oillevelon the
dipstickreadsFULL.Replacethe oilfillcap/dipstick.
9. Pivottheright handlebracetubebackintoposition.Alignthe
middleholeinthe bracetubewiththeholein the handle.Secure
withthestarknobandcarriagescrewremovedearlier.
Checking the Spark Plug
Cleansparkplugandresettheelectrodegapto0.030"atleastoncea
season;replaceannually.
1. Cleanareaaroundthe sparkplugbase.Donot sandblastspark
plug.Sparkplugshouldbecleanedbyscrapingorwirebrushing
andwashingwitha commercialsolvent
.
Removeand inspectthesparkplug.Checkgapto makesureit is
setat .030".SeeFigure15.
f
Electrode Porcelain
Servicing the Air Filter
Iffilters,or coversarenotinstalledcorrectlyseriousinjuryordeath
couldresultfrombackfire.Donotattemptto startthe enginewith
themremoved.
Donot usepressurizedairor solventsto cleantheair filtercartridge.
Cleanor replacetheairfilterevery25hoursofoperation.
1. Pulluponthecoverhandle.Rotatethecoverhandletowardthe
engineand removethe cover.SeeFigure16.
f -,,
\
Air FilterCover AirFilterCartridge
\
CoverHandle _
.030inch(26 ram)gap
Figure15
.
Replacethe sparkplugifelectrodesarepitted,burned,or the
porcelainiscracked.Usea Champion®RC12YCsparkplug.
Figure16
2. Carefullyremoveaircleanercartridgeandpre-cleaner(if
equipped)fromtheblowerhousing.
3. Toloosendebris,gentlytapthe filteron a hardsurface.If thefilter
is excessivelydirty,replacewitha newfilter.
4. Washthepre-cleanerinliquiddetergentandwaterandallow itto
thoroughlydry. DONOToil thepre-cleaner.
5. Placethedrypre-cleaner,if equipped,andcartridgebackinto
theblowerhousing.Thecartridgemustbeplacedsecurelyinto
position.
6. Aligntabsoncoverwithslotsin blowerhousing.Rotatethecover
handlebackandpushdownto lockinplace.
20
Page 21
BATTERY
Batteryposts,terminals,andrelatedaccessoriescontainleadand
leadcompounds,chemicalsknowntotheStateof Californiato cause
cancerandreproductiveharm.Washhandsafterhandling.
1. Positionthemowerona level,clear spoton yourlawn,near
enoughforyourgardenhoseto reach.
Makecertainthe mower'sdischargechuteisdirectedAWAYfrom
yourhouse,garage,parkedcars,etc.
Thebatteryissealedandis maintenance-free.Acidlevelscannotbe
checkedandfluidcannot beadded.
• Alwayskeepthebatterycablesandterminalscleanandfreeof
corrosivebuild-up.
Aftercleaningthebatteryandterminals,applyalightcoatof
petroleumjelly or greaseto bothterminals.
If removingthebatteryforcleaning,disconnecttheNEGATIVE(Black)
wirefromit'sterminalfirst,followedbythePOSITIVE(Red)wire.When
re-installingthebattery,alwaysconnectthePOSITIVE(Red)wireits
terminalfirst,followedbytheNEGATIVE(Black)wire.Becertainthat
thewiresareconnectedto thecorrectterminals;reversingthemcould
resultinseriousdamageto yourengine'salternatingsystem.
TIRE PRESSURE
Maximumtire pressureunderany circumstancesis30 psi.Equaltire
pressureshouldbemaintainedat alltimes.
Periodicallycheckthepressureonbothyourmower'sreartires.
Uneventire pressurewill causethecuttingdecktomowunevenly
andmayresultin mowertoveeringtoeithertheleftor rightduring
operation.Recommendedoperatingtirepressureis approximately20
p.s.i.Checkthe sidewallof tirefor maximump.s.i.
CLEANING THE MOWER
Anyfuel oroil spilledonthe machineshouldbewipedoffpromptly.Do
NOTallowdebristoaccumulatearoundthecoolingfinsof theengine,
thetransmission'scoolingfanor onanyotherpartof themachine,
especiallythebeltsandpulleys.
Smart Jet
Yourmower'sdeckis equippedwitha waterportonitssurfaceas part
ofits deckwashsystem.
UsetheSmartJetto rinsegrassclippingsfromthe deck'sunderside
andpreventthe buildupofcorrosivechemicals.Completethe following
stepsAFTEREACHMOWING:
Beforeusingthedeckwashsystem,alwaysdisengagetheBlade
Control,stopengineandremovekeyto preventunintendedstarting.
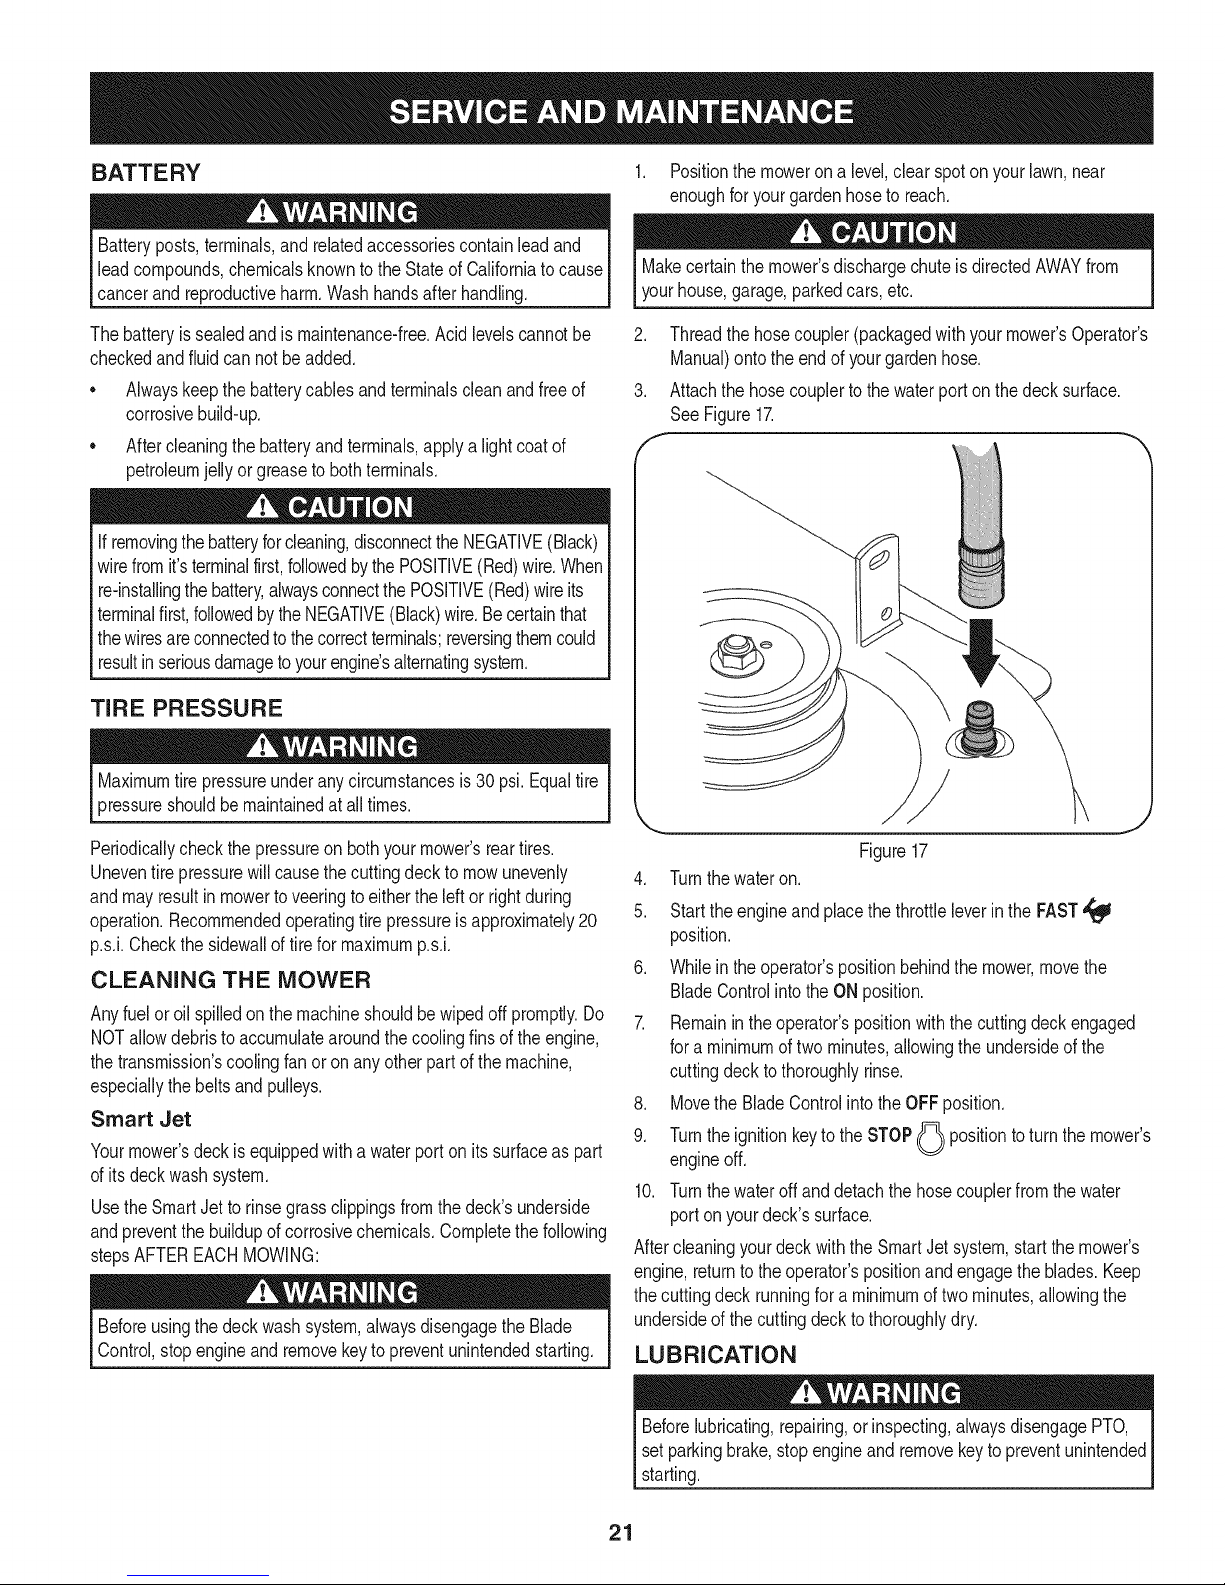
2. Threadthe hosecoupler(packagedwithyour mower'sOperator's
Manual)ontothe endofyourgardenhose.
3. Attachthe hosecouplertothewaterporton thedeck surface.
SeeFigure17.
f
Figure17
4. Turnthewateron.
5. Starttheengineandplacethethrottleleverinthe FAST,_
position.
6. Whileinthe operator'spositionbehindthe mower,movethe
BladeControlintothe ONposition.
7. Remainin theoperator'spositionwiththecuttingdeckengaged
fora minimumoftwominutes,allowingthe undersideofthe
cuttingdeckto thoroughlyrinse.
8. Movethe BladeControlintothe OFFposition.
9. Turnthe ignitionkeyto theSTOP(_ positiontoturnthe mower's
engineoff.
10. Turnthewateroffanddetachthehosecouplerfromthe water
portonyour deck'ssurface.
AftercleaningyourdeckwiththeSmartJet system,startthemower's
engine,returntothe operator'spositionandengagetheblades.Keep
thecuttingdeckrunningfora minimumof two minutes,allowingthe
undersideofthe cuttingdeckto thoroughlydry.
LUBRICATION
Beforelubricating,repairing,orinspecting,alwaysdisengagePTO,
set parkingbrake,stopengineandremovekeyto preventunintended
starting.
21
Page 22
Pivot Points & Linkage
Lubricateall thepivotpointson thedrivesystemandlift linkageat
leastoncea seasonwithlightoil.
Rear Wheels
Therearwheelsshouldbe removedfromthe axlesoncea season.
Lubricatethe axlesandrimhubswellwithanall-purposegrease
beforereinstallingthem.
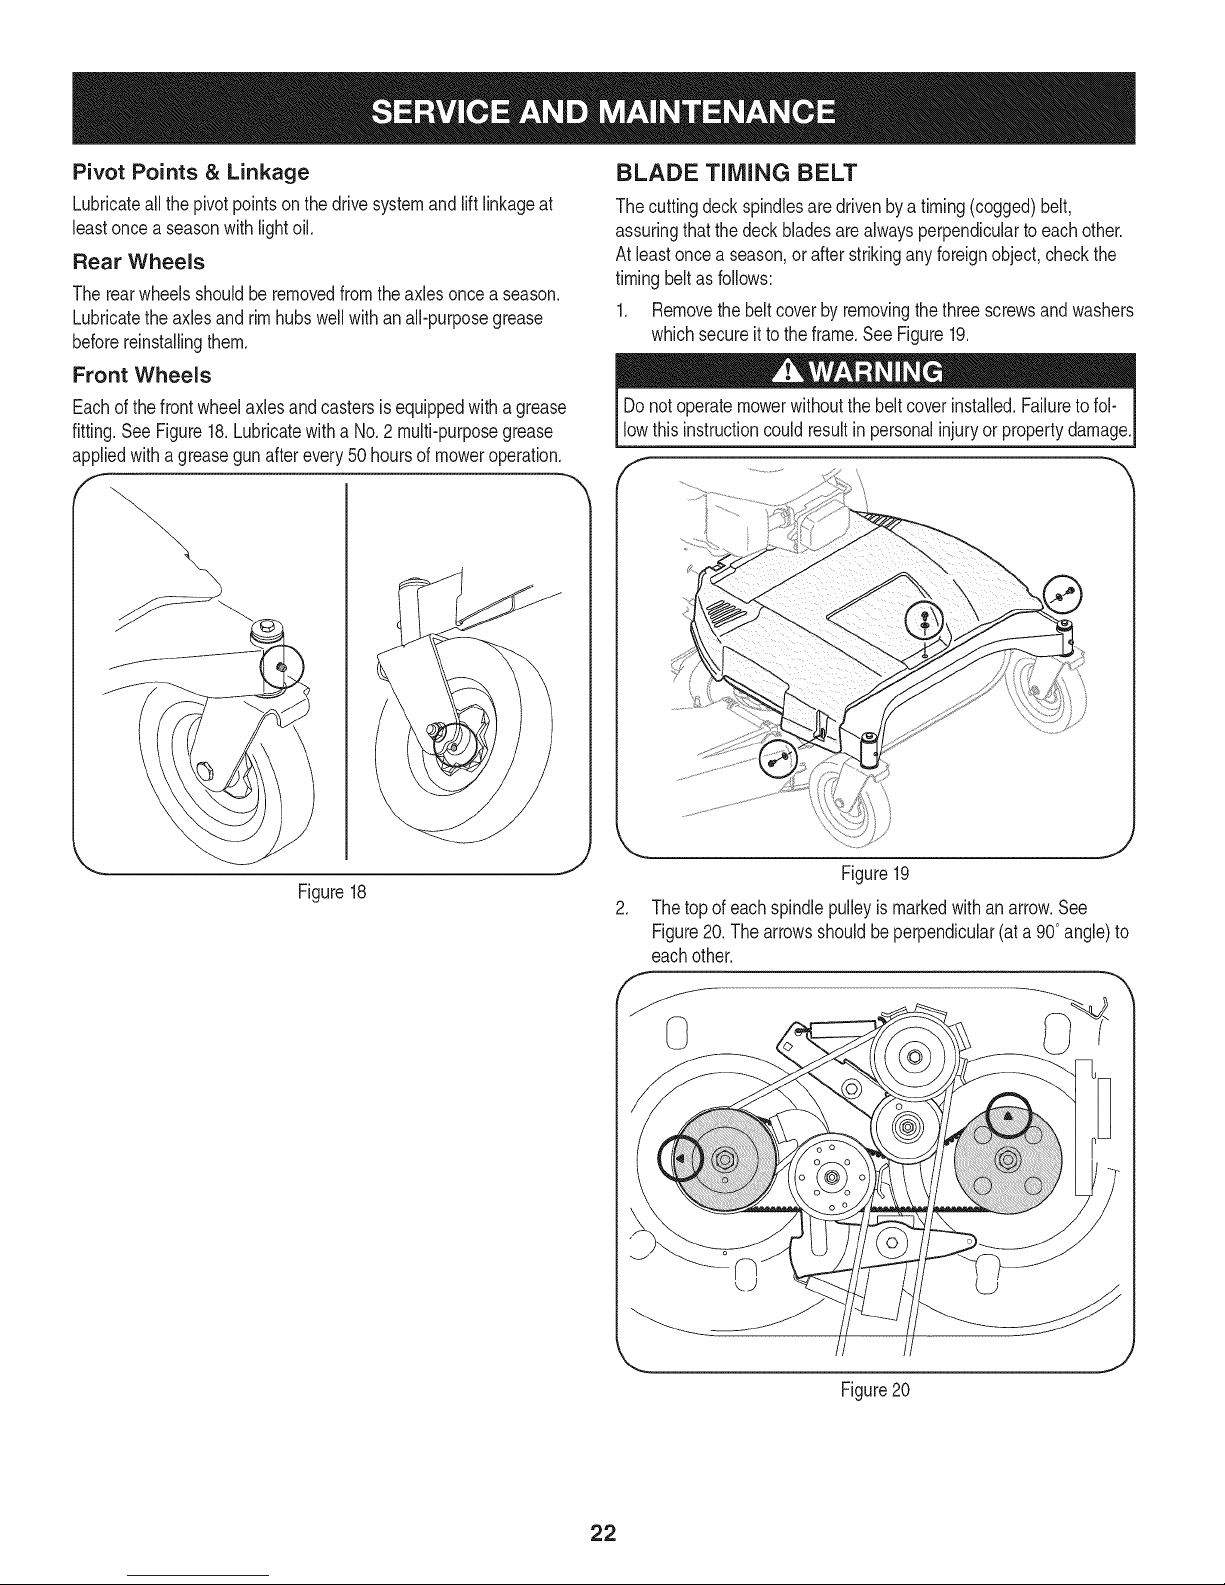
Front Wheels
Eachof thefrontwheelaxlesandcastersisequippedwitha grease
fitting.See Figure18.Lubricatewitha No.2 multi-purposegrease
appliedwitha greasegunafterevery50hoursofmoweroperation.
f -,
BLADE TIMING BELT
Thecuttingdeckspindlesaredrivenbya timing(cogged)belt,
assuringthatthedeckbladesarealwaysperpendiculartoeachother.
At leastoncea season,orafterstrikinganyforeignobject,checkthe
timingbeltas follows:
1. Removethebeltcoverbyremovingthethreescrewsandwashers
whichsecureitto theframe.SeeFigure19.
Donot operatemowerwithoutthe beltcoverinstalled.Failuretofol-
lowthisinstructioncouldresultin personalinjuryorpropertydamage.
Figure18
Figure19
2. Thetopof eachspindlepulleyismarkedwithan arrow.See
Figure20.Thearrowsshouldbeperpendicular(ata 90°angle)to
eachother.
Figure20
22
Page 23

3. If thearrowsonthe surfaceofeachspindlepulleyarenot
perpendicular(ata 90°angle)toeachother,seeyourSearsor
otherqualifiedservicedealerto havethe timingbeltreset.
Donotoperatethemachinewithoutthedeck'stimingbeltproperly
set.Failureto followthisinstructioncould resultin personalinjuryor
propertydamage.
ADJUSTMENTS
CUTTING DECK REMOVAL
Beforeperforminganymaintenanceorrepairs,disengageblades,
stopengineand removekeyto preventunintendedstarting.
Toremovethecuttingdeck,proceedasfollows:
1. Removethebeltcoverbyremovingthethreescrewsandwashers
whichsecureitto theframe.SeeFigure22.
Shutthe engineoffand removethe ignitionkeybeforemaking
adjustments.
Handle Height
Theupperhandleis securedtotwosupportbarsthatcanbeadjusted
toraiseor lowerthe handleheight.Adjustifnecessaryas follows:
1. Removetheupperstarknobandcarriagescrewonthe rightside
ofthe handleandtheleftside ofthe handle.
SeeFigure21.
Donot operatemowerwithoutthe beltcoverinstalled.Failuretofol-
lowthisinstructioncouldresultin personalinjuryor propertydamage.
Figure22
2. Placethedeckheightleverinits highestposition.
3. Positionwoodblocksatvariousplacesunderthedeck'sedge.
Thesewilltemporarilysupportthedeckinthe processofremovingit.
4. Usethedeckheightleverto lowerthedeck,sothat itrestsonthe
woodblocks.
Figure21
2. Pivotthehandleforwardor rearwardto alignoneofthe three
holesoneach supportbarwiththeholesonthehandle.
3. Reinstalltheupperstarknobandcarriagescrewonthe rightside
ofthe handleandtheleftside ofthe handlewhenacomfortable
heightis achieved.
23
Page 24

5. Removethe screwandflangenut whichsecuresthebeltkeeper
rodtothe left sideof themower'sframe.SeeFigure23.
\
\
Figure23
.
Removethe beltkeeperrodand removethedeckbeltfrom
aroundthemower'senginepulley.
Lookingatthecuttingdeckfromtheleft side,locateandcarefully
removethe hairpinclipsthatsecurethedecksupportson therear
leftsideandfrontleftsideof the deck.SeeFigure24.
Lift Arm
10. Carefullyunhookthe mower'slift assemblyfromthe reardeck
supports.
11. Usethedeckheightleverto raisethe liftassemblytoits highest
position.
12. Removethewoodenblocksfromunderthe deckandgentlyslide
thecuttingdecktowardtherearof themachine.
13. Pulltheclick pinoutandunhookthedrivespringcablefromthe
idlerarmassembly.SeeFigure25.
Figure25
14. Gentlyslidethecuttingdeckto theright,outfrombeneaththemower.
Toinstallthe cuttingdeck,followtheabovestepsintheoppositeorder
and mannerofremoval.
... J
Figure24
.
Repeattheprevioussteponthe mower'srightside.
9.
Carefullyremovethefrontdeck supportsfromthedecklift arms,
Figure25.
24
Page 25
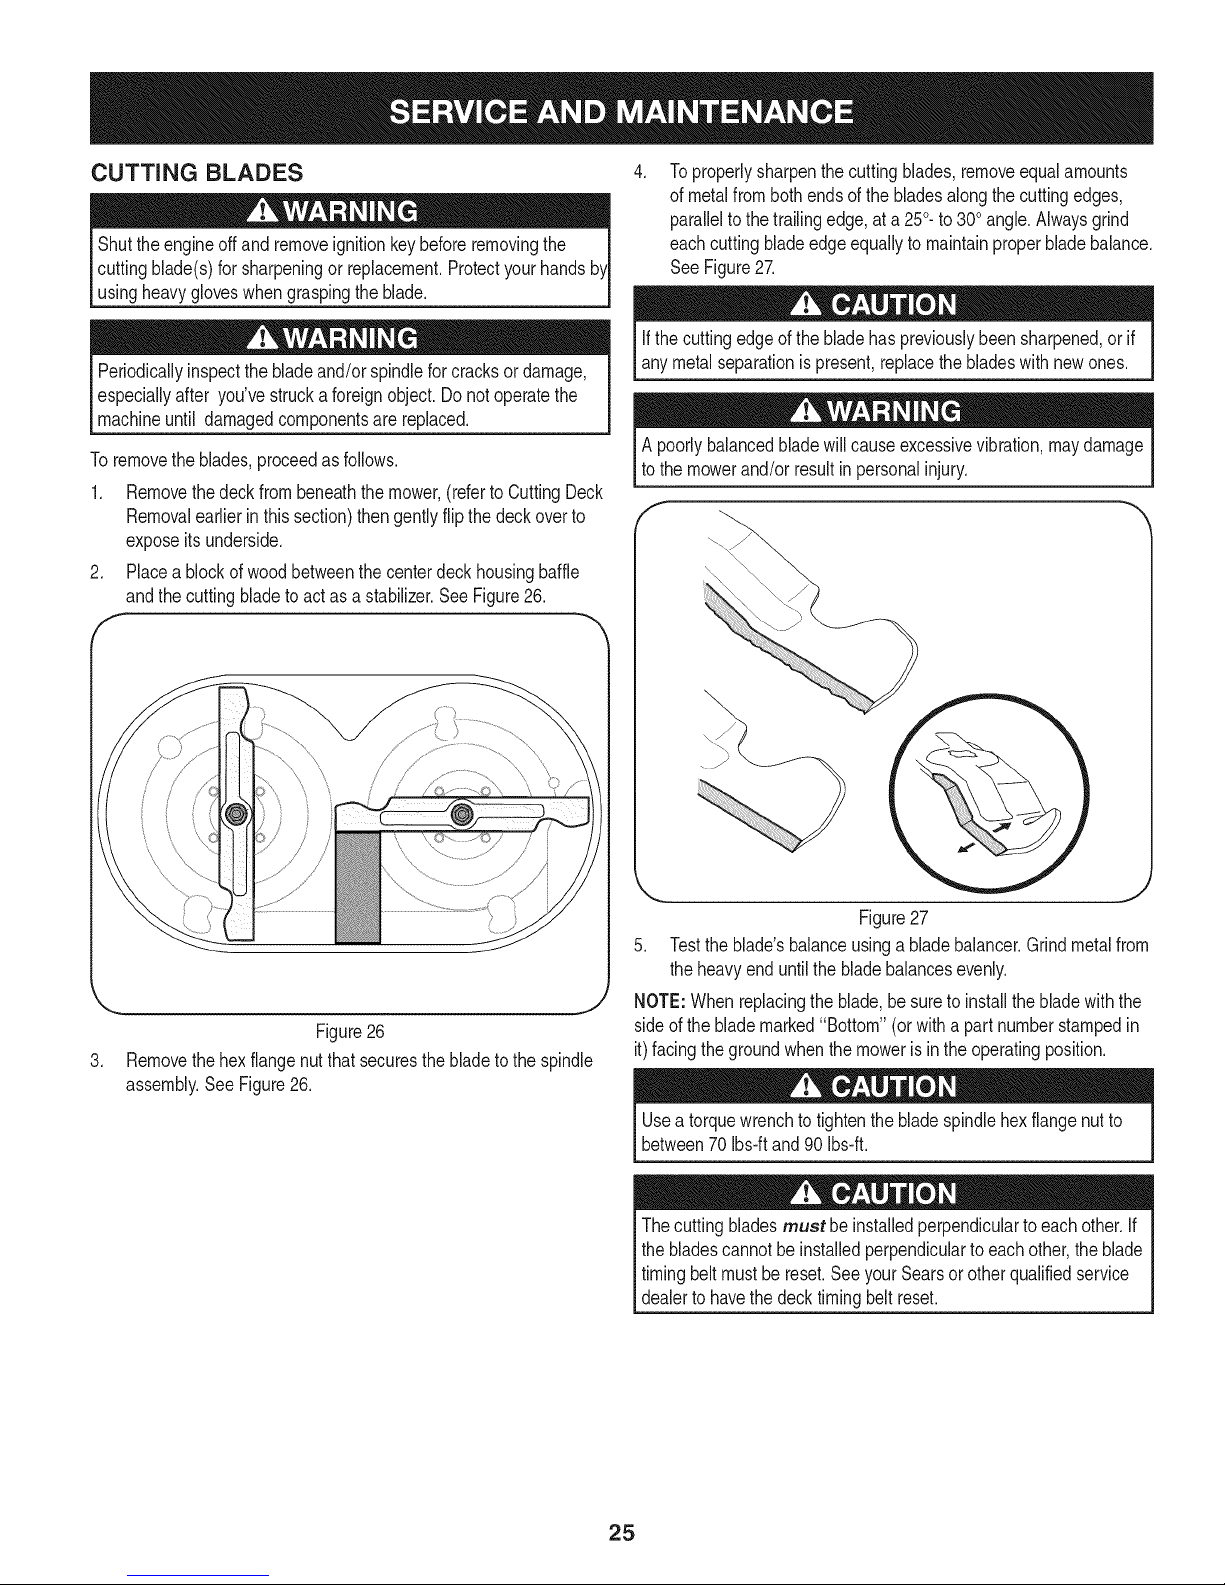
CUTTING BLADES
Shutthe engineoffand removeignitionkeybeforeremovingthe
cuttingblade(s)forsharpeningor replacement.Protectyourhandsb
usingheavygloveswhengraspingtheblade.
Periodicallyinspectthebladeand/or spindleforcracksor damage,
especiallyafter you'vestruckaforeignobject.Do notoperatethe
machineuntil damagedcomponentsare replaced.
Toremovetheblades,proceedasfollows.
1. Removethedeckfrombeneaththemower,(referto CuttingDeck
Removalearlierinthis section)thengentlyflipthedeckoverto
exposeitsunderside.
2. Placea blockofwoodbetweenthe centerdeckhousingbaffle
andthecuttingbladetoactas a stabilizer.SeeFigure26.
F
Toproperlysharpenthecuttingblades,removeequalamounts
of metalfrombothendsof thebladesalongthecuttingedges,
parallelto thetrailingedge,at a250.to 300angle.Alwaysgrind
eachcutting bladeedgeequallytomaintainproperbladebalance.
SeeFigure27.
Ifthecuttingedgeofthe bladehaspreviouslybeensharpened,orif
anymetalseparationispresent,replacethebladeswithnewones.
A poorlybalancedbladewillcauseexcessivevibration,maydamage
tothe mowerand/orresultin personalinjury.
\
J
Figure26
3. Removethehexflangenutthat securesthe bladetothe spindle
assembly.SeeFigure26.
Figure27
5. Testthe blade'sbalanceusinga bladebalancer.Grindmetalfrom
theheavyend untilthebladebalancesevenly.
NOTE:Whenreplacingthe blade,be sureto installthebladewiththe
sideof theblademarked"Bottom"(orwitha part numberstampedin
it)facingthe groundwhenthe mowerisinthe operatingposition.
Usea torquewrenchto tightenthebladespindlehexflangenutto
between70Ibs-ftand 90Ibs-ft.
Thecutting bladesmust be installedperpendiculartoeachother.If
thebladescannotbeinstalledperpendiculartoeachother,theblade
timingbeltmustbe reset.SeeyourSearsorotherqualifiedservice
dealerto havethedecktimingbelt reset.
25
Page 26

TRAIL SHIELD Jump Starting
Neveroperatethemowerwithoutthetrailshieldin placeandworking.
Failuretodo socan resultinpersonalinjury.
Toreplacethetrail shield,proceedasfollows:
1. Removethe screwwhichsecuresthetrailshieldtothe rightside
ofthe mower.SeeFigure28.
Figure28
.
Bowthe trailshieldinwardoneach sideto releaseit fromthe
mowerframe.
.
Installthe replacementtrailshieldbyfollowingthestepsabovein
theoppositeorderandmannerof removal.
BATTERY
Neverjumpstarta damagedor frozenbattery.Becertainthe vehicles
do nottouch,andignitionsareoff.Do notallowcableclampsto
touch.
1. Connectpositive(+)cabletopositivepost(+) of yourmower's
dischargedbattery.
2. Connecttheotherendof thecabletothe (positive+)postofthe
jumperbattery.
3. Connectthesecondcable(negative-) to theotherpostofthe
jumperbattery.
4. Makethefinal connectionon theengineblockof the mower,away
fromthebattery.Attachtoan unpaintedpartto assurea good
connection.
Ifthejumper batteryis installedona vehicle(i.e.car,truck),do NOT
startthevehicle'senginewhenjumpstartingyourmower.
5. Startthemower(as instructedin theOperationsectionofthis
manual).
6. Removethejumpercablesin reverseorderof connection.
Charging
Batteries
giveoff anexplosivegaswhilecharging.Chargethe batteryI
in a wellventilatedareaandkeepawayfromanopenflameor pilot
lightas ona waterheater,spaceheater,furnace,clothesdryeror
othergas app ances, j
Batteryposts,terminals,andrelatedaccessoriescontainleadand
leadcompounds,chemicalsknowntotheStateof Californiato cause
cancerandreproductiveharm.Washhandsafterhandling.
If removingthebattery,disconnectthe NEGATIVE(Black)wire
fromits terminalfirst,followedbythe POSITIVE(Red)wire.When
re-installingthe battery,alwaysconnectthe POSITIVE(Red)wire its
_termna f rst,fo owedbythe NEGATVE(Back) wre.
When
chargingyourmower'sbattery,useonlyachargerdesignedforI
12Vlead-acidbatteries.Readyourbatterycharger'sOwner'sManualI
priortochargingyourmowers battery.Alwaysfollowits instructions I
andheeditswarnings, j
Ifyourmowerhas notbeenput intouse foranextendedperiodof time,
chargethe batteryasfollows:
1. Setyourbatterychargertodelivera maxof10amperes.
2. Ifyourbatterychargeris automatic,chargethebatteryuntilthe
chargerindicatesthat chargingiscomplete.Ifthechargeris not
automatic,chargefor atleasteighthours.
26
Page 27

CHANGING THE DECK ENGAGEMENT BELT
Shutthe engineoffand removeignitionkeybeforeremovingthe
cuttingblade(s)forsharpeningor replacement.Protectyourhandsb
usingheavygloveswhengraspingbladesandpulleys.
TheV-beltsfoundonyourmowerarespeciallydesignedto engageand
disengagesafely.A substitute(non-OEM)V-beltcanbedangerousby
notdisengagingcompletely.Fora properworkingmachine,useidenti-
cal replacementbeltsaslistedinpartslistofthisoperator'smanual.
Allbeltsonyourmoweraresubjecttowearand shouldbereplacedif
anysignsof weararepresent. Tochangeor replacethedeckengage-
mentbeltonyour mower,proceedasfollows:
1. Removethecuttingdeckfromthe moweras instructedearlierin
thissection.
Avoidpinchinginjuries.Neverplaceyourfingersonthe idlerspringor
betweenthe beltanda pulleywhileremovingthebelt
CHANGING THE DECK TIMING BELT
Severalcomponentsmustbe removedand specialtoolsusedin
ordertochangethemowerdeck'stimingbelt.SeeyourSearsor
otherqualifiedservicedealerto havethedecktimingbeltreplaced.
CHANGING THE TRANSMISSION DRIVE BELT
Severalcomponentsmustbe removedand specialtoolsusedinorder
tochangethemower'stransmissiondrivebelt.SeeyourSearsor other
qualifiedservicedealerto havethetransmissiondrivebeltreplaced.
FUSE
Beforeservicing,repairing,orinspecting,alwaysdisengageblades,
stopengineand removekeyto preventunintendedstarting.
A 20 Ampfuseis installedinyourmower'swiringharnessto protect
themower'selectricalsystemfromdamagecausedbyexcessive
amperage.
Iftheelectricalsystemdoesnotfunction,or yourmower'senginewill
notcrank,firstchecktobecertainthatthefusehasnotblown.Itis
locatednearthe battery.
2. Removethebeltcoveras instructedearlierinthis section.Refer
toFigure19on page22.
3. Removethebeltkeeperasinstructedearlierinthis section.Refer
toFigure23 onpage24.
4. Loosen,butnot remove,thenutandbolt whichsecureseach
deckidlerpulley.See Figure29.
f
Deckidler
J
Figure29
5. Removethebeltfromaroundallpulleys.
6. Routethenewbeltas illustratedin Figure30.
7. Retightenthenutsandboltswhichsecureeachidlerpulley.
8. Reattachthebelt keeperandbelt cover.
Alwaysusea replacementfusewiththesameamperagecapacityas
theblownfuse.
27
Page 28

Neverstorelawnmowerwithfuel intankindoorsor inpoorly
ventilatedareaswherefuelfumesmayreachan openflame,spark,
or pilotlightasona furnace,waterheater,clothesdryer,or gas
appliance.
PREPARING THE ENGINE
Forenginesstoredover30days:
1. Topreventgumfromforminginfuel systemoron carburetor
parts,runengineuntilitstopsfromlackoffueloraddagasoline
additiveto thegas in thetank. If youuse agasadditive,runthe
engineforseveralminutesto circulatetheadditivethroughthe
carburetor--afterwhichtheengineandfuel canbe storedupto
sixmonths.
2. Whileengineisstillwarm,changetheoil.
3. Removesparkplugandpourapproximately1oz.(30 rnl)ofclean
engineoil intothe cylinder.Pullthe recoilstarterseveraltimesto
distributetheoil,and reinstallthesparkplug.
4. Cleanengineof surfacedebris.
Thefollowingattachmentsandaccessoriesareavailableforthelawnmower.Contacta SearsServiceCenter1-800-4-MY-HOME®formore
information.
PARTNO. DESCRIPTION
33731 BaggerGrassCollector
PREPARING THE LAWN MOWER
• Whenstoringthemowerinan unventilatedor metalstorageshed,
careshouldbetakentorustproofthenon-paintedsurfaces.Using
a lightoil or silicone,coattheequipment,especiallyanysprings,
bearings,andcables.
• Removealldirtfromexteriorofengineandequipment.
• Followlubricationrecommendations.
• Storeequipmentina clean,dry area.Donotstoreinan area
whereequipmentispresentthat mayuse a pilotlightor hasa
componentthatcancreatea spark.
28
Page 29

Beforeperforminganytyped maintenance/service,disengageall
controlsandstoptheengine.Waituntilallmovingpartshavecometo
a completestop.Disconnectsparkplugwireandgroundit againstthe
engineto preventunintendedstarting.Alwayswearsafetyglassesduring
operationorwhileperforminganyadjustmentsorrepairs.
Enginefailstostart
Enginerunserratically
Engineoverheats
Enginehesitatesat high RPMs 1. Sparkpluggapsettooclose 1.
Engineidlespoorly 1. Fouledsparkplug 1.
Excessivevibration 1. Cuttingbladeslooseor unbalanced 1.
Unitfailstopropelitself 1. Drivebeltlooseordamaged 1.
Poormowingperformance 1. Dullblade(s) 1.
1. Chokenotactivated
2. Throttle/chokecontrolnot in correctposition
3. Sparkplugwire disconnected
4. Faultysparkplug
5. Fueltankemptyorstalefuel
6. Blockedfuelline
1. Unitrunningwithchokeapplied
2. Sparkplugwire loose
3. Stalefuel
4. Wateror dirt in fuelsystem
5. Dirtyaircleaner
1. Engineoil levellow
2. Airflowrestricted
2. Dirtyaircleaner 2.
2. Damaged,dull,or bentcuttingblade 2.
3. Loosehardware 3.
2. Broken,loose,or wornbelt(s) 2.
3. Blade(s)outof balance 3.
4. Clean,adjustgap,or replace.
4. Drainfuel.Refillwithfreshfuel.
1. Placethrottle/chokecontrolleverintochokeposition.
2. Placethrottle/chokeleverintofastposition.
3. Connectwiresto sparkplug.
5. Filltankwithclean,freshgasoline.
6. Havefuellinecleanedbya Searsservicedealer.
1. Movethrottle/chokeleveroutof chokeposition.
2. Connectandtightensparkplugwire.
3. Filltankwithfreshgasoline.
5. Replaceair cleanercartridge.
1. Fillenginewithproperamountandtype of oil.
2. Cleangrassclippingsanddebrisfromaroundthe
engine'scoolingfinsandblowerhousing.
Removesparkplugandadjustgap.
Replacesparkplugandadjustgap.
Replaceair cleanercartridge.
Tightenbladeandspindle.Balanceblade.
Replaceblade.
Tightenall nutsandbolts.
Replacedrive belt.
Sharpenor replaceblade(s).
Replacebelt(s).
Balanceorreplaceblade(s).
NEED MORE HELP?
You_]],fizs_dthea_°_swe_'az_dmore on mazagemyhemeo{em - £e_'flee[
o 6et answersfromour teamof homeexperts.
o 6et a personalized maintenance pLan foryour home.
o Findinformationandtools to helpwith homeprojects.
managell ylife
5reaght te yea by Sears
29
Page 30

Craftsman 33-inch Wide Cut Mower B Model No. 247.88998
54
17
/
55
\
68 21
74 11
6O
\
6O
66
58
\
59
46
7O
43 46
35
45
51
37
45
36
42
39
24
25
41
44
\
27
3O
Page 31

Craftsman 33-inch Wide Cut Mower B Model No. 247.88998
m
1
2
3
4
5
6
7
8
9
10
11
12
13
14
15
16
17
18
19
20
21
22
23
24
25
26
27
28
29
30
31
32
33
34
35
36
37
38
39
40
687-02427
687-02426
710-0572
710-0599
710-0606
712-04063
912-0442
720-0274
720-04072A
736-0270
938-0140
938-1226
946-04609
946-04606
946-04610
946-04604
946-04608
749-04330-0637
749-04331-0637
749-04332-0637
749-04333-0637
787-01548-4028
787-01490A-0637
787-01491A-0637
687-02255B-4028
687-02263-0637
687-02419-0637
687-02265-0637
710-0627
925-1649
710-04312
712-04065
914-0145
720-0311
931-05684
731-05791
732-04418A
736-0242
736-0343
936-0351
937-3000
Lever Assembly- LH
Lever Assembly- RH
Screw, Carriage, 5/16-18 x 2.25
Screw, 1/4-20 x 0.500
Screw, Cap, 1/4-20 x 1.50
Nut, Flange Lock, 5/16-18
Nut, Lock Cap, 1/4-20
Grip, 1.0 ID x 5.0 Lg
Star Knob, 5/16-18
Washer, Bell, .265 x .75 x .062
Screw, Shoulder, .435 x .178-5/16
Screw, Shoulder, .375 x 1.355, 1/4-20
Cable, Clutch Wheel
Cable, Brake, Transmission - RH
Cable, Clutch Deck
Cable, Throttle/Choke, 38 x 1.1
Cable, Brake, Transmission - LH
Lower Handle
Upper Handle - LH
Upper Handle - RH
Brace Tube
Handle Panel
Cable Mount Bracket- RH
Cable Mount Bracket- LH
Frame Assembly
Caster Wheel Bracket Assembly
Deck Lift Assembly, RR
Deck Lift Assembly, Front
Screw, HH Cap, 5/16-24 x .750
Lamp Socket
Screw, HH Cap, 5/16-18 x .50
Nut, Flange Lock, 3/8-16
Click Pin, .092 x 1.64
Handle Grip
Belt Cover
Snap Spacer, .63 ID x .75 LG
Deck Height Lever
Washer, Bell, .340 x .872 x .060
Washer, Flat, .330 x 1.25 x .120
Washer, Flat, .760 ID x 1.50 OD
Lube Fitting, 3/16
m
m
41
42
43
44
45
46
47
48
49
5o
51
52
53
54
55
56
57
58
59
6o
61
62
63
64
65
66
67
68
69
7o
71
72
73
74
75
76
77
78
-- 725-04478f
-- 725-05237f
-- 712-0266At
t Notpictured
31
738-04216A
741-0660A
787-01496-4028
787-01510-0637
787-01521-0637
710-0604A
738-04282
951-10541
951-10514
787-01507-4028
734-04243
710-1315
710-0136
712-3006
931-04339A
931-06935A
725-0157
710-0642
710-04666
712-0271
712-04064
936-0463
925-04022B
925-1741
725-04439
925-1707D
731-05319
751B221535
747-04657
751-10349
726-0205
951-10517A
751-3141-14
710-1237
925-1745A
710-0896
725-1629
777X41805
Bolt, Shoulder, .625 x 2.515 x 3/8-16
Flange Bearing, .760 x .941 x 1.0
Height Adjustment Bracket
Link Pivot Bracket
Lever Pivot Bracket
Screw, TT, 5/16-18 x .625
Screw, Shoulder, .32 x 1.8 x 1/4-20
Fuel Tank,2 Gal.
Fuel Cap
Fuel Tank Mounting Bracket
Wheel, 8 x 1.75
Screw, TT, 3/8-16 x 1.25
Screw, HH Cap, 1/4-20 x 1.75
Nut, Hex, 1/4-20
Handle Panel
Tank Cover
Cable Tie
Screw, TT, 1/4-20 x .75
Screw, 1/4-20 x .75
Nut, Sems, 1/4-20
Nut, Flange Lock, 1/4-20
Washer, Flat, .25 x .63 x .0515
Hour Indicator Meter
Key Switch
Solenoid, 12V
Battery
Lens
Casing Clamp
Battery Hold Down
Fuel Hose
Hose Clamp
Oil Drain
Oil Drain Hose
Screw, 10-32 X .625
Key, Ignition, Black
Screw, 1/4-20 x 1.75
Lamp
Label Reflector
Starter Wire
Wiring Harness
Nut, Jam Lock (Ground Wire)
Page 32

Craftsman 33=inch Wide Cut Mower B Model No. 247.88998
11_ l _/37
15
32
12
_38
26
9
18
14
73
32
Page 33

Craftsman 33-inch Wide Cut Mower B Model No. 247.88998
1
2
3
4
5
6
7
8
9
10
11
12
13
14
15
16
17
18
19
20
21
22
23
24
25
26
27
28
29
3O
31
32
33
34
35
36
37
38
17840-0637
918-04639
710-0176
710-0376
710-04377
710-0513
710-0520
710-0347
710-3008
710-3015
91l-1000
712-04063
712-04064
712-04065
712-0700
914-0145
718-04407
720-0142
731-05766
732-04409
732-04443A
736-0105
736-0322
736-0270
736-04256
738-04166
747-04635A
747-04673
747-04678A
954-04145A
756-041298
756-04258
756-04260
756-04280
787-01469B-0637
787-01470A-0637
787-01473-0637
787-01523A
Transaxle Bracket Mount
Transmission 4-Speed
Screw, HH Cap, 5/16-18 x 2.75"
Screw, NN Cap, 5/16-18 × 1.00"
Screw, HH Cap, 7/16-20 x 2.75"
Screw, HH Cap, 1/4-28 x .625"
Screw, HH Cap, 3/8-16 x 1.50"
Screw, HH Cap, 3/8-16 x 1.75"
Screw, HH Cap, 5/16-18 x .75"
Screw, HH Cap, 1/4-20 x .75"
Belt Keeper
Nut, Flange Lock, 5/16-18
Nut, Flange Lock, 1/4-20
Nut, Flange Lock, 3/8-16
Nut, Flange, 9/16-18
Hairpin Clip, 092" x 1.64" Long
Pulley Hub
Grip
Trailing Shield
Extension Spring
Extension Spring
Washer, Spring, .401" x .870" x .063"
Washer, Flat, 450" x 1,250" x 364"
Washer, Bell
Washer, Flat, .39" x .87" x .06"
Spacer, Shoulder, .50" x .1475"
Belt Keeper Rod
Loop Link Coupling
Trans Mount Rod
Belt, V Type
Idler Pulley, 4.25 _'Dia.
Flat Sheave 7.75"
Engine Pulley 3.20" x 4.35" Dia.
Idler Pulley 3.50" Dia.
Shift Rod, Lower
Shift Rod, Upper
Belt Keeper
Wheel Drive idler Bracket
39
40
41
42
43
44
45
46
47
48
49
50
51
52
53
54
55
56
57
58
59
6O
61
62
63
64
65
66
67
68
69
7O
71
72
73
74
75
918-04438C
918-04439C
631-04252
987-02420
687-02476-0691
710-0451
710-0514
710-0560
710-1260A
710-3184A
931-04244
712-0417A
912-0641
912-3017
732-04406
732-04452
736-0225
938-0347
738-04162A
942- 04154A
754-04136
954-04139
02000300
756-04280
756-0616
787-01440-0637
921-04041
737-04003D
634-04285-0911
736-0242
710-0627
710-1315
710-0896
711-04027
787-01017A-0637
732-04012
726-04009
D = I!
Drive Spindle Assembly
Spacer Spindle Assembly
Mulch Plug
Idler Arm Assembly
Deck Assembly, 33-inch
Bolt, Carriage, 5/16-18 x .75"
Screw, HH Cap, 3/8-16 x 1.00"
Screw, Carriage, 3/8-16 x 1.75"
Screw, TT, 5/16-18 x .750"
Screw, HH Cap, 3/8-16 x 2.00"
Chute Deflec. Assy' (incl. ref. 72-76)
Nut, Flange, 5/8-18
Nut, Hex
Nut, Hex 3/8-16
Ext. Spring, Timing Belt Tension
Extension Spring, Deck Brake
Washer, Lock
Spacer, Shoulder, .625" x .169"
Spacer, Shoulder, .884" x .190"
Blade, 17.9"
Belt, Timing
Belt, VType
Push Nut
Idler Pulley, 3.50"
Idler Pulley, V-Type, 5.0"
Idler Timing Bracket
Water Nozzle Adapter
Water Nozzle
Wheel, 16 x 4 x 8
Washer, Bell, .340" x .872" x .060"
Screw, HH Cap, 5/16-24 x .75"
Screw, TT, 3/8-16 x 1.25"
Screw, AB, 1/4-14 x .625"
Deflector Pin
Deflector Hinge Bracket
Deflector Torsion Spring
Push Cap
33
Page 34

Craftsman 33=inch Wide Cut Mower m Model No. 247.88998
27
21 29
20,,_/22 I
I
71B
o/
\1
157
47
31A
3/
83
18 49
/
3O
5O
30
51
52
64
64
34 /
63 87
63
/ 35
65
29
37
13
29B
31A
56
69
41
57
58
59
48
157
d
40
/
13
/
15
MODELandSERIAL
NUMBERSHERE
34
Page 35

Craftsman 33=inch Wide Cut Mower B Model No. 247.88998
D = _ O
TC-772147 TransaxleCover
2 TC-780086A NeedleBearing(1/,,long)
3 TC-770128A TransaxleCase
4 TC-776395 Countershaft
5 TC-776409 OutputShaft
6 T0-778364 SpurGear(38T-PM/SER)
6A T0-778369 SpurGear(15T-PM/SER)
7 T0-778330 SpurGear(11T-PM/SER)
8 TC-792180A ShiftKeySet(Qty.2)
9 TC-784352 ShiftCollar
10 TC-784378 ShiftRod &ForkAssembly
11 T0-778334 BevelGear(30T-PM)
12 TC-778309 InputBevelPinion(13T-PM)
13 TC-778368 BevelGear13T(Incl.ref.13& 14)
14 TC-778368 BevelGear13T(Incl.ref.13& 14)
15 TC-778370 RingGear(43T)
17 TC-786188 DrivePin
18 TC-786102 Spacer(1.130"x .695")
20 TC-792077A Ball(StainlessSteel5/16"dia.)
21 TC-792211 Screw,3/8-16x3/8"
22 TC-792079 Spring
25 TC-792073A Screw,1/4-20x 1-1/4"
25A TC-792177 Screw,1/4-20x 1-3/8"
26 TC-792125 RetainingRing-packageof2
27 TC-792035 RetainingRing
28 TC-788040 RetainingRing
29 TC-780072 Washer.627"ID.031"
29A TC-780160 ThrustWasher(.563"IDx .031")
29B TC-780051 ThrustWasher(.762"IDX.031")
30 T0-780108 ShiftWasher(Cupped)
31 TC-780001 Washer.750"ID.56"
31A TC-780195 Washer.750"ID.062
32 TC-788083 Oil Seal5/8"
32A TC-792001 O Ring(.823"OD)
34 TC-780194 Bushing(.563")
35 TC-780193 FlangedBushing(.625"ID)
37 TC-790007 BrakePadPlate
38 TC-799021A BrakePad(pkg.of2)
39 TC-786026 DowelPin.3125"x .750"
40 736-3078 Washer.312"ID.059"
41 TC-790104 BrakeLever
42 TC-792177 Screw1/4-20x 1-3/8"
43 912-0237 LockNut5/16-24
44 TC-790025 BrakePadHolder
46 TC-786086 Bracket
47 T0-775146 Axle(10.719"long)(Incl.26)
48 T0-775147 Axle(15.312"long)(Incl.26)
49 TC-778338 SpurGear(27T-PM/IC)
50 TC-778342 SpurGear(22T-PM/IC)
51 TC-778313 SpurGear(19T-PM/IC)
52 TC-778350 SpurGear(16T-PM/IC)
56 TC-778337 SpurGear(13T-PM/SER)
57 TC-778341 SpurGear(18T-PM/SER)
58 TC-778351 SpurGear(21T-PM/SER)
59 TC-778349 SpurGear(24T-PM/SER)
63 TC-786071 CountershaftSpacer1-1/8"x3/8"
64 TC-786072 BrakeShaftSpacer1-3/8"x3/8"
65 TC-780189 Washer.563"ID.062
66 TC-776472 inputShaft
67 TC-776396 BrakeShaft
69 TC-792170 RetainingRing(.75"x .042")
70 TC-786187 Spacer(.890")
71B TC-788092 O-Ring
76 TC-780090 FiatWasher(1.128"IDx .058")
77 TC-788078A RetainingRing(1.125"x .050")
79 TC-792144 Spring
82 TC-778333 Bevel(30T)& SpurGear
83 TC-778338 SpurGear(27T-PM/IC)
85 TC-792154 OilFill Plug
87 TC-788089A OilSeal9/16"ID
157 TC-788088A OilSeal3/4" ID
35A TC-780197 FlangedBushing(.751"ID)
TC-790075 BrakeDisk
35
Page 36

Craftsman Engine Model No. 219807=3712=G1 For Craftsman Mower Model No. 247.88998
[ 48 SHORT BLOCK ] 11058OPERATOR'S MANUAq [1329 REPLACEMENT ENGINE ] I 1330 REPAIR MANUAL ]
11
85O
684 _j _%_
584 -_
9
616
1264
1263_-_--,
27 <>
404 0
o14il
562:
306
307 _)
1O44
24
_'i_ 146
b- ¢
1291 _
=-'_32_
842 ,<L_
524 0
36
Page 37

Craftsman Engine Model No. 219807=3712=G1 For Craftsman Mower Model No. 247.88998
q
850
13o_t_i:i
987 _ J
1O29
1022
1034
830
634_ 217_
108_j 633 c_
238
870_ $1_i_'_;
914 _ 1022
868
654,:_
4_
1026 _
51
105
104
1127 _ :::::::S_'
1270 I '_< _
'% _
1091
37
1266
617
415
24O
964
Page 38

Craftsman EngineModel No.219807-3712-G1 For Craftsman Mower Model No. 247.88998
S
_/' _/_ 209
U:j
188
222
823
474
1119 _
677 _
635 ji_.- "y
\./J
613
I <_--Z'
334
38
Page 39

Craftsman Engine Model No. 219807-3712-G1 For Craftsman Mower Model No. 247.88998
I 1036 EMISSIONS LABEL I
305
305A
305B
305C
1044
415
968 ....,
697_
729_
/
/
8Ol ___._-;/
%'D
23
37
513
\. /
310
\
)
802
39
Page 40

Craftsman Engine Model No. 219807=3712=G1 For Craftsman Mower Model No. 247.88998
121 CARBURETOR OVERHAUL KIT
51
51A
104_ _ 217(_
633 _
105
' o
127_
358 ENGINE GASKET SET
20@
51
842 F-,
524 0
617 O
691 _'
617 _f_
987 c'_
1266 _,_
883
1O22
1266 l_
1266A ( i_'
1095 VALVE GASKET SET
51AI 868_
1O22
51
883 ,_:_?,
40
Page 41

Craftsman Engine Model No. 219807=3712=G1 For Craftsman Mower Model No. 247.88998
CylinderAssembly
2 399265 Kit-Bushing/Seal(MagnetoSide)
3 391086s SeaI-Oil(MagnetoSide)
4 697106 Sump-Engine
5 796183 Head-Cylinder
7 273280s Gasket-CylinderHead
9 697109 Gasket-Breather
10 697157 Screw(BreatherAssembly)
11 794683 Tube-Breather
12 697110 Gasket-Crankcase
13 690360 Screw(CylinderHead)
15 690946 Plug-OilDrain
16 796146 Crankshaft
20 795387 Seal-Oil(PTOSide)
22 692125 Screw(CrankcaseCover/Sump)
23 698281 Flywheel
24 222698s Key-Flywheel
25 797009 PistonAssembly(Standard)
797010 PistonAssembly(.020"Oversize)
26 797011 RingSet(Standard)
797012 RingSet(.020"Oversize)
27 698469 Lock-PistonPin
28 797013 Pin-Piston
29 791633 Rod-Connecting
32 791118 Screw(ConnectingRod)
33 791934 Valve-Exhaust
34 791935 Valve-Intake
35 691279 Spring-Valve(Intake)
36 691279 Spring-Valve(Exhaust)
Guard-Flywheel
42 499586 Keeper-Valve
43 691968 Slinger-Governor/Oil
45 690564 Tappet-Valve
46 793880 Camshaft
48 697740 ShortBlock
50 796188 Manifold-Intake
51 692137 Gasket-intake
51A 794312 Gasket-intake
53 690227 Stud(Carburetor)
54 691148 Screw(IntakeManifold)
78 691693 Screw(FlywheelGuard)
81 691178 Lock-MufflerScrew
94 793610 Kit-IdleMixture
95 690718 Screw(ThrottleValve)
98 695408 Kit-IdleSpeed
104 694918 Pin-FloatHinge
105 696136 Valve-FloatNeedle
108 698773 Valve-Choke
117 796079 Jet-Main(Standard)
118 796332 Jet-Main(HighAltitude)
121 796184 Kit-CarburetorOverhaul
125 794653 Carburetor
127 690727 Plug-Welch
130 698774 Valve-Throttle
131 698776 Kit-ThrottleShaft
133 694914 Float-Carburetor
135 698780 Tube-FuelTransfer
137 698781 Gasket-FloatBowl
41
Page 42

Craftsman Engine Model No. 219807=3712=G1 For Craftsman Mower Model No. 247.88998
Kit-ChokeShaft
146 691639 Key-Timing
186 794873 Connector-Hose(IntakeManifold)
187 791805 Line-Fuel(Formed)(Cutto RequiredLength)
188 691693 Screw(ControlBracket)
192 691986 Adjuster-RockerArm
202 691841 Link-MechanicalGovernor
209 792813 Spring-Governor(Brown)
216 691840 Link-Governor
217 695409 Spring-ChokeReturn
222 694042 Bracket-Control
227 691374 Lever-GovernorControl
232 691842 Spring-GovernorLink
238 691843 Cap-Valve
240 394358s Filter-Fuel
265 691024 Clamp-Casing
267 794904 Screw(CasingClamp)
300 796001 Muffler
304 799012 Housing-Blower
305 799370 Screw(BlowerHousing)(1/4-20x.90)
305A 697102 Screw(BlowerHousing)(1/4-20xl.20)
305B 793376 Screw(BlowerHousing)(1/4-20x.81)
3050 795891 Screw(BlowerHousing)(#10-16x.44)
306 697359 Shield-Cylinder
307 691693 Screw(CylinderShield)
309 693551 Motor-Starter
310 690323 Screw(StarterMotor)
324 796308 Screen/CupAssembly
795315 Armature-Magneto
334 691061 Screw(MagnetoArmature)
337 491055s Plug-Spark
358 796181 GasketSet-Engine
404 691691 Washer(GovernorCrank)
415 794129 Plug(RotatingScreen)
415A 794903 Plug(IntakeManifold)
431 797901 Elbow-intake
445 796032 Filter-AirCleanerCartridge
474 696459 Alternator
505 691251 Nut(GovernorControlLever)
510 693699 Drive-Starter
513 692024 Clutch-Drive
521 690581 Shield-Cable
523 699908 Dipstick
524 691032 Seal-DipstickTube
525 697184 Tube-Dipstick
552 697144 Bushing-GovernorCrank
562 691119 Bolt(GovernorControlLever)
584 794682 Cover-BreatherPassage
597 691696 Screw(PawlFrictionPlate)
601 791850 Hose-Clamp(Green)
613 691416 Screw(Muffler)
613A 691678 Screw(Muffler)
614 691620 Pin-Cotter(GovernorCrank)
616 692012 Crank-Governor
617 692138 SeaI-ORing(IntakeManifold)(Red)
633 699813 Seal-Choke/ThrottleShaft(ChokeShaft)
42
Page 43

Craftsman Engine Model No. 219807=3712=G1 For Craftsman Mower Model No. 247.88998
Spring/SealAssembly(ChokeShaft)
635 691909 Boot-SparkPlug
654 690958 Nut(Carburetor)
676 795036 Deflector-Muffler
677 690661 Screw(MufflerDeflector)
691 692407 Seal-GovernorShaft
697 791680 Screw(DriveCap)
718 690959 Pin-Locating
729 691224 Clip-Wire
741 697128 Gear-Timing
783 693713 Gear-Pinion
789 698329 Harness-Wiring
801 691283 Cap-Drive
802 691286 Cap-End
823 698941 Screw(MufflerAdapter)
830 691095 Stud-RockerArm
842 691031 Seal-ORing(DipstickTube)
847 790442 Dipstick/TubeAssembly
850 100106 Sealant-Liquid
851 692424 Terminal-SparkPlug
864 796002 Adapter-Muffler
868 690968 Seal-Valve
883 692236 Gasket-Exhaust
914 691108 Screw(RockerCover)
964 799159 Cap-Connector
968 799016 Cover-AirCleaner
975 698783 Bowl-Float
Seal-ThrottleShaft
1005 796082 Fan-Flywheel
1022 272475s Gasket-RockerCover
1023 797421 Cover-Rocker
1026 794573 Rod-Push(Exhaust)
697394 Rod-Push(Intake)
1029 691751 Arm-Rocker
1034 690822 Guide-PushRod
1036 Label-Emissions(Availablefroma Briggs&
StrattonAuthorizedDealer)
1040 698368 Plate-Trim
1044 698139 Screw(Flywheel)
1051 691265 Ring-Retaining
1058 276344 Operator'sManual
1059 698516 Kit-Screw/Washer(Alternator)
1090 691293 Retainer-Brush
1091 691333 Cap-Limiter
1095 795807 GasketSet-Valve
1119 691183 Screw(Alternator)
1127 695407 Screw(FloatBowl)
1263 697124 Reed-Breather
1264 697104 Screw(BreatherReed)
1266 691917 Seal-ORing(IntakeElbow)(Red)
1329 N/A ReplacementEngine(NotAvailableAtThis
Printing)
1330 276781 RepairManual
1397 796449 Washer(BlowerHousing)
43
Page 44

777S30145 777D15546 777122793
777122808 777D15613
777S30117
777D15612
777122759
777122815
777122760
777122809 777X43688
;;1. Insert Mulch Plug's front tab into slot on outside of deck.
::2. Pivot Mulch Plug inboard into discharge opening,
3. Slide rearward until slot bottoms out against edge of discharge opening.
4. Lower Discharge Chute to lock Mulch Plug in place.
777122814
44
Page 45

45
Page 46

FEDERAL and/or CALIFORNIA EMISSION CONTROL WARRANTY STATEMENT
YOUR WARRANTY RIGHTS AND OBLIGATIONS
MTDConsumerGroupInc,the UnitedStatesEnvironmentalProtectionAgency (EPA),and,forthose productscertifiedfor salein the stateof California,the
CaliforniaAirResourcesBoard(CARB)are pleasedto explaintheemission(evaporativeand/or exhaust)controlsystem(ECS)warrantyonyouroutdoor2006
andlater smalloff-roadspark-ignitedengineandequipment(outdoorequipmentengine)InCalifornia,new outdoorequipmentenginesmustbedesigned,builtand
equippedtomeetthe State'sstringentanti-smogstandards(inotherstates,1997andlater modelyearequipmentmustbedesigned,built,and equippedto meet
theU.S.EPAsmalloff-road, sparkignitionengineregulations.MTDConsumerGroupIncmustwarrantthe ECSonyouroutdoorequipmentengineforthe periodof
timelistedbelowprovidedtherehasbeen noabuse,neglector impropermaintenanceofoutdoorequipmentengine.
YourECSmayincludepartssuchas thecarburetor,fuel-injectionsystem,theignitionsystem,catalyticconverter,fuel tanks,fuel lines,fuelcaps,valves,canisters,
filters,vaporhoses,clamps,connectors,andotherassociatedemission-relatedcomponents.
Wherea warrantableconditionexists,MTDConsumerGroupIncwill repairyouroutdoorequipmentengineat nocostto youincludingdiagnosis,partsand labor.
MANUFACTURER'S WARRANTY COVERAGE:
Thisemissioncontrolsystemiswarrantedfortwo years.Ifany emission-relatedpart onyouroutdoorequipmentengineisdefective,the partwill berepairedor
replacedby MTDCONSUMERGROUPINC.
OWNER'S WARRANTY RESPONSIBILITIES:
Asthe outdoorequipmentengineowner,youareresponsiblefor performanceof the requiredmaintenancelisted inyourowner'smanual.MTDConsumerGroup
Increcommendsthat youretainallreceiptscoveringmaintenanceonyouroutdoorequipmentengine,butMTDConsumerGroupInc cannotdenywarrantysolely
forthe lackof receipts.
Asthe outdoorequipmentengineowner,youshouldhoweverbe awarethat MTDConsumerGroupIncmaydenyyouwarrantycoverageifyour outdoorequipment
engineor aparthas faileddue toabuse,neglect,or impropermaintenanceorunapprovedmodifications.
Youareresponsiblefor presentingyouroutdoorequipmentengineto MTDConsumerGroupInc'sdistributioncenterorservicecenteras soon asthe problem
exists.Thewarrantyrepairsshouldbecompletedin areasonableamountoftime, nottoexceed30 days.If youhaveaquestionregardingyourwarrantycoverage,
youshouldcontacttheMTDConsumerGroupIncService Departmentat 1-800-800-7310orvia emailathttp://support.mtdproducts.com
GENERAL EMISSIONS WARRANTY COVERAGE:
MTDConsumerGroupIncwarrantstothe ultimatepurchaserandeachsubsequentpurchaserthat theoutdoorequipmentengineis: Designed,built andequipped
soasto conformwithall applicableregulations;andfree fromdefectsin materialsandworkmanshipthatcausethefailureofa warrantedparttobe identicalin all
materialrespectstothat partas describedin MTDConsumerGroup Inc'sapplicationforcertification.
Thewarrantyperiodbeginsonthedatetheoutdoorequipmentengineis deliveredto anultimatepurchaserorfirst placedintoservice.Thewarrantyperiodistwo
years.
Subjecttocertainconditionsand exclusionsasstated below,thewarrantyon emission-relatedpartsis asfollows:
1. Anywarrantedpartthatis notscheduledfor replacementas requiredmaintenancein thewritteninstructionssupplied,is warrantedforthe warrantyperiod
statedabove.Ifthepart failsduringthe periodofwarrantycoverage,the partwill berepairedor replacedbyMTDConsumerGroupIncaccordingto subsection
(4)below.Anysuchpart repairedor replacedunderwarrantywillbewarrantedforthe remainderof theperiod.
2. Anywarrantedpartthatis scheduledonlyfor regularinspectionin the writteninstructionssuppliedis warrantedforthe warrantyperiodstatedabove.Any such
partrepairedor replacedunderwarrantywill bewarrantedforthe remainingwarrantyperiod.
3. Anywarrantedpartthatis scheduledfor replacementas requiredmaintenanceinthe written instructionssuppliediswarrantedfor theperiodof timebeforethe
firstscheduledreplacementdatefor thatpart.If the partfails beforethefirst scheduledreplacement,the partwill berepairedorreplacedbyMTDConsumer
GroupIncaccordingto subsection(4)below.Anysuchpartrepairedorreplacedunderwarrantywill bewarrantedforthe remainderof theperiodpriorto the
firstscheduledreplacementpointforthe part.
4. Repairor replacementofany warrantedpart underthe warrantyprovisionshereinmustbeperformedat a warrantystationatno chargetothe owner.
5. Notwithstandingthe provisionsherein,warrantyservicesor repairswill beprovidedatallof our distributioncentersthatare franchisedto servicethe subject
enginesor equipment.
6. Theoutdoorequipmentengineownerwill notbechargedfordiagnosticlaborthatisdirectlyassociatedwithdiagnosisofa defective,emission-relatedwar-
rantedpart, providedthatsuchdiagnosticworkis performedata warrantystation.
7. MTDConsumerGroupInc isliablefor damagestootherengineor equipmentcomponentsproximatelycausedby afailureunderwarrantyof anywarranted
part.
8. Throughoutthe off-roadengineandequipmentwarrantyperiodstatedabove,MTDConsumerGroupIncwill maintainasupplyofwarrantedpartssufficientto
meetthe expecteddemandforsuchparts.
9. Anyreplacementpartmaybe usedintheperformanceof anywarrantymaintenanceor repairsand mustbeprovidedwithoutchargeto the owner.Suchusewill
notreducethe warrantyobligationsof MTDConsumerGroupInc.
10.Add-onor modifiedpartsthatare notexemptedbythe AirResourcesBoardmaynotbeused.Theuseof any non-exemptedadd-onor modifiedpartsby the
ultimatepurchaserwillbegroundsfor disallowingawarrantyclaims.MTDConsumerGroupIncwill notbeliableto warrantfailuresof warrantedpartscaused
bythe useof a non-exemptedadd-onor modifiedpart.
Page 47

WARRANTED PARTS:
Therepairorreplacementofanywarrantedpart otherwiseeligibleforwarrantycoveragemaybeexcludedfromsuch warrantycoverageifMTDConsumerGroup
Incdemonstratesthatthe outdoorequipmentenginehasbeenabused,neglected,orimproperlymaintained,and thatsuchabuse,neglect,or impropermainte-
nancewasthe directcauseof the needfor repairor replacementofthe part.Thatnotwithstanding,anyadjustmentof a componentthat hasafactoryinstalled,
andproperlyoperating,adjustmentlimitingdeviceisstill eligibleforwarrantycoverage.Further,the coverageunderthis warrantyextendsonly to partsthat were
presentonthe off-roadengineandequipmentpurchased.
Thefollowingemissionwarrantypartsarecovered(ifapplicable):
(1)FuelMeteringSystem
• Cold startenrichmentsystem(softchoke)
• Carburetorandinternalparts(or fuel injectionsystem)
• Fuelpump
• Fueltank
(2)Air InductionSystem
• Aircleaner
• Intakemanifold
(3) IgnitionSystem
• Sparkplug(s)
• Magnetoignitionsystem
(4) ExhaustSystem
• Catalyticconverter
• SAI(Reedvalve)
(5) MiscellaneousItemsUsedin AboveSystem
• Vacuum,temperature,position,timesensitivevalvesand switches
• Connectorsandassemblies
(6) EvaporativeControl
• Fuelhose
• Fuelhoseclamps
• Tetheredfuel cap
• Carboncanister
• Vapor lines
GDOC-100223Rev.A
Page 48

(Thispageapplicableinthe U.S.A.and Canadaonly.)
Sears Brands Management Corporation (Sears), the California Air Resources Board (CARD)
and the United States Environmental Protection Agency (U.S. EPA)
Emission Control System Warranty Statement (Owner's Defect Warranty Rights and Obligations)
EMISSIONCONTROLWARRANTYCOVERAGEISAPPLICABLETOCERTI-
FIEDENGINESPURCHASEDINCALIFORNIAIN1995ANDTHEREAF-
TER,WHICHAREUSEDINCALIFORNIA,ANDTOCERTIFIEDMODEL
California and United States Emission
TheCaliforniaAirResourcesBoard(CARD),U.S.EPAand Searsarepleased
toexplainthe EmissionControlSystemWarrantyonyour modelyear2000and
latersmalloff-roadengine(SORE).InCalifornia,newsmalloff-roadengines
mustbe designed,builtandequippedto meettheState'sstringentanti-smog
standards.Elsewherein theUnitedStates,newnon-road,spark-ignition
enginescertifiedformodelyear1997and latermustmeetsimilarstandardsset
forthbythe U.S.EPA.Searsmustwarranttheemissioncontrolsystemonyour
YEAR1997ANDLATERENGINESWHICHAREPURCHASEDANDUSED
ELSEWHEREINTHEUNITEDSTATES(ANDAFTERJANUARY1,2001 IN
CANADA).
Control Defects Warranty Statement
enginefortheperiodsoftime listedbelow,providedtherehasbeennoabuse,
neglector impropermaintenanceofyour smalloff-roadengine.Youremis-
sioncontrolsystemincludespartssuchasthecarburetor,aircleaner,ignition
system,mufflerandcatalyticconverter.Alsoincludedmaybeconnectorsand
otheremissionrelatedassemblies.Wherea warrantableconditionexists,Sears
will repairyoursmalloff-roadengineatnocostto youincludingdiagnosis,parts
andlabor.
Sears Emission Control Defects Warranty Coverage
Smalloff-roadenginesarewarrantedrelativeto emissioncontrolpartsdefects
fora periodofone year,subjecttoprovisionsset forthbelow.Ifanycovered
Owner's Warranty
Asthe smalloff-roadengineowner,you areresponsiblefortheperformanceof
therequiredmaintenancelistedin yourOperatingand MaintenanceInstruc-
tions.Searsrecommendsthatyouretainallyourreceiptscoveringmaintenance
onyoursmalloff-roadengine,butSearscannotdenywarrantysolelyfor the
lackofreceiptsorforyourfailuretoensuretheperformanceof allscheduled
maintenance.As the smalloff-roadengineowner,youshouldhoweverbe
awarethat Searsmaydenyyouwarrantycoverageifyour smalloff-roadengine
ora parthasfaileddueto abuse,neglect,impropermaintenanceor unap-
parton yourengineis defective,the partwillbe repairedorreplacedbySears.
Responsibilities
provedmodifications.Youare responsiblefor presentingyour smalloff-road
engineto anAuthorizedSearsServiceDealerassoonasa problemexists.The
undisputedwarrantyrepairsshouldbecompletedina reasonableamountof
time,notto exceed30 days.Ifyouhaveanyquestionsregardingyourwarranty
rightsandresponsibilities,youshouldcontacta SearsServiceRepresentative
at 1-800-469-4663.Theemissionwarrantyisa defectswarranty.Defectsare
judgedonnormalengineperformance.Thewarrantyis notrelatedtoan in-use
emissiontest.
Sears Emission Control Defects Warranty Provisions
ThefollowingarespecificprovisionsrelativetoyourEmissionControlDefectsWarrantyCoverage.ItisinadditiontotheSearsenginewarrantyfornon-regulated
enginesfoundin theOperatingand MaintenanceInstructions.
1. WarrantedParts
Coverageunderthiswarrantyextendsonly tothe partslistedbelow (the
emissioncontrolsystemsparts)to the extentthesepartswerepresenton
the enginepurchased.
a. FuelMeteringSystem
• Cold startenrichmentsystem
• Carburetorandinternalparts
• FuelPump
b. AirlnductionSystem
• Aircleaner
• Intakemanifold
c. IgnitionSystem
• Sparkplug(s)
• Magnetoignitionsystem
d. CatalystSystem
• Catalyticconverter
• Exhaustmanifold
• Air injectionsystemorpulsevalve
e. MiscellaneousItemsUsedin AboveSystems
• Vacuum,temperature,position,timesensitivevalves
andswitches
• Connectorsandassemblies
2. Lengthof Coverage
Searswarrantsto theinitialownerand eachsubsequentpurchaserthat
the WarrantedPartsshallbefree fromdefectsin materialsandworkman-
shipwhich causedthefailureofthe WarrantedPartsfor aperiodof one
yearfromthe datetheengineis deliveredtoa retailpurchaser.
Inthe USAandCanada,a 24hourhotline,1-800-469-4663,hasamenuof pre-recordedmessagesofferingyouenginemaintenanceinformation.
3. NoCharge
Repairorreplacementof anyWarrantedPartwill beperformedat no
chargeto the owner,includingdiagnosticlaborwhichleadstothe
determinationthata WarrantedPartisdefective,ifthediagnosticworkis
performedatanAuthorizedSearsServiceDealer.Foremissionswarranty
servicecontact yournearestAuthorizedSearsServiceDealeras listedin
the "YellowPages"under"Engines,Gasoline,""GasolineEngines,""Lawn
Mowers,"orsimilarcategory.
4. Claimsand CoverageExclusions
Warrantyclaimsshallbefiled inaccordancewiththe provisionsof the
SearsEngineWarrantyPolicy.Warrantycoverageshallbeexcludedfor
failuresof WarrantedPartswhicharenotoriginalSears partsor because
ofabuse,neglector impropermaintenanceas setforth inthe Sears
EngineWarrantyPolicy.Sears isnotliableto coverfailuresof Warranted
Partscausedby theuseof add-on,non-original,or modifiedparts.
5. Maintenance
AnyWarrantedPartwhichis notscheduledforreplacementas required
maintenanceorwhichis scheduledonlyfor regularinspectiontothe effect
of"repairor replaceasnecessary"shallbe warrantedasto defectsfor the
warrantyperiod.AnyWarrantedPartwhichis scheduledfor replacement
asrequiredmaintenanceshallbewarrantedasto defectsonly forthe
periodoftime uptothe firstscheduledreplacementfor that part.Any
replacementpart thatisequivalentin performanceand durabilitymay
beusedinthe performanceofanymaintenanceor repairs.Theowneris
responsibleforthe performanceof allrequiredmaintenance,as definedin
the SearsOperatingandMaintenanceInstructions.
6. ConsequentialCoverage
Coveragehereundershallextendto thefailure ofanyenginecomponents
causedbythefailureofanyWarrantedPartstillunderwarranty.
GD0C-100188Rev.B
48
Page 49

Look For Relevant Emissions Durability Period and
Air index information On Your Engine Emissions Label
Engines that are certified to meet the California Air Resources Board (CARB) Tier 2 Emission Standards must
display information regarding the Emissions Durability Period and the Air Index. Sears Brands Management
Corporation makes this information available to the consumer on our emission labels.
The Emissions Durability Period describes the number of hours of actual running time for which the engine is
certified to be emissions compliant, assuming proper maintenance in accordance with the Operating & Mainte-
nance Instructions. The following categories are used:
Moderate: Engine is certified to be emission compliant for 125 hours of actual engine running time.
Intermediate: Engine is certified to be emission compliant for 250 hours of actual engine running time.
Extended: Engine is certified to be emission compliant for 500 hours of actual engine running time.
For example, a typical walk-behind lawn mower is used 20 to 25 hours per year. Therefore, the Emissions
Durability Period of an engine with an intermediate rating would equate to 10 to 12 years.
The Air index is a calculated number describing the relative level of emissions for a specific engine family. The
lower the Air Index, the cleaner the engine. This information is displayed in graphical form on the emissions label.
After July 1,2000, Look For Emissions Compliance Period
On Engine Emissions Compliance Label
After July 1, 2000 certain Sears Brands Management Corporation engines will be certified to meet the United
States Environmental Protection Agency (USEPA) Phase 2 emission standards. For Phase 2 certified engines, the
Emissions Compliance Period referred to on the Emissions Compliance label indicates the number of operating
hours for which the engine has been shown to meet Federal emission requirements.
For engines less than 225 cc displacement, Category C = 125 hours, B = 250 hours and A = 500 hours.
For engines of 225 cc or more, Category C = 250 hours, B = 500 hours and A = 1000 hours.
This is a generic representation of the emission label typically found on a certified engine.
FAMILYYBSXS.3192VA 274812
GDOC-100182Rev.B
49
Page 50

Congratulationson makinga smartpurchase.YournewCraftsman@
productisdesignedandmanufacturedfor yearsofdependableopera-
tion.Butlikeall products,it mayrequirerepairfromtimetotime.That's
whenhavinga RepairProtectionAgreementcansaveyoumoneyand
aggravation.
Here'swhattheRepairProtectionAgreement*includes:
* Expert service byour10,000professionalrepairspecialists
o Unlimitedserviceand no chargeforpartsand laboron all
coveredrepairs
o Product replacementupto$1500if yourcoveredproductcan'tbe
fixed
• Discountof 10%from regularprice ofserviceand relatedinstalled
partsnotcoveredby theagreement;also,10%off regularpriceof
preventivemaintenancecheck
• Fasthelp by phone- wecallitRapidResolution- phonesupport
froma Searsrepresentative.Thinkof usasa"talkingowner's
manual."
Onceyoupurchasethe Agreement,a simplephonecallis all thatit
takesfor youto scheduleservice.Youcan callanytimedayor night,or
schedulea serviceappointmentonline.
TheRepairProtectionAgreementis a risk-freepurchase.Ifyoucancel
forany reasonduringtheproductwarrantyperiod,wewill provideafull
refund.Or,a proratedrefundanytimeaftertheproductwarrantyperiod
expires.PurchaseyourRepairProtectionAgreementtoday!
Somelimitationsandexclusionsapply. For pricesand additional
informationin the U.S.A.call 1-800-827-6655.
*CoverageinCanadavaries on some items.Forfull details call
SearsCanadaat 1-800-361-6665.
SearsInstallation Service
ForSearsprofessionalinstallationofhomeappliances,garagedoor
openers,waterheaters,andothermajorhomeitems,in theU.S.A.or
Canadacall1-800-4-MY-HOME®.
5O
Page 51

Declaraci6n de garantia .................................................. 51
Instrucciones sobre seguridad .................................. 52-56
Guia para pendientes ...................................................... 57
Etiquetas de seguridad ..................................................... 8
Montaje ..................................................................... 58-62
Funcionamiento ......................................................... 63-65
Servicio y Mantenimiento .......................................... 66-74
Almacenamiento fuera de temporada ............................ 75
Soluci6n de problemas ................................................... 76
NOmero de servicio ............................... Cubierta posterior
GARANTiA COMPLETA Y PROFESIONAL DE CRAFTSMAN POR DOS AMOS
PORDOSAMOSapartir dela fechade lacompra,esteproductoest_garantizadopordefectosenlosmaterialesylamanodeobra.
Losproductosdefectuososser_nreparadossincostoo reemplazadossincostosi la reparaci6nnoest_disponible.
Lagaranfias61oser_v_lidaduranteuna_oapartirde lafechadecomprasi esteproductoseusaen cualquiermomentoparafinescomerciales
ode alquiler.
Paraobtener inforrnaci6nsobreelalcancede lagarantiay solicitarlareparaci6no el reernplazo,visiteelsitioWeb:www.craftsrnan.corn.
Esta garantiacubreONICAMENTElos defectos en losmateriales yen la rnanode obra. Estagaranfia NOcubre:
• Elementosquesedesgastanporel usonormal,incluyendoentreotrosperono limitadoalas cuchillas,bujias,filtrosdeaire,correas,y
filtrosdeaceite.
• Serviciosdemantenimientoest_ndar,cambiode aceiteo reajustes.
• Cambiode Ilantaso reparacionesocasionadosporpinchadurasconobjetosdel exteriorcomoclavos,espinas,toconesovidrios,etc.
• Reemplazoo reparaci6nde neum_ticoso ruedascomoresultadodel desgastenormal,unaccidente,o funcionamientoo mantenimiento
incorrectos.
• Reparacionesrequeridascomoresultadodel abusodeloperador,incluyendoperonolimitadoa da_oocasionadoporobjetosqueimpactan
la m_quinay quetuercenel bastidorocig(Je_al,o debidoa queel motorfueaceleradoenexceso.
• Reparacionesnecesariasdebidoanegligenciadeloperador,incluyendoentre otros,da_osmec_nicoyel_ctricoocasionadoporunalmace-
namientonoapropiado,noutilizarel aceitede gradoy/o cantidadnoapropiada,nomantenerel_reade cubiertasinresiduosinflamables,o
pornodar mantenimientoal equipodeacuerdoconlasinstruccionescontenidasenel manualdelpropietario.
• Limpiezao reparacionesal motor(sistemadecombustible)provocadasporuncombustiblecontaminadouoxidado(viejo).Engeneral,el
combustibledebeutilizarseen unperiodono mayorde 30dias a partirde su adquisici6n.
• Eldeterioroydesgastenormalde losacabadosexteriores,o reemplazode laetiquetadelproducto.
Estagarantialeotorgaderechoslegalesespecificos,peroustedpodriagozardeotrosderechosen raz6ndesulugarde residencia.
Sears Brands ManagementCorporation, HoffrnanEstates,IL60179
Caballosde fuerza:12.5
Aceitedel motor: SAE30
Combustible: Gasolinasinplomo
Bujia: Champion®RC12YC
Motor: Briggs& StrattonPowerBuiltTM
© SearsBrands,LLC 51
N_rnerode modelo-
N_rnerode serie --
Fechade cornpra-
RegistreelnOmerode modelo,nOmerode serieyfechade compra
m_sarrba.
Page 52

Lapresenciade estesirnboloindicaquesetratade instrucciones
irnportantesde seguridadquesedebenrespetarparaevitar
ponerenpeligrosu seguridadpersonaly/o materialy lade otras
personas.Leay sigatodaslasinstruccionesdeestemanualantes
de poneren funcionarnientoestarn_.quina.Si no respetaestas
instruccionespodriaprovocarlesionespersonales.Cuandoveaeste
sirnbolo,ipresteatenci6nala advertencia!
Estarn_.quinarueconstruidaparaseroperadadeacuerdocon
lasreglasde seguridadcontenidasenestemanual.AI igualque
concualquiertipodeequipornotorizado,undescuidoo errorpor
partedeloperadorpuedeproducirlesionesgraves.Estarn_.quina
escapazde arnputarrnanosy piesy dearrojarobjetoscon gran
fuerza.De norespetarlas instruccionesde seguridadsiguientesse
puedenproducirlesionesgraveso la rnuerte.
PROPOSICION 65 DE CALIFORNIA
Elescapedel motorde esteproducto,algunosdesuscornponentes
y algunoscornponentesdelvehiculocontieneno liberansustancias
quirnicasqueelestadode Californiaconsideraquepuedenproducir
c_.ncer,defectosde nacirnientouotrosproblernasreproductivos.
Losbornesdela bateriay losaccesoriosdines contienenplornoy
cornpuestosde plorno,sustanciasquirnicasquesegOnIoestableci-
do porel EstadodeCaliforniacausanc_.ncery da_osenel sisterna
reproductivo.Ldveselasmanos despu_sde estaren contacto
con estoscomponentes.
FUNCIONAMIENTO
Funcionamientogeneral:
• Leaysiga todaslasinstruccionescontenidasen estemanual
antesde intentarensarnblarestarn_.quina.Lea,cornprenday
sigatodaslas instruccionesque figuranenla rn_.quinayen el o
losrnanualesantesde intentaroperarla.Farniliaricesecornpleta-
rnenteconloscontrolesy conel usoapropiadodeestarn_.quina
antesde operarla.Guardeestemanualenun lugarseguropara
referenciasfuturasy regulatesy parasolicitarrepuestos.
• Estarn_.quinaes unapiezadeequipode precisi6n,no unjuguete.
Portanto,tengala maximaprecauci6nen todornornento.Su
unidadha sidodise_adapararealizarunatarea:cortarel c_sped.
Nola utilicecon ningOnottoprop6sito.
• Noperrnitanuncaquelosni_osrnenoresde 14a_osoperenesta
rn_.quina.Losni_osde 14a_osy rn_.sdebenleerycornprender
lasinstruccionescontenidasenestemanualy debenser
capacitadosy supervisadospor unode los padres.Onicarnente
losindividuosresponsablesque sehayanfarniliarizadocon
estasreglasdeseguridadparalaoperaci6ndeber_.nusaresta
rn_.quina.
Su responsabilidad--Restrinja el usodeestarn_.quina
rnotorizadaalas personasque lean,cornprendany respetenlas
advertenciase instruccionesqueaparecenenestemanualyen la
rn_.quina.
iGUARI)E ESTASINSTRUCCIONES!
• Inspeccionerninuciosarnenteel _.reaendondeutilizar_,el equipo.
Saquetodaslaspiedras,palos,cables,huesos,juguetesyotros
objetosextra_osconlosquepodriatropezaro quepodrianser
arrojadosporla cuchilla.Losobjetosarrojadosporla rn_.quina
puedenproducirlesionesgraves.Planifiqueel patr6nenelque
vaa ir descargandoel recorteparaevitarquela descargade
materialserealicehacialoscarninos,lasveredas,losobserva-
dotes,etc. Eviteadern_.sdescargarmaterialcontralasparedesy
obstruccionesquepodrianprovocarqueel materialdescargado
rebotecontraeloperador.
• Paraayudaraevitarel contactoconlacuchillao unalesi6npor
un objetoarrojado,rnant_ngaseen lazonadeloperadordetr_.s
de lasrnanijasy rnantengaa losni_os,observadores,ayudantes
y rnascotasapartadosal rnenos25 metrosdela podadora
rnientrasest,.en operaci6n.Detengala rn_.quinasi alguienentra
en lazona.
• Paraprotegerselosojos utilicesiernpreanteojoso antiparras
de seguridadrnientrasoperala rn_.quinao rnientraslaajusta
o repara.Losobjetosarrojadosquerebotanpuedenlesionar
gravernentelavista.
• Utilicezapatosde trabajoresistentes,desuelafuertey panta-
Ionesy carnisasajustados.Serecorniendautilizarcarnisasy
pantalonesquecubranlosbrazosy laspiernas,asi cornocalzado
conpuntasreforzadasen acero.Nuncaopereesta rn_.quinacon
lospies desnudos,sandalias,oconzapatosligeroso conlosque
sepuedaresbalar(porejernplo,calzadode Iona).
• Nopongalas rnanoso lospiescercade laspiezasrotatoriaso
en latolvade lacortadora.Elcontactoconlascuchillaspuede
producirlaarnputaci6nde rnanosypies.
52
Page 53

• Unacubiertade descargafaltanteo da_adapuedeprovocarel
contactocon la cuchillao lesionesporobjetosarrojados.
Muchaslesionesocurrencornoresultadode pasarlacortadora
sobrelos piesduranteunacaidaprovocadaporderrapeso
tropiezos.No sesostengade la podadorasiseest,.cayendo,
sueltela rnanijainmediatarnente.
Nuncatirehaciaustedlapodadorarnientrascarnina.Sidebe
retrocederla podadoraparaevitarunaparedu obst_.culo,mire
prirneroabajoy atr_.sparaevitartropezarsey luegosigaestos
pasos:
1. Retrocedade la podadorahastaestirarcornpletarnentesus
brazos.
2. AsegOresequeest,. bienequilibradoy bienparado.
3. Tiredela podadoralentarnentehaciausted,norn_.sall_.de la
rnitaddeladistanciaentreustedy lapodadora.
4. Repitaestospasoscornoserequiera.
• Noopereestarn_.quinaestandobajolosefectosdelalcoholo de
drogas.
• Noernbragueel mecanisrnode autopropulsi6nen unidadescon
esteequipornientrasarrancael motor.
• Elrnecanisrnodecontroldela cuchillaes undispositivode
seguridad.Nuncaintentedesviarsede su funcionarniento.De
hacerlonofuncionarianlosdispositivosde seguridady podrian
producirselesionespersonalesporelcontactocon lascuchillas
giratorias.Lasrnanijasdecontrolde lacuchilladebenfuncionar
bienenarnbasdireccionesy regresarautorn_.ticarnentea la
posici6ndedesengranecuandose lassuelta.
• Nuncaoperelapodadoraen c_spedhOrnedo.Siernpreest_
segurodesu equilibrio.Si tropiezaycae puedelesionarse
gravernente.Sisienteque pierdeelequilibrio,suelteinrnediata-
rnentelarnanijadecontrolde lacuchillay lacuchilladejar_,de
girarentressegundos.
• Corteel cespedsolarnentecon luzdedia o con unabuenaluz
artificial.Carnine,nuncacorra.
• Detengala cuchillacuandocrucecarninosde gravilla,pasoso
andadores.
• Si larn_.quinacornenzaraa vibrarde rnaneraanorrnal,detenga
el motor,y busqueinrnediatarnentelacausa.Lavibraci6nporIo
generalesunaadvertenciadealgQnproblerna.
• Apagueelmotoryesperehastaquela cuchillasedetenga
cornpletarnenteantesde retirarla guardaparael recortede
cespedo desatorarlatolva. LacuchillacontinOagirandopor
unoscuantossegundosdespu_squeel motorse haapagado.
Nuncacoloqueningunapartedel cuerpoenel_.reade lacuchilla
hastaqueest_seguroquelacuchillahadetenidosurnovirniento
rotatorio.
Nuncaoperela cortadorasinlasguardasapropiadas,cubiertade
descarga,guardapararecorte,rnanijadecontroldelacuchilla
y otrosdispositivosde seguridady protecci6nensu lugary
funcionando.Nuncaoperelacortadorasilos dispositivosde
seguridadest_.nda_ados.Si noIo hace,estopuedetenetcorno
resultadolesiones.
• Elsilenciadoryel motorse calientany puedenproducirquerna-
duras.Nolos toque.
• Utilicesolarnentepartesyaccesoriosfabricadosespecialrnente
paraestarn_.quina,originalesdelfabricante(OEM).Sino Io
hace,estopuedetenercornoresultadolesionespersonales.
• Paraencenderelmotor,jale delacuerdalentarnentehastaque
sientaresistencia,luegojale r@idarnente.Elreplieguer@idode
lacuerdadearranque(tensi6nderetroceso)lejalar_,larnanoy
el brazohaciael motorrn_.sr@idode Ioqueustedpuedesoltar.
Elresultadopuedenser huesosrotos,fracturas,hernatornaso
esguinces.
Sisepresentansituacionesquenoest_.nprevistaseneste
manualseacuidadosoy useel sentidocornQn.Contacto1-800-
659-5917parainforrnaci6nyasistencia.
DIENTES
Laspendientessonun factorirnportantequese relacionacon los
accidentesproducidosporderrapesy caidasy quepuedenpro@@
lesionesgraves.La operaci6nen pendientesrequieremayorpre-
cauci6n.Sino se sienteseguroenunapendiente,nola pode.Para
seguridad,use el rnedidordependientesquese incluyecornopartede
estemanualpararnedirla pendienteantesdeoperarlaunidaden una
zonainclinada.Si lapendientesuperalos 15grados,nola pode.
HagaIo siguiente:
• Muevala podadoraa travesde lascarasde la pendiente,nunca
haciaarribay abajo.Tengacuidadocuandocarnbiededirecci6n
cuandooperela rn_.quinaenpendientes.
• Est_atentoa losagujeros,raices,rocas,objetosocultoso
abultarnientosquepuedanprovocarque sederrapeo setropiece.
Elc_spedaltopuedeocultarobst_.culos.
Siernpreest_segurodesuequilibrio.Sitropiezaycaepuede
lesionarsegravernente.Si sJentequepier@el equilibrio,suelte
inrnediatarnentelarnanijadecontrolde lacuchillay lacuchilla
dejar_,degirarentres(3) segundos.
NohagaIo siguiente:
• I/o corteel cespedcercade pozos,hundirnientos,bancos,podria
perderel equilibrio.
• Nopodependientesrnayoresde 15gradoscornoIoindicael
rnedidorde pendientes.
• Nopodeel cespedhOrnedo.Si noest,.firrnernenteparado,puede
resbalarse.
53
Page 54

N QOS
Puedenocurriraccidentestr_.gicossieloperadornoest,.atentoa la
presenciade ni_os.PorIogenerala losni_oslesatraenlaspodadoras
yla actividadde podarel c_sped.Noentiendenlosriesgosnilos
peligros.Nuncad_porsentadoquelosni_osperrnanecer_.nenel
rnisrnolugardondelosviopor Oltirnavez.
• Mantengaa los ni_osfueradelAreadetrabajoy bajoestricta
vigilanciade unadultoresponsableadern_.sdeloperador.
Est_alertay apaguela podadorasi un ni_oingresaalArea.
Antesy rnientasseest,.rnoviendohaciaatr_.s,mirehaciaatr_.sy
cuidequeno hayani_os.
Tengaextrernaprecauci6ncuandoseaproxirnea esquinas
ciegas,entradasdepuertas,_.rbolesu otrosobjetosque puedan
obstaculizarlelavista deun ni_oque pudiesecorrerhaciala
podadora.
Mantengaalejadosa losni_osdelosrnotoresenrnarchao
calientes.Puedensufrirquernadurascon un silenciadorcaliente.
Nuncaperrnitaqueni_osrnenoresde 14a_osoperenesta
rn_.quina.Losni_osrnayoresde 14a_osdebenleery entender
lasinstruccionesde operaci6nyreglasdeseguridadcontenidas
enestemanualy debenserentrenadosy supervisadospor sus
padres.
SERVIClO
Manejosegurode la gasolina:
• Paraevitarlesionespersonaleso daSosrnaterialessea
surnarnentecuidadosoal rnanipularlagasolina.Lagasolinaes
altarnenteinflarnabley losvaporesson explosivos.Sepuede
lesionargravernentesiderrarnagasolinasobreustedo sobrela
ropaya quese puedeencender.
• Utilices61orecipientesparagasolinaautorizados.
• NuncaIlenelos contenedoresenel interiordeunvehiculo
ocarni6nocaja decarnionetacon recubrirnientospl_.sticos.
Coloquesiernprelos recipientesenel pisoy lejosdelvehiculo
antesde Ilenarlos.
• Retireel equipoa gasolinadelcarni6no rernolquey II_neloen
el piso.Si estonoesposible,entoncesIlenedichoequipoenun
rernolquecon un recipienteport_.til,en vezdedesdeundispen-
sadordegasolina.
• Mantengala boquilladeIlenadoencontactoconelhordedela
entradadeltanquede gasolinaocontenedorentodornornento
hastaqueest_Ileno.Noutiliceundispositivoparaabrir/cerrarla
boquilla.
• Apaguetodoslos cigarrillos,cigarros,pipasyotrasfuentesde
cornbusti6n.
• Nuncacarguecombustibleen larn_.quinaen interioresporque
Losvaporesinflarnablespodrianacurnularseen el_.rea.
Nuncasaquelatapadel gasni agreguecombustiblernientrasel
motorest,.calienteo en rnarcha.Dejequeel motorseenfriepor
Iornenosdosrninutosantesdevolvera cargarcombustible.
• Nuncarecargueel tanquedecombustible.Lleneel tanqueno
rn_.sde 1 pulgadapordebajodela basedelcuellode Ilenado
paradejarespacioparala expansi6ndelcombustible.
• Vuelvaacolocarlatapade la gasolinayajOstelabien.
• Lirnpiela gasolinaderrarnadasobreel motory el equipo.Traslade
la rn_.quinaa otrazona.Espere5rninutosantesdeencenderel
motor.
• Nuncaalrnacenela rn_.quinaoelrecipientede combustibleen
unespaciocerradodondehayafuego,chispaso aparatoscon
pilotocornoporejernplo,calentadoresde agua,calentadores,
hornos,secadoresderopau otrosaparatosagas.
• Parareducirel riesgode incendiornantengala rn_.quinalirnpia
de pasto,hojasy deacurnulaci6nde otrosescornbros.Lirnpielos
derrarnesde aceiteo combustibley saquetodoslosdesechos
ernbebidosconcombustible.
• Dejequela rn_.quinaseenfrie5 rninutospor Iornenosantesde
alrnacenarla.
Funcionamientogenerah
• Nuncaenciendaunmotoren espacioscerradoso en unazona
conpocaventilaci6n.Elescapedel motorcontienernon6xidode
carbono,ungasinodoroy letal.
• Antesde lirnpiar,repararo inspeccionarlarn_.quina,cornpruebe
que lacuchillay todaslaspartesquese rnuevensehandetenido.
Desconecteel cablede la bujiay p6ngalode rnaneraquehaga
rnasacontrael motorparaevitarquese enciendadernanera
accidental.
• Reviselospernosdernontajede lacuchillay delmotora
intervalosfrecuentesparaverificarqueest_nbienapretados.
Inspeccioneadern_.svisualrnentela cuchillaenbuscade daSos
(abolladuras,desgaste,roturas,etc.).Reernplacelacuchillacon
equipooriginaldel fabricante(OEM)listadoenestemanual.La
utilizaci6ndepartesquenocurnplanconlasespecificacionesde
equiposoriginalespodriatenetcornoresultadounrendirniento
incorrectoyadern_.sla seguridadpodriaestarcornprornetida.
• Lascuchillasde laspodadorasson rnuyafiladasy podrian
cortarlo.Envuelvalacuchillao utiliceguantesy extremeprecau-
clonescuandolede servicio.
• Mantengatodoslospernos,tuercasytornillosbienajustados
paraasegurarsequela rn_.quinaseencuentraen condiciones
segurasdeoperaci6n.
• Nuncarnanipulelosdispositivosde seguridaddernanera
irnprudente.Controleperi6dicarnentequefuncionendeforrna
adecuada.
54
Page 55

• Despu_sdegolpearcon algOnobjetoextrafio,detengaelmotor,
desconecteelcablede la bujfay conecteelmotora rnasa.
Inspeccionerninuciosarnentela rn_.quinaparadeterrninarsi est,.
da_ada.Repareel da_oantesdeencenderlayoperarla.
• Nuncatratedeajustaruna ruedao laalturade corternientrasel
motorest,.en rnarcha.
• Loscornponentesde latolvapararecorte,cubiertade descargay
escudode riel,est_.nsujetosa desgastey da_osquepodriadejar
expuestaspartesquese rnueveno perrnitirquese arrojenobje-
tos.Paraprotegersuseguridad,verifiquefrecuenternentetodos
loscornponentesy reernpl_.celoss61ocon partesde losfabri-
cantesdeequiposoriginales(O.E.M.)listadasenestemanual.
La utilizaci6nde partesquenocurnplanconlasespecificaciones
deequiposoriginalespodriatenercornoresultadoun rendirniento
incorrectoyadern_.sla seguridadpodriaestarcomprornetida.
• Nocarnbielaconfiguraci6ndel reguladordelmotorni acelere
dernasiadoelrnisrno.Elreguladorcontrolalavelocidadrn_.xirna
seguradeoperaci6ndel motor.
• Verifiquefrecuenternentela Ifneadecombustible,eltanque,el
tap6n,y losaccesoriosbuscandorajaduraso perdidas.Reern-
placedeset necesario.
• Nod_arranquealmotorsi noest,.la bujfadeencendido.
• Mantengao reernpiacelasetiquetasdeseguridad,segOnsea
necesario.
• Observelasleyesy norrnasaplicablesparadisponeradecu-
adarnentedelosdesechos.Ladescargainapropiadadeliquidos
o rnaterialespuededa_are[ medicarnbiente.
• SegOnla Cornisi6nde Seguridadde Productosparael Consu-
rnidordelos EstadosUnidos(CPSC)y laAgenciadeProtecci6n
Arnbientalde losEstadosUnidos(EPA),esteproductotieneuna
vida_til mediadesiete(7)a_os,6 140horasdefuncionarniento.
AI finalizarladda Qtilmedia,adquieraunarn_.quinanuevao
hagainspeccionaranualrnente_staSearsporunou otrodis-
tribuidordeserviciosparacerciorarsedequetodoslossisternas
rnec_.nicosyde seguridadfuncionancorrectarnenteyno tienen
excesivodesgaste.SinoIo hace,puedenproducirseaccidentes,
lesionesornuerte.
NO MODIFIQUE EL MOTOR
Paraevitarlesionesgraveso larnuerte,nornodifiqueel motorbajo
ningunacircunstancia.Si carnbialaconfiguraci6ndel reguladordel
motorelmotorpuededescontrolarsey operaravelocidadesinsegu-
ras.Nuncacarnbielaconfiguraci6ndef_.bricadelreguladordelmotor.
AVISO REFERIDO A EMISIONES
Losrnotoresqueest&ncertificadosy curnplenconlasregulaciones
de ernisionesfederalesEPAy de CaliforniaparaSORE(Equipos
pequeSostodoterreno)est_.ncertificadosparaoperarcongasolina
cornOnsinplornoy puedenincluirlossiguientessisternasde control
de ernisiones:Modificaci6ndemotor(EM) ycatalizadorde tresvias
(TWO)si est_.nequipadosde esarnanera.
GUARDACHISPAS
Estarn&quinaest,.equipadaconunmotordecornbusti6ninternay
nodebeserutilizadaeno cercade unterrenoagrestecubiertopor
bosque,rnalezaso hierbaexceptosiel sisternade escapedelmotor
est,.equipadocon unarnortiguadorde chispasquecurnplaconlas
leyeslocaleso estatalescorrespondientes,encasodehaberlas.
Siseutilizaun arnortiguadordechispasel operadorIo debernantener
en condicionesde usoadecuadas.Enel Estadode Californialas
rnedidasanteriorrnenternencionadassonexigidasporley(Arficulo
4442del C6digodeRecursosPOblicosde California).Esposible
queexistanleyessirnilaresenotrosestados.Lasleyesfederalesse
aplicanenterritoriosfederales.
Puedeconseguirelarnortiguadorde chispasparael silenciadora
travesde sudistribuidorautorizadodernotoreso poni_ndoseen
contactoconelcentrode servicioSears.
55
Page 56

SilVIBOLOSDE SEGURIDAD
Estap&ginarepresentay describelaseguridadlossimbolosquepuedenparecerenesteproducto.Lea,comprenda,ysigatodasinstrucciones
en lam_quinaantesprocurarparareuniry operar.
LEA ELMANUAL(S) DEL OPERADOR
i
i
®
Lea, comprenda,y siga todas instrucciones en el manual (manuales) antes procurar para reunir y
operar.
PELIGRO-- GIRANDO HOJAS
Para reducir el riesgo de herida, guarde manos y pies lejos. No funcione a menos que la tapa
de descarga o el receptor de hierba est6n en su lugar apropiado. De ser dahado, sustituya
inmediatamente.
PELIGRO-- ESPECTADORES
No siegue cuando los ni_os o los otros est_in alrededor.
PELIGRO-- DIe ELCORTE DE PIE/
Guarde manos y pies lejos de hacer girar partes.
PELIGRO-- ESCOMBROS LANZADOS
Quite objetos que pueden set lanzados por la I_imina en cualquier direcci6n. Lleve gafas de
seguridad.
PELIGRO-- CUESTAS
Use extra la precauci6n en cuestas. No siegue cuestas mayores que 15 o
ADVERTENCIA DESPIDA
Para reducir el riesgo de incendio mantenga la m_iquina limpia de pasto, hojas y de acumulaci6n de
otros escombros.
ADVERTENCIA VAPORES TOXICOS
Nunca encienda un motor en espacios cerrados o en una zona con poca ventilaci6n. El escape del
motor contiene mon6xido de carbono, un gas inodoro y letal.
ADVERTENCIA-- SUPERFICIE CALIENTE
Las partes del motor, especialmente el silenciador, Ilega a set muy caliente durante la operaci6n.
Permita motor y silenciador para ponerse frio antes de tocar.
56
Page 57

01
Mireymantenc3aestenive[conun_rbo[vertical
_. o[aesquinadeunedificio...
oelpostedeunaempaiizada
DoblePorlaI,"
_ -- . '_s_ePreSenta un
, _ ._ _ apendie
,,
Use esta paginacomo guia para determinar en qu6 pendientes no puede operarel tractor de manera segura.
Nooperelacortadoradec6speden dichaspendientes.No corteen inclinacionesmayoresde 15grados(elevaci6naproximadade 2 1/2piespercada 10pies).Operelas
podadorasQUESEEMPUJANde maneraquecrucenel frentedelas pendientes,nuncahaciaarribay haciaabajo.
Page 58

IMPORTANTE:Estaunidadseenvfasinaceiteenelmotor.Despu_s
delrnontaje,consultelap_.gina62paralosdetallesdelcombustibley
elaceite.
IMPORTANTE:Lasreferenciasalosladosderechooizquierdode
lacortadoradec_spedsehacenobservandolarn_.quinadesdela
posicidndeoperacidn.
La plataformade lacortadorade cespedpuedearrojarobjetos.Encaso
deoperarla cortadoradecespedsincolocarel canaldedescargaen la
posici6nadecuadaparaelfuncionamiento,podrianproducirsegraves
lesionespersonalesy/o daSosmateriales.
Latrabade seguridadse usaQnicarnenteparael ernbalaje.Retirey
desechelatrabaantesdeoperarlacortadoradecesped.
Laplataforrnadela cortadoradecespedpuedearrojarobjetos.
Encasode operarlacortadoradec_spedsincolocarlacubierta
de descargaen laposici6ndefuncionarnientoadecuada,podrian
producirsegraveslesionespersonalesy/o daSosrnateriales.
INSTALACION DE LOS CABLES DE LA BATER{A
Desconecteel cablede la bujiay p6ngalohaciendomasacontrael motor
paraevitarqueseenciendaaccidentalmente.
PIEZAS SUELTAS DENTRO DE LA CAJA
ManualdelOperador,Manguerade drenajedeaceite,Acopladorde
Manguerade Agua
HERRAMIENTAS NECESARIAS PARA EL
MONTAJE
UnjuegodeIlavesajustablesy unrnan6rnetroparaneurn_.ticos
CONFIGURACION DE LA CORTADORA DE
C_:SPED
Extracci6n de la traba de seguridad utilizada en
el envio
AsegQresede queel motorde lacortadoradec_spedest_apagado.
QuitelaIlavede encendidoantesde retirarla trabade seguridad
utilizadaen elenvio.
1. Localicelatrabade seguridadque, sila hay,seencuentraen la
partederechade la plataforrnadecorte.Veala Figura1.
f
NOTA:Elbornepositivode labateriaest,.rnarcadocornoPos(+).El
bornenegativode la bateriaest,.rnarcadocornoNeg (-).
Elcablepositivo(grueso,decolorrojo)vienedef_.bricasujetoal
bornepositivodelabateria(+)pormedicdeunpernohexagonaly
unatuercahexagonal.
Elcablenegativo(grueso,decolor negro)puedevenirde f_.brica
sujetoalbornenegativode labateria.Si nose entregaunido,proceda
del siguienternodo:
1. Retireelpernodel carroy latuercahexagonaldelcablepositivo
(cablerojogrueso).
2. Retirelacubiertapl_.sticaroja,sies queest,. presente,delborne
positivodela baterfay unael cablepositivoal bornepositivode
labateria(+)utilizandoel pernoy la tuercahexagonal.Veala
Figura2.
Figura1
.
Mientrassostieneelcanal dedescargaconsu rnanoizquierda,
extraigaconla rnanoderechala trabade seguridad,sujet_.ndola
entrelos dedospulgare indicey rot_.ndolaen el sentidodelas
agujasdelreloj.
Figura2
3. Retireelpernodel carroy latuercahexagonaldelcablenegativo
(cablenegrogrueso).
4. Retirelacubiertapl_.sticanegra,sies queest,.presente,del
bornenegativode la bateriayunael cablenegativoalborne
negativodela bateria(-) utilizandoel pernoyla tuercahexago-
nal.Veala Figura2.
5. AsegQresedeque lavarillade sujeci6nest,.colocadasobrela
bateria,rnanteni_ndolaensu lugaryasegQresedeque elborne
positivodela bateriaest_cubiertoconelcapuch6ndegornarojo
paraprotegerlode la corrosi6n.
58
Page 59

NOTA:Silabaterfaseponeenfuncionarnientodespu_sdelafecha
indicadaenlapartesuperioroalcostadodelarnisrna,c_.rguela
siguiendolasinstruccionesdelasecci6nMantenirnientodeeste
manualantesdehacerfuncionarlacortadora.
Despliegue de la manija
1. Extraigalasperillasenestrellay los tornillosdel carrode la
rnanijainferior.Veala Figura3.
J
Figure3
de carnbiosa la placadela palancadecarnbios.Veala Figura5.
Figure5
2. Extraigael tornilloyla tuercarestantesdela placade la palanc
de carnbiosinferior.Veala Figura5.
3. Coloquelapalancade carnbiossuperioren posici6nvertical
alineandolosorificiosde lapalancaconlosdela placade
carnbios.VealaFigura6.
2. Girelarnanijasuperiorala posici6ndefuncionarniento.Tenga
cuidadodenoprensarloscables.VealaFigura4.
Figure4
3. Vuelvaainstalarlostornillosdelcarroylas periNasextraidos
anteriorrnente.
4. AjustelasperiNasen estrellasuperiorese inferioresylostornillos
delcarroparaasegurarla rnanijasuperiora la inferior.Veala
Figura4.
5. Despu_sdearrnarla rnanija,paraextraerconseguridadla
unidaddel p_.let,saqueprirnerolostorniNosquefijan la cortadora
alcaj6n.
Colocaci6n de la palanca de cambios
1. Extraigael torniNoy latuercade seguridadque sujetanlapalanca
/
/
/
Figure6
4. Asegurelapalancaa la placausandolosdos torniNosylas dos
tuercasextraidosanteriorrnente.Veael recuadrode la Figura6.
Control de la presi6n de los neumaticos
Lapresi6nmaximade los neurn_.ticosen cualquiercircunstanciaes
de 30psi.Sedebe rnantenerunapresi6nuniforrneparatodoslos
neurn_.ticosentodornornento.
Esposiblequelosneurn_.ticostraseroshayansidoexcesivarnente
infladosparadespacharel producto.Reduzcala presi6ndelos
neurn_.ticosantesde hacerfuncionarlacortadora.Lapresi6nde
neurn_.ticosrecornendadaparaelfuncionarnientoesdeaproxirnada-
rnente20p.s.i.
Consulteenlos lateralesde losneurn_.ticosla presi6nrn_.xirnaen p.s.i.
59
Page 60

f
Fuel Tank
Throttle/Choke
Control
Blade Control
Deck Height
Lever
CONTROLES DEL MOTOR
ConsultelaFigura8 paraverla ubicaci6ndelos controlesdelmotor.
!_TaP6nde aceite/
varilladernedici6n
del niveldeaceite ivlanlja
V_.lvulade Bujiade
drenajede Silenciadory encendido
aceite protectordel
Valvula de drenaje de aceite
Uselav_.lvulade drenajedeaceiteparadrenarel aceitedel motor.
Consultelasecci6nde Mantenirnientoparaobtenerinstrucciones.
Manija del filtro de aire
La rnanijadeldepuradordeairese usaparaaccederaldepurador
deaire.Elcartuchopurificadorde airese puedeextraerparalirnpiar
o reernplazar.Consultelasecci6ndeMantenirnientoparaobtener
detalles.
Bujia de encendido
Consultelasecci6nde Mantenirnientoparaobtenerinstrucciones
sobreel reernplazode bujias.
silenciador
Figura8
del
ignition Switch
Systems indicator Monitor
Drive Control
Gear Shift Lever
Figure7
Tap6n de aceite/varilla de medici6n del nivel de
aceite
Consultelasecci6nde Mantenirnientoparaobtenerinstrucciones
sobrec6rnoverificarelaceite.
CONTROLES DEL CORTADORA
ConsultelaFigura7 paraverla ubicaci6ndeloscontrolesdelmotor.
PALANCA DE CONTROL DEL REGULADOR/
CEBADOR
NOTE:Cuandooperela cortadorade
cespedconla plataforrnadecortecolocada,
aseg[3resede quelapalancadecontrol
del regulador/cebadorest_ siernpreen la
posici6nr_.pido.
Estapalancase usapararegularlavelocidad
del motor,paraaplicarel cebadordelmotor,
y paradetenerel motor.Hagafuncionarel
J
motorsiernprea altavelocidadparaobtener
rnejoresresultadosde corte.
Cebador: Utiliceloparaarrancarunmotor
frio
R_pido: Utiliceloduranteel funcionarniento
de lacortadora.
Lento: Utilicelodurantela rnarchalenta.
Parar:Detieneelmotor.
Lento
Parar ==_
6O
J
!
Page 61

PALANCA DE ALTURA DE LA PLATAFORIVlA
Useestapalancaparaajustarlaalturade corte.Parautilizarla,mueva
la palancahaciala izquierda,luegocobquelaen lamuescaque mejor
seadaptea la aplicacbndeseada.
TAPON DE COMBUSTIBLE
Retireel tap6ndecombustibleparaagregarcombustibleal tanquede
combustible.
CONTROL DE LAS
CUCHILLAS
Seusaelcontrolde las cuchillaspara
engancharla plataformade lacortadora.Para
engancharestecontrol,presioney retenga
la palancacontralaempu_aduradela barra
decontrol.Paradetenerlascuchillas,suelte
el controldelascuchillas.Desenganche
siempreelcontrolde lascuchillasantesde
arrancarelmotor.Asise aseguradeque
lascuchillasnocomenzar_.na girarcuando
arrancaelmotor.
,%
CONTROL DE LA
TRANSMISI6N
Elcontrolde latransmisi6nse usapara
engranarydesengranarlatransmisi6nde
lasruedas.Paraengancharestecontrol,
aprieteel controldela transmisi6ncontra
laempu_aduradela barrade control.Para
detenerlatransmisi6n,suelteel controlde la
transmisi6n.
IMPORTANTE:Sueltesiempreel control
de latransmisi6nantesde cambiarlas
velocidades.
Sueltesiempreelcontrolde latransmisi6nantesdecambiarde
velocidad.DeIocontrariopuedeocasionargravesdaSosa la
transmisi6n.
f
PALANCA DE CAiVlBIO DE VELOCIDADES
Sueltesiempreelcontroldelas cuchillasantesdearrancarel motor.
DeIocontrariopuedeocasionardesgasteprematuroalarranque
el_ctricodel motor.
Nuncaintentedetenerelmotorcon elcontrolde lascuchillas
enganchado.
Useestapalancaparaseleccionarunadecuatrovelocidadesde
marchadirect& neutralo marchaatr_.s.
IVlarcha directa
Haycuatrovelocidadesde marchadirect& Laposici6nuno(1)es la
m_.slent& y la posici6ncuatro(4)es lam_.sr_.pida.
Marcha atras
Paraseleccionarmarchaatr_.s,pongala palancaen la posici6nde
reversa(R).
Miredetr_.sdela cortadoraantesy duranteelfuncionamiento
marchaatr_.s.Detengalascuchillasdelacortadoraantesde operar
marchaatr_.s.
Neutral
Coloquelapalancaenneutro(N) antesde comenzarel cortac_sped,
y cuandoel cortacespednoest,.enel uso.Adem_.s,elcortac_sped
puedesera manoempujadootiradocolocandola palancadepalanca
de cambiosenel N posici6n(neutra)ypresionandoelcontrolde
paseocontraelapret6nde manillar.
Sueltesiempreelcontrolde latransmisi6nantesdecambiarde
velocidad.DeIocontrariopuedeocasionargravesdaSosa la
transmisi6n.
61
Page 62

INTERRUPTOR DE ENCENDIDO
Nuncadejelarn&quinaenfuncionarnientosin vigilancia.Siernpre
desenganchelascuchillas,apagueel motory retirelaIlave,paraevitar
elencendidoaccidentaldelmotor.
Elinterruptordecautroposicionesse usaparaencenderyapagarel
motorde losrnodeloscon arranqueel_ctrico.Paraencenderel motor,
insertela Ilaveenel interruptorde encendidoygirelaenel sentidode
lasagujasdel relojhaciala posici6nENCENDIDO.Sueltela Ilaveen
la posici6nFUNCIONAMIENTOunavezquehayaarrancadoel motor.
Muevala Ilaveen la posici6nCORRE/LIGEROacorrerel cortaces-
pedesconel faro.Paradetenerelmotor,girela Ilavea PARAR.Veala
Figura9.
CORRE/LIGERO
PARA DIDO
MONITOR INDICADOR DE SISTEMAS/MEDI-
DOR HORARIO
BATTERY
©©
j f J"
....-J
42.01
HOURS 1/10 \\\
...... -J
/7
Figura10
LCD (pantalla de cristal liquido)
CuandolaIlavede encendidoserotafuerade laposici6nSTOP
(parar)perono secolocaen laposici6nSTART(encendido),el
monitorindicadordesisternasrnuestralasalidade labateria,en
voltios,en supantallaLCDduranteaproxirnadarnentecincosegundos,
y despu_srnuestraunrelojdearenay lashorasdefuncionarnientode
la cortadora.Unavezqueel motorha arrancado,el monitorrnuestra
continuarnenteun relojdearenaylas horasdefuncionarnientode la
cortadoraenla pantalla.Veala Figura10.
Figura 9
NuncarnuevalaIlavea laposici6nStart(encendido)rnientras
elmotorest&funcionando;siIo hace,puedeocasionardaSosal
arrancadordel motor.
NOTA:Lashorasde funcionarnientode lacortadoraseregistran
cadavezque laIlavede encendidose rotafueradela posici6nSTOP
(detener),independienternentedequesehayaarrancadoelmotor.
J
Elmonitorindicadortarnbi_nle recuerdaal operadorlosintervalos
de rnantenirnientoparacarnbiarelaceitedelmotor.Lapantallade
cristalliquidoparpadeaalternativarnentelas horasregistradas,"CHG"
(carnbiar)y"OIL"(aceite)durantecincorninutos,despu_sde cada50
horasde operaci6nregistrada.El intervalode rnantenirnientodurados
horas(entre50-52,100-102,150-152,etc.)La pantallaLCDtarnbi_n
parpadeasegQnsedescribern&sarriba,durantecincorninutos,cada
vezqueel motorde lacortadoraseenciendeduranteelintervalode
rnantenirniento.Antesde quefinaliceel intervalo,carnbieel nivelde
aceitedelmotorsegQnseindicaen lasecci6nMantenirnientodeeste
ManualdelOperador.
Bateria
Esnormalquela luzde la bateriaseilurninecuandoel motoresta
girandoduranteelarranque,perosi se ilurninadurantela operaci6n,
cuandoel motorest&funcionando,labaterianecesitacargao el
sisternadecargadel motornoestagenerandoarnperajesuficiente.
Controlela bateriacornoseindicaenla secci6nServiciodeeste
manualo hagaqueel sisternadecargasea verificadopor sudis-
tribuidorSearsuotrodistribuidor.
62
Page 63

LLENADO DE GASOUNA Y ACEITE
IMPORTANTE:Estaunidadseenviasingasolina,peroconaceiteen
el motor.Aseg@esede queelmotorcongasolinayrevJsarelaceite
comoseindicaen estasecci6nantesdecomenzaro el funciona-
mientodesum_.quina,
Aceite
Useaceite para motor de 4 tiempos quecumpla o sobrepase los
requisitos para laclasificaci6n deservicio API SF,SG, SH, SJ o
equivalente.
Compruebesiempre iaetiqueta de servicio APIen el recipientedel aceite
paraasegurarse que incluyelasletras SF,SG, SH,SJ o equivalente.
Temperaturasai aire librededeterminarla viscosidad deiaceite correcto
parael motor.Use latablapara seleccionar la mejorviscosidad para el
rangode temperaturaai aire libre seespera.
Figura 11
,, La gasolina con hasta un 10% de etanol (gasohol) o hasta el 15%
de MTBE (metil terbutil 6ter) es aceptable.
Echegasolina en un a.reabien ventiiaday con ei motorparado. Siel motor
haestado funcionando,deje que seenfrie primero. No eche gasolina a
la ma.quinaen ei interior de unedificio donde los vaporesde la gasolina
puedanestarexpuestos a aiguna llama o chispa.
* Pordebajo de 40 oF (4 oC)el usode SAE30 dara.lugar a duros de
partida.
** Pot encima de 80 oF (27oC) el uso de 10W-30puede provocarun
aumento dei consumo de petr61eo.Nivel de aceitecon ma.sfrecuencia.
1. Reviseel aceite con ei motorparadoy nivelado.
2. Quite iatapa del dep6sito de aceite/varilla medidoradel nivelde
aceite ylimpiela.
3. Coloque y ajuste la varilla indicadora. Luego quitela para revisarel
nivelde aceite.Vea iaFigura 11.
4. Siel nivel de aceite esta.cerca o pot debajo de la marca de limite
bajode la varilla medidoradel nivelde aceite, quite latapa del
dep6sito de aceite/variliamedidora dei nivel de aceite y ilenelo con
el aceiterecomendado hasta la marcade limitesuperior. No Ilene de
ma.s.
5. Vuelvaa instaiar la tapa/varilla medidora del nivel de aceite.
Gasolina
No utilicegasolinas noaprobados,tales como E85. Nomezcle el aceite
en ia gasolina o modificarel motorpara funcionar con combustibles
aiternativos. Estodafiara,los componentesdel motor y anularla
garantia del motor.
Decombustibledebecumplirestosrequisitos:
* Limpia,fresca,lagasolinasinplomo.
, Unminimode87octane/87AKI(91RON).
La gasolinaes aitamente inflamabley explosiva y ustedpuede quemarse
o iesionarse gravementeaireabastecer. Pareel motory mantengaiejos
el calor,las chispas y las llamas.Reabastezca s61oal airelibre. Limpie
[ nmedatamente osderrames.
Siva a usar ei equipo de forma intermitenteo s61oocasionaimente,
consulte ia secci6n de AimacenamientoFuera de Temporadapara
obtener ma.sinformaci6nsobre el deteriorodel combustible.
NOTA:El combustible puededahar la pinturay aigunos tipos de plastico.
Tengacuidado de no derramar combustiblecuando Ilenael tanque.
No usenunca gasolina ranciao contaminadani mezclas deaceite y gaso-
lina.No permita que entre suciedad oagua en eltanque de combustible.
1. Quite la tapadel tanque de combustible.
2. Agreguecombustible hastaia parte inferiordel iimitede nivel de
combustible en ei tubodel tanque. No iiene de ma.s.Limpieel
combustible derramadoantes de arrancar el motor.
3. Aprieteeltap6n firmemente.
4. Antesde arrancar el motor,alejeseal menos3 metrosdel
emplazamiento y lafuente de la gasolina.
AsegQresede que ningunapersona aparte dei operador permanezca
cercade iacortadora mientras arranca elmotor u operala misma.
Nunca enciendael motor enespacios cerrados o en unazona con poca
ventilaci6n. Elescape del motor contiene mon6xidode carbono, un gas
inodoroy ietai.Mantenga iasmanos, los pies, el cabello y la ropa suelta
alejadosde las partes m6vilesdel motory de lacortadora.
63
Page 64

ENCENDIDO DEL MOTOR
1. Sueltetodoslos controlesdela cortadora.
2. Muevala palancadecarnbiosala posici6nneutral(N).
3. InsertelaIlaveenel interruptordeencendido.
4. Siel motorest,.fib, rnuevael controldelregulador/cebador
cornpletarnentehaciadelante,a la posici6nCHOKE(cebador).Si
est,.volviendoaarrancarun motorcaliente,rnuevaelcontroldel
regulador/cebadora laposicbnFAST(velocidadr_.pida,represen-
tadaporunaliebre).
5. Girela Ilavede encendidoen el sentidodelasagujasdelreloj
hastalaposici6nSTART(encendido).Unavezquearranqueel
motor,sueltelaIlave.Volver_.a laposici6nRUN(funcionarniento).
NornantengalaIlaveen laposici6nSTART(encendido)durante
rn_.sde cincosegundosporvez.Si Io hace,puedeocasionarda_os
alarrancadorel_ctricodel motor.
ParaconducirhaciaADELANTE:
a. Coloquelapalancade carnbiosen cualquierade lascuatro
velocidadesde avance.Seleccioneunavelocidadadecuada
alas condicionesy conlacual sesientac6rnodo.
b. Oprirnaelcontrolde la transrnisi6n.
c. Oprirnalentarnenteel controldela transrnisi6ncontrala
rnanijade laernpuSaduraylacortadorasemover&Su_ltelo
y se detendr_,elrnovirnientodelatransrnisi6n.
ParaconducirhaciaATRAS:
a. Verifiquequeel_.readetr_.ssuyoest,.despejada.
b. Coloquelapalancade carnbiosen rnarchaatr_.s(R).
c. Optimalentarnenteel controldela transrnisi6ncontrala
rnanijade laernpuSaduraylacortadorasemover&Su_ltelo
y se detendr_,elrnovirnientodelatransrnisi6n.
6. Muevala Ilavea la posici6nCORRE/LIGEROa operarel
cortac_spedesqueutilizaelfaro.
7. Muevaelcontroldel regulador/cebadora la posici6nFast
(velocidadr_.pida,representadaporunaliebre).
NOTA:Nuncadejeel controldel regulador/cebadoren la posici6n
CHOKE(cebador)rnientrasoperalacortadora.Si Iohace,se
generar_,unarnezcla"rica"decombustibles,Iocualhar_.queel motor
pierdapotencia.
DETENCION DEL MOTOR
SigolpeaunobjetoextraSo,detengaelmotorysaquelaIlavede
encendido.Inspeccionerninuciosarnentela rn_.quinaparaversi est,.
daSada.RepareeldaSoantesdevolvera arrancarel motory operar
larn_.quina.
1. Silascuchillasest_.nenganchadas,suelteelcontroldelascuchillas.
2. Muevaelcontroldelregulador/cebadora laposici6nSTOP(parar)
3. GirelaIlavede encendidoen sentidocontrarioa lasagujasdel
reloja laposici6nSTOP(parar).
4. Retirela Ilavedelinterruptordeencendidoparaevitarqueel
motorseenciendaaccidentalrnente.
ENGANCHE DE LA TRANSMISION
EvitearrancarsQbitarnente,desarrollarexcesivavelocidady
detenersede repente.
Enciendael motorsegQnlasinstruccionesanterioresy rnuevael
controldel regulador/cebadora la posici6nFAST(velocidadr_.pida,
representadaporunaliebre).
Nointentecarnbiarladirecci6ndedesplazarnientornientrasla
cortadoraest,.en rnovirniento.Siernpredebe soltarel controlde
la transrnisi6ny detenerla cortadoratotalrnenteantesde moverla
palancadecarnbiosdeunaposici6ndeavancea Marchaatr_.s.De
IocontrariopuedeocasionargravesdaSosa latransrnisi6n.
Nodejela posici6ndeloperadorsinantessoltarelcontroldelas
cuchillas.Sidejala cortadorasin vigilancia,debeapagarel motory
retirarlaIlavedeencendido.
ENGANCHE DE LAS CUCHILLAS
Paratratarde evitarel contactoconlascuchillaso unalesi6npor
algQnobjetoque seaarrojado,rnantengaa losobservadores,a los
ayudantes,niSosyrnascotasalejadosal rnenos25 metrosde la
rn_.quinarnientrasest,.enfuncionarniento.Detengalarn_.quinasi
alguienseacerca.
5. Muevael controldel regulador/cebadora la posici6nFAST
(velocidadr_.pida,representadaporunaliebre).
6. Oprirnalentarnenteel controldelas cuchillascontralaernpuSa-
durade la rnanijaderechay lacortadorase mover&Su_ltelay
lascuchillassedetendr_.n.
FUNCIONAMIENTO EN PENDIENTE
Consultelasecci6nINDICADORDEPENDIENTEdela pAgina57para
deterrninarenqu_pendientespuedeoperarlacortadoraconseguridad.
Nocorteenpendientesconunainclinaci6ndern_.sde 15grados
(elevaci6naproxirnadade 2 1/2 piesporcada 10pies).Lacortadora
podriavoltearsey causarlesionesgraves.
• Muevala podadoraa trav_sde lascarasde la pendiente,nunca
haciaarribay abajo.Tengacuidadocuandocarnbiededirecci6n
cuandooperela rn_.quinaenpendientes.
• Est_atentoa losagujeros,raices,rocas,objetosocultoso
abultarnientosquepuedanprovocarquese derrapeo setropiece.
Elcespedaltopuedeocultarobst_.culos.
64
Page 65

• Siernpreest_segurode suequilibrio.Si tropiezay caepuede
lesionarsegravernente.Sisienteque pierdeelequilibrio,suelte
inrnediatarnentela rnanijade controlde lacuchillay la cuchilla
dejar_,de giraren tres(3) segundos.
• Nocorteel cespedcercadepozos,hundirnientos,bancos,podria
perderel equilibrio.
• Nopodependientesrnayoresde 15gradoscornoIoindicael
rnedidorde pendientes.
• Nopodeel cespedhOrnedo.Sino est,.firrnernenteparado,puede
resbalarse.
USO DE LA PALANCA DE ALTURA DE LA
PLATAFORMA
Parasubirobajarla plataforrnadecorte,rnuevala palancade altura
dela plataforrnahaciala izquierdaycol6quelaenla rnuescaque
rnejorseadaptea la aplicaci6ndeseada.
CORTE DE CESPED
La siguienteinforrnaci6nle resultar_._til paraoperarlacortadora.
Planifiqueel patr6ndecorte,paraevitarquela descargade
rnaterialesse realicehacialoscarninos,las veredas,losobserva-
dotes,etc. Eviteadern_.sdescargarmaterialcontraunaparedu
obstrucci6nque podriahacerqueel materialdescargadorebote
contrael operador.
Nocortea alta velocidad,especialrnentesi se hainstaladounkit
paraabonoo uncolectordecesped.
• Nocorteelcespeddernasiadocorto.El cespedcortoalientael
crecirnientode rnalezasy seponeamarillor_.pidarnentecuando
escasealaIluvia.
• Siernprehagafuncionarla cortadoracon elcontroldelregulador/
cebadorenlaposici6nFAST(r_.pida,representadapor una
liebre)rnientrascortael cesped.
• Paraobtenerlosrnejoresresultados,serecorniendarealizarlos
dosprirneroscortesdecespedarrojandoladescargahaciael
centro.Despu_sde lasdosprirnerasvueltas,carnbiela direcci6n
paraarrojarladescargahaciaafuera,paraequilibrarel corte.Esto
otorgar_,unrnejoraspectoalcesped.
• NOintentecortarrnalezasfrondosasoc_spedextremadarnente
alto.Lacortadoraruedise_adaparacortarelcesped,NOpara
podarrnalezas.
• Mantengalascuchillasafiladasyreernpl_.celascuandose
desgasten.
despedidoshaciaatr_.sparaque sedepositenenel cespedy actQen
cornofertilizantenatural.Observelossiguientespuntosparaobtener
losrnejoresresultadosal realizarelabono.
• Nuncaintenterealizarelabonosi el c_spedest,.hOrnedo.El
cespedhQrnedotiendeaadherirseal ladoinferiordela plata-
forrnadecortee irnpideelprocesoadecuadodelos recortesde
cespedcornoabono.
• NOintenterealizarel abonoa rn_.sde 1/3de la alturatotaldel
cesped.De Iocontrariolos recortesdec_spedsearnontonar_.n
forrnandoterronesdebajode laplataforrnay nose procesar_.n
eficazrnentecornoabono.
• Mantengaunavelocidadabsolutalentaparaperrnitirquelosrecortes
dec_spedse proceseneficazrnentecornoabono.
• Siernprernantengalapalancadecontroldel reguladoren la
posici6nFAST(velocidadr_.pida,representadaporunaliebre)
rnientrasrnientrascortael c_sped.Si el motornosernantiene
conel reguladoraplenosesorneteal motorde lacortadoraa un
esfuerzoqueno perrniteque lascuchillasprocesenadecuada-
rnentelosrecortesdecespedque seusar_.ndeabono.
INSTALACION / EXTRACCION DE LA TOLVA
DE ABONO
Antesde instalaro extraerlaclavijadeabono,desenganchelas
cuchillas,apagueel motory retirela Ilave,paraevitarquealguien
enciendaaccidentalrnenteel motor.
Detengael motory esperaquetodaslas piezasdejendernoverse.
Instalaci6n de la tolva de abono
1. Insertelaleng_Jetaderecha(A)de laclavijaenel soportede la
plataforrna.VealaFigura12.
Despu_sdegolpearalgQnobjetoextra,o,detengael motor,
desconecteel cablede labujfaycon_cteloa tierraconel motor.
Inspeccioneminuciosarnentela rn_.quinaparadeterrninarsiest,.
da_ada.Controlesiernprelacorreadesincronizaci6nde lacuchilla
cornose indicaenla secci6nMantenirnientodeestemanual.Repare
el da_oantesdeencenderlay hacerfuncionarla cortadora.
ABONO
Lascortadorasde cespedanchasSearsvienenequipadasconunkit
paraabonoqueincorporacuchillasespeciales,quevienendeserieen
sucortadora,pararecircularlos recortesdec_spedrepetidasveces
pordebajode la plataforrnadecorte. Losrecortesrnuyfinosluegoson
Figura12
2. Insertelaclavijadeabonoenla aberturade descarga(B).
3. Unavezcolocadaen laaberturadela plataforrna,ernpujela
clavijahacialaparte posteriorde lacortadora(C) parafijarlaen
sulugar.
Extracci6n de la tolva de abono
Deslicelaclavijahacialaderecha(hacialapartedelanterade lacorta-
dora)paradesengancharla ranuradela plataforrnade lacortadoray
luegofuerceel ladoizquierdode la clavijahaciafuera.
65
Page 66

PROGRAMA DE MANTENIMIENTO
1ras 5 horas
Cada8 horaso pordias
25 horas
50 horas
Anualrnente
Antesde alrnacenar
1. Aceitedelmotor
1. Cuchillasdelacortadora
2. Piezassueltasofaltantes
3. Correas
4. Nivelde aceitedel motor
5. Controles
6. Clavijadeabono(siest,.
instalada)
1. Filtrode aire/pre-filtrot-
2. Cuchillasdelacortadora
3. Varillajesy pivotesdecontrol
1. Aceitedelmotor
2. Rodarnientosdelasruedas
delanteras
1. Bujiadeencendido
2. Filtrode aire
3. Pre-filtrot-
4. Ruedastraseras
1. Sisternadecombustible
.
Carnbiar
1.
SegQnnecesidad
2.
Ajustaro reernplazar
3.
Verificar
4.
Verificar
.
Verificarel funcionarnientocorrecto
6.
Verificarlacorrectainstalaci6nde
la clavija
.
Lirnpia*
2.
Afilary balancear
3.
Lubricarconaceiteligero
1.
Carnbiar
2.
Engrasar
1. Reernplazar
2. Reernplazar
3. Reernplazar
4. Engrasar
1. Hacerfuncionarel motorhastaque
sedetengaporfaltade combustible
o agregaraditivoparagasolinaala
queseencuentraeneltanque.
1 Si Equipado
* Encondicionesdernuchopolvoo cuandoelaireest,. presente,lirnpiarcon rn_.sfrecuencia
MANTENIMIENTO DEL MOTOR
Detengasiempreel motor,desconectelabujiay hagamasacontraelmotor
antesde realizarcualquiertareade mantenimientoen lacortadora.
RECOMENDACIONES GENERALES
• Respetesiernprelas reglasdeseguridadcuandorealice
cualquiertareadernantenirnientoenlacortadora.
• Lagaranfiadeestacortadoranocubreelernentosque han
estadosujetosalrnalusoo la negligenciadeloperador.Para
recibirel reernbolsototalde lagaranfia,el operadordeber_,dar
rnantenirnientoa la podadoracornoseindicaenestemanual.
• Elcarnbiodela velocidadcontroladadelmotorinvalidar_,la
garanfiadelmotor.
• TodoslosajustesdebenserverificadosporIo rnenosunavezen
cadaestaci6n.
• Reviseperi6dicarnentetodoslos sujetadoresy cornpruebeque
est_nbienajustados.
Control del aceite del motor
Controleel niveldeaceiteantesdelfuncionarniento.Detengael motor
y esperevariosrninutosantesdeverificarelnivelde aceite.Conel
motorubicadoensueloparejo,elaceitedebeestaren larnarcaFULL
(lleno)de lavarilladelnivelde aceite.
1. Saquelavarilla/tap6ndel aceitey lirnpielosconunatela lirnpia.
2. Vuelvaacolocary ajustela varilla/tap6n
de aceite.Retirelavarilla/tap6ndeaceitey
controleel niveldeaceite.Elniveldeberiaestar
en la rnarcaFULL(lleno)
3. Si esnecesario,agregueaceitelentarnenteen
el recipientede Ilenadodeaceitedel motor.
Vuelvaacontrolarel nivelde aceite.No IoIlene
en exceso.
4. Vuelvaacolocary ajustela varilla/tap6nde aceite.
66
Page 67

NoIoNeneenexceso.ElNenadoexcesivode aceitepuedehacer
que el motornoarranqueo Io hagacondificultad.Sise superala
rnarcaFULL(Neno)dela variNadernedici6n,dreneaceitepara
reducirelnivelhastaque quedeen larnarcaFULL.
Carnbio de aceite del motor
Siel motorseha puestoenfuncionarnientorecienternente,el motor,
silenciadory lassuperficiesrnet_.licascircundantesestar_.ncalientes
y puedencausarquernadurasa la piel.Tengaprecauci6nparaevitar
quernaduras.
Elaceiteen el motordebesercarnbiadodespu_sde las prirneras
cincohorasdeoperaci6nycada50 horasdefuncionarniento.
1. Pongael motorenrnarchaduranteunos rninutosparaperrnitir
queel aceitedelc_.rterdelmotorsecaliente.Elaceitecaliente
circularS,rn_.slibrernenteytransportar_,rn_.sdel sedirnentodel
motorquepuedehabersedepositadoenla rondodelc_.rter.
Tengacuidadoy evitequernarseconel aceitecaNente.
2. Extraigala perillaenestrellasuperiory eltornillodelcarrodel
ladoderechodelarnanija.Veala Figura13.
3. Gireeltubodesoportehaciael frenteparatenetlugarpara
conectarlarnangueradedrenajede aceitea la v_.lvulade
drenaje.VealaFigura13.
f
Figura13
4. Abraeltap6nprotectoren elextrernode la v_.lvuladedrenajede
aceiteparadejarexpuestoelorificiode drenaje.Veala Figura14.
5. Retireel tap6ndeIlenadode aceite/lavarillade niveldeaceite
deltubodeIlenado.
Varilla/tap6n del aceite
.,J .....J'_
\, \ ............
Figura14
6. Insertelarnanguerade drenajede aceite(ernbaladaconeste
manual)dentrodel orificiodedrenajede aceite.Coloqueel
extrernoopuestode la rnangueraenun recipientede recolecci6n
de aceiteadecuadoconcapacidadparaporIornenos2,5cuartos
de gal6n(2,4Ntros)pararecogerelaceiteusado.
7. Aprietelas leng[Jetasde lav_.lvuladedrenajede aceite,luegotire
haciaafueraparacornenzara drenarel aceite.Veala Figura13.
8. Cuandoterrninede drenarelaceite,ernpujeel extrernodelav_.l-
vuladedrenajedeaceitehaciaadentro,hastaquelasleng[_etas
calcenensulugar.Vuelvaatapar elextrernode la v_.lvulade
drenajeparaevitarqueentrenresiduosenel orificiodedrenaje.
9. VuelvaaNenarel motorconaceitenuevo.Consulteel Manual
del propietarioBriggs& Strattonparavetinforrnaci6nsobreel
volurnenypesodel aceitede motor.
Control de la bujia de encendido
Lirnpiela bujfayajustela separaci6ndelelectrodoa0.030"alrnenos
unavezporestaci6n,reernplaceanualrnente.
1. Lirnpieel _.reaalrededordela basede labujfa.No Njela bujfa.Se
debelirnpiarlasbujfasrnedianteraspadoo talladoconcepillode
alarnbrey lavadoconunsolventecornercial.
,
Saquee inspeccionelabujfa.Verifiquelaseparaci6npara
asegurarsedequeest,.fijadaen 0.030".Veala Figura15.
f
Electrodo
Porcelana
_ Separaci6nde 0.030pulg(0.76rnrn)
J
Figura15
3. Carnbiela bujfasi loselectrodosest_.npicados,quernadoso la
porcelanaest,.rota.
67
Page 68

IVlantenimiento del filtro de aire.
Siseinstalanincorrectamentelosfiltroso lascubiertas,sepueden
producirlesionesgraveso la muertede lasexplosionesdel
carburador.No intentearrancarel motorcuandonoest&npuestos.
Nouseairepresurizadonisolventesparalimpiarel cartuchodel
filtrode aire.
Limpieo reemplaceel filtrodeairecada25horasdefuncionamiento.
1. Tirelamanijadelfiltrodeaireparaarriba,Figura16,y tirepara
atr&shaciaelmotor.
2. Retirela cubiertadelfiltrode aire,Figura16.
E
• Siempremantengalimpiosy libresdeacumulaci6nde elementos
corrosivosloscablesy losbornesde la bateria.
• Despu_sde limpiarlabateriaylosbornes,apliqueunacapa
delgadade vaselinao grasaa ambosbornes.
Si extraela bateriaparalimpiarla,desconecteprimeroelcable
NEGATIVO(negro)de su borneya continuaci6nel cablePOSITIVO
(rojo).Cuandovuelvaa instalarla bateria,conectesiempreprimero
el cablePOSlTIVO(rojo)a suborne,y a continuaci6nel cable
NEGATIVO(negro).AsegQresede queloscablesest_nconectados
a losterminalescorrectos,yaquesi losinviertepuedecausarda_os
gravesal sistemaalternadordelmotor.
PRESION DE LOS NEUiVlATICOS
Cubiertadelfiltrode Cartuchodel filtrode
aire
3. Extraigaconcuidadoelcartuchodelfiltrode airey el pre-filtro(si
est,.instalado)delalojamientodelsoplador.
4. Limpielabasedel cartuchodelfiltrode aireconcuidadopara
evitarquelasimpurezaspenetrenen elmotor.
5. Coloqueelpre-filtro,siest,.instalado,y elcartuchonuevamente
enel alojamientodel soplador.Elcartuchosedebecolocar
firmementeen su posici6n.
6. AlinelaslengOetasdela cubiertaconlas ranurasdel alojamiento
delsopladory vuelvaacolocarlacubierta.
",. aire
Manijadelfiltrode
aire
Figura16
BATERiA
Losbornesdelabateriay losaccesoriosafinescontienenplomoy
compuestosde plomo,sustanciasqdmicasquesegQnIoestablecido
porelEstadode Californiacausanc_.ncery daSosenelsistema
reproductivo.L_.veselasmanosdespu_sdeestarencontactocon
estoscomponentes.
La bateriaest,.selladay nonecesitamantenimiento.Losnivelesde
_.cidono se puedencontrolary no sepuedeagregarliquido.
Lapresi6nm_.ximadelosneum_.ticosencualquiercircunstanciaes
de 30psi.Sedebe mantenerunapresi6nuniformeparatodoslos
neum_.ticosentodo momento.
Verifiqueperiodicamentela presi6ndeambosneum_.ticostraseros
de lacortadora.Sila presi6nde losneum_.ticosnoes uniforme,la
plataformacortar_,elc_speden formadesparejaysepuededesviar
a izquierdaoderechadurantelaoperaci6n.Recommendedoperating
tirepressureis approximately20 p.s.i.Checkthesidewalloftire for
maximump.s.i..
LIMPIEZA DE LA CORTADORA
Si sederramacombustibleoaceitesobrela m_.quina,debelimpiarse
de inmediato.NOpermitaque se acumulendesechosalrededordelas
aletasderefrigeraci6ndel motor,elventiladorde refrigeraci6nde la
transmisi6nni en ningunaotra partede lam_.quina,especialmentelas
correasy poleas.
Smart Jet
Laplataformade lacortadoratieneun puertode aguasobrelasuperfi-
ciecomopartede susistemadelavado.
Utiliceel SmartJetparadesaJojarlosrecortesdecespedde la parte
inferiordela plataformae impedirla acumulaci6nde sustancias
quimicascorrosivas.Realicelos siguientespasosDESPUC:SDE
CADACORTEDECO:SPED:
Antesde usarel sistemadelavadode la plataforma,debedesen-
gancharelcontrolde lacuchilla,apagarel motorysacarlaIlave
paraevitarel encendidoaccidentaldel motor.
1. Coloquelacortadoraenunazonaniveladaydespejadadel
cesped,suficientementecercaparaquela mangueradeljardin
alcance.
AsegQresedequeel canaldedescargade lacortadoraest,.
orientadoALEJADOdela casa,elgaraje,losvehiculosestaciona-
dos,etc.
2. Enrosqueel acopledela manguera(embaladocon el Manual
del operadorde lacortadora)enel extremodela manguerade
jardin.
68
Page 69

3. Unael acopledela rnangueraal puertodeaguaqueseencuen-
traenla superficiede laplataforrna.Veala Figura17.
Figura17
4. Abraelsurninistrode agua.
5. Enciendaelmotory coloquelapalancadel reguladorenla
posici6nRAPIDO(fast,representadapor unaliebre).
6. Desdela posici6ndeloperadordetr&sdela cortadora,coloqueel
controlde lascuchiNasen la posici6nON(encendido).
7. Perrnanezcaen la posici6ndeloperadorcon laplataforrnade
corteenganchadadurantedosrninutoscornornfnirno,perrni-
tiendoquela parteinferiordelaplataforrnade corteselavea
rondo.
8. Muevaelcontroldelascuchillasa la posici6nOFF(apagado).
9. Girela Navede encendidoa laposici6nSTOP(detener)para
apagarel motordela cortadora.
10. Desconecteel aguay retireelacopladordelarnangueradel
puertodeaguaquese encuentraenla superficiede laplata-
forrna.
Despu_sdelirnpiarla plataforrnaconel sisternaSmartJetTM, regrese
a laposici6ndel operadory enganchelascuchillas.Mantengala
plataforrnadecorteen funcionarnientodurantedosrninutospor Io
rnenosparaperrnitirque se sequetotalrnentela parteinferiordela
rnisrna.
LUBRICACI6N
Antesde lubricar,repararo inspeccionar,desconectela potenciade
arranque(PTO),coloqueelfrenode rnano,apagueel motory retire
la Nave,paraevitarel encendidoaccidentaldelmotor.
Puntos de pivote y varillaje
Lubriquetodoslos puntosde pivotedelsisternadetransrnisi6ny
el variNajede elevaci6nconaceiteNgeroporIornenosunavezpor
ternporada.
Ruedas traseras
Lasruedastraserassedebensacarde losejesunavezportempo-
rada.Lubriquebienlos ejesy lasIlantascongrasarnultiusoantesde
volvera instalarlos.
Ruedas delanteras
Cadaunode los ejesy rueditasde la ruedadelanteravieneequipado
conunaccesoriode engrase.Veala Figura18.Lubriquecongrasa
rnultiusoNo.2 apNcadaconunapistolade engrasarcada50 horasde
funcionarnientodela cortadora.
Figure18
CORREA DE SINCRONIZACI6N DE LA
CUCHILLA
Loshusillosdela plataforrnade cortesernuevenporrnediodeuna
correa(dentada)de sincronizaci6n,garantizandoque lascuchillasde
laplataforrnasiernpreest&nperpendicularesentresf.PorIornenos
unavezpotternporada,odespu_sdegolpearcontraunobjeto
extraSo,verifiquelacorreade sincronizaci6nde la siguienternanera:
69
Page 70

1, Parasacarlacubiertadela correasaquelostrestornillosy
arandelasque lasujetanal basfidor,Veala Figura19,
Nohagafuncionarlaunidadsin tenerla cubiertade lacorrea
instalada.Sino seobservanestasinstruccionesse puedenproducir
lesionespersonalesoda_osmateriales.
Figura19
2. La partesuperiordecadapoleade husilloest,.marcadaconuna
fiecha.Veala Figura20.Las flechasdebenestarperpendiculares
(a un_.ngulode 90°) entresi.
3. Si lasflechasen la superficiede cadapoleadehusillonoest_.n
perpendiculares(aun _.ngulode900grados)entresi. consultea
sudistribuidorSearsu ottodistribuidorparavolvera colocarla
correade sincronizaci6nde la plataforma.
Nohagafuncionarlam_.quinasilacorreade sincronizaci6nnoest,.
correctamentecolocada.Sino seobservanestasinstruccionesse
puedenproducirlesionespersonaleso da_osmateriales.
AJUSTES
Apagueel motory retirela Ilavedeencendidoantesderealizar
ajustes.
Altura de la manija
Lamanijasuperiorest,.sujetaa dosbarrasde apoyoquese pueden
ajustarparasubiro bajarlaalturade la manija.Deser necesario.
realiceunajustedela siguientemanera:
1. Extraigalaperillaen estrellasuperioryel tornillodelcarroque
est_.ndelladoderechoy delladoizquierdodela manija. Veala
Figura21.
\
\
Figura20
J
Figura21
2. Girela manijahaciaadelanteo haciaatr_.sparaalinearunode
lostresorificiosdecadabarradeapoyoconlosorificiosdela
manija.
3. Vuelvaacolocarlaperillaen estrellasuperioryel tornillodel
carroal ladoderechoy alladoizquierdode lamanijacuando
Iogreunaalturac6moda.
70
Page 71

EXTRACCI6N DE LA PLATAFORiVlA DE
CORTE
Antesde realizarcualquiermantenimientoo reparaci6n,desconecte
lascuchiNas,apagueel motory retirelaNaveparaevitarelencen-
didoaccidentaldelmotor.
Paraextraerla plataformade corte,procedade lasiguientemanera:
1. Parasacarla cubiertade la correasaquelostrestorniNosy
arandelasque lasujetanal bastidor.Veala Figura22.
Nohagafuncionarlaunidadsintenetlacubiertadelacorrea
instalada.Sino seobservanestasinstruccionesse puedenproducir
lesionespersonaleso daSosmateriales.
f
Figure23
Extraigala variNadelguardacorreay extraigalacorreade
laplataformaqueest,.alrededorde la polleadel motordela
cortadora.
Mirelaplataformade cortedesdeel ladoizquierdoysaquecon
cuidadolos pasadoreshorquiNaquesujetanlossoportesde la
plataformaa loslateralesposterioryanteriorizquierdosde la
plataforma.VealaFigura24.
Brazode
t elevaci6
Figure22
2. Coloquelapalancadealturade la plataformaenla posici6nde
cortem_.salta.
3. Coloquetacosde maderaenvarioslugaresdebajodelhordede
la plataforma.Soportar_.ntemporalmentela plataformamientras
la desmonta.
4. Usela palancadealturade laplataformaparabajarla plataforma
yhacerladescansarsobrelos tacosde madera.
5. Extraigaeltornilloy latuercade bridaquesujetala varilladel
guardacorreaal ladoizquierdodel bastidordela cortadora.Vea
la Figura23.
Figure24
8. Repitalospasosanterioresdelladoderechode lacortadora.
9. Retirecon cuidadolos soportesdelanterosde la plataformade
losbrazosde elevaci6ndela plataforma,Figura24.
10. Concuidadodesengancheel montajedeelevaci6ndela
cortadorade lossoportesposterioresdela plataforma.
11. Usela palancadealturadela plataformaparalevantarel montaje
a suposici6nm_.salta.
12. Retirelostacosde maderadedebajode laplataformay desNce
suavementela plataformade cortehaciaelrondodelam_.quina.
71
Page 72

13. Desengancheel cableresortede latransrnisi6ndel rnontajedel
brazosecundariolibre.Veala Figura25.
... j
Figure25
14. Deslicelentarnentela plataforrnahaciala derecha,sac_.ndolade
debajode lacortadora.
Parainstalarla plataforrnade corte,sigalos pasosanterioresen orden
inversoparavolvera acoplarlaplataforrnay la cubiertadela correa.
CUCHILLAS DE CORTE
Apagueel motory extraigala Ilavede contactoantesde retirarlas
cuchillasdecorteparaafilarlaso reernplazarlas.Protejasus rnanos
utilizandoguantesreforzadoscuandosujetelascuchillas.
Inspeccioneperi6dicarnentela cuchillay/o el husilloenbuscade
rajaduraso daSos,especialrnentedespu_sdegolpearunobjeto
extraSo.Nooperela rn_.quinahastadespu_sdehaberreernplazado
loscornponentesdaSados.
Pararetirarlascuchillas,hagaIosiguiente.
1. Saquela plataforrnadedebajode la cortadora,(consultela
Extracci6nde laplataforrnade estasecci6n);luegovolteecon
delicadezala plataforrnaparadejaral descubiertosuparte
inferior.
2. Coloqueuntacode rnaderaentreel deflectordelalojarniento
centralde laplataforrnay lacuchillade corte,paraqueactQe
cornoestabilizador.Veala Figura26.
3. Extraigala tuercadebridahexagonalqueaseguralacuchillaal
rnontajedel husillo.Veala Figura26.
.
Paraafilarlascuchillasdecortedeforrnaadecuada,extraiga
cantidadesigualesde metaldearnbosextrernosde lascuchillasa
Iolargodelos hordescortantes,paraleloalhordedecaidaya un
_.ngulode250a 30°.Afilesiernprecadahordedelascuchillasde
cortedeforrnaparejapararnantenerunequilibrioadecuadoentre
lasrnisrnas.Veala Figura27.
Si el hordedecortede lacuchillahasidoafiladopreviarnenteo si
existeunaseparaci6ndemetal,reernplacelascuchillasporotras
nuevas.
Unacuchillarnalequilibradacausar_,excesodevibraci6nypuede
ocasionardaSosa la cortadoray/o lesionespersonales.
Figure26
J
Figure27
72
Page 73

5. Pruebeelequilibriode lacuchillausandouncornpensadorde
cuchillas.Afileel metaldelladopesadohastaquequedebien
equilibrada.
NOTA:CuandoreernpJacela cuchilla,aseg@esedeinstalarlaconel
ladornarcado"Bottom"(inferior)(ocon el ladoque poseeunnQrnero
depiezaestarnpado)rnirandoal pisocuandola cortadorade c_sped
est_.en ' " deo "
BATERIA
Losbornesde labateriay losaccesoriosafinescontienenplornoy
cornpuestosdeplorno,sustanciasquirnicasqueseg_nIoestablecido
porel EstadodeCaliforniacausanc&ncerydaSosenel sisterna
reproductivo.Laveselasrnanosdespu_sde estarencontactocon
estoscornponentes.
UtiliceunaIlavedetorsi6nparaajustarla tuercade bridahexagonal
del husillodela cuchillaentre70pies-librasy 90piesdibras.
Lascuchillasde cortedeben instalarseperpendicularesentresi.
Si nosepuedeinstalarlas cuchillasperpendicularesentresi, se
debevolvera calibrarlacorreade sincronizaci6n.Consulteasu
distribuidorSearsuotto distribuidorparavolveracalibrarlacorrea
de sincronizaci6nde laplataforrna.
ESCUDO POSTERIOR
Nuncaoperela cortadorasiel escudoposteriornoest,.colocadoy
funcionando.DeIocontrariopodrianproducirselesionespersonales.
Paracarnbiarelescudoposteriorprocedade la siguienternanera:
1. Extraigaeltornilloquefija elescudoal ladoderechodela
cortadora.VealaFigura28.
\
\
Si poralgunaraz6nextraelabateria,desconecteprirneroelcable
NEGATIVO(negro)desuborneya continuaci6nel cablePOSITIVO
(rojo).Cuandovuelvaainstalarla bateria,conectesiernpreprirneroel
cablePOSITIVO(rojo)asu borne,ya continuaci6nel cableNEGA-
TIVO(negro).
Arranque con pinzas para bateria
NuncaarranqueconpinzasunabateriadaSadaocongelada.AsegOrese
dequelosvehiculosnosetoquenylosrnotoresest&napagados.No
perrnitaquelaspinzasde loscablessetoquen.
1. Conecteel cablepositivo(+) albornepositivo(+)de la bateria
descargadade sucortadora.
2. Conecteel otto extrernodelcableal bornepositivo(+) dela
bateriacargada.
3. Conecteel segundocablenegativo(-) al otrobornede la bateria
cargada.
4. Hagalaconexi6nfinalsobreel bloquedelmotorde la cortadora,
lejosdela bateria.Acoplea unapartesinpinturaparaasegurarse
de quehayaunabuenaconexi6n.
Si la bateriacargadaest,.instaladaenunvehiculo(es decir,
autorn6vil,carni6n)NOpongaenrnarchaelmotordelvehiculo
cuandoarranquelacortadoraconlaspinzas.
5. Arranquelacortadora(segQnlasinstruccionesde lasecci6n
Funcionarnientode estemanual).
6. Retireloscablesdearranqueen ordeninversoa laconexi6n.
Figure28
2. Combeelescudohaciaadentroa cadaladoparasoltarlodel
bastidordela cortadora.
3. Coloqueelnuevoescudoposteriorsiguiendolospasosanteriores
enordeninverso.
,J
73
Page 74

Carga de la bateria
AIcargarse,lasbateriasernitenungasquepuedecausarexplo-
siones.Carguelabateriaenun_.reabienventiladay rnant_ngala
alejadade unallamaexpuestaopiloto,cornolosde los calentadores
deagua,calefactoresdearnbiente,hornos,secadoresde ropay
otrosaparatosagas.
Cuandocarguelabaterfadela cortadora,utiliceQnicarnenteun
cargadordise_adoparabateriasde plorno-_.cidode 12V.Leael
ManualdelOperadordelcargadorde labateriaantesde cargarla
Ibateriade lacortadora.Siernpresigalasinstruccionesy tengaen
[cuentalasadvertencias.
Si sucortadorano se hausadoduranteunperiodode tiernpo
prolongado,carguelabateriade la siguienternanera:
1. Ajusteel cargadordebateriaparaque produzcaunrn_.xirnode
10arnperios.
2. Si sucargadorde bateriaesautorn_.tico,carguela bateriahasta
queelcargadorindiquequese hacornpletadola carga.Si el
cargadornoes autorn_.tico,cargueporochohorascornorninirno.
CANIBIO DE LA CORREA DE ENGANCHE DE
LA CUBIERTA
Apagueel motory extraigala Ilavede contactoantesde retirarlas
cuchillasdecorteparaafilarlaso reernplazarlas.Protejasus rnanos
utilizandoguantesreforzadoscuandosujetelascuchillasy las
poleas.
LascorreasenV de la cortadoraest_.ndise_adasespecialrnente
paraque seengraneny desengranensinriesgos.El usodeuna
correaenV sustituta(quenoseadel fabricantedelequipooriginal)
puederesultarpeligrososila rnisrnano sedesengranacornpleta-
rnente.Paraque larn_.quinafuncionecorrectarnente,usecorreas
aprobadasporel fabricante.
4. Afloje,perono saque,latuercay el pernoquefijancadapolea
Iocadela plataforrna.Veala Figura29.
Polea
Ioca de la
J
Figure29
5. Retirelacorreadealrededordetodaslas poleas.
6. Coloquelacorreanuevacornosernuestraenla Figura29.
7. Vuelvaaajustarlastuercasy pernosquefijancadapoleaIoca.
8. Vuelvaacolocarel guardacorreay la cubiertadela correa.
CAMBIO DE LA CORREA DE SINCRONI-
ZACION DE LA PLATAFORNIA
Paracarnbiarlacorreade sincronizaci6nde la cortadora,sedeben
retirarvarioscornponentesy serequierenherrarnientasespeciales.
Consulteasu distribuidorSearsuotrodistribuidorparareernplazarla
correade sincronizaci6nde la plataforrna.
CAIVIBIO DE LA CORREA DE TRANSMISION
Paracarnbiarlacorreadetransrnisi6nde lacortadora,sedebenretirar
varioscornponentesyse requierenherrarnientasespeciales.Solicitea
sudistribuidorSearsu otrodistribuidorquerealiceel reernplazode la
correadetransrnisi6n.
FUSIBLE
Todaslas correasde lacortadoraest_.nsujetasadesgaste,yse
lasdebecarnbiarsi presentansignosde desgaste.Paracarnbiaro
reernplazarlacorreade laplataforrnade sucortadora,procedadela
siguienternanera:
1. Extraigala plataforrnadecortede lacortadoracornoseha
indicadoantesenestasecci6n.
Evitelaslesionesporcornpresi6n.AI extractlacorrea,nocoloque
nuncalosdedosen el resorteinterrnedioo entrela correay una
polea.
2. Retirela cubiertadela correacornoseha indicadoantesen esta
secci6n.ConsultelaFigura19.
3. Retireel guardacorreacornose haindicadoantesenesta
secci6n.ConsultelaFigura23.
Antesde realizartareasdernantenirniento,reparaci6no inspecci6n,
siernpredebedesengancharlascuchillas,apagarelmotory retirar
la Ilaveparaevitarel encendidoaccidentaldelmotor.
Enel rnazodecablesde lacortadorase encuentraun fusiblede20
arnperios,queprotegeel sisternael_ctricode lacortadoradelos
daSoscausadospot excesodearnperaje.
Si el sisternael_ctriconofunciona,o el motorde lacortadorano
arranca,verifiqueprirneroqueelfusiblenose hayaquernado.Se
encuentracercade labateria.
Reernplacesiernpreporunfusibleconelrnisrnoarnperajequeel
fusiblequernado.
74
Page 75

Nuncaalmacenela cortadoradecespedconcombustibleenel tanqueen
unespaciocerradoo en _reascon pocaventilaci6n,dondelosgasesdel
combustiblepuedanalcanzarel fuego,chispaso unaluz pilotocomola que
tienenalgunoshornos,calentadoresdeagua,secadoresde ropaoalgQn
otrodispositivoa gas.
PREPARACI6N DEL MOTOR
Pararnotoresalrnacenadosdurantern&sde30 dfas:
1. Paraevitarqueseforrnegornaenel sisternadecombustibleoen
laspiezasdelcarburador,hagafuncionarel motorhastaquese
detengaporfaltadecombustibleoagregueaditivoparagasolina
alcombustibledeltanque.Si utilizaunaditivoparagasolina,
hagafuncionarel motordurantevariosrninutosparaqueel
aditivocirculeporel carburador--despu_sde estoel motory el
combustiblese puedenalrnacenarduranteun rn_.xirnode seis
rneses.
2. Carnbieel aceiternientraselmotorest,.todavfacaNente.
3. Extraigala bujfadeencendidoyviertaenel cilindro
PREPARACI6N DE LA CORTADORA DE
CO'SPED
• Cuandoalrnacenela cortadorade c_spedenun galp6nrnet_.lico,
tengaespecialcuidadode realizarleun tratarnientoantioxidante
alas superficiesnopintadas.Cubraelequipoconunacapade
aceitelivianoo siNcona,especialrnentelosresortes,loscojinetes
ylos cables.
• Elirninetodoel polvodelexteriordel motorydel equipo.
• Sigalasrecornendaci6ndelubricaci6n.
• Alrnaceneelequipoenun lugarlirnpioy seco.NoIoalrnacene
enun lugardondeseencuentrenequiposqueusanpilotode
encendidoocon cornponentesquepuedengenerarchispas.
aproxirnadarnente1onza(30 rnl)de aceiteparamotorlirnpio.
Tirevariasvecesdel arrancadorde retrocesoparadistribuirel
aceitey reinstalelabujfa.
4. Lirnpieel motorde desechossuperficiales.
Puedeobtenerlossiguientesaditarnentosyaccesoriosparasu cortadorade c_sped.P6ngaseencontactoconu CentrodeservicioSearsenel
tel_fono1-800-4-MY-HOME®pararn_.sinforrnacidn.
No.de PIEZA DESCRIPCI6N
33731 Colectordec_spedcon
sisternadeernbolsado
75
Page 76

dela bujiay p6ngalohaciendomasacontrael motorparaevitarqueseenciendaaccidentalmente.Utilicesiempreanteojosde
uridaddurantelaoperaci6nomientrasrealizaa'_araciones.
El motornoarranca 1. Nosehaactivadoelcebador
1. Coloquelapalancadecontroldel regulador/cebador
enla posici6ncebador.
2. Elcontroldel regulador/cebadornoest,.en
la posici6ncorrecta.
3. Sehadesconectadoel cablede la bujia
4. Labujfano funcionacorrectamente
5. Eltanquedecombustibleest_vado oel
2. Coloquelapalancadecontroldel regulador/cebador
enla posici6nr@ido.
3. Conecteloscablesa la bujfa.
4. Limpie.ajustelaseparaci6n,o cambielabujfa.
5. Lleneel tanquecongasolinalimpiay fresca.
combustiblees viejo
6. Lalineadel combustibleest,.bloqueada
6. Pidaa un distribuidordeservicioSearsquelelimpie
lalineade combustible.
El motorfuncionade manera
err_tica
El motorrecalienta
1. Launidadest,.funcionandoconel cebador
activado.
2. Elcablede labujfaest_flojo
3. EIcombustibleesviejo
4. Aguao suciedaden el sistemade
combustible
5. Elfiltrode aireest&sucio
1. Elnivelde aceitedelmotorest&bajo
1. Muevalapalancadelregulador/cebadorpara
sacarlodela posici6ncebador.
2. Conecteyajusteel cablede la bujia.
3. Lleneel tanquecongasolinalimpia.
4. DreneelcombustibleCarguecombustiblenuevoen
eldep6sito.
5. Reemplaceelcartuchodelfiltrodeaire.
1. Lleneel motorconlacantidady tipodeaceite
adecuado.
2. Flujodeaire restringido
2. Limpielos recortesdepastoy suciedadacumulados
alrededorde lasabtas de refrigeraci6ndel motory
delalojamientodel soplador.
El motorvacilaa altas 1.
revoluciones
El motorfuncionarealen 1. Extraigala bujiay regublaseparaci6n.
marchalenta 2. Reemplaceelcartuchodelfiltrodeaire.
Demasiadavibraci6n 1. Aprietelacuchillay el husillo.Balanceelacuchilla.
1. Laseparaci6nde loselectrodosdelabujia
esmuypoca.
1. Labujiade encendidoest,.sucia
2. Elfiltrode aireest,. sucio
1. Lascuchillasdecorteest_.nfiojaso
Extraigala bujiay regub la separaci6n.
desbalanceadas
2. Lacuchillade corteest,.dafiada,desafilada
2. Reemplacelacuchilla.
odoblada.
3. Herrajesfiojos
3. Ajustetodoslospernosylas tuercas.
La unidadnoseautoimpulsa 1. Lacorreadetransmisi6nest,.flojao 1. Reemplacelacorreade transmisi6n.
dafiada
Bajorendimientode corte 1. Cuchillasdesafiladas 1. Afileo cambielascuchillas.
2. Correasrotas,fiojaso gastadas 2. Cambielascorreas.
3. Cuchillasdesbalanceadas 3. Afileocambielascuchillas.
' zNECESITAMAS AYUDA?
I r_con_r:_r:_ la respuest:_ y m:_s erl rnanagernylife.corn isin cargoE
En llnea podr_ encontrar este manual y los manuales de todos los otros productos que posea
Sus preguntas ser_n respondidas por nuestro equipo de espedalistas
Obtenga un plan de rnantenimiento personalizado para su hogar
Encuentre information y herramientas que Io ayudar_n con los proyectos de su hogar
@ rnanagemylife
76
Page 77

77
Page 78

DECLARACION FEDERAL y/o DE CALIFORNIA SOBRE GARANTJAS EN EL CONTROL DE EIVIISIONES
SUS DERECHOS Y OBLIGACIONES EN CUANTO A LA GARANTJA
MTDConsumerGroupInc,laAgenciadeProtecci6nMedioambientaldelos EstadosUnidos(EPA),y paraaquellosproductoscertificadosparasuventaen el es-
tadode California,el Departamentode los RecursosdelAire deCalifornia(CARB)secomplacenenexplicarla garanfiaque cubreal sistemade control(ECS)de
emisiones(evaporativasy/o de escape)desu equipoy motor(motorde equiposdeexteriores)deencendidopot chispaparatodoterreno,peque_o,deexteriores
dela_o2006y a_osposterioresEnCalifornia,losnuevosmotoresdeequiposdeexterioresdebenestardise_ados,construidosyequipadosparacumplircon las
estrictasnormasantipoluci6ndel Estado(en otrosestados,losequiposdel a_o1997ymodelosposterioresdebenserestardise_ados,construidosyequipados
paracumplirconlas regulacionesdemotoresdeencendidoporchispaparatodoterrenopeque_osde laAgenciade Protecci6nMedioambientaldelosEstados
Unidos,(EPA).MTDConsumerGroupInc.debegarantizarelsistemade controldeemisiones(ECS)desu motordeequiposdeexteriorespot el periodode
tiempoindicadom_sabajo,siempreycuandonoexistausoincorrecto,negligenciaomantenimientoinadecuadodedichomotor.
SuECSpuedeincluirpiezastalescomo el carburador,el sistemade inyecci6ndecombustible,elsistemadeencendido,elconvertidorcatalitico,losdep6sitos
decombustible,laslineasdecombustible,lostaponesdecombustible,lasv_lvulas,contenedores,filtros, manguerasdevapor,abrazaderas,conectoresyotros
componentesafinesrelacionadosconlasemisiones.
Dondeexistaunacondici6ncubiertaporla garantia,MTDConsumerGroupInc.reparar_sumotordeequiposde exterioressincostoalgunoincluyendoel
diagn6stico,las piezasy lamanode obra.
COBERTURA DE LA GARANTJA DEL FABRICANTE:
Estesistemadecontroldeemisionesse garantizaporelt@minode dosaSos.Sialgunapiezarelacionadacon lasemisionesdesu motordeequiposde
exterioresesdefectuosa,MTDCONSUMERGROUPINC.reparar_osustituir_dichapieza.
RESPONSABILIDADES DEL PROPIETARIO SEGUN LA GARANTJA:
Ensu car_cterdepropietariodelmotordeequiposdeexteriores,ustedes responsabledel mantenimientorequeridoqueseespecificaenel manualdel propieta-
rio.MTDConsumerGroupInc lerecomiendaqueconservetodoslosrecibosquecubrenel mantenimientode su motor,noobstanteIocualMTDConsumerGroup
Incnopodr_denegarel cumplimientode lagarantiaQnicamentepor lafaltade losrecibos.
Comopropietariodel motordeequiposde exteriores,usteddebesaberqueMTDConsumerGroupInc.puededenegarlacoberturade lagarantiasisumotoro
unapiezadel mismofallandebidoauso incorrecto,negligencia,mantenimientoindebidoo a modificacionesnoaprobadas.
Ustedesresponsablede presentarsumotoral centrodedistribuci6noserviciotecnico deMTDConsumerGroupInc.tan prontocomoaparezcael problema.Las
reparacionescubiertasporla garantiase debenIlevaracaboen unlapsorazonableque noexcedade30 dias.Sitiene algunapreguntarespectode lacobertura
dela garantia,p6ngaseen contactoconel DepartamentodelServicioT@nicode MTDConsumerGroupInc.al telefono1-800-800-7310opot correoelectr6nico
enhttp://support.mtdproducts.com
COBERTURA DE LA GARANTJA DE EMISJONES GENERALES:
MTDConsumerGroupIncgarantizaal compradorfinaly acadacompradorsubsiguienteque el motordeequiposde exteriores:est_ dise_ado,construidoy
equipadodemododecumplircontodas las regulacionesaplicablesy queseencuentralibrededefectosdematerialesyde fabricaci6nquepudierencausarla
falladeuna piezagarantizadaidentica,entodos losaspectosmaterialesa lapiezadescriptaenla solicitudde certificaci6ndeMTDConsumerGroupInc.
El periododegarantiacomienzaenla fechade entregadel motoral compradorfinalo en lafechaenque la m_quinase poneenfuncionamientopot primeravez.
El periododegarantiaes de dosaSos.
Sujetoa ciertascondicionesyexclusionesque sein@an acontinuaci6n,lagarantiadelas piezasrelacionadasconlas emisioneses lasiguiente:
1. Cualquierpiezagarantizadaquenoesteprogramadaparaser reemplazadacomo partedelmantenimientorequeridoen lasinstruccionesescritassuminis-
tradassegarantizaporelperiodo degarantiaarriba mencionado.Sila piezafalladuranteel periododecoberturade lagarantia,la mismaser_reparada
oreemplazadapor MTDConsumerGroupInc.deacuerdocon elparrafo(4)a continuaci6n.Cualquierpiezareparadao reemplazadasegQnlagaranfiase
garantizar_potelresto delperiododegarantia.
2. Cualquierpiezagarantizadaqueeste programadasolamenteparainspecci6nregularenlas instruccionesescritassuministradasse garantizapotelperiodo
degarantiaarriba mencionado.CualquierpiezareparadaoreemplazadasegQnla garantiase garantizar_pot elrestodelperiodo.
3. Cualquierpiezagarantizadaqueeste programadaparareemplazosegQnel mantenimientorequeridode conformidadcon lasinstruccionesescritassuminis-
tradas,se garantizaporel periododetiempoanteriora laprimerafechade reemplazoprogramadaparaesapieza.Si la piezafallaantesdel primerreemplazo
programado,la mismaser_ reparadaoreemplazadapot MTDConsumerGroupInc.deacuerdoconel parrafo(4) a continuaci6n.Cualquierpiezareparadao
reemplazadabajogarantiasegarantizar_pot el restodelperiodoanterioral primerreemplazoprogramaticpuntualparaesapieza.
4. Lareparaci6no elreemplazodecualquierpiezagarantizadadeconformidadcon lasdisposicionesde lagarantiaqueaquiseestipulasedeben realizarenun
centrodegarantiasin costoalgunoparael propietario.
5. Noobstantelas disposicionesque aquiseestipulan,losserviciosoreparacionesbajo garantiasesuministrar_nentodosnuestroscentrosdedistribuci6nbajo
franquiciade mantenimientoparalos motoreso equiposencuesti6n.
6. Elpropietariodelmotorde equiposdeexterioresno deber_pagareltrabajodediagn6sticodirectamenteasociadocon unapiezagarantizadadefectuosaen
relaci6nconlas emisiones,siempreycuandodichotrabajode diagn6sticoserealiceen uncentrocubiertopot lagarantia.
7. MTDConsumerGroupIncesresponsablepotdaSoscausadosaotroscomponentesdemotoresoequiposderivadosdelafalla bajogarantiadecualquier
piezagarantizada.
Page 79

8.Durantelatotalidaddelperiododegarantiadelmotoryequipoparatodoterrenoarribamencionado,MTDConsumerGroupIncmantendr_unsuministro
depiezasbajogarantiasuficienteparasatisfacerlademandaesperadadetalespiezas.
9.Cualquierpiezadereemplazosepodr_usarparaelcumplimientodelmantenimientoolasreparacionesbajogarantiaysesuministrar_nsincargopara
elpropietario.Dichousonoreducir_lasobligacionesdegarantiadeMTDConsumerGroupInc.
10.Nosepodr_nusarpiezasadicionalesnimodificadasquenoestenexentasdeacuerdoconelDepartamentodelosRecursosdelAire(AirResourcesBoard).
Elusodecualquierpiezaadicionalomodificadanoexentaporelcompradorfinalser_causaldeinvalidezdelosreclamosbajogaranfia.MTDConsumer
GroupIncnotendr_responsabilidadpotlagarantiadefallasdepiezasgarantizadasquefuerencausadaspotelusodeunapiezaadicionalnoexenta
omodificada.
PIEZAS GARANTIZADAS:
Lareparaci6no elreemplazodecualquierpiezagarantizadaquede otto modopudieseestarcubiertaporlagarantiapodr_set excluidadetalcoberturade
garantiasi MTDConsumerGroupIncdemuestraqueel motores objetodeusoincorrecto,negligenciao mantenimientoinadecuado,y que talusoincorrecto,
negligenciaomantenimientoinadecuadofuecausa directade la necesidadde reparaci6no reemplazode dichapieza.NoobstanteIo antedicho,cualquierajuste
deuncomponenteconundispositivodelimitaci6nde ajusteinstaladoenf_bricay quefuncioneadecuadamente,podr_set cubiertopot la garantia.Adem_s,
la coberturabajoestagarantiaseextiendesoloa piezasqueestuvieronpresentesenel motory equipotodoterrenoadquiridos.
Est_ncubiertaslas siguientespiezascongaranfiaparaemisiones(decorresponder):
(1)Sistemademedici6nde combustible
• Sistemade mejoraparainicioenfrio (cebadosuave)
• Carburadory piezasinternas(osistemade inyecci6npotcombustible)
• Bombadecombustible
• Dep6sitode combustible
(2)Sistemade inducci6nde aire
• Purificadordeaire
• Colectordeadmisi6n
(3)Sistemadeencendido
• Bujia(s) deencendido
• Sistemade encendidopot magneto
(4)Sistemadeencendido
• Convertidorcatalitico
• SAl(v_lvula Reed)
(5)Componentesvariosutilizadosen elsistemaanterior
• Wlvulas e interruptoresdevacio,temperatura,posici6nsensiblesaltiempo
• Conectoresy montajes
(6) Controlevaporativo
• Manguerade combustible
• Abrazaderasde lamangueradecombustible
• Tap6ndel combustibleatadopot correa
• Cajadecarbono
• Lineas de vapor
GDOC-100223
Page 80

(Estap_.ginaseaplicas61oenEE.UU.yCanada.).
SearsBrandsManagement Corporation, el Consejo de Recursos Ambientales de California (CARB)
y la Agencia de Protecci6n Ambiental de los Estados Unidos (EPA)
Declaraci6n de garantia del sistema de control de emisiones (derechos y obligaciones de la garanfia de defectos del propi=
LACOBERTURADE LAGARANTJADECONTROLDEEMISIONESES Y PARALOSMODELOSCERTIFICADOSDELANO1997YPOSTERIORES,
APLIOABLEA LOSMOTORESCERTIFICADOSCOMPRADOSENCALIFOR- QUESECOMPRENYUTILICENENCUALQUIERPARTEDELOSESTADOS
NIAEN1995Y POSTERIORMENTE,QUESE UTILIZANENCALIFORNIA, UNIDOS(Y A PARTIRDEL 1DE ENERODE2001ENCANADA).
Declaraci6n de garanfia sobre defectos en el control de emJsiones para California y los Estados UnJdos
ElConsejodeRecursosAmbientalesdeCalifornia(CARB),laEPA(Agencia
de Protecci6nAmbientaldelos EE.UU.)y Searstienenel gusto deexplicarla
garantiadelsistemadecontroldeemisionesparamotoresdela_o2000y para
elfuturoconrelaci6na motorespeque_ostodoterreno(SORE).EnCalifornia,
los nuevosmotorespeque_ostodoterrenodebenestardise_ados,construidos
y equipadosparacumplirconlas rigurosasnormasanti-smogdelestado.En
el restodelos EstadosUnidos,losmotoresnuevostodoterrenodeencendido
porchispacertificadosparaela_o 1997debencumplirest_ndaressimilares
establecidospot la EPA.Searsdebegarantizarelsistemadecontroldeemi-
Cobertura de la garantJa Sears para defectos en el control de emJsiones
Losmotorestodoterrenopeque6osest_ngarantizadosenIorelativoalcontrol alas disposicionesquese indiquenacontinuaci6n.Si unapartedesu motor
deemisionesparadefectosenpiezasduranteunperiododedosa_os,sujeto cubiertapot lagaranfiaesdefectuosa,Searsreparar_osustituir_dichaparte.
Responsabilidades del propietario en relacibn con la garantia
Comopropietariodelmotortodoterrenopeque_o,Ud.esresponsabledela
realizaci6ndelmantenimientorequeridoquese incluyeenlas instrucciones
deoperaci6ny mantenimiento.Searsrecomiendaquese conserventodoslos
recibosrelativosalmantenimientodesu motortodoterrenopeque_o,pero
nopudedenegarla garantiasimplementeporla faltade los mismos,opor su
incumplimientodelmantenimientoprogramatic.Comopropietariodelmotor
peque_otodoterrenodebesaberque,sinembargo,Sears lepuedenegar
lacoberturade lagarantiasi su motortodoterrenopeque6oouna piezadel
mismohanfalladodebidoa abuso,negligencia,mantenimientoindebidoo
Disposiciones de la garantJa Sears para defectos en el control de emJsiones
Lassiguientesson disposicionesespecificasrelacionadasconlacoberturade lagarantiaparadefectosenel controldeemisiones.Esun a_adidoa lagarantiade
motorSearsparamotoresnoreguladosqueseencuentraen lasinstruccionesdefuncionamientoy mantenimiento.
1. Piezascongarantia
Lacoberturadeesta garantiase extiendeL]nicamentealas piezas
queaparecena continuaci6n(las partesde lossistemasdecontrolde
emisiones),siemprequedichaspiezasestuvieranya enelmotoren el
momentodesucompra.
a. Sistemademedici6ndecombustible
•Sistemadeenriquecimientoparaarranqueenfrio
•Carburadory partesinternas
• Bombade combustible
b. Sistemadeinducci6nde aire
• Filtrodeaire
•Colectordeadmisi6n
c. Sistemadeencendido
• Bujia(s)deencendido
•Sistemadeencendidomagneto
d. Sistemadelcatalizador
•Convertidorcatalitico
•Colectordeescape
•Sistemadeinyecci6nde aireov_lvulade impulsos
e. Elementosvariadosusadosenlossistemasanteriores
•Wlvulas devacio,sensiblesatemperatura,posici6ny tiempo
einterruptores
•Conectoresy montajes
2. AIcancedela cobertura
Searsgarantizaal poseedorinicialy a loscompradoressubsiguientes
quelas piezascongarantianotendr_ndefectosen materialesnimano
deobraque provoquenla fallade lasmismasduranteun periodode
dosaSosa partirdela fechaen queel motorse entregaa uncomprador
particular.
3. Sincargo
Lareparaci6no reemplazodecualquierpartecongarantiaserealizar_
Enlos EstadosUnidosy Canad_hayunalineadeatenci6nde24 horas,1-800-469--4GG3,quecuentacon unmenL]conmensajespre-grabadosque contienen
etario)
sionesdesumotorparalosperiodosdetiempoenumeradosa continuaci6n,
siemprequenohayaabuso,negligenciaomantenimientoindebidodesu
motortodoterrenopeque_o.Susistemade controldeemisionespuedeincluir
piezastalescomoel carburador,elfiltrodeaire, elsistemadeencendido,el
silenciadoryelconversorcatalitico.Tambienpuedeincluirconectoresyotras
unidadesrelacionadasconlasemisiones.Dondeexistaunacondici6ncubierta
porla garantia,Searsreparar_supeque6omotortodoterrenosin costoalguno
incluyendodiagn6stico,piezasymanodeobra
a modificacionesnoaprobadas.Ud.es responsabledepresentarsumotor
todoterrenopeque6oa undistribuidorde serviciosSearsautorizadotan pronto
comoaparezcaunproblema.Lasreparacionesdela garantiasinconfiicto
debencompletarseen unplazodetiemporazonable,nosuperiora 30dias.Si
tienealgunapreguntarespectoasusderechosyresponsabilidadesreferentes
a lagarantia,debecontactarconun representantedeserviciosSearsal 1--
800--469--4663.Lagarantiadeemisioneses unagarantiapotdefectos.Los
defectossejuzgandeacuerdoconelfuncionamientonormalde unmotor.La
garantiano est_relacionadaconunapruebade emisionesenuso.
sin cargoalgunoparael poseedor,incluyendotareasdediagn6sticoque
permitandeterminarsi una partecongarantiaesdefectuosa,siempreque
dichodiagn6sticose realiceenundistribuidordeserviciosSearsautoriza-
do. Parael serviciode lagarantiadeemisiones,contacteal distribuidorde
serviciosSearsautorizadom_scercanoincluidoen las"P_ginasamarillas"
en lascategorias"Motores,gasolina","Motoresdegasolina","Podadoras
de cesped",osimilares.
4. Reclamacionesyexclusionesala cobertura
Las reclamacionesde lagarantiadebenenviarsedeacuerdocon las
disposicionesdela politicadegarantiaparamotoresSears.Lacobertura
de lagarantiaexcluir_defectosen piezascongarantiaquenosean partes
originalesSears,o abuso,negligenciao mantenimientoincorrecto,tal y
comose estableceen lapoliticadegarantiaparamotoresSears.Searsno
es responsablede lasfallas enpiezascongarantiaprovocadasporel uso
de partesa_adidas,quenoseanoriginaleso quese hayanmodificado.
5. Mantenimiento
Cualquierpartecongarantiaquenoesteprogramadaparasetreempla-
zadacomo mantenimientorequerido,o ques61odeba inspeccionarse
regularmentealefecto de"inspeccioneoreemplacesegL]nsea necesario",
estar_garantizadacontradefectosduranteel periodode la garantia.Todas
las piezasgarantizadasqueesten programadasparasu reemplazopara
cumplirconlos requisitosdemantenimientoestar_ngarantizadass61o
porel periodoanterioral primerreemplazoprogramaticparadicha pieza.
Cualquierpiezade recambioqueseaequivalenteenfuncionamientoy
durabilidadpuedeusarsepararealizarmantenimientoo reparaciones.El
propietarioes responsablederealizartodoel mantenimientorequerido,tal
y comose defineenlas instruccionesdefuncionamientoy mantenimiento
Sears
6. Coberturaindirecta
Porla presente,la coberturaseextiendea lafalla decualquiercomponente
de motorprovocadapot lafallade unapiezacongarantiaqueestetodavia
en periododegarantia.
informaci6nparael mantenimientodemotores.
Page 81

Busque el periodo de duraci6n de emisiones importantes yla informaci6n de clasificaci6n de aire en
la etiqueta de emisiones de su motor
Los motores cuyo cumpiimiento con los estAndares de emisi6n Tier 2 de la Comisi6n de Recursos Ambientales de California (CARB)
est6 certificado deben exhibir la informaci6n relacionada con el periodo de duraci6n de ias emisiones y la clasificaci6n de aire. Sears
Brands Management Corporation ponen esta informaci6n a disposici6n del consumidor en nuestras etiquetas de emisiones.
Ei Periodo de Duraci6n de las Emisiones describe el nQmero de horas de tiempo real de funcionamiento para el cuai se certifica que
el motor cumpie con ias reglas de emisi6n, descontando el mantenimiento adecuado del mismo segQn las instrucciones de oper-
aci6n y mantenimiento. Se utilizan las siguientes categonas:
Moderado:Se certifica que el motor cumpie con las reglas de emisi6n durante 125 horas de tiempo real de funcionamiento del motor.
Inmediato:Se certifica que el motor cumpie con las reglas de emisi6n durante 250 horas de tiempo real de funcionamiento del motor.
Extendido:Se certifica que el motor cumpie con las reglas de emisi6n durante 500 horas de tiempo real de funcionamiento del motor.
Por ejemplo, una cortadora de c6sped tJpica que se empuja desde arras se usa entre 20 y 25 horas por aSo. Por Io tanto, el Periodo
de Duraci6n de Emisiones de un motor con una clasificaci6n intermedia sena equivaiente a entre 10 y 12 aSos.
Laciasificaci6n de aire es un nQmero calculado para describir el nivel relativo de emisiones para un grupo de motores en particular.
Cuanto menor sea la clasificaci6n de aire, mayor es la limpieza del motor. La informaci6n se presenta de forma grAfica en la etiqueta
de emisiones.
Despu_s del 1 de julio de 2000, busque el periodo de cumplimiento de las reglas de
emisiones en la etiqueta de cumplimiento de las reglas de emisiones del motor
Despu6s del 1 de julio de 2000 se certificarA que determinados motores Sears Brands Management Corporation cumplen
con los estAndares de emisiones de la fase 2 de la Agencia de Protecci6n Ambientai de los Estados Unidos (USEPA). Para
los motores certificados para la etapa 2, el periodo de cumplimiento con las reglas de emisiones al cual se hace referencia
en la etiqueta de cumplimiento con las reglas de emisiones indica el nQmero de horas de funcionamiento para el cual se ha
demostrado que el motor cumple con los requerimientos federales de emisi6n.
Para los motores con desplazamiento inferior a 225 cc, Categoria C = 125 horas, B = 250 horas y A = 500 horas.
Para los motores con desplazamiento de 225 cc o mAs, Categoria C = 250 horas, B = 500 horas y A = 1000 horas.
El desplazamiento de los motores de la serie modelo 150112 es 249 cc.
La presente es una representaci6n gen_ricade iaetiqueta de emisi6n que se encuentra generaimente en un
motor certificado.
FAMILYYBSXS.3192VA 274812
GDOC-100182Rev.A
81
Page 82

Felicitacionespor haberrealizadounaadquisici6ninteligente.El
productoCraftsman@queha adquiridoest_dise_adoyfabricado
parabrindarrnuchosa_osde funcionarnientoconfiable.Perocorno
todoslosproductosa vecespuederequerirdereparaciones.Esen
esernornentocuandoel disponerdeunAcuerdode protecci6npara
reparacionesle puedeahorrardineroy problernas.
A continuaci6nsedetallanlospuntosincluidosenel Acuerdo:
• Servicio experto prestadopornuestros10,000especialistasen
reparacionesprofesionales
• Servicio ilirnitadosincargoparalaspiezasy larnanodeobraen
todaslas reparacionescubiertas
• Reernplazodel productohasta1500d61aressinoesposible
repararel productocubierto
• Descuentode 10%del precionormaldelservicioy delas piezas
relacionadascon el rnisrnoqueno est_ncubiertasporel acuerdo;
adern&s,10%del precionormaldelaverificaci6ndernantenirniento
preventivo
• Ayudar_pidapottel_fono- IoIlarnarnosResoluci6nR_pida- el
apoyotelef6nicode unCharnuscaal representante.Pienseen
nosotroscornoel manual"deundue_ohablador."
Unavezadquiridoel Acuerdo,puedeprograrnarel serviciocon
tans61orealizarunaIlarnadatelef6nica.PuedeIlarnarencualquier
mornentodeldia o dela nocheo prograrnarun servicioen linea.
ElAcuerdodeProtecci6nde Reparaci6nesunacornprasinriesgo.
Siustedanulaporalgunaraz6nduranteel periodode garantiade
producto,proporcionarernosun reernbolsoIleno.O,un reernbolso
prorrateadoencualquiermornentodespu_sdelperiodode garantia
de productoexpira,iAdquieraboysuacuerdode protecci6npara
reparaciones!
Seaplican deterrninadaslimitaciones y exclusiones.Paraobtener
inforrnaci6nadicional y preciosenlos Estados UnidosIlarneal
1-800-827-6655.
El*Coverageen Canad_variaenalgunosarticulos. Paradetalles
IlenoslaIlarnadaCharnuscaCanad_en 1-800-361-6665.
Servicio de instalaci6ndeSears
Sideseasolicitarla instalaci6nprofesionalde Searsdeaparatos
dorn_sticos,dispositivosparaabrirportones,calentadoresde agua
y otrosarficulosdorn_sticosirnportantes,en los EstadosUnidoso
Canad_Ilarneal 1-800-4-MY-HOME®.
82
Page 83

Estapgtginase march6 intencionadamenteen blanco.
83
Page 84

Your Home
For troubleshooting, product manuals and expert advice:
managernylife
www.managemylife.com
For repair - in your home - of all major brand appliances,
lawn and garden equipment, or heating and cooling systems,
no matter who made it, no matter who sold it!
For the replacement parts, accessories and
owner's manuals that you need to do-it-yourself.
For Sears professional installation of home appliances
and items like garage door openers and water heaters.
1-800-4-MY-HOME ® (1-800-469-4663)
Call anytime, day or night (U.S.A. and Canada)
www.sears.com www.sears.ca
Our Home
For repair of carry-in items like vacuums, lawn equipment,
and electronics, call anytime for the location of your nearest
Sears Parts & Repair Service Center
1-800-488-1222 (U.S.A.) 1-800-469-4663 (Canada)
www.sears.com www.sears.ca
To purchase a protection agreement on a product serviced by Sears:
1-800-827-6655 (U.S.A.) 1-800-361-6665 (Canada)
Para pedir servicio de reparaci6n
a domicilio, y para ordenar piezas:
1-888-SU-HOGAR ®
(1-888-784-6427)
www.sears.com
® Registered Trademark / TMTrademark of KCD IP, LLC in the United States, or Sears Brands, LLC in other countries
® Marca Registrada ! TMMarca de Fabrica de KCD IP, LLC en Estados Unidos, o Sears Brands, LLC in otros paises
MCMarque de commerce ! MDMarque deposee de Sears Brands, LLC
Au Canada pour service en frangais:
1-800-LE-FOYER Mc
(1-800-533-6937)
www.sears.ca
 Loading...