

Page 1
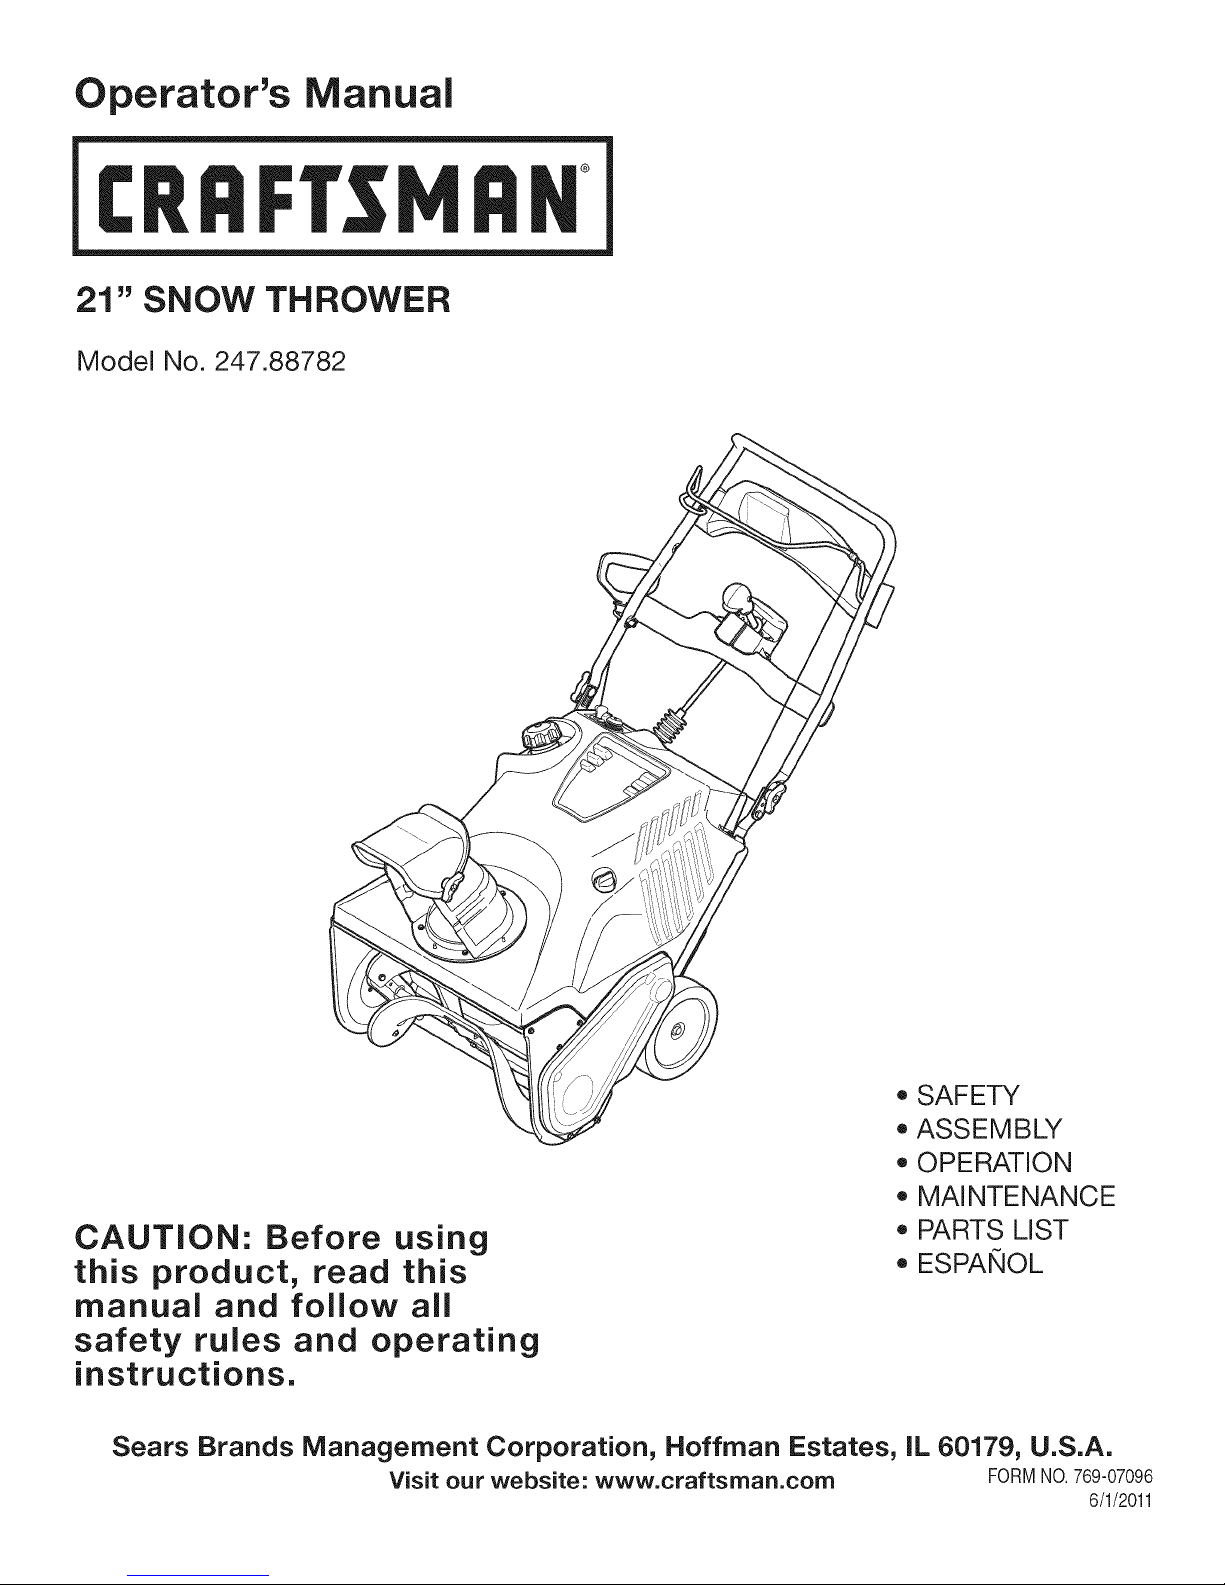
Operator's Manual
CRRFr MRN
21" SNOW THROWER
Model No. 247.88782
CAUTION: Before using
this product, read this
manual and follow all
safety rules and operating
instructions.
Sears Brands Management Corporation, Hoffman Estates, IL 60179, U.S.A.
Visit our website: www.craftsman.com FORM1/0.769-07096
o SAFETY
ASSEMBLY
OPERATION
MAINTENANCE
PARTS LIST
o ESPANOL
6/1/2011
Page 2
WarrantyStatement..................................Page2
SafeOperationPractices..........................Pages3-6
Assembly..................................................Pages7-10
Operation..................................................Pages11-13
ServiceandMaintenance.........................Pages14-18
Off-SeasonStorage..................................Page19
Troubleshooting........................................Page20
PartsList...................................................Pages22-25
Labels.......................................................Page26
RepairProtectionAgreement...................Page31
Espafiol.....................................................Page32
ServiceNumbers......................................BackCover
CRAFTSMANTWOYEARFULLWARRANTY
FORTWOYEARSfromthedateofpurchase,thisproductiswarrantedagainstanydefectsinmaterialorworkmanship.Defectiveproductwill
receivefreerepairorfreereplacementifrepairisunavailable.
Thiswarrantyisvoidifthisproductiseverusedwhileprovidingcommercialservicesorifrentedtoanotherperson.
Forwarrantycoveragedetails to obtain repairor replacement,visit the website: www.craftsman.com
This warranty covers ONLYdefects in material andworkmanship.Warrantycoverage does NOTinclude:
• Expendableitemsthatcanwearoutfromnormalusewithinthewarrantyperiod,includingbut not limitedto augers,augerpaddles,drift
cutters,skidshoes,shaveplate,shearpins,sparkplug,aircleaner,belts,andoil filter.
• Standardmaintenanceservicing,oilchanges,or tune-ups.
• Tire replacementorrepaircausedbypuncturesfromoutsideobjects,suchas nails,thorns,stumps,orglass.
Tireor wheelreplacementor repairresultingfromnormalwear,accident,orimproperoperationormaintenance.
Repairsnecessarybecauseof operatorabuse,includingbutnotlimitedtodamagecausedbyover-speedingtheengine,orfromimpacting
objectsthatbendtheframe,augershaft,etc.
• Repairsnecessarybecauseof operatornegligence,includingbutnot limitedto,electricalandmechanicaldamagecausedbyimproper
storage,failureto usethepropergradeandamountofengineoil,or failureto maintainthe equipmentaccordingtotheinstructionscontained
intheoperator'smanual.
• Engine(fuelsystem)cleaningorrepairscausedbyfuel determinedto becontaminatedoroxidized(stale).In general,fuelshouldbeused
within30 daysof itspurchasedate.
Normaldeteriorationandwearoftheexteriorfinishes,orproductlabelreplacement.
Thiswarrantygivesyouspecificlegalrights,andyoumayalsohaveotherrightswhichvaryfromstatetostate.
Sears Brands Management Corporation, Hoffman Estates, IL 60179
EngineOilType: SAE5W-30
EngineOilCapacity: 20ounces
FuelCapacity: 2 Quarts
SparkPlug: F6RTC
SparkPlugGap: .020"-.030"
©KCDIR LLC
Model Number.................................................................
Serial Number .................................................................
Dateof Purchase.............................................................
Recordthemodelnumber,serialnumber
anddateof purchaseabove
2
Page 3
Thissymbolpointsoutimportantsafetyinstructionswhich,if not
followed,couldendangerthepersonalsafetyand/orpropertyof
yourselfandothers. Readandfollowall instructionsinthismanual
beforeattemptingtooperatethismachine.Failuretocomplywith
theseinstructionsmayresultin personalinjury.Whenyouseethis
symbol,HEEDITSWARNING!
Thismachinewasbuilttobeoperatedaccordingtothe safeopera-
tionpracticesinthis manual.Aswithanytypeof powerequipment,
carelessnessorerroron thepartoftheoperatorcanresultin serious
injury.Thismachineiscapableofamputatingfingers,hands,toes
andfeetandthrowingdebris.Failuretoobservethefollowingsafety
instructionscouldresultin seriousinjuryor death.
CALIFORNIA PROPOSITION 65
EngineExhaust,someof itsconstituents,andcertainvehicle
componentscontainoremitchemicalsknowntoStateofCalifornia
tocausecancerandbirthdefectsorotherreproductiveharm,
TRAiNiNG
• Read,understand,andfollowall instructionsonthemachineand
in themanual(s)beforeattemptingtoassembleandoperate.
Failuretodo socan resultinseriousinjurytothe operatorand/
orbystanders.Keepthismanualina safeplaceforfutureand
regularreferenceandfororderingreplacementparts.Toorder
replacementpartscall,1-800-4MY-HOME.
• Befamiliarwithall controlsandtheirproperoperation.Knowhow
tostopthemachineanddisengagethemquickly.
• Neverallowchildrenunder14yearsofagetooperatethis
machine.Children14andovershouldreadandunderstandthe
instructionsandsafeoperationpracticesinthismanualandon
themachineandbetrainedandsupervisedbyanadult.
Neverallowadultsto operatethis machinewithoutproper
instruction.
• Thrownobjectscancauseseriouspersonalinjury.Planyour
snow-throwingpatterntoavoiddischargeof materialtoward
roads,bystandersandthelike.
Keepbystanders,petsandchildrenat least75feetfromthe
machinewhileit is in operation.Stopmachineifanyoneenters
thearea.
• Exercisecautiontoavoidslippingorfalling,especiallywhen
operatinginreverse.
Your Responsibility--Restrict theuseofthispowermachineto
personswhoread,understandandfollowthewarningsand instruc-
tionsin thismanualandon themachine,
SAVE THESE INSTRUCTIONS!
PREPARATION
Thoroughlyinspecttheareawheretheequipmentisto beused.
Removeall doormats,newspapers,sleds,boards,wiresandother
foreignobjects,whichcouldbe trippedoverorthrownbytheauger/
impeller.
• Alwayswearsafetyglassesor eyeshieldsduringoperationand
whileperforminganadjustmentor repairto protectyoureyes.
Thrownobjectswhichricochetcancauseseriousinjuryto the
eyes.
Donot operatewithoutwearingadequatewinteroutergarments.
Donot wearjewelry,longscarvesorotherlooseclothing,which
couldbecomeentangledinmovingparts.Wearfootwearwhich
willimprovefootingonslipperysurfaces.
Usea groundedthree-wireextensioncordand receptacleforall
machineswithelectricstartengines.
Disengageallcontrolleversbeforestartingtheengine.
• Neverattempttomakeanyadjustmentswhileengineis running,
exceptwherespecificallyrecommendedintheoperator'smanual.
Letengineandmachineadjusttooutdoortemperaturebefore
startingtoclearsnow.
3
Page 4
SafeHandlingof Gasoline
Toavoidpersonalinjuryor propertydamageuseextremecarein
handlinggasoline.Gasolineisextremelyflammableandthevaporsare
explosive.Seriouspersonalinjurycanoccurwhengasolineisspilled
onyourselforyourclotheswhichcanignite. Washyourskinand
changeclothesimmediately.
• Useonlyan approvedgasolinecontainer.
• Extinguishallcigarettes,cigars,pipesandother sourcesof
ignition.
• Neverfuel machineindoors.
• Neverremovegascapor addfuelwhiletheengineis hot or
running.
• Allowenginetocoolat leasttwo minutesbeforerefueling.
• Neveroverfillfuel tank.Filltankto nomorethan1/2inchbelow
bottomoffillerneckto providespaceforfuel expansion.
• Replacegasolinecapandtightensecurely.
• Ifgasolineisspilled,wipeitoff theengineandequipment.Move
machinetoanotherarea.Wait5 minutesbeforestartingthe
engine.
• Neverstorethe machineorfuel containerinsidewherethereisan
openflame,sparkor pilotlight(e.g.furnace,waterheater,space
heater,clothesdryeretc.).
• Allowmachinetocool at least5 minutesbeforestoring.
• Neverfill containersinsideavehicleor ona truckor trailerbed
witha plasticliner.Alwaysplacecontainersonthegroundaway
fromyourvehiclebeforefilling.
• If possible,removegas-poweredequipmentfromthetruckor
trailerandrefuelit ontheground.Ifthis is not possible,then refuel
suchequipmentona trailerwitha portablecontainer,ratherthan
froma gasolinedispensernozzle.
• Keepthe nozzlein contactwiththerimofthefueltankor
containeropeningatalltimes untilfuelingiscomplete.Donot use
a nozzlelock-opendevice.
OPERATION
• Do not puthandsorfeetnear rotatingparts,in the auger/impeller
housingorchuteassembly.Contactwiththerotatingpartscan
amputatehandsandfeet.
• Theauger/impellercontrolleveris a safetydevice.Neverbypass
itsoperation.Doingsomakesthemachineunsafeandmaycause
personalinjury.
• Thecontrolleversmustoperateeasilyinbothdirectionsand
automaticallyreturntothedisengagedpositionwhenreleased.
• Neveroperatewitha missingor damagedchuteassembly.Keep
all safetydevicesin placeandworking.
• Neverrunanengineindoorsorina poorlyventilatedarea.Engine
exhaustcontainscarbonmonoxide,anodorlessanddeadlygas.
• Do notoperatemachinewhileundertheinfluenceofalcoholor
drugs.
• Mufflerandenginebecomehotandcancausea burn.Donot
touch.Keepchildrenaway.
• Exerciseextremecautionwhenoperatingonorcrossinggravel
surfaces.Stayalertforhiddenhazardsortraffic.
Exercisecautionwhenchangingdirectionandwhileoperatingon
slopes.
Planyoursnow-throwingpatternto avoiddischargetowards
windows,walls,carsetc. Thus,avoidingpossibleproperty
damageorpersonalinjurycausedbya ricochet.
Preventpossiblepropertydamageorpersonalinjuryfrom
objectricochetbyplanningyoursnowthrowingpatterntoavoid
dischargetowardswindows,walls,cars,etc.
• Donotoverloadmachinecapacitybyattemptingtoclearsnowat
toofastof a rate.
• Neveroperatethismachinewithoutgoodvisibilityorlight.Always
be sureofyourfootingandkeepafirmholdon the handles.Walk,
neverrun.
• Disengagepowertotheauger/impellerwhentransportingor not
in use.
• Neveroperatemachineathightransportspeedsonslippery
surfaces.Lookdownand behindand usecarewhenbackingup.
• Ifthemachineshouldstartto vibrateabnormally,stoptheengine,
disconnectthe sparkplugwireandgrounditagainsttheengine.
Inspectthoroughlyfordamage.Repairanydamagebefore
startingandoperating.
• Disengageallcontrolleversandstopenginebeforeyouleave
theoperatingposition(behindthehandles).Waituntilthe auger/
impellercomestoa completestopbeforeuncloggingthechute
assembly,makinganyadjustments,orinspections.
• Neverputyourhandinthedischargeorcollectoropenings.Do
notunclogchuteassemblywhileengineisrunning.Shutoff
engineand remainbehindhandlesuntilall movingpartshave
stoppedbeforeunclogging.
• Useonlyattachmentsandaccessoriesapprovedbythemanufac-
turer(e.g.wheelweights,tirechains,cabsetc.).
• Whenstartingengine,pullcordslowlyuntilresistanceisfelt,then
pull rapidly.Rapidretractionofstartercord(kickback)willpull
handandarmtowardenginefasterthan youcanletgo.Broken
bones,fractures,bruisesorsprainscould result.
• Call 1-800-4MY-HOMEfor the locationof the nearestSearsParts
& RepairServiceCenter.
CLEARING A CLOGGED DISCHARGE CHUTE
Handcontactwiththe rotatingimpellerinsidethedischargechute
is themostcommoncauseof injuryassociatedwithsnowthrowers.
Neveruseyourhandtocleanoutthedischargechute.
Toclear thechute:
1. SHUTTHEENGINEOFF!
2. Wait 10secondstobe suretheimpellerbladeshavestopped
rotating.
3. Alwaysusea clean-outtool,not yourhands.
4
Page 5
MAINTENANCE & STORAGE
• Nevertamperwithsafetydevices.Checktheirproperoperation
regularly.Refertothemaintenanceandadjustmentsectionsof
thismanual.
• Beforecleaning,repairing,or inspectingmachinedisengageall
controlleversandstoptheengine.Waituntilthe auger/impeller
cometoa completestop.Disconnectthe sparkplugwireand
groundagainsttheengineto preventunintendedstarting.
Checkboltsand screwsfor propertightnessat frequentintervals
tokeepthe machineinsafeworkingcondition.Also,visually
inspectmachineforanydamage.
Donotchangetheenginegovernorsettingorover-speedthe
engine.Thegovernorcontrolsthe maximumsafeoperatingspeed
oftheengine.
Snowthrowershaveplatesandskidshoesaresubjecttowear
anddamage.Foryoursafetyprotection,frequentlycheckall
componentsandreplacewithoriginalequipmentmanufacturer's
(OEM)partsonlyas listedinthe Partspagesof thisOperator's
Manual.Useofpartswhichdonot meetthe originalequipment
specificationsmayleadto improperperformanceandcompro-
misesafety!
Checkcontrolleversperiodicallytoverifytheyengageanddisen-
gageproperlyandadjust,ifnecessary.Referto the adjustment
sectioninthisoperator'smanualforinstructions.
Maintainorreplacesafetyandinstructionlabels,asnecessary.
Observeproperdisposallawsand regulationsforgas,oil,etc.to
protecttheenvironment.
Priorto storing,runmachinea few minutestoclearsnowfrom
machineandpreventfreezeupofauger/impeller.
Neverstorethemachineorfuelcontainerinsidewherethereisan
openflame,sparkorpilotlightsuchasa waterheater,furnace,
clothesdryeretc.
Alwaysrefertotheoperator'smanualforproperinstructionson
off-seasonstorage.
Checkfuelline,tank,cap,andfittingsfrequentlyfor cracksor
leaks.Replaceif necessary.
Donotcrankenginewithsparkplugremoved.
AccordingtotheConsumerProductsSafetyCommission(CPSC)
andtheU.S.EnvironmentalProtectionAgency(EPA),thisproduct
hasan AverageUsefulLifeof seven(7)years,or60 hoursof
operation.At the endoftheAverageUsefulLifehavethemachine
inspectedannuallybyan authorizedservicedealertoensurethat
allmechanicalandsafetysystemsareworkingproperlyandnot
wornexcessively.Failuretodo socan resultinaccidents,injuries
ordeath.
DO NOT MODIFY ENGINE
Toavoidseriousinjuryor death,do notmodifyengineinanyway.
Tamperingwiththegovernorsettingcanleadto a runawayengineand
causeittooperateat unsafespeeds.Nevertamperwithfactorysetting
ofenginegovernor.
NOTICE REGARDING EMiSSiONS
EngineswhicharecertifiedtocomplywithCaliforniaandfederal
EPAemissionregulationsforSORE(SmallOffRoadEquipment)are
certifiedto operateon regularunleadedgasoline,and mayinclude
thefollowingemissioncontrolsystems:EngineModification(EM),
OxidizingCatalyst(OC),SecondaryAirInjection(SAI)and ThreeWay
Catalyst(TWO)if soequipped.
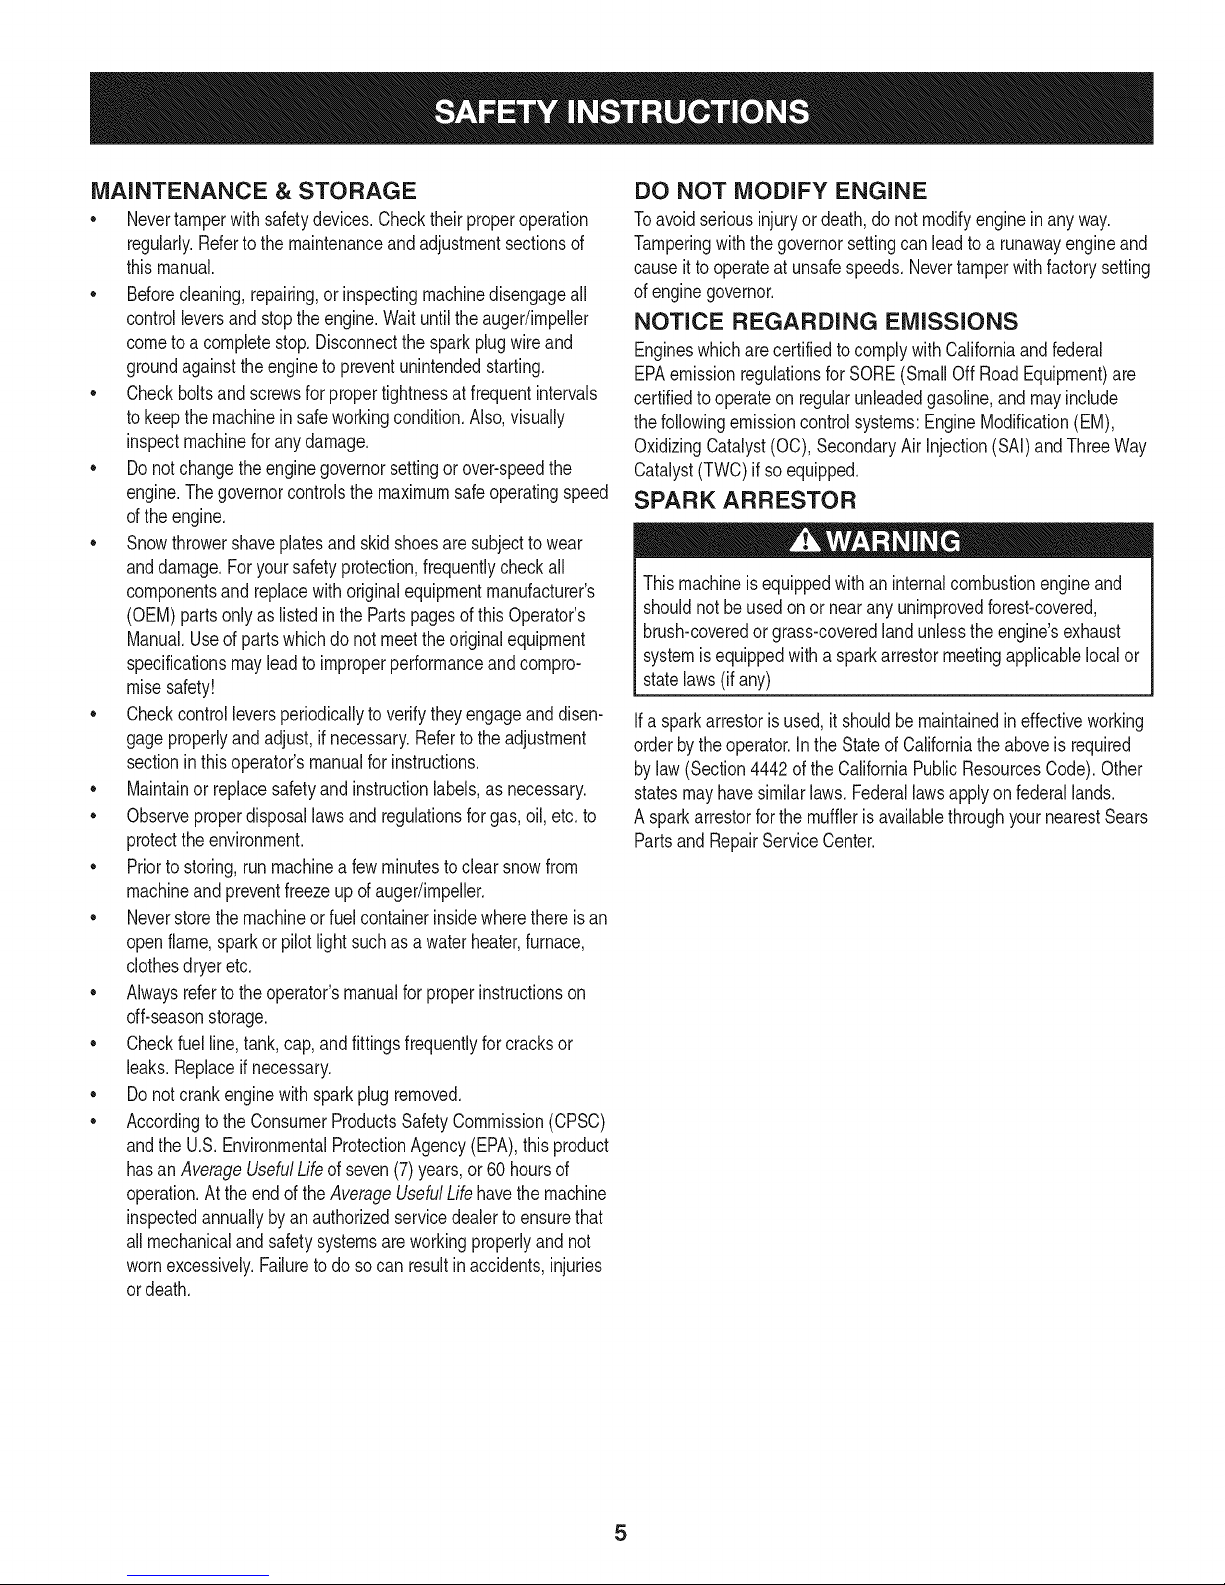
SPARK ARRESTOR
Thismachineisequippedwithaninternalcombustionengineand
shouldnotbe usedonor nearanyunimprovedforest-covered,
brush-coveredorgrass-coveredlandunlesstheengine'sexhaust
systemisequippedwitha sparkarrestormeetingapplicablelocalor
statelaws(ifany)
Ifa sparkarrestorisused,it shouldbe maintainedin effectiveworking
orderbytheoperator.IntheStateof Californiatheaboveis required
bylaw (Section4442oftheCaliforniaPublicResourcesCode).Other
statesmayhavesimilarlaws. Federallawsapplyonfederallands.
A sparkarrestorforthe mufflerisavailablethroughyournearestSears
PartsandRepairServiceCenter.
Page 6
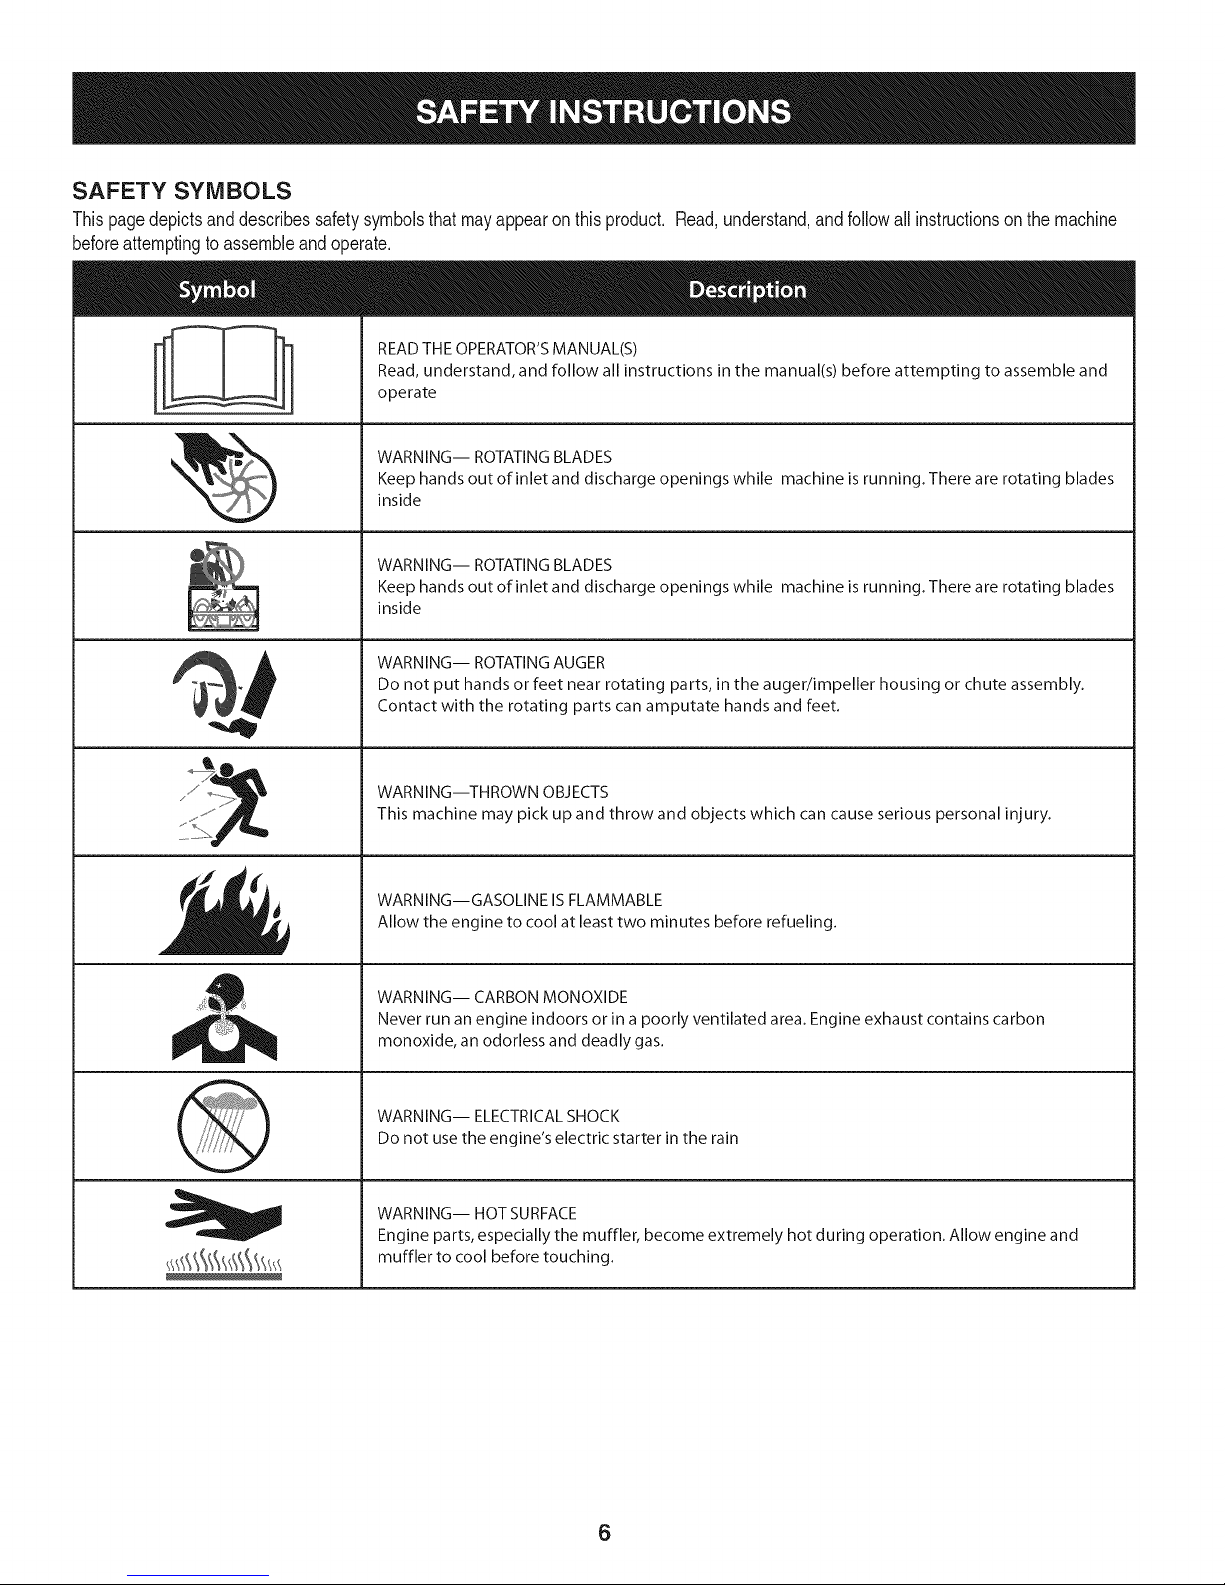
SAFETY SYMBOLS
Thispagedepictsanddescribessafetysymbolsthatmayappearonthisproduct. Read,understand,andfollowall instructionson themachine
beforeattemptingtoassembleandoperate.
READ THE OPERATOR'S MANUAL(S)
i
. +
i
Read, understand, and follow all instructions in the manual(s) before attempting to assemble and
operate
WARNING-- ROTATING BLADES
Keep hands out of inlet and discharge openings while machine is running. There are rotating blades
inside
WARNING-- ROTATING BLADES
Keep hands out of inlet and discharge openings while machine is running. There are rotating blades
inside
WARNING-- ROTATING AUGER
Do not put hands or feet near rotating parts, in the auger/impeller housing or chute assembly.
Contact with the rotating parts can amputate hands and feet.
"JIp
WARNING--THROWN OBJECTS
This machine may pick up and throw and objects which can cause serious personal injury.
WARNING--GASOLINE ISFLAMMABLE
Allow the engine to cool at least two minutes before refueling.
WARNING-- CARBON MONOXIDE
Never run an engine indoors or in a poorly ventilated area. Engine exhaust contains carbon
monoxide, an odorless and deadly gas+
WARNING-- ELECTRICAL SHOCK
Do not use the engine's electric starter in the rain
WARNING-- HOT SURFACE
Engine parts, especially the muffler, become extremely hot during operation. Allow engine and
muffler to cool before touching.
6
Page 7
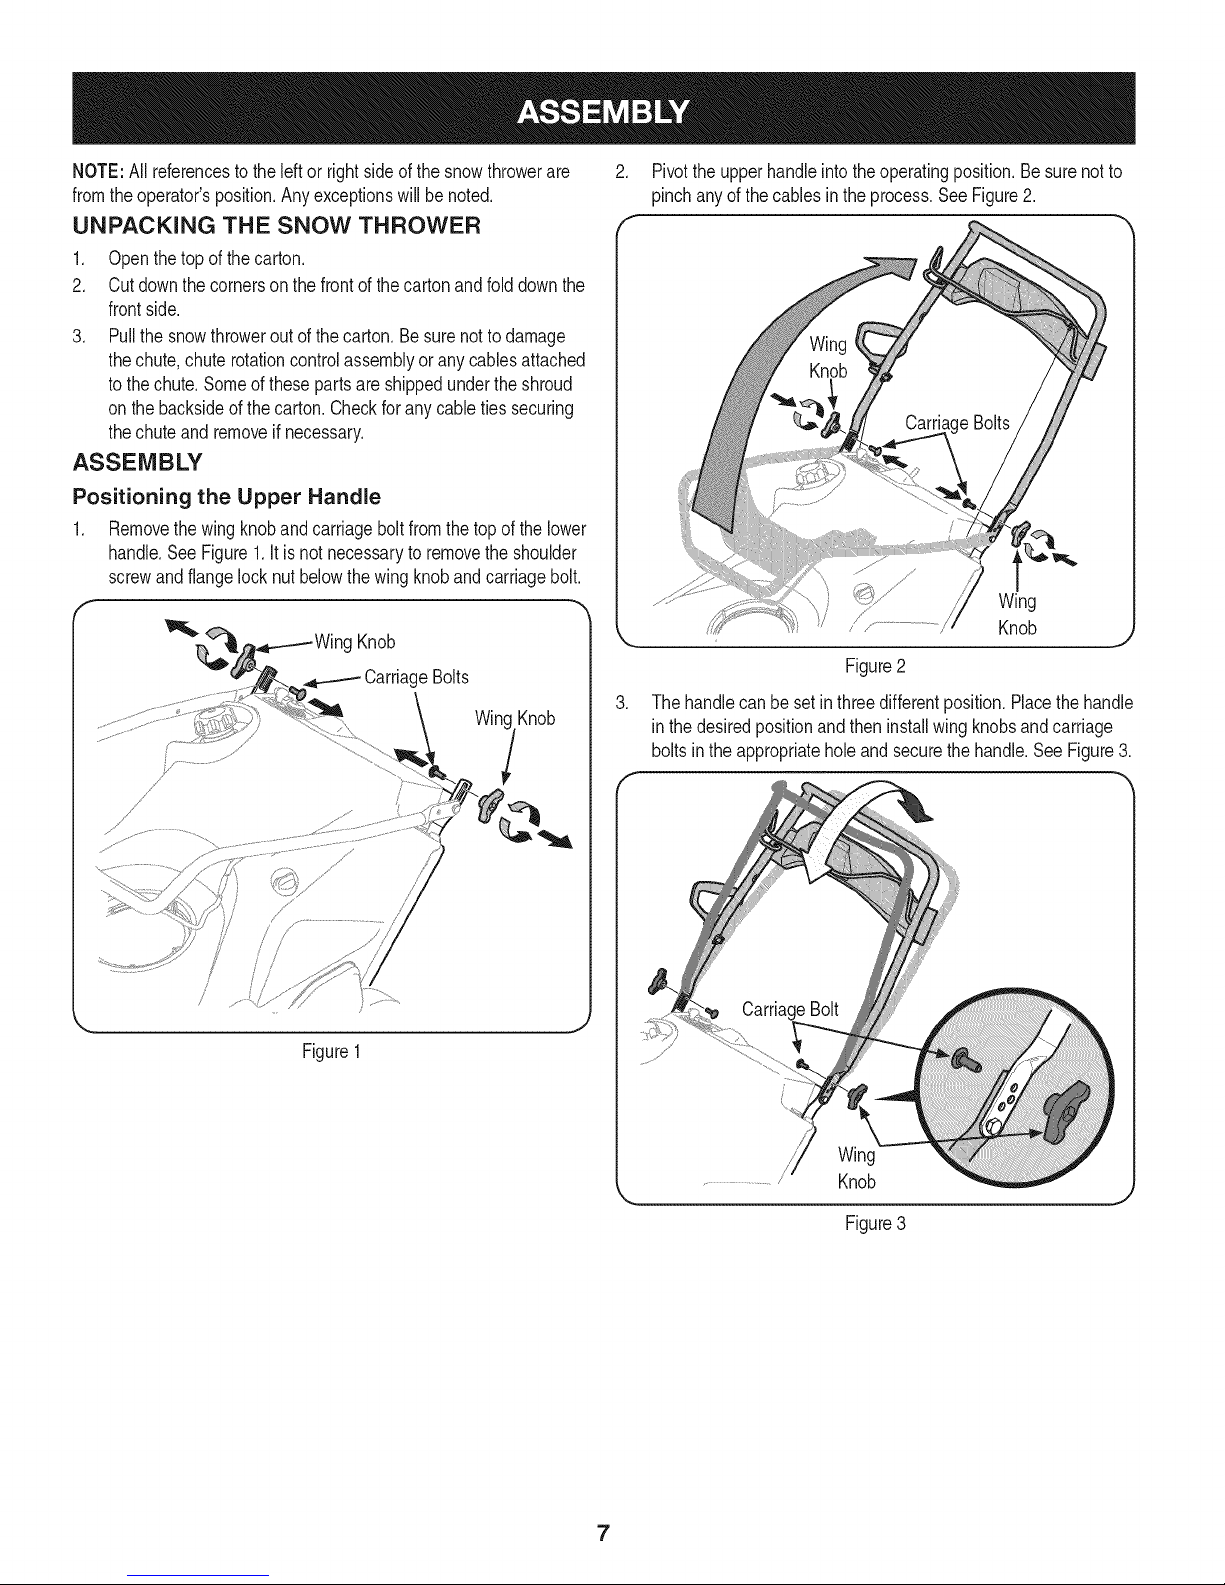
NOTE:All referencestotheleftor rightsideofthesnowthrowerare
fromtheoperator'sposition.Anyexceptionswill be noted.
UNPACKING THE SNOW THROWER
1. Openthetopofthecarton.
2. Cutdownthecornersonthefrontof thecartonandfolddownthe
frontside.
3. Pullthesnowthroweroutofthecarton.Besurenotto damage
thechute,chuterotationcontrolassemblyoranycablesattached
tothechute.Someofthesepartsareshippedundertheshroud
onthebacksideofthecarton.Checkforanycabletiessecuring
thechuteand removeifnecessary.
ASSEMBLY
Positioning the Upper Handle
1. Removethewingknobandcarriageboltfromthe top of the lower
handle.SeeFigure1.Itis notnecessarytoremovetheshoulder
screwandflangelocknutbelowthewingknobandcarriagebolt.
g Knob
CarriageBolts
Win(
2. Pivottheupperhandleintotheoperatingposition.Besurenotto
pinchanyof the cablesin theprocess.SeeFigure2.
Wing
/ J'................... Knob
Figure2
.
Thehandlecanbesetin threedifferentposition.Placethehandle
in the desiredpositionandtheninstallwingknobsandcarriage
boltsin theappropriateholeandsecurethehandle.SeeFigure3.
Figure1
.J
ing
Knob
Figure3
7
Page 8
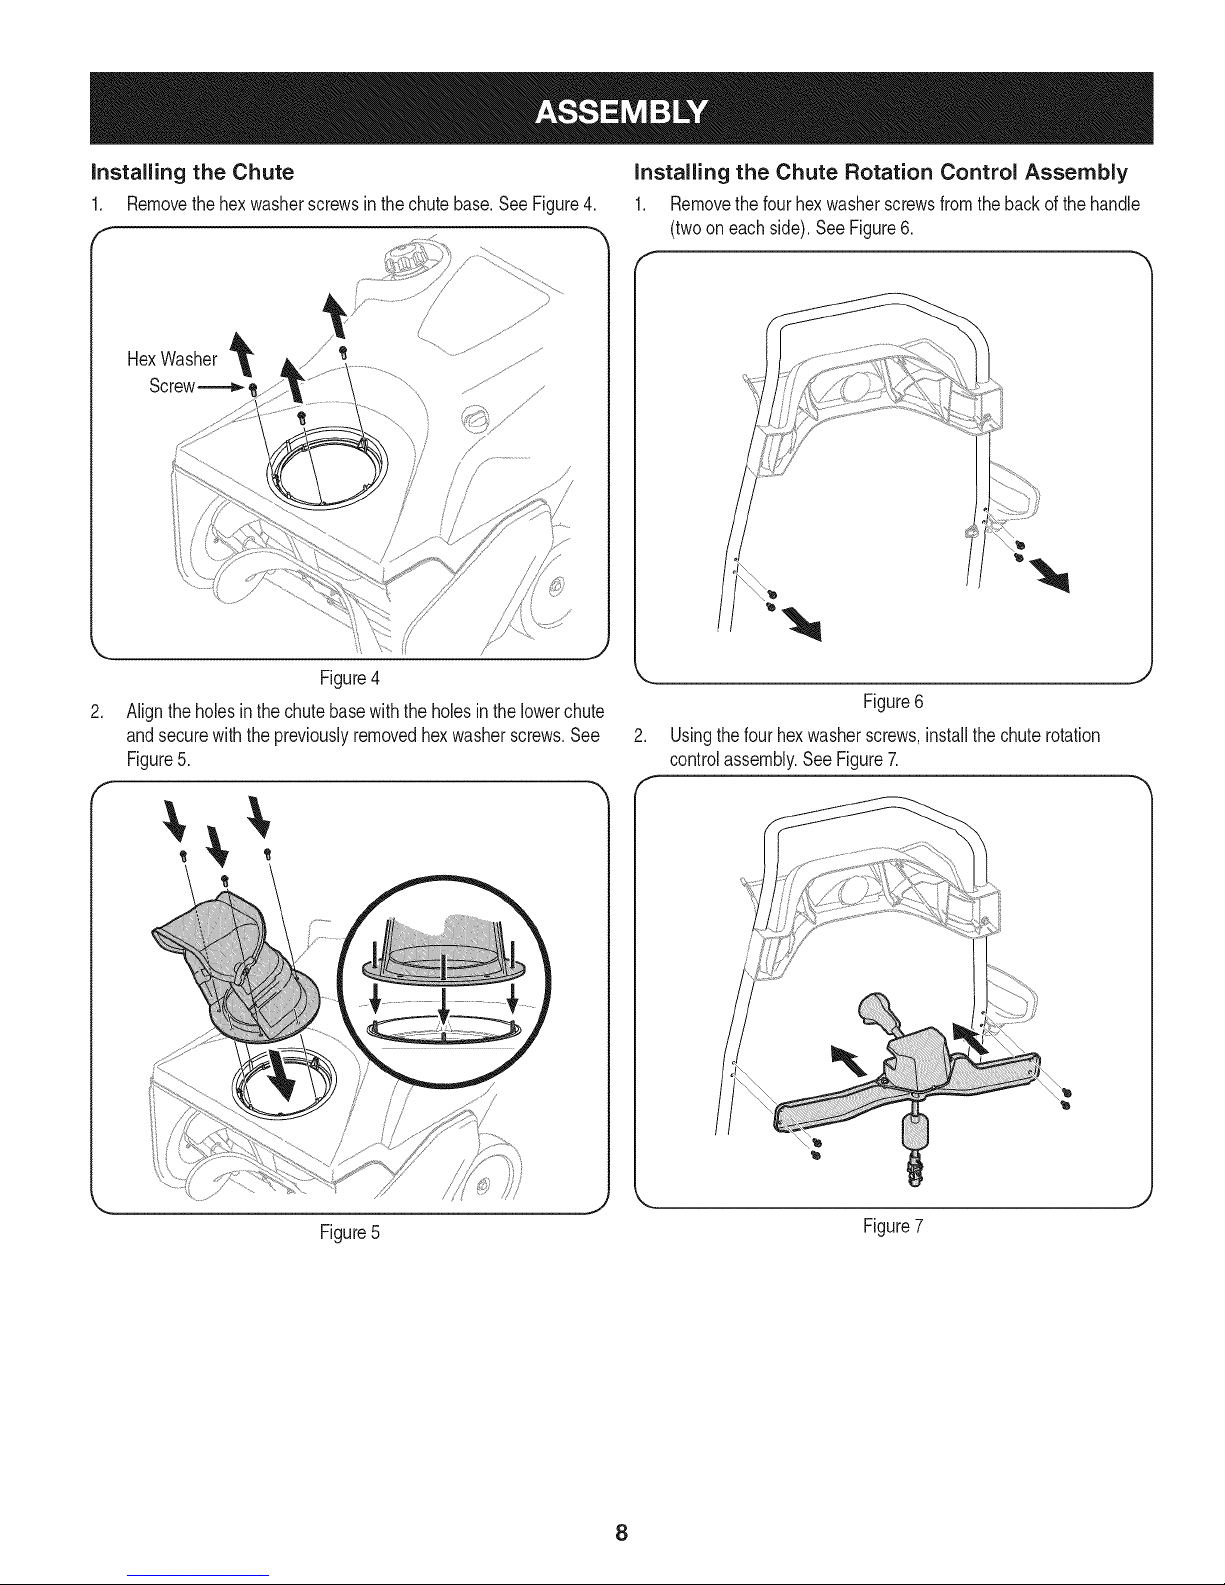
installing the Chute
1. Removethehexwasherscrewsinthechutebase.SeeFigure4.
HexWasher
Screw_,
/
/
Figure4
.
Aligntheholesinthechutebasewiththe holesinthe lowerchute
andsecurewiththepreviouslyremovedhexwasherscrews.See
Figure5.
Installing the Chute Rotation Control Assembly
1. Removethefourhexwasherscrewsfromthebackofthehandle
(twoon eachside).SeeFigure6.
Figure6
Usingthefour hexwasherscrews,installthechuterotation
controlassembly.SeeFigure7.
Figure5
Figure7
8
Page 9
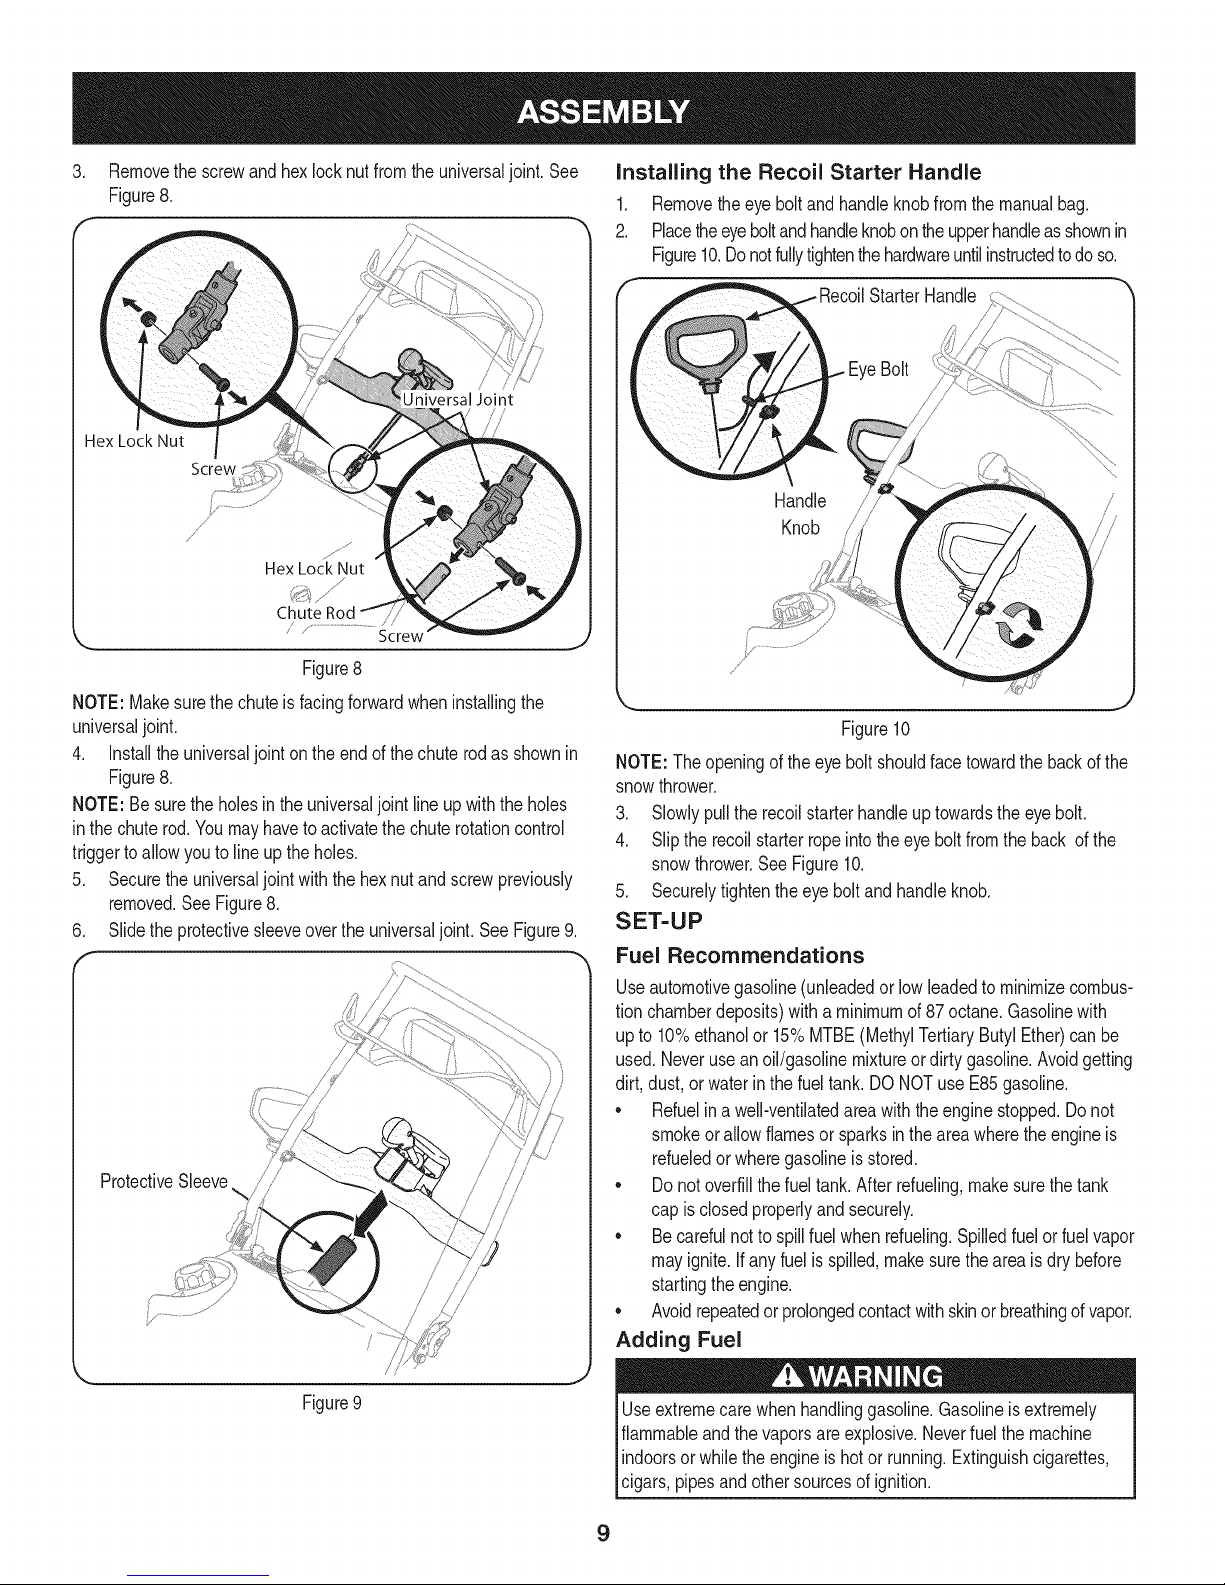
3. Removethe screwandhexlocknutfromtheuniversaljoint.See
Figure8.
Universal Join{
Hex Lock Nut
Screw
f
/
//
Hex Lock Nut
Chute
/_ "..............................................Screw
Figure8
NOTE:Makesurethe chuteis facingforwardwheninstallingthe
universaljoint.
4. Installthe universaljointon theend ofthechuterodasshownin
Figure8.
NOTE:Besuretheholesinthe universaljointlineup withthe holes
inthechuterod.Youmayhavetoactivatethechuterotationcontrol
triggerto allowyoutoline uptheholes.
5. Securetheuniversaljointwiththehexnutandscrewpreviously
removed.See Figure8.
6. Slidethe protectivesleeveovertheuniversaljoint.See Figure9.
/
ProtectiveSleeve%/ ,
/
Installing the Recoil Starter Handle
1. Removetheeyeboltandhandleknobfromthemanualbag.
2. Placetheeyeboltandhandleknobonthe upperhandleas shownin
Figure10.Donotfullytightenthehardwareuntilinstructedtodoso.
Handle /
Knob
J
j
Figure10
NOTE:Theopeningof the eyeboltshouldfacetowardthe backofthe
snowthrower.
3. Slowlypullthe recoilstarterhandleuptowardstheeyebolt.
4. Slipthe recoilstarterropeinto theeyeboltfromtheback of the
snowthrower.See Figure10.
5. Securelytightentheeyebolt andhandleknob.
SET-UP
Fuel Recommendations
Useautomotivegasoline(unleadedorlowleadedtominimizecombus-
tionchamberdeposits)witha minimumof87 octane.Gasolinewith
up to 10%ethanolor15%MTBE(MethylTertiaryButylEther)canbe
used.Neveruseanoil/gasolinemixtureordirty gasoline.Avoidgetting
dirt, dust,or waterinthe fuel tank.DONOTuseE85gasoline.
• Refuelina well-ventilatedareawiththeenginestopped.Donot
smokeorallowflamesor sparksintheareawheretheengineis
refueledor wheregasolineisstored.
• Donotoverfillthe fueltank.After refueling,makesurethetank
capisclosedproperlyandsecurely.
• Becarefulnotto spillfuel whenrefueling.Spilledfuelorfuelvapor
mayignite.Ifany fuelis spilled,makesuretheareaisdrybefore
startingthe engine.
• Avoidrepeatedor prolongedcontactwithskinorbreathingofvapor.
Adding Fuel
Figure9
Useextremecarewhenhandlinggasoline.Gasolineisextremely
flammableandthevaporsareexplosive.Neverfuelthemachine
indoorsorwhilethe engineishotor running.Extinguishcigarettes,
cigars,pipesandothersourcesof ignition.
9
Page 10
Alwayskeephandsandfeetclearof equipmentmovingparts.Do not
usea pressurizedstartingfluid.Vaporsare flammable.
1. Removethegascap,checkthefuellevelandaddfuel if necessary.
Fillthetankuntilthefuel reaches1/2"belowthebottomofthefiller
necktoallowforfuelexpansion.Becarefulnottooverfill.
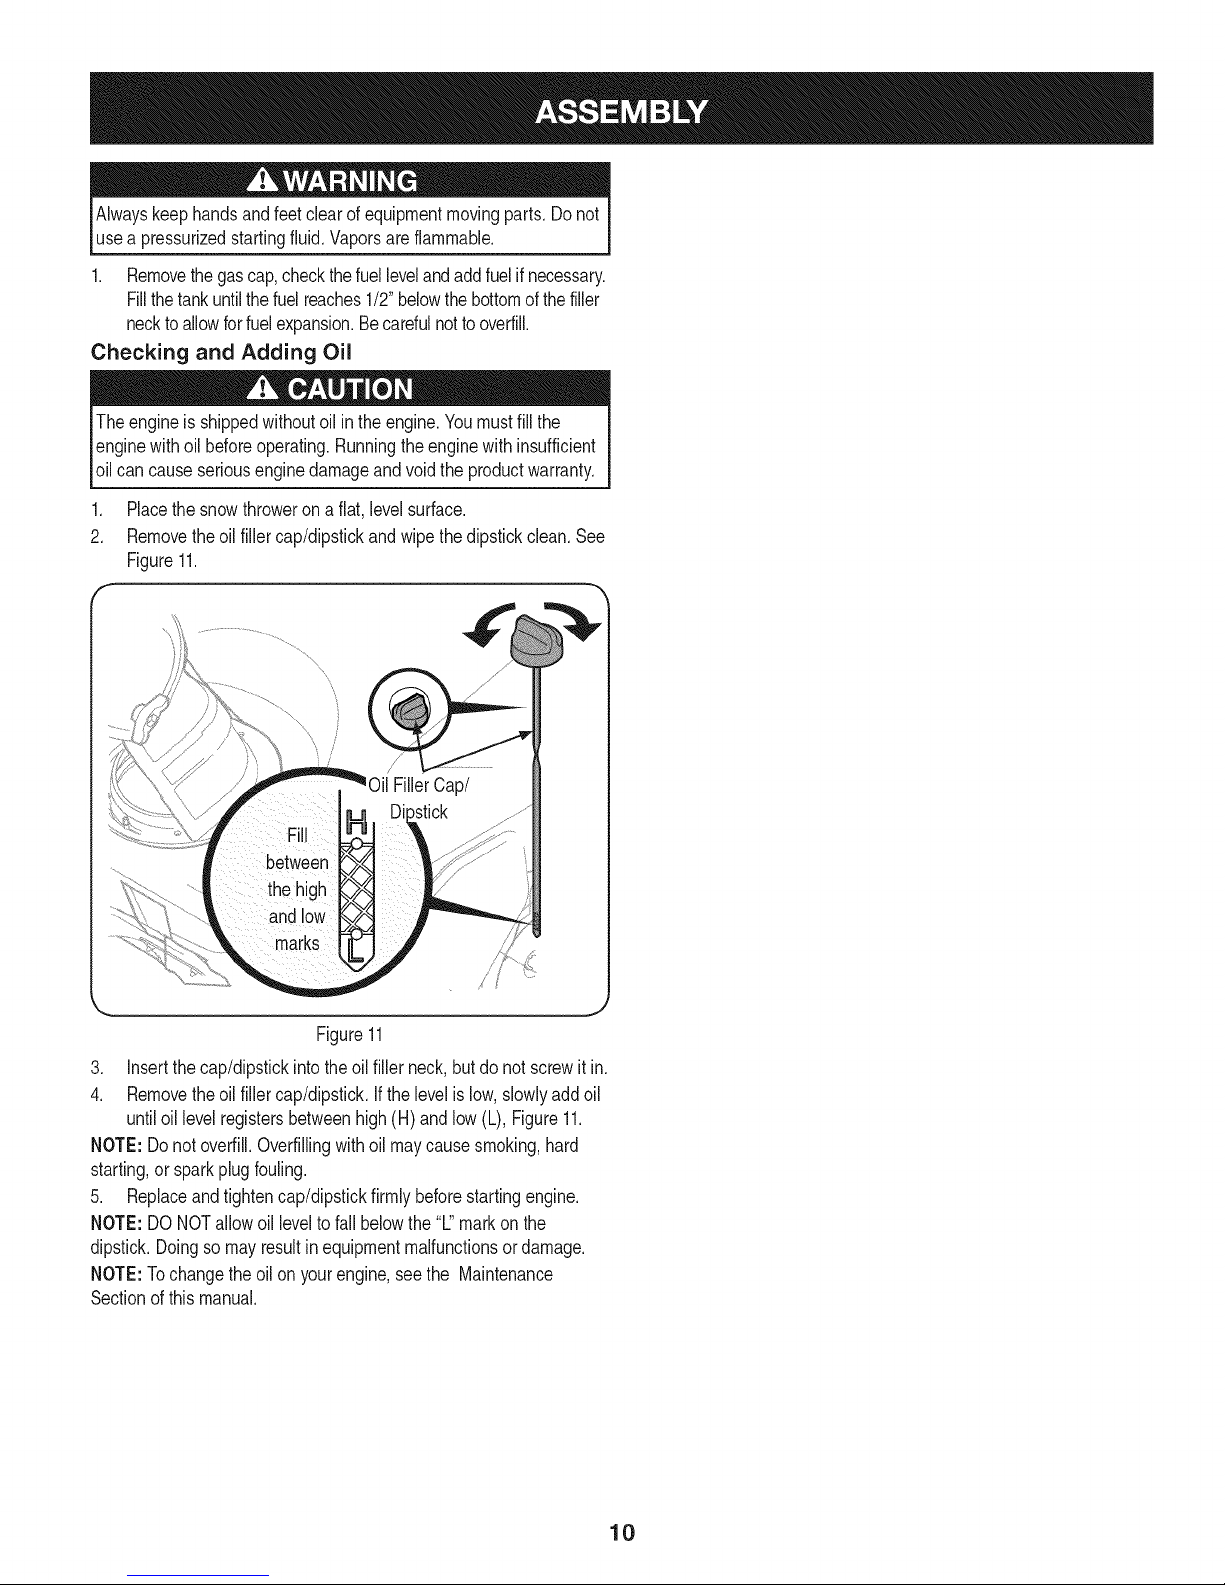
Checking and Adding Oil
Theengineis shippedwithoutoil in theengine.Youmustfill the
enginewithoilbeforeoperating.Runningtheenginewithinsufficient
oilcancauseseriousenginedamageandvoid the productwarranty.
Placethe snowthrowerona flat, levelsurface.
2. Removetheoil fillercap/dipstickandwipethedipstickclean.See
Figure11.
\
Figure11
.
Insertthe cap/dipstickintotheoilfillerneck,butdo notscrewit in.
4.
Removetheoil fillercap/dipstick.Ifthelevelis low,slowlyaddoil
untiloil levelregistersbetweenhigh(H) andlow(L), Figure11.
NOTE:Donot overfill.Overfillingwithoil maycausesmoking,hard
starting,or sparkplugfouling.
5. Replaceandtightencap/dipstickfirmlybeforestartingengine.
NOTE:DONOTallowoil leveltofallbelowthe"L"markonthe
dipstick.Doingsomayresultin equipmentmalfunctionsordamage.
NOTE:Tochangetheoilon yourengine,seethe Maintenance
Sectionofthismanual.
10
Page 11
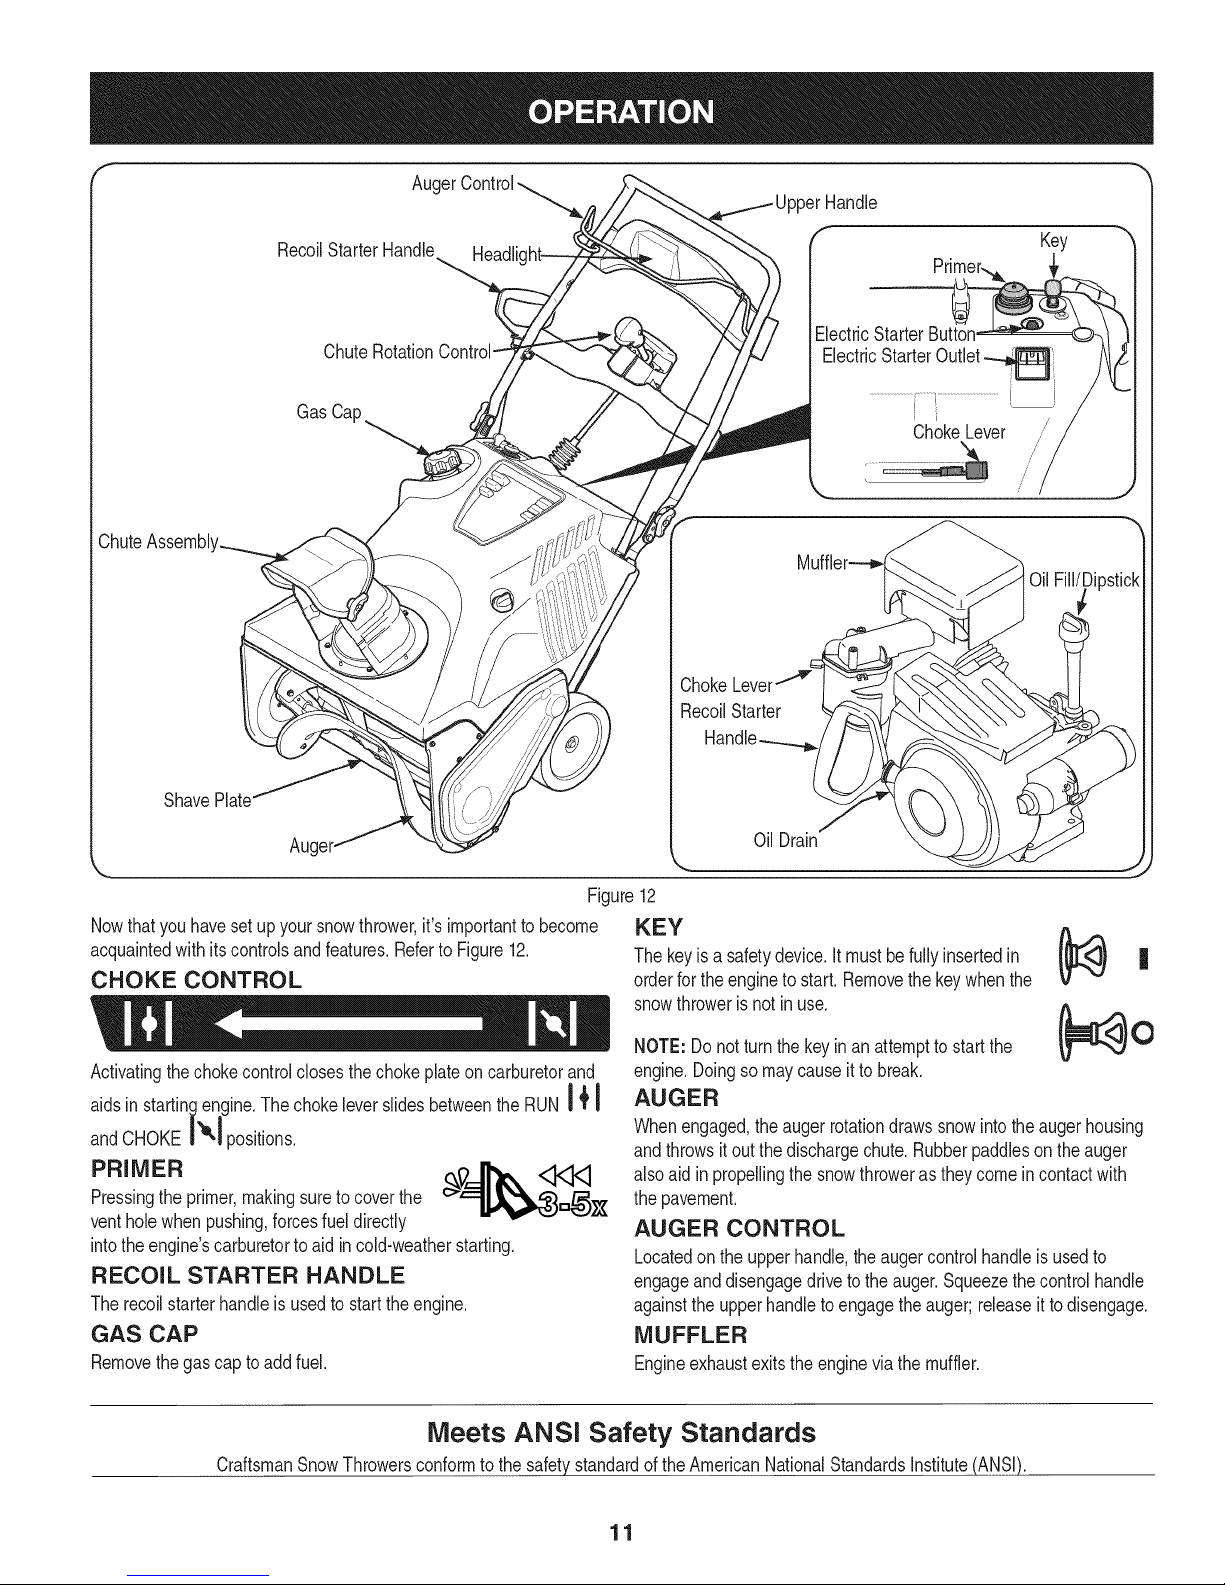
f Auger
ChuteAssembl'
Shave
RecoilStarterHandle
ChuteRotation
GasCap
Key
ElectricStarterButton
ElectricStarterOutlet
Aug
Nowthatyouhavesetupyoursnowthrower,it'simportanttobecome
acquaintedwithitscontrolsandfeatures.RefertoFigure12.
CHOKE CONTROL
Activatingthechokecontrolclosesthechokeplateoncarburetorand
aidsin startingengine.ThechokeleverslidesbetweentheRUNI { I
|
andCHOKEi'_ positions.
Pressing the primer, making sure to cover the
ventholewhenpushing,forcesfueldirectly
intothe engine'scarburetorto aidin cold-weatherstarting.
RECOIL STARTER HANDLE
Therecoilstarterhandleisusedtostarttheengine.
GAS CAP
Removethegascaptoaddfuel.
Oil Drain
12
Figure
KEY
Thekeyisa safetydevice.Itmustbefullyinsertedin
orderfortheengineto start.Removethekeywhenthe
snowthrowerisnotinuse.
NOTE:Do notturnthekeyinan attemptto startthe
engine.Doingsomaycauseittobreak.
AUGER
Whenengaged,theaugerrotationdrawssnowintothe augerhousing
andthrowsitout the dischargechute.Rubberpaddlesontheauger
alsoaidin propellingthesnowthrowerastheycomein contactwith
thepavement.
AUGER CONTROL
Locatedontheupperhandle,theaugercontrolhandleis usedto
engageanddisengagedrivetotheauger.Squeezethecontrolhandle
againsttheupperhandletoengagetheauger;releaseittodisengage.
MUFFLER
Engineexhaustexitstheengineviathemuffler.
CraftsmanSnowThrowersconformto the safetystandardoftheAmericanNationalStandardsInstitute(ANSI).
Meets ANSI Safety Standards
11
Page 12
CHUTE ROTATION CONTROL
Thechuterotatecontrolis locatedin thecenterof the controlpanel
andcontrolsthedirectionsnowisthrown.Depressthe buttonand
rotatethechuterotationcontroltothe rightto turnthe chuteto the right
androtatetothelefttoturnthechutetotheleft.
CHUTE ASSEMBLY
Thepitchofthedischargechutecontrolstheangleatwhichthe snow
isthrown.Loosenthe wing knobonthe side of the dischargechute
beforepivotingthedischargechuteupwardordownward.Retighten
theknoboncethedesiredpositionhasbeenachieved.
SHAVE PLATE
Theshaveplatemaintainscontactwiththepavementasthesnow
throwerispropelled,allowingsnowcloseto thepavement'ssurfaceto
bedischarged.
OIL FILL/DIPSTICK
Engineoillevelcanbecheckedandoil addedthroughtheoil fill.
OIL DRAIN
Engineoilcanbedrainedthroughtheoil drain.
HEADLIGHT
Theheadlightislocatedon the uppercenterof the controlpanelandis
onwhenthesnowthroweris running.
ELECTRIC STARTER OUTLET
Requirestheuseofa three-prongoutdoorextensioncordanda 120V
powersource/walloutlet.
ELECTRIC STARTER BUTTON
Pressingtheelectricstarterbuttonengagestheengine'selectric
starterwhenpluggedintoa120Vpowersource.
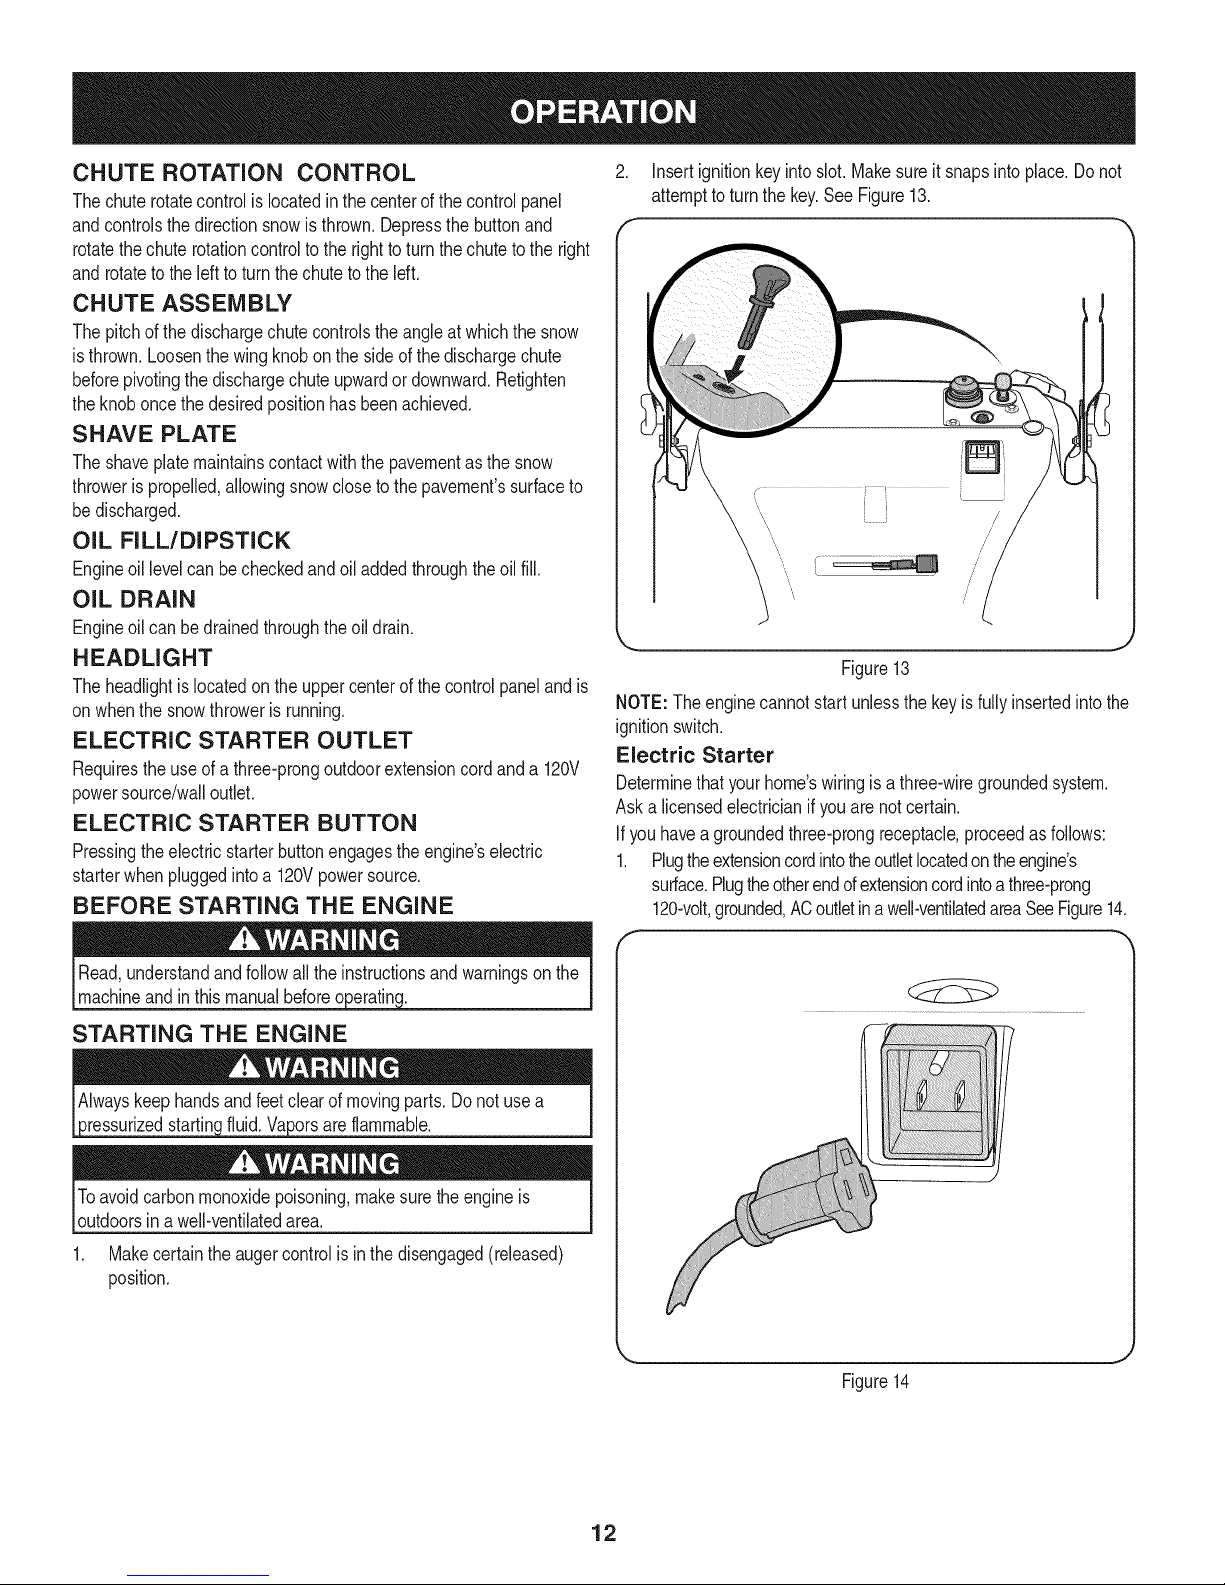
BEFORE STARTING THE ENGINE
2. Insertignitionkeyinto slot.Makesureitsnapsintoplace.Donot
attempttoturnthekey.SeeFigure13.
Figure13
NOTE:Theenginecannotstartunlessthe keyis fullyinsertedintothe
ignitionswitch.
Electric Starter
Determinethatyourhome'swiringisa three-wiregroundedsystem.
Aska licensedelectricianifyou arenotcertain.
Ifyouhaveagroundedthree-prongreceptacle,proceedasfollows:
1. Plugtheextensioncordintotheoutletlocatedontheengine's
surface.Plugtheotherendofextensioncordintoathree-prong
120-volt,grounded,ACoutletinawell-ventilatedareaSeeFigure14.
f
machineandinthismanualbefore
STARTING THE ENGINE
3ressurizedstartinc areflammable.
Toavoidcarbonmonoxidepoisoning,makesuretheengineis
outdoorsin awell-ventilatedarea.
1. Makecertaintheaugercontrolisin thedisengaged(released)
position.
Figure14
12
Page 13
2. PushthechokelevertotheCHOKEI'e,I position.
a
3. If theengineiswarm,placethechokeinthe RUNi ! position
insteadof CHOKEI_1.
4. Pushthe primerthree(3) times,makingsuretocoverthe vent
holewhenpushing.
5. If theengineiswarm,pushthe primerbuttononlyonce.
6. Pushstarterbuttontostartengine.
7. Oncethe enginestarts,releasestarterbutton.
8. Allowtheengineto warmup severalminutes,adjustingchoke
| |
towardRUN| _position.Waituntilenginerunssmoothlybefore
eachchokeadjustment.
9. Whendisconnectingtheextensioncord,alwaysunplugtheend
atthethree-prongwalloutletbeforeunpluggingtheoppositeend
fromthesnowthrower.
Recoil Starter
1. Pushthechokeleverto the CHOKEI_1 position.
2. If theengineiswarm,placethechokeinthe RUNI_1 position
insteadof CHOKEI"_1.
3. Pushthe primerthree(3) times,makingsuretocoverthe vent
holewhenpushing.
4. If theengineiswarm,pushthe primerbuttononlyonce.
5. Graspthe recoilstarterhandleandslowlypullthe ropeout.At
thepointwhereitbecomesslightlyhardertopulltherope,slowly
allowthe ropeto recoil.
6. Pullthestarterhandlewitha firm, rapidstroke.Donot release
thehandleandallowitto snap back.Keepa firmholdonthe
starterhandleandallowit to slowlyrecoil.
7. Allowtheengineto warmup severalminutes,adjustingchoke
| |
towardRUN| _position.Waituntilenginerunssmoothlybefore
eachchokeadjustment.
STOPPING THE ENGINE
1. Runthe enginefora fewminuteswithoutloadbeforestoppingto
helpdryoff anymoistureontheengine.
2. Tostoptheengineremovethekeyand storeit in asafeplace.
3. Wipeallthesnowandmoistureawayfromtheenginecontrols
area.
Muffler,engineandsurroundingareasbecomehotandcan causea
burn.Becarefulanddonot touchwhentheyare hot.
ENGAGING THE AUGER
Engagethe augerby squeezingtheaugercontrolagainsttheupper
handle.Releasethecontroltostoptheauger.
ENGAGING THE DRIVE
Liftup slightlyontheupperhandletoallowthe rubberpaddleson the
augertocontactthepavementandpropelthe snowthrowerforward.
Pushingdownwardonthe handlewill raisetheaugeroff theground
and stopthe forwardmotion.
NOTE:Excessiveupwardpressureonthehandlewillresultin
prematureweartotherubberaugerpaddles,whichwillnotbecovered
bythe warranty.
CLEARING A CLOGGED DISCHARGE CHUTE
Handcontactwiththe rotatingimpellerinsidethedischargechute
isthe mostcommoncauseof injuryassociatedwithsnowthrowers.
Neveruseyourhandtocleanoutthe dischargechute.
Toclear thechute:
1. SHUTTHEENGINEOFF!
2. Wait 10secondstobe suretheimpellerbladeshavestopped
rotating.
3. Alwaysusea clean-outtoolor stick,notyourhands.
13
Page 14
MAINTENANCE SCHEDULE
Beforeperforminganytypeofmaintenance/service,disengageall
controlsandstoptheengine.Waituntilall movingpartshavecome
toa completestop.Disconnectsparkplugwireandgrounditagainst
theenginetopreventunintendedstarting.Alwayswearsafetyglasses
duringoperationorwhileperforminganyadjustmentsor repairs.
Eachuse .
Engineoillevel.
2.
Snowthrowerandexhaust
1. Check
2. Clean
Followthemaintenanceschedulegivenbelow.Thischartdescribes
serviceguidelinesonly.UsetheServiceLogcolumntokeeptrackof
completedmaintenancetasks.To locate the nearestSearsService
Centeror to scheduleservice,simplycontactSearsat
1-800-4-MY-HOME®.
= =
area.
1st5 hours 1. 1. Change.
Every5hours 1. 1. Check.
25 hours 1. 2. Check.
Everyseason/50hours 1. 1. Change
Everyseason/100hours 1. 1. Clean,replace,re-gap
Everyseason/Before 1. 1. Lubricate
storage 2. 2. Lubricate
ENGINE MAINTENANCE
Engineoil.
Engineoil.
Exhaustarea.
2. 2. Clean.
Sparkplug.
Engineoil
Sparkplug
Pivotpoints
Controlhandle
3. 3. Lubricate
Extensionspring
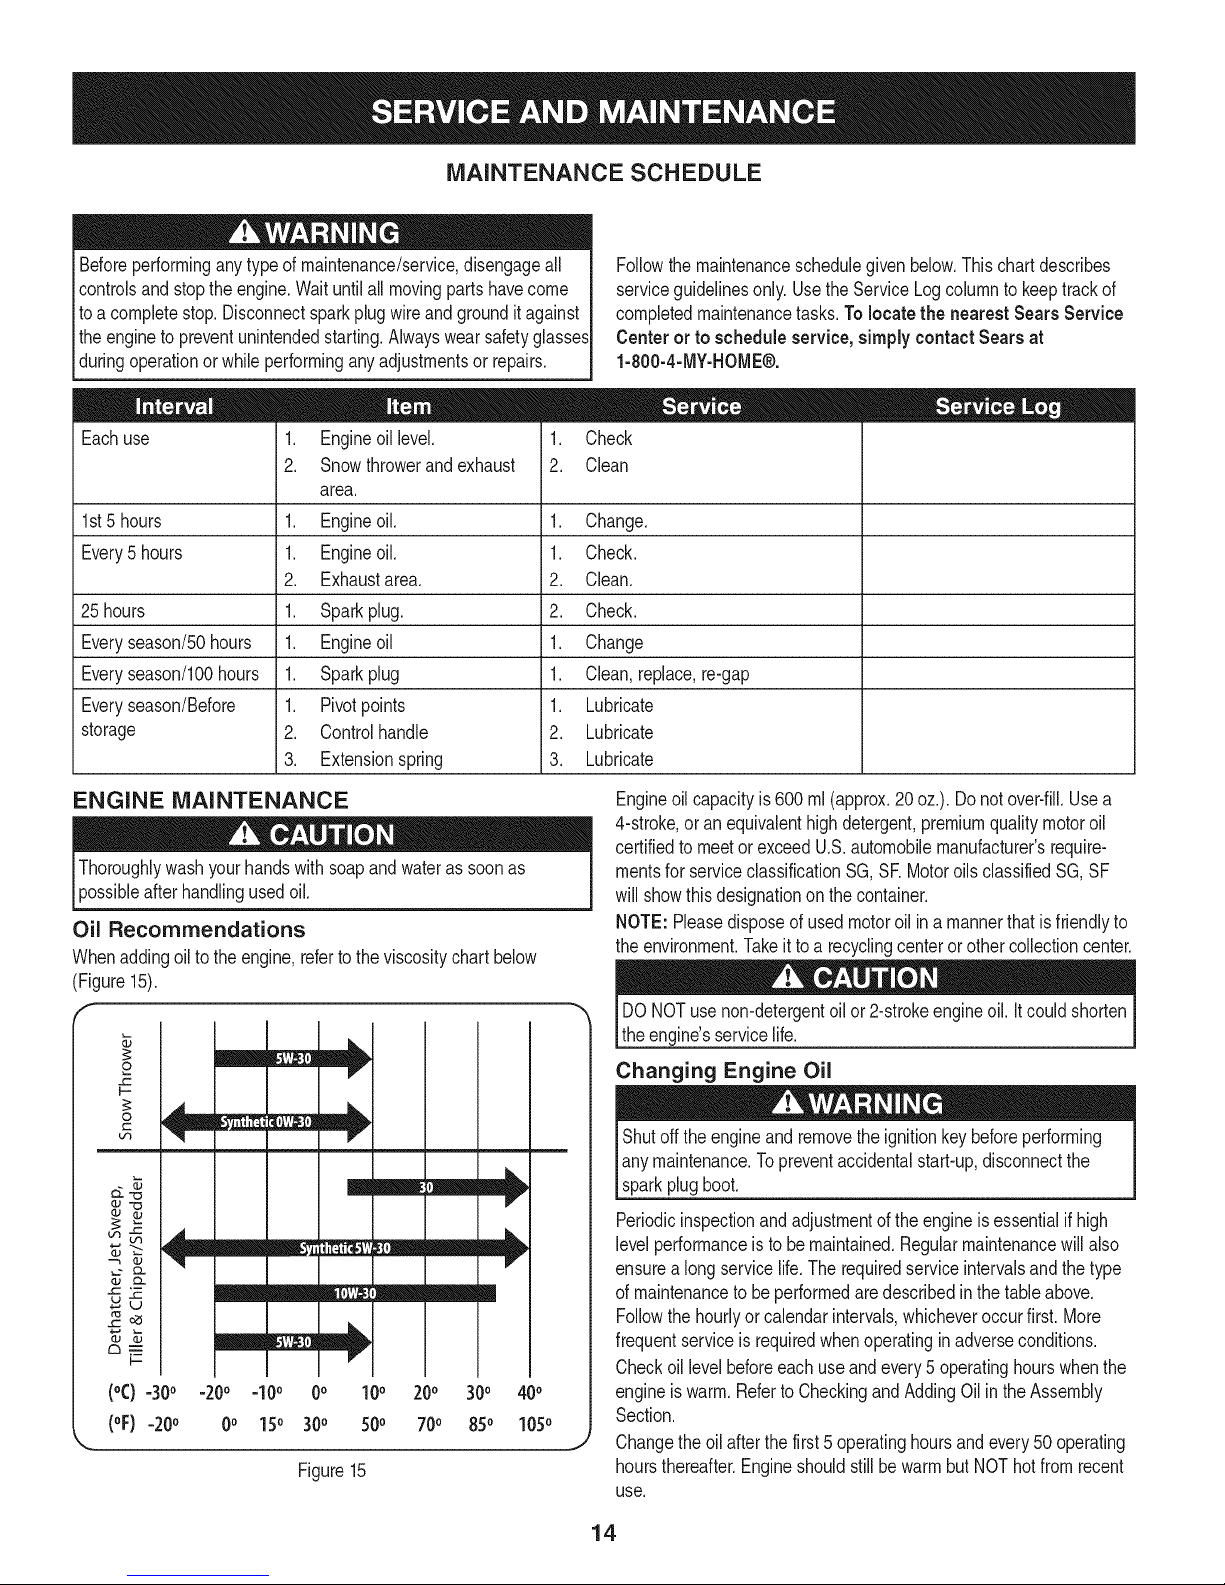
Engineoilcapacityis600ml (approx.20oz.). Do notover-fill.Usea
4-stroke,oran equivalenthighdetergent,premiumqualitymotoroil
certifiedto meetor exceedU.S.automobilemanufacturer'srequire-
mentsfor serviceclassificationSG,SE MotoroilsclassifiedSG,SF
usedoil.
Oil Recommendations
Whenaddingoiltotheengine,referto theviscositychartbelow
willshowthis designationon thecontainer.
NOTE:Pleasedisposeofusedmotoroilin amannerthatisfriendlyto
theenvironment.Takeittoa recyclingcenteror othercollectioncenter.
(Figure15).
DONOTusenon-detergentoil or2-strokeengineoil.It couldshorten
I
£
F-
O
Lf_
- r I ] [
theengine'sservicelife.
Changing Engine Oil
Shutofftheengineand removetheignitionkeybeforeperforming
anymaintenance.Topreventaccidentalstart-up,disconnectthe
mW/==b,
Iv
sparkplugboot.
Periodicinspectionandadjustmentoftheengineisessentialifhigh
levelperformanceis to bemaintained.Regularmaintenancewillalso
oJ t'_
CL
mm /m!
V
ensurea longservicelife.The requiredserviceintervalsandthetype
of maintenancetobe performedaredescribedinthe tableabove.
Followthehourlyorcalendarintervals,whicheveroccurfirst.More
mm mlb,
I-=
(°C) =30° -20o =10o 0o 100 200 300 400
(oF)-20 o 0o 150 300 500 700 850 1050
frequentserviceis requiredwhenoperatinginadverseconditions.
Checkoil levelbeforeeachuseandevery5 operatinghourswhenthe
engineiswarm.RefertoCheckingandAddingOilintheAssembly
Section.
Changetheoil afterthe first5 operatinghoursandevery50 operating
Figure15
hoursthereafter.EngineshouldstillbewarmbutNOThotfrom recent
use.
14
Page 15
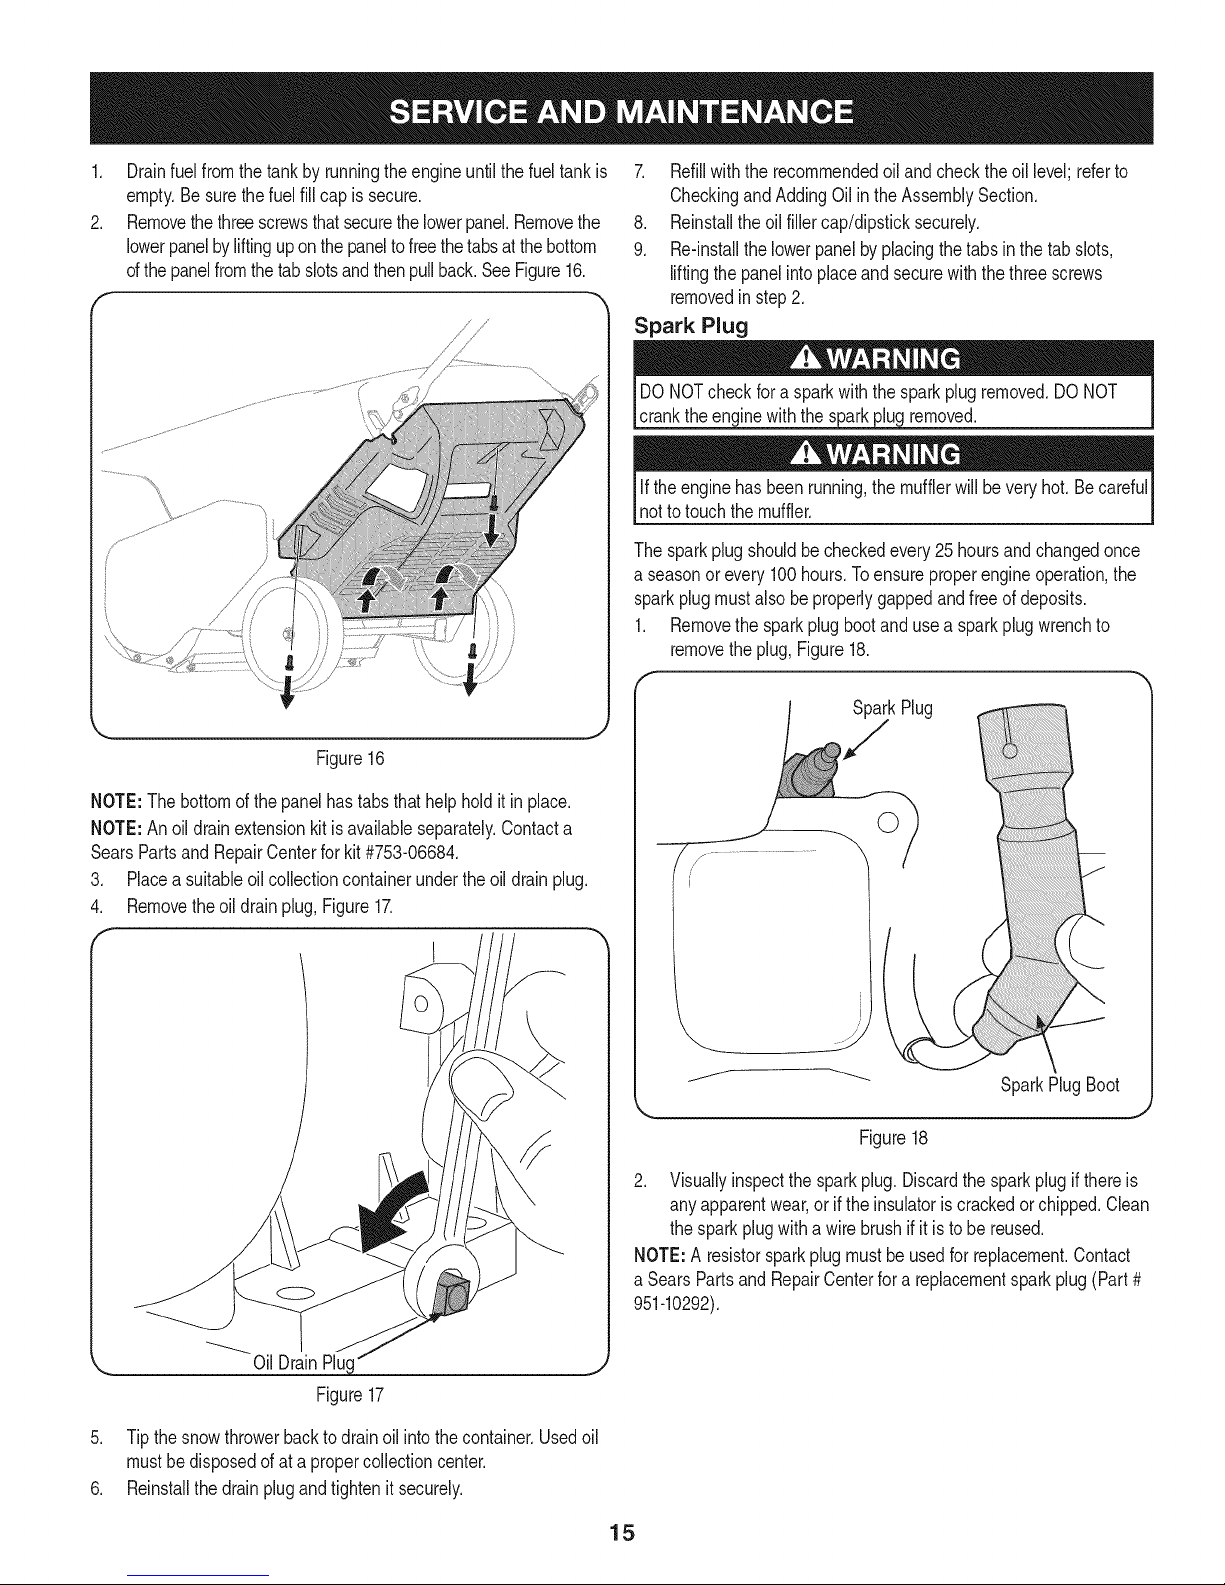
.
Drainfuelfromthe tankby runningtheengineuntilthefueltankis
empty.Besurethefuel fill capis secure.
2.
Removethethreescrewsthatsecurethelowerpanel.Removethe
lowerpanelbyliftinguponthe paneltofreethetabsatthe bottom
d thepanelfromthetab slotsandthenpullback.SeeFigure16.
f
7. Refillwiththerecommendedoiland checktheoil level;referto
CheckingandAddingOil intheAssemblySection.
8. Reinstallthe oil fillercap/dipsticksecurely.
9. Re-installthe lowerpanelbyplacingthetabs inthe tab slots,
liftingthepanelintoplaceandsecurewiththethreescrews
removedinstep2.
Spark Plug
DONOTcheck fora sparkwiththesparkplugremoved.DONOT
cranktheenginewiththesparkplugremoved.
Iftheenginehasbeenrunning,the mufflerwillbeveryhot. Becareful
nottotouchthemuffler.
/
k. j
Figure16
NOTE:The bottomofthepanelhastabsthathelpholdit inplace.
NOTE:An oildrainextensionkitisavailableseparately.Contacta
SearsPartsand RepairCenterforkit#753-06684.
3. Placea suitableoilcollectioncontainerundertheoildrainplug.
4. Removetheoil drainplug,Figure17.
F 1
Thesparkplugshouldbecheckedevery25hoursandchangedonce
a seasonor every100hours.Toensureproperengineoperation,the
sparkplugmustalsobeproperlygappedandfreeof deposits.
1. Removethesparkplugbootand usea sparkplugwrenchto
removetheplug,Figure18.
SparkPlugBoot
k_ Oil DrainPlug
Figure17
5. Tipthesnowthrowerbacktodrainoil intothecontainer.Usedoil
mustbedisposedofata propercollectioncenter.
6. Reinstallthedrainplugandtightenit securely.
Figure18
2. Visuallyinspectthe sparkplug. Discardthe sparkplugifthereis
anyapparentwear,or if theinsulatoriscrackedorchipped.Clean
thesparkplugwitha wirebrushifit istobe reused.
NOTE:A resistorsparkplugmustbeusedforreplacement.Contact
a Sears PartsandRepairCenterfora replacementsparkplug(Part#
951-10292).
15
Page 16
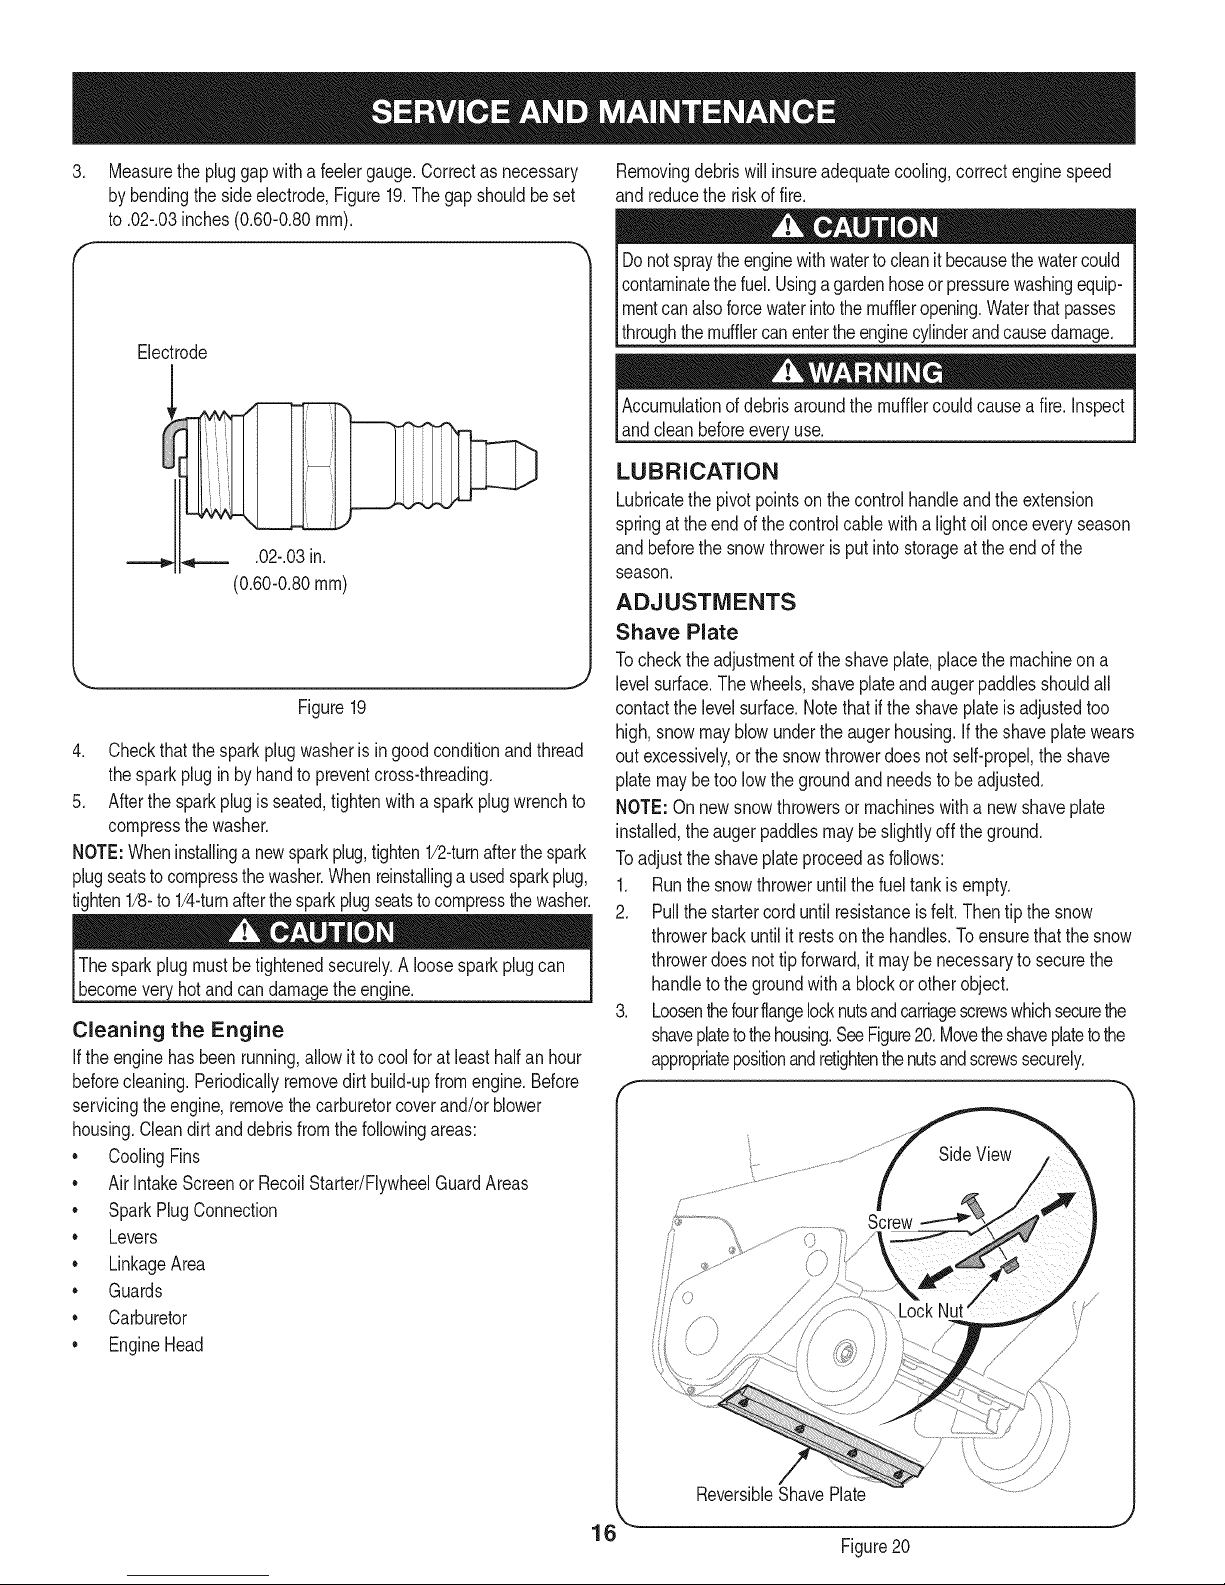
.
Measurethepluggapwitha feelergauge.Correctasnecessary
bybendingthe side electrode,Figure19.Thegapshouldbeset
to.02-.03inches(0.60-0.80ram).
Electrode
.02-.03in.
(0.60-0.80ram)
Figure19
4. Checkthatthesparkplugwasherisingoodconditionandthread
thesparkplugin byhandtopreventcross-threading.
5. Afterthe sparkplugisseated,tightenwithasparkplugwrenchto
compressthewasher.
NOTE:Wheninstallinganewsparkplug,tighten1/2-turnafterthespark
plugseatstocompressthewasher.Whenreinstallingausedsparkplug,
tighten1/8-to1/4-turnafterthesparkplugseatstocompressthewasher.
Thesparkplugmustbetightenedsecurely.Aloosesparkplugcan
becomeveryhotandcandamagetheengine.
Cleaning the Engine
Iftheenginehasbeenrunning,allowittocoolforatleasthalfan hour
beforecleaning.Periodicallyremovedirtbuild-upfromengine.Before
servicingtheengine,removethecarburetorcoverand/orblower
housing.Cleandirtanddebrisfromthefollowingareas:
• CoolingFins
• AirIntakeScreenorRecoilStarter/FlywheelGuardAreas
• SparkPlugConnection
• Levers
• LinkageArea
• Guards
• Carburetor
• EngineHead
Removingdebriswillinsureadequatecooling,correctenginespeed
and reducetheriskoffire.
Donotspraytheenginewithwatertocleanitbecausethewatercould
contaminatethefuel.Usingagardenhoseorpressurewashingequip-
mentcanalsoforcewaterintothemuffleropening.Waterthatpasses
throughthemufflercanentertheenginecylinderandcausedamage.
Accumulationofdebrisaroundthemufflercouldcausea fire.Inspect
andcleanbeforeevery_use.
LUBRICATION
Lubricatethe pivotpointson thecontrolhandleandtheextension
springat the endofthecontrolcablewitha light oilonceeveryseason
and beforethesnowthrowerisputintostorageat the endof the
season.
ADJUSTMENTS
Shave Plate
Tochecktheadjustmentofthe shaveplate,placethemachineon a
levelsurface.Thewheels,shaveplateandaugerpaddlesshouldall
contactthelevelsurface.Notethat ifthe shaveplateisadjustedtoo
high,snowmayblowundertheaugerhousing.Iftheshaveplatewears
outexcessively,or thesnowthrowerdoesnotself-propel,the shave
platemaybetoolowthegroundandneedstobeadjusted.
NOTE:Onnewsnowthrowersormachineswitha newshaveplate
installed,theaugerpaddlesmaybeslightlyofftheground.
Toadjusttheshaveplateproceedasfollows:
1. Runthe snowthroweruntilthefueltankisempty.
2. Pullthestartercorduntil resistanceisfelt.Thentip the snow
throwerbackuntilit restsonthe handles.Toensurethatthe snow
throwerdoesnot tip forward,it maybenecessarytosecurethe
handletothegroundwitha blockorotherobject.
3. Loosenthefourflangelocknutsandcarriagescrewswhichsecurethe
shaveplatetothehousing.SeeFigure20.Movetheshaveplatetothe
appropriatepositionandretightenthenutsandscrewssecurely.
16 ``.¸
ReversibleShavePlate
J
Figure20
Page 17
4. Tipthesnowthrowerbacktotheoperatingpositionandpullthe
starterhandleafewtimestoseeifitisdifficulttopull.
5. Ifthestarterisdifficulttopull,removethesparkplugandpullthe
handleseveraltimestoensurethatanyoiltrappedintheengine
headisremoved.
Oilmaycomeoutofthesparkplugholewhenitisremovedandthe
starterhandleispulled.
6. Inspectthesparkplug.Ifitiswet,cleanoffanyoilbefore
re-installing.
Control Cable
Asaresultofboththecontrolcableandtheaugerdrivebeltstretching
duetowear,periodicadjustmentsmaybenecessary.Iftheauger
seemstohesitatewhenrotating,proceedasfollows:
Theupperholeinthecontrolhandleprovidesforanadjustmentin
cabletension.Toadjust,disconnecttheendofcontrolcablefromthe
bottomholeinthecontrolhandleandreinsertitintheupperhole.
InsertthecablefromtheoutsideasshowninFigure21.
f
Control
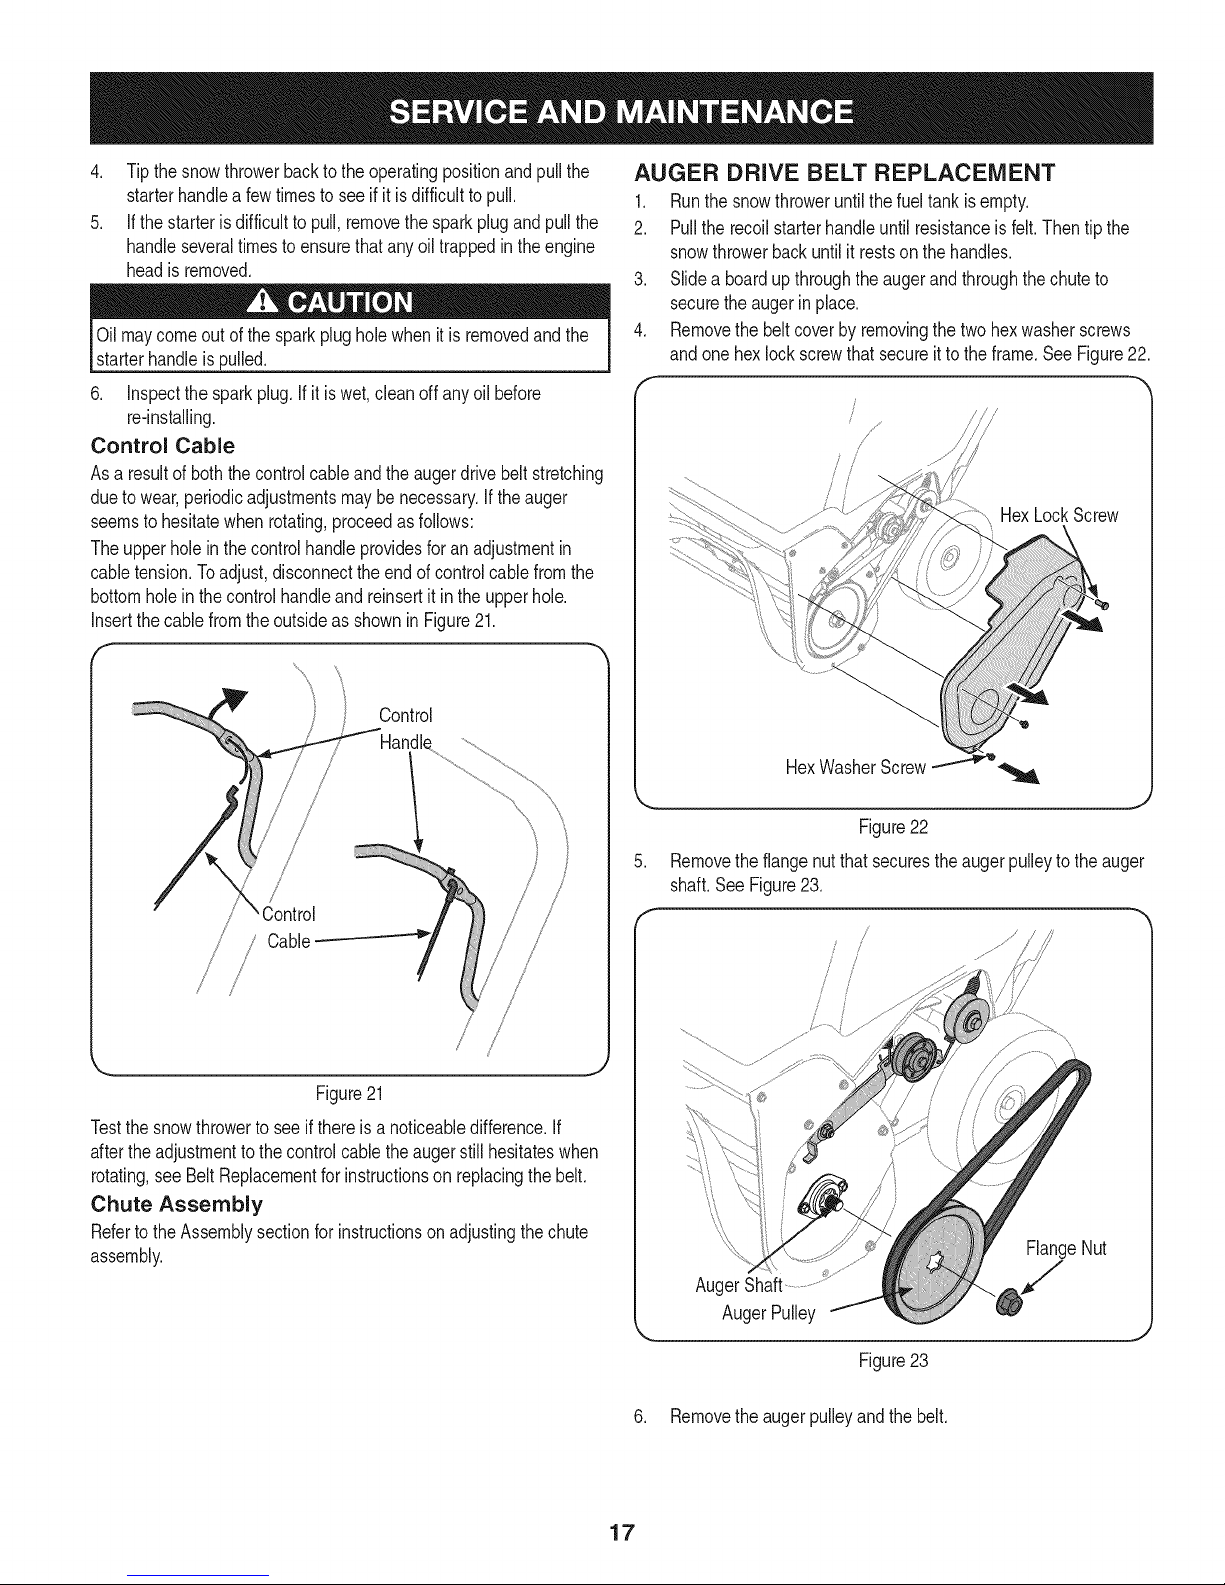
AUGER DRIVE BELT REPLACEMENT
1. Runthe snowthroweruntilthefueltankisempty.
2. Pullthe recoilstarterhandleuntilresistanceisfelt.Thentipthe
snowthrowerbackuntilitrestson thehandles.
3. Slidea boardupthroughtheaugerandthroughthechuteto
securetheaugerinplace.
4. Removethe beltcoverbyremovingthetwohexwasherscrews
andone hexlockscrewthatsecureittotheframe.SeeFigure22.
HexLockScrew
/
Cable
Figure21
Testthesnowthrowertoseeifthereisa noticeabledifference.If
aftertheadjustmentto the controlcabletheaugerstill hesitateswhen
rotating,seeBeltReplacementforinstructionson replacingthebelt.
Chute Assembly
RefertotheAssemblysectionforinstructionsonadjustingthechute
assembly.
j
/
/
/
Figure22
.
Removetheflangenutthat securestheaugerpulleytotheauger
shaft.SeeFigure23.
/
FlangeNut
AugerShaft
AugerPulley
Figure23
J
J
6. Removethe augerpulleyandthebelt.
17
Page 18

Toreplacethebeltfollowtheseinstructionsandreferto Figure24:
Drive
js
Figure24
1. Routethebeltaroundthe drivepulleyandundertheidlerpulley.
2. Routetheendofthebeltaroundtheaugerpulleyandslidethe
pulleybackon tothe augershaft.It maybe necessaryto push
downontheidlerpulleytoget theaugerpulleyunderthebelt
keeper.
3. Replacetheflangenutandtightensecurely.
4. Reinstallthebeltcoverremovedearlier.
5. Removethe boardfromtheaugerandchute.
REPLACING AUGER PADDLES
Thesnowthrowerauger'srubberpaddlesaresubjectto wearand
shouldbereplacedifanysignsof excessiveweararepresent.
DoNOTallowthe auger'srubberpaddlesto weartothepointwhere
Iportionsof the metalaugeritselfcancomein contactwiththepave-
_ment.Doingsocan resultin seriousdamageto yoursnowthrower.
Tochangetherubberpaddles,proceedasfollowsandreferto Figure
25:
HexWasherScrew
HexWasherScrew
Figure25
1. Runthe snowthroweruntilthefueltankisempty.
2. Pulltherecoilstarterhandleuntil resistanceisfelt.Then tip the
snowthrowerbackuntilitrestson thehandles.
3. Removethe existingrubberpaddlesbyunthreadingthehex
washerscrewswhichsecurethemtotheauger.SeeFigure25.
NOTE:Theaugerpaddlesshouldbereplacedoneat a timesothat
theaugerstillattachedcanbeusedas anexampleforpositioningand
re-installingthenewauger.
4. Securethe replacementrubberpaddlestotheaugerusingthe
hardwareremovedearlier.
Toobtaina fullaugerreplacementkitincludingrubberpaddlesand
hexwasherscrews,callSearsat 1-800-4-MYHOME.Askforpart
753-06469.
REPLACING OR REVERSING SHAVE PLATE
Theshaveplateis attachedtothebottomof the augerhousingand
is subjecttowear.Itshouldbecheckedperiodically.Therearetwo
wearingedgesandtheshaveplatecan be reversed.
1. Runthe snowthroweruntilthefueltankisempty.
2. Pulltherecoilstarterhandleuntil resistanceisfelt.Then tip the
snowthrowerbackuntilitrestson thehandles.
3. Removethe fourcarriageboltsandflangelocknutswhichattach
it tothe snowthrowerhousing.Referto Figure20on page14.
4. Reversethe existingshaveplateor installanewone,makingsure
thenewshaveplateandthe headsofthe carriageboltsareon
theinsideof the housing.
5. Adjustthe shaveplateas instructedon page14.
6. Tightensecurelyonceadjusted.
Toobtaina newshaveplate,callSearsat 1-800-4-MY-HOME.Askfor
part#731-08171.
18
Page 19

Ifthe snowthrowerwillnot be usedfor30 daysor longer,orif it is the endofthesnowseasonwhenthe lastpossibilityof snowisgone,the
equipmentneedstobestoredproperly.Followstorageinstructionsbelowtoensuretopperformancefromthe snowthrowerfor manymoreyears.
PREPARING THE ENGINE
Enginesstoredover30daysneedto bedrainedoffueltoprevent
deteriorationandgumfromforminginthefuelsystemoronessential
carburetorparts.If thegasolineinyourenginedeterioratesduring
storage,youmayneedto havethecarburetor,andotherfuelsystem
components,servicedorreplaced.
1. Removeall fuelfromthetankby runningtheengineuntilit stops.
2. Changetheengineoil.
3. Removethe sparkplugandpourapproximately1oz.(30 ml)of
cleanengineoil intothecylinder.Pullthe recoilstarterseveral
timesto distributetheoil,and reinstallthe sparkplug.
4. Cleantheexterioroftheenginebywipingdirtanddebrisfromthe
followingareas:
• CoolingFins
• AirIntakeScreenorRecoilStarter/FlywheelGuardAreas
• SparkPlugConnection
• Levers
LinkageArea
Guards
Carburetor
EngineHead
!
PREPARING SNOW THROWER
Ifthesnowthrowerwillnotbeusedfor30daysor longer,followthe
instructionsbelow.
1. Storetheequipmentinaclean,dryarea.
2. Wipedownthesnowthrowerwitha ragand removeanydirtor
debris.
3. Ifstoringthe snowthrowerin anunventilatedarea,rustproofthe
metalpartsof the machinewitha lightoil orsiliconecoating.
Donotspraytheenginewithwatertocleanitbecausethewatercould
contaminatethefuel.Usinga gardenhoseorpressurewashingequip-
Imentcanalsoforcewaterintothemuffleropening.Waterthatpasses
[throughthe mufflercanentertheenginecylinderandcausedamage.
5. Storeina clean,dry andwellventilatedareaawayfromany
appliancethatoperateswitha flameorpilotlight,suchas a
furnace,waterheateror clothesdryer.Avoidanyareawitha spark
producingelectricmotor,or wherepowertoolsareoperated.
Neverstoresnowthrowerwithfuelintank indoorsorinpoorlyventi-
latedareas,wherefuelfumesmayreachanopenflame,sparkor pilol
lightas ona furnace,waterheater,clothesdryerorgasappliance.
6. If possible,avoidstorageareaswithhighhumidity.
7. Keeptheenginelevelin storage.Tiltingtheengine can cause
fuelor oilleakage.
19
Page 20

Beforeperforminganytypeof maintenance/service,disengageallcontrolsandstoptheengine.Waituntilall
movingpartshavecometo acompletestop.Disconnectsparkplugwireandgrounditagainsttheengineto
Ipreventunintendedstarting.Alwayswearsafetyglassesduringoperationorwhileperforminganyadjustmentsor
[repairs.
This section addresses minor service issues. Tolocate the nearestSearsService Centeror to schedule service, simply contact Sears
at 1-800-4-MY-HOME®.
Enginefailsto start 1. Fueltankempty,or stalefuel.
2. Blockedfuelline.
3. Keynotinsertedalltheway.
4. Sparkplugwiredisconnected.
5. Faultysparkplug.
6. Enginenotprimed.
7. Enginefloodedfromexcessivepriming.
Enginerunningerratically/
inconsistentRPM(huntingor
surging)
1. Enginerunningonchoke.
2. Fuellineblocked,or stalefuel.
3. Wateror dirtinfuel system.
1. Filltankwithcleanfreshgasoline.
2. Contacta SearsServiceCenter.
3. Insertkeyalltheway.
4. Connectwireto sparkplug.
5. Cleansparkplug,readjustgap,or replace.
6. Pushtheengineprimerbuttonfivetoseventimes.
7. Waitatleasttenminutesbeforestarting.
1. MovechokecontroltoRUNposition.
2. Contacta SearsServiceCenter.
3. Runengineuntilthefueltank isempty.Rdill with
freshfuel.
4. Carburetoroutofadjustment.
5. Over-governedengine
Engineoverheats Contacta SearsServiceCenter.
Lossof power Firmlyconnectsparkplugwire.
1. Carburetoroutofadjustment.
1. Sparkplugwireloose.
2. Ventin gascap plugged.
Excessivevibration Stopengineimmediatelyandremovekey.Checkfor
1. Loosepartsordamagedauger.
4. Contacta SearsServiceCenter.
5. Contacta SearsServiceCenter.
1.
1.
2.
Clearvent.
1.
possibledamage.Tightenall boltsand nuts.Repair
asneeded.Ifproblempersists,takesnowthrowerto
a SearsServiceCenter.
Snowthrowerfailsto self- 1. Augercontrolcableoutofadjustment. 1. Adjustaugercontrolcableasshownin Serviceand
propel Maintenancesection.
2. Augerdrivebeltlooseor damaged. 2. Replaceaugerdrivebelt.
Augercontinuesto rotate 1. Augercontrolcableoutof adjustment. 1. Adjustaugercontrolcableasshownin Serviceand
Maintenancesection.
Unitfailstodischargesnow 1. Chuteassemblyclogged. 1.
Stopengineanddisconnectsparkplugwire.Clean
chuteand insideof augerhousingwithclean-outtool
or stick.
2. Foreignobjectlodgedin auger.
2. Stopengineimmediatelyanddisconnectthespark
plugwire.Removeobjectfromauger.
3. Augercontrolcableoutof adjustment.
4. Augerbeltlooseor damaged.
3. Adjustaugercontrolcable.
4. Replaceaugerbelt.
lqg_/1 find the a_swez a[_d z[_or{÷on maztagemy[£e,,,_om - [0[ [ree!
Find this and all your other product manual.sonl.ine.
Get answers from our team of home experts.
Get a personaLized maintenance pl.anfor your home.
Find information and tools to hel.pwith home projects.
_ managemylife
b_g_t t_ ye_ By S_a_'s
2O
Page 21

This page intentionally left blank. Use this page to make any notes regarding your snow thrower.
21
Page 22

Craftsman Snow Thrower Model 247.88782
i
i (
_31)
22
Page 23

Craftsman Snow Thrower IViodel 247.88782
|= 0 =
684-04168 IdlerPulleyAssembly
2. 984-04393 AugerAssembly
-- 753-06469 Rubber Auger Paddle Kit (Includes 2
paddles and 12hexwasher screws)
3. 684-04398-4044
4. 710-0134
5. 710-04484
6. 710-05183
710-0599
FrameAssembly
CarriageScrew,1/4-20x .62
HexWasherScrew,5/16-18x .750
HexScrew,5/16-24x 1.25
HexWasherScrew,1/4-20x .500
8. 710-0627 HexLockScrew,5/16-24x .750
9. 710-0778 HexWasherScrew,1/4-20x 1.500
10. 710-0817 HexWasherScrew,5/16-18x 1.250
L
11. 710-0895
12. 710-1652
13. 712-04064
14. 712-04065
HexWasherScrew,1/4-15x .750
HexWasherScrew,1/4-20x .625
FlangeLockNut, 1/4-20
FlangeLockNut,3/8-16
15. L71804836 LPulleyHub
16. 726-0233 PushNut,.25x .50
17. 731-07737A BeltCover
18. 731-08171 ShavePlate
19. 732-04748
20. 738-04456
21. 741-04517
22. 747-05360A
23. 748-0234
24. 749-04810-0637
ExtensionSpring,.70x 3.035
ShoulderBolt,5/16-24x .496x2.18
BallBearing,.5000x 1.375x.4375
DriveCableWireSupport
ShoulderSpacer
LowerHandle
D = O 0
750-04571 ShoulderSpacer
26. 790-00426-0637 IdlerCableBracket
27. 790-00444-4044 RHSidePlate
28. 790-00445-4044 LHSidePlate
29. 790-00457-4044 BearingCup
30. 790-00461-0637 IdlerBracket
31. 726-0299 PushCap,1/2
32. 734-1781 Wheel,8 x 1.7
33. 750-05417 SleeveSpacer,.525x .78x 1.07
34. 929-0071A ExtensionCord
35. 710-0627 HexLockScrew,5/16-24x .750
36. 710-0654A HexWasherScrew,3/8-16x 1.000
37. 710-0895 HexWasherScrew,1/4-15x .750
38. 912-0702 FlangeNut,7/16-20
39. 726-0205 HoseClamp,.490
40. 731-07664 ChokeExtensionLever
41. 736-0371 ThrustWasher,.343x .880x.062
42. 747-05513 GasTankWireSupport
43. 751-10487A FuelCap
44. 751-11648 FuelTank
45. 954-04050 Belt,.500x 35.06
46. 956-0416B PulleyHalf,.625x 2.25
47. 756-04443 Pulley,1/2x 6.00
48. 946-04782 ClutchCable
49. 952Z370-JU-11 ReplacementEngine
23
Page 24

Craftsman Snow Thrower Model 247.88782
/
/
/
Ix • _
\
24
Page 25

Craftsman Snow Thrower IViodel 247.88782
|= 0 =
631-04526P ChuteRotationControlAssembly
2. 684-04350 JointBlockAssembly
3. _684-04383-0637_indicatorBracketAssembly
4. 710-0451
5. 710-05108
6. 710-05179A
7. 710-0599
8. 710-0895
9. 712-04035
10. 712-04263
11. 714-04003
CarriageBolt,5/16-18x .750
HexWasherScrew,1/4x .750
MachineScrew,#8-32x .88
HexWasherScrew,1/4-20x0.500
HexWasherScrew,1/4-15x 0.750
HexLockNut,#8-32
HexLockNut,#8-32
CotterPin,.125x2.5
12. 715-04095 SpringPin,.156x .85
13. 917-04844B BevelGear,95T
14. 717-04940 SpurGear,35T
15. 717-04941 SpurGear,40T/11T
16. 720-04122 WingKnob,5/16-18
17. 720-04174 Grip,1.18x 3.33
18. 731-04426A UpperChute
19. .931-07626A J ChuteAdapter
20. 731-07708 ChutePlug
21. 931-07753A LowerChute
22. 731-07957 ChuteRotationCover
23. 736-04161 FiatWasher,.75x 1.00x .06
24. 941-0475 PlasticBushing,.380
25. 747-05299A ChuteRotationRod,3/8
26. 790-00416 GearMountingPlate
27. 790-00471 GearRetainerBracket
m
28. 731-07784 HandlePanelLens
D = O O
631-04504 HandlePanel
-- 777X44559 LightLabel
30. 710-04998 CarriageScrew,5/16-18x1.00
31. 710-05348 EyeBolt,1/4-20
32. 712-04064 FlangeLockNut, 1/4-20
33. 720-0279 WingKnob,1/4-20
34. 720-04122 WingKnob,5/16-18
35. 725-0157 CableTie,3/16x .05x 7.4
36. 725-1629 Lamp,#1141
37. 738-04419A ShoulderScrew,1/4-20x .375x .148
38. 747-05327B-0637AugerControl
39. 749-04693B-0637UpperHandle
40. 931-04579 BottomCoverAssembly
41. 631-04607 CoverAssembly
42. 710-04187 HexWasherScrew,1/4-15x .50
43. 732-04789 CompressionSpring,.460x 1.469
44. 731-08018 ChuteRotationRod
45. 925-04031A IgnitionSwitchAssembly
46. 951-10645A ElectricStarter
47. 951-10639A Primer
48. 684-04381-0637 ChuteRotationRodAssembly
49. 710-04352 Screw,#6x .375
50. 710-04353 Screw,#8x 1.00
51. 731-04904 RHControlKnob
52. 731-04905 LHControlKnob
53. 731-06525 JoystickTrigger
54 715-0150 RollPin,3/16x 1.1
NS 925-04139 WiringHarness
25
Page 26

Craftsman Snow Thrower Model 247.88782
777D16367 777X43688
777S34027 777i22139
g0 N_r 777S33731
USEE85 ORFUEL
CONTAININGMORE
THAN10% ETHANOL
777122992
777S32236
777S33118
777D16345
777123463
777123574
26
Page 27

This page intentionally left blank. Use this page to make any notes regarding your snow thrower.
27
Page 28

MTD CONSUMER GROUP (MTD), the California Air Resources Board (CARB)
and the United States Environment Protection Agency (U. S. EPA)
Emission Control System Warranty Statement
(Owner's Defect Warranty Rights and Obligations)
EMiSSiONCONTROLSYSTEMCOVERAGEISAPPLICABLETOCERTiFiEDENGINESPURCHASEDINCALIFORNIAIN2005ANDTHERE-
AFTER,WHICHAREUSEDINCALiFORNiA,ANDTOCERTiFiEDMODELYEAR2005ANDLATERENGINESWHICHAREPURCHASEDAND
USEDELSEWHEREINTHEUNITEDSTATES.
CaliforniaandelsewhereintheUnitedStatesEmissionControlDefectsWarrantyCoverage
TheCaliforniaAirResourcesBoard(CARB),U.S. EPAandMTDarepleasedtoexplaintheemissionscontrolsystemwarrantyonyour modelyear
2006andlatersmalloff-roadengine.In California,newsmalloff-roadenginesmustbe designed,builtand equippedtomeettheStatesanti-smog
standards.ElsewhereintheUnitedStates,newnon-road,spark-ignitionenginescertifiedformodel2005and later,mustmeetsimilarstandardsset
forthbytheU.S. EPA.MTDmustwarrantytheemissioncontrolsystemonyourengineforthe periodof timelistedbelow,providedtherehasbeen
noabuse,neglector impropermaintenanceofyoursmalloff-roadengine.
Youremissioncontrolsystemmayincludepartssuchasthecarburetor,fuel-injectionsystem,theignitionsystem,andcatalyticconverter,fuel
tanks,fuellines,fuelcaps,valves,canisters,filters,vaporhoses,clamps,connectors,andotherassociatedemission-relatedcomponents.
Whereawarrantableconditionexists,MTDwill repairyoursmalloff-roadengineat nocost to yourincludingdiagnosis,partsandlabor.
MANUFACTURER'S WARRANTY COVERAGE:
Thisemissionscontrolsystemiswarrantedfortwoyears.If anyemission-relatedpartonyourengineis defective,thepart will berepairedor
replacedbyMTD.
OWNER'S WARRANTY RESPONSIBILITIES:
Asthesmalloff-roadengineowner,youare responsibleforthe performanceofthe requiredmaintenancelistedinyourOwner'sManual.MTD
recommendsthatyou retainall yourreceiptscoveringmaintenancesonyoursmalloff-roadengine,but MTDcannotdenywarrantysolelyforthe
lackofreceiptsorforyourfailureto ensuretheperformancetoallscheduledmaintenance.
Asthesmalloff-roadengineowner,youshouldhoweverbeawarethatMTDmaydenyyourwarrantycoverageif yoursmalloff-roadengineorpart
hasfaileddue toabuse,neglect,impropermaintenanceor unapprovedmodifications.
Youare responsibleforpresentingyoursmalloff-roadengineto an AuthorizedMTDServiceDealerassoonasa problemexists.Thewarranted
repairsshouldbe completedina reasonableamountof time,notto exceed30 days.
Ifyouhaveanyquestionsregardingyourwarrantyrightsand responsibilities,youshouldcontacta MTDServiceRepresentativeat 1-800-800-7310
andaddressisMTDCONSUMERGROUP,RO.Box361131,ClevelandOH,44136-0019.
DEFECTS WARRANTY REQUIREMENTS FOR 1995 AND LATER SMALL OFF=ROAD ENGINES:
Thissectionappliesto 1995andlatersmalloff-roadengines.Thewarrantyperiodbeginsonthe datetheengineor equipmentisdeliveredtoan
ultimatepurchaser.
(a) GeneralEmissionsWarrantyCoverage
MTDmustwarranttotheultimatepurchaserandeachsubsequentpurchaserthattheengineis:
(1)Designed,built,andequippedsoasto conformwithallapplicableregulationsadoptedbythe AirResourcesBoardpursuantto itsauthorityin
Chapters1and2,Part5,Division26of theHealthandSafetyCode;and
(2) Freefromdefectsin materialsandworkmanshipthatcausethe failureofa warrantedparttobeidenticalin allmaterialrespectstothepartas
describedintheenginemanufacturer'sapplicationfor certificationfora periodoftwoyears.
(b)Thewarrantyonemissions-relatedpartswill be interpretedasfollows:
(1)Anywarrantedpart thatisnotscheduledforreplacementas requiredmaintenanceinthe writteninstructionsrequiredby Subsection(c)
mustbewarrantedforthewarrantyperioddefinedinSubsection(a)(2).Ifanysuchpartfailsduringtheperiodof warrantycoverage,it mustbe
repairedorreplacedbyMTDaccordingto Subsection(4)below.Anysuchpartrepairedorreplacedunderthewarrantymustbewarrantedfor
theremainingwarrantyperiod.
(2)Anywarrantedpartthat isscheduledonlyfor regularinspectioninthewritteninstructionsrequiredbySubsection(c)mustbewarrantedfor
thewarrantyperioddefinedinSubsection(a)(2).A statementinsuchwritteninstructionsto the effectof "repairor replaceasnecessary"will
notreducetheperiodofwarrantycoverage.Anysuchpart repairedorreplacedunderwarrantymustbe warrantedfortheremainingwarranty
period.
(3) Anywarrantedpartthat whichisscheduledfor replacementas requiredmaintenancein the writteninstructionsrequiredbySubsection(c)
mustbewarrantedfortheperiodoftimepriortothefirstscheduledreplacementpointforthat part.Ifthepartfailspriorto thefirst scheduled
replacement,thepartmustbe repairedor replacedbyMTDaccordingtoSubsection(4) below.Any suchpart repairedor replacedunder
warrantymustbewarrantedforthe remainderofthe periodpriortothefirstscheduledreplacementpointforthepart.
Page 29

(4)Repairorreplacementofanywarrantedpartunderthewarrantyprovisionsofthisarticlemustbeperformedatnochargetotheownerata
warrantystation.
(5)NotwithstandingtheprovisionsofSubsection(4)above,warrantyservicesorrepairsmustbeprovidedatallMTDdistributioncentersthat
arefranchisedtoservicethesubjectengines.
(6)Theownermustnotbechargedfordiagnosticlaborthatleadstothedeterminationthatawarrantedpartisinfactdefective,providedthat
suchdiagnosticworkisperformedatawarrantystation.
(7)Theenginemanufacturerisliablefordamagestootherenginecomponentsproximatelycausedbyafailureunderwarrantyofanywarranted
part.
(8)Throughouttheengine'swarrantyperioddefinedinSubsection(a)(2),MTDwillmaintainasupplyofwarrantedpartssufficienttomeetthe
expecteddemandforsuchparts.
(9)Anyreplacementpartmaybeusedintheperformanceofanywarrantymaintenanceorrepairsandmustbeprovidedwithoutchargetothe
owner.SuchusewillnotreducethewarrantyobligationsofMTD.
(10)Add-onormodifiedpartsthatarenotexemptedbytheAirResourcesBoardmaynotbeused.Theuseofanynon-exemptedadd-onor
modifiedpartsshallbegroundsfordisallowingawarrantyclaimmadeinaccordancewiththisarticle.Theenginemanufacturershallnotbe
liableunderthisarticletowarrantfailuresofwarrantedpartscausedbytheuseofnon-exemptedadd-onormodifiedpart.
(c)MTDwill includea copyofthefollowingemissionwarrantypartslistwitheachnewengine,usingthoseportionsofthelistapplicabletothe
e__&gine.
(1)FuelMeteringSystem
•Coldstartenrichmentsystem(softchoke)
,,Carburetorandinternalparts
•FuelPump
•FuelTank
(2)Air InductionSystem
•Aircleaner
•Intakemanifold
(3) IgnitionSystem
•Sparkplug(s)
•MagnetoIgnitionSystem
(4)ExhaustSystem
Catalyticconverter
•SAI(Reedvalve)
(5) MiscellaneousItemsUsedin AboveSystem
Vacuum,temperature,position,timesensitivevalvesand switches
Connectorsandassemblies
(6) Evaporativecontrol
•FuelHosecertifiedforARBevaporativeemissionof2006.
•FuelHoseClamps
Tetheredfuelcap
Carboncanister
Vaporlines
GD0C-100174Rev.A
Page 30

Look For Relevant Emissions Durability Period and
Air index information On Your Engine Emissions Label
Engines that are certified to meet the California Air Resources Board (CARB) Tier 2 Emission Standards must
display information regarding the Emissions Durability Period and the Air Index. Sears Brands Management
Corporation makes this information available to the consumer on our emission labels.
The Emissions Durability Period describes the number of hours of actual running time for which the engine is
certified to be emissions compliant, assuming proper maintenance in accordance with the Operating & Mainte-
nance Instructions. The following categories are used:
Moderate: Engine is certified to be emission compliant for 125 hours of actual engine running time.
Intermediate: Engine is certified to be emission compliant for 250 hours of actual engine running time.
Extended: Engine is certified to be emission compliant for 500 hours of actual engine running time.
For example, a typical walk-behind lawn mower is used 20 to 25 hours per year. Therefore, the Emissions
Durability Period of an engine with an intermediate rating would equate to 10 to 12 years.
The Air index is a calculated number describing the relative level of emissions for a specific engine family. The
lower the Air Index, the cleaner the engine. This information is displayed in graphical form on the emissions label.
After July 1,2000, Look For Emissions Compliance Period
On Engine Emissions Compliance Label
After July 1, 2000 certain Sears Brands Management Corporation engines will be certified to meet the United
States Environmental Protection Agency (USEPA) Phase 2 emission standards. For Phase 2 certified engines, the
Emissions Compliance Period referred to on the Emissions Compliance label indicates the number of operating
hours for which the engine has been shown to meet Federal emission requirements.
For engines less than 225 cc displacement, Category C = 125 hours, B = 250 hours and A = 500 hours.
For engines of 225 cc or more, Category C = 250 hours, B = 500 hours and A = 1000 hours.
This isa generic representation of the emission label typically found on a certified engine.
FAMILYYBSXS.3192VA 274812
GDOC-100182Rev.B
38
Page 31

Congratulations on making a smart purchase. Your new Craftsman® product is designed and
manufactured for years of dependable operation. But like all products, it may require repair
from time to time. That's when having a Repair Protection Agreement can save you money and
aggravation.
Here's what the Repair Protection Agreement* includes:
[] Expert service by our 10,000 professional repair specialists
[] Unlimited service and no charge for parts and labor on all covered repairs
[] Product replacement up to $1500 if your covered product can't be fixed
[] Discount of 25% from regular price of service and related installed parts not covered by the
agreement; also, 25% off regular price of preventive maintenance check
[] Fast help by phone - we call it Rapid Resolution - phone support from a Sears representative.
Think of us as a "talking owner's manual."
Once you purchase the Repair Protection Agreement, a simple phone call is all that it takes for you
to schedule service. You can call anytime day or night, or schedule a service appointment online.
The Repair Protection Agreement is a risk-free purchase. If you cancel for any reason during the
product warranty period, we will provide a full refund. Or, a prorated refund anytime after the
product warranty period expires. Purchase your Repair Protection Agreement today!
Some limitations and exclusions apply. For prices and additional information in the U.S.A.
call 1=800=827=6655.
*Coverage in Canada varies on some items. For full details call Sears Canada at 1=800=361=
6665.
Sears Installation Service
For Sears professional installation of home appliances, garage door openers, water heaters, and
other major home items, inthe U.S.A. or Canada call 1=800=4=MY=HOME®.
39
Page 32

Declaraci6n de garantia ............ Pagina 32
Medidas de seguridad ............. Paginas 33-36
Montaje ......................... Paginas 37-40
Funcionamiento .................. Paginas 41-43
Servicio y Mantenimiento ........... Paginas 44-49
GARANTiA COMPLETA CRAFTSMAN POR DOS AltOS
PORDOSANOSapartirdela fechadelacornpra,esteproductoest_garantizadopotdefectosen los rnaterialesyla rnanodeobra.
Losproductosdefectuososser_nreparadossincostooreernplazadossincostosi la reparaci6nnoest_disponible.
La presentegarantiase anulasiseutilizaesteproductoalgunavezparaprestarservicioscornercialeso siseIoalquilaa otrapersona.
Paraobtener informaci6nsobre el alcancede la garantiay solieitar la reparaci6noelreemplazo,visite elsitio Web:www.craftsman.com
Esta garanfia eubre0NiCAMENTElosdefectos en los rnaterialesy en lamanode obra. Estagaranfia NOcubre:
• Elernentosno renovablesquepuedendesgastarsepor elusonormal,duranteeiplazodela garantia,incluyendoentreotros,las barrenas,
laspaletasdelasbarrenas,loscortadoresdedesplazarniento,laszapatasantideslizantes,la placade raspado,lospasadoresdecuchilla,
la bujia,elfiltrode aire,las correasy el filtrodeaceite.
• Serviciosde rnantenirnientoestandar,carnbiosdeaceiteo afinaci6n.
• Carnbiode neurn_ticoso reparacionesporpinchadurasconobjetosexternoscornoclavos,espinas,toconesovidrios.
• Reernplazoo reparaci6ndeneurn_ticoso ruedascornoresultadodel desgastenormal,unaccidente,o funcionarniento
o rnantenirnientoincorrectos.
• Reparacionesrequeridascornoresultadodel uso inadecuadopot partedeloperador,incluyendoentreotrosel dafioocasionadoporobjetos
queirnpactanlarnaquinay quetuercenel bastidor,elejede labarrena,etc.,odebidoa queel motorrueaceleradoenexceso.
• Reparacionesnecesariasdebidoanegligenciadeloperador,incluyendoentreotros,dafiosrnec_nicoyel@tricoocasionadopor
unalrnacenarnientonoapropiado,fallaporel usodeaceitede gradoy/o cantidadnoapropiadoso fallapornodar rnantenirniento
alequipodeacuerdoconlasinstruccionescontenidasenel manualdeloperador.
• Lirnpiezao reparacionesdelmotor(sisternade combustible)debidasa combustiblequesedeterrninaest_contarninadouoxidado(viejo).
Engeneral,elcombustibledebeutilizarseenunperiodono mayorde 30dias a partirde suadquisici6n.
• Eldeterioroydesgastenormalde losacabadosexteriores,oreernplazode laetiquetadelproducto.
Almacenamiento fuera de temporada . Pagina 50
Solucion de problemas ............. Pagina 51
Acuerdo de protecci6n
para reparaciones ................. Pagina 55
NOmeros de servicio ............... Contratapa
Estagarantialeotorgaderechoslegalesespecificos,peroustedpodriagozardeotrosderechosenraz6ndesulugarde residencia.
Sears Brands Management Corporation, Hoffman Estates, IL 60179
Tipodeaceitedelmotor:
Capacidaddeaceitedel motor:
Capacidaddecombustible:
Bujfas:
Separaci6ndelasbujias:
©KCDIP,LLC
SAE5W-30
20onzas
2 Cuartosdegai6n
F6RTC
0.020"-0.030"
NSrnerodernodelo ...............................
N_rnerode serie .................................
Feehadeeompra ................................
RegistrearribaelnQrnerodelrnodeio,elnQrnero
deserie yla fechadecornpra
32
Page 33

Lapresenciade estesfmboloindicaque setratade instruccionesde
seguridadimportantesquedeberespetarparaevitarponeren riesgosu
seguridadpersonaly/o materialy la de losdemos.Leay cumplatodas las
instruccionesdeestemanualantesde intentaroperarestam_quina.Si no
respetaestas instruccionespuedeprovocarlesionespersonales.Cuando
veaestesfmbolo,iTENGAENCUENTALAADVERTENClA!
Estam_quinaest_dise_adaparasetutilizadarespetandolasnormas
de seguridadcontenidaseneste manual.AIigualquecon cualquiertipo
de equipomotorizado,un descuidoo errorporpartedeloperadorpuede
producirlesionesgraves.Estam_quinaescapaz deamputardedos,
manosy piesy dearrojarresiduos.Deno respetarlasinstruccionesde
seguridadsiguientessepuedenproducirlesionesgraveso la muerte.
PROPOSICl6N 05 DE CALIFORNIA
Elescapedelmotorde esteproducto,algunosde suscomponentesy
algunoscomponentesdelvehfculocontieneno liberansustanciasqufmicas
queel estadode Californiaconsideraque puedenproducirc_ncer,
defectosdenacimientouotrosproblemasreproductivos.
CAPAClTACl6N
• Lea,entienday cumplatodaslas instruccionesinchidas en lam_quina
yen el(los)manual(es)antesde intentarrealizarel montajede launidad
y utilizarla.Si no Iohace,sepuedenprovocarlesionespersonalesal
operadoroalos transeQntes.Guardeestemanualenun lugarseguro
paraconsultasfuturasy peri6dicas,asfcomo parasolicitarrepuestos.
Antecualquierduda,Ilameal 1-800-4MY-HOME.
• Familiarfcesecontodosloscontrolesy conel usoadecuadode
los mismos.Sepac6modetenerla m_quinay desengancharlos
controlesrapidamente.
• Nopermitanuncaque losniSosmenoresde 14aSosutilicenesta
m_quina.LosniSosde14aSosen adelantedebenleer yentenderlas
instruccionesdeoperaci6ny normasde seguridadcontenidaseneste
manualyen la m_quinay debensetentrenadosysupervisadospot
unadulto.
• Nuncapermitaquelos adultosoperenesta m_quinasinrecibirantesla
instrucci6napropiada.
• Losobjetosarrojadosporlam&quinapuedencausarlesionesgraves.
Planifiqueelpatr6nenel queva air arrojandonieveparaevitar que
la descargadematerialse realicehacialos caminos,
losobservadores,etc.
• Mantengaa losobservadores,mascotasyniSosporIomenosa 75pies
dela m_quinasiemprequeestefuncionando.Detengala m_quinasi
alguiense acerca.
• Seaprecavidoparaevitarpatinarseo caerseespecialmentecuando
operala m_quinaenmarchaarras.
Su Responsabilidad -- Estam_quinamotorizadas61opuedenusarlalas
personasque lean,comprendanyrespetenlasadvertenciaseinstruc-
clonesque apareceneneste manualyen la m_quina.
iGUARDE ESTAS INSTRUCClONES!
PR E PARATIVO S
Inspeccioneminuciosamenteel_readondeutilizar_el equipo.Saquetodos
losfelpudos,peri6dicos,trineos,tablas,cablesy otrosobjetosextraSoscon
losquepodrfatropezaroque podrfanset arrojadosporla barrena/impulsor.
• Paraprotegerselos ojosutilicesiempreanteojoso antiparrasde
seguridadmientrasoperalam_quinao mientrasla ajustao repara.Los
objetosarrojadosquerebotanpuedencausarlesionesocularesgraves.
• Nooperela m&quinasin lavestimentaadecuadaparaestaral aire libre
en invierno.No utilicealhajas,bufandaslargasuotrasprendassueltas
quepodrfanenredarseen laspartesm6viles.Utiliceuncalzadoespecial
parasuperficiesresbaladizas.
• Useunprolongadoryuntomacorrientedetres cablesconconexi6na
tierra paratodas las m_quinasconmotoresde encendidoelectrico.
• Desengranetodas laspalancasde controlantesde arrancarel motor.
• Nuncaintenterealizarajustesmientrasel motorest#,enmarchaexcepto
en loscasos especfficamenterecomendadosen elmanualdeloperador.
• Dejequeel motory lam_quinaseadaptena latemperaturaexterior
antesde comenzarasacar lanieve.
33
Page 34

Manejo seguro de la gasolina
Paraevitarlesionespersonalesoda_osmaterialessea sumamentecuida-
dosoal manipularlagasolina.La gasolinaessumamenteinflamableysus
vaporespuedencausarexplosiones.Sise derramagasolinaencimao sobre
la ropase puedelesionargravementeyaquese puedeencender. Lavesela
piely c_mbiesederopade inmediato.
• Utilices61olos recipientesparagasolinaautorizados.
• Apaguetodos los cigarrillos,cigarros,pipasyotrasfuentes
decombusti6n.
• Nuncacarguecombustibleen lam_quinaenun espaciocerrado.
• Nuncasaquela tapadel combustibleniagreguecombustiblemientrasel
motorest&calienteo en marcha.
• Dejeque el motorse enfriepot Iomenosdosminutosantesde volvera
cargarcombustible.
• NuncaIleneenexcesoeldep6sitodecombustible.Lleneeltanque a no
m&sdeV2pulgadapordebajodela basedel cuellode Ilenadodejando
espacioparala dilataci6ndel combustible.
• Vuelvaacolocar la tapadel combustibley ajL]stelabien.
• Limpieel combustiblequese hayaderramadosobreelmotory el
equipo.Trasladelam_quinaa otrazona. Espere5 minutosantesde
encenderelmotor.
• Nuncaalmacenelam_quinao el recipientede combustibleen un
espaciocerradodondehayafuego,chispaso luz piloto(porejemplo,
hornos,calentadoresdeagua,calefactores,secadoresde ropa,etc.).
• Dejeque la m_quinaseenfrie potIomenos5 minutosantes
deguardarla.
• NuncaIlenelosrecipientesen el interiordeunvehiculoocami6no
cajaderemolquecon recubrimientopl_stico.Coloquesiemprelos
recipientesenel pisoy lejos delvehiculoantesde Ilenarlos.
• Sies posible,retireelequipoa gasolinadel cami6noremolquey Ilenelo
enel suelo.Siesto noesposible,Ileneel equipoen unremolquecon un
recipienteport_til,en vezde hacerlocon unaboquilladispensadora
degasolina.
• Mantengala boquillade Ilenadoencontactoconel hordedeldep6sito
decombustibleo conla aberturadelrecipienteen todo momento,hasta
terminarlacarga.No utiliceundispositivodeboquilladeapertura/cierre.
FUNCIONAIVIIENTO
• Nopongalasmanoso los piescercadelas piezasgiratorias,en la
cajadela barrena/impulsor oen el montajedelcanalde descarga.El
contactocon laspiezasgiratoriaspuederesultaren la amputaci6nde
manoso pies.
• Lapalancadecontrolde la barrena/impulsor es undispositivode
seguridad.Nuncaevitesu funcionamiento.Dehacerlolaoperaci6nde la
m&quinaes riesgosay puedeocasionarlesiones.
• Laspalancasde controldebenfuncionarbienen ambasdirecciones
y regresarautom_ticamentea la posici6ndedesengranecuandose
lassuelta.
• Nuncaoperela m&quinasi falta unmontajedelcanalo si el mismo
est_daSado.Mantengatodoslosdispositivosde seguridadensu lugar
yen funcionamiento.
• Nuncaenciendael motoren espacioscerradoso enunazonaconpoca
ventilaci6n.Elescapedel motorcontienemon6xidode carbono,ungas
inodoroy letal.
• Noutilicela m_quinabajola influenciadelalcoholo lasdrogas.
• Elsilenciadoryel motorse calientany puedencausarquemaduras.
No lostoque.Mantengaa losniSosalejados.
• Seasumamenteprecavidocuandooperela m&quinasobreuna
superficiecongravao cuandola cruce.Mantengasealerta pot si se
presentanpeligrosocultosotr_nsito.
• Tengacuidadocuandocambiededirecci6no cuandooperela m_quina
enpendientes.
• Planifiqueelpatr6nen elque vaair arrojandonieveparaevitarque
la descargade materialseproduzcahacialasventanas,las paredes,
los autom6viles,etc.y evitarasi posiblesdaSosmaterialesolesiones
producidasporlos rebotes.
• Nuncadirijala descargahacialos niSos,losobservadoresolas
mascotasnideje quenadiese paredelantede lam&quina.
• Nosobrecarguela capacidadde la m_quinatratandodesacarla nieve
muy r_pidamente.
• Nuncaopereesta m_quinasinbuenavisibilidado iluminaci6n.Siempre
debeestarsegurodeque est&bienafirmadoy sujetandofirmementelas
manijas.Camine,nuncacorra.
• Cortela corrientea la barrena/impulsorcuandotransportela m_quina
ocuandola mismanoest&enuso.
• Nuncaopere lam&quinaaalta velocidaddedesplazamientosobre
superficiesresbaladizas.Mire haciaabajo y haciaarrasy tengacuidado
cuandovayamarchaatr&s.
• Sila m&quinacomenzaraa vibrarde maneraanormal,detengael motor,
desconecteel cabledela bujiay p6ngalademaneraquehaga masa
contrael motor.Inspeccionelam_quinaminuciosamenteparaver si
est&daSada.ReparetodoslosdaSosantesdeencendery operar
la m&quina.
• Desengranetodas las palancasde controly detengael motorantesde
dejarla posici6ndeoperaci6n(detr&sde las manijas).Espereaquela
barrena/impulsorsedetengaporcompletoantesdedestaparel montaje
delcanalo realizarajustese inspecciones.
• Nuncapongalas manosenlasaberturasdedescargao derecolecci6n.
No destapeel montajedelcanal mientrasel motorest&enfunciona-
miento.Antesdedestaparlo,apagueelmotory permanezcadetr_s
de las barrasdecontrolhastaquetodaslas partesm6vilesse
hayandetenido.
• Uses61ounionesyaccesoriosaprobadosporelfabricante(porejemplo,
pesasparalasruedas,cadenasparalosneum_ticos,cabinas,etc.).
• Paraencenderel motor,jaledela cuerdalentamentehastaquesienta
resistencia,luegojale r_pidamente.Elreplieguer&pidode lacuerda
de arranque(tensi6nde retroceso)lejalar&la manoy el brazohaciael
motorm_sr&pidode Io que ustedpuedesoltar.PuedeIlegara causar
huesosrotos,fracturas,hematomasyesguinces.
• Llameal 1-800-4MY-HOMEparalaubicaci6nm_scercanade Sears
Parts& ServiceCenterdereparaci6n.
DESPEJE DE UN CANAL DE DESCARGA
OBSTRUIDO
Elcontactode las manosconel impulsorrotatorioqueest_dentro del canal
de descargaeslacausam_scomL]nde lesionesasociadascon lasm_quinas
quitanieve.Nuncausesu manoparalimpiarel canaldedescarga.
Paradespejarel canal:
1. iAPAGUEELMOTOR!
2. Espere10segundosparaestarsegurode quelas cuchillasdelmotor
handejadode rotar.
3. Utilicesiempreunaherramientadelimpieza,nouselas manos.
34
Page 35

MANTENIMIENTO Y ALMACENAMIENTO
,, Nuncaalterelosdispositivosdeseguridad.Controleperi6dicamenteque
funcionencorrectamente.Remitasealas seccionesdemantenimientoy
ajustede estemanual.
• Antesde realizarla limpieza,repararo revisarlam_quina,
desengranetodas las palancasde controly detengaelmotor.Esperea
quelabarrena/impulsorsedetenga porcompleto.Desconecteel cable
dela bujia y p6ngalohaciendomasacontrael motorparaevitar quese
enciendaaccidentalmente.
• Controlefrecuentementeque todoslos pernosytornillosesten bien
ajustadosparacomprobarquelam_quinaseencuentraen condiciones
segurasdefuncionamiento.Adem_s,hagauna inspecci6nvisualdela
m_quinaparaverificarsi est_da_ada.
• Nocambielaconfiguraci6ndel reguladordel motorniacelerede-
masiadoelmismo.Elreguladordel motorcontrolalavelocidadm_xima
defuncionamientosegurodelmotor.
• Quitanievesafeitarplacasy patinesest_nsujetosa desgasteyda_os.
Parasuprotecci6nde seguridad,verifiquefrecuentementetodoslos
componentesy con(OEM)delfabricantedel equipooriginals61o
apareceenlas p_ginasdepiezasdeeste manualdeloperador.Eluso
depiezasque nocumplencon lasespecificacionesdel equipooriginal
puedeconducira lamalaejecuci6ny la seguridaddecompromiso!
• Reviselaspalancasde controlperi6dicamenteparaverificarque
engraneny desengranenadecuadamentey ajL]stelossies necesario.
Consultelasecci6ndeajusteseneste manualdeloperadorpara
obtenerinstrucciones.
• Mantengao reemplacelasetiquetasdeseguridady de instrucciones
seg0nsea necesario.
• Observelareglamentaci6nylasnormasrespectoala eliminaci6n
correctadegasolina,aceite,etc.paraprotegerel medicambiente.
• Antesdealmacenarlam_quinaenciendalaunosminutosparasacarla
nievequehayaquedadoen la mismay paraevitar asi quese congele
la barrena/impulsor.
• Nuncaalmacenelam_quinao el recipientede combustibleen un
espaciocerradodonde hayafuego,chispaso luz pilotocomo pot
ejemplo,calentadoresde agua,hornos,secadoresde ropa,etc.
• Consultesiempreel manualdeloperadorparaobtenerinstrucciones
adecuadasparaelalmacenamientofuera detemporada.
• Verifiquefrecuentementelalineade combustible,el dep6sito,el tap6n,
y losaccesoriosbuscandorajaduraso perdidas.Reemplacede
setnecesario.
• Node arranquealmotorsi noest_ labujiadeencendido.
• Seg0nlaComisi6ndeSeguridadde Productosparael Consumidorde
los EstadosUnidos(CPSC)y la Agenciade Protecci6nAmbientalde los
EstadosUnidos(EPA),este productotieneunavida Otilmediadesiete
(7)a_oso 60 horasdefuncionamiento.AIfinalizarlavida Qtilmedia
hagainspeccionaranualmenteestaunidadporun distribuidorde
servicioautorizadoparacerciorarsedeque todoslos sistemas
mec_nicosy deseguridadfuncionancorrectamentey notienen
excesivodesgaste.Si no Iohace,puedenproducirseaccidentes,
lesioneso lamuerte.
NO MODIFIQLIE EL MOTOR
Paraevitarlesionesgraveso la muerte,nomodifiqueel motordeninguna
manera.Sialtera laconfiguraci6ndelregulador,el motorse puededesbocar
y funcionara velocidadesque nosonseguras.Nuncacambiela configuraci6n
def_bricadel reguladordelmotor.
AVISO REFERIDO A EMISIONES
Losmotoresque est_ncertificadosycumplenconlas regulacionesde
emisionesfederalesEPAy de CaliforniaparaSORE(Equipospeque6ostodo
terreno)est_ncertificadosparafuncionarcongasolinasin plomocomL]ny
puedenincluirlos siguientessistemasde controlde emisiones:Modificaci6n
de motor(EM), catalizadoroxidante(CO),inyecci6ndeairesecundaria(SAI)
y catalizadorde tresvias (TWO)si est_ninstalados.
AMORTIGUADOR DE CHISPAS
Estam_quinaest_equipadaconun motorde combusti6ninternoyno
debeserutilizadaenocercadeunterrenoagrestecubiertopot bosque,
malezaso hierbaexceptoqueel sistemadeescapedelmotoreste
equipadoconunamortiguadordechispasquecumplacon las leyes
localeso estatalescorrespondientes(encasode existir).
Si se utilizaunamortiguadordechispasel operadorIo debemanteneren
condicionesde usoadecuadas.Enel EstadodeCalifornia lasmedidas
anteriormentemencionadassonexigidasporley (Articulo4442del C6digo
de RecursosPQblicosdeCalifornia).Es posibleque existanleyessimilares
en otrosestados.Lasleyesfederalesseaplicanenterritoriosfederales.
Podr_obtenerunamortiguadorde chispasparael silenciadoren el centro
de serviciode piezasy reparacionesSearsm_scercano.
35
Page 36

SiMBOLOS DE SEGURIDAD
En esta p_gina se presentan y describen los simbolos de seguridad que pueden aparecer en este producto. Lea, entienda y cumpla todas las instrucciones
incluidas en la m_quina antes de intentar realizar el montaje de la unidad y utilizarla.
-_ _'"-_ - LEA LOS MANUALES DEL OPERADOR
I Lea, entienda y cumpla todas las instrucciones incluidas en los manuales antes de realizar el montaje
de la unidad y utilizarla.
I
ADVERTENClA -- CUCHILLAS GIRATORIAS
Mientras la m_iquina est,1 en funcionamiento mantenga las manos lejos de las aberturas de entrada
y de descarga. En el interior hay cuchillas giratorias.
ADVERTENClA -- CUCHILLAS GIRATORIAS
Mientras la m_iquina est,1 en funcionamiento mantenga las manos lejos de las aberturas de entrada
y de descarga. En el interior hay cuchillas giratorias.
ADVERTENClA-- BARRENA GIRATORIA
No ponga las manos o los pies cerca de las piezas giratorias, en la caja de la barrena / impulsor
o en el montaje del canal de descarga. El contacto con las piezas giratorias puede resultar en la
amputaci6n de manos o pies.
A
ADVERTENCIA--ARROJA OBJETOS
Esta m_iquina puede levantar y arrojar objetos Io cual puede causar lesiones personales graves.
ADVERTENClA--LA GASOLINA ES INFLAMABLE
Deje que el motor se enfrie pot Io menos dos minutos antes de volver a cargar combustible.
ADVERTENCIA -- MONOXIDO DE CARBONO
Nunca encienda el motor en espacios cerrados o en una zona con poca ventilaci6n. El escape del
motor contiene mon6xido de carbono, un gas inodoro y letal.
ADVERTENCIA-- DESCARGAS EL¢CTRICAS
No use el arranque el_ctrico del motor bajo la Iluvia.
ADVERTENCIA-- SUPERFIClE CALIENTE
Las piezas del motor, especialmente el silenciador, se recalientan durante la operaci6n. Deje que
el motor y el silenciador se enfrien antes de tocarlos.
36
Page 37

NOTA:Todaslas referenciasa losladosderechoo izquierdode la
m_.quinaquitanievese hacenobservandola rnismadesdela posici6n
deloperador.Encasodequehubieseunaexcepci6n,seespecificar_.
claramente.
COMO DESEMBALAR LA MAQUINA QUITA-
NIEVE
1. Abrala partede arribade lacaja.
2. Cortelasesquinasdelfrentede lacaja y done haciaabajo
elfrente.
3. Saquela m_.quinaquitanievedelacaja.AsegOresede nodaSar
elcanal,el rnontajedelcontrolde rotaci6ndelcanalni los
cablesqueest_.nconectadosal canal.AIgunasdeestaspiezas
seenviandebajodela cubiertaen laparteposteriordela caja.
Controlesihayprecintossujetandoel canaly refirelossi es
necesario.
MONTAJE
5. Girelamanijasuperiora laposici6ndefuncionamiento.AsegOrese
de noapretarloscablesenel proceso.VealaFigura2.
Colocaci6n de la manija superior
4. Extraigalasperillasdealetasyel pernode carrode laparte
dearribadela manijainferior.VealaFigura1. Noesnecesario
extraereltornilloconrebordey la tuercade seguridadcon brida
queest_.ndebajodela periNadealetasyel pernode carro.
PeriNade aletas
Pernosdecarro
Perilladealetas
7
/
Figura1
Perilla
/ ,,...............................dealetas
Figura2
.
Lamanijasepuedeajustarentresposiclonesdiferentes.Ubique
la manijaen la posici6ndeseadayluegoinstalelasperillasde
aletasylospemosde carroenel orificioadecuadoy sujetela
manija.Veala Figura3.
de aletas
Figura3
37
Page 38

Instalaci6n del canal
7. Extraigalostornillosde cabezahexagonalde labasedel canal.
Veala Figura4.
Tornillo '_
decabeza
hexagonal
Ji
Instalaci6n del montaje del control de rotaci6n
del canal
9. Extraigaloscuatrotornillosdecabezahexagonaldela parte
posteriordela manija(dosa cadalado). Veala Figura6.
Figura4
. Alineelos orificiosde la basedelcanalcon los orificiosdel canal
inferiory suj_teloconlostornillosdecabezahexagonalque
extrajoanteriormente.Veala Figura5.
Figura5
Figura6
10.
Usandoloscuatrotornillosdecabezahexagonal,instaleel
montajedelcontrolderotaci6ndelcanal.Veala Figura7.
Figura7
J
38
Page 39

11. Retireel tornilloy latuercahexagonalde lajuntauniversal.Vea
la Figura8.
Instalaci6n de la manija del arrancador
de retroceso
1. Retireelpernodeojoy la periNadela rnanijadela bolsadel
manual.
2. Coloqueelpernode ojoy la periNadelarnanijaenla rnanija
superiorcornoseindicaen laFigura10.Noajustecornpleta-
rnentelosherrajeshastaquesele indiquequeIohaga.
i Manijadelarrancador
Tuerca de
seguridad Tornillo
hexagonal
J
'J' Tuerca de
seguridad hexagonal'
Varilla del canal
//
Figura8
NOTA:Cornpruebequeelcanalest_orientadohaciaadelantecuando
instalelajuntauniversal.
12. Coloquelajuntauniversalenel extrernodela varilladel canal
congoseindicaenla Figura8.
NOTA:Cornpruebequelosorificiosde lajuntauniversalsealineen
conlosorificiosde lavariNadelcanal.Esposiblequetengaque
activareldisparadorparapoderaNnearlosorificios.
13. Sujetelajuntauniversalconla tuercahexagonaly eltorniNoque
extrajopreviarnente.Veala Figura8.
14. Desliceelrnanguitode protecci6nsobrelajuntauniversal.
VealaFigura9.
_ Perno _
_ deojo '_i
Bot6n
de
Mango
Figura10
NOTA:Laaberturadelpernode ojodebeestarorientadahaciala
parteposteriordelarn_.quinaquitanieve.
3. Tirelentarnentedela rnanijadelarrancadorde retrocesohacia
arribahaciael pernodeojo.
4. Deslicelacuerdadelarrancadorderetrocesodentrodelperno
de ojodesdela parteposteriorde la rn_.quinaquitanieve.Veala
Figura10.
5. Ajustebienel pernodeojoy la periNadela rnanija.
CONFIGURACION
Manguitodeprotecc
Figura 9
Recomendaciones sobre el combustible
Utilicegasolinaparaautorn6viles(sinplornoo bajocontenidode
plornopararninirnizarlosdep6sitosenlac_.rnaradecornbusti6n)con
un rnfnirnode87octanos.SepuedeusargasoNnaconhastaun 10%
de etanolo un 15%de MTBE(eterrnetflicoterciario-butfNco).Nunca
useunarnezcladeaceiteygasolinanigasolinasucia.Evitequese
introduzcasuciedad,polvooaguaenel tanquedecombustible.NO
utilicegasolinaE85.
• Carguecombustibleen un_.reabienventiladayconel motor
apagado.NofumeniperrnitaNarnaso chispasen el lugardonde
secargacombustibleosealrnacenalagasolina.
• NoIleneenexcesoel dep6sitodecombustible.Despu_sde
cargarcombustible,asegOresedequeel tap6ndeldep6sitoest_
biencerradoy asegurado.
• Tengacuidadodeno derrarnarcombustibleal realizarlarecarga.
Elcombustiblederrarnadoo susvaporessepuedenincendiar.
Si se derrarnacombustible,asegOresede queel_.reaest_seca
antesdearrancarelmotor.
39
Page 40

• Eviteel contactorepetidoo prolongadoconla pielyla inhalaci6n
delosvapores.
Carga de combustible
Tengarnuchocuidadoal trabajarcongasolina.Lagasolinaes
surnarnenteinflarnableysusvaporespuedencausarexplosiones.
Nuncaagreguecombustibleala rn_.quinaeninterioresnirnientrasel
motorest,.calienteoen funcionarniento.Apaguecigarrillos,cigarros,
pipasy otrasfuentesdecornbusti6n.
Siernprernantengalasrnanosylospiesalejadosde las piezas
rn6vilesdelequipo.Noutilicefluidoscornprirnidosparaarrancar.Los
vaporessoninflarnables.
Extraigalatapadelcombustible,controleel nively carguern_.s
combustibledeset necesario.Cargueeldep6sitohastaqueel
combustibleIleguea1/2pulgadapotdebajode la basedelcuellode
Ilenadoparadejarespacioparalaexpansi6ndelcombustible.Tenga
cuidadodenoIlenarenexceso.
Procedimiento para controlar y agregar aceite
4. Saqueel tap6n/la varillade rnedici6ndeaceite.Siel niveles
bajo,agreguelentarnenteaceitehastaqueel nivelregistradoest_
en unpuntointerrnedioentrealto(H)ybajo(L), Figura11.
NOTA:No IoIleneenexceso.Si secargadernasiadoaceitesepuede
generarhurno,problernasdearranqueosuciedaden labujfa.
5. Vuelvaacolocarel tap6n/ lavarillade rnedici6ndeaceitebien
ajustadosantesdeponeren rnarchael motor.
NOTA:NOperrnitaqueelniveldeaceitecaigapordebajode larnarca
"L"de lavarilladernedici6n.Si Io haceelequipopuedefuncionarrnal
o daSarse.
NOTA:Paracarnbiarelaceitedelmotor,consultelasecci6nde
Mantenirnientode estemanual.
Elmotorseenviasinaceiteenel motor.Antesdeponerel motoren
rnarchadebeIlenarlode aceite.Sisehacefuncionarelmotorsin
suficienteaceitepuedecausardaSosgravesalmotory anularla
garanfiadelproducto.
Coloquelarn_.quinaquitanieveenunasuperficiefirrney nivelada.
2. Retireel tap6ndeIlenado/varilladernedici6ndeaceitey lirnpie
bienlavarilla.Veala Figura11.
f
de aceite/varilla
de rnedici6n
del niveldeaceite
Figura11
3. Introduzcaeltap6n/la varilladernedici6nde aceitedentrodel
cuellodeIlenadodeaceiteperonolosatornille.
4O
Page 41

Controldela barrena ManijadeSuperior
Montajede[canal
Placaderaspado
Manijadelarrancador
de retroceso
Controlde rotaci6ndelcanal
Tapade
Faro
Paiancade[
Manijadel
arrancad(
Jeretroceso
del aceite
Bot6ndelarrancador
Salidadel arrancador_
Silenciador
Drena
Cebador
el_ctrico '_-_' _
i
Palancadelcebador/
Llave
/
Varillade
Ilenado/nivel
Figura12
Ahoraqueyaha ajustadosurn_.quinaquitanieveparael fun-
cionarniento,es irnportantefarniliarizarseconsuscontrobsy
caracteristicas.ConsultelaFigura12.
CONTROL DEL CEBADOR
AIactivarel controldelcebadorsecierralaplacaestrangubdoradel
carburadory seayudaa arrancarelmotor.Lapalancadelcebadorse
m ii
des,zaentrelasposicionesRUN(funcionarniento)| IyCHOKE
(cebador)I",1
,,oo.
Presioneel cebador,asegur_.ndosedecubrir
el orificiodeventilaci6ncuandoIo haga,de
esarnaneraseenvb combustibledirectarnenteal carburadordel
motorparaayudaralencendidocuandoel clirnaesfib.
MANIJA DEL ARRANCADOR DE RETROCESO
Larnanijadelarrancadorde retrocesose utilizaparaencenderelmotor.
TAPON DE COMBUSTIBLE
Saqueel tap6ndelcombustibleparaagregarcombustible.
LLAVE
LaIlave
esundispositivodeseguridad.Debeestar I0]_<:3} |
completarnenteinsertadaparaqueel motorarranque.
NOTA:Nogire laIlaveparaintentararrancarelmotor.
ExtraigalaIlavecuandonouselarn_.quinaquitanieve. _A ^ 0
AIhacerlopodrb rornperla.
BARRENA
Cuandoest,.engranada,larotaci6nde labarrenadirigelanievedentro
de lacajadela barrenay laarrojahaciaafuerapotelcanaldedes-
carga.Laspaletasde cauchodela barrenatarnbi_nayudana irnpulsar
larn_.quinaquitanieveal ponerseencontactoconel pavirnento.
CONTROL DE LA BARRENA
Larnanijadecontrolde labarrenaest,.ubicadaenla barrasuperior
y seusaparaengranary desengranarlatransrnisi6ndela barrena.
Aprietela rnanijadecontrolcontrala barradecontrolsuperiorpara
engranarlabarrena,afl6jelaparadesengranarla.
Cumple con los estandares de seguridad de ANSI
Lasrn&quinasquitanieveCraftsmancurnplenconlosest&ndaresdeseguridaddelInstitutoEstadounidensede Est&ndaresNacionales(ANSI).
41
Page 42

SILENCIADOR
Elescapedel motorsaledel motora travesdelsilenciador.
CONTROL DE ROTACION DEL CANAL
Elcontrolde rotaci6ndelcanalest_ubicadoen el centrodelpanel
decontroly controlaladirecci6nenque searrojala nieve.Oprirnael
bot6ny roteelcontrolde rotaci6ndelcanalhaciala derechaparagirar
elcanalhacialaderechay r6telohaciala izquierdaparaqueel canal
girea laizquierda.
MONTAJE DEL CANAL
Lainclinaci6ndelcanaldedescargacontrolael&nguloconelquesear-
rojalanieve.Aflojela perilladealetasdelcostadodelcanaldedescarga
antesdegirarelcanaldedescargahaciaarribaohaciaabajo.Vuelvaa
ajustarlaperilladespu_sdealcanzarlaposici6ndeseada.
PLACA DE RASPADO
La placade raspadohacecontactoconel pavirnentoa rnedidaquese
irnpulsalarn_quinaquitanieve,perrnitiendoquesedescarguelanieve
queest_cercade lasuperficiedel pavirnento.
VARILLA DE LLENADO/NIVEL DE ACEITE
Esposiblecontrolarelniveldeaceitedel motor,asfcornotarnbi_n
agregaraceite,a travesdelNenadodeaceite.
DRENAJE DEL ACEITE
Elaceitedelmotorse puededrenara travesdeltubo dedrenaje.
FARO DELANTERO
Elfarodelanteroest_ubicadoenla partecentralsuperiordelpanelde
controly seenciendecuandola rn_quinaquitanieveest_en rnarcha.
SALIDA DEL ARRANCADOR ELleCTRICO
Esnecesariousarun prolongadorparaexterioresde trespatasy una
fuentedealirnentaci6n/ tornacorrientede paredde120V.
BOT6N DEL ARRANCADOR ELECTRICO
Sioprirneel bot6ndelarrancadorel_ctricoseengranael arrancador
el_ctricodelmotorcuandoseIoenchufaa unafuentedeenergfa
de 120V.
ANTES DE ARRANCAR EL MOTOR
2. Insertela Navedeencendidoenla ranura.AsegOresedequeentre
a presi6nensulugar.NointentegirarlaNave.VealaFigura13.
Figura13
NOTA:Elmotorno puedearrancarsi laIlaveno est,.cornpletarnente
insertadaenel interruptordeencendido.
Bot6n del arrancador
Determinesiel cableadodesuhogaresun sisternadetrescables
conectadoatierra.Consulteconunelectricistarnatriculadosino
est&seguro.
Si cuentacon un recept_.culoparatrespatasconectadoa tierra,
reaNcelossiguientespasos:
1. Conecteelprolongadoralasalidasituadaen lasuperficiedel
motor.Conecteelotroextrernodelprolongadorauntornacor-
rientedeCA,120voltiosconconexi6na tierra,paratrespatas,en
un _.reabienventilada.Veala Figura14.
en la rn_ enestemanualantesdehacerlafuncionar.
ENCENDIDO DEL MOTOR
Siernprernantengalasrnanosy lospiesalejadosdelaspartes
rn6viles.Noutilicefluidoscornprirnidosparaarrancar.Losvapores
soninflarnables.
iueel motorest_alaireNbreen un_reabienventilada.
Verifiquequeel controldela barrenaseencuentreen posici6n
desenganchada(suelta).
Figura14
42
Page 43

2. Empujelapalancadelcebadoralaposici6nCHOKE(cebador)I'.,I
3. Siel motoryaest,.caliente,ubiqueel cebadoren laposici6n
RUN(funcionamiento)__ _en lugarde CHOKE(cebador)i'_1.
4. Presionetres (3)vecesel bot6ndecebado,asegur_.ndosede
cubrirel orificiodeventilaci6nalpresionar.
5. Siel motorest,.caliente,presioneel bot6ndelcebadorunasola
vez.
6. Presioneel bot6ndelarrancadorparaarrancarelmotor.
7. Unavezencendidoelmotor,suelteelbot6ndelarrancador.
8. Dejequeel motorsecalientevariosminutos,ajustandoel
R÷A
cebadorhacialaposici6nRUN(funcionamiento)I I Espere
hastaqueel motorfuncionesuavementeantesde cadaajustede
la obturaci6n.
9. Cuandodesconecteel prolongador,desenchufesiempreel
extremodelrecept_.culoparatrespatasdel tomacorrientede
paredantesde desenchufarelextremoopuestoqueest,.en
la m_.quinaquitanieve.
Arrancador de retroceso
1. Empujelapalancadelcebadora laposici6nCHOKE(cebador)
N
2. Siel motoryaest,.caliente,ubiqueel cebadoren laposici6n
RUN(funcionamiento)I { _en lugarde CHOKE(cebador)i",1
3. Presionetres (3)vecesel bot6ndecebado,asegur_.ndosede
cubrirel orificiodeventilaci6nalpresionar.
4. Siel motorest,.caliente,presioneel bot6ndelcebadorunasola
vez.
5. Tomelamanijadelarrancadorde retrocesoytirede lacuerda
haciaafueralentamente.Enel puntoque se hacelevemente
m_.sdificiltirarde lacuerda,permitaque lamismaretroceda
lentamente.
6. Tiredela manijadelarrancadorconunmovimientofirmey
r_.pido.Nosueltelamanijanidejeque retrocedaasuposici6n
original.Mantengala manijadel arrancadorfirmementesujetay
dejequelacuerdaretrocedalentamente.
7. Dejequeel motorsecalientevariosminutos,ajustandoel
cebadorhacialaposici6nRUN(funcionamiento)| | Espere
hastaqueel motorfuncionesuavementeantesde cadaajustedel
cebador.
R A
DETENCION DEL MOTOR
1. Hagafuncionarelmotorduranteunosminutossincargaantesde
pararparaayudara secarlahumedadenel motor.
2. Paradetenerelmotorsaquela Ilavey gu_.rdelaen unlugar
seguro.
3. Limpietodalanievey la humedaddel_.readelos controlesdel
motor.
Elsilenciador,elmotory las _.reascircundantesserecalientany
puedencausarquemaduras.Seaprecavidoyno lostoquecuando
est_.ncalientes.
ENGANCHE DE LA BARRENA
Paraengranarla barrenaaprietela manijadecontrolcontrala barra
de controlsuperior.Suelteel controlparadetenerlabarrena.
ENGANCHE DE LA TRANSMISlON
Levanteligeramenteel asasuperiorparapermitirquelaspaletasde
gomaen elsinfinde ponerseencontactoconelpavimentoe impulsar
el quitanieveshaciadelante.Empujandohaciaabajosobrela manija
levantarlabarrenadelatierray detenerelmovimientohaciaadelante.
NOTA:Sila presi6nascendentesobrelamanijaesexcesivatendr_.
comoresultadoundesgasteprematurodelaspaletasdecauchode la
barrenayestono estar_,cubiertoporla garantia.
DESPEJE DE UN CANAL DE DESCARGA
OBSTRUIDO
Elcontactodelas manosconel impulsorrotatorioqueest,.dentrodel
canalde descargaes la causam_.scomOnde lesionesasociadascon
lasm_.quinasquitanieve.Nuncauselasmanosparalimpiarelcanal
de descarga.
Paradespejarelcanal:
1. iAPAGUEEL MOTOR!
2. Espere10segundosparaestarsegurodeque lascuchillasdel
motorhandejadode rotar.
3. Utilicesiempreunaherramientadelimpiezaovarilla,no use
lasmanos.
43
Page 44

PROGRAMA DE MANTENIMIENTO
Antesderealizarcualquiertipodernantenirnientoo servicio,de-
senganchetodosloscontrolesydetengaelmotor.Espereaquese
detengancornpletarnentetodaslaspiezasrn6viles.Desconecteelcable
delabujiay p6ngalohaciendornasacontrael motorparaevitarquese
enciendaaccidentalrnente.Utilicesiernpreanteojosdeseguridaddurante
elfuncionarnientoo rnientras_ustao reparaestee ui.o.
Cadauso .
Niveldeaceitedelmotor.
2.
M_.quinaquitanievey _.rea
1. Verificar
2. Lirnpiar
deescape.
l ras5 horas 1. 1.
Cada5 horas 1. 1.
25 horas 1. 1.
Cadaternporada/50horas 1. 1.
Cadaternporada/100horas 1. 1.
Cadaternporada/antes 1. 1.
de alrnacenar 2. 2.
Aceitedelmotor.
Aceitedelmotor.
2. 2.
Areadelescape.
Bujiade encendido.
Aceitedelmotor.
Bujfadeencendido.
Puntosdepivote
Manijadecontrol
Resortedeextensi6n
3. 3.
MANTENIMIENTO DEL MOTOR
L_.vesebienlasrnanosconaguayjab6ninrnediatarnentedespu_s
detocaraceiteusado.
Recomendaciones sobre el aceite
Cuandole agregueaceiteal motor,consultelatabladeviscosidadque
aparecerrnr_tsabajo(Figura15).
f
2
r--
o
_Z3
(°C)
(oF)
-30o
-20o
m
m
-20o0o-10o
150
Figura15
m
300
850
400
1050
Sigael cronograrnadernantenirnientoque se presentaacontinuaci6n.
Estatablas61odescribepautasde servicio.Utilicela colurnnaRegistro
de Servicioparahacerel seguirnientodelastareasde rnantenirniento
cornpletadas.Paraubicar el Centrode Servicio Searsm_s cercano
o para programarun servicio, sirnplementecomuniquese con
Searsal tel_fono 1-800-4-MY-HOME®.
Carnbio.
Verificar.
Lirnpiar.
Verificar.
Carnbio
Lirnpiar,reernplazar,regular
Lubricar
Lubricar
Lubricar
Lacapacidaddeaceitedelmotores600rnl(aprox.20 onzas).NoIlene
excesivarnente.Useunaceiteparamotordecuatrotiernpos,ounaceite
detergentedecalidadpremiumequivalenteconcertificadoquecubra
o excedalasexigenciasdelosfabricantesdeautorn6vilesarnericanos
respectode laclasificaci6ndeservicioSGy SR Losaceitesparamotor
conlaclasificaci6nSG,SFtienenest,.designaci6nenel envase.
NOTA:Elirnineelaceiteusadodelmotordeunarnaneraquenoperjudiqueel
rnedioarnbiente.Ll_veloauncentroderecicladouotrocentroderecoleccbn.
NOutiliceaceitessindetergenteniaceiteparamotorde dostiernpos.
Podriareducirsela vidaOtildel motor.
Cambio del aceite del motor
Apagueel motory retirelaIlavedeencendidoantesde realizar
cualquiertrabajodernantenirniento.Paraevitarunapuestaen
rnarchaaccidental,desconectela fundadela bujia.
Lainspecci6ny losajustesperi6dicosdel motorsonesencialessise
desearnantenerunaltonivelde desernpeSo.Elrnantenirnientoregular
tarnbi_ngarantizar_,unaprolongadavidaOtildelmotor.Losintervalos
de rnantenirnientorequeridosy el tipode rnantenirnientoa realizar
sedescribenenla tabJaprecedente.Sigalosintervalosporhorao
calendarios,Ioqueocurraprirnero.Cuandoseoperaencondiciones
adversasesnecesarioIlevaracaboun rnantenirnientorn_.sfrecuente.
Controleel niveldeaceiteantesdecadausoy cada 5 horasde
funcionarnientocuandoel motorest,.tibio.ConsulteProcedirniento
paracontrolary agregaraceiteenla secci6nArrnado.
Carnbieelaceitedespu_sdelas5 prirnerashorasde operaci6ny
cada50horasdeoperaci6napartirde esernornento.Elmotordebe
estartibioaQnperoNOcalienteporsuusoreciente.
44
Page 45

Vadeel combustibledeldep6sitohaciendofuncionarel motor
hastaqueel dep6sitodecombustibleest6vado. Cerci6resede
queel tap6ndeIlenadodelcombustibleest,.bienajustado.
.
Extraigalostres tornilDsquesujetanelpanelinferior.Extraigael
panelinferiorlevant_.ndoloparaliberarlasleng(Jetasqueest_.nen
la basedelpanelde lasranurasparalengOetasy luegotirehacia
atr_.s.VealaFigura16.
,/' j'
,/' ,/'
k. j
Figura16
NOTA:Enla parteinferiordelpanelhayleng(Jetasqueayudan
a mantenerloen sulugar.
NOTA:Un kitde extensi6ndeldrenajedeaceiteseencuentra
disponibleporseparado.Comuniqueseconuncentrode partesy
reparaci6nSearsparaconseguirelkitn.° 753-06684.
3. Coloqueunrecipienteadecuadopara recolectarelaceitebajoel
tap6ndedrenajedeaceite.
4. Retireel tap6ndedrenajedeaceite,Figura17.
5. inclinelam_.quinaquitanievehaciaatr_.sparadrenarel aceiteen
el recipiente.Elaceiteusadosedebedescartarenun centrode
recolecci6nadecuado.
6. Vuelvaacolocarel tap6nde drenajey ajOstelobien.
7. VuelvaaIlenarconel aceiterecomendadoy controleel nivelde
aceite,consulteel Procedimientoparacontrolaryagregaraceite
en la secci6nArmado.
8. Vuelvaacolocary ajustareltap6ndeIlenado/lavarilladenivel
de aceite.
9. Instalenuevamenteel panelinferiorcolocandolasleng(Jetasen
susranuras,levantandoelpanelparacolocarloen sulugary
suj6teloconlostrestornillosqueextrajoen elpaso2.
Bujia de encendido
NOpruebela chispasino est,.la bujiade encendido.NOd6
arranqueal motorsi noest,.la bujiadeencendido.
Si el motorhaestadofuncionando,el silenciadorestar_,muycaliente.
Tengacuidadodeno tocarelsilenciador.
Sedebecontrolarla bujfacada25horasy seladebecambiarunavez
portemporadao cada100horas.Paraasegurarsedequeel motor
funcionebien,la bujfadebetenerunaseparaci6ncorrectay tambi6n
debeestarlibrededep6sitos.
1. Retirelafundade la bujiay utiliceunaIlaveparabujiaspara
extraerla,Figura18.
Bujiadeencendido
0
,_ Tap6ndedrenajedeaceite ,.,
Figura17
1
Fundadebujia
Figura18
2. Inspeccionevisualmentelabujia.Eliminelabujiasi presenta
desgastevisible,o si elaislanteest,.agrietadooastiJlado.Limpie
labujiacon uncepillodealambresisevaa reutilizar.
NOTA:parael reemplazose debeutilizarunabujfade resistor.
Contacteconun centrodepartesy reparaci6nSearsparaunabujia
de repuesto(piezan.° 951-10292).
45
Page 46

.
Midala separaci6ndebujiaconuncalibrador.Realicelosajustes
necesariostorciendoelelectrodolateral,Figura19.Laseparaci6n
debeajustarseen0,02-0,03pulgadas(0,60-0,80rnrn).
Electrodo
0,02-0,03pulgadas
(0,60-0,80rnrn)
Figura19
4. Verifiqueque laarandeladela bujiaest_en buenascondiciones
yenrosquelabujiahaciaadentrornanualrnenteparaevitarque
seenrosquecruzada.
5. Unavezquela bujfaest,.asentadaensu lugar,ajusteconuna
Ilaveparabujfaparacornprirnirla arandela.
NOTA:Cuandoinstaleunabujianueva,unavezcolocadala bujfa
apriete1/2vueltaparacornprirnirla arandela.Cuandovuelvaa
colocarunabujiausada,unavezcolocadala bujiaapriete1/8- 1/4 de
vueltaparacornprirnirlaarandela.
La bujfadebeestarbienajustada.Sila bujiaest,.fiojapuede
recalentarseydaSarelmotor.
Limpieza del motor
Siel motorhaestadofuncionando,dejequeseenfrieduranteal
rnenosmediahoraantesde lalirnpieza.Peri6dicarnente,elirninela
acurnulaci6nde suciedaddelmotor.Antesderepararel motor,retirela
tapadelcarburadory/ o lacajadelventilador.Lirnpiela suciedady los
escornbrosde lassiguientes_.reas:
• Aletasde refrigeraci6n
• Filtrode adrnisi6nde aireo Areasde protecci6ndel volante/
arrancadorde retroceso
• Conexi6ndelabujia
• Palancas
• Areade enlace
• Protecciones
Carburador
• Culatadelmotor
Laextracci6ndelos residuosaseguraqueel enfriarnientoseaadec-
uado,la velocidaddel motorcorrectayel riesgodeincendiornenor.
Norode el motorconaguaparalirnpiarloporqueelaguapodria
contarninarelcombustible.Si seutilizaunarnanguerade jardino
equipode lavadoa presi6ntarnbi_npuedeentraraguadentrodela
aberturadelsilenciador.Elaguaquepasaporel silenciadorpuede
ingresaren elcilindro,causandodaSos.
Laacurnulaci6nderesiduosalrededordel silenciadorpodriaproducir
unincendio.Inspecci6neloy lirnpieloantesdecadauso.
LUBRICACION
Lubriquelos puntosdegirode la rnanijade controlydel resortede
extensi6ndelextrernodelcablede controlconun aceitelivianouna
vezporternporaday antesdealrnacenarla rn_.quinaquitanieveal final
de laternporada,
AJUSTES
Placa de raspado
Paracornprobarelajustedela placadeafeitar,coloqueelequipo
sobreuna superficieplana.Lasruedas,se afeitanla placay laspalas
del sinfintodosdebencornunicarseconlasuperficieplan&Tengaen
cuentaque si la placadeafeitarse ajustadernasiadoalto,la nieve
puedesoplarenel alojarnientode la barrena.Si la placadeafeitar
sedesgastaexcesivarnente,o el quitanievesno seauto-propulsi6n,
el afeitadoplacapuedeserdernasiadobaja,elsueloy necesitaser
ajustado.
NOTA:Enlasunidadesnuevaso enlasquetienenunaplacade
raspadonuevalas paletasdela barrenapuedenestarun poco
separadasdel suelo.
Paraajustarla placaderaspadoprocedadela siguienternanera:
1. Pongaenrnarchalarn_.quinaquitanievehastaqueeltanquede
combustibleest_vado.
2. Jaledela cuerdade arranquehastasentirresistencia.Luegoin-
clinela rn_.quinaquitanievehaciaatr_.shastaquequedeapoyada
sobrelas rnanijas.Paraasegurarque la rn_.quinaquitanieveno
seinclinehaciaadelante,puedesernecesariosujetarla rnanijaal
pisoconunbloqueu otroobjeto.
46
Page 47

3, Aflojeloscuatrotuercasy lostornillosdebloqueodetransporte
quesujetanlaplacadeafeitaralavivienda.ConsultelaFigura20.
Muevaelafeitadoplacaenlaposicbnadecuadayvuelvaaapretar
lastuercasylostornillos.
f
Vistalateral
Placaderaspadoreversible
Figura20
Cable de control
Esposiblequenecesiterealizarajustesperi6dicosdebidoal estirarnien-
todelcabledecontrolyde lacorreadetransrnisi6nocasionadoporel
desgaste.Silabarrenaparecetitubearrnientrasgira,hagaIosiguiente:
Elagujerosuperiordelabarradecontrolpreveelajustedelatensi6ndel
cable.Pararealizarelajuste,desconecteelextrernodelcable
decontroldelagujeroinferiordelarnanijadecontrole ins_rteloenelagujero
superior.Inserteelcabledesdeelexteriorcornoseindicaenla Figura21.
Manija
l_rol
S
Cable
de control
4. Inclinela rn_.quinaquitanievenuevarnentealaposici6nde
funcionarnientoy jale dela rnanijadearranquevariasveces
paraversies dificiljalarde larnisrna.
5. Siesdificiljalardelarranque,extraigalabujfay jaledela mania
variasvecesparaestarsegurodequeseextraigacualquiercantidad
deaceitequehayaquedadoatrapadaenlaculatadelmotor.
Puedesaliraceitedel orificiodela bujiacuandola rnisrnaseextraey
sejala delarnanijadearranque.
6. Inspeccionelabujfa.Siest,.hQrneda,lirnpiecualquierrestode
aceiteantesde volvera instalar.
Figura21
Pruebelarn_.quinaquitanieveparaversiseIograunadiferencia
apreciable.Si luegode realizadoelajustedel cabledecontrolla
barrenasiguetitubeandoalgirar,consultelasecci6nReernplazodela
correaparaobtenerlasinstruccionesparael reernplazode lacorrea.
Montaje del canal
Consultela secci6nMontajeparaverlas instruccionesdelajustedel
rnontajedelcanal.
47
Page 48

REENIPLAZO DE LA CORREA
DE TRANSMISION DE LA BARRENA
1. Pongaenmarchala m&quinaquitanievehastaqueel tanquede
combustibleest_vacio.
2. Jalede lamanijadelarrancadorde retrocesohastasentir
resistencia.Luegoincline la m_.quinaquitanievehaciaatr_.s
hastaquequedeapoyadasobrelasmanijas.
3. Desliceunatablahaciaarribaa trav_sdela barrenay a traves
delcanalparasujetarla barrenaen sulugar.
4. Parasacarlacubiertadela correasaquelosdostornillosde
cabezahexagonaly untornillodeseguridadhexagonalquela
sujetanal bastidor.Veala Figura22.
Tornillode
_eguridadhexagonal
Tornillodecabezahexagonal
Figura22
.
Extraigala tuercadebridaquesujetala poleadela barrenaaleje
de labarrena.Veala Figura23.
6. Extraigalapoleadela barrenay la correa.
Paravolvera colocarla correasigaestasinstruccionesy consulte
la Figura24:
Poleadetransmisi6n
/ i
/ Polea Ioca
/
I !
Figura24
1. Paselacorreaalrededordelapoleadetransmisi6nypordebajo
de la poleaIoca.
2. Paseelextremodelacorreaalrededordela poleadelabarrena
y deslicelapoleahaciaatr_.ssobreeleje dela barren&Puede
set necesarioempujarhaciaabajola poleaIocaparahacerquela
poleade labarrenapasepordebajodel guardacorrea.
J
3. Vuelvaacolocarlatuercade bridayajQstelabien.
4. Vuelvaa instalarlacubiertade lacorreaquesac6anteriormente.
5. Quitelatablade la barrenay el canal.
Ejedela barrena
Poleade labarrena
Figura23
Tuercacon
reborde
J
48
Page 49

REENIPLAZO DE LAS PALETAS
DE LA BARRENA
Laspaletasdecauchode labarrenadela rn&quinaquitanievese
desgastany selasdebecarnbiarsisepresentansignosdedesgaste
excesivo.
NOperrnitaquelaspaletasde cauchodela barrenasedesgasten
hastael puntoenque partesdela barrenarnet_.licarnisrnatoquen
el pavirnento.Siestosucedelarn_.quinaquitanievepuededa_arse
seriarnente.
Paracarnbiarlaspaletasdecaucho,procedacornosiguey consulte
la Figura25:
REEMPLAZO O REVERSO DE LA PLACA DE
RASPADO
Laplacade raspadoest,.adosadaal fondode la cajade la barrena
y sujetaa desgaste.Se ladebe controlarperi6dicarnente.La placa
de raspadotienedos hordesde desgastey sela puedeinvertir.
1. Pongaenrnarchalarn_.quinaquitanievehastaqueel tanquede
combustibleest_vacio.
2. Jaledelarnanijadelarrancadorderetrocesohastasentirresistencia.
Luegoinclinelarn_.quinaquitanievehaciaatr_.shastaquequede
apoyadasobrelasrnanijas.
3. Quiteloscuatropernosdecarro y las tuercasde seguridadcon
bridaquela sujetanalacajadela rn_.quinaquitanieve.Refi_rase
a la Figura20en lap_.gina52.
4. Inviertala placade raspadoexistenteo instaleunanueva,
cornprobandoquela placade raspadonuevay lascabezas
de los pernosdecarroquedenenel interiorde la caja.
5. Coloquelaplacade raspadocornose indicaen la p_.gina14.
6. Unavezcolocada,ajustebien.
Paraobtenerunaplacade raspadonueva,cornuniqueseconSears
al tel_fono1-800-4-MY-HOME.Pidala piezan.° 731-08171.
Tornillode cabezahexagonal
,,. j
Figura25
1. Pongaen rnarchala rn_.quinaquitanievehastaqueel tanquede
combustibleest_vado.
2. Jaledelamaniadelarrancadorderetrocesohastasentirresistencia.
Luegoinclinela rn_.quinaquitanievehaciaatr_.shastaquequede
apoyadasobrelasrnanijas.
3. SaquelaspaletasdecauchoyaexistentesparaIocualdesenrosque
lostornillosdecabezahexagonalquelas unena labarrena.Vea
la Figura25.
NOTA:Las paletasdela barrenadebenreernplazarseunaa lavezde
rnaneraquesepuedausarla barrenaaQnconectadacornoejernplo
paraelposicionarnientoy lareinstalaci6nde la barrenanueva.
4. Ajustelasnuevaspaletasde cauchoa la barrenausandolos
elernentosde ferreteriaque sac6anteriorrnente.
Paraobtenerunkit debarrenade repuestocornpletoqueincluyalas
paletasdecauchoy lostornillosde cabezahexagonal,cornuniquese
conSearsaltel_fono1-800-4-MYHOME.Pidalapieza753-06469.
49
Page 50

Si nosevaa utilizarlarn_.quinaquitanievedurante30 diaso rn_.s,o sies el finalde laternporadadenieveyyanoexisteposibilidaddeque
nieve,esnecesarioalrnacenarelequipodernaneraadecuada.Sigalasinstruccionesdealrnacenarnientoque seindicana continuaci6npara
garantizarelrendirnientorn_.xirnode larn_.quinaquitanieveduranternuchosaSosrn_.s.
PREPARACION DEL MOTOR
Losrnotoresquesealrnacenandurantern_.sde30dias debenser
drenadosdecombustibleparaevitarquesedeterioreny se forrnegorna
enelsisternadecombustibleo enlaspiezasprincipalesdelcarburador.
Sila gasolinaensu motorsedeterioraduranteelalrnacenarniento,
puederesultarnecesariorepararo reernphzarelcarburadory otros
cornponentesdel sisternade combustible.
1. Elirninetodoelcombustibledeltanquehaciendofuncionarel motor
hastaquesedetenga.
2. Carnbieel aceitedelmotor.
3. Extraigala bujiade encendidoyviertaenel cilindro
aproxirnadarnente1onza(30 rnl)de aceiteparamotorlirnpio.Tire
variasvecesdelarrancadorde retrocesoparadistribuirel aceitey
reinstalelabujia.
4. Lirnpieelexteriordelmotoralelirninarlasuciedady losescornbros
delassiguientes_.reas:
• Aletasde refrigeraci6n
• Filtrode adrnisi6nde aireo Areasdeprotecci6ndel volante/
arrancadorde retroceso
• Conexi6ndelabujia
• Palancas
• Areade enlace
• Protecciones
Carburador
Culatadelmotor
PREPARACION DE LA M.&.QUINA QUITANIEVE
Si no sevaa usarlarn_.quinaquitanievedurante30diaso rn_.s,siga
lassiguientesinstruccionesincluidasa continuaci6n.
1. Alrnaceneel equipoenun_.readespejaday seca.
2. Lirnpiela rn_.quinaquitanieveconuntrapo y quitela suciedad
o los residuos.
3. Si alrnacenala rn_.quinaquitanieveen unlugarrnalventilado,
cubralas piezasrnet_.licasdela rn_.quinaconunacapadelgada
de aceiteo siliconacornoantioxidante.
Norocieel motorconaguaparalirnpiarloporqueelaguapodria
contarninarel combustible.Siseutilizaunarnangueradejardin
o equipodelavadoa presi6ntarnbi_npuedeentraraguadentro
dela aberturadelsilenciador.Elaguaquepasaporel silenciador
puedeingresarenelcilindro,causandodaSos.
5. AIrnaceneel motorenun sectorlirnpio,secoy bienventilado,
lejosdecualquierartefactoquefuncionecon unallamao luz
pilotocornohornos,calentadoresdeaguao secadoresde ropa.
Evitecualquiersectorconunmotorel_ctricoqueproduzca
chispasodondeseutilicenherrarnientasel_ctricas.
Nuncaalrnacenela rn_.quinaquitanievecon combustibleenel tanque
enunespaciocerradoo en_.reascon pocaventilaci6n,dondelos
gasesdelcombustiblepuedanalcanzarel fuego,chispaso unaluz
pilotocornola quetienenalgunoshornos,calentadoresdeagua,
secadoresde ropaoalg_nottodispositivoagas.
6. Sies posible,evitesectoresdealrnacenarnientoconrnucha
hurnedad.
7. MantengaelmotorniveladocuandoIoalrnacene.Lainclinaci6n
delmotorpuederesultarenfugasdecombustibleoaceite.
5O
Page 51

Antesde realizarcualquier tipode mantenimientoo servicio, desenganche todoslos controlesy detengael motor.Esperea quesedetenganI
completamentetodas las piezas m6viles.Desconecteel cable de la bujfa y p6ngalohaciendo masacontra elmotor paraevitar que se I
[enc enda acc dentamente. Ut ce sempreanteojos de segurdad durantee func onam entoo mentras ajusta o reparaeste equpo. I
En esta secci6n se analizan problernas menores de servicio. Para ubicar el Centro de Servicio Sears mils cercano o para prograrnar
un servicio, sirnplernente cornuniquese con Sears al tel6fono 1-800-4-MY-HOME®.
El motor no arranca 1. B tanque de combustible estfi vacio o el combustible se 1. Llene el dep6sito con gasolina limpia y nueva.
ha echado a perder.
2. La iineadei combustibleestfi bloqueada.
3. No se introdujocompletamentela Ilave.
4. Se hadesconectado elcable de la bujia.
5. La bujianofuncionacorrectamente.
6. El motor noestficebado.
2. Comuniquesecon el centrode servicio Sears.
3. Introduzcacompletamentelallave.
4. Conecteel cablea la bujia.
5. Limpiela bujia, ajuste ladistancia disruptiva o cambie
la bujia.
6. Optima el botdndel cebador del motorentre cinco
y siete veces.
7. El motor estfi ahogado ya que hasidocebado demasiado.
7. Aguarde ai menosdiez minutosantes de encender
ei motor.
El motor funciona
de maneraerrfitica/
RPMdesiguales
(oscilacidn
o sobretensi6n)
Ei motor recaiienta
Perdidade potencia
Vibraci6n excesiva
1. Elmotorestfi funcionandoen laposici6n"choke"(cebador).
2. Lalineadelcombustibleestfitapadaoei combustibleesviejo.
3. Hayaguao suciedadenel sistemade combustible.
4. Es necesario regularel carburador.
5. Excesoderegulaci6n dei motor
1. Esnecesario regulareicarburador.
1. El cable de la bujia esta.flojo.
2. Laventiiaci6nde iatapa dei combustibleestfi obstruida.
1. Hay piezas queestfin flojas o la barrena estfi da_ada.
1. Muevalapalancadelcebadoralaposici6nRUN(marcha).
2. Comuniquesecon ei centrode servicio Sears.
3. Hagafuncionarel motorhastaque el tanque de
combustibleestfi vacio. Relienecon combustiblefresco.
4. Comuniquesecon ei centrode servicio Sears.
5. Comuniquesecon ei centrode servicio Sears.
1. Comuniquesecon ei centrode servicio Sears.
1. Conectefirmementeel cable de la bujia.
2. Destapeiaventiiaci6n.
1. Detengael motor de inmediatoy retireia ilave. Controle
si la mfiquinaestfi da_ada. Ajuste todos los pernos y
las tuercas. Realice las reparaciones necesarias.Si el
problemapersiste,iieve ia mfiquina quitanieve ai centro
de servicio Sears.
La mfiquina 1. Elcabledelcontrolde labarrenanecesitaunajuste. 1.
quitanieve nose
autopropulsa 2. Lacorreadetransmisi6n dela barrena estfi flojaoda_ada. 2.
La barrena continQa 1. Elcabledel controlde labarrenanecesitaunajuste. 1.
rotando
La unidad no
1. El conjunto delcanal estfi tapado 1.
descarga la nieve
Ajuste el cable de controlde labarrena tal y comose
muestraen iasecci6n de Servicio y Mantenimiento.
Reemplaceia correade transmisi6n de iabarrena.
Ajuste el cable de controlde labarrena tal y comose
muestraen lasecci6n de Servicio y Mantenimiento.
Detengael motory desconecteel cable de labujia.
Limpieel canaly el interiorde lacaja de la barrenacon
la herramientade iimpiezao unavariiia.
2. Hay un objetoextra_o en la barrena.
2,
Detengael motorde inmediatoy desconecteel cable
de la bujia. Retire el objeto de la barrena.
3. Elcabledelcontrolde labarrenanecesitaunajuste.
4. La correade la barrenaestfi floja oda_ada.
3.
Ajuste el cable delcontrol de la barrena.
4.
Reemplacela correade la barrena.
Esteylosmanualesdetodossusotrosproductoslosencontrarfienlinea.
Suspreguntasserfinrespondidaspornnestroequipodeespedalistas.
_Obtengaunplandemantenimientopersonalizadoparasuhogar.
Encuentreinformad6nyherramientasqueIoayudar_nconInsproyectosdom_sticos.
51
Page 52

MTD CONSUMER GROUP, iNC. (MTD), el Bordo de Recursos de Aire de California (CARB)
y la Agencia de Protecci6n Medioambiental de Estados Unidos (U. S. EPA)
Declaraci6n de Garantia del Sistema de Control de Emisiones
(Derechos y obligaciones del propietario seg_n la garantia contra defectos)
LACOBERTURADESISTEMADECONTROLDEEMISIONESAPLICABLEA MOTORESCERTIFICADOSCOMPRADOSENCALIFORNIA
EN2005Y A PARTIRDE ENTONCES,QUESON USADOSENCALIFORNIA,Y HASTAANO2005DEMODELOCERTIFICADOY MOTORES
POSTERIORESQUESON COMPRADOSY USADOSENOTRAPARTEENLOSESTADOSUNIDOS.
Californiayen otraparteen la Coberturade Garantiade DefectosdeControlde Emisi6ndelos EstadosUnidos
El Bordode Recursosde Airede California(CARB),la U.S.EPAy MTDsecomplacenenexplicarla garantiadelsistemade controldeemisiones
de su motorparaequipotodo terreno,modelo,aSo2005y versionesposteriores.EnCalifornia,losnuevosmotorespequeSosparaequipotodo
terrenosedebendise5ar,fabricaryequiparparacumplirconest_.ndaresde antinieblat6xicadeestados.Enotraparteen losEstadosUnidos,
el nuevonocamino,motoresdeignici6ndechispacertificadosparaelmodelo2005ym_.starde,debeencontrareljuegode est_.ndaressimilar
adelanteporlos EstadosUnidos.EPA.MTDdebegarantizarel sistemadecontrolde emisionesdesu motorpor elperiodode tiempoindicadom&s
abajo,siempreycuandonohayaexistidousoincorrecto,negligencianimantenimientoinadecuadode sumotorpequeBoparaequipotodoterreno.
El sistemadecontrolde emisionespuedeincluirpiezascomo,porejemplo,elcarburador,sistemadeinyecci6ndecombustible,el sistemade
encendido,el catalizador,losdep6sitosdecombustible,abastecedecombustiblelineas,gorrasdecombustible,v&lvulas,latas,filtros,mangueras
devapor,abrazaderas,conectoresy otroscomponentesrelacionadosconlasemisiones.
Dondeexistaunacondici6ncubiertaporla garantia,MTDreparar&su motorpequeBoparaequipotodoterrenosincostoalgunoincluyendoel
diagn6stico,laspiezasy la manodeobra.
COBERTURA DE LA GARANTJA DEL FABRICANTE:
Estesistemade controldeemisionessegarantizaporel t@rminodedos a5os.Si algunapiezade sumotorrelacionadacon lasemisioneses
defectuosa,MTDreparar&o sustituir&dichapieza.
RESPONSABJLIDADES DEL PROPIETARIO SEGUN LA GARANTJA:
Comopropietariodeun motorpequeSode equipotodoterreno,ustedes responsablede realizarel mantenimientonecesarioquefigura enel
manualdelpropietario.MTDlerecomiendaqueconservetodoslosrecibosquecubrenlos serviciosdemantenimientodel motorpeque5opara
equipotodoterreno,noobstanteIocualMTDnopodr&denegarelcumplimientodela garantiaQnicamenteporlafaltade recibosoporsu imposi-
bilidaddeasegurarqueserealizar_.ntodoslosserviciosde mantenimientoprogramado.
Comopropietariodelmotorpeque5oparaequipotodoterreno,sinembargo,ustedtambi@ndebesaberque MTDpuededenegarlacoberturadela
garantiasi su motorpeque5oparaequipotodoterrenoo unapiezadelmismofallandebidoa usoincorrecto,negligencia,mantenimientoindebido
oa modificacionesnoaprobadas.
Ustedes responsablede presentarlacortadoradecespedal centrode distribuci6no de mantenimientode MTDCONSUMERGROUP,INC.tan
prontocomoaparecierael problem&LasreparacionescubiertasporlagarantfasedebenIlevaracabo enun lapsorazonableque noexcedade
30dias.Si desearealizaralgunaconsultaconrespectoa la coberturade lagarantia,debeponerseencontactoconsudistribuidorlocalde MTD.
Paracomunicarseconla LineadeAsistenciaalClientede DistribuidoresdeMTD,Ilameal nQmero(877)282-8684.
REQUERJMJENTOS DE GARANTJA SOBRE DEFECTOS PARA MOTORES PEQUENOS DE EQUJPO TODO TERRENO
DE 1995YVERSJONES POSTERJORES:
Estasecci6nseaplicaa motorespeque5osdeequipotodo terrenode 1995y versionesposteriores.Elperiododegarantiacomienzaapartirde la
fechaen queel motoro elequiposeentreganalcompradorfinal.
(a)Coberturade la garantiacontraemisionesgenerales
MTDgarantizaalcompradorfinaly acadacompradorsubsiguientequeel motor:
(1)hasido diseSado,construidoy equipadodemaneraquecumplacontodaslasregulacionesvigentesadoptadasporel Departamentodelos
RecursosdeAire envirtuda suautoridadconferidaen loscapitulos1y 2, Parte5, Divisi6n26del C6digode Saludy Seguridad;y
(2)est,. librededefectosenlosmaterialesyen la manodeobraquecausenlafalla deunapiezabajogarantiaqueseaid@nticaentodoslos
aspectosmaterialesa lapiezacomoaparecedescriptaenlaaplicaci6ndelfabricantedel motorparacertificaci6npor unperiododedosa5os.
Lb/LagarantiasobrepiezasrelacJonadasconemisJonesseinterpretar_,de lasJguientemanera:
(1)Cualquierpiezacubiertaporgarantiaquenoest@programadaparasu reemplazosegQnel mantenimientorequeridoenlasinstrucciones
escritasdela Subsecci6n(c)debeestargarantizadapor unperiodode garantiadefinidoenla Subsecci6n(a)(2). Sila piezafalladurante
el periododecoberturadela garantia,lamismaser_.reparadao reemplazadaporMTD de acuerdoconlaSubsecci6n(4)a continuaci6n.
Cualquierpiezareparadao reemplazadasegQnlagarantiasegarantizarB,porel restodelperiodode garantia.
(2) Cualquierpiezacubiertaporgarantfaqueest@programadasoloparainspecci6nregularenlasinstruccionesescritasde la Subsecci6n
(c)debeestargarantizadaporun periododegarantiadefinidoenla Subsecci6n(a) (2). Unadeclaraci6nen dichasinstruccionesporescrito
alefectode"reparaci6no reemplazosegQnseanecesario"noreducir_,elperiodode coberturade lagarantia.Cualquierpiezareparadao
Page 53

reernplazadasegQnlagarantiasegarantizar_,porelrestodelperiododegarantia.
(3) Cualquierpiezagarantizadaqueest_prograrnadaparareernplazosegQnelrnantenirnientorequeridodeconforrnidadconlasinstruc-
clonesescritasdelaSubsecci6n(c)segarantizaporelperiododetiernpoanterioralaprirnerafechadereernplazoprograrnadaparaesa
pieza.Silapiezafallaantesdelprimerreernplazoprogramatic,larnisrnaser_.reparadaoreernplazadaporMTDdeacuerdoconlaSubsecci6n
(4)acontinuaci6n.Cualquierpiezareparadaoreernplazadabajogaranfiasegarantizar_,porelrestodelperiodoanterioralprimerreernplazo
programaticpuntualparaesapieza.
(4)Lareparaci6noelreernplazodecualquierpiezagarantizadadeconforrnidadconlasdisposicionesdelagaranfiaqueaquiseestipulase
deberealizarenuncentrodegaranfiasincostoalgunoparaelpropietario.
(5)SinperjuiciodelasdisposicionesdelaSubsecci6n(4)anterior,losserviciosoreparacionescubiertosporlagaranfiadebensersurnin-
istradosportodosloscentrosdedistribuci6ndeMTDquetenganlafranquiciapararealizarreparacionesyrnantenirnientoalosrnotoresen
cuesti6n.
(6)ElpropietarionodebeafrontarningQncargoparatrabajosdediagn6sticoqueIlevenalaconclusi6ndequeunapiezabajogaranfiapresenta
efectivarnentedefectos,siernpreycuandodichodiagn6sticoseaIlevadoacaboenuncentrocubiertoporlagarantia.
(7)Elfabricantedelmotoresresponsableporda_oscausadosaotroscornponentesdernotoresderivadosdelafallabajogaranfiadecualquier
piezagarantizada.
(8)DurantetodoelperiododegaranfiadelmotordefinidoenlaSubsecci6n(a)(2),MTDrnantendr_,unsurninistrodepiezascubiertaspor
garantiasuficienteparasatisfacerladernandaesperadaparatalespiezas.
(9)Cualquierpiezadereernplazosepodr_,usarparaelcurnplirnientodelrnantenirnientooreparacionesbajogaranfia,ysesurninistrar_,sin
cargoalpropietario.Dichousonoreducir_,lasobligacionesdegarantiadeMTD.
(10)Nosepodr_.nusarpiezasadicionalesnirnodificadasquenoest_nexentasdeacuerdoconelDepartarnentodelosRecursosdelAire(Air
ResourcesBoard).Elusodepiezasadicionalesornodificadasnoexentasser_.causasuficienteparaanularunreclarnobajogaranfiarealizado
deacuerdoconestearticulo.Elfabricantedelmotornotendr_,responsabilidad,enconforrnidadconestearticulo,degarantizarfallasdepiezas
garantizadasquefuerencausadasporelusodeunapiezanoexentaadicionalornodificada.
.(c)MTDincluir_,unacopiade lasiguientelistade piezasbajogarantiacontraernisionescon cadanuevomotor,utilizandolaspartesde la lista
a_plicablesalmotor.
(1)Sisternadernedici6ndecombustible
•Sisternadernejoraparainicioenfrio (cebadosuave)
•Carburadory cornponentesinternos
•Bornbadecombustible
•Dep6sitodecombustible
(2) Sisternadeinducci6ndeaire
•Filtrode aire
•Colectordeentrada
(3) Sisternadeencendido
•Bujia(s)
•Sisternadeencendidopormagneto
(4)Sisternadeescape
•Catalizador
•SAI(v_JvuladeCa_a)
(5) Cornponentesvariosutilizadosen elsisternaanterior
•V_Jvulaseinterruptoresde vado,ternperatura,posici6nsensiblesaltiernpo
•Conectoresy rnontajes
(6)Controlde Evaporative
•Manguerade CombustiblecertificadaparaARBevaporativeernisi6nde2006.
•Abrazaderasde MangueradeCombustible
•Gorrade combustibleatada
•Latade carb6n
•Lineasdevapor
GD0C-100174Rev.B
Page 54

Busque el periodo de duraci6n de emisiones importantes yla informaci6n de clasificaci6n de aire en
la etiqueta de emisiones de su motor
Los motores cuyo cumpiimiento con los estAndares de emisi6n Tier 2 de laComisi6n de Recursos Ambientales de California (CARB)
est6 certificado deben exhibir la informaci6n relacionada con el periodo de duraci6n de ias emisiones y la clasificaci6n de aire. Sears
Brands Management Corporation ponen esta informaci6n a disposici6n del consumidor en nuestras etiquetas de emisiones.
Ei Periodo de Duraci6n de las Emisiones describe el nQmero de horas de tiempo real de funcionamiento para el cuai se certifica que
el motor cumpie con ias reglas de emisi6n, descontando el mantenimiento adecuado del mismo segQn las instrucciones de oper-
aci6n y mantenimiento. Se utilizan las siguientes categonas:
Moderado:Se certifica que el motor cumpie con las reglas de emisi6n durante 125 horas de tiempo real de funcionamiento del motor.
Inmediato:Se certifica que el motor cumpie con las reglas de emisi6n durante 250 horas de tiempo real de funcionamiento del motor.
Extendido:Se certifica que el motor cumpie con las reglas de emisi6n durante 500 horas de tiempo real de funcionamiento del motor.
Por ejemplo, una cortadora de c6sped tJpica que se empuja desde arras se usa entre 20 y 25 horas por aSo. Por Io tanto, el Periodo
de Duraci6n de Emisiones de un motor con una clasificaci6n intermedia sena equivaiente aentre 10 y 12 aSos.
Laciasificaci6n de aire es un nQmero calculado para describir el nivel relativo de emisiones para un grupo de motores en particular.
Cuanto menor sea la clasificaci6n de aire, mayor es la limpieza del motor. La informaci6n se presenta de forma grAfica en la etiqueta
de emisiones.
Despu_s del 1 de julio de 2000, busque el periodo de cumplimiento de las reglas de
emisiones en la etiqueta de cumplimiento de las reglas de emisiones del motor
Despu6s del 1 de julio de 2000 se certificarA que determinados motores Sears Brands Management Corporation cumplen
con los estAndares de emisiones de la fase 2 de la Agencia de Protecci6n Ambientai de los Estados Unidos (USEPA). Para
los motores certificados para la etapa 2, el periodo de cumplimiento con ias reglas de emisiones al cual se hace referencia
en la etiqueta de cumplimiento con las reglas de emisiones indica el nQmero de horas de funcionamiento para el cual se ha
demostrado que el motor cumple con los requerimientos federales de emisi6n.
Para los motores con desplazamiento inferior a 225 cc, Categoria C = 125 horas, B = 250 horas y A = 500 horas.
Para los motores con desplazamiento de 225 cc o mAs, Categoria C = 250 horas, B = 500 horas y A = 1000 horas.
El desplazamiento de los motores de la serie modelo 150112 es 249 cc.
La presente es una representaci6n gen_ricade laetiqueta de emisi6n que se encuentra generaimenteen un
motor certificado.
FAMILYYBSXS.3192VA 274812
GDOC-100182Rev.A
54
Page 55

Felicitaciones por haber realizado una adquisici6n inteligente. El producto Craftsman® que ha
adquirido esta diseSado y fabricado para brindar muchos aSos de funcionamiento confiable. Pero
como todos los productos a veces puede requerir de reparaciones. Es en ese momento cuando el
disponer de un Acuerdo de protecci6n para reparaciones le puede ahorrar dinero y problemas.
A continuaci6nse detallanlos puntosincluidos en el Acuerdo:
[] Servicio experto prestadopor nuestros10,000especialistasen reparacionesprofesionales
[] Servicio ilirnitado sin cargo para laspiezasy lamano de obraen todas las reparacionescubiertas
[] Reernplazo del producto hasta 1500d61aressi no es posible repararel productocubierto
[] Descuento de 25% del precionormal delservicio y de las piezas relacionadascon el mismo que no estencubiertas
por el acuerdo; ademas,25% del precio normal de laverificaci6n de mantenimientopreventivo
[] Ayuda r_pida pot tel_fono - Io IlamamosResoluci6n RApida- el apoyo telef6nicode unChamusca al representante.
Pienseen nosotroscomo el manual"de un dueSohablador."
Una vezadquiridoel Acuerdo,puede programarel serviciocon tan s61orealizar una Ilamadatelef6nica. Puede Ilamaren
cualquier momentodeldia o de la nocheo programarun servicioen linea.
ElAcuerdode Protecci6nde Reparaci6nes unacompra sin riesgo.Si ustedanulapor alguna raz6n duranteel periodode
garantiade producto,proporcionaremosun reembolsoIleno.O, un reembolsoprorrateadoen cualquier momentodespues
del periodode garantia de productoexpira, iAdquiera hoysu acuerdode protecci6npara reparaciones!
Se aplican determinadas limitaciones y exclusiones. Paraobtener informaciTnadicional y precios en los Estados
Unidos Ilame al 1-800-827-6655.
El *Coverage en Canad_ivaria en algunos articulos. Para detalles Ilenos la Ilamada Chamusca Canad_ien 1-800-
361-8885.
Servicio de instalaci6nde Sears
Sidesea solicitar lainstalaci6nprofesionalde Sears de aparatosdomesticos,dispositivos paraabrir portones,calentado-
resde aguay otrosarticulos domesticosimportantes, en los EstadosUnidoso Canada flameal 1-800-4-MY-HOME®.
55
Page 56

Your Home
For troubleshooting, product manuals and expert advice:
managernylife
www.managemylife.com
For repair - in your home - of all major brand appliances,
lawn and garden equipment, or heating and cooling systems,
no matter who made it, no matter who sold it!
For the replacement parts, accessories and
owner's manuals that you need to do-it-yourself.
For Sears professional installation of home appliances
and items like garage door openers and water heaters.
1-800-4-MY-HOME ® (1-800-469-4663)
Call anytime, day or night (U.S.A. and Canada)
www.sears.com www.sears.ca
Our Home
For repair of carry-in items like vacuums, lawn equipment,
and electronics, call anytime for the location of your nearest
Sears Parts & Repair Service Center
1-800-488-1222 (U.S.A.) 1-800-469-4663 (Canada)
www.sears.com www.sears.ca
To purchase a protection agreement on a product serviced by Sears:
1-800-827-6655 (U.S.A.) 1-800-361-6665 (Canada)
Para pedir servicio de reparaci6n
a domicilio, y para ordenar piezas:
1-888-SU-HOGAR ®
(1-888-784-6427)
www.sears.com
® Registered Trademark / TMTrademark of KCD IP, LLC in the United States, or Sears Brands, LLC in other countries
® Marca Registrada ! TMMarca de Fabrica de KCD IP, LLC en Estados Unidos, o Sears Brands, LLC in otros paises
MCMarque de commerce ! MDMarque deposee de Sears Brands, LLC
Au Canada pour service en frangais:
1-800-LE-FOYER Mc
(1-800-533-6937)
www.sears.ca
 Loading...