

Page 1
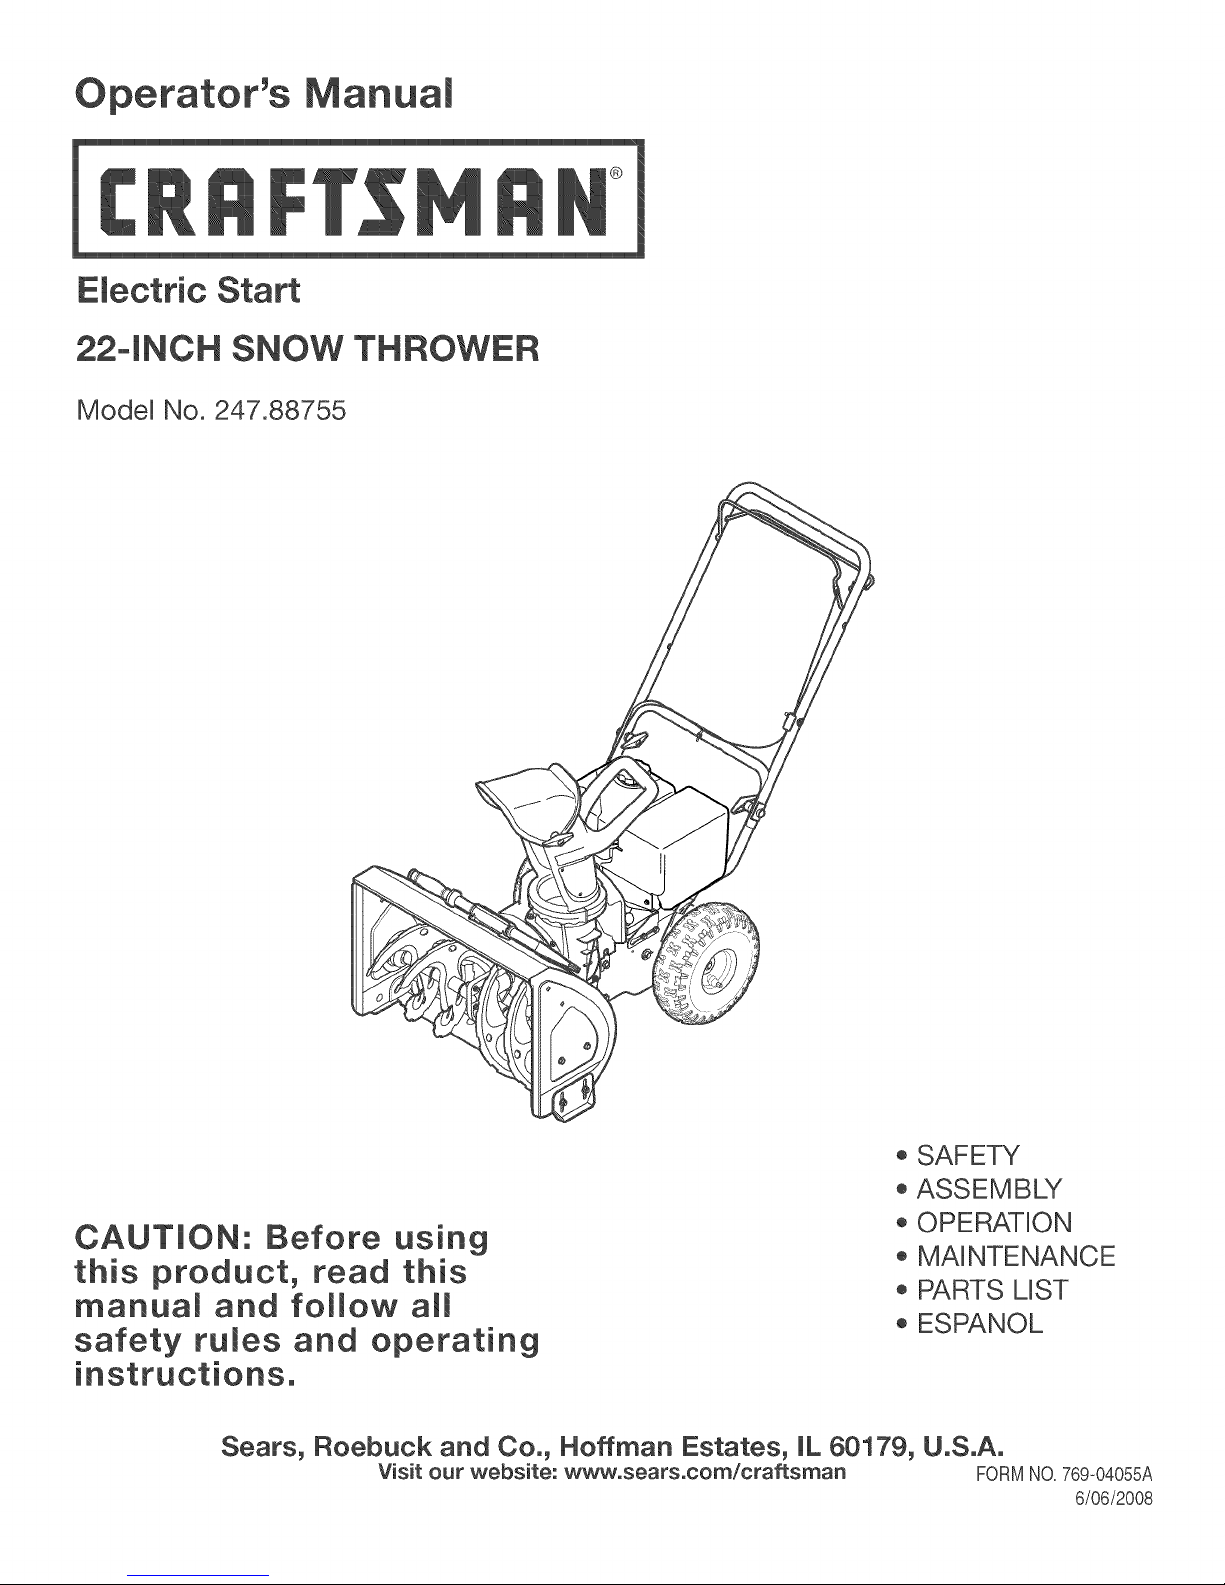
Operator's Manual
Electric Start
°iNCH SNOW THROWER
Model No. 247.88755
®
CAUTION: using
this product, read this
manua_ and folmow aml
safety fumes and operating
instructions.
Sears, Roebuck and Co., Hoffman Estates, IL 60179, U.S.A.
Visit our website: www.sears.com/craftsman FORMNO.769-04055A
®SAFETY
®ASSEMBLY
®OPERATION
® MAINTENANCE
® PARTS LIST
® ESPANOL
6/06/2008
Page 2
Warranty Statement .................... Page 2
Safe Operation Practices ................ Page 3
Safety LabeUs ......................... Page 7
Setup & Adjustment .................... Page 8
Operation ........................... Page 12
Maintenance & Service ................. Page 16
Off-Season Storage ................... Page 21
TroubUeshooting ...................... Page 22
Parts List ............................ Page 23
Repair Protection Agreement ............ Page 32
Espa_oU............................. Page 33
Contact Numbers .................. Back Cover
CRAFTSMAN UMUTED WARRANTY
Two Years on Snow Thrower
Whenoperatedandmaintainedaccordingto allsuppliedinstructions,ifthissnowthrowerfailsdueto a defectinmaterialorworkmanshipwithintwoyearsfromthe
dateor purchase,returnitto anyauthorizedCraftsmandrop-offlocationforfree repair. Forthe nearestauthorizedlocation,call 1-800-4MYHOME.
Thiswarrantyappliesforonly90 daysfromthedateof purchaseifthissnowthroweriseverusedforcommercialorrentalpurposes.
Thiswarranty'coversONLYdefectsin materialandworkmanship.Searswill NOTpayfor:
* Expendableitemsthat becomewornduringnormaluse,includingbutnotlimitedto skidshoes,shaveplate,shearpins,sparkplug,air cleaner,belts,
andoilfilter.
, Standardmaintenanceservicing,oil changes,ortuneqps.
* Tirereplacementorrepaircausedbypuncturesfrom outsideobiects,suchasnails,thorns,stumps,orglass.
* Tireorwheelreplacementor repairresultingfromnormalwear,accident,orimproperoperationor maintenance.
* Repairsnecessarybecauseofoperatorabuse,includingbutnotlimitedtodamagecausedbyimpactingobiectsthatbendtheframeor crankshaft,or
over-speedingtheengine.
, Repairsnecessarybecauseofoperatornegligence,includingbutnotlimitedto,ebctrical andmechanicaldamagecausedbyimproperstorage,failure
tousethe propergradeand amountof engineoil,or failureto maintaintheequipmentaccordingtothe instructionscontainedinthe operator'smanual.
* Engine(fuelsystem)cleaningor repairscausedbyfueldeterminedto becontaminatedor oxidized(stale).Ingeneral,fuelshouldbe usedwithin30
daysof itspurchasedate.
* Normaldeteriorationandwearof the exteriorfinishes,or productlabelreplacement.
Thiswarrantyappliesonlywhilethisproductiswithinthe UnitedStates.
Thiswarranty'givesyouspecificlegalrights,andyoumayalsohaveotherrightswhichvaryfromstatetostate.
Sears, Roebuck and Co., Hoffman Estates, JL60179
EngineOilType: 5%30
EngineOilCapacity: 20ounces
FuelCapacity: 2.3Quarts
SparkHug: TorchF6RTC(F6TC)
SparkHug Gap: .020"to.030"
ModeJNumber.................................................................
SeriaJNumber.................................................................
Dateof Purchase.............................................................
Recordthemodelnumber,serialnumber
anddateof purchaseabove
@SearsBrands,LLC
2
Page 3
Thissymbolpointsoutimportantsafetyinstructionswhich,if not
followed,couldendangerthepersonalsafetyand/orpropertyof
yourselfandothers. Readandfollowall instructionsinthismanual
beforeattemptingtooperatethismachine.Failuretocomplywith
theseinstructionsmayresultin personalinjury.Whenyouseethis
symbol,HEEDiTSWARNING!
Thismachinewasbuilttobeoperatedaccordingtothesafeopera-
tionpracticesinthis manualAswithanytypeof powerequipment,
carelessnessorerroron thepartoftheoperatorcanresultin serious
injury.Thismachineiscapableofamputatingfingers,hands,toes
andfeetandthrowingdebris.Failuretoobservethe followingsafety
instructionscouldresultin seriousinjuryor death.
CAUFORNIA PROPOSmON 65
EngineExhaust,someof itsconstituents,andcertainvehicle
componentscontainoremitchemicalsknowntoStateofCalifornia
tocausecancerandbirthdefectsorotherreproductiveharm.
, Read,understand,andfollowallinstructionson themachineand
in themanual(s)beforeattemptingto assembleandoperate.
Failuretodosocan resultinseriousinjurytotheoperatorand/
orbystanders.Keepthismanualina safeplaceforfutureand
regularreferenceandfororderingreplacementparts.Forques-
tionscall,1-800-659-5917.
Befamiliarwithallcontrolsandtheirproperoperation.Knowhow
tostopthemachineanddisengagethemquickly.
Neverallowchildrenunder14yearsofagetooperatethis
machine.Children14andovershouldreadandunderstandthe
instructionsandsafeoperationpracticesin thismanualandon
themachineandbe trainedandsupervisedbyanadulL
Neverallowadultsto operatethis machinewithoutproper
instruction.
Thrownobjectscan causeseriouspersonalinjury.Planyour
snow4hrowingpatterntoavoiddischargeof materialtoward
roads,bystandersandthelike.
Keepbystanders,petsandchildrenatbast75feetfromthe
machinewhileit isin operation.Stopmachineif anyoneenters
thearea.
Exercisecautiontoavoidslippingorfalling,especiallywhen
operatinginreverse.
Your Responsibility--Restrict theuseofthis powermachineto
personswhoread,understandandfollowthewarningsand instruc-
tionsinthismanualandon themachine.
SAVE THESE NSTRUCT ONS!
Thoroughlyinspecttheareawheretheequipmentistobeused.
Removeall doormats,newspapers,sleds,boards,wiresandother
foreignobjects,whichcouldbetrippedoverorthrownbythe auger/
impeller.
Alwayswearsafetyglassesor eyeshieldsduringoperationand
whileperformingan adjustmentor repairto protectyoureyes.
Thrownobjectswhichricochetcancauseseriousinjuryto the
eyes.
, Donot operatewithoutwearingadequatewinteroutergarments.
Donot wearjew@y,longscarvesorotherlooseclothing,which
couldbecomeentangledinmovingparts.Wearfootwearwhich
willimprovefootingonslipperysurfaces.
, Usea groundedthree-wireextensioncordand receptacleforall
machineswithelectricstartengines.
, Disengageall controlleversbeforestartingtheengine.
, Adjustcollectorhousingheighttocleargravelorcrushedrock
surfaces.
, Neverattempttomakeanyadjustmentswhileengineis running,
exceptwherespecificallyrecommendedintheoperator'smanual
, Letengineandmachineadjusttooutdoortemperaturebefore
startingtoclearsnow.
3
Page 4
SafeHandlingof Gasoline
Toavoidpersonalinjuryorpropertydamageuseextremecarein
handlinggasoline.Gasolineisextremelyflammableandthevaporsare
explosive.Seriouspersonalinjurycan occurwhengasolineisspilled
onyourselfor yourclotheswhichcanignite. Washyourskinand
changeclothesimmediately_
, Useonlyanapprovedgasolinecontainer.
, Extinguishall cigarettes,cigars,pipesandothersources
ofignition.
, Neverfuelmachineindoors.
, Neverremovegascaporaddfuel whiletheengineis hot
or running.
, Allowengineto coolat bast two minutesbeforerefueling.
, Neveroverfill fueltanL Filltanktono morethanY_inch
belowbottomoffillerneckto providespaceforfuel
expansion.
, Replacegasolinecapandtightensecurely.
, ifgasolineisspilled,wipeit offtheengineandequipmenL
Movemachinetoanotherarea.Wait5 minutesbefore
startingtheengine.
, Neverstorethemachineor fuelcontainerinsidewhere
thereis anopenflame,sparkor pilotlight(e.g.furnace,
waterheater,spaceheater,clothesdryeretc.).
, Allowmachinetocoolatbast 5 minutesbeforestori%
, Neverfillcontainersinsidea vehicleorona truckortrailer
bedwithaplasticliner.Alwaysplacecontainersonthe
groundawayfromyourvehiclebeforefilling.
, if possible,removegas_poweredequipmentfromthetruck
ortrailerand refueliton theground,if thisisnotpossible,
thenrefuelsuchequipmentona trailerwitha portable
container,ratherthanfromagasolinedispensernozzle.
, Keepthenozzleincontactwiththe rimofthefueltankor
containeropeningatalltimesuntilfuelingis complete.Do
notuse anozzlelock-opendevice.
, Do notputhandsorfeetnearrotatingparts,in theauger/impeller
housingorchuteassembly.Contactwiththerotatingpartscan
amputatehandsandfeel
, Theauger/impellercontrolleveris a safetydevice.Neverbypass
itsoperation.Doingso makesthemachineunsafeandmaycause
personalinjury.
, Thecontrolleversmustoperateeasilyinbothdirectionsand
automaticallyreturntothedisengagedpositionwhenreleased.
, Neveroperatewithamissingor damagedchuteassembly.Keep
all safetydevicesin placeandworki%
, Neverrunanengineindoorsorina poorlyventilatedarea. Engine
exhaustcontainscarbonmonoxide,anodorlessanddeadlygas.
, Do notoperatemachinewhileundertheinfluenceofalcoholor
drugs.
, Mufflerandenginebecomehotandcancausea burn.Do not
toucL Keepchildrenaway.
, Exerciseextremecautionwhenoperatingonorcrossinggravel
surfaces.Stayalertforhiddenhazardsor traffic.
, Exercisecautionwhenchangingdirectionandwhileoperatingon
slopes.
, Planyoursnow-throwingpatternto avoiddischargetowards
windows,walls,carsetc. Thus,avoidingpossibleproperty
damageorpersonalinjurycausedbya ricocheL
, Neverdirectdischargeatchildren,bystandersand petsor allow
anyoneinfrontofthe machine.
, Donot overloadmachinecapacitybyattemptingto clearsnowat
toofastof a rate.
, Neveroperatethismachinewithoutgoodvisibilityorlight.Always
be sureofyourfootingand keepafirmholdon thehandles.Walk,
neverrun.
, Disengagepowertotheauger/impellerwhentransportingor not
in use.
, Neveroperatemachineathightransportspeedson slippery
surfaces.Lookdownand behindand usecarewhenbackingup.
, ifthemachineshouldstartto vibrateabnormally,stoptheengine,
disconnectthesparkplugwireandgrounditagainsttheengine.
inspectthoroughlyfordamage.Repairanydamagebefore
startingandoperati%
, Disengageall controlleversandstopenginebeforeyouleave
theoperatingposition(behindthehandles).Waituntilthe auger/
impellercomestoa completestopbeforeuncloggingthechute
assembly,makinganyadjustments,or inspections.
, Neverputyourhandinthe dischargeor collectoropenings.Do
notunclogchuteassemblywhileengineisrunning.Shutoff
engineand remainbehindhandlesuntilall movingpartshave
stoppedbeforeuncloggi%
, Useonlyattachmentsandaccessoriesapprovedbythemanufac_
turer(e.g.wheelweights,tire chains,cabsetc.).
, Whenstartingengine,pullcordslowlyuntilresistanceis felt,then
pull rapidly.Rapidretractionofstartercord(kickback)willpull
handandarmtowardenginefasterthan youcan letgo.Broken
bones,fractures,bruisesorsprainscouldresulL
, ifsituationsoccurwhichare notcoveredinthis manual,usecare
andgoodjudgmenLContactCustomerSupportforassistance
andthenameof yournearestservicingdealer.
CLEARUNG A CLOGGED DUSCHAF{GE CHUTE
Handcontactwiththe rotatingimpellerinsidethe dischargechute
is themostcommoncauseofinjuryassociatedwithsnowthrowers.
Neveruseyourhandtocleanout thedischargechute.
Toclear thechute:
1. SHUTTHEENGINEOFF!
2. Wait 10secondstobe suretheimpellerbladeshavestopped
rotating_
3_ Alwaysusea clean-outtool,notyourhands.
4
Page 5
MAUNTENANCE& STORAGE
, Nevertamperwithsafetydevices_Checktheirproperoperation
regularly.Refertothe maintenanceandadjustmentsectionsof
thismanual
, Beforecleaning,repairing,or inspectingmachinedisengageall
controlleversandstoptheengine.Waituntiltheauger/impeller
cometoa completestop.Disconnectthe sparkplugwireand
groundagainsttheenginetopreventunintendedstarting.
, Checkboltsandscrewsfor propertightnessatfrequentintervals
tokeepthemachinein safeworkingcondition.Also,visually
inspectmachineforanydamage.
, Do notchangetheenginegovernorsettingor over-speedthe
engine.Thegovernorcontrolsthe maximumsafeoperatingspeed
oftheengine.
, Snowthrowershaveplatesand skidshoesaresubjectto wear
anddamage.Foryoursafetyprotection,frequentlycheckall
componentsand replacewithoriginalequipmentmanufacturer's
(OEM)partsonly."Useofpartswhichdo notmeettheoriginal
equipmentspecificationsmayleadto improperperformanceand
compromisesafety!"
, Checkcontrolleversperiodicallyto verifytheyengageanddisen-
gageproperlyandadjust,ifnecessary.Refertothe adjustment
sectioninthisoperator'smanualforinstructions.
, Maintainorreplacesafetyandinstructionlabels,asnecessary.
Observeproperdisposallawsand regulationsforgas,oil,etc.to
protecttheenvironment.
, Priorto storing,runmachinea few minutestoclearsnowfrom
machineand preventfreezeupofauger/impeller.
, Neverstorethe machineorfuelcontainerinsidewherethereis an
openflame,sparkorpilotlightsuchasa waterheater,furnace,
clothesdryeretc.
, Alwaysreferto theoperator'smanualforproperinstructionson
off-seasonstorage.
, Checkfuelline,tank,cap,andfittingsfrequentlyfor cracksor
leaks.Replaceif necessary.
, Do notcrankenginewithsparkplugremoved.
, AccordingtotheConsumerProductsSafetyCommission(CPSC)
andtheU.S.EnvironmentalProtectionAgency(EPA),thisproduct
hasan AverageUsefulLifeof seven(7)years,or60 hoursof
operation.AttheendoftheAverageUsefulLifehavethemachine
inspectedannuallybyan authorizedservicedealerto ensurethat
allmechanicalandsafetysystemsareworkingproperlyandnot
wornexcessively.Failuretodoso canresultinaccidents,injuries
ordeath.
DO NOT MODUFY ENGUNE
Toavoidseriousinjuryor death,do notmodifyengineinany way.
Tamperingwiththegovernorsettingcanleadtoa runawayengineand
causeittooperateat unsafespeeds.Nevertamperwithfactorysetting
ofenginegovernor.
NOTUOE REGARDUNG EMUSSUONS
EngineswhicharecertifiedtocomplywithCaliforniaandfederal
EPAemissionregulationsforSORE(SmallOffRoadEquipment)are
certifiedto operateon regularunleadedgasoline,and mayinclude
thefollowingemissioncontrolsystems:EngineModification(EM),
OxidizingCatalyst(CO),SecondaryAirInjection(SAI)and ThreeWay
Catalyst(TWO)if so equipped.
SPARK ARRESTOR
Thismachineis equippedwithaninternalcombustionengineand
shouldnotbeusedonornearanyunimprovedforest-covered,
brush-coveredorgrass-coveredlandunlesstheengine'sexhaust
systemisequippedwithasparkarrestermeetingapplicablelocalor
statelaws(ifany)
Ifasparkarresterisused,itshouldbemaintainedineffectiveworking
orderbytheoperator.IntheStateofCaliforniatheaboveis required
bylaw (Section4442oftheCaliforniaPublicResourcesCode).Other
statesmayhavesimilarlaws. Federallawsapplyonfederallands.
A sparkarresterfor themuffleris availablethroughyournearestSears
PartsandRepairServiceCenter.
Page 6
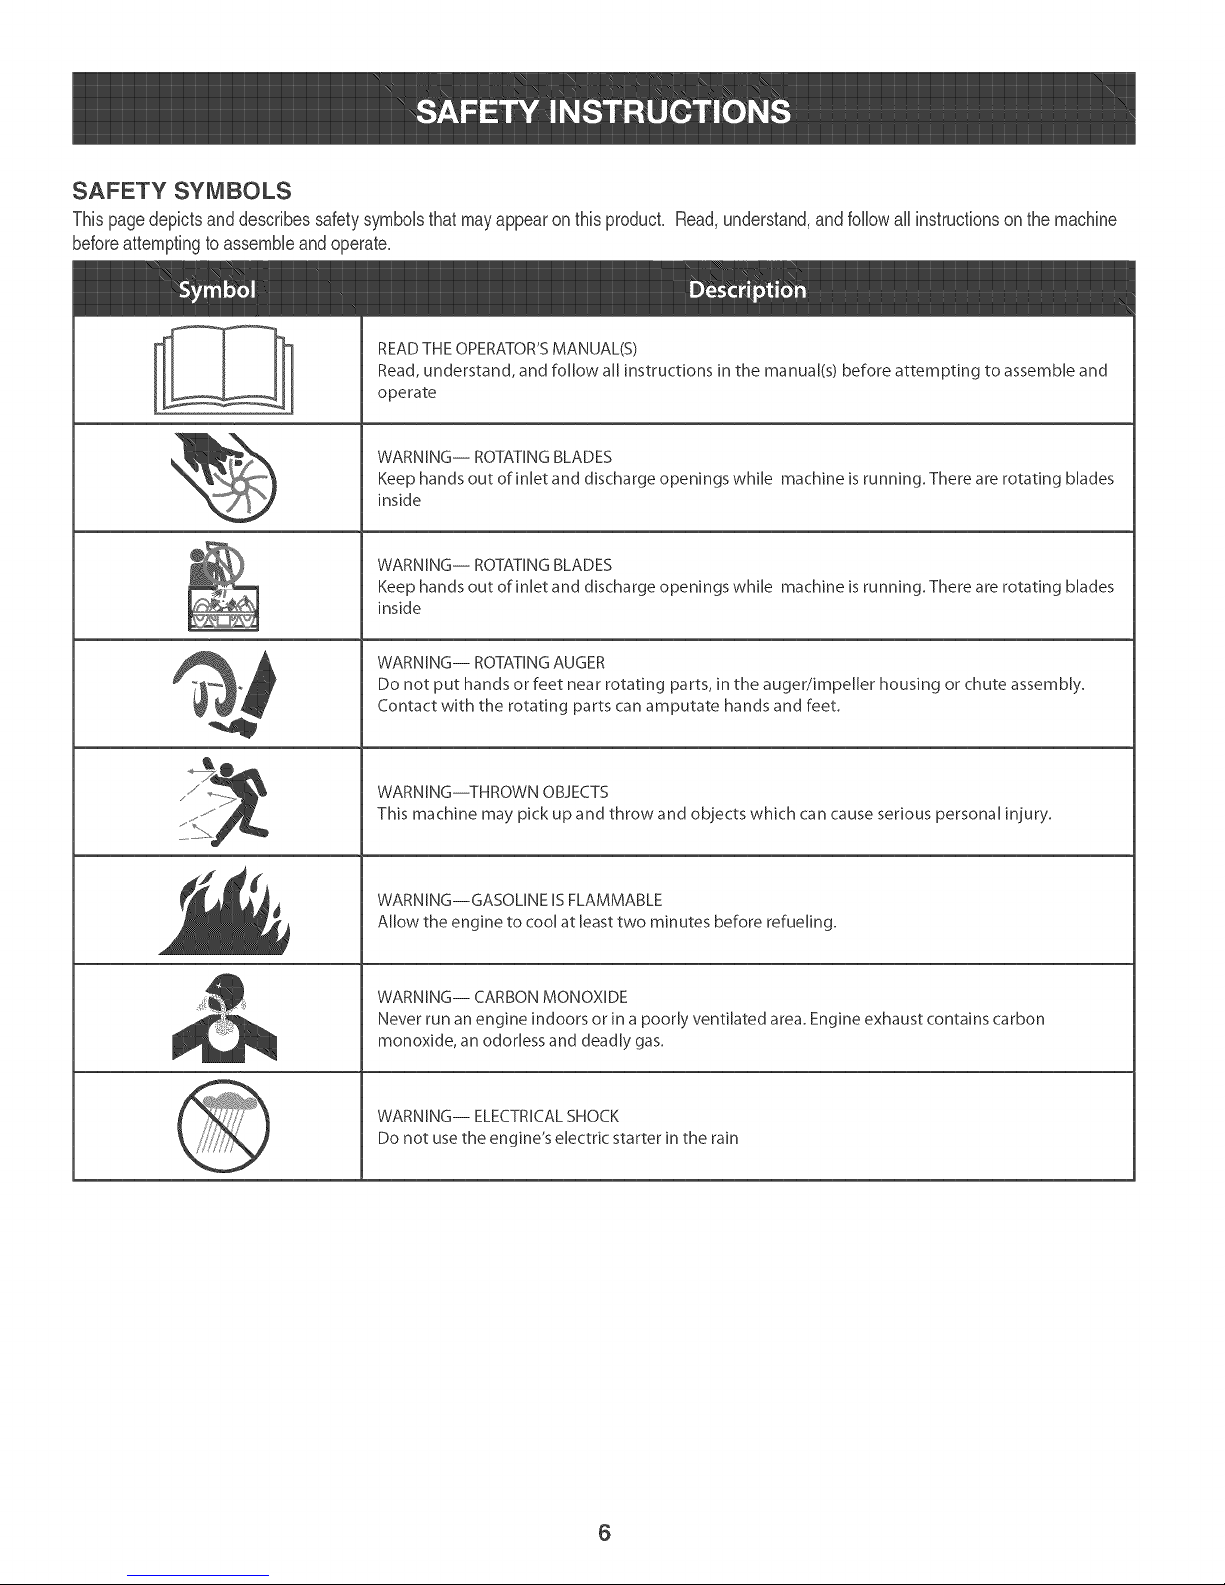
SAFETY SYMBOLS
Thispagedepictsanddescribessafetysymbolsthatmayappearonthisproduct. Read,understand,andfoflowaftinstructionson themachine
beforeattemptingtoassembleandoperate.
°
i
\
READ THE OPERATOR'S MANUAL(S)
Read, understand, and follow all instructions in the manual(s) before attempting to assemble and
operate
WARNING-- ROTATING BLADES
Keep hands out of inlet and discharge openings while machine ]s running. There are rotating blades
inside
WARNING-- ROTATING BLADES
Keep hands out of inlet and discharge openings while machine ]s running. There are rotating blades
inside
WARNING-- ROTATING AUGER
Do not put hands or feet near rotating parts, ]n the auger/impeller housing or chute assembly.
Contact with the rotating parts can amputate hands and feet.
WARNING--THROWN OBJECTS
This machine may pick up and throw and objects which can cause serious personal injury.
WARNING--GASOLINE IS FLAMMABLE
Allow the engine to cool at least two minutes before refueling.
WARNING-- CARBON MONOXIDE
Never run an engine indoors or in a poorly ventilated area. Engine exhaust contains carbon
monoxide, an odorless and deadly gas.
WARNING-- ELECTRICALSHOCK
Do not usethe engine's electric starter in the rain
6
Page 7
I,KEEPAWAY FROM ROTATINGiMPELLER
ANDAUGER.CONTACTWiTHiMPELLEROR
AUGER CAN AMPUTATEHANDSAND FEET.
2.USE CLEAN-OUTTOOLTO UNCLOG
DISCHARGECHUTE.
3.DISENGAGECLUTCHLEVERS,STOPENGINE,
AND REMAINBEHINDHANDLESUNTILALL
MOVING PARTSHAVE STOPPEDBEFORE
UNCLOGGING OR SERVICINGMACHINE.
4.TO AVOIDTHROWN OBJECTSiNJURIES,
NEVERDIRECTDISCHARGEATBYSTANDERS.
USEEXTRACAUTIONWHENOPERATINGON
GRAVEL SURFACES.
5, READOPERATOR'SMANUAL.
7
Page 8
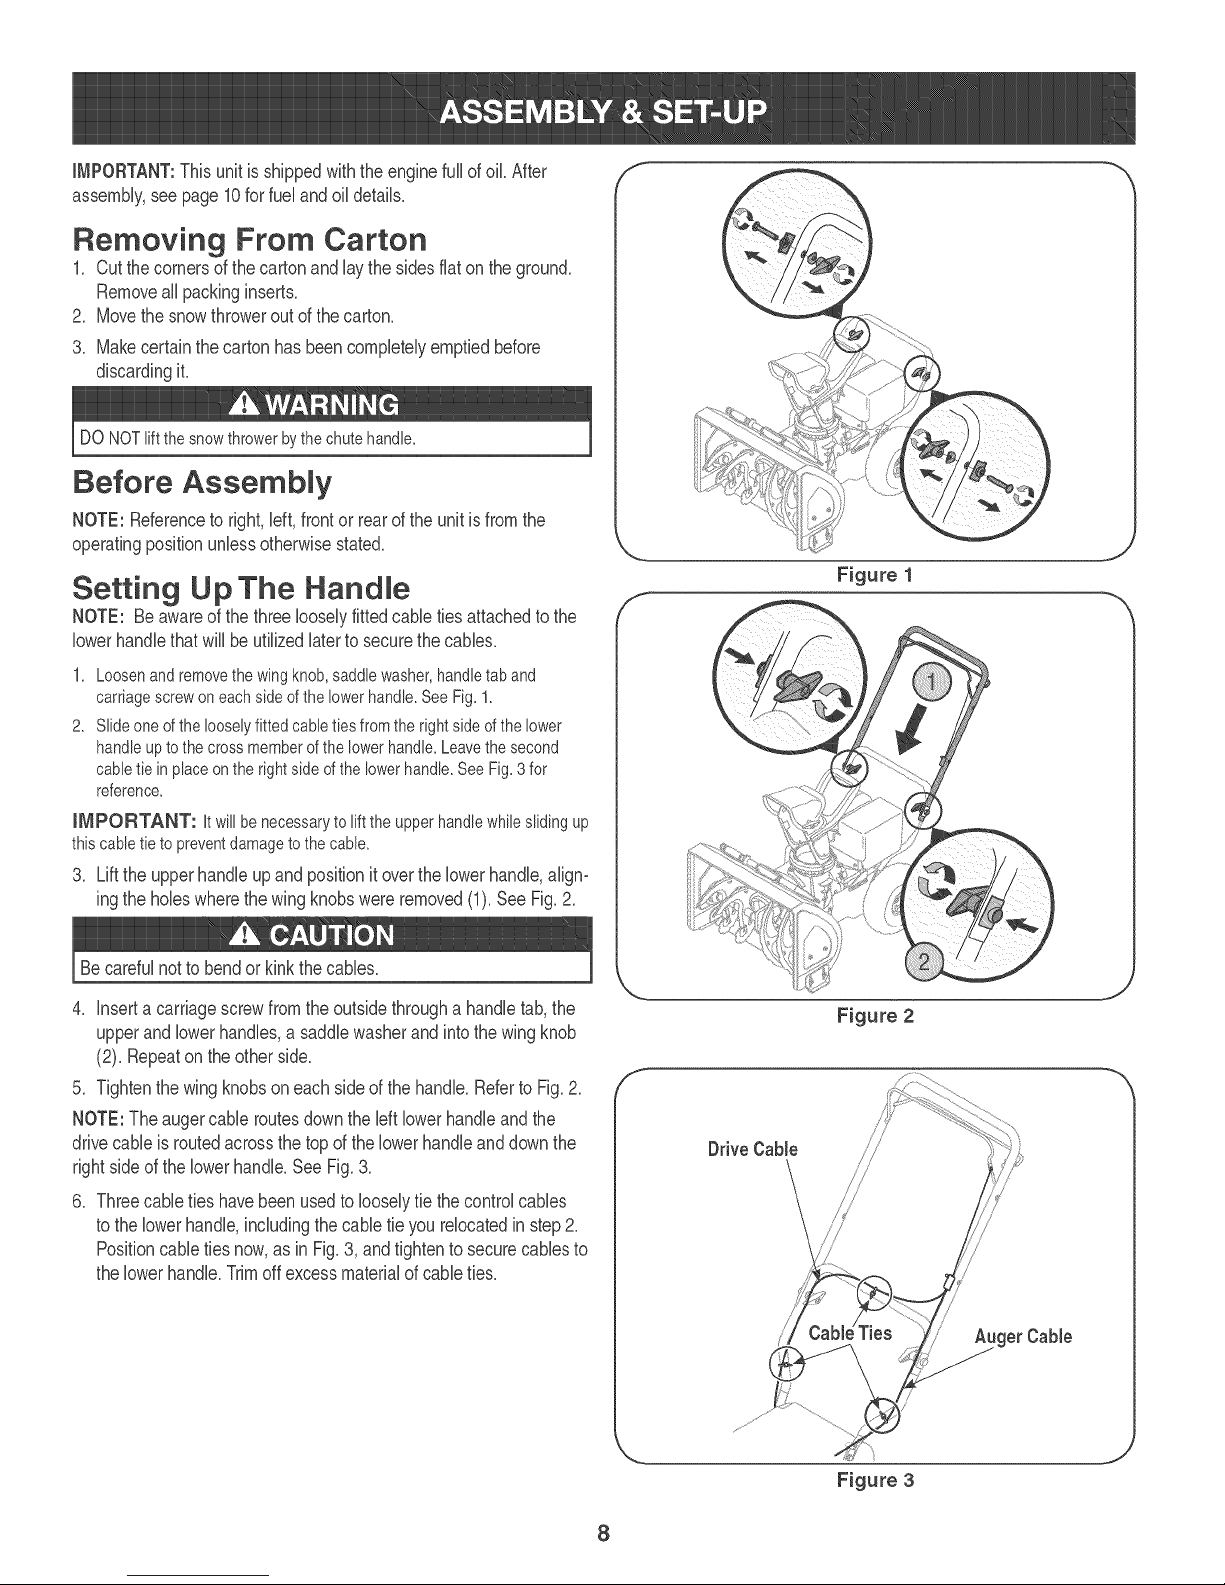
iMPORTANT:Thisunitis shippedwiththeenginefullofoil.After
assembly,seepage10for fuelandoildetails.
Removing From Carton
1. Cutthecornersofthecartonandlaythesidesflaton theground.
Removeall packinginserts.
2_ Movethesnowthroweroutof thecarton.
3. Makecertainthecartonhasbeencompletelyemptiedbefore
discardingit.
DO NOTliftthesnowthrowerbythechutehandle.
Before Assembly
NOTE:Referenceto right,left, frontorrearof theunitis fromthe
operatingpositionunlessotherwisestated.
Setting Up The Handme
NOTE: Beawareofthethreelooselyfitted cabletiesattachedtothe
lowerhandlethatwillbeutilizedlatertosecurethecables.
1. Loosenandremovethewing knob,saddlewasher,handletab and
carriagescrewoneachside ofthe lowerhandle.See Fig.1.
2. Slideone of thelooselyfitted cabletiesfromthe rightsideofthe lower
handleuptothecrossmemberofthe lowerhandle.Leavethesecond
cabletiein placeon the rightsideofthe lowerhandle.See Fig.3 for
reference.
IMPORTANT: Itwillbenecessarytolifttheupperhandlewhileslidingup
thiscabletietopreventdamagetothecable.
3. Lifttheupperhandleupandpositionit overthelowerhandle,align-
ingtheholeswherethewing knobswereremoved(1).SeeFig.2.
f
Becarefulnottobendor kinkthecables.
4_ Inserta carriagescrewfromtheoutsidethroughahandletab,the
upperand lowerhandles,a saddlewasherandintothewingknob
(2)_Repeatontheotherside.
5_ Tightenthewingknobsoneach sideofthe handle.Referto Fig.2_
NOTE:The augercableroutesdowntheleftlowerhandleandthe
drivecableis routedacrossthetop ofthelowerhandleanddownthe
rightside ofthelowerhandle.SeeFig.3_
.
Threecabletieshavebeenusedto looselytiethecontrolcables
tothelowerhandle,includingthecabletieyourelocatedinstep2_
Positioncabletiesnow,asin Fig.3,andtightento securecablesto
thelowerhandle.Trimoffexcessmaterialofcableties.
Figure 2
DriveCable
\
get Cable
Figure 3
8
Page 9
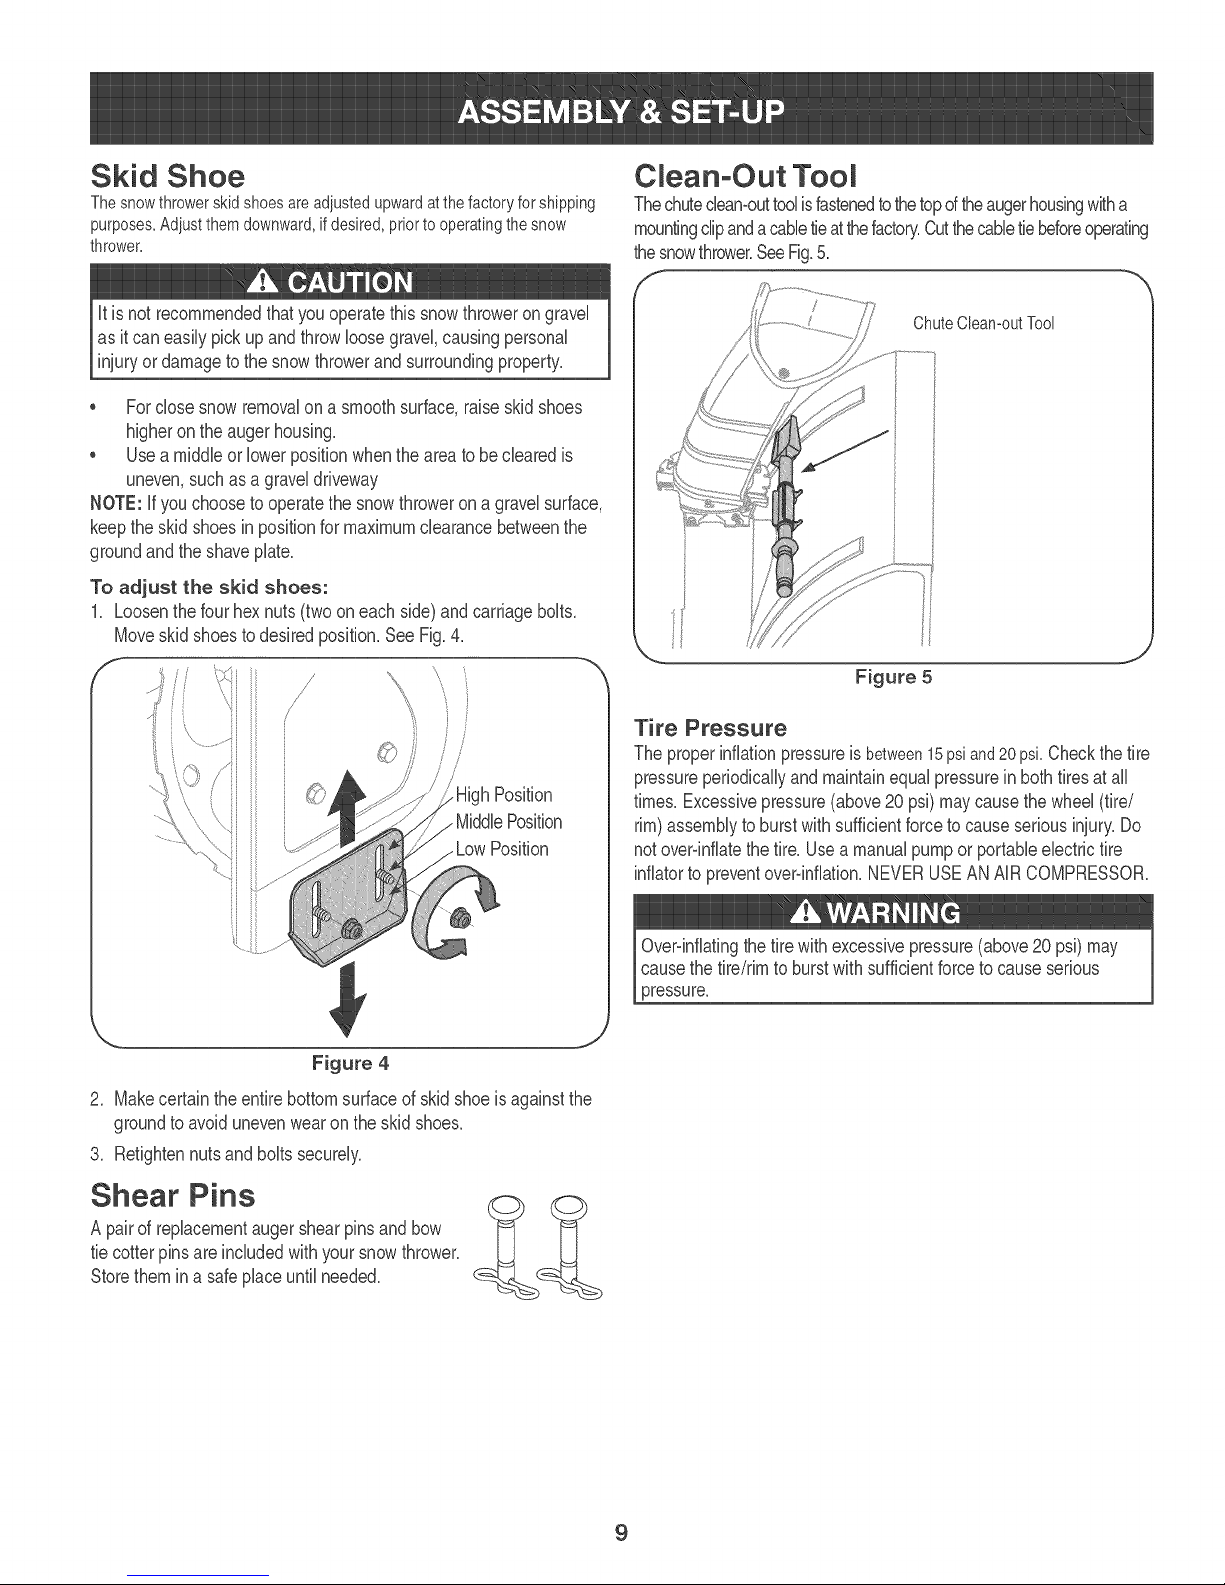
Skid Shoe
Thesnowthrowerskidshoesareadiustedupwardatthefactoryforshipping
purposes.Adiustthemdownward,ifdesired,priortooperatingthesnow
thrower.
Clean-Out Tool
Thechuteclean-outtoolisfastenedto thetopd theaugerhousingwitha
mountingdipandacabletieatthefactory.Cutthecabletiebeforeoperating
thesnowthrower.SeeFig.5.
f
It isnotrecommendedthatyouoperatethis snowthrowerongravel
as itcaneasilypickupandthrowloosegravel,causingpersonal
injuryordamagetothesnowthrowerand surroundingproperty.
, Fordose snowremovalona smoothsurface,raiseskidshoes
higherontheaugerhousing.
, Useamiddleor lowerpositionwhentheareatobe clearedis
uneven,suchasa graveldriveway
NOTE:Ifyouchooseto operatethe snowthroweronagravelsurface,
keepthe skidshoesinpositionfor maximumclearancebetweenthe
groundandtheshaveplate.
To adjust the skid shoes:
1. Loosenthefourhexnuts(twooneachside)andcarriagebolts.
Moveskidshoestodesiredposition.See Fig.4.
/
/
/
.MiddlePosition
ChuteCleamoutTool
Figure 5
Tire Pressure
Theproperinflationpressureisbetween15psiand20psi.Checkthetire
pressureperiodicallyandmaintainequalpressurein bothtiresatall
times.Excessivepressure(above20psi)maycausethewheel(tire/
rim)assemblytoburstwithsufficientforcetocauseseriousinjury.Do
notovePinflatethe tire.Usea manualpumpor portableelectrictire
inflatorto preventover-inflation.NEVERUSEANAIRCOMPRESSOR.
2_ Makecertaintheentirebottomsurfaceof skidshoeisagainstthe
groundtoavoidunevenwearonthe skidshoes.
3. Retightennutsandboltssecurely.
Shear Pins
A pairof replacementaugershearpinsandbow
tiecotterpinsare includedwithyoursnowthrower.
Storethemina safeplaceuntilneeded.
Over-inflatingthetirewithexcessivepressure(above20psi) may
causethetire/rimto burstwithsufficientforcetocauseserious
pressure.
9
Page 10
FueURecommedations
Useautomotivegasoline(unleadedor lowleadedtominimizecombus-
tionchamberdeposits)withaminimumof87octane.Gasolinewith
upto 10%ethanolor 15%MTBE(MethylTertiaryButylEther)canbe
used.Neveruseanoil/gasolinemixtureordirtygasoline.Avoidgetting
dirt,dust,or waterin thefuel tank.DONOTuse E85gasoline.
, Refuelin awelFventilatedareawiththeenginestopped.Donot
smokeorallowflamesorsparksintheareawheretheengineis
refueledorwheregasolineisstored.
, Do notoverfillthefueltank.Afterrefueling,makesurethetank
capisclosedproperlyandsecurely.
, Becarefulnottospillfuel whenrefueling.Spilledfuelorfuelvapor
mayignite.Ifanyfuelisspilled,makesuretheareaisdrybefore
startingtheengine.
, Avoidrepeatedor prolongedcontactwithskinorbreathingof
vapor.
Adding FueU
Useextremecarewhenhandlinggasoline.Gasolineisextremely
flammableandthe vaporsareexplosive.Neverfuel themachine
indoorsorwhile theengineishotor running.Extinguishcigarettes,
cigars,pipesandothersourcesofignition.
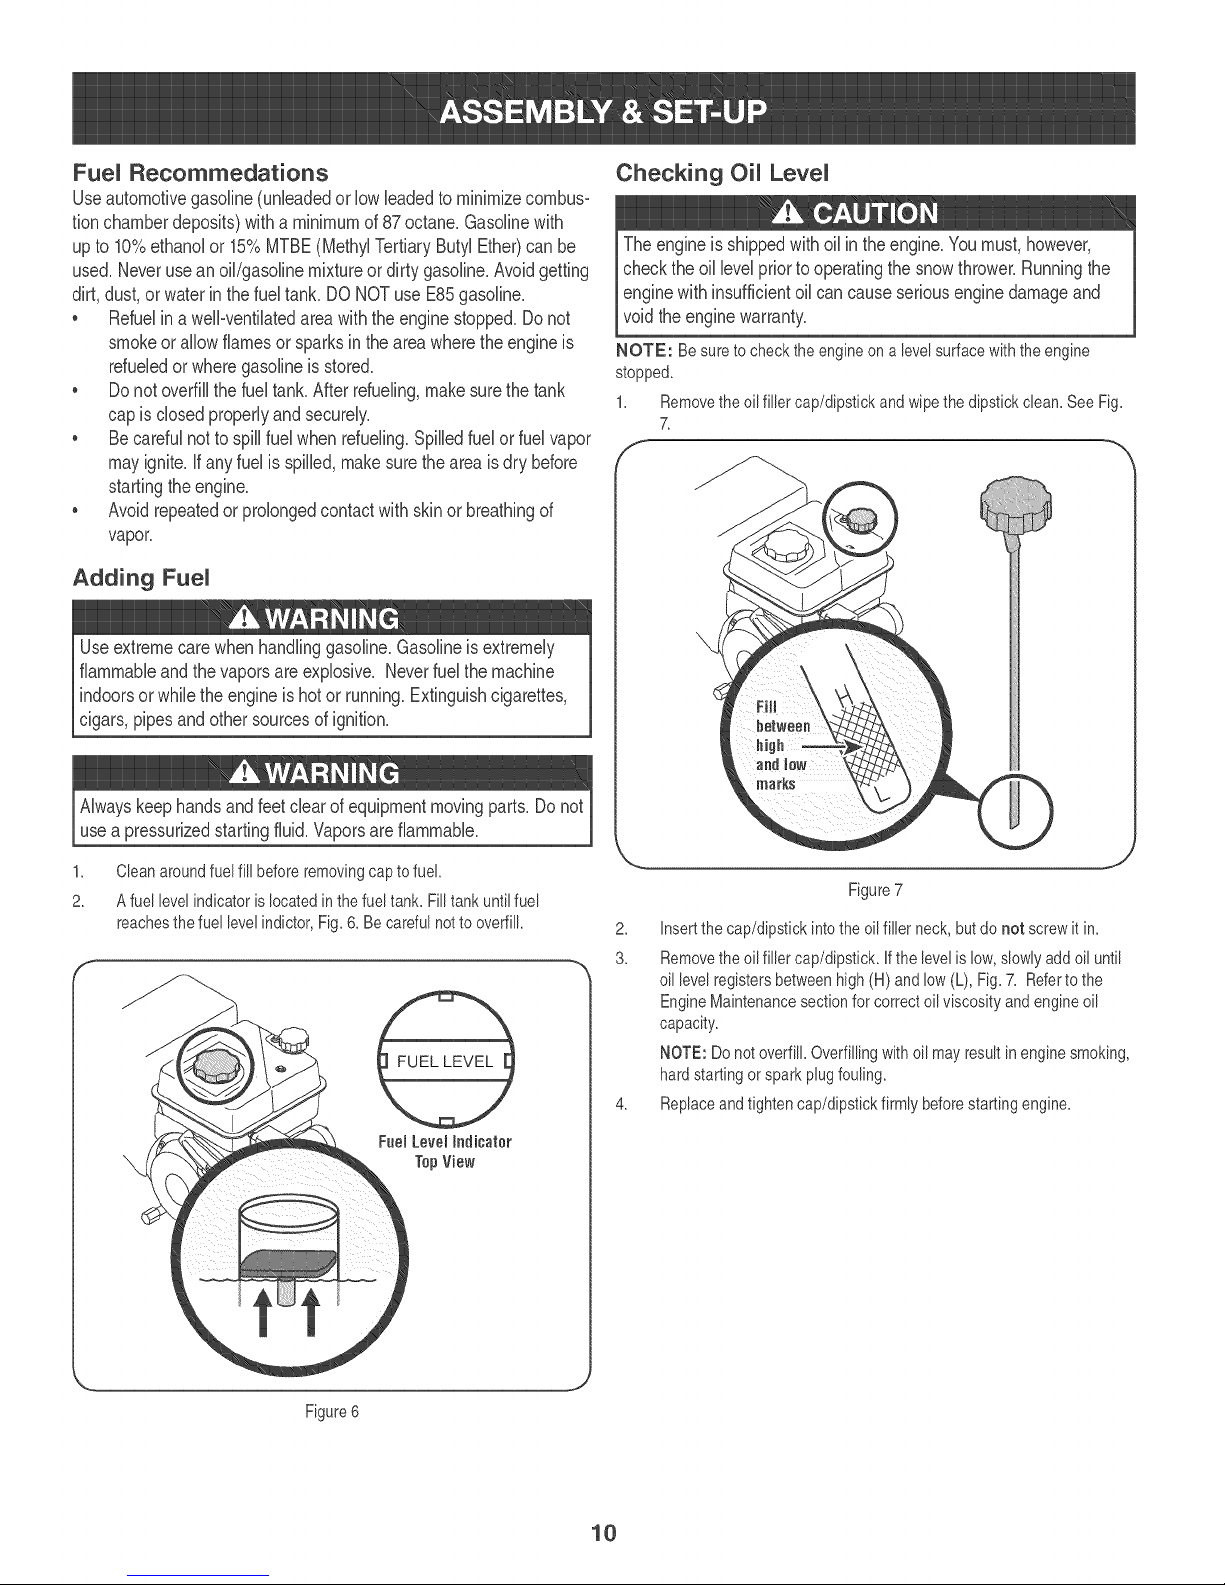
Checking OiU LeveU
Theengineisshippedwithoil intheengine.Youmust,however,
checkthe oillevelpriortooperatingthesnowthrower.Runningthe
enginewithinsufficientoil cancauseseriousenginedamageand
voidtheenginewarranty.
NOTE: Besuretochecktheengineonalevelsurfacewiththeengine
stopped.
1. Removetheoilfillercap/dipstickandwipethedipstickclean.SeeFig.
7.
Alwayskeephandsandfeetclearof equipmentmovingparts.Do not
usea pressurizedstartingfluid.Vaporsareflammable.
1. Cleanaroundfuel fill beforeremovingcaptofuel.
2. A fuellevelindicatorislocatedinthefuel tank. Filltankuntil fuel
reachesthefuellevel indictor,Fig.6.Becarefulnotto overfill.
Figure7
2. Insertthe cap/dipstickintotheoilfillerneck,butdo not screwit in.
3. Removetheoil fillercap/dipstick.Ifthe levelis low,slowlyadd oiluntil
oil levelregistersbetweenhigh(H) andlow(L), Fig.7. Refertothe
EngineMaintenancesectionfor correctoil viscosityandengineoil
capacity.
NOTE:Do notoverfill.Overfillingwith oil mayresultin enginesmoking,
hardstartingorsparkplugfouling.
4. Replaceandtightencap/dipstickfirmly beforestartingengine.
Figure6
10
Page 11
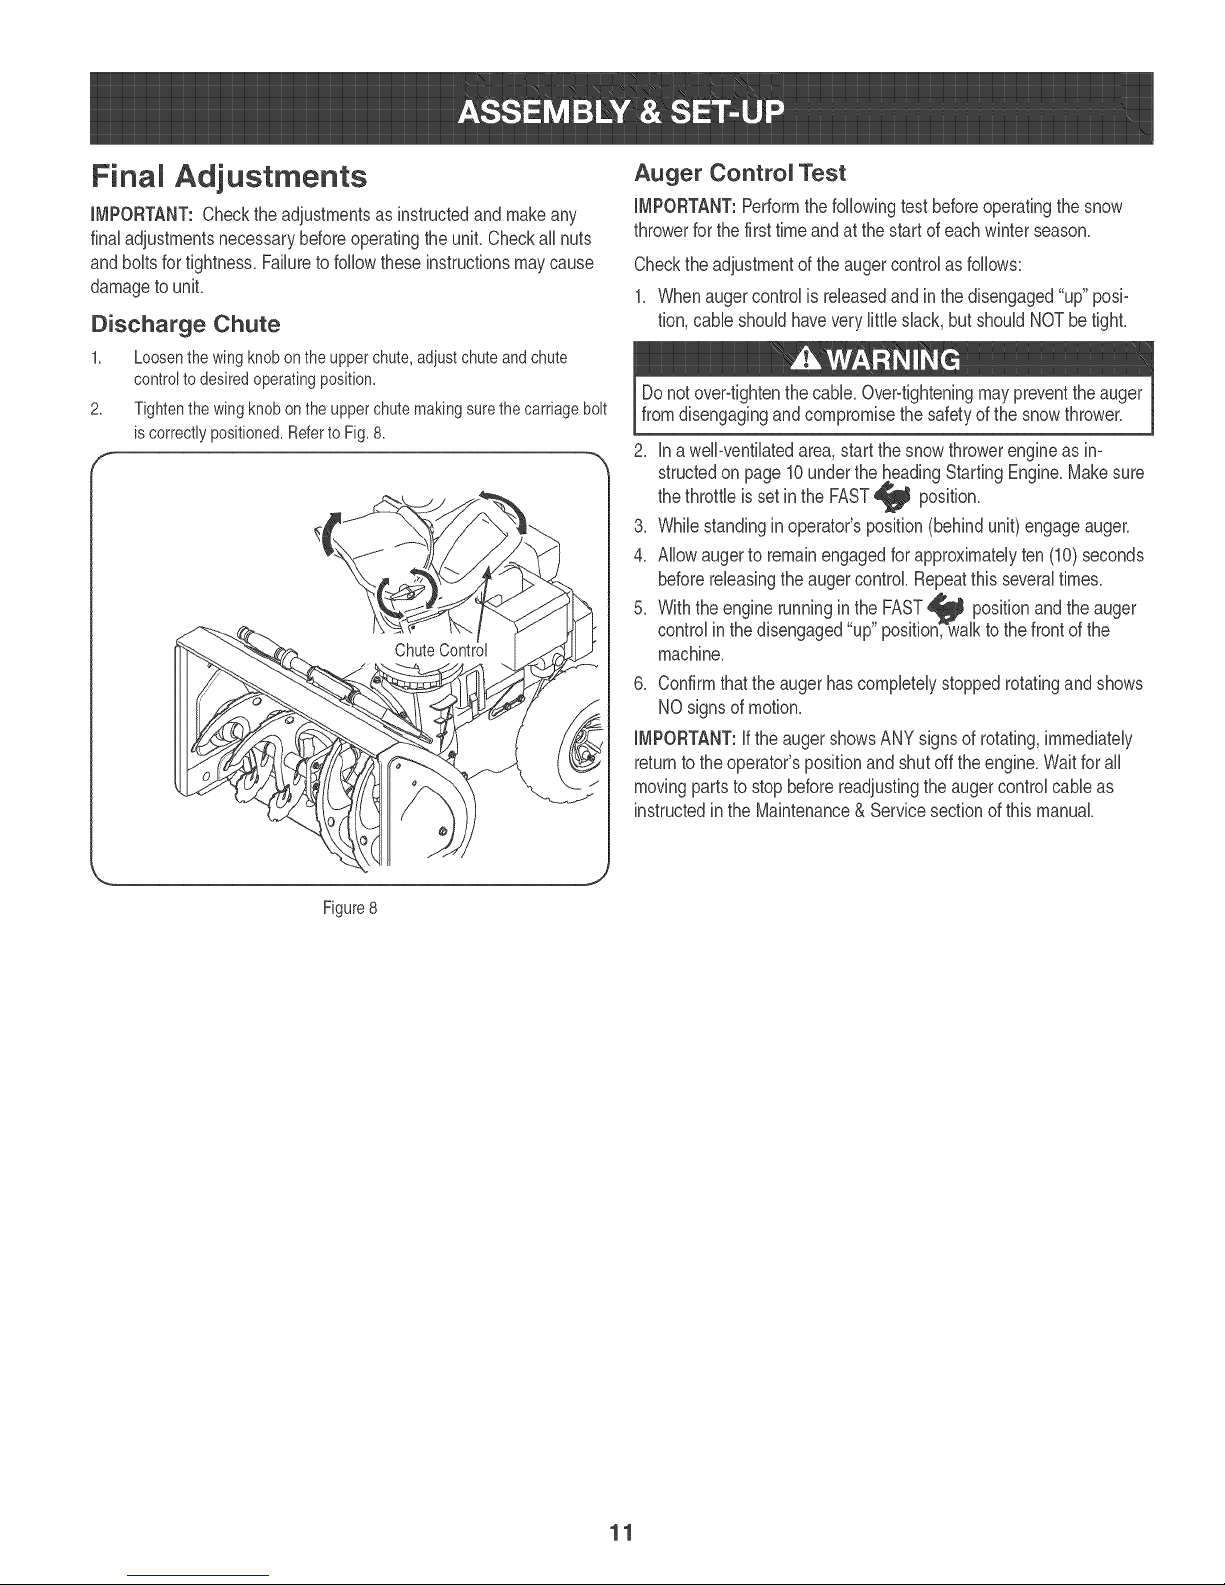
Final Adjustments
iMPORTANT:Checktheadjustmentsasinstructedandmakeany
finaladjustmentsnecessarybeforeoperatingtheunit.Checkallnuts
andboltsfortightness.Failureto followtheseinstructionsmaycause
damagetounit.
Discharge Chute
1. Loosenthewingknobontheupperchute,adiustchuteandchute
controlto desiredoperatingposition.
2. Tightenthewingknobontheupperchutemakingsurethecarriagebolt
iscorrectlypositioned.RefertoFig.8.
f, -,
Auger ControU Test
IMPORTANT:Performthefollowingtestbeforeoperatingthesnow
throwerforthefirsttimeandatthestartof eachwinterseason.
Checktheadjustmentof theaugercontrolasfollows:
1. Whenaugercontrolis releasedandinthedisengaged"up"posi=
tion,cableshouldhaveverylittleslack,butshouldNOTbetight.
Donot over4ightenthecane. Overqighteningmaypreventtheauger
fromdisengagingandcompromisethesafetyofthesnowthrower.
2. inaweIFventilatedarea,startthesnowthrowerengineasin-
structedon page10underthe_.headingStartingEngine.Makesure
thethrottleissetintheFAST position.
3. Whilestandinginoperator'sposition(behindunit)engageauger.
4. Allowaugerto remainengagedforapproximatelyten(10)seconds
beforereleasingtheaugercontrol.Repeatthisseveraltimes.
5. Withtheenginerunninginthe FAST_ positionandtheauger
controlinthedisengaged"up"position,w-alkto thefrontofthe
machine.
6. Confirmthattheaugerhascompletelystoppedrotatingand shows
NOsignsofmotion.
IMPORTANT:ifthe augershowsANYsignsof rotating,immediately
returntotheoperator'spositionand shutofftheengine.Waitfor all
movingpartstostopbeforereadjustingtheaugercontrolcane as
instructedinthe Maintenance& Servicesectionofthismanual.
,.. j
Figure8
11
Page 12
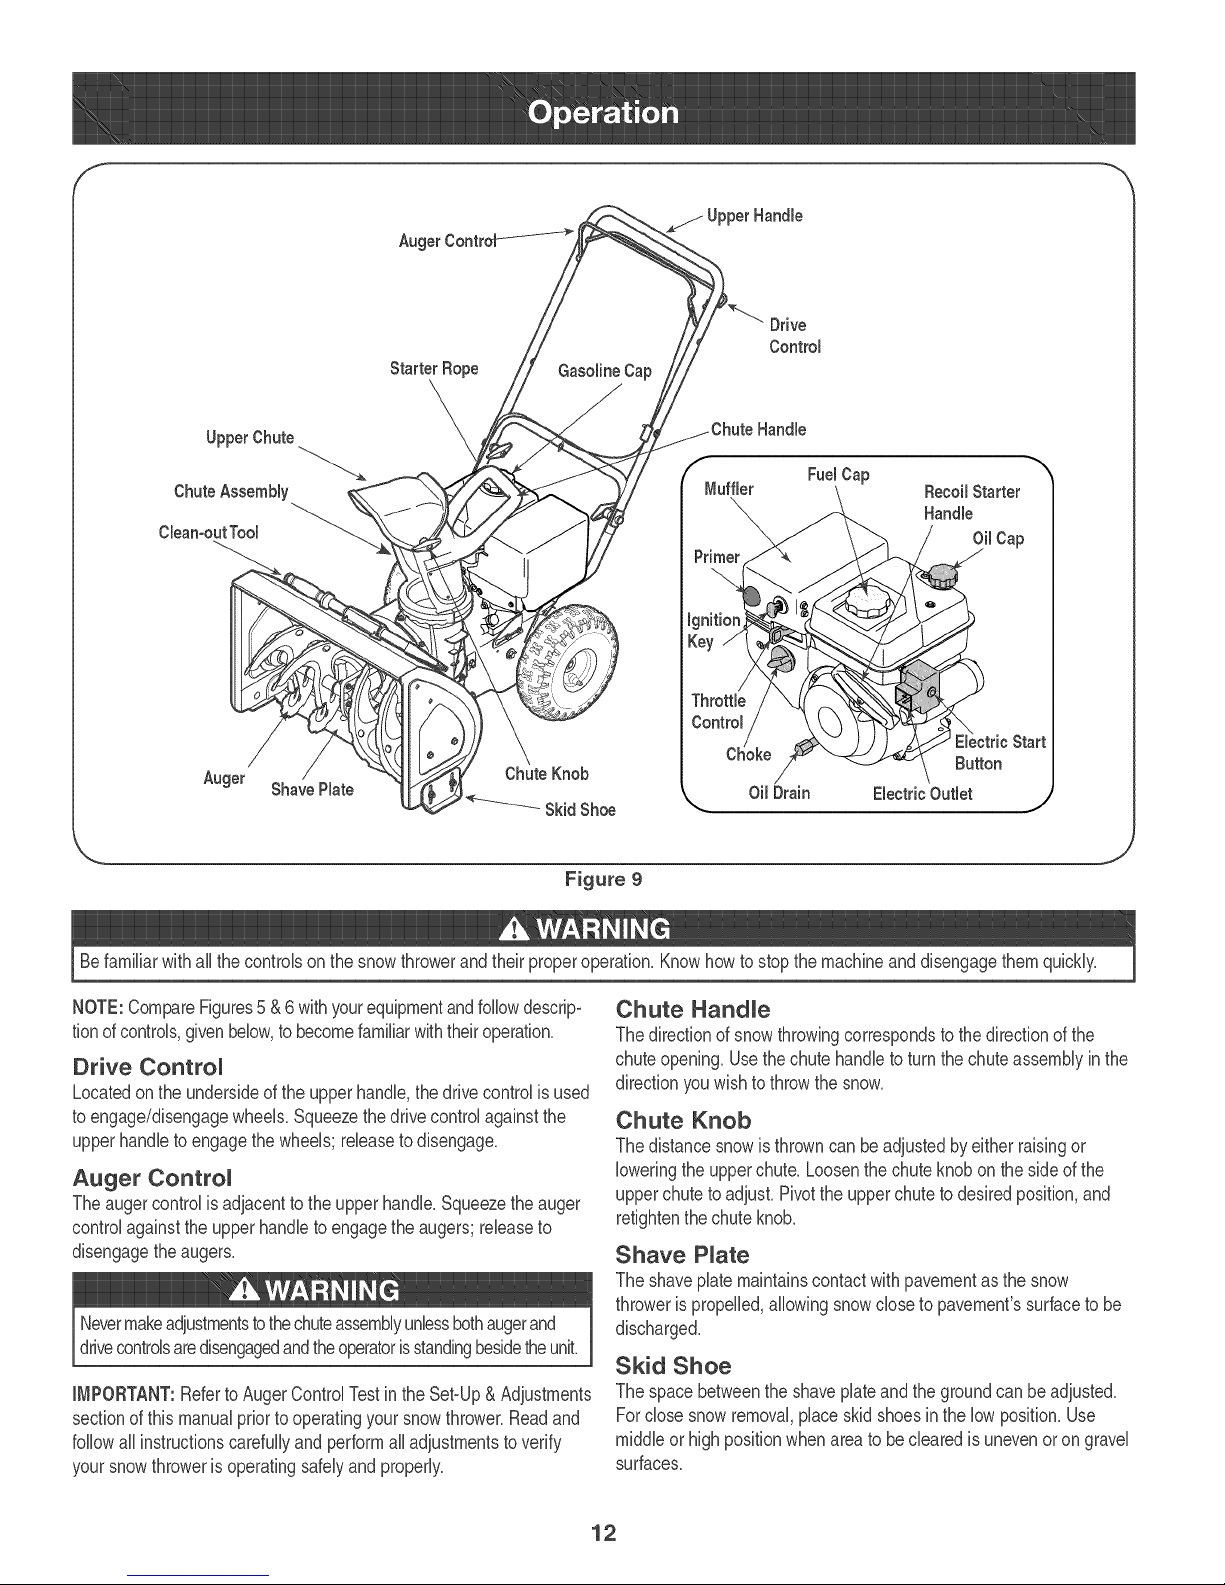
AugerContr_
S UpperHandle
Ddve
Control
StarterRope GasolineCap
UpperChute _",, Handle
"_ FuelCap
ChuteAssembly
Clean-outTool
Recoil Starter
Handle
Figure 9
Befamiliarwithallthecontrolsonthesnowthrowerand theirproperoperation.Knowhowto stopthemachineanddisengagethemquickly.
NOTE:CompareFigures5 &6withyourequipmentandfollowdescrip-
tionof controls,givenbelow,tobecomefamiliarwiththeiroperation.
Drive ControU
Locatedon theundersideof the upperhandle,thedrivecontrolis used
toengage/disengagewheel&Squeezethedrivecontrolagainstthe
upperhandleto engagethe wheels;releasetodisengage.
Auger Control
Theaugercontrolisadjacentto theupperhandle.Squeezetheauger
controlagainsttheupperhandletoengagethe augers;releaseto
disengagetheauger&
Chute HandUe
Thedirectionof snowthrowingcorrespondsto thedirectionofthe
chuteopening.Usethechutehandleto turnthechuteassemblyinthe
directionyouwishtothrowthe snow.
Chute Knob
Thedistancesnowisthrowncanbeadjustedbyeither raisingor
loweringtheupperchute.Loosenthechuteknobontheside ofthe
upperchutetoadjust.Pivotthe upperchutetodesiredposition,and
retightenthechuteknob.
Shave PUate
Theshaveplatemaintainscontactwithpavementas thesnow
throwerispropelled,allowingsnowclosetopavement'ssurfacetobe
Nevermakeadjustmentstothechuteassemblyunlessbothaugerand
discharged.
ddvecontrolsaredisengagedandtheoperatorisstandingbesidetheunit.
Skid Shoe
IMPORTANT:RefertoAugerControlTestintheSebUp& Adjustments
sectionofthismanualpriortooperatingyoursnowthrower.Readand
followall instructionscarefullyandperformalladjustmentsto verify
yoursnowthroweris operatingsafelyandproperly.
Thespacebetweentheshaveplateand thegroundcan beadjusted.
Forclosesnowremoval,placeskidshoesin thelowposition.Use
middleor highpositionwhenareato beclearedis unevenorongravel
surfaces.
J
12
Page 13
Whenengaged,theaugersrotateanddrawsnowintotheauger
housing.
Chute AssembUy
Snowdrawnintotheaugerhousingisdischargedoutthechute
assemNy.
Choke ControU
Activatingchokecontrolbyturningitall theway
tothebft doses thechokeplateoncarburetor
andaidsin startingthe engine.Forinformationon
chokeusage,seeStartingTheEnginelaterin this
section.
RecoiU Starter & Starter HandUe
Thismotorisfittedwitha recoilactionpullstart andamittengrip
handb foreasyaccesswhib wearingglovesormitten&
Ugnition Key
Theignitionkeyisa safetydevice,it mustbefully ___,,_
insertedinorderfortheenginetostart.Remove
theignitionkeywhenthesnowthroweris notin
use.
NOTE:Do notturnthe ignitionkeyin anattemptto
startthe engine.Doingsomaycauseittobreak.
,O
EUectric Starter Button
Pressingtheelectricstarterbuttonengagestheengine'selectric
starterwhenpluggedintoa 120Vpowersource.
EUectric Starter OutUet
Requirestheuseof athree-prongoutdoorextensioncord(included)
anda120Vpowersource/walloutleL
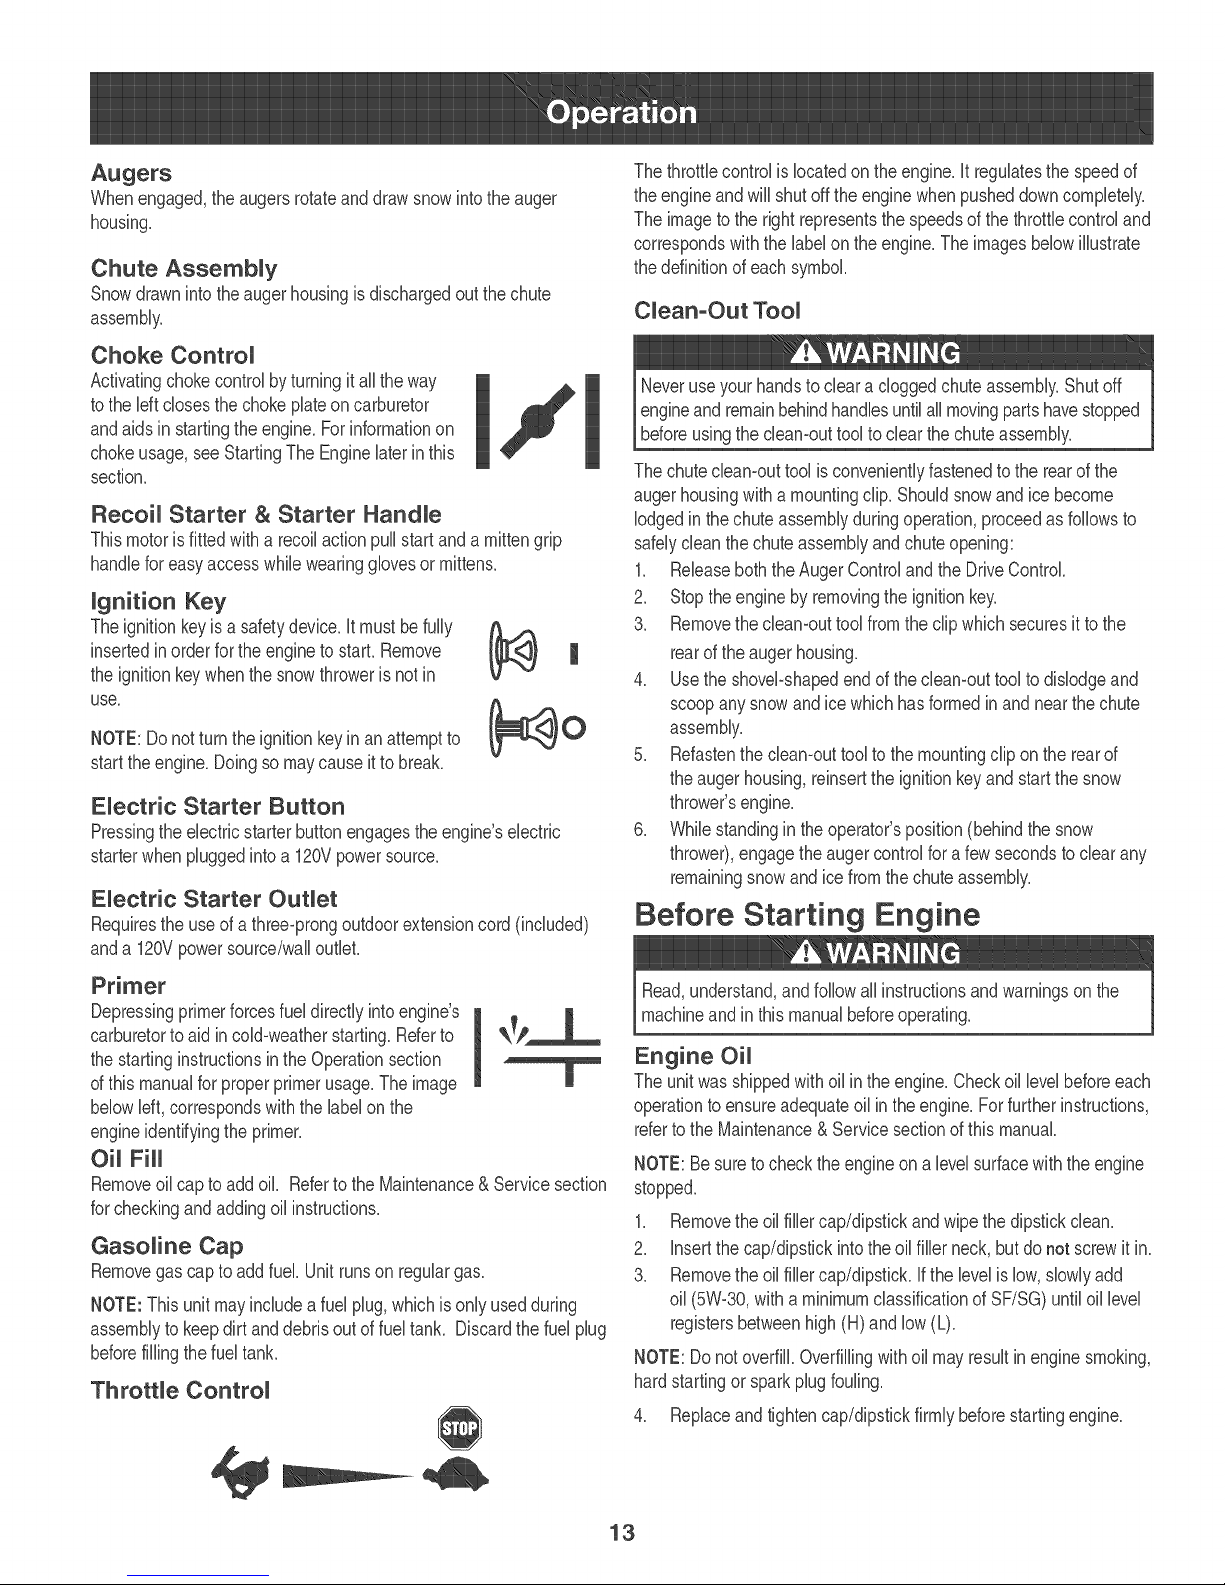
Thethrottlecontrolislocatedontheengine,it regulatesthe speedof
theengineandwillshutofftheenginewhen pusheddowncompletely.
Theimagetotherightrepresentsthe speedsofthethrottlecontroland
correspondswiththelabelontheengine.Theimagesbelowillustrate
thedefinitionofeachsymbol.
CUean=Out TooU
Neveruseyour handstoclearacloggedchuteassembly.Shutoff
engineandremainbehindhandlesuntilall movingpartshavestopped
beforeusingthecleamouttooltoclear thechuteassembly.
Thechutecleamouttoolisconvenientlyfastenedtotherearofthe
augerhousingwitha mountingcliF Shouldsnowand icebecome
lodgedinthechuteassemblyduringoperation,proceedasfollowsto
safelycleanthechuteassemblyandchuteopening:
1_ ReleaseboththeAugerControlandtheDriveControl
2_ Stoptheenginebyremovingthe ignitionkey.
3_ Removethecleamouttoolfromtheclipwhichsecuresitto the
rearoftheaugerhousing.
4_ Usethe shovePshapedendoftheclean-outtoolto dislodgeand
scoopanysnowandicewhichhas formedinandnearthe chute
assembly.
5_ Refastenthecleamouttoolto themountingclipon therearof
theaugerhousing,reinserttheignitionkeyandstartthesnow
thrower'sengine.
6_ Whilestandingintheoperator'sposition(behindthesnow
thrower),engagetheaugercontrolfora fewsecondstoclearany
remainingsnowand icefromthe chuteassembly.
Before Starting Engine
Depressingprimerforcesfueldirectlyintoengine's
carburetorto aidincold-weatherstarting_Referto _k1_)_,,,,,,,,a,,,,,m
thestartinginstructionsinthe Operationsection
ofthismanualforproperprimerusage.The image
belowleft,correspondswiththelabelonthe
engineidentifyingtheprimer.
Oil Fill
Removeoilcap toaddoil Referto the Maintenance&Servicesection
forcheckingandaddingoilinstruction&
GasoUine Cap
Removegascaptoaddfuel.Unitrunson regulargas.
NOTE:Thisunitmayincludea fuelplug,whichisonlyusedduring
assemblytokeepdirtanddebrisout offueltank. Discardthefuel plug
beforefillingthefueltank.
ThrottUe ControU
1
Read,understand,andfollowallinstructionsandwarningsonthe
machineandinthismanualbeforeoperating.
Engine OiU
Theunitwasshippedwith oilinthe engine.Checkoillevelbeforeeach
operationtoensureadequateoil intheengine.Forfurtherinstructions,
refertothe Maintenance& Servicesectionofthismanual.
NOTE:Besuretocheckthe engineonalevelsurfacewiththeengine
stoppe&
1_ Removetheoilfillercap/dipstickandwipe thedipstickclean.
2_ insertthe cap/dipstickintotheoilfiller neck,butdonot screwit in.
3_ Removetheoilfillercap/dipsticL ifthe levelislow,slowlyadd
oil (5%30, witha minimumclassificationofSF/SG)untiloillevel
registersbetweenhigh(H)andlow(L).
NOTE:Donotoverfill.Overfillingwithoil mayresultin enginesmoking,
hardstartingor sparkplugfouling.
4_ Replaceandtightencap/dipstickfirmlybeforestartingengine.
13
Page 14
Gasolne
Useautomotivegasoline(unleadedor lowleadedtominimizecombus-
tionchamberdeposits)withaminimumof87octane.Gasolinewith
upto 10%ethanolor 15%MTBE(MethylTertiaryButylEther)canbe
used.Neveruseanoil/gasolinemixtureordirtygasoline.Avoidgetting
dirt,dust,or waterin thefuel tank.DONOTuse E85gasoline.
, Refuelin awell-ventilatedareawiththe enginestopped.Donot
smokeorallowflamesorsparksintheareawheretheengineis
refueledorwheregasolineisstored.
, Do notoverfillthefueltank.Afterrefueling,makesurethetank
capisclosedproperlyandsecurely.
, Becarefulnottospillfuel whenrefueling.Spilledfuelorfuelvapor
mayignite.Ifanyfuelisspilled,makesuretheareaisdrybefore
startingtheengine.
, Avoidrepeatedor prolongedcontactwithskinorbreathingof
vapor.
Useextremecarewhenhandlinggasoline.Gasolineisextremely
flammableandthevaporsareexplosive.Neverfuel themachine
indoorsorwhiletheengineishotorrunning.Extinguishcigarettes,
cigars,pipesandothersourcesofignition.
.
Cleanaroundfuelfill beforeremovingcaptofuel.
2.
Afuellevelindicatorislocatedinthefueltank.Filltankuntilfuel
reachesthefuel levelindictor.SeeFigure10inset.Becarefulnot
tooverfill.
Starting The Engine
Determinethatyourhome'swiringisathree-wiregroundedsystem.
Askalicensedelectricianifyou arenotcertain.
Ifyouhaveagroundedthree-prongreceptacle,proceedasfollows.
Ifyoudonothavetheproperhousewiring,DONOTusetheelectric
starterunderanyconditions.
1. Plugtheextensioncordintotheoutletlocatedon theengine's
surface.Plugtheotherendof extensioncordintoathree-prong
120-volt,grounded,AC outletinawell-ventilatedarea.
2. Movethrottlecontrolto FAST(rabbit)_ position.
3. MovechoketotheONposition1,,#'1(coldenginestart).Ifengine
is warm,placechokeinOFFposition.
4. Pushprimerthreeto five(3-5)times,makingsuretocovervent
holewhenpushing.If engineiswarm,pushprimeronlyonce.
Alwayscoverventholewhenpushing.Coolweathermayrequire
primingto berepeated.
5. Pushstarterbuttonto startengine.Oncetheenginestarts,im-
mediatelyreleasestarterbutton.Electricstarterisequippedwith
thermaloverloadprotection;systemwilltemporarilyshut-downto
allowstartertocoolif electricstarterbecomesoverloaded.
6. Asthe enginewarms,slowlyrotatethechokecontroltoOFF
position.Iftheenginefalters,restartengineand runwithchoke
at half-chokepositionfor a shortperiodoftime,andthenslowly
rotatethechokeintoOFFposition.
Afterengine
Whendisconnecting,alwaysunplugtheendatthewall outlet
beforeunpluggingtheoppositeendfromtheengine.
Recoil Starter
Alwayskeephandsandfeetclearof movingparts.Do notusea
pressurizedstartingfluid.Vaporsareflammable.
NOTE:Forlocationofalltheenginecontrolsreferredto inthis section,
referto Fig.9onpage 12.
NOTE:Allowtheengineto warmupfor afewminutesafterstarting.
Theenginewill notdevelopfullpoweruntilit reachesoperating
temperatures.
1. Makecertainboththe augercontrolanddrivecontrolare inthe
disengaged(released)position.
2. insertignitionkeyinto slot.Makesureitsnapsintoplace.Donot
attempttoturnthekey.
NOTE:The enginecannotstartwithoutthekeyfullyinsertedintothe
Electric Starter
Theoptionalelectricstarterisequippedwitha groundedthree-wire
powercordandplug,andisdesignedtooperateon 120voltAC
householdcurrent,it mustbeusedwitha properlygroundedthree-
prongreceptacleatalltimestoavoidthe possibilityofelectricshock.
Followall instructionscarefullypriortooperatingtheelectricstarter.
DONOTuseelectricstarterinthe rain.
Donot pullthestarterhandlewhiletheenginerunning.
1. Movethrottlecontrolto FAST(rabbit)_ position.
2. MovechoketotheONpositionlJ 1(coldenginestart),ifengineis
warm,placechokeinOFFposition.
3. Pushprimerthreeto five(3-5)times,makingsuretocovervent
hob whenpushing,if engineis warm,pushprimeronlyonce.
Alwayscoverventhob whenpushing.Coolweathermayrequire
primingto berepeated.
4. Pullgentlyonthestarterhandleuntil itbeginsto resist,thenpull
quicklyandforcefullyto overcomethecompression.Do notrelease
thehandleandallowit tosnapback.ReturnropeSLOWLYto
originalposition,if required,repeatthisstep.
5. Astheenginewarms,slowlyrotatethechokecontrolto OFF
position,if theenginefalters,restartengineandrunwith chokeat
hal-choke positionfora shortperiodoftime,andthenslowlyrotate
thechokeintoOFFposition.
Toavoidunsupervisedengineoperation,neverleavethemachine
unattendedwiththeenginerunning.Turntheengineoff afteruseand
removeignitionkey.
14
Page 15
Stopping The Engine
Runenginefor afewminutesbeforestoppingtohelpdryoff any
moistureonthe engine.
1. MovethrottlecontroltoSTOP position.
2. Removetheignitionkey.Removingthekeywill reducethepos-
sibilityof unauthorizedstartingof theenginewhileequipmentis
notinuse.Keepthekeyin a safeplace.Theenginecannotstart
withouttheignitionkey.
Positioning Discharge Chute
Loosenthechuteknobandpivotupperchuteto desiredposition.Tighten
thechuteknobmakingsurethecarriageboltiscorrectlypositioned.
Rotatechutehandletodesiredoperatingposition.
Donot liftthe snowthroweratany timebythechutehandle.
3. Wipeanymoistureawayfromthecontrolsontheengine.
Before Stopping
1. Runenginefor afewminutestohelpdry offanymoistureonengine.
2. Toavoidpossiblefreeze-upof therecoilstarter,followthisstep:
RecoiU Starter
a. Withtheenginerunning,pullthe starterropewitha rapid,
continuousfullarm strokethreeor fourtimes.
To Stop The Snow Thrower
1. Tostopthewheels,releasethe drivecontrok
2. Tostopthrowingsnow,releasetheaugercontrok
3. Tostopengine,pushthrottlecontrollevertoOFF @ and pullout
thekey.Donotturn key.
Thetemperatureofmufflerandthesurroundingareasmayexceed
1500F.Avoidtheseareas.
Clearing The Snow
CAUTION:Checktheareatobe clearedfor foreignobjects.Remove
foreignobjects,if any.
1. Starttheenginefollowingstartinginstructions.
2. Allowtheenginetowarmupfora fewminutesastheenginewillnot
developfullpoweruntilit reachesoperatingtemperature.
3. Rotatethechuteassemblyto thedesireddirection,awayfrom
bystandersand/or buildings.
4. Makingcertainno bystandersor obstaclesarein frontoftheunit,
squeezetheaugercontrolcompletelyagainsttheupperhandleto
fullyengagetheaugers.
5. Whiletheaugercontrolisengaged,squeezethedrivecontrol
completelyagainstthe upperhandleto engagethewheels.Donot
"feather"thedrivecontrok
6. Asthesnowthrowerstartsto move,maintaina firmholdonthe
handle,andguidethesnowthroweralongthe pathto becleared.
7. Releasetheaugerand drivecontrolstostopthesnowthrowing
actionandforwardmotion.
NOTE:Yourunit isequippedwitha clutchin thetransmission,if the
wheelsstopturningwhiletryingtodischargelargevolumesofsnow,
immediatelydisengagethedrivecontrolandallowtherotatingaugers
todischargesnowfromthehousing.Reducetheclearingwidthand
continueoperation.
8. Oneachsucceedingpass,readjustthechuteassemblytothe
desiredpositionandslightlyoverlapthepreviouslyclearedpath.
Operating Tips
1. Formostefficientsnowremoval,removesnowimmediatelyafteritfalls.
2. Dischargesnowdownwindwheneverpossible.Slightlyoverlap
eachpreviouspath.
3. Setthe skidshoes1/4"belowtheshaveplatefornormalusage.
Theskidshoesmaybeadjustedupwardfor hard-packedsnow.
NOTE:it isnotrecommendedthatyouoperatethis snowthroweron
gravelas loosegravelcanbe easilypickedupandthrownbytheauger
causingpersonalinjuryand/ordamagetothesnowthrower.
4. ifforsomereason,youhaveto operatethesnowthrowerongravel,
keeptheskidshoeinthehighestpositionformaximumclearance
betweenthegroundandtheshaveplate.
5. Cleanthesnowthrowerthoroughlyaftereachuse.
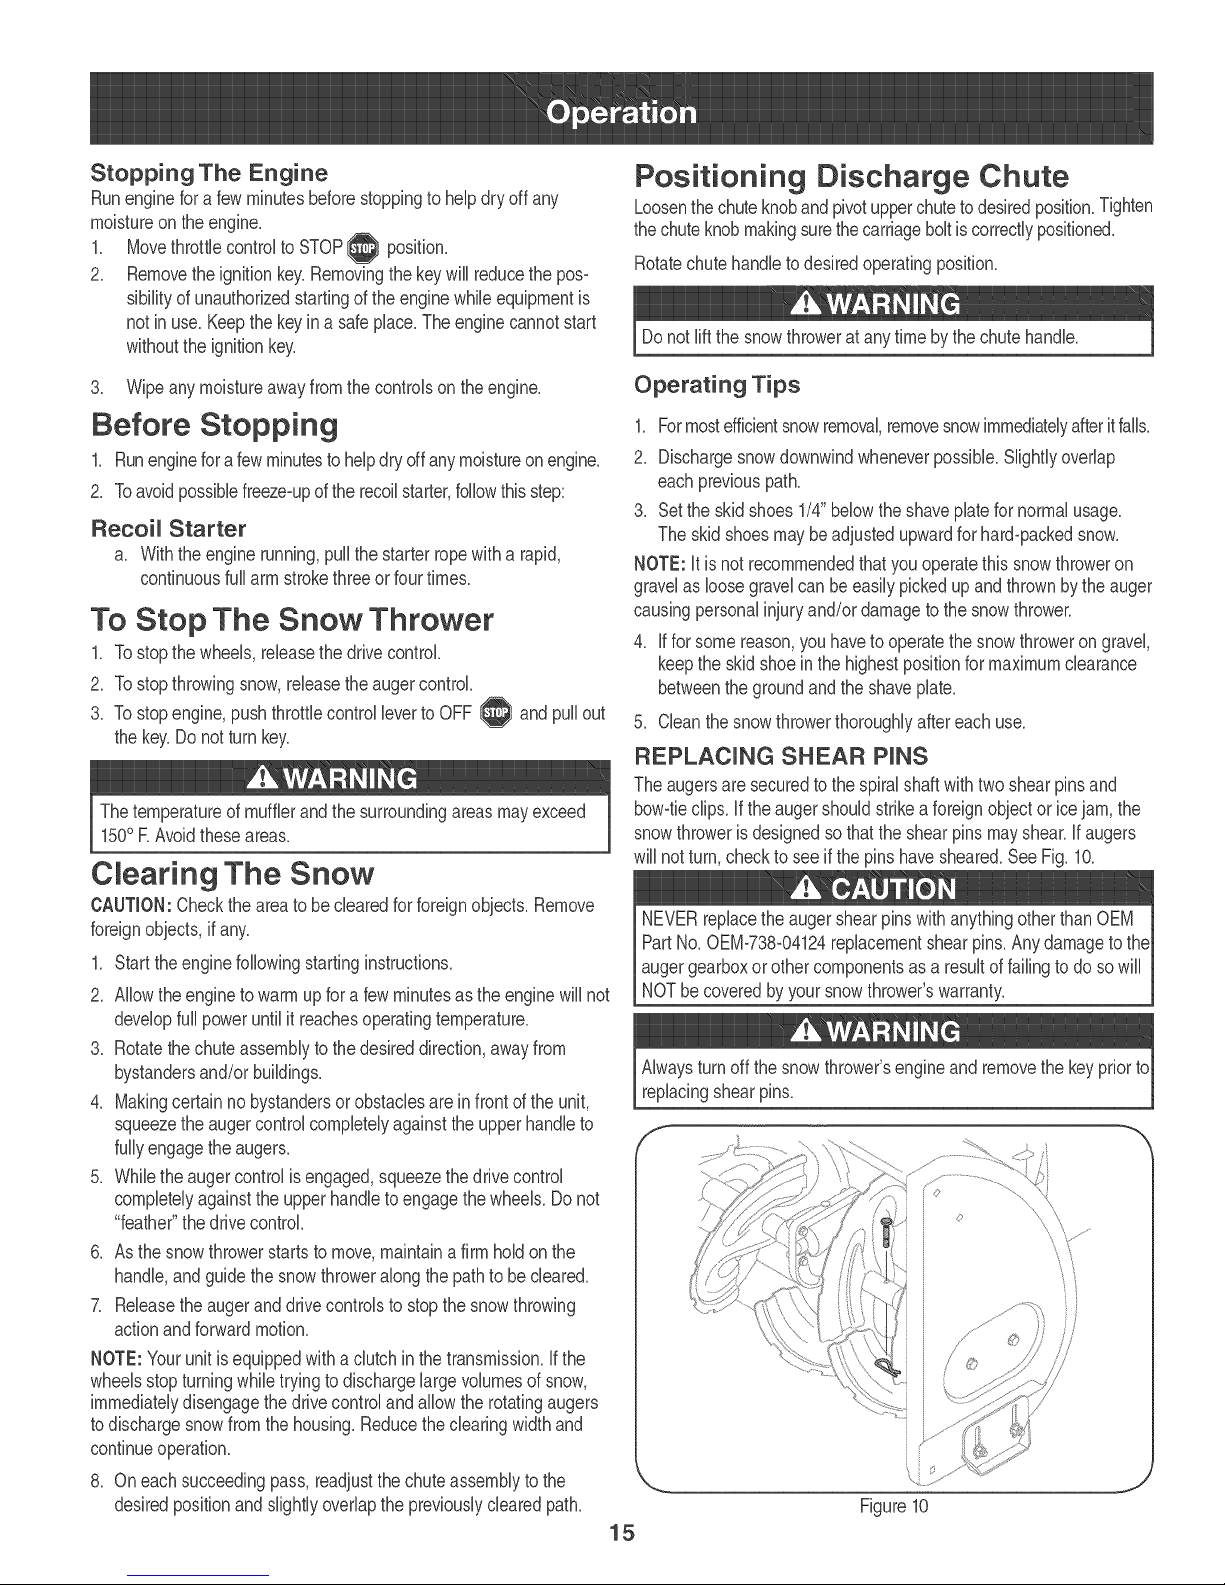
REPLACUNG SHEAR PUNS
Theaugersaresecuredtothespiralshaftwithtwo shearpinsand
bow-tieclips,if theaugershouldstrikea foreignobjector icejam,the
snowthrowerisdesignedsothatthe shearpinsmayshear,if augers
willnotturn,checkto seeif thepinshavesheared.SeeFig. 10.
NEVERreplacetheaugershearpinswithanythingotherthanOEM 1
PartNo.0EM-738-04124replacementshearpins.Anydamageto the1
augergearboxorothercomponentsasaresultof failingtodosowill j
NOTbecoveredbyyoursnowthrowerswarranty.
Alwaysturnoffthesnowthrower'sengineand removethekeypriorto
replacingshearpins.
f "-,
// @
/
Figure10
15
Page 16

ENGUNE MAUNTENANCE f _,
Beforelubricating,repairing,or inspecting,disengageall controls
andstopengine.Waituntilall movingpartshavecometo a complete
stop,
Checking Engine Oim
NOTE: Checktheoil levelbeforeeachuseandaftereveryfivehours
ofoperationtobesurecorrectoillevelismaintained.
Whenaddingoiltothe engine,referto viscositychart below.Engine
oilcapacityis 600ml(approx.20oz.).Donotover-fill.Usea4-stroke,
oranequivalenthighdetergent,premiumqualitymotoroilcertified
tomeetorexceedU.S.automobilemanufacturer'srequirementsfor
serviceclassificationSG,SR MotoroilsclassifiedSG, SFwillshow
thisdesignationonthe container.
1. Removethe oilfillercap/dipstickandwipethe dipstickclean.
2. insertthecap/dipstickintotheoilfillerneck,butdo notscrewitin.
3. Removethe oilfillercap/dipsticL if levelislow,slowlyadd oiluntil
oil levelregistersbetweenhigh(H) andlow(L).SeeFigure11.
4. Replaceandtightencap/dipstickfirmlybeforestartingengine.
Figure11
J
f
Changing Engine Oim
NOTE:Changetheengineoilafterthefirst5 hoursof operationand
oncea seasonorevery50 hoursthereafter,
1. Drainfuelfromtankbyrunningengineuntilthe fueltankisempty.
Besurefuelfillcapissecure,
2. Placesuitableoilcollectioncontainerunderoildrainplug.
3. Removeoil drainplug.SeeFigure12.
4. Tipengineto drainoil intothecontainer,Usedoil mustbe
disposedofat apropercollectioncenter,
Usedoil isa hazardouswasteproducLDisposeofusedoilproperly.
Donotdiscardwithhouseholdwaste.Checkwithyour localauthori-
tiesorSearsServiceCenterforsafedisposal/recyclingfacilities.
.
Reinstallthedrainplugandtightenit securely.
6.
Refillwiththe recommendedoil andchecktheoillevel See
RecommendedOilUsage charL The engine's oilcapacity is 20
ounces.
Synthetic
H
(°F)-400 -200 0o 200 400
J
Figure12
DONOTusenondetergentoilor 2_strokeengineoil.it couldshorten
theengine'sservicelife.
7. Reinstalltheoil fillercap/dipsticksecurely.
(oc) -300 -200 -10° 0°
Thoroughlywashyourhandswithsoapandwaterassoonas
possibleafterhandlingusedoil.
16
Page 17
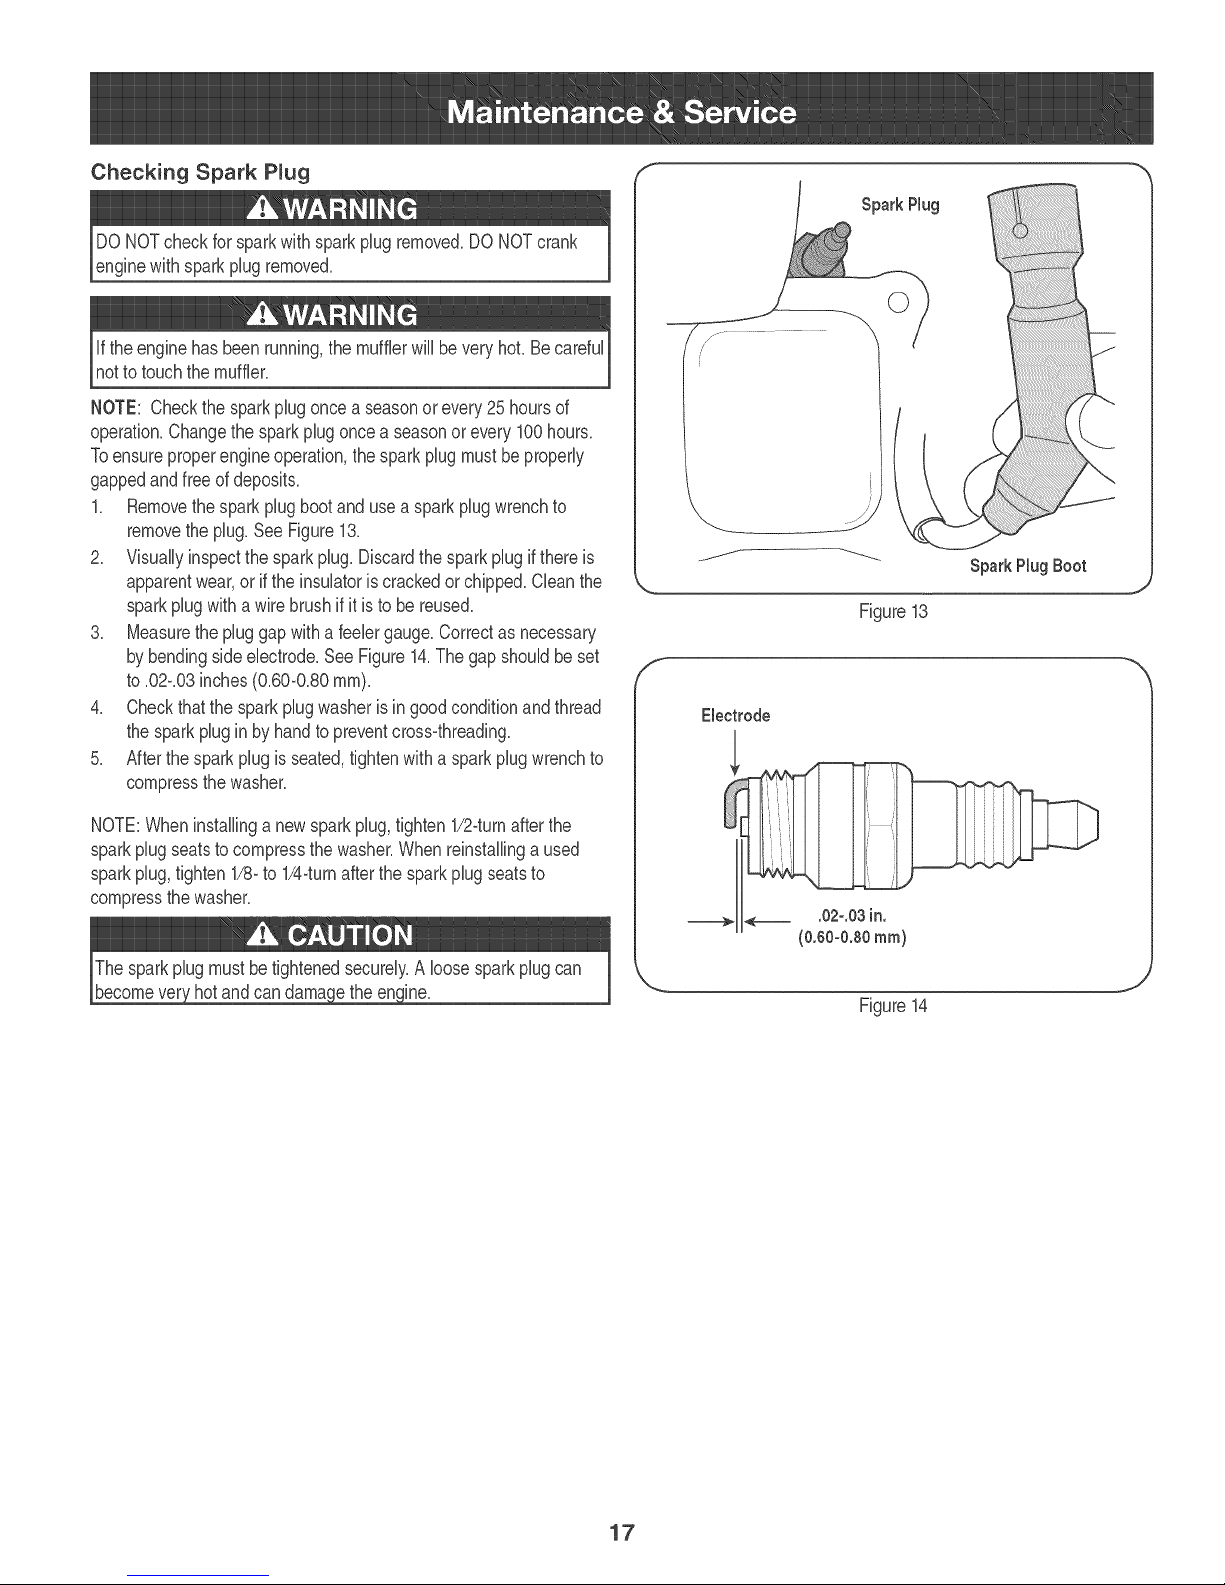
Checking Spark Pmug "
DONOTcheckforsparkwithsparkpBgremoved.DONOTcrank
enginewithsparkplugremoved.
iftheenginehasbeenrunning,themufflerwillbeveryhoLBecareful
notto touchthemuffler.
NOTE: Checkthesparkplugoncea seasonorevery25hoursof
operation.Changethesparkplugoncea seasonor every100hours.
Toensureproperengineoperation,thesparkplugmustbe properly
gappedandfreeofdeposits.
1_ Removethesparkplugbootanduse asparkplugwrenchto
removetheplug.SeeFigure13_
2_ Visuallyinspectthesparkplug.Discardthesparkplugifthereis
apparentwear,orif the insulatoriscrackedor chipped.Cleanthe
sparkplugwithawirebrushifit isto be reuse&
3_ Measurethepluggapwitha feelergauge.Correctas necessary
bybendingsideelectrode.SeeFigure14_Thegapshouldbeset
to_02_03inches(0_60@_80mm).
4_ Checkthatthe sparkplugwasherisingoodconditionandthread
thesparkplugin byhandtopreventcross-threadi%
5_ Afterthesparkplugis seated,tightenwitha sparkplugwrenchto
compressthewasher.
SparkPlug
©
SparkPlugBoot
Figure13
Electrode
NOTE:Wheninstallinga newsparkplug,tighten1/2_turnafterthe
sparkplugseatstocompressthewasher.Whenreinstallinga used
sparkplug,tighten1/8_to 1/4-turnafterthesparkplugseatsto
compressthewasher.
Thesparkplugmustbe tightenedsecurely.A loosesparkplugcan
becomeveryhotandcandama ethe en ine.
Figure14
17
Page 18
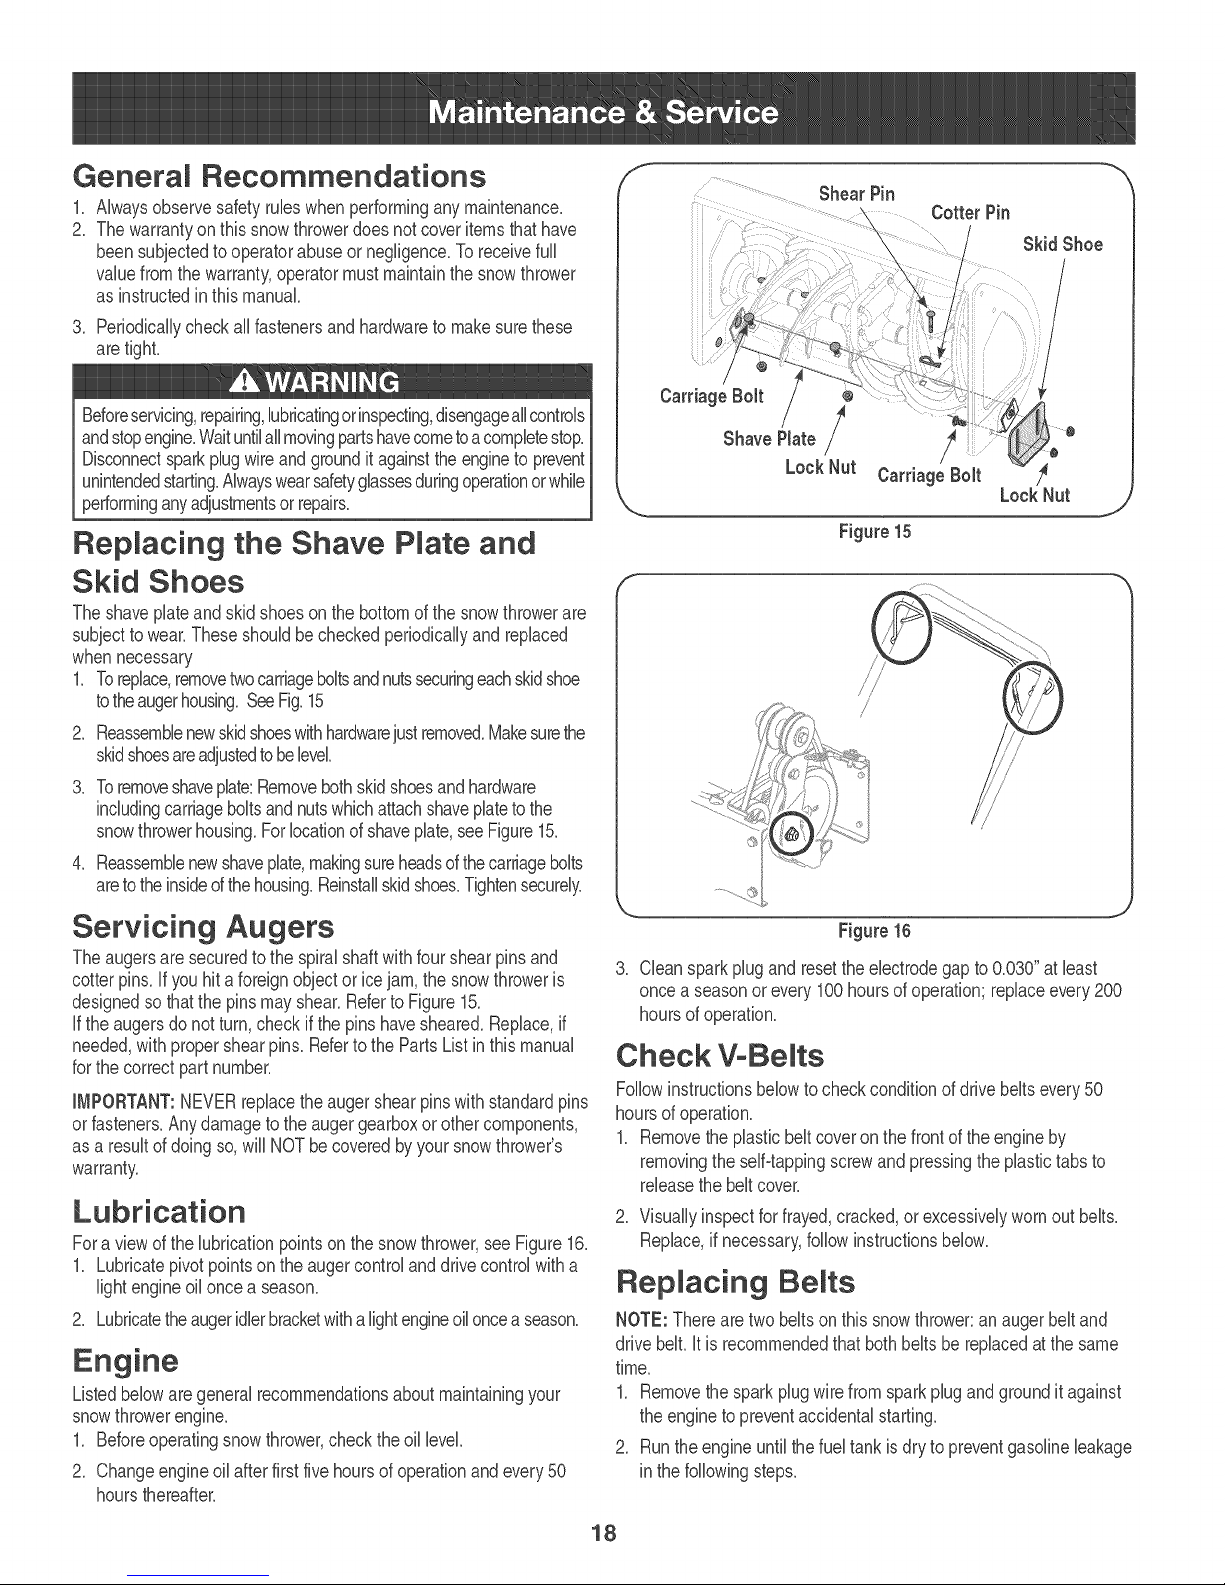
General Recommendations
.
Alwaysobservesafetyrubs whenperforminganymaintenance.
2_
Thewarrantyon thissnowthrowerdoesnotcoveritemsthathave
beensubjectedtooperatorabuseor negligence.Toreceivefull
valuefromthe warranty,operatormustmaintainthe snowthrower
asinstructedin thismanual.
3. Periodicallycheckallfastenersandhardwaretomakesurethese
aretighL
Beforeservicing,repairing,lubricatingorinspecting,disengageallcontrols
andstopengine.WaituntilallmovingpartshavecometoacompletestoF
Disconnectsparkplugwireandgroundit againsttheenginetoprevent
unintendedstarting.Alwayswearsafetyglassesduringoperationorwhile
performinganyadjustmentsor repair&
Replacing the Shave Pmateand
Skid Shoes
Theshaveplateandskidshoesonthebottomofthesnowthrowerare
subjecttowear.Theseshouldbe checkedperiodicallyandreplaced
whennecessary
1. Toreplace,removetwocarriageboltsandnutssecuringeachskidshoe
totheaugerhousing_SeeFig_15
.
Reassemblenewskidshoeswithhardwarejustremove&Makesurethe
skidshoesareadjustedtobelevel
3_
Toremoveshaveplate:Removebothskidshoesandhardware
includingcarriageboltsandnutswhichattachshaveplatetothe
snowthrowerhousing.Forlocationof shaveplate,see Figurel&
.
Reassemblenewshaveplate,makingsureheadsof thecarriagebolts
aretotheinsideof thehousing.Reinstallskidshoe&Tightensecurely.
S Shear Pin
CarriageBolt
ShavePlate /
Lock Nut
CarriageBolt
Figure 15
Cotter Pin
!
Skid Shoe
!
Lock Nut
J
Servicing Augers
Theaugersaresecuredtothespiralshaftwithfourshearpinsand
cotterpin& ifyouhita foreignobjectorice jam,thesnowthroweris
designedsothatthepinsmayshear_RefertoFigurel&
iftheaugersdo notturn,checkifthepinshavesheare&Replace,if
needed,withpropershearpin&Referto thePartsListinthismanual
forthecorrectpartnumber_
iMPORTANT:NEVERreplacetheaugershearpinswithstandardpins
orfastener&Anydamagetothe augergearboxor othercomponents,
asa resultofdoingso,willNOTbe coveredbyyoursnowthrower's
warranty_
Lubrication
Fora viewofthe lubricationpointson the snowthrower,seeFigure16.
1. Lubricatepivotpointsontheaugercontrolanddrivecontrolwitha
lightengineoil onceaseason.
2. Lubricatetheaugeridlerbracketwithalightengineoilonceaseason.
Engine
Listedbelowaregeneralrecommendationsaboutmaintainingyour
snowthrowerengine.
1. Beforeoperatingsnowthrower,checktheoillevel.
2_ Changeengineoil afterfirstfivehoursofoperationandevery50
hoursthereafter.
Figure16
3. Cleansparkplugandresettheelectrodegapto 0.030"at bast
oncea seasonor every100hoursof operation;replaceevery200
hoursof operation.
Check VoBemts
Followinstructionsbelowtocheckconditionofdrivebeltsevery50
hoursof operation.
1_ Removetheplasticbeltcoveron thefrontoftheengineby
removingthe self4appingscrewandpressingtheplastictabsto
releasethebeltcover.
2_ Visuallyinspectforfrayed,cracked,or excessivelywornoutbelts.
Replace,if necessary,followinstructionsbelow.
Replacing Berets
NOTE:Therearetwobeltsonthis snowthrower:anaugerbeltand
drivebelt.itis recommendedthatbothbeltsbe replacedatthe same
time.
1. Removethesparkplugwirefromsparkplugandgrounditagainst
theenginetopreventaccidentalstarting.
2. Runtheengineuntilthefueltankisdryto preventgasolineleakage
in thefollowingstep&
18
Page 19

Performbeltmaintenanceoutdoorsassomegasmaypossibly
leakfromthecarburetoreventhoughyouplaceda sheetofphsfic
underneaththegas capto preventthegascapfromleaking.
3. Removetheself-tappingscrewshowninFigure17,and pressthe
plastictabsto releasethe beltcover.Pullthebeltcoverupandout
fromaroundtheengineandchuteassembly.Setit asideandsave.
Auger Belt
IMPORTANT:Gascould leakfromthecarburetoratthis point,the
engineshouldhavebeenrununtilthefueltankwasdry,aspreviously
instructed.
1. Tipthesnowthrowerupandforwardsothat itrestsonthe auger
housing. RemovethebeltkeeperascalledoutinFigure19.Return
thesnowthrowertoits uprightpositionto completethefollowing
Figure17
f
er Belt
steps.
2. Slipthefrontaugerbeltoffof theenginepulleypushingitforward
and rollinginoffof thepulley.SeeFigure18.
3. Squeezetheaugercontrolhandleto releasetheaugerbrake,
whichisthetab thatholdsthebeltontotheaugerpulley.Remove
Drive
thebelt.
4, Replacewithnewbeltafterreplacingthedrive belt.
Drive Belt
NOTE:Replacethedrivebeltbeforereassemblingthenewaugerbelt.
1.Tip thesnowthrowerupandforwardsothatit restsontheauger
housing.
IMPORTANT:Gascould leakfromthecarburetoratthis point,the
engineshouldhavebeenrununtilthefueltankwasdry,aspreviously
instructed.
J
Figure18
f
2. Removethe springthatconnectsthetransmissionto a bolton the
engineframe.SeeFigure19.
NOTE:it maybeeasiertofirst removetheflangelocknut,thenuse
needle-nosedpliersto firmlygripspringand removefrombolt.
.
Pivotthetransmissionforwardto releasepressureonthe drivebelt.
Removebeltfromtransmissionpulley.
4,
Removethedrivebeltfromaroundtheenginepulley,andaway
fromtheunit.
5,
Placethenewdrivebeltintothe grooveon theenginepulley.See
Figure18.
6.
Tilt thetransmissionforwardandpositionthedrivebeltontothe
transmissionpulley.
7,
Reconnectthe springtothe bolton theengineframeand secure
thetransmission.Reinstalltheflangelocknut.
.
Installnewaugerbelt.
9.
Reassemblethebeltcoveron thesnowthrower.
Figure19
10.Reassemblethebelt keepertothehousing.
19
Page 20

Adjusting The Auger Cable
Periodicadjustmenttotheaugercontrolcabb mayberequireddue
tonormalstretchandwearonthe beL Adjustmentis neededifthe
augersseemto hesitatewhib turning,buttheenginemaintainsspeed,
orcontinueturningwiththeaugercontroldisengaged.
1. Loosentherearhexbolton the cabb adjustmentbracket.See
Figure20.
2. Slidethecabb adjustmentbracketbackwardstakingoutthe slack
in theaugercabb.
3. Refightentherearhexbolt
4. Startengineandverifyaugercontrolengagesanddisengages
properly.
NOTE:ifaugercontinuesto rotatewiththe controldisengaged,shut
offtheengineand readjustthecablebracketforward.Thenrecheck
theaugeroperation.
f
Bottom Auger
Housing Screw
Auger Cabb_
Adjustment
Bracket
TopAuger
"" Housing Screw
Figure20
J
Followthe maintenancescheduie given below. Someadjustmentswiii have to be madeperiodicaliyto maintainyour unit
properiy. Periodicaliycheck aii fastenersandmakesure these aretight. Keeptrack of your scheduiedservice by fiiiing in
theService Dates fieid below.
Beforeservicing,repairing,lubricatingor inspecting,disengageallcontrolsandstopengine.Waituntilallmovingpartshavecometoa completestop.
Disconnectsparkplugwireandgroundit againsttheengineto preventunintendedstarting.Alwayswearsafetyglassesduringoperationor while
performinganyadjustmentsorrepairs.
Maintenance Schedule
'I _ _'d_R-1i
BeforeEachUse
AfterEachUse
1st5 hours
After25hours
BeforeStorage
Oncea Season
1. CheckengineoilleveL
1. CheckequipmenL
2. Checkskidshows.
1. Engineoil
1. CheckWbelts.
1. Fuelsystem.
1. Pivotpoints.
2. Drivesystem&hex gear
shafL
3. Wheelshall
4. Sparkplug.
1. Filloiliflow
1. Clean
2. Clean
1. Change.
2. Adjustor replaceif necessary.
1. Empty.
1. Lubricate.
2. Lubricate.
3. Grease.
4. Changeifnecessary.
20
Page 21

ifthe snowthrowerwillnotbe usedfor30 daysor longer,or ifit istheendof thesnowseasonwhenthe lastpossibilityof snowisgone,the
equipmentneedsto bestoredproperly.Followstorageinstructionsbelowtoensuretopperformancefromthesnowthrowerformanymoreyear&
PREPARUNG ENGUNE
Short-Terns Storage
it isimportanttopreventgumdepositsfromforminginessentialfuel
systempartsof theenginesuchasthecarburetor,fuel filter,fuelhose,
ortankduringshortqermstorage(15_30days).Topreventthis,treat
thefuel systemusingafuel stabilizer.
Fuelstabilizer(suchas STA-BILTM or ULTRA-FRESWM)isanaccepb
ablealternativein minimizingtheformationoffuel gumdepositsduring
storage.Addstabilizertogasolineinfueltankorstoragecontainer.
Alwaysfollowmixratiofoundonstabilizercontainer.Runengineat
bast 10minutesafteraddingstabilizertoallowittoreachthecarbure-
tor.
latedareas,wherefuelfumesmayreachan openflame,
lightas onafurnace,waterheater,clothesdryerorgasappliance.
PREPARUNG SNOW THROWER
, Whenstoringthesnowthrowerin anunventilatedormetalstop
age shed,careshouldbetakento rustprooftheequipmenLUsing
a lightoilor silicone,coattheequipment,especiallyanychains,
springs,bearingsandcables.
, Removealldirt fromexteriorof engineandequipmenL
, Followlubricationrecommendation&
, Storeequipmentin a clean,dryare&
Long-Term Storage
Toavoidengineproblems,thefuelsystemshouldbeemptiedbefore
storagefor30 daysor longer.
Fuelleftin engineduringwarmweatherdeterioratesandwillcause
seriousstartingproblems.
1. Runthe engineuntilthefuel tankisemptyandit stopsdueto lack
offuel.Donotattempttopourfuelfromtheengine.
Neveruseengineor carburetorcleaningproductsinthefueltankor
permanentdamagemayoccur.
,
Removethe sparkplugandpourone (1)ounceofengineoil
throughthesparkplughob into thecylinder.Coversparkplughob
witharagandcrankthe engineseveraltimestodistributetheoil.
Replacesparkplug.
21
Page 22

Beforeperforminganytyped maintenance/service,disengageall
controlsandstoptheengine.Waituntilallmovingpartshavecometo
a completestop.Disconnectsparkplugwireandgroundit againstthe
enginetopreventunintendedstarting.Alwayswearsafetyglassesduring
operationorwhileperforminganyadjustmentsorrepairs.
This section addressesminor service issues. Tolocate the nearest SearsServiceCenteror to seheduJeservice, simpJycontact Sears
at 1-800-4-MYoHOME®.
1. Chokecontrolnotin ONposition.
Enginerunserratically
Engineoverheats
Excessivevibration
2. Sparkplugwiredisconnected.
3. Faultysparkplug.
4. Fueltankemptyorstab fuel.
5. Enginenotprimed.
6. Safetykeynot inserted.
1. EnginerunningonCHOKE.
2. Stab fuel.
3. Wateror dirtinfuelsystem.
4. Carburetoroutofadjustment.
1. Carburetornotadjustedproperly.
1. Loosepartsordamagedauger.
2. Connectwireto sparkplug.
3. Clean,adjustgap,or replace.
4. Filltankwithclean,freshgasoline.
5. Primeengineasinstructedin theOperationSection.
6. insertkeyfullyintothe switch.
2. Filltankwithclean,freshgasoline.
3. Drainfueltank.Refillwithfreshfuel.
4. ContactyourSearsParts& RepairCenter.
Lossof power 1. Sparkplugwireloose. 1.
2. Gascapventhob plugged. 2.
Unitfailsto propelitself 1. Drivecane inneedof adjustment. 1.
2. Drivebeltlooseordamaged. 2.
Unitfailsto dischargesnow 1. Chuteassemblyclogged. 1.
2. Foreignobjectlodgedin auger.
3. Augercane inneedofadjustment.
4. Augerbeltlooseor damaged.
5. Shearpin(s)sheared.
2. Stopengineimmediatelyanddisconnectsparkplug
3. Adjustaugercontrolcable.RefertoAssembly
4. Replaceaugerbelt.Referto Serviceand Mainte-
5. Replacewith newshearpin(s).
1. MovechokecontroltoON position.
1. MovechokecontroltoOFFposition.
1. ContactyourSearsParts&RepairCenter.
1. Stopengineimmediatelyanddisconnectsparkplug
wire.Tightenall boltsandnuts.if vibrationcontinues,
haveunit servicedby aSearsParts& RepairCenter.
Connectandtightensparkplugwire.
Removeiceandsnowfromgascap.Becertainvent
hob isclear.
Adjustdrivecontrolcable.RefertoServiceand
Maintenancesection.
Replacedrivebelt.Referto Service&Maint.section.
Stopengineimmediatelyanddisconnectsparkplug
wire.Cleanchuteassemblyandinsideofauger
housingwithclean-outtoolora stick.
wire.Removeobjectfromaugerwithclean-outtool
or astick.
section.
nancesection.
NEED MORE HELP?
_£}u_11_indt_e ;_nswe_a_Idl:Iloreon _a_age_ryhe_e4_e_ o fenf_÷e!
o Find this and at[ your other product raanua[s on[_ne
o Get answers from our team of home experts,
o Get a persorla[ized maintenance p[an fo_"your home,
o Find information and too[s to help with home projects,
22
Page 23

Craftsman Snow Thrower Modem 247.88755
23
Page 24

Craftsman Snow Thrower Modem 247.88755
1 684-04037 ChuteAssembly
2 710-04071 CarriageBolt5/16-18x1.0"
3 710-0451 CarriageBolt5/16-18
4 710-0280A CarriageBolt5/16-18x.62
5 720-0284 WingKnob5/16-18
6 731-04388A ChuteHandle
7 731-04426A UpperChute
8 736-0287 FlatWasher.385x .87x .06
9 731-04127 LowerChute
10 731-04353 ChuteRing
11 731-2836A ChuteAdapter5"Dia.
12 732-04111 ChuteAdiustmentSpring
13 712-04064 FlangeLockNut1/4-20
14 731-2843 Clean-outTool
15 731-2835 Clean-outToolMount
16 725-0157 CableTie
17 710-0134 CarriageScrew1/4-20x0.62"
18 710-0520 HexBolt3/8-16x 1.50"
19 710-04484 AB Screw5/16-18x .750
20 712-04063 FlangeLockNut,5/16-18
21 712-04065 FlangeLockNut,3/8-16
22 750-04852 ShoulderSpacer
23 715-04020 SpiralPin
24 728-04012 PushOnNut
25
28
27
28
29
30
31
32
33
34
35
36
37
38
39
40
41
42
43
44
45
46
47
731-04218B
732-0611
736-0174
738-0281
741-0245
741-0309
750-04191
741-0919
784-0434
790-00075
618-04292A
684-04113A
684-04114A
684-04166A
714-04040
731-04870
736-0351
738-04124A
741-0493A
790-00087A
790-00117
784-5580
710-04606
Impeller
ExtensionSpring
WaveWasher
ShoulderScrew3/8-16
HexFlangeBearing
BallBearing
Spacer
FlatIdler
AugerIdlerBracket
BearingHousing
AugerGearboxAssembly
AugerAssembly- LH
AugerAssembly- RH
AugerHousing,22"
BowTieCotterPin72
Spacer,1.25x.75x 1.00
FlatWasher
ShearPin,.25x 1.50
FlangeBushing
HexBearingHousing
ShavePlate2.25x 21.66LG
SkidShoe
BeltKeeper
24
Page 25

Craftsman Snow Thrower Modem 247.88755
25
Page 26

Craftsman Snow Thrower Modem 247.88755
1 710-0449 CarriageScrew5/16-18x2.25
2 710-0605 Mach.Screw1/4-20x1.825
3 710-04484 Screw5/16-18x .75
4 712-04064 Range LockNut1/4-20
5 720-0284 WingKnob5/16-18
6 725-0157 CableTie
7 748-04256 DriveCable
8 748-04236 AugerCable
9 747-1161A AugerControl
10 747-1214 DriveControl
11 749-04147 LowerHandle
12 749-04459 UpperHandle
13 790-00053 HandleTab
14 618-04296A TransmissionAssembly
15 710-0809 TTScrew1/4-20x 1.25
16 710-1652 Screw1/4-20x .625
17 711-1364 ClevisPin
18 714-0115 CotterPin1/8 x 1.0
19 714-04040 BowTieCotter Pin 72
20 715-0249 RollPin
21 717-04066A Pinion14T
22 717-04073A Gear70T
23 732-0429A ExtensionSpring
24 i 736-0192 FlatWasher
25 738-04184A ShoulderScrewl/4-20
26 J738-0924A ShoulderScrew1/4-28
27 741-0245 HexFlangeBearing
28 741-04108 HexFlangeBearing
29
3O
31
32
33
34
35
36
37
38
39
4O
41
42
43
44
45
46
47
48
49
5O
51
52
53
54
55
756-0625
784-0419C
790-00223A
790-00224
634-04282A
710-0627
736-0242
738-04321
710-0224
710-0654A
710-0696
710-1245B
731-04162A
736-0247
736-0505
748-04067A
750-1355
750-1356
754-04013
754-04014
756-04024
756-0569
729-04035
731-05672A
736-0160
736-0451
750-04913
CableRoller
DriveHousingFrame
AugerCable Bracket
AugerCableAdi. Bracket
WheelAssy SnowHogGray
LockBolt5/16-24x .75
BellWasher.34x.872x.06
Axle
HexScrew#10-16x.500
TTSeresScrew3/8-16x 1.0
HexBolt3/8-24x .875
LockBolt5/16-24x .875
BeltCover
FlatWasher.406IDx 1.25OD
FlatWasher.34IDx1.50OD
Pulley:Adapter.75Dia.
Spacer.876x 1.25x .19
Spacer.876x 1.25x .86
V-Belt3/8 x21.108Lg.
V-Belt3/8 x26.680Lg.
AugerPulley
PulleyHalf
AmpSealedConnector
Spacer
FlatWasher.53x.93x .05
SaddleWasher
Spacer
26
Page 27

Craftsman Engine Modem ZS385oSU For Snow Thrower Modem 247.88755
(,0
_ . _-_i_!¸
27
Page 28

Craftsman Engine Modem ZS385oSU For Snow Thrower Modem 247.88755
751q0645
751q0646
751q0663
751q0658
751q0654
751q0664
751q0665
751q0655
751q0656
751q0662
751q0652
751q0653
751q0642
751q0666
751q0292
751q0639
751q0638
751q0635
751q0637
751q0630
751q0636
751q0634
751q0643
751q0640
751q0651
751o10307
731@5696
952Z365_
ElectricStarter 84
ignitionCoil 22
FanCoverComplete 112
RecoilStarterAssembly 121
GovernorSpring 77
ThrottleReturnSpring 78
GovernorRod 79
Dipstick 107
DipstickTube 108
Cover_Engine/Dipstick 110
FuelFilter 113
FuelTank 115
MufflerShroud 37
MufflerGasket 59
SparkPlug 58
Primer 64
CarburetorAssembly 65
Air FilterHeatingPipeCover 69
ignitionSwitch 70
ignitionKey 71
ChokeLever 73
EngineShroud 72
MufflerShield 40
ChokePushRod 66
FuelTankNipple 116
FlywheelKey N/A
StarterHandle N/A
EngineComplete N/A
751q0660
751q0661
751q0668
GasketKitComplete
OilSeal
CrankcaseCoverGasket
O_Ring
CylinderHeadGasket
MufflerGasket
HeadCoverGasket
CarbInsulatorGasket
CarburetorInsulator
CarburetorGasket
PaperGasket
OilDrainWasher
GasketKitExternal
OilDrainWasher
MufflerGasket
CarbInsulatorGasket
CarburetorInsulator
CarburetorGasket
HeadCoverGasket
CylinderHeadAssembly
RockerArm
intakeValve
ExhaustValve
ValveSpring
ValveSpringRetainers_Exhaust
PivotAdjustingNut
RockerArmLockNut
RockerArmStuds
PushRodGuide
ValveCoverGasket
CarburetorInsulatorPlateGasket
CarburetorInsulatorPlate
MufflerGasket
CylinderHeadGasket 170
CylinderHead
ExhaustValveAdjuster
ValveSpringRetainer_ intake
4
10
15
55
59
47
61
62
63
42
19
19
59
61
62
63
47
51
103
98
100
101
52
53
5O
49
47
61
62
59
55
N/A
102
104
28
Page 29

Craftsman Engine Modem ZS385oSU For Snow Thrower Modem 247.88755
751_10659 ShortBlock
CrankcaseComplete 17
Oil PipeReserve N/A
CrankcaseCover 5
Piston 93
PistonRingSet_Complete 95
PistonPin 94
PistonPinClip 92
ConnectingRodAssemblyComplete 91
ValveLifter(Tappet) 96
CamshaftAssembly 7
CarbInsulatorplategasket 61
CrankshaftAssembly 11
CarburetorInsulatorHate 62
MufflerGasket 59
GovernorArmShaft 16
Pin Lock 14
GovernorAssembly 12
CaseCoverGasket 10
CylinderHeadGasket 55
ValveCoverGasket 47
Oil DrainBolt 20
Oil DrainPlugWasher 19
DowelPin 9
DowelPin 8
DowelPin 56
751_10641
751_10647
751_10648
751_10649
751_10650
751_10657
751_10669
751_10644
OilDrainAssembly
OilDrainPipe
DrainBolt
ValveKit
ExhaustValve
intakeValve
PushRodKit
PushRod
FuelCapAssembly
FuelCapComplete
Packing( Gasket )
Clip ( GasketRetainer)
FuelLineKit
FuelLineClamp
FuelLine
MufflerStudAssembly
MufflerStud
OilFillPlugAssembly
OilFillHug
O-Ring
MufflerAssemblyComplete
MufflerAssembly
ExhaustPipe
18
2
98
103
97
111
N/A
N/A
117
118
6O
2
3
41
43
Bearing 13
Bolt 1
Oil Seal 4
O-Ring- GovernorArm 15
Oil FillerPlug 2
O-Ring- Oil FillerPlug 3
Oil DrainPipe 18
29
Page 30

MTD CONSUMER GROUP (NC (MTD), the Caifornia Air Resources Board (CARD)
and the United States Environment Protection Agency (UoSoEPA)
Emission Contro( System Warranty Statement
(Owner's Defect Warranty Rights and Obigations)
EMISSIONCONTROLSYSTEMCOVERAGEISAPPLICABLETOCERTIFIEDENGINESPURCHASEDINCALIFORNIAIN2005ANDTHERE-
AFTER,WHIOHAREUSEDINCALIFORNIA,ANDTOCERTIFIEDMODELYEAR2005ANDLATERENGINESWHICHAREPURCHASEDAND
USEDELSEWHEREINTHEUNITEDSTATES.
Californiaandelsewherein theUnitedStatesEmissionControlDefectsWarrantyCoverage
TheCaliforniaAir ResourcesBoard(CARB),U.S.EPAandMTDarepleasedtoexplaintheemissionscontrolsystemwarrantyonyourmodelyear
2006andlatersmalloff-roadengine,in California,newsmalloff-roadenginesmustbe designed,builtandequippedtomeettheStatesanti-smog
standards.ElsewhereintheUnitedStates,newnon-road,spark-ignitionenginescertifiedformodel2005andlater,mustmeetsimilarstandardsset
forthbytheU.S.EPA.MTDmustwarrantytheemissioncontrolsystemonyourengineforthe periodoftimelistedbelow,providedtherehasbeen
noabuse,neglectorimpropermaintenanceofyour smalloff-roadengine.
Youremissioncontrolsystemmayincludepartssuchasthe carburetor,fuel-injectionsystem,theignitionsystem,andcatalyticconverter,fuel
tanks,fuellines,fuelcaps,valves,canisters,filters,vaporhoses,clamps,connectors,andotherassociatedemission-relatedcomponents.
Whereawarrantableconditionexists,MTDwillrepairyoursmalloff-roadengineat nocosttoyourincludingdiagnosis,partsandlabor.
MANUFACTURER'S WARRANTY COVERAGE:
Thisemissionscontrolsystemiswarrantedfortwoyears,if anyemission-relatedpartonyourengineisdefective,thepart willberepairedor
replacedbyMTD.
OWNER'S WARRANTY RESPONSlBILmES:
Asthesmalloff-roadengineowner,youare responsibleforthe performanceofthe requiredmaintenancelistedinyourOwner'sManual.MTD
recommendsthatyouretainall yourreceiptscoveringmaintenanceson yoursmalloff-roadengine,butMTDcannotdenywarrantysolelyfor the
lackofreceiptsorfor yourfailureto ensuretheperformancetoallscheduledmaintenance.
Asthesmalloff-roadengineowner,youshouldhoweverbeawarethat MTDmaydenyyourwarrantycoverageifyoursmalloff-roadengineorpart
hasfailedduetoabuse,neglect,impropermaintenanceorunapprovedmodifications.
Youare responsibleforpresentingyoursmalloff-roadenginetoan AuthorizedMTDServiceDealerassoonasa problemexists.Thewarranted
repairsshouldbe completedin a reasonableamountof time,nottoexceed80 days.
if youhaveanyquestionsregardingyourwarrantyrightsand responsibilities,youshouldcontacta MTDServiceRepresentativeat 1-800-800-7310
andaddressisMTDCONSUMERGROURRO.Box361131,ClevelandOH,44136@019.
DEFECTS WARRANTY REQU(REMENTS FOR 1995 AND LATER SMALL OFF-ROAD ENG(NES:
Thissectionapples to 1995andlatersmalloff-roadengines.The warrantyperiodbeginsonthe datethe engineorequipmentisdeliveredtoan
ultimatepurchaser.
!a) GeneralEmissionsWarrant_
MTDmustwarranttotheultimatepurchaserandeachsubsequentpurchaserthatthe engineis:
(1)Designed,built,andequippedsoasto conformwithallapplicableregulationsadoptedbytheAirResourcesBoardpursuantto itsauthorityin
Chapters1and2,Part5,Division26of theHealthandSafetyCode;and
(2) Freefromdefectsin materialsandworkmanshipthatcausethefailureofa warrantedpartto be identicalin all materialrespectstothepartas
describedin theenginemanufacturer'sapplicationforcertificationfora periodof twoyears.
!b)Thewarrantyonemissions-relatedpartswillbe interpretedasfollows:
(1)Anywarrantedpart thatisnotscheduledforreplacementas requiredmaintenanceinthewritteninstructionsrequiredbySubsection(c)
mustbewarrantedfor thewarrantyperioddefinedinSubsection(a)(2).ifanysuchpartfailsduringthe periodof warrantycoverage,it mustbe
repairedor replacedbyMTDaccordingto Subsection(4)below.Anysuchpartrepairedor replacedunderthewarrantymustbewarrantedfor
theremainingwarrantyperiod.
(2)Anywarrantedpartthatis scheduledonlyfor regularinspectioninthewritteninstructionsrequiredbySubsection(c) mustbewarrantedfor
thewarrantyperioddefinedin Subsection(a)(2).A statementinsuchwritteninstructionstotheeffectof"repairor replaceasnecessary"will
notreducetheperiodofwarrantycoverage.Anysuchpartrepairedor replacedunderwarrantymustbe warrantedfortheremainingwarranty
period.
(3) Anywarrantedpartthatwhichis scheduledforreplacementas requiredmaintenancein thewritteninstructionsrequiredbySubsection(c)
mustbewarrantedfor theperiodoftimepriortothe firstscheduledreplacementpointforthat part.ifthepart failspriortothefirst scheduled
replacement,the partmustbe repairedor replacedbyMTDaccordingtoSubsection(4) below.Anysuchpartrepairedor replacedunder
warrantymustbewarrantedfor theremainderof theperiodpriortothefirstscheduledreplacementpointforthepart.
Page 31

(4)Repairorreplacementofanywarrantedpartunderthewarrantyprovisionsofthisarticlemustbeperformedatnochargetotheownerata
warrantystation.
(5)NotwithstandingtheprovisionsofSubsection(4)above,warrantyservicesorrepairsmustbeprovidedatallMTDdistributioncentersthat
arefranchisedtoservicethesubjectengines.
(6)Theownermustnotbechargedfordiagnosticlaborthatleadstothedeterminationthatawarrantedpartisinfactdefective,providedthat
suchdiagnosticworkisperformedatawarrantystation.
(7)Theenginemanufacturerisliablefordamagestootherenginecomponentsproximatelycausedbyafailureunderwarrantyofanywarranted
part.
(8)Throughouttheengine'swarrantyperioddefinedinSubsection(a)(2),MTDwillmaintainasupplyofwarrantedpartssufficienttomeetthe
expecteddemandforsuchparts.
(9)Anyreplacementpartmaybeusedintheperformanceofanywarrantymaintenanceorrepairsandmustbeprovidedwithoutchargetothe
owner.SuchusewillnotreducethewarrantyobligationsofMTD.
(10)Add-onormodifiedpartsthatarenotexemptedbytheAirResourcesBoardmaynotbeused.Theuseofanynon-exemptedadd-onor
modifiedpartsshallbegroundsfordisallowingawarrantyclaimmadeinaccordancewiththisarticle.Theenginemanufacturershallnotbe
liableunderthisarticletowarrantfailuresofwarrantedpartscausedbytheuseofnon-exemptedadd-onormodifiedpart.
__)MTDwillincludea co_yofthefollowingemissionwarrantyLpartslistwitheachnewen_q thoseportionsofthe listap#licabletothe
(1)FuelMeteringSystem
, Coldstartenrichmentsystem(softchoke)
•Carburetorandinternalparts
, FuelPump
, FuelTank
(2)AirinductionSystem
, Aircleaner
, Intakemanifold
(3) ignitionSystem
, Sparkplug(s)
, MagnetoIgnitionSystem
(4)ExhaustSystem
, Catalyticconverter
, SAI(Reedvalve)
(5) MiscellaneousItemsUsedin AboveSystem
, Vacuum,temperature,position,timesensitivevalvesand switches
, Connectorsandassemblies
(6) Evaporativecontrol
, FuelHosecertifiedforARBevaporativeemissionof2006.
, FuelHoseClamps
, Tetheredfuelcap
, Carboncanister
, Vaporlines
GDOC-100174Rev,B
Page 32

Look For ReUevant Emissions DurabiUity Period and
Air Unde× Unformation On Your Engine Emissions LabeU
Engines that are certified to meet the California Air Resources Board (CARB) Tier 2 Emission Standards must
display information regarding the Emissions Durability Period and the Air index. Sears, Roebuck and Co., U.S.A.
makes this information available to the consumer on our emission labels.
The Emissions Durability Period describes the number of hours of actua_ running time for which the engine is
certified to be emissions compliant, assuming proper maintenance in accordance with the Operating & Mainte-
nance Instructions. The following categories are used:
Moderate: Engine is certified to be emission compliant for 125 hours of actual engine running time.
mntermediate: Engine is certified to be emission compliant for 250 hours of actual engine running time.
Extended: Engine is certified to be emission compliant for 500 hours of actual engine running time.
For example, a typical walk-behind lawn mower is used 20 to 25 hours per year. Therefore, the Emissions
Durabimity Period of an engine with an intermediate rating would equate to 10 to 12 years.
The Air mndex is a calculated number describing the relative level of emissions for a specific engine family. The
lower the Air Index, the cleaner the engine. This information is displayed in graphical form on the emissions label.
After July 1,2000, Look For Emissions Compliance Period
On Engine Emissions CompUiance LabeU
After July 1, 2000 certain Sears, Roebuck and Co., U.S.A. engines will be certified to meet the United States
Environmental Protection Agency (USEPA) Phase 2 emission standards. For Phase 2 certified engines, the Emis-
sions Compliance Period referred to on the Emissions Compliance _abei indicates the number of operating hours
for which the engine has been shown to meet Federal emission requirements.
For engines less than 225 cc displacement, Category C = 125 hours, B = 250 hours and A = 500 hours.
For engines of 225 cc or more, Category C = 250 hours, B = 500 hours and A = 1000 hours.
This is a generic representation of the emission labe_typically found on acertified engine.
GDOC-100182Rev.A
32
Page 33

Congratulationsonmakingasmartpurchase.YournewCraftsman®
productisdesignedandmanufacturedforyearsofdependabbopera-
tion.ButlikeaiIproducts,itmayrequirerepairfromtimetotime.That's
whenhavingaRepairProtectionAgreementcansaveyoumoneyand
aggravation.
Here'swhattheRepairProtectionAgreement*incBdes:
, Expertservicebyour10,000professionalrepairspecialists
, Unlimitedserviceandnochargeforpartsandlaboronall
coveredrepairs
, Productreplacementupto$1500ifyourcoveredproductcan'tbe
fixed
, Discountof10%fromregularpriceofserviceandrelatedinstalled
partsnotcoveredbytheagreement;also,10%offregularpriceof
preventivemaintenancecheck
, FastheJpbyphone=wecallitRapidResolution=phonesupport
fromaSearsrepresentative.Thinkofusasa"talkingowner's
manual/'
Onceyoupurchasethe Agreement,a simplephonecallisallthatit
takesfor youto scheduleservice.Youcancallanytimedayor night,or
schedulea serviceappointmentonline.
TheRepairProtectionAgreementisa risk-freepurchase,if youcancel
foranyreasonduringtheproductwarrantyperiod,wewillprovideafull
refund.Or,a proratedrefundanytimeafterthe productwarrantyperiod
expires.PurchaseyourRepairProtectionAgreementtoday!
SomeJimitations andexclusions apply. Forprices and additional
information in the U.S.A.call 1-800-827-6655.
*Coveragein Canadavaries on some items.Forfull detaib call
SearsCanadaat 1-800-361-6665.
SearsInstallation Service
ForSearsprofessionalinstallationofhomeappliances,garagedoor
openers,waterheaters,andothermajorhomeitems,inthe U.S.A.or
Canadacall1-800-4-MY-HOME®.
33
Page 34

DecUaraci6n de garantia ............................ Pagina 33
Practicas operaciOn seguras ..................... Pagina 34
Montaje ...................................................... Pagina 38
OperaciOn .................................................. Pagina 42
Servicio y Mantenimiento .......................... PAgina 46
SoUuci6n de proMemas .............................. Pagina 52
Etiquetas de segundad .............................. Pagina 7
Lista de piezas ........................................... Pagina 23
Acuerdo de protectiOn para reparaciones .... Pagina 55
N0mero de servicio ................................... Cubierta posterior
AUmacenamiento fuera de temporada ....... Pagina 51
CRAFTSMAN GARANT[A L_MUTADA
Dos ASos en Lanzador de Nieve
Cuandohechofuncionary mantenidosegOntodaslas instruccionessuministradas,si estelanzadordenievefalladebidoa undefectoen matedalohabilidadden-
tro dedosaSosdela fechao compra,vueltaestoaalgunoautoriz6Craftsmanposici6ndeba]adaparareparaci6nlibre.Parala posici6nautorizadam&scercana,
Ilamar1-800-4MYHOME.
EstagaranfiasoIMtas61o90d[asde lafechade lacomprasiestelanzadorde nieveesusadoalgunavezparaob]efivosdealquileropublicidad.
EstagaranfiacubreSOLOdefectosen matedalyhabilidad.Chamuscano pagar¶:
• LosarficulosprescindiblesquesehacenIlevadospuestosduranteel uso normal,incluso,perono Iimitadosparapafinarzapatos,platodeafeitado,
esquilanalfileres,bujia,filtro deaire,cinturones,yfiltrodelaceite.
• Revisi6ndemantenimientoest_ndar,cambiosde aceite,o puestasapunto.
• Reemplazodeneum_ficoo reparaci6ncausadaporpinchazosdesdefueradeobietos,comou_as,espinas,tocones,o cristal.
• Neum_ticoo reemplazoderuedaoreparaci6nqueresultade ropanormal,accidente,uoperaci6nimpropiaomantenimiento.
• Lasreparacionesnecesariasdebidoal abusode operador,inclusoperonolimitadoparada_arcausadoafectandoobietosquedoblanel marcoo el
cigOeSal,o elsobreexcesodevelocidaddelmotor.
• Reparacionesnecesariasdebidoanegligenciadeoperador,[nchso peronolimitadocon,da_oelectricoy mecanicocausadopotalmacenaie[mprop[o,
fracasodeusarelgradoapropiadoycantidaddepetr61eodemotor,o fracasodemantenerelequiposegOnlasinstruccionescontenidasenelmanual
deloperador.
• Motor(sistemadecombustible)la Iimpiezao lasreparacionescausadasporel combustibledeterminarondeset contaminadasu oxidado(sevuelven
duro).Engeneral,el combustibledeberiaser usado30d[asdespuesdesufechadecompra.
• Elempeioramientonormaly la ropadelosfinesexteriores,o productoefiquetanel reemplazo.
Estagarantiaseaplicas61omientrasesteproductoes dentrode losEstadosUnidos.
Estagarantialedaderechoslegalesespecificos,yustedtambienpuedetenetotrosderechosquevariandeestadoalestado.
Sears, Roebuck and Co., Hoffman Estates, IL 60179
Tipodeaceitedelmotor:
Capacidadde aceitedel motor:
Capacidadde combustible:
Bujias:
Separaci6ndehs bujias:
@Sears Brands,LLC
5%30
20onzas
2.3cuartos
TorchF6RTC(F6TC)
.020"to.030"
N(_merode mode!o ..........................................................
Nemero deserie..............................................................
Feehadeeompra.............................................................
Registrearribaeln0merodelmodelo,eln0merode serieyla fecha
de compra
34
Page 35

Lapresendadeeste simboloindicaquesetratade instrucdones
importantesde seguridadquesedebenrespetarparaevitar
ponerenpeligrosuseguridadpersonaly/o materialy lade otras
personas.Leay sigatodasbs instrucdonesdeestemanualantes
de ponerenfundonamientoestamAquina.Si no respetaestas
instrucdonespodriaprovocarlesionespersonales.Cuandoveaeste
simbolo,ipresteatend6nab advertenda!
EstamAquinarueconstruidaparaseroperadadeacuerdocon
bs regbsdeseguridadcontenidasenestemanual.AIigualque
concualquiertipodeequipomotorizado,undescuidoo errorpor
partedeloperadorpuedeproducirlesionesgraves.EstamAquina
escapazde amputarmanosy piesy dearrojarobjetoscongran
fuerza.Denorespetarbs instruccionesde seguridadsiguientesse
puedenproducirlesionesgraveso lamuerte.
PROPOSICION 65 DE CALIFORNmA
Elescapedelmotordeesteproducto,algunosde suscomponentes
y algunoscomponentesdelvehiculoconfieneno liberansustandas
quimicasqueelestadodeCaliforniaconsideraquepuedenproducir
cAncer,defectosde nadmientouotrosproblemasreproductivos.
, Lea,entienday cumpbtodasbs instruccionesinduidasen
b mAquinayen losmanualesantesdemontarby utilizarb.
Guardeestemanualenun lugarseguroparaconsultasfuturasy
peri6dicas,asi comoparasolicitarrepuestos.
, Leael ManualdelOperadorysigatodasbs advertenciase
instruccionesdeseguridad.Elfracasode hacerasi puedecausar
b heridaseriaal operadory/o personaspresentes.ParaIbmada
depreguntas,1_800_659-5917.
, Familiaricesecontodoslos controlesyconel usoadecuado
delosmismos.Sepac6modetenerlamAquinaydesactivarlos
controlesrApidamente.
, No permitanuncaque losni_osmenoresde 14a_osutilicen
estamaquina.Los ni_osde 14a_osenadebntedebenleery
entenderbs instruccionesdeoperaci6ny normasdeseguridad
contenidaseneste manual,yen la mAquinaydebenser entrenao
dosy supervisadosporun adulto.
, NuncapermitaquelosadultosoperenestamAquinasinrecibir
antesb instrucci6napropiada.
, Losobjetosarrojadosporb mAquinapuedenproducirlesiones
graves.Pbnifiqueel patr6nenel quevaa irarrojandonievepara
evitarque b descargade materialserealicehacialos caminos,
losobservadores,etc.
, Mantengaalosobservadores,ayudantes,mascotasy ni_ospor
Iomenosa 75piesde b mAquinamientrasb mismaestaen
funcionamiento.Detengala mAquinasialguienseacerca.
, Seaprecavidoparaevitarpatinarseo caerseespecialmente
cuandooperala mAquinaen reversa.
Su responsabi[idad--Restrinja el usode estamaquina
motorizadaa bs personasquelean,comprendany respetenbs
advertenciase instruccionesqueaparecenen estemanualyen la
mAquina.
iGIJARDEESTASINSTRIJCCIONES!
%
bspeccioneminuciosamenteelAreadondeutilizarAel equipo.Saque
todoslosMpudos,peri6dicos,trineos,tabbs, cablesy otrosobjetos
extra_osconlosquepodriatropezaro quepodrianserarrojadospor
b barrena/impubor.
, Paraprotegerselosojos utilicesiempreanteojosoantiparras
de seguridadmientrasoperalamaquinao mientrasla ajusta
o repara.Losobjetosarrojadosquerebotanpuedenproducir
lesionesocubres graves.
, Nooperelamaquinasinla vestimentaadecuadaparaestaral
airelibreeninvierno.Noutilicealhajas,bufandasbrgas uotras
prendassueltasquepodrianenredarseenbs partesm6viles.
Utiliceuncalzadoespecialparasuperficiesresbabdizas.
, Useun prolongadory untomacorrientedetrescablescon
conexi6na tierraparatodasbs maquinasconmotoresde
encendidoel_ctrico.
, Ajusteb alturadelacajadeltomacorrienteparalimpiarlagrava
o bs superficiesconpiedrastrituradas.
, Desengranetodasbs pabncasde controlantesde arrancarel
motor.
. Nuncaintenterealizarajustesmientraselmotorestaenmarcha
exceptoenloscasosespecificamenterecomendadosen el
manualdeloperador.
. Dejequeelmotoryla maquinaseadaptena latemperatura
exteriorantesde comenzara sacarla nieve.
35
Page 36

Manejosegurode la gasolina
Paraevitarlesionespersonaleso dafiosmaterialestengamnucho
cuidadocuandotrabajecon gasolina.Lagasolinaessumamente
inflammableysusvaporespuedencausarexplosiones.Si sederrama
gasolinaencimaosobrelaropasepuedelesionargravementeyaque
sepuedeincendiar. L_.vesela pielycb.mnbiesede ropade inmediato.
, Utilices61olosrecipientesparagasolinaautorizados.
, Apaguetodoslos cigarrillos,cigarros,pipasyotrasfuentesde
comnbustidn.
, Nuncacarguecombustibleen lamnbquinaen unespaciocerrado.
, Nuncasaquelatapadelcombustibleniagreguecombustible
mientraselmotorestacalienteo en marcha.
, Dejequeelmotorse enfrieporIomenosdos minutosantesde
volvera cargarcombustible.
, NuncaIleneenexcesoel depdsitodecombustible.Lleneel
tanqueano mnb.sdeY2pulgadapordebajode la basedelcuello
de Ilenadodejandoespacioparaladilataci6ndelcombustible.
, Vuelvaa colocarlatapade lagasolinay ajOstelabien.
, Limnpieel comnbustiblequesehayaderramnadosobreel motory el
equipo.Trasladela mnbquinaa otrazona.Espere5minutosantes
deencenderel motor.
, Nuncaalmacenelamnb.quinaoelrecipientedecombustibleen
unespaciocerradodon@ hayafuego,chispaso luzpiloto(por
ejemnplo,hornos,calentadoresdeagua,calefactores,secadores
de ropa,etc.).
, DejequelamnbquinaseenfrieporIo menos5 minutosantesde
guardarla.
, NuncaIlenelosrecipientesenel interiordeunvehiculoo cami6n
ocajade remolquecon recubrimientosplb.sticos.Coloque
siemprelosrecipientesenel pisoy lejosdelvehiculoantesde
Ilenarlos.
, Sies posible,retireel equipoa gasolinadelcamni6no remolque
y116neloen el suelo.Siestonoes posible,Ileneelequipoenun
remolqueconcontenedorportatil,envezdedesdeunaboquilla
dispensadoradegasolina.
, Mantengalaboquilladispensadoraen contactoconel bordedel
dep6sitode combustibleo conla aberturadelrecipienteentodo
momento,hastaterminarlacarga.Noutiliceundispositivode
apertura/cierrede boquilla.
FUNOIONAMIENTO
, No pongalasmanoso lospiescercadelas piezasrotatorias,
en lacajade la barrena/ impulsoro enelmontajedelcanalde
descarga.Hacercontactoconpiezasgiratoriaspuederesultaren
laamnputaci6ndemanoso pies.
, La palancadecontroldela barrena/ impulsores undispositivo
de seguridad.Nuncaevitesu funcionamiento.Dehacerlola
operaci6nde la mnbquinaesriesgosay puedeocasionarlesiones.
, Las palancasdecontrol@benfuncionarbienenambasdirec-
clonesy regresarautomnb.ticamentea la posici6nde desengrane
cuandose lassuelta.
, Nuncaoperela mnb.quinasifaltaunmontajedelcanalo siel
mismoest,.daiado. Mantengatodoslosdispositivosde seguri-
dadensulugaryen funcionamiento.
, Nuncaenciendaelmotorenespacioscerradoso en unazona
conpocaventilaci6n.Elescapedel motorcontienemon6xidode
carbono,ungasinodoroyletal.
, Noutilicela mnbquinabajola influenciadelalcoholo lasdrogas.
, Elsilenciadory el motorsecalientanypuedencausarquemadu-
ras.Nolostoque.Mantengaa losniios alejados.
, Seasumamenteprecavidocuandooperelamnbquinasobreuna
superficiecongravaocuandola cruce.Mant_ngasealertaporsi
sepresentanpeligrosocultoso trb.nsito.
, Tengacuidadocuandocambiede direcci6no cuandooperela
mnbquinaen pendientes.
, Planifiqueel patr6nenel quevaair arrojandonieveparaevitar
que ladescargade mnaterialseproduzcahacialasventanas,
laspare@s,losautomn6viles,etc.y evitarasi posiblesdaios
mnaterialeso lesionesproducidaspotlos rebotes.
, Nuncadirijaladescargahacialosniios, losobservadoreso las
mascotasnidejequenadieseparedelantedela mnbquina.
, Nosobrecarguelacapacidaddela mnb.quinatratandodesacarla
nievemuyr@idamnente.
, Nuncaopereestamnbquinasinbuenavisibilidadoilumninaci6n.
Siemnpredebeestarsegurodequeestabienafirmadoy su-
jetandofirmnemnentelas mnanijas.Carnine,nuncacorra.
, Cortela corrientea la barrena/ impulsorcuandotransportela
mn_.quinao cuandolamismanoestaenuso.
, Nuncaoperela mn_.quinaaaltavelocidaddedesplazamniento
sobresuperficiesresbaladizas.Mirehaciaabajoy haciaatrb.sy
tengacuidadocuandovayamarchaatrb.s.
, Si la mnbquinacomenzaraavibrarde mnaneraanormnal,detengael
motor,desconecteel cablede labujiay p6ngalademaneraque
hagamasacontraelmotor.Inspeccionela mnbquinaminuciosa-
menteparavetsi est,.da_ada.Reparetodoslosda_osantesde
encenderyoperarlamnbquina.
, Desengranetodaslaspalancasdecontrolydetengaelmotor
antesdedejarla posici6ndeoperaci6n(detr_.sdelasmnanijas).
Espereaque labarrena/ impulsorsedetengapotcompleto
antesdedestaparelmontajedelcanalo realizarajustese
inspecciones.
, Nuncapongalasmanosenlasaberturasdedescargao de
recolecci6n.Utilicesiemprelaherramientadelimnpiezaquese
adjuntaparadestaparla aberturadedescarga.Nodestapeel
montajedelcanalmientrasel motorest,.en funcionamiento.
Antesde destaparlo,@agueelmotory permnanezcadetrb.sdelas
manijashastaque todaslaspartesmn6vilessehayandetenido.
, Uses61ounionesyaccesoriosaprobadospotel fabricante(pot
ejemnplo,pesasparalasruedas,cadenasparalosneumnb.ticos,
cabinas,etc.).
36
Page 37

, Paraencenderel motor,jale de lacuerdalentamentehastaque
sientaresistenda,luegojale rApidamente.ElreplieguerApidode
la cuerdade arranque(tensi6nde retroceso)lejalarAla manoy
el brazohaciaelmotormAsrapidodeIoqueustedpuedesoltar.
El resultadopuedenserhuesosrotos,fracturas,hematomaso
esguinces.
, Si sepresentansituadonesquenoestanprevistaseneste
manual,seacuidadosoyuseel senfidocomOn.P6ngaseen
contactoconAsistendaalClienteparasolicitarayudayel
hombredeldistribuidordeservMomAscercano.
MANTENUMUENTO Y ALMACENAMUENTO
, Nuncaalterelosdispositivosde seguridad.Controleperi6dicao
mentequefuncionencorrectamente.Remitasealas secciones
demantenimientoyajustede estemanual.
, Antesde realizarlalimpieza,repararo revisarla maquina,
desengranetodaslaspalancasdecontroly detengael motor.
Espereaquela barrena/ impulsorse detengaporcompleto.
Desconecteel cabledela bujiayp6ngalohaciendomasacontra
el motorparaevitarquese enciendaaccidentalmente.
, Controlefrecuentementequetodoslospernosytornillosest_n
bienajustadosparacomprobarquela mAquinase encuentra
encondicionessegurasdefuncionamiento.Ademas,hagauna
inspecci6nvisualde lamAquinaparaverificarsiestadaSada.
, No cambielaconfiguraci6ndel reguladordelmotorni acelere
demasiadoelmismo.Elreguladordelmotorcontrolala velocidad
maximaseguradefuncionamientodelmotor.
, Las placasderaspadoy laszapatasantideslizantesquese
usancon lamaquinaquitanievesedesgastanyse daSan.
Paraprotegersuseguridad,verifiquefrecuentementetodoslos
componentesy reemplAceloss61oconpartesdelos fabricantes
deequiposoriginales(OEM)."iElusodepiezasquenocumplen
conlasespecificacionesdelequipooriginalpuederesultaren
rendimientoinadecuadoademasde ponerenriesgola seguri-
dad!"
, Reviselaspalancasde controlperi6dicamenteparaverificar
queengraneny desengranenadecuadamentey ajOstelossies
necesario.Consultelasecci6nde ajustesdeeste manualdel
operadorparaobtenerinstrucciones.
, Mantengaoreemplacelasetiquetasde seguridade instrucciones
segOnseanecesario.
, Respetelasnormasreferentesa ladisposici6ncorrectay las
reglamentacionessobregasolina,aceite,etc.paraprotegerel
medioambiente.
, Antesdealmacenarlamaquinaenci_ndalaunosminutospara
sacarla nievequehayaquedadoenlamismay paraevitarasi
quesecongelelabarrena/impulsor.
, SegOnlaComisi6ndeSeguridadde ProductosparaelConsu-
midordelosEstadosUnidos(CPSC)yla Agenciade Protecci6n
Ambientalde losEstadosUnidos(EPA),esteproductotieneuna
vidaOtilmediadesiete(7)aSos,660horasdefuncionamiento.
AI finalizarlavidaOtilmedia,adquieraunamaquinanuevao
hagainspeccionaranualmente_staporundistribuidordeservicio
autorizadoparacerciorarsede quetodoslossistemasmecanicos
y deseguridadfuncionancorrectamentey notienenexcesivo
desgaste.Si no Iohace,puedenproducirseaccidentes,lesiones
o muerte
, Nuncaalmacenela maquinao el recipientedecombustibleenun
espaciocerradodondehayafuego,chispaso luzpilotocomopor
ejemplo,calentadoresde agua,hornos,secadoresde ropa,etc.
, Consultesiempreel manualdeloperadorparaobtener
instruccionesadecuadasparaelalmacenamientofuerade
temporadaVerifiquefrecuentementelalineade combustible,el
tanque,el tap6n,y losaccesoriosbuscandorajaduraso p6rdidas.
Reemplacede sernecesario.
, Nod_ arranqueal motorsinoesta labujiade encendido.
NO MODUFUQUE EL MOTOR
Paraevitarlesionesgraveso lamuerte,nomodifiqueel motorbajo
ningunacircunstancia.Si cambiala configuraci6ndel reguladorel
motorpuededescontrolarsey operaravelocidadesinseguras.Nunca
cambielaconfiguraci6ndefabricadel reguladordel motor.
AWSO REFERMDO A EMMSMONES
Losmotoresqueestancertificadosycumplenconlasregulaciones
de emisionesfederalesEPAyde CaliforniaparaSORE(Equipos
pequeSostodoterreno)estancertificadosparaoperarcongasolina
comOnsinplomoy puedenincluirlossiguientessistemasde control
de emisiones:Modificaci6ndemotor(EM) ycatalizadorde tresvias
(TWO)si estanequipadosde esamanera.
GUARDACHUSPAS
Siseutilizaun amortiguadordechispaseloperadorIodebemantener
en condicionesde usoadecuadas.Enel Estadode Californialas
medidasanteriormentemencionadassonexigidasporley (Articulo
4442delC6digode RecursosPOblicosde California).Esposible
queexistanleyessimilaresenotrosestados.Lasleyesfederalesse
aplicanenterritoriosfederales.
Puedeconseguirelamortiguadorde chispasparaelsilenciadora
trav_sde sudistribuidorautorizadodemotoreso poni_ndoseen
contactoconeldepartamentodeservicios.
37
Page 38

SiMBOLOS DE SEGURUDAD
Estap_.ginadescribelossimbolosy figurasde seguridadinternadonalesquepuedenaparecerenesteproducto_Leaelmanualdeloperador
paraobtenerla informad6nterminadasobreseguridad,reunirse,operad6ny mantenimientoy reparad6n.
°
i
\
LEAELMANUALDELOPERADOR(S)
Lea,entienda, y sigatodas [asinstrucdones en el manual (es)antes de intentar reunirse y fundonar.
LA ADVERTENCIA -- PLATOS ROTATOR[OS
Guarde manos de entrada y aperturas de [a descarga mientras [a m_iquina corre. Al[[el[os hacen para
girar platos dentro.
LAADVERTENCIA-- LAMINASROTATIVAS
Guarde manos de entrada y aperturas de descarga mientras la m_iquina corre. All[ hacen girar I_iminas
dentro.
LA ADVERTENCIA -- TALADRO ROTATIVO
No ponga manos o pies cerca de[ giro de partes, en el alojamiento de taladro/aspa o asamblea de
tolva. Contacto con [as partes rotativas puede amputar manos y pies.
OBJETOS LANZADOS PORADVERTENCIA
Esta m_iquina puede recoger y [anzar y objetos que pueden causar [a herida personal seria.
GASOL[NADEADVERTENCIAESINFLAMABLE
Permita que el motor seenfrie a[ menos dos minutos antes de[ reabastedmiento de combustible.
ADVERTENCIA -- MONOXIDO DE CARBONO
Nunca dirijas un motor dentro o en un _irea mal ventilada. Los gases de combusti6n de motor
contienen el mon6xido de carbono, un gas inodoro y mortal.
ADVERTENCIA- ELECTROCHOQUE
No use eljuez de saJidaeJ_ctrico deJmotor en la Iluvia.
38
Page 39

IMPORTANTE:Estaunidadseenviaconel motorIlenode aceite.
Despu_sdelmontaje,consultelapagina10paralosdetallesdel
combustibley elaceite.
Extracci6n de (a unidad de (a caja
1. Cortelasesquinasdela cajade cart6ny extiendaloslados
de maneraquequedenpianossobreel piso Quitetodoslos
separadoresde empaque.
2. Saquela maquinaquitanievede lacaja.
3. Aseg0resedevaciarcompletamentelacajaantesdetirarla.
NO e)eve)em&quinaquitanievetom&ndo)ade)amaniiade)canal.
Antes del monta)e
NOTA:Lasreferenciasquecontieneestemanualsobrelosladosderecho
oizquierdodelamaquinaquitanievesehacenobservandola misma
desdelaposici6ndeoperaci6na menosqueseindiqueIocontrario.
Configuraci6n de (a manija
NOTA: Tengaencuentalas tresunionesdecableflojasqueestan
unidasa labarradecontrolinferioryseutilizaranposteriormentepara
sujetarloscables.
1. Afioie)aperi/a dealetas,laarande)ac6ncava,)alengOetade )abarra
decontroly eltorn/Iodel carroqueest&na ambosladosde la barrade
controlinferioryrefirelos.Vea)aFig.1.
2. Des/ce unade lasun)onesde cablefioiasdesdeel ladoderechode la
barrade controlinferiorhastaeltravesaSode la m)sma.Deielasegunda
unbn decable ensus)t)oa laderechadela barrade controlinferior.Vea
)aFig.3 comoreferencia.
(MPORTANTE: Paraevitarque se daSeelcableresultar&necesario
)evantar)abarradecontrolsuperiormientrassedes/za esta uni6ndecable
haciaarriba.
J
Figura 1
3. Elevelabarradecontrolsuperiory ubiquelasobrelabarrainferior,
alineandolosorificiosde loscualesseextrajeronlasperillasde
aletas(1).Veala Fig.2.
Tengacuidadode nodoblarnitorcerlos cables.
. Inserteuntornillodecarrodesdeelexterioratrav_sdeuna
lengieta de labarradecontrol,lasbarrassuperioreinferior,una
arandelac6ncava,yal interiordelaperilladealetas(2).RepitaIo
mismoenel otrolado.
5. Ajustelasperillasdealetasacadaladodela barradecontrol.
ConsultelaFig.2.
NOTA:Elrecorridodel cabledelabarrenapasapordebajodela
barrade controlinferiorizquierday el cablede transmisi6npasaa
trav_sdela partesuperiorde labarradecontrolinferiorypordebajo
delladoderechode la misma.VealaFig.3.
.
Seutilizarontresunionesdecableparasujetarloscablesdecontrol
a labarradecontrolinferiorsinajustarlos,incluidalauni6nquese
reubic6enelpaso2.Ubiqueahoralasunionesdecable,como
seindicaenlaFig.3 yajOstelasparasujetarloscablesalabarra
inferior.Recorteelmaterialexcedentedelasunionesdecable.
Figura 2
Cablede la transmisi6n
Cablede la barrena
i
Figura 3
39
Page 40

Zapata antidesmizante
Laszapatasantideslizantesdelam@uinaquitanieveseajustanhaciaarriba
enfAbrica,paraelenvio,SiIodesea,puedeajustarlashaciaabajoantesde
hacerfuncionarlam@uinaquitanieve,
Serecomiendanooperarestambquinaquitanievesobregravayaque
launidadpuederecogerylanzargravasueltafb.cilmente,causando
lesionespersonaleso dafiosa lambquinay losobjetosquelarodean.
Sideseaquitarlanieveal rasen unasuperficielisa,elevea
mayoralturalaszapatasantideslizantesde la cajade la barren&
, Uselasposicionesintermediaobajacuandolasuperficieque
deseelimpiaresdespareja,potejemploenuncaminodegrava.
NOTA:Sidecideusarla mbquinaquitanievesobreunasuperficie
degrava,mantengalaszapatasantideslizantesenlaposici6nque
permitaIograrunaseparaci6nmaximaentreel sueloy laplacade
raspado.
Para ajustar _aszapatas antideslizantes:
1. Aflojelascuatrostuercashexagonales(dosa cadalado)ylos
pernosdelcarro.Muevalaszapatasantideslizantesa laposici6n
deseada.VealaFig.4_
Herramienta de limpieza
Laherramientadelimpiezadelcanalvieneajustadadefabricaalaparte
superiordelacajadelabarrenaconunpasadordeensambladoyunauni6n
decable.Cortelauni6ndecableantesdeoperarlambquinaquitanieve.
VealaFig.5.
Herramientade
limpbzadelcanal
/
/
/
/
\
Figura 4
2. Compruebequetodala superficieinferiordelaszapatas
antideslizantesestacontraelsueloparaevitareldesgaste
desparejode lasmismas.
3_ Vuelvaa ajustarbienlastuercasy lospernos.
Pasadores de cuchiiia
Sumbquinaquitanievetraeunpardepasadores
decuchilladela barrenay pasadoresde chaveta
conuni6ncurvade reemplazo.AImac6nelosen un
lugarsegurohastaque losnecesite.
Figura 5
Presi6n de Uos neum_ticos
Lapresi6nde infladoadecuadaesdeentre15psiy20psLVerifiquela
presi6ndelos neumaticosregularmenteymantengasiemprela misma
presi6nenlos dosneumb.ticos.Unapresi6nexcesiva(porencima
de 20psi)puedehacerqueel conjuntode la rueda(neumb@o/
llanta)exploteconunafuerzasuficientecomeparacausarlesiones
graves.Noinfledemasiadoel neumb.tico.Utiliceunabombamanual
o uninfladorde neumb@osel@tricoportatilparaevitarinflarlo
excesivamente.NOUSENUNCAUNCOMPRESORDEAIRE
Elinfladoexcesivodelosneumb.ticosconunapresi6nexcesiva
(potencimade 20 psi)puedehacerqueelconjuntodela rueda
(neumb.tico/llanta)exploteconunafuerzasuficientecomopara
causarlesionesgrave&
40
Page 41

Recomendaciones sobre eUcombustibUe
UtiHicegasoHinaparaautom6viHes(sinpHomooba]ocontenidodepHomo
paraminimizarHosdep6sitosenHac&maradecombusti6n)conunminimo
de87octanos.SepuedeusargasoHinaconhastaun10%deetanoHo un
15%de MTBE(6termetiiicoterciario-butiiico).Nuncauseunamezcia
deaceitey gasoiinanigasoiinasucia.Evitequeseintroduzcasuciedad,
poivooaguaenel dep6sitodecombustible.NOutiiicegasoiinaE85.
, Carguecombustibleenun Areabienventiiadayconel motor
apagado.Nofumenipermitallamasochispaseneliugardon@
secargacombustibleo seaimacenaHagasoiina.
, No iieneenexcesoel dep6sitode combustible.Despu6sde
cargarcombustible,aseg@esedequeeltap6ndei dep6sitoest_
biencerradoy asegurado.
, TengacuidadodenoderramarcombustibleaMreaiizarHarecarga.
Elcombustiblederramadoo susvaporessepuedenincendiar.
Si sederramacombustible,asegOresede queelAreaest_seca
antesde arrancarel motor.
, Eviteel contactorepetidooproiongadoconHapieio Hainhaiaci6n
de losvapores.
Carga de combustibUe
TengamuchocuidadoaMtrabajarcongasoiina.Lagasoiinaes
sumamenteinfiamabiey susvaporespuedencausarexpiosiones.
Nuncaagreguecombustiblea Hamb.quinaen interioresni mientrasel
Jmotorestacaiienteoen funcionamiento.Apaguecigarriiios,cigarros,
mpipasy otrasfuentesdecombusti6n.
Verificaci6n deU niveU de aceite
Elmotorseenviaconaceiteenelmotor.Sinembargo,debe
controiarelniveide aceiteantesdehacerfuncionarHamb.quina
quitanieve.Si sehacefuncionarel motorsinsuficienteaceitepuede
daSarsegravementey seanuiaHagarantia.
NOTA: Paracomprobarel motorasegOresedeque esteapagadoysobre
unasuperficienivelada.
1. Retireel tap6ndeIlenadodeaceite/lavarillade medM6ny limpie la
vadllademedici6nde aceite.VealaFig.7.
maroasde
SiempremantengaHasmanosy lospiesaHejadosde Haspiezas
m6viHesdellequipo.No utiHicefiuidoscomprimidosparaarrancar.Los
vaporessoninfiamaNes.
1,
Antesdesacar eltap6n paracargar combustible,limpieaJrededor.
2.
Enel dep6sitodecombustiblehayunindicadordenivekLleneel
dep6sitohastaIlegaral nivelde combustibledel indicador;veala
Figura6.TengacuidadoparanoIlenare! dep6sitoenexceso.
Vistasuperiordel indicadorde
nivel de combustible
Figura7
2. Hntroduzcaeltap6n/la varillademedici6nde aceitedentrodelcuello
de Ilenadodeaceiteperono losatornille.
3. Saqueeltap6n/ lavarillade medici6ndeaceite.Si elnivelesbajo,
agregueaceitelentamentehastaqueel registromarqueentre nivelalto
(H)y baio(L}, Figura7.Consultela secci6nMantenimientodelmotor
paravet laviscosidadycapacidaddeaceitedel motorcorrectas.
NOTA:No Iolleneenexceso. Elllenadoexcesivodeaceite puede
hacerqueel motorgenerehumo,quecuestearrancadoo quefalle la
buj[a.
4. Vueivaaco[ocare[tap6n/ [avarillademedici6ndeaceitebien
ajustadosantesdeponeren marchaelmotor.
Figura6
41
Page 42

Ajustes finales
IMPORTANTE:Controb losajustesdeacuerdoconlasinstrucdones
y reaibelosajustesfinabs necesariosantesde operarla unidad.
ControbeIajustede todaslastuercasy lospernos.Sino sigueestas
instrucdones,launidadpodriadaSarse.
CanaU de descarga
1. Afioielaperilladeabtasdelcanalsuperior,aiusteelcanaly elcontrol
delcanalalaposici6ndefuncionamientodeseada.
2. Aprietelaperilbdeabtasdelcanalsuperiorasegur&ndosedequeel
pemodelcarroseencuentrecorrectamentecolocado.ConsulteB Fig.8.
Figura8
Prueba de controU de Uabarrena
IMPORTANTE:Reaibelapruebasigubnteantesdeoperarla
mbquinaquitanbveporprimeravezy aIprincipiodecada invbrno.
CompruebeeI ajustedelcontroldela barrenade la siguienteforma:
1. Cuandosesueltaelcontroldela barrenay estaenposici6n
desengranadaarriba,elcabledebetenermuypocojuego,peteNO
debeestarajustado.
Noajustedemasiadoelcable.Elajusteexcesivopuedeimpedir
quelabarrenasedesengraney ponerenpeligrola seguridadde la
mbquinaquitanieve.
Enunb.reabienventilada,arranqueelmotordelam_.quina
quitanievesegOnseindicaenla p_.gina10bajoel encabezado
"Encendidodelmotor".AsegOresedequeel reguladorse
encuentreen la posici6nFAST(rb.pida)
.
Paradoen laposici6ndeloperador(detrb.sdela unidad),engrane
labarrena.
4_
Dejelabarrenaengranadaduranteaproximadamentediez(10)
segundosantesde soltarel controldelamisma.Repitaesta
operaci6nvariasveces.
5. Conel motorfuncionandoen posici6nFAST(rb.pida)_ yel
controlde labarrenaen posici6ndesengranadaarriba,camine
haciaelfrentede la mb.quina.
6. Confirmequela barrenahadejadodegirarpot completoy no
muestraNINGONsignode movimiento.
IMPORTANTE:SilabarrenamuestraALGONsignode rotaci6n,
vuelvainmediatamentea la posici6ndeloperadory @agueelmotor.
Espereaquetodaslaspartesm6vilessedetenganantesdereajustar
el cablede controldela barrenacomeseindicaen la secci6n
Mantenimientoy Serviciode estemanual:
u
42
Page 43

Tapade la
gasolina
LIavede
encendido
/ Bot6n de
Plata de
raspado "_'-_ Zapata -J
PeciIIadel canal
antideslizante
Cebado_' v arranque
Tubo de d_'enaie Salida del
%. de aceite arrancador el_ctrico
/ el@tcico
Figura 9
Famiiiaricesecon elusode todosloscontrobsde Hamb.quinaquitanieveyconsucorrectofuncionamiento.Sepac6modetenerHamb.quinay
desactivarloscontrobs r@idamente.
NOTA:CompareHasFiguras5 y6 consuequipoysigaHadescripci6n
deloscontrobs,que seofrecena continuaci6n,parafamiiiarizarse
consuoperaci6n.
ControU de Uatransmisi6n
UbicadoenHaparteinferiordellganchosuperior,elcontrolde Ha
transmisi6nseutiiizaparaengranar/desengranarHasruedas.Apriete
el controldeHatransmisi6ncontraHabarradecontrolsuperiorpara
engranarHasruedas,y su_iteioparadesengranadas.
ControU de Uabarrena
ElcontroldeHabarrenaestaaMiadodeHabarrade controlsuperior.
Aprieteelcontrolde HabarrenacontraHabarradecontrolsuperiorpara
engranarHasbarrenas,y su_iteioparadesengranadas.
concuidado,y realicetodoslosajustesparaverificarquesumbquina
quitanieveestafuncionandodeformasegurayadecuada.
Manija deU canaU
Ladirecci6nen quesearrojalanievecorrespondea ladirecci6nde
aperturadelcanal.Usela manijadelcanalparagirarel montajedel
canalen la direcci6nen laquedeseearrojarla nieve.
PeriHa deU canaU
Esposibleajustarladistanciaa lacualsearrojala nieveelevando
o bajandoelcanalsuperior.Afiojelaperilladelcanaldel ladodel
canalsuperiorparaa]ustarlo.Gireelcanalsuperiorhastala posici6n
deseaday vuelvaaajustarla perilladelcanal.
PUaca de raspado
Laplacade raspadomantieneelcontactoconel pavimentoa medida
que seimpulsala mbquinaquitanieve,permitiendoque sedescargue
NuncareaiiceajustesaMmontajedellcanala menosqueloscontrobs
de Habarrenay Hatransmisi6nest_ndesengranadosyel operador
est_ paradojuntoa Haunidad.
IMPORTANTE:ConsultelaInformaci6nsobrelapruebadecontroldela
barrenaenla secci6nMontajeyAjustesdeestemanualantesdehacer
funcionarla mbquinaquitanieve.Leay cumplatodaslasinstrucciones
lanievequeestacercade lasuperficiedelpavimento.
Zapata antidesHzante
Sepuedeajustarelespacioqueexisteentrela placaderaspadoy
el suelo.Si@seaquitarnieveal rasdelsuelo,coloquelas zapatas
antideslizantesen laposici6nbaja.Uselasposicionesmediao alta
cuandola superficiequedesealimpiarseadesparejao est_cubierta
de grava.
43
Page 44

Cuandoestanengranadas,lasbarrenasgirany mandanlanievehacia
el interiordelacajadela barrena.
Montaje deUcanaU
La nieveempujadaalinteriorde lacajade la barrenasedescargapot
el montajedel canal
ControU deUcebador
AIactivarelcontroldelcebadorsecierralaplaca
decebadodelcarburadory seayudaaencenderel
motor.Potinformaci6nacercadel usodelcebador,
consulteArranquedel Motormb.sadelanteen esta
secci6n.
Arrancador de retroceso y manija del
arranoador
Estemotorcuentaarranquepot estiramientoconacci6nderetroceso
ymanijadelaempuSadurademit6nparaunfb.cilaccesousando
guanteso mitones.
Save de encendido
La llavede encendidoes undispositivodeseguridad.
Debeestarcompletamenteinsertadaparaque el
motorarranque.Retirelallavedeencendidocuando
no usela mb.quinaquitanieve.
0
NOTA:Nogirelallavede encendidoparaintentar
arrancarelmotor.AIhacerlopodriaromperla.
Bot6n deUarrancador eU6ctrico
Sioprimeelbot6ndelarrancadorel@tricoseengranaelarrancador
el@tricodelmotorcuandoseIoenchufaa unafuentedeenergiade 120V_
SaHda deUarrancador eU_ctrico
Esnecesariousaruncord6nprolongadorparaexterioresdetres patas
(seincluye)yunafuentedeenergia/ tomacorrientede paredde 120W
Cebador
AIpresionarel cebadorseenviacorrlbustible _,_P_,,,,,,,,,,L,_
directamenteal carburadordelmotorpara
facilitarelarranquecuandohacefrio.Consulte
lasinstruccionesde encendidoenla secci6nde
operaci6nde estemanualparausarcorrectamente
elcebador.Laimagenqueapareceacontinuaci6na la izquierda,
coincideconla etiquetaqueidentificaalcebadorenelmotor.
Uenado de aceite
Saqueel tap6ndeaceiteparaagregaraceite_Consultelasecci6n
Mantenimientoy Servicioparaobtenerinstruccionessobrecontroly
llenadodeaceite.
Tapa de UagasoUina
Saquela tapade lagasolinaparaagregarcombustible.Launidad
operaconcombustiblenormal
NOTA:Estaunidadpuedeincluiruntap6ndecombustible,que
Onicamenteseutilizaduranteelmontajeparamantenerel dep6sito
decombustiblelibredesuciedady residuos. Descarteeltap6nde
combustibleantesdellenareldep6sitodecombustible.
ControU deU reguUador
Elcontroldelreguladorest,. ubicadoenel motor.Regulalavelocidad
del motor,y Ioapagacuandose presionahaciaabajocompletamente.
Laimagende laderecharepresentalasvelocidadesdel control
del reguladory coincideconlaetiquetaubicadaenel motor.Las
imb.genesa continuaci6nilustranla definici6ndecada simbolo.
Nuncauselasmanosparadespejarun montajede canaltapado.
Apagueelmotorypermanezcadetrb.sde lasmanijasbasraquetodas
laspartesm6vilessehayandetenidoantesde utilizarla herramienta
de limpiezaparadespejarelconjuntodelcanal
Laherramientade limpiezadel canalest,.ajustadaconvenientemente
a laparteposteriorde la cajade la barrenaconunpasadorde
ensamblado.8i seacumulannievey hieloen el canaldedescarga
durantelaoperaci6n,procedacomoseindicaa continuaci6npara
limpiarde manerasegurael montajedelcanaly laaberturadel canal:
1_ Suelteelcontroldelabarrenayelcontrolde latransmisi6n.
2_ Paradetenerel motorsaquela llavedeencendido.
3_ Saquelaherramientadelimpiezade la horquillaque laajustaa la
parteposteriorde lacajadela barrena.
4_ Useel extremoconformade palade laherramientade limpieza
paradesplazary recogerlanieveyel hieloqueseformendentro
y cercadel montajedel canal
5_ Vuelvaa ajustarlaherramientade limpiezaalpasadorde
ensambladoubicadoenla parteposteriorde lacajade la
barrena,insertedenuevolallavede encendidoy enciendael
motorde lamb.quinaquitanieve.
6_ Paradoenlaposici6ndeloperador(detrb.sde lamb.quina
quitanieve),engraneel controldelabarrenaduranteunos
segundosparaeliminarlanieveoel hieloquehayanquedadoen
el montajedelcanal
Antes de encender el motor
Lea,comprenday sigatodaslasinstruccionesy advertenciasque
aparecenenlamb.quinayen estemanualantesde operarla.
Aceite deU motor
Estaunidadseenvi6conaceiteen elmotor.Controleel nivelde
aceiteantesdecadaoperaci6nparaasegurarsedeque hayaaceite
suficienteen el motor.Potmb.sinstrucciones,consultelasecci6n
Mantenimientoy Serviciodeestemanual.
NOTA:ParacomprobarelmotorasegOresedequeest_apagadoy
sobreuna superficienivelada.
1_ Retireeltap6ndellenadodeaceite/lavarillade medici6nylimpie
la varillademedici6ndeaceite.
2_ Introduzcael tap6n/la varillade medici6ndeaceitedentrodel
cuellode llenadodeaceiteperono losatornille.
3_ Saqueel tap6n/la varillade medici6nde aceite.Siel niveles
bajo,agregueaceitelentamente (5%30, conunaclasificaci6n
minimade SF/SG)hastaqueel nivelregistradoest_entre los
puntosalto(H)y bajo(L).
NOTA:NoIolleneen exceso.Elllenadoexcesivodeaceitepuedehacer
queelmotorgenerehumo,quecuestearrancarlooquefallela bujia.
4_ Vuelvaa colocareltap6n/ lavarillademedici6ndeaceitebien
ajustadosantesdeponeren marchaelmotor.
44
Page 45

GasoHna
Utiiicegasoiina para autom6viles(sin piomo obajo contenido de plomo
para minimizarlos dep6sitos en ia camarade combusti6n) con un m[nimo
de 87octanos, Se puede usargasoiina con hasta un 10%de etanol o un
15%de MTBE (eter metiiico terciarioobutilico).Nunca useuna mezcia
de aceitey gasolina ni gasoiinasucia. Evitequese introduzcasuciedad,
polvo oagua en ei dep6sitode combustible. NO utiiicegasolina E85.
Cargue combustible en un a.reabienventiiaday conei motor
apagado.No fume ni permita llamaso chispas en eilugardonde se
carga combustibleo se aimacena ia gasoiina.
No iiene en exceso el dep6sito de combustible. Despuesde cargar
combustible,asegOresede queei tap6n deldep6sitoest_ bien
cerrado y asegurado.
Tengacuidadode noderramarcombustible ai reaiizar ia recarga. El
combustiblederramado o susvaporesse pueden incendiar.Si se
derramacombustible, asegOresede queei a.reaest_seca antes de
arrancarei motor.
Eviteei contacto repetidoo prolongado con la pielo lainhalaci6n de
los vapores.
Tengamuchocuidadoaltrabaiarcongasolina.Lagasolinaessumamente
inflamableysusvaporespuedencausarexplosiones.Nuncaagregue
combustiblea lamaquinaeninterioresomientraselmotorest,.calienteo en
funcionamiento.Apaguecigarrillos,cigarros,pipasyotrasfuentesdecombusti6n.
1.
Antesde sacar ei tap6n paracargar combustible, iimpieairededor.
2.
Enei dep6sitode combustiblehay un indicador de nivei. Lieneel
dep6sito hasta Ilegar ainivei de combustible dei indicador.Veael
recuadrode la Figura10.Tengacuidado de no Ilenaren exceso.
Encendido del motor
NO use eiarrancador eiectrico en ninguna circunstancia.
1. Conecte el prolongadora ia salida situada en lasuperficie dei motor.
Conecte ei otto extremedei proiongadora un tomacorrientede CA,
120voitios conconexi6n a tierra,para tres patas, en un areabien
ventiiada.
2. Mueva ia paianca de control del re_ hasta la posici6nFAST
(rapido, representadopot una Iiebre
3. Mueva la palanca del cebador hastaIa posici6nON (encendido)
1,,,_1. Si eImotor esta caliente, ubiqueel cebadoren la
OFF (apagado).
4. Presioneei bot6ndei cebadortresa cinco (3°5)veces, asegurandose
de cubrireiorificio deventilaci6ncuando iohaga.Si el motoresta.
caiiente,presioneei bot6ndeicebadorunasola vez. Cubrasiempreel
orificiode ventiiaci6ncuandooptimael bot6ndeicebador.Sihacefr[o
puede resuitar necesariorepetirei cebado.
5. Presioneel bot6n deiarrancador paraarrancar ei motor. Unavez
encendido ei motor, sueite inmediatamenteel bot6n deIarrancador.
Eiarrancador electrico tieneuna protecci6n contrasobrecarga
t_rmica; el sistemase apagaratransitoriamente parapermitir quese
enfr[eel arrancadoren caso que se sobrecargue.
6. A medida quese caiienta ei motor,rote ientamenteei control del
cebador hasta Iaposici6n OFF (apagado). Si el motor se detiene,
vueiva a encenderlo,hagalo funcionar conei cebador ensu posici6n
media durante un lapsobrevey iuegogire lentamenteei cebador
hasta Iaposici6n OFF (apagado).
7. Unavez que ei motoreste en funcionamiento,desconecte dei
arrancador eiectricoel cable de aiimentaci6n. Paradesconectario,
desenchufesiempre ei extremoque esta enchufadoai tomacorriente
de paredantes de desenchufarei extremo opuestoque esta
conectado ai motor.
posici6n
Arrancador de retroceso
Siempremantengalasmanosy los piesalejadosde laspartesm6viles.No
utilicefluidoscomprimidosparaarrancar.Losvaporessoninflamables.
NOTA: Paraubicar todos loscontroies dei motorque se mencionanen
esta secci6n,consuite la Figura9 de la pa.gina12.
NOTA: Deje queei motorse caiientedurante unosminutos tras ei
arranque. El motor no desarrollara,toda su potencia hasta queaicance
temperaturasoperativas.
1. Aseg0resede que ei control de la barrenay el control de la
transmisi6nesten en posici6n desengranada(sin presionar).
2. Insertela Ilavede encendido en ia ranura.Aseg0resede que entre a
presi6n en su lugar. Nointentegirar ia iiave.
NOTA: El motorno puede arrancarsi la Ilaveno esta.completamente
insertada enei interruptor de encendido.
Arrancador eU_ctrico
Elarrancadorelectricoopcionalest_equipadocon uncabledealimentaci6n
detreshilosconectadoatierray unenchufey estadise_adopara
operarconcorrientedomesticaCA, 120voltios.Debeser utilizadocon
unrecept_.culoparatrespatascorrectamenteconectadoafierraentodo
momentoparaevitar laposibilidaddedescargaselectricas.Sigatodaslas
instruccionescuidadosamenteantesde operarelarrancadorelectrico.NO
ufiliceel arrancadorelectricoenla Iluvia.
Determinesi el cableado de su hogar es unsistema de tres cables
conectado atierra. Consultecon un eiectricista matriculadosi no esta.
seguro.
Si tieneun receptacuio de tres terminaies con conexi6na tierra, proceda
de la siguiente manera: Si el cableado de su hogar noes eiadecuado,
Notirede la manijadelarrancadormientrasel motorestaen march&
1. Mueva lapalanca de control del regula_orhasta la posici6n FAST
(r@ido, representado pot unaIiebre) _ .
2. Mueva lapalanca del cebador hastaIa posici6nON (encendido)
l,jl (encendido con elmotor en if[o). Siel motoresta.caliente,
ubique el cebadoren la posici6nOFF (apagado).
3. Presioneel bot6n deicebador tresa cinco (3°5)veces, asegurandose
de cubrir elorificio de ventilaci6n cuando io hag& Si ei motoresta.
caiiente, presioneei bot6ndel cebador unasola vez. Cubra siempreel
orificio de ventiiaci6n cuandooptima ei bot6ndeIcebador. Si hacefr[o
puede resultar necesariorepetir ei cebado.
4. Jale suavementeIamanija deIarrancador hasta quecomience a
ofrecer resistencia,Iuegojalela r@idamentey con fuerza parasuperar
la compresi6n. Nosuelte la manija ni permita quese desenganche.
VuelvaIa soga LENTAMENTEa su posici6n original. De set necesario,
repita este paso.
5. A medida quese calienta ei motor,rote ientamenteei control dei
cebador hasta la posici6nOFF (apagado). Si el motorse detiene,
vuelva a encenderlo,h_.galofuncionar conel cebador ensu posici6n
media durante un lapsobrevey iuegogire lentamenteei cebador
hasta Iaposici6n OFF (apagado).
Paraevitarque el motorfuncionesincontrol,nuncadejela m_quinasin
vigilanciamientrasest_en march&Apagueelmotorluegode usadoy
saquela Ilavedeencendido.
45
Page 46

Detenci6n de[ motor
Dejeencendido ei motordurante aigunos minutosantes de detenerlopara
permitirque se sequeia humedaden ei mismo.
1. Muevaeicontroldei reguladorhastaIaposici6nSTOP(detenci6n)_.
2. Retireia iiavede encendido. Ai retirar laiiave se reduceia posibiiidad
de queel motorsea puesto en marchasin autorizaci6n mientras ei
equipo no esta.enuso. Guardeia iiaveen un lugar seguro. Elmotor
no puede arrancar sin la Ilavede encendido.
3. Eliminela humedad de los controlesdel motor.
Antes de detener la ro .quina
1. Dejeencendidoei motorduranteaigunosminutospara permitirque se
sequela humedaden el mismo.
2. Paraevitarunposiblecongelamientodei arrancador deretroceso,siga
estospasos:
Arrancador de retroceso
a. Conei motor en marcha, tirede la cuerda del arrancadorcon
movimientora.pidoycontinuo del brazo treso cuatroveces.
Procediroiento para detener la
m .quina quitanieve
1. Paradetenerlas ruedas,sueite eicontrol de la transmisi6n.
2. Paradejar de quitar Ia nieve,sueite eicontrol de la barrena.
3. Paradetenerei motor presionetapaiancade controldeireguiadorhasta
la posici6nOFF (apagado)_ y saquela Ilave.No girela Ilave.
Ubicaci6n de[ canal de descarga
Afioje IaperilIadeIcanal ygireeIcanal superiorhastala posici6ndeseada.
Ajuste Ia perilladel canal comprobandoque el perno decarroeste ubicado
correctamente.
Gire Ia manijadel canal aIa posici6n de operaci6n deseada.
Noelevenuncala m&_uitanieve tom&ndoladelamaniladel canal.
Consejos de operaci6n
1. Paraqueel quitadodeianievesea m_.seficientedebehacerlo
inmediatamentedespu6sde iacdda de ia misma.
2. Enio posibie, descarguela nieve en la direcci6n del viento. Traslape
levementecada pasada anterior.
3. Configure ias zapatas antidesiizantes 1/4"por debajo de ia piacade
raspado para un uso normal.Las zapatas antidesiizantes se pueden
ajustar hacia arriba cuando Ia nieveest_ muy compactada.
NOTA:No se recomienda ia operaci6nde esta m_.quinaquitanievesobre
grava, ya quees posibie que iam_.quinaquitanievetome la gravasuelta y
la barrena Iaexpulse, Iocual podr[a causar lesiones personales oda_ar la
maquina quitanieve.
4. Si por aigOnmotivo tieneque usarla maquinaquitanievesobre grava,
mantenga ia zapataantidesiizante en ia posici6n m_.seievada para
Iograr unaseparaci6n maximaentre ei sueio y ia piacade raspado.
5. Limpiecuidadosamentela m_.quinaquitanievedespues de cada uso.
REEMPLAZO DE LOS PASADORES DE
Latemperaturadel si[enciadoryde las_reasque Iorodeanpuedesuperar
los 1500R Evitedichas_reas.
Procediroiento para quitar la nieve
PRECAUCtON: Revise lazona quedesea limpiar paradetectar la
presenciade objetos extrahos. Refireiossi Ios hay.
1. Enciendael motorsiguiendo las instrucciones de encendido.
2. Dejeque eI motorse caliente unosminutosya queeImismo no
desarrolla iapotencia m_.ximahastaque aicanza latemperatura de
funcionamiento.
3. Gire el conjunto deIcanal hacia la direcci6n deseada, lejos de
transeOntesoedificios.
4. AsegOresedeque no haya ningOntranseOnteni ningOnobjetoenfrente
de ia unidad, presioneei control de iabarrena completamente contra
la barra superior hastaengranartotaimentelas barrenas.
5. Mientrasengranaei controlde ia barrena, presione el control de la
transmisi6ncompletamentecontra Iamanijasuperior para engranar
las ruedas. Noponga horizontaiel control de transmisi6n.
6. Amedida que ia m_.quinaquitanieve comienza a moverse, sostenga
firmemente Iamanijay gale la m_.quinaa Iolargodel camino que
desea Iimpiar.
7. Sueitelos controies de la barrena y iatransmisi6n para que ia
m_.quinadeje de quitar nievey de desptazarsehacia delante.
NOTA:Su unidadesta.equipada con un embrague en latransmisi6n. Si
las ruedas se detienen mientras trata dedescargar grandesvoiOmenesde
nieve,inmediatamentedesengrane eIcontrol de Iatransmisi6n y deje que
las barrenas queesta.ngirando descarguen Ianieve de la caja. Reduzca
la anchura de separaci6ny continOelaoperaci6n.
8. ConIaspasadassucesivasreajusteel conjuntodeIcanal en Iaposici6n
deseaday traslape levementela pasada queIimpi6 previamente.
Lasbarrenasesta.najustadas ai eje espiraicon dos pasadoresde cuchilla
y pasadoresde chaveta. Lam_.quinaquitanieve ha sido dise_iadapara
que los pasadores se quiebren si Iabarrenagolpeara unobjeto extra_io
o un trozode hieio. Si iasbarrenas nogiran,verifique si los pasadoresse
han quebrado.Vea la Fig. 10.
NUNCAcambielospasadoresde cuchillade lasbarrenasporotracosaque[
los pasadoresdecuchiIIade repuestodel fabdcantedel equipooriginal,NO [
de pieza-738-04124.Cua[quierda_oque sufrala caiade engranaiesdela [
barrenao cuaiquierotto componentepor respetarlaindicaci6nprecedente, [
NOestaracubierto orla aranfiade su m_ uina uitanieve.
Siempredebeapagarel motorde lam_quinaquitanievey retirarlaIlave
antesde cambiarlospasadoresde cuchilla.
46
Figura10
Page 47

MANTENUMUENTO DEL MOTOR f
Antesde reaiizar tareas de iubricaci6n, reparaci6no inspecci6n,
desengrane todos loscontroies y detengaei motor.Esperea que se
detengancompietamente todas ias piezas m6viies.
Control del aceite del motor
NOTA: Verifique ei nivei de aceite antesde cada usoy despues de cada
cinco horasde funcionamiento para cerciorarse quese mantieneei nivel
de aceiteindicado.
Cuandoleagregueaceiteai motor,consulteia siguientetabia de
viscosidad.Lacapacidadde aceitedeI motores 600mI (aprox.20 onzas).
No Ileneexcesivamente.Useunaceite paramotor decuatrotiempos,o un
aceitedetergentede caiidadpremiumequivaienteconcertificadoquecubra
oexcedalas exigenciasde los fabricantesde autom6vilesamericanos
respectode ia ciasificaci6ndeservicioSG y SE Los aceites paramotorcon
la clasificaci6nSG,SFtienen estadesignaci6nenelenvase.
1. Retireei tap6n de Ilenadodeaceite/la varillade medici6ny Iimpiela
varillade medici6nde aceite.
2. Introduzcaei tap6n /ia varillade medici6n de aceite dentro deicueilo
de iienadode aceite perono los atornille.
3. Saque el tap6n /Ia varilIade medici6n de aceite.Si eI niveIes bajo,
agregueientamente aceitehastaque el niveI registrado est_ en un
punto intermedioentre alto (H) y bajo (L). Vea Ia Figura11.
4. Vueivaa colocar eitap6n /ia variiia de medici6nde aceite bien
ajustados antes de poneren marcha el motor.
Cambio de aceite del motor
J
Figura11
f
NOTA:Gambleel aceitedei motor despuesde ias primeras cinco horas
de funcionamientoy,en Iosucesivo, una vez pottemporada ocada
cincuenta horas.
1. Vac[eei combustibledeI dep6sitohaciendo funcionar el motor hasta
queet dep6sitode combustible est4 vac[o. Cerci6rese de queei
tap6n de Ilenadodel combustibleesta bien ajustado.
2. Pararecolectarei aceite coloque un recipiente adecuado bajo el
tap6n de drenajede aceite.
3. Saque el tap6n de drenajedel aceite. Vea la Figura12.
4. Inctineei motorpara drenar elaceite en eJrecipiente. Eiaceite usado
sedebe descartar en un centrode recolecci6n adecuado.
El aceiteusadoes unresiduopeligroso.EiimineeJaceiteusadoadecu-
adamente.NoIoarrojejuntocon Iosresiduosdomiciliarios.Consuitealas
autoridadesiocaieso ai centrode servicioSears para averiguard6nde hay
instalacionesparala eliminaci6n/reciclaje segura(o)delaceite usado.
5. VueJvaa colocar eitap6n de drenaje y ajOsteJobien.
6. VueJvaa cargar eiaceite recomendado y controleei niveldeaceite.
Consuiteei gra.ficode uso de aceite recomendado. La capacidad de
aceitedei motoresde 20 onzas.
Tap6n de
drenaje de
aceite
Figura 12
NOufiliceaceitessindetergenteo paramotordedosfiempos.Podria
reducirsela vidaOfildel motor.
7. Vuelvaa colocar yajustar el tap6n de Ilenado/lavarilla de nivelde
aceite.
(oF)-400-200 0o 200 400
(°c) -300 -200 -100 0°
L_.vesebienlasmanosconaguayjab6ninmediatamentedespu@s
detocaraceiteusado.
47
Page 48

Control de la bujia
NO pruebe lachispa si noesta.iabuj[a de encendido, NO dearranque al
motorsi no esta.la buj[ade encendido,
Si eimotor ha estadofuncionando, ei silenciador estara,muycaiiente,
Tenga cuidadode notocar ei silenciador,
NOTA: Oontroie Ia buj[auna vezpot temporadao cada25 horas de
funcionamiento,Cambie Ia buj[auna vez pot temporada o cada 100 horas
de funcionamiento,
Paraasegurarse de queet motor funcionebien, Ia buj[adebe tenet una
separaci6n correctaydebe estar iibre de dep6sitos,
1, Retire la funda de buj[ay utilice unaIlavepara buj[aspara extract la
buj[a,Yea laFigura 13,
2, Inspeccionevisualmente Iabuj[a, Elimine Iabuj[a si presenta mucho
desgaste,o si el aisianteesta.agrietado o astiiiado,Limpie la buj[a
con un cepiiiode aiambre si seva a reutiiizar,
3, MidaIaseparaci6n de buj[a con un calibrador, Corrijade set
necesariotorciendo ei eiectrodo lateral, Vea la Figura 14,La
separaci6ndebe establecerseentre 0,02 y 0,03pulgadas (0,60°0,80
mm).
4, Verifiqueque Ia arandelade la buj[aest_en buenas condiciones
y enrosqueIabuj[a hacia adentromanualmente para evitar quese
enrosquecruzada,
5. Unavezque labuj[a esta.colocadaen su lugar,aprietecon una Ilave
para buj[apara comprimir laarandela.
©
o
Fundade bujia
Figura 13
Electrodo
NOTA:Cuandoinstaie una buj[a nueva,apriete 1/2vueita,despues que
la buj[a se encuentra colocada en su Iugar,paracomprimir Iaarandela,
Cuando reinstaleuna buj[ausada, ajuste 1/8-a 1/4degiro, despuesque la
buj[ase encuentra colocadaen su lugar,a fin de comprimir la arandela,
Labuj[adebe estar bienajustada, Si la buj[aesta.floja puede
recaientarse y daharel motor,
Figura14
48
Page 49

Recomendaciones generales
1. Respetesiempre ias regiasde seguridad cuando reaiicetareas de
mantenimiento.
2. La garanfia de estama.quinaquitanieveno cubre eiementos que han
estado sujetosaImaI usoo negligencia del operador.Pararecibir et
reemboisototai de ia garanfia,ei operador deber_,dar mantenimiento
ala m_.quinaquitanieve como se indica eneste manuai.
3. Reviseperi6dicamentetodos los sujetadores y los eiementos de
ferreter[aparacomprobar que esten bien ajustados.
/-
Pasador de _,
cucNIla Pasador de
chaveta Zapata
antidesJizante
.....
Reaiiceei mantenimientode la correa ai aireiibre, ya que es posible
quehaya perdidasde combustible delcarburador inciuso cuando se
ubica un trozode pl_.sticobajola tapa de Ilenadode combustible para
evitarque estesufra perdidas.
Carnbio de la piaca de raspado y
las zapatas antidesiizantes
La piaca de raspado y ias zapatasantidesiizantes ubicadas en ia base
de ia m_tquinaquitanieveestan sujetas adesgaste. Debe controiarlas
peri6dicamentey reempiazarias cuando sea necesario.
1. Paracambiarias,quitelospemosdecarroylastuercasqueasegurancada
zapataantidesiizantea lacajadeiam_quinaquitanieve.Vealafigura15.
2. Vueivaaensamblarnuevaszapatasantidesiizantesconloseiementosde
ferreter[aqueacabade retirar.Compruebequelaszapatasantideslizantes
estanajustadasparaquequedenparejas.
3. Pararetirarla piacaderaspado:Retireambaszapatasantideslizantesy
los elementosdeferreter[a,inciuyendolos pernosdel carroy ias tuercas
queunen Ia placade raspadoa lacaja de Ia m_quinaquitanieve.Pot la
ubicacbn dela placaderaspado,consultelafigura 15.
4. Vuelvaaensambiariaplacade raspadonueva,asegura.ndosedeque las
cabezasdeIospemosdeicarroseencuentrendei Iadointeriordela caja.
Vueivaa instaiarlaszapatasantidesiizantes.Ajustebien.
Servicio de las barrenas
Las barrenasestansujetas aI ejeespiraI con cuatro pasadoresde cuchilla
y pasadoresde chaveta. La m_.quinaquitanieveesterdiseSadade manera
queIos pasadoresse quiebransi golpea unobjeto extraho o una barra de
hieto.Consuite ia Figura15.
Si Iasbarrenas nogiran, verifique si Ios pasadoresse quebraron. Si es
necesario,reempi_.ceiosporpasadores de cuchilla adecuados.Consulte
ei n0mero de pieza correctoen laIista de piezas de este manual.
IMPORTANTE:NoreemplaceNUNOAIospasadoresdecuchilIade Ias
barrenaspor pasadoresosujetadoresestandar.CuatquierdaSoquesufraeI
engranajedela barrenao cualquierotrocomponentepor eIusodepasadores
est_tndarNO estara,cubiertopot lagaranfiadesuma.quinaquitanieve.
Lubricaci6n
Paraubicar los puntos de lubricaci6n de la m_.quinaquitanieve,consulte
la Figura 16.
1. Unavez por temporada,iubrique los puntosde girodei control de ia
barrenay el control de ia transmisi6ncon un aceiteIiviano para motor.
2. Unavezpor temporada,lubriqueel soporteintermediodelabarrenacon
unaceiteIiviano.
Acontinuaci6n se enumeran recomendacionesgeneralessobre ei
mantenimientodei motor de su m_.quinaquitanieve.
1. Antesde operar lam_.quinaquitanieve,controle ei nivelde aceite.
/' !
raspado Tuerca de Pemo deJ Tue !e
seguridad carro sequridad
Figura 15
///
Figura16
2. Gambleei aceite deJmotordespues de iasprimeras cinco horas de
funcionamiento y a partirde ah[ cada 50 horas.
3. LimpieIabuj[a y reajusteIaseparaci6n de electrodos a0,030" aI
menos unavez pottemporada ocada 100horas defuncionamiento;
reempl_.ceJacada 200horas de funcionamiento.
Verifique las correas en
Siga ias instrucciones que se suministrana continuaci6n paraverificarel
estado de iascorreas de transmisi6ncada 50 horasde funcionamiento.
1. Saque la cubierta pl_.sticade la correa ubicada en elfrente del motor.
Paraeiiosaque los torniiiosautorroscantes y presionelas lengQetas
pia.sticasparasoitar lacubierta de lacorrea.
2. Verifiquevisuaimente ia existenciade correasra[das, agrietadaso
excesivamentegastadas. En caso de set necesario,reemplace seg0n
las instrucciones queaparecen a continuaci6n.
Reemplazo de las correas
NOTA: Estama.quinaquitanieve vieneequipada con dos correas: una
correa de ia barrenay unacorreade transmisi6n. Se recomiendaque
ambas correassean reemplazadasai mismotiempo.
1. Retirede Iabuj[aetcablede Iamisma,y p6ngalode maneraque haga
masacontra eimotorpara evitarque seenciendade maneraaccidentai.
2. Hagafuncionar ei motor hasta queel dep6sito de combustible sevade
para evitar una perdida de gasolina durantelos siguientes pasos.
49
V
J
Page 50

f
PoJeadel
motor
Correade la
transmisi6n
Figura17
Correade barrena
}_ oJea de la
barrena
Antesde reaiizartareas de servicio, reparaci6n,iubricaci6no inspecci6n,
/
i!
/
desengrane todos loscontroies y detenga ei motor.Espere aque se
detengancompietamente todas iaspiezas m6viies. Desconecteei cable
de Ia buj[ay p6ngalo haciendomasa contra ei motorpara evitarque
se encienda accidentalmente.Utilice siempre anteojosde seguridad
_durante a operac 6n o m entras tea zaa usteso reparacones.
Retireel tomillo autorroscantequese muestra en iaFigura 17,y
presioneias iengOetaspi_.sticasparasoltar ia cubierta de ia correa.
Tire de ia cubierta de la correa haciaarriba y hacia afuera sac_.ndola
de airededor del motor y el montajedel canal. Dejelaseparada y
gu_.rdela.
Correa de barrena
IMPORTANTE: Recuerdeque puede haber perdidade gasolina deI
carburador eneste punto;debe haber hechofuncionar et motorhasta
vaciarei dep6sito de combustiblecomose indic6 previamente.
1. Inctinela m_.quinaquitanieve hacia arribay hacia adelante de
maneraquequede apoyada sobre Iacajade Iabarrena. Retireel
guardacorreacomo se indica en la Figura 19.Regrese ia m_.quina
quitanievea suposici6n vertical para completar lossiguientes paso&
2. Desiiceia correade la barrenafrontal fuerade la poieadeI motor
empujandola hacia adelantey haciendola rodarfuera de la polea.Vea
la Figura l&
3. Apriete ia barrade control de iabarrena parasoitar elfreno de ia
barrena,que es IalengOetaque sujeta la correa sobre la poleade la
barrena.Retire ia correa.
4. Reempi_.ceiapot la nuevacorrea despues de reemplazar la correa de
latransmisi6n.
f
Poleadetransmisi6n
Figura19
Correa de la transmisi6n
NOTA: Reemplaceia correa de ia transmisi6n antesde volver a
ensamblarIa nuevacorreade labarrena.
1. Incline ia maquinaquitanieve haciaarriba y haciaadeiante de manera
quequede apoyadasobre Iacaja de Ia barrena.
IMPORTANTE: Recuerdeque puede haber perdidade gasolina deI
carburador eneste punto;debe haber hechofuncionar et motorhasta
vaciarei dep6sito de combustiblecomose indic6 previamente.
2. Quite elresorte que conecta la transmisi6na un pernoen ei cuadro del
motor.Vea ia Figura 19.
NOTA: Puedeset m_.sfa,cil retirar iatuerca de seguridad bridada en
primerIugar,yluego usar pinzasde punta de aguja parasujetarcon
firmeza ei resortey retirariodei perno.
3. Gire ia transmisi6nhacia adelante parasoitar ia presi6nen la correa
de transmisi6n. Retirela correa de la poiea de transmisi6n.
4. Quite ia correade transmisi6n dealrededor de la polea del motor y
s_.quelade Ia unidad.
5. Instaieuna nueva correa de transmisi6ndentro de laranura de la
poleadei motor.Veala Figura 18.
6. Incline ia transmisi6nhacia adelantey ubique lacorreade transmisi6n
en ia poiea de transmisi6n.
7. Vueivaa conectar ei resorteai pernoen ei marco del motory ajustela
transmisi6n. Vueivaa instaiar ia tuerca de seguridadbridada.
8. Coioquela correa de barrenanueva.
9. Vueivaa montar la cubierta de la correa en la m_.quinaquitanieve:
10.Vuelvaa montar el guardacorreaa lacaja.
5O
Page 51

Ajuste demcabme de la barrena
Esposibie que se requieran ajustesperi6dicos del cable de controlde
la barrena debido ai estiramiento y ai desgastenormal de lacorrea. Se
necesitara.najustessi Iasbarrenasparecen temblar mientras giranpero
eImotor mantiene su velocidad, o sisigue girando con ei control de la
barrenadesengranado.
1. Afloje Iatuerca hexagonalposterior en el soportede ajustedelcable.
Yea la Figura20.
2. Desliceei soportede ajuste del cane hacia atra.sreduciendoel juego
del cane dela barrena.
3. Vuelvaa ajustaria tuerca hexagonalposterior.
4. Enciendaei motory verifique queel control de la barrena seengrana
y desengranaadecuadamente.
NOTA: Si ia barrenacontinOagirando con ei control desengranado,
apagueel motory reajusteel soporte deicane hacia adelante. Luego
vuelva acontrolar elfuncionamiento de la barrena.
f
Soportede
ajuste de1cable
de Jabarrena
TomiHode
Jacajadela
barrenainferior
J
Figura20
Siga elcronograma de mantenimiento que se presenta a continuaci6n. AIgunos ajustes deben ser realizados peri6dicamente para
el mantenimientoadecuado de launidad. Revise peri6dicamente todos lossujetadores y compruebe que esten bien ajustados.
Controle su calendario de mantenimiento completando el campo "Fechas de los servicios" que aparece a continuaci6n.
Antesde reaiizartareas de servicio,reparaci6n,lubricacbno inspecci6n,desengranetodoslos controlesy detengael motor.Esperea que sedetengan
completamentetodaslaspiezasm6viles.Desconecteelcabledelabuj[ayp6ngaiohaciendomasacontraelmotorparaevitarqueseenciendaaccidentaimente.
Utilicesiempreanteojosdeseguridaddurantelaoperacbno mientrasrealizaajusteso reparacione&
Programa de mantenimiento
,,,%_[,
Antesde cadauso
Despu_sdecadauso 1. 1.
1ras 5horas 1. 1.
Revise el nivel de aceite del
motor.
Verifique el equipo.
2. 2.
Verifique el estado de las
zapatas.
Aceite del motor
Luegode 25horas 1. Compruebelas correasen 1.
V.
Antesde almacenar Sistemadecombustible.
Unavezportemporada
.
Puntosde pivote.
2_
Sistemadetransmisi6nyeje
deengranajehexagonal.
.
Ejedelasruedas.
4_
Bujiade encendido.
Carguadeaceitesielnivelesta
bajo
Limpieza
Limpieza
Cambio.
Ajusteo reparaci6nsegOnresulte
necesario.
1. Vaciado.
1. Lubricaci6n.
2. Lubricaci6n.
3. Engrasado.
4. Cambiodesernecesario.
";_-__]_ _d_r_[,,_-
51
Page 52

Si no seva a utiiizar et equipo durante 30 d[as oma.s,o si es ei finalde la temporada de nieve y ya noexiste posibiiidadde que nieve,es necesario
aimacenarel equipo de manera adecuada. Siga ias instrucciones de aimacenamientoque se indicana continuaci6n paragarantizar ei rendimiento
m_.ximode lam_.quinaquitanievedurantemuchos aSosm_.s.
PREPARACU6N DEL MOTOR
Ammacenamiento a corto pmazo
Esimportante evitar quedurante ei aimacenamientose formendep6sitos
de goma en iaspiezas esenciaiesdei sistema de combustible deImotor
como, pot ejemplo,en eIcarburador,et filtro de combustible, Iamanguera
de combustibleo ei dep6sito duranteei aimacenamientoa corto plazo
(15-30d[as). Paraevitar que esto suceda, trateel sistema de combustible
con unestabilizador de combustible.
El uso de estabilizadoresde combustible (talescomo STA-BHUM
o ULTRA-FRESWM)es unaalternativaaceptable para minimizar
la formaci6n de dep6sitos de goma de combustible duranteeI
aimacenamiento.Agregueel estabilizadora ia gasoiina que se encuentra
en el dep6sito de combustibleo en eI recipientede aimacenamiento.
Respetesiempre ia proporci6nde mezciado quefigura en ei recipiente
deiestabiiizador. Pongael motor en marcha potIo menos 10minutos
despues de agregar elestabilizador para permitirie iiegarai carburador.
Nuncaaimacene lam_.quinaquitanievecon combustible en ei dep6sito
en un espaciocerrado oen a.reascon pocaventiiaci6n,donde losgases
deI combustible puedanaicanzar eI fuego,chispas o una iuz piiotocomo
la que tienen aigunos hornos,calentadoresde agua, secadores de ropa
o aigOnotto dispositivo a gas.
PREPARACU6N DE LA M._QUUNA
QUUTANUEVE
• Cuando aimacene la ma.quinaquitanieveen un gaip6n dedep6sito
meta.iicoocon poca ventiiaci6n,tengaespecial cuidado de reaiizarle
un tratamiento antioxidanteai equipo. Useaceite ligeroo silic6n
para recubrir ei equipo, especiaimente las cadenas,los resortes,los
cojinetes y Ioscables.
Eiiminetodo elpolvo dei exterior deI motor y dei equipo.
Siga Ias recomendacionesde lubricaci6n.
Almaceneel equipo en un lugar limpio y seco.
Loscombustibles con mezcla de alcohol (que se iiamangasohoi, oque
utiiizanetanol o metanoI) puedenatraer Iahumedad,Ioque conduce a
la separaci6n y formaci6n de a.cidosduranteel aimacenamiento. Ei gas
addico puede da_iareisistema de combustible de un motor durante ei
aimacenamientodei mismo.
Ammacenamiento a margo pmazo
ParaevitarproblemasconeImotor,sedebevaciareisistemade
combustibleantesdeaimacenarlam_.quinadurante30d[asoma.s.
El combustiblequese dejeen ei motorse deterioracuando elclima es
c_.Iidoy causa graves problemasde encendido.
1. Pongaei motor en marcha hastavaciarei dep6sito de combustible y
hastaque ei motor sedetenga debido a la faita de combustible. No
intenteverter combustibledel motor.
Nunca use productosde Iimpieza paraet motor oel carburadoren ei
dep6sito de combustible yaque esto provocara,undaho permanente.
2.
Extraigaia buj[a y vierta una(1)onza de aceite paramotorpot ei
orificio de Iabuj[ay dentro delcilindro. Cubraet orificio de Iabuj[acon
un trapo y ponga ei motoren marcha varias veces paradistribuir ei
aceite.Reemplace la buj[a.
52
Page 53

Antesde realizarcuaiquiertipode mantenimientooservicio,desenganche
todosloscontrolesydetengael motor.Espereaque sedetengancomple-
tamentetodaslaspiezasm6vileaDesconecteelcablede la bujiay p6ngalo
haciendomasacontraelmotorparaevitarquese enciendaaccidentalmente.
Utilicesiempreanteojosdeseguridaddurantela operaci6nomientrasrealiza
ajusteso reparacionea
Esta seed6n analizaprobiemaa menoresde servieio. Paraubiear el CentrodeServido Sears rMs eereanoo para programar un servi-
eio,simplemente eomuniqueaecon Searsal tel_fono 1-800-4-MY-HOME®.
Elmotorno arranca
Elmotorfundona de 1.
maneraerrafica 2.
Elmotorrecalienta 1.
Vibrad6n excesiva 1.
P6rdidadepotenda 1.
Launidadnose 1.
autoimpulsa
Launidadno 1.
descargala nieve
1. Elcontroldelcebadornoestaenlaposid6nON (encendido).
2. Sehadesconectadoel cablede la bujia,
3. Labuiianofundona correctamente.
4. Eldep6sitodecombustibleestavacio o el combustiblese
1. Pongaelcontroldelcebadorenla posici6nON(encendido).
2. Conecteel cablea labuiia,
3. Limpiela,aiustela distanciadisruptivao cambiela.
4. Lleneeltanquecongasolinalimpia yfresca,
haechadoaperder.
5. Elmotornoestacebado.
5. Cebeelmotortalcomose exNic6en lasecci6n
Funcionamiento.
6.
LaIlavede seguridadnosehainsertado.
Elmotorestafundonando en la posici6nCHOKE(cebador).
Elcombustiblees vieio.
3.
Elsistemadelcombustibletieneaguao estasucio.
6. InsertelaIlavetotalmentedentrodelinterruptor.
1. Muevaelcontroldel cebadora la posici6nOFF(apagado).
2. Lleneel dep6sitocongasolinalimpiayfresca,
3. Vacieeldep6sitode combustible.VuelvaaIlenarel
dep6sitoconcombustiblenuevo.
4.
Contactecon sucentrode partesyreparacionesSears.Esnecesarioregularel carburador. 4.
Elcarburadornoestabienregulado. 1. Contacteconsucentrode partesy reparacionesSears.
Haypiezasqueestanfioias o la barrenaestadaSada, 1. Detengaelmotordeinmediatoy desconecteel cabledela
buiia,Aiustetodos los pernosy las tuercas.Si lavibraci6n
continda,Ilevela unidadarepararauncentrode partesy
reparaci6nSears.
Elcablede la buiiaestafioio. 1. Conectey ajusteelcablede labuiia.
2.
Elorificiode ventilaci6ndeltap6ndecombustibleesta 2. RetireelhMo y la nievedeltap6nde combustible.
obstruido. Compruebequeelorificiodeventilaci6nnoest6obstruido.
Elcablede latransmisi6nnecesitaunaiuste. 1. Aiusteel cabledel controldetransmisi6n.Consultela
secci6ndeServicioy Mantenimiento.
2.
Lacorreadetransmisi6nestafioiao daSada. 2. ReemNacelacorreadetransmisi6n.Consultelasecci6nde
Servicioy Mant.
Elconiuntodel canalestatapado. 1.
Detengaelmotordeinmediatoy desconecteel cabledela
buiia,Limpieel montajedel canaly el interiorde lacaiade
labarrenaconla herramientade limpiezaounavarilla,
2.
HayunobietoextraSoenla barrena.
2. Detengaelmotordeinmediatoy desconecteel cabledela
buiia,Retireelobietodela barrenaconlaherramientade
limpiezaounavarilla,
3.
Elcablede la barrenanecesitaunaiuste.
3. Aiusteel cabledelcontroldelabarrena.Consultelasecci6n
Montaie.
4.
Lacorreade la barrenaesta fioiao daSada.
4. ReemNacelacorreadelabarrena,Consultelasecci6nde
Servicioy Mantenimiento.
5.
Elo lospasadoresdecuchilla esta(n)quebrado(s).
5. ReemNacecon nuevo(s)pasador(es)decuchilla,
_.NECESITA MAS AYUDA?
, En iinea pedra egeegirar este manua{ y Ies maguaies de tedoa sus otros pmduetes.
, SuapreguntasaeraI_respotldidasperI_uestroequipedeespeeiali_tas.
, Obtenga u_ p_a. de magienimiento p_segatizade papa su hogar.
, Encu_ntre informacio_ y her_amie_tas que le ayudara_ co_ los preyectes demesticos.
53
Page 54

MTD CONSUMER GROUP, INC. (MTD), el Bordo de Recursos de Aire de California (CARB)
y la Agencia de Protecci6n Medioambiental de Estados Unidos (U. S. EPA}
DeclaraciSn de Garant_a del Sistema de Control de Ernisiones
(Derechos y obligaciones del propietario seg_n la garant(a contra defectos}
LACOBERTURADESISTEMADECONTROLDEEMISIONESAPLICABLEA MOTORESCERTIFICADOSCOMPRADOSENCALiFORNiA
EN2005Y A PARTIRDEENTONCES,QUESONUSADOSEN CALiFORNiA,Y HASTAANO2005DE MODELOCERTIFICADOY MOTORES
POSTERIORESQUESONCOMPRADOSY USADOSENOTRAPARTEENLOSESTADOSUNIDOS.
Californiayen otra parteen la Coberturade GarantiadeDefectosdeControlde Emisi6nde losEstadosUnidos
El BordodeRecursosde AiredeCalifornia(CARB),la U.S.EPAy MTDsecomplacenenexplicarlagarantiadel sistemade controldeemisiones
de sumotorparaequipotodoterreno,modelo,a_o2005yversionesposteriores.EnCalifornia,losnuevosmotorespeque_osparaequipotodo
terrenose@bendise_ar,fabricaryequiparparacumplirconestandaresde antinieblat6xicade estados.Enotraparteenlos EstadosUnidos,
el nuevonocamino,motoresdeignici6ndechispacertificadosparaelmodelo2005ymb.star@,debeencontrareljuegodeestandaressimilar
adelanteporlos EstadosUnidos.EPA.MTDdebegarantizarel sistemadecontrolde emisionesdesumotorporelperiodode tiempoindicadomb.s
abajo,siempreycuandono hayaexistidousoincorrecto,negligencianimantenimientoinadecuadode sumotorpequeSoparaequipotodoterreno.
El sistemadecontrolde emisionespuedeincluirpiezascomo,porejemplo,elcarburador,sistemadeinyecci6ndecombustible,el sistemade
encendido,el catalizador,losdep6sitosdecombustible,abastecedecombustiblelineas,gorrasdecombustible,vb@ulas,latas,filtros,mangueras
devapor,abrazaderas,conectoresy otroscomponentesrelacionadosconlasemisiones.
Dondeexistaunacondici6ncubiertaporlagarantia,MTDrepararb,su motorpequeSoparaequipotodoterrenosincostoalgunoincluyendoel
diagn6stico,laspiezasy lamanode obra.
COBERTURA DE LA GARANTiA DEL FABRICANTE:
Estesistemade controldeemisionessegarantizaporel t@rminodedos aSos.Si algunapiezadesu motorrelacionadaconlasemisioneses
defectuosa,MTDrepararb,o sustituirb,dichapieza.
RESPONSABILIDADES DEL PROPIETARIO SEGUN LA GARANTIA:
Comopropietariodeun motorpeque_ode equipotodoterreno,ustedes responsablede realizarel mantenimientonecesarioquefigura enel
manualdelpropietario.MTDle recomiendaqueconservetodoslos recibosquecubrenlosserviciosdemantenimientodel motorpequeSopara
equipotodoterreno,noobstanteIocualMTDnopodrb,denegarel cumplimientodela garantiaOnicamentepotlafaltade reciboso potsuimposibi=
lidadde asegurarqueserealizarb.ntodoslosserviciosdemantenimientoprogramado.
ComopropietariodelmotorpequeSoparaequipotodoterreno,sinembargo,ustedtambi_ndebesaberque MTDpuededenegarlacoberturadela
garantiasi sumotorpequeSoparaequipotodoterrenoo unapiezadelmismofallandebidoa usoincorrecto,negligencia,mantenimientoindebido
o amodificacionesnoaprobadas.
Ustedes responsablede presentarlacortadoradec6spedalcentrodedistribuci6no de mantenimientode MTDCONSUMERGROURiNC.tan
prontocomoaparecierael problema.Lasreparacionescubiertaspot lagarantiasedebenllevaracaboenun lapsorazonableque noexcedade
30dias.Sidesearealizaralgunaconsultaconrespectoala coberturadelagarantia,debeponerseencontactoconsudistribuidorlocalde MTD.
Paracomunicarseconla LineadeAsistenciaal Clientede Distribuidoresde MTD,llameal nOmero(877)282=8684.
REQUERIMIENTOS DE GARANTiA SOBRE DEFECTOS PARA MOTORES PEQUENOS DE EQUIPO TODO TERRENO
DE 1995YVERSIONES POSTERIORES:
Estasecci6nse aplicaa motorespequeSosdeequipotodoterrenode 1995yversionesposteriores.Elperiododegarantiacomienzaa partirdela
fechaen queelmotoro elequiposeentreganal compradorfinak
La_Coberturade lagarantiacontraemisionesgenerales
MTDgarantizaalcompradorfinaly acadacompradorsubsiguientequeel motor:
(1)hasidodiseSado,construidoy equipadodemaneraquecumplacontodaslasregulacionesvigentesadoptadaspotel Departamentodelos
RecursosdeAire envirtuda suautoridadconferidaenloscapitulos1y2, Parte5, Divisi6n26delC6digodeSaludy Seguridad;y
(2)estalibrededefectosenlosmaterialesyen lamanode obraquecausenlafalla deunapiezabajogarantiaque seaid6nticaentodoslos
aspectosmaterialesa lapiezacomoaparecedescriptaen laaplicaci6ndelfabricantedelmotorparacertificaci6npot unperiododedos aSos.
_garantia sobrepiezasrelacionadasconemisionesseinterpretarb,de la siguientemanera:
(1)Cualquierpiezacubiertapot garantiaquenoest_programadaparasureemplazosegOnel mantenimientorequeridoenlas instrucciones
escritasdelaSubsecci6n(c) debeestargarantizadapot unperiodode garantiadefinidoen la Subsecci6n(a)(2). Sila piezafalladurante
el periododecoberturadela garantia,lamismaseth.reparadao reemplazadapot MTD de acuerdoconla Subsecci6n(4)acontinuaci6n.
Cualquierpiezareparadao reemplazadasegOnlagarantiasegarantizarb,potel restodelperiodode garantia.
(2) Cualquierpiezacubiertapot garantiaqueest_programadasoloparainspecci6nregularen lasinstruccionesescritasde la Subsecci6n
(c)debeestargarantizadapotun periododegarantiadefinidoenla Subsecci6n(a) (2). Unadeclaraci6nen dichasinstruccionespotescrito
alefectode "reparaci6no reemplazosegOnseanecesario"no reducirb,elperiodode coberturade la garantia.Cualquierpiezareparadao
Page 55

reempiazadasegOnlagarantiasegarantizarb,porelrestodelperiododegarantia.
(3) Cualquierpiezagaranfizadaqueest_programadaparareempbzosegOnelmantenimientorequeridodeconformidadconlasinstruc-
clonesescritasdelaSubsecci6n(c)segarantizaporelperiododefiempoanterioralaprimerafechadereemplazoprogramadaparaesa
pieza.Silapiezafallaantesdelprimerreemplazoprogramado,lamismaserb.reparadaoreemplazadaperMTDdeacuerdoconlaSubsecci6n
(4)aconfinuaci6n.Cualquierpiezareparadaoreemplazadabajogarantiasegarantizarb,porelrestodelperiodoanterioralprimerreemplazo
programadopuntualparaesapieza.
(4)Lareparaci6noelreemplazodecualquierpiezagarantizadadeconformidadconlasdisposicionesdelagarantiaqueaquiseestipulase
deberealizarenuncentredegarantiasincostoalgunoparaelpropietario.
(5)SinperjuiciodebsdisposicionesdelaSubsecci6n(4)anterior,losserviciosoreparacionescubiertosporlagarantiadebensersumim
istradospertodosloscentrosdedistribuci6ndeMTDquetenganlafranquiciapararealizarreparacionesymantenimientoalosmotoresen
cuesti6n.
(6)ElpropietarionodebeafrontarningOncargoparatrabajosdediagn6sticoqueIlevenalaconclusi6ndequeunapiezabajogarantiapresenta
efectivamentedefectos,siempreycuandodichodiagn6sticoseaIlevadoacaboenuncentrecubiertoporlagarantia.
(7)Elfabricantedelmotoresresponsableporda_oscausadosaotroscomponentesdemotoresderivadosdelafallabajogarantiadecualquier
piezagarantizada.
(8)DurantetodoelperiododegarantiadelmotordefinidoenlaSubsecci6n(a)(2),MTDmantendrb,unsuministrodepiezascubiertaspor
garantiasuficienteparasatisfacerlademandaesperadaparatalespiezas.
(9)Cualquierpiezadereemplazosepodrb,usarparaelcumplimientodelmantenimientooreparacionesbajogarantia,ysesuministrarb,sin
cargoalpropietario.Dichousenoreducirb,lasobligacionesdegarantiadeMTD.
(10)Nosepodranusarpiezasadicionalesnimodificadasquenoest_nexentasdeacuerdoconelDepartamentodelosRecursosdelAire(Air
ResourcesBoard).Elusedepiezasadicionalesomodificadasnoexentasserb.causasuficienteparaanubrunreclamobajogarantiarealizado
deacuerdoconestearticulo.Elfabricantedelmotornotendraresponsabilidad,enconformidadconestearticulo,degarantizarfallasdepiezas
garantizadasquefuerencausadasporelusedeunapiezanoexentaadicionalomodificada.
_) MTDincluirb,unacopiade lasiguientelistade piezasbajoqarantiacontraemisionesconcadanuevomotor,utilizandolaspartesde la lista
_licables almotor.
(1)Sistemademedici6ndecombustible
, Sistemademejoraparainicioenfrio (cebadosuave)
, Carburadory componentesinternes
, Bombadecombustible
, Dep6sitodecombustible
(2) Sistemadeinducci6ndeaire
, Filtrode aire
, Colectordeentrada
(3) Sistemadeencendido
oBujia(s)
, Sistemadeencendidoper magneto
(4)Sistemadeescape
, Catalizador
, SAI(valvulade Ca_a)
(5) Componentesvariesutilizadosen el sistemaanterior
, Wlvulaseinterruptoresde vacio,temperatura,posici6nsensiblesal tiempo
, Conectoresy montajes
(6)ControldeEvaporative
, Manguerade CombustiblecertificadaparaARBevaporativeemisi6nde 2006.
, Abrazaderasde Manguerade Combustible
, Gorrade combustibleatada
, Latadecarb6n
, Uneasdevapor
GDOC-100174Rev,B
Page 56

Busque e( per(odo de duraci6n de emisiones importantes y(a informaci6n de c(asificaci6n de aire en
meetiqueta de emisiones de su motor
Los motores cuyo cump(imiento con los estAndares de emisi6n Tier 2 de laComisidn de Recursos Ambienta(es de California (CARB)
est_ certificado deben exhibir la informaci6n relacionada con el per(odo de duraci6n de lasemisiones y (aclasificaci6n de aire. Sears,
Roebuck and Co., de los Estados Unidos ponen esta informaci6n a disposici6n del consumidor en nuestras etiquetas de emisiones.
El Per(odo de Duraci6n de las Emisiones describe el nQmero de horas de tiempo real de funcionamiento para el cual se certifica que
el motor cumple con las reglas de emisi6n, descontando el mantenimiento adecuado del mismo segQn las instrucciones de opero
aci6n y mantenimiento. Se utilizan las siguientes categodas:
Moderado:Se certifica que el motor cumple con las reg(as de emisi6n durante 125 horas de tiempo real de funcionamiento del motor.
)nmediato:Se certifica que el motor cumple con las reg(as de emisi6n durante 250 horas de tiempo real de funcionamiento del motor.
Extendido:Se certifica que el motor cumple con las reglas de emisi6n durante 500 horas de tiempo real de funcionamiento del motor.
Por ejemplo, una cortadora de c6sped t(pica que se empuja desde atrAs se usa entre 20 y 25 horas por a_o. Por Io tanto, el Per_odo
de Duraci6n de Emisiones de un motor con una ciasificaci6n intermedia seda equiva(ente a entre 10 y 12 aSos.
Laclasificaci6n de aire es un nQmero calcu(ado para describir el nivel relativo de emisiones para un grupo de motores en particular.
Cuanto menor sea la clasificaci6n de aire, mayor es la limpieza del motor. La informaci6n se presenta de forma grafica en la etiqueta
de emisiones.
Despu_s de( 1 de juHo de 2000, busque e( pedodo de cumpHmiento de (as reglas de
emisiones en (a etiqueta de cump(imiento de (as reg(as de emisiones de( motor
Despu6s del 1 de julio de 2000 se certificara que determinados motores Sears, Roebuck and Co., de los Estados Unidos
cumplen con los estAndares de emisiones de la fase 2 de (a Agencia de Protecci6n Ambiental de los Estados Unidos (USE°
PA). Para los motores certificados para la etapa 2, el pedodo de cumplimiento con las reg(as de emisiones al cual se hace
referencia en (aetiqueta de cumplimiento con las reglas de emisiones indica el nQmero de horas de funcionamiento para el
cual se ha demostrado que el motor cumple con los requerimientos federales de emisi6n.
Para los motores con desplazamiento inferior a 225 cc, Categoda C = 125 horas, B = 250 horas y A = 500 horas.
Para los motores con desplazamiento de 225 cc o mAs, Categoda C = 250 horas, B = 500 horas y A = 1000 horas.
El desplazamiento de los motores de la serie modelo 150112 es 249 cc.
La presente es una representaci6n gen_rica de (aetiqueta de emisi6n que se encuentra genera(mente en un
motor certificado.
GDOC-100182Rev.A
56
Page 57

Felicitacionespor haberrealizadounaadquMd6ninteligente.El
productoCraftsman®quehaadquiridoestadise_adoyfabricado
parabrindartouchesa_osdefundonamientoconfiable.Perocome
todoslosproductosavecespuederequerirde reparaciones.Esen
esemementocuandoeldisponerdeunAcuerdode protecd6npara
reparacionesle puedeahorrardineroy problemas.
A confinuad6nsedetallanlospuntosincluidosenelAcuerdo:
, Servicio e×pertoprestadopernuestros10,000espedalistasen
reparacionesprofesionales
, Servicio iiimitado sin cargo paralaspiezasyla manedeobraen
todaslas reparadonescubiertas
, ReempJazodel producto hasta1500d61aressino esposible
repararel productocubierto
, Descuento de 10%delprecionormaldelservicioy delaspiezas
relacionadascon elmismoqueno est_ncubiertasperel acuerdo;
ademb.s,10%del precionormalde laverificaci6nde manten-
imientopreventive
, Ayudar_pida pot teJ_fono- IoIlamamosResoluci6nRapida- el
apoyotelef6nicode unChamuscaal representante.Pienseen
nosotroscomeelmanual"deundue5ohablador."
Unavezadquiridoel Acuerdo,puedeprogramarel serviciocon
tans61orealizarunaIlamadatelef6nica.PuedeIlamarencualquier
mementodeldia o delanocheoprogramarun servicioenlinea.
ElAcuerdode Protecci6nde Reparaci6nesunacomprasinriesgo.
Siustedanulaperalgunaraz6nduranteelperiodode garantiade
producto,proporcionaremosun reembolsoIleno.O,un reembolso
prorrateadoencualquiermementodespu@sdelperiodode garantia
de productoexpira,iAdquieraheysuacuerdodeprotecci6npara
reparaciones!
Se apJican determinadas timitaciones y e×ctusiones. Para obtener
informaci6n adicional y precios en los Estados Unidos llame al
1-800-827-6655.
El *Coverage en Canad_ vada en algunos articuJos. Para detalles
llenos la llamada Chamusca Canad_ en 1-800-361-6665.
Servicio deinstalaci6n de Sears
Sideseasolicitarlainstalaci6nprofesionalde Searsde aparatos
dom_sticos,dispositivosparaabrirportones,calentadoresde agua
y otrosarticulosdom6sticosimportantes,en losEstadosUnidoso
Canada.Ilameal 1-800-4-MY-HOME®.
57
Page 58

Your Home
For expert troubleshooting and home solutions advice:
www.managemyhome.com
For repair - in your home - of all major brand appliances,
lawn and garden equipment, or heating and cooling systems,
no matter who made it, no matter who sold it!
For the replacement parts, accessories and
owner's manuals that you need to do-it-yourself.
For Sears professional installation of home appliances
and items like garage door openers and water heaters.
1-800-4-MY-HOME ® (1-800-469-4663)
Call anytime, day or night (U.S.A. and Canada)
www.sears.com www.sears.ca
Our Home
For repair of carry-in items like vacuums, lawn equipment,
and electronics, call anytime for the location of your nearest
Sears Parts & Repair Service Center
1-800-488-1222 (U.S.A.) 1-800-469-4663 (Canada)
www.sears.com www.sears.ca
To purchase a protection agreement on a product serviced by Sears:
1-800-827-6655 (U.S.A.) 1-800-361-6665 (Canada)
Para pedir servicio de reparaci6n
a domicilio, y para ordenar piezas:
1-888-SU-HOGAR ®
(1-888-784-6427)
Au Canada pour service en fran£ais:
1-800-LE-FOYER M°
(1-800-533-6937)
www.sears.ca
® Registered Trademark / TMTrademark / SM Service Mark of Sears Brands, LLC
® Marca Registrada / TMMarca de F&brica / Marca de Servicio de Sears Brands, LLC
MCMarque de commerce / MD Marque depos6e de Sears Brands, LLC © Sears Brands, LLC
SM
 Loading...