

Page 1
Operator's Manual
CRRFr MRN
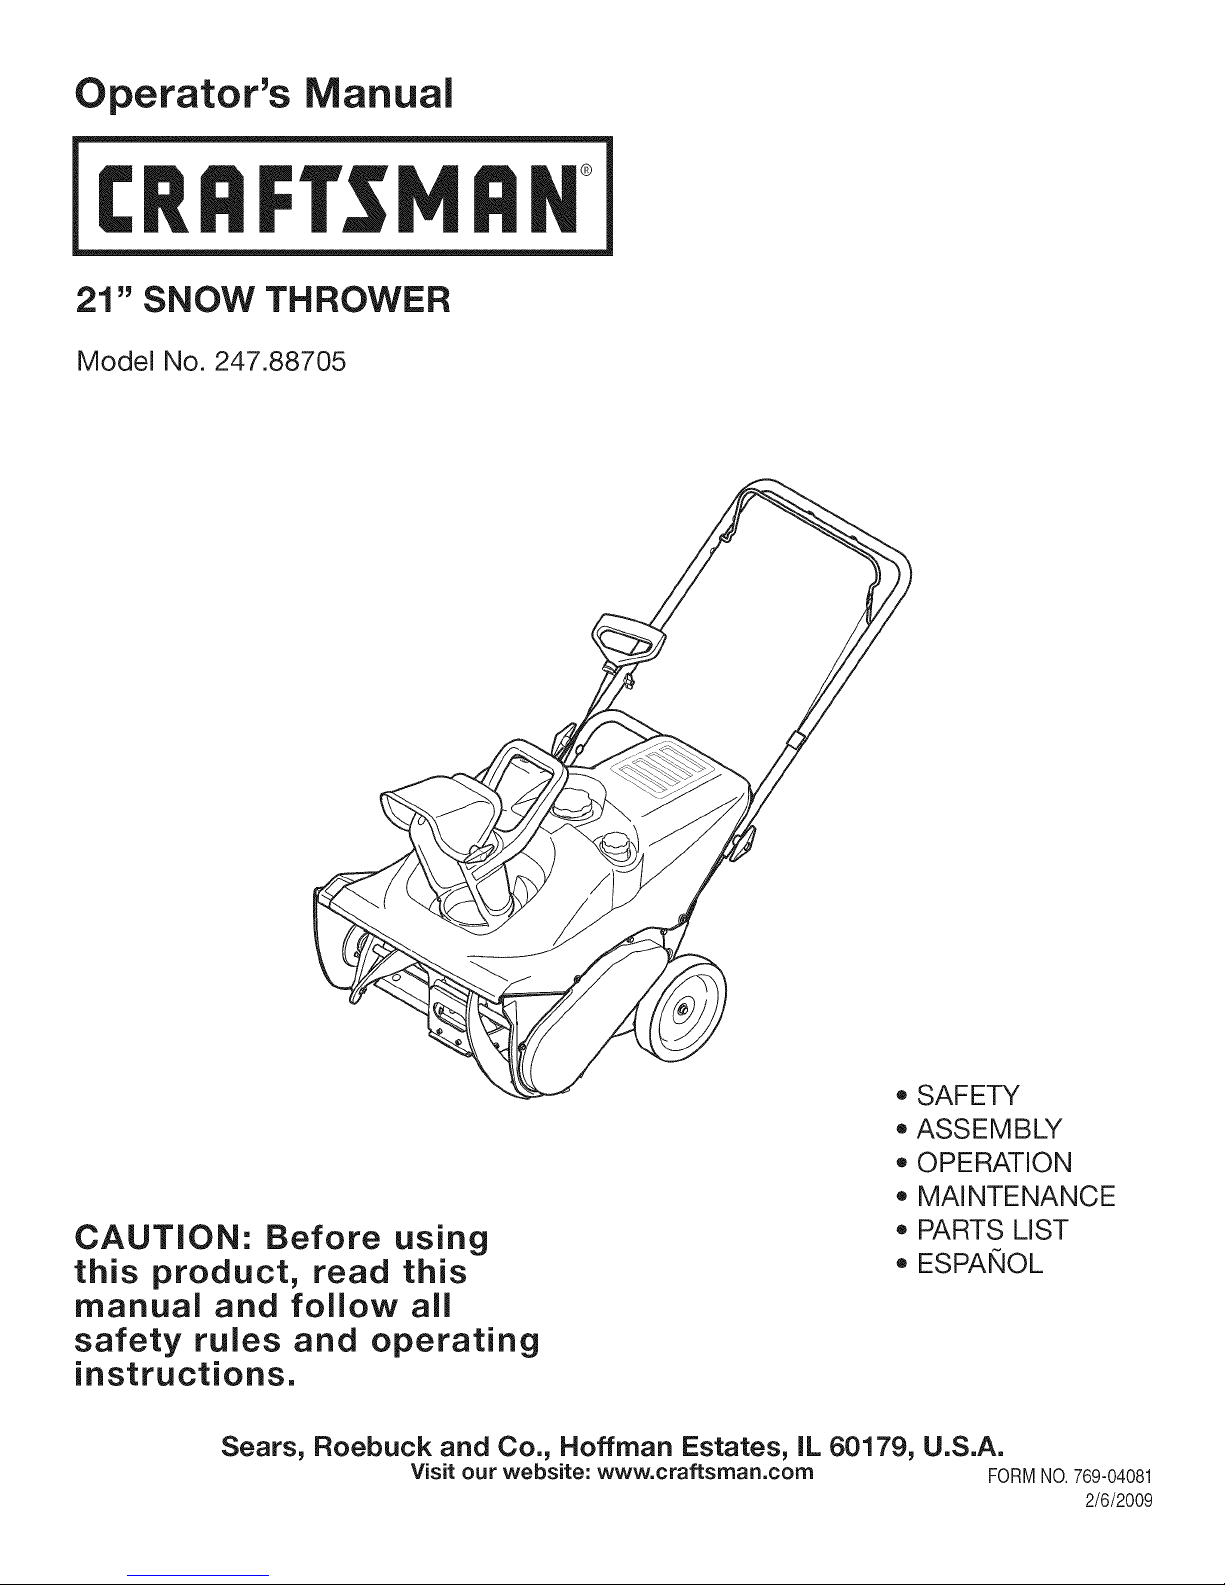
21" SNOW THROWER
Model No. 247.88705
CAUTION: Before using
this product, read this
manual and follow all
safety rules and operating
instructions.
Sears, Roebuck and Co., Hoffman Estates, IL 60179, U.S.A.
Visit our website: www.craftsman.com FORMNO.769-04081
o SAFETY
ASSEMBLY
OPERATION
MAINTENANCE
PARTS LIST
o ESPANOL
2/6/2009
Page 2
WarrantyStatement..................................Page2
SafeOperationPractices..........................Pages3-5
SafetyLabels............................................Page6
Assembly..................................................Pages7-9
Operation..................................................Pages10-12
ServiceandMaintenance.........................Pages13-17
CRAFTSMAN LiMiTED WARRANTY
Two Years on Snow Thrower
Whenoperatedand maintainedaccordingtoallsuppliedinstructions,ifthissnowthrowerfailsdueto a defectinmaterialorworkmanshipwithin
twoyearsfromthedateor purchase,call 1-800-4-MY-HOME®toarrangeforfree repair.
Thiswarrantyappliesforonly90daysfromthedateof purchaseifthissnowthroweriseverusedfor commercialor rentalpurposes.
Duringthefirstyearofpurchase,therewillbenochargefor warrantyserviceinyourhome.Foryourconvenience,in-homewarrantyservicewill
stillbeavailableafterthe firstyearof purchase,butatripchargewillapply.Thischargewillbe waivedif youtransportthesnowthrowertoan
authorizedCraftsmandrop-offlocation.Forthenearestauthorizedlocation,call 1-800-4-MY-HOME®.
Thiswarranty coversONLYdefects in material andworkmanship. Searswill NOTpayfor:
• Expendableitemsthatbecomewornduringnormaluse,includingbutnot limitedtoskidshoes,shaveplate,shearpins,sparkplug,air
cleaner,belts,andoil filter.
• Standardmaintenanceservicing,oilchanges,ortune-ups.
Tirereplacementorrepaircausedbypuncturesfromoutsideobjects,suchas nails,thorns,stumps,or glass.
Tireor wheelreplacementor repairresultingfromnormalwear,accident,orimproperoperationor maintenance.
Repairsnecessarybecauseof operatorabuse,includingbutnot limitedtodamagecausedbyimpactingobjectsthatbendthe frameor
crankshaft,orover-speedingtheengine.
• Repairsnecessarybecauseof operatornegligence,includingbutnotlimitedto,electricalandmechanicaldamagecausedbyimproper
storage,failureto usethepropergradeandamountof engineoil,or failureto maintaintheequipmentaccordingtothe instructionscontained
intheoperator'smanual.
• Engine(fuelsystem)cleaningorrepairscausedbyfuel determinedto becontaminatedoroxidized(stale).Ingeneral,fuelshouldbeused
within30 daysof itspurchasedate.
Normaldeteriorationandwearoftheexteriorfinishes,orproductlabelreplacement.
Off-SeasonStorage..................................Page18
TroubleShooting.......................................Page19
PartsList...................................................Page20-27
RepairProtectionAgreement...................Page31
Espa_ol.....................................................Page32
ServiceNumbers......................................BackCover
Thiswarrantyappliesonlywhilethisproductis usedinthe UnitedStates.
Thiswarrantygivesyouspecificlegalrights,andyou mayalsohaveotherrightswhichvaryfromstatetostate.
Sears, Roebuckand Co.,Hoffman Estates, IL 60179
EngineOilType: SAE5W-30
EngineOilCapacity: 20ounces
FuelCapacity: 2 Quarts
SparkPlug: TorchF6RTC
SparkPlugGap: .020"-.030"
©SearsBrands,LLC
Model Number.................................................................
Serial Number .................................................................
Dateof Purchase.............................................................
Recordthemodelnumber,serialnumber
anddateof purchaseabove
2
Page 3
Thissymbolpointsout importantsafetyinstructionswhich,ifnot
followed,couldendangerthepersonalsafetyand/orpropertyof
yourselfandothers. Readandfollowall instructionsin thismanual
beforeattemptingtooperatethismachine.Failuretocomplywith
theseinstructionsmayresultin personalinjury.Whenyouseethis
symbol,HEEDITSWARNING!
Thismachinewasbuiltto beoperatedaccordingtothesafeopera-
tionpracticesinthis manual.Aswithanytypeof powerequipment,
carelessnessorerroron thepartof theoperatorcanresultin serious
injury.Thismachineiscapableofamputatingfingers,hands,toes
andfeetandthrowingdebris.Failuretoobservethefollowingsafety
instructionscouldresultin seriousinjuryor death.
CALIFORNIA PROPOSITION 65
EngineExhaust,someof itsconstituents,andcertainvehicle
componentscontainoremitchemicalsknowntoStateofCalifornia
tocausecancerandbirthdefectsorotherreproductiveharm,
TRAiNiNG
• Read,understand,andfollowall instructionsonthe machineand
in themanual(s)beforeattemptingtoassembleandoperate.
Failuretodo socan resultinseriousinjurytothe operatorand/
orbystanders.Keepthismanualin a safeplaceforfutureand
regularreferenceandfor orderingreplacementparts.Forques-
tionscall,1-800-659-5917.
• Befamiliarwithall controlsandtheir properoperation.Knowhow
tostopthe machineanddisengagethemquickly.
• Neverallowchildrenunder14yearsofageto operatethis
machine.Children14andover shouldreadandunderstandthe
instructionsandsafeoperationpracticesin thismanualandon
themachineandbe trainedandsupervisedbyanadult.
• Neverallowadultsto operatethismachinewithoutproper
instruction.
• Thrownobjectscancauseseriouspersonalinjury.Planyour
snow-throwingpatterntoavoiddischargeof materialtoward
roads,bystandersandthe like.
• Keepbystanders,petsandchildrenat least75feetfromthe
machinewhileitisinoperation.Stopmachineifanyoneenters
thearea.
• Exercisecautiontoavoidslippingor falling,especiallywhen
operatinginreverse.
Your Responsibility--Restrict the useof this powermachineto
personswhoread,understandandfollowthewarningsand instruc-
tionsin thismanualandon themachine,
SAVE THESE INSTRUCTIONS!
PREPARATION
Thoroughlyinspecttheareawheretheequipmentis tobeused.
Removeall doormats,newspapers,sleds,boards,wiresandother
foreignobjects,whichcouldbe trippedoverorthrownbythe auger/
impeller.
Alwayswearsafetyglassesoreyeshieldsduringoperationand
whileperformingan adjustmentor repairtoprotectyoureyes.
Thrownobjectswhichricochetcancauseseriousinjurytothe
eyes.
Donot operatewithoutwearingadequatewinteroutergarments.
Donot wearjewelry,longscarvesorotherlooseclothing,which
couldbecomeentangledinmovingparts.Wearfootwearwhich
willimprovefootingonslipperysurfaces.
Usea groundedthree-wireextensioncordand receptacleforall
machineswithelectricstartengines.
Disengageall controlleversbeforestartingtheengine.
Neverattempttomakeanyadjustmentswhileengineis running,
exceptwherespecificallyrecommendedintheoperator'smanual.
Letengineandmachineadjustto outdoortemperaturebefore
startingtoclearsnow.
3
Page 4

SafeHandling of Gasoline
Toavoidpersonalinjuryor propertydamageuseextremecarein
handlinggasoline.Gasolineisextremelyflammableandthe vaporsare
explosive.Seriouspersonalinjurycanoccurwhengasolineis spilled
onyourselforyourclotheswhichcan ignite.Washyourskinand
changeclothesimmediately.
• Useonlyanapprovedgasolinecontainer.
• Extinguishall cigarettes,cigars,pipesandothersources
ofignition.
• Neverfuelmachineindoors.
• Neverremovegascapor addfuelwhiletheengineis hot
or running.
• Allowenginetocoolat leasttwo minutesbeforerefueling.
• Neveroverfillfueltank.Filltanktono morethan1/2inch
belowbottomoffiller neckto providespaceforfuel
expansion.
• Replacegasolinecapandtightensecurely.
• Ifgasolineisspilled,wipeit offtheengineandequipment.
Movemachinetoanotherarea.Wait5 minutesbefore
startingtheengine.
• Neverstorethemachineor fuel containerinsidewhere
thereis anopenflame,sparkor pilotlight (e.g.furnace,
waterheater,spaceheater,clothesdryeretc.).
• Allowmachinetocoolat least5 minutesbeforestoring.
• Neverfillcontainersinsidea vehicleor ona truckor trailer
bedwitha plasticliner.Alwaysplacecontainersonthe
groundawayfromyourvehiclebeforefilling.
• If possible,removegas-poweredequipmentfromthetruck
ortrailerand refueliton theground.If thisisnotpossible,
thenrefuelsuchequipmentonatrailerwitha portable
container,ratherthanfromagasolinedispensernozzle.
• Keepthenozzleincontactwiththe rimofthe fueltankor
containeropeningatalltimesuntilfuelingiscomplete.Do
notuse a nozzlelock-opendevice.
OPERATION
• Donot puthandsorfeetnear rotatingparts,in theauger/impeller
housingorchuteassembly.Contactwiththe rotatingpartscan
amputatehandsandfeet.
• Theauger/impellercontrolleveris a safetydevice.Neverbypass
itsoperation.Doingsomakesthe machineunsafeandmaycause
personalinjury.
• Thecontrolleversmustoperateeasilyinbothdirectionsand
automaticallyreturntothedisengagedpositionwhenreleased.
• Neveroperatewitha missingor damagedchuteassembly.Keep
all safetydevicesinplaceandworking.
• Neverrunanengineindoorsorina poorlyventilatedarea.Engine
exhaustcontainscarbonmonoxide,anodorlessanddeadlygas.
• Donotoperatemachinewhileundertheinfluenceofalcoholor
drugs.
• Mufflerandenginebecomehotandcancausea burn.Donot
touch.Keepchildrenaway.
• Exerciseextremecautionwhenoperatingonorcrossinggravel
surfaces.Stayalertforhiddenhazardsortraffic.
• Exercisecautionwhenchangingdirectionandwhileoperatingon
slopes.
• Planyoursnow-throwingpatternto avoiddischargetowards
windows,walls,carsetc.Thus,avoidingpossibleproperty
damageorpersonalinjurycausedby a ricochet.
• Neverdirectdischargeat children,bystandersand petsor allow
anyoneinfrontof themachine.
• Donotoverloadmachinecapacitybyattemptingtoclearsnowat
toofastof a rate.
• Neveroperatethismachinewithoutgoodvisibilityorlight.Always
be sureof yourfootingandkeepafirmholdon the handles.Walk,
neverrun.
• Disengagepowertotheauger/impellerwhentransportingor not
in use.
• Neveroperatemachineathightransportspeedsonslippery
surfaces.Lookdownand behindandusecarewhenbackingup.
• Ifthemachineshouldstartto vibrateabnormally,stoptheengine,
disconnectthe sparkplugwireandgrounditagainstthe engine.
Inspectthoroughlyfordamage.Repairanydamagebefore
startingandoperating.
• Disengageall controlleversandstopenginebeforeyouleave
theoperatingposition(behindthehandles).Waituntiltheauger/
impellercomestoa completestopbeforeuncloggingthechute
assembly,makinganyadjustments,or inspections.
• Neverputyourhandinthedischargeorcollectoropenings.Do
notunclogchuteassemblywhileengineis running.Shutoff
engineand remainbehindhandlesuntilall movingpartshave
stoppedbeforeunclogging.
• Useonlyattachmentsandaccessoriesapprovedbythemanufac-
turer(e.g.wheelweights,tirechains,cabsetc.).
• Whenstartingengine,pullcord slowlyuntilresistanceisfelt,then
pull rapidly.Rapidretractionofstartercord(kickback)willpull
handandarmtowardenginefasterthanyoucanlet go.Broken
bones,fractures,bruisesorsprainscouldresult.
• Ifsituationsoccurwhichare notcoveredinthis manual,use care
andgoodjudgment.ContactCustomerSupportforassistance
andthenameofyour nearestservicingdealer.
CLEARING A CLOGGED DISCHARGE CHUTE
Handcontactwiththe rotatingimpellerinsidethedischargechute
is the mostcommoncauseofinjuryassociatedwithsnowthrowers.
Neveruseyourhandtocleanoutthedischargechute.
Toclear thechute:
1. SHUTTHEENGINEOFF!
2. Wait 10secondstobe suretheimpellerbladeshavestopped
rotating.
3. Alwaysusea clean-outtool,notyourhands.
4
Page 5
MAINTENANCE & STORAGE
• Nevertamperwithsafetydevices.Checktheirproperoperation
regularly.Refertothemaintenanceandadjustmentsectionsof
thismanual.
• Beforecleaning,repairing,or inspectingmachinedisengageall
controlleversandstoptheengine.Waituntilthe auger/impeller
cometoa completestop.Disconnectthe sparkplugwireand
groundagainsttheengineto preventunintendedstarting.
Checkboltsand screwsforpropertightnessatfrequentintervals
tokeepthemachineinsafeworkingcondition.Also,visually
inspectmachineforanydamage.
Donotchangetheenginegovernorsettingor over-speedthe
engine.Thegovernorcontrolsthe maximumsafeoperatingspeed
ofthe engine.
Snowthrowershaveplatesandskidshoesaresubjecttowear
anddamage.Foryoursafetyprotection,frequentlycheckall
componentsand replacewithoriginalequipmentmanufacturer's
(OEM)partsonly."Useofpartswhichdo notmeetthe original
equipmentspecificationsmayleadto improperperformanceand
compromisesafety!"
Checkcontrolleversperiodicallytoverifytheyengageanddisen-
gageproperlyandadjust,ifnecessary.Refertotheadjustment
sectioninthisoperator'smanualforinstructions.
Maintainorreplacesafetyandinstructionlabels,asnecessary.
• Observeproperdisposallawsand regulationsfor gas,oil,etc. to
protecttheenvironment.
Priorto storing,runmachineafew minutestoclearsnowfrom
machineandpreventfreezeupof auger/impeller.
Neverstorethemachineorfuel containerinsidewherethereisan
openflame,sparkorpilot lightsuchas a waterheater,furnace,
clothesdryeretc.
Alwaysrefertothe operator'smanualfor properinstructionson
off-seasonstorage.
Checkfuelline,tank, cap,andfittingsfrequentlyforcracksor
leaks.Replaceif necessary.
Donotcrankenginewithsparkplugremoved.
AccordingtotheConsumerProductsSafetyCommission(CPSC)
andtheU.S.EnvironmentalProtectionAgency(EPA),thisproduct
hasan AverageUsefulLifeof seven(7)years,or60 hoursof
operation.At theendoftheAverageUsefulLifehavethemachine
inspectedannuallybyan authorizedservicedealerto ensurethat
allmechanicalandsafetysystemsareworkingproperlyand not
wornexcessively.Failureto do socanresultinaccidents,injuries
ordeath.
DO NOT MODIFY ENGINE
Toavoidseriousinjuryor death,do notmodifyengineinanyway.
Tamperingwiththegovernorsettingcanleadto a runawayengineand
causeitto operateat unsafespeeds.Nevertamperwithfactorysetting
ofenginegovernor.
NOTICE REGARDING EMISSIONS
EngineswhicharecertifiedtocomplywithCaliforniaandfederal
EPAemissionregulationsfor SORE(SmallOff RoadEquipment)are
certifiedto operateonregularunleadedgasoline,and mayinclude
thefollowingemissioncontrolsystems:EngineModification(EM),
OxidizingCatalyst(OC),SecondaryAirInjection(SAI)and ThreeWay
Catalyst(TWO)if soequipped.
SPARK ARRESTOR
Thismachineisequippedwithaninternalcombustionengineand
shouldnotbe usedonor nearanyunimprovedforest-covered,
brush-coveredorgrass-coveredlandunlesstheengine'sexhaust
systemisequippedwitha sparkarrestermeetingapplicablelocalor
statelaws(if any)
Ifa sparkattesterisused,itshouldbemaintainedin effectiveworking
orderbytheoperator.Inthe StateofCaliforniatheaboveis required
bylaw (Section4442ofthe CaliforniaPublicResourcesCode).Other
statesmayhavesimilarlaws. Federallawsapplyonfederallands.
A sparkarresterforthemuffleris availablethroughyournearestSears
PartsandRepairServiceCenter.
Page 6
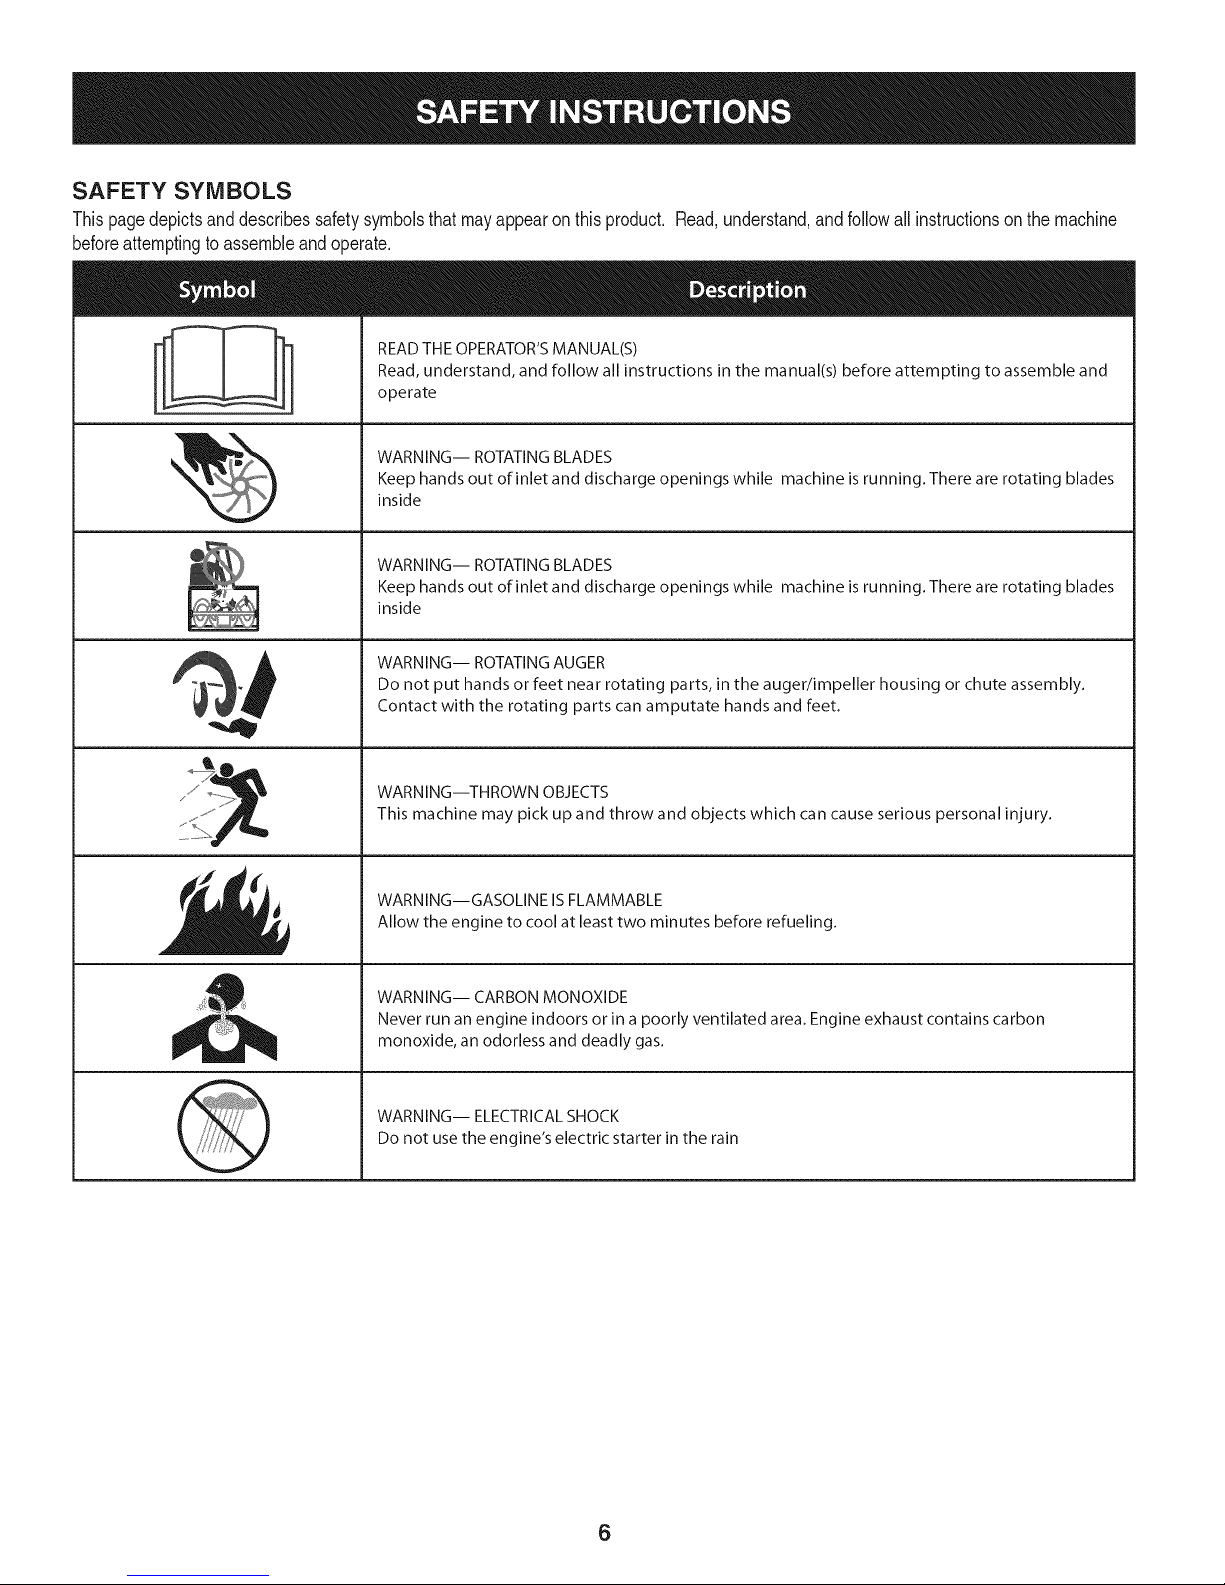
SAFETY SYMBOLS
Thispagedepictsanddescribessafetysymbolsthatmayappearonthisproduct. Read,understand,andfollowallinstructionson themachine
beforeattemptingtoassembleandoperate.
READ THE OPERATOR'S MANUAL(S)
i
i
Read, understand, and follow all instructions in the manual(s) before attempting to assemble and
operate
WARNING-- ROTATING BLADES
Keep hands out of inlet and discharge openings while machine is running. There are rotating blades
inside
WARNING-- ROTATING BLADES
Keep hands out of inlet and discharge openings while machine is running. There are rotating blades
inside
WARNING-- ROTATING AUGER
Do not put hands or feet near rotating parts, in the auger/impeller housing or chute assembly.
Contact with the rotating parts can amputate hands and feet.
WARNING--THROWN OBJECTS
This machine may pick up and throw and objects which can cause serious personal injury.
WARNING--GASOLINE ISFLAMMABLE
Allow the engine to cool at least two minutes before refueling.
WARNING-- CARBON MONOXIDE
Never run an engine indoors or in a poorly ventilated area. Engine exhaust contains carbon
monoxide, an odorless and deadly gas.
WARNING-- ELECTRICAL SHOCK
Do not use the engine's electric starter in the rain
6
Page 7
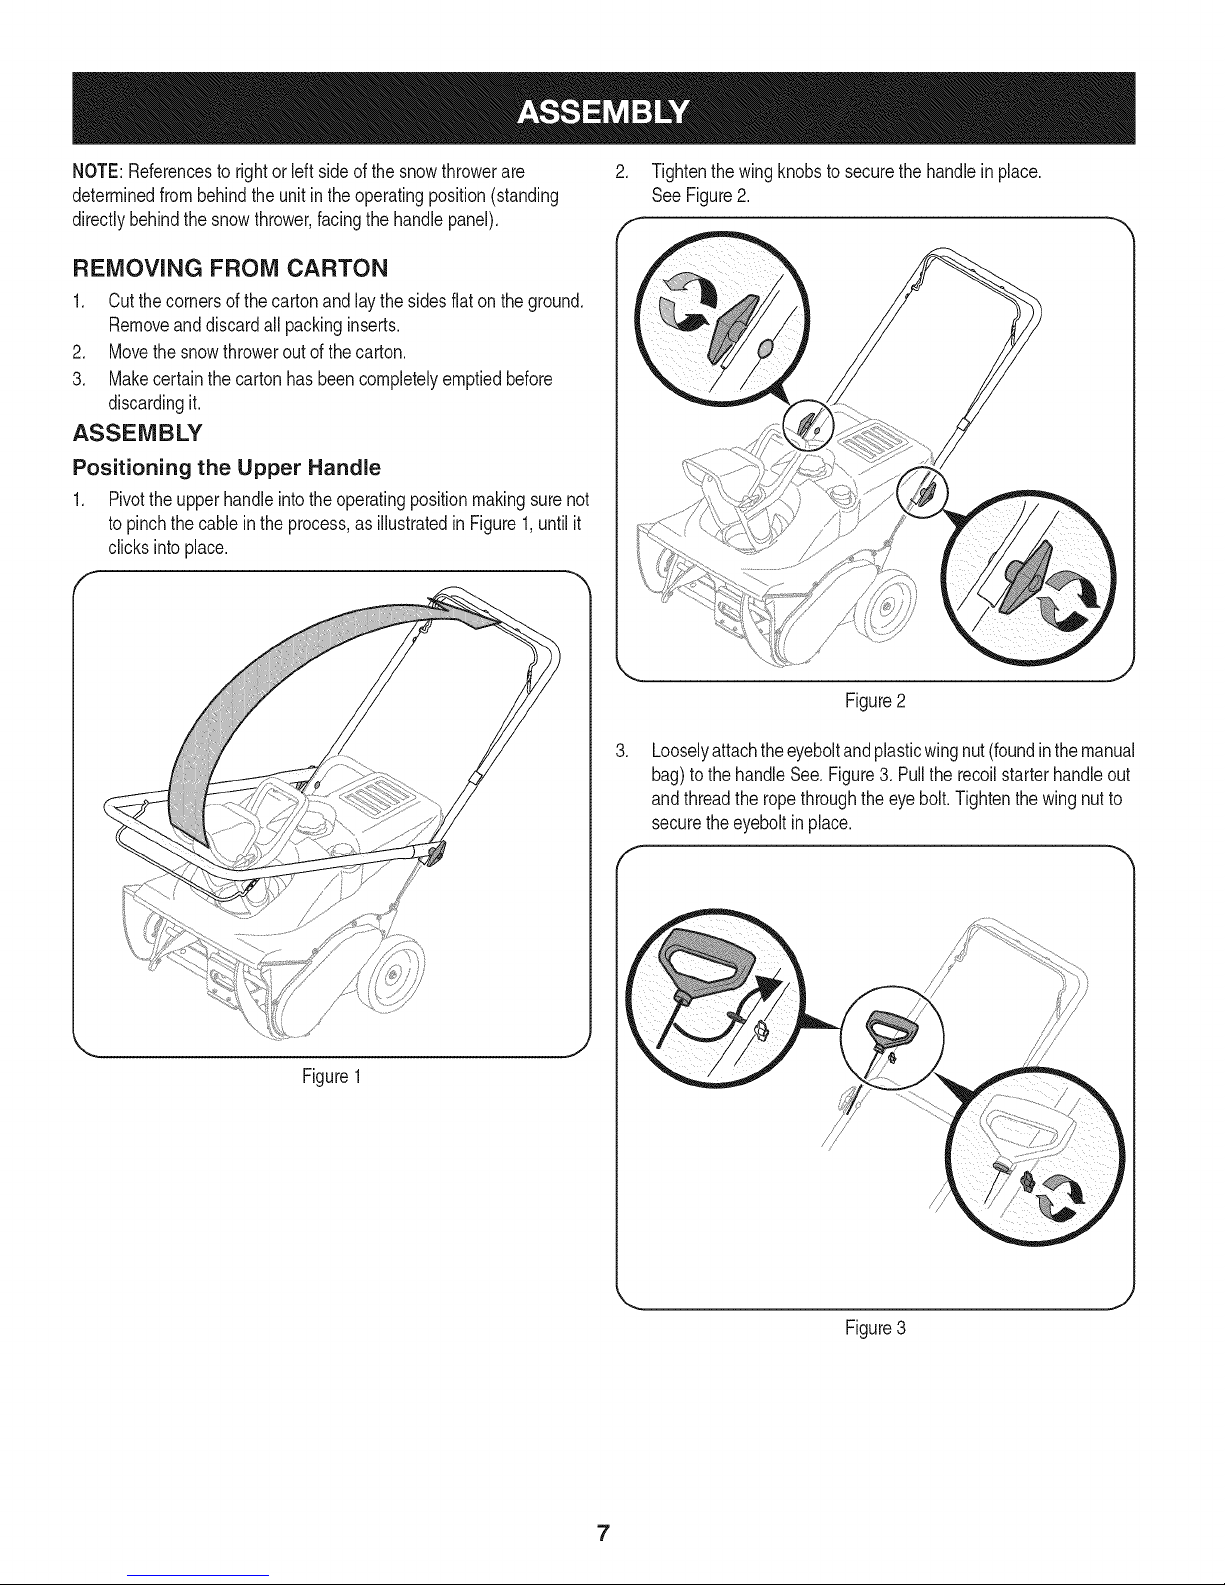
NOTE:Referencesto rightorleft sideofthesnowthrowerare
determinedfrombehindtheunitinthe operatingposition(standing
directlybehindthesnowthrower,facingthe handlepanel).
REMOVING FROM CARTON
1. Cutthecornersofthecartonandlaythesidesflaton theground.
Removeanddiscardallpackinginserts.
2. Movethesnowthroweroutofthecarton.
3. Makecertainthecartonhasbeencompletelyemptiedbefore
discardingit.
ASSEMBLY
Positioning the Upper Handle
1. Pivottheupperhandleintothe operatingpositionmakingsurenot
topinchthecablein theprocess,as illustratedinFigure1,untilit
clicksintoplace.
2. Tightenthewingknobstosecurethehandleinplace.
See Figure2.
f
J
Figure2
3. Looselyattachtheeyeboltandplasticwingnut(foundinthemanual
bag)tothe handleSee.Figure3. Pulltherecoilstarterhandleout
andthreadthe ropethroughtheeyebolt.Tightenthe wingnutto
securetheeyeboltin place.
f
Figure1
,,,..
Figure3
7
Page 8
SET-UP
Fuel Recommendations
Useautomotivegasoline(unleadedor lowleadedtominimizecombus-
tionchamberdeposits)witha minimumof87octane.Gasolinewith
upto 10%ethanolor 15%MTBE(MethylTertiaryButylEther)canbe
used.Neveruseanoil/gasolinemixtureordirtygasoline.Avoidgetting
dirt,dust,or waterinthe fueltank.DONOTuseE85gasoline.
• Refuelina well-ventilatedareawiththe enginestopped.Donot
smokeorallowflamesorsparksintheareawheretheengineis
refueledorwheregasolineisstored.
• Donotoverfillthefuel tank.Afterrefueling,makesurethetank
capis closedproperlyandsecurely.
• Becarefulnotto spillfuelwhenrefueling.Spilledfuelor fuelvapor
mayignite.Ifanyfuel isspilled,makesuretheareaisdrybefore
startingtheengine.
• Avoidrepeatedor prolongedcontactwithskinorbreathingof
vapor.
Adding Fuel
extreme when Gasolineis
flammableandthevaporsare explosive.Neverfuel themachine
indoorsorwhilethe engineishotor running.Extinguishcigarettes,
IUse care handlinggasoline, extremely
cigars,pipesandothersourcesof ignition.
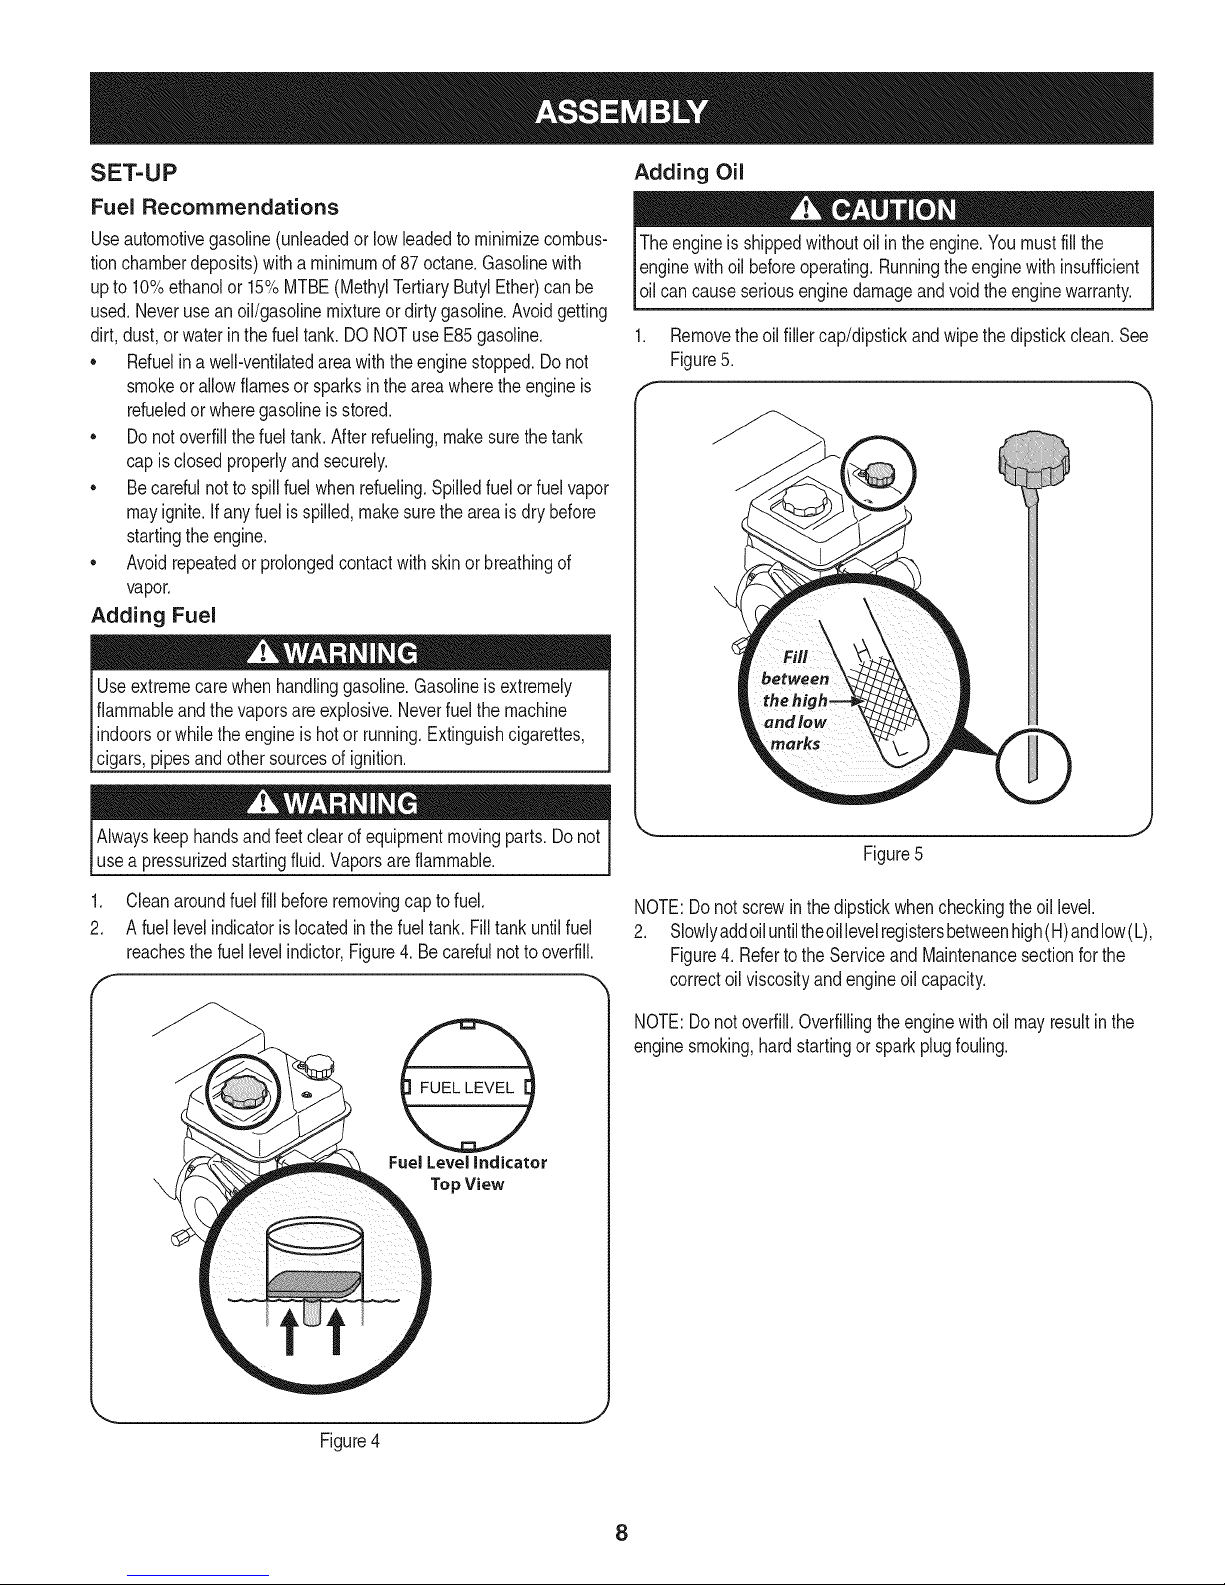
Adding Oil
Theengineis shippedwithoutoil intheengine.Youmustfillthe
enginewithoil beforeoperating.Runningthe enginewithinsufficient
_o cancauseserous engne damageandvod the engnewarranty.
1. Removetheoilfillercap/dipstickandwipe thedipstickclean.See
Figure5.
Alwayskeephandsandfeetclearofequipmentmovingparts.Donot
usea pressurizedstartingfluid.Vaporsareflammable.
1. Cleanaroundfuelfillbeforeremovingcapto fuel.
2. A fuellevelindicatorislocatedinthefueltank.Filltankuntilfuel
reachesthefuellevelindictor,Figure4.Becarefulnotto overfill.
(
Fuel Level indicator
Top View
Figure4
Figure5
NOTE:Donotscrewin thedipstickwhencheckingtheoil level.
2. Slowlyaddoiluntiltheoillevelregistersbetweenhigh(H)andlow(L),
Figure4.Refertothe Serviceand Maintenancesectionforthe
correctoilviscosityandengineoilcapacity.
NOTE:Donotoverfill.Overfillingtheenginewithoilmayresultinthe
enginesmoking,hardstartingor sparkplugfouling.
J
8
Page 9
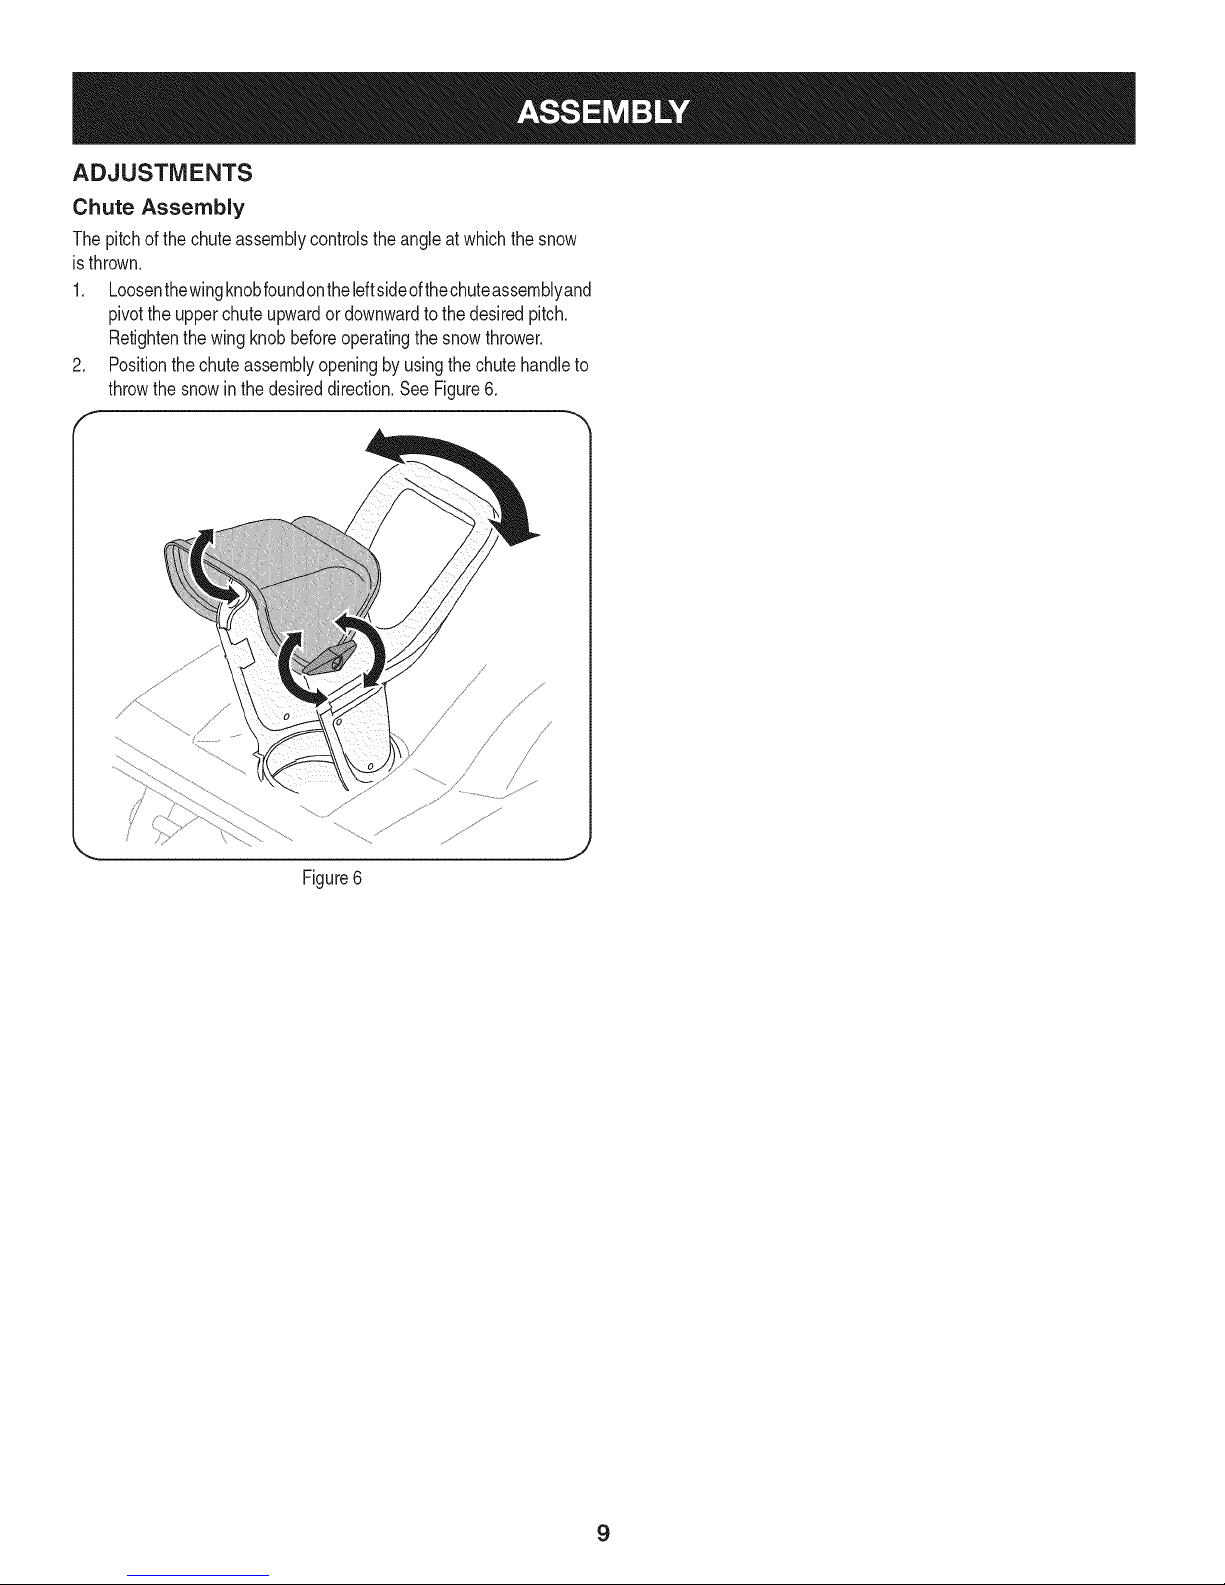
ADJUSTMENTS
Chute Assembly
Thepitchof thechuteassemblycontrolstheangleat whichthesnow
isthrown.
1. Loosenthewingknobfoundontheleftsideofthechuteassemblyand
pivottheupperchuteupwardor downwardto thedesiredpitch.
Retightenthewingknobbeforeoperatingthesnowthrower.
2. Positionthechuteassemblyopeningbyusingthechutehandleto
throwthesnowinthe desireddirection.SeeFigure6.
F
j .......................
Figure6
9
Page 10
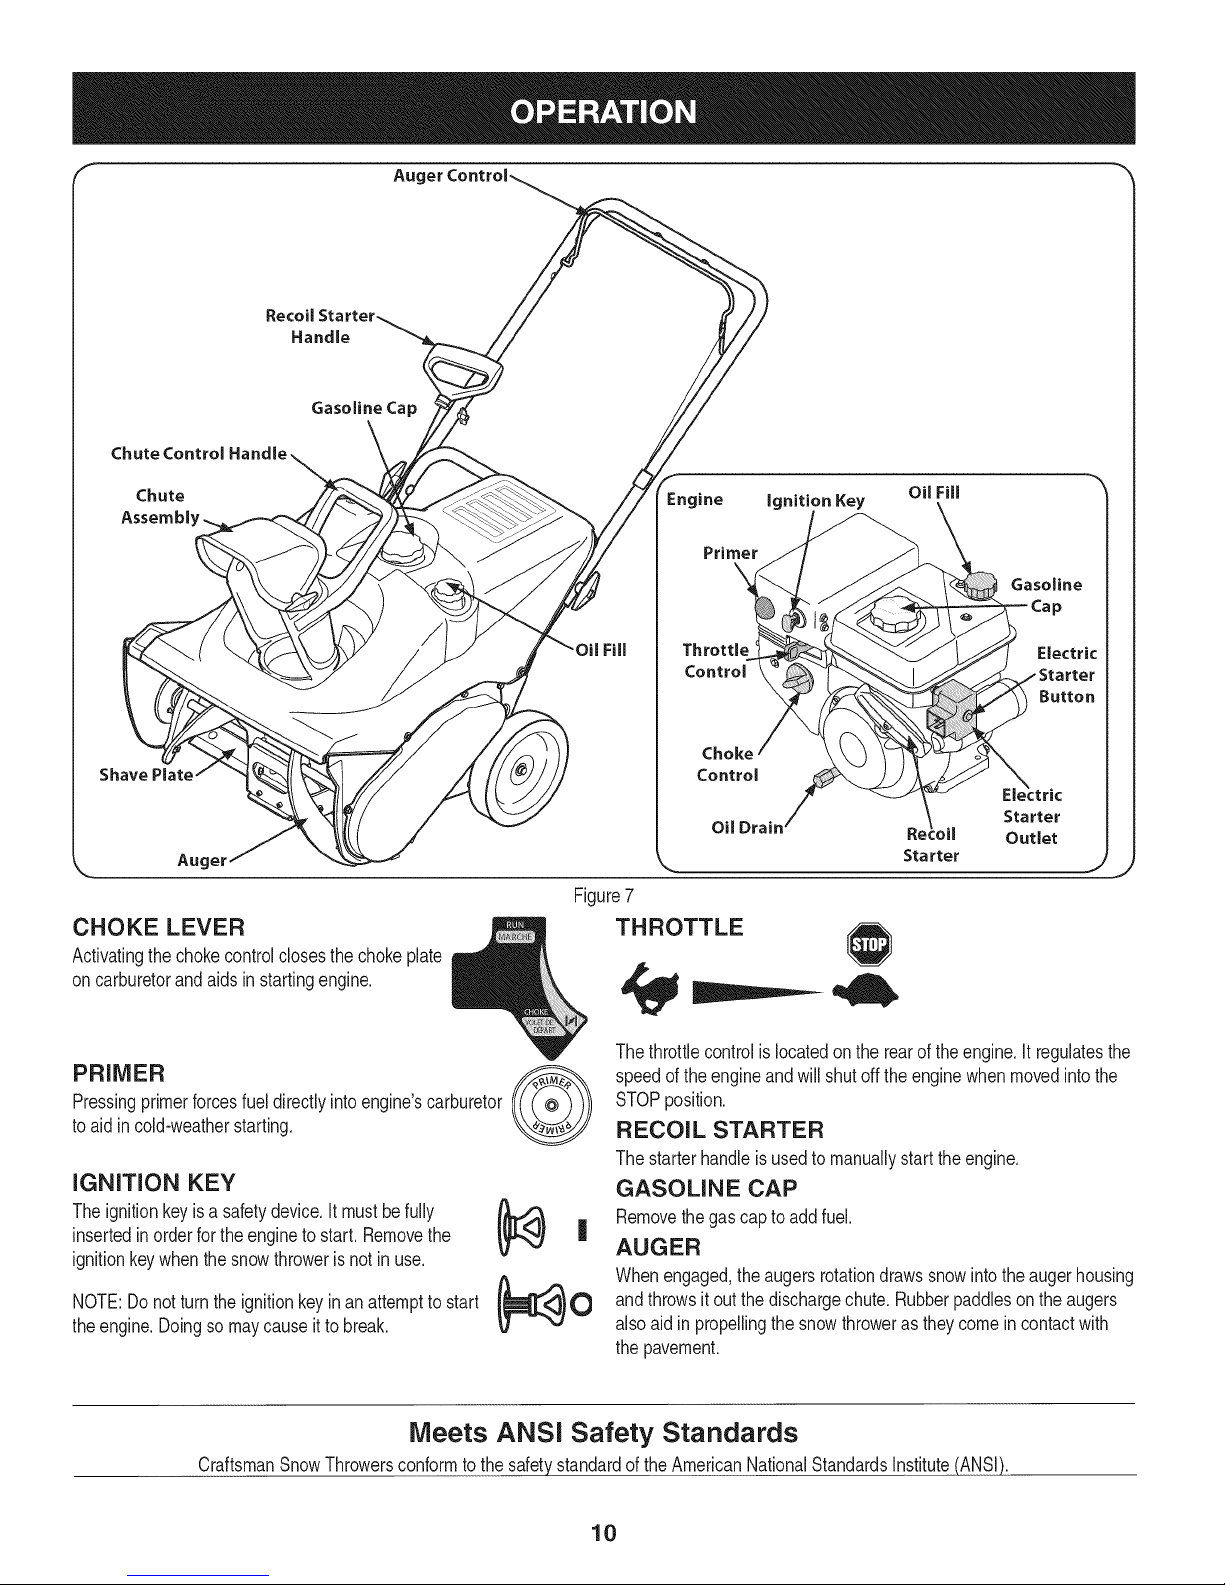
Recoil Starter_
Handle _
Gasoline Cap
Aug
Chute
Assembl'
Aug,
CHOKE LEVER
Activatingthechokecontroldoses thechokeplate
oncarburetorandaidsinstartingengine.
Pressingprimerforcesfueldirectlyintoengine'scarburetor
PRIMER
toaidin cold-weatherstarting.
iGNiTiON KEY
Theignitionkeyisa safetydevice,It mustbefully
insertedinorderfortheengineto start.Removethe
ignitionkeywhenthesnowthrowerisnotin use,
NOTE:Donotturntheignitionkeyinan attemptto start
theengine.Doingso maycauseitto break.
Engine ignition Key
Gasoline
Throttle Electric
Control
Button
Choke
Control
Oil Drain
Starter
Starter
Outlet
Figure7
THROTTLE
Thethrottlecontrolislocatedonthe rearoftheengine.It regulatesthe
speedof theengineandwill shutofftheenginewhenmovedintothe
STOPposition.
RECOIL STARTER
Thestarterhandleisusedtomanuallystarttheengine.
GASOLINE CAP
Removethegascaptoaddfuel.
AUGER
Whenengaged,theaugersrotationdrawssnowintotheaugerhousing
andthrowsitoutthe dischargechute.Rubberpaddlesontheaugers
alsoaidinpropellingthesnowthrowerastheycomeincontactwith
thepavement.
Meets ANSi Safety Standards
CraftsmanSnowThrowersconformtothe safetystandardofthe AmericanNationalStandardsInstitute(ANSI).
10
Page 11
AUGER CONTROL
Locatedon theupperhandle,theaugercontrolhandleis usedto
engageanddisengagedriveto theauger.Squeezethe controlhandle
againsttheupperhandleto engagetheauger;releaseittodisengage.
CHUTE ASSEMBLY
Rotatethedischargechuteto theleftor rightusingthechutehandle.
Thepitchof thedischargechutecontrolstheangleat whichthesnow
isthrown.Loosenthewingknobontheside ofthedischargechute
beforepivotingthedischargechuteupwardordownward.Retighten
theknoboncethe desiredpositionhasbeenachieved.
SHAVE PLATE
Theshaveplate maintainscontactwiththepavementasthe snow
throwerispropelled,allowingsnowclosetothe pavement'ssurfaceto
bedischarged.
ELECTRIC STARTER OUTLET
Theelectricstarteroutletrequirestheuseofa three-prongoutdoor
extensioncordanda 120Vpowersource/walloutlet.
NOTE:Theelectricstarterismountedtotheplasticshroudandis
shownin Figure7attachedtothe engineforeasierreference.
ELECTRIC STARTER BUTTON
Pressingtheelectricstarterbuttonengagestheengine'selectric
starterwhenpluggedintoa 120Vpowersource.
BEFORE STARTING THE ENGINE
machineandinthismanualbefore
1. Thesparkplugwirewasdisconnectedforsafety.Attachthesparkplug
wireto thesparkplugbeforestarting.
STARTING THE ENGINE
_ressurizedstartinc flammable.
Toavoidcarbonmonoxidepoisoning,makesurethe engineis
outdoorsina well-ventilatedarea.
NOTE:Allowtheengineto warmup forafewminutesafterstarting.
Theenginewill notdevelopfull poweruntilitreachesoperating
temperatures.
Electric Starter
Theelectricstarteris equippedwithagroundedthree-wirepower
cordandplug,andisdesignedtooperateon 120voltAChousehold
current.It mustbeusedwitha properlygroundedthree-prong
receptacleatalltimesto avoidthe possibilityofelectricshock.Follow
all instructionscarefullypriortooperatingtheelectricstarter.DONOT
useelectricstarterin rain.
1. Determinethatyourhome'swiringisathree-wiregroundedsystem.
Aska licensedelectricianifyouare unsure.Ifyouhavea
groundedthree-prongreceptacle,proceedasfollows.Ifyoudo
nothavetheproperhousewiring,DONOTusetheelectricstarter
underanyconditions.
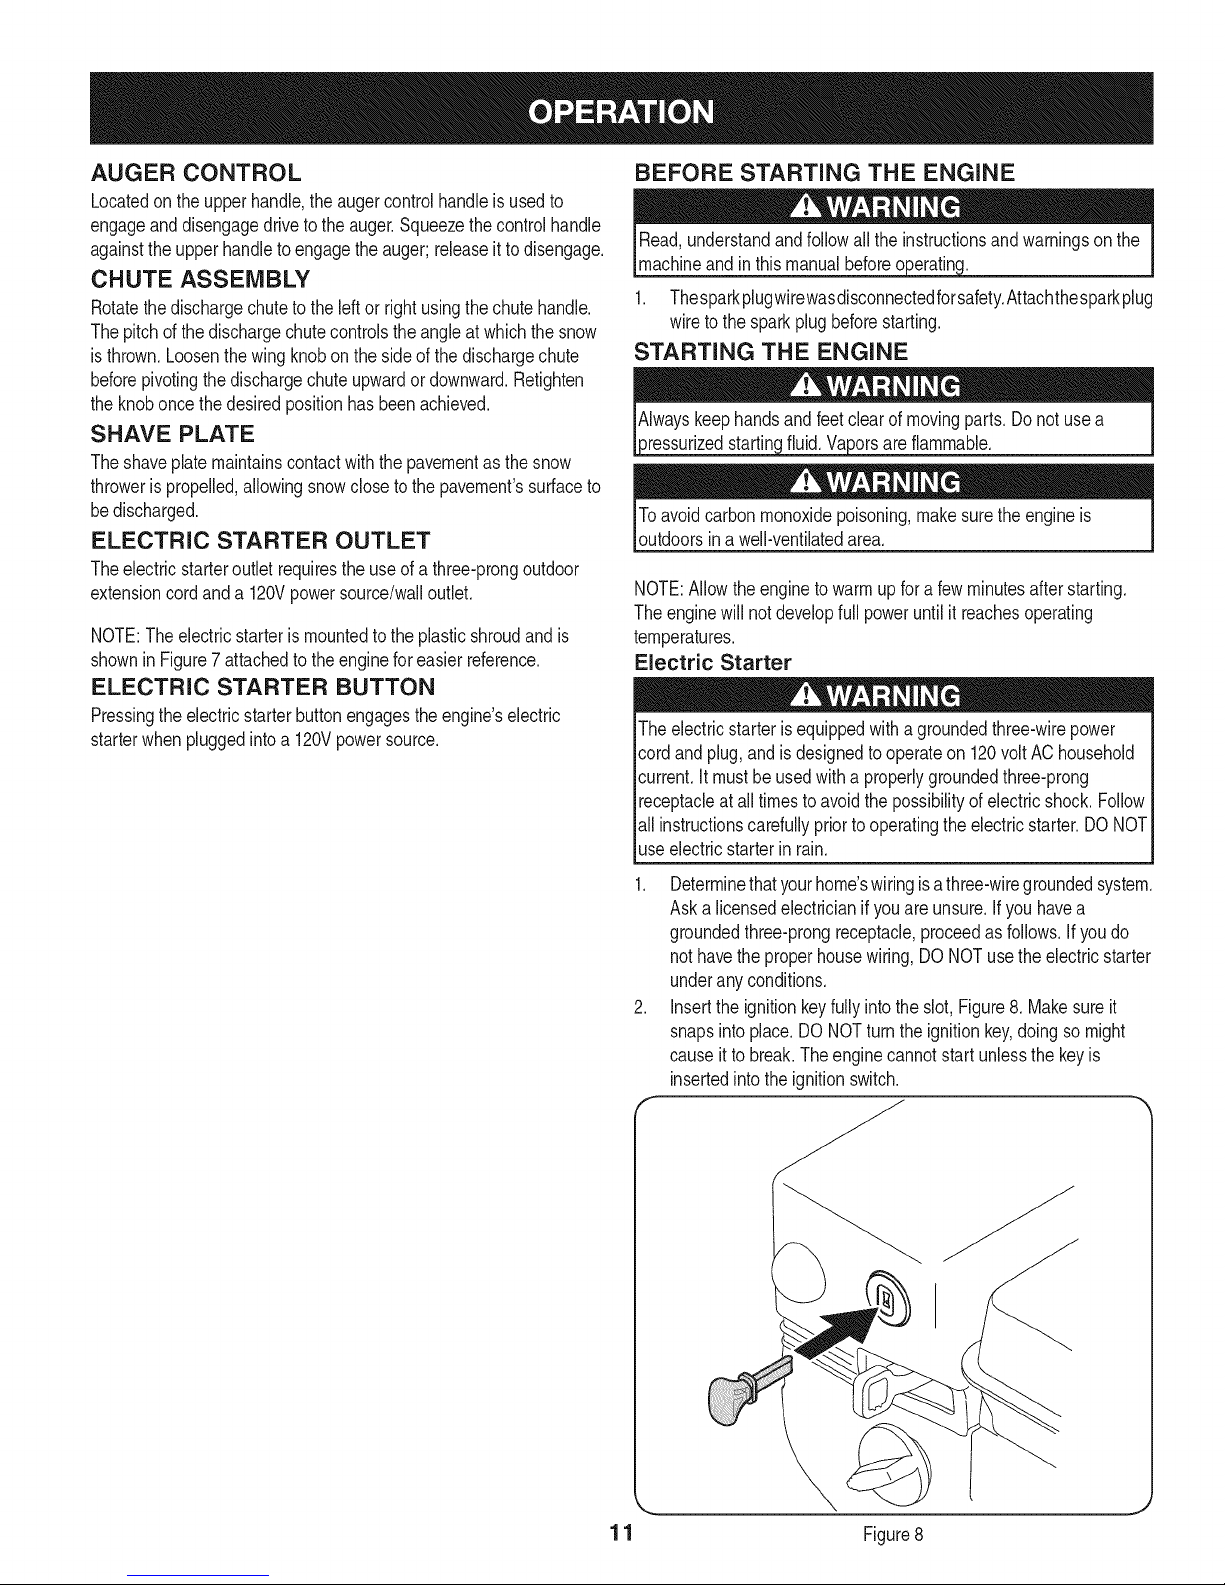
2. Insertthe ignitionkeyfullyintotheslot,Figure8. Makesureit
snapsintoplace.DO NOTturntheignitionkey,doingsomight
causeitto break.Theenginecannotstartunlessthekeyis
insertedintotheignitionswitch.
1 1 Figure8
Page 12
.
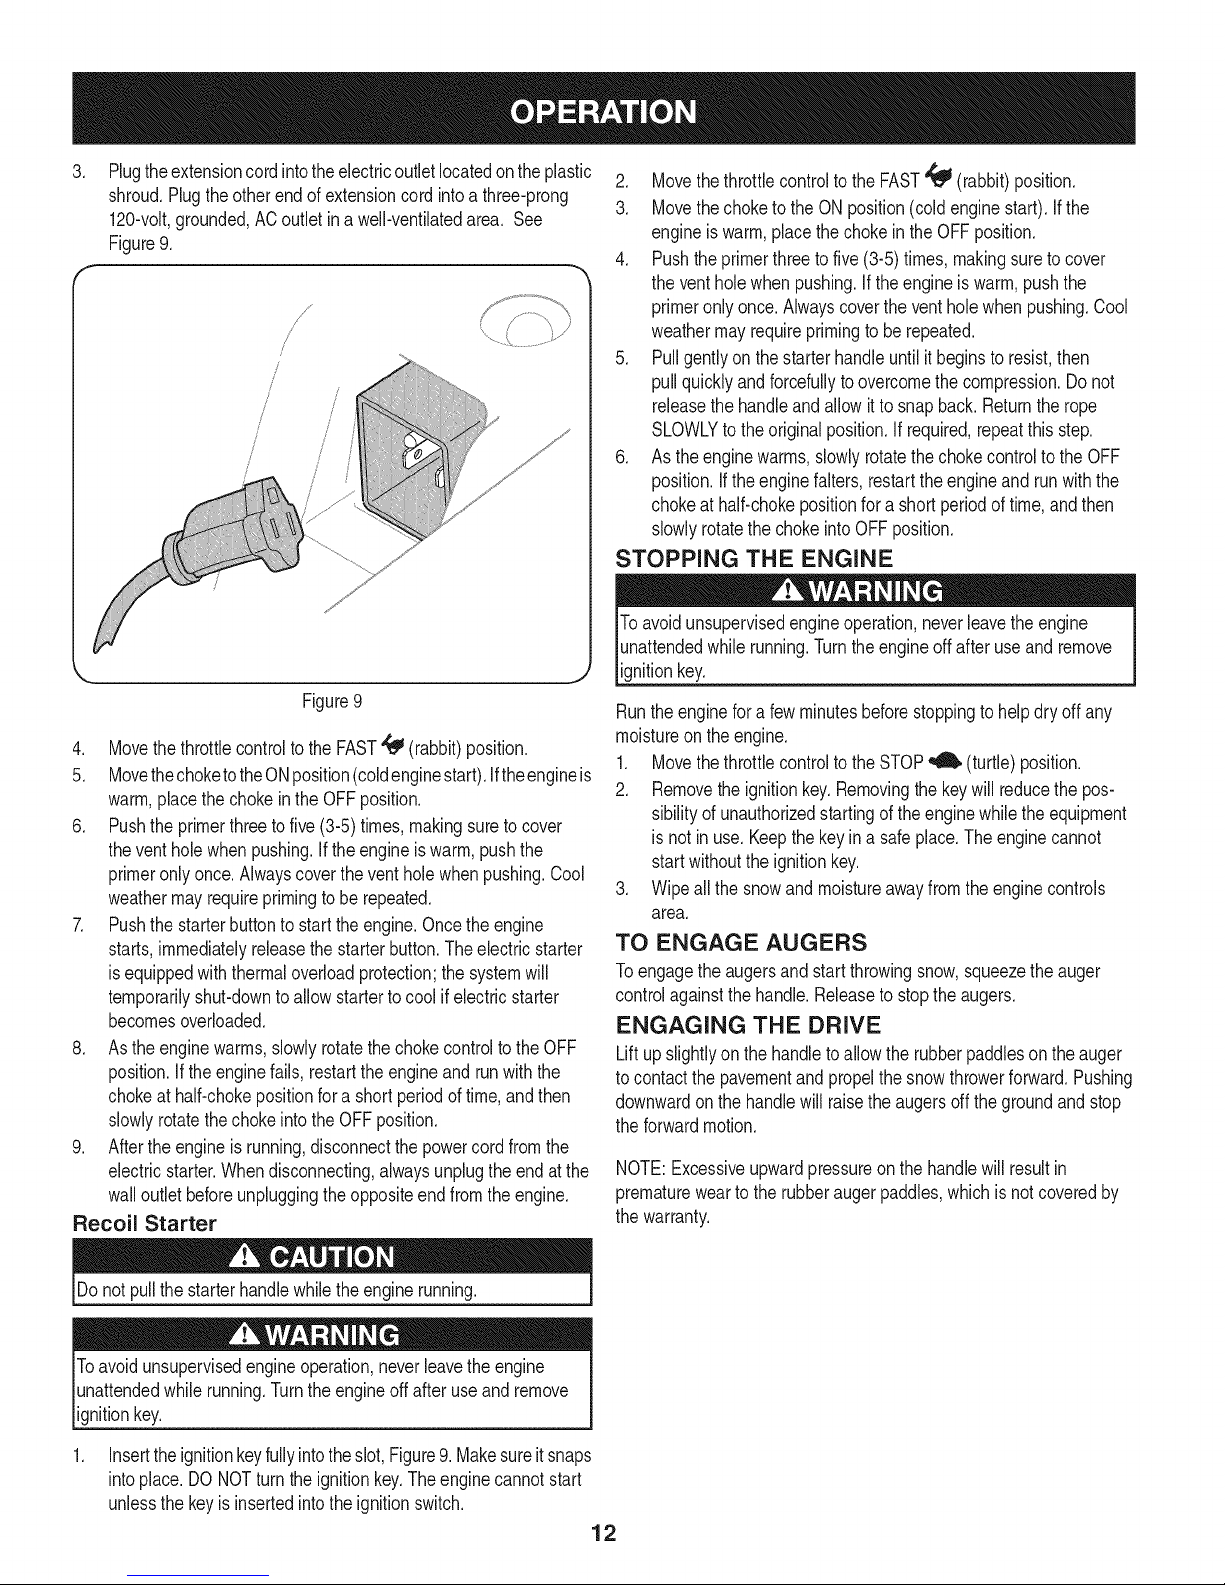
Plugtheextensioncord intotheelectricoutletlocatedonthe plastic
shroud.Plugtheotherendofextensioncordintoa three-prong
120-volt,grounded,ACoutletin a well-ventilatedarea. See
Figure9.
f
/
/
/
/
/
/
/
f
J
Figure9
4. MovethethrottlecontroltotheFAST_ (rabbit)position.
5. MovethechoketotheONposition(coldenginestart).Iftheengineis
warm,placethechokeinthe OFFposition.
6. Pushthe primerthreetofive (3-5)times,makingsureto cover
theventholewhen pushing.Iftheengineis warm,pushthe
primeronlyonce.Alwayscovertheventholewhenpushing.Cool
weathermayrequireprimingtobe repeated.
7. Pushthe starterbuttontostarttheengine.Oncetheengine
starts,immediatelyreleasethestarterbutton.Theelectricstarter
isequippedwiththermaloverloadprotection;the systemwill
temporarilyshut-downtoallowstartertocool ifelectricstarter
becomesoverloaded.
8. Astheenginewarms,slowlyrotatethe chokecontrolto theOFF
position.Ifthe enginefails,restarttheengineandrunwiththe
chokeathalf-chokepositionfor a shortperiodof time,andthen
slowlyrotatethechokeintothe OFFposition.
9. Aftertheengineisrunning,disconnectthe powercordfromthe
electricstarter.Whendisconnecting,alwaysunplugtheendatthe
walloutletbeforeunpluggingthe oppositeendfromtheengine.
Recoil Starter
2. MovethethrottlecontroltotheFAST'_ (rabbit)position.
3. Movethechoketo theONposition(coldenginestart).Ifthe
engineiswarm,placethe chokein theOFFposition.
4. Pushtheprimerthreetofive(3-5)times,makingsureto cover
theventholewhenpushing.Iftheengineis warm,pushthe
primeronlyonce.Alwayscovertheventholewhenpushing.Cool
weathermayrequireprimingtoberepeated.
5. Pullgentlyonthestarterhandleuntilitbeginsto resist,then
pullquicklyandforcefullytoovercomethecompression.Donot
releasethehandleandallowit tosnapback.Returnthe rope
SLOWLYtotheoriginalposition.Ifrequired,repeatthisstep.
6. Astheenginewarms,slowlyrotatethechokecontroltotheOFF
position.Ifthe enginefalters,restarttheengineandrunwiththe
chokeat half-chokepositionfora shortperiodof time,andthen
slowlyrotatethe chokeintoOFFposition.
STOPPING THE ENGINE
Toavoidunsupervisedengineoperation,neverleavetheengine
lunattendedwhile running.Turntheengineoffafter useandremove
lignitionkey.
Runtheenginefora fewminutesbeforestoppingtohelpdryoff any
moistureontheengine.
1. Movethethrottlecontroltothe STOP_ (turtle)position.
2. Removethe ignitionkey.Removingthe keywillreducethepos-
sibilityof unauthorizedstartingoftheenginewhilethe equipment
is not inuse.Keepthekeyina safeplace.Theenginecannot
startwithouttheignitionkey.
3. Wipeallthesnowandmoistureawayfromtheenginecontrols
area.
TO ENGAGE AUGERS
Toengagethe augersandstartthrowingsnow,squeezetheauger
controlagainstthehandle.Releaseto stoptheaugers.
ENGAGING THE DRIVE
Liftupslightlyonthe handletoallowtherubberpaddlesontheauger
tocontactthe pavementand propelthesnowthrowerforward.Pushing
downwardonthehandlewill raisetheaugersoffthe groundandstop
theforwardmotion.
NOTE:Excessiveupwardpressureonthehandlewillresultin
prematureweartotherubberaugerpaddles,whichisnotcoveredby
thewarranty.
Donot pullthestarterhandlewhiletheenginerunning.
Toavoidunsupervisedengineoperation,neverleavetheengine
unattendedwhilerunning.Turntheengineoff afteruseand remove
ignitionkey.
Inserttheignitionkeyfullyintotheslot,Figure9.Makesureitsnaps
intoplace.DO NOTturnthe ignitionkey.Theenginecannotstart
unlessthekeyis insertedintothe ignitionswitch.
12
Page 13
MAINTENANCE SCHEDULE
Beforeperforminganytypeof maintenance/service,disengageall
controlsandstoptheengine.Waituntilallmovingpartshavecometo
acompletestop.Disconnectsparkplugwireandgrounditagainstthe
enginetopreventunintendedstarting.Alwayswearsafetyglassesduring
operationor whileperforminganyadjustmentsor repairs.
EachUse .
1st5 hours 1. 1. Change.
Every5 hours 1. 1. Check.
25hours 1. 2. Check.
Everyseason/50hours 1. 1. Change
Everyseason/lO0hours 1. 1. Clean,replace,re-gap
Everyseason/Before 1. 1. Lubricate
storage 2. 2. Lubricate
Engineoillevel.
2.
SnowThrowerandexhaust
area.
Engineoil.
Engineoil.
Exhaustarea.
2. 2. Clean.
SparkPlug.
Engineoil
Sparkplug
Pivotpoints
Controlhandle
3. 3. Lubricate
Extensionspring
1. Check
2. Clean
ENGINE MAINTENANCE
Topreventaccidentalstart-up,shutoffthe engineand removethe
ignitionkeybeforeperforminganytypeofenginemaintenance.
Periodicinspectionandadjustmentoftheengineis essentialifhigh
levelperformanceis tobe maintained.Regularmaintenancewillalso
ensurealongservicelife.Therequiredserviceintervalsandthetype
ofmaintenanceto beperformedaredescribedinthetableabove.
Followthehourlyor calendarintervals,whicheveroccurfirst.More
frequentserviceis requiredwhenoperatinginadverseconditions.
Followthemaintenanceschedulegivenbelow.Thischartdescribes
serviceguidelinesonly.UsetheServiceLogcolumnto keeptrackof
completedmaintenancetasks.To locate the nearest SearsService
Centeror toscheduleservice,simplycontactSears at
1-800-4-MY-HOME®.
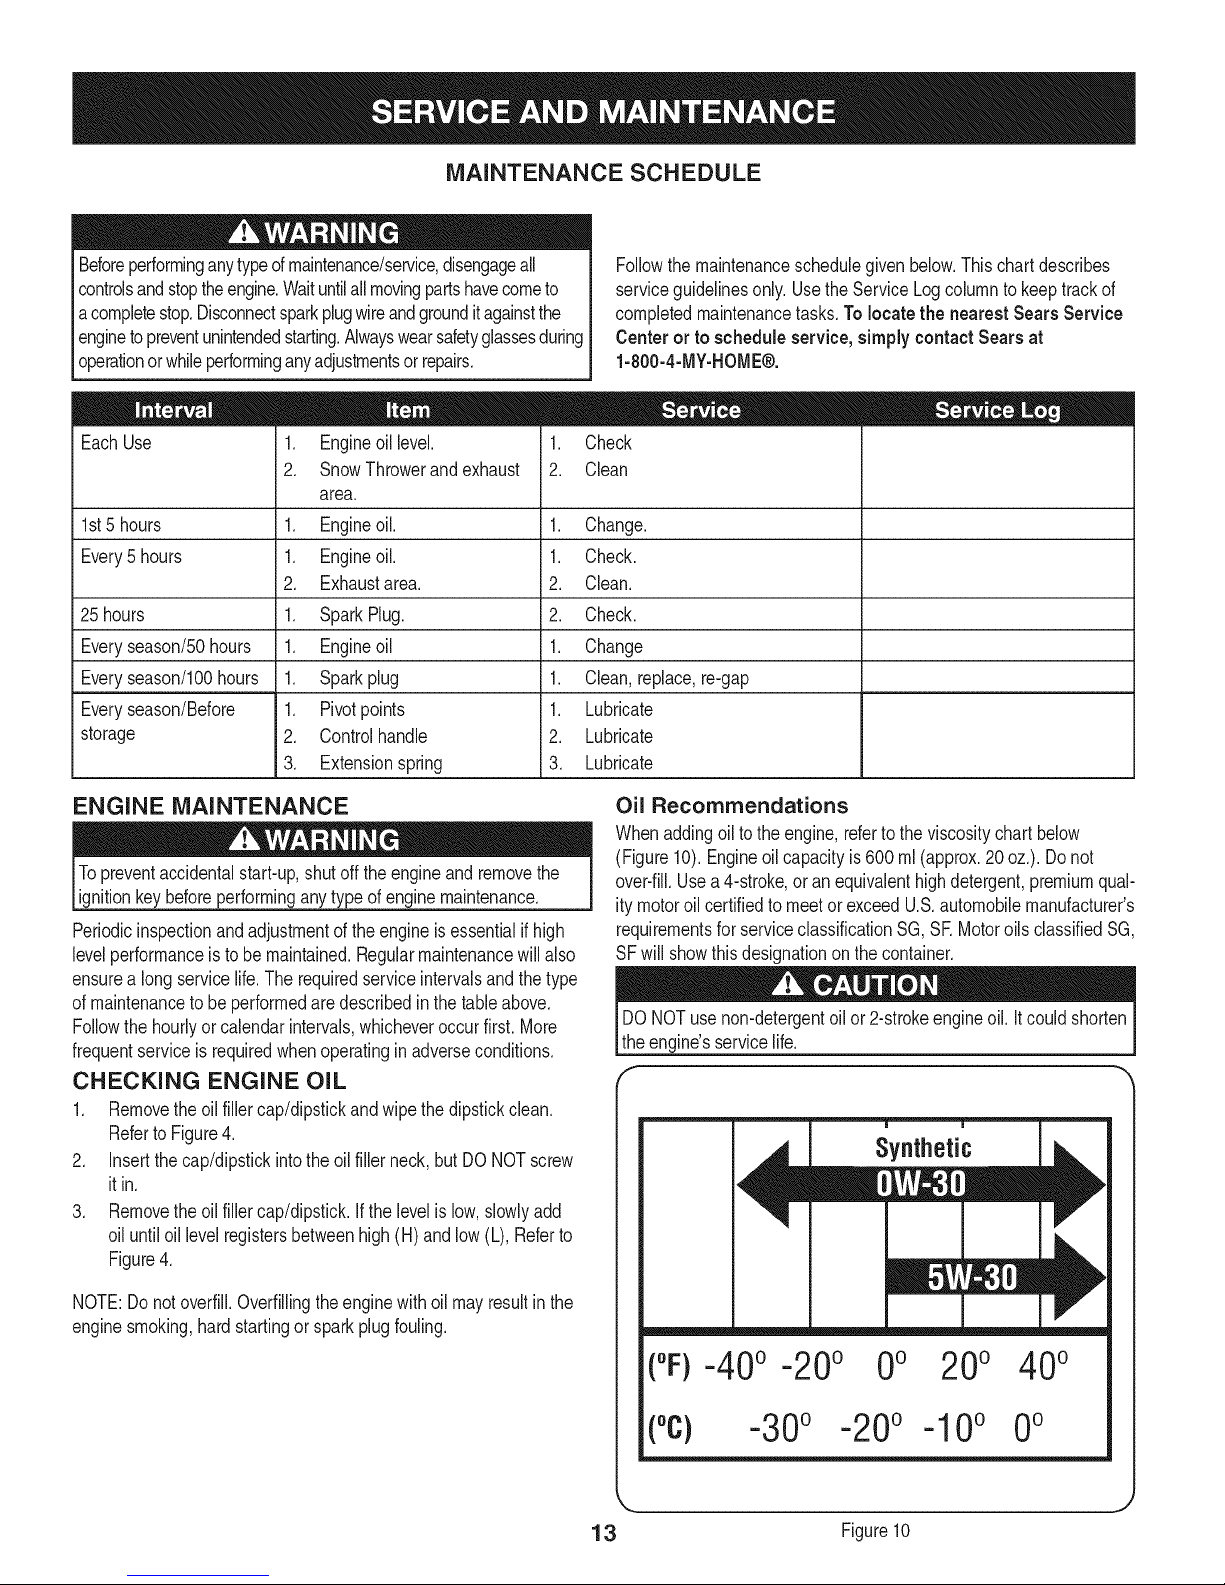
Oil Recommendations
Whenaddingoil to theengine,refertotheviscositychartbelow
(Figure10). Engineoilcapacityis600 rnl(approx.20oz.). Donot
over-fill.Usea4-stroke,oran equivalenthighdetergent,premiumqual-
itymotoroil certifiedto meetor exceedU.S.automobilemanufacturer's
requirementsfor serviceclassificationSG,SE MotoroilsclassifiedSG,
SFwill showthisdesignationonthecontainer.
DONOTusenon-detergentoil or2-strokeengineoil.It couldshorten
theengine'sservicelife.
CHECKING ENGINE OIL
1. Removetheoil fillercap/dipstickandwipethedipstickclean.
RefertoFigure4.
2. Insertthe cap/dipstickintotheoilfillerneck,but DONOTscrew
itin.
3. Removetheoil fillercap/dipstick.Ifthelevelislow,slowlyadd
oil untiloil levelregistersbetweenhigh(H)andlow(L),Referto
Figure4.
m m
Synthetic
NOTE:Donotoverfill.Overfillingtheenginewithoil mayresultin the
enginesmoking,hardstartingorsparkplugfouling.
(%-40 ° -20o 0o 200 400
(oc) -30° -20° -10° 0°
13 Figure10
Page 14
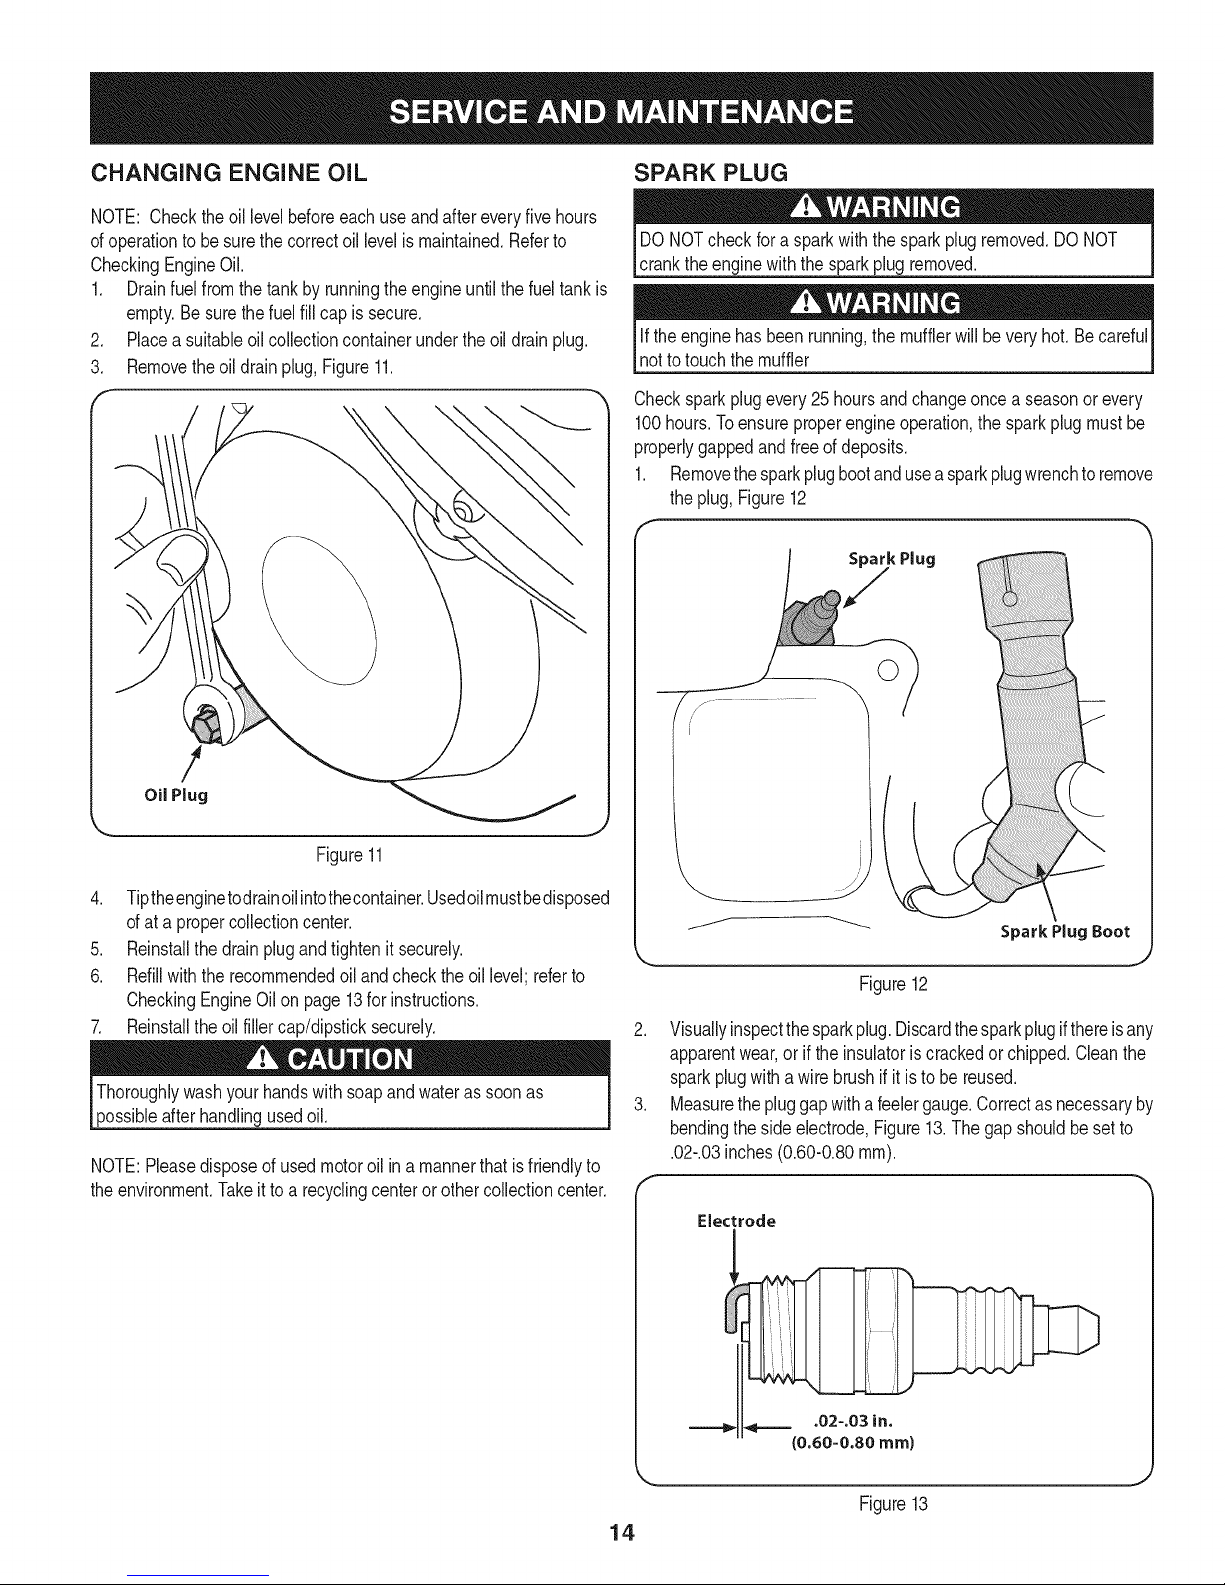
CHANGING ENGINE OiL SPARK PLUG
NOTE: Checktheoil levelbeforeeachuseandaftereveryfivehours
ofoperationtobesurethecorrectoil levelismaintained.Referto
CheckingEngineOil.
1. Drainfuelfromthetankby runningtheengineuntilthefueltankis
empty.Besurethe fuelfill capis secure.
2. Placea suitableoilcollectioncontainerundertheoildrainplug.
3. Removetheoil drainplug,Figure11.
DONOTcheck fora sparkwiththesparkplugremoved.DONOT
cranktheenginewiththe sparkplugremoved.
Iftheenginehas beenrunning,the mufflerwillbeveryhot. Becareful
notto touchthemuffler
Checksparkplugevery25hoursandchangeoncea seasonorevery
100hours.Toensureproperengineoperation,the sparkplugmustbe
properlygappedand freeofdeposits.
1. Removethesparkplugbootanduseasparkplugwrenchtoremove
theplug, Figure12
SparkPlug
,J
©
!
Oil Plug
Figure11
4. Tiptheenginetodrainoilintothecontainer.Usedoilmustbedisposed
ofat a propercollectioncenter.
5. Reinstallthedrainplugandtightenit securely.
6. Refillwiththerecommendedoil andchecktheoil level;referto
CheckingEngineOilon page13for instructions.
7. Reinstalltheoilfillercap/dipsticksecurely.
Thoroughlywashyourhandswithsoapandwaterassoonas
possibleafterhandlingusedoil.
NOTE:Pleasedisposeofusedmotoroil ina mannerthatisfriendlyto
theenvironment.Takeit toa recyclingcenteror othercollectioncenter.
J
SparkPlugBoot
.J
Figure12
2. Visuallyinspectthesparkplug.Discardthesparkplugifthereisany
apparentwear,orif theinsulatoriscrackedorchipped.Cleanthe
sparkplugwithawirebrushifit is tobe reused.
3. Measurethe pluggapwithafeelergauge.Correctasnecessaryby
bendingthe sideelectrode,Figure13.Thegapshouldbesetto
.02-.03inches(0.60-0.80ram).
Electrode
.02=.03 in.
(0.60-0.80 rnrn)
Figure13
14
Page 15

4. Checkthatthesparkplugwasherisingoodconditionandthreadthe3.
sparkpluginbyhandtopreventcross-threading.
5. Afterthesparkplugisseated,tightenwithasparkplugwrenchto
compressthewasher, f
NOTE:Wheninstallinganewsparkplug,tighten1/2-turnafterthe
sparkplugseatstocompressthewasher.Whenreinstallingaused
sparkplug,tighten1/8-to1/4-turnafterthesparkplugseatsto
corn_ressthewasher.
becomeverhotandcandamac me.
CLEANING THE ENGINE
Iftheenginehasbeenrunning,allowitto coolforatleasthalfan hour
beforecleaning.Periodicallyremovedirtbuild-upfromengine.
Donot spraytheenginewithwaterto cleanitbecausethewater
couldcontaminatethefuel.Usinga gardenhoseor pressurewashing
Iequipmentcanalsoforcewaterintothemuffleropening.Waterthat
[passesthroughthe muffercan enterthecy nderandcausedamage,j
Loosenthefourlocknutsandboltswhichsecurethe shave
plateto thehousing.SeeFigure14.Movethe shaveplatetothe
desiredpositionandretightenthenutsandboltssecurely.
Figure14
Accumulationofdebrisaroundthe mufflercouldcausea fire. Inspect
andcleanbeforeeveryuse.
LUBRICATION
Lubricatethepivotpointsonthecontrolhandleandtheextension
springat theendof thecontrolcablewitha lightoil onceeveryseason
andbeforethesnowthroweris putintostorageattheendof the
season.
ADJUSTMENTS
BeforeServicing,repairingor inspectingthesnowthrower,disengage
theaugercontrol.Stoptheengineand removethekeytoprevent
unintendedstarting.
Shave Plate
Tochecktheadjustmentof theshaveplate,placethemachineona
levelsurface.Thewheels,shaveplateandaugersshouldallcontact
thelevelsurface.Notethatifthe shaveplateisadjustedtoohigh,
snowmayblowundertheaugerhousing.Iftheshaveplatewearsout
excessively,orthe snowthrowerdoesnot self-propel,theshaveplate
maybetoolowandneedsto beadjusted.
NOTE:Onnewsnowthrowersormachineswitha newshaveplate
installed,theaugersmaybeslightlyoffthe ground.
4. Tipthesnowthrowerbacktotheoperatingpositionandpullthestarter
handlea fewtimesto seeifit isdifficultto pull.
5. Ifthestarterisdifficultto pull,removethesparkplugand pullthe
handleseveraltimestoensurethatanyoiltrappedinthe headis
removed.
Oilmaycomeoutof thesparkplugholewhenitis removedandthe
starterhandleispulled.
6. Inspectthesparkplug.If itiswet,cleanoffanyoil before
re-installing.
Toadjustthe shaveplateproceedasfollows:
1. Drainthegasfromthesnowthrower.
2. Pullthestartercorduntil resistanceisfelt. Thentip thesnow
throwerbackuntilit restson thehandles.
15
Page 16
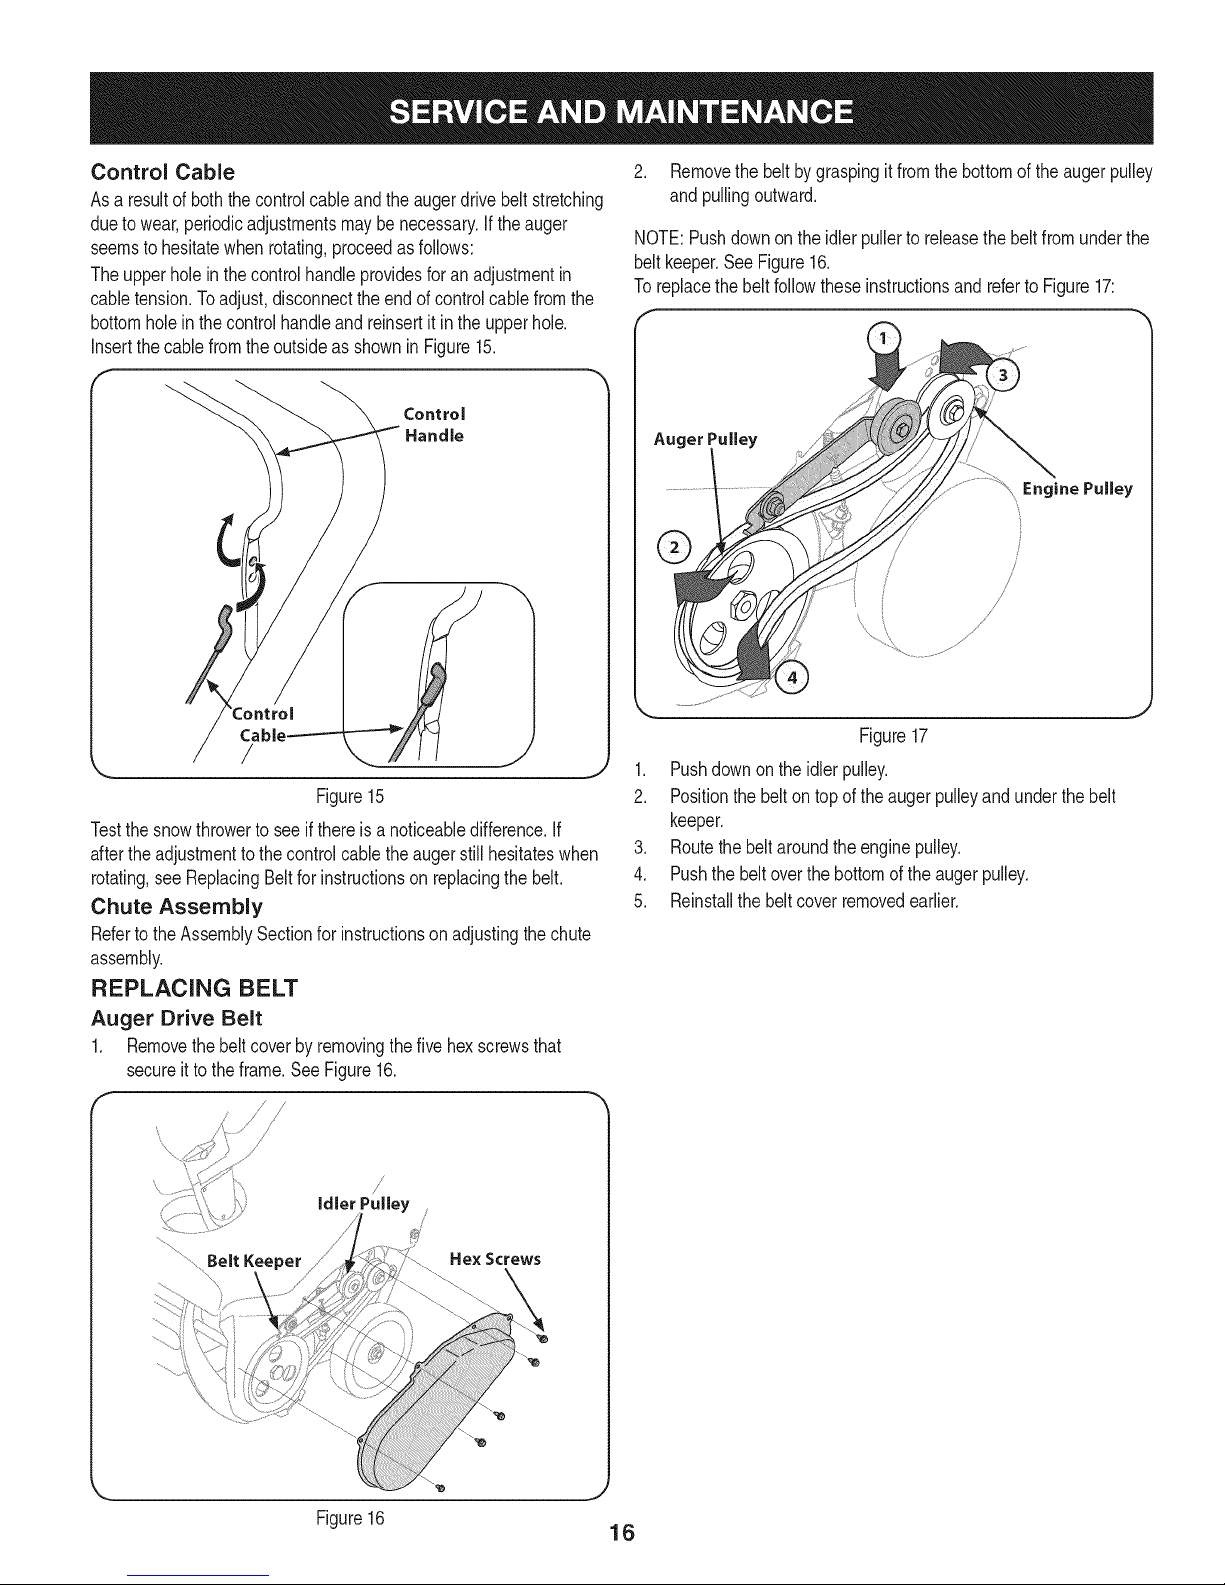
Control Cable
Asa resultof boththecontrolcableandtheaugerdrivebeltstretching
duetowear,periodicadjustmentsmaybenecessary.Iftheauger
seemsto hesitatewhenrotating,proceedasfollows:
Theupperholeinthe controlhandleprovidesforanadjustmentin
cabletension.Toadjust,disconnectthe endofcontrolcablefromthe
bottomholein the controlhandleand reinsertitintheupperhole.
Insertthe cablefromtheoutsideasshownin Figure15.
f
2. Removethe beltbygraspingit fromthebottomoftheaugerpulley
and pullingoutward.
NOTE:Pushdownonthe idlerpullerto releasethebeltfromunderthe
beltkeeper.SeeFigure16.
Toreplacethebeltfollowtheseinstructionsand referto Figure17:
/
Figure15
Testthesnowthrowerto seeifthere isa noticeabledifference.If
aftertheadjustmenttothecontrolcabletheaugerstill hesitateswhen
rotating,seeReplacingBeltforinstructionson replacingthebelt.
Chute Assembly
Refertothe AssemblySectionforinstructionson adjustingthe chute
assembly.
REPLACING BELT
Auger Drive Belt
1. Removethebeltcoverby removingthefivehex screwsthat
secureitto theframe.SeeFigure16.
.........Belt Keeper
Figure17
1. Pushdownon theidlerpulley.
2. Positionthebelton topof theaugerpulleyandunderthe belt
keeper.
3. Routethebeltaroundtheenginepulley.
4. Pushthebeltoverthebottomoftheaugerpulley.
5. Reinstallthe beltcoverremovedearlier.
Figure16 16
Page 17
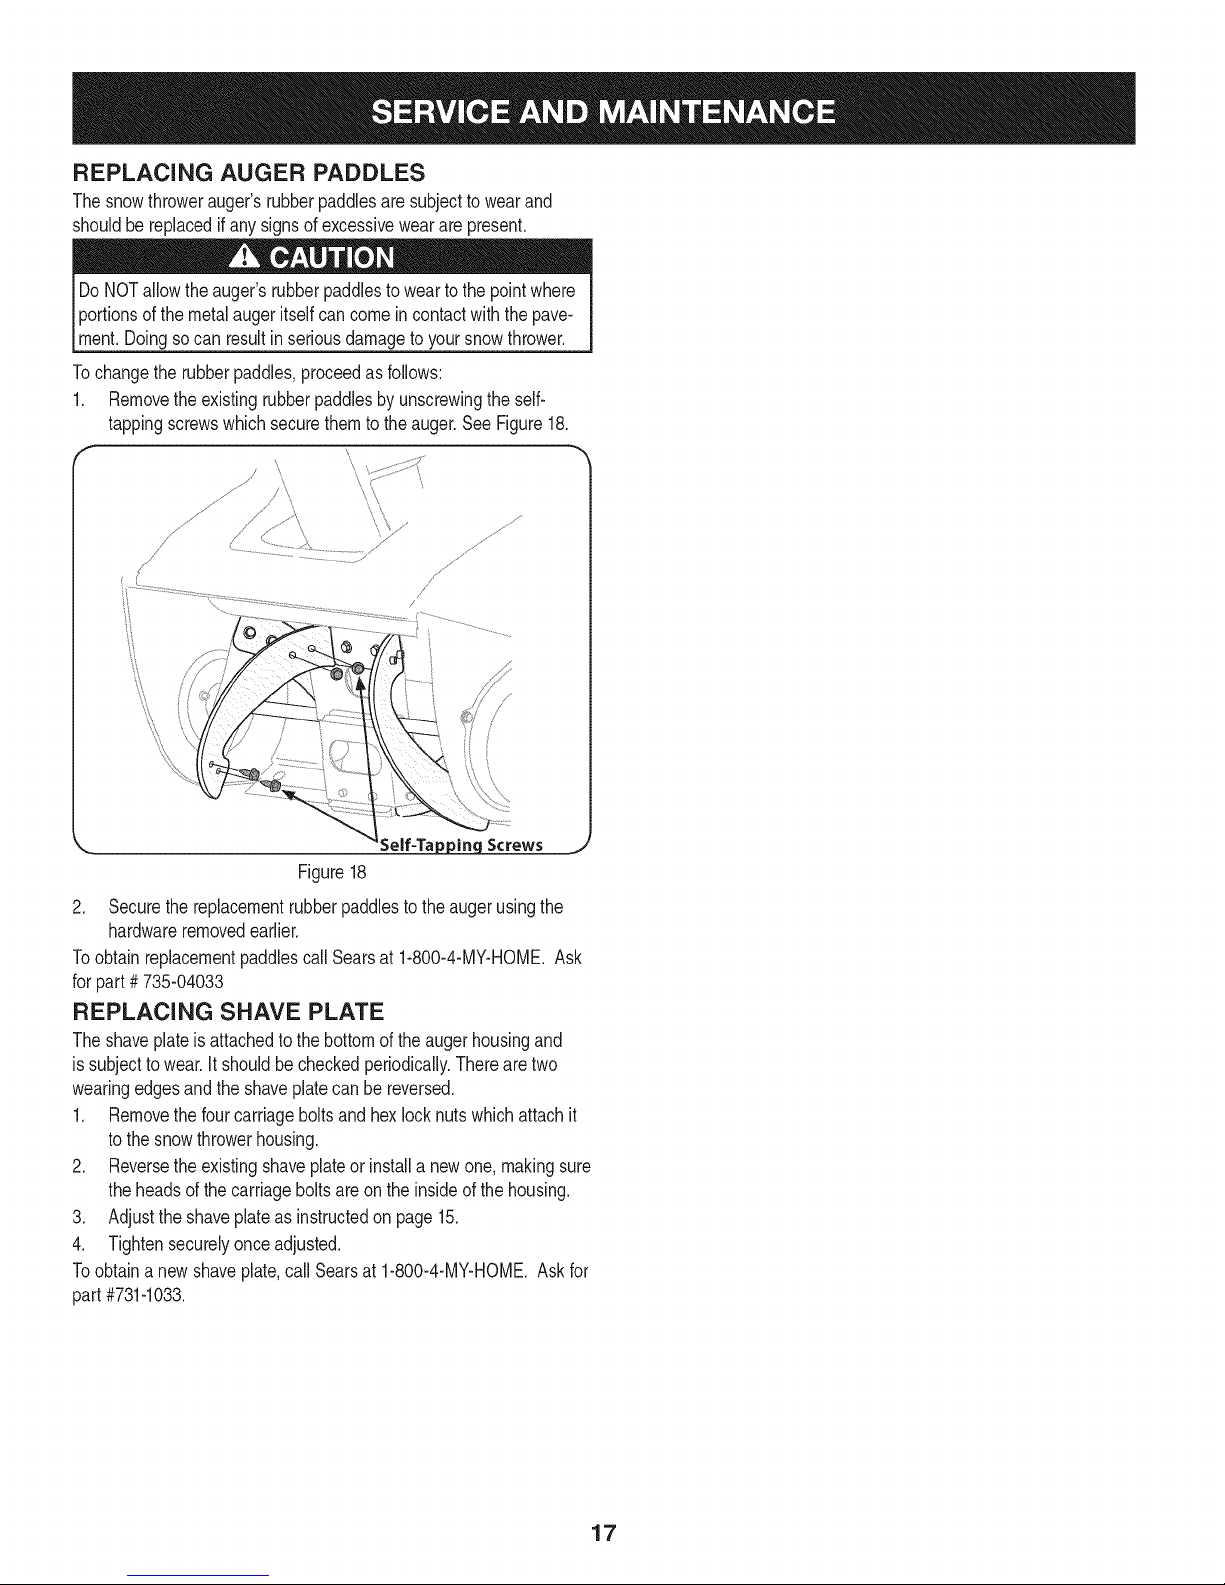
REPLACING AUGER PADDLES
Thesnowthrowerauger'srubberpaddlesaresubjecttowearand
shouldbereplacedifany signsof excessiveweararepresent.
DoNOTallowtheauger'srubberpaddlesto weartothepointwhere
portionsofthe metalaugeritselfcancomein contactwiththepave-
ment.Doingsocan resultin seriousdamageto yoursnowthrower.
Tochangethe rubberpaddles,proceedasfollows:
1. Removetheexistingrubberpaddlesbyunscrewingthe self-
tappingscrewswhichsecurethemto theauger.SeeFigure18.
Self-Ta
Screws
Figure18
2. Securethereplacementrubberpaddlestotheaugerusingthe
hardwareremovedearlier.
ToobtainreplacementpaddlescallSearsat 1-800-4-MY-HOME.Ask
forpart# 735-04033
REPLACING SHAVE PLATE
Theshaveplateis attachedtothe bottomoftheaugerhousingand
issubjecttowear.It shouldbecheckedperiodically.Therearetwo
wearingedgesandtheshaveplatecanbe reversed.
1. Removethefourcarriageboltsandhexlocknutswhichattachit
tothe snowthrowerhousing.
2. Reversetheexistingshaveplateor installa newone,makingsure
theheadsof thecarriageboltsareon theinsideofthe housing.
3. Adjusttheshaveplateasinstructedon page15.
4. Tightensecurelyonceadjusted.
Toobtaina newshaveplate,call Searsat 1-800-4-MY-HOME.Askfor
part#731-1033.
17
Page 18

Ifthe snowthrowerwillnotbeusedfor30 daysor longer,orifit istheendof thesnowseasonwhenthelastpossibilityof snowisgone,the
equipmentneedstobestoredproperly.Followstorageinstructionsbelowtoensuretop performancefromthe snowthrowerformanymoreyears.
PREPARING ENGINE
Enginesstoredover30daysneedtobedrainedof fuelto prevent
deteriorationandgumfromforminginfuelsystemoronessential
carburetorparts.If thegasolineinyourenginedeterioratesduring
storage,youmayneedto havethecarburetor,andotherfuelsystem
components,servicedorreplaced.
1. Removeall fuel fromtank byrunningengineuntil itstops.
2. Changetheengineoil.
3. Removesparkplugandpourapproximately1oz.(30 rnl)of clean
engineoil intothe cylinder.Pullthe recoilstarterseveraltimesto
distributetheoil,and reinstallthesparkplug.
4. Cleandebrisfromaroundengine,andunder,around,andbehind
muffler.Applya lightfilmofoilon anyareasthatare susceptible
torust.
• Storeina clean,dry andwellventilatedareaawayfromanyap-
pliancethatoperateswithaflameor pilotlight,suchasafurnace,
waterheater,or clothesdryer.Avoidanyareawitha spark
producingelectricmotor,or wherepowertoolsareoperated.
Neverstoresnowthrowerwithfuelintank indoorsorinpoorlyventi-
latedareas,wherefuelfumesmayreachanopenflame,sparkor pilol
lightas ona furnace,waterheater,clothesdryerorgas appliance.
PREPARING SNOW THROWER
Whenstoringthe snowthrowerin anunventilatedormetalstor-
age shed,careshouldbetakentorustprooftheequipment.Using
a lightoilorsilicone,coattheequipment,especiallyanychains,
springs,bearingsandcables.
• Removealldirt fromexteriorofengineandequipment.
• Followlubricationrecommendations.
• Storeequipmentina clean,dry area.
• If possible,avoidstorageareaswithhighhumidity.
• Keeptheenginelevelin storage.Tiltingcancausefueloroil
leakage.
18
Page 19

Beforeperforminganytypeof maintenance/service,disengageallcontrolsandstoptheengine.Waituntilall
movingpartshavecometoa completestop.Disconnectsparkplugwireandgrounditagainsttheengineto
preventunintendedstarting.Alwayswearsafetyglassesduringoperationorwhileperforminganyadjustmentsor
repairs.
Thissectionaddressesminorserviceissues.Tolocate the nearest SearsService Centeror to scheduleservice,simplycontactSears
at 1-800-4-MY-HOME®.
Enginefailsto start
Enginerunserratically
Engineoverheats Contacta SearsServiceCenter.
Lossof power Firmlyconnectsparkplugwire.
Excessivevibration Stopengineimmediatelyanddisconnectsparkplug
1. Fueltankempty,or stalefuel.
2. Blockedfuelline.
3. Keynotinsertedalltheway.
4. Sparkplugwiredisconnected.
5. Faultysparkplug.
6. Enginenotprimed.
7. Enginefloodedfromexcessivepriming.
1. Enginerunningonchoke.
2. Fuellineblocked,or stalefuel.
3. Wateror dirtinfuelsystem.
4. Carburetoroutofadjustment.
1. Carburetoroutofadjustment.
1. Sparkplugwireloose.
2. Ventin gascap plugged.
1. Loosepartsordamagedauger.
1. Filltankwithcleanfreshgasoline.
2. Cleanfuel line.
3. Insertkeyalltheway.
4. Connectwiretosparkplug.
5. Cleansparkplug,readjustgap,or replace.
6. Primeenginefivetoseventimes.
7.
Waitatleastten minutesbeforestarting.
1.
Movechokeleverto OFFposition.
2.
Cleanfuel lineandfilltankwithfresh,cleangasoline.
3.
Drainfueltank.Refillwithfreshfuel.
4.
Contacta SearsServiceCenter.
1.
1.
2.
Clearvent.
1.
wire.Checkforpossibledamage.Tightenallbolts
andnuts.Repairasneeded.If theproblempersists,
takesnowthrowertoa SearsServiceDealer.
Snowthrowerfailsto self- 1. Augercontrolcableoutofadjustment. 1. Adjustaugercontrolcableas shownin Serviceand
propel Maintenancesection.
2. Augerdrivebeltlooseordamaged. 2. Replaceaugerdrivebelt.
Augerscontinueto rotate 1. Augercontrolcableoutofadjustment. 1. Adjustaugercontrolcableas shownin Serviceand
Maintenancesection.
Unitfailstodischargesnow 1. Chuteassemblyclogged. 1.
Stopengineanddisconnectsparkplugwire.Clean
chuteand insideof augerhousingwithclean-outtool
or stick.
2. Foreignobjectlodgedin auger.
2. Stopengineimmediatelyanddisconnectthespark
plugwire.Removeobjectfromauger.
3. Augercontrolcableoutofadjustment.
4. Augerbeltlooseor damaged.
3. Adjustaugercontrolcable.
4. Replaceaugerbelt.
NEED MORE HELP?
You'll fir_d the a_lswe: au_d mo_e ou_ m_!:jemy[]ome corn - I_:_ I_'ee
Find this and all your other product manuals online.
Get answers from our team of home experts.
Get a personalized maintenance plan for your home.
Find information and tools to help with home projects.
b_ought to you by Sea_s
19
Page 20

Craftsman Snow Thrower IViodel 247.88705
2O
Page 21

Craftsman Snow Thrower IViodel 247.88705
710-04532 CarriageScrew,5/16-18x2.00
2. 720-0284 WingKnob,5/16-18
3. 725-0157 CableTie,3/16 x.05x 7.4
4. 747-04165-0637 BailControl
5. 749-04459-0637 UpperHandle
6. 731-04127 LowerChute
7. 731-04353 ChuteRing
8. 731-04886 ChuteAdapter
9. 732-04111 ChuteAdjustmentSpring
10. 710-04071 CarriageBolt.5/16-18x 1.00
11. 710-0451 CarriageBolt.5/16-18x.750
12. 712-04063 FlangeLockNut,5/16-18
13. 731-04388A ChuteHandle
14. 731-04426A UpperChute
15. 731-1033 ShavePlate,21"
16. 712-04064 FlangeLockNut,1/4-20
17. 710-0134 CarriageScrew,1/4-20
18. 736-0176 FiatWasher,.265x .938x .120
19. 710-0895 HexScrew,5/16-18x .750
20. 710-0528 HexScrew,5/16-18x 1.25
21. 712-04063 FlangeLockNut,5/16-18
22. 720-0279 HandleKnob
23. 710-1205 EyeBolt,1/4-20
24. 710-04669 HexScrew,10-16x .625
25. 731-06551 Shroud
26. 746-04237 ClutchCable
27. 710-3008 HexScrew,5/16-18x.75
D = 0
21
Page 22

Craftsman Snow Thrower Model 247.88705
/
/
/
/
/
/ /
/ ,//
/
/
/
/
/
/
/
/
\
'\ j
\T"\
/
/
/
/
/
22
Page 23

Craftsman Snow Thrower IViodel 247.88705
|= 0 e
736-0326 FiatWasher,.510x 1.000x .125
2. 734-1855 Wheel,8x 1.7
3. L7260299 . PushCap,1/2"
4. 710-0896 HexScrew,1/4-14x .625
5. 710-0653 HexScrew,1/4-20x .375
6. 790-00045B-0721 BeltCover
7. 710-0879 HexBolt,3/8-24x 1.25
8. 736-0247 FiatWasher,.406x 1.25x .157
9. 756-04353A PulleyHalf,4bV x .240OD
10. 754-04204 V-Belt
11. 750-04303 Spacer,.875IDx 1.185OD
12. 750-05084 Spacer,.88IDx 1.18ODx.74
13. 710-0409 HexBolt,5/16-24x 1.75
14. 736-0119 LockWasher,5/16
15. 750-04297B Spacer,.875x .320x 1.027
16. 726-0154 CableTie,7.5"
17. 710-0148 HexScrew,#8-32x .375
18. 751-10768 HeatShield
19. 751-10769 ExhaustTube
20. 790-00334-0637 EngineSupportBracket
21. 710-0654A HexScrew,3/8-16x 1.000
22. 756-04232 Pulley,1/2x6.00OD
23. 710-0106 HexScrew,1/4-20x 1.25
D = O
750-04571 ShoulderSpacer,.260x .785x .538
25. 684-04168 IdlerPulleyAssembly,1.917OD
26. 790-00238A-0637 IdlerBracket
27. 712-04064 FlangeLockNut, 1/4-20
28. 710-1005 HexScrew,1/4-14x .500
29. 790-00249-0637 BearingCap
30. 741-04188A BallBearing,.625x 37x 12x .6301
31. 738-0924A ShoulderScrew,.340x .335x C
32. 756-0625 CableRoller
33. 712-0896 HexLockNut,1/4-28
34. 750-04757 AugerSpacer,LH
35. 750-04758 AugerSpacer,RH
36. 684-04253-0637 AugerAssembly,21"(Incl.37,38& 39)
37. 710-0896 HexScrew,1/4-14x .625
38. 735-04033 RubberPaddle
39. 735-04032 SpiralCrescent
40. 710-0642 HexScrew,1/4-20x .750
41. 736-0329 LockWasher,1/4
42. 736-0176 FiatWasher,.265x .938x .120
43. 732-0357A ExtensionSpring,.33 ODx 1.12
44. 684-04314-0721 AugerHousing,21"
45. 712-04063 FlangeLockNut,5/16-18
46. 748-0234 ShoulderSpacer
23
Page 24

Craftsman Engine IViodel ZS365=SUA For Snow Thrower IViodel 247.88705
O3
O3
24
Page 25

Craftsman Engine IViodel ZS365=SUA For Snow Thrower IViodel 247.88705
751-10645A
710-04934
710-04935
751-10646
710-04919
710-04940
751-10663A
751-10658
710-04903
710-04938
751-11138
710-04929
751-10654
751-10664
751-10665
712-04212
710-04918
710-04941
751-10655
751-10656
710-04905
751-10662
751-10652
710-04928
751-10653A
712-04213
710-04942
710-04928
751-10642A
712-04210
710-04928
710-04933
710-04939
751-10666
751-10292
751-10657
751-10639
D = O
ElectricStarter
Screw,M4x55
Screw,M4x60
IgnitionCoil
FlangeBolt,M6x25
Bolt,M6x 10
FanCoverComplete
RecoilStarterAssembly
FuelDrainPlug
FuelDrainPlug
GovernorArm
Bolt,M6x 20
GovernorSpring
ThrottleReturnSpring
GovernorRod
Nut,M6
FlangeBolt,M6x20
Bolt,M6x 12
Dipstick
DipstickTube
Bolt
Cover- Engine/Dipstick
FuelFilter
Bolt,Flange,M6x 12
FuelTank
Nut
Bolt,M6x 16,FillTube
FlangeBolt,M6x 12
MufflerShroud
Nut,M8
Bolt,M6x 12
Bolt,M8x 55
Stud,M6x 118
MufflerGasket
SparkPlug
Stud,M8x 34
Primer
m
i
184
i
i
i
185
i
i
186
i
i
i
i22
!
i
i
123
i
i
125
i
i
i
i112
!
i
1
1121
1
1
1122
1
1
1
i124
!
i
_75
1
1
1
_76
1
1
1
i77
!
i
_78
1
1
1
_79
1
1
1
i154
!
i
_90
1
1
1
i106
1
1
1107
1
1
1
i108
!
i
1
1109
1
1
1110
1
1
1
i113
!
i
1114
1
1
1
1115
1
1
1
i148
!
i
1153
1
1
1
_36
1
1
1
i37
!
i
_44
1
1
1
i45
!
!
i
_48
1
1
i 151
1
1
1
i59
!
i
1
_58
1
1
_57
1
1
1
i64
I
751-10974
751-11020
710-04910
751-10635
751-10637
751-10630
712-04216
751-10636
751-10634
710-04927
751-10643
751-10640
751-10651
751-10307
731-05696
952Z365-SUA
710-04914
751-10719
712-04209
751-10911
751-10909
751-10805
710-04920
751-10757
751-10758
751-11108
715-04088
710-04943
751-11109
751-11110
751-11111
751-11112
751-11113
751-11114
751-11012
751-10768
D = O
CarburetorAssembly
CarburetorKitMajor
Stud,M6x 105
Air FilterHeatingPipeCover
IgnitionSwitch
IgnitionKey
Nut,M6
ChokeLever
EngineShroud
Bolt,Flange,M5x 8
MufflerShield
ChokePushRod
FuelTankNipple
FlywheelKey
StarterHandle
EngineComplete
FlangeBolt,M6 x 10
Stator
Nut,M14
StarterCup
CoolingFan
Flywheel
Bolt,M6x 28
ThrottleControlKnob
ThrottleControlAssembly
GovernorShield
DowelPin
Bolt,M61x 28
BlowerHousingShield
Air FlowShield
ExhaustPipeShield
ChokeControlBracket
Air Shield
SwitchMountingHousingBracket
RecoilMountingBolts
ExhaustDeflectorShield
m
65
60
69
70
71
74
73
72
39
40
66
116
149
N/A
N/A
152
28
33
32
31
30
29
82
81
105
87
88
89
24
38
67
26
83
35
120
25
Page 26

Craftsman Engine IViodel ZS365=SUA For Snow Thrower IViodel 247.88705
751-10723A
736-04440
751-10661A
751-10722
751-11123
751-11124
710-04902
m = O
GasketKitComplete
OilSeal 4
CrankcaseCoverGasket 10
O-ring 15
CylinderHeadGasket 55
MufflerGasket 59
HeadCoverGasket 47
CarbInsulatorGasket 61
CarburetorInsulator 62
CarburetorGasket 63
PaperGasket 42
Oil DrainWasher 19
GasketKit External
Oil DrainWasher 19
MufflerGasket 59
CarburetorInsulatorGasket 61
CarburetorInsulator 62
CarburetorGasket 63
HeadCoverGasket 47
CylinderHeadAssembly
RockerArm 51
IntakeValve 103
ExhaustValve 98
ValveSpring 100
ValveSpringRetainers-Exhaust 101
PivotAdjustingNut 52
RockerArmLockNut 53
RockerArmStuds 50
PushRodGuide 49
ValveCoverGasket 47
CarburetorInsulatorPlateGasket 61
CarburetorInsulatorPlate 62
MufflerGasket 59
CylinderHeadGasket 170 55
CylinderHead N/A
ExhaustValveAdjuster 102
ValveSpringRetainer-Intake 104
751-10724
714-04074
710-04907
736-04440
715-04092
715-04089
715-04090
710-04932
m = O
ShortBlock
CrankcaseComplete
OilPipeReserve
CrankcaseCover
Piston
PistonRingSet- Complete
PistonPin
PistonPinClip
ConnectingRodAssemblyComplete
ValveLifter(Tappet)
CamshaftAssembly
CarburetorInsulatorplategasket
CrankshaftAssembly
CarburetorInsulatorPlate
MufflerGasket
GovernorArmShaft
GovernorShaftClip
GovernorAssembly
CaseCoverGasket
CylinderHeadGasket
ValveCoverGasket
OilDrainBolt
OilDrainPlugWasher
DowelPin,7 x 14
DowelPin,9 x 14
DowelPin
RadialBallBearing
Bolt
OilSeal
RadialBallBearing
O-ring- GovernorArm
OilFillerPlug
O-ring- Oil FillerPlug
OilDrainPipe
/
17
N/A
5
93
95
94
92
91
96
7
61
11
62
59
16
14
12
10
55
47
20
19
9
8
56
13
1
4
6
15
2
3
18
26
Page 27

Craftsman Engine IViodel ZS365-SUA For Snow Thrower IViodel 247.88705
751-11100
751-10769
751-11054
751-10641
751-10647
751-10648
751-10649
751-10650
D = O O
CrankcaseKit
GovernorSeal 150
RadialBallBearing 13
O-ring- GovernorArm 15
CrankcaseComplete 17
Seal 21
ExhaustDeflectorPipe 119
ValveCover 46
Oil DrainAssembly
Oil DrainPipe
DrainBolt
18
2
ValveKit
ExhaustValve
IntakeValve
98
103
PushRodKit
PushRod
97
FuelCapAssembly
FuelCapComplete 111
Packing(Gasket) N/A
Clip (GasketRetainer) N/A
FuelLineKit
FuelLineClamp 117
FuelLine 118
|= o o
751-10669 OilFill PlugAssembly
OilFillPlug 2
O-ring 3
751-10644 MufflerAssemblyComplete
MufflerAssembly 41
ExhaustPipe 43
751-11098 CrankcaseCoverKit
710-04932 Bolt 1
OilFillerPlug 2
O-ring- Oil FillerPlug 3
OilSeal 4
CrankcaseCover 5
RadialBallBearing 6
CrankcaseCoverGasket 10
751-11099 CrankshaftKit
OilSeal 4
RadialBallBearing 6
CrankshaftAssembly 11
RadialBallBearing 13
Seal 21
FlywheelKey 149
751-11063 ValveCoverKit
ValveCover 46
ValveCoverGasket 47
27
Page 28

MTD CONSUMER GROUP INC (MTD), the California Air Resources Board (CARB)
and the United States Environment Protection Agency (U. S. EPA)
Emission Control System Warranty Statement
(Owner's Defect Warranty Rights and Obligations)
EMISSIONCONTROLSYSTEMCOVERAGEISAPPLICABLETOCERTIFIEDENGINESPURCHASEDINCALIFORNIAIN2005ANDTHERE-
AFTER,WHICHAREUSEDINCALIFORNIA,ANDTOCERTIFIEDMODELYEAR2005ANDLATERENGINESWHICHAREPURCHASEDAND
USEDELSEWHEREINTHEUNITEDSTATES.
Californiaandelsewherein the UnitedStatesEmissionControlDefectsWarrantyCoverage
TheCaliforniaAir ResourcesBoard(CARB),U.S. EPAandMTDarepleasedtoexplaintheemissionscontrolsystemwarrantyonyour modelyear
2006andlatersmalloff-roadengine.InCalifornia,newsmalloff-roadenginesmustbe designed,builtand equippedto meettheStatesanti-smog
standards.Elsewhereinthe UnitedStates,newnon-road,spark-ignitionenginescertifiedfor model2005and later,mustmeetsimilarstandardsset
forthbythe U.S.EPA.MTDmustwarrantytheemissioncontrolsystemonyourenginefortheperiodoftimelistedbelow,providedtherehasbeen
noabuse,neglector impropermaintenanceofyour smalloff-roadengine.
Youremissioncontrolsystemmayincludepartssuchasthecarburetor,fuel-injectionsystem,the ignitionsystem,andcatalyticconverter,fuel
tanks,fuellines,fuel caps,valves,canisters,filters,vaporhoses,clamps,connectors,andotherassociatedemission-relatedcomponents.
Whereawarrantableconditionexists,MTDwillrepairyoursmalloff-roadengineat nocostto yourincludingdiagnosis,partsandlabor.
MANUFACTURER'S WARRANTY COVERAGE:
Thisemissionscontrolsystemiswarrantedfortwoyears.If anyemission-relatedpartonyourengineisdefective,thepart willberepairedor
replacedbyMTD.
OWNER'S WARRANTY RESPONSIBILITIES:
Asthe smalloff-roadengineowner,youare responsibleforthe performanceofthe requiredmaintenancelistedinyourOwner'sManual.MTD
recommendsthatyouretainallyourreceiptscoveringmaintenanceson yoursmalloff-roadengine,butMTDcannotdenywarrantysolelyforthe
lackofreceiptsor foryourfailureto ensuretheperformanceto allscheduledmaintenance.
Asthe smalloff-roadengineowner,youshouldhoweverbeawarethatMTDmaydenyyourwarrantycoverageifyoursmalloff-roadengineorpart
hasfaileddue toabuse,neglect,impropermaintenanceor unapprovedmodifications.
Youare responsiblefor presentingyour smalloff-roadenginetoan AuthorizedMTDServiceDealerassoonas a problemexists.Thewarranted
repairsshouldbe completedina reasonableamountof time,nottoexceed30 days.
Ifyouhaveanyquestionsregardingyourwarrantyrightsand responsibilities,youshouldcontacta MTDServiceRepresentativeat 1-800-800-7310
andaddressisMTDCONSUMERGROUP,RO.Box361131,ClevelandOH,44136-0019.
DEFECTS WARRANTY REQUIREMENTS FOR 1995 AND LATER SMALL OFF-ROAD ENGINES:
Thissectionappliesto 1995andlater smalloff-roadengines.Thewarrantyperiodbeginsonthe datethe engineor equipmentisdeliveredtoan
ultimatepurchaser.
(a) GeneralEmissionsWarrantyCoverage
MTDmustwarranttothe ultimatepurchaserandeachsubsequentpurchaserthatthe engineis:
(1)Designed,built,andequippedsoasto conformwithallapplicableregulationsadoptedbytheAirResourcesBoardpursuantto itsauthorityin
Chapters1and2,Part5, Division26of the HealthandSafetyCode;and
(2) Freefromdefectsin materialsandworkmanshipthatcausethefailureofa warrantedparttobeidenticalinall materialrespectstothe partas
describedintheenginemanufacturer'sapplicationforcertificationfora periodoftwoyears.
(b)Thewarrantyonemissions-relatedpartswill be interpretedasfollows:
(1)Anywarrantedpartthatisnot scheduledforreplacementas requiredmaintenanceinthewritteninstructionsrequiredbySubsection(c)
mustbewarrantedforthewarrantyperioddefinedinSubsection(a)(2).Ifany suchpartfailsduringthe periodof warrantycoverage,it mustbe
repairedorreplacedbyMTDaccordingtoSubsection(4)below.Anysuchpartrepairedor replacedunderthewarrantymustbewarrantedfor
theremainingwarrantyperiod.
(2)Anywarrantedpartthat isscheduledonlyfor regularinspectioninthewritteninstructionsrequiredbySubsection(c)mustbewarrantedfor
thewarrantyperioddefinedinSubsection(a)(2).A statementinsuchwritteninstructionstotheeffectof"repairor replaceasnecessary"will
notreducetheperiodof warrantycoverage.Anysuchpartrepairedorreplacedunderwarrantymustbe warrantedforthe remainingwarranty
period.
(3) Anywarrantedpartthat whichisscheduledfor replacementas requiredmaintenancein the writteninstructionsrequiredby Subsection(c)
mustbewarrantedfortheperiodof timepriortothefirstscheduledreplacementpointforthatpart.Ifthepart failspriorto thefirst scheduled
replacement,thepartmustbe repairedor replacedbyMTDaccordingtoSubsection(4) below.Anysuchpart repairedor replacedunder
warrantymustbewarrantedfortheremainderofthe periodpriortothefirstscheduledreplacementpointforthe part.
Page 29

(4)Repairorreplacementofanywarrantedpartunderthewarrantyprovisionsofthisarticlemustbeperformedatnochargetotheownerata
warrantystation.
(5)NotwithstandingtheprovisionsofSubsection(4)above,warrantyservicesorrepairsmustbeprovidedatallMTDdistributioncentersthat
arefranchisedtoservicethesubjectengines.
(6)Theownermustnotbechargedfordiagnosticlaborthatleadstothedeterminationthatawarrantedpartisinfactdefective,providedthat
suchdiagnosticworkisperformedatawarrantystation.
(7)Theenginemanufacturerisliablefordamagestootherenginecomponentsproximatelycausedbyafailureunderwarrantyofanywarranted
part.
(8)Throughouttheengine'swarrantyperioddefinedinSubsection(a)(2),MTDwillmaintainasupplyofwarrantedpartssufficienttomeetthe
expecteddemandforsuchparts.
(9)Anyreplacementpartmaybeusedintheperformanceofanywarrantymaintenanceorrepairsandmustbeprovidedwithoutchargetothe
owner.SuchusewillnotreducethewarrantyobligationsofMTD.
(10)Add-onormodifiedpartsthatarenotexemptedbytheAirResourcesBoardmaynotbeused.Theuseofanynon-exemptedadd-onor
modifiedpartsshallbegroundsfordisallowingawarrantyclaimmadeinaccordancewiththisarticle.Theenginemanufacturershallnotbe
liableunderthisarticletowarrantfailuresofwarrantedpartscausedbytheuseofnon-exemptedadd-onormodifiedpart.
(c)MTDwillincludea copyofthefollowingemissionwarrantypartslistwitheachnewengine,usingthoseportionsofthe listapplicabletothe
e__&gine.
(1)FuelMeteringSystem
•Coldstart enrichmentsystem(softchoke)
,,Carburetorandinternalparts
•FuelPump
•FuelTank
(2)Air InductionSystem
•Aircleaner
•Intakemanifold
(3) IgnitionSystem
•Sparkplug(s)
•MagnetoIgnitionSystem
(4)ExhaustSystem
Catalyticconverter
•SAI(Reedvalve)
(5) MiscellaneousItemsUsedin AboveSystem
Vacuum,temperature,position,timesensitivevalvesandswitches
Connectorsandassemblies
(6) Evaporativecontrol
•FuelHosecertifiedforARBevaporativeemissionof2006.
•FuelHoseClamps
Tetheredfuelcap
Carboncanister
Vaporlines
GD0C-100174Rev.B
Page 30

Look For Relevant Emissions Durability Period and
Air index information On Your Engine Emissions Label
Engines that are certified to meet the California Air Resources Board (CARB) Tier 2 Emission Standards must
display information regarding the Emissions Durability Period and the Air Index. Sears, Roebuck and Co., U.S.A.
makes this information available to the consumer on our emission labels.
The Emissions Durability Period describes the number of hours of actual running time for which the engine is
certified to be emissions compliant, assuming proper maintenance in accordance with the Operating & Mainte-
nance Instructions. The following categories are used:
Moderate: Engine is certified to be emission compliant for 125 hours of actual engine running time.
Intermediate: Engine is certified to be emission compliant for 250 hours of actual engine running time.
Extended: Engine is certified to be emission compliant for 500 hours of actual engine running time.
For example, a typical walk-behind lawn mower is used 20 to 25 hours per year. Therefore, the Emissions
Durability Period of an engine with an intermediate rating would equate to 10 to 12 years.
The Air Index is a calculated number describing the relative level of emissions for a specific engine family. The
lower the Air Index, the cleaner the engine. This information is displayed in graphical form on the emissions label.
After July 1,2000, Look For Emissions Compliance Period
On Engine Emissions Compliance Label
After July 1, 2000 certain Sears, Roebuck and Co., U.S.A. engines will be certified to meet the United States
Environmental Protection Agency (USEPA) Phase 2 emission standards. For Phase 2 certified engines, the Emis-
sions Compliance Period referred to on the Emissions Compliance label indicates the number of operating hours
for which the engine has been shown to meet Federal emission requirements.
For engines less than 225 cc displacement, Category C = 125 hours, B = 250 hours and A = 500 hours.
For engines of 225 cc or more, Category C = 250 hours, B = 500 hours and A = 1000 hours.
This is a generic representation of the emission label typically found on a certified engine.
FAMILYYBSXS.3192VA 274812
GDOC-100182Rev.A
30
Page 31

Congratulationson makingasmartpurchase.YournewCraftsman®
productisdesignedandmanufacturedforyearsofdependableopera-
tion.Butlikeall products,it mayrequirerepairfromtimeto time.That's
whenhavinga RepairProtectionAgreementcan saveyoumoneyand
aggravation.
Here'swhattheRepairProtectionAgreement*includes:
* Expert service byour10,000professionalrepairspecialists
* Unlimited service and no charge forpartsand laboronall
coveredrepairs
* Product replacementupto$1500ifyourcoveredproductcan'tbe
fixed
* Discountof 10%from regularpriceof serviceand relatedinstalled
partsnotcoveredby theagreement;also,10%off regularpriceof
preventivemaintenancecheck
* Fasthelp by phone- wecallitRapidResolution- phonesupport
froma Searsrepresentative.Thinkof usasa "talkingowner's
manual."
OnceyoupurchasetheAgreement,a simplephonecall isallthatit
takesfor youto scheduleservice.Youcancallanytimedayor night,or
schedulea serviceappointmentonline.
TheRepairProtectionAgreementisa risk-freepurchase.Ifyoucancel
forany reasonduringtheproductwarrantyperiod,wewill provideafull
refund.Or,aproratedrefundanytimeafterthe productwarrantyperiod
expires.PurchaseyourRepairProtectionAgreementtoday!
Somelimitations and exclusionsapply. For prices and additional
informationin the U.S.A.call 1-800-827-8855.
*CoverageinCanadavaries on some items.For full details call
SearsCanada at 1-800-381-8665.
SearsInstallation Service
ForSearsprofessionalinstallationofhomeappliances,garagedoor
openers,waterheaters,andothermajorhomeitems,intheU.S.A.or
Canadacall 1-800-4-MY-HOME®.
31
Page 32

Declaraci6n de garantia ........................ Pagina 32
Medidas importantes de seguridad ..... Paginas 33-35
Etiquetas de seguridad ......................... Pagina 36
Montaje ................................................. Paginas 37-39
Funcionamiento .................................... Paginas 40-42
Servicio y Mantenimiento ..................... Paginas 43-47
AImacenamiento fuera de temporada..Pagina 48
Soluci6n de problemas ......................... Pagina 49
Acuerdo de protecci6n para
reparaciones .................................... Pagina 55
NOmero de servicio .............................. Cubierta
posterior
GARANTiA LIMITADA CRAFTSMAN
Dos Ahos en Lanzador de Nieve
Cuandohechofuncionary mantenidosegQntodaslasinstruccionessuministradas,si estelanzadordenievefalladebidoa undefectoenmate-
rialo habilidaddentrode dosa_osde lafechao compra,llame1-800-4MYHOMEhacerlosarreglosparareparaci6nlibre.
Estagarantias61otendr_validezdurante90 diassiesteproductoseutilizaencualquiermomentoparafinescomercialeso de alquiler.
Duranteelprimera_odela compra,no habr_ningQnprecioparael serviciodegarantiaen sucasa.Parasuconveniencia,ende casael servicio
degarantiatodaviaestar_disponibledespu_sdel primera_ode lacompra,perounpreciodeviaje seaplicar&Esteprecioserarenunciado
siustedtransportaal lanzadordenievea unaposici6nde bajadadeArtesanoautorizada.Parala posici6nautorizadam_scercana,llame
1-800-4-MY-HOME®.
Esta garantiacubreSOLOdefectos en materialy habilidad.Searsno pagar_para:
• LosarficulosprescindiblesquesehacenIlevadospuestosduranteeluso normal,incluso,perono limitadosparapatinarzapatos,platode
afeitado,esquilanalfileres,bujia,filtrodeaire,cinturones,y filtrodel aceite.
• Revisi6ndemantenimientoest_ndar,cambiosdeaceite,o puestasa punto.
• Reemplazodeneum_ticooreparaci6ncausadaporpinchazosdesdefueradeobjetos,comou_as,espinas,tocones,ocristal.
• Neum_ticooreemplazode ruedao reparaci6nqueresultade ropanormal,accidente,uoperaci6nimpropiaomantenimiento.
• Lasreparacionesnecesariasdebidoal abusodeoperador,inclusoperono limitadoparada_arcausadoafectandoobjetosquedoblanel
marcoo el cigOe_al,o el sobreexcesode velocidaddel motor.
• Reparacionesnecesariasdebidoa negligenciadeloperador,induyendoentreotros,da_osmec_nicoyel_ctricoocasionadoporun
almacenamientonoapropiado,fallaporelusode aceitedegradoy/o cantidadnoapropiadao fallapor nodarmantenimientoal equipode
acuerdoconlasinstruccionescontenidasenel manualdeloperador.
• Limpiezaoreparacionesal motor(sistemadecombustible)provocadasporuncombustiblecontaminadouoxidado(viejo).Engeneral,el
combustibledebeutilizarseenunperiodono mayorde30diasa partirde su adquisici6n.
• Elempejoramientonormaly la ropade losfinesexteriores,o productoetiquetanelreemplazo.
Estagarantias61otendrAvalidezmientrasel productoseutiliceen losEstadosUnidos.
Estagarantialeotorgaderechoslegalesespecificos,peroustedpodriagozardeotrosderechosenraz6ndesulugarde residencia.
Sears, Roebuckand Co.,HoffrnanEstates,IL 60179
Tipode aceitedelmotor:
Capacidaddeaceitedelmotor:
Capacidaddecombustible:
Bujiadeencendido
Separaci6nde lasbujias:
©SearsBrands,LLC
SAE5W-30
20onzas
2 Cuartosdegal6n
TorchF6RTC
.020"-.030"
N_mero de modelo.........................................................
N_mero de serie ............................................................
Fecha de cornpra.........................................................................
RegistreelnQmerodemodelo,nQmerode serie
Vfechade compram_sarriba
32
Page 33

La presencia de este simbolo indica que se trata
de instrucciones importantes de seguridad que
se deben respetar para evitar poner en peligro
su seguridad personal y/o material y la de otras
personas. Lea y siga todas las instrucciones de
este manual antes de poner en funcionamiento
esta m_quina. Si no respeta estas instrucciones
podria provocar lesiones personales. Cuando
vea este sfmbolo, ipreste atenci6n a la
advertencia!
PROPOSICION 65 DE CALIFORNIA
Elescapedel motordeesteproducto,algunosdesuscomponentes
y algunoscomponentesdelvehiculocontienenoliberansustancias
quimicasqueelestadodeCaliforniaconsideraque puedenproducir
c_ncer,defectosdenacimientouotrosproblemasreproductivos.
Esta m_quina rue construida para ser operada de acuerdo
con las reglas de seguridad contenidas en este manual.
AI igual que con cualquier tipo de equipo motorizado, un
descuido o error por parte del operador puede produdr
lesiones graves. Esta mSquina escapaz de amputar manos y
pies y de arrojar objetos con gran fuerza. De no respetar las
instrucciones de seguridad siguientes se pueden producir
lesiones graves o la muerte.
Su responsabilidad--Restrinja el uso de esta m_iquina
motorizada a las personas que lean, comprendan y respeten
las advertencias e instrucciones que aparecen en este
manual y en la m_iquina.
GUARDEESTASINSTRUCCIONES
CAPAClTAClON
• Leer,entendery seguirtodaslasinstruccionesen la m&quina
yen el manual(s)antesde intentarmontary operar.No
hacerlopuederesultarenlesionesgravesparael operadory/
o transe0ntes.Guarcleestemanualenunlugarseguroparael
futuroy regulardereferendayparapedirpiezasderepuesto.
ParapreguntasIlameal, 1-800-659-5917.
• Familiaricesecontodosloscontrolesyconel usoaclecuado
delosmismos.Sepac6modetenerlam_quinaydesactivarlos
controlesr&pidamente.
• Nopermitanuncaque losniSosmenoresde14aSosutilicen
estam&quina.Losni5osde 14a5osen adelantedebenleery
entenderlasinstruccionesde operaci6ny normasdeseguridad
contenidaseneste manualyen lamaquinaydebenser
entrenadosy supervisadospor unadulto.
• Nuncapermitaquelosadultosoperenestam&quinasin recibir
antesla instrucci6napropiada.
• Losobjetosarrojadosporla m&quinapuedenproducirlesiones
graves.Planifiqueel patr6nenel quevaair arrojandonievepara
evitarque ladescargadematerialserealicehacialos caminos,
losobservadores,etc.
• Mantengaa lostranseOntes,mascotasyni5osal menosa 75
piesde la m&quinamientrasest&en funcionamiento.Detengala
m&quinasialguienseacerca.
• Seaprecavidoparaevitarpatinarseo caerseespecialmente
cuandooperala m&quinaen marchaatr&s.
PR E PARATIVO S
Inspeccioneminuciosamenteel_readondeutilizar_el equipo.Saque
todoslosfelpudos,peri6dicos,trineos,tablas,cablesy otrosobjetos
extraSosconlosquepodriatropezaro quepodrianset arrojadospor
labarrena/impulsor.
1. Paraprotegerselosojosutilicesiempreanteojosoantiparras
de seguridadmientrasoperala m&quinao mientrasla ajusta
o repara.Losobjetosarrojadosquerebotanpuedenproducir
lesionesocularesgraves.
2. Nooperelam&quinasin la vestimentaadecuadaparaestaral
airelibreen invierno.Noutilicealhajas,bufandaslargasuotras
prendassueltasquepodrianenredarseenlaspartesm6viles.
Utiliceuncalzadoespecialparasuperficiesresbaladizas.
3. Useun prolongadory untomacorrientedetrescablescon
conexi6na tierraparatodaslas m&quinascon motoresde
encendidoel_ctrico.
4. Desengranetodaslas palancasde controlantesde arrancarel
motor.
5. Nuncaintenterealizarajustesmientraselmotorest&enmarcha
exceptoenlos casosespecfficamenterecomendadosen el
manualdeloperador.
6. Dejequeelmotoryla m&quinase adaptena latemperatura
exteriorantesde comenzarasacarla nieve.
33
Page 34

NIANEJO SEGURO DE LA GASOLINA
Paraevitarlesionespersonaleso da_osrnaterialestengarnucho
cuidadocuandotrabajecongasolina.Lagasolinaessurnarnente
inflarnableysusvaporespuedencausarexplosiones.Si sederrarna
gasolinaencirnao sobrela ropase puedelesionargravernenteyaque
sepuedeencender. L_.vesela pielyc_.rnbiesede ropade inrnediato.
• Utilices61olosrecipientesparagasolinaautofizados.
• Apaguetodoslos cigarrillos,cigarros,pipasy otrasfuentesde
cornbusti6n.
• Nuncacarguecombustibleen larn_.quinaenunespaciocerrado.
• Nuncasaquela tapade lagasolinaniagreguecombustible
rnientraselmotorest,.calienteo enrnarcha.
• Dejequeel motorse enfrieporIornenosdosrninutosantesde
volvera cargarcombustible.
• NuncaIleneenexcesoel dep6sitodecombustible.Lleneel
tanqueano rn_.sde1/2pulgadapordebajodela basedelcuello
de Ilenadodejandoespacioparaladilataci6ndelcombustible.
• Vuelvaacolocarla tapadelcombustibleyajQstelabien.
• Lirnpieelcombustiblequese hayaderrarnadosobreel motoryel
equip&Trasladelarn_.quinaa otrazona.Espere5rninutosantes
deencenderelmotor.
• Nuncaalrnacenela rn_.quinaoel recipientedecombustibleen
unespaciocerradodondehayafuego,chispasoluz piloto(por
ejernplo,hornos,calentadoresdeagua,calefactores,secadores
de ropa,etc.).
• Dejequela rn_.quinaseenfrieporIornenos5 rninutosantesde
guardafla.
• NuncaIlenelos recipientesenel interiordeunvehiculoo carni6n
ocajade rernolquecon recubrirnientopl_.stico.Coloquesiernpre
losrecipientesenelpisoy lejosdel vehiculoantesdeIlenarlos.
• Sies posible,retireelequipoa gasolinadelcarni6no rernolque
yII_neloenel suelo.Siestonoes posible,Ileneel equipoen un
rernolqueconun contenedorport_.til,envezdeconunaboquilla
dispensadoradegasolina.
• Mantengala boquilladispensadoraen contactoconel hordedel
dep6sitode combustibleo con la aberturadelrecipienteentodo
rnornento,hastaterrninarlacarga.Noutiliceundispositivode
apertura/cierrede boquilla.
FUNCIONANIIENTO
1. Nopongalasrnanosolospiescercadelaspiezasrotatorias,
en lacajade la barrena/ irnpulsoroen el rnontajedelcanalde
descarga.Elcontactoconlaspiezasgiratoriaspuederesultaren
laarnputaci6ndernanoso pies.
2. La palancadecontroldela barrena/ irnpulsores un dispositivo
de seguridad.Nuncaevitesu funcionarniento.Dehacerlola
operaci6nde la rn_.quinaesriesgosay puedeocasionarlesiones.
3. Laspalancasdecontroldebenfuncionarbienen arnbas
direccionesy regresarautorn_.ticarnentealaposici6nde
desengranecuandoselassuelta.
4. Nuncaoperelarn_.quinasi faltaun rnontajedel canalo si
el rnisrnoest,.da_ado.Mantengatodoslosdispositivosde
seguridaden sulugary enfuncionarniento.
5. Nuncaenciendaelmotorenespacioscerradosoenunazona
conpocaventilaci6n.Elescapedelmotorcontienernon6xidode
carbono,ungasinodoroy letal.
6. Noutilicelarn_.quinabajola influenciadelalcoholo las drogas.
7. Elsilenciadoryel motorsecalientanypuedencausar
quernaduras.Nolostoque.Mantengaa los ni_osalejados.
8. Seasurnarnenteprecavidocuandooperelarn_.quinasobreuna
superficiecongravaocuandola cruce.Mant_ngasealerta porsi
sepresentanpeligrosocultosotr_.nsito.
9. Tenga cuidado cuando cambie de direcci6n o cuando opere la m_.quinaen
pendientes.
10. Planifique el patr6n en el que va air arrojando nieve para evitar que
la descarga de material se produzca hacia lasventanas, las paredes,
los autom6viles, etc. y evitar asf posibles dares materiales o lesiones
producidas per los rebotes.
11. Nunca dirija la descarga hacia los niRos,los observadores o las mascotas ni
deje que nadie se pare delante de la m_.quina.
12. No sobrecargue la capacidad de la m_.quinatratando de sacar la nieve muy
r_.pidamente.
13. Nunca opere esta m_.quinasin buena visibilidad o iluminaci6n. Siempre
debe estar seguro de que est,. bien afirmado y sujetando firmemente las
manijas. Camine, nunca corra.
14. Corte lacorriente a la barrena/impulsor cuando transporte la m_.quinao
cuando la misma no est,. en use.
15. Nunca opere la m_.quinaa alta velocidad de desplazamiento sobre
superficies resbaladizas. Mire hacia abajo y hacia atr_.sy tenga cuidado
cuando vaya marcha atr_.s.
16. Si la m_.quinacomenzara a vibrar de maneraanormal, detenga el motor,
desconecte el cable de la bujfay p6ngala de maneraque haga masa contra
el motor. Inspeccione la m_.quinaminuciosamente para ver si est,. daRada.
Repare redes los dares antes de encender y operar la m_.quina.
17. Desengrane todas las palancas de control y detenga el motor antes dedejar
la posici6n de operaci6n (detr_.sde las manijas). Espere a que la barrena/
impulsor se detenga per complete antes de destapar el montaje del canal o
realizarajustes e inspecciones.
18. Nunca ponga las manes en las aberturas de descarga o de recolecci6n.
No destape el montaje del canal mientras el motor est,. enfuncionamiento.
Antes de destaparlo, apague el motory permanezca detr_.sde las manijas
hasta que todas las partes m6viles se hayan detenido.
19. Use s61ouniones y accesorios aprobados per elfabricante (per ejemplo,
pesas para las ruedas, cadenas para los neum_.ticos,cannas, etc.).
20. Para encender el motor,jale de la cuerda lentamente hasta que sienta
resistencia, luego jale r_.pidamente.El repliegue r_.pidode la cuerda de
arranque (tensi6n de retroceso) le jalar_, la mane y el braze hacia el motor
m_.sr_.pidode Io que usted puede soltar. El resultado pueden ser huesos
rotes, fracturas, hematomaso esguinces.
21. Si se presentan situaciones que no est_.nprevistas en este manual, sea
cuidadoso y use el sentido comOn.P6ngase en contacto con Asistencia
al Cliente para solicitar ayuda y el nombre del distribuidor de servicio m_.s
cercano.
34
Page 35

DESPEJE DE UN CANAL DE DESCARGA
OBSTRUIDO
Elcontactode lasmanosconel impulsorrotatorioqueest,.dentrodel
canaldedescargaes lacausam_.scomQnde lesionesasociadascon
lasm_.quinasquitanieve.Nuncausesumanoparalimpiarelcanalde
descarga.
Paradespejarelcanal:
1. iAPAGUEELMOTOR!
2. Espere10segundosparaestarsegurode quelascuchillasdel
motorhandejadode rotar.
3. Utilicesiempreunaherramientadelimpieza,nouselasmanos.
MANTENIMIENTO Y ALMACENAMIENTO
1. Nuncaalterelos dispositivosde seguridad.Controle
peri6dicamentequefuncionencorrectamente.Remftasealas
seccionesdemantenimientoyajustede estemanual.
2. Antes de realizar la limpieza, repararo revisar la mAquina,desengrane
todas las palancas de control y detenga el motor.Espere a que la barrena/
impulsor se detenga por completo. Desconecte el cable de la bujfa y
p6ngalo haciendo masa contra el motor paraevitar que se encienda
accidentalmente.
3. Controlefrecuentementequetodoslospernosytornillosestenbien
ajustados para comprobar quelamaquina se encuentraencondiciones
segurasdefuncionamiento.AdemAs, hagauna inspecci6n visualdela
mAquinaparaverificarsiestAdaSada.
4. Nocambielaconfiguraci6n del regulador delmotorniaceleredemasiado
elmismo.Elregulador delmotorcontrolalavelocidadmaximasegurade
funcionamientodelmotor.
5. Lasplacas de raspado ylaszapatas antideslizantesqueseusanconla
maquina quitanievese desgastan ysedaSan.Paraproteger su seguridad,
verifiquefrecuentementetodosloscomponentesy reemplaceloss61ocon
partes delosfabricantesdeequipos originales (OEM). "iEIusodepiezas
quenocumplenconlasespecificaciones del equipo original puede resultar
enrendimientoinadecuadoademasdeponeren riesgo la seguridad!'
6. Reviselaspalancas decontrolperi6dicamente paraverificarqueengranen
ydesengranen adecuadamenteyajQstelossiesnecesario.Consultela
secci6ndeajustes deestemanualdeloperador paraobtenerinstrucciones.
7. Mantenga o reemplace lasetiquetas de seguridadeinstruccionessegQn
sea necesario.
8. Respete lasnormasreferentesaladisposici6n correctay las
reglamentaciones sobre gasolina, aceite, etc.paraproteger elmedic
ambiente.
9. Antesdealmacenarlamaquina enciendalaunosminutosparasacarla
nievequehayaquedadoenlamismay paraevitarasiquesecongele la
barrena/impulsor.
10. Nuncaalmacenelamaquina oel recipiente decombustibleenunespacio
cerradodondehaya fuego, chispasoluzpiloto como por ejemplo,
calentadoresdeagua,hornos, secadoresderopa,etc.
11. Consultesiempre elmanualdeloperador paraobtenerinstrucciones
adecuadasparaelalmacenamientofueradetemporada.
12. Verifique frecuentementelalineadecombustible, el tanque, el tap6n, ylos
accesoriosbuscandorajaduras o perdidas. Reemplace desernecesario.
13. NodearranquealmotorsinoestAlabujia deencendido.
14. SegOnlaComisi6nde Seguridadde Productosparael
Consumidorde los EstadosUnidos(CPSC)yla Agencia
de Protecci6nAmbientalde losEstadosUnidos(EPA),este
productotieneunavidedtilmediede siete(7)a_os660 horasde
funcionamiento.AIfinalizarla videdtil mealiehagainspeccionar
anualmenteestaunidadporundistribuidordeservicioautorizado
paracerciorarsede quetodoslossistemasmec_.nicosy de
seguridadfuncionancorrectamentey notienenexcesivo
desgaste.Si no Iohace,puedenproducirseaccidentes,lesiones
o la muerte.
NO iVIODIFIQUE EL MOTOR
Paraevitarlesionesgraveso lamuerte,nomodifiqueelmotorbajo
ningunacircunstancia.Si cambiala configuraci6ndel reguladordel
motor,este puededescontrolarsey operaravelocidadesinseguras.
Nuncacambielaconfiguraci6ndef_.bricadelreguladordel motor.
AVlSO REFERIDO A EIVIISIONES
Losmotoresqueest_.ncertificadosycumplencon lasregulaciones
de emisionesfederalesEPAyde CaliforniaparaSORE(Equipos
peque_ostodoterreno)est_.ncertificadosparaoperarcongasolina
comOnsinplomoy puedenincluirlossiguientessistemasde control
de emisiones:Modificaci6ndemotor(EM),catalizadoroxidante(OC),
inyecci6nde airesecundaria(SAI)y catalizadorde tresvias(TWO)si
est_.nequipadosde esa manera.
Amortiguadordechispas
Estam_.quinaest,.equipadaconunmotorde combusti6ninternoy
nodebeserutilizadaeno cercadeunterrenoagrestecubiertopor
bosque,malezaso hierbaexceptoqueelsistemade escapedel
motorest_equipadocon unamortiguadordechispasquecumpla
conlas leyeslocaleso estatalescorrespondientes(encasode
existir)
Siseutilizaun amortiguadordechispaseloperadorIo debemantener
en condicionesde usoadecuadas.Enel EstadodeCalifornialas
medidasanteriormentemencionadassonexigidasporley(Arficulo
4442del C6digodeRecursosPOblicosde California).Esposible
queexistanleyessimilaresenotrosestados.Lasleyesfederalesse
aplicanenterritoriosfederales.
Puedeconseguirelamortiguadorde chispasparael silenciadora
travesde sudistribuidordemantenimientode motoresautorizadom_.s
cercanoo poni_ndoseencontactoconeldepartamentode servicios,
ApartadoPostal361131Cleveland,Ohio44136-0019.
35
Page 36

Simbolosde seguddad
En esta p_igina se presentan y describen los simbolos de seguridad que pueden aparecer en este producto. Lea, entienda y cumpia todas las
instrucciones incluidas en la m_iquina antes de intentar realizar el montaje de la unidad y utilizarla.
LEA EL(LOS) MANUAL(ES) DEL OPERADOR
Lea, entienda y cumpla todas las instrucciones incluidas en el(los) manuales antes de intentar
i
I
realizar el montaje de la unidad y utilizarla.
ADVERTENClA- CUCHILLAS GIRATORIAS
Mientras la m_iquina est,1 en funcionamiento mantenga las manos fuera de las aberturas de entrada y
de descarga. En el interior hay cuchillas giratorias
ADVERTENClA- CUCHILLAS GIRATORIAS
Mientras la m_iquina est,1 en funcionamiento mantenga las manos fuera de las aberturas de entrada y
de descarga. En el interior hay cuchillas giratorias
ADVERTENCIA - CUCHILLAS GIRATORIAS
No ponga las manos o los pies cerca de las piezas rotatorias, en la caja de la barrena/motor o
en el montaje del canal de descarga. El contacto con las piezas giratorias puede resultar en la
amputaci6n de manos o pies.
ADVERTENClA - OBJETOS ARROJADOS
Esta m_iquina puede levantar y arrojar objetos Io cual puede causar lesiones personales graves.
-[I=
ADVERTENClA- LA GASOLINA ES INFLAMABLE
Deje que el motor seenfrie pot Io menos dos minutos antes de cargar combustible.
ADVERTENCIA - MONOXIDO DE CARBONO
Nunca encienda el motor en espacios cerrados o en una zona con poca ventilaci6n. El escape del
motor contiene mon6xido de carbono, un gas inodoro y letal.
ADVERTENCIA- DESCARGAS ELECTRICAS
No use el arranque el6ctrico del motor bajo la Iluvia
36
Page 37

NOTA:Lasreferenciasa ladoderechooizquierdodela rn_.quina
quitanievesedeterrninansitu_.ndosedetr_.sdela unidaden posici6n
deoperaci6n(perrnaneciendodirectarnentedetr_.sdela rn_.quina
quitanieve,rnirandohaciael panelde larnanija).
EXTRACCION DE LA UNIDAD DE LA CAJA
1. Cortelasesquinasdelacajade cart6ny extiendalosladosde
rnaneraquequedenpianossobreelpisoQuiteydescartetodos
losinsertosdeernpaque.
2. Saquela rn_.quinaquitanievedelacaja.
3. AsegQresedevaciarcornpletarnentela cajaantesdetirarla.
iVIONTAJE
Colocaci6n de la barra de control superior
1. Girelabarradecontrolsuperiorhastalaposici6ndeoperaci6n,corno
seilustraen la Figura1hastaquequedeensu lugar,cuidando
de nopeNizcarel cableenel proceso.
,. -..,,
2. Ajustelasperillasdealetasparasujetarlabarraensulugar.
Veala Figura2.
Figura2
3. Vagarnenteadjuntareyebolty latuercarnariposadepl_.stico(quese
encuentranenel manualdebolsa)paraverel mango.Figura3.
Tirede larnanillaretrocesode hiloyla cuerdaatravesdelojo
saeta.Aprietelatuercarnariposaparagarantizarlaeyeboltensu
lugar.
f
Figura1
Figure3
37
Page 38

CONFIGURACION
Recomendaciones sobre el combustible
Utilicegasolinaparaautorn6viles(sinplornoobajoplornopara
rninirnizarlosdep6sitosenla c_rnaradecornbusti6n)conunrninirno
de87 octanos.Sepuedeusargasolinaconhastaun 10%deetanol
o un 15%de MTBE(eterrnefilicoterciario-bufilico).Nuncauseuna
rnezcladeaceiteygasolinanigasolinasucia.Evitequeseintroduzca
suciedad,polvooaguaen eldep6sitodecombustible.NOutilice
gasolinaE85.
• Carguecombustibleenun _reabienventiladay conel motor
apagado.Nofumeni perrnitallamasochispasenel lugardonde
secargacombustibleo se alrnacenala gasolina.
• NoIleneen excesoeldep6sitodecombustible.Despu_sde
cargarcombustible,asegQresede queeltap6ndel dep6sitoest_
biencerradoyasegurado.
• Tengacuidadode noderrarnarcombustibleal cargarlo.El
combustiblederrarnadoo susvaporessepuedenincendiar.Sise
derrarnacombustible,asegQresedequeel _reaest_secaantes
dearrancarelmotor.
• Eviteel contactorepetidooprolongadoconla pielo la inhalaci6n
delosvapores.
Carga de combustible
Tengarnuchocuidadoaltrabajarcongasolina.Lagasolinaes
sumarnenteinfiarnabley susvaporespuedencausarexplosiones.
Nuncaagreguecombustibleala rn&quinaen interioresnirnientrasel
motorest&calienteo en funcionarniento.Apaguecigarrillos,cigarros,
pipasy otrasfuentesdecornbusti6n.
Siernprernantengalas rnanosylospiesalejadosdelaspiezas
rn6vilesdelequipo.Noutilicefluidoscornprirnidosparaarrancar.Los
vaporesson nfarnabes.
1. Lirnpiealrededorde terrapl_ndel combustibleantesdequitarel
casquilloparaaprovisionardecombustible.
2. Unindicadorllanodecombustibleest_situadoenel dep6sitode
gasolina.Lleneel tanquehastaqueel combustiblealcanceel
indictordelniveldecombustible,Figura4. tengacuidadodeno
sobrellenar.
f
Figura4
,,,j
Visi6n superior del
indicador llano de
combustible
1
J
38
Page 39

Procedirniento para agregar aceite
Elmotorseenviasinaceiteenel motor.Antesdeponerlarn_.quina
enrnarchadebecargaraceiteenel motor.Sise hacefuncionarel
motorsinsuficienteaceitepuededaSarsegravernentey se producto
la garantia.
1. Retireel tap6ndeIlenadode aceite/lavarillade rnedici6ny lirnpie
lavarillade rnedici6ndeaceite.Veala Figura5.
AJUSTES
IViontaje del canal
Lainclinaci6ndelrnontajedelcanalcontrolael _.nguloconel que se
arrojala nieve.
1. Aflojela perillaa rnariposaqueseencuentradel ladoizquierdodel
rnontajedelcanaly gireelcanal superiorhaciaarribao hacia
abajohastaalcanzarla inclinaci6ndeseada.Vuelvaa ajustar
la perillaa rnariposaantesdeponerlarn_.quinaquitanieveen
funcionarniento.Veala Figura6.
/7
//
,/
/
// /' /
/,
/ /
/ /
Figura5
NOTA:Noajustelavarillade rnedici6ncuandocontrolel nivelde
aceite.
2. Agregueaceitelentarnentehastaqueel registromarque
entrenivelalto(H) ybajo(L),Figura5.Consultelasecci6n
Mantenirnientodel motorparavet la viscosidadycapacidadde
aceitedel motorcorrectas.
NOTA:NoIoIleneenexceso.El Ilenadoexcesivode aceitepuede
hacerqueel motorgenerehurno,quecuestearrancarlooquefallela
bujia.
Figura6
2.
Posicionela aberturadel rnontajedelcanalconla rnanijadelcanal
paraarrojarla nieveenla direcci6ndeseada.
Veala Figura6.
J
39
Page 40

Manija del arrancador
Tapa de
combustible
Motor
Llavedeencendido
Cebador
de aceite
/
Tap6n de
llenado de
aceite
Control
de v6lvula
reguladora
Control del
cebador el_ctrico para
Tubo de principiantes
drenaje del
aceite Manija del arrancador
de retroceso
Figura7
CONTROL DE VALVULA
CONTROL DE VALVULA REGULADORA
REGULADORA
AIactivarel controldelcebadorsecierrala placade
obturaci6ndelcarburadory se ayudaaencenderel
motor.
Elcontroldelaceleradorseencuentraenla partetraseradel motor.
Se regulala velocidaddelmotory seapagar_,elmotorcuandose
AIpresionarelcebadorseenviacombustibledirectamente
CEBADOR
alcarburadordelmotorparafacilitarelarranquecuando
hacefrio.
LLAVE DE ENCENDIDO
La Ilavedeencendidoes undispositivodeseguridad.
Debeestarcompletamenteinsertadaparaqueelmotor
arranque.RetirelaIlavede encendidocuandonousela
m_.quinaquitanieve.
NOTA:Nogire laIlavede encendidoparaintentar
arrancarelmotor.AIhacerlopodriaromperla.
trasladarona la posici6nSTOR
MANIJA DEL ARRANCADOR DE
RETROCESO
Lamanillase utilizaparainiciarmanualmenteel motor.
TAPA DEL COMBUSTIBLE
Saquelatapade la gasolinaparaagregarcombustible.
BARRENA
Cuandoest_engranada,la rotaci6ndela barrenadirigelanieve
dentrode lacaja dela barrenay la arrojahaciaafueraporel canalde
descarga.Laspaletasdecauchode Insbarrenastambi_nayudana
impulsarla unidadal ponerseencontactoconel pavimento.
Cumple con los estandares de seguridad de ANSI
Lasm_.quinasquitanieveCraftsmancumplenconlosest_.ndaresdesequridaddelInstitutoEstadounidensede Est_.ndaresNacionales(ANSI).
40
Page 41

CONTROL DE LA BARRENA
La rnanijadecontroldela barrenaest,.ubicadaenla rnanijasuperior
yse usaparaengranarydesengranarla transrnisi6nde la barrena.
Aprietelarnanijadecontrolcontralarnanijasuperiorparaengranarla
barrena,afi6jelaparadesengranarla.
iViONTAJE DEL CANAL
Hagarotarel rnontajedel canalhaciaizquierdaoderechausadola
rnanijadelcanal.Lainclinaci6ndelcanalde descargacontrolael
_.ngulocon elque searrojalanieve.Aflojela perillade aletasdel
costadodelcanaldedescargaantesdegirarelcanaldedescarga
haciaarribao haciaabajo.Vuelvaa ajustarla perilladespu_sde
alcanzarlaposici6ndeseada.
PLACA DE RASPADO
La placaderaspadohacecontactocon elpavirnentoa rnedidaquese
irnpulsalarn_.quinaquitanieve,perrnitiendoquesedescarguela nieve
queest,.cercade la superficiedelpavirnento.
TONIACORRIENTE ELECTRICO PARA PRIN-
CIPIANTES
Elarranqueel_ctricosalidarequiereelusode unperiododetres
patasal airelibrecabledeextensi6ny unafuentedealirnentaci6n
120V/ pared.
NOTA:Elarranqueel_ctricoest,.rnontadoparala rnortajadepl_.stico
yse rnuestraenla Figura7adjuntaal motorparafacilitarlareferencia.
BOTON DE ARRANQUE ELECTRICO
AIpulsarel bot6ndearranqueel_ctricosededicael motorde
arranqueel_ctricocuandoconectadoaunafuentedealirnentaci6n
120V.
ANTES DE ENCENDER EL MOTOR
Arranque el_ctrico
Elarranqueel_ctricoest&equipadoconunatierradetreecables
cabledealirnentaci6nyenchufe,y est,.diseSadoparafuncionara
120voltiosAChogaractual.Debeserusadoconunatierraadecuada
de treepatasrecipienteentodo rnornentoparaevitarla posibilidadde
unadescargaelectrica.Sigatodaslasinstruccionescuidadosarnente
antesdeoperarel arranqueel_ctrico.NOusearranqueel_ctricoen
laIluvia.
Deterrninarquesucasadelcableadoesunadetrescablesatierradel
sisterna.PregOnteleaun electricistaautorizadosinoest,.seguro.
Sitieneunatierrade treepatasrecipiente,sigaestospasos.
Sinotieneelbuencableadode lacasa,noutiliceelarranque
el_ctricobajocualquiercondici6n.
InsertelaIlavedeencendidocornpletarnenteenla ranura,Figura
8.AsegOresede queencajeen susitio.NO girarlaIlavede
encendido.Elmotornopuedecornenzara rnenosquela clavese
insertaenel interruptorde encendido.
en larn_._ en estemanualantesdeoperarla.
1. Elcabledelabujiaruedesconectadoporseguridad.Conecteelcable
dela bujiaa la rnisrna.
ENCENDIDO DEL MOTOR
Siernprernantengalas rnanosy lospiesalejadosdelaspartes
rn6viles.Noutilicefiuidoscornprirnidosparaarrancar.Losvapores
soninfiarnables.
ueel motorest_alairelibreen un&ea bienventilada.
NOTE:Allowtheengineto warmupforafewminutesafterstarting.
Theenginewill notdevelopfullpoweruntilit reachesoperating
temperatures.
41
\
J
Figura8
Page 42

. Enchufeelcablede extensi6nen latornadecorrientesituada
en larnortajadepl_.stico.Conecteelotroextrernodelcablede
extensi6nen unperiodode trespatasde 120voltios,tierra,torna
de CAenun _.reabienventilada.Veala Figura9.
f
/
/
/
/
/
4. Moverelcontroldel aceleradorparael FAST'_(conejo).
5. Muevaelestranguladora la posici6nON(arranquedelmotor
enfrio). Siel motorest,.caliente,coloqueel estranguladoren la
posici6nOFE
6. Ernpujeelprimerdetresa cinco(3-5)veces,asegur_.ndosede
cubrirelagujerode ventilaci6ncuandoernpujando.Siel motor
est,.caliente,elprimerernpujeunasolavez.Siernprecubrirel
agujerodeventilaci6ncuandoernpujando.Cool rneteorol6gicas
puedenrequerircebadoqueserepita.
7. Presioneelbot6nde arranqueparaquearranqueelmotor.Una
vezqueel motorarranque,la puestaen libertadde inrnediato
el bot6ndearranque.Elarranqueel_ctricoest,.equipadocon
protecci6ncontrasobrecargat_rrnica;el sisternaternporalrnente
la paradadearranqueparaperrnitirquese enfriesi seconvierte
enarranqueel_ctricosobrecargado.
8. A rnedidaqueel motorsecalienta,girarlentarnenteel controldel
estranguladora laposici6nOFRSi elmotorfalla,reinicieelmotor
ycorrerconel ,,starter,ala rnitad-elestranguladorposici6n
duranteunbreveperiodode tiernpo,y luegogirarlentarnenteel
estranguladorenla posici6nOFR
9. Despu_sdequeel motorest,.en funcionarniento,desconecte
elcabledealirnentaci6ndelarranqueel_ctrico.AIdesconectar,
siernpredesenchufeelfin a la tornade corrienteantesde
desconectarel extrernoopuestodelmotor.
Motor de arranque
Notire larnanillarnientrasqueel motorenrnarcha.
/
/
/
Figura9
J
1. InsertelaIlavedeencendidocornpletarnenteenla ranura,Figura
9.AsegQresedequeencajeen susitio.NOgirarlaIlavede
encendido.Elmotorno puedecornenzara rnenosquela clavese
insertaenel interruptordeencendido.
2. Moverel controldelaceleradorparael FAST4_(conejo).
3. Muevael estranguladora laposici6nON (arranquedelmotor
en fr[o).Si el motorest,.caliente,coloqueelestranguladoren la
posici6nOFE
4. Ernpujeel primerdetresa cinco(3-5)veces,asegur_.ndosede
cubrirel agujerodeventilaci6ncuandoernpujando.Siel motor
est,.caliente,elprimerernpujeunasolavez. Siernprecubrirel
agujerodeventilaci6ncuandoernpujando.Coolrneteorol6gicas
puedenrequerircebadoque serepita.
5. Tiresuavernenteenla rnanillahastaque@stacorniencea resistir,
a continuaci6n,tire r_.pidarnenteyconfuerzaparasuperarla
cornpresi6n.Noliberarelasay perrnitaqueestebrochedela
espalda.Volverlacuerdalentarnentea laposici6noriginal.Sies
necesario,repitaestepaso.
6. A rnedidaqueel motorsecalienta,girarlentarnenteel controldel
estranguladora la posici6nOFE Siel motorfalla,reinicieel motor
y correrconel ,,starter, a la rnitad-elestranguladorposici6n
duranteunbreveperiododetiernpo,yluegogirarlentarnenteel
estranguladoren laposici6nOFE
DETENCION DEL MOTOR
Paraevitarel funcionarnientodel motorsinsupervisi6n,nunca
dejedesatendidoel motordurantelaejecuci6n.Enciendael motor
lapagadodespu@sdesu usoy e rnnar avedeencenddo.
Ejecuteelmotorduranteunosrninutosantesde pararensecopara
ayudara cualquierhurnedaden elmotor.
1. Moverel controldelaceleradorparaelSTOP,_mb,(tortuga).
2. RetirelaIlavedeencendido.Laelirninaci6ndelaclavedereducirla
posibilidaddeno autorizadoarranquedelmotor,rnientrasqueel
equiponoest,.enuso.MantengalaIlaveenunlugarseguro.El
motornopuedecornenzarsinla Ilavedeencendido.
3. Lirnpietodalanieveylahurnedaddesdelazonadecontroldelmotor.
ENGANCHE DE LAS BARRENAS
Paraengranarla barrenaaprietelarnanijadecontrolcontrala rnanija
de controlsuperior.Suelteparadetenerlasbarrenas.
ENGANCHE DE LA TRANSMISION
Levanteapenasla rnanijaparaperrnitirquelas paletasdecaucho
de la barrenatoquenel pavirnentoe irnpulsenla rn_.quinaquitanieve
haciaadelante.Sipresionala rnanijahaciaabajo,elevar_,labarrena
del sueloy detendr_,el avancelarn_.quina.
NOTA:Si la presi6nascendentesobrela rnanijaes excesivatendr_.
cornoresultadoundesgasteprernaturode lascuchillasdegornade la
barrena y estonoestar_,cubiertopor lagaranfia.
Paraevitarel funcionarnientodel motorsinsupervisi6n,nunca I
dejedesatendidoel motordurantelaejecuci6n.Enciendaelmotor
_apagadodespu_sde suusoye rnnar avede encenddo. 42
J
Page 43

PROGRAMA DE MANTENIMIENTO
Antesderealizarcualquiertipodemantenirnientooservicio,
desenganchetodosloscontrolesy detengael motor.Esperea quese
detengancornpletarnentetodaslaspiezasrn6viles.Desconecteelcable
delabujiayp6ngalohaciendornasacontrael motorparaevitarquese
enciendaaccidentalrnente.Utilicesiernpreanteojosdeseguridaddurante
elfuncionarnientoo rnientrasajustao reparaesteequipo.
Cadauso
1ras5 horas
Cada5horas
25 horas
Cadaternporada/50horas
Cadaternporada/100horas
Cadaternporada/antesde
alrnacenar
1. Nivelde aceitedel motor.
2. M_.quinaquitanievey
_.readeescape.
1. Aceitedel motor.
1. Aceitedel motor.
2. Areadelescape.
1. Bujiadeencendido.
1. Aceitedel motor
1. Bujfadeencendido
1. Puntosdepivote
2. Manijadecontrol
3. Resortedeextensi6n
MANTENIMIENTO DEL MOTOR
Paraevitarelarranqueaccidental,apagueelmotory retirelallavede
encendidoantesderealizarcualquiertipode rnantenirnientodel motor.
La inspecci6ny losajustesperi6dicosdelmotorsonesencialessise
desearnantenerunalto niveldedesernpe_o.El rnantenirnientoregular
tarnbi_ngarantizar_,unaprolongadavidaQtildel motor.Losintervalos
de rnantenirnientorequeridosyel tipodernantenirnientoa realizarse
describenenlatablaarriba.Sigalosintervalosporhorao calendarios,
Ioqueocurra prirnero.Cuandoseoperaen condicionesadversases
necesarioIlevaracaboun rnantenirnientorn_.sfrecuente.
COMPROBACION DEL ACEITE DEL MOTOR
1. Retireel tap6ndeldep6sitodeaceite/ varillaylirnpiela varilla
lirnpia.Consultela Figura4.
2. Insertelatapa/ varillarnedidoradeaceiteenel cuellodeIlenado,
peroNOtornilloquepulg
3. Retireel tap6ndeldep6sitodeaceitey varilla.Siel niveles bajo,
agreguelentarnenteel aceitehastael niveldeaceiteentrelos
registrosdealta (H)y baja(L),ConsultelaFigura4.
Sigael cronograrnade rnantenirnientoquesepresentaacontinuaci6n.
Estatablas61odescribepautasdeservicio.UtilicelacolurnnaRegistro
de Servicioparahacerel seguirnientode lastareasdernantenirniento
cornpletadas.Paraubicar elCentrode Servicio Sears m_s cercano
o paraprogramarun servicio, sirnplementecomuniquesecon
Searsal tel_fono 1-800-4-MY-HOME®.
1. Verificar
2. Lirnpieza
1. Carnbio.
1. Verificar.
2. Lirnpieza.
1. Verificar.
1. Carnbiar
.
Lirnpiar,reernplazar,regular
1.
Lubrique
2.
Lubrique
3.
Lubrique
Recomendaciones sobre el aceite
Cuandoleagregueaceiteal motor,consultelatabladeviscosidadque
aparecern_.sabajo(Figura10).Lacapacidaddeaceitedel motores
600 rnl(aprox.20onzas).No Ileneexcesivarnente.Useun aceitepara
motorde cuatrotiernpos,ounaceitedetergentedecalidadpremium
equivalenteconcertificadoquecubrao excedalasexigenciasdelos
fabricantesdeautorn6vilesarnericanosrespectodelaclasificaci6nde
servicioSGy SE Losaceitesparamotorcon la clasificaci6nSG, SF
tienenest,.designaci6nenel envase.
1
I
Sint_tico
NOTA:Nodernasiado.Excesivodelmotorcon el petr61eopuede
resultarenel motordefurnar,duralapuestaen rnarchao labujia
sucios.
(°F) -40 ° -20° 0o 20° 40°
(°C) -30 ° -20 ° -10° 0°
Figura10
43
Page 44

NOutiliceaceitessindetergenteniaceiteparamotordedos tiempos,
PodriareducirselavidaQtildelmotor,
Cambio del aceite del motor
Elaceitedel motorsedebecambiardespu_sdelas primerascinco
horasdeuso yluegounavezportemporadao cada50horasde uso,
NOTA:Verifiqueel niveldeaceiteantesde cadauso ydespu_sde
cadacincohorasdefuncionamientoparacerciorarsequesemantiene
el niveldeaceiteindicado.ConsultelaVerificaci6ndel niveldeaceite,
1, Vacieelcombustibledeldep6sitohaciendofuncionarelmotorhasta
queel dep6sitodecombustibleest_vacio.Cerci6resede queel
tap6ndeIlenadodel combustibleest&bienajustado,
2, Coloqueunrecipienteadecuadopararecolectarel aceitebajoel
tap6ndedrenajedeaceite,
3, Retireel tap6ndedrenajedeaceite,Figura11,
Bujia de encendido
NOpruebela chispasi no est,.la bujiade encendido.NOd_
arranqueal motorsinoest,.la bujiadeencendido.
Si el motorhaestadofuncionando,el silenciadorestar_,muycaliente.
Tengacuidadodeno tocarel silenciador.
Sedebecontrolarla bujiacada25horasy seladebecambiarunavez
portemporadao cada100horas.Paraasegurarsedequeel motor
funcionebien,la bujiadebetenetunaseparaci6ncorrectaytambi_n
debeestarlibrededep6sitos.
1. RetirelafundadelabujiayutiliceunaIlaveparabujiasparaextraerla,
Figura12.
BujJade
%
Y
Tap6nde drenaje
de aceite
Figura11
4. Inclineelmotorparadrenarelaceiteenelrecipiente.Elaceiteusado
sedebedescartarenuncentrode recolecci6nadecuado.
5. Vuelvaacolocareltap6ndedrenajey aj[3stelobien.
6. Recargaconel petr61eoy recomiendacomprobarel nivelde
aceite;se refierenalacomprobaci6ndelaceitedelmotoren la
p_.gina41paraobtenerinstrucciones.
7. Vuelvaacolocaryajustarel tap6nde Ilenado/lavarilladenivel
deaceite.
L_.vesebienlas manosconaguayjab6ninmediatamentedespu_s
detocaraceiteusado.
NOTA:Elimineelaceiteusadodelmotorde unamaneraqueno
perjudiqueel medioambiente.Ll@eloauncentrode recicladouotro
centrode recolecci6n.
J
2. Inspeccionevisualmentelabujia.Eliminelabujiasipresentadesgaste
visible,o si el aislanteest,.agrietadoo astillado.Limpielabujia
conuncepillode alambresisevaa reutilizar.
3. Midalaseparaci6nde bujiaconun calibrador.Realicelos ajustes
necesariostorciendoelelectrodolateral,Figura13.Laseparaci6n
debeajustarseen0,02-0,03pulgadas(0,60-0,80ram).
Electrodo
"----_ FundadebujJa
Figura12
Figura13
44
Page 45

4. Verifiquequelaarandeladelabujfaest_enbuenascondicionesy
enrosquelabujiahaciaadentrornanualrnenteparaevitarquese
enrosquecruzada.
5. Unavezquelabujfaest,.colocadaensulugar,aprieteconuna
Ilaveparabujiaparacornprirnirlaarandela.
NOTA:Cuandoinstaleunabujfanueva,apriete1/2vuelta,despu_s
quelabujfaseencuentracolocadaensulugar,paracornprirnirla
arandela.Cuandoreinstaleunabujfausada,ajuste1/8-a1/4degiro,
despu_squelabujiaseencuentracolocadaensulugar,afinde
cornprirnirlaarandela.
Labujfadebeestarbienajustada.Silabujiaest,.fiojapuede
recalentarseyda_arelmotor.
Limpieza del motor
Siel motorhaestadofuncionando,d_jeloenfriarduranteporIornenos
mediahoraantesde lirnpiarlo.Retireperi6dicarnentelasuciedad
acurnuladaen el motor.
Norode el motorconaguaparalirnpiarloporqueelaguapodria
contarninarel combustible.Siseutilizaunarnangueradejardino
equipode lavadoapresi6ntarnbi_npuedeentraraguadentrode la
aberturadelsilenciador.Elaguaquepasaporel silenciadorpuede
in_ndro, causandoda_os.
Paraajustarla placaderaspadoprocedadela siguienternanera:
1. Drenelagasolinade larn_.quinaquitanieve.
2. Jaledelacuerdadearranquehastasentirresistencia.Luegoinclinela
rn_.quinaquitanievehaciaatr_.shastaquequedeapoyadasobre
lasrnanijas.
3. Aflojelascuatrotuercasypernosdeseguridadquefijanlaplacade
raspadoa lacaja.Veala Figura14.Muevalaplacade raspado
hacialaposici6ndeseadayvuelvaa apretarlastuercasy los
pernosbienajustados.
Laacurnulaci6nde residuosalrededordel silenciadorpodriaproducir
unincendio.Inspeccioney lirnpieantesdecadauso.
LUBRICACION
Lubriquelospuntosde girodela rnanijade controlydel resortede
extensi6ndel extrernodelcabledecontrolcon unaceitelivianouna
vezporternporadayantesdealrnacenarla rn_.quinaquitanievealfinal
de laternporada.
AJUSTES
Antesde realizarelrnantenirniento,repararo inspeccionarel
lanzadordenieve,la separaci6ndela barrena.Pareelmotory quitar
la Ilaveparaprevenirnodeseadasa partir.
Placa de raspado
Paraverificarelajustede la placade raspado,ubiquelaunidad
sobreunasuperficienivelada.Lasruedas,la placaderaspadoy las
barrenasdebentocarla superficienivelada.Tengaencuentaque si
seafeitanla placaseajustadernasiadoalto,lanieveMayogolpeenel
marcodel sinfin.Silaplacaderaspadosedesgastaexcesivarnente,o
la unidadnoseautopropulsa,es posiblequelaplacade raspadoest_
dernasiadobajay debaserajustada.
NOTA:Enlas unidadesnuevaso en lasquetienenunaplacade
raspadonuevalasbarrenaspuedenestarunpoco separadasdel
suelo.
Figura14
4.
Inclinelarn_.quinaquitanievenuevarnentea la posici6nde
funcionarnientoy jalede la rnanijadearranquevariasvecespara
vet siesdificiljalardelarnisrna.
.
Si esdificiljalardelarranque,extraigalabujiay jale dela rnanija
variasvecesparaestarsegurode queseextraigacualquier
cantidaddeaceiteatrapadaenel cabezal.
Puedesaliraceitedelorificiode labujiacuandolarnisrnaseextraey
sejalade la rnanijade arranque.
6. Inspeccionelabujfa.Siest,.hQrneda,lirnpiecualquierrestodeaceite
antesdevolvera instalar.
45
Page 46

Cable de control
Esposibleque necesiterealizarajustesperi6dicosdebidoal
estiramientodelcabledecontroly dela correadetransmisi6n
ocasionadoporeldesgaste.Silabarrenaparecetitubearmientras
gira,hagaIo siguiente:
Elagujerosuperiordela manijadecontroltieneencuentael ajustede
la tensi6ndelcable.Pararealizarelajuste,desconecteelextremodel
cabledecontroldelagujeroinferiorde la manijadecontroleinsertelo
enel agujerosuperior.Inserteelcabledesdeel exteriorcomose
indicaenla Figura15.
Cable
de
Control
¢AMBIO DE CORREA
Correa de transrnisi6n de la barrena
1. Parasacarlacubiertade lacorreasaqueloscincotornillos
hexagonalesque lasujetanal bastidor.Veala Figura16.
/
\
Polealoca
..............Guardacorrea ,,,/'
Figura16
J Tornillos
de ca beza
hexagonal
Cable
de
Control
Figura 15
Pruebela m_.quinaquitanieveparaversi seIograunadiferencia
apreciable.Siluegoderealizadoel ajustedelcabledecontrolla
barrenasiguetitubeandoal girar,vealaSustituci6nBeltparaobtener
lasinstruccionesparaelreemplazodela correa.
Montaje del canal
Consultelasecci6nMontajey Configuraci6nparaverlasinstrucciones
paraelajustedel montajedelcanal.
2. Retirelacorreasujet_.ndolaporla basede la poleade la barrena
y tire haciaafuera.
Paraobtenerlasustituci6nde SearsremosIlamaral 1-800-4-MY-
HOME.Preguntepor parte# 735-04033.
NOTA:Tirehaciaabajola poleaIocaparasoltarla correadedebajo
del guardacorrea.Veala Figura16.
Paravolvera colocarlacorreasiga estasinstruccionesy consultela
Figura17:
Polea de la
barrena
Polea del
motor
Figura17
1. TirehaciaabajolapoleaIoca.
2. Ubiquelacorreaencimadela poleade labarrenaydebajodel
guardacorrea.
3. Coloquelacorreaalrededorde la poleadelmotor.
46
Page 47

4. Empujelacorreaporencimadela basedela poleade la barrena.
5. Vuelvaainstalarlacubiertadela correaquesac6anteriormente.
REEMPLAZO DE LAS PALETAS DE LA BARRENA
Laspaletasdecauchodelabarrenadelam&quinaquitanievesedesgastan
yselasdebecambiarsi sepresentansignosdedesgasteexcesivo.
NOpermitaquelaspaletasdecauchodelabarrenasedesgastenhastael
puntoenquepartesdelabarrenamet_.licamismatoquenelpavimento.Si
_estosucedeam_.qunaqutanevepuededa_arseseramente.
Paracambiarlaspaletasdecauchoprocedadela siguientemanera:
1. Saquelaspaletasdecauchoexistentesdesenroscandolostornillos
autorroscantesquelasunenalabarrena.VealaFigura18.
\\
f
\\
autorroscante_
Figura18
2. Ajustelasnuevaspaletasde cauchoa la barrenausandolos
elementosde ferreteriaquesac6anteriormente.
REEMPLAZO DE LA PLACA DE RASPADO
La placaderaspadoest&adosadaalfondodela barrenay sujetaa
desgaste.Seladebecontrolarperi6dicamente.Laplacaderaspado
tienedos hordesdedesgasteyse la puedeinvertir.
1. Quitelos cuatropernosdelcarroy lastuercasde seguridad
hexagonalesquela sujetanala cajade la m_.qulnaquitanieve.
2. Inversaexistenteo instalarunanuevaplacade afeitado,
asegur_.ndosede quelascabezasdelos pernosdelcarro
quedenenel interiordelacaja..
3. Coloquelaplacade raspadocomoseindicaen lap_.gina43.
4. Unavezcolocada,ajustebien.
Paraobtenerunanuevaplacade afeitado,IlameaSearsal
1-800-4-MY-HOME.Pregunteporparte# 731-1033.
47
Page 48

Sinosevaa utilizael equipodurante30dfasorn_.s,osies elfinaldelaternporadadenievey yanoexisteposibilidaddequenieve,esnecesario
alrnacenarelequipode rnaneraadecuada.Sigalasinstruccionesdealrnacenarnientoqueseindicanacontinuaci6nparagarantizarelrendirniento
rn_.xirnodelarn_.quinaquitanieveduranternuchosa_os.
PREPARACI6N DEL MOTOR
Losrnotoresquese alrnacenandurantern&sde30 dfasnecesitan
serdrenadosdecombustibleparaevitarquese deteriorenyseforrne
gornaenel sisternade combustibleoen las piezasprincipalesdel
carburador.Si lagasoNnade su motorsedeterioraduranteel alrnace-
narniento,esposiblequedeba repararoreernplazarelcarburadory
otroscornponentesdel sisternadecombustible.
1. Elirninetodoel combustibledel tanquehaciendofuncionarel
motorhastaquesedetenga.
2. Carnbieel aceitedel motor.
3. Extraigala bujfadeencendidoy viertaen elcilindroaproxirna-
darnente1onza(30 rnl)de aceiteparamotorNrnpio.Tirevarias
vecesdelarrancadorderetrocesoparadistribuirelaceitey
reinstalelabujfa.
4. Lirnpielos residuosdealrededordelmotor,ydebajo,alrededor,
ydetr_.sdel silenciador.ApNqueunacapa delgadadeaceiteen
todaslas_.reasquepuedenNegara oxidarse.
• Alrnaceneenun sectorlirnpio,secoy bienventilado,lejosde
cualquierartefactoquefuncioneconunaNarnao luz pilotocorno
unhomo,calentadordeaguao secadorde ropa.Evitecualquier
sectorconun motorel_ctricoqueproduzcachispaso dondese
utilicenherrarnientasel_ctricas.
PREPARACION DE LA iVlAQUINA QUITANIEVE
1. Cuandoalrnacenelarn&quinaquitanieveenungalp6nde
dep6sitornet_.licoo con pocaventilaci6n,tengaespecialcuidado
de realizarleuntratarnientoanti- oxidantealequipo.Useaceite
ligeroo silic6npararecubrirelequipo,especialrnentelas
cadenas,losresortes,loscojinetesy loscables.
2. Elirninetodo el polvodelexteriordelmotory delequipo.
3. Sigalasrecornendacionesde lubricaci6nen la secci6nde
mantenirnientodeestemanual.
4. Alrnaceneel equipoen un_.readespejaday seca.
Nuncaalrnacenelarn_.quinaquitanieveconcombustibleenel
tanqueenun espaciocerradooen _.reascon pocaventilaci6n,
dondelosgasesdelcombustiblepuedanalcanzarel fuego,chispas
o unaluzpilotocornola quetienenalgunoshornos,calentadoresde
agua,secadoresde ropao algQnotto dispositivoagas.
• Siesposible,evitesectoresdealrnacenarnientocon rnucha
hurnedad.
• Mantengael motorniveladoen el alrnac_n.Lainclinaci6ndel
motorpuedecausarperdidasdecombustibleo aceite.
48
Page 49

Antesde realizarcualquiertipo de rnantenirnientoo servicio,desenganche todos loscontrolesy detenga el
motor.Esperea quese detengan cornpletarnentetodas las piezas rn6viles.Desconecte el cable de la bujfa y
p6ngalohaciendo rnasa contrael motor paraevitarque se encienda accidentalrnente.Utilicesiernpreanteojos
[de segurdad durante e funconarnento o rnentras ajustao reparaeste equ po.
Esta secci6n analiza problemas menores de servicio. Para ubicar el Centro de Servicio Sears m_s cercano o para programar un
servicio, simplemente comuniquese con Sears al tel_fono 1-800-4-MY-HOME@.
Elmotorno arranca
Elmotorfuncionademanera
err_tica
1. Eldep6sitodecombustibleest_vacioo el
combustibleseha echadoa perder.
2. Lalineadelcombustibleest_bloqueada.
3. Nose introdujocompletamentela Ilave.
4. Sehadesconectadoelcablede la bujia.
5. Labujianofunciona correctamente.
6. El motornoest_cebado.
7. El motorest_ahogadoya queha sidocebado
demasiado.
1,
El motorest_funcionandoenla posici6n"choke"
(cebador).
2.
Lalineadelcombustibleest_tapadao el
combustibleesviejo.
3.
Hayaguaosuciedadenelsistemadecombustible.
1. Lleneel dep6sitocongasolinalimpiay nueva.
2. Limpielalinea delcombustible.
3. IntroduzcacompletamentelaIlave.
4. Conecteel cablealabujia.
5. Limpiela bujia,ajustela distanciadisruptivao cambiela
bujia.
6. Cebeel motordecinco asiete veces.
7. Aguardealmenosdiez minutosantesdeencenderel
motor.
1,
Muevalapalancadelcebadora la posici6nOFF
(apagado).
2.
Limpiela lineadel combustibley Ileneeldep6sitocon
gasolinalimpiay nueva.
3,
Vacieeltanquedecombustible.VuelvaaIlenarel
dep6sitoconcombustiblenuevo.
4.
Esnecesarioregularel carburador. 4.
Elmotorrecalienta Esnecesarioregularel carburador. 1.
Perdidadepotencia Elcablede la bujiaest_flojo. 1.
1.
1.
2.
Laventilaci6ndela tapa delcombustibleest_ 2.
Comuniqueseconuncentrode servicioSears.
Comuniqueseconuncentrode servicioSears.
Conectefirmementeel cable dela bujia.
Destapela ventilaci6n.
obstruida.
Vibraci6nexcesiva 1. Haypiezasqueest_nflojaso labarrenaest_ 1. Detengaelmotorde inmediatoydesconecteelcable
dafiada, de la bujia.Controlesi la m_quinaest_dafiada.Ajuste
todoslospernosy lastuercas.Realicelasreparaciones
necesarias.Siel problemacontinQa,Ilevela unidadaun
distribuidorde servicioSears.
Lam_quinaquitanievenose 1. Elcabledel controlde la barrenanecesitaunajuste. 1. Ajusteel cabledecontrolde labarrenataly comose
autopropulsa 2. Lacorreadetransmisi6ndelabarrenaest_ flojao muestraen lasecci6nde Servicioy Mantenimiento.
dafiada. 2. Reemplacela correadetransmisi6nde la barrena.
Lasbarrenassiguengirando 1. Elcabledelcontrolde la barrenanecesitaun ajuste. 1. Ajusteel cabledecontrolde labarrenataly comose
muestraen lasecci6nde Servicioy Mantenimiento.
Launidadnodescargala 1. Elconjuntodelcanalest_tapado. 1.
nieve
Detengaelmotory desconecteel cabledela bujia.
Limpieel canaly el interiordela cajadela barrenaconla
herramientade limpiezaouna varilla.
2. Hayunobjetoextrafioenla barrena.
2. Detengaelmotorde inmediatoy desconecteelcablede
la bujia. Retireelobjetode la barrena.
3. Elcabledelcontrolde la barrenanecesitaunajuste.
4. Lacorreadelabarrenaest_flojao dafiada.
3. Ajusteelcabledelcontrolde la barrena.
4. Reemplacela correade la barrena.
,NECESITAMA,S AYUDA?
• En linea podrb, encontrar este manual y los manuales de todos sus otros
productos.
Sus preguntas serb.n respondidas pot nuestro equipo de especialistas
• Obtenga un plan de mantenimiento personalizado para su hogar.
Encuentre informaci6n y herramientas que Io ayudaran con los proyectos
domesticos
ili
49
Page 50

50
Page 51

51
Page 52

MTD CONSUMER GROUP, iNC. (MTD), el Bordo de Recursos de Aire de California (CARB)
y la Agencia de Protecci6n Medioambiental de Estados Unidos (U. S. EPA)
Declaraci6n de Garantia del Sistema de Control de Emisiones
(Derechos y obligaciones del propietario seg_n la garantia contra defectos)
LACOBERTURADESISTEMADECONTROLDEEMISIONESAPLICABLEA MOTORESCERTIFICADOSCOMPRADOSENCALIFORNIA
EN2005Y A PARTIRDEENTONCES,QUESONUSADOSENCALIFORNIA,Y HASTAANO2005DEMODELOCERTIFICADOY MOTORES
POSTERIORESQUESON COMPRADOSY USADOSENOTRAPARTEENLOSESTADOSUNIDOS.
Californiayen otraparteenla Coberturade GarantiadeDefectosdeControlde Emisi6nde losEstadosUnidos
El Bordode Recursosde Airede California(CARB),laU.S. EPAy MTDsecomplacenenexplicarla garantiadel sistemade controldeemisiones
de sumotorparaequipotodo terreno,modelo,aSo2005yversionesposteriores.EnCalifornia,losnuevosmotorespequeSosparaequipotodo
terrenosedebendise5ar,fabricaryequiparparacumplirconest_.ndaresde antinieblat6xicade estados.Enotraparteen losEstadosUnidos,
el nuevonocamino,motoresdeignici6ndechispacertificadosparaelmodelo2005ym_.starde,debeencontrareljuegode est_.ndaressimilar
adelanteporlos EstadosUnidos.EPA.MTDdebegarantizarel sistemadecontrolde emisionesdesu motorpor elperiodode tiempoindicadom&s
abajo,siempreycuandono hayaexistidousoincorrecto,negligencianimantenimientoinadecuadode sumotorpequeBoparaequipotodoterreno.
El sistemadecontroldeemisionespuedeincluirpiezascomo,porejemplo,elcarburador,sistemadeinyecci6ndecombustible,elsistemade
encendido,el catalizador,losdep6sitosdecombustible,abastecedecombustiblelineas,gorrasde combustible,v&lvulas,latas,filtros,mangueras
devapor,abrazaderas,conectoresy otroscomponentesrelacionadosconlasemisiones.
Dondeexistaunacondici6ncubiertaporla garantia,MTDreparar&sumotorpequeBoparaequipotodoterrenosincostoalgunoincluyendoel
diagn6stico,laspiezasy la manodeobra.
COBERTURA DE LA GARANTJA DEL FABRICANTE:
Estesistemadecontroldeemisionessegarantizaporel t@rminodedos a5os.Si algunapiezadesumotorrelacionadacon lasemisioneses
defectuosa,MTDreparar&o sustituir&dichapieza.
RESPONSABJLIDADES DEL PROPIETARIO SEGUN LA GARANTJA:
Comopropietariodeun motorpequeSode equipotodoterreno,ustedes responsablede realizarel mantenimientonecesarioquefiguraenel
manualdelpropietario.MTDle recomiendaqueconservetodoslosrecibosquecubrenlosserviciosdemantenimientodel motorpeque5opara
equipotodoterreno,noobstanteIocual MTDnopodr&denegarelcumplimientodela garantiaQnicamenteporlafaltade reciboso porsuimposibi-
lidadde asegurarquese realizar_.ntodoslosserviciosdemantenimientoprogramado.
Comopropietariodelmotorpeque5oparaequipotodoterreno,sinembargo,ustedtambi@ndebesaberqueMTDpuededenegarlacoberturadela
garantiasi sumotorpeque5oparaequipotodoterrenoo unapiezadelmismofallandebidoa usoincorrecto,negligencia,mantenimientoindebido
o a modificacionesnoaprobadas.
Ustedes responsablede presentarlacortadoradecespedal centrode distribuci6no de mantenimientode MTDCONSUMERGROUP,INC.tan
prontocomoaparecierael problem&LasreparacionescubiertasporlagarantiasedebenIlevaracaboenun lapsorazonableque noexcedade
30dias.Si desearealizaralgunaconsultaconrespectoala coberturade lagarantia,debeponerseencontactocon sudistribuidorlocalde MTD.
Paracomunicarseconla LineadeAsistenciaal Clientede Distribuidoresde MTD,Ilameal nQmero(877)282-8684.
REQUERJMJENTOS DE GARANTJA SOBRE DEFECTOS PARA MOTORES PEQUENOS DE EQUJPO TODO TERRENO
DE 1995YVERSJONES POSTERJORES:
Estasecci6nseaplicaa motorespeque5osdeequipotodo terrenode1995yversionesposteriores.Elperiododegarantiacomienzaa partirdela
fechaen queel motoro elequiposeentreganalcompradorfinal.
(a) Coberturade la garantiacontraemisionesgenerales
MTDgarantizaalcompradorfinaly acada compradorsubsiguientequeel motor:
(1)hasidodiseSado,construidoy equipadode maneraquecumplacontodaslasregulacionesvigentesadoptadasporel Departamentodelos
RecursosdeAireenvirtuda suautoridadconferidaenloscapitulos1y2, Parte5, Divisi6n26del C6digodeSaludy Seguridad;y
(2)est,. librede defectosen losmaterialesyen la manodeobraquecausenlafalladeunapiezabajogarantiaqueseaid@nticaentodoslos
aspectosmaterialesa lapiezacomoaparecedescriptaenlaaplicaci6ndelfabricantedel motorparacertificaci6npor unperiododedos a5os.
_arantia sobrepiezasrelacJonadasconemisJonesse interpretar_,de la sJguientemanera:
(1)Cualquierpiezacubiertaporgarantiaquenoest@programadaparasureemplazosegQnel mantenimientorequeridoenlasinstrucciones
escritasdela Subsecci6n(c)debeestargarantizadapor unperiodode garantiadefinidoenla Subsecci6n(a)(2). Sila piezafalladurante
el periododecoberturadela garantia,lamismaser_.reparadaoreemplazadaporMTD de acuerdoconla Subsecci6n(4)a continuaci6n.
Cualquierpiezareparadao reemplazadasegQnlagarantiasegarantizarB,porel restodelperiodode garantia.
(2) Cualquierpiezacubiertaporgarantiaqueest@programadasoloparainspecci6nregularen lasinstruccionesescritasde la Subsecci6n
(c)debeestargarantizadaporun periododegarantiadefinidoenla Subsecci6n(a) (2). Unadeclaraci6nen dichasinstruccionesporescrito
alefectode "reparaci6no reemplazosegQnseanecesario"noreducir_,elperiodode coberturade la garantia.Cualquierpiezareparadao
Page 53

reernplazadasegQnlagarantiasegarantizar_,porelrestodelperiododegarantia.
(3) Cualquierpiezagarantizadaqueest_prograrnadaparareernplazosegQnelrnantenirnientorequeridodeconforrnidadconlasinstruc-
clonesescritasdelaSubsecci6n(c)segarantizaporelperiododetiernpoanterioralaprirnerafechadereernplazoprograrnadaparaesa
pieza.Silapiezafallaantesdelprimerreernplazoprogramatic,larnisrnaser_.reparadaoreernplazadaporMTDdeacuerdoconlaSubsecci6n
(4)acontinuaci6n.Cualquierpiezareparadaoreernplazadabajogaranfiasegarantizar_,porelrestodelperiodoanterioralprimerreernplazo
programaticpuntualparaesapieza.
(4)Lareparaci6noelreernplazodecualquierpiezagarantizadadeconforrnidadconlasdisposicionesdelagaranfiaqueaquiseestipulase
deberealizarenuncentrodegaranfiasincostoalgunoparaelpropietario.
(5)SinperjuiciodelasdisposicionesdelaSubsecci6n(4)anterior,losserviciosoreparacionescubiertosporlagaranfiadebensersurnin-
istradosportodosloscentrosdedistribuci6ndeMTDquetenganlafranquiciapararealizarreparacionesyrnantenirnientoalosrnotoresen
cuesti6n.
(6)ElpropietarionodebeafrontarningQncargoparatrabajosdediagn6sticoqueIlevenalaconclusi6ndequeunapiezabajogaranfiapresenta
efectivarnentedefectos,siernpreycuandodichodiagn6sticoseaIlevadoacaboenuncentrocubiertoporlagarantia.
(7)Elfabricantedelmotoresresponsableporda_oscausadosaotroscornponentesdernotoresderivadosdelafallabajogaranfiadecualquier
piezagarantizada.
(8)DurantetodoelperiododegaranfiadelmotordefinidoenlaSubsecci6n(a)(2),MTDrnantendr_,unsurninistrodepiezascubiertaspor
garantiasuficienteparasatisfacerladernandaesperadaparatalespiezas.
(9)Cualquierpiezadereernplazosepodr_,usarparaelcurnplirnientodelrnantenirnientooreparacionesbajogaranfia,ysesurninistrar_,sin
cargoalpropietario.Dichousonoreducir_,lasobligacionesdegarantiadeMTD.
(10)Nosepodr_.nusarpiezasadicionalesnirnodificadasquenoest_nexentasdeacuerdoconelDepartarnentodelosRecursosdelAire(Air
ResourcesBoard).Elusodepiezasadicionalesornodificadasnoexentasser_.causasuficienteparaanularunreclarnobajogaranfiarealizado
deacuerdoconestearticulo.Elfabricantedelmotornotendr_,responsabilidad,enconforrnidadconestearticulo,degarantizarfallasdepiezas
garantizadasquefuerencausadasporelusodeunapiezanoexentaadicionalornodificada.
.(c)MTDincluir_,unacopiade lasiguientelistade piezasbajogarantiacontraernisionesconcadanuevomotor,utilizandolaspartesde la lista
a_plicablesalmotor.
(1)Sisternadernedici6ndecombustible
•Sisternadernejoraparainicioenfrio (cebadosuave)
•Carburadorycornponentesinternos
•Bornbadecombustible
•Dep6sitodecombustible
(2) Sisternadeinducci6ndeaire
•Filtrode aire
•Colectordeentrada
(3) Sisternadeencendido
•Bujia(s)
•Sisternadeencendidopor magneto
(4)Sisternadeescape
•Catalizador
•SAI(v_Jvulade Ca_a)
(5) Cornponentesvariosutilizadosenel sisternaanterior
•V_Jvulase interruptoresde vado, ternperatura,posici6nsensiblesal tiernpo
•Conectoresy rnontajes
(6)Controlde Evaporative
•Manguerade CombustiblecertificadaparaARB evaporativeernisi6nde2006.
•Abrazaderasde Manguerade Combustible
•Gorrade combustibleatada
•Latade carb6n
•Lineasdevapor
GD0C-100174Rev.B
Page 54

Busque el periodo de duraci6n de emisiones importantes yla informaci6n de clasificaci6n de aire en
la etiqueta de emisiones de su motor
Los motores cuyo cumpiimiento con los estAndares de emisi6n Tier 2 de la Comisi6n de Recursos Ambientales de California (CARB)
est6 certificado deben exhibir la informaci6n relacionada con el perJodo de duraci6n de las emisiones y la clasificaci6n de aire. Sears,
Roebuck and Co., de los Estados Unidos ponen esta informaci6n a disposici6n deJ consumidor en nuestras etiquetas de emisiones.
El Periodo de Duraci6n de las Emisiones describe el nQmero de horas de tiempo real de funcionamiento para el cual se certifica que
el motor cumple con las reglas de emisi6n, descontando el mantenimiento adecuado deJmismo segQn las instrucciones de oper-
aci6n y mantenimiento. Se utilizan las siguientes categorias:
Moderado:Se certifica que el motor cumpie con las reglas de emisi6n durante 125 horas de tiempo real de funcionamiento deJmotor.
Inmediato:Se certifica que el motor cumple con las reglas de emisi6n durante 250 horas de tiempo real de funcionamiento deJ motor.
Extendido:Se certifica que el motor cumple con las reglas de emisi6n durante 500 horas de tiempo real de funcionamiento deJmotor.
Por ejemplo, una cortadora de c6sped tJpica que se empuja desde atrAs se usa entre 20 y 25 horas por afio. Por Io tanto, el Periodo
de Duraci6n de Emisiones de un motor con una clasificaci6n intermedia seria equivalente a entre 10 y 12 afios.
Laclasificaci6n de aJre es un nQmero calculado para describir eJnivel reiativo de emisiones para un grupo de motores en particular.
Cuanto menor sea Jaclasificaci6n de aire, mayor es JaJimpieza deJmotor. La informaci6n se presenta de forma gr&fica en Jaetiqueta
de emisiones.
Despu_s del 1 de julio de 2000, busque el periodo de cumplimiento de las reglas de
emisiones en la etiqueta de cumplimiento de las reglas de emisiones del motor
Despu_s deJ 1 de julio de 2000 se certificar_, que determinados motores Sears, Roebuck and Co., de los Estados Unidos
cumpien con los estAndares de emisiones de la fase 2 de la Agencia de Protecci6n Ambiental de los Estados Unidos (USE-
PA). Para los motores certificados para la etapa 2, el periodo de cumpiimiento con las reglas de emisiones al cual se hace
referencia en la etiqueta de cumpiimiento con las reglas de emisiones indica el nQmero de horas de funcionamiento para el
cuaJ se ha demostrado que el motor cumpie con los requerimientos federales de emisi6n.
Para los motores con desplazamiento inferior a 225 cc, Categoria C = 125 horas, B = 250 horas y A = 500 horas.
Para los motores con desplazamiento de 225 cc o mAs, Categoria C = 250 horas, B = 500 horas y A = 1000 horas.
El despiazamiento de los motores de la serie modelo 150112 es 249 cc.
La presente es una representaci6n gen_rica de la etiqueta de emisi6n que se encuentra generaimente en un
motor certificado.
FAMILYYBSXS.3192VA 274812
GDOC-100182Rev.A
54
Page 55

Felicitacionesporhaberrealizadounaadquisici6ninteligente.El
productoCraftsman®quehaadquiridoest&diseSadoyfabricado
parabrindarmuchosaSosdefuncionamientoconfiable.Perocomo
todoslosproductosa vecespuederequerirde reparaciones.Esen
esemomentocuandoel disponerdeunAcuerdode protecci6npara
reparacionesle puedeahorrardineroy problemas.
Acontinuaci6nsedetallanlos puntosincluidosenelAcuerdo:
• Servicio experto prestadopornuestros10,000especialistasen
reparacionesprofesionales
• Servicio ilimitadosincargoparalaspiezasy lamanodeobraen
todaslasreparacionescubiertas
• Reemplazodel productohasta1500d61aressino esposible
repararelproductocubierto
• Descuentode 10%del precionormaldelservicioy delaspiezas
relacionadasconel mismoquenoest_ncubiertasporel acuerdo;
adem&s,10%del precionormalde laverificaci6nde manten-
imientopreventivo
• Ayudar_pidapot tel_fono - Io IlamarnosResoluci6nR_pida- el
apoyotelef6nicode unChamuscaalrepresentante.Pienseen
nosotroscomoelmanual"deundue_ohablador."
UnavezadquiridoelAcuerdo,puedeprogramarelserviciocon
tans61orealizarunaIlamadatelef6nica.PuedeIlamarencualquier
momentodeldia o dela nocheo programarun servicioenlinea.
ElAcuerdodeProtecci6nde Reparaci6nesunacomprasinriesgo.
Si ustedanulaporalgunaraz6nduranteelperiodode garanfiade
producto,proporcionaremosun reembolsoIleno.O,un reembolso
prorrateadoen cualquiermomentodespu_sdelperiodode garantia
de productoexpira,iAdquieraboysuacuerdodeprotecci6npara
reparaciones!
Se aplican deterrninadaslimitacionesy exclusiones.Paraobtener
inforrnaci6nadicionaly preciosenlos EstadosUnidosIlarneal
1-800-827-6655.
El*Coverageen Canad_variaen algunosarticulos.Paradetalles
IlenoslaIlarnadaCharnuscaCanad_en 1-800-361-6665.
Servicio de instalaci6nde Sears
Si deseasolicitarla instalaci6nprofesionalde Searsdeaparatos
dom_sticos,dispositivosparaabrirportones,calentadoresde agua
y otrosarficulosdom_sticosimportantes,en losEstadosUnidoso
Canad_Ilameal 1-800-4-MY-HOME®.
55
Page 56

Your Home
For expert troubleshooting and home solutions advice:
www.managemyhome.com
For repair - in your home - of all major brand appliances,
lawn and garden equipment, or heating and cooling systems,
no matter who made it, no matter who sold it!
For the replacement parts, accessories and
owner's manuals that you need to do-it-yourself.
For Sears professional installation of home appliances
and items like garage door openers and water heaters.
1-800-4-MY-HOME ® (1-800-469-4663)
Call anytime, day or night (U.S.A. and Canada)
www.sears.com www.sears.ca
Our Home
For repair of carry-in items like vacuums, lawn equipment,
and electronics, call anytime for the location of your nearest
Sears Parts & Repair Service Center
1-800-488-1222 (U.S.A.) 1-800-469-4663 (Canada)
www.sears.com www.sears.ca
To purchase a protection agreement on a product serviced by Sears:
1-800-827-6655 (U.S.A.) 1-800-361-6665 (Canada)
Para pedir servicio de reparaci6n
a domicilio, y para ordenar piezas:
1-888-SU-HOGAR ®
(1-888-784-6427)
Au Canada pour service en fran£ais:
1-800-LE-FOYER M°
(1-800-533-6937)
www.sears.ca
® Registered Trademark / TMTrademark / SM Service Mark of Sears Brands, LLC
® Marca Registrada / TMMarca de F&brica / Marca de Servicio de Sears Brands, LLC
MCMarque de commerce / MDMarque depos6e de Sears Brands, LLC © Sears Brands, LLC
SM
 Loading...