

Page 1
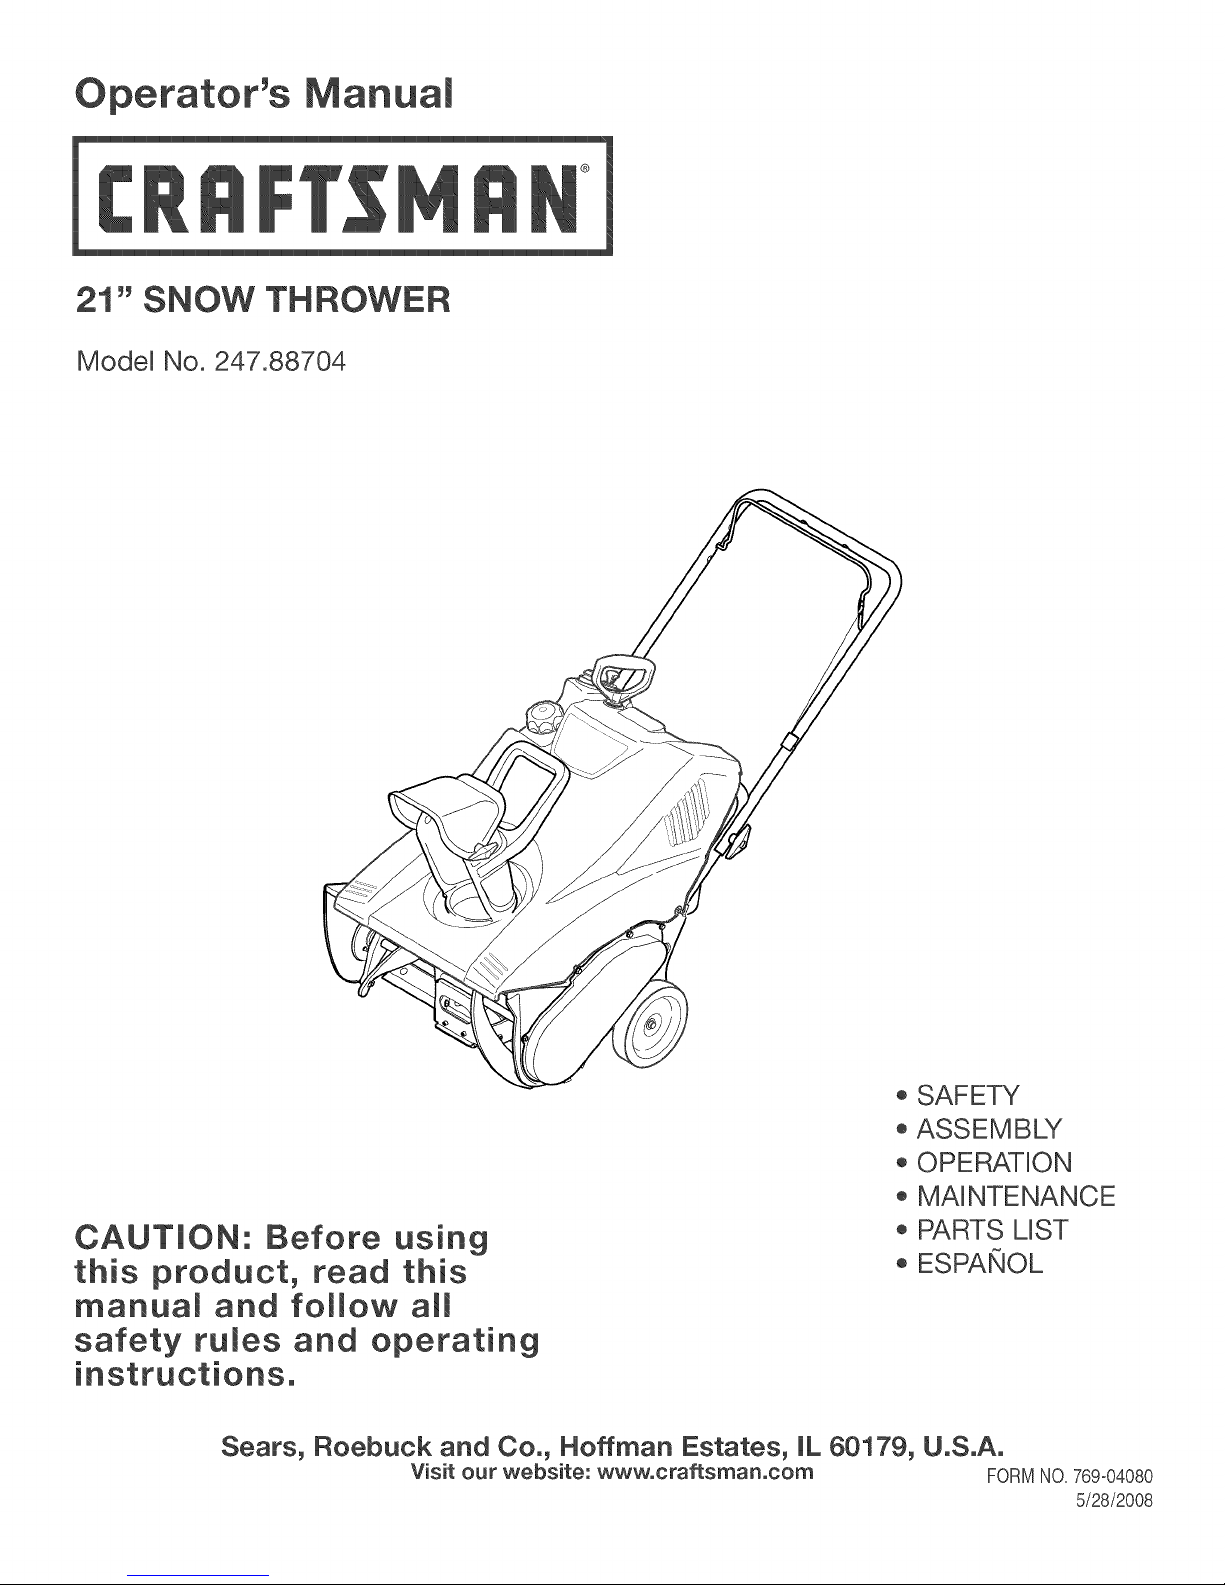
Operator's Manual
21" SNOW THROWER
Model No. 247.88704
®
CAUTION: using
this product, read this
manua_ and fo_mow am_
safety fumes and operating
instructions.
Sears, Roebuck and Co., Hoffman Estates, IL 60179, U.S.A.
Visit our website: www.craftsman.com FORMNO.769°04080
®SAFETY
®ASSEMBLY
®OPERATION
® MAINTENANCE
® PARTS LIST
® ESPAtIOL
5/28/2008
Page 2

Warranty Statement .................................. Page 2
Safe Operation Practices .......................... Pages 3=5
Safety LabeUs............................................ Page 6
AssemMy .................................................. Pages 7=8
Operation .................................................. Pages 9=11
Service and Maintenance ......................... Pages 12-16
Off=Season Storage .................................. Page 17
Troubb Shooting ....................................... Page 18
Parts List ................................................... Page 20-26
Repair Protection Agreement ................... Page 30
Espa_oU..................................................... Page 31
Service Numbers ...................................... Back Cover
CRAFTSMAN LiMiTED WARRANTY
Two Years on Snow Thrower
Whenoperatedand maintainedaccordingtoaiIsuppibd instructions,ifthis snowthrowerfaibdueto a defectinmaterialorworkmanshipwithin
twoyearsfromthedateor purchase,caiI1=800=4=MY-HOME®toarrangeforfreerepair.
Thiswarrantyappibsforonly90 daysfromthedateof purchaseifthissnowthroweriseverusedforcommercialorrentalpurposes.
Duringthefirstyearofpurchase,there wiiIbenochargeforwarrantyserviceinyourhome.Foryourconvenience,in-homewarrantyservicewill
stillbeavailableafterthefirstyearof purchase,buta tripchargewillapply.Thischargewillbe waivedif youtransportthe snowthrowertoan
authorizedCraftsmandrop-offlocation.Forthe nearestauthorizedlocation,call 1-800-4-MY-HOME®.
Thiswarranty covers ONLYdefects in material andworkmanship. Searswill NOTpayfor:
, Expendableitemsthatbecomewornduringnormaluse,includingbutnotlimitedtoskidshoes,shaveplate,shearpins,sparkplug,air
cleaner,belts,andoil filter.
, Standardmaintenanceservicing,oilchanges,or tune-ups.
, Tire replacementorrepaircausedbypuncturesfromoutsideobjects,suchasnails,thorns,stumps,or glass.
, Tireorwheelreplacementor repairresultingfromnormalwear,accident,orimproperoperationor maintenance.
, Repairsnecessarybecauseof operatorabuse,includingbutnot limitedtodamagecausedbyimpactingobjectsthat bendtheframeor
crankshaft,orover-speedingtheengine.
, Repairsnecessarybecauseof operatornegligence,includingbutnot limitedto,electricalandmechanicaldamagecausedbyimproper
storage,failureto usethepropergradeandamountofengineoil,or failureto maintaintheequipmentaccordingto theinstructionscontained
intheoperator'smanual.
, Engine(fuelsystem)cleaningorrepairscausedbyfueldeterminedto becontaminatedoroxidized(stale).Ingeneral,fuelshouldbeused
within30 daysof itspurchasedate.
, Normaldeteriorationandwearoftheexteriorfinishes,orproductlabelreplacement.
Thiswarrantyappliesonlywhilethisproductis usedinthe UnitedStates.
Thiswarrantygivesyouspecificlegalrights,andyoumayalsohaveotherrightswhichvaryfromstatetostate.
Sears, Roebuckand Co.,Noffman Estates,IL (}0179
EngineOilType:
EngineOilCapacity:
FuelCapacity:
SparkHug:
SparkHug Gap:
@SearsBrands,LLC
SAE 5%30
20 ounces
2 Quarts
Torch F6RTC
.020"-.030"
Model Number.................................................................
Serial Number.................................................................
Dateof Purchase.............................................................
Recordthemodelnumber,serialnumber
anddateof purchaseabove
2
Page 3
Thissymbolpointsoutimportantsafetyinstructionswhich,if not
followed,couldendangerthepersonalsafetyand/orpropertyof
yourselfandothers. Readandfollowall instructionsinthismanual
beforeattemptingto operatethismachine.Failuretocomplywith
theseinstructionsmayresultin personalinjury.Whenyouseethis
symbol,HEEDiTSWARNING!
Thismachinewasbuilttobeoperatedaccordingtothesafeopera-
tionpracticesinthis manualAswithanytypeof powerequipment,
carelessnessorerroron thepartoftheoperatorcanresultin serious
injury.Thismachineiscapableofamputatingfingers,hands,toes
andfeetandthrowingdebris.Failuretoobservethe followingsafety
instructionscouldresultin seriousinjuryor death.
CAUFORNIA PROPOSmON 65
EngineExhaust,someof itsconstituents,andcertainvehicle
componentscontainoremitchemicalsknowntoStateofCalifornia
tocausecancerandbirthdefectsorotherreproductiveharm.
, Read,understand,andfollowallinstructionson themachineand
in themanual(s)beforeattemptingtoassembleandoperate.
Failuretodosocan resultinseriousinjurytotheoperatorand/
orbystanders.Keepthismanualina safeplaceforfutureand
regularreferenceandfororderingreplacementparts.Forques-
tionscall,1-800-659-5917.
Befamiliarwithallcontrolsandtheirproperoperation.Knowhow
tostopthemachineanddisengagethemquickly.
Neverallowchildrenunder14yearsofagetooperatethis
machine.Children14andovershouldreadandunderstandthe
instructionsandsafeoperationpracticesinthismanualandon
themachineandbe trainedandsupervisedbyanadulL
Neverallowadultsto operatethis machinewithoutproper
instruction.
Thrownobjectscan causeseriouspersonalinjury.Planyour
snow4hrowingpatterntoavoiddischargeof materialtoward
roads,bystandersandthelike.
Keepbystanders,petsandchildrenat bast 75feetfromthe
machinewhileitisin operation.Stopmachineifanyoneenters
thearea.
Exercisecautiontoavoidslippingorfalling,especiallywhen
operatinginreverse.
Your Responsibility--Restrict theuseofthis powermachineto
personswhoread,understandandfollowthewarningsand instruc-
tionsinthismanualandonthemachine.
SAVE THESE NSTRUCT ONS!
Thoroughlyinspecttheareawheretheequipmentistobeused.
Removealldoormats,newspapers,sleds,boards,wiresandother
foreignobjects,whichcouldbetrippedoverorthrownbythe auger/
impeller.
Alwayswearsafetyglassesor eyeshieldsduringoperationand
whileperformingan adjustmentor repairtoprotectyoureyes.
Thrownobjectswhichricochetcancauseseriousinjuryto the
eyes.
, Donot operatewithoutwearingadequatewinteroutergarments.
Donot wearjew@y,longscarvesorotherlooseclothing,which
couldbecomeentangledinmovingparts.Wearfootwearwhich
willimprovefootingonslipperysurfaces.
, Usea groundedthree-wireextensioncordand receptaclefor all
machineswithelectricstartengines.
, Disengageall controlleversbeforestartingtheengine.
, Neverattempttomakeanyadjustmentswhileengineis running,
exceptwherespecificallyrecommendedintheoperator'smanual
, Letengineandmachineadjusttooutdoortemperaturebefore
startingtoclearsnow.
3
Page 4
SafeHandlingof Gasoline
Toavoidpersonalinjuryorpropertydamageuseextremecarein
handlinggasoline.Gasolineisextremelyflammableandthevaporsare
explosive.Seriouspersonalinjurycan occurwhengasolineisspilled
onyourselfor yourclotheswhichcanignite. Washyourskinand
changeclothesimmediately_
, Useonlyanapprovedgasolinecontainer.
, Extinguishallcigarettes,cigars,pipesandothersources
ofignition.
, Neverfuelmachineindoors.
, Neverremovegascaporaddfuel whiletheengineis hot
or running.
, Allowengineto coolat basttwo minutesbeforerefueling.
, Neveroverfill fueltanL Filltanktono morethanY_inch
belowbottomoffillerneckto providespaceforfuel
expansion.
, Replacegasolinecapandtightensecurely.
, ifgasolineisspilled,wipeit offtheengineandequipmenL
Movemachinetoanotherarea.Wait5 minutesbefore
startingtheengine.
, Neverstorethemachineorfuelcontainerinsidewhere
thereis anopenflame,sparkor pilotlight(e.g.furnace,
waterheater,spaceheater,clothesdryeretc.).
, Allowmachinetocoolatbast 5 minutesbeforestori%
, Neverfillcontainersinsidea vehicleor ona truckor trailer
bedwithaplasticliner.Alwaysplacecontainersonthe
groundawayfromyourvehiclebeforefilling.
, if possible,removegas_poweredequipmentfromthetruck
ortrailerand refueliton theground,if thisisnotpossible,
thenrefuelsuchequipmentona trailerwithaportable
container,ratherthanfromagasolinedispensernozzle.
, Keepthenozzleincontactwiththe rimofthefueltankor
containeropeningatalltimesuntilfuelingiscomplete.Do
notuse anozzlelock-opendevice.
, Do notputhandsorfeetnearrotatingparts,in theauger/impeller
housingorchuteassembly.Contactwiththerotatingpartscan
amputatehandsandfeel
, Theauger/impellercontrolleverisasafetydevice.Neverbypass
itsoperation.Doingsomakesthemachineunsafeandmaycause
personalinjury.
, Thecontrolleversmustoperateeasilyinbothdirectionsand
automaticallyreturntothedisengagedpositionwhenreleased.
, Neveroperatewithamissingor damagedchuteassembly.Keep
all safetydevicesin placeandworki%
, Neverrunanengineindoorsorina poorlyventilatedarea.Engine
exhaustcontainscarbonmonoxide,anodorlessanddeadlygas.
, Do notoperatemachinewhileundertheinfluenceofalcoholor
drugs.
, Mufflerandenginebecomehotandcancausea burn.Do not
toucL Keepchildrenaway.
, Exerciseextremecautionwhenoperatingon orcrossinggravel
surfaces.Stayalertforhiddenhazardsor traffic.
, Exercisecautionwhenchangingdirectionandwhileoperatingon
slopes.
, Planyoursnow-throwingpatternto avoiddischargetowards
windows,walls,carsetc.Thus,avoidingpossibleproperty
damageorpersonalinjurycausedbya ricocheL
, Neverdirectdischargeatchildren,bystandersand petsor allow
anyoneinfrontofthe machine.
, Donot overloadmachinecapacityby attemptingtoclearsnowat
toofastof a rate.
, Neveroperatethismachinewithoutgoodvisibilityorlight.Always
be sureofyourfootingand keepafirmholdon thehandles.Walk,
neverrun.
, Disengagepowertotheauger/impellerwhentransportingor not
in use.
, Neveroperatemachineathightransportspeedson slippery
surfaces.Lookdownand behindand usecare whenbackingup.
, ifthe machineshouldstartto vibrateabnormally,stopthe engine,
disconnectthesparkplugwireandgrounditagainsttheengine.
inspectthoroughlyfor damage.Repairanydamagebefore
startingandoperati%
, Disengageall controlleversandstopenginebeforeyouleave
theoperatingposition(behindthehandles).Waituntilthe auger/
impellercomestoa completestopbeforeuncloggingthechute
assembly,makinganyadjustments,or inspections.
, Neverputyourhandinthe dischargeor collectoropenings.Do
notunclogchuteassemblywhileengineisrunning.Shutoff
engineand remainbehindhandlesuntilall movingpartshave
stoppedbeforeuncloggi%
, Useonlyattachmentsandaccessoriesapprovedbythemanufac_
turer(e.g.wheelweights,tirechains,cabsetc.).
, Whenstartingengine,pullcordslowlyuntilresistanceisfelt,then
pull rapidly.Rapidretractionofstartercord(kickback)willpull
handandarmtowardenginefasterthan youcan letgo.Broken
bones,fractures,bruisesorsprainscouldresulL
, ifsituationsoccurwhichare notcoveredinthis manual,usecare
andgoodjudgmenLContactCustomerSupportforassistance
andthenameof yournearestservicingdealer.
CLEARUNG A CLOGGED DUSCHAF{GE CHUTE
Handcontactwiththe rotatingimpellerinsidethedischargechute
is themostcommoncauseofinjuryassociatedwithsnowthrowers.
Neveruseyourhandtocleanoutthedischargechute.
Toclear thechute:
1. SHUTTHEENGINEOFF!
2. Wait 10secondstobesuretheimpellerbladeshavestopped
rotating_
3_ Alwaysusea clean-outtool,notyourhands.
4
Page 5
MAUNTENANCE& STORAGE
, Nevertamperwithsafetydevices_Checktheirproperoperation
regularly.Refertothemaintenanceandadjustmentsectionsof
thismanual
, Beforecleaning,repairing,or inspectingmachinedisengageall
controlleversandstoptheengine.Waituntiltheauger/impeller
cometoa completestop.Disconnectthe sparkplugwireand
groundagainsttheenginetopreventunintendedstarting.
, Checkboltsandscrewsforpropertightnessatfrequentintervals
tokeepthemachinein safeworkingcondition.Also,visually
inspectmachineforanydamage.
, Do notchangetheenginegovernorsettingor over-speedthe
engine.Thegovernorcontrolsthe maximumsafeoperatingspeed
oftheengine.
, Snowthrowershaveplatesandskidshoesaresubjecttowear
anddamage.Foryoursafetyprotection,frequentlycheckall
componentsand replacewithoriginalequipmentmanufacturer's
(OEM)partsonly."Useofpartswhichdo notmeettheoriginal
equipmentspecificationsmayleadto improperperformanceand
compromisesafety!"
, Checkcontrolleversperiodicallytoverifytheyengageanddisen-
gageproperlyandadjust,ifnecessary.Referto theadjustment
sectioninthisoperator'smanualforinstructions.
, Maintainorreplacesafetyandinstructionlabels,asnecessary.
Observeproperdisposallawsand regulationsforgas,oil,etc. to
protecttheenvironment.
, Priorto storing,runmachinea few minutestoclearsnowfrom
machineand preventfreezeupofauger/impeller.
, Neverstorethe machineorfuelcontainerinsidewherethereisan
openflame,sparkorpilotlightsuchasawaterheater,furnace,
clothesdryeretc.
, Alwaysreferto theoperator'smanualforproperinstructionson
off-seasonstorage.
, Checkfuelline,tank,cap,andfittingsfrequentlyforcracksor
leaks.Replaceif necessary.
, Do notcrankenginewithsparkplugremoved.
, AccordingtotheConsumerProductsSafetyCommission(CPSC)
andtheU.S.EnvironmentalProtectionAgency(EPA),thisproduct
hasan AverageUsefulLifeof seven(7)years,or60 hoursof
operation.AttheendoftheAverageUsefulLifehavethemachine
inspectedannuallybyan authorizedservicedealertoensurethat
allmechanicalandsafetysystemsareworkingproperlyandnot
wornexcessively.Failuretodosocanresultinaccidents,injuries
ordeath.
DO NOT MODUFY ENGUNE
Toavoidseriousinjuryor death,do notmodifyengineinany way.
Tamperingwiththegovernorsettingcanleadto a runawayengineand
causeittooperateat unsafespeeds.Nevertamperwithfactorysetting
ofenginegovernor.
NOTUOE REGARDUNG EMUSSUONS
EngineswhicharecertifiedtocomplywithCaliforniaandfederal
EPAemissionregulationsforSORE(SmallOffRoadEquipment)are
certifiedto operateon regularunleadedgasoline,and mayinclude
thefollowingemissioncontrolsystems:EngineModification(EM),
OxidizingCatalyst(CO),SecondaryAirInjection(SAI)and ThreeWay
Catalyst(TWO)if soequipped.
SPARK ARRESTOR
Thismachineisequippedwithaninternalcombustionengineand
shouldnotbeusedonornearanyunimprovedforest-covered,
brush-coveredorgrass-coveredlandunlesstheengine'sexhaust
systemisequippedwithasparkarrestermeetingapplicablelocalor
statelaws(ifany)
Ifasparkarresterisused,itshouldbemaintainedineffectiveworking
orderbytheoperator.IntheStateofCaliforniatheaboveis required
bylaw (Section4442oftheCaliforniaPublicResourcesCode).Other
statesmayhavesimilarlaws. Federallawsapplyonfederallands.
A sparkarresterforthemufflerisavailablethroughyournearestSears
PartsandRepairServiceCenter.
Page 6
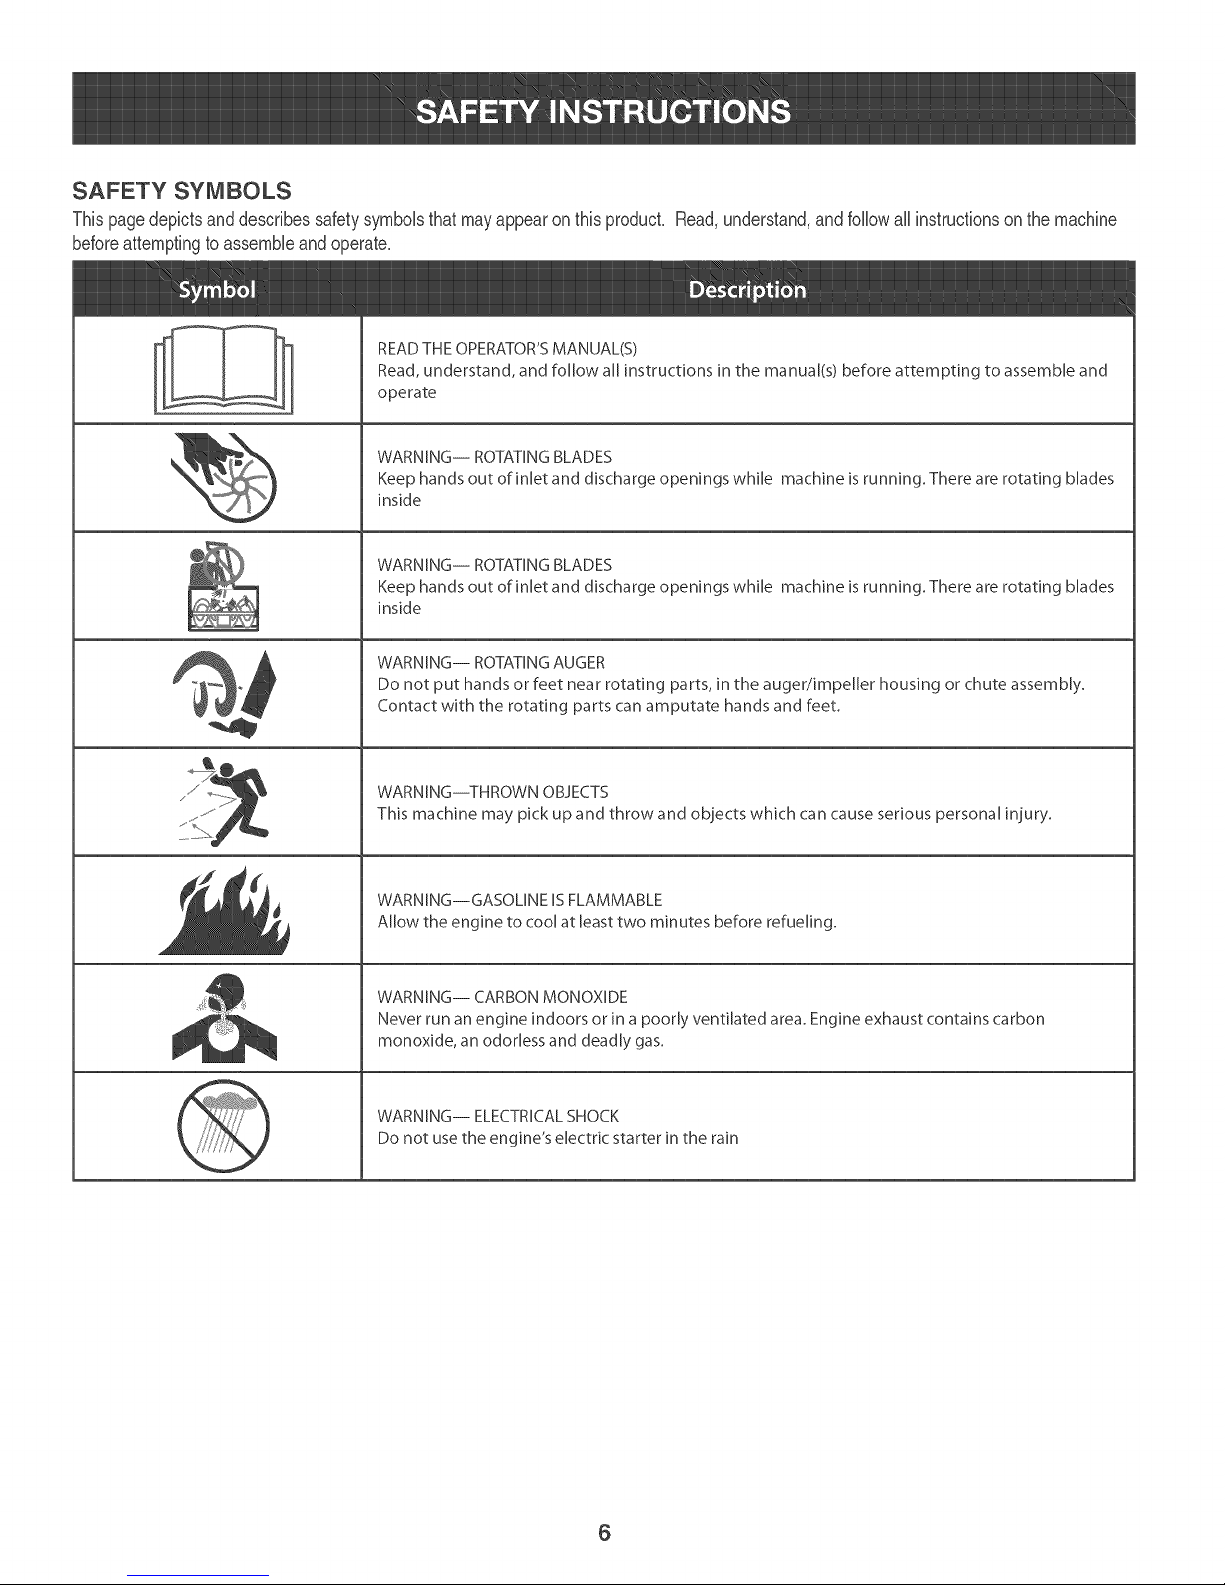
SAFETY SYMBOLS
Thispagedepictsanddescribessafetysymbolsthatmayappearonthisproduct. Read,understand,andfoflowaftinstructionsonthe machine
beforeattemptingto assembleandoperate.
°
i
\
READ THE OPERATOR'S MANUAL(S)
Read, understand, and follow all instructions in the manual(s) before attempting to assemble and
operate
WARNING-- ROTATING BLADES
Keep hands out of inlet and discharge openings while machine ]s running. There are rotating blades
inside
WARNING-- ROTATING BLADES
Keep hands out of inlet and discharge openings while machine ]s running. There are rotating blades
inside
WARNING-- ROTATING AUGER
Do not put hands or feet near rotating parts, ]n the auger/impeller housing or chute assembly.
Contact with the rotating parts can amputate hands and feet.
WARNING--THROWN OBJECTS
This machine may pick up and throw and objects which can cause serious personal injury.
WARNING--GASOLINE IS FLAMMABLE
Allow the engine to cool at least two minutes before refueling.
WARNING-- CARBON MONOXIDE
Never run an engine indoors or in a poorly ventilated area. Engine exhaust contains carbon
monoxide, an odorless and deadly gas.
WARNING-- ELECTRICALSHOCK
Do not usethe engine's electric starter in the rain
6
Page 7
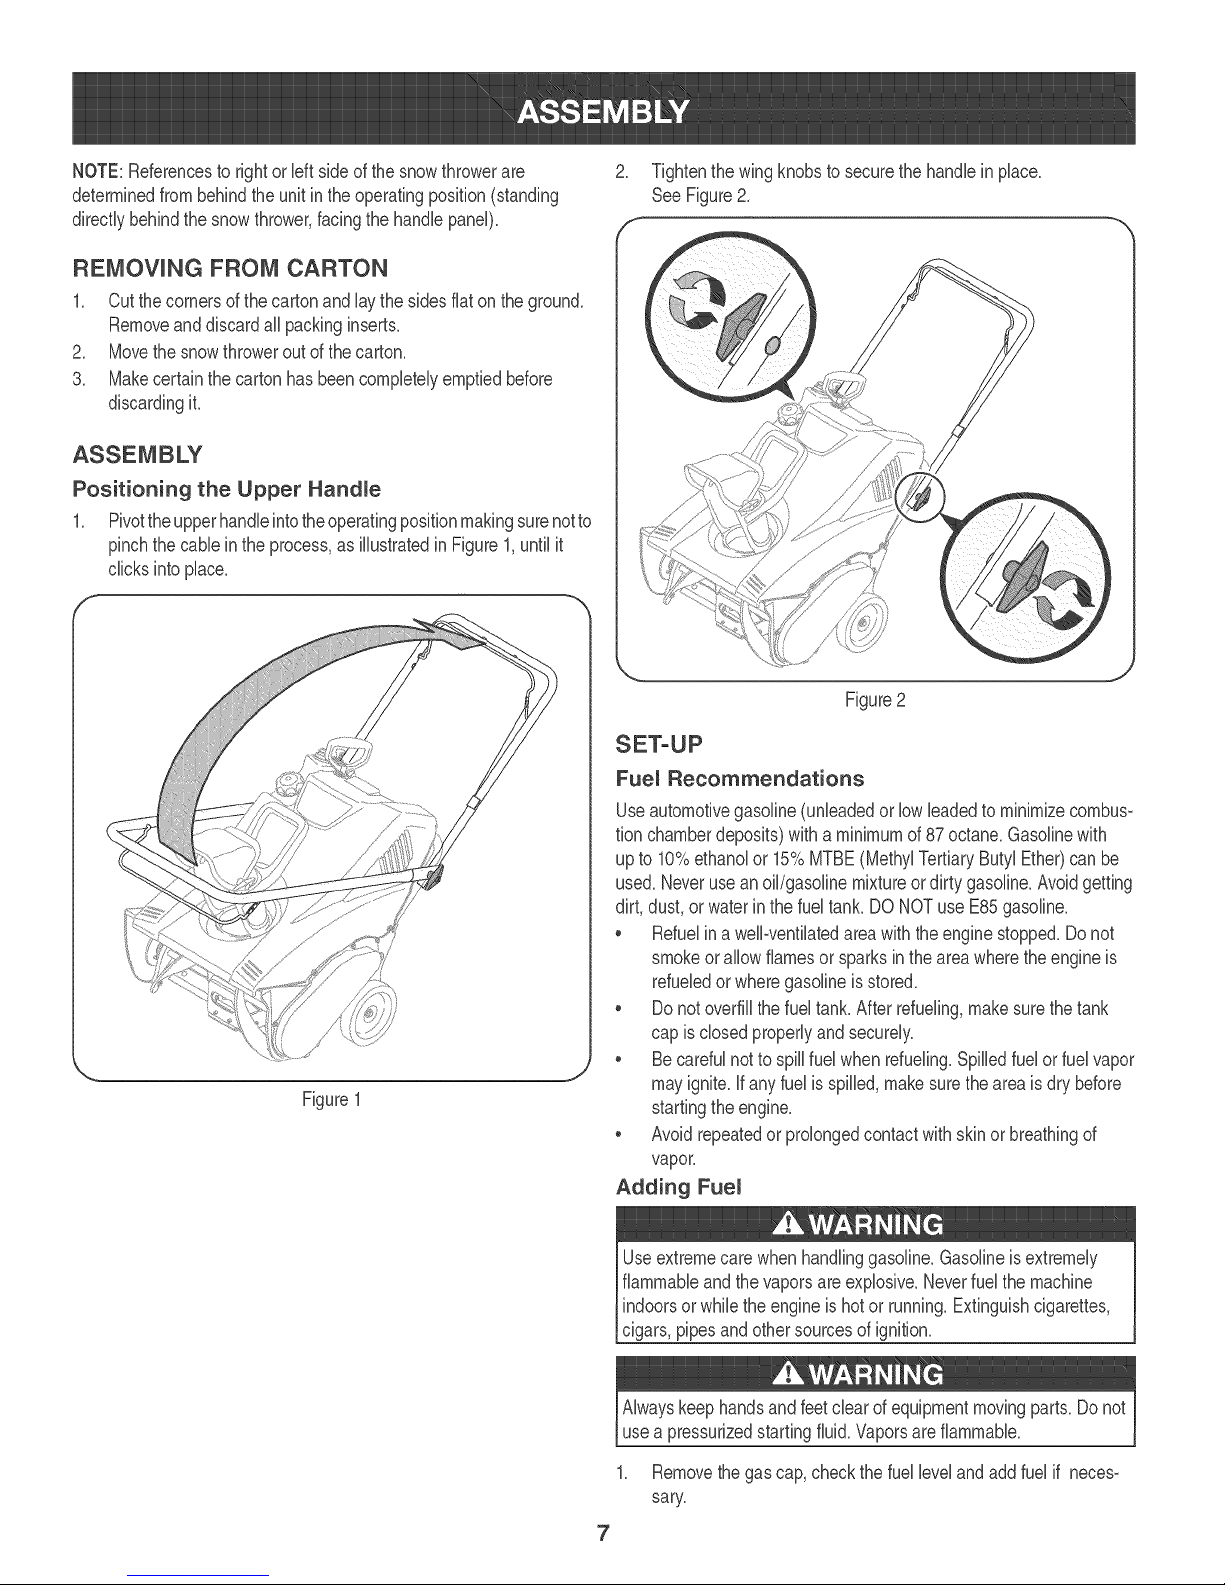
NOTE:Referencesto rightorHeftsideof thesnowthrowerare
determinedfrombehindtheunitinthe operatingposition(standing
directlybehindthesnowthrower,facingthe handHepaneH).
REMOVUNG FROM CARTON
1. CutthecornersofthecartonandHaythesidesflaton theground.
RemoveanddiscardaHHpackinginserts.
2. Movethesnowthrowerout ofthecarton.
3. MakecertainthecartonhasbeencompHeteHyemptiedbefore
discardingit.
Positioning the Upper Handme
1. PivottheupperhandHeintotheoperatingpositionmakingsurenotto
pinchthe cabHeinthe process,asiHHustratedin Figure1,untiHit
chicksintopHace.
2_ TightenthewingknobstosecurethehandHeinpHace.
See Figure2,
if
Figure2
Figure1
Fuem Recommendations
UseautomotivegasoHine(unHeadedorHowHeadedtominimizecombus-
tionchamberdeposits)withaminimumof87 octane.GasoHinewith
up to 10%ethanoHor 15%MTBE(MethyHTertiaryButyHEther)canbe
used.Neverusean oiH/gasoHinemixtureordirtygasoHine.Avoidgetting
dirt, dust,or waterinthefueHtank.DONOTuseE85gasoHine.
, RefueHina weHH-ventiHatedareawiththeenginestopped.Donot
smokeoraHHowflamesor sparksin theareawheretheengineis
refuelledor wheregasoHineis stored.
, Donot overfiHHthefueHtank.After refuelling,makesurethetank
capisdosed properHyandsecureHy.
, BecarefuHnotto spiHHfueHwhenrefuelling.SpiHHedfueHorfueHvapor
J
mayignite.HfanyfueHis spiHHed,makesurethe areaisdrybefore
startingthe engine.
, AvoidrepeatedorproHongedcontactwithskinor breathingof
vapor.
Adding Fuem
UseextremecarewhenhandHinggasoHine.GasoHineisextremeHy
fHammabHeandthevaporsareexpHosive.NeverfueHthe machine
indoorsorwhiHetheengineishotor running.Extinguishcigarettes,
cigars,pipesandothersourcesofignition.
AHwayskeephandsandfeetcHearofequipmentmovingparts.Do not
usea pressurizedstartingfluid.VaporsarefHammabHe.
1. Removethegascap,checkthefueHHeveHandaddfueHif neces-
sary.
7
Page 8
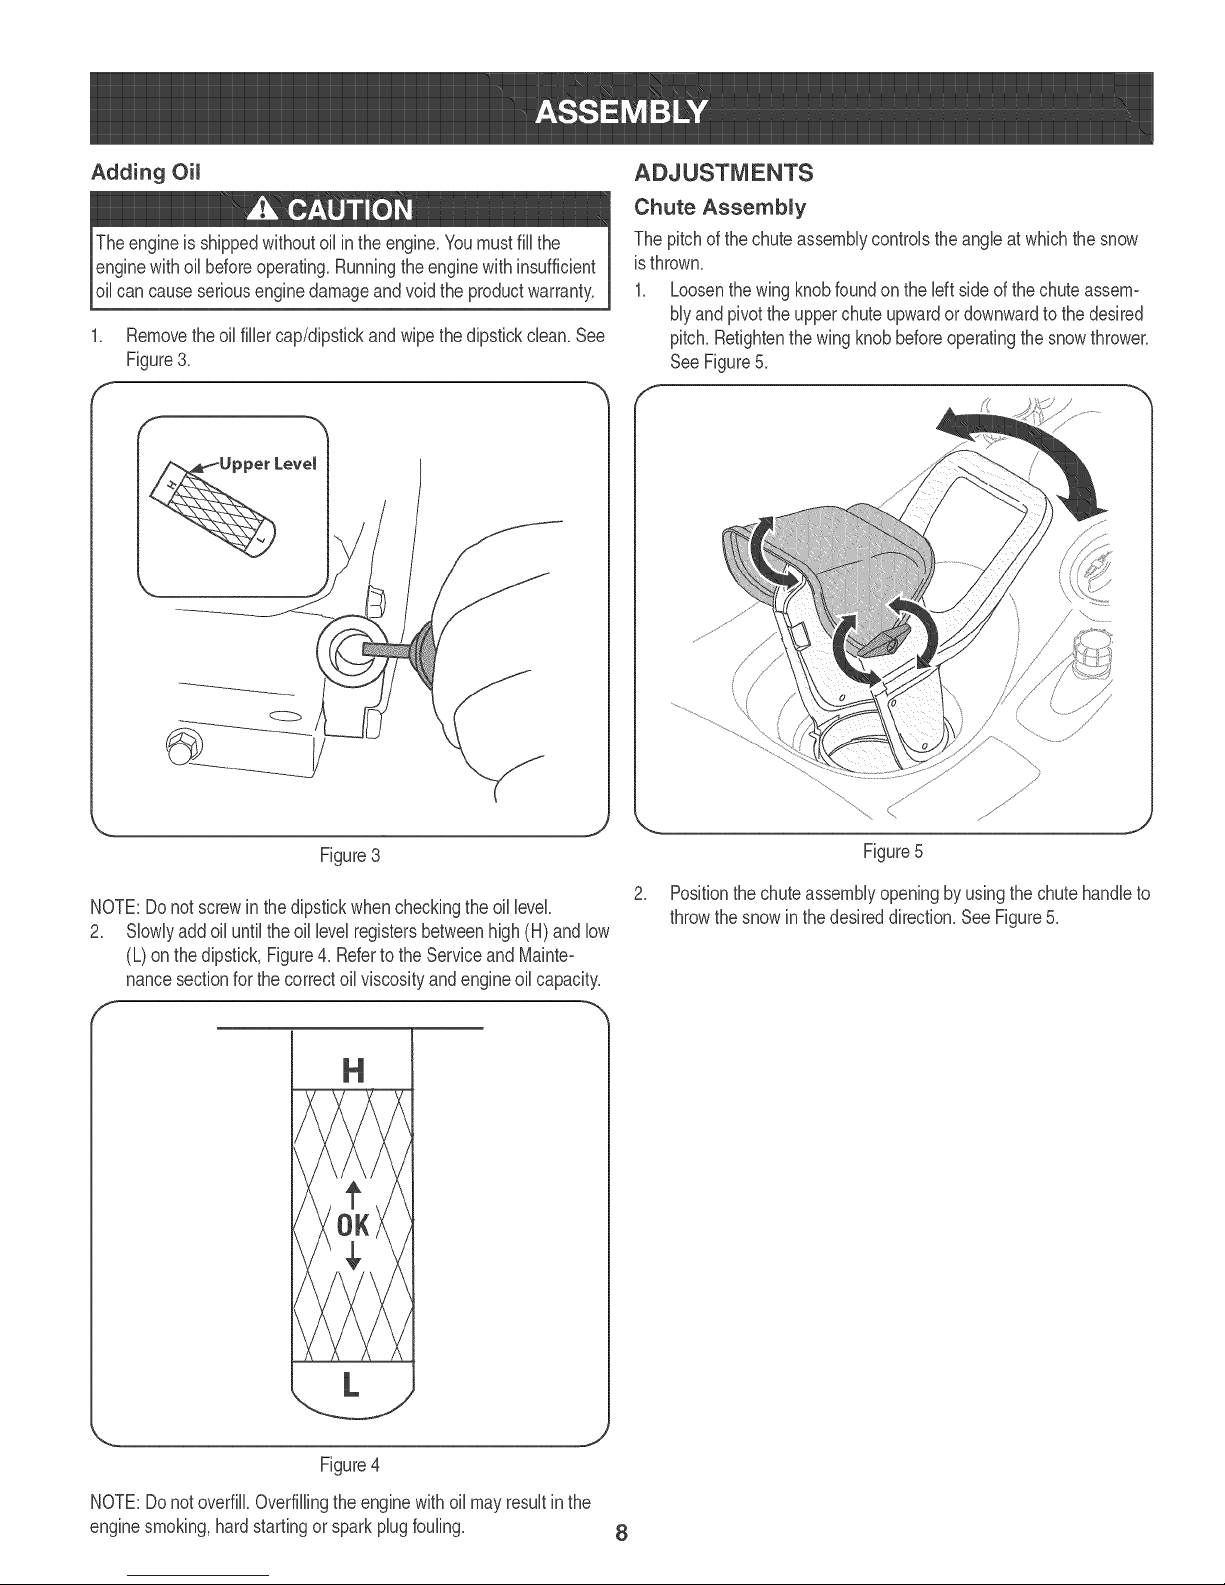
Adding Oim
Theengineis shippedwithoutoilin theengine.Youmustfillthe
enginewithoilbeforeoperating.Runningtheenginewithinsufficient
oilcancauseseriousenginedamageandvoid theproductwarranty.
1. Removetheoil fillercap/dipstickandwipethedipstickclean.See
Figure3.
f
Chute Assembmy
Thepitchofthechuteassemblycontrolstheangleat whichthesnow
isthrown.
1. Loosenthewingknobfoundontheleft sideofthechuteassem-
blyandpivottheupperchuteupwardordownwardtothedesired
pitch.Retightenthewingknobbeforeoperatingthesnowthrower.
SeeFigure5.
/
J
Figure3
NOTE:Donotscrewinthe dipstickwhencheckingtheoil level
2. Slowlyaddoil untiltheoillevelregistersbetweenhigh(H)andlow
(L)onthedipstick,Figure4. Referto theServiceandMainteo
nancesectionforthecorrectoil viscosityandengineoilcapacity.
f
Figure5
Positionthechuteassemblyopeningbyusingthechutehandleto
throwthesnowin thedesireddirection.SeeFigure5_
Figure4
NOTE:Donotoverfill Overfillingtheenginewithoil mayresultinthe
enginesmoking,hardstartingor sparkplugfouling.
8
Page 9

Gas Cap
Chute Assembl
Shave Plate
Nowthatyouhavesetupyour snowthrower,it'simportanttobecome
acquaintedwith itscontrolsandfeatures.RefertoFigure10.
CHOKE LEVER
Activatingthechokecontrolclosesthechokeplateoncarburetorand
aidsin startingengine.
Pressingprimerforcesfueldirectlyintoengine'scarburetor
PRUMER @
toaidin cold=weatherstarting.
UGNUTUONKEY
Theignitionkeyisa safetydevice_it mustbefully I_:"_}
insertedinorderfortheenginetostart.Removethe
ignitionkeywhenthesnowthroweris notinuse.
Figure10
RECOUL STARTER
Thestarterhandleisusedto starttheengine_
GASOLINE CAP
Removethegascaptoaddfuel
AUGER
Whenengaged,theaugersrotationdrawssnowintotheaugerhousing
andthrowsitoutthedischargechute.Rubberpaddiesontheaugers
alsoaidin propellingthesnowthrowerastheycomeincontactwith
thepavemenL
AUGER CONTROL
Locatedontheupperhandle,theaugercontrolhandleis usedto
engageanddisengagedrivetotheauger.Squeezethe controlhandle
againsttheupperhandleto engagetheauger;releaseittodisengage.
NOTE:Donotturnthe ignitionkeyinanattemptto start
theengine.Doingsomaycauseit tobreaL
CraftsmanSnowThrowersconformtothesafetystandardoftheAmericanNationalStandardsinstitute(ANSI).
Meets ANSi Safety Standards
9
Page 10
CHUTE ASSEMBLY
Rotatethedischargechutetotheleftor rightusingthechutehandb.
Thepitchofthedischargechutecontrolstheangleatwhichthesnow
isthrown.Loosenthewingknobonthesideofthedischargechute
beforepivotingthedischargechuteupwardordownwar&Retighten
theknoboncethedesiredpositionhasbeenachbve&
SHAVE PLATE
Theshaveplatemaintainscontactwiththepavementasthesnow
throwerispropelled,allowingsnowcloseto thepavement'ssurfaceto
bedischarge&
BEFORE STARTING THE ENGUNE
machineand inthismanualbefore
1. Thesparkplugwirewasdisconnectedforsafety.Attachthespark
plugwiretothesparkplugbeforestarting.
STARTUNG THE ENGUNE
3ressurizedstarfinc areflammabb.
5. Iftheengineis warm,pushtheprimerbuttononlyonce.
NOTE:Alwayscovertheventholeintheprimerbuttonwhenpushing.
Additionalprimingmaybe necessaryforthefirst startifthetempera-
tureisbelow15° R
6. Graspthe starterhandleandpulltheropeoutslowly,untilitpulls
slightlyharder.Lettheroperewindslowly.
7. Pullthestarterhandlerapidly.Donotallowthehandletosnap
back.Allow ittorewindslowlywhilekeepingafirmholdonthe
handle.
8. Asthe enginewarmsupandbeginsto operateevenly,slidethe
chokeleverslowlytothe 1/2chokeposition.Whentheengine
I I
beginsto runsmoothly,movethechoketo theOFF_ _position.
Iftheenginefails,returnto FULL1"_1choke,thenslowlymoveto
| I
1/2chokethenthe OFF_ _position.
STOPPING THE ENGINE
1. Runtheenginefora fewminutesbeforestoppingto helpdryoffany
moistureontheengine.
2. Tostopthe engineremovetheignitionkeyandstoreitin a safe
place.
3. Wipeallthesnowandmoistureawayfromtheenginecontrols
area.
Toavoidcarbonmonoxidepoisoning,makesuretheengineis
outdoorsin awelPventilatedarea.
1. inserttheignitionkeyintotheslot.SeeFigure11.Donotattempt
toturnthekey.Doingsomaycauseittobreak.
x
\
\
\,
\
....\
Figure11
Muffler,engineandsurroundingareasbecomehotandcancausea
burn.BecarefulanddonottouchwhentheyarehoL
ENGAGUNG THE AUGERS
Engagetheaugerbysqueezingtheaugercontrolagainsttheupper
handle.Releasethecontroltostoptheaugers.
ENGAGUNG THE DRUVE
Liftupslightlyonthehandletoallowtherubberpaddlesonthe auger
tocontactthe pavementand propelthesnowthrowerforwar&Pushing
downwardonthehandlewill raisetheaugersoffthegroundandstop
theforwardmotion.
NOTE:Excessiveupwardpressureonthe handlewillresultin
prematurewearto therubberaugerpaddies,whichisnotcoveredby
thewarranty.
2. MovethechokelevertotheFULL1'_'1chokeposition<cold
enginestart).
3. ifthe engineiswarm,placethechokeintheOFF! I position
insteadofFULL.
4. Pushthe primerfiveto seven(5_7)times,makingsureto cover
theventhob whenpushing.
A
{,
10
Page 11

ThispageUeftintentionallybUank.
11
Page 12
MAUNTENANCESCHEDULE
Followthemaintenanceschedubgivenbeiow.Thischartdescribes
serviceguidelinesoniy.UsetheServiceLogcoBmntokeeptrackof
compbtedmaintenancetasks.To locatethe nearest SearsService
Centeror to schedule service,simply contact Searsat
1-800-4-MY-HOME®.
'I m [d_.] _d_t _=
Eachuse 1. 1. Check
1st5 hours 1. 1. Change.
Every5hours 1. 1. Check.
25 hours 1. 2. Check.
Everyseason/50hours 1. 1. Change
Everyseason/lO0hours 1. 1. Cban, replace,re-gap
Everyseason/Before 1. 1. Lubricate
storage 2. 2. Lubricate
EngineoilbveI.
2. 2. Cban
Snowthrowerandexhaust
area.
Engineoil
Engineoil
2. 2. Cban.
Exhaustarea.
SparkpBg.
Engineoil
SparkpBg
Pivotpoints
Controlhandle
3. 3. Lubricate
ENGINE MAINTENANCE
ine maintenance.
Periodicinspectionandadjustmentoftheengineis essentialifhigh
levelperformanceistobemaintaine&Regularmaintenancewill also
ensurealongservicelife.The requiredserviceintervalsandthetype
ofmaintenanceto beperformedaredescribedinthetableabove.
Followthehourlyorcalendarintervals,whicheveroccurfirst.More
frequentserviceis requiredwhenoperatinginadverseconditions.
Changing Engine Oim
Theengineoil shouldbechangedafterthefirstfivehoursof useand
thenoncea seasonorafterevery50 hoursof use.
NOTE:Checktheoil levelbeforeeachuse andaftereveryfivehours
ofoperationtobesurethe correctoil levelis maintaine&Referto
CheckingOilLevelintheOperationSection.
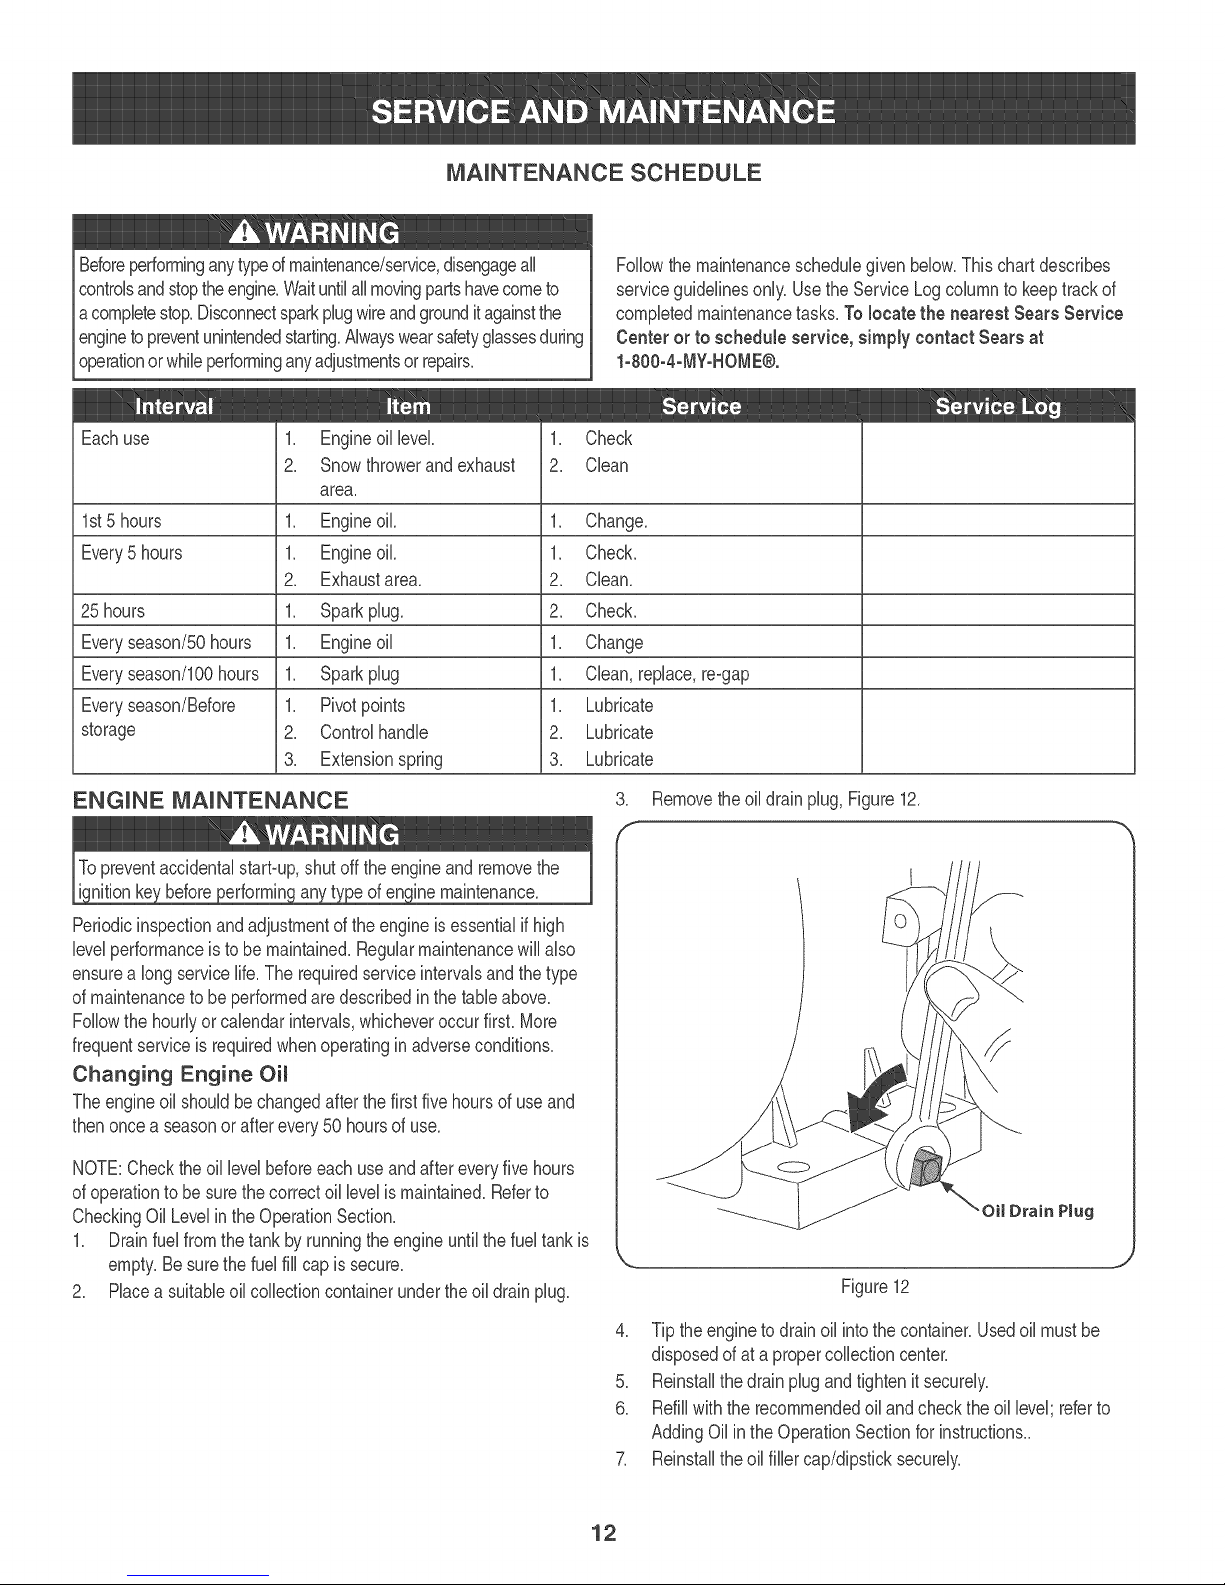
1. Drainfuelfromthetankbyrunningtheengineuntilthefueltankis
empty.Besurethefuel fillcapissecure.
2. Race a suitableoilcollectioncontainerundertheoil drainplug.
.
Removetheoildrainplug,Figure12.
f
/
Figure12
4. Tipthe enginetodrainoilintothecontainer.Usedoil mustbe
disposedofata propercollectioncenter.
5. Reinstallthedrainplugandtightenitsecurely.
6. Refillwiththerecommendedoilandchecktheoil level;referto
AddingOilintheOperationSectionforinstructions_
7. Reinstalltheoil fillercap/dipsticksecurely.
12
Page 13
Thoroughiywashyourhandswithsoapandwaterassoonas
possibieafterhandBgusedoil
NOTE:Pieasedisposeofusedmotoroiiina mannerthatis frbndHyto
theenvironment.Takeit toa recycBgcenteror othercoiiecfioncenter.
OimRecommendations
Whenaddingoiitothe engine,refertotheviscositychartbellow
(Figure13).Engineoiicapacityis600 mi(approx.20 oz.).Donot
overqiLUsea 4-stroke,or anequivaienthighdetergent,premiumquai-
ity motoroiicertifiedtomeetor exceedU.S.automoWemanufacturer's
requirementsfor serviceciassifbafionSG,SRMotoroiis ciassifbdSG,
SFwiiishowthisdesicnationonthecontainer.
DONOTusenonqetergentoilor bstroke engineoil itcouldshorten
theengine'sservicelife.
f -,
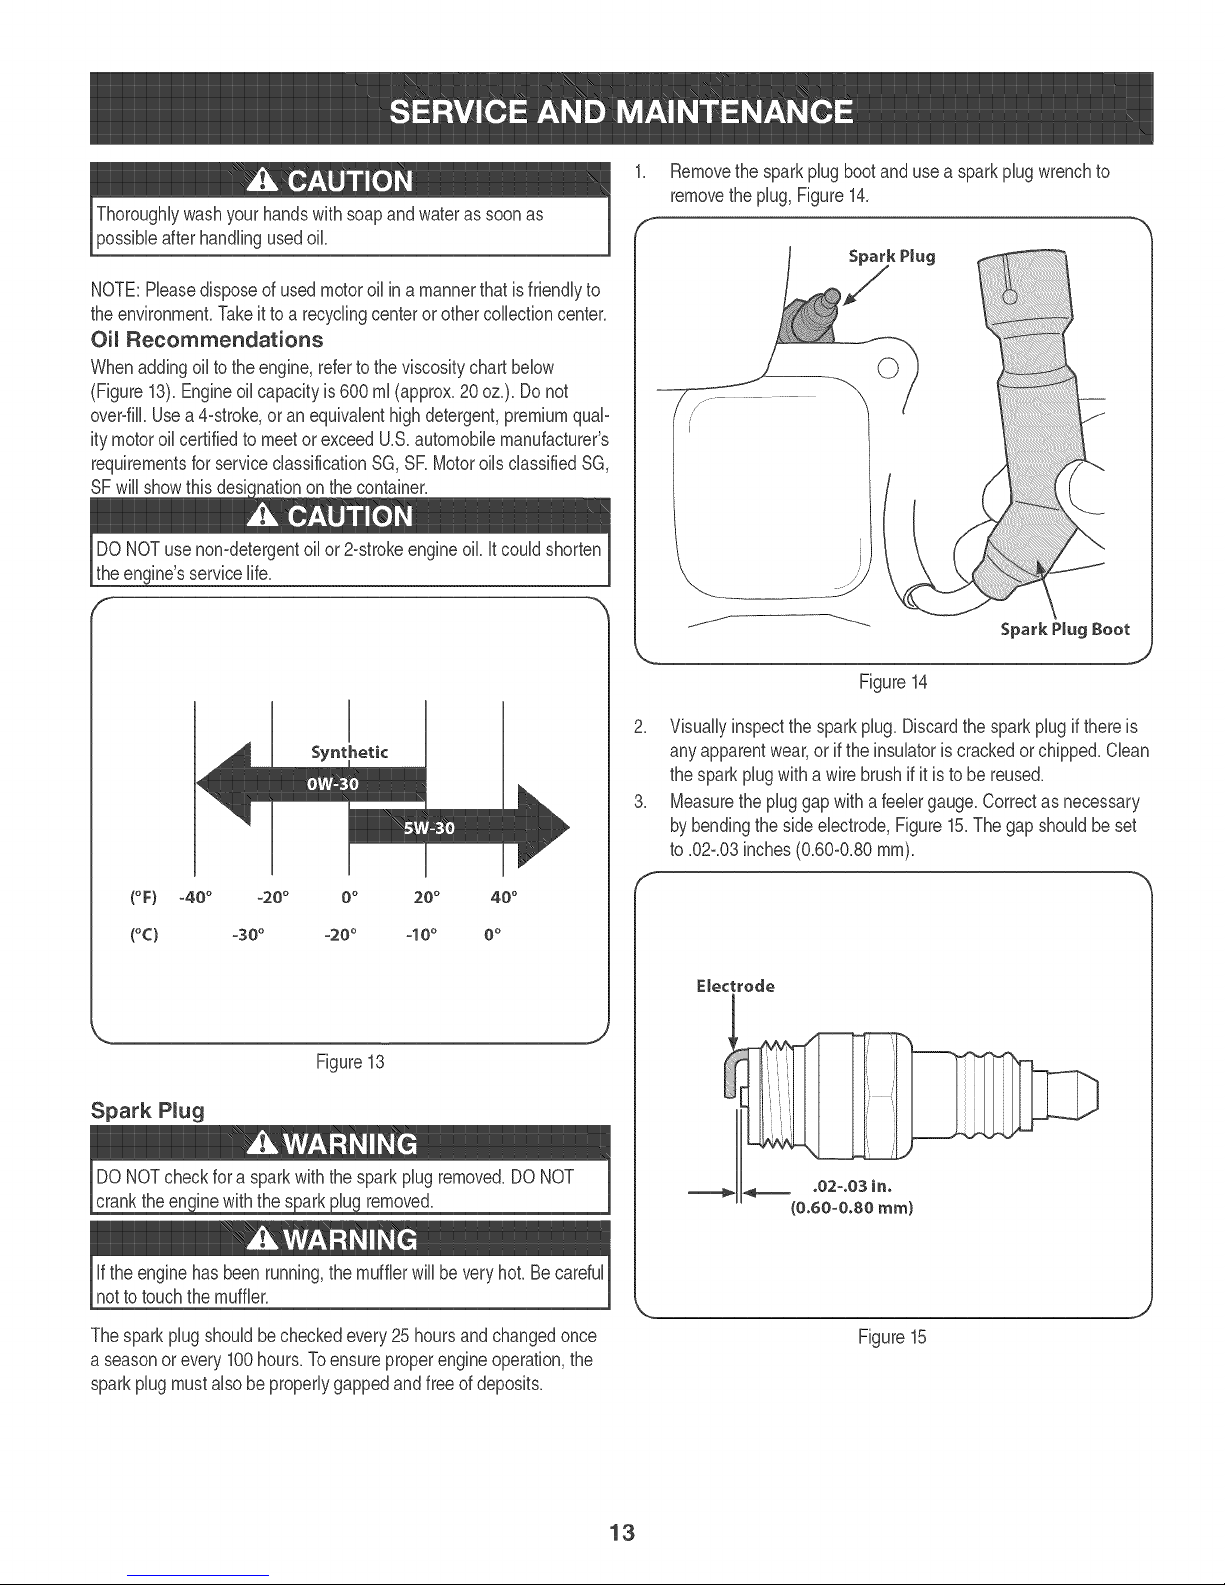
Removethesparkplugbootand usea sparkplugwrenchto
removetheplug,Figure14.
Figure14
Visuallyinspectthe sparkplug.Discardthe sparkplugifthereis
anyapparentwear,oriftheinsulatoriscrackedorchipped.Clean
thesparkplugwitha wirebrushifit isto bereused.
Measurethepluggapwitha feelergauge.Correctasnecessary
bybendingthe sideelectrode,Figure15.Thegap shouldbeset
to .02-.08inches(0.60-0.80ram).
(°F) 40 ° -20° 0o 20 ° 40°
(°C) -30 ° -20 ° qO ° 0 °
Figure13
Spark Plug
cranktheen(inewiththe_ removed.
iftheenginehasbeenrunning,themufflerwillbe veryhoLBecareful
notto touchthemuffler.
Thesparkplugshouldbecheckedevery25 hoursandchangedonce
a seasonorevery100hours.Toensureproperengineoperation,the
sparkplugmustalsobeproperlygappedandfreeofdeposits.
Electrode
_ o02=o03in,
(0,60=0,80 ram)
Figure15
13
Page 14
4. CheckthatthesparkpBgwasheris ingoodconditionandthread
thesparkplugin byhandtopreventcross4hreading.
5. Afterthe sparkpBg isseated,tightenwitha sparkpBgwrenchto
compressthewasher.
NOTE:Wheninstallinga newsparkpBg,tighten1/24urnafterthe
sparkpBgseatstocompressthewasher.Whenreinstallinga used
sparkpBg,tighten1/8-to 1/44urnafterthe sparkpBgseatsto
corn)ressthe washer.
becomever hotandcan damac une.
Cmeaning the Engine
iftheenginehasbeenrunning,allowittocoolforatbast halfanhour
beforecbaning.Periodballyremovedirtbuild-upfromengine.
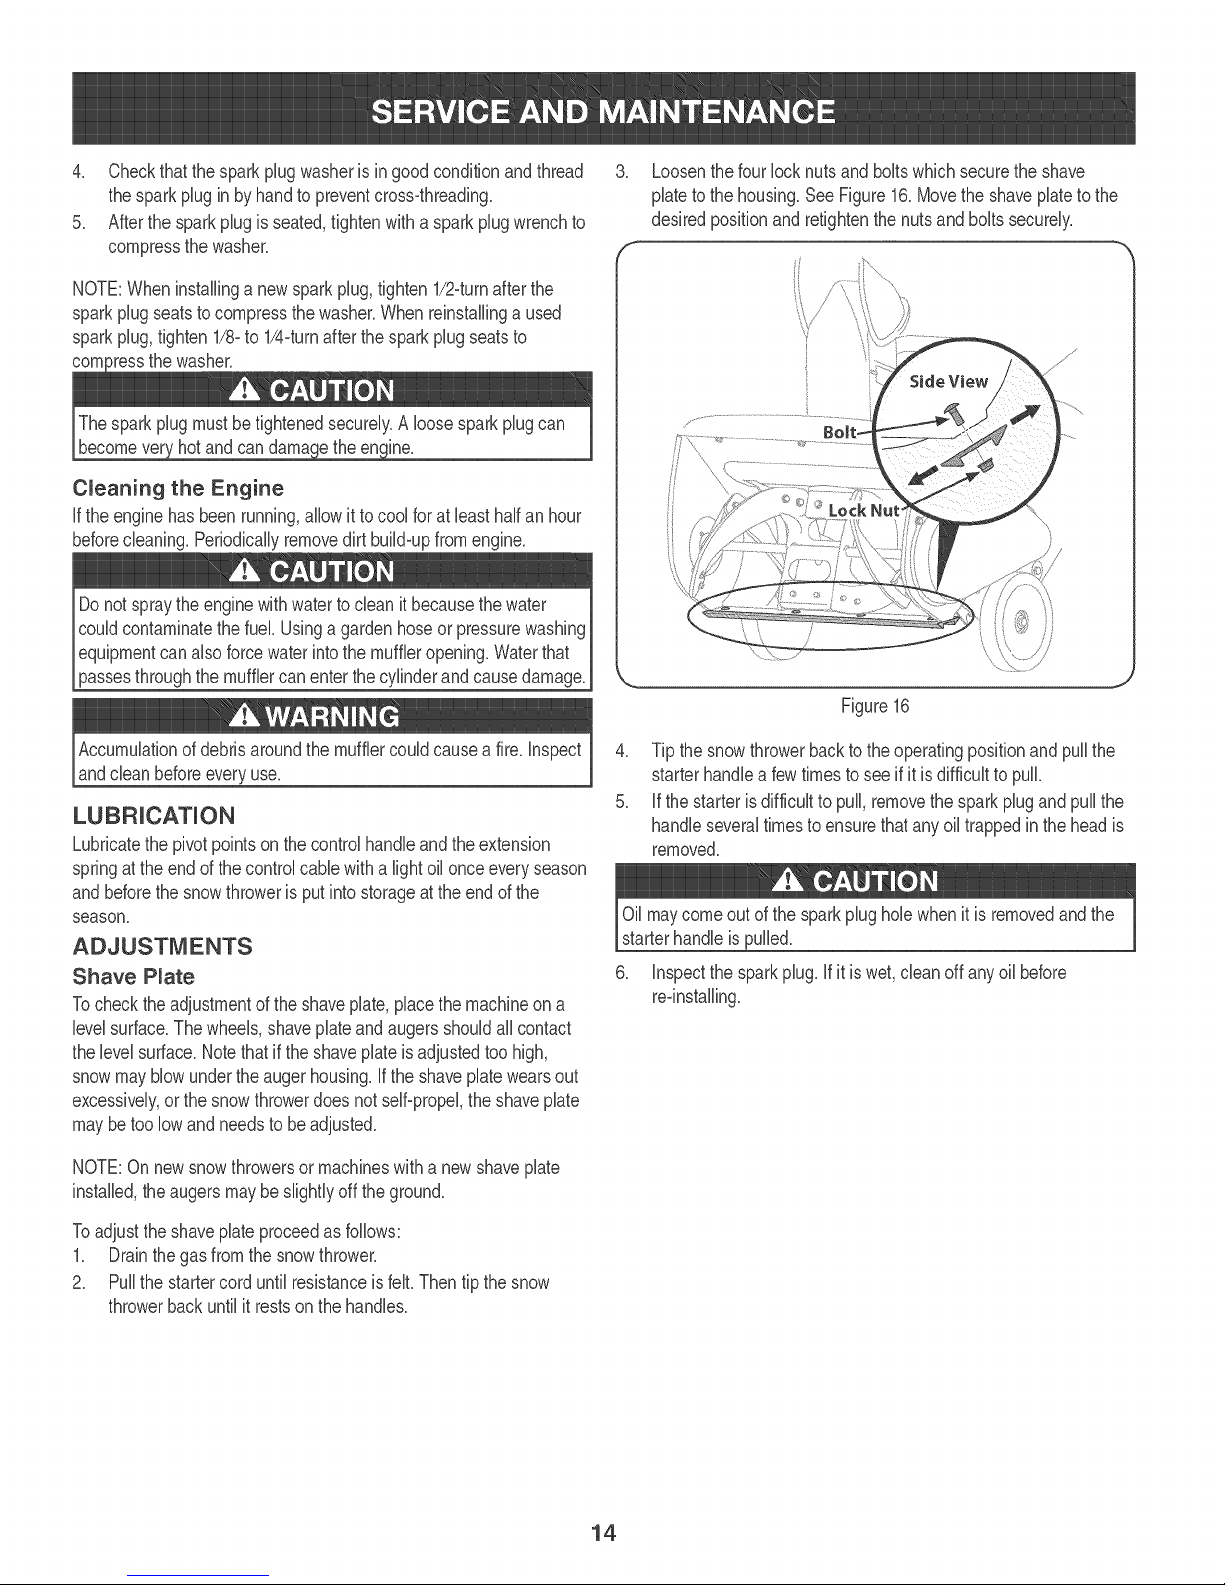
3_ Loosenthefour locknutsandboltswhichsecuretheshave
phte tothehousing.SeeFigure16_Movethe shaveplatetothe
desiredpositionandretightenthenutsandboltssecurely.
Figure16
Accumulationofdebrisaroundthemufflercouldcausea fire. Inspect
andcleanbeforeeveryuse.
Lubricatethepivotpointsonthecontrolhandleandtheextension
springat theendofthecontrolcablewithalightoil onceeveryseason
andbeforethesnowthroweris putintostorageattheendof the
season.
Shave Plate
Tochecktheadjustmentof theshaveplate,placethe machineona
levelsurface.Thewheels,shaveplateandaugersshouldallcontact
thelevelsurface.Notethatif theshaveplateisadjustedtoohigh,
snowmayblowundertheaugerhousing.Iftheshaveplatewearsout
excessively,orthe snowthrowerdoesnotseBpropel,theshaveplate
maybetoolowandneedsto beadjusted.
NOTE:Onnewsnowthrowersor machineswitha newshaveplate
installed,theaugersmaybeslightlyoffthe ground.
Toadjustthe shaveplateproceedasfollows:
1. Drainthegasfromthesnowthrower.
2. Pullthestartercorduntilresistanceisfelt.Thentipthesnow
throwerbackuntilitrestson thehandles.
4_ Tipthesnowthrowerbacktotheoperatingpositionandpullthe
starterhandlea fewtimesto seeifit isdifficulttopull.
5_ if thestarterisdifficultto pull,removethesparkplugandpullthe
handleseveraltimestoensurethatanyoil trappedinthe headis
remove&
Oilmaycomeoutofthesparkplughob whenitis removedandthe
starterhandleis pulled.
6. inspectthesparkplug.if itiswet, cleanoffanyoil before
14
Page 15

Controm Cabme
Asa resultofboth thecontrolcane andthe augerdrivebeltstretching
duetowear,periodicadjustmentsmaybenecessary,iftheauger
seemsto hesitatewhenrotating,proceedasfollows:
Theupperhob inthecontrolhandleprovidesforanadjustmentin
cane tension.Toadjust,disconnecttheendofcontrolcane fromthe
bottomhob in thecontrolhandleand reinsertit intheupperhob.
insertthecane fromtheoutsideas shownin Figure17.
2. Removethebeltbygraspingitfromthebottomofthe augerpulley
and pullingoutward.
NOTE:Pushdownontheidler )ullerto releasethebeltfromunderthe
beltkeeper.SeeFigurel&
Toreplacethebeltfollowtheseinstructionsand referto Figure19:
Figure17
Testthesnowthrowerto seeif thereisa noticeabledifference,if
aftertheadjustmenttothecontrolcane theaugerstill hesitateswhen
rotating,seeBeltReplacementfor instructionson replacingthebell
Chute Assembmy
RefertotheAssemblysectionforinstructionsonadjustingthechute
assembly.
BELT REPLACEMENT
Auger Drive Beret
1. Removethebeltcoverby removingthefivehexscrewsthat
secureittotheframe.SeeFigure18.
f* j /
/
\
//
/
/ /
/
/
/
/
Figure19
1. Pushdownon theidlerpulley.
2. Positionthebelton topof theaugerpulleyand underthebelt
keeper.
3. Routethebeltaroundtheenginepulley.
4. Pushthebeltoverthebottomoftheaugerpulley.
5. Reinstallthebeltcoverremovedearlier.
Figure18 15
Page 16
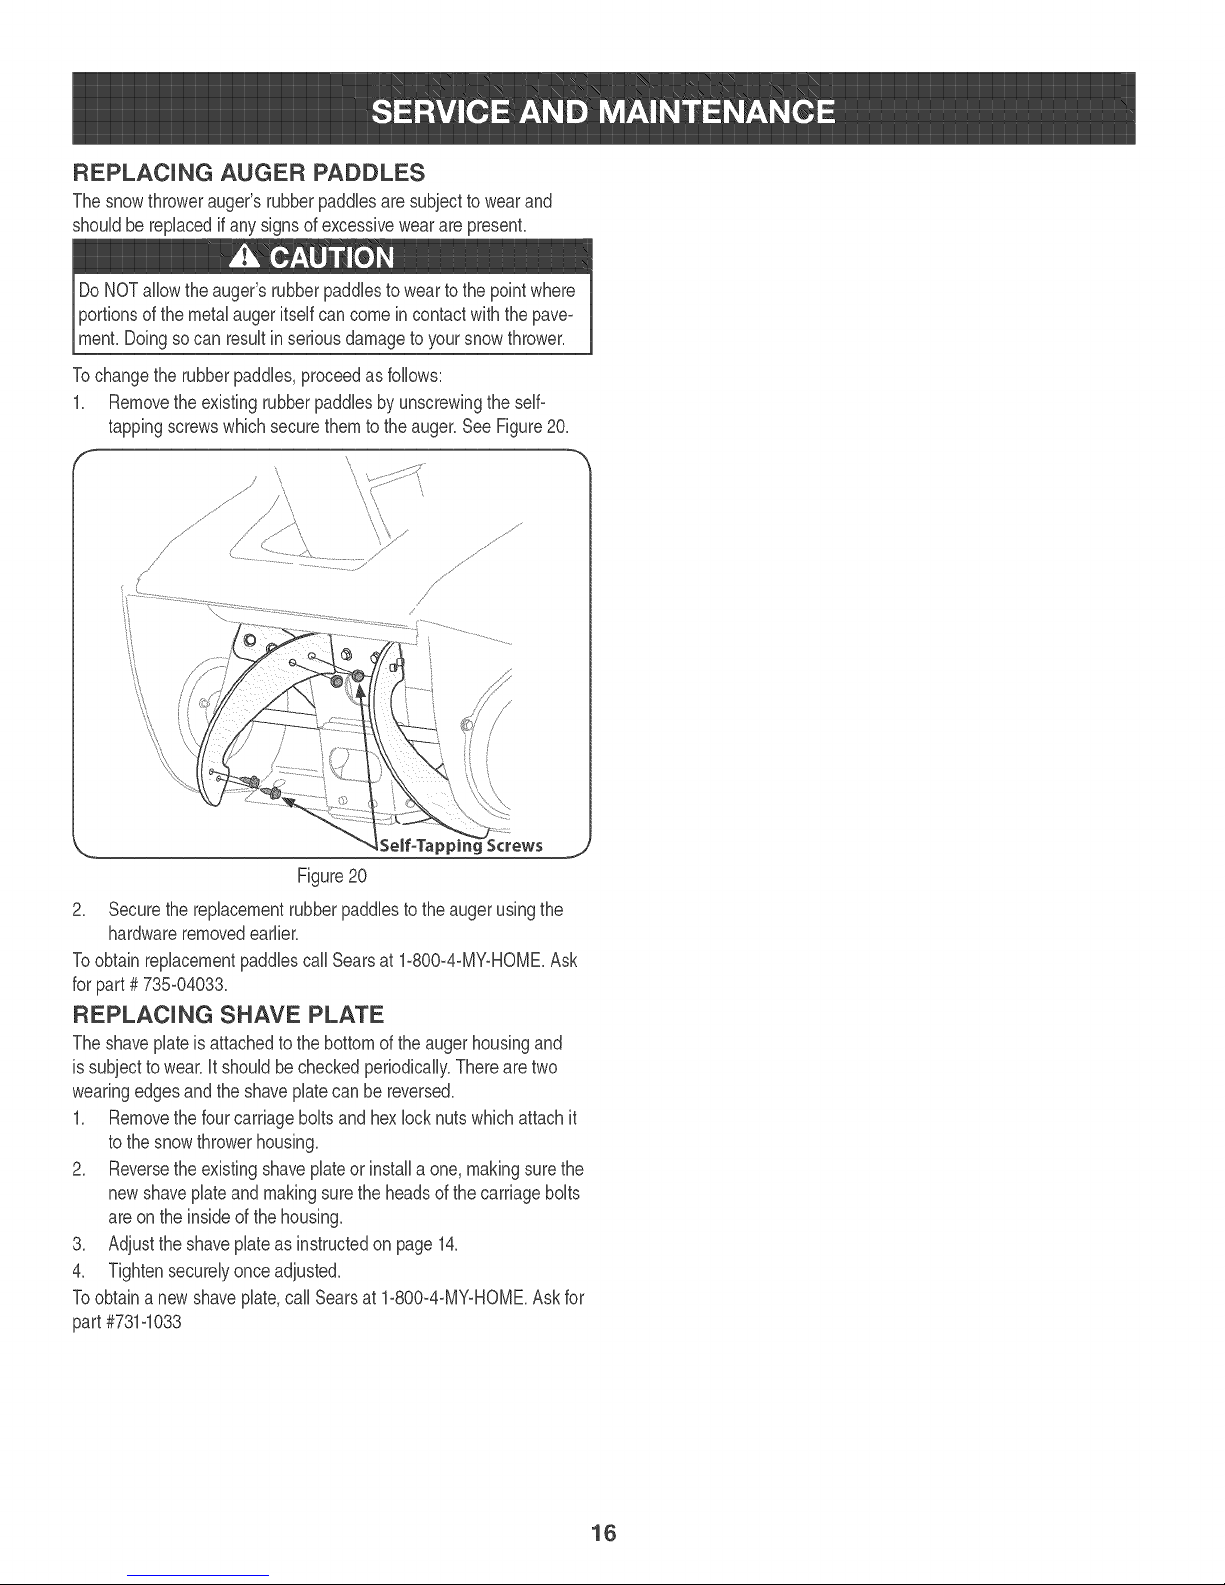
REPLACUNGAUGER PADDLES
Thesnowthrowerauger'srubberpaddiesaresubjecttowearand
shouldbereplacedifanysignsof excessiveweararepresent.
DoNOTallowtheauger'srubberpaddiesto weartothepointwhere
Tochangethe rubberpaddies,proceedasfollows:
1. Removetheexistingrubberpaddiesbyunscrewingtheself-
tappingscrewswhichsecurethemto theauger.SeeFigure20_
_,_ $etf-Tappir j
Figure20
2. Securethereplacementrubberpaddiestothe augerusingthe
hardwareremovedearlier.
ToobtainreplacementpaddiescallSearsat 1-800-4-MY-HOME.Ask
forpart#735-04033.
REPLACUNG SHAVE PLATE
Theshaveplateis attachedtothebottomoftheaugerhousingand
issubjecttowear.it shouldbecheckedperiodically.Therearetwo
wearingedgesandtheshaveplatecanbe reversed.
1. Removethefourcarriageboltsandhexlocknutswhichattachit
tothesnowthrowerhousing.
2. Reversetheexistingshaveplateor installaone,makingsurethe
newshaveplateandmakingsuretheheadsofthecarriagebolts
areontheinsideof thehousing.
3. Adjusttheshaveplateasinstructedon page14.
4. Tightensecurelyonceadjusted.
Toobtainanewshaveplate,callSearsat 1-800-4-MY-HOMEAskfor
part#731-1033
16
Page 17

ifthe snowthrowerwillnotbe usedfor30 daysor longer,or ifit istheendofthesnowseasonwhenthe lastpossibilityof snowisgone,the
equipmentneedsto bestoredproperly.Followstorageinstructionsbelowtoensuretop performancefromthesnowthrowerfor manymoreyears.
PREPARUNG ENGUNE
Enginesstoredover30daysneedto bedrainedoffuelto prevent
deteriorationandgumfromforminginfuelsystemor onessential
carburetorparts,if thegasolineinyourenginedeterioratesduring
storage,youmayneedto havethecarburetor,andotherfuelsystem
components,servicedor replace&
1_ Removeallfuelfromtank byrunningengineuntilit stops.
2_ Changetheengineoil.
3_ Removesparkplugandpourapproximately1oz.(% ml)of clean
engineoil intothecylinder.Pullthe recoilstarterseveraltimesto
distributetheoil,and reinstallthesparkplug.
4_ Cleandebrisfromaroundengine,andunder,around,andbehind
muffler.Applya lightfilmofoilonanyareasthatare susceptible
torusL
, Storeinaclean,dry andwellventilatedareaawayfromanyapo
pliancethatoperateswithaflameor pilotlight,suchasa furnace,
waterheater,or clothesdryer.Avoidanyareawitha spark
producingelectricmotor,orwherepowertoolsareoperate&
latedareas,wherefuelfumesmayreachan openflame,
lightas onafurnace,waterheater,clothesdryerorgasappliance.
PREPARUNG SNOW THROWER
, Whenstoringthesnowthrowerin anunventilatedormetalstop
age shed,careshouldbetakento rustprooftheequipmenLUsing
a lightoilor silicone,coattheequipment,especiallyanychains,
springs,bearingsandcables.
, Removealldirt fromexteriorofengineandequipmenL
, Followlubricationrecommendations.
, Storeequipmentinaclean,dry area.
, if possible,avoidstorageareaswithhighhumidity.
, Keepthe enginelevelin storage.Tiltingcancausefueloroil
leakage.
17
Page 18

or
This section addressesminor service issues.Tolocatethe nearestSears ServiceCenteror to scheduleservice, simply contact Sears
at 1-800-4-MYoHOME®.
"o1_1'£'_:
Enginefaib to start
Enginerunserratically
Engineoverheats
Lossof power
Excessivevibration
1. Fueltankempty,or stab fuel
2. Blockedfuelline.
3. Keynotinsertedalltheway.
4. Sparkplugwiredisconnecte&
5. Faultysparkplug.
6. Enginenotprime&
7. Enginefloodedfromexcessivepriming.
1. Enginerunningonchoke.
2. Fuellineblocked,or stab fuek
3. Wateror dirtinfuelsystem.
4. CarburetoroutofadjustmenL
1. CarburetoroutofadjustmenL
1. Sparkplugwireloose.
2. Ventin gascapplugge&
1. Loosepartsordamagedauger.
1. Filltankwithcleanfreshgasoline.
2. Cleanfuel line.
3. insertkeyall theway.
4. Connectwiretosparkplug.
5. Cleansparkplug,readjustgap,or replace.
6. Primeenginefivetoseventimes.
7. Waitatbast tenminutesbeforestarting.
1. Movechokeleverto OFFposition.
2. Cleanfuel lineandfilltankwithfresh,cleangasoline.
3. Drainfueltank.Refillwithfreshfuel
4. Contacta SearsServiceCenter.
1. Contacta SearsServiceCenter.
1. Firmlyconnectsparkplugwire.
2. ClearvenL
1. Stopengineimmediatelyanddisconnectsparkplug
wire.Checkforpossibledamage.Tightenallbolts
andnuts.Repairasnee@&if problempersists,take
snowthrowertoa SearsServiceDealer.
Snowthrowerfailsto selh 1. AugercontrolcableoutofadjustmenL 1.
propel
2. Augerdrivebeltlooseor damage& 2.
Augerscontinueto rotate 1. AugercontrolcableoutofadjustmenL 1.
Adjustaugercontrolcableasshownin Serviceand
Maintenancesection.
Replaceaugerdrivebell
Adjustaugercontrolcableasshownin Serviceand
Maintenancesection.
Unitfailstodischargesnow 1. Chuteassemblyclogge& 1.
Stopengineanddisconnectsparkplugwire.Clean
chuteand insideof augerhousingwithcleamouttool
or sticL
2. Foreignobjectlodgedinauger.
2. Stopengineimmediatelyanddisconnectthespark
plugwire.Removeobjectfromauger.
3. AugercontrolcableoutofadjustmenL
4. Augerbeltlooseordamage&
3. Adjustaugercontrolcable.
4. ReplaceaugerbelL
You'H fred the answer" and more o_'1manaoemyho_'y_e corn - kw I_'ee
Find this and all your other product manuals online.
Get answers from our team of home experts_
Get a personalized maintenance plan for your home,
Find information and tools to help with home projects,
NEED MORE HELP?
otagt e y@ by Sear,
18
Page 19

19
Page 20

Craftsman Snow Thrower Modem 247.88704
/
/
/
2O
Page 21

Craftsman Snow Thrower Modem 247.88704
1. 684-04236A Shroud
2. 710-04669 HexScrew,10-16x .625
3. 710-1090 HexFlangeScrew,5/16-18x 1.25
4. 712-04063 FlangeLockNut,5/16-18
5. 710-1882 HexFlangeScrew,5/16-18x 1.50
6. 984-04127 HexScrew,1/4-15x .750
7. 720-0284 WingNut,5/16-18
8. 710-04071 CarriageBolt,5/16-18x 1.00
9. 712-04063 FlangeLockNut,5/16-18
10. 710-0451 CarriageBolt,5/16-18x .750
11. 731-04426A UpperChute
12. 731-04388A ChuteHandle
13. 684-04127 LowerChute
14. 749-04459 UpperHandle
15. 747-04165 BailControl
16. 725-0157 CableTie,3/16x .05x 7.4
17. 746-04237 ClutchCable
18. 710-04532 CarriageBolt,5/16-18x 2.00
19. 731-1033 ShavePlate,21"
20. 710-0134 CarriageScrew,1/4o20x .62
21. 712-04064 FlangeLockNut,1/4-20
22. 710-3008 HexScrew,5/16-18x .75
23. 736-0176 FlatWasher,.265x .938x .120
24. 750-04297B Spacer,.875x.320x 1.027
25. 749-04114 LowerHandle
26. 731-04353 LowerChuteRing
27. 731-04886 ChuteAdapter
28. 732-04111 ChuteAdjustmentSpring
21
Page 22

/- ¸\
3
O
O
-4
Page 23

Craftsman Snow Thrower Modem 247.88704
1. 751-10487 FuelCap
2. 751-10023 FuelTank,2 Qt.
3. 790-00134 FuelTankBracket
4. 747-04236 FuelTankSupportWire
5. 726-0205 HoseClamp,.490
6. 751-0535 FuelLineHose
7. 712-04064 HangeLockNut,1/4-20
8. 710-0751 HexBolt, 1/4-20x .620
9. 710-0654A SeresScrew,3/8-16x 1.000
10. 790-00216 EngineBracket
11. 726-0233 PushNut,.25IDx .50OD
12. 726-0154 CableTie,7.5"
13. 756-0416B PulleyHalf,.625IDx .225OD
14. 736-0242 BellWasher,.340x .872x.060
15. 710-0627 HexBolt,5/16-24x .750
16. 756-04232 Pulley,1/2x 6.00
17. 754-0101A V-Belt
18. 790-00045B BeltCover
19. 710-0653 HexScrew,1/4-20x.375
20. 710-0896 HexScrew,1/4-14x .625
21. 710-1005 HexScrew,1/4-14x .500
22. 790-00249 BearingCup
23. 741-04188A BallBearing,.625x 37x 12
24. 712-04063 HangeLockNut,5/16-18
25.
26.
27.
28.
29.
30.
31.
32.
33.
34.
35.
36.
37.
38.
39.
40.
41.
42.
43.
44.
45.
46.
47.
48.
748-0234
790-00238A
684-04168
750-04571
710-0106
726-0299
738-0924A
756-0625
684-04253
750-04757
750-04758
710-0642
736-0329
736-0176
732-0357A
712-0896
684-04227
710-0896
735-04033
735-04032
734-04063
710-0409
736-0119
750-04297B
ShoulderSpacer
IdlerBracket
IdlerPulleyAssembly,1.917
ShoulderSpacer,.280x .785x .538
HexScrew,1/4-20x 1.25
PushCap,1/2
ShoulderScrew,
CableRoller
AugerAssembly,21"
LHSpacer
RHSpacer
HexScrew,1/4-20x .750
LockWasher,1/4
FlatWasher,.265x .938x .120
ExtensionSpring,.33x 1.12
HexLockNut,1/4-28
AugerHousingAssembly,21"
HexScrew,1/4-14x .625
RubberPaddle
SpiralCrescent
Wheel,7 x 1.5
HexBolt,5/16-24x 1.75
LockWasher,5/16
Spacer,.875x .320xl.027
23
Page 24

59
81
79
17
16
67
84
21
66 64
22
20
3
O
O
45
42
@ ,@
Page 25

Craftsman Snow Thrower Modem 247.88704
751-10950
O-RingGowShaft
751-10949
751-10951
751-10952
CylinderHeadAssembly
HeadCoverGasket
RockerArm&BoltAssembly(Incl.50-53)
PivotBolt
RockerArm
ValveAdjustingNut
PivotLockingNut
ValveSpring
intakeValveSpringSeat
ExhaustValveSpringSeat
ExhaustValveAdjuster
PushRodGuidePlate
CarburetorInsulator
CarburetorInsulatorGasket
CylinderHead-Complete
CylinderHeadGasket
GasketKit- Complete
O-Ring
CrankcaseCoverGasket
O-Ring,52 x 1.9
OilSeal,22x 35x 7
Washer,10x 16x 1.5
CylinderHeadGasket
MufflerGasket
HeadCoverGasket
CarburetorInsulatorGasket
Packing
CarburetorGasket
GasketKit- External
O-Ring
Washer,10x 16x 1.5
MufflerGasket
HeadCoverGasket
CarburetorInsulatorGasket
CarburetorGasket
E
7O
49
5O
51
52
53
56
57
58
59
62
4O
79
74
76
2
9
11
84
17
76
9O
7O
79
81
45
2
17
9O
7O
79
45
25
Page 26

751q0948
751q0292
751q0953
751q0954
751o10955
731@5696
751q0657
751q0307
751q0908
751q0910
751q0956
751q0961
751q0962
751q0912
751q0913
751q0948
751q0957
751q0958
751q0370
751q0959
751q0901
751q0639
751q0307
CarburetorKitMajor
SparkPlug
GovernorReturnSpring
ThrottleReturnSpring
RecoilStarterAssembly
RecoilStarterHandle
MufflerStudAssembly
FlywheelKey
Flywheel
CoolingFan
CarburetorAssembly
intakeHeaterBox
intakeHeaterBoxBase
ValveKit
PushRodKit
CarburetorKit- Major
DipstickAssembly
ignitionCoil
Oil DrainPlugandWasherAssembly
MufflerGasket
MufflerAssembly
Primer
Flywheel
NS
73
34
32
91
27
75
92
21
22
47
43
42
54,55
61
NS
2,3
18
16,17
90
39
43
92
26
Page 27

MTD CONSUMER GROUP mNC(MTD), the California Air Resources Board (CARD)
and the United States Environment Protection Agency (U. S. EPA)
Emission Contro_ System Warranty Statement
(Owner's Defect Warranty Rights and Obligations)
EMiSSiONCONTROLSYSTEMCOVERAGEIS APPLICABLETOCERTiFiEDENGINESPURCHASEDiNCALiFORNiAiN2005ANDTHERE-
AFTER,WHICHAREUSEDiNCALiFORNiA,ANDTOCERTiFiEDMODELYEAR2005ANDLATERENGINESWHICHAREPURCHASEDAND
USEDELSEWHEREiN THEUNITEDSTATE&
CaliforniaandelsewhereintheUnitedStatesEmissionControlDefectsWarrantyCoverage
TheCaliforniaAir ResourcesBoard(CARB),U.S.EPAandMTDarepleasedtoexplaintheemissionscontrolsystemwarrantyonyourmodelyear
2006andlatersmalloff-roadengine,in California,newsmalloff-roadenginesmustbe designed,builtand equippedtomeettheStatesanti-smog
standards.ElsewhereintheUnitedStates,newnon-road,spark=ignitionenginescertifiedformodel2005andlater,mustmeetsimilarstandardsset
forthbytheU.S.EPA.MTDmustwarrantytheemissioncontrolsystemonyourengineforthe periodoftimelistedbelow,providedtherehasbeen
noabuse,neglectorimpropermaintenanceofyoursmalloff-roadengine.
Youremissioncontrolsystemmayincludepartssuchasthe carburetor,fuel-injectionsystem,theignitionsystem,andcatalyticconverter,fuel
tanks,fuellines,fuelcaps,valves,canisters,filters,vaporhoses,clamps,connectors,andotherassociatedemission-relatedcomponents.
Whereawarrantableconditionexists,MTDwillrepairyoursmalloff-roadengineat nocostto yourincludingdiagnosis,partsand labor.
MANUFACTURER'S WARRANTY COVERAGE:
Thisemissionscontrolsystemiswarrantedfortwoyears,if anyemission-relatedpartonyourengineisdefective,thepartwill berepairedor
replacedbyMTD.
OWNER'S WARRANTY RESPONSIBIUTmES:
Asthesmalloff=roadengineowner,youareresponsibleforthe performanceofthe requiredmaintenancelistedinyour Owner'sManuakMTD
recommendsthatyouretainallyourreceiptscoveringmaintenancesonyoursmalloff=roadengine,butMTDcannotdenywarrantysolelyforthe
lackofreceiptsorforyourfailureto ensuretheperformanceto allscheduledmaintenance.
Asthesmalloff=roadengineowner,youshouldhoweverbeawarethatMTDmaydenyyourwarrantycoverageif yoursmalloff=roadengineorpart
hasfailedduetoabuse,neglect,impropermaintenanceor unapprovedmodifications.
Youare responsibleforpresentingyour smalloff=roadenginetoan AuthorizedMTDServiceDealerassoonasa problemexists.Thewarranted
repairsshouldbe completedina reasonableamountof time,nottoexceed30 days.
ifyouhaveanyquestionsregardingyourwarrantyrightsand responsibilities,youshouldcontacta MTDServiceRepresentativeat 1-800-800-7310
andaddressisMTDCONSUMERGROURRO.Box361131,ClevelandOH,44136-0019_
DEFECTS WARRANTY REQUmREMENTS FOR 1995 AND LATER SMALL OFF-ROAD ENGmNES:
Thissectionappliesto 1995andlatersmalloff-roadengines.Thewarrantyperiodbeginsonthedatetheengineor equipmentisdeliveredtoan
ultimatepurchaser.
!a) GeneralEmissionsWarrant_
MTDmustwarranttotheultimatepurchaserandeachsubsequentpurchaserthattheengineis:
(1)Designed,built,andequippedsoas to conformwithallapplicableregulationsadoptedbytheAirResourcesBoardpursuantto itsauthorityin
Chapters1and2,Part5,Division26of theHealthandSafetyCode;and
(2) Freefromdefectsin materialsandworkmanshipthatcausethe failureofawarrantedparttobeidenticalin all materialrespectstothepartas
describedin theenginemanufacturer'sapplicationforcertificationfora periodoftwoyears.
!b)Thewarrantyonemissions-relatedpartswillbe interpretedasfollows:
(1)Anywarrantedpartthatisnotscheduledforreplacementas requiredmaintenanceinthewritteninstructionsrequiredbySubsection(c)
mustbewarrantedforthewarrantyperioddefinedinSubsection(a)(2).ifanysuchpartfailsduringthe periodof warrantycoverage,it mustbe
repairedor replacedbyMTDaccordingto Subsection(4)below.Anysuchpartrepairedorreplacedunderthewarrantymustbewarrantedfor
theremainingwarrantyperiod.
(2)Anywarrantedpartthatisscheduledonlyfor regularinspectioninthewritteninstructionsrequiredbySubsection(c)mustbewarrantedfor
thewarrantyperioddefinedin Subsection(a)(2).A statementinsuchwritteninstructionstothe effectof"repairor replaceasnecessary"will
notreducetheperiodofwarrantycoverage.Anysuchpartrepairedor replacedunderwarrantymustbe warrantedfortheremainingwarranty
period.
(3) Anywarrantedpartthatwhichis scheduledfor replacementas requiredmaintenanceinthewritteninstructionsrequiredbySubsection(c)
mustbewarrantedfortheperiodoftimepriortothefirstscheduledreplacementpointforthat part.ifthe partfailspriorto thefirstscheduled
replacement,thepart mustbe repairedor replacedbyMTDaccordingto Subsection(4) below.Anysuchpartrepairedorreplacedunder
warrantymustbewarrantedfortheremainderoftheperiodpriortothefirstscheduledreplacementpointfortheparL
Page 28

(4)Repairorreplacementofanywarrantedpartunderthewarrantyprovisionsofthisarticlemustbeperformedatnochargetotheownerata
warrantystation.
(5)NotwithstandingtheprovisionsofSubsection(4)above,warrantyservicesorrepairsmustbeprovidedatallMTDdistributioncentersthat
arefranchisedtoservicethesubjectengines.
(6)Theownermustnotbechargedfordiagnosticlaborthatleadstothedeterminationthatawarrantedpartisinfactdefective,providedthat
suchdiagnosticworkisperformedatawarrantystation.
(7)Theenginemanufacturerisliablefordamagestootherenginecomponentsproximatelycausedbyafailureunderwarrantyofanywarranted
part.
(8)Throughouttheengine'swarrantyperioddefinedinSubsection(a)(2),MTDwillmaintainasupplyofwarrantedpartssufficienttomeetthe
expecteddemandforsuchparts.
(9)Anyreplacementpartmaybeusedintheperformanceofanywarrantymaintenanceorrepairsandmustbeprovidedwithoutchargetothe
owner.SuchusewillnotreducethewarrantyobligationsofMTD.
(10)Add-onormodifiedpartsthatarenotexemptedbytheAirResourcesBoardmaynotbeused.Theuseofanynon-exemptedadd-onor
modifiedpartsshallbegroundsfordisallowingawarrantyclaimmadeinaccordancewiththisarticle.Theenginemanufacturershallnotbe
liableunderthisarticletowarrantfailuresofwarrantedpartscausedbytheuseofnon-exemptedadd-onormodifiedpart.
__)MTDwill includeaco_yofthefollowingemissionwarrantyLpartslistwitheach newen_q thoseportionsofthelistap#licabletothe
(1)FuelMeteringSystem
, Coldstartenrichmentsystem(softchoke)
•Carburetorandinternalparts
, FuelPump
, FuelTank
(2)AirinductionSystem
, Aircleaner
, Intakemanifold
(3) ignitionSystem
, Sparkplug(s)
, MagnetoIgnitionSystem
(4)ExhaustSystem
, Catalyticconverter
, SAI(Reedvalve)
(5) MiscellaneousItemsUsedin AboveSystem
, Vacuum,temperature,position,timesensitivevalvesandswitches
, Connectorsandassemblies
(6) Evaporativecontrol
, FuelHosecertifiedforARBevaporativeemissionof2006.
, FuelHoseClamps
, Tetheredfuel cap
, Carboncanister
, Vaporlines
GDOC-100174Rev,B
Page 29

Look For ReUevant Emissions DurabiUity Period and
Air Unde× Unformation On Your Engine Emissions LabeU
Engines that are certified to meet the California Air Resources Board (CARB) Tier 2 Emission Standards must
display information regarding the Emissions Durability Period and the Air index. Sears, Roebuck and Co., U.S.A.
makes this information available to the consumer on our emission labels.
The Emissions Durability Period describes the number of hours of actua_ running time for which the engine is
certified to be emissions compliant, assuming proper maintenance in accordance with the Operating & Mainte-
nance Instructions. The following categories are used:
Moderate: Engine is certified to be emission compliant for 125 hours of actual engine running time.
mntermediate: Engine is certified to be emission compliant for 250 hours of actual engine running time.
Extended: Engine is certified to be emission compliant for 500 hours of actual engine running time.
For example, a typical walk-behind lawn mower is used 20 to 25 hours per year. Therefore, the Emissions
Durabimity Period of an engine with an intermediate rating would equate to 10 to 12 years.
The Air mndexis a calculated number describing the relative level of emissions for a specific engine family. The
lower the Air Index, the cleaner the engine. This information is displayed in graphical form on the emissions label.
After July 1,2000, Look For Emissions Compliance Period
On Engine Emissions CompUiance LabeU
After July 1, 2000 certain Sears, Roebuck and Co., U.S.A. engines will be certified to meet the United States
Environmental Protection Agency (USEPA) Phase 2 emission standards. For Phase 2 certified engines, the Emis-
sions Compliance Period referred to on the Emissions Compliance _abei indicates the number of operating hours
for which the engine has been shown to meet Federal emission requirements.
For engines less than 225 cc displacement, Category C = 125 hours, B = 250 hours and A = 500 hours.
For engines of 225 cc or more, Category C = 250 hours, B = 500 hours and A = 1000 hours.
This is a generic representation of the emission labe_typically found on a certified engine.
GDOC-100182Rev.A
29
Page 30

Congratulationsonmakingasmartpurchase.YournewCraftsman®
productisdesignedandmanufacturedforyearsofdependabbopera-
tion.ButlikeaiIproducts,itmayrequirerepairfromtimetotime.That's
whenhavingaRepairProtectionAgreementcansaveyoumoneyand
aggravation.
Here'swhattheRepairProtectionAgreement*incBdes:
, Expertservicebyour10,000professionalrepairspecialists
, Unlimitedserviceandnochargeforpartsandlaboronall
coveredrepairs
, Productreplacementupto$1500ifyourcoveredproductcan'tbe
fixed
, Discountof10%fromregularpriceofserviceandrelatedinstalled
partsnotcoveredbytheagreement;also,10%offregularpriceof
preventivemaintenancecheck
, FastheJpbyphone=wecallitRapidResolution=phonesupport
fromaSearsrepresentative.Thinkofusasa"talkingowner's
manual/'
OnceyoupurchasetheAgreement,asimplephonecall isall thatit
takesfor youto scheduleservice.Youcancallanytimedayor night,or
schedulea serviceappointmentonline.
TheRepairProtectionAgreementisarisk-freepurchase,if youcancel
foranyreasonduringtheproductwarrantyperiod,wewillprovideafull
refund.Or,a proratedrefundanytimeaftertheproductwarrantyperiod
expires.Purchaseyour RepairProtectionAgreementtoday!
SomeJimitations andexclusions apply. Forprices and additional
information in the U.S.A.call 1-800-827-6655.
*Coveragein Canadavaries on some items.Forfull detaib call
SearsCanadaat 1-800-361-6665.
SearsInstallation Service
ForSearsprofessionalinstallationofhomeappliances,garagedoor
openers,waterheaters,andothermajorhomeitems,inthe U.S.A.or
Canadacall1-800-4-MY-HOME®.
3O
Page 31

DedaraciOn de garantia ........................ Pagina 31
Medidas importantes de seguridad .....Paginas 32=34
Etiquetas de seguridad ......................... Pagina 35
Montaje ................................................. Paginas 36=37
Funcionambnto .................................... Paginas 38=40
Servicio y Mantenimbnto ..................... Paginas 41=45
AImacenambnto fuera de temporada..Pagina 46
SoluciOn de problemas ......................... Pagina 47
Acuerdo de protecci6n para
reparaciones .................................... Pagina 51
NOmero de servido .............................. Cubbrta
posterior
GARANTJA UMITADA CRAFTSMAN
Dos ASos en Lanzador de Nieve
Cuandohechofuncionary mantenidoseg_ntodaslasinstruccionessuministradas,siestelanzadordenievefalladebidoa undefectoenmate°
rialohabilidaddentrode dosaSosde lafechaocompra,llameI=800=4MYHOMEhacerlosarreglosparareparaci6nlibre.
Estagarantias61oten@b,validezdurante90dias siesteproductoseutilizaen cualquiermomentoparafinescomercialeso de alquiler.
Duranteel primeraSodela compra,nohabrb,ningOnprecioparael serviciodegarantiaen sucasa. Parasuconveniencia,ende casaelservicio
degarantiatodaviaestarb,disponibledespu_sdel primeraSode lacompra,perounpreciodeviajese aplicarb_Esteprecioseth.renunciado
siustedtransportaallanzadorde nieveaunaposici6nde bajadade Artesanoautorizada.Parala posici6nautorizadamb.scercana,llame
1=8004-MY-HOME@.
Esta gatantiacubre SOLOdefectosen material y habilidad. Searsno pagar_pata:
, Losarficulosprescindibbsquese hacenIbvadospuestosduranteeluse normal,incBso,perono limitadosparapatinarzapatos,platode
afeitado,esquilanalfibres, bujia,filtrodeaire,cinturones,yfiltrodel aceite.
, Revisi6ndemantenimientoest_.ndar,cambiosdeaceite,opuestasa punto.
, Reemplazodeneumb@oo reparaci6ncausadaporpinchazosdesdefueradeobjetos,comeuSas,espinas,tocones,ocristal.
, Neumb@ooreemplazode ruedao reparaci6nqueresultade ropanormal,accidente,uoperaci6nimpropiao mantenimiento.
, Las reparacionesnecesarias@bideal abusedeoperador,incBsoperonolimitadoparadaSarcausadoafectandoobjetosquedoblanel
marcoo elcigOeSal,oel sobreexcesode velocidaddelmotor.
, Reparacionesnecesarias@bidea negligenciadeloperador,induyendoentreotros,daSosmecb.nicoyel@triceocasionadoporun
almacenamientonoapropiado,falla porelusede aceitedegradey/o cantidadnoapropiadao fallaper nodarmantenimientoal equipode
acuerdoconlasinstruccionescontenidasenel manualdeloperador.
, Limpiezaoreparacionesal motor(sistemadecombustible)provocadasporuncombustiblecontaminadouoxidado(viejo).Engeneral,el
combustibledebeutilizarseenunperiodono mayorde 30diasa partirde suadquisici6n.
, Elempejoramientonormaly laropadelosfinesexteriores,oproductoetiquetanelreemplazo.
Estagarantias61oten@b,validezmientraselproductoseutiliceenlos EstadosUnidos.
Estagarantialeotorgaderechoslegalesespecificos,peroustedpodriagozarde otrosderechosen raz6ndesulugarde residencia.
Sears, Roebuckand Co.,Hoffman Estates,IL (}0179
Tipode aceitedelmotor:
Capacidaddeaceitedelmotor:
Capacidaddecombustible:
Bujiadeencendido
Separaci6nde lasbujias:
@SearsBrands,LLC
SAE5W=30
20onzas
2 Cuartosdegal6n
TorchF6RTC
.020"=.030"
N(_metode mode!o.........................................................
Nemero de serie ............................................................
Fecha de compra.........................................................................
RegistreelnOmerodemodelo,nQmerode serie
y fechade compramb.sarriba
31
Page 32

La presenda de este simbolo indica que se trata
de instrucciones importantes de seguridad que
se deben respetar para evitar poner en peligro
su seguddad personal y/o material y la de otras
personas. Lea y siga todas las instrucdones de
este manual antes de poner en funcionamiento
esta rna'quina. Si no respeta estas instrucciones
podria provocar lesiones personales. Cuando
vea este simbolo, ipreste atenci6n a la
advertencia!
PROPOSUCU6N 65 DE CAL_FORNUA
Elescapedelmotordeesteproducto,algunosdesuscomponentes
y algunoscomponentesdelvehicWocontieneno liberansustandas
quimicasqueelestadode Californiaconsideraque puedenprodudr
cancer,defectosdenacimientouotrosproNemasreproductivos.
Esta ma'quina fue construida para ser operada de acuerdo
con las reglas de seguddad contenidas en este manual.
AI igual que con cualquier tipo de equipo motorizado, un
descuido o error pot parte del operador puede producir
lesiones graves. Esta m_iquina es capaz de amputar manos y
pies y de arrojar objetos con gran fuerza. De no respetar las
instrucciones de seguridad siguientes se pueden _roducir
lesiones graves o la muerte.
Su responsabilidad--Restrinja el uso de esta maquina
motorizada a las personas que lean, comprendan y respeten
las advertencias e instrucdones que aparecen en este
manual y en la ma'quina.
6gARgI:BTA$ INSTRg(:(:IONE$
, Leer,entendery seguirtodaslasinstruccionesenlamaquina
yen elmanual(s)antesdeintentarmontary operar.No
hacerlopuederesWtaren lesionesgravesparaeloperadory/
otranseOntes.Guardeestemanualenunlugarseguroparael
futurey regularde referenciayparapedirpiezasde repuesto.
ParapreguntasIlameal, 1-800-659-5917.
, Familiaricesecontodosloscontrolesyconel useadecuado
de losmismos.Sepac6modetenerlamaquinaydesactivarlos
controlesrapidamente.
, No permitanuncaque losnifiosmenoresde14ariesutilicen
estamaquina.Losnifiosde 14ariesenadelantedebenleery
entenderlasinstruccionesde operaci6nynormasdeseguridad
contenidasen estemanualyen lamaquinay debenser
entrenadosy supervisadosporun adWto.
, NuncapermitaquelosadWtosoperenestamaquinasinrecibir
antesla instrucci6napropiada.
, Losobjetosarrojadosporla maquinapuedenproducirlesiones
graves.Planifiqueel patr6nenel quevaa irarrojandonievepara
evitarqueladescargadematerialse realicehacialoscaminos,
losobservadores,etc.
, MantengaalostranseOntes,mascotasynifiosalmenosa 75
piesde la maquinamientrasestaen funcionamiento.Detengala
maquinasialguienseacerca.
, Seaprecavidoparaevitarpatinarseo caerseespecialmente
cuandooperala maquinaenmarchaatras.
Inspeccioneminuciosamenteelareadondeutilizarael equipo.Saque
todoslosfelpudos,peri6dicos,trineos,taNas,cablesy otrosobjetos
extrafiosconlosquepodriatropezaro quepodrianserarrojadospor
la barrena/impWsor.
1. Paraprotegerselosojosutilicesiempreanteojosoantiparras
de seguridadmientrasoperalamaquinao mientraslaajusta
o repara.Losobjetosarrojadosquerebotanpuedenproducir
lesionesocWaresgraves.
2. Nooperelamaquinasinla vestimentaadecuadaparaestaral
aire libreeninvierno.Noutilicealhajas,bufandaslargasuotras
prendassueltasquepodrianenredarseenlaspartesm6viles.
Utiliceuncalzadoespecialparasuperficiesresbaladizas.
3. Useun prolongadory untomacorrientedetrescablescon
conexi6natierraparatodaslasmaquinasconmotoresde
encendidoel_ctrico.
4. Desengranetodaslaspalancasdecontrolantesde arrancarel
motor.
5. Nuncaintenterealizarajustesmientraselmotorest,.enmarcha
exceptoenloscasosespecificamenterecomendadosenel
manualdeloperador.
6. Dejequeelmotory lam_.quinaseadaptenalatemperatura
exteriorantesdecomenzara sacarla nieve.
32
Page 33

MANEJO SEGURO DE LA GASOUNA
Paraevitarlesionespersonaleso daSosmaterialestengamucho
cuidadocuandotrabajecongasolina.Lagasolinaessumamente
infiamableysusvaporespuedencausarexplosiones.Si sederrama
gasolinaendmaosobrela ropasepuedelesionargravementeyaque
sepuedeencender.L_.veselapM y cb.mbiesede ropade inmediato.
, Ufilices61olos recipientesparagasolinaautorizados.
, Apaguetodoslos cigarrillos,dgarros, pipasyotrasfuentesde
combusti6n.
, Nuncacarguecombustibleen lamb.quinaenunespadocerrado.
, Nuncasaquelatapade lagasolinani agreguecombustible
mientraselmotorestacalienteo en marcha.
, Dejequeelmotorse enfriepot Iomenosdosminutosantesde
volvera cargarcombustible.
, NuncaIleneenexcesoeldep6sitodecombustible.Lleneel
tanqueano mb.sdeY2pulgadapotdebajode la basedelcuello
deIlenadodejandoespacioparaladilataci6ndelcombustible.
, Vuelvaa colocarlatapadelcombustibleyajOstelabien.
, Limpieelcombustiblequesehayaderramadosobreel motoryel
equipo.Trasladela mb.quinaa otrazona.Espere5 minutosantes
deencenderel motor.
, Nuncaalmacenelamb.quinao el recipientede combustibleen
unespaciocerradodondehayafuego,chispaso luzpiloto(pot
ejemplo,hornos,calentadoresdeagua,calefactores,secadores
de ropa,etc.).
, Dejequelamb.quinaseenfriepot Iomenos5 minutosantesde
guardarla.
, NuncaIlenelosrecipientesenelinteriordeunvehiculoocami6n
o caiade remolqueconrecubrimientoplb.stico.Coloquesiempre
losrecipientesenelpiso ylejosdelvehiculoantesdeIlenarlos.
, Sies posible,retireel equipoa gasolinadelcami6no remolque
y116neloen el suelo.Siestono es posible,Ileneel equipoen un
remolqueconun contenedorportatil,envezde conunaboquilla
dispensadoradegasolina.
, Mantengalaboquilladispensadoraen contactoconelbordedel
dep6sitode combustibleoconla aberturadelrecipienteen todo
momento,hastaterminarlacarga.Noutiliceundispositivode
apertura/cierredeboquilla.
FUNCUONAMUENTO
1. Nopongalasmanoso lospiescercadelaspiezasrotatorias,
enlacajade la barrena/ impulsoro en elmontajedelcanalde
descarga.Elcontactocon laspiezasgiratoriaspuederesultaren
la amputaci6ndemanoso pies.
2. La palancadecontrolde la barrena/ impulsores undispositivo
deseguridad.Nuncaevitesufuncionamiento.De hacerlola
operaci6ndela mS.quinaesriesgosay puedeocasionarlesiones.
3. Laspalancasdecontroldebenfuncionarbienen ambas
direccionesy regresarautomb.ticamentea laposici6nde
desengranecuandose lassuelta.
4. Nuncaoperelamaquinasifaltaunmontajedelcanalosi
el mismoestada_ado.Mantengatodoslosdispositivosde
seguridadensulugaryen funcionamiento.
5. Nuncaenciendaelmotoren espacioscerradosoenunazona
conpocaventilaci6n.Elescapedelmotorcontienemon6xidode
carbono,ungasinodoroyletal.
6. Noutilicela mb.quinabajola infiuenciadelalcohololas drogas.
7. Elsilenciadoryel motorsecalientany puedencausar
quemaduras.No lostoque.Mantengaa losniSosalejados.
8. SeasumamenteprecavidocuandooperelamS.quinasobreuna
superficiecongravao cuandolacruce.Mant_ngasealerta porsi
sepresentanpeligrosocultoso tr_.nsito.
9. Tenga cuidado cuando cambie de direcci6n ocuando opere la mSquina en
pendientes.
10. Planifique el patr6n en el que vaa ir arrojando nieve para evitar que
la descarga de material se produzca hacia lasventanas, las paredes,
losautom6viles, etc. y evitar asi posiblesdahos matedales o lesiones
producidas por los rebotes.
11. Nunca diriia la descarga hacia los nihos, losebservadores o las mascotas ni
deie que nadie se pare delante de lamb,quina.
12. No sebrecargue la capacidad de lamSquina tratando de sacar la nieve muy
rApidamente.
13. Nunca opere esta mb,quina sin buena visibilidad o iluminaci6n. Siempre
debe estar seguro de que est5 bien afirmado y sujetando firmemente las
maniias. Camine, nunca corra.
14. Corte la corriente a la barrena/impulsor cuando transporte la mSquinao
cuando lamisma no estA en use.
15. Nunca opere la mAquina aalta velocidad de desplazamiento sobre
superficies resbaladizas. Mire hacia abajo y hacia atrb,sy tenga cuidado
cuando vaya marcha atrb,s.
16. Si la mSquina comenzara a vibrar de manera anormal, detenga elmotor,
desconecte el cable de la buiia y p6ngala de manera que haga masa contra
el motor. Inspeccione lamb,quina minuciosamente para vet siest_ dahada.
Reparetodos los dahos antes de encender yoperar lamAquina.
17. Desengrane todas laspalancas de control ydetenga el motorantes dedeiar
la pesici6n de operaci6n (detr_s de las manijas). Espere aque la barrena/
impulsor se detenga por completo antes de destapar el montajedel canal o
realizar ajustes e inspecciones.
18. Nunca penga las manos en las aberturas de descarga o de recelecci6n.
Nodestape el montaje del canal mientras elmotor estb,enfuncionamiento.
Antes de destaparlo, apague elmotor y permanezca detrb,s de las manijas
hasta quetodas las partes m6vilesse hayan detenido.
19. Use s61ounionesy accesodos aprobados per el fabricante (porejemplo,
pesaspara las ruedas, cadenas para los neumaficos, cabinas, etc.).
20. Paraencender elmotor,iale de la cuerda lentamente hasta que sienta
resistencia, luegojale r_pidamente. El repliegue rSpido de la cuerda de
arranque (tensi6n de retroceso) le jalarb_lamano y el braze hacia el motor
ragsr_pido de Io que usted puede soltar. El resultado pueden ser huesos
rotos, fracturas, hematomas oesguinces.
21. Sise presentan situaciones que no est_n previstas en este manual,sea
cuidadoso y use elsenfido cemOn.P6ngase en contacto con Asistencia
al Cliente para solicitar ayuda y el hombre del distribuidor de servicio mSs
cercano.
33
Page 34

DESPEJE DE UN CANAL DE DESCARGA
OBSTRUiDO
EIcontactodelasmanoscon eIirnpuborrotatorioqueest&dentrodeI
canaldedescargaesla causarrlb.scorrl_ndebsionesasodadascon
lasmb.quinasquitanbve.Nuncause sumanoparalimpiareIcanal de
descarga.
ParadespejareIcanak
1. iAPAGUEELMOTOR!
2. Espere10segundosparaestarsegurode quelascucHias deI
motorhandejadoderotar.
3. Utilicesiempreunaherramientadelimpieza,nouselasmanos.
MANTENUMUENTO Y ALMAOENAMUENTO
1. Nuncaalterelos dispositivosdeseguridad.Controb
peri6dicamentequefuncionencorrectamente.Remitasealas
seccionesde mantenimientoyajustede estemanual.
2, Antes de realizar lalimpieza, reparar o revbar la mAquina,desengrane
todas las palancas de control y detenga el motor, Espere a que la barrena/
impulsor se detenga per cempleto, Desconecte el cane de la buiia y
p6ngale hacbndo masa contra el motor para evitar quese encbnda
accidentalmente,
3, Controle frecuentemente que todos los pernos y tornillos est6n bien
ajustados para comprobar que la mAquinase encuentra encondiciones
seguras de funcionambnto, AdemAs,haga una inspecci6n visual de la
mAquinapara verificar si estAdahada,
4, No cambb la configuraci6n del reguladordel motor ni acelere demasiado
el mismo, El regulador del motorcontrola la velocidad maxima segura de
funcionambnto del motor,
5, Las placas de raspado y las zapatasantideslizantes quese usan con la
mAquinaquitanbve sedesgastan y se dahan, Para proteger su seguridad,
verifique frecuentemente todos los componentes y reemplAcelos s61ocon
partes de los fabricantes de equipos originales (OEM), "iEI use de piezas
que nocumplen con las especificaciones del equipo original puede resultar
en rendimiento inadecuado ademAs de poneren rbsgo la seguridad!"
6, Revise las palancas de control peri6dbamente para verificar queengranen
y desengranen adecuadamente y ajOstelossi es necesario, Consulte la
seccidn de aiustes de este manual del operador paraobtener instrucciones,
7, Mantenga o reemplace las etiquetas de seguridad e instrucciones segOn
sea necesario,
8, Respete las normas referentes a la disposbi6n correcta y las
reglamentaciones sobre gasolina, aceite, etc, para proteger el medio
ambiente,
9, Antes de almacenar la mAquina enci6ndala unos minutos para sacar la
nbve que haya quedado en la misma y paraevitar asi que secongele la
barrena/impulsor,
10, Nunca almacene la maquina oel recipiente de combustible en un espacio
cerrade donde hayafuego, chbpas o Bz piloto come per ejemplo,
cabntadores de agua, hornos, secadores de ropa, etc,
11, Consulte sbmpre el manual del eperador para obtener instrucciones
adecuadas para el almacenambnto fuera de temporada,
12, Verifique frecuentemente la linea de combustibb, el tanque, el tapdn,y los
accesofios buscando rajaduras o p6rdidas, Reemplace de ser necesario,
13, No de arranque al motorsi no estA la bujia de encendido.
14. SegOnlaComisidndeSeguridaddeProductosparael
ConsumidordelosEstadosUnidos(CPSC)yla Agencia
de ProteccidnAmbientaldelosEstadosUnidos(EPA),este
productotieneunavidadtflmediadesiete(7)aSos660horasde
funcionamiento.AI finalizarla vidadfilmedia hagainspeccionar
anualmenteestaunidadporundistribuidordeservicioautorizado
paracerciorarsede quetodoslossistemasmecb.nicosy de
seguridadfuncionancorrectamentey notienenexcesivo
desgaste.SinoIohace,puedenproducirseaccidentes,bsiones
o lamuerte.
NO MODUFUQUE EL MOTOR
Paraevitarbsiones gravesolamuerte,nomodifiqueelmotorbajo
ningunacircunstancia.Si cambialaconfiguracidndel reguladordel
motor,_stepuededescontrolarsey operaravelocidadesinseguras.
Nuncacambielaconfiguraci6ndefb.bricadelreguladordelmotor.
AWSO REFERUDO A EMUSUONES
Losmotoresqueestancertificadosycumpbn con lasregulaciones
de emisionesfederalesEPAy deCaliforniaparaSORE(Equipos
pequeSostodoterreno)estancertificadosparaoperarcongasolina
comOnsinplomoy puedenincluirlossiguientessistemasde control
de emisiones:Modificaci6nde motor(EM),catalizadoroxidante(OC),
inyecci6ndeaire secundaria(SAI) ycatalizadordetresvias(TWC)si
estanequipadosde esamanet&
Amertiguader de chispas
Estambquinaestaequipadaconunmotorde combusti6ninternoy
nodebesetutilizadaenocercade unterrenoagrestecubiertopot
bosque,malezaso hierbaexceptoque elsistemadeescapedel
motorest_equipadoconunamortiguadordechispasquecumpla
conlasbyeslocaleso estatalescorrespondientes(encasode
existir)
Si seutilizaunamortiguadorde chispaseloperadorIodebemantener
en condicionesde usoadecuadas.Enel Estadode Californialas
medidasanteriormentemencionadassonexigidaspot ley(Articulo
4442delC6digode RecursosPOblicosde California).Esposible
queexistanbyes similaresenotrosestados.Lasbyesfederalesse
aplicanenterritoriosfederales.
Puedeconseguirelamortiguadordechispasparael silenciadora
tray,s desudistribuidorde mantenimientode motoresautorizadomb.s
cercanoo poni_ndoseencontactoconeldepartamentode servicios,
ApartadoPostal361131Cleveland,Ohio44136@019.
34
Page 35

S mbe[esdeseguridad
En esta p_igina se presentan y descr]ben los simboJos de seguridad que pueden aparecer en este producto. Lea, entJenda y cump[a todas [as
]nstrucc]ones ]ncluidas en [a m_iquina antes de [ntentar realJzar el montaje de [a un]dad y uti[Jzar[a.
i u E Bl _ E _m E E illl_
LEA EL(LOS) MANUAL(ES) DEL OPERADOR
Lea, ent]enda y cumpla todas [as ]nstrucc]ones ]nclu]das en el(los) manuales antes de ]ntentar
real]zar el montaje de [a un]dad y ut]l]zarla.
ADVERTENCIA- CUCHILLAS GIRATORIAS
MJentras [a m_iquina est.1 en fundonamJento mantenga [as manos fuera de [as aberturas de entrada y
de descarga. En el interior hay cuch]lhs g]rator]as
ADVERTENCIA- CUCHILLAS GIRATORIAS
M]entras la m_iquina est.1 en fundonam]ento mantenga [as manos fuera de [as aberturas de entrada y
de descarga. En el interior hay cuch]llas g]rator]as
ADVERTENCIA- CUCHILLAS GIRATORIAS
No ponga [as manos o los pies cerca de [as pJezas rotatorias, en [a caja de [a barrena/motor o
en el montaje de[ canal de descarga. El contacto con [as p]ezas g]ratodas puede resultar en [a
amputad6n de manos o pies.
ADVERTENCIA- OBJETOS ARROJADOS
Esta m_iquina puede [evantar y arrojar objetos [o cua[ puede causar [esiones personales graves.
ADVERTENCIA- LA GASOONA ESINFLAMABLE
Deje que el motor se enfrie por Io menos dos m]nutos antes de cargar combustible.
ADVERTENCIA- MONOXIDO DE CARBONO
Nunca encienda el motor en espados cerrados o en una zona con poca vent][ad6n. El escape de[
motor cont]ene mon6x]do de carbono, un gas ]nodoro y [etaL
ADVERTENCIA- DESCARGAS ELECTRICAS
No use el arranque el@ctrJco del motor bajo la [[uv]a
35
Page 36

NOTA:LasreferendasaHadoderechooizquierdodeHamb.quina
quitanievesedeterminansitu_.ndosedetr_.sdeHaunidaden posici6n
deoperad6n(permanedendodirectamentedetrb.sdeHamb.quina
quitanieve,mirandohaciaeHpaneHdeHamanija).
EXTRACCI6N DE LA UNIDAD DE LA CAJA
1. Cortelasesquinasdela cajade cart6ny exfiendalosladosde
maneraquequedenpianossobreeipisoQuiteydescartetodos
losinsertosdeempaque.
2. SaqueHamb.quinaquitanievedeHacaja.
3. AsegOresedevadarcompHetamenteHacajaantesdetirarHa.
Colocaci6n de la barra de control superior
1. GireHabarradecontroHsuperiorhastaHaposM6ndeoperad6n,
comeseiHustraenHaFigura1hastaquequedeen suHugar,
cuidandodenopeHHizcareHcabHeeneHproceso.
f- ,,
2. AjusteHasperiHHasdeaHetasparasujetarHabarraensuHugar.
VeaHaFigura2.
Figura2
Figura1
Recomendaciones sobre el combustible
UtiHicegasoHinaparaautom6viHes(sinpHomoobajopHomopara
minimizarHosdep6sitosenHac_.marade combusti6n)conun minimo
de 87octanes.SepuedeusargasoHinacon hastaun 10%deetanoH
o un15%deMTBE(6termetiHicoterciario-butiHico).Nuncauseuna
mezcHadeaceitey gasoHinani gasoHinasucia.Evitequeseintroduzca
suciedad,poHvoo aguaeneHdep6sitodecombustibHe.NOutiHice
gasoHinaE85.
, CarguecombustibHeen unb.reabienventiHadayconeHmotor
apagado.NofumenipermitaHHamaso chispaseneHHugardonde
secargacombustibHeo seaHmacenaHagasoHina.
, NoHHeneenexcesoeHdep6sitodecombustibHe.Despu6sde
cargarcombustibHe,asegOresedequeeHtap6ndelldep6sitoest_
biencerradoy asegurado.
, Tengacuidadodeno derramarcombustibHeaMcargarHo.EH
combustibHederramadoosusvaporesse puedenincendiar.Si se
derramacombustibHe,asegOresedequeeHb.reaest_secaantes
de arrancareHmotor.
, EviteeHcontactorepetidoo proHongadoconHapieHo HainhaHaci6n
de Hosvapores.
Carga de combustible
TengamuchocuidadoaMtrabajarcongasoHina.LagasoHinaes
sumamenteinfHamabHey susvaporespuedencausarexpHosiones. I
NuncaagreguecombustibHea Hamb.quinaeninterioresnimientraseHI
motorest,.caHienteoen funcionamiento.ApaguecigarriHHos,cigarros,I
pipasy otrasfuentesde combusti6n. J
SiempremantengaHasmanosy lospiesaiejadosdeHaspiezas
m6viiesdeiequipo.Noutiiicefiuidoscomprimidosparaarrancar.Los
vaporessoninfiamabies.
36
Page 37

1. Extraigalatapadelcombustible,controleelnivelycarguemb.s
combustibledesernecesario.
Procedimiento paraagregar aceite
Elmotorseenviasinaceiteenelmotor.Antesdeponerlambquina
enmarchadebecargaraceiteenelmotor.Sisehacefuncionarel
motorsinsuficienteaceitepuededaiarsegravementeyseproducto
lagarantia.
1. Retireeltap6ndellenadodeaceite/lavarillademedici6nylimpie
lavarillademedici6ndeaceite.VealaFigura3.
f -,
NOTA:NoIolleneen exceso.Elllenadoexcesivodeaceitepuede
hacerqueel motorgenerehumo,quecuestearrancarloo quefallela
bujia.
AJUSTES
Montaje demcanal
Lainclinaci6ndelmontajedelcanalcontrolael b.ngulocon elquese
arrojalanieve.
1. Afiojelaperillaa mariposaqueseencuentradelladoizquierdo
del montajedelcanalygireel canalsuperiorhaciaarribao hacia
abajohastaalcanzarlainclinaci6ndeseada.Vuelvaa ajustar
laperillaamariposaantesdeponerla mbquinaquitanieveen
funcionamiento.
2. Posicionelaaberturadelmontajedelcanalconlamanijadel
canalparaarrojarlanieveenla direcci6ndeseada.Veala Figura
5.
f
Figura3
NOTA:Noajustelavarillade medici6ncuandocontrolel nivelde
aceite.
2. Agregueaceitelentamentehastaqueel registromarque
entrenivelalto(H)y bajo(L),Figura4. Consultelasecci6n
Mantenimientodel motorparavet laviscosidadycapacidadde
aceitedel motorcorrectas.
f
/
/
Figura5
J
\
Figura4
Page 38

Manija dei arrancador
de retroceso
Llave de
encendido _
Cebador
Tapa de
combustible
Montaje dei canal
Piaca de raspado
Ahoraqueyahaajustadosumaquinaquitanbveparael
funcionamiento,es importantefamiNarizarseconsuscontrobsy
caracteristicas.ConsultelaFigura10.
Control de la
barrena
Manija de control
Figura10
ARRANCADOR DE RETROCESO
Lamanijadel arrancadorseutilizaparaarrancarelmotor.
TAPA DEL COMBUSTIBLE
Saquelatapade la gasolinaparaagregarcombustible.
PALANCA DEL CEBADOR
AIactivarelcontroldelcebadorsecierralaplacade obturaci6ndel
carburadory seayudaaencenderel motor.
AIpresionarelcebadorseenvfacombustibledirectamentet_'(/_-<_"_'_
alcarburadordelmotorparafacilitarelarranquecuando
hacefrfo.
LLAVE DE ENCENDIDO
La Navede encendidoes undispositivodesegurida& I_
Debeestarcompletamenteinsertadaparaque elmotor
arranque.RetirelaNavede encendidocuandonousela
maquinaquitanieve, iO
NOTA:Nogire laNavedeencendidoparaintentar
arrancarelmotor.AIhacerlopodriaromperla.
Cumple con los estandares de seguridad de ANSi
LasmbquinasquitanieveCraftsmancumpbn conlosestandaresdeseguridaddelInstitutoEstadounidensede EstandaresNacionabs(ANSI).
CuandoestD.engranada,la rotaci6ndelabarrenadirigelanieve
dentrode lacajadela barrenay la arrojahaciaafuerapotel canalde
descarga.Laspaletasdecauchodelas barrenastambi_nayudana
impulsarla unidadalponerseencontactoconel pavimento.
CONTROL DE LA BARRENA
Lamanijade controlde labarrenaestD.ubicadaenlamanijasuperior
y seusaparaengranary desengranarlatransmisi6ndelabarren&
Aprietela manijadecontrolcontrala manijasuperiorparaengranarla
#&
barrena,aflqela paradesengranarla.
38
Page 39

MONTAJE DEL CANAL
Hagarotarelmontqedel canalhaciaizquierdaoderechausadola
manijadeicanal Lainciinaci6ndeicanaldedescargacontroiaei
Anguioconeique searrojaHanbve.AflojeHaperiiiade abtasdei
costadodeicanaldedescargaantesdegkar eicanaldedescarga
haciaarribao haciaabajo.VueivaaajustarHaperiiiadespu_sde
aicanzarHaposbi6ndeseada.
PLACA DE RASPADO
La pHacade raspadohacecontactocon eHpavimentoamedidaquese
impuBaHamAquinaquitanbve,permifiendoquesedescargueHanbve
queestAcercadeHasuperficbdenpavimento.
ANTES DE ENOENDER EL MOTOR
en HamA_ en estemanualantesdeoperarHa.
1. Elcablede Habujiafuedesconectadoporsegurida&Conecteel
cablede HabujiaaHamisma.
ENOENDUDO DEL MOTOR
5. Presioneelbot6ndencebadorcincoa siete(5#) veces,
asegurAndosede cubrirelorificiodeventihci6ncuandoHehaga.
6. Siel motorestacaHiente,presioneel bot6ndencebadorunasoma
vez.
NOTA:Siemprecubrael orificiode ventiHaci6nenelbot6ncebador
cuandoHepresiona.TaMvezdebacebarHamAquinamAsparael
arranqueiniciaHsiHatemperaturaes menora 15gradosFahrenheL
7_ TomeHamanijadenarrancadory tirede Hasoga bntamentehasta
quequedeunpoco mAstirante.DejequeHacuerdaseenroHb
bntamente.
8_ TiredeHamanijadenarrancadorrApidamente.Nopermitaque Ha
manijaretrocedaa su posici6noriginalPermitaquese enroHb
bntamentemientrassqeta firmementeHamanijadenarrancador.
9. MientraseHmotorsecaHientaycomienzaafuncionaruniformemente,
gireHapaHancadencebadorbntamentehaciaHaposici6n1/£
Cuandoelmotorcomienzaa funcionarreguHarmente,mueva
SiempremantengaHasmanosylospiesabjadosde Haspartes
m6vibs. NoutiHicefiuidoscomprimidosparaarrancar.Losvapores
soninfiamabbs.
ueelmotorest@aMaireHibreen unAreabienventiHada.
1_ HnserteHaHHavede encendidoenHaranura,VeaHaFigura11,
\
DETENCKSN DEL MOTOR
1. Dejeelmotorencendidoduranteaigunosminutesantesde
detenerioparaayudara secartodaHahumedaddei motor.
2. ParadetenerelmotorsaqueHaiiavede encendidoyguardeiaen
unlu uro.
Elsilenciador,el motory laszonasquelosrodeansecalientany
puedencausarquemaduras.Seaprecavidoynolostoquecuando
estancalientes.
3_ Limpietodalanieveyla humedaddesdelazonade controldel
motor.
ENGANCHE DE LAS BARRENAS
ParaengranarHabarrenaaprieteHamanijadecontrolcontraHamanija
de controlsuperior.SueHteparadetenerHasbarrenas.
ENGANCHE DE LA TRANSMUSK)N
LevanteapenasHamanijaparapermitirqueHaspabtas decaucho
de Habarrenatoquenel pavimentoeimpuBenHamaquinaquitanieve
haciaadeHante.SipresionaHamanijahaciaabajo,ebvara Habarrena
densueHoydetendraelavanceHamAquina.
NOTA:Sila presi6nascendentesobrelamanijaesexcesivatendra
comoresultadoundesgasteprematurode lascuchillasdegomade la
barrenay estonoestaracubiertopotla garantia.
Figura11
2. Notratede girarHaiiave.Siio hace,podriaprovocarsuruptura.
NointentegirarHaiiave.AMhaceriopodriaromperia.
3. MuevaHapaiancadeicebadoraHaposici6nFULLI_1
(encendidocon el motorenfrio).
4. Siel motoryaestacaiiente,ubiqueelcontroldeiobturadorenHa
posici6nOFFI _ lea BgardeFULL
J
39
Page 40

Estap_.ginase dej6 en bUancointencionaUmente.
4O
Page 41

PROGRAMA DE MANTENUMUENTO
Antesderealizarcualquiertipodemantenimientoo servicio,
desenganchetodosloscontrobsydetengael motor.Esperea quese
detengancompbtamentetodaslaspbzasm6viles.Desconecteelcable
delabujiayp6ngalohacbndomasacontraelmotorparae\4tarquese
encbndaacddentalmente.Utilbesbmpreanteojosdeseguridaddurante
elfundonambntoo mbntrasajustaoreparaesteequipo.
±!7_o
Cada uso .
1ras5 horas 1. 1.
Cada5horas 1. 1.
25 horas 1. 1.
Cadatemporada/50horas 1. 1.
Cadatemporada/lO0horas 1. 1.
Cadatemporada/antesde 1. 1.
almacenar 2. 2.
Nivelde aceitedelmotor.
2_
Mbquinaquitanievey
b.readeescape.
Aceitedel motor.
Aceitedel motor.
2. 2.
Areadelescape.
Bujiadeencendido.
Aceitedel motor
Bujiadeencendido
Puntosdepivote
Manijadecontrol
3_ 3_
Resortedeextensi6n
MANTENUMUENTO DEL MOTOR
Sigael cronogramademantenimientoquese presentaacontinuaci6n.
Estatablas61odescribepautasde servicio.Utilicela columnaRegistro
de Servicioparahacerel seguimientode las tareasdemantenimiento
completadas.Paraubbar eJCentrode Servicio Searsm_scercano
o paraprogramar un servicie, simplementecomun_quesecon
Searsal tel_fono 1-800-4-MYoHOME®,
i!,r_
1_ Verificar
2_ Limpieza
Cambio.
Verificar.
Limpieza.
Verificar.
Cambiar
Limpiar,reemplazar,regular
Lubrique
Lubrique
Lubrique
3. Retireel tap6nde drenajedeaceite,Figura12.
Paraevitarelarranqueaccidental,apagueel motory retirelallavede
encendidoantesderealizarcualquiertipode mantenimientodel motor.
La inspecci6ny losajustesperi6dicosdelmotorsonesencialessise
deseamantenerunalto niveldedesempeSo.Elmantenimientoregular
tambi_ngarantizarb,unaprolongadavidaOtildel motor.Losintervalos
de mantenimientorequeridosy el tipodemantenimientoa realizarse
describenen latablaarriba.Sigalos intervalospothoraocalendarios,
Ioqueocurraprimero.Cuandoseoperaen condicionesadversases
necesariollevaracabounmantenimientomb.sfrecuente.
Cambio dem aceite demmotor
Elaceitedelmotorsedebecambiardespu6sdelas primerascinco
horasdeusoy luegounavezpot temporadaocada50horasde uso.
NOTA:Verifiqueel nivelde aceiteantesde cadausoy despu6sde
cadacincohorasdefuncionamientoparacerciorarsequesemantiene
el niveldeaceiteindicado.ConsultelaVerificaci6ndel niveldeaceite
en lasecci6nFuncionamiento.
1. Vacieelcombustibledeldep6sitohaciendofuncionarel motor
hastaqueeldep6sitodecombustibleest_vacio.Cerci6resede
queeltap6ndellenadodelcombustibleestabienajustado.
2. Coloqueunrecipienteadecuadopararecolectarelaceitebajoel
tap6ndedrenajede aceite.
Tap6n de
dtenaje de
aceite
Figura 12
4. Inclineelmotorparadrenarel aceiteenel recipiente.Elaceite
usadose debedescartaren uncentroderecolecci6nadecuado.
5. Vuelvaacolocarel tap6ndedrenajey ajOstelobien.
6. Recargaconel petr61eoy recomiendacomprobarelnivelde
aceite;se refierena la comprobaci6ndelaceitedelmotorpara
obtenerinstrucciones.
7. Vuelvaacolocary ajustareltap6ndellenado/lavarilladenivel
de aceite.
41
Page 42

L_.vesebienHasmanosconaguayjab6n inmediatamentedespu6s
detocaraceiteusado.
NOTA:Eiimineei aceiteusadodellmotorde unamaneraqueno
perjudiqueei medioambbnte.Li@eioauncentrode recbHadouotro
centrode recoiecd6n.
Recomendaciones sobre emaceite
NOufiHbeaceitessindetergenteniaceiteparamotordedosfiempos.
PodriaredudrseHavidaOfiidellmotor.
CuandoHeagregueaceiteaMmotor,consuiteHatabiadeviscosidadque
aparecemb.sabajo(Figura13).Lacapaddadde aceitedellmotores
600mi(aprox.20onzas).Noiieneexcesivamente.Useunaceitepara
motordecuatrofiempos,ounaceitedetergentede caiidadpremium
equivaienteconcertificadoquecubraoexcedaHasexigenciasde ios
fabricantesdeautom6viiesamericanosrespectode Haciasificaci6nde
servicioSGySELos aceitesparamotorconHacHasificaci6nSG,SF
tienenestadesignaci6nen eienvase.
1. RetireHafundade Habujiay utiiiceunaiiaveparabqias para
extraeria,Figura14.
f
Figura14
2_
inspeccionevisuaimenteHabujia.EiimineHabujiasi presenta
desgastevisibie,o sieiaisianteest,.agrietadoo astiiiado.Limpie
Habqia conuncepiiiodeaiambresisevaa reutiiizar.
MidaHaseparaci6nde bujiaconun caiibrador.Reaiiceios ajustes
necesariostorciendoeieiectrodoiateraLFigura15.Laseparaci6n
debeajustarseen0,02-0,03puigadas(0,60-0,80ram).
bujia
J
(°F) =40° =20° 0o ::)0o 40 °
(°C) =30° =20° =10° 0°
Figura13
Bujia de encendido
NOpruebeHachispasinoestaHabujiadeencendido.NOd_
arranqueaMmotorsi noest,.Habujiade encendido.
_acuidadodenotocarei siienciador.
SedebecontroiarHabujiacada25 horasyseHadebecambiarunavez
portemporadaocada100horas.Paraasegurarsede queei motor
funcionebien,Habujiadebetenerunaseparaci6ncorrectay tambi_n
debeestariibrededep6sitos.
£1ectrodo
0,02=0,03
putgadas
(0,60=0,80 ram)
Figura15
Verifiquequelaarandelade la bujiaest_enbuenascondicionesy
enrosquelabujiahaciaadentromanualmenteparaevitarquese
enrosquecruzada.
42
Page 43

5. Unavezquelabujiaestacolocadaensulugar,aprieteconunalave
parabujiaparacomprimirla arandela.
NOTA:Cuandoinstaleunabujianueva,apriete1/2vuelta,despu_s
quelabujiaseencuentracolocadaen sulugar,paracomprimirla
arandela.Cuandoreinstaleunabujiausada,ajuste1/8-a 1/4degiro,
despu_sque labujiaseencuentracolocadaensulugar,a finde
comprimirlaarandela.
La buj[adebeestarbienajustada.Sila buj[aestaflojapuede
recalentarseydaiar elmotor.
Limpieza del motor
Sielmotorhaestadofuncionando,d6jeloenfriarduranteporIomenos
mediahoraantesde Iimpiarlo.Retireperi6dicamentela suciedad
acumuladaen el motor.
Laacumulacidnde residuosalrededordelsilenciadorpodriapro@dr
unincendio.Inspeccioney Iimpieantesdecadauso.
Lubriquelospuntosde girodela manijade controlydel resortede
extensi6ndelextremodelcabledecontrolconunaceiteIivianouna
vezportemporadayantesde almacenarlambquinaquitanievealfinal
de latemporada.
AJUSTES
Placa de raspado
Paraverificarelajustede la placade raspado,ubiquela unidad
sobreunasuperficienivelada.Lasruedas,la placaderaspadoy las
barrenasdebentocarla superficienivelada.Tengaencuentaque si
seafeitanla placaseajustademasiadoalto,lanieveMayogolpeenel
marcodel sinfin.Sila placaderaspadosedesgastaexcesivamente,o
la unidadnoseautopropulsa,es posiblequela placaderaspadoest_
demasiadobajay debaserajustada.
3. Aflojelas cuatrotuercasy pernosdeseguridadquefijanla placa
de raspadoa lacaja.VealaFig.16.Muevalaplacade raspado
hacialaposici6ndeseadayvuelvaa apretarlastuercasy los
pernosbienajustados.
f ",,
.......... J
Figura16
4. Inclinelambquinaquitanievenuevamentea la posici6nde
funcionamientoyjab de la manijadearranquevariasvecespara
vet siesdificiljalarde lamisma.
5. Si esdificiljalar delarranque,extraigalabujiayjab dela manija
variasvecesparaestarsegurodequeseextraigacualquier
cantidaddeaceiteatrapadaenel cabezal.
Puedesaliraceitedelorificiode labujiacuandolamismase extraey
sejalade la manijadearranque.
6. Inspeccionela bujia.Siesta hOmeda,limpiecualquierrestode
aceiteantesdevolverainstalar.
NOTA:Enlas unidadesnuevaso en lasquetienenunaplacade
raspadonuevalasbarrenaspuedenestarunpoco separadasdel
suelo.
Paraajustarlaplacade raspadoprocedade lasiguientemanera:
1. Drenelagasolinade lambquinaquitanieve.
2. Jab de lacuerdadearranquehastasentirresistencia.Luego
inclinela mbquinaquitanievehaciaatrb.shastaquequede
apoyadasobrelasmanijas.
43
Page 44

Cabme de controm
Esposiblequenecesiterealizarajustesperiddicosdebidoal
estiramientodelcablede controly dela correade transmisidn
ocasionadoporeldesgaste.Sila barrenaparecetitubearmientras
gira,hagaIosiguiente:
Elagujerosuperiorde la manijadecontroltieneencuentaelajustede
la tensi6ndelcable.Pararealizarel ajuste,desconecteelextremedel
cabledecontroldelagujeroinferiordela manijadecontrole ins6rtelo
enelagujerosuperior.Inserteel cabledesdeelexteriorcomose
indicaenla Figura17.
CAMBIO DE CORREA
Correa de transmisi6n de mabarrena
1. Parasacarlacubiertadelacorreasaqueloscincotornillos
hexagonalesque lasujetanalbastidor.Veala Figura18.
2. Retirelacorreasujetandolaporla basedelapoleade la barrena
y firehaciaafuera.
Paraobtenerlasustituci6ndeSearsremosIlamaral 1-800-4-MY-
HOME.Preguntepor parte# 735-04033.
NOTA:Tirehaciaabajola poleaIocaparasolar la correadedebajo
del guardacorrea.Veala Figura18.
f
\
/ /
/
Figura17
Pruebela maquinaquitanieveparaversi seIograunadiferencia
apreciable.Siluegoderealizadoel ajustedelcablede controlla
barrenasiguetitubeandoal girar,vealaSustituci6nBeltparaobtener
lasinstruccionesparaelreemplazodelacorrea.
Montaje demcanam
Consultelasecci6nMontajey Configuraci6nparaverlasinstrucciones
paraelajustedelmontajedelcanal.
Polealoca
Torailos
de cabeza
he×agonal
Figura18
Paravolvera colocarlacorreasigaestasinstruccionesy consultela
Figura19:
i
/
/
/
//
Figura19
1. TirehaciaabajolapoleaIoca.
2. Ubiquelacorreaencimade la poleadelabarrenay debajodel
guardacorrea.
3. Coloquelacorreaalrededorde la poleadelmotor.
44
Page 45

4. Empujelacorreaporencimadela basedelapoleade la barrena.
5. Vuelvaainstalarlacubiertade la correaquesac6anteriormente.
REEMPLAZO DE LAS PALETAS DE LA BARRENA
Laspaletasdecauchodelabarrenadelam&quinaquitanievesedesgastan
yselasdebecambiarsisepresentansignosdedesgasteexcesivo.
NOpermitaqueIaspaletasdecauchodeIabarrenasedesgastenhastael
puntoenquepartesdeIabarrenametalicamismatoqueneIpavimento.Si
estosucedelamb.quinaquitanievepuededa_arseseriamente.
\\
\ \
Tomilos autorroscantes :2
Figura20
Paracambiarlaspaletasdecauchoprocedadela siguientemanera:
1. SaquelaspaletasdecauchoexistentesdesenroscandoIostorni/os
autorroscantesqueIasunena labarrena.VealaFigura20.
2. Ajustelasnuevaspaletasdecauchoa la barrenausandolos
elementosdeferreteriaquesac6anteriormente.
REEMPLAZO DE LA PLACA DE RASPADO
La placade raspadoest,.adosadaal rondodelabarrenay sujetaa
desgaste.Seladebecontrolarperi6dicamente.Laplacade raspado
tienedos berriesde desgasteysela puedeinvertir.
1. Quitelos cuatropemosdel carteylastuercasdeseguridad
hexagonalesquela sujetanalacajadelamb.quinaquitanieve.
2. Inversaexistenteoinstalarunanuevaplacade afeitado,
asegurb.ndosede quelascabezasdelos pernosdelcarte
quedenenelinteriorde lacaja.
3. Coloquelaplacaderaspadocomeseindicaenlap_.gina15.
4. Unavezcolocada,ajustebien.
Paraobtenerunanuevaplacade afeitado,lamea Searsal
1-800-4-MY-HOME.Pregunteperparte#731-1033.
45
Page 46

SinosevaautiHizaeHequipodurante30diasorob.s,o sieseHfinaHdeHatemporadadenbvey yanoexbteposiWidaddequenbve,esnecesario
dmacenareHequipodemaneraadecuada.SigaHasinstrucdonesdedmacenambntoqueseindbanacontinuaci6nparagarantizareHrendimbnto
mb.ximodeHamb.quinaquitanbvedurantemuchosaSos.
PREPARACION DEL MOTOR
LosmotoresqueseaHmacenandurantemb.sde30 diasnecesitan
serdrenadosdecombusfibbparaevitarquese deteriorenyse forme
gomaeneHsistemade combustibboenHaspbzas principabsdell
carburador.Si HagasoHinade sumotorsedeterioraduranteel aHmaceo
namiento,esposibbquedeba repararoreempiazarelcarburadory
otroscomponentesdellsistemade combustible.
1. Eiiminetodoel combustibledei tanquehaciendofuncionarel
motorhastaquesedetenga.
2. Cambieelaceitedellmotor.
3. ExtraigaHabujiadeencendidoy viertaenelciHindroaproximao
damente1onza(30 raM)de aceiteparamotorHimpio.Tire varias
vecesdellarrancadorde retrocesoparadistribuirelaceitey
reinstabHabujia.
4. Limpielos residuosdeaHrededordellmotor,ydebajo,aHrededor,
ydetrb.sdellsibnciador.ApHiqueunacapadeHgadade aceiteen
todasHasb.reasquepuedenHbgaraoxidarse.
, Nmaceneenun sectorHimpio,secoy bienventiHado,bjos de
cuaHquierartefactoquefuncioneconunallamao Bz piHotocomo
unhomo,cabntadordeaguao secadorde ropa.EvitecuaHquier
sectorconunmotorei@tricoqueproduzcachispasodon@se
utiHicenherramientaseH@tricas.
PREPARACKSN DE LA MAQUUNA QUUTANUEVE
1. Cuandoalmacenelambquinaquitanieveen ungalp6nde
dep6sitometalicooconpocaventilaci6n,tengaespecialcuidado
de realizarleuntratamientoanti_oxidantealequipo.Useaceite
ligeroosilic6npararecubrirel equipo,especialmentelas
cadenas,losresortes,loscojinetesy loscables.
2. Eliminetodoel polvodelexteriordelmotory delequipo.
3. Sigalasrecomendacionesde lubricaci6nen la secci6nde
mantenimientodeestemanual
4. AImaceneelequipoen unb.readespejaday seca.
Nuncaalmacenelambquinaquitanieveconcombustibleenel
tanqueenun espaciocerradooen areasconpocaventilaci6n,
dondelosgasesdelcombustiblepuedanalcanzarel fuego,chispas
o unaluzpilotocomola quetienenalgunoshornos,calentadoresde
agua,secadoresde ropaoalgOnottodispositivoagas.
, Siesposible,evitesectoresdealmacenamientoconmucha
humedad.
, Mantengael motorniveladoenel almac_n.Lainclinaci6ndel
motorpuedecausarp6rdidasdecombustibleo aceite.
46
Page 47

Antesderealizarcualquiertipodemantenimientoo servicio,desenganchetodosloscontrolesy detengael
motor.Esperea quesedetengancompletamentetodaslaspiezasm6viles.Desconecteelcabledelabujiay
pdngalohaciendomasacontrael motorparaevitarqueseendendaacddentalmente.Utilicesiempreanteojos
|desegurdaddurantee funconamentoomentrasajustaoreparaesteequpo.
Esta secci6n anaiizaproMemas menoresdeservicio.Paraubicar el CentrodeServicio Searsm_scercano o para programar un
servicie, simplementecemun_quesecen Sears altel_fene 1-800-4-MYoHOME®.
Elmotorno arranca
El motor funciona de manera
err_tica
Elmotorrecalienta 1. Es necesadoregularelcarburador. 1.
Perdidadepotencia 1. Elcabledela buiiaestafioio. 1.
1. Eldep6sitode combustibleest_vac[oo el
combustiblese haechadoa perder.
2. LaI[neadelcombustibreest_bloqueada.
3. Nose introduiocompletamentelaHave.
4. Sehadesconectadoel cablede la buiia.
5. Labui[anofuncionacorrectamente.
6. El motornoest_cebado.
7. El motorest_ahogadoyaqueha sidocebado
demasiado.
1. El motorest&funcionandoenlaposici6n"choke"
(cebador).
2. Lalineadelcombustibleest&tapadaoel
combustiblees vieio.
3. Hayaguaosuciedadenel sistemadecombustible.
4. Es necesarioregularelcarburador.
2. Lavenfilaci6ndela tapadelcombustibleesta 2.
1. Lleneel dep6sitocongaso%alimpiay nueva.
2. Limpielal[nea delcombustible.
3. IntroduzcacompletamentelaIlave.
4. Conecteel cableala buiia.
5. Limpiela bui[a,aiustela distanciadisrupfivaocambiela
bujia.
6, Cebeelmotordecincoasieteveces.
7, Aguardealmenosdiezminutosantesdeencenderel
motor,
1,
Mueva lapalanca del cebador a la posici6n OFF
(apagado).
2.
Limpie la I[nea del combustible y Ilene el dep6sito con
gaso%a limpia y nueva,
3,
Vacie el tanque de combustible. Vuelva a Ilenar el
dep6sito con combustible nuevo,
4,
Comuniquese con un centro de servicio Sears,
Comuniquese con un centro de servicio Sears,
Conecte firmemente el cable de la buiia,
Destape la venfilaci6n.
obstruida.
Vibraci6nexcesiva 1. Haypiezasqueest&nfioiaso labarrenaest& 1. Detengae! motorde inmediatoy desconecteelcable
daSada, de la buiia.Controlesi la mbquinaest&daSada.Aiuste
todoslospernosy lastuercas.Realicelasreparaciones
necesarias.SielproblemaconfinOa,Ilevela unidada un
distribuidorde servicioSears.
Lam&quinaquitanievenose 1. Elcabledelcontrolde labarrenanecesitaunaiuste. 1. Ajusteel cabledecontroldelabarrenatal y comose
autopropulsa 2. Lacorreadetransmisi6nde la barrenaesta fiojao muestraen lasecci6nde Servicioy Mantenimiento.
daSada. 2. Reemplacelacorreadetransmisi6nde labarrena.
Lasbarrenassiguengirando 1. Elcabledelcontrolde la barrenanecesitaunaiuste. 1. Aiusteelcabledecontrolde labarrenataly comose
muestraen lasecci6nde Servicioy Mantenimiento.
Launidadnodescargala 1. Elconiuntodelcanalest&tapado. 1.
nieve
Detengaelmotory desconecteelcabledelabuiia.
Limpieel canaly el interiordelacaiadela barrenaconla
herramientade limpiezaouna varilla.
2. HayunobietoextraSoenla barrena.
2. Detengaelmotorde inmediatoy desconecteelcablede
la buiia. Retireel objetode la barrena.
3. Elcabledelcontroldela barrenanecesitaunaiuste.
4. Lacorreadela barrenaestafioiaodaSada.
3. Aiusteelcabledelcontrolde la barrena.
4. Reemplacelacorreade la barrena.
47
Page 48

MTD CONSUMER GROUP, INC. (MTD), el Bordo de Recursos de Aire de California (CARB)
y la Agencia de Protecci6n Medioambiental de Estados Unidos (U. S. EPA}
DeclaraciSn de Garant_a del Sistema de Control de Ernisiones
(Derechos y obligaciones del propietario seg_n la garant(a contra defectos}
LACOBERTURADESISTEMADECONTROLDEEMISIONESAPLICABLEA MOTORESCERTIFICADOSCOMPRADOSENCALiFORNiA
EN2005Y A PARTIRDEENTONCES,QUESON USADOSENCALiFORNiA,Y HASTAANO2005DE MODELOCERTIFICADOYMOTORES
POSTERIORESQUESON COMPRADOSY USADOSENOTRAPARTEENLOSESTADOSUNIDOS.
Californiayen otraparteen la CoberturadeGarantiade DefectosdeControlde Emisi6ndelosEstadosUnidos
El BordodeRecursosdeAiredeCalifornia(CARB),laU.S.EPAy MTDsecomplacenenexplicarla garantiadelsistemadecontroldeemisiones
de sumotorparaequipotodoterreno,modelo,a_o2005yversionesposteriores.EnCalifornia,los nuevosmotorespeque_osparaequipotodo
terrenosedebendiseSar,fabricaryequiparparacumplirconestandaresde antinieblat6xicadeestados.Enotraparteen losEstadosUnidos,
el nuevonocamino,motoresdeignici6ndechispacertificadosparaelmodelo2005ymb.star@,debeencontrareljuegode estandaressimilar
adelanteporlos EstadosUnidos.EPA.MTDdebegarantizarelsistemadecontrolde emisionesdesu motorporelperiododetiempoindicadomb.s
abajo,siempreycuandono hayaexistidousoincorrecto,negligencianimantenimientoinadecuadodesu motorpequeSoparaequipotodoterreno.
El sistemadecontroldeemisionespuedeincluirpiezascomo,porejemplo,elcarburador,sistemadeinyecci6ndecombustible,el sistemade
encendido,el catalizador,losdep6sitosdecombustible,abastecedecombustiblelineas,gorrasde combustible,vb@ulas,latas,filtros,mangueras
devapor,abrazaderas,conectoresy otroscomponentesrelacionadosconlasemisiones.
Dondeexistaunacondici6ncubiertaporlagarantia,MTDrepararb,sumotorpequeSoparaequipotodoterrenosincostoalgunoincluyendoel
diagn6stico,laspiezasy lamanode obra.
COBERTURA DE LA GARANTiA DEL FABRICANTE:
Estesistemadecontroldeemisionessegarantizaporel t@rminodedosaSos.Si algunapiezade su motorrelacionadacon lasemisioneses
defectuosa,MTD repararb,o sustituirb,dichapieza.
RESPONSABILIDADES DEL PROPIETARIO SEGUN LA GARANTIA:
Comopropietariodeun motorpeque_ode equipotodoterreno,ustedes responsablede realizarel mantenimientonecesarioquefigura enel
manualdelpropietario.MTDle recomiendaqueconservetodoslosrecibosquecubrenlos serviciosdemantenimientodelmotorpequeSopara
equipotodoterreno,noobstanteIocualMTDnopodrb,denegarel cumplimientodela garantiaOnicamentepotlafaltade reciboso potsuimposibi=
lidadde asegurarqueserealizarb.ntodoslosserviciosdemantenimientoprogramado.
ComopropietariodelmotorpequeSoparaequipotodoterreno,sinembargo,ustedtambi_ndebesaberque MTDpuededenegarlacoberturadela
garantiasi sumotorpequeSoparaequipotodoterrenoo unapiezadel mismofallandebidoausoincorrecto,negligencia,mantenimientoindebido
o amodificacionesnoaprobadas.
Ustedes responsablede presentarlacortadoradec6spedal centrode distribuci6nodemantenimientode MTDCONSUMERGROURiNC.tan
prontocomoaparecierael problema.Lasreparacionescubiertaspot lagarantiasedebenllevaracaboenun lapsorazonableque noexcedade
30dias.Sidesearealizaralgunaconsultaconrespectoala coberturade lagarantia,debeponerseencontactoconsu distribuidorlocalde MTD.
Paracomunicarseconla LineadeAsistenciaal ClientedeDistribuidoresdeMTD,llameal nOmero(877)282=8684.
REQUERIMIENTOS DE GARANTiA SOBRE DEFECTOS PARA MOTORES PEQUENOS DE EQUIPO TODO TERRENO
DE 1995YVERSIONES POSTERIORES:
Estasecci6nseaplicaa motorespequeSosdeequipotodoterrenode1995y versionesposteriores.Elperiododegarantiacomienzaa partirde la
fechaen queelmotoro elequiposeentreganal compradorfinak
La_Coberturade lagarantiacontraemisionesgenerales
MTDgarantizaalcompradorfinaly acadacompradorsubsiguientequeelmotor:
(1)hasidodiseSado,construidoy equipadode maneraquecumplacontodaslasregulacionesvigentesadoptadaspotelDepartamentodelos
RecursosdeAireenvirtuda suautoridadconferidaen loscapitulos1y2, Parte5, Divisi6n26del C6digodeSaludy Seguridad;y
(2)estalibrededefectosenlosmaterialesyen lamanodeobraquecausenlafalladeunapiezabajogarantiaque seaid6nticaentodoslos
aspectosmaterialesa lapiezacomoaparecedescriptaenlaaplicaci6ndelfabricantedelmotorparacertificaci6npot unperiododedosaSos.
_garantia sobre piezasrelacionadasconemisionesseinterpretarb,de lasiguientemanera:
(1)Cualquierpiezacubiertapotgarantiaquenoest_programadaparasu reemplazosegOnelmantenimientorequeridoenlas instrucciones
escritasdelaSubsecci6n(c)debeestargarantizadapot unperiododegarantiadefinidoenla Subsecci6n(a)(2). Silapiezafalladurante
el periododecoberturadela garantia,lamismaseth.reparadao reemplazadapotMTD deacuerdoconla Subsecci6n(4)acontinuaci6n.
Cualquierpiezareparadao reemplazadasegOnlagarantiasegarantizarb,potel restodelperiododegarantia.
(2) Cualquierpiezacubiertapotgarantiaqueest_programadasoloparainspecci6nregularenlas instruccionesescritasde la Subsecci6n
(c)debeestargarantizadapotun periododegarantiadefinidoenla Subsecci6n(a) (2). Unadeclaraci6nen dichasinstruccionespotescrito
alefectode "reparaci6no reemplazosegOnseanecesario"noreducirb,elperiodode coberturade la garantia.Cualquierpiezareparadao
Page 49

reempiazadasegOnlagarantiasegarantizarb,porelrestodelperiododegarantia.
(3) Cualquierpiezagaranfizadaqueest_programadaparareempbzosegOnelmantenimientorequeridodeconformidadconlasinstruc-
clonesescritasdelaSubsecci6n(c)segarantizaporelperiododefiempoanterioralaprimerafechadereemplazoprogramadaparaesa
pieza.Silapiezafallaantesdelprimerreemplazoprogramado,lamismaserb.reparadaoreemplazadaperMTDdeacuerdoconlaSubsecci6n
(4)aconfinuaci6n.Cualquierpiezareparadaoreemplazadabajogarantiasegarantizarb,porelrestodelperiodoanterioralprimerreemplazo
programadopuntualparaesapieza.
(4)Lareparaci6noelreemplazodecualquierpiezagarantizadadeconformidadconlasdisposicionesdelagarantiaqueaquiseestipulase
deberealizarenuncentredegarantiasincostoalgunoparaelpropietario.
(5)SinperjuiciodebsdisposicionesdelaSubsecci6n(4)anterior,losserviciosoreparacionescubiertosporlagarantiadebensersumim
istradospertodosloscentrosdedistribuci6ndeMTDquetenganlafranquiciapararealizarreparacionesymantenimientoalosmotoresen
cuesti6n.
(6)ElpropietarionodebeafrontarningOncargoparatrabajosdediagn6sticoqueIlevenalaconclusi6ndequeunapiezabajogarantiapresenta
efectivamentedefectos,siempreycuandodichodiagn6sticoseaIlevadoacaboenuncentrecubiertoporlagarantia.
(7)Elfabricantedelmotoresresponsableporda_oscausadosaotroscomponentesdemotoresderivadosdelafallabajogarantiadecualquier
piezagarantizada.
(8)DurantetodoelperiododegarantiadelmotordefinidoenlaSubsecci6n(a)(2),MTDmantendrb,unsuministrodepiezascubiertaspor
garantiasuficienteparasatisfacerlademandaesperadaparatalespiezas.
(9)Cualquierpiezadereemplazosepodrb,usarparaelcumplimientodelmantenimientooreparacionesbajogarantia,ysesuministrarb,sin
cargoalpropietario.Dichousenoreducirb,lasobligacionesdegarantiadeMTD.
(10)Nosepodranusarpiezasadicionalesnimodificadasquenoest_nexentasdeacuerdoconelDepartamentodelosRecursosdelAire(Air
ResourcesBoard).Elusedepiezasadicionalesomodificadasnoexentasserb.causasuficienteparaanubrunreclamobajogarantiarealizado
deacuerdoconestearticulo.Elfabricantedelmotornotendraresponsabilidad,enconformidadconestearticulo,degarantizarfallasdepiezas
garantizadasquefuerencausadasporelusedeunapiezanoexentaadicionalomodificada.
_) MTDincluirb,unacopiadelasiguientelistade piezasbajoqarantiacontraemisionesconcadanuevomotor,utilizandolaspartesde lalista
_licables almotor.
(1)Sistemademedici6ndecombustible
, Sistemademejoraparainicioenfrio (cebadosuave)
, Carburadorycomponentesinternes
, Bombadecombustible
, Dep6sitodecombustible
(2) Sistemadeinducci6ndeaire
, Filtrode aire
, Colectordeentrada
(3) Sistemadeencendido
oBujia(s)
, Sistemadeencendidoper magneto
(4)Sistemadeescape
, Catalizador
, SAI(valvuladeCa_a)
(5) Componentesvariesutilizadosen el sistemaanterior
, Wlvulaseinterruptoresde vacio,temperatura,posici6nsensiblesal tiempo
, Conectoresy montajes
(6)ControldeEvaporative
, MangueradeCombustiblecertificadaparaARBevaporativeemisi6nde2006.
, Abrazaderasde MangueradeCombustible
, Gorrade combustibleatada
, Latadecarb6n
, Uneasdevapor
GDOC-100174Rev,B
Page 50

Busque e( per(odo de duraci6n de emisiones importantes y(a informaci6n de c(asificaci6n de aire en
meetiqueta de emisiones de su motor
Los motores cuyo cump(imiento con los estAndares de emisi6n Tier 2 de laComisidn de Recursos Ambienta(es de California (CARB)
est_ certificado deben exhibir la informaci6n relacionada con el per(odo de duraci6n de las emisiones y (a clasificaci6n de aire. Sears,
Roebuck and Co., de los Estados Unidos ponen esta informaci6n a disposici6n del consumidor en nuestras etiquetas de emisiones.
El Per(odo de Duraci6n de las Emisiones describe el nQmero de horas de tiempo real de funcionamiento para el cual se certifica que
el motor cumple con las reglas de emisi6n, descontando el mantenimiento adecuado del mismo segQn las instrucciones de opero
aci6n y mantenimiento. Se utilizan las siguientes categodas:
Moderado:Se certifica que el motor cumple con las reg(as de emisi6n durante 125 horas de tiempo real de funcionamiento del motor.
)nmediato:Se certifica que el motor cumple con las reg(as de emisi6n durante 250 horas de tiempo real de funcionamiento del motor.
Extendido:Se certifica que el motor cumple con las reglas de emisi6n durante 500 horas de tiempo real de funcionamiento del motor.
Por ejemplo, una cortadora de c6sped t(pica que se empuja desde atrAs se usa entre 20 y 25 horas por a_o. Por Io tanto, el Per_odo
de Duraci6n de Emisiones de un motor con una ciasificaci6n intermedia seda equiva(ente aentre 10 y 12 aSos.
Laclasificaci6n de aire es un nQmero calcu(ado para describir el nivel relativo de emisiones para un grupo de motores en particular.
Cuanto menor sea la clasificaci6n de aire, mayor es la limpieza del motor. La informaci6n se presenta de forma grafica en la etiqueta
de emisiones.
Despu_s de( 1 de juHo de 2000, busque e( pedodo de cumpHmiento de (as reglas de
emisiones en (a etiqueta de cump(imiento de (as reg(as de emisiones de( motor
Despu6s del 1 de julio de 2000 se certificara que determinados motores Sears, Roebuck and Co., de los Estados Unidos
cumplen con los estAndares de emisiones de la fase 2 de (a Agencia de Protecci6n Ambiental de los Estados Unidos (USE°
PA). Para los motores certificados para la etapa 2, el pedodo de cumplimiento con las reg(as de emisiones al cual se hace
referencia en (a etiqueta de cumplimiento con las reglas de emisiones indica el nQmero de horas de funcionamiento para el
cual se ha demostrado que el motor cumple con los requerimientos federales de emisi6n.
Para los motores con desplazamiento inferior a 225 cc, Categoda C = 125 horas, B = 250 horas y A = 500 horas.
Para los motores con desplazamiento de 225 cc o mAs, Categoda C = 250 horas, B = 500 horas y A = 1000 horas.
El desplazamiento de los motores de la serie modelo 150112 es 249 cc.
La presente es una representaci6n gen_rica de (aetiqueta de emisi6n que se encuentra genera(mente en un
motor certificado.
GDOC-100182Rev.A
50
Page 51

Felicitacionespor haberrealizadounaadquMd6ninteligente.El
productoCraftsman®quehaadquiridoestadise_adoyfabricado
parabrindartouchesa_osdefundonamientoconfiable.Perocome
todoslosproductosavecespuederequerirde reparaciones.Esen
esemementocuandoeldisponerdeunAcuerdode protecd6npara
reparacionesle puedeahorrardineroy problemas.
A confinuad6nsedetallanlospuntosincluidosenelAcuerdo:
, Servicio e×pertoprestadopernuestros10,000espedalistasen
reparacionesprofesionales
, Servicio iiimitado sin cargo paralaspiezasyla manedeobraen
todaslas reparadonescubiertas
, ReempJazodel producto hasta1500d61aressino esposible
repararel productocubierto
, Descuento de 10%del precionormaldelservicioy delaspiezas
relacionadasconel mismoquenoest_ncubiertasperelacuerdo;
ademb.s,10%del precionormalde laverificaci6ndemanten-
imientopreventive
, Ayudar_pida pot teJ_fono- IoIlamamosResoluci6nRapida- el
apoyotelef6nicode unChamuscaalrepresentante.Pienseen
nosotroscomeelmanual"deundue5ohablador."
Unavezadquiridoel Acuerdo,puedeprogramarel serviciocon
tans61orealizarunaIlamadatelef6nica.PuedeIlamarencualquier
mementodeldia o dela nocheo programarunservicioen linea.
ElAcuerdode Protecci6ndeReparaci6nesunacomprasinriesgo.
Siustedanulaperalgunaraz6nduranteelperiodode garantiade
producto,proporcionaremosun reembolsoIleno.O,un reembolso
prorrateadoencualquiermementodespu@sdelperiodode garantia
de productoexpira,iAdquieraheysuacuerdode protecci6npara
reparaciones!
Se apJican determinadas timitaciones y e×ctusiones. Para obtener
informaci6n adicional y precios en los Estados Unidos llame al
1-800-827-6655.
El *Coverage en Canad_ vada en algunos articuJos. Para detalles
llenos la llamada Chamusca Canad_ en 1-800-361-6665.
Servicio deinstalaci6n de Sears
Sideseasolicitarlainstalaci6nprofesionalde Searsdeaparatos
dom_sticos,dispositivosparaabrirportones,calentadoresde agua
y otrosarticulosdom6sticosimportantes,enlosEstadosUnidoso
Canada.Ilameal 1-800-4-MY-HOME®.
51
Page 52

Your Home
For expert troubleshooting and home solutions advice:
www.managemyhome.com
For repair - in your home - of all major brand appliances,
lawn and garden equipment, or heating and cooling systems,
no matter who made it, no matter who sold it!
For the replacement parts, accessories and
owner's manuals that you need to do-it-yourself.
For Sears professional installation of home appliances
and items like garage door openers and water heaters.
1-800-4-MY-HOME ® (1-800-469-4663)
Call anytime, day or night (U.S.A. and Canada)
www.sears.com www.sears.ca
Our Home
For repair of carry-in items like vacuums, lawn equipment,
and electronics, call anytime for the location of your nearest
Sears Parts & Repair Service Center
1-800-488-1222 (U.S.A.) 1-800-469-4663 (Canada)
www.sears.com www.sears.ca
To purchase a protection agreement on a product serviced by Sears:
1-800-827-6655 (U.S.A.) 1-800-361-6665 (Canada)
Para pedir servicio de reparaci6n
a domicilio, y para ordenar piezas:
1-888-SU-HOGAR ®
(1-888-784-6427)
Au Canada pour service en fran£ais:
1-800-LE-FOYER M°
(1-800-533-6937)
www.sears.ca
® Registered Trademark / TMTrademark / SM Service Mark of Sears Brands, LLC
® Marca Registrada / TMMarca de F&brica / Marca de Servicio de Sears Brands, LLC
MCMarque de commerce / MDMarque depos6e de Sears Brands, LLC © Sears Brands, LLC
SM
 Loading...