

Page 1
Operator's Manual
T
28" SNOW THROWER
Model No. 247.88690
CAUTION: using
this product, read this
manua_ and folmow aml
safety fumes and operating
instructions.
Sears, Roebuck and Co., Hoffman Estates, IL 60179, U.S.A.
Visit our website: www.craftsman.com FORMNO.769°03973
®SAFETY
®ASSEMBLY
®OPERATION
® MAINTENANCE
® PARTS LIST
® ESPAtIOL
6/24/2008
Page 2

WarrantyStatement.................... Page2
SafeOperationPractices.............. Pages3=6
SafetyLabeUs......................... Page7
AssembUy......................... Pages8=11
Operation........................ Pages12=15
Off=SeasonStorage................... Page24
Troubbshooting...................... Page25
PartsList......................... Pages26-38
RepairProtectionAgreement............ Page42
EspanoU............................. Page43
Service&Maintenance.............. Pages16=23
CRAFTSMAN LiMiTED WARRANTY
Two Years on Snow Thrower
Whenoperatedand maintainedaccordingtoaiIsuppibd instructions,ifthis snowthrowerfaibdueto a defectinmaterialorworkmanshipwithin
twoyearsfromthedateor purchase,caiI1=800=4=MY-HOME@toarrangeforfreerepair.
Thiswarrantyappibsforonly90 daysfromthedateof purchaseifthissnowthroweriseverusedforcommercialorrentalpurposes.
Duringthefirstyearofpurchase,therewiiIbenochargeforwarrantyserviceinyourhome.Foryourconvenience,in-homewarrantyservicewill
stillbeavailableafterthefirstyearof purchase,buta tripchargewillapply.Thischargewillbe waivedif youtransportthe snowthrowertoan
authorizedCraftsmandrop-offlocation.Forthenearestauthorizedlocation,call 1-800-4-MY-HOME@.
Thiswarranty covers ONLYdefects in material andworkmanship. Searswill NOTpayfor:
, Expendableitemsthatbecomewornduringnormaluse,includingbutnotlimitedtoskidshoes,shaveplate,shearpins,sparkplug,air
cleaner,belts,andoil filter.
, Standardmaintenanceservicing,oilchanges,ortune-ups.
, Tire replacementor repaircausedbypuncturesfromoutsideobjects,suchasnails,thorns,stumps,or glass.
, Tireorwheelreplacementor repairresultingfromnormalwear,accident,orimproperoperationormaintenance.
, Repairsnecessarybecauseof operatorabuse,includingbutnotlimitedto damagecausedbyimpactingobjectsthatbendthe frameor
crankshaft,orover-speedingtheengine.
, Repairsnecessarybecauseof operatornegligence,includingbutnotlimitedto,electricalandmechanicaldamagecausedby improper
storage,failureto usethepropergradeandamountofengineoil,or failureto maintaintheequipmentaccordingto theinstructionscontained
intheoperator'smanual.
, Engine(fuelsystem)cleaningorrepairscausedbyfueldeterminedto becontaminatedoroxidized(stale).Ingeneral,fuelshouldbeused
within30 daysof itspurchasedate.
, Normaldeteriorationandwearoftheexteriorfinishes,orproductlabelreplacement.
Thiswarrantyappliesonlywhilethisproductis usedinthe UnitedStates.
Thiswarrantygivesyouspecificlegalrights,andyoumayalsohaveotherrightswhichvaryfromstatetostate.
Sears, Roebuckand Co.,Noffman Estates,IL (}0179
EngineOilType:
EngineOilCapacity:
FuelCapacity:
SparkHug:
SparkHug Gap:
@SearsBrands,LLC
SAE 5%30
20 ounces
3 Quarts
Champion@ RC12YC
.030"
ModelNumber.................................................................
SeriatNumber.................................................................
Dateof Purchase .............................................................
Recordthemodelnumber,serialnumber
anddateof purchaseabove
2
Page 3

Thissymbolpointsoutimportantsafetyinstructionswhich,if not
followed,couldendangerthepersonalsafetyand/orpropertyof
yourselfandothers. Readandfollowall instructionsin thismanual
beforeattemptingto operatethismachine.Failuretocomplywith
theseinstructionsmayresultin personalinjury.Whenyouseethis
symbol,HEEDiTSWARNING!
Thismachinewasbuiltto beoperatedaccordingtothesafeopera-
tionpracticesin thismanualAswithanytypeofpowerequipment,
carelessnessor erroronthepartoftheoperatorcanresultinserious
injury.Thismachineiscapableofamputatingfingers,hands,toes
andfeetandthrowingdebris.Failuretoobservethefollowingsafety
instructionscould resultinseriousinjuryor death.
CAUFORNUA PROPOSUTUON 65
EngineExhaust,someof itsconstituents,andcertainvehicle
componentscontainoremitchemicalsknowntoStateofCalifornia
tocausecancerandbirthdefectsorotherreproductiveharm.
, Read,understand,andfollowallinstructionson themachineand
in themanual(s)beforeattemptingtoassembleandoperate.
Keepthis manualina safeplaceforfutureandregularreference
andfororderingreplacementpart&
, ReadtheOperator'sManualand followallwarningsand safety
instruction&Failuretodosocanresultin seriousinjuryto the
operatorand/orbystander&Forquestionscall, 1-800-659-5917.
, Befamiliarwithall controlsandtheir properoperation.Knowhow
tostopthemachineanddisengagethemquickly.
, Neverallowchildrenunder14yearsofagetooperatethis
machine.Children14andovershouldreadandunderstandthe
instructionsandsafeoperationpracticesin thismanualandon
themachineandbe trainedandsupervisedbyanadulL
, Neverallowadultstooperatethismachinewithoutproper
instruction.
, Thrownobjectscancauseseriouspersonalinjury.Planyour
snow4hrowingpatternto avoiddischargeof materialtoward
roads,bystandersandthelike.
, Keepbystanders,petsandchildrenat bast 75feetfromthe
machinewhileitisin operation.Stopmachineifanyoneenters
thearea.
, Exercisecautiontoavoidslippingor falling,especiallywhen
operatinginreverse.
Your Responsibility--Restrict theuseofthis powermachineto
personswhoread,understandandfollowthewarningsandinstruc-
tionsinthismanualandonthemachine.
SAVE THESE NSTRUCT ONS!
Thoroughlyinspecttheareawheretheequipmentistobeused.
Removeall doormats,newspapers,sleds,boards,wiresandother
foreignobjects,whichcouldbetrippedoverorthrownbythe auger/
impeller.
, Alwayswearsafetyglassesoreyeshieldsduringoperationand
whileperformingan adjustmentor repairto protectyoureyes.
Thrownobjectswhichricochetcancauseseriousinjuryto the
eyes.
, Donot operatewithoutwearingadequatewinteroutergarments.
Donot wearjew@y,longscarvesorotherlooseclothing,which
couldbecomeentangledinmovingparts.Wearfootwearwhich
willimprovefootingonslipperysurfaces.
, Usea groundedthree-wireextensioncordandreceptacleforall
machineswithelectricstartengines.
, Adjustcollectorhousingheighttocleargravelorcrushedrock
surfaces.
, Disengageall controlleversbeforestartingtheengine.
, Neverattempttomakeanyadjustmentswhileengineis running,
exceptwherespecificallyrecommendedintheoperator'smanual.
, Letengineandmachineadjusttooutdoortemperaturebefore
startingtoclearsnow.
3
Page 4
SafeHandlingof Gasoline
Toavoidpersonalinjuryorpropertydamageuseextremecarein
handlinggasoline.Gasolineisextremelyflammableandthevaporsare
explosive.Seriouspersonalinjurycan occurwhengasolineisspilled
onyourselfor yourclotheswhichcanignite. Washyourskinand
changeclothesimmediately.
, Useonlyanapprovedgasolinecontainer.
, Extinguishall cigarettes,cigars,pipesandothersources
ofignition.
, Neverfuelmachineindoors.
, Neverremovegascaporaddfuelwhiletheengineis hot
or running.
, Allowengineto coolat bast two minutesbeforerefueling.
, Neveroverfill fueltank.Filltanktono morethanY_inch
belowbottomoffillerneckto providespaceforfuel
expansion.
, Replacegasolinecapandtightensecurely.
, ifgasolineisspilled,wipeit offtheengineandequipment.
Movemachinetoanotherarea.Wait5 minutesbefore
startingtheengine.
, Neverstorethemachineor fuelcontainerinsidewhere
thereis anopenflame,sparkor pilotlight(e.g.furnace,
waterheater,spaceheater,clothesdryeretc.).
, Allowmachinetocoolatbast 5 minutesbeforestoring.
, Neverfillcontainersinsidea vehicleor onatruckor trailer
bedwithaplasticliner.Alwaysplacecontainersonthe
groundawayfromyourvehiclebeforefilling.
, if possible,removegas_poweredequipmentfromthetruck
ortrailerand refueliton theground,if thisisnotpossible,
thenrefuelsuchequipmentona trailerwithaportable
container,ratherthanfromagasolinedispensernozzle.
, Keepthenozzleincontactwiththe rimofthefueltankor
containeropeningatalltimesuntilfuelingiscomplete.Do
notuse anozzlelock-opendevice.
, Do notputhandsorfeetnearrotatingparts,in theauger/impeller
housingorchuteassembly.Contactwiththerotatingpartscan
amputatehandsandfeet.
, Theauger/impellercontrolleverisa safetydevice.Neverbypass
itsoperation.Doingsomakesthemachineunsafeandmaycause
personalinjury.
, Thecontrolleversmustoperateeasilyinbothdirectionsand
automaticallyreturntothedisengagedpositionwhenreleased.
, Neveroperatewithamissingor damagedchuteassembly.Keep
all safetydevicesin placeandworking.
, Neverrunanengineindoorsorina poorlyventilatedarea.Engine
exhaustcontainscarbonmonoxide,anodorlessanddeadlygas.
, Do notoperatemachinewhileundertheinfluenceofalcoholor
drugs.
, Mufflerandenginebecomehotandcancausea burn.Do not
touch.Keepchildrenaway.
, Exerciseextremecautionwhenoperatingon orcrossinggravel
surfaces.Stayalertforhiddenhazardsor traffic.
, Exercisecautionwhenchangingdirectionandwhileoperatingon
slopes.
, Planyoursnow4hrowingpatternto avoiddischargetowards
windows,walls,carsetc.Thus,avoidingpossibleproperty
damageorpersonalinjurycausedbya ricochet.
, Neverdirectdischargeatchildren,bystandersand petsor allow
anyoneinfrontofthe machine.
, Donot overloadmachinecapacitybyattemptingtoclearsnowat
toofastof a rate.
, Neveroperatethismachinewithoutgoodvisibilityorlight.Always
be sureofyourfootingand keepafirmholdon thehandles.Walk,
neverrun.
, Disengagepowerto theauger/impellerwhentransportingor not
in use.
, Neveroperatemachineathightransportspeedson slippery
surfaces.Lookdownand behindand usecare whenbackingup.
, ifthemachineshouldstartto vibrateabnormally,stoptheengine,
disconnectthesparkplugwireandgrounditagainsttheengine.
inspectthoroughlyfor damage.Repairanydamagebefore
startingandoperating.
, Disengageall controlleversandstopenginebeforeyouleave
theoperatingposition(behindthehandles).Waituntilthe auger/
impellercomestoa completestopbeforeuncloggingthechute
assembly,makingany adjustments,orinspections.
, Neverputyourhandinthe dischargeorcollectoropenings.
Alwaysusetheclean_outtoolprovidedtounclogthedischarge
opening.Donotunclogchuteassemblywhileengineisrunning.
Shutoff engineand remainbehindhandlesuntilallmovingparts
havestoppedbeforeunclogging.
, Useonlyattachmentsandaccessoriesapprovedbythe manufae
turer(e.g.wheelweights,tirechains,cabsetc.).
, Whenstartingengine,pullcordslowlyuntilresistanceisfelt,then
pull rapidly.Rapidretractionofstartercord(kickback)willpull
handandarmtowardenginefasterthan youcan letgo.Broken
bones,fractures,bruisesorsprainscouldresult.
, ifsituationsoccurwhichare notcoveredinthis manual,usecare
andgoodjudgment.ContactCustomerSupportforassistance
andthenameof yournearestservicingdealer.
4
Page 5
MAUNTENANCE& STORAGE
, Nevertamperwithsafetydevices_Checktheirproperoperation
regularly.Refertothemaintenanceandadjustmentsectionsof
thismanual
, Beforecleaning,repairing,or inspectingmachinedisengageall
controlleversandstoptheengine.Waituntiltheauger/impeller
cometoa completestop.Disconnectthe sparkplugwireand
groundagainsttheenginetopreventunintendedstarting.
, Checkboltsandscrewsforpropertightnessatfrequentintervals
tokeepthemachinein safeworkingcondition.Also,visually
inspectmachineforanydamage.
, Do notchangetheenginegovernorsettingor over-speedthe
engine.Thegovernorcontrolsthe maximumsafeoperatingspeed
oftheengine.
, Snowthrowershaveplatesandskidshoesaresubjecttowear
anddamage.Foryoursafetyprotection,frequentlycheckall
componentsand replacewithoriginalequipmentmanufacturer's
(OEM)partsonly."Useofpartswhichdo notmeettheoriginal
equipmentspecificationsmayleadto improperperformanceand
compromisesafety!"
, Checkcontrolleversperiodicallytoverifytheyengageanddisen-
gageproperlyandadjust,ifnecessary.Refertotheadjustment
sectioninthisoperator'smanualforinstructions.
, Maintainorreplacesafetyandinstructionlabels,asnecessary.
Observeproperdisposallawsand regulationsforgas,oil,etc. to
protecttheenvironment.
, Priorto storing,runmachinea few minutestoclearsnowfrom
machineand preventfreezeupofauger/impeller.
, Neverstorethe machineorfuelcontainerinsidewherethereisan
openflame,sparkorpilotlightsuchasawaterheater,furnace,
clothesdryeretc.
, Alwaysreferto theoperator'smanualforproperinstructionson
off-seasonstorage.
, Checkfuelline,tank,cap,andfittingsfrequentlyforcracksor
leaks.Replaceif necessary.
, Do notcrankenginewithsparkplugremoved.
, AccordingtotheConsumerProductsSafetyCommission(CPSC)
andtheU.S.EnvironmentalProtectionAgency(EPA),thisproduct
hasan AverageUsefulLifeof seven(7)years,or60 hoursof
operation.AttheendoftheAverageUsefulLifehavethemachine
inspectedannuallybyan authorizedservicedealertoensurethat
allmechanicalandsafetysystemsareworkingproperlyandnot
wornexcessively.Failureto dosocanresultinaccidents,injuries
ordeath.
DO NOT MODUFY ENGUNE
Toavoidseriousinjuryor death,do notmodifyengineinany way.
Tamperingwiththegovernorsettingcanleadto arunawayengineand
causeittooperateat unsafespeeds.Nevertamperwithfactorysetting
ofenginegovernor.
NOTUOE REGARDUNG EMUSSUONS
EngineswhicharecertifiedtocomplywithCaliforniaandfederal
EPAemissionregulationsfor SORE(SmallOffRoadEquipment)are
certifiedto operateon regularunleadedgasoline,and mayinclude
thefollowingemissioncontrolsystems:EngineModification(EM),
OxidizingCatalyst(CO),SecondaryAirInjection(SAI)and ThreeWay
Catalyst(TWO)if soequipped.
SPARK ARRESTOR
Thismachineisequippedwithaninternalcombustionengineand
shouldnotbeusedonornearanyunimprovedforest-covered,
brush-coveredorgrass-coveredlandunlesstheengine'sexhaust
systemisequippedwithasparkarrestermeetingapplicablelocalor
statelaws(ifany)
Ifasparkarresterisused,itshouldbemaintainedineffectiveworking
orderbytheoperator.IntheStateofCaliforniatheaboveis required
bylaw (Section4442oftheCaliforniaPublicResourcesCode).Other
statesmayhavesimilarlaws. Federallawsapplyonfederallands.
A sparkarresterforthemufflerisavailablethroughyournearestSears
PartsandRepairServiceCenter.
Page 6
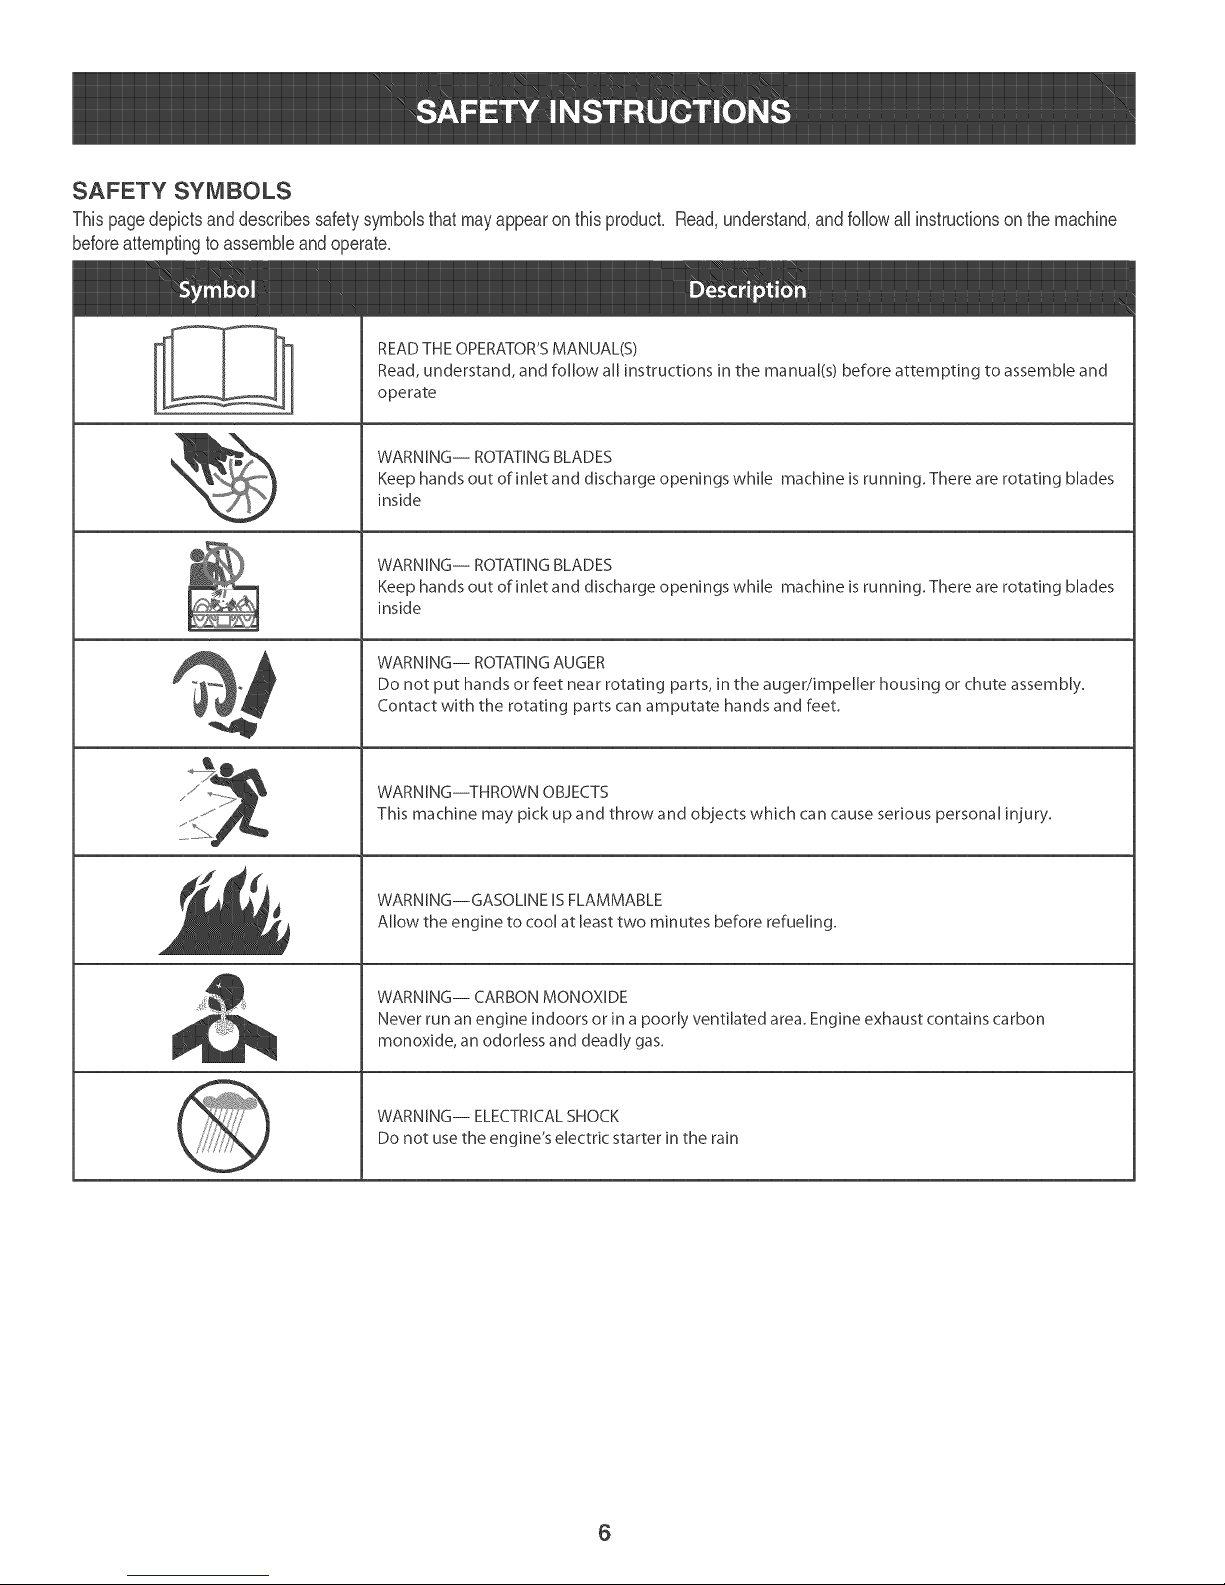
SAFETY SYMBOLS
Thispagedepictsanddescribessafetysymbolsthatmayappearonthisproduct. Read,understand,andfoflowaftinstructionson the machine
beforeattemptingto assembleandoperate.
°
i
\
READ THE OPERATOR'S MANUAL(S)
Read, understand, and follow all instructions in the manual(s) before attempting to assemble and
operate
WARNING-- ROTATING BLADES
Keep hands out of inlet and discharge openings while machine ]srunning. There are rotating blades
inside
WARNING-- ROTATING BLADES
Keep hands out of inlet and discharge openings while machine ]srunning. There are rotating blades
inside
WARNING-- ROTATING AUGER
Do not put hands or feet near rotating parts, ]n the auger/impeller housing or chute assembly.
Contact with the rotating parts can amputate hands and feet.
WARNING--THROWN OBJECTS
This machine may pick up and throw and objects which can cause serious personal injury.
WARNING--GASOLINE IS FLAMMABLE
Allow the engine to cool at least two minutes before refueling.
WARNING-- CARBON MONOXIDE
Never run an engine indoors or in a poorly ventilated area. Engine exhaust contains carbon
monoxide, an odorless and deadly gas.
WARNING-- ELECTRICALSHOCK
Do not usethe engine's electric starter in the rain
6
Page 7
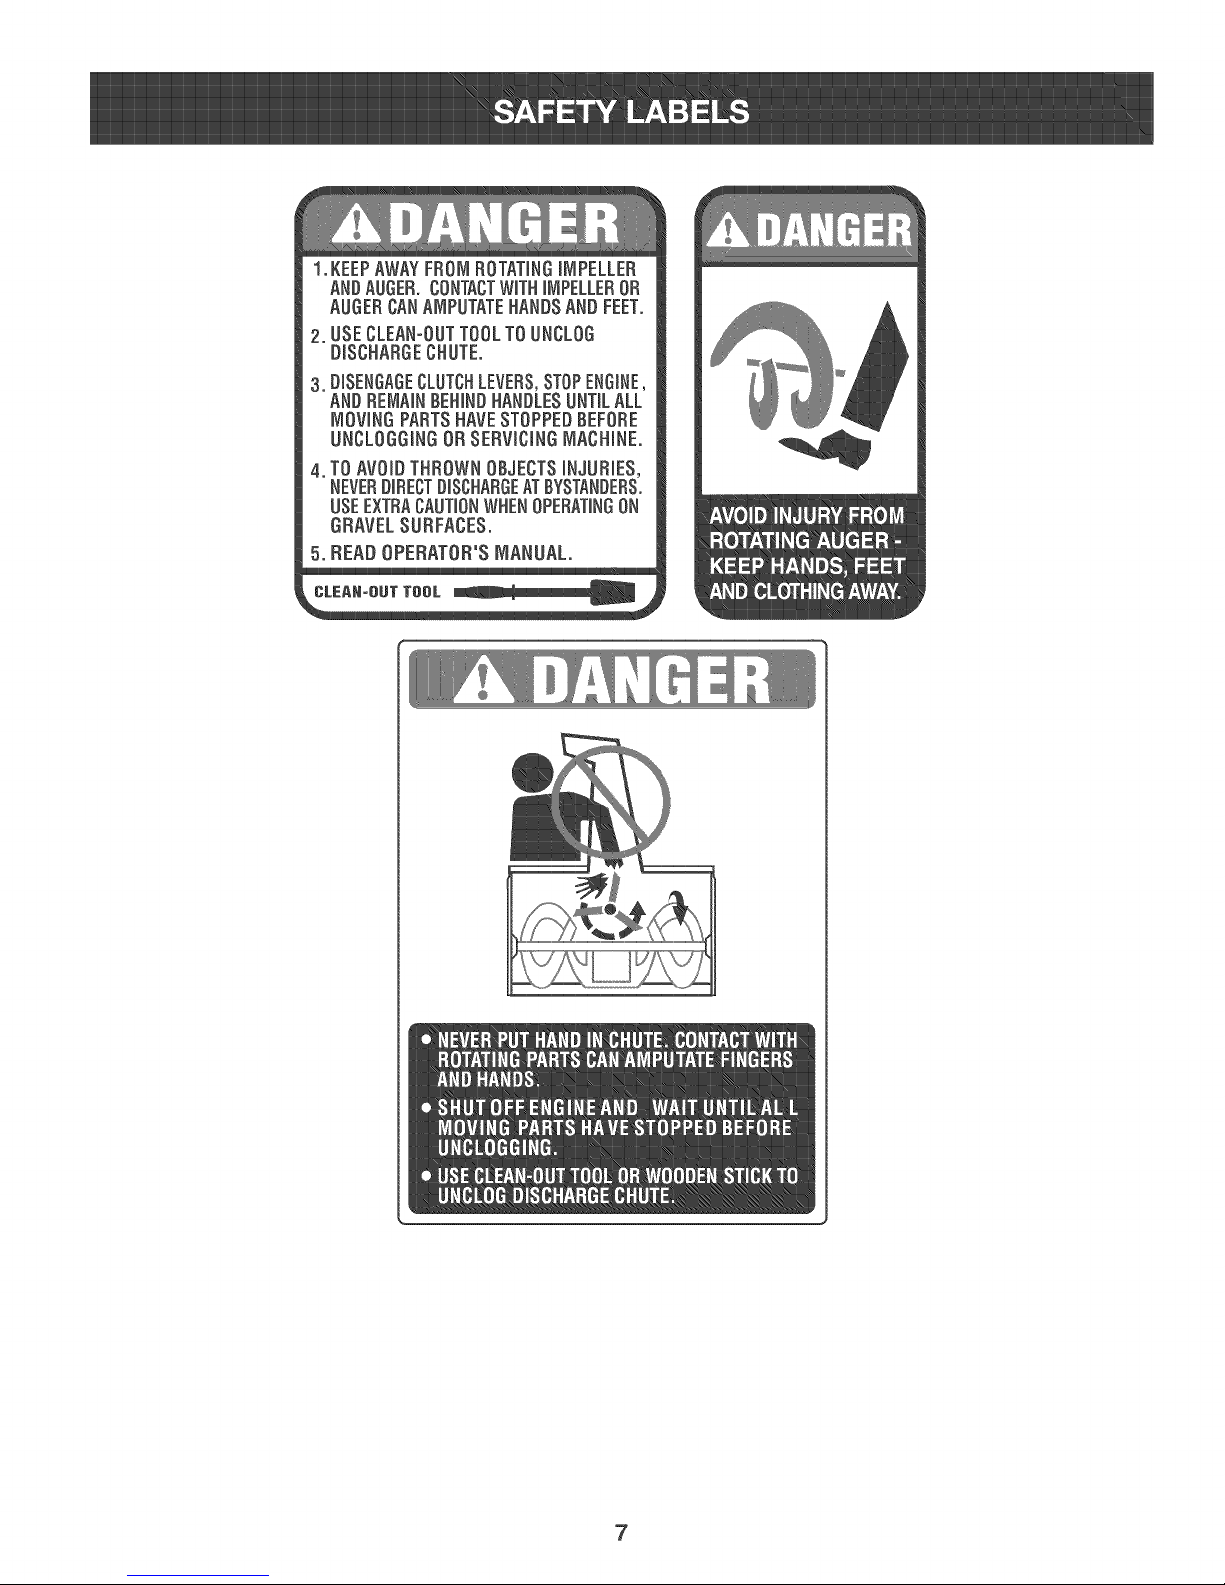
I,KEEPAWAY FROM ROTATINGiMPELLER
ANDAUGER.CONTACTWiTHiMPELLEROR
AUGER CAN AMPUTATEHANDSAND FEET.
2.USE CLEAN-OUTTOOL TO UNCLOG
DISCHARGECHUTE.
3.DISENGAGECLUTCHLEVERS,STOPENGINE,
AND REMAINBEHINDHANDLESUNTILALL
MOVING PARTSHAVE STOPPEDBEFORE
UNCLOGGING OR SERVICINGMACHINE.
4.TO AVOIDTHROWN OBJECTSiNJURIES,
NEVERDIRECTDISCHARGEATBYSTANDERS.
USEEXTRACAUTIONWHENOPERATINGON
GRAVEL SURFACES.
5, READOPERATOR'SMANUAL.
7
Page 8
NOTE:Referencesto rightorbft sideof thesnowthrowerare
determinedfrombehindtheunitintheoperatingposition(standing
directlybehindthesnowthrower,facingthe handb pan@.
REMOVUNG FROM CARTON
1. Cutthecornersofthecartonandlaythesidesfiaton theground.
RemoveanddiscardaiIpackinginserts.
2. Movethesnowthrowerout ofthecarton.
3. Makecertainthecartonhasbeencompbteiyemptiedbefore
discardingit.
LOOSE PARTS
Tworeplacementaugershearpinsare incBdedwiththis manual.Refer
toReplacingShearPinsinthe Operationsectionformoreinformation
regardingshearpin replacement.
.
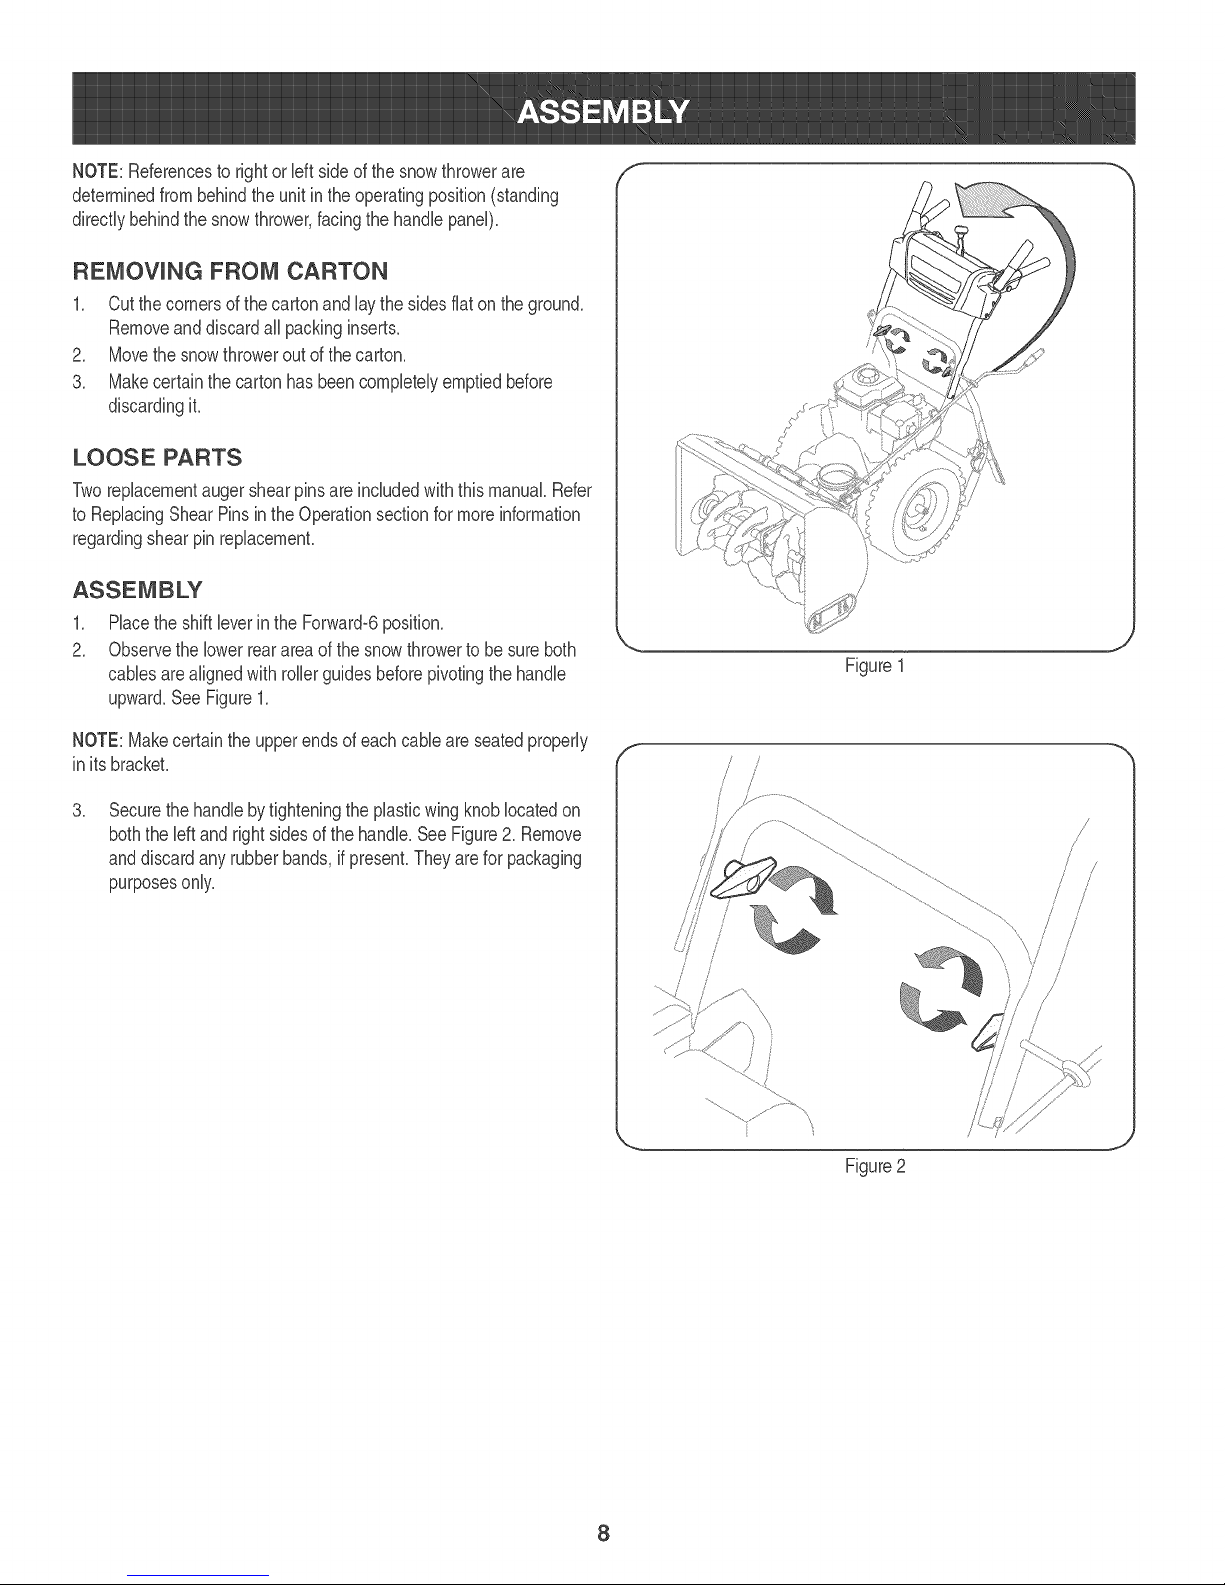
Placethe shiftbver in the Forward-6position.
2_
Observethe lowerrearareaofthesnowthrowertobesureboth
cabbs arealignedwithroibr guidesbeforepivotingthehandle
upward.See Figure1.
f
Figure1
NOTE:Makecertainthe upperendsofeachcableare seatedproperly
in itsbracket.
.
Securethehandlebytighteningtheplasticwingknoblocatedon
boththe leftandrightsidesofthehandle.SeeFigure2.Remove
anddiscardanyrubberbands,ifpresenLTheyareforpackaging
purposesonly.
f
/
/
/
j
/ i/
/
J
Figure2
8
Page 9

.
Positionthechuteassemblyoverthebase.See Figure3.
5.
Closetheflangekeepersto securethechuteassemblytothe
chutebase.SeeFigure4.The flangekeeperswillclickintoplace
whenproperlysecure.
NOTE:if theflangekeeperswill noteasilyclickintoplace,usethe
palmof yourhandtoapplyswift,firmpressuretothe backofeach.
.
a.
Removethefiatwasherandhairpinclipfromtheendofthe
chutedirectionalcontrol.
b.
inserttheendofthechutedirectionalcontrolintothelower
bracketandsecurewiththefiatwasherandhairpinclipjust
removed.See Figure5.if necessary,thelowerbracketcan
beadjusted.Referto ChuteBracketAdjustmentinthe
Service& Maintenancesection.
Figure4
Figure3
Figure5
9
Page 10
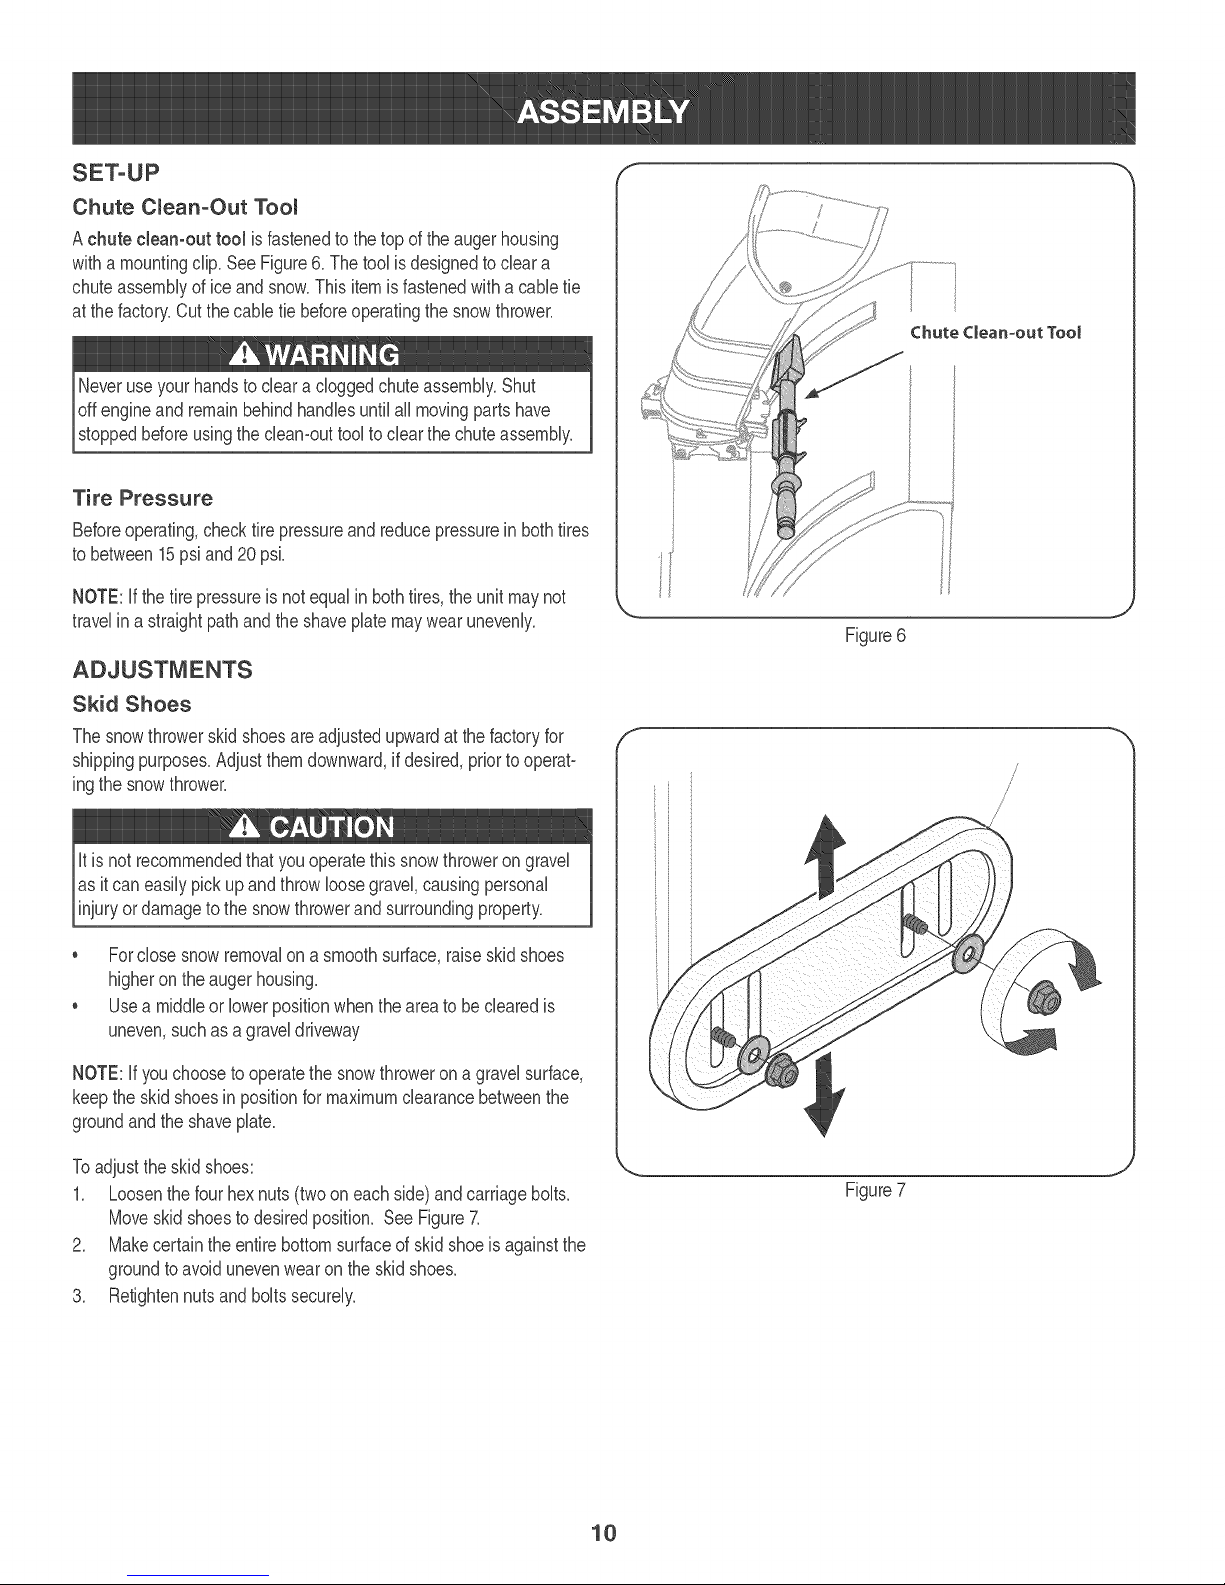
Chute CmeanoOut Toom
Achute clean-out tool isfastenedtothetopof theaugerhousing
withamountingdip. SeeFigure6.Thetoolisdesignedtodear a
chuteassemblyoficeandsnow.Thisitemisfastenedwitha cabletie
atthefactory.Cutthecable tiebeforeoperatingthesnowthrower.
Neveruseyour handstodeara dogged chuteassembly.Shut
offengineandremainbehindhandlesuntilall movingpartshave
stoppedbeforeusingthedeamouttoolto dearthe chuteassembly.
Tire Pressure
Beforeoperating,checktirepressureand reducepressureinbothtires
tobetween15psiand20 psi.
NOTE:If thetirepressureis notequalinbothtires,theunit maynot
travelin astraightpathandthe shaveplatemaywearunevenly.
Skid Shoes
Thesnowthrowerskidshoesareadjustedupwardat thefactoryfor
shippingpurposes.Adjustthemdownward,ifdesired,priortooperab
ingthesnowthrower.
Chute Clean-out Tool
Figure6
f --,,
it isnotrecommendedthatyouoperatethis snowthrowerongravel
asitcaneasilypickupandthrowloosegravel,causingpersonal
injuryordamageto thesnowthrowerandsurroundingproperty.
, Forclosesnowremovalona smoothsurface,raiseskidshoes
higherontheaugerhousing.
, Usea middleorlowerpositionwhentheareatobeclearedis
uneven,suchasa graveldriveway
NOTE:If youchoosetooperatethesnowthroweronagravelsurface,
keepthe skidshoesinpositionfor maximumclearancebetweenthe
groundandtheshaveplate.
Toadjustthe skidshoes:
1. Loosenthefourhexnuts(twooneachside)andcarriagebolts.
Moveskidshoestodesiredposition. SeeFigure7.
2. Makecertaintheentirebottomsurfaceof skidshoeis againstthe
groundtoavoidunevenwearonthe skidshoes.
3. Retightennutsandboltssecurely.
Figure7
10
Page 11
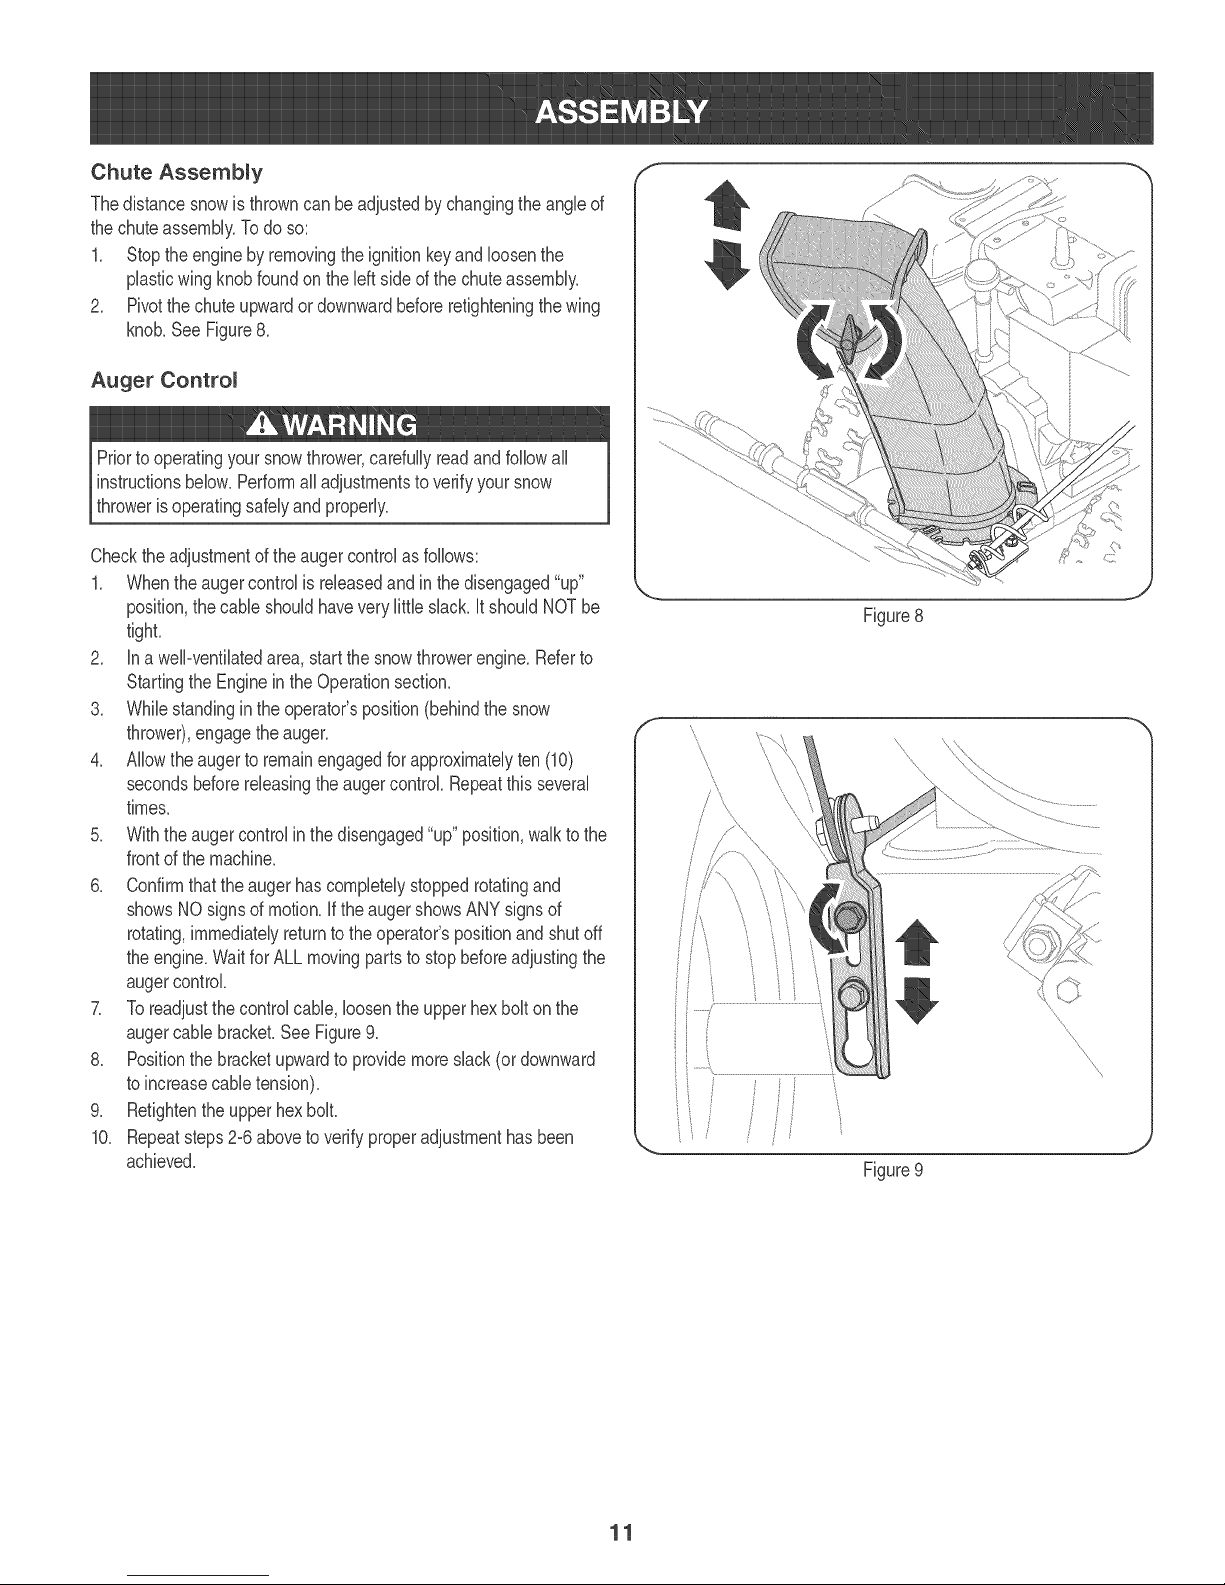
Chute Assembmy
Thedistancesnowisthrowncanbeadjustedbychangingtheangleof
thechuteassembly.Todo so:
1. Stopthe enginebyremovingtheignitionkeyandloosenthe
plasticwingknobfoundonthe left sideofthe chuteassembly.
2. Pivotthechuteupwardordownwardbeforeretighteningthewing
knob.See Figure8.
Auger Controm
Priorto operatingyoursnowthrower,carefullyreadandfollowall
instructionsbelow.Performalladjustmentstoverifyyoursnow
throwerisoperatingsafelyandproperly.
Checktheadjustmentoftheaugercontrolas follows:
1. Whentheaugercontrolis releasedandin thedisengaged"up"
position,thecableshouldhavevery littleslack,itshouldNOTbe
tight.
2. in a welPventilatedarea,startthesnowthrowerengine.Referto
StartingtheEngineintheOperationsection.
3. Whilestandinginthe operator'sposition(behindthe snow
thrower),engagethe auger.
4. Allowtheaugertoremainengagedforapproximatelyten (10)
secondsbeforereleasingthe augercontrol.Repeatthisseveral
times.
5. Withtheaugercontrolin thedisengaged"up"position,walktothe
frontofthemachine.
6. Confirmthatthe augerhascompletelystoppedrotatingand
showsNOsignsofmotion,if theaugershowsANYsignsof
rotating,immediatelyreturntotheoperator'spositionandshutoff
theengine.WaitforALLmovingpartstostopbeforeadjustingthe
augercontrok
7. Toreadjustthecontrolcable,loosentheupperhexboltonthe
augercablebracket.SeeFigure9.
8. Positionthebracketupwardtoprovidemoreslack(or downward
toincreasecabletension).
9. RetightentheupperhexboL
10. Repeatsteps2-6aboveto verifyproperadjustmenthasbeen
achieved.
/
\
J
//
J
Figure9
11
Page 12
f
Shift Lever
Drive Control p
)J
Chute Directional Contro[
Recoil Starter
Handle
Electric Start
Button
_., J
Figure10
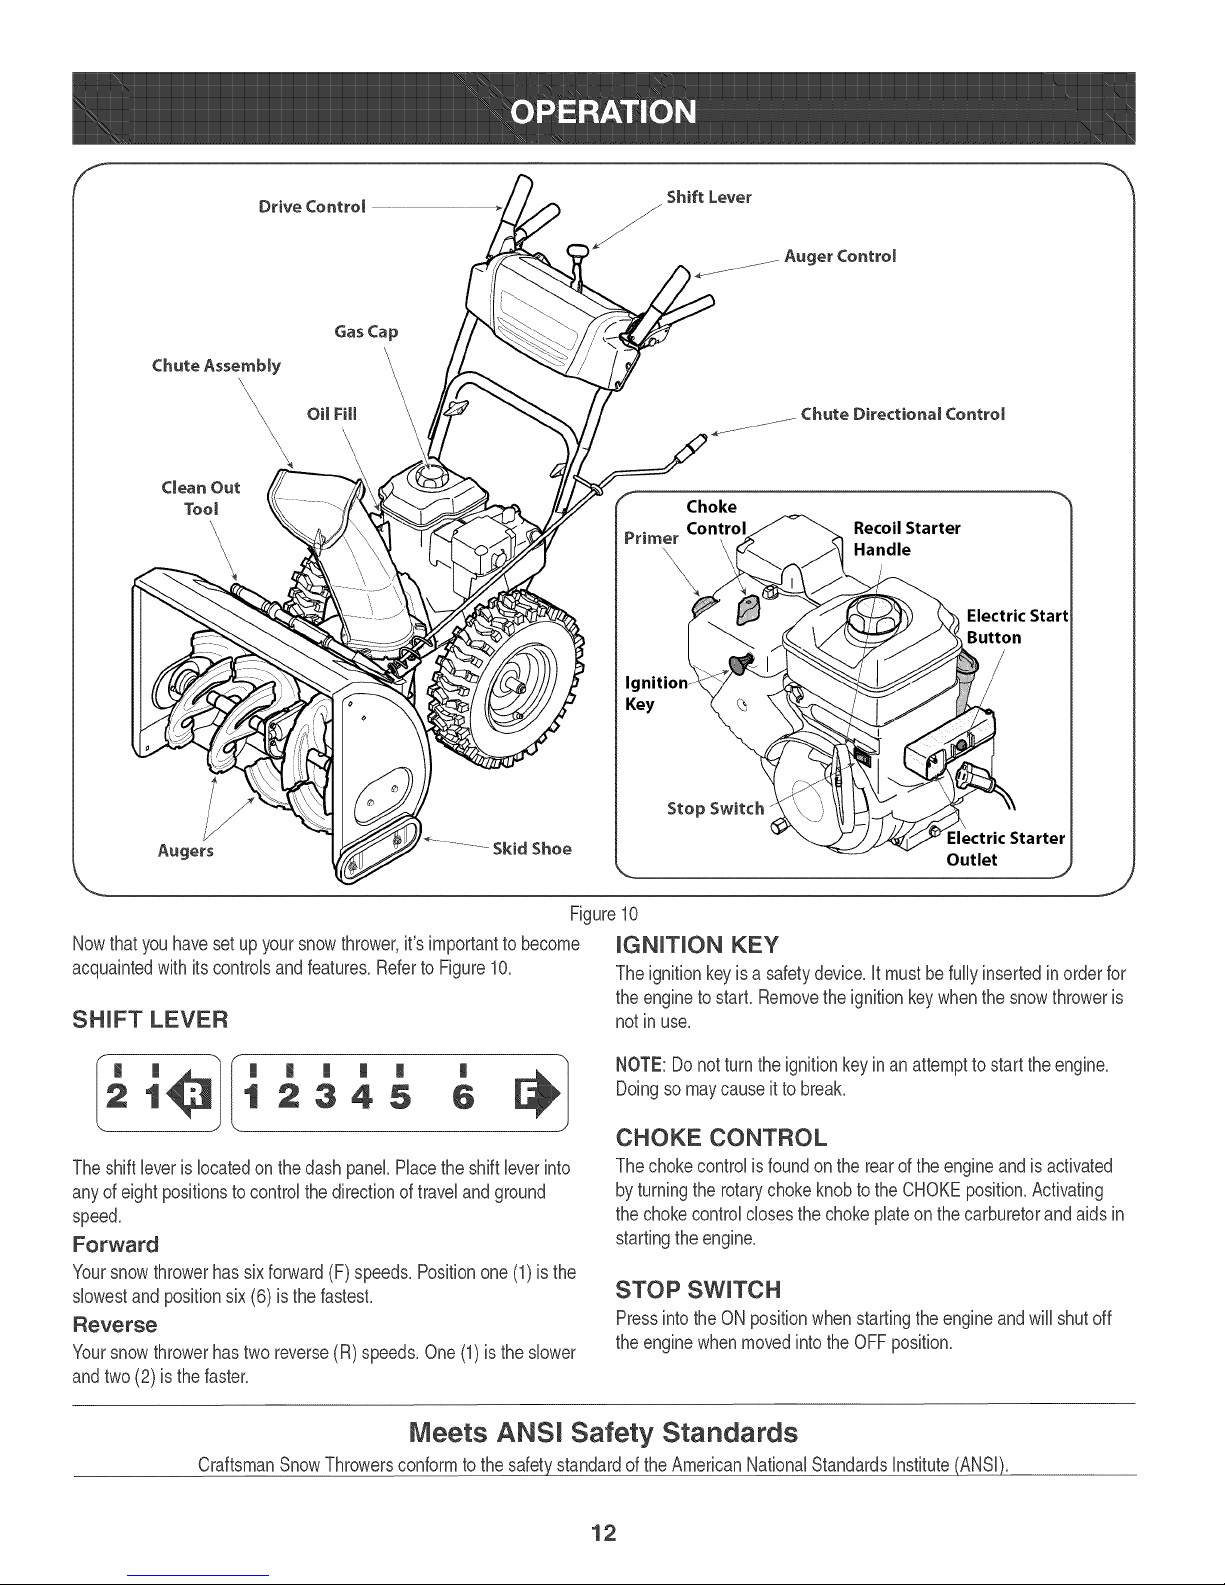
Nowthat youhavesetup yoursnowthrower,it'simportanttobecome [GNUTUON KEY
acquaintedwith itscontrolsandfeature&RefertoFigure10.
SHUFT LEVER
1 2345 5
'e}I °
Theignitionkeyisa safetydevice,it mustbe fullyinsertedinorderfor
theenginetostarL Removetheignitionkeywhenthesnowthroweris
notin use.
NOTE:Donotturnthe ignitionkeyinan attemptto starttheengine.
Doingsomaycauseitto break.
CHOKE CONTROL
Theshiftleverislocatedonthedashpanel.Placetheshiftleverinto
anyof eightpositionstocontrolthedirectionoftravelandground
speed.
Forward
Yoursnowthrowerhassixforward(F)speeds.Positionone(1)is the
siowestandpositionsix(6)is thefastest.
Reverse
Yoursnowthrowerhastwo reverse(R)speeds.One(1)istheshower
andtwo(2)is thefaster.
Thechokecontrolisfoundon therearofthe engineandis activated
byturningtherotarychokeknobtothe CHOKEposition.Activating
thechokecontrolclosesthechokeplateon thecarburetorandaids in
startingthe engine.
STOP SWUTCH
Pressintothe ONpositionwhenstartingtheengineandwillshutoff
theenginewhenmovedintotheOFFposition.
Meets ANSi Safety Standards
CraftsmanSnowThrowersconformtothesafetystandardoftheAmericanNationalStandardsInstitute(ANSI).
Outlet
J
12
Page 13
RECOULSTARTER HANDLE
Thishandbisusedto manuallystarttheengine_
ELECTRUC STARTER BUTTON
Pressingtheebctrb starterbuttonengagestheengine'sebctrb
starterwhenpBggedintoa 120Vpowersource.
ELECTRUC STARTER OUTLET
Requirestheuseof athree-prongoutdoorextensioncord(included)
anda120Vpowersource/wailoutbt.
Depressingthe primerforcesfueldirectlyintotheengine'scarburetor
toaidin cold-weatherstarting.
OUL FULL
Engineoil bveIcanbecheckedand oiladdedthroughtheoilfill.
GAS CAP
Unthreadthegascaptoaddgasolinetothefueltank.
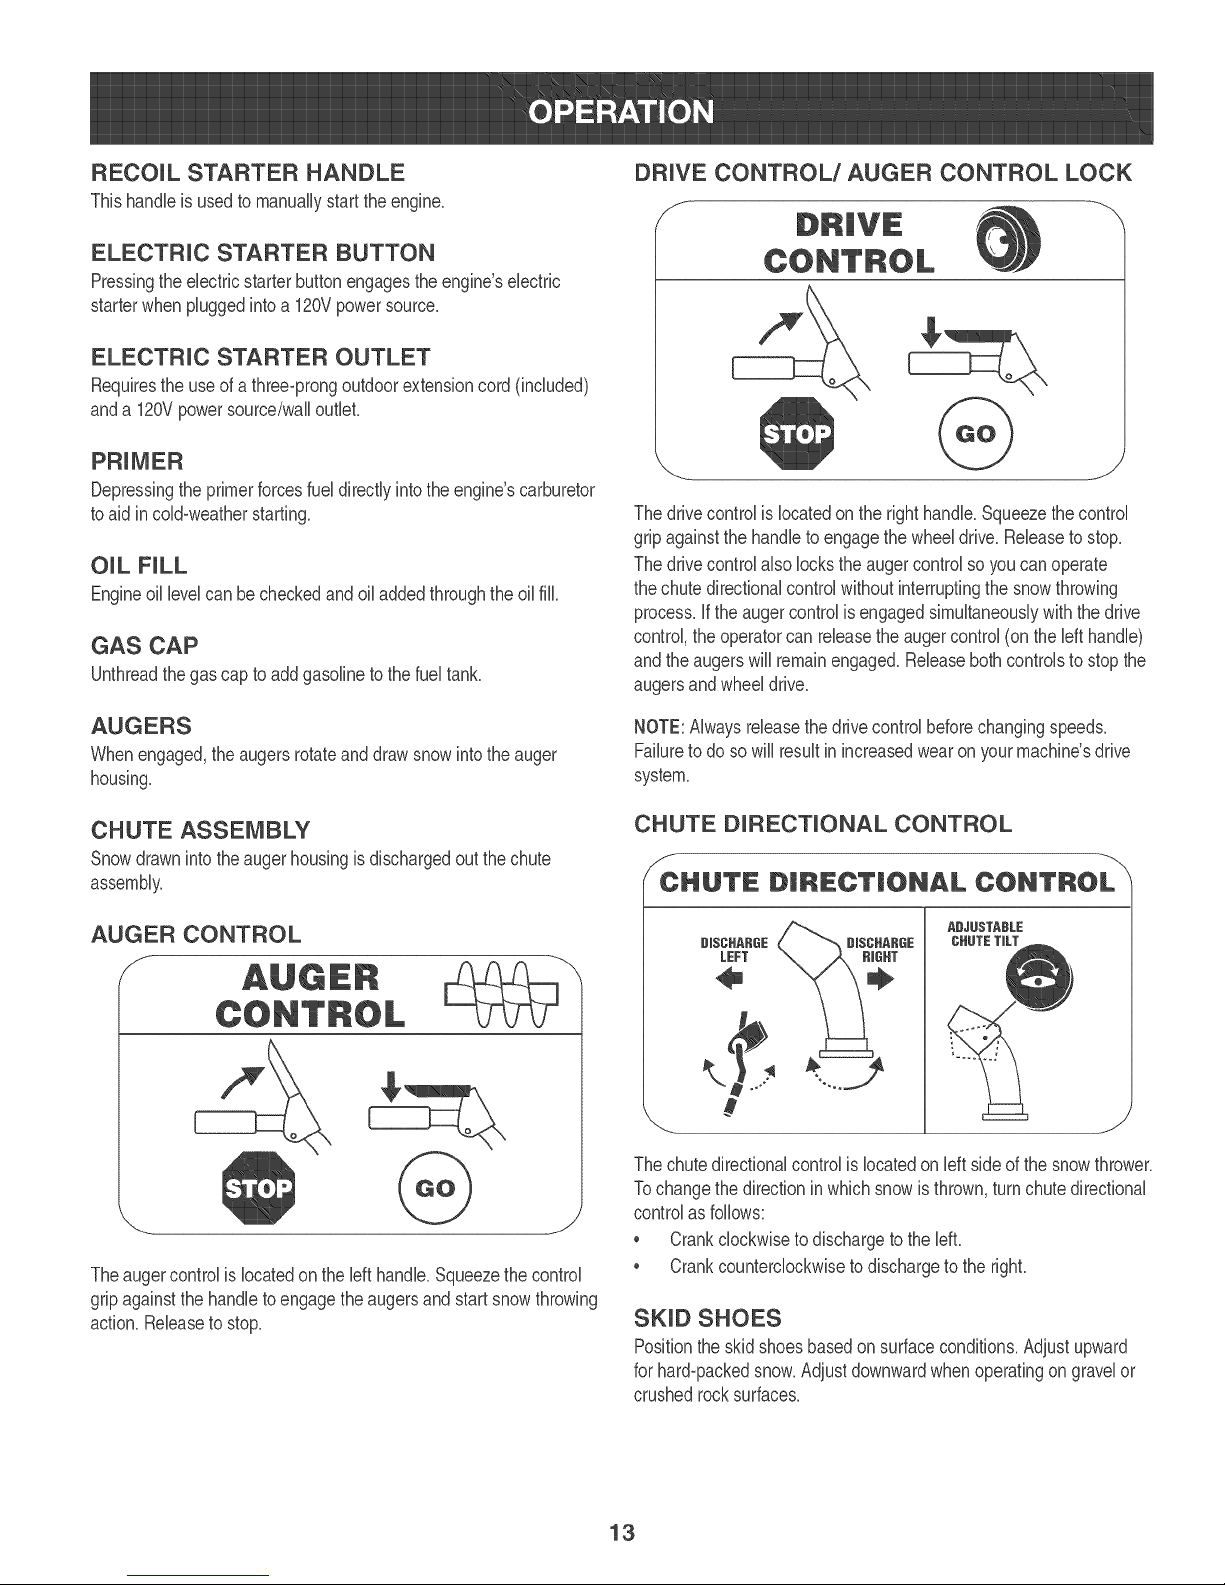
DRUVE CONTROL/AUGER CONTROL LOCK
Thedrivecontrolis locatedon therighthandle.Squeezethecontrol
gripagainstthehandletoengagethe wheeldrive.ReleasetostoF
Thedrivecontrolalsolockstheaugercontrolsoyoucan operate
thechutedirectionalcontrolwithoutinterruptingthe snowthrowing
process,if theaugercontrolisengagedsimultaneouslywiththedrive
control,the operatorcanreleasetheaugercontrol(onthelefthandle)
andtheaugerswill remainengage&Releasebothcontrolstostopthe
augersandwheeldrive.
AUGERS
Whenengaged,theaugersrotateanddrawsnowintotheauger
housing.
CHUTE ASSEMBLY
Snowdrawnintotheaugerhousingisdischargedoutthechute
assembly.
AUGER CONTROL
J
Theaugercontrolislocatedonthe lefthandle.Squeezethecontrol
gripagainstthehandletoengagetheaugersandstartsnowthrowing
action.ReleasetostoF
NOTE:Alwaysreleasethedrivecontrolbeforechangingspeeds.
Failureto dosowillresultinincreasedwearon yourmachine'sdrive
system.
CHUTE DURECTUONAL CONTROL
/c. D c .ALco.r.o
\
Thechutedirectionalcontrolislocatedonleft sideofthesnowthrower.
Tochangethedirectioninwhichsnowisthrown,turnchutedirectional
controlasfollows:
, Crankclockwiseto dischargetotheleft.
, Crankcounterclockwisetodischargetothe righL
SKUD SHOES
Positiontheskidshoesbasedonsurfacecondition&Adjustupward
forhard-packedsnow.Adjustdownwardwhenoperatingongravelor
crushedrocksurface&
13
Page 14
CLEAN-OUT TOOL
Neveruseyour handsto dearadogged chuteassembly.Shut
offengineandremainbehindhandlesuntilall movingpartshave
stoppedbeforeusingthedean-outtooltodear thechuteassembly.
Thechutedean-outtoolisconvenientlyfastenedtotherearofthe
augerhousingwitha mountingdip. Shouldsnowandice become
lodgedin thechuteassemblyduringoperation,proceedasfollowsto
safelydean thechuteassemblyandchuteopening:
1. Releaseboththe AugerControlandtheDriveControk
2. Stopthe enginebyremovingtheignitionkey.
3. Removethedean-outtoolfromthedip whichsecuresitto the
rearoftheaugerhousing.
4. Usetheshovel-shapedendof thedean-outtool todislodgeand
scoopanysnowand icewhichhasformedinandnearthechute
assembly.
5. Refastenthedean-outtooltothe mountingdip ontherearof
theaugerhousing,reinserttheignitionkeyandstartthesnow
thrower'sengine.
6. Whilestandinginthe operator'sposition(behindthesnow
thrower),engagethe augercontrolfora fewsecondstoclearany
remainingsnowandice fromthechuteassembly.
BEFORE STARTUNG ENGUNE
flammableandthevaporsareexplosive.Neverfuelthemachine
indoorsorwhiletheengineishotorrunning.Extinguishcigarettes,
I Useextremecarewhenhandlinggasoline.Gasolineisextremely
cigars,pipesandothersourcesof ignition.
, Alwaysfillthefueltankoutdoorsandusea funnelorspoutto
preventspilling.
Fillfuel tankwithclean,fresh,unleadedgasolinewitha minimum
of85 octane.Freshfuelpreventsgumfromforminginthefuel
systemoronessentialcarburetorparts.Purchasefuelin a
quantitythatcanbeusedwithin30days.
, Neverfillthefueltankcompletely.Fillthetanktowithin1-1/2"
fromthetopto providespaceforexpansionoffuel.
, Makesureto wipeoff anyspilledfuelbeforestartingtheengine.
STARTING THE ENGINE
1. Makecertainboththe augercontrolanddrivecontrolarein the
disengaged(released)position.
2. Insertignitionkeyintoslot.Makesureitsnapsintoplace.Do not
attempttoturnthe key.
NOTE:Theenginecannotstartwithoutthe keyisfully insertedintothe
ignitionswitch.
Electric Starter
Determinethatyourhome'swiringis athree-wiregroundedsystem.
Askalicensedelectricianifyou arenotcertain.
Read,understand,andfollowall instructionsandwarningsonthe
machineand inthismanualbeforeoperating.
Oil
Theunitwasshippedwithoilintheengine.Checkoillevelbeforeeach
operationto ensureadequateoilinthe engine.Forfurtherinstructions,
referto thestepsonpage16.
1. Removethedipstickfromtheoil fill.
2. Checkandmakesurethatthelevelof oilisuptothe FULLmark
onthedipstick.
3. Iftheoil levelisnotupto FULL,pourfreshmotoroil(5%30, with
a minimumclassificationofSF/SG/SH/SJ)slowlythroughthe
opening.Replaceoil filldipstickandcheckoil levelagain.
Gasoline
, Storegasolinein aclean,approvedcontainerandkeepthecapin
placeonthecontainer.
, Makesurethatthecontainerfromwhichyoupourthegasolineis
cleanandfreefromrustor otherforeignparticles.
Theoptionalelectricstarterisequippedwithagroundedthree-wire
powercordandplug,and isdesignedto operateon120voltAC
householdcurrent.It mustbeusedwitha properlygroundedthree-
prongreceptacleatalltimestoavoidthepossibilityofelectricshock.
Followall instructionscarefullypriortooperatingtheelectricstarter.
DONOTuse electricstarterintherain.
Ifyouhaveagroundedthree-prongreceptacle,proceedasfollows:
1. Plugtheextensioncordintotheoutletlocatedontheengine's
surface.Plugtheotherendof extensioncord intoa three-prong
120wok,grounded,ACoutletina wellwentibtedarea.
2. RotatechokecontroltoCHOKE1,,_¢1position.
3. Ifit is 15°Forhigherpushprimertwotimes,if below15°Epush
primerfourtimes.
4. PushStopswitchtoON position.
14
Page 15
5_ Pushstarterbuttonto startengine.
Toprolongstarterlife,useshortstartingcycles(5 secondsmaximum
thenwaitoneminute).
6. Oncethe enginestarts,releasestarterbutton.
7. Allowtheenginetowarmup severalminutes,adjustingchoke
towardRUNposition.Waituntilenginerunssmoothlybeforeeach
chokeadjustment.
8. Whendisconnectingthe extensioncord,alwaysunplugtheend
atthethree-prongwalloutletbeforeunpluggingtheoppositeend
fromthesnowthrower.
Recoim Starter
1. Rotatechokecontrolto CHOKE lJl position.
2. Depressprimer,ifit is 15°For higherpushprimertwotimes,if
below15°Rpushprimerfourtimes.
3. PushStopswitchto ONposition.
4. Graspthe recoilstarterhandleandslowlypullthe ropeout.At
thepointwhereitbecomesslightlyharderto pulltherope,slowly
allowthe ropeto recoil.
5. Pullthestarterhandlewithafirm,rapidstroke.Donotrelease
thehandleandallowit tosnapback.Keepa firmholdonthe
starterhandleandallowittoslowlyrecoil.
6. Allowtheenginetowarmup severalminutes,adjustingchoke
towardRUNposition.Waituntilenginerunssmoothlybeforeeach
chokeadjustment.
NOTE:NEVERrepositiontheshiftlever(changespeedsor direction
oftravel)withoutfirstreleasingthe drivecontrolandbringingthesnow
throwertoa completestop.Doingsowill resultin prematurewearto
thesnowthrower'sdrivesystem.
TO ENGAGE AUGERS
1_ Toengagetheaugersandstartthrowingsnow,squeezethe
augercontrolagainstthelefthandle.Releasetostoptheaugers.
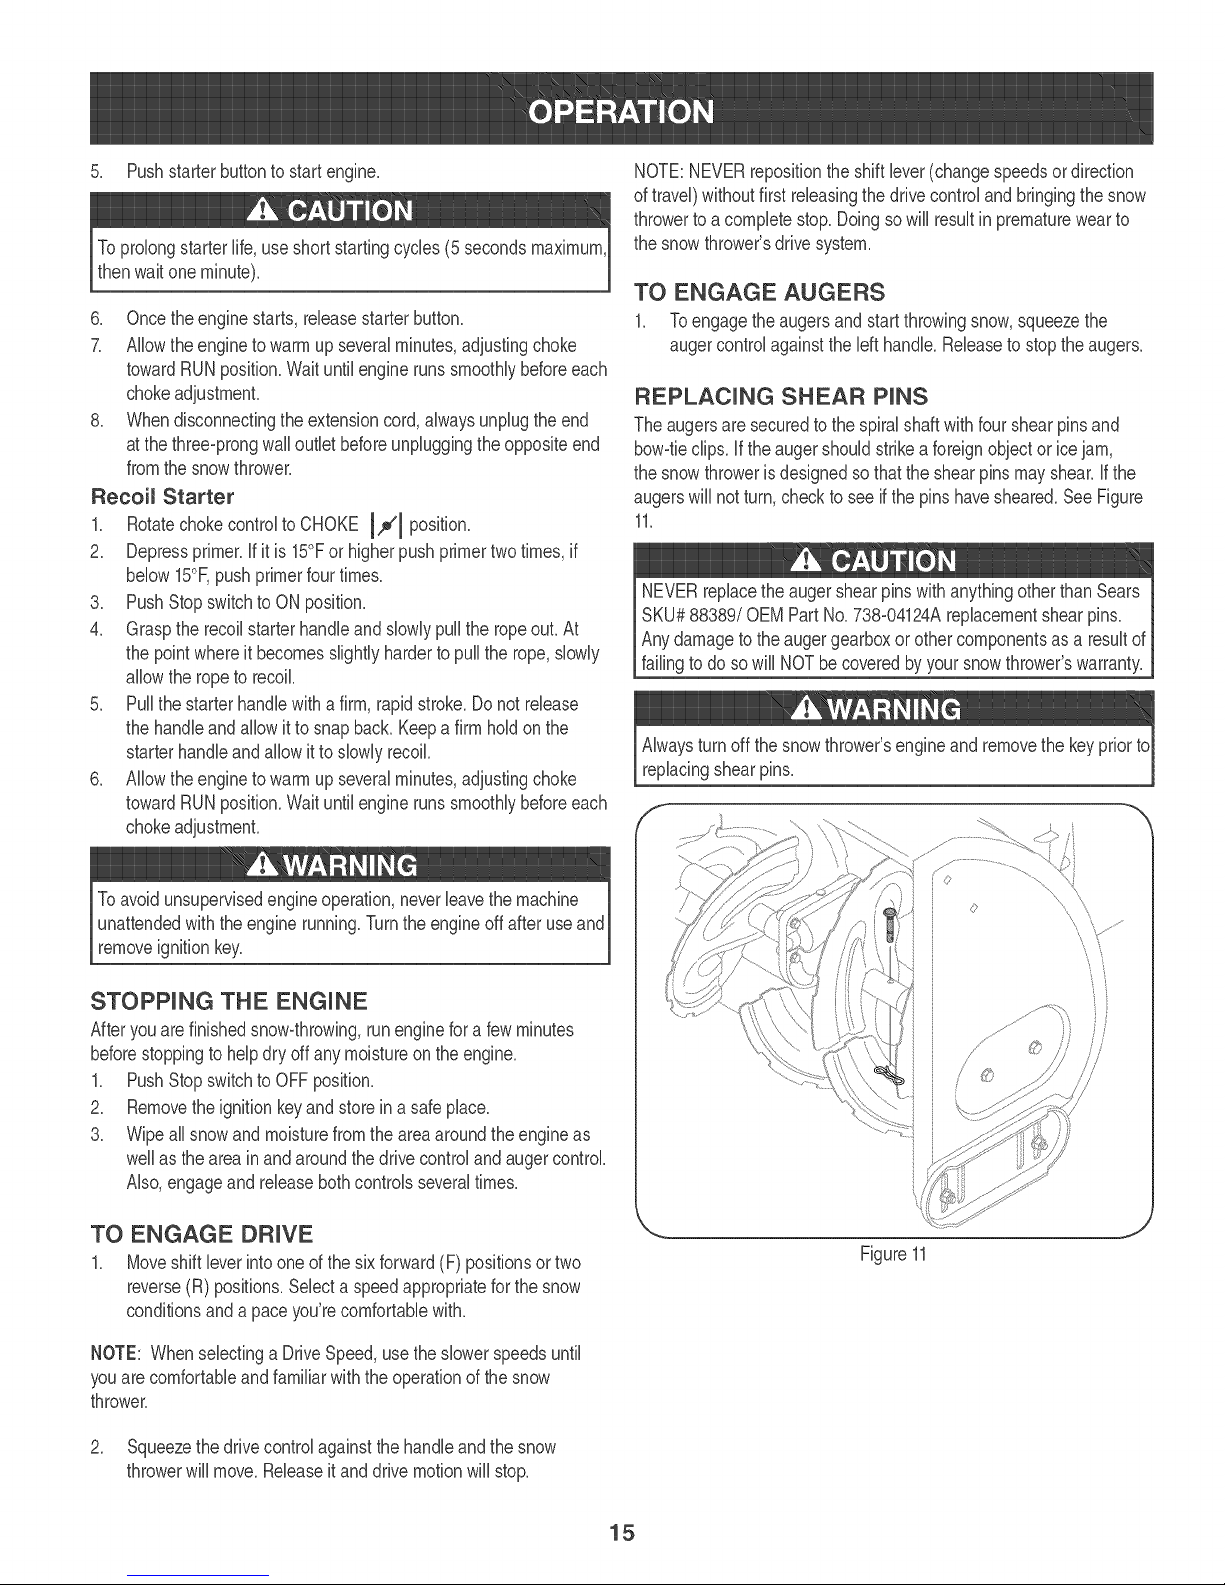
REPLACUNG SHEAR PUNS
TheaugersaresecuredtothespiraHshaftwithfourshearpinsand
bow-tiechips.Hfthe augershouHdstrikeaforeignobjector icejam,
thesnowthrowerisdesignedsothattheshearpinsmayshear.Hfthe
augerswiHHnotturn,checkto seeifthe pinshavesheare&SeeFigure
11_
NEVERrepHacetheaugershearpinswithanythingotherthanSears
SKU#88389/OEM PartNo.738-04124ArepHacementshearpins.
Anydamagetotheaugergearboxorothercomponentsasa resuHtof
faiHingto do sowiHHNOTbecoveredbyyoursnowthrower'swarranty.
Alwaysturnoffthesnowthrower'sengineandremovethekeypriorto
replacingshearpins.
f. -_,
Toavoidunsupervisedengineoperation,neverleavethemachine
unattendedwiththeenginerunning.Turntheengineoffafter useand
removeignitionkey.
STOPPUNG THE ENGUNE
Afteryouarefinishedsnow-throwing,runenginefor afewminutes
beforestoppingtohelpdryoffanymoistureonthe engine.
1. PushStopswitchto OFFposition.
2. Removetheignitionkeyandstoreina safeplace.
3. Wipeallsnowandmoisturefromtheareaaroundtheengineas
wellas theareainandaroundthedrivecontrolandaugercontrol.
Also,engageand releasebothcontrolsseveraltimes.
TO ENGAGE [:)RUVE
1. MoveshiftHeverintooneofthe sixforward(F) positionsortwo
reverse(R)positions.SeHecta speedappropriateforthe snow
conditionsand a paceyou'recomfortabHewith.
NOTE: Whenselectinga DriveSpeed,usetheslowerspeedsuntil
youarecomfortableandfamiliarwiththeoperationofthesnow
thrower.
2. SqueezethedrivecontroHagainstthe handHeandthesnow
throwerwiHHmove.ReHeaseit anddrivemotionwiHHstop.
/
©
Figure11
15
Page 16
MAUNTENANCESCHEDULE
Followthemaintenanceschedubgivenbelow.Thischartdescribes
serviceguidelinesonly.UsetheServiceLogcoBmntokeeptrackof
compbtedmaintenancetasks.Tolocate the nearestSears Service
Centeror to schedule service,simply contact Searsat
1-800-4-MY-HOME®.
EachUse
1st5 to8 hours
Annuallyor100hours
BeforeStorage
Underheavyloador inhightemperatures
1. EngineoiIbveI
2. Looseormissinghardware
3. Unitandengine.
1. Engineoil
1. Engineoilt
2. Controllinkagesand pivots
3. Wheels
4. GearshaftandAugershaft
1. Engineoil
1. Sparkplug
1. Fuelsystem
1. Check
2. Tightenorreplace
3. Clean
1. Change
1. Change
2. Lubewithlightoil
3. Lubewithmultipurposeautogrease
4. Lubewithlightoil
1. Change
1. Check/Change
1. Runengineuntilit stopsfromlackof
ENGUNE MAUNTENANCE
Beforelubricating,repairing,or inspecting,disengageallcontrols
andstopengine.Waituntilall movingpartshavecometo a complete
stop.
fueloradda gasolineadditivetothe
gasin thetanL
f
Checking Engine OiJ
1. Besureengineisuprightand levek
2. Unscrewoil fillcapfromoilfillertubeandwipedipstickclean.
3. Screwoil fillcapbackintooil fillertube.Tightensecurely.
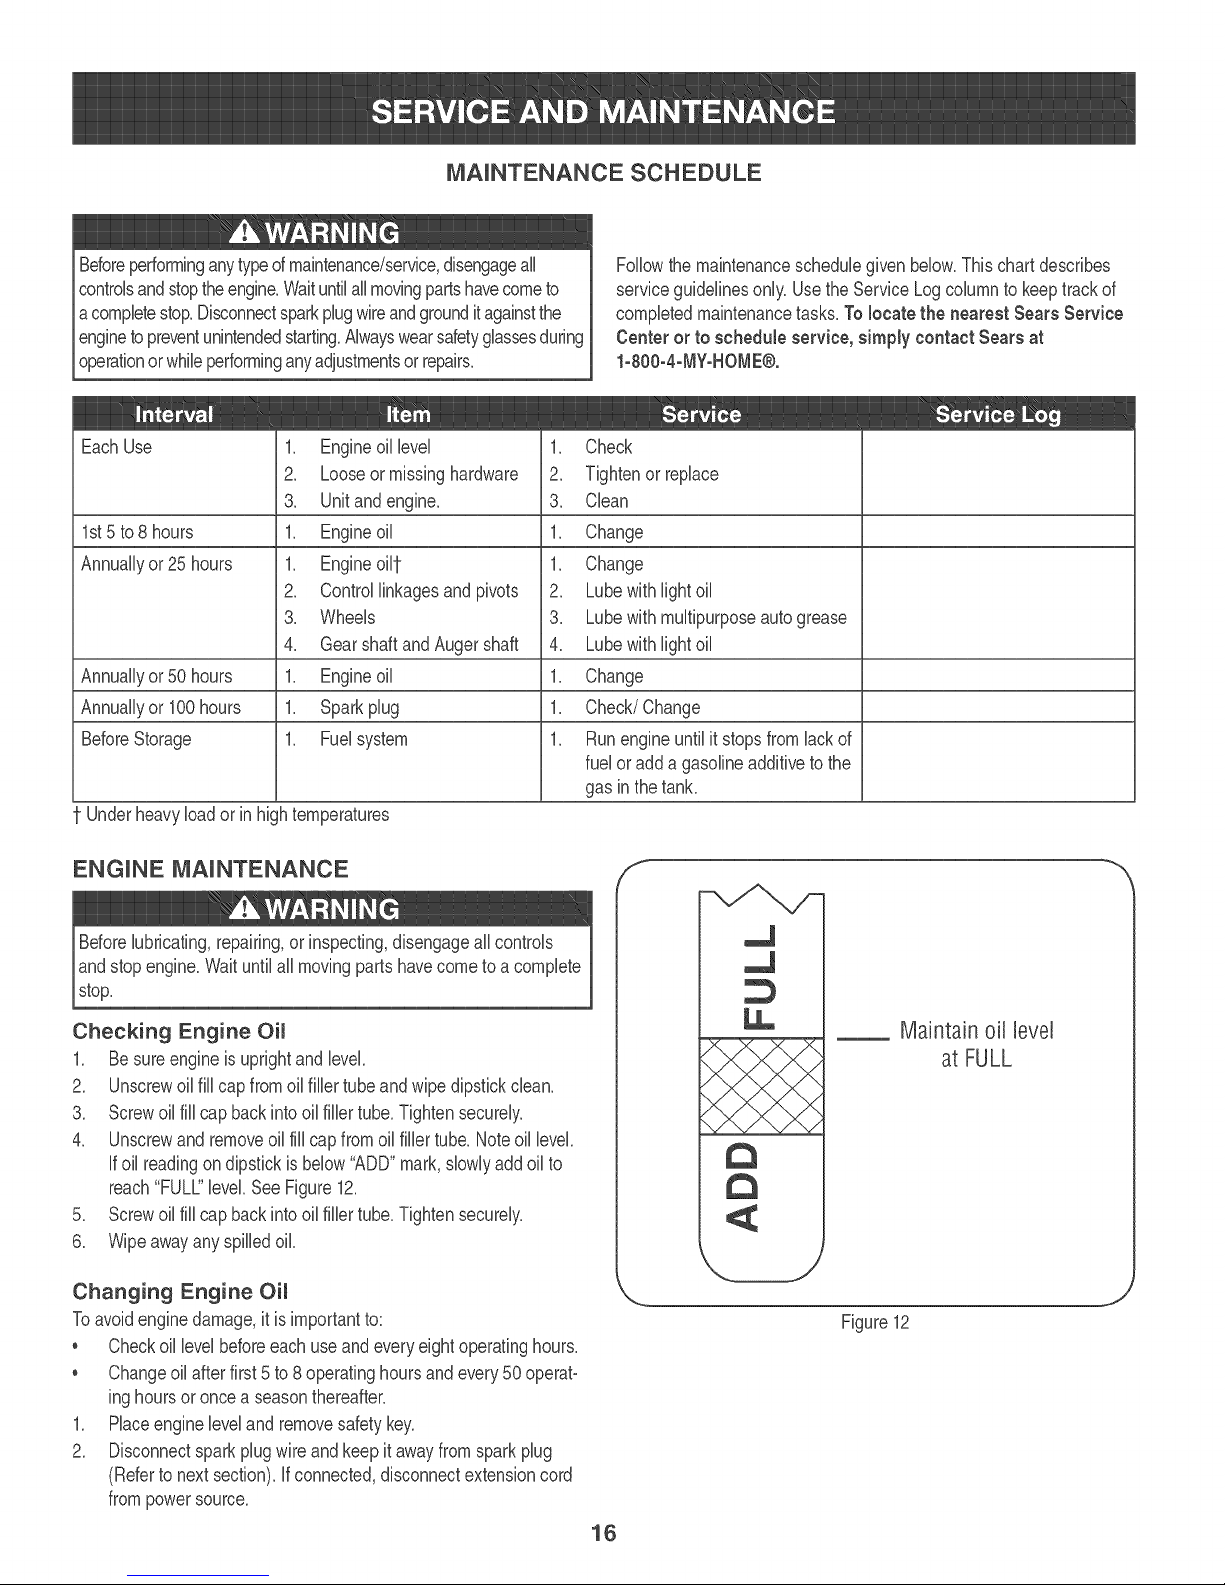
4. Unscrewand removeoilfillcapfromoilfillertube.Noteoil levek
ifoil readingondipstickisbelow"ADD"mark,slowlyaddoil to
reach"FULL"levekSeeFigure12.
5. Screwoil fillcapbackintooil fillertube.Tightensecurely.
6. Wipeawayanyspilledoil.
Changing Engine OiJ
Toavoidenginedamage,it isimportantto:
, Checkoil levelbeforeeachuseandeveryeightoperatinghours.
, Changeoil afterfirst5 to8 operatinghoursandevery50operat_
inghoursor oncea seasonthereafter.
1. Placeenginelevelandremovesafetykey.
2. Disconnectsparkplugwireandkeepit awayfromsparkplug
(Refertonextsection),ifconnected,disconnectextensioncord
frompowersource.
Maintain off level
at FULL
J
Figure12
16
Page 17
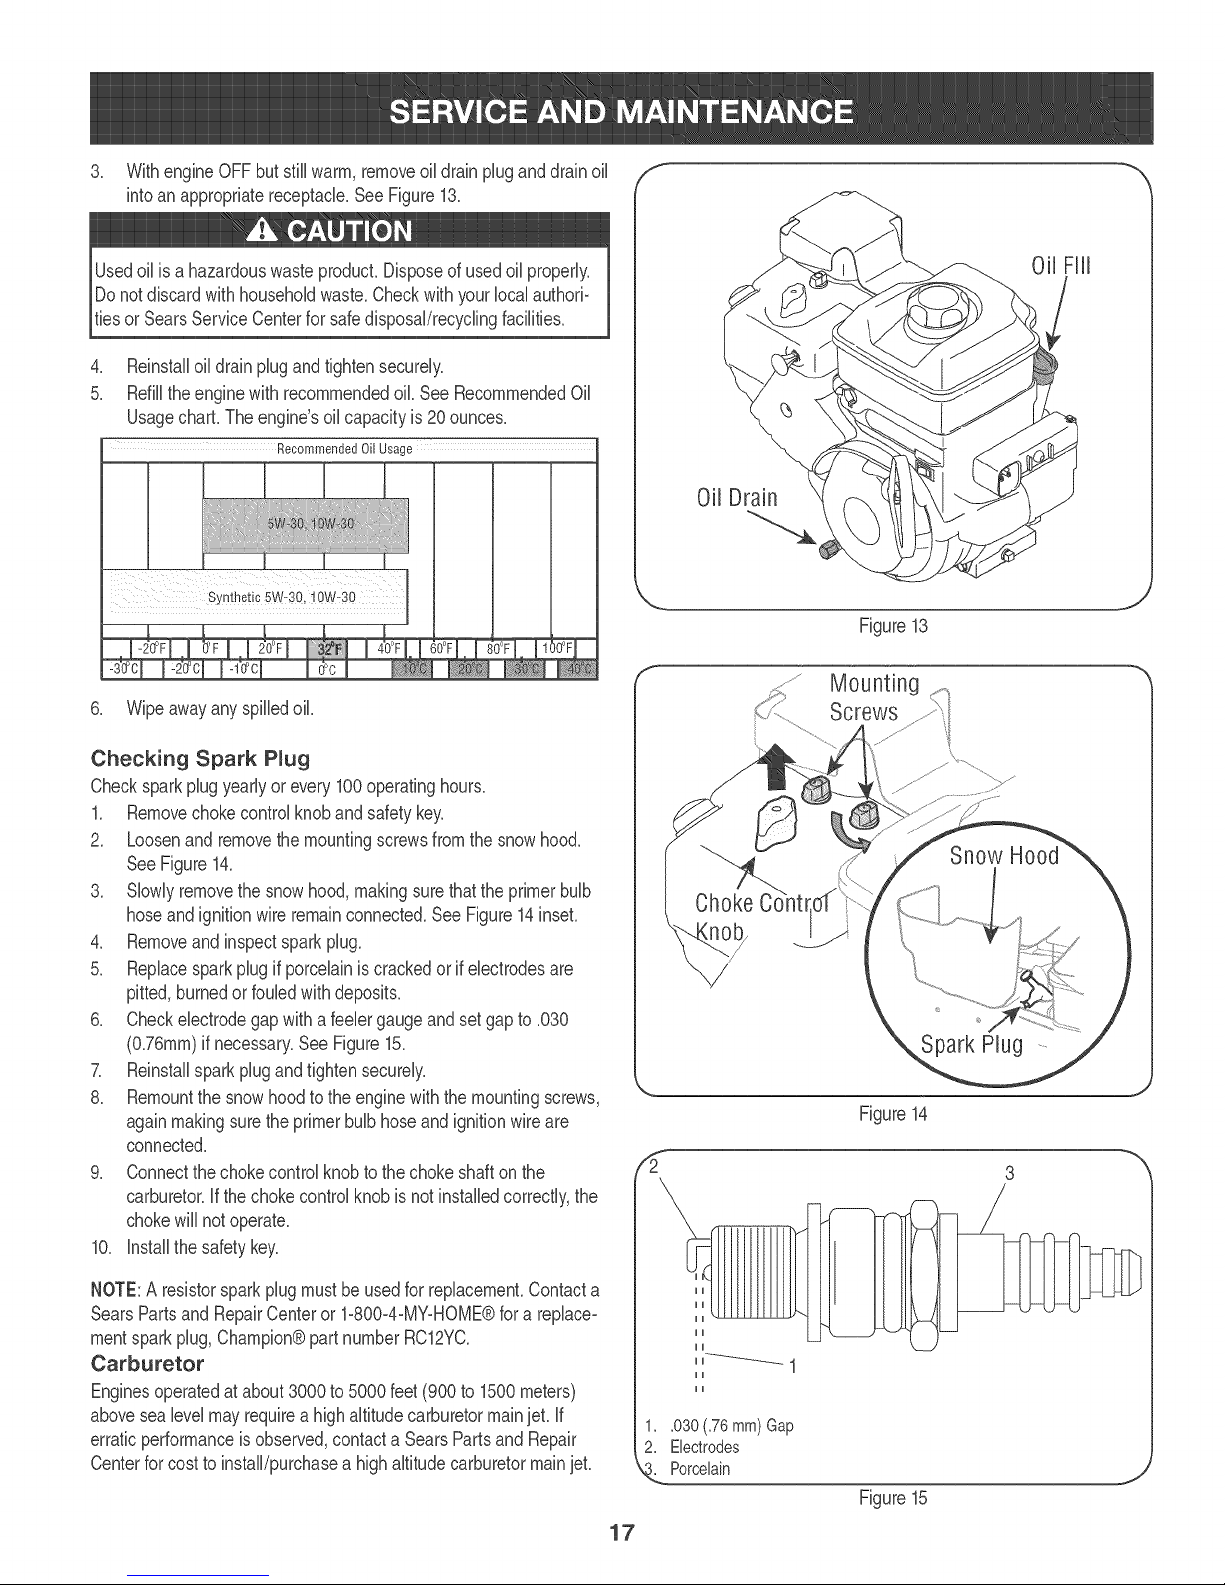
3. WithengineOFFbutsillwarm,removeoldrainpBganddrainol
intoanappropriatereceptacle.SeeFigure13.
Usedolisahazardouswasteproduct.Disposeofusedolproperly.
Donotdiscardwithhouseholdwaste.Checkwithyourlocalauthori-
tiesorSearsServiceCenterforsafedisposal/recyclngfacltbs.
4. Reinstalloildrainplugandtightensecurely.
5. RefilltheenginewithrecommendedoilSeeRecommendedOil
UsagecharLTheengine'soilcapacityis20ounces.
Recommended Oil Usaqe
l [
6. Wipeawayanyspilledoil.
Ot Drain
Figure13
Checking Spark Plug
Checksparkplugyearlyor every100operatinghours.
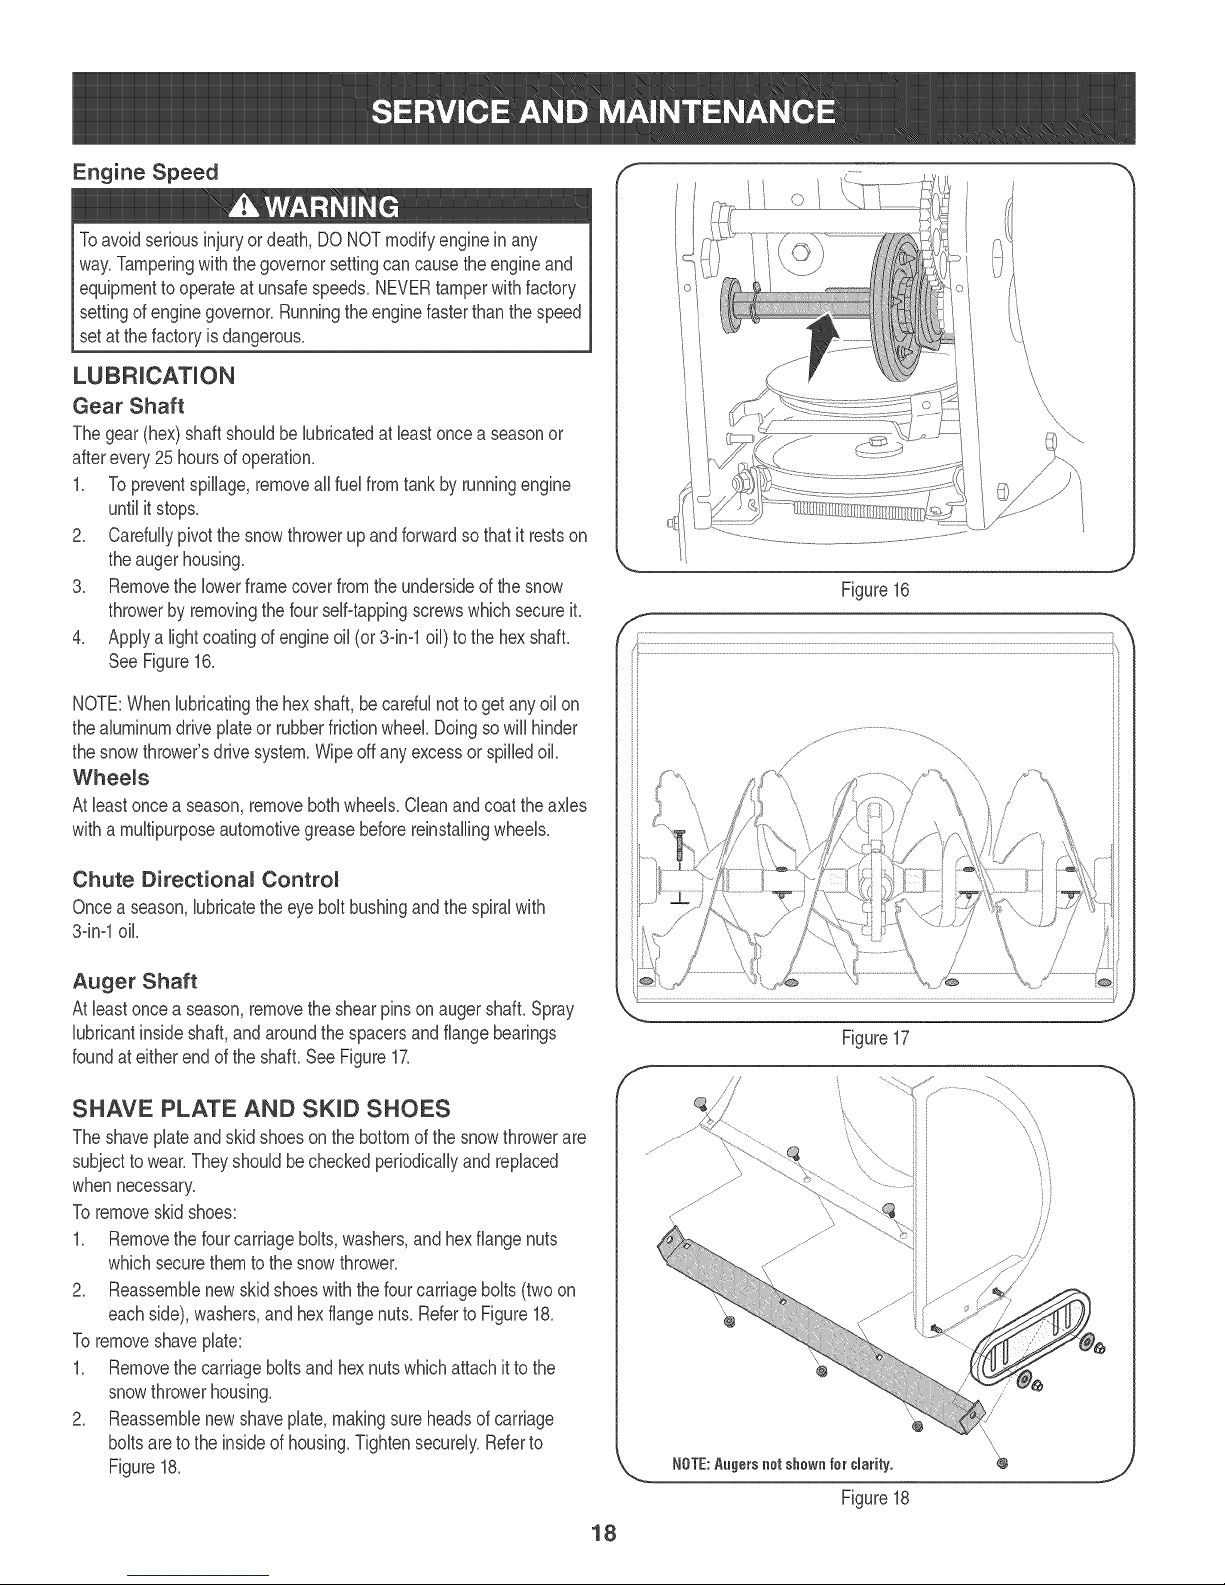
1. Removechokecontrolknobandsafetykey.
2. Loosenandremovethemountingscrewsfromthesnowhood.
SeeFigure14.
3. Slowlyremovethesnowhood,makingsurethattheprimerbulb
hoseandignitionwireremainconnected.SeeFigure14inset.
4. Removeandinspectsparkplug.
5. Replacesparkplugif porcelainiscrackedorif electrodesare
pitted,burnedorfouledwithdeposits.
6. Checkelectrodegapwitha feelergaugeandsetgapto .030
(O]6mm) ifnecessary.SeeFigure15.
7. Reinstallsparkplugandtightensecurely.
8. Remountthe snowhoodtotheenginewiththemountingscrews,
againmakingsurethe primerbulbhoseandignitionwireare
connected.
9. Connectthechokecontrolknobto thechokeshaftonthe
carburetor,if thechokecontrolknobis notinstalledcorrectly,the
chokewillnotoperate.
10. instal thesafetykey.
NOTE:A resistorsparkplugmustbe usedfor replacement.Contacta
SearsPartsand RepairCenteror1-8004-MYoHOME@for a replace-
mentsparkplug,Champion@partnumberRC12YC.
Carburetor
Enginesoperatedatabout3000to 5000feet(900to 1500meters)
abovesealevelmayrequireahighaltitudecarburetormainjet. if
erraticperformanceis observed,contacta SearsPartsandRepair
Centerforcosttoinstal/purchasea highaltitudecarburetormainjet.
,,!
II
II
II
1..030 (.76ram)Gap
2. Electrodes
Q Porcelain
17
Figure14
3
Figure15
Page 18
Engine Speed
iioi
Toavoidseriousinjuryor death,DONOTmodifyengineinany
way.Tamperingwiththegovernorsettingcancausetheengineand
equipmenttooperateatunsafespeeds.NEVERtamperwithfactory
settingofenginegovernor.Runningtheenginefasterthanthe speed
setatthefactoryis dangerous.
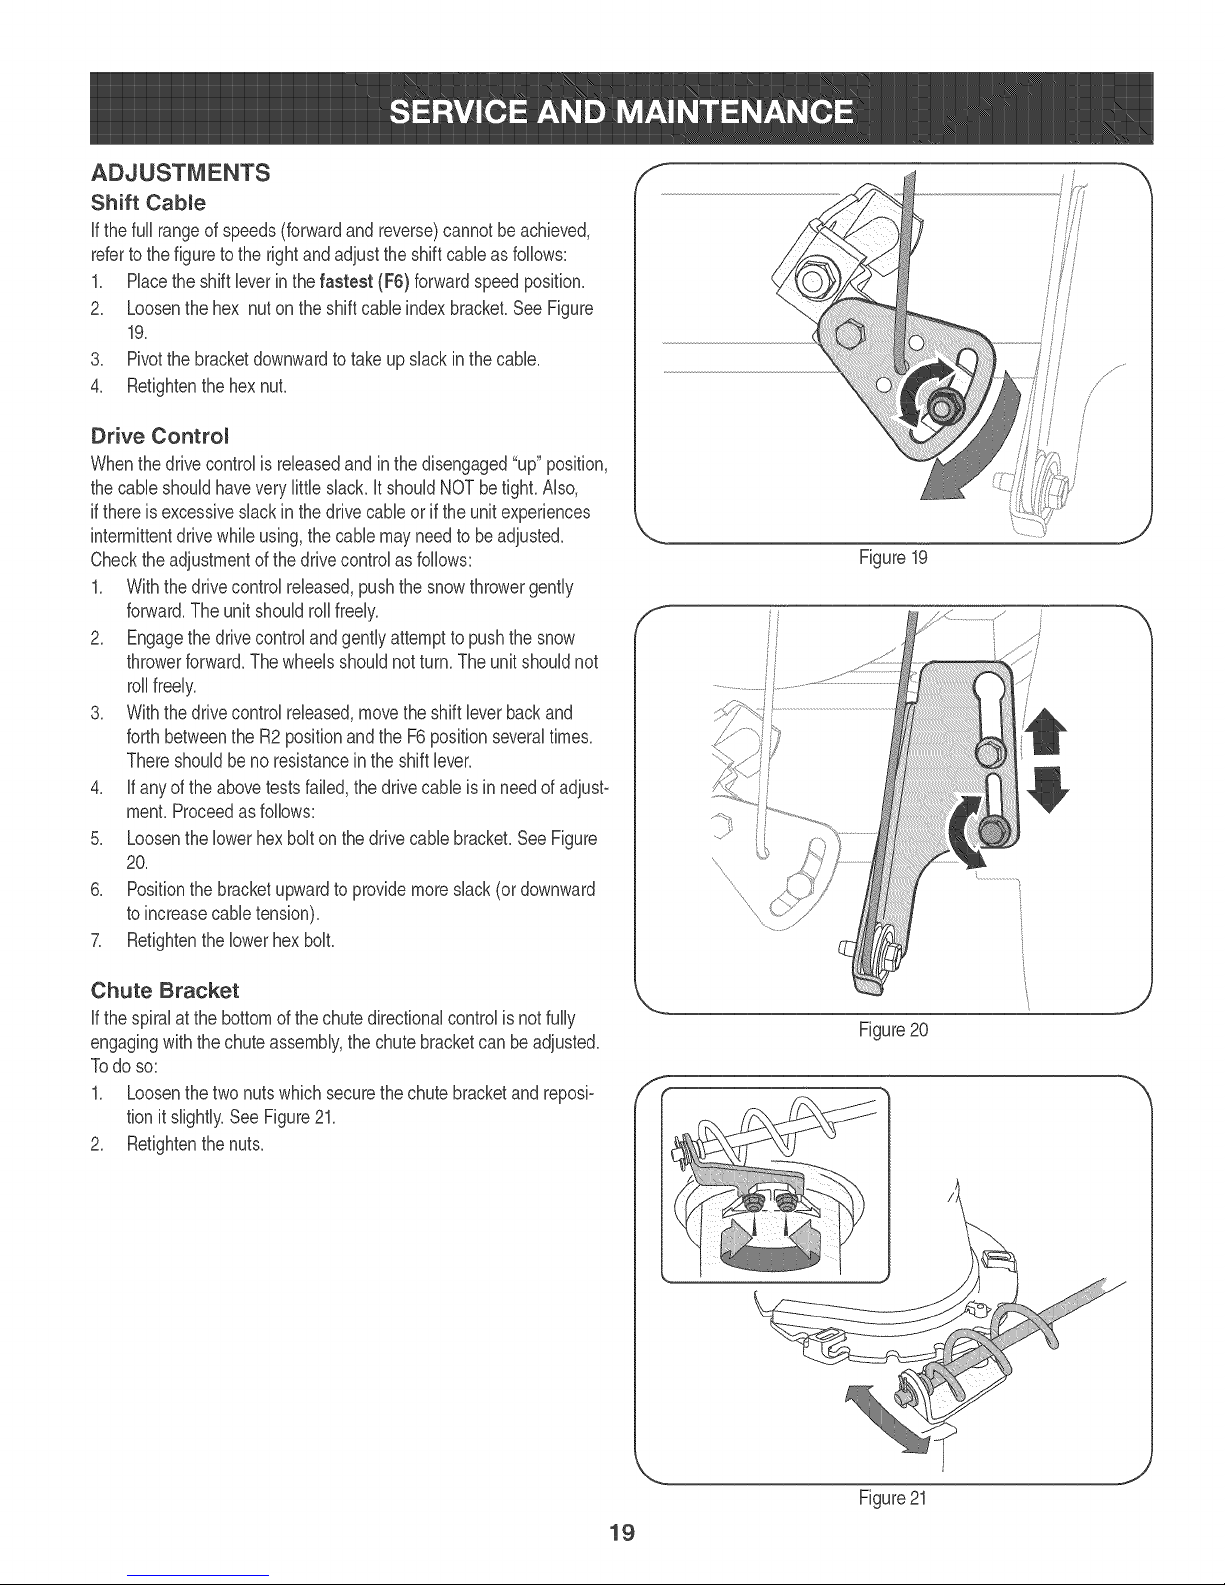
Gear Shaft
Thegear(hex)shaftshouHdbe Bbrbatedat bast oncea seasonor
afterevery25hoursofoperation.
1. TopreventspiHHage,removeaHHfueHfromtank byrunningengine
unfiHitstops.
2. CarefuHHypivotthesnowthrowerupandforwardso thatitrestson
theaugerhousing.
3. Removethe Hewerframecoverfromtheundersideofthesnow
throwerbyremovingthefourseBtappingscrewswhichsecureit.
4. AppHyaHightcoatingofengineoiH(or34ml oiH)tothehexshaft.
SeeFigure16.
NOTE:Whenlubricatingthehexshaft,be carefulnottogetany oilon
thealuminumdriveplateor rubberfrictionwheel Doingsowillhinder
thesnowthrower'sdrivesystem.Wipeoff anyexcessor spilledoil.
Wheems
Atbast oncea season,removebothwheeb.Cban andcoattheaxbs
withamuHtipurposeautomotivegreasebeforereinstallingwheels.
c
o i
Figure16
Chute Directionam Controm
Oncea season,lubricatetheeyeboltbushingand thespiralwith
34nq oil.
Auger Shaft
Atbast oncea season,removetheshearpinson augershaft.Spray
lubricantinsideshaft,andaroundthespacersandflangebearings
foundat eitherendofthe shaft.SeeFigure17.
SHAVE PLATE AND SKUD SHOES
Theshaveplateandskidshoesonthebottomofthesnowthrowerare
subjecttowear.Theyshouldbecheckedperiodicallyandreplaced
whennecessary.
Toremoveskidshoes:
1. Removethefourcarriagebolts,washers,andhexflangenuts
whichsecurethemtothesnowthrower.
2. Reassemblenewskidshoeswiththefourcarriagebolts(twoon
eachside),washers,andhexflangenut&RefertoFigurel&
Toremoveshaveplate:
1. Removethecarriageboltsand hexnutswhichattachit tothe
snowthrowerhousi%
2. Reassemblenewshaveplate,makingsureheadsofcarriage
boltsaretotheinsideofhousi% Tightensecurely.Referto
Figurel&
18
f
NOTE:Angers not shown for clarity.
Figure17
S
Figure18
t
i i
t
ii
J
Page 19
Shift Cabme
IfthefuiIrangeofspeeds(forwardandreverse)cannotbeachieved,
refertothefiguretotherightandadjusttheshiftcabbasfollows:
1. Placetheshiftbverinthefastest(F6)forwardspeedposition.
2. Loosenthehexnutontheshiftcabbindexbracket.SeeFigure
19.
3. Pivotthebracketdownwardtotakeupslackinthecabb.
4. Refightenthehexnut.
DriveControm
Whenthedrivecontrolisreleasedandinthedisengaged"up"position,
thecableshouldhaveverylittleslack,itshouldNOTbetight.ABe,
ifthereisexcessiveslackinthedrivecableoriftheunitexperiences
intermittentdrivewhileusing,thecablemayneedtobeadjusted.
Checktheadjustmentofthedrivecontrolasfollows:
1. Withthedrivecontrolrelease&pushthesnowthrowergently
forward.Theunitshouldrollfreely.
2. Engagethedrivecontrolandgentlyattempttopushthesnow
throwerforward.Thewheelsshouldnotturn.Theunitshouldnot
rollfreely.
3. Withthedrivecontrolreleased,movetheshiftleverbackand
forthbetweentheR2positionandtheF6positionseveraltimes.
Thereshouldbenoresistanceintheshiftlever.
4. ifanyoftheabovetestsfailed,thedrivecableisinneedofadjust-
menLProceedasfollows:
5. LoosenthelowerhexboltonthedrivecablebrackeLSeeFigure
20.
6. Positionthebracketupwardtoprovidemoreslack(ordownward
toincreasecabletension).
7_ Retightenthelowerhexboil
Figure19
f
Chute Bracket
ifthespiralatthebottomofthechutedirectionalcontrolisnotfully
engagingwiththechuteassembly,thechutebracketcanbeadjusted.
Todoso:
1_ Loosenthetwonutswhichsecurethechutebracketandreposi-
tionitslightly_SeeFigure21_
2_ Retightenthenuts.
Figure20
f
Figure21
19
Page 20
Auger Controm
RefertotheAssemblysectionforinstructionsonadjustingtheauger
controlcable.
Skid Shoes
RefertotheAssemblysectionforinstructionsonadjustingtheskid
shoes.
BELT REPLACEMENT
Auger Beret
Toremoveandreplaceyoursnowthrower'saugerbelt,proceedas
follows:
1. Topreventspillage,removeallfuelfromtankby runningengine
untilitstops.
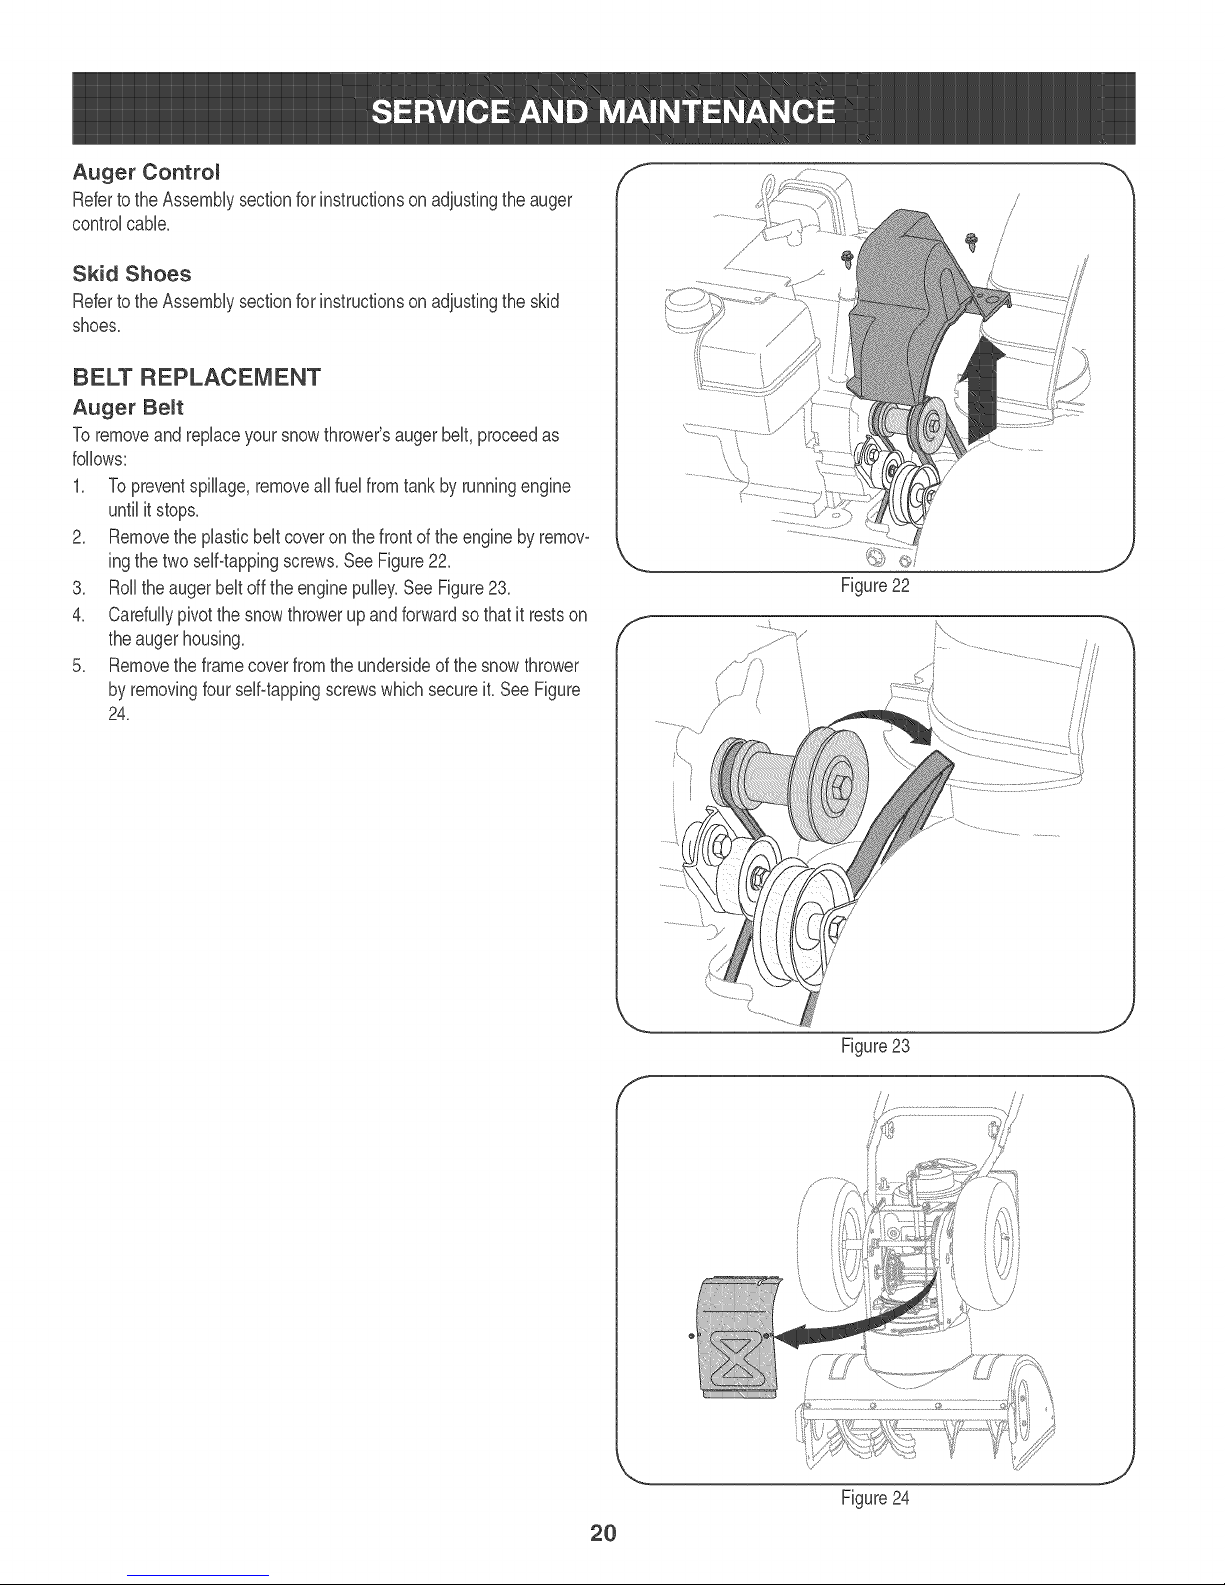
2. Removethe plasticbeltcoveronthefrontoftheengineby remov-
ingthetwoself-tappingscrews.SeeFigure22.
3. Rolltheaugerbeltoff theenginepulley.See Figure23.
4. Carefullypivotthesnowthrowerupandforwardsothat itrestson
theaugerhousing.
5. Removetheframecoverfromtheundersideof thesnowthrower
byremovingfourselfftappingscrewswhichsecureit.SeeFigure
24.
f
/
J
Figure22
f
Figure23
f
// ,.
J
Figure24
2O
Page 21
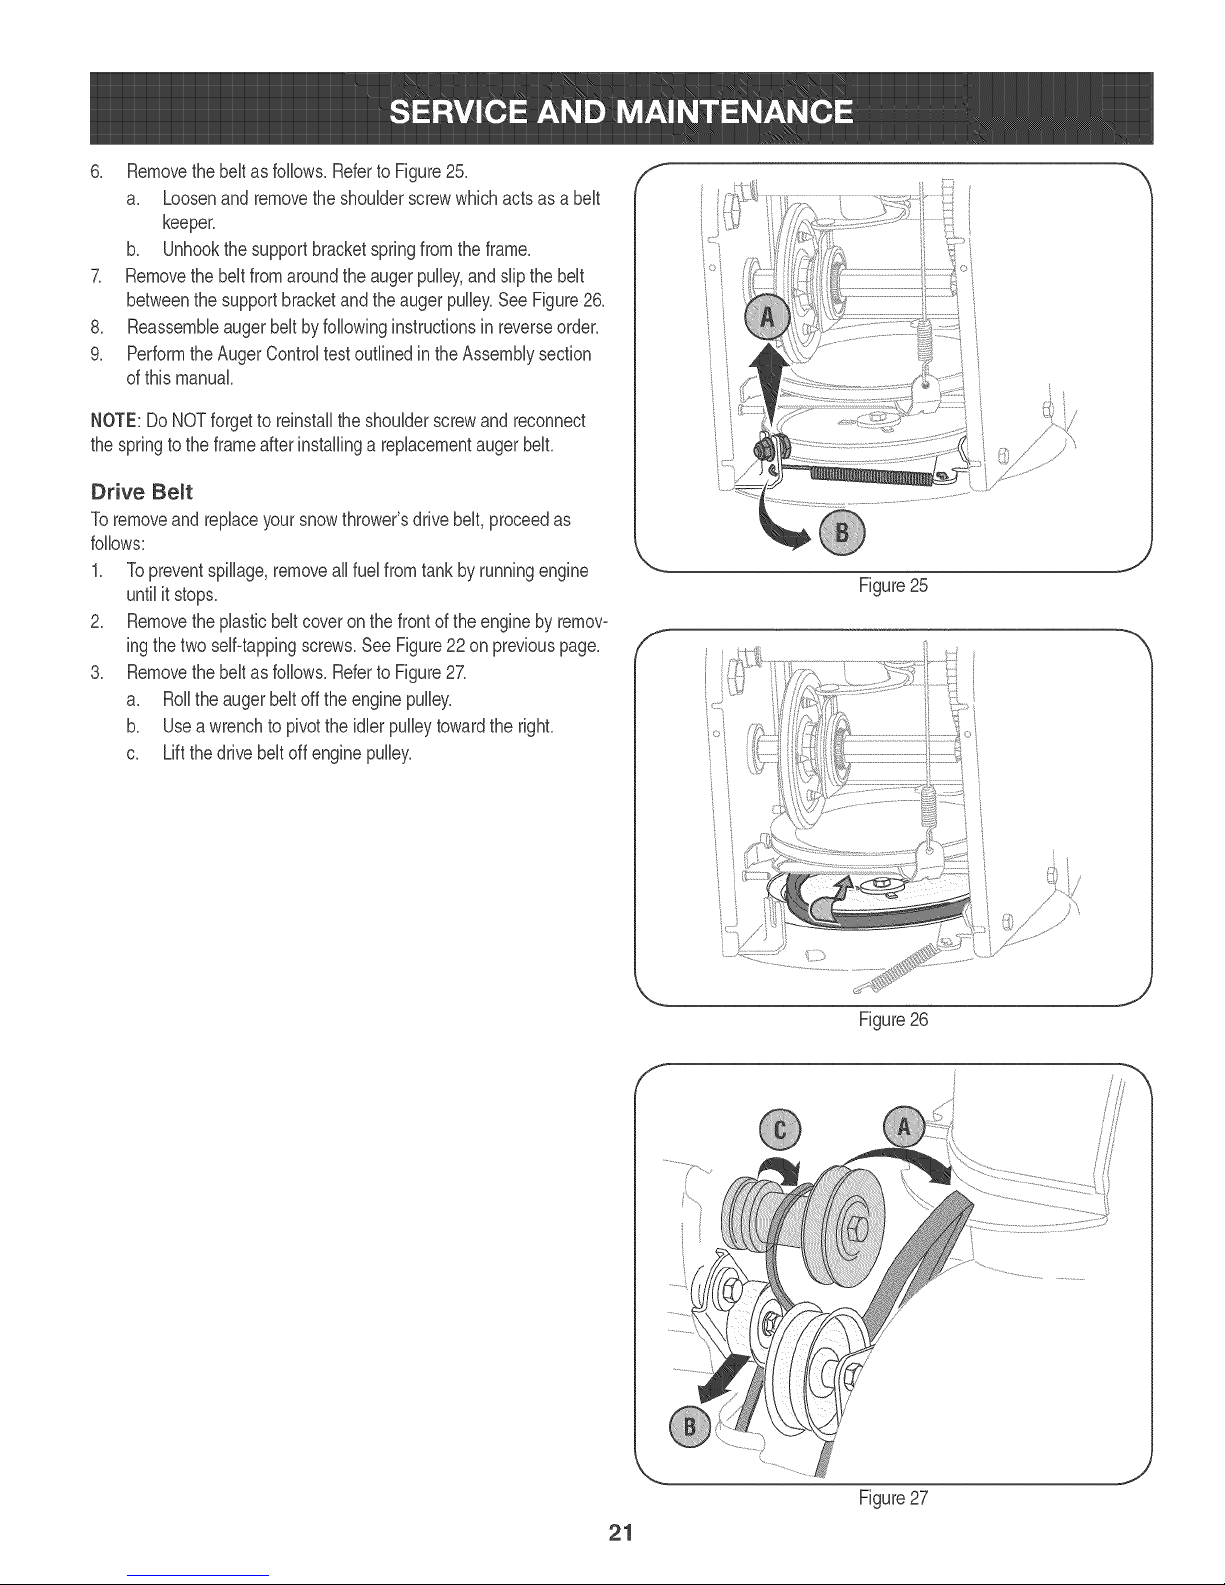
6_ Removethebeltasfollows.RefertoFigure25_
a. Loosenandremovetheshoulderscrewwhichactsasabelt
keeper.
b. Unhookthesupportbracketspringfromtheframe.
7_ Removethebeltfromaroundtheaugerpulley,andslipthebelt
betweenthesupportbracketandtheaugerpulley.SeeFigure26_
8_ Reassembleaugerbeltbyfollowinginstructionsinreverseorder.
9_ PerformtheAugerControltestout%edintheAssemblysection
ofthismanuak
NOTE:DoNOTforgettoreinstalltheshoulderscrewandreconnect
thespringtotheframeafterinstallingareplacementaugerbelt.
Drive Belt
Toremoveandrepbceyoursnowthrower'sdrivebelt,proceedas
follows:
1. Topreventspilbge,removeallfuelfromtankbyrunningengine
untilitstops.
2. Removethepbsticbeltcoveronthefrontoftheenginebyremow
ingthetwoself-tappingscrews.SeeFigure22onpreviouspage.
3. Removethebeltasfollows.RefertoFigure27.
a. Rolltheaugerbeltofftheenginepulley.
b. Useawrenchtopivottheidlerpulleytowardtheright.
c. Liftthedrivebeltoffenginepulley.
f
Figure25
f
i°i
Figure26
Figure27
21
Page 22
4. Carefullypivotthesnowthrowerupandforwardsothatitrestson
theaugerhousing.
5. Removetheframecoverfromtheundersideofthesnowthrower
byremovingfourseBtappingscrewswhichsecureit.Referto
Figure24.
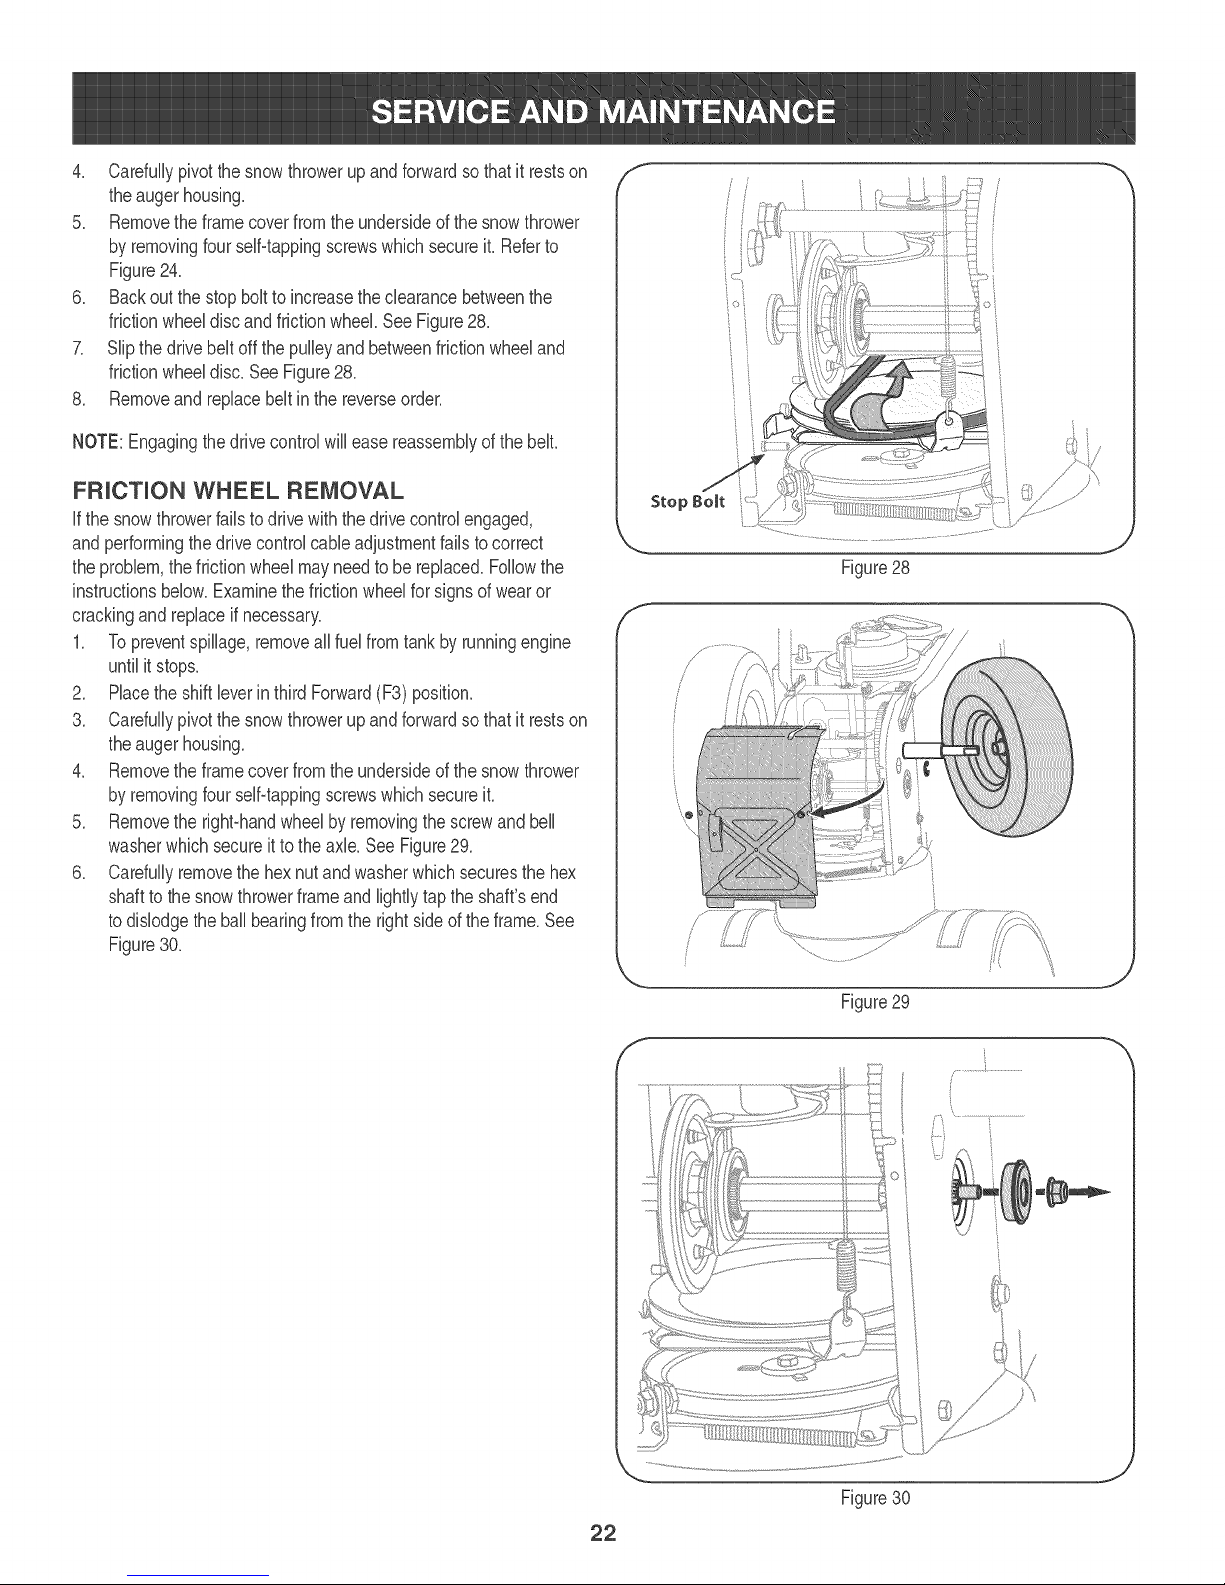
6. Backoutthestopbolttoincreasethecbarancebetweenthe
frictionwheeldiscandfrictionwheel.SeeFigure2&
7. Slipthedrivebeltoffthepuibyandbetweenfrictionwheeland
frictionwheeldisc.SeeFigure2&
8, Removeandreplacebeltinthereverseorder.
NOTE:Engagingthedrivecontrolwilleasereassemblyofthebell
FRUCTUON WHEEL REMOVAL
ifthe snowthrowerfailstodrivewiththedrivecontrolengaged,
andperformingthedrivecontrolcane adjustmentfailstocorrect
theproblem,thefrictionwheelmayneedto bereplace&Followthe
instructionsbelow.Examinethefrictionwheelforsignsofwearor
crackingandreplaceifnecessary.
1_ Topreventspillage,removeall fuelfromtank byrunningengine
untilitstops.
2_ Placetheshiftleverin thirdForward(F3)position.
3_ Carefullypivotthesnowthrowerupandforwardsothat itrestson
theaugerhousi%
4_ Removetheframecoverfromtheundersideofthesnowthrower
byremovingfourself4appingscrewswhichsecureiL
5_ Removethe right-handwheelby removingthescrewandbell
washerwhichsecureitto theaxle.SeeFigure29_
6_ Carefullyremovethehexnutandwasherwhichsecuresthe hex
shaftto thesnowthrowerframeand lightlytaptheshaft'send
todislodgetheballbearingfromtherightsideof theframe.See
Figure30_
f
J
Figure28
f
Figure29
f
/ /
J
Figure30
22
Page 23

NOTE:Becarefulnottodamagethethreadsontheshaft.
7. Carefullypositionthehexshaftdownwardandtotheleftbefore
carefullyslidingthefrictionwheelassemblyofftheshaft.See
Figure31.
NOTE:Ifyou'rereplacingthefrictionwheelassemblyasawhole,
discardthewornpartandslidethenewpartontothehexshaft.
Followthestepsaboveinreverseordertoreassemblecomponents.If
you'redisassemblingthefrictionwheelandreplacingonlytherubber
ring,proceedasfollows:
1. Removethefourscrewswhichsecurethefrictionwheel'sside
platestogether.SeeFigure32.
2. Removetherubberringfrombetweentheplates.
3. Reassemblethesideplateswithanewrubberring.
NOTE:Whenreassemblingthefrictionwheelassembly,makesure
thattherubberringiscenteredandseatedproperlybetweentheside
plates.Tighteneachscrewonlyonerotationbeforeturningthewheel
clockwiseandproceedingwiththenextscrew.Repeatthisprocess
severaltimestoensuretheplatesaresecuredwithequalforce
(between6flabsand9flabs).
4. Slidethefrictionwheelassemblybackontothehexshaftand
followthestepsaboveinreverseordertoreassemble
components.
5. PerformtheDriveControlTestoutlinedearlierintheServiceand
Maintenancesection.
Figure31
Figure32
23
Page 24

ifthe snowthrowerwillnotbe usedfor30 daysor longer,or ifit istheendofthesnowseasonwhenthe lastpossibilityof snowisgone,the
equipmentneedsto bestoredproperly.Followstorageinstructionsbelowtoensuretop performancefromthesnowthrowerfor manymoreyears.
PREPARUNG ENGUNE
Forenginesstoredover30days:
1_ Topreventgumfromforminginfuel systemoron essentialcarbureo
tot parts:
a.if fueltankcontainsoxygenatedor reformulatedgasoline
(gasolineblendedwithanalcoholorether),runengineuntilit stops
fromlackoffuel
b.if fueltankcontainsgasoline,eitherrunengineuntilit stopsfrom
lackoffueloradda gasolineadditivetothegasinthetanL ifyou
usea gasadditive,runtheengineforseveralminutestocirculate
theadditivethroughthecarburetor.
latedareas,wherefuelfumesmayreachan openflame,
lightas onafurnace,waterheater,clothesdryerorgasappliance.
.
Whiletheengineisstillwarm,changetheoil,
3_
Removethe sparkplugandpourabout 1/2ounceofengineoil
throughthesparkplughob into thecylinder_Replacesparkplug
andcranktheengineseveraltimesto distributetheoil
PREPARUNG SNOW THROWER
, Whenstoringthesnowthrowerin anunventilatedormetalstop
age shed,careshouldbetakento rustprooftheequipmenLUsing
a lightoilor silicone,coattheequipment,especiallyanychains,
springs,bearingsandcables.
, Removealldirt fromexteriorofengineandequipmenL
, Followlubricationrecommendations.
, Storeequipmentinaclean,dry area.
Neveruseengineor carburetorcleaningproductsin thefueltankor
permanentdamagemayoccur_
24
Page 25

Enginefairstostart
Enginerunserratically
Engineoverheats
Excessivevibration
Lossofpower
Unitfailstopropelitself
Unitfailstodischargesnow
1. ChokecontrolnotinONposition
2. Sparkplugwire disconnected
3. Faultysparkplug
4. Fueltankemptyorstab fuel
5. Enginenotprimed.
6. Safetykeynot inserted.
1. Enginerunningon CHOKE
2. Stab fuel
3. Wateror dirtin fuelsystem
4. Carburetoroutof adjustment
1. Carburetornotadjustedproperly
1. Loosepartsordamaged auger
1_ Sparkplugwireloose.
2_ Gascapventhob plugged.
1_ Drivecable inneedofadjustment
2_ Drivebelt looseordamaged
3_ Wornfrictionwheek
1_ Chuteassemblyclogged.
2. Foreignobjectlodgedinauger.
3. Augercablein needof adjustmenL
4. Augerbeltlooseordamaged.
5. Shearpin(s)sheared.
1. Movechokecontrolto ONposition.
2. Connectwiretosparkplug.
3. Clean,adjustgap,or replace.
4. Filltankwithclean,freshgasoline.
5. Primeengineas instructedintheOperationSection.
6. insertkeyfully intotheswitch.
1. Movechokecontrolto OFFposition.
2. Filltankwithclean,freshgasoline.
3. Drainfueltank.Refillwithfreshfuek
4. ContactyourSearsParts& RepairCenter.
1. ContactyourSearsParts& RepairCenter.
1. Stopengineimmediatelyanddisconnectsparkplug
wire.Tightenall boltsandnuts.ifvibrationcontinues,
haveunitservicedbyaSearsParts&RepairCenter.
1. Connectandtightensparkplugwire.
2. Removeiceandsnowfromgascap.Becertainvent
hob isclear.
Adjustdrivecontrolcable.RefertoServiceand
Maintenancesection.
2.
Replacedrivebell Referto ServiceandMainte-
nancesection.
3.
ChangefrictionwheelorcontactyourSearsParts&
RepairCenter.
Stopengineimmediatelyanddisconnectsparkplug
wire.Cleanchuteassemblyandinsideofauger
housingwithclean-outtoolora stick.
Stopengineimmediatelyanddisconnectsparkplug
wire.Removeobjectfromaugerwithcleamouttool
orasticL
3_
Adjustaugercontrolcable.RefertoAssembly
section.
4_
Replaceaugerbell RefertoServiceandMainte-
nancesection.
5_
Replacewithnewshearpin(s).
NEED MORE HELP?
You'll fi_d the arlswe_ and mo_e orr_managemyBo_s_e corn - I_:_rI_'ee
Find this and all your other product manuals online,
o Get answers from our team of home experts.
Get a personalized maintenance plan for your home.
o Find information and tools to help with home projects.
..... !!! ..
}s_es._g_t te ye_t by Sea_xs
25
Page 26

Craftsman Snow Thrower Modem 247.88690
i
!
I
L.
--.
/
/
t\ 7_
i i\:/,
21i
Page 27

Craftsman Snow Thrower Modem 247.88690
1. 731-2635
2. 684-04057A
3. 710-0347
4. 710-0451
5. 710-04484
6. 710-0703
7. 712-04063
8. 712-04064
9. 712-04065
10. 714-04040
11. 725-0157
12. 726-04012
13. 731-04705C
14. 732-04460
15. 736-0174
16. 736-0242
17. 746-04230
18. 731-2643
19. 738o0143
20. 738o0281
21. 738-04124A
22. 741-0245
23. 741-0309
24. 756-0981B
25. 790-00075
26. 790-00080A
27. 618-04173A
28. 684°04268
SnowRemovalToolMount
ImpellerAssembly,12"Dia.
HexScrew,3/8-16,1.75,Gr5
Bolt,Carriage,5/16-18,.750Gd
Screw,5/16-18,0.750
Screw,Carriage,1/4-20,.750,Gr5
Nut,Hange Lock,5/16-18,Nylon
Nut,FlangeLock,1/4-20,Nylon
Nut,Hange Lock,3/8-16,Nylon
CotterPin,Bow-tie
Cable,Tie,3/16x .05x 7.4
Nut,Push-on,.25 Dia
Chute,Adapter5"Dia
Spring,Extension,.38 ODx4.59
Washer,Wave,.625x .885x .015
Washer,Bell,.340x.872x .060
ClutchCable,Auger,4723"
SnowRemovalTool
Screw,Shoulder,.498x .34,3/8-16
Screw,Shoulder,.625x .17,3/8-16
ShearPin,.25 x 1.50
Bearing,HexHangex .75ID
Bearing,Ball,.75ID x1.85OD
FlatPulley,Idler,2.75OD
Housing,Bearing,1.85ID
Bracket,AugerIdlerw/Brake
GearboxAssembly,Auger,28"
HousingAssembly,Auger28"
29. 684-04107 SpiralAssembly,LH
30. 684-04108 SpiralAssembly,RH
31. 731-04870 Spacer,1.25ODx .75IDx 1.00
32. 736-0188 Washer,Flat,.76x 1.49x .06
33. 741-0493A Bushing,Flange,.80IDx .91OD
34. 790-00087A Housing,l"Hex Bearing
35. 790-00118 ShavePlate,2.25x27.66
36. 731-05984A SlideShoe
37. 618-0123A Housing,Auger,RHReduced
38. 618-0124A Housing,Auger,LHReduced
39. 721-0338 Seal,Oil,.750x 1.00x.125
40. 741-0662 Bearing,Flange,.75x 1.0x .59
41. 710-0642 Screw,Self-tapping,1/4o20,0.750
42. 711-04283 Axle,Auger,28"
43. 714o0161 Key,Hi-pro3/16x 5/8
44. 715-04021 Pin,Dowel,.25ODx 1.2
45. 717-04126 Shaft,Worm.75OD
46. 717-0528A Gear,Worm20T
47. 718-04071 Collar,Thrust
48. 721-0325 Plug,1/4x .437
49. 721-0327 Seal,Oil,.75x 1x .131
50. 736-0351 Washer,Flat,.760IDx 1.50D
51. 736-3084 Washer,Flat,.51x 1.12
52. 741-0663 Bearing,Flange,.75x 1.0x .925
53. 741-0661A Bearing,Flange,.75x 1.00x .975
54. 629-0071 ExtensionCord,110V
55. 710-0276 Screw,Carriage,5/16-18x 1.00
56. 736-0159 Washer,Flat,.349x .879x .063
27
Page 28

Craftsman SnowThrower Modem247.88690
28
Page 29

Craftsman Snow Thrower Modem 247.88690
s
1. 631-04133A
2. 631-04134B
3. 684-04111B
4. 684-04112B
5. 631o04131B
6. 710-04326
7. 710-3069
8. 710-04586
9. 790-00219
10. 710-1233
11. 684-04250
12. 712-04063
13. 790-00248B
14. 712-04081A
15. 720-0274
16. 720°04039
17. 731-04894D
18. 731-04896B
19. 732-0193
20. 732-04219C
21. 732-04238
22. 749-04138A
23. 735-0199A
24. 736-0262
25. 738°04118
26. 738°04348
HandleAssembly,ClutchLock,LH
HandleAssembly,ClutchLock,RH
HandleAss'y,Engage,LH
HandleAss'y,Engage,RH
ChuteAssembly(IncludesRefl# 27)
Screw,#8o16x .50
Screw,1/4-20,.50
Screw,1/4-20,1.625,Gr5
Panel,Handle,(nocutout)
Screw,Machine,#10-24,1.375
PivotRod
Nut,FlangeLock,5/16-18,Nylon
Bracket,Panel
Nut,Hex,1/4-20,Shoulder
Grip,1.0IDx5.0
Knob,Shift,Black
LockPlate
Cam,ClutchLock
Spring,.39x .60x .88
Spring,ClutchLock
Spring,Torsion,0.8156IDx .3038
Handle,Lower
Bumper,Rubber,.62OD x 22
Washer,Flat,.385x .870x.092
Bolt,Shoulder,5/16-18x0.905
Screw,Shoulder,.43x 1.3,1/4-20
27.
28.
29.
30.
31.
32.
33.
34.
35.
36.
37.
38.
39.
40.
41_
42.
43_
44.
45_
46_
47_
48_
49.
50_
51_
52_
731-04869
746-04397
749-04191A
747-0697
790-00313
731-04912B
710-0276
710-04071
710-0451
731o04426A
736-0159
741-0475
784-5647
684-04104
710-0449
710-04484
714-0104
720-0201A
720-0284
726-0100
735-0234
736-0185
749-04190A
714-0145
731-06471
712-3010
Chute,FlangeKeeper
Cable,SpeedSelector
Handle,Upper,LH
EyeBolt,ChuteCrank
Shift Lever
Chute,Lower,5.0Dia.
Bolt,Carriage,5/16-18,1.0
Bolt,Carriage,5/16-18,1.0
Bolt,Carriage,5/16-18,.750
Chute,Upper,w/Label
Washer,.349x .879x .063
Bushing,Plastic,.380
Bracket,ChuteCrank
CrankAssembly,Chute
Screw,Carriage,5/16-18,2.25
Screw,5/16-18,2.25,Gr5
Pin,Cotter,.072x 1.13
CrankKnob,1.0Dia.x 3.2,Black
Knob,5/16-18,Black
Cap,Push,3/8 Rod
Grommet,.44IDx .94ODx .50
Washer,Flat,.375x .738x .063
Handle,Upper,RH
ClickPin
HandlePanelCover
Nut,Hex,5/16-18
29
Page 30

Craftsman Snow Thrower Modem 247.88690
A
S //
/
/
,/
/
3O
Page 31

Craftsman Snow Thrower Modem 247.88690
1. 656-04025A DiscAssembly,FrictionWheel
2. 684-04153 FrictionWheelAssembly,5.50D
3. 684-04154 SupportBracket,FrictionWheel
4. 684-04156A ShiftAssembly,Rod
5. 710-0627 HexScrew,5/16-24,.750,Gr5
6. 710-0788 Screw,1/4-20,1.000
7. 710-1652 Screw,1/4-20x .625
8. 712-04065 Nut,FlangeLock,3/8-16,Nylon
9. 712-0417A Nut,Flange,5/8-18
10. 714-0126 Key,HiPro,3/16x 3/4 Dia.
11. 716-0104 E-ring,.500Dia.
12. 716-0136 E-ring,Retaining,.875Dia.
13. 716-0231 E-ring,.750Dia.
14. 717-04209A HexShaft,.8125,7-Tooth
15. 717-04230 Gear,80-Tooth
16. 726-0221 SpeedNut,.500
17. 732-0264 ExtensionSpring
18. 736-0242 Washer,Bell,.340x .872x .060
19. 736-0287 Washer,Fiat,.793x 1.24x.060
20. 736-04161 Washer,Fiat,.75x 1.00x .060
21. 790-00289A Pit.,Cvr.
22. 748-0234 ShoulderSpacer
23. 738-04184A Screw,Shoulder,.37x.105, 1/4-20
24. 738-0924A Screw,1/4-28,.375
25. 741-0245 Bearing,HexFlangex .75 ID
26. 741-0563 Bearing,Ball,17x 40x 12
27. 746-04229 ClutchCable,Wheel,44.95"
28. 735-04054 Rubber,FrictionWheel,5.50D
29. 748-0190 Spacer,.508IDx .75ODx .68
30. 756-0625 Roller,Cable
31. 790-00096 FrontGuideBracket,AugerCable
32. 790-00180A Frame
33. 790-00206A GuideBracket,AugerCable
34. 790-00207B GuideBracket,DriveCable
35. 790-00316 Cover,Frame
36. 634-04147A LHWheelAssembly,15x 5 x6
37_
38_
39_
40_
41_
42_
43_
44_
45_
46_
47_
48_
49_
50_
51_
52_
53_
54_
55_
56_
57_
58_
59_
60_
61_
62.
63.
64_
65_
66.
67_
68_
69.
70_
71_
634-04148A
731-04873
738-04168
790-00218A
710-0809
710-0191
710-0672
710-0654A
710-1245B
710-0896
726-04012
731-04792A
732-04308A
736-0247
736-0119
736-0505
748-04053A
748-04112B
750-04303
750-04477
754-04050
754-0367
756-04109
756-04113
756-04252
790-00208C
684-04169
750-04571
735-04099
735-04100
712-04064
710-0751
732-04311
712-04063
736-3015
790-00217A
RHWheelAssembly,15x 5 x6
Spacer,1.25x .75x 3.0
Axle,.75x22"
ShiftBracket,SpeedSelector
HexScrew,1/4-20,1.25,Gr5
HexScrew,3/8-24, 1.25,Gr8
HexScrew,5/16-24,1.25,Gr5
Screw,Seres,3/8o16,1.00
HexScrew,5/16-24,.875,Gr8
Screw,1/4-20x.625
Nut,Push-on,25 Dia.
Cover,Belt
Spring,Torsion,.850IDx .354
Washer,Fiat, .406x 1.25x .157
Washer,Lock.3125
Washer,Fiat, .34x 1.50x .150
Pulley,Adapter,.75Dia.
Spacer,Shoulder,.317x.50x .102
Spacer,.875IDx 1.185OD
Spacer,.340x .750x.360
Belt,AugerDrive
Belt,WheelDrive
Pulley,AugerDrive,8.1x .5
Pulley,Half,V x2.600OD
Pulley,Half,3/8-V x 1.7160OD
IdlerBracket,WheelDrive
IdlerPulleyAssembly
Spacer,Shoulder,.26 x .79x .538
Plug,3/8 ID
Plug,1/2 ID
Nut,FlangeLock,1/4-20,Nylon
HexScrew,1/4-20,.620,Gr5
Spring,Torsion,.750IDx .968
Nut,FlangeLock,5/16-18,Nylon
Wash.,Fiat,.469x.875x .105
PivotBracket,SpeedSelector
31
Page 32

Craftsman Engine Modem 15C103-0661 For Snow Thrower Modem 247.88690
i10580PERATOR'S MANUAL] i 48 SHORT BLOCK I [1329 REPLACEMENT ENGINE i 1330 REPAIR MANUAL ]
307A _
ss2i_
684 _"
21
718
2(
46 ¢',,'_Y;'_' _*_LLL_
177 _._
[
24 '¢:_
741
598
358 ENGINE GASKET SET
12
2O
51
1022
,,_
993
883 _-_-_-J_>_
287 _'
J
524 _<-_
32
Page 33

Craftsman Engine Modem 15C103-0661 For Snow Thrower Modem 247.88690
383
635
45
ff .......
35 238 _
1026 ........
1O29
238 ¢
36
u,_,"x_,
1022
619 _!:_
1034
51
\
1095 VALVE GASKET SET
993
601
1022
33
1022
957
914
Page 34

Craftsman Engine Modem 15C103-0661 For Snow Thrower Modem 247.88690
1196A _
1196
731A
_--- -.
731 .....--
472
528
990
/' /
11 ,,' ,'
663z%
281
604 c "_ _ o
564 £_>_
604
610
//
\
/
347
332
65A_?
305 _
1252A C!_"
455
1036 EMHSSHONSLABEL
/
/
832
836_:
1252
300
613
883 , _- >,
34
Page 35

Craftsman Engine Modem 15C103-0661 For Snow Thrower Modem 247.88690
632
562 _.t:_,
1054
578
851
1347
108
682
1009
334 Gt'*'S
735
i "\ \ \' \\\ _"/S,,_\
.._,,\ .,,v,, ,.-_ _.._-_
459
689 _%
456
51
186
_ ¢_2__:_ 104_- ,
276 _
121 CARBURETOR OVERHAUL KIT
104
127 _ 276 d,¢p
633 P_
137
592 (_:_
55
58
35
Page 36

Craftsman Engine Modem 15C103-0661 For Snow Thrower Modem 247.88690
794188 CylinderAssembly
2 399269 Kit-Bushing/Seal(MagnetoSide)
3 299819s, Seal-Oil(MagnetoSide)
5 791720 Head-Cylinder
7 791716,+ Gasket-CylinderHead
11 695745 Tube-Breather
12 699485, Gasket-Crankcase
13 699482 Screw(CylinderHead)
15 691686 Plug-OilDrain
16 795116 Crankshaft
18 699696 Cover-Crankcase
20 692550, Seal-Oil(PTOSide)
21 281658s Cap-OilFill
22 699478 Screw(CrankcaseCover/Sump)
23 699516 Flywheel
24 222698s Key-Flywheel
25 791786 PistonAssembly(Standard)
791791 PistonAssembly(.020"Oversize)
26 791787 RingSet(Standard)
791792 RingSet(.020"Oversize)
27 690975 Lock-PistonPin
28 690229 Pin-Piston
29 791783 Rod-Connecting
32 791784 Screw(ConnectingRod)
33 499642 Valve-Exhaust
34 499641 Valveqntake
65 690937 Screw(RewindStarter)(SAE)
65A 699228 Screw(RewindStarter)(Metric)
95 691636 Screw(ThrottleValve)
97 690024 Shaft-Throttle
98 3981850 Kit-IdleSpeed
104 6912420 Pin-FloatHinge
108 695807 Valve-Choke
109 791954 Shaft-Choke
117 691428 Jet-Main(Standard)
118 690048 Jet-Main(HighAltitude)
121 792006 Kit-CarburetorOverhaul
122 791717 Spacer-Carburetor
125 794588 Carburetor
127 6917390 Plug-Welch
130 691181 Valve-Throttle
133 398187 Float-Carburetor
134 398188 Kit-Needle/Seat
137 6939810 Gasket-FloatBowl
146 690979 Key-Timing
155 698214 Plate-CylinderHead
177 795015 Seal-ORing(Dipstick)
186 692317 Connector-Hose(Carburetor)
187 791874 Line-Fuel(Formed)
188 699479 Screw(ControlBracket)
190 699220 Screw(FuelTank)
192 694543 Bali-RockerArm
35 691304 Spring-Valve(Intake)
36 691304 Spring-Valve(Exhaust)
40 692194 Retainer-Valve
45 690977 Tappet-Valve
46 693404 Camshaft
48 N/A ShortBlock
51 7917180,+ Gasket-Intake
55 696710 Housing-RewindStarter
58 693389 Rope-Starter
60 699334 Grip-StarterRope
209 692571 Spring-Governor
219 693578 Gear-Governor
220 691724 Washer(GovernorGear)
222 793100 Bracket-Control
227 794367 Lever-GovernorControl
238 691300 Cap-Valve
276 271716 Washer-Sealing
281 793122 Panel-Control
300 794728 Muffler
304 699598 Housing-Blower
36
Page 37

Craftsman Engine Modem 15C103o0661 For Snow Thrower Modem 247.88690
305 699480 Screw(BlowerHousing)
306 695710 Shield_Cylinder
307 699483 Screw(CylinderShMd) (M4)
307A 699234 Screw(CylinderShield)(M5)
307B 790557 Screw(CylinderShMd) (M4)
309 793667 MotoPStarter
318 690370 Screw(MountingBracket)
332 792723 Nut(Hywheel)
333 695711 Armature-Magneto
334 699477 Screw(MagnetoArmature)
337 491055s HugoSpark
347 698338 Switch-Rocker
356 695630 Wke-Stop
358 791797 GasketSebEngine
363 19203
365 699484 Screw(Carburetor)
383 19374s Wrench_SparkPlug
455 692591 Cup-Flywheel
456 692299 Hate-PawlFriction
459 281505s Pawl_Ratchet
472 791948 Knob_ChokeShaft
493 695744 BrackebMounfing
505 691251 Nut(GovernorControlLever)
523 790546 Dipstick
524 281370s Seal_DipsfickTube
528 793006 Hose-Primer
552 692346 Bushing-GovernorCrank
562 691119 Bolt(GovernorControlLever)
564 699854 Screw(ControlCover)
578 791956 WireAssembly
584 791759 CovePBreatherPassage
585 791760 GaskebBreatherPassage
592 690800 Nut(RewindStarter)
597 691696 Screw(PawlFrictionPlate)
598 220624 Shim_EndHay
601 791850 Hose-Clamp
604 793134
604A 790473
608 699335
610 794614
613 791972
615 692576
616 692547
619 699480
632 692653
633 6913210
635 692927
663 699854
682 698039
684 791761
689 691855
692 690572
718 690959
731 794589
731A 793643
741 695087
742 692564
746 790278
830 694544
832 793193
836 699584
847 790545
851 493880s
883 691893,
892 791944
914 699480
914A 692557
914B 697551
957 795027
972 694260
975 790559
976 793382
CovePControl
CovePControl
StartePRewind
ArrestePIntake
Screw(Muffler)
RetainePGovernorShaft
Crank-Governor
Screw(CylinderHeadHate)
Spring/Link-MechanicalGovernor
Seal_Choke/ThrottleShaft(ThrottleShft)
BoobSparkHug
Screw(ControlPanel)
ShMd_Starter
Screw(BreatherPassageCover)
Spring-Detent
PimLocating(Cylinder)
Hood_Snow
Hood_Snow
GeaPTiming
RetainePERing
GeaPIdler
Stud-RockerArm
Guard_Muffler
Screw(MufflerGuard)
Dipstick/TubeAssembly
Terminal_SparkHug
Gasket-Exhaust
Switch-Key
Screw(RockerCover)(M6)
Screw(RockerCover)(1/3inchesLong)
Screw(RockerCover)(2/3 inchesLong)
Cap-FuelTank
Tank-Fuel
Bowl_FIoat
PrimePCarburetor
37
Page 38

Craftsman Engine Modem15C103-0661For SnowThrower Modem247.88690
990 794696 KeySet
993 694088 Gasket-CylinderHeadPlate
996 794687 Shield-Carburetor
998 794701 Pipe-Oil
1005 692592 Fan-Flywheel
1009 790537 Screw(StarterMotor)
1022 691890,+ Gasket-RockerCover
1023 499924 CovePRocker
1026 790287 Rod-Push
1029 691230 Arm-Rocker
1034 691343 Guide-PushRod
1036 Label-Emissions
1054 280275 Tie-Cable
1058 277104 Operator'sManual
1070 699201 Screw(FlywheelFan)
1095 791798 GasketSet-Valve
1196 696692 Screw(SnowHood)
1196A 699854 Screw(SnowHood)
1210 498144 Pulley/SpringAssembly(Pulley)
1210A 498144 Pulley/SpringAssembly(Spring)
1230 699847 Stud(ControlBracket)
1251 790555 Shield-Snow
1251A 790556 Shield-Snow
1252 699234 Screw(SnowShield)(M5)
1252A 699632 Screw(SnowShield)(M6)
1329 15Dl1140017
1330 272147 RepairManual
1347 699200 Screw(StarterShield)
1427 695757 Cap-Pipe
, Includedin EngineGasketSet,KeyNumber358.
0 IncludedinCarburetorOverhaulKit,KeyNumber121.
+IncludedinValveGasketSet,KeyNumber1095.
38
Page 39

39
Page 40

(This page applicable in the U.S.A. and Canada only.)
Sears, Roebuck and Co., U.S.A. (Sears), the California Air Resources Board (CARB)
and the United States Environmenta_ Protection Agency (U.S. EPA)
Emission Contro_ System Warranty Statement (Owner's Defect Warranty Rights and Obligations)
EMiSSiONCONTROLWARRANTYCOVERAGEISAPPLICABLETOCERTI- YEAR1997ANDLATERENGINESWHICHARE PURCHASEDANDUSED
FlEDENGINESPURCHASEDiNCALiFORNiAiN1995ANDTHEREAF- ELSEWHEREiNTHEUNITEDSTATES(ANDAFTERJANUARY1,2001 iN
TER,WHICHAREUSEDiNCALiFORNiA,ANDTOCERTiFiEDMODEL CANADA).
California and United States Emission Contro_ Defects Warranty Statement
TheCaliforniaAirResourcesBoard(CARB),U.S.EPAandSearsarepleased enginefor theperiodsoftimelistedbelow,providedtherehas been noabuse,
toexplainthe EmissionControlSystemWarrantyonyourmodelyear2000and negbctorimpropermaintenanceofyour smalloff-roadengine.Youremis-
latersmalloff-roadengine(SORE).inCalifornia,newsmalloff-roadengines sion controlsystemincludespartssuchasthecarburetor,aircleaner,ignition
mustbe designed,builtand equippedto meettheState'sstringentanti-smog system,mufflerandcatalyticconverter.Alsoincludedmaybeconnectorsand
standards.Elsewherein theUnitedStates,newnon-road,spark-ignition otheremissionrelatedassemblies.Whereawarrantableconditionexists,Sears
enginescertifiedformodelyear1997and latermustmeetsimilarstandardsset will repairyoursmalloff-roadengineatnocostto youincludingdiagnosis,parts
forthbythe U.S.EPA.Searsmustwarranttheemissioncontrolsystemonyour and labor.
Sears Emission Contro_ Defects Warranty Coverage
Smalloff-roadenginesarewarrantedrelativeto emissioncontrolpartsdefects parton yourengineis defective,the partwillbe repairedorreplacedbySears.
fora periodofoneyear,subiecttoprovisionssetforthbelow,ifanycovered
Owner's Warranty Responsibilities
Asthe smalloff-roadengineowner,youareresponsibbfortheperformanceof provedmodifications.Youareresponsiblefor presentingyoursmalloff-road
therequiredmaintenancelistedinyourOperatingand MaintenanceInstruc- engineto anAuthorizedSearsServiceDeabr as soonas aproblemexists.The
tions.Searsrecommendsthatyouretainallyourreceiptscoveringmaintenance undisputedwarrantyrepairsshouldbecompbted ina reasonabbamountof
onyoursmalloff-roadengine,butSears cannotdenywarrantysoblyforthe time,notto exceed30days.ifyouhaveanyquestionsregardingyourwarranty
lackofreceiptsorforyourfailuretoensuretheperformanceof allschedubd rightsandresponsibilities,youshouldcontactaSearsServiceRepresentative
maintenance.Asthe smalloff-roadengineowner,youshouldhoweverbe at 1-800-469-4663.Theemissionwarrantyisa defectswarranty.Defectsare
awarethat Searsmaydenyyouwarrantycoverageifyour smalloff-roadengine iudgedonnormalengineperformance.The warrantyis notrelatedtoan imuse
ora parthasfaileddueto abuse,neglect,impropermaintenanceor unap- emissiontest.
Sears Emission Contro_ Defects Warranty Provisions
ThefollowingarespecificprovisionsrelativetoyourEmissionControlDefectsWarrantyCoverage.itisin additiontothe Searsenginewarrantyfornomregulated
enginesfoundintheOperatingand Maintenanceinstructions.
1. WarrantedParts 3. NoCharge
Coverageunderthiswarrantyextendsonly to theparts listedbelow(the Repairor replacementof anyWarrantedPartwillbeperformedat no
emissioncontrolsystemsparts)to the extentthese partswere presenton chargetotheowner,includingdiagnosticlaborwhichleadstothe
the enginepurchased, determinationthata WarrantedPartisdefective,ifthe diagnosticwork is
a. FuelMeteringSystem performedatanAuthorizedSearsServiceDealer.Foremissionswarranty
• Coldstart enrichmentsystem servicecontact yournearestAuthorizedSearsServiceDeabr as listedin
• Carburetorandinternalparts the "YellowPages"under"Engines,Gasoline,""GasolineEngines,""Lawn
• FuelPump Mowers,"orsimilarcategory.
b. AirinductionSystem 4. Claimsand CoverageExclusions
• Aircleaner Warrantyclaimsshallbefliedin accordancewiththe provisionsofthe
• intakemanifold SearsEngineWarrantyPolicy.Warrantycoverageshallbeexcludedfor
c. ignitionSystem failuresof WarrantedPartswhicharenotoriginalSearspartsor because
ofabuse,neglector impropermaintenanceassetforth intheSears
• SparkpBg(s) EngineWarrantyPolicy.Searsisnotliabb to coverfaiBresof Warranted
• Magnetoignitionsystem Partscausedby theuseof add-on,nomoriginal,or modifiedparts.
d. CatalystSystem 5. Maintenance
• Catalyticconverter AnyWarrantedPartwhichis notschedubdforreplacementasrequired
• Exhaustmanifold maintenanceor whichis scheduledonlyfor regularinspectiontothe effect
• Air iniectionsystemor pulsevalve of"repairorreplaceasnecessary"shallbewarrantedasto defectsforthe
e. MiscellaneousitemsUsedin AboveSystems warrantyperiod.AnyWarrantedPartwhichisscheduledfor replacement
• Vacuum,temperature,position,timesensitivevalves asrequiredmaintenanceshallbewarrantedasto defectsonlyforthe
andswitches periodoftime uptothefirstschedubd replacementforthat part.Any
• Connectorsandassemblbs replacementpartthat is equivabnt inperformanceanddurabilitymay
2. Lengthof Coverage beusedin the performanceofanymaintenanceorrepairs.The owneris
Searswarrantsto the initialownerand eachsubsequentpurchaserthat responsibbforthe performanceof allrequiredmaintenance,asdefinedin
the WarrantedPartsshallbefreefromdefectsin materialsandworkman- the SearsOperatingandMaintenanceinstructions.
shipwhich causedthefailureofthe WarrantedPartsfor aperiodofone 6. ConsequentialCoverage
yearfromthe datethe engineis deliveredtoa retailpurchaser. Coveragehereundershallextendtothefailureofanyenginecomponents
causedbythe failureof anyWarrantedPartstill underwarranty.
intheUSAandCanada,a 24hourhotline,1o800o469o4663,hasamenuofpre-recordedmessagesofferingyouenginemaintenanceinformation.
GDOC-100188Rev.A
40
'1
'1
Page 41

Look For ReUevant Emissions DurabiUity Period and
Air Unde× Unformation On Your Engine Emissions LabeU
Engines that are certified to meet the California Air Resources Board (CARB) Tier 2 Emission Standards must
display information regarding the Emissions Durability Period and the Air index. Sears, Roebuck and Co., U.S.A.
makes this information available to the consumer on our emission labels.
The Emissions Durability Period describes the number of hours of actua_ running time for which the engine is
certified to be emissions compliant, assuming proper maintenance in accordance with the Operating & Mainte-
nance Instructions. The following categories are used:
Moderate: Engine is certified to be emission compliant for 125 hours of actual engine running time.
mntermediate: Engine is certified to be emission compliant for 250 hours of actual engine running time.
Extended: Engine is certified to be emission compliant for 500 hours of actual engine running time.
For example, a typical walk-behind lawn mower is used 20 to 25 hours per year. Therefore, the Emissions
Durabimity Period of an engine with an intermediate rating would equate to 10 to 12 years.
The Air mndex is a calculated number describing the relative level of emissions for a specific engine family. The
lower the Air Index, the cleaner the engine. This information is displayed in graphical form on the emissions label.
After July 1,2000, Look For Emissions Compliance Period
On Engine Emissions CompUiance LabeU
After July 1, 2000 certain Sears, Roebuck and Co., U.S.A. engines will be certified to meet the United States
Environmental Protection Agency (USEPA) Phase 2 emission standards. For Phase 2certified engines, the Emis-
sions Compliance Period referred to on the Emissions Compliance _abei indicates the number of operating hours
for which the engine has been shown to meet Federal emission requirements.
For engines less than 225 cc displacement, Category C = 125 hours, B = 250 hours and A = 500 hours.
For engines of 225 cc or more, Category C = 250 hours, B = 500 hours and A = 1000 hours.
This is a generic representation of the emission labe_typically found on a certified engine.
GDOC-100182Rev.A
41
Page 42

Congratulationson makingasmartpurchase.YournewCraftsman®
productisdesignedandmanufacturedfor yearsofdependabbopera-
tion.ButlikeaiIproducts,itmayrequirerepairfromtimetotime.That's
whenhavinga RepairProtectionAgreementcansaveyoumoneyand
aggravation.
Here'swhattheRepairProtectionAgreement*incBdes:
, Expert service byour 10,000professionalrepairspecialists
, Unlimited service and no charge for partsand laboronall
coveredrepairs
, Product replacementupto$1500if yourcoveredproductcan'tbe
fixed
, Discount of 10%from regularpriceofserviceand relatedinstalled
partsnotcoveredbytheagreement;also,10%off regularpriceof
preventivemaintenancecheck
, FastheJpbyphone =wecallitRapidResolution= phonesupport
fromaSearsrepresentative.Thinkof usasa "talkingowner's
manual/'
OnceyoupurchasetheAgreement,asimplephonecall isall thatit
takesfor youto scheduleservice.Youcancallanytimedayor night,or
schedulea serviceappointmentonline.
TheRepairProtectionAgreementisa risk-freepurchase,ifyoucancel
foranyreasonduringtheproductwarrantyperiod,wewillprovideafull
refund.Or,a proratedrefundanytimeaftertheproductwarrantyperiod
expires.Purchaseyour RepairProtectionAgreementtoday!
SomeJimitations andexclusions apply. Forprices and additional
information in the U.S.A.call 1-800-827-6655.
*Coveragein Canadavaries on some items.Forfull detaib call
SearsCanadaat 1-800-361-6665.
SearsInstallation Service
ForSearsprofessionalinstallationofhomeappliances,garagedoor
openers,waterheaters,andothermajorhomeitems,inthe U.S.A.or
Canadacall1-800-4-MY-HOME®.
42
Page 43

Declaraci6n de garantia ............................ Pagina 43
Practicas operaciOn seguras ..................... Pagina 44
Montaje ...................................................... Pagina 48
OperaciOn .................................................. Pagina 52
Servicio y Mantenimbnto .......................... PAgina 56
AImacenambnto fuera de temporada ....... Pagina 64
Soluci6n de problemas .............................. Pagina 65
Acuerdo de protecciOn para reparaciones .... Pagina 69
Etiquetas de seguddad .............................. Pagina 7
Lista de pbzas ........................................... Pagina 26
NOmero de servicio ................................... Cubbrta
posterior
GARANTJA UMITADA CRAFTSMAN
Dos ASos en Lanzador de Nieve
Cuandohechofuncionary mantenidosegOntodaslasinstrucdonessuministradas,siestelanzadordenbve falla@bideaundefectoenmate°
rialohabilidaddentrode dosaSosde lafechaocompra,llameI=800=4MYHOMEhacerlosarreglosparareparaci6nlibre.
Estagarantias61oten@b,validezdurante90 diassiesteproductoseutilizaencualquiermomentoparafinescomerciabso de alquibr.
Duranteel primeraSodela compra,nohabrb,ningOnprecioparael serviciodegarantiaensucasa.Parasu conveniencia,endecasael servicio
degarantiatodaviaestarb,disponibledespu_sdel primeraSodelacompra,perounpreciodeviajeseaplicarb_Esteprecioseth.renunciado
siustedtransportaallanzadorde nieveaunaposici6nde bajadade Artesanoautorizada.Parala posici6nautorizadamb.scercana,llame
1=800=4-MY=HOME@.
Esta garantiacubre SOLOdefectos en material y habilidad. Sears no joagar_para:
, Losarticulosprescindibbsquese hacenIbvadospuestosduranteeluse normal,incDso,perono limitadosparapatinarzapatos,platode
afeitado,esquilanalfibres, bujia,filtrodeaire,cinturones,yfiltrodel aceite.
, Revisi6ndemantenimientoest_.ndar,cambiosdeaceite,o puestasapunto.
, Reemplazodeneumb.ticoo reparaci6ncausadaporpinchazosdesdefuerade objetos,comeuSas,espinas,tocones,ocristaL
, Neumb.ticoo reemplazoderuedao reparaci6nqueresultaderopanormal,accidente,uoperaci6nimpropiaomantenimiento.
, Las reparacionesnecesarias@bideal abusedeoperador,incDsoperono limitadoparadaSarcausadoafectandoobjetosquedoblanel
marcoo elcigOeSal,o el sobreexcesode velocidaddelmotor.
, Reparacionesnecesarias@bidea negligenciadeloperador,induyendoentreotros,daSosmecb.nicoy el@triceocasionadoporun
almacenamientonoapropiado,fallaporel usedeaceitedegradey/o cantidadnoapropiadaofallaper nodarmantenimientoal equipode
acuerdoconlasinstruccionescontenidasenel manualdeloperador.
, Limpiezaoreparacionesal motor(sistemadecombustible)provocadasporuncombustiblecontaminadouoxidado(viejo).Engeneral,el
combustibledebeutilizarseen unperiodono mayorde30diasapartirde suadquisici6n.
, Elempejoramientonormalylaropade losfinesexteriores,o productoetiquetanelreemplazo.
Estagarantias61otendrb,validezmientrasel productoseutiliceen losEstadosUnidos.
Estagarantialeotorgaderechoslegalesespecificos,peroustedpodriagozarde otrosderechosenraz6nde sulugarde residencia.
Sears, Roebuckand Co.,Hoffman Estates,IL (}0179
Tipode aceitedelmotor:
Capacidaddeaceitedelmotor:
Capacidaddecombustible:
Bujias:
Separaci6nde lasbujias:
@SearsBrands,LLC
SAE5W-30
20onzas
3 cuartos
Champion@RC12YC
.030"
N_lmerode mode!o ..........................................................
Nemerodeserie ..............................................................
Feehade eompra.............................................................
RegistrearribaelnOmerodelmodelo,elnOmerodeseriey lafecha
decompra
43
Page 44

Lapresendade estesimboloindicaquesetratade instrucdones
importantesde seguridadquesedebenrespetarparaevitar
ponerenpeligrosu seguridadpersonaly/o materialy lade otras
personas.Leay sigatodasbs instrucdonesdeestemanualantes
de ponerenfuncionamientoestamAquina.Si no respetaestas
instrucdonespodriaprovocarlesionespersonales.Cuandoveaeste
simbolo,ipresteatend6nala advertenda!
EstamAquinarueconstruidaparaseroperadadeacuerdocon
bs regbsdeseguridadcontenidasenestemanual.AIigualque
concualquiertipodeequipomotorizado,undescuidooerrorpor
partedeloperadorpuedeproducirlesionesgraves.EstamAquina
escapazde amputarmanosy piesy dearrojarobjetoscongran
fuerza.De norespetarbs instruccionesde seguridadsiguientesse
puedenproducirlesionesgraveso la muerte.
PROPOSICION 65 DE CALIFORNmA
Elescapedelmotordeesteproducto,algunosdesuscomponentes
y algunoscomponentesdelvehiculocontieneno liberansustandas
quimicasqueelestadode Californiaconsideraque puedenprodudr
cancer,defectosdenacimientouotrosproblemasreproductivos.
, Lea,entienday cumpbtodasbs instruccionesincbidasen
la mAquinayen losmanualesantesde montarbyutilizarb.
Guardeestemanualenun lugarseguroparaconsultasfuturasy
peri6dicas,asi comoparasolicitarrepuestos.
, Leael ManualdelOperadory sigatodasbs advertenciase
instruccionesdeseguridad.El fracasodehacerasi puedecausar
la heridaseriaal operadory/o personaspresentes.ParaIbmada
de preguntas,1_800-659-5917.
, Familiaricesecontodosloscontrolesyconel usoadecuado
de losmismos.Sepac6modetenerb mAquinay desactivarlos
controlesrApidamente.
, No permitanuncaque losni_osmenoresde14a_osutilicen
estamaquina.Losni_osde 14a_osenadebnte debenleery
entenderbs instruccionesde operaci6nynormasdeseguridad
contenidasen estemanual,yen la mAquinaydebenserentrenao
dosy supervisadosporunadulto.
, NuncapermitaquelosadultosoperenestamAquinasinrecibir
antesla instrucci6napropiada.
, Losobjetosarrojadosporb mAquinapuedenproducirlesiones
graves.Pbnifiqueel patr6nenel quevaa irarrojandonievepara
evitarqueladescargadematerialse realicehacialoscaminos,
losobservadores,etc.
, Mantengaalosobservadores,ayudantes,mascotasy ni_ospor
Iomenosa 75piesde lamAquinamientrasla mismaestaen
funcionamiento.Detengab mAquinasialguienseacerca.
, Seaprecavidoparaevitarpatinarseo caerseespecialmente
cuandooperab mAquinaenreversa.
Su responsabi_idad--Restrinja el usode estamAquina
motorizadaa bs personasquelean,comprendany respetenbs
advertenciase instruccionesqueaparecenenestemanualyen la
mAquina.
iGUARDEBTAS INSTRUCaONES!
Inspeccioneminuciosamenteel AreadondeutilizarAel equipo.Saque
todoslosfelpudos,peri6dicos,trineos,tabbs, cablesyotrosobjetos
extra_osconlosquepodriatropezaro quepodrianserarrojadospor
b barrena/ impulsor.
, Paraprotegerselosojos utilicesiempreanteojosoantiparras
de seguridadmientrasoperalamaquinao mientraslaajusta
o repara.Losobjetosarrojadosquerebotanpuedenproducir
lesionesocubresgraves.
, Nooperelamaquinasinla vestimentaadecuadaparaestaral
aire libreeninvierno.Noutilicealhajas,bufandasbrgasu otras
prendassueltasquepodrianenredarseenbs partesm6viles.
Utiliceuncalzadoespecialparasuperficiesresbabdizas.
, Useun prolongadory untomacorrientedetrescablescon
conexi6natierraparatodasbs maquinasconmotoresde
encendidoel_ctrico.
, Ajustelaalturadelacajadeltomacorrienteparalimpiarlagrava
o bs superficiesconpiedrastrituradas.
, Desengranetodasbs pabncasde controlantesdearrancarel
motor.
, Nuncaintenterealizarajustesmientraselmotorestaenmarcha
exceptoenloscasosespecificamenterecomendadosenel
manualdeloperador.
, Dejequeel motory b maquinaseadaptenab temperatura
exteriorantesdecomenzara sacarla nieve.
44
Page 45

Manejoseguro de la gasolna
Paraevitarlesionespersonalesodafiosmaterialestengamucho
cuidadocuandotrabajecongasolina.Lagasolinaessumamente
inflamableysusvaporespuedencausarexplosiones.Si sederrama
gasolinaencimaosobrelaropase puedelesionargravementeyaque
sepuedeincendiar. Lavesela pielycb.mbiesede ropade inmediato.
, Utilices61olos recipientesparagasolinaautorizados.
, Apaguetodoslos cigarrillos,cigarros,pipasyotrasfuentesde
combusti6n.
, Nuncacarguecombustibleenlamb.quinaen unespaciocerrado.
, Nuncasaquelatapadelcombustibleniagreguecombustible
mientraselmotorestacalienteo en marcha.
, Dejequeelmotorse enfriepor Iomenosdosminutosantesde
volvera cargarcombustible.
, Nuncalleneenexcesoeldep6sitodecombustible.Lleneel
tanqueano mb.sdeY2pulgadapordebajode la basedelcuello
dellenadodejandoespacioparaladilataci6ndelcombustible.
, Vuelvaa colocarlatapade lagasolinay ajOstelabien.
, Limpieelcombustiblequesehayaderramadosobreel motoryel
equipo.Trasladela mb.quinaa otrazona.Espere5minutosantes
deencenderel motor.
, Nuncaalmacenelamb.quinao el recipientede combustibleen
unespaciocerradodondehayafuego,chispaso luzpiloto(por
ejemplo,hornos,calentadoresdeagua,calefactores,secadores
de ropa,etc.).
, Dejequelamb.quinase enfrieporIomenos5 minutosantesde
guardarla.
, Nuncallenelosrecipientesenel interiordeunvehiculoo cami6n
o cajade remolqueconrecubrimientosplb.sticos.Coloque
siemprelosrecipientesenelpisoy lejosdelvehiculoantesde
llenarlos.
, Sies posible,retireel equipoa gasolinadelcami6no remolque
yll6neloen el suelo.Siestonoes posible,lleneelequipoenun
remolqueconcontenedorportatil,envezdedesdeunaboquilla
dispensadoradegasolina.
, Mantengalaboquilladispensadoraen contactoconel hordedel
dep6sitode combustibleoconla aberturadelrecipienteen todo
momento,hastaterminarlacarga.Noutiliceundispositivode
apertura/cierrede boquilla.
FUNOIONAI_IENTO
, No pongalasmanoso lospiescercadelas piezasrotatorias,
enlacajade la barrena/ impulsoro en elmontajedelcanalde
descarga.Hacercontactocon piezasgiratoriaspuederesultaren
la amputaci6ndemanoso pies.
, La palancadecontroldela barrena/ impulsores undispositivo
deseguridad.Nuncaevitesufuncionamiento.De hacerlola
operaci6ndela mb.quinaesriesgosay puedeocasionarlesiones.
, Las palancasdecontroldebenfuncionarbienenambasdirec-
clonesy regresarautomb.ticamenteala posici6ndedesengrane
cuandoselassuelta.
, Nuncaoperelamaquinasifaltaunmontajedelcanalo siel
mismoestadaiado. Mantengatodoslosdispositivosde seguri-
dadensulugaryen funcionamiento.
, Nuncaenciendaelmotoren espacioscerradosoen unazona
conpocaventilaci6n.Elescapedelmotorcontienemon6xidode
carbono,ungasinodoroyletal.
, Noutilicela mb.quinabajola influenciadel alcohololasdrogas.
, Elsilenciadoryel motorsecalientanypuedencausarquemadu-
ras.Nolostoque.Mantengaa los niios alejados.
, Seasumamenteprecavidocuandooperelamb.quinasobreuna
superficiecon gravao cuandolacruce.Mant_ngasealertapot si
sepresentanpeligrosocultoso trb.nsito.
, Tengacuidadocuandocambiede direcci6nocuandooperela
mb.quinaen pendientes.
, Planifiqueel patr6nenelquevaair arrojandonieveparaevitar
que ladescargadematerialse produzcahacialas ventanas,
lasparedes,losautom6viles,etc.y evitarasiposiblesdaios
materialeso lesionesproducidaspot losrebotes.
, Nuncadirija ladescargahacialosniios, losobservadoreso las
mascotasni dejequenadieseparedelantedelamb.quina.
, Nosobrecarguelacapacidaddela mb.quinatratandodesacarla
nievemuyrapidamente.
, Nuncaopereestamb.quinasinbuenavisibilidadoiluminaci6n.
Siempredebeestarsegurodequeestabienafirmadoysu-
jetandofirmementelasmanijas.Camine,nuncacorra.
, Cortela corrientealabarrena/ impulsorcuandotransportela
maquinao cuandolamismanoestaenuso.
, Nuncaoperelamb.quinaa altavelocidaddedesplazamiento
sobresuperficiesresbaladizas.Mirehaciaabajoy haciaatrb.sy
tengacuidadocuandovayamarchaatrb.s.
, Silamb.quinacomenzaraavibrarde maneraanormal,detengael
motor,desconecteelcabledela bujiay p6ngalademaneraque
hagamasacontraelmotor.Inspeccionela mb.quinaminuciosa-
menteparavet siesta daiada. Reparetodoslosdaios antesde
encendery operarlamb.quina.
, Desengranetodaslaspalancasde controly detengael motor
antesdedejarla posici6ndeoperaci6n(detrasdelasmanijas).
Espereaquela barrena/ impulsorsedetengapotcompleto
antesdedestaparel montajedelcanalo realizarajustese
inspecciones.
, Nuncapongalasmanosen lasaberturasdedescargaode
recolecci6n.Utilicesiemprelaherramientadelimpiezaquese
adjuntaparadestaparla aberturadedescarga.Nodestapeel
montajedelcanalmientraselmotorestaen funcionamiento.
Antesdedestaparlo,apagueel motorypermanezcadetrb.sde las
manijashastaquetodaslaspartesm6vilessehayandetenido.
, Uses61ounionesyaccesoriosaprobadospotelfabricante(pot
ejemplo,pesasparalasruedas,cadenasparalosneumb.ticos,
cabinas,etc.).
45
Page 46

, Paraencenderel motor,jab de lacuerdabntamentehastaque
sbnta resbtenda, luegojab r@idamente.Eirepibgue r@idode
lacuerdade arranque(tensi6nde retroceso)lejaiarb,lamanoy
el brazohaciaelmotormb.sr@idodeIoqueustedpuedesoitar.
Ei resuitadopuedenserhuesosrotos,fracturas,hematomaso
esguinces.
, Si sepresentansituadonesqueno estanprevbtasen este
manual,seacuidadosoy useel senfidocomOn.P6ngaseen
contactoconAsbtenda al Cibnte parasoibitarayuday el
nombredeldistribuidordeserviciomascercano.
MANTENUMUENTO Y ALMACENAMUENTO
, Nuncaalterelosdispositivosdeseguridad.Controleperi6dicao
mentequefuncionencorrectamente.Remitasealas secciones
de mantenimientoy ajustedeestemanual
, Antesde realizarlalimpieza,repararo revisarla maquina,
desengranetodaslas palancasdecontroly detengaelmotor.
Espereaquela barrena/ impulsorsedetengapotcompleto.
Desconecteelcabledelabujiayp6ngalohaciendomasacontra
el motorparaevitarquese enciendaaccidentalmente.
, Controlefrecuentementequetodoslospernosytornillosest_n
bienajustadosparacomprobarquela mbquinaseencuentra
encondicionessegurasdefuncionamiento.Ademas,hagauna
inspecci6nvisualdelambquinaparaverificarsiestadaSada.
, Nocambielaconfiguraci6ndel reguladordelmotorniacelere
demasiadoel mismo.Elreguladordelmotorcontrolalavelocidad
mb.ximaseguradefuncionamientodel motor.
, Las placasderaspadoy las zapatasantideslizantesquese
usancon lambquinaquitanievesedesgastany sedaSan.
Paraprotegersuseguridad,verifiquefrecuentementetodoslos
componentesy reemplaceloss61oconpartesdelosfabricantes
deequiposoriginales(OEM)."iEI usode piezasquenocumplen
conlasespecificacionesdelequipooriginalpuederesultaren
rendimientoinadecuadoademb.sde ponerenriesgola seguri_
dad!"
, Reviselaspalancasde controlperi6dicamenteparaverificar
queengranenydesengranenadecuadamentey ajOstelossies
necesario.Consultela secci6nde ajustesdeestemanualdel
operadorparaobtenerinstrucciones.
, Mantengaoreemplacelasetiquetasde seguridade instrucciones
segOnseanecesario.
, Respetelasnormasreferentesa ladisposici6ncorrectay las
reglamentacionessobregasolina,aceite,etc.paraprotegerel
medioambiente.
, Antesde almacenarlambquinaenci_ndalaunosminutospara
sacarlanievequehayaquedadoenla mismayparaevitarasi
quesecongebla barrena/ impuBor.
, SegOnlaComisi6nde SeguridaddeProductosparael Consu_
midorde losEstadosUnidos(CPSC)yla AgenciadeProtecci6n
Ambientalde losEstadosUnidos(EPA),esteproductotieneuna
vidaOtilmediade siete(7)aSos,660horasdefuncionamiento.
AI finalizarla vidaOtilmedia,adquieraunambquinanuevao
hagainspeccionaranualmente_stapot undistribuidordeservicio
autorizadoparacerciorarsedeque todoslossistemasmecanicos
y deseguridadfuncionancorrectamentey notienenexcesivo
desgaste.SinoIohace,puedenproducirseaccidentes,lesiones
o muerte
, Nuncaalmacenela mbquinao el recipientede combustibleenun
espaciocerradodon@hayafuego,chispaso luzpilotocomopot
ejemplo,calentadoresde agua,hornos,secadoresde ropa,etc.
, Consultesiempreel manualdeloperadorparaobtener
instruccionesadecuadasparaelalmacenamientofuerade
temporadaVerifiquefrecuentementelalineadecombustible,el
tanque,el tap6n,y losaccesoriosbuscandorajaduraso p6rdidas.
Reemplacede set necesario.
, Nod6 arranqueal motorsino estalabujiadeencendido.
NO MODUFUQUE EL MOTOR
Paraevitarlesionesgraveso lamuerte,nomodifiqueel motorbajo
ningunacircunstancia.Si cambialaconfiguraci6ndel reguladorel
motorpuededescontrolarseyoperara velocidadesinseguras.Nunca
cambiela configuraci6ndefb.bricadelreguladordelmotor.
AWSO F{EFEF{MDO A EMMSMONES
Losmotoresqueestancertificadosycumplencon lasregulaciones
de emisionesfederalesEPAyde CaliforniaparaSORE(Equipos
pequeSostodoterreno)estancertificadosparaoperarcongasolina
comOnsinplomoy puedenincluirlossiguientessistemasdecontrol
de emisiones:Modificaci6ndemotor(EM)ycatalizadordetresvias
(TWC)siestanequipadosde esamanera.
GUARDACHUSPAS
Estambquinaestaequipadaconunmotorde combusti6ninternay
nodebesetutilizadaeno cercade unterrenoagrestecubiertopot
bosque,malezaso hierbaexceptosiel sistemade escapedelmotor
estaequipadoconunamortiguadordechispasquecumplaconlas
byes localesoestatalescorrespondientes,encasodehaberlas.
Si seutilizaunamortiguadordechispasel operadorIodebemantener
en condicionesde usoadecuadas.Enel Estadode Californialas
medidasanteriormentemencionadassonexigidaspot icy(Articulo
4442delC6digode RecursosPOblicosde California).Esposible
queexistanbyes similaresenotrosestados.Lasbyesfederalesse
aplicanenterritoriosfederales.
Puedeconseguirelamortiguadordechispasparael silenciadora
tray,s desudistribuidorautorizadode motoreso poni_ndoseen
contactoconel departamentodeservicios.
46
Page 47

SiMBOLOS DE SEGURUDAD
Estap_.ginadescribelossimbolosy figurasde seguridadinternadonalesquepuedenaparecerenesteproducto_Leael manualdeloperador
paraobtenerla informad6nterminadasobreseguridad,reunirse,operad6ny mantenimientoy reparad6n.
°
i
\
LEAELMANUALDELOPERADOR(S)
Lea,entienda, y sigatodas [asinstrucdones en el manual (es)antes de intentar reunirse y fundonar.
LA ADVERTENCIA -- PLATOS ROTATOR[OS
Guarde manos de entrada y aperturas de [a descarga mientras [a m_iquina corre. Al[[el[os hacen para
girar platos dentro.
LAADVERTENCIA-- LAMINASROTATIVAS
Guarde manos de entrada y aperturas de descarga mientras la m_iquina corre. All[ hacen girar I_iminas
dentro.
LA ADVERTENCIA -- TALADRO ROTATIVO
No ponga manos o pies cerca de[ giro de partes, en el alojamiento de taladro/aspa o asamblea de
tolva. Contacto con [as partes rotativas puede amputar manos y pies.
OBJETOS LANZADOS POR ADVERTENCIA
Esta m_iquina puede recoger y [anzar y objetos que pueden causar [a herida personal seria.
GASOL[NADEADVERTENCIAESINFLAMABLE
Permita que el motor seenfrie a[ menos dos minutos antes de[ reabastedmiento de combustible.
ADVERTENCIA -- MONOXIDO DE CARBONO
Nunca dirijas un motor dentro o en un _irea mal ventilada. Los gases de combusti6n de motor
contienen el mon6xido de carbono, un gas inodoro y mortal.
ADVERTENCIA- ELECTROCHOQUE
No use eljuez de saJidaeJ_ctrico deJmotor en la Iluvia.
47
Page 48

NOTA:las referendasaIladoderechooycbrtos de lamb.quina
quitanbvesedeterminandesdelaparteposteriordelaunidaden
posbi6ndeoperad6n(permanecbndodirectamentedetr_.sdela
mb.quinaquitanbve,mirandohada eIpanelde lamanija).
EXTRACCU6N DE LA UNUDAD DE LA CAJA
1. Cortelasesquinasdela cajade cart6ny exfi6ndaiaeneIpiso
Quitey descartetodoslosinsertosde empaque.
2. Saquela mb.quinaquitanbvede lacaja.
3. AsegOresedevadarcompbtamentelacajaantesdetiraria.
PARTES SU ELTAS
Conestemanualseinduyendos pasadoresdecucHia de barrenade
repuesto.Consuitela secci6n"Barrenas"enlasecci6ndeServicioy
Mantenimientoparaobtenermb.sinformaci6nsobreelreemplazode
lospasadoresdecuchillade barrena.
.
Coloquelapalancadecambiosenla posici6ndeavance(F)6.
2.
Observeel b.reainferiortraseradelamaquinaquitanievepara
asegurarsede queamboscablesest6nalineadosconlas guias
rotatoriasantesdegirarla manijahaciaarriba.Yeala figura1.
NOTA:AsegOresede quelosextremossuperioresdecadacable
estancorrectamenteasentadosen susoporte.
f
Figura1
f
.
Asegurelamanijaajustandolaperillaa mariposadeplb.stico
situadaen losladosizquierdoyderechodedichamanija.Veala
figura2. Retirey descartetodoslasbandasde plb.stico,si Las
hubiera.Unicamentese utilizanparaelempaque.
Figura2
/
/
/
/ /
/
J
i
/
/
/
/
/
J
48
Page 49

4_
SitOeel montajedelcanalsobrela base.Vealafigura3.
5_
Cierrelos fijadoresdelabridaparaasegurarel montajedelcanal
a labasedelcanal.Vealafigura4.Losfijadoresdelabrida
emitenun chasquidocuandoest_.nbienasegurados.
NOTA:si losfijadoresde labridanoseajustanensulugarfb.cilmente,
utilicelapalmade sumaneparaaplicarunapresi6nrb.pidayfirmeen
la parteposteriorde cadauno.
6_
a_
Quitela arandelaplanay elbrochede horquilladelextremo
delcontroldireccionaldelcanal.
b_
Inserteelextremedelcontroldireccionddelcanalenel soporte
inferiory asegOrelomediantelaarandelaplanay elbroche
dehorquillaqueacabaderetirar.Vealafigura5. Sies
necesario,puedeajustarseelsoporteinferior.Consulte"Ajuste
delsoportedelcanal"enlasecci6nde Servicioy
Mantenimiento.
J
Figura4
Figura3
Figura5
49
Page 50

Herramienta de Limpieza del Canal
Hayuna herramientadelimpiezadelcanal iajustadaala parte
superiordeb cajadeb barrenaconun pasadordeensambbdo.Vea
lafigura6. LaherramientaestadiseSadaparalimpiarel hieloy b
nievedelmontajede un canakEsteproductosesujetamedianteuna
uni6nde cableen b fb.brica.Corteb uni6ndecableantesdeoperar
la mbquinaquitanieve.
agueelmotorypermanezcadetrasde lasmanijashastaquetodas
laspartesm6vilessehayandetenidoantesde ufilizarlaherramienta
Nuncausesus manosparaliberarunmontajedecanaltapado.Apo
de limpiezaparalimpiarel montajedelcanal.
Presi6n de los neumaticos
Antesde cualquieroperaci6n,compruebelapresi6ndeambos
neumb.ticosy reduzcalamismaaentre15psiy 20psi.
NOT,€:Silapresi6nde losneumb.ticosno esigualenambosneumb.ti-
cos,es posiblequela unidadnosigaunatrayectoriarectay quela
placade raspadosedesgastede formadespareja.
AJUSTES
Zapatas antideslizantes
Laszapatasantideslizantesde lambquinaquitanieveseajustanpara
arribaen fb.bricaparaelenvio.SiIodesea,puedeajustarlashacia
abajoantesdehacerfuncionarlambquinaquitanieve.
HeH'amienta de
Lira _ieza det Canal
Figura6
Nose recomiendaqueopereestambquinaquitanievesobregrava,
yaqueesposiblequelambquinaquitanievetomelagravasueltay
la barrenalaexpulse,Iocual podriacausarlesionespersonaleso
daSarla mbquinaquitanieve.
, Sideseaquitarnieveal rasdelsuelo,elevemb.sbs zapatas
antideslizantesenla cajade la barrena.
, Uselasposicionesmediaobajacuandolasuperficiequedesee
limpiarseadespareja,comeuncaminodegrava.
NOTA:Sitienequeusar la mbquinaquitanievesobregrava,mantenga
lazapataantideslizanteen la posici6nmb.selevadaparaIograruna
separaci6nmb.ximaentreel pisoy lapbca de raspado.
Paraajustarlaszapatasantideslizantes:
1. Aflojelas cuatrostuercashexagonales(dosencadalado)y los
pernosdelcarro.Muevalaszapatasantideslizantesa la posici6n
deseada.
2. Compruebequetodala superficieinferiorde laszapatas
antideslizantesest_contrael sueloparaevitarundesgaste
desparejode losmismos.
3. Vuelvaaajustarbienlastuercasy lospernos.
Figura7
5O
Page 51

Ajuste del montaje del canal
Esposibbajustarb distanciaa lacuaIsearrojalanbve cambiandoeI
b.nguIodeImontajedeIcanakParahacerIo:
1. DetengaeImotorquitandolaIbve deencendidoyafiojelaperiiia
a ma@osadepib.sficoqueseencuentraeneIbdo izqubrdodeI
montajedeIcanak
2. Gireelcanalhaciaarribaohaciaabajoantesdeapretarlaperiiia
a ma@osa.Vealafigura8.
Prueba de control de la barrena
Antesdeoperarsumaquinaquitanbve,ba atentamentey cumpb
todasbs instrucdonesqueaparecenaconfinuad6n.Reaibe
todoslosajustesparaverificarquela mbquinaestaoperandocon
seguridadycorrectamente.
Compruebeel ajustedelcontroldela barrenadela siguienteforma:
1. Cuandosesueltaelcontrolde la barrenayestaen posici6n
desengranadaarriba,elcabledebetenermuypocojuego.NO
debeestartenso.
2. Enunb.reabienventibda,arranqueelmotorde b mbquina
quitanieveseg0nseindicaanteriormenteenestamismasecci6n.
3. Paradoen la posici6ndeloperador(detrb.sde la mbquina
quitanieve),engranelabarrena.
4. Dejela barrenaengranadaduranteaproximadamentediez(10)
segundosantesde soltarelcontrolde la barrena.Repitaesta
operaci6nvariasveces.
5. Conla barrenaenposici6ndesengranadaarriba,caminealfrente
delambquina.
6. Confirmequela barrenahadejadode girarpotcompletoyno
muestraNINGONsignodemovimiento.Si labarrenamuestra
CUALQUIERsignode rotaci6n,vuelvaa la posici6ndel operador
y@agueel motorinmediatamente.EspereaqueTODASlas
partesm6vilessedetenganantesde volvera ajustarelcontrolde
la barrena.
7_ Paravolvera ajustarel cabledecontrol,aflqe la tuercahexago_
halsuperioren la m_nsuladelcablede la barrena.
8. Ubiquelam_nsulahaciaarribaparabrindarmasjuego(o hacia
abajoparaaumentarlatensi6ndelcable).Veala figura9.
9. Vuelvaaapretarla tuercahexagonalsuperior.
10. Repitala pruebadecontrolde labarrenaparaverificarque seha
Iogradoelajusteadecuado.
Figura8
f
J
Figura9
51
Page 52

f
Control de Transmisi6n
Tapbn de
combustible
Montaje delcanal
\
\
Llendo de \
\\ aceite
\
\
\
Manija del arrancador
de retroceso
Botbn del
arrancador
eldctrico
Llave
encendidc
antideslizantes
Figura10
Ahoraqueyahaajustadosula mb.quinaquitanieveparala operaci6n,
familiariceseconsuscontrolesycaracteristicas.YealaFigura10_
PALANCA DE CAMBUOS
t2345 5
t t t t t t
La palancadecambiosestaubicadaenelpaneldecarrera.SitOe
la palancadecambiosencualquierade lasochoposicionespara
controlarladirecci6ndeldesplazamientoy lavelocidadde piso.
Avarice
Hayseisposicionesde avance(F). Laposici6nuno(1)es lamb.s
lenta,y la posici6nseis(6) esla mb.srb.pida.
Retroceso
Haydosvelocidadesderetroceso(R). Launo(1)eslamb.slenta,yla
dos(2)esla mb.srb.pida.
Pare el
Interruptoi
arrancador
eldctrico
J
LLAVE DE ENCENDUDO
Lallavedeencendidoesundispositivodeseguridad.Debeestar
completamenteinsertadaparaqueel motorarranque.Retirelallave
de encendidocuandonousela mb.quinaquitanieve.
NOTE:Nogirelallavedeencendidoparaintentararrancarelmotor.AI
hacerlopodriaromperla.
CONTROL DE OBTURACKSN
Elcontroldeobturaci6nseencuentraen laparteposteriordel motor,
y seactivahaciendogirarelcontroldeobturaci6naposici6nde
OBTURACION.AIactivarel controldeobturaci6nsecierralaplacade
obturaci6ndelcarburadoryseayudaa encenderelmotor.
PARE EL UNTERRUPTOR
Presioneel ENlaposici6ncomenzandoelmotory cerrarb,el motor
cuandomovidoen ELde la posici6n.
Cumple con los estandares de seguridad de ANSi
Lasm&quinasquitanievedeCraftsmancumplenconlosest&ndaresde seguridaddelinstituteestadounidensedeest&ndaresnacionales(ANSi).
52
Page 53

MANUJADELARRANCADOR DE RETRO-
CESO
EstamanijaseufiiizaparaarrancareImotormanuakr_ente.
BOTON DEL ARRANCADOR
Sioprimeel bot6ndelarrancadorel@tricoseengranael arrancador
el@tricodelmotorcuandose Ioenchufaaunafuentedeenergiade
120V.
SAL[DA DEL ARRANCADOR
CONTROL DE LA BARRENA
J CONTNOL DN
LA NA@@ :NA
Esnecesariousaruncord6nprolongadorparaexterioresdetres
espigasyunafuentede energia/tomacorrientede paredde 120V.
Cuandoestanengranadas,lasbarrerasgirany retiranlanieveal
interiordelacajade labarren&
MONTAJE DEL CANAL
La nieveretiradaalinteriorde la cajade la barrenasedescargaenel
montajedel canal
CEBADOR
AIpresionarelcebadorseenviacombustibledirectamentealcarburao
dotdelmotorparaayudaralencendidocuandoelclimaesfrio.
LLENADO DE ACE[TE
Esposiblecontrolarelniveldeaceitedelmotor,asicornotambi_n
agregaraceite,a tray,sdel llenadodeaceite.
TAPON DE COMBUSTIBLE
Desenrosqueel tap6ndecombustibleparaagregargasolinaaltanque
decombustible.
ZAPATAS ANTUDES UZANTES
Ubiquelaszapatasantideslizantesenfunci6ndelascondicionesde
la superficie.Ajustehaciaarribasila nieveestamuycompactad&
AjOstelashaciaabajosi usalambquinaengravasosuperficiescon
pie@astrituradas.
Elcontroldelabarrenaestaubicadoen lamanijaizquierd&Aprietela
empuffaduradecontrolcontrala manijaparaengranarlasbarrenasy
empiecea quitarnieve.Suelteparaquese deteng&
CONTROL DE LA TRANSMUSU6N/CONTROL
DE LA BARRENA DE CERRADURA
CONTROL #E LA
J
Elcontroldetransmisi6nestaubicadoen lamanijaderech&Presione
laempuffaduradecontrolcontralamanijaparaengranarla ruedade
transmisi6n.Suelteparaquese deteng&
Elcontroldelatransmisi6ntambi_nbloqueaelcontrolde la barrena
de maneraquepuedeoperarelcontroldireccionaldelcanalsin
interrumpirel procesodequitarla nieve.Sielcontroldelabarrenase
engranasimultaneamenteconelcontroldetransmisi6n,el operador
puedesoltarel controldelabarrena(enla manijaizquierda)y lasbar_
renascontinuaranengranada&Suelteamboscontrolesparadetener
tantolasbarrenascomolatransmisi6nde lasrueda&
NOTA:Sueltesiempreel controldelatransmisi6nantesde cambiar
de velocida&Deno procederasi, aumentarb,eldesgastedelsistema
de transmisi6ndesumbquina.
58
Page 54

CONTROL DURECCUONALDEL CANAL
CONTROL #IRECCIONAL #EL CANAL
JNCLIUACi6NDEL
CANALAJUSTABLE
#
Paracambiarla direcci6nhacialacualse arrojalanbve,gire el
controldirectionaldelcanalde la sigubntemanera:
, Gireensenfidode lasagujasdelrelojparadescargarla nbve
haciala izqubrda.
, Gireendirecci6ncontrafiadelasagujasdel reiojparadescar-
gariahacialaderecha.
HERRAMUENTA DE UMPUEZA
Nuncausesus manosparaliberarunmontajedecanaltapado.Antes
de destaparlo,@agueel motorypermanezcadetrb.sde lasmanijas
hastaquetodaslaspartesm6viiessehayandetenido.
La herramientadelimpiezadelcanalestaajustadaconvenientemente
a laparteposteriorde lacajadela barrenaconun pasadordeensam=
blado.Siseacumulannievey hieloen elcanaldedescargadurante
laoperaci6n,procedacomoseindicaa continuaci6nparalimpiarde
maneraseguraelmontajedelcanaly laaberturadelcanal:
1. Suelteelcontrolde la barrenay elcontrolde latransmisi6n.
2. Paradetenerelmotorsaquelallavedeencendido.
3. Saquela herramientade limpiezadelpasadorque laajustaala
parteposteriordela cajade la barren&
4. Useelextremoconformadepaiade laherramientade limpieza
paradesplazary recogerlanieveyel hieloqueseformaroncerca
delconjuntodelcanal.
5. Vuelvaaajustarla herramientade limpiezaal pasadordeens=
ambladoubicadoen laparteposteriorde lacajadela barrena,
insertede nuevola Ilavedeencendidoyenciendael motorde la
mbquinaquitanieve.
6. Paradoenlaposici6ndeloperador(detrb.sdelambquinaquitao
nieve),engraneelcontroldelabarrenaduranteunossegundospara
eliminarlanieveoelhieloquehayanquedadoenelconjuntodel
canal.
ANTES DE ENCENDER EL MOTOR
Lea,comprenday sigatodaslasinstruccionesy advertenciasque
aparecenenla maquinayen estemanualantesde operarla.
Aceite
Elmotorseenvi6conaceiteenelmotor.Controleel niveldeaceite
antesdecadaoperaci6nparaasegurarsede quehayaaceite
suficienteen elmotor.Paraobtenermasinstrucciones,remitasea los
pasosqueaparecenen la pagina52_
1_ Saquelavarilladelnivelde aceitedelorificiodellenadode
aceite.
2_ Controley compruebequeelniveldeaceiteest_hastaarribaen
la marcaFULLdelavarilladelniveldelaceite.
3_ Si el niveldeaceitenollegahastaFULL,viertaaceitede motor
nuevo(5%30, conunaclasificaci6nminimadeSF/SG/SH/SJ)
lentamentea tray,sdelaabertura.Vuelvaacolocarlavarilladel
nivelaceiteenel llenadodeaceiteycontrolenuevamenteel nivel
de aceite_
GasoJina
, AImacenelagasolinaen un recipienteaprobadolimpioy coloque
la tapaen el recipiente.
, Aseg@esedequeelrecipientedes@elcualviertelagasolina
est_limpioynoest_oxidadonicontaminadoconotrasperticulas
extra,as.
, Llenesiempreel tanquedecombustibleal airelibrey useun
embudoo picoparaevitarderramamientos.
, Lleneeltanquedecombustiblecongasolinasinplomo,limpiayfresca
conminimode85octano.Elcombustibledecompraenunacantidad
quepuedesetusadadentrode30dias.
, Nuncallenecompletamenteeltanque.Ueneeltanquehasta1=1/2pulg
pordebajodeltope,dejandoasiespacioparaladilataci6ndelcombus-
tible.
, AsegQresede limpiarelcombustiblequese hayaderramado
antesdearrancarel motor.
ENCENDUDO DEL MOTOR
1_ AsegOresedeque elcontrolde la barrenay elcontrolde la
transmisi6nest_nen posici6ndesengranada(sinpresionar).
2_ Insertelallavedeencendidoenla ranura.AsegOresedeque
entrea presi6nensu lugar.Nointentegirarlallave.
NOTA:Elmotorno puedearrancarsi lallaveno estacompletamente
insertadaenelinterruptordeencendido.
54
Page 55

Arrancador em_ctrico
Determinesi eIcabbadode suhogaresunsbtemadetrescabbs
conectadoa fierra.Consuiteconunebctfidsta matrbuiadosinoest,.
seguro.
Elarrancadorel@trbo optional estaequipadoconuncabb deali_
mentaci6ny unenchufedetresterminalesconectadosa fierray esta
diseSadoparaoperarcon corrbntedom_stbade 120volfios.Debe
serufilizadocon unreceptaculode tresterminalescorrectamente
conectadoa fierraentodomomentoparaevitarla posibilidadde
descargasel@trbas.Sigatodaslasinstrucdonescuidadosamente
paraoperarel arrancadorel@trbo.
Sicuentaconun receptaculodetresterminales,sigalossiguientes
pasos:
1_ Conecteel prolongadora lasalidasituadaenla superficiedel
motor.Conecteel ottoextremodel prolongadoren unrecept_.culo
deCAconconexi6natierradetresterminalesde 120voltios,en
unb.reabienventilada.
2_ Gireelcontrolde obturaci6na posici6ndeOBTURACION.IYl
3_ Sies 15°Focebadordeempujemb.saltadosveces,si abajo
15°Rcebadordeempujecuatroveces.
4_ Empujeel interruptorde rockeroaENla posici6n.
5_ Presioneel bot6ndelarrancadorparaarrancarel motor.
Paraprolongarla vidadejuezde salida,useciclosinicialescortos(5
mb.ximodesegundos,luegoespereunminuto).
6_ Unavezencendidoel motor,suelteelbot6ndel arrancador.
7_ Permitaqueel motorcalientevariosminutos,ajustandoel
est_.rterhaciala posici6nDIRIGIDA.Esperehastacarrerasde
motorsuavementeantesde cadaajustede est_.rter.
8_ Cuandodesconecteel prolongador,desenchufesiempreel
extremodelrecept_.culode tresterminaleseneltomacorriente
deparedantesdedesenchufarel extremoopuestode la
mb.quinaquitanieve.
Arraneador de retroeeso
1. GireeIcontrolde obturad6na posbi6n deOBTURACION.lJl
2. DeprimaeIcebador.Sies15°Focebadordeempqe mb.saita
dosveces,siabajo15°Rcebadordeempujecuatroveces.
3. Empujeelinterruptorde rockeroa ENlaposici6n.
4_ Tomelamanijadelarrancadorde retrocesoytirede lacuerda
haciaafueralentamente.Enelmomentoen elquese haga
levementemb.sdificiltirarde lacuerda,permitaquelamisma
retrocedalentamente.
5_ Tire delamanijadel arrancadorcon unmovimientofirmey
rb.pido.Nosueltela manijanipermitaquesedesenganche.
Mantengala manijadelarrancadorfirmementesujetay permita
que lacuerdaretrocedalentamente.
6_ Permitaqueel motorcalientevariosminutos,ajustandoel
estarterhacialaposici6nDIRIGIDA.Esperehastacarrerasde
motorsuavementeantesdecadaajustedeest_.rter.
Paraevitarqueelmotorfuncionesincontrol,nuncaIodejesin
vigilanciamientrasest,.en marcha.Apagueel motorluegodeusarlo
ysaquelallavedeencendido
DETENCU6N DEL MOTOR
Dejeencendidoel motordurantealgunosminutosantesdedetenerlo
parapermitirquesesequela humedaden elmismo.
1_ Empujeelinterruptorde rockeroaOFFlaposici6n.
2_ Retirelallavedeencendidoy gu_.rdelaen unlugarseguro.
3_ Limpielanievey la humedaddelb.reaalrededordel motor,asi
comotambi_nenel_.rea(yalrededorde6sta)del interiordelos
controlesdelatransmisi6nyde la barrena.Asimismo,enganche
y suelteamboscontrolesvariasveces.
PROCEDUMUENTO PARA ENGRANAR LA
Muevala palancadecambiosaunadelasseisposicionesde
avance(F)o de lasdos posicionesde reversa(R).Seleccione
lavelocidadadecuadaparaelestadodelanieveexistenteyuna
velocidadconla quesesientac6modo.
NOTA:AIseleccionarunavelocidadde latransmisi6n,uselasveloci-
dadesmb.slentashastaquesesientac6modoy sehayafamiliarizado
conel funcionamientode la mb.quinaquitanieve.
2_ Aprieteelcontroldela transmisi6ncontralamanijaderecha,yla
mb.quinaquitanievesemoverb_Su_lteloy sedetendrb,el
movimientodelatransmisi6n.
NOTA:NUNCAcambielaposici6nde lapalancadecambios(cambio
de velocidadeso dedirecci6ndedesplazamiento)sinsoltarprimeroel
controlde transmisi6nydetenerpotcompletolamb.quinaquitanieve.
Estoproducirb,undesgasteprematurodel sistemadetransmisi6nde
lamb.quinaquitanieve.
PROCEDUMUENTO PARA ENGRANAR LAS
1. Aprieteelcontroldela barrenacontralamanijay lasbarrenas
rotarb.n.Su_ltelay lasbarrenassedetendrb.n.
55
Page 56

USTA DE MANTENIMIENTO
Antesde realizarcualquiertipodel mantenimiento/servicio,suelte
todoslosmandosy pareelmotor.Esperehastaquetodaslaspartes
de movimientohayanvenidoaunaparadacompleta.Desconecteel
alambredebujiaybaselocontraelmotorparaprevenirelcomienzo
involuntario.Siemprellevepuestoscristalesinastillablesdurantela
operaci6norealizandocualquierajusteo reparaciones.
_b
CadaUse
los 5- 8 horas
Anualmenteo 25horas
Anualmenteo50 horas 1. Elaceitede motor 1. Cambio
Anualmenteo100horas 1. Bujia 1. Comprobar/Cambio
Antesde AImacenaje 1. Sistemadecombustible 1. Elmotordirigidohastaqueestose
Bajocargapesadaoentemperaturasaltas
1. Niveldel aceitede motor
2. Hardwaresueltooausente
3. Unidadymotor
1. Elaceitede motor
1. Elaceitedemotort
2. Encadenamientosdecontrol
ypivotes
3. Ruedas
4. Ejedeengranajey qe de la
barrena
1. Comprobar
2. Aprieteosustituir
3. Limpio
1. Cambio
1. Cambio
2. Lubricaci6nconpetr61eoligero
3. Lubricaci6nconautomotores
4. Lubricaci6nconpetr61eoligero
Sigalalistademantenimientodadaabajo.Estacartadescribepautas
de servicios61o.Usela columnade Troncode Servicioparaguardar
la pistadetareasdemantenimientocompletadas.Localizarelmb.s
cercanoChamuscael Centrode8erviciooprogramarelservicio,sim-
plementeponerseencontactoChamuscaen 1-800-4-MYoHOME®.
multiusos
pareafaltadelcombustibleoaSada
un aditivodegasolinaal gasenel
tanque.
MANTENIMIENTO DE MOTOR
Antesde realizartareasde lubricaci6n,reparaci6no inspecci6n,
desengranetodosloscontrolesydetengael motor.Espereaquese
detengantodaslaspiezasm6viles.
Controm demaceite demmotor
1. AsegOresedequeelmotorestaverticalynivelado.
2. Desenrosqueeltap6ndellenadodeaceitedel tubodellenadode
aceitey limpielavarillade niveldeaceite.
3. Vuelvaaenroscareltap6ndellenadodeaceiteen eltubode
llenadodeaceite.Ajustebien.
4. Desenrosquey retireeltap6ndellenadodeaceitedel tubode
llenadodeaceite.Fijeseen el niveldeaceite.Sila lecturaen
lavarilladel niveldeaceiteestaperdebajode lamarca"ADD"
(agregue),agregueaceitelentamentehastaalcanzarelnivel
"FULL"(lleno).VealaFigura11.
5. Vuelvaaenroscareltap6ndellenadodeaceiteen eltubode
llenadodeaceite.Ajustebien.
6. Limpietodoel aceitequesehayaderramado.
f
,,J
,,,J
Mantenga el niveI
de aceite en FULL (Ibno)
J
Figura11
56
Page 57

Cambio deaceite del motor
Paraevitarqueelmotorresultedaiado,esimportanteque:
, Controleelniveldeaceiteantesdecadausoycadaochohoras
deoperaci6n.
, Cambieelaceitedespu_sdelas5a8primerashorasde
operaci6nydespu_sdecada50horasdeoperaci6nounavez
portemporada.
1. Coloqueelniveldemotoryquitelalavedeseguridad.
2. DesconectelabujiaIoalambranyguardanlejosdelabujia.(Reo
fi_rasealasiguientesecci6n).Deestarrelacionado,desconecte
lacuerdadeextensi6ndelafuentedealimentaci6n.
3. ConelmotorLEJOSperotodaviacalientan,quitanelenchufe
dedesagiedelaceiteydrenanelpetr61eoenunreceptaculo
apropiado.VealaFigura12.
Elaceiteusadoes unresiduopeligroso. Eiimineei aceiteusado
adecuadamente.NoIoarrojejuntocon Iosresiduosdomiciliarios.Consulte
aias autoridadeslocaleso ai centrode servicioSearsparaaveriguar
ld6nde hayinstatacionesparala eliminaci@/reciclaje segura(o) delaceite
[usado.
.
InstaledenuevoeldesagOedelaceitetapanyse aprietanbien.
5.
Relleneelmotorconel petr61eorecomendado.Verlacartade
UsodelAceiteRecomendada.Lacapacidaddel aceitedelmotor
es20onzas.
Recommended Oil Usage
TapOnde Ilenado
deaceite
TapOnpara
drenado de
aceite _
1 I I
6. Borrecualquierpetr61eoderramado.
Control de la bujia
Controlela bujiaanualmenteocada 100horasde operaci6n.
1. Quiteel bot6ndecontrolde estartery lalave de seguridad.
2. Sueltey quitelos tornillosquemontandela capuchadenieve.
3. Despacioquitelacapuchade nieve,asegurandoseque la
manguerade bulbode cartillay elalambredeignici6nperman-
ecenrelacionados.VerlaFigura13.
4. Quitee inspeccionelabuj[a.
5. Sustituyala buj[asi laporcelanaes rajadao siloselectrodosson
picados,quemadoso ensuciadoscondep6sitos.
6. Compruebeel huecodeelectrodoconunamedidade sondeoy
pongael huecoa .030(O.76mm)sies necesario.Veala Figura
14.
7. Instaledenuevolabuj[ayapri@tesebien.
8. Montede nuevolacapuchade nieveal motorconlostornillos
quemontan,otravezasegurb.ndosequela manguerade bulbo
decartillayel alambredeignici6nestanrelacionados.
II
II
II
1. Espaciode0,030pulg(0,76ram)
2. Electrodo
3. Porcelana
57
Figura13
Figura14
Page 58

9. Unaelbot6ndecontroldeestarteralejedeest_.rterenel
carburador.Sielbot6ndecontroldeest_.rternoesinstalado
correctamente,elest_.rternofuncionar&
10_Instalelallavedesegurida&
NOTA:ParaeIreempiazosedebeufiiizarunabujiaderesistor.
Contacteconuncentrodepartesyreparaci6nSearso1_800_4-MY-
HOME®paraunabujiaderepuesto,Champion®RC12YC.
Carburador
Losmotoreshechosfuncionarenaproximadamente3000a5000pies
(900a1500metros)encimadeIniveIdeImarpuedenrequeriruncar-
buradordeaititudaltoavi6nareacd6nprincipalSilainterpretad6n
err_.ficaesobservada,contacteconuncentrodepartesyreparaci6n
SearsparaeIcosteparainstaiar/compraruncarburadordeaifitudalto
avi6nareacci6nprindpaI.
Velocidaddel motor
Paraevitarbsionesgravesolamuerte,NOmodifiqueeImotorbajo
ningunadrcunstanda.Sicambialaconfigurad6ndelregulador,el
motoryelequipopuedenoperaravelocidadesinseguras.NUNCA
cambielaconfiguraci6ndefb.bricadelreguhdordelmotor.Hacer
funcionarelmotoraunavelocidadsuperioralaestabbcidaen
fb.bricaespeligroso.
Ejede engranaje
Elejedeengranaje(hexagonal)sedebeBbricaralmenosunavezpor
temporadaotrascada25horasdeoperaci6n.
1. Paraprevenirelderramamiento,eliminetodoelcombustibledel
tanquehaciendofuncionarelmotorhastaquesedeteng&
2. Gireconcuidadolamb.quinaquitanievehaciaarribayhacia
delantedemaneraquequedeapoyadasobrelacajadela
barren&
& Retirelacubiertadelmarcoinferiorquitandoloscuatrotornillos
quelaaseguran_
4_ Apliquealejehexagonalunacapaligeradeunagrasamultiusos
aptaparacondicionesclimb@asm8ltiples_Vealafigural&
NOTA:Evitelosderramesdeaceitesobrelaruedadefricci6nde
cauchoysobrelaplacadetransmisi6ndealuminio.Haciendotan
dificultarb,elsistemadepaseodellanzadordenieve.Borrecualquier
excesoopetr61eoderramado.
Ruedas
Retireambasruedasalmenosunavezcadatemporada.Limpiey
recubralosejesconunagrasaparaautomotoresmultiusosantesde
volverainstalarlasruedas.
Control direccionamdemcanal
Lubriqueelmanguitodelpernodeqoylaespiralconaceite3-end
unavezportemporada.
Figura15
Ejede mabarrena
AImenosunavezportemporada,quitelospasadoresdecuchilladel
ejedelabarren&Rocielubricantealinteriordeleje,alrededorde
losseparadores.Asimismo,lubriqueloscojinetesbridadosquese
encuentranenambosextremosdeleje.Vealafigura16.
PLACA DE RASPADO Y ZAPATAS
ANTUDESUZANTES
Laplacade raspadoy laszapatasantideslizantesubicadasenla base
de lambquinaquitanieveestansujetasadesgaste.Peri6dicamente
deberiacontrolarlospernosy reemplazarloscuandoseanecesario.
Pararetirarlaszapatasantideslizantes:
1. Quiteloscuatropernosdelcarro,arandelas,y lastuercasde
bridahexagonalesquelosaseguranalambquinaquitanieve.
58
Page 59

2. Montelasnuevaszapatasantideslizantesconcuatrospernos
decarro(dosencada lade),arandelas,ylastuercasdebrida
hexagonales.Consultela figura17.
Pararetirarlaplacaderaspado:
1. Quitelos pernosde carroy lastuercashexagonalesque la
sujetana lacajadelamb.quinaquitanieve.
2. Montela placade raspadonueva,asegurb.ndosede quelas
cabezasdelospernosdecarroseencuentrendel ladeinteriorde
la caja.Ajustebien.Consultelafigura 17.
AJUSTES
Cable de cambios
Si nosepuedeIogrartodalagamade veloddades(avanceyretro=
ceso),consultela figuradela izquierdayajusteelcablede cambios
delasiguienteforma:
1. Coloquelapalancadecambiosenla terceraposici6nmb.srb.pida
deavance(F6).
2. Aflojelatuercahexagonaldelsoportedeposicionamientodel
cabledecambios.Vealafigura18.
3. Gireel soportehaciaabajoparareducireljuegodel cable.
4. Vuelvaaapretarla tuercahexagonal.
Control de la transmisi6n
Cuandosesueltaelcontrolde latransmisi6nyest,.enposici6n
desenganchadaarriba,el cabledebetenermuypocojuego.NOdebe
estartenso.Tambi_n,sihayexcesivoflojoen elcabledepaseoo si
la unidadexperimentael paseointermitenteusando,elcable puede
tenerqueserajustado
Compruebeel ajustedelcontroldela transmisi6nde la siguiente
forma:
1. Cuandosuelteelcontrolde latransmisi6n,empujesuavemente
la mb.quinaquitanievehaciadelante.Launidaddeberiaavanzar
libremente.
2. Engancheel controlde latransmisi6ne intenteempujarsuave°
mentela mb.quinaquitanievehaciadelante.Lasruedasnodeben
girar.Launidadnodebeavanzarlibremente.
3. Conel controlde latransmisi6nsuelto,muevala palancade
cambioshaciaatrb.sy haciadelanteentrelaposici6nR2yla
posici6nF6variasveces.Nodeberiahaberresistenciaen la
palancadecambios.
4. Sifallacualquieradelaspruebasanteriores,esnecesarioajustar
el cabledela transmisi6n.Procedadelasiguientemanera:
5. Aflojelatuercahexagonalinferiordelsoportedelcablede la
transmisi6n.Veala figura19.
6. Ubiquelam_nsulahaciaarribaparabrindarmb.sjuego(o hacia
abajoparaaumentarlatensi6ndelcable).
7. Vuelvaaapretarla tuercahexagonalsuperior.
®
Figura17
< i
i /
i /
Figura19
59
Page 60

Soporte del canal
Silaespiralsituadaenlaparteinferiordelcontroldireccionaldelcanal
noseenganchacompbtamenteconelmontajedelcanal,esposible
ajustarelsoportedelcanalParahacerlo:
1. Aflojelasdostuercasquesujetanelsoportedelcanalycambb
suposici6nligeramente.Vealafigura20.
2. Vuelvaaajustarlastuercas.
Contromde mabarrena
Consultelaseciondemontajeparaajustardichocontrol.
Zapatasantidesmizantes
ConsultelaseciondemontajeparaajustarLaszapatasantidesli=
zantes.
REEMPLAZO DE LA CORREA
La Correa de mabarrena
Pararetiraryreemplazarlacorreade labarrenadesu m&quina
quitanieve,procedacomoseindicaacontinuaci6n:
1. Paraprevenirelderramamiento,eliminetodoelcombustibledel
tanquehaciendofuncionarel motorhastaquesedetenga.
2. Saquela cubiertaplb.sticade lacorreaubicadaen el frentedel
motor.Paraellosaquelosdostornillosautorroscantes.Veala
figura21.
3. Saquela correadela barrenade la poleadelmotor.Vealafigura
22.
4. Gireconcuidadolamb.quinaquitanievehaciaarribay hacia
delantedemaneraquequedeapoyadasobrela cajadela
barrena.
5. Saquela cubiertadelmarcodesdedebajode la mbquina
quitanieveretirandoloscuatrotornillosautorroscantesquela
aseguran.Veala figura23.
Figure20
f
//
As{........................
Figura23
//
f
Figure21
Figure22
/
/
6O
Page 61

6. a. AflojeyretireeltornilloconrebordequeactOacomoguarda
delacorrea.Vealafigura24.
b. Desengancheelresortedelam_nsuladesoportedel
marco.
7. Retirelacorreadealrededordelapoleadelabarrenaydeslice
lamismaentrelam_nsuladesoporteylapoleadelabarrena.
Vealafigura25.
8. Pararealizarelreensambladodelacorreadelabarrenasigalas
instruccionesenordeninverso.
9. RealicelapruebadeControldeTaladroperfiladaenlasecci6n
deAsambleadeestemanual.
NOTA:NOolvidevolverainstalareltornilloconrebordeyvolvera
conectarelresortealmarcotrasinstalarunacorreadelabarrenade
repuesto.
La correa de matransmisi6n
Pararetiraryreemplazarlacorreadelabarrenadesumb.quina
quitanieve,procedacomoseindicaacontinuaci6n:
1. Paraprevenirelderramamiento,eliminetodoelcombustibledel
tanquehaciendofuncionarelmotorhastaquesedetenga.
2. Saquelacubiertaplb.sticadelacorreaubicadaenelfrentedel
motor.Paraellosaquelosdostornillosautorroscantes.Veala
figura21.
3. a. Saquelacorreadelabarrenadelapoleadelmotor.
b. TomelapoleaIocaygirelahacialaderecha.Vealafigura
26.
c. Levantelacorreadelabarrenaparasacarladelapoleadel
motor.
f
Figure24
...../ \
Figure25
f
f
Figure26
61
Page 62

4. Gireconcuidadolamb.quinaquitanievehaciaarribayhacia
delantedemaneraquequedeapoyadasobrelacajadela
barrena.
5. Saquelacubiertadelmarcodesdedebajodelamaquinaquita
nieveretirandoloscuatrotornillosautorroscantesquela
aseguran.Vealafigura23.
6. Detrb.slaparadaseescapaparaaumentarlaautorizaci6nentreel
discoderuedadefricci6nyruedadefricci6n.Vealafigura27.
7. Deslicelacorreadelatransmisi6nfueradelapoleaydeentrela
ruedadefricci6nyeldiscodelaruedadefricci6n.Yealafigura
27.
8. Retireyreemplacelacorreaenelordeninverso.
NOTA:Engranandoelcontroldelatransmisi6nsefacilitaelmontaje
delacorrea.
EXTRACCION DE LA RUEDA DE FRICCION
Si lam&quinaquitanievenoseaccionacuandoelcontroldela trans-
misi6nestaengranado,y sial realizarel ajustedel cabledecontrolde
latransmisi6nqueapareceel problemanose corrige,talvezsedeba
reemplazarla ruedadefricci6n.Sigalasinstruccionesqueaparecen
acontinuaci6n.Examinelaruedadefricci6nenbuscadesignosde
desgasteogrietasyreemplacesiesnecesario.
1. Paraprevenirelderramamiento,eliminetodoelcombustibledel
tanquehaciendofuncionarel motorhastaquesedetenga.
2. Coloquelapalancadecambiosenlaterceraposici6ndeavance
(FS).
3. Gireconcuidadolamb.quinaquitanievehaciaarribay hacia
delantedemaneraquequedeapoyadasobrela cajadela
barrena.
4. Saquelacubiertadelmarcodesdedebajodelambquinaquitanieve
retirandoloscuatrotornillosautorroscantesquelaaseguran.
5. Retirela ruedaderechaquitandoel tornilloylaarandelade
campanaquelaaseguranal eje.Veala figura28.
6. Retireconcuidadola tuercahexagonaly laarandelaquesujetan
elejehexagonalal marcode lamaquinaquitanieve,ygolpee
suavementeelextremodel ejeparadesplazarelcojinetede
bolasdel ladoderechodelmarco.Vealafigura29.
f
Parada
S@
escapa
J
Figure27
f
Figure28
f
J
Figure29
Page 63

NOTA:Tengacuidadodenodaiarlasroscasdeleje.
7. Concuidado,ubiqueelejehexagonalhaciaabajoyhaciala
izquierdaantesdedeslizarconprecauci6nelmontajedelarueda
defricci6nfueradeleje.Vealafigura30.
NOTA:Cuandosedeseareemplazarelconjuntodelaruedade
fricci6ncomplete,descartelapiezadesgastadaydeslicelanueva
piezaenelejehexagonal.
Parareensamblarloscomponentessigalospasosanterioresenorden
inversoSiestadesmontandolaruedadefricci6nparareemplazar
Onicamenteelanillodegoma,procedacomoseindicaacontinuaci6n:
1 Saqueloscuatrotornillosdemantienenunidaslasplacas
lateralesdelaruedadefricci6nVealafigura31
2 Retireelanillodegomadeentrelasplacas
3 Reensamblelasplacaslateralesconunnuevoanillodegoma
NOTA:AIreensamblarelconjuntodelaruedadefricci6n,asegOrese
dequeelanillodegomaestacorrectamentecentradoyasentado
entrelasplacaslateralesAprietecadatornilloOnicamenteungiro
antesdegirarlaruedaenelsentidodelasagujasdelrelqyproceder
conelsiguientetornilloRepitaesteprocesovariasvecespara
asegurarsedequelasplacasseaprietanconlamismafuerza(entre6
y9pies-libras)
Figure30
f-
4 Vuelvaadeslizarelconjuntodelaruedadefricci6nsobreeleje
hexagonalysigalospasosanterioresenordeninversopara
reensamblarloscomponentes
5 RealicelaPruebadeControldePaseoperfiladaantesenla
secci6ndeServicioyMantenimiento
Lasbarrenasestanajustadasalejeespiralconcuatropasadores
decuchillaypasadoresdechavetaSilabarrenagolpeaunobjeto
extraioounabarradehielo,lambquinaquitanieveestadiseiadade
maneraquelospasadoressepuedencortarSilasbarrenasnogiran,
verifiquesilospasadoressecortaronVealafigura32
NUNCAcambielospasadoresdecuchilladelasbarrenaspot
otracosaquelospasadoresdecuchilladerepuestodelfabricante
delequipooriginal,SearsSKU#88389/Nodepieza738-04124A
Cualquierdaioquesulfaelengranajedelabarrenaocualquierotto
componentepot@jardehacerloIoanterior,NOestarb,cubiertopot
lagarantiadesumbquinaquitanieve
Siempredebeapagarelmotordelamaquinaquitanieveyretirarla
laveantesdecambiarlospasadoresdecuchilla
Figure31
f
/
o \ \
\\
"...._"_'Ai //
Figure32
63
Page 64

SinosevaautiHizaeHequipodurante30diasomAs,osieseHfinaHdeHatemporadadenieveyyanoexisteposiWidaddequenieve,esnecesario
dmacenareHequipodemaneraadecuada.SigaHasinstrucdonesdedmacenamientoqueseindicanacontinuaci6nparagarantizareHrendimiento
mAximodeHamAquinaquitanievedurantemuchosaSos.
PREPARACION DEL MOTOR
YaqueHosmotoresaHmacenaronmAsde30 dias:
1. Hmpedira gomaformarseen sistemade combusfibHeo en partes
decarburadoresendaHes:
a.SieHdep6sitodecombustibHecontieneHagasoHinaoxigenada
oformuHadadenuevo(gasoHinamezdadaconunalcoholo_ter),
dirijaselmotorhastaqueestoseparea faHtadellcombustible.
b.Siel dep6sitode combustiblecontieneHagasoHina,motordirigido
hastaqueestoseparea faHtadellcombustibleo aSadaunaditivo
degasoHinaaMgasenel tanque.Siustedusaunaditivodegas,
dirigeel motordurantevariosminutosparaponerencircuHaci6nel
aditivoporelcarburador.
PREPARACKSN DE LA MAQUUNA QUUTANUEVE
1. CuandoaHmaceneHamAquinaquitanieveen ungaHp6nde
dep6sitometaHicoo conpocaventiHaci6n,tengaespecialcuidado
de reaHizarHeuntratamientoanti-oxidanteaMequipo.Useaceite
Higeroo siHic6npararecubrirelequipo,especiaHmenteHas
cadenas,losresortes,loscojinetesy loscables.
2. EHiminetodoel poHvodellexteriordellmotory dellequipo.
3. SigaHasrecomendacionesde Hubricaci6nen Hasecci6nde
mantenimientodeestemanual.
4. Nmaceneel equipoen unAreadespejaday seca.
.
MientraselmotorestodaviacaHiente,cambioelpetr6Heo.
3_
QuiteHabujiay manesobreHaonza1/2depetr6Heode motorpor
elagujerodebujiaen el ciHindro.SustituyaHabujiay arranquecon
HamaniveHael motorvariasvecesparadistribuirel petr6Heo.
Nuncauseel motoro elcarburadorqueHimpiaproductosenel
dep6sitodecombustibleoeldaSopermanentepuedeocurrir.
64
Page 65

El motornoarranca
El motorfuncionademanera
errb.tica
El motorrecalienta
Demasiadavibraci6n
.
Lapalancade obturaci6nnoestaenla
posici6nON(encendido)
2.
Sehadesconectadoel cabb delabujia
3.
Labujianofuncionacorrectamente
4.
Eltanquedecombustibleest,.vaciooel
combustibleesviejo
5.
Elmotornoestacebado
6.
Lalave de seguridadnose encuentraenel
encendidodel motor
1.
Launidadestafuncionandoenla posici6n
CHOKE(obturaci6n)
2.
Elcombustibbesviejo
3.
Aguao suciedadenelsistemadelcombus-
tible
4.
Esnecesarioajustarelcarburador
1.
Elcarburadornoestaajustadocorrecta-
mente
1.
Haypiezasqueest_.nflojaso labarrena
est,.da_ada
1. Pongael interruptorenlaposici6nCHOKE(obtura-
ci6n).
2. Conecteelcable a labujia.
3. Limpie,ajusteladistanciadisruptivaocambie.
4. Lleneel tanquecongasolinalimpiay fresca.
.
Cebeel motortalycomoseindicaenla secci6nde
operaci6n.
6.
Insertelalave totalmentedentrodelinterruptor.
1.
Cambielapalancade obturaci6na la posici6nOFF
(apagado).
2.
Lleneel tanquecongasolinalimpiay fresca.
3.
Vacieeltanquedelcombustible.Vuelvaallenarlo
concombustiblelimpio.
4.
Contacteconsucentrodepartesy reparaciones
Sears.
1.
Contacteconuncentrode partesy servicioSears.
1.
Detengael motordeinmediatoydesconecteel
cabledela bujia.Ajustetodoslos pernosy las
tuercas.Si lavibraci6ncontinOa,llevelaunidada
reparara uncentrodepartesy reparaci6nSears.
65
Page 66

P@didadepotencia 1. Elcabledela bqia estaflojo
2. Elorificiodeventilaci6ndel tap6nde
Ilenadodelcombustibleestaobstruido
Launidadnoseautopropulsa
1. Elcabledel controldetransmisi6nnecesita
unajuste
2. Lacorreadetransmisi6nest,.flojao
daiada
3. Rue@de fricci6nIlevadapuesta.
Launidadnodescargala
1. Elmontajedelcanalest,.tapado
nieve
2. Hayunobjetoextraio enla barrena
.
Elcabb del controlde labarrenanecesita
unajuste
4.
Lacorreadela barrenaestaflojao daiada
5.
El/lospasador/esde cuchila estan
cortados
.
Conecteyajusteelcablede labujia.
2.
Retireel hieloy la nievedeltap6ndellenadodel
combustible.Compruebequeel orificiode venti-
laci6nnoest6obstruido.
1. Ajusteel cabledelcontroldetransmisi6n.Consulte
la secci6nde Servicioy Mantenimiento.
2. Reemplacelacorreade latransmisi6n.Consultela
secci6ndeServicioy Mantenimiento.
3. Ruedadefricci6nde cambioocontacteconsu
centrode partesy reparacionesSears.
1. Detengael motorde inmediatoy desconecteel
cablede labujia.Limpieel montajedelcanalyel
interiordelacajadela barrenaconlaherramienta
delimpiezaounavarilla.
2. Detengael motorde inmediatoy desconecteel
cablede labujia.Retireelobjetodelabarrenacon
la herramientadelimpiezaounavarilla.
3. Ajusteel cabledelcontrolde la barrena.Consultela
secci6ndemontaje.
4. Reemplacelacorreade labarrenaConsultela
secci6ndeServicioy Mantenimiento.
5. Reemplaceconnuevo(s)pasador(es)de cuchilla.
]
66
Page 67

Sears, Roebuck and Co., LLS.A. (Sears), el Consejo de Recursos Ambientames de California (CARB)
y la Agencia de Protecci6n Ambientai de mosEstados Unidos (EPA)
Decmaraci6n de garantia demsistema de control de emisiones (derechos y obiigaciones de la garantia de defectos dempropi-
LACOBERTURADELA GARANTiADE CONTROLDEEMISIONESES Y PARALOSMODELOSCERTIRCADOSDELA_lO1997YPOSTERIORES,
APLICABLEA LOSMOTORESCERTIFICADOSCOMPRADOSENCALiFOR-
NiA EN1995YPOSTERIORMENTE,QUESE UTILIZANENCALiFORNiA,
Declaraci6n de garantia sobre defectos en el control
ElConsejodeRecursosAmbbntabs deCalifornia(CARB),la EPA(Agenda
deProtecci@Ambientaldelos EE.UU.)y Searstienenelgustode explicarla
garanfiadelsistemadecontrolde emisionesparamotoresdela_o2000y para
elfuturocon relaci@a motorespequeSostodo terreno(SORE).EnCalifornia,
losnuevosmotorespequeSostodoterreno@benestardiseSados,construidos
yequipadosparacumplirconlas rigurosasnormasanti-smogdelestado.En
el restode losEstadosUnidos,losmotoresnuevostodoterrenodeencendido
porchispacertificadosparaelaSo1997debencumplirest&ndaressimilares
estabbcidospot la EPA.Searsdebegarantizarel sistemade controldeemis-
Cobertura de magarantia Sears para defectos en el controm de emisiones
LosmotorestodoterrenopequeSosest&ngarantizadosen Iorelativoa!control alas disposicionesquese indiquena continuaci6n.Siunapartedesumotor
deemisionesparadefectosenpbzasduranteunper[ododedos aSos,sujeto cubbrta por la garanfiaesdefectuosa,Searsreparar&o susfituir&dichaparte.
ResponsabiHdades del propietario en remaci6n con magarantia
Comopropbtanodel motortodoterrenopequeSo,Ud.es responsabbdela
realizaci@delmantenimbntorequeridoqueseincluyeenlas instrucciones
deoperaci6ny mantenimiento.Searsrecomiendaqueseconserventodoslos
recibosrelativosalmantenimientode su motortodoterrenopequeSo,pero
nopudedenegarlagarantiasimplementeporla faltadelosmismos,oporsu
incumplimientodelmantenimientoprogramatic.Comopropietariodelmotor
pequeSotodoterrenodebesaberque,sinembargo,Searsle puedenegar
la coberturadelagarantiasi su motortodoterrenopequeSoounapiezadel
mismohanfalladodebidoa abuso,negligencia,mantenimientoindebidoo
Disposiciones de la garantia Sears para defectos en el control de emisiones
Lassigubntessondisposbionesespedficasrelacionadasconla coberturade lagaranfiaparadefectosenel controldeemisiones.Es unaSadidoa lagaranfiade
motorSearsparamotoresno reguladosqueseencuentraen lasinstruccionesdefuncionambntoy mantenimiento.
1. Piezascongarantia
Lacoberturade estagarantiaseextiendeOnicamentealas piezas
queaparecena continuaci6n(las partesde lossistemasdecontrolde
emisiones),sbmpre que dichaspbzasestuvbran yaenel motorenel
momentodesucompra.
a. Sistemademedici@de combustible
•Sistemade enriquecimbntoparaarranqueenfrio
•Carburadorypartesinternas
• Bombade combustible
b. Sistemadeinducci6nde aire
• Filtrodeaire
•Cobctor de admisi6n
c. Sistemadeencendido
• Buj[a(s) deencendido
•Sistemade encendidomagneto
d. Sistemadelcatalizador
•Convertidorcatalitico
•Colectorde escape
•Sistemade inyecci6ndeaireo v_lvula deimpulsos
e. Ebmentosvariadosusadosen lossistemasantedores
•Wlvulas de vacio,sensibbsatemperatura,posici6ny fiempo
einterruptores
•Conectoresy montaies
2. AIcancedela cobertura
Searsgarantizaal poseedorinicialy a loscompradoressubsiguientes
quelaspiezascongarantianotendr_ndefectosen materiabsni mano
deobraqueprovoquenlafalladelas mismasduranteunperiodode
dosa_osa parfirdelafechaen queel motorse entregaa uncomprador
particular.
3. Sincargo
Lareparaci6no reemplazodecualquierpartecongarantiase realizara
Enlos EstadosUnidosy Canad_hayunalineadeatenci6nde24 horas,1o800-469oo4663,quecuentaconunmenOconmensaiespre-grabadosque contbnen
(Esta p_@nase apiba s6Ioen EE.UU. y CanadA).
etario)
QUESE COMPRENYUTILICENENCUALQUIERPARTEDELOS ESTADOS
UNIDOS(YA PARTIRDEL1 DEENERODE 2001 ENCANAD/_),
de emisiones para California y los Estados Unidos
ionesdesumotorparalosperiodosdetiempoenumeradosa continuaci6n,
siemprequenohayaabuso,negligenciao mantenimientoindebidode su
motortodoterrenopeque_o.Susistemadecontroldeemisionespuedeincluir
piezastabs comoelcarburador,el filtrodeaire,el sistemadeencendido,el
silenciadoryelconversorcataIRico.Tambienpuedeincluirconectoresy otras
unidadesrelacionadasconlas emisiones.Don@existaunacondici6ncubbrta
potlagaranfia,Searsreparar6,su peque_omotortodoterrenosin costoalguno
incluyendodiagn6stico,piezasy manodeobra
a modificacionesno aprobadas.Ud.esresponsabbdepresentarsumotor
todoterrenopeque_oaundistribuidorde serviciosSearsautorizadotan pronto
comoaparezcaunprobbma.Lasreparacionesdela garantiasinconfiicto
@bencompbtarseen unplazodetiemporazonabb,nosuperiora 30dias.Si
tienealgunapreguntarespectoa sus derechosy responsabilidadesreferem
tesa lagaranfia,debecontactarconun representantedeserviciosSearsal
1--800--469--4663.Lagaranfiadeemisioneses unagaranfiapordefectos.Los
defectosseiuzgan deacuerdoconelfuncionamientonormaldeunmotor.La
garanfianoest,.relacionadaconunapruebadeemisionesenuso.
sin cargoalgunoparael poseedor,incByendotareasde diagn6sficoque
permitandeterminarsi unapartecon garantiaesdefectuosa,siempreque
dichodiagn6sticose realiceenundistribuidorde serviciosSearsautoriza-
do. Paraelserviciode lagarantiadeemisiones,contacteal distribuidorde
serviciosSearsautorizadom_scercanoincluidoen las"Paginasamarillas"
en lascategorias"Motores,gasolina","Motoresdegasolina","Podadoras
de cesped",osimibres.
4. Reclamacionesy exclusionesalacobertura
Lasreclamacionesde lagaranfiadebenenviarsedeacuerdoconlas
disposicionesdela pol[ticadegaranfiaparamotoresSears.La cobertura
de la garanfiaexcluir_defectosenpbzas congaranfiaque noseanpartes
originalesSears,oabuso,negligenciao mantenimientoincorrecto,taly
comose estabbceenla pol[ficadegaranfiaparamotoresSears.Searsno
esresponsablede lasfallas enpiezascongaranfiaprovocadasporel uso
de partesa_adidas,quenoseanoriginabs o quesehayan modificado.
5. Mantenimbnto
Cualqubr partecongaranfiaque noesteprogramadaparasetreem-
plazadacomomantenimientorequerido,oque s61odeba inspeccionarse
regularmentealefecto de'%speccioneoreemplacesegOnsea necesario",
estar_garantizadacontradefectosduranteel periodode la garanfia.Todas
laspiezasgarantizadasqueestenprogramadasparasu reemplazopara
cumplircon los requisitosde mantenimientoestarangarantizadass61o
porel periodoanterioral primerreemplazoprogramadoparadichapieza.
Cualqubr pbza de recambioquesea equivabnte enfuncionambntoy
durabilidadpuedeusarsepararealizarmantenimientoo reparaciones.El
propietarioes responsabb de realizartodo elmantenimientorequerido,tal
y comose defineenlasinstruccionesdefuncionambntoy mantenimbnto
Sears
6. Coberturaindirecta
Porla presente,lacoberturase extiendea lafalladecualquiercomponente
de motorprovocadapot lafalla de unapbza congaranfiaqueestetodav[a
en periododegaranfia.
informaci6nparaelmantenimbntodemotores.
Page 68

Busque e( per(odo de duraci6n de emisiones importantes y(a informaci6n de c(asificaci6n de aire en
meetiqueta de emisiones de su motor
Los motores cuyo cump(imiento con los estAndares de emisi6n Tier 2 de laComisidn de Recursos Ambienta(es de California (CARB)
est_ certificado deben exhibir la informaci6n relacionada con el per(odo de duraci6n de las emisiones y (aclasificaci6n de aire. Sears,
Roebuck and Co., de los Estados Unidos ponen esta informaci6n a disposici6n del consumidor en nuestras etiquetas de emisiones.
El Per(odo de Duraci6n de las Emisiones describe el nQmero de horas de tiempo real de funcionamiento para el cual se certifica que
el motor cumple con lasreglas de emisi6n, descontando el mantenimiento adecuado del mismo segQn las instrucciones de opero
aci6n ymantenimiento. Se utilizan las siguientes categodas:
Moderado:Se certifica que el motor cumple con las reg(as de emisi6n durante 125 horas de tiempo real de funcionamiento del motor.
)nmediato:Se certifica que el motor cumple con las reg(as de emisi6n durante 250 horas de tiempo real de funcionamiento del motor.
Extendido:Se certifica que el motor cumple con las reglas de emisi6n durante 500 horas de tiempo real de funcionamiento del motor.
Por ejemplo, una cortadora de c6sped t(pica que se empuja desde atrAs se usa entre 20 y 25 horas por a_o. Por Io tanto, el Per_odo
de Duraci6n de Emisiones de un motor con una ciasificaci6n intermedia seda equiva(ente a entre 10 y 12 aSos.
Laclasificaci6n de aire es un nQmero calcu(ado para describir el nivel relativo de emisiones para un grupo de motores en particular.
Cuanto menor sea la clasificaci6n de aire, mayor es la limpieza del motor. La informaci6n se presenta de forma grafica en la etiqueta
de emisiones.
Despu_s de( 1 de juHo de 2000, busque e( pedodo de cumpHmiento de (as reglas de
emisiones en (a etiqueta de cump(imiento de (as reg(as de emisiones de( motor
Despu6s del 1 de julio de 2000 se certificara que determinados motores Sears, Roebuck and Co., de los Estados Unidos
cumplen con los estAndares de emisiones de la fase 2 de (a Agencia de Protecci6n Ambiental de los Estados Unidos (USE°
PA). Para los motores certificados para la etapa 2, el pedodo de cumplimiento con las reg(as de emisiones al cual se hace
referencia en (a etiqueta de cumplimiento con las reglas de emisiones indica el nQmero de horas de funcionamiento para el
cual se ha demostrado que el motor cumple con los requerimientos federales de emisi6n.
Para los motores con desplazamiento inferior a 225 cc, Categoda C = 125 horas, B = 250 horas y A = 500 horas.
Para los motores con desplazamiento de 225 cc o mAs, Categoda C = 250 horas, B = 500 horas y A = 1000 horas.
El desplazamiento de los motores de la serie modelo 150112 es 249 cc.
La presente es una representaci6n gen_rica de (aetiqueta de emisi6n que se encuentra genera(mente en un
motor certificado.
GDOC-100182Rev.A
68
Page 69

Felicitacionespor haberrealizadounaadquMd6ninteligente.El
productoCraftsman®quehaadquiridoestadise_adoyfabricado
parabrindartouchesa_osdefundonamientoconfiable.Perocome
todoslosproductosavecespuederequerirde reparaciones.Esen
esemementocuandoeldisponerdeunAcuerdode protecd6npara
reparacionesle puedeahorrardineroy problemas.
A confinuad6nsedetallanlospuntosincluidosenelAcuerdo:
, Servicio e×pertoprestadopernuestros10,000espedalistasen
reparacionesprofesionales
, Servicio iiimitado sin cargo paralaspiezasy lamanedeobraen
todaslas reparadonescubiertas
, ReempJazodel producto hasta1500d61aressi no esposible
repararel productocubierto
, Descuento de10%del precionormaldel servicioy delaspiezas
relacionadasconel mismoquenoest_ncubiertasperelacuerdo;
ademb.s,10%del precionormaldelaverificaci6ndemanten-
imientopreventive
, Ayudar_pida pot teJ_fono- IoIlamamosResoluci6nRapida- el
apoyotelef6nicode unChamuscaalrepresentante.Pienseen
nosotroscomeelmanual"deundue5ohablador."
Unavezadquiridoel Acuerdo,puedeprogramarel serviciocon
tans61orealizarunaIlamadatelef6nica.PuedeIlamarencualquier
mementodeldia o delanocheo programarun servicioenlinea.
ElAcuerdode Protecci6ndeReparaci6nes unacomprasinriesgo.
Siustedanulaperalgunaraz6nduranteelperiodode garantiade
producto,proporcionaremosun reembolsoIleno.O,un reembolso
prorrateadoencualquiermementodespu@sdelperiododegarantia
de productoexpira,iAdquieraheysuacuerdode protecci6npara
reparaciones!
Se apJican determinadas timitaciones y e×ctusiones. Para obtener
informaci6n adicional y precios en los Estados Unidos llame al
1-800-827-6655.
El *Coverage en Canad_ vada en algunos articuJos. Para detalles
llenos la llamada Chamusca Canad_ en 1-800-361-6665.
Servicio deinstalaci6n de Sears
Sideseasolicitarlainstalaci6nprofesionalde Searsdeaparatos
dom_sticos,dispositivosparaabrirportones,calentadoresde agua
y otrosarticulosdom6sticosimportantes,enlos EstadosUnidoso
Canada.Ilameal 1-800-4-MY-HOME®.
69
Page 70

70
Page 71

71
Page 72

Your Home
For expert troubleshooting and home solutions advice:
www.managemyhome.com
For repair - in your home - of all major brand appliances,
lawn and garden equipment, or heating and cooling systems,
no matter who made it, no matter who sold it!
For the replacement parts, accessories and
owner's manuals that you need to do-it-yourself.
For Sears professional installation of home appliances
and items like garage door openers and water heaters.
1-800-4-MY-HOME ® (1-800-469-4663)
Call anytime, day or night (U.S.A. and Canada)
www.sears.com www.sears.ca
Our Home
For repair of carry-in items like vacuums, lawn equipment,
and electronics, call anytime for the location of your nearest
Sears Parts & Repair Service Center
1-800-488-1222 (U.S.A.) 1-800-469-4663 (Canada)
www.sears.com www.sears.ca
To purchase a protection agreement on a product serviced by Sears:
1-800-827-6655 (U.S.A.) 1-800-361-6665 (Canada)
Para pedir servicio de reparaci6n
a domicilio, y para ordenar piezas:
1-888-SU-HOGAR ®
(1-888-784-6427)
Au Canada pour service en fran£ais:
1-800-LE-FOYER M°
(1-800-533-6937)
www.sears.ca
® Registered Trademark / TMTrademark / SMService Mark of Sears Brands, LLC
® Marca Registrada / TMMarca de F&brica / Marca de Servicio de Sears Brands, LLC
MCMarque de commerce / MDMarque depos6e de Sears Brands, LLC © Sears Brands, LLC
SM
 Loading...