

Craftsman 247881900 Owner’s Manual
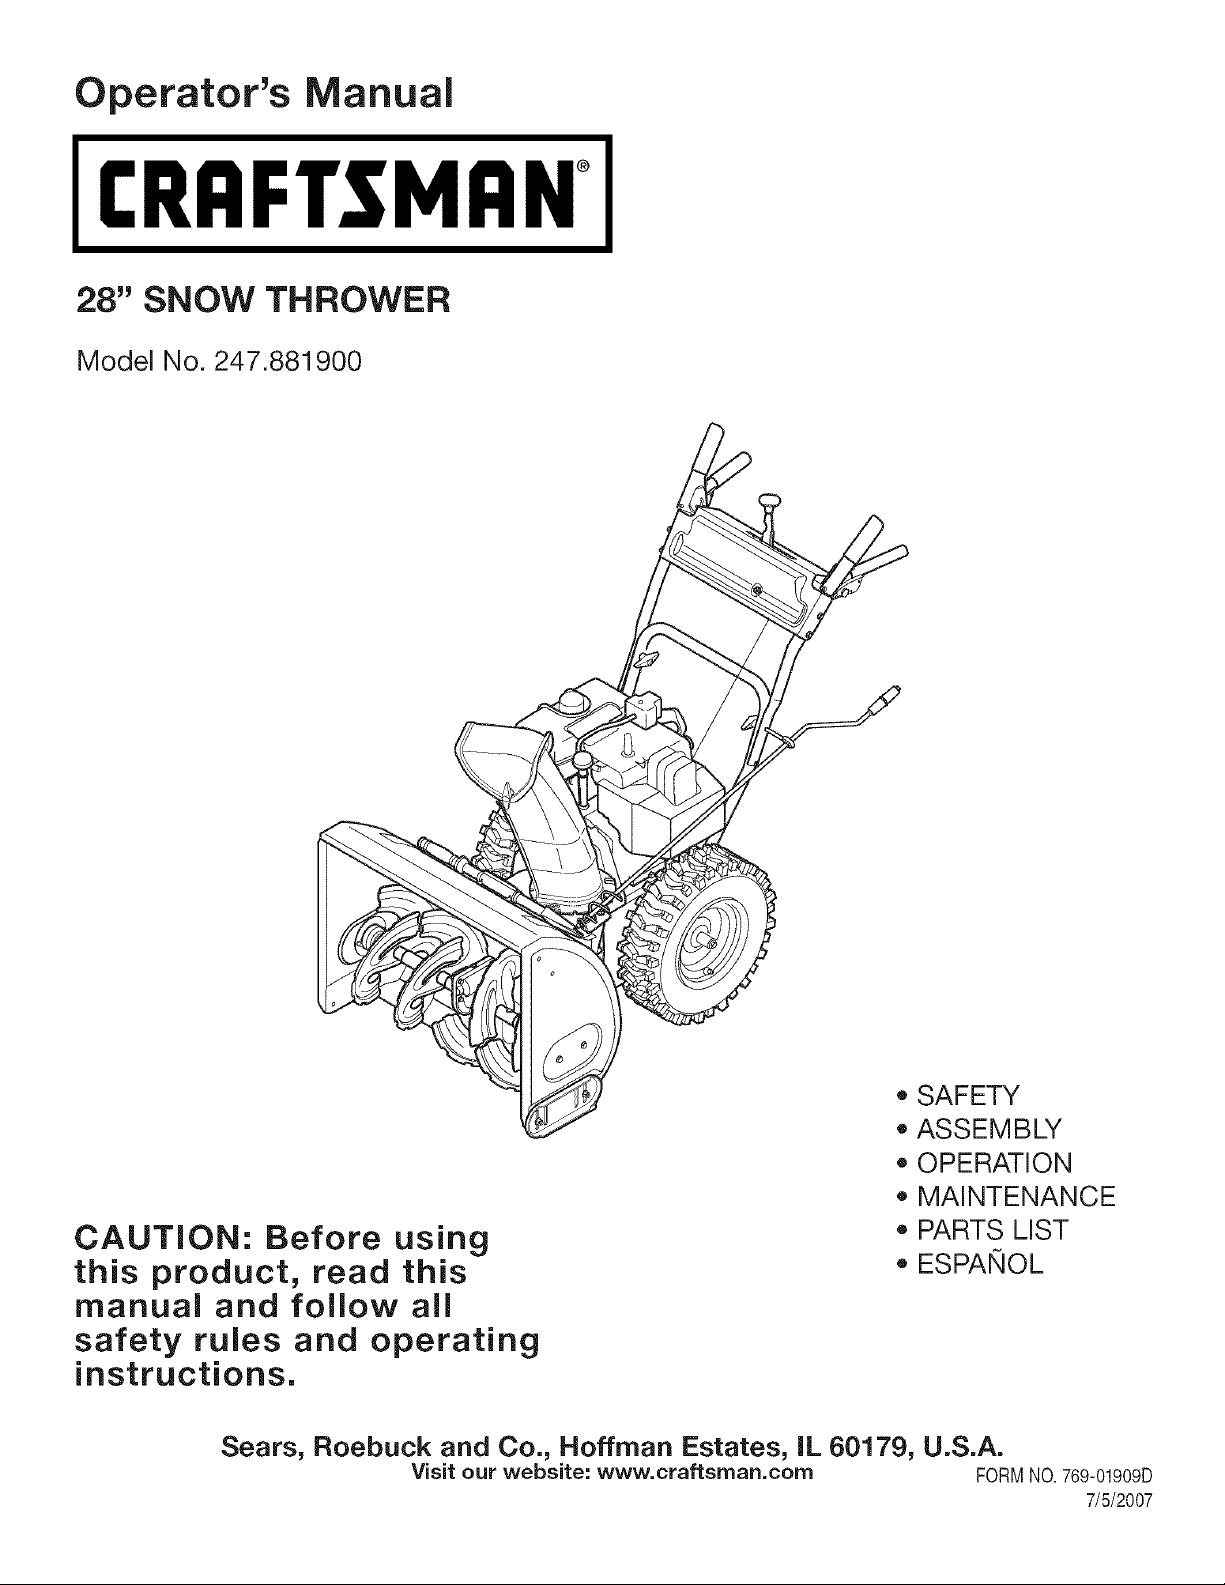
Operator's Manual
CRAFTSMAN°
28" SNOW THROWER
Model No. 247.881900
CAUTION: Before using
this product, read this
manual and follow all
safety rules and operating
instructions.
Sears, Roebuck and Co., Hoffman Estates, IL 60179, U.S.A.
Visit our website: www, craftsrnan.corn FORMNO.769-01909D
• SAFETY
ASSEMBLY
OPERATION
MAINTENANCE
PARTS LiST
ESPAI_OL
7/5/2007
WarrantyStatement.................... Page2
RepairProtectionAgreement............. Page3
SafeOperationPractices.............. Pages4-5
SafetyLabels......................... Page7
Assembly......................... Pages8-11
Service&Maintenance.............. Pages16-23
Off-SeasonStorage................... Page24
Troubleshooting...................... Page25
PartsList......................... Pages26-37
Espa_ol............................. Page40
Operation........................ Pages12-15
Two-YearWarranty on CraftsmanSnowThrower
Thisequipmentiscoveredbyatwo-yearwarranty,providedthatitismaintained,lubricated,andtunedupaccordingtotheinstructionsinthe
operator'smanual.Duringthewarrantyyear,ifthisequipmentexperiencesanyfailureduetodefectsinmaterialorworkmanship,RETURNITTO
YOURNEARESTSEARSPARTS&REPAIRCENTER,andSearswillrepairit,freeofcharge.In-homewarrantyserviceisavailable,butyouwill
havetopayatripcharge.
Thiswarrantydoesnotcover:
Expendableitemswhichbecomewornduringnormaluse,suchasskidshoes,shaveplateandsparkplugs.
Repairsnecessarybecauseofoperatornegligence,includingbutnotlimitedto,electricalandmechanicaldamagecausedbyimproper
storage,bentcrankshafts,failuretousethepropergradeandamountofengineoil,orfailuretomaintaintheequipmentaccordingtothe
instructionscontainedintheoperator'smanual.
Engine(fuelsystem)cleaningorrepairscausedbyfueldeterminedtobecontaminatedoroxidized(stale).Ingeneral,fuelshouldbeused
within30daysofitspurchasedate.
Equipmentifusedforcommercialorrentalpurposes.
Thiswarrantyappliesforonly90daysifthisproductiseverusedforcommercialorrentalpurposes.
ThiswarrantyappliesonlywhilethisproductisusedintheUnitedStates.
Thiswarrantygivesyouspecificlegalrights,andyoumayalsohaveotherrightswhichvaryfromstatetostate.
Sears,RoebuckandCo.,HoffmanEstates,IL60179
EngineOilType: SAE5W-30
EngineOilCapacity: 26ounces
FuelCapacity: 4Quarts
SparkPlug: Champion®RJ19LM
SparkPlugGap: .030"
ModelNumber.................................................................
SerialNumber.................................................................
DateofPurchase.............................................................
Recordthemodelnumber,serialnumber
anddateof purchaseabove
©SearsBrands,LLC
Congratulationson makingasmartpurchase.YournewCraftsman®
productisdesignedandmanufacturedforyearsof dependableopera-
tion.Butlikeall products,it mayrequirerepairfromtimeto time.That's
whenhavinga RepairProtectionAgreementcansaveyoumoneyand
aggravation.
Here'swhat'sincludedintheAgreement:
,, Expertserviceby our 12,000professionalrepairspecialists
,, Unlimitedserviceandnochargefor partsandlaboronall covered
repairs
,, Productreplacementifyourcoveredproductcan'tbefixed
,, Discountof 10%fromregularpriceofserviceandservice-related
partsnotcoveredbytheagreement;also,10%off regularpriceof
preventivemaintenancecheck
,, Fasthelpbyphone- phonesupportfromaSearstechnicianon
productsrequiringin-homerepair,plusconvenientrepair
scheduling
Purchasea RepairProtectionAgreementnowandprotectyourself
fromunexpectedhassleandexpense.
Onceyou purchasetheAgreement,a simplephonecall isall thatit
takesfor you toscheduleservice.Youcancall anytimedayornight,or
schedulea serviceappointmentonline.
Searshasover12,000professionalrepairspecialists,who have
accesstoover4.5millionqualitypartsandaccessories.That'sthe
kindof professionalismyoucancounton tohelpprolongthelifeof
yournewpurchaseforyearstocome.PurchaseyourRepairProtection
Agreementtoday!
Somelimitationsandexclusionsapply. For pricesand additional
informationcall 1-800-827-6655.
SearsInstallation Service
ForSearsprofessionalinstallationof homeappliances,garagedoor
openers,waterheaters,andothermajorhomeitems,in theU.S.A.call
1-800-4-MY-HOME®
which,ifnotfollowed,couldendangerthepersonal
__L Thissymbolpointsoutimportantsafetyinstructions
safetyand/orpropertyofyourselfandothers.Read
andfollowallinstructionsinthismanualbefore
attemptingtooperatethismachine.Failuretocomplywiththese
instructionsmayresultinpersonalinjury.Whenyouseethissymbol,
HEEDITSWARNING!
Thismachinewasbuilttobeoperatedaccordingtotherulesfor
safeoperationinthismanual.Aswithanytypeofpowerequipment,
carelessnessorerroronthepartoftheoperatorcanresultinserious
injury.Thismachineiscapableofamputatinghandsandfeetand
throwingobjects.Failuretoobservethefollowingsafetyinstructions
couldresultinseriousinjuryordeath.
YourResponsibility:Restricttheuseofthispowermachineto
personswhoread,understand,andfollowthewarningsandinstruc-
tionsinthismanualandonthemachine.
TRAINING
,, Read,understand,andfollowallinstructionsonthemachineandin
the manual(s)beforeattemptingtoassembleandoperate.Keepthis
manualina safeplaceforfuture andregularreferenceandforordering
replacementparts.
,, Be familiarwithallcontrolsandtheirproperoperation.Knowhowto stop
the machineanddisengagethemquickly.
,, Neverallowchildrenunder14yearsoldto operatethismachine.Chil-
dren14yearsoldandovershouldreadandunderstandthe operation
instructionsandsafetyrulesinthis manualand shouldbetrainedand
supervisedbya parent.
,, Neverallowadultsto operatethismachinewithoutproperinstruction.
,, Thrownobjectscancauseseriouspersonalinjury.Planyoursnow-
throwingpatterntoavoiddischargeof materialtowardroads,bystanders
andthe like.
,, Keepbystanders,helpers,petsandchildrenatleast75feetfromthe
machinewhileit is inoperation.Stop machineif anyoneentersthearea.
,, Exercisecautiontoavoidslippingorfalling,especiallywhenoperatingin
reverse.
Engine Exhaust, some of its constituents, and certain vehicle
components contain or emit chemicals known to State of California to
1cause cancer and birth defects or other reproductive harm.
PREPARATION
Thoroughlyinspecttheareawheretheequipmentisto beused.Removeall
doormats,newspapers,sleds,boards,wiresandotherforeignobjects,which
couldbetrippedoverorthrownbythe auger/impeller.
,, Alwayswearsafetyglassesoreyeshieldsduringoperationandwhile
performinganadjustmentor repairto protectyoureyes.Thrownobjects
whichricochetcancauseserious injurytothe eyes.
,, Donotoperatewithoutwearingadequatewinteroutergarments.Donot
wearjewelry,longscarvesor otherlooseclothing,whichcouldbecome
entangledinmovingparts.Wearfootwearwhichwill improvefootingon
slipperysurfaces.
,, Usea groundedthree-wireextensioncordand receptacleforall units
with electricstartengines.
,, Adjustcollectorhousingheighttoclear gravelor crushedrocksurfaces.
,, Disengageall controlleversbeforestartingthe engine.
,, Neverattemptto makeanyadjustmentswhileengineis running,except
wherespecificallyrecommendedinthe operator'smanual.
,, Letengineand machineadjustto outdoortemperaturebeforestartingto
clearsnow.
Safe Handling of Gasoline
Toavoidpersonalinjuryorpropertydamageuseextremecarein handling
gasoline.Gasolineisextremelyflammableandthevaporsareexplosive.
Seriouspersonalinjurycanoccurwhengasolineis spilledonyourselforyour
clothes,whichcan ignite.Washyourskinand changeclothesimmediately.
,, Useonlyanapprovedgasolinecontainer.
,, Extinguishall cigarettes,cigars,pipesand othersourcesofignition.
,, Neverfuel machineindoors.
,, Neverremovegascaporaddfuelwhilethe engineishot or running.
,, Allowenginetocoolatleasttwominutesbeforerefueling.
,, Neveroverfill fuel tank.Filltankto nomorethan Y2inchbelowbottomof
fillerneckto providespacefor fuelexpansion.
,, Replacegasolinecapandtightensecurely.
,, Ifgasolineisspilled,wipeit offtheengineandequipment.Move
machineto anotherarea.Wait5 minutesbeforestartingthe engine.
,, Neverstorethemachineorfuelcontainerinsidewherethereisan open
flame,sparkor pilotlight(e.g.furnace,waterheater,spaceheater,
clothesdryeretc.).
,, Allowmachineto coolatleast5minutesbeforestoring.
4
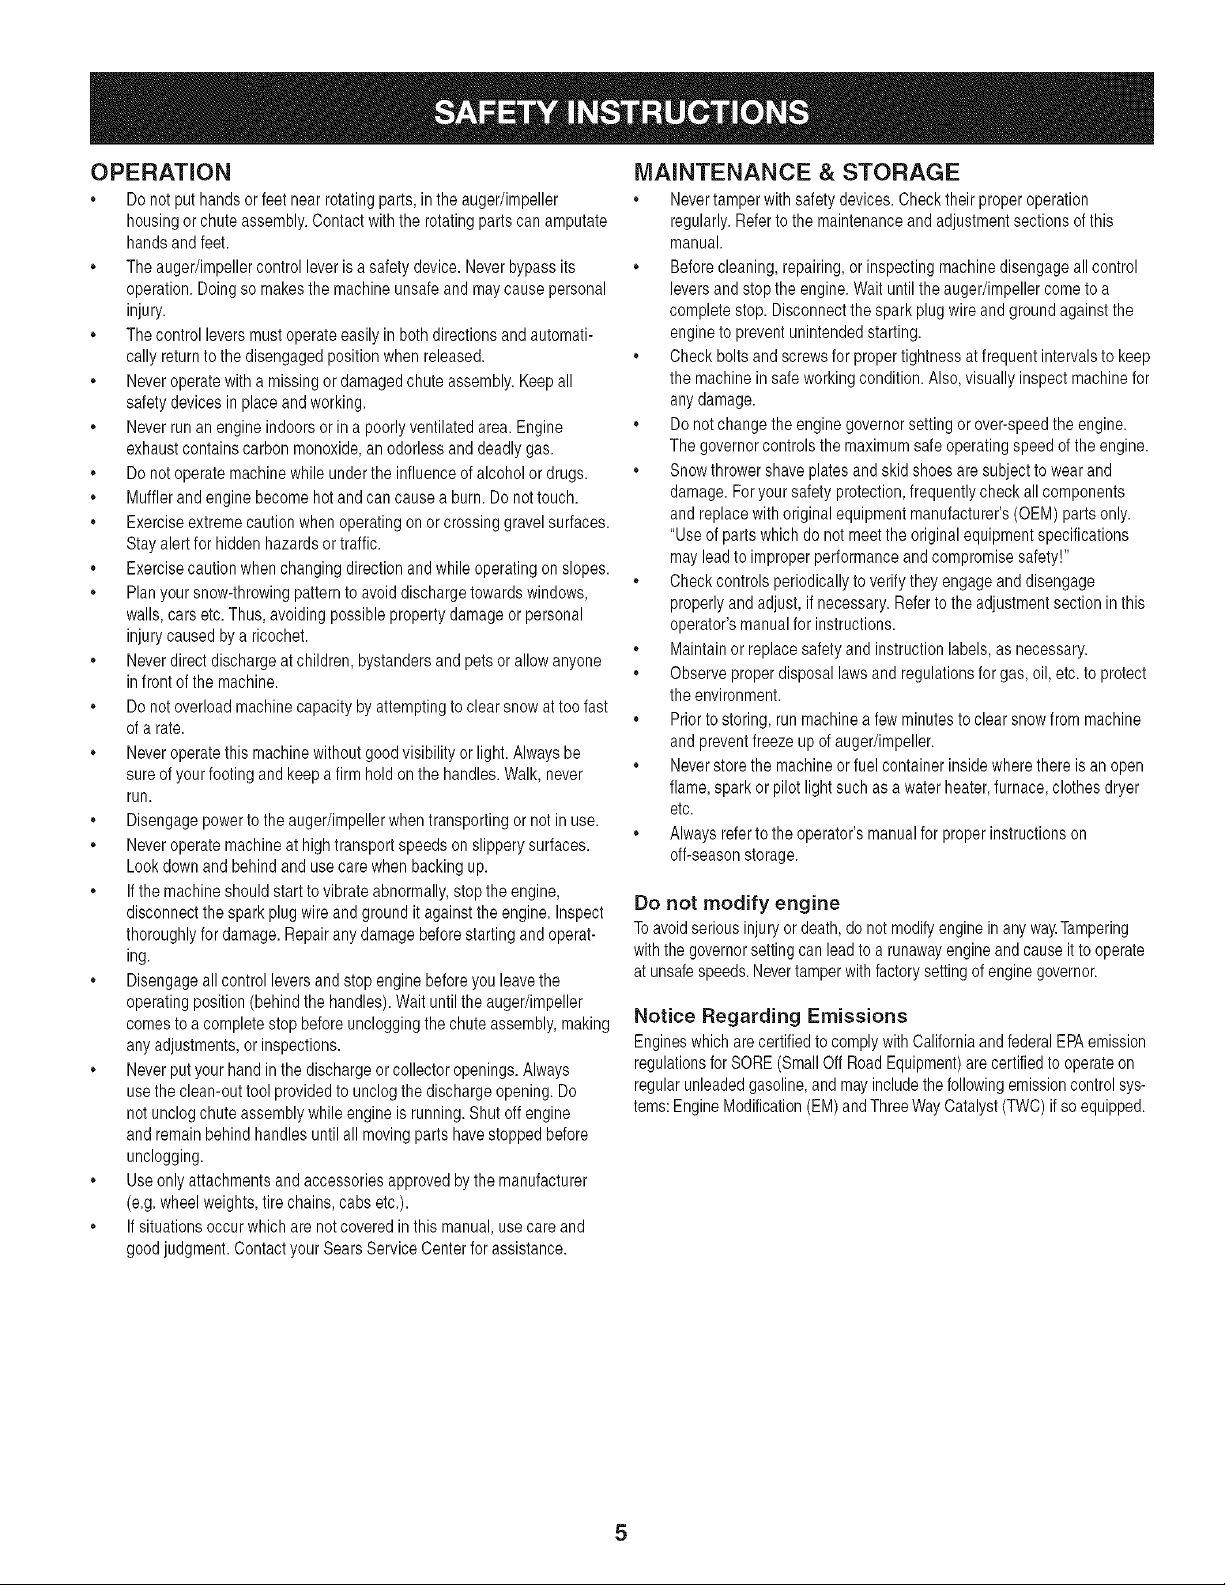
OPERATION
. Do notputhandsorfeet nearrotatingparts,intheauger/impeller
housingor chuteassembly.Contactwiththerotatingpartscanamputate
handsand feet.
,, The auger/impellercontrolleverisasafetydevice.Neverbypassits
operation.Doingso makesthe machineunsafeandmaycausepersonal
injury.
,, The controlleversmustoperateeasilyin bothdirectionsandautomati-
callyreturnto thedisengagedpositionwhenreleased.
,, Neveroperatewitha missingor damagedchuteassembly.Keepall
safetydevicesinplaceand working.
,, Neverrunan engineindoorsorin a poorlyventilatedarea.Engine
exhaustcontainscarbonmonoxide,anodorlessanddeadlygas.
,, Do notoperatemachinewhileunderthe influenceofalcoholor drugs.
,, Mufflerandenginebecomehotand cancauseaburn.Donottouch.
. Exerciseextremecautionwhenoperatingonorcrossinggravel surfaces.
Stayalertfor hiddenhazardsortraffic.
. Exercisecautionwhenchangingdirectionandwhileoperatingon slopes.
. Planyoursnow-throwingpatterntoavoiddischargetowardswindows,
walls,carsetc.Thus,avoidingpossiblepropertydamageorpersonal
injurycausedbya ricochet.
. Neverdirectdischargeatchildren,bystandersand petsor allowanyone
infrontofthe machine.
. Do notoverloadmachinecapacitybyattemptingto clearsnowattoofast
ofa rate.
. Neveroperatethismachinewithoutgood visibilityorlight.Alwaysbe
sureof your footingandkeepa firm holdon the handles.Walk, never
run.
. Disengagepowertothe auger/impellerwhentransportingor notinuse.
,, Neveroperatemachineat hightransportspeedsonslipperysurfaces.
Lookdownand behindand usecarewhenbackingup.
,, If themachineshouldstart to vibrateabnormally,stopthe engine,
disconnectthesparkplugwireandgrounditagainsttheengine.Inspect
thoroughlyfordamage.Repairanydamagebeforestartingandoperat-
ing.
. Disengageallcontrolleversandstop enginebeforeyouleavethe
operatingposition(behindthe handles).Waituntiltheauger/impeller
comesto a completestopbeforeuncloggingthechute assembly,making
anyadjustments,orinspections.
,, Neverputyourhandinthe dischargeorcollectoropenings.Always
usetheclean-outtoolprovidedto unclogthedischargeopening.Do
not unclogchuteassemblywhileengineisrunning.Shutoffengine
andremainbehindhandlesuntilallmovingpartshavestoppedbefore
unclogging.
,, Useonlyattachmentsandaccessoriesapprovedbythe manufacturer
(e.g.wheelweights,tirechains,cabs etc.).
,, If situationsoccurwhich arenotcoveredinthis manual,usecareand
goodjudgment.ContactyourSearsServiceCenterforassistance.
MAINTENANCE & STORAGE
. Nevertamperwithsafetydevices.Checktheir properoperation
regularly.Refertothe maintenanceandadjustmentsectionsof this
manual.
,, Beforecleaning,repairing,or inspectingmachinedisengageallcontrol
leversand stoptheengine.Waituntiltheauger/impellercometoa
completestop.Disconnectthe sparkplugwireand groundagainstthe
enginetopreventunintendedstarting.
. Checkboltsandscrewsfor propertightnessatfrequentintervalsto keep
the machinein safeworkingcondition.Also,visuallyinspectmachinefor
anydamage.
. Donotchangetheenginegovernorsettingor over-speedthe engine.
Thegovernorcontrolsthe maximumsafeoperatingspeedofthe engine.
. Snowthrowershaveplatesandskidshoesare subjectto wearand
damage.Foryoursafetyprotection,frequentlycheckallcomponents
andreplacewith originalequipmentmanufacturer's(OEM)partsonly.
"Useof partswhichdonotmeetthe originalequipmentspecifications
may leadto improperperformanceandcompromisesafety!"
. Checkcontrolsperiodicallytoverifytheyengageanddisengage
properlyandadjust,ifnecessary.Referto theadjustmentsectionin this
operator'smanualforinstructions.
. Maintainorreplacesafetyandinstructionlabels,as necessary.
. Observeproperdisposallawsandregulationsfor gas, oil,etc.to protect
the environment.
. Priortostoring,runmachineafewminutesto clearsnowfrommachine
andpreventfreezeup ofauger/impeller.
. Neverstorethe machineorfuelcontainerinsidewherethere isanopen
flame,sparkor pilotlightsuch asa waterheater,furnace,clothesdryer
etc.
,, Alwaysreferto the operator'smanualfor properinstructionson
off-seasonstorage.
Do not modify engine
Toavoidseriousinjuryor death,do notmodifyenginein anyway.Tampering
withthegovernorsettingcanleadto a runawayengineandcauseitto operate
at unsafespeeds.Nevertamperwithfactorysettingofenginegovernor.
Notice Regarding Emissions
Engineswhichare certifiedto complywith CaliforniaandfederalEPAemission
regulationsforSORE(SmallOff RoadEquipment)arecertifiedtooperateon
regularunleadedgasoline,and mayincludethefollowingemissioncontrolsys-
tems:EngineModification(EM)andThreeWayCatalyst(TWO)if so equipped.

Thispage left intentionallyblank.
6
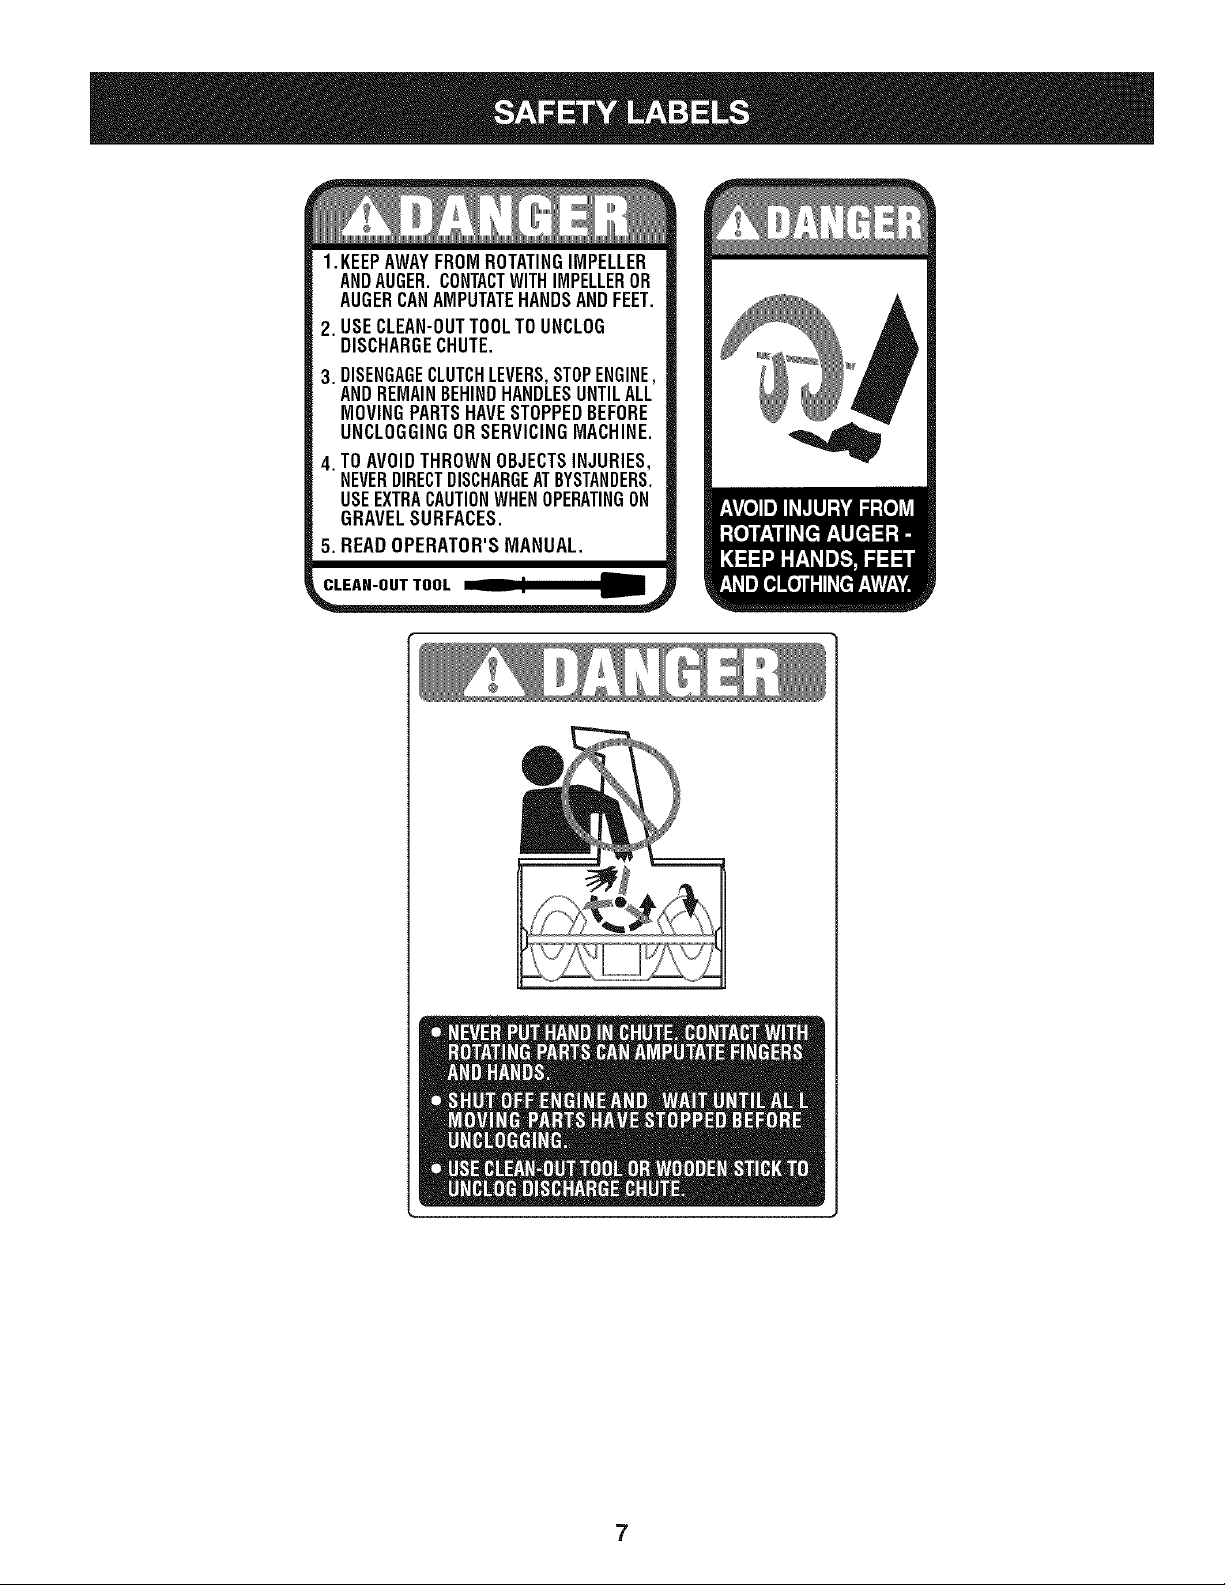
1.KEEPAWAYFROMROTATINGIMPELLER
ANDAUGER.CONTACTWITHIMPELLEROR
AUGERCANAMPUTATEHANDSANDFEET.
2. USECLEAN-OUTTOOLTOUNCLOG
DISCHARGECHUTE.
3. DISENGAGECLUTCHLEVERS,STOPENGINE,
ANDREMAINBEHINDHANDLESUNTILALL
MOVINGPARTSHAVESTOPPEDBEFORE
UNCLOGGINGORSERVICINGMACHINE.
4. TOAVOIDTHROWNOBJECTSINJURIES,
NEVERDIRECTDISCHARGEATBYSTANDERS.
USEEXTRACAUTIONWHENOPERATINGON
GRAVELSURFACES.
5. READOPERATOR'SMANUAL.
CL_K-O_T_LU___
7
NOTE:Referencesto rightorleftsideofthe snowthrowerare
determinedfrombehindthe unitintheoperatingposition(standing
directlybehindthesnowthrower,facingthehandlepanel).
REMOVING FROM CARTON
1. Cutthecornersofthecartonandlaythesidesflat ontheground.
Removeand discardallpackinginserts.
2. Movethesnowthroweroutofthecarton.
3. Makecertainthecartonhasbeencompletelyemptiedbefore
discardingit.
LOOSE PARTS
Tworeplacementaugershearpinsareincludedwiththis manual.Refer
toReplacingShearPinsintheOperationsectionformoreinformation
regardingshearpin replacement.
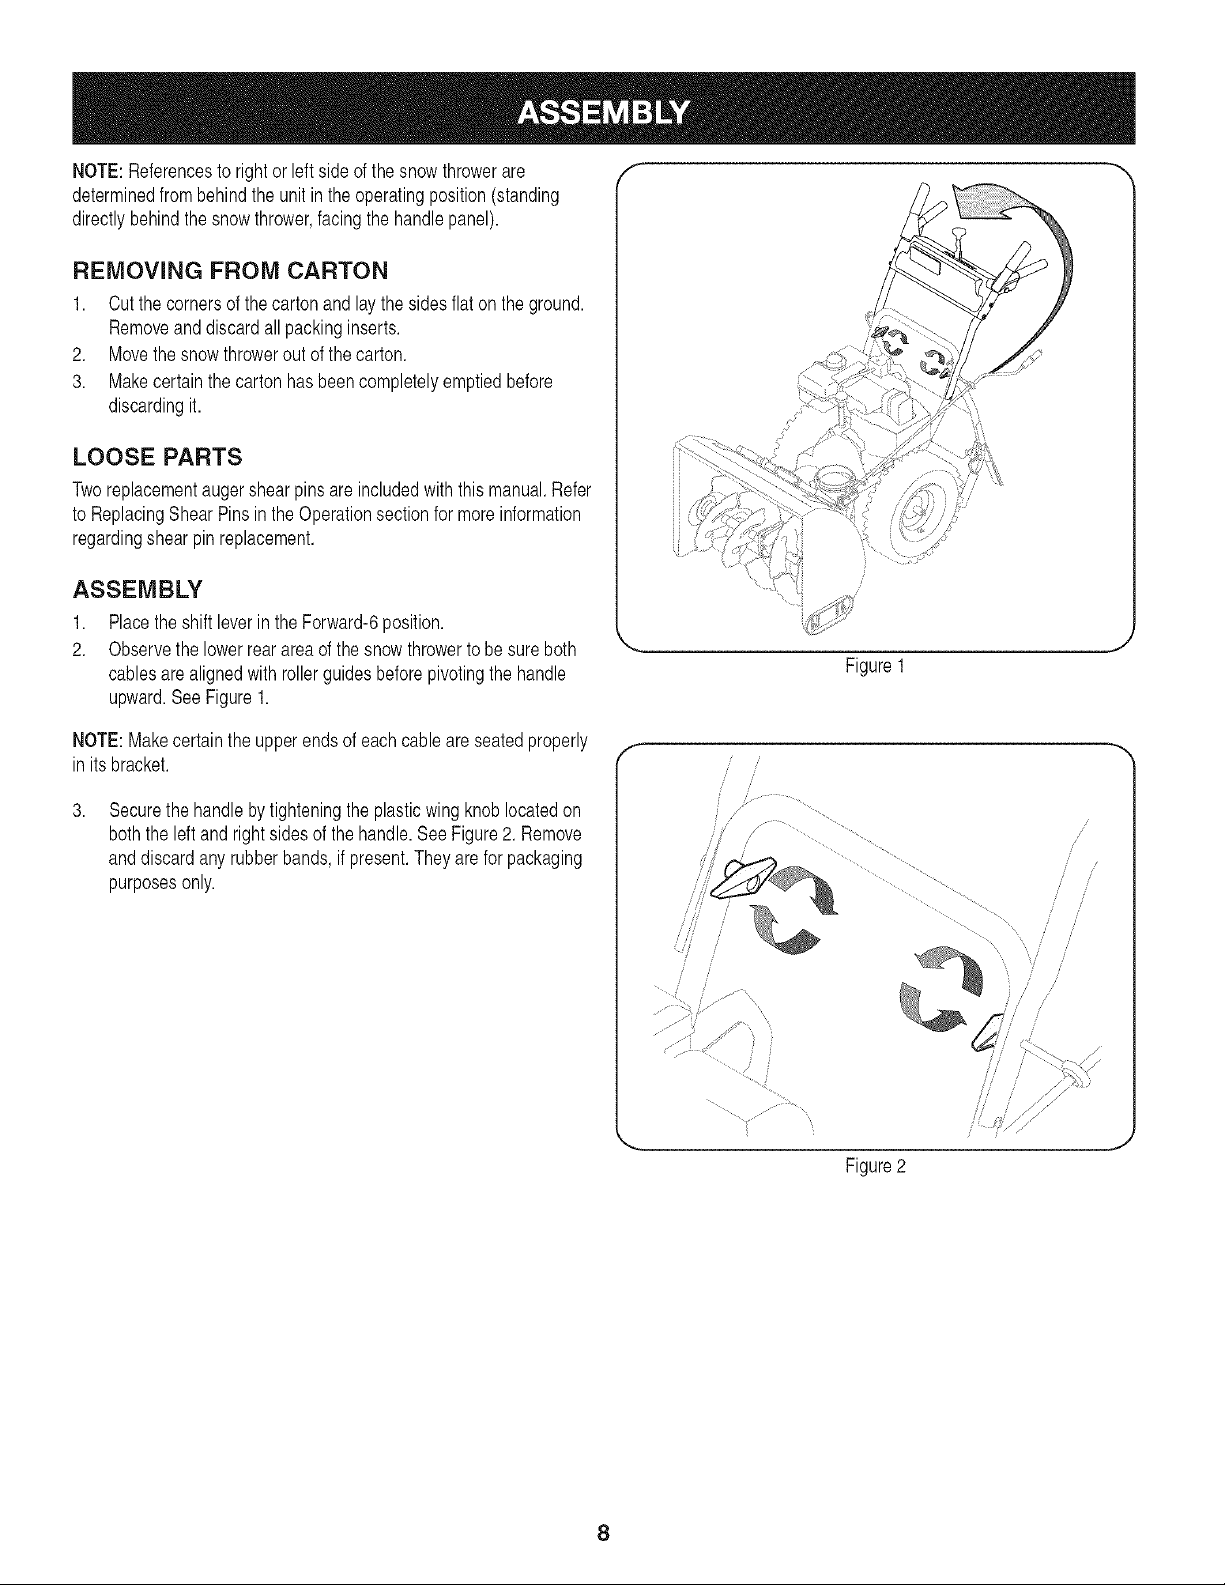
ASSEMBLY
1. Placethe shiftleverin theForward-6position.
2. Observethe lowerrearareaofthesnowthrowertobesureboth
cablesarealignedwithrollerguidesbeforepivotingthe handle
upward.SeeFigure1.
NOTE:Makecertainthe upperendsofeachcableare seatedproperly
in itsbracket.
Figure1
3,
Securethe handlebytighteningtheplasticwingknoblocatedon
boththe left andrightsidesofthehandle.SeeFigure2.Remove
anddiscardanyrubberbands,if present.Theyareforpackaging
purposesonly.
/
/
/
/
/
/
J /
/ /
/
Figure2
8
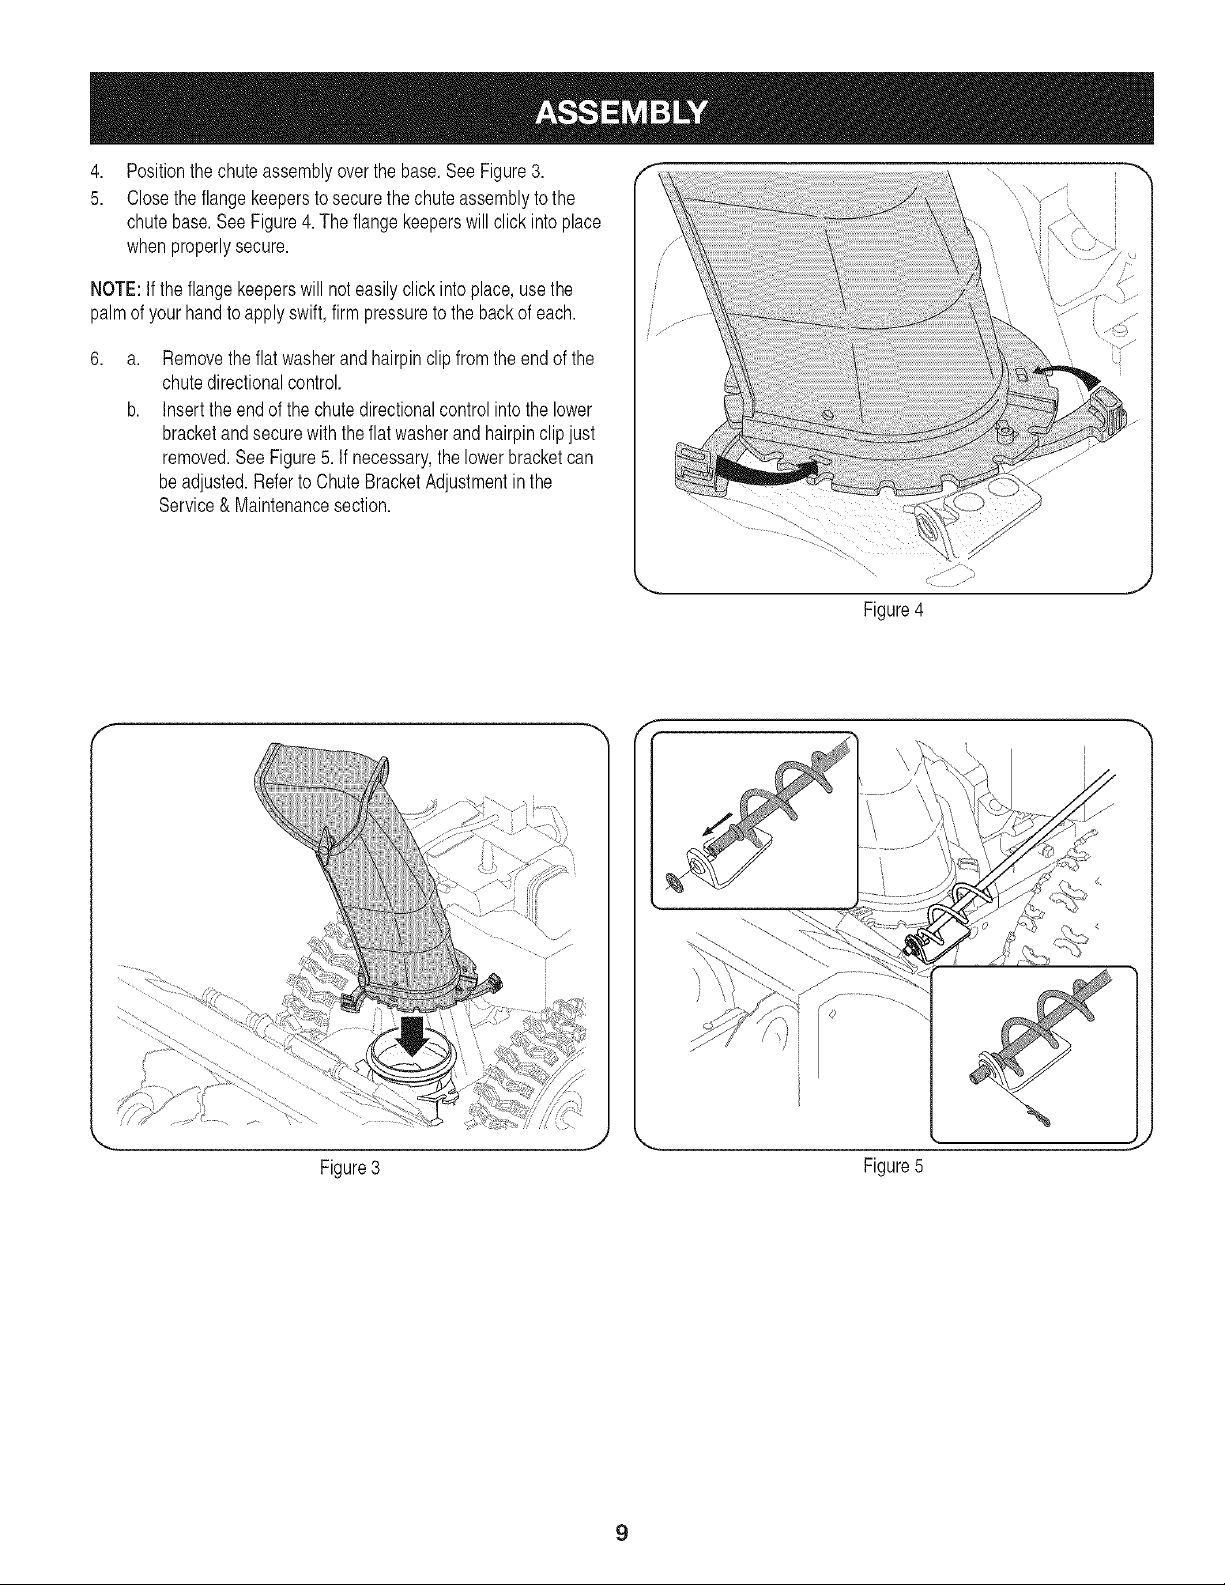
4,
Positionthechuteassemblyoverthebase.SeeFigure3.
5.
Closetheflangekeepersto securethechuteassemblyto the
chutebase.SeeFigure4.Theflangekeeperswillclick into place
whenproperlysecure.
NOTE:If theflangekeeperswillnoteasilyclickintoplace,usethe
palmof your handtoapplyswift,firmpressuretothebackof each.
6,
a.
Removetheflat washerandhairpinclipfromthe endofthe
chutedirectionalcontrol.
b.
Insertthe endofthe chutedirectionalcontrolintothelower
bracketandsecurewiththeflatwasherandhairpinclipjust
removed.SeeFigure5.If necessary,thelowerbracketcan
be adjusted.Referto ChuteBracketAdjustmentinthe
Service&Maintenancesection.
J
Figure4
Figure5
9
SET-UP
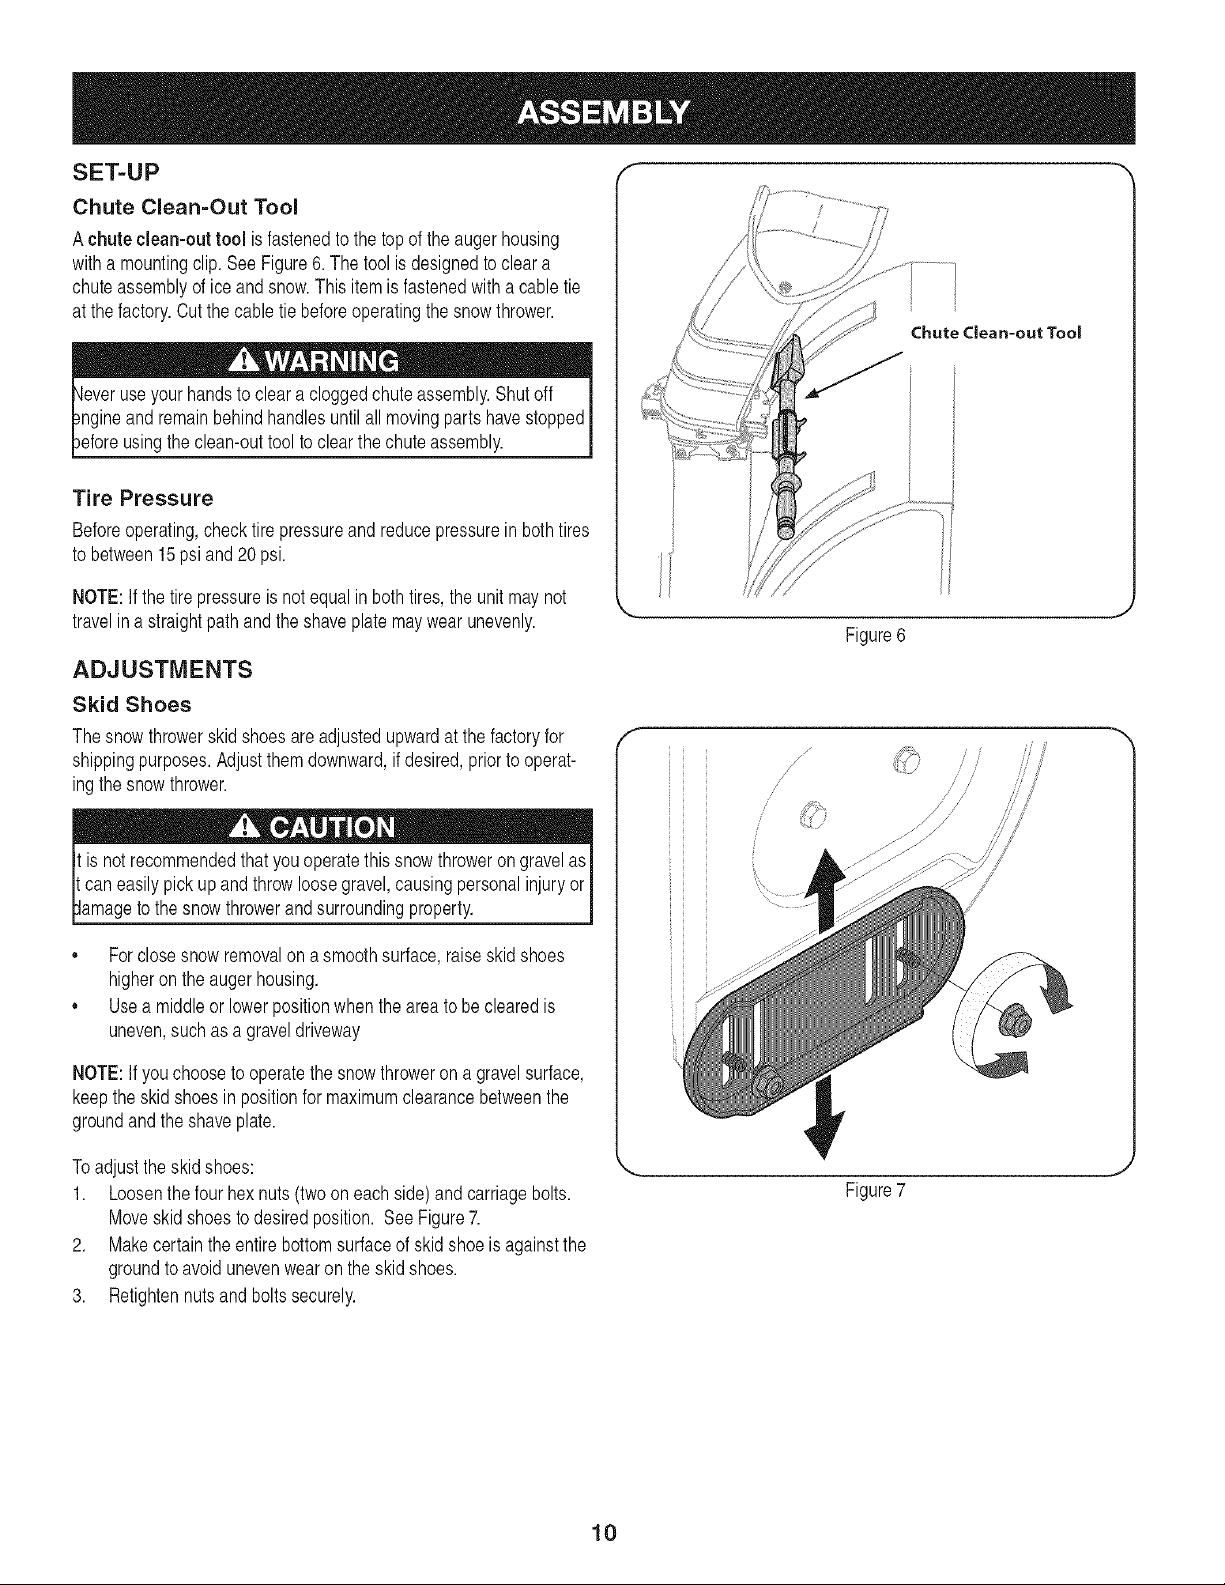
Chute Clean=Out Tool
A chute clean-out tool is fastenedtothetopofthe augerhousing
withamountingclip.SeeFigure6.Thetool is designedtocleara
chuteassemblyoficeandsnow.Thisitemisfastenedwithacabletie
atthefactory.Cutthecabletiebeforeoperatingthesnowthrower.
bever useyourhandstoclearacloggedchuteassembly.Shutoff I
_ngineandremainbehindhandlesuntilallmovingpartshavestoppedI
_oeforeusingthe clean-outtool to clearthechuteassembly. 1
Tire Pressure
Beforeoperating,checktire pressureand reducepressureinbothtires
tobetween15psiand20 psi.
NOTE:If thetire pressureisnotequalin bothtires,theunitmaynot
travelin a straightpathandtheshaveplatemaywearunevenly.
ADJUSTMENTS
Skid Shoes
Thesnowthrowerskidshoesareadjustedupwardatthefactoryfor
shippingpurposes.Adjustthemdownward,if desired,priorto operat-
ingthesnowthrower.
isnotrecommendedthat this thrower
caneasilypickupandthrowloosegravel,causingpersonalinjuryor I
tt youoperate snow ongravelas
amageto the snowthrowerandsurroundingproperty. 1
Chute Clean-out Tool
Figure6
,//
/
/
/
/
o, / /, ._
/
/_//"
/ /
/ /
/ //
J
• Forclosesnowremovalona smoothsurface,raiseskidshoes
higheron theaugerhousing.
• Useamiddleorlowerpositionwhentheareatobe clearedis
uneven,suchasa graveldriveway
NOTE:If youchoosetooperatethesnowthroweron agravelsurface,
keepthe skidshoesin positionformaximumclearancebetweenthe
groundandtheshaveplate.
Toadjustthe skidshoes:
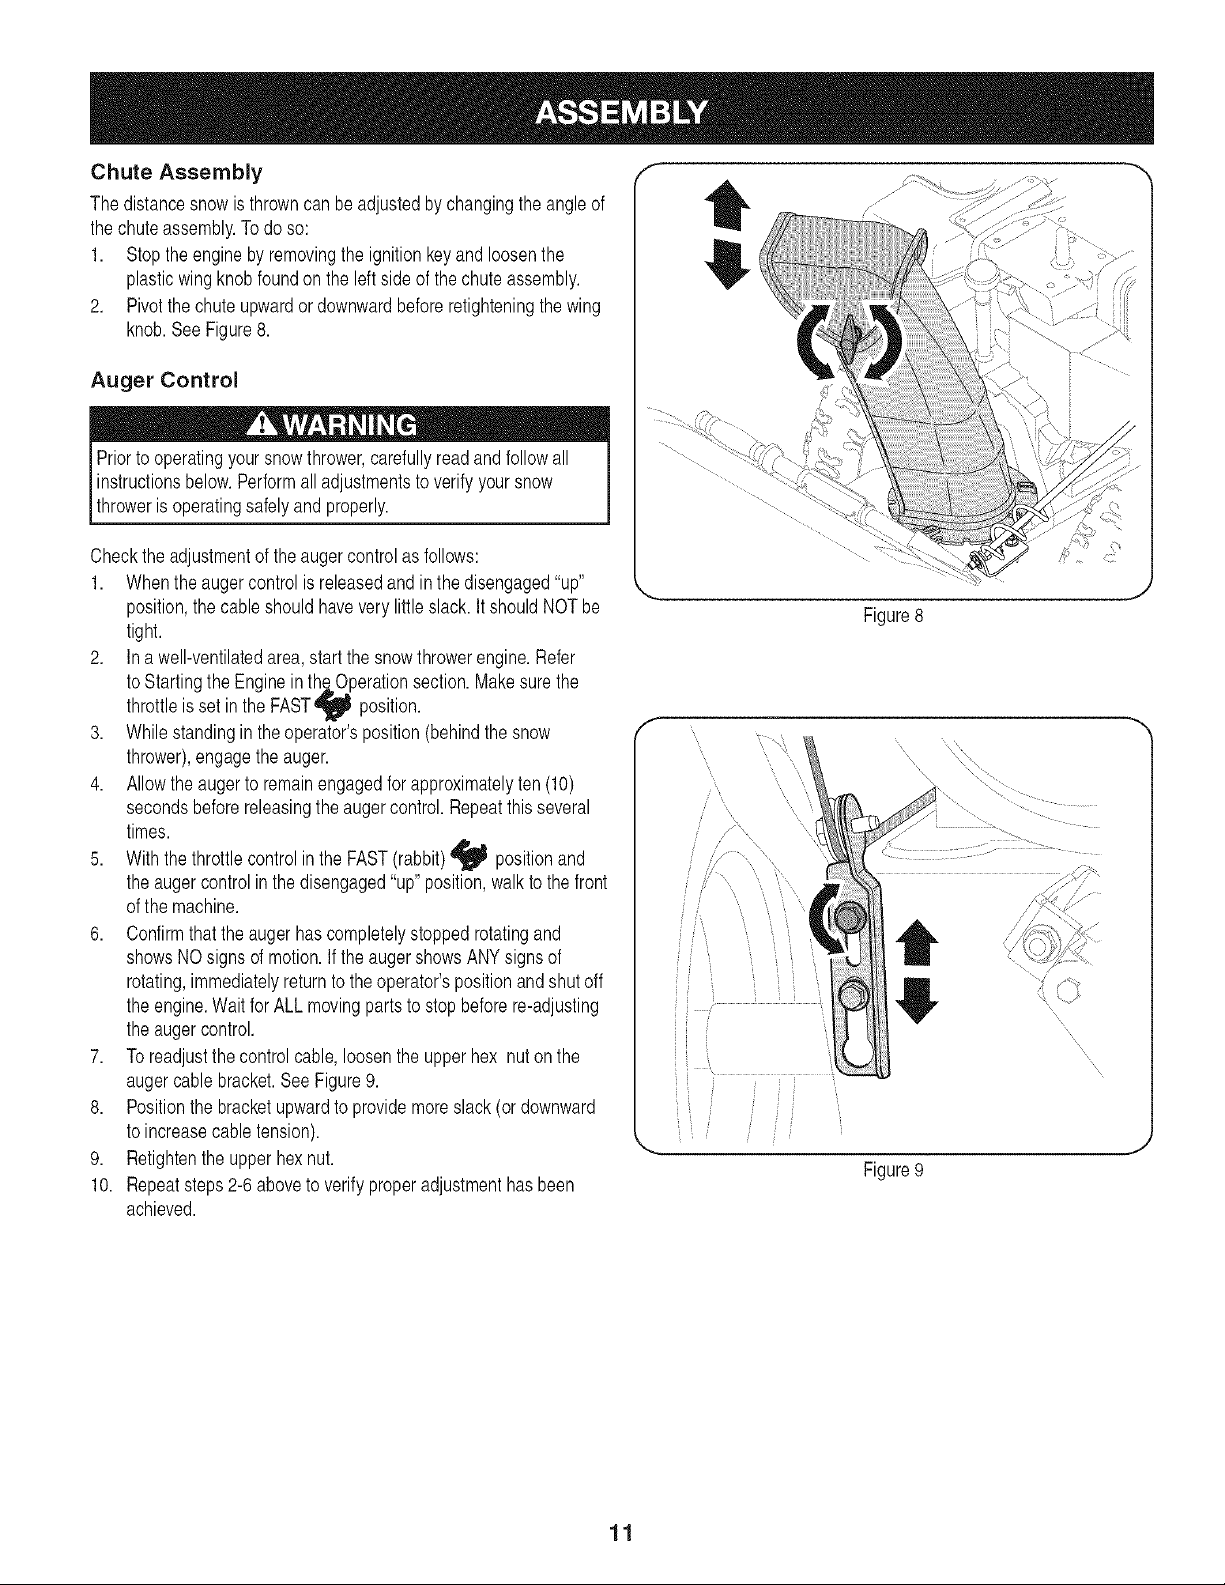
1. Loosenthefourhexnuts(twooneachside)andcarriagebolts.
Moveskidshoesto desiredposition. SeeFigure7.
2. Makecertaintheentirebottomsurfaceof skidshoeisagainstthe
groundtoavoidunevenwearontheskidshoes.
3. Retightennutsandboltssecurely.
Figure7
10
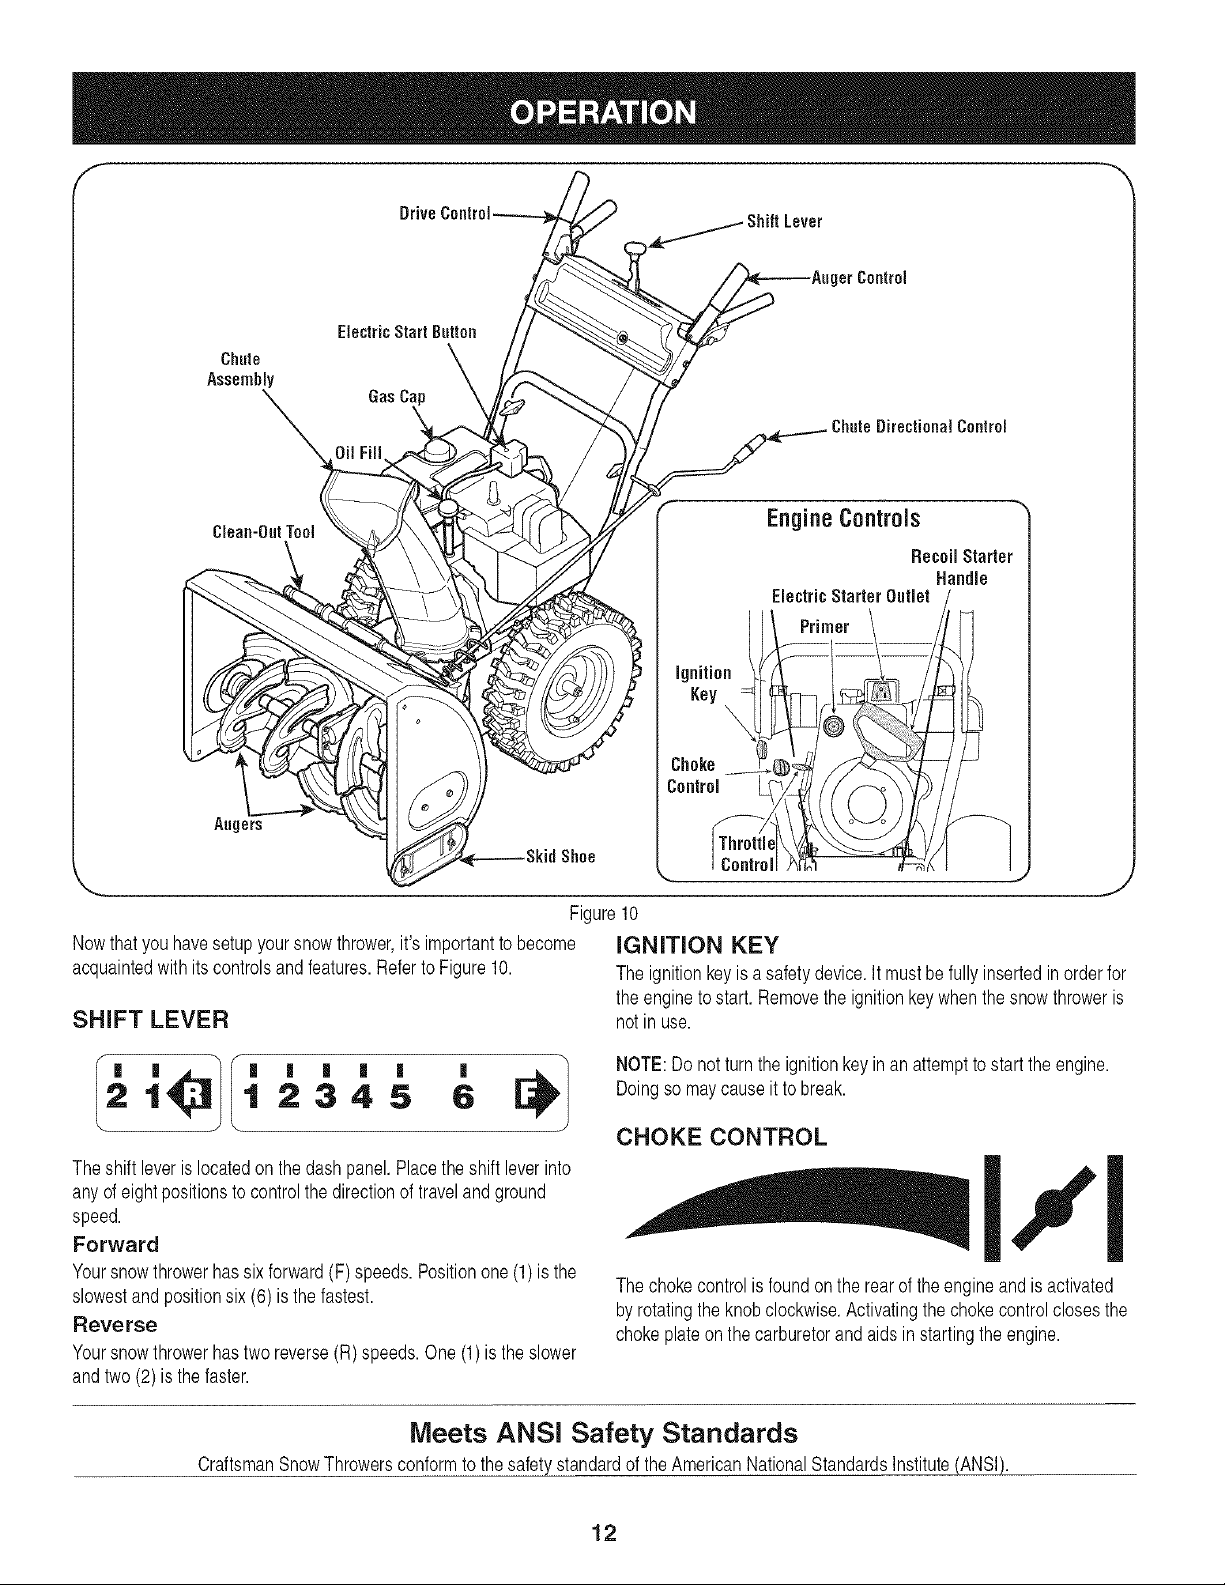
Chute Assembly
Thedistancesnowis throwncanbeadjustedbychangingtheangleof
thechuteassembly.Todoso:
1. Stopthe engineby removingthe ignitionkeyandloosenthe
plasticwingknobfoundon theleftsideof thechuteassembly.
2. Pivotthechuteupwardordownwardbeforeretighteningthe wing
knob.SeeFigure8.
Auger Control
Priorto operatingyoursnowthrower,carefullyreadandfollowall
instructionsbelow.Performalladjustmentstoverifyyoursnow
throwerisoperatingsafelyandproperly.
Checktheadjustmentofthe augercontrolasfollows:
1. Whentheaugercontrolis releasedandinthedisengaged"up"
position,thecableshouldhaveverylittleslack.ItshouldNOTbe
tight.
2. Ina well-ventilatedarea,startthesnowthrowerengine.Refer
toStartingtheEngineinthaiOperationsection.Makesurethe
throttleis setin theFAST_1 position.
3. Whilestandingintheoperator'sposition(behindthesnow
thrower),engagetheauger.
4. Allowthe augerto remainengagedforapproximatelyten(10)
secondsbeforereleasingtheaugercontrol.Repeatthisseveral
times.
5. WiththethrottlecontrolintheFAST(rabbit)_ positionand
theaugercontrolin thedisengaged"up"position,walktothefront
ofthemachine.
6. Confirmthatthe augerhascompletelystoppedrotatingand
showsNOsignsof motion.If the augershowsANYsignsof
rotating,immediatelyreturntotheoperator'spositionandshutoff
theengine.WaitforALL movingpartstostopbeforere-adjusting
theaugercontrol.
7. Toreadjustthecontrolcable,loosentheupperhex nutonthe
augercablebracket.SeeFigure9.
8. Positionthebracketupwardtoprovidemoreslack(or downward
toincreasecabletension).
9. Retightentheupperhexnut.
10. Repeatsteps2-6aboveto verifyproperadjustmenthasbeen
achieved.
Figure8
x
Figure9
11
Chute
Assembly
get Control
ElectricStart Button
DirectionalControl
EnGineControls
RecoilStarter
Handle
ElectricStarterOutlet /
Ignition 1\ /_/'
\ J
%. ,j
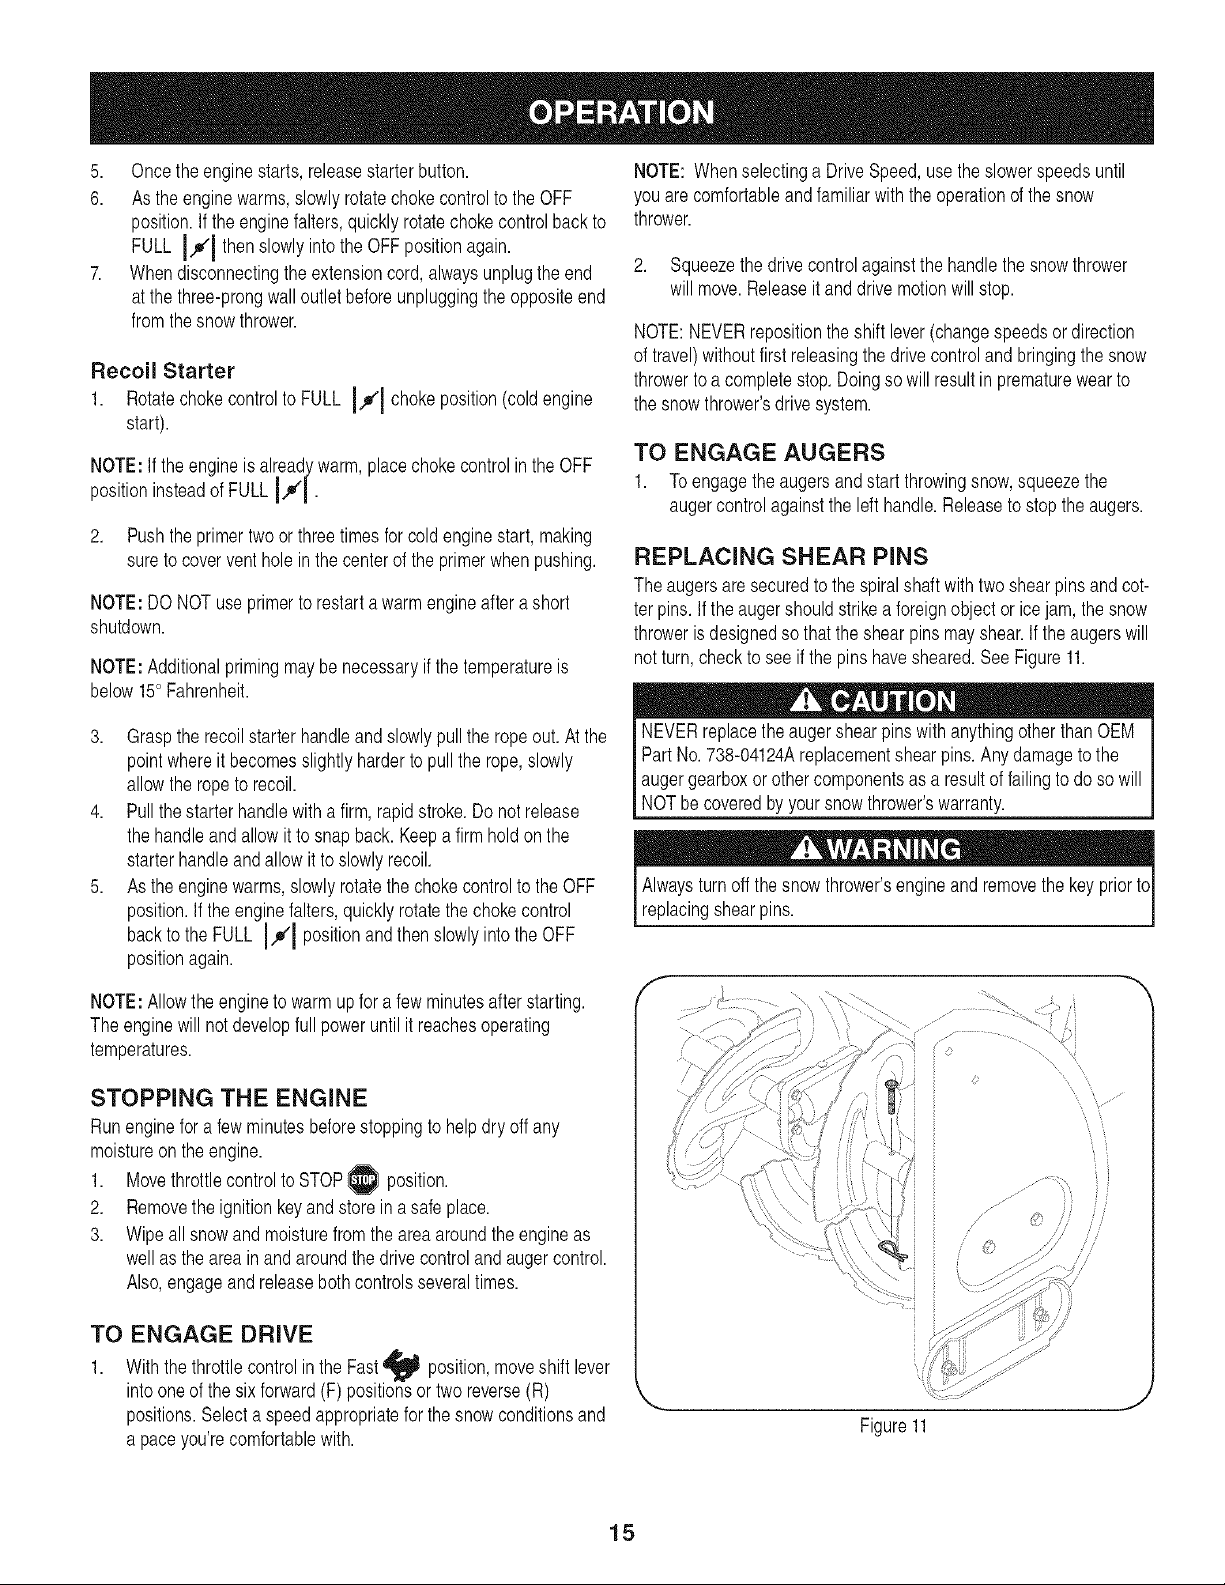
Figure10
Nowthatyouhavesetupyoursnowthrower,it'simportanttobecome [GNITION KEY
acquaintedwithitscontrolsandfeatures.RefertoFigure10. Theignitionkeyis asafetydevice.It mustbefullyinsertedinorderfor
theenginetostart. Removetheignitionkeywhenthesnowthroweris
SHIFT LEVER notin use.
|
6
NOTE:Donotturntheignitionkeyinan attempttostartthe engine.
Doingso maycauseit tobreak.
CHOKE CONTROL
Theshift leverislocatedon thedashpanel.Placetheshiftleverinto
anyof eightpositionstocontrolthe directionof travelandground
speed.
Forward
Yoursnowthrowerhassix forward(F)speeds.Positionone(1)isthe
slowestandpositionsix (6)is thefastest.
Reverse
Yoursnowthrowerhastwo reverse(R)speeds.One(1)is the slower
andtwo(2)is thefaster.
Thechokecontrolisfoundontherearof theengineandisactivated
byrotatingthe knobclockwise.Activatingthechokecontrolclosesthe
chokeplateonthecarburetorandaidsinstartingthe engine.
III
Meets ANSi Safety Standards
CraftsmanSnowThrowersconformto thesafetystandardoftheAmericanNationalStandardsInstitute(ANSI).
12

THROTTLE CONTROL
Thethrottlecontrolis locatedontherearoftheengine.
It regulatesthespeedofthe engineandwillshutoff the
enginewhenmovedintotheSTOPposition.
RECOIL STARTER HANDLE
This handleisusedto manuallystarttheengine.
ELECTRIC STARTER BUTTON
Pressingtheelectricstarterbuttonengagesthe engine's
electricstarterwhenpluggedintoa 120Vpowersource.
ELECTRIC STARTER OUTLET
Requirestheuseofa three-prongoutdoorextensioncord
(included)anda 120Vpowersource/walloutlet.
AUGERS
Whenengaged,theaugersrotateanddrawsnowintotheauger
housing.
CHUTE ASSEMBLY
Snowdrawnintotheaugerhousingisdischargedout thechute
assembly.
PRIMER
Depressingtheprimerforcesfueldirectlyintotheengine'scarburetor
toaidincold-weatherstarting.
OIL FILL
Engineoil levelcanbecheckedandoiladdedthroughtheoilfill.
GAS CAP
Unthreadthegascapto addgasolineto thefuel tank.
DRIVE CONTROL/AUGER CONTROL LOCK
f-
DRIVE
CONTROL
@
J
Thedrivecontrolis locatedonthe righthandle.Squeezethe control
gripagainstthehandletoengagethewheeldrive.Releaseto stop.
Thedrivecontrolalso lockstheaugercontrolso you canoperate
thechutedirectionalcontrolwithoutinterruptingthe snowthrowing
process.Iftheaugercontrolis engagedsimultaneouslywiththedrive
control,the operatorcanreleasetheaugercontrol(onthelefthandle)
andtheaugerswillremainengaged.Releasebothcontrolstostopthe
augersandwheeldrive.
NOTE:Alwaysreleasethedrive controlbeforechangingspeeds.
Failuretodoso willresultinincreasedwearon yourmachine'sdrive
system.
CHUTE DIRECTIONAL CONTROL
f
CHUTE DiRECTiONAL CONTROL
ADJUSTABLE
DISCHARGE
LEFT
CHUTETiLT
AUGER CONTROL
f_
Theaugercontrolislocatedonthe lefthandle.Squeezethecontrol
gripagainstthehandletoengagetheaugersandstart snowthrowing
action.Releasetostop.
Thechutedirectionalcontrolislocatedonleftsideof the snowthrower.
Tochangethedirectioninwhichsnowisthrown,turnchutedirectional
controlasfollows:
,, Crankclockwisetodischargetotheleft.
,, Crankcounterclockwisetodischargetotheright.
SKID SHOES
Positiontheskidshoesbasedonsurfaceconditions.Adjustupward
forhard-packedsnow.Adjustdownwardwhenoperatingongravelor
crushedrocksurfaces.
13

CLEAN-OUT TOOL NOTE:Aplasticdustcapmaybefoundinsidethefuelfillopening.
Removeanddiscard,ifpresent.
Neveruseyourhandstoclearacloggedchuteassembly.Shut
off engineand remainbehindhandlesuntilallmovingpartshave
stoppedbeforeunclogging.
Thechuteclean-outtoolis convenientlyfastenedto the rearofthe
augerhousingwitha mountingclip.Shouldsnowandicebecome
lodgedin the chuteassemblyduringoperation,proceedasfollowsto
safelycleanthechuteassemblyandchuteopening:
1. ReleaseboththeAugerControlandtheDriveControl.
2. Stopthe engineby removingthe ignitionkey.
3. Removetheclean-outtoolfromthe clip whichsecuresit tothe
rearoftheaugerhousing.
4. Usetheshovel-shapedendof the clean-outtooltodislodgeand
scoopanysnowandicewhichhasformedin andnearthechute
assembly.
5. Refastenthe clean-outtool to themountingclip onthe rearof
theaugerhousing,reinsertthe ignitionkeyandstartthe snow
thrower'sengine.
6. Whilestandingintheoperator'sposition(behindthesnow
thrower),engagetheaugercontrolfora fewsecondsto clearany
remainingsnowandicefromthechuteassembly.
BEFORE STARTING ENGINE
,, Alwaysfill thefueltankoutdoorsanduseafunnelorspoutto
preventspilling.
,, Fillfuel tankwithclean,fresh,unleadedgasoline.
,, Neverfill thefuel tankcompletely.Fillthetanktowithin1/2"from
thetoptoprovidespaceforexpansionoffuel.
,, Makesureto wipeoff anyspilledfuelbeforestartingtheengine.
STARTING THE ENGINE
1. Attachsparkplugwireto sparkplug.Makecertainthe metal
loopon theendof the sparkplugwire(insidethe rubberboot) is
fastenedsecurelyoverthemetaltip onthesparkplug.
2. Makecertainboththe augercontrolanddrivecontrolarein the
disengaged(released)position.
3. MovethrottlecontroluptoFAST_ position.Insertignitionkey
intoslot. Makesureitsnapsintoplace.Donotattemptto turn the
key.
NOTE:Theenginecannotstartwithoutthekeyis fullyinsertedintothe
ignitionswitch.
Electric Starter
Determinethatyourhome'swiringisa three-wiregroundedsystem.
Askalicensedelectricianifyouarenotcertain.
Read,understand,andfollowallinstructionsandwarningsonthe
machineandinthis manualbeforeoperating.
Oil
Theunit wasshippedwithoilintheengine.Checkoil levelbeforeeach
operationtoensureadequateoil intheengine.Forfurtherinstructions,
referto the stepsonpage 17.
1. Removethedipstickfromtheoilfill.
2. Checkandmakesurethatthelevelofoilis upto theFULLmark
onthedipstick.
3. If theoillevelis notupto FULL,pourfreshmotoroil (5W-30,with
a minimumclassificationof SL/SJ)slowlythroughtheopening.
Replaceoilfilldipstickandcheckoil levelagain.
Gasoline
Useextremecarewhenhandlinggasoline.Gasolineisextremely
flammableandthevaporsareexplosive.Neverfuel the machine
indoorsorwhilethe engineishotor running.Extinguishcigarettes,
[c gars,ppesandothersourcesof gnt on.
,, Storegasolinein aclean,approvedcontainerandkeepthecap in
placeonthecontainer.
,, Makesurethatthecontainerfromwhichyou pourthegasolineis
cleanandfreefromrustor otherforeignparticles.
Theoptionalelectricstarteris equippedwitha groundedthree-wire
powercordandplug,andis designedtooperateon120voltAC
householdcurrent.It mustbeusedwithaproperlygroundedthree-
prongreceptacleatall timestoavoidthepossibilityofelectricshock.
Followall instructionscarefullypriortooperatingtheelectricstarter.
Ifyouhavea groundedthree-prongreceptacle,proceedasfollows:
1. Plugtheextensioncordintotheoutletlocatedontheengine's
surface.Plugtheotherend ofextensioncordinto athree-prong
120-volt,grounded,ACoutletinawell-ventilatedarea.
2. RotatechokecontroltoFULL I,.#'1chokeposition(foracold
enginestart).
NOTE:If theengineisalreadywarm,placechokecontrolintheOFF
positioninsteadofFULLIJl •
3. Pushtheprimertwoor threetimesforcoldenginestart,making
sureto coverventholeinthecenterofthe primerwhenpushing.
NOTE:DO NOTuse primertorestarta warmengineaftera short
shutdown.
4. Pushstarterbuttontostartengine.
NOTE:Donotholdthebuttondownforlongerthanseven(7)seconds
ata time.Doingso maydamageyourengine'selectricstarter.
14
5. Oncetheenginestarts,releasestarterbutton.
6. Astheenginewarms,slowlyrotatechokecontrolto theOFF
position.Iftheenginefalters,quicklyrotatechokecontrolbackto
FULL 14D"Ithenslowlyintothe OFFpositionagain.
7. Whendisconnectingtheextensioncord,alwaysunplugtheend
atthethree-prongwall outletbeforeunpluggingthe oppositeend
fromthesnowthrower.
Recoil Starter
1. Rotatechokecontrolto FULL IJl chokeposition(coldengine
start).
NOTE:Iftheengineisalreadywarm,placechokecontrolinthe OFF
position
2. Pushthe primertwoorthreetimesforcoldenginestart,making
NOTE:DONOTuseprimertorestartawarmengineafterashort
shutdown.
NOTE:Additionalprimingmaybe necessaryifthetemperatureis
below15°Fahrenheit.
insteadofFULLIJ|.
sureto coverventholeinthecenterof the primerwhenpushing.
NOTE:Whenselectinga DriveSpeed,usethe slowerspeedsuntil
youarecomfortableandfamiliarwiththeoperationofthesnow
thrower.
2. Squeezethedrivecontrolagainstthehandlethesnowthrower
will move.Releaseitanddrivemotionwillstop.
NOTE:NEVERrepositiontheshiftlever(changespeedsor direction
of travel)withoutfirstreleasingthedrive controlandbringingthesnow
throwertoa completestop.Doingsowillresultin prematurewearto
thesnowthrower'sdrivesystem.
TO ENGAGE AUGERS
1. Toengagetheaugersandstartthrowingsnow,squeezethe
augercontrolagainstthelefthandle.Releaseto stoptheaugers.
REPLACING SHEAR PiNS
Theaugersaresecuredto thespiralshaft withtwoshearpinsandcot-
terpins.if theaugershouldstrikea foreignobjector icejam,thesnow
throwerisdesignedsothattheshearpinsmayshear.Iftheaugerswill
notturn,checkto seeifthepinshavesheared.SeeFigure11.
3. Graspthe recoilstarterhandleandslowlypulltheropeout.Atthe
pointwhereitbecomesslightlyharderto pullthe rope,slowly
allowthe ropetorecoil.
4. Pullthestarterhandlewitha firm,rapidstroke.Donotrelease
thehandleandallowit to snapback.Keepa firmholdon the
starterhandleandallowitto slowlyrecoil.
5. Astheenginewarms,slowlyrotatethechokecontroltotheOFF
position.Iftheenginefalters,quicklyrotatethechokecontrol
backtotheFULL I,_1 positionandthenslowlyintotheOFF
positionagain.
NOTE:Allowtheenginetowarmupfor afewminutesafterstarting.
Theenginewill notdevelopfull poweruntilit reachesoperating
temperatures.
STOPPING THE ENGINE
Runenginefor a fewminutesbeforestoppingto helpdryoff any
moistureonthe engine.
Movethrottlecontrolto STOP1.position.
2. Removethe ignitionkeyandstoreinasafeplace.
3. Wipeall snowandmoisturefromtheareaaroundtheengineas
wellas the areainand aroundthedrivecontrolandaugercontrol.
Also,engageandreleasebothcontrolsseveraltimes.
NEVERreplacetheaugershearpinswith anythingotherthan OEM
PartNo.738-04124Areplacementshearpins.Anydamagetothe
augergearboxorothercomponentsasaresultof failingtodoso will
NOTbecoveredbyyoursnowthrower'swarranty.
Alwaysturnoffthe snowthrower'sengineand removethekeypriortc
replacingshearpins.
f
\
TO ENGAGE DRIVE
1. WiththethrottlecontrolintheFast_ position,moveshiftlever
intooneofthesix forward(F)positionsortworeverse(R)
positions.Selecta speedappropriateforthe snowconditionsand
a paceyou'recomfortablewith.
Figure11
15
ENGINE MAINTENANCE
Beforelubricating,repairing,orinspecting,disengageallcontrols
land stopengine.Waituntilall movingpartshavecometoacomplete
|stop.
Checking Engine Oil
1. Besureengineisuprightandlevel.
2. Unscrewoil fillcapfromoil fillertubeandwipedipstickclean.
3. Screwoil fill capbackintooilfillertube.Tightensecurely.
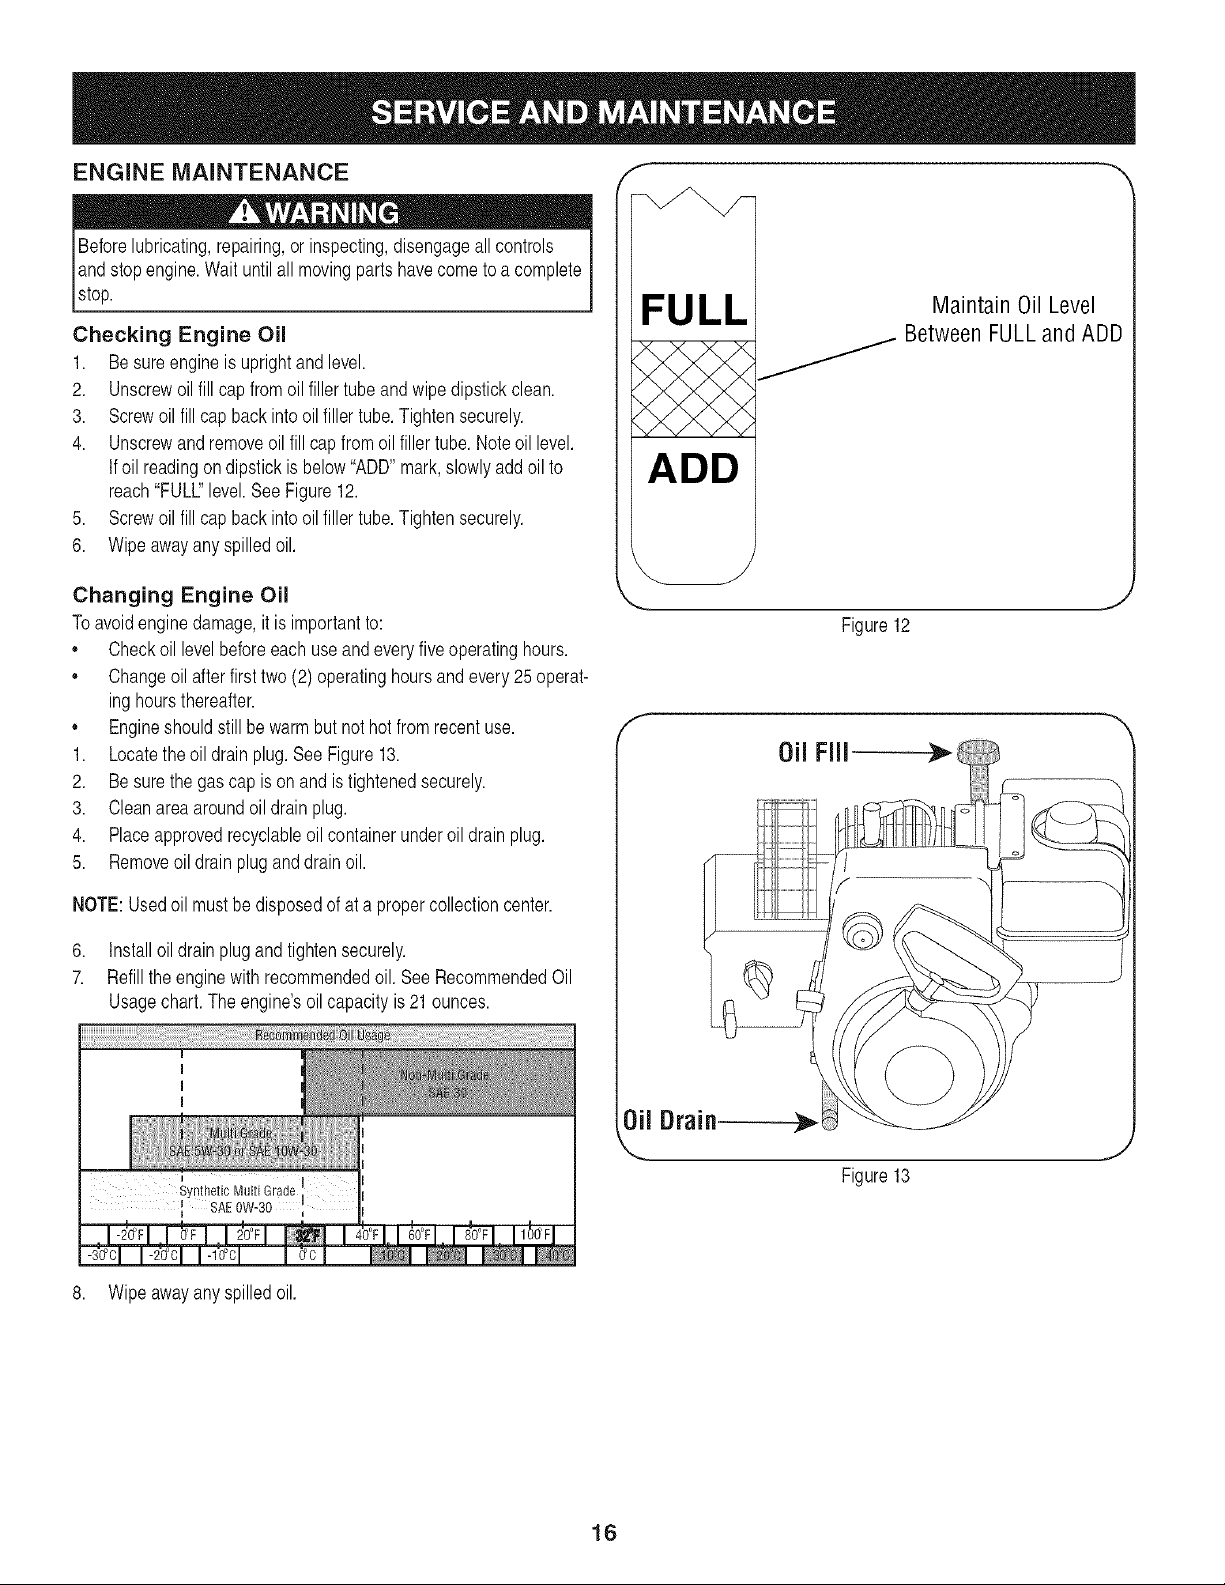
4. Unscrewandremoveoilfillcapfromoilfillertube.Noteoillevel.
ifoil readingondipstickisbelow"ADD"mark,slowlyaddoilto
reach"FULL"level.SeeFigure12.
5. Screwoil fill capbackintooilfillertube.Tightensecurely.
6. Wipeawayany spilledoil.
f --,,
FULL
_ Between FULLand ADD
Maintain Oil Level
ADD
Changing Engine Oil
Toavoidenginedamage,itisimportantto:
,, Checkoil levelbeforeeachuse andeveryfiveoperatinghours.
,, Changeoilafterfirsttwo (2)operatinghoursandevery25 operat-
inghoursthereafter.
,, Engineshouldstillbewarmbut nothot fromrecentuse.
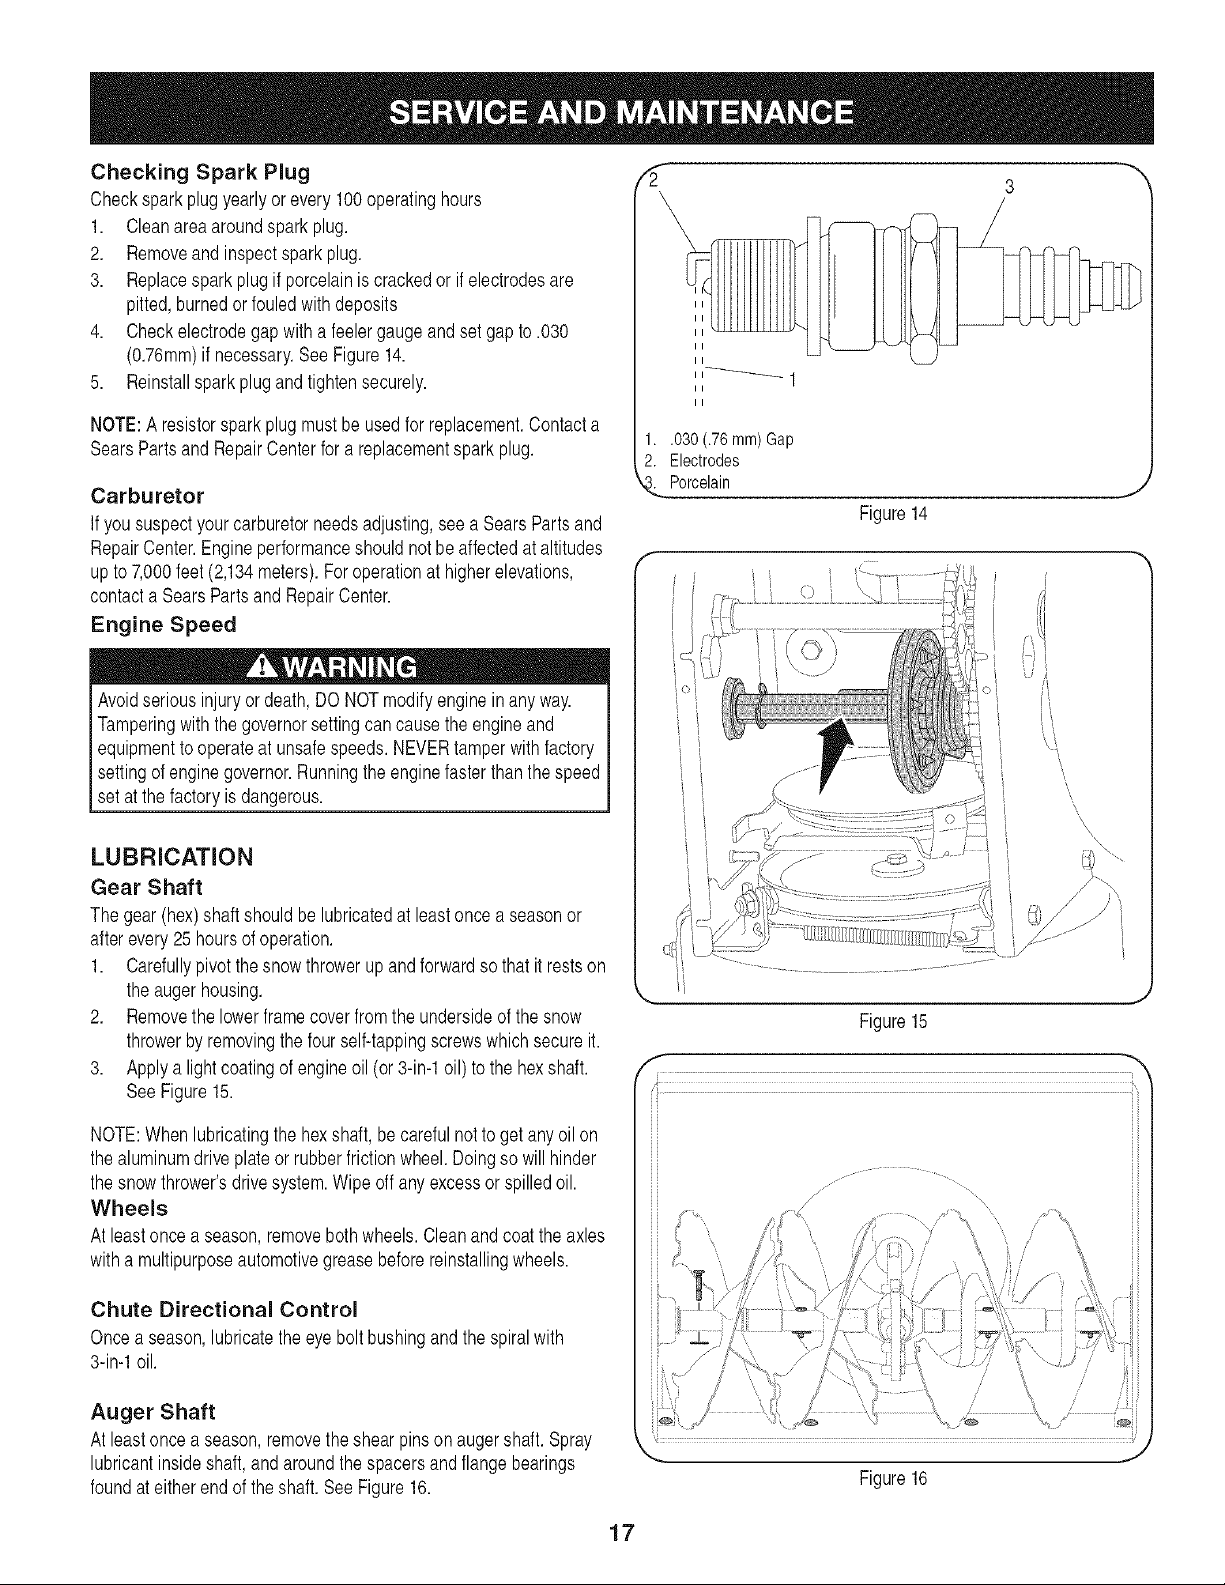
1. Locatetheoildrainplug.SeeFigure13.
2. Besurethegascap is onandistightenedsecurely.
3. Cleanareaaroundoil drainplug.
4. Placeapprovedrecyclableoilcontainerunderoildrainplug.
5. Removeoil drainpluganddrainoil.
NOTE:Usedoil mustbedisposedofat a propercollectioncenter.
6. Installoildrain plugandtightensecurely.
7. Refilltheenginewithrecommendedoil.SeeRecommendedOil
Usagechart.The engine'soilcapacityis21ounces.
Synthetic Multi Grade i
SAE0W-30 *
J
Figure12
0il FIll -_
0il Draia_
Figure13
8. Wipeawayany spilledoil.
16
Checking Spark Plug
Checksparkplugyearlyor every100operatinghours
1. Cleanareaaroundsparkplug.
2. Removeand inspectsparkplug.
3. Replacesparkplugif porcelainiscrackedorifelectrodesare
pitted,burnedorfouledwithdeposits
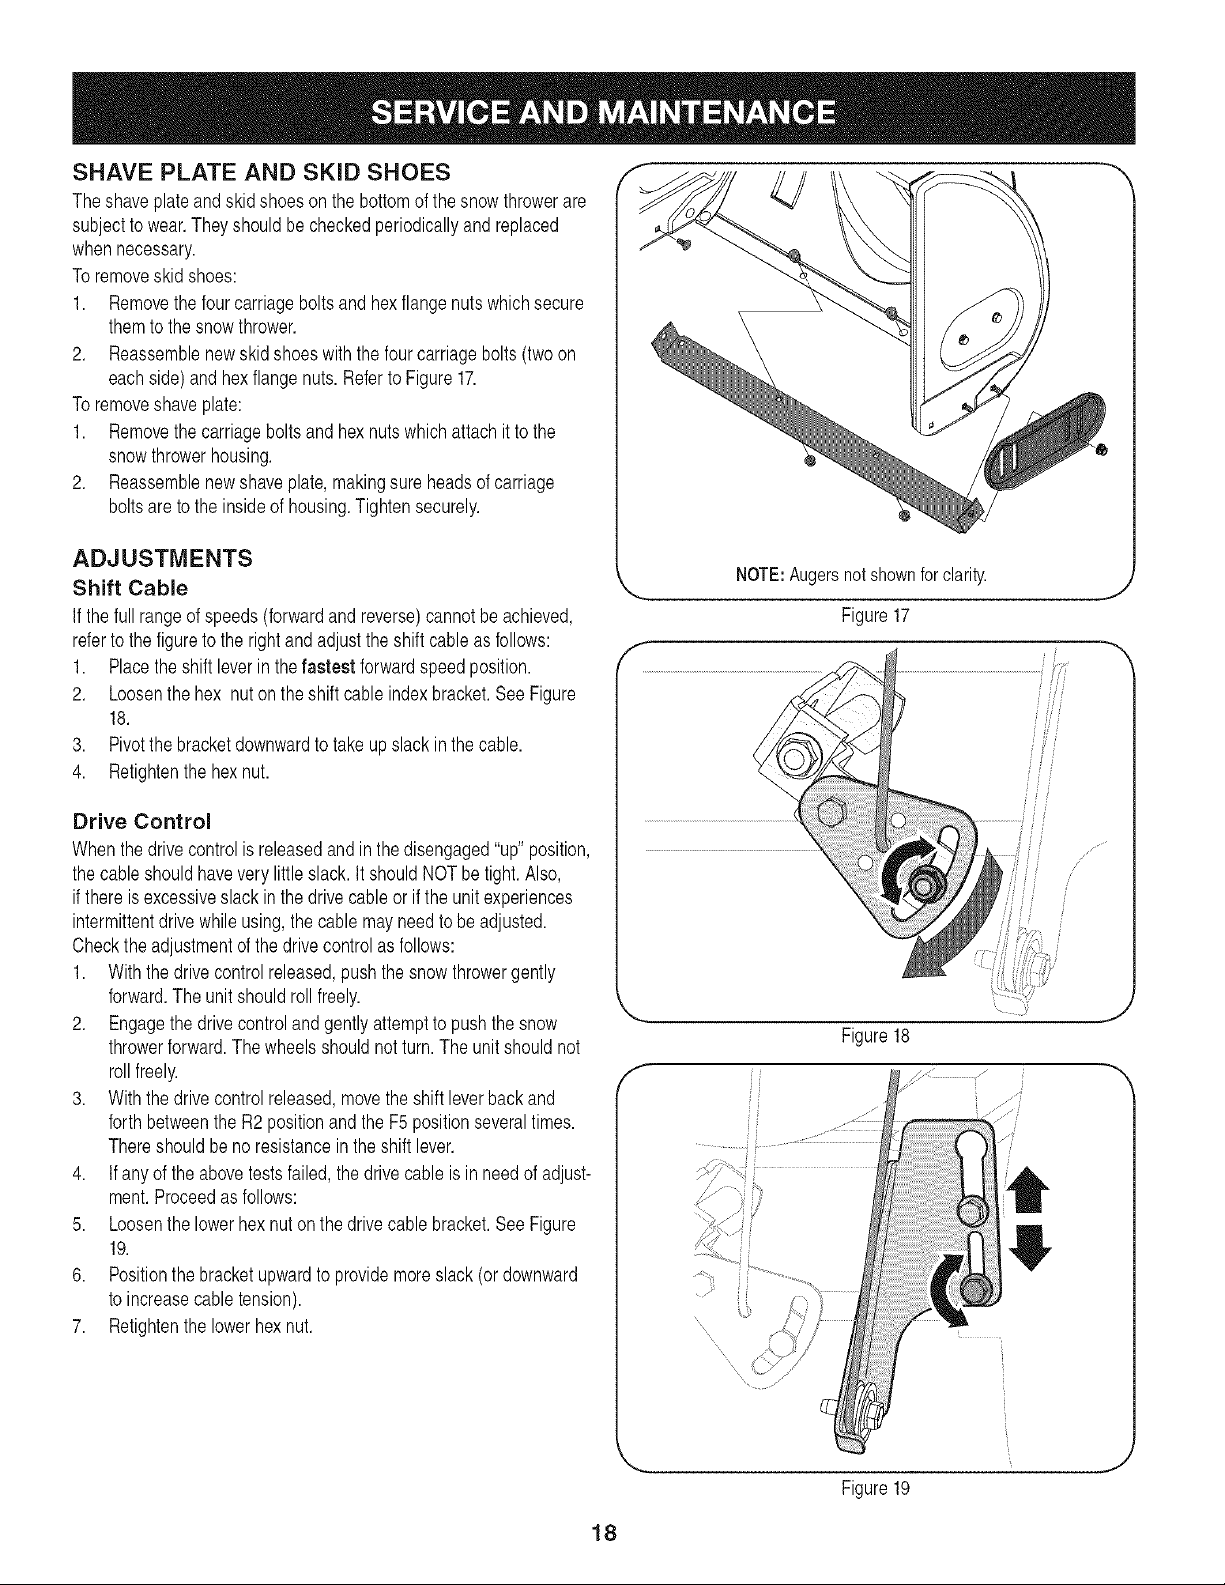
4. Checkelectrodegapwitha feelergaugeandsetgapto.030
(0.76ram)ifnecessary.SeeFigure14.
5. Reinstallsparkplugandtightensecurely.
NOTE:A resistorsparkplugmust beusedforreplacement.Contacta
SearsPartsand RepairCenterforareplacementsparkplug.
Carburetor
If yoususpectyourcarburetorneedsadjusting,seea SearsPartsand
RepairCenter.Engineperformanceshouldnotbeaffectedataltitudes
upto7,000feet(2,134meters).Foroperationathigherelevations,
contacta SearsPartsandRepairCenter.
Engine Speed
Avoidseriousinjuryordeath,DONOTmodifyengineinanyway.
Tamperingwiththegovernorsettingcancausethe engineand
equipmentto operateatunsafespeeds.NEVERtamperwithfactory
settingof enginegovernor.Runningtheenginefasterthanthe speed
set at thefactoryisdangerous.
LUBRICATION
Gear Shaft
Thegear(hex)shaftshouldbelubricatedatleastoncea seasonor
afterevery25hoursofoperation.
1. Carefullypivotthesnowthrowerup andforwardso thatit restson
theaugerhousing.
2. Removethe lowerframecoverfromtheundersideofthesnow
throwerbyremovingthefourself-tappingscrewswhichsecureit.
3. Applya lightcoatingof engineoil(or 3-in-1oil)tothehexshaft.
SeeFigure15.
II
II
1..030 (.76 ram)Gap
2. Electrodes
Porcelain
3
J
Figure14
\\\\
\,, ........
Figure15
NOTE:Whenlubricatingthe hexshaft,be carefulnottogetanyoilon
thealuminumdriveplateorrubberfrictionwheel.Doingso willhinder
thesnowthrower'sdrivesystem.Wipeoff anyexcessorspilledoil.
Wheels
Atleastoncea season,removebothwheels.Cleanandcoatthe axles
withamultipurposeautomotivegreasebeforereinstallingwheels.
Chute Directional Control
Oncea season,lubricatetheeyeboltbushingandthespiralwith
3-in-1oil.
Auger Shaft
Atleastoncea season,removetheshearpinson augershaft.Spray
lubricantinsideshaft,andaroundthespacersandflangebearings
foundat eitherendoftheshaft.SeeFigure16.
17
Figure 16
/ 7
/
/
J
SHAVE PLATE AND SKID SHOES
Theshaveplateandskidshoesonthe bottomofthesnowthrowerare
subjectto wear.Theyshouldbecheckedperiodicallyandreplaced
whennecessary.
Toremoveskidshoes:
1. Removethefourcarriageboltsandhexflangenutswhichsecure
themto thesnowthrower.
2. Reassemblenewskidshoeswiththe fourcarriagebolts(twoon
eachside) andhexflangenuts.Referto Figure17.
Toremoveshaveplate:
1. Removethecarriageboltsandhexnutswhichattachitto the
snowthrowerhousing.
2. Reassemblenewshaveplate,makingsure headsofcarriage
boltsareto theinsideof housing.Tightensecurely.
ADJUSTMENTS
Shift Cable
If the fullrangeofspeeds(forwardandreverse)cannotbe achieved,
referto the figuretothe rightandadjusttheshiftcableasfollows:
1. Placethe shiftleverin thefastest forwardspeedposition.
2. Loosenthehex nutontheshiftcable indexbracket.SeeFigure
18.
3. Pivotthebracketdownwardtotakeupslackinthecable.
4. Retightenthehexnut.
Figure17
Drive Control
Whenthe drivecontrolisreleasedandin thedisengaged"up"position,
thecableshouldhavevery littleslack.It shouldNOTbe tight.Also,
ifthereisexcessiveslackin thedrivecableorifthe unitexperiences
intermittentdrivewhileusing,thecablemayneedtobeadjusted.
Checktheadjustmentofthe drivecontrolasfollows:
1. Withthedrivecontrolreleased,pushthe snowthrowergently
forward.Theunitshouldrollfreely.
2. Engagethe drivecontrolandgentlyattempttopushthesnow
throwerforward.Thewheelsshouldnot turn.The unitshouldnot
rollfreely.
3. Withthedrivecontrolreleased,movetheshiftleverbackand
forthbetweentheR2 positionandtheF5 positionseveraltimes.
Thereshouldbenoresistanceintheshiftlever.
4. If anyoftheabovetestsfailed,thedrivecableisin needof adjust-
ment.Proceedasfollows:
5. Loosenthelowerhexnutonthedrivecablebracket.SeeFigure
19.
6. Positionthe bracketupwardtoprovidemoreslack(ordownward
toincreasecabletension).
7. Retightenthelowerhexnut.
,J
Figure18
f
--,,,
18
J
Figure19

Chute Bracket
If thespiralatthebottomofthechutedirectionalcontrolis not fully
engagingwiththechuteassembly,the chutebracketcan beadjusted.
Todoso:
1. Loosenthetwonutswhichsecurethechutebracketandreposi-
tionitslightly.SeeFigure20.
2. Retightenthenuts.
Auger Control
RefertotheAssemblysectionfor instructionsonadjustingtheauger
controlcable.
Skid Shoes
RefertotheAssemblysectionfor instructionsonadjustingtheskid
shoes.
f --,,
BELT REPLACEMENT
Auger Belt
Toremoveandreplaceyoursnowthrower'saugerbelt, proceedas
follows:
1. Topreventspillage,placea pieceofplasticwrapunderthegas
capand tightensecurely.
2. Removetheplasticbeltcoveronthefrontof the enginebyremov-
ingthetwoself-tappingscrews.SeeFigure21.
3. Rollthe augerbelt offthe enginepulley.SeeFigure22.
4. Carefullypivotthesnowthrowerup andforwardso thatit restson
theaugerhousing.
Figure20
f
/
19
J
Figure22
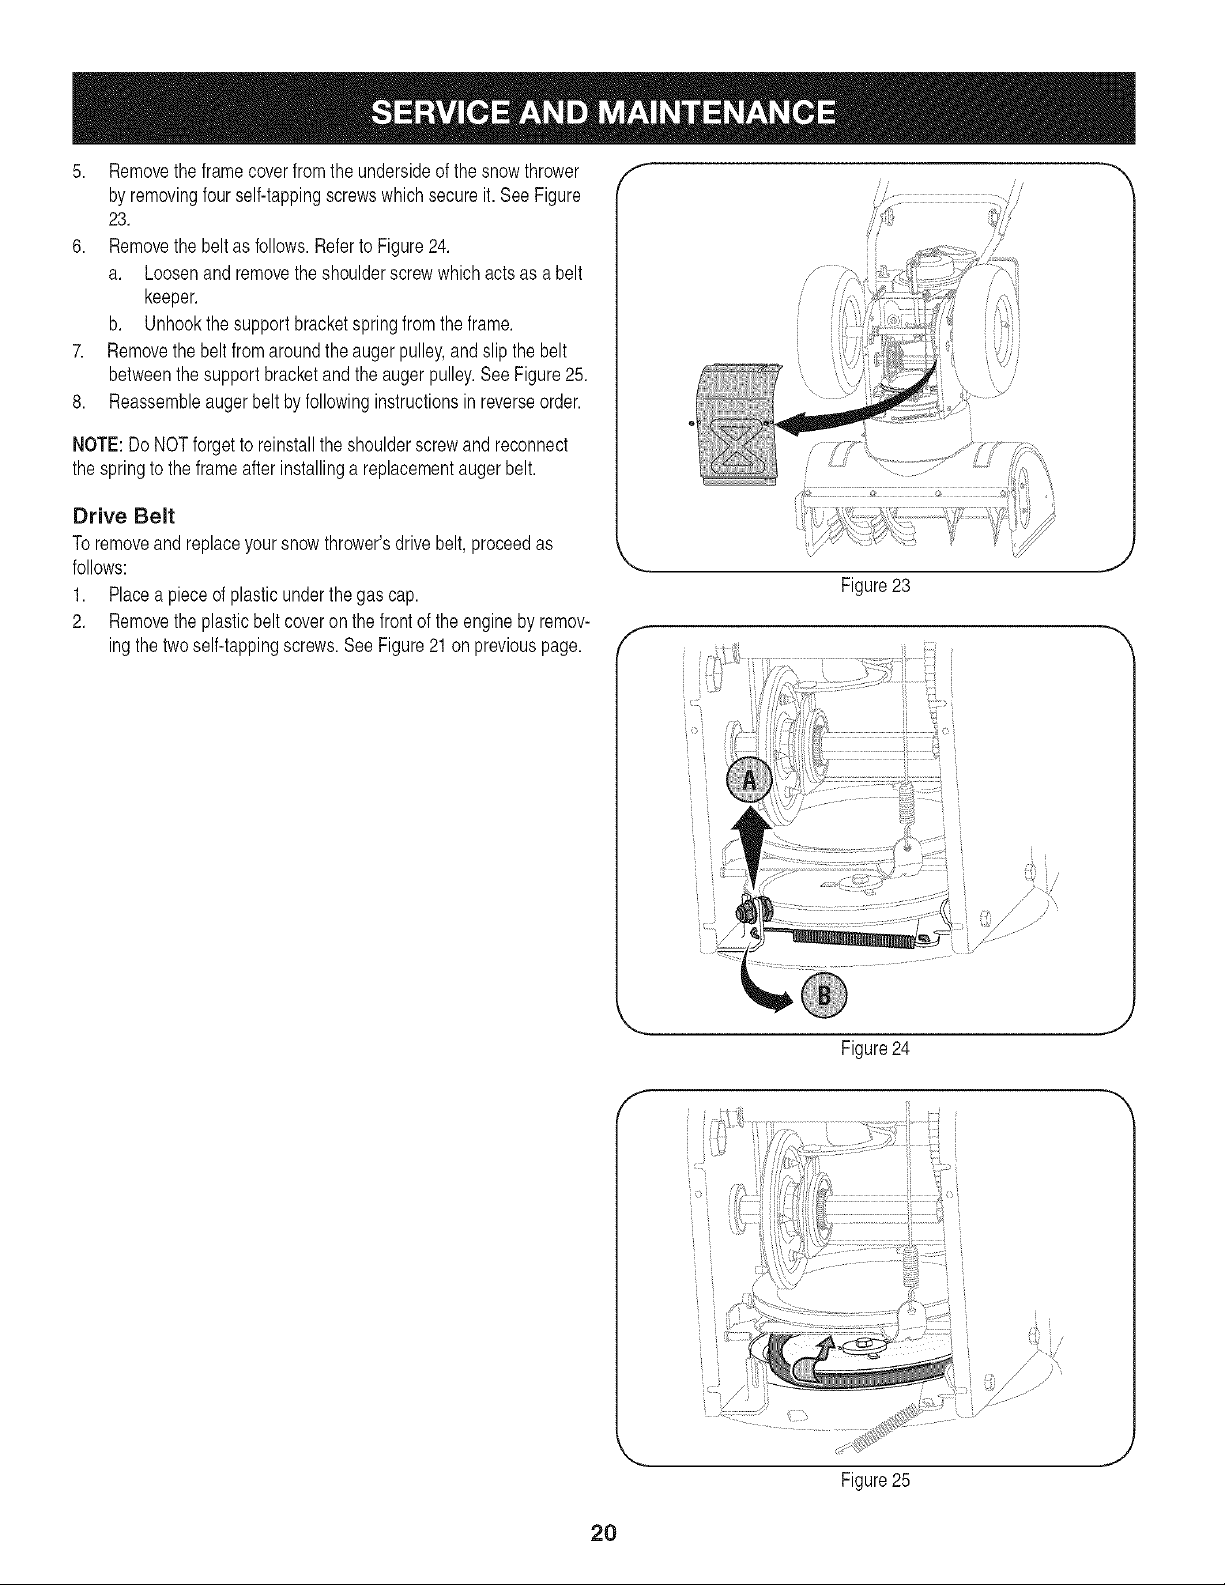
5. Removetheframecoverfromtheundersideofthesnowthrower
byremovingfourself-tappingscrewswhichsecureit. SeeFigure
23.
6. Removethe beltasfollows.RefertoFigure24.
a. Loosenandremovetheshoulderscrewwhichactsas abelt
keeper.
b. Unhookthesupportbracketspringfromtheframe.
7. Removethebeltfromaroundtheaugerpulley,andslipthebelt
betweenthesupportbracketandthe augerpulley.SeeFigure25.
8. Reassembleaugerbeltbyfollowinginstructionsin reverseorder.
NOTE:Do NOTforgetto reinstalltheshoulderscrewandreconnect
thespringto theframeafterinstallinga replacementaugerbelt.
Drive Belt
Toremoveandreplaceyoursnowthrower'sdrivebelt,proceedas
follows: "_.
1. Placea pieceof plasticunderthegas cap.
2. Removethe plasticbeltcoveronthefrontoftheenginebyremov-
ingthetwoself-tappingscrews.SeeFigure21onpreviouspage. f-
J
Figure23
--,,,,
Figure24
ii_ii
/
2O
Figure25
 Loading...