

Craftsman 247794500 Owner’s Manual
Owner's Manual
[I:RR
/
22 Ton Hydraulic
Log Splitter
Model No.
247.794500
/
/
Ii
CAUTION: Before using this product,
read this manual and follow all Safety
Rules and Operating Instructions.
Sears, Roebuck And Co., Hoffman Estates, IL 60179, U.S.A.
Printedin U.S.A. 770-10035A
(7/99)
I!
/
U
Content Page
Warranty Information......................................... 2
Safe Operation Practices................................... 3
Accessories ....................................................... 7
Assembly........................................................... 8
Operation........................................................... 10
Content Page
Maintenance...................................................... 14
Service & Adjustment........................................ 17
Off-Season Storage........................................... 19
Trouble-Shooting............................................... 20
Parts List............................................................ 22
ONE-YEAR WARRANTY ON CRAFTSMAN LOG SPLITTER
For one year from the date of purchase, when this Craftsman log splitter is maintained, lubricated, and tuned up
according to the operating and maintenance instructions in the operator's manual, Sears will repair, free of
charge, any defect in material or workmanship.
This warranty excludes the tires, spark plug, oil filter and air cleaner, which are expendable parts and become
worn during normal use.
If this log splitter is used for commercial or rental purposes, this warranty applies for only 30 days from the date
of purchase.
WARRANTY SERVICE IS AVAILABLE BY CONTACTING THE NEAREST SEARS SERVICE CENTER IN THE
UNITED STATES. THIS WARRANTY APPLIES ONLY WHILE THIS PRODUCT IS IN USE IN THE UNITED
STATES.
This warranty gives you specific legal rights, and you may also have other rights which vary from state to state.
Sears, Roebuck and Co., Dept. 817WA, Hoffman Estates, IL 60179
Horsepower: ......................... 5.0
Engine Oil.............................. SAE 30/1.25 pints
Fuel Capacity: ....................... unleaded/1.25 qts.
Hydraulic Fluid ...................... Dexron III/4 gallons
Tire Pressure ......................... 30 p.s.i, maximum
Spark Plug (Gap .030").......... Champion RJI9LM
Magnetron Ignition Air Gap.....0125"
Model Number..2..4,7.:7..9.4..5.0,0....................................
Serial Number ...........................................................
Date of Purchase ......................................................
Record model number, serial number and date of
purchase ofthe log splitterand keep in a safe place
for future reference.
Thissymbol points out important safety instructions which,ifnot followed,couldendangertheper-
sonalsafetyand/orpropertyof youmelfandothers.Read and follow all instructionsin thismanualbefore
attempting tooperateyour logsplitter.Failuretocomplywiththeseinstructions may resultinpersonal injury.
When you seethissymbol--heed its warning.
Your log splitter was built to be operated according to the rules for safe operation In this
manual, As with any type of power equipment, carelessness or error on the part of the oper-
ator can result in serious injury, if you violate any of these rules, y_u may cause serious
injury to yourself or others,
The engine exhaustfrom this product contains chemicals known to the state of California to cause
cancer, birthdefects or other reproductive harm.
Towing
• This unit should notbe towed on any street,
highway or publicroad withoutchecking the
existing federal, local or state requirements.
Such information may be obtained bycallingyour
state or local bureau of motorvehicles. Any
licensingormodificationsneeded tocomplywith
federal, localor state vehiclerequirements isthe
sole responsibilityofthe purchaser.
• Make sure you follow the wiring diagram color
codes when installing the light kit on the log
splitter. (e.g. ground to ground, left turn to left
turn, etc.). Failure to wire unit correctly may
cause the tow vehicle wiring to overheat and/or
the log splitterlights to operate incorrectly. It may
be necessary to replace the turn signal flasher
unitin your tow vehicle if it is notcapable of
operatingthe additionallightsonthe log splitter.
• Before towing the log splitter on a street, highway
or public road, verify that all lights are functioning
properly and the yellow side reflectors are in
position. Replace bulbs if they are burnt out.
• Before towing, always check to be certain the log
splitter is correctly and securely attached to the
tow vehicle, and safety chains are inplace.
Leave slack in chains for turning allowance.
• Use a class I or higher hitch with a 1-7/8" ball.
Keep ball socketand clamp face lubricated with
chassis grease.
• Be sure the coupleris secured to the hitch ball
and the lock lever isdown tight and locked.
• Check vehicle hitch, ball and coupler for signs of
wear or damage. Replace any parts that are worn
or damaged before towing.
• The coupler must be secured to the log splitter
tongue tube with the original equipment bolts and
nuts. See your authorized service dealer for
replacement parts. Coupler nuts should be
tightened securely (20 foot pounds).
• Make sure beam assembly is securely latched in
the horizontal position andjack stand (if provided)
ispivotedand secured inthe up positionbefore
towing log splitter,Never tow withthe beam in
vertical position.
• Do not tow the log splitterfasterthan 45 MPH.
Higher speeds may damage logsplitter.
Excessive highspeeds may cause the logsplitter
to=fishtail" or otherwise become unstable.
• Check the tire pressure on the logsplittertires. It
must be 30 p.s.i. MAXIMUM for highway travel.
• When parking, storingor usingyour logsplitter,
keep the coupler offthe groundso dirtwillnot
build up inthe ball socket.
• Do not allow anyone to sit or ride on your log
splitter. They can easily fall off and be seriously
injured.
Training
• Beforeoperating this log splitter, read and
understand thisoperator's manual completely.
Become familiar with itfor your ownsafety. To fail
to do somay cause serious injury. Do notallow
anyone to operate yourlog splitterwho has not
read this manual. Keep this manual in a safe
place for future and regular reference and for
ordering replacement parts.
• Never use your splitter for any other purpose than
splitting wood. It is designed for this use and any
other use may cause an injury.Your logsplitteris
a precisionpiece of power equipment, nota toy.
Therefore, exercise extreme caution at all times.
• Never arrow childrento operate your log splitter.
Do not allowadultsto operate itwithoutproper
instruction.Only personswell acquainted with
these rules of safe operationshouldbe allowedto
use your log splitter.
• Only the operatoristo be near your logsplitter
during use. Keep all others, includingpetsand
children,a minimumof20 feet away from your
workzone. Flyingwoodcan be hazardous. If a
helper is assisting in loadinglogs, never activate
3
the control untilthe helper isclear ofthe area,
More accidents occur when more than one
person operates thelogsplitterthan at any other
time.
No one should operate thisunit while intoxicated
or while taking medicationthat impairsthe
senses or reactions.A clear mindisessentialfor
safety. Never allow a person who is tired or
otherwise notalert to use yourlogsplitter.
Preparation
• Never wear loose clothingorjewelry thatcan be
caught by movingparts ofyour log splitterand
pullyou intoit. Keep clothingaway from all
moving partsof your log splitter.
• Wear properhead gear to keep hairaway from
moving parts. Always wear protectivehearing
devices as needed.
• Always wear safety shoes. A dropped logcan
seriouslyinjureyourfoot.
• Always wear safety glasses or goggles while
operatingyour splitter. A piece of splittinglog
couldfly off and hityoureyes.
• Wear leather work gloves. Be sure theyare tight
fitting without loose cuffsor draw strings.
• Use your log splitterin daylight, or undergood
artificial light.
• Never operate your splitter on slippery, wet,
muddy or icy surfaces. Safe footing is essential
in preventing accidents,
• Never operate your splitterwhile attached to a
towingvehicle.
• Only operate your splitter on level ground and
not on the sideof ahill. Itcould tip, or rolling logs
or poor footing could cause an accident.
Operating the splitteron level ground also
prevents the spillage of gasoline from the fuel
tank.
• Never attempt to move the log splitter over hilly
or uneven terrain without a tow vehicle or
adequate help.
• Always block the wheels to prevent movement
of log splitter while in operation.
• Check the fuel before starting the engine.
Gasoline is an extremely flammable fuel. Do not
fill the gasoline tank indoors, when the engine is
running, or while the engine is still hot. Replace
gasoline cap securely and wipe off any spilled
gasoline before startingthe engine as it may
cause a fire or explosion.
• Both ends of each log must be cut as square as
possible to help prevent the log from riding out of
the splitter during operation.
Operation
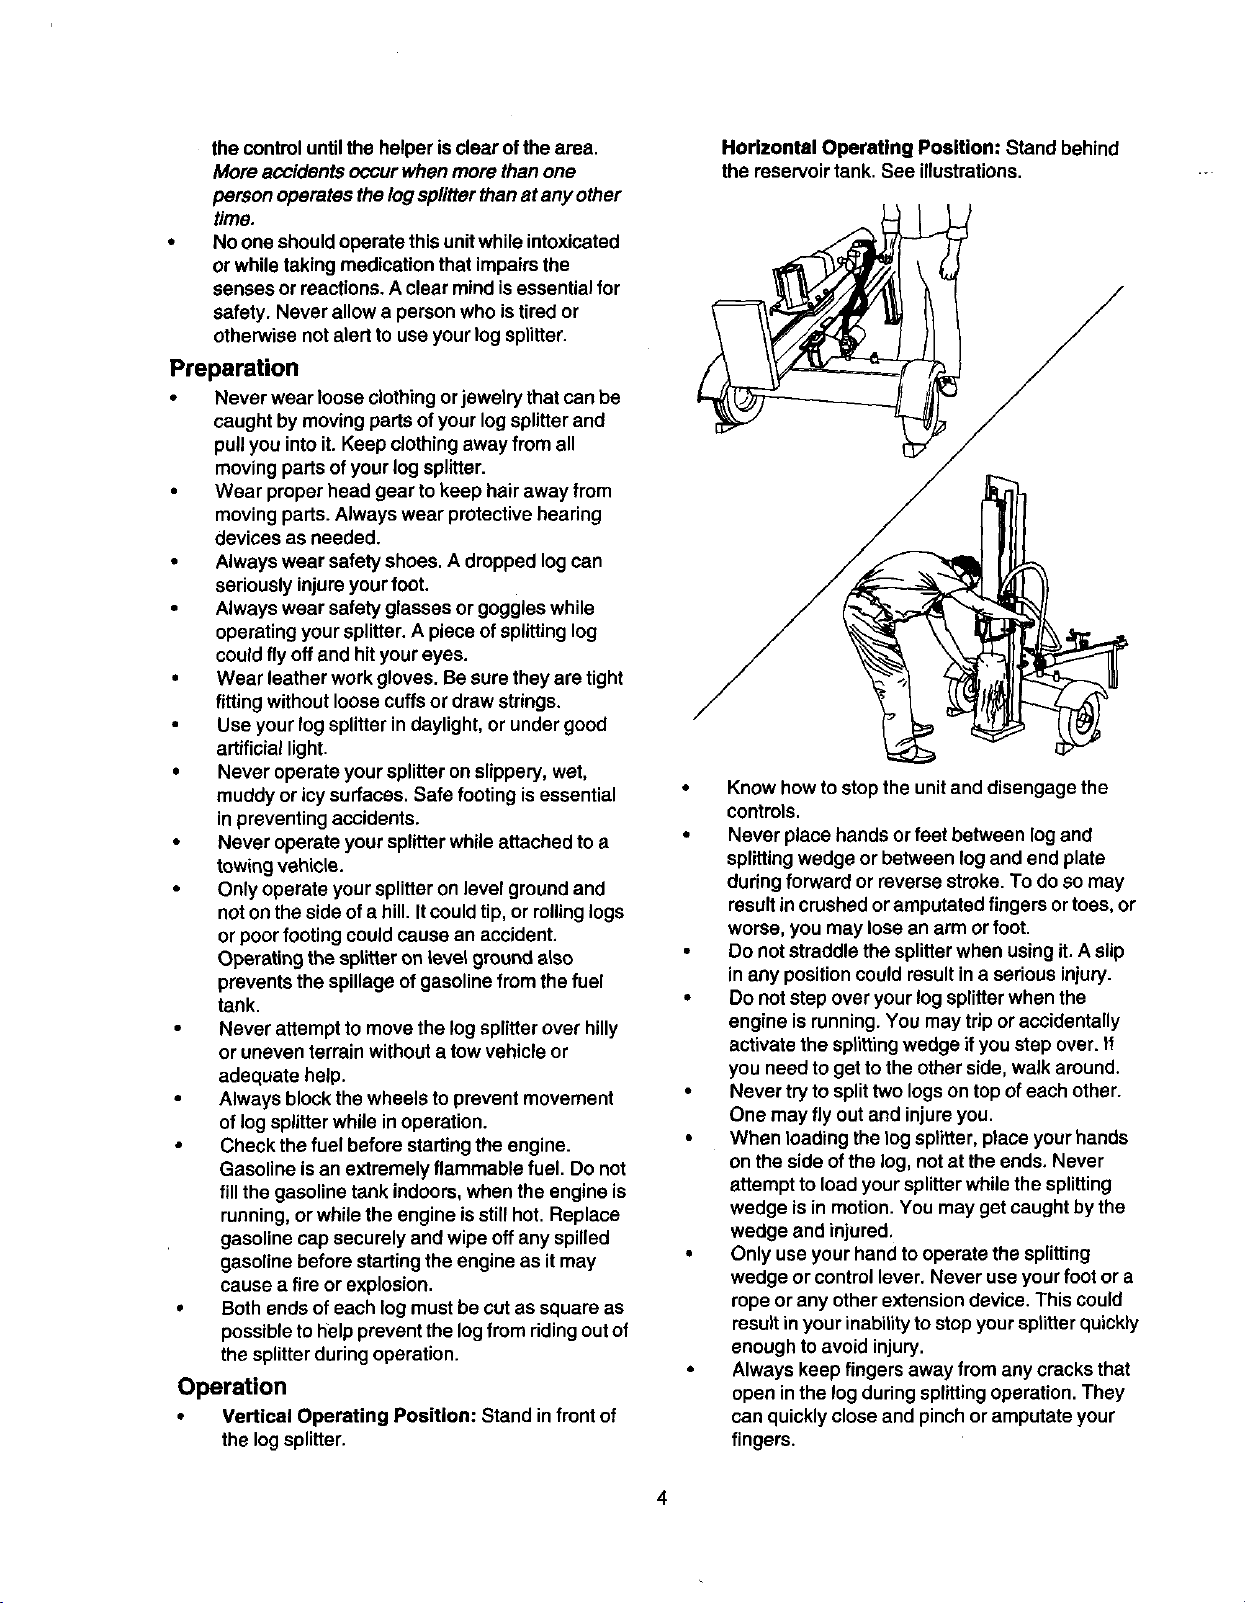
• Vertical Operating Position: Stand infront of
the logsplitter.
Horizontal Operating Position: Stand behind
the reservoirtank. See illustrations.
Know how to stop the unit and disengage the
controls.
Never place hands or feet between log and
splittingwedge or between log and end plate
during forward or reverse stroke. To do so may
result in crushed or amputated fingers or toes, or
worse, you may lose an arm or foot.
Do not straddle the splitter when using it. A slip
in any position could result in a serious injury.
Do not step over your log splitter when the
engine is running. You may trip or accidentally
activatethe splittingwedge if you step over.If
you need to get to the other side,walk around.
Never try to split two logs on top of each other.
One may fly out and injure you.
When loading the logsplitter, place your hands
on the side of the log, not at the ends. Never
attemptto load your splitter while the splitting
wedge is in motion. You may get caught by the
wedge and injured,
Only use your hand to operate the splitting
wedge or control lever, Never use your foot or a
rope or any other extensiondevice. This could
result in your inability to stopyour splitterquickly
enough to avoid injury.
Always keep fingers away from any cracks that
open inthe log during splitting operation. They
can quickly close and pinch or amputate your
fingers.
• Never attemptto split woods across the grain.
Some types ofwood may burst or fly out ofyour
splitterand result in injuryto you or a bystander.
• For logsthat are notcut square, the longest
portionof the logshould be rotated down and
the most square end placed against the splitting
wedge.
• Keep your work area clean. Immediately
remove splitwoodaround your splittersothat
you do notstumble over it. Clean chipsand dirt
offend plate (wood platform)after each logis
split, orwhenever necessaryto maintain flat
contact between wood and end plate (platform).
• Never move the togsplitterwhile the engine is
running.
• Never leave yourlogsplitterunattended withthe
engine running.Shut off the engine ifyou are
leaving your splitter,even for a short period of
time. Someone couldaccidentally activate the
splittingwedge and be injured.
• Do not run engine in an enclosed area. Exhaust
gases contain carbon monoxide.This odorless
gas can be deadly when inhaled.
• Be careful not to touch the mufflerafter the
engine has been running. It will be HOT!
• Ifthe equipment shouldstarttovibrate
abnormally, stopthe engine and check
immediately for thecause. Vibration is generally
a warning of trouble.
• When cleaning, repairingor inspecting,make
certain all moving parts have stopped.
Disconnectthe spark plugwire and keep the
wire away from the plugto prevent accidental
starting.
Customer Responsibilities
• Do not operate yoursplitter inpoor mechanical
conditionor when in need of repair,
• Periodicallycheck that all nuts, bolts, screws,
hose clamps and hydraulicfittingsare tightto be
sure equipment is insafe workingcondition.
Where appropriate, check all safety guards and
shieldsto be sure they are intheproper position.
Never operate yoursplitterwithsafety guards,
shields orother protectivefeatures removed.
These safety devices are for yourprotection.
• Replace all damaged orworn partssuch as
hydraulichoses and fittingsimmediately with
manufacturer approved replacement parts.
• Do not change the engine governor settingsor
overspeed the engine. This increases the
hazard of personal injury. The maximum engine
speed is preset by the manufacturer and is
within safety limits.
• Do not alter your log splitter in any manner such
as attaching a rope or extension to the control
lever or adding to the width or height of the
wedge. Such alterations may cause yoursplitter
to be unsafe.
• Perform all recommended maintenance
proceduresbefore you use your splitter.
• Do notservice or repair your log splitterwithout
disconnectingthe spark plugwire and movingit
away from the spark plug.
• Never storethe equipmentwithgasoline inthe
tank inside ofa buildingwhere ignitionsources
are present, such as hot water and space
heaters, clothes dryers and the like.Allow the
engineto cool before storinginany enclosure.
• Always storegasoline in an approved, tightly
sealed container. Store the container in a cool,
dryplace. Donot store in a building where
ignitionsources are present.
• To reduce fire hazard, keep engine free ofgrass,
leaves, wood chips, and excessive grease and
oil.
• The hydraulicsystem of yourlogsplitterrequires
carefulinspection,along with the mechanical
parts. Be sure to replace frayed, kinked,or
otherwisedamaged hydrauliccomponents.
• Fluidescaping from a very small hole can be
almostinvisible.Do notcheck for leakswithyour
hand. Escapingfluid underpressure can have
sufficientforce to penetrate skin, causing
seriouspersonal injury.Leakscan be locatedby
passinga piece of cardboardor wood over the
suspectedleak and lookingfor discoloration.
• Shoulditbecome necessary to loosenor
remove any hydraulicfitting or line, be sure to
relieveall pressure by shuttingoff the engine
and movingthe control handle back and forth
several times.
• Do not removethe capfrom thehydraulictank or
reservoirwhile your log splitterisrunning.Hot oil
under pressure could cause injury.
• The pressure relief valve on yoursplitteris
preset at the factory. Do notadjustthe valve.
Onlya qualified servicetechnician should
performthisadjustment.
• Completelydrain fuel tank priorto storage. This
guardsagainst accumulationoffuel fumes
which couldresult in a fire hazard.
• Never store log splitteroutsidewithouta
waterproofcover. Rain willcause ruston the
insideof the cylinder.
Important Information
Always:
• Use clean fluid and check fluid level regularly.
• Use Dexron III Automatic Transmission Fluid or
10W non-foaming hydraulic fluid.
• Use a filter (clean or replace regularly).
• Use a breather cap on fluid reservoir.
5
• Make certain pumpis mounted and aligned
properly.
• Use a flexible "spider" type couplingbetween
engine and pump drive shafts.
• Keep hoses clear and unblocked.
• Bleed air out ofhoses before operating.
• Flushand clean hydraulicsystem beforestart-
up after any malfunctionor servicing.
• Use "pipe dope" on all hydraulicfittings.
• Allow time for warm-up before splittingwood,
• Prime the pump before initialstart-up byturning
over the engine with spark plug disconnected.
• Split wood with thegrain (lengthwise) only.
Never:
• Use when fluid is below 20° F, orabove 150° F,
• Use a solidengine/pump coupling.
• Force pump when mounting.
• Operate through reliefvalve.
• Attempt to adjust unloadingor relief valve.
settingswithoutpressure gauges.
• Operate with air in hydraulic system.
• Use Teflon tape on hydraulicfittings.
• Attempt to cut woodacross the grain,
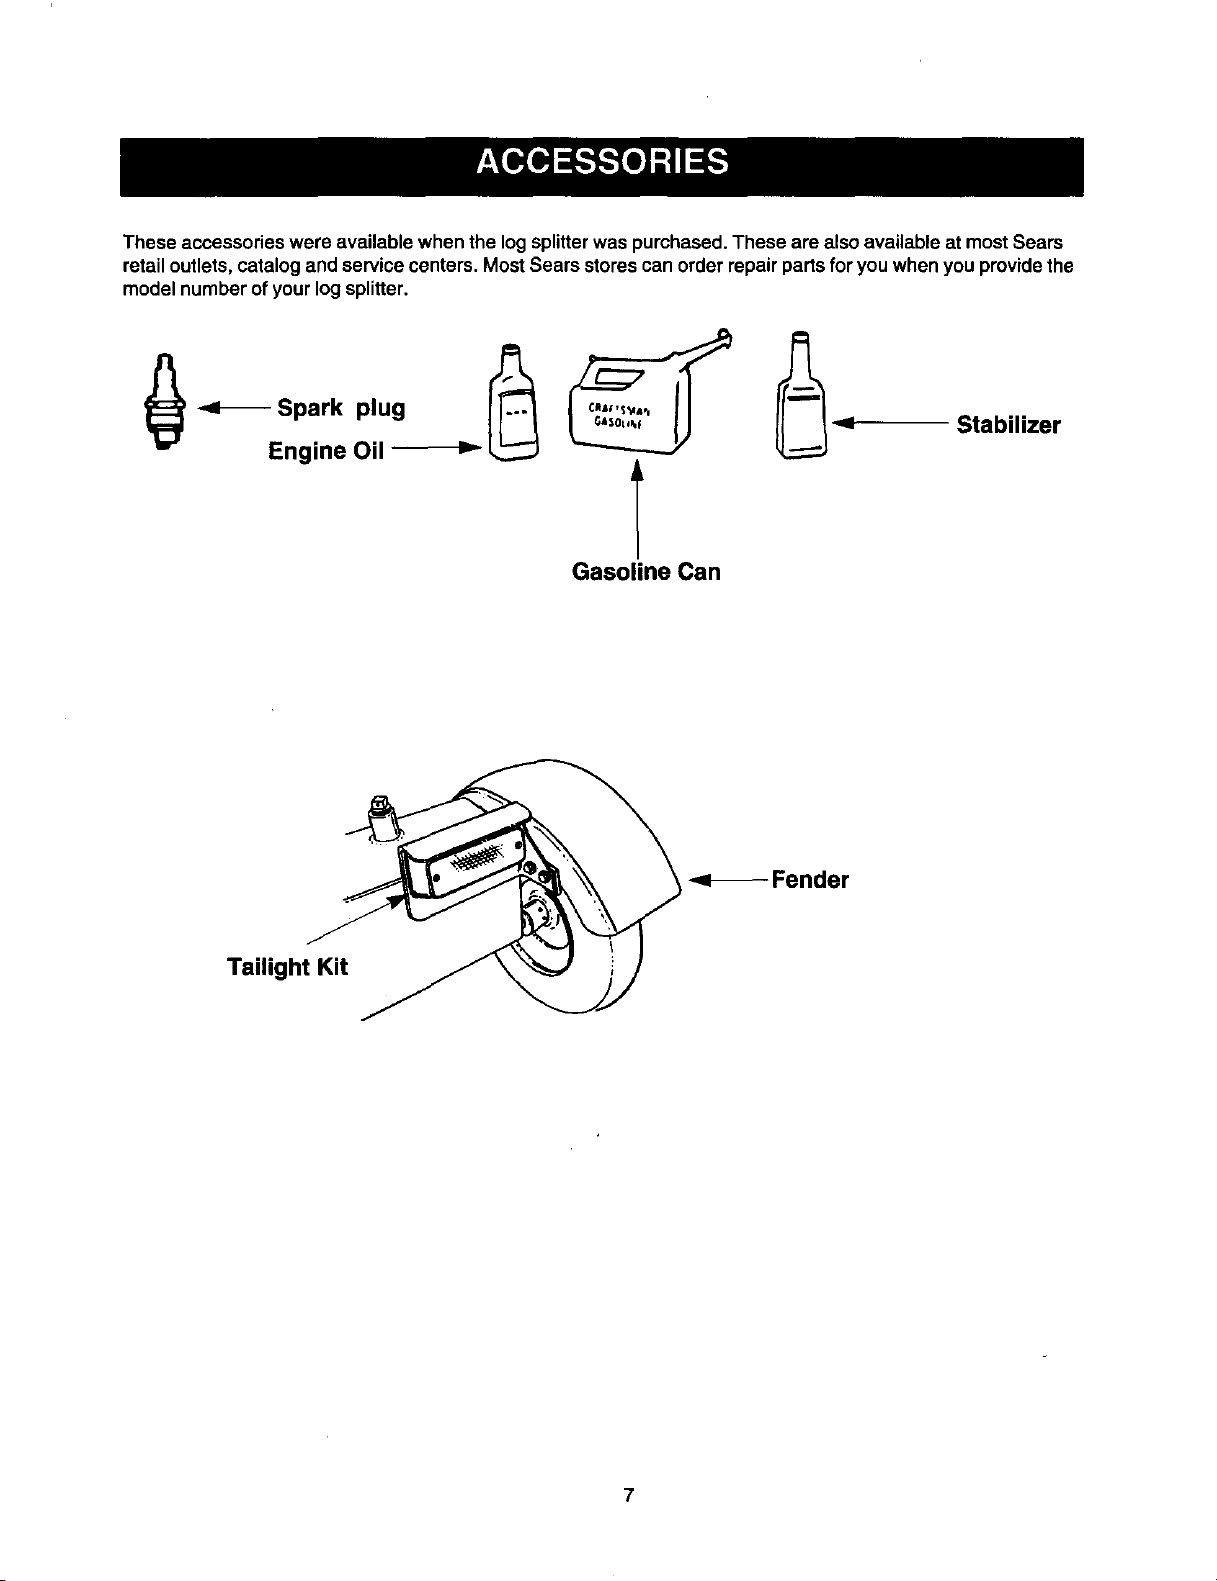
Theseaccessorieswereavailable when the logsplitterwas purchased. These are also available at most Sears
retail outlets, catalog and service centers. Most Sears stores can order repair parts for you when you provide the
model number of your log splitter.
Gasoline Can
Tailight Kit
-<_Fender
IMPORTANT: This unitisshipped without gasoline
in the engine. Afterassembly, see OPERATION
sectionofthis manual for properfuel fill-up.
Tools and Other Items Required
1. Crowbar orLarge Screwdriver
2. A pair of 9/16" Wrenches or a set ofAdjustable
Wrenches
3. Screwdriver
4. Cutters
5. Engine Oil for lubricatingbeam (equipmentis
shippedwith engine oil in the engine forstarting)
6. Unleaded Gasoline
7. Dexron III AutomaticTransmission Fluid or 10W
Non-Foaming Hydraulic Fluid (approximately 4
gallons)
Unpacking from Crate
WARNING: Exercise extreme caution as
parts are very heavy. Mechanical handling
equipment or sufficientmanpower should
beused to prevent injury.
• Prythe top, sides and ends offcrate using a
crowbar or large screwdriver.
• Set panels aside to avoid tire punctures or
personal injury.
• Remove and discard plastic bag that covers
unit.
Note: Do not remove the banding fromaround the
tankuntil the log splitteris assembled.
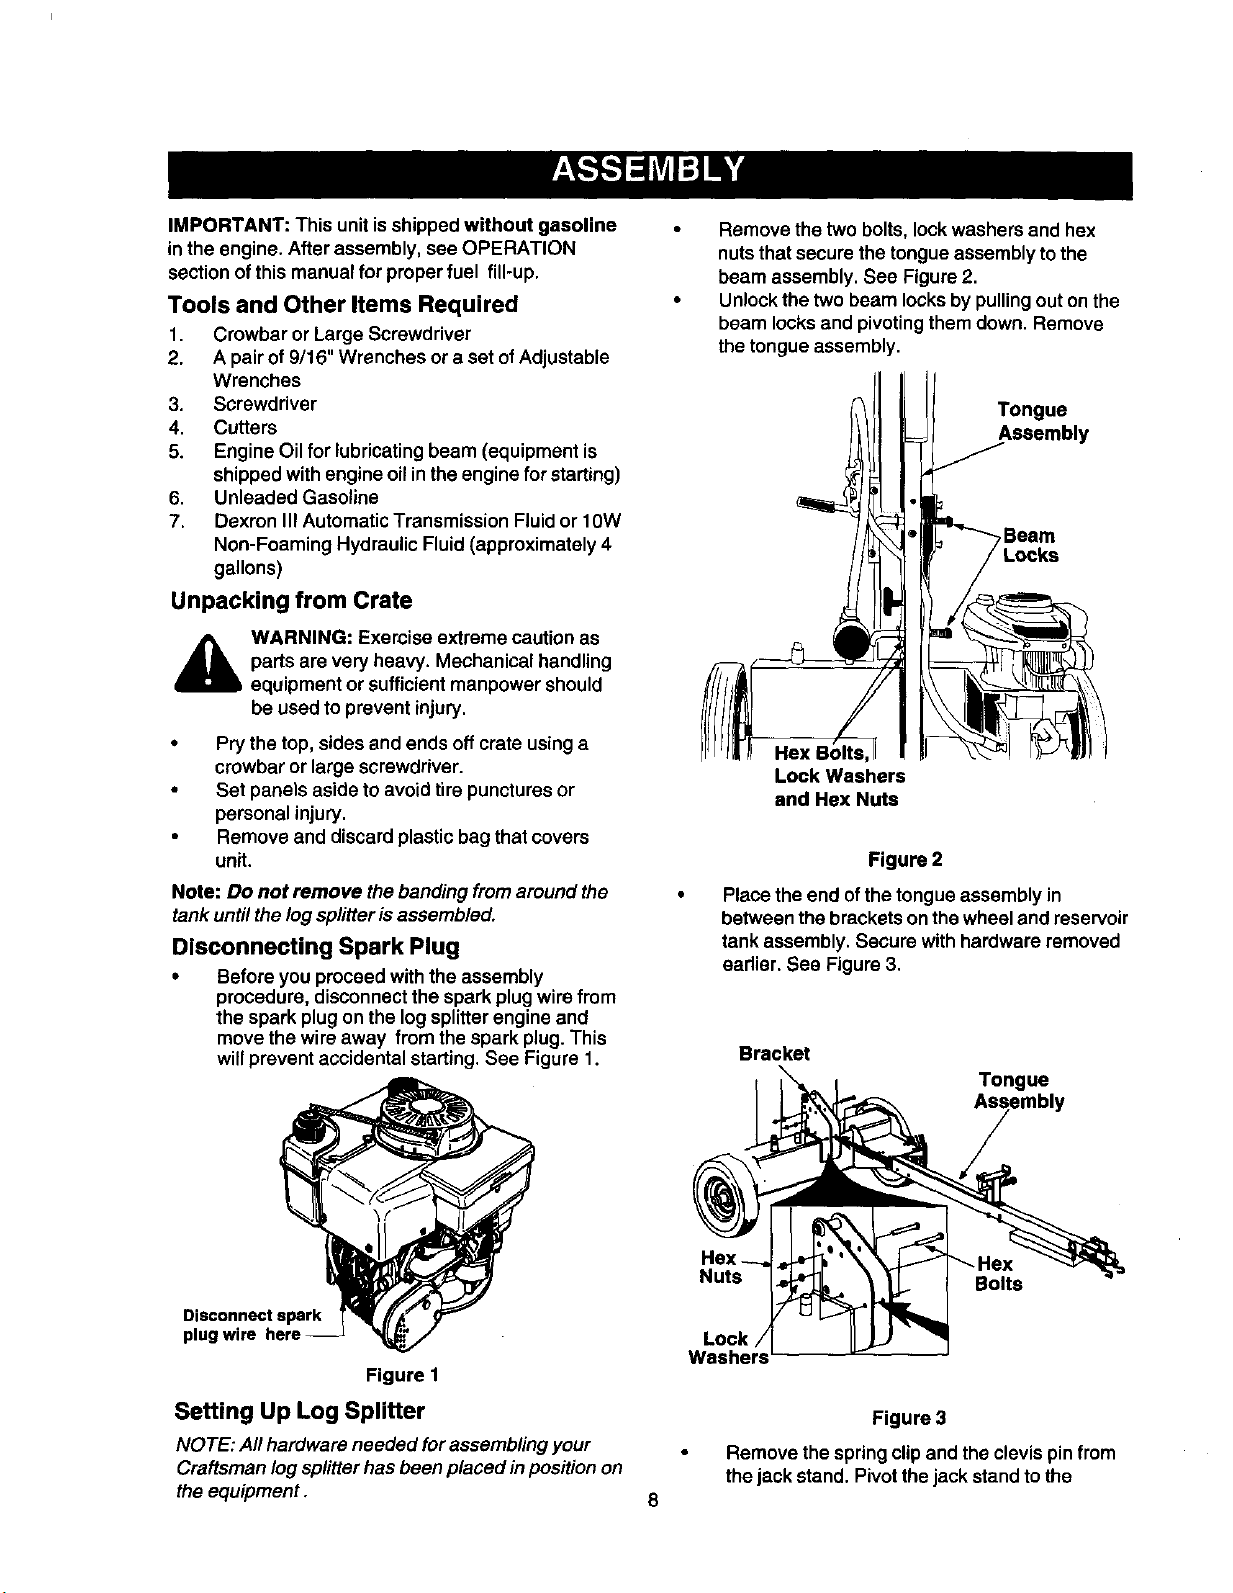
Disconnecting Spark Plug
• Before you proceed withthe assembly
procedure, disconnectthe sparkplugwire from
the spark plug on the logsplitterengine and
move the wire away from the spark plug. This
willprevent accidental starting.See Figure 1.
• Remove the two bolts, lock washers and hex
nutsthat secure the tongue assembly to the
beam assembly. See Figure 2.
• Unlockthe two beam locksby pullingouton the
beam locksand pivotingthem down. Remove
thetongue assembly.
Tongue
Assembly
Beam
Lock Washers
and Hex Nuts
Figure 2
Place the end ofthe tongue assembly in
between the bracketson thewheel and reservoir
tankassembly. Secure with hardware removed
eadier. See Figure3.
Bracket
Tongue
Disconnect spark
plug wire here
Figure 1
Setting Up Log Splitter
NOTE: All hardware needed for assembling your
Craftsman log splitterhas been placed in positionon
the equipment.
Nuts
Lock
Figure 3
Remove the spring clipand the clevispin from
the jack stand. Pivot thejack stand tothe
8
Bolts
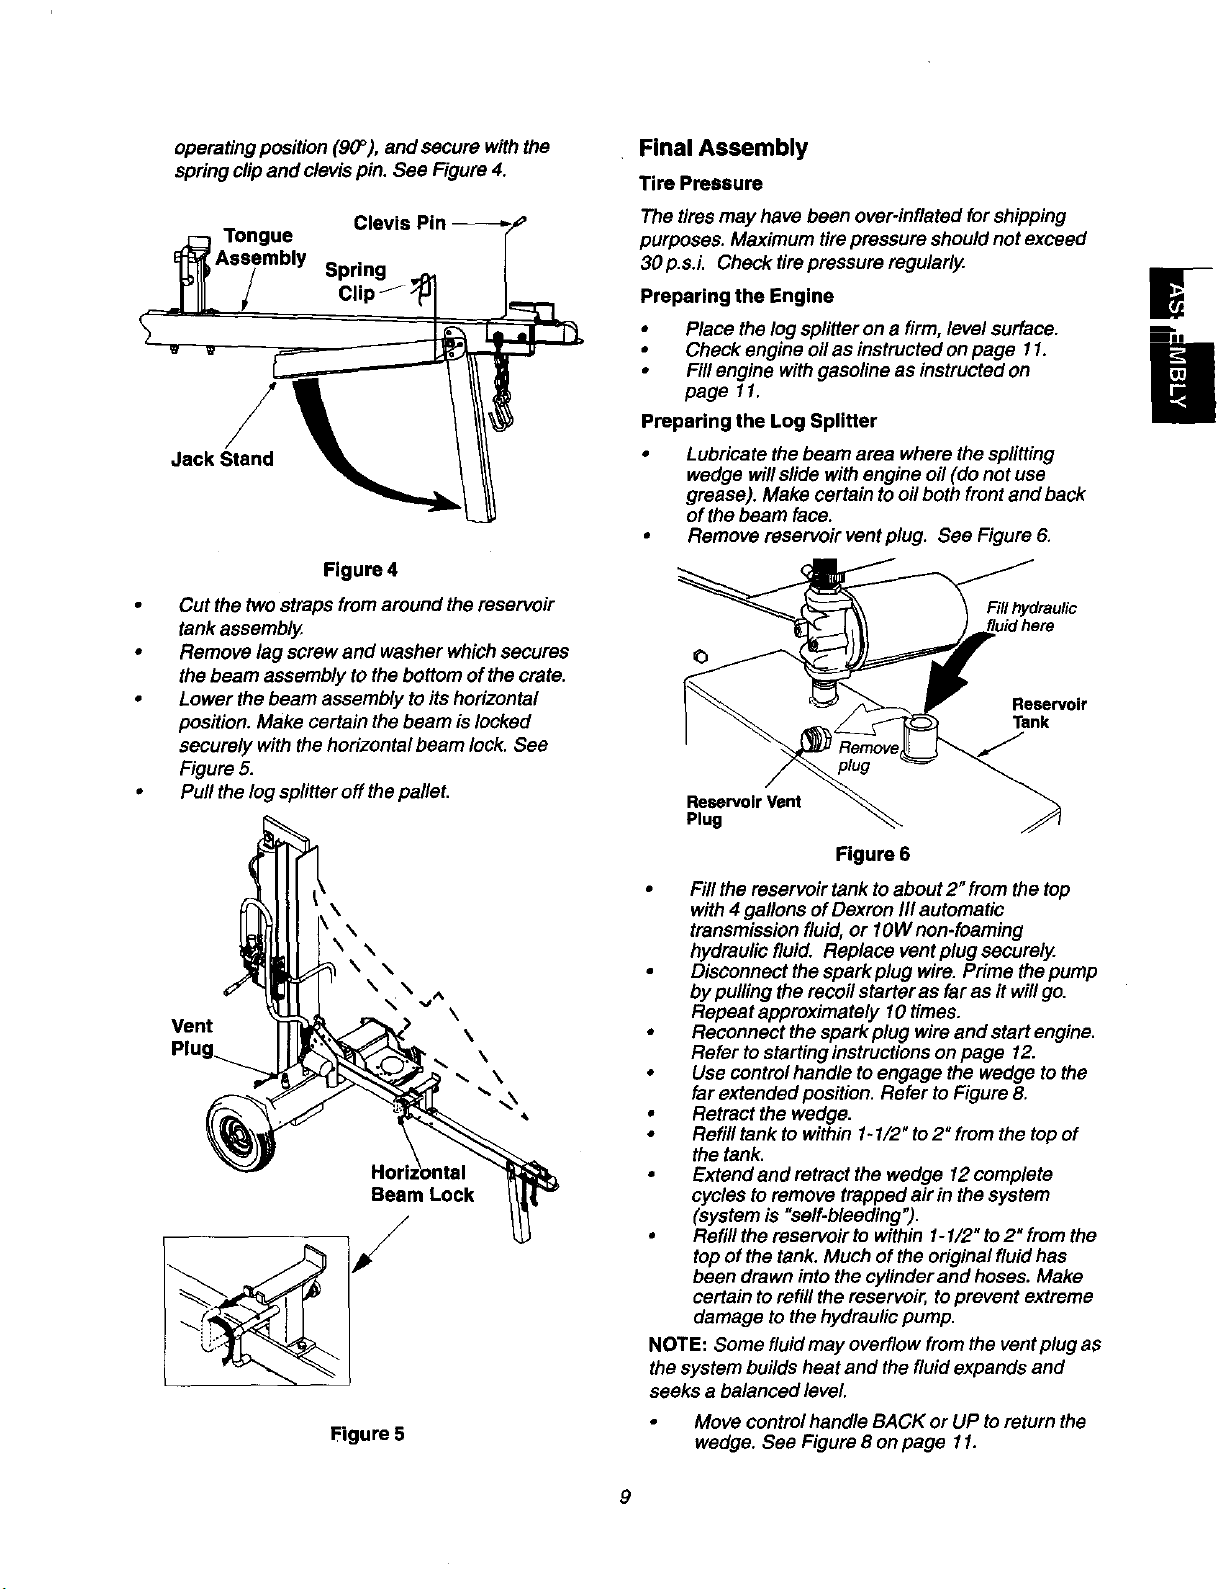
operatingposition (90°), and secure with the
springclipand clevispin. See Figure4.
Final Assembly
Tire Pressure
Tongue
Jack Stand
Figure 4
• Cut the twostraps fromaround the reservoir
tankassembly
• Remove lag screw and washer whichsecures
the beam assembly tothe bottom of thecrate.
• Lower the beam assembly to its horizontal
position. Make certain the beam is locked
securely with the horizontal beam lock. See
Figure 5.
• Puilthelogsplitteroffthepallet.
The tiresmay have been over-inflated for shipping
purposes. Maximum tirepressure should not exceed
30 p.s.i. Check tirepressure regularly.
Preparing the Engine
• Place the log splitteron a firm, level surface.
• Check engine oilas instructed on page 11.
• Fill engine withgasoline as instructedon
page 11.
Preparing the Log Splitter
• Lubricate the beam area where the splitting
wedge will slide withengine oil (do not use
grease). Make certain to oil both front and back
of the beam face.
• Remove reservoir vent plug. See Figure 6.
Fill hydraulic
Reservoir
Tank
Reservoir Vent
Plug
Figure 6
W
m
I|l
Vent
Plu
\
\
\ \
\ \
\\\_^
Beam Lock
,/
Figure 5
• Fill the reservoir tank to about 2" from the top
with4 gallons of Dexron III automatic
transmission fluid, or lOW non-foaming
hydraulic fluid. Replace ventplug securely
• Disconnect the spark plug wire. Prime the pump
by pulling the recoil starter as far as it will go.
\
\
Repeat approximately 10 times.
• Reconnect the sparkplug wire and start engine.
Refer to starting instructions on page 12.
• Use control handle to engage the wedge to the
far extended position. Refer to Figure 8.
• Retract the wedge.
• Refilltanktowithin 1-1/2"to2"fromthetopof
the tank.
• Extendandretractthewedge 12complete
cycles to remove trapped air in the system
(system is "self-bleeding").
• Refillthereservoirtowithin 1-1/2"to2"fromthe
top of the tank. Much of the original fluid has
been drawn into the cylinder and hoses. Make
certain to refill the reservoir, to prevent extreme
damage to the hydraulic pump.
NOTE: Some fluid may overflow from the ventplug as
the system builds heat and the fluid expands and
seeks a balanced level.
Move control handle BACK or UP to return the
wedge. See Figure 8 on page 11.
9
 Loading...