

Craftsman 247776050 Owner’s Manual
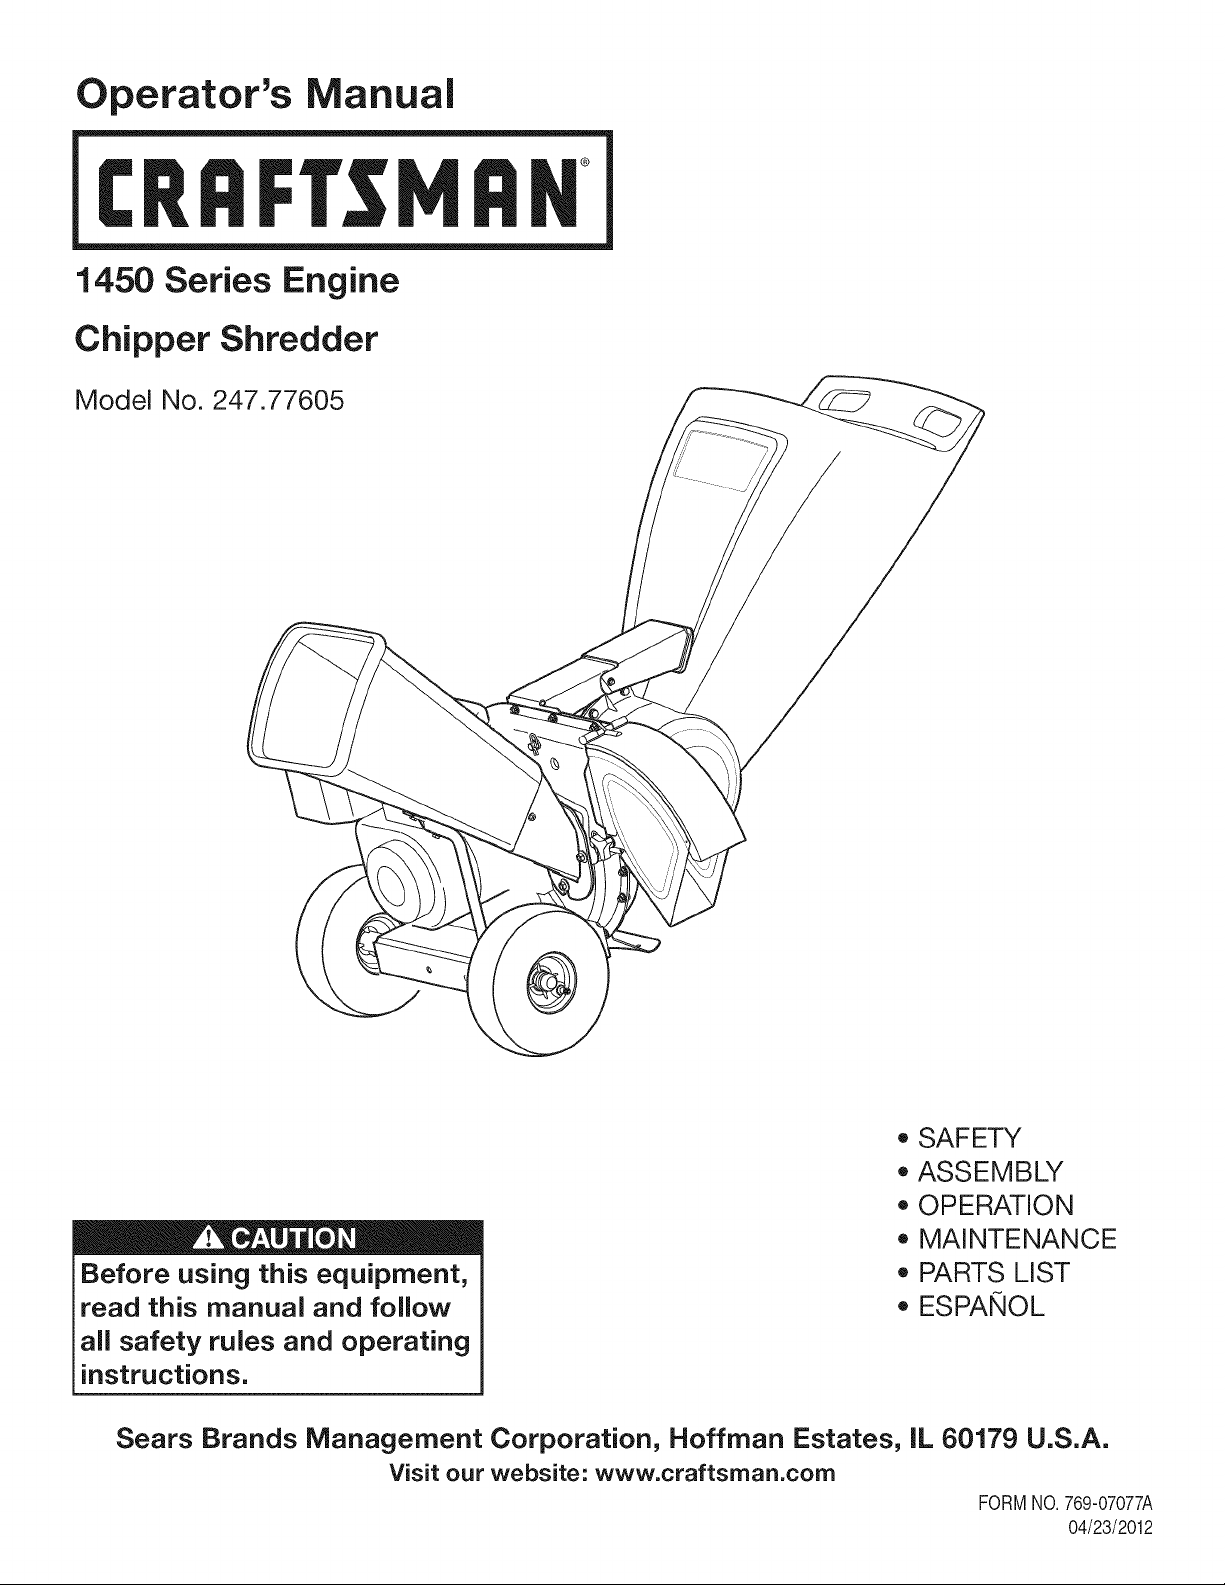
Operator's Manual
I:Rl FI'SlVl N
1450 Series Engine
Chipper Shredder
Model No. 247.77605
* SAFETY
* ASSEMBLY
* OPERATION
* MAINTENANCE
Before using this equipment,
read this manual and follow
all safety rules and operating
instructions.
Sears Brands Management Corporation, Hoffman Estates, iL 60179 U.S.A.
Visit our website: www.craftsman.com
* PARTS LIST
* ESPANOL
FORMNO.769-07077A
04/23/2012

Warranty Statement .................................. Pac
Safe Operation Practices .......................... Pac
Safety Labels ............................................ Pac
Assembly .................................................. Pac
Operation .................................................. Pac
Service and Maintenance ......................... Pac
Off-Season Storage .................................. Pac
e2
e3
e7
e8
e12
e14
e18
Trouble Shooting ....................................... Page 19
Parts List ................................................... Page 20
Label Map ................................................. Page 33
Repair Protection Agreement ................... Page 36
Espa_ol ..................................................... Page 37
Service Numbers ...................................... Back Cover
CRAFTSMAN TWO YEAR FULL WARRANTY
FORTWOYEARSfromthe dateof purchase,thisproductiswarrantedagainstanydefectsinmaterialorworkmanship.A defec-
tiveproductwillreceivefree repairor replacementif repairisunavailable.
Forwarrantycoveragedetailstoobtainfreerepairor replacement,visit theweb site:www.craftsman.com
ThiswarrantycoversONLYdefectsinmaterialandworkmanship.WarrantycoveragedoesNOTinclude:
• Expendableitemsthatcanwearoutfromnormalusewithinthewarrantyperiod,suchastheblades, sparkplug,air
cleaner,flailscreenandcatcherbag.
• Productdamageresultingfromuserattemptsatproductmodificationor repairorcausedbyproductaccessories.
• Repairsnecessarybecauseofaccidentor failuretooperateormaintaintheproductaccordingtoallsuppliedinstruc-
tions.
• Preventivemaintenance,orrepairsnecessarydueto improperfuel mixture,contaminatedorstalefuel.
Thiswarrantyisvoidif thisproductiseverusedwhileprovidingcommercialservicesorifrentedtoanotherperson.
Thiswarrantygivesyouspecificlegalrights,andyou mayalsohaveotherrightswhichvaryfromstatetostate.
SearsBrands ManagementCorporation, Hoffman Estates,IL60179
EngineSeries: 1450
EngineOilType: SAE30
EngineOilCapacity: 28ounces
Fuel: UnleadedGasoline
SparkPlug: Champion®RC-12YC
SparkPlugGap: .030"
Model Number.................................................................
Serial Number .................................................................
Dateof Purchase.............................................................
Recordthemodelnumber,serialnumber
anddateof purchaseabove
©SearsBrands,LLC 2
Thissymbolpointsout importantsafetyinstructionswhich,if not
followed,couldendangerthepersonalsafetyand/orpropertyof
yourselfandothers. Readandfollowall instructionsin thismanual
beforeattemptingtooperatethismachine.Failuretocomplywith
theseinstructionsmayresultin personalinjury.Whenyou seethis
symbol,HEEDITSWARNING!
Thismachinewasbuiltto beoperatedaccordingto thesafeopera-
tionpracticesinthismanual.Aswithanytypeof powerequipment,
carelessnessorerroronthe partof theoperatorcan resultin
seriousinjury.Thismachineiscapableofamputatingfingers,hands,
toesandfeetandthrowingdebris.Failureto observethefollowing
safetyinstructionscouldresultin seriousinjuryordeath.
CALIFORNIA PROPOSITION 65
EngineExhaust,someof itsconstituents,andcertainvehicle
componentscontainoremitchemicalsknowntoStateof California
tocausecancerandbirthdefectsorotherreproductiveharm.
TRAINING
• Read,understand,andfollowall instructionson themachineand
in themanual(s)beforeattemptingtoassembleandoperate.
Keepthis manualina safeplaceforfutureand regularreference
andfororderingreplacementparts.
• Readthe Operator'sManualandfollowallwarningsandsafety
instructions.Failuretodosocan resultin seriousinjuryto the
operatorand/orbystanders.
• Befamiliarwithall controlsandtheir properoperation.Knowhow
tostopthe machineanddisengagethemquickly.
• Neverallowchildrenunder16yearsofagetooperatethis
machine.Children16andovershouldreadandunderstandthe
instructionsandsafeoperationpracticesin thismanualandon
themachineandbe trainedandsupervisedbyanadult.
• Neverallowadultsto operatethismachinewithoutproper
instruction.
• Keepbystanders,pets,andchildrenat least75feetfromthe
machinewhileit isin operation.Stopmachineifanyoneenters
thearea.
• Neverrunanengineindoorsorina poorlyventilatedarea.Engine
exhaustcontainscarbonmonoxide,anodorlessanddeadlygas.
• Donot puthandsandfeetnearrotatingpartsorinthefeeding
chambersanddischargeopening.Contactwiththerotating
impellercanamputatefingers,hands,andfeet.
• Neverattempttounclogeitherthefeedintakeordischarge
opening,removeor emptybag,or inspectand repairthemachine
whilethe engineisrunning.Shutthe engineoff andwaituntilall
movingpartshavecometo a completestop.Disconnectthe spark
plugwireandgroundit againsttheengine.
Your Responsibility--Restrict theuseofthispowermachineto
personswhoread,understandandfollowthewarningsandinstruc-
tionsinthismanualandon the machine.
SAVETHESEINSTRUCTIONS!
PREPARATION
• Thoroughlyinspecttheareawherethe equipmentisto beused.
Removeall rocks,bottles,cans,or otherforeignobjectswhich
couldbepickedupor thrownandcausepersonalinjuryor
damageto themachine.
• Alwayswearsafetyglassesorsafetygogglesduringoperation
andwhileperformingan adjustmentorrepair,to protectyour
eyes.Thrownobjectswhichricochetcancauseseriousinjuryto
theeyes.
• Wearsturdy,rough-soledworkshoesandclose-fittingslacksand
shirts.Loosefittingclothesorjewelrycan becaughtin movable
parts.Neveroperatethismachineinbarefeetorsandals.Wear
leatherworkgloveswhenfeedingmaterialinthe chipperchute.
• Beforestarting,checkallboltsandscrewsforpropertightnessto
besurethe machineisinsafeworkingcondition.Also,visually
inspectmachinefor anydamageatfrequentintervals.
• Maintainor replacesafetyandinstructionslabels,asnecessary.
3
SafeHandling of Gasoline:
Toavoidpersonalinjuryor propertydamageuseextremecarein
handlinggasoline.Gasolineisextremelyflammableandthe vaporsare
explosive.Seriouspersonalinjurycan occurwhengasolineisspilled
onyourselforyourclotheswhichcan ignite.Washyourskinand
changeclothesimmediately.
• Useonlyan approvedgasolinecontainer.
• Neverfillcontainersinsidea vehicleor ona truckor trailerbed
witha plasticliner.Alwaysplacecontainersonthe groundaway
fromyourvehiclebeforefilling.
• Whenpractical,removegas-poweredequipmentfromthetruck
ortrailerand refuelitonthe ground.Ifthisis notpossible,then
refuelsuchequipmentona trailerwitha portablecontainer,rather
thanfroma gasolinedispensernozzle.
• Keepthenozzleincontactwiththerimof thefuel tankor
containeropeningatalltimes untilfuelingiscomplete.Donotuse
a nozzlelock-opendevice.
• Extinguishallcigarettes,cigars,pipesandothersourcesof
ignition.
• Neverfuelmachineindoors.
• Neverremovegascapor addfuelwhiletheengineishotor run-
ning.Allowenginetocool atleasttwo minutesbeforerefueling.
• Neveroverfill fueltank. Filltankto nomorethan1/2inchbelow
bottomoffillerneckto allowspacefor fuelexpansion.
• Replacegasolinecapandtightensecurely.
• Ifgasolineisspilled,wipeitoff theengineandequipment.Move
unitto anotherarea.Wait5 minutesbeforestartingtheengine.
• Toreducefirehazards,keepmachinefreeofgrass,leaves,or
otherdebrisbuild-up.Cleanupoil orfuelspillageand removeany
fuelsoakeddebris.
• Neverstorethemachineorfuel containerinsidewherethereisan
openflame,sparkor pilotlightas on awaterheater,spaceheater,
furnace,clothesdryerorothergasappliances.
OPERATION
• Donot puthandsandfeetnearrotatingpartsorinthefeeding
chambersanddischargeopening.Contactwiththerotating
impellercanamputatefingers,hands,andfeet.
• Beforestartingthemachine,makesurethechipperchute,feed
intake,andcuttingchamberare emptyandfreeofall debris.
• Thoroughlyinspectallmaterialtobe shreddedandremoveany
metal,rocks,bottles,cans,or otherforeignobjectswhichcould
causepersonalinjuryor damagetothemachine.
• If itbecomesnecessaryto pushmaterialthroughtheshredder
hopper,usea smalldiameterstick.Donotuseyourhandsor feet.
• Iftheimpellerstrikesa foreignobjectorifyourmachineshould
startmakinganunusualnoiseorvibration,immediatelyshut
theengineoff. Allowthe impellertocometoa completestop.
Disconnectthe sparkplugwire,grounditagainstthe engineand
performthefollowingsteps:
a. Inspectfordamage.
b. Repairor replaceanydamagedparts.
c. Checkforanyloosepartsandtightento assurecontinued
safeoperation.
• Donotallowanaccumulationof processedmaterialto buildupin
thedischargearea.Thiscanpreventproperdischargeandresult
inkickbackof materialthroughthefeedopening.
• Donotattempttoshredorchipmateriallargerthanspecified
on themachineorinthis manual.Personalinjuryor machine
damagecouldresult.
• Neverattempttounclogeitherthefeedintakeordischarge
openingwhilethe engineisrunning.Shuttheengineoff,waituntil
all movingpartshavestopped,disconnectthesparkplugwireand
grounditagainsttheenginebeforeclearingdebris.
• Neveroperatewithouttheshredderhopper,chipperchute,or
chutedeflectorproperlyattachedtothemachine.Neveremptyor
changedischargebagwhiletheengineis running.
• Keepallguards,deflectorsand safetydevicesinplaceand
operatingproperly.
• Keepyourfaceandbodybackandtothe sideof thechipper
chutewhilefeedingmaterialintothe machineto avoidaccidental
kickbackinjuries.
• Neveroperatethismachinewithoutgoodvisibilityorlight.
• Donotoperatethismachineona paved,gravelor non-level
surface.
• Donotoperatethismachinewhileundertheinfluenceof alcohol
or drugs.
• Mufflerandenginebecomehotandcancausea burn.Donot
touch.
• Neverpick uporcarrymachinewhiletheengineisrunning.
• Ifsituationsoccurwhichare notcoveredinthismanual,usecare
andgoodjudgement.Contact1-800-4-MY-HOMEforthelocation
ofthe nearestSearsParts& RepairServiceCenter.
MAINTENANCE & STORAGE
• Nevertamperwith safetydevices.Checktheirproperoperation
regularly.
• Checkboltsandscrewsfor propertightnessatfrequentintervals
to keepthemachineinsafeworkingcondition.Also,visually
inspectmachineforanydamageandrepair,ifneeded.
• Beforecleaning,repairing,or inspecting,stoptheengineand
makecertaintheimpellerandall movingpartshavestopped.
Disconnectthe sparkplugwireandgrounditagainsttheengine
to preventunintendedstarting.
• Donotchangetheenginegovernorsettingsoroverspeedthe
engine.Thegovernorcontrolsthemaximumsafeoperatingspeed
ofthe engine.
4
• Maintainor replacesafetyandinstructionlabels,asnecessary.
Followthismanualforsafeloading,unloading,transporting,and
storageof thismachine.
Neverstorethemachineorfuel containerinsidewherethereis an
openflame,sparkorpilot lightsuchas a waterheater,furnace,
clothesdryer,etc.
Allowmachinetocoolat least5 minutesbeforestoring.
• Alwaysrefertothe operator'smanualforproperinstructionson
off-seasonstorage.
• If thefuel tankhasto bedrained,dothisoutdoors.
• Observeproperdisposallawsand regulationsforgas,oil,etc.to
protecttheenvironment.
• Accordingtothe ConsumerProductsSafetyCommission(CPSC)
andtheU.S.EnvironmentalProtectionAgency(EPA),thisproduct
hasan AverageUsefulLifeofseven(7)years,or 60hoursof
operation.Atthe endoftheAverageUsefulLife havethemachine
inspectedannuallybyan authorizedservicedealertoensurethat
allmechanicalandsafetysystemsareworkingproperlyand not
wornexcessively.Failureto do socan resultinaccidents,injuries
ordeath.
DO NOT MODIFY ENGINE
Toavoidseriousinjuryordeath,donot modifyenginein anyway.
Tamperingwiththegovernorsettingcan leadto a runawayengineand
causeitto operateat unsafespeeds.Nevertamperwithfactorysetting
ofenginegovernor.
NOTICE REGARDING EMISSIONS
EngineswhicharecertifiedtocomplywithCaliforniaandfederal
EPAemissionregulationsfor SORE(SmallOff RoadEquipment)are
certifiedto operateonregularunleadedgasoline,and mayinclude
thefollowingemissioncontrolsystems:EngineModification(EM),
OxidizingCatalyst(CO),SecondaryAirInjection(SAI)and ThreeWay
Catalyst(TWO)if soequipped.
SPARK ARRESTOR
Thismachineis equippedwithan internalcombustionengineand
shouldnotbe usedonor nearanyunimprovedforest-covered,
brushcoveredor grass-coveredlandunlesstheengine'sexhaust
systemisequippedwitha sparkarrestormeetingapplicablelocalor
statelaws(if any)
Ifa sparkarrestorisused,it shouldbe maintainedin effectiveworking
orderbytheoperator.Inthe StateofCaliforniatheaboveis required
bylaw (Section4442ofthe CaliforniaPublicResourcesCode).Other
statesmayhavesimilarlaws. Federallawsapplyonfederallands.
A sparkarrestorforthe muffleris availablethroughyournearestSears
PartsandRepairServiceCenter.
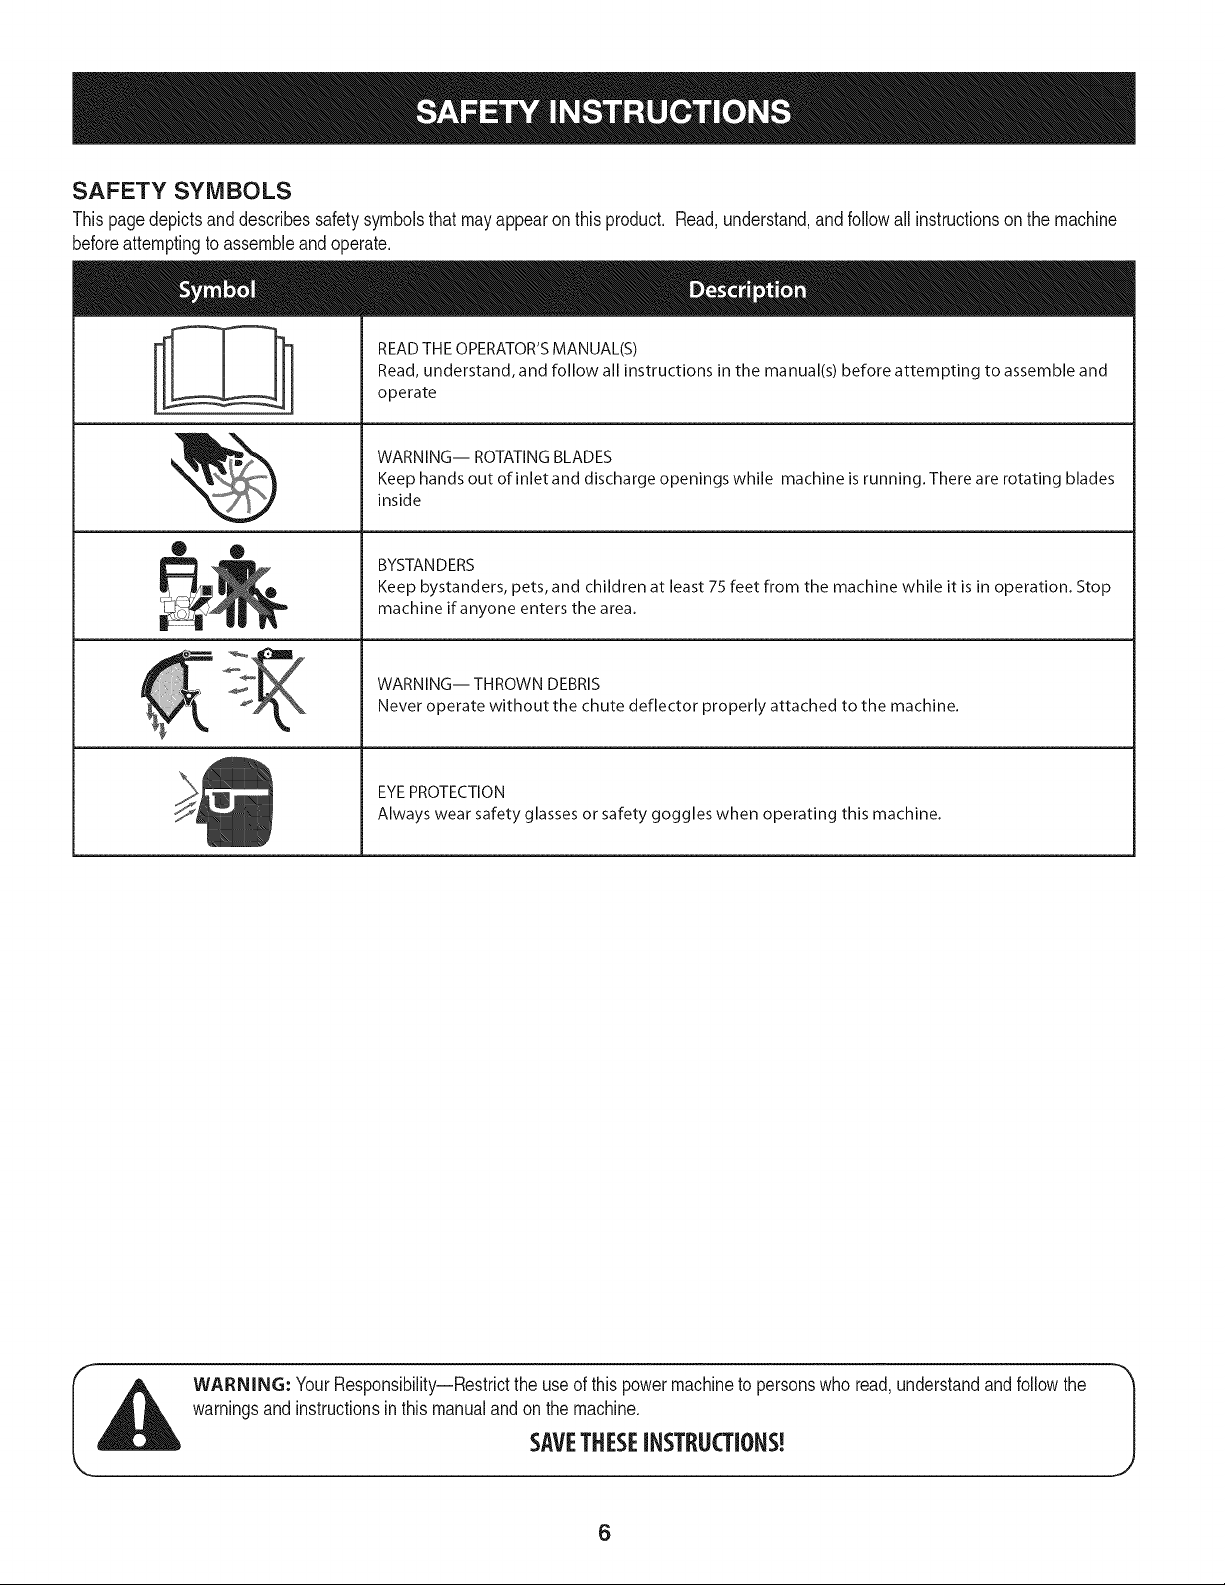
SAFETY SYMBOLS
Thispagedepictsanddescribessafetysymbolsthatmayappearonthisproduct. Read,understand,andfollowallinstructionson the machine
beforeattemptingto assembleandoperate.
READ THE OPERATOR'S MANUAL(S)
i
i
Read, understand, and follow all instructions in the manual(s) before attempting to assemble and
operate
WARNING-- ROTATING BLADES
Keep hands out of inlet and discharge openings while machine is running. There are rotating blades
inside
• ®
il
BYSTANDERS
Keep bystanders, pets, and children at least 75 feet from the machine while it is in operation. Stop
machine if anyone enters the area.
WARNING-- THROWN DEBRIS
Never operate without the chute deflector properly attached to the machine.
EYEPROTECTION
Always wear safety glasses orsafety goggles when operating this machine.
warningsand instructionsinthis manualandonthemachine.
I_ ARNING: YourResponsibility--Restricttheuseofthispowermachineto personswhoread,understandandfollowthe
SAVETHESEINSTRUCTIONS!
6
J
r
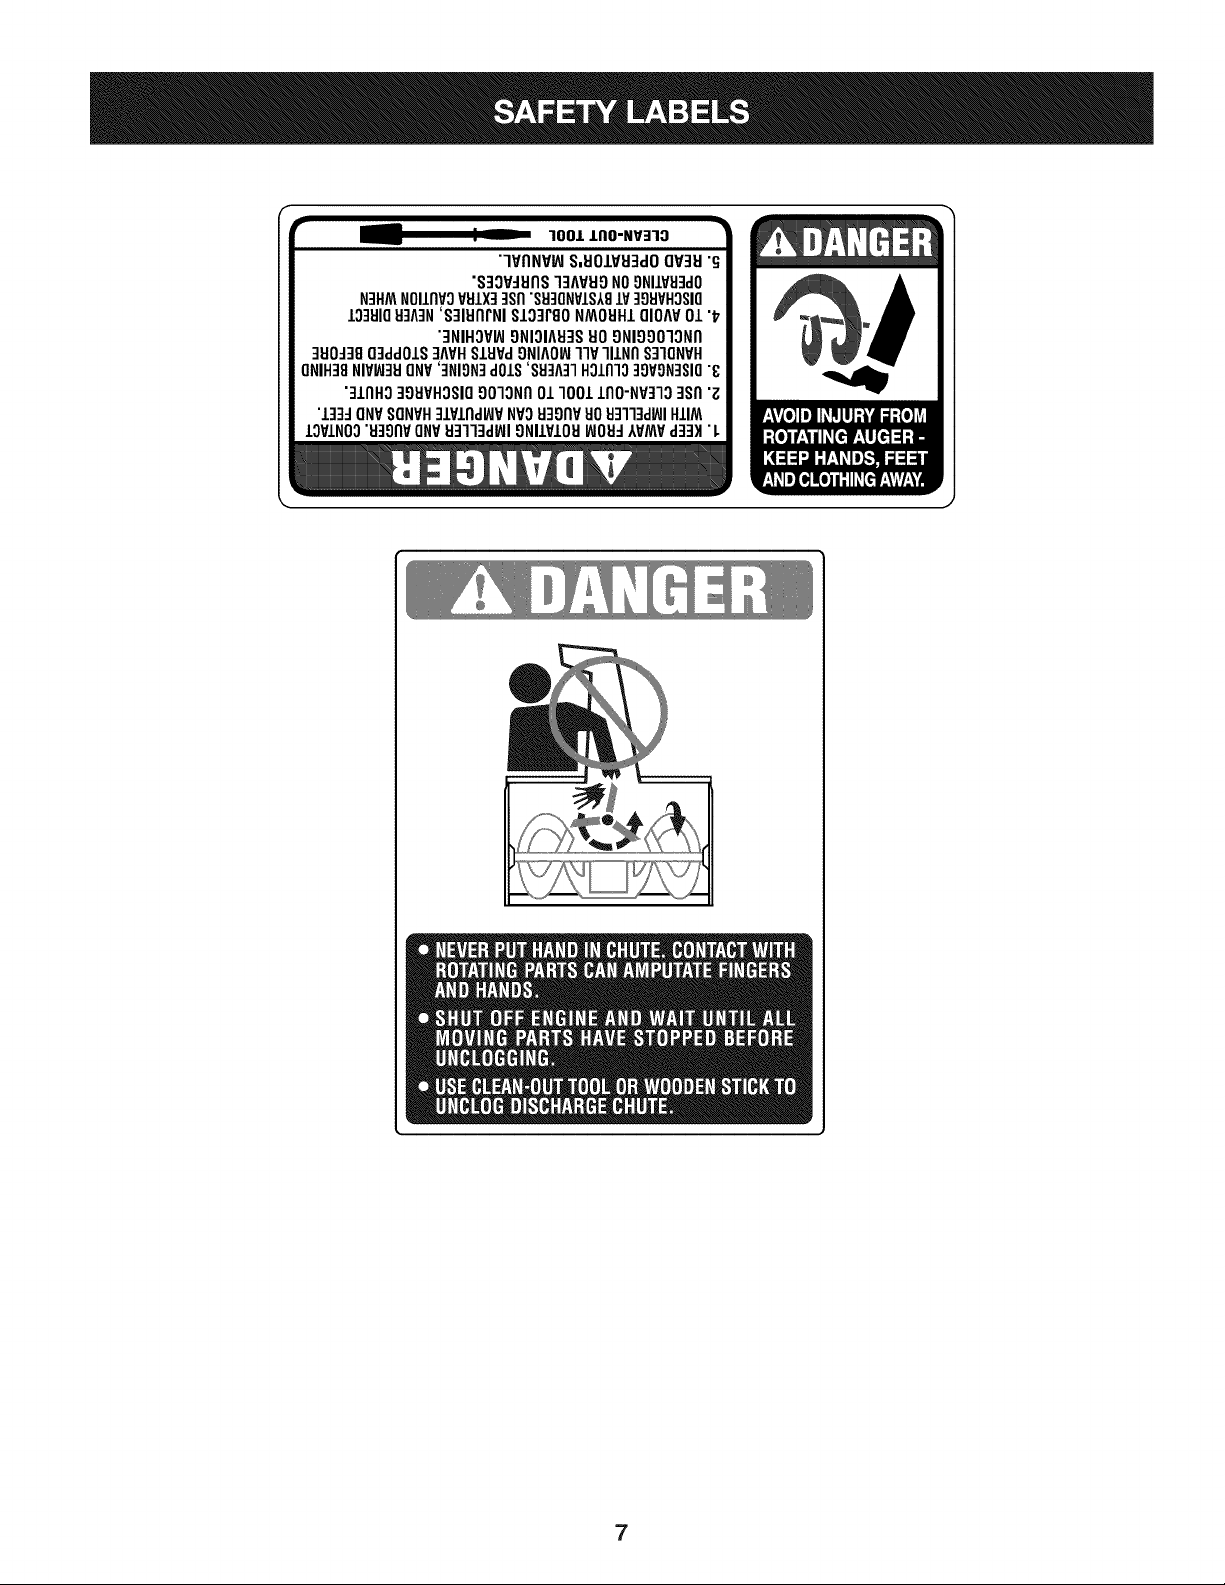
100/.LIIO-NV:IIO
"lVflNV_ S,UOIVU3dOQV3H"G
"S3OV_IJflS]3AVUONO9NIIV_J3dO
N3HMNOIIflVOVSIX]qsfl"S9]ONVIS181V]98VHOSIO
10381083A3N'S]IUflrNI SI03PgoNMOUHIQIOAV01 "_
"3NIHOV_ONIOIA83SUOONIOOO]ONfl
]UO_38O3ddOIS]AVHSlHPd9NIAOW11VlllNfl S]IQNVH
ONIH]8NIVW3UONV']NION]dOlS'88]A]1HOlnlo]9VON]SIO"8
"]lnHg ]gHVHOSIO9010Nfl01 1001lflO-NP]lO ]Sfl "Z
"l]]d ONVSONVH]lPlnd_P NVOH3onvuo Hq]l]d_JIHIIM
IOVINO0"u39npONV_J3113dWI9NllVIOU_JOH_IVMV d]3H"L
7
IMPORTANT:Thisunit isshippedwithoutgasolineoroil intheengine.
Becertaintoserviceenginewithgasolineandoilas instructedinthe
Operationsectionofthis manualbeforeoperatingyourmachine.
NOTE:Referenceto rightand lefthandsideof theChipperShredder
isobservedfromthe operatingposition.
OPENING CARTON
1. Cuteachcornerofthecartonverticallyfromtopto bottom.
2. Removeall looseparts.
3. Removeloosepackingmaterial.
REMOVING UNiT FROM CARTON
1. Liftunitfromthereartodetachitfromunderlyingcartonmaterial
androllunitout ofcarton.
2. Checkcartonthoroughlyforanyotherlooseparts.
LOOSE PARTS IN CARTON
• HopperAssembly
• Bag
• ChuteDeflector
• ChipperChute
• Tamper
• SafetyGlasses
• EngineOil
• Operator'sManual
f
J
Figure1
f
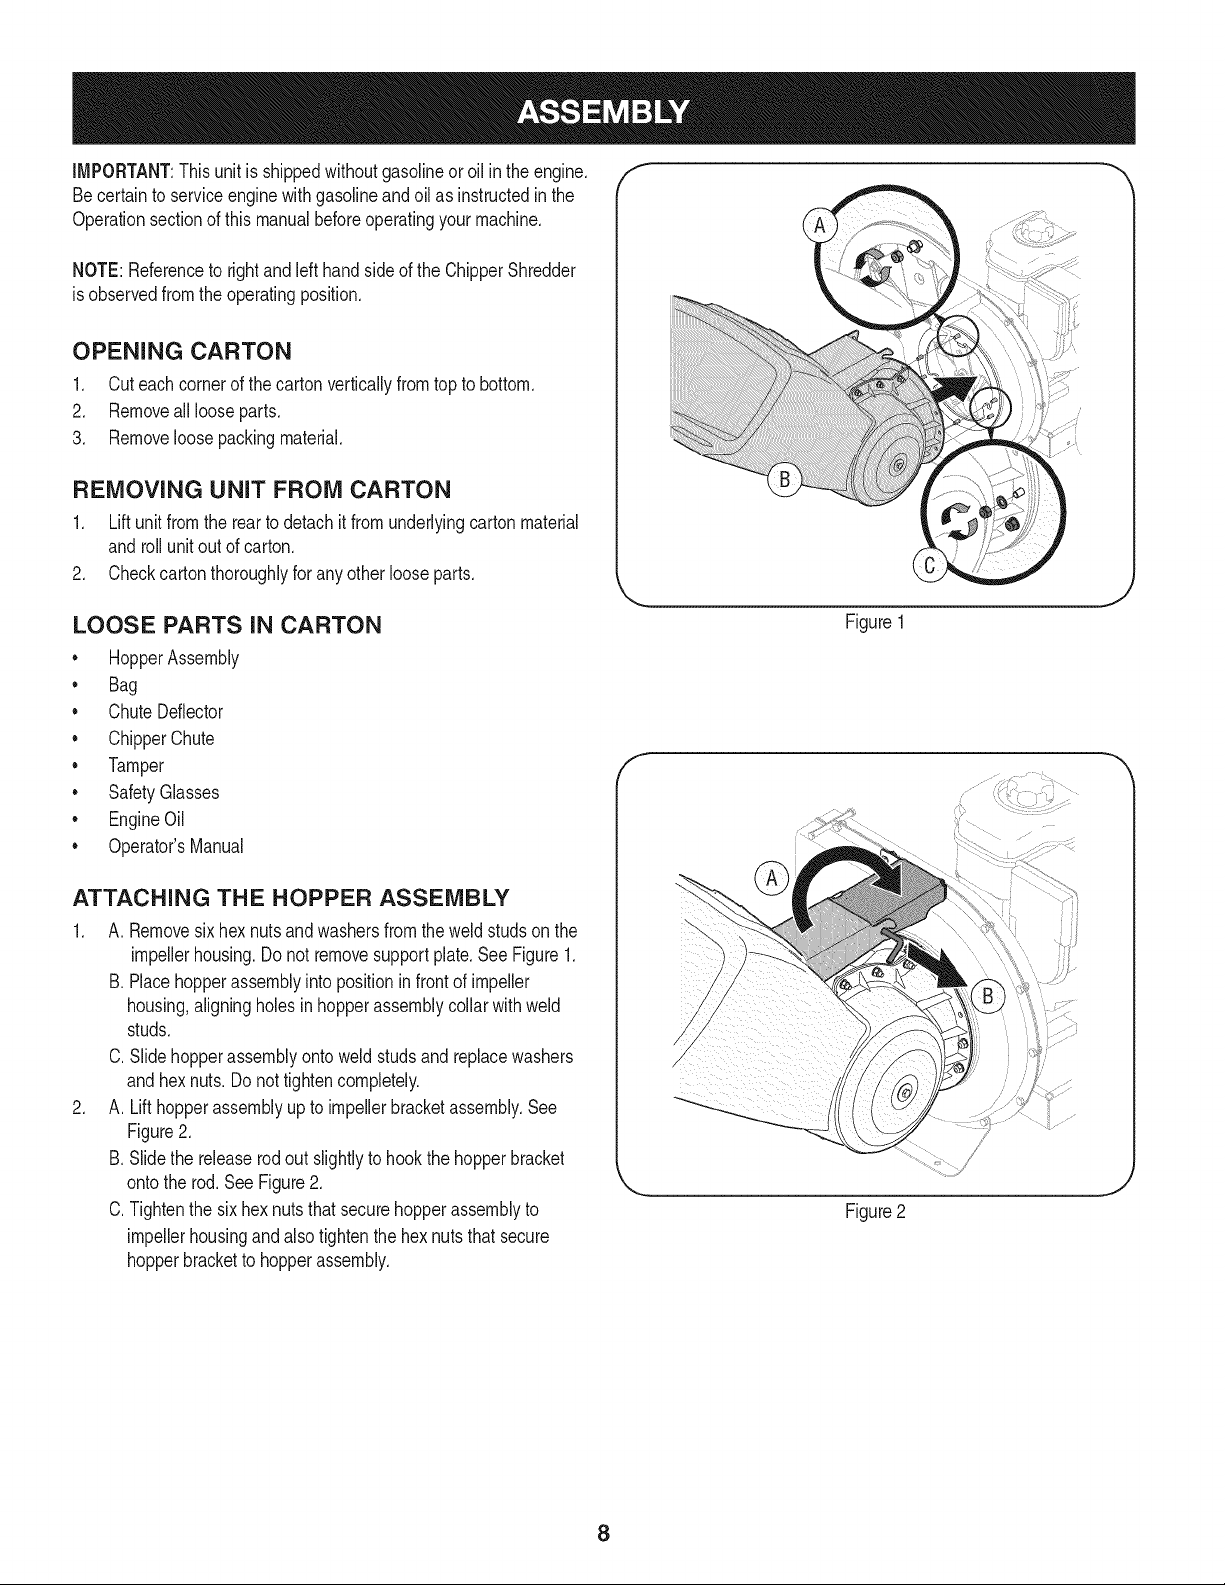
ATTACHING THE HOPPER ASSEMBLY
1. A. Removesixhexnutsandwashersfromtheweldstudson the
impellerhousing.Donotremovesupportplate.SeeFigure1.
B. Placehopperassemblyintopositioninfrontof impeller
housing,aligningholesinhopperassemblycollarwithweld
studs.
C. Slidehopperassemblyontoweldstudsand replacewashers
andhexnuts.Donottightencompletely.
2. A. Lifthopperassemblyuptoimpellerbracketassembly.See
Figure2.
B.Slidethe releaserodout slightlyto hookthe hopperbracket
ontothe rod.SeeFigure2.
C.Tightenthesixhex nutsthatsecurehopperassemblyto
impellerhousingandalsotightenthe hexnutsthat secure
hopperbracketto hopperassembly.
Figure2
8
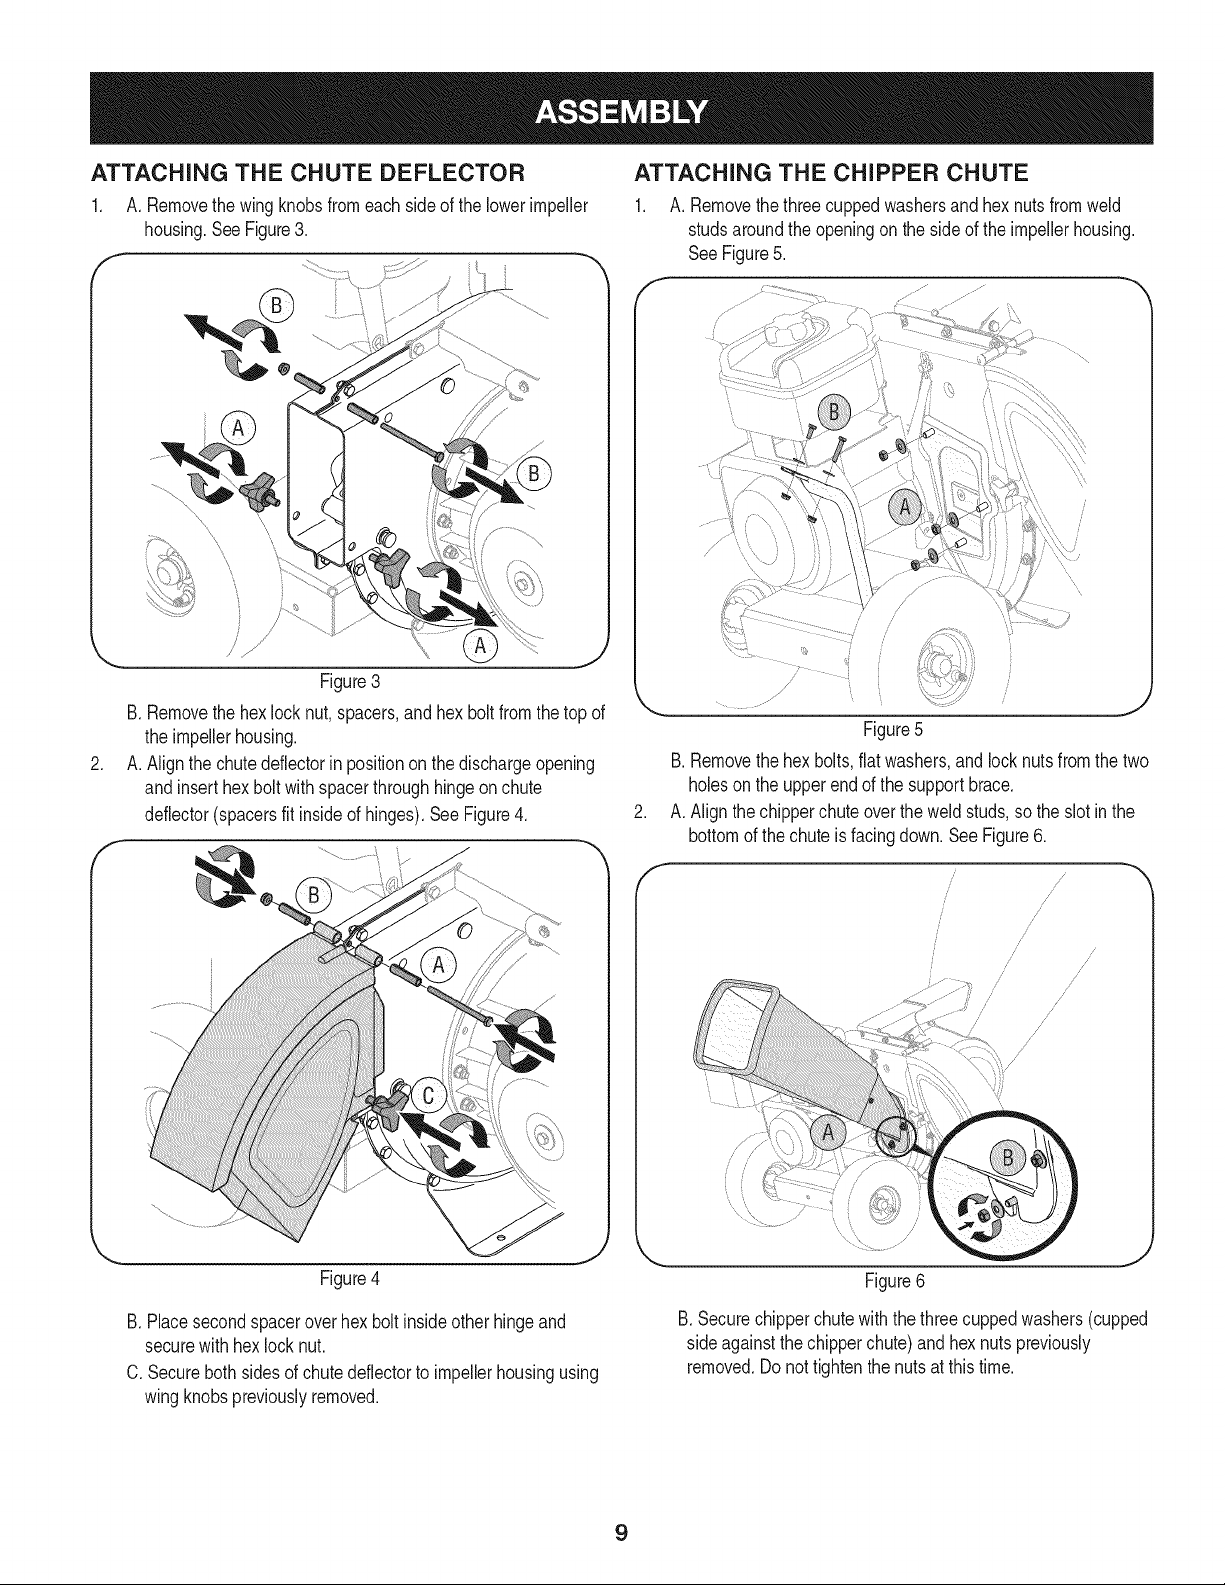
ATTACHING THE CHUTE DEFLECTOR
1. A. Removethewingknobsfromeachsideof thelowerimpeller
housing.SeeFigure3.
Figure3
B.Removethehexlocknut,spacers,andhexboltfromthetopof
theimpellerhousing.
.
A.Alignthe chutedeflectorinpositiononthe dischargeopening
andinserthexbolt withspacerthroughhingeonchute
deflector(spacersfit insideof hinges).SeeFigure4.
f
ATTACHING THE CHIPPER CHUTE
1. A. Removethethreecuppedwashersandhexnutsfromweld
studsaroundtheopeningontheside ofthe impellerhousing.
SeeFigure5.
Figure5
B.Removethehex bolts,flatwashers andlocknutsfromthetwo
holesonthe upperendofthe supportbrace.
A.Alignthechipperchuteovertheweldstuds,sothe slotinthe
bottomofthechuteis facingdown.SeeFigure6.
f
i
i
/
i
/
/
/ i"
/ ,/
/ /s
/
/
/
/
/
/
/
/
/
/ /
i
/
/
/
J
Figure4
B.Placesecondspaceroverhex boltinsideotherhingeand
securewithhexlocknut.
C. Securebothsidesofchutedeflectorto impellerhousingusing
wingknobspreviouslyremoved.
/
/ ,
/ /
J
Figure6
B.Securechipperchutewiththethreecuppedwashers(cupped
sideagainstthe chipperchute)andhex nutspreviously
removed.Donottightenthe nutsatthistime.
9
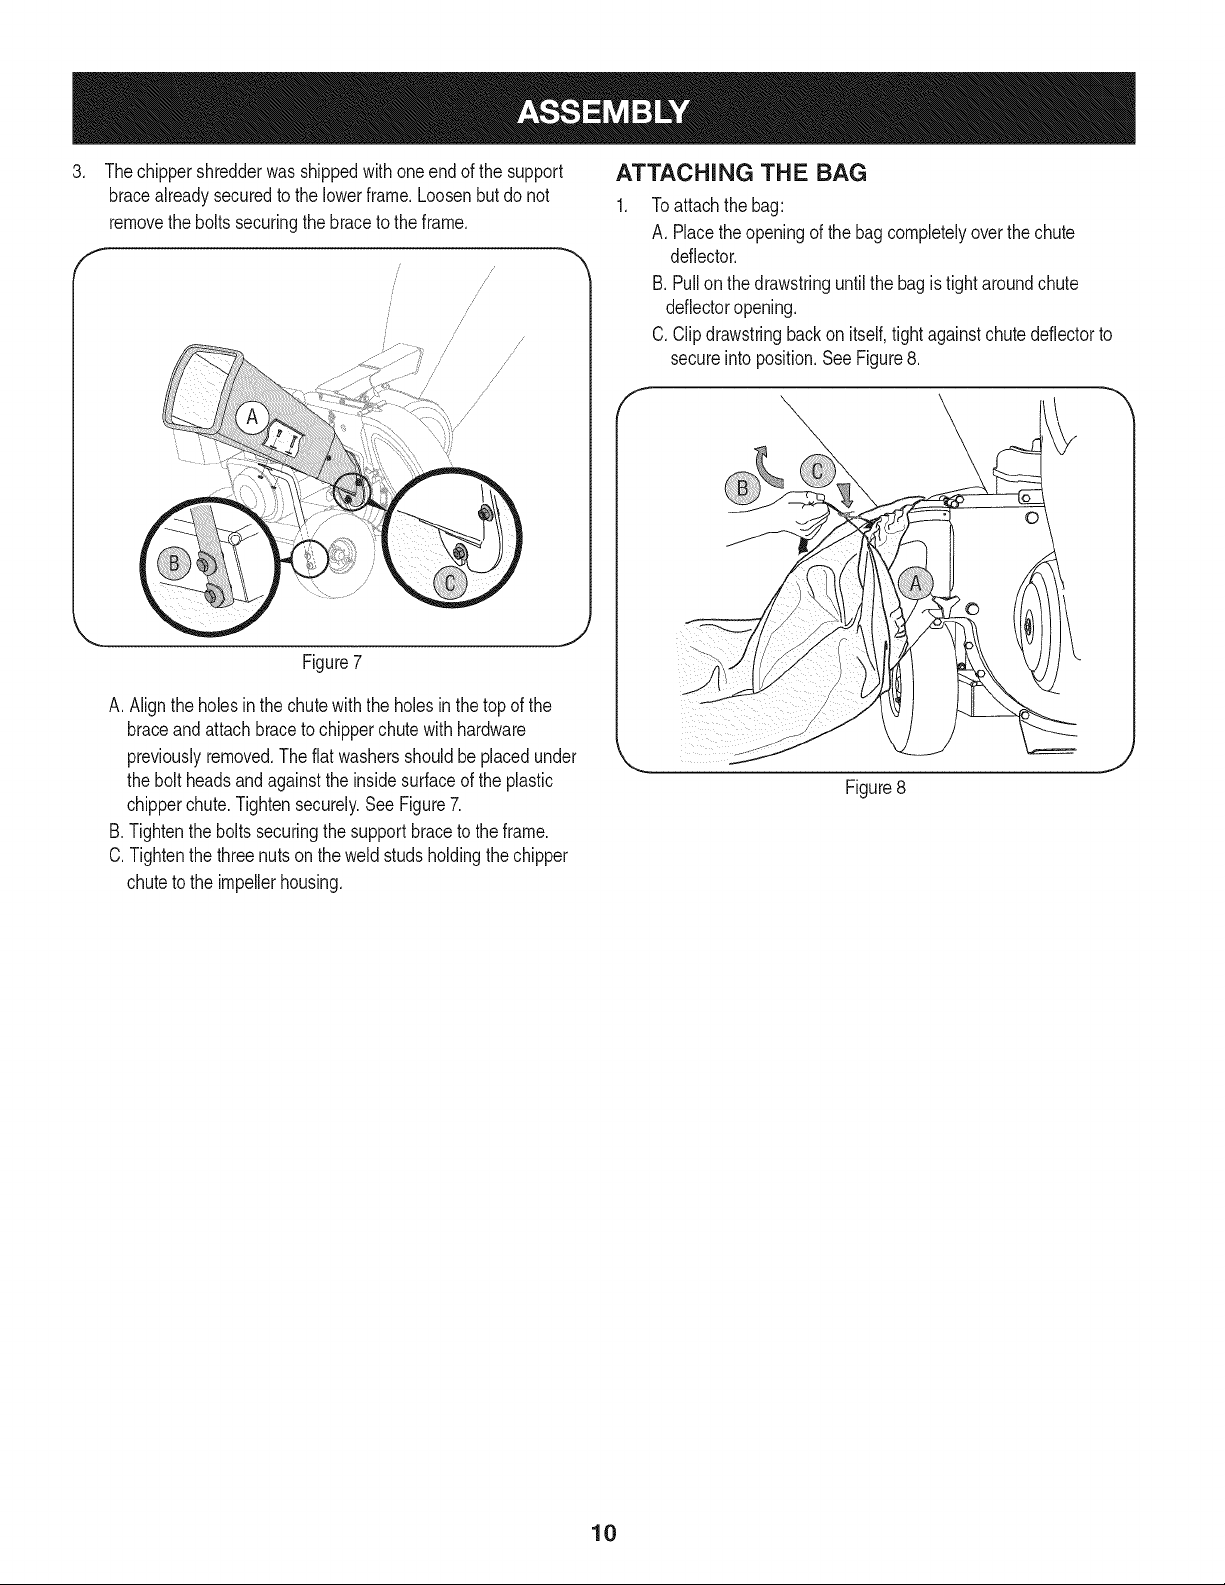
.
Thechippershredderwasshippedwithoneendofthesupport
bracealreadysecuredtothe lowerframe.Loosenbutdo not
removetheboltssecuringthe braceto theframe.
Figure7
A.Alignthe holesinthe chutewiththeholesinthetop ofthe
braceandattachbraceto chipperchutewithhardware
previouslyremoved.Theflatwashersshouldbeplacedunder
thebolt headsandagainstthe insidesurfaceofthe plastic
chipperchute.Tightensecurely.SeeFigure7.
B.Tightenthe boltssecuringthesupportbracetothe frame.
C.Tightenthethreenutsontheweld studsholdingthechipper
chutetothe impellerhousing.
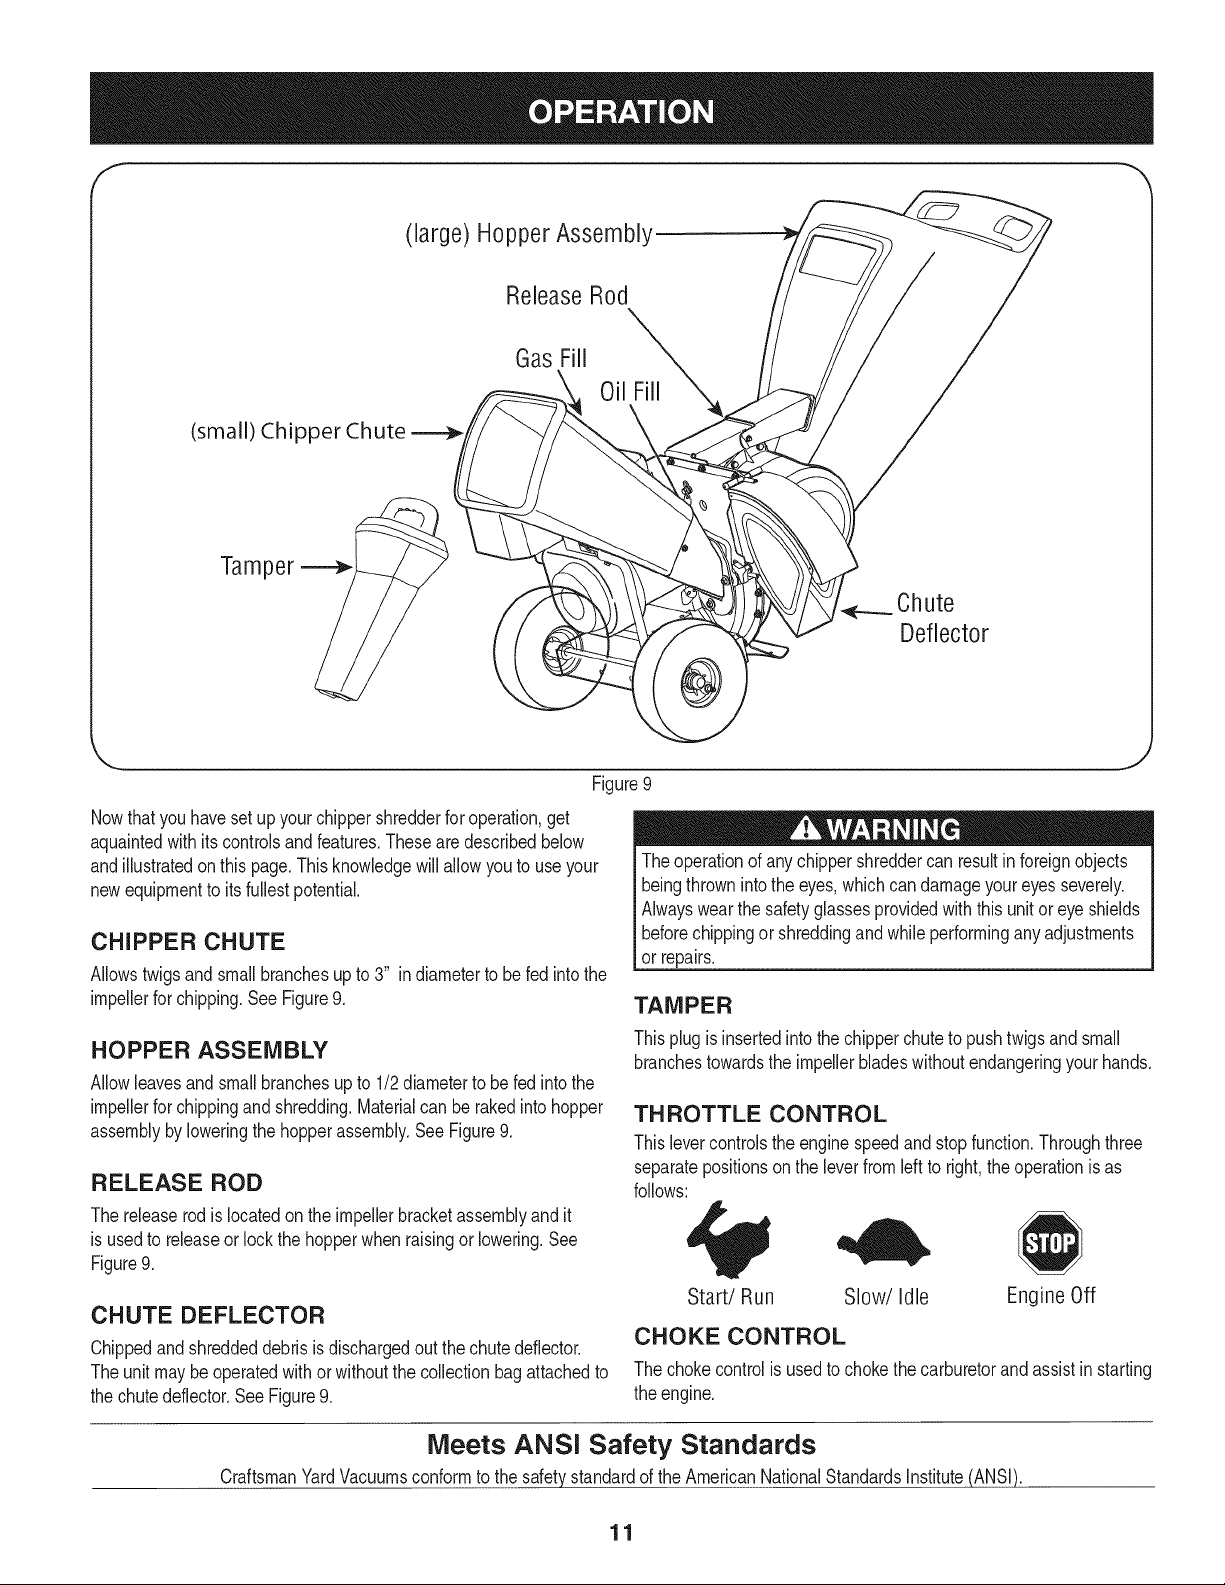
ATTACHING THE BAG
Toattachthebag:
A. Placetheopeningof thebagcompletelyoverthechute
deflector.
B.Pullon the drawstringuntilthebagis tightaroundchute
deflectoropening.
C.Clipdrawstringbackon itself,tightagainstchutedeflectorto
secureintoposition.SeeFigure8.
f
J
Figure8
10
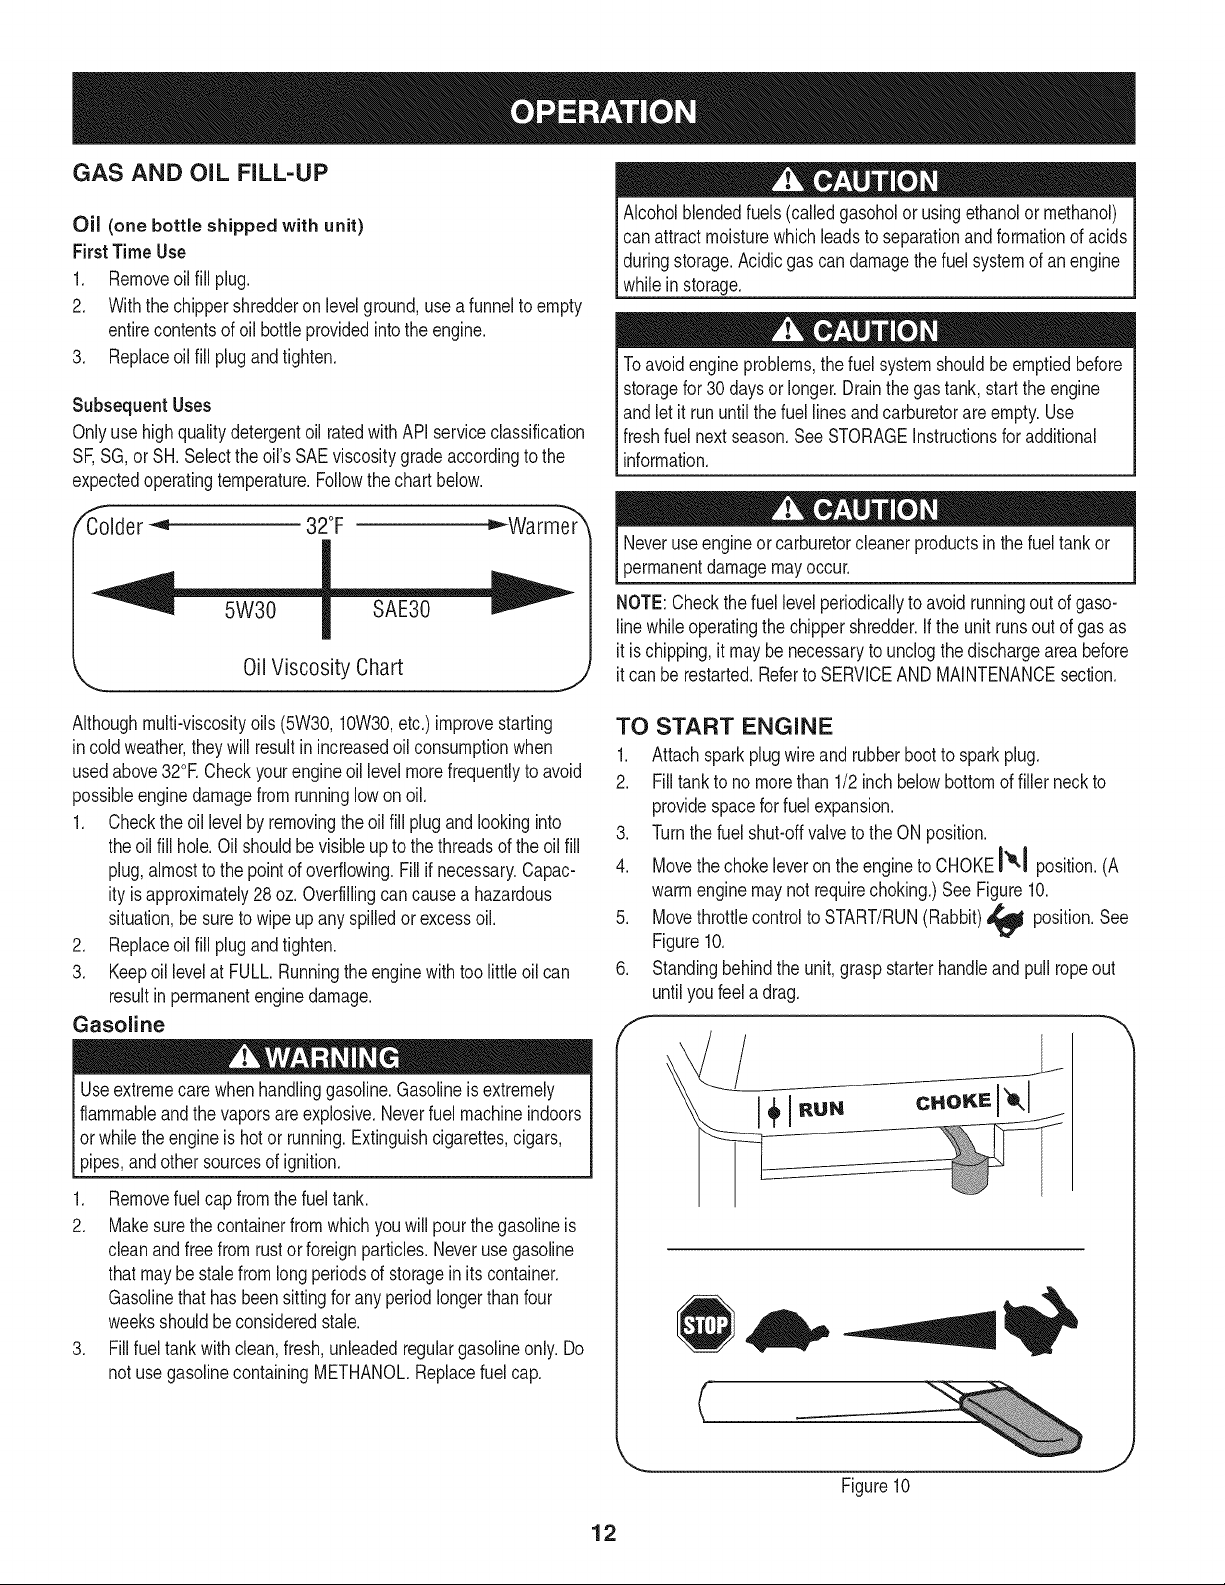
(large) Hopper Assembly
ReleaseRod
GasFill
(small) Chipper Chute
Tamper--=_
Figure9
Nowthatyouhavesetupyourchippershredderforoperation,get
aquaintedwithits controlsandfeatures.Theseare describedbelow
andillustratedon thispage.Thisknowledgewillallowyouto useyour
newequipmenttoits fullestpotential.
CHIPPER CHUTE
Allowstwigsandsmallbranchesupto 3" indiametertobefed intothe
impellerforchipping.SeeFigure9.
HOPPER ASSEMBLY
Allowleavesandsmallbranchesupto 1/2diameterto befedintothe
impellerforchippingandshredding.Materialcanberakedintohopper
assemblybyloweringthehopperassembly.SeeFigure9.
RELEASE ROD
Thereleaserodislocatedon the impellerbracketassemblyandit
isusedto releaseorlockthehopperwhen raisingorlowering.See
Figure9.
CHUTE DEFLECTOR
Chippedandshreddeddebrisis dischargedoutthechutedeflector.
Theunit maybeoperatedwithorwithoutthecollectionbagattachedto
thechutedeflector.SeeFigure9.
Chute
Deflector
@
Theoperationof anychippershreddercan resultinforeignobjects
beingthrownintothe eyes,whichcan damageyoureyesseverely.
Alwayswearthesafetyglassesprovidedwiththisunitor eyeshields
beforechippingor shreddingandwhileperforminganyadjustments
or repairs.
TAMPER
Thisplugisinsertedinto thechipperchuteto pushtwigsandsmall
branchestowardstheimpellerbladeswithoutendangeringyour hands.
TH ROTTLE CONTROL
Thislevercontrolstheenginespeedandstopfunction.Throughthree
separatepositionsonthe leverfromleftto right,theoperationisas
follows:
Start/Run Slow/Idle Engine Off
CHOKE CONTROL
Thechokecontrolis usedto chokethecarburetorand assistinstarting
theengine.
Meets ANSI Safety Standards
CraftsmanYardVacuumsconformto thesafetystandardoftheAmericanNationalStandardsInstitute(ANSI).
11
GAS AND OIL FILL-UP
Oil (one bottle shipped with unit)
FirstTimeUse
1. Removeoil fill plug.
2. Withthechippershredderonlevelground,useafunneltoempty
entirecontentsofoil bottleprovidedintotheengine.
3. Replaceoilfillplugandtighten.
Subsequent Uses
Onlyuse highqualitydetergentoil ratedwithAPIserviceclassification
SF,SG,or SH.Selectthe oil'sSAEviscositygradeaccordingtothe
expectedoperatingtemperature.Followthechartbelow.
_older _ 32°F _Warmer'_
OilViscosity Chart
Althoughmulti-viscosityoils (5W30,10W30,etc.)improvestarting
incoldweather,theywillresultinincreasedoilconsumptionwhen
usedabove32°E Checkyourengineoillevelmorefrequentlytoavoid
possibleenginedamagefromrunninglowon oil.
1. Checktheoillevelbyremovingtheoilfill plugandlookinginto
theoil fill hole.Oil shouldbevisibleup tothethreadsof theoil fill
plug,almosttothe pointof overflowing.Fillif necessary.Capac-
ity isapproximately28 oz.Overfillingcancausea hazardous
situation,be sureto wipeup anyspilledor excessoil.
2. Replaceoilfillplugandtighten.
3. KeepoillevelatFULL.Runningtheenginewithtoolittleoilcan
resultinpermanentenginedamage.
Gasoline
J
Alcoholblendedfuels(calledgasoholorusingethanolormethanol)
canattractmoisturewhichleadsto separationand formationof acids
duringstorage.Acidicgascandamagethefuel systemofanengine
whileinstorage.
Toavoidengineproblems,thefuelsystemshouldbeemptiedbefore
storagefor30daysorlonger.Drainthegastank,starttheengine
andletit rununtilthe fuellinesandcarburetorare empty.Use
freshfuelnextseason.See STORAGEInstructionsforadditional
information.
Neveruseengineorcarburetorcleanerproductsinthe fueltankor
permanentdamagemayoccur.
NOTE:Checkthefuel levelperiodicallyto avoidrunningoutofgaso-
linewhileoperatingthechippershredder.Iftheunit runsout ofgas as
itischipping,itmaybe necessarytounclogthedischargeareabefore
itcan be restarted.RefertoSERVICEANDMAINTENANCEsection.
TO START ENGINE
1. Attach sparkplugwireand rubberboottosparkplug.
2. Filltankto nomorethan 1/2inchbelowbottomoffiller neckto
providespaceforfuelexpansion.
3. Turnthefuelshut-offvalvetotheONposition.
4. MovethechokeleverontheenginetoCHOKEI'_1 position.(A
warmenginemaynotrequirechoking.)See Figure10.
5. MovethrottlecontroltoSTART/RUN(Rabbit)_ position.See
Figure10.
6. Standingbehindtheunit,graspstarterhandleandpullropeout
untilyoufeela drag.
f
Useextremecarewhenhandlinggasoline.Gasolineisextremely
flammableandthe vaporsareexplosive.Neverfuelmachineindoors
orwhilethe engineishotor running.Extinguishcigarettes,cigars,
pipes,andothersourcesof ignition.
1. Removefuelcapfromthefueltank.
2. Makesurethecontainerfromwhichyouwillpourthegasolineis
cleanandfreefromrustor foreignparticles.Neverusegasoline
thatmaybestalefromlongperiodsofstorageinitscontainer.
Gasolinethathasbeensittingfor anyperiodlongerthanfour
weeksshouldbeconsideredstale.
3. Fillfueltankwithclean,fresh,unleadedregulargasolineonly.Do
notusegasolinecontainingMETHANOL.Replacefuelcap.
J
Figure10
12

NOTE:Youwill heara noiseas theenginefindsthe startof the
compressioncycle.Thenoiseiscausedby thechippingandshredding
flails,andyouwillhearit untiltheengineimpellerreachesfullspeed.
7. Pulltheropewitha rapid,continuous,fullarmstroke.Keepa firm
griponthestarterhandle.Lettheroperewindslowly.
8. Repeat,ifnecessary,untilenginestarts.Whenenginestarts,
movechokecontrolgraduallytowardtheRUNI JtIposition..
9. Ifenginefalters,movechokecontrolbacktowardtheCHOKE
I'o,I positionandrepeatsteps5 though8.
10. ALWAYSkeepthethrottlecontrolin theSTART/RUNposition
whenoperatingthechippershredder.
TO STOP ENGINE
1. Movethrottlecontrolleverto slow(turtle)'_ position.
Wheneverpossible,graduallyreduceenginespeedbefore
stoppingengine.
2. MovethrottlecontrollevertoSTOPI or OFFposition.
3. Turnthefuelshut-offvalvetotheOFFposition.
4. Disconnectsparkplugwireandgrounditagainsttheengineto
preventaccidentalstartingwhilethe equipmentisunattended.
SHREDDING
Yardwastesuchas leavesandpineneedlescanbe placedinthe
hopperforshredding.Aftermaterialhasbeenprocessedbythe shred-
derbladeandflails,it willbeforcedout ofthe chutedeflector,and,if
attached,intoadebriscollectionbag.
Observethefollowingguidelineswhenshreddingyarddebris:
• Neverattempttoshredmaterialotherthan normalyarddebris
(leaves,twigs,pinecones,etc.).
• Avoidshreddingfibrousplantssuchastomatovines,palmfronds,
etc.,untiltheyare thoroughlydriedout.Freshvinesdo notshred
wellandtend towrapthemselvesaroundthe impellerandflails.
• Placereasonableamountsofdebrisintothehopperat a time.Do
notoverloadthehopper.
• Allowthe materialin thehopperto bedrawnintothebladesand
shreddedbeforeaddingadditionaldebristothe hopper.Failureto
duesomayresultin acloggedhopper,cloggedchutedeflectoror
a stalledengine.
CHIPPING
Branchesupto3" in diametercanbefedintothechipperchute.
Observethefollowingguidelineswhenchippingbranches:
• Keepbothhandsfirmlyonthe branchas youfeed itintothe
chipperchute.
• Neverfeedmorethanonebranchintothechipperchuteata time.
• Neverfeedanythingotherthanbranches(orwood)intothe
chipperchute.
• Applyintermittentpressure(force,inshortpulses)whilefeeding
larger(3-inchdiameter)branchesinto thechipperchute,to avoid
boggingor stallingtheengine.
IMPORTANT:Neverfeedbrancheswitha diametergreaterthan
three(3)inchesintothechipperchute.Doingsocan resultin serious
damageto yourunit'schipperblades,flailsor impeller.
NOTE:Forbestperformance,alwaysoperatetheunitwith sharp
chipperblades.If a noticeablelossin performanceisencountered
whilechippingbranches,the chipperbladesshouldbereplaced.
LOWERING THE HOPPER ASSEMBLY
1. Withonehandgraspthehandleat thetopofthe hopperassem-
blyandlift slightly.
2. Withtheotherhandpulloutonthereleaserodandlowerthe
hopperassemblytotheground.
TO EMPTY BAG
1. Un-clipdrawstringandloosenbagfromchutedeflectoropening.
2. Emptybagandreattachtothedischargechuteopening.Pullon
thedrawstringuntilthe bagistightaroundthe chuteopeningand
clipthe drawstringtightagainstthe chutedeflector.
IMPORTANT:Theflailscreenislocatedinsidethehousinginthe
dischargearea.Ifthe flailscreenbecomesclogged,removeand
cleanas instructedintheServiceandMaintenancesection.Forbest
performance,itis alsoimportanttokeepthechipperbladessharp.
13
MAINTENANCE SCHEDULE
Beforeperforminganytypeofmaintenance/service,disengageall
controlsandstoptheengine.Waituntilallmovingpartshavecometo
acompletestop.Disconnectsparkplugwireandgrounditagainstthe
enginetopreventunintendedstarting.Alwayswearsafetyglassesduring
operationor whileperforminganyadjustmentsor repairs.
EachUse
1st5 - 8 hours
25 hours
Annuallyor50hours
Annuallyor100hours
BeforeStorage 1. Fuelsystem
Underheavyloador inhightemperatures
.
Engineoillevel
2.
Looseormissinghardware
3.
Unitandengine.
1.
Engineoil
1.
Engineoill-
2.
Aircleaner
3.
Controllinkagesand pivots
1.
Engineoil
2.
Muffler
1.
Sparkplug
1. Check
2. Tightenorreplace
3. Clean
1. Change
1. Change
2. Replace
3. Lubewithlightoil
1. Change
2. Inspect
1. Clean,checkand resetgap,or
1. Runengineuntilit stopsfromlackof
Followthemaintenanceschedulegivenbelow.Thischartdescribes
serviceguidelinesonly.UsetheServiceLogcolumnto keeptrackof
completedmaintenancetasks.To locatethe nearest Sears Service
Centeror toscheduleservice,simplycontactSearsat
1-800-4-MY-HOME®.
replacesparkplug.
fueloradda gasolineadditivetothe
gasin thetank.
Alwaysstopengineanddisconnectsparkplugwire beforeperforming
Ianymaintenanceoradjustments.Alwayswearsafetyglassesduring
_operationor whileperforminganyadjustmentsor repairs.
GENERAL RECOMMENDATIONS
• Alwaysobserveallsafetyrulesfoundonproductlabelsandin
thisoperator'smanualwhenperforminganymaintenance.Safety
rulescan befoundonthe productlabelsandin thisOperator's
Manualbeginningon page3.
• Thewarrantyon thischippershredderdoesnotcoveritemsthat
havebeensubjectedtooperatorabuseor negligence.To receive
fullvalue fromwarranty,operatormustmaintaintheequipmentas
instructedhere.
• Someadjustmentswillhavetobe madeperiodicallytomaintain
yourunit properly.
• Periodicallycheckall fastenersandmakesurethesearetight.
ENGINE MAINTENANCE
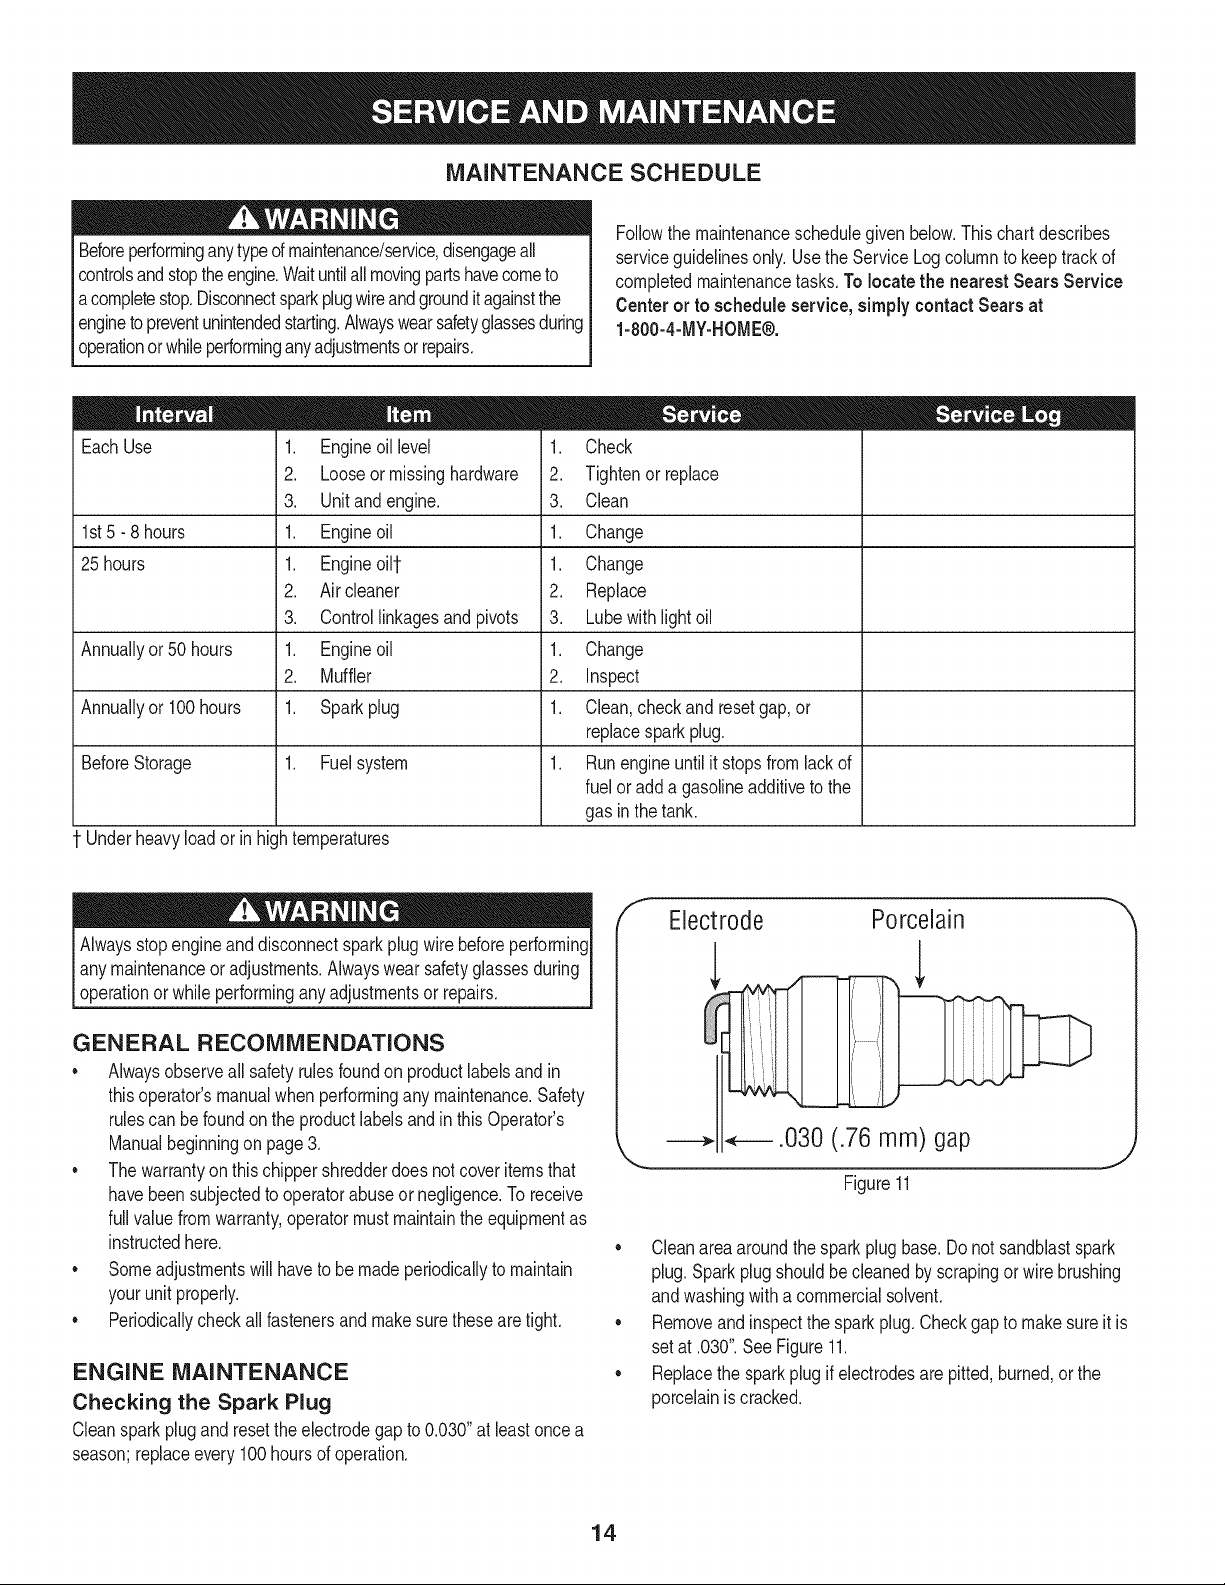
Checking the Spark Plug
Cleansparkplugandresettheelectrodegapto0.030"atleastoncea
season;replaceevery100hoursof operation.
f
Electrode
Porcelain
,L
.030 (.76 mm) gap
Figure 11
• Cleanareaaroundthe sparkplugbase.Donotsandblastspark
plug.Sparkplugshouldbecleanedbyscrapingorwirebrushing
andwashingwitha commercialsolvent.
Removeandinspectthesparkplug.Checkgapto makesureit is
setat .030".SeeFigure11.
Replacethesparkplugif electrodesarepitted,burned,orthe
porcelainiscracked.
14
Servicing the Air Cleaner
Donotusepressurizedairor solventstocleantheaircleaner
cartridge.
Theair cleanerpreventsdamagingdirt, dust,etc.,fromenteringthe
carburetorand beingforcedintothe engineandisimportanttoengine
lifeandperformance.Neverrunthe enginewithoutanaircleaner
completelyassembled.
Replacetheaircleanerevery25 hoursof operation.
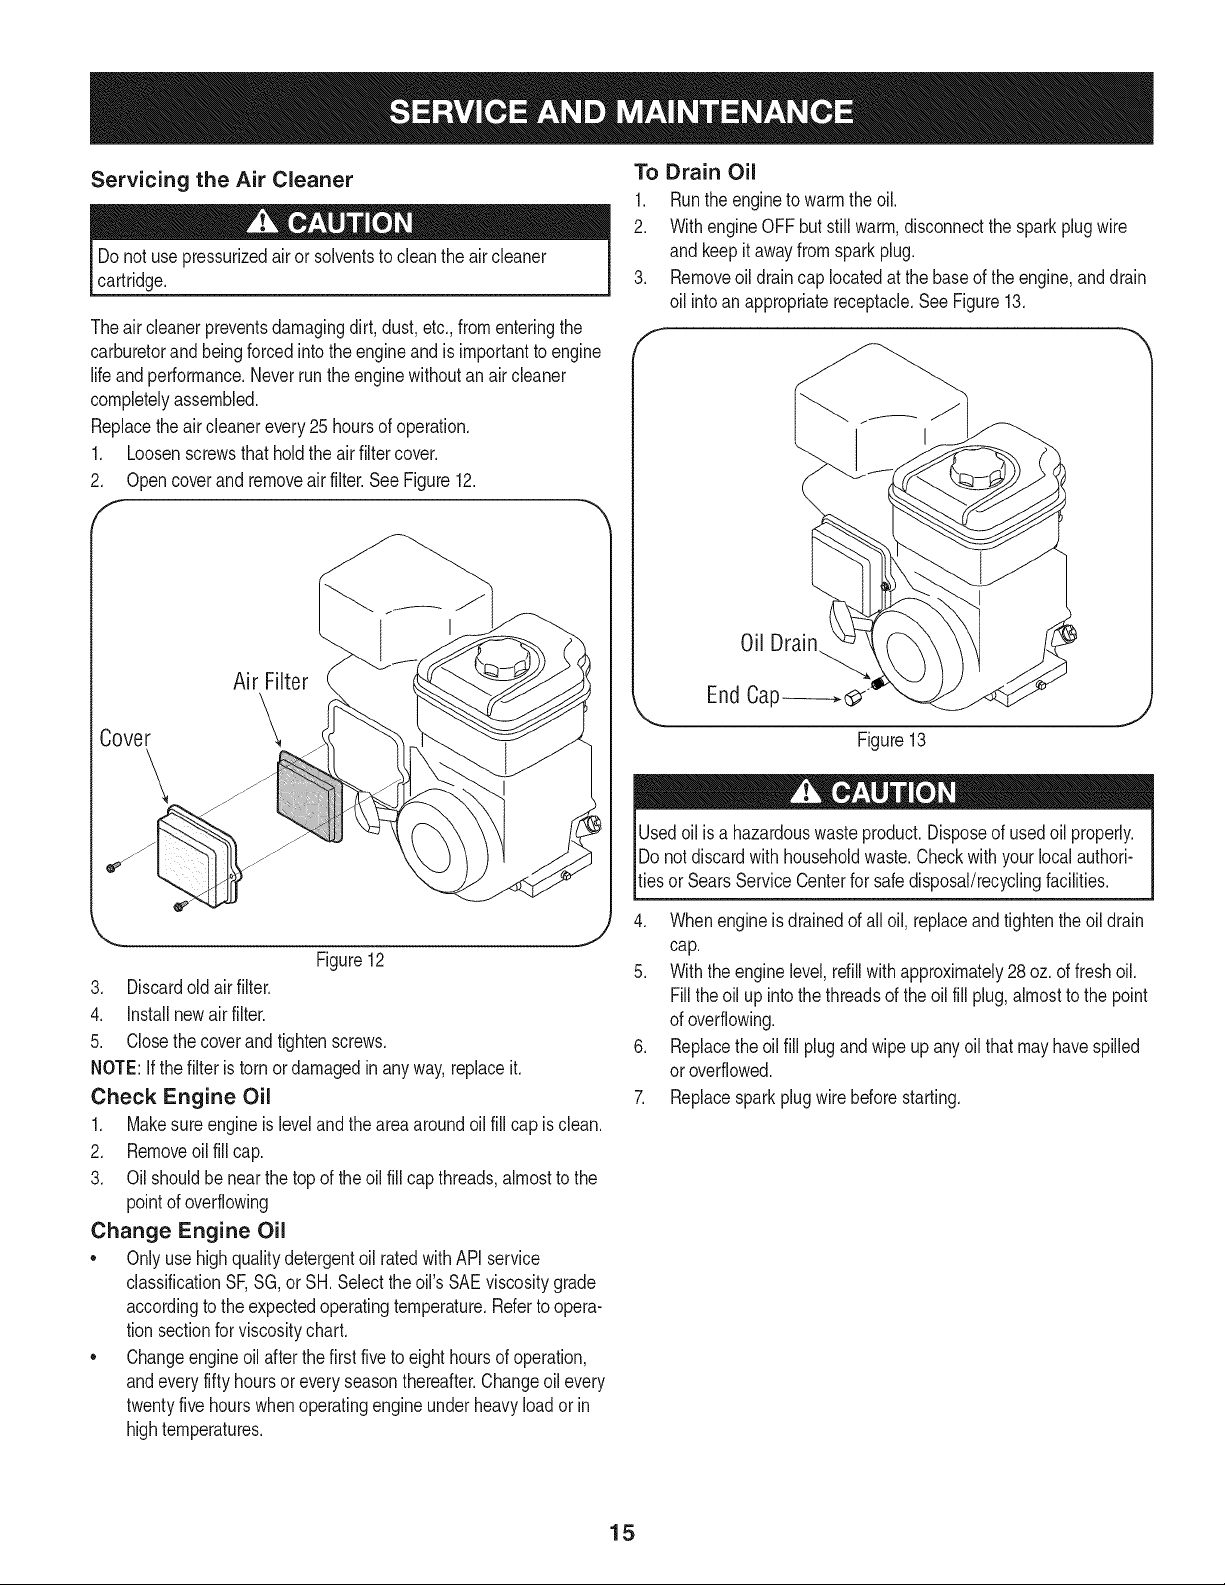
1. Loosenscrewsthatholdtheairfiltercover.
2. Opencoverandremoveairfilter.SeeFigure12.
f
To Drain Oil
1. Runtheengineto warmtheoil.
2. WithengineOFFbutstillwarm,disconnectthe sparkplugwire
and keepitawayfromsparkplug.
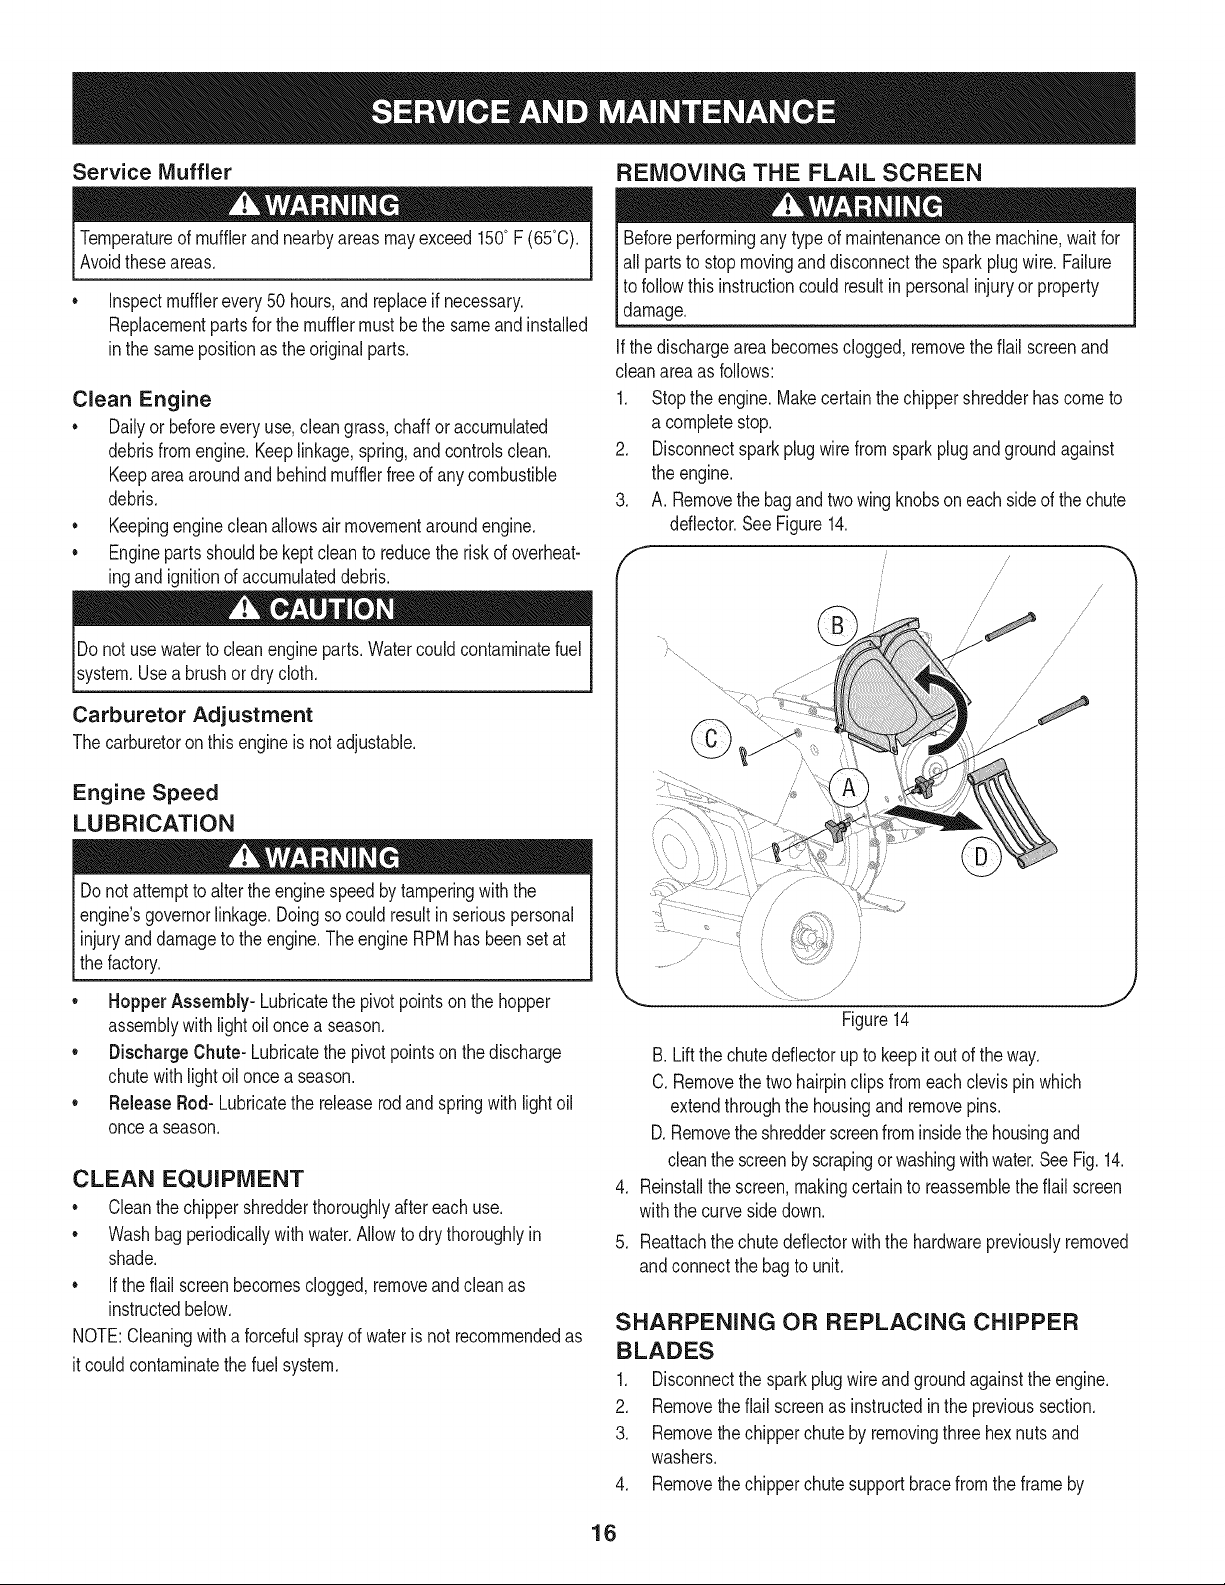
3. Removeoil draincaplocatedatthebaseoftheengine,anddrain
oil intoan appropriatereceptacle.SeeFigure13.
Oil Drain
Air Filter
Cover
3. Discardoldairfilter.
4. installnewairfilter.
5. Closethecoverandtightenscrews.
NOTE:Ifthe filteristorn ordamagedinanyway,replaceit.
Check Engine Oil
1. Makesureengineislevelandtheareaaroundoil fill capis clean.
2. Removeoilfillcap.
3. Oilshouldbe nearthetopoftheoil fillcapthreads,almosttothe
pointof overflowing
Change Engine Oil
* OnlyusehighqualitydetergentoilratedwithAPIservice
classificationSF,SG,orSH.Selecttheoil'sSAEviscositygrade
accordingtothe expectedoperatingtemperature.Refertoopera-
tionsectionforviscositychart.
. Changeengineoil afterthefirst fivetoeighthoursof operation,
andeveryfifty hoursoreveryseasonthereafter.Changeoil every
twentyfivehourswhenoperatingengineunderheavyloadorin
hightemperatures.
\
y
Figure12
End Cap _"
J
Figure13
e
Usedoil isa hazardouswasteproduct.Disposeofusedoil properly.
IDo notdiscardwithhouseholdwaste.Checkwithyour localauthori-
_tiesorSearsServiceCenterforsafedisposal/recyclingfacilities.
4. Whenengineisdrainedofall oil,replaceandtightentheoildrain
cap.
5. Withtheenginelevel,refillwithapproximately28oz.offreshoil.
Fillthe oil upintothe threadsofthe oilfill plug,almosttothepoint
ofoverflowing.
6. Replacetheoilfill plugandwipeupanyoil thatmayhavespilled
or overflowed.
7. Replacesparkplugwirebeforestarting.
15
Service IVluffler
REMOVING THE FLAIL SCREEN
Temperatureof mufflerandnearbyareasmayexceed150° F(65°C).
Avoidtheseareas.
• Inspectmufflerevery50 hours,andreplaceif necessary.
Replacementpartsforthemufflermustbethe sameandinstalled
inthe samepositionas theoriginalparts.
Clean Engine
Dailyor beforeeveryuse,cleangrass,chaffor accumulated
debrisfromengine.Keeplinkage,spring,andcontrolsclean.
Keepareaaroundandbehindmufflerfreeofanycombustible
debris.
• Keepingenginecleanallowsairmovementaroundengine.
• Enginepartsshouldbekeptcleanto reducetheriskofoverheat-
ingandignitionofaccumulateddebris.
Donot usewaterto cleanengineparts.Watercouldcontaminatefuel
system.Usea brushor dry cloth.
Carburetor Adjustment
Thecarburetoronthis engineisnotadjustable.
Engine Speed
LUBRICATION
Beforeperformingany typeofmaintenanceonthemachine waitfor
all partsto stopmovinganddisconnectthesparkplugwire. Failure
tofollowthis instructioncouldresultinpersonalinjuryor property
damage.
Ifthedischargeareabecomesclogged,removetheflail screenand
cleanareaas follows:
Stopthe engine.Makecertainthe chippershredderhascometo
a completestop.
.
Disconnectsparkplugwirefromsparkplugandgroundagainst
theengine.
3.
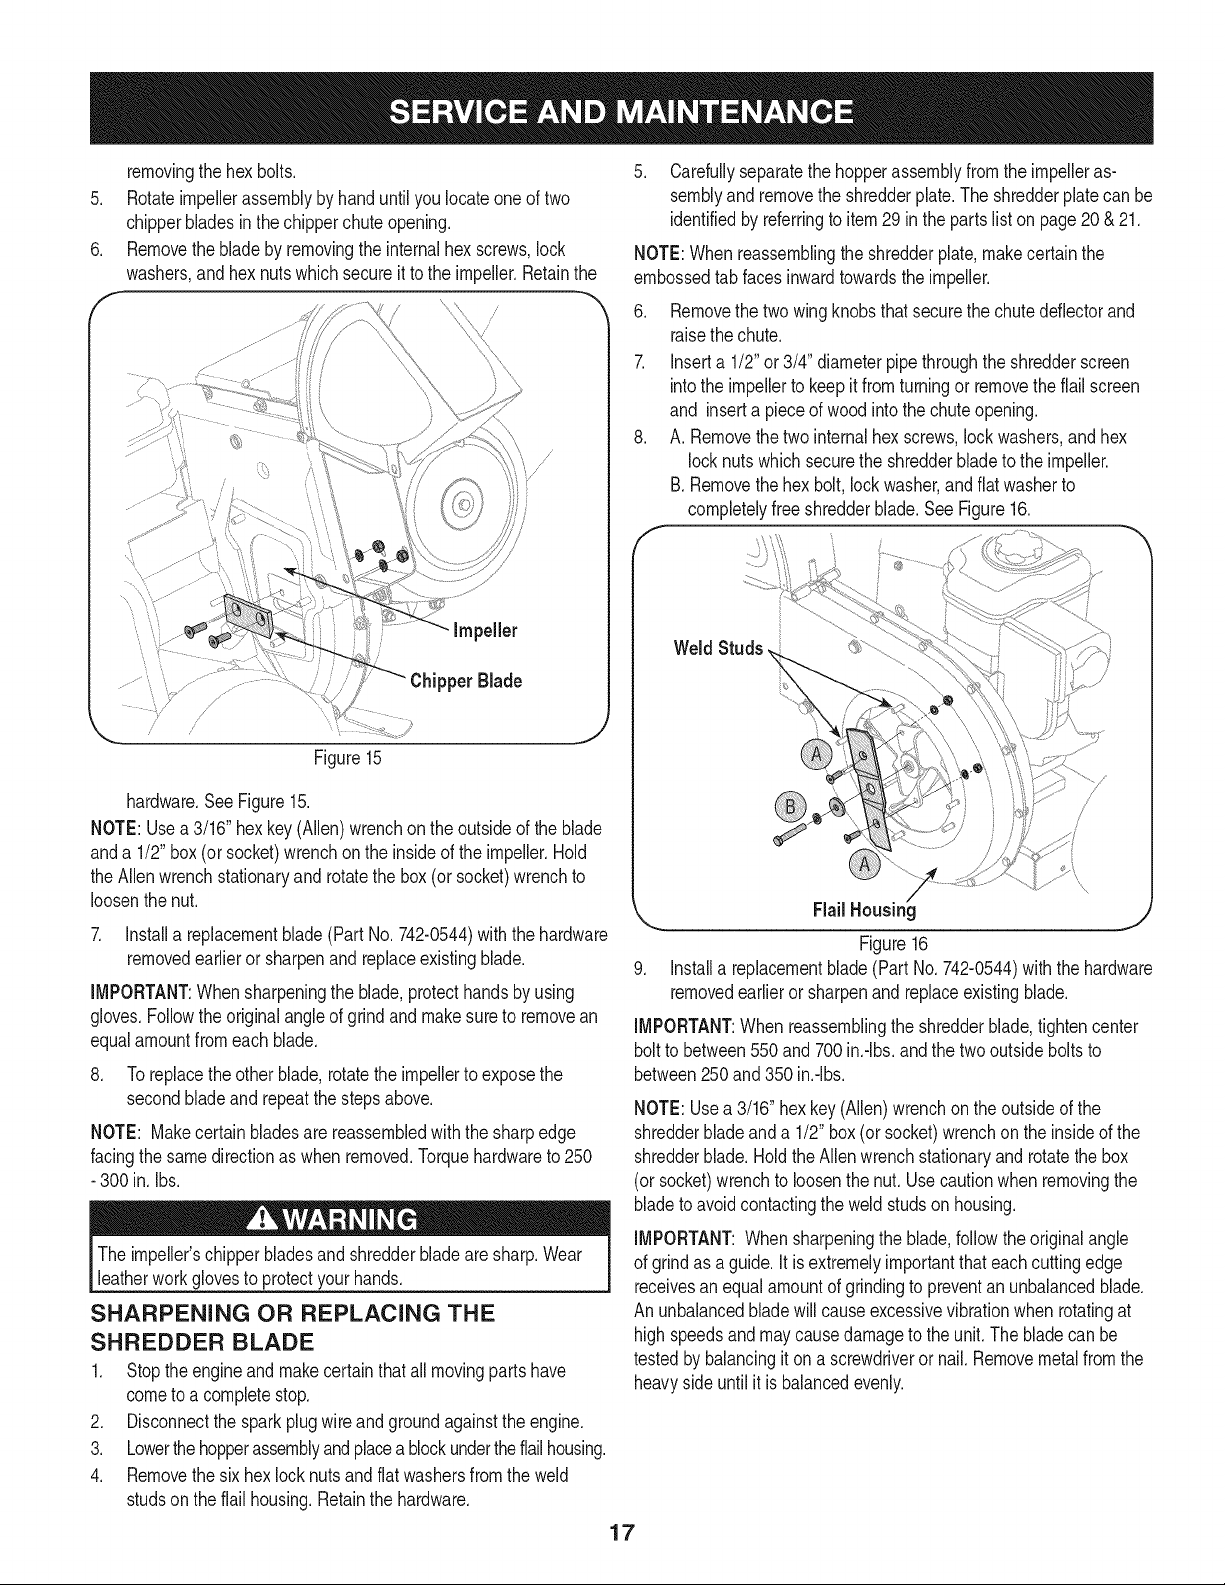
A. Removethebagandtwowingknobsoneachsideofthechute
deflector.SeeFigure14.
f
/
s /
/ /
//
/
s'
/
Donot,attemptto alterthe enginespeedby tamperingwiththe
enginesgovernorlinkage.Doingsocouldresultin seriouspersonal
Iinjuryanddamagetotheengine.TheengineRPMhasbeensetat
thefactory.
• HopperAssembly- Lubricatethepivotpointson thehopper
assemblywithlightoiloncea season.
• DischargeChute- Lubricatethepivotpointsonthedischarge
chutewithlightoilonce a season.
• ReleaseRod-Lubricatethereleaserodand springwithlightoil
oncea season.
CLEAN EQUIPMENT
• Cleanthechippershredderthoroughlyaftereachuse.
• Washbagperiodicallywithwater.Allowtodry thoroughlyin
shade.
• Iftheflail screenbecomesclogged,removeandcleanas
instructedbelow.
NOTE:Cleaningwitha forcefulsprayof waterisnot recommendedas
itcouldcontaminatethefuel system.
j
Figure14
B.Liftthe chutedeflectorupto keepit outof theway.
C.Removethetwo hairpinclipsfromeachclevispinwhich
extendthroughthehousingandremovepins.
D.Removetheshredderscreenfrominsidethehousingand
cleanthe screenbyscrapingorwashingwithwater.SeeFig.14.
4. Reinstallthescreen,makingcertaintoreassembletheflailscreen
withthecurvesidedown.
5. Reattachthechutedeflectorwiththehardwarepreviouslyremoved
andconnectthe bagto unit.
SHARPENING OR REPLACING CHIPPER
BLADES
1. Disconnectthesparkplugwireandgroundagainsttheengine.
2. Removetheflailscreenasinstructedinthe previoussection.
3. Removethechipperchutebyremovingthreehexnutsand
washers.
4. Removethechipperchutesupportbracefromtheframeby
16
removingthehexbolts.
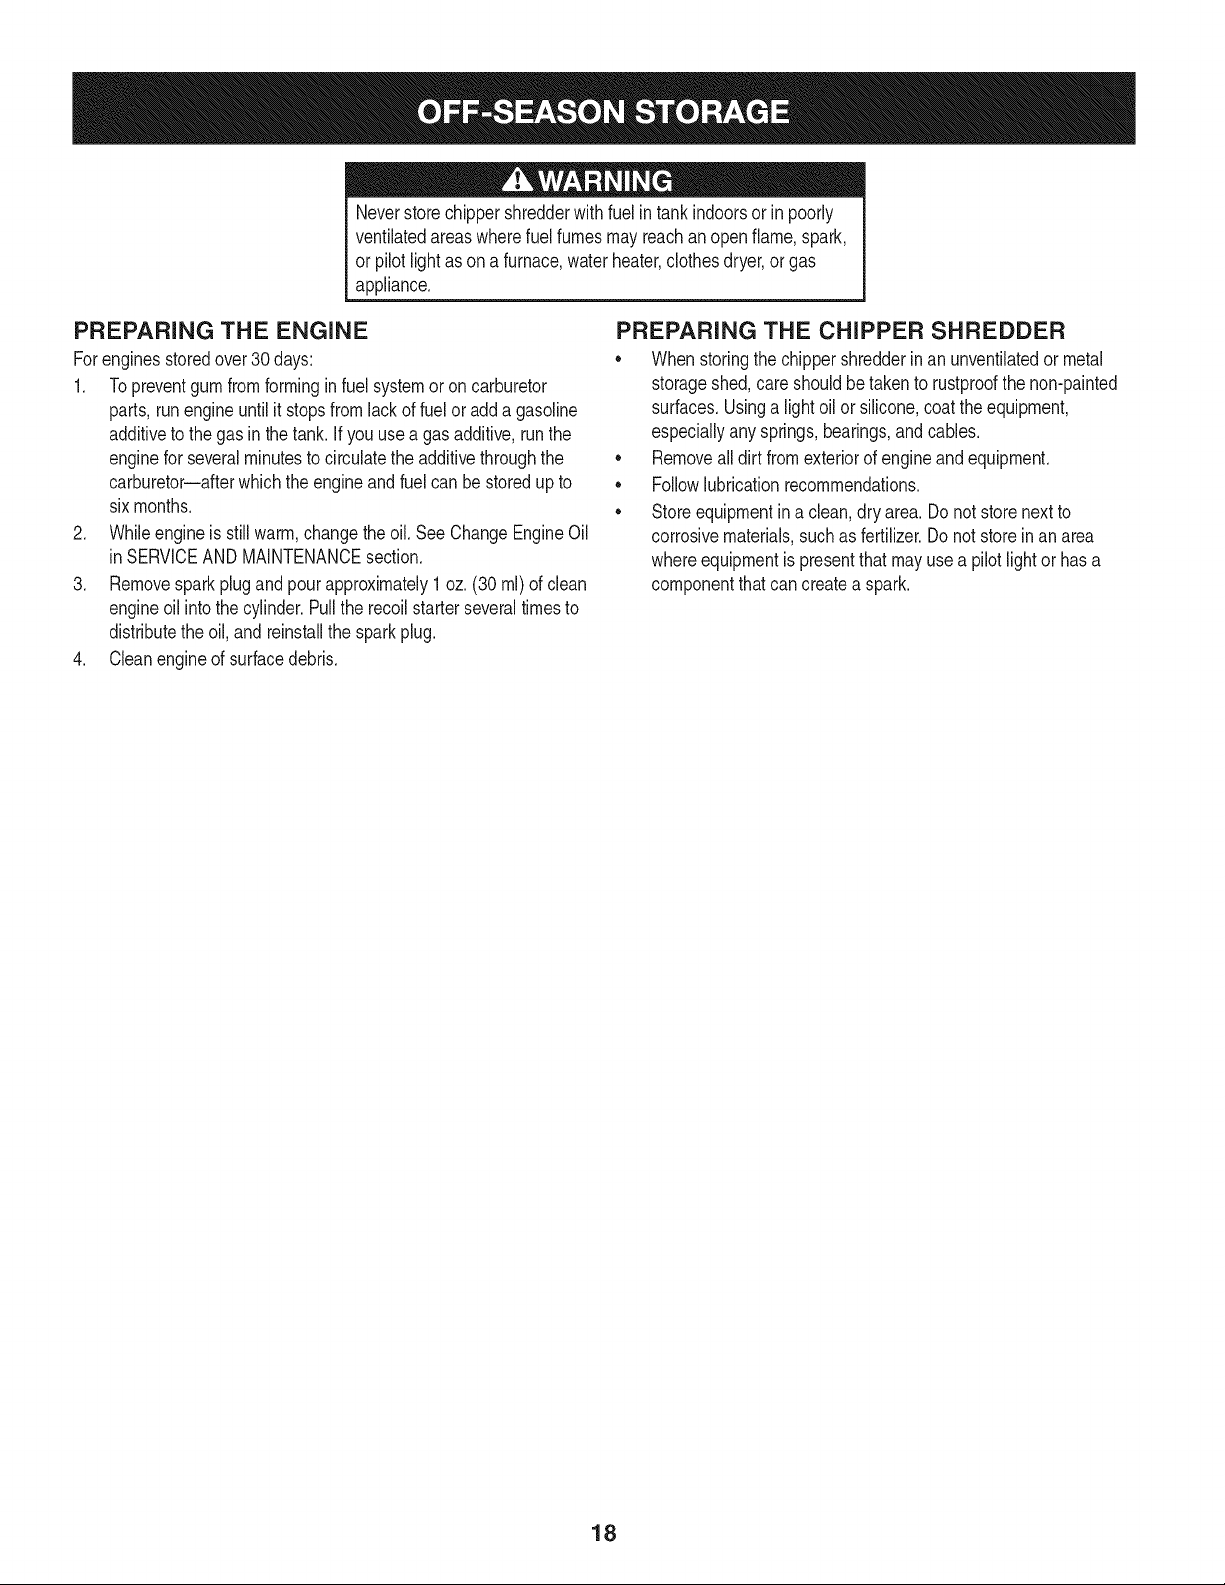
5. Rotateimpellerassemblybyhanduntilyoulocateone oftwo
chipperbladesin thechipperchuteopening.
6. Removethebladebyremovingtheinternalhexscrews,lock
washers,andhexnutswhichsecureit tothe impeller.Retainthe
/
/
5. Carefullyseparatethehopperassemblyfromtheimpelleras-
semblyandremovetheshredderplate.Theshredderplatecanbe
identifiedbyreferringtoitem29 in thepartslist onpage20& 21.
NOTE:Whenreassemblingtheshredderplate,makecertainthe
embossedtabfacesinwardtowardstheimpeller.
6. Removethetwowingknobsthatsecurethechuteddlectorand
raisethechute.
7. Inserta 1/2"or 3/4"diameterpipethroughtheshredderscreen
intothe impellertokeepit fromturningor removetheflailscreen
and inserta pieceofwoodintothechuteopening.
8. A. Removethetwointernalhexscrews,lockwashers,and hex
locknutswhichsecuretheshredderbladetothe impeller.
B.Removethehex bolt,lockwasher,andflatwasherto
completelyfreeshredderblade.SeeFigure16.
f
Weld
Figure15
hardware.SeeFigure15.
NOTE:Usea3/16"hexkey(Allen)wrenchon theoutsideoftheblade
anda 1/2"box(orsocket)wrenchontheinsideoftheimpeller.Hold
theAllenwrenchstationaryandrotatethe box(or socket)wrenchto
loosenthenut.
7. Installareplacementblade(PartNo.742-0544)withthehardware
removedearlieror sharpenandreplaceexistingblade.
IMPORTANT:Whensharpeningthe blade,protecthandsby using
gloves.Followtheoriginalangleofgrindandmakesuretoremovean
equalamountfromeachblade.
8. Toreplacetheotherblade,rotatetheimpellertoexposethe
secondbladeand repeatthestepsabove.
NOTE: Makecertainbladesare reassembledwiththe sharpedge
facingthesamedirectionas whenremoved.Torquehardwareto250
- 300in.Ibs.
Theimpeller'schipperbladesandshredderbladearesharp.Wear
leatherworkglovesto protectyourhands.
SHARPENING OR REPLACING THE
SHREDDER BLADE
1. Stoptheengineandmakecertainthatallmovingpartshave
cometoa completestop.
2. Disconnectthesparkplugwireandgroundagainsttheengine.
3. Lowerthehopperassemblyandplacea blockundertheflailhousing.
4. Removethesixhexlocknutsandflatwashersfromtheweld
studsonthe flailhousing.Retainthehardware.
FlailHousing
Figure16
9. Installa replacementblade(PartNo.742-0544)with thehardware
removedearlierorsharpenandreplaceexistingblade.
IMPORTANT:Whenreassemblingthe shredderblade,tightencenter
boltto between550and700in.-Ibs,andthetwooutsideboltsto
between250and350in.-Ibs.
NOTE:Usea 3/16"hexkey(Allen)wrenchontheoutsideofthe
shredderbladeanda 1/2"box(or socket)wrenchontheinsideofthe
shredderblade.Holdthe Allenwrenchstationaryand rotatethebox
(orsocket)wrenchtoloosenthenut. Usecautionwhen removingthe
bladetoavoidcontactingtheweldstudson housing.
IMPORTANT:Whensharpeningthe blade,followtheoriginalangle
ofgrindas a guide.It is extremelyimportantthateachcuttingedge
receivesan equalamountof grindingtopreventanunbalancedblade.
An unbalancedbladewill causeexcessivevibrationwhen rotatingat
highspeedsandmaycausedamagetotheunit.The bladecanbe
testedby balancingiton ascrewdriverornail.Removemetalfromthe
heavysideuntil itis balancedevenly.
17
Neverstorechippershredderwithfuelintankindoorsorinpoorly
ventilatedareaswherefuelfumesmayreachanopenflame,spark,
orpilotlightasonafurnace,waterheater,clothesdryer,orgas
appliance.
PREPARING THE ENGINE
Forenginesstoredover30 days:
1. To preventgumfromforminginfuel systemoroncarburetor
parts,runengineuntilit stopsfromlackof fuelor adda gasoline
additivetothe gasinthe tank.Ifyou usea gas additive,runthe
engineforseveralminutestocirculatetheadditivethroughthe
carburetor--afterwhichtheengineandfuel canbestoredup to
six months.
2. Whileengineis stillwarm,changetheoil. SeeChangeEngineOil
in SERVICEANDMAINTENANCEsection.
3. Removesparkplugand pourapproximately1oz. (30ml) ofclean
engineoil intothe cylinder.Pullthe recoilstarterseveraltimesto
distributetheoil,andreinstallthe sparkplug.
4. Cleanengineofsurfacedebris.
PREPARING THE CHIPPER SHREDDER
* Whenstoringthechippershredderinan unventilatedor metal
storageshed,careshouldbetakento rustproofthenon-painted
surfaces.Usinga lightoil orsilicone,coatthe equipment,
especiallyanysprings,bearings,andcables.
, Removealldirt fromexteriorofengineandequipment.
, Followlubricationrecommendations.
o Storeequipmentina clean,dry area.Do notstorenextto
corrosivematerials,suchas fertilizer.Donot storeinan area
whereequipmentispresentthatmayusea pilot lightor hasa
componentthatcancreatea spark.
18
 Loading...