

Craftsman 247774660 Owner’s Manual
Operator's Manual
I RA
27 Ton Hydraulic
Log Splitter
Model No. 247.77466
MAN 1
CAUTION: Before using
this product, read this
manual and follow all
Safety Rules and
Operating Instructions.
Sears, Roebuck and Co., Hoffman Estates, IL 60179, U.S.A.
Visit our Sears website: www.sears.com/craftsman
Printed inU.S.A. FORM NO. 769-00851B
• Safety
• Assembly
• Operation
• Maintenance
• Parts
• Espa_ol
(5/04)
Content Page Content Page
Warranty 2 Service and Adjustments 12
Safety 3 Storage 14
Assembly 5 Troubleshooting 15
Operation 7 Parts List 18
Maintenance 10 Espahol 27
Limited Warranty on Craftsman Log Splitter
For one (1) year from the date of purchase, iftills Craftsman Equipment is maintained, lubricated, and tuned up
according to the instructions to the operator's manual, Sears will repair or replace free of charge any parts found
to be defective in material or workmanship. Warranty service is available free of charge by returning Craftsman
equipment to your nearest Sears Service Center. In-home warranty service is available but a trip charge will
apply. This Warranty applies only while this product is in the United States.
This Warranty does not cover:
Expendable items which become worn during normal use, such as spark plugs, air cleaners, belts, and oil
filters.
Tire replacement or repair caused by punctures from outside objects, such as nails, thorns, stumps, or glass.
Repairs necessary because of operator abuse, including but not limited to, damage caused by objects, such
as stones or metal debris, oversized stock, impacting objects that bend the frame or crankshaft, or over-
speeding the engine.
Repairs necessary because of operator negligence, including but not limited to, electrical and mechanical
damage caused by improper storage, failure to use the proper grade and amount of engine oil, or failure to
maintain the equipment according to the instructions contained in the operator's manual.
Engine (fuel system) cleaning or repairs caused by fuel determine to be contaminated or oxidized (stale). In
general, fuel should be used within 30 days of its purchase date.
Equipment used for commercial or rental purposes.
TO LOCATE THE NEAREST SEARS SERVICE CENTER OR TO SCHEDULE SERVICE, SIMPLY CONTACT
SEARS AT 1-80O-4-MY-HOME.
This warranty gives you specific legal rights and you may also have other rights, which vary from state to state.
PRODUCT SPECIFICATION
Horsepower:
Engine 0il Type
Engine Oil Capacity
Fuel Capacity:
Spark Plug (.030" Gap)
Hydraulic Fluid
6.5 HP
SAE 30
20 Ounces
1.5 Quarts
Champion RJ-19LM
Dexron III / 3.0 gal
Model Nurobe r......._47z'_77_6_ .............................
Serial Number ...........................................................
Date of Purchase ......................................................
Record both serial number and date of purchase and
keep ina safe place for future reference.
WARNING: This symbol points out important safety instructions which, if not followed, could
endanger the personal safety and/or property of yourself and others. Read and follow all
instructions in this manual before attempting to operate this machine. Failure to comply with these
instructions may result in personal injury. When you see this symbol - heed its warning.
_ ARNING: Engine Exhaust, some of its constituents, and certain vehicle
components contain or emit chemicals known to State of California to cause cancer
and birth defects or other reproductive harm.
DANG ER: This machine was built to beoperated according tothe rules for safe operation inthis
manual. As with any type of power equipment, carelessness or error on the part of the operator can
result in serious injury. This machine is capable of amputating hands and feet and throwing objects.
Failure to observe the following safety instructionscould result in serious injury or death.
TRAINING
1. Read, understand, and follow all instructions on
the machine and in the manual(s) before
attempting to assemble and operate. Keep this
manual in a safe place for future and regular
reference and for ordering replacement parts.
2. Be familiar with all controls and their proper
operation. Know how to stop the machine and
disengage them quickly.
3. Never allow children under 14 years old to
operate this machine. Children 14 years old and
over should read and understand the operation
instructions and safety rules in this manual and
should be trained and supervised by a parent.
4. Never allow adults to operate this machine
without proper instruction.
5. Many accidents occur when more than one
person operates the machine. If a helper is
assisting in loading logs, never activate the
control until the helper is a minimum of 10 feet
from the machine.
6. Keep bystanders, helpers, pets, and children at
least 20 feet from the machine while it is in
operation.
7. Never allow anyone to ride on this machine.
8. Never transport cargo on this machine.
9. Hydraulic log splitters develop high fluid
pressures during operation. Fluid escaping
through a pin hole opening can penetrate your
skin and cause blood poisoning, gangrene, or
death. Give attention to the following instructions
at all times:
a. Do not check for leaks with your hand.
b. Do not operate machine with frayed,
kinked, cracked, or damaged hoses, fitting,
or tubing.
c. Stop the engine and relieve hydraulic
system pressure before changing or
adjusting fittings, hoses, tubing, or other
system components.
d. Do not adjust the pressure settings of the
pump or valve.
10. Leaks can be detected by passing cardboard or
wood, while wearing protective gloves and safety
glasses, over the suspected area. Look for
discok)ration of cardboard or wood.
11. If injured by escaping fluid, see a doctor
immediately. Serious infection or reaction can
develop if proper medical treatment is not
administered immediately.
12. Keep the operator zone and adjacent area clear
for safe, secure footing.
13. If your machine is equipped with an internal
combustion engine and it is intended for use near
any unimproved forest, brush, or grass covered
land, the engine exhaust should be equipped with
a spark attester. Make sure you comply with
applicable local, state, and federal codes. Take
appropriate fire fighting equipment with you.
14. This machine should be used for splitting wood
only, do not use itfor any other purpose.
15. Follow the instructions in the manual(s) provided
with any attachment(s) for this machine.
PREPARATION
1. Always wear safety shoes or heavy boots.
2. Always wear safety glasses or safety goggles
during operating this machine.
3. Never wear jewelry or loose clothing that [flight
become entangled in moving or rotating parts of
the machine.
4. Make sure this machine is on level surface before
operating.
5. Always block the machine as required to prevent
unintended movement, and lock in either the
horizontal or vertical posgk)n.
6. Always operate this machine from the operator
zone(s) specified in the manual.
7. Logs should be cut with square ends prk)r to
splitting.
8,
Use your log splitter in daylight or under good
artificial light.
9.
To avoid personal injury or property damage use
extreme care in handling gasoline. Gasoline is
extremely flammable and the vapors are explosive.
Serk)us personal injury can occur when gasoline is
spilled on yourself or your clothes which can ignite.
Wash your skin and change immediately.
a. Use only an approved gasoline container.
b. Extinguish all cigarettes, cigars, pipes, and
other sources of ignition.
c. Never fuel machine indoors.
d. Never remove gas cap or add fuel while the
engine is hot or running.
e. AIk)w engine to cool at least two minutes
before refueling.
f. Never overfill the fuel tank. Fill tank to no
more than 1/2 inch below bottom of filler neck
to provide space for fuel expansk)n.
g. Replace gasoline cap and tighten securely.
h. If gasoline is spilled, wipe it off the engine
and equipment, move machine to another
area. Wait 5 minutes before starting the
engine.
Never store the machine or fuel container
inside where there is an open flame, spark or
pilot light as on a water heater, space heater,
furnace, clothes dryer or other gas
appliances.
Allow machine to cool at least 5 minutes
before storing.
10. For logs which are not cut square, the least square
end and the longest portion of the log should be
placed toward the beam and wedge, and the
square end placed toward the end plate.
11. When splitting in the vertical position, stabilize the
log before moving the control. Split as follows:
a. Place log on the end plate and turn until it
leans against the beam and is stable.
b. When splitting extra large or uneven logs, the
log must be stabilized with wooden shims or
split wood between the log and the end plate
or ground.
12. Always keep fingers away from any cracks that
open in the k)g while splitting. They can quickly
close and pinch or amputate your fingers.
13. Keep your work area clean. Immediately remove
split wood around the machine so that you do not
stumble over it.
14. Never move this machine while the engine is
running.
15. This machine should not be towed on any street,
highway or public road without checking the
existing federal, state, or local vehicle
requirements. Any licensing or modifications such
as taillights, etc., needed to comply, is the sole
responsibility of the purchaser. If a "Statement of
Origin" is required in your state, see your local
dealer.
16. See the towing section in this manual for proper
towing instructions once all federal, local, or state
requirements are met.
OPERATION
1. Before starting this machine, review the "Safety
Instructions". Failure to follow these rules may
result in serious injury to the operator or
bystanders.
2. Never leave this machine unattended with the
engine running.
3. Do not operate machine while under the influence
of alcohol, drugs, or medication.
4. Never allow anyone to operate this machine
without proper instruction.
5. Always operate this machine with all safety
equipment in place and working. Make sure all
controls are properly adjusted for safe operation.
6. Do not change the engine governor settings or
overspeed the engine. The governor controls the
maximum safe operating speed of the engine.
7. When loading a log, always place your hands on
the sides of the log, not on the ends, and never use
your foot to help stabilize a log. Failure to do so,
may result in crushed or amputated fingers, toes,
hand, or foot.
8. Use only your hand to operate the controls.
9. Never attempt to split more than one log at a time
unless the ram has fully extended and a second log
is needed to complete the separation of the first log.
MAINTENANCEANDSTORAGE
1. Stop the engine, disconnect the spark plug and
ground it against the engine before cleaning, or
inspecting the machine.
2. Stop the engine and relieve hydraulic system
pressure before repairing or adjusting fittings,
hoses, tubing, or other system components.
3. To prevent fires, clean debris and chaff from the
engine and muffler areas. If the engine is equipped
with a spark attester muffler, clean and inspect it
regularly according to manufacturers instructions.
Replace if damaged.
4. Periodically check that all nuts and bolts, hose
clamps, and hydraulic fittings are tight to be sure
equipment is in safe working condition.
5. Check all safety guards and shields to be sure they
are in the proper position. Never operate with
safety guards, shields, or other protective features
removed.
6. The pressure relief valve is preset at the factory. Do
not adjust the valve.
7. Never attempt to move this machine over hilly or
uneven terrain without a tow vehicle or adequate
help.
IMPORTANT:Yourlogsplitterisshippedwithmotoroil
intheengine•However,youMUSTchecktheoillevel
beforeoperating•Becarefulnottooverfill.
NOTE:Reference to right or left hand side of the log
splitter is observed from the operating position.
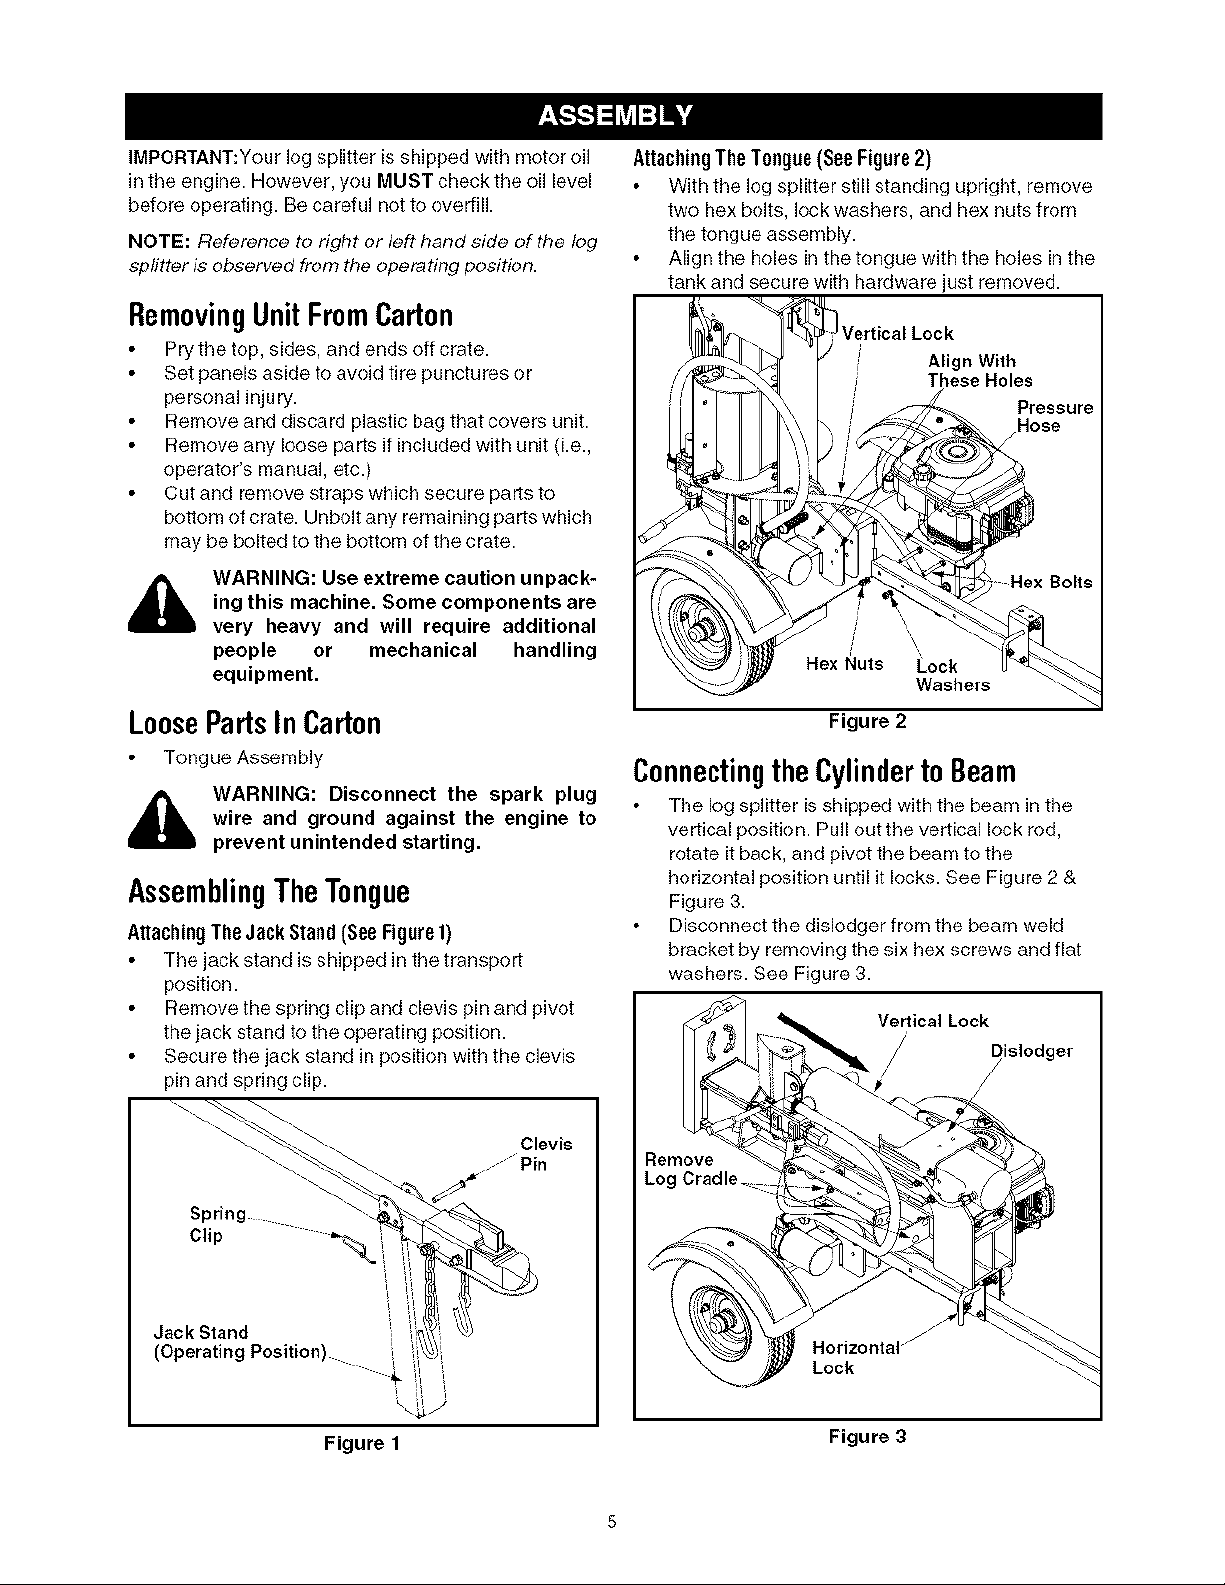
AttachingTheT0ague (SeeFigere2)
With the log splitter still standing upright, remove
two hex bolts, lock washers, and hex nuts from
the tongue assembly.
Align the holes inthe tongue with the holes in the
tank and secure with hardware just removed.
RemovingUnitFromCarton
Pry the top, sides, and ends off crate•
Set panels aside to avoid tire punctures or
personal injury.
Remove and discard plastic bag that covers unit.
Remove any loose parts if included with unit (i.e.,
operator's manual, etc.)
Cut and remove straps which secure parts to
bottom of crate• Unbolt any remaining parts which
may be bolted to the bottom of the crate•
ing this machine. Some components are
WARNING: Use extreme caution unpack-
very heavy and will require additional
people or mechanical handling
equipment.
LoosePartsInCarton
Tongue Assembly
wire and ground against the engine to
WARNING: Disconnect the spark plug
prevent unintended starting.
AssemblingTheTongue
AttachingTheJack Stand (See Figure1)
The jack stand is shipped in the transport
position•
Remove the spring clip and clevis pin and pivot
the jack stand to the operating position•
Secure the jack stand in position with the clevis
pin and spring clip•
Vertical Lock
Align With
These Holes
Pressure
Hose
Hex Nuts Lock
Washers
Figure 2
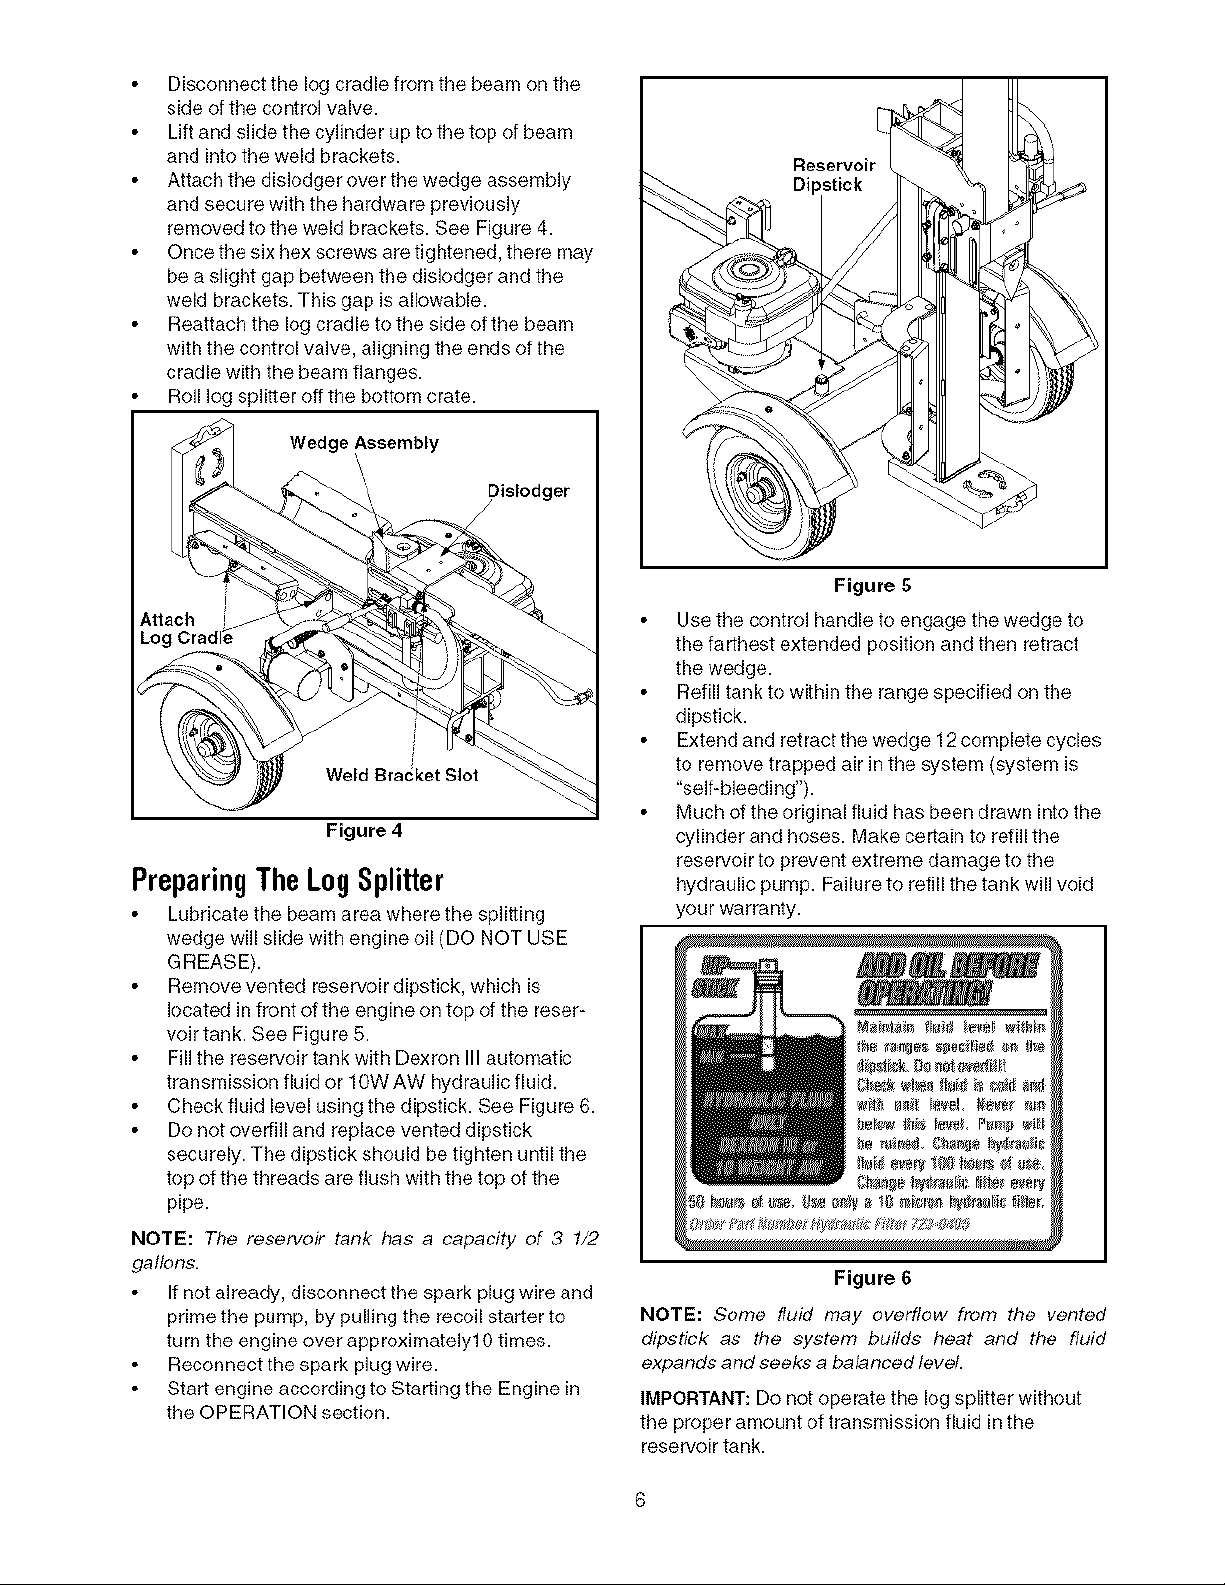
ConnectingtheCylinderto Beam
The log splitter is shipped with the beam in the
vertical positk)n. Pull out the vertical lock rod,
rotate it back, and pivot the beam to the
horizontal position until it locks• See Figure 2 &
Figure 3.
Disconnect the dislodger from the beam weld
bracket by removing the six hex screws and flat
washers• See Figure 3.
Medical Lock
Dislodger
_. Clevis
.......... Pin
--._-_.. ---_. _'_
S rin _" ' -._
P g -
Jack Stand _ ' ' '
(Operating Position) i _!
i_ '
Figure 1
Figure 3
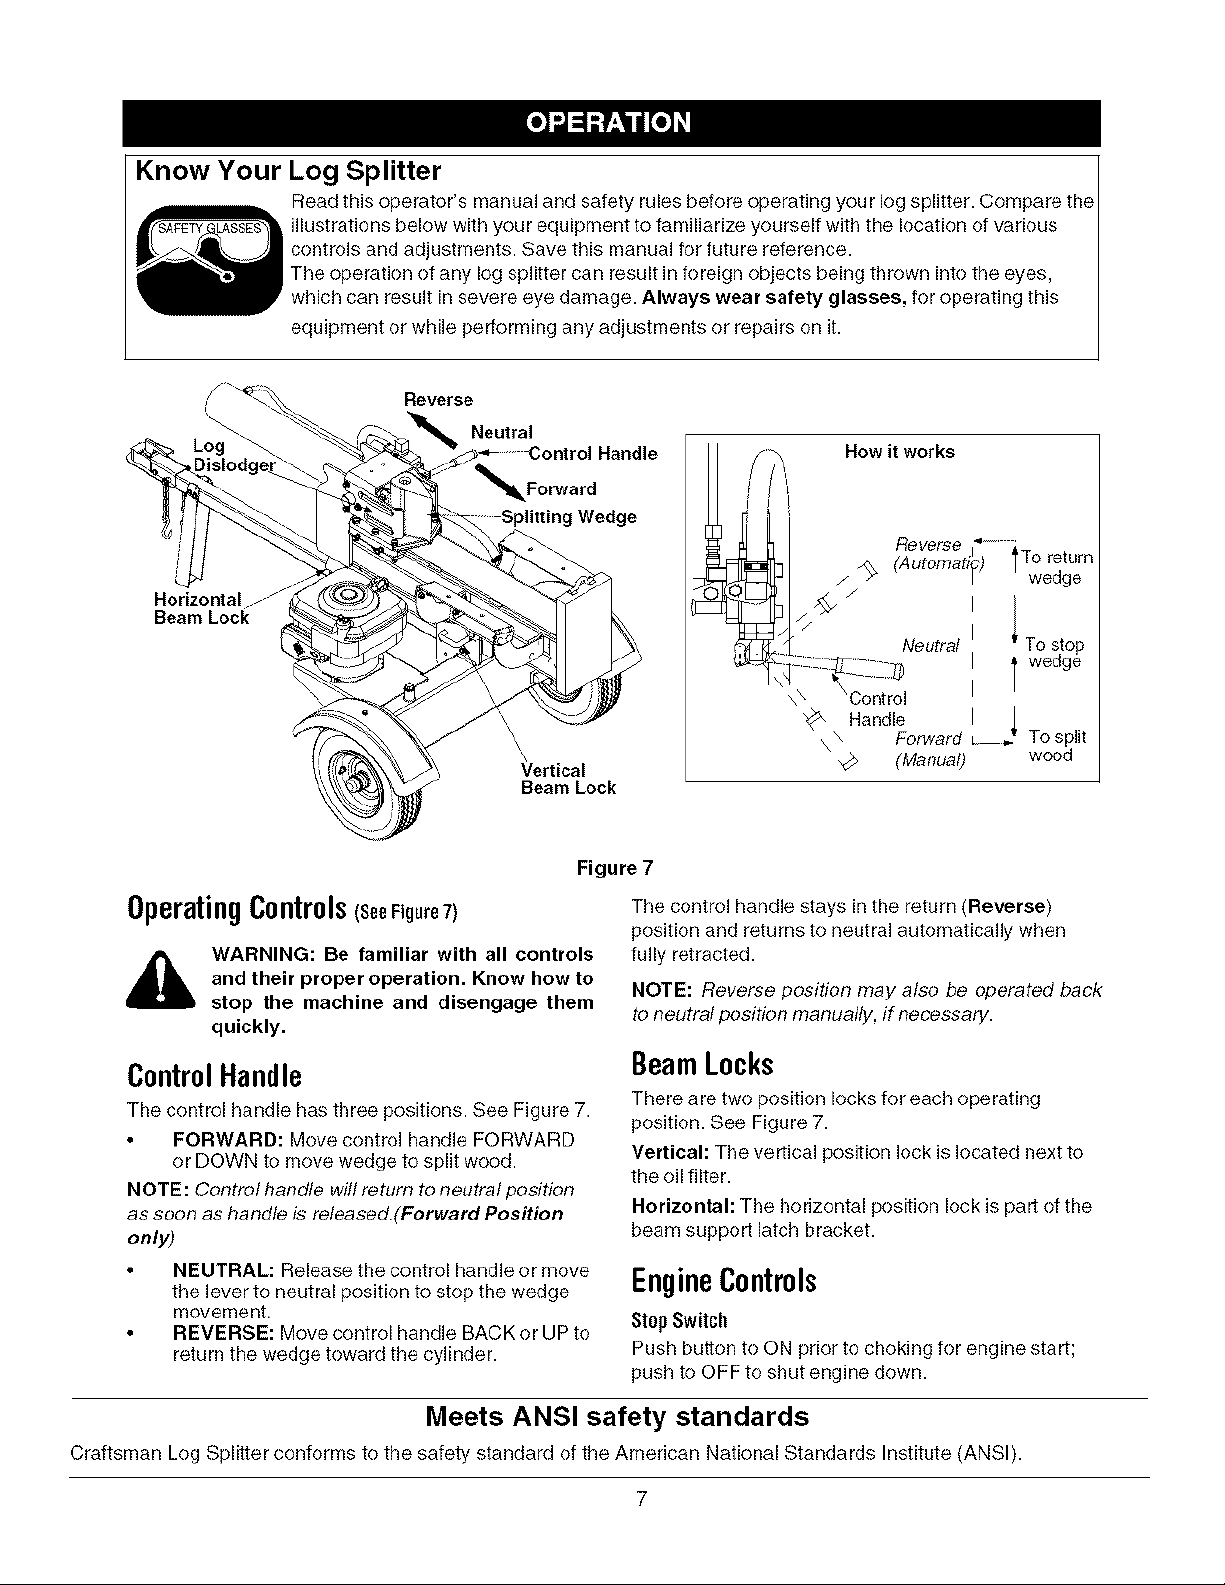
Disconnect the log cradle from the beam on the
side of the control valve.
Lift and slide the cylinder up to the top of beam
and into the weld brackets.
Attach the dislodger over the wedge assembly
and secure with the hardware previously
removed to the weld brackets. See Figure 4.
Once the six hex screws are tightened, there may
be a slight gap between the dislodger and the
weld brackets. This gap is allowable.
Reattach the log cradle to the side of the beam
with the control valve, aligning the ends of the
cradle with the beam flanges.
Roll log splitter off the bottom crate.
Wedge Assembly
Dislodger
Weld Bracket Slot
Figure 4
PreparingTheLogSplitter
Lubricate the beam area where the splitting
wedge will slide with engine oil (DO NOT USE
GREASE).
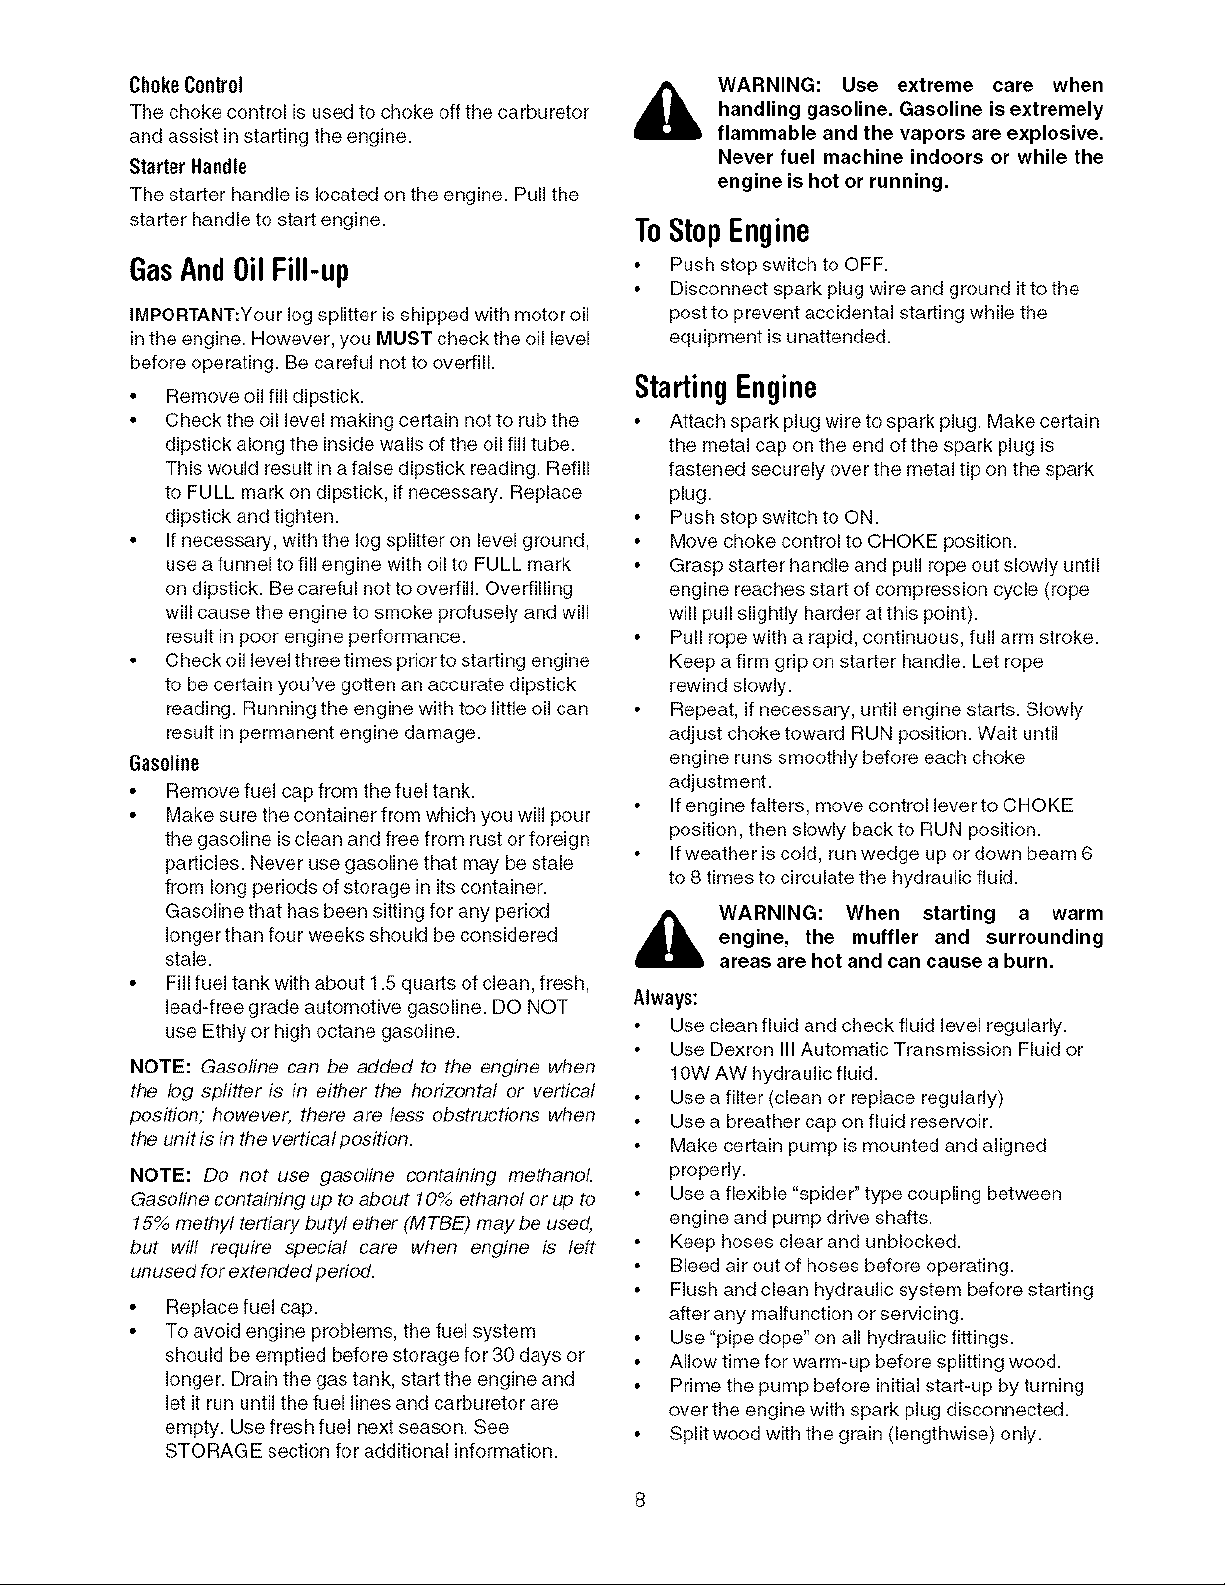
Remove vented reservoir dipstick, which is
located in front of the engine on top of the reser-
voir tank. See Figure 5.
Fill the reservoir tank with Dexron III automatic
transmission fluid or 10W AW hydraulic fluid.
Check fluid level using the dipstick. See Figure 6.
Do not ovedill and replace vented dipstick
securely. The dipstick should be tighten until the
top of the threads are flush with the top of the
pipe.
Figure 5
Use the control handle to engage the wedge to
the farthest extended position and then retract
the wedge.
Refill tank to within the range specified on the
dipstick.
Extend and retract the wedge 12 complete cycles
to remove trapped air in the system (system is
"self-bleeding').
Much of the original fluid has been drawn into the
cylinder and hoses. Make certain to refill the
reservoir to prevent extreme damage to the
hydraulic pump. Failure to refill the tank will void
your warranty.
NOTE: The reservoir tank has a capacity of 3 1/2
gallons.
If not already, disconnect the spark plug wire and
prime the pump, by pulling the recoil starter to
turn the engine over approximately1 g times.
Reconnect the spark plug wire.
Start engine according to Starting the Engine in
the OPERATION section.
Figure 6
NOTE: Some fluid may overflow from the vented
dipstick as the system builds heat and the fluid
expands and seeks a balanced level.
IMPORTANT: Do not operate the log splitter without
the proper amount of transmission fluid in the
reservoir tank.
Know Your Log Splitter
Read this operator's manual and safety rules before operating your log splitter. Compare the
illustrations below with your equipment to familiarize yourself with the location of various
controls and adjustments. Save this manual for future reference.
The operation of any log splitter can result in foreign objects being thrown into the eyes,
which can result in severe eye damage. Always wear safety glasses, for operating this
equipment or while performing any adjustments or repairs on it.
,,_.'"_%
Dislodge_
i
J
Beam Lock
Horizontal
Reverse
Neutral
._._-Control Handle
_Forward
_ S_ing Wedge
Vertical
Beam Lock
OperatingControls(seeFigure7)
,_ WARNING: Be familiar with all controls
and their proper operation. Know how to
stop the machine and disengage them
quickly.
How it works
Reverse
(Automatip) ITo return
/ -4_ / wedge
/
Neutral I
\\ \Control
"_x Handle I J
\ Forward _ To split
\ wood
Figure 7
The control handle stays in the return (Reverse)
position and returns to neutral automatically when
fully retracted.
NOTE: Reverse position may also be operated back
to neutral position manually, if necessary.
ControlHandle
The control handle has three positions. See Figure 7.
FORWARD: Move control handle FORWARD
or DOWN to move wedge to split wood.
NOTE: Control handle will return to neutral position
as soon as handle is released.(Forward Position
only)
NEUTRAL: Release the control handle or move
the lever to neutral position to stop the wedge
movement.
REVERSE: Move control handle BACK or UP to
return the wedge toward the cylinder.
BeamLocks
There are two position locks for each operating
position. See Figure 7.
Vertical: The vertical position lock is located next to
the oil filter.
Horizontal: The horizontal position lock is pail of the
beam support latch bracket.
EngineControls
Stop Switch
Push button to ON prior to choking for engine start;
push to OFF to shut engine down.
Meets ANSI safety standards
Craftsman Log Splitter conforms to the safety standard of the American National Standards Institute (ANSI).
7
Choke Control
The choke control is used to choke off the carburetor
and assist in starting the engine.
Starter Handle
The starter handle is located on the engine. Pull the
starter handle to start engine.
GasAnd0il Fill-up
IMPORTANT:Your log splitter is shipped with motor oil
in the engine. However, you MUST check the oil level
before operating. Be careful not to overfill.
Remove oil fill dipstick.
Check the oil level making certain not to rub the
dipstick along the inside walls of the oil tiff tube.
This would result in a false dipstick reading. Refill
to FULL mark on dipstick, if necessary. Replace
dipstick and tighten.
If necessary, with the log splitter on level ground,
use a funnel to fill engine with oil to FULL mark
on dipstick. Be careful not to overfill. Overfilling
will cause the engine to smoke profusely and will
result in poor engine performance.
Check oil level three times prior to starting engine
to be certain you've gotten an accurate dipstick
reading. Running the engine with too little oil can
result in permanent engine damage.
Gasoline
Remove fuel cap from the fuel tank.
Make sure the container from which you will pour
the gasoline is clean and free from rust or foreign
particles. Never use gasoline that may be stale
from long periods of storage in its container.
Gasoline that has been sitting for any period
longer than four weeks should be considered
stale.
Fill fuel tank with about 1.5 quarts of clean, fresh,
lead-free grade automotive gasoline. DO NOT
use Ethly or high octane gasoline.
NOTE: Gasoline can be added to tbe engine when
the log splitter is in eitber the horizontal or vertical
position; however, there are less obstructions when
the unit is in the vertical position.
NOTE: Do not use gasoline containing metbanoL
Gasofine containing up to about 10% ethanol or up to
15% methyl tertiary butyl ether (MTBE) may be used,
but will require special care when engine is left
unused for extended pedod.
Replace fuel cap.
To avoid engine problems, the fuel system
should be emptied before storage for 30 days or
longer. Drain the gas tank, start the engine and
let it run until the fuel lines and carburetor are
empty. Use fresh fuel next season. See
STORAGE section for additional information.
,_ WARNING: Use extreme care when
handling gasoline. Gasoline is extremely
flammable and the vapors are explosive.
Never fuel machine indoors or while the
engine is hot or running.
ToStopEngine
Push stop switch to OFF.
Disconnect spark plug wire and ground it to the
post to prevent accidental starting while the
equipment is unattended.
StartingEngine
Attach spark plug wire to spark plug. Make certain
the metal cap on the end of the spark plug is
fastened securely over the metal tip on the spark
plug.
Push stop switch to ON.
Move choke control to CHOKE position.
Grasp starter handle and pull rope out slowly until
engine reaches start of compression cycle (rope
will pull slightly harder at this point).
Pull rope with a rapid, continuous, full arm stroke.
Keep a firm grip on starter handle. Let rope
rewind slowly.
Repeat, if necessary, until engine starts. Slowly
adjust choke toward RUN position. Wait until
engine runs smoothly before each choke
adjustment.
If engine falters, move control lever to CHOKE
position, then slowly back to RUN position.
If weather is cold, run wedge up or down beam 6
to 8 tknes to circulate the hydraulic fluid.
,_ WARNING: When starting a warm
Always:
engine, the muffler and surrounding
areas are hot and can cause a burn.
Use clean fluid and check fluid level regularly.
Use Dexron III Automatic Transmission Fluid or
10W AW hydraulic fluid.
Use a filter (clean or replace regularly)
Use a breather cap on fluid reservoir.
Make certain pump is mounted and aligned
properly.
Use a flexible "spider" type coupling between
engine and pump drive shafts.
Keep hoses clear and unblocked.
Bleed air out of hoses before operating.
Flush and clean hydraulic system before starting
after any malfunction or servicing.
Use "pipe dope" on all hydraulic fittings.
Allow time for warm-up before splitting wood.
Prime the pump before initial start=up by turning
over the engine with spark plug disconnected.
Split wood with the grain (lengthwise) only.
Nevnr:
Use when fluid is below 20 ° F or above 150 ° F.
Use a solid engine/pump coupling.
Operate through relief valve for more than
several seconds.
Attempt to adjust unloading or relief valve
settings without pressure gauges.
Operate with air in hydraulic system.
Use teflon tape on hydraufic fittings.
Attempt to cut wood across the grain.
Attempt to remove partially split wood from the
wedge with your hands. Fully retract wedge to
dislodge wood with Jogdislodger.
UsingTheLogSplitter
Place the log splitter on level, dry, and solid
ground.
Place the beam in either the horizontal or vertical
position and lock in place with the appropriate
locking rod.
Block the front and back of both wheels.
Place the log against the end plate and only split
wood in the direction of the grain.
When necessary to stabilize the log, place your
hand only on sides of log. NEVER place hand on
the end between the log and splitting wedge.
Only one adult should stabilize the k)g and
operate the control handle, so the operator has
fun control over stabilizing the log and movement
of the splitting wedge.
ControlHandlePositions
Move control handle FORWARD or DOWN to
split wood.
Release the control handle to stop the wedge
movement.
Move control handle BACK or UP to return the
wedge.
Log Oislodger
The log dislodger is designed to remove any
partially split wood from the wedge. This may
occur while splitting large diameter wood or
freshly cut wood.
WARNING: Never remove partially split wood
from the wedge with your hands. Fingers may
become trapped between split wood.
To remove partially split wood from wedge, move
control handle to REVERSE position until wedge
is fully retracted to allow split wood portion to
contact the log dislodger.
Once removed from wedge with log dislodger,
split wood from opposite end or in another
k)cation.
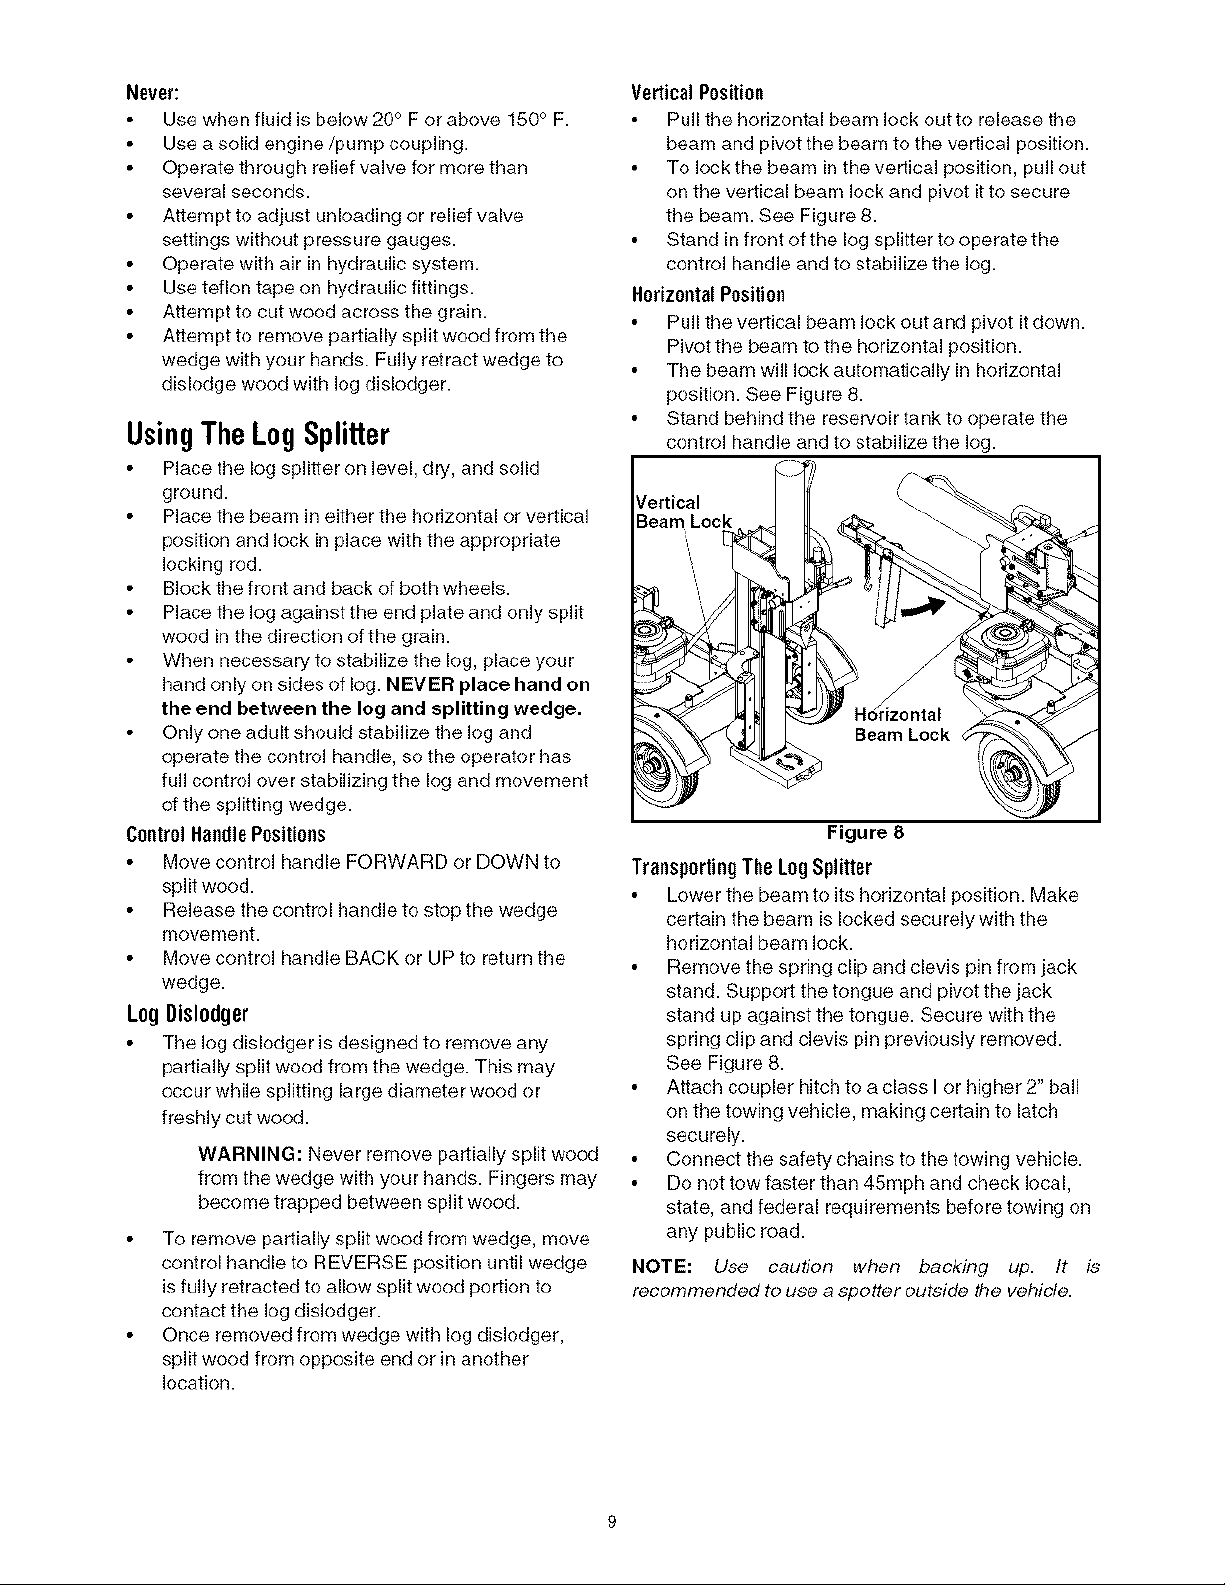
Vertical Position
Pull the horizontal beam lock out to release the
beam and pivot the beam to the vertical position.
To lock the beam in the vertical position, pull out
on the vertical beam lock and pivot it to secure
the beam. See Figure 8.
Stand in front of the log splitter to operate the
control handle and to stabilize the log.
Horizootnl Position
Pull the vertical beam lock out and pivot it down.
Pivot the beam to the horizontal position.
The beam win lock automaticaNy in horizontal
position. See Figure 8.
Stand behind the reservoir tank to operate the
control handle and to stabilize the Jog.
_/ertical
Beam Lock
Beam Lock
Figure 8
TransportingTheLog Splitter
Lower the beam to its horizontal position. Make
certain the beam is locked securely with the
horizontal beam lock.
Remove the spring clip and clevis pin from jack
stand. Support the tongue and pivot the jack
stand up against the tongue. Secure with the
spring clip and clevis pin previously removed.
See Figure 8.
Attach coupler hitch to a class I or higher 2" ball
on the towing vehicle, making certain to latch
securely.
Connect the safety chains to the towing vehicle.
Do not tow faster than 45mph and check local,
state, and federal requirements before towing on
any public road.
NOTE: Use caution when backing up. It is
recommended to use a spotter outside tbe vehicle.
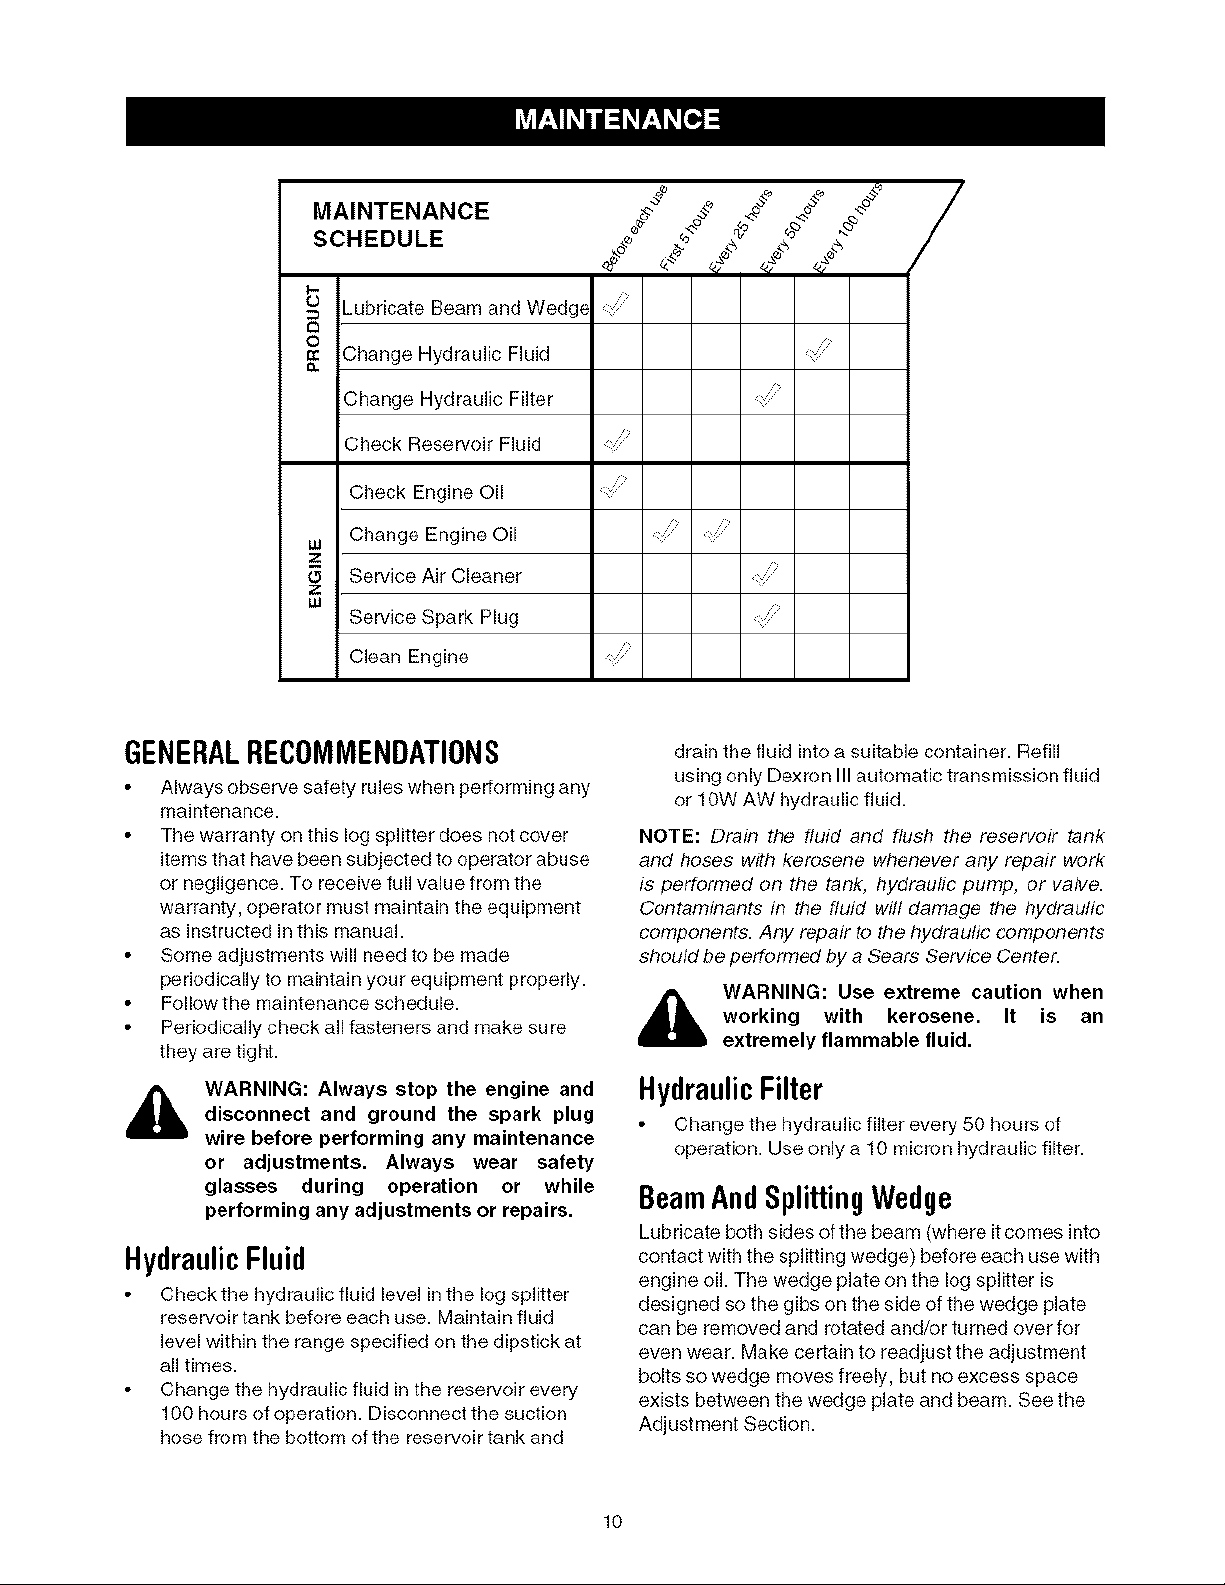
MAINTENANCE
SCHEDULE "_
_ _ubdcate Beam and Wedg_
_ Change Hydraulic Fluid
Change Hydraulic Filter
Check Reservoir Fluid
Check Engine Oil
Lu Change Engine Oil
Z
Service Air Cleaner
Z
uJ
Service Spark Plug
Clean Engine
GENERALREC0MMENDATIONS
Always observe safety rules when performing any
maintenance.
The warranty on this log splitter does not cover
items that have been subjected to operator abuse
or negligence. To receive full value from the
warranty, operator must maintain the equipment
as instructed in this manual.
Some adjustments will need to be made
periodically to maintain your equipment properly.
Follow the maintenance schedule.
Periodically check all fasteners and make sure
they are tight.
WARNING: Always stop the engine and
disconnect and ground the spark plug
wire before performing any maintenance
or adjustments. Always wear safety
glasses during operation or while
performing any adjustments or repairs.
HydraulicFluid
Check the hydraulic fluid level in the log splitter
reservoir tank before each use. Maintain fluid
level within the range specified on the dipstick at
all times.
Change the hydraulic fluid in the reservoir every
100 hours of operation. Disconnect the suction
hose from the bottom of the reservoir tank and
drain the fluid into a suitable container. Refill
using only Dexron III automatic transmission fluid
or 10W AW hydraulic fluid.
NOTE: Drain the fluid and flush the reservoir tank
and hoses with kerosene whenever any repair work
is performed on the tank, hydraulic pump, or valve.
Contaminants in the fluid will damage the hydraulic
components. Any repair to the hydraulic components
should be performed by a Sears Service Center.
_lb WARNING: Use extreme caution when
working with kerosene. It is an
extremely flammable fluid.
HydraulicFilter
Change the hydraulic filter every 50 hours of
operation. Use only a 10 micron hydraulic filter.
BeamAndSplittingWedge
Lubricate both sides of the beam (where it comes into
contact with the splitting wedge) before each use with
engine oil. The wedge plate on the log splitter is
designed so the gibs on the side of the wedge plate
can be removed and rotated and/or turned over for
even wear. Make certain to readjust the adjustment
bolts so wedge moves freely, but no excess space
exists between the wedge plate and beam. See the
Adjustment Section.
lO
EngineMaintenance
CheckEngineOil
Stop engine and wait several minutes before
checking oil level.
Remove oil fill dipstick.
Check oil level on dipstick. With engine on level
ground, the oil must be to FULL mark on dipstick.
Replace dipstick and tighten.
ChaegiagEegiaeOil
Only use high quality detergent oil rated with API
service classification SF, SG, or SH. Select the
oil's SAE viscosity grade according to the
expected operating temperature. Follow the chart
below:
Colder < 32°F -)_ Warmer
5W30
Oil Viscosity Chart
NOTE: Afihough multi-viscosity oils (SW30, 10W30,
etc.) improve starting in cold weather, they wiff resuff
in increased oil consumption when used above 32_'F.
Check your engine oil level more frequently to avoid
possible engine damage from running low on oil.
Change engine oil after the first five hours of
operation, and every 50 hours thereafter. Change
oil every 25 hours of operatk)n if the engine is
operated under heavy load or in high ambient
temperatures.
To Draie Oil
Drain oil while engine is warm. Follow the instructions
given bek)w.
Drain the gas tank, start the engine and let it run
until the fuel line and carburetor are empty.
Remove oil fill dipstick.
Tip unit on its side to drain through the oil fill tube.
When engine is drained of all oil, refill with
approximately 20 oz. of fresh oil Refer to Gas
And Oil Fill-up in OPERATION section.
Replace dipstick.
Service Air Cleaner
The air cleaner prevents damaging dirt, dust, etc.,
from entering the carburetor and being forced into the
engine and is important to engine life and
performance.
an air cleaner completely assembled.
WARNING: Never run the engine without
I SAE 30
To ServiceAirFilter
Loosen air cleaner cover screw, but do not
remove screw from cover. Swing cover down to
remove from hinge.
Inspect filter for discoloration or dirt
accumulation. If either is present, proceed as
follows:
Clean inside of body and cover thoroughly and
remove cartridge.
Reassemble new cartridge in the body. Swing
cover down and tighten the screw loosened
earlier.
WARNING: Temperature of muffler andnearby areas may exceed 150° F(65°C).
Avoid these areas.
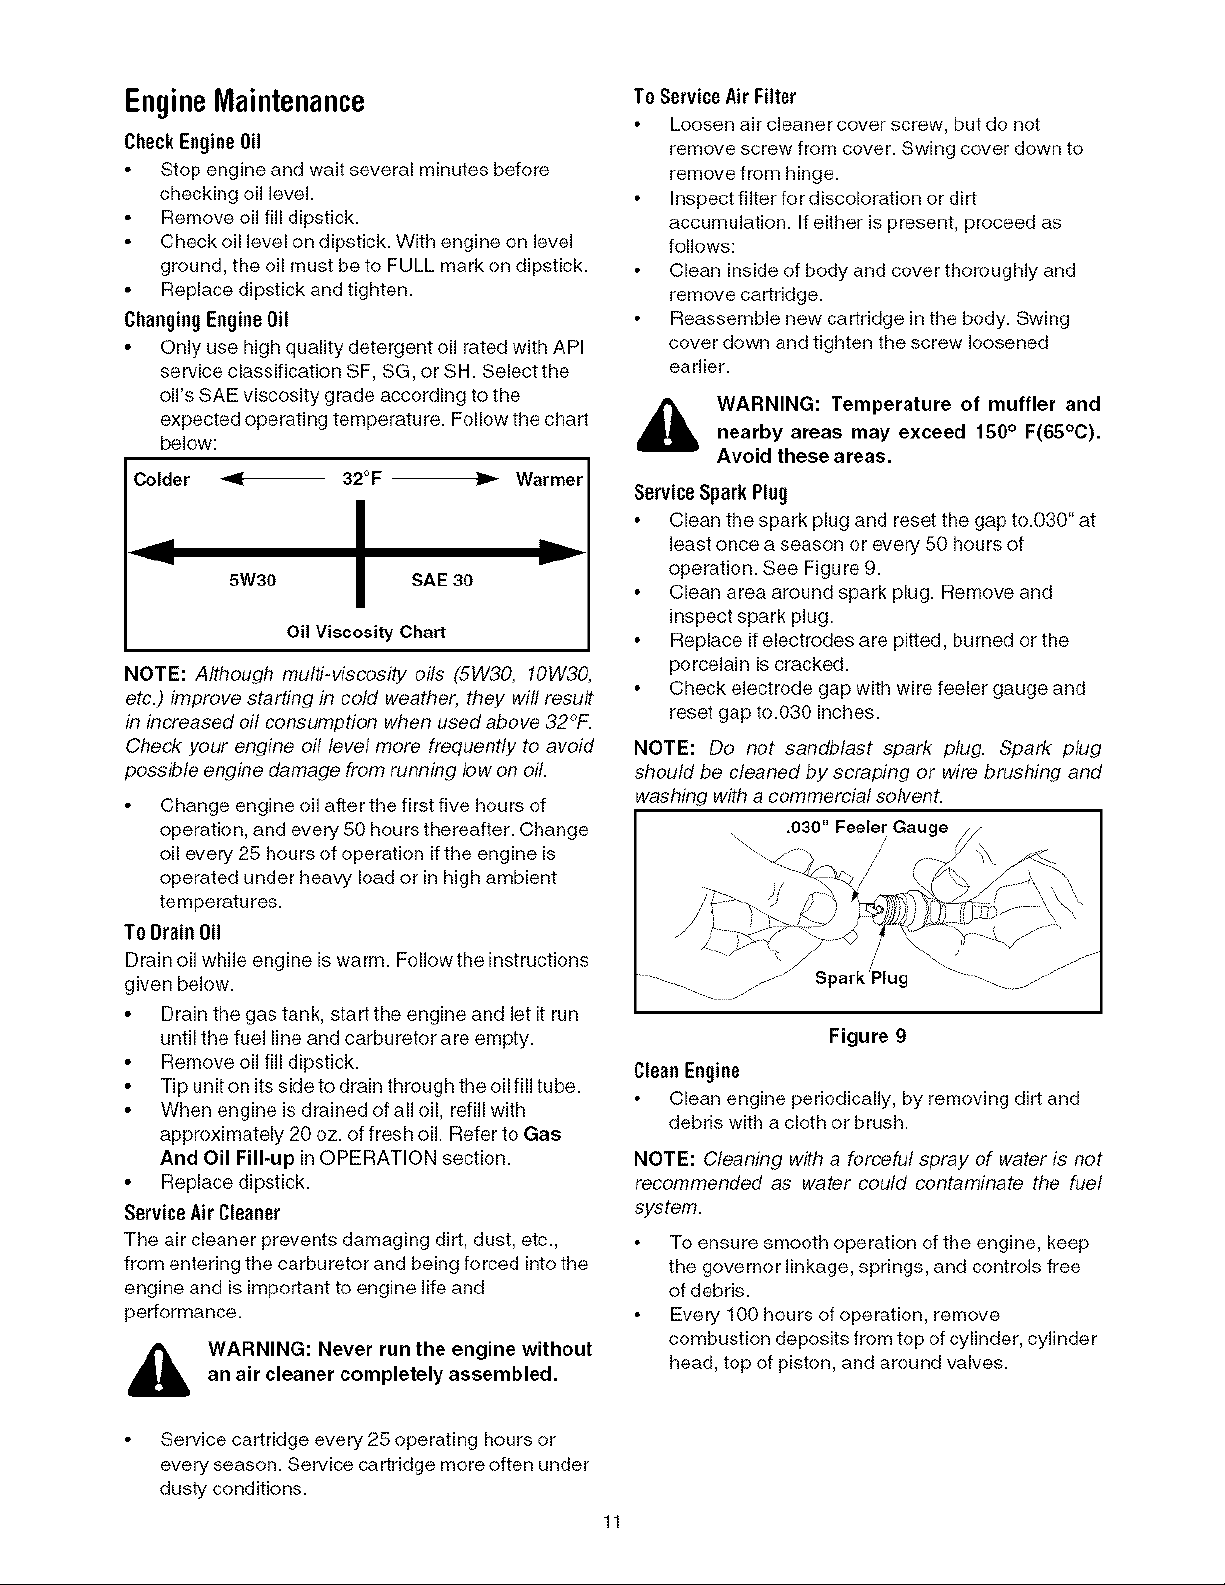
ServiceSparkPlug
Clean the spark plug and reset the gap to.030" at
least once a season or every 50 hours of
operation. See Figure 9.
Clean area around spark plug. Remove and
inspect spark plug.
Replace if electrodes are pitted, burned or the
porcelain is cracked.
Check electrode gap with wire feeler gauge and
reset gap to.030 inches.
NOTE: Do not sandblast spark plug. Spark plug
should be cleaned by scraping or wire brushing and
washing with a commercial sohvent.
,030" Feeler Gauge
.... . . " SparkPlug "
Figure 9
Clean Engine
Clean engine periodically, by removing dirt and
debdswgh a cloth or brush.
NOTE: Cleaning with a forceful spray of water is not
recommended as water could contaminate the fuel
system.
To ensure smooth operation of the engine, keep
the governor linkage, springs, and controls free
of debris.
Every 100 hours of operation, remove
combustion deposits from top of cylinder, cylinder
head, top of piston, and around valves.
Service cartridge every 25 operating hours or
every season. Service cartridge more often under
dusty conditions.
11
adjustments without first stopping
WARNING: Do not at any time make any
engine, disconnecting spark plug wire,
and grounding it against the engine.
Always wear safety glasses during
operation or while performing any
adjustments or repairs.
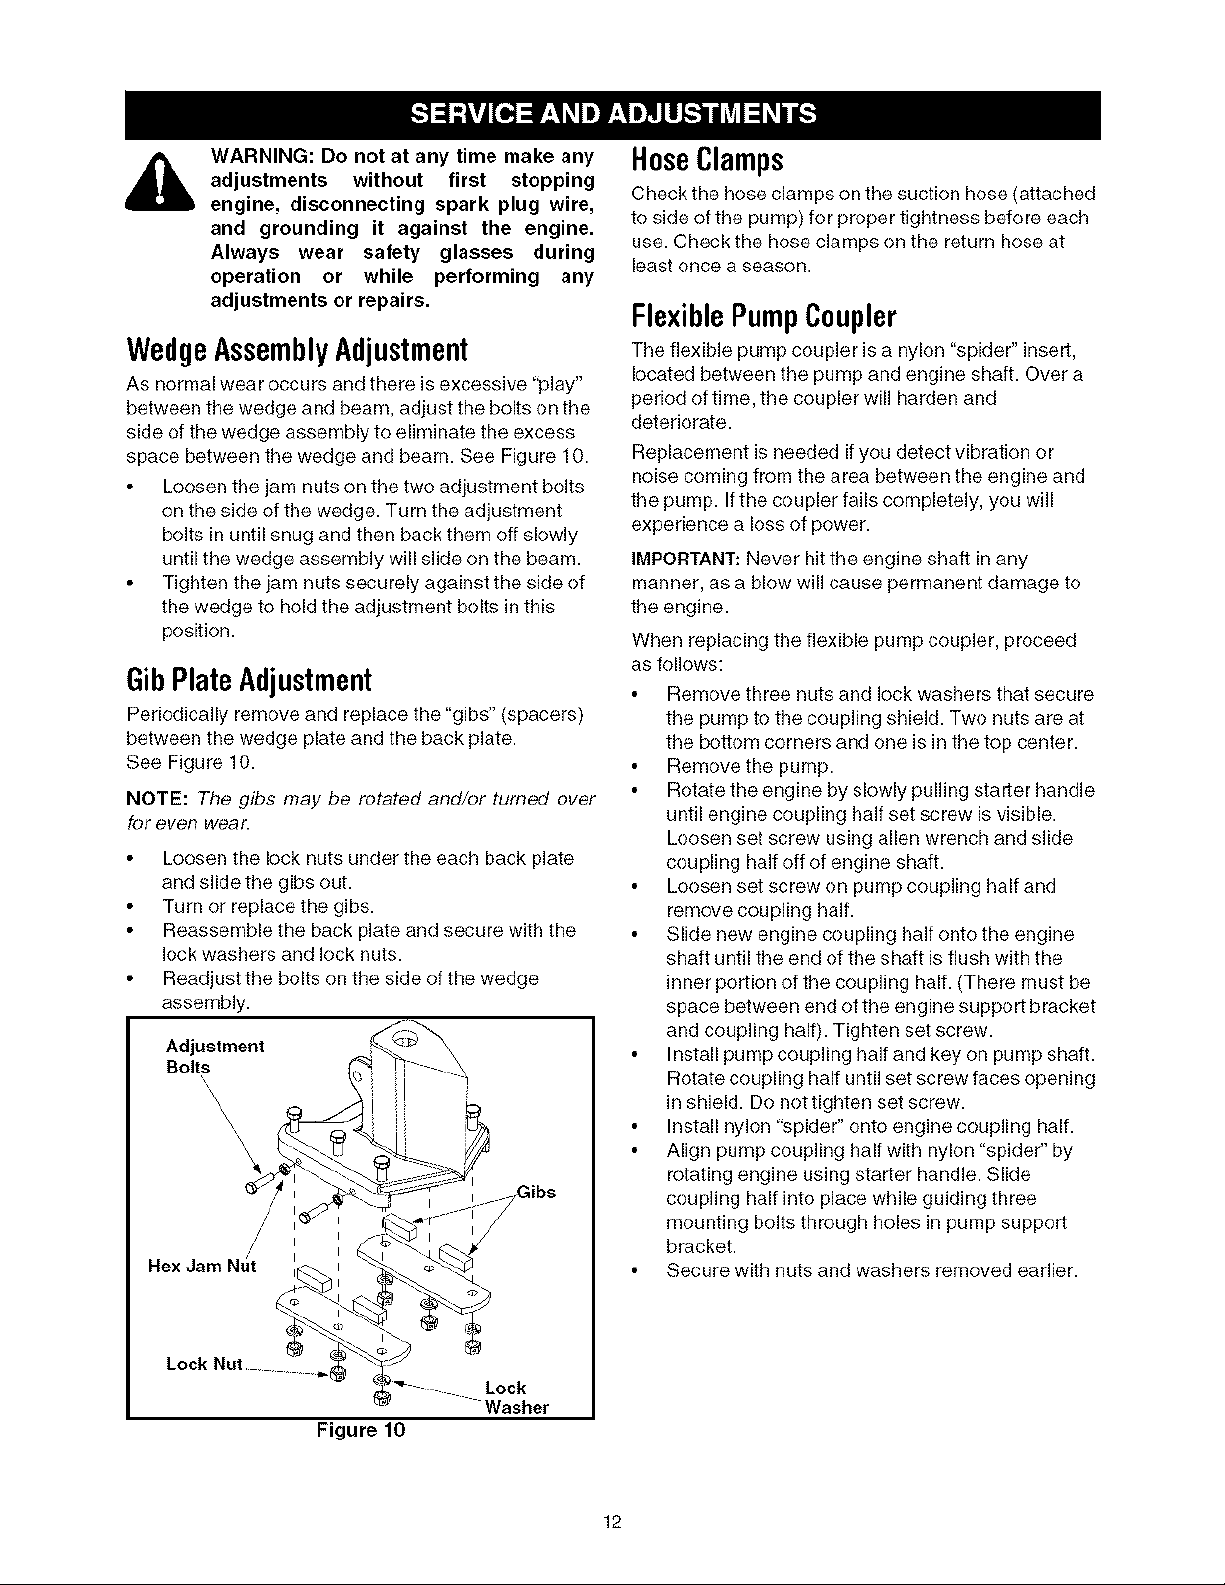
WedgeAssemblyAdjustment
AS normal wear occurs and there is excessive _'play"
between the wedge and beam, adjust the bolts on the
side of the wedge assembly to eliminate the excess
space between the wedge and beam. See Figure 10.
Loosen the jam nuts on the two adjustment bolts
on the side of the wedge. Turn the adjustment
bolts in until snug and then back them off slowly
until the wedge assembly will slide on the beam.
Tighten the jam nuts securely against the side of
the wedge to hold the adjustment bolts in this
position.
GibPlateAdjustment
Periodically remove and replace the "gibs" (spacers)
between the wedge plate and the back plate.
See Figure 10.
NOTE: The gibs may be rotated and/or turned over
for ever wear.
Loosen the lock nuts under the each back plate
and slide the gibs out.
Turn or replace the gibs.
Reassemble the back plate and secure with the
lock washers and lock nuts.
Readjust the bolts on the side of the wedge
assembly.
Adjustment
Bolts
\
\ i
\
\
\
I
/ i
/// i
Nex Jam Ntlt
/ I
I
I
HoseClamps
Check the hose clamps on the suction hose (attached
to side of the pump) for proper tightness before each
use. Check the hose clamps on the return hose at
least once a season.
FlexiblePumpCoupler
The flexible pump coupler is a nylon "spider" insert,
located between the pump and engine shaft. Over a
period of time, the coupler will harden and
deteriorate.
Replacement is needed if you detect vibration or
noise coming from the area between the engine and
the pump. If the coupler fails completely, you will
experience a loss of power.
IMPORTANT: Never hit the engine shaft in any
manner, as a blow will cause pemlanent damage to
the engine.
When replacing the flexible pump coupler, proceed
as follows:
Remove three nuts and lock washers that secure
the pump to the coupling shield. Two nuts are at
the bottom corners and one is in the top center.
Remove the pump.
Rotate the engine by slowly pulling starter handle
until engine coupling half set screw is visible.
Loosen set screw using allen wrench and slide
coupling half off of engine shaft.
Loosen set screw on pump coupling half and
remove coupling half.
Slide new engine coupling half onto the engine
shaft until the end of the shaft is flush with the
inner portion of the coupling half. (There must be
space between end of the engine support bracket
and coupling half). Tighten set screw.
Install pump coupling half and key on pump shaft.
Rotate coupling half until set screw faces opening
in shield. Do not tighten set screw.
Install nylon "spider" onto engine coupNng half.
Align pump coupling half with nylon "spider" by
rotating engine using starter handle. Slide
coupNng half into place while guiding three
mounting bolts through holes in pump support
bracket.
Secure with nuts and washers removed earlier.
Figure 10
Lock
Washer
12
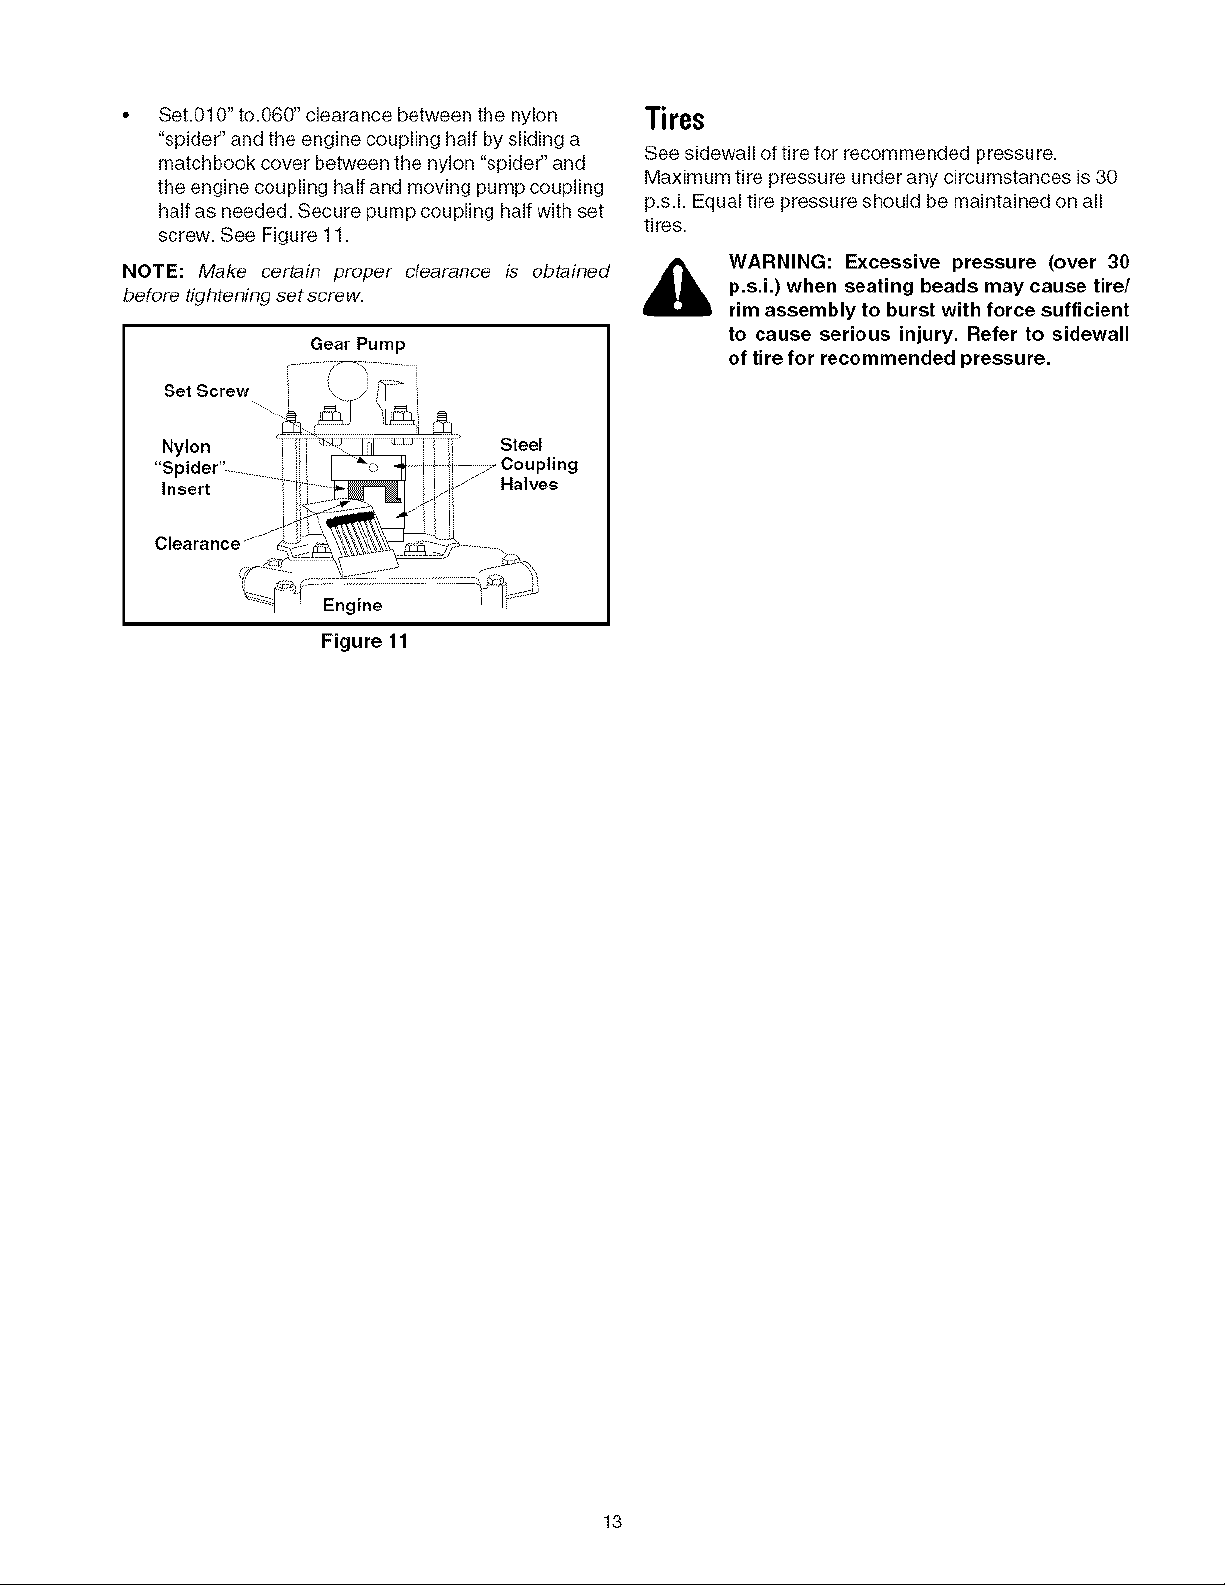
Set.010"to.060"clearancebetweenthenylon
"spider"andtheenginecouplinghalfbyslidinga
matchbookcoverbetweenthenylon"spider"and
theenginecouplinghalfandmovingpumpcoupling
halfasneeded.Securepumpcouplinghalfwithset
screw.SeeFigure11.
Tires
See sidewall of tire for recommended pressu re.
Maximum tire pressure under any circumstances is 30
p.s.i. Equal tire pressure should be maintained on all
tires.
NOTE: Make certain proper clearance is obtained
before tighteningsetscrew.
Gear Pump
Figure 11
,_ WARNING: Excessive pressure (over 30
p.s.i.) when seating beads may cause tire/
rim assembly to burst with force sufficient
to cause serious injury. Refer to sidewall
of tire for recommended pressure.
13
Prepare your log splitter for storage at the end of the
season or if the log splitter will not be used for 30 days
or more.
WARNING: Never store machine with fuel
in the fuel tank inside of building where
fumes may reach an open flame or spark
or where ignition sources are present
such as hot water and space heaters,
furnaces, clothes dyers, stoves, electric
motors, etc.
Never use engine or carburetor cleaner products
in the fuel tank or permanent damage may
occur. Use fresh fuel next season.
Remove spark plug, pour approximately 1/2 oz.
of engine oil into cylinder and crank slowly to
distribute oil.
Replace spark plug.
NOTE: Fuel stabilizer is an acceptable alternative in
minimizing for formation of fuel gum deposits during
storage.
NOTE: Yearly check-up by your local Sears service
center is a good way to ensure your log spfitter will
provide maxJfT_um performance next season.
LogSplitter
Clean the log splitter thoroughly.
Wipe unit with an oiled rag to prevent rust,
especially on the wedge and the beam.
Engine
IMPORTANT: It is important to prevent gum deposits
from forming in essential fuel system parts such as
carburetor, fuel filter, fuel hose, or tank du ring
storage. Also, alcohol blended fuels (called gasohol or
using ethanol or methanol) can attract moisture which
leads to separation and formation of acids during
storage. Acidic gas can damage the fuel system of an
engine while in storage.
Drain the fuel tank. Always drain fuel into
approved container outdoors away from open
flame. Be sure the engine is cool. Do not smoke
while handling the fuel.
Start the engine and let it run until the fuel lines
and carburetor are empty.
Please follow the instructions below for storing your
log splitter with fuel and stabilizer in the engine.
Add stabilizer to gasoline in fuel tank or storage
container.
Always follow the mix ratio found on stabilizer
container.
Run engine at least 10 minutes after adding
stabilizer to allow the stabilizer to reach the
carburetor.
Do not drain the gas tank and carburetor if using
fuel stabilizer. Drain all the oil from the
crankcase (this should be done after the engine
has been operated and is still warm) and refill the
crankcase with fresh oil.
Other
Do not store gasoline from one season to
another.
Replace your gasoline can if it starts to rust.
Store unit in aclean, dry area. Do not store next
to corrosive materials, such as fertilizer.
Wipe equipment with an oiled rag to prevent rust.
14
 Loading...