

Page 1
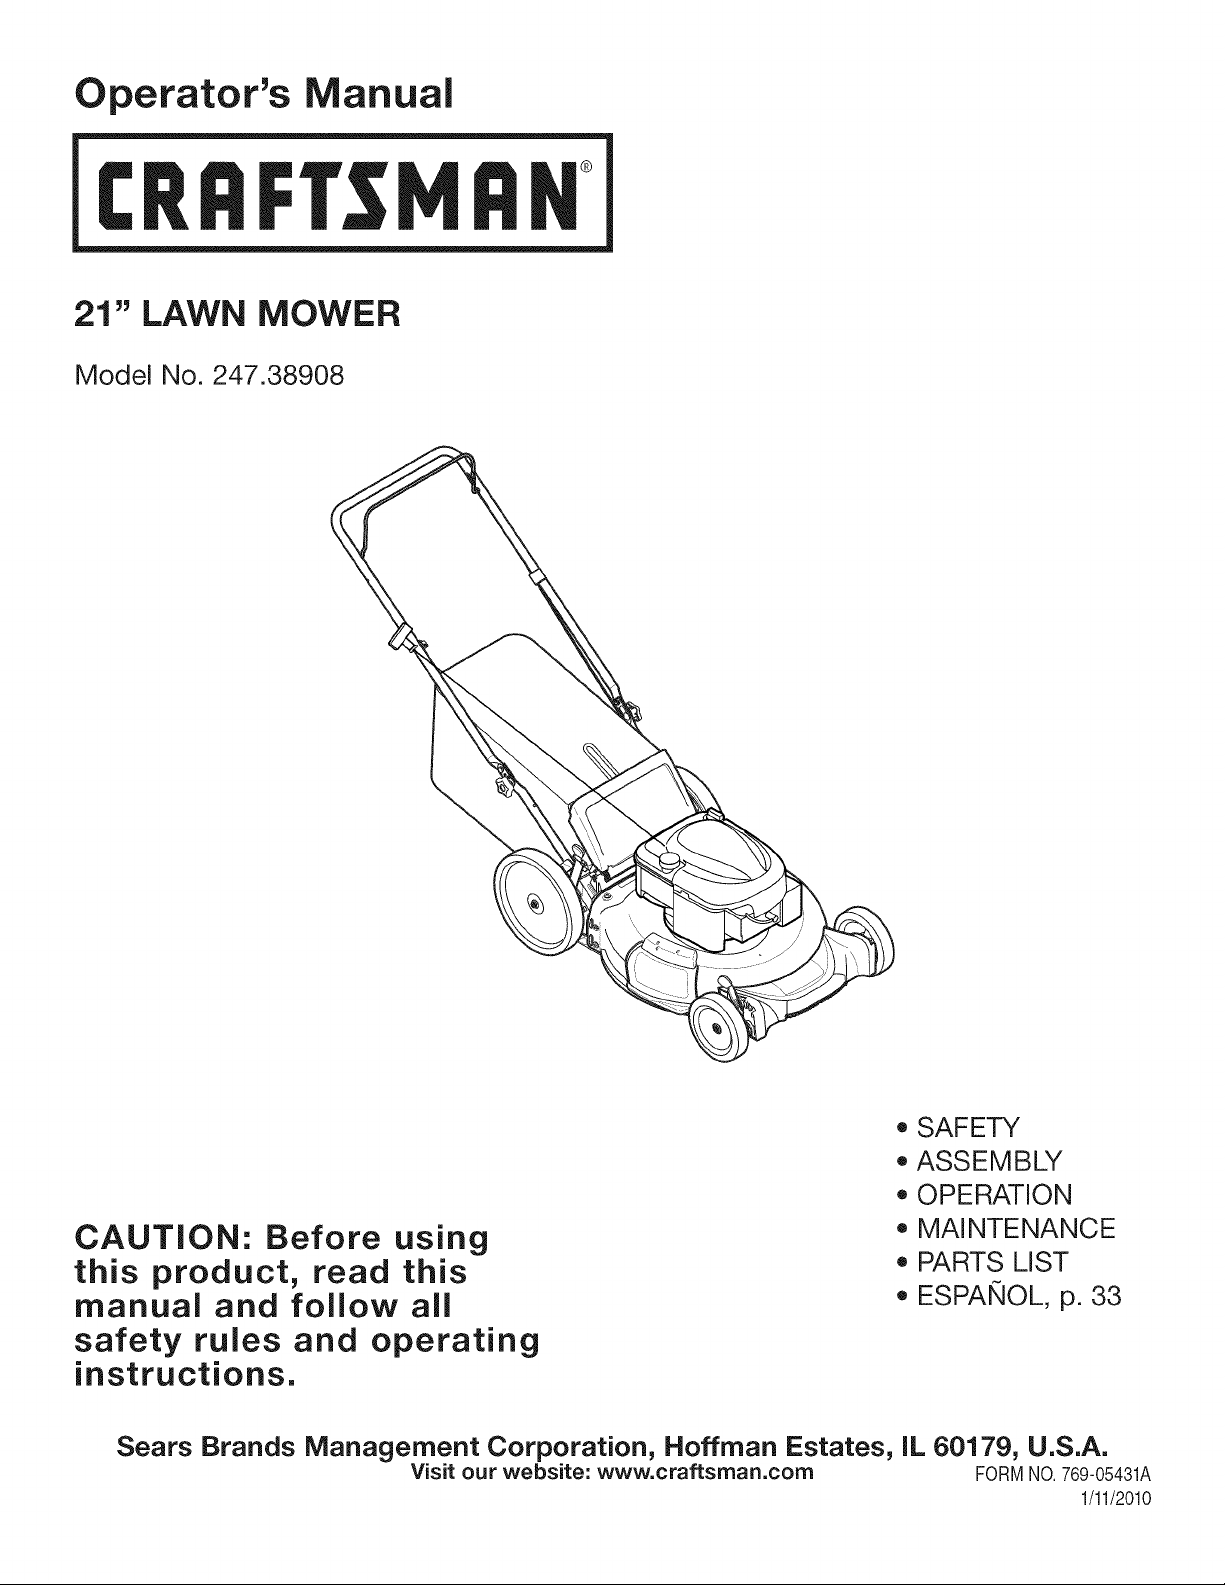
Operator's Manual
CRRFTSMRH
21" LAWN MOWER
Model No. 247.38908
o SAFETY
ASSEMBLY
OPERATION
CAUTION: Before using
MAINTENANCE
PARTS LIST
this product, read this
manual and follow all
o ESPANOL, p. 33
safety rules and operating
instructions.
Sears Brands Management Corporation, Hoffman Estates, IL 60179, U.S.A.
Visit our website: www.craftsman.com FORMNO.769-05431A
1/11/2010
Page 2
WarrantyStatement..................................Page2
Safetyinstructions....................................Pages3-6
SlopeGuide..............................................Page7
SafetyLabels............................................Page9
Assembly..................................................Pages10-13
Operation..................................................Pages14-15
ServiceandMaintenance.........................Pages16-19
Off-SeasonStorage..................................Page20
Troubleshooting........................................Page21
PartsList...................................................Page22-29
Espa_ol.....................................................Page33
ServiceNumbers......................................BackCover
Craftsman Full Warranty
IfthisCraftsmanproductfailsduetoadefectinmaterialorworkmanshipwithintwoyearsfromthedateofpurchase,returnittoanySearsstore,
SearsServiceCenter,orotherCraftsmanoutletintheUnitedStatesforfreerepair(orreplacementifrepairprovesimpossible).
Thiswarrantyappliesforonly90daysifthisproductiseverusedforcommercialorrentalpurposes.
Thiswarranty coversONLYdefects in materialandworkmanship. Searswill NOTpayfor:
• Expendableitemswhichcanwearoutfromnormalusewithinthewarrantyperiod,suchas mowerblades,bladeadapters,belts,filters,or
sparkplugs.
• Repairsnecessarybecauseof accident,suchas bentcrankshafts,or failuretooperateor maintainthe productaccordingtoall supplied
instructions.
• Preventativemaintenanceor repairsnecessarydueto improperfuelmixture,contaminatedorstalefuel.
Thiswarrantygivesyouspecificlegalrights,andyou mayalsohaveotherrightswhichvaryfromstateto state.
Sears, Roebuck andCo.,NoffmanEstates,IL 60179
EngineOilType: SAE30
EngineOilCapacity: 18ounces
Fuel: UnleadedGasoline
SparkPlug: Champion®RC12YC
Engine: Briggs& Stratton
ModelNumber.................................................................
Serial Number.................................................................
Dateof Purchase.............................................................
Recordthemodelnumber,serialnumber
anddateof purchaseabove
©SearsBrands,LLC 2
Page 3
Thissymbolpointsoutimportantsafetyinstructionswhich,if not
followed,couldendangerthepersonalsafetyand/orpropertyof
yourselfandothers. Readandfollowall instructionsin thismanual
beforeattemptingto operatethismachine.Failuretocomplywith
theseinstructionsmayresultin personalinjury.Whenyouseethis
symbol,HEEDITSWARNING!
Thismachinewasbuilttobeoperatedaccordingtothesafeopera-
tionpracticesinthis manual.Aswithanytypeof powerequipment,
carelessnessorerroron thepartoftheoperatorcanresultin serious
injury.Thismachineiscapableofamputatingfingers,hands,toes
andfeetandthrowingdebris.Failuretoobservethefollowingsafety
instructionscouldresultin seriousinjuryor death.
CALIFORNIA PROPOSITION 65
EngineExhaust,someof itsconstituents,andcertainvehicle
componentscontainoremitchemicalsknowntoStateofCalifornia
tocausecancerandbirthdefectsorotherreproductiveharm.
Batteryposts,terminals,and relatedaccessoriescontainleadand
leadcompounds,chemicalsknownto theStateof Californiato
causecancerandreproductiveharm.Washhandsafterhandling.
GENERAL OPERATION
* Readthisoperator'smanualcarefullyin itsentiretybefore
attemptingtoassemblethis machine.Read,understand,and
followall instructionsonthemachineandinthe manualsbefore
operation.Keepthismanualina safeplacefor futureandregular
referenceandfor orderingreplacementparts
, Becompletelyfamiliarwiththecontrolsandtheproperuseof this
machinebeforeoperatingit.
, Thismachineis a precisionpieceof powerequipment,not a
plaything.Therefore,exerciseextremecautionat alltimes.This
machinehasbeendesignedto performonejob:to mowgrass.
Donotuseitforanyother purpose.
, Neverallowchildrenunder14yearsof agetooperatethis
machine.Children14andover shouldreadandunderstandthe
instructionsandsafeoperationpracticesin thismanualandon
themachineandshouldbetrainedandsupervisedbyan adult.
, Only responsibleindividualswhoarefamiliarwiththeserulesof
safeoperationshouldbe allowedtousethis machine.
, Thoroughlyinspectthe areawheretheequipmentistobe used.
Removeallstones,sticks,wire,bones,toysandotherforeign
objects,whichcouldbetrippedoverorpickedupandthrownby
theblade.Thrownobjectscancauseseriouspersonalinjury.
, Planyour mowingpatternto avoiddischargeofmaterialtoward
roads,sidewalks,bystandersandthe like.Also,avoiddischarg-
ingmaterialagainstawall orobstruction,whichmaycause
dischargedmaterialto ricochetbacktowardthe operator.
, Tohelpavoidbladecontactor athrownobjectinjury,stayin
operatorzonebehindhandlesandkeepchildren,bystanders,
helpersandpetsatleast75feetfrommowerwhileitis inopera-
tion.Stopmachineifanyoneentersarea.
Your Responsibility--Restrict theuseofthis powermachineto
personswhoread,understandandfollowthewarningsand instruc-
tionsin thismanualandon themachine.
SAVE THESE INSTRUCTIONS!
• Alwayswearsafetyglassesorsafetygogglesduringoperation
andwhileperformingan adjustmentor repairto protectyoureyes.
Thrownobjectswhichricochetcancauseseriousinjurytothe
eyes.
Wearsturdy,rough-soledworkshoesandclose-fittingslacks
and shirts.Shirtsand pantsthatcoverthearmsandlegsand
steel-toedshoesare recommended.Neveroperatethis machine
inbarefeet,sandals,slipperyorlight-weight(e.g.canvas)shoes.
Donot put handsor feetnearrotatingpartsor underthecutting
deck.Contactwith bladecanamputatefingers,hands,toesand
feet.
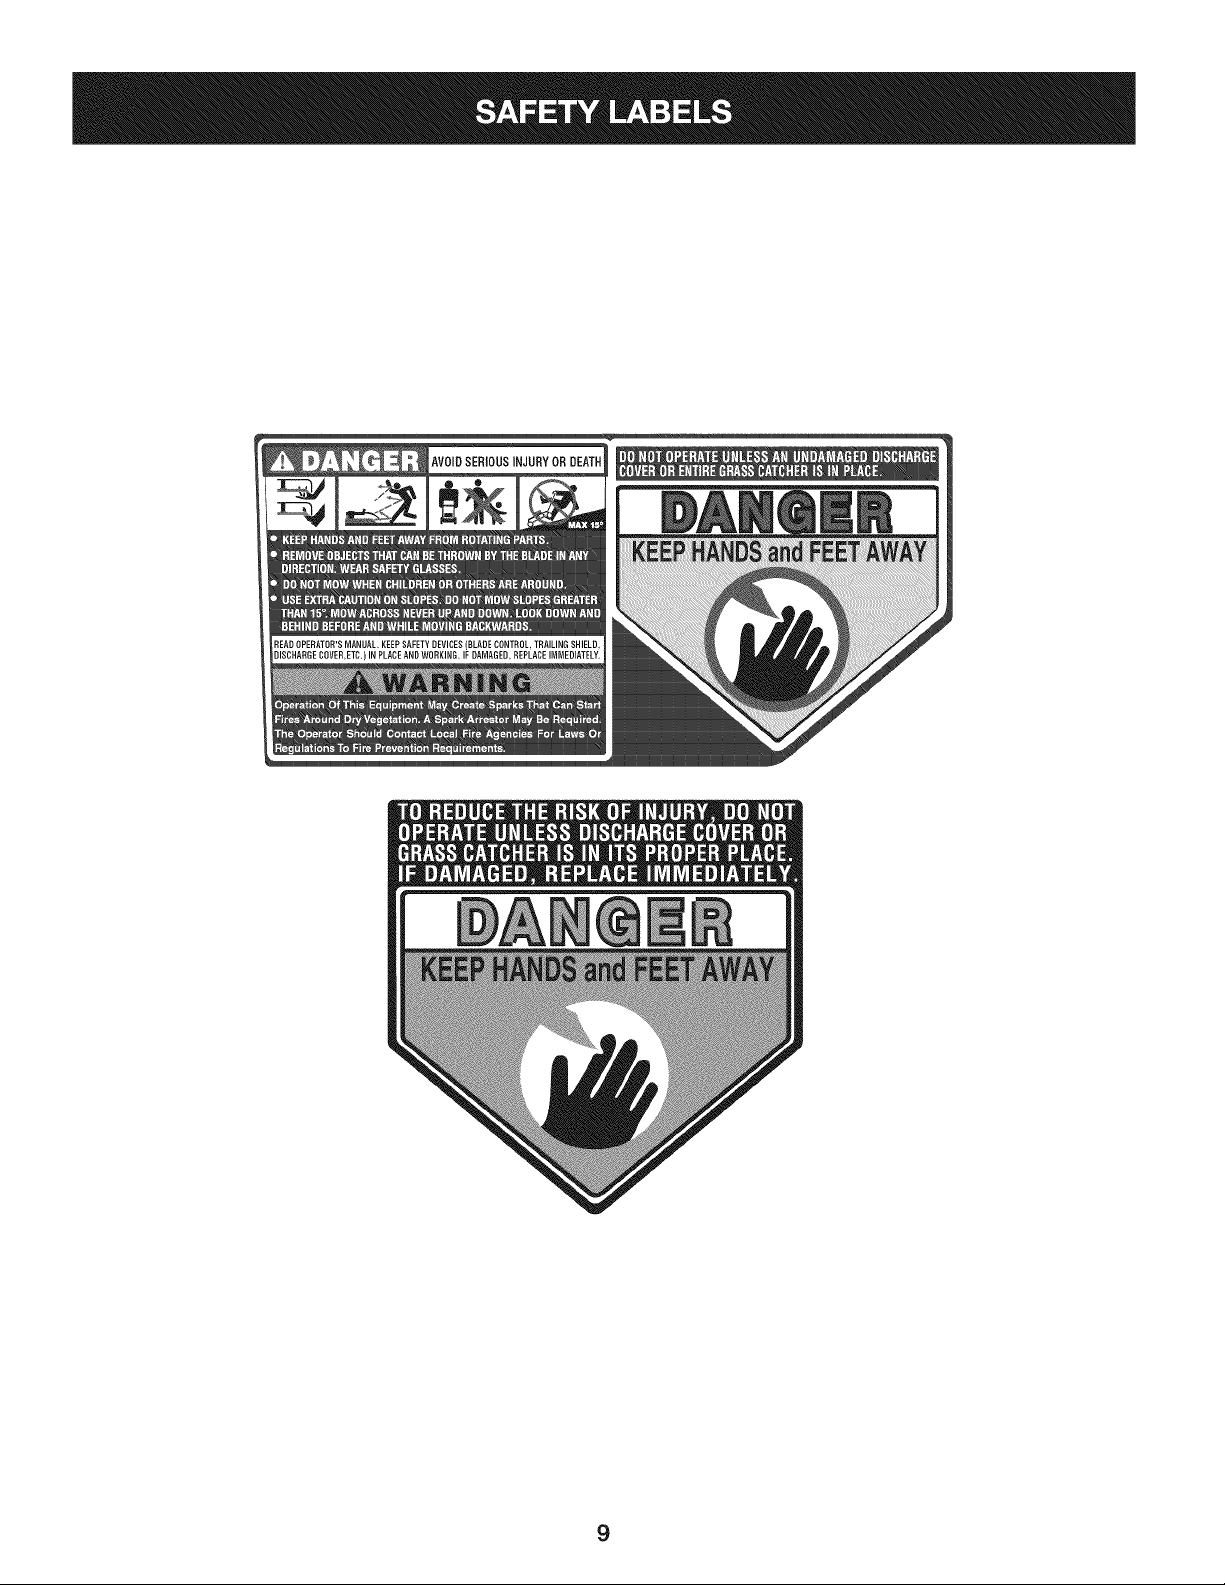
A missingor damageddischargecovercan causebladecontact
or thrownobjectinjuries.
Manyinjuriesoccuras a resultofthemowerbeingpulledoverthe
footduringafallcausedbyslippingortripping.Donot holdon to
themowerifyouarefalling:releasethehandleimmediately.
Neverpullthemowerbacktowardyouwhileyou arewalking.If
youmustbackthemowerawayfroma wallor obstructionfirst
lookdownandbehindto avoidtrippingandthenfollowthese
steps:
1. Stepbackfrommowertofullyextendyourarmsforward.
2. Besureyouare wellbalancedwithsurefooting.
3. Pullthemowerbackslowly,no morethanhalfwaytoward
you.
4. Repeatthesestepsasneeded.
Donot operatethemowerwhileunderthe influenceof alcoholor
drugs.
Donot engagethe self-propelledmechanismon machinesso
equippedwhilestartingengine.
3
Page 4
• Thebladecontrolhandleisa safetydevice.Neverattemptto
bypassitsoperation.Doingsomakesthesafetydeviceinopera-
tiveandmayresultin personalinjurythroughcontactwiththe
rotatingblade.Thebladecontrolhandlemustoperateeasily
in bothdirectionsandautomaticallyreturntothedisengaged
positionwhenreleased.
• Neveroperatethemowerinwetgrass.Alwaysbe sureofyour
footing.A slipandfall cancauseseriouspersonalinjury.Ifyou
feelyou arelosingyourfooting,releasethebladecontrolhandle
immediatelyandthebladewillstop rotatingwithinthreeseconds.
• Mowonlyin daylightor goodartificiallight.Walk,neverrun.
• Stopthe bladewhencrossinggraveldrives,walksorroads.
• Iftheequipmentshouldstartto vibrateabnormally,stopthe
engineandcheckimmediatelyforthecause.Vibrationis gener-
allya warningoftrouble.
• Shutthe engineoff andwaituntilthebladecomestoa complete
stopbeforeremovingthegrasscatcheror uncloggingthechute.
Thecuttingbladecontinuesto rotateforafewsecondsafterthe
bladecontrolisreleased.Neverplaceanypartofthe body inthe
bladeareauntilyouaresurethebladehasstoppedrotating.
• Neveroperatemowerwithoutpropertrailshield,dischargecover,
grasscatcher,bladecontrolhandleor othersafetyprotectivede-
vicesin placeandworking.Neveroperatemowerwithdamaged
safetydevices.Failuretodo socan resultinpersonalinjury.
Mufflerandenginebecomehotandcancausea burn.Donot
touch.
• Neverattempttomakea wheelorcuttingheightadjustmentwhile
theengineisrunning.
• Onlyuse partsand accessoriesmadeforthis machinebythe
manufactureraslistedin thePartspagesofthisOperator's
Manual.Failuretodoso can resultinpersonalinjury.
• Whenstartingengine,pullcordslowlyuntilresistanceisfelt,then
pullrapidly.Rapidretractionof startercord(kickback)willpull
handandarmtowardenginefasterthanyoucanlet go. Broken
bones,fractures,bruisesor sprainscouldresult.
• If situationsoccurwhicharenotcoveredinthismanual,usecare
andgoodjudgement.Contact1-800-4MY-HOME®forinformation
andassistance.
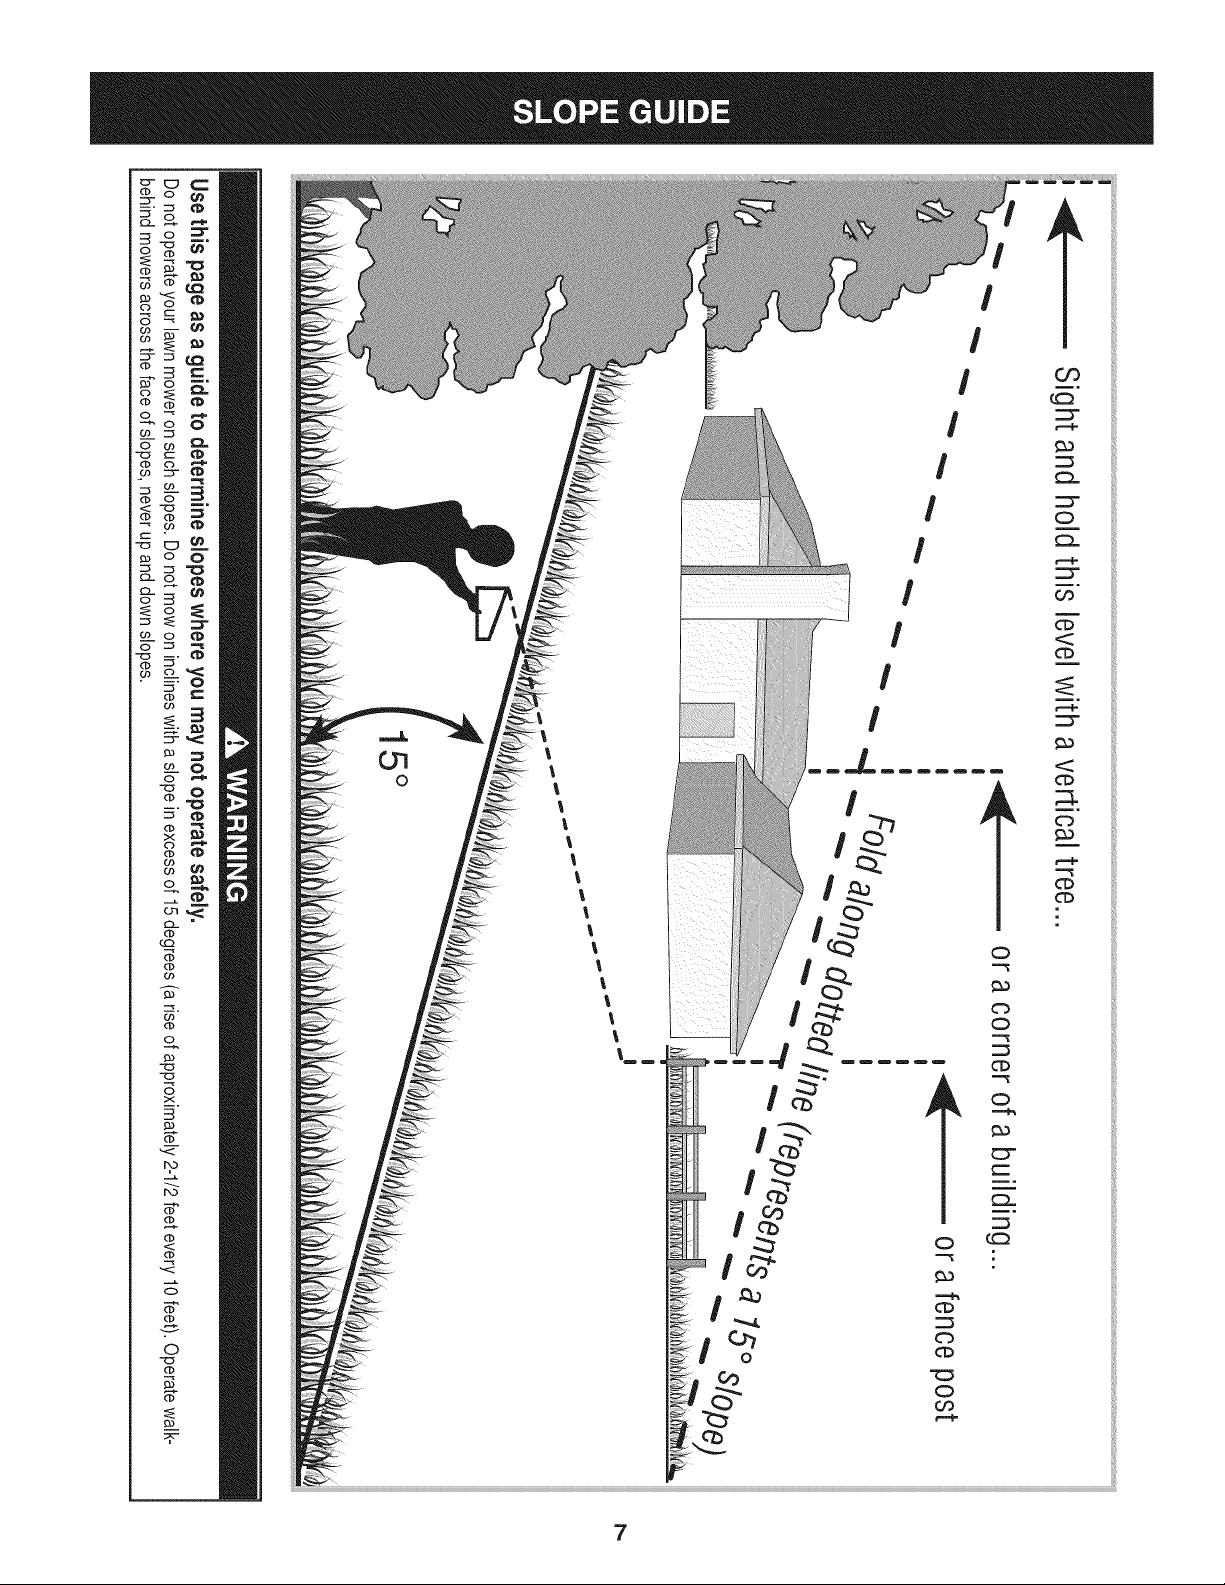
SLOPE OPERATION
Slopesareamajorfactorrelatedto slipandfallaccidents,whichcan
resultinsevereinjury.Operationon slopesrequiresextracaution.If
youfeel uneasyona slope,donotmowit. Foryoursafety,usethe
SlopeGuideincludedaspartof thismanualto measureslopesbefore
operatingthis machineon aslopedorhillyarea.Iftheslopeisgreater
than15degrees,donotmowit.
Do:
o
Mowacrossthefaced slopes;neverupanddown.Exercise
extremecautionwhenchangingdirectiononslopes.
• Watchfor holes,ruts, rocks,hiddenobjects,or bumpswhichcan
causeyoutosliportrip.Tallgrasscanhideobstacles.
• Alwaysbesureof yourfooting.A slipandfall can causeserious
personalinjury.Ifyoufeelyou arelosingyourbalance,release
thebladecontrolhandleimmediatelyandthe bladewillstop
rotatingwithinthree(3) seconds.
DoNot:
• Donotmowneardrop-offs,ditchesorembankments,because
youcouldloseyourfootingorbalance.
• Donotmowslopesgreaterthan15degreesas shownon the
slopeguide.
• Donotmowon wetgrass.Unstablefootingcouldcauseslipping.
CHILDREN
Tragicaccidentscanoccuriftheoperatorisnot alerttothe presence
ofchildren.Childrenareoftenattractedto themowerandthemowing
activity.Theydonot understandthe dangers.Neverassumethat
childrenwill remainwhereyoulastsawthem.
Keepchildrenoutofthemowingareaandunderwatchfulcareof
a responsibleadultotherthan theoperator.
• Bealertandturn moweroffif achildentersthe area.
• Beforeandwhilemovingbackwards,lookbehindanddownfor
smallchildren.
• Useextremecarewhenapproachingblindcorners,doorways,
shrubs,trees,orotherobjectsthatmayobscureyourvisionof a
childwhomayrunintothemower.
• Keepchildrenawayfromhot orrunningengines.Theycansuffer
burnsfroma hotmuffler.
• Neverallowchildrenunder14yearsofagetooperatethis
machine.Children14andovershouldreadand understandthe
instructionsandsafeoperationpracticesinthis manualandon
themachineand betrainedandsupervisedby anadult.
SERVICE
SafeHandlingOf Gasoline:
• Toavoid personalinjuryor propertydamageuseextremecare
in handlinggasoline.Gasolineisextremelyflammableandthe
vaporsareexplosive.Seriouspersonalinjurycanoccurwhen
gasolineis spilledon yourselfor yourclothes,whichcanignite.
Washyourskinandchangeclothesimmediately.
• Useonlyanapprovedgasolinecontainer.
• Neverfill containersinsidea vehicleoron atruck ortrailerbed
witha plasticliner.Alwaysplacecontainerson thegroundaway
fromyourvehiclebeforefilling.
• Removegas-poweredequipmentfromthetruck ortrailerand
refueliton theground.Ifthisis notpossible,thenrefuelsuch
equipmenton atrailer witha portablecontainer,ratherthanfrom
a gasolinedispensernozzle.
• Keepthenozzleincontactwiththe rimof the fueltankor
containeropeningatall timesuntilfuelingis complete.Donotuse
a nozzlelock-opendevice.
4
Page 5
• Extinguishall cigarettes,cigars,pipesandothersources
ofignition.
• Neverfuelmachineindoorsbecauseflammablevaporswill
accumulateinthe area.
• Neverremovegascap oraddfuelwhileengineis hotor running.
Allowengineto coolat leasttwo minutesbeforerefueling.
• Neverover-fillfueltank.Toallowfor expansionofthefuel,donot
fillabovethebottomofthefueltankneck.
• Replacegasolinecapandtightensecurely.
• If gasolineisspilled,wipeitoffthe engineandequipment.Move
machinetoanotherarea.Wait5 minutesbeforestartingengine.
• Neverstorethemachineorfuelcontainernearanopenflame,
sparkor pilot lightasona waterheater,spaceheater,furnace,
clothesdryerorothergasappliances.
• Toreducefirehazard,keepmachinefreeofgrass,leaves,or
otherdebrisbuild-up.Cleanupoil orfuelspillageandremoveany
fuel-soakeddebris.
Allowmachinetocoolatleast5 minutesbeforestoring.
GeneralService:
• Neverrunanengineindoorsor inapoorlyventilatedarea.Engine
exhaustcontainscarbonmonoxide,anodorlessanddeadlygas.
• Beforecleaning,repairing,or inspecting,makecertainthe
bladeandall movingpartshavestopped.Disconnectthespark
plugwireandgroundagainsttheenginetopreventunintended
starting.
Checkthebladeandenginemountingboltsatfrequentintervals
forpropertightness.Also,visuallyinspectbladefordamage(e.g.,
bent,cracked,worn).Replacebladewiththeoriginalequipment
manufacture's(O.E.M.)bladeonly,listedinthePartspagesofthis
manual.Useofpartswhichdonot meetthe originalequipment
specificationsmayleadto improperperformanceandcompro-
misesafety!
• Mowerbladesaresharpandcan cut. Wrapthe bladeor wear
gloves,anduse extracautionwhen servicingthem.
Keepall nuts,bolts,andscrewstighttobe suretheequipmentis
insafeworkingcondition.
Nevertamperwithsafetydevices.Checktheirproperoperation
regularly.
Afterstrikingaforeignobject,stopthe engine,disconnectthe
sparkplugwireand groundagainsttheengine.Thoroughly
inspectthemowerforanydamage.Repairthedamagebefore
startingandoperatingthemower.
Neverattempttomakea wheelorcuttingheightadjustmentwhile
theengineisrunning.
• Grasscatchercomponents,dischargecover,andtrailshieldare
subjectto wearand damagewhichcouldexposemovingpartsor
allowobjectstobethrown.Forsafetyprotection,frequentlycheck
componentsand replaceimmediatelywithoriginalequipment
manufacturer's(O.E.M.)partsonly,listedinthePartspages
ofthismanual.Useof partswhichdo notmeetthe original
equipmentspecificationsmayleadto improperperformanceand
compromisesafety!
Donot changetheengine'sgovernorsettingor over-speedthe
engine.Thegovernorcontrolsthe maximumsafeoperatingspeed
oftheengine.
Checkfuelline,tank,cap,andfittingsfrequentlyfor cracksor
leaks.Replaceifnecessary.
Donot crankenginewith sparkplugremoved.
• Maintainor replacesafetyandinstructionlabels,as necessary.
• Observeproperdisposallawsand regulations.Improperdisposal
offluidsandmaterialscanharmtheenvironment.
Accordingto theConsumerProductsSafetyCommission(CPSC)
andthe U.S.EnvironmentalProtectionAgency(EPA),this product
hasanAverageUsefulLifeof seven(7)years,or 140hoursof
operation.Atthe endoftheAverageUsefulLifehavethemachine
inspectedannuallybya Searsorotherqualifiedservicedealer
toensurethatall mechanicalandsafetysystemsareworking
properlyand notwornexcessively.Failuretodoso can resultin
accidents,injuriesordeath.
DO NOT MODIFY ENGINE
Toavoidseriousinjuryordeath,do notmodifyengineinanyway.
Tamperingwiththegovernorsettingcanleadto a runawayengineand
causeittooperateat unsafespeeds.Nevertamperwithfactorysetting
ofenginegovernor.Doingsowillvoidtheproductwarranty.
NOTICE REGARDING EMISSIONS
EngineswhicharecertifiedtocomplywithCaliforniaandfederal
EPAemissionregulationsforSORE(SmallOffRoadEquipment)are
certifiedto operateon regularunleadedgasoline,and mayinclude
thefollowingemissioncontrolsystems:EngineModification(EM)and
ThreeWayCatalyst(TWC)ifso equipped.
SPARK ARRESTOR
Thismachineisequippedwithaninternalcombustionengineand
shouldnotbe usedonor nearanyunimprovedforest-covered,
brush-coveredorgrass-coveredlandunlesstheengine'sexhaust
systemisequippedwitha sparkarrestermeetingapplicablelocalor
statelaws(ifany).
Ifa sparkarresterisused,itshouldbemaintainedineffectiveworking
orderbytheoperator.Inthe Stateof Californiatheaboveisrequired
bylaw(Section4442of the CaliforniaPublicResourcesCode).Other
statesmayhavesimilarlaws. Federallawsapplyonfederallands.
A sparkarresterfor the mufflerisavailablethroughyournearestSears
PartsandRepairServiceCenter.
Page 6
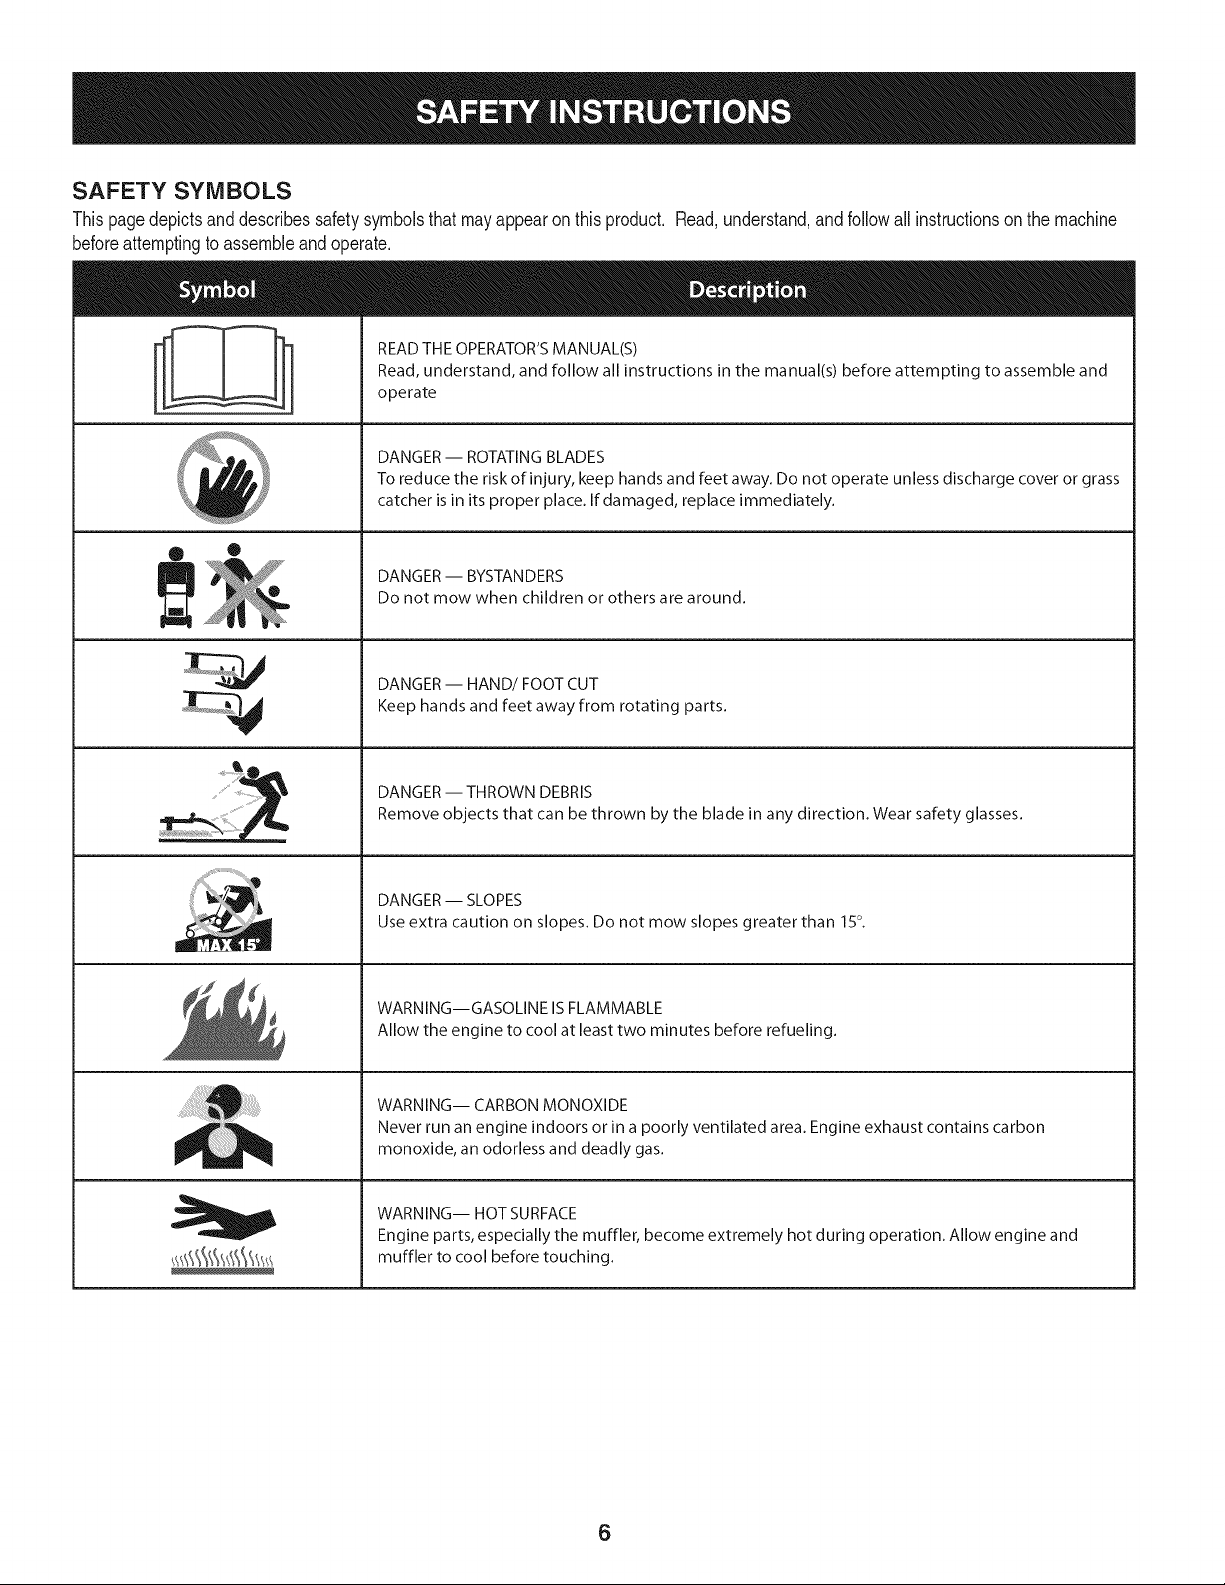
SAFETY SYMBOLS
Thispagedepictsanddescribessafetysymbolsthatmayappearonthisproduct. Read,understand,andfollowall instructionson the machine
beforeattemptingto assembleandoperate.
READ THE OPERATOR'S MANUAL(S)
i
i
®
Read, understand, and follow all instructions in the manual(s) before attempting to assemble and
operate
DANGER -- ROTATING BLADES
To reduce the risk of injury, keep hands and feet away. Do not operate unless discharge cover or grass
catcher is in its proper place. If damaged, replace immediately.
DANGER -- BYSTANDERS
Do not mow when children or others are around.
J
DANGER-- HAND/FOOT CUT
Keep hands and feet away from rotating parts.
DANGER -- THROWN DEBRIS
Remove objects that can be thrown by the blade in any direction. Wear safety glasses.
DANGER -- SLOPES
Use extra caution on slopes. Do not mow slopes greater than 15°.
WARNING--GASOLINE ISFLAMMABLE
Allow the engine to cool at least two minutes before refueling.
WARNING-- CARBON MONOXIDE
Never run an engine indoors or in a poorly ventilated area. Engine exhaust contains carbon
monoxide, an odorless and deadly gas.
WARNING-- HOT SURFACE
Engine parts, especially the muffler, become extremely hot during operation. Allow engine and
muffler to cool before touching.
6
Page 7
!
!
I
0
0
I
!
COo
!
0
0
!
!
o
_3
I
!
GO
!
0
0
CD
GO
CD
o l
l
l
l
l
l
l
l
l
l
l
l
l
l
l
_m_ a
_l
m_
o
o
X
J.
0
©
o
o
C_
o
GO
0
c
7
Page 8

This page left intentionallyblank.
8
Page 9
9
Page 10
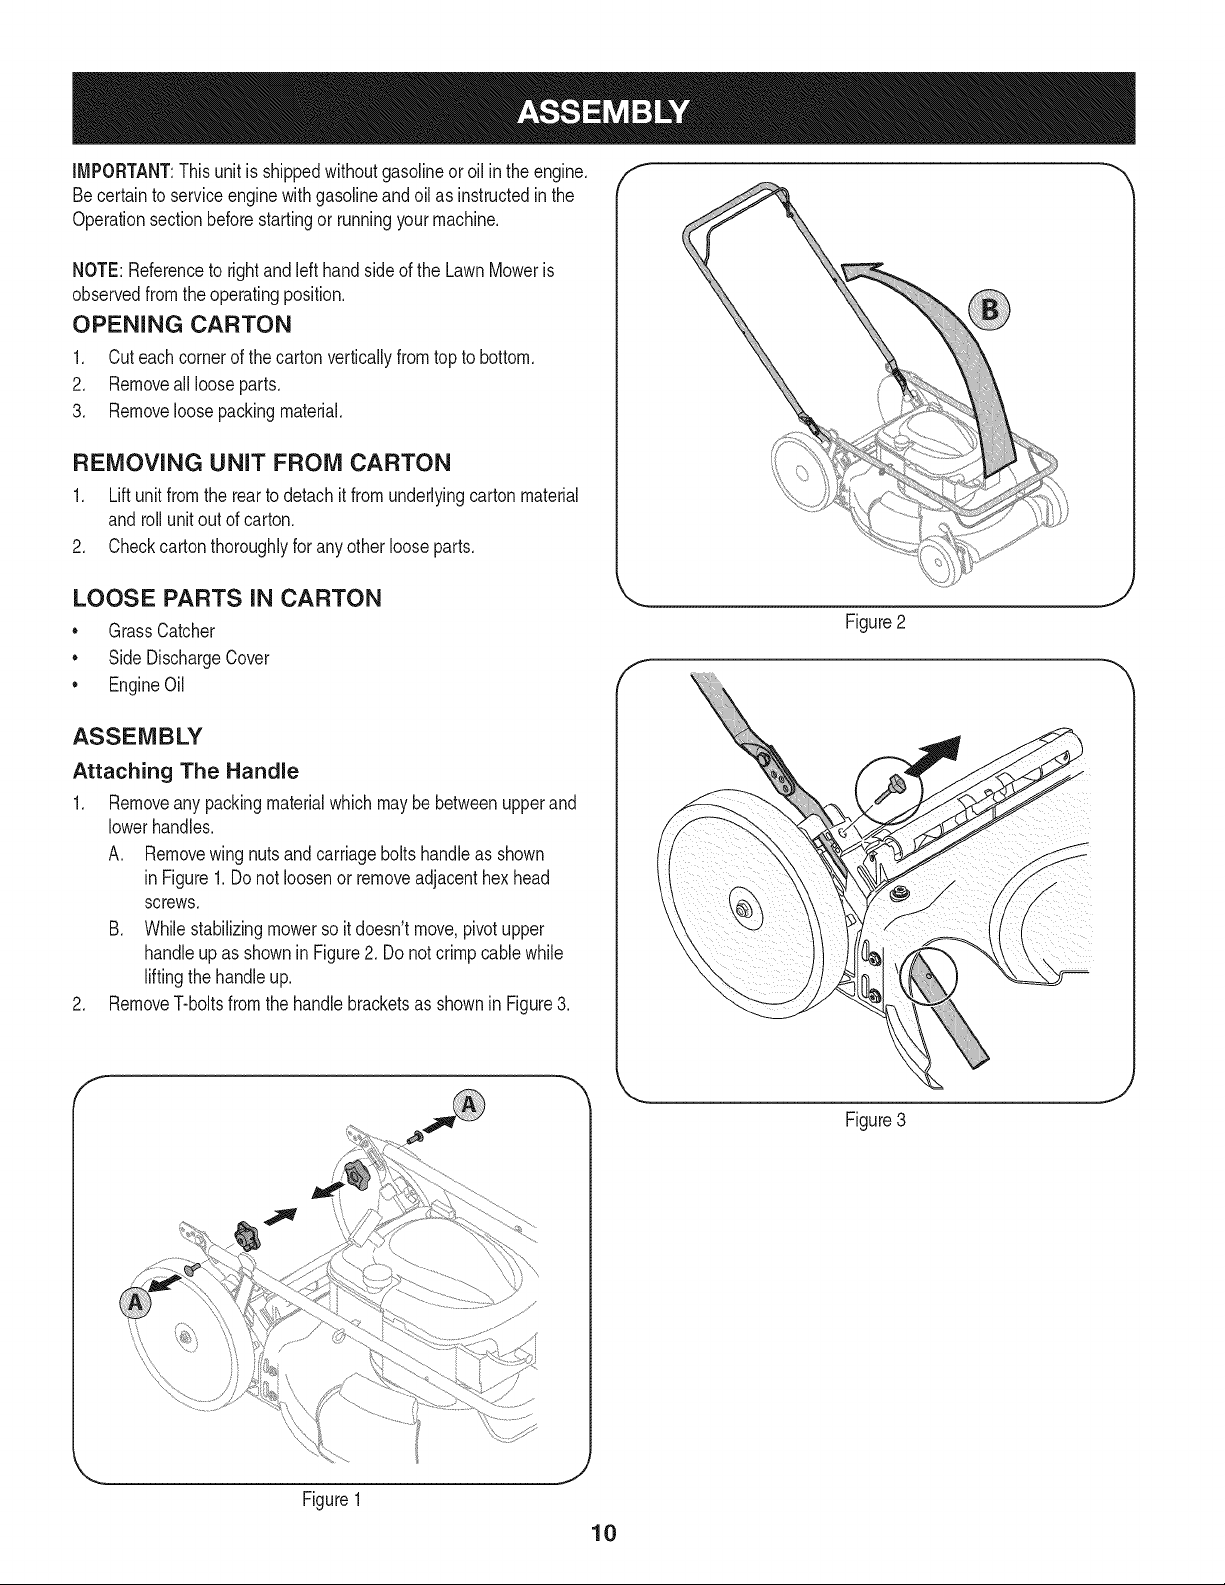
IMPORTANT:Thisunitisshippedwithoutgasolineoroil intheengine.
Becertainto serviceenginewithgasolineandoilasinstructedinthe
Operationsectionbeforestartingorrunningyourmachine.
NOTE:Referenceto rightandlefthandsideof theLawnMoweris
observedfromthe operatingposition.
OPENING CARTON
1. Cuteachcornerof the cartonverticallyfromtopto bottom.
2. Removeall looseparts.
3. Removeloosepackingmaterial.
REMOVING UNIT FROM CARTON
1. Liftunitfromthe reartodetachit fromunderlyingcartonmaterial
androllunit out ofcarton.
2. Checkcartonthoroughlyforanyotherlooseparts.
f
LOOSE PARTS IN CARTON
• GrassCatcher
• SideDischargeCover
• EngineOil
ASSEMBLY
Attaching The Handle
1. Removeany packingmaterialwhichmaybebetweenupperand
lowerhandles.
A. Removewing nutsandcarriageboltshandleas shown
in Figure1.Donotloosenorremoveadjacenthexhead
screws.
B. Whilestabilizingmowerso it doesn'tmove,pivotupper
handleupas showninFigure2.Donotcrimpcablewhile
liftingthehandleup.
2. RemoveT-boltsfromthehandlebracketsasshownin Figure3.
E
J
Figure2
Figure3
\\
Figure1
Page 11
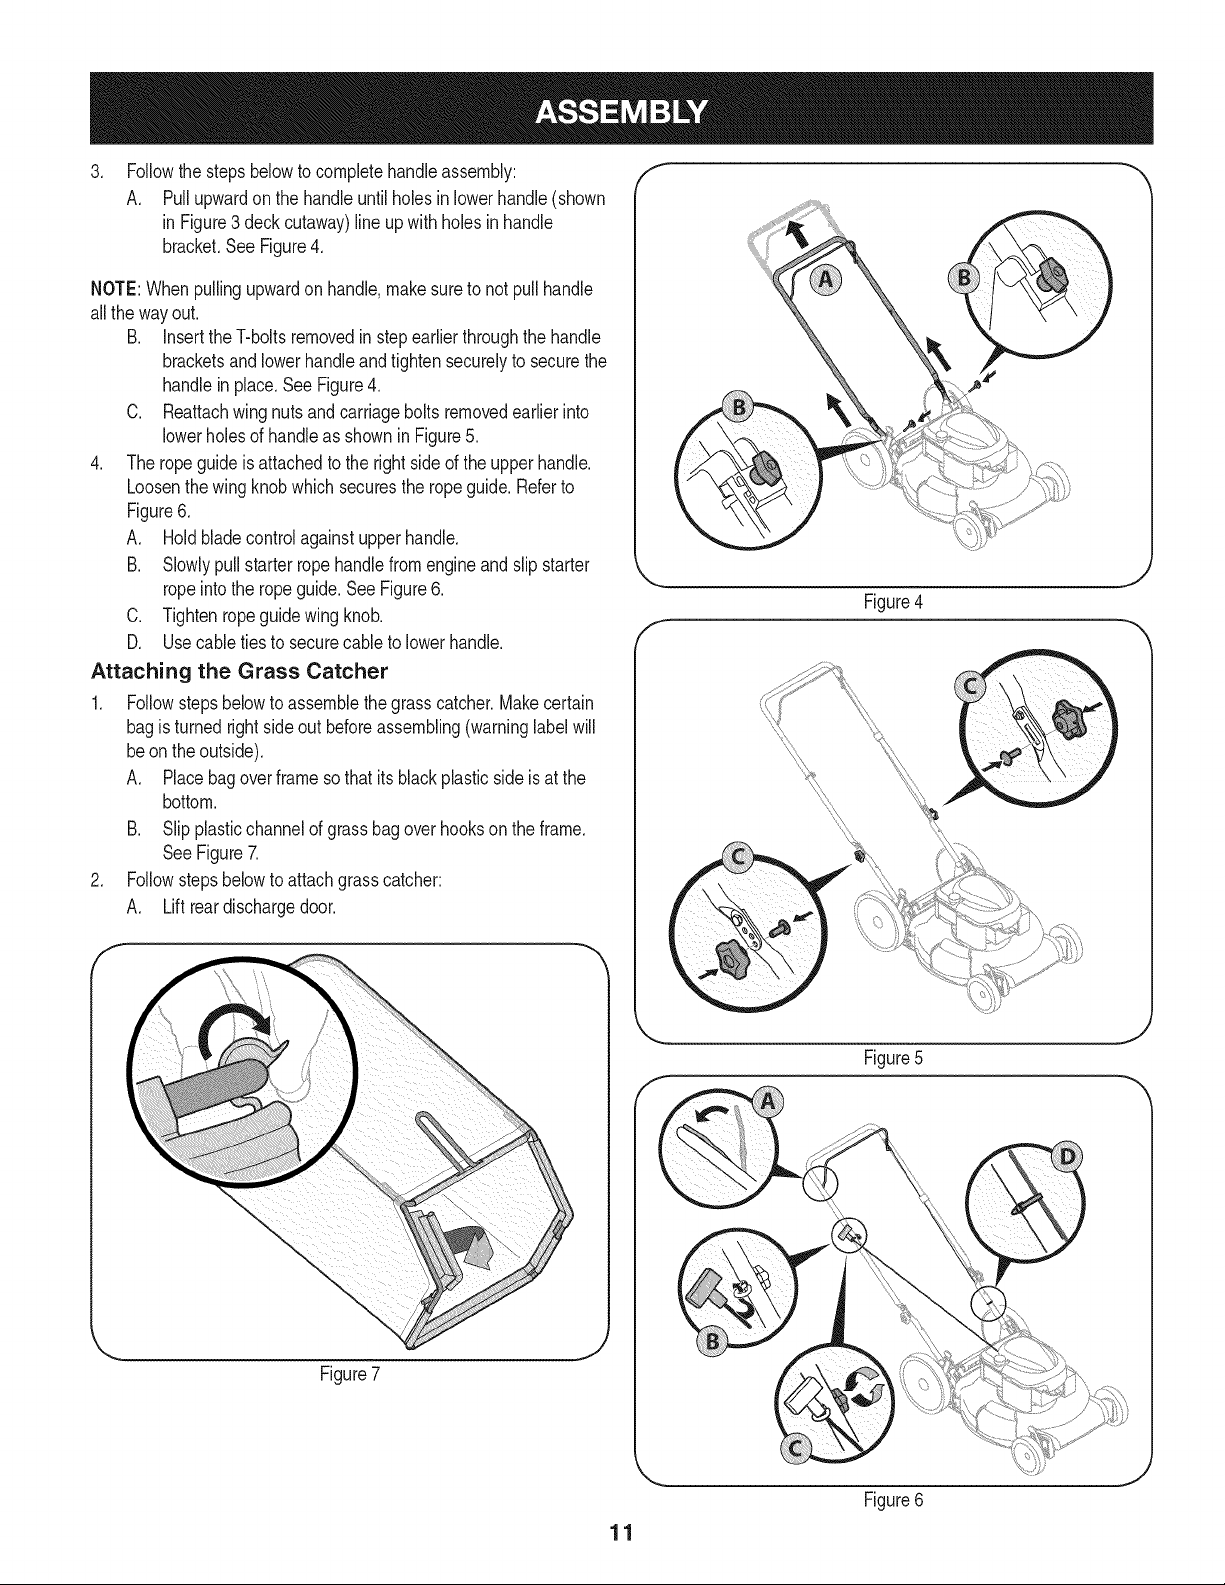
.
Followthestepsbelowtocompletehandleassembly:
A. Pullupwardonthehandleuntilholesin lowerhandle(shown
in Figure3 deckcutaway)lineupwith holesinhandle
bracket.SeeFigure4.
NOTE:Whenpullingupwardonhandle,makesuretonotpullhandle
allthewayout.
B. Insertthe T-boltsremovedin stepearlierthroughthehandle
bracketsandlowerhandleandtightensecurelyto securethe
handlein place.SeeFigure4.
C. Reattachwing nutsandcarriageboltsremovedearlierinto
lowerholesofhandleasshownin Figure5.
4. Theropeguideisattachedtotherightsideof theupperhandle.
Loosenthewingknobwhichsecurestheropeguide.Referto
Figure6.
A. Holdbladecontrolagainstupperhandle.
B. Slowlypullstarterropehandlefromengineandslipstarter
ropeintotheropeguide.SeeFigure6.
C. Tightenropeguidewing knob.
D. Usecabletiesto securecableto lowerhandle.
Attaching the Grass Catcher
1. Followstepsbelowto assemblethe grasscatcher.Makecertain
bagisturnedrightside outbeforeassembling(warninglabelwill
beon theoutside).
A. Placebagoverframeso thatits blackplasticsideis at the
bottom.
B. Slipplasticchannelofgrassbagoverhooksontheframe.
SeeFigure7.
2. Followstepsbelowto attachgrasscatcher:
A. Lift reardischargedoor.
J
Figure4
Figure7
Figure5
Figure6
11
Page 12
B, Placegrasscatcherintotheslotsinthehandlebracketsas
showninFigure8.Letgoofdischargedoorsothatitrests
onthegrasscatcher.
Toremovegrasscatcher,liftreardischargedooron themower.Lift
grasscatcherupandoff theslotsinthe handlebrackets.Releaserear
dischargedoorto allowittoclose rearopeningofmower,
Attaching Side Discharge Cover
Yourmowerisshippedasa mulcher.Toconverttoside discharge,
makesuregrasscatcherisoff ofthe unitand reardischargedooris
closed.
1. Onthesideof themower,liftthemulchingcover.SeeFigure9.
2, Slidetwo hooksof side dischargecoverunderhingepinon
mulchingcoverassembly.Lowermulchingcover.Donotremove
sidemulchingcoverat anytime,evenwhenyouarenotmulching.
f
" i \'
ADJUSTMENTS
Cutting Height
Thereis a cuttingheightadjustmentleverlocatedabovethefrontand
rearrightwheel,
1. Pulltheheightadjustmentlevertowardswheel(unitwill tendto
fallwhen leverismovedoutward).
2. Moveleverto desiredpositionfora changeincuttingheight.See
Figure10.
3, Releaselevertowardsdeck.
IMPORTANT:Allwheelsmustbeplacedinthe sameposition.For
roughor unevenlawns,moveeachheightadjustmentleverto a higher
position.Thiswill preventyoufromcuttingthegrasstoocloseto the
ground,
Handle Pitch
Forconvenienceofoperation,youmayadjustthepitchof the handle
asfollows:
1, Removewing nutsandcarriageboltsfromhandle,SeeFigure11,
2. Positionthehandlein oneofthethreepositionsthatis most
comfortable,SeeFigure11inset,
3. Secureintopositionwithwingnutsandcarriageboltsremoved
earlier,
J
Figure8
Figure9
f
Higher
Figure11
J
Figure10
12
Page 13
Side Discharge
Cover Adjustment
Cuttin¢
Lever
GasCap
Mulch Cover
BLADE CONTROL
Thebladecontrolisattachedtotheupperhandleof the mower.
Depressandsqueezeit againsttheupperhandleto operatetheunit.
Releaseittostopengineandblade.
Thisbladecontrolisa safetydevice.Neverattempttobypassits
operations.
Cutting Height
Adjustment
Lever
Figure12
thegrassclippingsina grasscatcherorusingthesidedischarge
chute,somemowermodelshavetheoptionofrecirculatingthe
clippingsbacktothelawn.Thisiscalledmulching.
SIDE DISCHARGE COVER
Yourmoweris shippedasa mulcher.Todischargethegrassclippings
tothesideinstead,followtheinstructionsin theAssemblysectionto
attachthe sidedischargecover.
CUTTING HEIGHT ADJUSTMENT LEVER
Oneadjustmentleverislocatedontherightrearwheelandoneis
Keephandsandfeetawayfromthechuteareaon cuttingdeck.Refer
towarninglabelonthe unit.
locatedontherightfrontwheel.Bothlevershaveto beatthesame
positiontoensureauniformcut.To adjustthecuttingheight,referto
theAssemblySection.
GRASS CATCHER
Thegrasscatcher,locatedatthe rearofthemower,is usedto bag
thegrassclippingsfordisposalat anothersite.Oncethebagisfull,
removeitupthroughthe handlesusingthestrapprovidedandemptyit
RECOIL STARTER
Therecoilstarterisattachedtotherightupperhandle.Standbehind
theunitandpulltherecoilstarterropeto starttheunit.
OIL FILL CAP/DIPSTICK
Referto theMaintenancesectionforinstructionsoncheckingtheoil.
TRAIL SHIELD
beforeanyfurthermowing.
MULCH COVER
Thetrailshieldis attachedtothe rearofthemowerand isthere to
protecttheoperatorfromflyingdebris.Donotusethe mowerunless
Themulchcoverisusedformulchingpurposes.Insteadofcollecting theshieldisfullyfunctionalandin place.
Meets ANSi Safety Standards
CraftsmanLawnMowersconformto thesafetystandardoftheAmericanNationalStandardsInstitute(ANSI).
13
Page 14
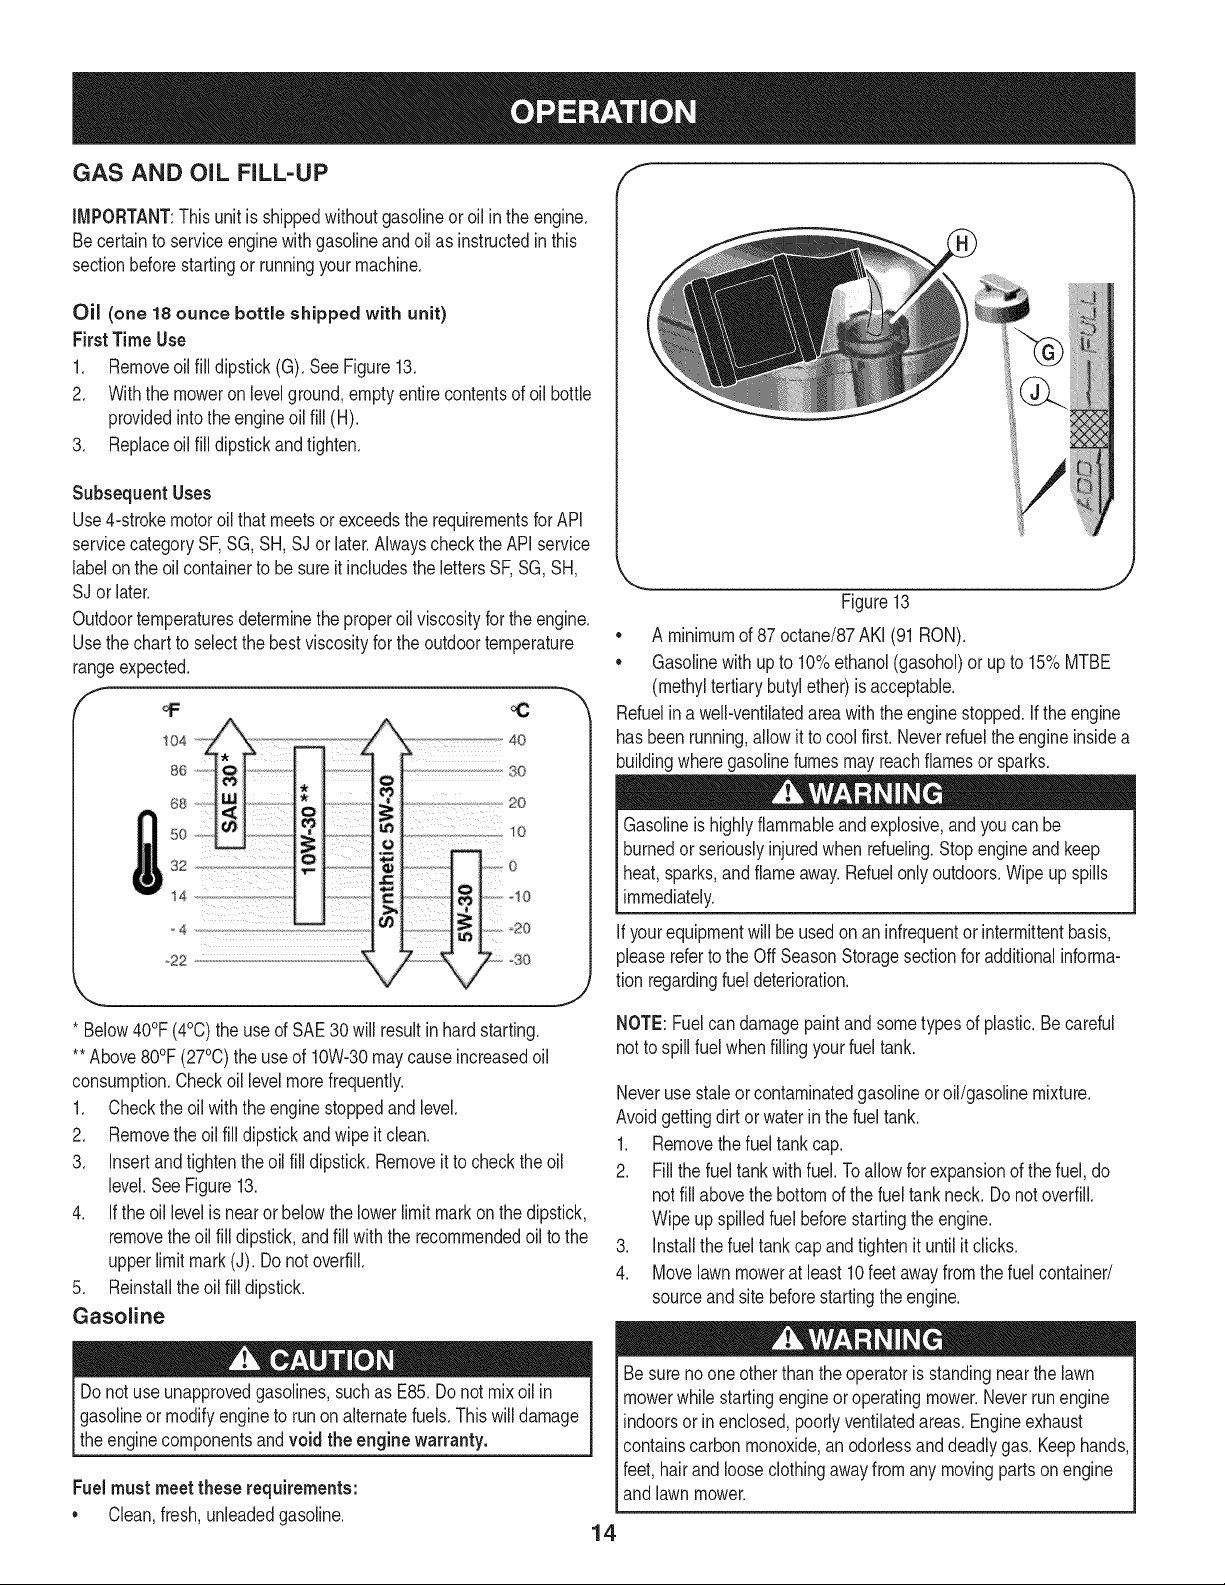
GAS AND OiL FILL-UP f "_
IMPORTANT:Thisunitisshippedwithoutgasolineoroil intheengine.
Becertainto serviceenginewithgasolineandoilasinstructedinthis
sectionbeforestartingor runningyourmachine.
Oil (one 18 ounce bottle shipped with unit)
FirstTime Use
1. Removeoil filldipstick(G).SeeFigure13.
2. Withthe moweron levelground,emptyentirecontentsofoil bottle
providedintotheengineoil fill (H).
3. Replaceoil filldipstickandtighten.
Subsequent Uses
Use4-strokemotoroilthatmeetsor exceedstherequirementsforAPI
servicecategorySF,SG,SH,SJor later.AlwayschecktheAPIservice
labelonthe oilcontainertobe sureitincludesthelettersSF,SG,SH,
SJor later.
Outdoortemperaturesdeterminetheproperoilviscosityfor the engine.
Usethechartto selectthebestviscosityfortheoutdoortemperature
rangeexpected.
f
40
30
16so4s6 o** " 2
¸
32
14
o4
20
10
°30
• A minimumof87 octane/87AKI (91RON).
• Gasolinewith upto 10%ethanol(gasohol)or upto 15%MTBE
(methyltertiarybutylether)isacceptable.
Refuelina well-ventilatedareawiththe enginestopped.Ifthe engine
hasbeenrunning,allowitto cool first.Neverrefueltheengineinsidea
buildingwheregasolinefumesmayreachflamesorsparks.
Gasolineishighlyflammableandexplosive,andyoucanbe
burnedor seriouslyinjuredwhenrefueling.Stopengineand keep
heat,sparks,and flameaway.Refuelonlyoutdoors.Wipeupspills
immediately.
Ifyourequipmentwill be usedonan infrequentorintermittentbasis,
pleaserefertotheOff SeasonStoragesectionforadditionalinforma-
tion regardingfueldeterioration.
Figure13
e
* Below40°F(4°C)theuseofSAE30 willresultin hardstarting.
**Above80°F(27°C)theuseof 10W-30maycauseincreasedoil
consumption.Checkoil levelmorefrequently.
1. Checktheoil withthe enginestoppedand level.
2. Removethe oil filldipstickandwipeit clean.
3. Insertandtightentheoilfilldipstick.Removeitto checkthe oil
level.SeeFigure13.
4. Iftheoil levelisnearor belowthelowerlimitmarkonthedipstick,
removetheoil filldipstick,andfillwiththe recommendedoilto the
upperlimitmark(J). Donotoverfill.
5. Reinstalltheoilfill dipstick.
Gasoline
Donotuse unapprovedgasolines,suchasE85.Donotmixoil in
Igasolineormodifyengineto runonalternatefuels.Thiswill damage
_theenginecomponentsandvoid the enginewarranty.
Fuelmustmeet theserequirements:
• Clean,fresh,unleadedgasoline.
NOTE:Fuelcandamagepaintand sometypesof plastic.Becareful
notto spill fuelwhenfillingyourfueltank.
Neverusestaleorcontaminatedgasolineoroil/gasolinemixture.
Avoidgettingdirt orwaterin thefueltank.
1. Removethe fuel tankcap.
2. Fillthefuel tankwithfuel.Toallowforexpansionofthe fuel,do
notfill abovethebottomofthefueltankneck.Donotoverfill.
Wipeupspilledfuelbeforestartingtheengine.
3. Installthefueltankcapandtightenituntilitclicks.
4. Movelawnmoweratleast10feet awayfromthe fuel container/
sourceandsitebeforestartingthe engine.
Besurenooneotherthantheoperatorisstandingnearthelawn
mowerwhilestartingengineoroperatingmower.Neverrunengine
indoorsorin enclosed,poorlyventilatedareas.Engineexhaust
containscarbonmonoxide,an odorlessanddeadlygas.Keephands,
feet,hairand looseclothingawayfromany movingpartson engine
andlawnmower.
14
Page 15

TO START ENGINE
1. Standingbehindthemower,squeezethebladecontrolhandle
againstupperhandle.SeeFigure14.
2. Holdingthesetwohandlestogetherfirmly,grasprecoilstarter
handleandpull ropeslowlyuntilresistanceisfelt,thenpullwitha
rapid,continuous,full arm stroke.SeeFigure14.Keepingafirm
griponthe starterhandle,letthe roperewindslowly.Repeatuntil
enginecranks.Letthe roperewindeachtimeslowly.
Rapidretractionof startercord(kickback)willpullhandandarm
towardenginefasterthanyoucanletgo.Brokenbones,fractures,
bruisesorsprainscouldresult.
NOTE:Ifenginefloods,waita fewminutesto restart.
TO STOP ENGINE
1. Releasebladecontroltostopthe engineandblade.
Waitforthebladeto stopcompletelybeforeperforminganyworkon
themoweror toremovethegrasscatcher.
USING YOUR LAWN MOWER
Besurelawnisclearofstones,sticks,wire,orotherobjectswhich
coulddamagelawnmoweror engine.Suchobjectscouldbeaccidently
thrownbythemowerin anydirectionandcauseseriouspersonalinjury
totheoperatorandothers.
Theoperationofanylawnmowercanresultinforeignobjectsbeing
thrownintothe eyes,whichcandamageyoureyesseverely.Always
wearsafetyglasseswhileoperatingthemower,or whileperforming
anyadjustmentsor repairson it.
USING AS MULCHER
Formulchinggrass,removethe grasscatcherandsidedischarge
chutefromthemower.Foreffectivemulching,donotcutwetgrass.If
thegrasshasbeenallowedtogrow inexcessoffourinches,mulching
isnotrecommended.Usethegrasscatchertobagclippingsinstead.
Figure14
USING GRASS CATCHER
Youcanusethegrasscatchertocollectclippingswhileyouare
operatingthemower.
1. Attachgrasscatcherfollowinginstructionsinthe "Assembly"
section.Grassclippingswillautomaticallycollectinbagas you
runmower.Operatemoweruntilgrassbagis full.
2. Stopenginecompletelyby releasingthebladecontrol.Makesure
thattheunithascometo a completestop.
3. Liftdischargedoorandpullgrassbagupandawayfromthe
mowerto removethe bag.Disposeofthegrassclippingsand
reinstallthebagwhencomplete.
Ifyoustrikeaforeignobject,stoptheengine.Removewirefromthe
sparkplug,thoroughlyinspectmowerfor anydamage,andrepair
damagebeforerestartingandoperating.Extensivevibrationof mower
duringoperationisan indicationof damage.Theunitshouldbe
promptlyinspectedandrepaired.
15
Page 16

MAINTENANCE SCHEDULE
Beforeperforminganytypeofmaintenance/service,disengageall
controlsandstoptheengine.Waituntilallmovingpartshavecometo
acompletestop.Disconnectsparkplugwireandgrounditagainstthe
enginetopreventunintendedstarting.
=
EachUse
1st5 hours
Annuallyor25hours
Annuallyor50hours
Annually
BeforeStorage
Cleanmoreoftenunderdustyconditionsor whenairbornedebrisis
.
Engineoillevel
2.
Looseormissinghardware
3.
Unitandengine.
1.
Engineoil
1.
Aircleanert
2.
Controllinkages/pivotsandwheels
3.
Undersided mowerdeck
1.
Engineoil
1.
Sparkplug
2.
AirCleaner
1.
Fuelsystem
Followthemaintenanceschedulegivenbelow.Thischartdescribes
serviceguidelinesonly.UsetheServiceLogcolumnto keeptrackof
completedmaintenancetasks.To locate the nearestSearsService
Centeror toscheduleservice,simplycontactSearsat
1-800-4-MY-HOME®.
1. Check
2. Tightenor replace
3. Clean
1. Change
1. Clean
2. Lubewithlightoil
3. Clean
1. Change
1. Replace
2. Replace
1. Runengineuntil itstopsfromlackof
fuel,oraddstabilizertoa fulltankof
freshfuelpriortostorage.
_resent.Replaceaircleanerifverydirty.
16
Page 17
Alwaysstopengine,disconnectsparkplugwire,andgroundagainst
enginebeforeperformingany typeofmaintenanceonyourmachine.
GENERAL RECOMMENDATIONS
• Alwaysobservesafetyruleswhenperforminganymaintenance.
• Thewarrantyon thislawnmowerdoesnot coveritemsthathave
beensubjectedtooperatorabuseor negligence.To receivefull
valuefromwarranty,operatormustmaintaintheequipmentas
instructedhere.
• Changingof engine-governedspeedwill voidenginewarranty.
• Alladjustmentsshouldbecheckedat leastonceeachseason.
• Periodicallycheckall fastenersandmakesurethesearetight.
ENGINE MAINTENANCE
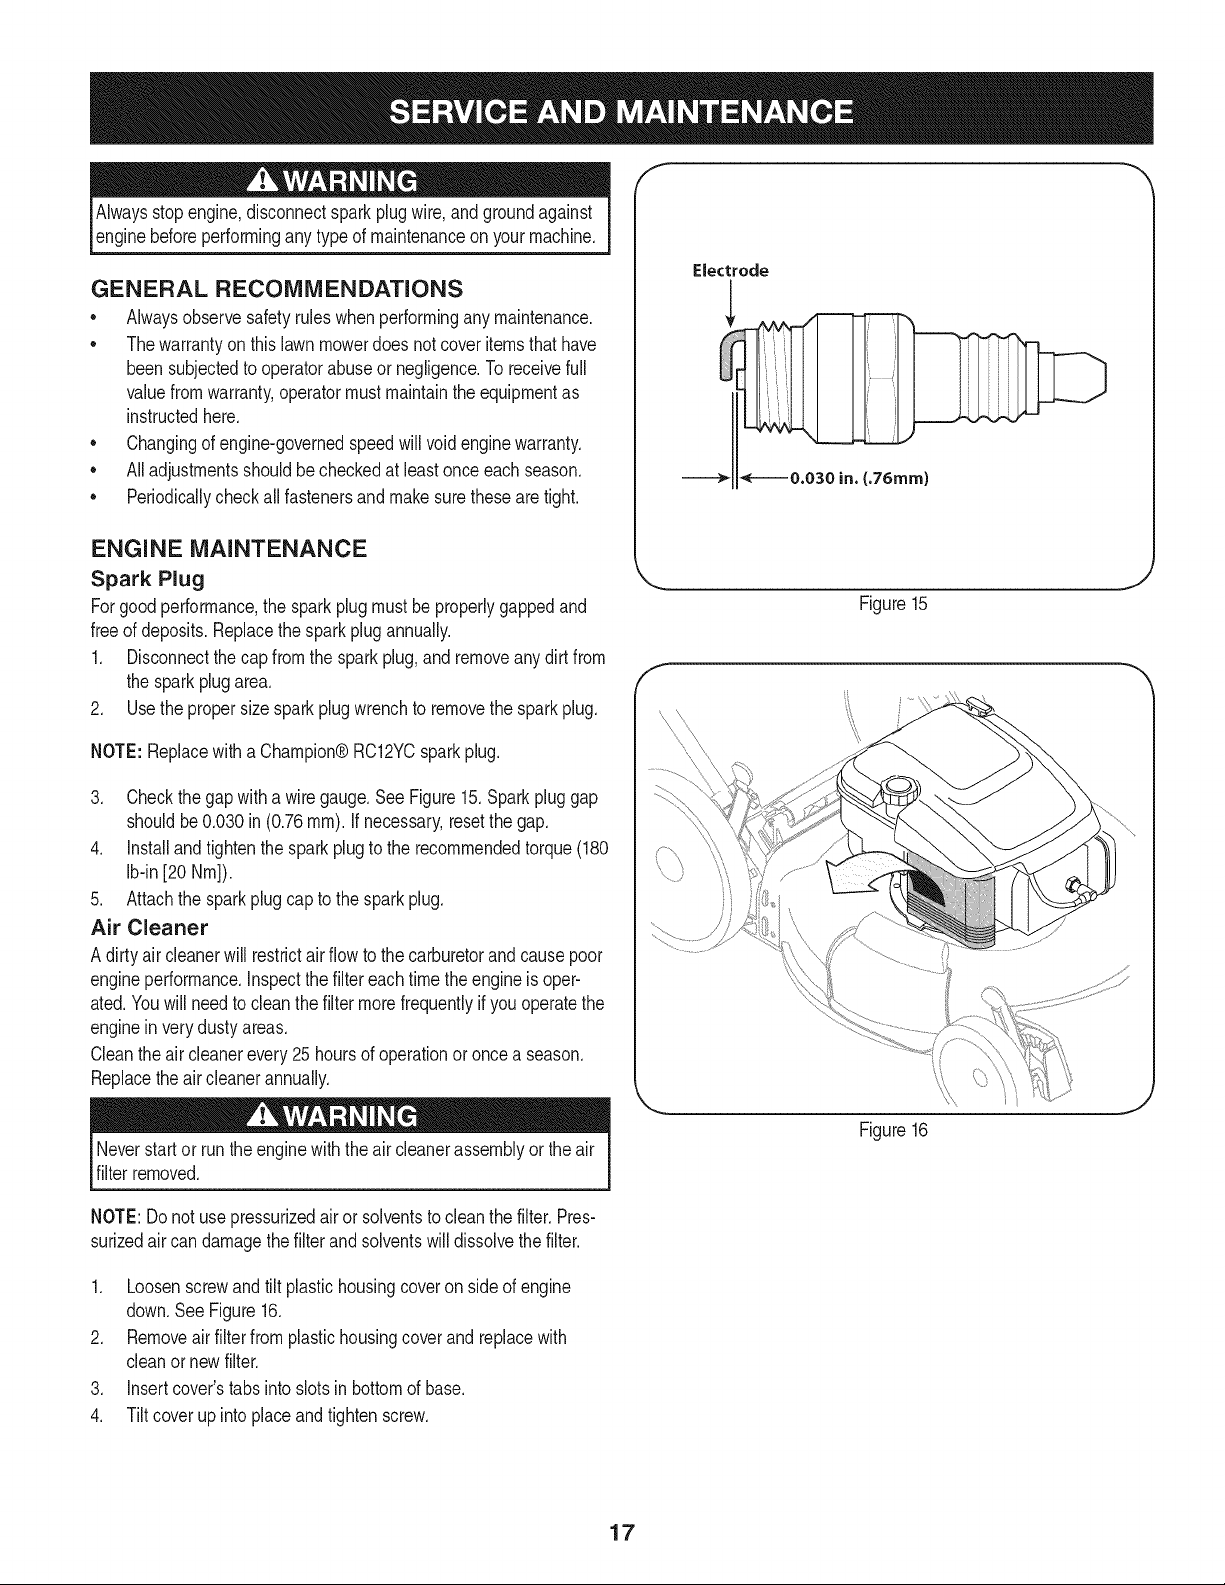
Spark Plug
Forgoodperformance,thesparkplugmustbeproperlygappedand
freeof deposits.Replacethesparkplugannually.
1. Disconnectthe capfromthesparkplug,andremoveanydirt from
thesparkplugarea.
2. Usethepropersizesparkplugwrenchtoremovethe sparkplug.
f
Electrode
Figure15
NOTE:Replacewitha Champion®RC12YCsparkplug.
3. Checkthegapwitha wiregauge.SeeFigure15.Sparkpluggap
shouldbe0.030in (0.76ram).If necessary,resetthegap.
4. installandtightenthe sparkplugtotherecommendedtorque(180
Ib-in[20 Nm]).
5. Attachthe sparkplugcapto thesparkplug.
Air Cleaner
A dirtyaircleanerwillrestrictairflowtothecarburetorandcausepoor
engineperformance,inspectthe filtereachtimetheengineisoper-
ated.Youwillneedtocleanthefiltermorefrequentlyifyouoperatethe
enginein verydusty areas.
Cleantheair cleanerevery25hoursofoperationoroncea season.
Replacetheaircleanerannually.
Neverstartor runtheenginewiththe aircleanerassemblyortheair
filterremoved.
NOTE:Do notusepressurizedairor solventstocleanthefilter.Pres-
surizedair candamagethefilterandsolventswilldissolvethefilter.
1. Loosenscrewandtilt plastichousingcoveronsideofengine
down.SeeFigure16.
2. Removeairfilterfromplastichousingcoverandreplacewith
cleanor newfilter.
3. insertcover'stabsintoslotsin bottomofbase.
4. Tiltcoverupintoplaceandtightenscrew.
Figure 16
17
Page 18

Check Engine Oil
Checkoillevelbeforeeachoperation.Besureoil levelis maintained.
1. Checktheoil withthe enginestoppedand level.
2. Removethe oil filldipstickandwipeitclean.
3. Insertandtightendipstick.Removeitto checktheoillevel.
4. Iftheoil levelisnearor belowthe lowerlimitmarkonthe dipstick,
removetheoil fillercap/dipstick,andfillwiththe recommendedoil
totheupperlimitmark.Donotoverfill.
5. Reinstalltheoilfill dipstick.
Change Engine Oil
Gasolineand itsvaporsareextremelyflammableandexplosive.
Fireor explosioncancausesevereburnsor death.
Changeengineoilafterthefirstfivehoursofoperation,andeveryfifty
hoursoroncea seasonthereafter.
J
Figure17
you top
emptyor fuelcanleakoutand resultinafireor explosion.Toempty
lWhen drainthe oil fromthe oilfill thefueltankmustbe
thefueltank,runtheengineuntilitstopsfromlackof fuel.
tube,
1. Withengineoff butstillwarm,disconnectthe sparkplugwireand
keepit awayfromthesparkplug.
2. Placea suitablecontainernextto theenginetocatchthe usedoil.
3. Removethe oil filldipstickanddraintheoil intothecontainerby
tippingtheenginetowardtheoil fillerneck.See Figure17.
Usedoilisa hazardouswasteproduct.Disposeofusedoil properly.
IDonotdiscardwithhouseholdwaste.Checkwithyourlocalauthori-
_tiesor SearsServiceCenterforsafedisposal/recyclingfacilities.
4. Withtheengineina levelposition,filltotheupperlimitmarkon
thedipstickwiththerecommendedoil.
Runningtheenginewitha lowoil levelcancauseenginedamage.
5. Reinstalltheoilfill dipsticksecurely.
Clean Engine
• Dailyor beforeeveryuse,cleangrass,chaffor accumulated
debrisfromengine.Keeplinkage,spring,andcontrolsclean.
Keepareaaroundandbehindmufflerfreeofanycombustible
debris.
• Keepingenginecleanallowsairmovementaroundengine.
• Enginepartsshouldbekeptcleanto reducetheriskof overheat-
ingandignitionofaccumulateddebris.
Figure18
LUBRICATION
Blade Control
Lubricatepivotpointsonthebladecontrolat leastoncea seasonwith
lightoil.Thiscontrolmustoperatefreelyinbothdirections.SeeFigure
18.
Donotusewatertocleanengineparts.Watercouldcontaminatefuel
system.Usea brushor drycloth.
18
Page 19

CLEANING DECK
Cleanundersideofthemowerdeckonceaseasonto preventbuild-up
ofgrassclippingsorotherdebris.Followstepsbelowfor thisjob.
1. Disconnectsparkplugwire.Runengineuntilit stopsfromlackof
fuel.
2. Tipmowersothat it restson thehousing,keepingthemufflerside
down.Referbackto Figure17.Holdmowerfirmly.
Nevertip themowermorethan900inanydirectionanddo notleave
the mowertippedforanylengthoftime. Oilcandrainintotheupper
partof the enginecausingastartingproblem.
3. Scrapeandcleanthe undersideof thedeckwitha suitabletool.
Donot spraywithwater.
IMPORTANT:Donotusea pressurewasheror gardenhosetoclean
yourunit.Thesemaycausedamageto bearings,ortheengine.The
useof waterwillresultin shortenedlifeandreduceserviceability.
4. Putthemowerbackon itswheelsontheground.
BLADE CARE
Whenremovingthecuttingbladeforsharpeningor replacement,
protectyourhandswitha pairofheavyglovesor usea heavyragto
holdtheblade.
Periodicallyinspectthebladeadapterforcracks,especiallyif you
strikea foreignobject.Replacewhennecessary.Followthesteps
belowfor bladeservice.
1. Disconnectsparkplugbootfromsparkplug.Turnmoweronitsside
makingsurethattheairfilterandthecarburetorarefacingup.
2. Removetheboltandthebladebellsupportwhichholdthebladeand
thebladeadaptertotheenginecrankshaft.SeeFigure19.
3. Removebladeandadapterfromthecrankshaft.
4. Removebladefromtheadapterfortestingbalance.Balancetheblade
ona roundshaftscrewdrivertocheck.Removemetalfromthe
heavysideuntilitbalancesevenly.Whensharpeningtheblade,
followtheoriginalangleofgrind.Grindeachcuttingedgeequally
tokeepthe bladebalanced.
Figure19
Anunbalancedbladewillcauseexcessivevibrationwhenrotatingat
highspeeds.Itmaycausedamagetomowerandcouldbreakcausin(
personalinjury.
5. Lubricatetheenginecrankshaftandtheinnersurfaceoftheblade
adapterwithlightoil. Slidethe bladeadapterontothe engine
crankshaft.Placethebladeon theadaptersuchthatthesideof
theblademarked"Bottom"(orwithpartnumber)facestheground
whenthe moweris intheoperatingposition.Makesurethatthe
bladeisalignedandseatedon thebladeadapterflanges.See
Figure19inset.
6. Placebladebellsupporton theblade.Alignnotchesontheblade
bellsupportwithsmallholesin blade.
7. Replacehexboltandtightenhexbolttotorque:450in.Ibs.rain.,600
in.Ibs.max.
Toensuresafeoperationof yourmower,periodicallychecktheblade
boltfor correcttorque.
19
Page 20

Neverstorelawnmowerwithfuelintankindoorsorin poorly
ventilatedareaswherefuelfumesmayreachanopenflame,spark,
or pilot lightasona furnace,waterheater,clothesdryer,orgas
appliance.
PREPARING THE ENGINE
Forenginesstoredover30days:
1. Topreventgumfromforminginfuelsystemoron carburetor
parts,runengineuntilitstopsfromlackof fueloradda gasoline
additiveto thegas inthetank. Ifyouuse agasadditive,runthe
engineforseveralminutesto circulatetheadditivethroughthe
carburetor--afterwhichtheengineandfuelcanbe storedupto
24months.
2. Whileengineis stillwarm,changetheoil.
3. Cleanengineof surfacedebris.
PREPARING THE LAWN MOWER
• Cleanandlubricatemowerthoroughlyasdescribedinthe lubrica-
tioninstructions.
• Donotusea pressurewasheror gardenhosetocleanyour unit.
• Coatmower'scuttingbladewithchassisgreaseto prevent
rusting.
• RefertoPREPARINGTHE ENGINEfor correctenginestorage
instructions.
• Storemowerin adry,cleanarea.Donotstorenexttocorrosive
materials,suchasfertilizer.
Whenstoringany typeofpowerequipmentina poorlyventilatedor
metalstorageshed,careshouldbetakentorust-prooftheequipment.
Usinga lightoil orsilicone,coatthe equipment,especiallycablesand
all movingpartsof yourlawnmowerbeforestorage.
20
Page 21

Beforeperforminganytypeofmaintenance/service,disengageall
controlsandstoptheengine.Waituntilallmovingpartshavecometo
a completestop.Disconnectsparkplugwireandgroundit againstthe
enginetopreventunintendedstarting.Alwayswearsafetyglassesduring
operationorwhileperforminganyadjustmentsorrepairs.
Enginefailsto start
1. Bladecontroldisengaged.
2. Sparkplugbootdisconnected.
3. Fueltankemptyorstalefuel.
4. Faultysparkplug.
5. Engineflooded.
6. Blockedfuelline.
Enginerunserratic
1. Sparkplugbootloose.
2. Stalefuel.
3. Ventingascapplugged.
4. Waterordirtin fuelsystem.
5. Dirtyair cleaner.
6. Blockedfuelline.
Engineoverheats 1. Engineoillevellow.
2. Airflowrestricted.
Occasionalskips(hesitates) 1. Sparkpluggaptooclose.
Idlespoorly 1. Sparkplugfouled,faulty,or gaptoowide.
2. Dirtyair cleaner.
Excessivevibration 1. Cuttingbladelooseor unbalanced.
2. Bentcuttingblade.
Mowerwillnot mulchgrass 1. Wetgrass.
2. Excessivelyhighgrass.
3. Dullblade.
Unevencut
1. Wheelsnotpositionedcorrectly.
2. Dullblade.
1. Engagebladecontrol.
2. Connectwiretosparkboot.
3. Filltankwithclean,freshgasoline.
4. Clean,adjustgap,or replace.
5. Waita fewminutesto restart.
6. ContactyourSearsParts& RepairCenterto have
fuellinecleaned.
1. Connectandtightensparkplugboot.
2. Filltankwithclean,freshgasoline.
3. Clearvent.
4. Runengineuntil it stopsfromlackoffuel.Refillwith
freshfuel.
5. RefertoAirCleanerinEngineMaintenancesection.
6. ContactyourSearsParts& RepairCenterto have
fuellinecleaned.
1. Fillcrankcasewithproperoil.
2. Cleanareaaroundandon topofengine.
1. Adjustgapto.030".
1. Resetgapto.030"or replacesparkplug.
7. RefertoAirCleanerinEngineMaintenancesection.
1. Tightenbladeandadapter.Balanceblade.
2. Replaceblade.
1. Donotmowwhengrassis wet;waituntil
laterto cut.
2. Mowonceata highcuttingheight,thenmowagain
atdesiredheightor makea narrowercuttingpath.
3. Sharpenor replaceblade.
1. Adjustcuttingheightleveronrightfrontandright
rearwheelto sameposition.
2. Sharpenor replaceblade.
NEED MORE HELP?
You'll fir/cf tl'e ar_swe_ _ld mo_e orl 1"__4_-_4!]e_r_y[]omeco_r_ -Io[ Iree!
= Find this and all your other product manuals online.
= Get answers from our team of home experts.
= Get a personalized maintenance plan for your home.
Find information and tools to help with home projects.
B;ro#.ght to ye_J 1by Seals
21
Page 22

Craftsman Mower- Model No. 247.38908
11
13
Page 23

Craftsman Mower B Model No. 247.38908
1
747-05184
2
749-04681-0637
3
747-05226-0637
4
749-04608A-0637
5
720-0279
6
710-1205
7
710-04998
8
964-04119
9
720-04072A
10
731-07486
11
725-0157
12
712-04222
13
631-04369
14
747-0710
15
787-01779
16
732-04673
17
634-04642
18
731-07139
19
710-05073
2O
787-01776-4044
21
987-02516
22
732-04674
BladeControl
UpperHandle
GrassCatcherFrame
LowerHandle
WingNut
RopeGuide
CarriageScrew,5/16-18
GrassBag
HandKnob
SideChute
CableTie
Nut,Sq.,1/4-20
RearDischargeDoorAssembly
HingePin
ChuteDeflectorBracket
TorsionSpring- RH
Wheel,7 x 2
RearBaffle
Screw,1/4-20x .500
Deck- 21"
HingedMulchPlugAssembly
TorsionSpring- LH
23
748-04096
24
942-0741A
25
710-1044
26
731-07530
731-07517
27
738-04419A
28
712-04217
29
720-04130
30
720-04123
31
736-0524B
32
712-04064
33
634-04630
34
946-04661
35
710-0654A
36
731-07203
37
731-07174
38
732-1014
39
787-01818-0637
40
911-04144
41
911-04143
42
710-04995
43
710-0895
D = O
BladeAdapter
MulchingBlade
Screw,3/8-24x 1.50
HubCap- Front
HubCap- Rear
Sldr.Screw,.375x .126x 1/4-20
FlangeLockNut,3/8-16
AdjustmentLeverKnob
WingNut
BladeBellSupport
Nut,FlangeLock,1/4-20
Wheel,11x 2
ControlCable
TTSeresScrew,3/8-16x 1.0
Trailshield
FrontCover
TorsionSpring
FrontHeightAdjusterPlate
RearAxleAssembly
FrontAxleAssembly
Screw,5/16-14x .750
Screw,1/4-15x.750
23
Page 24

Craftsman Engine Model No. 126TO2-O795=B1 For Craftsman Mower Model No. 247.38908
[ 48S.ORTBLOCK] 11058OPERATOR'SMANUAL
I [ 1329 REPLACEMENT ENGINE ]
S
562
306
5o5 @
615 _ 307
33_ 4o45_
1330 REPAIR MANUAL
718 @
684
lO_
d_O
©
24@
1095 VALVE GASKET SET
883 _
358 ENGINE GASKET SET
3_
617 51
20_
163
842 C_ 524
34_ _k_
<Y
[L_ 32
287 _ _5_
524 (_
g
22
883
24
Page 25

Craftsman Engine Model No. 126T02-0795=B1 For Craftsman Mower Model No. 247.38908
121 CARBURETOR OVERHAUL KIT
_o___0_0
36s
108
633A _ [633 @
163
127 Q} 633 O
163_ 276_ 633A 1_
883
188
883
J
443
968
163
445
1388 T
138_
25
Page 26

Craftsman Engine Model No. 126T02=0795=B1 For Craftsman Mower Model No. 247.38908
I 1036 EMISSIONS LABEL I
604 _ 304
s64
55
1211
1210
456
6_
592
969[
6890
921
597 _
74s
92_J 922
621
305 (_
332 _
78
455
3s6w<:m_
334
635
8s1
26
Page 27

Craftsman Engine Model No. 126T02=0795=B1 For Craftsman Mower Model No. 247.38908
CylinderAssembly
2 399269 Kit-Bushing/Seal(MagnetoSide)
3o 299819s Seal-Oil(MagnetoSide)
4 493279 Sump-Engine
5 691160 Head-Cylinder
7o+ 692249 Gasket-CylinderHead
8 695250 BreatherAssembly
9 699472 Gasket-Breather
10 691125 Screw(BreatherAssembly)
11 691781 Tube-Breather
11A 691923 Tube-Breather
12o 692232 Gasket-Crankcase
13 690912 Screw(CylinderHead)
15 691680 Plug-OilDrain
16 691450 Crankshaft
20, 399781s SeaI-Oil(PTOSide)
22 691092 Screw(CrankcaseCover/Sump)
23 691987 Flywheel
24 222698s Key-Flywheel
25 797302 PistonAssembly(Standard)
797303 PistonAssembly(.020"Oversize)
26 797304 RingSet(Standard)
797305 RingSet(.020"Oversize)
27 691588 Lock-PistonPin
28 298909 Pin-Piston
797306 Rod-Connecting
32 691664 Screw(ConnectingRod)(Short)
32A 695759 Screw(ConnectingRod)(Long)
33 262651s Valve-Exhaust
34 262652s Valve-Intake
35 691270 Spring-Valve(Intake)
36 691270 Spring-Valve(Exhaust)
37 793756 Guard-Flywheel
40 692194 Keeper-Valve
43 691997 Slinger-Governor/Oil
45 690548 Tappet-Valve
46 691449 Camshaft
48 792741 ShortBlock
50 794305 Manifold-Intake
51_ 794306 Gasket-Intake
54 691650 Screw(IntakeManifold)
55 691421 Housing-RewindStarter
58 697316 Rope-Starter
60 281434s Grip-StarterRope
65 690837 Screw(RewindStarter)
78 691108 Screw(FlywheelGuard)
81 691740 Lock-MufflerScrew
97 696565 Shaft-Throttle
1040 691242 Pin-FloatHinge
108 795935 Valve-Choke
27
Page 28

Craftsman Engine Model No. 126T02=0795=B1 For Craftsman Mower Model No. 247.38908
Shaft-Choke
117 498977 Jet-Main(Standard)(IncludesO-RingSeal)
118 694975 Jet-Main(HighAIt.)(IncludesO-RingSeal)
121 498260 Kit-CarburetorOverhaul
125 794304 Carburetor
1270 694468 Plug-Webh
130 696564 Valve-Throttle
133 398187 Float-Carburetor
134 398188 Kit-Needb/Seat
1370 796610 Gasket-FloatBowl
163@o 795269 Gasket-AirCleaner
187 791766 Line-Fuel(CutToRequiredLength)
188 693399 Screw(ControlBracket)
190 690940 Screw(FuelTank)
202 691829 Link-MechanicalGovernor
209 699056 Spring-Governor(NoColor)
222 793754 Bracket-Control
227 690783 Lever-GovernorControl
276 271716 Washer-Sealing
287 690940 Screw(DipstickTube)
291 790830 Thermostat
300 790828 Muffler
304 790826 Housing-Blower
305 691108 Screw(BlowerHousing)
306 790836 Shield-Cylinder
307 690345 Screw(CylinderShield)
690662 Nut(Flywheel)
333 802574 Armature-Magneto
334 691061 Screw(MagnetoArmature)
337 802592s Plug-Spark
356 692390 Wire-Stop
358 794307 GasketSet-Engine
365 691688 Screw(Carburetor)
404 690272 Washer(GovernorCrank)
425 690670 Screw(AirCleanerCover)
443 692523 Screw(AirCleanerPrimerBase)
445 491588s Filter-AirCleanerCartridge
455 791960 Cup-Flywheel
456 692299 Plate-PawlFriction
459 281505s PawI-Ratchet
505 691251 Nut(GovernorControlLever)
523 499621 Dipstick
524 692296 Seal-DipstickTube
525 495265 Tube-Dipstick
562 691119 Bolt(GovernorControlLever)
564 698589 Screw(ControlCover)
584 697734 Cover-BreatherPassage
585 691879 Gasket-BreatherPassage
592 690800 Nut(RewindStarter)
597 691696 Screw(PawlFrictionPlate)
601 791850 Hose-Clamp(Green)
604 790703 Cover-Control
28
Page 29

Craftsman Engine Model No. 126T02=0795=B1 For Craftsman Mower Model No. 247.38908
Starter-Rewind
613 790833 Screw(Muffler)
615 690340 Retainer-GovernorShaft
616 698801 Crank-Governor
6170+ 270344s SeaI-ORing
621 692310 Switch-Stop
633 @ 691321 Seal-Choke/ThrottleShaft(ThrottleShaft)
633A 693867 Seal-Choke/ThrottleShaft(ChokeShaft)
635 66538s Boot-SparkPlug
668 493823 Spacer
684 690345 Screw(BreatherPassageCover)
689 691855 Spring-Friction
718 690959 Pin-Locating
741 795755 Gear-Timing
745 691648 Screw(Brake)
842 691031 SeaI-ORing(DipstickTube)
847 692047 Dipstick/TubeAssembly
851 493880s Terminal-SparkPlug
868o+ 697338 Seal-Valve
869 691155 Seat-Valve(Intake)
870 690380 Seat-Valve(Exhaust)
871 262001 Bushing-ValveGuide(Exhaust)
63709 Bushing-ValveGuide(Intake)
883• 691881 Gasket-Exhaust
921 795064 Cover-BlowerHousing
923 796136 Brake
Cap-FuelTank
966 795259 Base-AirCleanerBase
968 692298 Cover-AirCleaner
969 690700 Screw(BlowerHousingCover)
972 699374 Tank-Fuel
975 796611 Bowl-Float
976 694395 Primer-Carburetor
1036 Label-Emissions(Availablefroma Briggs&
StrattonAuthorizedDealer)
1058 277039 Operator'sManual
1059 692311 Kit-Screw/Washer(FuelTank)
1095 498528 GasketSet-Valve
1210 498144 Pulby/SpringAssembly(Pulley)
1211 498144 Pulby/SpringAssembly(Spring)
1329 126T02- ReplacementEngine
0625-F1
1330 270962 RepairManual
1386 790848 Vane-Air
1387 790849 Spring-AirVane
1388 790850 Screw(AirVane)
EngineGasketSet ReferenceNumber358
O CarburetorOverhaulKit ReferenceNumber121
+ ValveGasketSet ReferenceNumber1095
29
Page 30

(Thispageapplicableinthe U.S.A.and Canadaonly.)
Sears, Roebuck and Co., U.S.A. (Sears), the California Air Resources Board (CARD)
and the United States Environmental Protection Agency (U.S. EPA)
Emission Control System Warranty Statement (Owner's Defect Warranty Rights and Obligations)
EMISSIONCONTROLWARRANTYCOVERAGEISAPPLICABLETOCERTI-
FIEDENGINESPURCHASEDINCALIFORNIAIN1995ANDTHEREAF-
TER,WHICHAREUSEDINCALIFORNIA,ANDTOCERTIFIEDMODEL
California and United States Emission
TheCaliforniaAirResourcesBoard(CARD),U.S.EPAand Searsarepleased
toexplainthe EmissionControlSystemWarrantyonyourmodelyear2000and
latersmalloff-roadengine(SORE).InCalifornia,newsmalloff-roadengines
mustbe designed,builtandequippedtomeettheState'sstringentanti-smog
standards.Elsewherein theUnitedStates,newnon-road,spark-ignition
enginescertifiedformodelyear1997and latermustmeetsimilarstandardsset
forthbythe U.S.EPA.Searsmustwarranttheemissioncontrolsystemonyour
YEAR1997ANDLATERENGINESWHICHARE PURCHASEDANDUSED
ELSEWHEREINTHEUNITEDSTATES(ANDAFTERJANUARY1,2001 IN
CANADA).
Control Defects Warranty Statement
enginefortheperiodsoftime listedbelow,providedtherehasbeen noabuse,
neglector impropermaintenanceofyoursmalloff-roadengine.Youremis-
sioncontrolsystemincludespartssuchasthecarburetor,aircleaner,ignition
system,mufflerandcatalyticconverter.Alsoincludedmaybe connectorsand
otheremissionrelatedassemblies.Wherea warrantableconditionexists,Sears
will repairyoursmalloff-roadengineatnocostto youincludingdiagnosis,parts
andlabor.
Sears Emission Control Defects Warranty Coverage
Smalloff-roadenginesarewarrantedrelativeto emissioncontrolpartsdefects
fora periodofone year,subjectto provisionsset forthbelow.Ifanycovered
Owner's Warranty
Asthe smalloff-roadengineowner,youareresponsiblefor theperformanceof
therequiredmaintenancelistedin yourOperatingand MaintenanceInstruc-
tions.Searsrecommendsthatyouretainallyourreceiptscoveringmaintenance
onyoursmalloff-roadengine,butSearscannotdenywarrantysolelyforthe
lackofreceiptsorfor yourfailureto ensuretheperformanceof allscheduled
maintenance.Asthe smalloff-roadengineowner,youshouldhoweverbe
awarethat Searsmaydenyyouwarrantycoverageifyoursmalloff-roadengine
ora parthasfaileddueto abuse,neglect,impropermaintenanceor unap-
parton yourengineis defective,the partwillbe repairedorreplacedbySears.
Responsibilities
provedmodifications.Youareresponsiblefor presentingyour smalloff-road
engineto anAuthorizedSearsServiceDealeras soonas a problemexists.The
undisputedwarrantyrepairsshouldbecompletedinareasonableamountof
time,notto exceed30days.Ifyouhaveanyquestionsregardingyourwarranty
rightsandresponsibilities,youshouldcontactaSearsServiceRepresentative
at 1-800-469-4663.Theemissionwarrantyis a defectswarranty.Defectsare
judgedonnormalengineperformance.Thewarrantyis notrelatedtoan in-use
emissiontest.
Sears Emission Control Defects Warranty Provisions
ThefollowingarespecificprovisionsrelativetoyourEmissionControlDefectsWarrantyCoverage.ItisinadditiontotheSearsenginewarrantyfornon-regulated
enginesfoundin theOperatingandMaintenanceInstructions.
1. WarrantedParts
Coverageunderthis warrantyextendsonlytothe partslistedbelow(the
emissioncontrolsystemsparts)tothe extentthesepartswere presenton
the enginepurchased.
a. FuelMeteringSystem
• Coldstart enrichmentsystem
• Carburetorand internalparts
• FuelPump
b. AirlnductionSystem
• Aircleaner
• Intakemanifold
c. IgnitionSystem
• Sparkplug(s)
• Magnetoignitionsystem
d. CatalystSystem
• Catalyticconverter
• Exhaustmanifold
• Air injectionsystemor pulsevalve
e. MiscellaneousItemsUsedin AboveSystems
• Vacuum,temperature,position,timesensitivevalves
andswitches
• Connectorsandassemblies
2. Lengthof Coverage
Searswarrantsto the initialownerand eachsubsequentpurchaserthat
the WarrantedPartsshallbe freefromdefectsin materialsandworkman-
shipwhich causedthefailureof the WarrantedPartsforaperiodofone
yearfromthe datethe engineisdeliveredtoa retailpurchaser.
Inthe USAandCanada,a 24hourhotline, 1-800-469-4663,hasamenuof pre-recordedmessagesofferingyouenginemaintenanceinformation.
3. NoCharge
Repairorreplacementof anyWarrantedPartwill beperformedat no
chargeto the owner,includingdiagnosticlaborwhichleadsto the
determinationthata WarrantedPartis defective,ifthe diagnosticworkis
performedatanAuthorizedSearsServiceDealer.Foremissionswarranty
servicecontact yournearestAuthorizedSearsServiceDealeraslistedin
the "YellowPages"under"Engines,Gasoline,""GasolineEngines,""Lawn
Mowers,"orsimilarcategory.
4. Claimsand CoverageExclusions
Warrantyclaimsshall befiledin accordancewiththe provisionsof the
SearsEngineWarrantyPolicy.Warrantycoverageshallbeexcludedfor
failuresof WarrantedPartswhichare notoriginal Searspartsor because
ofabuse,neglector impropermaintenanceas setforth inthe Sears
EngineWarrantyPolicy.Searsis notliableto coverfailuresof Warranted
Partscausedby theuseof add-on,non-original,ormodifiedparts.
5. Maintenance
AnyWarrantedPartwhichis notscheduledforreplacementas required
maintenanceor whichis scheduledonly for regularinspectiontothe effect
of"repairor replaceas necessary"shallbe warrantedasto defectsfor the
warrantyperiod.AnyWarrantedPartwhichisscheduledfor replacement
asrequiredmaintenanceshallbewarrantedasto defectsonlyforthe
periodoftime uptothe firstscheduledreplacementfor that part.Any
replacementpartthat isequivalentinperformanceand durabilitymay
beusedin theperformanceofanymaintenanceor repairs.Theowneris
responsibleforthe performanceof allrequiredmaintenance,as definedin
the SearsOperatingand MaintenanceInstructions.
6. ConsequentialCoverage
Coveragehereundershallextendtothefailureof anyenginecomponents
causedbythe failureofanyWarrantedPartstill underwarranty.
GDOC-100188Rev.A
30
Page 31

Look For Relevant Emissions Durability Period and
Air index information On Your Engine Emissions Label
Engines that are certified to meet the California Air Resources Board (CARB) Tier 2 Emission Standards must
display information regarding the Emissions Durability Period and the Air Index. Sears, Roebuck and Co., U.S.A.
makes this information available to the consumer on our emission labels.
The Emissions Durability Period describes the number of hours of actual running time for which the engine is
certified to be emissions compliant, assuming proper maintenance in accordance with the Operating & Mainte-
nance Instructions. The following categories are used:
Moderate: Engine is certified to be emission compliant for 125 hours of actual engine running time.
Intermediate: Engine is certified to be emission compliant for 250 hours of actual engine running time.
Extended: Engine is certified to be emission compliant for 500 hours of actual engine running time.
For example, a typical walk-behind lawn mower is used 20 to 25 hours per year. Therefore, the Emissions
Durability Period of an engine with an intermediate rating would equate to 10 to 12 years.
The Air Index is a calculated number describing the relative level of emissions for a specific engine family. The
lower the Air Index, the cleaner the engine. This information is displayed in graphical form on the emissions label.
After July 1,2000, Look For Emissions Compliance Period
On Engine Emissions Compliance Label
After July 1, 2000 certain Sears, Roebuck and Co., U.S.A. engines will be certified to meet the United States
Environmental Protection Agency (USEPA) Phase 2 emission standards. For Phase 2 certified engines, the Emis-
sions Compliance Period referred to on the Emissions Compliance label indicates the number of operating hours
for which the engine has been shown to meet Federal emission requirements.
For engines less than 225 cc displacement, Category C = 125 hours, B = 250 hours and A = 500 hours.
For engines of 225 cc or more, Category C = 250 hours, B = 500 hours and A = 1000 hours.
This isa generic representation of the emission label typically found on a certified engine.
FAMILYYBSXS.3192VA 274812
31
GDOC-100182Rev.A
Page 32

Congratulationson makingasmartpurchase.YournewCraftsman@
productisdesignedandmanufacturedfor yearsof dependableopera-
tion.Butlikeall products,it mayrequirerepairfromtimetotime.That's
whenhavinga RepairProtectionAgreementcansaveyoumoneyand
aggravation.
Here'swhattheRepairProtectionAgreement*includes:
* Expert service byour 10,000professionalrepairspecialists
o Unlimitedserviceand nochargeforpartsand laboronall
coveredrepairs
o Product replacementupto $1500if yourcoveredproductcan't be
fixed
• Discountof 10%fromregularpriceof serviceand relatedinstalled
partsnotcoveredbytheagreement;also,10%off regularpriceof
preventivemaintenancecheck
• Fasthelp by phone- we call itRapidResolution- phonesupport
froma Searsrepresentative.Thinkof usasa "talkingowner's
manual."
Onceyoupurchasethe Agreement,a simplephonecall is allthatit
takesfor youto scheduleservice.Youcan call anytimedayor night,or
schedulea serviceappointmentonline.
TheRepairProtectionAgreementisa risk-freepurchase.Ifyoucancel
foranyreasonduringtheproductwarrantyperiod,wewillprovideafull
refund.Or,a proratedrefundanytimeafterthe productwarrantyperiod
expires.Purchaseyour RepairProtectionAgreementtoday!
Somelimitationsandexclusionsapply. Forpricesand additional
informationin the U.S.A.call 1-800-827-6655.
*CoverageinCanadavaries on someitems.Forfull details call
SearsCanadaat 1-800-361-6665.
SearsInstallation Service
ForSearsprofessionalinstallationof homeappliances,garagedoor
openers,waterheaters,andothermajorhomeitems,in theU.S.A.or
Canadacall1-800-4-MY-HOME®.
32
Page 33

Declaraci6n de garantia .................................................. 33
Instrucciones de seguridad ....................................... 34-38
Guia de cuesta ................................................................ 39
Etiquetas de seguridad ..................................................... 9
Montaje ..................................................................... 40-43
Operaci6n .................................................................. 44-45
Servicio y Mantenimiento ......................................... 46-50
Almacenamiento fuera de temporada ............................ 51
Soluci6n de problemas ................................................... 52
NOmero de servicio ............................... Cubierta posterior
Garantia de Craftsman
SiesteproductoCraftsmanfalladebidoa undefectoenlosmaterialeso lamanodeobradentrodelos dos aSosde lafechade compra,sirvase
devolverloa cualquiertiendaSears,Centrode servicioSears,uotro puntodeventaCraftsmanen losEstadosUnidosparasu reparaci6nsin
cargo(o reemplazosila reparaci6ndemuestraimposible).
Estagaranfias61otendr&validezdurante90 diassi esteproductose utilizaen cualquiermomentoparafinescomercialeso dealquiler.
Esta garantiacubreSOLOdefectos enmaterial y habilidad.Searsno pagar_para:
• Articulosdeduraci6nlimitadaquepuedendesgastarsebajocondicionesnormalesdeusoduranteelperiododegarantia,talescomo
cuchillasdecortadora,adaptadoresparacuchillas,correas,filtrosdeaire,y bujiasdeencendido.
• Lasreparacionesrequeridasdebidoa abusoo negligenciadeloperador,incluiyendoabolladurasdel cig(Je_aly nooperaro mantenerel
equipodeacuerdoconlas instruccionessuministradas.
• Mantenimientopreventivoo reparacionesnecesariasdebidoa mezcladecombustibleimpropia,combustiblecontaminadoo a_ejo.
Estagarantialeotorgaderechoslegalesespecificos,peroustedpodriagozardeotrosderechosenraz6ndesulugarde residencia.
Sears, Roebuck andCo.,HoffmanEstates,IL 60179
Aceitedelmotor: SAE30
Capacidaddeaceitedel motor: 18onzas
Combustible: Gasolinasinplomo
Bujia: Champion®RC12YC
Motor: Briggs& Stratton
NSmerode modelo ..........................................................
N_mero de serie..............................................................
Fechade compra .............................................................
RegistreelnQmerode modelo,nQmerode serieyfechade compra
m&sarriba.
© SearsBrands,LLC 33
Page 34

Lapresenciade estesirnboloindicaque setratade instrucciones
irnportantesde seguridadquese debenrespetarparaevitar
ponerenpeligrosu seguridadpersonaly/o materialy lade otras
personas.Leay sigatodaslasinstruccionesdeestemanualantes
de poneren funcionarnientoestarn_.quina.Sino respetaestas
instruccionespodriaprovocarlesionespersonales.Cuandoveaeste
sirnbolo,ipresteatenci6nala advertencia!
Estarn_.quinarueconstruidaparaseroperadadeacuerdocon
lasreglasdeseguridadcontenidasenestemanual.AIigualque
concualquiertipodeequipornotorizado,undescuidoo errorpor
partedeloperadorpuedeproducirlesionesgraves.Estarn_.quina
escapazde arnputarrnanosypiesy dearrojarobjetoscongran
fuerza.De norespetarlas instruccionesde seguridadsiguientesse
puedenproducirlesionesgraveso larnuerte.
PROPOSICION 65 DE CALIFORNIA
Elescapedel motorde esteproducto,algunosdesuscornponentes
y algunoscornponentesdelvehiculocontieneno liberansustancias
quirnicasqueelestadode Californiaconsideraque puedenproducir
c_.ncer,defectosde nacirnientouotrosproblernasreproductivos.
Losbornesdela bateriaylosaccesoriosdines contienenplornoy
cornpuestosde plorno,sustanciasqdrnicas quesegOnIoestableci-
do pot elEstadodeCaliforniacausanc_.ncery da_osenel sisterna
reproductivo.Ldveselasmanos despu_sde estaren contacto
con estoscomponentes.
FUNCIONAIVIIENTO
Funcionarnientogeneral:
• Leaysigatodaslas instruccionescontenidasen estemanual
antesde intentarensarnblarestarn_.quina.Lea,cornprenday
sigatodaslasinstruccionesquefiguranenla rn_.quinayen el o
losrnanualesantesde intentaroperarla.Farniliaricesecornpleta-
rnenteconloscontrolesy conel usoapropiadodeestarn_.quina
antesde operarla.Guardeestemanualenun lugarseguropara
referenciasfuturasy regulatesy parasolicitarrepuestos.
• Estarn_.quinaes unapiezadeequipode precisi6n,no unjuguete.
Portanto,tengala maximaprecauci6nen todornornento.Su
unidadha sidodise_adapararealizarunatarea:cortarel c_sped.
Nola utiliceconningOnottoprop6sito.
• Noperrnitanuncaque losni_osrnenoresde 14a_osoperenesta
rn_.quina.Losni_osde 14a_osy rn_.sdebenleery cornprender
lasinstruccionescontenidasenestemanualy debenser
capacitadosy supervisadosporunode lospadres.Onicarnente
losindividuosresponsablesque se hayanfarniliarizadocon
estasreglasdeseguridadparalaoperaci6ndeber_.nusaresta
rn_.quina.
Su responsabilidad--Restrinja el usode estarn_.quina
rnotorizadaalas personasque lean,cornprendany respetenlas
advertenciase instruccionesqueaparecenenestemanualyen la
rn_.quina.
iGUARDEESTASINSTRUCCIONES!
• Inspeccionerninuciosarnenteel _.reaendondeutilizar_,elequipo.
Saquetodaslaspiedras,palos,cables,huesos,juguetesy otros
objetosextra_osconlosquepodriatropezaro quepodrianser
arrojadosporla cuchilla.Losobjetosarrojadosporla rn_.quina
puedenproducirlesionesgraves.Planifiqueel patr6nen elque
vaa irdescargandoel recorteparaevitarquela descargade
materialserealicehacialoscarninos,lasveredas,losobserva-
dotes,etc. Eviteadern_.sdescargarmaterialcontralasparedesy
obstruccionesquepodrianprovocarqueel materialdescargado
rebotecontraeloperador.
• Paraayudaraevitarel contactoconlacuchillao unalesi6npor
un objetoarrojado,rnant_ngaseen lazonadeloperadordetr_.s
de las rnanijasy rnantengaa losni_os,observadores,ayudantes
y rnascotasapartadosalrnenos25 metrosde lapodadora
rnientrasest,.en operaci6n.Detengala rn_.quinasialguienentra
en lazona.
• Paraprotegerselosojosutilicesiernpreanteojosoantiparras
de seguridadrnientrasoperala rn_.quinaornientrasla ajusta
o repara.Losobjetosarrojadosquerebotanpuedenlesionar
gravernentelavista.
• Utilicezapatosde trabajoresistentes,desuelafuerteypanta-
Ionesy carnisasajustados.Se recorniendautilizarcarnisasy
pantalonesquecubranlosbrazosy las piernas,asi cornocalzado
conpuntasreforzadasen acero.Nuncaopereestarn_.quinacon
lospiesdesnudos,sandalias,oconzapatosligerosocon losque
sepuedaresbalar(porejernplo,calzadode Iona).
• Nopongalasrnanoso lospiescercade laspiezasrotatoriaso
en latolvade lacortadora.Elcontactocon las cuchillaspuede
producirlaarnputaci6nde rnanosypies.
34
Page 35

• Unacubiertade descargafaltanteoda_adapuedeprovocarel
contactoconla cuchillaolesionesporobjetosarrojados.
Muchaslesionesocurrencornoresultadode pasarlacortadora
sobrelos piesduranteunacaidaprovocadaporderrapeso
tropiezos.Nose sostengade lapodadorasi seest,.cayendo,
sueltela rnanijainmediatarnente.
Nuncatirehaciaustedlapodadorarnientrascarnina.Sidebe
retrocederla podadoraparaevitarunaparedu obst_.culo,mire
prirneroabajoy atr_.sparaevitartropezarsey luegosigaestos
pasos:
1. Retrocedade la podadorahastaestirarcornpletarnentesus
brazos.
2. AsegOresequeest,. bienequilibradoy bienparado.
3. Tirede lapodadoralentarnentehaciausted,norn_.sall_.de la
rnitaddeladistanciaentreustedy lapodadora.
4. Repitaestospasoscornoserequiera.
• Noopereestarn_.quinaestandobajolosefectosdelalcoholo de
drogas.
• Noernbragueel mecanisrnode autopropulsi6nen unidadescon
esteequipornientrasarrancael motor.
• Elrnecanisrnodecontroldela cuchillaesundispositivode
seguridad.Nuncaintentedesviarsede sufuncionarniento.De
hacerlonofuncionarianlosdispositivosde seguridady podrian
producirselesionespersonalesporel contactoconlascuchillas
giratorias.Lasrnanijasdecontrolde lacuchilladebenfuncionar
bienenarnbasdireccionesy regresarautorn_.ticarnentea la
posici6ndedesengranecuandose lassuelta.
• Nuncaoperelapodadoraenc_spedhOrnedo.Siernpreest_
segurodesuequilibrio.Si tropiezay caepuedelesionarse
gravernente.Sisienteque pierdeelequilibrio,suelteinrnediata-
rnentelarnanijade controldelacuchillay lacuchilladejar_,de
girarentressegundos.
• Corteel cespedsolarnentecon luz dedia ocon unabuenaluz
artificial.Carnine,nuncacorra.
• Detengala cuchillacuandocrucecarninosde gravilla,pasoso
andadores.
• Si larn_.quinacornenzaraavibrarde rnaneraanorrnal,detenga
el motor,y busqueinrnediatarnentelacausa.Lavibraci6nporIo
generalesunaadvertenciadealgQnproblerna.
• Apagueelmotory esperehastaquela cuchillase detenga
cornpletarnenteantesde retirarla guardaparael recortede
cespedo desatorarlatolva. LacuchillacontinOagirandopor
unoscuantossegundosdespu_squeel motorsehaapagado.
Nuncacoloqueningunapartedel cuerpoen el_.reade lacuchilla
hastaqueest_seguroquelacuchillahadetenidosurnovirniento
rotatorio.
Nuncaoperela cortadorasinlasguardasapropiadas,cubiertade
descarga,guardapararecorte,rnanijadecontroldela cuchilla
y otrosdispositivosde seguridady protecci6nensu lugary
funcionando.Nuncaoperelacortadorasilos dispositivosde
seguridadest_.nda_ados.Si noIohace,estopuedetenetcorno
resultadolesiones.
• Elsilenciadoryel motorsecalientanypuedenproducirquerna-
duras.Nolostoque.
• Utilicesolarnentepartesyaccesoriosfabricadosespecialrnente
paraestarn_.quina,originalesdelfabricante(OEM).Sino Io
hace,estopuedetenercornoresultadolesionespersonales.
• Paraencenderelmotor,jale dela cuerdalentarnentehastaque
sientaresistencia,luegojale r@idarnente.Elreplieguer@idode
lacuerdadearranque(tensi6nde retroceso)lejalar_,larnanoy
el brazohaciael motorrn_.sr@idode Ioque ustedpuedesoltar.
Elresultadopuedenser huesosrotos,fracturas,hernatornaso
esguinces.
Sisepresentansituacionesquenoest_.nprevistaseneste
manualseacuidadosoy useel sentidocornQn.Contacto1-800-
659-5917parainforrnaci6ny asistencia.
DIENTES
Laspendientessonun factorirnportantequese relacionaconlos
accidentesproducidosporderrapesy caidasy quepuedenpro@@
lesionesgraves.Laoperaci6nen pendientesrequieremayorpre-
cauci6n.Sino sesienteseguroenunapendiente,nola pode.Para
seguridad,useel rnedidordependientesquese incluyecornopartede
estemanualpararnedirla pendienteantesdeoperarlaunidaden una
zonainclinada.Si lapendientesuperalos 15grados,nola pode.
HagaIo siguiente:
• Muevala podadoraa travesde lascarasde lapendiente,nunca
haciaarribay abajo.Tengacuidadocuandocarnbiededirecci6n
cuandooperela rn_.quinaenpendientes.
• Est_atentoa losagujeros,raices,rocas,objetosocultoso
abultarnientosquepuedanprovocarque sederrapeo setropiece.
Elc_spedaltopuedeocultarobst_.culos.
Siernpreest_segurodesuequilibrio.Sitropiezaycaepuede
lesionarsegravernente.Si sJentequepier@el equilibrio,suelte
inrnediatarnentelarnanijadecontrolde lacuchillay lacuchilla
dejar_,degirarentres(3) segundos.
NohagaIo siguiente:
• I/o corteel cespedcercadepozos,hundirnientos,bancos,podria
perderel equilibrio.
• Nopodependientesrnayoresde 15gradoscornoIoindicael
rnedidorde pendientes.
• Nopodeel cespedhOrnedo.Si noest,.firrnernenteparado,puede
resbalarse.
35
Page 36

N QOS
Puedenocurriraccidentestr_.gicossi eloperadornoest,.atentoa la
presenciade ni_os.PorIogenerala losni_oslesatraenlaspodadoras
yla actividadde podarelc_sped.Noentiendenlosriesgosnilos
peligros.Nuncad_porsentadoquelosni_osperrnanecer_.nen el
rnisrnolugardondelosviopor Oltirnavez.
• Mantengaa losni_osfueradelAreadetrabajoybajoestricta
vigilanciade unadultoresponsableadern_.sdeloperador.
Est_alertayapaguela podadorasi un ni_oingresaalArea.
Antesy rnientasseest,.rnoviendohaciaatr_.s,mirehaciaatr_.sy
cuidequeno hayani_os.
Tengaextrernaprecauci6ncuandoseaproxirnea esquinas
ciegas,entradasdepuertas,_.rbolesu otrosobjetosquepuedan
obstaculizarlelavistadeun ni_oque pudiesecorrerhaciala
podadora.
Mantengaalejadosalosni_osdelos rnotoresenrnarchao
calientes.Puedensufrirquernadurasconun silenciadorcaliente.
Nuncaperrnitaqueni_osrnenoresde 14a_osoperenesta
rn_.quina.Losni_osrnayoresde 14a_osdebenleery entender
lasinstruccionesde operaci6nyreglasdeseguridadcontenidas
enestemanualy debenserentrenadosy supervisadosporsus
padres.
SERVIClO
Manejosegurode la gasolina:
• Paraevitarlesionespersonaleso daSosrnaterialessea
surnarnentecuidadosoal rnanipularlagasolina.Lagasolinaes
altarnenteinflarnabley losvaporessonexplosivos.Sepuede
lesionargravernentesi derrarnagasolinasobreustedo sobrela
ropaya quesepuedeencender.
• Utilices61orecipientesparagasolinaautorizados.
• NuncaIlenelos contenedoresenel interiordeunvehiculo
ocarni6nocajadecarnionetaconrecubrirnientospl_.sticos.
Coloquesiernprelosrecipientesenel pisoy lejosdelvehiculo
antesde Ilenarlos.
• Retireel equipoa gasolinadelcarni6no rernolqueyII_neloen
el piso.Si estonoes posible,entoncesIlenedichoequipoenun
rernolqueconun recipienteport_.til,en vezdedesdeundispen-
sadordegasolina.
• Mantengala boquillade Ilenadoencontactoconelhordedela
entradadeltanquede gasolinaocontenedoren todornornento
hastaqueest_Ileno.No utiliceundispositivoparaabrir/cerrarla
boquilla.
• Apaguetodoslos cigarrillos,cigarros,pipasyotrasfuentesde
cornbusti6n.
• Nuncacarguecombustibleen larn_.quinaeninterioresporque
Losvaporesinflarnablespodrianacurnularseen el_.rea.
Nuncasaquelatapadel gasni agreguecombustiblernientrasel
motorest,.calienteo enrnarcha.Dejequeel motorseenfriepor
Iornenosdosrninutosantesdevolvera cargarcombustible.
• Nuncarecargueel tanquedecombustible.Lleneel tanqueno
rn_.sde 1 pulgadapor debajodela basedelcuellode Ilenado
paradejarespacioparala expansi6ndelcombustible.
• Vuelvaacolocarlatapade lagasolinayajOstelabien.
• Lirnpiela gasolinaderrarnadasobreel motoryel equipo.Traslade
la rn_.quinaa otrazona.Espere5rninutosantesde encenderel
motor.
• Nuncaalrnacenela rn_.quinao elrecipientedecombustibleen
unespaciocerradodondehayafuego,chispaso aparatoscon
pilotocornoporejernplo,calentadoresde agua,calentadores,
hornos,secadoresderopau otrosaparatosagas.
• Parareducirel riesgodeincendiornantengala rn_.quinalirnpia
de pasto,hojasy deacurnulaci6nde otrosescornbros.Lirnpielos
derrarnesde aceiteocombustibleysaquetodoslosdesechos
ernbebidoscon combustible.
• Dejequela rn_.quinaseenfrie5 rninutosporIornenosantesde
alrnacenarla.
Funcionamientogenerah
• Nuncaenciendaunmotoren espacioscerradoso enunazona
conpocaventilaci6n.Elescapedel motorcontienernon6xidode
carbono,ungasinodoroyletal.
• Antesde lirnpiar,repararo inspeccionarlarn_.quina,cornpruebe
que lacuchillaytodaslaspartesquesernuevensehandetenido.
Desconecteel cablede labujiay p6ngalode rnaneraque haga
rnasacontrael motorparaevitarqueseenciendade rnanera
accidental.
• Reviselospernosde rnontajede lacuchillay delmotora
intervalosfrecuentesparaverificarqueest_nbienapretados.
Inspeccioneadern_.svisualrnentela cuchillaenbuscade daSos
(abolladuras,desgaste,roturas,etc.).Reernplacelacuchillacon
equipooriginaldel fabricante(OEM)listadoenestemanual.La
utilizaci6ndepartesquenocurnplanconlasespecificacionesde
equiposoriginalespodriatenetcornoresultadoun rendirniento
incorrectoyadern_.sla seguridadpodriaestarcornprornetida.
• Lascuchillasdelaspodadorasson rnuyafiladasy podrian
cortarlo.Envuelvalacuchillao utiliceguantesy extremeprecau-
clonescuandolede servicio.
• Mantengatodoslos pernos,tuercasytornillosbienajustados
paraasegurarsequelarn_.quinaseencuentraen condiciones
segurasdeoperaci6n.
• Nuncarnanipulelosdispositivosde seguridaddernanera
irnprudente.Controleperi6dicarnentequefuncionendeforrna
adecuada.
36
Page 37

• Despu_sdegolpearcon algOnobjetoextrafio,detengaelmotor,
desconecteelcablede labujfayconecteelmotora rnasa.
Inspeccionerninuciosarnentela rn_.quinaparadeterrninarsiest,.
dafiada.Repareel dafioantesdeencenderlayoperarla.
• Nuncatratedeajustaruna ruedaolaalturade corternientrasel
motorest,.en rnarcha.
• Loscornponentesde latolvapararecorte,cubiertadedescargay
escudode riel,est_.nsujetosadesgastey dafiosquepodriadejar
expuestaspartesquese rnueveno perrnitirquesearrojenobje-
tos.Paraprotegersuseguridad,verifiquefrecuenternentetodos
loscornponentesy reernpl_.celoss61oconpartesde losfabri-
cantesdeequiposoriginales(O.E.M.)listadasenestemanual.
La utilizaci6nde partesquenocurnplanconlas especificaciones
deequiposoriginalespodriatenercornoresultadounrendirniento
incorrectoyadern_.sla seguridadpodriaestarcomprornetida.
• Nocarnbielaconfiguraci6ndel reguladordelmotorni acelere
dernasiadoelrnisrno.Elreguladorcontrolalavelocidadrn_.xirna
seguradeoperaci6ndel motor.
• Verifiquefrecuenternentela Ifneadecombustible,eltanque,el
tap6n,y losaccesoriosbuscandorajaduraso perdidas.Reern-
placedeset necesario.
• Nod_arranquealmotorsinoest,.la bujfadeencendido.
• Mantengao reernpiace[asetiquetasdeseguridad,segOnsea
necesario.
• Observelasleyesynorrnasaplicablesparadisponeradecu-
adarnentedelosdesechos.Ladescargainapropiadadeliquidos
o rnaterialespuededafiar e[medicarnbiente.
• SegOnla Cornisi6nde Seguridadde Productosparael Consu-
rnidordelos EstadosUnidos(CPSC)y laAgenciadeProtecci6n
Arnbientalde losEstadosUnidos(EPA),esteproductotieneuna
vidadtil media desiete(7)afios,6 140horasdefuncionarniento.
AI finaiizar[avida dtilmedia,adquieraunarn_.quinanuevao
hagainspeccionaranualrnente_staSearsporunou otrodis-
tribuidordeserviciosparacerciorarsedequetodoslos sisternas
rnec_.nicosyde seguridadfuncionancorrectarnentey notienen
excesivodesgaste.Si no1ohace,puedenproducirseaccidentes,
[esionesornuerte.
NO MODIFIQUE EL MOTOR
Paraevitarlesionesgraveso larnuerte,nornodifiqueel motorbajo
ningunacircunstancia.Si carnbiala configuraci6ndel reguladorde[
motorelmotorpuededescontrolarsey operara velocidadesinsegu-
ras.Nuncacarnbielaconfiguraci6ndef_.bricadelreguladordel motor.
AVISO REFERIDO A EMISIONES
Losrnotoresqueest&ncertificadosycurnplenconlas regulaciones
de ernisionesfederalesEPAy de CaliforniaparaSORE(Equipos
pequefiostodoterreno)est_.ncertificadosparaoperarcongasolina
cornOnsinplornoy puedenincluirlossiguientessisternasdecontrol
de ernisiones:Modificaci6ndemotor(EM)y catalizadorde tresvias
(TWO)si est_.nequipadosde esarnanera.
GUARDACHISPAS
Estarn&quinaest,.equipadacon unmotorde cornbusti6ninternay
nodebeser utiiizadaeno cercadeunterrenoagrestecubiertopor
bosque,rnalezaso hierbaexceptosiel sisternade escapedelmotor
est,.equipadocon unarnortiguadorde chispasquecurnplaconlas
[eyeslocalesoestataiescorrespondientes,encasodehaberlas.
Siseutiiizaun arnortiguadordechispasel operadorIo debernantener
en condicionesde usoadecuadas.Enel Estadode California[as
rnedidasanteriorrnenternencionadassonexigidasporley (Arficulo
4442del C6digode RecursosPOblicosde California).Esposible
queexistanleyessirnilaresenotrosestados.Lasleyesfederalesse
aplicanenterritoriosfederaies.
Puedeconseguirelarnortiguadorde chispasparael silenciadora
travesde sudistribuidorautorizadode rnotoreso poni_ndoseen
contactoconelcentrode servicioSears.
37
Page 38

SilVIBOLOS DE SEGURIDAD
Estap&ginarepresentay describelaseguridadlossimbolosquepuedenparecerenesteproducto.Lea,comprenda,ysigatodasinstrucciones
en lam_quinaantesprocurarparareuniry operar.
LEA EL MANUAL(S) DEL OPERADOR
i
i
®
Lea, comprenda, y siga todas instrucciones en el manual (manuales) antes procurar para reunir y
operar.
PELIGRO-- GIRANDO HOJAS
Para reducir el riesgo de herida, guarde manos y pies lejos. No funcione a menos que la tapa
de descarga o el receptor de hierba est_n en su lugar apropiado. De ser dahado, sustituya
inmediatamente.
PELIGRO-- ESPECTADORES
No siegue cuando los nihos o los otros est_in alrededor.
PELIGRO-- DE ELCORTE DE PIE/
Guarde manos y pies lejos de hacer girar partes.
PELIGRO-- ESCOMBROS LANZADOS
Quite objetos que pueden ser lanzados por la I_imina en cualquier direcci6n. Lleve gafas de
seguridad.
PELIGRO-- CUESTAS
Use extra la precauci6n en cuestas. No siegue cuestas mayores que 15 o
ADVERTENCIA DESPIDA
Para reducir el riesgo de incendio mantenga la m_iquina limpia de pasto, hojas y de acumulaci6n de
otros escombros.
ADVERTENCIA VAPORES TOXICOS
Nunca encienda un motor en espacios cerrados o en una zona con poca ventilaci6n. Elescape del
motor contiene mon6xido de carbono, un gas inodoro y letal.
ADVERTENCIA-- SUPERFICIE CALIENTE
Las partes del motor, especialmente el silenciador, Ilega a set muy caliente durante la operaci6n.
Permita motor y silenciador para ponerse frio antes de tocar.
38
Page 39

U
°_
r_
E
0
r_
0
c5
°_
0
(D
0
(D
C_
°_
I
i
I
:2 _-'
o_ o5
I
0
I
I
I
I
l
l
m_
g"; .-
l
m
t"r_
0
l
l
l
l
l
0
l
/
/
0
'_ N-o
00
_ Z_
E
°m
_E
_x5
/
0 "00 _
/
0
_o
39
Page 40

IMPORTANTE: Estaunidad seenvfa sin gasolina ni aceite enel motor.
Antesde comenzarocorrer iama.quinacargue el motorcon gasolina y
aceitecomose indica en la secci6n de operaci6n de este manual.
NOTA: Las referencias a los ladosderecho e izquierdode iacortadora de
cespedse hacenobservando la ma.quinadesde laposici6n de operaci6n.
APERTURA DE LA CAJA DE CARTON
1. Cortecada una de ias esquinas de la caja verticaimente, de laparte
superiora la base.
2. Saquetodaslas piezassueltas.
3. Quiteel material deempaque suelto.
C61VIO SACAR LA UNIDAD DE LA CAJA
1. Elevela unidaddesde la parteposterior parasepararla del material
de iacaja que quede debajoy hagarodaria unidadfuera de ia caja.
2. Verifiquecuidadosamente si en la cajaqueda aiguna partesuelta.
PIEZAS SUELTAS DENTRO DE LA CAJA
Colectorde cesped
Tolvade descarga lateral
Aceite del motor
f
J
Figura2
iVIONTAJE
IVlontaje de la manija
1. Retireel materialde empaqueque pudieraestar entrelas manijas
superiore inferior.
A. Quite los tornillosy tuercasde mariposatransporte desde
el mango como se muestra en la figura 1.No afloje o quitar
adyacentestorniilos de cabeza hexagonal.
B. Si bien iaestabilizaci6n de cortacesped potio que no se
mueve, pivoteasa superior como se muestraen la figura2. No
engarzadocable mientraslevanta ia palancahacia arriba.
2. Retireia T-pernosde la manijaentre corchetescomo se muestraen
la figura 3.
Figura 3
Figura1
,J
40
Page 41

3,
Siga los siguientespasos para completar conjuntodel mango:
A. Tire haciaarriba en elasa hastaagujeros en lamanija(que se
muestraen la figura3 corte de la cubierta)se alineancon los
agujerosen el mango soporte. Vea la figura4.
NOTA: AI tirar hacia arriba la palanca, asegOrese de que no tire de
manejar todo el camino.
B. Inserteei T-pernos quit6anteriormentea travesdei mango
corchetesy asa inferior yapriete bien paraasegurar elmango
en sulugar. Veaia figura4.
C. Vuelva acolocar tuercasy pernosde transporte retirarse antes
en unareducci6n de losagujeros de la manija comose muestra
en lafigura 5.
4. Laguia de la cuerda,que esta.conectadaa lavariiiade sosten,se
encuentrasobreel ladoderechode lamanija inferior.Veala Figura6.
A. Sostengala manija de control de la cuchilla contra la manija
superior.
B. Jale lacuerda dearranque parasacarla del motor.Suelte el
control de la cuchilla.
C. Deslice lacuerda dearranque en la guia.
D. La atadurade cables uso (s) paragarantizarcable (s) para
bajarde manejar.
Conexi6n de la colectora de c_sped
1. Paraensamblar el colector decesped (de sernecesario), Hagael
cierto bolsoes dio vuelta a la derecha el lado antesde reunir(la
advertenciade laetiquetasera.pot fuera).
A. Coloque labolsa sobre el marcocon el lado negrode pla.stico
en elrondo.
B. Desliceel canal de pla.sticosobre losganchos delmarco.Vea
la figura 7.
2. Paraacoplar el colectorde cesped.
A. Levantela puerta de descargaposterior.
Figura5
J
f
f
Figure6
\
\
\
\
\
\
\
\
\
J
Figura4
,J
Figura7
41
Page 42

B. Lugarde colecciHnde cesped en lasranuras en el mangoentre
corchetescome se muestra en iafigura 8. Sueltela puerta de
descarga demodeque descanse sobreel colector de cesped.
Paraquitar al receptorde hierba,levanteia puertade descarga trasera
en elcortacesped. Ascensor cespedy fuera deias ranuras enel mango
entre parentesis. Elreversede liberaciHndescarga ia puerta parapermitir
queello cerrara la apertura traseradel cortacesped.
Conexi6n de Canal de Descarga Lateral
Su podadoraha side enviadacomo abonadora.Si hace laconversiHna
descarga lateral,asegurese deque el colectorde cesped este fuerade la
unidad y queia puerta de descarga traseraeste cerrada.
1. Enel costadode la podadora,levanteel adaptadorpara abono.Vea
figura 9.
2. Deslicelos dos ganchosdel canal de descarga lateral debajo del
pasadorde bisagrasobre el montajedel adaptador para abono. Baje
el adaptador paraabono. No extraigala clavija paraabono lateralen
cuaiquiermomento,aQncuando no este abonando.
AJUSTES
Altura de torte
Hay una palanca de ajuste de aitura de corte, situadoencima de la rueda
delanteraderecha ytrasera.
1. Presionela palancahacia la rueda(unidadtendera,a caercuando se
sueltala palanca).
2. Muevalaa cuaiquier de las posicionespara laaitura decorte
deseado.Vea lafigura 10.
3. Liberela palanca haciala cubierta de la podadora.
f
®
J
Figura 8
Clavija para
abono lateral
IMPORTANTE:Tantolas ruedasdelanterasy traserasdeben
colocarseenla misrnaposiciHnrelativa.Cuandoelterrenoesagreste
o irregularcambielapalancadeajustede laalturaa unaposiciHnrn&s
alta.Deesta rnanerasecuidarn&selcesped.
Inclinaci6n de la manija
PerconvenienciadelaoperaciHn,puedeajustarlainclinaciHndela
manijadelasiguientemanera:
1. Quitelostornillosytuercasde mariposatransportedemanejar.Vea
lafigura11.
2. Coloqueei mangoenunadeiastresposicionesquesesientama,s
cHmodo.Vealafigura11inserciHn.
3. FijelaposiciHncontuercasy pernosdetransporteeliminadoantes.
f
Figura9
,\
Superior
Figura 11
J
Figura10
42
Page 43

f Control de
Arrancador
de retroceso
Colector de C_sped
Palanca de ajuste de altura
ajuste de air de torte
Canalde
Descarga Lateral
Tap6n de aceite/varilla
de medici6n del nivel
de aceite
Palanca de
__pdn DeGasolina
Clavija
abono
Figura12
CONTROL DE CUCHILLA
Elcontrolde lacuchillaest,.unidoa larnanijasuperior.Presionela
rnanijade controldelacuchillacontralarnanijasuperiorparaoperarla
unidad.Sueltela rnanijadecontrolde lacuchillaparadetenerelmotor
yla cuchilla.
El control de ia cuchiiiaes un dispositivode seguridad.Nunca intente
anular su funcionamiento.
PALANCA DE AJUSTE DE LA ALTURA DE
CORTE
Unapalancade ajustese encuentraenla ruedatraseraderechayel
ottoseencuentraenla ruedadelanteraderecha.Losdospalancas
tienenqueestaren la rnisrnaposici6nrelativaparaaseguraruncorte
uniforrne.Paraajustarla alturade corte,serefierena la secci6nde
Montaje.
ARRANCADOR DE RETROCESO
Elarrancadorde retrocesoest,.unidoa la rnanijasuperiorderecha.
Paraencenderlaunidadcol6quesedetr_.sdela rnisrnay tirede la
cuerdadelarrancadorde retroceso.
COLECTOR DE ClaSPED
Elcolectordecesped,Iocalizadoenel reversodel cortacesped,es
usadoparaernpaquetarlosrecortesdeperi6dicodec_spedparala
disposici6nenotto sitio.Unavezqueel bolsoes Ileno,tienequeser
quitadodelcortacespedyvaciadoantesrn_.slejossegar.
CLAVIJA PARA ABONO
EladaptadorparaabonoseutilizaQnicarnenteparaprop6sitosde
abono.Envezde recolectarlosrecortesdelc_spedenun colector
de c_spedo canaldedescargalateral,algunosrnodelosde podadora
tienenla opci6nde recircularlosrecortesenel c_sped.Estosellama
abonar.
CANAL DE DESCARGA LATERAL
Sucortacespedestransportadocornoun rnulcher.Paradescargarlos
recortesdeperi6dicode hierbaal ladoencarnbio,sigalasinstruc-
clonesen la secci6ndeMontajeparaatarelcanalde descargalateral.
Mantengasus manosy pies alejadosdel area del canal dela plataforrna
de corte.Consultela etiqueta deadvertenciasen la unidad.
TAPON DE ACEITE/VARILLA DE MEDICI()N
DEL NIVEL DE ACEITE
Consulteiasecci6nMantenimientoparaobtenerinstruccionessobre
c6moverificarel aceite.
ESCUDO DE RUTA
Elescudo de ruta seadjunta a la partetrasera de iama.quinayesta.
ahi paraprotegeral operadorde escombrosque vuelan.No utilice el
cortacesped a menosque el escudoes totalmente funcionaly en su lugar.
43
Page 44

LLENADO DE GASOLINA Y ACEITE
Aceite (se envia una botella junto con la unidad)
Primer uso
1. Saquela varilla del niveldeaceite (G).
2. Con la cortadorade cesped ubicada en suelo nivelado, vierta el
aceitebntamente pot dentro del tubode Ilenadode aceitedel motor
(H) hastala marca de limite alto enla varilla medidora del nivelde
aceite(J). Vea la Figura 13.
3. Vuelvaa colocar la varilla de Ilenadode aceitey ajQstela.
Usos posteriores
Use aceite para motorde 4tiempos que cumplao sobrepase los
requisitos para laclasificaci6n de servicio APi SK SG, SH,SJ o
equivalente.
Compruebesiempre ia etiquetade servicioAPI en el recipientedei aceite
para asegurarseque incluye lasletrasSK SG,SH, SJ oequivalente.
Temperaturasai aire libre de determinar laviscosidaddei aceitecorrecto
para el motor.Use latabla paraseleccionar la mejor viscosidadpara el
rangode temperaturaai aire librese espera.
86 _ _o ..... so
2o
50 _ o
C '_'t?'p?:C:_ *'?" 4,10
f
Figura13
,, La gasoiina con hasta un 10% de etanol (gasohoi) o hasta el 15%
de MTBE (metil terbutil _ter) es aceptable.
Eche gasolinaen un a.reabien ventiiada y conei motor parado. Siel motor
haestado funcionando, deje queseenfrie primero.No eche gasolinaa
la ma.quinaenei interior de unedificio donde losvapores de lagasolina
suedanestar ex uestosa al unallama o chis a.
-_22
* Potdebajo de 40 oF (4 oC) el uso de SAE30 dara.lugara duros de
partida.
** Potencima de 80 oF (27o C) el usode 10W-30puede provocarun
aumentodei consumode petr61eo.Nivel deaceite con ma.sfrecuencia.
1. Reviseel aceitecon el motor paradoy nivelado.
2. Quiteia tapa deldep6sito de aceite/varilla medidoradel nivelde
aceitey limpiela.
3. Coioque y ajuste la varilla indicadora. Luegoquitela para revisarel
nivelde aceite.Vea ia Figura13.
4. Siel nivel deaceite esta.cercao pot debajode la marcade limite
bajo de la varilla medidoradel nivelde aceite,quitela tapa del
dep6sito de aceite/varilia medidoradei niveide aceite yiBnelo con
el aceite recomendado hastala marca de limitesuperior. NoIlene de
ma.s.
5. Vuelvaa instalar la tapa/varilla medidora del nivel de aceite.
Gasolina
No utilice gasolinas noaprobados, tales como E85. No mezcleel aceite
en ia gasolinao modificarel motor parafuncionar con combustibles
aiternativos. Esto dafiara,los componentesdel motory anular la
garantia del motor.
De combustible debe cumplir estos requisitos:
,, Limpia, fresca, la gasolina sin piomo.
• Un minimo de 87 octane/87 AKI (91 RON).
Lagasolina esaitamente inflamable yexplosiva y usted puedequemars_
o iesionarsegravementeai reabastecer. Pareel motor y mantenga iejos
el calor, las chispas y las llamas. Reabastezcas61oaiaire libre. Limpie
inmediatamente losderrames.
Siva a usarei equipo de forma intermitenteo s61oocasionalmente,
consulte iasecci6n deAimacenamiento FueradeTemporada para
obtener ma.sinformaci6nsobre eldeterioro delcombustible.
NOTA:El combustible puede dafiar la pintura y aigunos tipos de plastico.
Tengacuidado de no derramarcombustible cuandoIlena el tanque.
No use nuncagasolina rancia ocontaminada nimezclas de aceitey gaso-
lina.No permitaqueentre suciedad o aguaen eltanque de combustible.
1. Quite ia tapa dei tanquede combustible.
2. Agreguecombustible hasta iaparte inferiordel iimitede nivel de
combustible en ei tubo del tanque. No iiene de ma.s.Limpieel
combustible derramadoantes de arrancarel motor.
3. Aprieteeltap6n firmemente.
4. Antes dearrancarel motor,aBjese almenos 3metros del
emplazamiento y la fuente dela gasolina.
AsegQresede queninguna personaaparte deioperador permanezca
cerca de ia cortadora mientras arranca elmotor u opera la misma.
Nunca encienda el motoren espacioscerrados o en una zona conpoca
ventilaci6n. El escapedel motorcontiene mon6xido de carbono, un gas
inodoro yietai. Mantengaias manos,los pies, el cabello yla ropa suelta
alejados delas partes m6vilesdel motory de la cortadora.
44
Page 45

PARA ENCENDER EL MOTOR
1. Coi6quesedetra.sdela podadora, aprieteia manijade control de la
cuchillay sostengala contrala manija superior.Vea laFigura 14.
2. Sostengafirmemente lasdos manijasjuntas, tomela manija del
arrancadorde retroceso y tirede iacuerda para sacarlacon un
movimientora.pidoy continuo. Veala Figura 14.Mantenga firme la
manijadel arrancador,deje que la cuerdaregrese lentamenteal
arrancador.Repitahasta que el motoreste en marcha. Dejeque la
cuerdase enrosquelentamente de regreso.
De retracci6n ra.pidadel cord6n de arranque (soborno) tirara,de mano y
el brazo haciael motor ma.sra.pidode Io que puede dejar ir. Lasfracturas
de huesos,fracturas, contusiones o esguinces podriaresultar.
PARA DETENER EL MOTOR
1. Sueltela manija de control de la cuchilla paradetener el motory la
cuchilla.
Esperea que ia cuchillase hayadetenidopot completo antes de hacer
cualquiertrabajoen lacortadora o deretirarel colector de cesped.
USO DE LA CORTADORA DE ClaSPED
Aseguresedeque elcesped esta.librede piedras,palos, cablesu otros
objetosque pudiesendafiar la cortadorao elmotor.Dichos objetospueden
setarrojadosaccidentalmentepot lacortadoraencualquier direcci6ny
provocarlesionespersonalesgravesai operadorya otraspersonas.
AIoperar una cortadora de cespedes posible que objetos extrafios sean
arrojadosa los ojos,Iocual puededafiarlos gravemente. Utilicesiempre
galas de seguridad durante laoperaci6n de lacortadora de cesped o
mientrasla ajustao repara.
USO COMO ABONADORA
Paraabonar elcesped, quiteel colector de cesped de la ma.quina.La
puerta dedescarga posteriordebera estarcerrada. Para un abono
eficiente, nocorte cesped hQmedo.Si el cesped ha crecidoma.sde 10,2
cm. (4pulg.) no serecomienda eluso de la podadoracomoabonadora.
Enese caso, use elcolector decesped para embolsarlos recortes.
Figura14
USO DEL COLECTOR DE ClaSPED
Puedeutilizar el colector de cesped para recoger dichos recortes mientras
opera lapodadora.
1. Acople elcolector de cesped siguiendoias instrucciones en ia
secci6n de Montaje.Los recortesde cespedse recolectara.n
automa.ticamenteenla bolsa a medidaquepase ia podadora.Opere
la podadorahasta queia bolsa de recolecci6n este Ilena.
2. Detengaei motor pot completosoltando la manijade control de la
cuchilla. Compruebeque la unidadse hayadetenido potcompleto.
3. Paradeshacerse delos recortes de cesped ievanteia puerta de
descarga ytire de la bolsade recolecci6nhacia arriba, aparta.ndola
de la podadora.
Si golpea un objeto extrafio,detenga eimotor.Retire elcable de ia
bujia, inspeccione detenidamentela cortadora para vet que notenga
dafios, y repare eldafio antes devolver a encender y operar.Elexceso
de vibraci6nde lacortadora durante la operaci6nes una indicaci6n de
dafio. Se debe inspeccionary reparar launidad Ioantes posible.
45
Page 46

PROGRAMA DE iVlANTENllVllENTO
Antesde realizarcuaiquiertipo de mantenimientoo servicio,desenganche
todosloscontrolesydetengael motor.Espereaque sedetengancomple-
tamentetodaslaspiezasm6viles.Desconecteelcane de labujiay p6ngalo
haciendomasacontrael motorparaevitarqueseenciendaaccidentaimente.
Siga el cronogramade mantenimientoque se presentaacontinuaci6n.
Estatabla s61odescribe pautasde servicio. Utiiiceia columna Registro
de Servicio para hacer ei seguimientode las tareas de mantenimiento
completadas. Para ubicar el Centro de Servieio Sears m_s cercano o
para programarun servieio, simplemente comun/quese con Sears al
tel_fono 1-800-4-MY-HOME®.
Cada uso
lras 5 horas
Anuaimenteo 25 horas
Anuaimenteo 50 horas 1. 1. Oambiar
Anuaimente 1. 1.
Antesde almacenar 1. 1.
1. Nivelde aceitedei motor
2. Piezassueltasofaltantes
3. Unidady motor
1. Aceitedei motor
1. Depuradordeairet
2. Varillajes/pivotesde control yruedas
3. La parte inferiorde ia plataformade
ia cortadora de cesped
Aceite dei motor
Bujia deencendido
2. 2.
Depuradorde aire
Sistemade combustible
1. Verificar
2. Ajustaroreemplazar
3. Limpie
1. Cambiar
1. Limpiaroreemplazar
2. Lubricarcon aceiteligero
3. Limpie
Reemplazar
Reemplazar
Hacerfuncionarel motorhastaque se
detenga porfaita de combustibleo aSadir
estabilizadorde un tanque Ilenode
combustiblenuevo antes de suaimace-
namiento.
Limpiorn_.sa menudoen condicionespolvorientaso cuandolos escombrosaerotransportadosest_.npresentes.Sustituyaelfiltrode airede
sermuysucio.
46
Page 47

Detengasiempreelmotor,desconecteelcabledela bujiayhagamasa
contraelmotorantesde reaiizarcuaiquiertareade mantenimientoa su
mfiquina.
RECONIENDACIONES GENERALES
• Respetesiemprelasreglasdeseguridadcuandorealicetareasde
mantenimiento.
• Lagaranfiadeestacortadoranocubreelementosquehan
estadosujetosalmalusoola negligenciadeloperador.Para
recibirel reembolsototaldelagarantia,eioperadordeberfidar
mantenimientoaiequipotaiycomoseindicaenestemanual.
• Elcambiode lavelocidadcontroladadelmotorinvalidarfilagarantia
deimotor.
• TodoslosajustesdebenserverificadospotIo menosunavezen
cadaestaci6n.
• Reviseperi6dicamentetodoslossujetadoresycompruebequeesten
bienajustados.
IVIANTENIMIENTO DEL MOTOR
Bujia de encendido
Paraunbuenfuncionamiento,labujiadebeestaradecuadamente
abiertay librededep6sitos.Cambielabujiacada50horaso unavezpor
temporada.Reemplacela bujiaanualmente.
1. Desconecteelcapuch6nde labujiayretirecualquiersuciedaddel
fireadeesta.
2. UselaIlavedebujiasdeltama_oadecuadoparaextraerla.
f
Electrodo
J
Figura15
NOTA:ReemplazarconunaChampion®RC12YCbujia.
3. Compruebeel entrehierroconuncalibradordealambre.La
separaci6ncorrectaes0,030in.(0,76mm).VealaFigura15.Sies
necesario,reajusteelentrehierro.
4. Instaieyapriete[abujiaa[parde aprieterecomendado.Parael
ajustedelentrehierroo elpardeapriete,consultela secci6nde
Especificaciones.
5. Coloqueel capuch6ndela bujia.
Filtro de aire
Unfiltrode airesuciorestringir&elfiujo deaireal carburadory causar&
el funcionamientodefectuosodelmotor.Inspeccioneelfiltrocadavez
queopereel motor.Necesitar_.limpiarcon m_.sfrecuenciaelfiltro si
ustedoperael motorenfireasmuypolvorientas.
Limpioelfiltrodeaire cada25horasde laoperaci6nounavezpor
temporada.Reemplaceel filtrodeaireanualmente.
Nuncaarranqueuopereel motorsiremovi6elconjuntodelfiltrode
aireo elfiltrode aire.
NOTA:Nouseairea presi6nnisolventesparalimpiarelfiltro.Elairea
presi6npuededaSarelfiltroylos solventespuedendisolverlo.
1. Aflojareltornilloyla inclinaci6ndelaviviendacubiertade
pl_.sticoen el ladodel motorhaciaabajo.VerFigura16.
2. Quiteelfiltrode airedela viviendacubiertadepl_.sticoy limpiaro
sustituirconfiltronuevo.
3. Inserteaquicubiertaenlasranurasenla parteinferiordelabase.
4. Tiltcubriren su lugary aprietelostornillos.
Figura16
4.7
Page 48

Comprobarel aceitedel motor
Comprobarel nivel de aceiteantesde cada operaci6n.Aseg_resede que
el nivei de aceitese mantiene.
1. Reviseel aceitecon ei motor paradey nivelado.
2. Quiteia tapa deldep6sito de aceite/varilla medidoradel nivelde
aceitey limpiela.
3. Coloque y ajuste la varilla indicadora. Luegoquitela para revisarel
nivelde aceite.
4. Siel nivel deaceite esta.cercao pot debajode la marcade limite
bajo de la varilla medidoradel nivelde aceite,quitela tapa del
dep6sito de aceite/varilia medidoradei niveide aceite yilenelo con
el aceite recomendado hastala marca de limitesuperior. NoIlene de
ma.s.
5. Vueivaa instalar ia tapa/variiia medidora del nivei de aceite.
Cambiar el aceite del motor
Filtro de aire
_ ap6n de
aceite/vatilla de
medici6n del nivel
de aceite
/
Silenciador
La gasolina y sus vapores son extrernadarnente inflarnables y
explosivos. Un incendio o una explosi6n pueden causar graves
quernaduras o a rnuerte.
Carnbieel aceitedelmotordespu6sdelasprirnerascinco horasde
operaci6n,ycadacincuentahoraso unaveza laternporadadespu6s.
Si drenael aceitedesdeel tubosuperiordeIlenadodeaceite,el
tanquedecombustibledebeestarvacioo deIo contrariopodria
presentarseunafugade combustiblequepodriaocasionarun
incendioounaexplosi6n.Paradesocuparel tanquede combustible,
opereel motorhastaquese detengapor lafaltadecombustible.
1. Con el motor apagado pero aQncaliente, desconecte el cable de la
bujia y rnant6ngalo a distancia de la bujia.
2. Coloque unrecipiente adecuadocerca del motorpara recogerel
aceiteusado.
3. Quitela tapa/varilla medidora del nivelde aceitey dreneel aceite ai
recipienteinclinando el motorhacia eltube de Ilenado del aceite.
Vea la Figura 17.
El aceite usadoes unresiduo peligroso.Elimineel aceite usado
adecuadamente.NoIo arroje juntocon los residuesdomiciliarios.CensuRe
alas autoridadeslocaleso al centrede servicioSears paraaveriguar
d6nde hayinstalacionesparala eliminaci6n/reciclaje segura(o)del aceite
usado.
J
FJgura 17
4. Conelmotoren unaposici6n nivelada,lienehasta lamarcadeiimitealto
en iavarilla medidoradel nivelde aceitecon el aceiterecomendado.
5. Vuelvaa instaiarbien la tapa/varilla medidora del nivel deaceite.
Ponerenrnarchaelmotorconunnivelde aceitebajopuedecausar
da_osenel motor.
Limpie el motor
Diariamenteo antes de cadause, limpie el cesped,la grasa o los
residues acumulados del motor. Mantenga limpios elvarillaje, los
resortes ylos controles. Mantengaei a.reaque rodea al silenciadory
detra.sdei mismo iibrede cualquier residuecombustible.
El mantenimientodel motoren condicioneslimpias permiteel
movimientode aire airededordel mismo.
Laspartes dei motor se @ben mantenerlimpias parareducir
el riesgode sobrecalentamientoy combusti6n de los residues
acumulados.
No useagua paralimpiar ias piezas dei motor. Elagua puede contaminar
el sistema de combustible. Use un cepillo o un traposeco.
48
Page 49

LUBRICACION
Control de la cuchilla
Lubriquecon aceiteligero los puntosde pivotedel control de lacuchilla al
menos una vezcada estaci6n. Estecontroledebe funcionar libremente en
ambas direcciones. Vea la Figura18.
LIMPIEZA DE LA PLATAFORIVIA
Debelimpiar la parte inferiorde la plataformade lacortadora decesped
unavez una temporada paraprevenirla acumulaci6n de recortesde
cesped uotros desechos.Siga los pasosque aparecen debajo para
reaiizar esta tarea.
1. Desconecteel cablede la bujia.Opere el motor hasta que se
detenga por la falta de combustible.
2. inclinela cortadora de cesped de modoque quede apoyadasobre
al alojamiento, mantengael silenciadorde costado hacia abajo.
Refierasea la figura 17.Sostenga firmementela cortadora.
Nunca incline ia cortadora de cesped ma.sde 900en ningunadirecci6n
y no dejela unidad inclinada. Sepuede filtrar aceitedentro de la parte
superior del motor y causar problemas dearranque.
3. Raspey limpiela parteinferiorde iaplataforma medianteel usode una
herramientaadecuada. No larode con agua.
Figura18
IMPORTANTE: No utiliceuna lavadoraa presi6n o manguerade jardin
para limpiar su unidad. Puedenproducir daSosa los rodamientos oai
motor.El uso de aguaacortara,la vida Qtilde lama.quinay reducira,su
capacidadde servicio.
4. Vuelvaa colocar la cortadora decesped sobresus ruedasen elsuelo.
49
Page 50

CUIDADO DE LA CUCHILLA _"
Cuandosaque lacuchilla de corte para afilarlao reemplazarla,protejase
las manos usandoun parde guantespara trabajo rudoo un trapo gruesc
parasostener la cuchilla.
Inspeccioneperi6dicamente el adaptadorde la cuchiiiaen buscade
rajaduras,especialmentecuando golpee un objeto extra_o. Realicelos
reemplazosque resulten necesarios. Siga lospasos queaparecen debajo
para realizar elmantenimientode lacuchilla.
1. Desconecteel capuch6n delcable de la bujia. Gire lacortadora
de cespedsobre ei costado ycompruebe que elfiltro de airey el
carburadorqueden mirando haciaarriba.
2. Saqueel perno y el soportede campanade iacuchiiia quesostienen
la cuchilla y el adaptador de lamismaal cigQe_aidel motor.Vea la
Figura 19.
3. Saquela cuchilla y el adaptador delcigQe_ai.
\
\
Cu_:hiHa
NOTA:Quitandoestos articulos, laarandela tambienpueden iiberarse
de elcigQe_al.Este seguro parahacer lanota de laorientaci6n deeste
articulo paranuevasesi6n.
4. Saqueia cuchilia del adaptador paracomprobar el equilibrio.
Balanceela cuchilla sobre un destornilladorde eje redondopara
inspeccionarla.Saque metaldei iado pesado hastaque quede bien
equilibrada.Cuandoafile la cuchilla, siga elfingulo original de la
muelacomo guia. Afile cada horde decorte pot igual para mantener
el balance de la cuchilla.
Si ia cuchiiia estfi desequiiibradagenerarfi vibraciones excesivas cuandoI
rotea aitas velocidades.Puede producirda_os a iacortadora decesped j
[y se puede romper,causando asi esones personaes. j
5. LubriqueeicigQe_aideimotoryla superficieinternadel adaptadordeia
cuchiiiacon aceite iigero.Deslice eladaptador de ia cuchiiia sobre
el cigQe_aidei motor.Instale ia cuchilla en eiadaptador conel lado
marcado "Bottom" (inferior)(o conel numerode parte) haciael piso
cuando la cortadorade cesped estfi en posici6nde funcionamiento.
AsegQresequeia cuchilla quede aiineada y asentadaen las bridas
deladaptador.
6. Coloqueel soportede campana de lacuchilla en ia misma. Aiinee
las muescas del soporte de campana dela cuchilla con los orificios
peque_osde la cuchilla.
7. Vuelvaa colocar el pemo hexagonaly ajQstelosegQnlos siguientes
valoresde torsi6n: 450 Ib-pulg como minimo,600 Ib-pulg como
mfiximo.
Paragarantizar ia operaci6n segurade la cortadora de cesped,revise
periddicamenteel pernode lacuchilla paradeterminar si estfi bien
ajustado.
J
Figura19
5O
Page 51

Nunca almacene la cortadora de cesped concombustible en el tanque
en unespacio cerrado o en a.reascon poca ventilaci6n,donde los
gases deicombustible puedanalcanzar el fuego, chispaso una luz
pilotocomo ia que tienen algunos homos,calentadores de agua,
secadores deropa o aigQnotto dispositivo a gas.
PREPARACI6N DEL MOTOR
Yaquelos motoresalmacenaronm_.sde30 dfas:
1. Paraimpedirala gomaformarseenel sistemade combustible
o en partesdecarburador,dirijasel motorhastaqueestose
parea faltadelcombustibleoa_adirunaditivode gasolinaal
gasenel tanque.Siustedusaunaditivodegas,dirigeel motor
durantevariosminutosparaponerencirculaci6nel aditivoporel
carburador-- despu_squeel motoryel combustiblepuedenser
almacenadoshasta24 meses.
2. Mientrasel motorestodavfacaliente,cambioelpetr61eo.
3. Limpieel motordeescombrossuperficiales.
PREPARACI6N DE LA CORTADORA DE
CO'SPED
Limpiey iubrique lacortadora como sedescribe en las instrucciones
de lubricaci6n.
• No utilice una lavadoraa presi6n ni una manguerade jardfn para
limpiar suunidad.
Cubra lacuchilla de lacortadora con grasa parachasis paraimpedir
la oxidaci6n.
• Refierasea la PREPARACIONDEL MOTORpara instruccionesde
almacenaje demotorcorrectas.
• Almacene la unidad en una zonalimpia y seca. Nola almacene
cerca de materialescorrosivos como pot ejemplo fertilizantes.
Cuando almacene cuaiquier tipode equipo motorizadoen un gaip6n
de dep6sitomet_.iicoo con poca ventilaci6n,tenga especialcuidado
de realizarle un tratamiento antioxidanteal equipo. Useaceite ligero o
silicona pararecubrir eiequipo, especialmentelos cablesy partes m6viles
de su cortadora antes de aimacenarla.
51
Page 52

hayanvenidoa unaparadacompleta.Desconecteel alambredebujfay b_.selocontrael motorparaprevenirel comienzoinvolun-
SiempreIlevepuestoscristabs inastillaNesdurantelaoperaci6norealizandocualquierajusteo reparaciones.
Elmotor noarranca
1. Controlde iacuchilla desenganchado.
2. Se hadesconectado elcapuch6n de la bujia.
3. Eldep6sito de combustibleesta.vacio oel
1. Engraneel control de ia cuchiila.
2. Conecteel cable alcapuch6n de labujia.
3. Lleneel tanque con gasolina limpiay nueva.
combustiblese haechado a perder.
Elmotor funciona de
manera erra.tica
4. La bujia nofuncionacorrectamente.
5. Elmotorsedesbord6.
6. Lineade combustible bloqueada.
1. Elcapuch6nde la bujiaesta.flojo.
2. Elcombustiblese haechado a perder.
3. La ventilaci6nde latapa delcombustible esta.
4. Limpie,ajuste la separaci6n, ocambie la bujia.
5. Esperarunos minutos parareactivarse.
6. Contactecon su centro de partes yreparaciones Sears.
1. Conectey ajuste elcapuch6nde la bujia.
2. Lleneel tanque con gasolina limpiay nueva.
3. Destapelaventilaci6n.
obstruida.
4. Aguao suciedad en el sistema del combustible.
4. Vacieei tanquede combustible. Carguecombustible
nuevoen el dep6sito.
El motor recalienta
5. Elfiitro de aire esta.sucio.
6. Lineade combustible bloqueada.
1. Elnivel de aceitedel motoresta.bajo
2. Flujodeairerestringido
5. Consulteia secci6n Mantenimientodel manual.
6. Contactecon su centro de partesy reparacionesSears.
1. Lleneel motor conia cantidad y tipo de aceite adecuado.
2. Limpielos residuosde airededor delas aietas de
refrigeraci6ndel motory delalojamiento del soplador.
El motor vacila a altas 1. Poca separaci6nde los electrodosde la bujia 1.
Ajuste la separaci6na .030".
revoluciones
El motor funciona mal 1. Bujia atorada,averiada oexcesode separaci6n. 1. Limpie,reemplace o reajuste la separaci6na .030".
en marchaienta 2. Elfiitro de aireesta.sucio 2. Consulte ia secci6n Mantenimientodei manual.
Demasiadavibraci6n 1. Cuchilla de corte floja o descentrada. 1. Aprietela cuchilla y el adaptador Baianceeia cuchilla.
2. Cuchillaabollada. 2. Cambielacuchilla.
La cortadorade
cesped noregresa
el recorte de cesped
comoabono
1. CespedhQmedo.
2. Cespeddemasiadoalto.
1.
No corte el cesped cuandoeste mojado,espere hasta
quesea ma.stardepara hacerlo.
2.
Corteuna veza aitura de corte elevada,iuego vueiva a
cortara ia altura deseadao haga unsendero de corte
ma.sangosto.
Afileo cambiela cuchilla.3. Lacuchiiia de ia cortadora no esta.afiiada. 3.
Cortedesiguai 1. La posici6nde lasruedas noes correcta. 1. Coloqueias cuatro ruedas en la misma posici6n de aitura.
2. Lacuchiiia de iacortadora no esta.afiiada. 2. Afiieo cambieia cuchiiia.
_NECESITA MAS AYUDA?
Eric }rKr_K5 b I_espu_st_ y m_s en managemy.com _ isin cargo!
Enlinea podr_ encontrar este manual y los manuales de todos los otros productos que posea.
Sus preguntas ser3n respond@as pot nuestro equipo de especialistas.
Obtenga un plan de mantenimiento personalizado para su hogar,
Encuentre informad6n herramientas Io ayudar_n con los proyectos de su hogar,
Y que
manage _ home
i
}_o_ght to you by Sea_s
52
Page 53

(Esta p_.ginase aplica s61oen EE.UU. y Canada.).
Sears, Roebuck and Co., U.S.A. (Sears), el Consejo de Recursos Arnbientales de California (CARB)
y la Agencia de Protecci6n Arnbiental de los Estados Unidos (EPA)
Declaraci6n de garantia del sistema de control de emisiones (derechos y obligaciones de la garantia de defectos del propi=
LACOBERTURADE LAGARANTJADECONTROLDEEMISIONESES Y PARALOSMODELOSCERTIFICADOSDELANO 1997YPOSTERIORES,
APLIOABLEALOSMOTORESCERTIFICADOSCOMPRADOSENCALIFOR- QUESE COMPRENY UTILICENENCUALQUIERPARTEDE LOSESTADOS
NIAEN1995Y POSTERIORMENTE,QUESE UTILIZANENCALIFORNIA, UNIDOS(Y APARTIRDEL1 DE ENERODE2001ENCANADA).
Declaraci6n de garanfia sobre defectos en el control de ernisiones para California y los Estados Unidos
ElConsejode RecursosAmbientalesdeCalifornia(CARB),la EPA(Agencia
de Protecci6nAmbientaldelos EE.UU.)y Searstienenel gusto de explicarla
garantiadelsistemadecontroldeemisionesparamotoresdela_o 2000y para
elfuturoconrelaci6na motorespeque_ostodoterreno(SORE).EnCalifornia,
los nuevosmotorespeque_ostodo terrenodebenestardise_ados,construidos
y equipadosparacumplirconlas rigurosasnormasanti-smogdelestado.En
el restodelos EstadosUnidos,losmotoresnuevostodoterrenodeencendido
porchispacertificadosparael a_o 1997debencumplirest_ndaressimilares
establecidospot laEPA.Searsdebegarantizarel sistemadecontroldeemis-
Cobertura de la garantJa Sears para defectos en el control de ernJsiones
Losmotorestodoterrenopeque6osest_ngarantizadosenIorelativoalcontrol alas disposicionesque se indiquena continuaci6n.Siuna partedesumotor
deemisionesparadefectosenpiezasduranteunper[ododedosa_os,sujeto cubiertapot lagaranfiaes defectuosa,Searsreparar_osustituir_dichaparte.
Responsabilidades del propietario en relacibn con la garantia
Comopropietariodelmotortodoterrenopeque_o,Ud.esresponsabledela
realizaci6ndelmantenimientorequeridoquese incluyeenlas instrucciones
deoperaci6ny mantenimiento.Searsrecomiendaquese conserventodoslos
recibosrelativosalmantenimientodesu motortodoterrenopeque_o,pero
nopudedenegarlagarantiasimplementeporla faltade losmismos,oporsu
incumplimientodelmantenimientoprogramatic.Comopropietariodelmotor
peque_otodoterrenodebe saberque, sinembargo,Searslepuedenegar
lacoberturade lagarantiasi su motortodoterrenopeque6oouna piezadel
mismohanfalladodebidoaabuso,negligencia,mantenimientoindebidoo
Disposiciones de la garantJa Sears para defectos en el control de emJsiones
Lassiguientessondisposicionesespecificasrelacionadasconla coberturade lagarantia paradefectosenel controldeemisiones.Esuna_adidoa lagarantiade
motorSearsparamotoresnoreguladosque seencuentraen lasinstruccionesdefuncionamientoy mantenimiento.
1. Piezascongarantia
Lacoberturade esta garantiaseextiendeL]nicamentealas piezas
queaparecena continuaci6n(las partesde lossistemasdecontrolde
emisiones),siemprequedichaspiezasestuvieranyaenel motoren el
momentodesucompra.
a. Sistemademedici6ndecombustible
•Sistemadeenriquecimientoparaarranqueenfrio
•Carburadory partesinternas
• Bombade combustible
b. Sistemadeinducci6nde aire
• Filtrodeaire
•Colector deadmisi6n
c. Sistemadeencendido
• Bujia(s)deencendido
•Sistemadeencendidomagneto
d. Sistemadelcatalizador
•Convertidorcatalitico
•Colector deescape
•Sistemadeinyecci6nde aireo v_lvulade impulsos
e. Elementosvariadosusadosenlos sistemasanteriores
•Wlvulas devacio,sensiblesa temperatura,posici6ny tiempo
einterruptores
•Conectoresy montajes
2. AIcancedela cobertura
Searsgarantizaal poseedorinicialy a loscompradoressubsiguientes
quelas piezascon garantianotendr_ndefectosen materialesni mano
deobraqueprovoquenlafalla delas mismasduranteun periodode
dosaSosa partirdela fechaen queel motorse entregaa uncomprador
particular.
3. Sincargo
Lareparaci6no reemplazodecualquierpartecongarantiase realizar_
Enlos EstadosUnidosy Canad_hayunalineadeatenci6nde24 horas,1-800-469--4GG3,quecuentacon unmenL]conmensajespre-grabadosque contienen
informaci6nparael mantenimientodemotores.
etario)
ionesdesu motorparalosperiodosdetiempoenumeradosa continuaci6n,
siemprequenohayaabuso,negligenciaomantenimientoindebidode su
motortodoterrenopeque_o.Susistemadecontroldeemisionespuedeincluir
piezastalescomoel carburador,el filtrodeaire,elsistemadeencendido,el
silenciadoryel conversorcatalitico.Tambienpuedeincluirconectoresyotras
unidadesrelacionadasconlasemisiones.Dondeexistaunacondici6ncubierta
porla garantia,Searsreparar_su peque6omotortodoterrenosin costoalguno
incluyendodiagn6stico,piezasy manodeobra
a modificacionesnoaprobadas.Ud.es responsabledepresentarsumotor
todoterrenopeque6oa undistribuidorde serviciosSearsautorizadotan pronto
comoaparezcaunproblema.Lasreparacionesdela garantiasinconflicto
debencompletarseen unplazodetiemporazonable,nosuperiora30dias.Si
tienealgunapreguntarespectoa sus derechosy responsabilidadesreferen-
tesa lagarantia,debecontactarconunrepresentantedeserviciosSearsal
1--800--469--4663.Lagarantiadeemisioneses unagarantiapor defectos.Los
defectossejuzgandeacuerdoconelfuncionamientonormalde unmotor.La
garantiano est_relacionadaconunapruebade emisionesen uso.
sin cargoalgunoparael poseedor,incluyendotareasde diagn6sticoque
permitandeterminarsi unapartecongarantiaes defectuosa,siempreque
dichodiagn6sticoserealiceenundistribuidordeserviciosSearsautoriza-
do. Parael serviciode lagarantiadeemisiones,contactealdistribuidorde
serviciosSearsautorizadom_scercanoincluidoen las"P_ginasamarillas"
en lascategorias"Motores,gasolina","Motoresdegasolina","Podadoras
de cesped",o similares.
4. Reclamacionesyexclusionesa la cobertura
Las reclamacionesde lagarantiadebenenviarsedeacuerdocon las
disposicionesdela politicade garantiaparamotoresSears.Lacobertura
de lagarantiaexcluir_defectosen piezascongarantiaquenoscan partes
originalesSears,o abuso,negligenciao mantenimientoincorrecto,tal y
comoseestableceen lapoliticadegarantiaparamotoresSears.Searsno
es responsablede lasfallas enpiezascongarantiaprovocadaspor el uso
de partesa_adidas,quenoscanoriginaleso quese hayanmodificado.
5. Mantenimiento
Cualquierpartecongarantiaque noesteprogramadaparaserreem-
plazadacomomantenimientorequerido,o ques61odebainspeccionarse
regularmentealefecto de"inspeccioneoreemplacesegL]nsea necesario",
estar_garantizadacontradefectosduranteel periodode la garantia.Todas
las piezasgarantizadasqueesten programadasparasu reemplazopara
cumplirconlos requisitosdemantenimientoestar_ngarantizadass61o
porel periodoanterioral primerreemplazoprogramaticparadicha pieza.
Cualquierpiezade recambioqueseaequivalenteenfuncionamientoy
durabilidadpuedeusarsepararealizarmantenimientoo reparaciones.El
propietarioes responsablederealizartodoel mantenimientorequerido,tal
y comose defineenlas instruccionesdefuncionamientoy mantenimiento
Sears
6. Coberturaindirecta
Porla presente,la coberturase extiendea lafalla decualquiercomponente
de motorprovocadapotlafallade unapiezacongarantiaque estetodavia
en periododegarantia.
Page 54

Busque el periodo de duraci6n de emisiones importantes yla informaci6n de clasificaci6n de aire en
la etiqueta de emisiones de su motor
Los motores cuyo cumpiimiento con los estAndares de emisi6n Tier 2 de la Comisi6n de Recursos Ambientales de California (CARB)
est6 certificado deben exhibir la informaci6n relacionada con el perJodo de duraci6n de las emisiones y la clasificaci6n de aire. Sears,
Roebuck and Co., de los Estados Unidos ponen esta informaci6n a disposici6n deJconsumidor en nuestras etiquetas de emisiones.
El Periodo de Duraci6n de las Emisiones describe el nQmero de horas de tiempo real de funcionamiento para el cual se certifica que
el motor cumple con las reglas de emisi6n, descontando el mantenimiento adecuado deJmismo segQn las instrucciones de oper-
aci6n y mantenimiento. Se utilizan las siguientes categorias:
Moderado:Se certifica que el motor cumpie con las reglas de emisi6n durante 125 horas de tiempo real de funcionamiento deJ motor.
Inmediato:Se certifica que el motor cumple con las reglas de emisi6n durante 250 horas de tiempo real de funcionamiento deJ motor.
Extendido:Se certifica que el motor cumple con las reglas de emisi6n durante 500 horas de tiempo real de funcionamiento deJmotor.
Por ejemplo, una cortadora de c6sped tJpica que se empuja desde atrAs se usa entre 20 y 25 horas por afio. Por Io tanto, el Periodo
de Duraci6n de Emisiones de un motor con una clasificaci6n intermedia seria equivalente aentre 10 y 12 afios.
Laclasificaci6n de aJre es un nQmero calculado para describir eJnivel reiativo de emisiones para un grupo de motores en particular.
Cuanto menor sea Jaclasificaci6n de aire, mayor es JaJimpieza deJmotor. La informaci6n se presenta de forma gr&fica en Jaetiqueta
de emisiones.
Despu_s del 1 de julio de 2000, busque el periodo de cumplimiento de las reglas de
emisiones en la etiqueta de cumplimiento de las reglas de emisiones del motor
Despu_s deJ 1 de julio de 2000 se certificar_, que determinados motores Sears, Roebuck and Co., de los Estados Unidos
cumpien con los estAndares de emisiones de la fase 2 de la Agencia de Protecci6n Ambiental de los Estados Unidos (USE-
PA). Para los motores certificados para la etapa 2, el periodo de cumpiimiento con las reglas de emisiones al cual se hace
referencia en la etiqueta de cumpiimiento con las reglas de emisiones indica el nQmero de horas de funcionamiento para el
cuaJ se ha demostrado que el motor cumpie con los requerimientos federales de emisi6n.
Para los motores con desplazamiento inferior a 225 cc, Categoria C = 125 horas, B = 250 horas y A = 500 horas.
Para los motores con desplazamiento de 225 cc o mAs, Categoria C = 250 horas, B = 500 horas y A = 1000 horas.
El despiazamiento de los motores de la serie modelo 150112 es 249 cc.
La presente es una representaci6n gen_rica de laetiqueta de emisi6n que se encuentra generaimente en un
motor certificado.
FAMILYYBSXS.3192VA 274812
54
GDOC-100182Rev.A
Page 55

Felicitacionespor haberrealizadounaadquisici6ninteligente.El
productoCraftsman@queha adquiridoest_dise_adoyfabricado
parabrindarrnuchosa_osde funcionarnientoconfiable.Perocorno
todoslosproductosavecespuederequerirdereparaciones.Esen
esernornentocuandoeldisponerdeunAcuerdodeprotecci6npara
reparacionesle puedeahorrardineroy problernas.
A continuaci6nsedetallanlospuntosincluidosenel Acuerdo:
• Servicio experto prestadopornuestros10,000especialistasen
reparacionesprofesionales
• Servicio ilirnitadosincargoparalaspiezasy larnanodeobraen
todaslas reparacionescubiertas
• Reernplazodel productohasta1500d61aressino es posible
repararel productocubierto
• Descuentode 10%delprecionormaldelservicioy delas piezas
relacionadasconel rnisrnoqueno est_ncubiertasporel acuerdo;
adern&s,10%del precionormaldelaverificaci6nde rnanten-
irnientopreventivo
• Ayudar_pidapottel_fono- IoIlarnarnosResoluci6nR_pida- el
apoyotelef6nicode unCharnuscaal representante.Pienseen
nosotroscornoel manual"de undue_ohablador."
Unavezadquiridoel Acuerdo,puedeprograrnarel serviciocon
tans61orealizarunaIlarnadatelef6nica.PuedeIlarnarencualquier
mornentodeldia odela nocheo prograrnarunservicioenlinea.
ElAcuerdodeProtecci6nde Reparaci6nes unacornprasinriesgo.
Siustedanulaporalgunaraz6nduranteelperiodode garantiade
producto,proporcionarernosunreernbolsoIleno.O,un reernbolso
prorrateadoencualquiermornentodespu_sdelperiodode garantia
de productoexpira,iAdquieraboysuacuerdodeprotecci6npara
reparaciones!
Seaplican deterrninadaslimitaciones y exclusiones.Paraobtener
inforrnaci6nadicional y preciosen los Estados UnidosIlarneal
1-800-827-6655.
El*Coverageen Canad_variaenalgunosarticulos. Paradetalles
IlenoslaIlarnadaCharnuscaCanad_en 1-800-361-6665.
Servicio de instalaci6ndeSears
Sideseasolicitarlainstalaci6nprofesionalde Searsdeaparatos
dorn_sticos,dispositivosparaabrirportones,calentadoresde agua
y otrosarficulosdorn_sticosirnportantes,en los EstadosUnidoso
Canad_Ilarneal 1-800-4-MY-HOME®.
55
Page 56

Your Home
For troubleshooting, product manuals and home solutions advice:
÷anag÷
www.managemyhome.com
For repair - in your home - of all major brand appliances,
lawn and garden equipment, or heating and cooling systems,
no matter who made it, no matter who sold it!
For the replacement parts, accessories and
owner's manuals that you need to do-it-yourself.
For Sears professional installation of home appliances
and items like garage door openers and water heaters.
1-800-4-MY-HOME ® (1-800-469-4663)
Call anytime, day or night (U.S.A. and Canada)
www.sears.com www.sears.ca
Our Home
For repair of carry-in items like vacuums, lawn equipment,
and electronics, call anytime for the location of your nearest
Sears Parts & Repair Service Center
1-800-488-1222 (U.S.A.) 1-800-469-4663 (Canada)
www.sears.com www.sears.ca
To purchase a protection agreement on a product serviced by Sears:
1-800-827-6655 (U.S.A.) 1-800-361-6665 (Canada)
Para pedir servicio de reparaci6n Au Canada pour service en fran£ais:
a domicilio, y para ordenar piezas: 1-800-LE-FOYER Mc
1-888-SU-HOGAR ® (1-800-533-6937)
(1-888-784-6427) www.sears.ca
® Registered Trademark / TMTrademark of KCD IP, LLC in the United States, or Sears Brands, LLC in other countries
® Marca Registrada / TMMarca de Fabrica de KCD IP, LLC en Estados Unidos, o Sears Brands, LLC in otros paises
MCMarque de commerce / MDMarque deposee de Sears Brands, LLC
;ii
 Loading...