

Craftsman 247384260 Owner’s Manual

OWNER'S
MANUAL
MODELNO,
247.384260
®
Caution:
Readand Follow
All Safety Rules
and Instructions
BeforeOperating
This Equipment
4 HORSEPOWER
4 CYCLE ENGINE
20" ROTARY
iViULCHING MOWER
Assembly
Operation
Maintenance
Service and Adjustment
Repair Parts
I,I,II,H i i,/,_i illlll ....
SEARS,ROEBUCKANDCO., Chicago,IL 60684 U.S.A.
IMPOFITA .. ES FORSAFEOPERATION
,A _. ANDIORPROPERTYOFYOURSELFANDOTHERS.READANDFOLLOWALL INSTRUCTIONS1NTHISMANUALBEFO ,_mL
_IJL.TO OPERATEYOURLAWNMOWERFAILURETOCOMPLYWITHTHESEINSTRUCTIONSMAYRESULTINPERSONALINJURYWHENJBIm_
_YOU SEETHISSYMBOL-- _ HEEDITSWARNING.
Your lawn mower was built to be operatedaccordingto the rules for safe operationin this manual. As
DANGER:
with any type of powerequipment, carelessness or erroronIhe pad of the operatorcan resultin serious
injury. If you violate any of these rules, you may causeserious Injury to yourselfor others°
TRAINING
1. Readthisowner'sguidecarefullyinitsentiretybeforeattempting
toassembleoroperatethismachineBecompletelyfamiliarwith
thecontrolsandtheproperuseofthismachinebeforeoperating
it. Keepthismanualin asafeplaceforfutureandregularreference
andfororderingreplacementparts
2 Yourrotarymowerisa precisionpieceofpowerequipment,not
aplaything,Therefore,exerciseextremecautionatalltimesYour
unithas beendesignedto performonejob:tomow grass Do
not useit forany otherpurpose
3. Neverallowchildrenunder14yearsoIdto operatea powermower
Children14yearsoldandovershouldonlyoperatemowerunder
closeparentalsuper'¢isionOnlypersonswellacquaintedwiththese
rulesof safeoperationshouldbeallowedto useyour mower.
4 Keeptheareaof operationclearofallpersons,particularlysmall
childrenandpets.Stopenginewhentheyarein thevicinityof
yourmowerto helppreventbladecontactor thrownobjectin-
jury Althoughtheareaofoperationshouldbecompletelycleared
offoreignobjects,anobjectmayhavebeenoverlookedandcouId
beaccidentIythrownby themowerin anydirectionandcause
seriouspersonalinjuryto the operatoror anyothersaJtowedin
the area
PREPARATION
1. Thoroughlyinspectthe areawherethe equipmentisto beused..
Removealt stones,stickswire,bonesandotherforeignobjects
whichcouldbepickedupandthrownbythemowertnanydirec-
tionandcausesedouspersonalinjurytotheoperatororanyothers
allowedin thearea.Planyourmowingpatterntoavoiddischarge
ofmaterialtowardroads,sidewalks,bystandersandthelike,
2 Alwayswearsafetyglassesoreyeshieldsduringoperationorwhile
performinganadjustmentorrepair,to protecteyesfromforeign
objectsthatmaybethrownfromthe machinein anydirection.
3. Wearsturdy,rough-soledworkshoesandclose-fittingslacksand
shirts Shirtsandpantsthatcoverthearmsandlegsandsteel-
toedshoesarerecommended=Donotwearloosefittingclothes
or jewelry Theycanbecaughtin movingparts Neveroperate
a unit in barefeet, sandals,orsneakers
4 Beforeworkingwithgasoline,extinguishallcigarettes,cigars,pipes
andothersourcesof ignition Checkthefuellevelbeforestarting
theengineGasolineis anextremelyflammablefuel Donotfill
thegasolinetank indoors,whilethe engineisrunning,oruntil
enginehas beenallowedto cool for at leasttwo minutesafter
running.Replacegasolinecapsecurelyandwipeoff anyspilled
gasolinebeforestartingthe engineas it may causea fire or
explosion
5 Disengagetheself_propelledmechanismordriveclutchon units
so equippedbeforestartingthe engine
6. Thebladecontrolhandleis asafetydeviceNeverattempttobypass
itsoperation.Doingso makesthesafetydeviceinoperativeand
may resultinpersonalinjury throughcontactwiththe rotating
blade.Thebladecontrolhandlemustoperateeasilyinbothdirec-
tionsandautomaticallyreturntothedisengagedpostitionwhen
released.
7. Neverattempttomakeawheelorcuttingheightadjustmentwhile
the engineis running.
....................81Ne_eTbpe-t_tethbmowetinwetgrass:Alwaysbesureofyour............................................5; Checkthegrasscatcherbagfrequentlyforwearordeterioration:..........................................
looting.A slip andfai!cancauseseriouspersonalinjury.Keep Replaceawornordamagedbagimmediately.Forsafetyprotec-
afirmholdonthehandleandwork,neverrun Mowonlyindaylight lion, replaceonly with new bag meetingoriginalequipment
or in goodartificiallight specifications_
2
Foryoursafety,usetheslopegaugeincludedaspartofthismanual
to measureslopesbeloreoperatingthisunitona slopedorhilly
areaiftheslopeisgreaterthan15`=asshownontheslopegauge,
donotoperatethisunitonthatareaorseriousinjurycouldresult.
PERATION
Donot changetheenginegovernorsettingsor overspendthe
engine.Excessiveenginespeedsaredangerous
2 Donotputhandsorfeetnearorunderrotatingparts.Keepclear
of thedischargeopeningat aHtimesastherotatingbladecan
causeinjury
3. Stopthe bladewhencrossingg_aveldrives,walksor roads
4 Afterstrikinga foreignobject,stoptheengine,removethewire
from thesparkplug,andthoroughlyinspectthe mowerfor any
damageRepairthe damagebeforerestartingandoperatingthe
mower,
5 iftheequipmentshouldstarttovibrateabnormalJy,stoptheengine
andcheckimmediatelyforthecause.Vibrationisgenerallyawarn-
ingof trouble.
6 Shuttheengineoffandwaituntilthebladecomestoacomplete
stopbeforeremovingthegrasscatcheroruncloggingthechute.
Thecuttingbladecontinuesto rotatefora fewsecondsafterthe
engineisshutoff. Neverplaceanypartof the bodyin theblade
areauntilyou are surethe bladehasstoppedrotating,
7 Beforecleaning,repairingor inspecting,makecertaintheblade
andallmovingpartshavestopped.Disconnectthesparkptugwire,
andkeepthewireawayfromthesparkplugto preventaccidental
starting.
8 Do not runthe engineindoors
9 Nevercutgrassbypullingmowertowardyou Mowacrossthe
faceof slopes,neverup-and-down.Exerciseextremecautionwhen
changingdirectiononslopes.Donotmowexcesalvelysteepslopes
Alwaysbesureofyourfooting.Aslipandtalecancauseserious
personalinjury.
10 Neveroperatemowerwithoutproperguards,platesorothersafety
protectivedevicesin pFace
11 Mufflerandenginebecomehot andcan causea burn Donot
touch,
MAINTENANCEANDSTORAGE
1 Checkthe bladeandenginemountingboltsatfrequentintervals
forpropertightnessAJsovisuallyinspectbladefordamage(e.g
bent,cracked).Replacewith bladewhichmeetsoriginalequip-
mentspecifications
2 Keepall nuts,bolts,andscrewstightto besuretheequipment
is in safeworkingcondition.
3 Neverstorethemowerwithgasolineinthetankorgascontainers
insideofabuildingwherefumesmayreachanopenflameorspark
(e.g,gashotwaterheater).AHowtheengineto coolbeforestor-
inginany enclosure,
4. To reducefire hazard,keeptheenginefreeof grass,leavesand
excessiveoil.
CONGRATULATIONS on your purchase of a Sears
Craftsman Lawn Mower. l't has been designed, engineered
and manufactured to give you 'thebest possible dependability
and performance.
Should you experience any problem you cannot easily
remedy, please contact your neP,rest Sears Service
Center/Department We have competent, well-trained tech-
nicians and the proper tools to service or repair thts unit
Please read and retain this manual The instructi_ns wili
enable you to assemble and maintain your lawn mower
properly. Always observe the "SAFETY RULES"
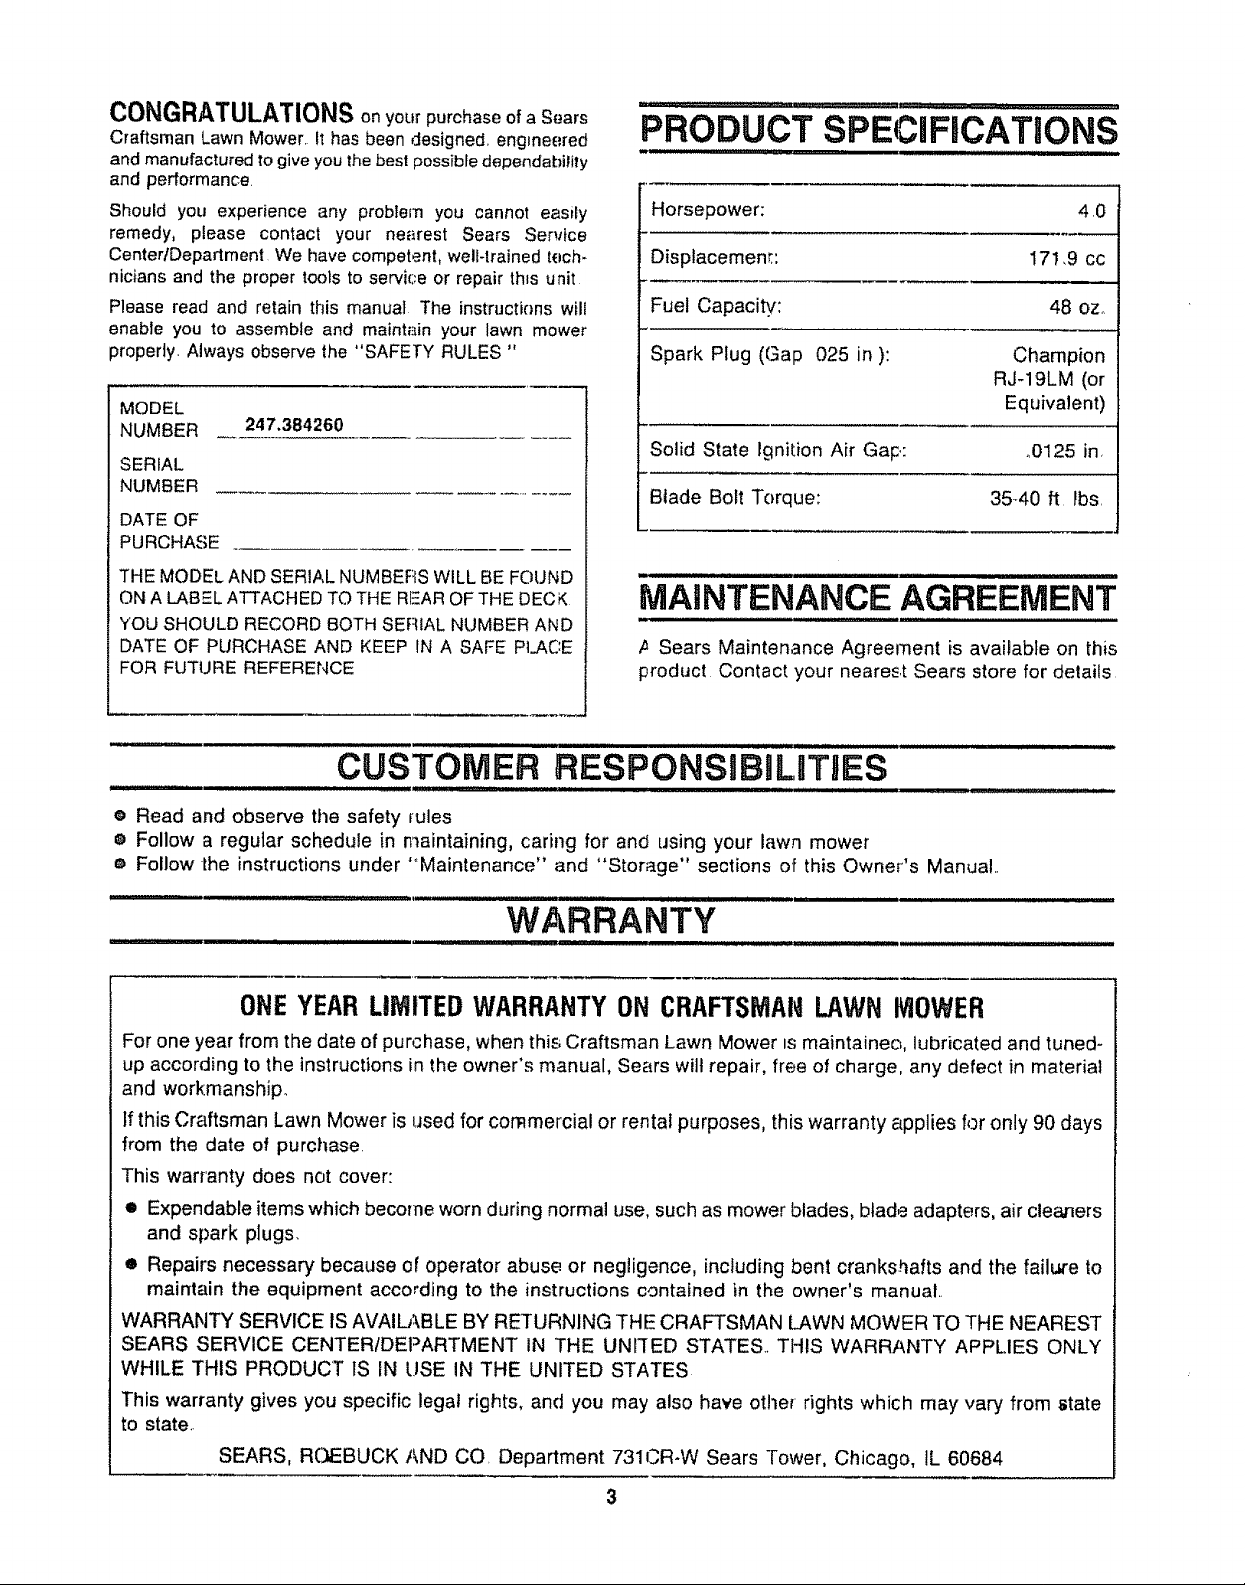
MODEL
NUMBER 247,384260
SERIAL
NUMBER
DATE OF
PURCHASE
THE MODEL AND SERIAL NUMBERS WILL BE FOUND
ON A LABEL ATTACHED TO THE REAR OF THE DECK
YOU SHOULD RECORD BOTH SERIAL NUMBER AND
DATE OF PURCHASE AND KEEP IN A SAFE PLAC:E
FOR FUTURE REFERENCE
PRODUCT SPECIFICATIONS
iiiiii]i I iiiii ]iiii] ] LI _ J,
Horsepower: 4.0
Displacement: 171,9 cc
Fuel Capacity'.: 48 oz.
Spark Plug (Gap 025 in ): Champion
RJ-19LM (or
Equivalent)
Solid State Ignition Air Gal:.: _0125 in,
Blade Bolt Torque: 35-40 ft lbs.
MAINTENANCE AGREEMENT
/_ Sears Maintenance Agreement is availabfe on this
product Contact your neare_c.tSears store for details
IIIIILIIIIIIiii iiiiiiiiiiiiiii ................................. i
CUSTOMER RESPONSBBIL,JTJES
: IIIII III III I I II ........................... IIIII I I iiiiiiiii iiii i ii i I • : :::::: :: : iiI
e Read and observe the safety rules
® Follow a regular schedule in r_aintaining, caring for and using your lawn mower
o Follow the instructions under '"Maintenance" and "Storage" sections of this Owner's Manual..
: iiiii iiiWl L'J_l"ll'l"l'l_l'llJLIIl_'II I::: : ::: IIIII1'1 II I I I I I
WARRANTY
OHEYEAR LIMITED WARRANTYON CRAFTSMAHLAWN MOWER
For one year from the date of purchase, when thi_ Craftsman Lawn Mower ts maintaineo, lubricated and tuned-
up according to the instructions inthe owner's manual, Sears wilt repair, free of charge, any defect in materiat
and workmanship.
If this Craftsman Lawn Mower is used for commercial or rental purposes, this warranty applies for only 90 days
from the date of purchase.
This warranty does not cover:
• Expendable items which become worn during normal use, such as mower blades, blade adapters, air clea_ers
and spark plugs.
• Repairs necessary because ef operator abuse or negligence, including bent crankshafts and the faille to
maintain the equipment according to the instructions contained in the owner's manual..
WARRANTY SERVICE IS AVAILABLE BY RETURNING THE CRAFTSMAN LAWN MOWER TO THE NEAREST
SEARS SERVICE CENTER/DEPARTMENT IN THE UNTIED STATES. THIS WARRANTY APPLIES ONLY
WHILE THIS PRODUCT IS IN USE IN THE UNITED STATES
This warranty gives you specific legal rights, and you may also have other rights which may vary from state
to state..
SEARS, ROEBUCK AND CO. Department 731CR-W Sears Tower, Chicago, IL 60684
3
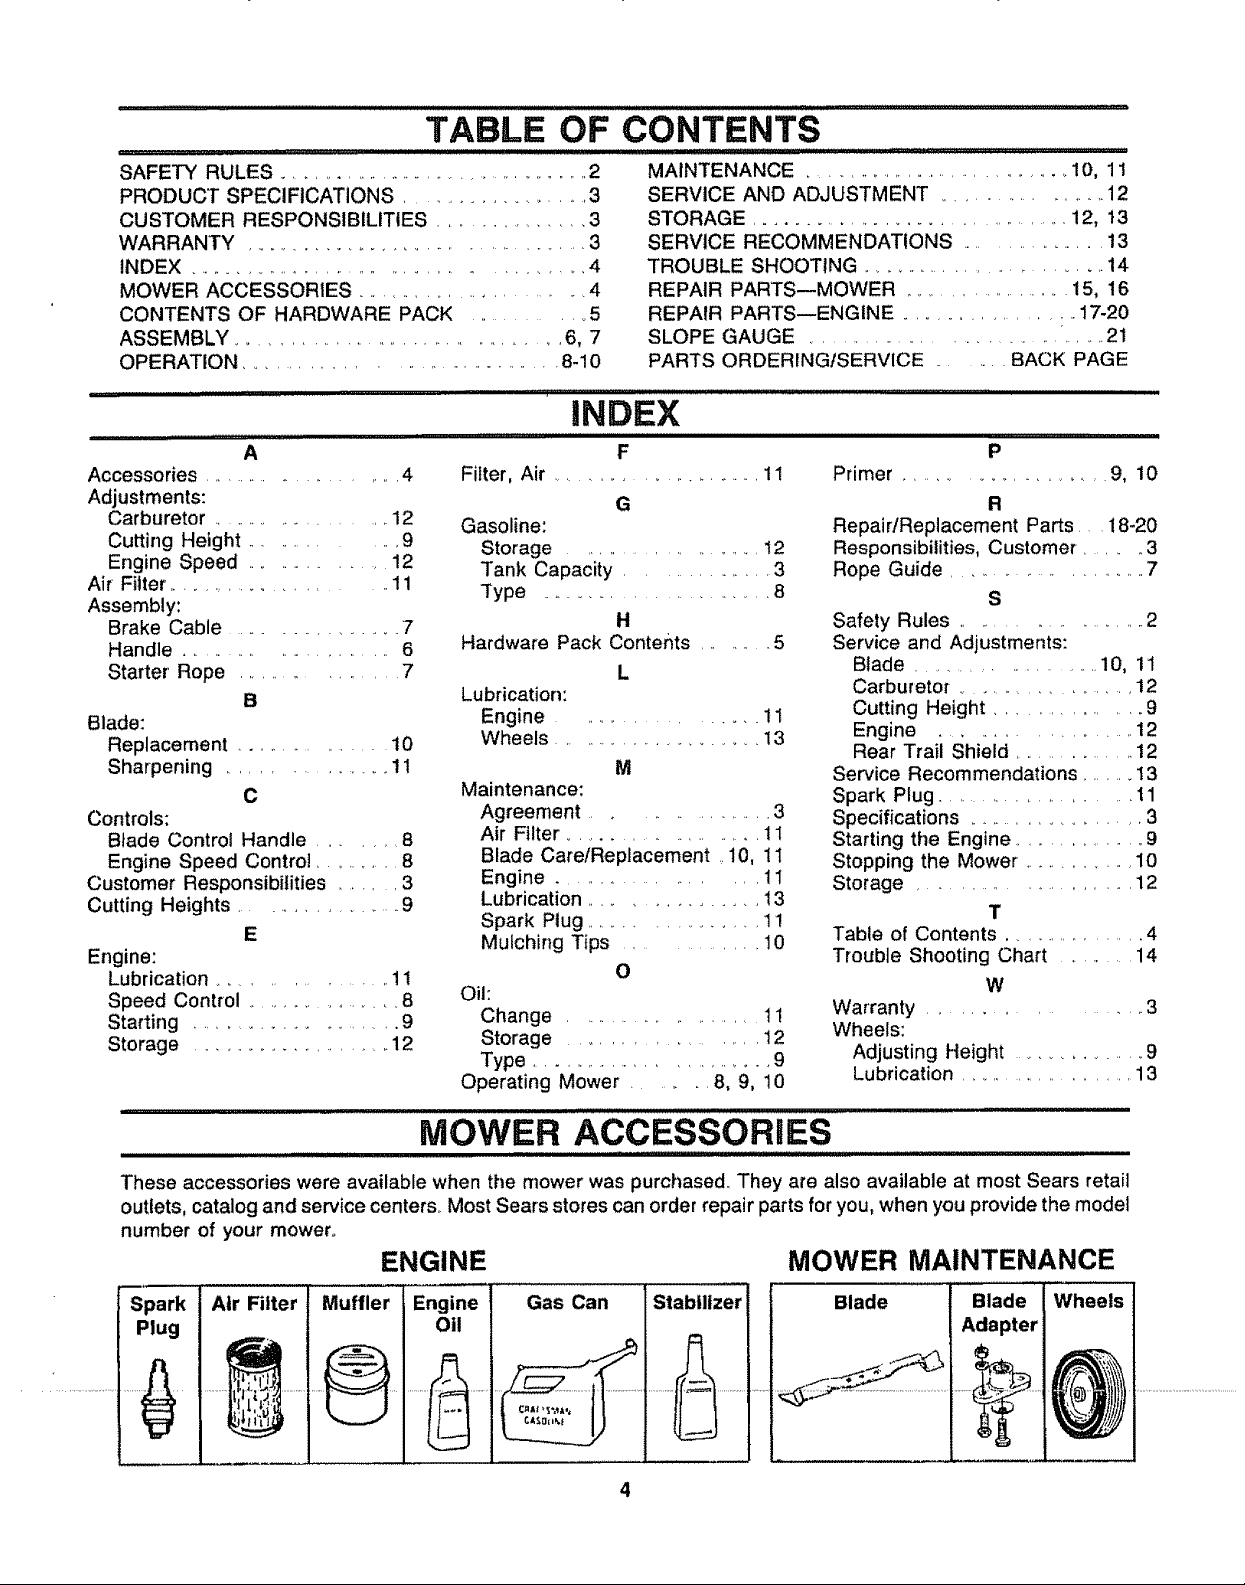
TABLE OF CONTENTS
SAFETY RULES ............................................. 2
PRODUCT SPECIFICATIONS ..................... 3
CUSTOMER RESPONSIBILITIES ............... 3
WARRANTY ..................................... 3
INDEX ................................................ 4
MOWER ACCESSORIES ......................... 4
CONTENTS OF HARDWARE PACK ............. 5
ASSEMBLY ..................................... 6, 7
OPERATION ..................................... 8-10
A
Accessories ........................ 4
Adjustments:
Carburetor ....................... 12
Cutting Height ............. 9
Engine Speed ................ 12
Air Filter .................... 11
Assembly:
Brake Cable ............... 7
Handle ......................... 6
Starter' Rope ................. 7
B
Blade:
Replacement .................. 10
Sharpening ............... 1!
C
Controls:
Blade Control Handle ......... 8
Engine Speed Control .......... 8
Customer Responsibilities ...... 3
Cutting Heights ................... 9
E
Engine:
Lubrication ................ 1t
Speed Control ................ 8
Starting ....................... 9
Storage ................... 12
'111'"'1'1111111'l"lll'll'l"lllll'"lllllllllllllllllllnllll iiiiinl nnll nllllllll I
Filter, Air ........................ 11 Primer ......................... 9, 10
Gasoline:
Storage ........................ 12
Tank Capacity ............... 3
Type ........................ 8
Hardware Pack Contents ......... 5
Lubrication:
Engine .................. 11
Wheels ........................ 13
Maintenance:
Agreement .................. 3
Air Filter ....................... 1I
Blade Care/Replacement ..10, 11
Engine ................... 1I
Lubrication ................ 13
Spark Plug .................. 11
Mulching Tips .............. 10
Oil:
Change ....................... 11
Storage .................... 12
Type ........................... 9
Operating Mower ........ 8, 9, !0
MAINTENANCE ................................. 10, 11
SERVICE AND ADJUSTMENT ...................... 12
STORAGE .................................. 12, t3
SERVICE RECOMMENDATIONS .................. 13
TROUBLE SHOOTING ............................ 14
REPAIR PARTS--MOWER ........................ 15, 16
REPAIR PARTS--ENGINE .................. 17-20
SLOPE GAUGE ..................................... 21
PARTS ORDERINGtSERVlCE ....... BACK PAGE
iNDEX
F P
G
RepairlReplacement Parts 18-20
Responsibilities, Customer. ...... 3
Rope Guide ....................... 7
H
L
M
O
Safety Rules ....................... 2
Service and Adjustments:
Blade ........................ 10, 11
Carburetor .................... 12
Cutting Height ................ 9
Engine ................... 12
Rear Trail ShieJd ............... 12
Service Recommendations ........ t 3
Spark Plug .......................... t 1
Specifications ...................... 3
Starting the Engine ................... 9
Stopping the Mower. .............. 10
Storage .......................... 12
Table of Contents ................... 4
Trouble Shooting Chart ....... 14
Warranty ................... 3
Wheels:
Adjusting Height .............. 9
Lubrication .......................... 13
R
S
T
W
MOWER ACCESSORIES
These accessories were available when the mower was purchased. They are also available at most Sears retail
outlets, catalog and service center& Most Sears stores can order repair parts for you, when you provide the mode1
number of your mower.
ENGINE
Spark Air Filter Muffler Engine
Plug OU
¢x:=o
_==af
Gas Can Stabilizer
MOWER MAINTENANCE
Blade
Blade Wheels
Adapter
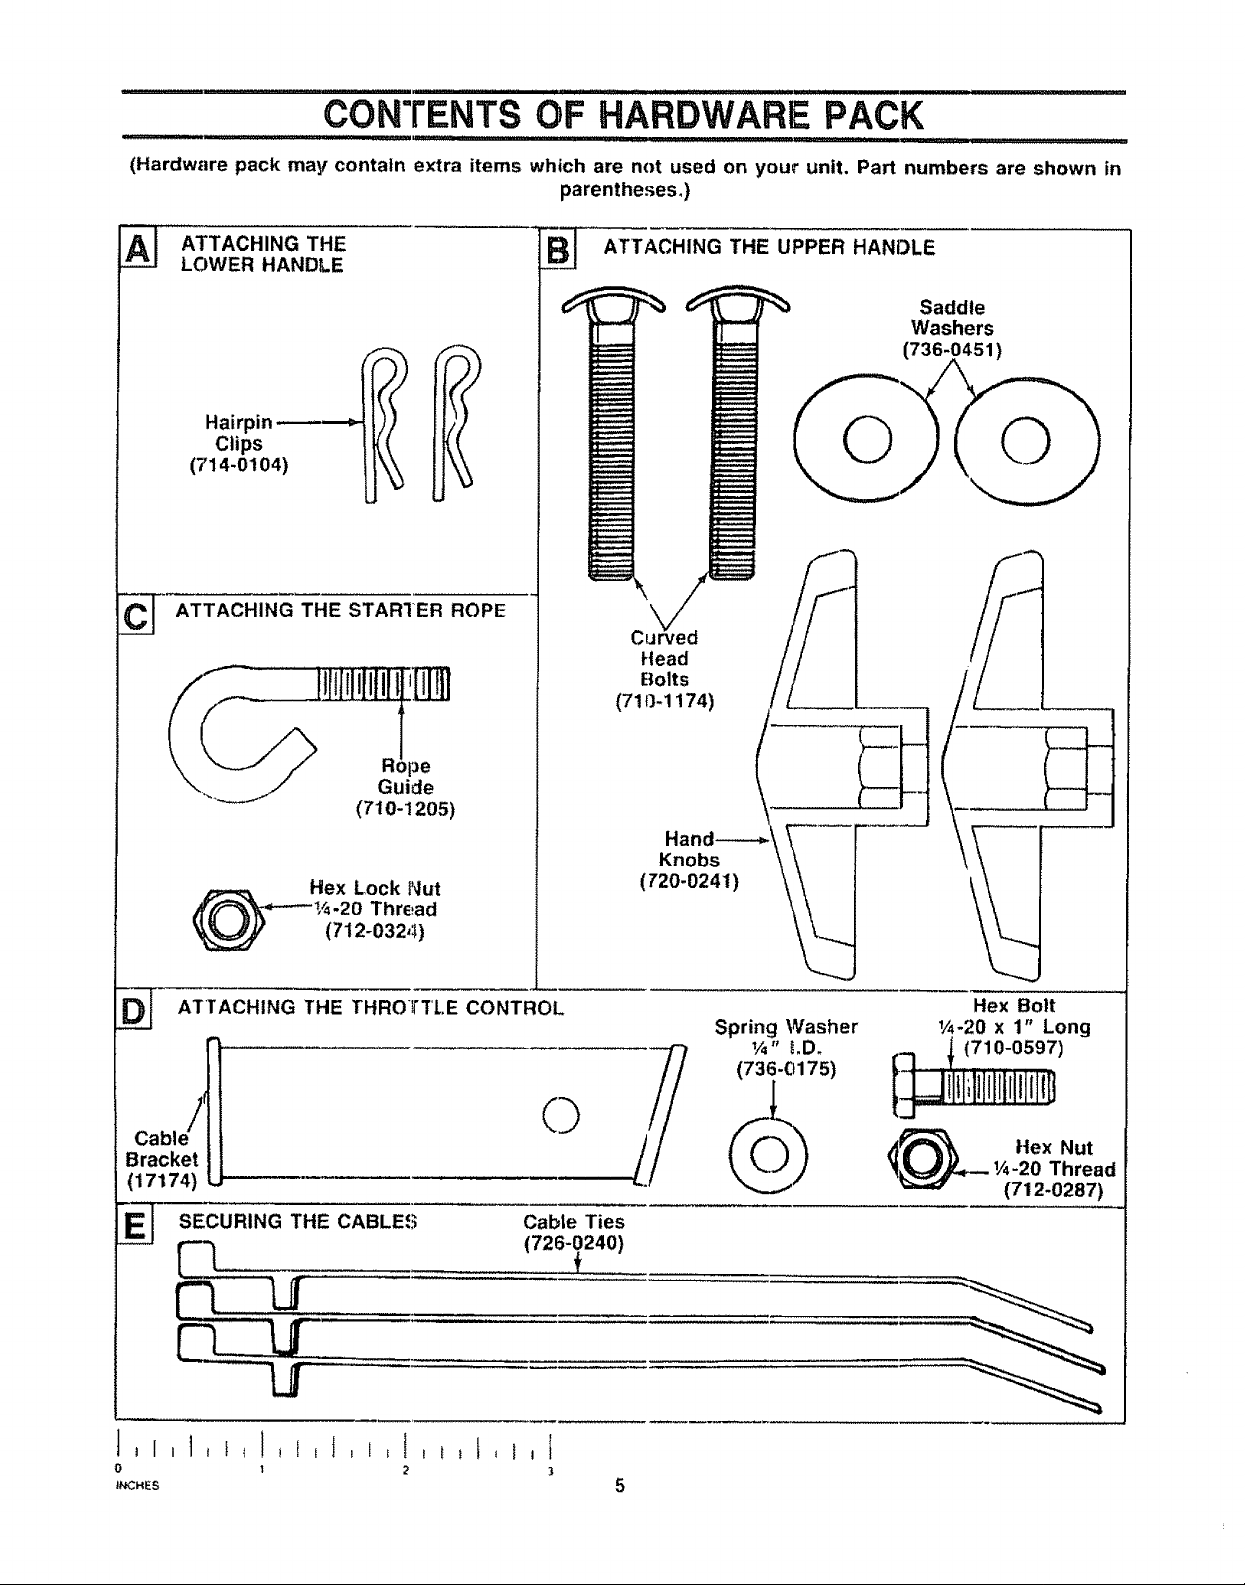
CONTENTS OF HARDWARE PACK
(Hardware pack may contatn extra items which are not used on your unit. Part numbers are shown in
parentheses.)
A_ ATTACHING THE
LOWER HANDLE
Hairpinclips - "_'t
(714-0104)
ATTACHING THE STARIER ROPE
cZ
l
Guide
(710-1205)
ATTACHING THE UPPER HANDLE
Saddle
Washers
(736-0451)
\
C
Head
Bolts
(71 {)-1174)
l:le
____._ Hex Lock Nut
t_-20 Thread
(712-0324)
ATTACHING THE THROTTLE CONTROL
(17174) U"
SECURING THE CABLES Cable Ties
EZ
-._ (726-0240)
0 I 2 3
INCHES
Spring Washer
¼" LD.
(736-0175)
Hex Bolt
1/4-20 x 1" Long
710-0597)
t_ Hex Nut
k_=J_-- 1/4"20 Thread
(712-0287)
i..... ii, r,..,.,,,, I Ill' I''
ASSEMBLY INSTRUCTIONS
-- ................ f I I '111 _ ,1_..11 '1 J iJ_l H jlj
IMPORTANT: This unit is shipped WITHOUT
GASOLINE or OIL. After assembly, be certain to ser-
vice engine with gasoline and oil before operating
your mower.
NOTE: Reference to right or left hand side of the
mower is observed from the operating position.
Tools Required for Assembly
(1) Pair of Pliers
(2) 7/16" Wrenches or Adjustable Wrenches
(1) Flat Bladed Screwdriver
k_\\ Handle
\ \ Mounting
Lower \\ \ Bracket
).\.
UNPACKING
• Remove the lawn mower from the carton by open-
ing the top flaps and lifting the unit out. Be careful
of the staples. Make certain all parts and literature
have been removed from the carton before the car-
ton is discarded
• Disconnect the spark plug wire from the spark plug
and ground against the engine,
e Stretch out control cable and place on the floor,. Be
careful not to bend orkink the cable at any time dur-
ing assembly
@ Lay out the contents of the hardware pack accord-
ing to the illustration on page 5 for identification
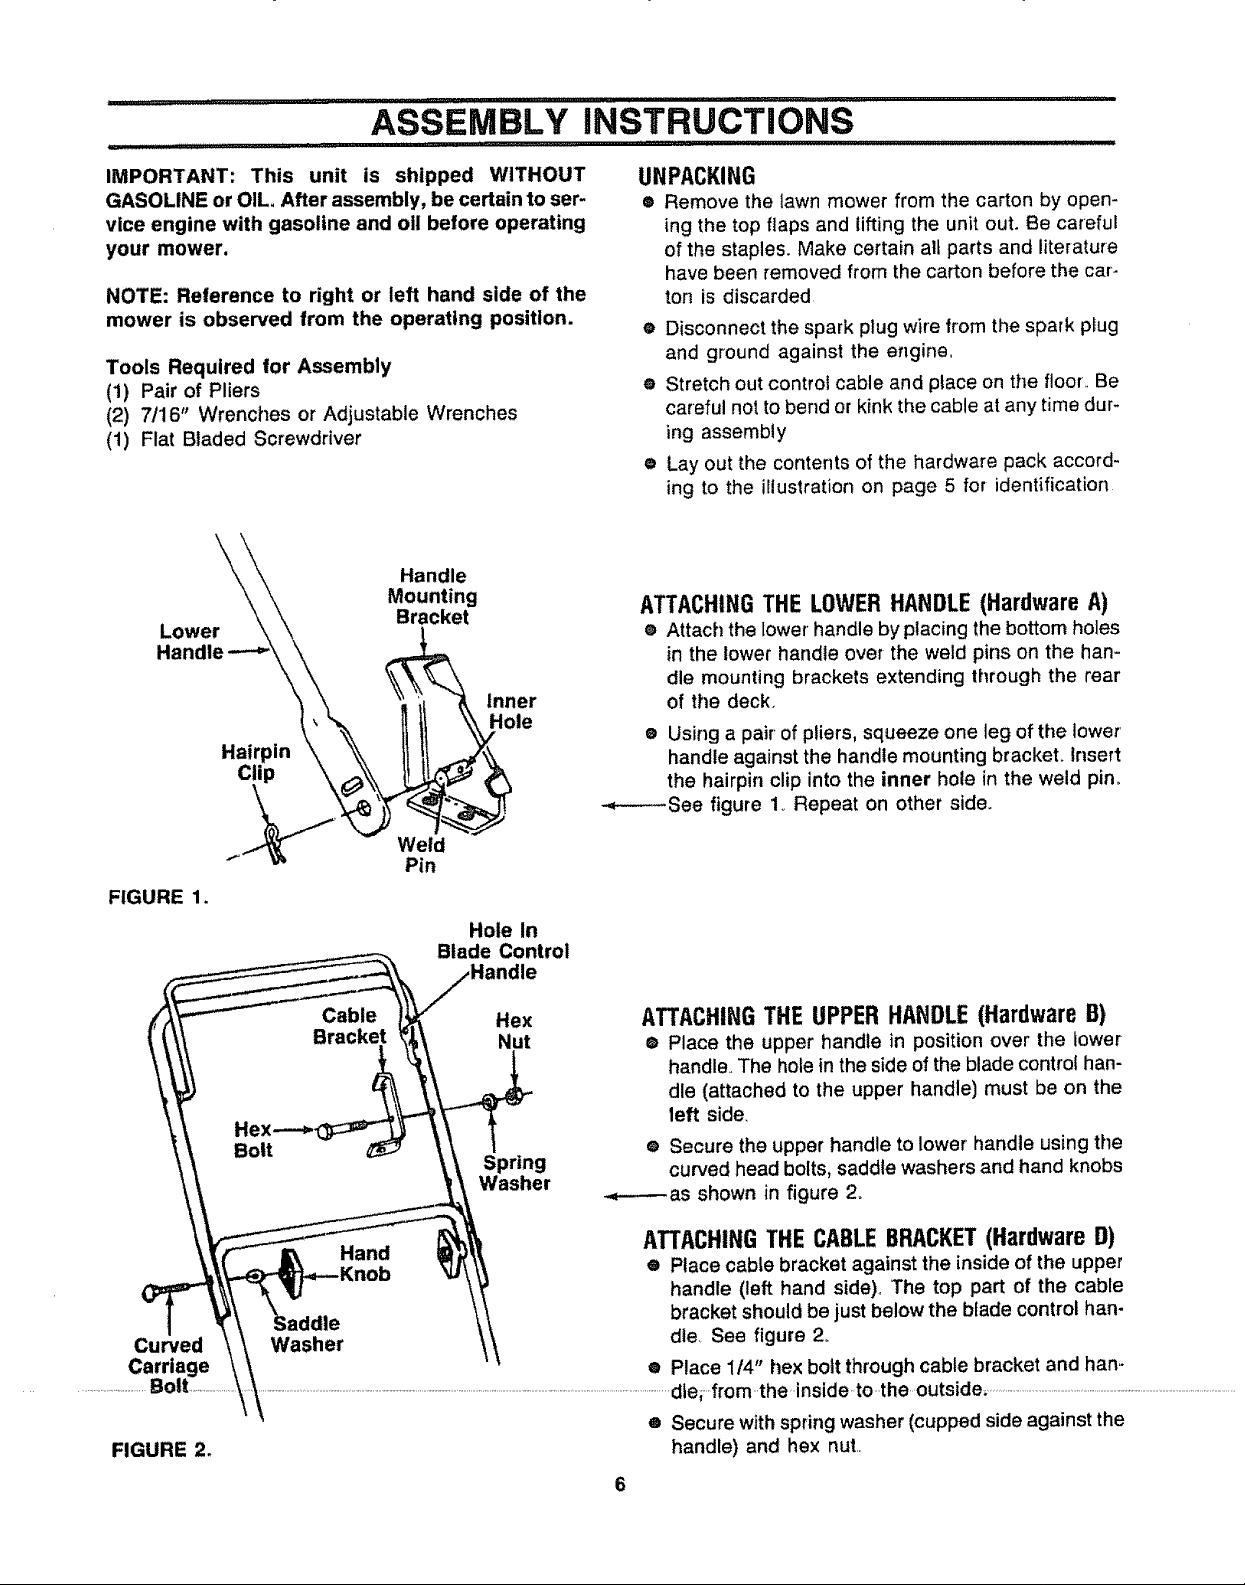
ATTACHING THE LOWER HANDLE (Hardware A)
® Attach the lower' handle by placing the bottom holes
in the lower handle over the weld pins on the han-
dle mounting brackets extending through the rear
of the deck.
e Using a pair' of pliers, squeeze one leg of the lower'
handle against the handle mounting bracket, Insert
the hairpin clip into the inner hole in the weld pin_
-.-------See figure 1_Repeat on other side.
FIGURE 1.
Bolt
Curved
Carriage
..........................Bolt .................
FIGURE 2.
Cable Hex
Bracket Nut
Hand
Washer
Hole In
Blade Control
lie
Spring
Washer
ATTACHINGTHE UPPERHANDLE(HardwareB)
• Place the upper handle in position over the lower
handle. The hole in the side of the blade control han-
dle (attached to the upper handle) must be on the
left side.
® Secure the upper handle to lower handle using the
curved head bolts, saddle washers and hand knobs
-._------as shown in figure 2.
ATTACHINGTHECABLEBRACKET(Hardware D)
• Place cable bracket against the inside of the upper
handle (left hand side), The top part of the cable
bracket should be just below the blade control han-
dle See figure 2o
e Place 114" hex bolt through cable bracket and han-
dte_ from the inside to the outside_ ...................................................................................................................................................
e Secure with spring washer (cupped side against the
handle) and hex nut,,
\
"Z" Fitting
Control
Handte
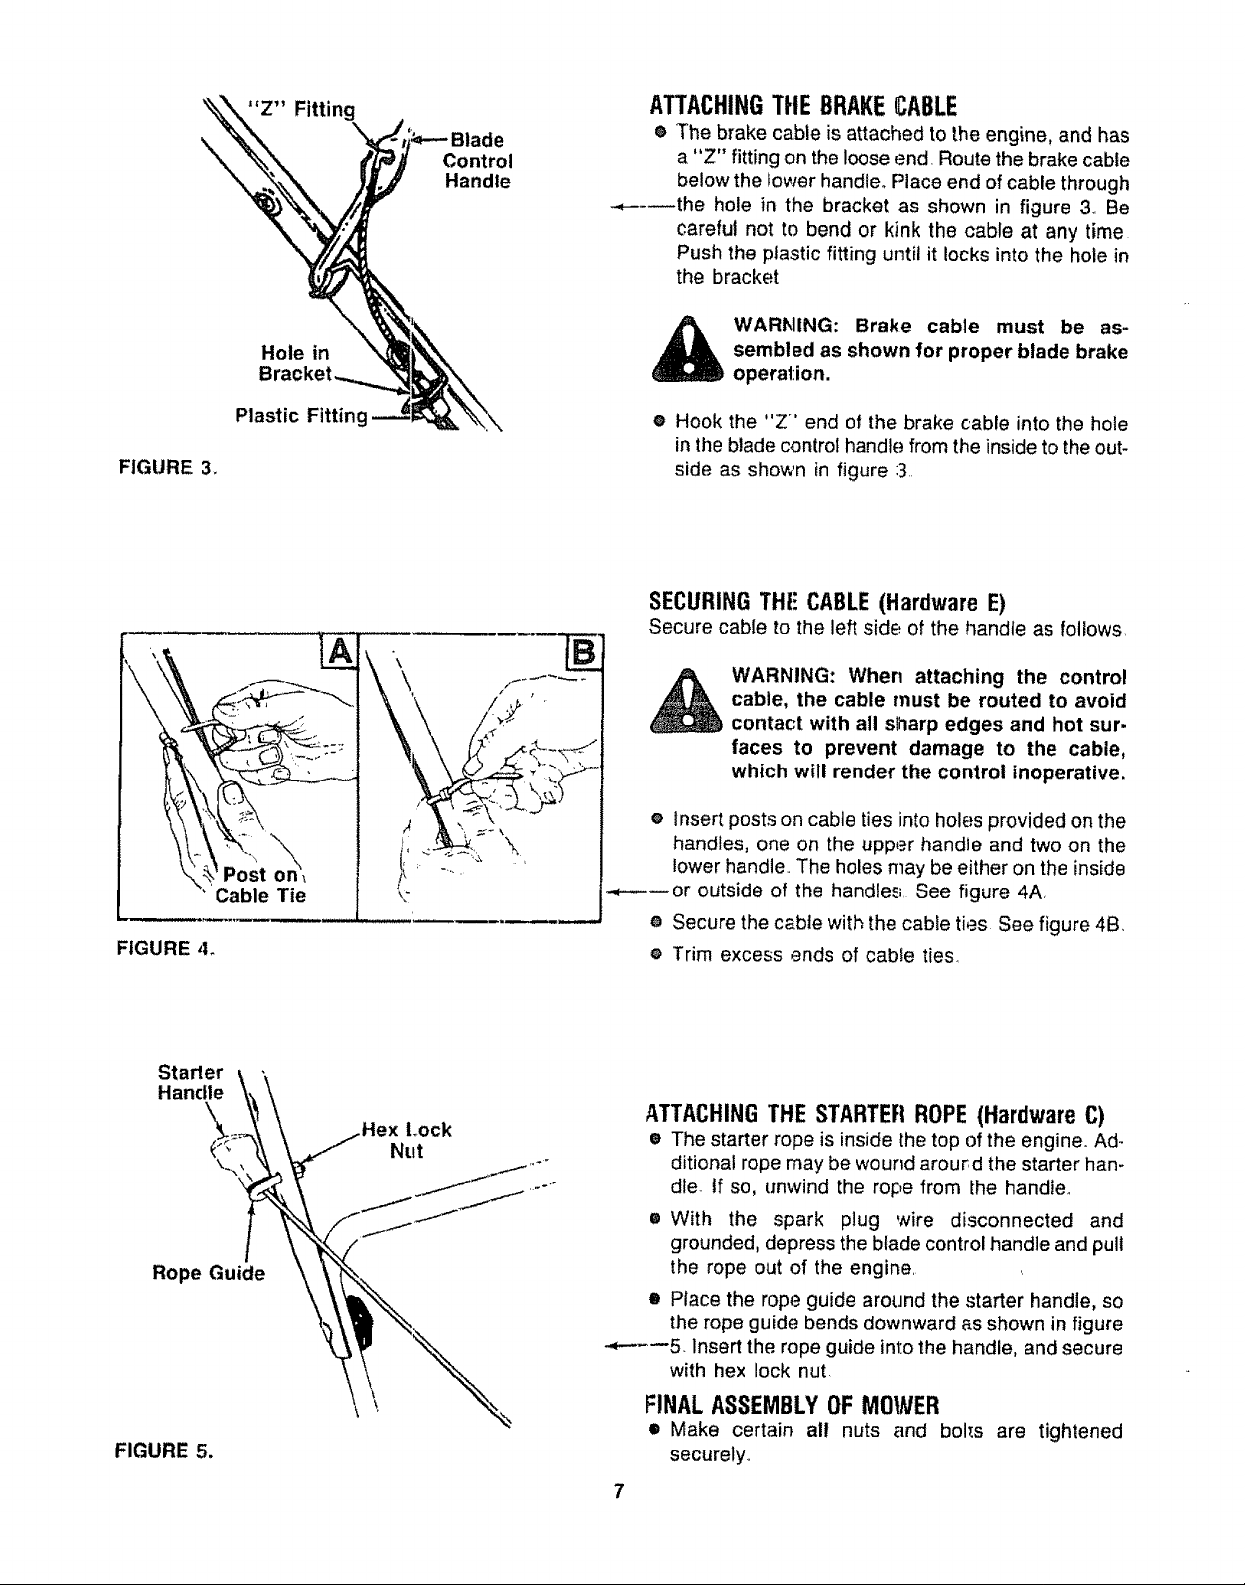
ATTACHINGTtlE BRAKECABLE
® The brake cable is attached to the engine, and has
a "Z" fitting on the loose end, Route the brake cable
below the bower handler Place end of cable through
.-.------the hole in the bracket as shown in figure 3, Be
careful not to bend or kink the cable at any time
Push the plastic fitting until it locks into the hole in
the bracket
FIGURE 3_
FIGURE ,I.
Hole in
Plastic Fitting
on_
Cable Tie
sembled as shown for proper blade brake
WARNING: Brake cable must be as-
operation.
e Hook the "Z" end of the brake cable into the hole
in the blade control handle from the inside to the out-
side as shown in figure 3,,
SECURING THE CABLE(Hardware E)
Secure cable to the left side of the handle as foliows,
\
\
_ WARNING: When attaching the control
e Insert posts on cable ties into holes provided on the
•.,------or outside of the handle_;, See figure 4A
• Secure the cable with, the cable ties See figure 4B.
e Trim excess ends of cabie ties
cable, the cable must be routed to avoid
contact with all sharp edges and hot sur-
faces to prevent damage to the cable,
which will render the control inoperative.
handles, one on the upper handle and two on the
lower handle,, The holes may be either on the inside
Starter
Handle
Rope Guide
FIGURE 5.
Nut
Lock
ATTACHING THE STARTER ROPE (Hardware C)
• The starter rope is inside the top of the engine. Ad-
ditional rope may be wound around the starter han-
dle- If so, unwind the rope from [_hehandier
® With the spark plug wire disconnected and
grounded, depress the blade control handle and pull
the rope out of the engine
• Place the rope guide around the starter handle, so
the rope guide bends downward as shown in figure
-.,_'--_5 Insert the rope guide into the handle, and secure
with hex lock nut.
FINAL ASSEMBLY OF MOWER
• Make certain al! nuts and bohs are tightened
securely,
7
 Loading...