

Page 1
Operator's Manual
CRRFTSMRH
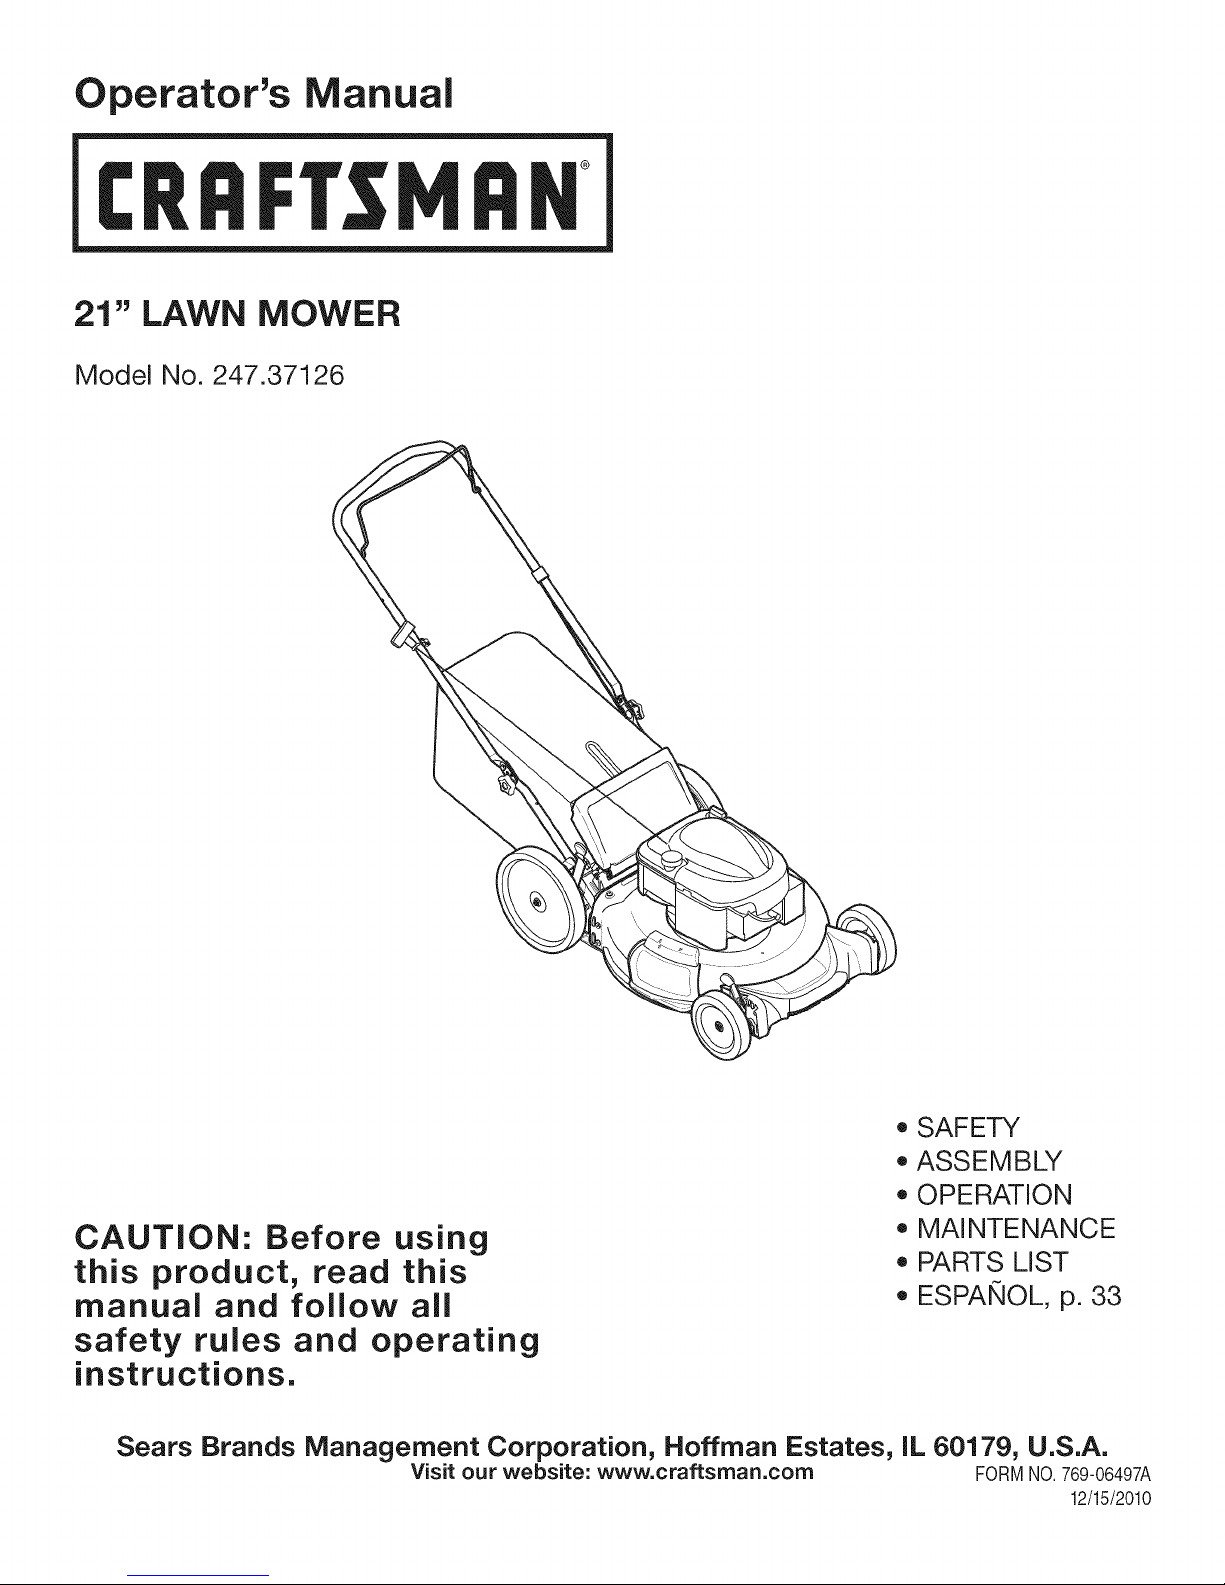
21" LAWN MOWER
Model No. 247.37126
CAUTION: Before using
this product, read this
manual and follow all
safety rules and operating
instructions.
Sears Brands Management Corporation, Hoffman Estates, IL 60179, U.S.A.
Visit our website: www.craftsman.com FORM1/O.769-06497A
o SAFETY
ASSEMBLY
OPERATION
MAINTENANCE
PARTS LIST
o ESPANOL, p. 33
12/15/2010
Page 2
WarrantyStatement..................................Page2
Safetyinstructions....................................Pages3-6
SlopeGuide..............................................Page7
SafetyLabels............................................Page9
Assembly..................................................Pages10-13
Operation..................................................Pages14-15
ServiceandMaintenance.........................Pages16-19
Off-SeasonStorage..................................Page20
Troubleshooting........................................Page21
PartsList...................................................Page22-29
Espa_ol.....................................................Page33
ServiceNumbers......................................BackCover
Craftsman TwoYearFull Warranty
FORTWOYEARSfromthedateofpurchase,thisproductiswarrantedagainstanydefectsinmaterialorworkmanship.Defectiveproductwill
receivefreerepairorfreereplacementifrepairisunavailable.
Forwarrantycoveragedetailstoobtainrepairorreplacement,visitthewebsite:www.craftsman.com.
ThiswarrantycoversONLYdefectsinmaterialandworkmanship.WarrantycoveragedoesNOTinclude:
• Expendableitemswhichcanwearoutfromnormalusewithinthewarrantyperiod,suchasmowerblades,bladeadapters,belts,filters,or
sparkplugs.
Productdamageresultingfromuserattemptsatproductmodificationorrepairorcausedbyproductaccessories.
Repairsnecessarybecauseofaccidentorfailuretooperateormaintaintheproductaccordingtoallsuppliedinstructions.
Preventativemaintenanceorrepairsnecessaryduetoimproperfuelmixture,contaminatedorstalefuel.
Thiswarrantyisvoidifthisproductiseverusedwhileprovidingcommercialservicesorifrentedtoanotherperson.
Thiswarrantygivesyouspecificlegalrights,andyoumayalsohaveotherrightswhichvaryfromstatetostate.
SearsBrandsManagementCorporation, HoffmanEstates,IL60179
EngineOilType: SAE30
EngineOilCapacity: 18ounces
Fuel: UnleadedGasoline
SparkPlug: Champion®RC12YC
Engine: Briggs& Stratton
ModelNumber.................................................................
Serial Number.................................................................
Dateof Purchase.............................................................
Recordthemodelnumber,serialnumber
anddateof purchaseabove
©SearsBrands,LLC 2
Page 3
Thissymbolpointsoutimportantsafetyinstructionswhich,if not
followed,couldendangerthepersonalsafetyand/orpropertyof
yourselfandothers. Readandfollowallinstructionsin thismanual
beforeattemptingto operatethismachine.Failuretocomplywith
theseinstructionsmayresultinpersonalinjury.Whenyou seethis
symbol,HEEDITSWARNING!
Thismachinewasbuilttobeoperatedaccordingto the safeopera-
tionpracticesinthismanual.Aswithanytypeof powerequipment,
carelessnessorerroronthe partoftheoperatorcanresultinserious
injury.Thismachineiscapableof amputatingfingers,hands,toes
andfeetandthrowingdebris.Failuretoobservethefollowingsafety
instructionscouldresultin seriousinjuryordeath.
CALIFORNIA PROPOSITION 65
EngineExhaust,someof itsconstituents,andcertainvehicle
componentscontainoremitchemicalsknowntoStateofCalifornia
tocausecancerandbirthdefectsorother reproductiveharm.
Batteryposts,terminals,and relatedaccessoriescontainleadand
leadcompounds,chemicalsknownto theStateof Californiato
causecancerandreproductiveharm.Washhandsafterhandling.
GENERAL OPERATION
* Readthisoperator'smanual carefullyin itsentiretybefore
attemptingtoassemblethis machine.Read,understand,and
followall instructionsonthemachineandinthemanualsbefore
operation.Keepthismanualina safeplaceforfutureandregular
referenceandfororderingreplacementparts
, Becompletelyfamiliarwiththecontrolsandtheproperuseofthis
machinebeforeoperatingit.
, Thismachineis a precisionpieceof powerequipment,nota
plaything.Therefore,exerciseextremecautionat alltimes.This
machinehasbeendesignedto performonejob:to mowgrass.
Donotuseitforanyotherpurpose.
, Neverallowchildrenunder14yearsof agetooperatethis
machine.Children14andovershouldreadandunderstandthe
instructionsandsafeoperationpracticesinthismanualandon
themachineandshouldbetrainedandsupervisedbyan adult.
, Onlyresponsibleindividualswhoarefamiliarwiththeserulesof
safeoperationshouldbe allowedtousethismachine.
, Thoroughlyinspecttheareawheretheequipmentistobeused.
Removeallstones,sticks,wire,bones,toysandotherforeign
objects,whichcouldbetrippedoverorpickedupandthrownby
theblade.Thrownobjectscancauseseriouspersonalinjury.
, Planyourmowingpatterntoavoiddischargeofmaterialtoward
roads,sidewalks,bystandersandthe like.Also,avoiddischarg-
ingmaterialagainstawall orobstruction,whichmaycause
dischargedmaterialto ricochetbacktowardthe operator.
, Tohelpavoidbladecontactor athrownobjectinjury,stayin
operatorzonebehindhandlesandkeepchildren,bystanders,
helpersandpetsatleast75feetfrommowerwhileitis inopera-
tion.Stopmachineifanyoneentersarea.
Your Responsibility--Restrict theuseofthis powermachineto
personswhoread,understandandfollowthewarningsandinstruc-
tionsinthismanualandon themachine.
SAVE THESE INSTRUCTIONS!
• Alwayswearsafetyglassesor safetygogglesduringoperation
andwhileperforminganadjustmentorrepairto protectyoureyes.
Thrownobjectswhichricochetcancauseseriousinjurytothe
eyes.
Wearsturdy,rough-soledworkshoesandclose-fittingslacks
and shirts.Shirtsand pantsthatcoverthearmsandlegsand
steel-toedshoesare recommended.Neveroperatethis machine
inbarefeet,sandals,slipperyor light-weight(e.g.canvas)shoes.
Donot put handsor feetnearrotatingpartsor underthecutting
deck.Contactwith bladecanamputatefingers,hands,toesand
feet.
A missingor damageddischargecovercancausebladecontact
or thrownobjectinjuries.
Manyinjuriesoccuras a resultofthemowerbeingpulledoverthe
footduringafallcausedby slippingor tripping.Donotholdonto
themowerifyouarefalling:releasethe handleimmediately.
Neverpullthemowerbacktowardyouwhileyouarewalking.If
youmustbackthemowerawayfroma wallor obstructionfirst
lookdownandbehindto avoidtrippingandthen followthese
steps:
1. Stepbackfrommowertofullyextendyourarmsforward.
2. Besureyouare wellbalancedwithsurefooting.
3. Pullthemowerbackslowly,no morethanhalfwaytoward
you.
4. Repeatthesestepsasneeded.
Donot operatethemowerwhileundertheinfluenceof alcoholor
drugs.
Donot engagethe self-propelledmechanismon machinesso
equippedwhilestartingengine.
3
Page 4
• Thebladecontrolhandleisa safetydevice.Neverattemptto
bypassitsoperation.Doingsomakesthe safetydeviceinopera-
tiveandmayresultin personalinjurythroughcontactwiththe
rotatingblade.Thebladecontrolhandlemustoperateeasily
in bothdirectionsandautomaticallyreturntothedisengaged
positionwhenreleased.
• Neveroperatethemowerinwetgrass.Alwaysbe sureofyour
footing.A slipandfall cancauseseriouspersonalinjury.Ifyou
feelyou arelosingyourfooting,releasethebladecontrolhandle
immediatelyandthebladewillstop rotatingwithinthreeseconds.
• Mowonlyin daylightor goodartificiallight.Walk,neverrun.
• Stopthe bladewhencrossinggraveldrives,walksorroads.
• Iftheequipmentshouldstart tovibrateabnormally,stopthe
engineandcheckimmediatelyforthecause.Vibrationis gener-
allya warningoftrouble.
• Shutthe engineoff andwaituntilthebladecomesto a complete
stopbeforeremovingthegrasscatcheroruncloggingthe chute.
Thecuttingbladecontinuesto rotateforafewsecondsafterthe
bladecontrolisreleased.Neverplaceany partofthebodyinthe
bladeareauntilyouaresurethe bladehasstoppedrotating.
• Neveroperatemowerwithoutpropertrailshield,dischargecover,
grasscatcher,bladecontrolhandleor othersafetyprotectivede-
vicesin placeandworking.Neveroperatemowerwithdamaged
safetydevices.Failuretodosocan resultinpersonalinjury.
Mufflerandenginebecomehotandcancausea burn.Donot
touch.
• Neverattempttomakea wheelorcuttingheightadjustmentwhile
theengineisrunning.
• Onlyuse partsand accessoriesmadeforthis machineby the
manufactureraslistedin thePartspagesofthisOperator's
Manual.Failuretodoso canresultinpersonalinjury.
• Whenstartingengine,pullcordslowlyuntilresistanceisfelt,then
pullrapidly.Rapidretractionof startercord(kickback)willpull
handandarmtowardenginefasterthanyoucanletgo.Broken
bones,fractures,bruisesor sprainscouldresult.
• If situationsoccurwhicharenotcoveredinthismanual,usecare
andgoodjudgement.Contact1-800-4MY-HOME®forinformation
andassistance.
SLOPE OPERATION
Slopesareamajorfactorrelatedto slipandfallaccidents,whichcan
resultinsevereinjury.Operationon slopesrequiresextracaution.If
youfeel uneasyona slope,donotmowit. Foryoursafety,usethe
SlopeGuideincludedas partof thismanualto measureslopesbefore
operatingthis machineon aslopedorhillyarea.Ifthe slopeisgreater
than15degrees,donotmowit.
Do:
o
Mowacrossthefaced slopes;neverupanddown.Exercise
extremecautionwhenchangingdirectiononslopes.
• Watchfor holes,ruts, rocks,hiddenobjects,orbumpswhichcan
causeyoutosliportrip.Tallgrasscanhideobstacles.
• Alwaysbesureof yourfooting.A slipandfallcancauseserious
personalinjury.Ifyoufeelyouarelosingyourbalance,release
thebladecontrolhandleimmediatelyandthebladewillstop
rotatingwithinthree(3) seconds.
DoNot:
• Donotmowneardrop-offs,ditchesor embankments,because
youcouldloseyourfootingorbalance.
• Donotmowslopesgreaterthan15degreesas shownon the
slopeguide.
• Donotmowonwetgrass.Unstablefootingcouldcauseslipping.
CHILDREN
Tragicaccidentscanoccuriftheoperatorisnotalerttothepresence
ofchildren.Childrenareoftenattractedto themowerandthe mowing
activity.Theydonot understandthe dangers.Neverassumethat
childrenwill remainwhereyoulastsawthem.
Keepchildrenoutofthemowingareaandunderwatchfulcareof
a responsibleadultotherthantheoperator.
• Bealertandturnmoweroffif achild entersthearea.
• Beforeandwhilemovingbackwards,lookbehindanddown for
smallchildren.
• Useextremecarewhenapproachingblindcorners,doorways,
shrubs,trees,orotherobjectsthatmayobscureyourvisionofa
childwhomayrunintothe mower.
• Keepchildrenawayfromhot orrunningengines.Theycan suffer
burnsfroma hotmuffler.
• Neverallowchildrenunder14yearsofagetooperatethis
machine.Children14andovershouldreadand understandthe
instructionsandsafeoperationpracticesinthismanualandon
themachineand betrainedandsupervisedbyan adult.
SERVICE
SafeHandlingOf Gasoline:
• Toavoid personalinjuryorpropertydamageuseextremecare
in handlinggasoline.Gasolineis extremelyflammableandthe
vaporsareexplosive.Seriouspersonalinjurycanoccurwhen
gasolineis spilledon yourselfor yourclothes,whichcanignite.
Washyourskinandchangeclothesimmediately.
• Useonlyanapprovedgasolinecontainer.
• Neverfill containersinsideavehicleoronatruckortrailerbed
withaplasticliner.Alwaysplacecontainerson thegroundaway
fromyourvehiclebeforefilling.
• Removegas-poweredequipmentfromthetruck ortrailerand
refuelitontheground.Ifthisis notpossible,thenrefuelsuch
equipmenton atrailer witha portablecontainer,ratherthanfrom
a gasolinedispensernozzle.
• Keepthenozzleincontactwiththe rimofthefueltankor
containeropeningatall timesuntilfuelingiscomplete.Donot use
a nozzlelock-opendevice.
4
Page 5
• Extinguishall cigarettes,cigars,pipesandothersources
ofignition.
• Neverfuelmachineindoorsbecauseflammablevaporswill
accumulateinthearea.
• Neverremovegascap oraddfuelwhileengineis hotorrunning.
Allowengineto coolat leasttwominutesbeforerefueling.
• Neverover-fillfueltank.Toallowfor expansionof the fuel,donot
fillabovethebottomofthe fueltankneck.
• Replacegasolinecapandtightensecurely.
• If gasolineisspilled,wipeit offtheengineandequipment.Move
machinetoanotherarea.Wait5 minutesbeforestartingengine.
• Neverstorethemachineorfuelcontainernearanopenflame,
sparkor pilot lightasonawaterheater,spaceheater,furnace,
clothesdryerorothergasappliances.
• Toreducefirehazard,keepmachinefreeofgrass,leaves,or
otherdebrisbuild-up.Cleanupoil orfuelspillageand removeany
fuel-soakeddebris.
Allowmachinetocoolatleast5minutesbeforestoring.
GeneralService:
• Neverrunanengineindoorsor ina poorlyventilatedarea.Engine
exhaustcontainscarbonmonoxide,anodorlessanddeadlygas.
• Beforecleaning,repairing,or inspecting,makecertainthe
bladeandallmovingpartshavestopped.Disconnectthe spark
plugwireandgroundagainsttheenginetopreventunintended
starting.
Checkthebladeandenginemountingboltsatfrequentintervals
forpropertightness.Also,visuallyinspectbladefordamage(e.g.,
bent,cracked,worn).Replacebladewiththeoriginalequipment
manufacture's(O.E.M.)bladeonly,listedinthePartspagesofthis
manual.Useofpartswhichdonotmeettheoriginalequipment
specificationsmayleadto improperperformanceandcompro-
misesafety!
• Mowerbladesaresharpandcan cut.Wrapthe bladeor wear
gloves,anduse extracautionwhen servicingthem.
Keepall nuts,bolts,andscrewstighttobesuretheequipmentis
insafeworkingcondition.
Nevertamperwithsafetydevices.Checktheirproperoperation
regularly.
Afterstrikinga foreignobject,stoptheengine,disconnectthe
sparkplugwireand groundagainstthe engine.Thoroughly
inspectthemowerforanydamage.Repairthedamagebefore
startingandoperatingthemower.
Neverattempttomakea wheelorcuttingheightadjustmentwhile
theengineisrunning.
• Grasscatchercomponents,dischargecover,andtrailshieldare
subjectto wearand damagewhichcouldexposemovingpartsor
allowobjectstobethrown.Forsafetyprotection,frequentlycheck
componentsand replaceimmediatelywithoriginalequipment
manufacturer's(O.E.M.)partsonly,listedinthePartspages
ofthismanual.Useof partswhichdo notmeettheoriginal
equipmentspecificationsmayleadto improperperformanceand
compromisesafety!
Donot changetheengine'sgovernorsettingor over-speedthe
engine.Thegovernorcontrolsthemaximumsafeoperatingspeed
oftheengine.
Checkfuelline,tank,cap,andfittingsfrequentlyforcracksor
leaks.Replaceifnecessary.
Donot crankenginewith sparkplugremoved.
• Maintainor replacesafetyandinstructionlabels,as necessary.
• Observeproperdisposallawsand regulations.Improperdisposal
offluidsandmaterialscanharmtheenvironment.
Accordingto theConsumerProductsSafetyCommission(CPSC)
andthe U.S.EnvironmentalProtectionAgency(EPA),thisproduct
hasanAverageUsefulLifeof seven(7)years,or 140hoursof
operation.Atthe endoftheAverageUsefulLifehavethemachine
inspectedannuallybya Searsorotherqualifiedservicedealer
toensurethatallmechanicalandsafetysystemsareworking
properlyand notwornexcessively.Failuretodoso canresultin
accidents,injuriesordeath.
DO NOT MODIFY ENGINE
Toavoidseriousinjuryor death,donotmodifyengineinanyway.
Tamperingwiththegovernorsettingcanleadto arunawayengineand
causeittooperateat unsafespeeds.Nevertamperwithfactorysetting
ofenginegovernor.Doingsowillvoidthe productwarranty.
NOTICE REGARDING EMISSIONS
EngineswhicharecertifiedtocomplywithCaliforniaandfederal
EPAemissionregulationsfor SORE(SmallOffRoadEquipment)are
certifiedto operateon regularunleadedgasoline,andmayinclude
thefollowingemissioncontrolsystems:EngineModification(EM) and
ThreeWayCatalyst(TWC)ifso equipped.
SPARK ARRESTOR
Thismachineisequippedwithaninternalcombustionengineand
shouldnotbeusedonor nearanyunimprovedforest-covered,
brush-coveredorgrass-coveredlandunlesstheengine'sexhaust
systemisequippedwithasparkarrestormeetingapplicablelocalor
statelaws(ifany).
Ifasparkarrestorisused,itshouldbe maintainedineffectiveworking
orderbytheoperator.IntheStateof Californiathe aboveisrequired
bylaw(Section4442of theCaliforniaPublicResourcesCode).Other
statesmayhavesimilarlaws. Federallawsapplyonfederallands.
A sparkarrestor(PartNo.398067)forthemufflerisavailablethrough
yournearestSears PartsandRepairServiceCenter.
Page 6
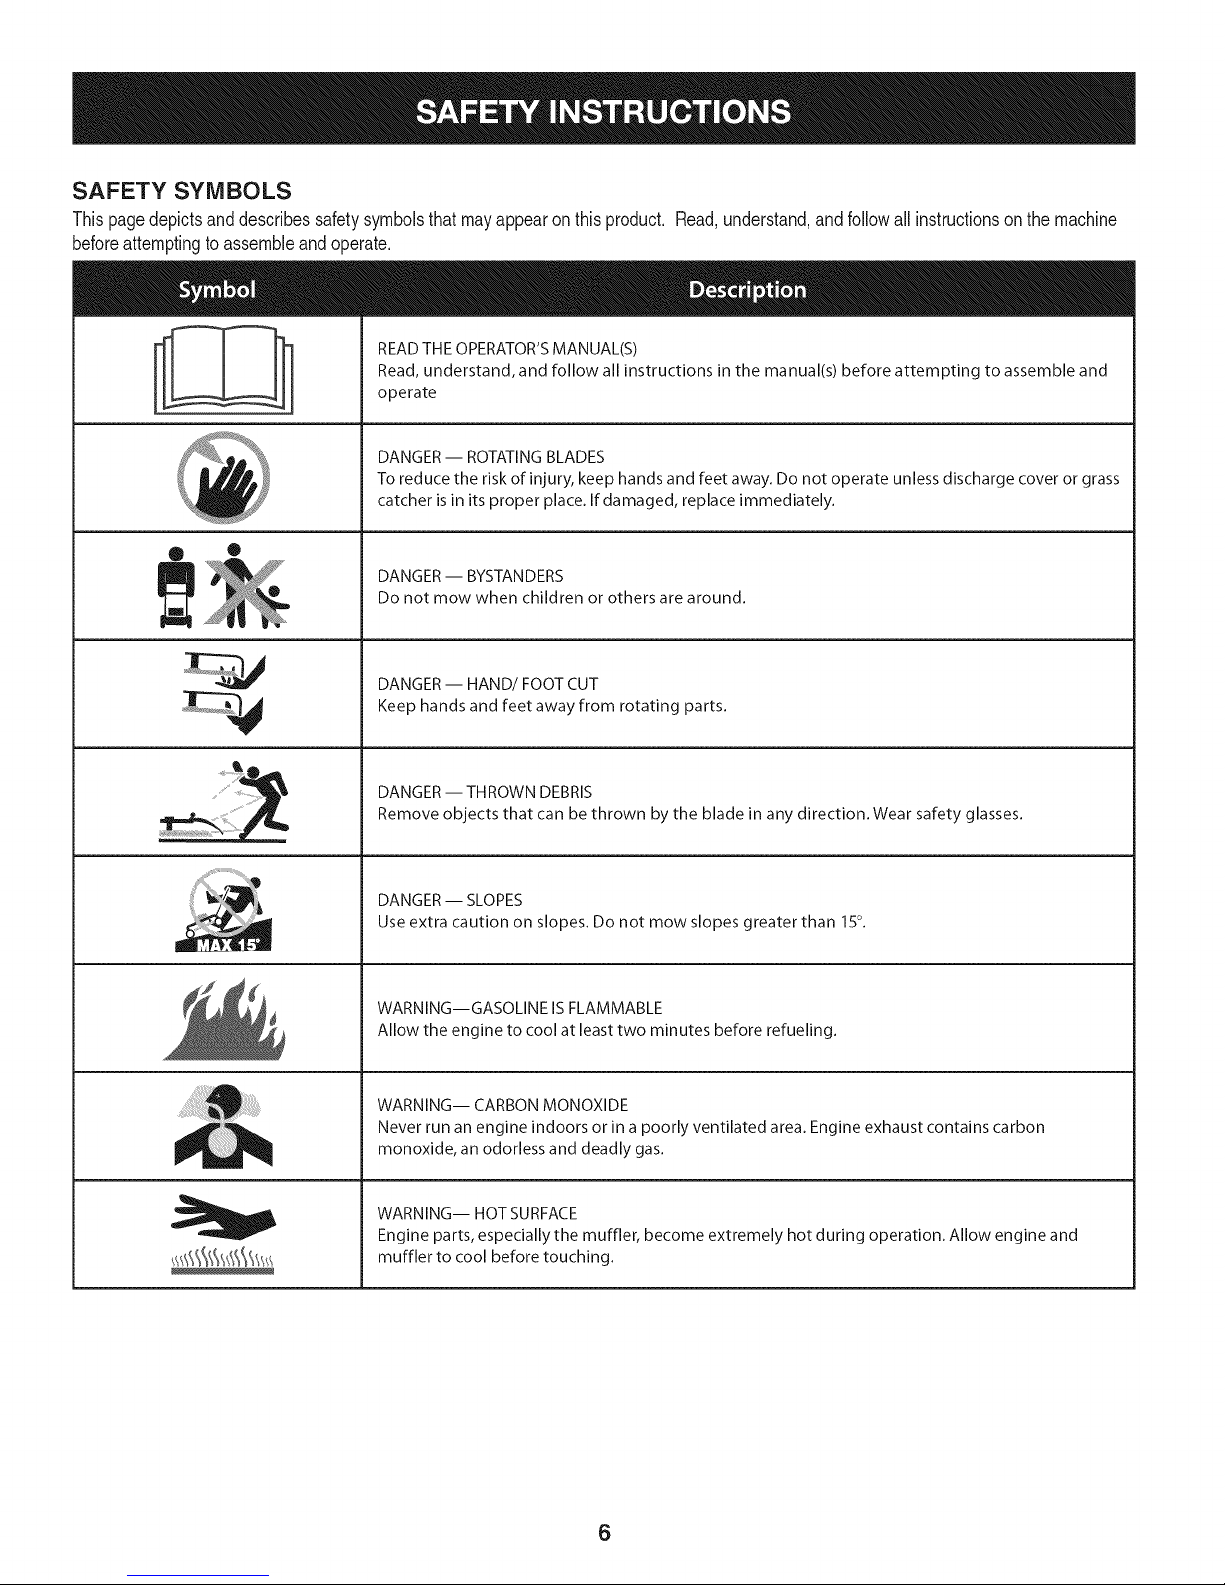
SAFETY SYMBOLS
Thispagedepictsanddescribessafetysymbolsthatmayappearonthisproduct. Read,understand,andfollowallinstructionson themachine
beforeattemptingto assembleandoperate.
READ THE OPERATOR'S MANUAL(S)
i
i
®
Read, understand, and follow all instructions in the manual(s) before attempting to assemble and
operate
DANGER -- ROTATING BLADES
To reduce the risk of injury, keep hands and feet away. Do not operate unless discharge cover or grass
catcher is in its proper place. If damaged, replace immediately.
DANGER -- BYSTANDERS
Do not mow when children or others are around.
J
DANGER-- HAND/FOOT CUT
Keep hands and feet away from rotating parts.
DANGER -- THROWN DEBRIS
Remove objects that can be thrown by the blade in any direction. Wear safety glasses.
DANGER -- SLOPES
Use extra caution on slopes. Do not mow slopes greater than 150.
WARNING--GASOLINE ISFLAMMABLE
Allow the engine to cool at least two minutes before refueling.
WARNING-- CARBON MONOXIDE
Never run an engine indoors or in a poorly ventilated area. Engine exhaust contains carbon
monoxide, an odorless and deadly gas.
WARNING-- HOT SURFACE
Engine parts, especially the muffler, become extremely hot during operation. Allow engine and
muffler to cool before touching.
6
Page 7
|
|
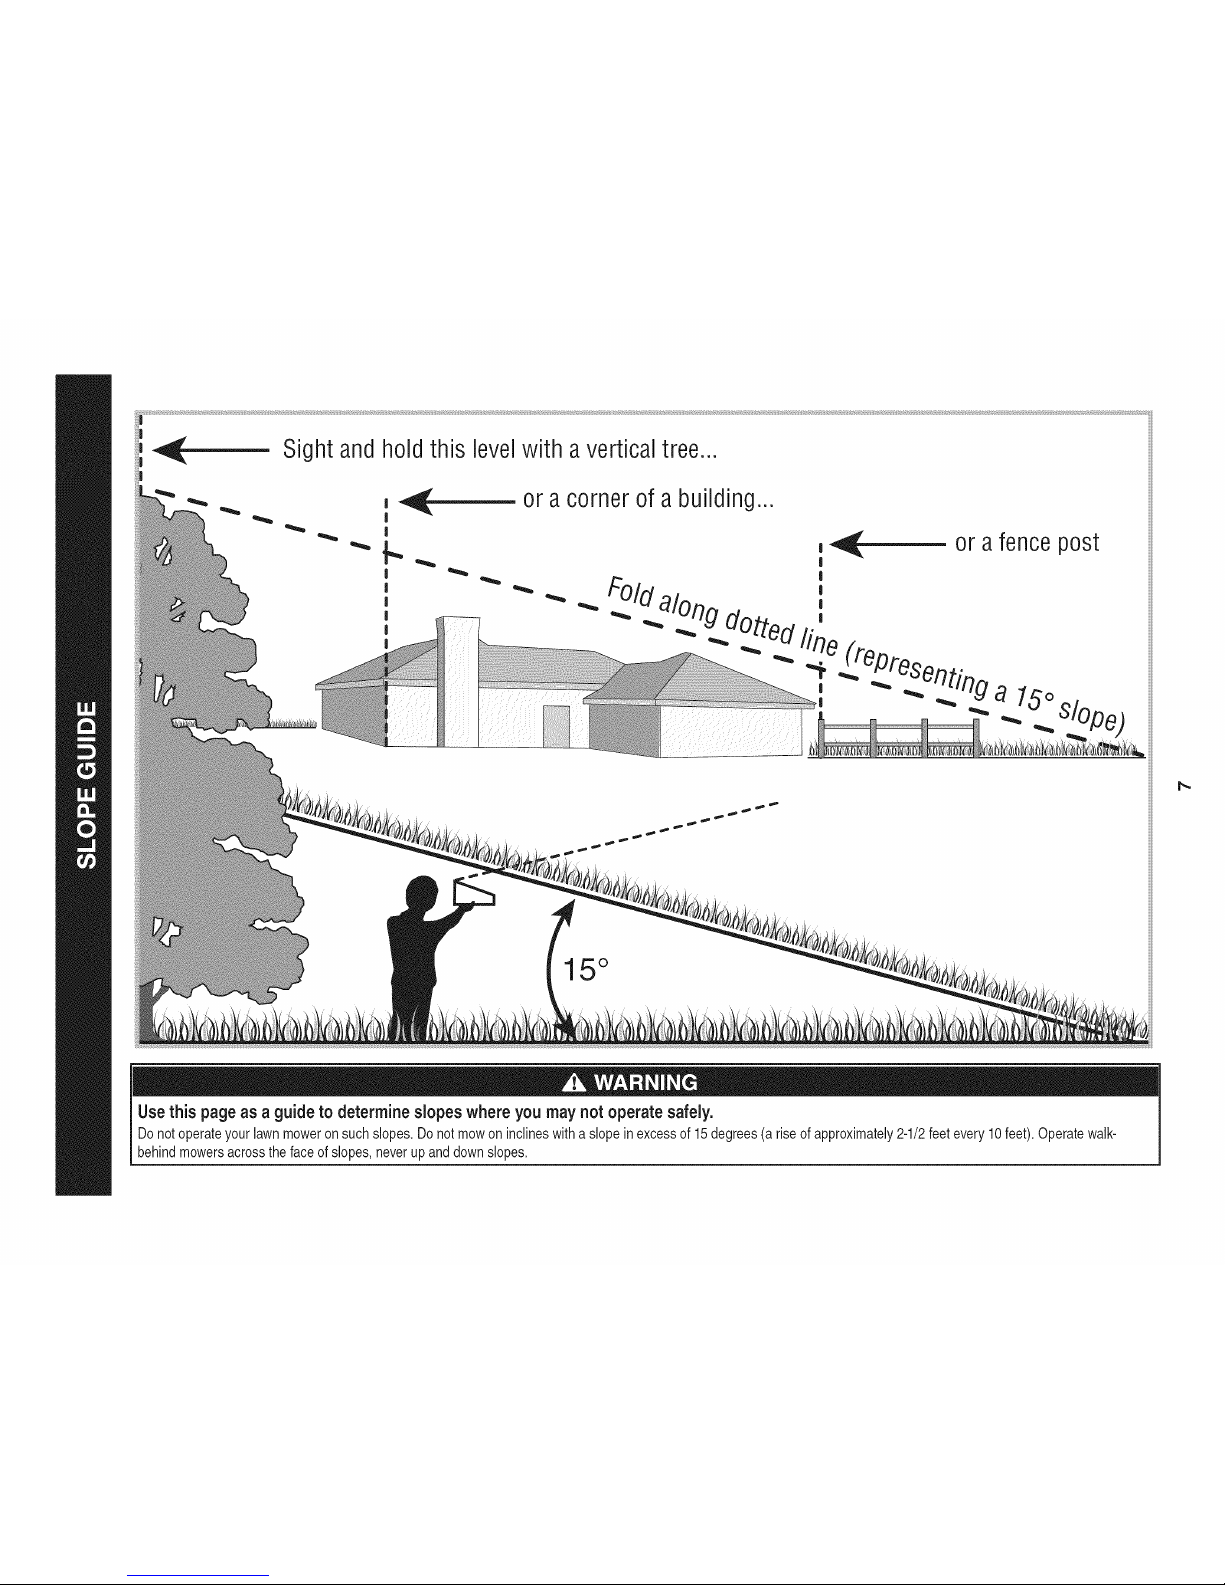
or acornerof a building...
15°
Use this page as a guideto determine slopes where you may not operate safely.
Donotoperateyourlawnmoweronsuchslopes.Donotmowoninclineswitha slopeinexcessof 15degrees(a riseofapproximately2-1/2feetevery10feet).Operatewalk-
behindmowersacrossthe faceofslopes,neverupanddownslopes.
Page 8

This page left intentionallyblank.
8
Page 9
9
Page 10
IMPORTANT:Thisunitisshippedwithoutgasolineoroil intheengine.
Becertainto serviceenginewithgasolineandoilasinstructedinthe
Operationsectionbeforestartingor runningyourmachine.
NOTE:Referenceto rightandlefthandsideoftheLawnMoweris
observedfromtheoperatingposition.
OPENING CARTON
1. Cuteachcornerof thecartonverticallyfromtopto bottom.
2. Removeall looseparts.
3. Removeloosepackingmaterial.
REMOVING UNIT FROM CARTON
1. Liftunitfromthereartodetachitfromunderlyingcartonmaterial
androllunit outofcarton.
2. Checkcartonthoroughlyforanyotherlooseparts.
f
LOOSE PARTS IN CARTON
• GrassCatcher
• SideDischargeCover
• EngineOil
ASSEMBLY
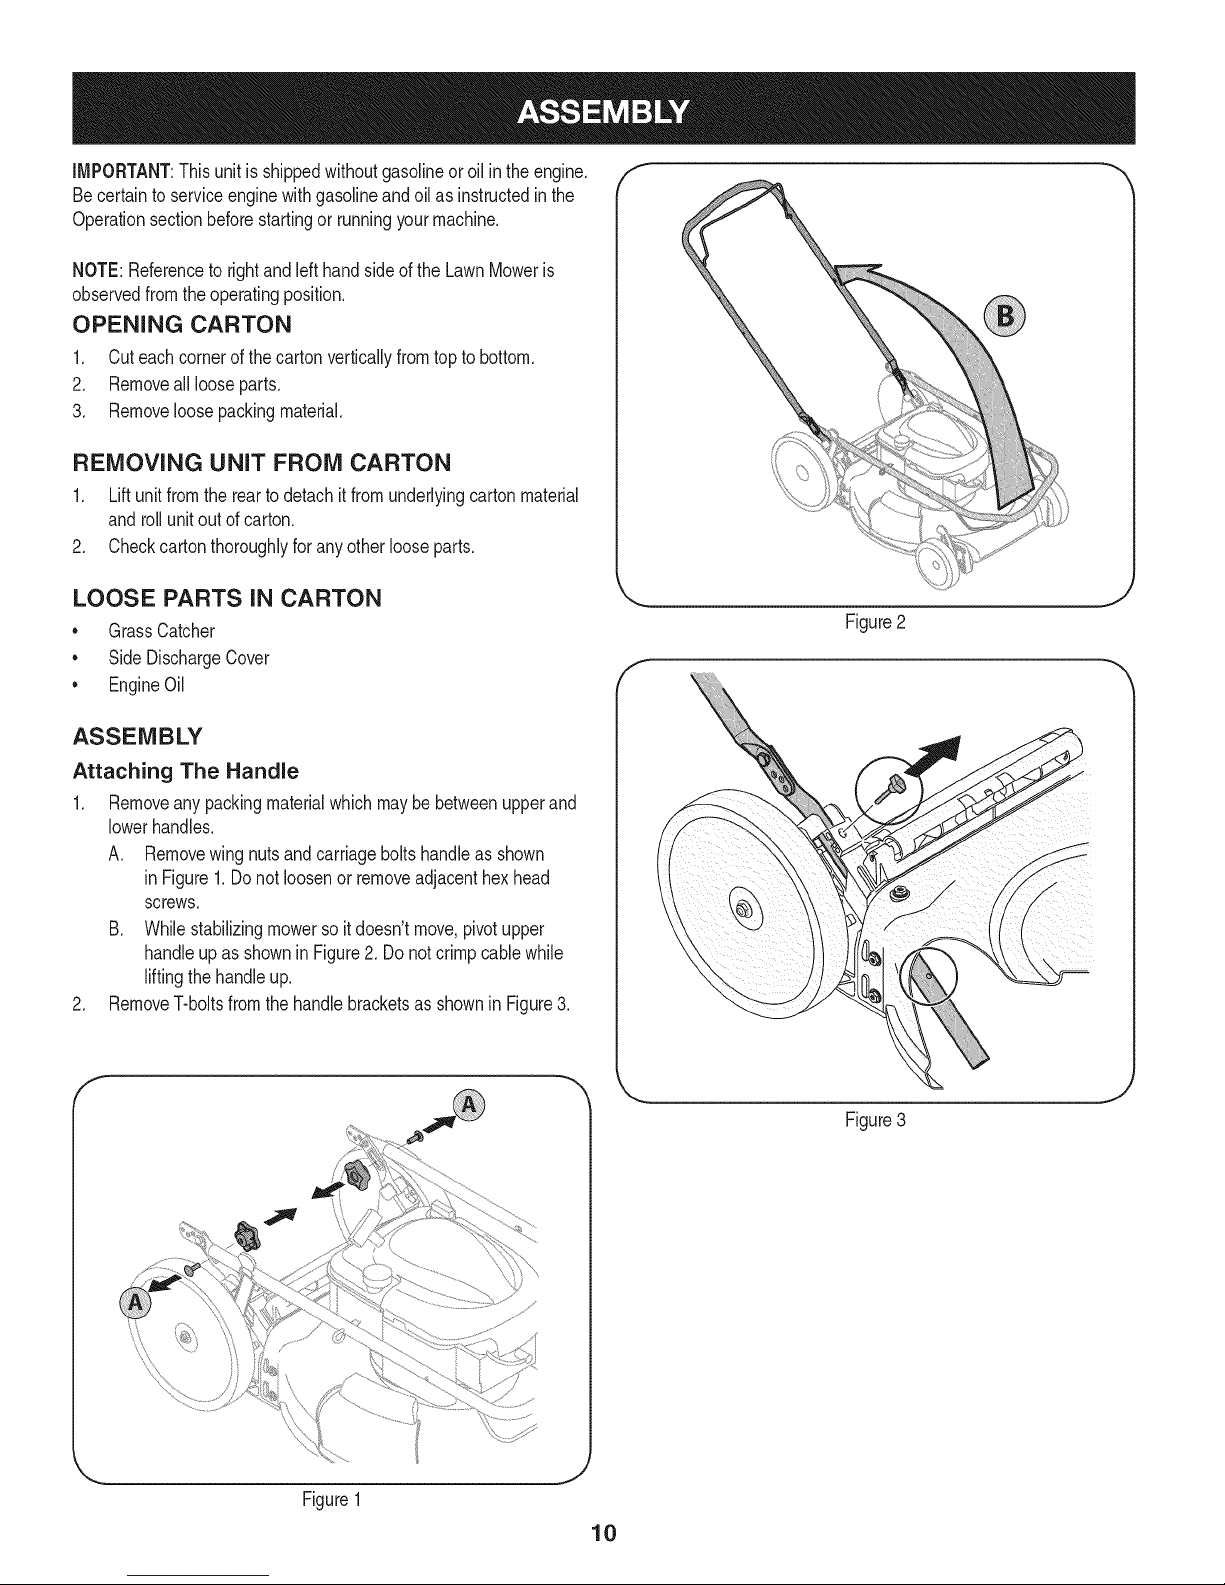
Attaching The Handle
1. Removeany packingmaterialwhichmaybebetweenupperand
lowerhandles.
A. Removewing nutsandcarriageboltshandleas shown
in Figure1.Donot loosenor removeadjacenthexhead
screws.
B. Whilestabilizingmowersoit doesn'tmove,pivotupper
handleupas showninFigure2.Donotcrimpcablewhile
liftingthehandleup.
2. RemoveT-boltsfromthehandlebracketsas shownin Figure3.
E
J
Figure2
Figure3
\\
Figure1
Page 11
.
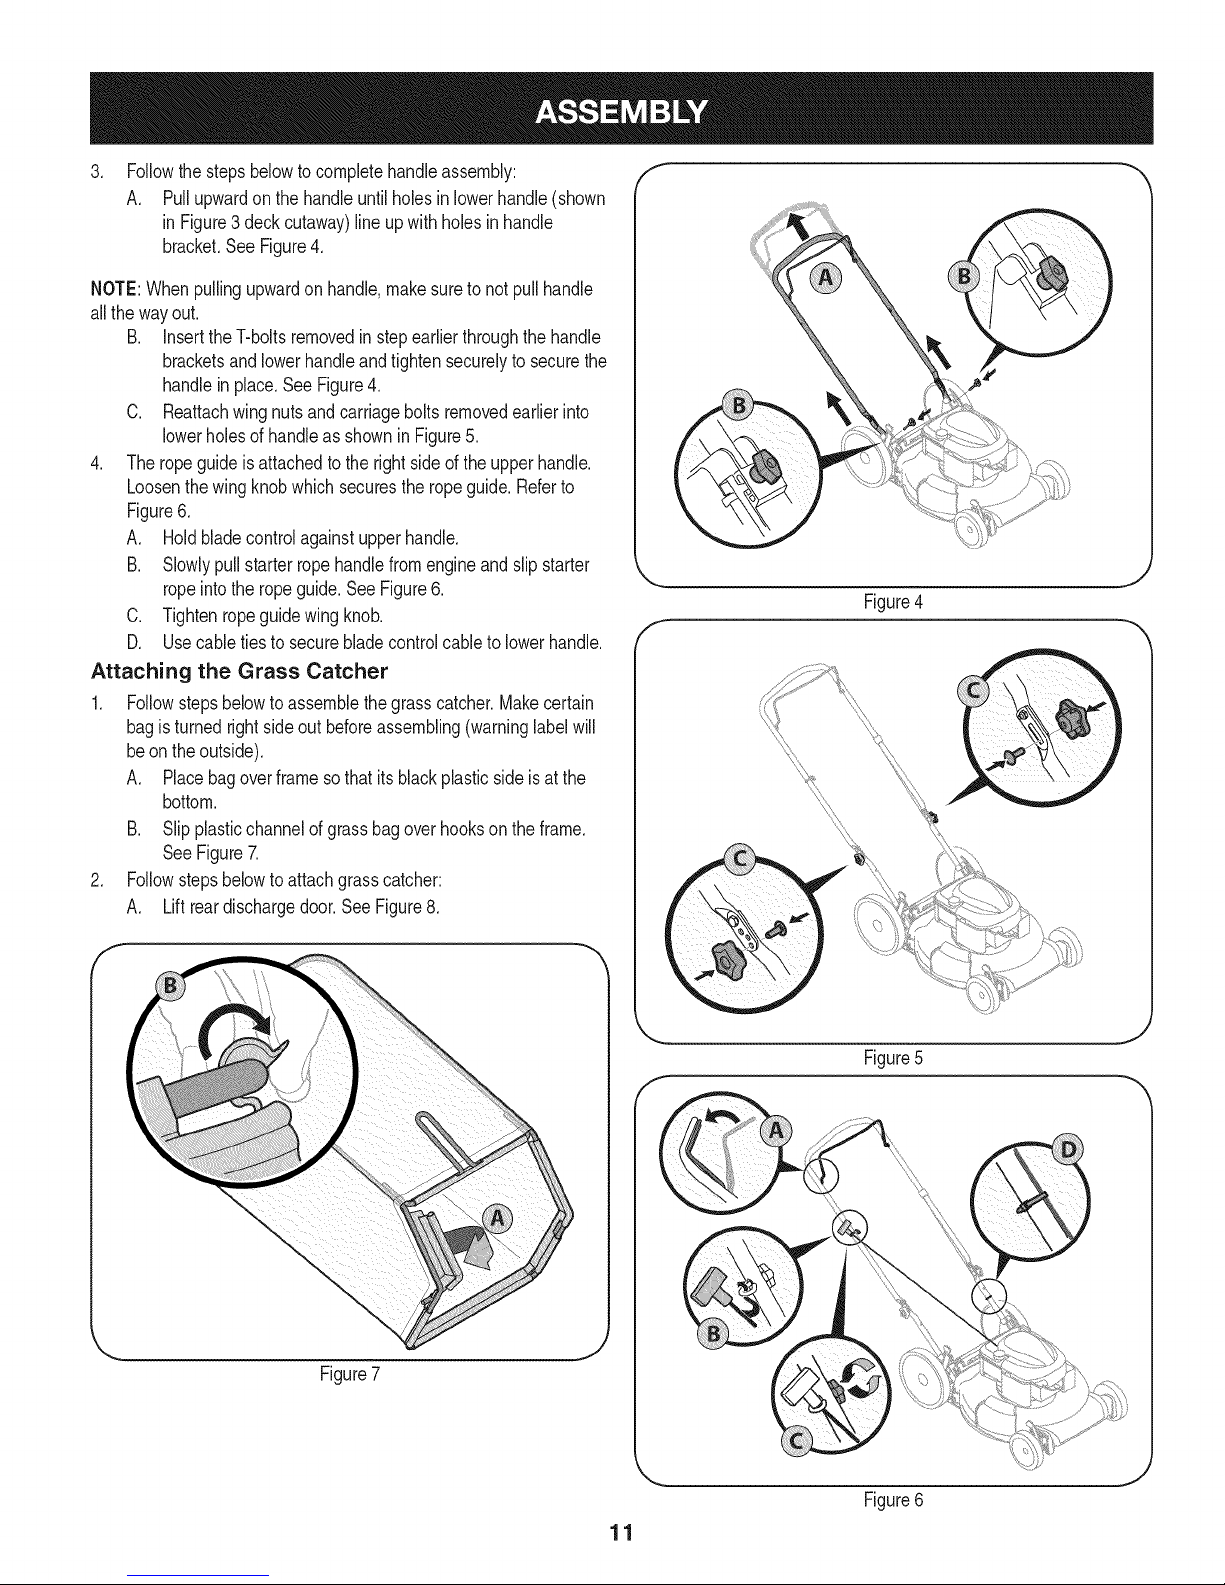
Followthestepsbelowtocompletehandleassembly:
A. Pullupwardonthehandleuntilholesinlowerhandle(shown
in Figure3 deckcutaway)lineupwith holesinhandle
bracket.SeeFigure4.
NOTE:Whenpullingupwardonhandle,makesuretonotpullhandle
allthewayout.
B. Insertthe T-boltsremovedin stepearlierthroughthehandle
bracketsandlowerhandleandtightensecurelyto securethe
handlein place.SeeFigure4.
C. Reattachwing nutsandcarriageboltsremovedearlierinto
lowerholesofhandleasshownin Figure5.
4. Theropeguideisattachedtotherightsideofthe upperhandle.
Loosenthewingknobwhichsecurestheropeguide.Referto
Figure6.
A. Holdbladecontrolagainstupperhandle.
B. Slowlypullstarterropehandlefromengineandslip starter
ropeintotheropeguide.SeeFigure6.
C. Tightenropeguidewingknob.
D. Usecabletiestosecurebladecontrolcabletolowerhandle.
Attaching the Grass Catcher
1. Followstepsbelowto assemblethegrasscatcher.Makecertain
bagisturnedrightsideoutbeforeassembling(warninglabelwill
beontheoutside).
A. Placebagoverframeso thatits blackplasticsideis at the
bottom.
B. Slipplasticchannelofgrassbagoverhooksonthe frame.
SeeFigure7.
2. Followstepsbelowto attachgrasscatcher:
A. Lift reardischargedoor.SeeFigure8.
Figure4
Figure7
Figure5
f
,J
Figure6
11
Page 12
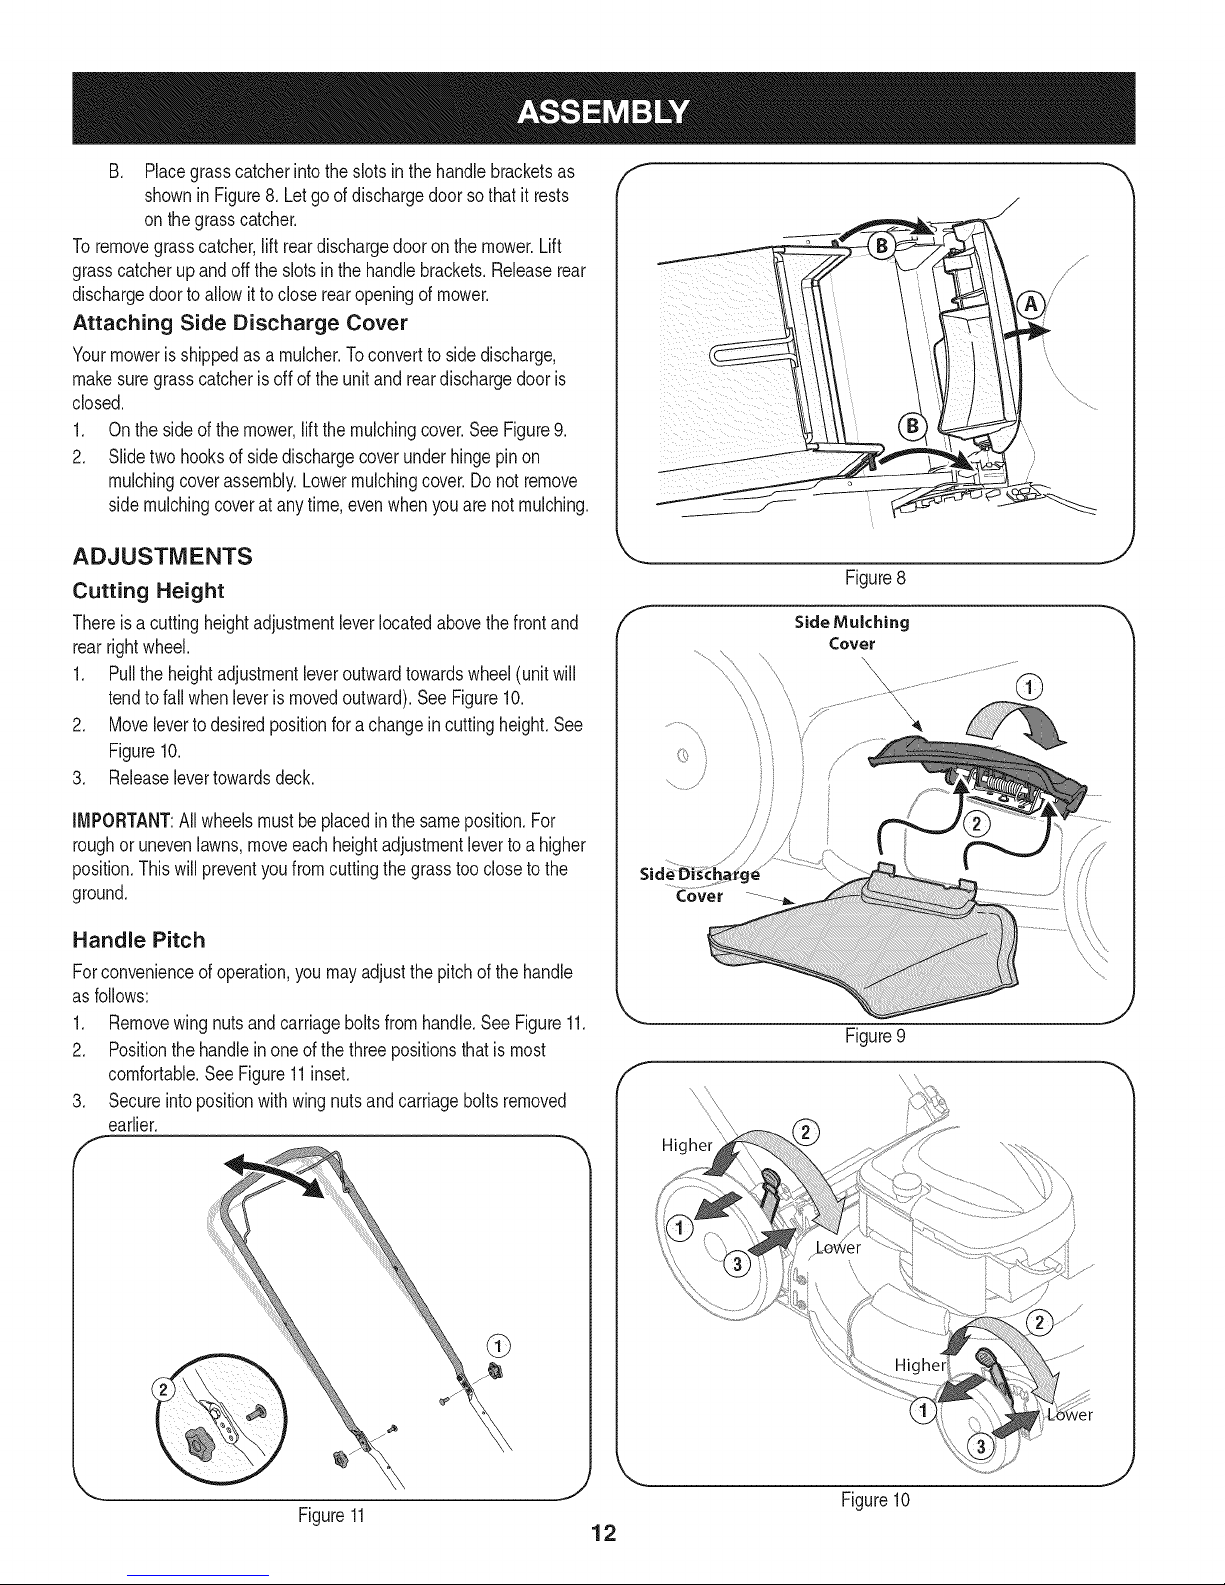
B, Placegrasscatcherintotheslotsinthehandlebracketsas
shownin Figure8. Letgoofdischargedoorsothatit rests
onthegrasscatcher.
Toremovegrasscatcher,liftreardischargedooronthemower.Lift
grasscatcherupandoffthe slotsinthe handlebrackets.Releaserear
dischargedoortoallowit tocloserearopeningofmower,
Attaching Side Discharge Cover
Yourmowerisshippedasarnulcher.Toconverttosidedischarge,
makesuregrasscatcherisoffof the unitand reardischargedooris
closed.
1. Onthesideof themower,lift themulchingcover.See Figure9.
2, Slidetwo hooksof sidedischargecoverunderhingepinon
mulchingcoverassembly.Lowermulchingcover.Donotremove
sidemulchingcoverat anytime,evenwhenyouarenotmulching.
ADJUSTMENTS
Cutting Height
Thereis a cuttingheightadjustmentleverlocatedabovethefrontand
rearrightwheel,
1. Pulltheheightadjustmentleveroutwardtowardswheel(unitwill
tendto fall whenleveris movedoutward).See Figure10,
2. Moveleverto desiredpositionfora changeincuttingheight.See
Figure10.
3, Releaselevertowardsdeck.
f
®
Figure8
f
IMPORTANT:Allwheelsmustbeplacedinthe sameposition.For
roughor unevenlawns,moveeachheightadjustmentlevertoa higher
position.Thiswill preventyoufromcuttingthegrasstooclosetothe
ground,
Handle Pitch
Forconvenienceofoperation,youmayadjustthepitchofthehandle
asfollows:
1, Removewing nutsandcarriageboltsfromhandle,SeeFigure11,
2. Positionthehandlein oneofthethreepositionsthatismost
comfortable,SeeFigure11inset,
3. Secureintopositionwithwingnutsandcarriageboltsremoved
earlier,
E
/
Figure9
f
Higher
Figure11
_J
Figure10
J
12
Page 13
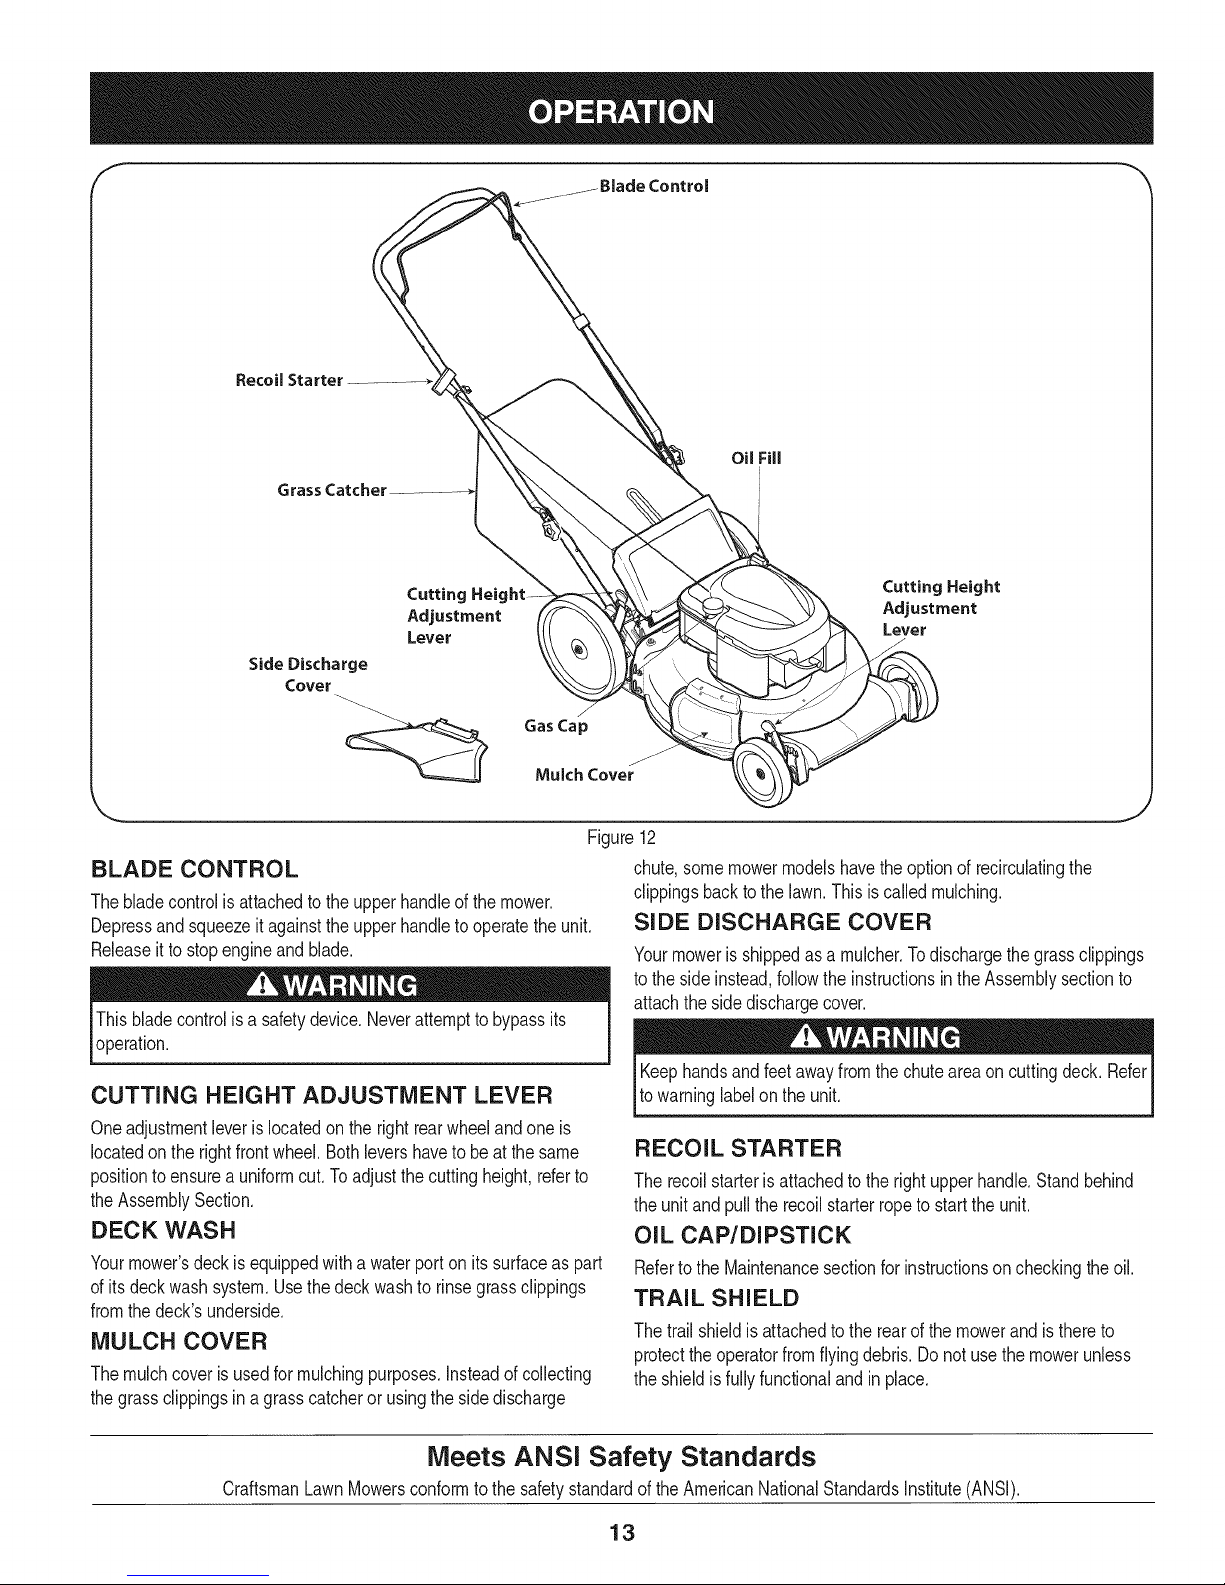
Recoil Starter
Cuttin¢
Adjustment
Lever
Cutting Height
Adjustment
Lever
SideDischarge
Cover
J
Gas Cap
MulchCover
Figure12
BLADE CONTROL chute,somemowermodelshavetheoptionofrecirculatingthe
Thebladecontrolisattachedtotheupperhandleofthemower, clippingsbacktothelawn.Thisiscalledmulching.
Depressandsqueezeit againsttheupperhandletooperatetheunit. Sl DE DISCHARGE COVER
Releaseittostopengineandblade.
Yourmowerisshippedasamulcher.Todischargethegrassclippings
tothesideinstead,followthe instructionsintheAssemblysectionto
attachthe sidedischargecover.
Thisbladecontrolisa safetydevice.Neverattempttobypassits
operation.
Keephandsandfeetawayfromthechuteareaoncuttingdeck.Refer
CUTTING HEIGHT ADJUSTMENT LEVER
towarninglabelonthe unit.
Oneadjustmentleverislocatedon therightrearwheelandoneis
locatedontherightfrontwheel.Bothlevershaveto beat the same
positiontoensureauniformcut.Toadjustthecuttingheight,referto
theAssemblySection.
DECK WASH
Yourmower'sdeckisequippedwitha waterport onitssurfaceas part
ofitsdeckwashsystem.Usethedeckwashto rinsegrassclippings
fromthedeck'sunderside.
MULCH COVER
Themulchcoverisusedformulchingpurposes.Insteadofcollecting
RECOIL STARTER
Therecoilstarterisattachedtotherightupperhandle.Standbehind
theunitandpulltherecoilstarterropeto starttheunit.
OIL CAP/DIPSTICK
Referto theMaintenancesectionforinstructionsoncheckingtheoil.
TRAIL SHIELD
Thetrailshieldis attachedto the rearof the mowerand isthereto
protecttheoperatorfromflyingdebris.Donotusethemowerunless
theshieldis fullyfunctionalandinplace.
thegrassclippingsin agrasscatcherorusingthesidedischarge
CraftsmanLawnMowersconformto thesafetystandardofthe AmericanNationalStandardsInstitute(ANSI).
Meets ANSI Safety Standards
13
Page 14
GAS AND OiL FILL-UP f "_
IMPORTANT:Thisunitisshippedwithoutgasolineoroil intheengine.
Becertainto serviceenginewithgasolineandoilasinstructedinthis
sectionbeforestartingor runningyourmachine.
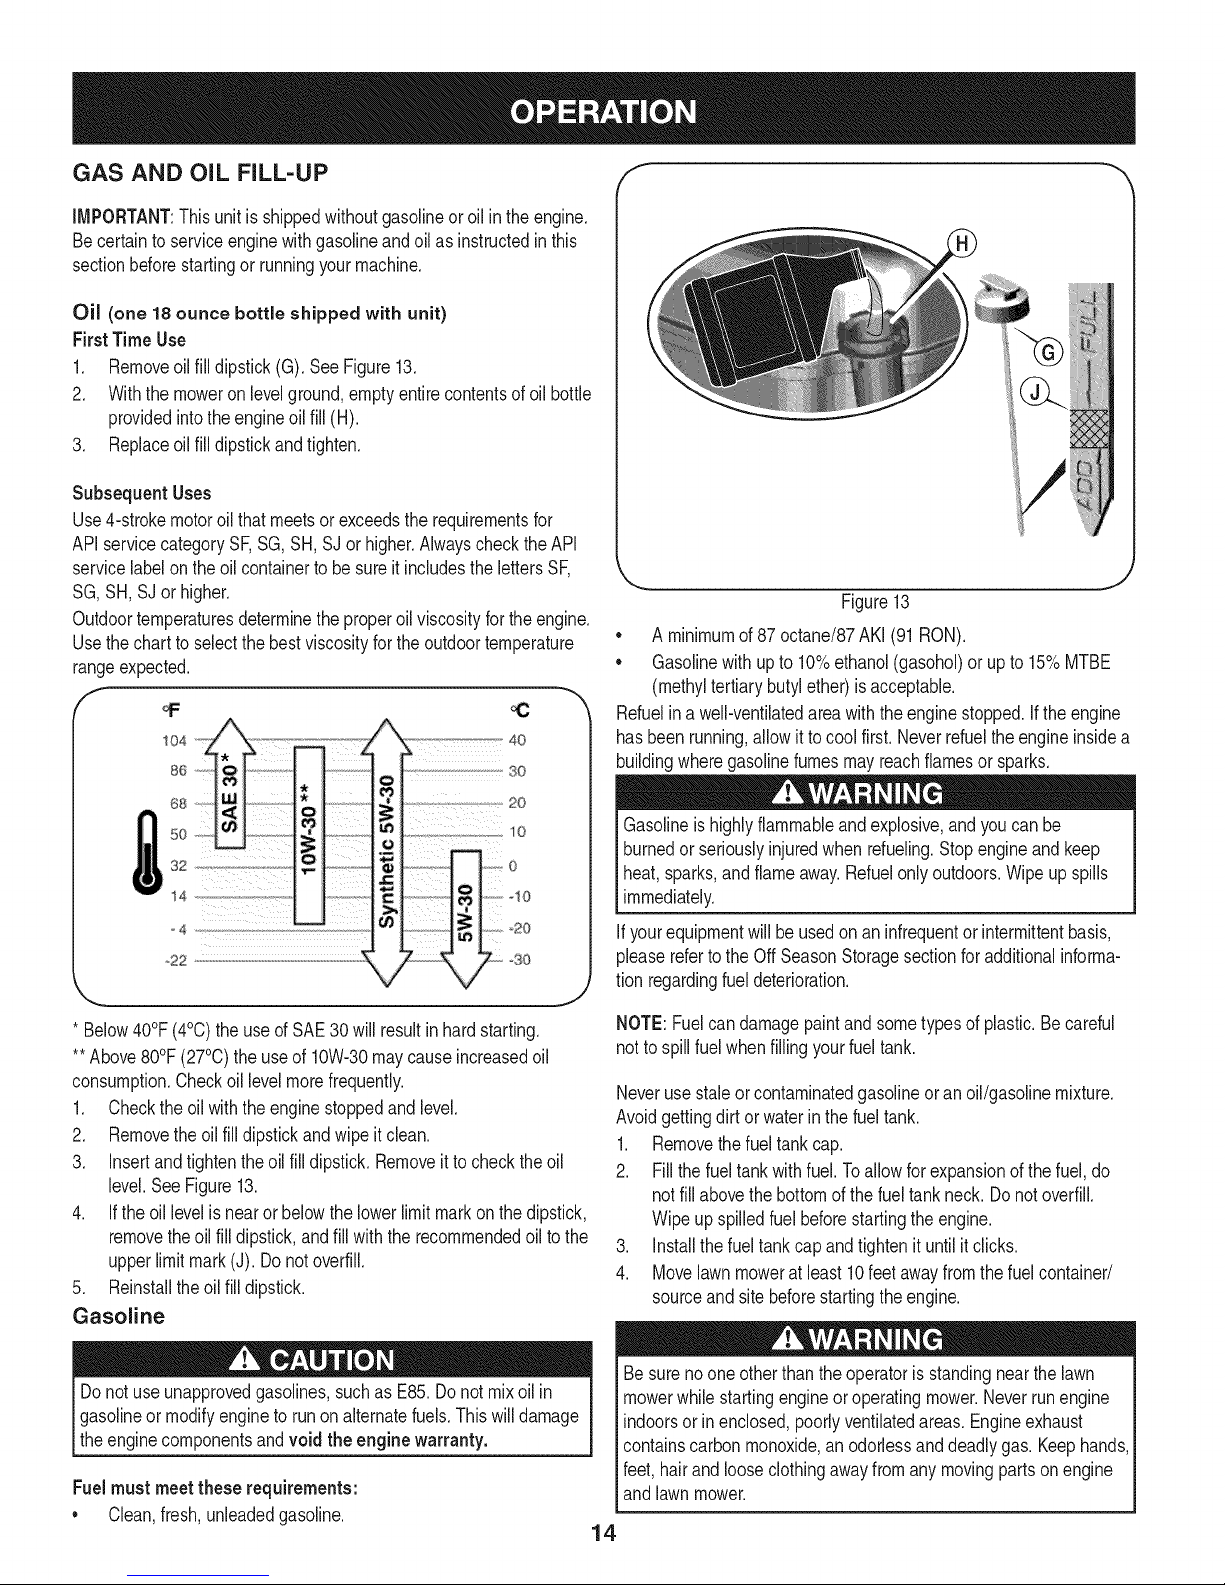
Oil (one 18 ounce bottle shipped with unit)
FirstTime Use
1. Removeoil filldipstick(G).SeeFigure13.
2. Withthe moweron levelground,emptyentirecontentsofoilbottle
providedintotheengineoil fill(H).
3. Replaceoil filldipstickandtighten.
Subsequent Uses
Use4-strokemotoroil thatmeetsor exceedsthe requirementsfor
APIservicecategorySF,SG, SH,SJorhigher.AlwayschecktheAPI
servicelabelon theoilcontainerto besureitincludesthelettersSF,
SG,SH,SJor higher.
Outdoortemperaturesdeterminetheproperoilviscosityfor theengine.
Usethechartto selectthe bestviscosityforthe outdoortemperature
rangeexpected.
f
"h
40
30
20
10
°30
• A minimumof87 octane/87AKI (91RON).
• Gasolinewith upto 10%ethanol(gasohol)or upto 15%MTBE
(methyltertiarybutylether)isacceptable.
Refuelina well-ventilatedareawiththeenginestopped.Iftheengine
hasbeenrunning,allowitto coolfirst.Neverrefueltheengineinsidea
buildingwheregasolinefumesmayreachflamesor sparks.
Gasolineishighlyflammableandexplosive,andyoucanbe
burnedor seriouslyinjuredwhenrefueling.Stopengineand keep
heat,sparks,and flameaway.Refuelonlyoutdoors.Wipeupspills
immediately.
ifyourequipmentwillbeusedonan infrequentorintermittentbasis,
pleaserefertotheOff SeasonStoragesectionfor additionalinforma-
tion regardingfueldeterioration.
Figure13
e
* Below40°F(4°C)theuseof SAE30 willresultin hardstarting.
**Above80°F(27°C)theuseof 10W-30maycauseincreasedoil
consumption.Checkoil levelmorefrequently.
1. Checktheoilwiththeenginestoppedand level.
2. Removethe oil filldipstickandwipeit clean.
3. Insertandtightentheoilfilldipstick.Removeittochecktheoil
level.SeeFigure13.
4. Iftheoillevelisnearorbelowthelowerlimitmarkonthe dipstick,
removetheoil filldipstick,andfill withthe recommendedoiltothe
upperlimitmark(J). Donotoverfill.
5. Reinstalltheoilfill dipstick.
Gasoline
Donotuse unapprovedgasolines,suchas E85.Donotmixoil in
Igasolineormodifyengineto runonalternatefuels.Thiswilldamage
_theenginecomponentsandvoid the enginewarranty.
Fuelmustmeetthese requirements:
• Clean,fresh,unleadedgasoline.
NOTE:Fuelcandamagepaintand sometypesof plastic.Becareful
notto spill fuelwhenfilling yourfueltank.
Neverusestaleorcontaminatedgasolineoranoil/gasolinemixture.
Avoidgettingdirt orwaterin the fueltank.
1. Removethe fuel tankcap.
2. Fillthefuel tankwithfuel.Toallowforexpansionofthefuel,do
notfill abovethebottomofthefueltankneck.Donotoverfill.
Wipeupspilledfuelbeforestartingtheengine.
3. Installthefueltankcapandtightenituntilitclicks.
4. Movelawnmoweratleast10feet awayfromthefuelcontainer/
sourceandsitebeforestartingthe engine.
Besurenooneotherthantheoperatorisstandingnearthelawn
mowerwhilestartingengineoroperatingmower.Neverrunengine
indoorsorin enclosed,poorlyventilatedareas.Engineexhaust
containscarbonmonoxide,an odorlessanddeadlygas.Keephands,
feet,hairand looseclothingawayfromanymovingpartson engine
andlawnmower.
14
Page 15

TO START ENGINE
1. Standingbehindthemower,squeezethebladecontrolhandle
againstupperhandle.SeeFigure14.
2. Holdingthesetwohandlestogetherfirmly,grasprecoilstarter
handleandpullropeslowlyuntilresistanceis felt,thenpullwitha
rapid,continuous,full arm stroke.SeeFigure14.Keepingafirm
griponthe startercordhandle,lettheroperewindslowly.Repeat
untilenginecranks.Letthe roperewindeachtimeslowly.
Rapidretractionof startercord(kickback)willpullhandandarm
towardenginefasterthanyoucanletgo. Brokenbones,fractures,
bruisesorsprainscouldresult.
NOTE:Ifenginefloods,waita fewminutesto restart.
TO STOP ENGINE
1. Releasebladecontroltostoptheengineandblade.
Waitforthebladeto stopcompletelybeforeperforminganyworkon
themoweror toremovethegrasscatcher.
USING YOUR LAWN MOWER
Besurelawnisclearofstones,sticks,wire,orotherobjectswhich
coulddamagelawnmoweror engine.Suchobjectscouldbeaccidently
thrownbythemowerin anydirectionandcauseseriouspersonalinjury
totheoperatorandothers.
Theoperationofanylawnmowercan resultinforeignobjectsbeing
thrownintothe eyes,whichcandamageyoureyesseverely.Always
wearsafetyglasseswhileoperatingthemower,or whileperforming
anyadjustmentsor repairson it.
USING AS MULCHER
Formulchinggrass,removethegrasscatcherandsidedischarge
chutefromthemower.Foreffectivemulching,donotcutwetgrass. If
thegrasshasbeenallowedtogrowinexcessoffourinches,mulching
isnotrecommended.Usethegrasscatchertobagclippingsinstead.
Figure14
USING GRASS CATCHER
Youcanusethegrasscatchertocollectclippingswhileyouare
operatingthemower.
1. Attachgrasscatcherfollowinginstructionsinthe"Assembly"
section.Grassclippingswillautomaticallycollectinbagasyou
runmower.Operatemoweruntilgrassbagisfull.
2. Stopenginecompletelyby releasingthebladecontrol.Makesure
thattheunithascometoa completestop.
3. Liftdischargedoorandpullgrassbagupandawayfromthe
mowerto removethe bag.Disposeofthegrassclippingsand
reinstallthebagwhencomplete.
Ifyoustrikeaforeignobject,stoptheengine.Disconnectthespark
plugwire,thoroughlyinspectmowerfor anydamage,and repair
damagebeforerestartingandoperating.Extensivevibrationof mower
duringoperationisanindicationof damage.Theunitshouldbe
promptlyinspectedandrepaired.
15
Page 16
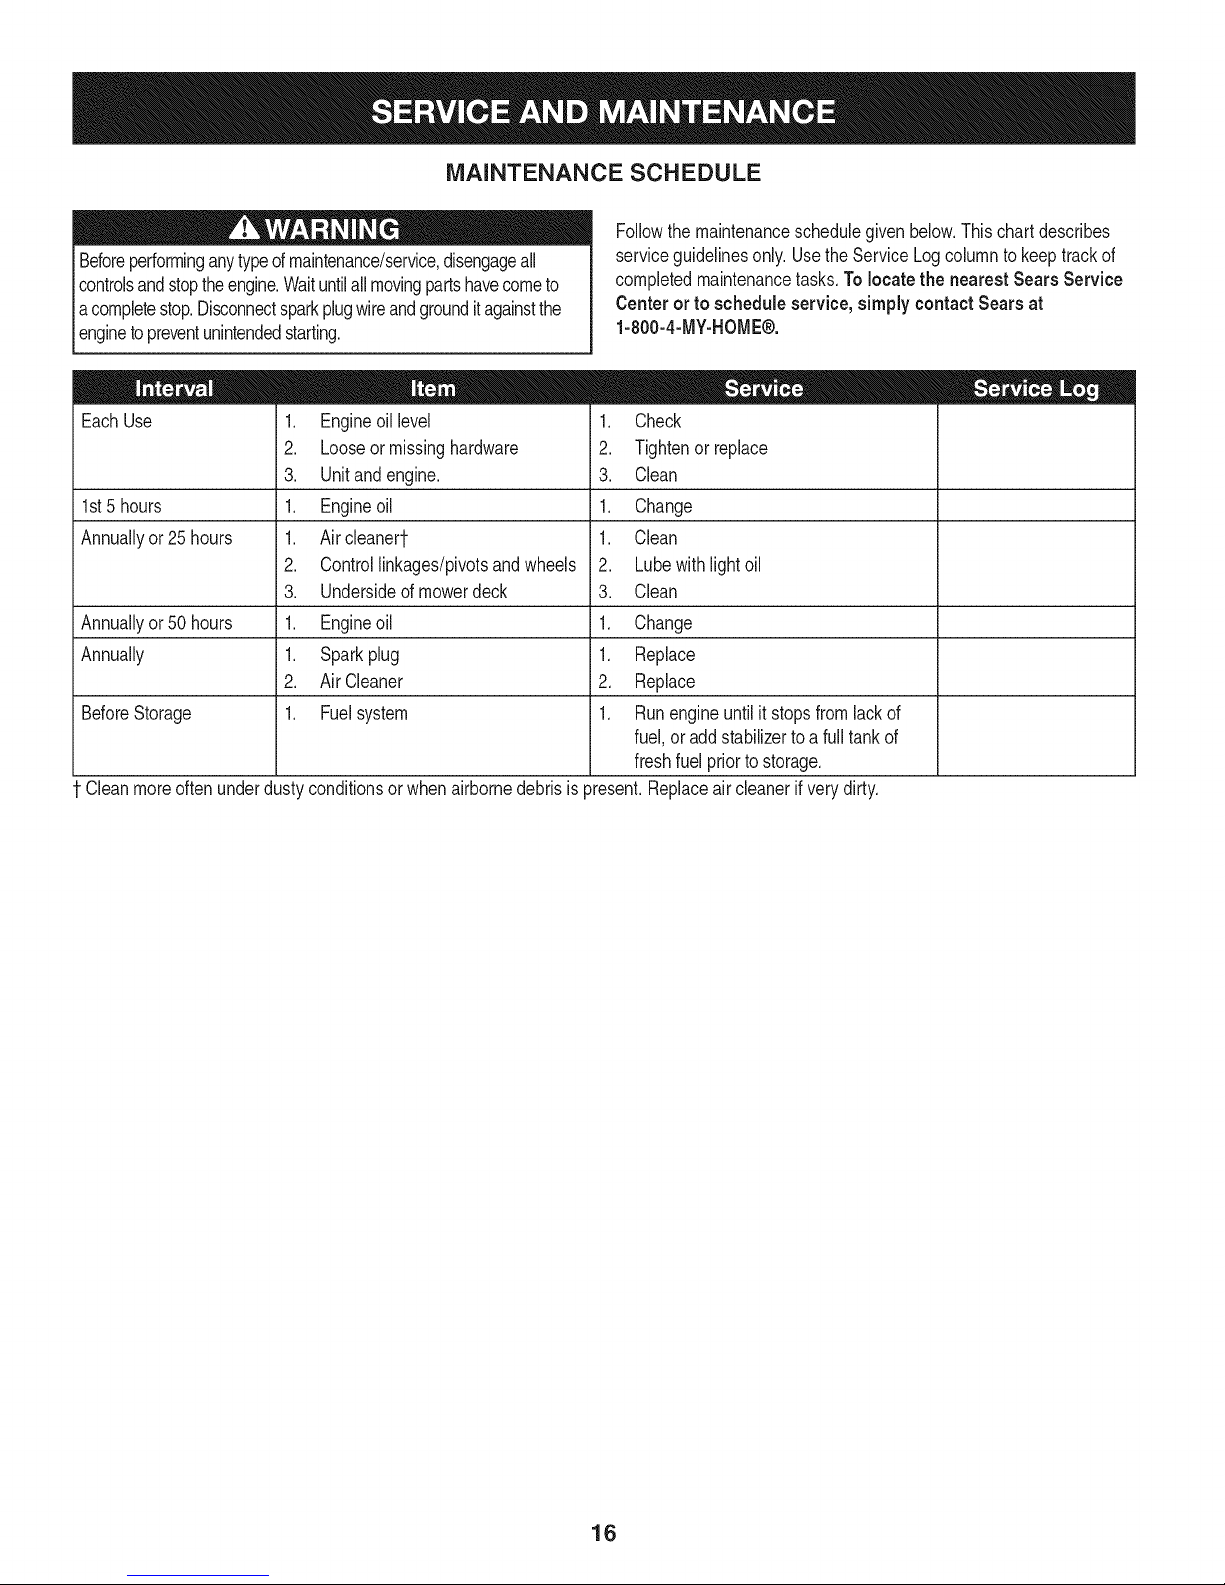
MAINTENANCE SCHEDULE
Beforeperforminganytypeofmaintenance/service,disengageall
controlsandstoptheengine.Waituntilallmovingpartshavecometo
acompletestop.Disconnectsparkplugwireandgrounditagainstthe
enginetopreventunintendedstarting.
=
EachUse
1st5 hours
Annuallyor25hours
Annuallyor50hours
Annually
BeforeStorage
Cleanmoreoftenunderdustyconditionsor whenairbornedebrisis
.
Engineoillevel
2.
Looseormissinghardware
3.
Unitandengine.
1.
Engineoil
1.
Aircleanert
2.
Controllinkages/pivotsandwheels
3.
Undersided mowerdeck
1.
Engineoil
1.
Sparkplug
2.
AirCleaner
1.
Fuelsystem
Followthemaintenanceschedulegivenbelow.Thischartdescribes
serviceguidelinesonly.UsetheServiceLogcolumntokeeptrackof
completedmaintenancetasks.To locate the nearestSears Service
Centeror to scheduleservice,simplycontactSearsat
1-800-4-MY-HOME®.
1. Check
2. Tightenor replace
3. Clean
1. Change
1. Clean
2. Lubewithlightoil
3. Clean
1. Change
1. Replace
2. Replace
1. Runengineuntil itstopsfromlackof
fuel,oraddstabilizertoa full tankof
freshfuelpriortostorage.
_resent.Replaceaircleanerifverydirty.
16
Page 17
Alwaysstopengine,disconnectsparkplugwire,andgroundagainst
enginebeforeperformingany typeofmaintenanceon yourmachine.
GENERAL RECOMMENDATIONS
• Alwaysobservesafetyruleswhenperforminganymaintenance.
• Thewarrantyon thislawnmowerdoesnotcoveritemsthathave
beensubjectedtooperatorabuseor negligence.To receivefull
valuefromwarranty,operatormustmaintaintheequipmentas
instructedhere.
• Changingof engine-governedspeedwill voidenginewarranty.
• Alladjustmentsshouldbecheckedat leastonceeachseason.
• Periodicallycheckall fastenersandmakesurethesearetight.
ENGINE MAINTENANCE
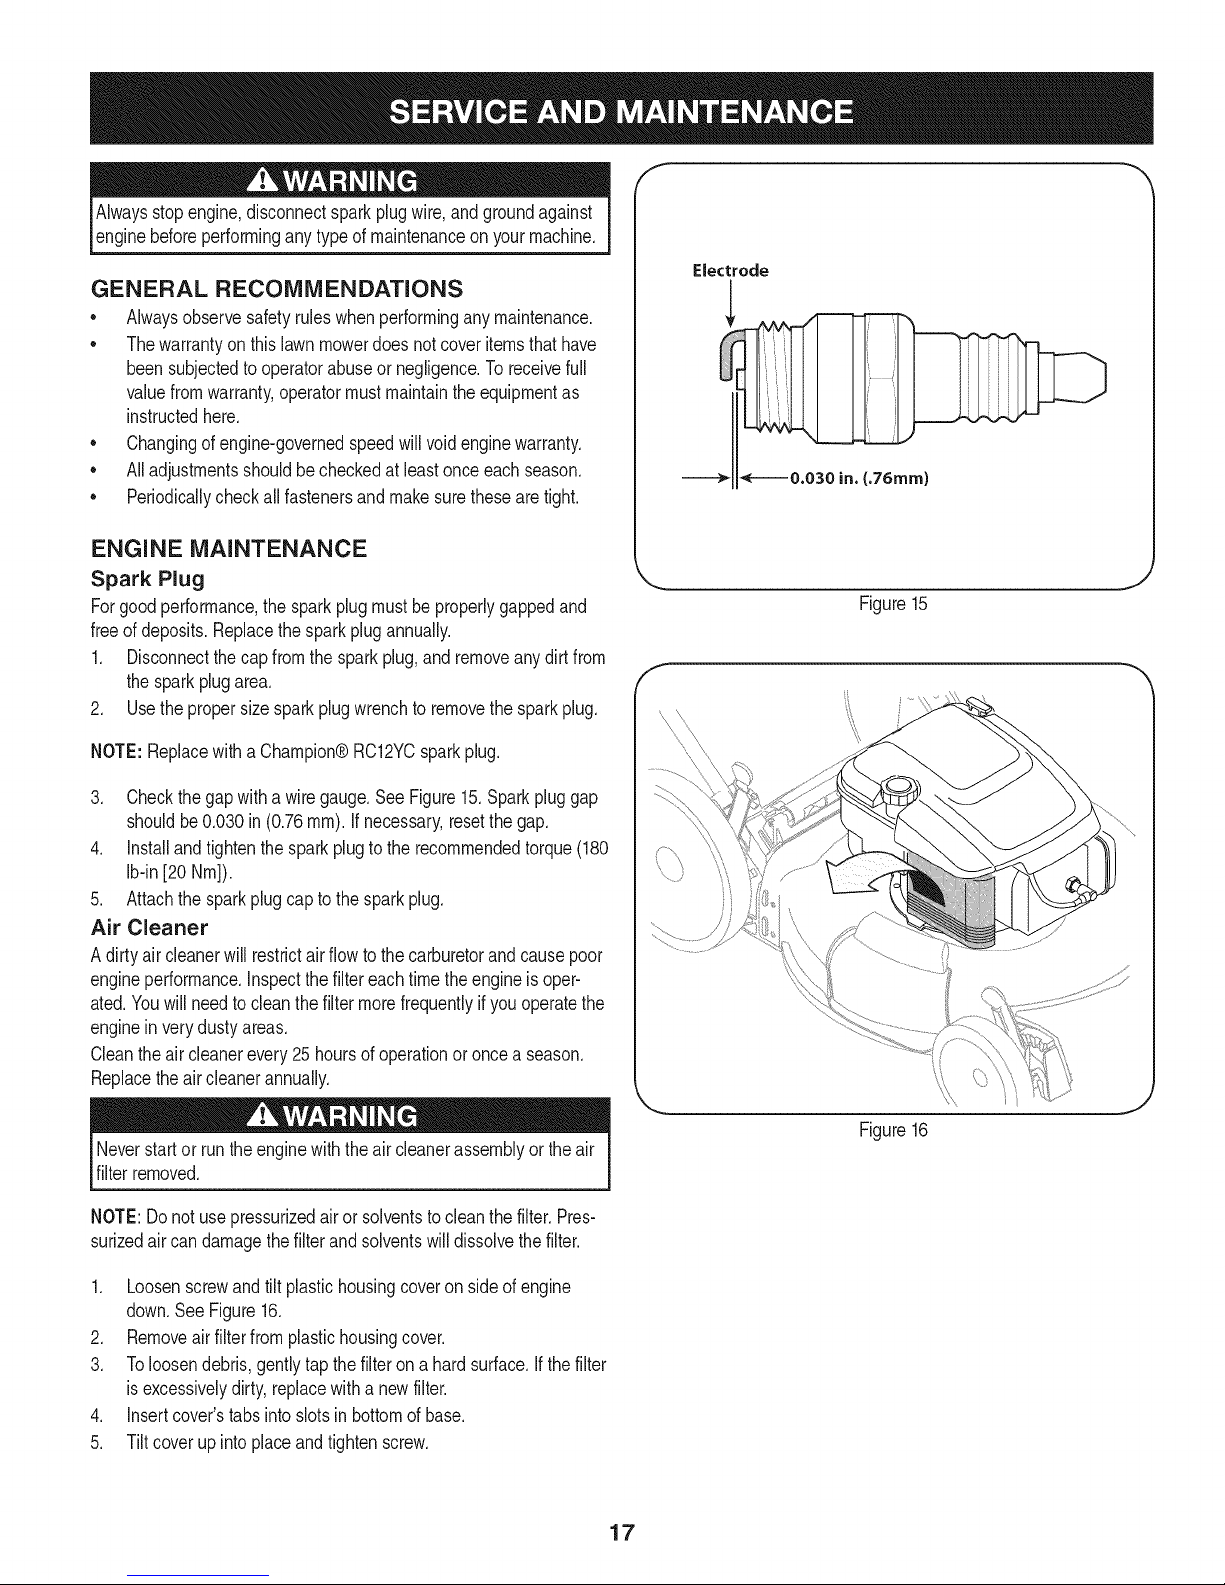
Spark Plug
Forgoodperformance,thesparkplugmustbeproperlygappedand
freeof deposits.Replacethesparkplugannually.
1. Disconnectthe capfromthesparkplug,andremoveanydirtfrom
thesparkplugarea.
2. Usethepropersizesparkplugwrenchto removethesparkplug.
f
Electrode
Figure15
NOTE:Replacewitha Champion®RC12YCsparkplug.
3. Checkthegapwitha wiregauge.SeeFigure15.Sparkpluggap
shouldbe0.030in (0.76ram).If necessary,resetthegap.
4. installandtightenthe sparkplugto the recommendedtorque(180
Ib-in[20 Nm]).
5. Attachthe sparkplugcapto thesparkplug.
Air Cleaner
A dirtyaircleanerwill restrictairflowtothecarburetorandcausepoor
engineperformance,inspectthe filtereachtimetheengineis oper-
ated.Youwillneedtocleanthe filtermorefrequentlyifyouoperatethe
enginein verydusty areas.
Cleantheaircleanerevery25hoursofoperationoroncea season.
Replacetheaircleanerannually.
Neverstartor runtheenginewiththe aircleanerassemblyor theair
filterremoved.
NOTE:Do notusepressurizedairor solventsto cleanthefilter.Pres-
surizedair candamagethefilterandsolventswilldissolvethefilter.
1. Loosenscrewandtiltplastichousingcoveron sideofengine
down.SeeFigure16.
2. Removeairfilterfromplastichousingcover.
3. Toloosendebris,gentlytapthefilterona hardsurface,ifthefilter
isexcessivelydirty,replacewithanewfilter.
4. insertcover'stabsintoslotsinbottomofbase.
5. Tiltcoverupintoplaceandtightenscrew.
Figure 16
17
Page 18

Check Engine Oil
Checkoillevelbeforeeachoperation.Besureoillevelis maintained.
1. Checktheoilwiththeenginestoppedand level.
2. Removethe oil filldipstickandwipeit clean.
3. Insertandtightendipstick.Removeitto checktheoillevel.
4. Iftheoillevelisnearorbelowthelowerlimitmarkonthedipstick,
removetheoil fillercap/dipstick,andfillwiththe recommendedoil
totheupperlimitmark.Do not overfill.
5. Reinstalltheoilfill dipstick.
Change Engine Oil
Gasolineand itsvaporsareextremelyflammableandexplosive.
Fireor explosioncancausesevereburnsor death.
Changeengineoilafterthefirstfivehoursof operation,andeveryfifty
hoursoroncea seasonthereafter.
Air Filte_
J
Figure17
you top
emptyor fuelcanleak outandresultinafireor explosion.Toempty
lWhen drainthe oilfromthe oil fill thefueltankmustbe
thefueltank,runthe engineuntilitstopsfromlackoffuel.
tube,
1. Withengineoffbutstillwarm,disconnectthesparkplugwireandkeep
itawayfromthesparkplug.
2. Placea suitablecontainernextto theenginetocatchtheusedoil.
3. Removethe oil filldipstickanddraintheoil intothecontainerby
tippingtheenginetowardtheoilfillerneck.See Figure17.
Usedoilisahazardouswasteproduct.Disposeofusedoil properly.
IDonotdiscardwithhouseholdwaste.Checkwithyourlocalauthori-
_tiesor SearsServiceCenterforsafedisposal/recyclingfacilities.
4. Withtheengineinalevelposition,fill totheupperlimitmarkonthe
dipstickwiththerecommendedoil.
Runningtheenginewitha lowoil levelcancauseenginedamage.
5. Reinstalltheoilfill dipsticksecurely.
Clean Engine
• Dailyor beforeeveryuse,cleangrass,chafforaccumulated
debrisfromengine.Keeplinkage,spring,andcontrolsclean.
Keepareaaroundandbehindmufflerfreeofany combustible
debris.
• Keepingenginecleanallowsairmovementaroundengine.
• Enginepartsshouldbe keptcleanto reducetheriskofoverheat-
ingandignitionofaccumulateddebris.
Figure18
LUBRICATION
Blade Control
Lubricatepivotpointsonthebladecontrolat leastoncea seasonwith
lightoil.Thiscontrolmustoperatefreelyinbothdirections.SeeFigure
18.
Donotusewatertocleanengineparts.Watercouldcontaminatefuel
system.Usea brushordry cloth.
18
Page 19

DECK WASH
Yourmower'sdeckisequippedwitha waterportonitssurfaceas part
ofits deckwashsystem.
Usethedeckwashtorinsegrassclippingsfromthedeck'sunderside
andpreventthe buildupd corrosivechemicals.Completethefollowing
stepsAFTEREACHMOWING:
1. Pushthemowertoa level,clearspotonyourlawn,nearenoughfor
yourgardenhoseto reach.Removethegrassbagifattached.
house,garage,parkedcars,etc.
2. Threadthehosecoupler(packagedwithyourmower'sOperator's
Manual)onto theendofyourgardenhose.
3. Attachthehosecouplertothewaterportonyourdeck'ssurface.See
Figure19.
4. Turnthewateron.
5. StarttheengineasdescribedintheOperationsection.
6. Runtheenginefora minimumoftwominutes,aNowingtheunderside
ofthecuttingdeckto thoroughlyrinse.
7. Releasebladecontrolto stoptheengineandblade.
8. Turnthewateroffanddetachthehosecouplerfromthewaterporton
yourdeck'ssurface.
Aftercleaningyourdeck,restartthe mower.Keeptheengineand
bladerunningfor aminimumoftwominutes,allowingthe undersideof
thecuttingdecktothoroughlydry.
BLADE CARE
Whenremovingthecuttingbladefor sharpeningor replacement,
protectyourhandswitha pairof heavyglovesor usea heavyragto
holdthe blade.
Periodicallyinspectthebladeadapterforcracks,especiallyif you
strikea foreignobject.Replacewhennecessary.Followthesteps
belowfor bladeservice.
1. Disconnectsparkplugbootfromsparkplug.Turnmoweronitsside
makingsurethattheairfilterandthe carburetorarefacingup.
2. Removetheboltandthebladebellsupportwhichholdthebladeand
thebladeadaptertotheenginecrankshaft.SeeFigure20.
3. Removebladeandadapterfromthe crankshaft.
4. Removebladefromtheadapterfortestingbalance.Balancetheblade
ona roundshaftscrewdriverto check.Removemetalfromthe
heavysideuntilitbalancesevenly.Whensharpeningtheblade,
followtheoriginalangleofgrind.Grindeachcuttingedgeequally
tokeepthe bladebalanced.
Anunbalancedbladewillcauseexcessivevibrationwhenrotatingat
highspeeds.It maycausedamagetomowerandcouldbreakcausing
personalinjury.
i,
,i
i
!
Figure19
r
L....................................!lade ft_11 i
Support @_F........ Bolt
Figure20
5. Lubricatetheenginecrankshaftandtheinnersurfaceof the blade
adapterwithlightoil. Slidethebladeadapterontothe engine
crankshaft.Placethebladeontheadaptersuchthatthe sideof
theblademarked"Bottom"(orwithpartnumber)facestheground
whenthe moweris intheoperatingposition.Makesurethatthe
bladeisalignedandseatedonthebladeadapterflanges.See
Figure19inset.
6. Placebladebellsupportontheblade.Alignnotchesonthe bladebell
supportwithsmallholesin blade.
7. Replacehexboltandtightenhexbolttotorque:450in.Ibs.rain.,600
in.Ibs.max.
Toensuresafeoperationof yourmower,periodicallychecktheblade
boltfor correcttorque.
19
J
Page 20

Neverstorelawnmowerwithfuelintankindoorsorinpoorly
ventilatedareaswherefuelfumesmayreachan openflame,spark,
or pilotlightasonafurnace,waterheater,clothesdryer,or gas
appliance.
PREPARING THE ENGINE
Forenginesstoredover30days:
1. Topreventgumfromforminginfuelsystemoroncarburetor
parts,runengineuntilitstopsfromlackoffuel oradda gasoline
additiveto thegas inthetank. Ifyouuse agas additive,runthe
engineforseveralminutesto circulatetheadditivethroughthe
carburetor--afterwhichtheengineandfuelcanbe storedupto
24months.
2. Whileengineis stillwarm,changetheoil.
3. Cleanengineof surfacedebris.
PREPARING THE LAWN MOWER
• Cleanandlubricatemowerthoroughlyasdescribedinthe lubrica-
tioninstructions.
• Donotusea pressurewasheror gardenhosetocleanyourunit.
• Coatmower'scuttingbladewithchassisgreaseto prevent
rusting.
• RefertoPREPARINGTHEENGINEfor correctenginestorage
instructions.
• Storemowerin adry,cleanarea.Donotstorenexttocorrosive
materials,suchasfertilizer.
Whenstoringany typeofpowerequipmentina poorlyventilatedor
metalstorageshed,careshouldbetakentorust-prooftheequipment.
Usinga lightoilorsilicone,coatthe equipment,especiallycablesand
all movingpartsof yourlawnmowerbeforestorage.
20
Page 21

Beforeperforminganytyped maintenance/service,disengageall
controlsandstoptheengine.Waituntilallmovingpartshavecometo
a completestop.Disconnectsparkplugwireandgrounditagainstthe
enginetopreventunintendedstarting.Alwayswearsafetyglassesduring
operationorwhileperforminganyadjustmentsorrepairs.
Enginefailstostart
1. Bladecontroldisengaged.
2. Sparkplugbootdisconnected.
3. Fueltankemptyorstalefuel.
4. Faultysparkplug.
5. Engineflooded.
6. Blockedfuelline.
Enginerunserratic
1. Sparkplugbootloose.
2. Stalefuel.
3. Ventingascapplugged.
4. Waterordirtinfuelsystem.
5. Dirtyair cleaner.
6. BIockedfuelline.
Engineoverheats 1. Engineoillevellow.
2. Air flowrestricted.
Occasionalskips(hesitates) 1. Sparkpluggaptooclose.
Idlespoorly 1. Sparkplugfouled,faulty,or gaptoowide.
2. Dirtyair cleaner.
Excessivevibration 1. Cuttingbladelooseorunbalanced.
2. Bentcuttingblade.
Mowerwillnot mulchgrass 1. Wetgrass.
2. Excessivelyhighgrass.
3. Dullblade.
Unevencut
1. Wheelsnotpositionedcorrectly.
2. Dullblade.
1. Engagebladecontrol.
2. Connectwiretosparkboot.
3. Filltankwithclean,freshgasoline.
4. Clean,adjustgap,or replace.
5. Waita fewminutesto restart.
6. ContactyourSearsParts&RepairCenterto have
fuellinecleaned.
1. Connectandtightensparkplugboot.
2. Filltankwithclean,freshgasoline.
3. Clearvent.
4. Runengineuntilit stopsfromlackof fuel.Refillwith
freshfuel.
5. RefertoAirCleanerinEngineMaintenancesection.
6. ContactyourSearsParts&RepairCenterto have
fuellinecleaned.
1. Fillcrankcasewithproperoil.
2. Cleanareaaroundandontopofengine.
1. Adjustgapto .030".
1. Resetgapto .030"or replacesparkplug.
7. RefertoAirCleanerinEngineMaintenancesection.
1. Tightenbladeandadapter.Balanceblade.
2. Replaceblade.
1. Donotmowwhengrassiswet;waituntil
laterto cut.
2. Mowonceata highcuttingheight,thenmowagain
atdesiredheightor makeanarrowercuttingpath.
3. Sharpenor replaceblade.
1. Adjustcuttingheightleveron rightfrontandright
rearwheelto sameposition.
2. Sharpenor replaceblade.
NEED MORE HELP?
Youql fk@ Lhe amm_e_ a_vi]mo_e cm ma_agemy_ifeo¢Om .......fo_ h_e÷!
Find this and aLLyour other product manuals online.
Get answers from our team of home experts.
o Get a personalized maintenance plan for your home.
21
Page 22

Craftsman Mower B Model No. 247.37126
10
44
24"
2slI
2O
42
29
%1
22
Page 23

Craftsman Mower B Model No. 247.37126
1
747-05204-0637
2
747-05450
747-05226-0637
3
747-05450
4
749-04608A-0637
5
720-0279
6
710-1205
7
710-04998
8
964-04154
9
720-04072A
10
731-07486
11
725-0157
12
712-04222
13
631-04369
14
747-0710A
15
787-01779
16
732-04673
17
634-04642
18
710-0895
19
710-05073
2O
787-01874A-0691
21
98_02516
22
732-04674
23
748-04096
24
942-0741A
D = O O
BladeControl
GrassCatcherFrame-Red
GrassCatcherFrame-Black
GrassCatcherFrame
LowerHandle
WingNut
RopeGuide
CarriageScrew,5/16-18
GrassBag
HandKnob
SideChute
CableTie
Nut,Sq.,1/4-20
RearDischargeDoorAssembly
HingePin
ChuteDeflectorBracket
TorsionSpring- RH
Wheel,7 x 2
Screw,1/4-15x .750
Screw,1/4-20x .500
Deck- 21"
HingedMulchPlugAssembly
TorsionSpring- LH
BladeAdapter
MulchingBlade
m
25
710-1044
26
731-07531
731-07533
27
738-04419A
28
712-04217
29
720-04130
30
720-04123A
31
736-0524B
32
712-04064
33
634-04630
34
946-04661
35
710-0654A
36
731-07203
37
731-07174A
38
732-1014C
39
787-01818A-0637
40
911-04144A
41
911-04143B
42
710-04995
43
787-01819
44
128LO2-O867-F1
45
738-04278
46
731-07487
47
921-04041
m = O
Screw,3/8-24x 1.50
HubCap- Front
HubCap- Rear
Sldr.Screw,.375x .126x 1/4-20
FlangeLockNut,3/8-16
AdjustmentLeverKnob
WingNut
BladeBellSupport
Nut,FlangeLock,1/4-20
Wheel,11x 2
ControlCable
TTSeresScrew,3/8-16x 1.0
Trailshield
FrontCover
TorsionSpring
FrontHeightAdjusterPlate
RearAxleAssembly
FrontAxleAssembly
Screw,5/16-14x .750
AxleRetainerBracket
Engine
Screw,1/4-20x .500
DeckWashNozzle
WaterNozzleAdapter
23
Page 24

Craftsman Engine Model No. 128L02=0867=F1 For Craftsman Mower Model No. 247.37126
I 48 SHORT BLOCK I I 1058 OPERATOR'S MANUAL I J 1329 REPLACEMENT ENGINE ] I 1330 REPAIR MANUAL I
684
868
51
306
307 _;,
_3_53:_' "_
240
7
|505 e
615
404 @
287
\
616 _
741
0
S
524
15
24
Page 25

Craftsman Engine Model No. 128L02=0867=F1 For Craftsman Mower Model No. 247.37126
38s
163
l 833A®
127 (__
I 276 @
188
222 _
968
445
443
209J202 _I_I_
2911
Ire/% I
I
qz:P
883
25
Page 26

Craftsman Engine Model No. 128L02=0867=F1 For Craftsman Mower Model No. 247.37126
564 _ 969
6O4
921
55 592
1211 _ 58 _
6o
1210 _
689 0
456
I 1036 EMiSSiONS LABEL ]
745 '_
621
597
304
305
332
455
635
26
Page 27

Craftsman Engine Model No. 128L02=0867=F1 For Craftsman Mower Model No. 247.37126
121 CARBURETOR OVERHAUL KiT
104q:_ _ 1370617 0
127 (_ 163_ 276@ 633 @
358 ENGINE GASKET SET
3@_ 2o@
7_ 20 51_:_
1095 VALVE GASKET SET
163
524
617
883
7
883 _
27
Page 28

Craftsman Engine Model No. 128L02=0867=F1 For Craftsman Mower Model No. 247.37126
697322 CylinderAssembly
2 399269 Kit-Bushing/Seal(MagnetoSide)
3 299819s Seal-Oil(MagnetoSide)
4 493279 Sump-Engine
5 691160 Head-Cylinder
7 692249 Gasket-CylinderHead
8 695250 BreatherAssembly
9 699472 Gasket-Breather
10 691125 Screw(BreatherAssembly)
11 691781 Tube-Breather
11A 691923 Tube-Breather
12 692232 Gasket-Crankcase
13 690912 Screw(CylinderHead)
15 691680 Plug-OilDrain
16 797017 Crankshaft
20 399781s Seal-Oil(PTOSide)
22 691092 Screw(CrankcaseCover/Sump)
23 691987 Flywheel
24 222698s Key-Flywheel
25 797302 PistonAssembly(Standard)
797303 PistonAssembly(.020"Oversize)
26 797304 RingSet(Standard)
797305 RingSet(.020"Oversize)
27 691588 Lock-PistonPin
28 298909 Pin-Piston
29 797306 Rod-Connecting
32 691664 Screw(ConnectingRod)(Short)
32A 695759 Screw(ConnectingRod)(Long)
33 262651s Valve-Exhaust
34 262652s Valve-Intake
35 691270 Spring-Valve(Intake)
36 691270 Spring-Valve(Exhaust)
37 793756 Guard-Flywheel
40 692194 Keeper-Valve
43 691997 Slinger-Governor/Oil
45 690548 Tappet-Valve
46 691449 Camshaft
792741 ShortBlock
50 796703 Manifold-Intake
51 796704 Gasket-Intake
54 691650 Screw(IntakeManifold)
55 691421 Housing-RewindStarter
58 697316 Rope-Starter
60 795426 Grip-StarterRope
65 690837 Screw(RewindStarter)
78 691108 Screw(FlywheelGuard)
81 691740 Lock-MufflerScrew
97 696565 Shaft-Throttle
104 691242 Pin-FloatHinge
108 796708 Valve-Choke
117 695042 Jet-Main(Standard)
118 498977 Jet-Main(HighAltitude)
121 498260 Kit-CarburetorOverhaul
125 796707 Carburetor
127 694468 Plug-Welch
130 696564 Valve-Throttle
133 398187 Float-Carburetor
134 398188 Kit-Needle/Seat
137 796610 Gasket-FloatBowl
141 796193 Kit- ChokeShaft
163 795629 Gasket-AirCleaner
187 791766 Line-Fuel(CutToRequiredLength)
188 693399 Screw(ControlBracket)
190 690940 Screw(FuelTank)
202 691829 Link-MechanicalGovernor
209 699056 Spring-Governor(NoColor)
222 793754 Bracket-Control
227 690783 Lever-GovernorControl
276 271716 Washer-Sealing
287 690940 Screw(DipstickTube)
291 790830 Thermostat
300 790828 Muffler
304 790826 Housing-Blower
305 691108 I Screw(BlowerHousing)
28
Page 29

Craftsman Engine Model No. 128L02=0867=F1 For Craftsman Mower Model No. 247.37126
790836 Shield-Cylinder 690345
307 690345 Screw(CylinderShield) 689 691855
332 690662 Nut(Flywheel) 718 690959
333 799381 Armature-Magneto 741 797521
334 691061 Screw(MagnetoArmature) 745 691648
337 796112s Plug-Spark 842 691031
356 692390 Wire-Stop
358 794307 GasketSet-Engine
365 691688 Screw(Carburetor)
404 690272 i Washer(GovernorCrank) 869 691155
425 690670 Screw(AirCleanerCover) 870 690380
443 692523 Screw(AirCleanerPrimerBase) 871 262001
445 491588s Filter-AirCleanerCartridge 63709
455 791960 Cup-Flywheel 883 691881
456 692299 Plate-PawlFriction 921 796706
459 281505s PawI-Ratchet 923 796136
505 691251 Nut(GovernorControlLever) 957 796577
523 499621 Dipstick 966 795259
524 692296 Seal-DipstickTube 968 692298
525 495265 i Tube-Dipstick 969 690700
562 691119 Bolt(GovernorControlLever) 972 796578
564 L698589 Screw (ControlCover) 975 796611
584 697734 Cover-BreatherPassage 1036
585 691879 Gasket-BreatherPassage
592 690800 Nut(RewindStarter) 1058 277039TRI
597 691696 Screw(PawlFrictionPlate) 1059 692311
601 791850 Hose-Clamp(Green) 1095 498528
604 790703 Cover-Control 1210 498144
608 497680 Starter-Rewind 1211 498144
613 790833 Screw(Muffler) 1329 128L02-
615 690340 Retainer-GovernorShaft 0867-F1
616 698801 Crank-Governor 1330 270962
617 270344s SeaI-ORing 1386 790848
621 692310 Switch-Stop
633 691321 Seal-Choke/ThrottleShaft(ThrottleShaft)
633A 693867 i Seal-Choke/ThrottleShaft(ChokeShaft)
635 66538s Boot-SparkPlug
847 692047 Dipstick/TubeAssembly
851 493880s Terminal-SparkPlug
868 697338 Seal-Valve
1387 790849 Spring-AirVane
1388 790850 Screw(AirVane)
CarburetorOverhaulKit
EngineGasketSet
ValveGasketSet
Screw(BreatherPassageCover)
Spring-Friction
Pin-Locating
Gear-Timing
Screw(Brake)
SeaI-ORing(DipstickTube)
Seat-Valve(Intake)
Seat-Valve(Exhaust)
Bushing-ValveGuide(Exhaust)
Bushing-ValveGuide(Intake)
Gasket-Exhaust
Cover-BlowerHousing
Brake
Cap-FuelTank
Base-AirCleanerBase
Cover-AirCleaner
Screw(BlowerHousingCover)
Tank-Fuel
Bowl-Float
Label-Emissions(Availablefroma Briggs&
StrattonAuthorizedDealer)
Operator'sManual
Kit-Screw/Washer(FuelTank)
GasketSet-Valve
Pulley/SpringAssembly(Pulley)
Pulley/SpringAssembly(Spring)
ReplacementEngine
RepairManual
Vane-Air
KeyNo.121
KeyNo.358
KeyNo.1095
29
Page 30

(Thispageapplicableinthe U.S.A.and Canadaonly.)
Sears Brands Management Corporation (Sears), the California Air Resources Board (CARD)
and the United States Environmental Protection Agency (U.S. EPA)
Emission Control System Warranty Statement (Owner's Defect Warranty Rights and Obligations)
EMISSIONCONTROLWARRANTYCOVERAGEISAPPLICABLETOCERTI-
FIEDENGINESPURCHASEDINCALIFORNIAIN1995ANDTHEREAF-
TER,WHICHAREUSEDINCALIFORNIA,ANDTOCERTIFIEDMODEL
California and United States Emission
TheCaliforniaAirResourcesBoard(CARD),U.S.EPAand Searsare pleased
toexplaintheEmissionControlSystemWarrantyonyour modelyear2000and
latersmalloff-roadengine(SORE).InCalifornia,newsmalloff-roadengines
mustbe designed,builtand equippedto meettheState'sstringentanti-smog
standards.Elsewherein theUnitedStates,newnon-road,spark-ignition
enginescertifiedformodelyear1997andlatermustmeetsimilarstandardsset
forthbythe U.S.EPA.Searsmustwarranttheemissioncontrolsystemonyour
YEAR1997ANDLATERENGINESWHICHARE PURCHASEDANDUSED
ELSEWHEREINTHEUNITEDSTATES(ANDAFTERJANUARY1,2001 IN
CANADA).
Control Defects Warranty Statement
enginefortheperiodsoftimelistedbelow,providedtherehasbeennoabuse,
neglector impropermaintenanceofyoursmalloff-roadengine.Youremis-
sioncontrolsystemincludespartssuchas thecarburetor,aircleaner,ignition
system,mufflerandcatalyticconverter.Alsoincludedmaybeconnectorsand
otheremissionrelatedassemblies.Whereawarrantableconditionexists,Sears
will repairyoursmalloff-roadengineatnocostto youincludingdiagnosis,parts
andlabor.
Sears Emission Control Defects Warranty Coverage
Smalloff-roadenginesarewarrantedrelativeto emissioncontrolpartsdefects
fora periodofone year,subjectto provisionssetforthbelow.Ifanycovered
Owner's Warranty
Asthe smalloff-roadengineowner,youareresponsiblefor theperformanceof
therequiredmaintenancelistedin yourOperatingand MaintenanceInstruc-
tions.Searsrecommendsthatyouretainallyourreceiptscoveringmaintenance
onyoursmalloff-roadengine,butSearscannotdenywarrantysolelyforthe
lackofreceiptsorfor yourfailuretoensuretheperformanceof allscheduled
maintenance.Asthe smalloff-roadengineowner,youshouldhoweverbe
awarethat Searsmaydenyyouwarrantycoverageifyour smalloff-roadengine
ora parthasfaileddueto abuse,neglect,impropermaintenanceor unap-
parton yourengineis defective,the partwillbe repairedorreplacedbySears.
Responsibilities
provedmodifications.Youareresponsibleforpresentingyour smalloff-road
engineto anAuthorizedSearsServiceDealerassoonas aproblemexists.The
undisputedwarrantyrepairsshouldbecompletedinareasonableamountof
time,notto exceed30days.Ifyouhaveanyquestionsregardingyourwarranty
rightsandresponsibilities,youshouldcontacta SearsServiceRepresentative
at 1-800-469-4663.Theemissionwarrantyisa defectswarranty.Defectsare
judgedonnormalengineperformance.Thewarrantyisnotrelatedtoanin-use
emissiontest.
Sears Emission Control Defects Warranty Provisions
ThefollowingarespecificprovisionsrelativetoyourEmissionControlDefectsWarrantyCoverage.ItisinadditiontotheSearsenginewarrantyfornon-regulated
enginesfoundin theOperatingand MaintenanceInstructions.
1. WarrantedParts
Coverageunderthis warrantyextendsonlytothepartslistedbelow(the
emissioncontrolsystemsparts)tothe extentthesepartswere presenton
the enginepurchased.
a. FuelMeteringSystem
• Coldstartenrichmentsystem
• Carburetorand internalparts
• FuelPump
b. AirlnductionSystem
• Aircleaner
• Intakemanifold
c. IgnitionSystem
• Sparkplug(s)
• Magnetoignitionsystem
d. CatalystSystem
• Catalyticconverter
• Exhaustmanifold
• Air injectionsystemorpulsevalve
e. MiscellaneousItemsUsedin AboveSystems
• Vacuum,temperature,position,timesensitivevalves
andswitches
• Connectorsandassemblies
2. Lengthof Coverage
Searswarrantsto the initialownerand eachsubsequentpurchaserthat
the WarrantedPartsshallbefree fromdefectsin materialsandworkman-
shipwhich causedthefailureofthe WarrantedPartsforaperiodofone
yearfromthe datetheengineis deliveredtoa retailpurchaser.
Inthe USAandCanada,a 24hourhotline,1-800-469-4663,hasamenuofpre-recordedmessagesofferingyouenginemaintenanceinformation.
3. NoCharge
Repairorreplacementof anyWarrantedPartwillbeperformedat no
chargeto the owner,includingdiagnosticlaborwhichleadstothe
determinationthata WarrantedPartisdefective,ifthe diagnosticworkis
performedatanAuthorizedSearsServiceDealer.Foremissionswarranty
servicecontact yournearestAuthorizedSearsServiceDealeras listed in
the "YellowPages"under"Engines,Gasoline,""GasolineEngines,""Lawn
Mowers,"orsimilarcategory.
4. Claimsand CoverageExclusions
Warrantyclaimsshallbefiledinaccordancewiththe provisionsof the
SearsEngineWarrantyPolicy.Warrantycoverageshallbeexcludedfor
failuresof WarrantedPartswhichare notoriginalSearspartsor because
ofabuse,neglector impropermaintenanceassetforth intheSears
EngineWarrantyPolicy.Sears isnotliableto coverfailuresof Warranted
Partscausedby theuseof add-on,non-original,ormodifiedparts.
5. Maintenance
AnyWarrantedPartwhichis notscheduledfor replacementasrequired
maintenanceor whichis scheduledonly for regularinspectiontotheeffect
of"repairorreplaceasnecessary"shallbe warrantedasto defectsfor the
warrantyperiod.AnyWarrantedPartwhichisscheduledfor replacement
asrequiredmaintenanceshallbe warrantedasto defectsonlyforthe
periodoftimeuptothe first scheduledreplacementfor that part.Any
replacementpartthat is equivalentin performanceanddurabilitymay
beusedin theperformanceof anymaintenanceorrepairs.Theowneris
responsiblefortheperformanceof allrequiredmaintenance,as definedin
the SearsOperatingand MaintenanceInstructions.
6. ConsequentialCoverage
Coveragehereundershallextendtothefailureofanyenginecomponents
causedbythe failureofanyWarrantedPartstill underwarranty.
GD0C-100188Rev.B
30
Page 31

Look For Relevant Emissions Durability Period and
Air index information On Your Engine Emissions Label
Engines that are certified to meet the California Air Resources Board (CARB) Tier 2 Emission Standards must
display information regarding the Emissions Durability Period and the Air Index. Sears Brands Management
Corporation makes this information available to the consumer on our emission labels.
The Emissions Durability Period describes the number of hours of actual running time for which the engine is
certified to be emissions compliant, assuming proper maintenance in accordance with the Operating & Mainte-
nance Instructions. The following categories are used:
Moderate: Engine is certified to be emission compliant for 125 hours of actual engine running time.
Intermediate: Engine is certified to be emission compliant for 250 hours of actual engine running time.
Extended: Engine is certified to be emission compliant for 500 hours of actual engine running time.
For example, a typical walk-behind lawn mower is used 20 to 25 hours per year. Therefore, the Emissions
Durability Period of an engine with an intermediate rating would equate to 10 to 12 years.
The Air index is a calculated number describing the relative level of emissions for a specific engine family. The
lower the Air Index, the cleaner the engine. This information is displayed in graphical form on the emissions label.
After July 1,2000, Look For Emissions Compliance Period
On Engine Emissions Compliance Label
After July 1, 2000 certain Sears Brands Management Corporation engines will be certified to meet the United
States Environmental Protection Agency (USEPA) Phase 2 emission standards. For Phase 2 certified engines, the
Emissions Compliance Period referred to on the Emissions Compliance label indicates the number of operating
hours for which the engine has been shown to meet Federal emission requirements.
For engines less than 225 cc displacement, Category C = 125 hours, B = 250 hours and A = 500 hours.
For engines of 225 cc or more, Category C = 250 hours, B = 500 hours and A = 1000 hours.
This isa generic representation of the emission label typically found on a certified engine.
FAMILYYBSXS.3192VA 274812
GDOC-100182Rev.B
31
Page 32

Congratulationson makingasmartpurchase.YournewCraftsman@
productisdesignedandmanufacturedfor yearsofdependableopera-
tion.Butlikeall products,it mayrequirerepairfromtimetotime.That's
whenhavinga RepairProtectionAgreementcansaveyoumoneyand
aggravation.
Here'swhattheRepairProtectionAgreement*includes:
* Expert service byour 10,000professionalrepairspecialists
o Unlimitedserviceand nochargeforpartsandlaboron all
coveredrepairs
o Product replacementupto$1500if yourcoveredproductcan'tbe
fixed
• Discountof 10%fromregularprice of serviceand relatedinstalled
partsnotcoveredbytheagreement;also,10%off regularpriceof
preventivemaintenancecheck
• Fasthelp by phone- wecallitRapidResolution- phonesupport
fromaSearsrepresentative.Thinkof usas a"talkingowner's
manual."
Onceyoupurchasethe Agreement,a simplephonecall isallthatit
takesfor youto scheduleservice.Youcan callanytimedayornight,or
schedulea serviceappointmentonline.
TheRepairProtectionAgreementisarisk-freepurchase.Ifyoucancel
foranyreasonduringtheproductwarrantyperiod,wewill provideafull
refund.Or,a proratedrefundanytimeaftertheproductwarrantyperiod
expires.Purchaseyour RepairProtectionAgreementtoday!
Somelimitationsandexclusionsapply. Forpricesand additional
informationin the U.S.A.call1-800-827-6655.
*CoverageinCanadavaries on some items.Forfull details call
SearsCanadaat 1-800-361-6665.
SearsInstallation Service
ForSearsprofessionalinstallationof homeappliances,garagedoor
openers,waterheaters,andothermajorhomeitems,in theU.S.A.or
Canadacall1-800-4-MY-HOME®.
32
Page 33

Declaraci6n de garantia .................................................. 33
Instrucciones de seguridad ....................................... 34-38
Guia de cuesta ................................................................ 39
Etiquetas de seguridad ..................................................... 9
Montaje ..................................................................... 40-43
Operaci6n .................................................................. 44-45
Servicio y Mantenimiento ......................................... 46-50
Almacenamiento fuera de temporada ............................ 51
Soluci6n de problemas ................................................... 52
NOmero de servicio ............................... Cubierta posterior
GARANTiA COMPLETA CRAFTSMAN POR DOS ANOS
PORDOSANOSapartirdelafechade lacompra,esteproductoest,.garantizadopordefectosen losmaterialesy la manodeobra.
Losproductosdefectuososser_.nreparadossincostooreemplazadossincostosi la reparaci6nnoest,.disponiNe.
Paraobtener informaci6nsobre elalcancede lagarantiay solicitar la reparaci6no elreemplazo,visiteelsitio Web:www.craftsman.com.
Esta garantiacubre 0NICAMENTElosdefectos en los materialesyen la manode obra. EstagarantiaNOcubre:
• Articulosdeduraci6nlimitadaquepuedendesgastarsebajocondicionesnormalesdeusoduranteelperiododegarantia,talescomo
cuchillasdecortadora,adaptadoresparacuchillas,correas,filtrosdeaire,y bujfasdeencendido.
• ProductodaSosresultantesdelos intentosdelusuariodemodificaci6ndelproducto,reparaci6no causadosporaccesoriosdeproductos.
• Reparacionesnecesariasdebidoal accidenteo pornooperaro mantenerel productoseg_nlas instruccionesprovistas.
• Mantenimientoprevenfivoo reparacionesnecesariasdebidoa mezcladecombustibleimpropia,combustiblecontaminadoo aSejo.
La presentegarantiase anulasise utilizaesteproductoalgunavezparaprestarservicioscomercialeso sise Ioalquilaaotra persona.
Estagaranfiale otorgaderechoslegalesespecificos,peroustedpodriagozardeotrosderechosen raz6ndesulugarderesidencia.
Sears BrandsManagementCorporation, Hoffman Estates,IL60179
Aceitedelmotor: SAE30
Capacidaddeaceitedel motor: 18onzas
Combustible: Gasolinasinplomo
Bujia: Champion®RC12YC
Motor: Briggs& Stratton
NSrnerode modelo ..........................................................
N_mero de serie..............................................................
Fechade compra .............................................................
RegistreelnOmerode modelo,nQmerode serieyfechade compra
m_.sarriba.
© SearsBrands,LLC 33
Page 34

Lapresenciade estesirnboloindicaque setratadeinstrucciones
irnportantesde seguridadquesedebenrespetarparaevitar
ponerenpeligrosu seguridadpersonaly/omaterialy lade otras
personas.Leay sigatodaslasinstruccionesdeestemanualantes
de poneren funcionarnientoestarn_.quina.Sino respetaestas
instruccionespodriaprovocarlesionespersonales.Cuandoveaeste
sirnbolo,ipresteatenci6na laadvertencia!
Estarn_.quinarueconstruidaparaseroperadadeacuerdocon
lasreglasdeseguridadcontenidasenestemanual.AIigualque
concualquiertipodeequipornotorizado,undescuidooerrorpor
partedeloperadorpuedeproducirlesionesgraves.Estarn_.quina
escapazde arnputarrnanosy piesy dearrojarobjetoscon gran
fuerza.De norespetarlas instruccionesde seguridadsiguientesse
puedenproducirlesionesgraveso larnuerte.
PROPOSICION 65 DE CALIFORNIA
Elescapedelmotorde esteproducto,algunosdesuscornponentes
y algunoscornponentesdelvehiculocontieneno liberansustancias
quirnicasqueelestadode Californiaconsideraque puedenproducir
c_.ncer,defectosde nacirnientouotrosproblernasreproductivos.
Losbornesdela bateriay losaccesoriosdines contienenplornoy
cornpuestosde plorno,sustanciasquirnicasquesegOnIoestableci-
do porel EstadodeCaliforniacausanc_.nceryda_osenel sisterna
reproductivo.Ldveselasmanos despu_sde estarencontacto
con estoscomponentes.
FUNCIONAMIENTO
Funcionamientogeneral:
• Leaysigatodaslasinstruccionescontenidasen estemanual
antesde intentarensarnblarestarn_.quina.Lea,cornprenday
sigatodaslasinstruccionesquefiguranen la rn_.quinayen el o
losrnanualesantesde intentaroperarla.Farniliaricesecornpleta-
rnenteconloscontrolesy conel uso apropiadodeestarn_.quina
antesde operarla.Guardeestemanualenun lugarseguropara
referenciasfuturasy regulatesy parasolicitarrepuestos.
• Estarn_.quinaes unapiezadeequipode precisi6n,no unjuguete.
Portanto,tengalamaximaprecauci6nen todornornento.Su
unidadha sidodise_adapararealizarunatarea:cortarel c_sped.
Nola utiliceconningOnottoprop6sito.
• Noperrnitanuncaque losni_osrnenoresde 14a_osoperenesta
rn_.quina.Losni_osde14a_osy rn_.sdebenleerycornprender
lasinstruccionescontenidasenestemanualy debenser
capacitadosy supervisadosporunode lospadres.Onicarnente
losindividuosresponsablesque se hayanfarniliarizadocon
estasreglasdeseguridadparalaoperaci6ndeber_.nusaresta
rn_.quina.
Su responsabilidad--Restrinja el usode estarn_.quina
rnotorizadaalas personasque lean,cornprendany respetenlas
advertenciase instruccionesqueaparecenenestemanualyen la
rn_.quina.
iGUARI)E ESTASINSTRUCCIONES!
• Inspeccionerninuciosarnenteel _.reaendondeutilizar_,el equipo.
Saquetodaslaspiedras,palos,cables,huesos,juguetesyotros
objetosextra_osconlosquepodriatropezaroquepodrianser
arrojadosporla cuchilla.Losobjetosarrojadosporla rn_.quina
puedenproducirlesionesgraves.Planifiqueel patr6nen elque
vaa irdescargandoel recorteparaevitarquela descargade
materialserealicehacialoscarninos,lasveredas,losobserva-
dotes,etc. Eviteadern_.sdescargarmaterialcontralasparedesy
obstruccionesquepodrianprovocarqueel materialdescargado
rebotecontraeloperador.
• Paraayudaraevitarel contactoconlacuchillaounalesi6npor
un objetoarrojado,rnant_ngaseen lazonadeloperadordetr_.s
de las rnanijasy rnantengaa losni_os,observadores,ayudantes
y rnascotasapartadosalrnenos25 metrosde lapodadora
rnientrasest,.en operaci6n.Detengala rn_.quinasialguienentra
en lazona.
• Paraprotegerselosojosutilicesiernpreanteojoso antiparras
de seguridadrnientrasoperalarn_.quinao rnientrasla ajusta
o repara.Losobjetosarrojadosquerebotanpuedenlesionar
gravernentelavista.
• Utilicezapatosde trabajoresistentes,desuelafuerteypanta-
Ionesy carnisasajustados.Se recorniendautilizarcarnisasy
pantalonesquecubranlos brazosy laspiernas,asicornocalzado
conpuntasreforzadasen acero.Nuncaopereesta rn_.quinacon
lospiesdesnudos,sandalias,oconzapatosligerosoconlosque
sepuedaresbalar(porejernplo,calzadode Iona).
• Nopongalasrnanoso lospiescercade las piezasrotatoriaso
en latolvade lacortadora.Elcontactoconlascuchillaspuede
producirlaarnputaci6nde rnanosypies.
34
Page 35

• Unacubiertade descargafaltanteoda_adapuedeprovocarel
contactoconla cuchillaolesionesporobjetosarrojados.
Muchaslesionesocurrencornoresultadode pasarlacortadora
sobrelos piesduranteunacaidaprovocadaporderrapeso
tropiezos.Nose sostengadela podadorasiseest,.cayendo,
sueltela rnanijainmediatarnente.
Nuncatirehaciaustedlapodadorarnientrascarnina.Sidebe
retrocederla podadoraparaevitarunaparedu obst_.culo,mire
prirneroabajoy atr_.sparaevitartropezarsey luegosigaestos
pasos:
1. Retrocedade lapodadorahastaestirarcornpletarnentesus
brazos.
2. AsegOresequeest,. bienequilibradoy bienparado.
3. Tirede lapodadoralentarnentehaciausted,norn_.sall_.de la
rnitaddeladistanciaentreustedy lapodadora.
4. Repitaestospasoscornoserequiera.
• Noopereestarn_.quinaestandobajolosefectosdelalcoholode
drogas.
• Noernbragueel mecanisrnode autopropulsi6nenunidadescon
esteequipornientrasarrancael motor.
• Elrnecanisrnodecontroldela cuchillaes undispositivode
seguridad.Nuncaintentedesviarsede sufuncionarniento.De
hacerlonofuncionarianlosdispositivosde seguridady podrian
producirselesionespersonalesporel contactoconlascuchillas
giratorias.Lasrnanijasdecontrolde lacuchilladebenfuncionar
bienenarnbasdireccionesy regresarautorn_.ticarnentea la
posici6ndedesengranecuandose lassuelta.
• Nuncaoperelapodadoraenc_spedhOrnedo.Siernpreest_
segurodesuequilibrio.Si tropiezaycaepuedelesionarse
gravernente.Sisienteque pierdeelequilibrio,suelteinrnediata-
rnentelarnanijade controldelacuchillay lacuchilladejar_,de
girarentressegundos.
• Corteel cespedsolarnentecon luzdedia o con unabuenaluz
artificial.Carnine,nuncacorra.
• Detengala cuchillacuandocrucecarninosde gravilla,pasoso
andadores.
• Si larn_.quinacornenzaraavibrardernaneraanorrnal,detenga
el motor,y busqueinrnediatarnentelacausa.Lavibraci6nporIo
generalesunaadvertenciadealgQnproblerna.
• Apagueelmotory esperehastaquelacuchillasedetenga
cornpletarnenteantesderetirarlaguardaparael recortede
cespedo desatorarlatolva. LacuchillacontinOagirandopor
unoscuantossegundosdespu_squeel motorse haapagado.
Nuncacoloqueningunapartedel cuerpoen el_.reade lacuchilla
hastaqueest_seguroquelacuchillahadetenidosu rnovirniento
rotatorio.
Nuncaoperela cortadorasinlasguardasapropiadas,cubiertade
descarga,guardapararecorte,rnanijadecontroldela cuchilla
y otrosdispositivosde seguridady protecci6nensu lugary
funcionando.Nuncaoperelacortadorasilosdispositivosde
seguridadest_.nda_ados.Si noIohace,estopuedetenetcorno
resultadolesiones.
• Elsilenciadoryel motorsecalientany puedenproducirquerna-
duras.Nolostoque.
• Utilicesolarnentepartesyaccesoriosfabricadosespecialrnente
paraestarn_.quina,originalesdelfabricante(OEM).Sino Io
hace,estopuedetenercornoresultadolesionespersonales.
• Paraencenderelmotor,jale dela cuerdalentarnentehastaque
sientaresistencia,luegojale r@idarnente.Elreplieguer@idode
lacuerdadearranque(tensi6nde retroceso)lejalar_,larnanoy
el brazohaciael motorrn_.sr@idode Ioque ustedpuedesoltar.
Elresultadopuedenserhuesosrotos,fracturas,hernatornaso
esguinces.
Sisepresentansituacionesquenoest_.nprevistaseneste
manualseacuidadosoy useel sentidocornQn.Contacto1-800-
659-5917parainforrnaci6nyasistencia.
DIENTES
Laspendientessonun factorirnportantequese relacionacon los
accidentesproducidosporderrapesy caidasy quepuedenpro@@
lesionesgraves.Laoperaci6nen pendientesrequieremayorpre-
cauci6n.Sino sesienteseguroen unapendiente,nola pode.Para
seguridad,useel rnedidordependientesqueseincluyecornopartede
estemanualpararnedirla pendienteantesdeoperarlaunidaden una
zonainclinada.Si lapendientesuperalos 15grados,nola pode.
HagaIo siguiente:
• Muevala podadoraa travesde lascarasdela pendiente,nunca
haciaarribay abajo.Tengacuidadocuandocarnbiededirecci6n
cuandooperela rn_.quinaenpendientes.
• Est_atentoa losagujeros,raices,rocas,objetosocultoso
abultarnientosquepuedanprovocarque sederrapeo setropiece.
Elc_spedaltopuedeocultarobst_.culos.
Siernpreest_segurodesuequilibrio.Sitropiezay cae puede
lesionarsegravernente.Si sJentequepier@elequilibrio,suelte
inrnediatarnentelarnanijadecontroldelacuchillay lacuchilla
dejar_,degirarentres(3) segundos.
NohagaIo siguiente:
• I/o corteel cespedcercadepozos,hundirnientos,bancos,podria
perderel equilibrio.
• Nopodependientesrnayoresde 15gradoscornoIoindicael
rnedidorde pendientes.
• Nopodeel cespedhOrnedo.Si noest,.firrnernenteparado,puede
resbalarse.
35
Page 36

N QOS
Puedenocurriraccidentestr_.gicossi eloperadornoest,.atentoala
presenciade ni_os.PorIogeneralalos ni_oslesatraenlaspodadoras
yla actividadde podarelc_sped.Noentiendenlosriesgosnilos
peligros.Nuncad_porsentadoquelosni_osperrnanecer_.nen el
rnisrnolugardondelosvioporOltirnavez.
• Mantengaa losni_osfueradelAreadetrabajoybajoestricta
vigilanciade unadultoresponsableadern_.sdeloperador.
Est_alertayapaguela podadorasi unni_oingresaalArea.
Antesy rnientasseest,.rnoviendohaciaatr_.s,mirehaciaatr_.sy
cuidequeno hayani_os.
Tengaextrernaprecauci6ncuandoseaproxirnea esquinas
ciegas,entradasdepuertas,_.rbolesuotrosobjetosque puedan
obstaculizarlelavistadeunni_oque pudiesecorrerhaciala
podadora.
Mantengaalejadosalos ni_osdelosrnotoresenrnarchao
calientes.Puedensufrirquernadurasconun silenciadorcaliente.
Nuncaperrnitaqueni_osrnenoresde 14a_osoperenesta
rn_.quina.Losni_osrnayoresde 14a_osdebenleery entender
lasinstruccionesdeoperaci6nyreglasdeseguridadcontenidas
enestemanualy debenserentrenadosy supervisadospor sus
padres.
SERVIClO
Manejosegurode la gasolina:
• Paraevitarlesionespersonaleso daSosrnaterialessea
surnarnentecuidadosoal rnanipularlagasolina.Lagasolinaes
altarnenteinflarnabley losvaporessonexplosivos.Sepuede
lesionargravernentesi derrarnagasolinasobreustedo sobrela
ropaya quesepuedeencender.
• Utilices61orecipientesparagasolinaautorizados.
• NuncaIlenelos contenedoresenelinteriordeunvehiculo
ocarni6nocajadecarnionetacon recubrirnientospl_.sticos.
Coloquesiernprelosrecipientesenel pisoy lejosdelvehiculo
antesde Ilenarlos.
• Retireel equipoa gasolinadelcarni6no rernolqueyII_neloen
el piso.Si estonoes posible,entoncesIlenedichoequipoenun
rernolqueconun recipienteport_.til,en vezdedesdeundispen-
sadordegasolina.
• Mantengala boquillade Ilenadoencontactoconelhordedela
entradadeltanquedegasolinaocontenedoren todornornento
hastaqueest_Ileno.No utiliceundispositivoparaabrir/cerrarla
boquilla.
• Apaguetodosloscigarrillos,cigarros,pipasyotrasfuentesde
cornbusti6n.
• Nuncacarguecombustibleen larn_.quinaen interioresporque
Losvaporesinflarnablespodrianacurnularseen el_.rea.
Nuncasaquelatapadel gasni agreguecombustiblernientrasel
motorest,.calienteoen rnarcha.Dejequeelmotorseenfriepor
Iornenosdosrninutosantesde volveracargarcombustible.
• Nuncarecargueel tanquedecombustible.Lleneel tanqueno
rn_.sde 1pulgadapor debajodela basedelcuellode Ilenado
paradejarespacioparala expansi6ndelcombustible.
• Vuelvaacolocarlatapade la gasolinayajOstelabien.
• Lirnpiela gasolinaderrarnadasobreelmotoryel equipo.Traslade
la rn_.quinaa otrazona.Espere5 rninutosantesde encenderel
motor.
• Nuncaalrnacenela rn_.quinao elrecipientedecombustibleen
unespaciocerradodondehayafuego,chispasoaparatoscon
pilotocornoporejernplo,calentadoresde agua,calentadores,
hornos,secadoresderopau otrosaparatosagas.
• Parareducirel riesgodeincendiornantengala rn_.quinalirnpia
de pasto,hojasy deacurnulaci6nde otrosescornbros.Lirnpielos
derrarnesde aceiteocombustibleysaquetodoslosdesechos
ernbebidoscon combustible.
• Dejequela rn_.quinaseenfrie5 rninutospor Iornenosantesde
alrnacenarla.
Funcionamientogenerah
• Nuncaenciendaunmotoren espacioscerradoso enunazona
conpocaventilaci6n.Elescapedel motorcontienernon6xidode
carbono,ungasinodoroyletal.
• Antesde lirnpiar,repararo inspeccionarlarn_.quina,cornpruebe
que lacuchillaytodaslaspartesquesernuevense handetenido.
Desconecteel cablede labujiay p6ngalode rnaneraque haga
rnasacontrael motorparaevitarquese enciendade rnanera
accidental.
• Reviselospernosdernontajede lacuchillay delmotora
intervalosfrecuentesparaverificarqueest_nbienapretados.
Inspeccioneadern_.svisualrnentela cuchillaenbuscadedaSos
(abolladuras,desgaste,roturas,etc.).Reernplacelacuchillacon
equipooriginaldel fabricante(OEM)listadoenestemanual.La
utilizaci6ndepartesquenocurnplanconlasespecificacionesde
equiposoriginalespodriatenetcornoresultadoun rendirniento
incorrectoyadern_.slaseguridadpodriaestarcornprornetida.
• Lascuchillasde laspodadorassonrnuyafiladasy podrian
cortarlo.Envuelvalacuchillao utiliceguantesy extremeprecau-
clonescuandole deservicio.
• Mantengatodoslospernos,tuercasytornillosbienajustados
paraasegurarsequela rn_.quinaseencuentraencondiciones
segurasdeoperaci6n.
• Nuncarnanipulelosdispositivosde seguridaddernanera
irnprudente.Controleperi6dicarnentequefuncionendeforrna
adecuada.
36
Page 37

• Despu_sdegolpearcon algOnobjetoextrafio,detengael motor,
desconecteelcablede labujfayconecteel motora rnasa.
Inspeccionerninuciosarnentela rn_.quinaparadeterrninarsiest,.
da_ada.Repareel da_oantesdeencenderlayoperarla.
• Nuncatratedeajustaruna ruedao laalturadecorternientrasel
motorest,.enrnarcha.
• Loscornponentesde latolvapararecorte,cubiertade descargay
escudode riel,est_.nsujetosadesgastey da_osquepodriadejar
expuestaspartesquesernueveno perrnitirquese arrojenobje-
tos.Paraprotegersuseguridad,verifiquefrecuenternentetodos
loscornponentesy reernpl_.celoss61oconpartesde losfabri-
cantesdeequiposoriginales(O.E.M.)listadasenestemanual.
La utilizaci6nde partesquenocurnplanconlasespecificaciones
deequiposoriginalespodriatenercornoresultadounrendirniento
incorrectoyadern_.slaseguridadpodriaestarcomprornetida.
• Nocarnbielaconfiguraci6ndel reguladordelmotorniacelere
dernasiadoelrnisrno.Elreguladorcontrolalavelocidadrn_.xirna
seguradeoperaci6ndel motor.
• Verifiquefrecuenternentela Ifneadecombustible,eltanque,el
tap6n,y losaccesoriosbuscandorajaduraso perdidas.Reern-
placedeset necesario.
• Nod_arranqueal motorsi noest,.la bujfadeencendido.
• Mantengao reernpiacelasetiquetasde seguridad,segOnsea
necesario.
• Observelasleyesynorrnasaplicablesparadisponeradecu-
adarnentedelosdesechos.Ladescargainapropiadadeliquidos
o rnaterialespuededa_are[medicarnbiente.
• SegOnla Cornisi6nde Seguridadde ProductosparaelConsu-
rnidordelos EstadosUnidos(CPSC)y laAgenciade Protecci6n
Arnbientalde losEstadosUnidos(EPA),esteproductotieneuna
vida_til media desiete(7)a_os,6140horasdefuncionarniento.
AI finalizarladda Qtilmedia,adquieraunarn_.quinanuevao
hagainspeccionaranualrnente_staSearsporunou otrodis-
tribuidordeserviciosparacerciorarsedequetodoslossisternas
rnec_.nicosyde seguridadfuncionancorrectarnenteyno tienen
excesivodesgaste.Si noIohace,puedenproducirseaccidentes,
lesionesornuerte.
NO MODIFIQUE EL MOTOR
Paraevitarlesionesgraveso larnuerte,nornodifiqueel motorbajo
ningunacircunstancia.Si carnbiala configuraci6ndel reguladordel
motorelmotorpuededescontrolarsey operara velocidadesinsegu-
ras.Nuncacarnbielaconfiguraci6ndef_.bricadelreguladordel motor.
AVISO REFERIDO A EMISIONES
Losrnotoresqueest&ncertificadosycurnplenconlasregulaciones
de ernisionesfederalesEPAyde CaliforniaparaSORE(Equipos
pequeSostodoterreno)est_.ncertificadosparaoperarcongasolina
cornOnsinplornoy puedenincluirlossiguientessisternasde control
de ernisiones:Modificaci6ndemotor(EM) y catalizadorde tresvias
(TWO)si est_.nequipadosde esarnanera.
GUARDACHISPAS
Estarn&quinaest,.equipadacon unmotorde cornbusti6ninternay
nodebeser utilizadaen ocercade unterrenoagrestecubiertopor
bosque,rnalezaso hierbaexceptosiel sisternade escapedelmotor
est,.equipadocon unarnortiguadorde chispasquecurnplaconlas
leyeslocaleso estatalescorrespondientes,encasodehaberlas.
Siseutilizaunarnortiguadordechispasel operadorIo debernantener
en condicionesde usoadecuadas.Enel Estadode Californialas
rnedidasanteriorrnenternencionadassonexigidasporley (Arficulo
4442delC6digodeRecursosPOblicosdeCalifornia).Esposible
queexistanleyessirnilaresenotrosestados.Lasleyesfederalesse
aplicanenterritoriosfederales.
Puedeconseguirelarnortiguadorde chispasparael silenciadora
travesde sudistribuidorautorizadode rnotoreso poni_ndoseen
contactoconelcentrodeservicioSears.
37
Page 38

SilVIBOLOS DE SEGURIDAD
Estap&ginarepresentay describelaseguridadlossimbolosquepuedenparecerenesteproducto.Lea,comprenda,y sigatodasinstrucciones
en lam_quinaantesprocurarparareuniry operar.
LEA EL MANUAL(S) DEL OPERADOR
i
i
®
Lea, comprenda,y siga todas instrucciones en el manual (manuales) antes procurar para reunir y
operar.
PELIGRO-- GIRANDO HOJAS
Para reducir el riesgo de herida, guarde manos y pies lejos. No funcione a menos que la tapa
de descarga o el receptor de hierba est6n en su lugar apropiado. De ser dahado, sustituya
inmediatamente.
PELIGRO-- ESPECTADORES
No siegue cuando los ni_os o los otros est_in alrededor.
PELIGRO-- DIe ELCORTE DE PIE/
Guarde manos y pies lejos de hacer girar partes.
PELIGRO-- ESCOMBROS LANZADOS
Quite objetos que pueden set lanzados por la I_imina en cualquier direcci6n. Lleve gafas de
seguridad.
PELIGRO-- CUESTAS
Use extra la precauci6n en cuestas. No siegue cuestas mayores que 15 o
ADVERTENCIA DESPIDA
Para reducir el riesgo de incendio mantenga la m_iquina limpia de pasto, hojas y de acumulaci6n de
otros escombros.
ADVERTENCIA VAPORES TOXICOS
Nunca encienda un motor en espacios cerrados o en una zona con poca ventilaci6n. El escape del
motor contiene mon6xido de carbono, un gas inodoro y letal.
ADVERTENCIA-- SUPERFICIE CALIENTE
Las partes del motor, especialmente el silenciador, Ilega a set muy caliente durante la operaci6n.
Permita motor y silenciador para ponerse frio antes de tocar.
38
Page 39

Mireymantenc3aestenive[conun_rbo[vertical
Use esta paginacomo guia para determinar en qu_ pendientes no puedeoperar eI tractor de manera segura.
Nooperelacortadoradec_speden dichaspendientes.No corteeninclinacionesmayoresde 15grados(elevaci6naproximadade 21/2piespercada 10pies).Operelas
podadorasQUESE EMPUJANde maneraquecrucenelfrentedelaspendientes,nuncahaciaarribay haciaabajo.
Page 40

IMPORTANTE: Estaunidad seenvfasin gasolina ni aceite enel motor.
Antesde comenzaro correr lama.quinacargue el motorcon gasolinay
aceitecomo se indica en la secci6n de operaci6n de este manual.
NOTA: Las referenciasa los ladosderecho e izquierdode lacortadora de
cespedse hacenobservando la ma.quinadesde la posici6nde operaci6n.
APERTURA DE LA CAJA DE CARTON
1. Cortecada unade iasesquinas de la caja verticaimente,de laparte
superiora labase.
2. Saquetodaslas piezassueltas.
3. Quiteel material deempaque suelto.
C61VIO SACAR LA UNIDAD DE LA CAJA
1. Elevela unidaddesde la parte posterior parasepararladel material
de iacaja quequededebajo yhaga rodaria unidadfuerade ia caja.
2. Verifiquecuidadosamentesi en la caja queda aiguna parte suelta.
PIEZAS SUELTAS DENTRO DE LA CAJA
Colectorde cesped
Tolvade descarga lateral
Aceite del motor
f
J
Figura2
iVIONTAJE
IVlontaje de la manija
1. Retireel material deempaque que pudiera estar entre las manijas
superiore inferior.
A. Quite los tornillosytuercas de mariposatransportedesde
el mango como se muestra en lafigura 1. No aflojeo quitar
adyacentestorniilosde cabeza hexagonal.
B. Si bien iaestabilizaci6n decortacesped pot io que nose
mueve, pivoteasa superior comose muestraen la figura2. No
engarzadocable mientraslevantaia palancahaciaarriba.
2. Retireia T-pernosde la manijaentrecorchetescomo se muestraen
la figura 3.
Figura 3
Figura1
,J
40
Page 41

3,
Siga los siguientes pasos paracompletar conjuntodel mango:
A. Tire haciaarriba en elasa hasta agujeros en lamanija (que se
muestraen la figura3 corte de la cubierta)se alineancon los
agujerosen elmangosoporte. Veala figura 4.
NOTA: AI tirar hacia arriba la palanca, aseg@ese de que no tire de
manejar todo el camino.
B. Inserteei T-pernos quit6anteriormente a travesdei mango
corchetesy asa inferiory apriete bienparaasegurar elmango
en sulugar.Veaia figura4.
C. Vuelva acolocar tuercas ypernos de transporte retirarse antes
en unareducci6n delos agujeros de la manija como se muestra
en lafigura 5.
4. Laguiade lacuerda,queesta.conectadaa lavariiia de sosten,se
encuentrasobreel ladoderechodela manijainferior.Vea la Figura6.
A. Sostengala manijade controlde lacuchillacontra la manija
superior.
B. Jale lacuerdade arranqueparasacarla del motor. Suelte el
control de la cuchilla.
C. Deslice lacuerda dearranque en laguia.
D. La atadurade cables uso (s)para garantizarcable(s) para
bajarde manejar.
Conexi6n de la colectora de c6sped
1. Paraensamblarel colector decesped (de sernecesario), Hagael
cierto bolsoes dio vuelta a la derechael ladoantesde reunir(la
advertenciade laetiqueta sera.pot fuera).
A. Coloque labolsa sobre elmarco conel lado negrode pla.stico
en elrondo.
B. Desliceel canalde pla.sticosobre losganchos delmarco. Vea
la figura 7.
2. Paraacoplarelcolectorde cesped.
A. Levantela puerta de descarga posterior.Veala figura 8.
Figura5
f
Figura4
Figure6
f
J
,J
Figura7
41
Page 42

B. Lugarde colecciHnde cespeden lasranuras en el mango entre
corchetescome semuestra enia figura 8. Sueltelapuerta de
descarga demodeque descansesobreel colector decesped.
Paraquitar al receptor dehierba, levante ia puerta de descarga trasera
en elcortacesped. Ascensorcespedyfuera de iasranuras enel mango
entre parentesis. Elreversede liberaciHndescarga ia puerta parapermitir
queello cerrara la apertura traseradel cortacesped.
Conexi6n de Canal de Descarga Lateral
Su podadorahaside enviadacomo abonadora. Sihace la conversiHna
descarga lateral,asegurese deque el colectorde cesped este fuerade la
unidad y queia puerta de descarga trasera este cerrada.
1. Enel costadode la podadora,levanteel adaptador para abono. Vea
figura 9.
2. Deslicelos dos ganchos del canal de descarga lateraldebajodel
pasadorde bisagrasobreel montaje del adaptador para abono. Baje
el adaptador para abono. No extraigala clavija paraabono lateralen
cuaiquiermomento,aQncuando no este abonando.
AJUSTES
Altura de torte
Hay una palancade ajustede aitura de corte,situadoencima dela rueda
delanteraderecha y trasera.
1. Presionela palancahaciala rueda (unidad tendera,a caercuando se
sueltala palanca).Vea la figura 10.
2. Muevalaa cuaiquier de las posicionespara la aitura de corte
deseado.Veala figura 10.
3. Liberela palanca hacia la cubierta dela podadora.
f
®
J
Figura 8
Clavija para
abono lateral
IMPORTANTE: Tanto las ruedas delanteras y traseras deben
colocarse en la misrna posiciHn relativa. Cuando el terreno es agreste
o irregular cambie la palanca de ajuste de la altura a una posicidn m&s
alta. De esta manera se cuida m&s elcesped.
Inclinaci6n de la manija
Perconvenienciade laoperaciHn,puedeajustar lainclinaciHnde la
manijade lasiguiente manera:
1. Quitelos tornillos ytuercas de mariposatransporte demanejar.Vea
la figura 11.
2. Coloqueei mangoen una de ias tres posicionesque sesientama.s
cHmodo.Vea la figura 11inserciHn.
3. Fije ia posiciHncon tuercasy pernos de transporte eliminadoantes.
Figura9
f
Superior
Figura 11
_J
J
Figura10
42
Page 43

Arrancador
de retroceso
Colector de C_sped
Tap6n de aceite/varilla
de medici6n del nivel
de aceite
Palanca de
aj
de torte
Canal de
DescargaLateral
J
TapdnDeGasolina
Clavijapara
abono
Figura12
CONTROL DE CUCHILLA
Elcontroldela cuchillaest,.unidoa la rnanijasuperior.Presionela
rnanijade controldelacuchillacontralarnanijasuperiorparaoperarla
unidad.Sueltela rnanijadecontrolde lacuchillaparadetenerelmotor
yla cuchilla.
El control de ia cuchiiiaes un dispositivo deseguridad. Nunca intente
anular su funcionamiento.
PALANCA DE AJUSTE DE LA ALTURA DE
CORTE
Unapalancade ajustese encuentraen laruedatraseraderechayel
ottoseencuentraen laruedadelanteraderecha.Losdospalancas
tienenqueestaren larnisrnaposici6nrelativaparaaseguraruncorte
uniforrne.Paraajustarla alturade corte,serefierena la secci6nde
Montaje.
ARRANCADOR DE RETROCESO
Elarrancadorde retrocesoest,.unidoa la rnanijasuperiorderecha.
Paraencenderlaunidadcol6quesedetr_.sde la rnisrnay tiredela
cuerdadelarrancadorde retroceso.
LAVADO DE LA PLATAFORMA
La plataforrnade supodadoraest,.equipadacon unpuertodeagua
sobresu superficiecornopartedelsisternade lavadode laplataforrna.
Palanca de
ajuste de altura
de corte
Utiliceellavadodela plataforrnaparalavarlaparteinferiordela
plataforrnay quitarlosrecortesde c_sped.
CLAVIJA PARA ABONO
EladaptadorparaabonoseutilizaQnicarnenteparaprop6sitosde
abono.Envezderecolectarlosrecortesdelc_spedenun colector
de c_spedo canaldedescargalateral,algunosrnodelosde podadora
tienenla opci6nde recircularlosrecortesenel c_sped.Estose llama
abonar.
CANAL DE DESCARGA LATERAL
Sucortacespedes transportadocornoun rnulcher.Paradescargarlos
recortesdeperi6dicode hierbaal ladoencarnbio,sigalasinstruc-
clonesen la secci6ndeMontajeparaatarelcanalde descargalateral.
Mantengasus manosypies alejadosdel areadel canal de laplataforrna
de corte.Consultela etiqueta deadvertencias en la unidad.
TAPON DE ACEITE/VARILLA DE iVlEDICION
DEL NIVEL DE ACEITE
Consulteiasecci6nMantenimientoparaobtenerinstruccionessobre
c6moverificarel aceite.
ESCUDO DE RUTA
Elescudo de ruta seadjuntaa la parte traserade iama.quinay esta.
ahi paraprotegeral operadorde escombrosquevuelan. No utiliceel
cortacesped a menosque el escudoes totalmentefuncionalyen su lugar.
43
Page 44

LLENADO DE GASOLINA Y ACEITE
Aceite (se envia una botella junto con la unidad)
Primer uso
1. Saquela varilla del niveldeaceite (G).
2. Con lacortadorade cesped ubicada en suelo nivelado, vierta el
aceitebntamente pot dentrodel tubo de Ilenadodeaceite del motor
(H) hastala marcade limitealto en la varilla medidora del nivel de
aceite(J). Vea la Figura 13.
3. Vuelvaacolocar lavarilla deIlenadode aceite y ajQstela.
Usos posteriores
Use aceite paramotorde 4tiempos que cumpla o sobrepase los
requisitos para laclasificaci6n deservicio APi SK SG, SH,SJ o
equivalente.
Compruebesiempre iaetiqueta de servicio API en el recipientedei aceite
para asegurarseque incluye lasletrasSK SG,SH, SJ o equivalente.
Temperaturasai aire libre de determinar laviscosidad dei aceite correcto
para el motor.Usela tabla paraseleccionar la mejor viscosidadpara el
rangode temperaturaai aire librese espera.
86 _ _o ..... so
2o
50 _ o
C '_'t?'p?:C:_ *'?" 4,10
f
Figura13
,, La gasoiina con hasta un 10% de etanol (gasohoi) o hasta el 15%
de MTBE (metil terbutil _ter) es aceptable.
Eche gasolinaen un a.reabien ventiiaday conei motorparado. Siel motor
haestado funcionando, deje que seenfrie primero. Noeche gasolinaa
la ma.quinaenei interior de unedificio donde los vapores dela gasolina
suedanestarex uestos a al unallama ochis a.
-_22
* Potdebajo de 40 oF (4oC) el usode SAE30dara.lugaraduros de
partida.
** Potencima de 80 oF (27oC)el usode 10W-30puede provocar un
aumentodei consumo depetr61eo.Niveldeaceite con ma.sfrecuencia.
1. Reviseelaceite con el motor paradoy nivelado.
2. Quiteia tapa del dep6sito deaceite/varilla medidora del nivel de
aceitey limpiela.
3. Coioque y ajuste la varilla indicadora. Luegoquitela para revisarel
nivelde aceite.Veaia Figura13.
4. Siel nivel deaceite esta.cercao pot debajo de la marcade limite
bajo de la varilla medidoradel nivelde aceite,quitela tapa del
dep6sito de aceite/varilia medidoradei niveide aceite y iBnelo con
el aceite recomendadohastala marca delimitesuperior. NoIlenede
ma.s.
5. Vuelvaainstalar latapa/varilla medidoradel nivelde aceite.
Gasolina
No utilice gasolinas noaprobados, tales como E85.No mezcle elaceite
en ia gasolinao modificar el motorparafuncionarcon combustibles
aiternativos. Esto dafiara,los componentesdel motory anularla
garantia del motor.
De combustible debe cumplir estos requisitos:
,, Limpia, fresca, la gasolina sin piomo.
• Un minimo de 87 octane/87 AKI (91 RON).
Lagasolina es aitamenteinflamabley explosivay usted puede quemars_
o iesionarsegravementeai reabastecer.Pareelmotory mantenga iejos
el calor, las chispasy las llamas. Reabastezcas61oaiaire libre. Limpie
inmediatamente losderrames.
Si va a usareiequipo de forma intermitenteos61oocasionalmente,
consulte iasecci6n deAimacenamiento FueradeTemporada para
obtener ma.sinformaci6nsobre eldeterioro delcombustible.
NOTA:El combustible puede dafiarla pintura yaigunos tiposde plastico.
Tengacuidado de no derramarcombustible cuandoIlenael tanque.
No use nuncagasolina rancia o contaminada ni mezclas deaceite y gaso-
lina.No permitaque entre suciedado aguaen eltanque de combustible.
1. Quite ia tapa dei tanque de combustible.
2. Agreguecombustible hasta iaparte inferior del iimitede nivelde
combustible en ei tubo del tanque. No iienede ma.s.Limpieel
combustible derramadoantes dearrancarel motor.
3. Aprieteeltap6n firmemente.
4. Antes dearrancarel motor,aBjese almenos 3metrosdel
emplazamiento y la fuente de la gasolina.
AsegQresede queninguna personaaparte dei operador permanezca
cerca de ia cortadora mientras arranca elmotor uopera la misma.
Nunca encienda el motoren espacios cerrados o en una zonacon poca
ventilaci6n. El escapedel motorcontienemon6xidode carbono, ungas
inodoro yietai. Mantengaiasmanos, lospies, el cabello y la ropasuelta
alejados delas partesm6viles del motory de la cortadora.
44
Page 45

PARA ENCENDER EL MOTOR
1. Coi6quesedetra.sde la podadora,apriete ia manija de control dela
cuchillay sostengala contra lamanija superior.Vea laFigura 14.
2. Sostengafirmementelas dos manijasjuntas, tomela manijadel
arrancadorde retrocesoy tire de ia cuerda parasacarlacon un
movimientora.pidoy continuo. Veala Figura 14.Mantenga firmela
manijadel arrancador,dejeque la cuerda regreselentamenteal
arrancador.Repitahastaqueel motor este en marcha. Dejeque la
cuerdase enrosque lentamente de regreso.
De retracci6n ra.pidadel cord6n de arranque (soborno) tirara,de mano y
el brazo haciael motorma.sra.pidodeIo quepuede dejarir. Lasfracturas
de huesos,fracturas, contusiones o esguinces podria resultar.
PARA DETENER EL MOTOR
1. Sueltela manijade control de lacuchilla paradetener el motory la
cuchilla.
Esperea que ia cuchillase hayadetenidopot completoantes de hacer
cualquiertrabajo en lacortadora o de retirarel colectorde cesped.
USO DE LA CORTADORA DE ClaSPED
Aseguresedeque elcespedesta.librede piedras,palos, cablesu otros
objetosquepudiesendafiarla cortadorao el motor.Dichosobjetospueden
setarrojadosaccidentalmentepot la cortadoraencualquierdirecci6ny
provocarlesionespersonalesgravesaioperadory a otraspersonas.
AIoperar una cortadora de cespedes posibleque objetos extrafios sean
arrojadosa los ojos, Io cual puede dafiarlos gravemente. Utilicesiempre
galas de seguridad durante laoperaci6n dela cortadora de cespedo
mientrasla ajusta o repara.
USO COMO ABONADORA
Paraabonar el cesped,quite el colector decespedde la ma.quina.La
puerta dedescargaposterior deberaestarcerrada. Paraun abono
eficiente, no corte cesped hQmedo.Siel cesped ha crecidoma.sde 10,2
cm. (4pulg.) noserecomienda eluso de la podadora como abonadora.
Enese caso, use el colector de cesped paraembolsarlos recortes.
Figura14
USO DEL COLECTOR DE ClaSPED
Puedeutilizarel colector de cesped para recogerdichos recortes mientras
opera lapodadora.
1. Acople elcolector decesped siguiendoias instrucciones en ia
secci6n de Montaje.Los recortesdecesped se recolectara.n
automa.ticamenteenla bolsa a medidaque pase ia podadora.Opere
la podadorahasta que ia bolsade recolecci6n esteIlena.
2. Detengaei motor pot completosoltando la manija de control de la
cuchilla. Compruebeque la unidad se hayadetenido pot completo.
3. Paradeshacerse delos recortes de cesped ievanteia puerta de
descarga ytire de la bolsade recolecci6n hacia arriba, aparta.ndola
de la podadora.
Si golpea un objeto extrafio, detenga eimotor.Retire el cable de ia
bujia, inspeccione detenidamente la cortadora para vet queno tenga
dafios, y repare eldafio antesde volveraencender y operar.Elexceso
de vibraci6nde lacortadora durantela operaci6n es unaindicaci6nde
dafio. Se debe inspeccionary reparar la unidad Ioantes posible.
45
Page 46

PROGRAMA DE iVlANTENllVllENTO
Antesde realizarcuaiquiertipo de mantenimientoo servicio,desenganche
todosloscontrolesy detengaelmotor.Esperea que sedetengancomple-
tamentetodaslaspiezasm6viles.Desconecteelcane delabujiayp6ngalo
haciendomasacontrael motorparaevitarque seenciendaaccidentaimente.
Siga el cronogramade mantenimientoque sepresenta acontinuaci6n.
Estatabla s61odescribe pautasde servicio. Utiiiceiacolumna Registro
de Servicio parahacer ei seguimientode las tareasde mantenimiento
completadas. Para ubicar el Centro de Servieio Sears m_s cercano o
para programarun servieio, simplemente comun/quese con Sears al
tel_fono 1-800-4-MY-HOME®.
Cada uso
lras 5 horas
Anuaimenteo25 horas
Anuaimenteo 50 horas 1. 1. Oambiar
Anuaimente 1. 1.
Antesde almacenar 1. 1.
1. Niveldeaceite dei motor
2. Piezassueltasofaltantes
3. Unidady motor
1. Aceitedei motor
1. Depuradordeairet
2. Varillajes/pivotesde control yruedas
3. La parte inferiorde ia plataformade
ia cortadora de cesped
Aceite dei motor
Bujia deencendido
2. 2.
Depuradorde aire
Sistemade combustible
1. Verificar
2. Ajustaroreemplazar
3. Limpie
1. Cambiar
1. Limpiaroreemplazar
2. Lubricarcon aceiteligero
3. Limpie
Reemplazar
Reemplazar
Hacerfuncionarel motor hasta que se
detenga porfaitade combustibleo aSadir
estabilizadorde un tanqueIleno de
combustiblenuevoantes de su aimace-
namiento.
Limpiorn_.sa menudoen condicionespolvorientaso cuandolos escombrosaerotransportadosest_.npresentes.Sustituyaelfiltrodeairede
sermuysucio.
46
Page 47

Detengasiempreelmotor,desconecteelcabledelabujiayhagamasa
contraelmotorantesdereaiizarcuaiquiertareade mantenimientoa su
mfiquina.
RECOiVIENDACIONES GENERALES
• Respetesiemprelasreglasdeseguridadcuandorealicetareasde
mantenimiento.
• Lagaranfiadeestacortadoranocubreelementosquehan
estadosujetosalmalusoola negligenciadeloperador.Para
recibirel reembolsototaldelagarantia,eioperadordeberfidar
mantenimientoaiequipotaiy comoseindicaenestemanual.
• Elcambiodelavelocidadcontroladadelmotorinvalidarfilagarantia
deimotor.
• TodoslosajustesdebenserverificadospotIomenosunavezen
cadaestaci6n.
• Reviseperi6dicamentetodoslossujetadoresy compruebequeesten
bienajustados.
IVIANTENIMIENTO DEL MOTOR
Bujia de encendido
Paraunbuenfuncionamiento,labujiadebeestaradecuadamente
abiertay librededep6sitos.Cambielabujiacada50horaso unavezpor
temporada.Reemplacela bujiaanualmente.
1. Desconecteelcapuch6nde labujiayretirecualquiersuciedaddel
fireadeesta.
2. UselaIlavedebujiasdeltama_oadecuadoparaextraerla.
f
Electrodo
J
Figura15
NOTA:ReemplazarconunaChampion®RC12YCbujia.
3. Compruebeel entrehierroconuncalibradordealambre.La
separaci6ncorrectaes0,030in.(0,76mm).VealaFigura15.Sies
necesario,reajusteelentrehierro.
4. Instaieyapriete[abujiaa[pardeaprieterecomendado.Parael
ajustedelentrehierroo elpardeapriete,consultela secci6nde
Especificaciones.
5. Coloqueel capuch6ndelabujia.
Filtro de aire
Unfiltrodeairesuciorestringir&elfiujodeaireal carburadory causar&
el funcionamientodefectuosodelmotor.Inspeccioneelfiltrocadavez
queopereelmotor.Necesitar_.limpiarcon m_.sfrecuenciaelfiltrosi
ustedoperaelmotorenfireasmuypolvorientas.
Limpioelfiltrodeairecada25horasdelaoperaci6no unavezpor
temporada.Reemplaceel filtrodeaireanualmente.
Nuncaarranqueuopereel motorsiremovi6elconjuntodelfiltrode
aireoel filtrodeaire.
NOTA:Nouseaireapresi6nnisolventesparalimpiarelfiltro.Elairea
presi6npuededaSarelfiltroylossolventespuedendisolverlo.
1. Aflojareltornilloylainclinaci6nde laviviendacubiertade
pl_.sticoen elladodel motorhaciaabajo.VerFigura16.
2. Quiteelfiltrodeairedelaviviendacubiertadepl_.stico.
Figura16
3. Paraaflojarlosdesechos,golpeesuavementeelfiltrosobreuna
superficiedura. Siel filtroest,.excesivamentesucio,reempl_.celo
conun nuevofiltro.
4. Inserteaquicubiertaenlasranurasenlaparteinferiorde labase.
5. Tilt cubrirensulugary aprietelostornillos.
4.7
Page 48

Comprobarel aceitedel motor
Comprobarel nivelde aceiteantesde cada operaci6n. Aseg_resede que
el nivei de aceite se mantiene.
1. Reviseelaceite con ei motor paradey nivelado.
2. Quiteia tapa del dep6sito deaceite/varilla medidora del nivel de
aceitey limpiela.
3. Coloque y ajuste la varilla indicadora. Luegoquitela para revisarel
nivelde aceite.
4. Siel nivel deaceite esta.cercao pot debajo de la marcade limite
bajo de la varilla medidoradel nivelde aceite,quitela tapa del
dep6sito de aceite/varilia medidoradei niveide aceite y ilenelo con
el aceite recomendadohastala marca delimitesuperior. NoIlenede
ma.s.
5. Vueivaainstalar iatapa/variiia medidoradel niveide aceite.
Cambiar el aceite del motor
Filtro de aire j
_ ap6n de
aceite/varUla de
medici6n del nivel
de aceite
Silenciador
La gasolina y sus vapores son extrernadarnente inflarnables y
explosivos. Un incendio o una explosi6n pueden causar graves
quernaduras o a rnuerte.
Carnbieel aceitedelmotordespu6sdelasprirnerascinco horasde
operaci6n,ycadacincuentahorasounavezalaternporadadespu6s.
Si drenael aceitedesdeeltubosuperiorde Ilenadodeaceite,el
tanquedecombustibledebeestarvacioodeIocontrariopodria
presentarseunafugade combustiblequepodriaocasionarun
incendioounaexplosi6n.Paradesocupareltanquedecombustible,
opereel motorhastaquesedetengaporlafaltadecombustible.
1. Con el motor apagado pero a[3ncaliente, desconecte el cable de
la bujfa y rnant6ngalo a distancia de la bujia.
2. Coloque unrecipiente adecuadocerca del motor para recoger el
aceiteusado.
3. Quitela tapa/varilla medidora del nivel de aceitey dreneel aceite
al recipiente inclinandoel motorhacia el tube deIlenadodel aceite.
Vea la Figura 17.
El aceite usadoes unresiduopeligroso.Elimineelaceite usado
adecuadamente.NoIoarrojejuntoconlos residuesdomiciliarios.CensuRe
alas autoridadeslocalesoalcentrede servicioSears paraaveriguar
d6nde hayinstalacionesparala eliminaci6n/reciclaje segura(o)delaceite
usado.
J
FJgura 17
4. Con eimotoren una posici6nnivelada, Ilene hastaiamarca de
limite are en lavarilla medidoradel nivelde aceitecon el aceite
recomendado.
Ponerenrnarchael motorconunnivelde aceitebajopuedecausar
daSosen elmotor.
5. Vueivaa instaiarbienla tapa/varilla medidoradel niveldeaceite.
Limpie el motor
Diariamenteoantes decada use, limpie el cesped, la grasao los
residues acumulados del motor. Mantenga limpiosel varillaje, los
resortes ylos controles. Mantengaei a.reaque rodea alsilenciadory
detra.sdei mismo iibrede cualquier residue combustible.
El mantenimientodel motoren condiciones limpiaspermiteel
movimientode aire airededor del mismo.
Laspartesdei motorse @ben mantenerlimpias para reducir
el riesgode sobrecalentamientoy combusti6n delos residues
acumulados.
No useagua para limpiar ias piezas dei motor.Elagua puede contaminar
el sistema de combustible. Useun cepillo o un trapo seco.
48
Page 49

LUBRICACION
Control de la cuchilla
Lubriqueconaceite ligero los puntosde pivotedel control de la cuchilla al
menos una vezcada estaci6n. Estecontrole debe funcionar librementeen
ambas direcciones. Vea la Figura18.
LAVADO DE LA PLATAFORiVlA
Laplataformade su podadoraest&equipada con un puertodeagua sobre
susuperficie como partedel sistema de lavadode ia plataforma.
Utiliceel iavado de la plataformapara lavar iaparte inferior de la
plataformay quitar los recortes de cesped e impedir laacumulaci6nde
sustanciasquimicas corrosivas.
Realicelos siguientes pasosDESPUESDECADACORTEDE CESPED:
1. Ernpujela podadora a una zona nivelada y despejada del cesped,
que se encuentre suficienternente cerca de una canilla de agua
al alcance de la rnanguera del jardin. Si adjunta, quite la bolsa de
cesped.
AsegQresede queelcanal dedescarga de la podadora NO ESTE
ORIENTADOen ladirecci6n en que se encuentran la casa, elgaraje,los
vehiculosestacionados, etc.
2. Enrosqueelacoplede rnanguera(ernbaladoconel Manualdel
Operadorde sutractor)enelextrernode la rnangueradejardin.
3. Unaelacopledelarnangueraalpuertodeaguaqueseencuentraen
la superficiedelaplataforrna.Veala Figura19.
4. Abraelsurninistrodeagua.
5. Arranqueel motorcornosedescribeen la secci6nde Operaci6n.
6. Hacerfuncionarel motordurantedosrninutoscornominirno,
perrnitiendoquela parteinferiordela plataforrnadecorteselave
a rondo.
7. Hojadecontrolde lacuchillaal pararelmotory lacuchilla.
8. Desconecteel aguay retireelacopladorde larnangueradesde
el puertode aguaqueseencuentraenla superficiede la
plataforrna.
Despuesdelimpiariaplataforma,reinicielapodadora.Mantengaei motor
yiacuchiiiaenfuncionamientodurantedosminutosporiomenospara
permitirquesesequetotaimenteelladoinferiordela misma.
Figura18
/'
/
/
/,
j,//*
/
/
/
!
Figura19
49
Page 50

CUIDADO DE LA CUCHILLA _"
Cuandosaque la cuchilla de corte paraafilarla o reemplazarla, protejase
las manos usandoun parde guantes paratrabajo rudoo untrapo gruesc
parasostener la cuchilla.
Inspeccioneperi6dicamente eladaptadorde la cuchiiia en busca de
rajaduras,especialmentecuando golpee un objetoextra_o. Realicelos
reemplazosque resulten necesarios.Siga lospasos que aparecendebajo
para realizar elmantenimiento de lacuchilla.
1. Desconecteel capuch6n delcable dela bujia. Girela cortadora
de cespedsobre ei costado y compruebe que elfiltro deaire y el
carburadorqueden mirando haciaarriba.
2. Saqueel perno yel soportede campana de ia cuchiiia que sostienen
la cuchiila y eladaptador de la misma al cigQe_aidel motor. Vea la
Figura20.
3. Saquela cuchilla y el adaptadordelcigQe_ai.
NOTA:Quitando estos articulos, la arandela tambienpueden iiberarse
de elcigQe_al.Este seguroparahacer lanotade laorientaci6n de este
arficulo paranuevasesi6n.
4. Saqueia cuchilia del adaptador paracomprobar elequilibrio.
Balanceela cuchilla sobre un destornilladorde eje redondo para
inspeccionarla.Saque metaldei iado pesadohasta que quede bien
equilibrada.Cuandoafile lacuchilla, siga el a.ngulooriginalde la
muelacomo guia.Afile cadahorde decorte pot igualpara mantener
el balance de la cuchilla.
Figura20
Si ia cuchiiia esta.desequiiibradagenerara,vibracionesexcesivas cuandoI
rotea aitas velocidades. Puedeproducirda_os a ia cortadora decespedI
[y se puederomper,causandoasi es ones personaes. j
5. Lubriqueel cigQehaidei motor yia superficieinternadel adaptador
de iacuchilla conaceite iigero. Desliceel adaptadordela cuchilla
sobre el cigQe_aldel motor. Instaleia cuchiiia enei adaptador
con ellado marcado "Bottom"(inferior)(o conel numerode parte)
hacia ei piso cuando iacortadora de cesped esta.en posici6n
de funcionamiento.AsegQreseque la cuchilla quede aiineaday
asentadaen ias bridas del adaptador.
6. Coloqueel soportede campana de la cuchilla enia misma. Aiinee
las muescas del soportedecampana de la cuchillacon los orificios
peque_osde la cuchilla.
7. Vuelvaacolocar elpemo hexagonaly ajQstelosegQnlossiguientes
valoresde torsi6n: 450 Ib-pulgcomo minimo,600 Ib-pulgcomo
ma.ximo.
Paragarantizar iaoperaci6n segura dela cortadora de cesped,revise
periddicamenteel pernode lacuchilla paradeterminarsiesta, bien
ajustado.
5O
Page 51

Nunca almacene la cortadora de cesped concombustible en eltanque
en unespacio cerrado o ena.reascon pocaventilaci6n,donde los
gases deicombustible puedanalcanzarel fuego, chispaso una luz
pilotocomo ia quetienen algunoshomos, calentadoresde agua,
secadores deropa o aigQnotto dispositivo agas.
PREPARACI6N DEL MOTOR
Yaquelos motoresalmacenaronm_.sde30dfas:
1. Paraimpedirala gomaformarseenel sistemade combustible
o en partesdecarburador,dirijasel motorhastaqueestose
pareafaltadelcombustibleoa_adirunaditivodegasolinaal
gaseneltanque.Si ustedusaunaditivodegas,dirigeel motor
durantevariosminutosparaponerencirculaci6nel aditivoporel
carburador-- despu_squeelmotoryel combustiblepuedenser
almacenadoshasta24 meses.
2. Mientrasel motorestodavfacaliente,cambioel petr61eo.
3. Limpieel motordeescombrossuperficiales.
PREPARACI6N DE LA CORTADORA DE
CO'SPED
Limpiey iubriquelacortadora como sedescribeen las instrucciones
de lubricaci6n.
• No utilice unalavadoraa presi6nni una manguerade jardfnpara
limpiar suunidad.
Cubra lacuchilla de la cortadora con grasa parachasis para impedir
la oxidaci6n.
• Refierasea laPREPARACIONDELMOTORpara instrucciones de
almacenaje demotor correctas.
• Almacene la unidad en unazonalimpia yseca. No laalmacene
cerca de materialescorrosivos como pot ejemplofertilizantes.
Cuando almacene cuaiquier tipode equipo motorizadoen un gaip6n
de dep6sitomet_.iicoocon poca ventilaci6n,tenga especialcuidado
de realizarle untratamiento antioxidanteal equipo. Useaceite ligero o
silicona pararecubrir eiequipo, especialmente los cablesy partes m6viles
de su cortadoraantes de aimacenarla.
51
Page 52

hayanvenidoa unaparadacompleta.Desconecteelalambrede bujfayb_.selocontraelmotorparaprevenirel comienzoinvolun-
SiempreIlevepuestoscristabs inastillablesdurantelaoperaci6norealizandocualquierajusteo reparaciones.
Elmotor noarranca
1. Controldeia cuchilla desenganchado.
2. Se hadesconectado elcapuch6n de labujia.
3. Eldep6sito de combustibleesta.vacio oel
1. Engraneel control deia cuchiila.
2. Conecteel cableal capuch6n de labujia.
3. Lleneel tanquecon gasolina limpiay nueva.
combustiblese haechado aperder.
Elmotorfuncionade
manera erra.tica
4. La bujia nofuncionacorrectamente.
5. Elmotorsedesbord6.
6. Lineade combustible bloqueada.
1. Elcapuch6nde la bujiaesta.flojo.
2. Elcombustiblese haechado aperder.
3. La ventilaci6nde latapa delcombustible esta.
4. Limpie,ajuste laseparaci6n,o cambie la bujia.
5. Esperarunos minutos parareactivarse.
6. Contactecon su centro de partes yreparaciones Sears.
1. Conecteyajuste el capuch6ndela bujia.
2. Lleneel tanquecon gasolina limpiay nueva.
3. Destapelaventilaci6n.
obstruida.
4. Aguaosuciedad en el sistemadel combustible.
4. Vacieei tanquede combustible. Carguecombustible
nuevoen el dep6sito.
El motor recalienta
5. Elfiitro deaire esta.sucio.
6. Lineade combustible bloqueada.
1. Elnivel de aceitedel motoresta.bajo
2. Flujodeairerestringido
5. Consulteiasecci6n Mantenimientodel manual.
6. Contactecon su centro de partesy reparacionesSears.
1. Lleneel motorcon iacantidad y tipo deaceite adecuado.
2. Limpielos residuosdeairededor de las aietasde
refrigeraci6ndel motory delalojamientodel soplador.
El motor vacilaa altas 1. Poca separaci6nde los electrodosde la bujia 1.
Ajuste la separaci6na .030".
revoluciones
El motor funcionamal 1. Bujia atorada,averiada oexcesode separaci6n. 1. Limpie, reemplace o reajustelaseparaci6n a .030".
en marchaienta 2. Elfiitro de aireesta.sucio 2. Consulteiasecci6n Mantenimientodei manual.
Demasiadavibraci6n 1. Cuchilla de corte flojao descentrada. 1. Apriete la cuchilla yel adaptador Baianceeia cuchilla.
2. Cuchillaabollada. 2. Cambielacuchilla.
La cortadorade
cesped noregresa
el recorte de cesped
comoabono
1. CespedhQmedo.
2. Cespeddemasiadoalto.
1.
No corte el cesped cuando este mojado,esperehasta
quesea ma.stardepara hacerlo.
2.
Corteuna veza aitura de corte elevada, iuego vueivaa
cortara ia altura deseadao haga un sendero de corte
ma.sangosto.
Afileo cambiela cuchilla.3. Lacuchiiia de iacortadora no esta.afiiada. 3.
Cortedesiguai 1. La posici6n delas ruedas noes correcta. 1. Coloqueias cuatro ruedasen la misma posici6nde aitura.
2. Lacuchiiia de iacortadora noest,. afiiada. 2. Afile o cambiela cuchilla.
_NECESITA MAS AYUDA?
Fr_cor_V;rar_Sla e pue v:ay m/_ en managemylife.com - isin cargo!
En linea podr3 encontrar este manual y los rnanuales de todos los otros productos que posea.
Sus preguntas ser3n respondidas por nuestro equipo de especialistas.
Obtenga un plan de mantenimiento personalizado para su hogar,
Encuentre information y herramientas que Io ayudar_n con los proyectos de su hogar,
managemylife
52
Page 53

(Esta p_.ginase aplica s61oen EE.UU. y Canada.).
Sears Brands Management Corporation, el Consejo de Recursos Ambientales de California (CARB)
y la Agencia de Protecci6n Ambiental de los Estados Unidos (EPA)
Declaraci6n de garantia del sistema de control de emisiones (derechos y obligaciones de la garanfia de defectos del propi=
LACOBERTURADELAGARANTJADECONTROLDEEMISIONESES Y PARALOSMODELOSCERTIFICADOSDELANO 1997YPOSTERIORES,
APLIOABLEALOSMOTORESCERTIFICADOSCOMPRADOSENCALIFOR- QUESECOMPRENYUTILICENENCUALQUIERPARTEDE LOSESTADOS
NIAEN1995Y POSTERIORMENTE,QUESE UTILIZANENCALIFORNIA, UNIDOS(Y APARTIRDEL1DE ENERODE2001ENCANADA).
Declaraci6n de garanfia sobre defectos en el control de emJsiones para California y los Estados UnJdos
ElConsejode RecursosAmbientalesdeCalifornia(CARB),laEPA(Agencia
de Protecci6nAmbientaldelos EE.UU.)y Searstienenelgustodeexplicarla
garantiadelsistemadecontroldeemisionesparamotoresdela_o 2000y para
elfuturoconrelaci6na motorespeque_ostodo terreno(SORE).En California,
los nuevosmotorespeque_ostodo terrenodebenestardise_ados,construidos
y equipadosparacumplirconlas rigurosasnormasanti-smogdelestado.En
el restode los EstadosUnidos,losmotoresnuevostodoterrenodeencendido
porchispacertificadosparaela_o1997debencumplirest_ndaressimilares
establecidospot laEPA.Searsdebegarantizarelsistemade controldeemi-
Cobertura de la garantJa Sears para defectos en el control de emJsiones
Losmotorestodoterrenopeque6osest_ngarantizadosenIorelativoalcontrol alas disposicionesque seindiquenacontinuaci6n.Siuna partedesumotor
deemisionesparadefectosenpiezasduranteunperiododedosa_os,sujeto cubiertapot lagaranfiaesdefectuosa,Searsreparar_o sustituir_dichaparte.
Responsabilidades del propietario en relacibn con la garantia
Comopropietariodelmotortodoterrenopeque_o,Ud.esresponsabledela
realizaci6ndelmantenimientorequeridoqueseincluyeenlas instrucciones
deoperaci6ny mantenimiento.Searsrecomiendaquese conserventodoslos
recibosrelativosalmantenimientodesu motortodoterrenopeque_o,pero
nopudedenegarla garantiasimplementepor la faltade los mismos,opor su
incumplimientodelmantenimientoprogramatic.Comopropietariodelmotor
peque_otodoterrenodebe saberque, sinembargo,Sears lepuedenegar
lacoberturade lagarantiasi sumotortodoterrenopeque6oouna piezadel
mismohanfalladodebidoa abuso,negligencia,mantenimientoindebidoo
Disposiciones de la garantJa Sears para defectos en el control de emJsiones
Lassiguientessondisposicionesespecificasrelacionadasconlacoberturadelagarantiaparadefectosenel controldeemisiones.Esuna_adidoa lagarantiade
motorSearsparamotoresnoreguladosqueseencuentraenlasinstruccionesdefuncionamientoy mantenimiento.
1. Piezascongarantia
Lacoberturadeestagarantiase extiendeL]nicamentea laspiezas
queaparecenacontinuaci6n(las partesde lossistemasdecontrolde
emisiones),siemprequedichaspiezasestuvieranyaenelmotoren el
momentodesucompra.
a. Sistemademedici6ndecombustible
•Sistemadeenriquecimientoparaarranqueenfrio
•Carburadorypartesinternas
• Bombade combustible
b. Sistemadeinducci6nde aire
• Filtrodeaire
•Colectordeadmisi6n
c. Sistemadeencendido
• Bujia(s)deencendido
•Sistemadeencendidomagneto
d. Sistemadelcatalizador
•Convertidorcatalitico
•Colectordeescape
•Sistemadeinyecci6nde aireo v_lvuladeimpulsos
e. Elementosvariadosusadosenlossistemasanteriores
•Wlvulas devacio,sensiblesatemperatura,posici6ny tiempo
einterruptores
•Conectoresy montajes
2. AIcancedelacobertura
Searsgarantizaal poseedorinicialy a loscompradoressubsiguientes
quelas piezascon garantianotendr_ndefectosen materialesnimano
deobraqueprovoquenla falladelas mismasduranteun periodode
dosaSosa partirdela fechaenqueelmotorse entregaa un comprador
particular.
3. Sincargo
Lareparaci6noreemplazodecualquierpartecongarantiase realizar_
EnlosEstadosUnidosyCanad_hayunalinea deatenci6nde24 horas,1-800-469--4GG3,quecuentacon un menL]conmensajespre-grabadosque contienen
etario)
sionesdesu motorparalosperiodosdetiempoenumeradosa continuaci6n,
siemprequenohayaabuso,negligenciao mantenimientoindebidode su
motortodoterrenopeque_o.Susistemade controldeemisionespuedeincluir
piezastalescomoel carburador,el filtrode aire, elsistemadeencendido,el
silenciadoryelconversorcatalitico.Tambienpuedeincluirconectoresyotras
unidadesrelacionadasconlasemisiones.Dondeexistaunacondici6ncubierta
porla garantia,Searsreparar_su peque6omotortodoterrenosincostoalguno
incluyendodiagn6stico,piezasy manodeobra
a modificacionesnoaprobadas.Ud.es responsabledepresentarsu motor
todoterrenopeque6oa undistribuidorde serviciosSearsautorizadotan pronto
comoaparezcaunproblema.Lasreparacionesde la garantiasinconfiicto
debencompletarseen un plazodetiemporazonable,nosuperiora 30dias.Si
tienealgunapreguntarespectoa sus derechosy responsabilidadesreferentes
a lagarantia,debe contactarconun representantedeserviciosSearsal 1--
800--469--4663.La garantiadeemisioneses unagarantiapotdefectos.Los
defectossejuzgandeacuerdoconelfuncionamientonormalde un motor.La
garantiano est_relacionadaconunapruebade emisionesenuso.
sin cargoalgunoparael poseedor,incluyendotareasdediagn6sticoque
permitandeterminarsi unapartecongarantiaesdefectuosa,siempreque
dichodiagn6sticoserealiceenundistribuidordeserviciosSearsautoriza-
do. Parael serviciode lagarantiade emisiones,contacteal distribuidorde
serviciosSearsautorizadom_scercanoincluidoen las"P_ginasamarillas"
en lascategorias"Motores,gasolina","Motoresdegasolina","Podadoras
de cesped",o similares.
4. Reclamacionesyexclusionesa la cobertura
Las reclamacionesde lagarantiadebenenviarsedeacuerdocon las
disposicionesdelapoliticadegarantiaparamotoresSears.Lacobertura
de lagarantiaexcluir_defectosen piezascongarantia quenoseanpartes
originalesSears,o abuso,negligenciao mantenimientoincorrecto,tal y
comoseestableceen lapoliticadegarantiaparamotoresSears.Sears no
es responsablede lasfallas enpiezascongarantiaprovocadasporel uso
de partesa_adidas,quenoseanoriginalesoquese hayanmodificado.
5. Mantenimiento
Cualquierpartecongarantiaque noesteprogramadaparaset reempla-
zadacomo mantenimientorequerido,oque s61odebainspeccionarse
regularmentealefecto de"inspeccioneo reemplacesegL]nsea necesario",
estar_garantizadacontradefectosduranteel periododela garantia.Todas
las piezasgarantizadasqueestenprogramadasparasureemplazopara
cumplirconlosrequisitosdemantenimientoestar_ngarantizadass61o
porel periodoanterioral primerreemplazoprogramaticparadicha pieza.
Cualquierpiezade recambioqueseaequivalenteenfuncionamientoy
durabilidadpuedeusarsepararealizarmantenimientoo reparaciones.El
propietarioes responsablederealizartodoel mantenimientorequerido,tal
y comosedefineenlasinstruccionesdefuncionamientoy mantenimiento
Sears
6. Coberturaindirecta
Porla presente,la coberturase extiendea lafalladecualquiercomponente
de motorprovocadapotlafallade unapiezacon garantiaque estetodavia
en periododegarantia.
informaci6nparaelmantenimientodemotores.
Page 54

Busque el periodo de duraci6n de emisiones importantes yla informaci6n de clasificaci6n de aire en
la etiqueta de emisiones de su motor
Los motores cuyo cumpiimiento con los estAndares de emisi6n Tier 2 de la Comisi6n de Recursos Ambientales de California (CARB)
est6 certificado deben exhibir la informaci6n relacionada con el periodo de duraci6n de ias emisiones y la clasificaci6n de aire. Sears
Brands Management Corporation ponen esta informaci6n a disposici6n del consumidor en nuestras etiquetas de emisiones.
Ei Periodo de Duraci6n de las Emisiones describe el nQmero de horas de tiempo real de funcionamiento para el cuai se certifica que
el motor cumpie con ias reglas de emisi6n, descontando el mantenimiento adecuado del mismo segQn las instrucciones de oper-
aci6n y mantenimiento. Se utilizan las siguientes categonas:
Moderado:Se certifica que el motor cumpie con las reglas de emisi6n durante 125 horas de tiempo real de funcionamiento del motor.
Inmediato:Se certifica que el motor cumpie con las reglas de emisi6n durante 250 horas de tiempo real de funcionamiento del motor.
Extendido:Se certifica que el motor cumpie con las reglas de emisi6n durante 500 horas de tiempo real de funcionamiento del motor.
Por ejemplo, una cortadora de c6sped tJpica que se empuja desde arras se usa entre 20 y 25 horas por aSo. Por Io tanto, el Periodo
de Duraci6n de Emisiones de un motor con una clasificaci6n intermedia sena equivaiente aentre 10 y 12 aSos.
Laciasificaci6n de aire es un nQmero calculado para describir el nivel relativo de emisiones para un grupo de motores en particular.
Cuanto menor sea la clasificaci6n de aire, mayor es la limpieza del motor. La informaci6n se presenta de forma grAfica en la etiqueta
de emisiones.
Despu_s del 1 de julio de 2000, busque el periodo de cumplimiento de las reglas de
emisiones en la etiqueta de cumplimiento de las reglas de emisiones del motor
Despu6s del 1 de julio de 2000 se certificarA que determinados motores Sears Brands Management Corporation cumplen
con los estAndares de emisiones de la fase 2 de la Agencia de Protecci6n Ambientai de los Estados Unidos (USEPA). Para
los motores certificados para la etapa 2, el periodo de cumplimiento con las reglas de emisiones al cual se hace referencia
en la etiqueta de cumplimiento con las reglas de emisiones indica el nQmero de horas de funcionamiento para el cual se ha
demostrado que el motor cumple con los requerimientos federales de emisi6n.
Para los motores con desplazamiento inferior a 225 cc, Categoria C = 125 horas, B = 250 horas y A = 500 horas.
Para los motores con desplazamiento de 225 cc o mAs, Categoria C = 250 horas, B = 500 horas y A = 1000 horas.
El desplazamiento de los motores de la serie modelo 150112 es 249 cc.
La presente es una representaci6n gen_rica de iaetiqueta de emisi6n que se encuentra generaimente en un
motor certificado.
FAMILYYBSXS.3192VA 274812
GDOC-100182Rev.A
54
Page 55

Felicitacionespor haberrealizadounaadquisici6ninteligente.El
productoCraftsman@quehaadquiridoest_dise_adoyfabricado
parabrindarrnuchosa_osdefuncionarnientoconfiable.Perocorno
todoslosproductosavecespuederequerirde reparaciones.Esen
esernornentocuandoeldisponerde unAcuerdodeprotecci6npara
reparacionesle puedeahorrardineroy problernas.
A continuaci6nsedetallanlospuntosincluidosenel Acuerdo:
• Servicio experto prestadopornuestros10,000especialistasen
reparacionesprofesionales
• Servicio ilirnitadosincargoparalaspiezasylarnanodeobraen
todaslas reparacionescubiertas
• Reernplazodel productohasta1500d61aressino esposible
repararel productocubierto
• Descuentode 10%delprecionormaldel servicioy delaspiezas
relacionadasconel rnisrnoquenoest_ncubiertasporelacuerdo;
adern&s,10%del precionormalde laverificaci6nde rnantenirniento
preventivo
• Ayudar_pidapottel_fono- IoIlarnarnosResoluci6nR_pida- el
apoyotelef6nicode unCharnuscaal representante.Pienseen
nosotroscornoel manual"de undue_ohablador."
Unavezadquiridoel Acuerdo,puedeprograrnarel serviciocon
tans61orealizarunaIlarnadatelef6nica.PuedeIlarnarencualquier
mornentodeldiao dela nocheo prograrnarunservicioen linea.
ElAcuerdode Protecci6nde Reparaci6nesunacornprasinriesgo.
Siustedanulaporalgunaraz6nduranteel periododegarantiade
producto,proporcionarernosunreernbolsoIleno.O,unreernbolso
prorrateadoencualquiermornentodespu_sdelperiodode garantia
de productoexpira,iAdquieraboysuacuerdodeprotecci6npara
reparaciones!
Seaplican deterrninadaslimitaciones y exclusiones.Paraobtener
inforrnaci6nadicional y preciosen los Estados UnidosIlarneal
1-800-827-6655.
El*CoverageenCanad_variaenalgunosarticulos. Paradetalles
IlenoslaIlarnadaCharnuscaCanad_en 1-800-361-6665.
Servicio de instalaci6ndeSears
Sideseasolicitarlainstalaci6nprofesionaldeSearsde aparatos
dorn_sticos,dispositivosparaabrirportones,calentadoresde agua
y otrosarficulosdorn_sticosirnportantes,en losEstadosUnidoso
Canad_Ilarneal 1-800-4-MY-HOME®.
55
Page 56

Your Home
For troubleshooting, product manuals and expert advice:
managernylife
www.managemylife.com
For repair - in your home - of all major brand appliances,
lawn and garden equipment, or heating and cooling systems,
no matter who made it, no matter who sold it!
For the replacement parts, accessories and
owner's manuals that you need to do-it-yourself.
For Sears professional installation of home appliances
and items like garage door openers and water heaters.
1-800-4-MY-HOME ® (1-800-469-4663)
Call anytime, day or night (U.S.A. and Canada)
www.sears.com www.sears.ca
Our Home
For repair of carry-in items like vacuums, lawn equipment,
and electronics, call anytime for the location of your nearest
Sears Parts & Repair Service Center
1-800-488-1222 (U.S.A.) 1-800-469-4663 (Canada)
www.sears.com www.sears.ca
To purchase a protection agreement on a product serviced by Sears:
1-800-827-6655 (U.S.A.) 1-800-361-6665 (Canada)
Para pedir servicio de reparaci6n
a domicilio, y para ordenar piezas:
1-888-SU-HOGAR ®
(1-888-784-6427)
www.sears.com
® Registered Trademark / TMTrademark of KCD IP, LLC in the United States, or Sears Brands, LLC in other countries
® Marca Registrada ! TMMarca de Fabrica de KCD IP, LLC en Estados Unidos, o Sears Brands, LLC in otros paises
MCMarque de commerce ! MDMarque deposee de Sears Brands, LLC
Au Canada pour service en frangais:
1-800-LE-FOYER Mc
(1-800-533-6937)
www.sears.ca
 Loading...