

Page 1
Operator's Manual
19-inch Rechargeable
Rotary Mower
Model No. 247.370480
CAUTION: Before using
this products read this
manual and follow ail
safety rules and operating
instructions.
Sears, Roebuck and Co., Hoffman Estates, IL 60179, U.S.A.
Visit our
web
This symbol on the product’s nameplate
means It Is listed by
®
listed underwriters laboratories INC.
site: www.craftsman.com
® SAFETY
• ASSEMBLY
• OPERATION
• MAINTENANCE
• PARTS LIST
• ESPAÑOL P. 22
FORM NO. 769-04644A
January 11, 2010
Page 2

TABLE OF CONTENTS
Warranty Statement
Safety Instructions............................................................3
Safety Labels.............................................................................. 6
Slope Guide................................................................................7
Assembly................................................................................... 8
Operation.................................................................................. 10
.........................................................
2
Service and Maintenance ..............................................13
Off-Season Storage
Troubleshooting..............................................................17
Parts List
Español
Service Numbers
........................................................................
..........................................................................
.......................................................
..............................................
16
18
22
Back Cover
WARRANTY STATEMENT
Craftsman Two Year Limited Warranty
If this Craftsman product fails due to a defect in material or workmanship within two years from the date of purchase, return it to any Sears store,
Sears Service Center, or other Craftsman outlet in the United States for free repair.
This warranty does not include:
• Expendable items which can wear out from normal use within the warranty period, such as the grass bag and rotary mower blade.
• Repairs necessary because of operator abuse or negligence, including bent motor shafts and the failure to operate or maintain the
equipment according to all supplied instructions.
This warranty applies for only 90 days if this product is ever used for commercial or rental purposes.
This warranty applies only while this product is used in the United States.
This warranty gives you specific legal rights, and you may also have other rights which vary from state to state.
Sears, Roebuck and Co., Hoffman Estates, IL 60179
PRODUCT SPECIFICATIONS
Battery: 12 Volt
Motor: 48 Volt DC
MODEL NUMBER
Model Number
Serial Number
Date of Purchase
Record the model number, serial number.
and date of purchase above.
§ Sears Brands, LLC
Page 3

SAFETY INSTRUCTIONS
J
AWARNING
This symbol points out important safety instructions
which, if not followed, could endanger the personal
safety and/or property of yourself and others. Read
A
and follow all instructions in this manual before
attempting to operate this machine. Failure to comply with these
instructions may result in personal injury. When you see this symbol,
HEED ITS WARNING!
Your Responsibility:
Restrict the use of this power machine to
persons who read, understand, and follow the warnings and instruc
tions in this manual and on the machine.
This machine was built to be operated according to the rules tor
safe operation in this manual. As with any type of power equipment,
carelessness or error on the part of the operator can result in serious
injury. This machine is capable of amputating hands and feet and
throwing objects. Failure to observe the following safety instructions
could result in serious injury or death.
When using electric lawn mowers, basic safety precautions should
always be followed to reduce the risk of fire, electric shock, and
personal injury. These basic precautions include the following:
Children
Tragic accidents can occur if operator is not alert to presence of children. Chil
dren are often attracted to mower and mowing activity. They do not understand
the dangers. Never assume that children will remain where you last saw them.
• Keep children out of the mowing area and under watchful care of a
responsible adult other than the operator.
• Be alert and turn mower off if a child enters the area.
• Before and while moving backwards, look behind and down for small
children.
• Use extreme care when approaching blind corners, doorways, shrubs,
trees, or other objects that may obscure your vision of a child who may
run into the mower.
• Never allow children under 14 years old to operate a power mower.
Children 14 years old and over should read and understand operation
instructions and safety rules in this manual and should be trained and
supervised by a parent.
Operation
General Operation:
Read this operator’s manual carefully in its entirety before attempting
to assemble this machine. Read, understand, and follow all instructions
on the machine and in the manual(s) before operation. Be completely
familiar with the controls and the proper use of this machine before
operating it. Keep this manual in a safe place for future and regular
reference and for ordering replacement parts.
This machine is a precision piece of power equipment, not a plaything.
Therefore, exercise extreme caution at all times. Your unit has been
designed to perform one job: to mow grass. Do not use it for any other
purpose.
Don’t force lawn mower - it will do the job better and safer at the rate for
which it was designed.
Never allow children under 14 years old to operate this machine.
Children 14 years old and over should read and understand the instruc
tions in this manual and should be trained and supervised by a parent.
Only responsible individuals who are familiar with these rules of safe
operation should be allowed to use this machine.
A DANGER
AWARNING
Thoroughly inspect the area where the equipment is to be used. Remove
all stones, sticks, wire, bones, toys and other foreign objects which could
be tripped over or picked up and thrown by the blade. Thrown objects
can cause serious personal injury. Plan your mowing pattern to avoid
discharge of material toward roads, sidewalks, bystanders and the like.
Also, avoid discharging material against a wall or obstruction which may
cause discharged material to ricochet back toward the operator.
To help avoid blade contact or a thrown object injury, stay in operator
zone behind handles and keep children, bystanders, helpers and pets at
least 75 feet from mower while it is in operation. Stop machine if anyone
enters area.
Always wear safety glasses or safety goggles during operation and while
performing an adjustment or repair to protect your eyes. Thrown objects
which ricochet can cause serious injury to the eyes.
Wear sturdy, rough-soled work shoes and close-fitting slacks and shirts.
Shirts and pants that cover the arms and legs and steel-toed shoes
are recommended. Never operate this machine in bare feet, sandals,
slippery or light weight (e.g. canvas) shoes.
Do not put hands or feet near rotating parts or under cutting deck.
Contact with blade can amputate hands and feet.
A missing or damaged discharge cover can cause blade contact or
thrown object injuries.
Many injuries occur as a result of the mower being pulled over the foot
during a fall caused by slipping or tripping. Do not hold on to the mower if
you are falling; release the handle immediately.
Never pull the mower back toward you while you are walking. If you must
back the mower away from a wall or obstruction first look down and
behind to avoid tripping and then follow these steps:
Step back from mower to fully extend your arms.
Be sure you are well balanced with sure footing.
Pull the mower back slowly, no more than half way toward you.
Repeat these steps as needed.
Do not operate the mower while under the influence of alcohol or drugs.
Stay alert - Watch what you are doing. Use common sense. Do not
operate lawn mower when you are tired.
Page 4

SAFETY INSTRUCTION
I
• The motor/blade control handle is a safety device. Never attempt to
bypass its operation. Doing so makes the safety device inoperative and
may result in personal injury through contact with the rotating blade. The
motor/blade control handle must operate easily in both directions and
automatically return to the disengaged position when released.
• Do not charge the mower in rain, or in wet conditions.
• Never operate the mower in rain or wet grass. Always be sure of your
footing. A slip and fall can cause serious personal injury. If you feel
you are losing your footing, release the motor/blade control handle
immediately and the blade will stop rotating within three seconds.
• Mow only in daylight or good artificial light. Walk, never run.
• Stop the blade when crossing gravel drives, walks or roads.
• If the equipment should start to vibrate abnormally, stop the motor and
check immediately for the cause. Vibration is generally a warning of
trouble.
• Shut the motor off and wait until the blade comes to a complete stop
before removing the grass catcher or unclogging the chute. The cutting
blade continues to rotate for a few seconds after the motor is shut off.
Never place any part of the body in the blade area until you are sure the
blade has stopped rotating.
• Never operate mower without proper trailing shield, discharge cover,
grass catcher, motor/blade control handle or other safety protective
devices in place and working. Never operate mower with damaged
safety devices. Failure to do so, can result in personal injury.
• Only use parts and accessories made for this machine by manufacturer.
Failure to do so can result in personal injury.
• If situations occur which are not covered in this manual, use care and
good judgment. Contact your Sears Service Center for assistance.
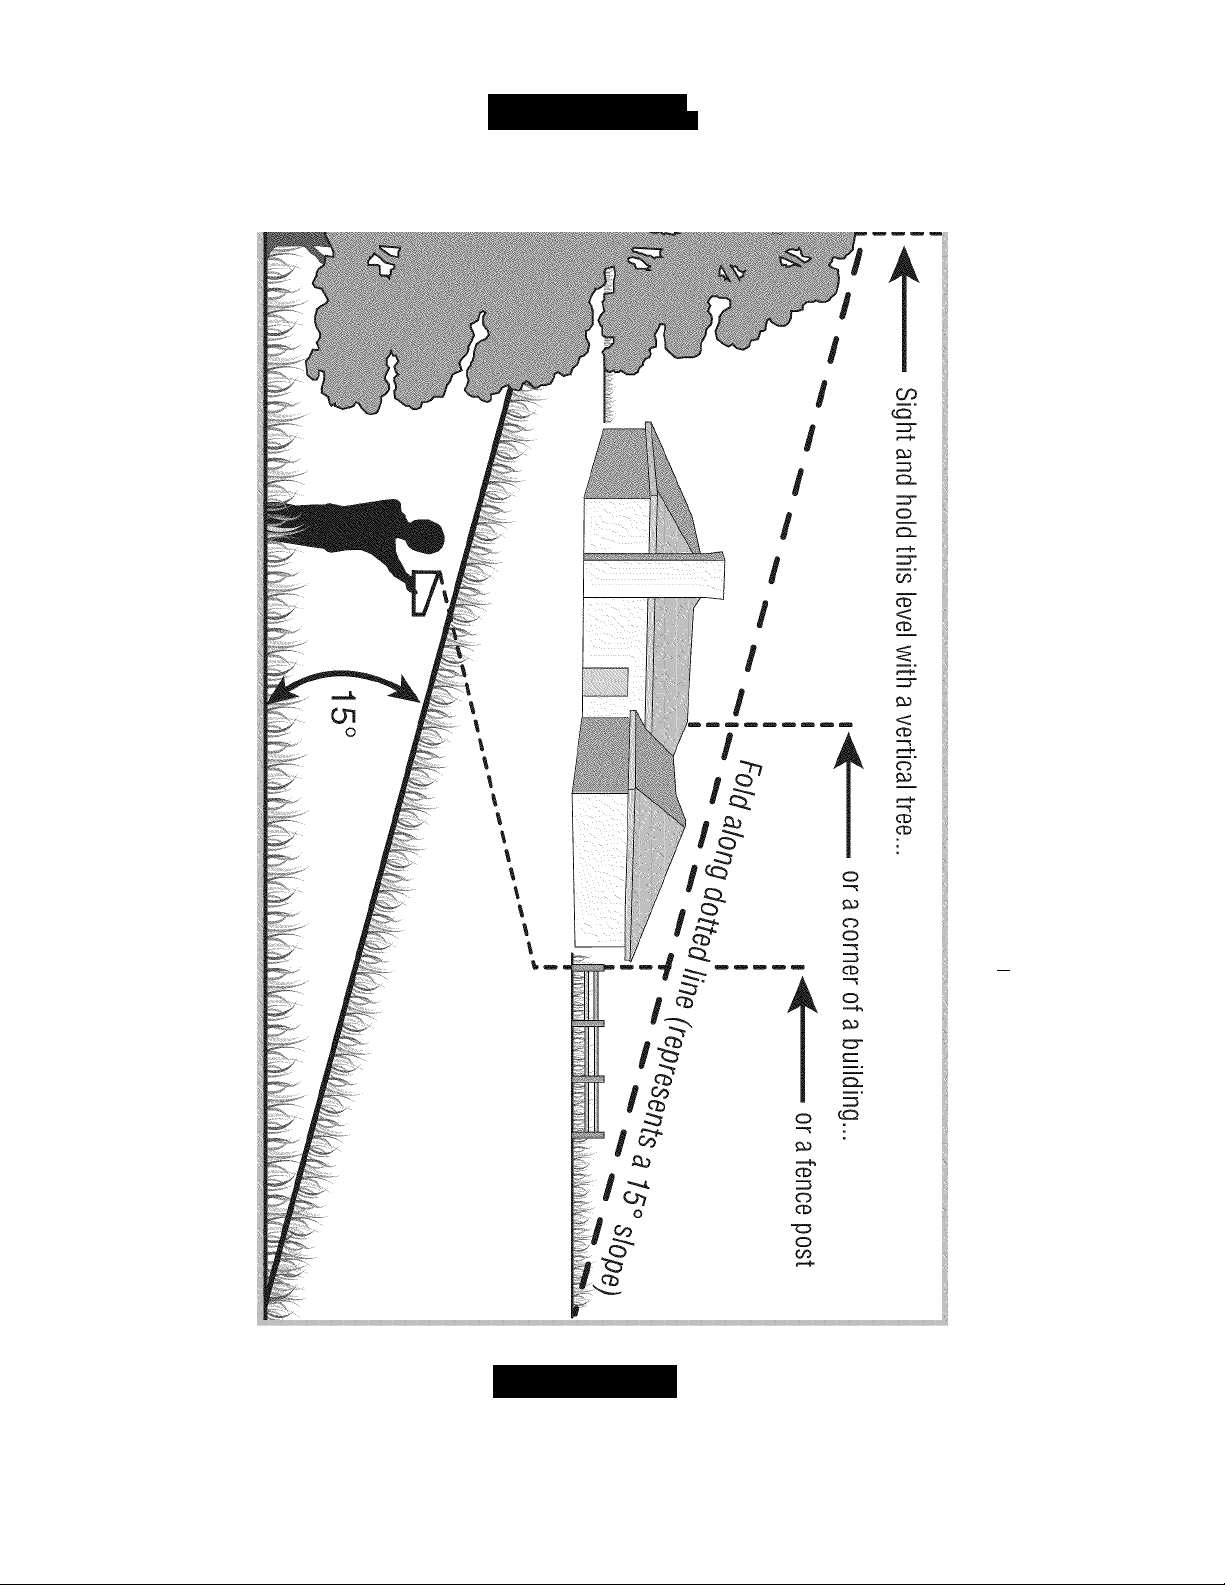
Slope Operation:
Slopes are a major factor related to slip and fall accidents which can result in
severe injury. Operation on slopes requires extra caution. If you feel uneasy on
a slope, do not mow it. For your safety, use the slope gauge included as part
of this manual to measure slopes before operating this unit on a sloped or hilly
area. If the slope is greater than 15 degrees, do not mow it.
Do:
• Mow across the face of slopes; never up and down. Exercise extreme
caution when changing direction on slopes.
• Watch for holes, ruts, rocks, hidden objects, or bumps which can cause
you to slip or trip. Tall grass can hide obstacles.
• Always be sure of your footing. A slip and fall can cause serious personal
injury. If you feel you are losing your balance, release the motor/blade
control handle immediately, and the blade will stop rotating within three
(3) seconds.
Service
If the mower’s built-in overload protection switch frequently trips, contact
your nearest Sears Service Center for repair.
Remove key and store idle lawn mower indoors when not in use. Allow
motor to cool before storing in any inclosure. Lawn mower should be
stored indoors in a dry, high, or locked-up place, out of reach of children.
When servicing use only identical replacement parts listed in this
manual. “Use of parts which do not meet the original equipment specifi
cations may lead to improper performance and compromise safety!”
Before cleaning, repairing, or inspecting, make certain the blade and
all moving parts have stopped. Remove the key to prevent accidental
starting.
Remove key before servicing, cleaning, or removing material from the
lawn mower.
Follow instructions for lubricating and changing accessories.
Keep handles dry, clean and free from oil and grease.
To reduce a fire hazard, keep the motor cover free of grass, leaves and
debris build-up.
Check the blade and motor mounting bolts at frequent intervals
for proper tightness. Also, visually inspect blade for damage (e.g.,
bent, cracked, and worn). Replace blade with the original equipment
manufacturer’s (OEM) blade only, listed in this manual.
Maintain your mower with care — Keep mower blade sharp and clean for
best and safest performance. Mower blades are sharp and can cut, wrap
the blade or wear gloves and use extra caution when servicing them.
Keep all nuts, bolts, and screws tight to be sure the equipment is in safe
working condition.
Never tamper with safety devices. Check their proper operation regularly.
Never attempt to make wheel or cutting height adjustments while the
motor is running.
After striking a foreign object, stop the motor, remove the key, and
thoroughly inspect the mower for any damage. Repair the damage
before operating the mower.
Grass catcher components, discharge cover, and trailing shield are
subject to wear and damage which could expose moving parts or allow
objects to be thrown. For safety protection, frequently check components
and replace immediately with original equipment manufacturer’s (OEM)
parts only, listed in this manual.
SAVE THESE INSTRUCTIONS!
Do Not:
• Do not mow near drop-offs, ditches or embankments, you could lose
your footing or balance.
• Do not mow slopes greater than 15 degrees as shown on the slope
gauge.
• Do not mow on wet grass. Unstable footing could cause slipping.
Page 5

SAFETY INSTRUCTIONS
SAFETY SYMBOLS
This page depicts
before attempting to assemble and operate.
and
describes safety symbols that may appear
Symbol Description
on
this product. Read, understand, and follow all instructions on the machine
J
r
B
READ THE OPERATOR’S MANUAL(S)
Read, understand, and follow all instructions in the manual(s) before attempting to assemble and
operate.
DANGER — ROTATING BLADES
To reduce the risk of injury, keep hands and feet away. Do not operate unless discharge cover or grass
catcher is in its proper place. If damaged, replace immediately.
DANGER — BYSTANDERS
Do not mow when children or others are around.
DANGER — HAND/ FOOT CUT
Keep hands and feet away from rotating parts.
DANGER — THROWN DEBRIS
Remove objects that can be thrown by the blade in any direction. Wear safety glasses.
DANGER — SLOPES
Use extra caution on slopes. Do not mow slopes greater than 15°.
Q
WARNING— ELECTRICAL SHOCK
Do not operate the mower in the rain.
Page 6
SLOPE GUIO
■
I
Use this page as a guide to determine slopes where you may not operate safely.
Do not operate
the lawn mower on such slopes.
o
-o
CD
53
>
r_
=3- o
CD CD
S’I
3
O
o
o
CQ
■S
T3
03
13 03
CL -O
Q. -O
o o
C/3 03
-S S'
ro
cn t\3
CD
O
CD
C/5
C/5
CD
O
5
CD
O
AWARNING
This symbol points out important safety instructions which, it not followed, could endanger the personal safety and/or property of yourself and
others. Read and follow all instructions in this manual before attempting to operate this machine. Failure to comply with these instructions may
result in personal injury. When you see this symbol, HEED ITS WARNING!
Page 7

SAFETY LABELS
AVOID SERIOUS INJURY OR DEATH
' TO REDUCE THE RISK OF ELECTRIC SHOCK, DO NOT EXPOSE • REMOVE OBJECTS THRT CAN BE THROWN BY THE BLADE IN
UNIT TO WATER OR OPERATE UNIT ON WET GROUND. ANY DIRECTION. WEAR SAFETY GLASSES.
> REMOVE KEY BEFORE SERVICING OR REMOVING BLADE.
' KEEP HANDS AND FEET AWAY FROM ROTATING PARTS.
' DO NOT MOW WHEN CHILDREN OR OTHERS ARE AROUND.
READ OPERATOR'S MANUAL. KEEP SAFETY DEVICES (SLADE CONTROL, TRAILING SHIELD, DISCHARGE C0VER,ETC.) IN PLACE AND
WORKING. IF DAMAGED. REPLACE IMMEDIATELY.
• USE EXTRA CAUTION ON SLOPES. DO NOT MOW SLOPES
GREATER THAN 15’. MOW ACROSS. NEVER UP AND DOWN.
NEVER PULL MOWER CLOSE TO YOUR FEET. LOOK DOWN
AND BEHIND BEFORE AND WHILE MOVING BACKWARDS.
AWARNING
WHEN REPAIRING THIS UNIT USE
ONLY I DENTiCAL REPLACEMENT
PARTS. REFER TO REPAIR PARTS
SECTION OF YOUR OWNERS
MANUAL OR CONTACT YOUR
AUTHORIZED SERVICE CENTER.
I
TO REDUCE THE RISK OF INJURY, DO NOT
OPERATE UNLESS DISCHARGE C6VER OR
GRASS CATCHER IS IN ITS PROPER PLACE.
IF DAMAGED, REPLACE IMMEDIATELY.
KEEP HANDS and FEET AWAY
SÄÜ
MULCH/BAG/SIDE DISCHARGE
r*
Page 8
ASSEMBLY
IMPORTANT:
before operating your mower. Refer to Operation section.
NOTE:
right hand corresponds to the right side of the mower; your left hand
corresponds to the left side of the mower.
Stand behind the mower as it you were going to operate it. Your
Be certain to charge the battery tor at least 14 hours
6. Tighten star knobs securing lower handle to handle brackets. See
LOOSE PARTS IN CARTON
The following items are packaged loose in the carton:
Operator’s Manual, Grass Catcher
REMOVING THE UNIT FROM THE CARTON
1. Cut the comers of the carton and lay the sides flat on the ground.
Remove all packing inserts.
2. Move the mower and grass catcher out of the carton.
3. Make certain the carton has been completely emptied before
discarding it.
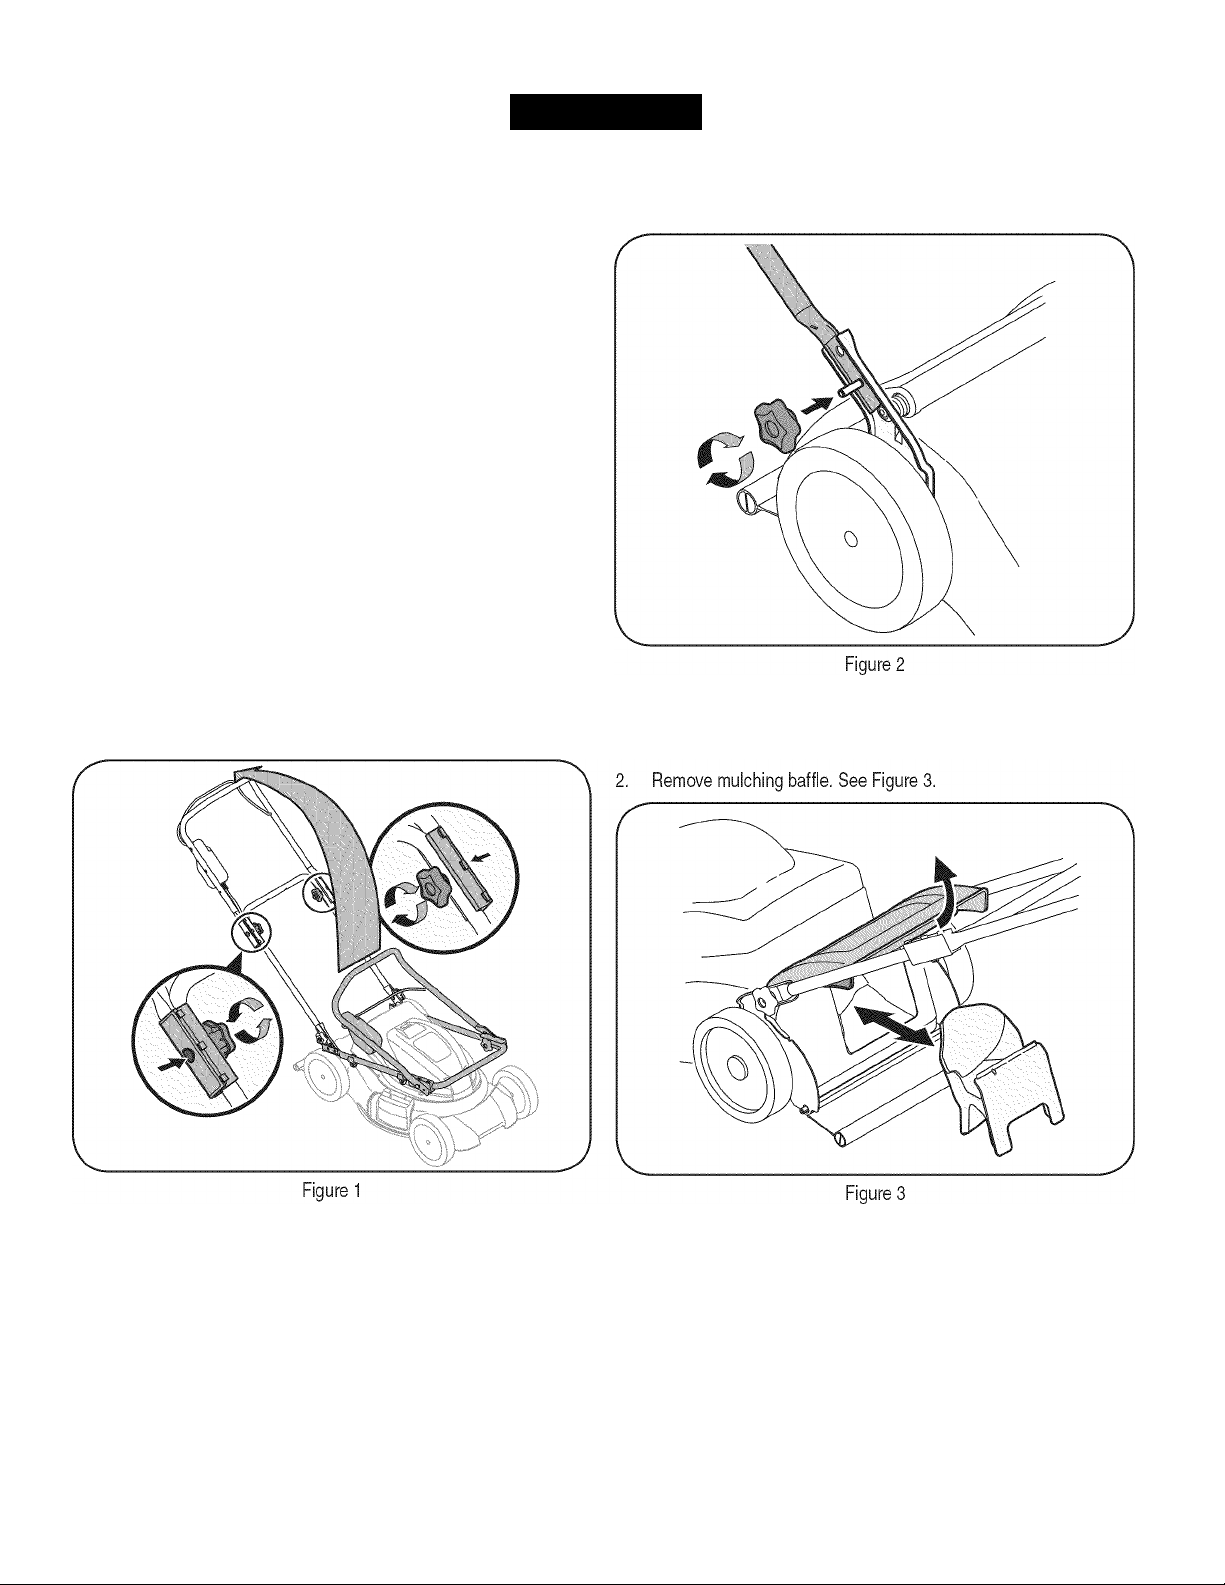
ASSEMBLING THE HANDLE
1. Remove any packing material which may be between upper and
lower handles.
2. Loosen each hand knob found on the inside of the upper handle.
3. Gently lift and pivot the upper handle into the operating position
as shown in Figure 1.
ATTACHING THE GRASS CATCHER
1. Lift rear discharge door.
Figure 2. Make certain the lower handle is seated securely into
the handle mounting brackets.
Remove star knobs from handle mounting brackets and secure
the lower handle onto the handle brackets by placing the lower
hole of the lower handle onto the pins of the handle brackets.
5.
Secure the upper handle and lower handle by tightening the
hand knobs. Each carriage bolt must be seated properly into the
square hole found in the plastic connector.
Page 9
ASSEMBLY
J
3. Place grass catcher on the pivot rod. Let go of discharge door so
that it rests on the grass catcher. See Figure 4. you are not mulching.
To remove the grass catcher, lift the rear discharge door on the
mower. Lift the grass catcher up, off of the pivot rod. Release the rear
discharge door.
NOTE:
Do
not
remove the side mulching plug at any time, even when
The cutting height adjustment lever is
located above the rear left wheel. See
Figure 6.
1. Pull the lever out and away from the
mower.
2. Move the lever forward or back for
desired cutting height.
3. Release lever towards mower deck.
Do not at any time make any adjustment to lawn mower without first
stopping motor and removing key.
AWARNING
Awarning
Never operate mower unless the hooks on the grass catcher are
firmly seated on the pivot rod and the rear discharge door rests firmly
against top of the grass catcher.
CONVERTING TO SIDE DISCHARGE
To convert to side discharge, make sure grass catcher is off of the unit.
Replace the rear mulching baffle and close rear discharge door. To
discharge grass to the side:
1. Lift mulching plug on the right side of mower.
2. Slide two hooks of side discharge chute under the hinge pin on
the mulching plug assembly and lower the side mulching plug.
See Figure 5.
Figure 6
Page 10
OPERATION
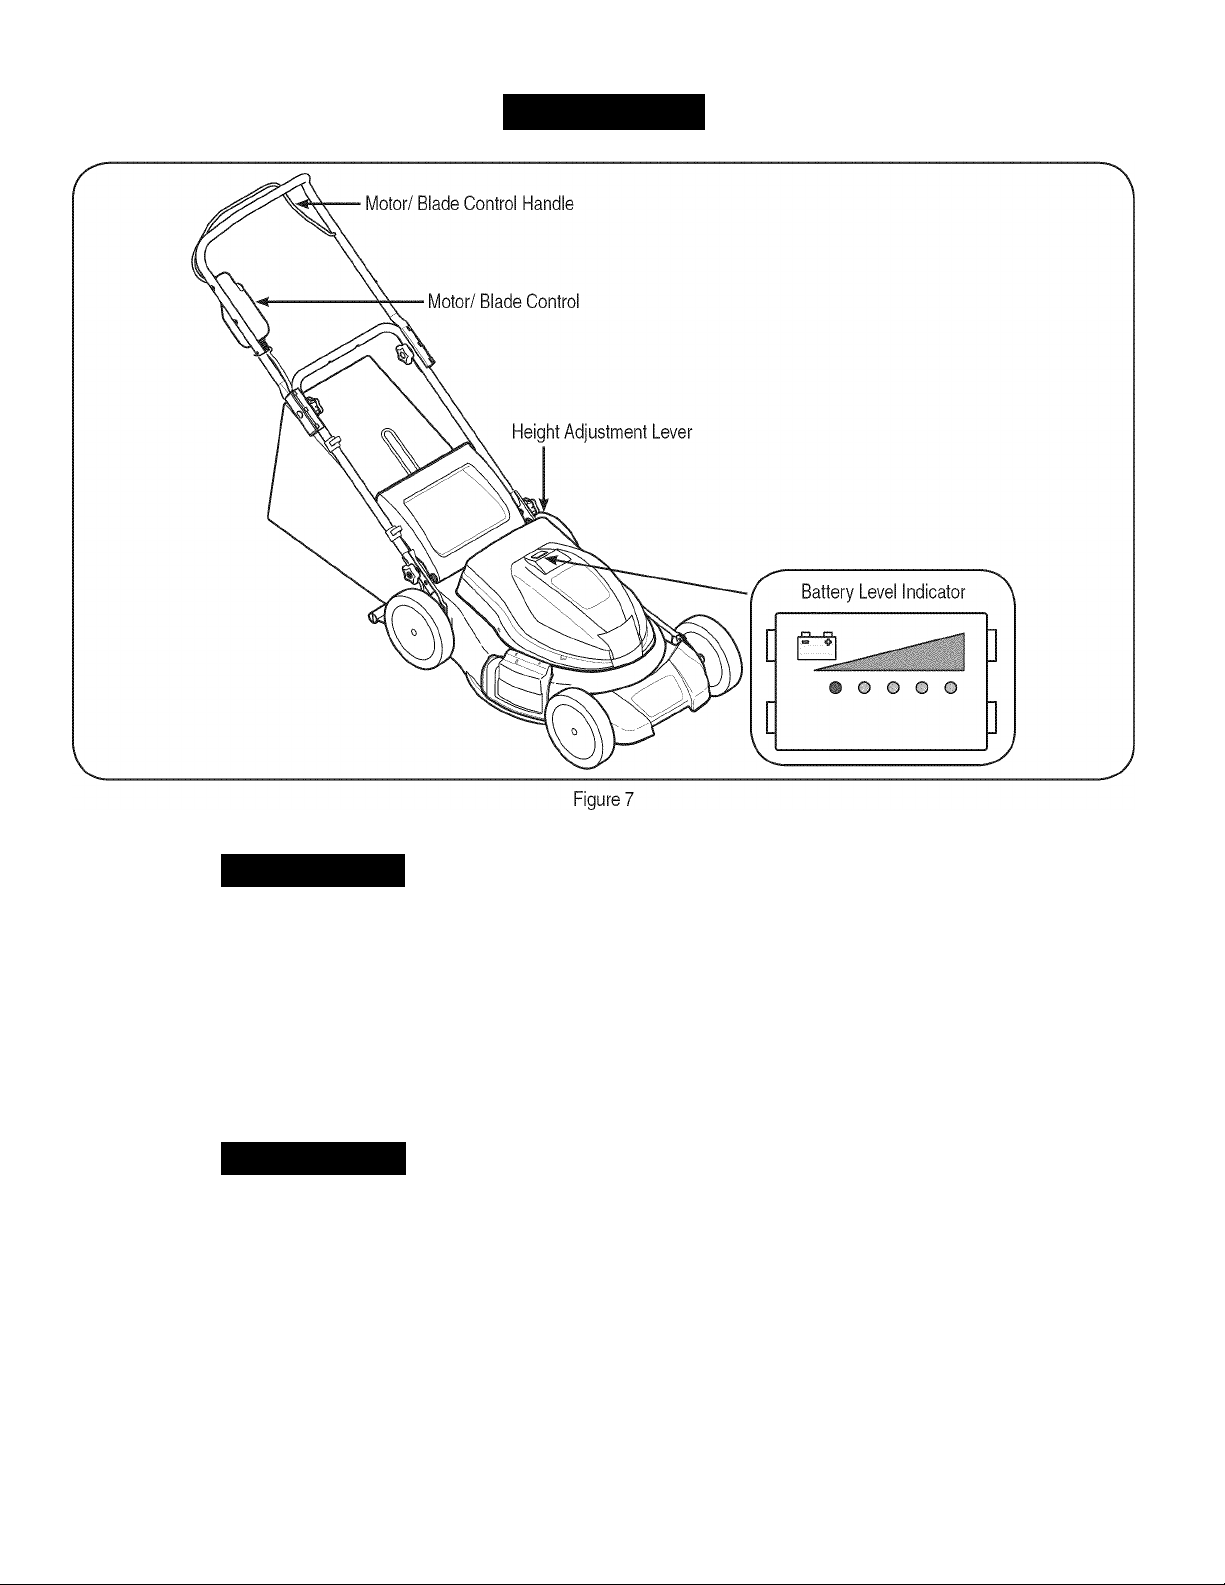
MOTOR/BLADE CONTROL HANDLE
AWARNING
The motor/blade control handle Is a safety device. Never attempt to
bypass Its operations.
The motor/blade control handle Is located on the upper handle of the
mower. See Figure 7. The motor/blade control handle engages and
disengages the motor and blade. The motor/blade control consists of
three parts - starter button, motor/blade control handle, and key.
Release the motor/blade control handle to stop the motor and blade.
Remove the key to prevent accidental starting when equipment Is
unattended.
IMPORTANT:
need to be recharged before further use. Continued operation before
charging may shorten the life of the batteries.
CIRCUIT BREAKER RESET BUTTON
The mower Is equipped with a circuit breaker reset button, located on
the motor/blade control. Refer to Figure 7. This circuit breaker reset
button may pop out when too much strain Is placed on the motor. Refer
to Maintenance Section to reset this button.
KEY
The key must be present and Inserted before the motor can be started.
See Figure 8. DO NOT TURN KEY.
AWARNING
The blade will be rotating whenever the motor Is running.
HEIGHT ADJUSTMENT LEVER
The cutting height adjustment lever Is located above the left rear
wheel. To adjust the cutting height, refer to the Assembly Section.
BATTERY LEVEL INDICATOR
The battery level Indicator Is located on the motor cover. The Indicator
shows the condition of the battery and Is on when the motor Is on. The
Indicator lit all the way to the right Indicates the battery Is fully charged;
as the Indicator Is lit more toward the left. It Indicates the battery Is
discharging. See Figure 7 Inset.
It the far left red light Illuminates, the batteries will
10
Page 11

OPERATION
CHARGING THE BATTERY
Charge the mower for 14 hours before initial use.
indoors in a dry area out of the weather. DO NOT charge in rain or wet
locations.
IMPORTANT:
(Part number 725-04387).
Plug the battery charger into the mower first, and then into any
standard 110/120 volt household electrical outlet. See Figure 8 inset for
battery charging location on mower.
Use only the battery charger provided with this mower
Charge mower
IMPORTANT:
it used) from the electrical outlet first, then disconnect battery charger
from mower.
STARTING THE MOWER AND BLADE
1. Insert key. Refer to Figure 9.
Always disconnect battery charger (or extension cord,
3. Pull motor/blade control handle up against upper handle.
4. Release starter button when motor starts.
STOPPING THE MOTOR AND BLADE
NOTE:
size 16 AWG. Connect the extension cord to charger before plugging
extension cord into electrical outlet.
The battery contains corrosive fluid and toxic material - HANDLE
WITH CARE. Keep away from children. Do not puncture,
disassemble, mutilate, or incinerate. Explosive gases could be vented
during charging or discharging. Use in a well ventilated area, away
from sources of ignition.
IMPORTANT:
stage charger. The first stage, equalize, supplies a higher voltage to
the batteries. This helps speed charge time and balance the charge
across the individual batteries. The second stage, float, supplies a
lower voltage. This prevents the batteries from experiencing
overcharging damage and also “tops off” the battery charge.
Depending on battery condition the equalize stage will complete in
approximately 8 hours. When the equalize stage is complete the
charger's green LED will stop blinking. This starts the float stage.
During the float stage the chargers green LED will be on continuously.
The float stage will “top off” the batteries in approximately 4-6 hours,
again, depending on the condition of the battery. However, a full 14
hour charge is always recommended.
NOTE:
months during storage.
If an extension cord is required, use one that is at least wire
AWARNING
________________________________
Always recharge mower fully. The charger is a two
It is recommended that the mower be charged once every two
1. Release motor/blade control handle to stop motor and blade.
The blade continues to rotate for a few seconds after the motor is shut
off. If motor does not come to a stop when the motor/blade control
handle is released, contact your nearest Sears Service Center.
2. Remove the key to prevent accidental starting when equipment is
3. Charge the mower.
AWARNING
________
unattended.
11
Page 12

OPERATION
USING YOUR LAWN MOWER
AWARNING
The operation of any lawn mower can result in foreign objects being
thrown into the eyes, which can damage your eyes severely. Always
wear safety glasses while operating the mower, or while performing
any adjustments or repairs on it.___________________________
Be sure that lawn is clear of stones, sticks, wires, or other objects
which could damage the lawn mower or motor. Such objects
could be accidentally thrown by the mower in any direction and
cause serious personal injury to the operator and others.
AWARNING
If you strike a foreign object, stop the motor, and remove the key.
Thoroughly inspect the mower for any damage, and repair the
damage before restarting and operating the mower. Excessive
vibration of the mower during operation is an indication of damage.
The unit should be promptly inspected and repaired.
When using the side discharge, the most effective mowing pattern
is one that allows the clippings to discharge towards the uncut
part of the lawn.
DO NOT use mower in the rain.
For a healthy lawn, always cut off one-third or less of the total
length of the grass.
For best results, do not cut wet grass because It tends to stick
to the underside of the deck preventing proper mulching or
discharge of grass clippings. New or thick grass may require a
narrower cut.
I
12
Page 13

SERVICE AND MAINTENANC
I
J
GENERAL RECOMMENDATIONS
• Always observe safety rules when performing
any type of maintenance.
• The warranty on this lawn mower does not cover Items that have
been subjected to operator abuse or negligence. To receive full
value from warranty, operator must maintain the lawn mower as
Instructed here.
• All adjustments should be checked at least once each season.
• Periodically check all fasteners and make sure these are tight.
LUBRICATION
DECK CARE
The underside of mower deck should be cleaned after each use as
grass clippings, leaves, dirt and other debris will accumulate. This
accumulation of grass clippings, etc., is undesirable as it will promote
rust and corrosion.
1. Remove any buildup of grass and leaves on or around the motor
To reduce the risk of electric shock, do not expose the mower to
water.
Awarning
Always stop the motor and remove key before cleaning, lubricating
or performing any repairs or maintenance on the lawn mower.
Always wear safety glasses during operation or while performing any
adjustments or repairs.
Lubricate the wheels at least once a season with light oil (or motor
oil). If wheels are removed for any reason, lubricate surface of the
pivot arm and inner surface of the wheel with light oil.
See Figure 10.
2. If debris is allowed to build up on the underside of the unit, tilt the
REPLACING TRAILING SHIELD
Never operate mower unless the trailing shield is in place and
working. Never operate mower with damaged safety devices. Failure
to do so, can result in personal injury.
The trailing shield is subject to wear and damage which could expose
moving parts or allow objects to be thrown. For safety protection,
frequently check the trailing shield and replace immediately with
original equipment manufacturer’s (OEM) part only, listed in this
manual.
1. To remove trailing shield, lift rear door, and bend (bow) the trailing
cover (do not use water). Wipe the mower clean with a dry cloth
occasionally.
Awarning
mower and scrape it clean with a suitable tool (make certain the
key is removed).
AWARNING
shield inward on each side to release tabs from the holes in the
mower frame. See Figure 11.
Figure 10
Lubricate the torsion spring and pivot point on the rear discharge
door and side mulch plug periodically with light oil to prevent rust.
See Figure 10.
Figure 11
2. Replace with new trailing shield by bending the shield to allow
each tab to tit into holes in mower frame.
13
Page 14

SERVICE AND MAINTENANCE
BLADE CARE
AWARNING
When removing the cutting blade tor sharpening or replacement,
protect your hands with a pair of heavy gloves or use a heavy rag to
hold the blade. Be certain to stop motor and remove key.
Periodically inspect the blade adapter tor cracks, especially if you
strike a foreign object. Replace when necessary. Follow the steps
below for blade service.
Blade Removal
1. Stop the motor and remove ignition key. Turn the mower on its
side.
2. Place a 2x4 block of wood approximately 8.5” long between the
deck housing and the cutting blade to act as a stabilizer. See
Figure 12.
r
Block of
Wood
Locking
Plate
Blade
Bolt
Blade Sharpening
IMPORTANT:
with new ones.
To properly sharpen the cutting blades, remove equal amounts of
metal from both ends of the blades along the cutting edges, parallel to
the trailing edge, at a 25° to 30° angle. See Figure 13.
A
NOTE:
to maintain proper blade balance. A poorly balanced blade will cause
excessive vibration and may cause damage to the mower and result
in personal injury. The blade can be tested by balancing It on a round
shaft screwdriver. Grind metal from the heavy side until It balances
evenly.
If any metal separation is present, replace the blades
Figure 13
It is important that each cutting blade edge be ground equally
AWARNING
Figure 12
3. Loosen and remove the blade bolt, locking plate, and blade. See
Figure 12.
An unbalanced blade will cause excessive vibration when rotating
at high speeds. It may cause damage to mower and could break
causing personal injury.
Blade Installation
1. Place the cutting blade, locking plate, and blade bolt on the motor
NOTE:
they were removed. When installing the cutting blade, be sure It is
installed with the curved ends pointing towards the mower deck and
not towards the ground.
2. Torque the blade bolt down using a torque wrench to assure the
To ensure safe operation of your mower, periodically check the blade
bolt for correct torque.
The blade hardware is not only used to attach the blade assembly,
but is also an insulated safety device and should never be altered in
any way. If replacement is necessary, use original equipment parts as
shown in the parts list.
shaft and thread the blade bolt in finger tight.
Make certain to replace the parts in the exact order in which
bolt is tightened properly. The recommended torque for the blade
bolt is 170-220 in. lbs.
AWARNING
14
Page 15

SERVICE AND MAINTENANCE
J
RESETTING CIRCUIT BREAKER RESET
BUTTON
This mower is equipped with an circuit breaker reset button to prevent
overheating damage to the motor.
If the circuit breaker reset button pops out:
1. Release the motor/blade control handle and do NOT re-start the
mower for at least one minute, allowing for the motor time to cool.
2. Press the circuit breaker reset button inward to reset. See
Figure 14.
If the circuit breaker reset button pops out shortly after resetting:
1. Release the motor/blade control handle and do NOT re-start the
2. Press the circuit breaker reset button inward to reset.
3. Restart unit.
BATTERY CARE
IMPORTANT:
this mower (Part number 725-04381A). The battery should only be
replaced by a Sears Service Center.
• Do not store unit below -20 degrees Celsius (-4 degrees F).
• Store the mower fully charged. Charging the unit every two
• These batteries will not leak and can be stored on their sides.
Due to a potential shock hazard, DC NCT attempt to remove the
motor/battery shroud. There are no user serviceable parts inside.
Contact your nearest Sears Service Center if repairs are needed.
mower for at least 15 minutes to allow the motor extra time to
cool.
NOTE:
during operation or will not remain in when attempting to reset,
contact your nearest Sears Service Center to arrange for repair.
months during storage will provide additional insurance that the
batteries will not suffer any capacity loss.
If the circuit breaker reset button pops out repeatedly
Replace with only the identical battery provided with
AWARNING
MAINTENANCE SCHEDULE
AWARNING
Always stop the motor and remove key before cleaning, lubricating
or performing any repairs or maintenance on the lawn mower. Always
wear safety glasses during operation or while performing any adjustments
or repairs.
Interval
Each Use 1. Mower blades 1. Sharpen as required
2. Loose or missing hardware 2. Tighten or replace
3. Controls 3. Check for proper operation
4. Motor 4. Remove any buildup of grass and
5. Deck
Annually or 25 hours 1. Wheels 1. Lube with light oil
2. Rear discharge door and
side mulch plug
3. Mower blades 3. Sharpen and balance
Before Storage 1. Battery 1. Fully charge
During Storage 1. Battery 1. Charge every two months
Item
5. Clean underside of deck with a
2. Lube torsion spring and pivot point
Follow the maintenance schedule given below. This chart describes
service guidelines only. Use the Service Log column to keep track of
completed maintenance tasks.
Center or to schedule service, simply contact Sears at
1-800-4-MY-HOME®.
Service Service Log
leaves on or around the motor cover
(do not use water).
suitable tool (do not use water).
with light oil.
To locate
the
nearest Sears Service
15
Page 16

OFF-SEASON STORAG
PREPARING THE LAWN MOWER
The following steps should be taken to prepare your lawn mower for
storage:
• Lubricate mower thoroughly as described in the lubrication
instructions.
• Remove any buildup of grass and leaves on or around the motor
cover (do not use water). Wipe the mower clean with a dry cloth.
• If debris is allowed to build up on the underside of the unit, tilt the
mower and scrape it clean with a suitable tool (make certain the
key is removed).
• Store mower fully charged. Charging the unit every two months
during storage will provide additional insurance that the batteries
will not suffer any capacity loss.
IMPORTANT:
once every two months during storage.
• Store mower in a dry, clean area. Do not store next to corrosive
materials, such as fertilizer.
• Wipe the cord to remove any stains or foreign substance such as
oil.
• Coat mower’s cutting blade with chassis grease to prevent
rusting.
• Do not store unit below -20 degrees Celsius (-4 degrees F).
• These batteries will not leak and can be stored on their sides.
We strongly recommend the mower be charged
I
16
Page 17

1
I
TROUBLESHOOTIN
J
Awarning
Always stop the motor and remove key before cleaning, lubricating
or performing any repairs or maintenance on the lawn mower. Always
wear safety glasses during operation or while performing any adjustments
or repairs.
Problem
Motor fails to start 1. Key not in switch 1. Insert ignition key.
2. Motor/blade control disengaged. 2. Depress starter button, and engage motor blade control.
3. Battery discharged. 3. Charge battery.
4. Mower deck clogged with grass and debris. 4. Unclog mower deck. Make certain blade is free to move.
Mower stops while mowing 1. Discharged battery. 1. Charge battery.
2. Cutting too much grass. 2. Raise cutting height.
3. Clogged deck. 3. Unclog mower deck. Raise cutting height, or cut a
4. Circuit breaker reset button is tripped. 4. Reset the circuit breaker reset button following the
Excessive vibration 1. Cutting blade loose.
2. Cutting blade unbalanced. 2. Balance blade following the instructions in the Service
3. Bent cutting blade. 3. Replace blade.
4. Bent motor shaft. 4. Contact nearest Sears Service Center.
Mower will not mulch grass 1. Mower deck clogged. 1. Unclog mower deck. Make certain blade is free to move.
2. Wet grass. 2. Do not mow when grass is wet; wait until later to cut.
3. Excessively high grass. 3. Mow once at a high cutting height, then mow again at
4. Dull blade. 4. Sharpen or replace blade.
Uneven cut 1. Dull blade. 1. Sharpen or replace blade.
Cause Remedy
Replacement fuse must be a UL listed or recognized component,
rated 40 amp, 58 volt. If mower blows fuse, contact your nearest
authorized service dealer for repair. Do not use any other type or size
fuse.
1. Tighten blade bolt.
Awarning
narrower swath.
instructions in the Service and Maintenance section of
this manual.
and Maintenance section of this manual.
desired height or make a narrower cutting swath (1/2
width).
NEED MORE HELP?
> Find this and all your other product manuals online.
< Get answers from our team of home experts.
> Get a personalized maintenance plan for your home.
< Find information and tools to help with home projects.
17
Page 18

PARTS LIST
19-inch Rechargeable Rotary Mower — Model No. 247.370480
I
18
Page 19

I
PARTS LIS
19-inch Rechargeable Rotary Mower — Model No. 247.370480
J
Ref. No. Part No. Description
1 787-01649-4044 19” Deck
2 731-05727 Motor Bracket
3 710-1241 Screw, 1/4-15 X 1.000
4 724-04025P Motor, 48V
5 749-04312 Lower Handie
6 731-05753 Battery Shroud
7 631-04228 Blade Hub
8 731-05832 Electric Fan
9 942-04152 Mulching Blade
10 782-7051 Blade Locking Plate
11 624-0078 Blade Bolt Assembly
12 731-05639A Trail Shield
13 731-05746 Rear Mulch Plug
14 731-04177 Side Discharge Chute
15 987-02055 Mulch Plug (Incl. 16-18)
16 732-1014 Torsion Spring
17 747-0710 Hinge Pin
18 17032A Chute Deflector Adapter
19 736-0270 Belleville Washer
20 710-0599 Screw
21 931-05686 Rear Door
22 931-05634 Front Cover
23 687-02325-0637 Handle Bracket - RH
— 687-02324-0637 Handle Bracket - LH
24 964-04076 Grass Bag
25 647-04082-0637 Grass Bag Frame
26 687-02225-0637 Front Bracket Assembly
27 938-0148 Screw, Shoulder, .50 x .66
28 687-02228-0637 Rear Bracket Assembly
29 710-3025 Hhcs, 5/16-18 X.625
30 710-04995 Screw, 5/16-14 X .750
31 712-04063 Nut, Flange Lock, 5/16-18
32 712-04065 Nut, Flange Lock, 3/8-16
33 734-04176A Front Wheel
34 734-2004B Rear Wheel
35 720-0230 Foam Grip
36 712-0324 Nut, Hex Lock, 1/4-20
Ref. No. Part No. Description
37 749-04353 Upper Handle
38 925-04037A Motor/Blade Control
39 753-04430 Screw, Flat, 1/4-20x1.75
40 749-04356-0637 Cross Bracket
41 738-04278 Screw, Shidr., 1/4-20 x .50
42 731-05186 Lower Handle Insulator
43 731-05178 Upper Handle Insulator
44 747-04663A Motor/Blade Control Handle
45 710-0572 Bolt Carriage, 5/16-18 x 2.50
46 720-04072A Star Knob
47 731-0571OA Rear Baffle
48 732-04534 Door Torsion Spring - RH
— 732-04535 Door Torsion Spring - LH
49 732-04377C Spring Lever
50 726-0201 Nut, Speed
51 936-0504 Washer, Wave, .510 x .750 x .017
52 938-0507B Screw, Shoulder, .500 Dia. X .434
53 741-0492A Bushing, Block, .505 Dia. X .62
54 747-04589 Rear Door Pivot Rod
55 925-04381A Battery, 12V
56 725-04387A Battery Charger
57 725-04438 Battery Level Indicator
58 731-05754 Battery Tray
59 725-04497A Battery Jumper
60 710-0895 Screw, 1/4-15 X.750
61 731-2422 Cable Guide
62 731-05880 Spacer, .515 x 1.00 x .310 Lg.
63 936-0255 Washer, Bell, .510 x 1.14 x .040
64 736-04413 Washer, Wave, .385 x .598
65 731-07532 Hubcap
66 710-0779A Screw, #10-16 X .500
67 710-0726 Screw, 5/16-12 X.750
68 726-0230 Cable Tie
—
—
—
731-06089t
725-04763t
725-04539t
Not Shown
Key
Fuse
Circuit Breaker
19
Page 20

LABELS
777S32911
TO REDUCE THE RISK OF INJURY. DO NOT
OPERATE UNLESS DISCHARGE COVER OR
GRASS CATCHER IS IN ITS PROPER PLACE.
IF DAMAGED. REPLACE IMMEDIATELY.
777S33576
777S32817
( ^ 1
.. •»'
AVOID SERIOUS INJURY OR DEATH
• TO REDUCE THE RISK OF ELECTRIC SHOCK, DO NOT EXPOE • REMOVE OBJECTS THW CAN BE THROWN BY THE BLADE IN
UNIT TO WATER OR OPERATE UNIT ON WET GROUND. ANY DIRECTION. WEAR SAFETY GLASSES.
• REMOVE KEY BEFORE SERVICING OR REMOVING BLADE.
• KEEP HANDS AND FEET AWAY FROM ROTATING PARTS.
• DO NOT MOW WHEN CHILDREN OR OTHERS ARE AROUND.
READ OPERATOR S MANUAL. KEEP SAFETY DEVICES (BLADE CONTROL, TRAILING SHIELD, DISCHARGE COVER,ETC.) IN PLACE H
WORKING. IF DAMAGED. REPLACE IMMEDIATELY.
WHEN REPAIRING THIS UNIT USE
ONLY I DENTICAL REPLACEMENT
PARTS. REFER TO REPAIR PARTS
SECTION OF YOUR OWNERS
MANUAL OR CONTACT YOUR
AUTHORIZED SERVICE CENTER.
• USE EXTRA CAUTION ON SLOPES. DO NOT MOW SLOPES
GREATER THAN 15°. MOW ACROSS, NEVER UP AND DOWN.
NEVER PULL MOWER CLOSE TO YOUR FEET. LOOK DOWN
AND BEHIND BEFORE AND WHILE MOVING BACKWARDS.
777D11051
Q
777122748
MULCH/BAG/SIDE DISCHARGE
4
POTENTIAL SHOCK HAZARD INSIDE.
777122813
777D11056
___ VOLT
■ ■ 1 ■ I Hi
777122946
EACH USE.
MANUAL FDR DEIAILI.
»mi
20
Page 21

REPAIR PROTECTION AGREEMENT
Congratulations on making a smart purchase. Your new Craftsman®
product is designed and manufactured for years of dependable opera
tion. But like all products, it may require repair from time to time. That's
when having a Repair Protection Agreement can save you money and
aggravation.
Here’s what the Repair Protection Agreement* includes:
• Expert service
• Unlimited service and no charge
covered repairs
• Product replacement
fixed
• Discount of 10%
parts not covered by the agreement; also, 10% off regular price of
preventive maintenance check
• Fast help by phone
from a Sears representative. Think of us as a “talking owner’s
manual.”
by our 10,000 professional repair specialists
for parts and labor on all
up to $1500 it your covered product can’t be
from regular price of service and related installed
- we call it Rapid Resolution - phone support
Once you purchase the Agreement, a simple phone call is all that it
takes for you to schedule service. You can call anytime day or night, or
schedule a service appointment online.
The Repair Protection Agreement is a risk-free purchase. If you cancel
for any reason during the product warranty period, we will provide a full
refund. Or, a prorated refund anytime after the product warranty period
expires. Purchase your Repair Protection Agreement today!
Some limitations and exclusions apply. For prices and additional
information in the U.S.A. call 1-800-827-6655.
‘Coverage in Canada varies on some items. For full details call
Sears Canada at 1-800-361-6665.
Sears Installation Service
For Sears professional installation of home appliances, garage door
openers, water heaters, and other major home items, in the U.S.A. or
Canada call
1-800-4-MY-HOME®.
21
Page 22

Declaración de garantía.................................................22
Instrucciones de seguridad
Guía de cuesta...............................................................26
Etiquetas de seguridad
Montaje...........................................................................28
Operación
......................................................................
............................................
..................................................
31
Servicio y Mantenimiento
23
Almacenamiento fuera de temporada
Solución de problemas...................................................38
27
Piezas de Reemplazo
Número de servicio
...............................................
............................
............................
...............................
18 (Manual inglés)
Cubierta posterior
34
37
DECLARACION DE GARANTIA
I
Garantía de dos años de Craftsman
Si este producto Craftsman falla debido a un defecto en los materiales o la mano de obra dentro de los dos años de la fecha de compra, sírvase
devolverlo a cualquier tienda Sears, Centro de servicio Sears, u otro punto de venta Craftsman en los Estados Unidos para su reparación sin
cargo.
Esta garantía no cubre:
• Artículos de duración limitada que pueden desgastarse bajo condiciones normales de uso durante el período de garantía, tales como
correas y cuchillas de cortadora rotativas.
• Las reparaciones requeridas debido a abuso o negligencia del operador, incluiyendo abolladuras del cigüeñal y no operar o mantener el
equipo de acuerdo con las instrucciones suministradas.
Esta garantía sólo tendrá validez durante 90 días si este producto se utiliza en cualquier momento para fines comerciales o de alquiler.
Esta garantía sólo tendrá validez mientras el producto se utilice en los Estados Unidos.
Esta garantía le otorga derechos legales específicos, pero usted podría gozar de otros derechos en razón de su lugar de residencia.
Sears, Roebuck and Co., Hoffman Estafes, IL 60179
Batería:
Motor:
ESPECIFICACIONE
PRODUCTO
12 Voltios
48 Voltios DC
NUMERO DE MODELO
Número de modelo_______________________________
Número de serie
Fecha de compra
Registre el número de modelo, número de serie y fecha de compra
________________________________
-----------------------------------------------------
más arriba.
§ Sears Brands, LLC
22
Page 23

INSTRUCCIONES DE SEGURIDAD
J
AADVERTENCIA
la presencia de este símbolo indica que se trata
de instrucciones de seguridad importantes que
debe respetar para evitar poner en riesgo su
A
seguridad personal y/o material y la de los demás.
Lea y siga todas las Instrucciones de este manual antes de poner
en funcionamiento esta máquina. Si no respeta estas instrucciones
puede provocar lesiones personales. Cuando vea este símbolo,
¡TENGA EN CUENTA LA ADVERTENCIA!
Su responsabilidad;
Restrinja el uso de esta máquina motorizada
a las personas que lean, comprendan y respeten las advertencias e
instrucciones que figuran en este manual y sobre la máquina.
Esta máquina está diseñada para ser utilizada respetando las reglas
de seguridad contenidas en este manual. Al igual que con cualquier
tipo de equipo motorizado, un descuido o error por parte del operador
puede producir lesiones graves. Esta máquina es capaz de amputar
manos y pies y de arrojar objetos con gran fuerza. De no respetar las
instrucciones de seguridad siguientes se pueden producir lesiones
graves
Cuando se utilizan cortadoras de césped eléctricas, se deben cumplir
siempre las precauciones básicas de seguridad para reducir la
posibilidad de Incendios, descargas eléctricas y lesiones personales.
Estas precauciones básicas incluyen:
Niños
Pueden ocurrir accidentes trágicos si el operador no está atento a la presencia
de niños. Por lo general a los niños les atraen las cortadoras y la actividad de
cortar el césped. No entienden los riesgos ni los peligros. Nunca suponga que
los niños permanecerán en el lugar donde los vio por última vez.
• Mantenga a los niños fuera del área de trabajo y bajo estricta vigilancia
de un adulto responsable además del operador.
• Esté alerta y apague la cortadora si un niño ingresa al área.
• Antes de moverse hacia atrás y mientras lo esté haciendo, mire hacia
atrás y cuide que no haya niños.
• Tenga mucho cuidado cuando se aproxime a las esquinas ciegas,
puertas, arbustos, árboles u otros objetos que puedan obstaculizarle la
vista de un niño que pudiese correr hacia la cortadora.
• Nunca permita que niños menores de 14 años operen esta máquina.
Los niños mayores de 14 años deben leer y entender las instrucciones
de funcionamiento y reglas de seguridad contenidas en este manual y
deben ser entrenados y supervisados por sus padres.
Funcionamiento
Funcionamiento general:
• Lea y siga todas las instrucciones contenidas en este manual antes de
intentar ensamblar esta máquina. Lea, comprenda y respete todas las
instrucciones que figuran en la máquina y en el(los) manual(es) antes
de hacerla funcionar. Antes de hacer funcionar este equipo, familiarícese
totalmente con los controles y el uso correcto del mismo. Guarde este
manual en un lugar seguro para consultas futuras y periódicas, así como
para solicitar repuestos.
• Esta máquina es un equipo motorizado de precisión, no un juguete.
Por lo tanto, tenga mucho cuidado en todo momento. Esta unidad fue
diseñada para realizar una tarea: cortar el césped. No la utilice para
ningún otro fin.
• No fuerce la cortadora - trabajará mejor y con más seguridad a la
velocidad para la cual fue diseñada.
• No permita nunca que los niños menores de 14 años utilicen esta
máquina. Los niños mayores de 14 años deben leer y entender las
instrucciones de operación contenidas en este manual, y deben ser
entrenados y supervisados por sus padres. Sólo se debe permitir usar
esta máquina a individuos responsables y familiarizados con sus reglas
de seguridad.
A PELIGRO
o la
muerte.
___________________________________
AADVERTENCIA
Inspeccione minuciosamente el área donde utilizará el equipo. Retire
todas las piedras, palos, alambre, huesos, juguetes y otros objetos
extraños que podrían hacer tropezar o ser recogidos y arrojados por
la acción de la cuchilla. Los objetos arrojados por la máquina pueden
producir lesiones graves. Planifique el patrón de corte ha seguir
para evitar descargar el material en los caminos, las veredas, los
observadores, etc. Evite además descargar material contra una parede
u obstrucción que podría hacer que el material descargado rebote
contra el operador.
Para ayudar a evitar el contacto con la cuchilla o una lesión por un
objeto arrojado, manténgase en la zona del operador detrás de las
manijas y mantenga a los niños, observadores, ayudantes y mascotas
apartados al menos 25 metros de la podadera mientras está en
funcionamiento. Detenga la máquina si alguien entra en el área.
Para protegerse los ojos utilice siempre anteojos o antiparras de
seguridad mientras opera la máquina o mientras hace ajustes o la
repara. Los objetos arrojados que rebotan pueden producir lesiones
oculares graves.
Utilice zapatos de trabajo resistentes, de suela fuerte, así como
pantalones y camisas ajustados. Se recomienda vestir camisa y
pantalón para cubrir brazos y piernas y usar zapatos con puntera de
acero. Nunca opere esta máquina descalzo, con sandalias, zapatos
resbalosos o livianos (por ej. de lona).
No ponga las manos o los pies cerca de las piezas rotatorias ni debajo
de la plataforma de corte. El contacto con las cuchillas puede producir la
amputación de manos y pies.
Una cubierta de descarga faltante o dañada puede provocar el contacto
con la cuchilla o lesiones por objetos arrojados.
Muchas lesiones ocurren como resultado de pasar la cortadora sobre
los pies durante una caída luego de resbalar o tropezar. No se sostenga
de la cortadora si se está cayendo, suelte la manija inmediatamente.
Nunca tire la cortadora hacia usted mientras camina. Si debe retroceder
con la cortadora para evitar una pared u obstáculo, mire primero abajo y
atrás para evitar tropezarse y luego siga estos pasos:
Retroceda de la cortadora hasta estirar completamente los brazos.
Asegúrese que está bien equilibrado y bien parado.
Jale la cortadora lentamente hacia usted, no más de la mitad de la
distancia entre usted y la cortadora.
Repita estos pasos tantas veces como sea necesario.
No opere esta cortadora bajo los efectos del alcohol o las drogas.
Manténgase alerta: Observe lo que está haciendo. Utilice el sentido
común. No utilice la cortadora si está cansado.
23
Page 24

INSTRUCCIONES DE SEGURIDA
I
• La manija de control del motor/la cuchilla es un dispositivo de seguridad.
Nunca intente evitar su funcionamiento. De hacerlo, dejarían de operar
los dispositivos de seguridad y podrían producirse lesiones personales
por el contacto con la cuchilla giratoria. La manija de control del motor/
la cuchilla debe funcionar fácilmente en ambas direcciones y regresar
automáticamente a la posición desenganchada cuando se la suelta.
• No cargue la cortadora bajo la lluvia o en condiciones húmedas.
• Nunca haga funcionar la cortadora en la lluvia o sobre el césped
mojado. Siempre esté seguro de estar bien parado. Si resbala y cae
puede lesionarse seriamente. Si siente que pierde el equilibrio, suelte
inmediatamente la manija de control del motor/la cuchilla y la cuchilla
dejará de rotar en tres segundos.
• Corte el césped solamente con luz de día o con una buena luz artificial.
Camine, nunca corra.
• Detenga la cuchilla cuando cruce sendas, senderos o caminos de grava.
• Si la máquina comenzara a vibrar de manera anormal, detenga el motor,
y busque inmediatamente la causa. La vibración por lo general es una
advertencia de algún problema.
• Apague el motor y espere hasta que la cuchilla se detenga
completamente antes de retirar el colector de césped o destapar la
tolva. La cuchilla continúa rotando por unos cuantos segundos después
que el motor se ha apagado. Nunca coloque ninguna parte del cuerpo
en el área de la cuchilla hasta que esté seguro de que la misma ha
detenido su movimiento giratorio.
• Nunca haga funcionar la cortadora sin el correspondiente escudo
posterior, la cubierta de descarga, el colector de césped, la manija
de control del motor/la cuchilla y otros dispositivos de seguridad y
protección colocados y funcionando. Nunca opere la cortadora si los
dispositivos de seguridad están dañados. De lo contrario, pueden
producirse lesiones personales.
• Utilice solamente partes y accesorios manufacturados especialmente
para esta máquina por el fabricante. Si no lo hace, pueden producirse
lesiones personales.
• Si se presentan situaciones que no están previstas en este manual,
tenga cuidado y use el sentido común. Comuniqúese con su centro de
servicio Sears para obtener ayuda.
Funcionamiento en pendientes:
Las pendientes son un factor importante que se relaciona con los accidentes
producidos por derrapes y caídas y que pueden producir lesiones graves. La
operación en pendientes requiere mucha precaución. Si no se siente seguro
en una pendiente, no corte el césped. Para su seguridad, use el indicador de
pendientes que se incluye como parte de este manual para medir la pendiente
antes de operar la unidad en una zona inclinada. Si la pendiente supera los 15
grados, no corte el césped.
Haga lo siguiente:
• Corte en sentido transversal a la cars de la pendiente, nunca hacia
arriba y abajo. Tenga mucho cuidado al cambiar de dirección en una
pendiente.
• Esté atento a los agujeros, raíces, rocas, objetos ocultos o
abultamientos que puedan hacerlo resbalar o tropezar. El césped alto
puede ocultar obstáculos.
• Siempre esté seguro de estar bien parado. Si resbala y cae puede
lesionarse seriamente. Si siente que pierde el equilibrio, suelte
inmediatamente la manija de control del motor/la cuchilla y la cuchilla
dejará de girar en tres (3) segundos.
No haga lo siguiente:
• No corte el césped cerca de caídas, zanjas o terraplenes, puede perder
el equilibrio.
• No corte en pendientes mayores de 15 grados como ilustra el indicador
de pendientes.
• No corte el césped mojado. Si no está firmemente parado, puede
resbalarse.
Servicio
• Si el interruptor de protección contra sobrecarga incorporado se
desconecta frecuentemente, póngase en contacto con el Centro de
servicio Sears más cercano para hacerlo reparar.
• Cuando no la use, saque la llave y almacene la cortadora de césped
en el interior. Permita que el motor se enfríe antes de almacenarlo en
cualquier recinto. La cortadora de césped se debe almacenar en un
lugar seco, alto y bajo llave, fuera del alcance de los niños.
• Cuando efectúe el mantenimiento utilice sólo partes de reemplazo
idénticas de la lista de este manual. “El uso de piezas que no cumplen
con las especificaciones del equipo original podría tener como resultado
un rendimiento incorrecto y además poner en riesgo la seguridad”.
• Antes de limpiar, reparar o inspeccionar la máquina, compruebe que
la cuchilla y todas las partes móviles se hayan detenido. Saque la llave
para evitar el arranque accidental.
• Saque la llave antes de efectuar el mantenimiento, limpiar o retirar
material de la cortadora.
• Siga las instrucciones para lubricar y reemplazar los accesorios.
• Mantenga las manijas secas, limpias y sin aceite o grasa.
• Para reducir la posibilidad de incendio mantenga la tapa del motor sin
pasto, hojas y otros desechos acumulados.
• Revise los pernos de montaje de la cuchilla y del motor a intervalos
frecuentes para verificar que estén bien apretados. Además,
inspeccione visualmente la cuchilla para ver si está dañada (por
ejemplo, doblada, rajada, gastada). Reemplace la cuchilla únicamente
por otra del fabricante del equipo original
manual.
• Conserve la cortadora en buenas condiciones: Mantenga la cuchilla
afilada y limpia para un mejor y más seguro rendimiento. Las cuchillas
de la cortadora son afiladas y pueden cortar, envuelva la cuchilla o use
guantes y extreme las precauciones al efectuar el mantenimiento.
• Mantenga todos los pernos, tuercas y tornillos bien ajustados para
asegurarse de que la máquina se encuentra en condiciones seguras de
funcionamiento.
• Nunca altere los dispositivos de seguridad. Controle periódicamente que
funcionen correctamente.
• Nunca intente ajustar una rueda o la altura de corte mientras el motor
está en marcha.
• Después de golpear un objeto extraño, detenga el motor, saque la llave
e inspeccione detenidamente la cortadora para verificar si se produjo
algún daño. Repare el daño antes de hacer funcionar la cortadora.
• Los componentes del colector de césped, la cubierta de descarga y el
escudo posterior, están sujetos a desgaste y daños que podrían dejar
expuestas las partes móviles o permitir que se arrojen objetos. Para
proteger su seguridad, verifique frecuentemente todos los componentes
y reemplácelos inmediatamente sólo por piezas del fabricante del
equipo original (OEM) que aparecen en este manual.
(OEM)
que aparece en este
GUARDE ESTAS INSTRUCCIONES
24
Page 25

INSTRUCCIONES DE SEGURIDAD
J
Símbolos De Seguridad
Esta página representa y describe la seguridad los símbolos que pueden parecer en este producto. Lea, comprenda, y siga todas instrucciones
en la máquina antes procurar para reunir y operar.
Symbol Description
LEA EL MANUAL(S) DEL OPERADOR
1
.
i
JL_^
1
Lea, comprenda, y siga todas instrucciones en el manual (manuales) antes procurar para reunir y
operar.
PELIGRO—GIRANDO HOJAS
Para reducir el riesgo de herida, guarde manos y pies lejos. No funcione a menos que la tapa de des
carga 0 el receptor de hierba estén en su lugar apropiado. De ser dañado, sustituya inmediatamente.
PELIGRO— ESPECTADORES
No siegue cuando los niños o los otros están alrededor.
PELIGRO— DÉ EL CORTE DE PIE
Guarde manos y pies lejos de hacer girar partes.
PELIGRO— ESCOMBROS LANZADOS
Quite objetos que pueden ser lanzados por la lámina en cualquier dirección. Lleve gafas de seguridad.
I
Q
PELIGRO—CUESTAS
Use extra la precaución en cuestas. No siegue cuestas mayores que 15 °.
ADVERTENCIA — ELECTROCHOQUE
No use el juez de salida eléctrico del motor en la lluvia.
25
Page 26

GUIA DE CUESTA
Use esta página como guía para determinar las inclinaciones de las pendientes en las que podría no tener una operación segura. No opere la
podadera en dichas pendientes.
O O
<. T3
CD
i. §.
g_ § CD
CD
i °
TJ =:■
CD
^ K ^
<-> JD
=í^ < Q.
> o o
o
23 ÍH ^
Z3 03 ÜÎ
5- CD ^
5 o o
“ CD
ÍL i
CD “ “
-Q —>■
E CD ^
=r: CO
- §' i
o CD g-
O
CU
C£2
V _
i: í? <
05 ai a>
CD ■ O'
(O CO 3
03 CD
3 c: o
co —^
T3 03
g ÇD o.
3 _ 3 ju
__
CD
CD 2- K")
Ç2. CD ^
3 -Q ro
co -ü
^ co
03
3 T3
03 o
CD
ÇO TJ
^ Q-
g. »
O —^
03 ^
=
o-^
03 ■
S- <=
0 3
r> 03
CD TJ
—5 O
03> CL
CO jii
CL. CL.
CD O
1 S
(O
3
CD
I ^
CO O
3 o
1-
^
O o ^
CD'
o
CD
s
A
La presencia de este símbolo indica que se trata de instrucciones importantes de seguridad que se deben respetar para evitar
poner en peligro su seguridad personal y/o material y la de otras personas. Lea y siga todas las Instrucciones de este manual
antes de poner en funcionamiento esta máquina. Si no respeta estas instrucciones puede provocar lesiones personales. Cuando
vea este símbolo, ¡TENGA EN CUENTA LA ADVERTENCIA!
26
Page 27

ETIQUETAS DE SEGURIDA
AVOID SERIOUS INJURY OR DEATH
' TO REDUCE THE RISK OF ELECTRIC SHOCK, DO NOT EXPOSE • REMOVE OBJECTS THRT CAN BE THROWN BY THE BLADE IN
UNIT TO WATER OR OPERATE UNIT ON WET GROUND. ANY DIRECTION. WEAR SAFETY GLASSES.
> REMOVE KEY BEFORE SERVICING OR REMOVING BLADE.
' KEEP HANDS AND FEET AWAY FROM ROTATING PARTS.
' DO NOT MOW WHEN CHILDREN OR OTHERS ARE AROUND.
READ OPERATOR'S MANUAL. KEEP SAFETY DEVICES (SLADE CONTROL, TRAILING SHIELD, DISCHARGE C0VER,ETC.) IN PLACE AND
WORKING. IF DAMAGED. REPLACE IMMEDIATELY.
• USE EXTRA CAUTION ON SLOPES. DO NOT MOW SLOPES
GREATER THAN 15’. MOW ACROSS. NEVER UP AND DOWN.
NEVER PULL MOWER CLOSE TO YOUR FEET. LOOK DOWN
AND BEHIND BEFORE AND WHILE MOVING BACKWARDS.
AWARNING
WHEN REPAIRING THIS UNIT USE
ONLY I DENTiCAL REPLACEMENT
PARTS. REFER TO REPAIR PARTS
SECTION OF YOUR OWNERS
MANUAL OR CONTACT YOUR
AUTHORIZED SERVICE CENTER.
I
TO REDUCE THE RISK OF INJURY, DO NOT
OPERATE UNLESS DISCHARGE C6VER OR
GRASS CATCHER IS IN ITS PROPER PLACE.
IF DAMAGED, REPLACE IMMEDIATELY.
KEEP HANDS and FEET AWAY
SÄÜ
MULCH/BAG/SIDE DISCHARGE
r*
27
Page 28

IMPORTANTE:
14 horas antes de hacer funcionar la cortadora. Consulte la sección
Funcionamiento.
NOTA:
en funcionamiento. Su mano derecha corresponde al lado derecho de
la cortadora, su mano izquierda corresponde al lado izquierdo de la
cortadora.
Permanezca detrás de la cortadora como si fuese a ponerla
Asegúrese de cargar la batería durante no menos de
6. Apriete las perillas en estrella ajustando la manija inferior a los
soportes de la manija. Vea la Figura 2. Compruebe que la manija
inferior esté firmemente asentada en los soportes de montaje de
la manija.
PIEZAS SUELTAS DENTRO DE LA CAJA
Los siguientes elementos se empacan sueltos en la caja:
Manual del operador, Colector de recortes de césped
RETIRO DE LA UNIDAD DE LA CAJA
1. Corte las esquinas de la caja de cartón y extiénda los lados en el
piso Quite todos los separadores de empaque.
2. Saque la cortadora de césped y el colector de recortes de la caja.
3. Asegúrese de vaciar completamente la caja antes de tirarla.
MONTAJE DE LA MANIJA
1. Retire el material de empaque que pudiera estar entre las manijas
superior e inferior.
2. Afloje cada perilla de mano que se encuentra en el interior de la
manija superior.
3. Levante con cuidado y gire la manija superior a la posición de
1. Levante la puerta de descarga trasera.
4. Retire las perillas en estrella de los soportes de montaje de la
manija y sujete la manija inferior a los soportes de la manija
colocando el orificio inferior de la manija inferior en los pasadores
de los soportes.
5. Asegure la manija superior y la manija inferior apretando las
perillas de mano. Es necesario asentar correctamente cada perno
del carro en el orificio cuadrado del conector de plástico.
28
Page 29

MONTAJE
3. Coloque el colector de césped en la varilla de pivote. Suelte la
puerta de descarga de modo que descanse sobre el colector de
césped. Vea la Figura 4.
Para sacar el colector de césped, levante la puerta trasera de
descarga de la cortadora de césped. Levante el colector de césped y
sáquelo de la varilla de pivote. Libere la puerta de descarga trasera.
CONVERSION A DESCARGA LATERAL
Si hace la conversión a descarga lateral, asegúrese de que el colector
de césped esté fuera de la unidad. Vuelva a colocar la tolva de abono
posterior y cierre la puerta de descarga trasera. Para descargar los
recortes por el costado:
1. Levante la clavija de conexión para abono del lado derecho de la
2. Deslice los dos ganchos del canal de descarga lateral debajo del
cortadora.
pasador en el montaje de la clavija para abono y baje la clavija
para abono lateral. Vea la Figura 5.
Aadvertencia
Nunca opere la cortadora a menos que los ganchos del colector de
césped estén firmemente asentados en la varilla de pivote y la puerta
de descarga trasera descanse firmemente contra la parte superior
del colector de césped.
NOTA:
momento, aún si no está abonando.
Figura 5
No extraiga la clavija para abono lateral en cualquier
29
Page 30

MONTAJ
AJUSTE DE LA ALTURA DE CORTE
La palanca de ajuste de altura de corte se ubica por encima de la
rueda izquierda trasera. Vea la Figura 6.
1. Tire de la palanca hacia afuera de la
cortadora.
2. Mueva la palanca hacia adelante o
hacia atrás a la altura de corte deseada.
3. Suelte la palanca hacia la plataforma de
la cortadora.
A ADVERTENCIA
Bajo ninguna circunstancia realice ningún tipo de ajuste a la unidad
sin antes detener el motor y sacar la llave.
I
30
Page 31

CONOZCA SU CORTADORA DE CESPED
Figura 7
MANIJA DE CONTROL DEL MOTOR/LA
CUCHILLA
AADVERTENCIA
La manija de control del motor/la cuchilla es un dispositivo de
seguridad. Nunca intente anular su funcionamiento.
La manija de control del motor/la cuchilla está ubicada en la manija
superior de la cortadora de césped. Vea la Figura 7. La manija de
control del motor/la cuchilla engancha y desengancha el motor y la
cuchilla. El control del motor/la cuchilla consta de tres partes: botón
arrancador, manija de control del motor/la cuchilla y llave.
Suelte la manija de control del motor/la cuchilla para detener el motor
y la cuchilla. Saque la llave para evitar el arranque accidental cuando
el equipo no está vigilado.
INDICADOR DE NIVEL DE LA BATERÍA
El indicador de nivel de la batería se encuentra en la tapa del motor. El
indicador muestra el estado de la batería y está encendido mientras el
motor está encendido. Cuando el indicador está iluminado totalmente
hacia la derecha indica que la batería está totalmente cargada, a
medida que el indicador se va iluminando más hacia la izquierda
significa que la batería se está descargando. Vea el recuadro de la
Figura 7.
IMPORTANTE:
debe recargar la batería antes de poder volver a usarla. Continuar la
operación antes de cargar puede acortar la vida útil de las baterías.
AADVERTENCIA
La cuchilla girará siempre que el motor esté en marcha.
PALANCA DE AJUSTE DE LA ALTURA
La palanca de ajuste de altura de corte se ubica por encima de la
rueda izquierda trasera. Para ajustar la altura de corte, consulte la
sección Montaje.
Cuando se ilumina la luz roja de la izquierda, se
31
Page 32

CONOZCA SU CORTADORA DE CESPED
BOTON DE REPOSICION DEL DISYUNTOR
La cortadora tiene un botón de reposición del disyuntor ubicado en
el control del motor/la cuchilla. Consulte la Figura 8. El botón de
reposición del disyuntor puede saltar cuando se exige demasiado al
motor. Remítase a la sección Mantenimiento para reponer este botón.
IMPORTANTE:
es un cargador de dos etapas. La primera etapa, compensadora, en
vía tensión más alta a las baterías. Esto sirve para acelerar el tiempo
de carga y nivelar la carga en todas las baterías. La segunda etapa,
lenta, envía una tensión más baja. Esto evita el daño por sobrecarga
a las baterías y también “corona” la carga de las baterías. Según la
condición de la batería la etapa compensadora se completa aproxima
damente en 8 horas. Al completarse la etapa compensadora el LED
verde del cargador dejará de parpadear. Allí comienza la etapa lenta.
Durante la etapa lenta el LED verde se mantendrá constantemente
encendido. La etapa lenta “corona” las baterías en aproximadamente
4 a 6 horas, también según la condición de la batería. No obstante,
siempre se recomienda cargar durante las 14 horas completas.
NOTA:
dos meses mientras está almacenada.
IMPORTANTE:
de extensión, si se usa) del tomacorriente eléctrico, luego desconecte
el cargador de la cortadora.
ENCENDIDO DE LA CORTADORA Y LA
CUCHILLA
1. Inserte la llave. Consulte la Figura 9.
LLAVE
La llave debe estar presente e Insertada antes de poder arrancar el
motor. Vea la Figura 8. NO GIRE LA LLAVE.
Siempre recargue la cortadora totalmente. El cargador
Se recomienda cargar la cortadora de césped una vez cada
Siempre desconecte primero el cargador (o el cable
CARGA DE LA BATERÍA
Cargue la cortadora de césped durante 14 horas antes del uso
inicial.
NO la cargue en medio de la lluvia o en ubicaciones húmedas
IMPORTANTE:
esta cortadora (Pieza № 725-04387).
Primero enchufe el cargador en la cortadora, luego en cualquier toma-
corriente eléctrico estándar de 110/120 voltios. Vea en el recuadro de
la Figura 7 la ubicación del cargador de batería en la cortadora.
NOTA:
calibre 16 AWG por lo menos. Conecte la extensión al cargador antes
de enchufarla en el tomacorriente eléctrico.
La batería contiene fluido corrosivo y material tóxico; TENGA
MUCFIO CUIDADO. Mantenga alejado de los niños. No perfore,
desensamble, mutile o prenda fuego. Durante la carga o descarga se
podrían emitir gases explosivos. Utilícela en un área bien ventilada,
lejos de fuentes de combustión.____________________________
Cargue la cortadora en el interior en un área seca y protegida.
Use solamente el cargador de batería que viene con
Si hace falta un cable de extensión, utilice uno con alambre
2. Oprima el botón arrancador del control del motor/la cuchilla.
AADVERTENCIA
3. Tire de la manija de control del motor/la cuchilla contra la manija
4. Suelte el botón arrancador cuando el motor se encienda.
superior.
32
Page 33

CONOZCA SU CORTADORA DE CESPE
APAGADO DEL MOTOR Y LA CUCHILLA
1. Suelte la manija de control del motor/la cuchilla para detener el
motor y la cuchilla.
Aadvertencia
La cuchilla continua girando por unos cuantos segundos después
que el motor se ha apagado. SI el motor no se detiene cuando se
suelta la manija de control del motor/la cuchilla, póngase en contacto
con el centro de servicio Sears más cercano.
2. Saque la llave para evitar el arranque accidental cuando el
equipo no está vigilado.
3. Cargue la cortadora de césped.
USO DE LA CORTADORA DE CÉSPED
AADVERTENCIA
Al hacer funcionar la cortadora de césped puede ser que arroja
objetos extraños a los ojos, lo cual puede dañarlos gravemente.
Utilice siempre gafas de seguridad durante el funcionamiento de la
cortadora o mientras hace ajustes
Asegúrese que el césped está libre de piedras, palos, cables u
otros objetos que pudiesen dañar la cortadora o el motor. Dichos
objetos pueden ser accidentalmente arrojados en cualquier
dirección por la cortadora y provocar lesiones personales graves
al operador y a otras personas.
o la
repara.
_________________
J
Aadvertencia
SI golpea un objeto extraño, detenga el motor y saque la llave. In
speccione la cortadora minuciosamente para ver que no tenga daños
y repare el daño antes de volver a arrancarla y hacerla funcionar. El
exceso de vibración de la cortadora durante el funclonamiendo es
Indicación de daño. Se debe Inspeccionar y reparar la unidad lo antes
posible.
Cuando se usa la descarga lateral, el patrón de corte más eficaz
es el que permite descargar los recortes en un área del césped
aún no cortada.
NO utilice la cortadora en la lluvia.
SI desea un césped sano, corte siempre un tercio o menos de la
longitud total del mismo.
Para óptimos resultados, no corte césped húmedo porque tiende
a pegarse a la parte baja de la cortadora. Impidiendo preparar
el abono y descargar los recortes de césped correctamente. El
césped nuevo o grueso puede requerir un corte más estrecho.
33
Page 34

SERVICIO Y MANTENIMIENTO
I
RECOMENDACIONES GENERALES
• Respete siempre las reglas de seguridad cuando realice
cualquier tipo de mantenimiento.
• La garantía de esta podadera no cubre elementos que han
estado sujetos al mal uso o la negligencia del operador. Para
recibir el reembolso total de la garantía, el operador deberá
mantener la podadera como se indica en este manual.
• Todos los ajustes deben ser verificados por lo menos una vez por
temporada.
• Revise periódicamente todos los sujetadores y compruebe que
estén bien ajustados.
LUBRICACIÓN
A ADVERTENCIA
Apague el motor y retire la llave siempre antes de limpiar, lubricar
o realizar cualquier reparación o tarea de mantenimiento en la
cortadora de césped. Utilice siempre anteojos de seguridad durante
el funcionamiento o mientras ajusta o repara este equipo.
1. Lubrique las ruedas por lo menos una vez por temporada con
aceite ligero o aceite para motor. Si las ruedas se quitan por
cualquier razón, debe lubricar la superficie del brazo giratorio y la
superficie interna de la rueda con aceite ligero. Vea la Figura 10.
CUIDADO DE LA CUBIERTA
Debe limpiar la parte inferior de la plataforma de la cortadora después
de cada uso ya que se acumulan recortes de pasto, hojas, suciedad
y otros desechos. Esta acumulación de recortes de pasto, etc. no es
aconsejable porque produce óxido y corrosión.
1. Quite el pasto y hojas acumulados alrededor de la tapa del motor
(no use agua). Ocasionalmente limpie la cortadora con un paño
seco.
Para reducir el riesgo de sufrir descargas eléctricas, no exponga la
cortadora de césped al agua.
2. Si se han acumulado desechos en la parte inferior de la unidad,
incline la cortadora y limpie raspando con una herramienta
adecuada (asegúrese de haber sacado la llave).
REEMPLAZO DEL ESCUDO POSTERIOR
Nunca opere la cortadora si el escudo posterior no está colocado
y funcionando. Nunca opere la cortadora si los dispositivos de
seguridad están dañados. De lo contrario, pueden producirse
lesiones personales.
El escudo posterior está sujeto a desgaste y daños lo que podría
dejar expuestas las partes móviles o permitir que arroje objetos. Para
proteger su seguridad, verifique frecuentemente el escudo posterior
reemplazándolo inmediatamente con las piezas del fabricante original
del equipo identificadas en este manual.
1. Para retirar el escudo posterior, levante la puerta trasera y doble
(combe) el escudo hacia adentro a cada lado para soltar las
lengüetas de los orificios del bastidor de la cortadora. Vea la
A ADVERTENCIA
A ADVERTENCIA
________________________________
Figura 11.
2. Lubrique el resorte de torsión y el punto de pivote de la puerta
trasera de descarga y clavija de abono lateral periódicamente con
aceite ligero para evitar que se oxide. Vea la Figura 10.
34
2. Reemplace con un escudo nuevo doblando el escudo para
permitir que las lengüetas calcen en los orificios del bastidor de la
cortadora.
Page 35

SERVICIO Y MANTENIMIENTO
J
CUIDADO DE LA CUCHILLA
Aadvertencia
Cuando saque la cuchilla de corte para afilarla o reemplazarla,
protéjase las manos usando un par de guantes gruesos o un trapo
grueso para sostener la cuchilla. Asegúrese de apagar el motor y
retirar la llave.
Inspeccione periódicamente el adaptador de la cuchilla en busca
de rajaduras, especialmente cuando golpee un objeto extraño.
Reemplace según necesidad. Siga los pasos que aparecen debajo
para realizar el mantenimiento de la cuchilla.
Afilado de cuchillas
IMPORTANTE:
cuchillas por otras nuevas.
Para afilar las cuchillas de corte correctamente, extraiga cantidades
iguales de metal de ambos extremos de las cuchillas a lo largo de los
bordes cortantes, paralelo al borde de caída, a un ángulo de 25° a 30°.
Vea la Figura 13.
Extracción de cuchillas
1. Detenga el motor y retire la llave. Coloque la cortadora de césped
sobre un lado.
2.
Coloque un taco de madera 2x4 de aproximadamente 8,5 pulga
das de largo entre el alojamiento de la plataforma y la cuchilla de
corte, para que actúe como estabilizador. Vea la Figura 11.
Afloje y saque el perno de la cuchilla, la placa de seguridad y la
cuchilla. Vea la Figura 12.
Si existe una separación en el metal, reemplace las
NOTA:
por igual para mantener el equilibrio adecuado de la cuchilla. Una
cuchilla desequilibrada causará demasiada vibración, y puede ocasionar
daños a la cortadora que resulten en lesiones personales. Se puede
probar la cuchilla balanceándola sobre un destornillador de eje circular.
Afile el metal del lado pesado hasta que quede bien equilibrada.
Es importante que cada borde de corte de la cuchilla sea pulido
AADVERTENCIA
Si la cuchilla está desequilibrada causará demasiada vibración al
rotar a altas velocidades. Puede dañar la cortadora de césped y se
puede romper, causando lesiones personales.
Instalación de cuchillas
1. Coloque la cuchilla de corte, la placa de seguridad y el perno de
la cuchilla sobre el eje del motor y atornille el perno con la mano.
NOTA:
orden en que las retiró. Al instalar la cuchilla de corte, asegúrese
de instalarla con los extremos curvos hacia la plataforma de la
cortadora y no hacia el suelo.
2. Aplique torsión al perno de la cuchilla usando una llave de par
para asegurar que el perno está correctamente apretado. El torque
recomendado para el perno de la cuchilla es 170-220 pulg/lb.
Para asegurar la operación segura de la podadera revise periódica
mente el perno de la cuchilla para determinar si está bien ajustado.
Asegúrese de volver a colocar las partes en el mismo
Aadvertencia
Las piezas metálicas de la cuchilla no sólo se utilizan para fijar el conjunto
de la cuchilla, sino que también como dispositivo aislante de seguridad y
nunca deben modificarse de ninguna manera. Si es necesario reemplazar
las, use piezas originales como se muestra en la lista de piezas.
35
Page 36

SERVICIO Y MANTENIMIENTO
REPOSICION DEL BOTON DE REPOSICION
DEL DISYUNTOR
Esta cortadora de césped está equipada con un botón de
reposición del disyuntor para evitar que el motor se dañe debido a
recalentamiento.
SI el botón de reposición del disyuntor salta:
1. Suelte la manija de control del motor/la cuchilla y NO vuelva a
arrancar la cortadora durante al menos un minuto, dando tiempo
al motor para que se enfríe.
2. Empuje el botón de reposición del disyuntor hacia adentro para
reponer. Vea la Figura 14.
SI el botón de reposición del disyuntor salta poco después de
reponerlo:
1. Suelte la manija de control del motor/la cuchilla y NO vuelva a
2. Empuje el botón de reposición del disyuntor hacia adentro para
3. Vuelva a arrancar la unidad.
CUIDADO DE LA BATERÍA
IMPORTANTE:
la que viene con esta cortadora de césped (Pieza № 725-04381). La
batería debe ser reemplazada sólo por el centro de servicio Sears.
Debido al riesgo de chocque eléctrico, NO Intente quitar la cubierta
del motor/la batería. Adentro no hay piezas recamblables por el
usuario. SI hace falta reparar, póngase en contacto con el centro de
servicio Sears más cercano.
arrancar la cortadora durante al menos 15 minutos, dando más
tiempo al motor para que se enfríe.
reponer.
NOTA:
mente durante la operación o no se mantiene mientras se lo
Intenta reponer, póngase en contacto con el centro de servicio
Sears más cercano para acordar una reparación.
SI el botón de reposición del disyuntor salta repetida
Reemplace únicamente con una batería Idéntica a
A ADVERTENCIA
PROGRAMA DE MANTENIMIENTO
A
ADVERTENCIA
Apague el motor y retire la llave siempre antes de limpiar, lubricar
o realizar cualquier reparación o tarea de mantenimiento en la
cortadora de césped. Utilice siempre anteojos de seguridad durante el
funcionamiento o mientras ajusta o repara este equipo.
Siga el cronograma de mantenimiento que se presenta a continuación.
Esta tabla sólo describe pautas de servicio. Utilice la columna Registro
de Servicio para hacer el seguimiento de las tareas de mantenimiento
completadas.
o para programar un servicio, simplemente comuniqúese con
Sears al teléfono 1-800-4-MY-HOME®
Para ubicar
el
centro de servicio Sears más cercano
Intervalo Artículo Servicio Registro de servicio
Cada uso 1. Cuchillas de la cortadora 1. Afile según corresponda
2. Piezas sueltas o faltantes 2. Ajuste 0 reemplace
3. Controles 3. Verifique que funcione correctamente
4. Motor 4. Quite el pasto y hojas acumulados
alrededor de la tapa del motor (no use
agua).
5. Plataforma
Anualmente o cada 25 1. Ruedas 1. Lubrique con aceite ligero
horas
Antes de almacenar 1. Batería 1. Cargue totalmente
Durante el
almacenamiento
2. Puerta trasera de descarga y
clavija de abono lateral
3. Cuchillas de la cortadora 3. Afile y balancee
1. Batería 1. Cargue cada dos meses
5. Limpie la parte inferior de la plataforma
con una herramienta adecuada (no use
agua).
2. Lubrique el resorte de torsión y punto
de pivote con aceite ligero.
36
Page 37

ALMACENAMIENTO FUERA DE TEMPORAD
PREPARACION DE LA CORTADORA DE
CÉSPED
Se deben seguir estos pasos para preparar la cortadora para
almacenarla:
• Lubrique la cortadora según se describe en las instrucciones de
lubricación.
• Quite el pasto y hojas acumulados alrededor de la tapa del motor
(no use agua). Limpie la cortadora de césped con un paño seco.
• Si se han acumulado desechos en la parte inferior de la unidad,
incline la cortadora y limpie raspando con una herramienta
adecuada (asegúrese de haber sacado la llave).
• Almacene la cortadora total mete cargada.
IMPORTANTE:
de césped una vez cada dos meses mientras está almacenada.
• Almacene la unidad en una zona limpia y seca. No la almacene
cerca de productos corrosivos como por ejemplo fertilizantes.
• Limpie el cable para sacarle manchas o sustancias extrañas
como por ejemplo aceite.
• Cubra la cuchilla de la cortadora con grasa para chasis para
impedir que se oxide.
Se recomienda enfáticamente cargar la cortadora
J
37
Page 38

SOLUCION DE PROBLEMA
I
Aadvertencia
Siempre apague el motor y saque la llave antes de limpiar, lubricar
o realizar cualquier reparación o tarea de mantenimiento en la
cortadora de césped. Utilice siempre anteojos de seguridad durante la
operación o mientras realiza ajustes o reparaciones.
Problema Causa
El motor no arranca 1. La llave no está en el interruptor 1. Inserte la llave de encendido.
2. Control del motor/la cuchilla
desenganchado.
3. Batería descargada. 3. Cargue la batería.
4. Plataforma de la cortadora tapada con
pasto y residuos.
La cortadora se detiene 1. Batería descargada. 1. Cargue la batería.
cuando está cortando
Demasiada vibración 1. Cuchilla de corte floja. 1. Ajuste el perno de la cuchilla.
La cortadora de césped 1. Plataforma de la cortadora tapada. 1. Destape la plataforma de la cortadora. Cerciórese de
no procesa el recorte de
césped como abono
Corte desigual 1. Cuchilla desafilada. 1. Afile 0 cambie la cuchilla.
2. Corta demasiado pasto. 2. Eleve la altura de corte.
3. Plataforma tapada. 3. Destape la plataforma de la cortadora. Eleve la altura de
4. El botón de reposición del disyuntor está
desconectado.
2. Cuchilla de corte desequilibrada. 2. Equilibre la cuchilla siguiendo las instrucciones que
3. Cuchilla de corte doblada. 3. Reemplace la cuchilla.
4. Eje del motor doblado. 4. Comuniqúese con el centro de servicio Sears más
2. Césped húmedo.
3. Césped demasiado alto.
4. Cuchilla desafilada. 4. Afile 0 cambie la cuchilla.
El fusible de reemplazo debe ser un componente homologado o
certificado por UL, con tensión nominal de 40
salta un fusible de la cortadora, para repararlo comuniqúese con el
distribuidor de servicio autorizado más cercano. No utilice ningún otro
tipo ni tamaño de fusible.
2. Oprima el botón arrancador y enganche el control del
4. Destape la plataforma de la cortadora. Cerciórese de
que la cuchilla se puede mover.
corte, 0 corte una franja más angosta.
4. Reposicione el botón de reposición del disyuntor
aparecen en la sección Servicio y mantenimiento de
este manual.
cercano.
que la cuchilla se puede mover.
2. No corte el césped cuando esté mojado, espere hasta
que sea más tarde para hacerlo.
3. Corte una vez a una altura de corte elevada y luego
vuelva a cortar el césped a la altura deseada, o corte
Aadvertencia
amp,
58 voltios. Si
Solución
motor/la cuchilla.
siguiendo las instrucciones que aparecen en la sección
Servicio y mantenimiento de este manual.
una franja más angosta (1/2 ancho).
NECESITA MÁS AYUDA?
i
US preguntas serán respondidas por nuestro equipo de especialistas.
■■ t )btenga un plan de mantenimiento personalizado para su hogar.
■■ I ncuentre información y herramientas que lo ayudarán con los proyectos de su hogar.
38
Page 39

ACUERDO DE PROTECCION PARA REPARACIONES
Felicitaciones por haber realizado
producto Craftsman® que ha adquirido está diseñado y fabricado
para brindar muchos años de funcionamiento confiable. Pero como
todos los productos a veces puede requerir de reparaciones. Es en
ese momento cuando el disponer de un Acuerdo de protección para
reparaciones le puede ahorrar dinero y problemas.
A continuación se detallan los puntos incluidos en el Acuerdo:
• Servicio experto
reparaciones profesionales
• Servicio ilimitado sin cargo
todas las reparaciones cubiertas
• Reemplazo del producto
reparar el producto cubierto
• Descuento de 10%
relacionadas con el mismo que no estén cubiertas por el acuerdo;
además, 10% del precio normal de la verificación de manten
imiento preventivo
• Ayuda rápida por teléfono
apoyo telefónico de un Chamusca al representante. Piense en
nosotros como el manual “de un dueño hablador.”
una
adquisición inteligente. El
prestado por nuestros 10,000 especialistas en
para las piezas y la mano de obra en
hasta 1500 dólares si no es posible
del precio normal del servicio y de las piezas
- lo llamamos Resolución Rápida - el
Una vez adquirido el Acuerdo, puede programar el servicio con
tan sólo realizar una llamada telefónica. Puede llamar en cualquier
momento del día o de la noche o programar un servicio en línea.
El Acuerdo de Protección de Reparación es una compra sin riesgo.
Si usted anula por alguna razón durante el período de garantía de
producto, proporcionaremos un reembolso lleno. O, un reembolso
prorrateado en cualquier momento después del período de garantía
de producto expira. ¡Adquiera hoy su acuerdo de protección para
reparaciones!
Se aplican determinadas limitaciones y exclusiones. Para obtener
información adicional y precios en los Estados Unidos llame al
1-800-827-6655.
El ‘Coverage en Canadá varía en algunos artículos. Para detalles
llenos la llamada Chamusca Canadá en 1-800-361-6665.
Servicio de instalación de Sears
Si desea solicitar la instalación profesional de Sears de aparatos
domésticos, dispositivos para abrir portones, calentadores de agua
y otros artículos domésticos importantes, en los Estados Unidos o
Canadá llame al
1-800-4-MY-HOME®.
39
Page 40

Get it fixed, at your home or ours!
Your Home
Fortroubleshooting, product manuals and home solutions advice:
5
BJB
www.managemyhome.com
For repair - in your home - of all major brand appliances,
lawn and garden equipment, or heating and cooling systems,
no matter who made it, no matter who sold it!
For the replacement parts, accessories and
owner’s manuals that you need to do-it-yourself.
For Sears professional installation of home appliances
and items like garage door openers and water heaters.
1-800-4-MY-HOME® (i-8oo-469-4663)
■ .
-
Call anytime, day or night (U.S.A. and Canada)
www.sears.comwww.sears.ca
Our Home
For repair of carry-in items like vacuums, lawn equipment,
and electronics, call anytime for the location of your nearest
Sears Parts & Repair Service Center
1 -800-488-1222 (USA) 1 -800-469-4663 (Canada)
www.sears.com www.sears.ca
To purchase a protection agreement on a product serviced by Sears:
1 -800-827-6655 (USA) 1 -800-361 -6665 (Canada)
Para pedir servicio de reparación
a domicilio, y para ordenar piezas:
1-888-SU-HOGAR®
(1-888-784-6427)
www.sears.com
Au Canada pour service en français:
1-800-LE-FOYER“''
(1-800-533-6937)
www.sears.ca
® Registered Trademark / ™ Trademark of KCD IP, LLC in the United States, or Sears Brands, LLC in other countries
® Marca Registrada / ™ Marca de Fábrica de KCD IP, LLC en Estados Unidos, o Sears Brands, LLC in otros países
Marque de commerce / Marque déposée de Sears Brands, LLC
 Loading...