

Page 1
Operator's Manual
CRRFTSMRH
21" LAWN MOWER
Model No. 247.37031
o SAFETY
ASSEMBLY
OPERATION
CAUTION: Before using
this product, read this
manual and follow all
MAINTENANCE
PARTS LIST
o ESPArqOL, p. 33
safety rules and operating
instructions.
Sears Brands Management Corporation, Hoffman Estates, IL 60179, U.S.A.
Visit our website: www.craftsman.com FORMNO.769-07574
12/5/2011
Page 2
WarrantyStatement..................................Page2
SafetyInstructions....................................Pages3-6
SlopeGuide..............................................Page7
Assembly..................................................Pages8-11
Operation..................................................Pages12-13
Off-SeasonStorage..................................Page18
Troubleshooting........................................Page19
PartsList...................................................Page20-28
Espa_ol.....................................................Page33
ServiceNumbers......................................BackCover
ServiceandMaintenance.........................Pages14-17
Craftsman TwoYearFullWarranty
FORTWOYEARSfromthedateofpurchase,thisproductiswarrantedagainstanydefectsinmaterialorworkmanship.Defectiveproductwill
receivefreerepairorfreereplacementifrepairisunavailable.
Forwarrantycoveragedetailstoobtainrepairorreplacement,visitthewebsite:www.craftsman.com.
ThiswarrantycoversONLYdefectsinmaterialandworkmanship.WarrantycoveragedoesNOTinclude:
• Expendableitemswhichcanwearoutfromnormalusewithinthewarrantyperiod,suchasmowerblades,bladeadapters,belts,filters,or
sparkplugs.
Productdamageresultingfromuserattemptsatproductmodificationorrepairorcausedbyproductaccessories.
• Repairsnecessarybecauseofaccidentorfailuretooperateormaintaintheproductaccordingtoallsuppliedinstructions.
Preventativemaintenanceorrepairsnecessaryduetoimproperfuelmixture,contaminatedorstalefuel.
Thiswarrantyisvoidifthisproductiseverusedwhileprovidingcommercialservicesorifrentedtoanotherperson.
Thiswarrantygivesyouspecificlegalrights,andyoumayalsohaveotherrightswhichvaryfromstatetostate.
SearsBrandsManagementCorporation, HoffmanEstates,IL 60179
EngineOilType: SAE30
EngineOilCapacity: 18ounces
Fuel: UnleadedGasoline
SparkPlug: Champion®RJ2YXLE
Engine: Briggs& Stratton
ModelNumber.................................................................
Serial Number.................................................................
Dateof Purchase.............................................................
Recordthemodelnumber,serialnumber
anddateof purchaseabove
©SearsBrands,LLC 2
Page 3
Thissymbolpointsout importantsafetyinstructionswhich,if not
followed,couldendangerthepersonalsafetyand/orpropertyof
yourselfandothers. Readandfollowall instructionsinthismanual
beforeattemptingto operatethismachine.Failuretocomplywith
theseinstructionsmayresultin personalinjury.Whenyou seethis
symbol,HEEDITSWARNING!
Thismachinewasbuiltto beoperatedaccordingtothesafeopera-
tionpracticesinthis manual.Aswithanytypeof powerequipment,
carelessnessorerroron the partof theoperatorcanresultin serious
injury.Thismachineiscapableofamputatingfingers,hands,toes
andfeetandthrowingdebris.Failuretoobservethefollowingsafety
instructionscouldresultin seriousinjuryor death.
CALIFORNIA PROPOSITION 65
EngineExhaust,someof itsconstituents,andcertainvehicle
componentscontainoremitchemicalsknowntoStateofCalifornia
tocausecancerandbirthdefectsorotherreproductiveharm.
Batteryposts,terminals,and relatedaccessoriescontainleadand
leadcompounds,chemicalsknowntotheStateof Californiato
causecancerandreproductiveharm.Washhandsafterhandling.
GENERAL OPERATION
* Readthisoperator'smanualcarefullyin itsentiretybefore
attemptingtoassemblethismachine.Read,understand,and
followall instructionsonthe machineandinthemanualsbefore
operation.Keepthismanualina safeplaceforfutureand regular
referenceandfororderingreplacementparts
, Becompletelyfamiliarwiththecontrolsandtheproperuseofthis
machinebeforeoperatingit.
, Thismachineisa precisionpieceofpowerequipment,not a
plaything.Therefore,exerciseextremecautionat alltimes.This
machinehasbeendesignedto performonejob:to mowgrass.
Donot useit foranyotherpurpose.
, Neverallowchildrenunder14yearsofagetooperatethis
machine.Children14andovershouldreadandunderstandthe
instructionsandsafeoperationpracticesinthismanualandon
themachineandshouldbetrainedandsupervisedbyan adult.
, Onlyresponsibleindividualswhoarefamiliarwiththeserulesof
safeoperationshouldbe allowedtousethis machine.
, Thoroughlyinspecttheareawheretheequipmentistobe used.
Removeallstones,sticks,wire,bones,toysandotherforeign
objects,whichcouldbetrippedoverorpickedupandthrownby
theblade.Thrownobjectscancauseseriouspersonalinjury.
, Planyourmowingpatterntoavoiddischargeofmaterialtoward
roads,sidewalks,bystandersandthe like.Also,avoiddischarg-
ingmaterialagainstawallorobstruction,whichmaycause
dischargedmaterialto ricochetbacktowardtheoperator.
, Tohelpavoidbladecontactorathrownobjectinjury,stayin
operatorzonebehindhandlesandkeepchildren,bystanders,
helpersandpetsat least75feetfrommowerwhileit is inopera-
tion.Stopmachineif anyoneentersarea.
Your Responsibility--Restricttheuseofthispowermachineto
personswhoread,understandandfollowthewarningsandinstruc-
tionsin thismanualandon the machine.
SAVE THESE INSTRUCTIONS!
• Alwayswearsafetyglassesorsafetygogglesduringoperation
andwhileperformingan adjustmentorrepairto protectyoureyes.
Thrownobjectswhichricochetcancauseseriousinjurytothe
eyes.
Wearsturdy,rough-soledworkshoesandclose-fittingslacks
and shirts.Shirtsand pantsthatcoverthearmsandlegsand
steel-toedshoesare recommended.Neveroperatethis machine
inbarefeet,sandals,slipperyor light-weight(e.g.canvas)shoes.
Donot puthandsor feetnearrotatingpartsor underthecutting
deck.Contactwithbladecan amputatefingers,hands,toesand
feet.
A missingordamageddischargecovercancausebladecontact
or thrownobjectinjuries.
Manyinjuriesoccuras a resultofthe mowerbeingpulledoverthe
footduringafallcausedby slippingortripping.Do notholdon to
themowerif youarefalling:releasethehandleimmediately.
Neverpullthemowerbacktowardyouwhileyou arewalking.If
youmustbackthemowerawayfroma wallor obstructionfirst
lookdownandbehindtoavoidtrippingandthen followthese
steps:
1. Stepbackfrommowerto fullyextendyourarmsforward.
2. Besureyouarewellbalancedwithsurefooting.
3. Pullthemowerbackslowly,nomorethanhalfwaytoward
you.
4. Repeatthesestepsasneeded.
Donot operatethemowerwhileunderthe influenceofalcoholor
drugs.
Donot engagetheself-propelledmechanismon machinesso
equippedwhilestartingengine.
3
Page 4
• Thebladecontrolhandleis a safetydevice.Neverattemptto
bypassitsoperation.Doingsomakesthesafetydeviceinopera-
tiveandmayresultin personalinjurythroughcontactwiththe
rotatingblade.Thebladecontrolhandlemustoperateeasily
in bothdirectionsandautomaticallyreturntothe disengaged
positionwhenreleased.
• Neveroperatethemowerinwetgrass.Alwaysbe sureof your
footing.A slip andfallcancauseseriouspersonalinjury.Ifyou
feelyou arelosingyourfooting,releasethebladecontrolhandle
immediatelyandthebladewill stop rotatingwithinthreeseconds.
• Mowonlyin daylightorgoodartificiallight.Walk,neverrun.
• Stopthe bladewhencrossinggraveldrives,walksorroads.
• Iftheequipmentshouldstartto vibrateabnormally,stopthe
engineandcheckimmediatelyfor thecause.Vibrationis gener-
allya warningoftrouble.
• Shutthe engineoff andwaituntilthe bladecomesto a complete
stopbeforeremovingthe grasscatcheroruncloggingthechute.
Thecuttingbladecontinuesto rotateforafewsecondsafterthe
bladecontrolisreleased.Neverplaceanypartofthe bodyinthe
bladeareauntilyou aresurethe bladehasstoppedrotating.
• Neveroperatemowerwithoutpropertrailshield,dischargecover,
grasscatcher,bladecontrolhandleor othersafetyprotectivede-
vicesin placeandworking.Neveroperatemowerwithdamaged
safetydevices.Failuretodo socan resultinpersonalinjury.
Mufflerandenginebecomehotandcancausea burn.Donot
touch.
• Neverattempttomakea wheelorcuttingheightadjustmentwhile
theengineis running.
• Onlyuse partsand accessoriesmadeforthis machinebythe
manufactureraslistedin the Partspagesof thisOperator's
Manual.Failuretodosocan resultin personalinjury.
• Whenstartingengine,pullcordslowlyuntil resistanceisfelt,then
pullrapidly.Rapidretractionof startercord(kickback)willpull
handandarmtowardenginefasterthanyoucanlet go.Broken
bones,fractures,bruisesor sprainscould result.
• If situationsoccurwhicharenotcoveredinthismanual,usecare
andgoodjudgement.Contact1-800-4MY-HOME®forinformation
andassistance.
SLOPE OPERATION
Slopesareamajorfactorrelatedto slipandfallaccidents,whichcan
resultinsevereinjury.Operationon slopesrequiresextracaution.If
youfeel uneasyona slope,do notmowit. Foryoursafety,usethe
SlopeGuideincludedaspartof thismanualto measureslopesbefore
operatingthis machineona slopedor hillyarea. Iftheslopeisgreater
than15degrees,donot mowit.
Do:
o
Mowacrossthefaced slopes;neverupanddown.Exercise
extremecautionwhenchangingdirectiononslopes.
• Watchfor holes,ruts,rocks,hiddenobjects,or bumpswhichcan
causeyouto sliportrip.Tallgrasscanhideobstacles.
• Alwaysbesureofyourfooting.A slipandfallcan causeserious
personalinjury.Ifyou feelyou arelosingyourbalance,release
thebladecontrolhandleimmediatelyandthe bladewillstop
rotatingwithinthree(3) seconds.
DoNot:
• Donotmowneardrop-offs,ditchesorembankments,because
youcouldloseyourfootingorbalance.
• Donotmowslopesgreaterthan15degreesas shownon the
slopeguide.
• Donotmowon wetgrass.Unstablefootingcouldcauseslipping.
CHILDREN
Tragicaccidentscanoccuriftheoperatorisnot alertto thepresence
ofchildren.Childrenareoftenattractedto themowerandthemowing
activity.Theydonotunderstandthe dangers.Neverassumethat
childrenwill remainwhereyoulastsawthem.
Keepchildrenoutofthe mowingareaandunderwatchfulcareof
a responsibleadultotherthantheoperator.
• Bealertandturnmoweroffif achildentersthe area.
• Beforeandwhilemovingbackwards,lookbehindanddownfor
smallchildren.
• Useextremecarewhenapproachingblindcorners,doorways,
shrubs,trees,orotherobjectsthatmayobscureyourvisionof a
childwhomayrunintothe mower.
• Keepchildrenawayfromhot or runningengines.Theycansuffer
burnsfroma hot muffler.
• Neverallowchildrenunder14yearsofageto operatethis
machine.Children14andovershouldreadand understandthe
instructionsandsafeoperationpracticesinthis manualandon
themachineandbetrainedandsupervisedby an adult.
SERVICE
SafeHandlingOf Gasoline:
• Toavoid personalinjuryor propertydamageuseextremecare
in handlinggasoline.Gasolineisextremelyflammableandthe
vaporsareexplosive.Seriouspersonalinjurycanoccurwhen
gasolineis spilledonyourselfor yourclothes,whichcan ignite.
Washyourskinandchangeclothesimmediately.
• Useonlyanapprovedgasolinecontainer.
• Neverfillcontainersinsidea vehicleoron atruck ortrailerbed
witha plasticliner.Alwaysplacecontainerson thegroundaway
fromyourvehiclebeforefilling.
• Removegas-poweredequipmentfromthetruckortrailerand
refueliton theground.Ifthisis notpossible,thenrefuelsuch
equipmentonatrailerwitha portablecontainer,ratherthanfrom
a gasolinedispensernozzle.
• Keepthenozzleincontactwiththe rimofthefueltankor
containeropeningatall timesuntilfuelingiscomplete.Donotuse
a nozzlelock-opendevice.
4
Page 5
• Extinguishall cigarettes,cigars,pipesandothersources
ofignition.
• Neverfuelmachineindoorsbecauseflammablevaporswill
accumulateinthearea.
• Neverremovegascaporaddfuelwhileengineis hotor running.
Allowengineto coolat leasttwo minutesbeforerefueling.
• Neverover-fillfueltank.Toallowforexpansionofthefuel,donot
fillabovethebottomofthe fueltankneck.
• Replacegasolinecapandtightensecurely.
• If gasolineisspilled,wipeit offtheengineandequipment.Move
machinetoanotherarea.Wait5 minutesbeforestartingengine.
• Neverstorethemachineorfuel containernearanopenflame,
sparkor pilotlightasona waterheater,spaceheater,furnace,
clothesdryerorothergas appliances.
• Toreducefirehazard,keepmachinefreeof grass,leaves,or
otherdebrisbuild-up.Cleanupoil orfuelspillageand removeany
fuel-soakeddebris.
Allowmachinetocoolat least5 minutesbeforestoring.
GeneralService:
• Neverrunanengineindoorsor ina poorlyventilatedarea.Engine
exhaustcontainscarbonmonoxide,anodorlessanddeadlygas.
• Beforecleaning,repairing,or inspecting,makecertainthe
bladeandall movingpartshavestopped.Disconnectthe spark
plugwireandgroundagainstthe enginetopreventunintended
starting.
Checkthebladeandenginemountingboltsatfrequentintervals
forpropertightness.Also,visuallyinspectbladefordamage(e.g.,
bent,cracked,worn).Replacebladewiththeoriginalequipment
manufacture's(O.E.M.)bladeonly,listedinthe Partspagesofthis
manual.Useofpartswhichdonotmeettheoriginalequipment
specificationsmayleadto improperperformanceandcompro-
misesafety!
• Mowerbladesaresharpandcancut. Wrapthe bladeor wear
gloves,anduse extracautionwhenservicingthem.
Keepall nuts,bolts,andscrewstighttobe suretheequipmentis
insafeworkingcondition.
Nevertamperwithsafetydevices.Checktheirproperoperation
regularly.
Afterstrikingaforeignobject,stopthe engine,disconnectthe
sparkplugwireand groundagainsttheengine.Thoroughly
inspectthe mowerforanydamage.Repairthedamagebefore
startingandoperatingthemower.
Neverattempttomakea wheelorcuttingheightadjustmentwhile
theengineisrunning.
• Grasscatchercomponents,dischargecover,andtrailshieldare
subjectto wearanddamagewhichcouldexposemovingpartsor
allowobjectstobethrown.Forsafetyprotection,frequentlycheck
componentsand replaceimmediatelywithoriginalequipment
manufacturer's(O.E.M.)partsonly,listedinthePartspages
ofthismanual.Useof partswhichdo notmeettheoriginal
equipmentspecificationsmayleadto improperperformanceand
compromisesafety!
Donot changetheengine'sgovernorsettingorover-speedthe
engine.Thegovernorcontrolsthemaximumsafeoperatingspeed
ofthe engine.
Checkfuelline,tank,cap,andfittingsfrequentlyfor cracksor
leaks.Replaceifnecessary.
Donot crankenginewith sparkplugremoved.
• Maintainor replacesafetyandinstructionlabels,asnecessary.
• Observeproperdisposallawsand regulations.Improperdisposal
offluidsandmaterialscanharmtheenvironment.
Accordingto theConsumerProductsSafetyCommission(CPSC)
andthe U.S.EnvironmentalProtectionAgency(EPA),thisproduct
hasanAverageUsefulLifeof seven(7)years,or 140hoursof
operation.AttheendoftheAverageUsefulLifehavethemachine
inspectedannuallybya Searsorotherqualifiedservicedealer
toensurethatallmechanicalandsafetysystemsareworking
properlyand notwornexcessively.Failuretodosocan resultin
accidents,injuriesor death.
DO NOT MODIFY ENGINE
Toavoidseriousinjuryor death,do not modifyengineinany way.
Tamperingwiththegovernorsettingcanleadtoa runawayengineand
causeitto operateat unsafespeeds.Nevertamperwithfactorysetting
ofenginegovernor.Doingsowillvoidthe productwarranty.
NOTICE REGARDING EMISSIONS
EngineswhicharecertifiedtocomplywithCaliforniaandfederal
EPAemissionregulationsforSORE(SmallOffRoadEquipment)are
certifiedto operateonregularunleadedgasoline,and mayinclude
thefollowingemissioncontrolsystems:EngineModification(EM)and
ThreeWayCatalyst(TWC)ifsoequipped.
SPARK ARRESTOR
Thismachineisequippedwithaninternalcombustionengineand
shouldnotbe usedonor nearany unimprovedforest-covered,
brush-coveredorgrass-coveredlandunlessthe engine'sexhaust
systemisequippedwitha sparkarrestormeetingapplicablelocalor
statelaws(if any).
Ifa sparkarrestorisused,itshouldbe maintainedineffectiveworking
orderbytheoperator.Inthe StateofCaliforniatheaboveisrequired
bylaw(Section4442ofthe CaliforniaPublicResourcesCode).Other
statesmayhavesimilarlaws. Federallawsapplyonfederallands.
A sparkarrestor(PartNo.398067)forthemufflerisavailablethrough
yournearestSearsPartsandRepairServiceCenter.
Page 6
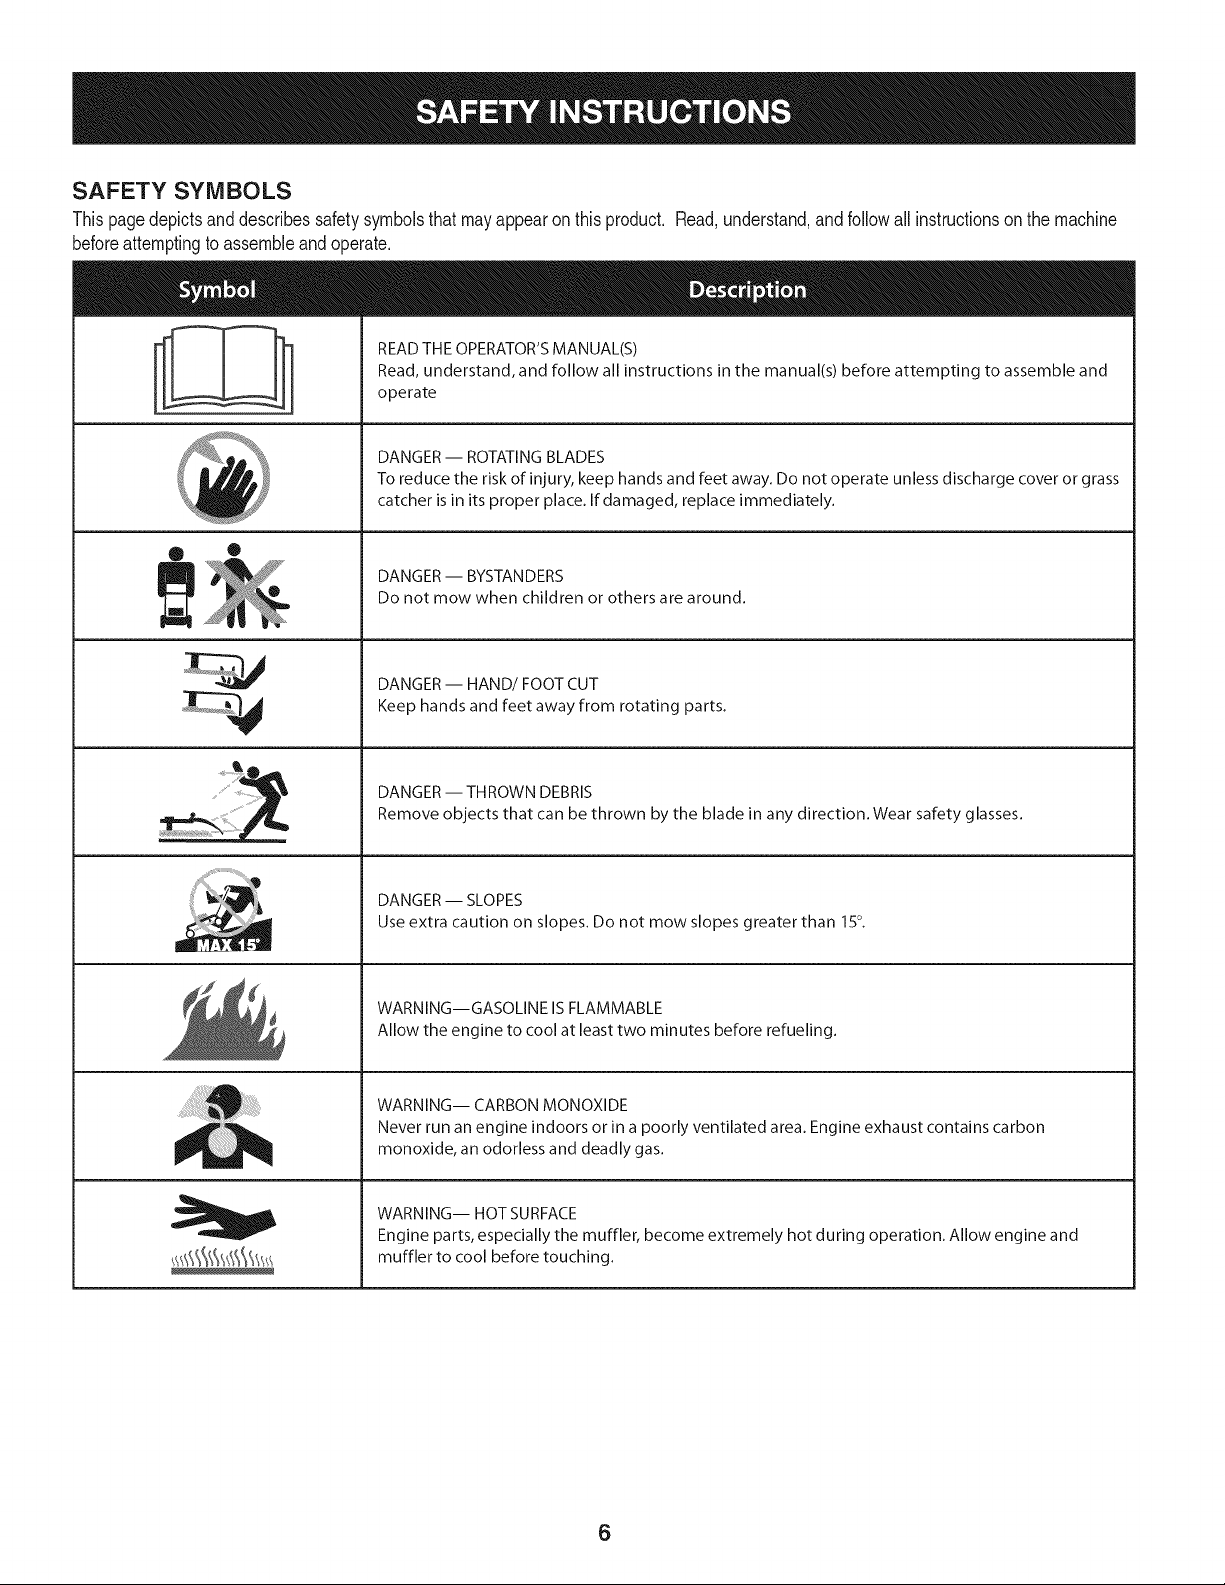
SAFETY SYMBOLS
Thispagedepictsanddescribessafetysymbolsthatmayappearonthisproduct. Read,understand,andfollowallinstructionson the machine
beforeattemptingto assembleandoperate.
READ THE OPERATOR'S MANUAL(S)
i
i
®
Read, understand, and follow all instructions in the manual(s) before attempting to assemble and
operate
DANGER -- ROTATING BLADES
To reduce the risk of injury, keep hands and feet away. Do not operate unless discharge cover or grass
catcher is in its proper place. If damaged, replace immediately.
DANGER -- BYSTANDERS
Do not mow when children or others are around.
J
DANGER-- HAND/FOOT CUT
Keep hands and feet away from rotating parts.
DANGER -- THROWN DEBRIS
Remove objects that can be thrown by the blade in any direction. Wear safety glasses.
DANGER -- SLOPES
Use extra caution on slopes. Do not mow slopes greater than 150.
WARNING--GASOLINE ISFLAMMABLE
Allow the engine to cool at least two minutes before refueling.
WARNING-- CARBON MONOXIDE
Never run an engine indoors or in a poorly ventilated area. Engine exhaust contains carbon
monoxide, an odorless and deadly gas.
WARNING-- HOT SURFACE
Engine parts, especially the muffler, become extremely hot during operation. Allow engine and
muffler to cool before touching.
6
Page 7
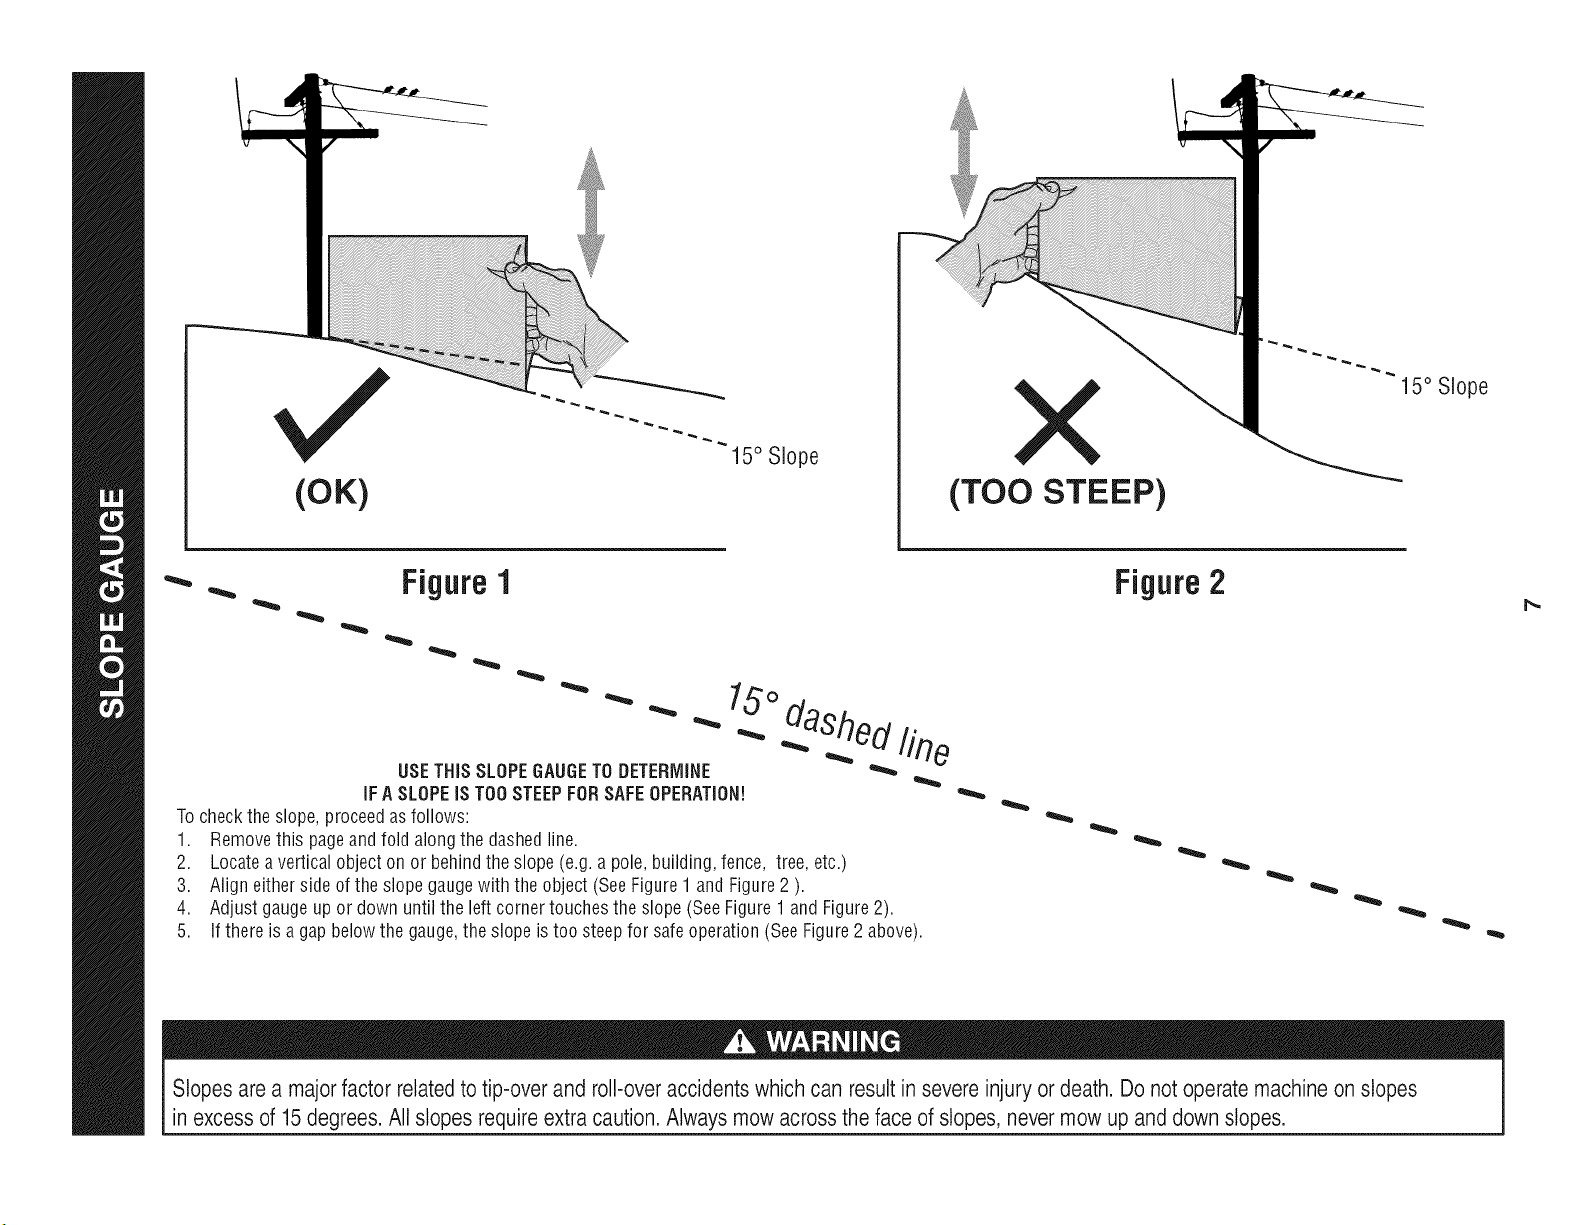
15° Slope
15° Slope
X
(OK)
_- _. Figure1
_O._daShed._fine
USETHiS SLOPEGAUGETO DETERMINE
iFA SLOPEiSTOOSTEEPFORSAFEOPERATION!
Tochecktheslope,proceedasfollows:
1. Removethis pageandfold alongthe dashedline.
2. Locateaverticalobjecton or behindthe slope(e.g.a pole,building,fence, tree, etc.)
3. Aligneitherside ofthe slopegaugewith the object(SeeFigure1 andFigure2 ).
4. Adjust gaugeup or down until the left cornertouchestheslope(SeeFigure1andFigure2).
5.
If thereis agap belowthe gauge,theslopeistoo steepfor safeoperation(SeeFigure2 above).
(TOO STEEP)
Figure2
Slopes area majorfactor relatedtotip-over and roll-over accidentswhich can resultin severe injury or death. Do not operate machineon slopes
in excess of 15degrees. All slopes requireextra caution.Always mow acrossthe face of slopes, never mow up and down slopes.
Page 8
IMPORTANT:Thisunit isshippedwithoutgasolineoroil intheengine.
Becertaintoserviceenginewithgasolineandoilas instructedinthe
Operationsectionbeforestartingorrunningyourmachine.
NOTE:Referenceto rightandlefthandsideof theLawnMoweris
observedfromtheoperatingposition.
OPENING CARTON
1. Cuteachcornerofthe cartonverticallyfromtopto bottom.
2. Removeall looseparts.
3. Removeloosepackingmaterial.
REMOVING UNIT FROM CARTON
1. Liftunitfromthe reartodetachit fromunderlyingcartonmaterial
androllunitout ofcarton.
2. Checkcartonthoroughlyforanyotherlooseparts.
f
LOOSE PARTS IN CARTON
• GrassCatcher
• SideDischargeCover
• EngineOil
ASSEMBLY
Attaching The Handle
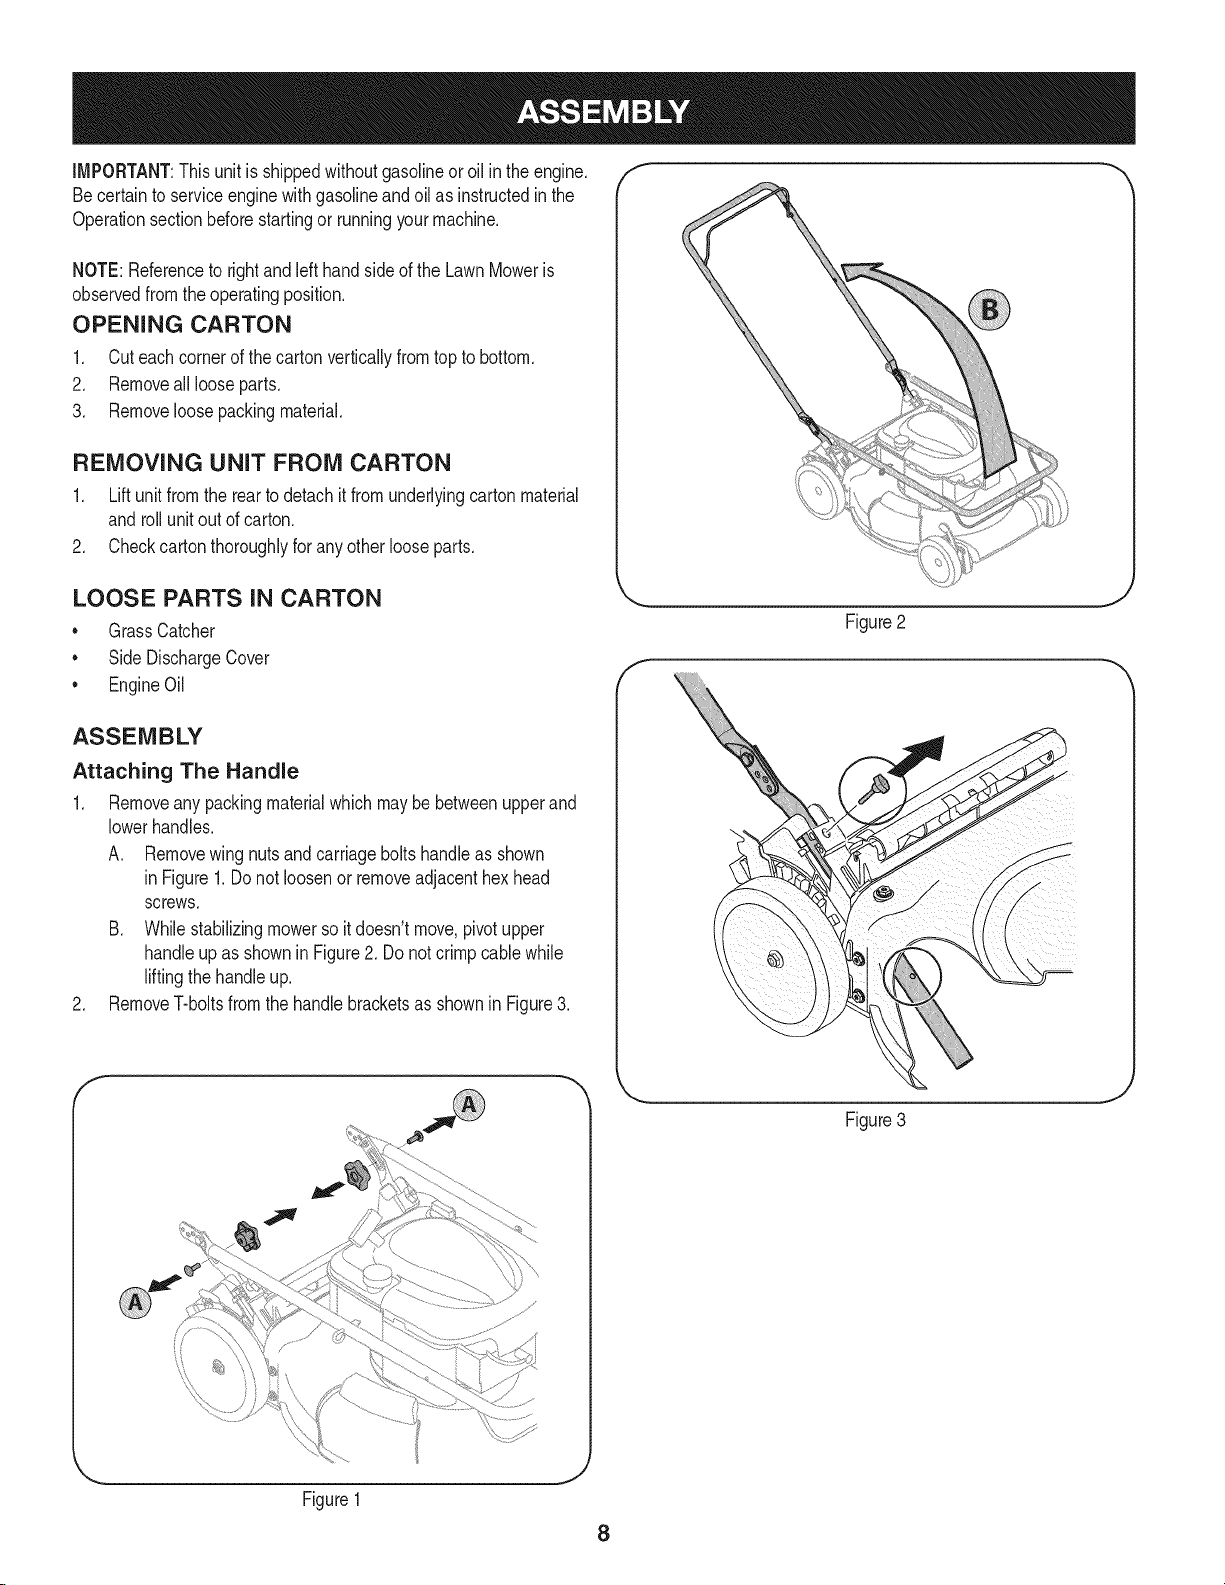
1. Removeany packingmaterialwhichmaybebetweenupperand
lowerhandles.
A. Removewing nutsandcarriageboltshandleas shown
in Figure1.Donot loosenorremoveadjacenthexhead
screws.
B. Whilestabilizingmowersoit doesn'tmove,pivotupper
handleupas showninFigure2.Do notcrimpcablewhile
liftingthehandleup.
2. RemoveT-boltsfromthehandlebracketsasshownin Figure3.
E
J
Figure2
Figure3
Figure1
Page 9
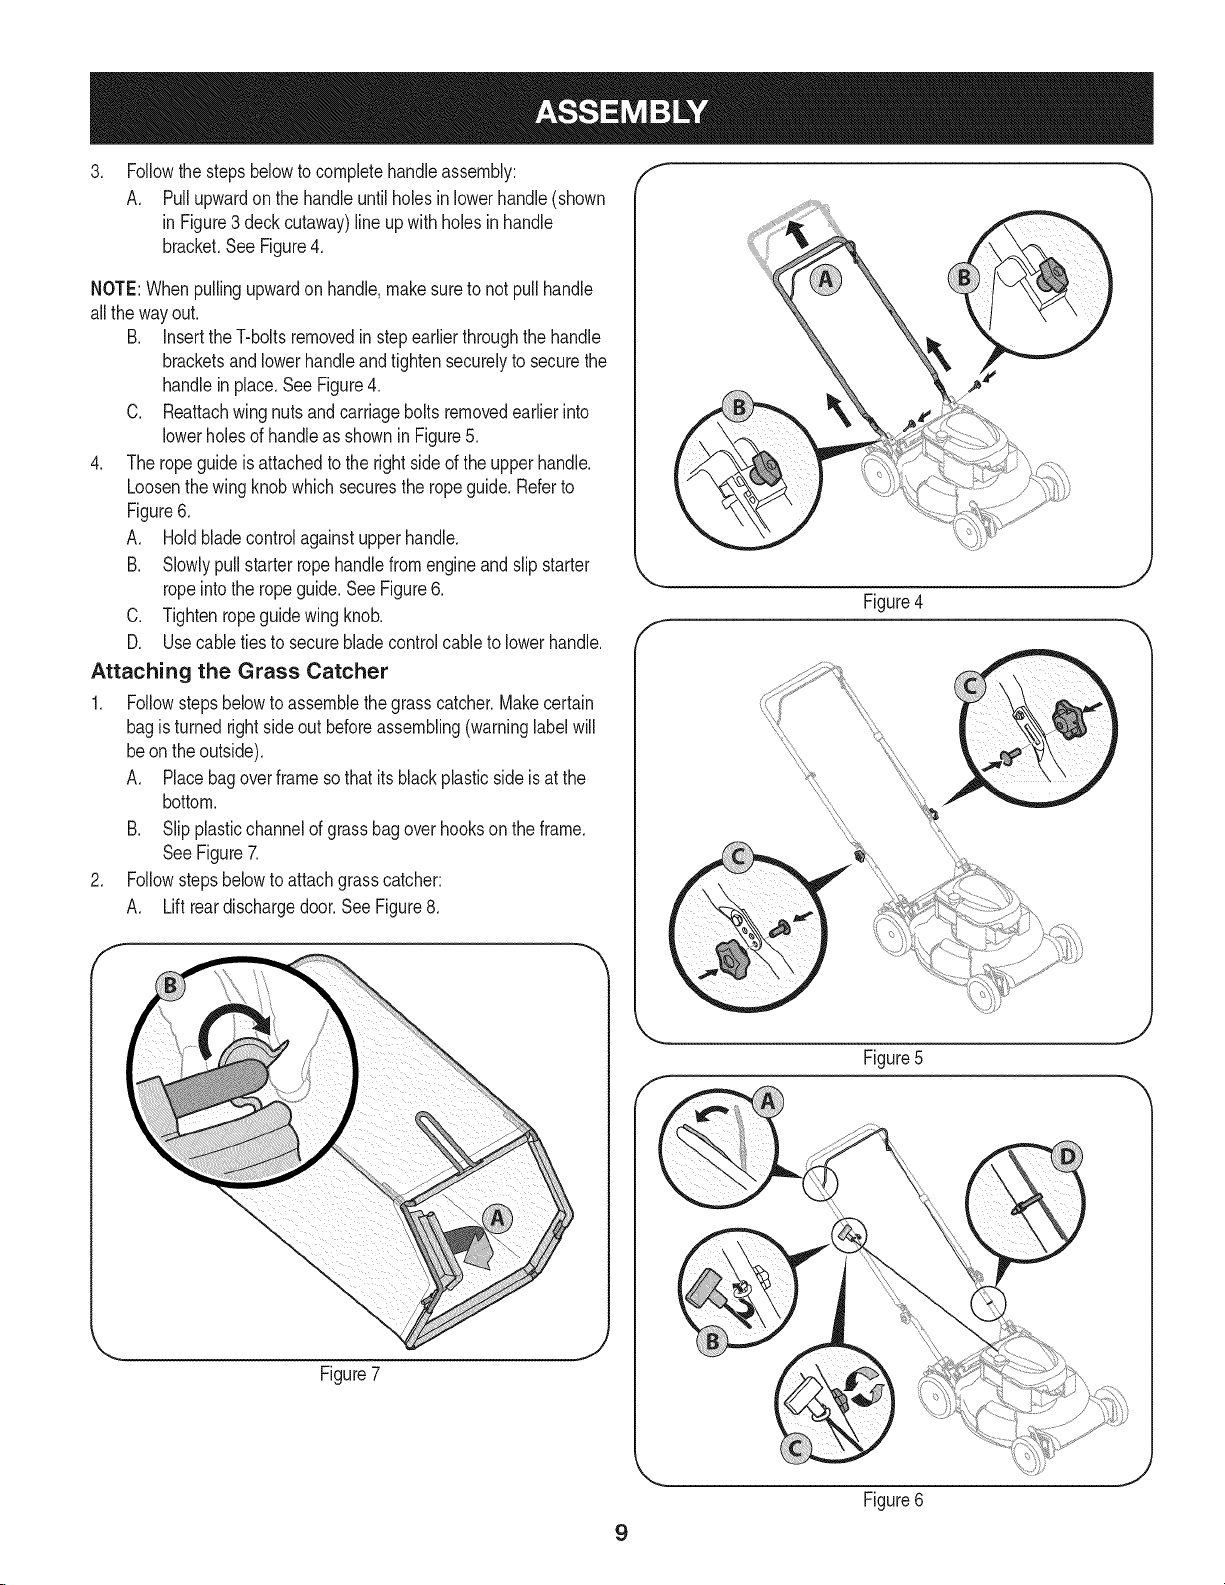
.
Followthestepsbelowtocompletehandleassembly:
A. Pullupwardonthe handleuntilholesin lowerhandle(shown
in Figure3deckcutaway)lineupwith holesinhandle
bracket.SeeFigure4.
NOTE:Whenpullingupwardonhandle,makesureto notpullhandle
allthewayout.
B. Insertthe T-boltsremovedin stepearlierthroughthehandle
bracketsandlowerhandleandtightensecurelyto securethe
handlein place.SeeFigure4.
C. Reattachwingnutsandcarriageboltsremovedearlierinto
lowerholesofhandleas shownin Figure5.
4. Theropeguideis attachedtotheright sideof theupperhandle.
Loosenthewingknobwhichsecurestheropeguide.Referto
Figure6.
A. Holdbladecontrolagainstupperhandle.
B. Slowlypullstarterropehandlefromengineandslip starter
ropeintothe ropeguide.SeeFigure6.
C. Tightenropeguidewingknob.
D. Usecabletiestosecurebladecontrolcabletolowerhandle.
Attaching the Grass Catcher
1. Followstepsbelowto assemblethegrasscatcher.Makecertain
bagisturnedrightside outbeforeassembling(warninglabelwill
beon theoutside).
A. Placebagoverframesothatits blackplasticsideis atthe
bottom.
B. Slipplasticchannelofgrassbagoverhooksontheframe.
SeeFigure7.
2. Followstepsbelowto attachgrasscatcher:
A. Lift reardischargedoor.SeeFigure8.
J
Figure4
Figure7
Figure5
Figure6
9
Page 10

B, Placegrasscatcherintotheslotsinthehandlebracketsas
showninFigure8.Letgoofdischargedoorsothatitrests
onthegrasscatcher.
Toremovegrasscatcher,liftreardischargedooron themower.Lift
grasscatcherupandoff the slotsinthe handlebrackets.Releaserear
dischargedoortoallowitto close rearopeningofmower,
Attaching Side Discharge Cover
Yourmowerisshippedasa mulcher.Toconverttoside discharge,
makesuregrasscatcherisoff of theunitand reardischargedooris
closed.
1. Onthesideof themower,liftthe mulchingcover.SeeFigure9.
2, Slidetwo hooksofside dischargecoverunderhingepinon
mulchingcoverassembly.Lowermulchingcover.Donot remove
sidemulchingcoveratanytime, evenwhenyouarenot mulching.
f
ADJUSTMENTS
Cutting Height
Thereis a cuttingheightadjustmentleverlocatedabovethefrontand
rearrightwheel,
1. Pulltheheightadjustmentleveroutwardtowardswheel(unitwill
tendto fallwhenleverismovedoutward).SeeFigure10,
2. Moveleverto desiredpositionfora changeincuttingheight.See
Figure10.
3, Releaselevertowardsdeck.
IMPORTANT:Allwheelsmustbeplacedinthe sameposition.For
roughor unevenlawns,moveeachheightadjustmentlevertoa higher
position.Thiswill preventyoufromcuttingthegrasstooclosetothe
ground,
Handle Pitch
Forconvenienceofoperation,youmayadjustthepitchofthehandle
asfollows:
1, Removewing nutsandcarriageboltsfromhandle,SeeFigure11,
2. Positionthehandlein oneofthethreepositionsthatis most
comfortable,SeeFigure11inset,
3. Secureintopositionwithwingnutsandcarriageboltsremoved
earlier,
J
Figure8
Side Mulching
Cover
\
Cover
Figure9
f
\
Figure11
,J
Figure10
10
Page 11
Recoil Starter
Grass Catcher
Deck Wash
Cutting Height
Adjustment
Lever
TrailShield
/
GasCap
Nulch Cover
Figure12
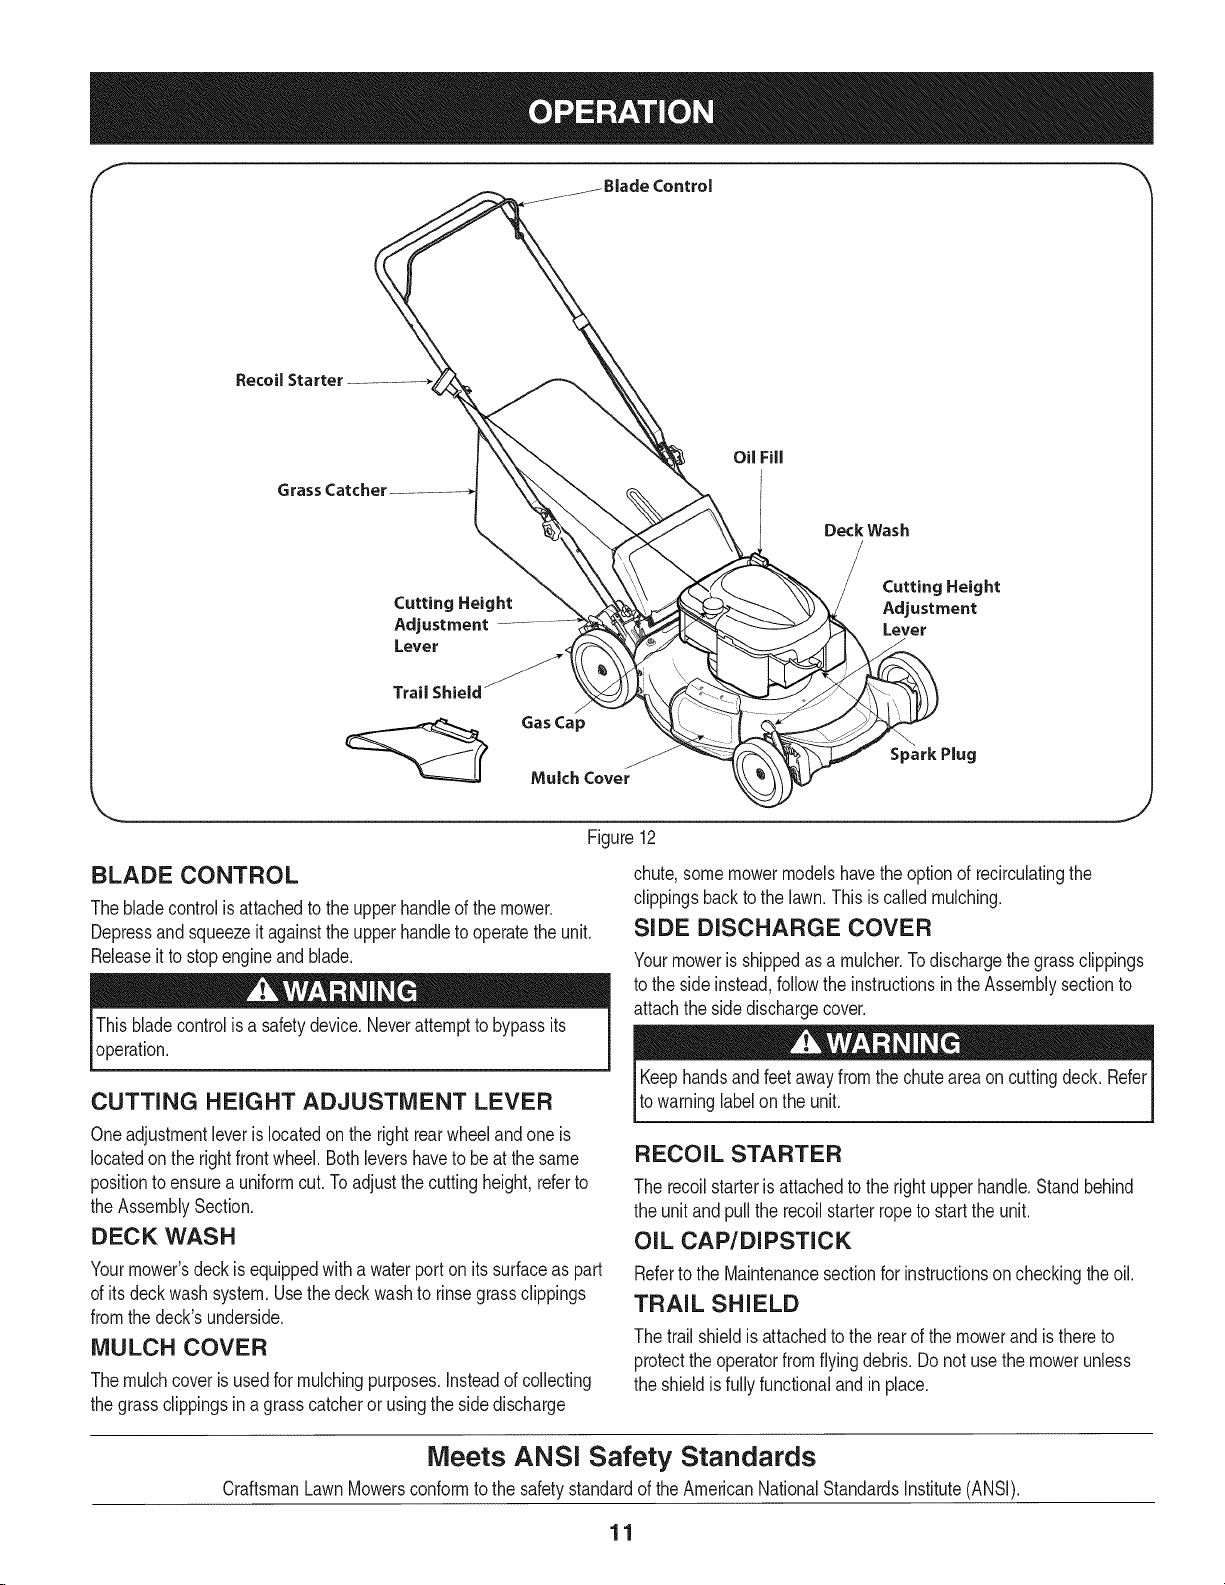
BLADE CONTROL
Thebladecontrolisattachedtotheupperhandleof themower.
Depressandsqueezeit againsttheupperhandletooperatetheunit.
Releaseitto stopengineandblade.
Thisbladecontrolisa safetydevice.Neverattempttobypassits
operation.
CUTTING HEIGHT ADJUSTMENT LEVER
Oneadjustmentleverislocatedontherightrearwheelandoneis
locatedontherightfrontwheel.Bothlevershaveto beat thesame
positiontoensurea uniformcut.To adjustthecuttingheight,referto
theAssemblySection.
DECK WASH
Yourmower'sdeckis equippedwitha waterport onitssurfaceas part
ofits deckwashsystem.Usethe deckwashto rinsegrassclippings
fromthedeck'sunderside.
MULCH COVER
Themulchcoveris usedfor mulchingpurposes.Insteadofcollecting
thegrassclippingsin agrasscatcheror usingthe sidedischarge
Cutting Height
Adjustment
Lever
Spark Plug
chute,somemowermodelshavetheoptionofrecirculatingthe
clippingsbacktothe lawn.Thisiscalledmulching.
SIDE DISCHARGE COVER
Yourmowerisshippedasa mulcher.Todischargethegrassclippings
tothe sideinstead,followtheinstructionsin theAssemblysectionto
attachthe sidedischargecover.
Keephandsandfeetawayfromthe chuteareaon cuttingdeck.Refer
towarninglabelonthe unit.
RECOIL STARTER
Therecoilstarteris attachedtotheright upperhandle.Standbehind
theunit andpulltherecoilstarterropeto starttheunit.
OIL CAP/DIPSTICK
Referto the Maintenancesectionforinstructionsoncheckingtheoil.
TRAIL SHIELD
Thetrail shieldis attachedtotherearof themowerandisthereto
protecttheoperatorfromflyingdebris.Do notusethemowerunless
theshieldisfullyfunctionalandin place.
Meets ANSi Safety Standards
CraftsmanLawnMowersconformto the safetystandardofthe AmericanNationalStandardsInstitute(ANSI).
11
Page 12
GAS AND OiL FILL-UP f "_
IMPORTANT:Thisunit isshippedwithoutgasolineoroil intheengine.
Becertaintoserviceenginewithgasolineandoilas instructedinthis
sectionbeforestartingor runningyourmachine.
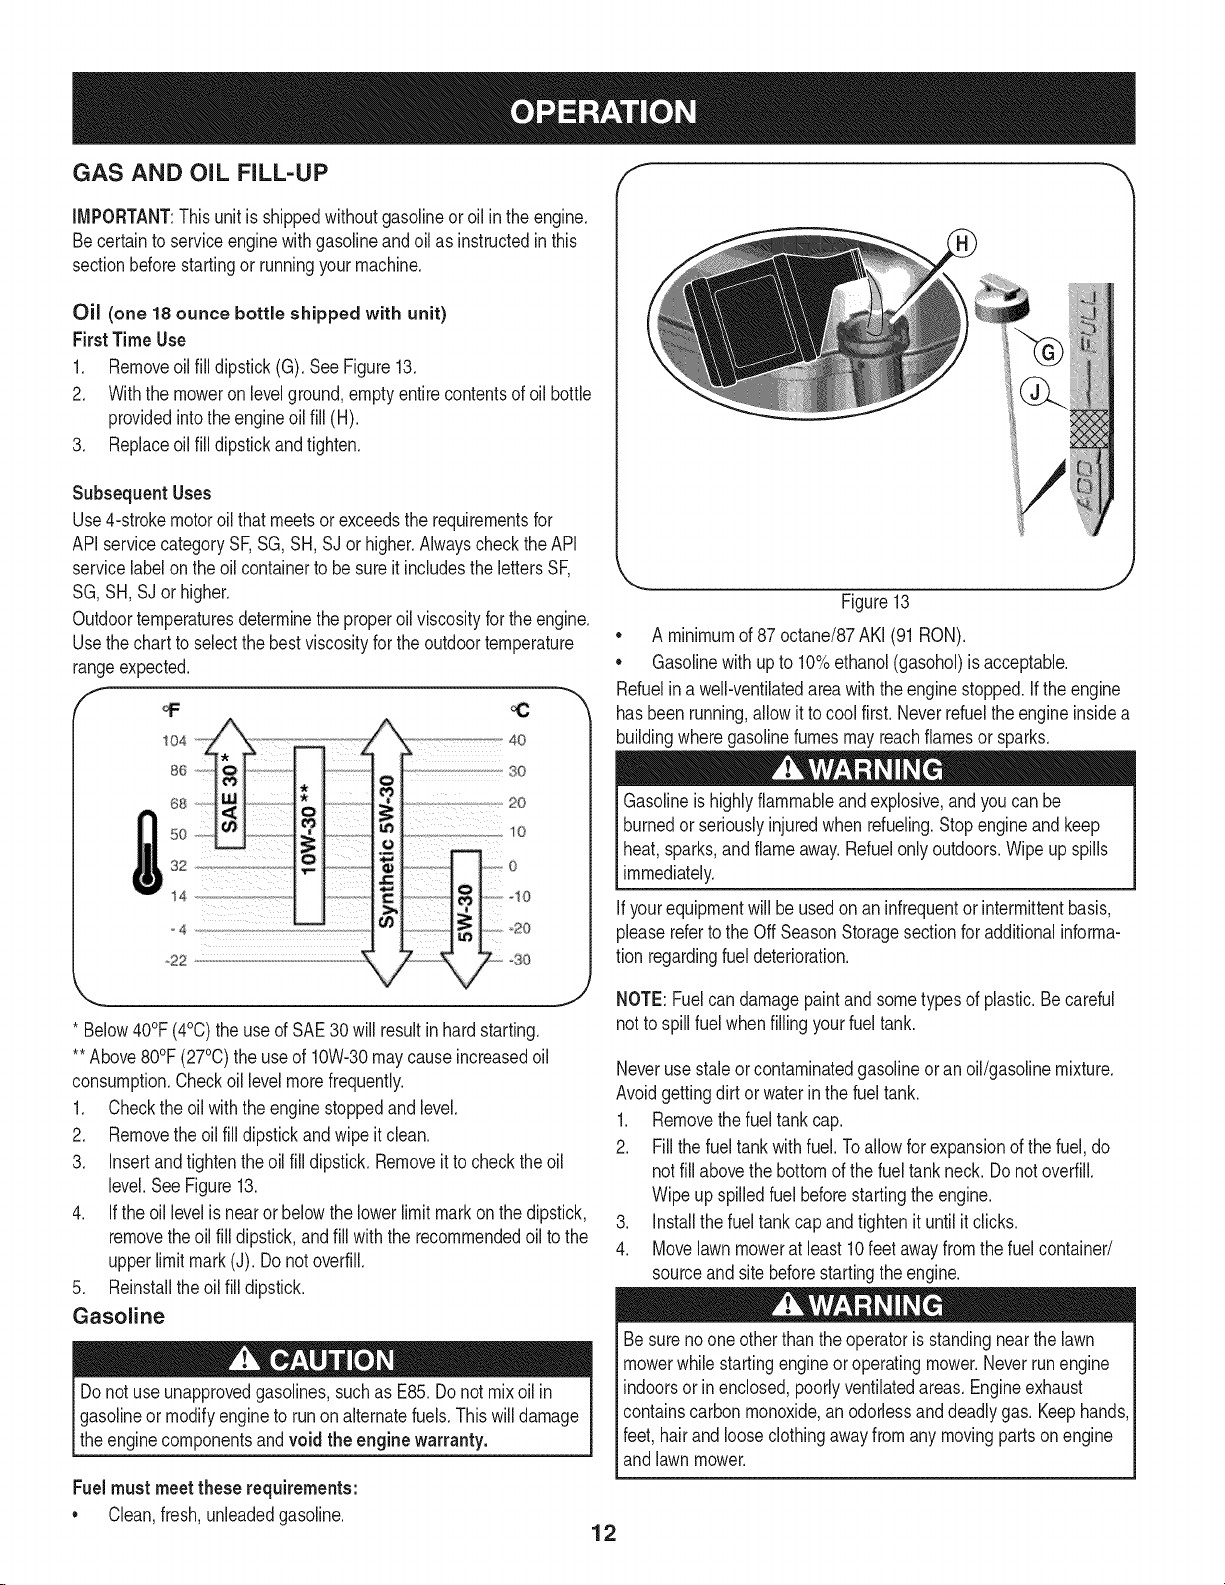
Oil (one 18 ounce bottle shipped with unit)
FirstTime Use
1. Removeoil fill dipstick(G).SeeFigure13.
2. Withthe moweronlevelground,emptyentirecontentsofoil bottle
providedintotheengineoil fill (H).
3. Replaceoilfilldipstickandtighten.
Subsequent Uses
Use4-strokemotoroilthatmeetsor exceedstherequirementsfor
APIservicecategorySF,SG,SH,SJorhigher.AlwayschecktheAPI
servicelabelon the oilcontainerto besure itincludesthelettersSF,
SG,SH,SJ or higher.
Outdoortemperaturesdeterminetheproperoilviscosityforthe engine.
Usethechartto selectthebestviscosityfortheoutdoortemperature
rangeexpected.
f
"h
40
30
20
10
°30
• A minimumof87 octane/87AKI(91RON).
• Gasolinewithupto 10%ethanol(gasohol)isacceptable.
Refuelina well-ventilatedareawiththeenginestopped.Iftheengine
hasbeenrunning,allowittocool first.Neverrefuelthe engineinsidea
buildingwheregasolinefumesmayreachflamesorsparks.
Gasolineishighlyflammableandexplosive,andyoucanbe
burnedor seriouslyinjuredwhenrefueling.Stopengineand keep
heat,sparks,andflameaway.Refuelonlyoutdoors.Wipeupspills
immediately.
ifyourequipmentwillbe usedonan infrequentorintermittentbasis,
pleaserefertothe Off SeasonStoragesectionforadditionalinforma-
tion regardingfuel deterioration.
Figure13
* Below40°F(4°C)theuseofSAE30 willresultin hardstarting.
**Above80°F(27°C)theuseof 10W-30maycauseincreasedoil
consumption.Checkoil levelmorefrequently.
1. Checktheoil withtheenginestoppedandlevel.
2. Removethe oil filldipstickandwipeit clean.
3. Insertandtightenthe oilfilldipstick.Removeittochecktheoil
level.SeeFigure13.
4. Iftheoil levelisnearor belowthelowerlimitmarkonthedipstick,
removetheoil fill dipstick,andfill withthe recommendedoil tothe
upperlimitmark(J). Donotoverfill.
5. Reinstalltheoilfilldipstick.
Gasoline
Donotuseunapprovedgasolines,suchas E85.Do notmixoil in
Igasolineor modifyengineto runonalternatefuels.Thiswill damage
_theenginecomponentsandvoid the engine warranty.
Fuelmustmeet these requirements:
• Clean,fresh,unleadedgasoline.
NOTE:Fuelcandamagepaintandsometypesof plastic.Becareful
notto spillfuelwhenfilling yourfueltank.
Neverusestaleorcontaminatedgasolineoranoil/gasolinemixture.
Avoidgettingdirt orwaterin thefueltank.
1. Removethe fueltankcap.
2. Fillthefueltankwithfuel.Toallowforexpansionofthefuel,do
notfill abovethe bottomofthefuel tankneck.Do notoverfill.
Wipeupspilledfuelbeforestartingtheengine.
3. Installthefueltankcapandtightenituntilitclicks.
4. Movelawnmoweratleast10feetawayfromthefuelcontainer/
sourceandsitebeforestartingtheengine.
Besurenooneotherthantheoperatoris standingnearthelawn
mowerwhilestartingengineoroperatingmower.Neverrunengine
indoorsorin enclosed,poorlyventilatedareas.Engineexhaust
containscarbonmonoxide,an odorlessanddeadlygas.Keephands,
feet,hairand looseclothingawayfromanymovingpartson engine
andlawnmower.
12
Page 13
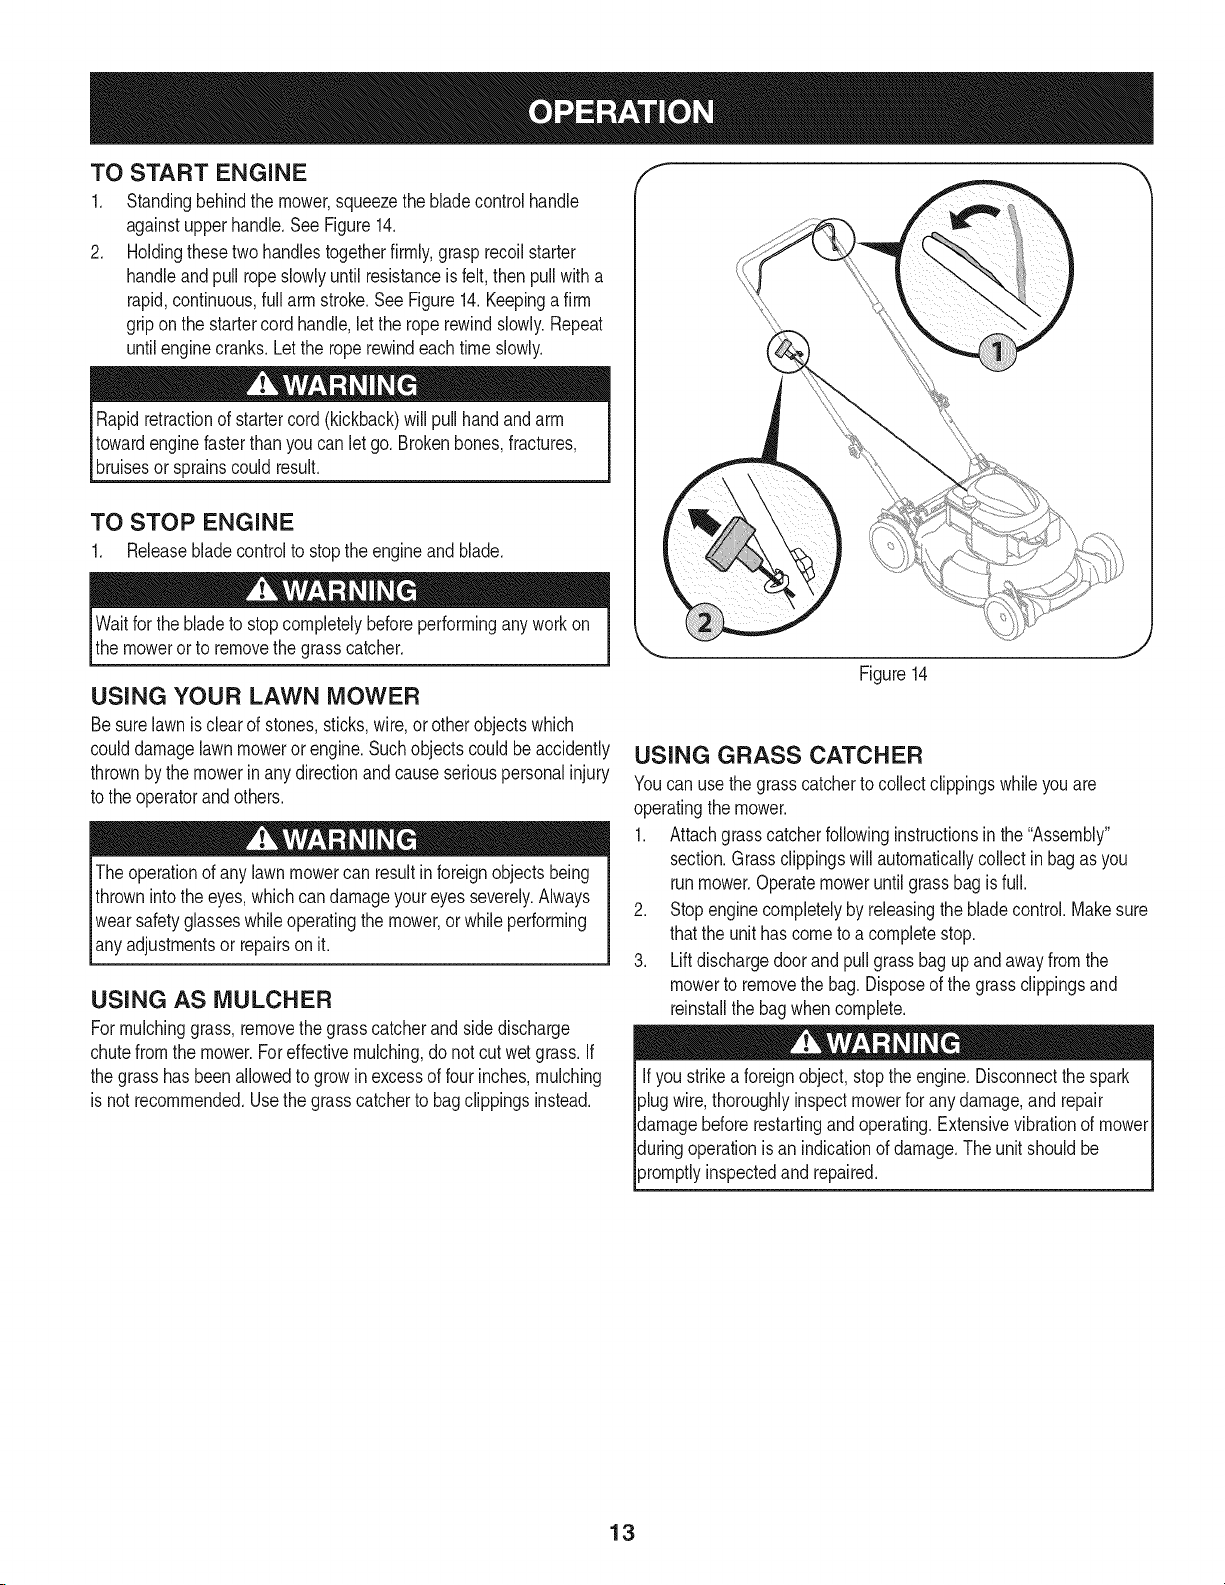
TO START ENGINE
1. Standingbehindthemower,squeezethe bladecontrolhandle
againstupperhandle.SeeFigure14.
2. Holdingthesetwohandlestogetherfirmly,grasprecoilstarter
handleandpull ropeslowlyuntil resistanceisfelt, thenpullwitha
rapid,continuous,full armstroke.SeeFigure14.Keepingafirm
griponthestartercordhandle,letthe roperewindslowly.Repeat
untilenginecranks.Lettheroperewindeachtimeslowly.
Rapidretractionof startercord(kickback)willpullhandandarm
towardenginefasterthanyoucanletgo.Brokenbones,fractures,
bruisesorsprainscouldresult.
TO STOP ENGINE
1. Releasebladecontroltostopthe engineandblade.
Waitforthe bladetostopcompletelybeforeperforminganyworkon
themowerorto removethegrasscatcher.
USING YOUR LAWN MOWER
Besurelawnisclearofstones,sticks,wire,orotherobjectswhich
coulddamagelawnmoweror engine.Suchobjectscouldbeaccidently
thrownbythemowerin anydirectionandcauseseriouspersonalinjury
tothe operatorandothers.
Theoperationofany lawnmowercanresultinforeignobjectsbeing
thrownintothe eyes,whichcandamageyoureyesseverely.Always
wearsafetyglasseswhileoperatingthemower,orwhileperforming
anyadjustmentsorrepairsonit.
USING AS MULCHER
Formulchinggrass,removethegrasscatcherandsidedischarge
chutefromthemower.Foreffectivemulching,donot cutwetgrass.If
thegrasshas beenallowedtogrowinexcessof fourinches,mulching
isnot recommended.Usethegrasscatchertobagclippingsinstead.
Figure14
USING GRASS CATCHER
Youcanuse thegrasscatchertocollectclippingswhileyou are
operatingthemower.
1. Attachgrasscatcherfollowinginstructionsinthe "Assembly"
section.Grassclippingswillautomaticallycollectinbagasyou
runmower.Operatemoweruntilgrassbagis full.
2. Stopenginecompletelybyreleasingthebladecontrol.Makesure
thattheunit hascometo a completestop.
3. Liftdischargedoorandpullgrassbagupandawayfromthe
mowerto removethebag.Disposeofthegrassclippingsand
reinstallthebagwhencomplete.
Ifyoustrikeaforeignobject,stoptheengine.Disconnectthe spark
plugwire,thoroughlyinspectmowerforanydamage,andrepair
damagebeforerestartingandoperating.Extensivevibrationof mower
duringoperationisan indicationofdamage.Theunitshouldbe
promptlyinspectedandrepaired.
13
Page 14
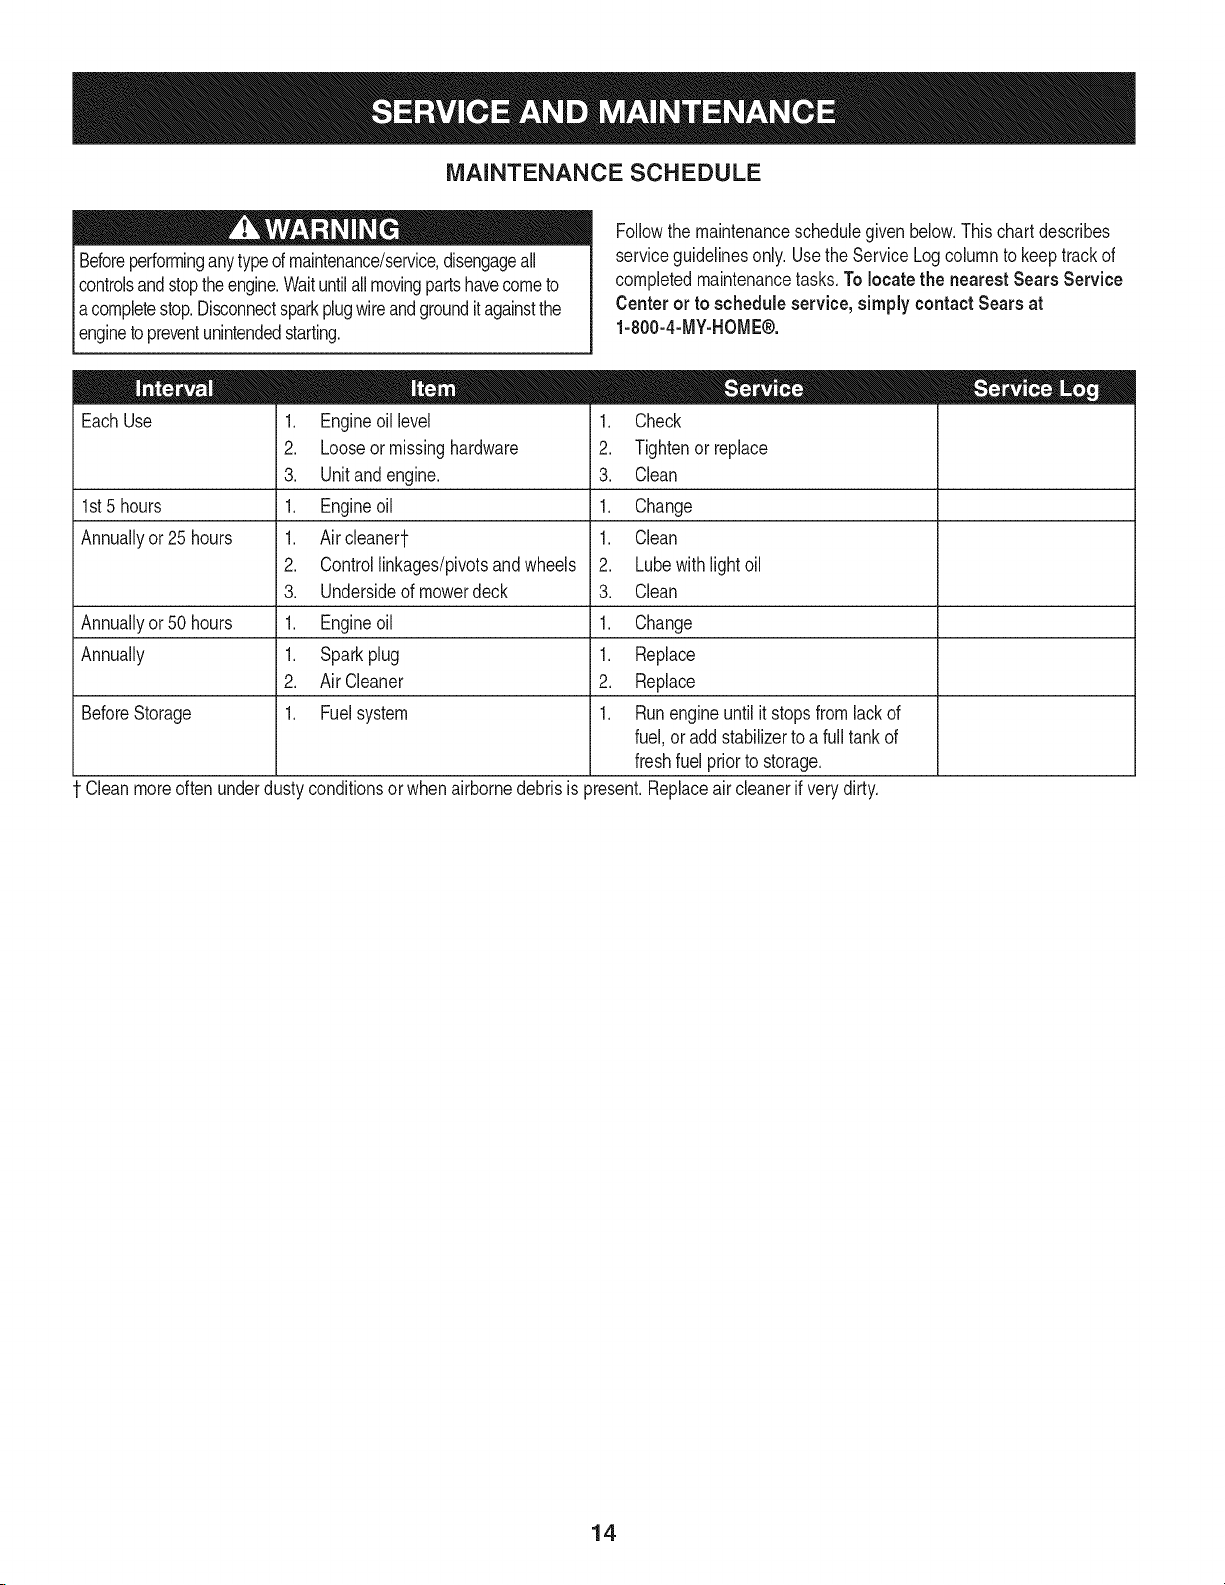
MAINTENANCE SCHEDULE
Beforeperforminganytypeofmaintenance/service,disengageall
controlsandstoptheengine.Waituntilallmovingpartshavecometo
acompletestop.Disconnectsparkplugwireandgrounditagainstthe
enginetopreventunintendedstarting.
=
EachUse
1st5 hours
Annuallyor25hours
Annuallyor50hours
Annually
BeforeStorage
Cleanmoreoftenunderdustyconditionsorwhenairbornedebrisis
.
Engineoillevel
2.
Looseormissinghardware
3.
Unitandengine.
1.
Engineoil
1.
Aircleanert
2.
Controllinkages/pivotsandwheels
3.
Undersideofmowerdeck
1.
Engineoil
1.
Sparkplug
2.
AirCleaner
1.
Fuelsystem
Followthemaintenanceschedulegivenbelow.Thischartdescribes
serviceguidelinesonly.UsetheServiceLogcolumnto keeptrackof
completedmaintenancetasks.To locate the nearest Sears Service
Centeror toscheduleservice,simplycontactSears at
1-800-4-MY-HOME®.
1. Check
2. Tightenor replace
3. Clean
1. Change
1. Clean
2. Lubewithlightoil
3. Clean
1. Change
1. Replace
2. Replace
1. Runengineuntil itstopsfromlackof
fuel,oraddstabilizertoa fulltankof
freshfuelpriorto storage.
_resent.Replaceaircleanerifverydirty.
14
Page 15
Alwaysstopengine,disconnectsparkplugwire,andgroundagainst
enginebeforeperformingany typeofmaintenanceon yourmachine.
GENERAL RECOMMENDATIONS
• Alwaysobservesafetyruleswhenperforminganymaintenance.
• Thewarrantyon thislawnmowerdoesnotcoveritemsthathave
beensubjectedto operatorabuseor negligence.Toreceivefull
valuefromwarranty,operatormustmaintaintheequipmentas
instructedhere.
• Changingof engine-governedspeedwillvoidenginewarranty.
• Alladjustmentsshouldbecheckedat leastonceeach season.
• Periodicallycheckall fastenersandmakesurethesearetight.
ENGINE MAINTENANCE
Spark Plug
Forgoodperformance,the sparkplugmustbeproperlygappedand
freeof deposits.Replacethesparkplugannually.
1. Disconnectthe capfromthe sparkplug,andremoveanydirtfrom
thesparkplugarea.
2. Usethepropersizesparkplugwrenchto removethesparkplug.
f
Electrode
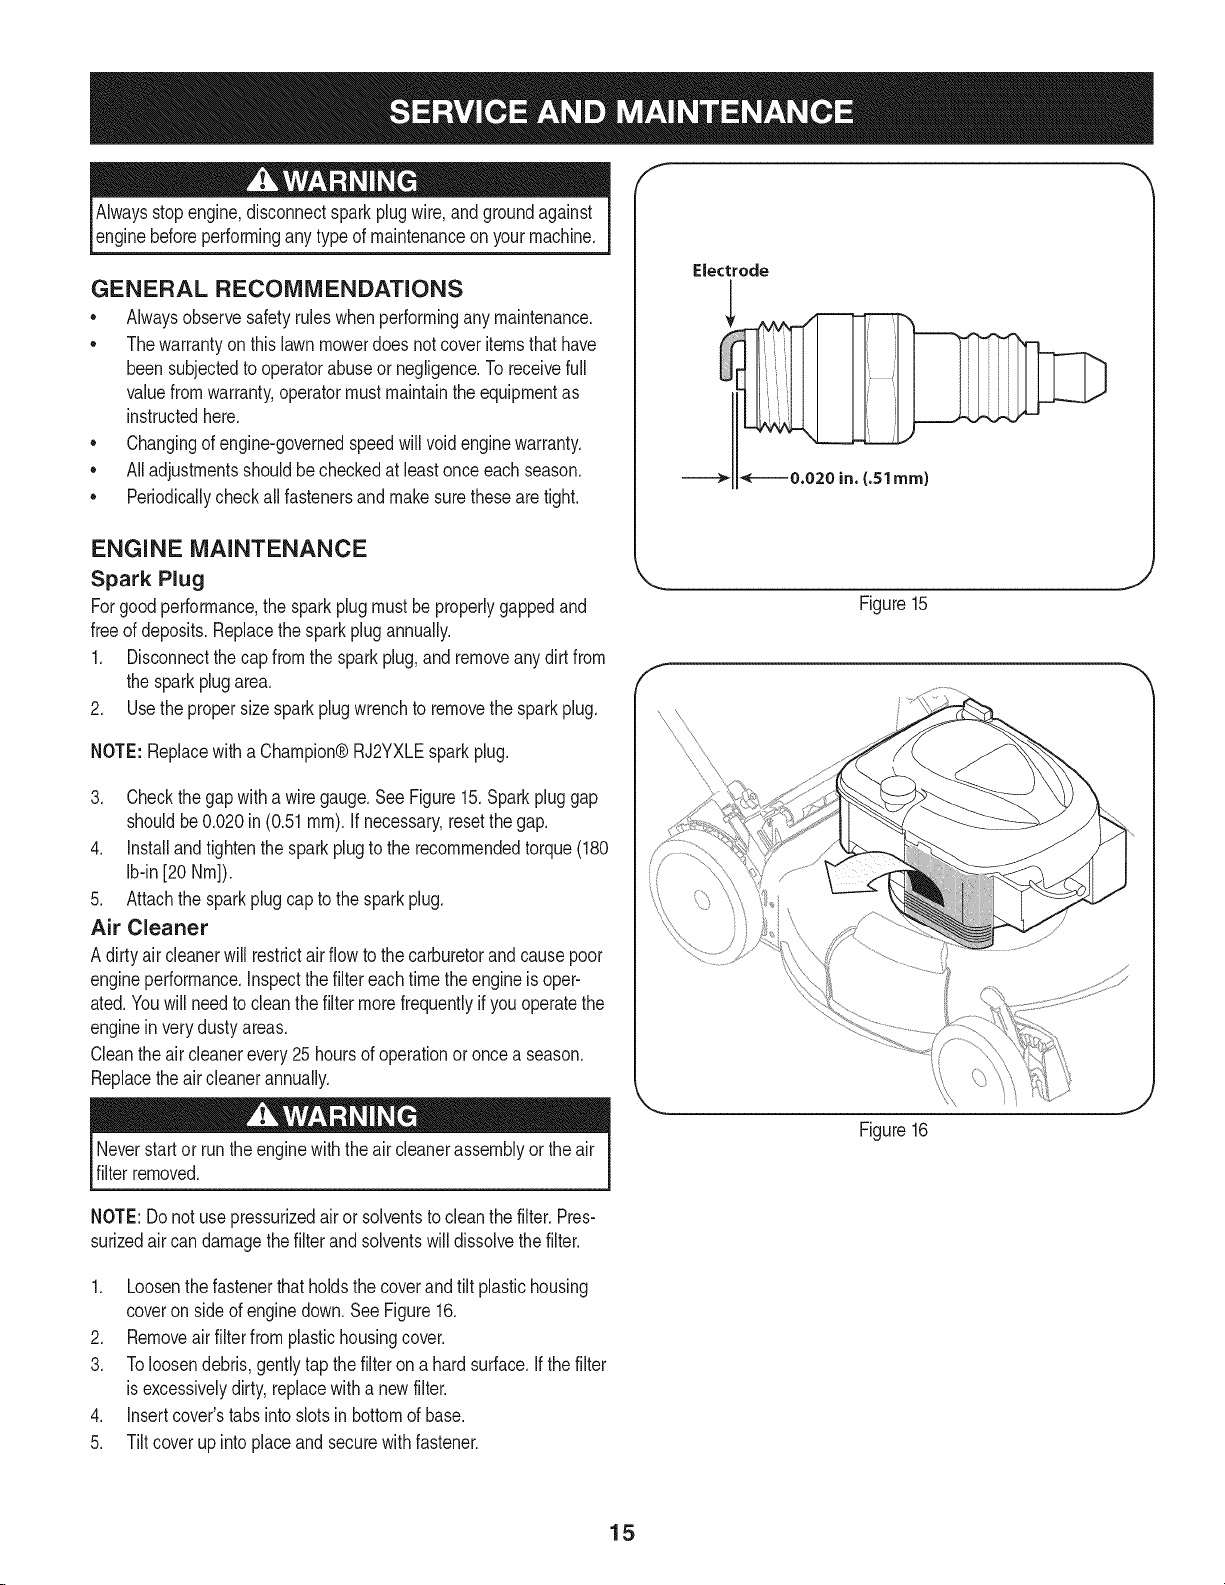
Figure15
NOTE:Replacewitha Champion®RJ2YXLEsparkplug.
3. Checkthegapwitha wiregauge.SeeFigure15.Sparkpluggap
shouldbe0.020in(0.51ram).If necessary,resetthegap.
4. installandtightenthesparkplugto therecommendedtorque(180
Ib-in[20 Nm]).
5. Attachthe sparkplugcapto thesparkplug.
Air Cleaner
A dirtyaircleanerwill restrictairflowtothe carburetorandcausepoor
engineperformance,inspectthe filtereachtimetheengineisoper-
ated.Youwillneedto cleanthe filtermorefrequentlyifyouoperatethe
enginein verydustyareas.
Cleantheair cleanerevery25hoursofoperationoroncea season.
Replacetheaircleanerannually.
Neverstartor runthe enginewiththeaircleanerassemblyor theair
filterremoved.
NOTE:Do notuse pressurizedairor solventstocleanthe filter.Pres-
surizedaircandamagethefilterandsolventswill dissolvethefilter.
1. Loosenthefastenerthatholdsthecoverandtilt plastichousing
coveron sideof enginedown.SeeFigure16.
2. Removeairfilterfromplastichousingcover.
3. Toloosendebris,gentlytapthe filterona hardsurface,ifthe filter
isexcessivelydirty, replacewitha newfilter.
4. insertcover'stabsintoslotsinbottomofbase.
5. Tiltcoverupintoplaceand securewithfastener.
Figure16
15
Page 16
Check Engine Oil
Checkoillevelbeforeeachoperation.Besureoil levelismaintained.
1. Checktheoil withtheenginestoppedandlevel.
2. Removethe oil filldipstickandwipeitclean.
3. Insertandtightendipstick.Removeittochecktheoillevel.
4. Iftheoil levelisnearor belowthelowerlimitmarkonthedipstick,
removetheoil fillercap/dipstick,andfill withtherecommendedoil
tothe upperlimitmark.Do notoverfill.
5. Reinstalltheoilfilldipstick.
Change Engine Oil
Gasolineand itsvaporsareextremelyflammableandexplosive.
Fireor explosioncancausesevereburnsor death.
Changeengineoilafterthefirstfivehoursofoperation,andeveryfifty
hoursoronce a seasonthereafter.
J
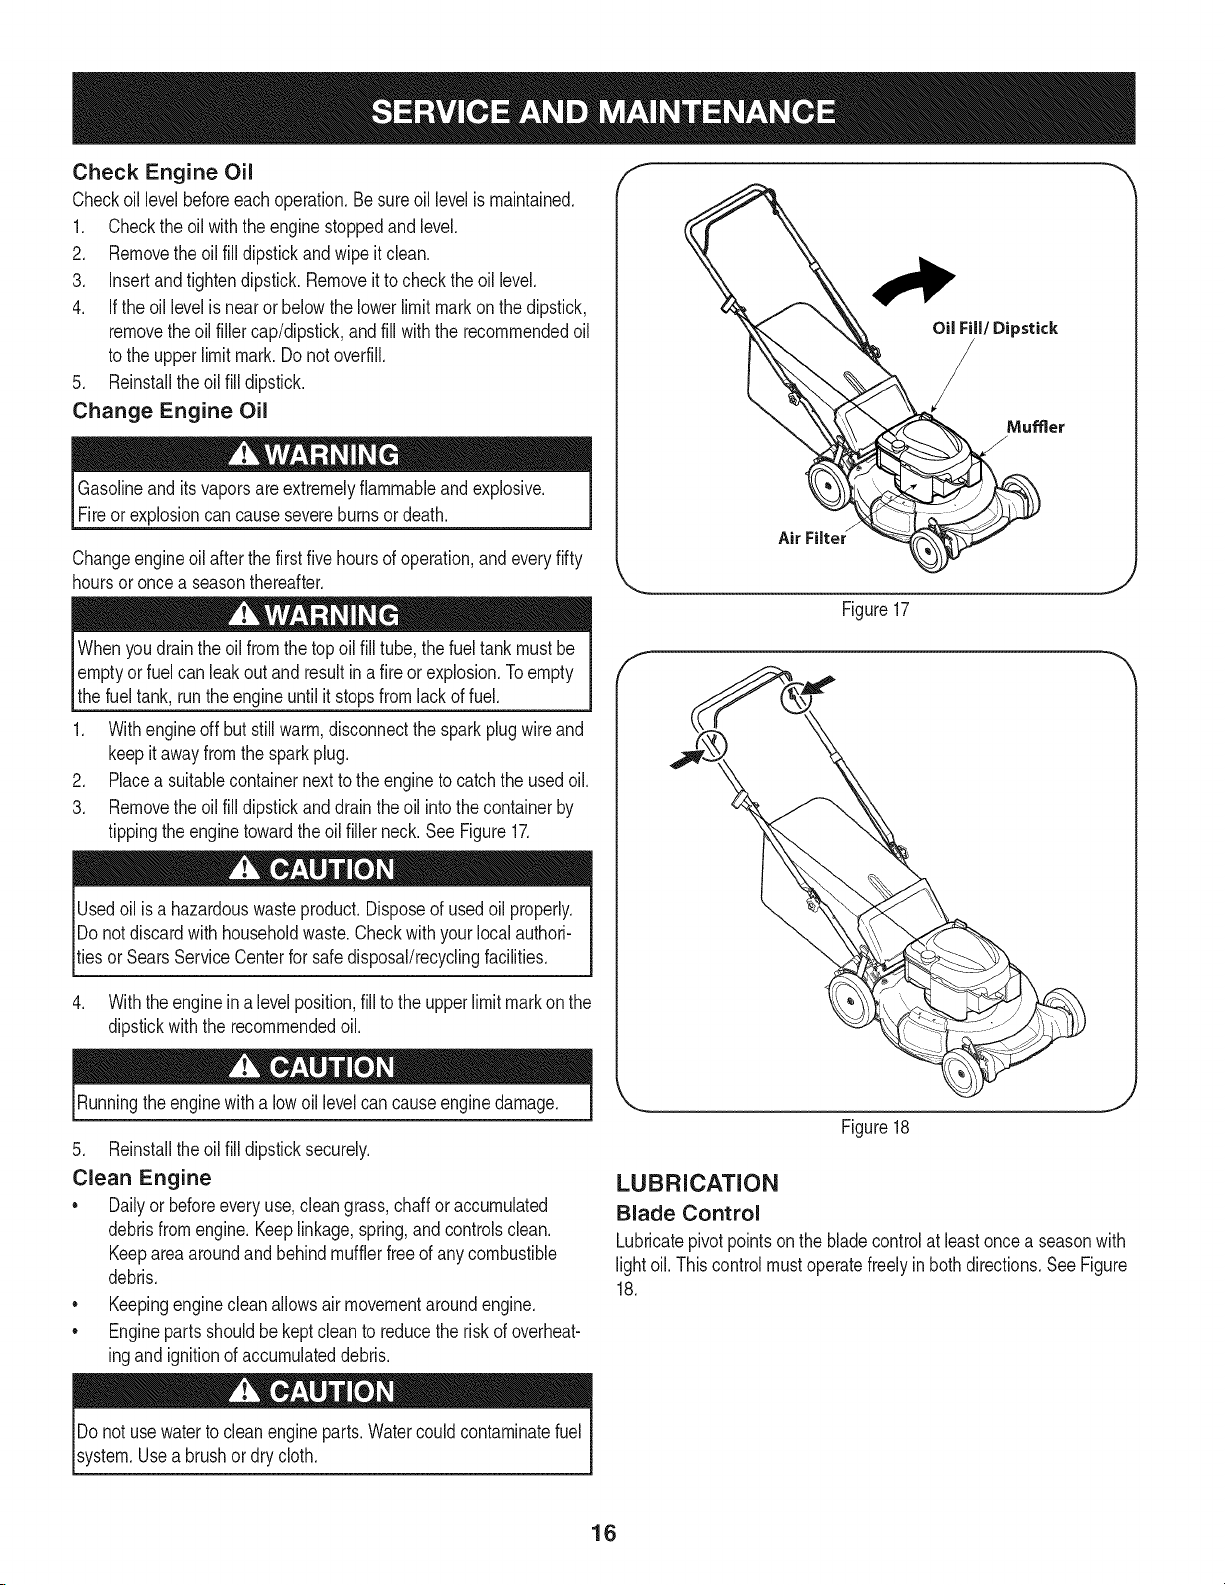
Figure17
you top
emptyor fuel canleak outand resultinafire or explosion.Toempty
lWhen drainthe oil fromthe oil fill the fueltankmustbe
thefuel tank,runthe engineuntilitstopsfromlackof fuel.
tube,
1. Withengineoff butstillwarm,disconnectthesparkplugwireand
keepit awayfromthesparkplug.
2. Placea suitablecontainernextto theengineto catchthe usedoil.
3. Removethe oil filldipstickanddraintheoil intothecontainerby
tippingtheenginetowardtheoil fillerneck.See Figure17.
Usedoilisa hazardouswasteproduct.Disposeofusedoil properly.
IDonotdiscardwithhouseholdwaste.Checkwithyourlocalauthori-
_tiesor SearsServiceCenterfor safedisposal/recyclingfacilities.
4. Withtheengineina levelposition,filltothe upperlimitmarkon the
dipstickwiththerecommendedoil.
Runningtheenginewitha lowoil levelcancauseenginedamage.
5. Reinstalltheoilfilldipsticksecurely.
Clean Engine
• Dailyor beforeeveryuse,cleangrass,chaffor accumulated
debrisfromengine.Keeplinkage,spring,andcontrolsclean.
Keepareaaroundandbehindmufflerfreeofany combustible
debris.
• Keepingenginecleanallowsairmovementaroundengine.
• Enginepartsshouldbekeptcleanto reducetheriskof overheat-
ingandignitionofaccumulateddebris.
Figure18
LUBRICATION
Blade Control
Lubricatepivotpointsonthebladecontrolat leastoncea seasonwith
lightoil.Thiscontrolmustoperatefreelyinbothdirections.SeeFigure
18.
Donot usewaterto cleanengineparts.Watercouldcontaminatefuel
system.Usea brushor dry cloth.
16
Page 17
DECK WASH
Yourmower'sdeckisequippedwitha waterportonitssurfaceaspart
ofits deckwashsystem.
Usethedeckwashto rinsegrassclippingsfromthe deck'sunderside
andpreventthe buildupofcorrosivechemicals.Completethefollowing
stepsAFTEREACHMOWING:
1. Pushthemowertoa level,clearspotonyourlawn,nearenough
foryourgardenhoseto reach.Removethegrassbagifattached.
house,garage,parkedcars,etc.
2. Threadthehosecoupler(packagedwithyourmower'sOperator's
Manual)onto theendof yourgardenhose.
3. Attachthe hosecouplertothe waterporton yourdeck'ssurface.
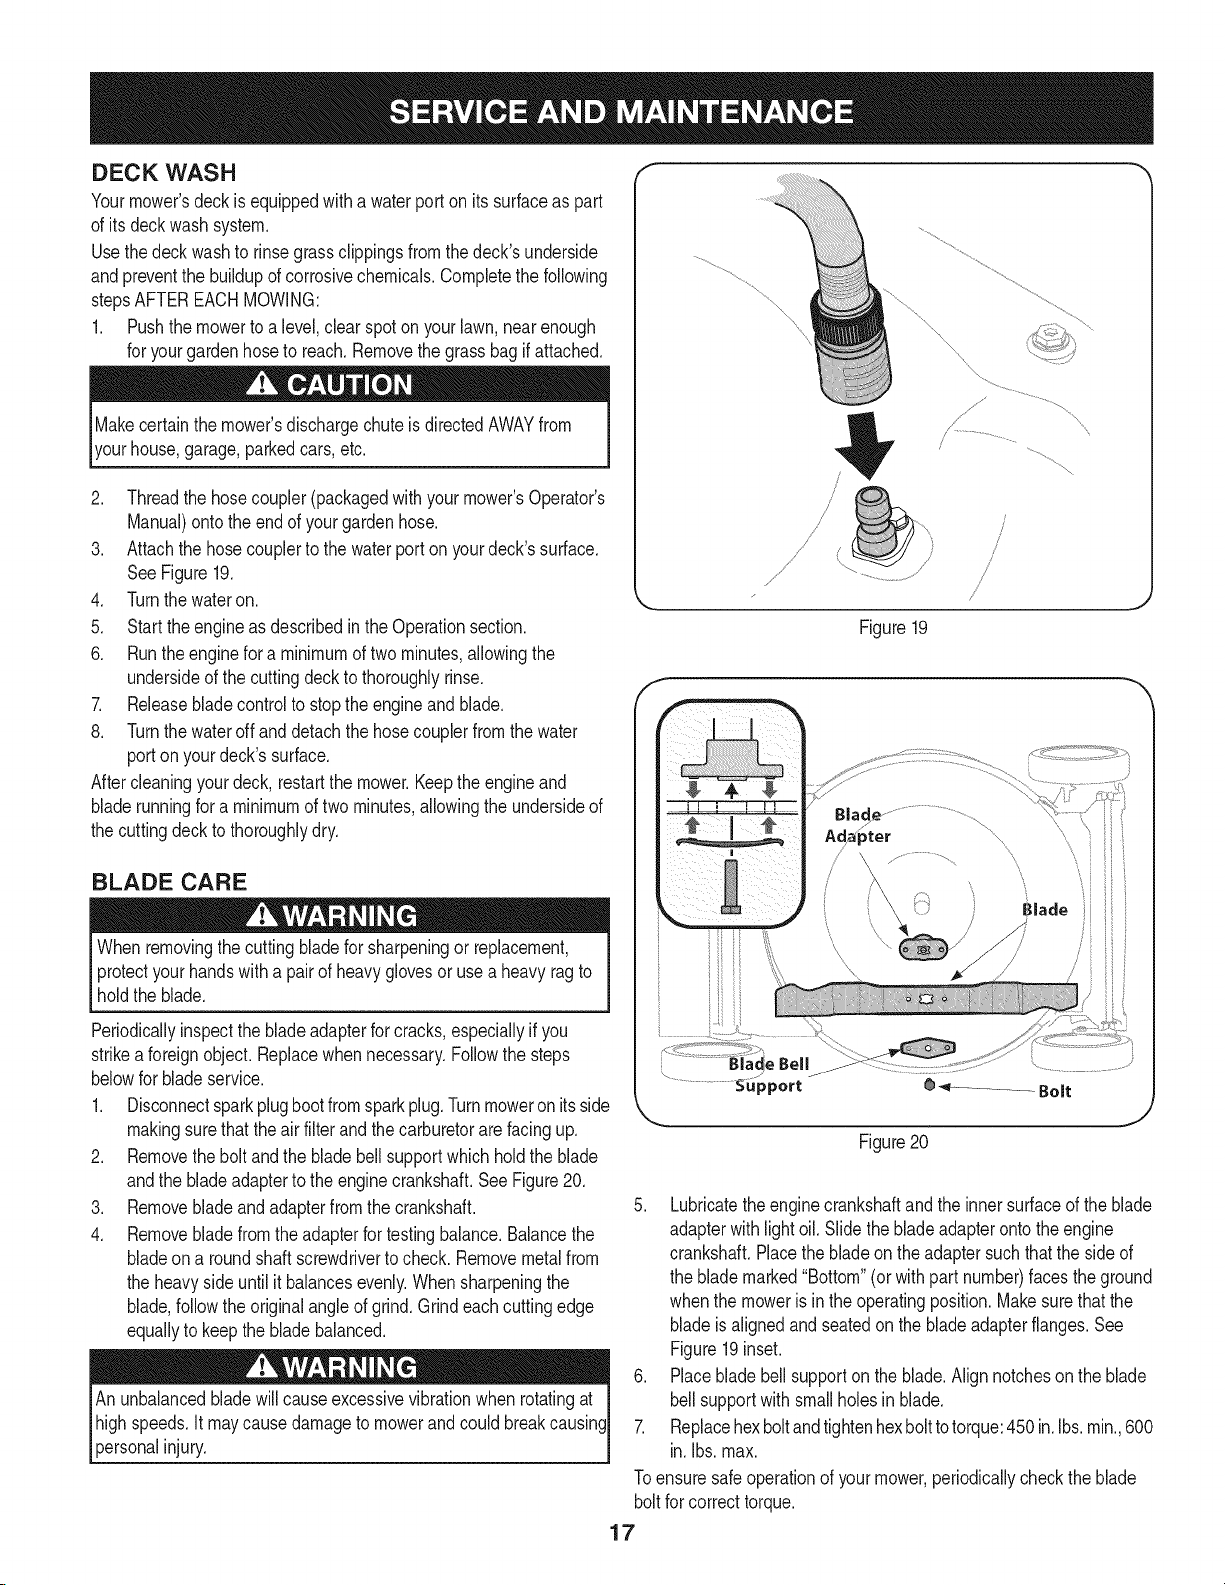
SeeFigure19.
4. Turnthewateron.
5. Starttheengineas describedintheOperationsection.
6. Runtheenginefora minimumoftwominutes,allowingthe
undersideofthecuttingdecktothoroughlyrinse.
7. Releasebladecontrolto stoptheengineandblade.
8. Turnthewateroff anddetachthehosecouplerfromthe water
portonyourdeck'ssurface.
Aftercleaningyourdeck,restartthemower.Keeptheengineand
bladerunningfora minimumoftwominutes,allowingthe undersideof
thecuttingdecktothoroughlydry.
Figure19
f
BLADE CARE
Whenremovingthe cuttingbladefor sharpeningor replacement,
protectyourhandswitha pairof heavyglovesor usea heavyragto
holdtheblade.
Periodicallyinspectthebladeadapterforcracks,especiallyifyou
strikea foreignobject.Replacewhennecessary.Followthe steps
belowfor bladeservice.
1. Disconnectsparkplugbootfromsparkplug.Turnmoweronitsside
makingsurethatthe airfilterandthecarburetorarefacingup.
2. Removetheboltandthebladebellsupportwhichholdtheblade
andthebladeadapterto theenginecrankshaft.SeeFigure20.
3. Removebladeandadapterfromthecrankshaft.
4. Removebladefromtheadapterfortestingbalance.Balancethe
bladeon a roundshaftscrewdriverto check.Removemetalfrom
theheavyside untilit balancesevenly.Whensharpeningthe
blade,followthe originalangleof grind.Grindeachcuttingedge
equallyto keepthe bladebalanced.
An unbalancedbladewill causeexcessivevibrationwhen rotatingat
highspeeds.Itmaycausedamagetomowerandcould breakcausing
personalinjury.
_ ........ Bolt
J
Figure20
5. Lubricatetheenginecrankshaftandthe innersurfaceoftheblade
adapterwithlightoil.Slidethe bladeadapterontotheengine
crankshaft.Placethebladeon theadaptersuchthatthesideof
theblademarked"Bottom"(orwithpart number)facestheground
whenthe mowerisin the operatingposition.Makesurethatthe
bladeisalignedandseatedon thebladeadapterflanges.See
Figure19inset.
6. Placebladebellsupporton theblade.Alignnotchesontheblade
bellsupportwithsmallholesin blade.
7. Replacehexboltandtightenhexbolttotorque:450in.Ibs.rain.,600
in.Ibs.max.
Toensuresafeoperationof yourmower,periodicallychecktheblade
boltfor correcttorque.
17
Page 18

Neverstorelawnmowerwithfuel intankindoorsorin poorly
ventilatedareaswherefuelfumesmayreachan openflame,spark,
or pilotlightasona furnace,waterheater,clothesdryer,orgas
appliance.
PREPARING THE ENGINE
Forenginesstoredover30days:
1. Topreventgumfromforminginfuelsystemoron carburetor
parts,runengineuntilitstopsfromlackoffuel oradda gasoline
additiveto thegasin thetank.If youuseagas additive,runthe
engineforseveralminutesto circulatetheadditivethroughthe
carburetor--afterwhichtheengineandfuel canbe storedupto
24months.
2. Whileengineis stillwarm,changetheoil.
3. Cleanengineof surfacedebris.
PREPARING THE LAWN MOWER
• Cleanandlubricatemowerthoroughlyas describedinthe lubrica-
tioninstructions.
• Donotuseapressurewasherorgardenhosetocleanyourunit.
• Coatmower'scuttingbladewithchassisgreaseto prevent
rusting.
• RefertoPREPARINGTHEENGINEforcorrectenginestorage
instructions.
• Storemowerina dry,cleanarea.Do notstorenextto corrosive
materials,suchasfertilizer.
Whenstoringany typeofpowerequipmentina poorlyventilatedor
metalstorageshed,careshouldbetakentorust-prooftheequipment.
Usinga lightoil orsilicone,coattheequipment,especiallycablesand
all movingpartsof yourlawnmowerbeforestorage.
18
Page 19

Beforeperforminganytyped maintenance/service,disengageall
controlsandstoptheengine.Waituntilallmovingpartshavecometo
a completestop.Disconnectsparkplugwireandgrounditagainstthe
enginetopreventunintendedstarting.Alwayswearsafetyglassesduring
operationorwhileperforminganyadjustmentsorrepairs.
Enginefailstostart
Enginerunserratic
Engineoverheats 1. Engineoillevellow.
Occasionalskips(hesitates) 1. Sparkpluggaptoo close.
Idlespoorly 1. Sparkplugfouled,faulty,or gaptoo wide.
Excessivevibration 1. Cuttingbladelooseor unbalanced.
Mowerwillnot mulchgrass 1. Wetgrass.
Unevencut
1. Bladecontroldisengaged.
2. Sparkplugbootdisconnected.
3. Fueltankemptyor stalefuel.
4. Faultysparkplug.
5. Engineflooded.
6. Blockedfuelline.
1. Sparkplugbootloose.
2. Stalefuel.
3. Ventingas capplugged.
4. Waterordirtinfuel system.
5. Dirtyair cleaner.
6. BIockedfuel line.
2. Air flowrestricted.
2. Dirtyair cleaner.
2. Bentcuttingblade.
2. Excessivelyhighgrass.
3. Dullblade.
1. Wheelsnotpositionedcorrectly.
2. Dullblade.
1. Engagebladecontrol.
2. Connectwiretosparkboot.
3. Filltankwithclean,freshgasoline.
4. Clean,adjustgap,or replace.
5. Waita fewminutesto restart.
6. ContactyourSearsParts& RepairCenterto have
fuellinecleaned.
1. Connectandtightensparkplugboot.
2. Filltankwithclean,freshgasoline.
3. Clearvent.
4. Runengineuntilitstopsfromlackoffuel.Refillwith
freshfuel.
5. RefertoAirCleanerinEngineMaintenancesection.
6. ContactyourSearsParts& RepairCenterto have
fuellinecleaned.
1. Fillcrankcasewithproperoil.
2. Cleanareaaroundandontop ofengine.
1. Adjustgapto.030".
1. Resetgapto .030"or replacesparkplug.
7. RefertoAirCleanerinEngineMaintenancesection.
1. Tightenbladeandadapter.Balanceblade.
2. Replaceblade.
1. Donotmowwhengrassis wet;waituntil
laterto cut.
2. Mowonceatahighcuttingheight,thenmowagain
at desiredheightor makea narrowercuttingpath.
3. Sharpenorreplaceblade.
1. Adjustcuttingheightleveronrightfrontandright
rearwheelto sameposition.
2. Sharpenorreplaceblade.
NEED MORE HELP?
Youqi fk@ the answe_ a_@ mo_e on _a_age_y_]feo¢Om .......fo_ f_e÷!
Find this and all your other product manuals online.
Get answers from our team of home experts.
o Get a personalized maintenance plan for your home.
o Find information and too[s to help with home projects.
mar]agemylife
19
Page 20

Craftsman Mower B Model No. 247.37031
32
J_ 7
44
21
25_
©29
16
22
46
42
42
29
20
Page 21

Craftsman Mower B Model No. 247.37031
1
747-05184A
2
749-04681-0637
3
747-05450
4
749-04608A-0637
5
720-0279
6
710-1205
7
710-04998
8
964-04154
9
720-04072A
10
731-07486
11
725-0157
12
712-04222
13
631-04369A
14
747-0710A
15
787-01779
16
732-04673
17
634-04642
18
921-04041
19
710-05073
2O
787-01874A-0691
21
987-02516
22
732-04674
23
748-04096
24
942-0741A
BladeControl
UpperHandle
GrassCatcherFrame
LowerHandle
WingNut
RopeGuide
CarriageScrew,5/16-18
GrassBag
HandKnob
SideChute
CableTie
Nut,Sq.,1/4-20
RearDischargeDoorAssembly
HingePin
ChuteDeflectorBracket
TorsionSpring- RH
Wheel,7 x2
WaterNozzleAdapter
Screw,1/4-20x .500
Deck-21"
HingedMulchPlugAssembly
TorsionSpring- LH
BladeAdapter
MulchingBlade
m
25
26
26a
27
28
29
30
31
32
33
34
35
36
37
38
39
40
41
42
43
44
45
46
710-1044
731-07531
731-07532
738-04419A
712-04217
720-04130
720-04123A
736-0524B
712-04064
734-04630
946-04661
710-0654A
731-07203
731-07174A
732-1014C
787-01818A-0637
911-04142
911-04143B
710-04995A
710-0895
126MO2-6863-F1
738-04278
731-07487
D = Q O
Screw,3/8-24 x 1.50
HubCap- Front
HubCap- Rear
Sldr.Screw,.375x .126x 1/4-20
FlangeLockNut,3/8-16
AdjustmentLeverKnob
WingNut
BladeBellSupport
Nut,FlangeLock,1/4-20
Wheel,8x 2
ControlCable
TTSeresScrew,3/8-16x 1.0
Trailshield
FrontCover
TorsionSpring
FrontHeightAdjusterPlate
RearAxleAssembly
FrontAxleAssembly
Screw,5/16-14x .750
Screw,1/4-15x.750
Engine
Screw,1/4-20x.500
DeckWashNozzle
21
Page 22

Craftsman Engine Model No. 126M02-6863-F1 For Craftsman Mower Model No. 247.37031
[ 48 SHORTB LOCK I I I0580 PERATOR'SM ANUAL I I 1329 REPLACEMENTE NGINE I [ 1330 REPAIR MANUAL I
684
306
307
sss
89
|505 e
615 _
404 @
616 _
240
287
12
524
22
Page 23

Craftsman Engine Model No. 126M02-6863=F1 For Craftsman Mower Model No. 247.37031
163
957
190
137_
276 Q
443
276 @
_202
11A
1386__
1387_
1388_
2911
883
23
Page 24

Craftsman Engine Model No. 126M02=6863=F1 For Craftsman Mower Model No. 247.37031
1036E MISSIONS LABEL i
604
921
334_
55 592
1211 _ 58 _
1210 _ 6O
745
456
597_
3O4
78
305
621
24
Page 25

Craftsman Engine Model No. 126M02-6863-F1 For Craftsman Mower Model No. 247.37031
121 CARBURETOR OVERHAUL KiT
_o4__ __0
127 (_
3_
1370 276@ 633 _
633A @
358 ENGINE GASKET SET
617 0
20
842(_
163
883
524_
585_
1095V ALVE GASKET SET
883 _
25
Page 26

Craftsman Engine Model No. 126M02=6863=F1 For Craftsman Mower Model No. 247.37034
590401 CylinderAssembly 794305
3 299819s Seal-Oil(MagnetoSide) 51 794306
4 493279 Sump-Engine 54 691650
5 590411 Head-Cylinder 55 691421
7 799875 Gasket-CylinderHead 58 697316
8 590395 BreatherAssembly 60 795426
9 699472 Gasket-Breather 690837
10 691125 Screw(BreatherAssembly) 78 691108
11 691781 Tube-Breather 81 691740
11A 691923 Tube-Breather 89 692348
12 692232 Gasket-Crankcase 97 696565
13 590422 Screw(CylinderHead) 104 797622
15 691680 Plug-OilDrain 108 795935
16 797017 Crankshaft 109 795936
20 399781s Seal-Oil(PTOSide) 590440
22 691092 Screw(CrankcaseCover/Sump) 121 498260
23 691987 Flywheel 125 799866
24 222698s Key-Flywheel 127 694468
25 590404 PistonAssembly(Standard) 130 696564
590405 PistonAssembly(.020"Oversize) 133 398187
26 590402 RingSet(Standard) 134 398188
590403 RingSet(.020"Oversize) 137 796610
27 691588 Lock-PistonPin
28 298909 Pin-Piston
29 797306 Rod-Connecting
32 691664 Screw(ConnectingRod)(Short)
32A 695759 Screw(ConnectingRod)(Long)
33 590394 Valve-Exhaust
34 590393 Valve-Intake
35 691270 Spring-Valve(Intake)
36 691270 Spring-Valve(Exhaust)
37 793756 Guard-Flywheel
40 692194 Keeper-Valve
43 691997 Slinger-Governor/Oil
45 690548 Tappet-Valve
46 691449 Camshaft
48 N/A ShortBlock(Notavailableatthis printing)
65
117
141 796193 Kit- ChokeShaft
163 795629 Gasket-AirCleaner
180 590490 Tank-Fuel
187 791766 Line-Fuel(CutToRequiredLength)
188 693999 Screw(ControlBracket)
190 690940 Screw(FuelTank)
202 691829 Link-MechanicalGovernor
209 699056 Spring-Governor(NoColor)
222 793754 Bracket-Control
227 690783 Lever-GovernorControl
276 271716 Washer-Sealing
287 690940 Screw(DipstickTube)
291 790830 Thermostat
300 790828 Muffler
304 790826 Housing-Blower
Manifold-Intake
Gasket-Intake
Screw(IntakeManifold)
Housing-RewindStarter
Rope-Starter
Grip-StarterRope
Screw(RewindStarter)
Screw(FlywheelGuard)
Lock-MufflerScrew
Plug-Oil(Cylinder)
Shaft-Throttle
Pin-FloatHinge
Valve-Choke
Shaft-Choke
Jet-Main(Standard)
Kit-CarburetorOverhaul
Carburetor
Plug-Welch
Valve-Throttle
Float-Carburetor
Kit-Needle/Seat
Gasket-FloatBowl
26
Page 27

Craftsman Engine Model No. 126M02=6863=F1 For Craftsman Mower Model No. 247.37031
691108 Screw(BlowerHousing) 66538s Boot-SparkPlug
306 790836 Shield-Cylinder 684 690345 Screw(BreatherPassageCover)
307 690345 Screw(CylinderShield) 689 691855 Spring-Friction
332 690662 Nut(Flywheel) 718 690959 Pin-Locating
333 590454 Armature-Magneto 725 590460 Shield-Heat
334 691061 Screw(MagnetoArmature) 741 797521 Gear-Timing
337 591040 Plug-Spark 745 691648 Screw(Brake)
356 692390 Wire-Stop 842 691031 Seal-ORing(DipstickTube)
358 590508 GasketSet-Engine 847 692047 Dipstick/TubeAssembly
365 691688 Screw(Carburetor) 851 493880s Terminal-SparkPlug
404 690272 Washer(GovernorCrank) 868 697338 Seal-Valve
425 690670 Screw(AirCleanerCover) 869 691155 Seat-Valve(Intake)
443 692523 Screw(AirCleanerPrimerBase) 870 690380 Seat-Valve(Exhaust)
445 491588s Filter-AirCleanerCartridge 871 590409 Bushing-ValveGuide
455 791960 Cup-Flywheel 883 691881 Gasket-Exhaust
456 692299 Plate-PawlFriction 921 796706 Cover-BlowerHousing
459 281505s PawI-Ratchet 922 692135 Spring-Brake
505 691251 Nut(GovernorControlLever) 923 796136 Brake
523 499621 Dipstick 957 591003 Cap-FuelTank
524 692296 Seal-DipstickTube 966 795259 Base-AirCleanerBase
525 495265 Tube-Dipstick 968 692298 Cover-AirCleaner
562 691119 Bolt (GovernorControlLever) 969 690700 Screw(BlowerHousingCover)
564 698589 Screw(ControlCover) 975 796611 Bowl-Float
584 697734 Cover-BreatherPassage 976 694395 Primer- Carburetor
585 691879 Gasket-BreatherPassage 1036 Label-Emissions(Availablefroma Briggs&
592 690800 Nut(RewindStarter) StrattonAuthorizedDealer)
597 691696 Screw(PawlFrictionPlate) 1058 380567TRI Operator'sManual
601 791850 Hose-Clamp(Green) 1059 692311 Kit-Screw/Washer(FuelTank)
604 790703 Cover-Control 1095 590507 GasketSet-Valve
608 497680 Starter-Rewind 1210 498144 Pulley/SpringAssembly(Pulley)
613 790833 _Screw(Muffler) 1211 498144 Pulley/SpringAssembly(Spring)
615 690340 Retainer-GovernorShaft 1329 N/A ReplacementEngine(N/Aat thisprinting)
616 698801 Crank-Governor 1330 270962 RepairManual
617 270344s Seal-ORing 1386 790848 Vane-Air
621 692310 Switch-Stop 1387 790849 Spring-AirVane
633 691321 Seal-Choke/ThrottleShaft(ThrottleShaft) 1388 790850 Screw(AirVane)
633A 693867 Seal-Choke/ThrottleShaft(ChokeShaft) 1448 690390 Washer(Armature)
CarburetorOverhaulKit KeyNo.121
EngineGasketSet KeyNo.358
ValveGasketSet KeyNo.1095
27
Page 28

Craftsman Mower Labels B Model No. 247.37031
777S33353
777S33350
777D14313
777123312
28
Page 29

This page left intentionallyblank.
29
Page 30

(Thispageapplicableinthe U.S.A.and Canadaonly.)
Sears Brands Management Corporation (Sears), the California Air Resources Board (CARD)
and the United States Environmental Protection Agency (U.S. EPA)
Emission Control System Warranty Statement (Owner's Defect Warranty Rights and Obligations)
EMISSIONCONTROLWARRANTYCOVERAGEISAPPLICABLETOCERTI-
FIEDENGINESPURCHASEDINCALIFORNIAIN1995ANDTHEREAF-
TER,WHICHAREUSEDINCALIFORNIA,ANDTOCERTIFIEDMODEL
California and United States Emission
TheCaliforniaAirResourcesBoard(CARD),U.S.EPAand Searsarepleased
toexplainthe EmissionControlSystemWarrantyonyour modelyear2000and
latersmalloff-roadengine(SORE).InCalifornia,newsmalloff-roadengines
mustbe designed,builtand equippedto meettheState'sstringentanti-smog
standards.Elsewherein theUnitedStates,newnon-road,spark-ignition
enginescertifiedformodelyear1997and latermustmeetsimilarstandardsset
forthbythe U.S.EPA.Searsmustwarranttheemissioncontrolsystemonyour
YEAR1997ANDLATERENGINESWHICHAREPURCHASEDANDUSED
ELSEWHEREINTHEUNITEDSTATES(ANDAFTERJANUARY1,2001 IN
CANADA).
Control Defects Warranty Statement
enginefortheperiodsoftimelistedbelow,providedtherehasbeennoabuse,
neglector impropermaintenanceofyoursmalloff-roadengine.Youremis-
sioncontrolsystemincludespartssuchasthecarburetor,aircleaner,ignition
system,mufflerandcatalyticconverter.Alsoincludedmaybeconnectorsand
otheremissionrelatedassemblies.Whereawarrantableconditionexists,Sears
will repairyoursmalloff-roadengineatnocostto youincludingdiagnosis,parts
andlabor.
Sears Emission Control Defects Warranty Coverage
Smalloff-roadenginesarewarrantedrelativeto emissioncontrolpartsdefects
fora periodofone year,subjecttoprovisionssetforthbelow.Ifanycovered
Owner's Warranty
Asthe smalloff-roadengineowner,youare responsiblefor theperformanceof
therequiredmaintenancelistedin yourOperatingandMaintenanceInstruc-
tions.Searsrecommendsthatyouretainallyourreceiptscoveringmaintenance
onyoursmalloff-roadengine,butSearscannotdenywarrantysolelyforthe
lackofreceiptsorfor yourfailureto ensuretheperformanceof allscheduled
maintenance.Asthesmalloff-roadengineowner,youshouldhoweverbe
awarethat Searsmaydenyyouwarrantycoverageifyoursmalloff-roadengine
ora part hasfaileddueto abuse,neglect,impropermaintenanceorunap-
parton yourengineis defective,the partwillbe repairedorreplacedbySears.
Responsibilities
provedmodifications.Youare responsibleforpresentingyour smalloff-road
engineto anAuthorizedSearsServiceDealerassoonas aproblemexists.The
undisputedwarrantyrepairsshouldbecompletedina reasonableamountof
time,notto exceed30days.Ifyouhaveanyquestionsregardingyourwarranty
rightsandresponsibilities,youshouldcontacta SearsServiceRepresentative
at 1-800-469-4663.Theemissionwarrantyisa defectswarranty.Defectsare
judgedonnormalengineperformance.The warrantyis notrelatedtoan in-use
emissiontest.
Sears Emission Control Defects Warranty Provisions
ThefollowingarespecificprovisionsrelativetoyourEmissionControlDefectsWarrantyCoverage.ItisinadditiontotheSearsenginewarrantyfornon-regulated
enginesfoundintheOperatingandMaintenanceInstructions.
1. WarrantedParts
Coverageunderthiswarrantyextendsonlytothe partslistedbelow(the
emissioncontrolsystemsparts)to the extentthesepartswerepresenton
theenginepurchased.
a. FuelMeteringSystem
• Cold startenrichmentsystem
• Carburetorandinternalparts
• FuelPump
b. AirlnductionSystem
• Aircleaner
• Intakemanifold
c. IgnitionSystem
• Sparkplug(s)
• Magnetoignitionsystem
d. CatalystSystem
• Catalyticconverter
• Exhaustmanifold
• Air injectionsystemor pulsevalve
e. MiscellaneousItemsUsedin AboveSystems
• Vacuum,temperature,position,timesensitivevalves
andswitches
• Connectorsandassemblies
2. Lengthof Coverage
Searswarrantsto theinitialownerandeachsubsequentpurchaserthat
theWarrantedPartsshallbefree fromdefectsin materialsandworkman-
shipwhich causedthefailureofthe WarrantedPartsfor a periodof one
yearfromthe datethe engineis deliveredtoa retailpurchaser.
Inthe USAandCanada,a 24hourhotline, 1-800-469-4663,has amenuofpre-recordedmessagesofferingyouenginemaintenanceinformation.
3. NoCharge
Repairorreplacementof anyWarrantedPartwillbe performedat no
chargeto the owner,includingdiagnosticlaborwhichleadstothe
determinationthata WarrantedPartisdefective,ifthediagnosticworkis
performedatanAuthorizedSearsServiceDealer.Foremissionswarranty
servicecontact yournearestAuthorizedSearsServiceDealeras listedin
the "YellowPages"under"Engines,Gasoline,""GasolineEngines,""Lawn
Mowers,"orsimilarcategory.
4. Claimsand CoverageExclusions
Warrantyclaimsshallbefiled in accordancewiththe provisionsofthe
SearsEngineWarrantyPolicy.Warrantycoverageshallbeexcludedfor
failuresof WarrantedPartswhicharenotoriginal Searspartsor because
ofabuse,neglector impropermaintenanceassetforth intheSears
EngineWarrantyPolicy.Searsisnotliableto coverfailuresof Warranted
Partscausedby theuseof add-on,non-original,ormodifiedparts.
5. Maintenance
AnyWarrantedPartwhichis notscheduledforreplacementasrequired
maintenanceor whichis scheduledonlyforregularinspectionto the effect
of"repairor replaceasnecessary"shallbe warrantedastodefectsfor the
warrantyperiod.AnyWarrantedPartwhichisscheduledfor replacement
asrequiredmaintenanceshallbewarrantedas todefectsonlyforthe
periodoftime uptothe firstscheduledreplacementforthat part.Any
replacementpartthat isequivalentinperformanceanddurabilitymay
beusedinthe performanceofanymaintenanceor repairs.Theowneris
responsibleforthe performanceof all requiredmaintenance,asdefinedin
the SearsOperatingandMaintenanceInstructions.
6. ConsequentialCoverage
Coveragehereundershallextendto thefailure ofanyenginecomponents
causedbythefailureofanyWarrantedPartstill underwarranty.
GDOC-100188Rev.B
3O
Page 31

Look For Relevant Emissions Durability Period and
Air index information On Your Engine Emissions Label
Engines that are certified to meet the California Air Resources Board (CARB) Tier 2 Emission Standards must
display information regarding the Emissions Durability Period and the Air Index. Sears Brands Management
Corporation makes this information available to the consumer on our emission labels.
The Emissions Durability Period describes the number of hours of actual running time for which the engine is
certified to be emissions compliant, assuming proper maintenance in accordance with the Operating & Mainte-
nance Instructions. The following categories are used:
Moderate: Engine is certified to be emission compliant for 125 hours of actual engine running time.
Intermediate: Engine is certified to be emission compliant for 250 hours of actual engine running time.
Extended: Engine is certified to be emission compliant for 500 hours of actual engine running time.
For example, a typical walk-behind lawn mower is used 20 to 25 hours per year. Therefore, the Emissions
Durability Period of an engine with an intermediate rating would equate to 10 to 12 years.
The Air index is a calculated number describing the relative level of emissions for a specific engine family. The
lower the Air Index, the cleaner the engine. This information is displayed in graphical form on the emissions label.
After July 1,2000, Look For Emissions Compliance Period
On Engine Emissions Compliance Label
After July 1, 2000 certain Sears Brands Management Corporation engines will be certified to meet the United
States Environmental Protection Agency (USEPA) Phase 2 emission standards. For Phase 2 certified engines, the
Emissions Compliance Period referred to on the Emissions Compliance label indicates the number of operating
hours for which the engine has been shown to meet Federal emission requirements.
For engines less than 225 cc displacement, Category C = 125 hours, B = 250 hours and A = 500 hours.
For engines of 225 cc or more, Category C = 250 hours, B = 500 hours and A = 1000 hours.
This isa generic representation of the emission label typically found on a certified engine.
FAMILYYBSXS.3192VA 274812
31
GDOC-100182Rev.B
Page 32

Congratulations on making a smart purchase. Your new Craftsman® product is designed and
manufactured for years of dependable operation. But like all products, it may require repair
from time to time. That's when having a Repair Protection Agreement can save you money and
aggravation.
Here's what the Repair Protection Agreement* includes:
[] Expert service by our 10,000 professional repair specialists
[] Unlimited service and no charge for parts and labor on all covered repairs
[] Product replacement up to $1500 if your covered product can't be fixed
[] Discount of 25% from regular price of service and related installed parts not covered by the
agreement; also, 25% off regular price of preventive maintenance check
[] Fast help by phone - we call it Rapid Resolution - phone support from a Sears representative.
Think of us as a "talking owner's manual."
Once you purchase the Repair Protection Agreement, a simple phone call is all that it takes for you
to schedule service. You can call anytime day or night, or schedule a service appointment online.
The Repair Protection Agreement is a risk-free purchase. If you cancel for any reason during the
product warranty period, we will provide a full refund. Or, a prorated refund anytime after the
product warranty period expires. Purchase your Repair Protection Agreement today!
Some limitations and exclusions apply. For prices and additional information in the U.S.A.
call 1=800=827=6655.
*Coverage in Canada varies on some items. For full details call Sears Canada at 1=800=361=
6665.
Sears Installation Service
For Sears professional installation of home appliances, garage door openers, water heaters, and
other major home items, in the U.S.A. or Canada call 1=800=4=MY=HOME®.
32
Page 33

Declaraci6n de garantia .................................................. 33
Instrucciones de seguridad ....................................... 34-38
Guia de cuesta ................................................................ 39
Montaje ..................................................................... 40-43
Servicio y Mantenimiento ......................................... 46-50
Almacenamiento fuera de temporada ............................ 51
Soluci6n de problemas ................................................... 52
NOmero de servicio ............................... Cubierta posterior
Operaci6n .................................................................. 44-45
GARANTiA COMPLETA CRAFTSMAN POR DOS ANOS
PORDOSANOSapartir dela fechade lacompra,esteproductoest,.garantizadopordefectosenlos materialesy la manodeobra.
Losproductosdefectuososser_.nreparadossincostooreemplazadossincostosi la reparaci6nnoest,.disponiNe.
Paraobtener informaci6nsobreel alcancede lagarantiay solicitar la reparaci6no el reemplazo,visiteelsitio Web:www.craftsman.com.
Esta garantiacubre 0NICAMENTElosdefectos en los materialesy enla mano de obra. EstagarantiaNOcubre:
• Articulosdeduraci6nlimitadaquepuedendesgastarsebajocondicionesnormalesdeuso duranteelperiododegarantia,talescomo
cuchillasdecortadora,adaptadoresparacuchillas,correas,filtrosdeaire,y bujfasdeencendido.
• ProductodaSosresultantesde losintentosdelusuariodemodificaci6ndelproducto,reparaci6no causadosporaccesoriosdeproductos.
• Reparacionesnecesariasdebidoal accidenteo por nooperaro mantenerelproductoseg_nlasinstruccionesprovistas.
• Mantenimientoprevenfivoo reparacionesnecesariasdebidoamezcladecombustibleimpropia,combustiblecontaminadooaSejo.
La presentegaranfiaseanulasise utilizaesteproductoalgunavezparaprestarservicioscomercialeso siseIoalquilaaotrapersona.
Estagarantiale otorgaderechoslegalesespecificos,peroustedpodriagozardeotrosderechosenraz6ndesulugarde residencia.
Sears Brands ManagementCorporation, Hoffman Estates,IL 60179
Aceitedelmotor: SAE30
Capacidaddeaceitedelmotor: 18onzas
Combustible: Gasolinasinplomo
Bujia: Champion®RJ2YXLE
Motor: Briggs& Stratton
NSrnerode modelo ..........................................................
N_mero de serie..............................................................
Fechade compra .............................................................
RegistreelnOmerode modelo,nQmerode serieyfechade compra
m_.sarriba.
© SearsBrands,LLC 33
Page 34

Lapresenciadeestesirnboloindicaquesetratade instrucciones
irnportantesde seguridadquesedebenrespetarparaevitar
ponerenpeligrosu seguridadpersonaly/omaterialylade otras
personas.Leay sigatodaslasinstruccionesdeestemanualantes
de poneren funcionarnientoestarn_.quina.Si no respetaestas
instruccionespodriaprovocarlesionespersonales.Cuandoveaeste
sirnbolo,ipresteatenci6nalaadvertencia!
Estarn_.quinarueconstruidaparaseroperadadeacuerdocon
lasreglasde seguridadcontenidasenestemanual.AIigualque
concualquiertipodeequipornotorizado,undescuidoo errorpor
partedeloperadorpuedeproducirlesionesgraves.Estarn_.quina
escapazde arnputarrnanosypiesy dearrojarobjetoscongran
fuerza.De norespetarlasinstruccionesdeseguridadsiguientesse
puedenproducirlesionesgraveso la rnuerte.
PROPOSICION 65 DE CALIFORNIA
Elescapedel motorde esteproducto,algunosde suscornponentes
y algunoscornponentesdelvehiculocontieneno liberansustancias
quirnicasqueelestadode Californiaconsideraquepuedenproducir
c_.ncer,defectosde nacirnientouotrosproblernasreproductivos.
Losbornesdela bateriay losaccesoriosdines contienenplornoy
cornpuestosde plorno,sustanciasquirnicasquesegOnIoestableci-
do potel EstadodeCaliforniacausanc_.nceryda_osenel sisterna
reproductivo.Ldveselasmanos despu_sde estaren contacto
con estoscomponentes.
FUNCIONAMIENTO
Funcionarnientogeneral:
• Leaysiga todaslasinstruccionescontenidasen estemanual
antesde intentarensarnblarestarn_.quina.Lea,cornprenday
sigatodaslas instruccionesque figuranen la rn_.quinayen elo
losrnanualesantesdeintentaroperarla.Farniliaricesecornpleta-
rnenteconloscontrolesy conel usoapropiadodeestarn_.quina
antesde operarla.Guardeestemanualenun lugarseguropara
referenciasfuturasy regulatesy parasolicitarrepuestos.
• Estarn_.quinaes unapiezadeequipodeprecisi6n,no unjuguete.
Portanto,tengala maximaprecauci6nen todornornento.Su
unidadha sidodise_adapararealizarunatarea:cortarel c_sped.
Nola utilicecon ningOnottoprop6sito.
• Noperrnitanuncaquelosni_osrnenoresde14a_osoperenesta
rn_.quina.Losni_osde 14a_osy rn_.sdebenleerycornprender
lasinstruccionescontenidasenestemanualy debenser
capacitadosy supervisadospor unode los padres.Onicarnente
losindividuosresponsablesque sehayanfarniliarizadocon
estasreglasdeseguridadparalaoperaci6ndeber_.nusaresta
rn_.quina.
Su responsabilidad--Restrinja el usodeestarn_.quina
rnotorizadaalas personasque lean,cornprendany respetenlas
advertenciase instruccionesqueaparecenenestemanualyen la
rn_.quina.
iGUARI)E ESTASINSTRUCCIONES!
• Inspeccionerninuciosarnenteel _.reaendondeutilizar_,el equipo.
Saquetodaslaspiedras,palos,cables,huesos,juguetesy otros
objetosextra_osconlosquepodriatropezaro quepodrianser
arrojadosporla cuchilla.Losobjetosarrojadosporla rn_.quina
puedenproducirlesionesgraves.Planifiqueel patr6nen elque
vaa ir descargandoel recorteparaevitarquela descargade
materialserealicehacialoscarninos,lasveredas,losobserva-
dotes,etc. Eviteadern_.sdescargarmaterialcontralasparedesy
obstruccionesquepodrianprovocarqueel materialdescargado
rebotecontraeloperador.
• Paraayudaraevitarelcontactoconlacuchillao unalesi6npor
un objetoarrojado,rnant_ngaseenlazonadeloperadordetr_.s
de lasrnanijasy rnantengaalosni_os,observadores,ayudantes
y rnascotasapartadosal rnenos25 metrosdela podadora
rnientrasest,.enoperaci6n.Detengalarn_.quinasialguienentra
en lazona.
• Paraprotegerselosojos utilicesiernpreanteojosoantiparras
de seguridadrnientrasoperala rn_.quinao rnientrasla ajusta
o repara.Losobjetosarrojadosquerebotanpuedenlesionar
gravernentelavista.
• Utilicezapatosde trabajoresistentes,desuelafuerteypanta-
Ionesy carnisasajustados.Serecorniendautilizarcarnisasy
pantalonesquecubranlosbrazosy laspiernas,asicornocalzado
conpuntasreforzadasenacero.Nuncaopereestarn_.quinacon
lospies desnudos,sandalias,o conzapatosligerosocon losque
sepuedaresbalar(porejernplo,calzadode Iona).
• Nopongalasrnanosolos piescercade laspiezasrotatoriaso
en latolvade lacortadora.Elcontactoconlascuchillaspuede
producirlaarnputaci6nde rnanosypies.
34
Page 35

• Unacubiertade descargafaltanteoda_adapuedeprovocarel
contactoconla cuchillao lesionesporobjetosarrojados.
Muchaslesionesocurrencornoresultadodepasarlacortadora
sobrelos piesduranteunacaidaprovocadaporderrapeso
tropiezos.Nosesostengade la podadorasiseest,.cayendo,
sueltela rnanijainmediatarnente.
Nuncatirehaciaustedlapodadorarnientrascarnina.Sidebe
retrocederlapodadoraparaevitarunapareduobst_.culo,mire
prirneroabajoy atr_.sparaevitartropezarsey luegosigaestos
pasos:
1. Retrocedade la podadorahastaestirarcornpletarnentesus
brazos.
2. AsegOresequeest,. bienequilibradoy bienparado.
3. Tirede la podadoralentarnentehaciausted,norn_.sall_.dela
rnitaddeladistanciaentreustedy lapodadora.
4. Repitaestospasoscornoserequiera.
• Noopereestarn_.quinaestandobajolosefectosdelalcoholo de
drogas.
• Noernbragueel mecanisrnode autopropulsi6nen unidadescon
esteequipornientrasarrancaelmotor.
• Elrnecanisrnodecontroldela cuchillaesundispositivode
seguridad.Nuncaintentedesviarsede sufuncionarniento.De
hacerlonofuncionarianlos dispositivosde seguridady podrian
producirselesionespersonalesporelcontactoconlascuchillas
giratorias.Lasrnanijasdecontrolde lacuchilladebenfuncionar
bienenarnbasdireccionesy regresarautorn_.ticarnentea la
posici6ndedesengranecuandoselas suelta.
• Nuncaoperelapodadoraenc_spedhOrnedo.Siernpreest_
segurodesu equilibrio.Si tropiezay caepuedelesionarse
gravernente.Sisienteque pierdeelequilibrio,suelteinrnediata-
rnentelarnanijadecontrolde lacuchillay lacuchilladejar_,de
girarentressegundos.
• Corteel cespedsolarnenteconluz dedia o conunabuenaluz
artificial.Carnine,nuncacorra.
• Detengalacuchillacuandocrucecarninosdegravilla,pasoso
andadores.
• Si larn_.quinacornenzaraa vibrarde rnaneraanorrnal,detenga
el motor,y busqueinrnediatarnentelacausa.Lavibraci6nporIo
generalesunaadvertenciadealgQnproblerna.
• Apagueelmotoryesperehastaquela cuchillasedetenga
cornpletarnenteantesde retirarla guardaparael recortede
cespedo desatorarlatolva.LacuchillacontinOagirandopor
unoscuantossegundosdespu_squeelmotorsehaapagado.
Nuncacoloqueningunapartedel cuerpoenel_.readelacuchilla
hastaqueest_seguroquelacuchillahadetenidosurnovirniento
rotatorio.
Nuncaoperelacortadorasinlasguardasapropiadas,cubiertade
descarga,guardapararecorte,rnanijadecontroldela cuchilla
y otrosdispositivosdeseguridady protecci6nensulugary
funcionando.Nuncaoperelacortadorasi losdispositivosde
seguridadest_.nda_ados.SinoIohace,estopuedetenetcorno
resultadolesiones.
• Elsilenciadoryel motorse calientany puedenproducirquerna-
duras.Nolos toque.
• Utilicesolarnentepartesyaccesoriosfabricadosespecialrnente
paraestarn_.quina,originalesdelfabricante(OEM).Sino Io
hace,estopuedetenercornoresultadolesionespersonales.
• Paraencenderelmotor,jale dela cuerdalentarnentehastaque
sientaresistencia,luegojale r@idarnente.Elreplieguer@idode
lacuerdadearranque(tensi6nderetroceso)lejalar_,larnanoy
el brazohaciael motorrn_.sr@idode Ioque ustedpuedesoltar.
Elresultadopuedenserhuesosrotos,fracturas,hernatornaso
esguinces.
Sisepresentansituacionesquenoest_.nprevistaseneste
manualseacuidadosoy useelsentidocornQn.Contacto1-800-
659-5917parainforrnaci6nyasistencia.
DIENTES
Laspendientessonun factorirnportantequese relacionaconlos
accidentesproducidosporderrapesycaidasy quepuedenpro@@
lesionesgraves.Laoperaci6nenpendientesrequieremayorpre-
cauci6n.Sino se sienteseguroenunapendiente,nola pode.Para
seguridad,useel rnedidordependientesquese incluyecornopartede
estemanualpararnedirla pendienteantesdeoperarlaunidadenuna
zonainclinada.Si lapendientesuperalos 15grados,nola pode.
HagaIo siguiente:
• Muevala podadoraa travesdelas carasde la pendiente,nunca
haciaarribay abajo.Tengacuidadocuandocarnbiededirecci6n
cuandooperela rn_.quinaenpendientes.
• Est_atentoa losagujeros,raices,rocas,objetosocultoso
abultarnientosquepuedanprovocarquesederrapeo setropiece.
Elc_spedaltopuedeocultarobst_.culos.
Siernpreest_segurodesu equilibrio.Sitropiezay caepuede
lesionarsegravernente.Si sJentequepier@el equilibrio,suelte
inrnediatarnentelarnanijadecontrolde lacuchillay lacuchilla
dejar_,degirarentres(3) segundos.
NohagaIo siguiente:
• I/o corteel cespedcercade pozos,hundirnientos,bancos,podria
perderelequilibrio.
• Nopodependientesrnayoresde 15gradoscornoIo indicael
rnedidorde pendientes.
• NopodeelcespedhOrnedo.Si noest,.firrnernenteparado,puede
resbalarse.
35
Page 36

N QOS
Puedenocurriraccidentestr_.gicossieloperadornoest,.atentoala
presenciadeni_os.PorIogenerala los ni_osles atraenlaspodadoras
yla actividadde podarel c_sped.Noentiendenlosriesgosnilos
peligros.Nuncad_porsentadoquelosni_osperrnanecer_.nenel
rnisrnolugardondelosviopor Oltirnavez.
• Mantengaalosni_osfueradelAreadetrabajoybajoestricta
vigilanciadeunadultoresponsableadern_.sdeloperador.
Est_alertay apaguela podadorasiun ni_oingresaalArea.
Antesy rnientasseest,.rnoviendohaciaatr_.s,mirehaciaatr_.sy
cuidequeno hayani_os.
Tengaextrernaprecauci6ncuandoseaproxirneaesquinas
ciegas,entradasdepuertas,_.rbolesu otrosobjetosque puedan
obstaculizarlelavistadeun ni_oque pudiesecorrerhaciala
podadora.
Mantengaalejadosalosni_osdelosrnotoresenrnarchao
calientes.Puedensufrirquernadurasconunsilenciadorcaliente.
Nuncaperrnitaqueni_osrnenoresde 14a_osoperenesta
rn_.quina.Losni_osrnayoresde 14a_osdebenleery entender
lasinstruccionesde operaci6nyreglasdeseguridadcontenidas
enestemanualy debenserentrenadosy supervisadospor sus
padres.
SERVIClO
Manejosegurode la gasolina:
• Paraevitarlesionespersonaleso daSosrnaterialessea
surnarnentecuidadosoalrnanipularlagasolina.Lagasolinaes
altarnenteinflarnabley losvaporessonexplosivos.Sepuede
lesionargravernentesi derrarnagasolinasobreustedo sobrela
ropaya quese puedeencender.
• Utilices61orecipientesparagasolinaautorizados.
• NuncaIlenelos contenedoresenel interiordeunvehiculo
ocarni6nocaja decarnionetaconrecubrirnientospl_.sticos.
Coloquesiernprelosrecipientesenelpisoy lejosdelvehiculo
antesde Ilenarlos.
• Retireel equipoa gasolinadelcarni6no rernolqueyII_neloen
el piso.Si estonoesposible,entoncesIlenedichoequipoenun
rernolqueconun recipienteport_.til,en vezdedesdeundispen-
sadordegasolina.
• MantengalaboquilladeIlenadoencontactoconelhordedela
entradadeltanquede gasolinaocontenedorentodornornento
hastaqueest_Ileno.Noutiliceundispositivoparaabrir/cerrarla
boquilla.
• Apaguetodosloscigarrillos,cigarros,pipasyotrasfuentesde
cornbusti6n.
• Nuncacarguecombustibleen larn_.quinaen interioresporque
Losvaporesinflarnablespodrianacurnularseen el_.rea.
• Nuncasaquelatapadel gasniagreguecombustiblernientrasel
motorest,.calienteo en rnarcha.Dejequeel motorse enfriepor
Iornenosdosrninutosantesdevolvera cargarcombustible.
• Nuncarecargueeltanquedecombustible.Lleneel tanqueno
rn_.sde 1 pulgadapor debajodela basedelcuellode Ilenado
paradejarespacioparala expansi6ndelcombustible.
• Vuelvaacolocarlatapade la gasolinayajOstelabien.
• Lirnpiela gasolinaderrarnadasobreel motoryel equipo.Traslade
la rn_.quinaa otrazona.Espere5rninutosantesdeencenderel
motor.
• Nuncaalrnacenelarn_.quinao el recipientede combustibleen
unespaciocerradodondehayafuego,chispaso aparatoscon
pilotocornoporejernplo,calentadoresdeagua,calentadores,
hornos,secadoresderopau otrosaparatosagas.
• Parareducirel riesgodeincendiornantengala rn_.quinalirnpia
de pasto,hojasy deacurnulaci6nde otrosescornbros.Lirnpielos
derrarnesde aceiteo combustibleysaquetodoslosdesechos
ernbebidoscon combustible.
• Dejequelarn_.quinaseenfrie5 rninutospor Iornenosantesde
alrnacenarla.
Funcionamientogenerah
• Nuncaenciendaunmotoren espacioscerradoso en unazona
conpocaventilaci6n.Elescapedelmotorcontienernon6xidode
carbono,ungasinodoroy letal.
• Antesde lirnpiar,repararo inspeccionarlarn_.quina,cornpruebe
que lacuchillay todaslaspartesquese rnuevensehandetenido.
Desconecteel cablede la bujiay p6ngalodernaneraquehaga
rnasacontrael motorparaevitarquese enciendadernanera
accidental.
• Reviselospernosdernontajede lacuchillay delmotora
intervalosfrecuentesparaverificarqueest_nbienapretados.
Inspeccioneadern_.svisualrnentela cuchillaenbuscade daSos
(abolladuras,desgaste,roturas,etc.).Reernplacelacuchillacon
equipooriginaldel fabricante(OEM)listadoenestemanual.La
utilizaci6ndepartesquenocurnplanconlasespecificacionesde
equiposoriginalespodriatenetcornoresultadounrendirniento
incorrectoyadern_.sla seguridadpodriaestarcornprornetida.
• Lascuchillasde laspodadorassonrnuyafiladasy podrian
cortarlo.Envuelvalacuchillao utiliceguantesy extremeprecau-
clonescuandolede servicio.
• Mantengatodoslospernos,tuercasytornillosbienajustados
paraasegurarsequelarn_.quinaseencuentraencondiciones
segurasdeoperaci6n.
• Nuncarnanipulelosdispositivosde seguridaddernanera
irnprudente.Controleperi6dicarnentequefuncionendeforrna
adecuada.
36
Page 37

• Despu_sdegolpearcon algOnobjetoextrafio,detengael motor,
desconecteelcablede la bujfayconecteel motora rnasa.
Inspeccionerninuciosarnentela rn_.quinaparadeterrninarsiest,.
da_ada.Repareelda_oantesdeencenderlayoperarla.
• Nuncatratedeajustaruna ruedao laalturade corternientrasel
motorest,.en rnarcha.
• Loscornponentesde latolvapararecorte,cubiertadedescargay
escudode riel,est_.nsujetosadesgastey da_osquepodriadejar
expuestaspartesquesernuevenoperrnitirquesearrojenobje-
tos.Paraprotegersuseguridad,verifiquefrecuenternentetodos
loscornponentesyreernpl_.celoss61ocon partesde losfabri-
cantesdeequiposoriginales(O.E.M.)listadasenestemanual.
La utilizaci6nde partesquenocurnplanconlas especificaciones
deequiposoriginalespodriatenercornoresultadounrendirniento
incorrectoyadern_.slaseguridadpodriaestarcomprornetida.
• Nocarnbielaconfiguraci6ndel reguladordelmotorni acelere
dernasiadoelrnisrno.Elreguladorcontrolalavelocidadrn_.xirna
seguradeoperaci6ndelmotor.
• Verifiquefrecuenternentela Ifneadecombustible,eltanque,el
tap6n,y losaccesoriosbuscandorajaduraso perdidas.Reern-
placedeset necesario.
• Nod_arranquealmotorsi noest,.la bujfadeencendido.
• Mantengaoreernplacelasetiquetasdeseguridad,segOnsea
necesario.
• Observelasleyesy norrnasaplicablesparadisponeradecu-
adarnentedelos desechos.Ladescargainapropiadadeliquidos
o rnaterialespuededa_arel medicarnbiente.
• SegOnla Cornisi6nde Seguridadde Productosparael Consu-
rnidordelos EstadosUnidos(CPSC)y laAgenciade Protecci6n
Arnbientalde los EstadosUnidos(EPA),esteproductotieneuna
vidadtil mediadesiete(7)a_os,6 140horasdefuncionarniento.
AI finaiizar[adda dtilmedia,adquieraunarn_.quinanuevao
hagainspeccionaranualrnente_staSearsporunou otrodis-
tribuidordeserviciosparacerciorarsedequetodoslossisternas
rnec_.nicosyde seguridadfuncionancorrectarnenteyno tienen
excesivodesgaste.SinoIohace,puedenproducirseaccidentes,
lesionesornuerte.
NO MODIFIQUE EL MOTOR
Paraevitarlesionesgraveso larnuerte,nornodifiqueel motorbajo
ningunacircunstancia.Sicarnbialaconfiguraci6ndelreguladordel
motorelmotorpuededescontrolarsey operara velocidadesinsegu-
ras.Nuncacarnbielaconfiguraci6ndef_.bricadelreguladordelmotor.
AVISO REFERIDO A EMISIONES
Losrnotoresqueest&ncertificadosycurnplenconlasregulaciones
de ernisionesfederalesEPAyde CaliforniaparaSORE(Equipos
peque_ostodoterreno)est_.ncertificadosparaoperarcongasolina
cornOnsinplornoy puedenincluirlossiguientessisternasde control
de ernisiones:Modificaci6ndemotor(EM) ycatalizadorde tresvias
(TWO)si est_.nequipadosde esa rnanera.
GUARDACHISPAS
Estarn&quinaest,.equipadaconunmotorde cornbusti6ninternay
nodebeserutilizadaeno cercade unterrenoagrestecubiertopor
bosque,rnalezaso hierbaexceptosiel sisternade escapedelmotor
est,.equipadoconunarnortiguadordechispasquecurnplaconlas
leyeslocaleso estatalescorrespondientes,encasodehaberlas.
Siseutilizaun arnortiguadordechispasel operadorIodebernantener
en condicionesde usoadecuadas.Enel EstadodeCalifornialas
rnedidasanteriorrnenternencionadassonexigidasporley(Arficulo
4442del C6digodeRecursosPOblicosde California).Esposible
queexistanleyessirnilaresenotrosestados.Lasleyesfederalesse
aplicanenterritoriosfederales.
Puedeconseguirelarnortiguadorde chispasparaelsilenciadora
travesde sudistribuidorautorizadodernotoresoponi_ndoseen
contactoconelcentrode servicioSears.
37
Page 38

SilVIBOLOS DE SEGURIDAD
Estap&ginarepresentay describelaseguridadlossimbolosquepuedenparecerenesteproducto.Lea,comprenda,ysigatodasinstrucciones
en lam_quinaantesprocurarparareuniry operar.
LEA EL MANUAL(S) DEL OPERADOR
i
i
®
Lea, comprenda, y siga todas instrucciones en el manual (manuales) antes procurar para reunir y
operar.
PELIGRO-- GIRANDO HOJAS
Para reducir el riesgo de herida, guarde manos y pies lejos. No funcione a menos que la tapa
de descarga o el receptor de hierba est6n en su lugar apropiado. De ser dahado, sustituya
inmediatamente.
PELIGRO-- ESPECTADORES
No siegue cuando los nihos o los otros est_in alrededor.
PELIGRO-- DE EL CORTE DE PIE/
Guarde manos y pies lejos de hacer girar partes.
PELIGRO-- ESCOMBROS LANZADOS
Quite objetos que pueden ser lanzados pot la I_imina en cualquier direcci6n. Lleve galas de
seguridad.
PELIGRO-- CUESTAS
Use extra la precauci6n en cuestas. No siegue cuestas mayores que 15 o
ADVERTENCIA DESPIDA
Para reducir el riesgo de incendio mantenga la m_iquina limpia de pasto, hojas y de acumulaci6n de
otros escombros.
ADVERTENCIA VAPORES TOXICOS
Nunca encienda un motor en espacios cerrados o en una zona con poca ventilaci6n. Elescape del
motor contiene mon6xido de carbono, un gas inodoro y letal.
ADVERTENCIA -- SUPERFICIE CALIENTE
Las partes del motor, especialmente el silenciador, Ilega a set muy caliente durante la operaci6n.
Permita motor y silenciador para ponerse frio antes de tocar.
38
Page 39

15° Pendiente
15° Pendiente
(ACEPTAR)
(DElVlASlADO ESCARPADO)
FiguraI Figura2
15°/fn
US0 DE ESTEPENDIENTEDECALIBREPARADETERMINAR
SI UNA PENDIENTEESDEMASIADOESCARPADOPARAUNAOPERACIONSEGURA!
Paracomprobar la pendiente, hagaIo siguiente:
1. Borrar esta p@ina y doblea Io largo de la linea discontinua.
2. Localizar un objeto vertical sobreo detr_.sde la pendiente(un poste, un edificio, una valla, un _.rbol,etc.)
3. Alinee cada lado de pendiente de calibre con el objeto vertical (consultar Figura1 and Figura 2 ).
4. Ajuste el pendientede calibre arriba o hacia abajohasta los toques esquina izquierda el pendiente
(consultar Figura 1 and Figura2).
5. Si hay unespacio pot debajo de la pendiente de calibre, el pendientees demasiado escarpa pot operaciCn
segura(consultar Figura2 above).
X
Las pendientesson un factor importante relacionadocon unvuelco y renovaciCndelos accidentesque puedenprovocarlesionesgraves o la muerte.
No utilicela ma.quinaenpendientes de masde 15grados. Todos pendientesrequiere mayorprecauciCn.Si no puede retrocederen la pendiente o si se
siente inseguroenella, no la recorte. Siempre corte el cespeden toda la superficie de la cuesta.Nunca arriba y abajo laspendientes.
Page 40

IMPORTANTE: Esta unidad se envfasin gasolina ni aceite enel motor.
Antesde comenzar ocorrer ia ma.quinacargue el motorcon gasolina y
aceitecomose indica en la secci6n de operaci6n de este manual.
NOTA: Las referenciasa los ladosderecho e izquierdode iacortadora de
cespedse hacenobservando la ma.quinadesde la posici6n de operaci6n.
APERTURA DE LA CAJA DE CARTON
1. Cortecada una de ias esquinas de la caja verticaimente,de la parte
superiora la base.
2. Saquetodas las piezassueltas.
3. Quiteel material de empaque suelto.
C61VIO SACAR LA UNIDAD DE LA CAJA
1. Elevelaunidaddesde la parte posterior parasepararladel material
de ia caja que quede debajo y haga rodaria unidadfuera de ia caja.
2. Verifiquecuidadosamentesi en la cajaqueda aiguna parte suelta.
PIEZAS SUELTAS DENTRO DE LA CAJA
Colectorde cesped
Tolvade descarga lateral
Aceite del motor
f
J
Figura2
iVIONTAJE
IVlontaje de la manija
1. Retireel material de empaqueque pudiera estar entre las manijas
superiore inferior.
A. Quite lostornillos y tuercas de mariposatransporte desde
el mangocomo se muestra en la figura 1.No afloje o quitar
adyacentestorniilosde cabeza hexagonal.
B. Si bien iaestabilizaci6n de cortacesped pot io que nose
mueve, pivoteasa superior comose muestraen la figura2. No
engarzadocable mientras levantaia palanca haciaarriba.
2. Retireia T-pernosde la manija entrecorchetescomo se muestraen
la figura 3.
Figura 3
Figura1
,J
40
Page 41

3,
Siga los siguientes pasospara completar conjuntodel mango:
A. Tire haciaarriba en el asa hastaagujeros en la manija(que se
muestraen la figura3 corte de la cubierta)se alineancon los
agujerosen el mango soporte. Vea lafigura 4.
NOTA: AI tirar hacia arriba la palanca, aseg@ese de que no tire de
manejar todo el camino.
B. Inserteei T-pernos quit6 anteriormentea travesdei mango
corchetesy asa inferior y apriete bien paraasegurar el mango
en sulugar. Veaia figura4.
C. Vuelva acolocar tuercas y pernosde transporte retirarse antes
en una reducci6n de los agujerosde la manija comose muestra
en la figura 5.
4. Laguiade lacuerda, queesta.conectadaa lavariiiade sosten,se
encuentrasobreel ladoderechode la manijainferior.Veala Figura6.
A. Sostengala manijade control de la cuchillacontra la manija
superior.
B. Jale la cuerdade arranque parasacarla del motor.Suelte el
control de la cuchilla.
C. Deslice la cuerda dearranque en la guia.
D. La atadurade cables uso (s) para garantizarcable (s) para
bajarde manejar.
Conexi6n de la colectora de c6sped
1. Paraensamblarel colector decesped (de ser necesario), Hagael
cierto bolso es dio vuelta a la derecha el lado antes de reunir(la
advertenciade la etiquetasera.potfuera).
A. Coloque la bolsa sobre elmarcocon el lado negro de pla.stico
en el rondo.
B. Desliceelcanal de pla.sticosobre los ganchos del marco.Vea
la figura 7.
2. Paraacoplarel colectorde cesped.
A. Levantela puerta de descarga posterior.Veala figura 8.
Figura5
f
J
Figura4
Figure6
,J
Figura7
41
Page 42

B. Lugarde colecci6n de cesped en las ranuras en el mangoentre
corchetescome semuestra en ia figura 8. Sueltela puerta de
descarga de modeque descanse sobreel colector de cesped.
Paraquitar al receptor de hierba,levante ia puertade descarga trasera
en el cortacesped. Ascensor cespedy fuera de ias ranuras enel mango
entre parentesis.Elreverse de liberaciHndescarga ia puerta parapermitir
queello cerrara la apertura traseradel cortacesped.
Conexi6n de Canal de Descarga Lateral
Su podadoraha side enviadacomo abonadora.Si hace la conversiHna
descarga lateral,asegurese de queel colectorde cesped este fuera de la
unidad y que iapuerta de descarga traseraeste cerrada.
1. Enel costadode la podadora, levanteel adaptador para abono. Vea
figura 9.
2. Deslicelos dos ganchos del canal de descarga lateraldebajo del
pasadorde bisagrasobre el montaje deladaptador para abono. Baje
el adaptador para abono.No extraiga la clavija paraabono lateral en
cuaiquiermomento, aOncuandono este abonando.
AJUSTES
Altura de torte
Hay unapalanca de ajuste de aitura de corte, situado encima de la rueda
delanteraderecha y trasera.
1. Presionela palancahacia la rueda (unidadtendera,a caer cuandose
sueltalapalanca). Vea la figura 10.
2. Muevalaa cuaiquier de las posicionespara la aitura de corte
deseado.Vea lafigura 10.
3. Liberela palanca hacia la cubierta de la podadora.
f
// x\ • •-.
J
Figura8
CJavija para
abono Jateral
\
\
IMPORTANTE: Tanto las ruedas delanteras y traseras deben
colocarse en la rnisrna posiciHn relativa. Cuando el terreno es agreste
o irregular carnbie la palanca de ajuste de la altura a una posicidn rn_.s
alta. De esta rnanera se cuida rn_.selcesped.
Inclinaci6n de la manija
Perconveniencia de la operaciHn,puedeajustar la inclinaciHnde la
manijade la siguiente manera:
1. Quitelos tornillos y tuercasde mariposatransporte de manejar.Vea
la figura 11.
2. Coloqueei mangoen unade iastres posiciones que se sienta ma.s
cHmodo.Vea lafigura 11inserciHn.
3. Fije laposiciHncon tuercas y pernos detransporte eliminado antes.
Figura 9
f
Inferior
)r
Figura 11
Figura10
42
Page 43

f
_rraffcador
de retroceso
Colector de C_sped
Palanca de ajuste de altura
ajuste de altura ............. de corte
de torte
Escudode ruta
Control de
Tap6n de aceite/varilla
de medici6n del nivel
de aceite
Lavado de la Plataforma
Palanca de
Gasolina Bujia de
Tap6n De
Clavija para encendido
abono
Figura12
CONTROL DE CUCHILLA
Elcontrolde la cuchillaest&unidoa la rnanijasuperior.Presionela
rnanijadecontroldelacuchillacontralarnanijasuperiorparaoperarla
unidad.Sueltela rnanijadecontroldelacuchillaparadetenerelmotor
yla cuchilla.
El control de ia cuchiiiaes un dispositivo de seguridad. Nuncaintente
anular sufuncionamiento.
PALANCA DE AJUSTE DE LA ALTURA DE
CORTE
Unapalancade ajusteseencuentraenla ruedatraseraderechayel
ottoseencuentraenla ruedadelanteraderecha.Losdos palancas
tienenqueestaren la rnisrnaposici6nrelativaparaaseguraruncorte
uniforrne.Paraajustarlaalturadecorte,serefierenala secci6nde
Montaje.
ARRANCADOR DE RETROCESO
Elarrancadorde retrocesoest&unidoa la rnanijasuperiorderecha.
Paraencenderlaunidadcol6quesedetr&sde la rnisrnay tirede la
cuerdadelarrancadorderetroceso.
LAVADO DE LA PLATAFORMA
La plataforrnade supodadoraest&equipadacon unpuertodeagua
sobresu superficiecornopartedelsisternadelavadode la plataforrna.
Utiliceellavadode la plataforrnaparalavarlaparteinferiordela
plataforrnay quitarlosrecortesde c_sped.
CLAVIJA PARA ABONO
EladaptadorparaabonoseutilizaOnicarnenteparaprop6sitosde
abono.Envezde recolectarlosrecortesdelc_spedenun colector
de c_spedo canaldedescargalateral,algunosrnodelosde podadora
tienenla opci6nde recircularlosrecortesenel c_sped.Estose llama
abonar.
CANAL DE DESCARGA LATERAL
Sucortacespedestransportadocornoun rnulcher.Paradescargarlos
recortesdeperi6dicode hierbaal ladoencarnbio,sigalas instruc-
clonesen la secci6ndeMontajeparaatar elcanalde descargalateral.
Mantengasus manosy pies alejadosdel area del canal de la plataforrna
de corte. Consultela etiqueta deadvertencias en la unidad.
TAPON DE ACEITE/VARILLA DE MEDICI()N
DEL NIVEL DE ACEITE
Consulteiasecci6nMantenimientoparaobtenerinstruccionessobre
c6moverificarel aceite.
ESCUDO DE RUTA
Elescudo de ruta se adjunta a la parte trasera de ia ma.quinay esta.
ahi paraprotegeral operadorde escombrosquevuelan. No utiliceel
cortacesped a menosque el escudoes totalmente funcionaly en su lugar.
43
Page 44

LLENADO DE GASOLINA Y ACEITE
Aceite (se envia una botella junto con la unidad)
Primer uso
1. Saquela varilla del nivel deaceite (G).
2. Con la cortadorade cesped ubicada en suelo nivelado, viertael
aceitebntamente pot dentrodel tubode Ilenadode aceitedel motor
(H) hastalamarca de limite alto en la varilla medidora del nivel de
aceite(J). Vea la Figura 13.
3. Vuelvaa colocar la varilla de Ilenadode aceite y ajQstela.
Usos posteriores
Use aceitepara motor de 4 tiempos que cumpla o sobrepase los
requisitos para laclasificaci6n de servicio APi SE SG, SH, SJ o
equivalente.
Compruebesiempre ia etiquetade servicio API en el recipientedei aceite
para asegurarseque incluye las letrasSE SG,SH, SJ o equivalente.
Temperaturasai aire libre de determinar laviscosidaddei aceite correcto
para el motor.Use la tabla paraseleccionar la mejor viscosidad para el
rangode temperatura aiairelibre se espera.
f
J
Figura13
L 40
6s g
8s_ _ _o ..... so
50 _ o
4 _C*,_*_**,!7.t, |
-.22 , _};::_:_,.,,..so
* Potdebajo de 40 oF (4 oC) el uso de SAE30 darfi lugaraduros de
partida.
** Potencima de 80 oF (27 oC) el usode 10W-30puede provocar un
aumentodei consumo de petr61eo.Nivel deaceite con mils frecuencia.
1. Reviseel aceite con el motorparadoy nivelado.
2. Quiteia tapa deldep6sito de aceite/varilla medidora del nivel de
aceiteylimpiela.
3. Coioque y ajuste la varilla indicadora. Luegoquitela para revisarel
nivelde aceite.Vea ia Figura 13.
4. Siel nivelde aceite estfi cercao pot debajo de la marcade limite
bajo de la varilla medidoradel nivelde aceite,quite la tapa del
dep6sito de aceite/varilia medidoradei nivei de aceite y iBnelo con
el aceiterecomendado hasta la marca de limitesuperior. No Ilene de
mils.
5. Vuelvaa instalar la tapa/varilla medidora del nivel de aceite.
: j{ -20
V
Gasolina
2o
€ ":7
,, La gasolina con hasta un 10% de etanoi (gasohoi) es aceptabb.
Eche gasolinaen un firea bien ventiiada y conei motor parado. Sielmotor
haestado funcionando, deje que seenfrie primero. No eche gasolinaa
la mfiquinaen ei interior de unedificio donde los vapores de la gasolina
_ued_ llama o chis a.
® A
Lagasolina es altamente inflamabley explosiva y usted puede quemars_
o lesionarse gravementeal reabastecer.Pare elmotor y mantenga lejos
el calor, las chispas y las llamas. Reabastezcas61oalaire libre. Limpie
inmediatamente los derrames.
Siva a usarei equipo de forma intermitenteo s61oocasionalmente,
consulte ia secci6n deAimacenamiento FueradeTemporada para
obtener mils informaci6nsobre el deterioro delcombustible.
NOTA:El combustible puede dafiar la pinturay algunos tipos de plfistico.
Tengacuidado de no derramar combustible cuando Ilena el tanque.
No use nuncagasolina rancia o contaminada ni mezclas de aceite y gaso-
lina.No permita queentre suciedad o aguaen el tanque de combustible.
1. Quite ia tapadei tanque de combustible.
2. Agreguecombustible hasta ia parte inferior del iimitede nivel de
combustible en ei tubo deltanque. No iiene de mils. Limpieel
combustible derramadoantes de arrancarel motor.
3. Aprieteeltap6n firmemente.
4. Antes de arrancarel motor,aBjese al menos 3 metrosdel
emplazamiento y la fuente de lagasolina.
No utilicegasolinas no aprobados, tales como E85. No mezcleel aceite
en ia gasolinao modificar el motorparafuncionar con combustibles
aiternativos. Esto daharfi los componentesdel motory anular la
garantia del motor.
De combustible debe cumplirestos requisitos:
,, Limpia, fresca, la gasolina sin piomo.
• Un minimo de 87 octane/87 AKI (91 RON).
AsegQresede que ninguna personaaparte deioperador permanezca
cerca de ia cortadora mientras arranca el motor u opera la misma.
Nunca encienda el motor en espacioscerrados o en una zona con poca
ventilaci6n. El escapedel motor contiene mon6xidode carbono, ungas
inodoro y ietai. Mantenga ias manos,los pies, el cabello y la ropa suelta
alejados de las partes m6viles del motor y de la cortadora.
44
Page 45

PARA ENCENDER EL MOTOR
1. Coi6quesedetra.sde la podadora, aprieteia manijade control de la
cuchillay sostengala contra lamanija superior.Vea la Figura 14.
2. Sostengafirmemente lasdos manijasjuntas, tomela manija del
arrancadorde retroceso y tire de iacuerda para sacarlacon un
movimientora.pidoycontinuo.Vea la Figura 14.Mantenga firme la
manijadel arrancador,deje que la cuerda regrese lentamenteal
arrancador.Repitahastaque el motor este en marcha. Dejeque la
cuerdase enrosque lentamentede regreso.
De retracci6nra.pidadel cord6n de arranque (soborno) tirara,de mano y
el brazo hacia elmotor ma.sra.pidodeIo que puededejar ir. Lasfracturas
de huesos,fracturas, contusiones o esguinces podriaresultar.
PARA DETENER EL MOTOR
1. Sueltela manija de control de la cuchilla paradetener el motor y la
cuchilla.
Espereaque ia cuchillase haya detenidopot completo antesde hacer
cualquiertrabajo en la cortadora o de retirarel colector de cesped.
USO DE LA CORTADORA DE CESPED
Aseg_resedequeel cespedest&librede piedras,palos, cablesuotros
objetosque pudiesendafiar la cortadorao el motor.Dichos objetospueden
setarrojadosaccidentalmentepotlacortadora encualquierdirecci6ny
provocarlesionespersonalesgravesai operadory a otraspersonas.
AIoperar una cortadora de cespedes posible que objetos extrafios sean
arrojadosalos ojos, Iocual puede dafiarlos gravemente.Utilicesiempre
galas de seguridad durante laoperaci6n de la cortadora de cespedo
mientrasla ajusta o repara.
USO COMO ABONADORA
Paraabonar el cesped, quite el colector de cespedde la ma.quina.La
puerta dedescarga posterior debera estar cerrada. Paraun abono
eficiente, nocorte cesped hQmedo.Siel cesped ha crecidoma.sde 10,2
cm. (4 pulg.) no se recomienda el uso de la podadora comoabonadora.
Enese caso, use el colector de cesped para embolsar los recortes.
Figura14
USO DEL COLECTOR DE ClaSPED
Puedeutilizar elcolector de cesped para recoger dichos recortes mientras
opera la podadora.
1. Acople el colector de cesped siguiendo ias instruccionesen ia
secci6n de Montaje.Los recortesde cesped se recolectara.n
automa.ticamenteenla bolsa a medida quepase ia podadora.Opere
la podadorahasta que ia bolsa de recolecci6n este Ilena.
2. Detengaei motor potcompletosoltando la manijade control de la
cuchilla. Compruebe que la unidad se hayadetenido por completo.
3. Paradeshacerse de los recortes de cesped ievante iapuerta de
descarga y tire de la bolsade recolecci6nhacia arriba, aparta.ndola
de la podadora.
Si golpea un objeto extrafio, detenga ei motor.Retire elcable de ia
bujia, inspeccione detenidamentela cortadora para vet que no tenga
dafios, y repare el dafio antesde volvera encender y operar. Elexceso
de vibraci6n de la cortadora durante la operaci6n es una indicaci6nde
dafio. Se debe inspeccionary reparar la unidad Io antes posible.
45
Page 46

PROGRAMA DE iVlANTENllVllENTO
Antesde realizarcuaiquiertipode mantenimientooservicio,desenganche
todosloscontrolesy detengaelmotor.Espereaque sedetengancomple-
tamentetodaslaspiezasm6viles.Desconecteelcane de labujiay p6ngalo
haciendomasacontraelmotorparaevitarquese enciendaaccidentaimente.
Siga el cronogramade mantenimientoque se presentaa continuaci6n.
Estatablas61odescribe pautasde servicio. Utiiiceia columna Registro
de Servicio para hacer ei seguimientode las tareas de mantenimiento
completadas. Para ubicar el Centro de Servieio Sears m_s cercano o
para programar un servieio, simplemente comun/quese con Sears al
tel_fono 1-800-4-MY-HOME®.
Cada uso
lras 5 horas
Anuaimenteo 25 horas
Anuaimenteo 50 horas 1. 1. Oambiar
Anuaimente 1. 1.
Antesde aimacenar 1. 1.
1. Nivelde aceite dei motor
2. Piezassueltaso faltantes
3. Unidady motor
1. Aceitedei motor
1. Depuradordeairet
2. Varillajes/pivotesde control y ruedas
3. La parteinferior de ia plataformade
ia cortadora de cesped
Aceite dei motor
Bujia de encendido
2. 2.
Depuradorde aire
Sistemade combustible
1. Verificar
2. Ajustaroreemplazar
3. Limpie
1. Cambiar
1. Limpiaroreemplazar
2. Lubricarcon aceiteligero
3. Limpie
Reemplazar
Reemplazar
Hacerfuncionar elmotor hastaque se
detenga porfaita de combustible o aSadir
estabilizadorde un tanque Ilenode
combustiblenuevoantes de su aimace-
namiento.
Limpiorn_.sa menudoen condicionespolvorientaso cuandolosescombrosaerotransportadosest_.npresentes.Sustituyaelfiltrode airede
sermuysucio.
46
Page 47

Detengasiempreelmotor,desconecteelcabledela bujiayhagamasa
contraelmotorantesdereaiizarcuaiquiertareade mantenimientoasu
ma.quina.
RECONIENDACIONES GENERALES
Respetesiemprelasreglasdeseguridadcuandorealicetareasde
mantenimiento.
Lagaranfiadeestacortadoranocubreelementosquehan
estadosujetosalmalusoola negligenciadeloperador.Para
recibirel reembolsototaldelagarantia,eioperadordebera,dar
mantenimientoaiequipotai ycomoseindicaenestemanual.
Elcambiode lavelocidadcontroladadelmotorinvaiidara,lagarantia
deimotor.
• TodoslosajustesdebenserverificadospotIomenosunavezen
cadaestaci6n.
• Reviseperi6dicamentetodoslossujetadoresy compruebequeesten
bienajustados.
iVlANTENIIVilENTO DEL MOTOR
Bujia de encendido
Paraunbuenfuncionamiento,labujiadebeestaradecuadamente
abiertay librededep6sitos.Cambielabujiacada50horaso unavezpor
temporada.Reemplacela bujiaanualmente.
1. Desconecteelcapuch6nde labujiay retirecualquiersuciedaddel
a.readeesta.
2. UselaIlavedebujiasdeltama_oadecuadoparaextraerla.
f
Electrodo
J
Figura15
NOTA:ReemplazarconunaChampion®RJ2YXLEbujia.
3. Compruebeel entrehierroconuncalibradordealambre.La
separaci6ncorrectaes 0,020in.(0,51mm).Vea[aFigura15.Sies
necesario,reajusteelentrehierro.
4. Instaieyapriete[abujiaa[parde aprieterecomendado.Parael
ajustedelentrehierroo el pardeapriete,consultela secci6nde
Especificaciones.
5. Coloqueel capuch6ndela bujia.
Filtro de aire
Unfiltrode airesuciorestringir&elfiujodeaireal carburadory causar&
el funcionamientodefectuosodelmotor.Inspeccioneelfiltrocada vez
queopereel motor.Necesitar_.limpiarcon m_.sfrecuenciaelfiltro si
ustedoperael motoren_.reasmuypoivorientas.
Limpioelfiltrodeaire cada25horasde laoperaci6no unavezpor
temporada.Reemplacee[fiitrodeaireanualmente.
Nuncaarranqueuopereel motorsiremovi6elconjuntodelfiitrode
aireo el filtrode aire.
NOTA:Nouseairea presi6nni solventesparalimpiarelfiltro.Elairea
presi6npuededaSarelfiltroy lossolventespuedendisolverlo.
1. Aflojeeltornilloquesujetalatapade pl_.sticoy tapade lacarcasa
deinclinaci6nenla partedeabajodelmotor.VerFigura16.
2. Quiteelfiltrode airedela viviendacubiertadepl_.stico.
Figura16
3. Paraaflojarlosdesechos,golpeesuavementeelfiltrosobreuna
superficiedura. Siel filtroest,.excesivamentesucio,reempl_.celo
conun nuevofiltro.
4. Inserteaqd cubiertaen las ranurasenla parteinferiordela base.
5. Inclinaci6nde lacubiertaparaarribaen lugarseguroyconcierre.
4.7
Page 48

Comprobarel aceitedel motor
Comprobarel nivelde aceiteantes de cada operaci6n. Aseg_resede que
el niveide aceite se mantiene.
1. Reviseel aceite con ei motorparadey nivelado.
2. Quiteia tapa deldep6sito de aceite/varilla medidora del nivel de
aceiteylimpiela.
3. Coloque y ajuste la varilla indicadora. Luegoquitela para revisarel
nivelde aceite.
4. Siel nivelde aceite esta.cercao pot debajo de la marcade limite
bajo de la varilla medidoradel nivelde aceite,quite la tapa del
dep6sito de aceite/varilia medidoradei nivei de aceite y ilenelo con
el aceiterecomendado hasta la marca de limitesuperior. No Ilene de
ma.s.
5. Vueivaa instalar ia tapa/variiia medidora del nivel de aceite.
Cambiar el aceite del motor
Filtro de aire
_ ap6n de
aceite/varUla de
medici6n del nivel
de aceite
/
_,,_.Silenciador
La gasolina y sus vapores son extrernadarnente infiarnables y
explosivos. Un incendio o una explosi6n pueden causar graves
quernaduras o a rnuerte.
Carnbieel aceitedelmotordespu6sdelas prirnerascinco horasde
operaci6n,ycadacincuentahorasounaveza laternporadadespu6s.
Si drenael aceitedesdeel tubosuperiordeIlenadodeaceite,el
tanquedecombustibledebeestarvacioo deIo contrariopodria
presentarseunafugade combustiblequepodriaocasionarun
incendioounaexplosi6n.Paradesocupareltanquedecombustible,
opereel motorhastaquesedetengapor lafaltadecombustible.
1. Con el motor apagado pero aQncaliente, desconecte el cable de la
bujia y rnant6ngalo adistancia de la bujia.
2. Coloque unrecipiente adecuadocerca del motor para recoger el
aceiteusado.
3. Quitela tapa/varilla medidora del nivelde aceite y dreneel aceite ai
recipienteinclinando el motor hacia el tubede Ilenado del aceite.
Vea laFigura 17.
El aceiteusadoes unresiduo peligroso.Elimineel aceite usado
adecuadamente.NoIoarroje juntocon los residuesdomiciliarios.CensuRe
alas autoridadeslocaleso al centrede servicioSears paraaveriguar
d6nde hayinstalacionesparalaeliminaci6n/reciclaje segura(o)delaceite
usado.
J
FJgura 17
4. Con ei motoren una posici6nnivelada, Ilene hastaiamarca de
limite are en la varilla medidora del nivel de aceite con el aceite
recomendado.
Ponerenrnarchaelmotorcon unnivelde aceitebajopuedecausar
da_osenel motor.
5. Vueivaa instaiarbien la tapa/varilla medidora del niveldeaceite.
Limpie el motor
Diariamenteoantes de cada use, limpie el cesped, la grasa o los
residues acumuladosdel motor.Mantenga limpios el varillaje,los
resortes y los controles. Mantenga eia.reaque rodea al silenciadory
detra.sdei mismo iibrede cualquier residue combustible.
El mantenimientodel motoren condicioneslimpias permiteel
movimientode aire airededordel mismo.
Laspartes dei motor se @ben mantenerlimpias para reducir
el riesgode sobrecalentamientoy combusti6n de los residues
acumulados.
No useagua para limpiar ias piezasdei motor.Elagua puede contaminar
el sistemade combustible. Use un cepillo o un trapo seco.
48
Page 49

LUBRICACION
Control de la cuchilla
Lubriquecon aceiteligero los puntosde pivote del control de la cuchilla al
menos unavezcada estaci6n. Estecontrole debe funcionar libremente en
ambas direcciones.Vea la Figura18.
LAVADO DE LA PLATAFORiVlA
Laplataformade su podadoraest&equipada con un puertode agua sobre
susuperficie como partedel sistema de lavadode ia plataforma.
Utiliceel iavadode la plataformapara lavar ia parte inferiorde la
plataformay quitar los recortesde cesped e impedir la acumulaci6nde
sustanciasquimicas corrosivas.
Realicelos siguientes pasos DESPUESDE CADACORTE DE CESPED:
1. Ernpujela podadora a una zona nivelada y despejada del cesped,
que se encuentre suficienternente cerca de una canilla de agua
al alcance de la rnanguera del jardin. Si adjunta, quite la bolsa de
cesped.
AsegQresede que elcanal de descarga de la podadoraNO ESTE
ORIENTADOen la direcci6n en que se encuentran la casa, elgaraje, los
vehiculosestacionados,etc.
2. Enrosqueelacopledernanguera(ernbaladoconel Manualdel
Operadordesutractor)enel extrernodelarnangueradejardin.
3. Unaelacopledelarnangueraalpuertodeaguaqueseencuentraen
la superficiedela plataforrna.VealaFigura19.
4. Abrael surninistrode agua.
5. Arranqueelmotorcornosedescribeenlasecci6nde Operaci6n.
6. Hacerfuncionarelmotordurantedosrninutoscornominirno,
perrnitiendoquela parteinferiordela plataforrnade cortese lave
a rondo.
7. Hojadecontrolde lacuchillaal pararel motory lacuchilla.
8. Desconecteel aguay retireelacopladorde la rnangueradesde
el puertodeaguaquese encuentraenla superficiedela
plataforrna.
Despuesde limpiariaplataforma,reinicielapodadora.Mantengaei motor
yiacuchiiiaenfuncionamientodurantedosminutosporiomenospara
permitirquesesequetotaimenteelladoinferiordela misma.
Figura18
/'
/
/
/,
j,//*
/
/
/
!
Figura19
49
Page 50

CUIDADO DE LA CUCHILLA "f _"
Cuandosaque la cuchilla de corte para afilarlao reemplazarla, protejase
las manos usandoun parde guantes para trabajo rudoo un trapo gruesc
parasostener la cuchilla.
Inspeccioneperi6dicamente el adaptadorde la cuchiiiaen busca de
rajaduras,especialmente cuandogolpeeun objeto extra_o. Realicelos
reemplazosqueresulten necesarios. Siga los pasosque aparecen debajo
para realizar eimantenimiento de la cuchilla.
1. Desconecteel capuch6n del cable de la bujia. Gire la cortadora de
cespedsobre ei costadoy compruebeque el filtro de aire y el
carburadorqueden mirando haciaarriba.
2. Saqueel perno y el soportede campana de ia cuchiiia que sostienen
la cuchiila y el adaptador de la mismaal cigQe_aldel motor.Veala
Figura20.
3. Saquela cuchilla y el adaptador delcigQe_ai.
NOTA:Quitando estos articulos, la arandela tambienpueden iiberarse
de ei cigQe_al.Este seguro para hacer lanota de laorientaci6n de este
arficulo para nuevasesi6n.
4. Saqueia cuchiiia del adaptador para comprobar el equilibrio.
Balanceela cuchilla sobre un destornilladorde eje redondo para
inspeccionarla.Saque metal dei iado pesado hastaque quede bien
equilibrada.Cuandoafile la cuchilla, siga el a.ngulooriginal de la
mueiacomo guia.Afile cada horde decorte pot igual para mantener
el balance de la cuchilla.
Si ia cuchiiia esta.desequiiibradagenerara,vibracionesexcesivas cuandoI
rotea aitas velocidades. Puede producirda_os a ia cortadora decespedI
[y se puede romper,causandoasi esonespersona es. j
5. Lubriqueel cigQehaidei motor y ia superficieinternadel adaptador
de ia cuchilla con aceite iigero. Desliceel adaptadorde la cuchilla
sobre el cigQe_aldel motor. Instaleia cuchiiia en ei adaptador
con el lado marcado "Bottom" (inferior)(o con el numerode parte)
hacia eipiso cuando iacortadora de cespedesta.en posici6n
de funcionamiento.AsegQreseque la cuchilla quede aiineaday
asentadaen ias bridasdel adaptador.
6. Coloqueei soportede campana de la cuchilla en ia misma. Aiinee
las muescas del soportede campana de la cuchillacon los orificios
peque_osde la cuchilla.
7. Vuelvaa colocar el pemo hexagonaly ajQstelosegQnlos siguientes
valoresde torsi6n: 450 Ib-pulg como minimo,600 Ib-pulg como
ma.ximo.
Paragarantizar ia operaci6n segura de la cortadora de cesped, revise
periddicamenteel perno de la cuchilla paradeterminar si esta.bien
ajustado.
J
Figura20
5O
Page 51

Nunca almacenela cortadora de cesped concombustible en el tanque
en unespacio cerrado o en a.reascon pocaventilaci6n,donde los
gases deicombustible puedanalcanzar el fuego, chispaso una luz
pilotocomo ia que tienen algunos homos, calentadores de agua,
secadores de ropa o aigQnottodispositivo a gas.
PREPARACI6N DEL MOTOR
Yaquelosmotoresalmacenaronm_.sde30 dfas:
1. Paraimpedirala gomaformarseenel sistemadecombustible
o en partesdecarburador,dirijaselmotorhastaqueestose
parea faltadelcombustibleoa_adirunaditivode gasolinaal
gasenel tanque.Si ustedusa unaditivodegas,dirigeel motor
durantevariosminutosparaponerencirculaci6neladitivoporel
carburador-- despu_squeel motoryelcombustiblepuedenser
almacenadoshasta24 meses.
2. Mientrasel motorestodavfacaliente,cambioelpetr61eo.
3. Limpieel motordeescombrossuperficiales.
PREPARACI6N DE LA CORTADORA DE
CO'SPED
Limpiey iubrique la cortadora como se describe en las instrucciones
de lubricaci6n.
• No utilice una lavadoraa presi6n niuna manguerade jardfn para
limpiar su unidad.
Cubra la cuchilla de la cortadora con grasa parachasis para impedir
la oxidaci6n.
• Refierasea la PREPARACIONDELMOTORpara instrucciones de
almacenaje de motor correctas.
• Almacene la unidad en una zonalimpia y seca. No la almacene
cerca de materiales corrosivoscomo pot ejemplo fertilizantes.
Cuando almacenecuaiquier tipo deequipo motorizadoen un gaip6n
de dep6sito met_.iicoocon poca ventilaci6n,tenga especial cuidado
de realizarle untratamiento antioxidanteal equipo. Use aceite ligeroo
silicona para recubrir ei equipo, especialmentelos cables y partes m6viles
de su cortadoraantes de aimacenarla.
51
Page 52

hayanvenidoa unaparadacompleta.Desconecteel alambrede bujfay b_.selocontrael motorparaprevenirel comienzoinvolun-
SiempreIlevepuestoscristabs inastillablesdurantelaoperaci6norealizandocualquierajusteo reparaciones.
Elmotor noarranca
1. Controlde ia cuchilla desenganchado.
2. Se hadesconectado el capuch6n de la bujia.
3. Eldep6sito de combustible esta.vacio oel
1. Engraneel control de la cuchiila.
2. Conecteel cable al capuch6n de la bujia.
3. Lleneel tanque con gasolina limpiay nueva.
combustiblese ha echado a perder.
Elmotorfunciona de
manera erra.tica
4. La bujia nofunciona correctamente.
5. Elmotorsedesbord6.
6. Lineade combustible bloqueada.
1. Elcapuch6n de la bujia esta.flojo.
2. Elcombustible se haechado aperder.
3. La ventilaci6nde la tapa del combustible esta.
4. Limpie,ajuste la separaci6n, ocambie la bujia.
5. Esperarunosminutos parareactivarse.
6. Contactecon sucentro de partes y reparaciones Sears.
1. Conectey ajuste el capuch6nde la bujia.
2. Lleneel tanque con gasolina limpiay nueva.
3. Destape laventilaci6n.
obstruida.
4. Aguao suciedad en el sistema del combustible.
4. Vacieeitanque de combustible. Carguecombustible
nuevoen el dep6sito.
Elmotor recalienta
5. Elfiitro de aire esta.sucio.
6. Lineade combustible bloqueada.
1. Elnivel de aceite del motor esta.bajo
2. Flujodeairerestringido
5. Consulteia secci6n Mantenimientodei manual.
6. Contactecon sucentro de partes y reparaciones Sears.
1. Lleneel motor con ia cantidady tipo de aceiteadecuado.
2. Limpielos residuosde airededor de las aietas de
refrigeraci6ndel motor y del alojamientodel soplador.
Elmotorvacila a altas 1. Poca separaci6n de los electrodosde la bujia 1.
Ajuste laseparaci6n a .030".
revoluciones
Elmotorfunciona mal 1. Bujia atorada,averiada o excesode separaci6n. 1. Limpie, reemplaceo reajuste la separaci6n a .030".
en marcha ienta 2. Elfiitro de aire esta.sucio 2. Consulteia secci6n Mantenimientodei manual.
Demasiadavibraci6n 1. Cuchilla de corte flojao descentrada. 1. Aprietela cuchilla y el adaptador Baianceela cuchilla.
2. Cuchillaabollada. 2. Cambielacuchilla.
Lacortadora de
cesped no regresa
el recorte de cesped
comoabono
1. CespedhQmedo.
2. Cespeddemasiadoalto.
1.
No corte el cesped cuando este mojado,espere hasta
quesea ma.stardepara hacerlo.
2.
Corte una vez aaitura de corte elevada, iuegovueiva a
cortara ia altura deseadao haga unsendero de corte
ma.sangosto.
Afileo cambie la cuchilla.3. La cuchiiiade ia cortadora no esta.afiiada. 3.
Corte desiguai 1. La posici6n de las ruedas no es correcta. 1. Coloque ias cuatroruedas en la misma posici6nde aitura.
2. La cuchiiiade ia cortadora no esta.afiiada. 2. Afiieo cambie ia cuchiiia.
_NECESITA MAS AYUDA?
[fr_cor_tr_>r5 b I'e pue v:_>y m4 en managemylife.com - isin cargo!
En linea podr3 encontrar este manual y los rnanuales de todos los otros productos que posea.
Sus preguntas ser3n respondidas por nuestro equipo de especialistas.
Obtenga un plan de mantenimiento personalizado para su hogar,
Encuentre informaciOn y herramientas que Io ayudar_n con los proyectos de su hogar,
managemylife
52
Page 53

(Esta p_.ginase aplica s61oen EE.UU. y Canada.).
Sears Brands Management Corporation, el Consejo de Recursos Ambientales de California (CARB)
y la Agencia de Protecci6n Ambiental de los Estados Unidos (EPA)
Declaraci6n de garantia del sistema de control de emisiones (derechos y obligaciones de la garanfia de defectos del propi=
LACOBERTURADE LAGARANTJADECONTROLDEEMISIONESES Y PARALOSMODELOSCERTIFICADOSDELANO 1997YPOSTERIORES,
APLIOABLEALOSMOTORESCERTIFICADOSCOMPRADOSENCALIFOR- QUESECOMPRENY UTILICENENCUALQUIERPARTEDE LOSESTADOS
NIAEN1995Y POSTERIORMENTE,QUESE UTILIZANENCALIFORNIA, UNIDOS(Y A PARTIRDEL 1DE ENERODE2001ENCANADA).
Declaraci6n de garanfia sobre defectos en el control de emisiones para California y los Estados Unidos
ElConsejodeRecursosAmbientalesdeCalifornia(CARB),la EPA(Agencia
de Protecci6nAmbientaldelosEE.UU.)y Searstienenelgusto deexplicarla
garantiadelsistemadecontroldeemisionesparamotoresdela_o 2000y para
elfuturoconrelaci6na motorespeque_ostodoterreno(SORE).EnCalifornia,
los nuevosmotorespeque_ostodoterrenodebenestardise_ados,construidos
y equipadosparacumplirconlas rigurosasnormasanti-smogdelestado.En
el restodelos EstadosUnidos,losmotoresnuevostodoterrenodeencendido
porchispacertificadosparaela_o 1997debencumplirest_ndaressimilares
establecidospot la EPA.Searsdebegarantizarelsistemadecontroldeemis-
Cobertura de la garantJa Sears para defectos en el control de emJsiones
Losmotorestodoterrenopeque6osest_ngarantizadosenIorelativoalcontrol alas disposicionesque seindiquenacontinuaci6n.Si una partedesumotor
deemisionesparadefectosenpiezasduranteunperiododedosa_os,sujeto cubiertapot lagaranfiaes defectuosa,Searsreparar_osustituir_dichaparte.
Responsabilidades del propietario en relacibn con la garantia
Comopropietariodelmotortodoterrenopeque_o,Ud.esresponsabledela
realizaci6ndelmantenimientorequeridoquese incluyeenlas instrucciones
deoperaci6ny mantenimiento.Searsrecomiendaquese conserventodoslos
recibosrelativosalmantenimientodesumotortodoterrenopeque_o,pero
nopudedenegarla garantiasimplementepor la faltade losmismos,opor su
incumplimientodelmantenimientoprogramatic.Comopropietariodelmotor
peque_otodoterrenodebesaberque,sinembargo,Searslepuedenegar
lacoberturade lagarantiasi su motortodoterrenopeque6oouna piezadel
mismohanfalladodebidoa abuso,negligencia,mantenimientoindebidoo
Disposiciones de la garantJa Sears para defectos en el control de emJsiones
Lassiguientessondisposicionesespecificasrelacionadasconla coberturadelagarantiaparadefectosenel controldeemisiones.Esun a_adidoa lagarantiade
motorSearsparamotoresnoreguladosqueseencuentraenlasinstruccionesdefuncionamientoy mantenimiento.
1. Piezascongarantia
Lacoberturadeesta garantiase extiendeL]nicamentealas piezas
queaparecena continuaci6n(las partesde lossistemasdecontrolde
emisiones),siemprequedichaspiezasestuvieranya enelmotoren el
momentodesucompra.
a. Sistemademedici6ndecombustible
•Sistemadeenriquecimientoparaarranqueenfrio
•Carburadory partesinternas
• Bombade combustible
b. Sistemadeinducci6nde aire
• Filtrodeaire
•Colectordeadmisi6n
c. Sistemadeencendido
• Bujia(s)deencendido
•Sistemadeencendidomagneto
d. Sistemadelcatalizador
•Convertidorcatalitico
•Colectordeescape
•Sistemadeinyecci6nde aireov_lvulade impulsos
e. Elementosvariadosusadosenlossistemasanteriores
•Wlvulas devacio,sensiblesa temperatura,posici6nytiempo
einterruptores
•Conectoresy montajes
2. AIcancedela cobertura
Searsgarantizaal poseedorinicialy a loscompradoressubsiguientes
quelas piezascongarantianotendr_ndefectosen materialesnimano
deobraque provoquenlafalladelas mismasduranteun periodode
dosaSosa partirdela fechaen queelmotorseentregaa uncomprador
particular.
3. Sincargo
Lareparaci6no reemplazodecualquierpartecongarantiase realizar_
Enlos EstadosUnidosy Canad_hayunalineadeatenci6nde24 horas,1-800-469--4GG3,quecuentacon unmenL]conmensajespre-grabadosque contienen
informaci6nparael mantenimientodemotores.
etario)
ionesdesumotorparalosperiodosdetiempoenumeradosacontinuaci6n,
siemprequenohayaabuso,negligenciao mantenimientoindebidode su
motortodoterrenopeque_o.Susistemade controldeemisionespuedeincluir
piezastalescomoel carburador,el filtrodeaire,elsistemadeencendido,el
silenciadoryelconversorcatalitico.Tambienpuedeincluirconectoresyotras
unidadesrelacionadasconlasemisiones.Dondeexistaunacondici6ncubierta
porla garantia,Searsreparar_supeque6omotortodoterrenosin costoalguno
incluyendodiagn6stico,piezasy manodeobra
a modificacionesnoaprobadas.Ud.es responsabledepresentarsumotor
todoterrenopeque6oaundistribuidordeserviciosSearsautorizadotan pronto
comoaparezcaunproblema.Lasreparacionesdelagarantiasinconfiicto
debencompletarseen unplazodetiemporazonable,nosuperiora 30dias.Si
tienealgunapreguntarespectoasusderechosyresponsabilidadesreferen-
tesa la garantia,debecontactarconunrepresentantedeserviciosSearsal
1--800--469--4663.Lagarantiadeemisioneses unagarantiapor defectos.Los
defectossejuzgandeacuerdoconelfuncionamientonormalde unmotor.La
garantiano est_relacionadaconunapruebade emisionesenuso.
sin cargoalgunoparael poseedor,incluyendotareasdediagn6sticoque
permitandeterminarsi unapartecongarantiaes defectuosa,siempreque
dichodiagn6sticose realiceenundistribuidorde serviciosSearsautoriza-
do. Parael serviciode lagarantia deemisiones,contactealdistribuidorde
serviciosSearsautorizadom_scercanoincluidoen las"P_ginasamarillas"
en lascategorias"Motores,gasolina","Motoresdegasolina","Podadoras
de cesped",o similares.
4. Reclamacionesyexclusionesala cobertura
Las reclamacionesde lagarantiadebenenviarsedeacuerdocon las
disposicionesdela politicadegarantiaparamotoresSears.Lacobertura
de lagarantiaexcluir_defectosen piezascongarantiaquenoscan partes
originalesSears,o abuso,negligenciao mantenimientoincorrecto,tal y
comose estableceen lapoliticadegarantiaparamotoresSears.Searsno
es responsablede lasfallasenpiezascongarantiaprovocadasporel uso
de partesa6adidas,que noscanoriginalesoquesehayan modificado.
5. Mantenimiento
Cualquierpartecongarantiaquenoesteprogramadaparaserreem-
plazadacomomantenimientorequerido,oque s61odebainspeccionarse
regularmentealefecto de"inspeccioneoreemplacesegL]nsea necesario",
estar_garantizadacontradefectosduranteel periodode la garantia.Todas
las piezasgarantizadasqueesten programadasparasureemplazopara
cumplirconlos requisitosdemantenimientoestar_ngarantizadass61o
porel periodoanterioral primerreemplazoprogramaticparadicha pieza.
Cualquierpiezade recambioqueseaequivalenteenfuncionamientoy
durabilidadpuedeusarsepararealizarmantenimientoo reparaciones.El
propietarioes responsablederealizartodoel mantenimientorequerido,tal
y comose defineenlas instruccionesdefuncionamientoymantenimiento
Sears
6. Coberturaindirecta
Porla presente,la coberturaseextiendea la falladecualquiercomponente
de motorprovocadapotlafallade unapiezacongarantiaque estetodavia
en periododegarantia.
Page 54

Busque el periodo de duraci6n de emisiones importantes yla informaci6n de clasificaci6n de aire en
la etiqueta de emisiones de su motor
Los motores cuyo cumpiimiento con los estAndares de emisi6n Tier 2 de laComisi6n de Recursos Ambientales de California (CARB)
est6 certificado deben exhibir la informaci6n relacionada con el periodo de duraci6n de ias emisiones y la clasificaci6n de aire. Sears
Brands Management Corporation ponen esta informaci6n a disposici6n del consumidor en nuestras etiquetas de emisiones.
Ei Periodo de Duraci6n de las Emisiones describe el nQmero de horas de tiempo real de funcionamiento para el cuai se certifica que
el motor cumpie con ias reglas de emisi6n, descontando el mantenimiento adecuado del mismo segQn las instrucciones de oper-
aci6n y mantenimiento. Se utilizan las siguientes categonas:
Moderado:Se certifica que el motor cumpie con las reglas de emisi6n durante 125horas de tiempo real de funcionamiento del motor.
Inmediato:Se certifica que el motor cumpie con las reglas de emisi6n durante 250 horas de tiempo real de funcionamiento del motor.
Extendido:Se certifica que el motor cumpie con las reglas de emisi6n durante 500 horas de tiempo real de funcionamiento del motor.
Por ejemplo, una cortadora de c6sped tJpica que se empuja desde arras se usa entre 20 y 25 horas por aSo. Por Io tanto, el Periodo
de Duraci6n de Emisiones de un motor con una clasificaci6n intermedia sena equivaiente aentre 10 y 12 aSos.
Laciasificaci6n de aire es un nQmero calculado para describir el nivel relativo de emisiones para un grupo de motores en particular.
Cuanto menor sea la clasificaci6n de aire, mayor es la limpieza del motor. La informaci6n se presenta de forma grAfica en la etiqueta
de emisiones.
Despu_s del 1 de julio de 2000, busque el periodo de cumplimiento de las reglas de
emisiones en la etiqueta de cumplimiento de las reglas de emisiones del motor
Despu6s del 1 de julio de 2000 se certificarA que determinados motores Sears Brands Management Corporation cumplen
con los estAndares de emisiones de la fase 2 de la Agencia de Protecci6n Ambientai de los Estados Unidos (USEPA). Para
los motores certificados para la etapa 2, el periodo de cumplimiento con ias reglas de emisiones al cual se hace referencia
en la etiqueta de cumplimiento con las reglas de emisiones indica el nQmero de horas de funcionamiento para el cual se ha
demostrado que el motor cumple con los requerimientos federales de emisi6n.
Para los motores con desplazamiento inferior a 225 cc, Categoria C = 125 horas, B = 250 horas y A = 500 horas.
Para los motores con desplazamiento de 225 cc o mAs, Categoria C = 250 horas, B = 500 horas y A = 1000 horas.
El desplazamiento de los motores de la serie modelo 150112 es 249 cc.
La presente es una representaci6n gen_rica de la etiqueta de emisi6n que se encuentra generaimenteen un
motor certificado.
FAMILYYBSXS.3192VA 274812
54
GDOC-100182Rev.A
Page 55

Felicitaciones por haber realizado una adquisici6n inteligente. El producto Craftsman® que ha
adquirido esta diseSado y fabricado para brindar muchos aSos de funcionamiento confiable. Pero
como todos los productos a veces puede requerir de reparaciones. Es en ese momento cuando el
disponer de un Acuerdo de protecci6n para reparaciones le puede ahorrar dinero y problemas.
A continuaci6n se detallanlos puntos incluidos en el Acuerdo:
[] Servicio experto prestadopor nuestros10,000especialistas en reparacionesprofesionales
[] Servicio ilirnitado sin cargo para las piezasy la mano de obraentodas las reparacionescubiertas
[] Reernplazo del producto hasta 1500 d61aressi no es posible repararelproducto cubierto
[] Descuento de 25% del precio normal delservicioy de las piezas relacionadascon el mismo que no estencubiertas
por el acuerdo; ademas,25% del precionormal de laverificaci6n de mantenimientopreventivo
[] Ayuda r_pida pot tel_fono - Io IlamamosResoluci6n RApida- elapoyotelef6nicode un Chamusca al representante.
Pienseen nosotroscomo el manual "de un dueSohablador."
Una vezadquirido el Acuerdo, puede programarel servicio con tan s61orealizarunaIlamadatelef6nica. Puede Ilamaren
cualquier momentodeldia o de la noche o programar unservicio en linea.
ElAcuerdode Protecci6nde Reparaci6nes unacompra sin riesgo.Si ustedanulapor alguna raz6n duranteel periodode
garantiade producto,proporcionaremosunreembolso Ileno.O, un reembolsoprorrateadoencualquier momentodespues
del periodode garantia de producto expira, iAdquiera hoy su acuerdode protecci6n para reparaciones!
Se aplican determinadas limitaciones y exclusiones. Para obtener informaciTn adicional y precios en los Estados
Unidos Ilame al 1-800-827-6655.
El *Coverage en Canad_ivaria en algunos articulos. Para detalles Ilenos la Ilamada Chamusca Canad_ien 1-800-
361-8885.
Servicio de instalaci6nde Sears
Sidesea solicitar la instalaci6n profesionalde Searsde aparatosdomesticos,dispositivos paraabrir portones,calentado-
resde agua y otros articulos domesticosimportantes,en los Estados Unidos o Canada flameal 1-800-4-MY-HOME®.
55
Page 56

Your Home
For troubleshooting, product manuals and expert advice:
managernylife
www.managemylife.com
For repair - in your home - of all major brand appliances,
lawn and garden equipment, or heating and cooling systems,
no matter who made it, no matter who sold it!
For the replacement parts, accessories and
owner's manuals that you need to do-it-yourself.
For Sears professional installation of home appliances
and items like garage door openers and water heaters.
1-800-4-MY-HOME ® (1-800-469-4663)
Call anytime, day or night (U.S.A. and Canada)
www.sears.com www.sears.ca
Our Home
For repair of carry-in items like vacuums, lawn equipment,
and electronics, call anytime for the location of your nearest
Sears Parts & Repair Service Center
1-800-488-1222 (U.S.A.) 1-800-469-4663 (Canada)
www.sears.com www.sears.ca
To purchase a protection agreement on a product serviced by Sears:
1-800-827-6655 (U.S.A.) 1-800-361-6665 (Canada)
Para pedir servicio de reparaci6n
a domicilio, y para ordenar piezas:
1-888-SU-HOGAR ®
(1-888-784-6427)
www.sears.com
® Registered Trademark / TMTrademark of KCD IP, LLC in the United States, or Sears Brands, LLC in other countries
® Marca Registrada ! TMMarca de Fabrica de KCD IP, LLC en Estados Unidos, o Sears Brands, LLC in otros paises
MCMarque de commerce ! MDMarque deposee de Sears Brands, LLC
Au Canada pour service en frangais:
1-800-LE-FOYER Mc
(1-800-533-6937)
www.sears.ca
 Loading...