

Page 1
Owner’s Manual
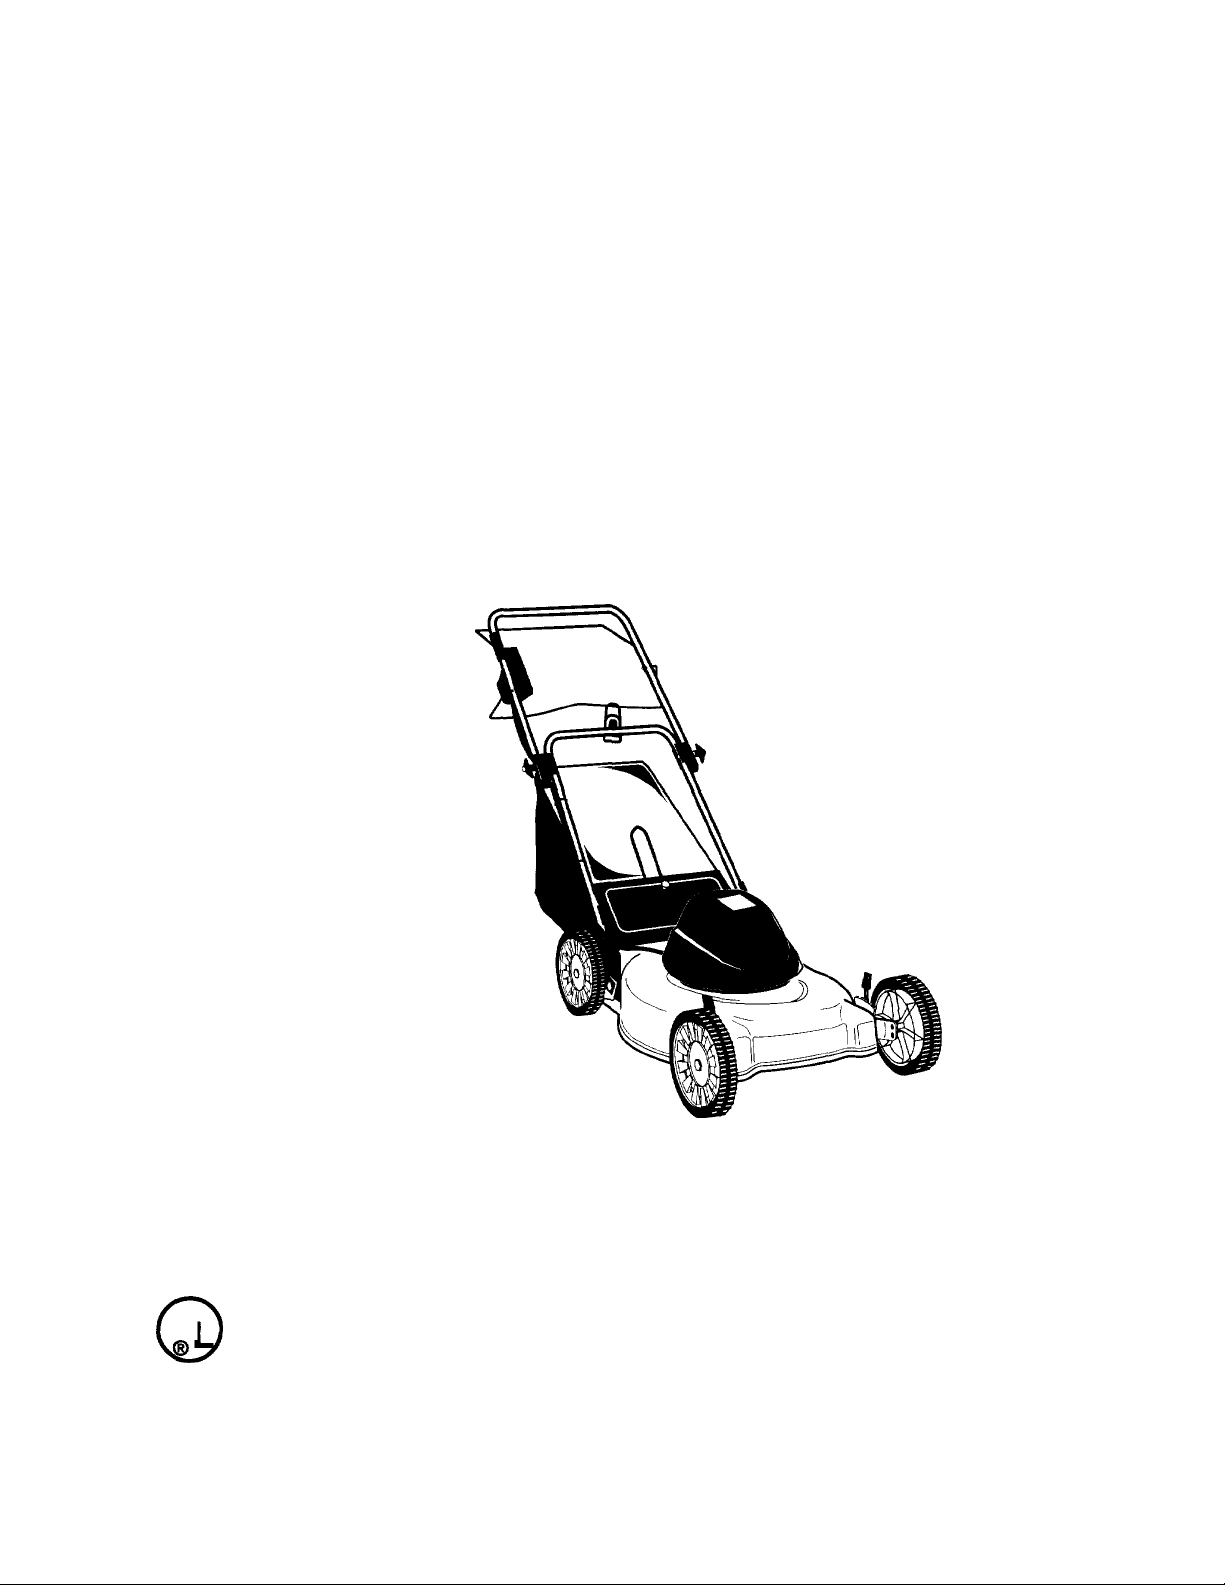
CRAFTSMAN
110 VOLT 12 AMP ELECTRIC
DOUBLE INSULATED
19” REAR DISCHARGE
MULCHING LAWN MOWER
Model No.
247.370253
CAUTION: Before using this product,
read this manual and follow all Safety
Rules and Operating Instructions.
This symbol on the product’s nameplate
u
Sears, Roebuck And Co., Hoffman Estates, IL 60179, U.S.A.
Printed in U.S.A.
means it is listed by
UNDERWRITERS LABORATORIES INC.
770-0253M
Page 2
TABUE OF CONTENTS
Content
Warranty Information
Safe Operation practices
Slope Gauge.............................................6
Assembly
Operation
.......................................
................................
..........................
..................................................
..................................................
Page
2
3
7
9
Content.............................................Page
Maintenance
Service & Adjustment
Off-Season Storage
Trouble-Shooting
Repair Parts.................................................17
................................................
..................................
.....................................
.........................................
12
15
15
16
WARRANTY INFORMATION
One-Year War-anty on Craftsman Lawn Mower
For one year from the date of purchase, whei i this Craftsman lawn mower is maintained, lubricated, and tuned up
according to the operating and maintenance nstructions in the operator’s manual, Sears will repair, free of
charge, any defect in material or workmanshio.
This warranty excludes the mower blades an 1 blade adapters, which are expendable parts and become worn
during normal use.
If this lawn mower is used for commercial or t ental purposes, this warranty applies for only 30 days from the date
of purchase.
WARRANTY SERVICE IS AVAILABLE BY CONTACTING THE NEAREST SEARS SERVICE CENTER IN THE
UNITED STATES. THIS WARRANTY APPLIES ONLY WHILE THIS PRODUCT IS IN USE IN THE UNITED
STATES.
This warranty gives you specific legal rights, and you may also have other rights which vary from state to state.
SEARS, ROEBUCK AND CO., D/817WA, HOFFMAN ESTATES, IL60179
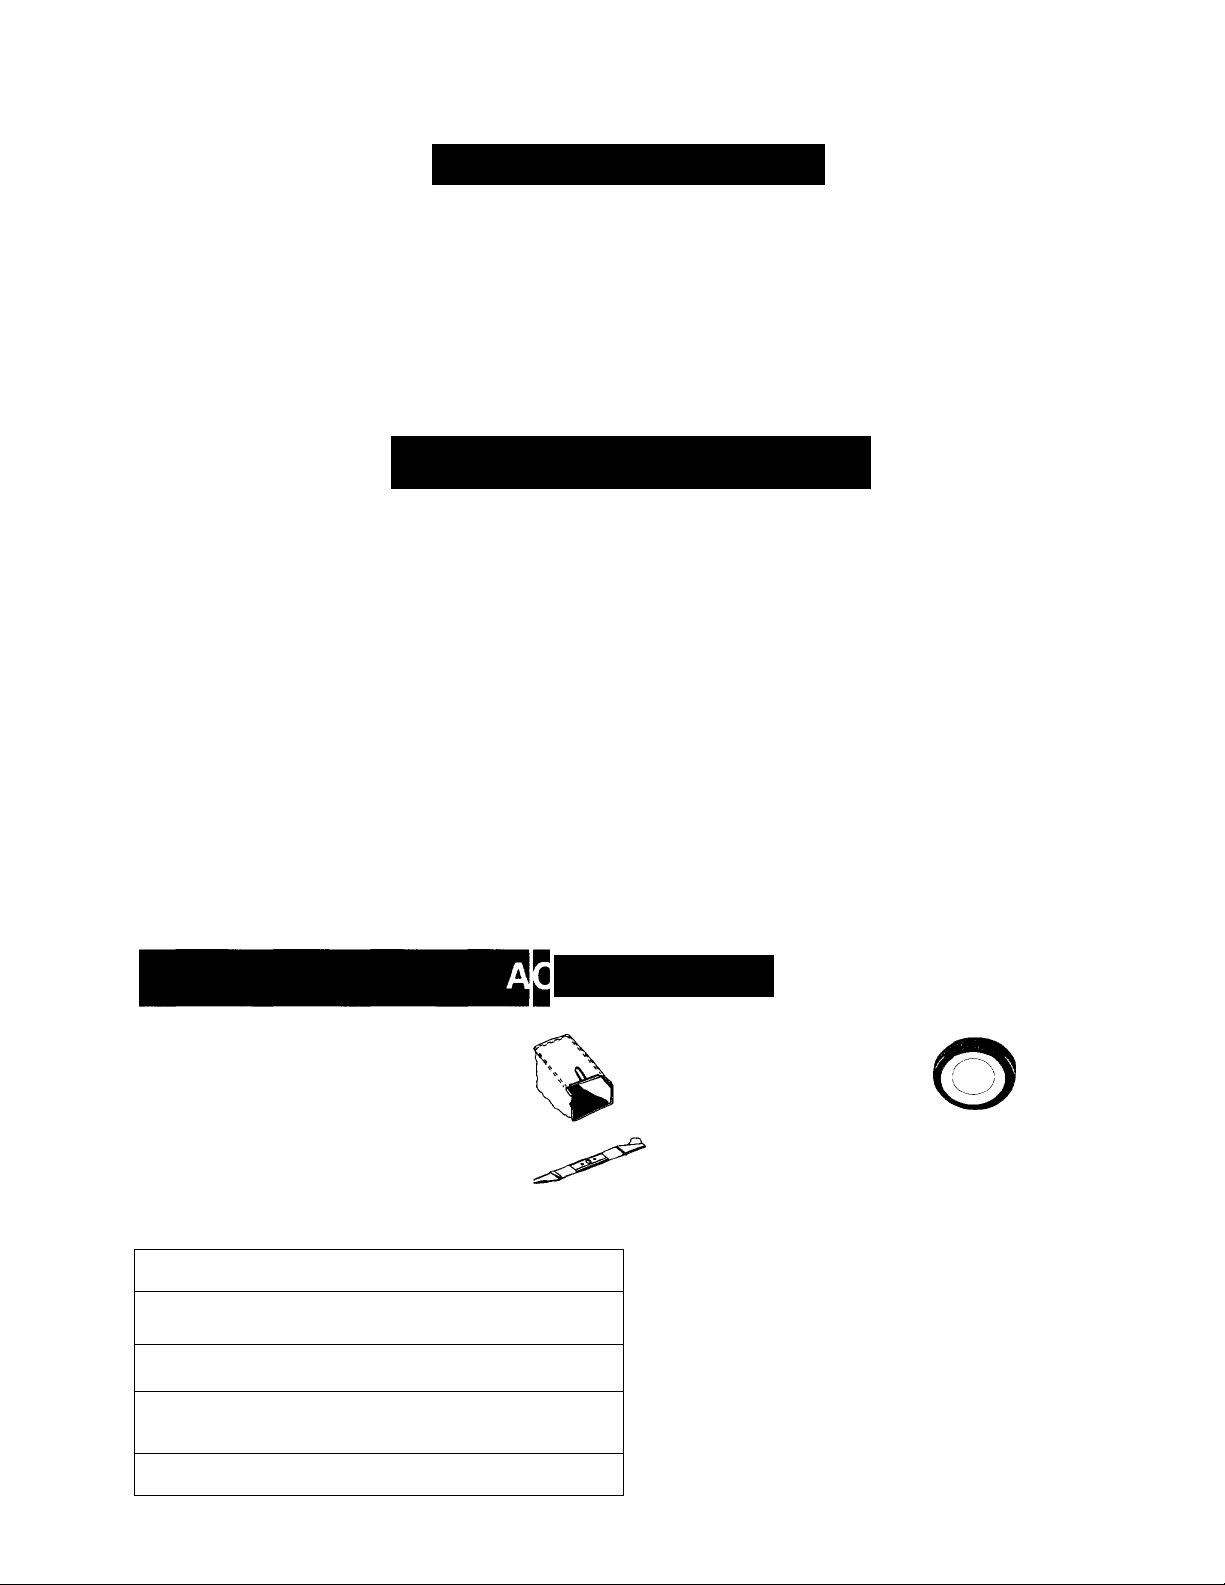
CESSORIES
These accessories were available when the
mower was purchased. They are also
available at most Sears retail outlets, catalog
and service centers. Most Sears stores can
order repair parts for you when you provide
the model number of your snow thrower.
PRODUCT SPECIFICATIONS
Voltage:
Amperage:
Hz.;
Blade Bolt Torque: 450-600 in. lbs.
110-120VO tsAC
12 amps.
60
Grass Bag
(Part No. 764-0447)
Blade
(Part No. 742-0719)
Blade Adapter
Model Number....
Serial Number
Date of Purchase
The model and serial numbers are on a label
attached to the deck, near the right rear wheel.
Record both serial number and date of purchase
and keep in a safe place for future reference.
.....
Extension Cord
(Not Shown)
Wheels
Page 3

A
A
SAFE OPERATION PRACTICES
This symbol points out important safety instructions which, if not followed, could endanger the
personal safety and/or property of yourself and others. Read and follow all instructions in this manual
before attempting to operate your electric lawn mower. Failure to comply with these instructions may
result in personal injury. When you see this symbol—heed its warning.
Your electric lawn mower was built to be operated according to the rules for safe opera
DANGER:
tion in this manual. As with any type of power equipment, carelessness or error on the part
of the operator can result in serious injury. If you violate any of these rules, you may
cause serious injury to yourself or others.
WARNING: When using electric lawn
A
mowers, basic safety precautions should
always be followed to reduce the risk of fire,
electric shock, and personal injury, including
the following:
1. TRAINING
1. Read all instructions carefully in their entirety
before attempting to assemble or operate this
machine. Be completely familiar with the
controls and the proper use of this machine
before operating it. Keep this manual in a safe
place for future and regular reference and for
ordering replacement parts.
2. Your rotary mower is a precision piece of power
equipment, not a plaything. Therefore, exercise
extreme caution at all times.
3. Use Right Appliance—Do not use lawn mower
for any job except that for which it is intended.
4. Never allow children to operate a power mower.
Only persons well acquainted with these rules of
safe operation should be allowed to use your
mower.
5. No one should operate this unit while intoxicated
or while taking medication that impairs the
senses or reactions.
6. Stay Alert—Watch what you are doing. Use
common sense. Do not operate lawn mower
when you are tired.
7. Keep the area of operation clear of all persons,
particularly small children and pets. Stop motor
when they are in the vicinity of your mower.
Although the area of operation should be
completely cleared of foreign objects, an object
may have been overlooked and could be
accidentally thrown by the mower in any
direction and cause serious personal injury to
the operator or any others allowed in the area.
2. PREPARATION
1. Thoroughly inspect the area where the
equipment is to be used. Remove all stones,
sticks, wire, bones and other foreign objects
which could be picked up and thrown by the
mower in any direction and cause serious
personal injury to the operator or any others
allowed in the area.
2. Always wear safety glasses or eye shields
during operation or while performing an
adjustment or repair, to protect eyes from
foreign objects that may be thrown from the
machine in any direction. Always use face or
dust mask if operation is dusty.
3. Dress properly. Wear sturdy, rough-soled work
shoes. Never operate a unit in barefoot, sandals
or sneakers. Do not wear loose clothing or
jewelry. They can be caught in moving parts.
Use of rubber gloves and footwear is
recommended when working outdoors.
4. Never attempt to make a wheel or cutting height
adjustment while the motor is running.
5. Mow only in daylight or in good artificial light.
6. Avoid Dangerous Environment—Never operate
the equipment in the rain or in damp wet
locations. Always be sure of your footing. A slip
and fall can cause serious personal injury. Keep
a firm hold on the handle and walk, never run.
Do not over-reach—keep footing and balance at
all times.
7. Warning—To prevent electric shock use only
with a UL Listed extension cord set suitable for
outdoor use, such as Type SW-A, SOW-A, STWA, STOW-A, SJW-A, SJOW-A, SJTW-A, or
SJTOW-A.
8. Extension Cord—Make sure your extension
cord set is in good condition, is heavy enough to
carry the current your mower will draw, and is
Page 4

polarized (one blade of plug is wider than the
other). A 100' length of 14 AWG extensiion cord
should be used. An acceptable substitute is a
50' length of 16 AWG cord. In applicati )ns
where a longer cord is needed, a 150' I angth of
12 AWG cord may be used. An unders zed cord
will cause a drop in line voltage resultir g in loss
of power and overheating. To reduce the
likelihood of disconnection of the extension cord
set from the lawn mower, be sure to us( ■. the cord
restraint provided or make a knot as sh own in
the illustration below
Connect Plug and Receptai le
Extension
Cord
Appliance
Cord
To reduce the risk of electric shock, your mower
is equipped with a polarized plug (one blade of
plug is wider than the other). If the outk t on the
end of your extension cord does not fit ully into
the plug on your mower, reverse the OLtlet and
try plugging it in again. The same is trui) for the
end of the extension cord you plug into your
house outlet. If after reversing the connections,
either one still does not fit, contact a qu alified
electrician to install the proper outlet ard/or
plug. Do not change the plug on the me wer in
any way.
Inspect extension cord periodically and replace
10.
if damaged. Keep handles dry, clean, and free
from oil and grease.
11.
Fuses—The mower should be operated on a 15
or 20 AMP circuit. If you experience difficulty in
starting with a standard 15 AMP fuse oi circuit
breaker, contact your nearest authorize 1 service
location. Do not use a higher rated fuse without
consulting your power company.
Ground Fault Circuit Interrupter (GFCI) p otection
12.
should be provided on the circuit(s) or ou let(s) to
be used for the lawn mower. Receptacle: are
available having built-in GFCI protection und may
be used for this measure of safety.
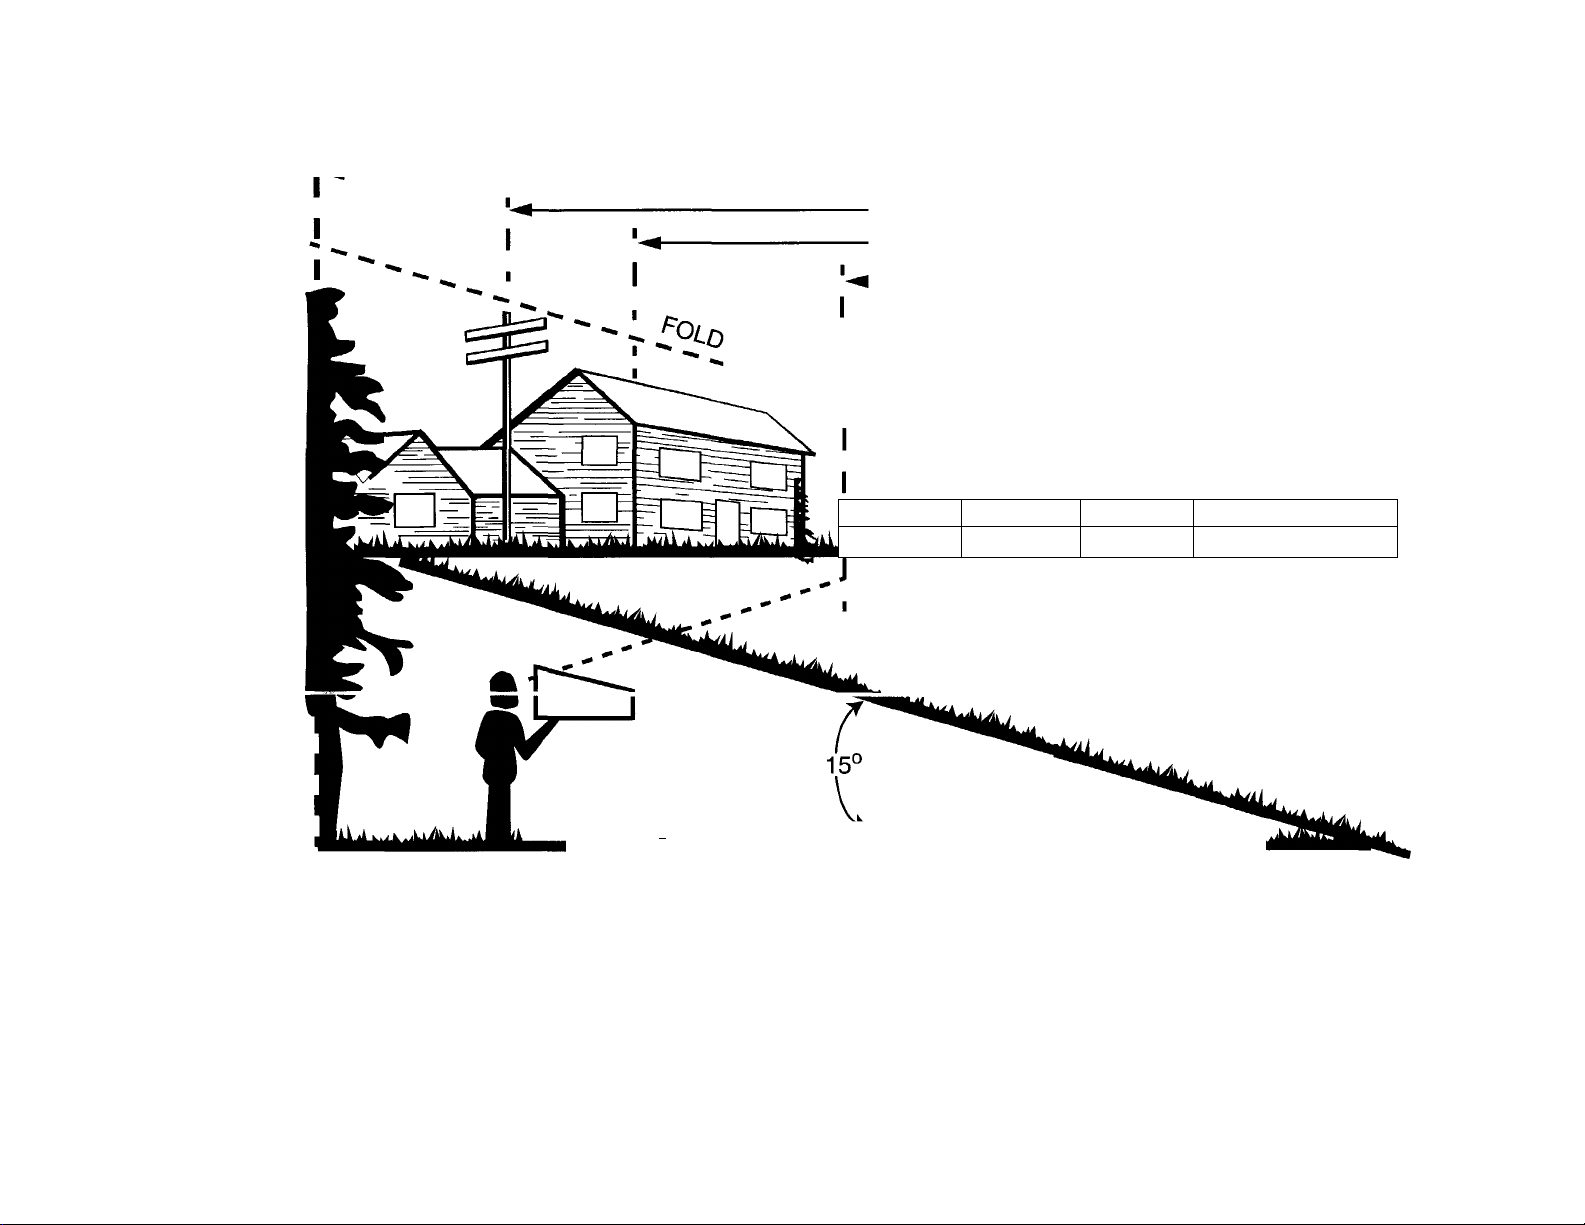
For your safety, use the slope gauge in eluded
13.
as part of this manual to measure slope s before
operating this unit on a sloped or hilly ar sa. If the
slope is greater than 15° as shown on tl le slope
gauge, do not operate this unit on that c rea or
serious injury could result.
3. OPERATION
1. Do not abuse cord—never pull lawn mower by
cord or yank it to disconnect from receptacle.
Keep cord from heat, oil, and sharp edges.
2. If extension cord is damaged in any manner
while plugged in, disconnect extension cord
from house receptacle.
3. Do not put hands or feet near or under rotating
parts. Keep clear of the discharge opening at all
times as the rotating blade can cause injury.
4. Stop the motor when you leave the mower and
before crossing gravel drives, walks or roads.
5. After striking a foreign object, shut off the motor,
make absolutely sure the blade and all moving
parts have completely stopped, disconnect the
power cord to prevent accidental starting, then
thoroughly inspect the mower for any damage.
Such damage must be repaired before restarting
and operating the mower.
6. If the equipment should start to vibrate
abnormally, stop the motor and check
immediately for the cause. Vibration is generally
a warning of trouble.
7. Stop the motor, unplug the power cord, and wait
for the blade and all moving parts to stop before
cleaning or unclogging, repairing or inspecting the
mower. The cutting blade continues to rotate for a
few seconds after the motor is shut off.
8. Do not force lawn mower. It will do the job better
and safer at the rate for which it was designed.
Use right appliance—Do not use lawn mower for
any job except that for which it is intended.
9. Mow across the face of slopes, never up-anddown. Never cut grass by pulling mower toward
you. Exercise extreme caution when operating
mower on uneven terrain or changing direction
on slopes. Do not mow excessively steep
slopes. Don’t overreach—Keep proper footing
and balance at all times. A slip and fall can
cause serious personal injury.
10. Never operate mower without proper guards,
plates or other safety protective devices in place
and in working order.
11. The blade/motor control on this mower is
installed to minimize the risk of blade contact
injury and is required by federal regulations. Do
not under any circumstances attempt to defeat
the function of the blade/motor control.
12. To avoid electric shock hazard, never push
mower over cord. Do not mow around the lawn
in circles. Always travel back and forth across
the lawn, beginning at the point nearest the
electric outlet to which the extension cord is
Page 5

connected. This will keep the cord on the mowed
area of the lawn and out of the way.
13. Do not operate mower after it has been dropped
or damaged in any manner. Return mower to
nearest authorized service location.
14. The use of accessory attachments not
recommended by the mower manufacturer may
cause hazards.
15. Do not operate this mower with the chute door
open, unless the complete grass catcher or side
chute deflector is properly mounted on the
mower.
7. Maintain lawn mower with care. Keep blade
sharp and clean for best and safest performance.
Follow instructions for iubricating and
changing accessories.
8. Check the grass catcher bag frequently for wear
or deterioration. Replace a worn or damaged bag
immediately. Be sure replacement bag meets
original equipment specifications.
5. DOUBLE INSULATED LAWN
MOWER
4. MAINTENANCE AND STORAGE
1.
Warning—Disconnect power cord from electrical
outlet before performing any maintenance or
service on mower.
Check the blade and motor mounting bolts at
2.
frequent intervals for proper tightness. Keep all
nuts, bolts, and screws tight to be sure the
equipment is in safe working condition.
Keep blade sharp.
3.
Use identical replacement blades only. Replace
4.
damaged cord.
To reduce fire hazard, keep the motor free of
grass, leaves, or excessive grease.
Store idle lawn mower indoors when not in use.
6.
Allow motor to cool before storing in any
enclosure. Lawn mower should be stored indoors
in dry, high or locked-up place, out of reach of
children.
SAVE THESE INSTRUCTIONS FOR FUTURE REFERENCE.
1. Double insulation is a concept in safety in electric
lawn mowers, which eliminates the need for the
usual three-wire grounded power cord and
grounded supply system. Wherever there is
electric current in the mower, there are two
complete sets of insulation to protect the user. All
exposed metal parts are isolated from the
internal metal motor components with protecting
insulation.
2. IMPORTANT—Servicing of a lawn mower with
double insulation requires extreme care and
knowledge of the system and should be
performed only by a qualified service technician.
For repair service we suggest you return the lawn
mower to your nearest authorized service
dealer. Always use original factory replacement
parts when servicing.
You will find the two safety labels reproduced below, on your mower. Please follow
instructions on these safety labels for safe operation of the mower.
TO REDUCE THE RISK OF INJURY, DO NOT
OPERATE MOWER UNLESS REAR TRAILING
SHIELD AND THIS GUARD OR ENTIRE
GRASS CATCHER IS IN ITS PROPER PLACE.
READ OPERATOR'S MANUAL. KEEP SAFETY DEVICES (BLADE CONTROL. |
JHAIUNGSHIELDjDISCHARGECOVER^gCjyNPWMANDW^
A DANGER
AVOID SERIOUS INJURY OR DEATH
■ KEEP HANDS AND FEET AWAY FROM
ROTATING PARTS.
■ REMOVE OBJECTS THAT CAN BE THROWN
BY THE BLADE IN ANY DIRECTION
WEAR SAFETY GLASSES.
■ DO NOT MOW WHEN CHILOREN OR
OTHERS ARE AROUND.
■ USE EXTRA CAUTION ON SLOPES DO NOT
MOW SLOPES GREATER THAN 15“ MOW
ACROSS, NEVER UP AND DOWN. NEVER
PULL MOWER CLOSE TO YOUR FEET LOOK
DOWN AND BEHIND BEFORE AND WHILE
MOVING BACKWARDS.
Page 6
I-
o
z
>■
<
s
3
o
>-
UJ
oc
lU
SIGHT AND HOLD THIS LEVEL WITH A VERTICAL TREE
A POWER POLE
■A CORNER OF A BUILDING
-------
OR A FENCE POST
LU
O
3
<
o
LU
0.
O
0)
(/)
LU
Q.
O
_l
(/)
lU
cc
UJ
H
Ui
UJ
9
3
o
<
CO ^
^ -J
UJ UJ
O ll
< <
a; <0
<0 jfi
is
UJ UJ
(0 0.
3 o
k .i . X li ..
' - -
—
..........
—r — r —r
L/il
▲
WARNING
^750
Do not mow on inclines with a slope in excess of 15 degrees (a rise of approximately 2-1/2 feet every 10 feet).
A riding mower could overturn and cause serious injury. If operating a walk-behind mower on such a slope, it is
extremely difficult to maintain your footing and you could slip, resulting in serious injury.
Operate RIDING mowers up and down slopes, never across the face of slopes.
Operate WALK-BEHIND mowers across the face of slopes, never up and down slopes.
(O
Page 7
ASSEMBLY
NOTE: Reference to right or left hand side of the
mower is observed from the operating position.
You will have to use an extension cord,
purchased separately, to run this unit. Please
refer to page 10 for appropriate cord selection.
1. REMOVING UNIT FROM
CARTON
• Remove staples, break glue on top flaps, or cut
tape at carton end and peel along top flap to
open carton.
• Remove loose parts if included with unit (i.e.,
owner’s manual, etc.).
• Cut along dotted lines and lay carton down flat.
• Remove packing material.
• Roll or slide unit out of carton. Check carton
thoroughly for loose parts.
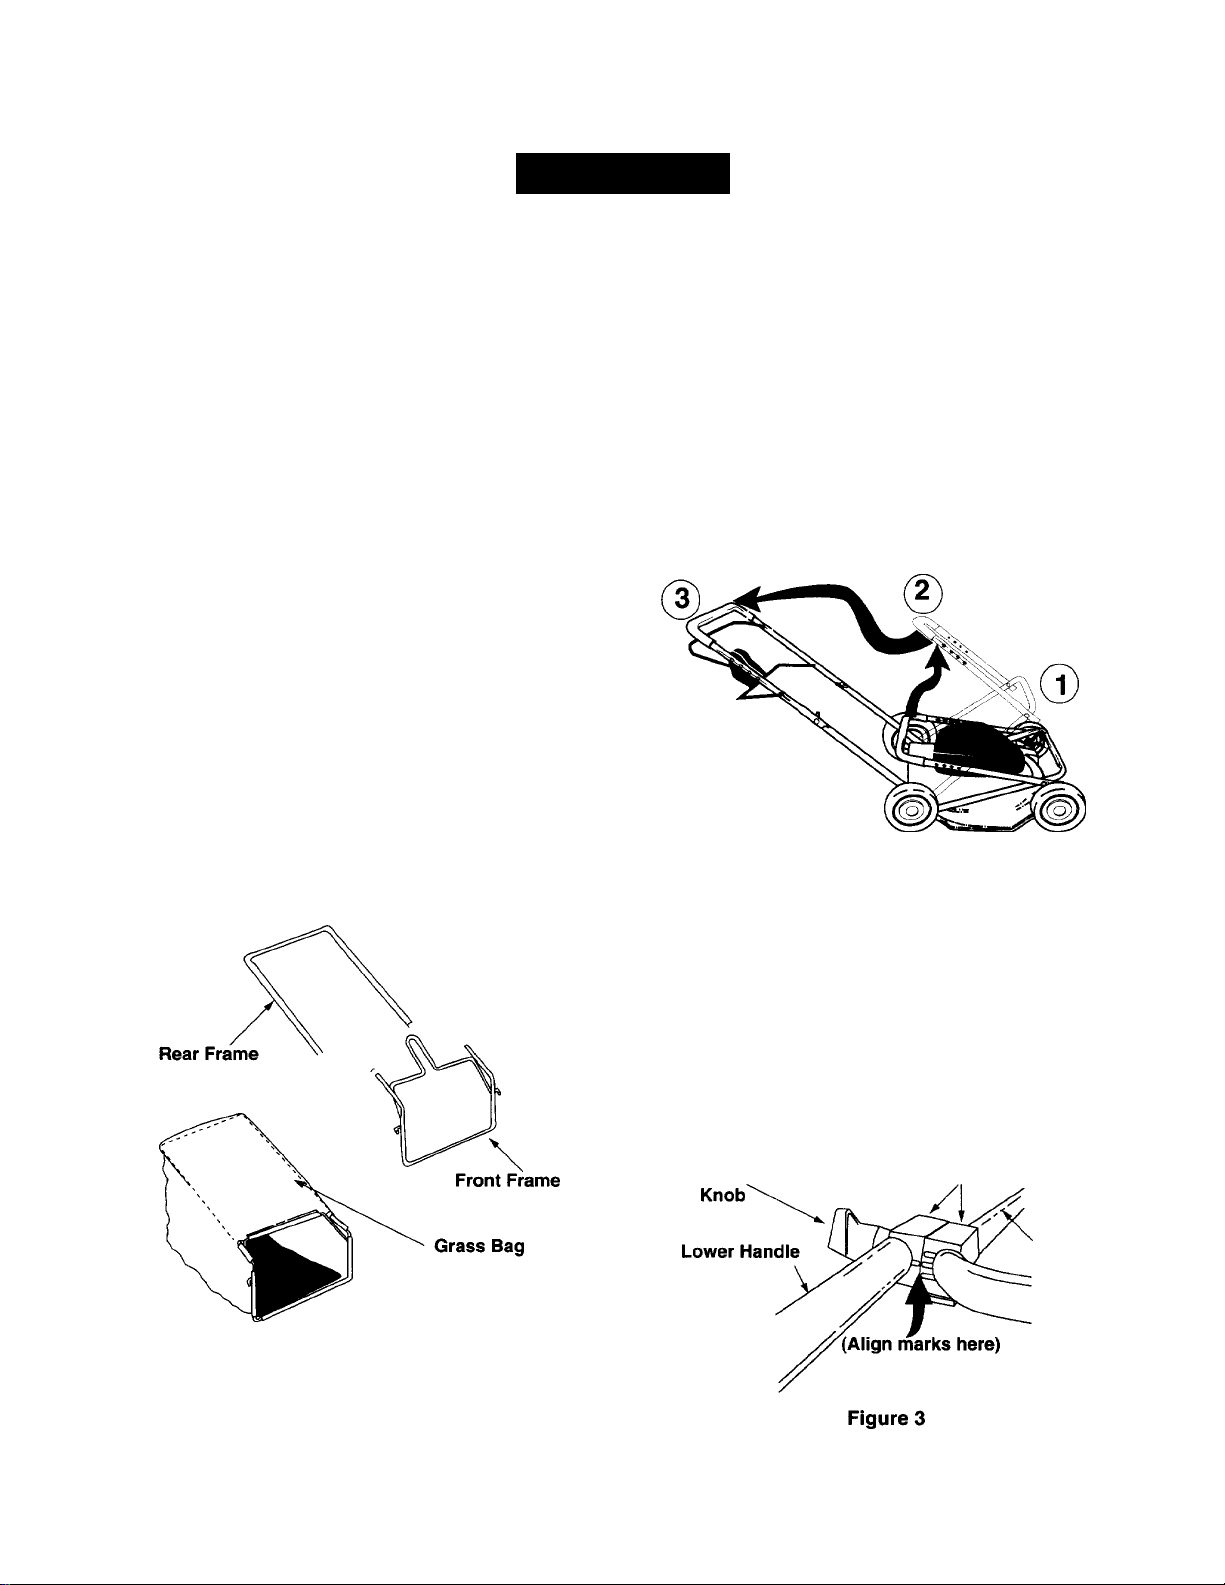
2. LOOSE PARTS IN CARTON
Refer to Figure 1.
1. Grass Catcher Assembly:
a. Front Frame
b. Rear Frame
c. Bag
Owner’s Manual (not shown)
4. ASSEMBLING HANDLE
Refer to Illustration Below
• Remove any packing material which may be
between the upper and lower handles for
shipping purposes.
• Pull up and back on the upper handle to raise the
handle into the operating position. Make certain
the lower handle is seated securely into the
handle mounting brackets. See steps 1,2, and 3
in figure 2.
Figure 2
Figure 1
3. TOOLS REQUIRED
A pair of pliers
The upper handle may be adjusted to three
different height positions. To adjust the handle
at the desired position, align one of the three
marks on the top of the lower handle insulators
with the mark on the upper handle insulators.
See figure 3.
Tighten the hand knobs on each side of the
handle. Make sure that carriage bolts are seated
properly into the handle insulators.
Hand
Insulator
Upper
Handle
Page 8
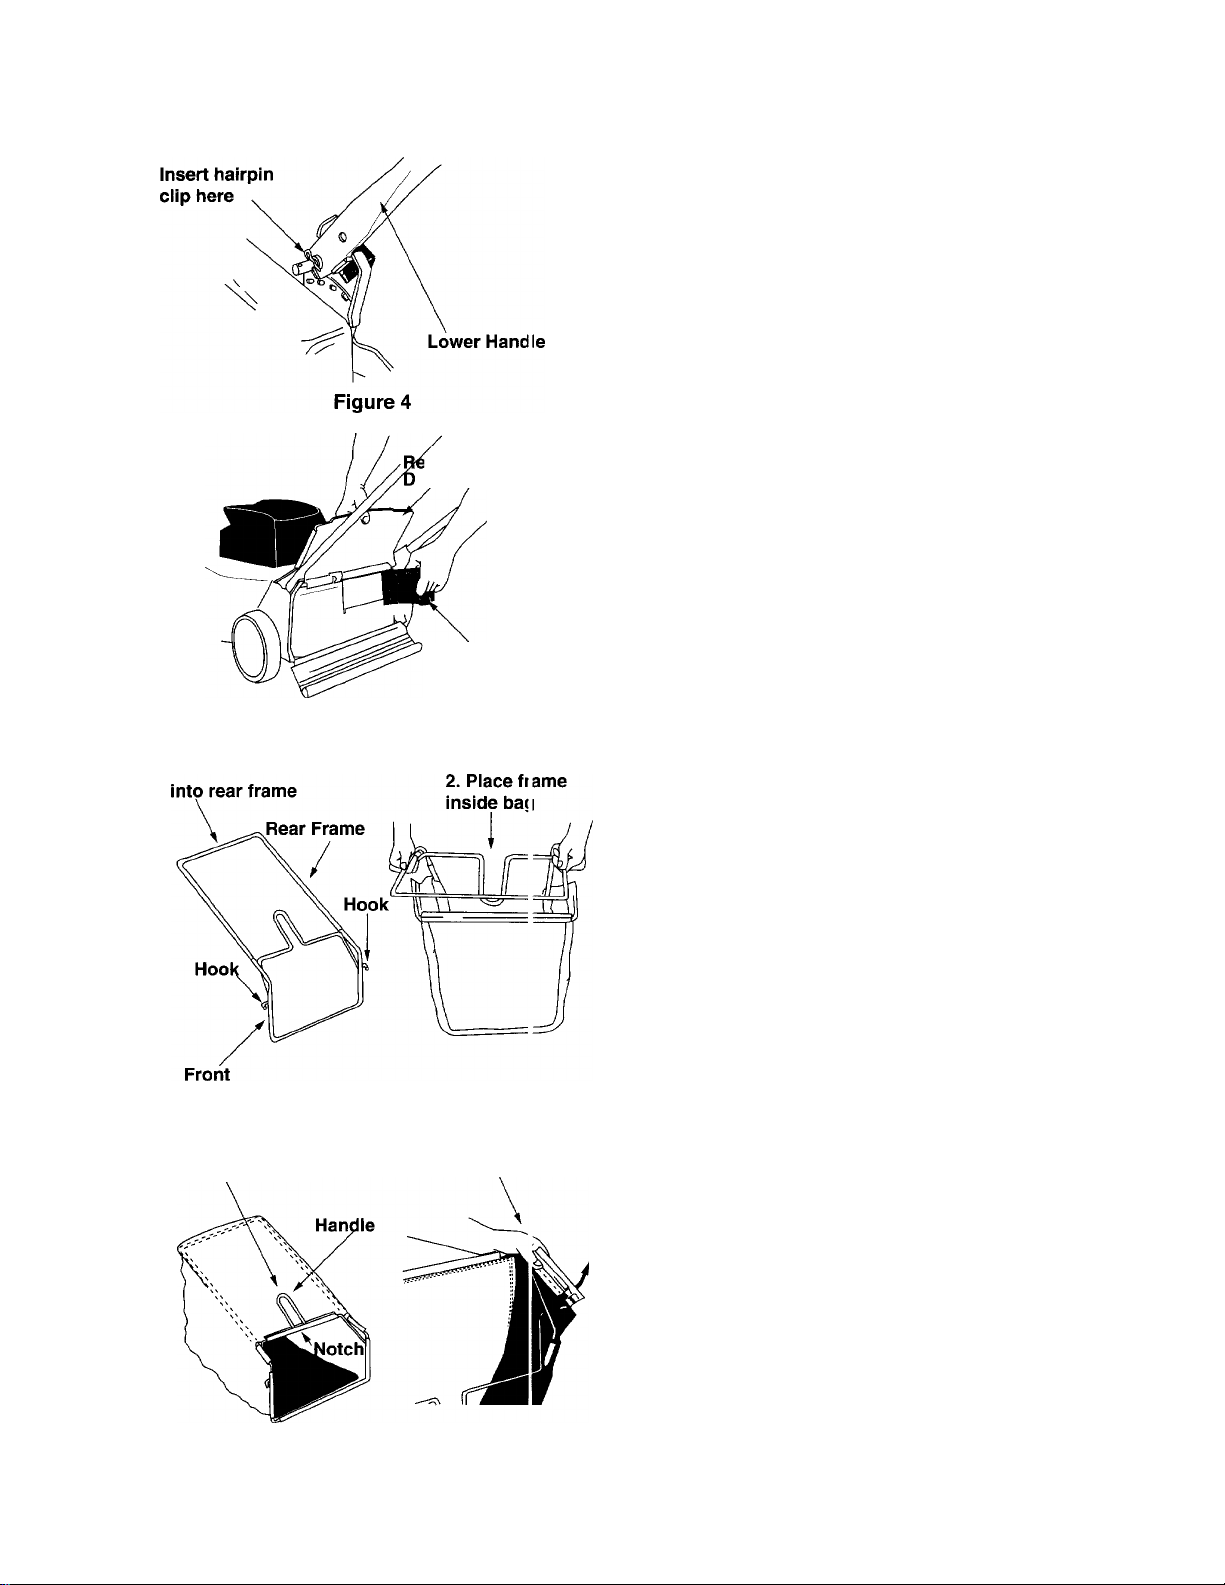
Remove the hairpin clips from the outer hole in
the weld pins on the handle mounting brackets.
Using a pair of pliers, squeeze one leg of the
lower handle against the handle mounting
bracket. Insert the hairpin clip into the inner hole
on the weld pin. Repeat on the other side. See
figure 4.
Make certain all nuts and bolts are tightened
securely.
Frame
3. Slip handle
out of notch
Figure 5
Figure 6
ar Dischargi!
oor
Mulching
Baffle
4. Slip plastic c lannel
over frame
5. CONVERTING FROM MULCHER
Your mower has been shipped as a mulcher with the
mulching baffle in place. In order to use the mower as
a rear discharge bagger unit, you will have to install
the grass catcher.
• To remove the mulching baffle, lift the rear
discharge door and pull the baffle out. See figure
5.
• To reinstall the mulching baffle, lift the rear
discharge door and place the baffle in the
opening.
6. ASSEMBLING GRASS CATCHER
Note: Before assembling, make sure that the grass
bag is turned right side out with the warning label on
the outside. Also the black plastic side is the bottom of
the bag.
• Insert the front frame into the rear frame as far
as it will go.
• Place frame assembly inside the bag.
• Slip the plastic channel of the bag over the frame
(adjacent to the handle of the grass catcher).
See figure 6. Make sure that the handle of the
grass catcher protrudes ouf of the notch in the
plastic channel on bag.
• Insert the two hooks on both sides of the frame
through the openings on both sides of the bag.
• Secure bag to the frame by working the plastic
channels on bag over frame on the other sides
as shown in figure.
Note: All of the plastic channel except center top of
bag attach from the outside of bag. Center top of bag
attaches from inside of bag.
rv Warning: Never operate the mower unless
hooks on the grass catcher are seated in
the slots on the handle bracket assemblies,
and the rear discharge door rests firmly
against the top of the grass catcher.
Page 9
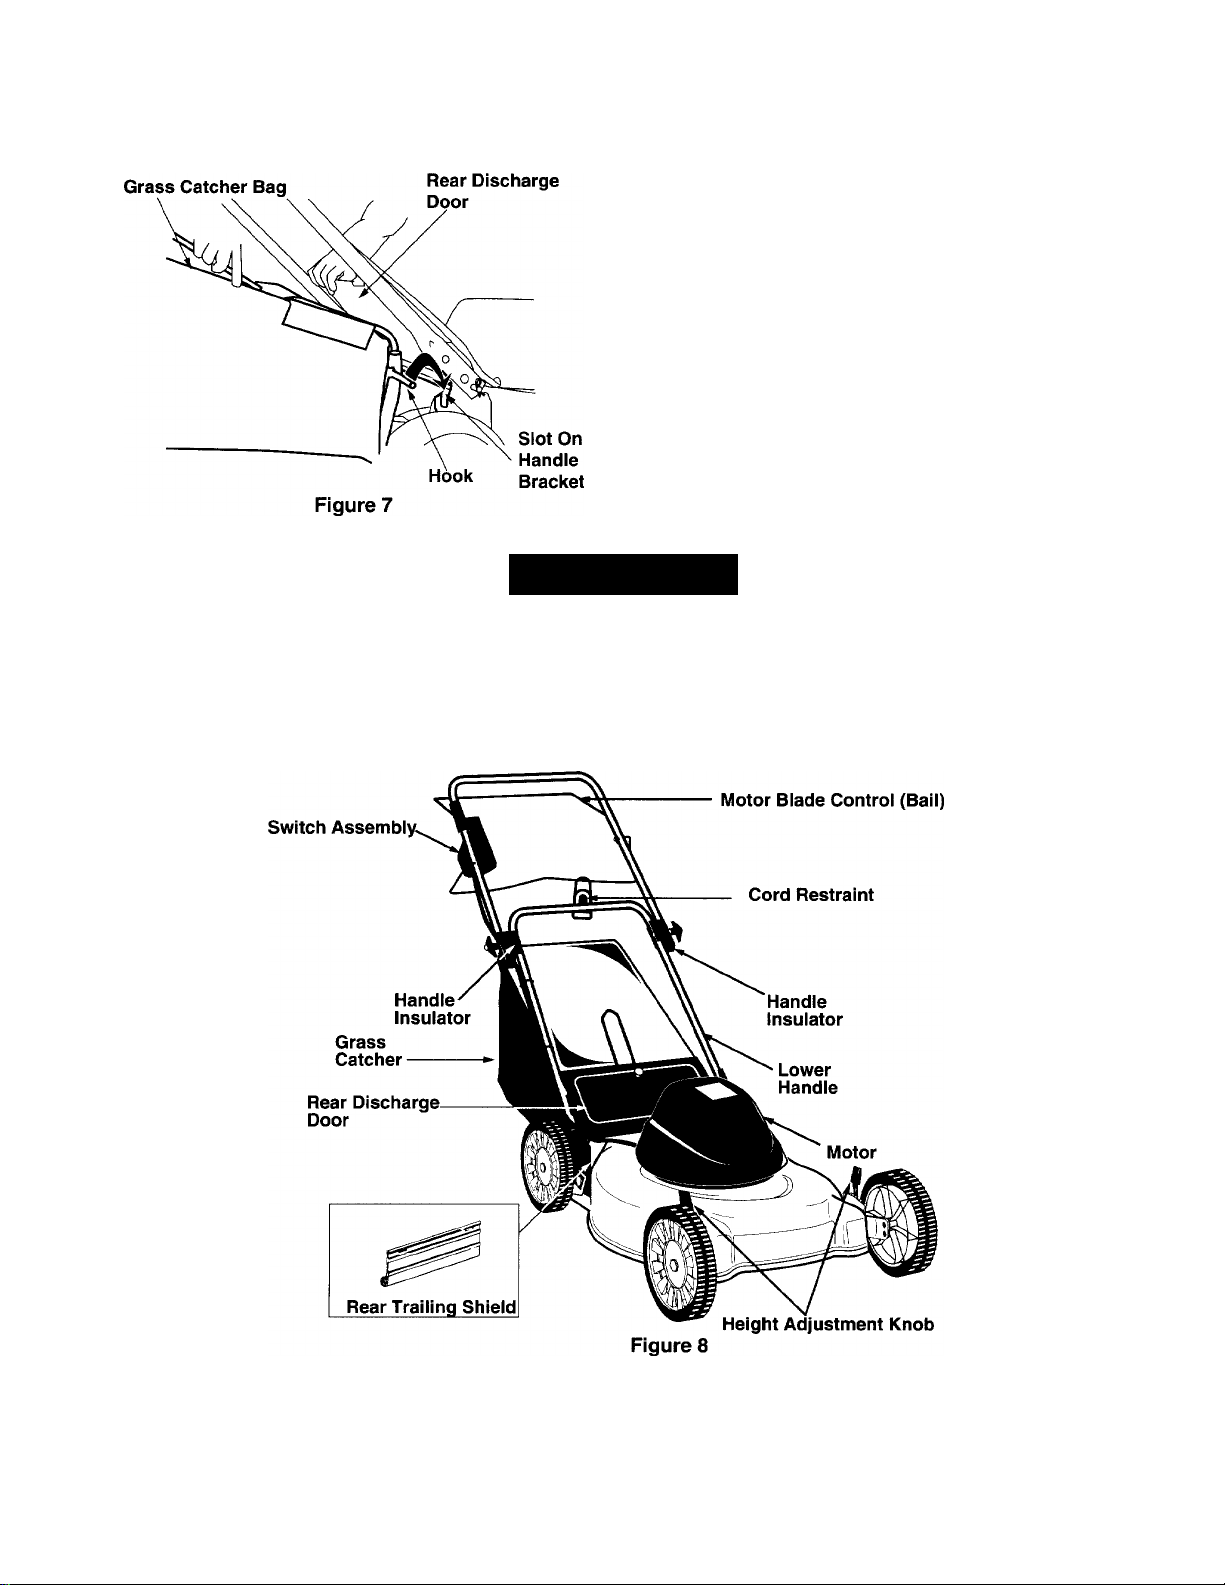
7. ATTACHING GRASS CATCHER
• Lift the rear discharge door on the mower and
remove the mulching baffle. See figure 6.
• Place the hooks of the grass catcher into the
slots in the handle bracket assembly on each
side of the lower handle. See figure 7. Release
the rear discharge door.
To remove the grass catcher, lift the rear discharge
door on the mower. Lift the grass catcher up, out of
the slots in the handle bracket assemblies. Release
the rear discharge door.
A WARNING: Do not operate this mower
with the chute door open, unless the
complete grass catcher is properly
mounted on the mower.
OPERATION
1. KNOW YOUR LAWN MOWER
READ THIS OWNER’S MANUAL AND SAFETY RULES BEFORE OPERATING YOUR LAWN MOWER.
Compare the illustrations with your lawn mower to familiarize yourself with the location of various controls and
adjustments. Save this manual for future reference.
MEETS CPSC BLADE SAFETY REQUIREMENTS
Sears rotary walk-behind power lawn mowers conform to the safety standards of the American National
Standards Institute and the U.S. Consumer Product Safety Commission. The blade turns when the motor is
running.
Page 10
Motor/Blade Control (Bail)
A WARNING: Federal regulations require a
motor/blade control to be installed on lawn
mower in order to minimize the risk о blade
contact injury. DO NOT under any
circumstances attempt to defeat the function
of the motor/blade control. Never attiimpt
to bypass its operations.
NOTE: Your lawn mower is equipped with a motor/
blade control which requires the operator to be
positioned behind the lawn mower handle to s. art and
operate the lawn mower.
2. CORD CONNECTION
Cord Selection
IMPORTANT: A 100 feet length of 14 AWG extension
cord should be used. An acceptable substitute is a 50
feet length of 16 AWG cord. In applications where a
longer cord is needed, a 150 -feet long 12 AWG cord
may be used. Using any other length or rating of cord
will diminish the performance and possibly the life of
the electric motor. In all cases, the extension cord
should be a UL listed cord set suitable for outdoor use.
Cord Restraint
The motor/blade control is located on the uppe r
handle of the mower. See figure 8. The motor blade
control handle engages and disengages the motor
and blade. The motor/blade control consists o1 two
parts -- a starter button and a motor/blade con rol
handle.
Rear Trailing Shield
The reartrailing shield, attached between the iear
wheels of your mower, is provided to minimize the
possibility that material will be discharged frorr
beneath the blade enclosure into the operator гопе.
See figure 8.
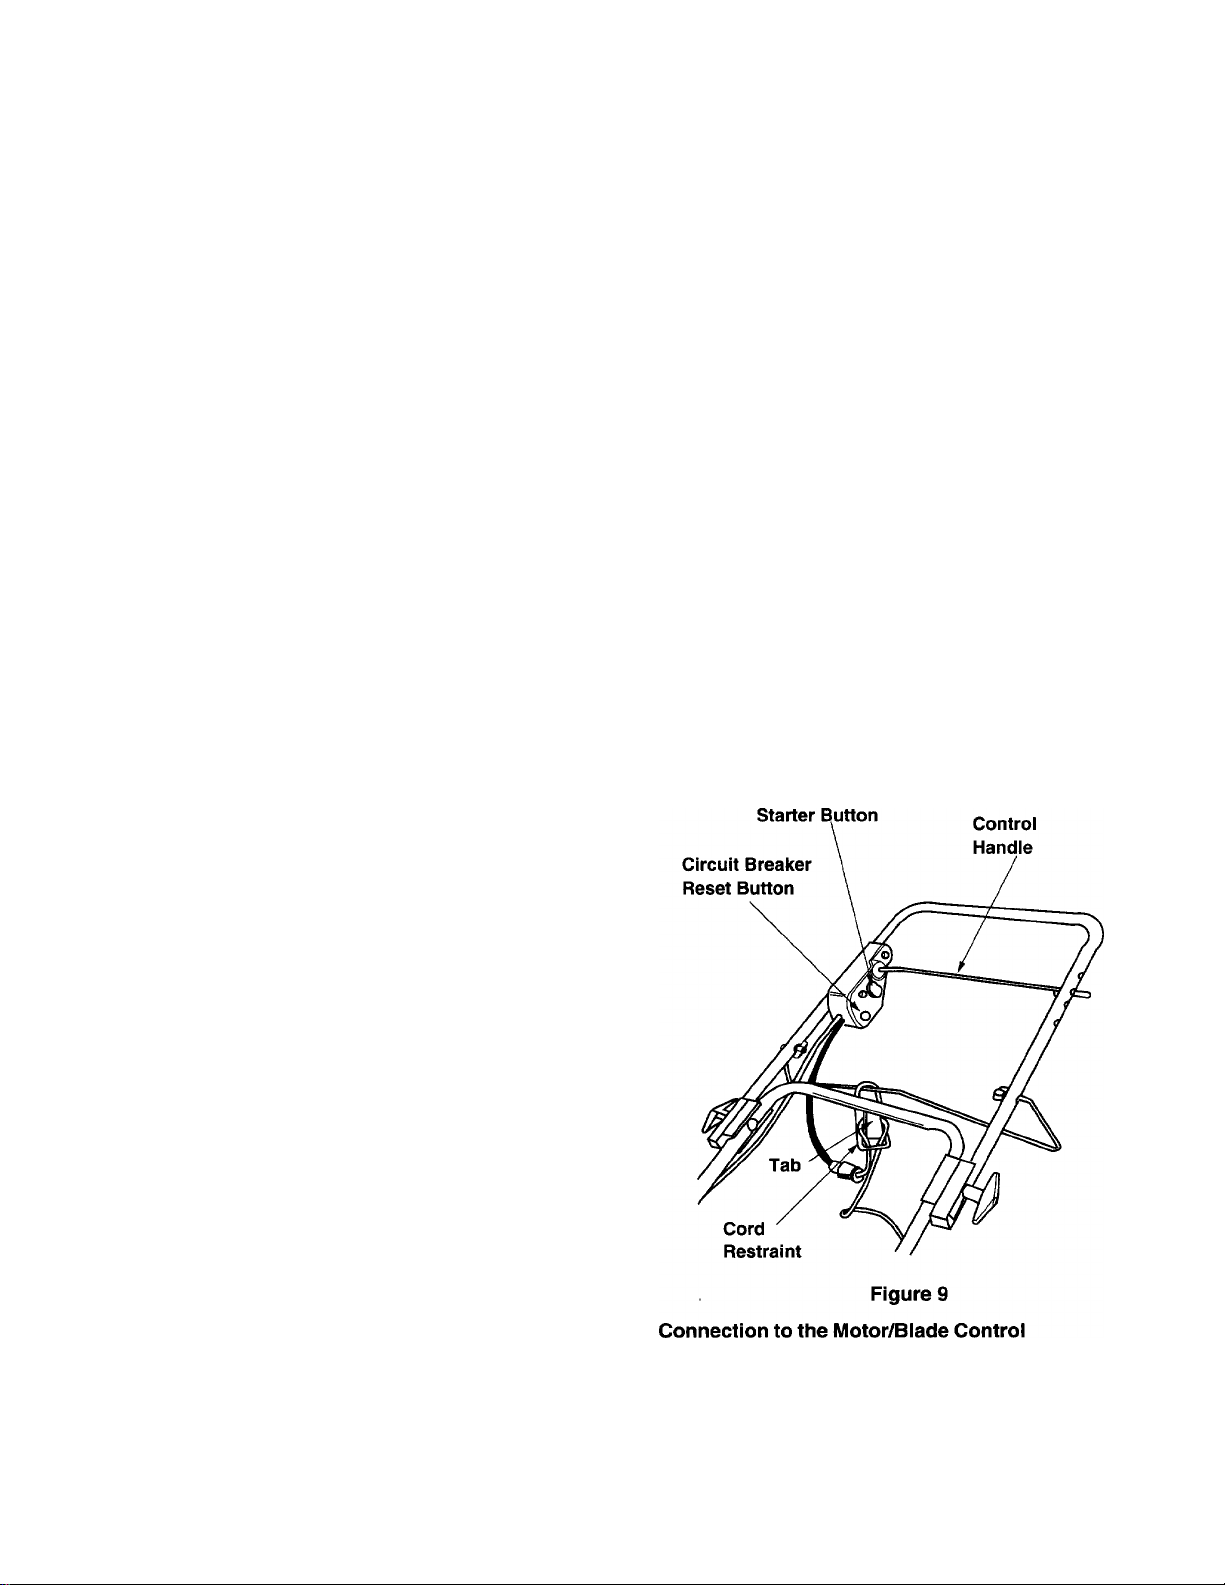
Circuit Breaker
Your mower is equipped with a circuit breaker, located
near the motor/blade control on the switch assambly.
This circuit breaker may trip when too much st ain is
placed on the mower.
Starter Button
The starter button is located on the switch assembly.
Standing behind the unit, depress the starter button
and squeeze the motor/blade control handle a gainst
the upper handle. The motor will start; release the
starter button once the motor starts.
• Attach extension cord (not provided with unit) to
the cord restraint as follows.
• Form a small loop in the extension cord. Allow
enough excess cord to make the connection to
the motor/blade control (approximately 20
inches).
• Slip the loop through the slot on the bottom of the
cord restraint, and up over the tab, to prevent
disconnection from the motor/blade control
during operation.
• Keep the cord restraint as close to the motor/
blade control as possible. See figure 9.
Motor/Blade
Stopping the mower
Release the motor/blade control handle to stop the
motor and the blade.
A WARNING: The operation of any la vn
mower can result in foreign objects b> iing
thrown into the eyes, which can resul: in
severe eye damage. Always wear safety
glasses or eye shields.
NOTE: The wheels on your unit are set in a lov' cutting
height position for shipping purposes. For best results,
raise the cutting position until it is determined i vhich
height is best for your lawn. See cutting height
adjustment.
Connect the plug on the extension cord fully onto
the plug on the mower. The mower is equipped
with a polarized AC power plug (one blade of the
plug is wider than the other), which will fit into the
plug on the extension cord only one way. If
10
Page 11
unable to make a full connection, try reversing
the plug on the extension cord. Should the plugs
still fail to fit, contact your service dealer for
assistance. Do not defeat the safety purpose of
the polarized plug.
Connection to the Electric Power Source
• Plug the extension cord into any convenient
110-120 volt 60 cycle A.C. outlet or receptacle
for your source of power. This outlet may be
located either out-of-doors or indoors. To avoid
blowing fuses, pick an outlet that is not
overloaded. Your mower will operate
satisfactorily on a circuit that is fused for 15
amperes. Do not use oversize fuses without
consulting your power company. If an inside
receptacle is used, the extension cord can be
taken out either through the doorway or a
window.
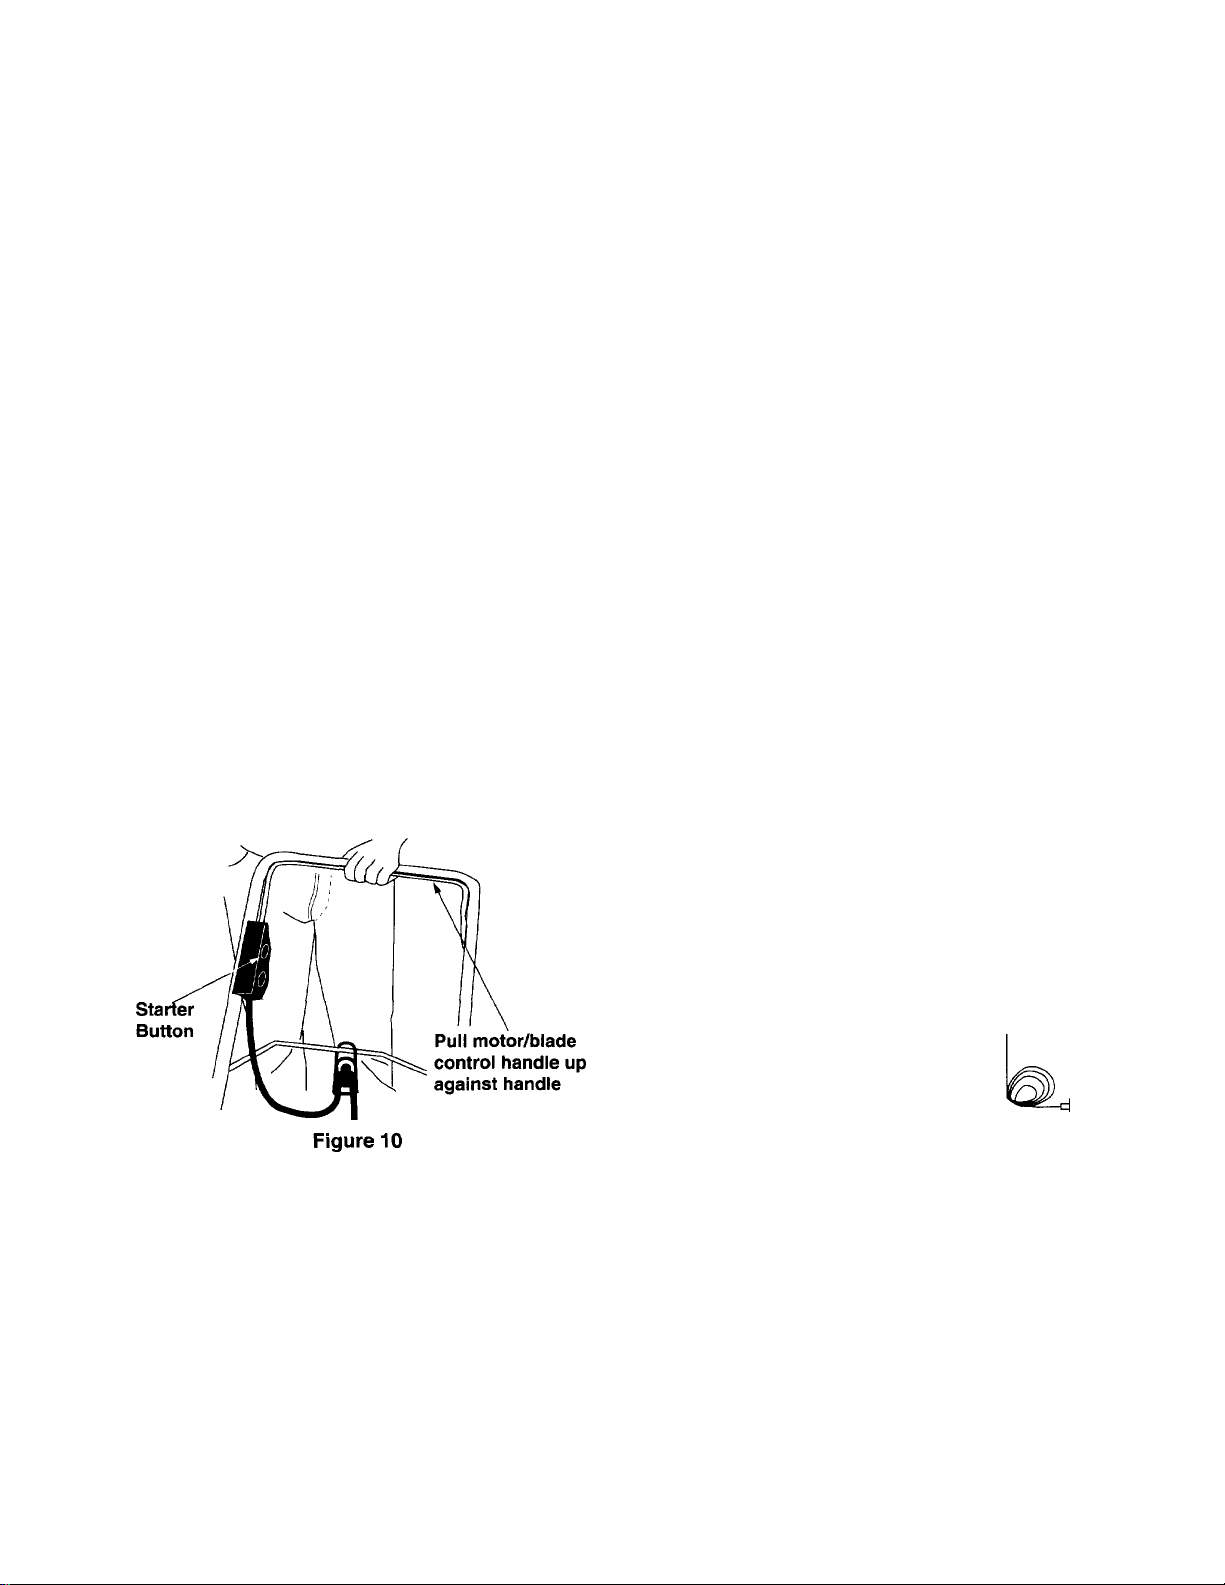
3. TO START MOTOR AND
ENGAGE BLADE
• Standing behind the unit, depress starter button
on the motor/blade control.
• Lift motor/blade control handle (bail) up against
handle. Release starter button. See figure 10.
WARNING: The blade continues to rotate
A
• Disconnect the power source to prevent
for a few seconds after the motor is shut off.
If motor does not come to an immediate
stop when the motor/blade control handle is
released, contact an authorized service
dealer.
accidental starting while equipment is
unattended.
5. USING YOUR ROTARY MOWER
yv WARNING: Do not operate this mower
with the chute door open, unless the
complete grass catcher is properly
mounted on the mower.
• Be sure that lawn is clear of stones, sticks,
wires, or other objects which could damage lawn
mower or motor. Such objects could be
accidentally thrown by the mower in any
direction and cause serious personal injury to
the operator and others.
• To prevent electric shock, do not operate the
mower in damp or wet locations.
Mowing Pattern:
• Always start from the point ciosest to the
power source where the cord is connected.
Never mow around the lawn in circles; travel
back and forth across the lawn, starting from the
point closest to the outlet and then moving away
from the outlet so the cord lies in the cut portion
of the lawn, out of the way. See figurel 1.
IMPORTANT: Your mower is equipped with a circuit
breaker, located on the motor/blade control housing.
See figure 9. If the circuit breaker trips, reset as
instructed in the Maintenance section.
4. TO STOP MOTOR AND BLADE
• Release the motor/blade control handle (bail) to
stop the motor and blade. A high pitched noise
will result, due to deceleration of the electric
motor. Sparking at the top of motor is also
normal during deceleration.
T = Obstacles
' /
Outlet
(Start here)
Figure 11 -- Mowing Pattern
Do not allow extension cord to wrap around
trees, shrubs or other obstacles. When picking
up the extension cord, wind the cord in a series
of equal loops on each side of your hand to
prevent snarling.
When cutting heavy grass, reduce walking speed
to allow more effective cut and proper discharge of
the clippings. For a healthy lawn, always cut off
11
Page 12

one-third or less of the total length of the c rass.
The average lawn should be approximately 1-1/2
to 2 inches during the cool season, and o^ er 2
inches during hot months. Fora healthier and
better looking lawn, cut more often and af er
moderate growth. The lawn should be cut in the
fall as long as there is growth.
Tips for mulching:
• For effective mulching, do not cut wet gi ass
because it tends to stick to the undersid a of the
deck, preventing proper mulching of grass
clippings. New or thick grass may requi 'e a
narrower cut. The ground speed should be
adjusted to the condition of the lawn. If nowing
M^VINTENANCE
Customer Responsibility Chart
has been delayed and the grass has been
allowed to grow in excess of 4", mow twice to
reduce the grass height to 3-1/4" maximum.
WARNING: If you strike a foreign object,
A
stop the motor. Disconnect the power
source, thoroughly inspect the mower for
any damage, and repair the damage
before restarting and operating the mower.
Extensive vibration of the mower during
operation is an indication of damage. The
unit should be promptly inspected and
repaired.
MAINTENANCE SCHEDULE / 0^ /^^ / SERVICE DATES*
Clean motor cover
,0
Clean lawn mower
n
C\j /
Clean blade and underside of deck
Inspect blade and blade adapter
Check all nuts and bolts
Check grass catcher bag
Lubricate hinge pin and bolt
V
/A/
h
n
A
n
A
* Fill in dates as you complete service.
</ Check.
12
Page 13

1. GENERAL RECOMMENDATIONS
Refer to Customer Responsibilities Chart for
maintenance schedule.
• Always observe safety rules when performing
any maintenance.
• The warranty on this electric mower does not
cover items that have been subjected to
operator abuse or negligence. To receive full
value from the warranty, operator must maintain
the mower as instructed in this manual.
• Some adjustments will need to be made
periodically to maintain your unit properly.
• All adjustments in the Service & Adjustments
section of this manual should be checked at
least once each season.
• Follow the maintenance schedule on page 12.
WARNING: Always stop motor and
A
disconnect the power source before
cleaning, lubricating or performing any
repairs or maintenance on lawn mower.
2. CUTTING BLADE
WARNING: Always protect hands by
A
Removing Blade
• Stop the motor and disconnect the power supply
• Use a block of wood between blade and mower
wearing heavy gloves and/or wrapping
cutting edges with newspapers or other
materials when performing any blade
maintenance. Be certain to disconnect the
power supply.
to the mower. Turn mower on its side.
deck to prevent blade from turning when bolt is
removed.
• Using a 9/16” box or open-end wrench, remove
center bolt and bell washer which hold the fan,
blade and adapter to the motor shaft. See figure 12.
• Remove the fan, blade and adapter from the
shaft.
• Remove the two small bolts, bell washers and
nuts which hold the blade to the adapter. See
figure 12. Remove fan from blade adapter.
Replacing Blade
• Put blade adapter on motor shaft.
• Fit blade in adapter making sure that the trailing
edge of the blade is up towards the engine, and
the side of the blade marked “Bottom” (or with
part number) faces the ground when the mower
is in the operating position.
• Before reassembling the blade and the blade
adapter to the unit, lubricate the motor shaft and
the inner surface of the blade adapter with light
oil (or engine oil). Lubricating the bolt holes,
bolts and inner surface of the nuts is also
recommended.
• Assemble bolts, washers, and nuts in the exact
order of removal. Make sure to assemble the fan
properly before running the mower. See figure 12.
WARNING: Periodically inspect the blade
A
Blade Mounting Torque
The recommended torque for the center blade bolt is
450-600 in. lbs. The recommended torque for the two
blade adapter bolts is 200-300 in. lbs.
To insure safe operation of your unit, all nuts and
bolts must be checked periodically for correct
tightness.
Sharpening blade
• The blade can be sharpened with a file or on a
• When sharpening the blade, follow the original
• Test the blade by balancing it on a round shaft
NOTE: An unbalanced blade will cause excessive
vibration when rotating at high speeds, may cause
damage to the mower and could break, causing
personal injury.
• If the blade is not balanced, remove metal from
adapter for cracks, especially if you strike a
foreign object. Replace when necessary.
grinding wheel. Do not attempt to sharpen
while on the mower.
angle of grind as a guide. It is extremely
important that each cutting edge receives an
equal amount of grinding to prevent an
unbalanced blade.
screwdriver or a blade balancer. See figure 13.
the heavy side until It balances evenly. We
recommend that the blade be always removed
13
Page 14

from the adapter for the best test of bale nee. surface of the wheel with light oil. See figure 14.
If you are reassembling the blade and the blade
adapter to the unit, lubricate the motor shaft and
the inner surface of the blade adapter with light
oil (or engine oil). See figure 14.
Also lubricate the bolt holes, bolts and inner
surface of the nuts in the blade adapter
assembly before reassembly. See figure 14.
Figure 13
• When replacing the blade, be sure to in stall the
blade with the side of the blade marked Bottom”
(or with part number) facing the ground when
the mower is in the operating position. >Jso
make sure to follow the correct order as shown
in figure 12.
3. DECK
NOTE: The underside of mower deck shoulibe
cleaned after each use as grass clippings, le ives, dirt
and other matter will accumulate. This accur nutation
of grass clippings, etc., is undesirable as it w ill
promote rust and corrosion.
• Remove any buildup of grass and leave is on or
around the motor cover (do not use wat sr). Wipe
mower clean with a dry cloth occasiona lly.
• Disconnect the power source. Tilt the n lower
forward or on its side and scrape clean with a
suitable tool.
WARNING: To reduce the risk of electric
A
shock, do not expose mower to wa er.
4. LUBRICATION
Refer to Lubrication Chart in the next columi i.
• Keep unit well lubricated. Lubricate the springs
on the rear discharge door with a light ( lil. See
figure 14.
• Lubricate the bolts holding the height
adjustment lever to the deck with a ligh t oil. See
figure 14.
• If the wheels are removed for any reas )n,
lubricate the surface of the axle and th< i Inner
Figure 14 - Lubrication Chart
14
Page 15

SERVICE & ADJUSTMENT
1. CUTTING HEIGHT ADJUSTMENT 2. HANDLE HEIGHT ADJUSTMENT
The upper handle may be adjusted to three different
height positions. To select desired position, loosen
hand knobs and align one of the three marks on the
top of the lower handle insulators with the mark on
the upper handle insulators. Tighten the hand knobs.
Refer to figure 2.
3. CIRCUIT BREAKER ADJUSTMENT
The circuit breaker is located on the motor/blade
control housing. This breaker may trip when too much
strain is placed on the mower. The circuit breaker has
A height adjustment lever at each wheel provides
cutting height adjustment. Each adjuster has nine
height positions. Height of cut will be changed when
the lever is moved from one position to another.
Simply depress the lever towards wheel and move
wheel and lever assembly to desired position. See
figure 15. All wheels must be placed in the same
relative position. For rough or uneven lawns, move
the wheels to a position which will give a higher
cutting height.
been tripped if the mower will not run, and the white
part of the reset button projects out of the motor/blade
control housing. Refer to figure 9.
• If this occurs, wait approximately 30 seconds,
then depress the reset button. Refer to figure 9.
• Restart the mower, but be sure to reduce the strain
on the mower (i.e., mow at a higher cutting height,
slow down, or take a smaller width of cut).
• If the circuit breaker does not reset, or if it trips
repeatedly under normal cutting conditions,
take the mower to an authorized service dealer.
OFF-SEASON STORAGE
Your mower should be prepared for off-season or long
storage by following the steps mentioned below.
1. MOWER
• Make certain motor/blade control switch is in
OFF position and power supply is disconnected.
• Clean mower as instructed in previous section.
• Inspect and replace/sharpen blade if required.
Refer to Cutting Blade section on page 13.
• Lubricate mower following instructions on page 14.
2. HANDLE
The handle may be folded away completely for
storage.
• Remove grass bag.
• Loosen the hand knobs on the sides of the
handle, and fold the upper handle down.
• Remove the hairpin clips from the two inside
holes in the weld pins on the handle mounting
brackets on each side to the outside holes.
• Pull outward on each side of the lower handle,
and lift the sides of the lower handlepast the
edges of the handle mounting brackets. Fold the
lower handle forward. Make sure not to bend or
kink the power cord.
3. EXTENSION CORD
• Wipe extension cord to remove any foreign
substance such as oil or stains. Replace
extension cord if cut or damaged in any way.
• Wind cord in a series of equal loops on each side
of your hand to prevent snarling.
4. STORAGE
• Store mower indoors, in a cool, dry place, out of
reach of children. Do not cover lawn mower with
a solid plastic sheet. Any plastic covering traps
moisture around the mower which promote rust
and corrosion.
15
Page 16

A
TROUBLE-SHOOTING
WARNING: Before doing any kind c f investigative or repair job on the mower, stop the motor and
disconnect from power source.
Always protect hands by wearing heavy gioves when performing any blade maintenance.
Trouble
Handle not in position
Mower not starting
Circuit breaker on the mower tripping
Mower cutting grass unevenly
Possible Causes
1. Carri. ige bolts not seated in the
hand e insulators
1. Cord disconnected from the motor/
blade control
2. Moto /blade control switch defective.
3. Exter sion cord not connected to
sourc e of power.
4. Circu t breaker on the mower or on
the h 3use receptacle tripped
1. Too r luch workload on the mower
2. Fuse blown; outlet overloaded.
1. Cuttii ig height not set properly.
2. Lawr rough or uneven.
Corrective Action
1. Adjust the height of the handle and
make sure that the carriage bolts
are seated properly into the handle
insulators. Tighten the hand knobs.
1. Reconnect the cord keeping the
cord restraint close to the motor/
blade control.
2. Replace motor/blade control switch.
3. Connect the extension cord to an
indoor or outdoor 110-120 volt 60
cycle A.C. receptacle.
4. Reset the circuit breaker following
instructions in the Maintenance
section of this manual.
1. Raise the cutting height, reset the
circuit breaker on the mower, take a
smaller width of cut, and walk
slowly.
2. Connect to an outlet that is fused
for 15 amperes. Reset the circuit
breaker and start the mower again.
1. All wheels must be placed in the
same cutting height for the mower
to cut evenly.
2. Move the wheels to a higher cutting
height position.
Mower not mulching properly
Hard to push
Mower vibrating at higher speed
For repairs beyond the minor adju stments listed above, contact your local authorized service dealer.
▼
1. Wet grass clippings stick to the
unde side of the deck.
1. High grass or cutting height too low.
2. Rear of mower housing and blade
drag; ling in heavy grass
1. Biadi I is unbalanced.
2. Bent motor shaft.
16
1. Wait till the grass dries before
mowing.
1. Raise cutting height
2. Raise cutting height.
1. Balance the blade by grinding each
cutting edge equally.
2. Stop the motor, disconnect the
power source and inspect for
damage. Repair before restarting. If
vibration persists, take it to a service
dealer.
Page 17

REPAIR PARTS
SEARS CRAFTSMAN 19” ELECTRIC MOWER MODEL NO. 247.370253
17
Page 18

SEARS CRAFTSMAN 19” ELECTRIC MOWER MODEL NO. 247.370253
KEY
NO.
1
2 747-0923
3
4 731-1270
5
6
7
8
9
10
11
12
13
14 764-0326
15
16 14765
17
18
19
20
21
22
23
24 736-0105
25
26
27
28
29
30
31
32 14578
* Common hardware -- can be purchased locall/.
t Part of Motor, Switch & Cord Ass’y. Comp. (Ref. 49
PART
NO.
749-0984 Upper Handle
725-1590
748-0356
738-0102 Axle Bolt
732-0712
731-1261
749-0882
782-7025
732-0677
732-0678
714-0104
738-0507B
14766
720-0190
732-0417a
710-0896
682-0514 Handle Bracket Ass’; ' (R.H.)
682-0513
710-1017
782-5026
736-0356
712-0798
14832
15262b
15261a
782-5025
782-0054
Handle Bracket Ass’; '. (L.H.)
Spring Lever Ass’y. V // Knob
DESCRIPTICN
Cord Control Rod
Strain-Relief Cord
Fan
Blade Adapter
Rear Flap Wire
Rear Flap
Lower Handle
Chute Door
Door Spring (L.H.)
Door Spring (R. H.)
Hairpin Clip
Front Catcher Frame
Shid. Bolt 5” X .434”
Pivot Bar (R.H.)
Pivot Bar (L.H.) (Not Shown)
Spring Lever Knob
Spring Lever
Hex AB-Tap Scr.
Torx. Mach. AB-Tap Scr.
Rear Baffle
Bell Washer .38” l.d.x .88”o.d.
Bell Washer .39” l.d.x 1.38”o.d.
Hex Nut 3/8-16 Thd. '
Pivot Bar
Height Adj. Plate
Front Baffle
19” Deck
Height Adj. Ass’y. Co mp. (R.H.)
KEY
NO.
33
34 710-3009
35
36
37 710-0654A
38
39
40
41
42
43
44
45
47 726-0240
48
49
50
51
52
53
54
66
67
68
69
70
71 724-0200
72 624-0070
73
74 710-3009
75
76
77 624-0029
78
79
80
83 710-1176
84
86
87
88
90
91
92 721-0311
93
94
95
-
PART
NO.
14579
731-1264
710-0605
712-0241
710-0191
736-0452
764-0447 Grass Bag
720-0241
734-1699
731-1268
731-1267
710-0450
736-0331
624-0072 Motor, Cord & Switch Ass’y t
625-0018B
725-1719
724-1246
782-5004 Mulching Baffle -TR.R.
782-5007
742-0719
747-0622 Control Handle
720-0295
720-0258
710-0192
720-0275 Knob
624-0031
721-0305
741-0875
-
624-0062
741-0124 Ball Bearing t
748-0348
712-0324 Hex L-Nut 1/4-20 Thd. t
721-0306
782-5016
725-1715
736-3090
726-0209
731-1388
710-1251
764-0325
770-0253M Owner’s Manual
DESCRIPTION
Height Adj. Ass'y Comp. (L.H.)
(Not Shown)
Motor Cover
Scr. #10-24 X .75” Lg.
C-Sunk Scr. 1/4-20 X 1.8” Lg.
Hex Nut 3/8-24 Thd.
Hex Tt-Tap Scr. 3/8-16 x 1 ” Lg.
Hex Bolt 3/8-24 x 1.25” Lg.
Bell Washer .396” l.d. x 1.14”
Plastic Knob
Wheel Ass’y Comp.
Upper Handle Insulator
Lower Handle Insulator
Carriage Bolt 5/16-18 x 3” Lg.
Cable Tie
Bell Washer 3/8” l.d.
Cord & Switch Ass’y Comp, t
Switch 20 Amp. t
Cord t
Mulching Baffle Plug
19” Mulching Blade
Foam Grip
Hub Cap
Truss Scr. #10-24 X .38” Lg.
Brush & Liner Ass’y T
Brush Holder Cap t
End Shield Ass’y W/plugt
(Includes Ref. 70&71)
Insulator Wire (Output) t
Hex Tap Scr. #10-16 X.62” Lg. T
Needle Bearing t
Not A Serviceable Part Order Ref. 49
Armature Ass’y t
Motor End Plate Ass’y t
Bearing Adapter t
Carriage Bolt t
Motor Hsg. Insulator T
Brkt. Rectifier/Heat Sink T
Rectifier
FI. Washer .26” I.D. x .72” O.D. t
Cable Tie
Insulator Motor Hsg.
Insulator Knob
Hex Bolt 3/8-24 x 2.5”
Rear Catcher Frame
18
Page 19

EXPLODED VIEW OF CORD & SWITCH ASSEMBLY (PART # 625-0018B) FOR SEARS CRAFTSMAN 19” ELECTRIC MOWER MODEL NO. 247.370253
KEY
NO.
1
2 710-1271 Drive Screw #8x1/2 Lg.
3
4
5
6
7 731-1571A
8
9 731-1848 Switch Housing (R.H.)
10 732-0741 Torsion Spring
11 782-9053 Actuator Arm
PART
NO.
631-0061
711-1145 Pivot
724-1246 Cord, 115Volt w/plug
725-1712
725-1719
731-1572
DESCRIPTION
Switch Hsg. Ass’y. (L.H.)
Circuit Breaker 120 voit 15 amp.
Switch, Micro 20 amp.
Ciip, Baii Lock
Button, Bail Lock
19
Page 20

For the repair or replacemen; parts you need
delivered directly to your home
Call 7 am - 7 pm, 7 days a week
1 -800-366-F^ART
(1-800-366-7278)
For in-home major brand repair service
Call 24 hours a day, 7 days a week
1-800-4-REPAIR
(1-800-473-7247)
For the location of )
Sears Parts and Repair Center in your area
Call 24 hours a day, 7 days a week
1-800-488-12222
For information on purchasing a Sears
Maintenance Agreement or to inquire
about an existing Agreement
call 9 am - 5 pm, Monday-Saturday
1-800-827-6IS55
!>
REPAIR SERVICE,
America’s Repair Specialists
Page 21

Sears se complace en ofrecer a sus clientes
servicio de reparación de aparatos electro
domésticos y electrónicos de todas las marcas.
En Sears, usted puede contar con operadores en
español, a los que puede llamar sin cargo alguno.
Para pedir servicio de reparación
a domicilio,
Llame 24 horas al día, 7 días a la semana
1 800-676-5811
Para ordenar piezas con entrega
a domicilio,
Llame de 7 am a 7 pm, 7 días a la semana
1 800-659-7084
REPAIR SERVICES
Page 22

Page 23

Page 24

Page 25

A
LOCALIZACION DE FALLAS
Detenga el motor y desconecte de la fuente de potencia, antes de efectuar cualquier clase de tareas de
investigación o de reparación.
Al efectuar cualquier mantenimiento de la cuchilla, proteja siempre las manos mediante el uso de guantes gruesos.
Problema
El mango no está en
posición
La cortadora no arranca
Se activa el interruptor de
circuitos en la cortadora
La cortadora corta el
césped de manera irregular
Causas posibles
1. Los pernos de acarreo no están asentados
en los aisladores del mango.
1. El cordón está desconectado del
control de motor/cuchilla
2. El interruptor del control de
motor/cuchilla es defectuoso.
3. El cordón de extensión no está conectado
a una fuente de potencia.
4. Se activa el interruptor de circuito en la
cortadora o en el receptáculo del hogar.
1. Demasiada carga de trabajo sobre la
cortadora.
2. Fusible quemado: el tomacorrientes está
sobrecargado.
1. No se ha graduado correctamente la
altura de corte.
2. Césped duro o irregular.
Acción correctora
1. Ajuste la altura del mango y asegúrese
que los pernos de acarreo estén
adecuadamente asentados dentro de los
aisladores del mango. Ajuste las perillas
manuales.
1. Reconecte el cordón manteniendo el
sujetador del cordón cerca del control de
motor/cuchilla.
2. Reemplace el interruptor del control de
motor/cuchilla.
3. Conecte el cordón de extensión a un
receptáculo interno o externo de 110-120
voltios y 60 ciclos de C.A.
4. Reposicione el interruptor de circuito
siguiendo las instrucciones de la sección
de Mantenimiento de este manual.
1. Aumente la altura de corte, reposicione el
interruptor de circuito en la cortadora,
disminuya el ancho de corte y camine
lentamente.
2. Conecte a un tomacorrientes con fusibles
de 15 amperios. Reposicione el interruptor
de circuito y arranque nuevamente la
cortadora.
1. Para que la cortadora corte uniformemente,
todas las ruedas deben colocarse a la
misma altura de corte.
2. Mueva las ruedas a una posición más
elevada de corte.
La cortadora no acolcha
correctamente
Difícil de empujar
La cortadora vibra a alta
velocidad
Consulte con su distribuidor autorizado de servicio,
menores listados arriba.
1. Los recortes húmedos de grama se
adhieren a la parte inferior de
la plataforma.
1. Césped alto o altura de corte demasiado
baja.
2. La parte posterior de la armadura de la
cortadora y la cuchilla se arrastran en un
césped denso.
1. La cuchilla está desequilibrada.
2. Eje doblado del motor.
para reparaciones más complicadas que los ajustes
16
1. Antes de cortar, espere hasta que la grama
se seque.
1. Aumente la altura de corte
2. Aumente la altura de corte
1. Equilibre la cuchilla desgastando
igualmente cada borde de corte.
2. Detenga el motor, desconecte la fuente de
potencia e inspeccione por averías. Antes
de arrancar nuevamente repare. Llévela a
un distribuidor de servicio, si persiste la
vibración.
Page 26

SERVICIO Y AJUISTE
1. AJUSTE DE LA ALTURA DE CORTE
Una palanca de ajuste en cada rueda provee un ajuste
de la altura de corte. Cada ajustador tiene nueve
posiciones de altura. La altura de corte se cambia
cuando la palanca se mueve de una posición a otra.
Simplemente presione la palanca hacia la rueda y
mueva el conjunto de rueda y palanca a la posición
deseada. Vea la figura 15. Todas las ruedas deben
colocarse en la misma posición relativa. Para céspedes
densos o irregulares, mueva las ruedas a una posición
que proveerá una mayor profundidad de corte.
Éi
2. AJL STE DE LA ALTURA DEL MANGO
El maní |o superior puede ajustarse a tres posiciones
diferentes de altura. Para seleccionar la posición
deseada afloje las perillas manuales y alinee una de
las tres marcas del tope de los aisladores del mango
inferior con la marca de los aisladores del mango
superio . Ajuste las perillas manuales. Refiérase a la
figura 2
3. AJL STE DEL INTERRUPTOR DE CIR
CUITOS
El interi uptor de circuitos está ubicado en la armadura
del control de motor/cuchilla. Este interruptor puede
activarse cuando se fuerce mucho la cortadora. Si la
cortado'a no funciona significa que se ha activado el
interruptor de circuitos, y la parte blanca del botón de
reposic ón se proyecta fuera de la armadura del
control le motor/cuchilla. Refiérase a la figura 9.
• Si ocurriera esto, espere 30 segundos
aproximadamente y a continuación active el botón
de r€ posición. Refiérase a la figura 9.
• Arrai ique nuevamente la cortadora, pero asegúrese
de rí ducir la carga sobre la misma (por ej., corte a
una altura mayor de corte, disminuya la velocidad o
dism nuya el ancho de corte).
• Si el interruptor de circuito no se reposiciona o si se
activ a repetidamente bajo condiciones normales de
corte, lleve la cortadora a un distribuidor autorizado
de SI srvicio.
ALMACENAMIENTO FUERA DE TEMPORADA
Su cortadora debe prepararse para almacenamiento
fuera de temporada o prolongado siguiendo los pasos
mencionados abajo.
1. CORTADORA
• Asegúrese que el interruptor del control de motor/
cuchilla esté en la posición OFF y que esté
desconectada la alimentación de potencia.
• Limpie la cortadora según las instruociones de la
sección previa.
• Inspeccione y reemplaoe/afile la cuchilla si fuera
requerido. Refiérase a la sección de la Cuchilla de
Corte en la página 14.
2. MANGO
El mango puede plegarse completamente para
almacenar.
• Retire la bolsa de grama.
• Afloje las perillas manuales a los lados del mango y
pliegue hacia abajo el mango superior.
• Tire hacia afuera de cada lado del mango inferior y
elev3 los lados del mango inferior pasando los
borres de los soportes de montaje del mango.
Pliegue el mango inferior hacia adelante. Asegúrese
de r o doblar ni retorcer el cordón de potencia.
3. CORDON DE EXTENSION
• Frot 3 el cordón de extensión para eliminar cualquier
subi ¡tanda extraña tal como aceite o manchas. Si el
corcón está cortado o dañado de alguna manera
reer ipláoelo.
• Enrolle el cordón en una serie de bucles iguales de
cad i lado de su mano para prevenir que se enrede.
4. ALVIACENAMIENTO
• Alm acene la cortadora bajo techo, en un lugar fresco
y Sí co, fuera del alcance de los niños. No oubra la
cortadora de césped con una oubierta plástica
sólida. La cubierta de plástico atrapa la humedad
alreledor de la cortadora lo que promueve la
oxic ación y la corrosión.
15
Page 27

Si la cuchilla no está equilibrada, elimine el metal
del lado más pesado hasta que se equilibre
uniformemente. Recomendamos que se extraiga
siempre la cuchilla del adaptador para efectuar la
mejor prueba de equilibrio.
1. Inserte el destornillador a través del orificio.
2. La cuchilla debe estar paralela al suelo
Lubrique los pernos que sujetan el ajustador de
altura a la plataforma, con un aceite liviano. Vea la
figura 14.
Si por alguna razón se sacaron las ruedas, lubrique
la superficie del eje y la superficie interior de la
rueda con aceite liviano. Vea la figura 14.
Si usted está reensamblando la cuchilla y el
adaptador de cuchilla a la unidad, lubrique el eje
del motor y la superficie interna del adaptador de
cuchilla con aceite liviano (o aceite de motor). Vea
la figura 14.
Lubrique también los orificios del perno, los pernos
y la superficie interna de las tuercas en el conjunto
del adaptador de cuchilla antes de reensamblar.
Vea la figura 14.
Destornillador
____
\
o
Figura 13
• Al reemplazar la cuchilla, asegúrese de instalar la
cuchilla con el lado de la cuchilla marcada "Bottom"
("Fondo" (o con el número de pieza) enfrentado al
suelo, cuando la cortadora esté en la posición de
operación. Asegúrese también de seguir el orden
correcto según se muestra en la figura 12.
Cuchilla
Suelo
3. PLATAFORMA
NOTA: Debe limpiarse el lado inferior de la plataforma
de la cortadora después de cada uso ya que se
acumularán recortes de grama, hojas, suciedad y
otras materias. Esta acumulación de recortes de
grama, etc. es indeseabie ya que promoverá óxido y
corrosión.
• Elimine toda la acumulación de grama y hojas
sobre o alrededor de la cubierta del motor (no use
agua). Ocasionalmente frote la cortadora con un
trapo seco y limpio.
• Desconecte la fuente de potencia. Incline la
cortadora hacia adelante o sobre un lado y raspe
limpio con una herramienta adecuada.
ADVERTENCIA: No exponga la cortadora al
agua para reducir el riesgo de choque
A
eléctrico.
4. LUBRICACION
Refiérase a la Tabla de Lubricación de Abajo
• Mantenga bien lubricada la unidad. Lubrique los
resortes de la puerta de descarga posterior con un
aceite liviano. Vea la figura 14.
Figura 14 - Tabla de lubricación
14
Page 28

1. RECOMENDACIONES GENERALES
Para el programa de mantenimiento, refiérase a
Tabla de Responsabilidades del Cliente.
• Observe siempre las reglas de seguridad
efectuar cualquier mantenimiento.
• La garantía de esta cortadora eléctrica no cubre
artículos que hayan estado sometidos a abuso o
negligencia por parte del operador. El operador
debe mantener la cortadora según se instruye en
este manual, para recibir el valor completo de la
garantía.
• Para mantener adecuadamente su unidad, deberá
efectuar algunos ajustes periódicamente.
• Deben inspeccionarse todos los ajustes en la
sección de Servicio y Ajustes una vez por cada
temporada por lo menos.
• Siga el programa de mantenimiento de la página
12.
ADVERTENCIA: Antes de limpiar, lubricar o
efectuar reparaciones o mantenimiento en la
A
cortadora de césped, siempre detenga el
motor y desconecte la fuente de potencia.
la
al
2. CUCHILLA DE CORTE
ADVERTENCIA: Al efectuar cualquier
mantenimiento de la cuchilla, proteja siempre
A
Extracción de la cuchilla
• Detenga el motor y desconecte la alimentación de
• Use un bloque de madera entre la cuchilla y la
las manos usando guantes gruesos y/o
envolviendo los bordes filosos con periódicos
u otros materiales. Asegúrese de
desconectar la fuente de potencia.
potencia a la cortadora. Vuelque la cortadora sobre
el lado.
plataforma de la cortadora para evitar que la
cuchilla gire cuando se extrae el perno.
• Usar do una llave de caja o de extremo abierto de
9/16', extraiga el perno central y la arandela
campana que mantienen la cuchilla y el adaptador
en el eje del motor. Vea la figura 12.
• Extrc iga la cuchilla y el adaptador del eje.
• Extrí Iga los dos pernos pequeños, arandelas de
seguridad y tuercas que mantienen la cuchilla en el
adap tador. Vea la figura 12.
Reemplazo de la cuchilla
• Colo :|ue el adaptador de la cuchilla en el eje del
mote r.
• Cale? la cuchilla en el adaptador asegurándose
que 3l borde posterior de la cuchilla esté colocado
hacia arriba hacia el motor, y que el lado de la
cuch lia marcado "Bottom" ("Fondo") (o con el
núm-sro de pieza) en frente del suelo cuando la
corte dora esté en la posición de operación.
• Antes de reensamblar la cuchilla y el adaptador de
la cuchilla a la unidad, lubrique el eje del motor y la
superficie interna del adaptador de cuchilla con
aceita liviano (o aceite de motor). Se recomienda
tamt ién la lubricación de los orificios de los pernos,
de los pernos y de la superficie interna de las
tuerc as.
• Ensamble los pernos, las arandelas y las tuercas
en e orden exacto de extracción. Vea la figura 12.
ADVERTENCIA: Inspeccione periódicamente
el adaptador de cuchilla por grietas,
A
I especialmente si usted ha golpeado un objeto
extraño. Reemplace cuando sea necesario.
Par tor sor de montaje de la cuchilla
El par 1 Drsor recomendado para el perno central de la
cuchilla es de 450-600 pulg.lbs. El par torsor
recome ndado para los dos pernos adaptadores de la
cuchilla es de 200-300 pulg.lbs.
Para garantizar una operación segura de su unidad,
deben inspeccionarse periódicamente todas las
tuercas y pernos para un ajuste correcto.
Tuerca
hexagonal
Tuerca de
seguridad
Adaptador
de cuchilla
Perno
hexagonal
Tuerca
hexagonal
Figura 12
Perno
hexagonal
Arandela de
seguridad
Tuerca
hexagonal
Afiladc de la cuchilla
• La cuchilla puede afilarse con una lima o en una
rueda desgastadora. No intente afilar mientras esté
inste lada en la cortadora.
• Al c filar la cuchilla, siga el ángulo original de
descaste como guía. Es extremadamente
impe rtante que cada borde de corte reciba un
grada igual de desgaste para prevenir una cuchilla
dése quilibrada.
• Pruebe la cuchilla equiibrándola sobre un
destarnillador de eje redondeado o en un
equi ibrador de cuchillas. Vea la figura 13.
NOTA: Una cuchilla desequilibrada causará una
vibrack >n excesiva al girar a altas velocidades, puede
causar averías a la cortadora y podría romperse,
causar do lesiones personales.
13
Page 29

un césped sano, corte siempre un tercio o menos
de la longitud total de la grama. El césped promedio
debe tener entre 1-1/2 y 2 pulg
adasaproximadamente durante la temporada fría y
más de 2 pulgadas durante los meses calurosos.
Para obtener un césped más sano y de mejor
apariencia, corte más a menudo y después de un
crecimiento moderado. El césped debe cortarse en
el otoño mientras crezca.
Consejos para el acolchado
• Para obtener un acolchado efectivo, no corte la
grama mojada ya que tiende a adherirse al lado
inferior de la plataforma, evitando el acolchado
adecuado de los recortes de grama. La grama
MANTENIMIENTO
Tabla de Responsabilidad del Cliente
nueva o espesa puede requerir un corte más
angosto. La velocidad sobre el suelo debe
ajustarse al estado del césped. Si se ha demorado
el corte y se ha permitido que la grama crezca en
exceso de 4", corte dos veces para reducir la altura
de la grama a 3-1/4" como máximo.
ADVERTENCIA: Desconecte el motor, si
usted golpea un objeto extraño. Antes de
A
arrancar y operar nuevamente la cortadora,
desconecte la fuente de potencia,
inspeccione completamente la cortadora por
averías y repare la avería. Una vibración
intensa de la cortadora durante la operación
es una indicación de avería. La unidad debe
ser prontamente inspeccionada y reparada.
/,? /'í’ /í.*' /
PROGRAMA DE MANTENiMIENT(^ ^/ FECHAS DE SERVICIO*
ñ
Limpie la cubierta del motor
/7
Limpie la cubierta
Limpie la cuchilla y el lado inferior
de la plataforma
Inspeccione la cuchilla y el
adaptador de cuchilla
'77''
0/7
cO
Inspeccione todas las tuercas
y pernos
o'
Inspeccione la bolsa retenedora
de grama
Lubrique la clavija de
bisagra y perno
■Cv/
//
qJ/
V
V
o
,0
* Anote las fechas a medida que completa el servicio
^ Marque
12
Page 30

manera. Si no puede efectuar una conexión
completa, trate de invertir el enchufe del cordón de
extensión. Consulte con su distribuidor de servicio
para asistencia, si todavía no puede calzar el
enchufe. No anule el propósito de seguridad del
enchufe polarizado.
Conexión a la fuente de potencia eléctrica
• Para su fuente de potencia, enchufe el cordón de
extensión a cualquier tomacorrientes o receptáculo
conveniente de 110-120 voltios 60 ciclos de C.A.
Este tomacorrientes puede estar ubicado al aire
libre o bajo techo. Seleccione un tomacorrientes
que no esté sobrecargado, para evitar quemar los
fusibles. Su cortadora operará satisfactoriamente
en un circuito que tiene fusibles para 15 amperios.
No use fusibles de tamaño mayor sin consultar con
su compañía de electricidad. El cordón de
extensión puede sacarse al aire libre por una
puerta o ventana, si se usa un receptáculo externo.
3. ARRANQUE DEL MOTOR Y ENGANCHE DE LA CUCHILLA
• Parándose detrás de la unidad accione el botón
arrancador del control de motor/cuchilla.
• Presione el mango de control de motor/cuchilla
contra el mango. Suelte el botón arrancador. Vea la
figura 10.
ADVERTENCIA: La cuchilla continúa
girando por unos pocos segundos después
A
• Des( onecte la fuente de potencia para prevenir el
de apagarse el motor. Consulte con un
distribuidor autorizado de servicio, si el motor
no se detiene inmediatamente cuando se
suelta el mango de control del motor/cuchilla.
arranque accidental mientras el equipo está
desc tendido.
5. USO DE SU CORTADORA GIRATORIA
ADVERTENCIA: No opere esta cortadora
con la puerta de la canaleta abierta, a menos
A
• Asegúrese que el césped esté despejado de
• No opere la cortadora en sitios húmedos o
Patrón de corte:
• Corr ience siempre en el punto más cercano a la
^ que el retén completo de grama esté
correctamente montado en la cortadora.
pied as, palos, alambres u otros objetos que
podrían averiar la cortadora de césped o el motor.
Talen objetos pueden ser accidentalmente
desf edidos en cualquier dirección por la cortadora
y ca jsar lesiones personales graves al operador y
a ott as personas.
moje dos, para prevenir el choque eléctrico.
fuente de potencia a la cual está conectado el
cordón. Nunca corte el césped en círculos; recorra
ida r vuelta sobre el césped, comenzando con el
punto más cercano al tomacorrientes y a
con! nuación alejándose del tomacorrientes de
marera que el cordón esté apartado sobre el área
cortada del césped. Vea la figura 11.
IMPORTANTE: Su cortadora está equipada con un
interruptor de circuito, ubicado en la armadura del
control de motor/cuchilla. Vea la figura 9. Si se activa
el interruptor de circuito, reposicione según las
instrucciones de la sección de Mantenimiento.
4. DETENCION DEL MOTOR Y DE LA CUCHILLA
• Para detener el motor y la cuchilla, suelte el mango
del control de motor/cuchilla. Se emitirá un sonido
agudo debido a la desaceleración del motor.
Durante la desaceleración es también normal un
chisporroteo en el tope del motor.
T = Obstáculos
^ ^
Tomacorrientes
(Comience aquí)
Figura 11 - Patrón de corte
No permita que el cordón de extensión se envuelva
aire fedor de árboles, matas u otros obstáculos. Al
rece ger el cordón de extensión, enrolle el cordón
en una serie de bucles iguales a cada lado de su
mar o para prevenir que se enrede.
Al cortar grama densa reduzca la velocidad de
marcha para permitir un corte más efectivo y una
des :arga adecuada de los recortes. Para obtener
11
Page 31

Control del Motor/Cuchilla
ADVERTENCIA: Las regulaciones federales
requieren que se instale un control de motor/
A
NOTA: Su cortadora de césped está equipada con un
control de motor/cuchilla que requiere que el operador
esté colocado detrás del mango de la cortadora de
césped para arrancar y operar la cortadora de césped.
El control del motor/cuchilla está ubicado en el mango
superior de la cortadora. Vea la figura 8. El mango de
control de motor/cuchilla engancha y desengancha el
motor y la cuchilla. El control de motor/cuchilla
consiste de dos partes - un botón arrancador y un
mango de control de motor/cuchilla.
Protector posterior de remolque
El protector posterior de remolque, fijado entre las
ruedas posteriores de su cortadora, se provee para
minimizar ia posibilidad de que haya objetos
despedidos al operador desde la parte posterior de la
cortadora. Vea la figura 8.
Interruptor de circuitos
Su cortadora está equipada con un interruptor de
circuito, ubicado cerca del control de motor/cuchilla en
el conjunto del interruptor. Este interruptor de circuito
puede activarse cuando se fuerce demasiado la
cortadora de césped.
cuchilla en la cortadora de césped para
minimizar el riesgo de lesiones por contacto
con la cuchilla. NO intente anular la función
del control de motor/cuchilla bajo ninguna
circunstancia. Nunca intente saltear sus
operaciones.
2. CONEXION DEL CORDON
Selección dei cordón
IMPORTANTE: Debe usarse un tramo de 100' de un
cordón de extensión 14 AWG. Un substituto aceptable
es un tramo de 50' de un cordón de extensión 16
AWG. Para aplicaciones donde se necesita un cordón
más largo, puede usarse un tramo de 150' de un
cordón 12 AWG. El uso de cualquier otra longitud o
clasificación de cordón disminuirá el rendimiento y
posiblemente la duración del motor eléctrico. En todos
los casos, el cordón de extensión debe estar listado
por UL como adecuado para uso al aire libre.
Sujetador del cordón
• Fije el cordón de extensión (no provisto con la
unidad) al sujetador de cordón como sigue:
• Forme un pequeño bucle en el cordón de
extensión. Permita suficiente exceso de cordón
para efectuar la conexión al control de motor/
cuchilla (20 pulgadas aproximadamente).
• Deslice el bucle a través de la ranura en el fondo
del sujetador del cordón, y hacia arriba sobre la
aleta, para prevenir la desconexión del control de
motor/cuchilla durante la operación.
• Mantenga el sujetador del cordón tan cerca como
sea posible del control de cuchilla/motor. Vea la
figura 9.
Botón de arranque
El botón de arranque está ubicado en el conjunto del
interruptor. Parándose detrás de la unidad, accione el
botón arrancador y presione el mango de control de
motor/cuchilla contra el mango superior. El motor
arrancará y al hacerlo suelte el botón arrancador.
Detención de la cortadora
Para detener el motor y la cuchilla suelte el mango de
control de motor/cuchilla.
ADVERTENCIA: La operación de cualquier
cortadora de césped puede resultar en que
A
NOTA: Para fines de transporte, las ruedas de su
unidad están graduadas en una posición de corte de
baja altura. Para obtener los mejores resultados, eleve
la posición de corte hasta que determine la altura
óptima para su césped. Vea el ajuste de la altura de
corte.
objetos extraños sean despedidos contra los
ojos, lo que puede resultar en lesiones
graves a los mismos. Use siempre gafas de
seguridad o protectores de los ojos.
Conexión al control de motor/cuchilla
• Conecte el enchufe del cordón de extensión
completamente en el enchufe de la cortadora. La
cortadora está equipada con un enchufe polarizado
de potencia de AC (una de las cuchillas del enchufe
es más ancha que la otra), que calzará dentro del
enchufe del cordón de extensión de una sola
10
Page 32

7. fu;)CION DEL RETEN DE GRAMA
• Eleve la puerta de descarga posterior en la
cortadora y extraiga el deflector de acolchado. Vea
la figi ra 5.
• Coloc ue los ganchos del retén de grama dentro de
las ra nuras en el conjunto de soportes del mango a
cada lado del mango inferior. Vea la figura 7.
Sueltí.
OPERACIO
1. CONOZCA SU CORTADORA DE CESPED
ANTES DE OPERAR SU CORTADORA DE CESPED LEA ESTE MANUAL DEL PROPIETARIO Y LAS REGLAS
DE SEGURIDAD. Compare las ilustraciones con su cortadora de césped para familiarizarse con la ubicación de
los diferentes controles y ajustes. Guarde este manual para referen ;ia futura.
Conjunto del interruptor
Aislad
del mango
Retén de
grama
Puerta de
descarga
posterior
Protector posterior
de remolque
I Control de motor/cuchilla
- Sujetador del cordón
Aislador del mango
Mango inferior
Perilla de ajuste de altura
Figura 8
CUMPLE CON LOS REQUERIMIENTOS CPSC DE SEGURIDAD
Las cortadoras de césped motorizados giratorias de empuje cumjilen con las normas de seguridad del Instituto
Americano de Normas Nacionales y la Comisión de Seguridad de f’roductos del Consumidor
de Estados Unidos. La cuchilla gira cuando funciona el motor.
Page 33

Figura 5
uerta de
descarga po
sterior
Deflector
de acolchado
Retire los broches del cabello del orificio exterior en
las clavijas soldadas en los soportes de montaje
del mango.
Usando un par de tenazas, presione uno de los
soportes del mango inferior contra el soporte de
montaje del mango. Inserte el broche del cabello
dentro del orificio interior de la clavija soldada.
Repita en el otro lado. Vea la figura 4.
Asegúrese que todas las tuercas y pernos estén
bien ajustados.
5. CONVERSION DE LA ACOLCHADORA
Su cortadora ha sido despachada como una
acolchadora con el deflector acolchador en su lugar.
Usted tendrá que instalar el retén de grama, para usar
la cortadora como una unidad embolsadora de
descarga posterior.
• Para extraer el deflector de acolchado, eleve la
puerta de descarga posterior y tire del deflector
hacia afuera. Vea la figura 5.
• Para instalar nuevamente el deflector de acolchado,
eleve la puerta de descarga posterior y coloque el
deflector en la abertura.
Frame
3. Deslice el mango
fuera de la muesca
4. Deslice el canal
plástico sobre el
marco \
Figura 6
6. ENSAMBLADO DEL RETEN DE GRAMA
Nota: Antes de ensamblar, asegúrese que la bolsa de
grama esté con el lado derecho hacia afuera con el
rótulo de advertencia en la parte de afuera. También el
lado de plástico negro es el fondo de la bolsa.
• Inserte el marco delantero dentro del marco
posterior tanto como sea posible.
• Coloque el conjunto del marco dentro de la bolsa.
• Deslice el canal plástico de la bolsa sobre el marco
(adyacente al mango del retén de grama). Vea la
figura 6. Asegúrese que el mango del retén de
grama sobresalga de la muesca del canal plástico
en la bolsa.
• Inserte los dos ganchos a ambos lados del marco a
través de las aberturas a ambos lados de la bolsa.
• Asegure la bolsa al marco trabajando los canales
plásticos en la bolsa sobre el marco en los otros
lados, según se muestra en la figura.
Nota: Todo el canal plástico, excepto el tope central
de la bolsa, se fija desde el exterior de la bolsa. El
tope central de la bolsa se fija desde el interior de la
bolsa.
Advertencia: Nunca opere la cortadora a
menos que los ganchos del retén de grama
A
estén asentados en las ranuras de los
conjuntos de soporte del mango, y la puerta
de descarga posterior se apoye firmemente
contra el tope del retén de grama.
Page 34

ENSAMBLAD
NOTA: Se observa desde la posición operativa la ref
erencia al lado derecho o izquierdo de la cortadora.
Usted deberá usar un cordón de extensión, com
prado separadamente, para hacer funcionar esta
unidad. Por favor, refiérase a la página 10 para una
selección correcta del cordón.
1. EXTRACCION DE LA UNIDAD DE LA
CAJA
• Para abrir la caja, extraiga los broches, rompa el
adhesivo en las aletas superiores o corte la cinta
del extremo de la caja y pele a lo largo de la aleta
superior.
• Extraiga las piezas sueltas si están incluidas con la
unidad (por ej., manual del propietario, etc.).
• Corte a lo largo de las líneas punteadas y apoye la
caja sobre una superficie plana.
• Extraiga el material de empaque.
• Ruede o deslice la unidad fuera de la caja. Inspec
cione completamente la caja por piezas sueltas.
2. PIEZAS SUELTAS EN LA CAJA
Refiérase a la Figura 1.
1. Juego del retén de grama:
a. Marco delantero
b. Marco posterior
c. Bolsa
4. ENSAMBLADO DEL MANGO
Refiéras í a la ilustración de abajo
• Extrai 3a todo el material de empaque incluido para
fines de transporte, que pueda estar entre los
mang ds superior e inferior.
• Tire hacia arriba y hacia atrás del mango superior,
para elevar el mango a la posición de operación.
Asegiirese que el mango inferior esté asentado
seguramente dentro de los soportes de montaje del
mang x Vea los pasos 1, 2, y 3 en la figura 2.
Figura 2
3. HERRAMIENTAS REQUERIDAS
Un par de tenazas
cf
El mango superior puede ajustarse a tres posi
ciones diferentes de altura. Para ajustar el mango a
la po jición deseada, alinee una de las tres marcas
en el tope de los aisladores del mango inferior con
la m£ rea en los aisladores del mango superior. Vea
la fig ira 3.
Ajusta las perillas manuales a cada lado del
mane 10. Asegúrese que los pernos de acarreo estén
correctamente asentados dentro de los aisladores
del rr ango.
Page 35

co
LÜ
K
z
m
Q
z
UJ
GL
UJ
O
GC
O
O
<
Ü
o
cc
<
oc
UJ
0.
o
UJ
Q
UJ
Z3
0.
Q
UJ
h-
V)
3
UJ
o
z
o
Q
(0
UJ
H
z
lU
Q
z
UJ
0.
oc
<
z
s
oc
UJ
I—
UJ
□
<
oc
<
5
o
o
s
o
Ü
Z 03
a. oc
< 3
P o
<n UJ
UJ (/)
UJ S
(0 o
3 o
MIRE Y MANTENGA ESTE NIVEL CON UN ARBOL VERTICAL
---------UN POLO DE POTENCIA
------------------
-----------------------------O UN POSTE DE CERCA
UNA ESQUINA DE UN EDIFICIO
¡¡5iiSlаiЙiiЙаЙЙЙЙaаа ■
A
No corte sobre inclinaciones con pendientes en exceso de 15 grados (una elevación de 2-1/2 pies cada 10 pies aproximadamente).
Una cortadora con el operador MONTADO podría volcarse y causar lesiones graves. Si opera una cortadora de EMPUJE en una
pendiente así, es extremadamente difícil mantenerse bien parado y usted podría resbalar, resultando en lesiones graves. Opere las
cortadoras con el operador MONTADO hacia arriba y abajo de las pendientes, nunca a través de la superficie de las mismas.
Opere las cortadoras de EMPUJE a través de la superficie de las pendientes, nunca hacia arriba y abajo de las mismas.
ADVERTENCIA
(O
Page 36

12. Nunca empuje la cortadora sobre el cordón, para
evitar el riesgo de choque eléctrico. No corte el
césped en círculos. Siempre recorra hacia
adelante y atrás sobre el césped, comenzando
con el punto más cercano al tomacorrientes eléc
trico, al cual está conectado el cordón de exten
sión. Esto mantendrá el cordón apartado en el
área cortada del césped.
13. No opere la cortadora después de haberse caído
o dañado de alguna manera. Retorne la cortadora
al centro más cercano autorizado de servicio .
14. El uso de aditamentos de accesorio no
recomendados por el fabricante de la cortadora
puede causar riesgos.
15. No opere esta cortadora con la puerta de la
canaleta abierta, a menos que el retén completo
de grama o el deflector de la canaleta lateral
estén montados correctamente en la cortadora.
4. MANTENIMIENTO Y ALMACENAMIENTO
Advertencia - Antes de efectuar cualquier man
1.
tenimiento o prestar servicio a la cortadora,
desconecte el cordón de potencia del tomacorri
entes eléctrico.
Inspeccione la cuchilla y los pernos de montaje
2.
del motor a intervalos frecuentes, por un ajuste
adecuado. Mantenga ajustados todas las tuercas,
pernos y tornillos, para asegurarse que el equipo
esté en una condición segura de trabajo.
Mantenga afilada la cuchilla.
3.
4.
Use sólo cuchillas idénticas de reemplazo. Reem
place el cordón dañado.
Mantenga el motor libre de grama, hojas o grasa
5.
excesiva, para reducir el riesgo de incendio.
Cuando no esté en uso, almacene la cortadora de
césped bajo techo. Antes de almacenar en un
recinto permita que el motor se enfríe. La corta
dora de césped debe almacenarse bajo techo en
un lugar seco, alto o cerrado con llave, fuera del
alcance de los niños.
7. Mar tenga con cuidado la cortadora de césped.
Mar tenga la cuchilla afilada y limpia para obtener
un uncionamiento mejor y más seguro. Para
lubr car y cambiar los accesorios siga las instruc
ción as.
8. Inspeccione frecuentemente la bolsa del retén de
grana por desgaste o deterioro. Reemplace
inmodiatamente una bolsa gastada o averiada.
Ase ]úrese que la bolsa de repuesto cumple con
las ( ispecificaciones originales del equipo.
5. COF TADORA DE CESPED DOE LEMENTE AISLADA
1. La iiislación doble es un concepto en seguridad
en IÌS cortadoras eléctricas de césped, que elim
ina a necesidad del cordón común de potencia de
tres conductores conectado a tierra y del sistema
de alimentación conectado a tierra. Siempre que
haya corriente eléctrica en la cortadora existen
dos juegos completos de aislación para proteger
al usuario. Todas las piezas expuestas de metal
est£ n aisladas de los componentes internos de
metal mediante una aislación protectora.
2. IMPORTANTE - El prestar servicio a una corta
dora de césped con aislación doble requiere ser
muj precavido y tener conocimiento del sistema y
deba ser efectuado sólo por un técnico calificado
de aervicio. Para un servicio de reparación suger
imos que retorne la cortadora de césped a su dis
tribuidor autorizado de servicio más cercano. Al
prestar servicio, use siempre piezas originales de
reemplazo.
GI ARDE ESTAS INSTRUCCIONES
Usted encontrará en su cortadora los dos rótulos de seguridc d reproducidos abajo. Por favor siga
las instrucciones de esos rótulos de seguridad para una operación segura de la cortadora.
PARA REDUCIR EL RIESGO DE LESIONES, N0 OPERE
LA CORTADORA A MENOS QUE ESTEN EN SU LUGAR
EL PROTECTOR POSTERIOR Y ESTA GUARDA 0 EL
RETEN COMPLETO DE GRAMA.
Page 37

necesita un cordón más largo, puede usarse un
tramo de 150' de un cordón 12AWG. Un cordón
de tamaño menor que el correspondiente causará
una caída en el voltaje de línea resultando en pér
dida de potencia y sobrecalentamiento. Aseg
úrese de usar el sujetador provisto del cordón o
de hacer un nudo según se muestra en la ilus
tración de abajo para reducir la posibilidad de
desconexión del juego del cordón de extensión de
la cortadora.
Conecte el enchufe y el
receptáculo
Cordón de
extensión
Cordón del
artefacto
9. Su cortadora está equipada con un enchufe polar
izado (una cuchilla del enchufe es más ancha que
la otra), para reducir el riesgo de choque eléctrico.
Si el tomacorrientes del extremo de su cordón de
extensión no se adapta completamente dentro del
enchufe de su cortadora, invierta el tomacorri
entes y trate de enchufar nuevamente. Lo mismo
es cierto para el extremo del cordón de extensión
que usted enchufa dentro del tomacorrientes de
su hogar. Consulte con un electricista calificado
para instalar el tomacorrientes y/o enchufe adec
uados, si después de invertir las conexiones, cual
quiera de ellas todavía no se adapta.
Absolutamente no cambie el enchufe de la corta
dora.
10. Inspeccione periódicamente el cordón de exten
sión y reemplace si está dañado. Mantenga los
mangos secos, limpios y libres de aceite y grasa.
11. Fusibles - La cortadora debe operarse en un cir
cuito de 15 ó 20 AMPERIOS. Consulte con su
centro más cercano autorizado de servicio, si
usted experimenta dificultades en arrancar con un
fusible o interruptor de circuitos estándar de 15
AMPERIOS. No use un fusible de clasificación
nominal mayor sin consultar antes con su com
pañía eléctrica.
12. Debe proveerse protección de Interruptor de Cir
cuito de Falla a Tierra (GFCI) en el circuito(s) o el
tomacorriente(s) a usarse en la cortadora de
césped. Están disponibles receptáculos con pro
tección incorporada de GFCI y puede usarse para
esta medida de seguridad.
13. Antes de operar esta unidad en un área empinada
o escarpada, use el indicador de pendientes
incluido como parte de este manual, para su seg
uridad. Si la inclinación es mayor que 15® según
se muestra en el indicador de pendientes, no
opere esta unidad en ese área ya que podría
resultar en lesiones graves.
3. OPERACION
1. No abuse el cordón - nunca tire de la cortadora
por el cordón ni lo tire bruscamente para
desconectarlo del receptáculo. Mantenga el
cordón alejado del calor, aceite y bordes afilados.
2. Desconecte el cordón de extensión del
receptáculo del hogar, si el cordón de extensión
estuviera dañado de alguna manera mientras
está enchufado.
3. No coloque las manos ni los pies cerca ni debajo
de las piezas giratorias. Manténgase alejado en
todo momento de las aberturas de descarga, ya
que la cuchilla giratoria puede causar lesiones.
4. Apague el motor al abandonar la cortadora y
antes de cruzar caminos particulares de pedreg
ullo, senderos o carreteras.
5. Apague el motor después de impactar un objeto
extraño y asegúrese bien que la cuchilla y todas
las piezas móviles se hayan detenido completa
mente, desconecte el cordón de potencia para
prevenir el arranque accidental y a continuación,
inspeccione completamente la cortadora por
averías. Tal avería debe repararse antes de arran
car nuevamente y operar la cortadora.
6. Si el equipo comenzara a vibrar anormalmente,
apague el motor e inspeccione inmediatamente la
causa. La vibración es generalmente una adver
tencia de problemas.
7. Apague el motor, desenchufe el cordón de poten
cia y espere que se detengan la cuchilla y todas
las piezas móviles, antes de limpiar o destapar,
reparar o inspeccionar la cortadora. La cuchilla de
corte continúa girando por unos pocos segundos
después que se apague el motor.
8. No fuerce la cortadora de césped. Efectuará la
tarea mejor y con más seguridad a la velocidad
para la cual fue diseñada. Use el artefacto cor
recto - No use la cortadora de césped para nin
guna tarea excepto aquellas para las cuales está
dedicada.
9. Corte a través de la superficie de las pendientes,
nunca hacia arriba y hacia abajo. Nunca corte el
césped tirando de la cortadora hacia usted. Sea
muy precavido ai operar la cortadora sobre un ter
reno irregular o al cambiar de dirección en las
pendientes. No corte en pendientes excesiva
mente escarpadas. No se incline demasiado.
Asegúrese siempre de pararse firmemente y
mantenga el equilibrio. Un resbalón y una caída
puede causar lesiones personales graves.
10. Nunca opere la cortadora sin que las guardas,
placas u otros mecanismos protectores de segu
ridad estén en su lugar y en buenas condiciones
de trabajo.
11. El control de cuchilla/motor en esta cortadora está
instalado para minimizar el riesgo de lesiones por
contacto con la cuchilla y se requiere por las
reglamentaciones federales. No trate, bajo nin
guna circunstancia, de anular la función de control
de cuchilla/motor.
Page 38

A
ik
PRACTICAS SEGURAS DB OPERACION
Este símbolo indica instrucciones importantes de seguridad las cuales, si no se siguen, podrían hacer
peligrar la seguridad personal y/o la propiedad suya y de 'erceros. Lea y siga todas las instrucciones
en este manual antes de intentar operar su cortadora electrica de césped. El no cumplir con estas
instrucciones puede resultar en lesiones personales. C uando vea este símbolo - obedezca su
advertencia.
Su cortadora eléctrica de césped fue construida para operar de acuerdo con las reglas de
PELIGRO:
operación segura de este manual. Lo mismo quo con cualquier tipo de equipo motorizado,
la falta de cuidado o error por parte del operar or puede resultar en una lesión grave. Si
usted violara cualquiera de estas reglas, puede :ausar lesiones graves a usted mismo o a
terceros.
ADVERTENCIA: Se deben seguir siempre
precauciones básicas de seguridad para
A
reducir el riesgo de incendio, choque
eléctrico y lesiones personales,
incluyendo lo siguiente:
1. ENTRENAMIENTO
1 Lea cuidadosamente todas las instrucciones en
su totalidad antes de intentar ensamblar u operar
esta máquina. Familiarícese completamente con
los controles y el uso correcto de esta máquina,
antes de operarla. Mantenga este manual en un
lugar seguro para referencia regular y futura y
para ordenar piezas de repuesto.
2. Su cortadora giratoria es una pieza de precisión
de equipo motorizado y no un juguete. Por con
siguiente sea extremadamente precavido en todo
momento.
3. Use el artefacto correcto - No use la cortadora de
césped para ninguna tarea excepto aquellas para
las cuales está dedicada.
4. Nunca permita que ios niños operen una corta
dora motorizada. Sólo debe permitir usar su cor
tadora a las personas bien familiarizadas con
esas reglas de operación segura.
5. Ninguna persona debe operar esta unidad mien
tras esté intoxicada o mientras tome cualquier
medicación que altere los sentidos o las reac
ciones.
6. Permanezca alerta - Observe lo que está haci
endo. Use sentido común. Cuando esté cansado
no opere la cortadora de césped.
7. Mantenga el área de operaciones despejada de
todas las personas, particularmente niños
pequeños y animales domésticos. Apague el
motor cuando estén cerca de su cortadora. A
pesar que el área de operaciones debe estar
completamente despejada de objetos extraños,
puede no haberse recogido un objeto el que
podría ser accidentalmente despedido por la cor
tadora en cualquier dirección y causar lesiones
personales graves al operador o a otras personas
permitidas en el área.
2. PREI>ARACION
1. Inspeccione completamente el área donde se
usara el equipo. Retire todas las piedras, palos,
alamcre, huesos y otros objetos extraños que
puecen ser tomados y despedidos por la corta
dora y causar lesiones personales graves al oper
ador o a otras personas permitidas en el área.
2. Durante la operación o al efectuar un ajuste o rep
aración, use siempre gafas de seguridad o protec-
tore? de los ojos, para proteger los ojos contra
objetos extraños que puedan ser despedidos por
la máquina en cualquier dirección. Si la operación
es pjivorienta, use una máscara facial o protec
tora jontra el polvo.
3. Víste se adecuadamente. Use zapatos resist
ente de suela áspera. Nunca opere una unidad
si está descalzo o usa sandalias o zapatillas. No
use opas holgadas ni joyas. Las mismas pueden
quec ar atrapadas en las piezas móviles. Se
reconienda usar guantes y calzado de goma al
trabajar al aire libre.
4. Miertras el motor está funcionando, nunca trate
de a ustar una rueda o la altura de corte.
5. Cort3 sólo a la luz del día o bajo una buena luz
artificial.
6. Evito un medio ambiente peligroso - Nunca opere
el equipo bajo la lluvia o en sitios húmedos o
mojí .dos. Asegúrese siempre de pararse firme
mente. Un resbalón y una caída puede causar
lesic nes personales graves. Sujete firmemente el
margo y camine, nunca corra.
No í e incline excesivamente - párese firmemente
y mantenga el equilibrio en todo momento.
7. Advertencia - Para prevenir el choque eléctrico,
use sólo con un cordón de extensión listado por
UL, adecuado para uso al aire libre, tal como Tipo
SW A, SOW-A, STW-A, STOW-A, SJW-A, SJOWA, £ JTW-A o SJTOW-A.
8. Cordón de extensión - Asegúrese que su cordón
de extensión esté en buenas condiciones, que
sea suficientemente pesado para acarrear la corrien e que absorberá su cortadora, y que esté
polc rizado (una cuchilla del enchufe es más
anc ia que la otra). Debe usarse un tramo de 100'
de i. n cordón de extensión 14 AWG. Un substituto
aceptable es un tramo de 50' de un cordón de
extensión 16AWG. Para aplicaciones donde se
Page 39

TABLA DE CONTENIDO
Contenido.........................................................Página
Información de garantía.......................................2
Prácticas seguras de operación
Indicador de pendiente........................................6
Ensamblado.........................................................7
Operación
............................................................
..........................
3
9
Contenido...........................................................Página
Mantenimiento.....................................................12
Servicio y Ajuste..................................................15
Almacenamiento fuera de temporada
Localización de fallas..........................................16
.................
15
GARANTIA DE INFORMACION
Garantía por un año de la Cortadora de Césped Craftsman
Sears reparará, libre de cargo, cualquier defecto de material o mano de obra, por un año a partir de la fecha de
compra, cuando esta cortadora de césped Craftsman sea mantenida, lubricada y afinada de acuerdo con las
instrucciones de operación y mantenimiento del manual del operador.
Esta garantía excluye las cuchillas de la cortadora y los adaptadores de las cuchillas, que son piezas descartables
y se gastan durante el uso normal.
Esta garantía se aplica sólo por 30 días a partir de la fecha de compra, si esta cortadora de césped se usa para
fines comerciales o de alquiler,
EL SERVICIO DE GARANTIA ESTA DISPONIBLE CONSULTANDO CON EL CENTRO
DE SERVICIO SEARS MAS CERCANO EN LOS ESTADOS UNIDOS. ESTA GARANTIA SE APLICA MIENTRAS
ESTE PRODUCTO SE USE EN LOS ESTADOS UNIDOS SOLAMENTE.
Esta garantía le otorga derechos legales específicos y usted puede tener también otros derechos que varían de
Estado a Estado.
SEARS, ROEBUCK AND CO., D/817WA, HOFFMAN ESTATES, IL.60179
Estos accesorios estaban disponibles en la
fecha de compra de la cortadora. Están
también disponibles en la mayoría de las
tiendas minoristas y centros de catálogos y
servicios de Sears. La mayoría de las tiendas
Sears pueden ordenar piezas de repuesto
para usted cuando usted provea el número
de modelo de su cortadora de césped.
ESPECIFICACIONES DEL PRODUCTO
Voltaje:
Amperaje:
Hz.:
Par torsor del perno
de la cuchilla
110-120 voltios de CA
12 amperios
60
450-600 Pulg.lbs
ACCESORIOS
Bolsa para césped
(Part No. 764-0447)
Cuchilla
(Part No. 742-0719)
Número de modelo
Número de serie
Fecha de compra
Los números de modelo y de serie están en un rótulo
pegado a la plataforma, cerca de la rueda posterior
derecha. Para referencia futura, registre el número de
serie y la fecha de compra y guárdelos en un lugar
seguro.
Ruedas
Cordón de extensión
(Not Shown)
Adaptador de cuchilla
Page 40

Manual del Propietario
CRRFTSMRN
CORTADORA ACOLCHADORA DE CESPED
ELECTRICA, 110 VOLTIOS 12 AMPERIOS
AISLACION DOBLE
DESCARGA POSTERIOR DE 19"
No. de modelo
247.370253
PRECAUCION: Antes de usar este producto,
lea este manual y siga todas las Reglas de
Seguridad y las Instrucciones de Operación.
Sears, Roebuck And Co., Hoffman Estates, IL. 60179, U.S.A.
Impreso en U.S.A.
770-0253M
 Loading...