

Page 1

OWNER’S
MANUAL
MODEL NO.
247.370252
CRRFTSMflN
110V12AMP ELECTRIC
DOUBLE INSULATED
Caution:
Read and Follow
All Safety Rules
and Instructions
Before Operating
This Equipment
SEARS, ROEBUCK AND CO., Hoffman Estates, IL 60179 U.S.A.
19" REAR DISCHARGE
MULCHING LAWN MOWER
Assembly
Operation
Customer Responsibilities
Service and Adjustment
Repair Parts
This symbol on the products nameplate ft ■
means it is listed by ( ^ I
UNDERWRITERS LABORATORIES INC.
FORM NO. 770-0253L
Page 2
IMPORTANT
THIS SYMBOL POINTS OUT IMPORTANT SAFETY INSTRUCTIONS WHICH, IF NOT FOLLOWED, COULD ENDANGER THE PERSONAL
SAFETY AND/OR PROPERTY OF YOURSELF AND OTHERS. READ AND FOLLOW ALL INSTRUCTIONS IN THIS MANUAL BEFORE
▲
AHEMPTING TO OPERATE YOUR ELECTRIC LAW\I MOWER. FAILURE TO COMPLY WITH THESE INSTRUCTIONS MAY RESULT IN
PERSONAL INJURY. WHEN YOU SEE THIS SYMBO^ HEED ITS WARNING.
Your electric lawn mowi r was built to be operated according to the rules tor safe operation in this manu-
DANGER: al. As with any type of lower equipment, carelessness or error on the part of the operator can result in
A
serious injury. It you vio ate any of these rules, you may cause serious injury to yourself or others.
SAFE OPERATION PRACTICES
I
WARNING: When using electric lawn mo wers, basic
safety precautions should always be tollowed to
reduce the risk of fire, electric shock, ai d personal
A
injury, including the following:
TRAINING
Read all instructions carefully in their entirety before; ttempting to
assemble or operate this machine. Be completely familiar with the con
trols and the proper use of this machine before operatinc it. Keep this
manual in a sate place for future and regular reference an i for ordering
replacement parts.
Your rotary mower is a precision piece of power equipmei t, not a play
thing. Therefore, exercise extreme caution at all times.
Use Right Appliance—Do not use lawn mower for any job i xcept that for
which it is intended.
Never allow children to operate a power mower. Only persons well
acquainted with these rules of safe operation should be a lowed to use
your mower.
No one should operate this unit while intoxicated or while t iking medica
tion that impairs the senses or reactions.
Stay Alert—Watch what you are doing. Use common S3nse. Do not
operate lawn mower when you are tired.
Keep the area of operation clear of all persons, particularly ;mall children
and pets. Stop motor when they are in the vicinity of /our mower.
Although the area of operation should be completely clea ed of foreign
objects, an object may have been overlooked and could 13 accidentally
thrown by the mower in any direction and cause serious f ersonal injury
to the operator or any others allowed in the area.
PREPARATION
Thoroughly inspect the area where the equipment is to be ised. Remove
all stones, sticks, wire, bones and other foreign objects w lich could be
picked up and thrown by the mower in any direction and ;ause serious,
personal injury to the operator or any others allowed in the rea.
Always wear safety glasses or eye shields during operatior or while per
forming an adjustment or repair, to protect eyes from foreii n objects that
may be thrown from the machine in any direction. Alwaj s use face or
dust mask if operation is dusty.
Dress properly. Wear sturdy, rough-soled work shoes. Ni ver operate a
unit in barefeet, sandals or sneakers. Do not wear loo: e clothing or
jewelry. They can be caught in moving parts. Use of rubtsr gloves and
footwear is recommended when working outdoors.
Never attempt to make a wheel or cutting height adjustr ent while the
motor is running.
Mow only in daylight or in good artificial light.
Avoid Dangerous Environment—Never operate the equipm snt in the rain
or in damp wet locations. Always be sure of your footing, ft slip and fall
can cause serious personal injury. Keep a firm hold on t le handle and
walk, never run. Do not over-reach—keep footing and aalance at all
times.
Warning—To prevent electric shock use only with a UL Li ;ted extension
cord set suitable for outdoor use, such as Type SW-A,-SI iW-A, STW-A,
STOW-A, SJW-A, SJOW-A, SJTW-A, or SJTOW-A.
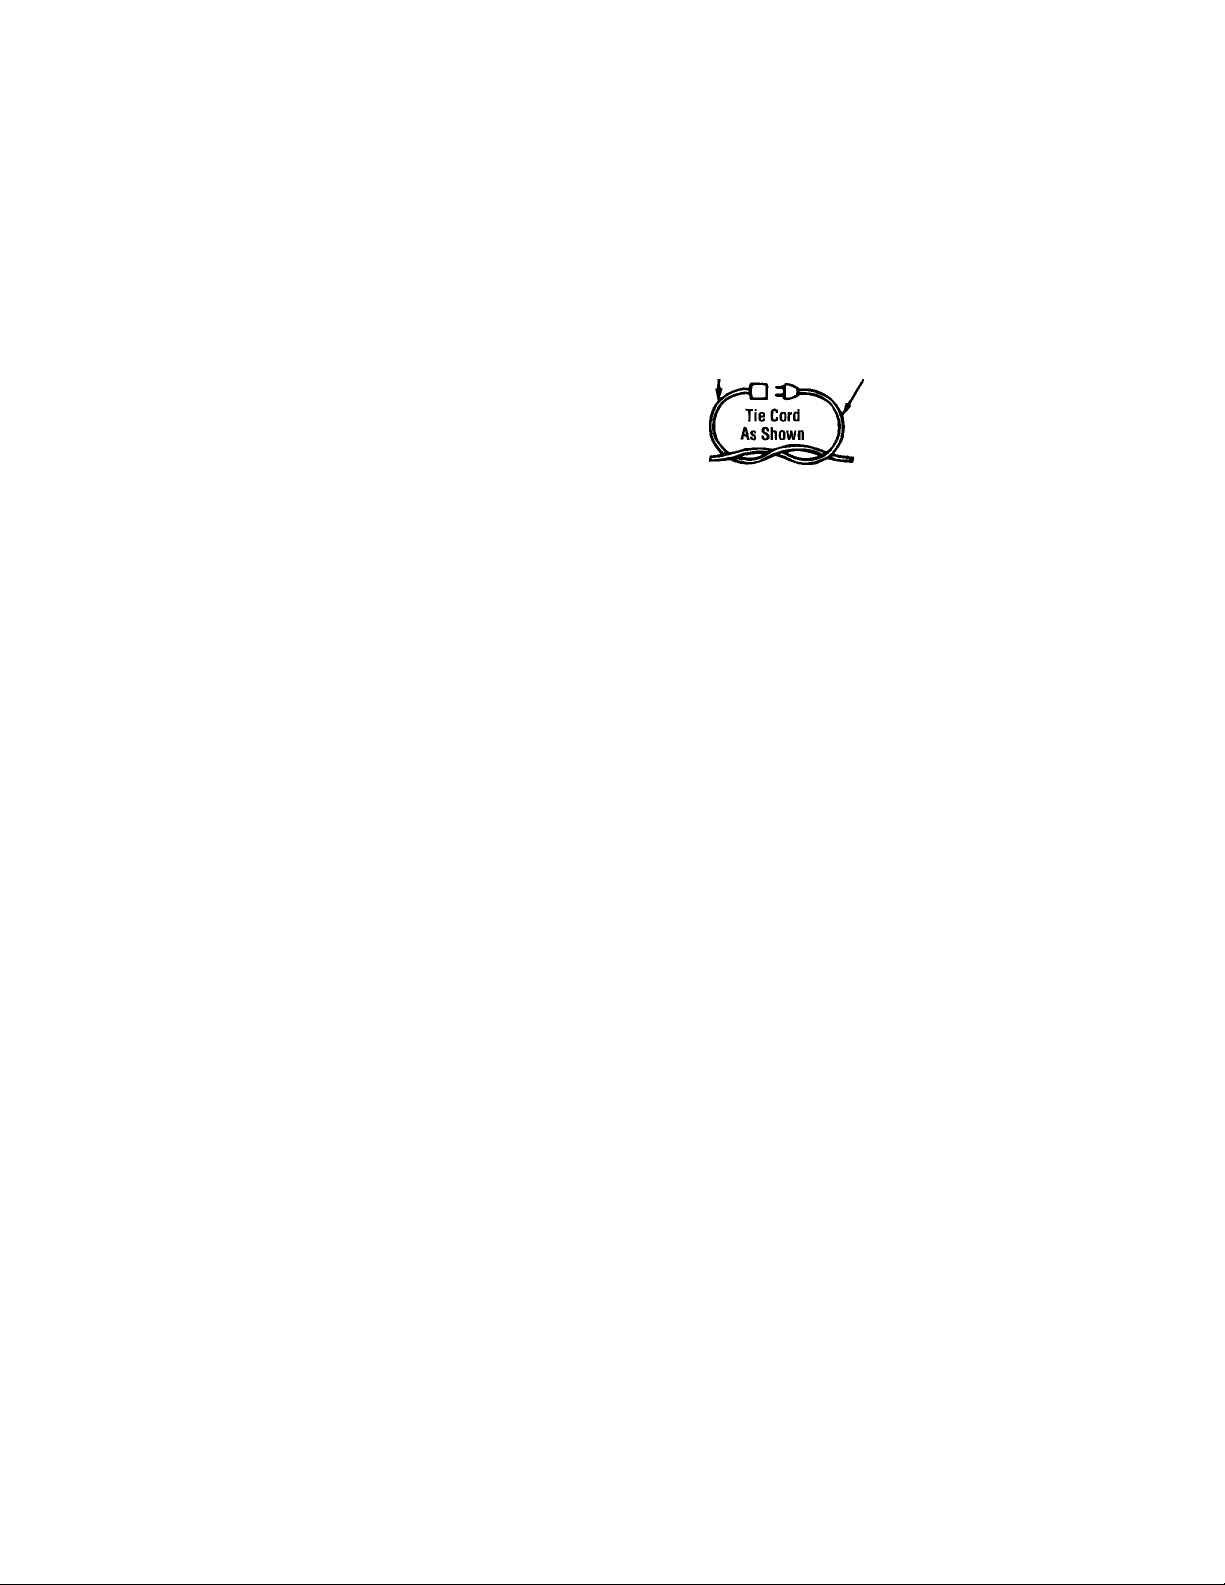
Extension Cord—Make sure your extension cord set is in g 30d condition,
is heavy enough to carry the current your mower will draw, and is polar
ized (one blade of plug is wider than the other). A 100' leni ith of 14 AW6
extension cord should be used. An acceptable substitute is a 50' length of
16 AWG cord. In applications where a longer cord is n reded, a 150'
length of 12 AWG cord may be used. An undersized corf will cause a
drop in line voltage resulting in loss of power and overheal ng. To reduce
the likelihood of disconnection of the extension cord set rom the lawn
mower, be sure to use the cord restraint provided or m. ke a know as
shown in the illustration in next column.
Extension Cord
To reduce the risk of electric shock, your mower is equipped with a
polarized plug (one blade of plug is wider than the other). If the outlet on
the end of your extension cord does not fit fully into the plug on your
mower, reverse the outlet and try plugging it in again. The same is true
for the end of the extension cord you plug into your house outlet. If after
reversing the connections, either one still does not fit, contact a qualified
electrician to install the proper outlet and/or plug. Do not change the plug
on the mower in any way.
Inspect extension cord periodically and replace if damaged. Keep handles
dry, clean, and free from oil and grease.
Fuses—The mower should be operated on a 15 or 20 AMP circuit. If
difficulty in starting is experienced with a standard 15 AMP fuse or circuit
breaker, contact your nearest authorized service location. Do not use a
higher rated fuse without consulting your power company.
Ground Fault Circuit Interrupter (GFCI) protection should be provided on
the circuit(s) or outlet(s) to be used for the lawn mower. Receptacles are
available having built-in GFCI protection and may be used for this
measure of safety.
For your safety, use the slope gauge included as part of this manual to
measure slopes before operating this unit on a sloped or hilly area. If the
slope is greater than 15° as shown on the slope gauge, do not operate
this unit on that area or serious injury could result.
Appliance Cord
Connect Plug
and Receptacle
OPERATION
Do not abuse cord—never pull lawn mower by cord or yank it to discon
nect from receptacle. Keep cord from heat, oil, and sharp edges.
If extension cord is damaged in any manner while plugged in, disconnect
extension cord from house receptacle.
Do not put hands or feet near or under rotating parts. Keep clear of the
discharge opening at all times as the rotating blade can cause injury.
Stop the motor when you leave the mower and before crossing gravel
drives, walks or roads.
After striking a foreign object, shut off the motor, make absolutely sure
the blade and all moving parts have completely stopped, disconnect the
power cord to prevent accidental starting, then thoroughly inspect the
mower for any damage. Such damage must be repaired before restarting
and operating the mower.
If the equipment should start to vibrate abnormally, stop the motor and
check immediately for the cause. Vibration is generally a warning of
trouble.
Stop the motor, unplug the power cord, and wait for the blade and ail
moving parts to stop before cleaning or unclogging, repairing or inspect
ing the mower. The cutting blade continues to rotate for a few seconds
after the motor is shut off.
Do not force lawn mower. It will do the job better and safer at the rate for
which it was designed. Use right appliance—Do not use lawn mower for
any job except that for which it is intended.
Mow across the face of slopes, never up-and-down. Never cut grass by
pulling mower toward you. Exercise extreme caution when operating
mower on uneven terrain or changing direction on slopes. Do not mow
excessively steep slopes. Don’t overreach—Keep proper footing and bal
ance at all times. A slip and fall can cause serious personal injury.
Never operate mower without proper guards, plates or other safety pro
tective devices in place and in working order.
Page 3

SAFE OPERATION PRACTICES (Continued)
• The blade/motor control on this mower is installed to minimize the risk
of hlade contact injury and is required by federal regulations. Do not
under any circumstances attempt to defeat the function of the
biade/motor controi.
• To avoid electric shock hazard, never push mower over cord. Do not mow
around the lawn in circles. Always travel back and forth across the lawn,
beginning at the point nearest the electric outlet to which the extension
cord is connected. This will keep the cord on the mowed area of the lawn
and out of the way.
• Do not operate mower after It has been dropped or damaged In any man- ^
ner. Return mower to nearest authorized service location.
• The use of accessory attachments not recommended by the mower man-**
ufacturer may cause hazards.
• Do not operate this mower with the chute door open, unless the complete
grass catcher or side chute deflector is properly mounted on the mower.
MAINTENANCE AND STORAGE
к
• Warning—Disconnect power cord from electrical outlet before perform
ing any maintenance or service on mower.
• Check the blade and motor mounting bolts at frequent intervals for proper
tightness. Keep all nuts, bolts, and screws tight to be sure the equipment
is in safe working condition.
• Keep blade sharp.
• Use identical replacement blades only. Replace damaged cord.
• To reduce fire hazard, keep the motor free of grass, leaves, or excessive
grease.
• Store idle lawn mower indoors when not in use. Allow motor to cool
before storing in any enclosure. Lawn mower should be stored indoors in
dry, high or locked-up place, out of reach of children,
• Maintain lawn mower with care. Keep blade sharp and clean for best and
safest performance. Follow instructions for lubricating and changing
accessories.
• Check the grass catcher bag frequently for wear or deterioration. Replace
a worn or damaged bag immediately. Be sure replacement bag meets
original equipment specifications.
DOUBLE INSULATED LAWN MOWER
DOUBLE INSULATION IS A CONCEPT IN SAFETY IN ELECTRIC LAWN
MOWERS, WHICH ELIMINATES THE NEED FOR THE USUAL THREE WIRE
GROUNDED POWER CORD AND GROUNDED SUPPLY SYSTEM. WHEREV
ER THERE IS ELECTRIC CURRENT IN THE MOWER, THERE ARE TWO
COMPLETE SETS OF INSULATION TO PROTECT THE USER. ALL EXPOSED
METAL PARTS ARE ISOLATED FROM THE INTERNAL METAL MOTOR
COMPONENTS WITH PROTECTING INSULATION.
IMPORTANT—SERVICING OF A LAWN MOWER WITH DOUBLE INSULA
TION REQUIRES EXTREME CARE AND KNOWLEDGE OF THE SYSTEM AND
SHOULD BE PERFORMED ONLY BY A QUALIFIED SERVICE TECHNICIAN.
FOR SERVICE WE SUGGEST YOU RETURN THE LAWN MOWER TO YOUR
NEAREST AUTHORIZED SERVICE DEALER FOR REPAIR. ALWAYS USE
ORIGINAL FACTORY REPLACEMENT PARTS WHEN SERVICING.
SAVE THESE INSTRUCTIONS
Page 4

CONGRATULATIONS on your purchase o' a Sears
Craftsman Lawn Mower. It has been designed, et gineered
and manufactured to give you the best possible de Dendability and performance.
Should you experience any problem you cannot ei isily rem
edy, please return the lawn mower to the near« st Sears
Service Center/Department in the United States. We have
competent, well-trained technicians and the prope r tools to
service or repair this unit.
Please read and retain this manual. The instructions will
enable you to assemble and maintain your lawn mower
properly. Always observe the “SAFETY RULES.”
MODEL
NUMBER 251.370252
SERIAL
NUMBER,
DATE OF
PURCHASE
THE MODEL AND SERIAL NUMBERS WILL BE FOUND
ON A LABEL ATTACHED TO THE DECK, NE KH THE
RIGHT REAR WHEEL.
YOU SHOULD RECORD BOTH SERIAL NUMB ER AND
DATE OF PURCHASE AND KEEP IN A SAFE PLACE
FOR FUTURE REFERENCE.
PRODUCT SPECIFICATIONS
Voltage;
Amperage; 12
Hz;
Blade Bolt Torque: 450-600 in. lbs.
110- 120 AC
60
MAINTENANCE AGREEMENT
A Sears Maintenance Agreement is available on this
product. Contact your nearest Sears store for details.
CUSTOMER RESPONSIBILITIES
• Read and observe the safety rules.
• Follow a regular schedule in maintaining, c aring for and using your lawn mower.
• Follow the instructions under “Customer Ri ¡sponsibilities” (page 10) and “Storage” sections of this Owner’s
Manual.
FULL ONE YEAR WARRANTY ON CRAFTSMAN LAWN MOWER
For one year from the date of purchase, whan this Craftsman lawn mower is maintained, lubricated, and tuned
up according to the operating and mainteni nee instructions in the operator’s manual. Sears will repair, free of
charge, any defect in material or workmanst ip.
This warranty excludes the mower blades i nd blade adapters, which are expendable parts and become worn
during normal use.
If this lawn mower is used for commercial >r rental purposes, this warranty applies for only 30 days from the
date of purchase.
WARRANTY SERVICE IS AVAILABLE BY CONTACTING THE NEAREST SEARS SERVICE CENTER IN THE
UNITED STATES. THIS WARRANTY APPLIES ONLY WHILE THIS PRODUCT IS IN USE IN THE UNITED
STATES.
This warranty gives you specific legal rights and you may also have other rights which vary from state to state.
SEARS ROEBUCK AND CO., DEPT. 817WA, HOFFMAN ESTATES, IL 60179
Page 5
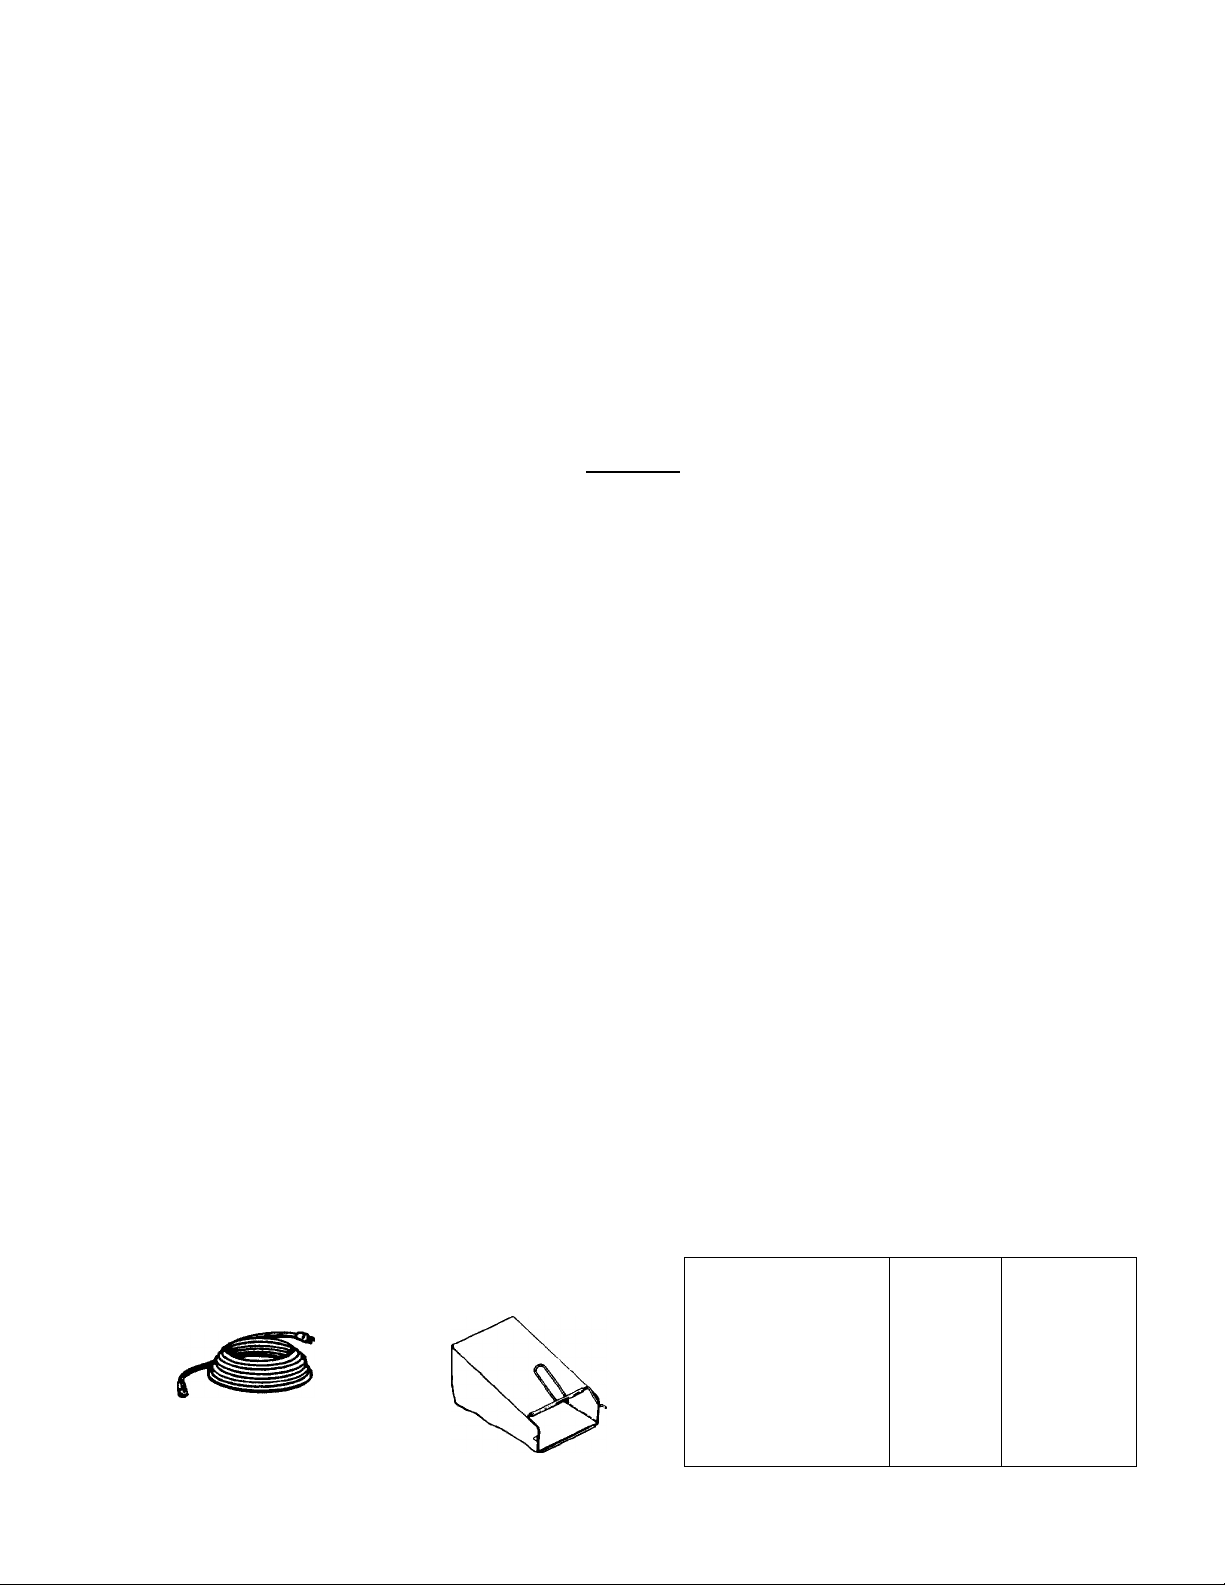
TABLE OF CONTENTS
SAFETY RULES........................................................2
PRODUCT SPECIFICATIONS..................................4
CUSTOMER RESPONSIBILITIES
WARRANTY
INDEX........................................................................5
MOWER ACCESSORIES
ASSEMBLY
OPERATION
Adjustments:
Cutting Height............................9
Handle Height
Assembly:
Handle.......................................6
Grass Catcher..........................6, 7
Blade:
Balancing
Replacement...........................11
Sharpening..............................11
Circuit Breaker
Cleaning
Controls:
Motor/Blade Control
Cord Restraint
Customer Responsibilities
Cutting Heights..............................9
Extension Cord
..............................................................
.........................................
...........................................................
........................................................
A
...........................
B
................................
C
...........................
....................................
..................
...............................
....
E
......................
............................
Handle Storage
Lubrication:
6
Maintenance:
11
8, 11
12
3,10-12
2, 9,10
Operating Mower
Repair/Replacement Parts
8
Responsibilities, Customer
9
6, 7
7-10
Motor
.......................................
Wheels
Wheel Adjusters
Agreement
Blade Care/Replacement
Cleaning
Lubrication
....................................
..................................
CUSTOMER RESPONSIBILITIES.
SERVICE AND ADJUSTMENTS...,
4
4
5
STORAGE
TROUBLE SHOOTING...................
PARTS ORDERING/SERVICE
REPAIR PARTS
SLOPE GAUGE
INDEX
H
...........................
L
......................
M
.................................
........
..............................
O
.....................
R
......
...
3, 10-12
7-10
14, 15
......................................
......
.............................
..............................
S
12
Safety Rules
Service and Adjustments:
Cutting Height............................9
11
11
11
4
11
12
11
Rear Trail Shield......................12
Service Recommendations
Specifications
Starting the Motor/Blade
Stopping the Motor/Blade
Storage........................................12
Table of Contents
Trouble Shooting Guide
Warranty........................................4
Wheels:
Adjusting Height
Lubrication
................................
................................
T
..........................
W
........................
...............................
..10-12
......
......
.......
......
.14, 15
.......
.........
...............
.............
..............
12
12
13
13
16
2, 3
10
4
8
8
5
13
9
11
MOWER ACCESSORIES
These accessories were available when the mower was purchased. They are also available at most Sears retail
outlets, catalog and service centers. Most Sears stores can order repair parts for you, when you provide the
model number of your mower.
MOWER PERFORMANCE
Extension
Cord
Grass Bag
(Part No. 764-0447)
(Part No. 742-0719)
MOWER MAINTENANCE
Blade
Blade
Adapter
f
Wheels
w
Page 6
ASSEMBLY
TO REMOVE MOWER FROM CARTON
Remove the carton inserts (if any). Lift the mower from
the carton, or cut the corners of the carton and roll the
mower out. Make certain all parts and literature have
been removed from the carton before the carton is
discarded.
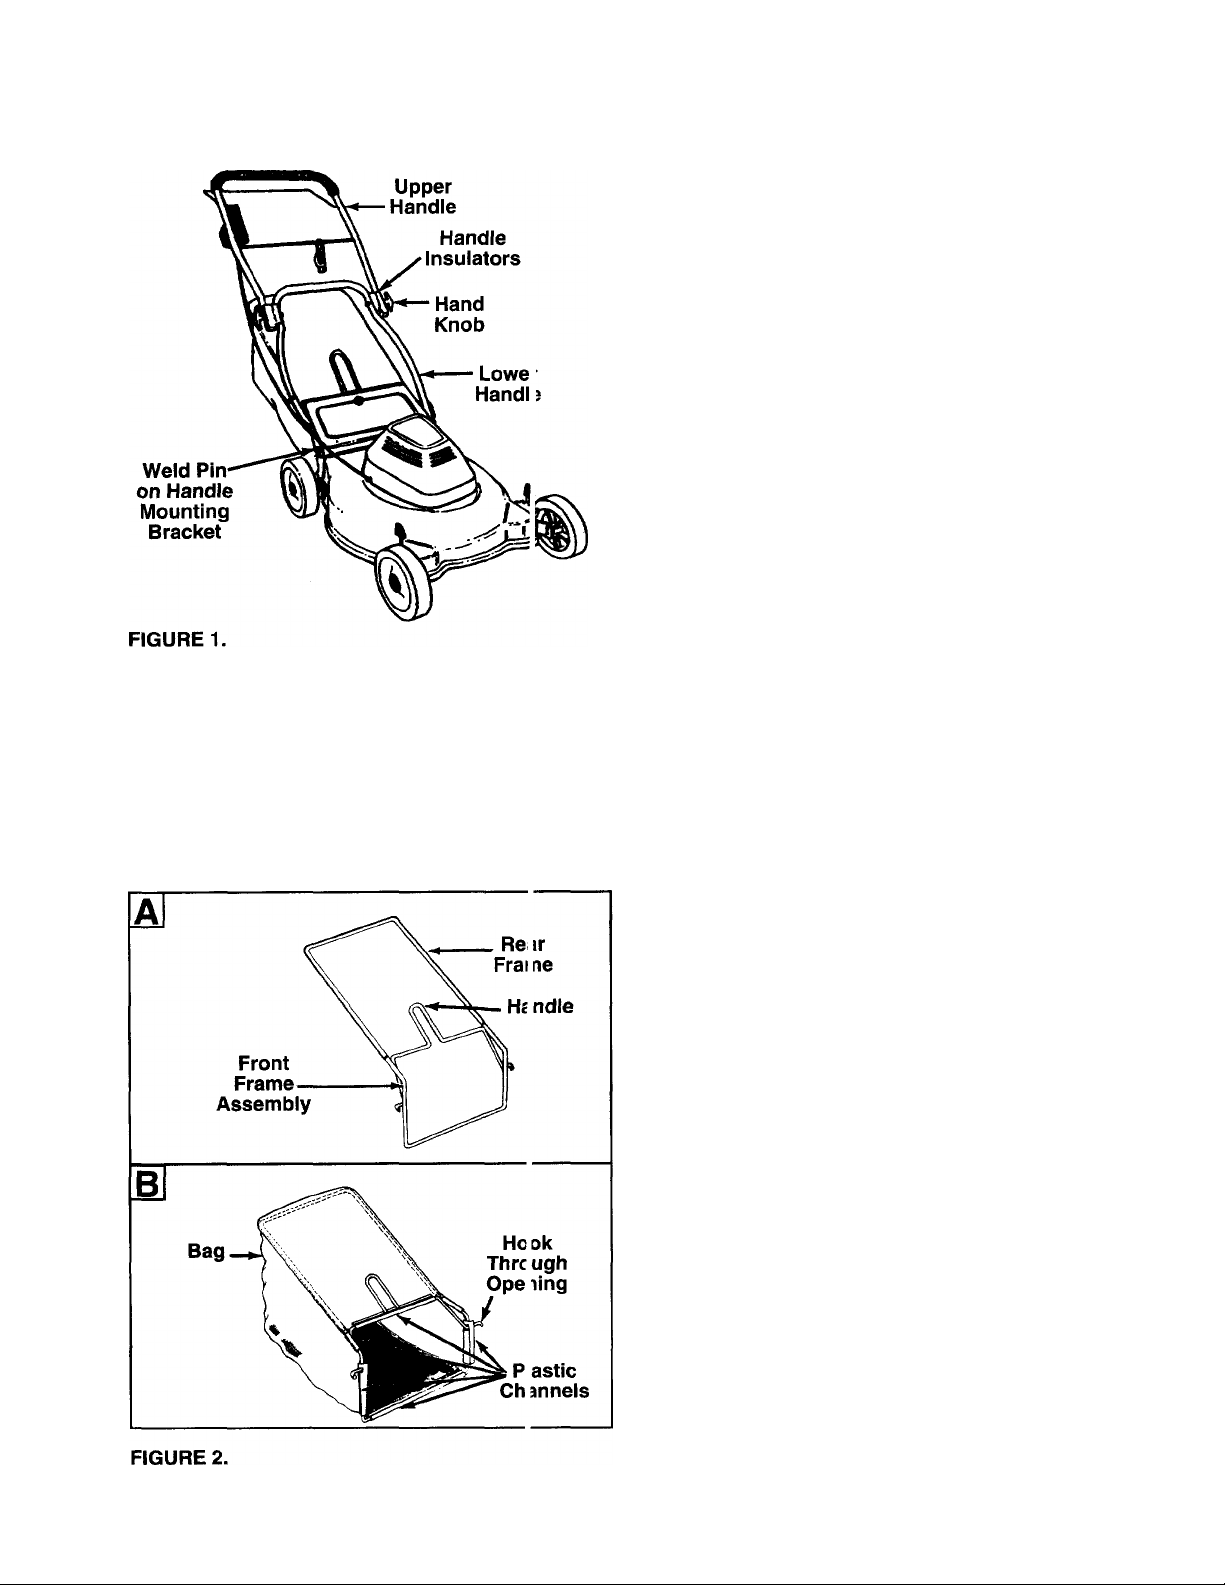
HOW TO SET-UP YOUR MOWER
• Remove any cardboard pieces which may be
between the upper and lower handles for shipping
— purposes.
• Pull up and back on the lower handle. Pivot the
upper handle up to raise the handle into the operat
ing position. See figure 1.
• The upper handle may be adjusted to three differ
ent height positions. To select desired position,
align one of the three marks on the top of the lower
handle insulators with the mark on the upper
handle insulators. Tighten the hand knobs.
• Remove the hairpin clips from the outer hole in the
weld pins on the handle mounting brackets. Place
the hairpin clips in the inner hole.
NOTE: The outer hole in the weld pin is for storage.
The hairpin clip must be placed in the inner hole for
operation.
IMPORTANT: YOUR MOWER IS SHIPPED WITH
THE MULCHING BAFFLE IN PLACE. THE
MULCHING BAFFLE ALLOWS THE BLADE TO CUT
AND RECUT THE GRASS CLIPPINGS INTO SMALL
PARTICLES, RETURNING THEM TO YOUR LAWN
AS NUTRIENTS FOR THE SOIL.
IF YOU WISH TO BAG INSTEAD OF MULCH THE
CLIPPINGS, SIMPLY LIFT THE REAR DISCHARGE
DOOR, AND REMOVE THE MULCHING BAFFLE
FROM THE REAR OF THE DECK BY PULLING OUT
WARD ON THE BAFFLE. THEN ASSEMBLE AND
ATTACH GRASS CATCHER AS FOLLOWS.
ASSEMBLING THE GRASS CATCHER
NOTE: Make certain the grass bag is turned right side
out before assembling (warning label will be on the
outside).
• Join the rear frame and front frame assembly as
— shown in figure 2A. Push frames together as far as
they will go.
• Place bag over frame (black plastic side is the bot
tom of bag) so the handle is outside the bag. Slip
openings in the side of the plastic channel on bag
over the hooks on the grass catcher frame.
NOTE: It may be necessary to pull the edge of the
fabric away from the plastic channel in order to see
the opening.
• Secure bag to frame by working the plastic chan
nels on bag over frame as shown in figure 2B. All
of the plastic channels except center top of bag
attach from the outside of bag. Center top of bag
attaches from the inside of bag.
Page 7
ASSEMBLY
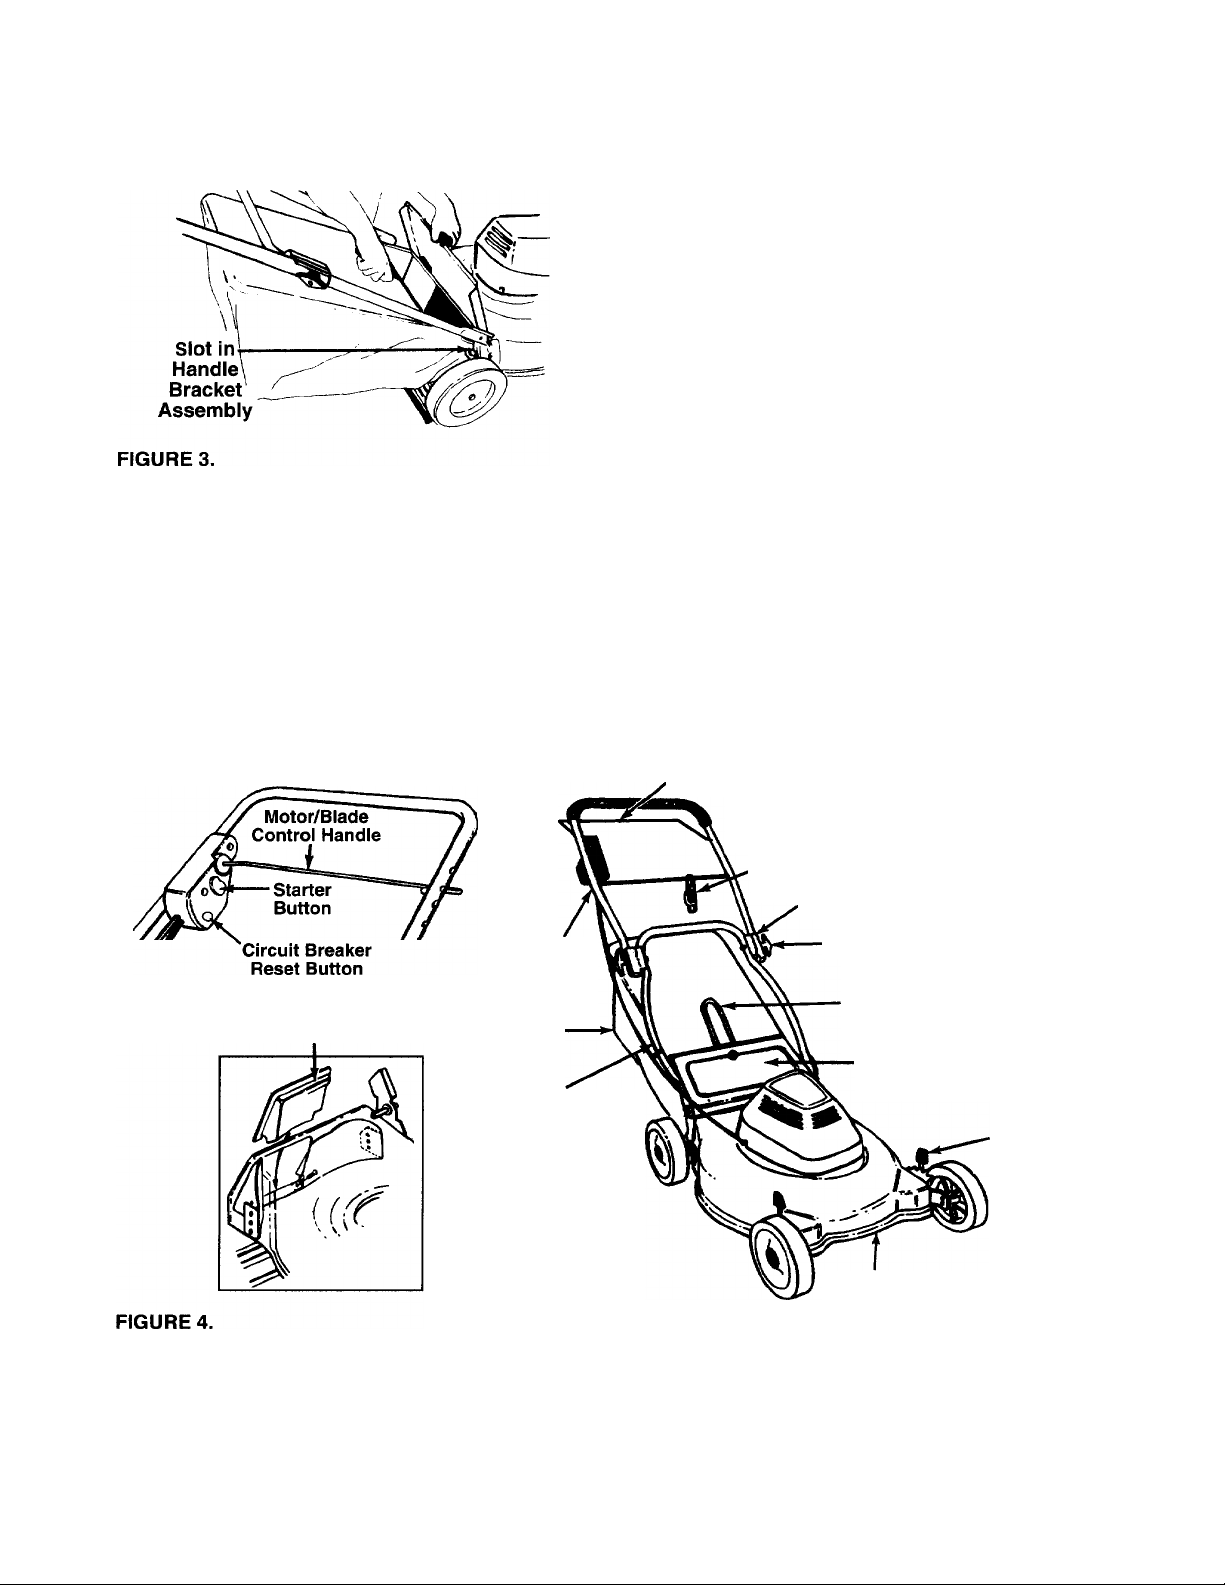
ATTACHING GRASS CATCHER TO MOWER
Lift the rear discharge door on the mower. Make cer
tain the mulching baffle has been removed. Place the
hooks on the grass catcher into the slots in the handle
-bracket assemblies. See figure 3. Release the rear
discharge door.
To remove the grass catcher, lift the rear discharge
door on the mower. Lift the grass catcher up, out of
the slots in the handle bracket assemblies. Release
the rear discharge door.
WARNING: NEVER OPERATE MOWER
UNLESS HOOKS ON GRASS CATCHER
A
ARE SEATED IN SLOTS ON HANDLE
BRACKET ASSEMBLIES, AND REAR DIS
CHARGE DOOR RESTS FIRMLY AGAINST
TOP OF GRASS CATCHER.
OPERATION
KNOW YOUR LAWN MOWER
READ THIS OWNER’S MANUAL AND SAFETY RULES BEFORE OPERATING YOUR LAWN MOWER.
Compare the illustrations with your lawn mower to familiarize yourself with the location of various controls and
adjustments. Save this manual for future reference.
Mulching Baffle
Upper
Handle
Grass
Catcher-
Lower Handle
’ Motor/Blade Control
Handle
'Cord Restraint
- Handie Insuiators
-Hand Knob
Grass Catcher
Handie
Rear Discharge
Door
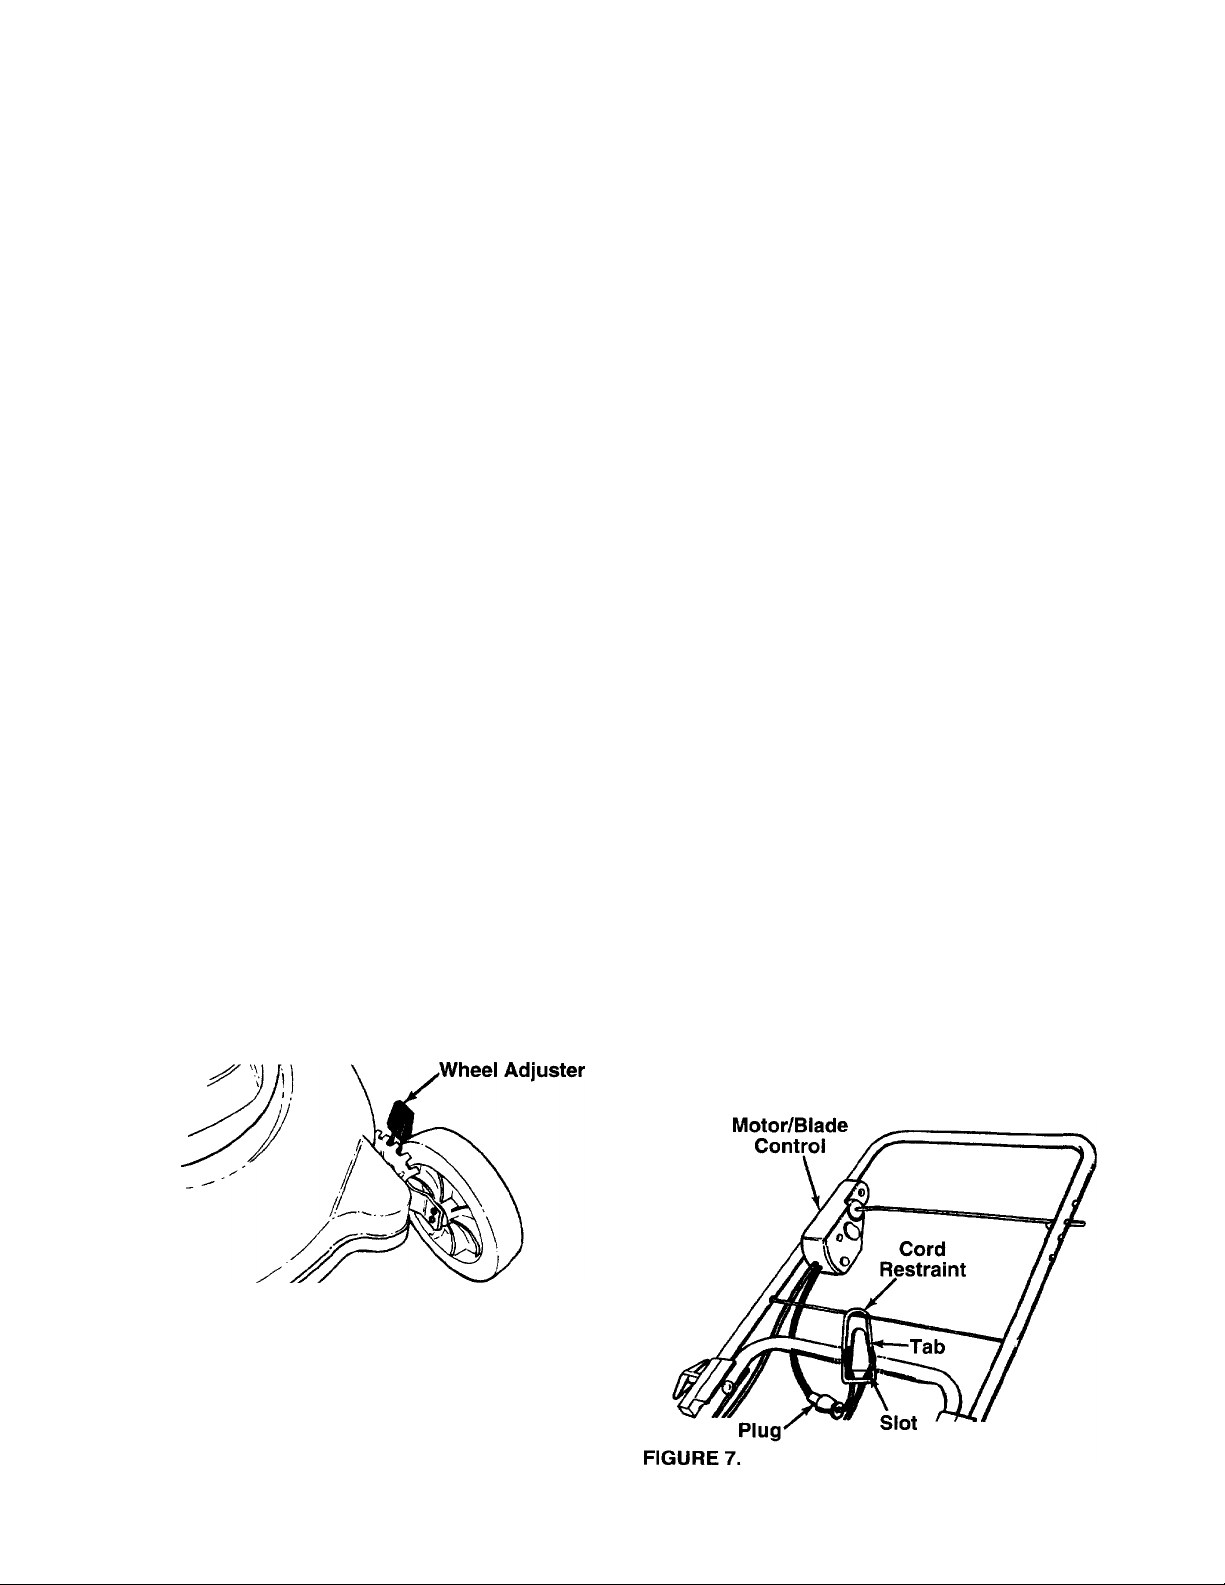
Wheel
Adjuster
Deck
MEETS CPSC BLADE SAFETY REQUIREMENTS
Sears Lawn Walk-Behind Mowers conform to the safety standards of the American National Standards Institute,
Underwriters Laboratories, inc., and the U.S. Consumer Product Safety Commission. The blade turns when the
motor is running.
Page 8

OPERATION
MOTOR/BLADE CONTROL—consists of t vo parts,
the motor/blade control handle and the starte' button.
• Motor/Blade Control Handle—must be held
against the handle to start and run the n lotor and
blade. Release to stop the motor and blad 3.
• Starter Button—must be depressed in order to
engage the motor/blade control handle.
BEFORE USING YOUR LAWN MOWER, AGAIN REFER TO THE “SAFETY RULES” AS SHOWN ON PAGE 2
OF THIS MANUAL. ALWAYS BE CAREFUL
The operation of an 1 lawn mower can result in foreign objects being thrown into the
eyes, which can result in severe eye damage. Always wear safety glasses or eye
shields before start! ig power tool operation or while performing any adjustments or
repairs. We recommend Wide Vision Safety Mask for over spectacles or standard
glasses available at Sears Retail or Catalog Stores.
HOW TO USE YOUR MOWER
WARNING: DO NOT OPERA' E THIS
MOWER WITH THE REAR DISCHARGE
A
A
A
TO STOP MOTOR AND BLADE
• Release the motor/blade control handle t
engine and blade. (You will hear a hig
trie motor. Sparking at the top of motor,
DOOR OPEN, UNLESS THE COMPLETE
GRASS CATCHER IS IN PLACE. DO NOT
OPERATE THE MOWER WITHOUT THE
PROTECTIVE SHIELD ON THE HEAR OF
THE DECK IN PLACE.
WARNING: BE SURE THAT LAWN IS
CLEAR OF STONES, STICKS, W RES, OR
OTHER OBJECTS WHICH COU -D DAM
AGE LAWN MOWER OR ENGINE. SUCH
OBJECTS COULD BE ACCIDENTALLY
THROWN BY THE MOWER IN ANY
DIRECTION AND CAUSE SERIOUS PER
SONAL INJURY TO THE OPERA’OR AND
OTHERS.
WARNING: TO PREVENT EL
SHOCK, DO NOT OPERATE THE
IN DAMP OR WET LOCATIONS.
noise, which is the result of deceleration 0
motor cover, is also normal during deceleri
ECTRIC
MOWER
) stop the
1 pitched
the elec-
nside the
tion.)
CORD RESTRAINT—helps prevent disconnection of
extension cord from motor/blade control.
CIRCUIT BREAKER RESET BUTTON—used to
reset the circuit breaker (circuit breaker prevents too
much strain being placed on the mower).
WARNING: IF YOU STRIKE A FOREIGN
OBJECT, STOP THE MOTOR. DISCON
A
TO START MOTOR AND ENGAGE BLADE
Standing behind the unit, depress starter button on
the motor/blade control. Pull motor/blade control
handle up against handle. Release starter button.
IMPORTANT: YOUR MOWER IS EQUIPPED WITH
A CIRCUIT BREAKER, LOCATED ON THE
MOTOR/BLADE CONTROL HOUSING. SEE FIGURE
5. IF THE CIRCUIT BREAKER TRIPS, RESET AS
INSTRUCTED IN THE MAINTENANCE SECTION.
NECT THE POWER SOURCE, THOR
OUGHLY INSPECT THE MOWER FOR
ANY DAMAGE, AND REPAIR THE DAM
AGE BEFORE RESTARTING AND OPER
ATING THE MOWER. EXTENSIVE VIBRA
TION OF THE MOWER DURING OPERA
TION IS AN INDICATION OF DAMAGE.
THE UNIT SHOULD BE PROMPTLY
INSPECTED AND REPAIRED.
WARNING: THE BLADE CONTINUES TO
ROTATE FOR A FEW SECOND 5 AFTER
A
• Disconnect the power source to prevent iccidental
THE MOTOR IS SHUT OFF. IF MOTOR
DOES NOT COME TO AN IMMEDIATE
STOP WHEN THE MOTOR/BLADE CON
TROL HANDLE IS RELEASED, C ONTACT
AN AUTHORIZED SERVICE LOCATION.
starting while equipment is unattended.
•
FIGURE 5.
Page 9
MOTOR/BLADE CONTROL
WARNING: THE MOTOR/BLADE CON
TROL ON THIS MOWER IS INSTALLED
A
The motor/blade control requires the operator to be
behind the handle to start and run the mower. When
the operator releases the control handle, the motor
will stop and an internal brake helps the blade to stop
quickly.
When the operator leaves the operating position to
remove the grass catcher, change the cutting height,
or pick up sticks or other objects in the way, the motor
will stop automatically when the motor/blade control
handle is released.
CUTTING HEIGHT ADJUSTMENT
A
Each wheel has an adjuster lever to set the cutting
height on your mower. They should always be set to
the same position.
• Raise wheels for low cut and lower wheels for high
cut.
• To change cutting height, move adjuster levers
toward wheels. See figure 6. Move wheels up or
down to suit your requirements. Be sure all four
levers are in the same setting.
TO MINIMIZE THE RISK OF BLADE CON
TACT INJURY AND IS REQUIRED BY
FEDERAL REGULATIONS. DO NOT
UNDER ANY CIRCUMSTANCES
ATTEMPT TO DEFEAT THE FUNCTION
OF THE MOTOR/BLADE CONTROL.
WARNING: TURN OFF MOTOR AND DIS
CONNECT POWER CORD BEFORE
ADJUSTING THE CUTTING HEIGHT.
CORD CONNECTION
EXTENSION CORD
IMPORTANT: A 100 FOOT LENGTH OF 14 AWG
EXTENSION CORD SHOULD BE USED. AN
ACCEPTABLE SUBSTITUTE IS A 50 FOOT
LENGTH OF 16 AWG CORD. IN APPLICATIONS
WHERE A LONGER CORD IS NEEDED, A 150
FOOT LENGTH OF 12 AWG CORD MAY BE USED.
USING ANY OTHER LENGTH OR RATING OF
CORD WILL DIMINISH THE PERFORMANCE AND
POSSIBLY THE LIFE OF THE ELECTRIC MOTOR.
IN ALL CASES, THE EXTENSION CORD SHOULD
BE A UL LISTED CORD SET SUITABLE FOR OUT
DOOR USE.
• The length of extension cord you will need (not pro
vided with unit) depends on the size of the area to
be mowed. See extension cord information above.
CORD RESTRAINT
• Attach extension cord to the cord restraint as fol
lows. Form a small loop in the extension cord. Allow
enough excess cord to make the connection to the
motor/blade control (approximately 20 inches). Slip
the loop through the slot on the bottom of the cord
restraint, and up over the tab, to prevent disconnec
tion from the motor/blade control during operation.
Leave enough cord to allow the cord restraint to
move freely from side to side. See figure 7.
CONNECTION TO THE MOTOR/BLADE CONTROL
• Connect the plug on the extension cord fully onto
the plug on the mower. The mower is equipped
with a polarized AC power plug (one blade of the
plug is wider than the other), which will fit Into the
plug on the extension cord only one way. If unable
to make a full connection, try reversing the plug on
the extension cord. Should the plugs still fail to fit,
contact your service dealer for assistance. Do not
defeat the safety purpose of the polarized plug.
FIGURE 6.
• Adjust cutting height to suit your requirements. Refer
to the “Mowing and Mulching Tips” on page 10. (The
height adjusters may seem hard to move when new.
They will operate easier after some use.)
•
Page 10
OPERATION
CONNECTION TO THE ELECTRIC POWER i SOURCE
• Plug the extension cord into any convenien: 110-120
volt 60 cycle A.C. outlet or receptacle for your
source of power. This outlet may be loca ed either
out-of-doors or indoors. If an inside recr ptacle is
used, the extension cord can be taken out either
through the doorway or a window. To avoi i blowing
fuses, pick an outlet that is not overloaced. Your
mower will operate satisfactorily on a circjit that is
fused for 15 amperes. Do not use overs ze fuses
without consulting your power company.
TO CONVERT MOWER TO MULCHEIi
• To convert the mower to a mulching mcwer, first
remove the grass catcher. Then simply lit [ the rear
discharge door, insert the mulching bcffle, and
release the rear discharge door.
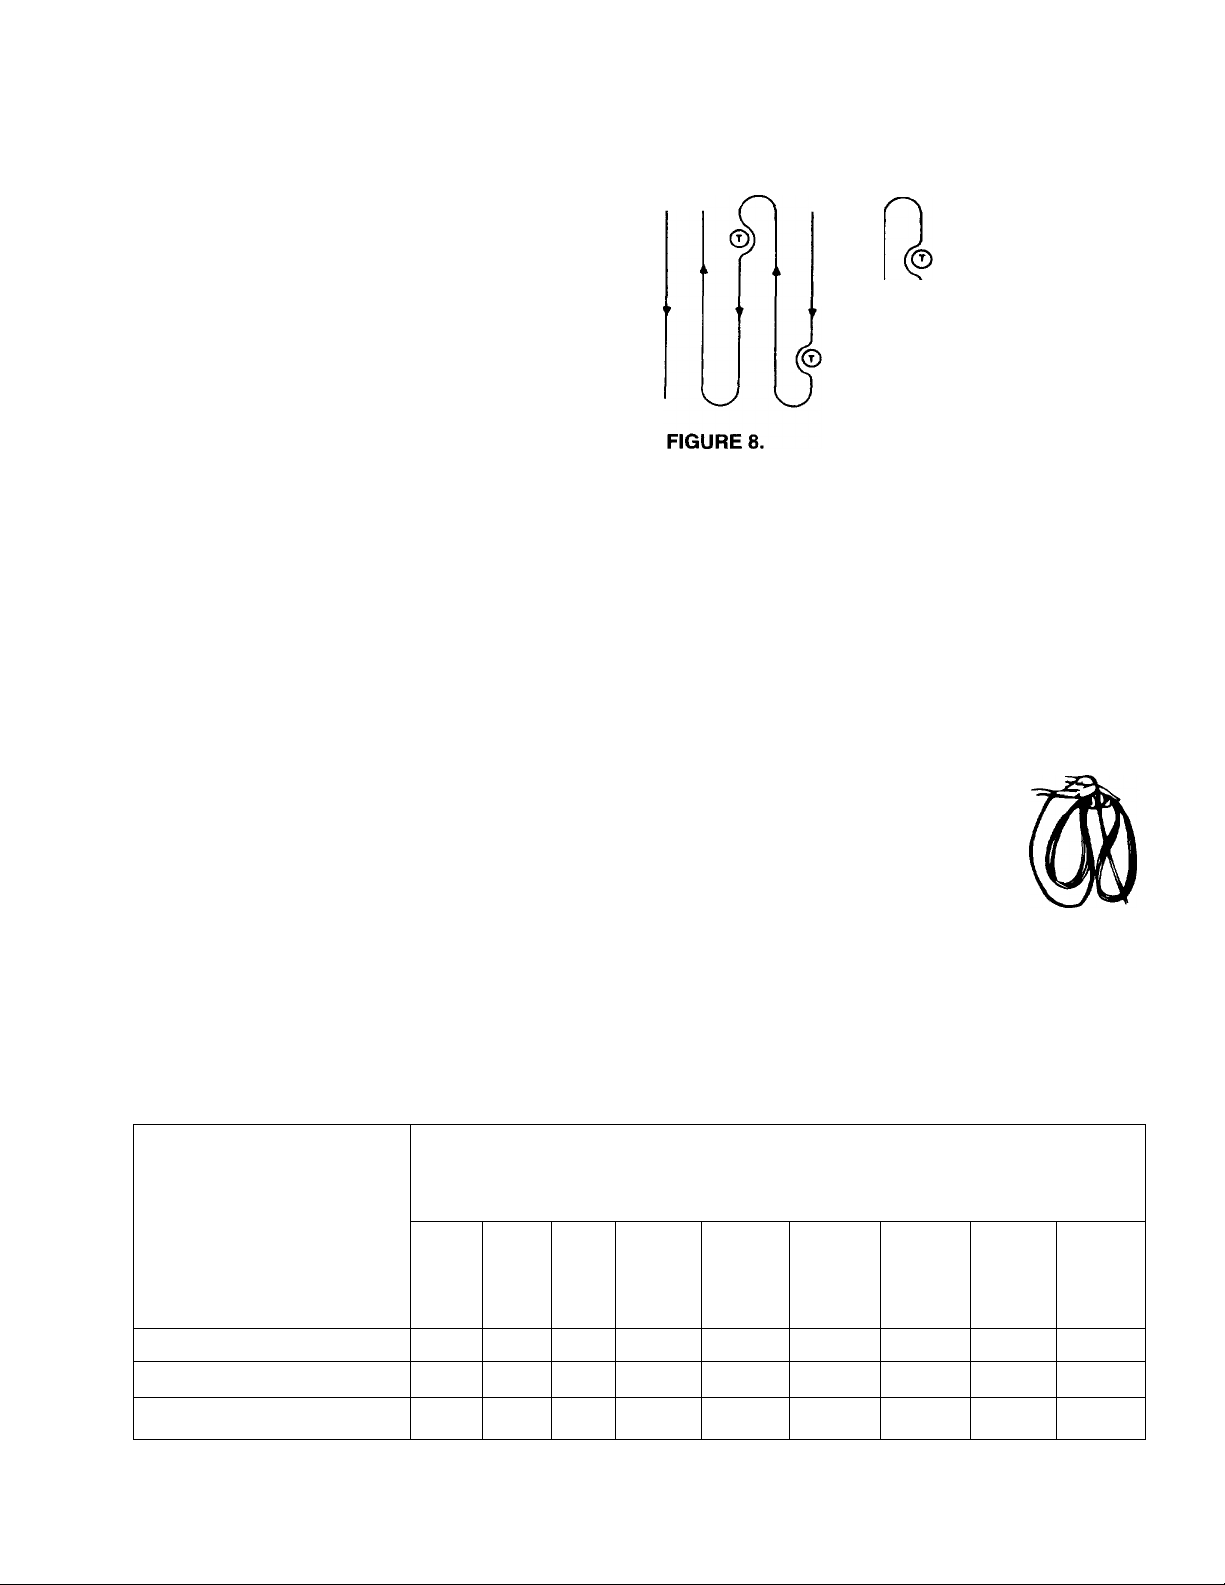
MOWING AND MULCHING TIPS
Never mow around the lawn in circles. Always travel
back and forth across the lawn, beginning at the point
nearest the electric outlet where cord is crmnected.
See figure 8. Cut grass moving away from :he outlet
so the cord lies in the cut portion of the lav/n, out of
the way. Do not allow extension cord to wrr p around
trees, shrubs or other obstacles.
T = Obstacles
Outlet
Start Here
The grass condition at the time of mowing determines
the proper mower cutting height setting for best iawn
appearance. For a healthy lawn, always cut one-third
or less of the total length of the grass at any one cut
ting.
For extremely heavy cutting, reduce the width of cut.
When mulching under certain conditions, such as very
tall grass, it may be necessary to raise the height of
cut to reduce pushing effort and to keep from over
loading the engine and leaving clumps of grass clip
pings. Under heavy conditions cross cut for additional
mulching of surface debris.
When picking up the extension cord,
wind the cord in a series of equal
loops on each side of your hand to
prevent snarling. See illustration at
right.
CUSTOMER RESPONSIBILITIES
GENERAL RECOMMENDATIONS
• Follow the Maintenance Schedule below.
MAINTENANCE SCHEDULE
SERVICE RECORD
Fill in dates as you
complete regular service
Blade Replaced
Lubricate Mower V
Cleaning V
V CHECK
SCHEDULE SERVICE DATES
Evey
Every
Use
Hou rs
25
10
A
WARNING: BE CERTAIN TO DISCON
NECT THE POWER SUPPLY BEFORE
PERFORMING ANY REPAIRS OR MAIN
TENANCE.
Page 11

CUSTOMER RESPONSIBILITIES
LUBRICATION
MOTOR
The motor on your mower does not require lubrication.
WHEELS
DO NOT oil or grease the wheels. Viscous lubricants
will attract dust and dirt that will shorten the life of the
wheels. If you feel the wheels must be lubricated, use
only a dry, silicone type lubricant sparingly.
WHEEL ADJUSTERS
For easy operation, lubricate the wheel adjusters at
least once a season with light oil.
MOWER
CIRCUIT BREAKER
The circuit breaker is located on the motor/blade con
trol housing. This breaker may trip when too much
strain is placed on the mower. The circuit breaker has
been tripped if the mower will not run, and the white
part of the reset button projects out of the motor/blade
control housing. If this occurs, wait approximately 30
seconds, then depress the reset button. Restart the
mower, but be sure to reduce the strain on the mower
(i.e., mow at a higher cutting height, slow down, or
take a smaller width of cut). If the circuit breaker does
not reset, or if it trips repeatedly under normal cutting
conditions, the mower should be examined at an
authorized service location.
BLADE CARE
Your mower will work better with a sharp blade.
WARNING: BE CERTAIN TO DISCON
A
TO REMOVE BLADE (See Figure 9):
• Turn mower on its side.
• Use a block of wood between blade and mower
deck to prevent blade from turning when bolt is
removed. Protect your hands with gloves and/or
wrap blade with heavy cloth.
• Remove center blade bolt by turning counterclock
wise. Use a 9/16" box or open-end wrench.
A
NECT THE POWER SUPPLY BEFORE
PERFORMING ANY MAINTENANCE.
WARNING: PERIODICALLY INSPECT
THE BLADE ADAPTER FOR CRACKS,
ESPECIALLY IF YOU STRIKE A FOREIGN
OBJECT. REPLACE WHEN NECESSARY.
TO REPLACE BLADE (See Figure 9):
• Put blade adapter on motor shaft.
• Fit blade in adapter. Be sure trailing edge of blade
is up towards engine.
• Assemble bolts, washers, and nuts in the exact
order of removal.
• Use block of wood to hold blade and tighten bolt
clockwise. The recommended torque for the center
blade bolt is 450-600 in. lbs. The recommended
torque for the two blade adapter bolts is 200-300
in. lbs. Torque wrenches are available at most
Sears stores and through the catalog.
IMPORTANT: THE BOLT USED TO SECURE THE
BLADE TO THE MOTOR SHAFT IS SPECIALLY
HEAT-TREATED. DO NOT SUBSTITUTE.
CAUTION: A LOOSE BLADE CAN BE
DANGEROUS AND MAY MAKE THE
A
Use only a Sears authorized replacement blade to get
the best cutting results.
TO SHARPEN BLADE
NOTE: We do not recommend sharpening the
blade—but if you do, be sure blade is balanced.
• The blade can be sharpened with a file or on a
grinding wheel. Do not attempt to sharpen while on
the mower.
• Care should be taken to keep the blade balanced.
An unbalanced blade will cause excessive vibration
when running and eventual damage to mower and
motor.
• To check blade balance, drive a nail into a beam or
wall. Leave about one inch of straight nail exposed.
Place center hole of blade over the head of the
nail. If blade is balanced, it should remain in a hori
zontal position. If either end of the blade moves
downward, blade is not balanced. Sharpen the
heavy end until the blade is balanced.
MOTOR HARD TO START.
11
Page 12

CUSTOMER RESPONSIBILITIES
CLEANING
WARNING: DISCONNECT POWER SUP
A
• Remove any build-up of grass and leave; on or
around motor cover. DO NOT USE WATER
• Clean the underside of your mower after e; ich use
by turning the mower on its side and sere ping to
remove any build-up of grass, leaves, dirt or other
matter. DO NOT USE WATER.
PLY BEFORE CLEANING YOUR MOWER.
SERVICE AND ADJUSTMENTS
REAR TRAIL SHIELD
The rear trail shield, attached between the rear
wheels of your mower, is provided to minin' ize the
possibility that objects will be thrown out the rear of
the mower toward the operator. If the shield b icomes
damaged, it should be replaced.
TO ADJUST CUTTING HEIGHT
Refer to “CUTTING HEIGHT ADJUSTME NT” in
Operation section of manual.
• Occasionally use a dry cloth to wipe mower.
• Wash grass bag periodically with water. Allow to
dry thoroughly in the shade. Do not use heat.
IMPORTANT: UNDER NORMAL USAGE, THE
GRASS BAG IS SUBJECT TO WEAR AND SHOULD
BE CHECKED PERIODICALLY. BE CERTAIN ANY
REPLACEMENT BAG COMPLIES WITH THE
MOWER MANUFACTURER’S SPECIFICATIONS.
TO ADJUST HANDLE HEIGHT
The upper handle may be adjusted to three different
height positions. To select desired position, loosen
hand knobs and align one of the three marks on the
top of the lower handle insulators with the mark on the
upper handle insulators. Tighten the hand knobs.
STORAGE
Your mower should be prepared for off-seas jn stor
age as follows:
MOWER
• Make sure motor/blade control Is in OFF (rt leased)
position for storage.
• Clean underside of mower housing (See “CLEAN
ING” in Customer Responsibilities se< tion of
manual).
• Inspect and replace/sharpen blade, if requited (See
“BLADE CARE” in Customer Respons bilities
section of manual).
• Lubricate as shown in “MAINTENANCE
SCHEDULE” (See Customer Responsibilit es sec
tion of manual).
HANDLE
The handle may be folded away completely or stor
age.
• Remove the grass bag (if attached).
• Loosen the hand knobs on the sides of the handle,
and let the upper handle fold down to the re ar.
• Pull outward on each side of the lower handle, and
lift the sides of the iower handle past the t dges of
the handle mounting brackets. Fold tha lower
handle forward.
CAUTION: When folding the handle for storage or
transportation, be carefui not to bend or kink the
power cord.
To return the mower to the operating position, pull up
and back on the handle until it locks in position.
Tighten the hand knobs which secure the upper and
lower handles.
EXTENSION CORD
• Replace extension cord if cut or abraded.
• Extension cord should be wiped dry of any foreign
substances such as oil or stains.
• Wind cord and store in cool, dry place (See cord
winding instruction on page 10).
OTHER
Do not store your mower under any plastic cover.
Plastic cannot breathe which aiiows condensation to
form and causes metal components of mower to rust.
12
Page 13

TROUBLE SHOOTING GUIDE
Trouble
Does not start
Frequent tripping of circuit
breaker or blowing of fuses
Loss of power
Poor or uneven cut
Too much vibration
Hard to push
Possible Cause(s)
1. Motor/blade control disengaged.
2. Extension cord disconnected.
3. Tripped circuit breaker.
4. Blown fuse or a tripped circuit breaker in
electrical circuit.
5. Motor/blade control switch defective.
1. Cutting too much grass.
2. Circuit overloaded.
1. Cutting too much grass.
2. Build-up of grass, leaves and debris under
mower.
1. Worn, bent or loose blade.
2. Build-up of grass, leaves and debris under
mower.
1. Worn, bent or loose blade.
2. Bent motor shaft.
1. High grass or cutting height too low.
2. Rear of mower housing and blade dragging
in heavy grass.
Corrective Action
1. Engage motor/blade control.
2. Be sure that the extension cord is plugged
into the outlet and the lawn mower switch
plug.
3. Reset circuit breaker.
4. Check to see if a fuse has been blown or a
circuit breaker tripped in your electrical box.
5. Replace motor/blade control switch.
1. Set in “Higher Cut” position, take smaller
width of cut, or slow down.
2. Do not use a higher rated fuse without
consulting your power company. If condition
persists (be sure circuit is not overloaded),
have your unit checked by your nearest
Authorized Sears Service Dealer.
1. Set in “Higher Cut” position.
2. Disconnect power cord and clean underside
of mower housing.
1. Replace blade. Tighten blade nut.
2. Disconnect power cord and clean underside
of mower housing.
1. Replace blade. Tighten blade nut.
2. Contact Sears Sen/lce Department.
1. Raise cutting height.
2. Raise cutting height.
Note: For repairs beyond the minor adjustments listed above, contact your nearest SEARS Service Center.
_______
Each lawn mower has its own model number.
The model number for your lawn mower will be found
on a label attached to the lawn mower near the right
rear wheel.
All parts listed herein may be ordered through Sears,
Roebuck and Co. Service Centers and most Retail
HOW TO ORDER REPLACEMENT PARTS
Your Sears merchandise has added value when you
consider that Sears has service units nationwide
staffed with Sears trained technicians...professional
technicians specifically trained on Sears products,
having the parts, tools and the equipment to ensure
that we meet our pledge to you...“we service what we
sell.”
Stores.
WHEN ORDERING REPAIR PARTS, ALWAYS GIVE
THE FOLLOWING INFORMATION:
‘PRODUCT - “19" Electric Mulching Mower”
‘MODEL NUMBER - 247.370252
‘PART NUMBER
‘PART DESCRiPTiON
IF YOU NEED REPAIR SERVICE OR PARTS:
REPAIR SERVICE
1-800-4-REPAIR
(1-800-473-7247)
ORDERING PARTS
1-800-FON-PART
(1-800-366-7278)
13
Page 14

SEARS CRAFTSMAN 19" ELECTRIC MULCHING MOWER MODEL NO. 247.370252
Repair Parts
Page 15

SEARS CRAFTSMAN 19" ELECTRIC MULCHING MOWER MODEL NO. 247.370252
Repair Parts
KEY
NO.
10 782-7025
11 732-0677
12 732-0678
13
14 764-0326
15
16 14765
17 720-0190
18
19 710-0896
20
21 682-0513
22 710-1017
23 782-5026
24
25
26 712-0798
27 14832
28
29
30 782-5025
31
32 14578
33
34 710-3009
70-^
PART
NO.
749-0984
1
2 747-0923
725-1590
3
4 731-1270
5 748-0356
738-0102 Axle Bolt
6
732-0712
7
731-1261
8
749-0882
9
714-0104
738-0507B
14766
732-0417A Spring Lever
682-0514
736-0105
736-0356
15262B Pivot Bar
15261A
782-0054
14579
731-1264
‘Common HardwaretPart of Motor, Switch & Cord Ass’y. Comp. (Ref. 49)
75__T
Upper Handle 35
Cord Control Rod
Strain Reiief—Cord
Fan
Blade Adapter
Rear Flap Wire
Rear Flap
Lower Handle 43
Chute Door
Door Spring—L.H. 45 710-0450
Door Spring—R.H. 47 726-0240 Cable Tie
Hairpin Clip 48 736-0331
Front Catcher Frame 49
Shid. Bolt .5" Dia. x .434"
Pivot Bar—R.H. 725-1565 Rocker Switch Onlyf
Pivot Bar—L.H. (Not Shown) 724-0243
Spring Lever Knob 51
Hex AB-Tap Scr. 1/4-14 x .62" 53 742-0719 19" Mulching Blade
Lg.
Handle Brkt. Ass’y-—R-H.
Handle Brkt. Ass’y.—L.H.
Torx. Mach. AB-Tap Scr. 1/4 x 68
.62" Lg. 69 720-0275 Knob
Rear Baffle
Bell-Wash. .38" I.D. x .88" O.D.
Bell-Wash. .39" I.D. x 1.38" O.D.
Hex Nut 3/8-16 Thd.* (Incl. Ref. 70&71)t
Spring Lever Ass’y. w/Knob 73 721-0305
Height Adj. Plate 75 741-0875
Front Baffle
19" Deck
Height Adj. Ass’y. Comp.—R.H.
Height Adj. Ass’y. Comp.—L.H. 78 724-0194
(Not Shown) 79
Motor Cover 80 748-0348 Bearing Adapter!
Scr. #10-24 X .75" Lg. 83 710-1176 Carriage Bolt!
-May be purchased locally. 86 721-0306 Motor Hsg. Insulator!
87
DESCRIPTION
00—Jy
71/—
1
KEY
NO.
36
37
38 710-0191
39 736-0452
40 764-0447 Grass Bag
41 720-0241 Plastic Knob
42 734-1699 Wheel Ass’y. Comp.
44 731-1267 Lower Handle Insulator
50
52
54 747-0622
66 720-0226
67 720-0258 Hub Cap
70 624-0031
71
72 624-0070
74 710-0436 Hex Tap Scr. #10-16 x .62" Lg.|
76
77
84 712-0324
87
88 725-1631
90
91 726-0209 Cable Tie
92
93 731-1388 Insulator—Knob
94 710-1251 Hex Bolt 3/8-24 x 2.5"
95 764-0325 Rear Catcher Frame
—
PART
NO.
710-0605
712-0241 Hex Nut 3/8-24 Thd.
710-0654A Hex TT-Tap Scr. 3/8-16 x 1" Lg.
731-1268 Upper Handle Insulator
818-60014 Motor, Cord & Switch Ass’y.
625-0018A
782-5004
782-5007
710-0192 Truss Scr. #10-24 X .38" Lg.
724-0200
—
624-0029
741-0124
782-5016 Brkt.-Rectifier/Heat Sink!
736-3090 FI-Wash. .26" I.D. x .72" O.D.!
721-0311
770-0253L Owner’s Manual
C-Sunk Scr. 1/4-20 x 1.8" Lg.
Hex Bolt 3/8-24 x 1.25" Lg.
Bell-Wash. .396" I.D. x 1.14"
Carriage Bolt 5/16-18 x 3" Lg.
Bell-Wash. 3/8" I.D.
Cord & Switch Ass’y. Comp.f
Cord Onlyt
Mulching Baffle—R.R.
Mulching Baffle Plug
Control Handle
Foam Grip
Brush and Liner Ass’y.t
Brush Holder Capt
End Shield Ass’y. w/Plug
Insulator Wire (Output)t
Needle Bearingf
Not a Serviceable Part—Order
Armature Ass’y.f
Motor End Platef
Ball Bearing!
Hex L-Nut 1/4-20 Thd.!
Rectifier!
Insulator Motor Hsg.
DESCRIPTION
Ref. 49
74
15
Page 16

o>
USE THIS PAGE AS A GUIDE TO DETERMINE SLOPES WHERE YOU MAY NOT OPERATE SAFELY.
SIGHT AND HOLD THIS LEVEL WITH A VERTICAL TREE
-------A POWER POLE
----------------------------A CORNER OF A BUILDING
OR A FENCE POST
t:
........
•
......................
■ ................................................................................................................................................................................
.......
GO
"O
o
WARNING
A(
Do not mow on inclines with a slope in excess of 15 degrees (a rise of approximately 2-1/2 feet every 10 feet). A
riding mower could overturn and cause serious injury. If operating a walk-behind mower on such a slope, it is
extremely difficult to maintain your footing and you could slip, resulting in serious injury.
Operate RIDING mowers up and down slopes, never across the face of slopes.
Operate WALK-BEHIND mowers across the face of siloes, never up and down slopes.
CO
Page 17

Page 18

Page 19

USE ESTA PAGINA COMO GUIA PARA DETERMINAR LOS PENDIENTES EN DONDE
NO SE PUEDE OPERAR EL CORTACÉSPED CON SEGURIDAD.
MANTENGA A LA VISTA ESTE NIVEL CON UN ARBOL VERTICAL
UNPOSTE DE SERVICIO DE LUZ O TELÉPHONO
---------------
..........
..... ........................
..
LA ESQUINA DE UN EDIFICIO
■
I
----------
I
I
.
'
...........................
!
..................................
FTTWTfTW'Tni I "r-• 1 TU n-nr n
--
- o LA ESTACA DE UN CERCADO
.
-^>0.
-fI'®'f''reoE,s
.
..............
m
30
ATENCION!
Ai
No opere la máquina en terrenos con pendiente en exceso de 15 grados (una elevación de 2-1/2 pies a cada 10 pies de distancia). Un cor-
tacésped de montar se puede volcar, resultando en lesiones serias para el operador. Si empuja un cortacésped de operación manuai en tal ter
reno, es muy difícil evitar resbalones que también pueden resultar en lesiones serias.
Los cortacésped de montar se deben manejar para arriba y para abajo de los terrenos con pendiente. Nunca se deben manejar lateralmente.
Los cortacésped de operación manual se deben manejar lateralmente en terrenos con pendiente. Nunca se deben manejar para arriba o para
abajo.
C/3
Page 20

GUIA PARA RESOLUCION [)E PROBLEMAS
Problema Causa(s) Posible(s)
El motor no arranca • Palanca de control de cuchilla desacoplada
Disparo frecuente del
cortocircuito 0 fusibles fundidos
Pérdida de energía • Está cortando demasiado césped.
Corta el césped de manera
desigual
• Cable de extensión desconectado
• Cortocircuito disparado
• Fusible quemado o un cortocircuito
disparado en el circuito eléctrico
• Interruptor del control del motor/cuchilla
defectuoso
• Esta cortando demasiado césped.
• Circuito recargado.
• Residuos de césped, hojas debajo del
cortacésped.
• Cuchilla desgastada, doblada.
• Residuos de césped, hojas debajo del
cortacésped
Acción Correctiva
• Acople la palanca de control
• Asegúrese de que el cable este
conectado al toma de corriente y el interruptor
del cortacésped conectado.
• Reconecte el cortacircuitos.
• Revise a ver si un fusible ha sido
quemado o un cortocircuito disparado en su
caja de conducto.
• Reemplace el interruptor del control
del motor/cuchilla.
• Coloque en la posición “Corte Más Alto”
(Higher Cut), corte franjas más angostas o
hágalo más despacio.
• No use un fusible de mayor potencia sin antes
consultar con su compañía de electricidad. Si
la condición persiste (asegúrese de que el cir
cuito no este recargado) lleve su unidad para
que la inspeccionen en un Centro de Servicio
Sears más cercano.
• Coloque en la posición “Corte Más Alto".
• Desconecte el cable eléctrico y limpie por
debajo de la caja del cortacésped.
• Reemplace la cuchilla Apriete la tuerca de la
cuchilla.
• Desconecte el cable eléctrico y limpie por
debajo de la caja del cortacésped
Vibración Excesiva
Difícil de empujar
• Cuchilla suelta o desequilibrada
• Cigüeñal doblado
• Césped alto o altura de corte demasiado baj;.
• La parte trasera de la caja del cortacésped
y la cuchilla rastreando en el césped pesado
• Reemplace la cuchilla. Apriete la tuerca.
• Llame a su Centro de Servicio Sears
• Levante la altura de corte.
• Levante la altura de corte.
Nota: Para reparaciones aparte de estos pequeños ajustes, póngase en contacto co> \ su Centro de Servicio Sears más cercano.
COMO ORDENAR PIEZAS DE REPUESTO
Cada cortacésped tiene su número propio de modelo. Cada
motor tiene su número propio de modelo.
El número de modelo para su cortacésped se encuentra en
un rótulo pegado al marco.
Todas las piezas listadas aquí pueden ordenarse de los
Centros de Servicio de Sears Roebuck and Co. y en la
mayoría de las tiendas al por menor.
CUANDO ORDENE PIEZAS DE REPUESTO SIEMPRE
PROPORCIONE LA INFORMACION SIGUIENTE:
• PRODUCTO - “CORTACÉSPED DE ELECTRICO”
• NUMERO DE MODELO - 247.370252
• NUMERO DE PIEZA
• DESCRIPCION DE LA PIEZA
Su mercadería de Sears tiene un valor agregado cuando
usted considera que Sears tiene unidades de servicio en
todo el país con personal técnico entrenado de Sears...
técnicos ¡rofesionales entrenados específicamente en los
productos de Sears, teniendo las piezas, herramientas y el
equipo pe ra asegurar que cumplamos con nuestra promesa
a usted.." servimos lo que vendemos.”
Para las [ iezas de repuesto, vea el reverso del manual. Las
listas de I is piezas comienzan en la página 14.
SI NECE! ílTA SERVICIO DE REPARACIÓN O PARTES:
SERVICK ) DE REPARACIÓN
1-800-4 REPAIR
1-800-47Í -7247
PARA OF DENAR PARTES
1-800-FO «í PART
1-800-36C -7278
13
Page 21

RESPONSABILIDADES DEL PROPIETARIO
LIMPIEZA
/V ADVERTENCIA: DESCONECTE LA
FUENTE DE ENERGIA ANTES DE
** LIMPIAR SU CORTACESPED.
• Quite cualquier residuo de hojas o césped encima
0 alrededor de la cubierta del motor NO USE
AGUA.
• Limpie la superficie inferior del cortacésped
después de cada uso para remover residuos de
césped, hojas, tierra u otras cosas. NO USE
AGUA.
MANTENIMIENTO Y AJUSTES
RESGUARDO TRASERO
El resguardo trasero que se encuentra entre las
ruedas traseras de su cortacésped se proporciona
para minimizar la posibilidad de que objetos salgan
volando por detrás de la máquina hacia el operador.
Si el resguardo se daña , se debe reemplazar.
PARA AJUSTAR LA ALTURA DE CORTE
Vea en la sección de operación del manual “AJUSTE
DE LA ALTURA DE CORTE”.
• De vez en cuando use una toalla seca para limpiar
el cortacésped..
• Lave la bolsa periódicamente con agua. Permita
que se seque completamente en la sombra. No
use calor.
IMPORTANTE: BAJO USO NORMAL, LA BOLSA
ES SOMETIDA AL DESGASTE Y SE DEBE REVIS
AR CON FRECUENCIA. ASEGURESE DE QUE
CUALQUIER BOLSA DE REPUESTO CUMPLA CON
LAS ESPECIFICACIONES DEL FABRICANTE DEL
CORTACESPED.
PARA AJUSTAR LA ALTURA DEL MANGO
La palanca superior se puede ajustar a tres posi
ciones diferentes. Para seleccionar la altura desea
da, afloje las perillas manuales, y alinee una de las
tres marcas en la parte superior de los aisladores del
mango inferior con la marca en los aisladores del
mango superior. Apriete las perillas de mano.
ALMACENAMIENTO
Su cortacésped se debe preparar de la siguiente
manera antes de almacenarlo:
CORTACESPED
• Asegúrese de que el control del motor/cuchilla se
encuentre en la posición OFF (apagado) para el
almacenaje.
• Limpie el lado inferior de la caja del cortacésped
(Vea “LIMPIEZA” en la sección “Responsabilidades
del Propietario” del manual).
• Inspeccione y reemplace/afile la cuchilla si es
necesario (Vea “CUIDADO DE LA CUCHILLA” en
la sección “Responsabilidades del Propietario” del
manual).
• Lubrique como se demuestra en “HORARIO DE
MANTENIMIENTO” (Vea la sección “Responsa
bilidades del Propietario” de este manual.
MANGO
El mango se puede doblar completamente para el
almacenaje.
• Quite la bolsa para césped (si está unida).
• Suelte las perillas de mano de los lados del mango
y deje que el mango superior se doble hacia atrás.
• Tire hacia afuera en cada lado del mango inferior y
levante los lados del mango inferior pasando los
bordes de los soportes del mango. Doble el
mango inferior hacia adelante.
PRECAUCION: Al doblar el mango para el almace
naje o transporte, asegúrese de no doblar o
enredar el cable eléctrico.
Para volver el cortacésped a la posición de
operación, tire hacia arriba y hacia atrás el mango
hasta que cierre en posición. Apriete las perillas de
mano que fijan los mangos superior e inferior.
CABLE DE EXTENSION
• Reemplace el cable de extensión si esta cortado o
desgastado.
• El cable se debe limpiar y mantener libre de aceite
o manchas.
• Enrolle el cable y almacénelo en un sitio fresco y
seco (Vea la instrucción de como enrollar el cable
en la página 10).
OTRA INFORMACION
No almacene su cortacésped bajo ninguna cubierta
de plástico. El plástico no deja respirar bien lo que
permite que se forme condensación y esto causa que
los componentes de metal de la máquina se herrum
bren.
12
Page 22

RESPONSABILIDADES DEL PROPIETARIO
LUBRICACION
MOTOR
El motor de su cortacésped no requiere lubricación.
RUEDAS
NO aceite ni engrase las ruedas. Varios lubricantes
atraerán polvo y suciedad que acortaran la duración
de las ruedas. Si considera prescindible lubricar las
ruedas, use solamente un lubricante seco de silicón
de vez en cuando.
AJUSTES DE LAS RUEDAS
Para la fácil operación, lubrique los ajustes de las
ruedas por lo menos una vez cada estación con
aceite ligero.
CORTACÉSPED
CORTACIRCUITOS
El cortacircuitos está situado en la caja del control del
motor/cuchilla. Este interruptor puede disparar cuan
do el cortacésped está bajo demasiado esfuerzo. Si
el cortacésped no funciona es porque el cortacircuitos
ha sido disparado y la parte blanca del botón de rea
juste se sale de la caja del control del motor/cuchilla.
Si esto ocurriera, espere aproximadamente 30 segun
dos y baje el botón de reajuste. Vuelva a encender el
cortacésped, pero asegúrese de reducir la carga del
cortacésped (ej.: corte con una altura de corte más
alta, corte en líneas más angostas). Si el cortacir
cuitos no se activa, o si se dispara con frecuencia
bajo condiciones de corte normales, esta máquina
debe ser examinada por un centro de servicio autor
izado.
CUIDADO DE LA CUCHILLA
Su cortacésped funcionará mejor con la cuchilla
filosa.
ADVERTENCIA: ASEGURESE DE
DESCONECTAR LA FUENTE DE ENER
A
PARA QUITAR LA CUCHILLA (Vea figura 9):
• Vuelque el cortacésped de lado. Asegúrese de
que el depurador de aire y el carburador estén arri
ba.
• Use un bloqueo de madera entre la cuchilla y la
plataforma del cortacésped para evitar que la
cuchilla gire al quitar el perno. Proteja sus manos
con guantes y/o envuelva la cuchilla en una manta
gruesa.
• Quite el perno de la cuchilla girando hacia la
izquierda. Use una llave de 9/16”.
A
GIA ANTES DE DARLE MANTENIMIEN
TO.
ADVERTENCIA: INSPECCIONE PERI
ODICAMENTE EL ADAPTADOR DE
CUCHILLA PARA VER SI ESTA AGRI
ETADO, ESPECIALMENTE SI HA GOL
PEADO ALGUN OBJETO. REEMPLACE
CUANDO SEA NECESARIO.
PARA REEMPLAZAR LA CUCHILLA (Vea figura 9):
• Ponga el adaptador de la cuchilla en el cigüeñal
del rr otor.
• Colot ue la cuchilla en el adaptador. Asegúrese de
que (I borde de salida de la cuchilla se dirija hacia
el mctor.
• Coloque los pernos, arandelas y tuercas en el
mism a orden en que las quitó.
• Use (I bloqueo de madera para sostener la cuchilla
y apratar el perno hacia la derecha. El momento
de to sión recomendado para el centro es de 450600 (iulgadas/libras. El momento de torsión para
los pomos del adaptador de la cuchilla es de 200300 pulgadas, libras. Las llaves de torsión son
dispo libles en la mayoría de los Centros Sears y a
travéo del catálogo.
IMPORTANTE: EL PERNO UTILIZADO PARA FIJAR
LA CUCHILLA AL MOTOR ES ESPECIALMENTE
TRATAf >0 CON CALOR. NO LO SUSTITUYA.
PRECAUCION: UNA CUCHILLA SUELTA PUEDE
SER PELIGROSA Y PUEDE DIFICULTAR EL
ARRANQUE DEL MOTOR.
ReempI ícela solamente con una cuchilla autorizada
Sears p rra obtener los mejores resultados.
PARA ; FILAR LA CUCHILLA
NOTA; No recomendamos afilar la cuchilla - pero si lo
hace, as egúrese de que la cuchilla este equilibrada.
• Se puede afilar con una lima o en una rueda de
amolí j. No trate de afilarla mientras este en el cor-
tacés)ed.
• Se díibe tener cuidado para mantener la cuchilla
equili xada. Una cuchilla desequilibrada causará
dema siada vibración al funcionar y eventualmente
dañai á el cortacésped y el motor.
• Para revisar el equilibrio de la cuchilla, clave un
clavo en una viga o pared. Deje aproximadamente
una f ulgada del clavo expuesta. Coloque el agu
jero iientral de la cuchilla sobre la cabeza del
clavo Si la cuchilla esta equilibrada, debe per
manecer en la posición horizontal. Si cualquier
lado t!e la cuchilla de dirige hacia abajo, la cuchilla
no es a equilibrada. Afile el lado grueso hasta que
la cuchilla se equilibre.
11
Page 23

OPERACION
CONEXION A LA FUENTE DE ELECTRICIDAD
• Conecte el cable de extensión a cualquier toma de
corriente o receptáculo de 110-120 voltios ciclo 60
A.C. Este toma de corriente puede estar adentro o
afuera. SI se usa un receptáculo adentro, el cable
de extensión se pude sacar ya sea por una puerta
o ventana, Para evitar fundir los fusibles, escoja
un toma de corriente que no este recargado. Su
cortacésped funcionará bien en un circuito que sea
para 15 amperios. No use fusibles demasiado
grandes sin antes consultar con su compañía de
electricidad.
PARA CDNVERTIR EL CDRTACESPED A UN TRITURADDR
• Para convertir el cortacésped a un triturador,
primero quite el colector de césped. Luego simple
mente levante la puerta de descarga trasera,
coloque el deflector y suelte la puerta de descarga
trasera.
CDNSEJDS DE CDRTE Y TRITURACIDN
Nunca corte el césped en círculos. Siempre vaya de
un lado hacia otro, empezando en el punto más cer
cano al toma de corriente al cual esta conectada la
máquina. Vea la figura
dose del cable de manera que vaya quedando en el
área ya cortada, lejos. No permita que el cable de
extensión se enrolle en árboles, arbustos y otros
obstáculos.
8. Corte el césped aleján
T = Obstáculos
Toma de
Corriente
Empiece por
W
FIGURA 8.
La condición del césped a la hora del corte determina
la altura de corte adecuada para mejor apariencia.
Para un césped saludable, siempre corte 1/3 parte o
menos de la longitud total.
Para corte demasiado grueso, reduzca el ancho del
corte.
Al triturar bajo ciertas circunstancias, como por ejem
plo si el césped es demasiado alto, es posible que
tenga que levantar la altura de corte para reducir el
esfuerzo de corte y evitar que el motor se recargue y
no dejar el césped cortado en grupos. Bajo condi
ciones pesadas corte en cruce para la trituración adi
cional.
Al levantar el cable de extensión,
enrolle el cable en una serie de lazos
iguales en cada lado de su mano
para prevenir que se enrede. Vea la
ilustración a la derecha.
Aquí
RESPONSABiLIDADES DEL PROPIETARIO
RECDMENDACIDNES GENERALES
• Siga el siguiente Horario de Mantenimiento.
MANTENIMIENTD HDRARID
CONTROL DE
MANTENIMIENTO
Llene las fechas en las que
realizó el mantenimiento
regular
Cambio de la Cuchilla
Lubricar el Cortacésped
Limpieza
V
Marque
HORARIO FECHAS DE MANTENIMIENTO
Cada
Cada
Uso
25
Horas
V
V
V
10
A
__________
ADVERTENCIA: ASEGURESE DE
DESCONECTAR LA FUENTE DE ENER
GIA ANTES DE EJERCER REPARA
CIONES O MANTENIMIENTO.
Page 24

CONTROL DEL MOTOR/CUCHILLA
ADVERTENCIA: EL CONTROL DEL
MOTOR/ CUCHILLA EN ESTE COR-
A
El control del motor/cuchilla requiere que el operador
se encuentre detrás del mango para arrancar y usar
el cortacésped. Cuando el operador suelta la palanca
de control, el motor se detiene y un freno interno
ayuda a que la cuchilla se detenga rápidamente.
Cuando el operador deja la posición de operación
para quitar el colector de césped, cambiar la altura de
corte o para recoger objetos, el motor se detendrá
automáticamente cuando la palanca de control del
motor/cuchilla se suelta.
AJUSTE DE LA ALTURA DE CORTE
A
Cada rueda tiene una palanca de ajuste para fijar la
altura de corte de su cortacésped. Siempre deben de
estar fijadas en la misma posición.
• Levante las ruedas para corte bajo y ruedas bajas
para corte alto.
• Para cambiar la altura de corte, mueva las palan
cas de ajuste hacia las ruedas. Vea la figura 6.
sea necesario. Asegúrese de que todas las palan
cas se encuentren en el mismo nivel.
TACÉSPED SE INSTALA PARA MINI
MIZAR EL RIESGO DE CONTACTO CON
LA CUCHILLA TAL COMO ES REQUERI
DO POR LAS REGLAS FEDERALES. NO
TRATE DE CAMBIAR BAJO NINGUNA
CIRCUNSTANCIA LA FUNCION DEL
CONTROL DEL MOTOR/CUCHILLA.
ADVERTENCIA: APAGUE EL MOTOR Y
DESCONECTE EL CABLE ELECTRICO
ANTES DE EFECTUAR EL AJUSTE.
Mueva las ruedas hacia arriba o hacia abajo como
CONliXION DEL CABLE
CABLE DE EXTENSION
IMPORTANTE: SE DEBE USAR UN CABLE DE 100’
DE LONGITUD DE 14 AWG. ESTE SE PUEDE
SUST TUIR POR CABLE DE 50’ DE LONGITUD DE
16 AV'G. PARA APLICACIONES EN LAS QUE SE
NECESITA CABLE MAS LARGO, SE PUEDE USAR
UN C/,BLE DE 150’ DE LONGITUD DE 12 AWG. EL
USO DE UN CABLE DE OTRO TAMAÑO O GRADO
DISMINUIRA EL FUNCIONAMIENTO Y POSIBLE
MENTE LA DURACION DEL MOTOR ELECTRICO.
EN TODOS LOS CASOS, EL CABLE DE EXTEN
SION DEBE SER UL ADECUADO PARA EL USO AL
AIRE LIBRE.
• La ongitud del cable que necesitará (no proporcior ado con la unidad) depende del área que vaya
a ci litar. Vea la información sobre el cable anteri
or.
SUJECION DEL CABLE
• Une el cable de extensión a la sujeción del cable
de la siguiente manera. Haga un lazo en el cable
de jxtensión. Deje suficiente cable para hacer la
con axión al control del motor/cuchilla (aproximada
mente 20 pulgadas). Deslice el lazo a través de la
hendedura en la parte inferior de la sujeción y
sob e la lengüeta, para prevenir la desconexión del
control del motor/cuchilla durante la operación.
Dej í suficiente cable para permitir que la sujeción
del :able se mueva libremente de lado a lado. Vea
la fi jura 7.
CONEXION AL CONTROL DEL MOTOR/CUCHILLA
• Cor ecte el enchufe del cable de extensión comple-
tanrente al enchufe del cortacésped. El cortacíisped tiene un enchufe polarizado AC (una
cuc lilla es más grande que la otra) que calzará en
el enchufe del cable de extensión solamente de
una manera. No lo puede conectar, dele media
vue ta al enchufe del cable de extensión y vuelva a
inte itarlo. Si aun de esta manera no calzan, llame
a si centro de servicio. No trate de alterar el accesori) de seguridad del enchufe polarizado.
FIGURA 6.
• Ajuste la altura de corte de acuerdo a sus necesi
dades. Vea la sección “Consejos Sobre el Corte
del Césped” en la página 10. (Los ajustes de
altura cuando son nuevos pueden ser difíciles de
mover. Funcionaran mejor después de ser usa
dos.)
Page 25

OPERACION
CONTROL DEL MOTOR/CUCHILLA - consiste de
dos partes, la palanca de control del motor/cuchilla y
el botón de arranque.
* Palanca de control del motor/cuchilla - debe de
mantenerse contra el mango para poder encender
y funcionar el motor y la cuchilla.
* Botón de Arranque - debe ser inclinado para
poder enganchar la palanca de control del
motor/cuchilla.
ANTES DE USAR SU CORTACÉSPED, DE NUEVO HAGA REFERENCIA A LAS “NORMAS DE SEGURIDAD”
DE LA PAGINA 2 DE ESTE MANUAL. TENGA SIEMPRE CUIDADO.
La operación de cualquier cortacésped puede hacer que objetos salgan volando y que
sean tirados a los ojos, lo que puede resultar en daño severo. Siempre use gafas de
seguridad o resguardo antes de encender cualquier herramienta o mientras que este
haciendo ajustes o reparaciones. Recomendamos la Máscara Ancha Protectora sobre
gafas o anteojos de seguridad disponibles a través de Sears.
COMO UTILIZAR SU CORTACESPED
ADVERTENCIA: NO OPERE ESTE COR
TACESPED CON LA PUERTA DE
A
A
A
PARA PARAR EL MOTOR Y LA CUCHILLA
• Suelte la palanca de control del motor/cuchilla para
DESCARGA TRASERA ABIERTA, AL
MENOS QUE EL COLECTOR DE CESPED
ESTE EN SU LUGAR. NO OPERE EL
CORTACESPED SIN LA PROTECCION
EN LA PARTE TRASERA DE LA
PLATAFORMA.
ADVERTENCIA: ASEGURESE DE QUE
NO HAYAN PIEDRAS, RAMAS, CABLES
U OTROS OBJETOS QUE PUEDEN
DAÑAR EL CORTACESPED O EL
MOTOR. TALES OBJETOS PUEDEN SER
ACCIDENTALMENTE ARROJADOS POR
EL CORTACESPED EN CUALQUIER
DIRECCION Y CAUSAR SERIAS
LESIONES AL OPERADOR Y A OTROS.
ADVERTENCIA: PARA PREVENIR EL
CHOQUE ELECTRICO, NO OPERE EL
CORTACESPED EN SITIOS HUMEDOS.
parar el motor. (Escuchará un ruido alto, siendo el
resultado de deceleración del motor eléctrico.
Chispas encima del motor, dentro de la cubierta
del motor, también es normal durante la decel
eración.)
SUJECION DEL CABLE - ayuda a prevenir que el
cable de extensión del control del motor/cuchilla se
d©scon©ctG.
BOTON DE REAJUSTE DEL CORTACIRCUITO -
usado para reajustar el cortacircuitos (el cortacircuitos
previene que la máquina sea sometida a demasiada
ifuerza).
• Desconecte la fuente de energía para prevenir
arranque accidental mientras el equipo este solo.
ADVERTENCIA: SI USTED GOLPEA
ALGUN OBJETO, PARE EL MOTOR,
A
PARA ENCENDER EL MOTOR Y ENGANCHAR LA CUCHILLA
Colocado detrás de la unidad, incline el botón de
arranque en la palanca de control del motor/cuchilla.
Tire la palanca de control hacia arriba contra el
mango. Suelte el botón de arranque.
IMPORTANTE: SU CORTACESPED TIENE UN
CORTACIRCUITOS, SITUADO EN LA CAJA DEL
CONTROL DEL MOTOR/CUCHILLA. VEA LA FIGU
RA 5. SI EL CORTACIRCUITOS SE DISPARA,
REAJUSTE COMO SE INDICA EN LA SECCION DE
MANTENIMIENTO.
DESCONECTE LA FUENTE DE ENERGIA
E INSPECCIONE BIEN EL CORTACE
SPED A VER SI HAY DANOS Y REPARE
EL DAÑO ANTES DE VOLVER A ENCEN
DER Y OPERAR LA MAQUINA. LA
VIBRACION EXCESIVA DURANTE LA
OPERACION EN UNA SEÑAL DE DAÑO.
LA UNIDAD SE DEBE INSPECCIONAR Y
REPARAR INMEDIATAMENTE.
Palanca de Control del
Motor/Cuchilla
A
ADVERTENCIA: LA CUCHILLA CONTIN
UA GIRANDO POR UNOS SEGUNDOS
DESPUES DE APAGAR EL MOTOR. SI EL
MOTOR NO PARA INMEDIATAMENTE
CUANDO EL DE CONTROL DEL
MOTOR/CUCHILLA SE SUELTA, LLAME A
UN CENTRO DE SERVICIO AUTORIZADO.
Cortacirculto
FIGURA 5.
Page 26

ENSAMBLAJE
UNIO^ DEL COLECTOR DE CESPED
AL CÍIRTACESPED
Levan :e la puerta de descarga trasera del cor-
tacésped. Asegúrese de que el deflector de tritu
ración se haya quitado. Coloque los ganchos en el
colecte r de césped en las hendeduras del soporte del
mango Vea la figura 3. Suelte la puerta de descarga
trasera,
Para q jitar el colector de césped, levante la puerta de
desear ja trasera del cortacésped. Levante el colec
tor de césped, sáquelos de las hendeduras del
soport í del mango. Suelte la puerta de descarga
trasera
ADVERTENCIA: NUNCA OPERE EL
CORTACESPED AL MENOS DE QUE LOS
A
PUER- A DE DESCARGA TRASERA ESTE FIRME
CONTHA LA PARTE SUPERIOR DEL COLECTOR
DE CE3PED.
GANCHOS EN EL COLECTOR DE CESPED
> ESTEN SITUADOS EN LAS HENDEDURAS
DEL SOPORTE DEL MANGO Y LA
OPERACION!
CONOZCA SU CORTACESPED
LEA ESTE MANUAL Y LAS NORMAS DE SEGURIDAD ANTES DE PONER SU MÁQUINA EN
FUNCIONAMIENTO. Compare las ilustraciones con su cortacésped para familiarizarse con la localización de
varios controles y ajustes. Guarde este manual para futuro uso.
Pala ica de Control
del i/lotor/Cuchilla
■ Sujeción para Cable
^Aisladores de Cable
Reajuste del
Cortacircuito
Deflector de Trituración
CUMPLE CON LOS REQUISITOS DE SEGURIDAD DE CUCHILLAS CPSC
Los Cortacésped Sears “Camina-Detras” cumplen con los requisitos de seguridad del American National
Standards Institute, Underwriters Laboratories, Inc. y la U.S. Consumer Product Safety Commision. La cuchilla
gira cuando el motor está encendido.
de Césped
Mango
Superior
Colector
Mango Inferior
-Perilla de Mano
Mango del
Colector de Césped
Puerta de
Descarga Trasera
Ajuste de
Ruedas
Plataforma
Page 27

ENSAMBLAJE
Mango Superior
Aisladores
del Mango
PARA SACAR LA MAQUINA DE LA CAJA
Quite el material añadido de empaque (si lo hay).
Saque el cortacésped del cartón o corte los cuatro
lados del cartón. Asegúrese de sacar todas las
piezas e información del cartón antes de botar la caja.
Clavija Soldada
en el Soporte
del Mango
FIGURAI.
Perilla de Mano
Mango
Inferior
COMO MONTAR SU CORTACÉSPED
• Quite cualquier pieza de cartón de empaque que
puede estar entre los mangos.
• Tire hacia arriba y atrás el mango inferior. Pivote
el mango superior hacia arriba para levantarlo a la
— posición de operación. Vea la figura 1.
• El mango superior se puede ajustar a tres difer
entes posiciones de altura. Para seleccionar la
altura deseada, alinee una de las tres marcas en la
parte de arriba de los aisladores del mango inferior
con la marca en los aisladores del mango superior.
Apriete los botones de mano.
• Quite las prensas del agujero exterior en los
pasadores soldados en los soportes del mango.
Coloque la prensa en el agujero interno.
NOTA: El agujero exterior en el pasador soldado es
para el almacenaje. La prensa debe colocarse en el
agujero interno para la operación.
IMPORTANTE: SU CORTACESPED SE ENVIA
CON EL DEFLECTOR DE TRITURACION EN SU
LUGAR. EL DEFLECTOR PERMITE QUE LA
CUCHILLA CORTE Y RECORTE LOS TROZOS DE
CESPED A PARTICULAS PEQUEÑAS ,
DEVOLVIENDOLAS AL CESPED COMO NUTRI
ENTES PARA LA TIERRA.
SI USTED DESEA RECOGER EL CESPED EN VES
DE TRITURARLO Y DEVOLVERLO A LA TIERRA,
SIMPLEMENTE LEVANTE LA PUERTA DE
DESCARGA TRASERA Y QUITE EL DEFLECTOR
DE TRITURACION POR LA PARTE TRASERA DE
LA PLATAFORMA JALANDOLO HACIA AFUERA.
LUEGO ENSAMBLE Y COLOQUE EL COLECTOR
DE CESPED DE LA SIGUIENTE MANERA.
Conjunto
del Bastidor
Frontal
B
Bolsa
FIGURA 2.
Gancho
por la
Abertura
Canales
Plásticos
ENSAMBLAJE DEL COLECTOR DE CESPED
NOTA: Asegúrese de que la bolsa para césped este
con el lado derecho hacia afuera antes del ensambla
je (la etiqueta de advertencia estará en el lado de
afuera).
• Una el bastidor trasero con el frontal tal como se
— demuestra en la figura 2A. Una ambos bastidores
completamente.
• Coloque la bolsa sobre el bastidor (el lado negro
plástico en el fondo de la bolsa) de manera que el
mango esté afuera de la bolsa. Deslice las aber
turas en el lado del canal plástico en la bolsa sobre
los ganchos en el bastidor del colector de césped.
NOTA: Puede ser necesario tener que jalar el borde
de la tela lejos del canal de plástico para poder ver la
abertura.
• Fije la bolsa al bastidor colocando los canales de
plástico de la bolsa sobre el bastidor tal como se
demuestra en la figura 2B. Todos los canales plás
ticos excepto la parte superior central se unen por
el lado de afuera de la bolsa. La parte superior
central se une por dentro de la bolsa.
Page 28

TABLA DE MATERIAS
REGLAS DE SEGURIDAD....................................2, 3
ESPECIFICACIONES DEL PRODUCTO
ACUERDO DE MANTENIMIENTO
RESPONSABILIDADES DEL PROPIETARIO ...4, 10-12
GARANTIA
ACCESORIOS...........................................................5
ENSAMBLAJE
................................................................
.......................................................
.................
...........................
6, 7
4
4
4
OPERACION........................................................7-10
RESPONSABILIDADES DEL PROPIETARIO ....10-12
MANTENIMIENTO Y AJUSTES
almace;namiento
LOCALi; :ACI0N de fallas
PIEZAS DE repuesto.............................................13
MEDIDC R DE PENDIENTES.................................14
....................................................
.............................
.....................................
12
12
13
ACCESORIOS DEL CORTACESPED
Estos accesorios eran disponibles en el momento de compra del i ¡ortacésped. También son disponibles en la
mayoría de los centros, catálogos y centros de servicio Sears. La nayoría de las tiendas Sears pueden hacerle
el pedido, cuando usted proporciona el número del modelo de su co tacésped.
FUNCIONAMIENTO DEL CORTACESPED
Cable de Extensión Bolsa para Césped
(Pieza No. 764-0447)
MANTENIMIENTO DEL CORTACESPED
Cuchilla
(Pieza No. 742-0719)
Adaptador
de Cuchilla
w
Ruedas
Page 29

FELICITACIONES por su compra de una Cortacésped
Craftsman Sears. Ha sido diseñada, concebida y fabricada
para proporcionarle la confiabilidad y el funcionamiento
mejor posible.
Por favor consulte con su Centro/Departamento de Servicio
Sears más cercano si experimenta algún problema que no
puede solucionar fácilmente. Tenemos técnicos
competentes y bien entrenados, y las herramientas
apropiadas para servir o reparar esta unidad.
Por favor lea y guarde este manual. Las instrucciones le
permitirán armar y mantener apropiadamente su cor
tacésped. Observe siempre las “REGLAS DE SEGURI
DAD”.
NUMERO DE
MODELO 247.370252
NUMERO DE
SERIE
_____
FECHA DE
COMPRA _
SE ENCONTRARAN EL MODELO Y EL NUMERO DE
SERIE EN EL ROTULO PEGADO AL CUERPO DE LA
CORTACÉSPED.
USTED DEBERIA REGISTRAR AMBOS: EL NUMERO
DE SERIE Y LA FECHA DE COMPRA Y GUARDARLO
EN UN LUGAR SEGURO PARA REFERENCIA FUTURA.
ESPECIFICACIONES DEL PRODUCTO
Voltaje
Amperaje
Hz:
Momento torsional
del Perno de la Cuchilla
110-120 AC
12
60
450-600
pulgadas libras
ACUERDO DE MANTENIMIENTO
Está disponible para este producto un Acuerdo de
Mantenimiento de Sears. Por detalles consulte a su
tienda Sears más cercana.
RESPONSABILIDADES DEL PROPIETARIO
• Leer y observar las reglas de seguridad.
• Observar un programa regular para mantener,
cuidar, y usar su cortacésped.
• Observar las instrucciones bajo “Responsa
bilidades del Proprietario” y “Almacenamiento” de
este Manual del Operador.
GARANTIA
GARANTIA COMPLETA DE UN ANO PARA LA CORTACESPED A GASOLINA CRAFTSMAN
Por un año desde la fecha de compra cuando esta Cortacésped Craftsman sea mantenida, lubricada y puesta
a punto de acuerdo con las instrucciones de operación y mantenimiento en el manual del operario, Sears
reparará libre de costo cualquier defecto de material o de mano de obra.
Esta garantía excluye las cuchillas y adaptadores de las cuchillas que son partes descartadles y se gastan
durante el uso normal.
Esta garantía se aplica por 30 días solamente desde la fecha de compra, si esta cortacésped se usa para fines
comerciales o de alquiler.
ESTA DISPONIBLE EL SERVICIO DE GARANTIA CONSULTANDO CON EL CENTRO DE SERVICIO SEARS
MAS CERCANO EN LOS ESTADOS UNIDOS. ESTA GARANTIA SE APLICA SOLAMENTE MIENTRAS ESTE
PRODUCTO ESTE EN USO EN LOS ESTADOS UNIDOS.
Esta garantía le otorga derechos legales específicos y usted puede también tener otros derechos que varían
de Estado a Estado.
SEARS, ROEBUCK AND CO. DEPT. 817WA, HOFFMAN STATES, IL 60179
Page 30

NORMAS DE SEGURIDAD (Continuación)
OPERACION
k» No maltrate el cable - nunca tire el cortacésped del cable ni lo jale
para desconectarlo del receptáculo. Mantenga el cable lejos del
No ope e este cortacésped con la puerta del canal abierta, al
menos lue todo el colector de césped o el deflector lateral este
montad ) adecuadamente en el cortacésped.
calor, aceite y bordes filosos.
• Si el cable se daña de algún modo mientras está conectado,
desconecte el cable de extensión del receptáculo de la casa.
• Mantenga las manos y los pies alejados de las piezas en
movimiento. Manténgase siempre alejado de la abertura de
descarga ya que la cuchilla giratoria puede causar daño.
• Pare el motor si va a dejar la máquina sola y antes de cruzar
caminos de grava, aceras o carreteras.
• Después de golpear algún objeto, apague el motor y asegúrese
de que todas las piezas en movimiento se hayan detenido com
pletamente. Desconecte el cable eléctrico para evitar el arranque
accidental y luego inspeccione bien a ver si la máquina ha sufrido
daño. Tal daño debe repararse anfes de volver a encender y usar
el cortacésped.
• Si la unidad empieza a vibrar fuera de lo normal, detenga el
motor y revise inmediatamente a ver cual es la causa.
Generalmente, la vibración indica que hay algún problema.
• Pare el motor, desconecte el cable eléctrico y espere hasta que la
cuchilla cese su movimiento antes de limpiar, desatascar, reparar
o inspeccionar el cortacésped. La cuchilla continua girando por
unos segundos después de apagar el motor.
• No esfuerce el cortacésped. Funcionará mejor y más seguro al
paso al cual fue diseñado. Use el aparato adecuado - No use el
cortacésped para ninguna otra labor excepto para la cual ha sido
creado.
MANTENIVIIENTO Y ALMACENAJE
Adverte icia - Desconecte el cable eléctrico del toma de corriente
antes di dar mantenimiento al cortacésped.
• Revise a cuchilla y los pernos de montaje con frecuencia para
asegure r que estén apretados. Mantenga todas las tuercas, per
nos y t ¡millos apretados para asegurar que el equipo este en
buena c ¡ndición de funcionamiento.
• Manten la la cuchilla afilada.
• Use las cuchillas de repuesto idénticas solamente. Reemplace el
cable d; ñado.
• Para ev tar el peligro de incendio, mantenga el motor limpio, sin
césped, hojas o grasa excesiva.
• Almace le el cortacésped en marcha en vacío bajo techo cuando
no este en uso. Permita que el motor enfríe antes de almace
narlo. ! :l cortacésped se debe almacenar en un lugar bajo techo
seco, al o o cerrado, lejos del alcance de los niños.
• Manten la el cortacésped con cuidado. Mantenga la cuchilla con
filo y lii ipia para obtener mejores resultados. Siga las instruc
ciones obre lubricación y cambio de accesorios.
• Revise 11 bolsa para césped a menudo para ver si se está deterio
rando o desgastando. Reemplace la bolsa si está en mala condi
ción inr lediatamente. Asegúrese de que la bolsa cumpla con las
especifi ¡aciones originales del equipo.
• CORTAI lESPED AISLADO DOBLE
• Corte a través de la superficie de las pendientes; nunca de arriba
a abajo. Nunca corte el césped tirando la máquina hacia usted.
Tenga mucho cuidado al usar la máquina en terreno desnivelado
o al cambiar dirección en pendientes. No corte el césped en pen
dientes demasiado empinadas. No trate de alcanzar demasiado
lejos - mantenga buena posición y equilibrio en todo momento.
Un resbalón o caída puede causar serias lesiones.
• Nunca opere el cortacésped sin los resguardos, placas u otros
dispositivos de seguridad adecuados en su lugar y en buena
condición de operación.
DOBLE AISLAMIENTO ES UN CONCEPTO DE SEGURIDAD EN LOS
CORTACESPED ELECTRICOS, EL CUAL ELIMINA LA NECESIDAD
DEL CABI E ELECTRICO A TIERRA TRADICIONAL DE TRES ALAM
BRES Y ;L SISTEMA DE ABASTECIMIENTO A TIERRA. EN
CUALQUILR PARTE DEL CORTACESPED DONDE HAY CORRIENTE,
HAY DOS CONJUNTOS COMPLETOS DE AISLAMIENTO PARA
PROTEG ;R al USUARIO. TODAS LAS PARTES DE METAL
EXPUEST tS SON AISLADAS DE LOS COMPONENTES DE METAL
interno: ; DEL MOTOR CON AISLAMIENTO PROTECTOR.
• El control del motor/cuchilla en este cortacésped se instala para
minimizar el riesgo de contacto con la cuchilla tal como es
requerido por las reglas federales. No trate de alterar bajo ningu
na circunstancia la función del control del motor/cuchilla
• Para evitar el peligro de choque eléctrico, nunca pase el cor
tacésped sobre el cable. No corte el césped en círculos Siempre
corte de un lado para otro, empezando del punto más cercano al
toma de corriente al cual está conectado el cable. Esto manten
IMPORT/NTE - MANTENIMIENTO DE UN CORTACESPED CON
DOBLE AISLAMIENTO REQUIERE DEMASIADO CUIDADO Y
CONOCIIV lENTO DEL SISTEMA Y DEBE EFECTUARSE SOLAMENTE
POR UN 1ECNICO C.ALIFICADO. PARA MANTENIMIENTO SUGERI
MOS QUE LLEVE LA MAQUINA A SU CENTRO DE SERVICIO MAS
CERCANO PARA EFECTUAR REPARACIONES. USE SIEMPRE
REPUEST )S ORIGINALES DE LA FABRICA.
drá el cable en el área ya cortada y fuera de alcance.
• No use el cortacésped si se ha caído o dañado de alguna manera.
Lleve la máquina al centro de servicio autorizado más cercano.
• El uso de accesorios no recomendados por el fabricante del cor
tacésped puede ser peligroso.
G JARDE ESTAS INSTRUCCIONES
Page 31

ADVERTENCIA:
El Escape del Motor de este producto contiene químicos que de acuerdo al Estado de
California causan cáncer, defectos de nacimiento u otros problemas de reproducción.
IMPORTANTE
ESTE SIMBOLO INDICA INSTRUCCIONES IMPORTANTES PARA SU SEGURIDAD. ESTAS INSTRUCCIONES SE DEBEN SEGUIR
RIGUROSAMENTE PARA EVITAR PELIGROS PARA EL OPERADOR Y PARA OTROS. LEA Y SIGA TODAS LAS INSTRUCCIONES QUE
A
SE ENCUENTRAN EN ESTE MANUAL ANTES DE INTENTAR OPERAR SU CORTACESPED. CUANDO VEA ESTE SIMBOLO—A PRESTE
ATENCION A SU ADVERTENCIA. “
Su cortacésped eléctrico fue diseñado para ser operado según las normas de seguridad que se
PELIGRO' encuentran en este manual. Al igual que con cualquier otro equipo eléctrico, error o falta de cuidado por
A
ADVERTENCIA: Cuando se usan cortacésped eléctricos, siempre
se deben seguir las precauciones básicas de seguridad para
reducir los riesgos de incendio, choque eléctrico y lesiones ,
incluyendo lo siguiente:
ORIENTACIDN
Lea este manual cuidadosamente y por completo antes de tratar
de ensamblar esta máquina. Familiarícese con los controles y el
uso adecuado de esta máquina antes de ponerla en fun
cionamiento. Mantenga este manual en un lugar seguro para
poder consultarlo con frecuencia y para hacer los pedidos de
repuestos.
Su cortacésped con motor rotativo es una máquina de precisión,
no un juguete. Por lo tanto, es necesario manejarlo con mucha
precaución en todo momento.
Use el aparato adecuado - No use el cortacésped para ninguna
otra labor excepto para la cual ha sido creado.
No permita que ningún niño opere una máquina de este tipo.
Solamente personas que están familiarizadas con estas normas
de seguridad deben utilizarla.
Ninguna persona debe utilizar el cortacésped si esta bajo la influ
encia de alcohol o drogas o si esta tomando algún medicamento
que puede impedir los sentidos o reacciones.
Manténgase Alerta - Ponga atención a lo que está haciendo.
Tenga sentido común. No use el cortacésped si está cansado.
Mantenga el área de trabajo libre de objetos, personas y animales
domésticos. Pare el motor si están cerca de su cortacésped. A
pesar de que el área de operación debe estar limpia de objetos,
existe la posibilidad de que cualquier cosa pasada por alto sea
arrojada y cause lesiones al operador u otras personas en la cer
canía.
PREPARACION
Inspeccione cuidadosamente el área en el cual va a trabajar, qui
tando ramitas, alambres, huesos, juguetes u otros objetos que
puedan ser arrojados por la máquina y cause lesiones serias al
operador o a otras personas.
Use siempre anteojos protectores mientras opere, repare o ajuste
la máquina para proteger los ojos contra la materia que puede
arrojar el cortacésped. Siempre use una mascarilla guardapolvo
si la operación es polvorosa.
Vista de manera apropiada. Use zapatos de suela gruesa. No
opere la unidad descalzo, con sandalias o tenis. No use ropa
suelta ni alhajas de ningún tipo, ya que se pueden atorar en la
máquina. Se recomienda usa guantes y zapatos de goma al tra
bajar afuera.
Nunca trate de efectuar ajustes de la altura de corte o las ruedas
cuando el motor este encendido.
Corte el césped solamente a la luz del día o bajo buena luz artifi
cial.
Evite Peligros Ambientales - Nunca opere el equipo bajo la lluvia
o en sitios húmedos. Vea como tiene colocados los pies. Un
resbalón o caída pueda causar serias lesiones. Agárrese bien del
mango y camine sin correr. No trate de alcanzar demasiado lejos
- manténgase en buena posición y equilibrio todo el tiempo.
rcLiunu. |jg| operador puede resultar en serias lesiones. Si usted infringe cualquiera de estas normas,
puede causar serias lesiones a usted o a otras personas.
NORMAS DE SEGURIDAD
A
Advertencia - Para prevenir el choque eléctrico use solamente
con un cable de extensión UL adecuado para el uso al aire libre
tal como Tipo SVI/-A, SOW-A, STW-A, STOW-A, SJW-A, SJOW-A
o SJTOW-A.
Cable de extensión - asegúrese de que este en buena condición,
que sea extra fuerte para aguantar la corriente que su cor
tacésped usará y que sea polarizado (una cuchilla del enchufe es
más ancha que la otra). Se debe usar un cable de 100' de longi
tud de 14 AWG. Este se puede sustituir por cable de 50’ de lon
gitud de 16 AWG. Para aplicaciones en las que se necesita cable
más largo, se puede usar un cable de 150’ de longitud de 12
AWG. Un cable más pequeño causaría una baja en el voltaje
resultando en la pérdida de energía o en recalentamiento. Para
reducir la posibilidad de desconectar el cable del cortacésped,
asegúrese de usar la sujeción del cable suministrado o haga un
nudo tal como se demuestra en la ilustración de la siguiente
columna.
Cable de Extensión Cable del Artefacto
{'Conecte el Enchutey
y Receptáculo
Para reducir el peligro de choque eléctrico, su cortacésped está
equipado con un enchufe polarizado (una cuchilla es más grande
que la otra). Si el toma de corriente al final de su cable de exten
sión no cabe completamente en el enchufe de su máquina, dele
vuelta al toma de corriente y trate de conectarlo otra vez. Lo
mismo se debe hacer con el otro extremo del cable de extensión
con el toma de corriente de su casa. Si después de darles vuelta
aun no cabe, llame a un electricista calificado para que instale el
toma y/o enchufe adecuado. No cambie el enchufe del cor
tacésped para nada.
Inspeccione el cable de extensión a menudo y reemplácelo si está
dañado. Mantenga los cogederos secos, limpios y sin aceite o
grasa.
Fusibles - El cortacésped se debe operar en un circuito de 15 o
20 AMP. Si nota dificultad al arrancar con un fusible o cortacir
cuitos estándar de 15 AMP, llame a su centro de servicio autor
izado. No use un fusible de mayor potencia sin antes consultar
con la compañía eléctrica.
Se debe suministrar un Interruptor Accionado por Corriente de
Pérdida a Tierra (GFI) en los circuitos y toma de corrientes que
se van a usar para el cortacésped. Hay receptáculos disponibles
con GFI y se pueden usar para esta medida de seguridad.
Para su seguridad, use el clisímetro incluido con este manual
para medir las pendientes antes de poner en operación esta
unidad en un terreno pendiente o montañoso. Si el terreno pen
diente es mayor a los 15 grados, tal como se demuestra en el
clisímetro, no use esta unidad en esa área ya que puede resultar
en serlas lesiones.
Page 32

MANUAL DEL
PROPIETARIO
NUMERO DE
MODELO
247.370252
CRAFTSMAN
110V12AMP ELECTRICO
DOBLE AISLADO
Precaución;
Lea y observe
todas las reglas
y instrucciones
de seguridad antes
de operar este
equipo
SEARS, ROEBUCK AND CO., Hoffman listates, IL 60179 U.S.A.
19" DESCARGA TRASERA
CORTACESPED - TRITURADOR
Ensamblaje
Operación
Responsabilidades del Propietario
Mantenimiento y Ajustes
Piezas de Reparación
770-0253L
 Loading...