

Page 1
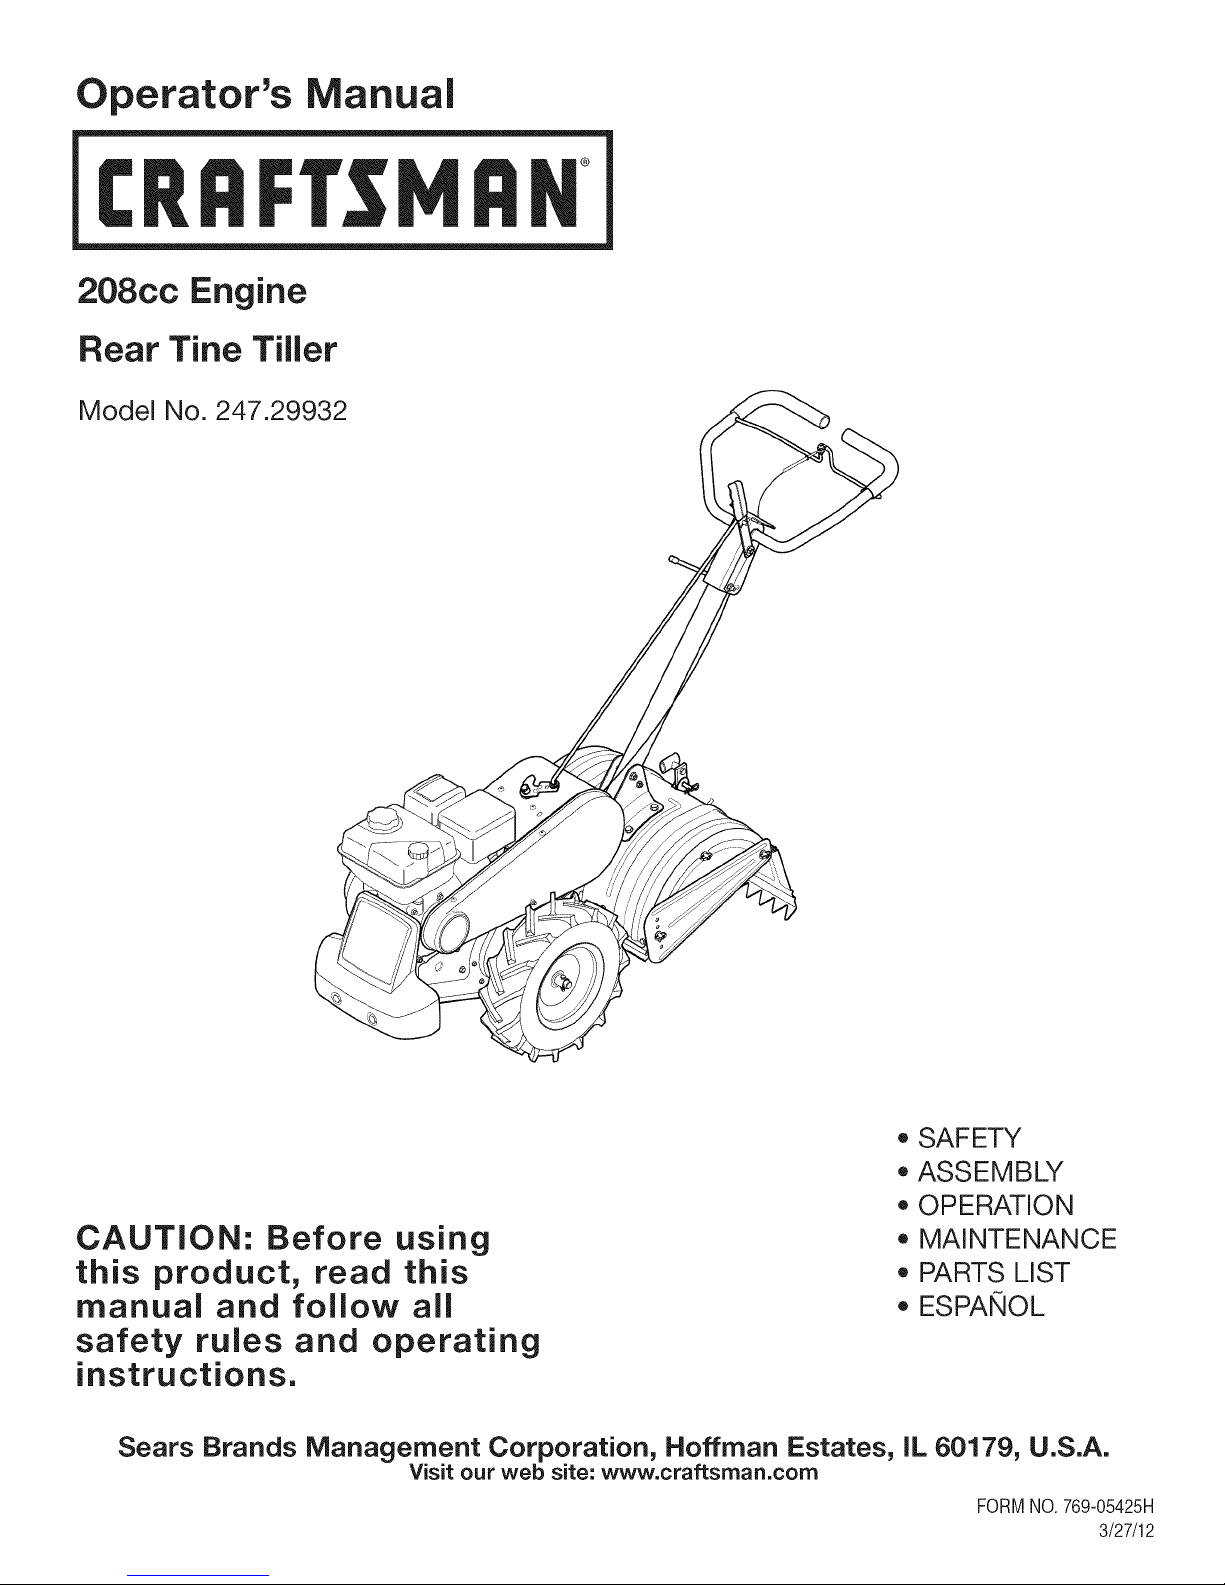
Operator's Manual
CRRFI'SMRN
208cc Engine
Rear Tine Tiller
Model No. 247.29932
CAUTION: Before using
this product, read this
manual and follow all
safety rules and operating
instructions.
Sears Brands Management Corporation, Hoffman Estates, IL 60179, U.S.A.
Visit our web site: www.craftsman.com
o SAFETY
ASSEMBLY
OPERATION
MAINTENANCE
PARTS LIST
o ESPANOL
FORMNO.769-05425H
3/27/12
Page 2
WarrantyStatement..................................Pac
Safetyinstructions....................................Pac
Assembly..................................................Pac
Operation..................................................Pac
ServiceandMaintenance.........................Pac
Off-SeasonStorage..................................Pac
Troubleshooting........................................Pac
CRAFTSMAN TWO YEAR FULL WARRANTY
FORTWOYEARSfromthe dateof purchase,this productis warrantedagainstanydefectsin materialorworkmanship,A defectiveproductwill
receivefreerepairorreplacementif repairis unavailable,
Forwarranty coverage details to obtain free repairor replacement,visit the web site: www.craftsman.com
This warranty covers ONLYdefects in material andworkmanship. Warrantycoverage does NOTinclude:
• Expendableitemsthatcan wearoutfromnormalusewithinthewarrantyperiod,suchas theblades,tines,orbelts.
• Productdamageresultingfromuserattemptsat productmodificationor repairorcausedby productaccessories.
• Repairsnecessarybecauseof accidentorfailuretooperateor maintaintheproductaccordingtoall suppliedinstructions.
• Preventivemaintenance,or repairsnecessarydueto improperfuelmixture,contaminatedor stalefuel.
e2
es3-6
es7-10
es11-16
es17-22
e23
e24
PartsList...................................................Page26-39
Labels.......................................................Page40
RepairProtectionAgreement...................Page43
Espa_ol.....................................................Page44
ServiceNumbers......................................BackCover
Thiswarrantyisvoidif thisproductiseverusedwhile providingcommercialservicesorif rentedtoanotherperson.
Thiswarrantygivesyouspecificlegalrights,andyou mayalsohaveotherrightswhichvaryfromstatetostate.
Sears Brands Management Corporation, Hoffman Estates, IL 60179
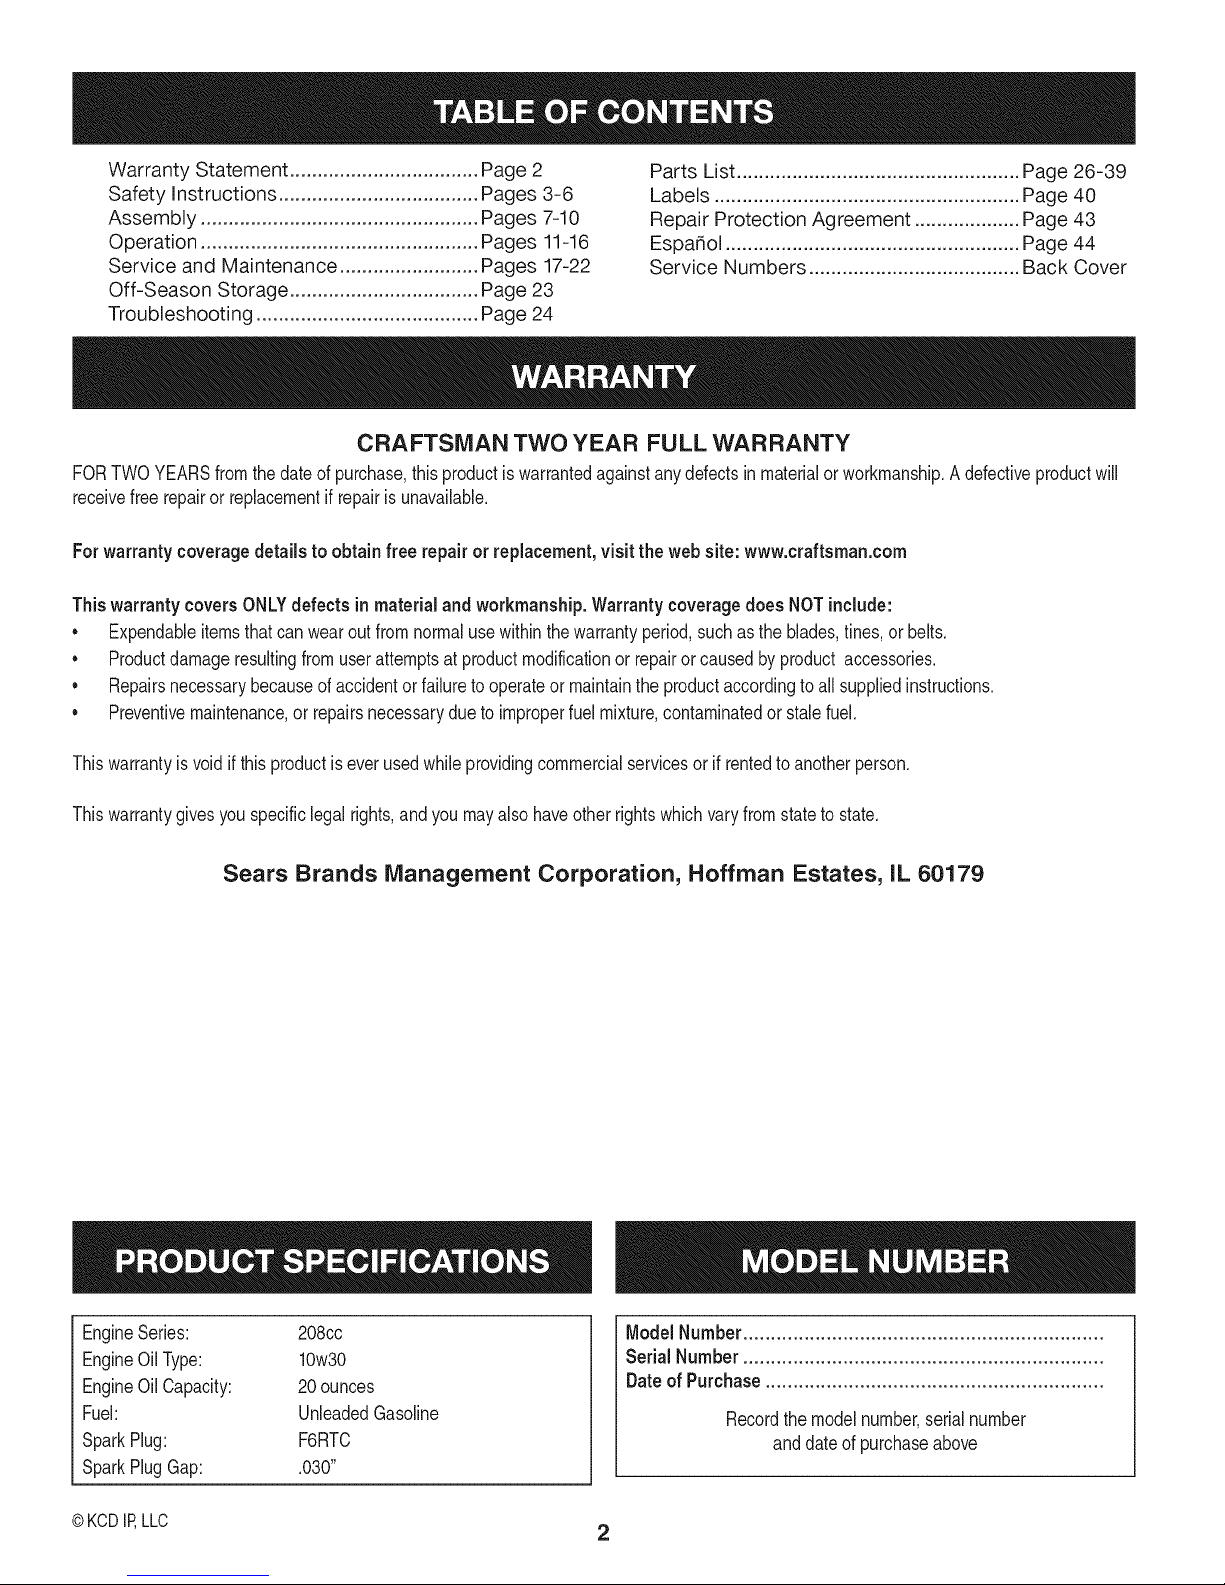
EngineSeries: 208cc
EngineOilType: 10w30
EngineOilCapacity: 20ounces
Fuel: UnleadedGasoline
SparkPlug: F6RTC
SparkPlugGap: .030"
ModelNumber.................................................................
Serial Number .................................................................
Dateof Purchase.............................................................
Recordthemodelnumber,serialnumber
anddateof purchaseabove
©KCDIP,LLC 2
Page 3
Thissymbolpointsout importantsafetyinstructionswhich,if not
followed,couldendangerthepersonalsafetyand/orpropertyof
yourselfandothers. Readandfollowall instructionsin thismanual
beforeattemptingtooperatethismachine.Failuretocomplywith
theseinstructionsmayresultin personalinjury.Whenyou seethis
symbol,HEEDITSWARNING!
Thismachinewasbuiltto beoperatedaccordingto thesafeopera-
tionpracticesinthismanual.Aswithanytypeof powerequipment,
carelessnessorerroronthe partof theoperatorcan resultin
seriousinjury.Thismachineiscapableofamputatingfingers,hands,
toesandfeetandthrowingdebris.Failureto observethefollowing
safetyinstructionscouldresultin seriousinjuryor death.
CALIFORNIA PROPOSITION 65
EngineExhaust,someof itsconstituents,andcertainvehicle
componentscontainoremitchemicalsknowntoStateof California
tocausecancerandbirthdefectsorotherreproductiveharm.Bat-
tery posts,terminals,andrelatedaccessoriescontainleadand lead
compounds,chemicalsknowntothe Stateof Californiatocause
cancerandreproductiveharm.Washhandsafterhandling.
TRAINING
• Read,understand,andfollowall instructionson the machineand
in themanual(s)beforeattemptingtoassembleandoperate.
Keepthis manualina safeplaceforfutureand regularreference
andfororderingreplacementparts.
• ReadtheOperator'sManualandfollowallwarningsandsafety
instructions.Failuretodosocan resultin seriousinjuryto the
operatorand/or bystanders.Forquestions,call1-800-4MY-HOME.
• Befamiliarwithall controlsandtheirproperoperation.Knowhow
tostopthe machineanddisengagethemquickly.
• Neverallowchildrenunder14yearsof agetooperatethis
machine.Children14andovershouldreadandunderstandthe
instructionsandsafeoperationpracticesin thismanualandon
themachineandbe trainedandsupervisedbyanadult.
• Neverallowadultstooperatethis machinewithoutproper
instruction.
• Keepbystanders,pets,andchildrenatleast75feetfromthe
machinewhileit isin operation.Stopmachineifanyoneenters
thearea.
• Neverrunanengineindoorsor ina poorlyventilatedarea.Engine
exhaustcontainscarbonmonoxide,anodorlessanddeadlygas.
Your Responsibility--Restrictthe useof thispowermachineto
personswhoread,understandandfollowthewarningsandinstruc-
tionsin thismanualandon the machine.
SAVETHESEINSTRUCTIONS!
PREPARATION
• Thoroughlyinspecttheareawheretheequipmentistobeused.
Removeall rocks,bottles,cans,or otherforeignobjectswhich
couldbepickedupor thrownandcausepersonalinjuryor
damageto themachine.
• Alwayswearsafetyglassesor safetygogglesduringoperation
andwhileperformingan adjustmentorrepair,to protectyour
eyes.Thrownobjectswhichricochetcancauseseriousinjuryto
theeyes.
• Wearsturdy,rough-soledworkshoesandclose-fittingslacksand
shirts.Loosefittingclothesorjewelrycan becaughtin movable
parts.Neveroperatethismachineinbarefeetorsandals.
• Beforestarting,checkallboltsandscrewsfor propertightnessto
besurethe machineisinsafeworkingcondition.Also,visually
inspectmachinefor anydamageatfrequentintervals.
• Disengageclutchleversandshift(if provided)into neutral("N")
beforestartingtheengine.
• Neverleavethismachineunattendedwiththeenginerunning.
• Neverattempttomakeanyadjustmentswhilethe engineis
running,exceptwherespecificallyrecommendedinthe operator's
manual.
• Maintainorreplacesafetyandinstructionslabels,asnecessary.
3
Page 4
SafeHandling of Gasoline:
Toavoidpersonalinjuryor propertydamageuseextremecarein
handlinggasoline.Gasolineisextremelyflammableandthe vaporsare
explosive.Seriouspersonalinjurycan occurwhengasolineisspilled
onyourselforyourclotheswhichcan ignite.Washyourskinand
changeclothesimmediately.
• Useonlyan approvedgasolinecontainer.
• Neverfill containersinsidea vehicleor ona truckor trailerbed
witha plasticliner.Alwaysplacecontainersonthe groundaway
fromyourvehiclebeforefilling.
• Whenpractical,removegas-poweredequipmentfromthetruck
ortrailerand refuelitonthe ground.Ifthisis notpossible,then
refuelsuchequipmentona trailerwitha portablecontainer,rather
thanfroma gasolinedispensernozzle.
• Keepthe nozzleincontactwiththerimofthe fueltankor
containeropeningatalltimes untilfuelingiscomplete.Donotuse
a nozzlelock-opendevice.
• Extinguishallcigarettes,cigars,pipesandother sourcesof
ignition.
• Neverfuel machineindoors.
• Neverremovegascapor addfuel whilethe engineishot or run-
ning.Allowenginetocool atleasttwo minutesbeforerefueling.
• Neveroverfillfueltank.Fill tankto nomorethan1/2inchbelow
bottomoffillerneckto allowspacefor fuelexpansion.
• Replacegasolinecapandtightensecurely.
• Ifgasolineisspilled,wipe itoff theengineandequipment.Move
unitto anotherarea.Wait5 minutesbeforestartingtheengine.
• To reducefirehazards,keepmachinefreeof grass,leaves,or
otherdebrisbuild-up.Cleanupoil orfuelspillageand removeany
fuelsoakeddebris.
• Neverstorethe machineorfuelcontainerinsidewherethereis an
openflame,sparkor pilotlightas on awaterheater,spaceheater,
furnace,clothesdryerorothergasappliances.
OPERATION
• Do notputhandsorfeetnear rotatingparts.Contactwiththe
rotatingpartscanamputatehandsandfeet.
• Do notoperatemachinewhileunderthe influenceof alcoholor
drugs.
• Neveroperatethismachinewithoutgoodvisibilityor light.Always
be sureof yourfootingandkeepa firmholdonthehandles.
• Keepbystandersawayfromthe machinewhileit isinoperation.
Stopthe machineif anyoneentersthearea.
• Becarefulwhentillinginhardground.Thetines maycatchinthe
groundandpropelthetillerforward.Ifthis occurs,let goofthe
handlebarsanddo not restrainthemachine.
• Exerciseextremecautionwhenoperatingonor crossinggravel
surfaces.Stayalertforhiddenhazardsortraffic. Donotcarry
passengers.
• Neveroperatethemachineat hightransportspeedsonhardor
slipperysurfaces.
• Exercisecautiontoavoidslippingorfalling.
• Lookdownand behindandusecarewhenin reverseor pulling
machinetowardsyou.
• Startthe engineaccordingtothe instructionsfoundinthis manual
and keepfeetwell awayfromthetinesat all times.
• Afterstrikingaforeignobjector ifyourmachineshouldstartmak-
inganunusualnoiseor vibration,immediatelyshutthe engineoff.
Disconnectthe sparkplugwire,grounditagainstthe engineand
performthefollowingsteps:
a. Inspectfordamage.
b. Repairorreplaceanydamagedparts.
c. Checkforanyloosepartsandtightento assurecontinued
safeoperation.
• Disengageall clutchlevers(iffitted)and stopenginebeforeyou
leavethe operatingposition(behindthe handles).Waituntil
thetinescometo a completestopbeforeuncloggingthe tines,
makinganyadjustments,or inspections.
• Neverrunanengineindoorsorina poorlyventilatedarea.Engine
exhaustcontainscarbonmonoxide,an odorlessanddeadlygas.
• Mufflerandenginebecomehotandcancausea burn.Do not
touch.
• Usecautionwhentillingnearfences,buildingsandunderground
utilities.Rotatingtinescan causepropertydamageorpersonal
injury.
• Donotoverloadmachinecapacitybyattemptingtotillsoil too
deepattoo fastof a rate.
• Ifthe machineshouldstartmakinganunusualnoiseor vibration,
stoptheengine,disconnectthesparkplugwire andgroundit
againsttheengine.Inspectthoroughlyfordamage.Repairany
damagebeforestartingandoperating.
• Keepallshields,guards,and safetydevicesinplaceandoperat-
ing properly.
• Neverpickuporcarrymachinewhiletheengineis running.
• Useonly attachmentsandaccessoriesapprovedbythe manu-
factureras listedin thePartsListpagesofthisoperator'smanual.
Failuretodosocan resultin personalinjury.
• Ifsituationsoccurwhichare notcoveredinthis manual,usecare
andgoodjudgement.ContactCustomerSupportat 1-800-4MY-
HOMEforassistanceandthenameof thenearestservicedealer
MAINTENANCE & STORAGE
• Keepthemachine,attachmentsandaccessoriesin safeworking
order.
• Allowthemachinetocoolat leastfiveminutesbeforestoring.
Nevertamperwithsafetydevices.Checktheirproperoperation
regularly.
• Checkboltsandscrewsforpropertightnessat frequentintervals
to keepthemachineinsafeworkingcondition.Also,visually
inspectmachineforanydamage.
• Beforecleaning,repairing,or inspecting,stopthe engineand
makecertainthetinesandall movingpartshavestopped.
Disconnectthe sparkplugwireandgrounditagainsttheengineto
preventunintendedstarting.
4
Page 5
• Do notchangetheenginegovernorsettingsor over-speedthe
engine.Thegovernorcontrolsthemaximumsafeoperatingspeed
ofengine.
Maintainor replacesafetyandinstructionlabels,as necessary.
Followthis manualfor safeloading,unloading,transporting,and
storageof thismachine.
Alwaysreferto theoperator'smanualforimportantdetailsifthe
machineisto bestoredforan extendedperiod.
If thefuel tankhasto be drained,do thisoutdoors.
Observeproperdisposallawsandregulationsforgas,oil, etc.to
protecttheenvironment.
Accordingtothe ConsumerProductsSafetyCommission(CPSC)
andtheU.S.EnvironmentalProtectionAgency(EPA),thisproduct
hasan AverageUsefulLifeof seven(7)years,or 130hoursof
operation.Atthe endof theAverageUsefulLifehavethemachine
inspectedannuallybyanauthorizedservicedealertoensurethat
allmechanicalandsafetysystemsareworkingproperlyandnot
wornexcessively.Failureto do socan resultinaccidents,injuries
ordeath.
DO NOT MODIFY ENGINE
Toavoidseriousinjuryordeath,donot modifyenginein anyway.
Tamperingwiththegovernorsettingcan leadto a runawayengineand
causeitto operateat unsafespeeds.Nevertamperwithfactorysetting
ofenginegovernor.
NOTICE REGARDING EMISSIONS
EngineswhicharecertifiedtocomplywithCaliforniaandfederal
EPAemissionregulationsfor SORE(SmallOff RoadEquipment)are
certifiedto operateonregularunleadedgasoline,and mayinclude
thefollowingemissioncontrolsystems:EngineModification(EM),
OxidizingCatalyst(CO),SecondaryAirInjection(SAI)and ThreeWay
Catalyst(TWO)if soequipped.
SPARK ARRESTOR
Thismachineis equippedwithan internalcombustionengineand
shouldnotbe usedonor nearanyunimprovedforest-covered,
brushcoveredor grass-coveredlandunlesstheengine'sexhaust
systemisequippedwitha sparkarrestormeetingapplicablelocalor
statelaws(if any)
Ifa sparkarrestorisused,it shouldbe maintainedin effectiveworking
orderbytheoperator.Inthe StateofCaliforniatheaboveis required
bylaw (Section4442ofthe CaliforniaPublicResourcesCode).Other
statesmayhavesimilarlaws. Federallawsapplyonfederallands.
A sparkarrestorforthe muffleris availablethroughyournearestSears
PartsandRepairServiceCenter.
Page 6
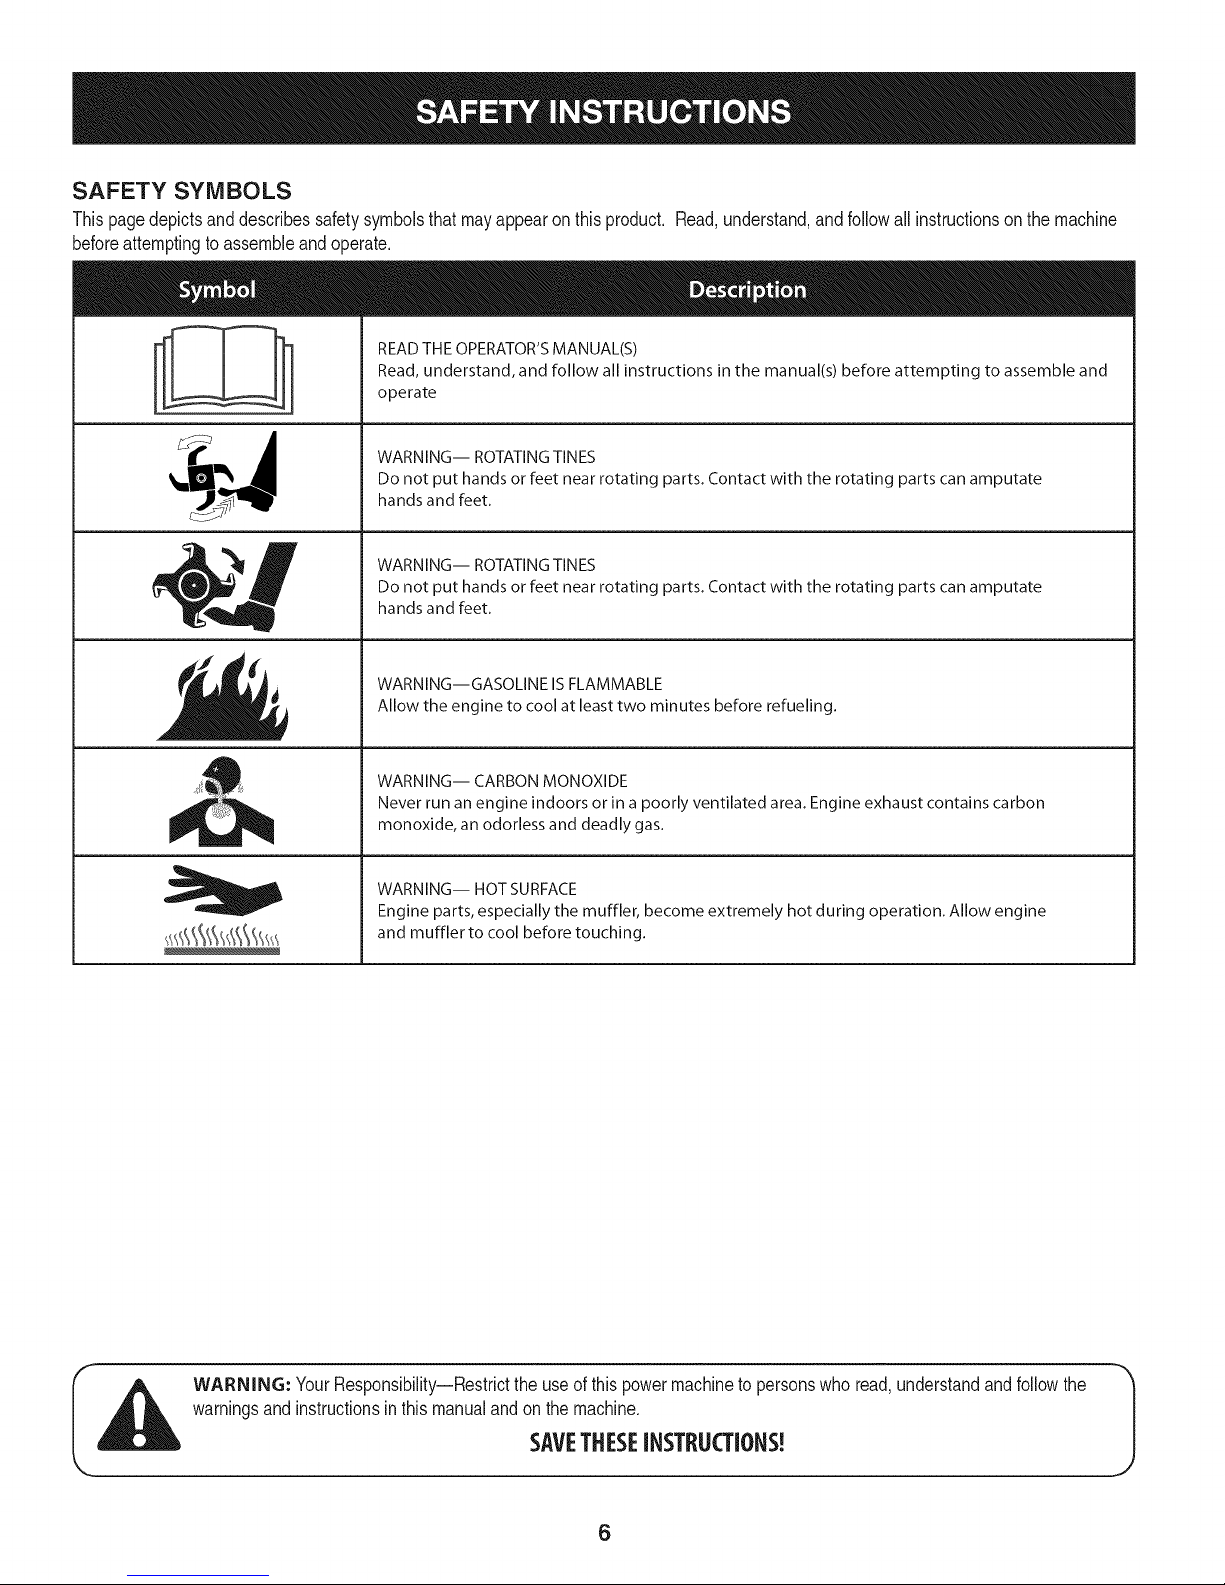
SAFETY SYMBOLS
Thispagedepictsanddescribessafetysymbolsthatmayappearonthisproduct. Read,understand,andfollowall instructionson the machine
beforeattemptingto assembleandoperate.
READ THE OPERATOR'S MANUAL(S)
i
i
Read, understand, and follow all instructions in the manual(s) before attempting to assemble and
operate
WARNING-- ROTATING TINES
Do not put hands or feet near rotating parts. Contact with the rotating parts can amputate
hands and feet.
WARNING-- ROTATING TINES
Do not put hands or feet near rotating parts. Contact with the rotating parts can amputate
hands and feet.
WARNING--GASOLINE IS FLAMMABLE
Allow the engine to cool at least two minutes before refueling.
WARNING-- CARBON MONOXIDE
Never run an engine indoors or in a poorly ventilated area. Engine exhaust contains carbon
monoxide, an odorless and deadly gas.
WARNING-- HOT SURFACE
Engine parts, especially the muffler, become extremely hot during operation. Allow engine
and muffler to cool before touching.
WARNING: YourResponsibility--Restricttheuseofthis powermachineto personswhoread,understandandfollowthe
warningsand instructionsinthis manualandonthemachine.
SAVETHESEINSTRUCTIONS!
6
Page 7

NOTE:Thisunitis shippedwithoutgasolineor oil intheengine.Be
certaintoserviceenginewithgasolineandoil as instructedin the
Operationsectionofthis manualbeforeoperatingyourmachine.
NOTE:Referenceto rightand lefthandsideof thetiller isobserved
fromtheoperatingposition.
OPENING CARTON
1. Removethe staples,breaktheglueonthetopflaps,orcutthe
tapeat theendof thecartonand peelit alongthetop flapto open.
2. Removealllooseparts.
3. Cutthecornersandlaythecartondownfiat.
4. Removeloosepackingmaterial.
REMOVING UNIT FROM CARTON
1. Usethehandlebartoliftand pullthetillerbackwardstoaflat
area.Checkthecartonthoroughlyforlooseparts.
2. Extendthecontrolcableandlayiton thefloor.Becarefulnotto
bendor kinkthecontrolcable.
LOOSE PARTS IN CARTON
• HandlebarAssembly
• Tiller
• EngineOil
• Operator'sManual
• ShiftRod
• DepthStake
ATTACHING THE DEPTH STAKE
3. Raisethefine shieldhingeflapassemblyand insertthedepth
stakeassemblyinthe slot,underthe fineshieldandup through
thetine shieldassembly.
4. Inserttheclevispinthroughthefineshieldanddepthstake
assemblies.Secureitwiththe cotterpin.
5. Insertthehexbolt intothe topholeof thedepthstakeassembly.
Placetheflatwasheronthehex boltandthreadtheT-knobonto
thehex bolt.Tightensecurely.SeeFigure1.
6. Tipthetillerbackdownsothatit restsonthe tines.
ATTACHING THE HANDLE ASSEMBLY
1. Removethetoptwoboltsandflangelocknutsfromthehandle
mountingbrackets,but do notremovethebottomboltandnut.
See Figure2.
f
.................. _,_i"_i_:...........
................... " Hex Screws
FlangeLockNuts
Beforeassembly,disconnectthesparkplugwireandgroundit
againsttheengineto preventunintendedstarting.
1. Tipthetillerforwardsothatitrestson thefrontcounterweight.
2. Unthreadthe"T"knobfromthetopofthedepthstakeand remove
theflat washerandhexbolt. Removethecotterpinfromtheclevis
pin.SeeFigure1.
Fiat Washer
Hex
Cotter Pin
Bolt
Depth
Stake
Figure1
Figure2
2. Placethehandleassemblyin positionbetweenthe handlemount-
ing brackets.See Figure3.
Handle Assembly.
Screws
Figure3
3. Lineup theholesinthehandlewiththe holesin the bracketand
7
securewiththehardwarepreviouslyremoved.
J
Page 8
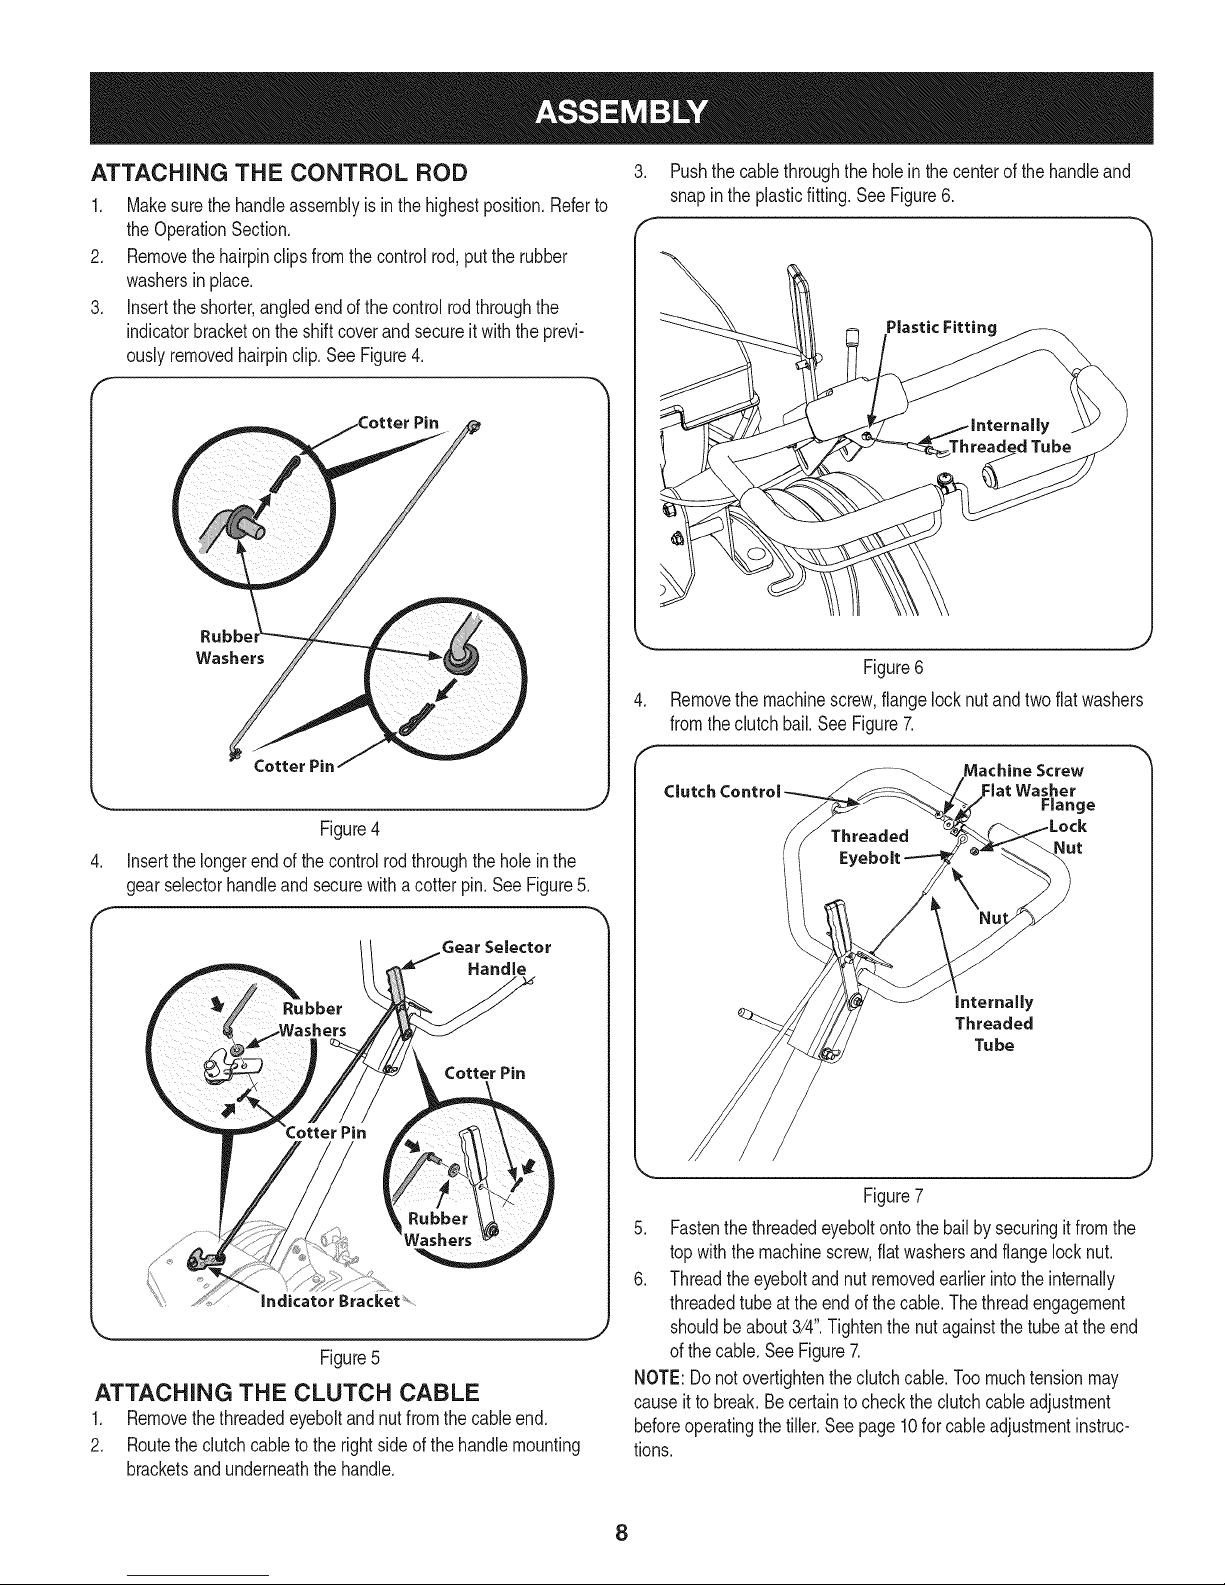
ATTACHING THE CONTROL ROD
1. Makesurethe handleassemblyisinthe highestposition.Referto
theOperationSection.
2. Removethehairpinclipsfromthecontrolrod,putthe rubber
washersinplace.
3. Insertthe shorter,angledendof thecontrolrodthroughthe
indicatorbracketonthe shiftcoverandsecureit withtheprevi-
ouslyremovedhairpinclip.SeeFigure4.
Rubb_
Washers
3. Pushthecablethroughthe holein the centerofthehandleand
snapinthe plasticfitting.SeeFigure6.
Threaded Tube
Figure6
Removethe machinescrew,flangelocknut andtwoflatwashers
fromtheclutchbail.See Figure7.
Figure4
4. Insertthe longerendofthe controlrodthroughthe holeinthe
gearselectorhandleandsecurewitha cotterpin.SeeFigure5.
Gear Selector
Handle
Cotter Pin
Figure5
ATTACHING THE CLUTCH CABLE
1. Removethethreadedeyeboltandnut fromthecableend.
2. Routetheclutchcableto therightsideofthehandlemounting
bracketsandunderneaththe handle.
Machine Screw
Clutch Control Flat Washer
Range
Nut
internally
Threaded
Tu be
Figure7
5. Fastenthe threadedeyeboltontothebailby securingitfromthe
topwiththe machinescrew,flatwashersandflangelocknut.
6. Threadtheeyeboltandnutremovedearlierintotheinternally
threadedtubeatthe endof thecable.Thethreadengagement
shouldbeabout3/4".Tightenthenutagainstthetubeattheend
ofthe cable.SeeFigure7.
NOTE:Donotovertightentheclutchcable.Toomuchtensionmay
causeitto break.Becertaintochecktheclutchcableadjustment
beforeoperatingthetiller.Seepage10for cableadjustmentinstruc-
tions.
8
Page 9

SET-UP
Tire Pressure
Checktheair pressureinbothtires.Theairpressureshouldbe
between15-20PSI.Keepbothtiresequallyinflatedtohelpprevent
machinefrompullingtoone side.
Checking and Adding Oil
Theengineis shippedwithoutoil in theengine.Youmustfill the
enginewithoil beforeoperating.Runningtheenginewithinsufficient
_o cancauseserous engnedamageandvod the productwarranty.
Initial Use
1. Removetheoil filldipstick.
2. Placethetilleronlevelground,usea funneltoemptyentire
contentsofthe oil bottleprovidedwiththe unitintotheengine.
3. Replacetheoilfilldipstickandtighten.
Checkingand adding oil
1. Placethetillerona flat, levelsurface.
2. Removetheoil fillercap/dipstickandwipethedipstickclean.See
Figure8.
Fuel Recommendations
Useautomotivegasoline(unleadedorlowleadedtominimizecombus-
tionchamberdeposits)witha minimumof 87 octane.Gasolinewith
up to 10%ethanolor 15%MTBE(MethylTertiaryButylEther)canbe
used.Neverusean oil/gasolinemixtureordirty gasoline.Avoidgetting
dirt, dust,or waterinthe fueltank.DONOTuse E85gasoline.
* Refuelina well-ventilatedareawiththeenginestopped.Donot
smokeorallowflamesor sparksin theareawheretheengineis
refueledor wheregasolineisstored.
. Donot overfillthefueltank.After refueling,makesurethetank
capis closedproperlyandsecurely.
. Becarefulnotto spillfuel whenrefueling.Spilledfuelorfuelvapor
mayignite.Ifany fuelis spilled,makesurethe areaisdry before
startingthe engine.
. Avoidrepeatedor prolongedcontactwithskinorbreathingofvapor.
Adding Fuel
Useextremecarewhenhandlinggasoline.Gasolineisextremely
flammableandthevaporsareexplosive.Neverfuelthe machine
indoorsorwhilethe engineishotor running.Extinguishcigarettes,
cigars,pipesandothersourcesof ignition.
1. Besureengineisoutdoorsandina well-ventilatedarea.
2. Cleanareaaroundthefuelfill capandremovethefuelfill cap.
3. UsinganapprovedredGASOLINEcontainer,addfuelslowly,being
carefultoavoidspilling.
4. Fillthetankuntilthefuelreachesthe "fuelfull"indicatormark.See
Figure9.
Figure8
3. Insertthe cap/dipstickintothe oilfillerneck,butdo not screwitin.
4. Removetheoil fillercap/dipstick.Ifthelevelislow,slowlyaddoil
untiloil levelregistersbetweenhigh(H) and low(L), Figure8.
NOTE:Donotoverfill.Overfillingwithoil maycausesmoking,hard
starting,or sparkplugfouling.
5. Replaceandtightencap/dipstickfirmlybeforestartingengine.
NOTE:DONOTallowoil leveltofall belowthe"L"markon the
dipstick.Doingsomayresultinequipmentmalfunctionsordamage.
NOTE:Tochangethe oilon yourengine,seethe Sericeand
Maintenancesectionofthismanual.
FuelLevelIndicator
TopView
\\
Figure9
.
Replacethefuelcapandtightensecurely.Wipeupspilledfuel
beforestartingengine.IffuelisspilledDONOTstartengine.Move
machineawayfromareaofspillage.Avoidcreatinganysourceof
ignitionuntilfuelvaporsaregone.
9
Page 10
ADJUSTMENTS
Priortooperatingyourtiller,carefullyreadandfollowall instructions
below.Performall adjustmentsto verifyyourtilleris operatingsafely
andpropery.
Clutch Cable
NOTE:Servicethe enginewithoil andgasolinebeforecheckingthis
adjustment.Referto theseparateEngineOperator'sManualpacked
withyourtillerforproperfuel andengineoil recommendations.
1. Positionthetiller sothefrontcounterweightisagainsta solid
object,suchas a wall.
2. WiththegearselectionleverinNEUTRAL,starttheengine.Refer
tothe separateEngineOperator'sManual.
3. Standingonthe rightsideofthe tiller,examinethebelt(insidethe
beltcover).It shouldnotbeturning.
Donot putyourfingersunderthebelt cover.
.
If thebeltturnswithoutthebailengaged,adjustit byun-threading
theinternallythreadedtubeat theendof thecablea fewturns
clockwise-- when standingin theoperator'sposition-- andthen
retightenthenut againstthetube.SeeFigure10.
f
Handle
Thehandleshouldbeadjustedsothatwhenthetiller isdigging3-4"
intothe soil,the handlefallsto aboutwaste-high.Rotatethehandle
adjustmentlock rearward,movethe handleto thedesiredpositionand
thenlockintoplaceby rotatingthehandleadjustmentlockforwardto
securethehandle.SeeFigure11.
Handle
Loosen
tighten
ustment
Lock
Figure11
Internally
ThreadedTube
Figure10
5. Nowmovetheshiftleverto theFORWARDposition.
6. Carefullyengagetheclutchbyliftingtheclutchcontrolbailagainst
thehandle.Thewheelsshouldspin.
7. If thewheelsdo not spinwiththe tillerinforward,adjustby
unthreadingthe tubeat theendof thecablea fewturnscounter-
clockwise-- when standingin operator'sposition-- andthen
retightenthenut againstthetube.
8. Recheckbothadjustments,andreadjustas necessary.
9. Aftertilling,ifthetinesstopmoving,re-adjustthecables.
NOTE:A secondarycableadjustmentisavailableifyoureachthe
pointthatadditionaladjustmentisneeded.SeetheServiceand
Maintenancesectionforsecondaryadjustmentinstructions.
10
Page 11
Gear Selection
Handle Adjustment
Clutch Control
Air Filter..
Choke
Control"
Fuel _p
OUFillCap
Shift Lever indicator
_th Stake
Throttlej
Control
l
Rear Tine Shield
Shield
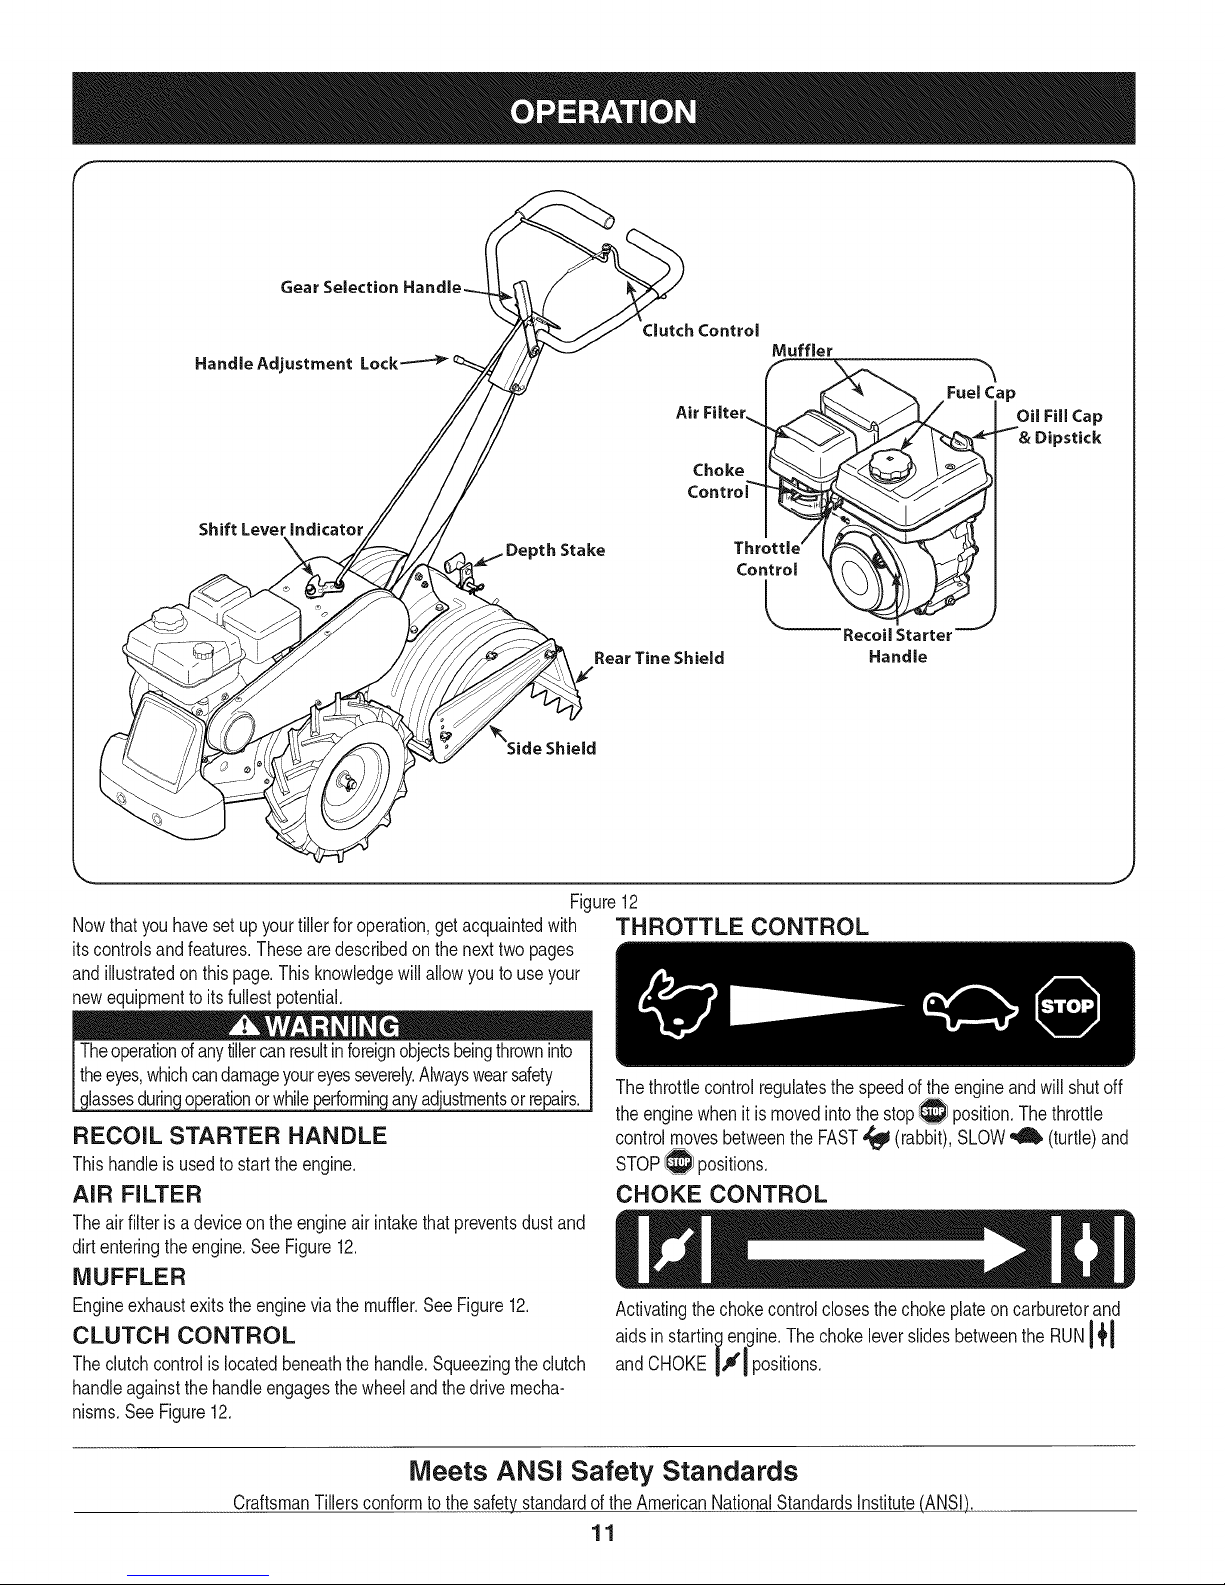
Figure12
Nowthat youhavesetup yourtillerforoperation,getacquaintedwith TH BOTTLE CONTROL
itscontrolsandfeatures.Thesearedescribedonthe nexttwopages
andillustratedonthispage.Thisknowledgewillallowyoutouseyour
newequipmenttoitsfullestpotential.
Theoperationofanytillercanresultinforeignobjectsbeingthrowninto
theeyes,whichcandamageyoureyesseverely.Alwayswearsafety
assesdurn o eratonorwh e erformn an adustmentsorre a rs.
RECOIL STARTER HANDLE
Thishandleisusedto starttheengine.
AiR FILTER
Theair filterisadeviceontheengineair intakethatpreventsdustand
dirtenteringtheengine.SeeFigure12.
MUFFLER
Engineexhaustexitstheenginevia themuffler.SeeFigure12.
CLUTCH CONTROL
Theclutchcontrolislocatedbeneaththehandle.Squeezingthe clutch
handleagainstthehandleengagesthewheeland thedrivemecha-
nisms.SeeFigure12.
Thethrottlecontrolregulatesthespeedofthe engineandwill shutoff
theenginewhenitismovedintothe stop_ position.Thethrottle
controlmovesbetweenthe FAST,_ (rabbit),SLOW_ (turtle)and
STOP_ positions.
CHOKE CONTROL
Activatingthechokecontrolclosesthechokeplateon carburetorand
aidsin startingengine.ThechokeleverslidesbetweentheRUN14'1
and CHOKEIJl positions.
Recoil Starter
Handle
Meets ANSi Safety Standards
CraftsmanTillersconformtothe safetystandardofthe AmericanNationalStandardsInstitute(ANSI)
11
Page 12
OiL FiLL CAP & DIPSTICK
Engineoil levelcanbecheckedandoiladdedthroughtheoil fill. See
Figure12.
NOTE:ThisunitwasshippedWITHOUToil inthe engine.Oilis
includedintheplasticbag packedwiththemanualinwiththeunit.
Addtheoil as directedintheGas & OilFillUp section.Checktheoil
levelbeforeeachoperationtoensureadequateoil isinthe engine.
Forfurtherinstructions,refertothestepsintheEngineMaintenance
sectionof thismanual.
GEAR SELECTION HANDLE
Thegearselectionhandleislocatedonthe frontof thehandle
assembly.It is usedto selectNEUTRAL,REVERSE,oroneof the
FORWARDmodeson the shiftleverindicator.SeeFigure12.
DEPTH STAKE
Thislevercontrolsthetillingdepthof thetines.Pullthecotter pinout
fromtheclevis pintoadjustthe tillingdepthtofivedifferentsettings.
SeeFigure12.
HANDLE ADJUSTMENT LOCK
Thehandlemaybe adjustedtotheheightdesiredbyunlockingthe
HandleAdjustmentLock,thenmovingthehandlebarsto thedesired
positionandthenre-lockingtheHandleAdjustmentLock.SeeFigure
12.RefertotheAssemblysectionofthismanualfor moreinformation.
REAR TiME SHIELD
Thereartine shieldprotectstheoperatorfromflyingdebriswhilealso
smoothingout freshlytilledsoil.SeeFigure12.
SIDE SHIELD
Theside shieldis usedto maintainclearevenrowsandmaybe
adjustedtooneof fivedifferentpositions.SeeFigure12.
TINES
Yourtiller'stinesarea seriesof hoesarrangedona revolvingpower-
drivenshaft.
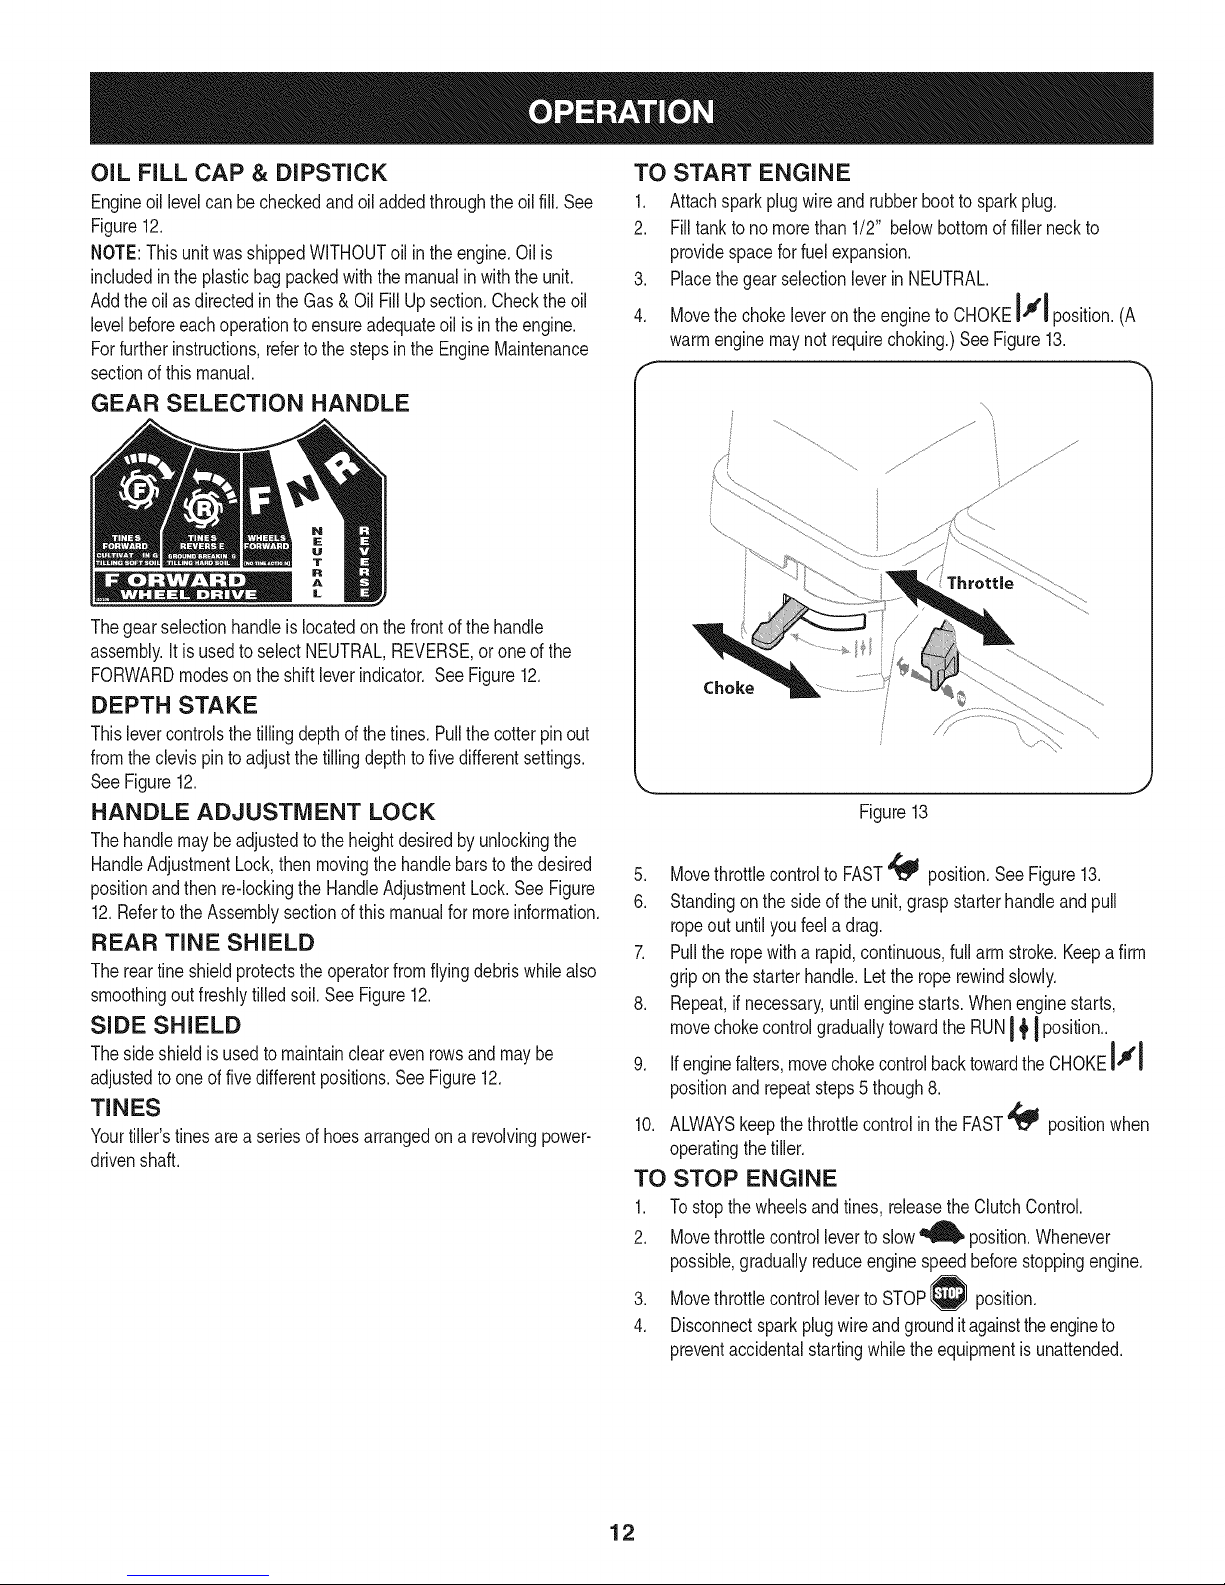
TO START ENGINE
1. Attachsparkplugwireandrubberbootto sparkplug.
2. Filltankto no morethan 1/2" belowbottomoffillerneckto
providespaceforfuelexpansion.
3. Placethegearselectionleverin NEUTRAL.
4. Movethechokeleveron theengineto CHOKEI."1position(A
warmenginemaynotrequirechoking.)SeeFigure13.
Choke
Figure13
5. Movethrottlecontrolto FAST_ position.SeeFigure13.
6. Standingon the sideof theunit,graspstarterhandleandpull
ropeoutuntilyoufeela drag.
7. Pullthe ropewitha rapid,continuous,fullarmstroke.Keepafirm
gripon thestarterhandle.Letthe roperewindslowly.
8. Repeat,ifnecessary,untilenginestarts.Whenenginestarts,
movechokecontrolgraduallytowardthe RUNI _'I position..
9. Ifenginefalters,movechokecontrolbacktowardtheCHOKEIJl
positionand repeatsteps5 though8.
10. ALWAYSkeepthethrottlecontrolin theFAST_ positionwhen
operatingthetiller.
TO STOP ENGINE
1. Tostopthe wheelsandtines,releasetheClutchControl.
2. Movethrottlecontrolleverto slow_ position.Whenever
possible,graduallyreduceenginespeedbeforestoppingengine.
3. Movethrottlecontrolleverto STOP position.
4. Disconnectsparkplugwireandgrounditagainsttheengineto
preventaccidentalstartingwhilethe equipmentisunattended.
12
Page 13
TO ENGAGE DRIVE & TINES
Donot pushdownon thehandlebarstotry to makethetillertill more
deeply.This preventsthe wheelsfromholdingthetiller backandcan
allowthe tinesto rapidlypropelthetiller,whichcould resultin lossof
control,propertydamage,orpersonalinjury.
Tomoveforward:
1. Forforwardmotionof thewheelsusethegearselectionhandle
andforpowertothe tinespulltheclutchcontrolupagainstthe
handlebar.
2. Whentilling,letthewheelspullthe machinewhilethetinesdig.
Walkslowlybehindthetillerallowingitto moveatits ownpace
whilekeepinga securegripon thehandlebarwithyourelbows
flexed.
3. Releasethebailto stopthewheelsandtines.
Tomoveinreverse:(Donot tillin reverse)
1. ReleasetheClutchControl.Thenliftthehandlebaruntilthetines
areoff theground.
2. Pullbackonthegearselectionhandle,andwalkbackwardswith
themachine.
NOTE:In reversemode,thetineswill reverserotation.
TURNING THE TILLER
1. Practiceturningthetiller in a level,openarea.Beverycarefulto
keepyourfeetandlegsawayfromthe tines.
2. Tobeginaturn,liftthe handlebarsuntilthetinesareout ofthe
groundandtheengineandtinesarebalancedoverthe wheels.
3. Withthetillerbalanced,pushsidewayson the handlebartosteer
in thedirectionoftheturn.Afterturning,slowlylowerthe tinesinto
thesoil toresumetilling.
SETTING THE DEPTH
Tillingdepthiscontrolledbythedepthstakewhichcan be adjustedto
fivedifferentsettings.Adjustthesideshieldsasyou adjustthedepth
stake.
• Whenusingthe tillerfor thefirsttime,usethesecondadjustment
holefromthetop (1"oftillingdepth).
• Whenbreakingupsodandforshallowcultivation,usethe setting
whichgives1"oftillingdepth(secondholefromthetop).Place
thesideshieldsintheirlowestposition.
• Forfurtherdepth,raisethedepthstakeandsideshieldsandalso
makeoneor twomorepassesoverthearea.
• Whentillingloosesoil,thedepthstakemayberaisedtoits
highestposition(usebottomadjustmenthole)to givethedeepest
tillingdepth.Raisethe sideshieldsto theirhighestposition.
• Totransporttiller,lowerthedepth stake(usetopadjustment
hole).
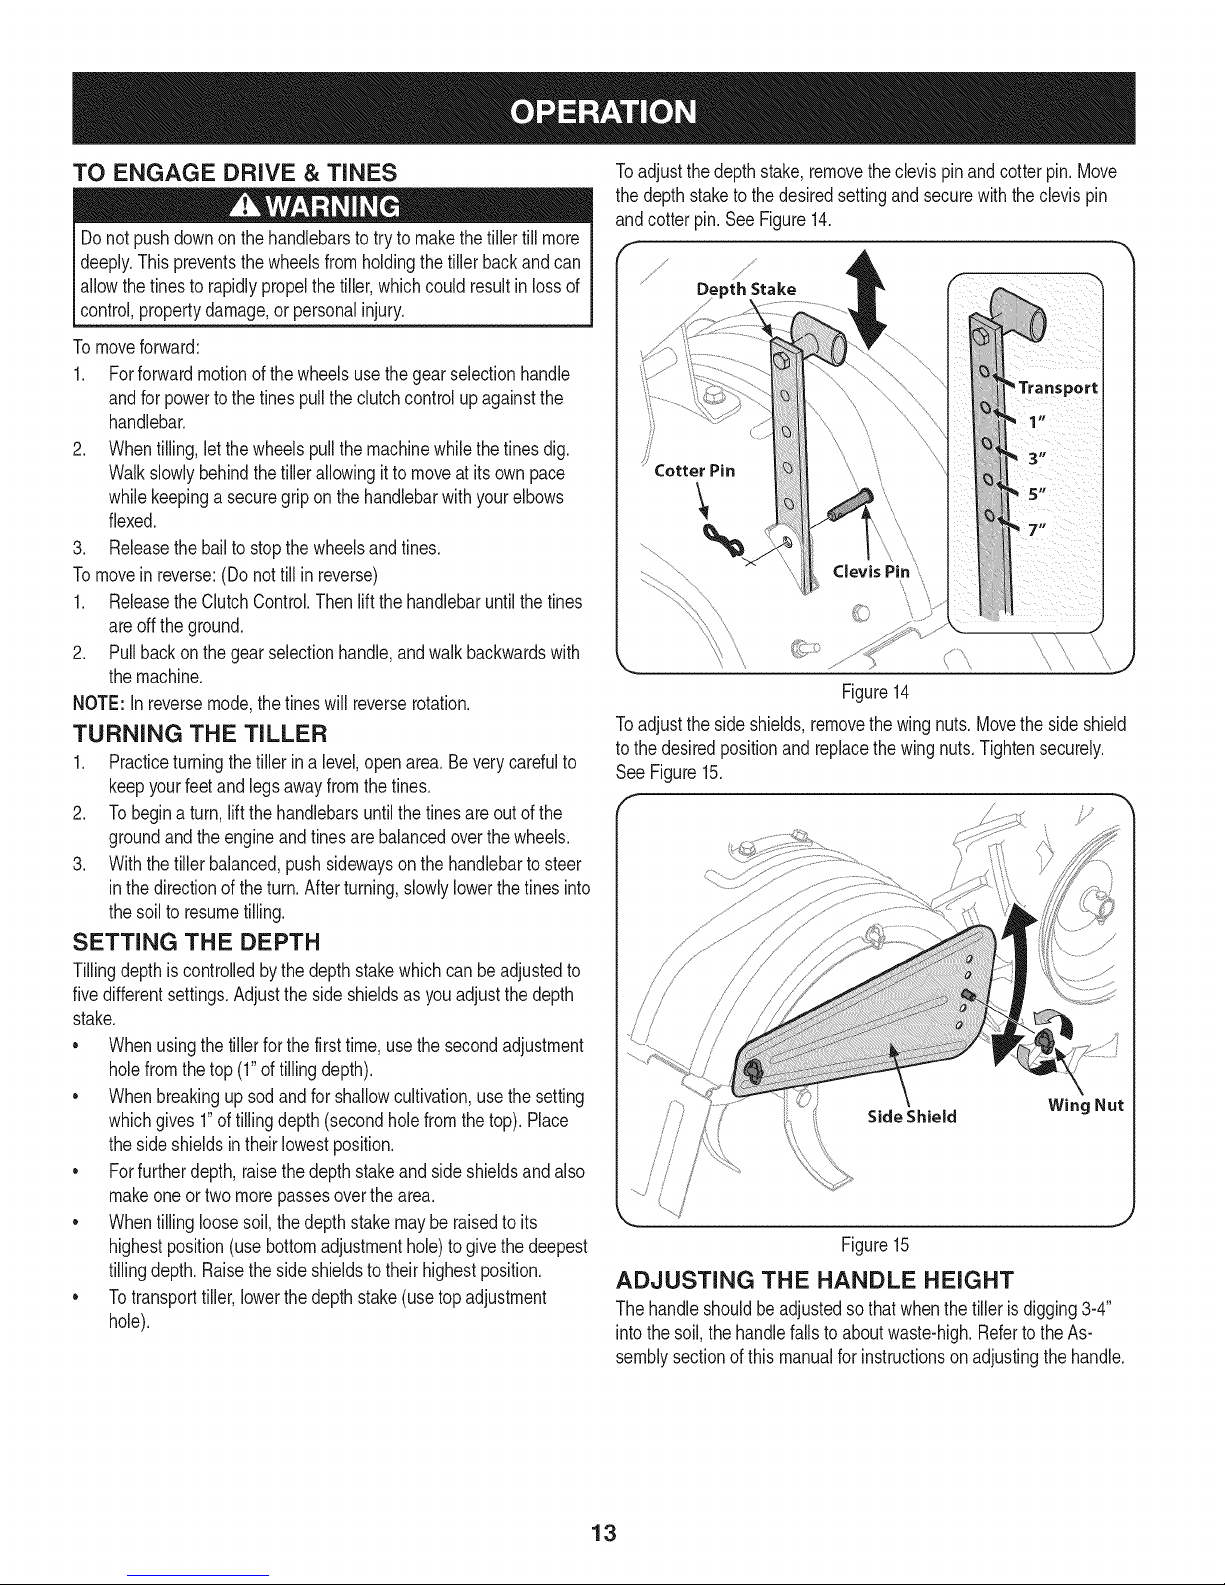
Toadjustthedepthstake,removetheclevispinandcotterpin.Move
thedepthstaketo thedesiredsettingandsecurewiththe clevispin
andcotterpin.SeeFigure14.
j_
DepthStake
Figure14
Toadjustthe sideshields,removethewingnuts.Movethesideshield
tothe desiredpositionandreplacethewingnuts.Tightensecurely.
See Figure15.
f J
/
!
_h J
Side Shield Wing Nut
Figure15
ADJUSTING THE HANDLE HEIGHT
Thehandleshouldbeadjustedsothat whenthetiller isdigging3-4"
intothe soil,thehandlefallsto aboutwaste-high.RefertotheAs-
semblysectionofthis manualforinstructionson adjustingthehandle.
13
Page 14
CLEARING THE TINES
Beforeclearingthetinesby hand,stoptheengine,allowall moving
partstostopanddisconnectthesparkplugwire.Failuretofollowthis
warningcouldresultinpersonalinjury.
• Thetines haveaself-clearingactionwhicheliminatesmostofthe
tanglingofdebris.However,occasionallydrygrass,stringystalks
ortoughvinesmaybecometangled.Followtheseproceduresto
helpavoidtanglingandtoclearthetines, ifnecessary.
• To reducetangling,setthedepthregulatordeepenoughtoget
maximum"chopping"actionasthetineschopthematerialagainst
theground.Also,trytotill undercropresiduesorcovercrops
whiletheyaregreen,moistandtender.
• Whiletilling,try swayingthehandlebarsfromsideto side(about
6"to 12").This"fishtailing"actionoftenclearsthetinesof debris.
TILLING TiPS & TECHNIQUES
Beforetilling,contactyourtelephoneor utilitiescompanyandinquire
l ifundergroundequipmentorlinesareusedon yourproperty.Donot
[till nearburiedelectriccables,telephonelines,pipesor hoses.
Tilling Depth
• Thisisa DDT(dual-directiontine)tiller.Asthewheelspullforward,
thetinesrotatebackward.As thewheelspullrearward,the tines
rotateforward.Thiscreatesan "uppercut"fineactionwhichdigs
deeply,uprootingsoilandweeds.Don'toverloadtheengine,butdig
asdeeplyaspossibleoneachpassOnlaterpasses,thewheels
maytendto spininthe softdirt.Helpthemalongbyliftingup
slightlyonthehandlebar(onehand,palmup,worksmosteasily).
• Avoidthetemptationto pushdownonthehandlebarsinan
attempttoforcethetillerto digdeeper.Doingsotakestheweight
off thepoweredwheels,causingthemto losetraction.Without
thewheelsto holdthetillerback,the tineswillattemptto propel
towardstheoperatororawayfromthe operator.
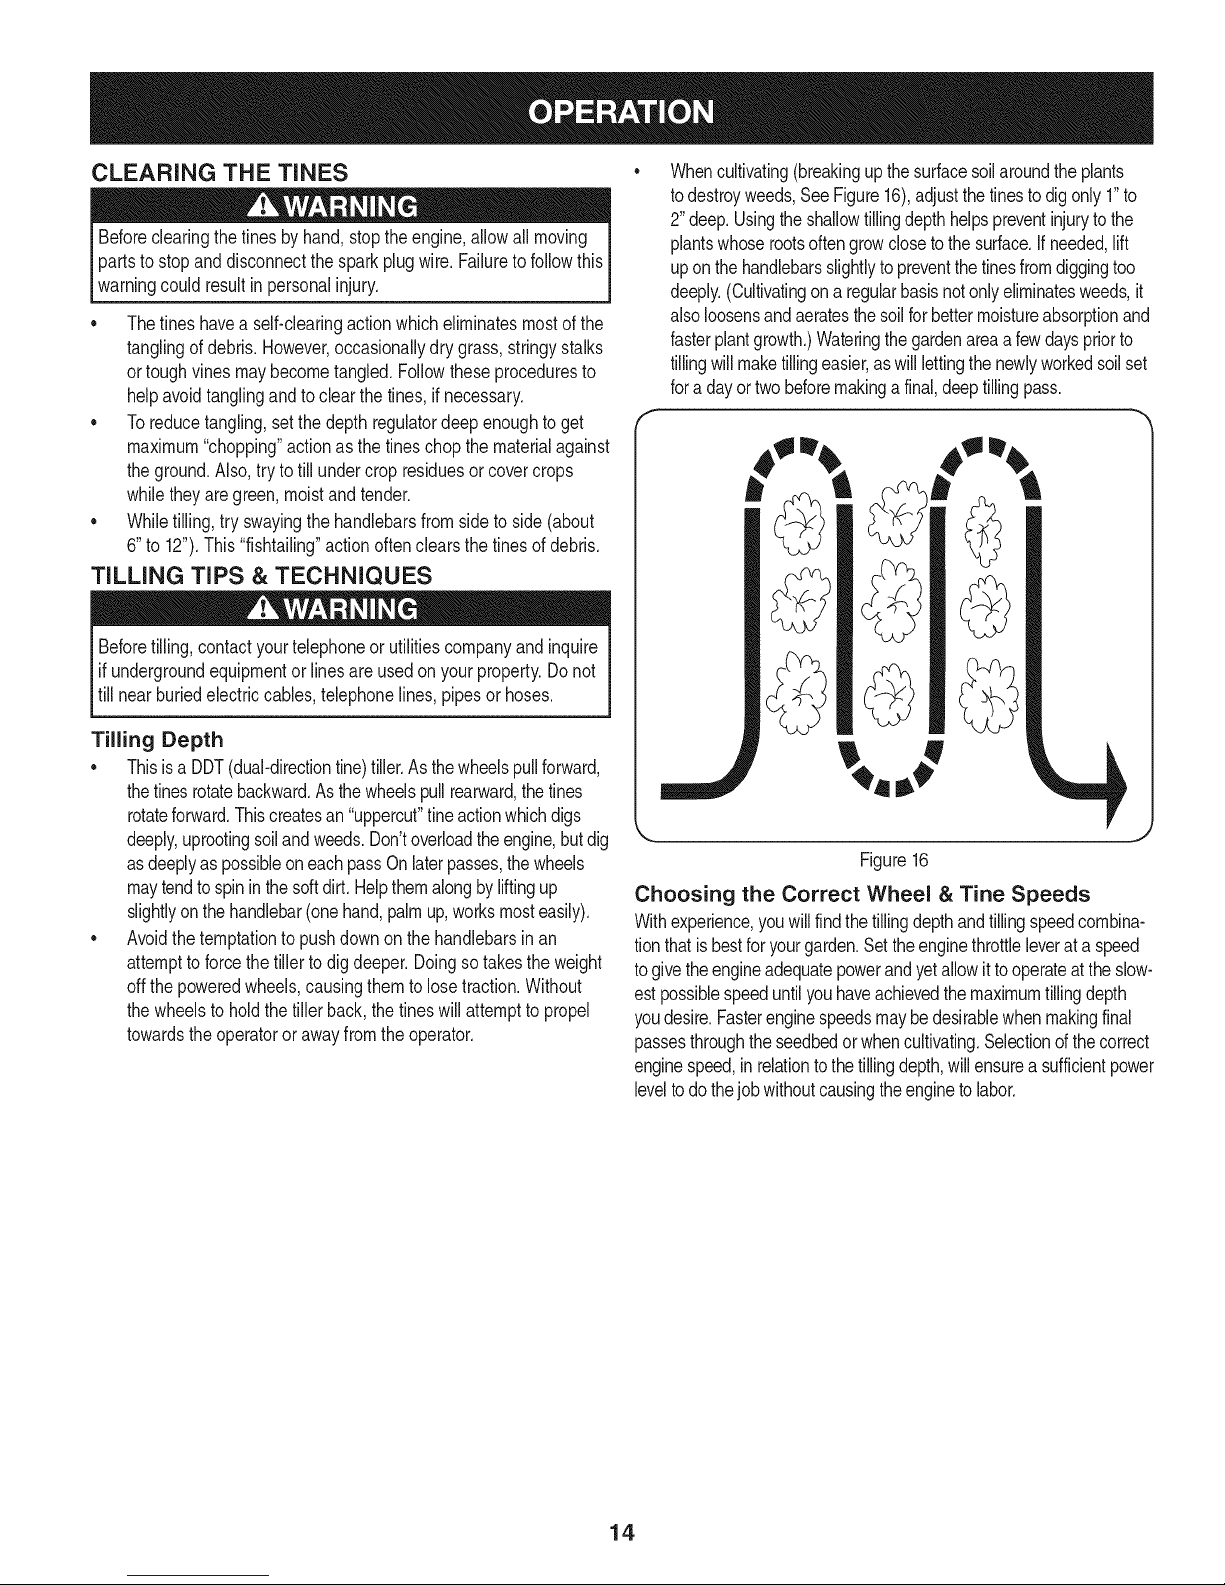
Whencultivating(breakingupthesurfacesoilaroundtheplants
todestroyweeds,SeeFigure16),adjustthe tinestodigonly1"to
2"deep.Usingtheshallowtillingdepthhelpspreventinjurytothe
plantswhoserootsoftengrowclosetothesurface.Ifneeded,lift
uponthehandlebarsslightlyto preventthetinesfromdiggingtoo
deeply.(Cultivatingona regularbasisnotonlyeliminatesweeds,it
alsoloosensandaeratesthesoilforbettermoistureabsorptionand
fasterplantgrowth.)Wateringthegardenareaafewdayspriorto
tillingwillmaketillingeasier,as willlettingthenewlyworkedsoilset
fora dayortwobeforemakingafinal,deeptillingpass.
,j
Figure16
Choosing the Correct Wheel & Tine Speeds
Withexperience,you willfindthetillingdepthandtillingspeedcombina-
tionthatisbestforyourgarden.Settheenginethrottleleverata speed
togivetheengineadequatepowerandyetallowittooperateattheslow-
estpossiblespeeduntilyouhaveachievedthemaximumtillingdepth
youdesire.Fasterenginespeedsmaybedesirablewhenmakingfinal
passesthroughtheseedbedor whencultivating.Selectionofthe correct
enginespeed,inrelationto thetillingdepth,willensurea sufficientpower
leveltodothejobwithoutcausingtheenginetolabor.
14
Page 15
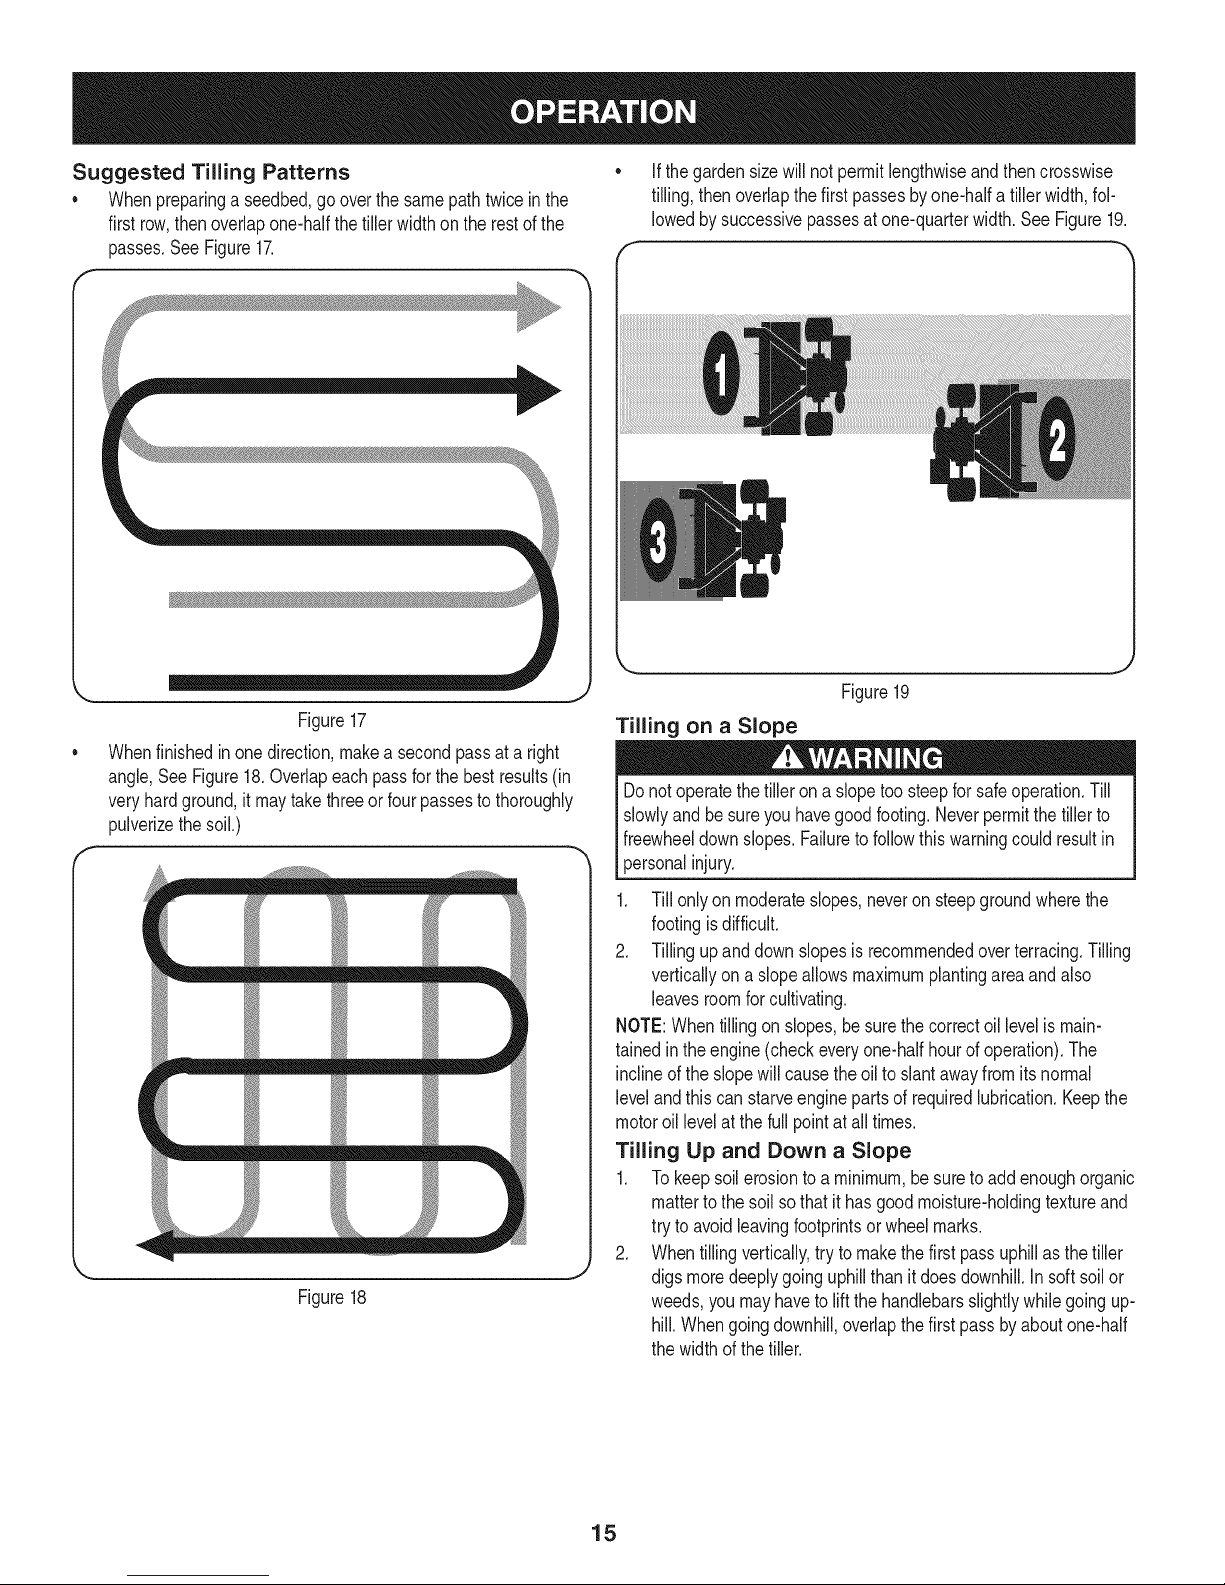
Suggested Tilling Patterns
• Whenpreparinga seedbed,gooverthe samepathtwice inthe
firstrow,thenoverlapone-halfthetiller widthontherestof the
passes.SeeFigure17.
• Ifthe gardensizewillnotpermitlengthwiseandthencrosswise
tilling,thenoverlapthefirst passesbyone-halfatiller width,fol-
lowedby successivepassesatone-quarterwidth.SeeFigure19.
Figure17
Whenfinishedinonedirection,makea secondpassata right
angle,SeeFigure18.Overlapeachpassfor thebestresults(in
veryhardground,it maytakethreeorfour passestothoroughly
pulverizethesoil.)
== ==== ==d
Figure18
J
Tilling on a Slope
Donotoperatethetillerona slopetoosteepfor safeoperation.Till
slowlyandbesureyouhavegoodfooting.Neverpermitthetillerto
freewheeldownslopes.Failuretofollowthiswarningcouldresultin
personalinjury.
1. Tillonlyon moderateslopes,neveron steepgroundwherethe
footingisdifficult.
2. Tillingupanddownslopesisrecommendedoverterracing.Tilling
verticallyon aslopeallowsmaximumplantingareaandalso
leavesroomforcultivating.
NOTE:Whentillingon slopes,be surethe correctoillevelismain-
tainedin theengine(checkeveryone-halfhourofoperation).The
inclineof theslopewillcausethe oilto slantawayfromitsnormal
levelandthis canstarveenginepartsof requiredlubrication.Keepthe
motoroil levelat thefull pointat all times.
Tilling Up and Down a Slope
1. Tokeepsoilerosiontoa minimum,besuretoaddenoughorganic
matterto thesoil sothat it hasgoodmoisture-holdingtextureand
try toavoidleavingfootprintsor wheelmarks.
2. Whentillingvertically,trytomakethefirstpassuphillasthetiller
J
digsmoredeeplygoinguphillthanit doesdownhill.Insoft soilor
weeds,youmayhaveto liftthehandlebarsslightlywhilegoingup-
hill.Whengoingdownhill,overlapthefirstpassby aboutone-half
thewidthof thetiller.
Figure19
15
Page 16

Terrace Gardening
1. Tocreatea terrace,startat thetop ofthe slopeandworkdown
Gobackandforthacrossthefirstrow.See Figure20.
f
to,
O
tI'REPEAT
Figure20
.
Eachsucceedinglowerterraceis startedby walkingbelowthe
terraceyouarepreparing.Foraddedstabilityof thetiller,always
keepthe uphillwheelin the soft,newlytilledsoil.Donottill the
last 12"ormoreof thedownhilloutsideedgeofeachterrace.This
untilledstriphelps preventtheterracesfrombreakingapart and
washingdownhill.Italsoprovidesawalkingpathbetweenthe
rOWS.
Loading & Unloading the Tiller
Loadingandunloadingthetillerintoa vehicleis potentiallyhazard-
Ious anddoingsois notrecommendedunlessabsolutelynecessary,
las thiscould resultin personalinjuryorpropertydamage.
Ifyoumustloadorunloadthetiller,followthe guidelinesgivenbelow:
• Beforeloadingorunloadingthetiller,stopthe engine,waitfor all
partsto stopmoving,disconnectthesparkplugwireandletthe
engineand mufflercool.
• The tilleris tooheavyand bulkyto besafelyliftedbyone person.
Twoor morepeopleshouldsharethe load.
• Usesturdyrampsand manually-- withtheengineshutoff-- roll
thetiller intoandout ofthe vehicle.Twoormorepeopleare
neededtodo this.
• The rampsmustbe strongenoughto supportthecombined
weightofthe tillerandanyhandlers.The rampsshouldprovide
goodtractionto preventslipping;theyshouldalsohaveside rails
toguidethe tilleralongthe ramps;andtheyshouldhavea locking
deviceto securethemto thevehicle.
J
• The handlersshouldwearsturdyfootwearthatwill helptoprevent
slipping.
• Positiontheloadingvehiclesothatthe rampangleis asflat
as possible(thelessinclineto theramp,the better).Turnthe
vehicle'sengineoffandapplytheparkingbrake.
• Whengoinguptheramps,standin thenormaloperatingposition
and pushthetilleraheadof you.Havea personateachsideto
turnthe wheels.
• Whengoingdownthe ramps,walkbackwardwiththetiller
followingyou.Keepalertfor anyobstaclesbehindyou.Positiona
personateachwheeltocontrolthe speedof thetiller.Nevergo
downthe rampstiller-first,asthetillercouldtip forward.
• Placewoodenblockson thedownhillsideof thewheelsif you
needtostopthe tillerfromrollingdowntheramp.Also,usethe
blockstotemporarilykeepthetiller in placeonthe ramps(if
necessary),andto chockthe wheelsin placeafterthe tilleris in
thevehicle.
• Afterloadingthe tiller,preventitfromrollingchockingthewheels
with blocksandsecurelytiethe tillerdown.
16
Page 17
MAINTENANCE SCHEDULE
Beforeperforminganytypeofmaintenance/service,disengageall
controlsandstoptheengine.Waituntilallmovingpartshavecometo
acompletestop.Disconnectsparkplugwireandgrounditagainstthe
enginetopreventunintendedstarting.Alwayswearsafetyglassesduring
serviceguidelinesonly.UsetheServiceLogcolumnto keeptrackof
completedmaintenancetasks.To locate the nearest Sears Service
Centeror to scheduleservice,simplycontactSearsat
1-800-4-MY-HOME®.
operationor whileperforminganyadjustmentsor repairs.
Followthemaintenanceschedulegivenbelow.Thischartdescribes
= =
EachUse
1st2 hours
1st5 hours
Every10hours
Every25 hours
Every30 hours
Every50 hours
Every100hours
BeforeStorage
1. Engineoillevel
2. Looseormissinghardware
3. Engineandaroundmuffler
4. Aircleaner
1. Drivebelttension
2. Nutsand Bolts
1. Engineoil
1. Drivebelttension
2. Unit
1. Sparkplug
2. Tinesforwear
3. Tirepressure
1. Engineoi11-
1. Aircleaner
2. SparkPlug
1. Fuelsystem
1. Check
2. Tightenor_place
3. Clean
4. Check
1. Check
2. Check
1. Change
1. Check
2. Lubricate
1. Check
1. Check
2. Check
1. Change
1. Change
2. Change
1. Runengineuntilit stopsfromlackof
fueloradda gasolineadditivetothe
gasin thetank.
Changeoileverytwentyfivehourswhenoperatingengineunderheavyloadorin hightemperatures.
ENGINE MAINTENANCE
Alwaysstopengineanddisconnectsparkplugwirebeforeperforming
lanymaintenanceor adjustments.Alwayswearsafetyglassesduring
_operationorwhile performinganyadjustmentsor repairs.
GENERAL RECOMMENDATIONS
• Alwaysobserveallsafetyrulesfoundonproductlabelsandin
thisoperator'smanualwhenperforminganymaintenance.Safety
rulescan befoundonthe productlabelsandin thisOperator's
Manualbeginningon page3.
• Thewarrantyonthistillerdoesnotcoveritemsthathavebeen
subjectedto operatorabuseor negligence.Toreceivefullvalue
fromwarranty,operatormustmaintaintheequipmentas
instructedhere.
• Someadjustmentswillhaveto be madeperiodicallytomaintain
yourunit properly.
• Periodicallycheckall fastenersand makesurethesearetight.
Iftheenginehas beenrunning,themufflerwillbeveryhot. Becareful
notto touchthemuffler.
Checking the Spark Plug
DONOTcheckforsparkwithsparkplugremoved.DONOTcrank
enginewithsparkplug removed.
Toensureproperengineoperation,thesparkplugmustbeproperly
gappedandfreeof deposits.Checkthe sparkplugevery25hoursand
replaceitevery100hours.
17
Page 18
.
Removethesparkplugbootanduse a sparkplugwrenchto
removetheplug.See Figure21.
Figure21
.
Visuallyinspectthesparkplug.Discardthesparkplugif thereis
apparentwear,orif the insulatoriscrackedorchipped.Cleanthe
sparkplugwitha wirebrush ifit isto be reused.
.
Measurethepluggapwitha feelergauge.Correctas necessary
bybendingsideelectrode.SeeFigure18.Thegapshouldbeset
to0.030in.
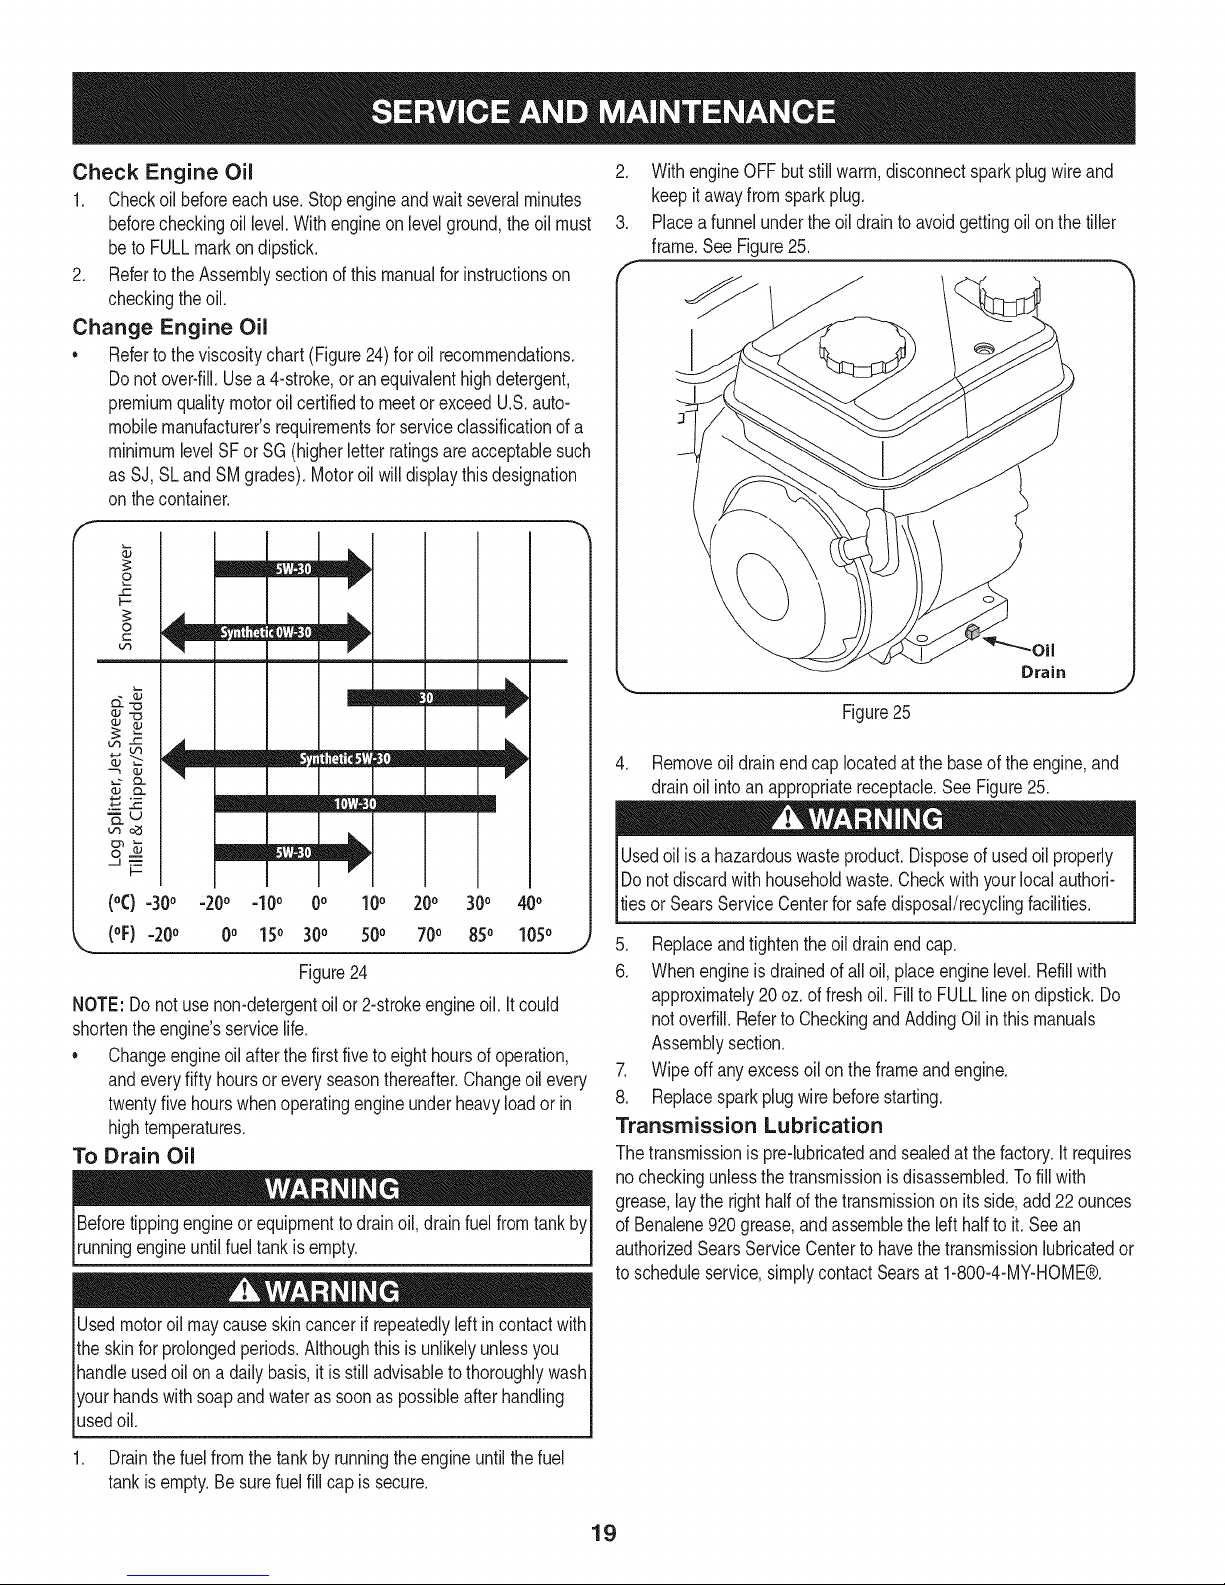
Servicing the Air Cleaner
Neverusegasolineor lowflashpoint solventsforcleaningtheair
cleanerelement.A fireor explosioncouldresult.
Theaircleanerpreventsdamagingdirt,dust,etc.,fromenteringthe
carburetorandbeingforcedintothe engineandis importanttoengine
lifeandperformance.Neverruntheenginewithoutanair cleaner
completelyassembled.Checktheair cleanerbeforeeachuse.
Paperfilterscannotbecleanedand mustbereplacedoncea year
or every100operatinghours;moreoftenif usedinextremelydusty
conditions.
1. Pressthetab ontheair filtercover,liftthecoverandremovethe
air filter.SeeFigure23.
..........
Air Filter
Cover
Filter
Figure22
4. Checkthatthe sparkplugwasherisingoodconditionandthread
thesparkplugin by handtopreventcross-threading.
5. Afterthesparkplugisseated,tightenwithasparkplugwrenchto
compressthewasher.
NOTE:Wheninstallinga newsparkplug,tighten1/2turnafterthespark
plugseatstocompressthewasher.Whenreinstallinga usedsparkplug,
tighten1/8-1/4turnafterthesparkplugseatstocompressthewasher.
Thesparkplugmustbe securelytightened.An improperlytightened
sparkplugcanbecomeveryhot andmaydamagetheengine.
Figure23
2. Discardoldair filter.
3. Installnewair filter.
4. Closethecover.
NOTE:Ifthe filteristornor damagedinany way,replaceit.
Cleaning the Engine
Donotsprayenginewithwatertocleanbecausewatercould
contaminatefuel.Usinga gardenhoseor pressurewashingequip-
mentcanalsoforcewaterintothe muffleropening.Waterthatpasses
throughthe mufflercanenterthe cylinder,causingdamage.
Accumulationofdebrisaroundmufflercouldcausea fire. Inspectand
cleanbeforeeveryuse.
Iftheenginehas beenrunning,allow itto coolfor at leasthalf anhour
beforecleaning.Periodicallyremovedirt build-upfromtheengine.
Cleanaroundthemuffler.Cleanwitha brushor compressedair.
Page 19
CheckEngine Oil
1. Checkoilbeforeeachuse.Stopengineandwaitseveralminutes
beforecheckingoillevel.Withengineonlevelground,theoilmust
betoFULLmarkondipstick.
2. RefertotheAssemblysectionofthismanualforinstructionson
checkingtheoil.
Change Engine Oil
• Referto theviscositychart(Figure24)foroil recommendations.
Donotover-fill.Usea 4-stroke,oranequivalenthighdetergent,
premiumqualitymotoroilcertifiedto meetor exceedU.S.auto-
mobilemanufacturer'srequirementsforserviceclassificationof a
minimumlevelSFor SG(higherletterratingsareacceptablesuch
asSJ,SLand SMgrades).Motoroil willdisplaythisdesignation
onthecontainer.
o
0
C
2. WithengineOFFbutstillwarm,disconnectsparkplugwireand
keepitawayfromsparkplug.
3. Placeafunnelundertheoildrainto avoidgettingoil onthe tiller
frame.SeeFigure25.
.-_ oj V
%u
(0C)=300 -20o =100 0o 10o 200 300 400
_. (oF) -20o 0o 15o 300 500 700 850 1050 j
Figure24
NOTE:Donotuse non-detergentoil or2-strokeengineoil. Itcould
shortentheengine'sservicelife.
• Changeengineoilafterthefirst fivetoeighthoursof operation,
andeveryfifty hoursoreveryseasonthereafter.Changeoil every
twentyfivehourswhenoperatingengineunderheavyloadorin
hightemperatures.
To Drain Oil
Beforetippingengineor equipmenttodrainoil, drainfuelfromtankby
runningengineuntilfuel tankisempty.
Drain
J
Figure25
4. Removeoil drainendcap locatedatthe baseof theengine,and
drainoil intoan appropriatereceptacle.See Figure25.
Usedoil isa hazardouswasteproduct.Disposeofusedoil properly
IDo notdiscardwithhouseholdwaste.Checkwithyourlocalauthori-
lties or SearsServiceCenterforsafedisposal/recyclingfacilities.
5. Replaceandtightentheoil drainendcap.
6. Whenengineisdrainedofall oil, placeenginelevel.Refillwith
approximately20oz.offreshoil. Fillto FULLlineondipstick.Do
notoverfill.RefertoCheckingandAddingOilinthismanuals
Assemblysection.
7. Wipeoffanyexcessoil ontheframeandengine.
8. Replacesparkplugwirebeforestarting.
Transmission Lubrication
Thetransmissionispre-lubricatedandsealedat thefactory.It requires
no checkingunlessthetransmissionisdisassembled.Tofillwith
grease,laythe righthalfof thetransmissionon itsside,add22ounces
of Benalene920grease,andassemblethelefthalf toit. Seean
authorizedSearsServiceCenterto havethe transmissionlubricatedor
to scheduleservice,simplycontactSearsat 1-800-4-MY-HOME®.
Usedmotoroil maycauseskincancerifrepeatedlyleftincontactwith
theskinfor prolongedperiods.Althoughthis isunlikelyunlessyou
handleusedoil ona daily basis,itisstilladvisableto thoroughlywash
yourhandswithsoapandwateras soonas possibleafter handling
usedoil.
1. Drainthefuelfromthetankbyrunningtheengineuntilthefuel
tankisempty.Besurefuelfill capis secure.
19
Page 20
LUBRiCATiON
Afterevery10operatinghours,oilor greasethelubricationpoints.Use
cleanlubricatingoil(#30weightmotoroil is suitable)andcleangeneral
purposegrease(greasecontaininga metallubricantis preferred,if
available).SeeFigure26.
_'_ Handlebar
Hardware
Regulator
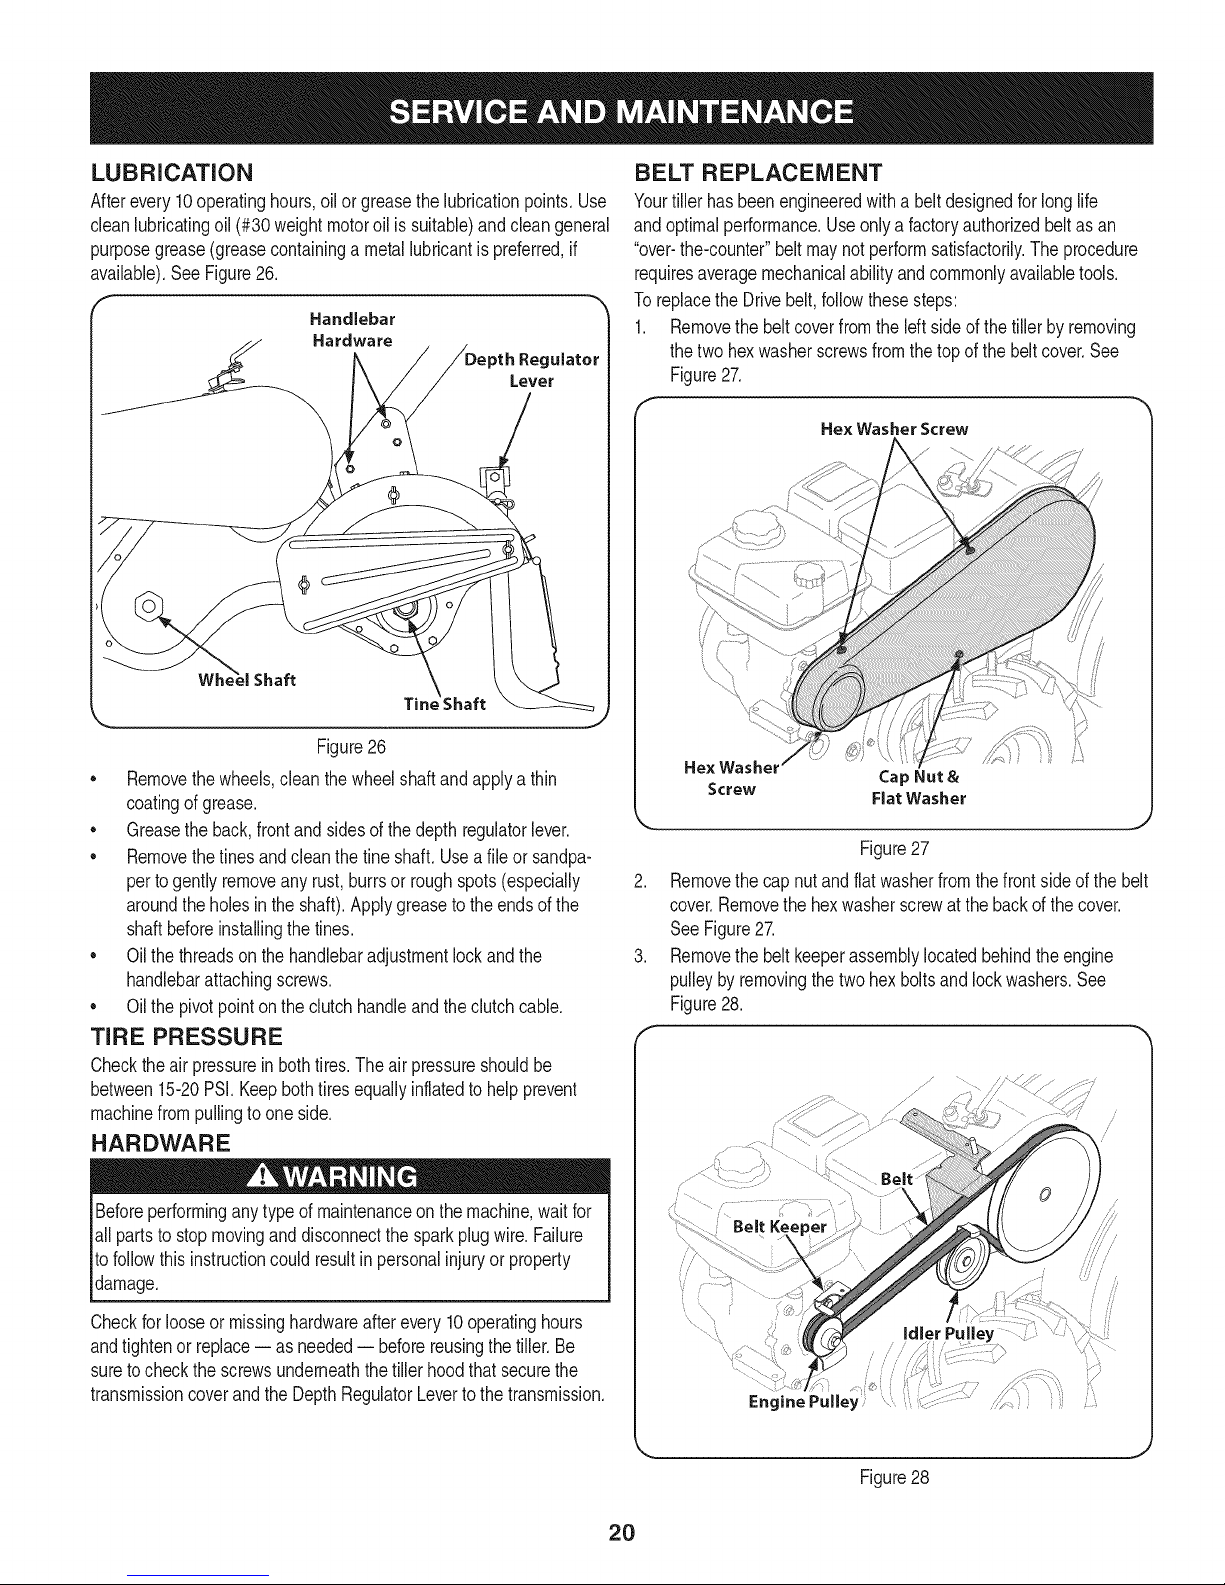
BELT REPLACEMENT
Yourtillerhasbeenengineeredwith a beltdesignedforlonglife
andoptimalperformance.Useonlya factoryauthorizedbeltasan
"over-the-counter"beltmaynotperformsatisfactorily.The procedure
requiresaveragemechanicalabilityandcommonlyavailabletools.
ToreplacetheDrivebelt,followthesesteps:
1. Removethebeltcoverfromtheleft sideofthetillerbyremoving
thetwo hexwasherscrewsfromthetopof the beltcover.See
Figure27.
Hex Washer Screw
Figure26
• Removethewheels,cleanthewheelshaft andapplya thin
coatingofgrease.
• Greasetheback,frontandsidesofthe depthregulatorlever.
• Removethetinesandcleanthefine shaft.Usea fileor sandpa-
pertogentlyremoveanyrust,burrsor roughspots(especially
aroundtheholesintheshaft).Applygreasetotheendsofthe
shaftbeforeinstallingthetines.
• Oilthe threadsonthehandlebaradjustmentlockandthe
handlebarattachingscrews.
• Oilthe pivotpointonthe clutchhandleandthe clutchcable.
TiRE PRESSURE
Checktheair pressurein bothtires.Theairpressureshouldbe
between15-20PSI.Keepbothtiresequallyinflatedtohelpprevent
machinefrompullingtoone side.
HARDWARE
Beforeperformingany typeofmaintenanceonthemachine,waitfor
all partsto stopmovinganddisconnectthesparkplugwire.Failure
tofollowthis instructioncouldresultinpersonalinjuryor property
damage.
Checkfor looseormissinghardwareafterevery10operatinghours
andtightenor replace-- asneeded-- beforereusingthetiller.Be
sureto checkthe screwsunderneaththe tillerhoodthatsecurethe
transmissioncoverandthe DepthRegulatorLeverto thetransmission.
He× Washel
Screw Flat Washer
Cap Nut &
Figure27
Removethe capnutandflatwasherfromthefrontsideofthe belt
cover.Removethehexwasherscrewat thebackof thecover.
SeeFigure27.
Removethe beltkeeperassemblylocatedbehindtheengine
pulleybyremovingthetwohex boltsand lockwashers.See
Figure28.
...............................
/ 7\
...........!..... Idler Pulley
Figure28
2O
Page 21

4. Removethe idlerpulleybyremovingtheboltand nut.
SeeFigure27.
5. Removetheold beltandinstallthenewbelt.Followtheinstruc-
tionsin reverseorderto re-installthebeltkeeperandbeltcover.
SeeFigure27.
NOTE:Uponreassernbly,makecertainthebelt is routedoverthe idler
pulleyandinsideofthe beltkeepersbytheenginepulley.
TINES
Thetineswillwearwithuseandshouldbeinspectedatthebeginningof
eachtillingseasonandafterevery30operatinghours.Thetinescanbe
replaced.RefertothePartsListsectionof thismanualforpartnumbers.
Tine Inspection
Withuse,thetineswill becomeshorter,narrowerandpointed.Badly
worntineswill resultina lossof tillingdepth,andreducedeffective-
nesswhenchoppingupandturningunderorganicmatter.
Removing/Installing a Tine Assembly
1. Removethetineshieldendcoversandsideshieldsbyremoving
thethree wingnutsoneach sidethatsecurethem.
2. Afineassemblyconsistsofalefthandfineanda righthandfine.
NOTE:Thefineassemblymovesina counter-rotatingmotionwith
thesharpedgesof thetinespositionedtoenterthe soilfirstwhen
counter-rotating.Notethis positionof thetinesfor reinstallationof the
newfine assemblies.
3. Toremoveafineassembly,simplyremovetheinternalcotterpin
securingtheclevispin.SeeFigure29.
ADJUSTMENTS
Handle
Thehandlemaybeadjustedto thedesiredheight.Refertothe
Assemblysectionfordetails.
Secondary Clutch Cable Adjustment
Ifadditionaladjustmentis necessaryaftertheprimaryadjustmentfrom
theAssemblysectioncannolongerbe used,the secondaryadjust-
mentcanbeperformedasfollows:
1. RemovethebeltcoverasinstructedtheBeltReplacementon
page21.
2. Locatethespringatthe endofthe cable.SeeFigure30.
• ® Clevis Pin
/
_ J
Figure29
4. Removetheclevispinandslidetheassemblytotheoutsideof
theunitandoff ofthe fineshaft.
5. Beforereinstallingthe fineassembly,inspectthetineshaftfor
rust,roughspotsorburrs.Lightlyfileor sand,as needed.Applya
thincoatof greaseto theshaft.
6. Installeachfineassemblysothatthecutting(sharp)edgeofthe
tineswillenterthesoilfirstwhenthetillermovesforward.Keepin
mindthatthesetinesarecounter-rotating,so securethetine as-
semblytothetineshaftusingtheclevispinandinternalcotterpin.
Figure30
.
Loosentheuppernut,thentightenor loosenthelowernutuntil
thepropertensionis reached.
4.
Oncethepropertensionisreached,re-tightenthe uppernutto
securethecable.
21
Page 22

idler Pulley Rod
Afterthebelttensionhasbeenadjusted,ifthebeltis excessivelystretched,
youmayneedtoadjusttheidlerpulleyrod.Thiscanbecheckedeasily.
Withtheengineoff andthe clutchcontrolbaildisengaged,shiftthe
gearselectionhandletoeachforwardmode.Ifthe indicatorbracket
touchestheidlerpulleyrodwiththeclutchcontrolbaildisengaged,
thenan adjustmentisnecessary.
1. Disconnectandgroundthe sparkplugwireagainsttheengine.
2. Removethebeltcoveras describedunderBeltReplacement
earlierinthissection.
3. Removethecotterpin andspringwasherfromtheidlerpulleyrod.
SeeFigure31.
F
Pin
idler Pulley
idler Pulley
Figure31
4. Movetheidlerpulleyrodtothelowerholeintheidlerbracket.
5. Replacethespringwasherandhairpinclip.
6. Checktheclearanceofthe idlerpulleyrodtotheindicatorbracket
byshiftingtoeach forwardmode.
22
Page 23

Neverstoretillerwithfuel in tankindoorsorin poorlyventilatedareasI
wherefuel fumesmayreachanopenflame,spark,or pilotlightason
a furnace,waterheater,cothesdryer,orgasapp ance. 1
PREPARING THE ENGINE
Enginesstoredbetween30and 90daysneedto betreatedwitha
gasolinestabilizerandenginesstoredover90daysneedto bedrained
offuel topreventdeteriorationandgumfromforminginfuelsystemor
on essentialcarburetorparts.Ifthegasolineinyourenginedeterio-
ratesduringstorage,youmayneedtohavethecarburetor,andother
fuelsystemcomponents,servicedor replaced.
1. Removeallfuelfromtankbyrunningengineuntilit stopsfrom
lackoffuel.
Neverleaveengineunattendedwhileit is running.
2. Changetheoil.SeeChangeEngineOil inSERVICEAND
MAINTENANCEsection.
3. Removesparkplugand pourabouta 1/2ounceof engineoilinto
thecylinder.Replacesparkplugandcrankit slowlytodistribute
oil.
4. Cleandebrisfromaroundtheengineandthe muffler.Touchup
anydamagedpaint,andcoatotherareasthatmayrustwitha light
filmofoil.
5. Storein a clean,dry andwellventilatedareaawayfromanyap-
pliancethatoperateswitha flameorpilot light,suchasa furnace,
waterheater,orclothesdryer.Alsoavoidany areawitha spark
producingelectricmotor,orwherepowertoolsare operated.
6. Ifpossible,alsoavoidstorageareaswithhighhumidity,because
that promotesrustandcorrosion.
7. Keeptheenginelevelinstorage.Tiltingcancausefuelor oil
leakage.
PREPARING THE TILLER
Whenthe tillerwon'tbeusedforanextendedperiod,prepareitfor
storageasfollows:
1. Cleanthe tillerandengine.
2. Followthelubricationrecommendationsandcheckfor looseparts
and hardware.
3. Storethe tillerina clean,dry area.
4. Neverstorethetillerwithfuelinthe fueltankinan enclosedarea
wheregas fumescouldreachanopenflameor spark,or where
ignitionsourcesare present(spaceheaters,hotwaterheaters,
furnaces,etc.).
23
Page 24

Beforeperforminganytyped maintenance/service,disengageallcontrolsandstoptheengine.Waituntilall
movingpartshavecometoacompletestop.Disconnectsparkplugwireandgrounditagainsttheenginetoprevent
unintendedstarting.Alwayswearsafetyglassesduringoperationorwhileperforminganyadjustmentsorrepairs.
Enginefailstostart
Enginerunserratically
Engineoverheats
Enginedoesnot shutoff
Wheels/Tineswill notturn
Tinesturn, butwheelsdon't
Wheelsturn,buttinesdon't
Poortillingperformance
1. Sparkplugwire disconnected.
2. EngineThrottleControlLeverincorrectlyset.
3. Fueltankemptyor stalefuel.
4. Dirtyairfilter.
5. Defectiveorincorrectlygappedsparkplug.
6. Misadjustedthrottlecontrol.
7. Dirtorwaterinfueltank.
1. Defectiveorincorrectlygappedsparkplug.
2. Dirtyairfilter(s).
3. Carburetoroutofadjustment.
4. Stalegasoline.
5. Dirtorwaterinfueltank.
6. Enginecoolingsystemclogged.
1. Enginecoolingsystemclogged.
2. Carburetoroutofadjustment.
3. Oillevelis low.
1. Misadjustedthrottlecontrolor ignitionswitch.
1. Improperuseofcontrols.
2. Worn,broken,or misadjusteddrivebelt(s).
3. Internaltransmissionwearor damage.
4. Boltlooseintransmissionpulley.
1. Boltlooseintransmissionpulley.
2. Internaltransmissionwearor damage.
1. Tineholdermountinghardwaremissing.
2. Boltlooseintransmissionpulley.
3. Internaltransmissionwearor damage.
1. Worntines.
2. ImproperDepthRegulatorsetting.
3. Incorrectthrottlesetting.
4. ForwardDriveBeltslipping.
1. Reconnectwire.
2. Putleverin STARTposition.
3. Filltankwithclean,freshgasoline.
4. Cleanor replacefilter.
5. Clean,adjustgap,or replace.
6. ContactyourSearsParts& RepairCenter.
7. ContactyourSearsParts& RepairCenter.
1. Clean,adjustgap,or replace.
2. Cleanor replace.
3. ContactyourSearsParts& RepairCenter.
4. Replacewithfreshgasoline.
5. ContactyourSearsParts& RepairCenter.
6. Cleanair coolingsystem.
1. Cleanair coolingarea.
2. ContactyourSearsParts& RepairCenter.
3. Checkoil level.
1. ContactyourSearsParts& RepairCenter.
1. ReviewOperationsection.
2. Replaceor adjustbelts.
3. ContactyourSearsParts& RepairCenter.
4. Tightenbolt.
1. Tightenbolt.
2. ContactyourSearsParts& RepairCenter.
1. Replacehardware.
2. Tightenbolt.
3. ContactyourSearsParts& RepairCenter.
1. ReplaceTines.
2. See"TillingTips& Techniques."
3. SeeService& MaintenanceSection.
4. SeeService& MaintenanceSection.
NEED MORE HELP?
Yolf[_ _w_ @e a_swe_ at@ more o_ _a_a_e_y_ife_¢:em _ fe_' free_
Findthis and aLLyour other product manuals online.
Get answers from our team of home experts.
Get a personalized maintenance plan for your home.
Find information and tools to help with home projects.
managemyli[e
b:_o_g_'_t to yo'a b_,_$ea_r_
24
Page 25

25
Page 26

Craftsman Tiller B IViodel No. 247.29932
17
6
14
27
10
44
46
\
39
38
5
25
4O
49
\
26
Page 27

Craftsman Tiller B IViodel No. 247.29932
747-1152 ShiftRod
2 649-0034-0691 LowerHandleTubeAssembly 28
3 649-0041-0691 UpperHandleAssembly 29
4 710-0946 Screw,1/4-20x 0.625 30
5 710-3005 HexScrew,3/8-16:1.25 31
6 710-3056 HexScrew,5/16-18x3.25 32
7 911-0415 ClevisPin,.375X 1.75 33
8 712-04064 HexLockNut,1/4-20 34
9 712-0379 FlangeLockNut,3/8-24 35
10 712-04063 HexLockNut,5/16-18 36
11 714-04043 CotterPin 37
12 720-0210A SmallTeeKnob 38
13 720-0278A FoamGrip,.970x 11.0
39 938-0849
14 720-0313 Grip,.1875x 1.00 40
15 726-0273 BatteryClamp,5/16 41
16 726-0317 CableTie,8.5 42
17 735-0246A EndPlug 43
18 936-0117 FlatWasher,.385x .620x .033 44
19 736-0242 BellWasher,.340x .872x .060 45
20 736-3090 FlatWasher,.260x .720x .060 46
21 938-0958 Spacer,.50x.190x .360 47
22. 747-1219-0637 ClutchBail 48
23 784-0190 HandleAdjustmentCrank 49
24 784-0191 HexNutRetainerBracket 50
25 786-0120-0637 TillerDepthControl 51
26 786-0181-0691 ShaftRodLever 52
735-0127
914-0104
686-0044B-0691
710-0176
710-0376
710-3022
710-04482
750-0194
712-04065
712-0421
926-0106
736-0204
747-0432
750-0885A
786-0090A-0691
786-0113A-0691
786-0176-0691
786-0177-0691
786-0178A-0691
786-0179-0637
786-0180-0637
710-0506
712-3058
736-0326
731-1595
Washer,.33x .87x .125
CotterPin, .072x 1.12
EndCoverAssembly
HexScrew,5/16-18x 2.75
HexScrew,5/16-18x 1.00
HexScrew,3/8-16x2.75
HexFlange,3/8-16x .875
Hub,.636x 1.00x .94
FlangeLockNut,3/8-16
WingNut,5/16-18
SpeedNutCap,1/4
FlatWasher,.344x .62x .033
Screw,Hex,5/16-18x .75
TillerFlapRod
Spacer,.322x .625x 2.00
SideShield
RearTine Shield
RH HandleMountBracket
LHHandleMountBracket
TineShield
FRTTine ShieldBracket
FRTTine ShieldSpacerBracket
HexScrew,1/2-20x5.50
HexLockNut,1/2-20
FlatWasher,1/2x 1.25x .10
Counterweight
27
Page 28

Craftsman Tiller- Model No. 247.29932
3S
Q _ 31
38
28
iO
43
26
1
14
/ 4
22
24
34
32
28
Page 29

Craftsman Tiller B IViodel No. 247.29932
686-0111-0637 BeltCoverBracketAssembly
2 710-1039 HexScrew,3/8-24 x 1.00
3 710-0170 HexLockScrew,5/16-24x .625
4 710-0513 HexLockScrew,1/4-28x .625 28
5 710-0502A Screw,3/8-16x 1.250 29
6 710-1652 HexWasherScrew,1/4-20x0.625 30
7 710-3005 HexScrew,3/8-16x 1.25 31
8 938-0688 ShoulderScrew,3/8-24x 1/2 x .325 32
9 712-0266A JamLockNut,3/8-16 33
10 742-0305A-0637 ArticulatingTine 34
11 914-0104 CotterPin,.072x 1.13 35
12 938-0689 ShoulderScrew,3/8-24x 1/2x .180 36
13 712-04063 FlangeLockNut,5/16-18 37
14 936-0176 FiatWasher,.265x .938x .120 38
15 984-0160-0637 TineAdaptorAssembly 39
16 936-0271 Washer,Spring,.317x .625x .020 40
17 731-07556 Cap 41
18 936-0452 BellWasher,.396x 1.140x .095 42
19 938-0876 ShoulderNut,7/16-20 43
20 746-1117 ClutchCable 44
21 747-1159 IdlerPulleyRod 45
22 954-0434 Belt 46
23 756-0405 FiatIdlerPulley,3.75
24 756-0971 EnginePulley,InnerHalf
26 756-1162 input Pulley,4 x8.594
27 786-0064A IdlerPulleyBracket
47 936-0208 FiatWasher,.51x 1.5x 0.07
48 952Z170-VOB ReplacementEngine
756-0972 EnginePulley,OuterHalf
786-0185A-0637
786-0187-0637
786-0193-0637
686-0109A
710-0653
936-0253
712-0392
915-0120
936-3020
784-0158A-0691
784-0208D-0691
634-04654
710-05289
712-04064
911-0415
714-04043
986-04074A
712-3054
936-0169
BeltKeeperBracket
ShiftCoverBracket
IdlerBeltKeeper
ShiftCrankAssembly
Screw,1/4-20:0.375
BellWasher,.525x 1.00x .050
LockNut,1/4-28
SpiralPin,3/16x 1.00
FiatWasher,.271x .630x .065
BeltCover
ShiftCover
Wheel,16x4.6 x8
HexScrew,1/4-20x 1.50
FlangeLockNut,1/4-20
ClevisPin, .375x 1.75
CotterPin
CompleteGearCaseAssembly
HexLockNut,3/8-24
LockWasher,3/8
29
Page 30

Craftsman Tiller B IViodel No. 247.29932
11
/
50
29\_ 37
10
16
.\
46
4O
.\
42
12
/
16
29
/
_13
30 16
/
3O
Page 31

Craftsman Tiller B IViodel No. 247.29932
611-0021 TineShaftAssembly
2 611-0128 JackShaftAssembly 28
3 611-0129 ShifInputShaftAssembly 29
4 611-04074A WheelShaftAssembly,33T 30
5 617-0058 ReverseIdlerGearAssembly,30T 31
6 617-0059 TineIdler GearAssembly,30T 32
7 617-0060 Tineinput SprocketAssembly,9T 33
8 617-0061 WheelinputSprocketAssembly,10T 34
9 617-0062 GearAssembly,11T 35
10 686-0108A-0637 RHChainCaseHousingAssembly 36
11 710-0376 HexHeadScrew,5/16-18x 1.00 37
12 710-1652 HexWasherScrew,1/4-20x .625 38
13 710-04484 HexWasherScrew,5/16-18x .750 39
14 750-0664 Spacer,.505x .88 x.440 40
15 711-1349A inputShaft,.75 41
16 712-0378 HexNut,7/16-20 42
17 712-04063 FlangeLockNut,5/16-18 43
18 913-0367 EndlessChain,#420x 50 44
19 913-0484 EndlessChain,#50x 54 45
20 716-0865 SnapRing,.500 46
21 717-0853A ClutchCollar 47
22 717-1582A GearSpur,44T 48
23 717-1583 GearSpur,30T
24 717-1584 GearSpur,30T
25 717-1585 GearSpur,44T
26 717-1587 GearSpur,44T
49 741-0862 DetentBall,.250
50 750-0258 Spacer,.315x .750x .375
51 950-0570 Spacer,1.0x 2.0x .5
-- 986-04074B CompleteGearCase
717-1594 GearSpur,16T
921-0378 ShaftSeal,1.0
721-0379 ShaftSeal,.75
786-0238 PositionerGearBracket
726-0277 TaperedCap Plug
732-04778 CompressionSpring,.230
936-0163
936-0171
936-0226
936-0351
736-0407
736-0518
736-3088
686-04129-0637
950-0671
738-0645
738-0648
738-04424
941-0600
941-0420
741-0421
941-0563
FiatWasher,1.03x 1.62x .03
LockWasher,7/16
FiatWasher,.474x .879x .064
FiatWasher,.760x 1.50
BellWasher,.45x 1.00x .062
ThrustWasher,.445x 1.92x .060
FiatWasher,1.595x .635x .062
LHChainCaseHousing
Spacer,.75x 2.0x .50
ShaftDetent,.5DIA
JackShaft,.625x 2.385
JackShaft,.6250x 5.0050
BallBearing,17x 40 x 12
FlangeBearing,1.0x 2.5x 1.38
FlangeBearing,.75x 2.5x 1.38
BallBearing,17x 40 x 12:6203
31
Page 32

Craftsman Engine IViodel 170-VOB For Tiller IViodel 247.29932
m
20
21
22
23
30
31
32
34
35
36
37
23
951-11285
712-04214
751-12294
710-05002
951-10806
712-04213
710-05102
951-12135
951-10794
951-10794
951-12136
23
_37
____-34
32-_ _ '_--32
20
31
D = O 0
ExhaustPipeGasket
Nut,M8
MufflerAssembly
Bolt
Air CleanerHousing
Nut
Self-TappingBoltM4.2x16
SilencerPlate
Air CleanerAssembly
Air CleanerAssembly
Air CleanerCover
32
Page 33

Craftsman Engine IViodel 170-VOB For Tiller IViodel 247.29932
d
a
c
29
m
28
29
a
b
C
d
e
f
g
h
I
J
k
I
951-10797
951-11571
951-11177
N/A
N/A
N/A
N/A
N/A
N/A
N/A
N/A
N/A
N/A
N/A
D = I! q!
CarburetorAssembly
CarburetorGasketPlate
ControlLever,Choke
ChokeShaft
ChokePlate
ThrottleShaft
ThrottlePlate
ScrewM3x5
LockWasher
IdleJetAssembly
Gasket,ThrottlePlate
IdleSpeedAdjustingScrew
MixtureScrew
CarburetorBody
m
I11
n
0
P
q
s
t
U
V
W
X
r
N/A
N/A
N/A
N/A
N/A
N/A
951-11589
N/A
951-11348
710-04945
951-11349
710-04938
951-12119
D = I! O
FloatPin
EmulsionTube
NeedleValve
MainJet
NeedleValveSpring
Float
FuelBowlGasket
FuelBowl
FuelBowlGasket
FuelBowlMountingBolt
FuelDrainPlugGasket
FuelDrainPlug
CarburetorKit- Major
(Incl Ref.I,m,n,o,p,q,r,s,u&w)
33
Page 34

Craftsman Engine Model 170-VOB For Tiller Model 247.29932
113
5a 64
56
63
55
45
4_4
112
46 4_7 _
45
34
Page 35

Craftsman Engine IViodel 170=VOB For Tiller IViodel 247.29932
m
44
45
46
47
48
49
5O
51
52
53
54
55
56
57
58
59
6O
61
62
63
64
65
65a
66
67
68
69
112
113
951-11253
951-11632
951-12007
951-11633
710-04915
951-11113
951-11573
951-11356
736-04461
951-11574
714-04074
951-11575
951-11369
951-12160
951-10307
951-11576
715-04092
715-04089
951-11371
951-12125
710-04932
951-11377
951-11577
951-11578
951-12155
736-04440
710-04906
951-10370
951-11283
D = B
PistonRingSet
PistonPinSnapRing
Piston
PistonPin
BoltM6x12
AirShield
ConnectingRodAssembly
GovernorArm Shaft
Washer5.2xl.9
GovernorSeal
CotterPin
CamshaftAssy.
RadialBallBearing,6205
CrankshaftAssembly
WoodruffKey
GovernorGear/ShaftAssembly
DowelPin7x14
DowelPin9x14
CrankcaseCoverGasket
CoverComp,LeftCrankcase
BoltM8x32
Oil FillerPlugAss'y
O-Ring
OilSeal,25x41.25x6
ShortBlock
(InclRef.4,20,25,26,38,
40,41,44-47,50-70)
Washer10x16x1.5
Oil DrainPlug
Oil DrainPlug& WasherAssembly
Oil FillPlugAssembly
35
Page 36

Craftsman Engine Model 170=VOB For Tiller Model 247.29932
18
16 38
114
36
Page 37

Craftsman Engine IViodel 170=VOB For Tiller IViodel 247.29932
m
1
2
3
3a
4
5
6
7
8
9
10
11
12
13
14
15
16
17
18
710-04968
951-11054
731-07059
726-04101
951-11565
951-11892
751-11124
751-11123
951-11893
710-04902
951-11895
951-12000
951-12002
951-12003
951-12004
951-11894
710-04933
951-10668A
951-10292
D = B 0
BoltM6x16
ValveCover
BreatherHose
HoseClamp
ValveCoverGasket
RockerArmAssembly
Nut,PivotLocking
AdjustingNut,Valve
RockerArm
Bolt,Pivot
PushRodGuide
Retainer,In.ValveSpring
Adjuster,ExhValve
Retainer,Ex.ValveSpring
ValveSpring
IntakeValveSeal
BoltM8x55
CylinderHeadAssembly
(InclRef.4,6-15,17,20,
25,26,38,42& 43)
SparkPlug/F6Rtc
m
19
19
24
25
26
27
38
39
4O
41
42
43
114
710-05276
951-10657
710-05101
951-11567
951-11568
951-11569
951-11572
951-10648
951-11899
715-04090
951-10647A
951-10647A
951-11063A
951-10819
951-12120
951-12121
D = O
MufflerStudM8x36
MufflerStudAssembly
StudM6x110
CarburetorInsulatorGasket
CarburetorInsulator
CarburetorGasket
Gasket,CylinderHead
PushRod
Tappet
DowelPin10x16
ValveKit
ValveKit
ValveCoverKit
CylinderHeadServiceKit
(InclRef.4,15,16& 38)
GasketKit,External
(InclRef.4,20,25,26,27,29& 68)
GasketKit,Complete
(InclRef.4,20,25,26,27,29,38,52,
53,62,66,68& 70)
37
Page 38

Craftsman Engine IViodel 170=VOB For Tiller IViodel 247.29932
74
82
81
p_
80
m
7O
71
72
73
74
75
76
77
79
80
81
82
109
110
111
951-12126
951-10792
710-04919
951-10805
951-10909
951-10911
712-04209
710-04915
951-11583
736-04455
710-04974
951-12127
712-04212
710-04918
951-11109
D = O O
Oil Seal25x41.25x6
IgnitionCoilAssembly
BoltM6x25
Flywheel
Fan,Cooling
Pulley,Starter
Nut,Special,M14x1.5
BoltM6x12
BlowerHousing
FlatWasher
BoltM6xlO
RecoilStarter
Nut,M6
BoltM6x20
BlowerHousingShield
38
Page 39

Craftsman Engine IViodel 170=VOB For Tiller IViodel 247.29932
m
1
83
84
85
86
87
88
9O
91
92
93
94
95
710-04968
951-11067
951-12131
710-04928
951-11585
951-10664
951-10665
951-11106
712-04212
710-04908
951-10650
951-11700
710-04915
D = O
BoltM6x16
ThrottleControlKnob
PrimerBracket
BoltM6x12
GovernorSpring
ThrottleLinkageSpring
ThrottleLinkage
GovernorArm
NutM6
GovernorArmBolt
FuelLineKit
FuelHoseClamp
BoltM6x12
m
96
97
98
1CO
101
101a
102
103
104
106
107
108
951-11914
710-04905
710-04915
951-11903
951-10656
951-11913
951-11904
951-11912
951-10917A
951-11933
951-12159
951-10651
D = O O
DipstickDecorationCover
Bolt
BoltM6x12
Oil FillTubeO-Ring
Oil FillTube
Oil FillTubeAssembly
Oil FillTubeO-Ring
DipstickAssembly
FuelCapAssembly
FuelLevelIndicator
FuelTank
FuelTankNipple
39
Page 40

Craftsman Tiller Model No. 247.29932
777120451 777D15446
777S33508
777D15445
777D15447
777S33612
777123106
Operation Of This Equipment May Cre_e Sparks That
Start Fires Around Dry Vegetattsn. A Spark Arrestor May Be
Required, The Operator Should Contact Local Fire Agencies
For Laws Or Regulations TO Fire Prevention Requirements.
777120358
777X43688
DONOT
USEE85 ORFUEL
CONTAININGMORE
THAN10% ETHANOL
777123259
777123174
777D15452
4O
Page 41

(Thispageapplicableinthe U.S.A.and Canadaonly.)
Sears Brands Management Corporation (Sears), the California Air Resources Board (CARD)
and the United States Environmental Protection Agency (U.S. EPA)
Emission Control System Warranty Statement (Owner's Defect Warranty Rights and Obligations)
EMISSIONCONTROLWARRANTYCOVERAGEISAPPLICABLETOCERTI-
FIEDENGINESPURCHASEDINCALIFORNIAIN1995ANDTHEREAF-
TER,WHICHAREUSEDINCALIFORNIA,ANDTOCERTIFIEDMODEL
California and United States Emission
TheCaliforniaAirResourcesBoard(CARD),U.S.EPAandSearsarepleased
toexplainthe EmissionControlSystemWarrantyonyourmodelyear2000and
latersmalloff-roadengine(SORE).InCalifornia,newsmalloff-roadengines
mustbe designed,builtand equippedto meettheState'sstringentanti-smog
standards.Elsewherein theUnitedStates,newnon-road,spark-ignition
enginescertifiedformodelyear1997and latermustmeetsimilarstandardsset
forthbythe U.S.EPA.Searsmustwarranttheemissioncontrolsystemonyour
YEAR1997ANDLATERENGINESWHICHAREPURCHASEDANDUSED
ELSEWHEREINTHEUNITEDSTATES(ANDAFTERJANUARY1,2001 IN
CANADA).
Control Defects Warranty Statement
enginefortheperiodsoftimelistedbelow,providedtherehasbeennoabuse,
neglector impropermaintenanceofyoursmalloff-roadengine.Youremis-
sioncontrolsystemincludespartssuchasthecarburetor,aircleaner,ignition
system,mufflerandcatalyticconverter.Alsoincludedmaybeconnectorsand
otheremissionrelatedassemblies.Whereawarrantableconditionexists,Sears
will repairyoursmalloff-roadengineatnocostto youincludingdiagnosis,parts
andlabor.
Sears Emission Control Defects Warranty Coverage
Smalloff-roadenginesarewarrantedrelativeto emissioncontrolpartsdefects
fora periodofone year,subjecttoprovisionssetforthbelow.Ifany covered
Owner's Warranty
Asthe smalloff-roadengineowner,youare responsiblefortheperformanceof
therequiredmaintenancelistedin yourOperatingand MaintenanceInstruc-
tions.Searsrecommendsthatyouretainallyourreceiptscoveringmaintenance
onyoursmalloff-roadengine,butSearscannotdenywarrantysolelyforthe
lackofreceiptsorfor yourfailuretoensuretheperformanceof allscheduled
maintenance.Asthesmalloff-roadengineowner,youshouldhoweverbe
awarethat Searsmaydenyyouwarrantycoverageifyoursmalloff-roadengine
ora parthasfaileddueto abuse,neglect,impropermaintenanceor unap-
parton yourengineis defective,thepart willbe repairedorreplacedbySears.
Responsibilities
provedmodifications.Youare responsibleforpresentingyour smalloff-road
engineto anAuthorizedSearsServiceDealerassoonas aproblemexists.The
undisputedwarrantyrepairsshouldbecompletedina reasonableamountof
time,notto exceed30days.Ifyouhaveanyquestionsregardingyourwarranty
rightsandresponsibilities,youshouldcontacta SearsServiceRepresentative
at 1-800-469-4663.Theemissionwarrantyisa defectswarranty.Defectsare
judgedonnormalengineperformance.Thewarrantyis notrelatedtoan in-use
emissiontest.
Sears Emission Control Defects Warranty Provisions
ThefollowingarespecificprovisionsrelativetoyourEmissionControlDefectsWarrantyCoverage.ItisinadditiontotheSearsenginewarrantyfornon-regulated
enginesfoundin theOperatingand MaintenanceInstructions.
1. WarrantedParts
Coverageunderthiswarrantyextendsonlytothe partslistedbelow(the
emissioncontrolsystemsparts)to the extentthesepartswerepresenton
theenginepurchased.
a. FuelMeteringSystem
• Cold startenrichmentsystem
• Carburetorandinternalparts
• FuelPump
b. AirlnductionSystem
• Aircleaner
• Intakemanifold
c. IgnitionSystem
• Sparkplug(s)
• Magnetoignitionsystem
d. CatalystSystem
• Catalyticconverter
• Exhaustmanifold
• Air injectionsystemorpulsevalve
e. MiscellaneousItemsUsedin AboveSystems
• Vacuum,temperature,position,timesensitivevalves
andswitches
• Connectorsandassemblies
2. Lengthof Coverage
Searswarrantsto theinitialownerand eachsubsequentpurchaserthat
theWarrantedPartsshallbefree fromdefectsin materialsandworkman-
shipwhich causedthefailureofthe WarrantedPartsfor aperiodof one
yearfromthe datetheengineis deliveredtoa retailpurchaser.
Inthe USAandCanada,a 24hourhotline,1-800-469-4663,hasa menuofpre-recordedmessagesofferingyouenginemaintenanceinformation.
3. NoCharge
Repairorreplacementof anyWarrantedPartwill beperformedatno
chargeto the owner,includingdiagnosticlaborwhichleadstothe
determinationthata WarrantedPartisdefective,ifthediagnosticworkis
performedatanAuthorizedSearsServiceDealer.Foremissionswarranty
servicecontact yournearestAuthorizedSearsServiceDealeras listedin
the "YellowPages"under"Engines,Gasoline,""GasolineEngines,""Lawn
Mowers,"orsimilarcategory.
4. Claimsand CoverageExclusions
Warrantyclaimsshallbefiled in accordancewiththe provisionsofthe
SearsEngineWarrantyPolicy.Warrantycoverageshallbeexcludedfor
failuresof WarrantedPartswhicharenotoriginalSearspartsor because
ofabuse,neglector impropermaintenanceas setforth intheSears
EngineWarrantyPolicy.Searsisnotliableto coverfailuresof Warranted
Partscausedby theuseof add-on,non-original,or modifiedparts.
5. Maintenance
AnyWarrantedPartwhichis notscheduledforreplacementas required
maintenanceor whichis scheduledonlyforregularinspectionto the effect
of"repairor replaceasnecessary"shallbe warrantedas todefectsfor the
warrantyperiod.AnyWarrantedPartwhichisscheduledfor replacement
asrequiredmaintenanceshallbewarrantedas todefectsonly forthe
periodoftime uptothe firstscheduledreplacementfor thatpart.Any
replacementpartthat isequivalentinperformanceanddurabilitymay
beusedinthe performanceofanymaintenanceor repairs.The owneris
responsibleforthe performanceof all requiredmaintenance,asdefinedin
the SearsOperatingandMaintenanceInstructions.
6. ConsequentialCoverage
Coveragehereundershallextendto thefailure ofanyenginecomponents
causedbythefailureofanyWarrantedPartstill underwarranty.
GD0C-100188Rev.B
41
Page 42

Look For Relevant Emissions Durability Period and
Air index information On Your Engine Emissions Label
Engines that are certified to meet the California Air Resources Board (CARB) Tier 2 Emission Standards must
display information regarding the Emissions Durability Period and the Air index. Sears Brands Management
Corporation makes this information available to the consumer on our emission labels.
The Emissions Durability Period describes the number of hours of actual running time for which the engine is
certified to be emissions compliant, assuming proper maintenance in accordance with the Operating & Mainte-
nance instructions. The following categories are used:
Moderate: Engine is certified to be emission compliant for 125 hours of actual engine running time.
intermediate: Engine is certified to be emission compliant for 250 hours of actual engine running time.
Extended: Engine is certified to be emission compliant for 500 hours of actual engine running time.
For example, a typical walk-behind lawn mower is used 20 to 25 hours per year. Therefore, the Emissions
Durability Period of an engine with an intermediate rating would equate to 10 to 12 years.
The Air index is a calculated number describing the relative level of emissions for a specific engine family. The
lower the Air index, the cleaner the engine. This information is displayed in graphical form on the emissions label.
After July 1,2000, Look For Emissions Compliance Period
On Engine Emissions Compliance Label
After July 1, 2000 certain Sears Brands Management Corporation engines wiii be certified to meet the United
States Environmental Protection Agency (USEPA) Phase 2 emission standards. For Phase 2 certified engines, the
Emissions Compliance Period referred to on the Emissions Compliance label indicates the number of operating
hours for which the engine has been shown to meet Federal emission requirements.
For engines less than 225 cc displacement, Category C = 125 hours, B = 250 hours and A = 500 hours.
For engines of 225 cc or more, Category C = 250 hours, B = 500 hours and A = 1000 hours.
This isa generic representation of the emission labeltypically found on a certified engine.
FAMILYYBSXS.3192VA 274812
GDOC-100182Rev.B
42
Page 43

Congratulations on making a smart purchase. Your new Craftsman® product is designed and
manufactured for years of dependable operation. But like all products, it may require repair
from time to time. That's when having a Repair Protection Agreement can save you money and
aggravation.
Here's what the Repair Protection Agreement* includes:
[] Expert service by our 10,000 professional repair specialists
[] Unlimited service and no charge for parts and labor on all covered repairs
[] Product replacement up to $1500 if your covered product can't be fixed
[] Discount of 25% from regular price of service and related installed parts not covered by the
agreement; also, 25% off regular price of preventive maintenance check
[] Fast help by phone - we call it Rapid Resolution - phone support from a Sears representative.
Think of us as a "talking owner's manual."
Once you purchase the Repair Protection Agreement, a simple phone call is all that it takes for you
to schedule service. You can call anytime day or night, or schedule a service appointment online.
The Repair Protection Agreement is a risk-free purchase. If you cancel for any reason during the
product warranty period, we will provide a full refund. Or, a prorated refund anytime after the
product warranty period expires. Purchase your Repair Protection Agreement today!
Some limitations and exclusions apply. For prices and additional information in the U.S.A.
call 1=800=827=6655.
*Coverage in Canada varies on some items. For full details call Sears Canada at 1=800=361=
6665.
Sears Installation Service
For Sears professional installation of home appliances, garage door openers, water heaters, and
other major home items, inthe U.S.A. or Canada call 1=800=4=MY=HOME®.
43
Page 44

Declaraci6n de garantia ........................ P_,gina 44
Medidas importantes de seguridad ..... P_,ginas 45-48
Armado ................................................. P_,ginas 49-52
Funcionamiento .................................... P_,ginas 53-58
Servicio y Mantenimiento ..................... P_.ginas 59-64
Almacenamiento fuera de temporada.. P_,gina 65
Soluci6n de problemas ......................... P_,gina 66
Acuerdo de protecci6n para reparaciones P_,gina 71
NQmero de servicio ............................... Cubierta posterior
CRAFTSMAN DOS AltOS DE GARANTIA
DurantedosaSosdesdela fechade compra,esteproductoest_garantizadocontracualquierdefectode materialeso manodeobra.Un
productodefectuosorecibir_lareparaci6no sustituci6ngratuitasi la reparaci6nnoest_disponible.
Paradetalles sobre lagarantia de coberturaparaobtener reparaci6ngratuita o reemplazo,visite elsitio web: www.craftsman.com
Esta garantias61ocubre defectos enmateriaies y mano de obra. Cobertura de lagarantiano ineiuye:
• Bienesfungiblesquepuedendesgastarseconel usonormalenel periodode garantia,comolas cuchillas,dientes,ocinturones.
• DaSosenel productoresultantede losintentosdel usuariodemodificaci6ndel productoola reparaci6no causadosporaccesoriosde
productos.
• Las reparacionesnecesariasdebidoa un accidenteo fallaparaoperaro mantenerel productoseg0nlasinstruccionessuministradas.
• Mantenimientopreventivoo reparacionesnecesariasdebidoa la mezcladecombustibleinadecuado,eJcombustiblecontaminadoo viciado.
Estagaranfiaser_nulasiel productoes utilizadoalgunavez,mientrasquela prestaci6nde servicioscomercialo sise alquilaa otrapersona.
Estagaranfiale otorgaderechoslegalesespecificos,y ustedtambi_npuedetenerotrosderechosquevariandeestadoaestado.
Sears Brands Management Corporation, Hoffman Estates, IL 60179
Seriedel motor: 208cc
Tipodeaceitedelmotor: 10W30
Capacidadde aceitedel motor: 20onzas
Combustible: GasoJinasinplomo
Bujia: F6RTC
Separaci6ndelas bujias: .030"
NSmerode modelo ..........................................................
NSmerode serie..............................................................
Fechade compra .............................................................
Registreeln0merodemodelo,nQmerode serie
y fechade compram_sarriba
©KCDIR LLC 44
Page 45

Lapresenciadeestesfmboloindicaquesetratadeinstruccionesde
seguridadimportantesquesedebenrespetarparaevitarponerenpeligro
suseguridadpersonaly/omaterialyladeotraspersonas.Leaycumpla
todaslasinstruccionesdeestemanualantesdeintentaroperaresta
m_quina.Sinorespetaestasinstruccionespuedeprovocarlesiones
personales.Cuandoveaestesfmbolo,ipresteatenci6nalaadvertencia!
Estam_quinaest_dise_adaparaserutilizadarespetandolasnormas
deseguridadcontenidasenestemanual.AIigualqueconcualquiertipo
deequipomotorizado,undescuidooerrorporpartedeloperadorpuede
producirlesionesgraves.Estam_quinaescapazdeamputardedos,
manosypiesydearrojarresiduos.Denorespetarlasinstruccionesde
seguridadsiguientessepuedenproducirlesionesgravesolamuerte.
PROPOSICI6N 65 DE CALiFORNiA
Elescapedelmotorde esteproducto,algunosde suscomponentesy
algunoscomponentesdelvehfculocontieneno liberansustanciasqufmicas
queelestadode Californiaconsideraque puedenproducirc_ncer,
defectosdenacimientouotrosproblemasreproductivos.Loshomesde la
baterfay los accesoriosalinescontienenplomoy compuestosde plomo,
sustanciasqufmicasquesegOnIoestablecidopor elEstadode California
causanc_ncery da_osen el sistemareproductivo.L_veselasmanos
despuesdeestarencontactoconestoscomponentes.
CAPAClTACI6N
• Lea,cornprenday respetetodaslasinstruccionesquefiguranen
la rn_.quinay enel o losrnanualesantesde procedera arrnarlay
hacerlafuncionar.Guardeestemanualenunlugarseguropara
consultasfuturasy peri6dicas,asf cornoparasolicitarrepuestos.
• Leael manualdeloperadorysigatodaslasadvertenciase
instruccionesdeseguridad.Deno hacerlo,puedeocasionar
heridasdegravedadal operadory/o alosobservadores.Ante
cualquierduda,Ilarneal1-800-4MY-HOME.
• Farniliarfcesecontodosloscontrolesysu correcto
funcionarniento.Sepac6rnodetenerla rn_.quinayc6rno
desconectarloscontrolesr_.pidarnente.
• No perrnitanuncaque losni_osrnenoresde14a_osutilicen
estarn_.quina.Losni_osde 14a_osen adelantedebenleery
entenderlasinstruccionesde operaci6ny norrnasdeseguridad
contenidaseneste manualyen larn_.quinaydebenser
entrenadosy supervisadospor unadulto.
• Nuncaperrnitaquelosadultosoperenestarn_.quinasinrecibir
antesla instrucci6napropiada.
• Mantengaalosobservadores,rnascotasy ni_osal rnenosa25
metrosdela rn_.quinarnientrasest,.en funcionarniento.Detenga
la rn_.quinasi alguienseacerca.
• Nuncaenciendael motorenespacioscerradosoen unazona
conpocaventilaci6n.Elescapedelmotorcontienernon6xidode
carbono,un gasinodoroy let&
Su responsabilidad--Lirnite el usode estarn_.quinarnotorizada
alas personasquelean,cornprendany curnplanlasadvertenciase
instruccionesqueaparecenenestemanualy enla rn_.quina.
iGUARDEESTASINSTRUCCIONES!
PR E PARATIVO S
• Reviserninuciosarnenteel _.readondeseva a usarel equipo.
Retiretodaslaspiedras,botellas,latasy otrosobjetosextra_os
que puedanserlevantadoso arrojadoscausandolesiones
personaleso da_osa la rn_.quina.
• Paraprotegerselosojos,utilicesiernpregalas o anteojosde
seguridadrnientrasoperalarn_.quinao rnientraslaajustao
repara.Losobjetosarrojadosquerebotanpuedenproducir
lesionesocularesgraves.
• Utilicezapatosdetrabajoresistentes,desuelafuerte,y
pantalonesycarnisasajustados.Lasprendassueltasy las
alhajasse puedenengancharen laspiezasrn6viles.Nuncaopere
estarn_.quinaestandodescalzoo consandalias.
• Antesdeencenderla rn_quinacontrolequetodoslospernosy
tornillosest_nbienajustadosparagarantizarquela rn_.quinase
encuentraen condicionessegurasdeoperaci6n.Adern_.s,realice
unainspecci6nvisualde la rn_.quinaa intervalosfrecuentespara
controlarsila rnisrnaest,.da_ada.
• Antesdearrancarel motor,desenganchelas palancasdel
ernbragueydespl_.celas(en casode haber)a la posici6nneutral
("N").
• Nuncadejelarn_.quinaenfuncionarnientosinvigilancia.
• Nuncaintenterealizarajustesrnientrasel motorest,.enrnarcha,
exceptoenlos casosespecfficarnenterecornendadosen el
manualdeloperador.
• Mantengao reernplacelasetiquetasdeseguridadeinstrucciones
segQnsea necesario.
45
Page 46

Manejo seguro de la gasolina:
Paraevitarlesionespersonalesy da_osmaterialestengamuchocuidadoal
manipularlagasolina.Lagasolinaessumamenteinflamableysus vapores
puedencausarexplosiones.Si sederramagasolinaencimaosobrela ropa
sepuedelesionargravementeya quese puedeincendiar. Lavesela piely
c_mbiesede ropade inmediato.
• Utilices61olosrecipientesparagasolinaautorizados.
• NuncaIlenelosrecipientesenel interiordeunveh[culoo cami6no
cajaderemolquecon unrecubrimientopl&stico.Coloquesiemprelos
recipientesenel pisoy lejos delveh[culoantesdeIlenarlos.
• Cuandoseafactible,retireel equipoagasolinadelcami6no remolquey
Ileneloenel suelo.Siesto noesposible,Ileneelequipoen unremolque
concontenedorport_til,envezdedesdeunaboquilladispensadorade
gasolina.
• Mantengala boquillaencontactoconel hordedeltanquede
combustibleo de laaberturadelrecipienteen todomomento,hasta
terminarde cargar.Noutiliceundispositivoparaabrir/cerrarla boquilla.
• Apaguetodos loscigarrillos,cigarros,pipasyotrasfuentesde
combusti6n.
• Nuncacarguecombustibleen lam&quinaenun espaciocerrado.
• Nuncasaquela tapadela gasolinani agreguecombustiblemientrasel
motorest&calienteoen marcha.Permitaque el motorse enfr[epot Io
menosdos minutosantesdevolvera cargarcombustible.
• Nuncalleneenexcesoeltanquede combustible.Lleneeltanqueno
m&sdeY2pulgadapordebajodela basedelcuellodeltap6nde carga,
paradejarespacioparalaexpansi6ndelcombustible.
• Vuelvaacolocarla tapadel combustibley ajL]stelabien.
• Limpiela gasolinaquese puedahaberderramadosobreel motoro el
equipo.Trasladelam_quinaaotrazona. Espere5minutosantesde
encenderelmotor.
• Parareducirel riesgode incendio,mantengala m&quinalimpiade
pasto,hojasy deacumulaci6nde otrosescombros.Limpielosderrames
deaceiteocombustibleysaquetodoslos escombrosembebidosde
combustible.
• Nuncaguardelam_quinaoel recipientede combustibleenun espacio
cerradodondehayafuego,chispasoluz piloto,comopor ejemplode
calentadoresdeagua,calefactoresdeambientes,hornos,secadoresde
ropauotros aparatosagas.
FUNCIONANIIENTO
• Nocoloquelas manosni los piescerca depiezasgiratorias.Elcontacto
conlas piezasgiratoriaspuedeocasionarenla amputaci6ndemanos
opies.
• Noutilicela m_quinabajola influenciadelalcoholo lasdrogas.
• Nuncaopereestam_quinasi no haybuenavisibilidadoiluminaci6n.
Siempredebeestarsegurodeque est_bien afirmadoysujetando
firmementelas manijas.
• Mantengaa lostranseL]ntesalejadosde la m&quinamientrasla misma
est&enfuncionamiento.Detengalam_quinasi alguienseacerca.
• Tengacuidadoal labrarunterrenoduro.Losdientespuedenclavarseen
latierrae impulsarlacultivadorahaciaadelante.Si estoocurre,suelteel
manubrioydejela m_quinalibre.
• Seasumamenteprecavidocuandooperela m&quinasobreuna
superficiecongravaoal cruzarla.Mantengasealertaporsi se
presentanpeligrosocultosotr&nsito.No transportepasajeros.
• Nuncautilicela m&quinaaaltasvelocidadesdedesplazamientosobre
superficiesdurasoresbaladizas.
• Tengacuidadoparaevitarresbalaro caerse.
• Mirehaciaabajoy haciaatr&sy tengacuidadocuandose desplaceen
marchaatr&so cuandojalede la m_quinahaciausted.
• Arranqueel motordeacuerdocon lasinstruccionesdel manualyaleje
los piesde losdientesentodo momento.
• Si golpeaalgOnunobjeto extraSoo si la m&quinacomienzaaemitir
un sonidopococomOnoavibrar,apagueel motordeinmediato.
Desconecteelcablede la buj[a,p6ngalohaciendomasacontrael motor
y sigalos pasossiguientes:
a. Inspeccionelam&quinaparaversi est_daSada.
b. Repareoreemplacelas piezasdaSadas.
c. Controlesihaypiezasflojasy ajQstelasparaasegurarquela
m&quinafuncionedemaneraseguray continua.
• Desenganchetodas las palancasdeembrague(silas hay)y detengael
motorantesde dejarla posici6nde operaci6n(detr&sde las manijas).
Esperehastaquelosdientes sedetengancompletamenteantesde
limpiarlos,haceralgQnajusteo inspeccionarlos.
• Nuncaenciendael motoren espacioscerradosoen unazonaconpoca
ventilaci6n.Elescapedelmotorcontienemon6xidodecarbono,ungas
inodoroy letal.
• Elsilenciadory el motorsecalientany puedencausarquemaduras.No
los toque.
• Tengaprecauci6ncuandolabreterrenocercadevallas,edificiosy
serviciossubterr_neos.LosdientesrotatoriospuedencausardaSos
materialesolesionespersonales.
• Nosobrecarguela capacidaddela m_quinaintentandolabrarelsueloa
un niveldemasiadoprofundoo a unavelocidaddemasiador@ida.
• Si lam&quinaarrancahaciendounsonidoo unavibraci6nrata, detenga
el motor,desconecteel cable dela buj[ay conecteloa masacontrael
motor.Inspeccionelam&quinaminuciosamenteparaver si est&daSada.
Reparetodoslos daSosantesde encenderyoperarla m&quina.
• Mantengatodos losescudos,protectoresydispositivosde seguridaden
su lugaryen correctofuncionamiento.
• Nuncalevanteotransportela m_quinacuandoel motorest_encendido.
• Utilices61odispositivosdesujeci6no accesoriosaprobadosporel
fabricantequefiguranenlas paginasde lalistadepiezasde este
manualdeloperador.Si noIohace,puedenproducirselesiones
personales.
• Si sepresentansituacionesquenoest&nprevistasen estemanual,sea
cuidadosoy useel sentidocomL]n.P6ngaseencontactoconAsistencia
al Clienteparasolicitarayudayel hombredeldistribuidordeservicio
m_s cercano.
MANTENINIIENTO Y ALMACENANIIENTO
• Mantengala m_quina,losaditamentosy accesoriosen condicionesde
funcionamientoseguro.
• Dejeque la m_quinase enfr[epor Iomenoscincominutosantes
de guardarla.Nuncaalterelos dispositivosdeseguridad.Controle
peri6dicamentequefuncionancorrectamente.
• Verifiquefrecuentementequelospernosytornillosestenajustados
correctamenteparaasegurarsedeque lam_quinaestetrabajandode
manerasegura.Adem_s,hagaunainspecci6nvisualdela m_quinapara
verificarsiest_daSada.
• Antesde limpiar,repararorevisar,detengael motoryasegOresedeque
los dientesytodaslaspartesm6vilessehandetenido.Desconecteel
cabledela buj[ay p6ngalohaciendomasacontraelmotorparaevitarque
seenciendaaccidentalmente.
• Nocambielaconfiguraci6ndelreguladordel motorniIohagafuncionar
ademasiadavelocidad.Elreguladordelmotorcontrolala velocidad
m_ximadefuncionamientosegurodel motor.
• Mantengao reemplacelasetiquetasdeseguridady deinstrucciones
segOnseanecesario.
• Sigalasinstruccionesdeestemanualparacargar,descargar,transportar
y almacenarde maneraseguraestam_quina.
• Si lam_quinasevaa almacenarpor unper[odoprolongado,consulte
siempreel manualdeloperadorparaobtenerinformaci6nimportante.
• Si debevaciareltanquedecombustible,h_galoal airelibre.
46
Page 47

,, Observelareglamentaci6nylasnormasrespectoalaeliminaci6n
correctadegasolina,aceite,etc.paraprotegerelmedicambiente.
• SegOnlaComisi6ndeSeguridaddeProductosparaelConsumidorde
losEstadosUnidos(CPSC)ylaAgenciadeProtecci6nAmbientaldelos
EstadosUnidos(EPA),esteproductotieneunavidaOtilmediadesiete
(7)a_os6130horasdefuncionamiento.AIfinalizarlavidaQtilmedia
hagainspeccionaranualmenteestaunidadporundistribuidordeservicio
autorizadoparacerciorarsedequetodoslossistemasmec_nicosyde
seguridadfuncionancorrectamenteynotienenexcesivodesgaste.Sino
Iohace,puedenproducirseaccidentes,lesionesolamuerte.
NO MODIFIQUE EL MOTOR
Paraevitarlesionesgraveso lamuerte,no modifiqueelmotorbajo ninguna
circunstancia.Si alteralaconfiguraci6ndel regulador,elmotorsepuede
desbocaryfuncionaravelocidadesquenoson seguras.Nuncamodifiquela
configuraci6ndef_bricadel reguladordelmotor.
AVISO REFERIDO A EMISIONES
Losmotoresque est_ncertificadosycumplencon lasregulacionesde
emisionesfederalesEPAy de CaliforniaparaSORE (EquiposSmallOff Road
Equipment)est&ncertificadosparaoperarcongasolinacomL]nsin plomoy
puedenincluirlos siguientessistemasde controlde emisiones:Modificaci6n
de motor(EM), catalizadoroxidante(OC),inyecci6ndeairesecundaria(SAI)
y catalizadorde tresvias (TWO)si est&nequipadosdeesa manera.
AMORTIGUADOR DE CHISPAS
Estam&quinaest&equipadaconun motorde combusti6ninternay no
debesetutilizadaenunterrenoagrestecubiertopot bosque,malezaso
hierbanicercadelmismoexceptoqueel sistemade escapedel motor
esteequipadoconunamortiguadordechispasquecumplaconlas leyes
localeso estatalescorrespondientes(encasode existir).
Si seutilizaunamortiguadordechispasel operadorIodebemanteneren
condicionesde usoadecuadas.EnelEstadodeCalifornialas medidas
anteriormentemencionadassonexigidasporley (Arficulo4442delC6digode
RecursosPQblicosde California).Esposiblequeexistanleyessimilaresen
otrosestados.Lasleyesfederalesse aplicanenterritoriosfederales.
Podr&obtenerunamortiguadorde chispasparaelsilenciadoren el centrode
serviciode piezasy reparacionesSearsm_scercano.
47
Page 48

SiIVIBOLOS DE SEGURIDAD
Enestap_ginasepresentanydescribenlossimbolosdeseguridadquepuedenaparecerenesteproducto.Lea,entienday cumplatodaslas
instruccionesincluidasenla m_quinaantesdeintentararmarlay utilizarla.
LEA LOS MANUALES DEL OPERADOR
Lea, entienda y cumpla todas las instrucciones incluidas en los manuales antes de intentar armar la
unidad y utilizarla.
ADVERTENCIA - DIENTES GIRATORIOS
No coloque las manos ni los pies cerca de piezas giratorias. El contacto con las piezas giratorias puede
ocasionar en la amputaci6n de manos o pies.
ADVERTENCIA - DIENTES GIRATORIOS
No coloque las manos ni los pies cerca de piezas giratorias. El contacto con las piezas giratorias puede
ocasionar en la amputaci6n de manos o pies.
ADVERTENCIA - LA GASOLINA ESINFLAMABLE
Deje que el motor se enfrie pot Io menos dos minutos antes de cargar combustible.
J'?i
ADVERTENCIA -MONOXIDO DE CARBONO
Nunca encienda el motor en espacios cerrados o en una zona con poca ventilaci6n. El escape del
motor contiene mon6xido de carbono, un gas inodoro y letal.
ADVERTENCIA -- SUPERFIClECALIENTE
Las piezas del motor, especialmente el silenciador, se recalientan durante la operaci6n. Deje que el
motor y el silenciador se enfrien antes de tocarlos.
ADVERTENCIA: Su responsabilidad--Limiteel usodeestam&quinamotorizadaalas personasquelean,comprendany
cumplanlasadvertenciaseinstruccionesque aparecenen estemanualyen lam&quina.
iGUARDEESTASINSTRUCCIONES!
48
Page 49

NOTA:Estaunidadse envfasingasolinaniaceiteen el motor.Antes
deoperarlam_.quinacargueel motorcongasolinay aceitecomose
indicaen lasecci6nFuncionamientode estemanual.
NOTA:Lasreferenciasa los ladosderechoe izquierdodela cultiva-
dorasehacenobservandola m&quinadesdelaposici6nde operaci6n.
APERTURA DE LA CAJA DE CARTON
1. Retirelasgrapas,rompael pegamentodelasaletassuperiores
ocorte lacintadelextremodela cajaytire a Iolargode la aleta
superiorparaabrirla.
2. Saquetodaslaspiezassueltas.
3. Cortea Iolargodelas esquinas,extiendalacaja haciaabajoen
formaplana.
4. Quiteel materialdeempaquesuelto.
C61VlO SACAR LA UNIDAD DE LA CAJA
1. Usela barradecontrolparaelevarytirardelacultivadorahacia
atr_.shastaunAreaplana.Inspeccioneminuciosamentela caja
paradetectarsi haypiezassueltas.
2. Estireel cablede controly exti_ndaloenel piso.Tengacuidado
de nodoblarni torcerel cabledecontrol.
PIEZAS SUELTAS DENTRO DE LA CAJA
• Montajedelas barrasdecontrol
• Cultivadora
• Aceitedel motor
• Manualdel Operador
• Varilladecambio
• Estacade profundidad
ACOPLE DE LA ESTACA DE PROFUNDIDAD
3. Levanteel montajede laaletacon bisagrasdel protectorde
dientese inserteel montajedela estacadeprofundidaden la
ranura,debajodelprotectory paraarribaatravesdelmontaje
protectordedientes.
4. Inserteel pasadordehorquillaenlosmontajesdelprotectordedientes
ydelaestacadeprofundidad.Asegureconelpasadordechaveta.
5. Inserteunpernohexagonalenel orificiosuperiordelmontaje
de laestacade profundidad.Coloquela arandelaplanasobre
el pernohexagonaly enrosquelaperiNaen "T"en el perno
hexagonal.Ajustebien.Veala Figura1.
6. Inclinelacultivadorahaciaatr&snuevamentehastaquedescanse
sobrelos dientes.
INSTALACION DE LA IVIANIJA
1. Retirelosdos pernossuperioresy lastuercasde seguridadcon
rebordede lossoportesdemontajede lamanija,perono retireel
pernoyla tuercainferiores.Veala Figura2.
Tornillos
.................. 7_;i__.....................de cabeza
.... - .... _ ........ ............hexagonal
....................Brida de las '
tuercas de
fijaci6n
Antesdelmontaje,desconecteel cablede labujfay p6ngalohaciendo
masacontrael motorparaevitarqueseenciendaaccidentalmente.
1. Inclinela cultivadorahaciaadelantehastaquedescansesobreel
contrapesofrontal.
2. Desenrosquela perillaen"T"delapartesuperiordelaestacade
profundidady retirelaarandelaplanayel pernohexagonal.Saque
elchavetadel pasadordehorquilla.Veala Figura1.
Aranclela Chaveta
plana
Chaveta de
hexagonal
Figure2
.
Posicionelaunidadde la manijaentrelasm_nsulasde montaje
de la manija.Veala Figura3.
f
Tomillos de
he×m onal
tuercas de
f!jaci6n
49
Figure3
Page 50

3. Alineelosorificiosenlamanijaconlosorificiosenlam_nsulay
fijelosconlosherrajesqueacabadeextraer.
ACOPLE DE LA VARILLA DE CONTROL
.
AsegQresede quela unidadde lamanijaestaenla posici6nm_.s
alta.Remitasea la Secci6nde Funcionamiento.
2.
Retirelosbrochesdehorquilladela varilladecontrol,coloquelas
arandelasde gornaen sulugar.
3.
Inserteelextrernom_.scorto,anguladodela varillade controla
travesdela m_nsuladelindicadorsobrelacubiertadecambios
yasegureconel brochede horquillaquequitaraanteriormente.
Veala Figura4.
Empujeelcablea travesdelorificiodel centrode lamanijae
introduzcaa presi6nel accesoriopl_tstico.Veala Figura6.
Accesorio
_l_sti¢o
Arandel
de goma
Figure4
4. Inserteelextrernom_.slargodela varilladecontrolatraves
delorificiode la manijaselectorade carnbiosyasegureconun
pasadordechaveta.Veala Figura5.
ManUa
selectora de)
eatables
Chaveta
Soportedel indicador
Figure5
ACOPLE DEL CABLE DEL EMBRAGUE
1. Quiteel pernodeojo roscadoy la tuercadelextremodelcable.
2. Conduzcaelcabledelembragueporelladoderechode las
m_nsulasde montajedela manijay pordebajode lamanija.
Figure6
Retireeltornillodecabezaranurada,latuercaylas dosarande-
lasplanasdelganchodelembrague.VealaFigura7.
Control de
embrague
J
Arandelas
_lanas
Tubocon
rosca
interna
Figure7
5. Fijeel pernodeojo roscadoalganchosujet_.ndolodesdearriba
conel tornillode cabezaranurada,las arandelasplanasy la
tuercadeseguridad.
6. Enrosqueel pernodeojo y la tuercaquequitaraanteriormenteen
el tubocon roscainternaqueest,.en elextremodel cable.Debe
enroscaruntrozodealrededorde 3/4".Aprietelatuercacontrael
tuboenel extremodelcable.VealaFigura7.
NOTA:Noajustedemasiadoelcabledeembrague.Demasiada
tensi6npodriaromperlo.AsegQresedecomprobarel ajustedelcable
de ernbragueantesdehacerfuncionarlacultivadora.Consultela
p_.gina52 paraobtenerinstruccionesdeajustedel cable.
5O
Page 51

CONFIGURACION
El control y la Adici6n de Aceite
Elmotorseenvia sinaceiteenel motor.UsteddebeIlenarel motor
conaceiteantesde operar.Elfuncionamientodel motorconelaceite
jque podriaprodudr undaSoserioal motory anularla garantiadel
[producto.
El UsoInicial
1. Retirelavarillade niveldeIlenadode aceite.
2. Coloqueelfim6naniveldel suelo,el usode unembudopara
vaciartodoel contenidodela botellade aceitesuministradacon
la unidadenel motor.
3. Vuelvaacolocarlavarillade nivelde Ilenadode aceitey apriete.
El control y la adicJ6nde aceite
1. Coloqueelmanillarenuna superficiephna y nivelada.
2. Retireel tap6ndeIlenado/ varillademedici6nyLimpielavarilla.
Wase la Figura8.
r
Recomendaciones sobre el combustible
Utilicegasolinaparaautom6viles(sinplomoo bajocontenidode
plomoparaminimizarlosdep6sitosen lacAmaradecombusti6n)con
un minimode87 octanos.Sepuedeusargasolinaconhastaun 10%
de etanolo un 15%deMTBE(etermetilicoterciario-butilico).Nunca
useunamezdade aceitey gasolinanigasolinasucia.Evitequese
introduzcasuciedad,polvooaguaenel tanquedecombustible.NO
utilicegasolinaE85.
• Carguecombustibleen unAreabienventiladaycon el motor
apagado.Nofumenipermitallamaso chispasenel lugardonde
secargacombustibleo sealmacenalagasolina.
• NoIleneenexcesoel dep6sitodecombustible.Despu_sde
cargarcombustible,asegQresedequeel tap6ndeldep6sitoest_
biencerradoy asegurado.
• Tengacuidadodeno derramarcombustibleal realizarlarecarga.
Elcombustiblederramadoosusvaporesse puedenincendiar.
Si sederramacombustible,asegQresede queel Areaest_seca
antesdearrancarelmotor.
• Eviteelcontactorepetidoo prolongadoconlapiely la inhalaci6n
de losvapores.
Carga de combustible
Tengamuchocuidadoaltrabajarcongasolina.Lagaso%aes
sumamenteinflamableysusvaporespuedencausarexplosiones.
Nuncaagreguecombustiblea lamAquinaen interioresnimientrasel
motorestAcalienteo enfuncionamiento.Apaguecigarrillos,cigarros,
pipasy otrasfuentesdecombusti6n.
Se debe
cargarentre
lasmarcas
denivelalto
y bajo.
Figura8
3. Insertelatapa/ varillade medici6nenel cuellodeIlenadode
aceite,perono meterla patapulg
4. Retireel tap6ndeIlenado/ varillademedici6n.Siel niveJesta
bajo,agreguelentamenteel aceitehastael niveldeaceiteentre
losregistrosdealta(H) y baja(L),la Figura8.
NOTA:NoIleneenexceso.Sobrellenadode aceitepuedecausar
eltabaquismo,problemasde arranque,ounachispaincrustaciones
enchufe.
5. Vuelvaacolocaryaprietelatapa /varillaconfirmezaantesde
arrancarelmotor.
NOTA:Nopermitaqueel niveJdeaceitecaigapordebajode lamarca
"L"enlavarilla.SiIo hace,puederesultaren realfuncionamientodel
equipoo daSos.
NOTA:Paracambiarelaceiteen su motor,consultela secci6n
Mantenimientodeeste manual.
1. AsegQresede motoralaire libreyen un Areabienventilada.
2. LimpieelAreaalrededordela tapade Ilenadodecombustibley
retirareltap6ndeIlenadodecombustible.
3. Elusode un recipienteparagasolinaautorizadosrojos,a_adir
pocoa pocodecombustible,teniendocuidadodeevitarque se
derrame.
4. Llenarel tanquehastaqueel combustibleIleguea la "llenode
combustible"marcadelindicador.Wa la Figura9.
VerArriba
51 Figure9
Page 52

5. Vuelvaacolocarlatapadecombustibleyaprietebien.Lirnpie
losderrarnesdecombustibleantesdearrancarelmotor.Sise
derrarnacombustibleNOarranqueelmotor.Muevalarn_.quina
fueradel_.readederrarne.Evitarlacreaci6ndecualquierfuente
deignici6nhastaque losvaporesdecombustiblesebanido.
AJUSTES
Antesde operarsucultivadora,leaatentarnenteycurnplatodas
lasinstruccionesqueaparecena continuaci6n.Realicetodoslos
ajustesparaverificarque launidadest,.operandoconseguridady
correctarnente.
Cable del embrague
NOTA:El serviciodel motorconel aceitey la gasolinaantesde
cornprobarelajuste.Consulteel manualdeloperadordel motor
separadaseincluyeconsu tirn6ndecombustibleadecuadoy las
recornendacionesdeaceitedel motor.
1. Laposici6ndeltirn6nparaqueelcontrapesodelanterocontraun
objetos61ido,cornounapared.
2. Conlapalancadeselecci6ndernarchasenpuntornuerto,rnarchael
motor.Consulteelmanualdeloperadordelmotorpot separado.
3. Depieenelladoderechodelacultivadora,examineelcintur6n(el
interiorde lacubiertadelacorrea).Nohayquegirar.
Nopongalos dedosbajola cubiertadela correa.
.
Silacorreagirasinfianzacomprornetida,sedebeajustarpotdesen-
roscareltuboconroscainternaenelextrernodelcabledeunparde
vueltashacialaderecha-alestardepieenlaposici6ndeloperador-y
luegovolvera apretarlatuercacontraeltubo.WaselaFigura10.
7. Silasruedasnogiranconeltirn6nen adelante,ajustepor
desenroscarel tuboen elextrernodelcablede unparde vueltas
a la izquierda-al estarde pieenla posici6ndeloperador-y
luegovolvera apretarlatuercacontrael tubo.
8. Vuelvaa revisarlosajustes,yreajustarsiesnecesario.
9. Despu_sde cultivar,si losdientesdejande rnoverse,volvera
ajustarloscables.
NOTA:Unajustedel cablesecundarioest,.disponiblesise Ilega
al puntodequeel ajusteadicional.Veala secci6nde Servicioy
Mantenirnientode las instruccionesdeajustesecundario.
Manejar
Elmangodebeset ajustadodernaneraquecuandolaca_aest,.
cavando3-4"enelsuelo,elmangocaesobrelosresiduosdealta.
Gireel controladorde ajustehaciaatr_.sde bloqueo,rnuevala palanca
a la posici6ndeseadayluegocolocadoen susitiogirandoelbloqueo
de ajustede palancahaciaadelanteparaasegurarla rnanija.Wase la
Figura11.
Bloqueo de
Aflo
la Manija
de Ajuste
Figura10
.
Ahorarnuevalapalancadecarnbiosa laposici6ndelantera.
6.
Cuidadosarnenteel ernbraguernedianteellevantarnientode la
fianzade controldeernbraguecontrael larguero.Lasruedas
debengirar.
Figura11
52
Page 53

Filtro de aire
Tap6n de
Tap6n de
Ilenado y varilla
del nivel de
aceite
Manija selectora
de cambios
Traba de ajuste de
manija embrague
Silenciador
Estaca de
profundidad
Protector de
dientes trasero
Protector
lateral
Figura12
Ahoraquetienelacultivadorapreparadaparafuncionar,farniliaricese
conloscontrolesy funciones.Encontrar_.lasdescripcionesen las
siguientesdos p_.ginasy las ilustracionesen_sta.Esteconocirniento
le perrnitir_,utilizarsunuevoequipoa surn_.xirnacapacidad.
AIoperarunacultivadoraesposiblequearrojeobjetosextra_osa
losojos,Io cualpodriacausarleslesionesgraves.Utilicesiernpre
losanteojosdeseguridadconestaunidado protectoresparaojos
lrn entras abray rnentrastea zaajusteso reparacones.
MANIJA DEL ARRANCADOR DE RETROCESO
Estarnanijaseutilizaparaarrancarel motor.
FILTRO DE AIRE
Elfiltrode airees undispositivodelatornadeairedel motorque
irnpidelaentradadepolvoy suciedadenel motor.Veala Figura12.
SILENCIADOR
Elescapedelmotorsaledelmotoratravesdelsilenciador.VealaFigura12.
CONTROL DE EIVIBRAGUE
Elcontroldel ernbragueest,.ubicadodebajodela rnanija.Para
engranarlosrnecanisrnosdelasruedasyde latransrnisi6nseaprieta
elcontroldelernbraguecontrala rnanija.Veala Figura12.
J
CONTROL DEL ACELERADOR
Elcontroldelaceleradorqueregulala velocidaddelmm_otory se apaga
el motorcuandose rnueveen la posici6ndeparada_. Elcontroldel
aceleradorsernueveentree_apido ,_t(conejo), lento_ (tortuga)
y las posicionesde parada_.
CONTROL DE OBTURADOR
Activarelcontroldelobturadorsecierra lav_.lvuladelestrangulador
del carburadory ayudaa arrancarel motor.Lasdiapositivaspalanca
obturadorentrecarrera! Y pos c onesestrangu adorII I
Cumple con los est_ndares de seguridad de ANSI
LascultivadorasCraftsmancurnplenconlasnorrnasde seguridaddel InstitutoNacionalArnericanode Norrnalizaci6n(ANSI).
53
Page 54

TAPON DE LLENADO Y VARILLA DEL NIVEL
DE ACEITE
Esposiblecontrolarel niveldeaceitedel motor,asicornotarnbi_n
agregaraceite,a travesdel Ilenadode aceite.Veala Figura12.
NOTA:EstaunidadseentregaSINaceiteenel motor.Se incluye
aceiteen la bolsapl_sticaernpacadaconel manualdela unidad.
Agregueaceitecornose indicaen lasecci6nCargadegasolinay
deaceite.Controleelnivelde aceiteantesde cadaoperaci6npara
asegurarsede quehayaaceitesuficienteenel motor.Pararn_s
inforrnaci6n,consultelasinstruccionesdela secci6nMantenirniento
delmotorde estemanual.
MANIJA SELECTORA DE CAMBIOS
La rnanijaselectoradecarnbiosestAubicadaenla partefrontal
delrnontajedelarnanija.SeutilizaparaseleccionarNEUTRAL,
REVERSE(Marchaatr_s),o unode losrnodosdeFORWARD
(Marchadirecta).Veala Figura12.
ESTACA DE PROFUNDIDAD
Estapalancacontrolalaprofundidadde labranzadelosdientes.Tire
delpasadordechavetahaciaafueradel pasadordehorquillapara
ajustarle profundidadde la labranzaacincoajustesdiferentes.Veala
Figura12.
TRABA DE AJUSTE DE LA MANIJA
La rnanijapuedeajustarseala alturadeseadadestrabandola traba
deajustede la rnanija,luegornoviendolasbarrasdela rnanijaa la
posici6ndeseadayluegovolviendoa trabarlatrabade ajustede la
rnanija. Veala Figura12.
PROTECTOR DE DIENTES TRASERO
Elprotectordedientestraseroprotegealoperadordelosdeshechos
quevuelany al rnisrnotiernpoaplananel sueloreci_nlabrado.Veala
Figura12.
PROTECTOR LATERAL
Elprotectorlateralsirvepararnantenerhilerasdefinidasy parejasy se
puedeajustaren unadecincoposicionesdiferentes.Veala Figura12.
DIENTES
Losdientesde lacultivadorasonunaseriedeazadasalineadasenun
ejegiratoriodepotencia.
PARA ARRANCAR EL MOTOR
1. Conectecabledela bujiaylabotade gornaa labujfa.
2. Lleneel tanqueano rn_.sde 1/2 "debajodelrondodelcuello
de Ilenadoparaproporcionarespacioparala expansi6ndel
combustible.
3. Coloquelapalancadeselecci6ndernarchasen puntornuerto.
4. Moverlapalancadelestranguladoren el motorse estrangulador
_/_iP°sici6n' (Un puedenorequerir asfixia.)
aseelgr_.fico13.
Estrangulado=
motorcaliente de
........................... i
Aceleradorl ............
...........
J
Figura13
5. Muevael controldelaceleradoralaposici6nde rapido_ .Vea
laFigura13.
6. Depieen el ladode la unidad,sujetelarnanillade arranquey tire
de lacuerdahastaquese sientaunacarga.
7. Tirardela cuerdaconunarespuestar&pida,carreracontinua,
todoel brazo.MantenerunfirrnecontrolsobrelaernpuSadurade
arranque.Dejequela cuerdase retraigalentarnente.
8. Repitasies necesario,hastaqueel motorarranque.Cuandoel
motorarranca,se rnuevenestranguladorgradualrnentehaciala
posici6nrnarcha14'I.
9. Siel motorfalla,sernuevenestranguladorhaciala posici6nde
estranguladory repitalospasosdel5 al 8.
10. SIEMPRErnantengael controldelacelerador_ enla posici6n
rapidoduranteelusodeltirn6n.
PARA DETENER EL MOTOR
1. Paradetenerlasruedasylosdientes,suelteelcontroldelembrague.
2. Moverla_alancade controldelaceleradoren la posici6nde
parada_. Siernpreque seaposible,reducirgradualrnentela
velocidaddelmotorantesdepararel motor.
3. Moverlapalancadecontroldelaceleradora laposici6nde
parada_.
4. Desconecteel cablede la bujiay tierracontrael motorparaevitar
unarranqueaccidentalrnientraselequipoest&sinvigilancia.
54
Page 55

PARA ENGRANAR LA TRANSMISION Y LOS DIENTES
Noempujehaciaabajosobrelasbarrasde controlparaintentarhacel
quelacultivadoralabremAsprofundo.Estoevitaquelas ruedas
retenganlacultivadoray puedapermitira los dientespropulsarla
cultivadorar_.pidamentehaciaadelante,Iocualpodriaocasionarla
perdidadecontrol,daSosmaterialeso lesionespersonales.
1. Paraun movimientohaciaadelantede lasruedas,utilicela
manijaselectorade cambiosy parapropulsarlosdientestiredel
controldelembraquehaciaarribacontralabarradecontrol.
2. Cuandorealicelalabranza,dejeque lasruedastirende la
m_.quinamientraslosdientescavan.Caminelentamentedetr_.s
de lacultivadorapermitiendoquese muevaa supropioritmo
manteniendola barradecontrolbiensujetaconloscodos
fiexionados.
3. Sueltelamanijaparadetenerlas ruedasy losdientes.
Paraconducirhaciaatr_.s:(No realicelabranzamientrassedesplaza
marchaatr_.s.)
1. Libereel controldelembrague.Luegolevantela barradecontrol
hastaque losdientesse separendelsuelo.
2. Tirehaciaatr_.sdelamanijaselectoradecambiosycamine
retrocediendoconlam_.quina.
NOTE:Enmodomarchaatr_.s,losdientesinvertir_.nla rotaci6n.
DAR LA VUELTA CON LA CULTIVADORA
1. Practiquedarla vueltaconlacultivadoraenun _.reaabiertay
nivelada.Tongacuidadoparamantenerlospies ylas piernas
lejosde losdientes.
2. Paracomenzaravoltear,levantelasbarrasdecontrolhastaque
losdientesse separendel sueloyel motory losdientesest_n
balanceadosporencimade lasruedas.
3. Conlacultivadoraequilibrada,empujehaciaelcostadosobrela
barrade controlen ladireccidnenqueseest,.volteando.Luego
dedar lavuelta,introduzcalentamentelos dientesen elsuelo
parareiniciarlalabranza.
AJUSTE DE LA PROFUNDIDAD
La profundidadde labranzaest,.controladaporla estacade
profundidadquese puederegularen cincoposicionesdiferentes.
Ajustelosprotectoreslateralesal regularlaestacadeprofundidad.
• Cuandouselacultivadoraporprimeravez,utiliceel segundo
orificiode ajustedearriba(1"deprofundidadde labranza).
Parafracturarelc_spedy paracultivosuperficial,utilicela
posicidnqueofrece1"deprofundidaddelabranza(segundo
orificiode arriba).Coloquelosprotectoreslateralesensu
posici6nm_.sbaja.
• Paramayorprofundidad,levantela estacay los protectores
lateralesy tambi_nhagaunao dos pasadasm_.ssobreel _.rea.
• Paralabrartierrasuelta,puedelevantarlaestacadeprofundidad
a suposicidnm_.salta(utiliceel orificiode regulacidninferior)
paraobtenerla mayorprofundidadde labranza.Subalos
protectoreslateralesa suposici6nm_.salta.
• Paratransportarla cultivadora,bajela estacadeprofundidad
(utiliceel orificiode de regulacidnsuperior).
Pararegularlaestacadeprofundidad,retireel pasadordehorquillay
el pasadordechaveta.Muevalaestacadeprofundidada la posici6n
deseadayfijecon el pasadodehorquillayel pasadordechaveta.Vea
la Figura10.
Pararegularlosprotectoreslaterales,saquelastuercasde mariposa.
Muevael protectorlaterala la posici6ndeseaday vuelvaa colocarlas
tuercasdemariposa.Ajustebien.Veala Figura14.
Figure14
Paraajustarla protecci6nlateral,quitarlastuercasde mariposa.
Moverla protecci6nlaterala la posici6ndeseaday vuelvaa colocar
lastuercasde mariposa.Ajusteconfirmeza.ConsultelaFigura15.
/
:' mariposa
,' lado
Escudo de
Tuerca de
Figure15
AJUSTE DE LA ALTURA DE LA lVlANIJA
Elmangodebeser ajustadode rnaneraquecuandolaca_aest,.
cavando3-4 "onelsuelo,elmangocaesobrelosresiduosdealta.
Consultelasecci6nde la Asambleadeestemanualparaobtener
instruccionessobrec6moajustarelmango.
55
Page 56

ELIMINACION DE LOS DIENTES
Antesdedespejarlosdientesa mano,detengaelmotor,dejeque
todaslaspartesen movimientose detenganydesconecteel cable
de la bujia.Si nose observaestaadvertenciase puedenproducir
lesionespersonales.
• Losdientestienenunaacci6nde auto-limpiezaqueeliminala
mayorpartedeIo intrincadode losescombros.Sinembargo,la
hierbasecadevezen cuando,lostallosfibrososo enredaderas
resistentespuedenenredarse.Sigaestospasosparaayudara
evitarque seenredey paralimpiarlosdientes,siesnecesario.
• Parareducirenredos,ajusteel reguladorde profundidadIo
suficientementeprofundoparaobtenerel mnaximo"cortar"laac-
ci6ncomolos dientescortanel materialcontrael suelo.AdernAs,
tratehastaen residuosde cosechaoloscultivosde cobertura,
mientrasquesonde colorverde,hOmedoy blando.
• Mientrasquela labranza,tratede vaivendel manillarde ladoa
lado(alrededorde6 "a12").Este"coleando"laacci6na menudo,
mejoralosdientesde losescombros.
SUGERENCIAS Y TleCNICAS DE LABRANZA
Antesde lalabranza,p6ngaseencontactoconla compa_ia
telef6nicao de serviciosy preguntesiseencuentraequipamiento
o lineassubterr_neasen suterreno.No realicelabranzacercade
dondehaycablesel_ctricos,lineastelef6nicas,ca_oso mangueras
enterrados.
AIrealizartareasde labranza(rompiendola superficiedesuelo
alrededordelasplantasparadestruirlasmalezas,veala Figura
16),ajustelos dientesparacavarOnicamentea unaprofundidad
de 1a 2pulgadas.Lalabranzaapocaprofundidadayudaa
evitarlesionesalas plantascuyasraicesa menudocrecen
cercade lasuperficie.Siesnecesario,levantelasbarrasde
controlligeramenteparaevitarquelosdientescavendemasiado
profundo.(Lalabranzaregularnos61oeliminamalezas,sino
queadem&saflojay aireael sueloparamejorabsorci6nde la
humedady crecimientom_.sr&pidodelas plantas).Sise riega
el _.readeljardinunoscuantosdfasantesde la labranzase
facilitar&estatarea;tambi_nse contribuyepermitiendoalsuelo
reci_ntrabajadoasentarseporunoo dosdiasantesde la pasada
final,profunda,de lacultivadora.
la profundidad de la labranza
• Estaes unacultivadoradelabranzacondobledirecci6n(DDT).
A medidaquelas ruedastiranhaciaadelante,losdientesrotan
haciaatr&s.A medidaquelas ruedastiranhaciaatr&s,los
dientesrotanhaciaadelante.Estocreaunaacci6nde "gancho"
delosdientesquecavanen profundidad,arrancandode raiz
sueloy malezas.1/osobrecargueel motor,encambiocave
tanprofundamentecomopuedaen cadapasada.Enpasadas
posterioreslas ruedaspuedentendera girarsobrelatierra
suelta.AyOdelaslevantandoligeramentelabarradecontrol(una
mano,la palmahaciaarriba,funcionacon muchafacilidad).
• Evitelatentaci6ndehacerpresi6nsobrelas barrasdecontrol
paraforzara lacultivadoraacavarm&sprofundo.Estoquita
pesoalas ruedasconpotencia,haci_ndolesperdertracci6n.
Sinlasruedaspararetenerlacultivadora,losdientesintentar&n
propulsarlacultivadorahaciaeloperadorodistanci&ndosedel
operador.
Figure16
Elecci6n de la velocidad correcta para las ruedas
y los dientes
Conexperiencia,podr_encontrarlacombinaci6nde profundidady
velocidaddelabranzam&sadecuadaalas necesidadesde sujardin.
Ajustelapalancadelreguladordelmotora unavelocidadqued_al
motoradecuadapotenciay queal mismotiempole permitafuncionar
a la menorvelocidadposiblehastaquehayaalcanzadolam_.xima
profundidadde labranzadeseada.AIrealizarlaspasadasfinales
a travesdellechode siembrao al realizarlalabranzatalvezsea
deseableutilizarvelocidadesm&sr&pidasdelmotor.Laselecci6n
de lavelocidadcorrectadelmotor,en relaci6nconla profundidadde
labranza,asegurar&un niveldepotenciasuficienteparahacerlatarea
sinsometeral motora excesivaexigencia.
56
Page 57

IViodelos de labranza sugeridos
• AI prepararel lechodesiernbra,recorrala rnisrnasendados
vecesenla prirnerahilera,luegotraslapela rnitaddelanchode la
cultivadoraen el restodelas pasadas.VealaFigura17.
Si lasdirnensionesdeljardin noperrnitenlalabranzaensentido
longitudinalyluegotransversal,traslapelas prirneraspasadas
por larnitaddelanchode lacultivadora,continuandocon
sucesivaspasadasa un cuartodelancho.Veala Figura19.
Figure17
Cuandoterrnineenunadirecci6n,realiceunasegundapasada
en_.ngulorecto,veala Figura18.Traslapecada pasadapara
obtenerelrnejorresultado(enterrenornuyduro,puedeser
necesariorealizartreso cuatropasadasparapulverizarel suelo
afondo).
tmmmm m
_m_m
_ _ m m
Figure18
Figure19
Labranza en pendiente
Nooperelacultivadoraen unapendientedernasiadoernpinadapara
unaoperaci6nsegura.Realicelalabranzalentarnentey asegQrese
deestarfirrnernenteparado.Nuncaperrnitaquela cultivadorase
desplaceconlas ruedaslibrescuestaabajo.Si noseobservaesta
advertenciase puedenproducirlesionespersonales.
1. Realicela labranzaQnicarnenteen pendientesrnoderadas,nunca
en terrenodernasiadoernpinadodondeseadificil rnantenerla
estabilidad.
2. Se recorniendalabrarsubiendoybajandolas pendientesen lugar
de hacerloenforrnadeterrazas.La labranzaverticalen una
pendienteperrniteun_.reamaximade plantaci6nyadern_.sdeja
espacioparael cultivo.
NOTA:Cuandorealicelalabranzaenpendientes,aseguresedernantener
el niveldeaceitecorrectoenel motor(controlecadamediahorade
funcionarniento).Lainclinaci6ndelapendientehacequeelaceitese
rnuevaensentidooblicuorespectodesunivelnormalyestopuede
subalirnentarciertaspartesdelmotorquerequierenlubricaci6n.Mantenga
el niveldeaceitedemotorenelpuntorn_.saltoentodornornento.
Labranza cuesta arriba y cuesta abajo
1. Pararnantenerlaerosi6ndelsueloal rninirno,asegQresede
agregarsuficienternateriaorg_.nicaal sueloparaque rnantenga
un nivelde hurnedadadecuado,ytratedeevitardejarpisadaso
rnarcasde ruedas.
2. AIrealizarla labranzaverticalrnente,tratede hacerlaprirnera
pasadahaciaarribayaquela cultivadoracavaconmayor
profundidadcuandosubequecuandobaja.Ensueloblandoo
dondehayrnalezas,puedesernecesarioquelevantelasbarras
de controllevernenteal ir cuestaarriba.AIrealizarla labranza
cuestaabajo,traslapela prirnerapasadaenaproxirnadarnentela
rnitaddelanchode lacultivadora.
57
Page 58

Jardineria en terrazas
1. Paracrearunaterraza,cornienceen la cirnadela pendientey
trabajehaciaabajo.Recorralaprirnerahilerahaciaatr_.sy hacia
adelante.Veala Figura20.
!q,
,O
O
| _ REPITA
\
Figure20
2.
Eltrabajoencada terrazainferiorsucesivacornienzacarninando
enla terrazadebajode laqueest,.preparando.Paramayor
estabilidaddela cultivadora,siernprernantengala ruedacuesta
arribaen el sueloblando,reci_nlabrado.Norealicela labranza
enlasQltirnas12"o rn_.sdel bordeexteriorcuestaabajodecada
terraza.Estafranjasinlabrarayudaa evitarquelasterrazasse
quiebreny desintegrencuestaabajo.Tarnbi_nproporcionauna
sendaparacarninarentrelas hileras.
Carga y descarga de la cultivadora
Lacargay descargade la cultivadoraenun vehiculoes
potencialrnentepeligrosay nose recorniendaa rnenosque sea
absolutarnentenecesario,yaqueestopodriaresultarenlesiones
personaleso da_osrnateriales.
Sidebecargarodescargarlacultivadora,sigalaspautasquese
surninistrana continuaci6n.
• Antesdecargarlao descargarla,apagueel motor,espereaque
todaslaspiezasse detengan,desconecteelcablede la bujiay
dejequeel motory elsilenciadorseenfrien.
• Lacultivadoraesdernasiadopesaday volurninosaparaque una
personalalevantecon seguridad.Doso rn_.spersonasdeben
repartirselacarga.
• Userarnpasresistentesy hagarodarlacultivadorarnanualrnente
(conel motorapagado)parasubirlao bajarladel vehiculo.Para
realizarestose necesitandos o rn_.spersonas.
• LasrarnpasdebenserIosuficienternentefuertescornopara
soportarel pesocornbinadode lacultivadoray de loscargadores.
Lasrarnpasdebenproporcionarbuenatracci6nparaevitar
resbalones,debentenerrieleslateralesparaguiarlacultivadora
a Iolargodelas misrnasydebenestarequipadascon un
dispositivode sujeci6nquelassujetealvehiculo.
• Loscargadoresdebenusarcalzadoresistentequelos ayudea
evitarresbalones.
• Posicioneel vehiculodecargade rnodoqueel _.ngulodela
rarnpaseaIorn_.spianoposible(cuantornenosinclinadaseala
tampa,rnejor).Apagueel motordel vehiculoy pongael frenode
estacionarniento.
• AI subirrarnpas,p_.reseenposici6nde funcionarnientonormal
detr_.sdela cultivadorayernpQjela.Unapersonaa cadalado
debehacergirarlas ruedas.
• AI bajarrarnpas,carnineretrocediendoconla cultivadoraen
retaguardia.Mant_ngasealerta porsihayalgQnobst_.culodetr_.s.
Posicioneunapersonaencada ruedaparacontrolarla velocidad
de lacultivadora.Nuncabajelatampaconla cultivadoraen
primerlugar,yaquela rn_.quinapodriavoltearsehaciaadelante.
• Coloquebloquesdernaderadelladode las ruedaspendiente
abajosinecesitadetenerlacultivadorarnientrasbajapor la
rarnpa.Adern_.s,uselos bloquespararnantenerlacultivadora
ternporariarnenteen sulugaren las rarnpas(encasode ser
necesario),y paracalzarlas ruedasen sulugarunavezquela
cultivadoraseencuentreen el vehiculo.
• Despu_sde cargarlacultivadora,evitequelarnisrnase
rnuevatrabandolasruedasconbloquesyajustefirrnernentela
cultivadorahaciaabajo.
58
Page 59

PROGRAMA DE MANTENIMIENTO
Antesderealizarcualquiertipodemantenirnientooservicio,
desenganchetodosloscontrolesydetengael motor.Esperea quese
detengancornpletarnentetodaslaspiezasrn6viles.Desconecteelcable
delabujfayp6ngalohaciendornasacontrael motorparaevitarquese
enciendaaccidentalrnente.Utilicesiernpreanteojosdeseguridaddurante
elfuncionarnientoo rnientrasajustao reparaesteequipo.
Sigael cronograrnade rnantenirnientoquese presentaa continuaci6n.
Estatablas61odescribepautasdeservicio.Utilicelacohrnna Registro
de Servicioparahacerel seguirnientode lastareasdernantenirniento
cornpletadas.Paraubicar elCentro de Servicio Sears m_s cercano
o paraprograrnarun servicio, simplementecomuniquesecon
Searsal tel_fono
1-800-4-MY-HOME®.
Cadauso 1. Niveldeaceitedel motor
2. Piezassueltasofaltantes
3. Motory alrededordelsilenciador
4. Purificadordeaire
1ras2 horas
l ras5 horas
Cada10horas
Cada25 horas
Cada30 horas
Cada50 horas
Cada100horas
Antesde alrnacenar
Carnbieel aceitecadaveinticincohorassi el motortrabajaconcarga
siernpredetengael motorydesconecteelcablede labujiaantes
de hacercualquiertipode rnantenirnientooajustes.Utilicesiernpre
lanteojosdeseguridadduranteel funcionarnientoo rnientrasajustao
[reparaesteequipo.
1. Tensi6ndela correadetransrnisi6n
2. Tuercasy pernos
1. Aceitedel motor
1. Tensi6ndela correadetransrnisi6n
2. Unidad
1. Bujiadeencendido
1. Desgastedelosdientes
2. Presi6ndelosneurn_.ticos
1. Aceitedel rnotort
1. Purificadordeaire
2. Bujfadeencendido
1. Sisternadecombustible
RECOMENDAClONES GENERALES
• Siernpreobservetodaslas reglasdeseguridadquese
encuentranen lasetiquetasdel productoy enel manualdel
operadorcuandovaa realizarrnantenirniento.Las reglasde
seguridadseencuentranen lasetiquetasdel productoyen este
manualdeloperadora partirde laCgina 3.
• Lagarantiadeestacultivadornocubreelernentosquehan
estadosujetosalrnalusoo negligenciadel operador.Pararecibir
el reintegrototalde lagarantia,el operadordeber_,rnantener
elequipotalcornoseindicaen estemanual.
• Algunosajustesdebenser realizadosperi6dicarnenteparael
mantenirnientoadecuadodela unidad.
• Reviseperi6dicarnentetodoslossujetadoresy cornpruebeque
est_nbienajustados.
1. Verificar
2. Ajusteo reernplace
3. Lirnpieza
4. Verificar
1. Verificar
2. Verificar
1. Carnbiar
1. Verificar
2. Lubrique
1. Verificar
1. Verificar
2. Verificar
1. Carnbiar
1. Carnbiar
2. Carnbiar
1. Hacerfuncionarel motorhastaque sedetenga
porfaltade combustibleo agregaraditivopara
gasolinaala quese encuentraenel tanque.
)esadaoa ternperaturaselevadas.
MANTENIMIENTO DEL MOTOR
NOpruebelachispasi noest,.la bujiade encendido.NOd_
arranqueal motorsinoest,. labujiade encendido.
Control de la bujia de encendido
Siel motorha estadofuncionando,el silenciadorestar_,rnuycaliente.
Tengacuidadode notocarel silenciador.
Paraasegurarsede queel motorfuncionebien,la bujiadebetener
una separaci6ncorrectay debeestarlibrededep6sitos.Controlela
bujiacada25horasy reernpl_.celacada100horas.
59
Page 60

Retirela fundadebujiay utiliceunaIlaveparabujiasparaextraer
la bujia.Veala Figura26.
Bujia de
encendido
IVlantenimiento del filtro de aire.
Nuncausegasolinao solventesde puntodeencendidobajopara
lirnpiarel elernentodeldepuradordeaire. Podriaproducirseun
incendiooexjolosi6n.
Elfiltrodeaireevitaelingresoalcarburadordesuciedad,polvo,etc.
perjudicialesyevitaquelosrnisrnosseanintroducidosdentrodelmotor.
Adern_.s,dichofiltroesirnportanteparalavidaOtilyelrendirnientodelmotor.
Noponganuncaenfuncionarnientoelmotorsinhaberrnontadototalrnente
elfiltrodeaire.Verifiqueeldepuradordeaireantesdecadauso.
Losfiltrosde papelno sepuedenlirnpiar.Sedebenreernplazar
unavezal aEoo cada100horasdefuncionarnientoy conmayor
frecuenciasiseutilizanen lugaresdondehaygrancantidadde polvo.
1. Oprirnala pesta_ade latapadelfiltrodeaire,levantelatapay
retireelfiltro.Veala Figura23.
Figura21
.
Inspeccionevisualrnentela bujfa.Elirninelabujfasipresenta
rnuchodesgaste,o si el aislanteest,.agrietadooastillado.Lirnpie
la bujfaconun cepillodealarnbresi seva a reutilizar.
.
Midala separaci6ndebujiacon uncalibrador.Corrijadeser
necesariotorciendoel electrodolateral.Veala Figura22. La
separaci6ndebeestablecerseen0,030pulg.
Electrodo
====_= _====== 0.60=0.80 mm
0,02=0,03 pulg.
Figura22
4. Verifiquequelaarandeladelabujfaest_en buenascondicionesy
coloquelabujiaenrosc_.ndolaa rnanoparanoestropearlarosca.
5. Unavezquela bujiaest,.asentadaensulugar,ajustecon una
Ilaveparabujiaparacornprirnirlaarandela.
NOTA:Cuandoinstaleunabujfanueva,unavezasentadalabujia,ajuste1/2
vueltaparacomprirnirlaarandela.Cuandovuelvaacolocarunabujiausada,
unavezasentadalabujiaajuste1/8-1/4devueltaparacornprirnirlaarandela.
Labujiadebeestarfirrnernenteasegurada.Si la bujianoest,.bien
aseguradapuedecalentarsernuchoy da_arel motor.
Elemento de
espuma
Tapa del
filtro de Filtro
aire deaire
Figura23
2. Desecheel filtrodeaire usado.
3. Instaleelfiltrodeairenuevo.
4. Cierrelacubierta.
NOTA:siel filtroest,.rotoo daSado,c_.rnbielo.
Limpieza del motor
Norode el motorconaguaparalirnpiarloporqueel aguapodria
contarninarelcombustible.Sise utilizauna rnangueradejardino
equipodelavadoa presi6ntarnbi_npuedeentraraguadentrode la
aberturadelsilenciador.Elaguaquepasaporel silenciadorpuede
ingresarenel cilindro,causandodaSos.
Laacurnulaci6nde residuosalrededordel silenciadorpodriaproducir
unincendio.Inspecci6neloylirnpieloantesdecada uso.
Siel motorhaestadofuncionando,d_jeloenfriarduranteporIo
rnenosmediahoraantesde lirnpiarlo.Dernaneraregular,elirninela
acurnulaci6nde suciedaddel motor.Lirnpiealrededordelsilenciador.
60 Lirnpieconuncepilloo airecornprirnido.
Page 61

Inspeccione el aceite del motor
1. Reviseelaceiteantesdecadauso.Pareel motory espereunos
rninutosantesde cornprobarelnivelde aceite.Conel motora
niveldelsuelo,el aceitedebeser de rnarcaFULLenlavarilla.
2. Consultelasecci6nde laAsarnbleadeestemanualparaobtener
instruccionessobreel controlde la petrolera.
Cambie el aceite del motor
• Consultelatabladeviscosidad(Figura24)paralas
recornendacionesdelpetr61eo.NoIlenedernasiado.Useun4
tiernpos,o undetergentedealtaequivalente,de prirneracalidadel
aceitede motorcertificadoparacurnpliro excederlos requisitosde
EE.UU.fabricantedeautorn6vilesparala clasificaci6nde servicios
deunnivelrninirnodeSF o SG(calificacionesrn_.saltasNota
esaceptablecornoSJ, SLy losgradosSM). Elaceitedemotor
rnostrar_,estadenorninaci6nenelenvase.
= =
Lf_
2. ConelmotorapagadoperoaQncaliente,desconecteelcablede
bujiay rnant_ngaloalejadode labujia.
3. Coloqueunernbudoeneldrenajedeaceiteparaevitarqueel
aceiteen el marcodetirn6n.Wase la Figura25.
Drenaje
del aceite
Figura25
4. Elirninarde drenajede aceitetapasituadaenla basedelmotor,y
drenarel aceiteen un recipienteapropiado.Wasela Figura25.
_u
-J
F-
m
(oC)=30° 200 30o 40o
(oF) -20o 70o 85o 105o j
NOTA:Noutiliceaceitesindetergenteo aceitede 2 tiernposmotor.Se
podriaacortarlavidadelmotorde servicio.
• Cambiarelaceitedelmotordespuesdelosprimeroscincoaochohoras
deoperaci6n,ycadacincuentahoraso cadatemporadaapartirde
entonces.Cambiodeaceitecadaveinticincohorasalfuncionamientodel
motorbajocargapesadaoenaltastemperaturas.
Drenaje del aceite
vacio.
Elaceiteusadodelmotorpuedecausarcancerde pielsi entraen
contactoconla pieldernanerareiteradayporperiodosprolongados.Si
bienestoesimprobablearnenosquernanipuleaceiteusadotodoslos
dfas,sinembargoes recornendablelavarsebienlasrnanoscon aguay
Elaceiteusadoes un residuopeligroso.Desecheel aceiteusadocot-I
rectarnente,nosedeshagade labasuradorn_stica.Consulteconlas
autoridadeslocaleso Centrode ServicioSearsparalaelirninaci6n I
se ura/recc ado.
5. Vuelvaacolocary aprietelatapade drenajedeaceite.
6. Cuandoelmotorsevada detodo el aceite,elnivelde motorde
sulugar.VuelvaaIlenarconaproxirnadarnente20oz de aceite
nuevo.Llenehastala lineaFULLen lavarilla.NoIleneenexceso.
Consultelasecci6nCornprobaci6nyadici6ndeaceiteen esta
secci6ndela Asarnblearnanuales.
7. Lirnpieelexcesodeaceitesobreelbastidory motor.
8. Vuelvaacolocarelcablede buj[aantesdecornenzar.
Lubricaci6n de la transmisi6n
Latransrnisi6nseentregapreviarnentelubricaday selladaenf&brica.
Norequiereverificaci6na rnenosquesedesarrnelatransrnisi6n.Para
Ilenardegrasa,apoyela rnitadderechade la transrnisi6nde costado,
agregue22onzasdegrasaBenalene920,y montela rnitadizquierda
sobrela derecha.Vayaa unCentrode ServicioSearsautorizado
paraquele carnbienel aceitede la transrnisi6no paraprograrnar
un servicio,sirnplernentecornuniqueseconSearsaltel_fono
1-800-4-MY-HOME®.
1. Dreneelcombustibledeltanquehaciendofuncionarel motor
hastaqueel tanqueest_vado. AsegQresedeque latapa de
Ilenadodecombustibleesseguro.
61
Page 62

LUBRICACION
Despu_sdecada 10horasdefuncionarniento,aceiteo engraselos
puntosde lubricaci6n-Useaceitelubricantelirnpio(esadecuado
el aceitepararnotoresde peso#30) y grasade usogenerallirnpia
(espreferiblegrasaquecontengaunlubricantedemetal,sihay
disponible).Veala Figura26.
la barra de
control Palanca del
ulador de
profundidad
Eje de las
ruedas Eje de los
di_nt_ J
Figura26
• Retirelas ruedas,lirnpieeleje delasruedasyapliqueleunacapa
delgadadegrasa.
• Engrasela parteposterior,el frenteylos ladosde la palancadel
reguladorde profundidad.
• Retirelos dientesylirnpieel ejede losdientes.Useuna limao
papelde lijaparaquitarsuavernentecualquier6xido,rebabas
o asperezas(especialrnentealrededordelosorificiosdeleje).
Apliquegrasaa losextrernosdelejeantesdeinstalarlos dientes.
• Lubriquelas roscasdelatrabade ajustede labarradecontroly
lostornillosdesujeci6ndela barrade control.
• Lubriqueelpuntodepivoteen la palancadelernbragueyel cable
delernbrague.
PRESION DE LOS NEUiVlATICOS
Verifiquela presi6ndeaireenlosdosneurn_.ticos.Lapresi6ndeaire
sedebeencontrarentre15PSIy20 PSI.Mantengalosdosneurn_.ticos
infladosdeforrnaparejaparaevitarquelarn_.quinatirehaciaunlado.
HARDWARE
CANIBIO DE CORREA
Sucultivadoraha sidoequipadaconunacorreadise_adaparauna
vidaOtilprolongaday un6ptirnorendirniento.UseOnicarnentecorreas
autorizadasporel fabricante,yaquelascorreasgen_ricaspuedenno
desernpe_arsesatisfactoriarnente.El procedirnientorequierehabilidad
rnec_.nicamediay herrarnientashabitualrnentedisponibles.
Parareernplazarlacorreadetransrnisi6n,sigaestospasos:
1. Saquelacubiertade lacorreadesdeel ladoizquierdode la
cultivadoraextrayendolosdos tornillosde lapartesuperiorde la
cubierta.Veala Figura27.
Tornillos
Tornillo Tuerca y arandela
Figura27
Retireconcuidadolatuercahexagonaly la arandelaplanadel
ladofrontaldela cubiertadela correa.Extraigael tornillode
cabezahexagonalen la parte )osteriorde lacubierta.Veala
Figura27.
Retireelconjuntodelguardacorreasdela correaubicadodetr_.s
de la _oleadelmotorextrayendolosdos pernoshexagonalesy
lasarandelasdeseguridad.Veala Figura28.
Correa
Antesde Ilevara caboalg_ntipo de rnantenirnientoenla rn_.quina,
dejequetodaslaspiezassedetengany desconecteel cablede la
bujia.Sino seobservanestasinstruccionessepuedenproducir
lesionespersonaleso daEosrnateriales.
Verifiquesi hayherrajessueltosofaltantescada 10horasde
operaci6nyajQsteloso c_.rnbielos(segQnsea necesario)antesde
volvera usarla cultivadora.AsegOresede inspeccionarlostornillos
queest_.ndebajode la cubiertadela cultivadoraquesujetanla
cubiertade latransrnisi6ny la palancadelreguladordeprofundidada
la transrnisi6n.
//
Polea Iota
motor
62 Figura28
J
Page 63

4. ExtraigalapoleaIocaretirandoelpernoylatuerca.
VealaFigura28.
5. Extraigalacorreausadaeinstaleunanueva.Sigalasinstruc-
cionesenordeninversaparareinstalarelguardacorreasyla
cubiertadelacorrea.VealaFigura28.
NOTA:AIvolveraarrnar,cerci6resedequelacorreapasesobrela
poleaIocayperdentrodelosguardacorreasjuntoalapoleadelmotor.
DIENTES
Losdientesse desgastanconel usey selos debeinspeccionaral
cornienzode cadaternporadade labranzay a intervalosde 30betas
defuncionarniento.Losdientesse puedenreernplazar.Consulteel
n_rnerode piezaenla secci6nListade piezasde estemanual.
Inspecci6n de los dientes
Conel use,losdientesseacortan,seangostanyvuelven
puntiagudos.Elusede dientesrnuydesgastadosresultar_,en p_rdida
de profundidadde la labranzay enrnenoreficaciaparacortarygirar
debajode larnateriaorg_.nica.
Retiro/Instalaci6n de un conjunto de dientes
1. Retirelascubiertasde losextremesylosprotectoreslateralesdel
protectordelos dientessacandolastrestuercasrnariposaqueIo
sujetana cadalade.
2. Unconjuntodedientesconstade unconjuntode dientes
izquierdoyunconjuntodedientesderecho.
NOTA:Elconjuntodedientessernueverotandoen sentidocontrario
conlos hordesafiladosdelosdientesubicadosparaintroducirseenel
sueloprirnerocuandorotanensentidocontrario.Observeestaposici6n
delosdientesparapoderreinstalarlosconjuntosdedientesnuevos.
3. Pararetirarunconjuntodedientes,sirnplernentesaquela
chavetaderet_ninternaquesujetala chavetadehorquilla.Vea
la Figura29.
6. Instalecadaconjuntodedientesde modequeelbordecortante
(filoso)delosdientespenetreel sueloprirnerocuandola
cultivadorasernuevahaciaadelante.Recuerdequeestosdientes
rotanensentidocontrario,asi queasegureelconjuntodedientes
al ejede losdientesconel pasadordehorquillayel pasadorde
chavetainterne.
AJUSTES
Manija
Se puedeajustarla rnanijaa la alturadeseada.Consultela secci6nde
Funcionarnientoparaobtenerdetalles.
Ajuste del cable del embrague secundario
Si el ajusteadicionalesnecesariadespu_sdequeel ajusteprirnario
de la secci6ndelaAsarnbleayano puedeser utilizado,el ajuste
secundariosepuederealizardela siguienternanera:
1. Retirelatapadela correacomeseindicala sustituci6nde la
correaen lap_.gina21.
2. Localizarel rnuelleenel extremedelcable.Consultela Figura30.
Tuerca
Pasadorde
herquilla
/
Pasador
interne
Figura29
.
Retirela chavetadehorquillay desliceel conjuntohaciaafuera
de launidady lejosdelejede losdientes.
5.
Antesde volvera instalarel conjuntodedientes,inspeccione
eleje delosdientesparaverificarsihay 6xido,asperezaso
rebabas.Limeolije ligerarnente,segQnseanecesario.Apliqueal
ejeunacapadelgadade grasa.
Figure30
3. Aflojarla tuercasuperiory luegoapretaro aflojarla tuercarn_.s
bajahastaquelatensi6nadecuadasealcanza.
4. Unavezquelatensi6nadecuadasealcanza,velveta apretarla
tuercasuperiorparaasegurarel cable.
Varilla de la polea Iota
Consultelasecci6nMontajeparavet lasinstruccionesdelajustede la
varillade lapoleaIoca.
J
63
Page 64

Polea Ioca de Rod
Despu_sdela tensi6nde lacorreasehaajustado,sila correaestA
demasiadoextendido,es posiNequenecesiteajustarlabarrade la
poleaIoca.Estose puedecomprobarf_.cilmente.
Conel motorapagadoy lalibertadbajofianzadecontrolmotor
desembragado,cambiarel manejadorde selecci6ndeequipos
paracadamododeavance.Siel soportedelindicadortocala barra
dela poleaIocaconla libertadbajofianzade controlde motor
desembragado,a continuaci6n,un ajustees necesario.
1. Desconecteyconecteelcablede la bujfacontraelmotor.
2. Retirela tapade lacorreacomosedescribeensustituci6nde la
correaantesenestasecci6n.
3. Quitela chavetay laarandeladelavarillade lapoleaIoca.
ConsultelaFigura31.
f
Polea
Iota
Chaveta
/
Soporte
de la
Polea Loca polea Iota
Figure31
4. Muevelabarrade lapoleatensoraparael orifidoinferiordel
soportede rodillos.
5. Vuelvaacolocarlaarandelayel clipdehorquilla.
6. Controlareljuegode la barrade poleaenel soporteindicador
cambiandoa cadamododeavance.
Polea Loca
Soporte
dela
polea Iota
64
Page 65

Nuncaalrnacenela cultivadoraconcombustibleenel tanqueenun
espaciocerradoo en_.reaspocoventiladasdondelos gasesdel
combustiblepuedanNegara una Narnaexpuesta,unachispao un
pilotocornoel quetienenalgunoshornos,calentadoresde agua,
secadoresde ropao algQnartefactoa gas.
Nuncadejeel motorsinvigilanciarnientrasest,.en funcionarniento.
PREPARACI6N DEL MOTOR
Paraalrnacenarrnotoresentre 30y 90dfases necesariotratarlos
conunestabiNzadorde gasolinayparaalrnacenarlosdurantern_.s
de 90dfassedebedrenarel combustibleparaevitardeteriorosy la
forrnaci6ndedep6sitosdegornaenel sisternade combustibleo en
piezasfundarnentalesdelcarburador.Sila gasolinaen sumotorse
deterioraduranteel alrnacenarniento,es posiblequedebareparar
o reernplazarel carburadoryotroscornponentesdelsisternade
combustible.
1. Extraigatodoelcombustibledeldep6sitohaciendofuncionarel
motorhastaquesedetengaporfaltade combustible.
2. Carnbieelaceite.ConsulteelCarnbiode aceiteen la secci6n
SERVlCIOY MANTENIMIENTO.
3. Retirelabujfay viertacercade 1/2onzade aceiteparamotor
en elciNndro.Vuelvaa colocarla bujfay d_ rnarchaalmotor
lentarnenteparadistribuirelaceite.
4. Lirnpiela suciedadde las_.reasdel motory del silenciador.
RetoquelapinturadaSada,y revistaotras_.reasque puedan
oxidarseconunapelfculadelgadadeaceite.
5. Alrnaceneenunsectorlirnpio,secoybienventilado,lejosde
cualquierartefactoquefuncioneconunaNarnao luz pilotocorno
un homo,calentadorde aguao secadorde ropa.Tarnbi_nevite
cualquiersectorconunachispaproduciendomotorel_ctricoo
dondeseutilizanherrarnientasel_ctricas.
6. Deser posible,tarnbi_nevita_.reasdealrnacenarnientocon
rnuchahurnedadparaevitaroxidaci6ny corrosi6n.
7. Mantengael motorniveladocuandoIoalrnacene.Lainclinaci6n
del motorpuederesultarenfugasdecombustibleo aceite.
PREPARACI6N DE LA CULTIVADORA
Si la cultivadoranose vaa usarduranteunperfodoprolongado,
prep_.relaparael alrnacenarnientodela siguienteforrna:
1. Lirnpiela cultivadorayel motor.
2. Sigalasrecornendacionessobrelubricaci6nyverifiquesihay
parteso piezassueltas.
3. Alrnacenelacultivadoraen un_.realirnpiayseca.
4. Nuncaalrnacenelacultivadoraconcombustibleenel tanqueen
un _.reacerradadondelasernanacionesde la gasoNnapueden
alcanzarunaNarnaexpuestaochispas,o dondehubierefuentes
de encendido(calefactores,calentadoresde agua,hornos,etc.).
65
Page 66

Antesde realizarcualquiertipodernantenirnientooservicio,desenganchetodosloscontrolesydetengael
motor.Espereaquesedetengancornpletarnentetodaslaspiezasrn6viles.Desconecteelcabledelabujfay
p6ngalohaciendornasacontraelmotorparaevitarqueseenciendaaccidentalrnente.Utilicesiernpreanteojosde
seguridaddurantelaoperaci6no rnientrasrealizaajusteso reparaciones.
El motornoarranca
El motorfuncionade maneraerratica
El motorrecalienta
El motornoseapaga. Contactecon sucentrode piezasyreparacionesSears.
Las ruedasy los dientesno giran
Los dientesgiran, las ruedasno.
Las ruedasgiran, losdientesno.
Rendimientodeficientede la labranza
1. Se hadesconectadoelcable de labujfa.
2. Ajusteincorrectode lapalancadecontrol del regulador
delmotor.
3. Eldep6sito decombustibleestavacfo o elcombustible
seha echadoaperder.
4. Filtrode aire sucio.
5. Separaci6ndefectuosao incorrectaen la bujia.
6. Ajusteincorrectodelcontroldel regulador.
7. Aguao suciedaden el tanque delcombustible.
1. Separaci6ndefectuosao incorrectaen la bujia.
2. Filtro(s) deaire sucio(s).
3. Esnecesario regularel carburador.
4. Gasolinavieja.
5. Aguao suciedaden el tanque delcombustible.
6. Sistemade enfriamientodelmotortapado.
1. Sistemade enfriamientodelmotortapado.
2. Esnecesario regularel carburador.
3. Niveldeaceite bajo.
1. Ajusteincorrectodelcontroldel reguladorodel
interruptordeencendido.
1. Usoincorrectode los controles.
2. Correa(s)de transmisi6ndesgastada(s),rota(s) o mal
ajustada(s).
3. Trasmisi6ninternadesgastadaodafiada.
4. Pernosueltoen la poleade transmisi6n.
1. Pernosueltoen la poleade transmisi6n.
2. Trasmisi6ninternadesgastadaodafiada.
1. Falta piezametalicapara montarel soportede dientes.
2. Pernosueltoen la poleade transmisi6n.
3. Trasmisi6ninternadesgastadaodafiada.
1. Dientesdesgastados.
2. Configuraci6nincorrecta delreguladordeprofundidad.
3. Configuraci6nincorrecta delregulador.
4. Deslizamientodela correa detransmisi6nde marcha
directa.
1. Reconecteel cable.
2. Coloque la palancaen la posici6nSTART(arranque).
3. Lleneeltanquecon gasolina limpiay nueva.
4. Limpieo cambieelfiltro.
5. Limpiela,ajusteladistanciadisruptivaocambiela.
6. Contacte con su centrode piezasy reparacionesSears.
7. Contacte con su centrode piezasy reparacionesSears.
1. Limpie,ajustela separaci6n,o cambiela bujia.
2. Limpieo reemplace
3. Contacte con su centrode piezasy reparacionesSears.
4. Cambiela porgasolinafresca.
5. Contacte con su centrode piezasy reparacionesSears.
6. Limpieel sistemade enfriamientodel motor
1. Limpieel Areade enfriamientodelmotor
2. Contacte con su centrode piezasy reparacionesSears.
3. Reviseel nivelde aceite.
1.
1. Revisela secci6ndeFuncionamiento
2. Reemplaceo ajuste lascorreas.
3. Contacte con su centrode piezasy reparacionesSears.
4. Ajuste el perno.
1. Ajusteel perno.
2. Contacte con su centrode piezasy reparacionesSears.
1. Reemplacela piezametalica.
2. Ajuste el perno.
3. Contacte con su centrode piezasy reparacionesSears.
1. Reemplacelosdientes.
2. Yea "Sugerenciasy t_cnicas para la labranza".
3. Consulte la secci6n Servicioy Mantenimiento
4. Consulte la secci6n Servicioy Mantenimiento
66
Page 67

67
Page 68

68
Page 69

(Esta p_.ginase aplica s61oen EE.UU. y Canada.).
Sears Brands Management Corporation, el Consejo de Recursos Ambientales de California (CARB)
y la Agencia de Protecci6n Ambiental de los Estados Unidos (EPA)
Declaraci6n de garantia del sistema de control de emisiones (derechos y obligaciones de la garanfia de defectos del propi=
LACOBERTURADE LAGARANTJADECONTROLDEEMISIONESES Y PARALOSMODELOSCERTIFICADOSDELANO 1997YPOSTERIORES,
APLIOABLEALOSMOTORESCERTIFICADOSCOMPRADOSENCALIFOR- QUESECOMPRENY UTILICENENCUALQUIERPARTEDE LOSESTADOS
NIAEN1995Y POSTERIORMENTE,QUESE UTILIZANENCALIFORNIA, UNIDOS(Y APARTIRDEL 1DE ENERODE2001ENCANADA).
Declaraci6n de garanfia sobre defectos en el control de emisiones para California y los Estados Unidos
ElConsejodeRecursosAmbientalesdeCalifornia(CARB),la EPA(Agencia
de Protecci6nAmbientaldelosEE.UU.)y Searstienenel gusto deexplicarla
garantiadelsistemadecontroldeemisionesparamotoresdela_o 2000y para
elfuturoconrelaci6na motorespeque_ostodoterreno(SORE).EnCalifornia,
los nuevosmotorespeque_ostodoterrenodebenestardise_ados,construidos
y equipadosparacumplirconlas rigurosasnormasanti-smogdelestado.En
el restodelos EstadosUnidos,losmotoresnuevostodoterrenodeencendido
porchispacertificadosparaela_o 1997debencumplirest_ndaressimilares
establecidospot la EPA.Searsdebegarantizarelsistemadecontroldeemis-
Cobertura de la garantJa Sears para defectos en el control de emJsiones
Losmotorestodo terrenopeque6osest_ngarantizadosenIorelativoalcontrol alas disposicionesque seindiquena continuaci6n.Si unapartedesu motor
deemisionesparadefectosenpiezasduranteunperiododedosa_os,sujeto cubiertapotlagaranfiaes defectuosa,Searsreparar_osustituir_dichaparte.
Responsabilidades del propietario en relacibn con la garantia
Comopropietariodelmotortodoterrenopeque_o,Ud.esresponsabledela
realizaci6ndelmantenimientorequeridoquese incluyeenlas instrucciones
deoperaci6ny mantenimiento.Searsrecomiendaquese conserventodoslos
recibosrelativosalmantenimientodesumotortodoterrenopeque_o,pero
nopudedenegarla garantiasimplementepor la faltade losmismos,opor su
incumplimientodelmantenimientoprogramatic.Comopropietariodelmotor
peque_otodoterrenodebesaberque, sinembargo,Searslepuedenegar
lacoberturade lagarantiasi su motortodoterrenopeque6oouna piezadel
mismohanfalladodebidoa abuso,negligencia,mantenimientoindebidoo
Disposiciones de la garantJa Sears para defectos en el control de emJsiones
Lassiguientessondisposicionesespecificasrelacionadasconla coberturadelagarantiaparadefectosenel controldeemisiones.Esuna_adidoa lagarantiade
motorSearsparamotoresnoreguladosquese encuentraenlasinstruccionesdefuncionamientoy mantenimiento.
1. Piezascongarantia
Lacoberturadeesta garantiase extiendeL]nicamentealas piezas
queaparecena continuaci6n(las partesde lossistemasdecontrolde
emisiones),siemprequedichaspiezasestuvieranya enelmotoren el
momentodesucompra.
a. Sistemademedici6ndecombustible
•Sistemadeenriquecimientoparaarranqueenfrio
•Carburadory partesinternas
• Bombade combustible
b. Sistemadeinducci6nde aire
• Filtrodeaire
•Colectordeadmisi6n
c. Sistemadeencendido
• Bujia(s)deencendido
•Sistemadeencendidomagneto
d. Sistemadelcatalizador
•Convertidorcatalitico
•Colectordeescape
•Sistemadeinyecci6nde aireov_lvulade impulsos
e. Elementosvariadosusadosenlossistemasanteriores
•Wlvulas devacio,sensiblesatemperatura,posici6ny tiempo
einterruptores
•Conectoresy montajes
2. AIcancedela cobertura
Searsgarantizaal poseedorinicialy a loscompradoressubsiguientes
quelas piezascongarantianotendr_ndefectosen materialesnimano
deobraque provoquenla falladelas mismasduranteun periodode
dosaSosa partirdela fechaen queel motorse entregaa un comprador
particular.
3. Sincargo
Lareparaci6no reemplazodecualquierpartecongarantiase realizar_
Enlos EstadosUnidosy Canad_hayunalineadeatenci6nde24 horas,1-800-469--4GG3,quecuentacon unmenL]conmensajespre-grabadosque contienen
etario)
ionesdesumotorparalosperiodosdetiempoenumeradosacontinuaci6n,
siemprequenohayaabuso,negligenciao mantenimientoindebidodesu
motortodoterrenopeque_o.Susistemade controldeemisionespuedeincluir
piezastalescomoel carburador,el filtrodeaire,elsistemadeencendido,el
silenciadoryelconversorcatalitico.Tambienpuedeincluirconectoresyotras
unidadesrelacionadasconlasemisiones.Dondeexistaunacondici6ncubierta
porla garantia,Searsreparar_supeque6omotortodoterrenosin costoalguno
incluyendodiagn6stico,piezasy manodeobra
a modificacionesnoaprobadas.Ud.es responsabledepresentarsumotor
todoterrenopeque6oaundistribuidorde serviciosSearsautorizadotan pronto
comoaparezcaunproblema.Lasreparacionesdela garantiasinconfiicto
debencompletarseen unplazodetiemporazonable,nosuperiora 30dias.Si
tienealgunapreguntarespectoasusderechosyresponsabilidadesreferen-
tesa lagarantia,debecontactarconunrepresentantedeserviciosSearsal
1--800--469--4663.Lagarantiadeemisioneses unagarantiapor defectos.Los
defectossejuzgandeacuerdoconelfuncionamientonormalde unmotor.La
garantiano est_relacionadaconunapruebade emisionesenuso.
sin cargoalgunoparael poseedor,incluyendotareasdediagn6sticoque
permitandeterminarsi unapartecongarantiaes defectuosa,siempreque
dichodiagn6sticose realiceenundistribuidordeserviciosSearsautoriza-
do. Parael serviciode lagarantiade emisiones,contacteal distribuidorde
serviciosSearsautorizadom_scercanoincluidoen las"P_ginasamarillas"
en lascategorias"Motores,gasolina","Motoresdegasolina","Podadoras
de cesped",o similares.
4. Reclamacionesyexclusionesa la cobertura
Las reclamacionesde lagarantiadebenenviarsedeacuerdocon las
disposicionesdela politicadegarantiaparamotoresSears.Lacobertura
de lagarantiaexcluir_defectosen piezascongarantiaquenoscan partes
originalesSears,o abuso,negligenciao mantenimientoincorrecto,tal y
comose estableceen lapolitica degarantiaparamotoresSears.Searsno
es responsablede lasfallasenpiezascongarantiaprovocadasporeluso
de partesa6adidas,que noscanoriginalesoquese hayanmodificado.
5. Mantenimiento
Cualquierpartecongarantiaquenoesteprogramadaparaserreem-
plazadacomomantenimientorequerido,oque s61odebainspeccionarse
regularmentealefecto de"inspeccioneoreemplacesegL]nsea necesario",
estar_garantizadacontradefectosduranteel periodode la garantia.Todas
las piezasgarantizadasqueesten programadasparasureemplazopara
cumplirconlos requisitosdemantenimientoestar_ngarantizadass61o
porel periodoanterioral primerreemplazoprogramaticparadicha pieza.
Cualquierpiezade recambioqueseaequivalenteenfuncionamientoy
durabilidadpuedeusarsepararealizarmantenimientoo reparaciones.El
propietarioes responsablederealizartodoel mantenimientorequerido,tal
y comose defineenlas instruccionesdefuncionamientoy mantenimiento
Sears
6. Coberturaindirecta
Porla presente,la coberturaseextiendea lafalla decualquiercomponente
de motorprovocadapot lafallade unapiezacongarantiaque estetodavia
en periododegarantia.
informaci6nparaelmantenimientodemotores.
Page 70

Busque el periodo de duraci6n de emisiones importantes yla informaci6n de clasificaci6n de aire en
la etiqueta de emisiones de su motor
Los motores cuyo cumpiimiento con los estAndares de emisi6n Tier 2 de laComisi6n de Recursos Ambientales de California (CARB)
est6 certificado deben exhibir la informaci6n relacionada con el periodo de duraci6n de ias emisiones y la clasificaci6n de aire. Sears
Brands Management Corporation ponen esta informaci6n a disposici6n del consumidor en nuestras etiquetas de emisiones.
Ei Periodo de Duraci6n de las Emisiones describe el nQmero de horas de tiempo real de funcionamiento para el cuai se certifica que
el motor cumpie con ias reglas de emisi6n, descontando el mantenimiento adecuado del mismo segQn las instrucciones de oper-
aci6n y mantenimiento. Se utilizan las siguientes categonas:
Moderado:Se certifica que el motor cumpie con las reglas de emisi6n durante 125 horas de tiempo real de funcionamiento del motor.
Inmediato:Se certifica que el motor cumpie con las reglas de emisi6n durante 250 horas de tiempo real de funcionamiento del motor.
Extendido:Se certifica que el motor cumpie con las reglas de emisi6n durante 500 horas de tiempo real de funcionamiento del motor.
Por ejemplo, una cortadora de c6sped tJpica que se empuja desde arras se usa entre 20 y 25 horas por aSo. Por Io tanto, el Periodo
de Duraci6n de Emisiones de un motor con una clasificaci6n intermedia sena equivaiente a entre 10 y 12 aSos.
Laciasificaci6n de aire es un nQmero calculado para describir el nivel relativo de emisiones para un grupo de motores en particular.
Cuanto menor sea la clasificaci6n de aire, mayor es la limpieza del motor. La informaci6n se presenta de forma grAfica en la etiqueta
de emisiones.
Despu_s del 1 de julio de 2000, busque el periodo de cumplimiento de las reglas de
emisiones en la etiqueta de cumplimiento de las reglas de emisiones del motor
Despu6s del 1 de julio de 2000 se certificarA que determinados motores Sears Brands Management Corporation cumplen
con los estAndares de emisiones de la fase 2 de la Agencia de Protecci6n Ambientai de los Estados Unidos (USEPA). Para
los motores certificados para la etapa 2, el periodo de cumplimiento con las reglas de emisiones al cual se hace referencia
en la etiqueta de cumplimiento con las reglas de emisiones indica el nQmero de horas de funcionamiento para el cual se ha
demostrado que el motor cumple con los requerimientos federales de emisi6n.
Para los motores con desplazamiento inferior a 225 cc, Categoria C = 125 horas, B = 250 horas y A = 500 horas.
Para los motores con desplazamiento de 225 cc o mAs, Categoria C = 250 horas, B = 500 horas y A = 1000 horas.
El desplazamiento de los motores de la serie modelo 150112 es 249 cc.
La presente es una representaci6n gen_ricade laetiqueta de emisi6n que se encuentra generaimenteen un
motor certificado.
FAMILYYBSXS.3192VA 274812
GDOC-100182Rev.A
70
Page 71

Felicitaciones por haber realizado una adquisici6n inteligente. El producto Craftsman® que ha
adquirido esta diseSado y fabricado para brindar muchos aSos de funcionamiento confiable. Pero
como todos los productos a veces puede requerir de reparaciones. Es en ese momento cuando el
disponer de un Acuerdo de protecci6n para reparaciones le puede ahorrar dinero y problemas.
A continuaci6n se detallan los puntosincluidosen elAcuerdo:
[] Servicio experto prestadopor nuestros10,000especialistasen reparacionesprofesionales
[] Servicio ilirnitado sin cargo paralaspiezasy lamanode obraentodas las reparacionescubiertas
[] Reernplazo del producto hasta 1500 d61aressi no es posible reparar el producto cubierto
[] Descuento de 25% del precionormal delservicio y de las piezas relacionadascon el mismo que no estencubiertas
por el acuerdo;ademas,25% del precionormal de laverificaci6n de mantenimientopreventivo
[] Ayuda r_pida por tel_fono - Io IlamamosResoluci6n RApida- el apoyotelef6nico de unChamusca al representante.
Pienseen nosotroscomo el manual"de un due_o hablador."
Una vezadquiridoel Acuerdo, puede programar el servicio con tan s61orealizaruna Ilamadatelef6nica. Puede Ilamaren
cualquier momentodeldia o de la noche o programarun servicio en linea.
ElAcuerdode Protecci6nde Reparaci6nes unacompra sin riesgo. Si ustedanulapor alguna raz6nduranteel periodode
garantiade producto,proporcionaremosun reembolso Ileno.O, un reembolsoprorrateadoencualquier momentodespues
del periodo de garantiade productoexpira,iAdquiera hoysu acuerdode protecci6n para reparaciones!
Se aplican determinadas limitaciones y exclusiones.Paraobtener informaciTn adicional y precios en los Estados
Unidos Ilame al 1-800-827-6655.
El *Coverage enCanad_ivaria en algunos articulos. Para detalles Ilenos la Ilamada Chamusca Canad_ien 1-800-
361-8885.
Servicio de instalaci6nde Sears
Sidesea solicitarla instalaci6nprofesionalde Searsde aparatosdomesticos,dispositivos paraabrir portones,calentado-
resde aguay otrosarticulos domesticosimportantes,en los EstadosUnidos o Canada flameal 1-800-4-MY-HOME®.
71
Page 72

Your Home
For troubleshooting, product manuals and expert advice:
managernylife
www.managemylife.com
For repair - in your home - of all major brand appliances,
lawn and garden equipment, or heating and cooling systems,
no matter who made it, no matter who sold it!
For the replacement parts, accessories and
owner's manuals that you need to do-it-yourself.
For Sears professional installation of home appliances
and items like garage door openers and water heaters.
1-800-4-MY-HOME ® (1-800-469-4663)
Call anytime, day or night (U.S.A. and Canada)
www.sears.com www.sears.ca
Our Home
For repair of carry-in items like vacuums, lawn equipment,
and electronics, call anytime for the location of your nearest
Sears Parts & Repair Service Center
1-800-488-1222 (U.S.A.) 1-800-469-4663 (Canada)
www.sears.com www.sears.ca
To purchase a protection agreement on a product serviced by Sears:
1-800-827-6655 (U.S.A.) 1-800-361-6665 (Canada)
Para pedir servicio de reparaci6n
a domicilio, y para ordenar piezas:
1-888-SU-HOGAR ®
(1-888-784-6427)
www.sears.com
® Registered Trademark / TMTrademark of KCD IP, LLC in the United States, or Sears Brands, LLC in other countries
® Marca Registrada ! TMMarca de Fabrica de KCD IP, LLC en Estados Unidos, o Sears Brands, LLC in otros paises
MCMarque de commerce ! MDMarque deposee de Sears Brands, LLC
Au Canada pour service en frangais:
1-800-LE-FOYER Mc
(1-800-533-6937)
www.sears.ca
 Loading...