

Craftsman 24729922 Owner’s Manual

Operator's Manual
I:Rl FI'SlVl N
205cc Engine
Front Tine Tiller
Model No. 247.29922
* SAFETY
* ASSEMBLY
* OPERATION
CAUTION: Before using
this product, read this
manual and follow all
* MAINTENANCE
* PARTS LIST
* ESPANOL
safety rules and operating
instructions.
Sears Brands Management Corporation, Hoffman Estates, iL 60179, U.S.A.
Visit our web site: www.craftsman.com
FORMNO.769-05525A
12/2/2010
WarrantyStatement..................................Pac
Safetyinstructions....................................Pac
SafetyLabels............................................Pac
Assembly..................................................Pac
Operation..................................................Pac
ServiceandMaintenance.........................Pac
Off-SeasonStorage..................................Pac
CRAFTSMAN TWO YEAR FULL WARRANTY
FORTWOYEAR(S)fromthe dateof purchase,thisproductis warrantedagainstanydefectsinmaterialorworkmanship.Defectiveproductwill
receivefreerepairorfree replacementif repairisunavailable,
For warranty coverage details to obtain repair or replacement, visit the web site: www.craftsman.com
This warranty covers ONLY defects in material and workmanship. Warranty coverage does NOT include:
• Expendableitemsthatcanwearoutfromnormalusewithinthewarrantyperiod,suchas
blades,tines,orbelts.
Productdamageresultingfromuserattemptsat productmodificationor repairorcausedby productaccessories.
Repairsnecessarybecauseof accidentorfailuretooperateor maintainthe productaccordingtoallsuppliedinstructions.
Preventivemaintenance,or repairsnecessaryduetoimproperfuel mixture,contaminatedor stalefuel.
e2
es3-6
e7
es8-10
es11-17
es18-22
e23
TroubleShooting.......................................Page24
PartsList...................................................Page26-29
LabelMap.................................................Page39
RepairProtectionAgreement...................Page42
Espa_ol.....................................................Page43
ServiceNumbers......................................BackCover
Thiswarrantyisvoidif thisproductisever usedwhileprovidingcommercialservicesorif rentedtoanotherperson.
Thiswarrantygivesyouspecificlegalrights,andyou mayalsohaveotherrightswhichvaryfromstatetostate.
Sears Brands Management Corporation, Hoffman Estates, IL 60179
EngineSeries: 205cc
EngineOilType: SAE30
EngineOilCapacity: 20ounces
Fuel: UnleadedGasoline
SparkPlug: Champion®RC-12YC
SparkPlugGap: .030"
Model Number.................................................................
Serial Number .................................................................
Dateof Purchase.............................................................
Recordthemodelnumber,serialnumber
anddateof purchaseabove
©SearsBrands,LLC 2
Thissymbolpointsout importantsafetyinstructionswhich,if not
followed,couldendangerthepersonalsafetyand/orpropertyof
yourselfandothers. Readandfollowall instructionsin thismanual
beforeattemptingtooperatethismachine.Failuretocomplywith
theseinstructionsmayresultin personalinjury.Whenyou seethis
symbol,HEEDITSWARNING!
Thismachinewasbuilttobeoperatedaccordingtothe safeopera-
tionpracticesinthismanual.Aswithanytypeof powerequipment,
carelessnessorerroronthe partof theoperatorcan resultin
seriousinjury.Thismachineiscapableofamputatingfingers,hands,
toesandfeetandthrowingdebris.Failureto observethefollowing
safetyinstructionscouldresultin seriousinjuryordeath.
CALIFORNIA PROPOSITION 65
EngineExhaust,someof itsconstituents,andcertainvehicle
componentscontainoremitchemicalsknowntoStateofCalifornia
tocausecancerandbirthdefectsorotherreproductiveharm.Bat-
tery posts,terminals,andrelatedaccessoriescontainleadand lead
compounds,chemicalsknownto theStateof Californiato cause
cancerandreproductiveharm.Washhandsafterhandling.
TRAINING
• Read,understand,andfollowall instructionson themachineand
in themanual(s)beforeattemptingtoassembleandoperate.
Keepthis manualina safeplaceforfutureand regularreference
andfororderingreplacementparts.
• ReadtheOperator'sManualandfollowallwarningsandsafety
instructions.Failuretodosocanresultin seriousinjurytothe
operatorand/or bystanders.Forquestions,call1-800-4MY-HOME.
• Befamiliarwithall controlsandtheirproperoperation.Knowhow
tostopthe machineanddisengagethemquickly.
• Neverallowchildrenunder14yearsof agetooperatethis
machine.Children14andovershouldreadandunderstandthe
instructionsandsafeoperationpracticesin thismanualandon
themachineandbe trainedandsupervisedbyanadult.
• Neverallowadultstooperatethis machinewithoutproper
instruction.
• Keepbystanders,pets,andchildrenatleast75feetfromthe
machinewhileitisinoperation.Stopmachineif anyoneenters
thearea.
• Neverrunanengineindoorsor ina poorlyventilatedarea.Engine
exhaustcontainscarbonmonoxide,anodorlessanddeadlygas.
Your Responsibility=Restrict theuseofthispowermachineto
personswhoread,understandandfollowthewarningsandinstruc-
tionsin thismanualandon the machine.
SAVETHESEINSTRUCTIONS!
PREPARATION
• Thoroughlyinspecttheareawheretheequipmentistobeused.
Removeall rocks,bottles,cans,or otherforeignobjectswhich
couldbepickedupor thrownandcausepersonalinjuryor
damageto themachine.
• Alwayswearsafetyglassesor safetygogglesduringoperation
andwhileperformingan adjustmentorrepair,to protectyour
eyes.Thrownobjectswhichricochetcancauseseriousinjuryto
theeyes.
• Wearsturdy,rough-soledworkshoesandclose-fittingslacksand
shirts.Loosefittingclothesorjewelrycan becaughtin movable
parts.Neveroperatethismachineinbarefeetorsandals.
• Beforestarting,checkallboltsandscrewsfor propertightnessto
besurethe machineisinsafeworkingcondition.Also,visually
inspectmachinefor anydamageatfrequentintervals.
• Disengageclutchleversandshift(if provided)intoneutral("N")
beforestartingtheengine.
• Neverleavethismachineunattendedwiththeenginerunning.
• Neverattempttomakeanyadjustmentswhiletheengineis
running,exceptwherespecificallyrecommendedinthe operator's
manual.
• Maintainor replacesafetyandinstructionslabels,asnecessary.
3
SafeHandling of Gasoline:
Toavoidpersonalinjuryor propertydamageuseextremecarein
handlinggasoline.Gasolineisextremelyflammableandthe vaporsare
explosive.Seriouspersonalinjurycanoccurwhengasolineis spilled
onyourselforyourclotheswhichcan ignite.Washyourskinand
changeclothesimmediately.
• Useonlyan approvedgasolinecontainer.
• Neverfill containersinsideavehicleor ona truckor trailerbed
witha plasticliner.Alwaysplacecontainersonthe groundaway
fromyourvehiclebeforefilling.
• Whenpractical,removegas-poweredequipmentfromthe truck
ortrailerand refuelitonthe ground.Ifthisis notpossible,then
refuelsuchequipmentona trailerwitha portablecontainer,rather
thanfroma gasolinedispensernozzle.
• Keepthe nozzleincontactwiththerimofthe fueltankor
containeropeningatalltimesuntilfuelingiscomplete.Donot use
a nozzlelock-opendevice.
• Extinguishallcigarettes,cigars,pipesandother sourcesof
ignition.
• Neverfuel machineindoors.
• Neverremovegascapor addfuel whilethe engineishot or run-
ning.Allowenginetocool atleasttwo minutesbeforerefueling.
• Neveroverfillfueltank.Fill tankto nomorethan1/2inchbelow
bottomoffillerneckto allowspacefor fuelexpansion.
• Replacegasolinecapandtightensecurely.
• Ifgasolineisspilled,wipe itoff theengineandequipment.Move
unitto anotherarea.Wait5 minutesbeforestartingtheengine.
• To reducefirehazards,keepmachinefreeofgrass,leaves,or
otherdebrisbuild-up.Cleanupoil orfuelspillageand removeany
fuelsoakeddebris.
• Neverstorethe machineorfuelcontainerinsidewherethereis an
openflame,sparkor pilotlightas on awaterheater,spaceheater,
furnace,clothesdryerorothergasappliances.
OPERATION
• Do notputhandsorfeetnear rotatingparts.Contactwiththe
rotatingpartscanamputatehandsandfeet.
• Do notoperatemachinewhileundertheinfluenceofalcoholor
drugs.
• Neveroperatethismachinewithoutgoodvisibilityor light.Always
be sureof yourfootingandkeepa firmholdonthehandles.
• Keepbystandersawayfromthe machinewhileitisinoperation.
Stopthe machineif anyoneentersthe area.
• Becarefulwhentillinginhardground.Thetines maycatchinthe
groundandpropelthetillerforward.Ifthis occurs,let goofthe
handlebarsanddo not restrainthemachine.
• Exerciseextremecautionwhenoperatingonor crossinggravel
surfaces.Stayalertforhiddenhazardsortraffic. Donotcarry
passengers.
• Neveroperatethemachineat hightransportspeedsonhardor
slipperysurfaces.
• Exercisecautiontoavoidslippingorfalling.
• Lookdownandbehindandusecarewhenin reverseor pulling
machinetowardsyou.
• Startthe engineaccordingtothe instructionsfoundinthis manual
and keepfeetwell awayfromthetinesat all times.
• Afterstrikingaforeignobjector ifyourmachineshouldstartmak-
inganunusualnoiseor vibration,immediatelyshutthe engineoff.
Disconnectthe sparkplugwire,grounditagainstthe engineand
performthefollowingsteps:
a. Inspectfordamage.
b. Repairorreplaceanydamagedparts.
c. Checkforanyloosepartsandtightento assurecontinued
safeoperation.
• Disengageall clutchlevers(iffitted)andstopenginebeforeyou
leavethe operatingposition(behindthe handles).Waituntil
thetinescometo a completestopbeforeuncloggingthe tines,
makinganyadjustments,or inspections.
• Neverrunanengineindoorsorinapoorlyventilatedarea.Engine
exhaustcontainscarbonmonoxide,an odorlessanddeadlygas.
• Mufflerandenginebecomehotandcancausea burn.Do not
touch.
• Usecautionwhentillingnearfences,buildingsandunderground
utilities.Rotatingtinescan causepropertydamageorpersonal
injury.
• Donotoverloadmachinecapacitybyattemptingtotillsoil too
deepattoo fastof a rate.
• Ifthemachineshouldstartmakinganunusualnoiseorvibration,
stoptheengine,disconnectthesparkplugwireandgroundit
againsttheengine.Inspectthoroughlyfor damage.Repairany
damagebeforestartingandoperating.
• Keepallshields,guards,and safetydevicesinplaceandoperat-
ing properly.
• Neverpick uporcarrymachinewhiletheengineis running.
• Useonlyattachmentsandaccessoriesapprovedbythemanu-
factureras listedin thePartsListpagesofthisoperator'smanual.
Failuretodosocan resultin personalinjury.
• Ifsituationsoccurwhichare notcoveredinthismanual,usecare
andgoodjudgement.ContactCustomerSupportat 1-800-4MY-
HOMEforassistanceandthe nameof thenearestservicedealer
MAINTENANCE & STORAGE
• Keepthemachine,attachmentsandaccessoriesin safeworking
order.
• Allowthemachinetocoolat leastfiveminutesbeforestoring.
Nevertamperwithsafetydevices.Checktheirproperoperation
regularly.
• Checkboltsandscrewsforpropertightnessat frequentintervals
to keepthemachineinsafeworkingcondition.Also,visually
inspectmachineforanydamage.
• Beforecleaning,repairing,or inspecting,stoptheengineand
makecertainthetinesandall movingpartshavestopped.
Disconnectthe sparkplugwireandgrounditagainsttheengineto
preventunintendedstarting.
4
• Do notchangetheenginegovernorsettingsor over-speedthe
engine.Thegovernorcontrolsthemaximumsafeoperatingspeed
ofengine.
Maintainor replacesafetyandinstructionlabels,as necessary.
Followthis manualforsafeloading,unloading,transporting,and
storageof thismachine.
Alwaysreferto theoperator'smanualforimportantdetailsifthe
machineisto bestoredforanextendedperiod.
If thefuel tankhasto be drained,do thisoutdoors.
Observeproperdisposallawsandregulationsforgas,oil,etc.to
protecttheenvironment.
AccordingtotheConsumerProductsSafetyCommission(CPSC)
andtheU.S.EnvironmentalProtectionAgency(EPA),thisproduct
hasan AverageUsefulLifeof seven(7)years,or 130hoursof
operation.Atthe endof theAverageUsefulLifehavethemachine
inspectedannuallybyanauthorizedservicedealertoensurethat
allmechanicalandsafetysystemsareworkingproperlyandnot
wornexcessively.Failureto do socan resultinaccidents,injuries
ordeath.
DO NOT MODIFY ENGINE
Toavoidseriousinjuryordeath,donot modifyenginein anyway.
Tamperingwiththegovernorsettingcanleadto arunawayengineand
causeitto operateat unsafespeeds.Nevertamperwithfactorysetting
ofenginegovernor.
NOTICE REGARDING EMISSIONS
EngineswhicharecertifiedtocomplywithCaliforniaandfederal
EPAemissionregulationsforSORE(SmallOff RoadEquipment)are
certifiedto operateonregularunleadedgasoline,and mayinclude
thefollowingemissioncontrolsystems:EngineModification(EM),
OxidizingCatalyst(CO),SecondaryAirInjection(SAI)and ThreeWay
Catalyst(TWO)if soequipped.
SPARK ARRESTOR
Thismachineis equippedwithan internalcombustionengineand
shouldnotbe usedonor nearanyunimprovedforest-covered,
brushcoveredor grass-coveredlandunlesstheengine'sexhaust
systemisequippedwitha sparkarrestormeetingapplicablelocalor
statelaws(if any)
Ifa sparkarrestorisused,it shouldbe maintainedin effectiveworking
orderbytheoperator.Inthe StateofCaliforniatheaboveisrequired
bylaw (Section4442ofthe CaliforniaPublicResourcesCode).Other
statesmayhavesimilarlaws. Federallawsapplyonfederallands.
A sparkarrestorforthemufflerisavailablethroughyournearestSears
PartsandRepairServiceCenter.
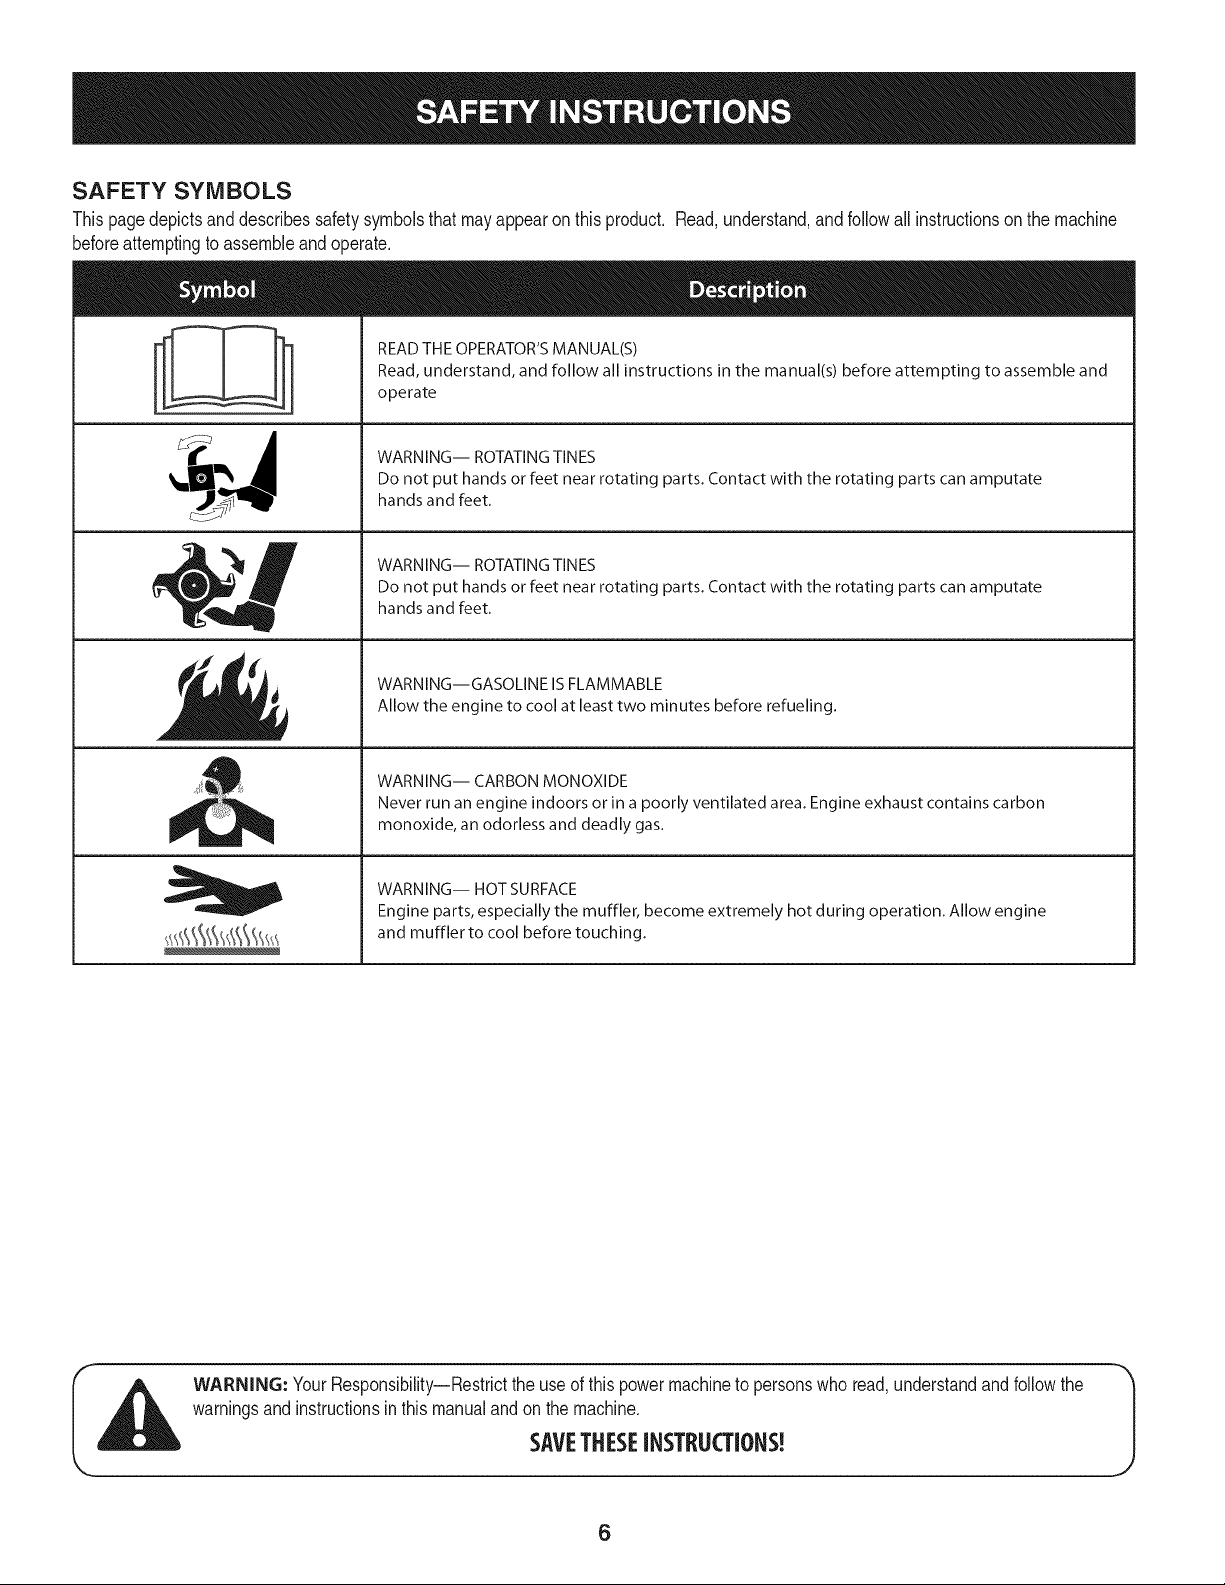
SAFETY SYMBOLS
Thispagedepictsanddescribessafetysymbolsthatmayappearonthisproduct. Read,understand,andfollowall instructionson themachine
beforeattemptingto assembleandoperate.
READ THE OPERATOR'S MANUAL(S)
i
i
Read, understand, and follow all instructions in the manual(s) before attempting to assemble and
operate
WARNING-- ROTATING TINES
Do not put hands or feet near rotating parts. Contact with the rotating parts can amputate
hands and feet.
WARNING-- ROTATING TINES
Do not put hands or feet near rotating parts. Contact with the rotating parts can amputate
hands and feet.
WARNING--GASOLINE IS FLAMMABLE
Allow the engine to cool at least two minutes before refueling.
WARNING-- CARBON MONOXIDE
Never run an engine indoors or in a poorly ventilated area. Engine exhaust contains carbon
monoxide, an odorless and deadly gas.
WARNING-- HOT SURFACE
Engine parts, especially the muffler, become extremely hot during operation. Allow engine
and muffler to cool before touching.
WARNING: YourResponsibility--Restricttheuse ofthispowermachinetopersonswhoread,understandandfollowthe
warningsand instructionsinthis manualandonthe machine.
SAVETHESEINSTRUCTIONS!
6
7
IMPORTANT:Thisunit isshippedwithoutgasolineoroil intheengine.
Becertaintoserviceenginewithgasolineandoilas instructedinthe
Operationsectionofthismanualbeforeoperatingyourmachine.
NOTE:Referenceto rightand lefthandsideofthe Tillerisobserved
fromtheoperatingposition.
OPENING CARTON
1. Cuteachcornerofthe cartonverticallyfromtopto bottom.
2. Removeall looseparts.
3. Removeloosepackingmaterial.
REMOVING UNIT FROM CARTON
1. Usethehandlebartoliftand pullthetiller backwardsto a flat
area.Checkthecartonthoroughlyforlooseparts.
2. Besurenotto kinkthe forwardclutchcable.
LOOSE PARTS IN CARTON
• HandlebarAssembly
• Tiller
• EngineOil
• Operator'sManual
• DepthGageAssembly
f
J
Figure2
f
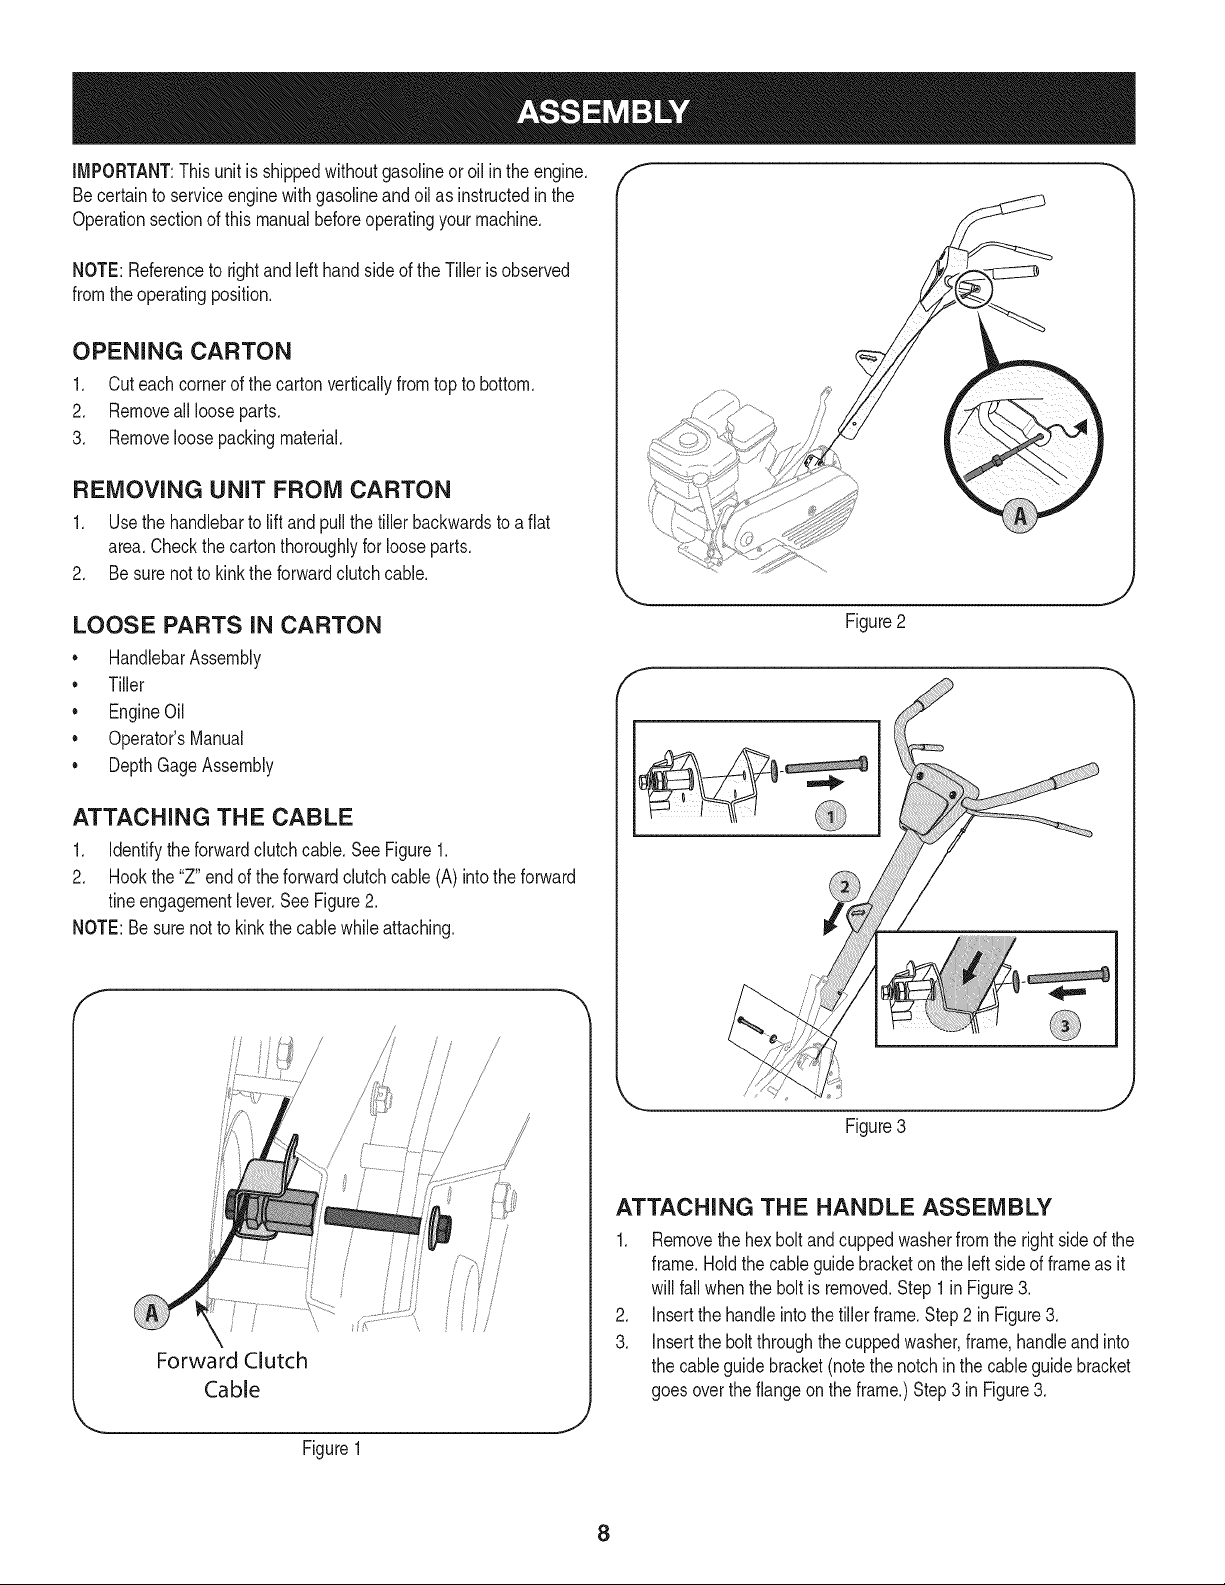
ATTACHING THE CABLE
1. Identifytheforwardclutchcable.SeeFigure1.
2. Hookthe"Z"endoftheforwardclutchcable(A)intotheforward
fineengagementlever.SeeFigure2.
NOTE:Besure notto kinkthecablewhileattaching.
/
/
/
Forward Clutch
Cable
J
Figure1
Figure3
ATTACHING THE HANDLE ASSEMBLY
1. Removethehexboltandcuppedwasherfromtherightsideofthe
frame.Holdthecableguidebracketonthe left sideof frameas it
willfall whenthe boltis removed.Step 1in Figure3.
2. Insertthehandleintothe tillerframe.Step2 in Figure3.
3. Inserttheboltthroughthecuppedwasher,frame,handleandinto
thecableguidebracket(notethenotchinthe cableguidebracket
goesovertheflangeon theframe.)Step3 in Figure3.
8
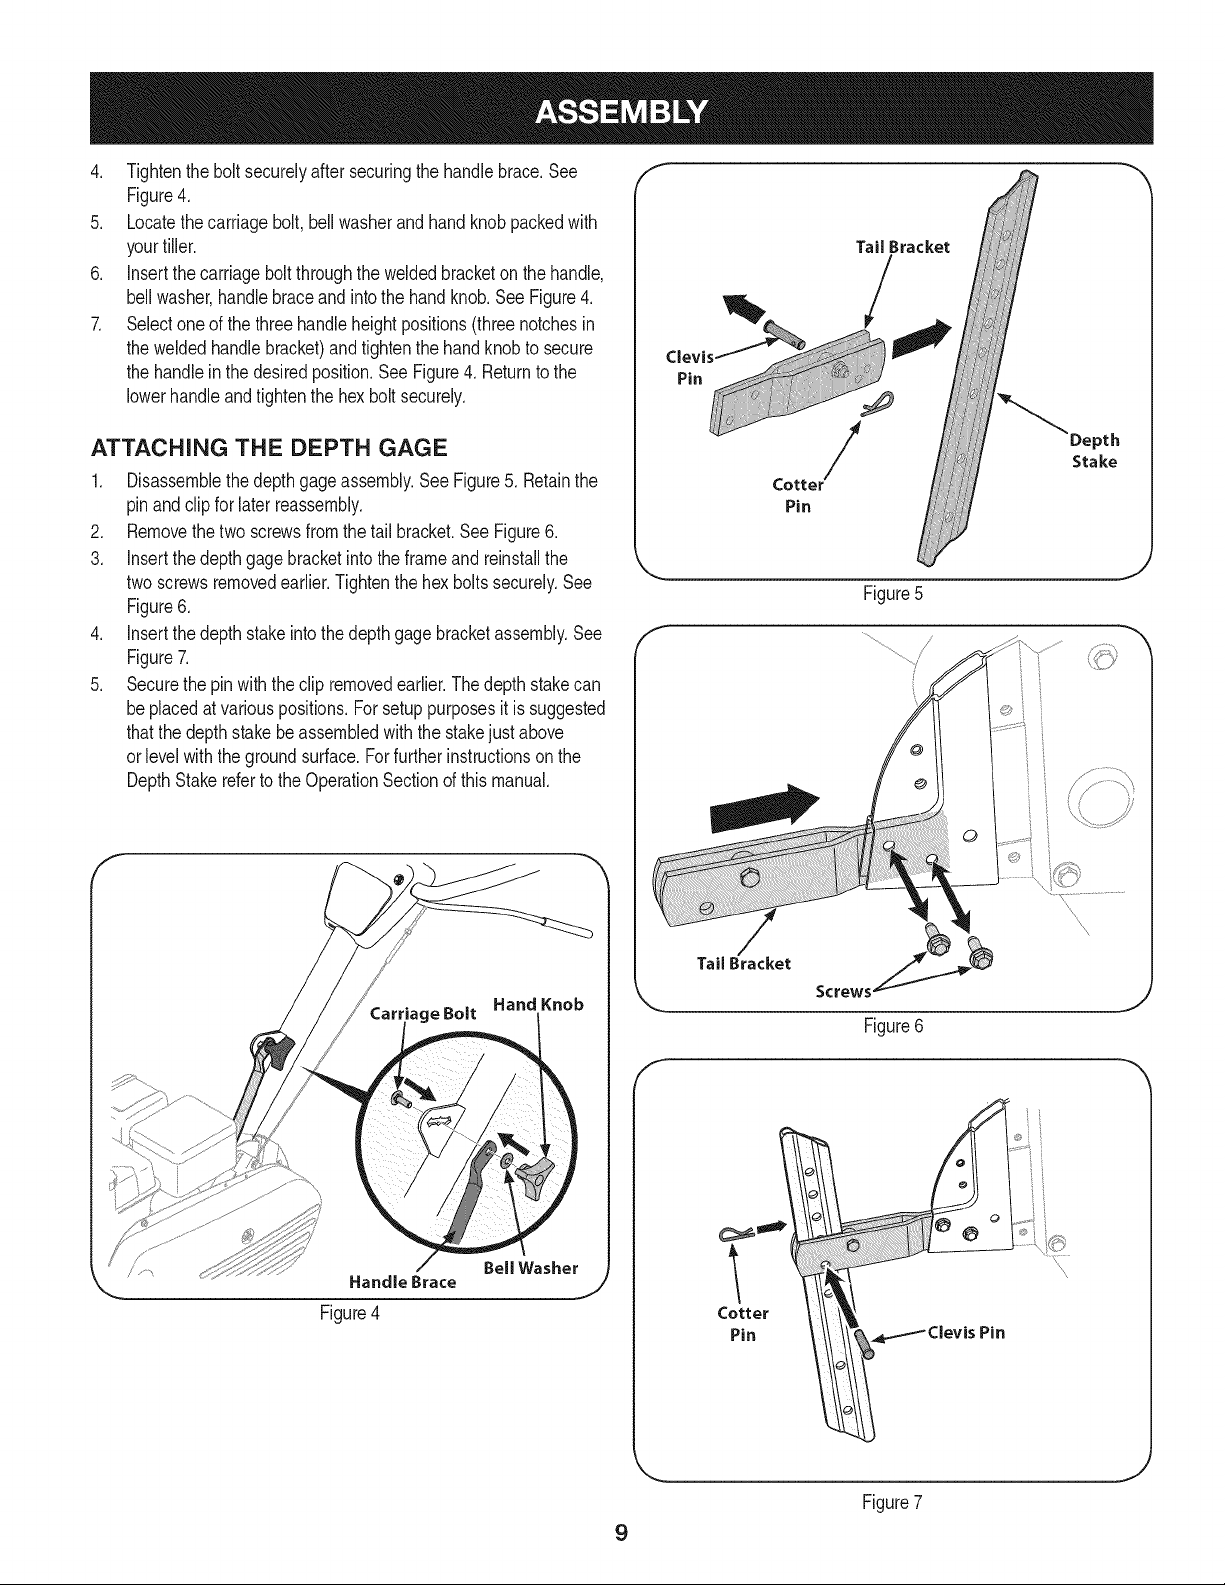
4. Tightentheboltsecurelyaftersecuringthe handlebrace.See
Figure4.
5. Locatethecarriagebolt,bellwasherandhandknobpackedwith
yourtiller.
6. Insertthe carriageboltthroughtheweldedbracketon the handle,
bellwasher,handlebraceandintothe handknob.SeeFigure4.
7. Selectoneofthe threehandleheightpositions(threenotchesin
theweldedhandlebracket)andtightenthe handknobtosecure
thehandleinthe desiredposition.SeeFigure4. Returntothe
lowerhandleandtightenthe hexbolt securely.
Tail Bracket
ATTACHING THE DEPTH GAGE
1. Disassemblethedepthgageassembly.See Figure5.Retainthe
pinandclipfor laterreassembly.
2. Removethetwo screwsfromthe tailbracket.SeeFigure6.
3. Insertthe depthgagebracketintothe frameand reinstallthe
twoscrewsremovedearlier.Tightenthehexboltssecurely.See
Figure6.
4. Insertthe depthstakeintothe depthgagebracketassembly.See
Figure7.
5. Securethepinwiththeclip removedearlier.Thedepth stakecan
beplacedat variouspositions.Forsetuppurposesit issuggested
thatthedepthstakebeassembledwiththestakejust above
orlevelwiththe groundsurface.Forfurtherinstructionsonthe
DepthStakerefertotheOperationSectionofthis manual.
Hand Knob
Depth
Stake
Pin
Figure5
.................. /,
.....................
Tail Bracket
Figure6
f
(:otter
Pin
9
_Clevis Pin
J
Figure7
ADJUSTMENTS
Priortooperatingyourtiller,carefullyreadand followall instructions
below.Performall adjustmentstoverifyyourtiller isoperatingsafely
_andpropery.
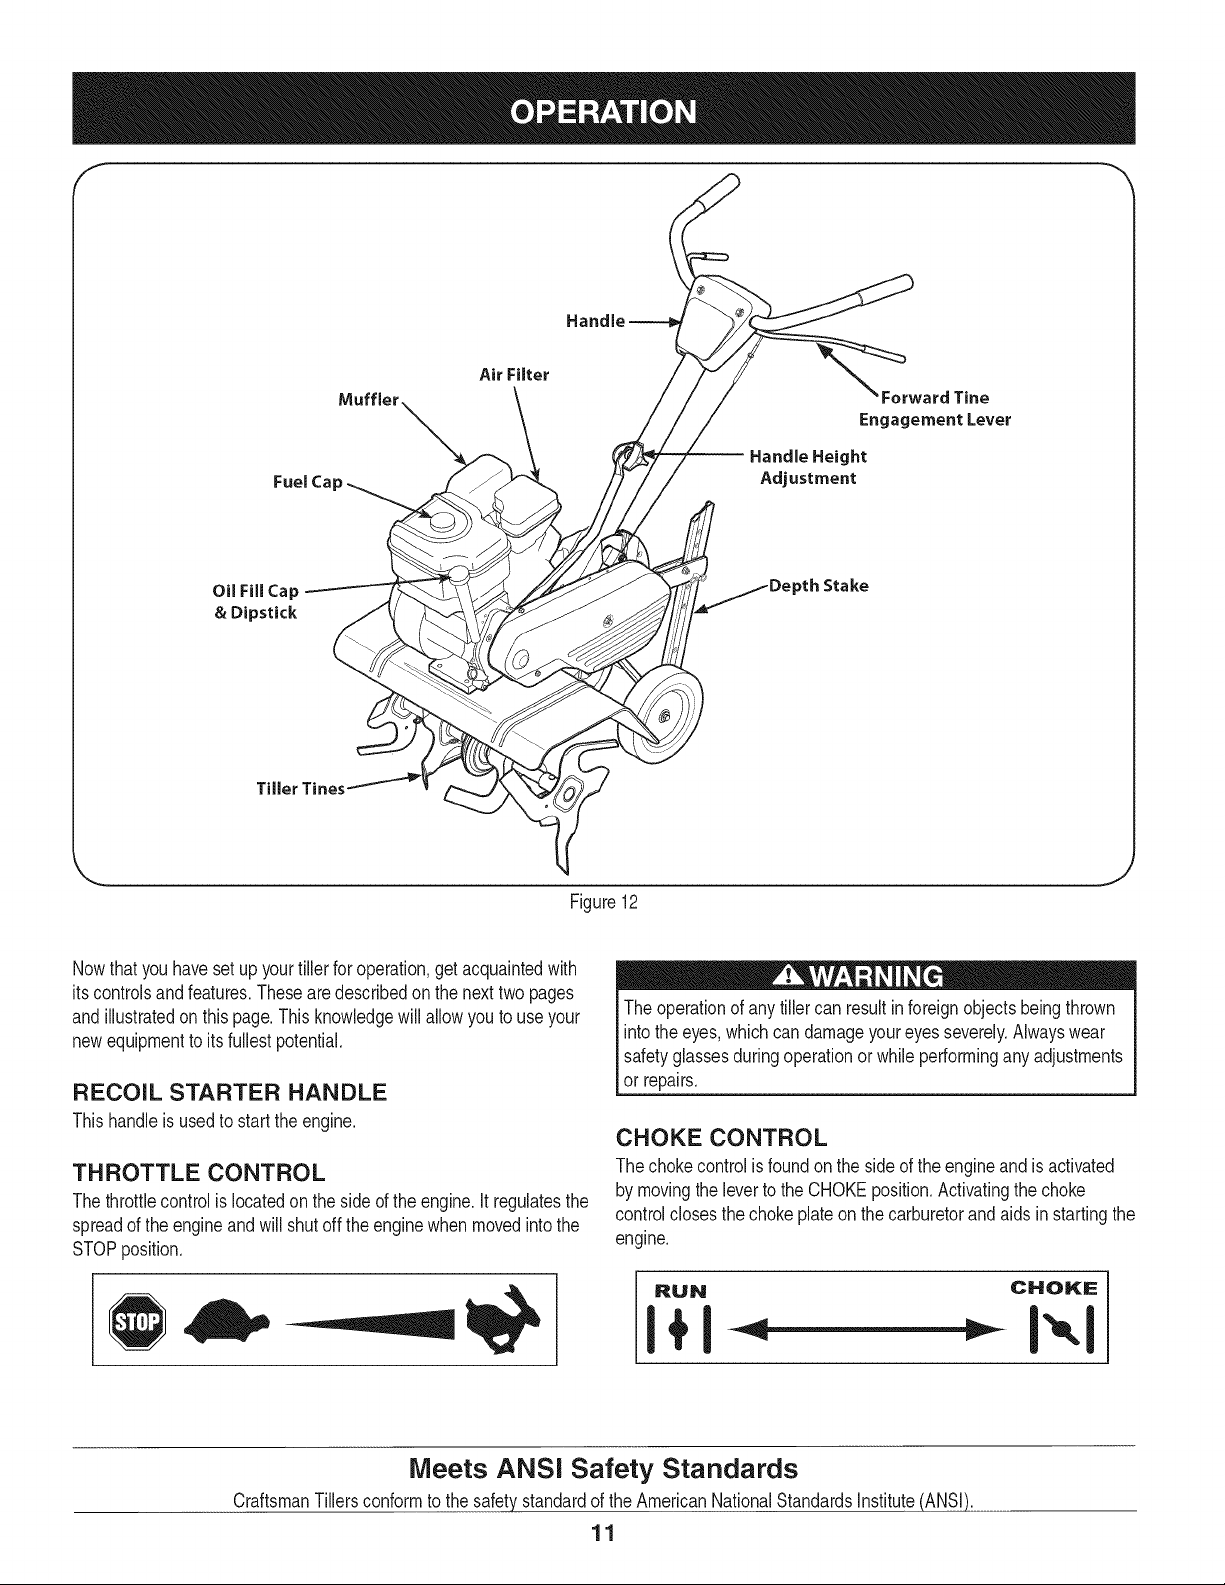
Checktheadjustmentofthewheels:
Thetiller isshippedwiththewheelsadjustedso thatthe machinesits
level.Thewheelsneedto beadjustedto meetyourtillingneedsbefore
operation.Thisadjustmentismadeby removingtheclevispinfromthe
wheelyokeand raisingthewheelsto thedesiredheight.SeeFigure8.
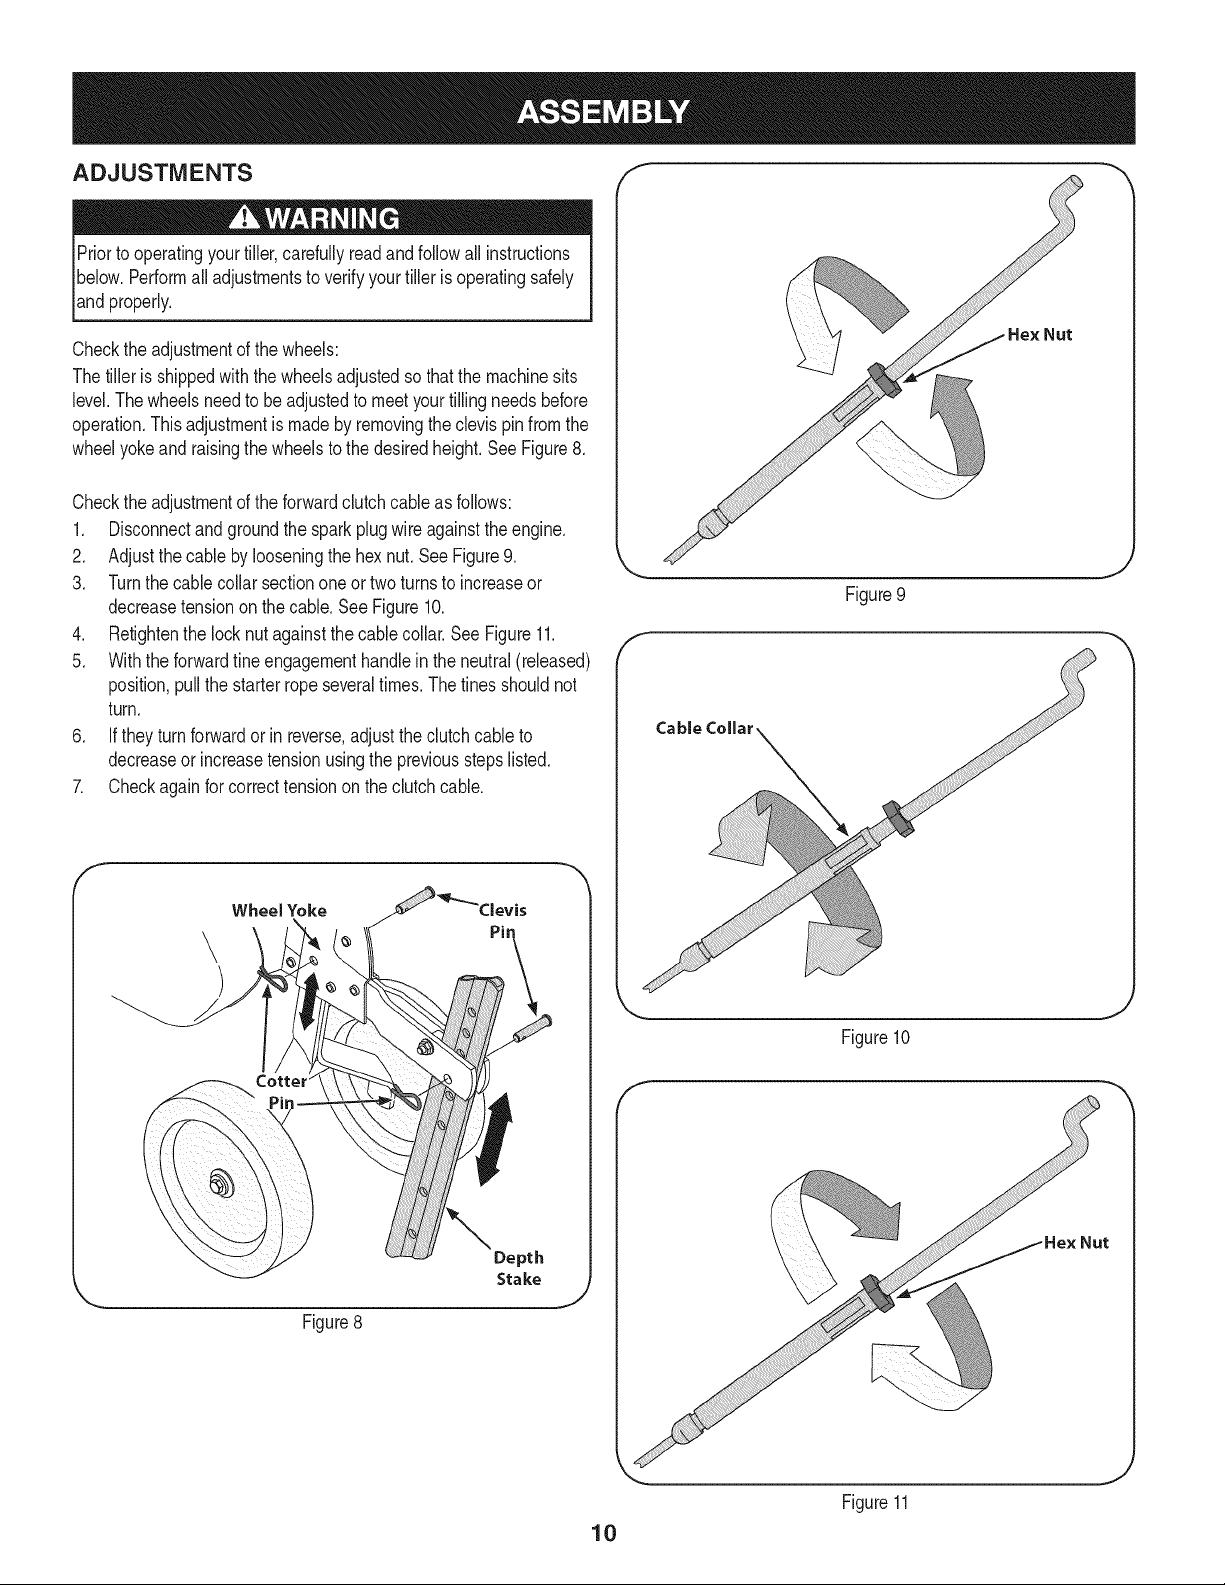
Checktheadjustmentoftheforwardclutchcableasfollows:
1. Disconnectandgroundthesparkplugwire againsttheengine.
2. Adjustthecablebylooseningthe hexnut.SeeFigure9.
3. Turnthecablecollar sectiononeor twoturnsto increaseor
decreasetensionon thecable.SeeFigure10.
4. Retightenthelocknut againstthecablecollar.SeeFigure11.
5. Withtheforwardfine engagementhandlein theneutral(released)
position,pullthe starterropeseveraltimes.Thetinesshouldnot
turn.
6. Iftheyturnforwardor in reverse,adjustthe clutchcableto
decreaseor increasetensionusingthepreviousstepslisted.
7. Checkagainfor correcttensiononthe clutchcable.
f
J
Figure9
f
WheelYoke
Pin
\
Figure10
f
Depth
Stake
J
Figure8
Nut
10
J
Figure11
f
Muffler Forward Tine
Fuel Cap Adjustment
Oil Fill Cap
& Dipstick
Tiller Tines
Figure12
Nowthat youhavesetup yourtillerforoperation,getacquaintedwith
itscontrolsandfeatures.Thesearedescribedonthe nexttwopages
andillustratedon thispage.Thisknowledgewillallowyouto useyour
newequipmenttoits fullestpotential.
RECOIL STARTER HANDLE
Thishandleisusedto starttheengine.
THROTTLE CONTROL
Thethrottlecontrolis locatedonthe sideof theengine.Itregulatesthe
spreadoftheengineandwill shutoff theenginewhen movedintothe
STOPposition.
Handle Height
Theoperationofanytillercan resultinforeignobjectsbeingthrown
intothe eyes,whichcan damageyoureyesseverely.Alwayswear
safetyglassesduringoperationor whileperforminganyadjustments
or repairs.
Engagement Lever
Stake
.J
CHOKE CONTROL
Thechokecontrolis foundon the sideof theengineandis activated
bymovingthe leverto theCHOKEposition.Activatingthe choke
controlclosesthe chokeplateon the carburetorandaidsin startingthe
engine.
@
RUN CHOKE
Meets ANSi Safety Standards
CraftsmanTillersconformtothesafetystandardof theAmericanNationalStandardsInstitute(ANSI).
11
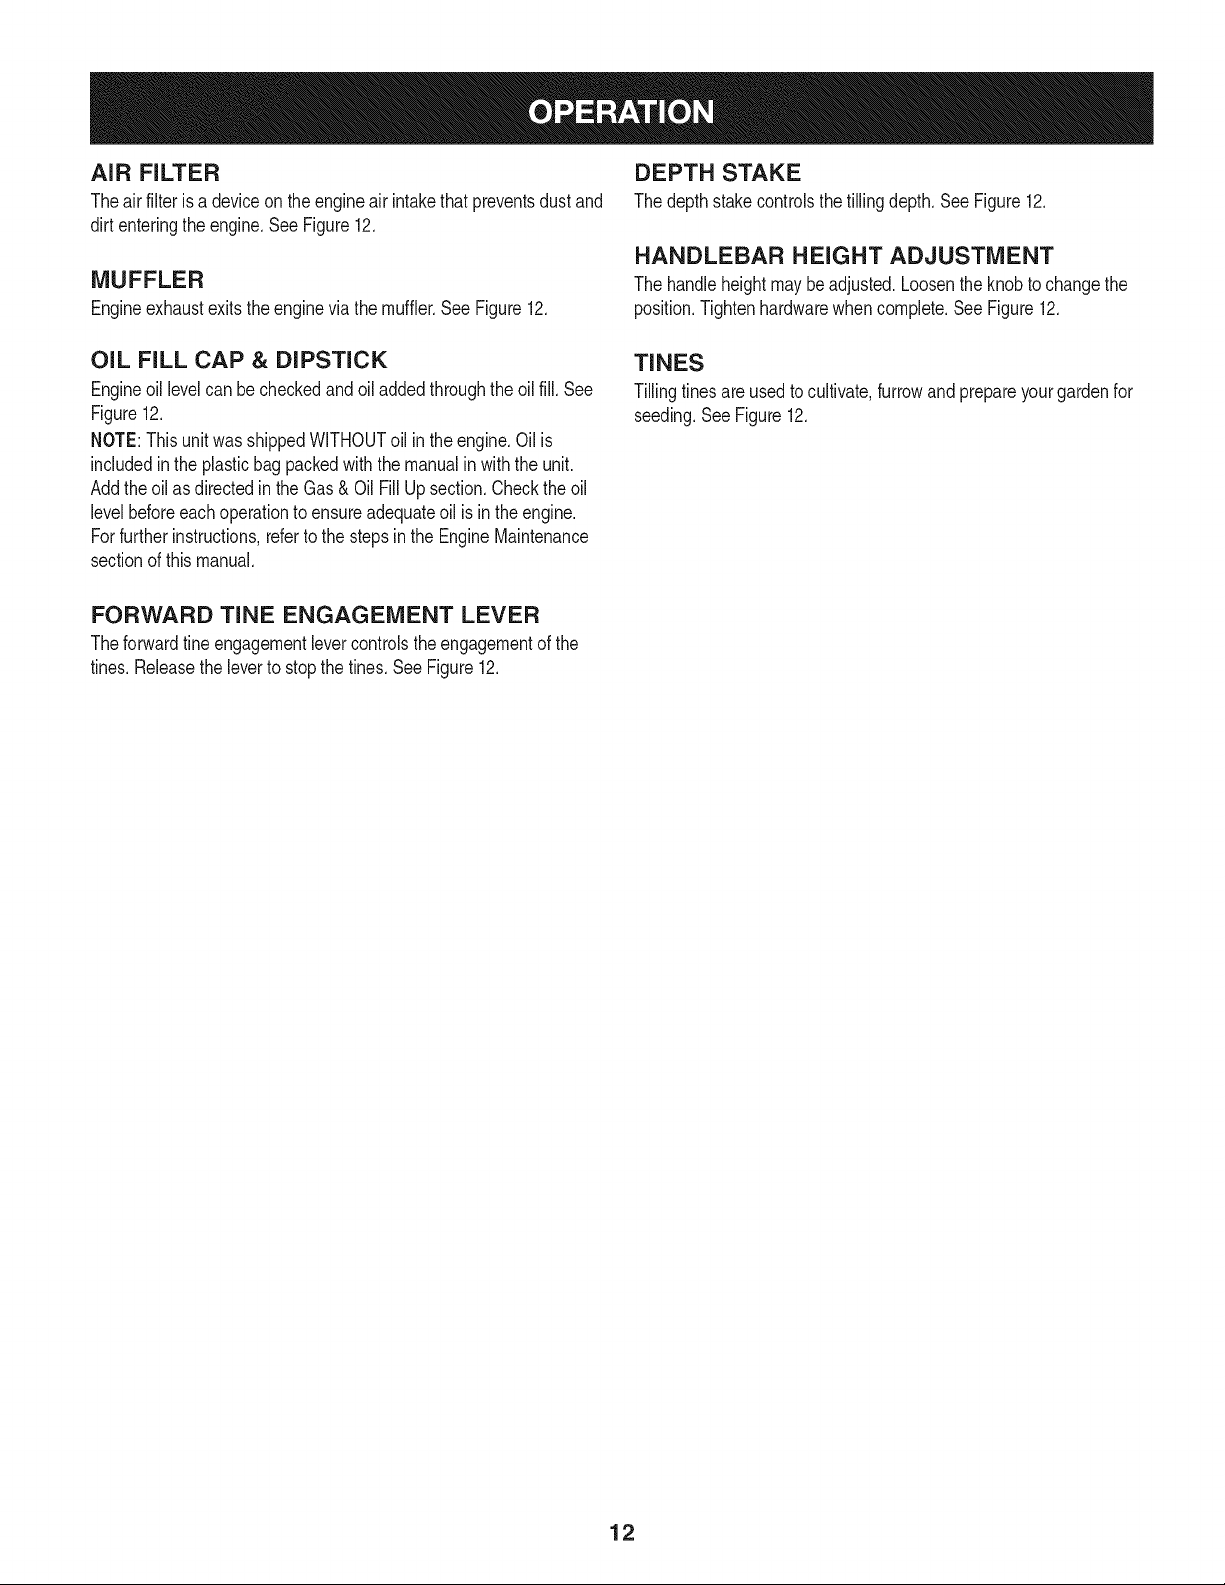
AiR FILTER
Theair filteris a deviceontheengineair intakethatpreventsdustand
dirtenteringtheengine.SeeFigure12.
MUFFLER
Engineexhaustexitstheenginevia themuffler.SeeFigure12.
DEPTH STAKE
Thedepthstakecontrolsthetillingdepth.SeeFigure12.
HANDLEBAR HEIGHT ADJUSTMENT
Thehandleheightmaybeadjusted.Loosentheknobtochangethe
position.Tightenhardwarewhencomplete.SeeFigure12.
OIL FILL CAP & DIPSTICK
Engineoil levelcanbecheckedandoiladdedthroughtheoil fill. See
Figure12.
NOTE:ThisunitwasshippedWITHOUToil inthe engine.Oilis
includedintheplasticbagpackedwiththe manualinwiththe unit.
Addtheoil as directedin theGas & OilFillUp section.Checktheoil
levelbeforeeachoperationtoensureadequateoil is intheengine.
Forfurtherinstructions,refertothestepsintheEngineMaintenance
sectionof thismanual.
FORWARD TINE ENGAGEMENT LEVER
Theforwardtine engagementlevercontrolstheengagementof the
tines.Releasetheleverto stopthetines.SeeFigure12.
TINES
Tillingtinesareusedtocultivate,furrowandprepareyourgardenfor
seeding.SeeFigure12.
12
GAS AND OIL FILL-UP
Oil (one bottle shipped with unit)
FirstTimeUse
1. Removeoilfilldipstick.
2. Withthetilleron levelground,usea funneltoemptyentire
contentsofoil bottleprovidedintothe engine.
3. Replaceoilfilldipstickandtighten.
Subsequent Uses
Onlyusehighqualitydetergentoil ratedwithAPIserviceclassification
SF,SG,SH,SJor higher.Selecttheoil'sSAEviscositygradeaccord-
ingtothe expectedoperatingtemperature.Followthe chartbelow.
°F °C
Althoughmulti-viscosityoils (5W30,10W30,etc.)improvestarting
incoldweather,theywillresultinincreasedoilconsumptionwhen
usedabove32°RCheckyourengineoillevelmorefrequentlyto avoid
possibleenginedamagefromrunninglowon oil.
1. Checktheoillevelmakingcertainnotto rubthedipstickalongthe
insidewallsoftheoil filltube.Thiswould resultina falsedipstick
reading.Wipedipstickcleanwithcloth. Replacedipstickinto
theoilfiller neck,but donotscrewitin.Removeandcheckoil
level.RefilltoFULLmarkondipstick,ifnecessary.Capacityis
approximately20oz.Overfillingwillcausetheenginetosmoke
profuselyandwill resultin poorengineperformance.
2. Replaceoilfilldipstickandtighten.
3. Keepoil levelat FULL.Runningtheenginewithtoo littleoilcan
resultinpermanentenginedamage.
Alcoholblendedfuels(calledgasoholorusingethanolormethanol)
canattractmoisturewhichleadsto separationandformationofacids
duringstorage.Acidicgascandamagethefuel systemofanengine
whilein storage.
Toavoidengineproblems,the fuelsystemshouldbeemptied
beforestoragefor30daysor longer.Drainthegas tank,start the
engineandletit rununtilthe gastank, fuellinesand carburetorare
empty.Usefreshfuelnextseason.SeeSTORAGEInstructionsfor
additionalinformation.
Neveruseengineor carburetorcleanerproductsinthefueltankor
permanentdamagemayoccur.
NOTE:Checkthefuellevelperiodicallytoavoidrunningoutof
gasolinewhileoperatingthetiller.
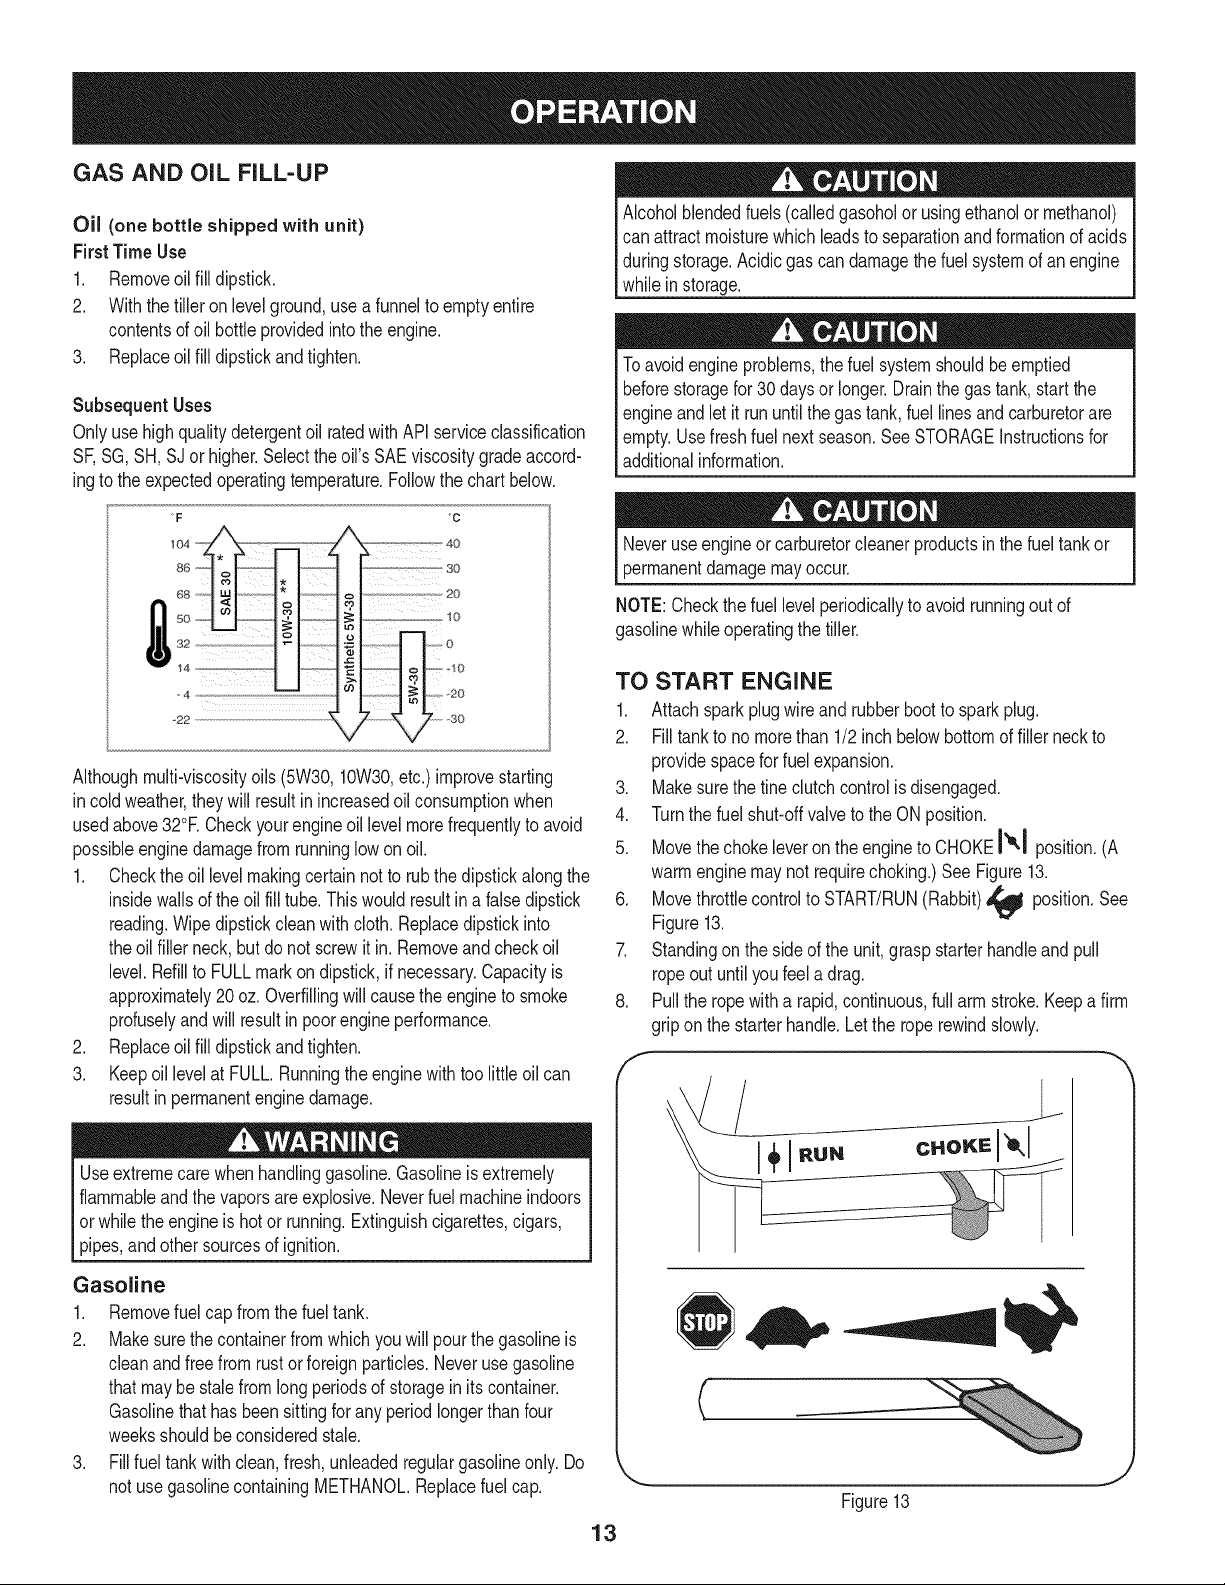
TO START ENGINE
1. Attachsparkplugwireandrubberbootto sparkplug.
2. Filltankto no morethan 1/2inch belowbottomoffiller neckto
providespacefor fuelexpansion.
3. Makesurethe tineclutchcontrolisdisengaged.
4. Turnthe fuelshut-offvalveto theONposition.
5. Movethechokeleveron theengineto CHOKEI'_1 position.(A
warmenginemaynotrequirechoking.)SeeFigure13.
6. Movethrottlecontrolto START/RUN(Rabbit)_ position.See
Figure13.
7. Standingonthe sideof theunit,graspstarterhandleandpull
ropeoutuntilyoufeela drag.
8. Pulltheropewitha rapid,continuous,fullarm stroke.Keepa firm
gripon thestarterhandle.Letthe roperewindslowly.
f
extreme when Gasolineis
flammableandthe vaporsareexplosive.Neverfuelmachineindoors
or whilethe engineishotor running.Extinguishcigarettes,cigars,
l Use care handlinggasoline, extremely
pipes,andothersourcesofignition.
Gasoline
1. Removefuelcap fromthefuel tank.
2. Makesurethecontainerfromwhichyouwill pourthegasolineis
cleanandfreefrom rustorforeignparticles.Neverusegasoline
thatmaybestalefromlongperiodsofstorageinitscontainer.
Gasolinethathas beensittingfor anyperiodlongerthan four
weeksshouldbeconsideredstale.
3. Fillfueltankwithclean,fresh,unleadedregulargasolineonly.Do
notusegasolinecontainingMETHANOL.Replacefuelcap.
C
J
Figure13
13

9. Repeat,if necessary,untilenginestarts.Whenenginestarts,
movechokecontrolgraduallytowardthe RUNI _'I position..
10. Ifenginefalters,movechokecontrolbacktowardtheCHOKE
I'_1 positionand repeatsteps5 though8.
11. ALWAYSkeepthethrottlecontrolintheSTART/RUN(Rabbit)
positionwhenoperatingthetiller.
TO STOP ENGINE
1. Tostopthewheelsandtines,releasethe ForwardClutchBail.
2. Movethrottlecontrollevertoslow(turtle)_ position.
Wheneverpossible,graduallyreduceenginespeedbefore
stoppingengine.
3. MovethrottlecontrollevertoSTOP_ orOFFposition.
4. Turnthefuelshut-offvalveto theOFFposition.
5. Disconnectsparkplugwireandgrounditagainsttheengineto
preventaccidentalstartingwhiletheequipmentis unattended.
Wheel Wheel Yoke
J
Figure14
TO ENGAGE DRIVE & TINES
1. Forforwardmotionof thewheelsand powertothetinespullthe
ForwardClutchBailupagainstthehandlebar.
2. Whentilling,relaxandletthewheelspullthemachinewhilethe
tinesdig.Walkslowlybehindthetiller allowingitto moveat its
ownpacewhilekeepinga securegriponthehandlebarwithyour
elbowsflexed.
3. Releasethebailtostoptheforwardmotionofwheelsandtines.
TURNING THE TILLER
1. Practiceturningthetillerinalevel,openarea.Beverycarefultokeep
yourfeetandlegs awayfromthetines.
2. Tobeginaturn, liftthe handlebarsuntil thetinesareout ofthe
groundandtheengineandtinesarebalancedoverthewheels.
3. Withthetillerbalanced,push sidewayson thehandlebartosteer
in thedirectionof theturn.Afterturning,slowlylowerthe tinesinto
thesoilto resumetilling.
Becertainsparkplugwireis disconnectedandgroundedagainstthe
enginewhenperformingany adjustments.
SETTING THE DEPTH
Yoke Forward
Attachthe wheelyokeso thatthewheelsareforward(nearesttotines)
forshallowtilling,cultivatingandtransportbyremovingthe clevispin
andcotterpin. SeeFigure14.
Wheel Yoke
Wheel
.J
Figure15
f
Depth Stake
Yoke Back
Attachthe wheelyokeso thatthewheelsaretowardthe rear(closest
todepthstake)for deeptillingandcultivatingbyremovingtheclevis
pinandcotterpin.SeeFigure15.
Depth Stake
Thedepth stakeactsasa brakeforthe tillerandcontrolsthedepth
andspeedat whichthemachinewill operate.Removetheclevispin
andhairpinclipto raiseorlowerthedepth stake.SeeFigure16.
J
Figure16
14
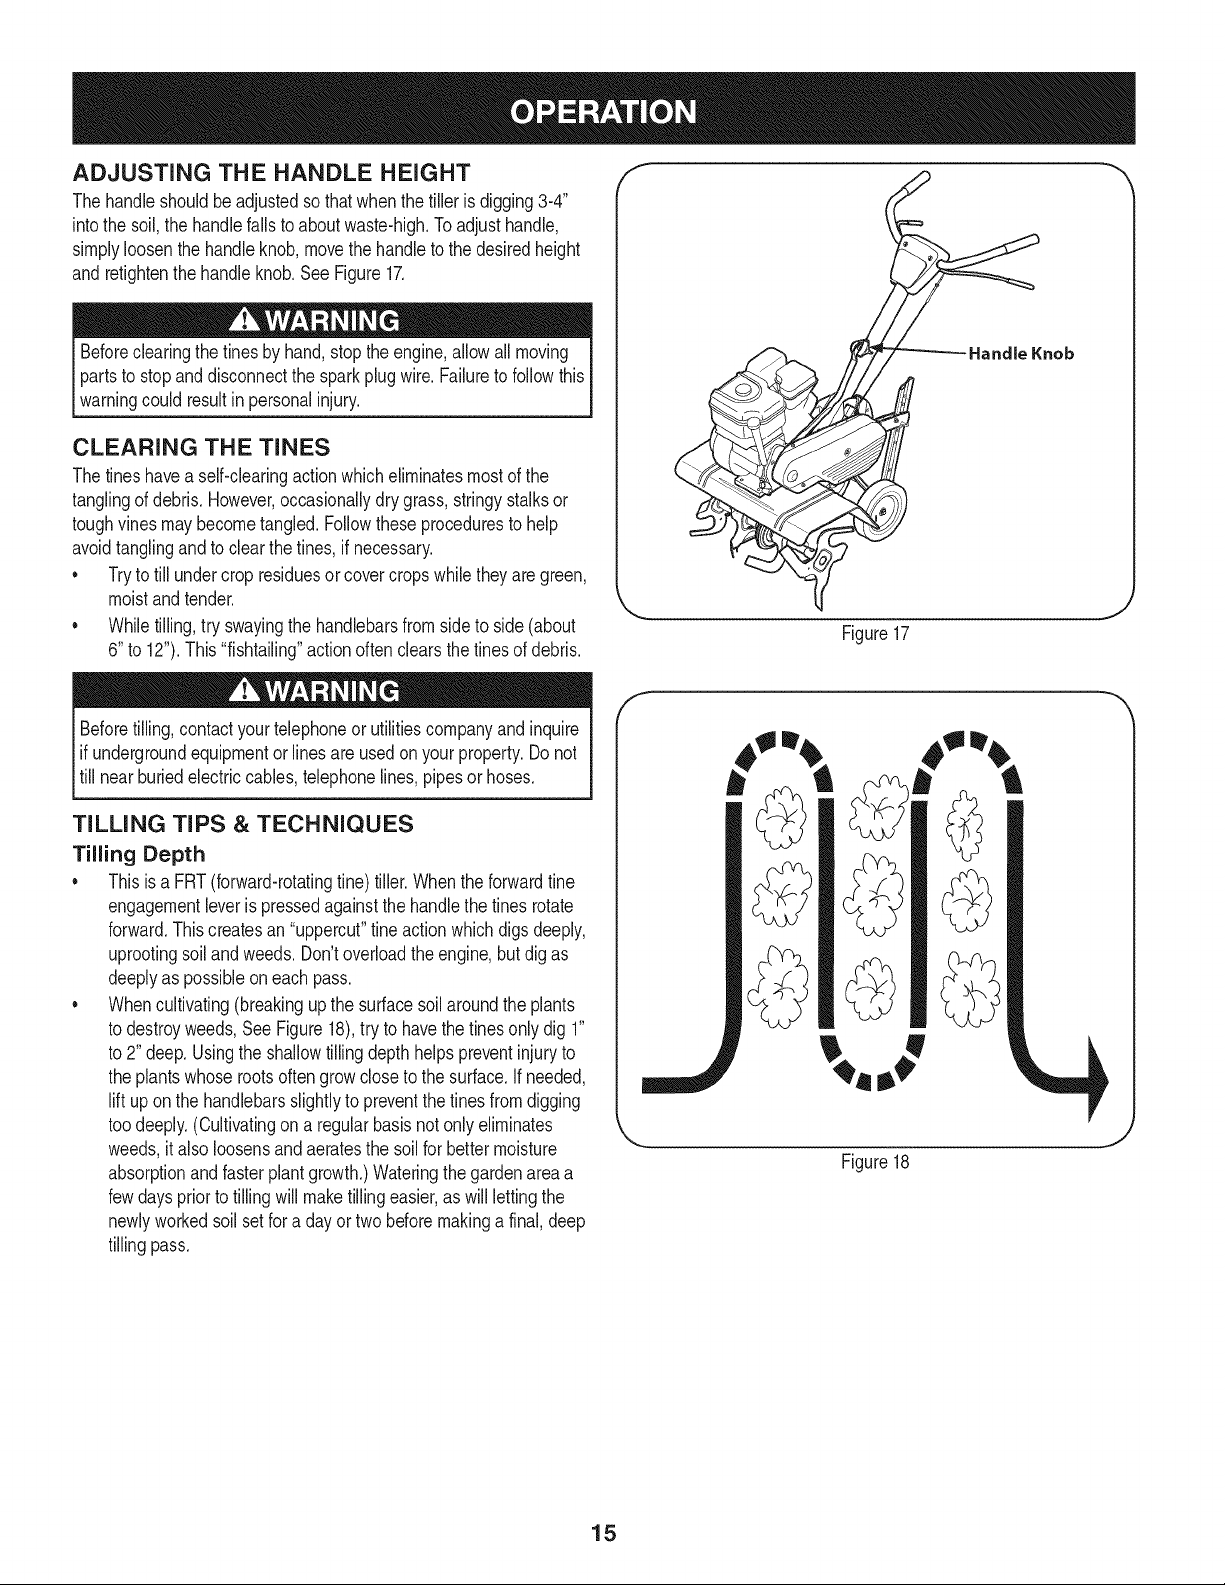
ADJUSTING THE HANDLE HEIGHT
Thehandleshouldbe adjustedsothatwhenthetillerisdigging3-4"
intothe soil,thehandlefallsto aboutwaste-high.To adjusthandle,
simplyloosenthehandleknob,movethe handletothe desiredheight
andretightenthehandleknob.SeeFigure17.
Beforeclearingthetinesbyhand,stoptheengine,allowall moving
partsto stopanddisconnectthe sparkplugwire.Failureto followthis
warningcouldresultin personalinjury.
CLEARING THE TINES
Thetineshavea self-clearingactionwhicheliminatesmostofthe
tanglingofdebris.However,occasionallydrygrass,stringystalksor
toughvinesmaybecometangled.Followtheseprocedurestohelp
avoidtanglingandtoclearthetines,if necessary.
• Tryto tillundercrop residuesor covercropswhiletheyaregreen,
moistandtender.
• Whiletilling,try swayingthehandlebarsfromsidetoside (about
6"to12").This"fishtailing"actionoftenclearsthetinesofdebris.
Beforetilling,contactyourtelephoneor utilitiescompanyandinquire
l ifundergroundequipmentorlinesareusedonyour property.Donot
|till nearburiedelectriccables,telephonelines,pipesor hoses.
[
TILLING TIPS & TECHNIQUES
Tilling Depth
• Thisisa FRT(forward-rotatingfine) tiller.Whenthe forwardtine
engagementleveris pressedagainstthehandlethe tinesrotate
forward.Thiscreatesan"uppercut"tineactionwhichdigsdeeply,
uprootingsoilandweeds.Don'toverloadthe engine,butdigas
deeplyas possibleon eachpass.
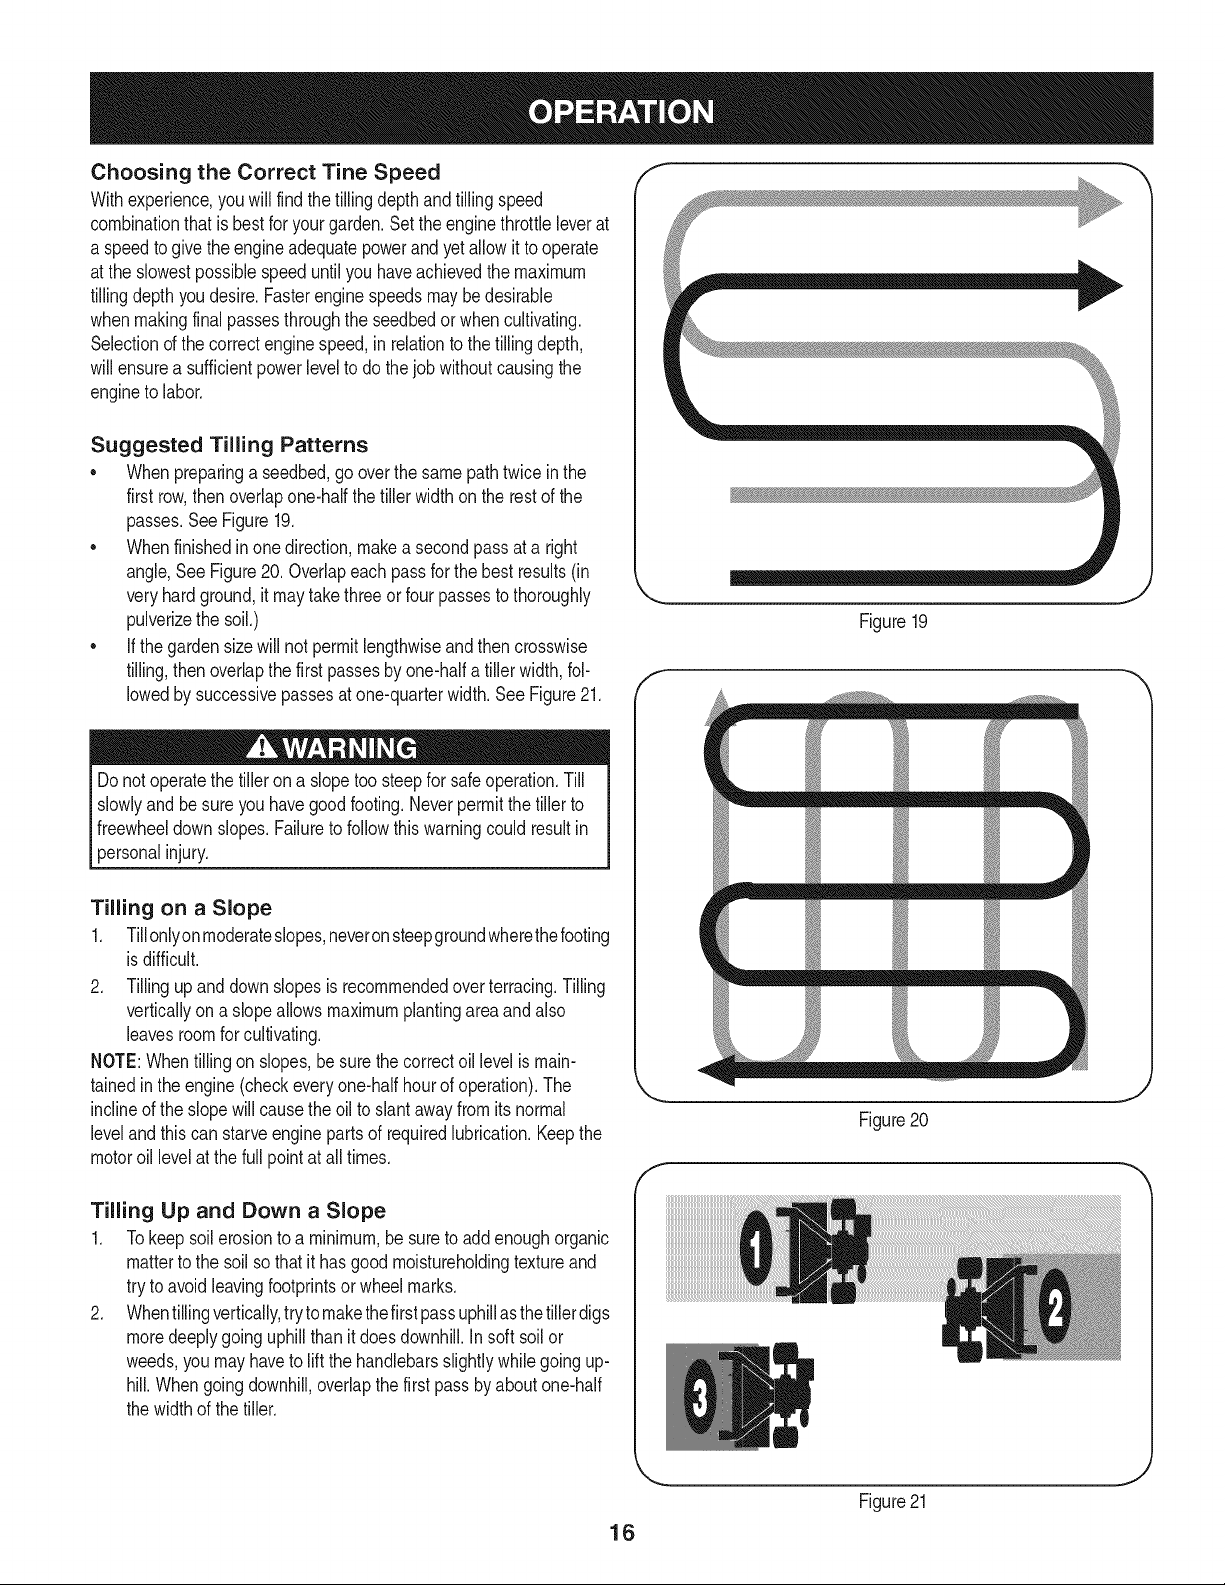
• Whencultivating(breakingupthesurfacesoilaroundtheplants
todestroyweeds,SeeFigure18),tryto havethetinesonlydig 1"
to2" deep.Usingtheshallowtilling depthhelpspreventinjuryto
theplantswhoserootsoftengrow closetothe surface.If needed,
lift uponthe handlebarsslightlytopreventthetinesfromdigging
toodeeply.(Cultivatingona regularbasisnotonlyeliminates
weeds,it alsoloosensandaeratesthe soilfor bettermoisture
absorptionandfasterplantgrowth.)Wateringthegardenareaa
fewdayspriortotillingwillmaketillingeasier,aswill lettingthe
newlyworkedsoilsetfora dayortwo beforemakinga final,deep
tillingpass.
Figure17
f
J
Figure18
15
Choosing the Correct Tine Speed
Withexperience,you willfindthetillingdepthandtilling speed
combinationthatisbestforyourgarden.Settheenginethrottleleverat
a speedtogivethe engineadequatepowerandyetallowittooperate
atthe slowestpossiblespeeduntilyouhaveachievedthe maximum
tillingdepthyoudesire.Fasterenginespeedsmaybedesirable
whenmakingfinalpassesthroughtheseedbedorwhencultivating.
Selectionofthecorrectenginespeed,inrelationto thetillingdepth,
willensurea sufficientpowerlevelto dothejob withoutcausingthe
enginetolabor.
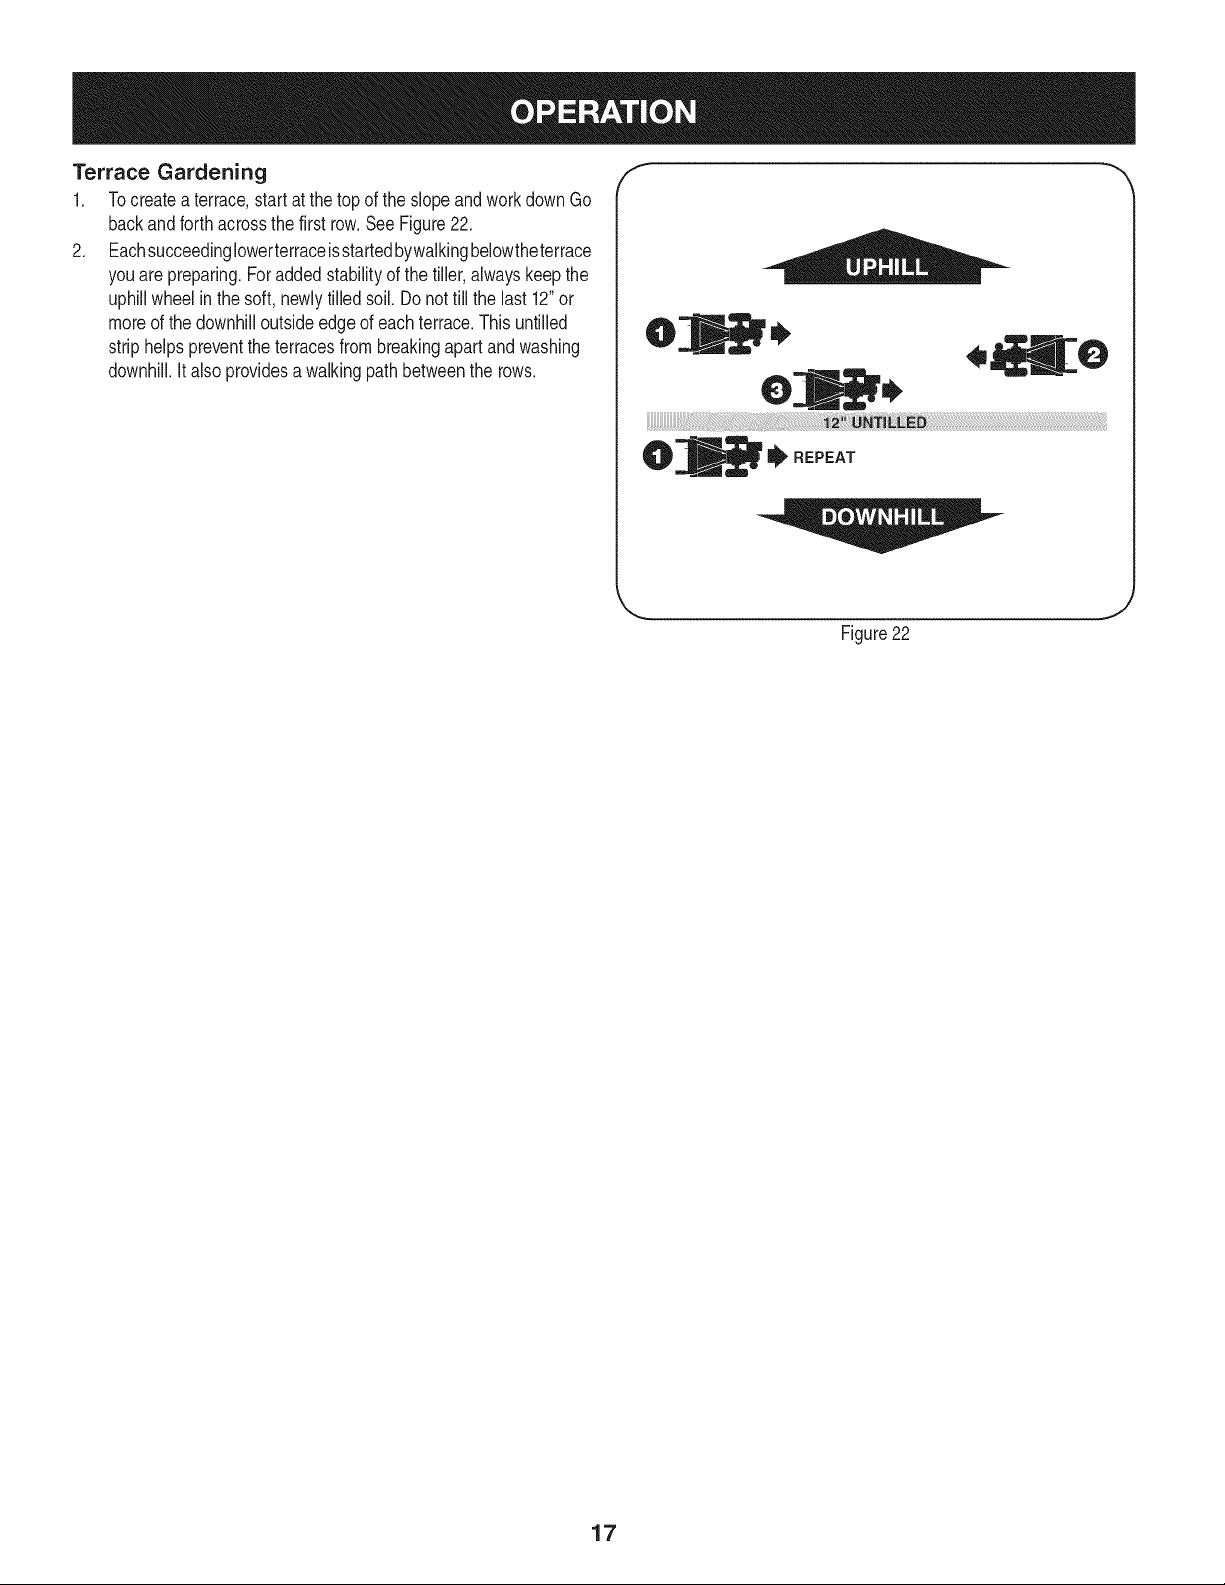
Suggested Tilling Patterns
• Whenpreparinga seedbed,go overthesamepathtwiceinthe
firstrow,thenoverlapone-halfthetillerwidthontherestof the
passes.SeeFigure19.
• Whenfinishedinonedirection,makeasecondpassat a right
angle,SeeFigure20.Overlapeachpassfor thebest results(in
veryhardground,itmaytakethreeorfour passestothoroughly
pulverizethesoil.)
• If thegardensizewillnot permitlengthwiseandthen crosswise
tilling,thenoverlapthefirstpassesby one-halfatillerwidth,fol-
lowedby successivepassesat one-quarterwidth.SeeFigure21.
Figure19
Donot operatethetilleron a slopetoosteepfor safeoperation.Till
slowlyandbe sureyouhavegoodfooting.Neverpermitthetillerto
freewheeldownslopes.Failuretofollowthiswarningcouldresultin
personalinjury.
Tilling on a Slope
1. Tillonlyonmoderateslopes,neveronsteepgroundwherethefooting
isdifficult.
2. Tillingupanddownslopesisrecommendedoverterracing.Tilling
verticallyon a slopeallowsmaximumplantingareaandalso
leavesroomforcultivating.
NOTE:Whentillingonslopes,besurethe correctoil levelismain-
tainedinthe engine(checkeveryone-halfhourofoperation).The
inclineof theslopewillcausethe oiltoslantawayfromitsnormal
levelandthiscan starveenginepartsof requiredlubrication.Keepthe
motoroil levelatthefullpointatalltimes.
Tilling Up and Down a Slope
1. Tokeepsoil erosiontoa minimum,be suretoaddenoughorganic
mattertothe soilsothatit hasgoodmoistureholdingtextureand
tryto avoidleavingfootprintsor wheelmarks.
2. Whentillingvertically,trytomakethefirstpassuphillasthetillerdigs
moredeeplygoinguphillthanit doesdownhill.Insoftsoil or
weeds,youmayhavetolift thehandlebarsslightlywhilegoingup-
hill.Whengoingdownhill,overlapthefirstpassbyaboutone-half
thewidthof thetiller.
[
m_m_
t j
Figure20
16
Figure21
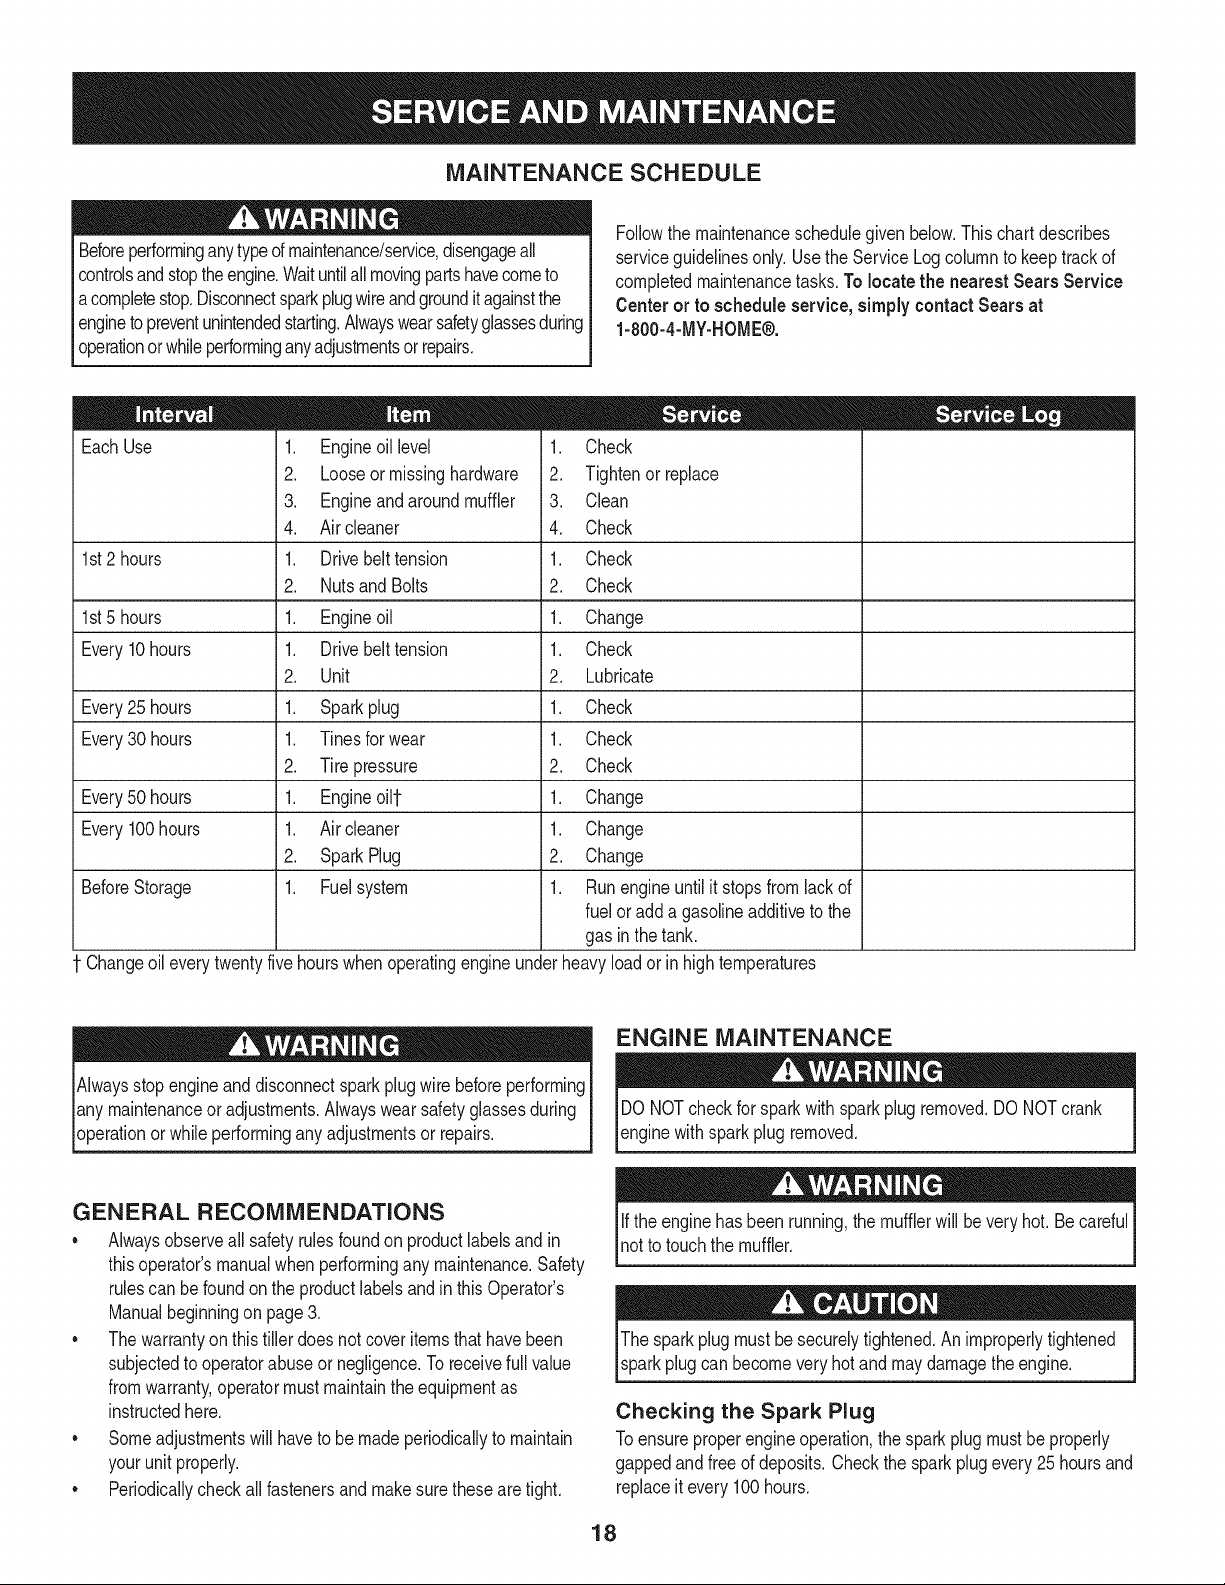
Terrace Gardening
1. Tocreateaterrace,startat thetop ofthe slopeandworkdownGo
backand forthacrossthe firstrow.SeeFigure22.
2. EachsucceedingIowerterraceisstartedbywalkingbelowtheterrace
youare preparing.Foraddedstabilityofthetiller,alwayskeepthe
uphillwheelinthe soft,newlytilledsoil.Donottill thelast 12"or
moreof thedownhilloutsideedgeofeachterrace.Thisuntilled
striphelpspreventtheterracesfrombreakingapartandwashing
downhill.Italsoprovidesawalkingpathbetweenthe rows.
f
,O
' REPEA'
J
Figure22
17
MAINTENANCE SCHEDULE
Beforeperforminganytypeofmaintenance/service,disengageall
controlsandstoptheengine.Waituntilallmovingpartshavecometo
acompletestop.Disconnectsparkplugwireandgrounditagainstthe
enginetopreventunintendedstarting.Alwayswearsafetyglassesduring
serviceguidelinesonly.UsetheServiceLogcolumnto keeptrackof
completedmaintenancetasks.To locate the nearest Sears Service
Centeror to scheduleservice,simplycontactSearsat
1-800-4-MY-HOME®.
operationorwhileperforminganyadjustmentsorrepairs.
Followthemaintenanceschedulegivenbelow.Thischartdescribes
= =
EachUse
1st2 hours
1st5 hours
Every10hours
Every25 hours
Every30 hours
Every50 hours
Every100hours
BeforeStorage
.
Engineoillevel
2.
Looseormissinghardware
3.
Engineandaroundmuffler
4.
Aircleaner
1.
Drivebelttension
2.
Nutsand Bolts
1.
Engineoil
1.
Drivebelttension
2.
Unit
1.
Sparkplug
1.
Tinesforwear
2.
Tirepressure
1.
Engineoill-
1.
Aircleaner
2.
SparkPlug
1.
Fuelsystem
1. Check
2. Tightenor_place
3. Clean
4. Check
1. Check
2. Check
1. Change
1. Check
2. Lubricate
1. Check
1. Check
2. Check
1. Change
1. Change
2. Change
1. Runengineuntilit stopsfromlackof
fueloradda gasolineadditivetothe
gasin thetank.
Changeoileverytwentyfivehourswhenoperatingengineunderheavyloadorinhightemperatures
Alwaysstopengineanddisconnectsparkplugwirebeforeperforming
lanymaintenanceor adjustments.Alwayswearsafetyglassesduring
[operationorwhileperforminganyadjustmentsor repairs.
GENERAL RECOMMENDATIONS
• Alwaysobserveallsafetyrulesfoundonproductlabelsandin
thisoperator'smanualwhenperforminganymaintenance.Safety
rulescan befoundonthe productlabelsandin thisOperator's
Manualbeginningon page3.
• Thewarrantyonthistillerdoesnotcoveritemsthathavebeen
subjectedto operatorabuseor negligence.Toreceivefullvalue
fromwarranty,operatormustmaintainthe equipmentas
instructedhere.
• Someadjustmentswillhaveto be madeperiodicallytomaintain
yourunit properly.
• Periodicallycheckall fastenersand makesurethesearetight.
ENGINE MAINTENANCE
DONOTcheckforsparkwithsparkplugremoved.DONOTcrank
enginewithsparkplug removed.
Iftheenginehas beenrunning,themufflerwillbeveryhot. Becareful
notto touchthemuffler.
Thesparkplugmustbesecurelytightened.Animproperlytightened
sparkplugcanbecomeveryhot andmaydamagetheengine.
Checking the Spark Plug
Toensureproperengineoperation,thesparkplugmustbeproperly
gappedandfreeof deposits.Checkthe sparkplugevery25hoursand
replaceitevery100hours.
18
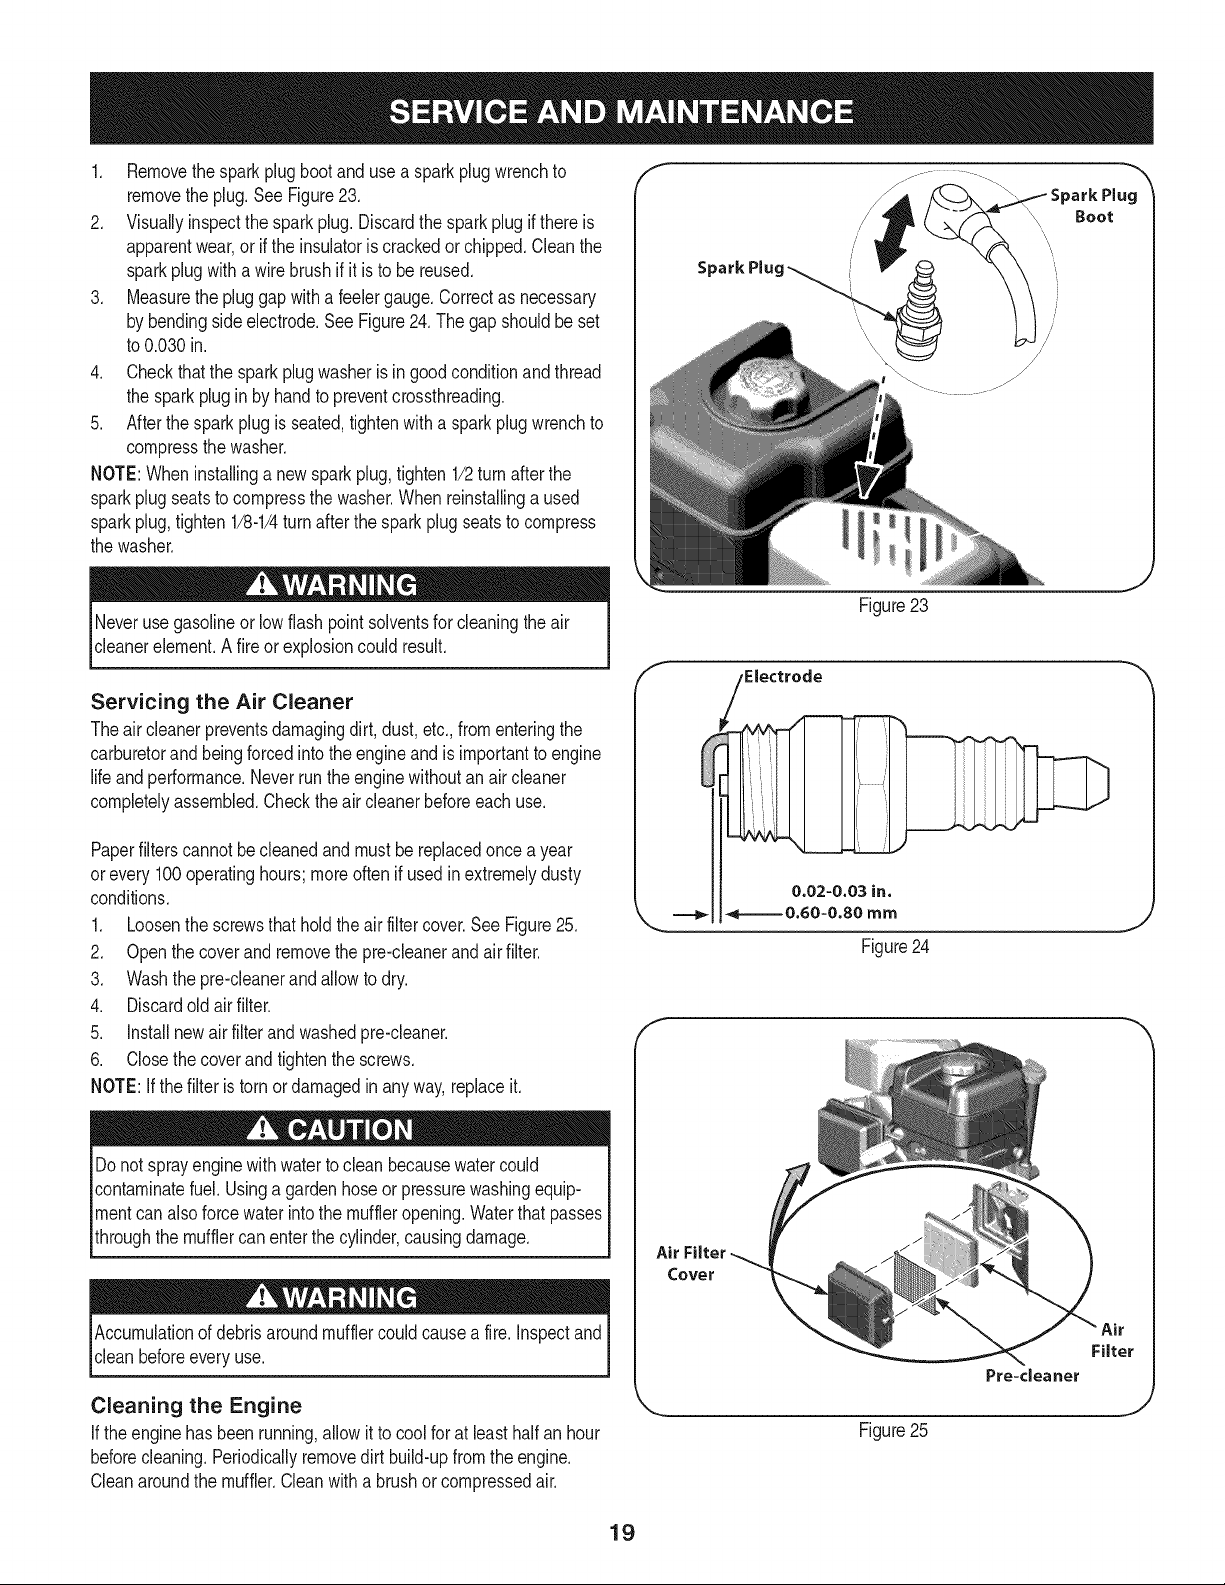
1. Removethesparkplugbootandusea sparkplugwrenchto
removetheplug.See Figure23.
2. Visuallyinspectthesparkplug.Discardthesparkplugif thereis
apparentwear,orif the insulatoriscrackedorchipped.Cleanthe
sparkplugwitha wirebrush ifit isto be reused.
3. Measurethe pluggapwitha feelergauge.Correctas necessary
bybendingsideelectrode.SeeFigure24.The gapshouldbeset
to0.030in.
4. Checkthatthe sparkplugwasherisingoodconditionandthread
thesparkplugin by handtopreventcrossthreading.
5. Afterthesparkplugis seated,tightenwitha sparkplugwrenchto
compressthewasher.
NOTE:Wheninstallinga newsparkplug,tighten1/2turnafterthe
sparkplugseatsto compressthewasher.Whenreinstallinga used
sparkplug,tighten1/8-1/4turnafterthesparkplugseatsto compress
thewasher.
Boot
Neverusegasolineorlowflashpointsolventsforcleaningthe air
ceanereement. A fre orexposoncou d resut.
Servicing the Air Cleaner
Theair cleanerpreventsdamagingdirt, dust,etc.,fromenteringthe
carburetorand beingforcedintothe engineandisimportanttoengine
lifeandperformance.Neverrunthe enginewithoutanaircleaner
completelyassembled.Checktheaircleanerbeforeeachuse.
Paperfilterscannotbecleanedandmustbe replacedonceayear
orevery 100operatinghours;moreoftenifusedin extremelydusty
conditions.
1. Loosenthescrewsthatholdtheair filtercover.SeeFigure25.
2. Openthecoverand removethepre-cleanerandairfilter.
3. Washthepre-cleanerandallowto dry.
4. Discardoldairfilter.
5. Installnewairfilterandwashedpre-cleaner.
6. Closethecoverandtightenthe screws.
NOTE:Ifthe filteristorn ordamagedinanyway,replaceit.
Donot sprayenginewithwatertoclean becausewatercould
contaminatefuel. Usinga gardenhoseorpressurewashingequip-
mentcanalso forcewaterintothe muffleropening.Waterthat passes
throughthemufflercanenterthe cylinder,causingdamage.
,Electrode
0.02-0.03 in.
===_1_====0.60=0.80 mm
E
Air Filter
Cover
Figure23
J
Figure24
Accumulationofdebrisaroundmufflercouldcausea fire.Inspectand
cleanbeforeeveryuse.
Cleaning the Engine
If theenginehasbeenrunning,allowitto coolfor atleasthalfan hour
beforecleaning.Periodicallyremovedirtbuild-upfromtheengine.
Cleanaroundthe muffler.Cleanwithabrushor compressedair.
Filter
Pre+cleaner
J
Figure25
19
Check Engine Oil
1. Checkoilbeforeeachuse.Stopengineandwaitseveralminutes
beforecheckingoil level.Withthetilleron levelground,the oil
mustbeto FULLmarkon dipstick.
2. Removeoil filldipstickandwipe cleanwithcloth.
3. Replacedipstickintotheoilfiller neck,but donotscrewitin.
Removeandcheckoil level.Levelshouldbeat FULLmark.
4. If needed,addoil slowly- recheck.Do notoverfill.
5. Wipedipstickclean,replacebutdonot tighten.Removeand
checkoil level.Oillevelshouldbeat FULLlineondipstick.
6. Replaceandtightendipstickfirmlybeforestartingengine.
DONOTuse non-detergentoilor 2-strokeengineoil.Itcouldshorten
theengine'sservicelife.
Change Engine Oil
• SAE30 is recommendedforgeneral,alltemperatureuse.When
addingoilto theengine,refertoviscositychartinthe operation
section.Usea4-stroke,oran equivalenthighdetergent,premium
qualitymotoroil certifiedto meetor exceedU.S.automobile
manufacturer'srequirementsforserviceclassificationSF,SG,SH,
SJor higher.MotoroilsclassifiedSF,SG, SHor SJ willshowthis
designationon thecontainer.
• Changeengineoil afterthefirst fivetoeight hoursofoperation,
andeveryfifty hoursoreveryseasonthereafter.Changeoil every
twentyfivehourswhenoperatingengineunderheavyloadorin
hightemperatures.
Figure26
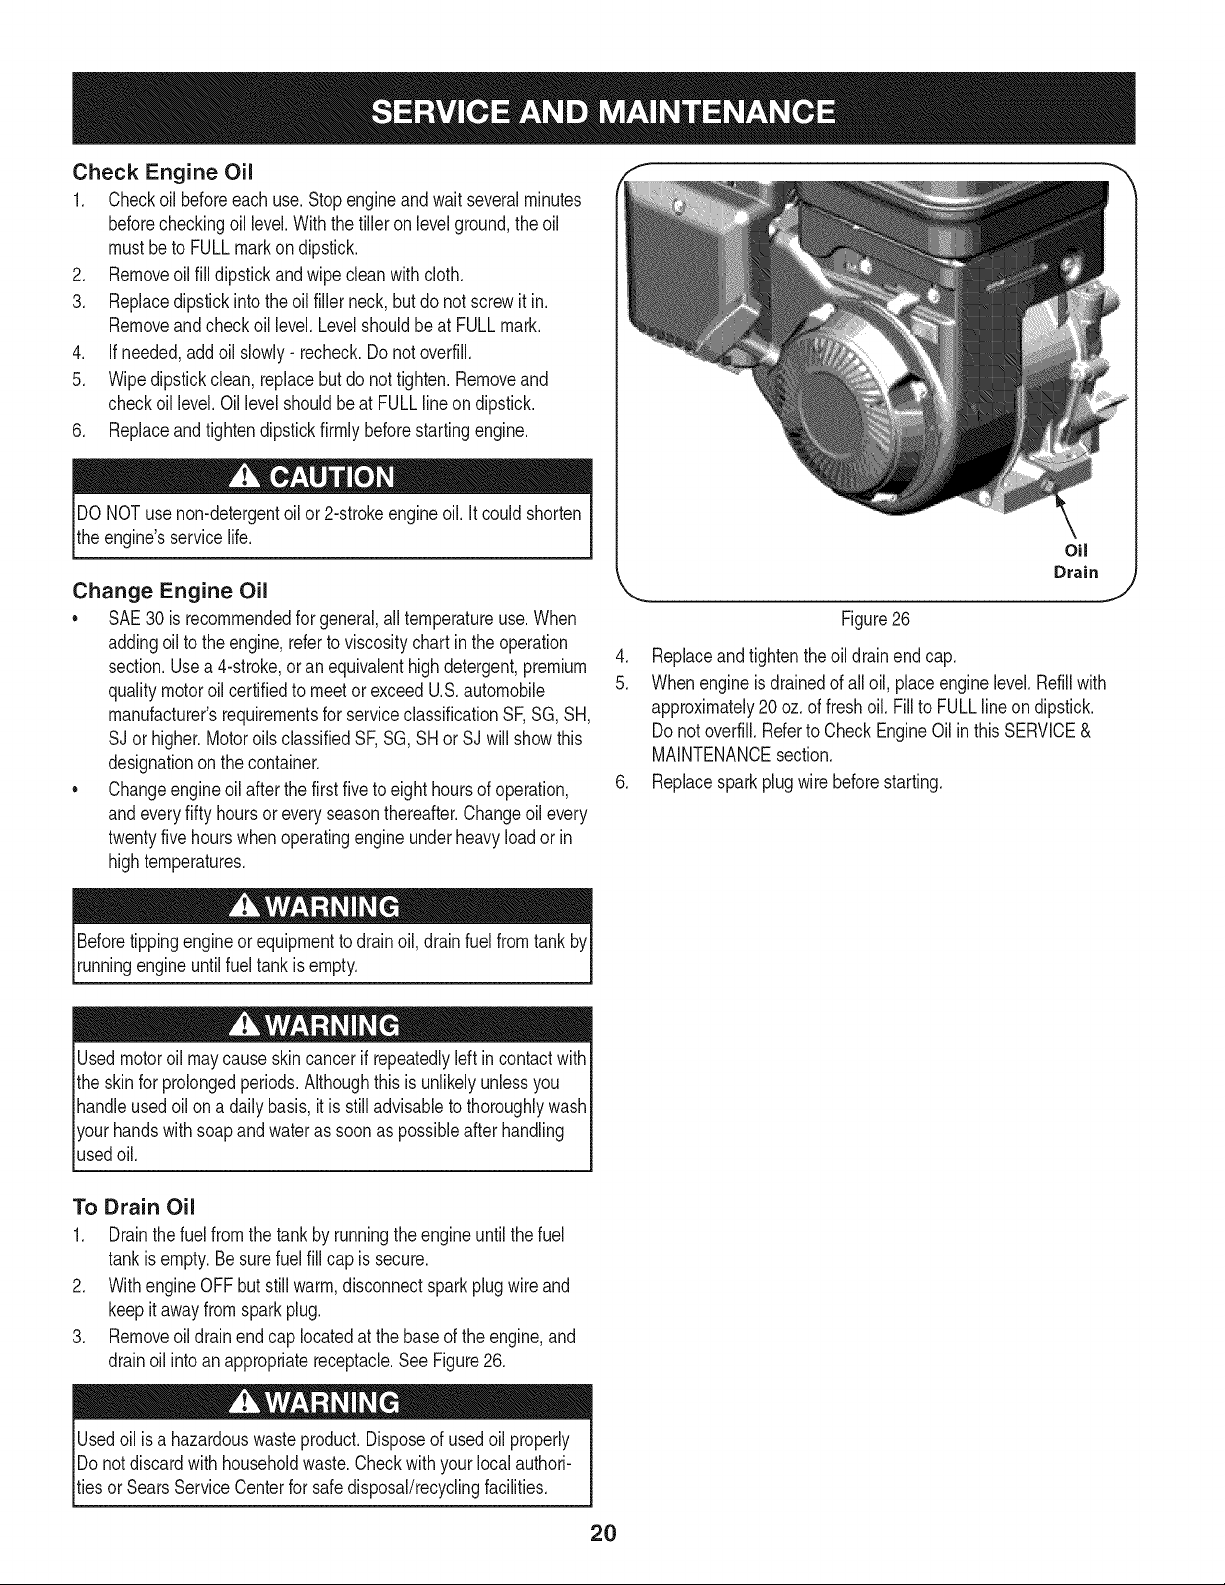
4. Replaceandtightentheoildrainendcap.
5. Whenengineisdrainedofall oil, placeenginelevel.Refillwith
approximately20oz.offreshoil. Fillto FULLlineondipstick.
Donot overfill.Referto CheckEngineOilinthis SERVICE&
MAINTENANCEsection.
6. Replacesparkplugwirebeforestarting.
Beforetippingengineor equipmenttodrainoil,drainfuelfromtankby
runningengineuntilfuel tankisempty.
Usedmotoroil maycauseskincancerifrepeatedlyleftincontactwith
theskinfor prolongedperiods.Althoughthis isunlikelyunlessyou
handleusedoil ona daily basis,itisstilladvisableto thoroughlywash
yourhandswithsoapandwateras soonas possibleafter handling
usedoil.
To Drain Oil
1. Drainthefuelfromthe tankbyrunningtheengineuntilthefuel
tankisempty.Besurefuelfill capissecure.
2. WithengineOFFbutstillwarm,disconnectsparkplugwire and
keepitawayfromsparkplug.
3. Removeoil drainendcaplocatedatthebaseofthe engine,and
drainoil intoanappropriatereceptacle.SeeFigure26.
Usedoilisa hazardouswasteproduct.Disposeofusedoil properly
IDonotdiscardwithhouseholdwaste.Checkwithyourlocalauthori-
_tiesor SearsServiceCenterfor safedisposal/recyclingfacilities.
2O
LUBRiCATiON
Afterevery10operatinghours,oilor greasethelubricationpoints.Use
cleanlubricatingoil(#30weightmotoroil is suitable)andcleangeneral
purposegrease(greasecontaininga metallubricantis preferred,if
available).
* Removethetinesandcleanthe fineshaft.Usea file or sandpa-
pertogentlyremoveanyrust,burrsor roughspots(especially
aroundtheholesintheshaft).Applygreasetotheendsofthe
shaftbeforeinstallingthetines.
, Removethebeltcoverandlubricateallthepivotpointsand
linkageswitha lightcoatofoil.Keepthebeltsfreeoflubrication.
* Thechaincaseis pre-lubricatedandsealedat thefactoryand
requiresnomaintenance.
f
J
HexStop
Nut
HARDWARE
Checkfor looseormissinghardwareafterevery10operatinghours
andtightenor replace= asneeded= beforereusingthetiller.Be
sureto checkthe screwsunderneaththe tillerhoodthatsecurethe
transmissioncoverandthe DepthRegulatorLeverto thetransmission.
Beforeperformingany typeofmaintenanceonthemachine,waitfor
all partsto stopmovinganddisconnectthesparkplugwire.Failure
tofollowthis instructioncouldresultinpersonalinjuryor property
damage.
BELT REPLACEMENT
If thedrive beltneedstobe replaced,makesureyouuseonlya
factoryauthorizedbeltlistedinthePartspagesofthisoperator's
manual,asan"over-the-counter"beltmaynotperformsatisfactorily.
Theprocedurerequiresaveragemechanicalabilityandcommonly
availabletools.
Toreplacethe Drivebelt,followthesesteps:
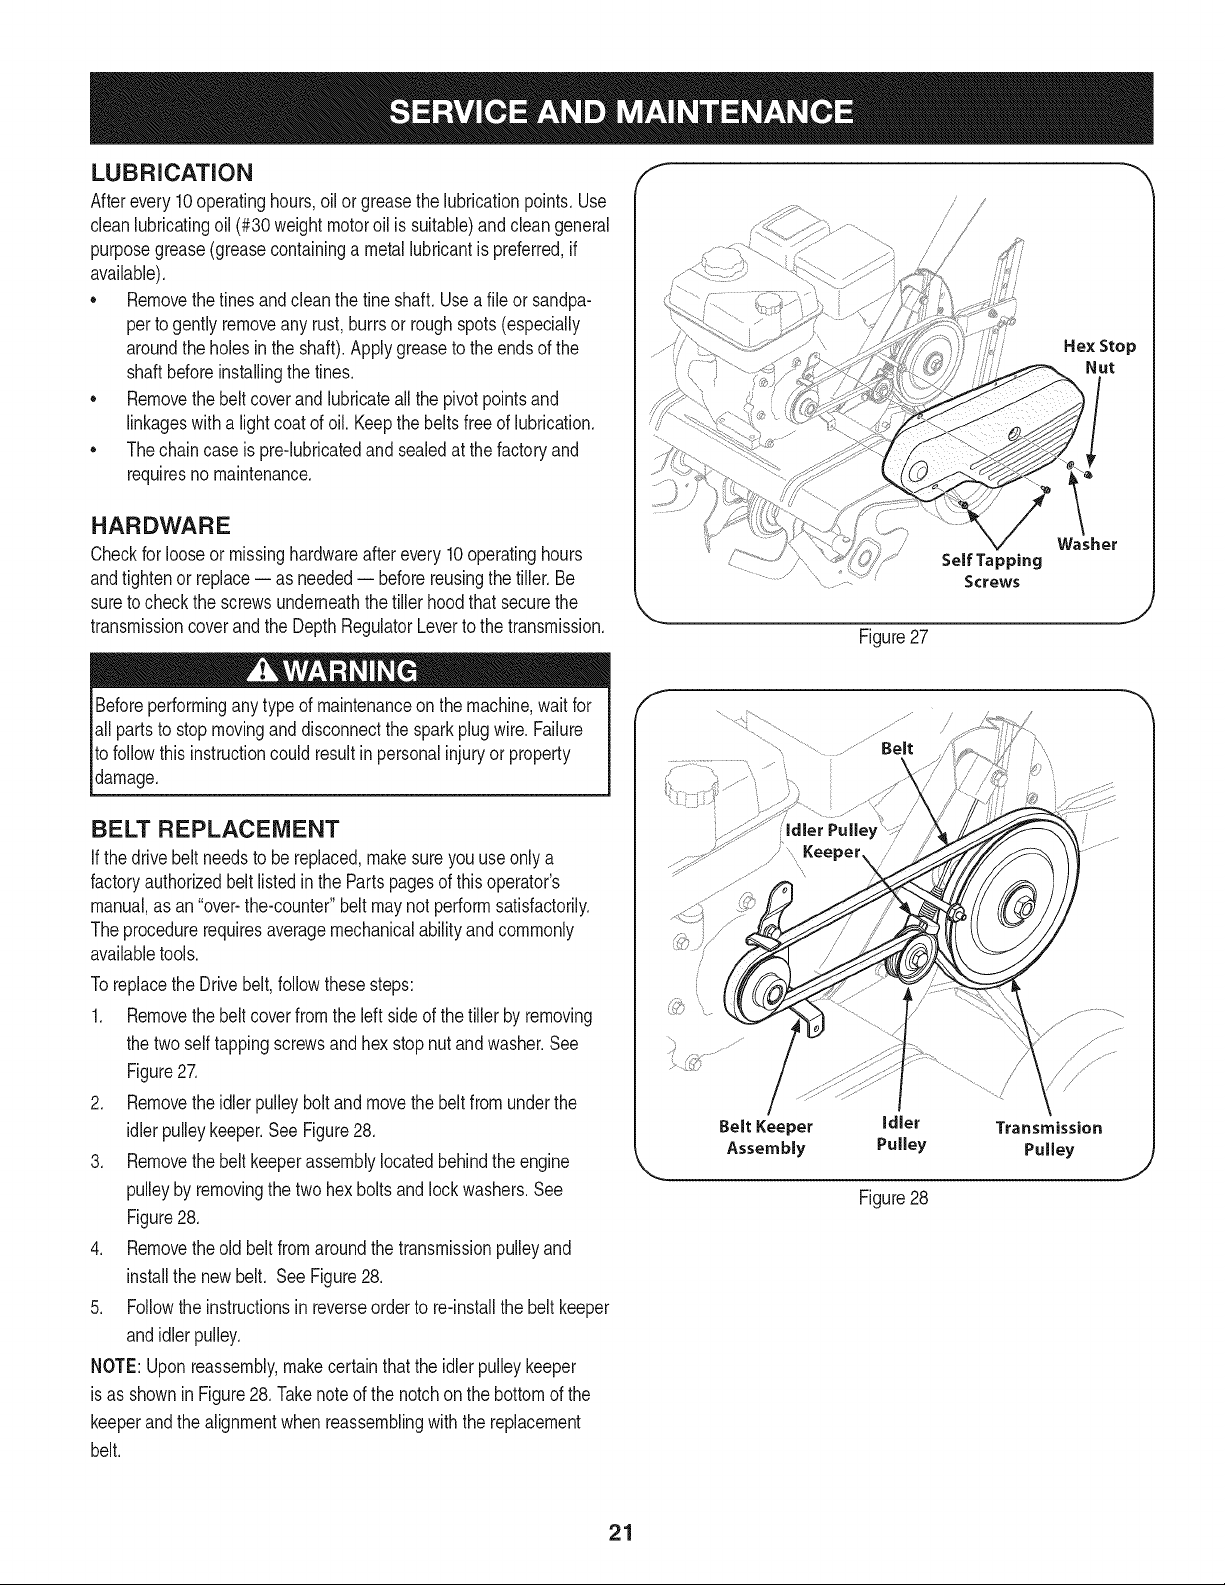
1. Removethebelt coverfromtheleftside ofthe tillerby removing
thetwoselftappingscrewsandhexstopnutandwasher.See
Figure27.
2. Removetheidlerpulleyboltandmovethe beltfromunderthe
idlerpulleykeeper.SeeFigure28.
3. Removethebeltkeeperassemblylocatedbehindtheengine
pulleyby removingthetwo hexboltsandlockwashers.See
Figure28.
4. Removetheold beltfromaroundthe transmissionpulleyand
installthenew belt. SeeFigure28.
5. Followtheinstructionsinreverseorderto re-installthebeltkeeper
andidlerpulley.
NOTE:Uponreassernbly,makecertainthattheidlerpulleykeeper
isas showninFigure28.Takenoteof thenotchon the bottomofthe
keeperandthe alignmentwhenreassemblingwiththereplacement
belt.
Washer
Figure27
Transmission
Pulley
J
Figure28
21
 Loading...