

Craftsman 247.290000 Operator's Manual

perator's
I:RnFrSMRN°
REAR ENGINE RiDiNG MOWER
6 Speed, Shift-on=the=Go
30" Deck
Model No. 247.290000
• Espanol, P. 70
This product has a low emission engine which operates differently
from previously built engines. Before you start the engine, read and
understand this Operator's Manual.
For answers to your questions about
Before using this equipment,
read this manual and follow
all safety rules and operating
instructions.
Sears Brands Management Corporation, Hoffman Estates, IL 60179 U.S.A.
Visit our website: www.craftsman.com FormNo.769-07597C
this product, Call:
1-800=659=5917
CraftsmanTractorHelpLine
7 am =7 pm CT, Mort. =Sun.
(December11,2012)
Warranty Statement ................................... 2
Safety Instructions .................................... 3
Slope Guide .......................................... 8
Assembly ............................................. 9
Operation ........................................... 15
Service and Maintenance ............................ 21
CRAFTSMANFULLWARRANTY
FORTWOYEARSfromthedateofpurchase,allnon-expendablepartsofthisridingequipmentarewarrantedagainstanydefectsinmaterialorworkmanship.
Adefectivenon-expendablepartwill receivefreein-homerepairorreplacementifrepairisunavailable.
BATTERYLIMITEDWARRANTY
FOR90DAYSfromthedateofpurchase,thebattery(anexpendablepart)ofthisridingequipmentiswarrantedagainstanydefectsinmaterialor
workmanship.Anewbatterywillbesuppliedfreeofcharge.Youareresponsibleforthelaborcostofbatteryinstallation.
ADDITIONALLIMITEDWARRANTIES
Inthefollowingadditionalwarranties,youareresponsiblefor thelaborcostof partinstallationafterthesecondyearfromthedateofpurchase.
FORFIVEYEARSfromthedateofpurchase,theframeofthisridingequipmentiswarrantedagainstanydefectsinmaterialorworkmanship.Anewframewill
besuppliedfreeof charge.
FORTENYEARSfromthedateofpurchase,thefrontaxleofthisridingequipmentiswarrantedagainstanydefectsin materialorworkmanship.Anewfront
axlewillbesuppliedfreeofcharge.
FORASLONGASITISUSEDbytheoriginalownerafterthetenthyearfromthedateofpurchase,thecastironfrontaxle(ifequipped)ofthisridingequipment
iswarrantedagainstanydefectsinmaterialorworkmanship.Withproofofpurchase,anewcastironfrontaxlewill besuppliedfreeofcharge.
WARRANTYSERVICE
Forwarrantycoveragedetailsto obtainfreerepairorreplacement,call1-800-659-5917orvisitthewebsite:www.craftsman.com
Inallcasesabove,if partrepairorreplacementisimpossible,the ridingequipmentwill bereplacedfreeofchargewith thesameoranequivalentmodel.
Alloftheabovewarrantycoverageisvoidifthisridingequipmentiseverusedwhileprovidingcommercialservicesorif rentedtoanotherperson.
ThiswarrantycoversONLYdefectsinmaterialandworkmanship.WarrantycoveragedoesNOTinclude:
• Expendableparts(exceptbattery)thatcanwearoutfromnormalusewithinthewarrantyperiod,includingbutnotlimitedtoblades,sparkplugs,air
cleaners,belts,andoilfilters.
• Standardmaintenanceservicing,oilchanges,ortune-ups.
• Tirereplacementorrepaircausedbypuncturesfromoutsideobjects,suchasnails,thorns,stumps,orglass.
• Tireorwheelreplacementorrepairresultingfromnormalwear,accident,orimproperoperationormaintenance.
• Repairsnecessarybecauseof operatorabuse,includingbut notlimitedtodamagecausedbytowingobjectsbeyondthecapabilityoftheriding
equipment,impactingobjectsthatbendtheframe,axleassemblyorcrankshaft,orover-speedingtheengine.
• Repairsnecessarybecauseof operatornegligence,includingbut notlimitedto,electricalandmechanicaldamagecausedbyimproperstorage,failureto
usethe propergradeandamountof engineoff,failuretokeepthedeckclearofflammabledebris,orfailuretomaintaintheridingequipmentaccording
totheinstructionscontainedinthe operator'smanual.
• Engine(fuelsystem)cleaningorrepairscausedbyfueldeterminedtobecontaminatedoroxidized(stale).Ingeneral,fuelshouldbeusedwithin30days
ofitspurchasedate.
• Normaldeteriorationandwearoftheexteriorfinishes,orproductlabelreplacement.
Thiswarrantygivesyouspecificlegalrights,andyoumayalsohaveotherrightswhichvaryfromstateto state.
SearsBrandsManagementCorporation,HoffmanEstates,IL60179
Off-Season Storage ................................... 32
Troubleshooting ..................................... 33
Parts List ............................................. 34
Espaffo[ .............................................. 69
Service Numbers ............................ Back Cover
Engine Oil: SAE30
Fuel: Unleaded Gasoline
Spark Plug: F6RTC (951-10292)
© Sears Brands, LLC
Model Number
Serial Number
Date of Purchase
Record the model number, serial number,
2
and date of purchase above.
Thissymbolpointsout importantsafetyinstructionswhich, ifnot
followed,couldendangerthe personalsafetyand/orproperty of
yourselfandothers.Readandfollow allinstructionsinthismanual
beforeattempting tooperatethismachine.Failuretocomplywith these
instructionsmayresultinpersonalinjury.Whenyouseethissymbol,HEED
ITSWARNING!
Thismachinewasbuilt to beoperatedaccordingto thesafeoperation
practicesinthis manual.Aswith anytype ofpowerequipment,
carelessnessorerroronthe part oftheoperatorcanresultinseriousinjury.
Thismachineiscapableof amputatingfingers, hands,toesandfeet and
throwing debris.Failureto observethefollowing safetyinstructionscould
resultin seriousinjuryor death.
CALIFORNIA PROPOSITION 65
EngineExhaust,someof itsconstituents,andcertainvehiclecomponents
containoremit chemicalsknowntoStateof Californiatocausecancerand
birth defectsorother reproductiveharm.
Batteryposts,terminals,andrelatedaccessoriescontainleadandlead
compounds,chemicalsknowntotheStateof Californiatocausecancerand
reproductiveharm.Washhandsafter handling.
GENERAL OPERATION
Read,understand,andfollowall instructionsonthemachineandinthe
manual(s)beforeattemptingtoassembleandoperate.Keepthismanualin
asafeplaceforfutureandregularreferenceandfororderingreplacement
parts.
Befamiliarwith allcontrolsandtheirproperoperation.Knowhowtostop
themachineanddisengagethemquickly.
Neverallowchildrenunder14yearsold tooperatethismachine.Children14
yearsoldandovershouldreadandunderstandtheoperationinstructions
andsafetyrulesinthismanualandshouldbetrainedandsupervisedbya
parent.
Neverallowadultstooperatethismachinewithout properinstruction.
Tohelpavoidbladecontactorathrownobjectinjury,keepbystanders,
helpers,childrenandpetsatleast75feetfromthemachinewhileitisin
operation.Stopmachineifanyoneentersthearea.
Thoroughlyinspecttheareawheretheequipmentistobeused.Remove
allstones,sticks,wire,bones,toys,andotherforeignobjectswhichcould
bepickedupandthrownbytheblade(s).Thrownobjectscancauseserious
personalinjury.
Planyourmowingpatterntoavoiddischargeof materialtowardroads,
sidewalks,bystandersandthelike.Also,avoiddischargingmaterialagainst
awall orobstructionwhichmaycausedischargedmaterialto ricochetback
towardtheoperator.
Alwayswearsafetyglassesorsafetygogglesduringoperationandwhile
performinganadjustmentor repairto protectyoureyes.Thrownobjects
whichricochetcancauseseriousinjurytotheeyes.
Wearsturdy,rough-soledworkshoesandclose-fittingslacksandshirts.
Loosefitting clothesandjewelrycanbecaughtinmovableparts.Never
operatethis machineinbarefeetorsandals.
Your ResponsibilityiRestrict theuseofthispowermachineto
personswho read,understandandfollow thewarningsand instructionsin
thismanualandonthe machine.
SAVETHESEINSTRUCTIONS!
Beawareof themowerandattachmentdischargedirectionanddonotpoint
it atanyone.Donotoperatethemowerwithoutthedischargecoverorentire
grasscatcherin itsproperplace.
Donotput handsorfeetnearrotatingpartsor underthecuttingdeck.
Contactwiththeblade(s)canamputatehandsandfeet.
Amissingordamageddischargecovercancausebladecontactorthrown
objectinjuries.
Stoptheblade(s)whencrossinggraveldrives,walks,orroadsandwhilenot
cuttinggrass.
Watchfortrafficwhenoperatingnearorcrossingroadways.Thismachineis
not intendedforuseonanypublicroadway.
Donotoperatethemachinewhileunderthe influenceof alcoholordrugs.
Mowonlyindaylightorgoodartificiallight.
Nevercarrypassengers.
Disengageblade(s)beforeshiftingintoreverse.Backupslowly.Alwayslook
clownandbehindbeforeandwhilebackingtoavoidaback-overaccident.
Slowdownbeforeturning.Operatethemachinesmoothly.Avoiderratic
operationandexcessivespeed.
Disengageblade(s),setparkingbrake,stopengineandwaituntilthe
blade(s)cometo acompletestopbeforeremovinggrasscatcher,emptying
grass,uncloggingchute,removinganygrassordebris,or makingany
adjustments.
Neverleavearunningmachineunattended.Alwaysturnoffblade(s),set
parkingbrake,stopengineandremovekeybeforedismounting.
Useextracarewhenloadingor unloadingthemachineintoatrailerortruck.
Thismachineshouldnotbedrivenupordownramp(s),becausethemachine
couldtipover,causingseriouspersonalinjury.Themachinemustbepushed
manuallyonramp(s)to loadorunloadproperly.
Mufflerandenginebecomehotandcancausea burn.Donottouch.
Checkoverheadclearancescarefullybeforedrivingunderlowhangingtree
branches,wires,dooropeningsetc.,wheretheoperatormaybestruckor
pulledfromthemachine,whichcouldresultinseriousinjury.
Disengageallattachmentclutchesanddepressthebrakepedalcompletely
beforeattemptingtostartengine.
Yourmachineisdesignedtocutnormalresidentialgrassofaheightnomore
than10".Donotattempttomowthroughunusuallytall,drygrass(e.g.,
pasture)orpliesofdryleaves.Drygrassorleavesmaycontacttheengine
exhaustand/orbuilduponthemowerdeckpresentingapotentialfire
hazard.
Useonlyaccessoriesandattachmentsapprovedforthismachinebythe
machinemanufacturer.Read,understandandfollowallinstructions
providedwiththeapprovedaccessoryorattachment.Foralistofapproved
accessoriesandattachments,call1-800-659-5917.
Dataindicatesthatoperators,age60yearsandabove,areinvolvedina
largepercentageofridingmower-relatedinjuries.Theseoperatorsshould
evaluatetheirabilitytooperatetheridingmowersafelyenoughtoprotect
themselvesandothersfromseriousinjury.
Ifsituationsoccurwhicharenotcoveredinthismanual,usecareandgood
judgment.
SLOPE OPERATION
Slopesareamajorfactorrelatedtolossofcontrolandtip-overaccidentswhichcan
resultinsevereinjuryordeath.Allslopesrequireextracaution.Ifyoucannotback
uptheslopeorif youfeeluneasyonit, donotmowit.
Foryoursafety,usetheSlopeGuideincludedaspartofthismanualtomeasure
slopesbeforeoperatingthis machineonaslopedorhilly area.If theslopeisgreater
than12degreesasshownonthe SlopeGuide,donotoperatethis machineonthat
areaorseriousinjurycouldresult.
Do;
Mowupanddownslopes,notacross.Exerciseextremecautionwhen
changingdirectiononslopes.
Watchfor holes,ruts,bumps,rocks,orotherhiddenobjects.Uneventerrain
couldoverturnthemachine.Tallgrasscanhideobstacles.
Useslowspeed.Choosealowenoughspeedsettingsothat youwill nothave
tostoporshiftwhileontheslope.Tiresmaylosetractiononslopeseven
thoughthebrakesarefunctioningproperly.Alwayskeepmachineingear
whengoingdownslopestotakeadvantageof enginebrakingaction.
Followthemanufacturer'srecommendationsfor wheelweightsor
counterweightsto improvestability.
Useextracarewith grasscatchersor otherattachments.Thesecanchange
thestabilityofthemachine.
Keepallmovementontheslopesslowandgradual.Donotmakesudden
changesinspeedordirection.Rapidengagementorbrakingcouldcause
thefrontofthemachineto lift andrapidlyflip overbackwardswhichcould
causeseriousinjury.
Avoidstartingorstoppingona slope.Iftireslosetraction,disengagethe
blade(s)andproceedslowlystraightdowntheslope.
Do Not:
Donotturnonslopesunlessnecessary;then,turnslowlyandgradually
downhill,if possible.
Donotmowneardrop-offs,ditchesorembankments.Themowercould
suddenlyturnoverira wheelisovertheedgeofacliff, ditch,orifanedge
cavesin.
Donottry tostabilizethemachinebyputtingyourfoot ontheground.
Donotuseagrasscatcheron steepslopes.
Donotmowonwetgrass.Reducedtractioncouldcausesliding.
Donotattemptto coastdownhill.Over-speedingmaycausetheoperatorto
losecontrolofthe machineresultinginseriousinjuryordeath.
Donottow heavypull behindattachments(e.g.loadeddumpcart,lawn
roller,etc.)onslopesgreaterthan5degrees.Whengoingdownhill,the
extraweighttendstopushthetractorandmaycauseyoutoloosecontrol
(e.g.tractormayspeedup,brakingandsteeringabilityarereduced,
attachmentmayjack-knifeandcausetractorto overturn).
CHILDREN
Tragicaccidentscanoccurif theoperatoris notalertto thepresenceofchildren.
Childrenareoftenattractedtothemachineandthemowingactivity.Theydonot
understandthedangers.Neverassumethatchildrenwill remainwhereyoulastsaw
them.
Keepchildrenoutofthemowingareaandinwatchfulcareofaresponsible
adultotherthantheoperator.
Bealertandturnmachineoff ifachildentersthearea.
Beforeandwhilebacking,lookbehindanddownforsmallchildren.
Nevercarrychildren,evenwith theblade(s)shutoff.Theymayfall off andbe
seriouslyinjuredorinterferewith safemachineoperation.
Useextremecarewhenapproachingblindcorners,doorways,shrubs,trees
orotherobjectsthatmayblockyourvisionofachildwhomayrunintothe
machine.
Toavoidback-overaccidents,alwaysdisengagethecuttingblade(s)before
shiftinginto Reverse.Ifequipped,the"ReverseCautionMode"(blades
operatewhilemachineridesinreverse)shouldnotbeusedwhenchildrenor
othersarearound.
Keepchildrenawayfromhotorrunningengines.Theycansufferburnsfrom
ahotmuffler.
Removekeywhenmachineisunattendedto preventunauthorized
operation.
Neverallowchildrenunder14yearsofagetooperatethismachine.Children14and
overshouldreadandunderstandtheinstructionsandsafeoperationpracticesin
thismanualandonthemachineandshouldbetrainedandsupervisedbyanadult.
TOWING
Towonlywitha machinethathasahitchdesignedfortowing.Donotattach
towedequipmentexceptat thehitchpoint.
Followthe manufacturersrecommendationforweightlimitsfortowed
equipmentandtowingonslopes.
Neverallowchildrenorothersinorontowedequipment.
4
Onslopes,theweightofthetowedequipmentmaycauselossoftractionand
lossofcontrol.
Alwaysuseextracautionwhentowingwithamachinecapableof making
tight turns(e.g."zero-turn"ride-onmower).Makewideturnstoavoid
jack-knifing.
Travelslowlyandallowextradistanceto stop.
Donotcoastdownhill.
SERVICE
Safe Handling of Gasoline:
Toavoidpersonalinjury orproperty damageuseextremecarein handling
gasoline.Gasolineisextremelyflammableand thevaporsareexplosive.
Seriouspersonalinjurycanoccurwhengasolineisspilled onyourselforyour
clotheswhichcanignite. Washyourskinandchangeclothesimmediately.
Useonlyanapprovedgasolinecontainer.
Neverfill containersinsideavehicleoronatruckortrailerbedwithaplastic
liner.AIwaysplacecontainerson thegroundawayfromyourvehiclebefore
filling.
Whenpractical,removegas-poweredequipmentfromthetruckor
trailerandrefuelitontheground.If thisisnotpossible,thenrefuelsuch
equipmentonatrailerwitha portablecontainer,ratherthanfromagasoline
dispensernozzle.
Keepthenozzlein contactwith therimofthefueltankorcontaineropening
atalltimesuntilfuelingiscomplete.Donotuseanozzlelock-opendevice.
Extinguishallcigarettes,cigars,pipesandothersourcesofignition.
Neverfuelmachineindoors.
Neverremovegascaporaddfuelwhiletheengineishotor running.Allow
engineto coolatleasttwo minutesbeforerefueling.
Neveroverfill fueltank.Filltanktonomorethan1/2inchbelowbottomof
fillernecktoallowspaceforfuelexpansion.
Replacegasolinecapandtightensecurely.
Ifgasolineisspilled,wipeit off theengineandequipment.Movemachineto
anotherarea.Wait5minutesbeforestartingtheengine.
Toreducefirehazards,keepmachinefreeof grass,leaves,orotherdebris
build-up.Cleanupoilorfuelspillageandremoveanyfuelsoakeddebris.
Neverstorethe machineorfuelcontainerinsidewherethereisanopen
flame,sparkorpilotlightasonawaterheater,spaceheater,furnace,clothes
dryerorothergasappliances.
Allowamachineto coolat leastfiveminutesbeforestoring.
General Service
Neverrunanengineindoorsorinapoorlyventilatedarea.Engineexhaust
containscarbonmonoxide,anodorless,anddeadlygas.
Beforecleaning,repairing,orinspecting,makecertaintheblade(s)andall
movingpartshavestopped.Disconnectthesparkplugwireandgroundagainst
theenginetopreventunintendedstarting.
Periodicallychecktomakesurethebladescometo completestopwithin
approximately(5)fivesecondsafteroperatingthe bladedisengagement
control.Ifthebladesdonotstopwithinthethistimeframe,yourmachine
shouldbeservicedprofessionallybyaSearsorotherqualifiedservicedealer.
Checkbrakeoperationfrequentlyasit issubjectedtowearduringnormal
operation.Adjustandserviceasrequired.
Checktheblade(s)andenginemountingboltsatfrequentintervalsfor
propertightness.Also,visuallyinspectblade(s)for damage(e.g.,excessive
wear,bent,cracked).Replacetheblade(s)with theoriginalequipment
manufacturer's(O.E.M.)blade(s)only,listedinthismanual.Useofparts
whichdonotmeettheoriginalequipmentspedficationsmayleadto
improperperformanceandcompromisesafety!
Mowerbladesaresharp.Wrapthebladeorweargloves,anduseextra
cautionwhenservicingthem.
Keepallnuts,bolts,andscrewstight tobesuretheequipmentisinsafe
workingcondition.
Nevertamperwith thesafetyinterlocksystemorothersafetydevices.Check
theirproperoperationregularly.
Afterstrikingaforeignobject,stoptheengine,disconnectthesparkplug
wire(s)andgroundagainsttheengine.Thoroughlyinspectthemachinefor
anydamage.Repairthedamagebeforestartingandoperating.
Neverattemptto makeadjustmentsorrepairstothe machinewhilethe
engineis running.
Grasscatchercomponentsandthedischargecoveraresubjecttowear
anddamagewhichcouldexposemovingpartsorallowobjectstobe
thrown.Forsafetyprotection,frequentlycheckcomponentsandreplace
immediatelywith originalequipmentmanufacturer's(O.E.M.)partsonly,
listedinthismanual.Useofpartswhichdonotmeettheoriginalequipment
specificationsmayleadtoimproperperformanceandcompromisesafety!
Donotchangetheenginegovernorsettingsorover-speedtheengine.The
governorcontrolsthemaximumsafeoperatingspeedof theengine.
Maintainorreplacesafetyandinstructionlabels,asnecessary.
Observeproperdisposallawsandregulationsforgas,off,etc.toprotectthe
environment.
AccordingtotheConsumerProductsSafetyCommission(CPSC)andtheU.S.
EnvironmentalProtectionAgency(EPA),this producthasanAverageUseful
Lifeof seven(7)years,or 270hoursofoperation.AttheendoftheAverage
UsefulLife,buyanewmachineorhavethemachineinspectedannuallyby
aSearsorotherqualifiedservicedealertoensurethat allmechanicaland
safetysystemsareworkingproperlyandnotwornexcessively.Failuretodo
socanresultin accidents,injuriesordeath.
DO NOT MODIFY ENGINE
Toavoidseriousinjuryordeath,donot modifyengineinanyway.Tampering
with thegovernorsettingcanleadtoarunawayengineandcauseit to
operateat unsafespeeds.Nevertamperwith factory settingof engine
governor.
NOTICE REGARDING EMiSSiONS
Engineswhich arecertified to complywithCaliforniaandfederalEPA
emissionregulationsfor SORE(SmallOffRoadEquipment)arecertified
tooperateonregularunleadedgasoline,andmayincludethefollowing
emissioncontrolsystems:EngineModification (EM),OxidizingCatalyst(0C),
SecondaryAirInjection(SAI)andThreeWayCatalyst(TWC)ifsoequipped.
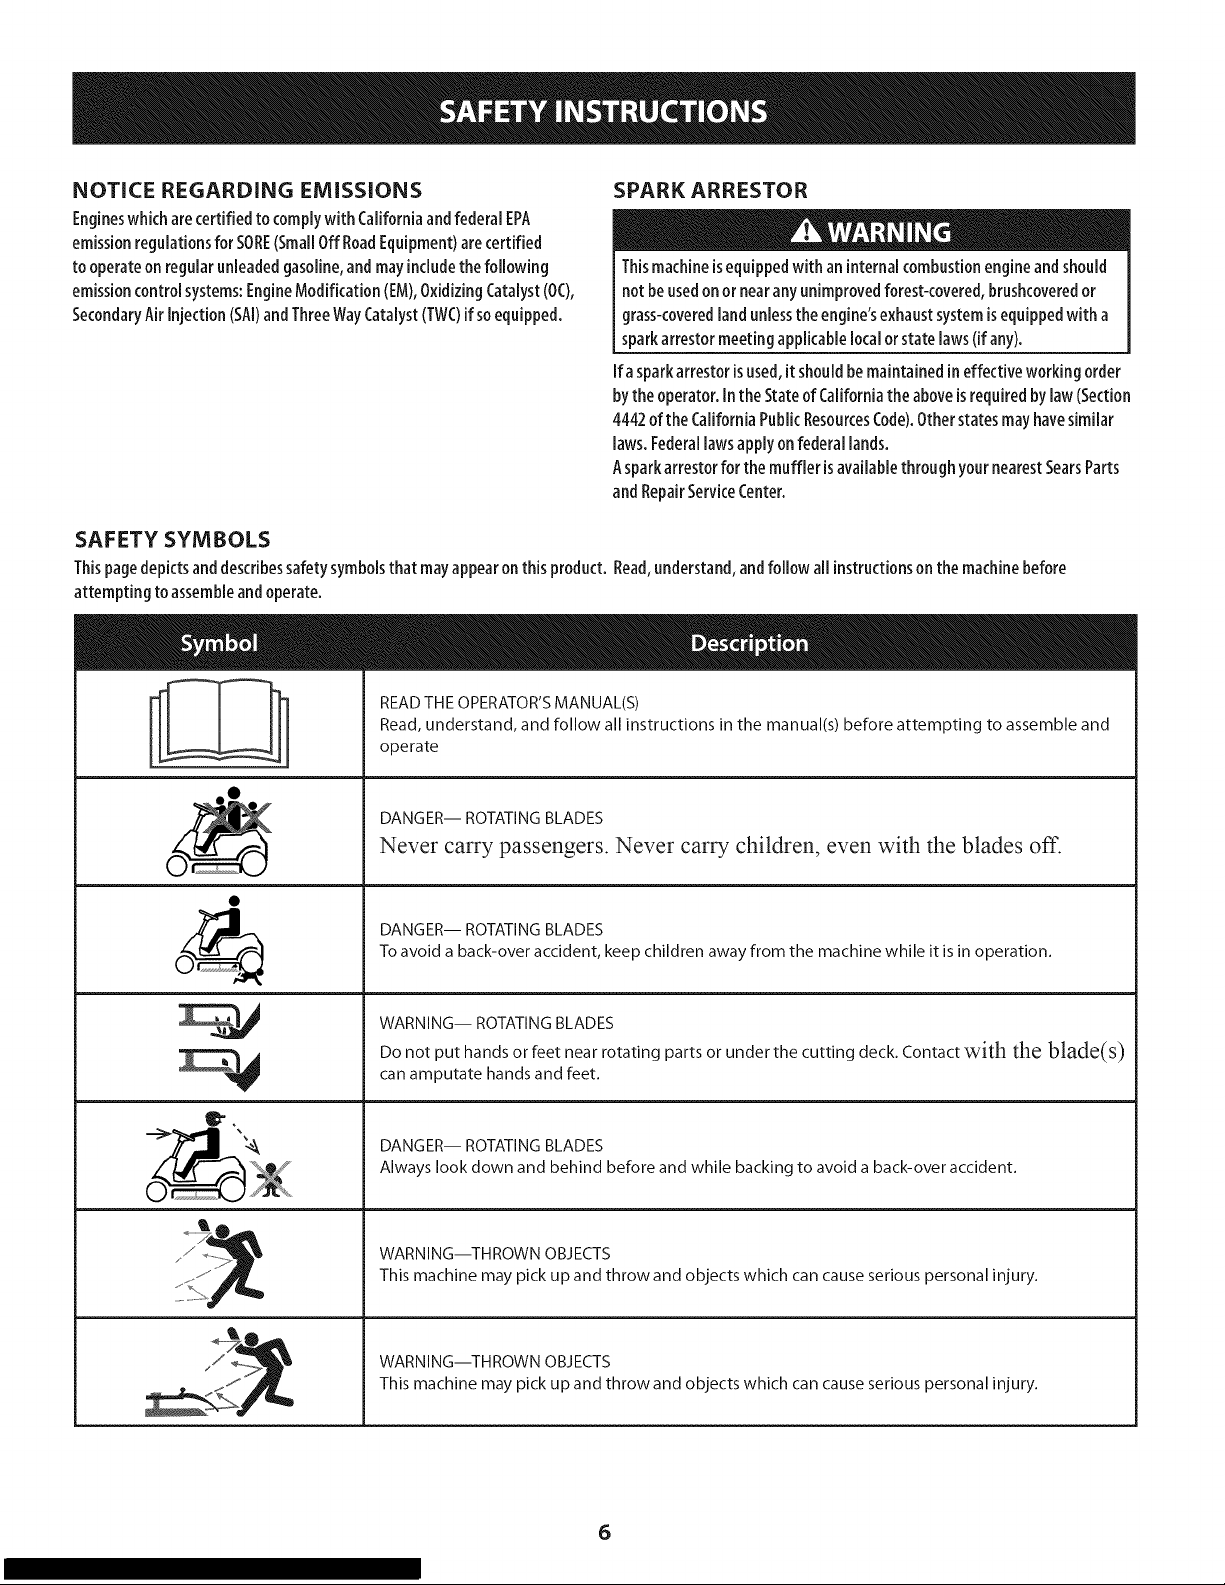
SAFETY SYMBOLS
Thispagedepictsanddescribessafetysymbolsthatmayappearonthisproduct. Read,understand,andfollow all instructionsonthemachinebefore
attempting toassembleandoperate.
" "i READTHEOPERATOR'SMANUAL(S)
i Read,understand, and follow all instructions in the manual(s) before attempting to assemble and
i
' operate
I
SPARK ARRESTOR
Thismachineisequippedwith aninternal combustionengineand should
not beusedonor nearanyunimprovedforest-covered,brusbcoveredor
grass-coveredland unlessthe engine'sexhaustsystemisequippedwith a
sparkarrestor meetingapplicablelocalorstate laws(ifany).
Ira sparkarrestorisused,it shouldbemaintainedin effectiveworking order
bythe operator.Inthe StateofCaliforniathe aboveisrequiredbylaw (Section
4442ofthe CaliforniaPublicResourcesCode).Otherstatesmayhavesimilar
laws.Federallawsapplyonfederal lands.
Asparkarrestorfor the muffler isavailablethroughyournearestSearsParts
andRepairServiceCenter.
DANGER-- ROTATINGBLADES
Never carry passengers. Never carry children, even with the blades off.
O_, DANGER-- ROTATINGBLADES
_j WARNING-- ROTATINGBLADES
..........._ •
,,,/_ WARNING--THROWN OBJECTS
JJ .
ii_;iil._',_....... This machine may pick up and throw and objects which can causeserious personal injury.
Toavoid a back-over accident, keep children awayfrom the machine while it isin operation.
Do not put hands or feet near rotating parts or under the cutting deck.Contact with the blade(s)canamputate hands and feet.
DANGER-- ROTATINGBLADES
Always look down and behind before and while backing to avoid a back-over accident.
/ WARN,NG--T.ROWNOBJECTS
Thismachinemaypickupandthrowandobjectswhichcancauseseriouspersona,injury
_f
6
®
O
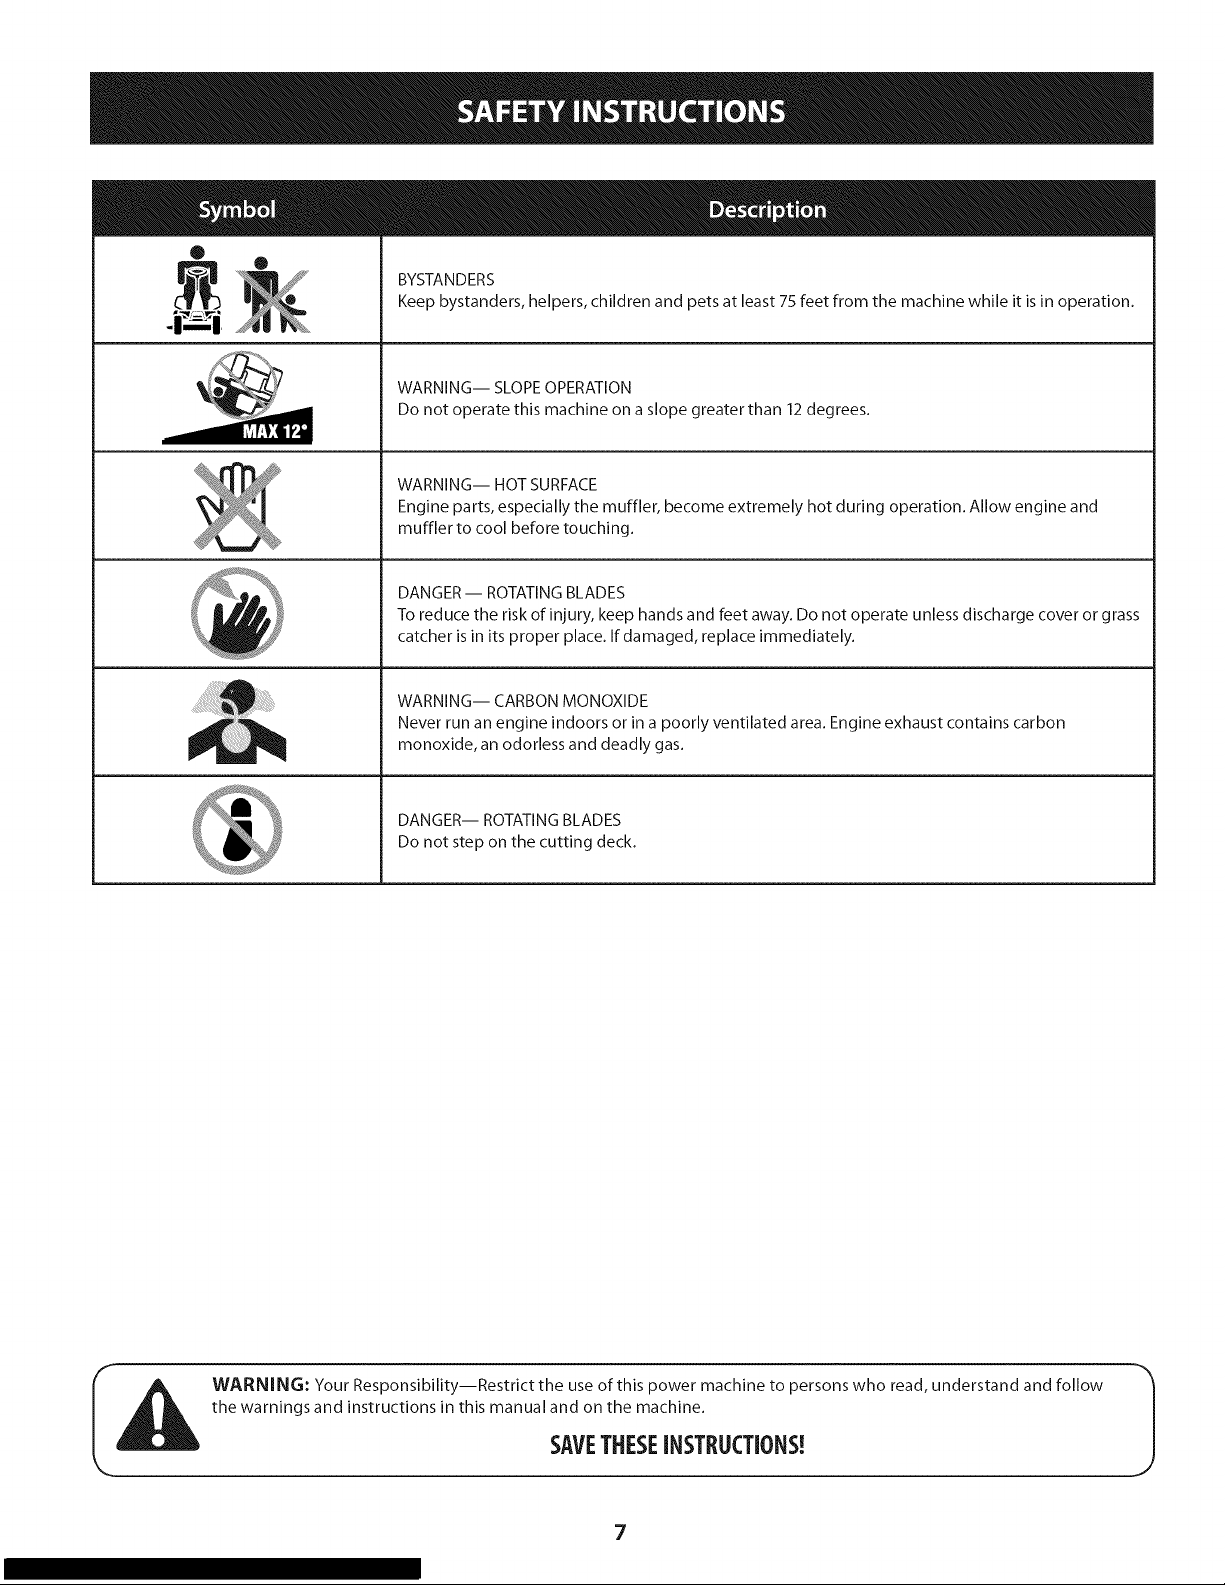
BYSTANDERS
Keep bystanders, helpers, children and pets at least 75 feet from the machine while it is in operation.
WARNING-- SLOPEOPERATION
Do not operate this machine on a slope greater than 12 degrees.
WARNING-- HOT SURFACE
Engine parts, especially the muffler, become extremely hot during operation. Allow engine and
muffler to cool before touching.
DANGER- ROTATING BLADES
To reduce the risk of injury, keep hands and feet away. Do not operate unless discharge cover or grass
catcher is in its proper place. If damaged, replace immediately.
WARNING-- CARBON MONOXIDE
Never run an engine indoors or in a poorly ventilated area. Engine exhaust contains carbon
monoxide, an odorless and deadly gas.
DANGER-- ROTATING BLADES
Do not step on the cutting deck.
WARNING: Your Responsibility--Restrict the use of this power machine to persons who read, understand and follow
the warnings and instructions in this manual and on the machine.
SAVETHESEINSTRUCTIONS!
,/
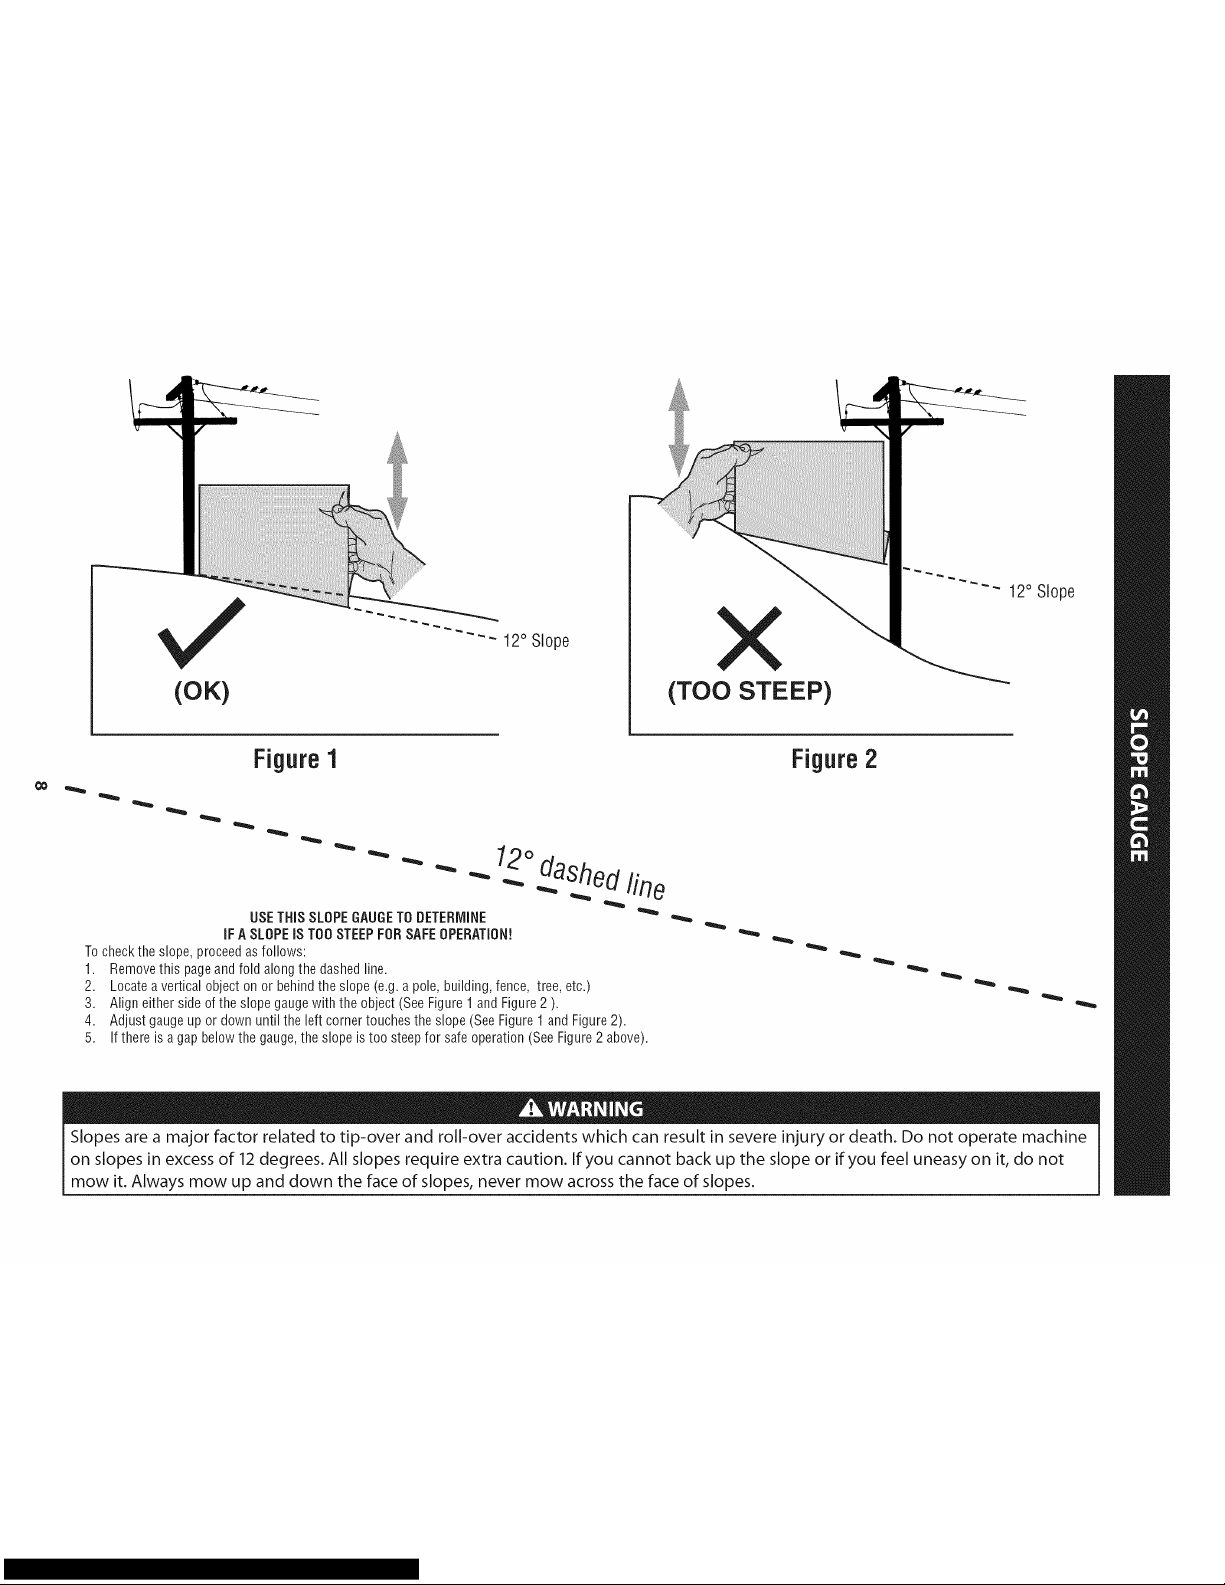
(OK)
"'- 12° Slope
X
(TOO STEEP)
- 12° Slope
Figure1
USETHiSSLOPEGAUGE TO DETERMINE
iFA SLOPE iSTOOSTEEPFOB SAFEOPERATION!
Tochecktheslope,proceedas follows:
1. Removethis pageandfoldalongthe dashedline.
2. Locateaverticalobjecton or behindtheslope (e.g.a pole,building,fence, tree,etc.)
3. Aligneithersideoftheslopegaugewith the object(SeeFigure1andFigure2 ).
4. Adjustgaugeupor downuntil theleftcornertouchestheslope(SeeFigure1 andFigure2).
5.
Ifthereisagapbelowthegauge,theslopeis toosteepfor safeoperation(SeeFigure2above).
Figure2
Slopes are a major factor related to tip-over and roll-over accidents which can result in severe injury or death. Do not operate machine
on slopes in excess of 12 degrees. All slopes require extra caution. If you cannot back up the slope or if you feel uneasy on it, do not
mow it. Always mow up and down the face of slopes, never mow across the face of slopes.

Contents of Crate
OneRidingMower
OneSteeringWheel/ShaftAssembly
OneRearHitchPlate
OneRidingMowerOperator'sManual
OneSeatAssembly
OneRearEngineCover
OneOilDrainSleeve
OneEngineOperator'sManual
Contents of Hardware Pack
Beforebeginninginstallation,removeallthecontentsfromthecrateandallthe
hardwarefromthepackfromto makesureeverythingispresent.Hardwareislisted
below.Partnumbersareshowninparentheses.
HitchPlate
SeatMountingBracket(withtwo shoulderbolts&locknutsinstalled)
EecommendedToolsfor Assembly
3/8"Wrench(orsocket) 9/16"Socket
1/2"Wrench(orsocket) 7/16"wrench
5/8"Wrench(orsocket) PhillipsScrewDriver
1/4"DriveRatchet
InstallingTheSteeringWheelAssembly
Ifthesteeringwheelassemblyforyourtractordidnotcomealreadyinstalled,
followthestepsbelow:
1. Slidethe pedestalcapontothesteeringshaftsothatwhenthesteering
shaftisinstalledonthetractor,thepedestalcapwillbeuprightasshownin
Figure1.
OneSteeringPedestalCap
OneDischargeChuteAssembly
OneHardwarePack
OneProductRegistrationCard
Lowerthesteeringwheelassemblyontothelowersteeringshaft(1)and
securewith boltandlocknut(2)previouslyremoved.SeeFigure2.
Figure2
Tightentheshoulderboltandlocknutusinga9/16"wrenchand
7/16"wrenchorsocket.
6. Removethepedestalcapmountscrewfactoryinstalledandlocatedonthe
tractor'ssteeringconsole.Retainthescrewforlaterinstructions.
7. SlidethePedestalcapdownontothetractor(1)andslightlyrotatetothe
rightto clipintoplace.Securethepedestalwith thescrew(2)previously
removed.SeeFigure3.
Figure1
Removetheshoulderboltandlocknutfromthesteeringshaftonthetractor
andretainforlatersteps.
Withthesteeringwheelassemblyuprightandpositionedoverthelower
steeringshaftonthetractor,alignthesteeringwheelsothatwith the
tractorwheelsstraight,thelargeopeningonthesteeringwheelisfacing
forward.
9 Figure3
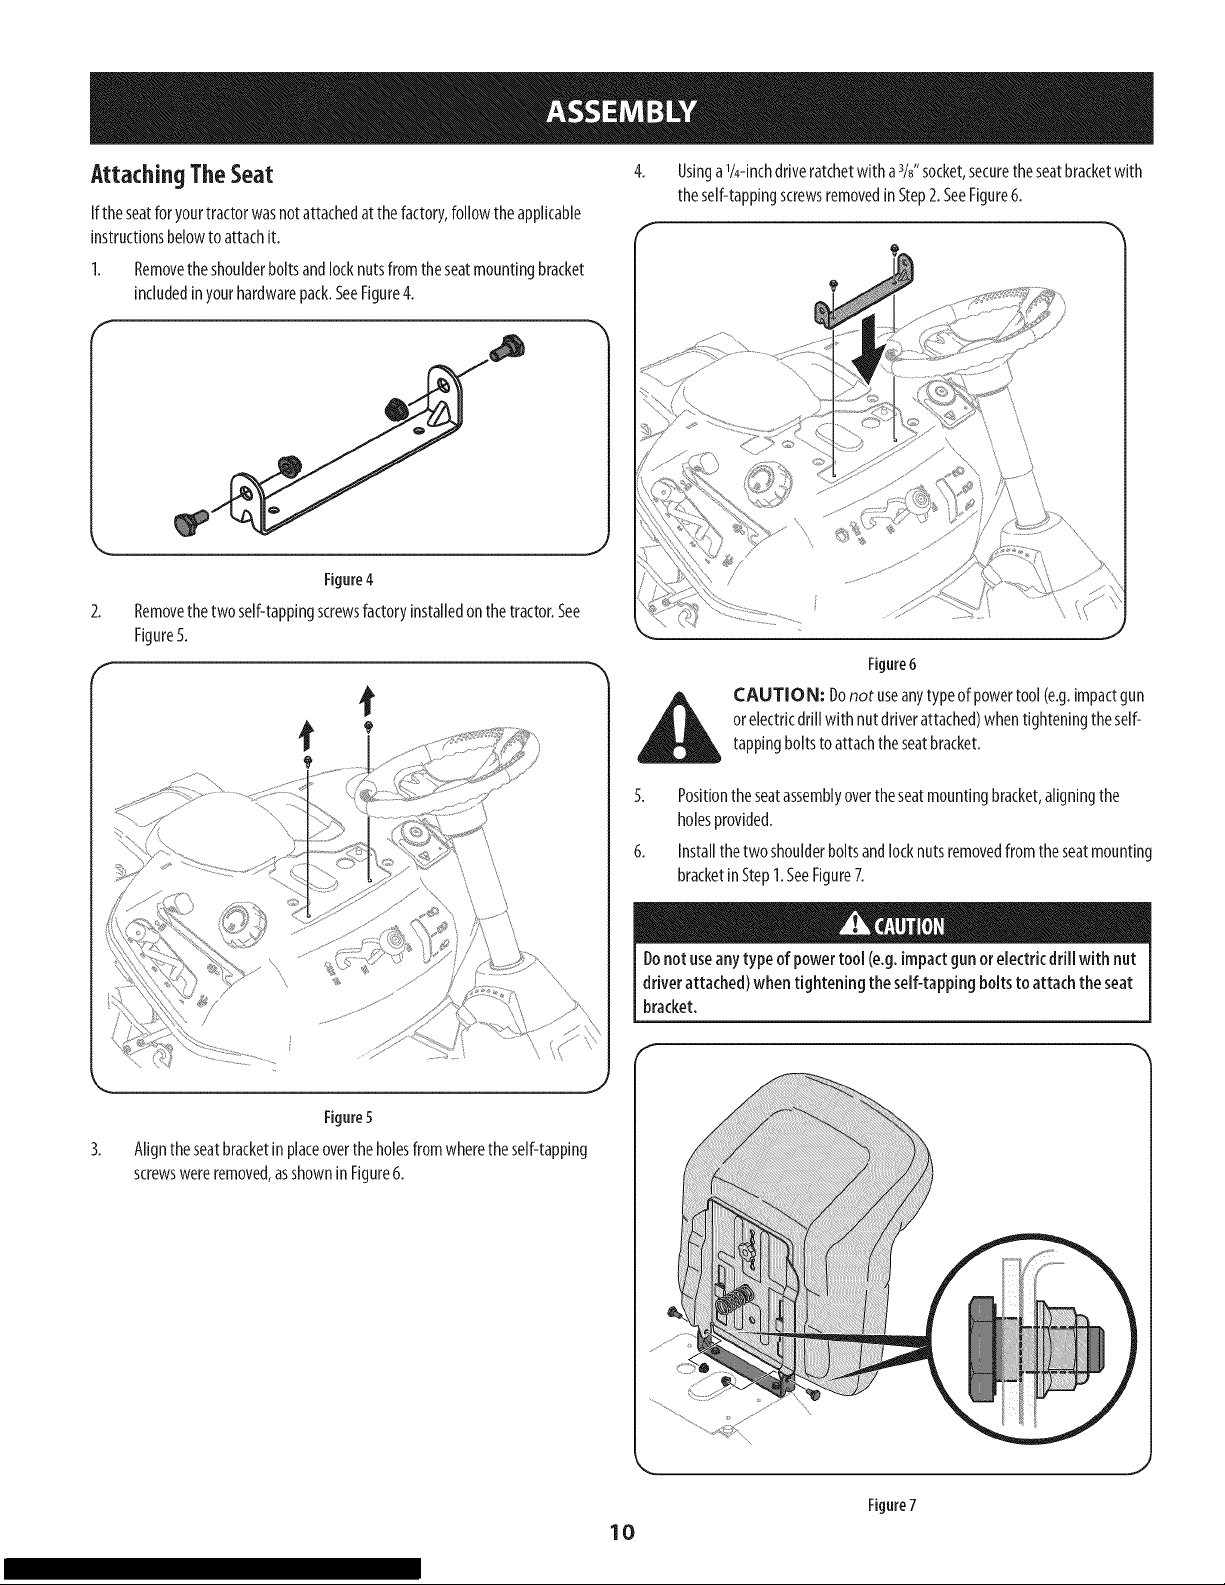
AttachingTheSeat
Iftheseatforyourtractorwasnotattachedatthefactory,followtheapplicable
instructionsbelowtoattachit.
2. Removetheshoulderboltsandlocknutsfromtheseatmountingbracket
includedinyourhardwarepack.SeeFigure4.
f
Figure4
2. Removethetwo self-tappingscrewsfactoryinstalledonthetractor.See
Figure5.
Usinga1/4-inchdriveratchetwith a%" socket,securetheseatbracketwith
theself-tappingscrewsremovedin Step2.SeeFigure6.
Figure6
Figure5
3.
Aligntheseatbracketinplaceovertheholesfromwheretheself-tapping
screwswereremoved,asshowninFigure6.
i_ll CAUTIO N: Donot useanytypeofpowertool(e.g.impactgun
5. Positiontheseatassemblyovertheseatmountingbracket,aligningthe
6. Installthetwo shoulderboltsandlocknutsremovedfromtheseatmounting
Donotuseanytype of powertool (e.g.impactgunor electricdrill with nut
driverattached)whentightening theself-tappingboltsto attachthe seat
bracket°
orelectricdrill with nutdriverattached)whentighteningtheself-
tappingboltstoattachtheseatbracket.
holesprovided.
bracketin Step1.SeeFigure7.
Figure7
I0
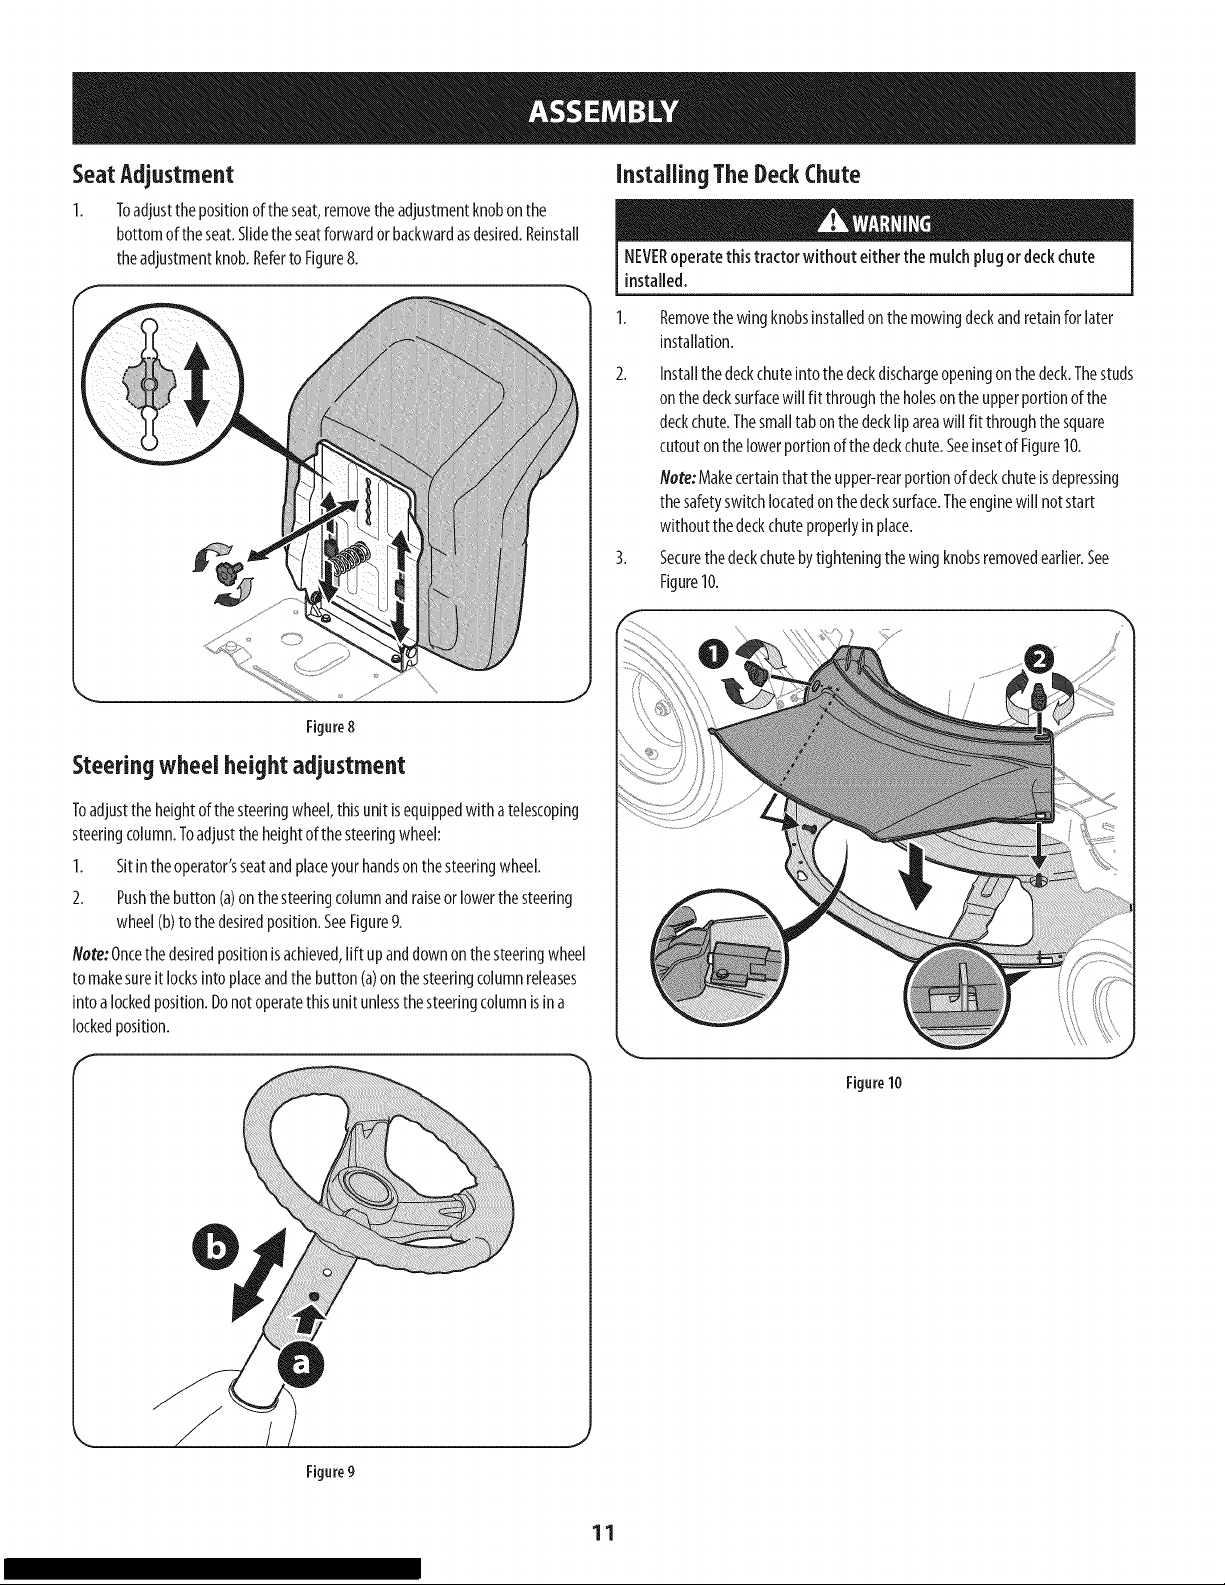
1. Toadjustthepositionoftheseat,removetheadjustmentknobonthe
bottomoftheseat.Slidetheseatforwardorbackwardasdesired.Reinstall
theadjustmentknob.RefertoFigure8.
f
s j_
Figure8
InstallingTheDeckChuteSeatAdjustment
NEVERoperatethis tractor without either the mulchplugordeckchute
installed.
Removethewingknobsinstalledonthemowingdeckandretainfor later
installation.
2. Installthedeckchuteintothedeckdischargeopeningonthedeck.Thestuds
onthedecksurfacewill fit throughtheholesonthe upperportionofthe
deckchute.Thesmalltabonthedecklip areawill fit throughthesquare
cutoutonthe lowerportionofthedeckchute.SeeinsetofFigure10.
Note:Makecertainthat theupper-rearportionofdeckchuteisdepressing
thesafetyswitchlocatedonthedecksurface.Theenginewill notstart
withoutthedeckchuteproperlyin place.
3. Securethedeckchutebytighteningthewingknobsremovedearlier.See
Figure10.
Steering wheel height adjustment
Toadjusttheheightofthesteeringwheel,thisunitisequippedwith atelescoping
steeringcolumn.Toadjusttheheightofthesteeringwheel:
1. Sitintheoperator'sseatandplaceyourhandsonthesteeringwheel.
2. Pushthebutton(a)onthesteeringcolumnandraiseorlowerthesteering
wheel(b)tothedesiredposition.SeeFigure9.
flete:Oncethedesiredpositionisachieved,lift upanddownonthesteeringwheel
tomakesureit locksintoplaceandthebutton(a)onthesteeringcolumnreleases
intoalockedposition.Donotoperatethisunitunlessthesteeringcolumnisina
lockedposition.
Figure10
Figure9
11
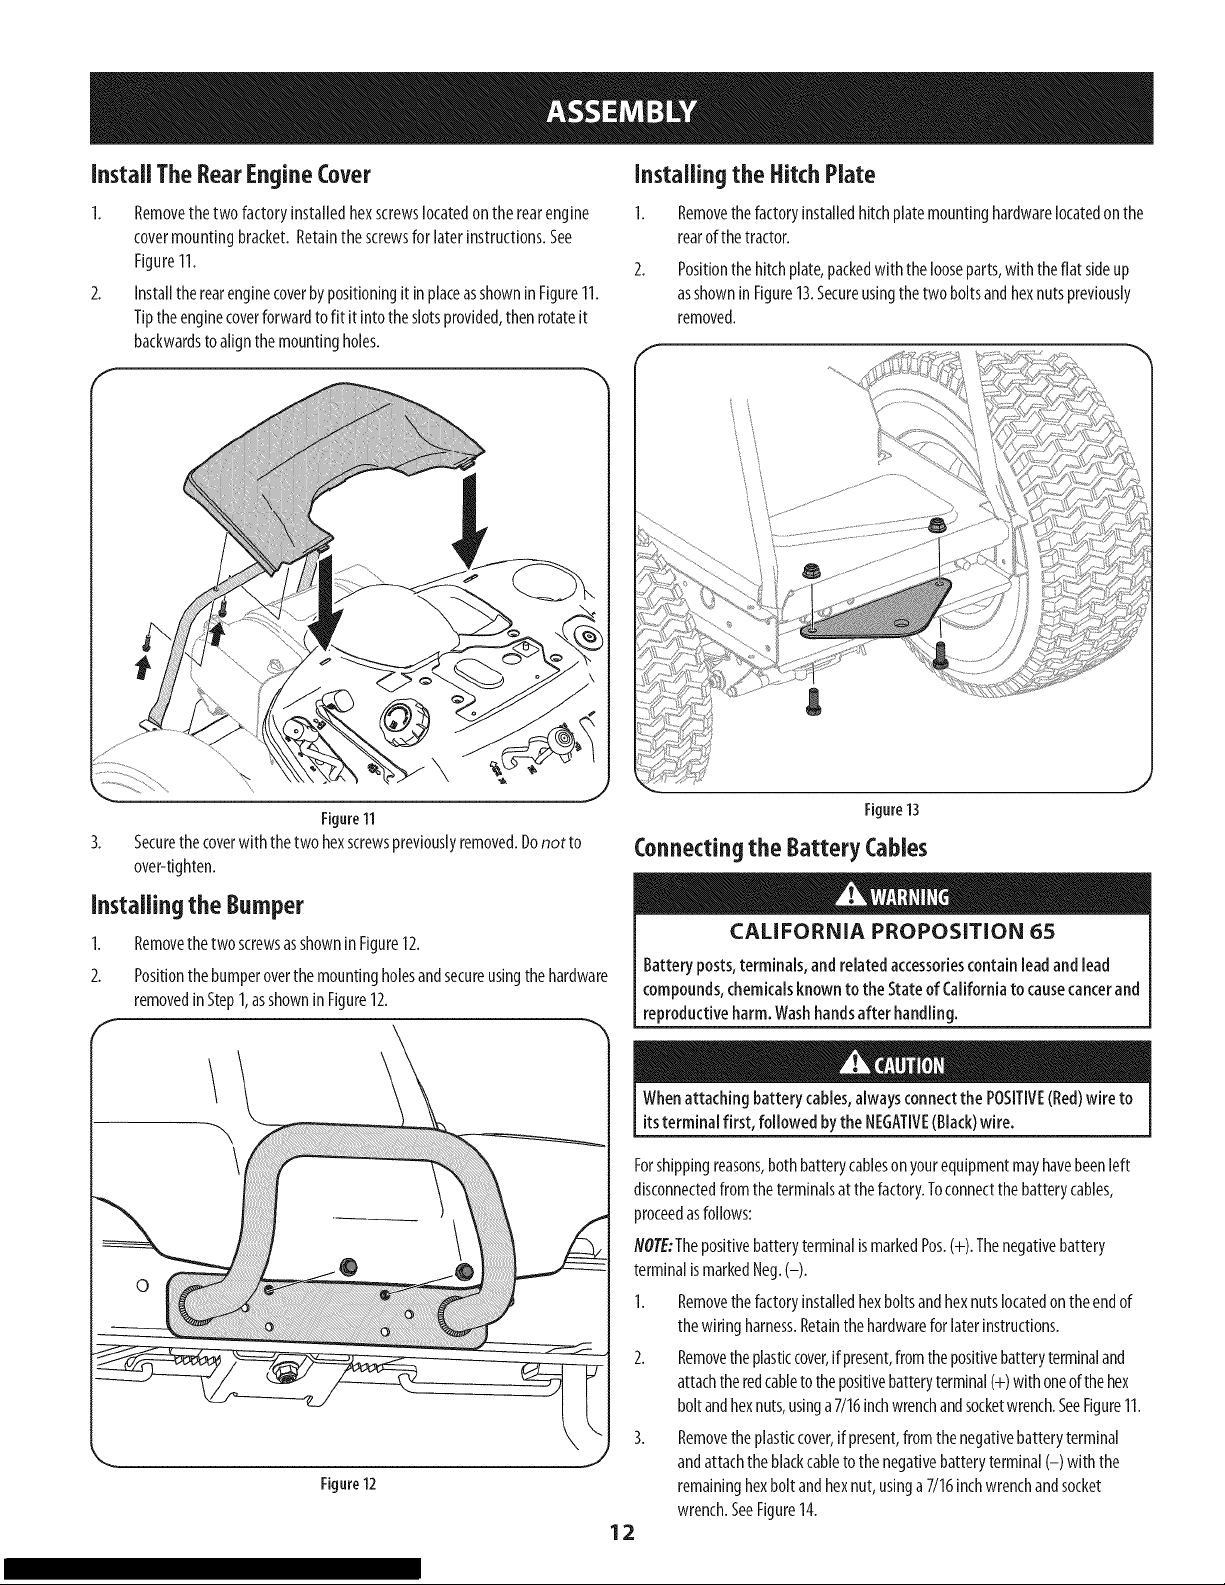
InstallTheRearEngineCover
Installingthe HitchPlate
1. Removethetwofactoryinstalledhexscrewslocatedontherearengine
covermountingbracket.Retainthescrewsfor later instructions.See
Figure11.
2. Installtherearenginecoverbypositioningitin placeasshowninFigure11.
Tiptheenginecoverforwardtofit it intotheslotsprovided,thenrotateit
backwardstoalignthemountingholes.
F
Removethefactoryinstalledhitchplatemountinghardwarelocatedonthe
rearofthetractor.
Positionthehitchplate,packedwiththe looseparts,with theflat sideup
asshowninFigure13.Secureusingthetwoboltsandhexnutspreviously
removed.
Figure11
3.
Securethecoverwith thetwohexscrewspreviouslyremoved.Donot to
over-tighten.
Installingthe Bumper
1. Removethetwo screwsasshownin Figure12.
2. Positionthebumperoverthemountingholesandsecureusingthehardware
removedinStep1,asshownin Figure12.
\
Figure12
Figure13
Connecting the Battery Cables
CALIFORNIA PROPOSITION 65
Batteryposts,terminals,andrelatedaccessoriescontainleadandlead
compounds,chemicalsknownto theStateof Californiato causecancerand
reproductiveharm.Washhandsafter handling.
Whenattachingbatterycables,alwaysconnectthe POSITIVE(Red)wire to
itsterminal first, followed bythe NEGATIVE(Black)wire.
Forshippingreasons,bothbatterycablesonyourequipmentmayhavebeenleft
disconnectedfromtheterminalsatthefactory.Toconnectthebatterycables,
proceedasfollows:
NOTE:ThepositivebatteryterminalismarkedPos.(+).Thenegativebattery
terminalismarkedNeg.(-).
1. Removethefactoryinstalledhexboltsandhexnutslocatedontheendof
thewiringharness.Retainthehardwarefor laterinstructions.
Removetheplasticcover,if present,fromthepositivebatteryterminaland
attachtheredcableto thepositivebatteryterminal(+)withoneofthehex
boltandhexnuts,usinga7/16inchwrenchandsocketwrench.SeeFigure11.
Removetheplasticcover,if present,fromthenegativebatteryterminal
andattachtheblackcabletothenegativebatteryterminal(-) with the
remaininghexboltandhexnut,usinga 7/16inchwrenchandsocket
wrench.SeeFigure14.
12
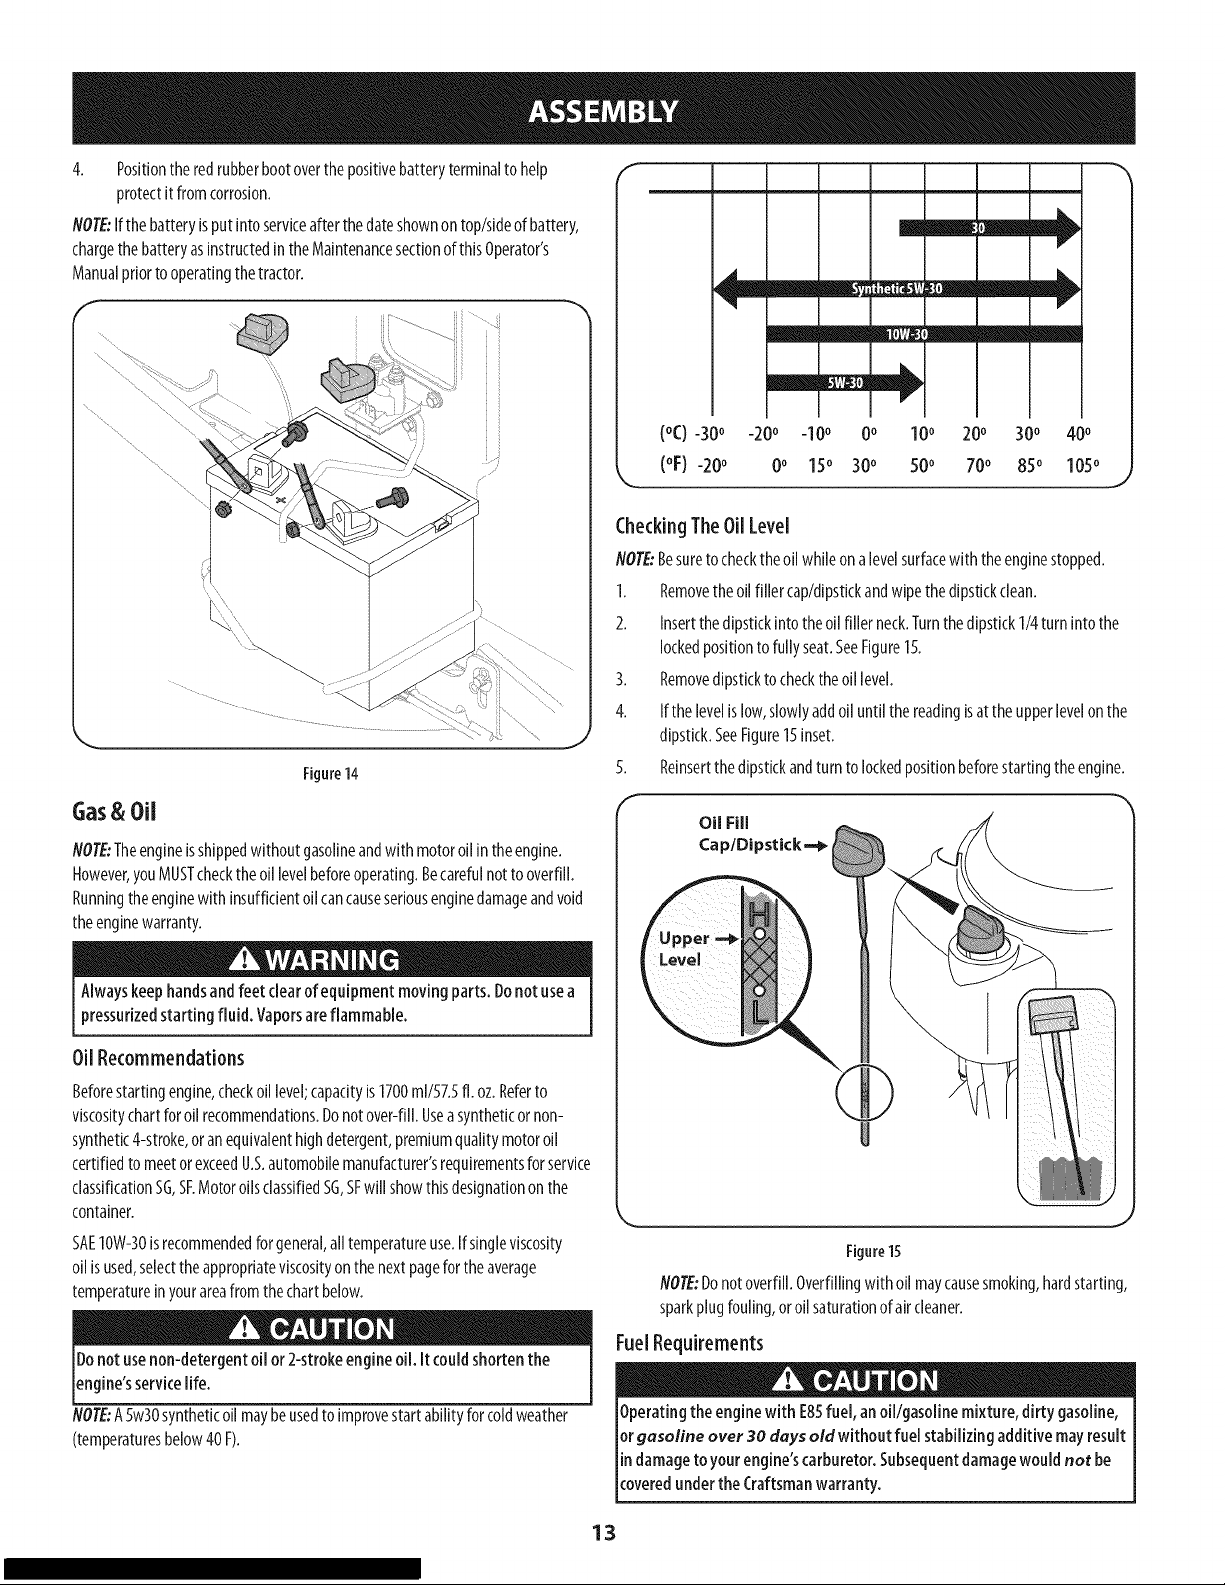
4. Positiontheredrubberbootoverthepositivebatteryterminaltohelp
protectitfromcorrosion.
NOTE:Ifthe batteryisput intoserviceafterthedateshownontop/sideofbattery,
chargethe batteryasinstructedintheMaintenancesectionofthisOperator's
Manualpriortooperatingthetractor.
Figure14
m///=lllb
v
v
mm mm
(°C)-30 ° -20° -10° 0° 10° 200 300
(°F)-20 ° 0° 150 300 50o 70o 85o 105o
CheckingThe Oil Level
NOTE:Besuretochecktheoilwhileonalevelsurfacewith theenginestopped.
1. Removetheoilfillercap/dipstickandwipethedipstickclean.
2. Insertthedipstickintotheoilfiller neck.Turnthedipstick1/4turnintothe
lockedpositiontofullyseat.SeeFigure15.
3. Removedipstickto checktheoil level.
4. Ifthelevelislow,slowlyaddoiluntilthereadingisattheupperlevelonthe
dipstick.SeeFigure15inset.
5. Reinsertthedipstickandturnto lockedpositionbeforestartingtheengine.
Gas&Oil
NOTE:Theengineisshippedwithoutgasolineandwithmotoroil intheengine.
However,youMUSTchecktheoil levelbeforeoperating.Becarefulnotto overfill.
Runningtheenginewithinsufficientoilcancauseseriousenginedamageandvoid
theenginewarranty.
Alwayskeephandsandfeet clearofequipment movingparts. Donot usea
pressurizedstarting fluid. Vaporsareflammable.
Oil Recommendations
Beforestartingengine,checkoillevel;capacityis1700ml/57.5ft. oz.Referto
viscositychartfor oilrecommendations.Donotover-fill.Useasyntheticornon-
synthetic4-stroke,oranequivalenthighdetergent,premiumqualitymotoroil
certifiedtomeetorexceedU.S.automobilemanufacturer'srequirementsforservice
classificationSG,SEMotoroilsclassifiedSG,SFwill showthisdesignationonthe
container.
SAE10W-30isrecommendedforgeneral,alltemperatureuse.Ifsingleviscosity
oilisused,selecttheappropriateviscosityonthe nextpagefortheaverage
temperatureinyourareafromthechartbelow.
Donotusenon-detergentoil or 2-strokeengineoil. It couldshortenthe
engine'sservicelife.
NOTE:A5w30syntheticoilmaybeusedtoimprovestartabilityforcoldweather
(temperaturesbelow40F).
Oil Fill
Cap/Dipstick-==_
Level
Figure15
NOTE:Donotoverfill.Overfillingwithoil maycausesmoking,hardstarting,
sparkplugfouling,oroilsaturationof aircleaner.
FuelRequirements
Operatingthe enginewith ESSfuel, anoil/gasolinemixture, dirty gasoline,
or gasoline over 30 days old without fuel stabilizingadditivemayresult
[indamagetoyourengine'-scarburetor.Subsequentdamagewouldnot be
coveredunderthe Craftsmanwarranty.
13
Useautomotivegasoline(unleadedorlowleadedtominimizecombustionchamber
deposits)witha minimumof87octane.Gasolinewith upto10%ethanolor15%
MTBE(MethylTertiaryButylEther)canbeused.Neveruseanoil/gasolinemixture
ordirtygasoline.Avoidgettingdirt,dust,orwaterinthefueltank.DONOTuseE85
gasoline.
AddingFuel
Anadult shouldfuel this engine.NEVERallow childrentorefuel itsengine.
Gasoline(fuel)vaporsarehighlyflammable andcanexplode.Fuelvapors
canspreadandbeignitedbyasparkor flamemanyfeetawayfrom engine.
Topreventinjuryor deathfrom fuel fires, follow theseinstructions:
Useextremecarewhen handling gasoline.Gasolineisextremelyflammable
andthevaporsare explosive.Neverfuel machineindoorsorwhile the
engineishot or running.Extinguishcigarettes,cigars,pipes,andother
sourcesofignition.
NOTE:Purchasegasolineinsmallquantities.Donotusegasolineleftoverfromthe
previousseason,to minimizegumdepositsinthefuelsystem.
Thisengineiscertifiedtooperateonunleadedgasoline.Forbestresults,fill
thefueltankwith onlyclean,fresh,unleadedgasolinewith apumpsticker 1.
octaneratingof 87orhigher.
Gasohol(upto10%ethylalcohol,90%unleadedgasolinebyvolume)isan
approvedfuel.Othergasoline/alcoholblends,suchasE85,arenotapproved.
MethylTertiaryButylEther(MTBE)andunleadedgasolineblends(uptoa
maximumof 15_ MTBEbyvolume)areapprovedfuels.Othergasoline/ether 3.
blendsarenotapproved.
Fillfueltankoutdoorsorinwell-ventilatedarea. f
Donotoverfillfueltank.Filltankto nomorethan1/2inchbelowbottomof
fillernecktoallowspaceforfuelexpansion.
Neverremovegascaporaddfuelwhiletheengineishotor running.Allow
engineto coolatleasttwo minutesbeforerefueling.
Ifgasolineisspilled,wipeit offtheengineandequipment.Movemachineto
anotherarea.Wait5minutesbeforestartingtheengine.
o
DONOTuseleadedfuel.
Fuelmustbefreshandclean.NEVERusefuelleftoverfromlastseasonor
storedforlongperiods.
NEVERmixoilwith fuel.
DONOTusefuelcontainingMethanol(WoodAlcohol)
NOTE:Beforerefueling,allowenginetocooltwominutes.
Turntheengineoffandlet enginecoolatleast2minutesbeforeremoving
thefuelcap.Thegasolinetankislocatedundertheseat.Thefuelcapis
tetheredtothetractortopreventitsloss.Donotattempttoremovethecap
fromthetractor.
2.
Cleanaroundfuelfill beforeremovingcaptofuel.
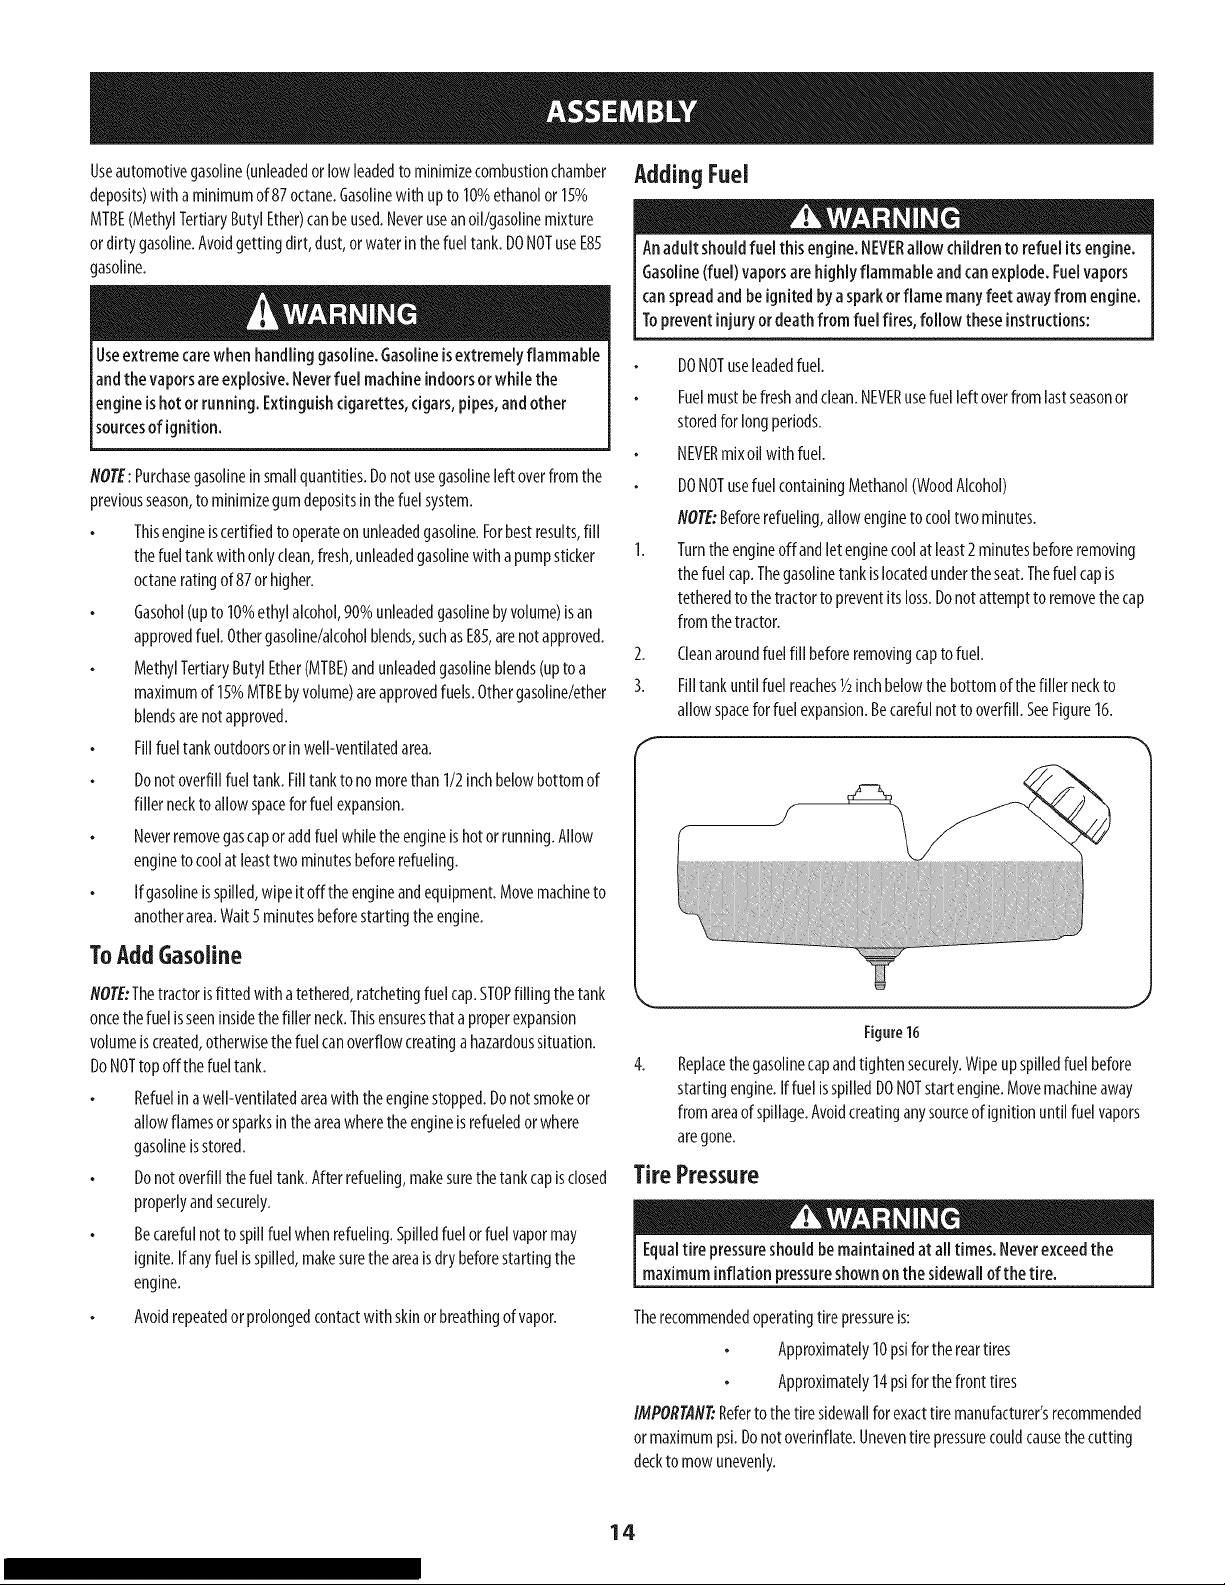
Filltankuntilfuelreaches1/2inchbelowthebottomof thefillerneckto
allowspaceforfuelexpansion.Becarefulnotto overfill.SeeFigure16.
ToAddGasoline
NOTE:Thetractorisfittedwith a tethered,ratchetingfuelcap.STOPfillingthetank
oncethefuelisseeninsidethefillerneck.Thisensuresthataproperexpansion
volumeiscreated,otherwisethefuelcanoverflowcreatinga hazardoussituation.
DoNOTtopoffthe fueltank.
Refuelin awell-ventilatedareawiththeenginestopped.Donotsmokeor
allowflamesorsparksintheareawheretheengineisrefueledorwhere
gasolineisstored.
Donotoverfillthefueltank.Afterrefueling,makesurethetankcapisclosed
properlyandsecurely.
Becarefulnotto spillfuelwhenrefueling.Spilledfuelorfuelvapormay
ignite.Ifanyfuelisspilled,makesuretheareaisdrybeforestartingthe
engine.
Avoidrepeatedorprolongedcontactwith skinorbreathingofvapor.
,. j
Figure16
4. Replacethegasolinecapandtightensecurely.Wipeupspilledfuelbefore
startingengine.IffuelisspilledDONOTstartengine.Movemachineaway
fromareaof spillage.Avoidcreatinganysourceof ignitionuntilfuelvapors
aregone.
TirePressure
Equaltire pressureshouldbemaintainedat alltimes. Neverexceedthe
maximuminflation pressureshownonthe sidewall of the tire.
Therecommendedoperatingtirepressureis:
Approximately10psiforthereartires
Approximately14psiforthefronttires
IMPORTANT:Refertothetiresidewallforexacttire manufacturer'srecommended
ormaximumpsi.Donotoverinflate.Uneventirepressurecouldcausethecutting
deckto mowunevenly.
14
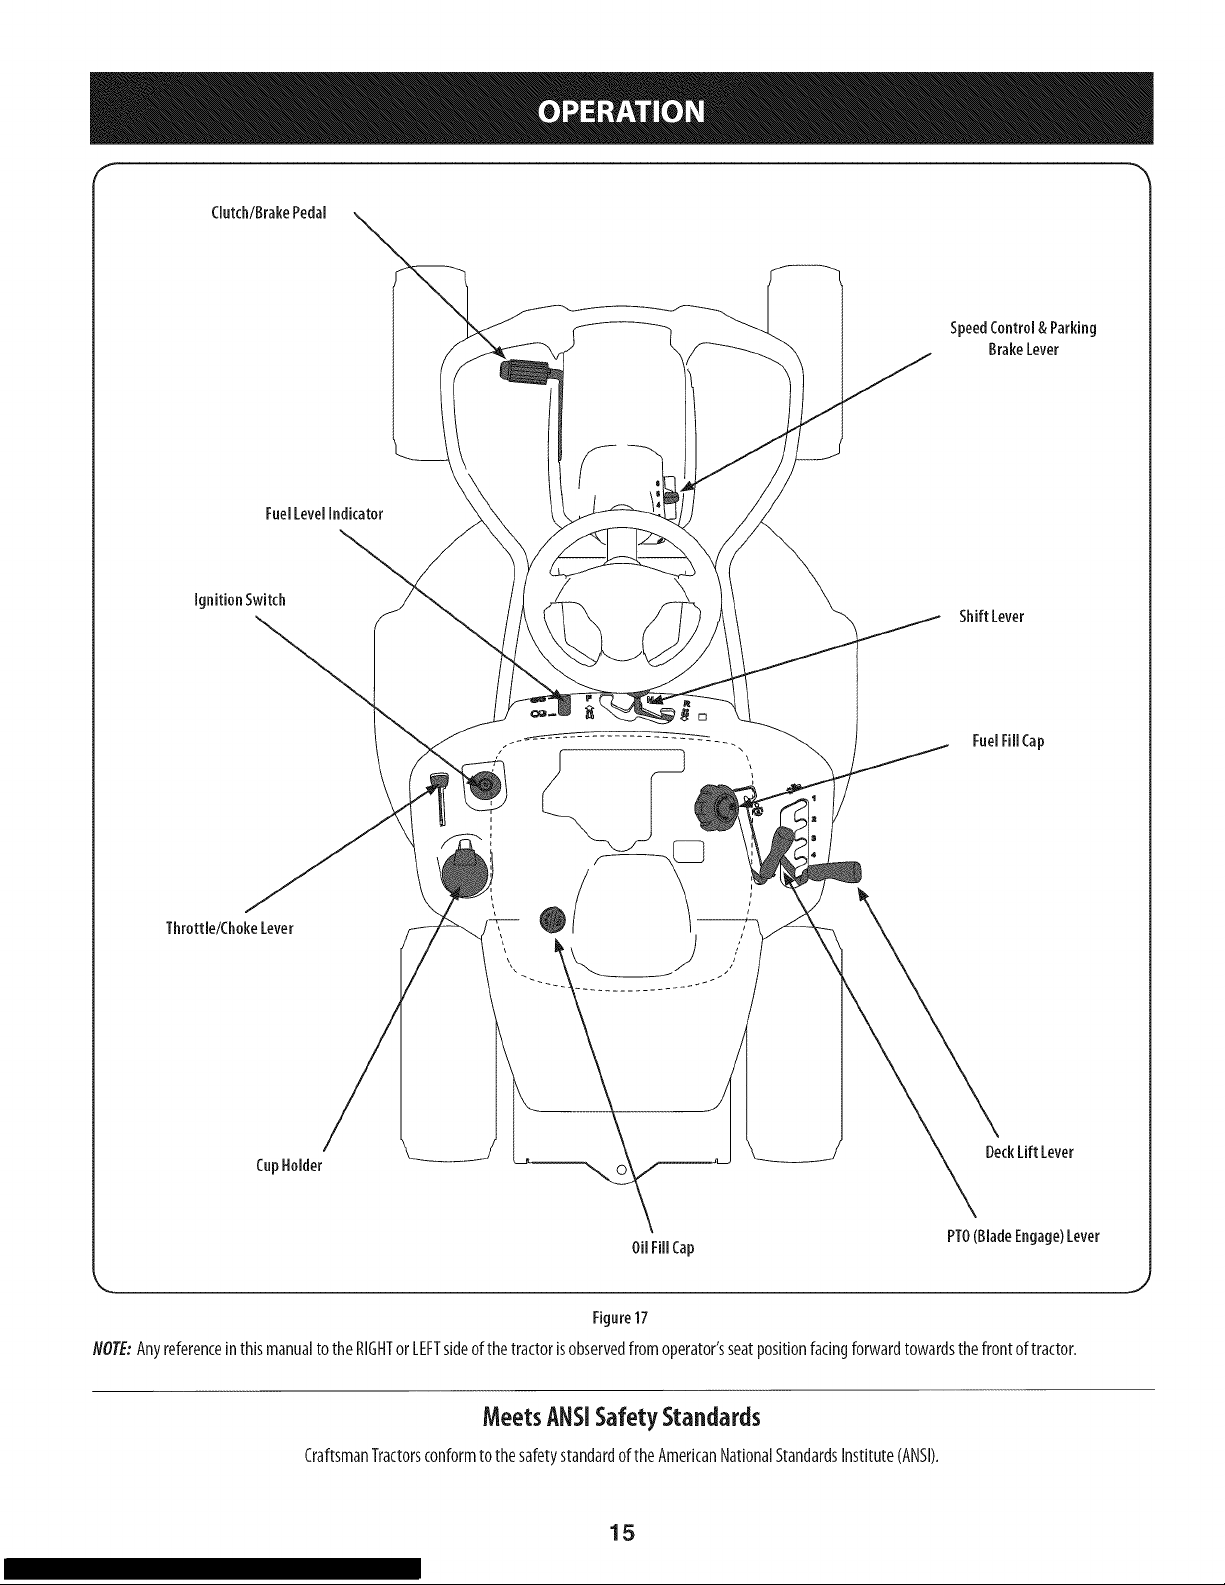
Clutch/BrakePedal
FuelLevelindicator
SpeedControl&Parking
BrakeLever
IgnitionSwitch
Throttle/ChokeLever
CupHolder
Shift Lever
FuelFillCap
DeckLift Lever
OilFillCap
Figure17
NOTE:Anyreferenceinthismanualto theRIGHTorLEFTsideofthetractorisobservedfromoperator'sseatpositionfacingforwardtowardsthefrontoftractor.
PTO(BladeEngage)Lever
MeetsANSiSafetyStandards
CraftsmanTractorsconformtothesafetystandardoftheAmericanNationalStandardsInstitute(ANSI).
15
Throttle/ ChokeControl
ShiftLever
Thethrottlecontrolleverislocatedontheleftfenderofthetractorasseenfromthe
operator'sposition,seeFigure17.Thislevercontrolsthespeedoftheengine,aswell
asthechokewhenit ispushedallthewayforward.Whensetinagivenposition,
thethrottlewill maintainauniformenginespeed.
IMPORTAfl#Whenoperatingthetractorwiththecuttingdeckengaged,becertain
thatthethrottle leverisalwaysintheFAST(rabbit)position.
Movingthethrottleleverallthewayforwardactivatestheengine'schokecontrol.
Activatingthechokecontrolclosesthechokeplateonthecarburetorandaidsin
startingtheengine.
RefertoStartingTheEnginein theOperationsectionofthis manualfordetailed
startinginstructions.
ignitionSwitch
Theignitionswitchislocatedontheleftfenderofthetractorasseenfromthe
operator'sposition,adjacentto theThrottle/ChokeControl.Activatethe Ignition
Switchtostarttheenginebyinsertingthekeyintothe ignitionswitchandturn
clockwisetotheSTARTposition.ReleasethekeyintotheONpositiononceengine
hasfired.SeeFigure18.
On
Start
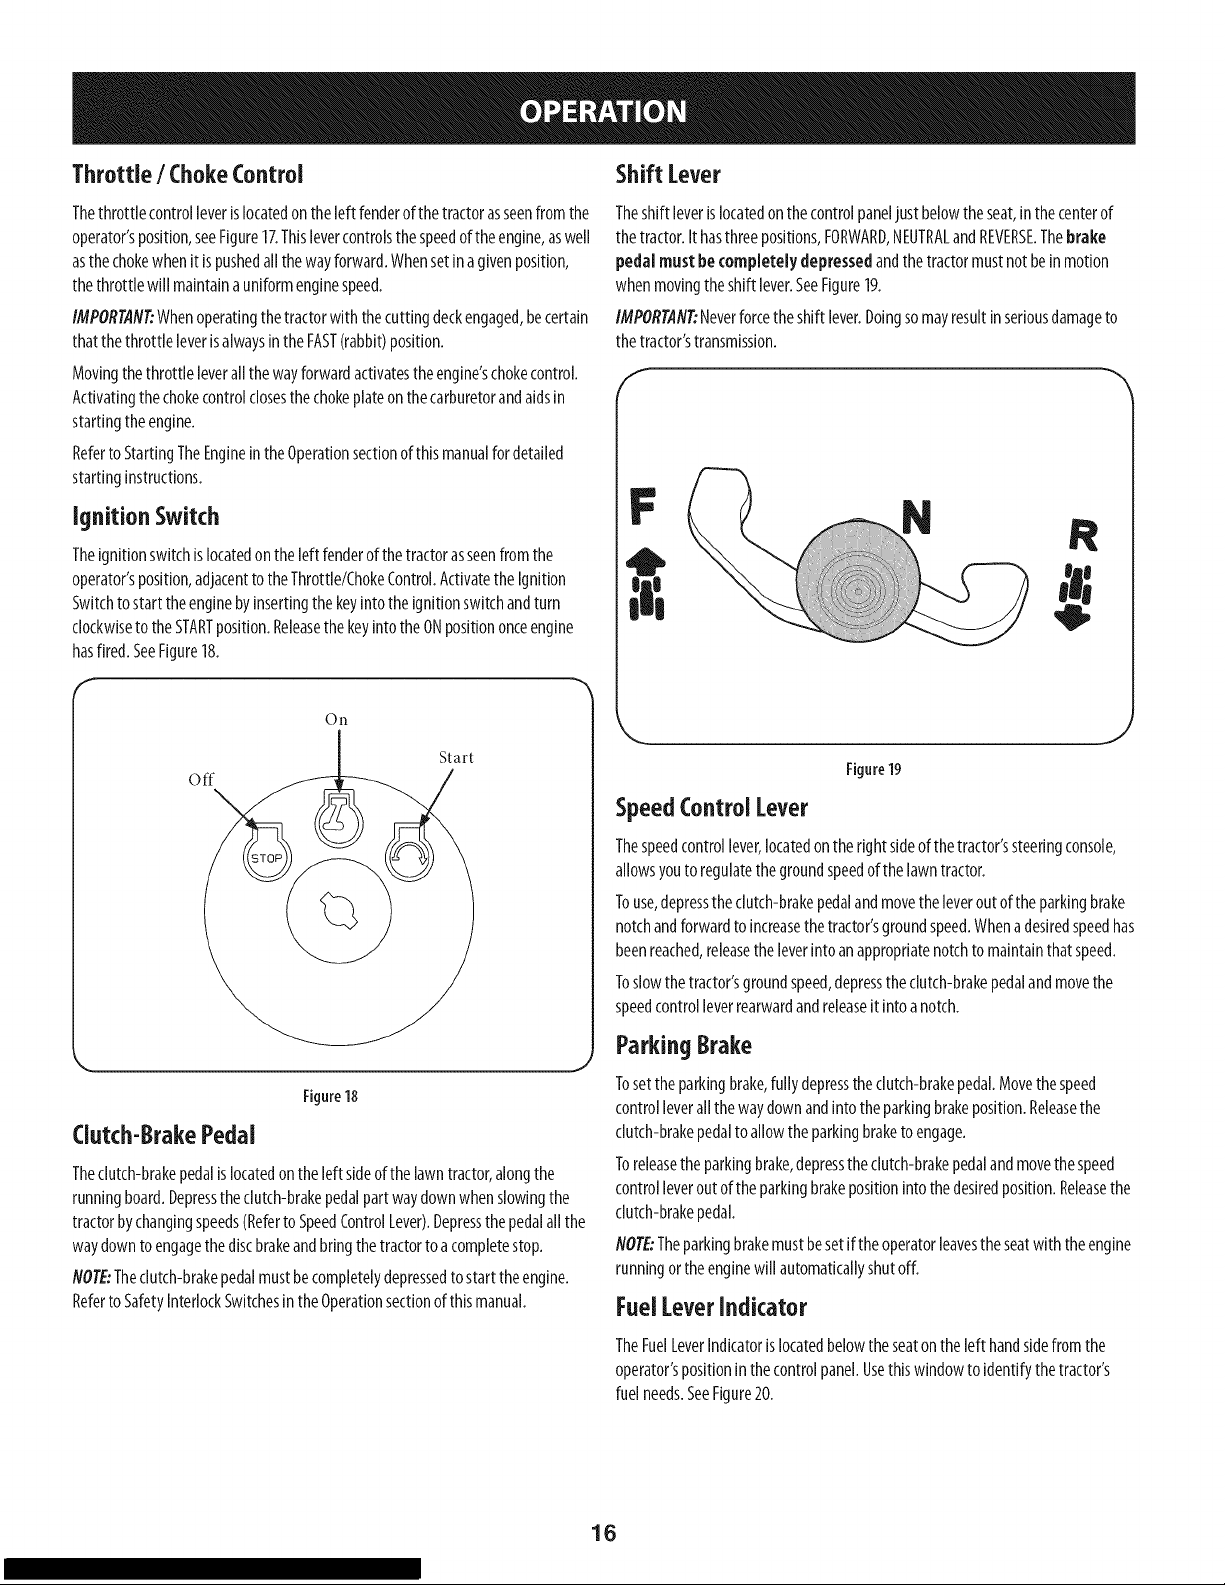
off
Theshiftleverislocatedonthecontrolpaneljustbelowtheseat,inthecenterof
thetractor.Ithasthreepositions,FORWARD,NEUTRALandREVERSE.Thebrake
pedalmustbe completely depressedandthetractormustnotbeinmotion
whenmovingtheshift lever.SeeFigure19.
IMPORTANT:Neverforcetheshift lever.Doingsomayresultin seriousdamageto
thetractor'stransmission.
f
Figure19
SpeedControl Lever
Figure18
Clutch-BrakePedal
Thedutch-brakepedalislocatedonthe leftsideofthe lawntractor,alongthe
runningboard.Depressthedutch-brakepedalpartwaydownwhenslowingthe
tractorbychangingspeeds(Referto SpeedControlLever).Depressthepedalallthe
wayclownto engagethediscbrakeandbringthetractorto acompletestop.
NOTE:Thedutch-brakepedalmustbecompletelydepressedto starttheengine.
RefertoSafetyInterlockSwitchesintheOperationsectionofthismanual.
Thespeedcontrollever,locatedontherightsideofthetractor'ssteeringconsole,
allowsyoutoregulatethegroundspeedofthelawntractor.
Touse,depressthedutch-brakepedalandmovetheleveroutoftheparkingbrake
notchandforwardtoincreasethetractor'sgroundspeed.Whenadesiredspeedhas
beenreached,releasetheleverintoanappropriatenotchtomaintainthat speed.
Toslowthetractor'sgroundspeed,depressthedutch-brakepedalandmovethe
speedcontrolleverrearwardandreleaseit intoa notch.
ParkingBrake
Tosettheparkingbrake,fullydepresstheclutch-brakepedal.Movethespeed
controlleverallthewaydownandintotheparkingbrakeposition.Releasethe
clutch-brakepedaltoallowtheparkingbraketoengage.
Toreleasetheparkingbrake,depresstheclutch-brakepedalandmovethespeed
controlleveroutoftheparkingbrakepositionintothedesiredposition.Releasethe
clutch-brakepedal.
NOTE:Theparkingbrakemustbesetiftheoperatorleavestheseatwith theengine
runningortheenginewill automaticallyshutoff.
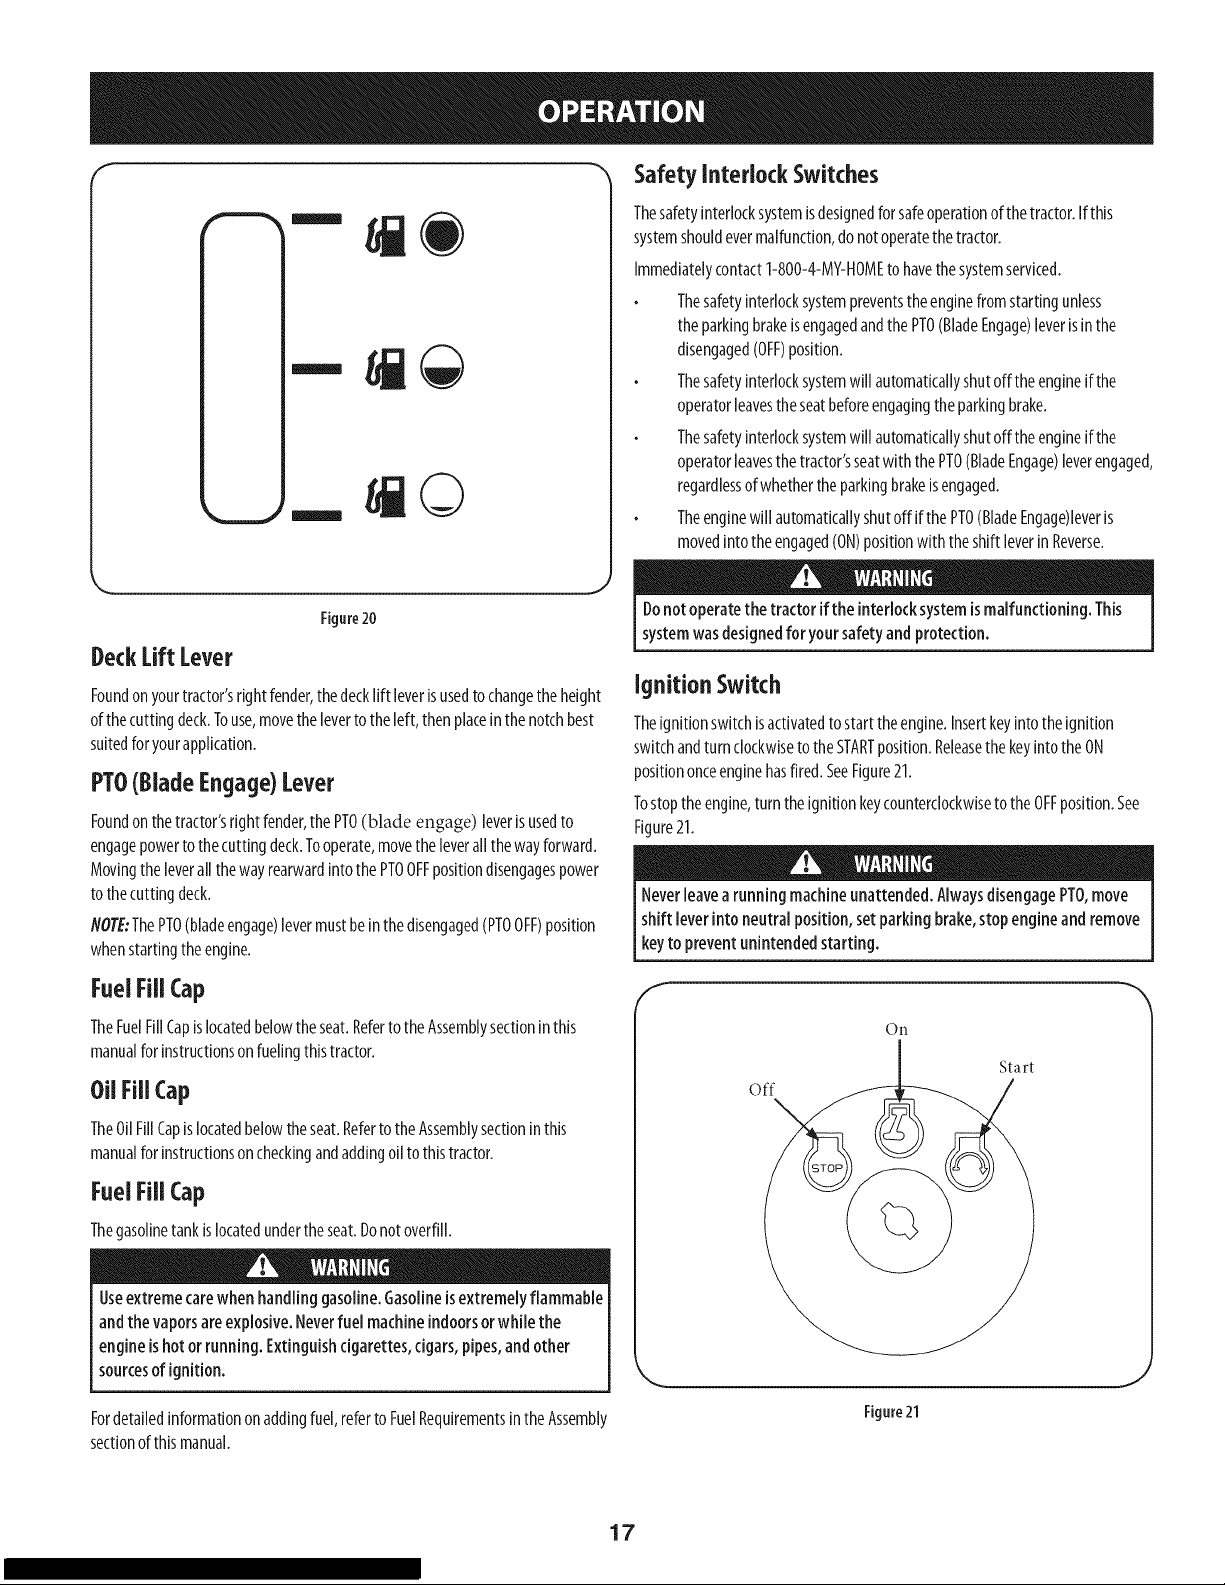
FuelLeverIndicator
TheFuelLeverIndicatorislocatedbelowtheseatontheleft handsidefromthe
operator'spositioninthecontrolpanel.Usethiswindowtoidentifythetractor's
fuelneeds.SeeFigure20.
16
©
Safety Interlock Switches
Thesafetyinterlocksystemisdesignedfor safeoperationofthetractor.Ifthis
systemshouldevermalfunction,do notoperatethetractor.
Immediatelycontact1-800-4-MY-HOMEto havethesystemserviced.
Thesafetyinterlocksystempreventstheenginefromstartingunless
theparkingbrakeisengagedandthePTO(BladeEngage)leverisinthe
disengaged(OFF)position.
Thesafetyinterlocksystemwill automaticallyshutofftheengineifthe
operatorleavestheseatbeforeengagingtheparkingbrake.
Thesafetyinterlocksystemwill automaticallyshutofftheengineifthe
operatorleavesthetractor'sseatwiththe PTO(BladeEngage)leverengaged,
regardlessofwhethertheparkingbrakeisengaged.
Theenginewill automaticallyshutoff ifthe PTO(BladeEngage)leveris
movedintotheengaged(ON)positionwiththeshiftleverin Reverse.
Figure20
DeckLiftLever
Foundonyourtractor'srightfender,thedecklift leverisusedto changetheheight
ofthecuttingdeck.Touse,movethelevertotheleft,then placeinthenotchbest
suitedfor yourapplication.
PTO(BladeEngage)Lever
Foundonthetractor'srightfender,the PTO(blade engage) leveris usedto
engagepowertothecuttingdeck.Tooperate,movetheleverallthewayforward.
Movingtheleverallthewayrearwardintothe PTOOFFpositiondisengagespower
tothecuttingdeck.
NOTE:ThePTO(bladeengage)levermustbeinthedisengaged(PTOOFF)position
whenstartingtheengine.
FuelFillCap
TheFuelFillCapislocatedbelowtheseat.RefertotheAssemblysectioninthis
manualforinstructionsonfuelingthistractor.
OilFill Cap
TheOilFillCapislocatedbelowtheseat.RefertotheAssemblysectioninthis
manualforinstructionsoncheckingandaddingoiltothistractor.
Donotoperatethetractor if the interlocksystemismalfunctioning. This
systemwasdesignedfor your safetyandprotection.
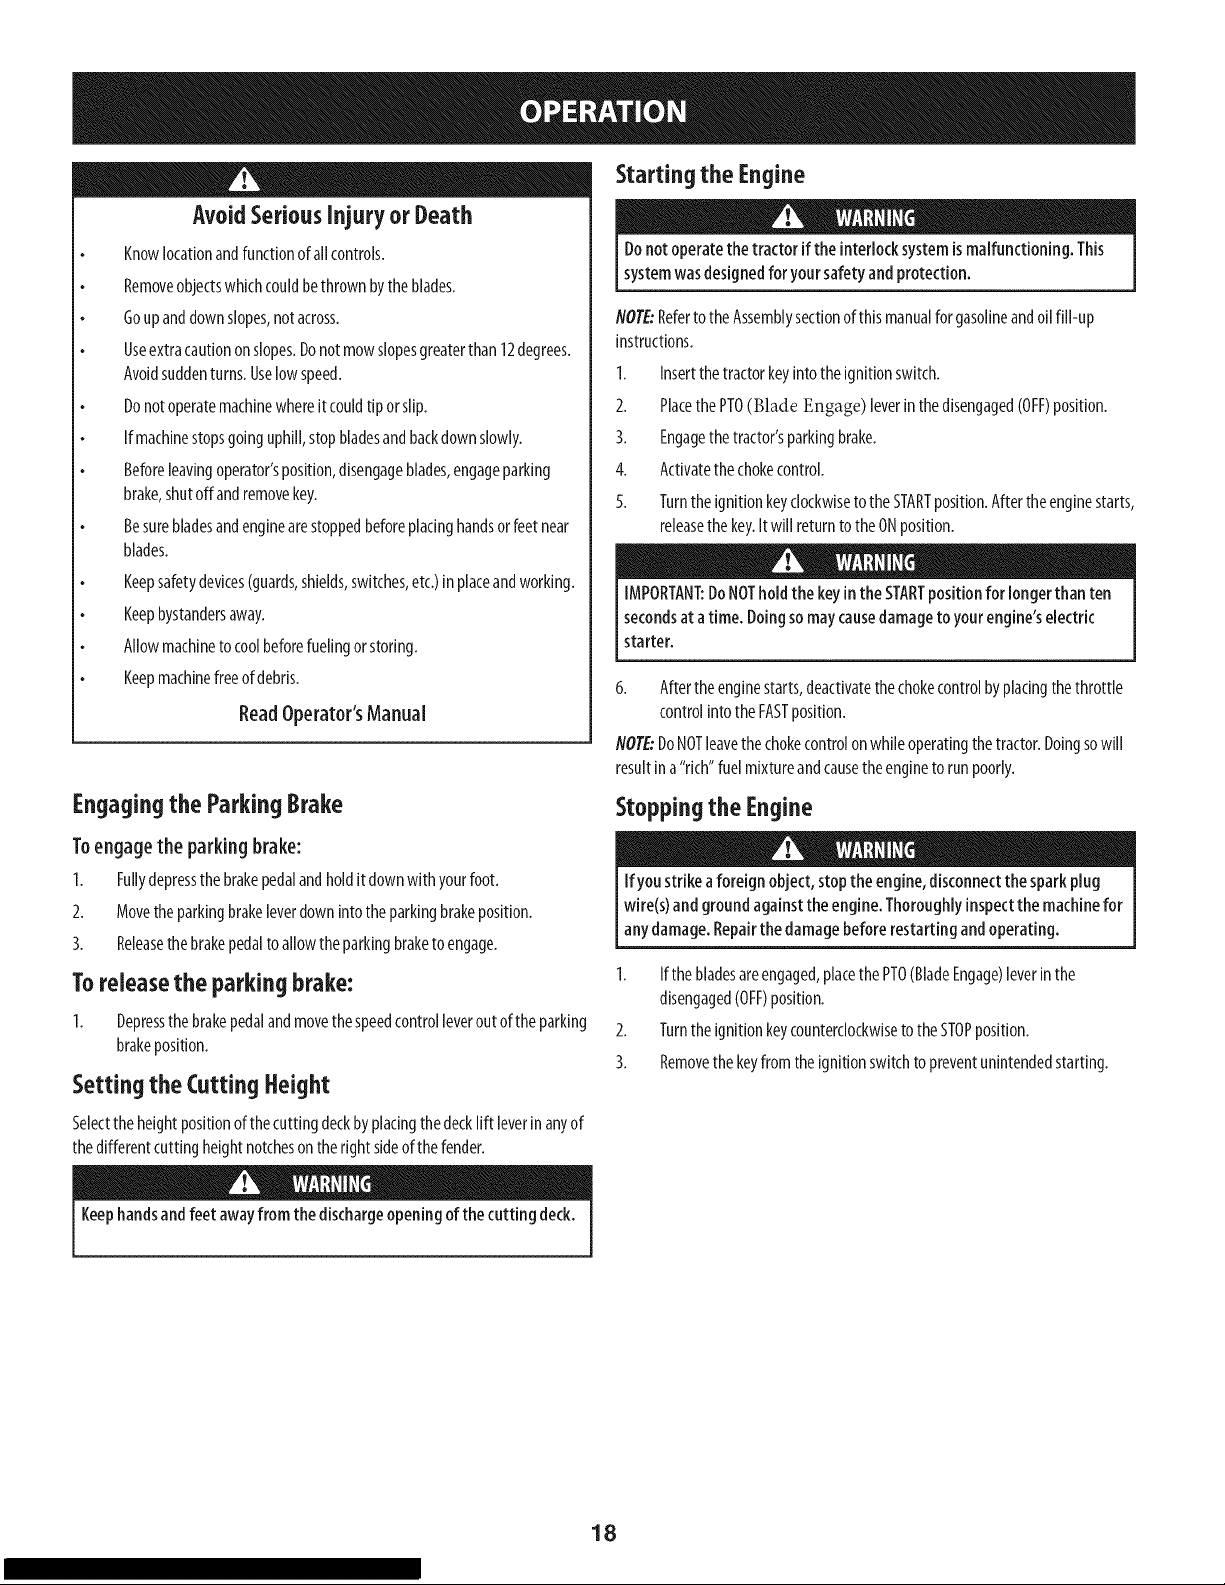
IgnitionSwitch
Theignitionswitchisactivatedtostart theengine.Insertkeyintotheignition
switchandturnclockwisetotheSTARTposition.ReleasethekeyintotheON
positiononceenginehasfired.SeeFigure21.
Tostoptheengine,turntheignitionkeycounterclockwiseto theOFFposition.See
Figure21.
Neverleavearunningmachineunattended.AlwaysdisengagePTO,move
shift leverinto neutralposition,setparking brake,stopengineandremove
keyto prevent unintendedstarting.
On
Start
off
FuelFill Cap
Thegasolinetankislocatedundertheseat.Donotoverfill.
Useextremecarewhen handlinggasoline.Gasolineisextremelyflammable
andthe vaporsareexplosive.Neverfuel machineindoorsorwhile the
engineishotorrunning. Extinguishcigarettes,cigars,pipes,andother
sourcesof ignition.
Fordetailedinformationonaddingfuel,referto FuelRequirementsintheAssembly
sectionofthis manual.
Figure21
17
AvoidSeriousinjuryor Death
Knowlocationandfunctionofallcontrols.
Removeobjectswhichcouldbethrownbytheblades.
Goupanddownslopes,notacross.
Useextracautiononslopes.Donotmowslopesgreaterthan12degrees.
Avoidsuddenturns.Uselowspeed.
Donotoperatemachinewhereitcouldtip orslip.
Ifmachinestopsgoinguphill,stopbladesandbackdownslowly.
Beforeleavingoperator'sposition,disengageblades,engageparking
brake,shutoff andremovekey.
Besurebladesandenginearestoppedbeforeplacinghandsorfeetnear
blades.
Keepsafetydevices(guards,shields,switches,etc.)inplaceandworking.
Keepbystandersaway.
Allowmachinetocoolbeforefuelingorstoring.
Keepmachinefreeofdebris.
ReadOperator'sManual
Starting the Engine
Donotoperatethetractor if the interlocksystemismalfunctioning. This
systemwasdesignedforyour safetyandprotection.
NOTE:RefertotheAssemblysectionofthismanualforgasolineandoilfill-up
instructions.
1. Insertthetractorkeyintotheignitionswitch.
2. PlacethePTO(Blade Engage) leverin thedisengaged(OFF)position.
3. Engagethetractor'sparkingbrake.
4. Activatethechokecontrol.
5. Turntheignitionkeyclockwiseto theSTARTposition.Aftertheenginestarts,
releasethekey.Itwill returntotheONposition.
IMPORTANT:DoNOTholdthe keyintheSTARTpositionfor longerthan ten
secondsat atime. Doingsomaycausedamagetoyourengine'selectric
starter.
6. Aftertheenginestarts,deactivatethechokecontrolbyplacingthethrottle
controlintotheFASTposition.
NOTE:DoNOTleavethechokecontrolonwhileoperatingthetractor.Doingsowill
resultina"rich"fuelmixtureandcausetheenginetorunpoorly.
Engagingthe ParkingBrake
Toengagethe parking brake:
I. Fullydepressthe brakepedalandholdit downwith yourfoot.
2. Movetheparkingbrakeleverdownintotheparkingbrakeposition.
3. Releasethebrakepedalto allowtheparkingbraketo engage.
Toreleasethe parking brake:
1. Depressthebrakepedalandmovethespeedcontrolleveroutof theparking
brakeposition.
Setting the Cuttingfreight
Selecttheheightpositionofthecuttingdeckbyplacingthedecklift leverinanyof
thedifferentcuttingheightnotchesontherightsideofthefender.
Keephandsandfeet awayfrom the dischargeopeningof thecutting deck.
Stopping the Engine
Ifyoustrikeaforeign object,stoptheengine,disconnectthesparkplug
wire(s)andgroundagainsttheengine.Thoroughlyinspectthemachinefor
anydamage.Repairthedamagebeforerestarting andoperating.
1. Ifthebladesareengaged,placethePTO(BladeEngage)leverin the
disengaged(OFF)position.
2. Turntheignitionkeycounterclockwiseto theSTOPposition.
3. Removethekeyfromtheignitionswitchtopreventunintendedstarting.
18
Driving TheTractor
Avoidsuddenstarts,excessivespeedandsuddenstops.
Donotleavethe seatofthe tractorwithout first placingthe PTO(Blade
Engage)leverinthe disengaged(OFF)position,depressingthe brakepedal
andengagingtheparkingbrake.Ifleavingthetractor unattended,also
turn the ignitionkeyoff andremovethe key.
Alwayslookdownandbehindbeforeandwhile backingupto avoidaback-
overaccident.
1. Depressthebrakepedalandmovethespeedcontrolleveroutof theparking
brakeposition,thenletthepedalrelease.
2. Movethethrottle leverintothe FAST(rabbit)position.
3. PlacetheshiftleverineithertheFORWARDorREVERSEposition.
IMPORTA#_DoNOTusetheshiftlevertochangethedirectionoftravelwhenthe
tractorisinmotion.Alwaysusethebrakepedaltobringthetractortoacomplete
stopbeforeshifting.
4. Releasetheparkingbrakebydepressingtheclutch-brakepedaland
positioningthespeedcontrolleverindesiredposition.
IMPOR@N_First-timeoperatorsshouldusespeedpositions1or2.Become
completelyfamiliarwith thetractor'soperationandcontrolsbeforeoperatingthe
tractorinhigherspeedpositions.
5. Releaseclutch-brakepedalslowlyto putunitintomotion.
6. Thelawntractorisbroughttoastopbydepressingtheclutch-brakepedal.
NOTE:Whenoperatingthe unitinitially,therewill belittle differencebetweenthe
highesttwospeedsuntilafterthebeltshaveseatedthemselvesintothepulleys
duringthebreak-inperiod.
5. Depressclutch-brakepedal.
6. Placespeedcontrolleverindesiredposition.
7. PlaceshiftleverineitherFORWARDorREVERSE,andfollownormaloperating
procedures.
Driving OnSlopes
Referto theSLOPEGAUGEin theSafetyInstructionssectionofthemanualtohelp
determineslopeswhereyoumayoperatethistractorsafely.
Donotmowoninclineswith aslopeinexcessof 12degrees(ariseof
approximately2feetevery10feet). Thetractor couldoverturnandcause
seriousinjury.
Mowupanddownslopes,NEVERacross.
Exerciseextremecautionwhenchangingdirectiononslopes.
Watchforholes,ruts,bumps,rocks,orotherhiddenobjects.Uneventerrain
couldoverturnthemachine.Tallgrasscanhideobstacles.
Avoidturnswhendrivingonaslope.Ifaturn mustbemade,turndownthe
slope.Turningupaslopegreatlyincreasesthechanceof arollover.
Avoidstoppingwhendrivingupa slope.Ifit isnecessarytostopwhile
drivingupa slope,start upsmoothlyandcarefullyto reducethepossibility
offlippingthetractoroverbackward.
Beforeleavingtheoperator'spositionforanyreason,disengagetheblades,place
theshiftleverinneutral,engagetheparkingbrake,shutengineoffand remove
thekey.
IMPORTAN_Whenstoppingthetractorforanyreasonwhileonagrasssurface,
always:
1. Placetheshiftleverinneutral,
2. Engagetheparkingbrake,
3. Shutengineoffandremovethekey.Doingsowill minimizethe possibility
ofhavingyourlawn"browned"byhotexhaustfromyourtractor'srunning
engine.
Ifunitstallswith speedcontrolinhighspeed,or ifunitwill notoperatewith speed
controlleverinalowspeedposition,proceedasfollows:
1. PlaceshiftleverinNEUTRAL.
2. Restartengine.
3. Placespeedcontrolleverinhighestspeedposition.
4. Releaseclutch-brakepedalfully.
19
Engagingthe Blades
Engagingthe PTO(BladeEngage)transferspowertothecuttingdeck.Toengage
theblades,proceedasfollows:
1. Movethethrottle/chokecontrollevertotheFAST(rabbit)position.
2. GraspthePTO(BladeEngage)leverandpivotit allthewayforwardintothe
engaged(ON)position.
3. Keepthethrottleleverinthe FAST(rabbit)positionfor themostefficientuse
ofthecuttingdeck.
NOTE:Theenginewill automaticallyshutoff ifthe PTO(BladeEngage)leveris
movedintotheengaged(ON)positionwith theshiftleverinReverse.
Mulching
Amulchkitisavailableasanattachment.Mulchingisaprocessofredrculating
grassclippingsrepeatedlybeneaththecuttingdeck.Theultra-fineclippingsare
thenforcedbackintothe lawnwheretheyactasanaturalfertilizer.Contactthe
nearestParts& RepairServiceCenterto purchaseamulchkit forthisunit.
TolocatethenearestParts& RepairServiceCenter,contact1-800-4-MY-HOME®.
Using the Deck Lift Lever
Toraisethecuttingdeck,movethedecklift leverto the left,then placeit inthe
notchbestsuitedfor yourapplication.Referto SettingTheCuttingHeightearlierin
thissection.
Mowing
Tohelpavoid bladecontactor athrown object injury,keepbystanders,
helpers,childrenandpetsat least75feet from the machinewhile it isin
operation.Stopmachineif anyoneentersthearea.
Thefollowinginformationwill behelpfulwhenusingthecuttingdeckwithyour
tractor:
Planyour mowing pattern to avoiddischargeof materialstowardroads,
sidewalks,bystandersandthe like.Also,avoiddischargingmaterialagainst
awall or obstructionwhichmaycausedischargedmaterialto ricochetback
towardthe operator.
Donotmowat highgroundspeed,especiallyifa mulchkitorgrasscollector
isinstalled.
Forbestresultsit isrecommendedthatthefirsttwo lapsbecutwiththe
dischargethrowntowardsthecenter.Afterthefirst two laps,reversethe
directiontothrowthedischargetotheoutsideforthebalanceofcutting.
Thiswill giveabetterappearancetothelawn.
Donotcutthegrasstooshort.Shortgrassinvitesweedgrowthandyellows
quicklyindryweather.
Mowingshouldalwaysbedonewiththeengineatfullthrottle.
Underheavierconditionsit maybenecessaryto gobackoverthecutareaa
secondtimeto getacleancut.
DoNOTattemptto mowheavybrushandweedsandextremelytall grass.
Yourtractorisdesignedtomowlawns,NOTclearbrush.
Keepthebladesharpandreplacethebladewhenworn.Referto Cutting
Bladein theMaintenancesectionof thismanualforproperbladesharpening
instructions.
Thelampsturn OFFwhentheignitionkeyismovedtotheSTOPposition.
2O
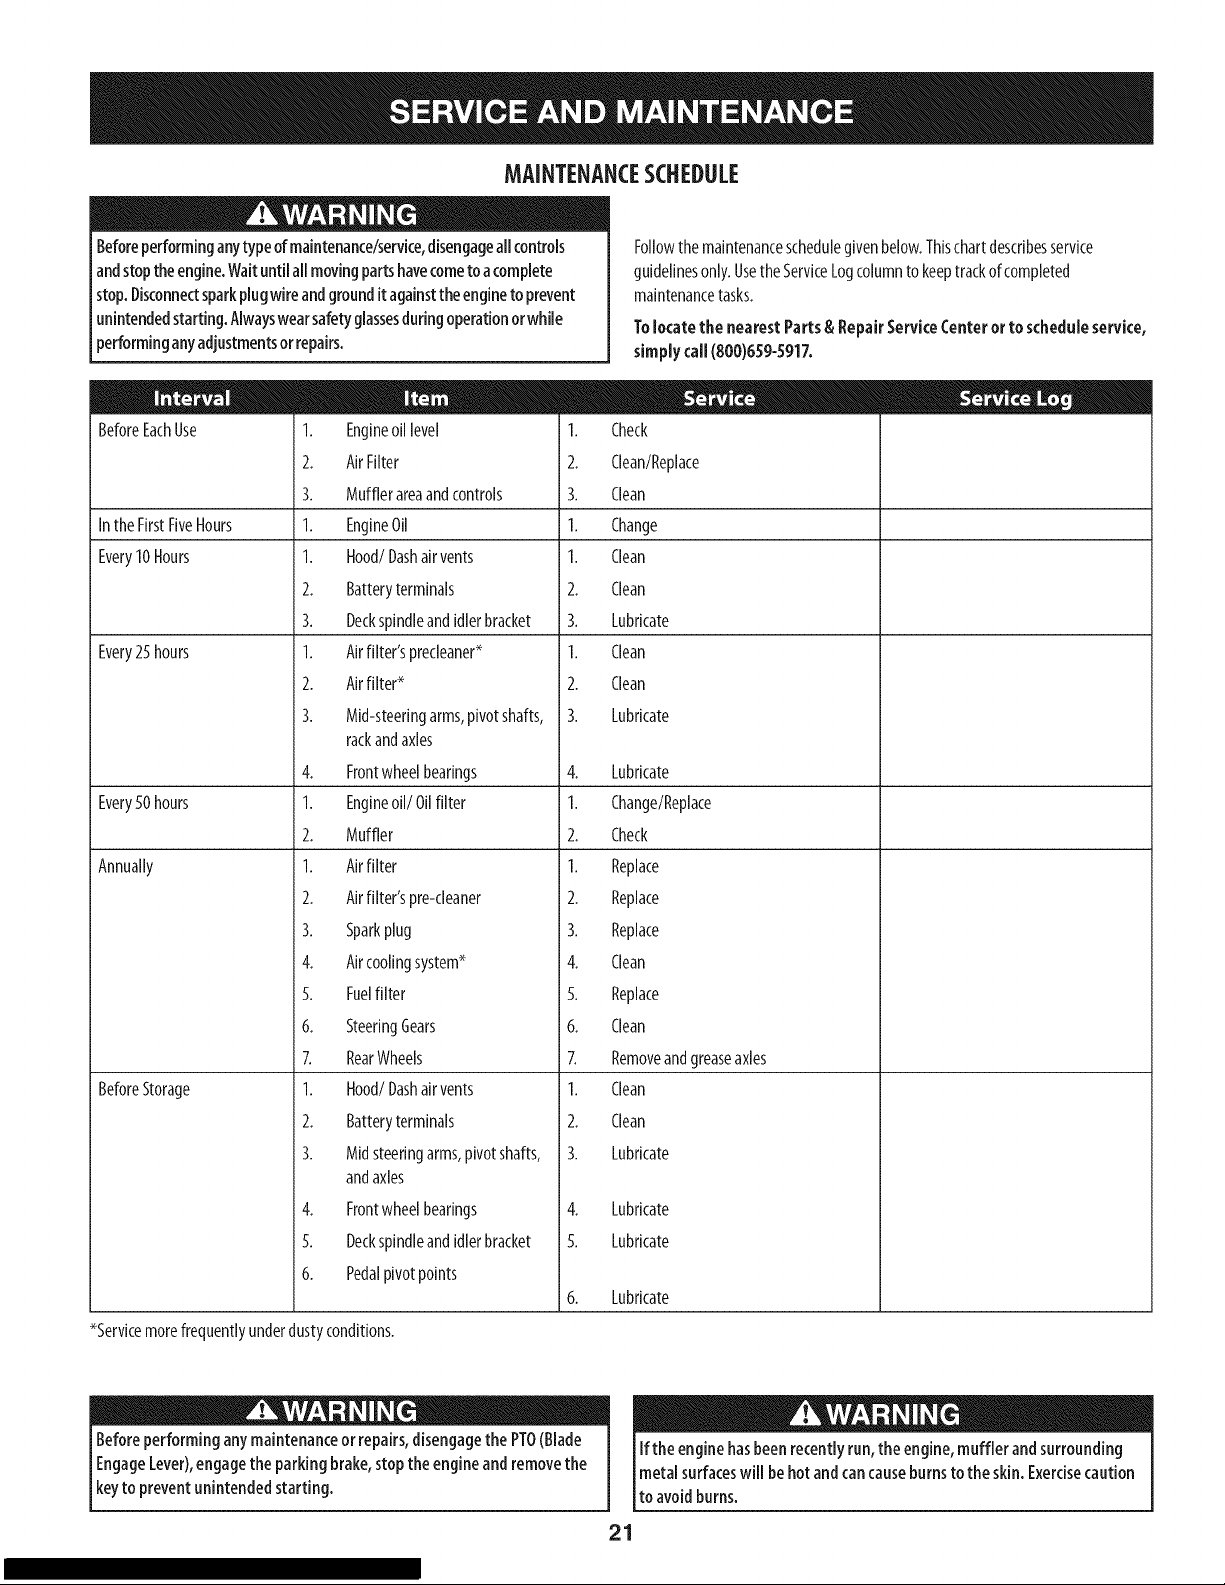
MAINTENANCESCHEDULE
Beforeperforminganytypeofmaintenance/service,disengageall controls
andstoptheengine.Waituntilallmovingpartshavecometo acomplete
stop.Disconnectsparkplugwireandgrounditagainsttheengineto prevent
unintendedstarting.AlwayswearsafetyglassesduringoperationorwhUe
performinganyadjustmentsor repairs.
BeforeEachUse
Inthe FirstFiveHours
Every10Hours
Every25hours
Every50hours
Annually
BeforeStorage
1. Engineoil level
2. AirFilter
3. Mufflerareaandcontrols
1. EngineOil
1. Hood/Dashairvents
2. Batteryterminals
3. Deckspindleandidlerbracket
1. Airfilter'sprecleaner*
2. Airfilter*
3. Mid-steeringarms,pivotshafts,
rackandaxles
4. Frontwheelbearings
1. Engineoil/Oil filter
2. Muffler
1. Airfilter
2. Airfilter'spre-cleaner
3. Sparkplug
4. Aircoolingsystem*
5. Fuelfilter
6. SteeringGears
Z RearWheels
1. Hood/Dashairvents
2. Batteryterminals
3. Midsteeringarms,pivotshafts,
andaxles
4. Frontwheelbearings
5. Deckspindleandidlerbracket
6. Pedalpivotpoints
Followthe maintenanceschedulegivenbelow.Thischartdescribesservice
guidelinesonly.UsetheServiceLogcolumnto keeptrackofcompleted
maintenancetasks.
Tolocate the nearestParts& RepairServiceCenteror toscheduleservice,
simply call(800)659-5917.
1. Check
2. Clean/Replace
3. Clean
1. Change
1. Clean
2. Clean
3. Lubricate
1. Clean
2. Clean
3. Lubricate
4. Lubricate
1. Change/Replace
2. Check
1. Replace
2. Replace
3. Replace
4. Clean
5. Replace
6. Clean
7. Removeandgreaseaxles
1. Clean
2. Clean
3. Lubricate
4. Lubricate
5. Lubricate
6. Lubricate
*Servicemorefrequentlyunderdustyconditions.
Beforeperforminganymaintenanceorrepairs,disengagethe PTO(Blade
EngageLever),engagethe parking brake,stopthe engineandremovethe
keyto preventunintendedstarting.
Ifthe enginehasbeenrecentlyrun,the engine,muffler andsurrounding
metalsurfaceswill behot andcancauseburnsto the skin. Exercisecaution
to avoidburns.
21
Engine Maintenance
Shutoff the enginebeforeperforminganymaintenance.Toprevent
accidentalstart-up,disconnectthesparkplug boot.
IMPORTAIV#If enginemustbetippedtotransportequipmentor toinspector
removegrass,keepsparkplugsideofengineup.Transportingortippingengine
sparkplugdownmaycausesmoking,hardstarting,sparkplugfouling,oroil
saturationofaircleaner.
Periodicinspectionandadjustmentoftheengineisessentialifhighlevel
performanceistobemaintained.Regularmaintenancewill alsoensurealong
servicelife.Therequiredserviceintervalsandthekindof maintenancetobe
performedaredescribedinthetableonthepreviouspage.Followthehourlyor
calendarintervals,whicheveroccurfirst.Morefrequentserviceisrequiredwhen
operatinginadverseconditions.
Ifthe enginehasbeenrunning,themuffler will bevery hot. Becarefulnot
totouch the muffler.
Servicingthe EngineOil
Checkthe oillevelregularly.
Besurecorrectoillevelismaintained.Checktheoiieveryfive to tenhoursof
operation,beforestartingtheengine.SeeCheckingOilLevelintheAssembly
section.
OnlyusehighqualitydetergentoilratedwithAPIserviceclassificationSIC,SG,
SH,or SJ.Selecttheoil'sSAEviscositygradeaccordingto theexpectedoperating
temperature.Referto Gas&Oilin theAssemblysectionofthismanual.
Oil Drain
IMPORTIIfl#Besureto checkengineonalevelsurfacewith theenginestopped.
Draintheoilwhiletheengineisstillwarmtoassurerapidandcompletedraining.
Fordrainingoiifromtheengine'scrankcaseofselectmodeltractors,aplasticoil
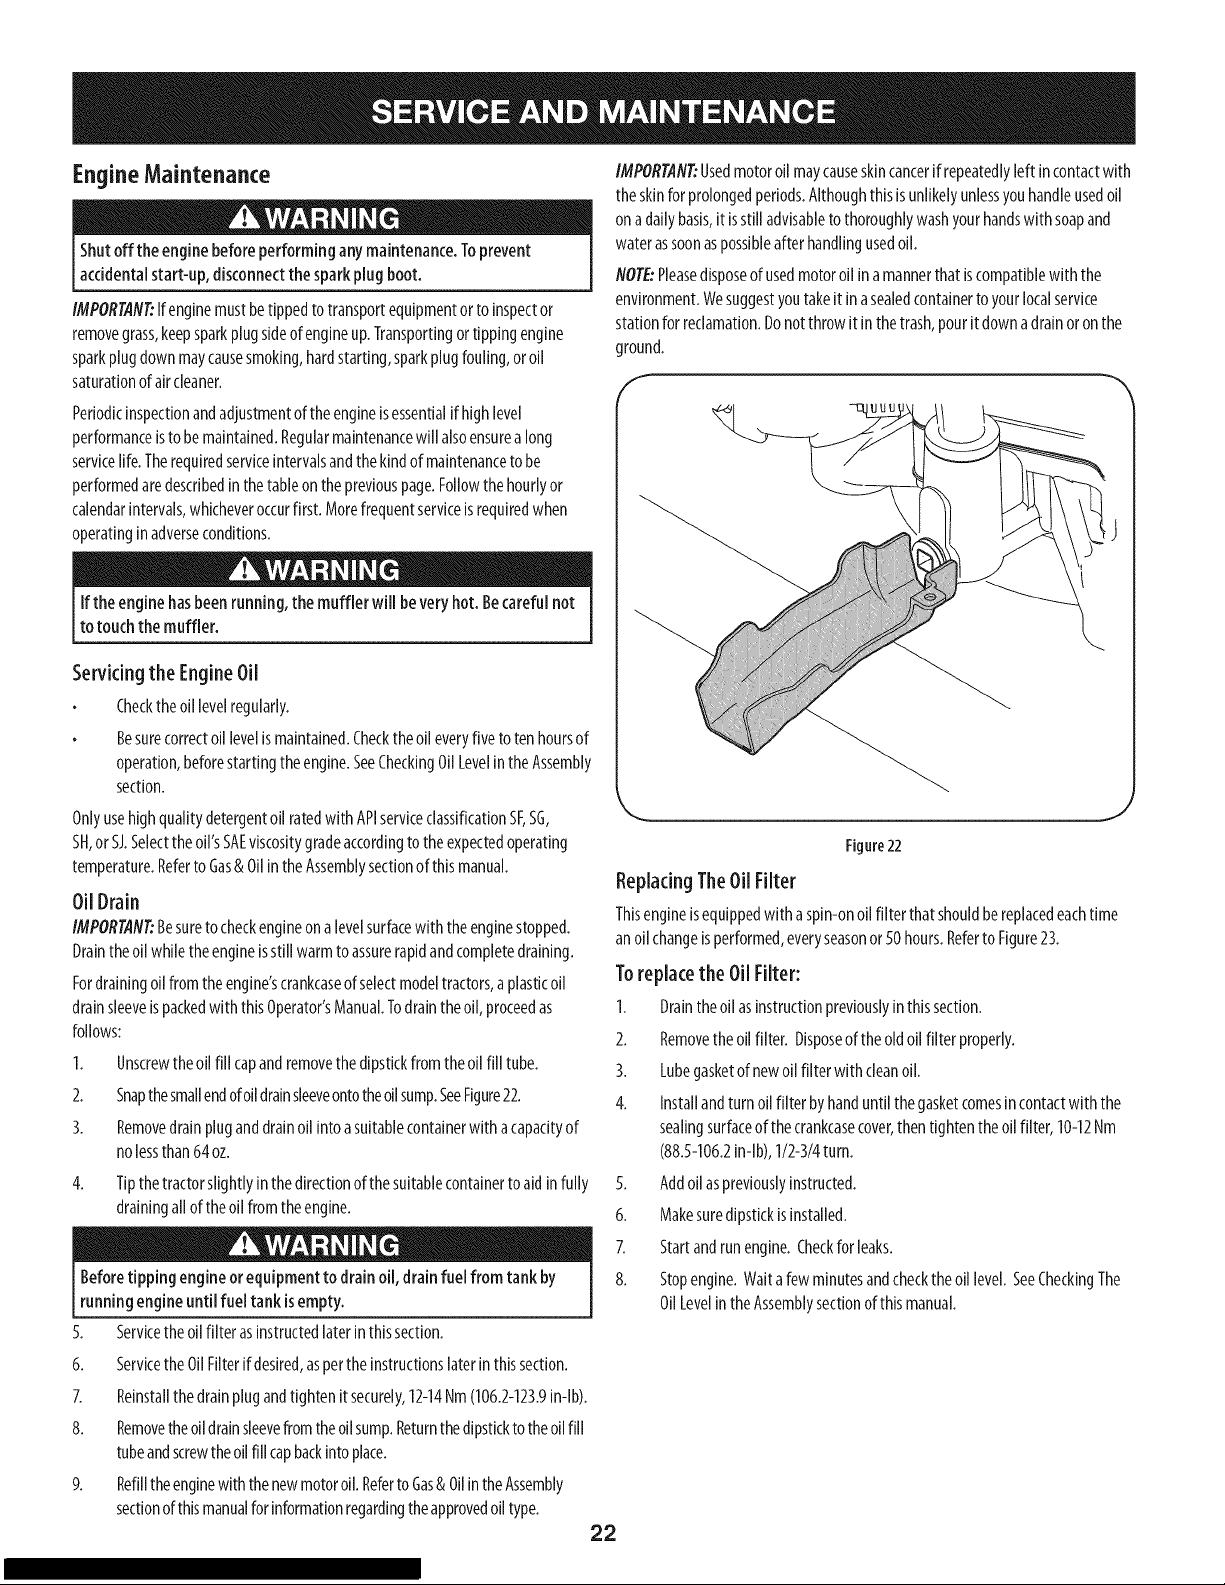
drainsleeveispackedwith thisOperator'sManual.Todraintheoil, proceedas
follows:
1. Unscrewtheoilfill capandremovethedipstickfromtheoil fill tube.
2. Snapthesmallendofoildrainsleeveontotheoilsump.SeeFigure22.
3. Removedrainpluganddrainoilintoasuitablecontainerwith acapacityof
nolessthan64oz.
4.
Tipthetractorslightlyinthedirectionof thesuitablecontainerto aidinfully
drainingall oftheoilfromtheengine.
Beforetipping engineor equipmentto drainoil, drain fuelfrom tank by
runningengineuntil fuel tank isempty.
5. Servicetheoilfilter asinstructedlaterinthissection.
IMPORTAIV#Usedmotoroilmaycauseskincancerifrepeatedlyleft incontactwith
theskinforprolongedperiods.Althoughthisisunlikelyunlessyouhandleusedoil
onadallybasis,itisstilladvisabletothoroughlywashyourhandswith soapand
waterassoonaspossibleafterhandlingusedoil.
flOTE:Pleasedisposeof usedmotoroilin amannerthatiscompatiblewith the
environment.Wesuggestyoutakeitinasealedcontainertoyourlocalservice
stationforreclamation.Donotthrowitinthetrash,pouritdownadrainoronthe
ground.
,, j
Figure22
ReplacingTheOil Filter
Thisengineisequippedwith aspin-onoilfilter thatshouldbereplacedeachtime
anoilchangeisperformed,everyseasonor50hours.Referto Figure23.
Toreplace the Oil Filter:
1. Draintheoil asinstructionpreviouslyinthissection.
2. Removetheoilfilter. Disposeof theoldoilfilter properly.
3. Lubegasketof newoilfilterwith cleanoil.
4. Installandturnoilfilter byhanduntilthegasketcomesincontactwiththe
sealingsurfaceofthecrankcasecover,thentightentheoilfilter, 10-12Nm
(88.5-106.2in-lb),1/2-3/4turn.
5. Addoilaspreviouslyinstructed.
6. Makesuredipstickisinstalled.
7. Startandrunengine.Checkfor leaks.
8. Stopengine.Waitafew minutesandchecktheoillevel.SeeCheckingThe
0il LevelintheAssemblysectionofthismanual.
6. Servicethe 0il Filterifdesired,aspertheinstructionslaterinthissection.
7. Reinstallthedrainplugandtightenitsecurely,12-14Nm(106.2-123.9in-lb).
8. Removetheoildrainsleevefromtheoilsump.Returnthedipsticktotheoilfill
tubeandscrewtheoilfill capbackintoplace.
9. Refilltheenginewith thenewmotoroil.RefertoGas&OilintheAssembly
sectionofthismanualforinformationregardingtheapprovedoiltype.
22
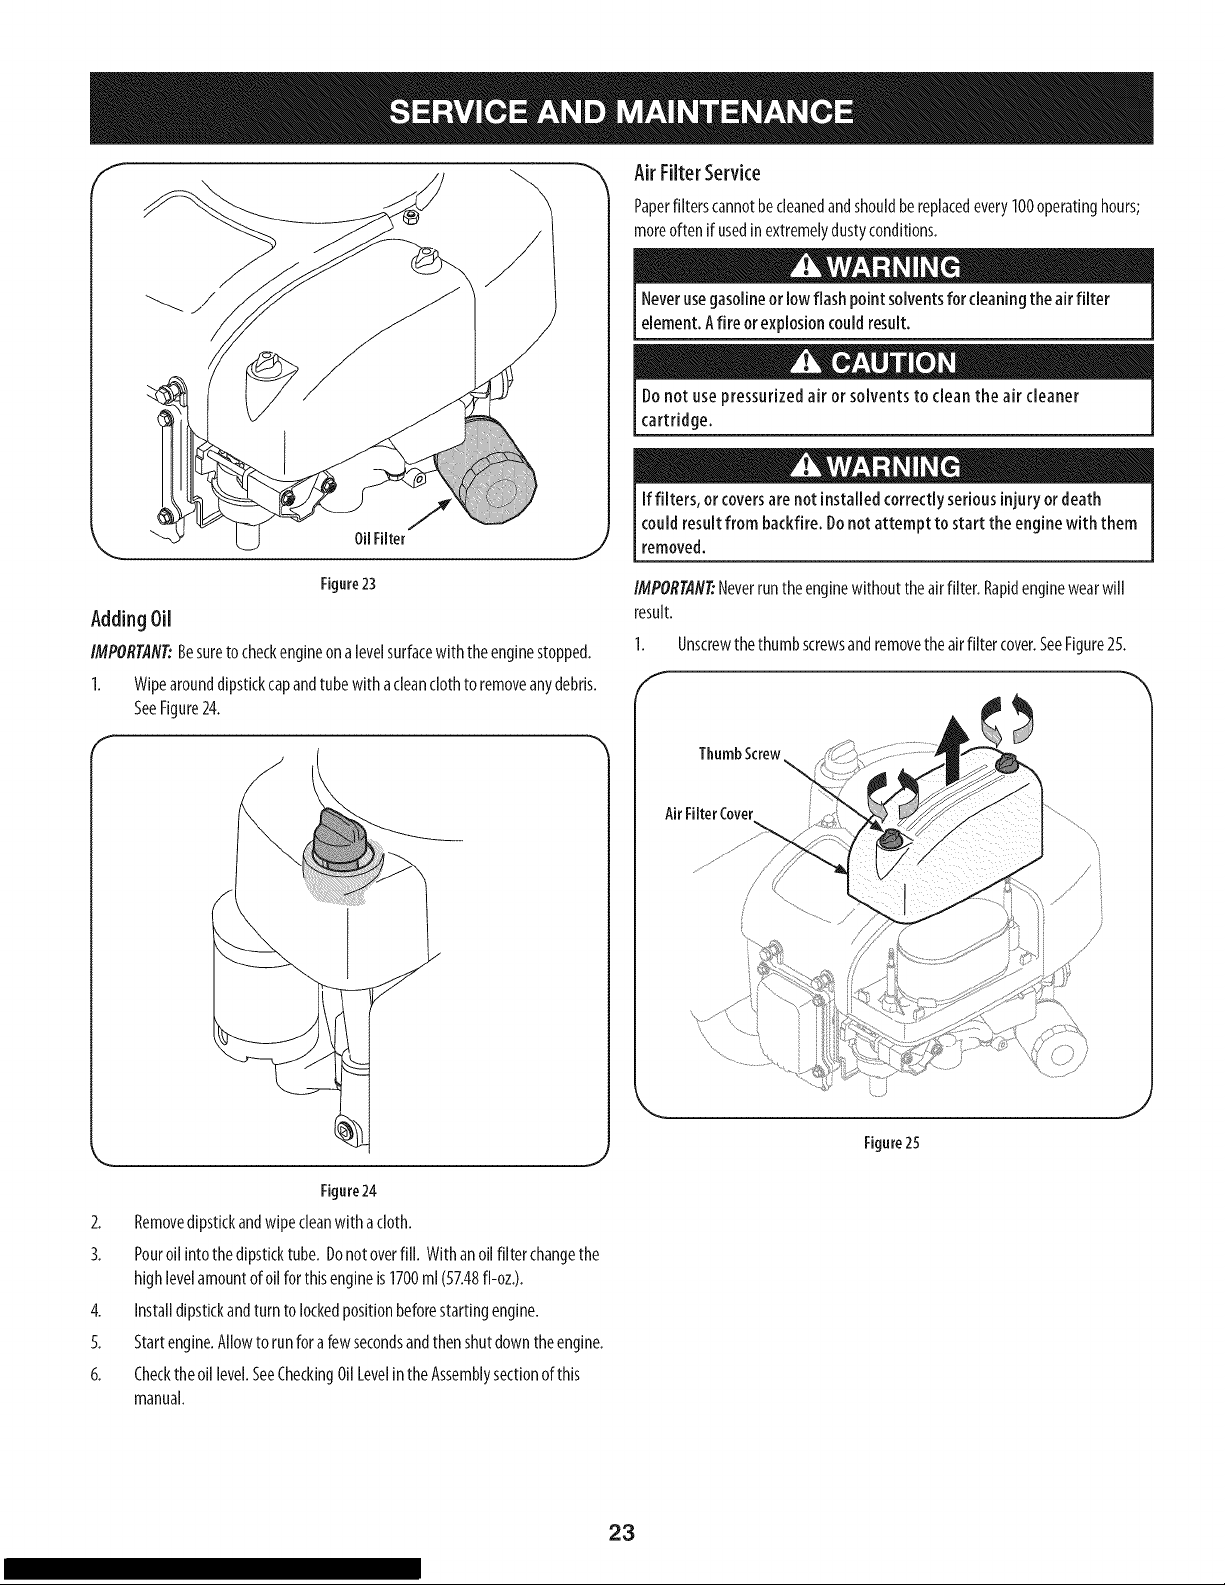
OilFilter
Air Filter Service
Paperfilterscannotbecleanedandshouldbereplacedevery100operatinghours;
moreoftenif usedinextremelydustyconditions.
Neverusegasolineor lowflashpointsolventsforcleaningtheairfilter
element.Afire or explosioncouldresult.
Donot usepressurizedair orsolventsto cleantheaircleaner
cartridge.
Iffilters, orcoversarenot installedcorrectly seriousinjuryordeath
could resultfrom backfire. Donot attempt to start the enginewith them
removed.
Figure23
Adding Oil
IMPORTANT:Besuretocheckengineonalevelsurfacewith theenginestopped.
I. Wipearounddipstickcapandtubewith acleanclothto removeanydebris.
SeeFigure24.
f
IMPORTANT:Neverruntheenginewithouttheairfilter.Rapidenginewearwill
result.
1. Unscrewthethumbscrewsandremovetheairfiltercover.SeeFigure25.
\
AirFilter Cover
Figure25
Figure24
2. Removedipstickandwipecleanwith acloth.
3. Pouroilintothedipsticktube. Donotoverfill. Withanoilfilterchangethe
highlevelamountofoilforthisengineis1700ml(57.48fl-oz.).
4. Installdipstickandturnto lockedpositionbeforestartingengine.
5. Startengine.Allowto runforafewsecondsandthenshutdowntheengine.
6. Checktheoil level.SeeCheckingOilLevelintheAssemblysectionofthis
manual.
23
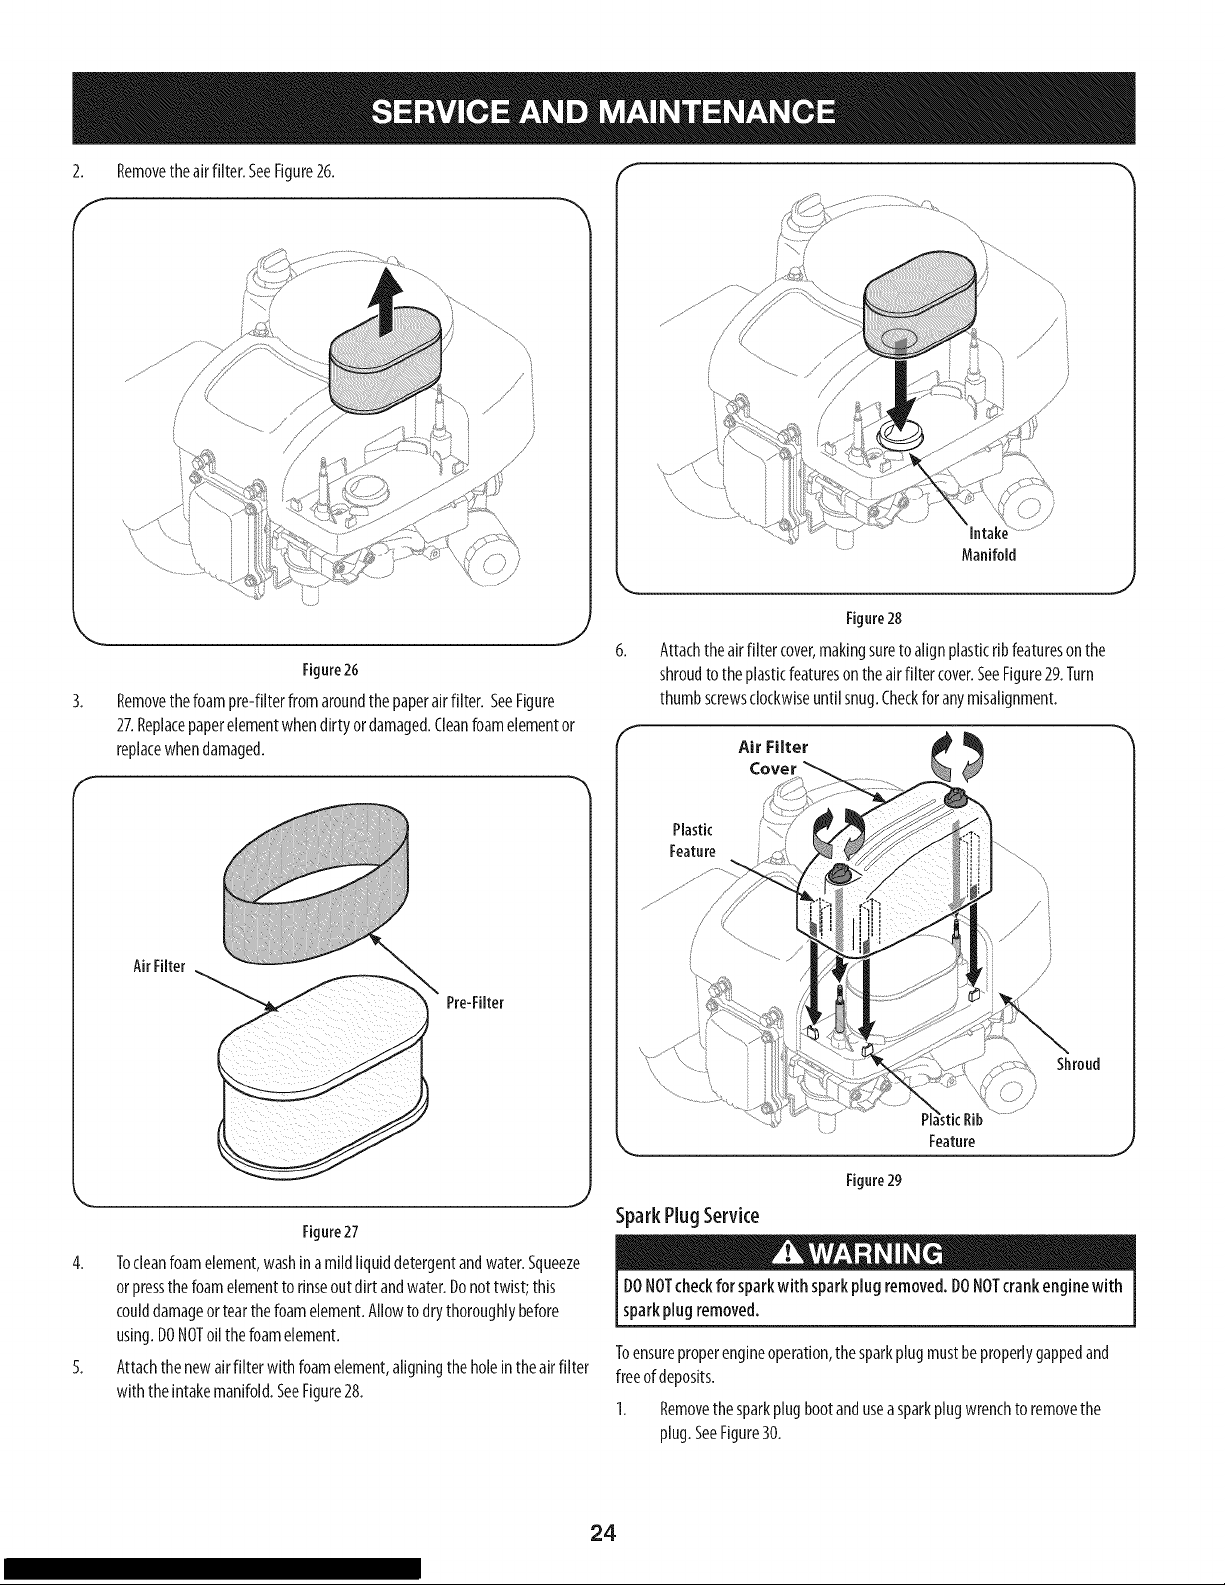
2.
Removetheairfilter.SeeFigure26.
f
._ j
Figure26
Removethefoampre-filterfromaroundthepaperairfilter. SeeFigure
27.Replacepaperelementwhendirtyordamaged.Cleanfoamelementor
replacewhendamaged.
/
Manifold
Figure28
Attachtheairfilter cover,makingsuretoalignplasticribfeaturesonthe
shroudtotheplasticfeaturesontheairfiltercover.SeeFigure29.Turn
thumbscrewsclockwiseuntilsnug.Checkforanymisalignment.
Air Filter
AirFilter
Pre-Filter
Figure27
4. Tocleanfoamelement,washinamildliquiddetergentandwater.Squeeze
orpressthefoamelementto rinseoutdirt andwater.Donottwist; this
coulddamageortearthefoamelement.Allowtodrythoroughlybefore
using.DONOToilthefoamelement.
5. Attachthenewairfilter with foamelement,aligningtheholeintheairfilter
with theintakemanifold.SeeFigure28.
Plastic
Feature
Shroud
PI,
Feature
Figure29
SparkPlugService
DONOTcheckfor sparkwith sparkplugremoved.DONOTcrankenginewith
sparkplug removed.
Toensureproperengineoperation,thesparkplugmustbeproperlygappedand
freeofdeposits.
1. Removethesparkplugbootanduseasparkplugwrenchtoremovethe
plug.SeeFigure30.
24
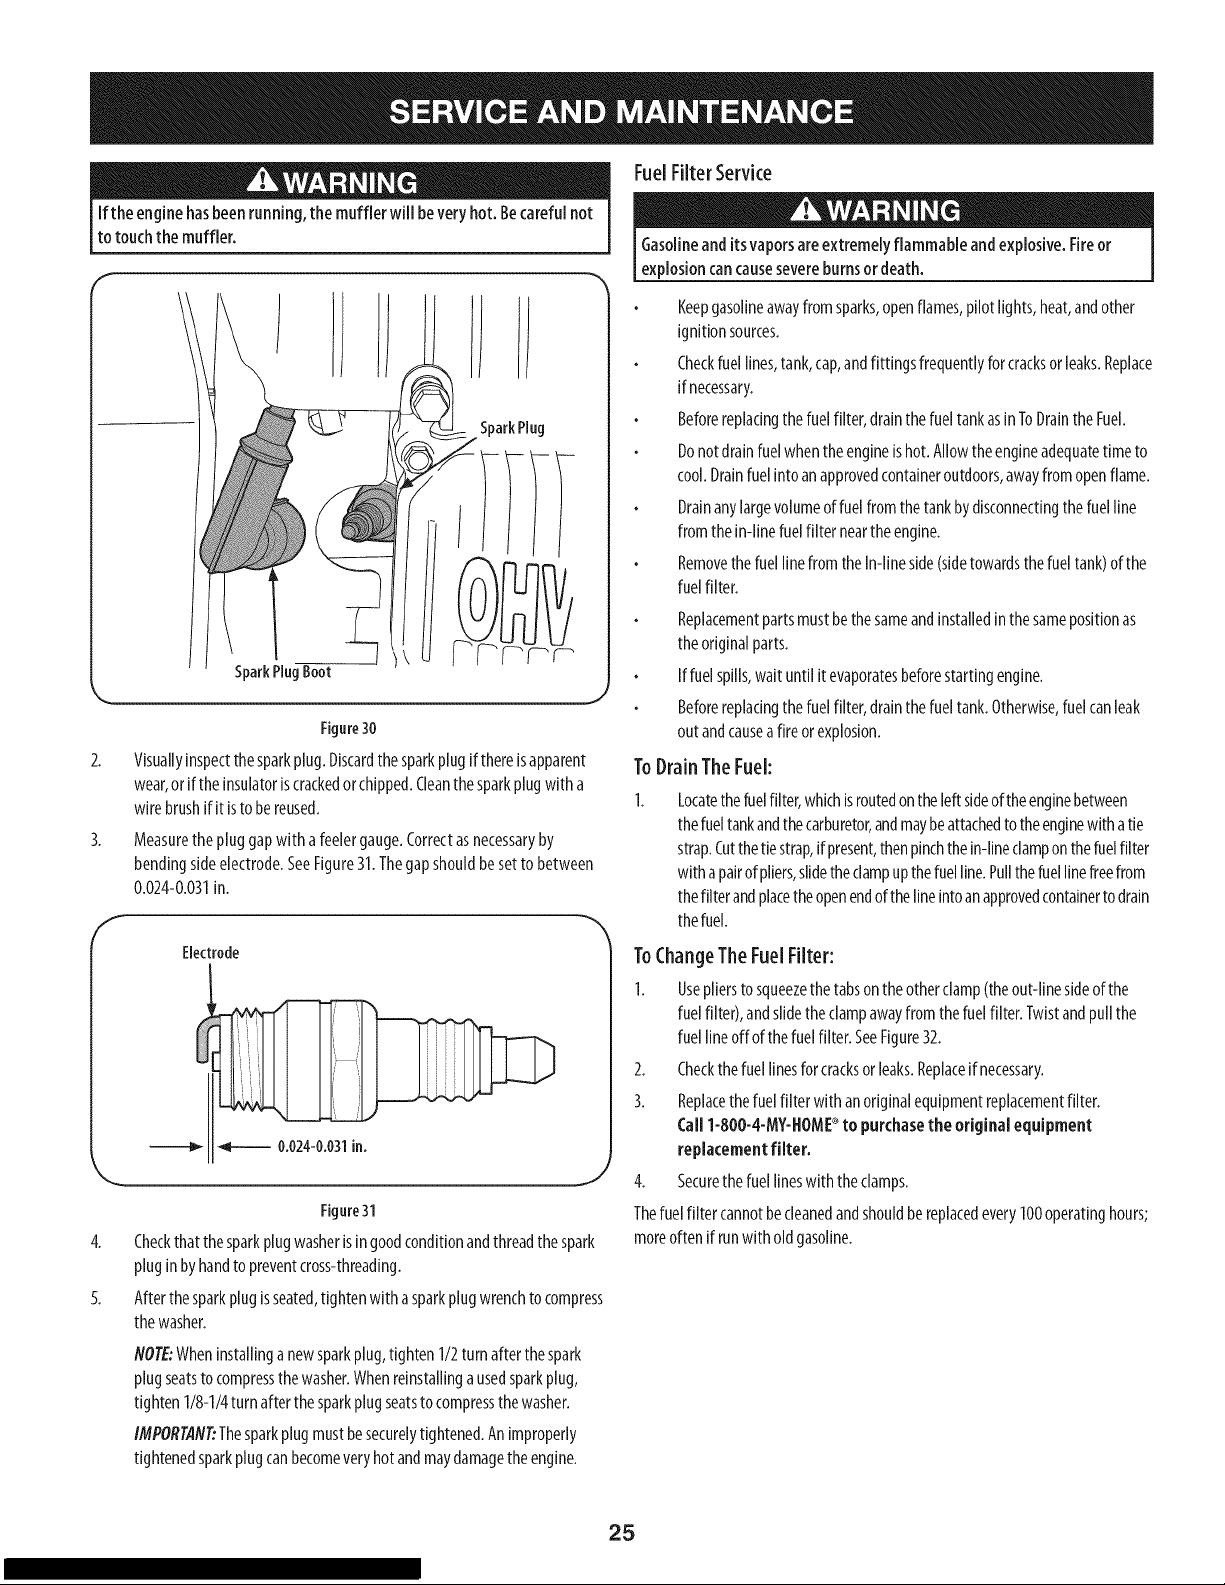
ifthe enginehasbeenrunning,the mufflerwii[ beveryhot.Becarefulnot
to touchthe muffler.
SparkPlug
SparkPlugBoot
Figure30
2.
Visuallyinspectthesparkplug.Discardthesparkplugif thereisapparent
wear,orif theinsulatoriscrackedorchipped.Cleanthesparkplugwitha
wirebrushifit istobe reused.
3.
Measurethepluggapwithafeelergauge.Correctasnecessaryby
bendingsideelectrode.SeeFigure31.Thegapshouldbesettobetween
0.024-0.031in.
f
Electrode
Figure31
4. Checkthatthesparkplugwasherisingoodconditionandthreadthespark
pluginbyhandtopreventcross-threading.
5. Afterthesparkplugisseated,tightenwith asparkplugwrenchtocompress
thewasher.
FuelFilter Service
Gasolineand itsvaporsareextremely flammable andexplosive.Fireor
explosioncancausesevereburnsor death.
Keepgasolineawayfromsparks,openflames,pilotlights,heat,andother
ignitionsources.
Checkfuellines,tank,cap,andfittingsfrequentlyforcracksorleaks.Replace
if necessary.
Beforereplacingthefuelfilter,drainthefueltankasinToDrainthe Fuel.
Donotdrainfuelwhentheengineishot.Allowtheengineadequatetimeto
cool.Drainfuelinto anapprovedcontaineroutdoors,awayfromopenflame.
Drainanylargevolumeoffuelfromthetankbydisconnectingthefuelline
fromthein-linefuelfilterneartheengine.
RemovethefuellinefromtheIn-lineside(sidetowardsthefueltank)ofthe
fuelfilter.
Replacementpartsmustbethesameandinstalledinthesamepositionas
theoriginalparts.
Iffuelspills,waituntilit evaporatesbeforestartingengine.
Beforereplacingthefuelfilter,drainthefueltank.Otherwise,fuelcanleak
outandcauseafireorexplosion.
ToDrainTheFuel:
Locatethefuelfilter,whichisroutedontheleftsideoftheenginebetween
thefueltankandthecarburetor,andmaybeattachedtotheenginewithatie
strap.Cutthetiestrap,ifpresent,thenpinchthein-lineclamponthefuelfilter
with apairofpliers,slidetheclampupthefuelline.Pullthefuellinefreefrom
thefilterandplacetheopenendofthelineintoanapprovedcontainertodrain
thefuel.
ToChangeTheFuelFilter:
I. Usepliersto squeezethetabsontheotherclamp(theout-linesideofthe
fuelfilter),andslidetheclampawayfromthefuelfilter.Twistandpullthe
fuellineoffofthefuelfilter. SeeFigure32.
2. Checkthefuellinesforcracksorleaks.Replaceifnecessary.
3. Replacethefuelfilter with anoriginalequipmentreplacementfilter.
Call1-800-4-MY-HOME_to purchasethe original equipment
replacementfilter.
4. Securethefuellineswith theclamps.
Thefuelfilter cannotbecleanedandshouldbereplacedevery100operatinghours;
moreoftenif runwitholdgasoline.
NOTE:Wheninstallinganewsparkplug,tighten1/2turnafterthespark
plugseatstocompressthewasher.Whenreinstallingausedsparkplug,
tighten1/8-1/4turnafterthesparkplugseatstocompressthewasher.
IMPORTANT:Thesparkplugmustbesecurelytightened.Animproperly
tightenedsparkplugcanbecomeveryhotandmaydamagetheengine.
25

F
FuelLine
Figure32
CleanEngine
Iftheenginehasbeenrunning,allowittocoolforatleasthalfanhourbefore
cleaning.Periodicallyremovedirt build-upfromengine.Cleantheenginecooling
finsevery25hours.Cleanwith a brushorcompressedair.
IMPORTANT:Donotsprayenginewith watertocleanbecausewatercould
contaminatefuel.Usingagardenhoseorpressurewashingequipmentcanalso
forcewaterintotheaircleanerormuffleropening.Waterintheaircleanerwill soak
thepaperelement,andwaterthatpassesthroughtheelementormufflercanenter
thecylinder,causingdamage.
Figure33
Removethebow-tiecotterpinandflatwasherfromthedecklift assembly,
andretainforreinstallationlater.SeeFigure34.
Accumulationof debrisaroundmuffler couldcausea fire. Inspectandclean
beforeeveryuse.
Cutting DeckRemoval
Toremovethe cutting deck,proceedas follows:
1. PlacethePTO(BladeEngage)leverinthedisengaged(OFF)positionand
engagethe parkingbrake.
2. Lowerthedeckbymovingthedecklift leverintothe bottomnotchonthe
rightfender.
3. Removethebeltfromaroundthetractor'sPTOpulley.SeeFigure33.
Avoidpinchinginjuries.Neverplaceyourfingersonthe idler spring or
betweenthebelt anda pulleywNle removingthe belt.
Figure34
26
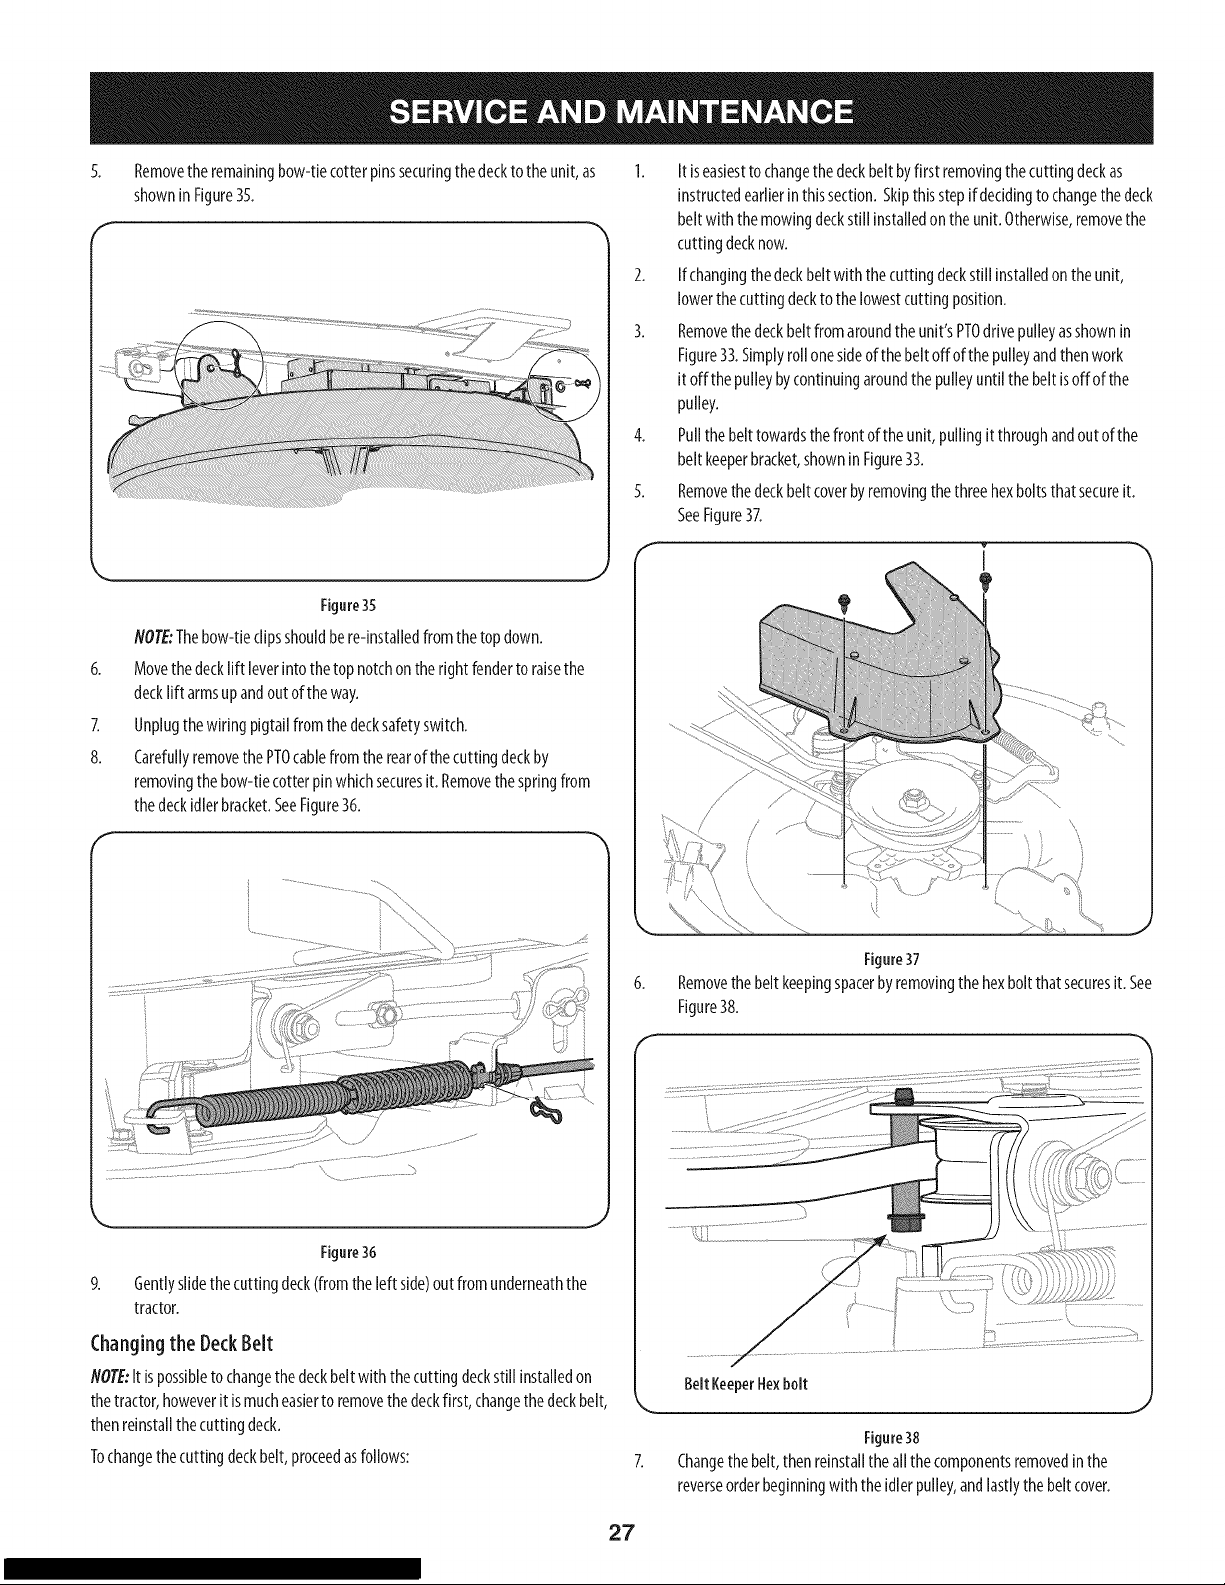
5.
Removetheremainingbow-tiecotterpinssecuringthedeckto theunit,as
shownin Figure35.
k. j
Figure35
NOTE:Thebow-tieclipsshouldbere-installedfromthetopdown.
6. Movethedeckliftleverintothetopnotchontherightfendertoraisethe
deckliftarmsupandoutoftheway.
7. Unplugthewiringpigtailfromthedecksafetyswitch.
8. CarefullyremovethePTOcablefromtherearof thecuttingdeckby
removingthebow-tiecotterpinwhichsecuresit.Removethespringfrom
thedeckidlerbracket.SeeFigure36.
f
1. Itiseasiestto changethedeckbeltbyfirst removingthecuttingdeckas
instructedearlierinthissection.Skipthisstepifderidingtochangethedeck
beltwith themowingdeckstill installedontheunit.Otherwise,removethe
cuttingdecknow.
2. Ifchangingthedeckbeltwith thecuttingdeckstillinstalledontheunit,
lowerthecuttingdecktothelowestcuttingposition.
3. Removethedeckbeltfromaroundtheunit'sPTOdrivepulleyasshownin
Figure33.Simplyrollonesideofthebeltoffof the pulleyandthenwork
itoffthe pulleybycontinuingaroundthepulleyuntil the beltisoffof the
pulley.
4. Pullthebelttowardsthefrontof theunit,pullingitthroughandoutof the
beltkeeperbracket,showninFigure33.
5. Removethedeckbeltcoverbyremovingthethreehexboltsthat secureit.
SeeFigure37.
Figure36
9. Gentlyslidethecuttingdeck(fromtheleft side)outfromunderneaththe
tractor.
Changingthe DeckBelt
NOTE:Itispossibletochangethedeckbeltwiththecuttingdeckstillinstalledon
thetractor,howeveritismucheasiertoremovethedeckfirst,changethedeckbelt,
thenreinstallthecuttingdeck.
Tochangethecutting deckbelt,proceedasfollows:
Figure37
Removethebeltkeepingspacerbyremovingthe hexboltthatsecuresit. See
Figure38.
BeltKeeperI-lexbolt
Figure38
Changethebelt,thenreinstalltheallthecomponentsremovedinthe
reverseorderbeginningwith theidlerpulley,andlastlythebeltcover.
27
8.
Feedthedeckbeltthroughthebeltkeeperbracketandworkit aroundand
ontothePTOdrivepulleyasshownin Figure33.
Tires
Neverexceedthe maximum inflationpressureshownonthe sidewallof tire.
Therecommendedoperatingtire pressureis:
Approximately10psiforthereartires
Approximately14psiforthefronttires
IMPORTANT:Refertothetiresidewallforexacttiremanufacturer'srecommended
ormaximumpsi.Donotovednflate.Uneventirepressurecouldcausethecutting
deckto mowunevenly.
CuttingBlade
Shutthe engineoffand removeignitionkeybeforeremovingthe cutting
bladefor sharpeningorreplacement.Protectyourhandsbyusingheavy
[g oveswhengraspngthe bade.
Periodicallyinspectthe bladeand/orspindleforcracksordamage,
[especiallyafter you'vestruckaforeign object.Donot operatethe machine
[until damagedcomponentsarereplaced.
Toremovetheblade,proceedasfollows.
NOTE:Itmaybeeasierto changethebladebyfirst removingthedeckfrom
beneaththetractor,(refertoCuttingDeckRemovalearlierinthissection)
thengentlyflip thedeckovertoexposeitsunderside.It ispossibletochange
theblade,however,with thedeckstillattachedto thetractor.Ifattempting
tochangethebladewith thedeckstillinstalledonthetractor,firstmovethe
decklift levertoitshighestcuttingposition.
1. Removethemulchplug,deckchuteorbaggingchute,ifequipped,exposing
thedeckchuteopening.
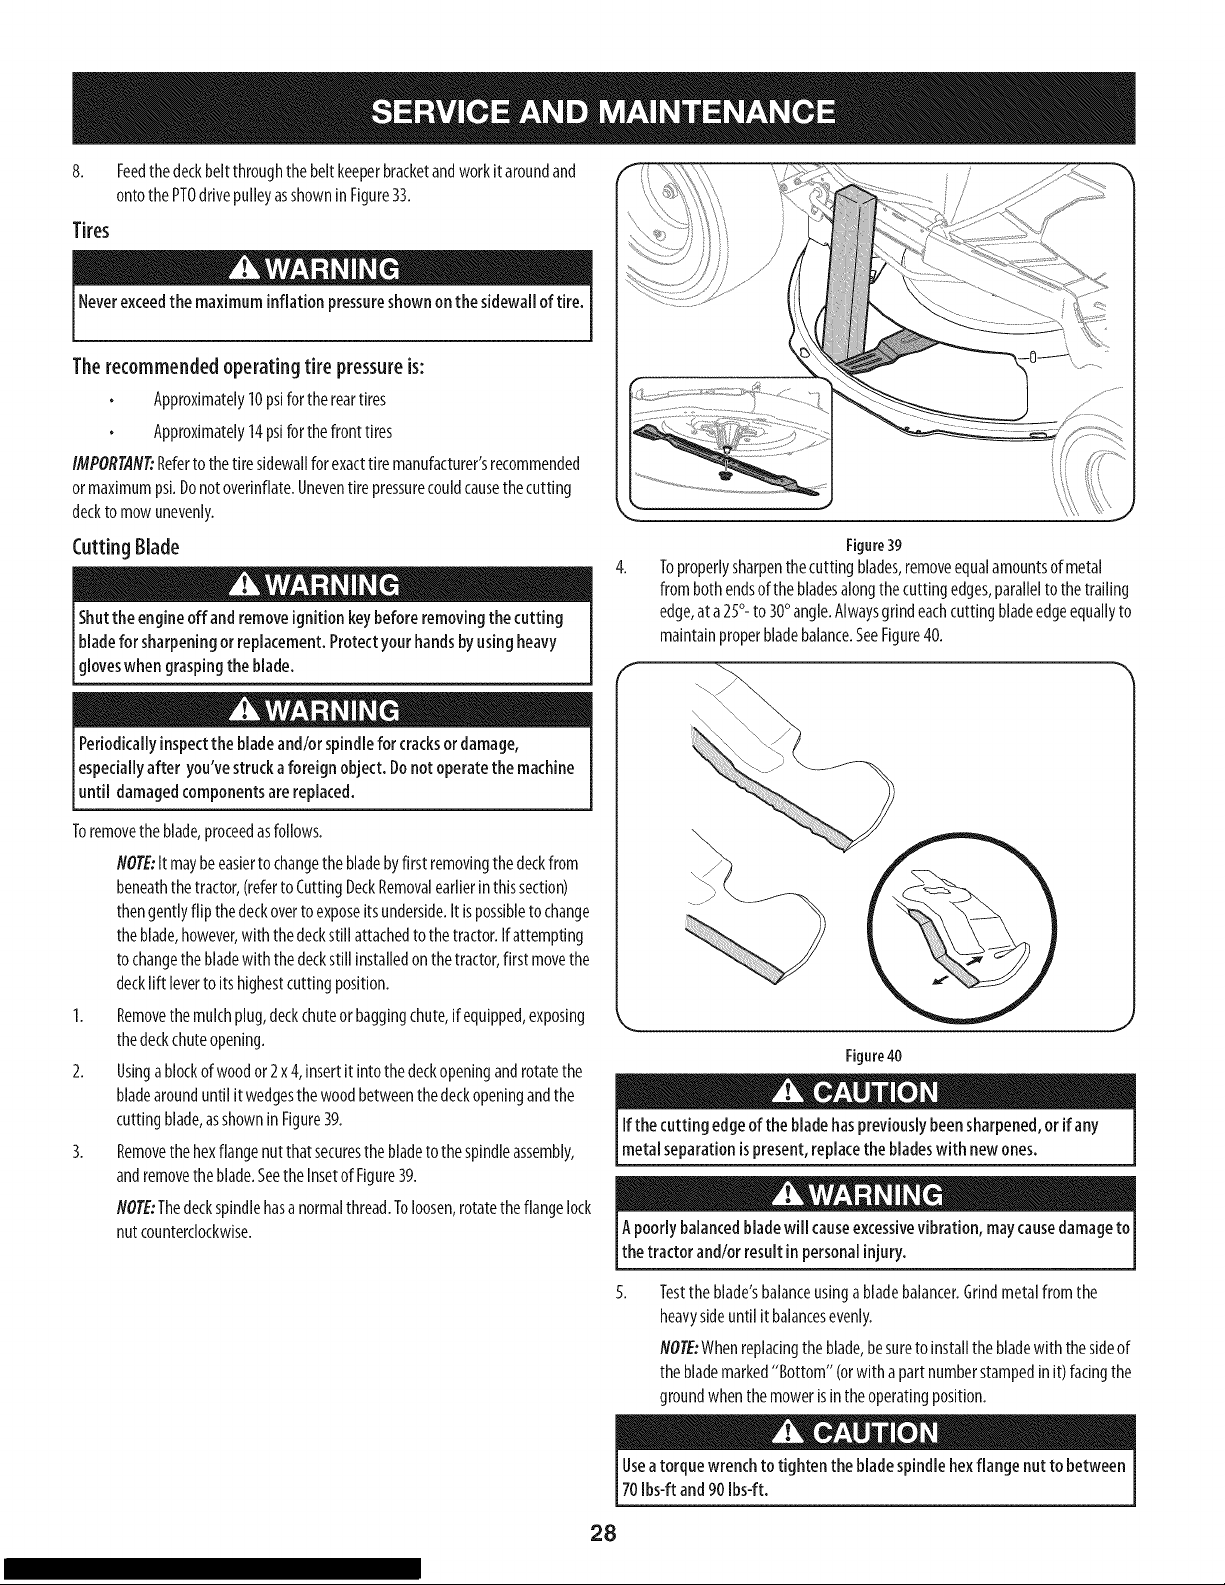
2. Usingablockofwoodor2x4,insertit intothedeckopeningandrotatethe
bladearounduntilitwedgesthewoodbetweenthedeckopeningandthe
cuttingblade,asshownin Figure39.
3. Removethehexflangenutthatsecuresthe bladetothespindleassembly,
andremovetheblade.SeetheInsetofFigure39.
NOTE:Thedeckspindlehasanormalthread.Toloosen,rotatetheflangelock
nutcounterclockwise.
Figure39
Toproperlysharpenthecuttingblades,removeequalamountsofmetal
frombothendsofthebladesalongthecuttingedges,paralleltothetrailing
edge,at a25°-to 30°angle.Alwaysgrindeachcutting bladeedgeequallyto
maintainproperbladebalance.SeeFigure40.
Figure40
Ifthe cuttingedgeofthebladehaspreviouslybeensharpened,orif any
metalseparationispresent,replacethe bladeswith newones.
Apoorlybalancedbladewill causeexcessivevibration, maycausedamageto
the tractor and/orresultin personalinjury.
Testtheblade'sbalanceusingabladebalancer.Grindmetalfromthe
heavysideuntilit balancesevenly.
NOTE:Whenreplacingthe blade,besuretoinstallthebladewith thesideof
the blademarked"Bottom" (orwitha partnumberstampedin it)facingthe
groundwhenthemowerisintheoperatingposition.
Useatorquewrenchto tighten the bladespindlehexflange nut to between
70Ibs-ftand 90Ibs4t.
28
Adjustments
ParkingBrakeAdjustment
Neverattempt to makeanyadjustmentswhiletheengineisrunning,except
wherespecifiedinthe operator'smanual.
Levelingthe Deck
NOTE:Checkthetractor'stire pressurebeforeperforminganydeckleveling
adjustments.Referto Tires,inthisServiceAndMaintenancesectionformore
informationregardingtire pressure.
Front ToRear
Itispossibleto adjustthepitchofthecuttingdeck.Thefrontofthedeckshouldbe
between0" (level)and1_,,lowerthantherearofthedeck.Adjustif necessaryas
follows:
Withthetractorparkedona firm, levelsurface,placetheleverforliftingthe
cuttingdeckintothemiddleposition(3)androtatethebladesothat it is
alignedwith thefrontandrearofthetractor.
2.
Measurethedistancefromthefrontofthe bladetiptothegroundandthe
rearofthe bladetip totheground.Thefirstmeasurementtakenshouldbe
between0" (level)and1_,,lessthanthesecondmeasurement.Determine
theapproximatedistancenecessaryfor properadjustmentandproceed,if
necessary,to thenextstep.
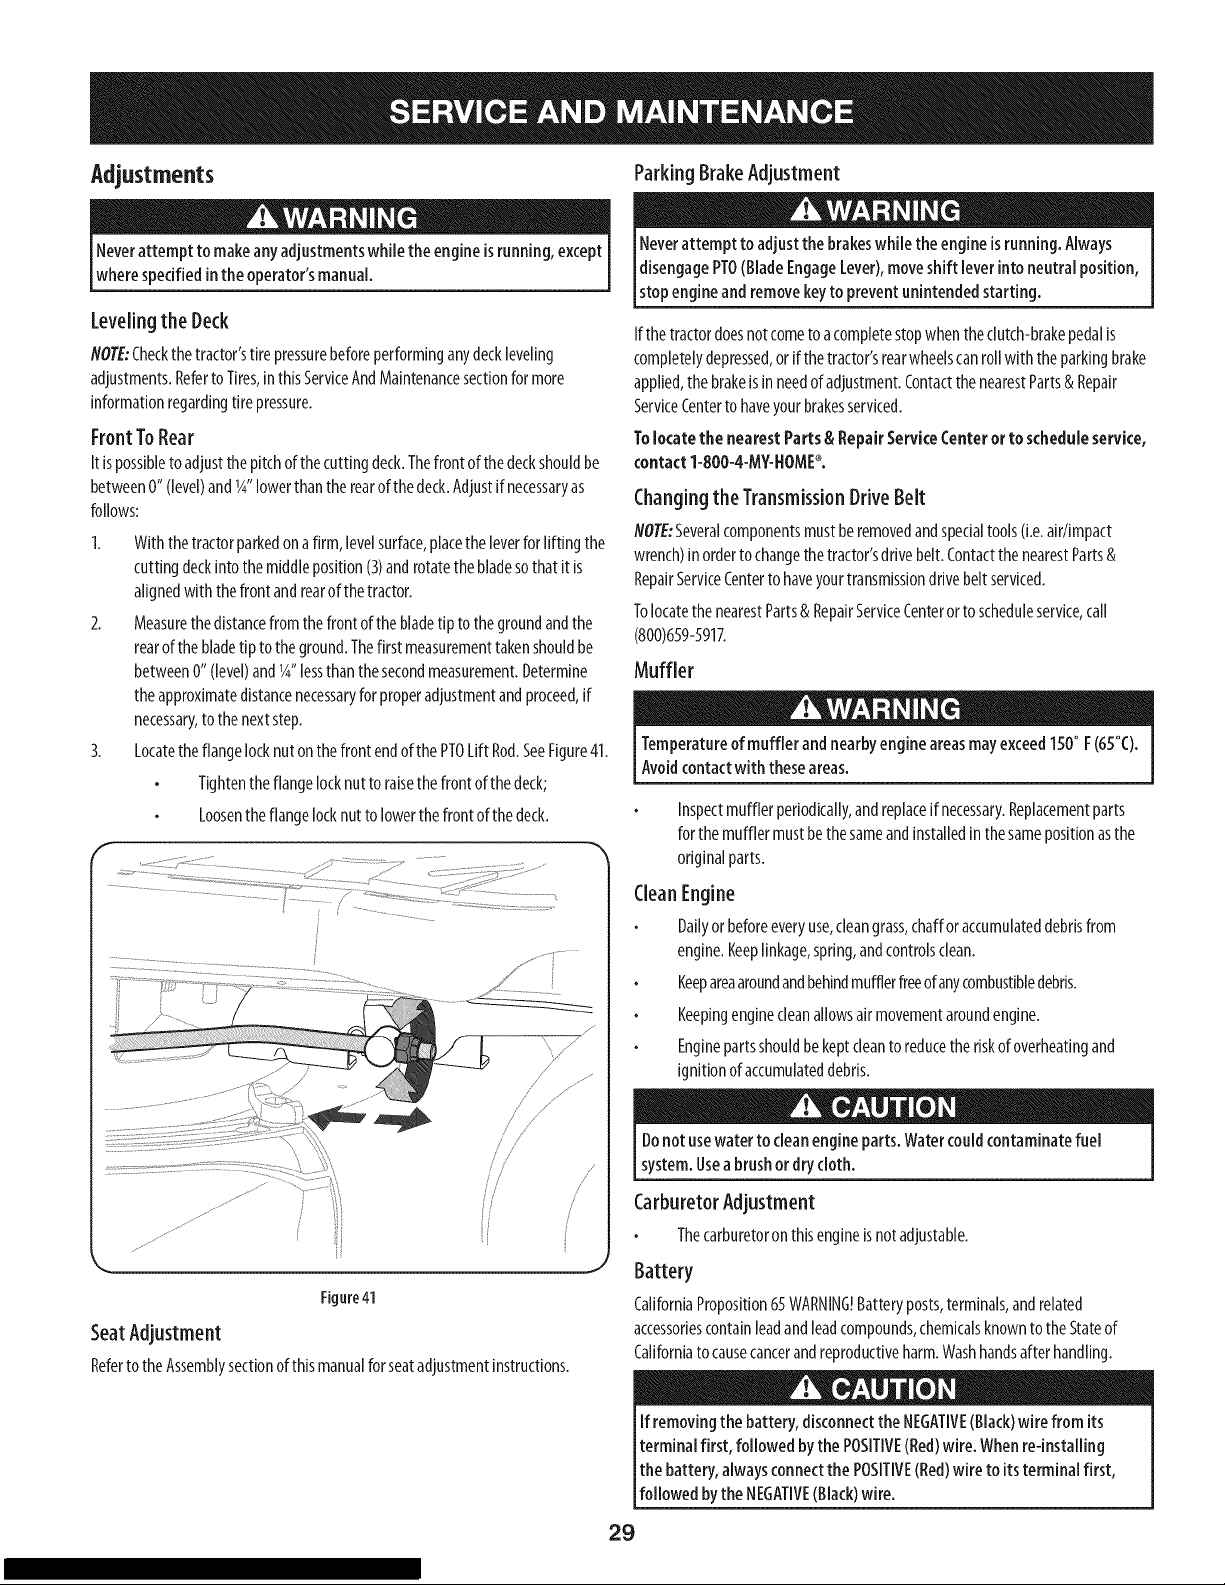
3.
LocatetheflangelocknutonthefrontendofthePTOLiftRod.SeeFigure41.
Tightentheflangelocknutto raisethefrontofthedeck;
Loosentheflangelocknutto lowerthefrontofthedeck.
Neverattempt to adjustthe brakeswhile the engineisrunning.Always
disengagePTO(BladeEngageLever),moveshift leverinto neutralposition,
stopengineandremovekeyto preventunintendedstarting.
Ifthetractordoesnotcometoacompletestopwhentheclutch-brakepedalis
completelydepressed,or ifthetractor'srearwheelscanrollwiththe parkingbrake
applied,thebrakeisinneedofadjustment.ContactthenearestParts& Repair
ServiceCentertohaveyourbrakesserviced.
Tolocate the nearestParts&Repair ServiceCenteror toscheduleservice,
contact 1-800-4-MY-HOME_.
Changingthe TransmissionDriveBelt
NOTE:Severalcomponentsmustberemovedandspecialtools(i.e.air/impact
wrench)inordertochangethetractor'sdrivebelt.ContactthenearestParts&
RepairServiceCentertohaveyourtransmissiondrivebeltserviced.
TolocatethenearestParts& RepairServiceCenterorto scheduleservice,call
(800)659-5917.
Muffler
Temperatureofmuffler and nearbyengineareasmayexceed150° F(65°C).
Avoidcontactwith theseareas.
Inspectmufflerperiodically,andreplaceif necessary.Replacementparts
forthe mufflermustbethesameandinstalledinthesamepositionasthe
originalparts.
/ ....
/ /
/ /
....................... / /
Figure41
/ / /
, /
SeatAdjustment
RefertotheAssemblysectionofthismanualforseatadjustmentinstructions.
Clean Engine
Dailyorbeforeeveryuse,cleangrass,chafforaccumulateddebrisfrom
engine.Keeplinkage,spring,andcontrolsclean.
Keepareaaroundandbehindmufflerfreeofanycombustibledebris.
Keepingenginecleanallowsairmovementaroundengine.
Enginepartsshouldbekeptcleantoreducetheriskofoverheatingand
ignitionof accumulateddebris.
Donotusewater tocleanengineparts.Watercouldcontaminatefuel
system.Useabrushor drycloth.
CarburetorAdjustment
Thecarburetoronthisengineisnotadjustable.
Battery
CaliforniaProposition65WARNING!Batteryposts,terminals,andrelated
accessoriescontainleadandleadcompounds,chemicalsknownto theStateof
Californiatocausecancerandreproductiveharm.Washhandsafterhandling.
Ifremovingthebattery, disconnecttheNEGATIVE(Black)wire from its
terminalfirst, followed bythePOSITIVE(Red)wire. Whenre-installing
the battery,alwaysconnectthe POSITIVE(Red)wire to itsterminal first,
followedbythe NEGATIVE(Black)wire.
29
Thebatteryissealedandismaintenance-free.Acidlevelscannotbechecked.
Alwayskeepthebatterycablesandterminalscleanandfreeof
corrosivebuild-up.
Aftercleaningthe batteryandterminals,applyalight coatof
petroleumjellyorgreasetobothterminals.
Alwayskeeptherubberbootpositionedoverthepositiveterminalto
preventshorting.
IMPORTAIV_If removingthe batteryforanyreason,disconnecttheNEGATIVE
(Black)wirefromitsterminalfirst, followedbythePOSITIVE(Red)wire.When
re-installingthebattery,alwaysconnectthePOSITIVE(Red)wiretoitsterminal
first, followedbytheNEGATIVE(Black)wire.Becertainthat thewiresareconnected
tothecorrectterminals;reversingthemcouldchangethepolarityandresultin
damageto yourengine'salternatingsystem.
CleaningBattery
Cleanthebatterybyremovingit fromthetractorandwashingwith abakingsoda
andwatersolution.If necessary,scrapethebatteryterminalswith awirebrushto
removedeposits.Coatterminalsandexposedwiringwith greaseorpetroleumjelly
topreventcorrosion.
Battery Failures
Somecommoncausesforbatteryfailureare:
Incorrectinitialactivation
Overcharging
Freezing
Undercharging
Corrodedconnections
ThesefailuresareNOTcoveredbyyourtractor'swarranty.
Jump Starting
Charging
Batteriesgive off anexplosivegaswhile charging.Chargethe battery in
awell ventilated areaand keepawayfrom anopenflame or pilot light
ason awater heater,spaceheater,furnace,clothesdryer or other gas
appliances.
Whenchargingyour tractor'sbattery, useonlyachargerdesignedfor 12V
lead-addbatteries.Readyour battery charger'sOwner'sManualpriorto
chargingyour tractor'sbattery. Alwaysfollow itsinstructionsandheedits
warnings.
Ifyourtractorhasnotbeenputintouseforanextendedperiodoftime,chargethe
batteryasfollows:
1. Setyourbatterychargerto delivera maxof 10amperes.
Ifyourbatterychargerisautomatic,chargethebatteryuntilthechargerindicates
thatchargingiscomplete.Ifthechargerisnotautomatic,chargefor nofewerthan
eighthours.
Fuse
One15AMPfuseisinstalledinyourtractor'swiringharnessto protectthetractor's
electricalsystemfromdamagecausedbyexcessiveamperage.
Iftheelectricalsystemdoesnotfunction,oryourtractor'senginewill notcrank;
first checkto becertainthatthefusehasnot blown.Itcanbefoundunderthe
fenderontheleftsideoftheunit,onthewiringharnessjustabovethe battery.
Alwaysuseafusewith thesameamperagecapacityfor replacement.
Lubrication
Neverjump start adamaged or frozen battery. Be certain the vehicles
do not touch, and ignitions areoff. Donot allow cable clamps to
touch.
1. Connectpositive(+) cabletopositivepost(+)ofyourtractor'sdischarged
battery.
2. Connecttheotherendofthecableto thepositive(+) postofthejumper
battery.
3. Connectthesecondcablenegative(-) to thenegativepost(-) ofthejumper
battery.
4. Connecttheotherendofthenegativecabletotheengineblockofthe
tractor,awayfromthebattery.Attachtoanunpaintedpartto assureagood
connection.
Ifthejumper batteryis installedonavehicle(i.e.car,truck),doNOTstart
the vehicle'senginewhenjump starting your tractor.
5. Startthetractor(asinstructedintheOperationsectionofthismanual).
6. Setthetractor'sparkingbrakebeforeremovingthejumpercables,inreverse
orderofconnection.
Beforelubricating, repairing,or inspecting,alwaysdisengagePTO(Blade
EngageLever),moveshift leverinto neutral position,setparking brake,stop
engneandremovekeyto preventun ntendedstart ng.
Pivot Points& Linkage
Lubricateallthepivotpointsonthedrivesystem,parkingbrakeandlift linkageat
leastonceaseasonwith lightoil.
RearWheels
Therearwheelsshouldberemovedfromtheaxlesonceaseason.Lubricatethe
axlesandtherimswellwith anall-purposegreasebeforere-installingthem.
FrontAxles
Eachendofthetractor'sfront pivotbarmaybeequippedwitha greasefitting.
Lubricatewith agreasegunafterevery25hoursoftractoroperation.
Steering Rack&Pinion
Onceperseason,orevery25hoursofoperation,it will benecessarytolubricatethe
steeringrackandpiniongearlocatedunderthefrontof theunit.Usingstandard
automotivegrease,applygreaseto thefrontsideandrearsideofthesteeringrack,
asindicatedin Figure42.
3O
 Loading...