


Craftsman 247288830 Owner’s Manual
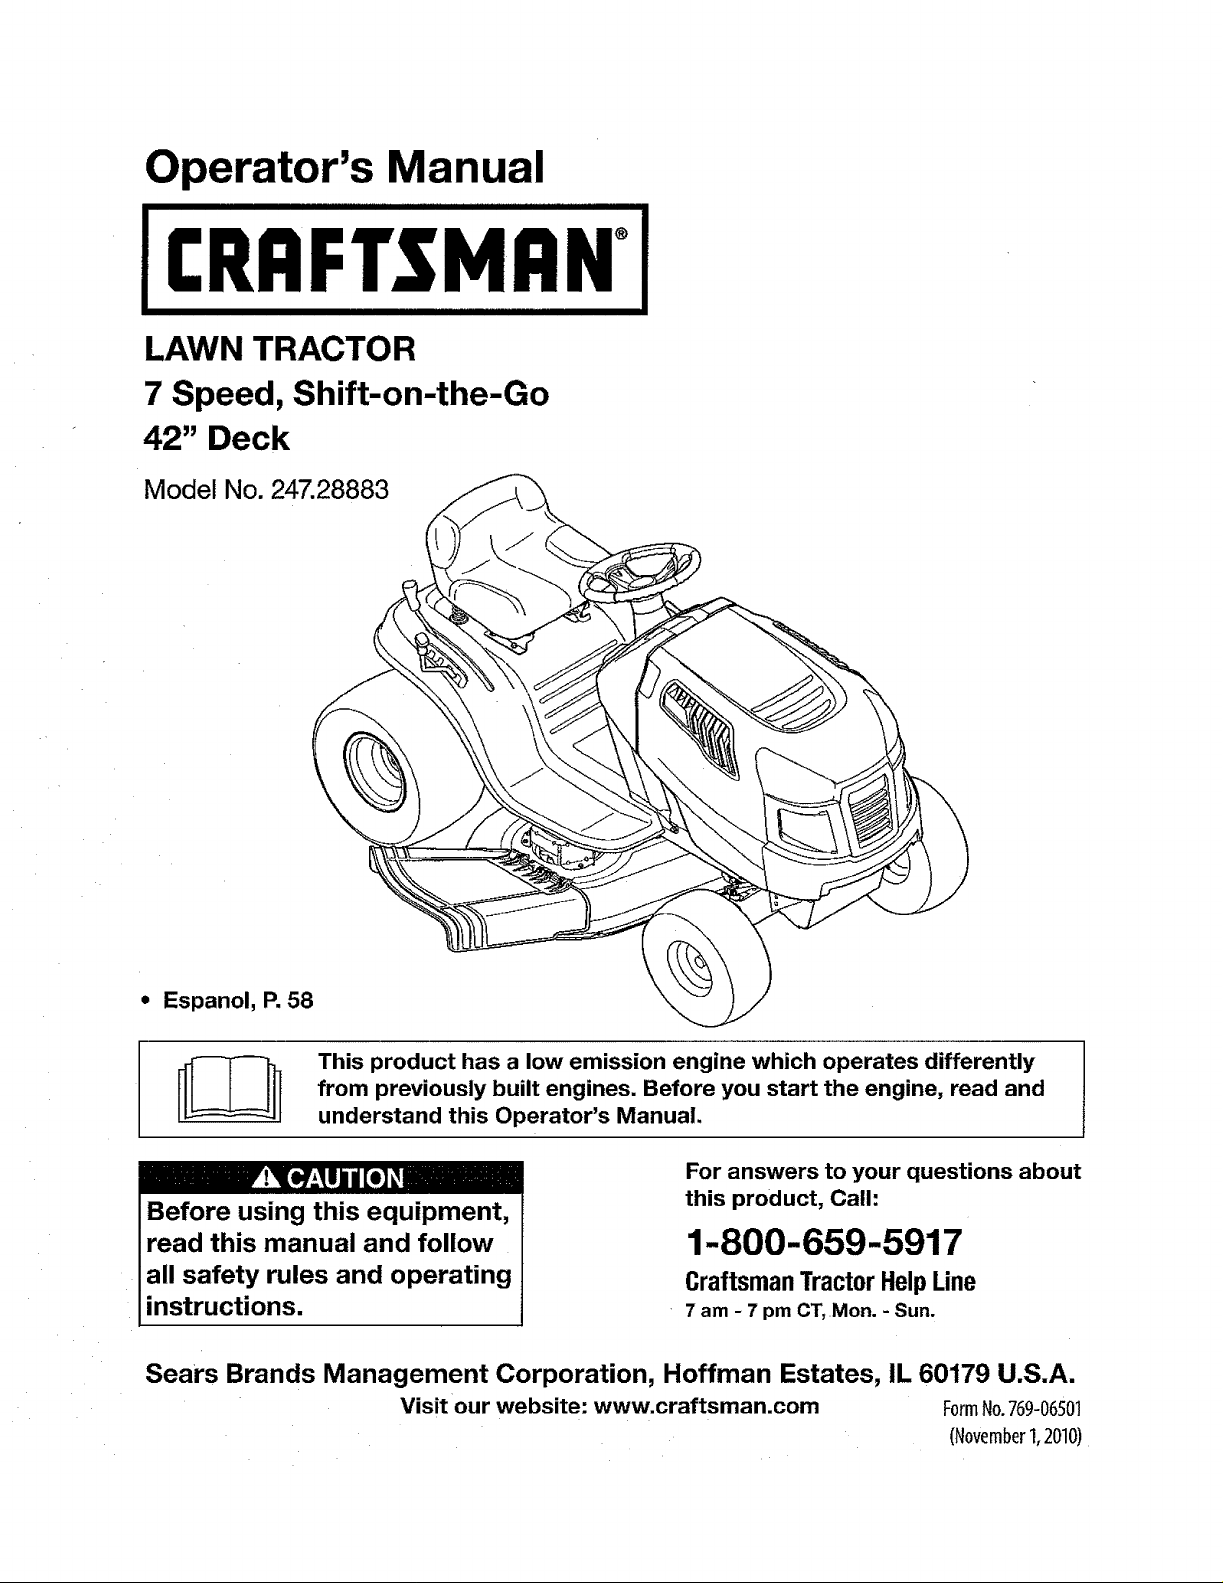
Operator's Manual
I:RRFTSMRN°
LAWN TRACTOR
7 Speed, Shift-on-the-Go
42" Deck
Model No. 247.28883
• Espanol, P. 58
This product has a low emission engine which operates differently
from previously built engines. Before you start the engine, read and
understand this Operator's Manual.
For answers to your questions about
Before using this equipment,
read this manual and follow
all safety rules and operating
instructions.
Sears Brands Management Corporation, Hoffman Estates, IL 60179 U.S.A.
Visit our website: www.craftsman.com FormNo.769-06501
this product, Call:
1-800-659-5917
Craftsman Tractor Help Line
7 am - 7 pm CT, Mon. - Sun.
(November1,2010)

Warranty Statement .......................................................... 2
Safety Instructions ............................................................ 3
Slope Gauge ..................................................................... 8
Safety Labels ............. ....................................................... 9
Assembly ......................................................................... 10
Operation ........................................................................ 12
Service and Maintenance .............................................. 18
Off-Season Storage ........................................................ 27
Troubleshooting .............................................................. 28
Labels ............................................................................. 29
Parts List ......................................................................... 30
Espaffol............................................................................ 57
Service Numbers ............................................. Back Cover
CRAFTSMAN TWO YEAR FULL WARRANTY
FORTWO YEARSfromthedateofpurchase,ifany non-expendablepartof thisridingequipmentfailsduetoadefectinmaterialorworkman-
ship,visitwww;craftsman.comorcall1-800-659-5917 toarrangefor free in-homerepair.
Theframeandfront axle willbe repairedfree of chargefor five years fromthe dateof purchaseif defectiveinmatedal or workmanship.
Inattcases,if repairprovesimpossible,the ridingequipmentwillbereplacedfreeofcharge withthe sameoran equivalentmodel.
The battery willbereplacedfreeof charge for 90daysfrom lhedate of purchaseif defectivein materialor workmanship(our testingprovesthat it
willnot hold acharge).
This warrantyisvoid ifthis productis ever used whileprovidingcommercialservicesor if rentedto another person.
Thiswarranty covers ONLYdefects inmaterialand workmanship.Warrantycoverage does NOT include:
• Expendableitemsthat can wearout from normal use withinthe warranty period, including butnot limitedto blades,spark plugs, air
cleaners,belts, andoil filters.
• Standardmaintenanceservicing,oil changes, ortune-ups.
• Tirereplacementor repaircausedbypuncturesfromoutside objects,such as nails,thorns; stumps,or glass.
• Tire orwheel replacementor repairresultingfrom normalwear,accident,or improperoperation ormaintenance.
• Repairsnecessarybecause of operator abuse, includingbut notlimitedto damage caused by towingobjects beyondthe capability of
the riding equipment,impacting objects thatbend the frameor crankshaft,or over-speedingthe engine.
• Repairsnecessarybecause of operator negligence,includingbut notlimitedto, electricaland mechanical damage causedbyimproper
Storage,failureto use thepropergrade and amount of engineoil, failureto keepthe deckclear offlammable debris,or failureto
maintainthe ridingequipmentaccordingto the instructionscontainedin theoperator's manual.
• Engine(fuel system)cleaningor repairscaused byfuel determinedto becontaminatedor oxidized(stale). tngeneral,fuel shouldbe
usedwithin30 daysof its purchasedate.
• Normaldeteriorationand wearof the exteriorfinishes, or productlabelreplacement.
Thiswarrantygivesyouspecificlegalrights,andyoumayalsohaveotherrightswhichvaryfromstatetostate.
SearsBrandsManagementCorporation,HoffmanEstates,]L60179
EngineOil: SAE30
Fuel: UnleadedGasoline
Spark Plug: Champion®RC12YC
Engine: Briggs& StrattonI/C®
© KCDFRLLC 2
ModelNumber:
SerialNumber:
Dateof Purchase:
Recordthe model number,serial number,
and dateofpurchaseabove.
Thissymbolpointsoutimportantsafetyinstructionswhich,if not
followed,couldendangerthepersonalsafetyand/orpropertyof
yourselfandothers.Readandfollowallinstructionsinthismanual
beforeattemptingtooperatethismachine.Failuretocomplywith
theseinstructionsmayresultinpersonalinjury.Whenyouseethis
symbol,HEEDITSWARNING!
Thismachinewasbuilttobeoperatedaccordingtothesafeopera-
tionpracticesinthismanual.Aswithanytypeofpowerequipment,
carelessnessorerroronthepartoftheoperatorcanresultinserious
injury.Thismachineiscapableofamputatingfingers,hands,toes
andfeetandthrowingdebris.Failuretoobservethefollowingsafety
instructionscouldresultinseriousinjuryordeath.
CALIFORNIA PROPOSITION 65
EngineExhaust,someofitsconstituenls,andcertainvehicle
componentscontainoremitchemicalsknownto StateofCalifornia
tocausecancerandbirthdefectsorotherreproductiveharm.
Batteryposts,terminals,andrelatedaccessoriescontain]eadand
leadcompounds,chemicalsknowntotheStaleofCaliforniato
causecancerandreproductiveharm.Washhandsafterhandling.
IIIIHIIIIIIIIIIIIIIIIIIIIII II I
GENERAL OPERATION
, Read,understand,andfollowallinstructionsonthemachineand
inthemanual(s)beforeattemptingtoassembleandoperate.
Keepthismanualinasafeplaceforfutureandregularreference
andfororderingreplacementparts.
• Befamiliarwithall controlsandtheirproperoperation.Knowhow
tostopthemachineanddisengagethemquickly.
• Neverallowchildrenunder14yearsoldtooperatethismachine.
Children14yearsoldandovershouldreadandunderstandthe
operationinstructionsandsafetyrulesinthismanualandshould
betrainedandsupervisedbya parent.
• Neverallowadultstooperatethismachinewithoutproper
instruction.
• Tohelpavoidbladecontactora thrownobjectinjury,keep
bystanders,helpers,childrenandpetsat least75feetfromthe
machinewhileitisinoperation.Stopmachineif anyoneenters
thearea.
Thoroughlyinspecttheareawheretheequipmentistobeused.
Removeallstones,sticks,wire,bones,toys,andotherforeign
objectswhichcouldbepickedupandthrownbytheblade(s).
Thrownobjectscancauseseriouspersonalinjury.
• Planyourmowingpatterntoavoiddischargeofmaterialtoward
roads,sidewalks,bystandersandthelike.Also,avoiddischarg-
ingmaterialagainsta wallorobstructionwhichmaycause
dischargedmaterialtoricochetbacktowardtheoperator.
YourResponsibility--Restricttheuseofthispowermachineto
personswhoread,understandandfollowthewarningsandinstruc-
tionsinthismanualandonthemachine,
SAVE THESE INSTRUCTIONS!
L I
• Alwayswearsafety glassesor safetygogglesduring operation
andwhile performingan adjustmentor repairto protectyoureyes.
Thrownobjectswhich ricochetcan causeseriousinjury to the
eyes.
, Wearsturdy,rough-soledworkshoes andclose-fittingslacksand
shirts.Loosefitting clothesand jewelry can becaught inmovable
parts.Never operatethismachineinbarefeet or sandals.
• Beawareofthe mowerand attachmentdischarge directionand
donot pointit atanyone. Do notoperatelhe mowerwithoutthe
dischargecover orentire grass catcherin its properplace.
• Donot puthandsor feet nearrotatingpartsor under the cutting
deck. Contact with theblade(s) canamputatehandsandfeet.
• A missingor damageddischarge cover can causebladecontact
or thrownobject injuries.
• Stop the blade(s) whencrossing graveldrives,walks, orroads
andwhile not cuttinggrass.
• Watch fortraffic whenoperating near or crossingroadways.This
machine isnot intendedfor use onany publicroadway.
• Do notoperatethe machinewhile underthe influenceof alcohol
or drugs.
• Mowonly indaylightor goodartificiallight.
• Nevercarry passengers.
• Disengageblade(s) beforeshifting intoreverse.Back up slowly.
Alwayslookdown andbehind beforeand while backingtoavoida
back-overaccident.
3
Slowdownbeforeturning.Operatethemachinesmoothly.Avoid
erraticoperationandexcessivespeed.
* Disengageblade(s),setparkingbrake,stopengineandwaituntil
theblade(s)cometoacompletestopbeforeremovinggrass
catcher,emptyinggrass,uncloggingchute,removinganygrassor
debris,or makinganyadjustments.
• Neverleavearunningmachineunattended.Alwaysturnoff
blade(s),setparkingbrake,stopengineandremovekeybefore
dismounting.
• Useextracarewhenloadingorunloadingthemachineintoa
trailerortruck.Thismachineshouldnotbedrivenupordown
ramp(s),becausethemachinecouldlip over,causingserious
personalinjury.Themachinemustbepushedmanuallyon
ramp(s)toloadorunloadproperly.
° Mufflerandenginebecomehotandcancausea burn.Donot
touch.
• Checkoverheadclearancescarefullybeforedrivingunderlow
hangingtreebranches,wires,dooropeningsetc.,wherethe
operatormaybestruckorpulledfromthemachine,whichcould
resultinseriousinjury.
, Disengageallattachmentclutchesanddepressthebrakepedal
completelybeforeattemptingtostartengine.
• Yourmachineisdesignedtocutnormalresidentialgrassofa
heightnomorethan10".Donotattempttomowthroughunusually
tall,drygrass(e.g.,pasture)orpilesofdryleaves.Drygrassor
leavesmaycontacttheengineexhaustand/orbuilduponthe
mowerdeckpresentinga potentialfirehazard.
• Useonlyaccessoriesandattachmentsapprovedforthismachine
bythemachinemanufacturer.Read,understandandfollowall
instructionsprovidedwiththeapprovedaccessoryorattachment.
Foralistofapprovedaccessoriesandattachments,call1-800-
659-5917.
• Dataindicatesthatoperators,age60yearsandabove,are
involvedinalargepercentageofridingmower-relatedinjuries.
TheseoperatorsshouJdevaluatetheirabilitytooperatetheriding
mowersafelyenoughto protectthemselvesandothersfrom
seriousinjury.
° Ifsituationsoccurwhicharenotcoveredinthismanual,usecare
andgoodjudgment.Contactt-800-659-5917for informationand
assistance.
SLOPE OPERATION
Slopesareamajorfactorrelatedtolossofcontrolandtip-over
accidentswhichcanresultinsevereinjuryordeath.Allslopesrequire
extracaution,ifyoucannotbackuptheslopeorifyoufeeluneasyon
it,do notmowit.
Foryoursafety,usetheSlopeGuideincludedaspartofthismanual
tomeasureslopesbeforeoperatingthismachineonaslopedorhilly
area.Iftheslopeisgreaterthant5 degreesasshownontheSlope
Guide,donotoperatethismachineonthatareaorseriousinjurycould
result.
Do:
o
Mowup anddownslopes, notacross. Exerciseextremecaution
whenchanging directionon slopes.
• Watch for holes, ruts,bumps, rocks,or otherhiddenobjects.
Uneventerrain couldoverturnthe machine.Tallgrasscanhide
obstacles.
* Useslowspeed. Choosea lowenough speedsetting so that
you willnothave tostop or shiftwhileon the slope. Tiresmay
lose tractionon slopeseven thoughthe brakesarefunctioning
properly.Alwayskeep machinein gear when goingdown slopes
to takeadvantageof enginebraking action.
• Followthe manufacturer'srecommendationsfor wheelweights
or counterweightsto improvestability.For recommendations,call
1-800-659-5917.
• Use extracarewithgrasscatchersor otherattachments. These
canchange thestabilityofthe machine.
• Keep all movementonthe slopesslow and gradual. Donot make
suddenchanges in speedor direction. Rapidengagementor
brakingcould cause thefront ofthe machinetolift and rapidlyflip
over backwardswhich couldcause seriousinjury.
* Avoid startingor stoppingon a slope. If tireslosetraction,disen-
gage theblade(s) andproceedslowly straightdown theslope.
Do Not:
• Do notturn onslopes unlessnecessary;then,turn slowlyand
graduallydownhill,ifpossibEe,
• Do notmownear drop-offs,ditches or embankments.The mower
could suddenlyturn overffa wheel isover the edgeof a cliff,
ditch, or if an edgecavesin.
• Do nottry tostabilizethe machineby puttingyour foot on the
ground.
• Do notusea grass catcheron steepslopes.
• Do notmowon wetgrass.Reducedtraction couldcausesliding.
° Do not attemptto coastdownhill.Over-speedingmaycausethe
operatorto lose controlof themachine resultingin seriousinjury
or death.
• Do nottow heavypull behindattachments(e.g. leadeddumpcart,
lawnroller,etc.) onslopes greaterthan5 degrees.When going
downhill, theextraweighttendsto pushthe tractor andmay
causeyou to loosecontrol(e.g.tractor mayspeed up,brakingand
steeringability are reduced,attachmentmayjack-knifeand cause
tractorto overturn).
4
CHILDREN
Tragicaccidentscan occur ifthe operator is notalert to the presence
of children.Childrenare oftenattractedto the machine andthe mowing
activity.They do not understandthe dangers. Neverassumethat
children will remainwhereyoulast sawthem,
• Keepchildrenout ofthe mowingareaandin watchful careof a
responsibleadult other thanthe operator.
• Be alertand turn machineoff ifachild entersthe area,
• Before and whilebacking, Fookbehind anddownfor small
chUdren,
• Never carrychildren, evenwith theblade(s) shutoff.They may
fail off andbe seriouslyinjured or interferewith safemachine
operation.
• Use extremecarewhenapproaching blindcorners,doorways,
shrubs,trees orotherobjects that mayblockyourvisionof a child
whomay runintothe machine.
• Toavoid back-overaccidents,always disengagethe cutting
blade(s) beforeshiftinginto Reverse,If equipped,the "Reverse anozzle lock-open device.
............................. -Caoti-on-Mode_-(bla-d-e+s-_p-e-rate-whiJ_m+a_hin-e-tPde-s_n-t_v_ts-e)-....... +-- -E:<tih-g_|_h-all-cig_t_ttes_-cig_T-pip_-8._-d_th_u_e_ f
should notbe usedwhenchildrenor others arearound.
• Keepchildren awayfrom hotor running engines.They cansuffer
burnsfrom ahot muffler.
• Removekeywhen machineis unattendedto preventunauthorized
operation.
Neverallow childrenunder 14yearsof ageto operatethis machine.
Children _4andovershould readand understandthe instructions and
safe operation practicesinthis manual andon themachine and should
be trainedand supervised by anadult.
TOWING
• Towonly witha machinethat hasa hitchdesigned for towing.Do
not attachtowed equipmentexcept at the hitch point.
• Followthe manufacturersrecommendationfor weightlimits for
towedequipmentand towingon stopes. Forrecommendations,
call 1-800-659-5917.
• Neverallow childrenor othersin or ontowed equipment.
• On slopes, the weightofthetowed equipment maycause lossof
tractionand loss of control
• Alwaysuse extracautionwhentowing withamachine capableof
makingtightturns (e.g."zero-turn" ride-onmower). Makewide
turns to avoidjack-knifing.
• Travelslowly and allow extradistanceto stop.
• Do notcoast downhill.
SERVICE
Safe Handlingof Gasoline
Toavoid personalinjury or property damage use extremecare in
handlinggasoline.Gasolineis extremelyflammable andthe vapors are
explosive.Serious personaliniurycan occurwhengasoline is spilled
onyourself or your clotheswhich canignite.Washyourskin and
changeclothes immediately.
• Useonly anapproved gasolinecontainer.
• Neverfill containersinside a vehicleor ona truck ortrailer bed
witha plasticliner.Alwaysplacecontainers on the groundaway
from your vehicle beforefilling.
• When practical,removegas-poweredequipmentfromthe truck
or trailer andrefuel iton the ground.If thisisnot possible,then
refuelsuch equipmentona trailer witha portablecontainer,rather
thanfrom a gasoline dispenser nozzle.
, Keepthe nozzlein contact withthe rimofthe fueltank or
containeropening at all times untilfueiing is complete.Do notuse
ignition.
• Neverfuel machineindoors.
, Neverremove gas capor addfueI whilethe engineis hotor run-
ning.Allow engine to cool at least twominutesbeforerefueling.
o Neverover fill fuel tank. Filltank tono morethan _/2inchbelow
bottomof filler neckto allowspace forfuel expansion.
° Replacegasoline cap andtightensecurely.
• If gasoline is spilled,wipeit offthe engineand equipment.Move
machine to another area.Wait 5minutes beforestarting the
engine.
• To reducefire hazards,keepmachinefree ofgrass, leaves,or
other debrisbuild-up.Clean upoil or fuel spillageand removeany
fuel soakeddebris.
° Neverstorethe machine orfuel containerinsidewherethere is an
openflame, sparkor pilotlightas ona water heater,space heater,
furnace,clothes dryeror othergas appliances.
• Allowa machineto cool at leastfive minutes beforestoring.

GeneralService
• Neverrunanengineindoorsorina poorlyventilatedarea.Engine
exhaustcontainscarbonmonoxide,anodorless,anddeadlygas.
, Beforecleaning,repairing,orinspecting,makecertainthe
blade(s)andallmovingpartshavestopped.Disconnectthespark
plugwireandgroundagainsttheenginetopreventunintended
starting.
• Periodicallychecktomakesurethebladescometocomplete
stopwithinapproximately(5)fivesecondsafteroperatingthe
bladedisengagementcontrol.Ifthebladesdonotstopwithinthe
thistimeframe,yourmachineshouldbeservicedprofessionally
bya Searsorotherqualifiedservicedealer
, Checkbrakeoperationfrequentlyasitissubjectedtowearduring
normaloperation.Adjustandserviceasrequired.
• Checktheblade(s)andenginemountingboltsatfrequent
intervalsforpropertightness.Also,visuallyinspectblade(s)
fordamage(e.g.,excessivewear,bent,cracked).Replacethe
blade(s)withtheoriginalequipmentmanufacturer's(O.E.M.)
blade(s)only,listedinthismanual.Useofpartswhichdonot
meettheoriginalequipmentspecificationsmayleadtoimproper
performanceandcompromisesafety]
• Mowerbladesaresharp.Wrapthebladeorweargloves,anduse
extracautionwhenservicingthem.
• Keepallnuts,bolts,andscrewstighttobesuretheequipmentis
insafeworkingcondition.
• Nevertamperwiththesafetyinterlocksystemorothersafety
devices.Checktheirproperoperationregularly.
• Afterstrikingaforeignobject,stoptheengine,disconnectthe
sparkplugwire(s)andgroundagainsttheengine.Thoroughly
inspectthemachineforanydamageRepairthedamagebefore
startingandoperating.
• Neverattempttomakeadjustmentsorrepairstothemachine
whiletheengineisrunning.
• Grasscatchercomponentsandthedischargecoveraresubject
towearanddamagewhichcouldexposemovingpartsor allow
objectstobethrown.Forsafetyprotection,frequentlycheck
componentsandreplaceimmediatelywithoriginalequipment
manufacturer's(O.E.M.)partsonly,listedinthismanua].Useof
partswhichdonotmeettheoriginalequipmentspecificationsmay
leadtoimproperperformanceandcompromisesafety!
• Donotchangetheenginegovernorsettingsorover-speedthe
engine.Thegovernorcontrolsthemaximumsafeoperatingspeed
oftheengine.
° Maintainorreplacesafetyandinstructionlabels,asnecessary.
° Observeproperdisposallawsandregulationsforgas,oil,etc.to
protecttheenvironment.
o AccordingtotheConsumerProductsSafetyCommission(CPSC)
andtheU.S.EnvironmentalProtectionAgency(EPA),thisproduct
hasanAverageUsefulLifeofseven(7)years,or270hours
ofoperation.AttheendoftheAverageUsefulLife,buya new
machineorhavethemachineinspectedannuallybya Searsor
otherqualifiedservicedealertoensurethatallmechanicaland
safetysystemsareworkingproperlyandnotwornexcessively,
Failuretodosocanresultinaccidents,injuriesordeath.
DO NOT MODIFY ENGINE
Toavoidseriousinjuryordeath,donotmodifyengineinanyway.
Tamperingwiththegovernorsettingcanleadtoa runawayengineand
causeitto operateatunsafespeeds.Nevertamperwithfactorysetting
ofenginegovernor.
NOTICE REGARDING EMISSIONS
EngineswhicharecertifiedtocomplywithCaliforniaandfederal
EPAemissionregulationsforSORE(SmallOffRoadEquipment)are
certifiedtooperateonregularunleadedgasoline,andmayinclude
thefollowingemissioncontrolsystems:EngineModification(EM)and
ThreeWayCatalyst(TWC)if soequipped.
SPARK ARRESTOR
.....Ir;
This machineis equippedwith an internalcombustionengineand
shouldnot beused on or near any unimprovedforest-covered,
brushcoveredor grass-coveredland unlessthe engine'sexhaust
systemisequippedwith a spark arrestor meetingapplicablelocalor
statelaws(if any).
Ifa sparkarrestoris used,it shouldbe maintainedin effectiveworking
orderby theoperator.In the Stateof Californiathe above is required
bylaw (Section4442 ofthe CaliforniaPublic ResourcesCode).Other
statesmay havesimilar laws.Federaltawsapplyonfederal lands.
A sparkarrestorfor the muffleris availablethroughyour nearestSears
Partsand RepairService Center.
6
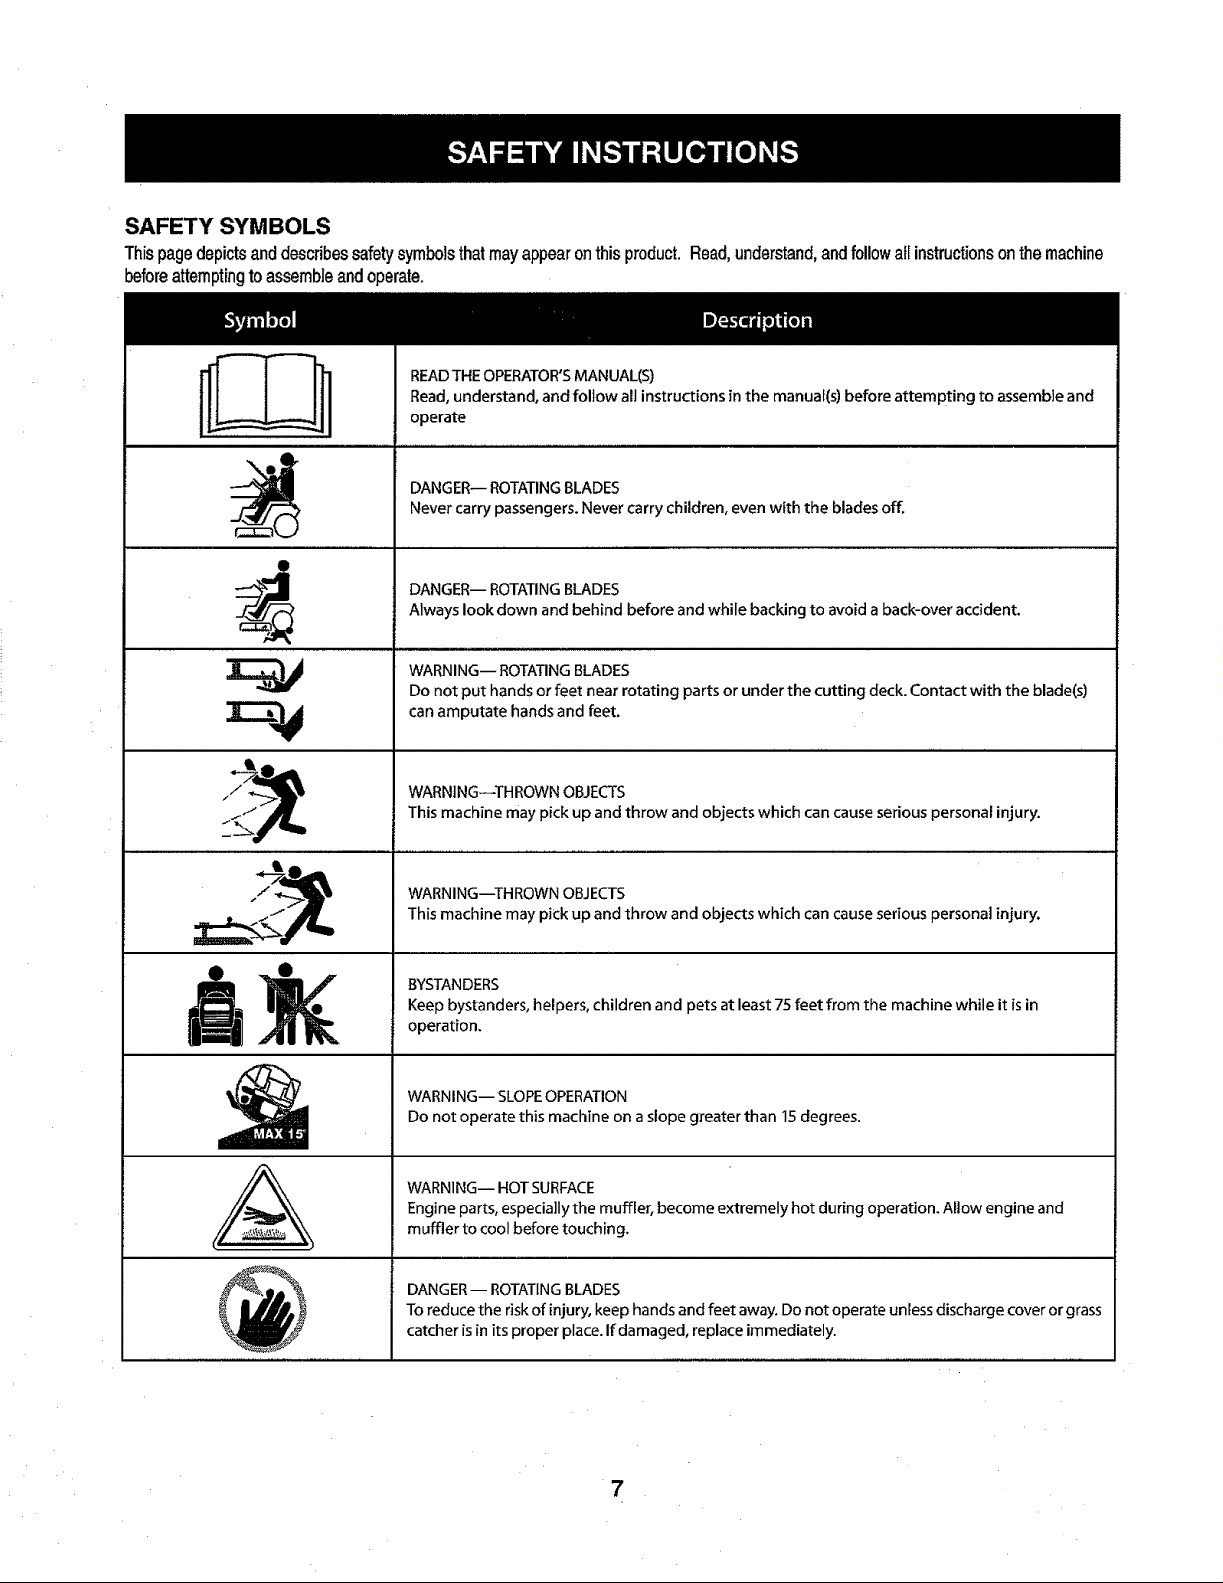
SAFETY SYMBOLS
Thispagedepictsanddescribessafetysymbolsthatmayappearonthisproduct.Read,understand,andfollowatlinstructionsonthemachine
beforeattemptingtoassembleandoperate.
READTHE OPERATOR'SMANUAL(S)
Read, understand, and follow all instructions in the manual(s) before attempting to assemble and
operate
DANGER-- ROTATINGBLADES
Never carry passengers. Never carry children, even with the blades off,
O
_, DANGER-- ROTATINGBLADES
& ,
Always look down and behind before and while backing to avoid a back-over accident.
WARNING-- ROTATING BLADES
Do not put hands or feet near rotating parts or under the cutting deck. Contact with the blade(s)
can amputate hands and feet.
WARNING--THROWN OBJECTS
This machine may pick up and throw and objects which can cause serious personal injury.
WARNING--THROWN OBJECTS
This machine may pick up and throw and objects which can cause serious personal injury.
BYSTANDERS
Keep bystanders, helpers, children and pets at least 7.5feet from the machine while it is in
operation.
WARNING-- SLOPEOPERATION
Do not operate this machine on a slope greater than 15 degrees.
WARNING-- HOTSURFACE
Engine parts, especia]Iy the muffler, become extremely hot during operation. Allow engine and
muffler to cool before touching.
,,, ,,,
DANGER-- ROTATINGBLADES
To reduce the risk of injury, keep hands and feet away. Do not operate unless discharge cover or grass
catcher isin its proper place. If damaged, replace immediately.
7
oo
Sightandholdthislevalwitha _rtica] tree...
oracomerofabuilding...
o
m
m
orafencepost
50
Usethispageas a guidetodetermineslopeswhereyoumaynotoperatesafely.
mowercouldoverturn and causeserious injury.Operateriding mowersupand down slopes,neveracrossthe faceofslopes.
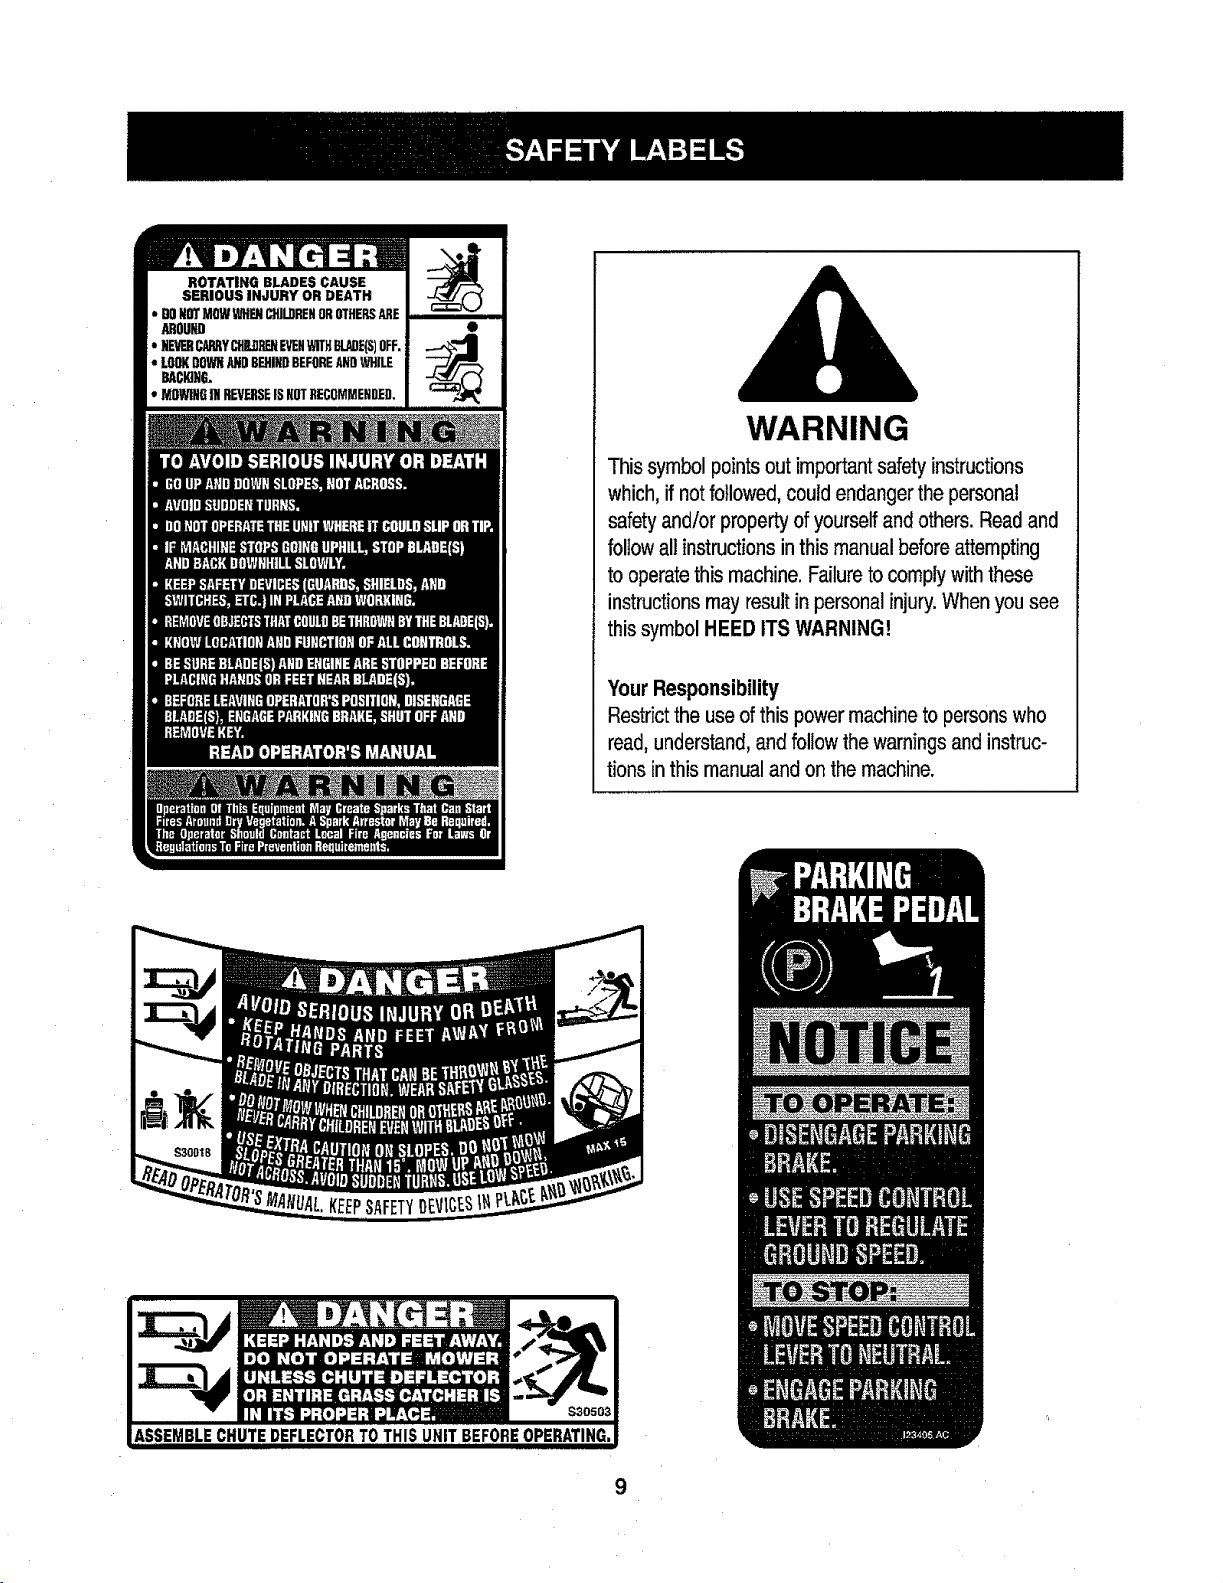
ROTATING BLADES CAUSE i
SERIOUS INJURY OR DEATH I
DONOTMOWWHENCH]InRENOROTHERSAREI
Mou_ I •
LOOKDOWNNil) BEHINDBEFOREANDWHILE |
_c_,G. I
NEVEHCARRYCHDRENEVEHWiTHBLeaE(S)OFF,I
MOWINGfli REVERSEIS NOTRECOMMENDED.J
WARNING
This symbol points outimportantsafety instructions
which, if not followed, could endanger the personal
safety and/or property of yourself and others. Read and
follow all instructionsin this manual before attempting
to operate this machine. Failure to comply with these
instructions may result in personal injury. When you see
this symbol HEED ITS WARNING!
Your Responsibility
Restrictthe use of thispower machine to persons who
read, understand, and follow the warnings and instruc-
tions inthis manual and on the machine.
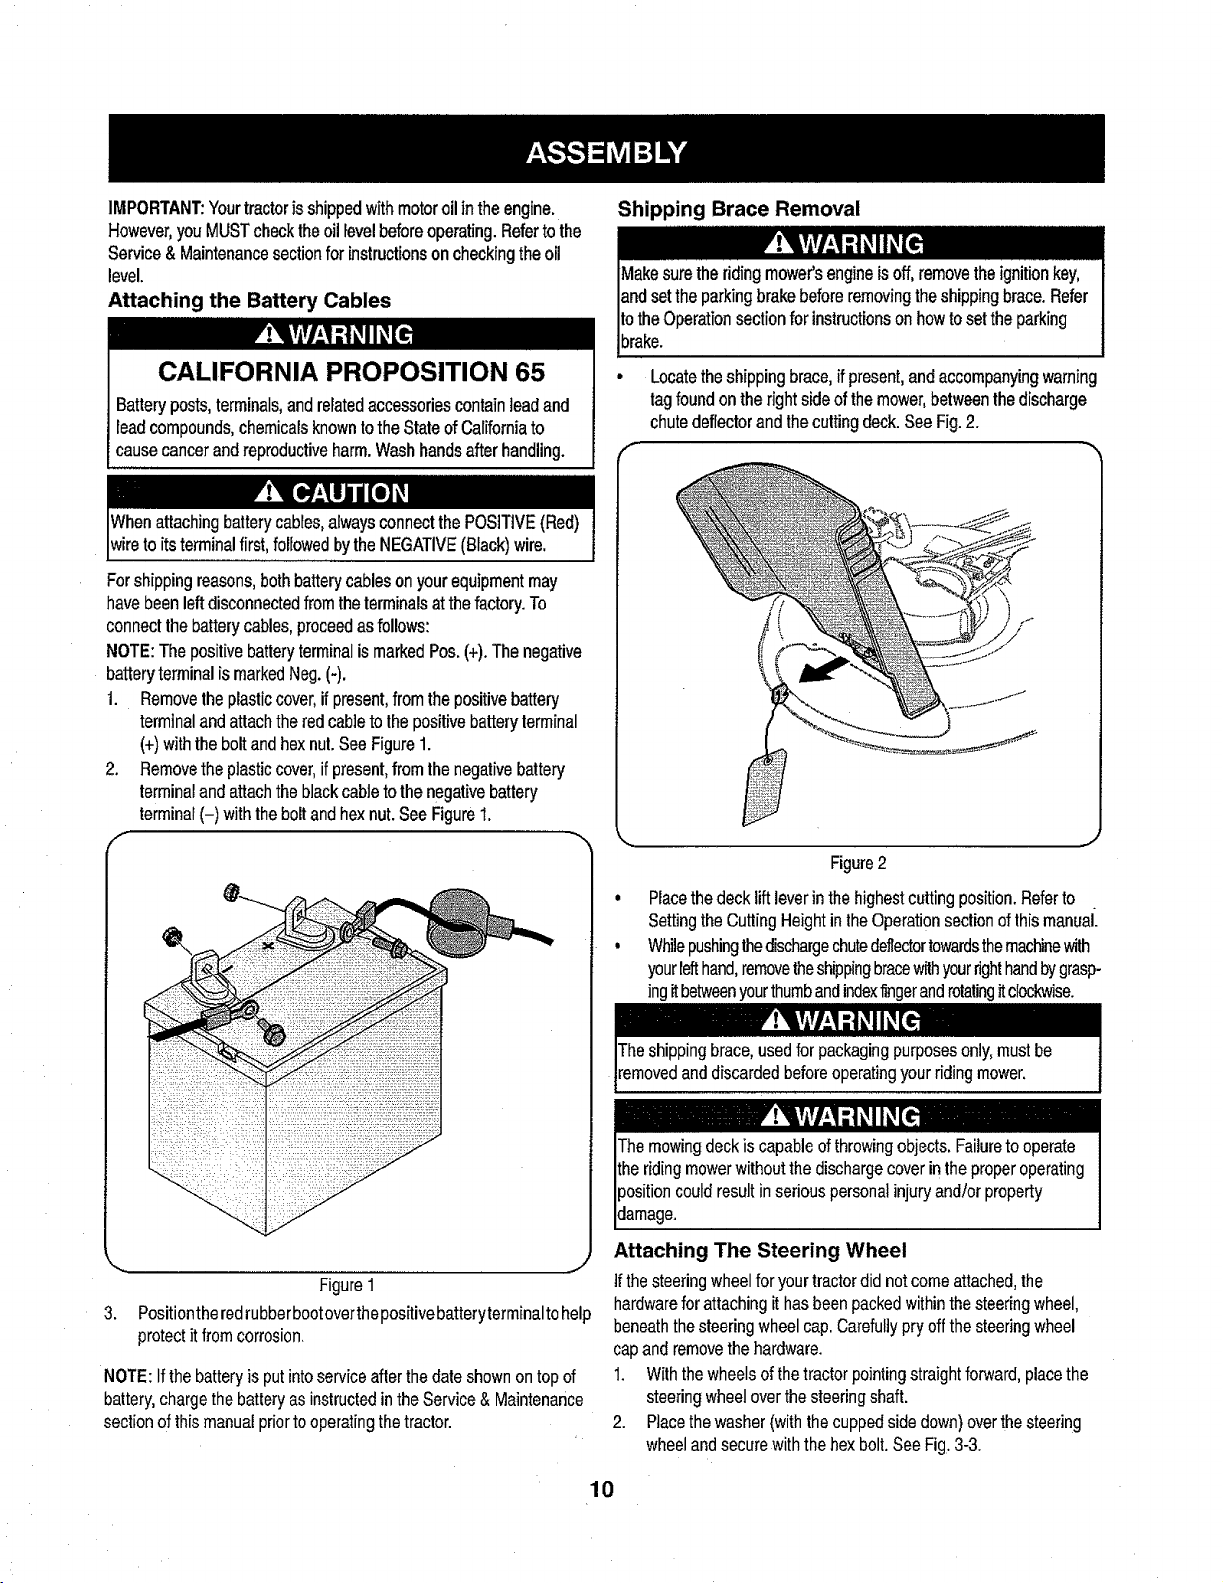
IMPORTANT:Yourtractorisshippedwithmotoroilinthe engine.
However,youMUSTchecktheoillevelbeforeoperating.Refertothe
Service& Maintenancesectionforinstructionsoncheckingtheoil
level.
Attaching the Battery Cables
CALIFORNIA PROPOSITION 65
Batteryposts,terminals,andrelatedaccessoriescontainleadand
leadcompounds,chemicalsknowntotheStateofCaliforniato
causecancerandreproductiveharm.Washhandsafterhandling.
Forshippingreasons,bothbatterycablesonyourequipmentmay
havebeenleftdisconnectedfromtheterminalsatthefactory.To
connectthebatterycables,proceedasfollows:
NOTE:ThepositivebatteryterminalismarkedPos.(+).Thenegative
batteryterminalismarkedNeg.(-).
1. Removetheplasticcover,if present,fromthepositivebattery
terminalandattachtheredcabletothepositivebatteryterminal
(+)withtheboltandhexnut.SeeFigure1.
2. Removetheplasticcover,ifpresent,fromthenegativebattery
terminalandattachtheblackcabletothenegativebattery
terminal(-) withtheboltandhexnut.SeeFigure1.
f
Shipping Brace Removal
Makesuretheridingmower'sengineisoff,removetheignitionkey,
andsettheparkingbrakebeforeremovingtheshippingbrace.Refer
totheOperationsectionforinstructionsonhowtosetthe parking
brake.
• Locatetheshippingbrace,ifpresent,andaccompanyingwarning
tagfoundontherightsideofthemower,betweenthedischarge
chutedeflectorandthecuttingdeck.SeeFig.2.
_,,, J
Figure2
• Placethedeckliftleverinthehighestcuttingposition.Referto
SettingtheCuttingHeightintheOperationsectionofthismanual.
• Whilepushingthedischargechutedeflectortowardsthemachinewith
yourlefthand,removetheshippingbracew_ yourrighthandbygrasp-
ingitbetweenyourthumbandindexfingerandrotatingitclockwise.
Figure1
3.
Positiontheredrubberbootoverthepositivebatteryterminalto help
protectitfrom corrosion.
NOTE:If the batteryis putintoserviceafter thedate shownon top of
battery,charge the batteryas instructedin the Service &Maintenance
sectionof thismanualpriorto operatingthetractor.
Theshipping brace,used for packagingpurposesonly,must be
removedanddiscardedbeforeoperatingyourriding mower.
Attaching The Steering Wheel
Ifthe steering wheelforyour tractordidnotcome attached, the
hardwarefor attachingit has beenpackedwithinthe steeringwheel,
beneaththe steeringwheelcap. Carefullypry off the steeringwheel
cap andremovethe hardware.
1. Withthe wheels of the tractorpointing straightforward,placethe
steeringwheel overthe steeringshaft.
2. Ptacethe washer (with the cuppedside down)overthe steering
wheelandsecurewith thehex bolt.See Fig, 3-3.
10
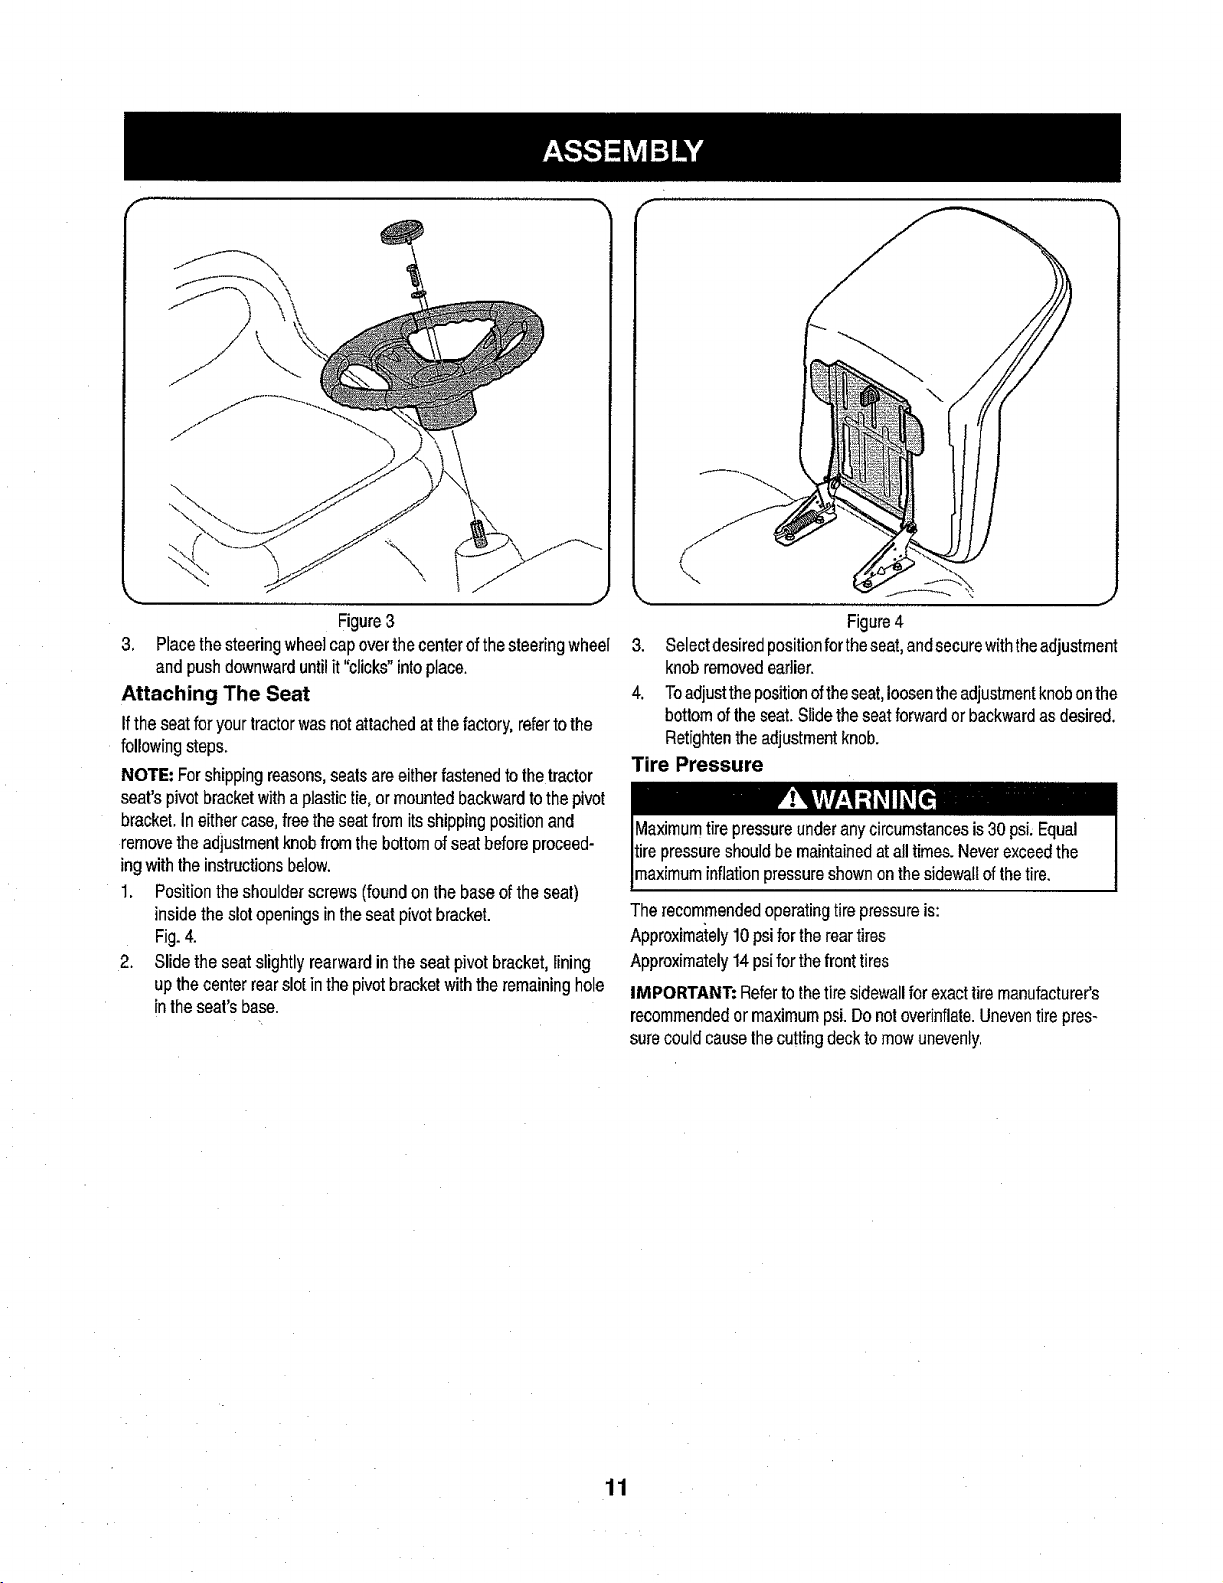
Figure3
3. Placethe steeringwheelcap overthe centerof the steeringwheeI
and push downwarduntilit "clicks"into place.
Attaching The Seat
Ifthe seatfor your tractor was notattached atthefactory, referto the
following steps.
NOTE: Forshippingreasons,sealsareeither fastenedtothe tractor
seat's pivotbracketwith a plastic tie, or mountedbackwardtothe pivot
bracket,Ineither case, freethe seatfrom itsshipping positionand
removethe adjustmentknob fromthe bottomof seat beforeproceed-
ingwiththe instructions below.
1. Position the shoulder screws(found on the base of the seat)
inside the slotopenings inthe seatpivot bracket.
Fig.4.
2. Slide the seat slightly rearward in theseat pivot bracket,lining
up thecenter rear slotinthe pivotbracket withthe remaininghole
in the sears base.
\
1
Figure4
3. Selectdesired positionfortheseat, andsecurewiththeadjustment
knob removedeadier.
4, Toadjustthe positionofthe seat,loosenthe adjustmentknobonthe
bottomofthe seat. Slidethe seatforward or backwardas desired.
Fletightenthe adjustmentknob.
Tire Pressure
pressureshouldbe maintainedat all times.Neverexceedthe
maximuminflationpressure shownonthe sidewallof the tire.
The recommendedoperatingtire pressureis:
Approximately10psi for the reartires
Approximately14 psi forthe fronttires
IMPORTANT: Referto thetire sidewallfor exacttire manufacturer's
recommendedor maximum psi. Do notoverinflate.Uneventire pres-
surecould cause thecuttingdeck tomowunevenly.
11
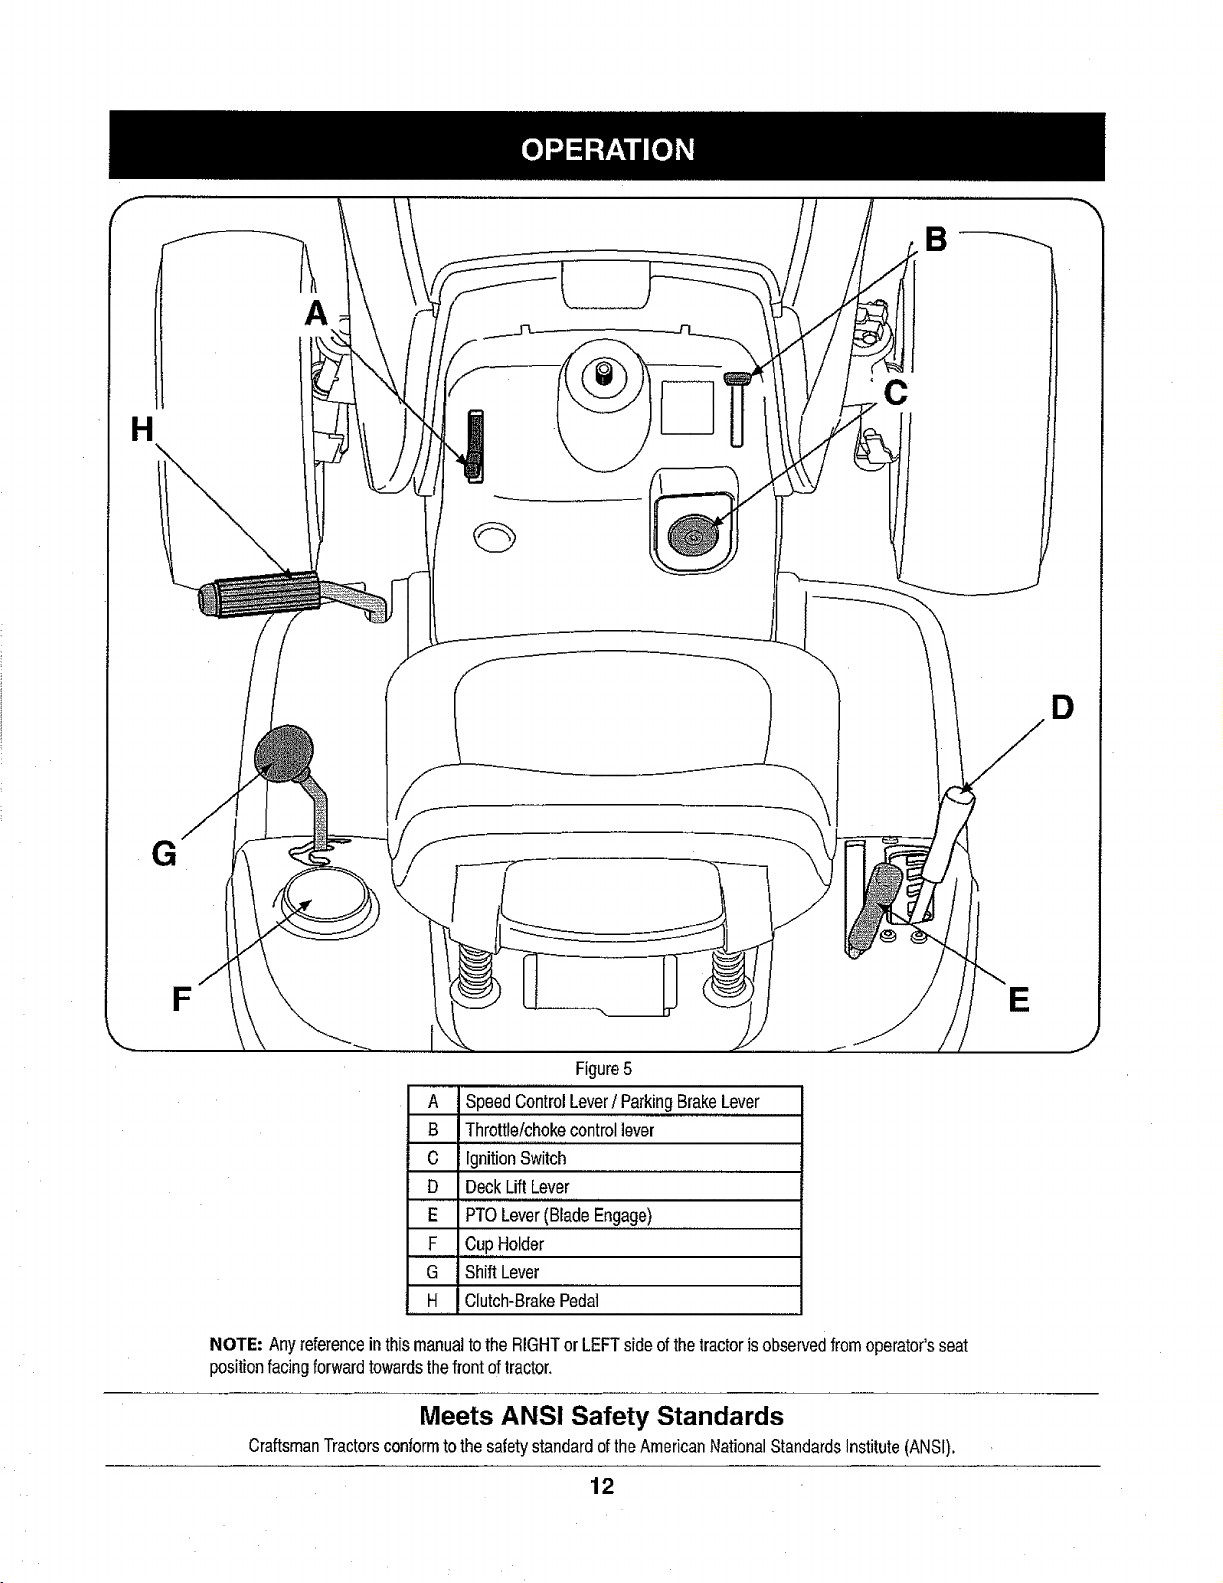
f
B
A
H
D
G
F
Figure5
A Speed Control Lever/Parking BrakeLever
B Throttle/choke controllever
C IgnitionSwitch
D Deck Lift Lever
E PTOLever(Blade Engage)
F ,,,Cup,,,Holder
G Shift Lever
H Clutch-Brake Pedal
NOTE-AnyreferenceinthismanualtotheRIGHTorLEFTsideofthetractoris observedfromoperator'sseat
positionfacingforwardtowardsthefrontoftractor.
Meets ANS! Safety Standards
CraftsmanTractorsconformto the safetystandard of the AmericanNational StandardsInstitute (ANSI).
E
12
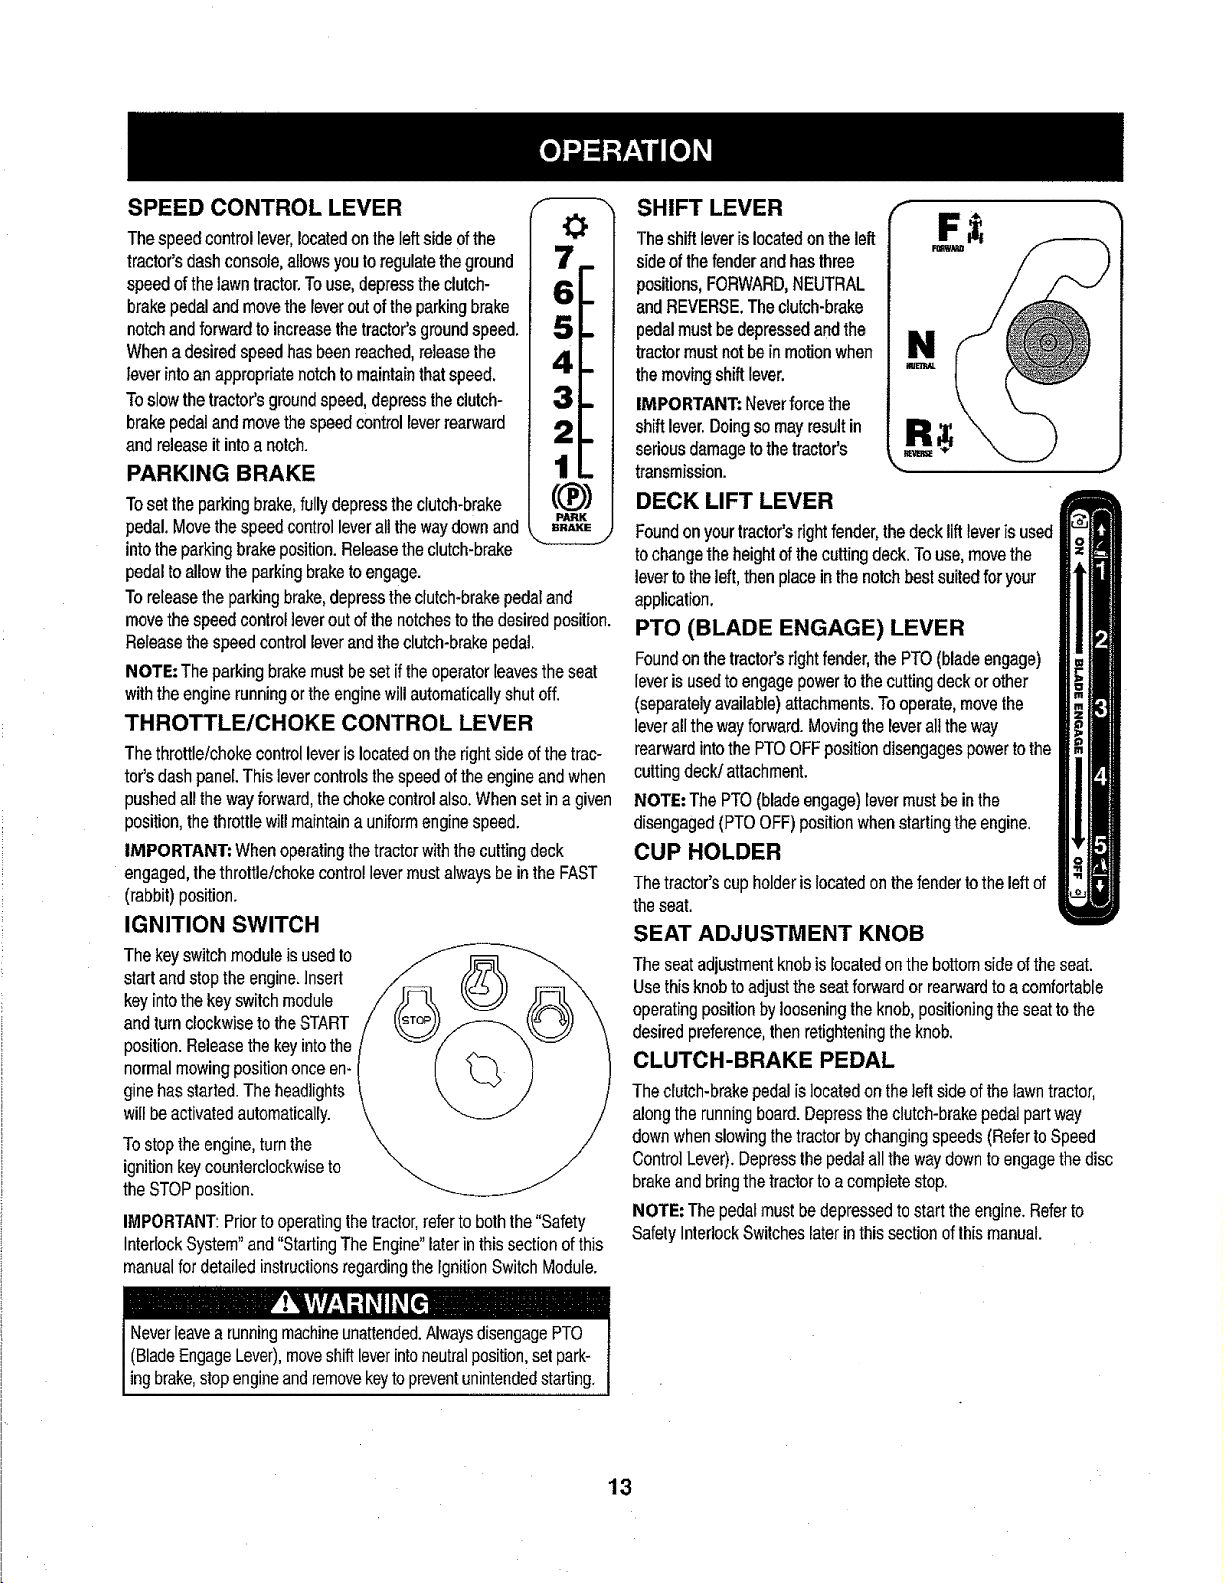
SPEEDCONTROLLEVER
The speedcontrol lever,locatedon lhe leftside ofthe
tractor's dash console, allows youtoregulatethe ground
speed ofthe lawntractor.Touse, depressthe clutch-
brake pedal and movethe leverout of the parkingbrake
notchand forward toincreasethe tractor'sground speed.
Whena desired speedhas beenreached,releasethe
leverintoan appropriatenotchto maintainthat speed.
Toslow thetractor's groundspeed,depress theclutch-
brakepedal and movethe speed controllever rearward
and release it intoa notch.
PARKING BRAKE
Tosetthe parkingbrake,fullydepresstheclutch-brake
pedal.Movethespeedcontrolleverallthewaydownand
intotheparkingbrakeposition.Releasetheclutch-brake
pedaltoallowtheparkingbraketoengage.
Toreleasethe parkingbrake,depress theclutch-brake pedaland
movethe speed controllever outofthe notchestothe desiredposition.
Releasethe speedcontrol leverand theclutch-brakepedal.
NOTE: The parkingbrakemust beset if the operatorleavesthe seat
withthe engine runningor theenginewill automaticallyshut off.
THROTTLE/CHOKE CONTROL LEVER
Thethrottle/choke controllever islocatedon the right sideof the trac-
tor's dashpanel.This levercontrols thespeed ofthe engineand when
pushed all thewayforward,the choke controlalso.When setin a given
position,the throttlewill maintain auniformengine speed.
IMPORTANT: Whenoperating thetractorwiththecuttingdeck
engaged,the throttle/choke controllevermust alwaysbe inthe FAST
(rabbit)position.
IGNITION SWITCH
The keyswitch moduleisused to
start andstop the engine.Insert
keyintothe keyswitch module
and turnclockwise to theSTART
position.Releasethe keyinto the
normalmowingposition once en-
gine has started.The headlights
will beactivatedautomatically.
Tostopthe engine,turnthe
ignitionkey counterclockwiseto
the STOP position.
IMPORTANT:Priortooperatingthe tractor,referto boththe "Safety
InterlockSystem"and "StartingThe Engine"later in thissection of this
manualfor detailed instructionsregardingthe IgnitionSwitch Module.
I
i
((!b)
P/iRK
SHIFT LEVER
Theshift leveris locatedon theleft
sideof the fenderand hasthree
positions,FORWARD,NEUTRAL
andREVERSE,The clutch-brake
pedalmust bedepressedand the
tractor mustnot be in motionwhen
the moving shift lever,
IMPORTANT: Neverforce the
shift lever.Doingso mayresultin
seriousdamageto the tractor's
transmission.
DECK LIFT LEVER
Foundonyourtractor'srightfender,thedeckliftleveris used
tochangetheheightofthecuttingdeck.Touse,movethe
levertotheleft,thenplaceinthe notchbestsuitedforyour
application.
PTO (BLADE ENGAGE) LEVER
Foundonthetractor'srightfender,thePTO(bladeengage)
leverisusedtoengagepowertothecuttingdeckor other
(separatelyavailable)attachments.Tooperate,movethe
leverallthewayforward.Movingtheleveralltheway
rearwardintothePTOOFFpositiondisengagespowertothe
cuttingdeck/attachment.
NOTE:ThePTO(bladeengage)levermustbeinthe
disengaged(Pro OFF)positionwhenstartingthe engine.
CUP HOLDER
Thetractor's cup holderis locatedon the fendertothe left of
the seat.
SEAT ADJUSTMENT KNOB
The seatadjustmentknobis locatedonthe bottom side of the seat.
Use this knob toadjust the seatforwardor rearwardto acomfortable
operatingposition byloosening theknob,posilioningthe seatto the
desired preference,then retighteningthe knob.
CLUTCH-BRAKE PEDAL
Theclutch-brake pedalislocated ontheleft sideof thelawntractor,
alongthe running board. Depressthe clutch-brakepedal part way
downwhen slowingthetractor bychanging speeds(Referto Speed
ControlLever).Depressthe pedalallthe waydown toengagethe disc
brakeand bring the tractorto acomplete stop.
NOTE: The pedalmust bedepressed to start the engine.Referto
Safely InterlockSwitcheslaterin this section of lhis manual.
,_ !_liVlv/_,!it Iill [l,
Neverleavea runningmachineunattended,AlwaysdisengagePTO
(BladeEngageLever),moveshift leverintoneutralposition,set park-
ng brake,stopeng neandremovekeyto preventunintendedstarting.
13

Gas and Oil Fill-up
Oil
IMPORTANT:Yourtractorisshippedwithmotoroilintheengine.
However,youMUSTchecktheoillevelbeforeoperating.Becareful
nottooverfil!.
Forinstructionsonhowtochecktheengineoil,refertoCheckingThe
EngineOilintheServiceandMaintenancesectionofthismanual.
Gasoline
Thegasolinetankislocatedunderthehood.Donotoverfill.
NOTE:Purchasegasolineinsmallquantities.Donotusegasolineleft
overfromthepreviousseason,tominimizegumdepositsinthefuel
system.
. Thisengineiscertifiedtooperateonunleadedgasoline.Forbest
results,fillthefueltankwithonlyclean,fresh,unleadedgasoline
witha pumpstickeroctaneratingof87orhigher.
• Gasohol(upto10%ethylalcohol,90%unleadedgasofineby
volume)is anapprovedfuel.Othergasofine/alcoholblends,such
asE85,arenotapproved.
, MethylTertiaryButylEther(MTBE)andunleadedgasofineblends
(uptoa maximumof15%MTBEbyvolume)areapprovedfuels.
Othergasoline/etherblendsarenotapproved.
• Fillfueltankoutdoorsorinwell-ventilatedarea.
• Donotoverfillfueltank.Filltankto nomorethan1/2inchbelow
bottomoffillernecktoallowspaceforfuelexpansion.
• Neverremovegascaporaddfuelwhiletheengineishotorrun-
ning.Allowenginetocoolat leasttwominutesbeforerefueling.
• Ifgasolineisspilled,wipeitofftheengineandequipment.Move
machinetoanotherarea.Wait5 minutesbeforestartingthe
engine.
TO Add Gasoline
1. Turnthe engineoffand let enginecool atleast2 minutesbefore
removingthe fuel cap. The gasolinetank islocatedunder the
hood. Removethe fuel cap byturning it counterclockwise.
2. Fillthe fueltankwithgasoline.Useonlyclean,fresh(no morethan
30daysold),unleadedgasoline.Filltankto nomorethan1/2 inch
belowbottomoffillerneckto allowspacefor fuelexpansion.
3. Reinstallthe fuel cap.
IMPORTANT: Donotoverfill thetank. Filltankto no morethan 1/2
inch belowbottomoffillerneck toallow spacefor fuel expansion.See
Fig.6.
Figure6
SAFETY INTERLOCK SYSTEM
The safetyinterlock systemis designedfor safeoperation ofthe trac-
tor. Ifthis systemshould ever malfunction,do not operatethe tractor.
Immediatelycontact 1-800-4-MY-HOMEto havethe systemserviced.
• The safetyinterlocksystem preventsthe enginefrom starting
unless the parkingbrake isengagedand the PTO(Blade Engage)
leveris inthe disengaged(OFF) position.
• The safety interlocksystem willautomatically shut offthe engineif
the operatorleavesthe seatbeforeengagingthe parkingbrake.
• Thesafetyinterlocksystemwillautomaticallyshut offthe engineif
theoperatorleavesthe tractor'sseatwiththe PTO(BladeEngage)
leverengaged,regardlessofwhethertheparkingbrakeis engaged.
• Theengine willautomaticallyshut offif the PTO(Blade Engage)
leveris movedinto the engaged(ON) position with theshift lever
in Reverse.
F: " FLI"tR11'
Avoid Serious Injury or Death
• Go UPand down slopes,notacross.
Avoidsudden turns.
Do not operatetheunit whereitcouldslip ortip.
If machinestopsgoing uphill,stopbladesand backdownhill
slowly.
Do not mowwhen childrenor othersare around.
Nevercarry children, evenwith bladesoff.
Lookdownand behindbeforeand whilebacking.
Keepsafety devices(guards,shields, andswitches) inplace
andworking.
Removeobjects that couldbethrown bythe blades,
Knowlocation and functionof allcontrols.
Besure blades and engineam stoppedbefore placinghandsor
feet nearblades.
• Beforeleavingoperator'sposition,stoptractor,disengage
blades,engage parkingbrake,shut engineoff, and removekey.
Read Operator's Manual
14
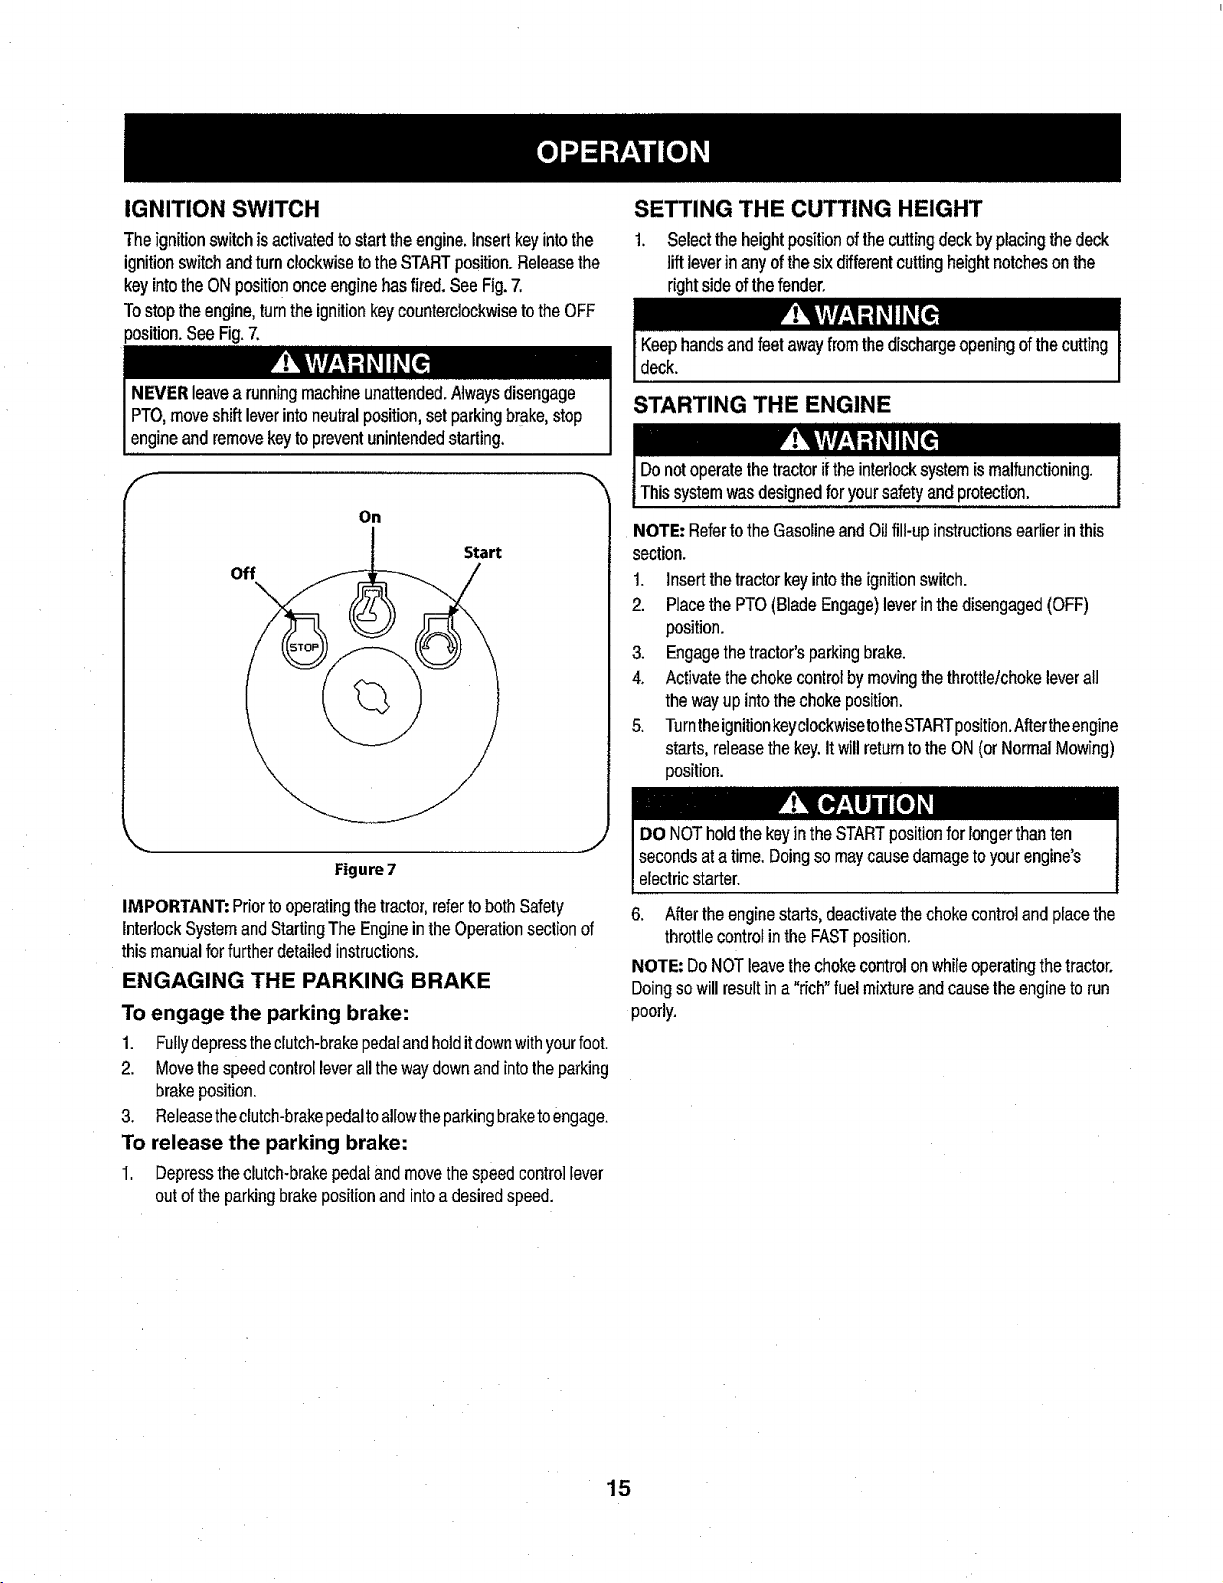
IGNITION SWITCH
Theignitionswitchisactivatedtostarttheengine,insertkeyintothe
ignitionswitchandturnclockwisetotheSTARTposition.Releasethe
keyintotheONposition onceenginehasfired.SeeFig.7.
Tostoptheengine,turntheignitionkeycounterclockwisetotheOFF
position.SeeFig.7.
SETTING THE CUTTING HEIGHT
1. Selecttheheightpositionofthecuttingdeckbyplacingthedeck
liftleverinanyofthesixdifferentcuttingheightnotchesonthe
rightsideofthefender.
NEVERleavea runningmachineunattended.Alwaysdisengage
PTO,moveshiftleverintoneutralposition,setparkingbrake,stop
engineandremovekeytopreventunintendedstarting.
On
Start
off
Figure 7
IMPORTANT:Priortooperatingthetractor,refertobothSafety
interlockSystemandStartingTheEngineintheOperationsectionof
thismanualforfurtherdetailedinstructions.
ENGAGING THE PARKING BRAKE
To engage the parking brake:
1. Fuflydepresstheclutch-brakepedalandholditdownwithyourfoot.
2. Movethespeedcontrolleverallthewaydownandintotheparking
brakeposition.
3. Releasetheclutch-brakepedaltoallowtheparkingbraketoengage.
To release the parking brake:
1. Depresstheclutch+brakepedalandmovethespeedcontrollever
outoftheparkingbrakepositionandintoadesiredspeed.
STARTING THE ENGINE
NOTE:RefertotheGasolineandOiJfill-upinstructionsearlierinthis
section.
1. Insertthetractorkeyintotheignitionswitch.
2. PlacethePTO(BladeEngage)leverinthedisengaged(OFF)
position.
3. Engagethetractor'sparkingbrake.
4. Activatethechokecontrolbymovingthethrottletchokeleverall
thewayupintothechokeposition.
5. TurntheignitionkeyclockwisetotheSTARTposition.Aftertheengine
starts,releasethekey.ItwillreturntotheON(orNormalMowing)
position.
DO NOT holdthe keyin theSTARTpositionfor longerthan ten
secondsat a time. Doingso maycausedamagetoyour engine's
electricstarter.
6. Aftertheengine starts, deactivatethechoke controland placethe
throttlecontrol inthe FASTposition.
NOTE: Do NOTleave the chokecontrolonwhileoperatingthe tractor.
Doingso willresultina "rich" fuel mixtureand cause theengineto run
poorly.
15
STOPPING THE ENGINE
Ifyoustrikeaforeignobject,stoptheengine,disconnectthespark
plugwire(s)andgroundagainsttheengine.Thoroughlyinspectthe
machineforanydamage.Repairthedamagebeforerestartingand
operating
1. ifthebladesareengaged,placethe PTO(BladeEngage)leverin
thedisengaged(OFF)position.
2. TurntheignitionkeycounterclockwisetotheSTOPposition.
3. Removethekeyfromtheignitionswitchtopreventunintended
starting.
DRIVING THE TRACTOR
Avoidsudden starts, excessivespeedand suddenstops.
Do not leavetheseat of the tractorwithoutfirst placingthe PTO
(Blade Engage) leverin thedisengaged(OFF) position,depressing
the brakepedaland engagingtheparking brake. Ifleavingthe tractor
unattended,alsoturn theignitionkeyoff and removethe key.
1. Placetheshiftleverinneutral,
2. Engagetheparkingbrake,
3. Shutengineoffandremovethekey.Doingsowillminimizethe
possibilityofhavingyourlawn"browned"byhotexhaustfrom
yourtractor'srunningengine.
Ifunitstallswithspeedcontrolinhighspeed,or ifunitwillnotoperate
withspeedcontrolleverina lowspeedposition,proceedasfollows:
1+ PlaceshiftleverinNEUTRAL.
2. Restartengine.
3. Placespeedcontrolleverinhighestspeedposition.
4. Releaseclutch-brakepedalfully.
5+ Depressclutch-brakepedal.
6. Placespeedcontrolleverindesiredposition.
7. PlaceshiftleverineitherFORWARDor REVERSE,andfollow
normaloperatingprocedures.
DRIVING ON SLOPES
RefertotheSLOPEGAUGEintheSafetyInstructionssectionofthe
manualtohelpdetermineslopeswhereyoumayoperatethistractor
safely.
Do not mowon inclineswitha slopein excessof 15degrees(a rise
ofapproximately 2-1/2feet every10feet). Thetractorcouldoverturn
andcause serious injury.
1. Depressthe clutch-brakepedalto releasethe parkingbrakeand
thenletthe pedal up.
2. Movethe throttle leverintothe FAST(rabbit) position.
3. Placethe shift leverin eitherthe FORWARDorREVERSE
position.
IMPORTANT: Do NOTusethe shift leverto changethe directionof
travelwhenthe tractoris in motion.Always usethe clutch-brake pedat
to bringthe tractor to a complete stopbeforeshifting.
4. Releasethe parkingbrakeby depressingtheclutch-brake pedal
and positioningthe speed controlleverin the desiredposition.
IMPORTANT: First-timeoperatorsshoulduse speedpositions1or
2. Becomecompletelyfamiliarwiththe tractor'soperationand controls
beforeoperating thetractorin higherspeed positions.
5. Releaseclutch-brakepedalslowlyto put unitinto motion.
6. The lawntractor isbroughtto astop by depressingthe clutch-
brakepedal.
NOTE: Whenoperatingthe unitinitially,therewillbe little difference
betweenthe highesttwo speedsuntilafter the belts haveseated
themselvesinto the pulleysduringthe break-inperiod.
rP1 [.el
WARNING! Beforeleavingthe operator'spositionfor any reason,
disengagethe blades,place theshiftlever inneutral,engagethe
parkingbrake,shut engine offand removethe key.
• Mow upand down slopes,NEVERacross.
• Exercise extremecautionwhenchangingdirection onslopes.
• Watch for holes, ruts,bumps, rocks,or otherhiddenobjects.
Uneventerrain could overturnthe machine.Tallgrasscan hide
obstacles.
, Avoidturns whendriving on aSlope.If aturn mustbe made,turn
downthe slope.Turningup a slopegreatly increasesthe chance
ofa roll over.
• Avoidstoppingwhendriving upa slope. Ifit is necessaryto stop
whiledriving upa slope,start up smoothlyandcarefully to reduce
thepossibilityofflipping thetractoroverbackward.
ENGAGING THE BLADES
Engagingthe PTO(Blade Engage)transfers powerto thecutting deck
or other(separately available)attachments.Toengagethe blades,
proceedas follows:
1. Movethe throtUeichokecontrolleverto theFAST(rabbit) position.
2. Graspthe PTO (Blade Engage)leverand pivotitall theway
forwardinto theengaged(ON) position.
3. Keepthe throttle leverin theFAST(rabbit) positionfor the most
efficientuse ofthe cutting deckor other(separatelyavailable)
attachments.
NOTE: Theengine will automaticallyshut offif thePTO(Blade
Engage)lever is movedintothe engaged(ON) positionwith the shift
leverin Reverse.
IMPORTANT;Whenstoppingthetractorforanyreasonwhileona
grasssurface,always:
16
MULCHING
A mulch kit isavailable asan attachment, Mulching isa processof
recirculating grassclippings repeatedly beneath the cutting deck,
The ultra-fine clippings arethen forced backinto the lawn where
. they act asa natural fertilizer.
A mulch kitcan be purchased.See the ReplacementParts & Attach-
mentssection of this manualfor more information.
USING THE DECK LIFT LEVER
Toraisethe cuttingdeck,movethedeck liftleverto the left, thenplace
it in thenotch bestsuited for yourapplication. Referto SettingThe
CuttingHeight earlierin thisOperationsection.
MOWING
I_he machine
while it is in operation.Stop machineif anyone entersthe area.
The followinginformation will behelpfulwhen usingthe cutting deck
withyourtractor:
Planyourmowingpatterntoavoiddischargeofmaterialstoward
roads,sidewalks,bystandersandthelike.Also,avoiddischarging
materialagainstawallorobstructionwhichmaycausedischarged
materialtoricochetbacktowardtheoperator.
HEADLIGHTS
, The lampsare ON wheneverthe tractor'sengineis running.
, The lampsturn OFF whenthe ignition keyis movedtothe STOP
position.
• Do notmowat highgroundspeed, especiallyifa mulch kitor
grasscollector isinstalled.
• Forbest resultsit is recommendedthatthe first two laps becut
with the dischargethrowntowardsthe center.After thefirsttwo
laps, reversethe directiontothrowthe discharge to the outside
forthe balanceofcutting.This willgivea better appearancetothe
lawn.
• Do notcutthe grasstoo short. Short grass invitesweedgrowth
andyellowsquickly indry weather.
• Mowing should alwaysbe donewith theengine at full throttle.
• Underheavier conditionsitmaybe necessaryto go back overthe
cut areaa secondtimeto geta cleancut.
• Do NOTattemptto mowheavy brushand weedsand extremely
tall grass.Yourtractor is designedto mowlawns,NOT clear
brush.
• Keep the bladessharpandreplacethe blades whenworn. Refer
toCutting Bladesin the-Servicesection of this manualfor proper
bladesharpeninginstructions.
17
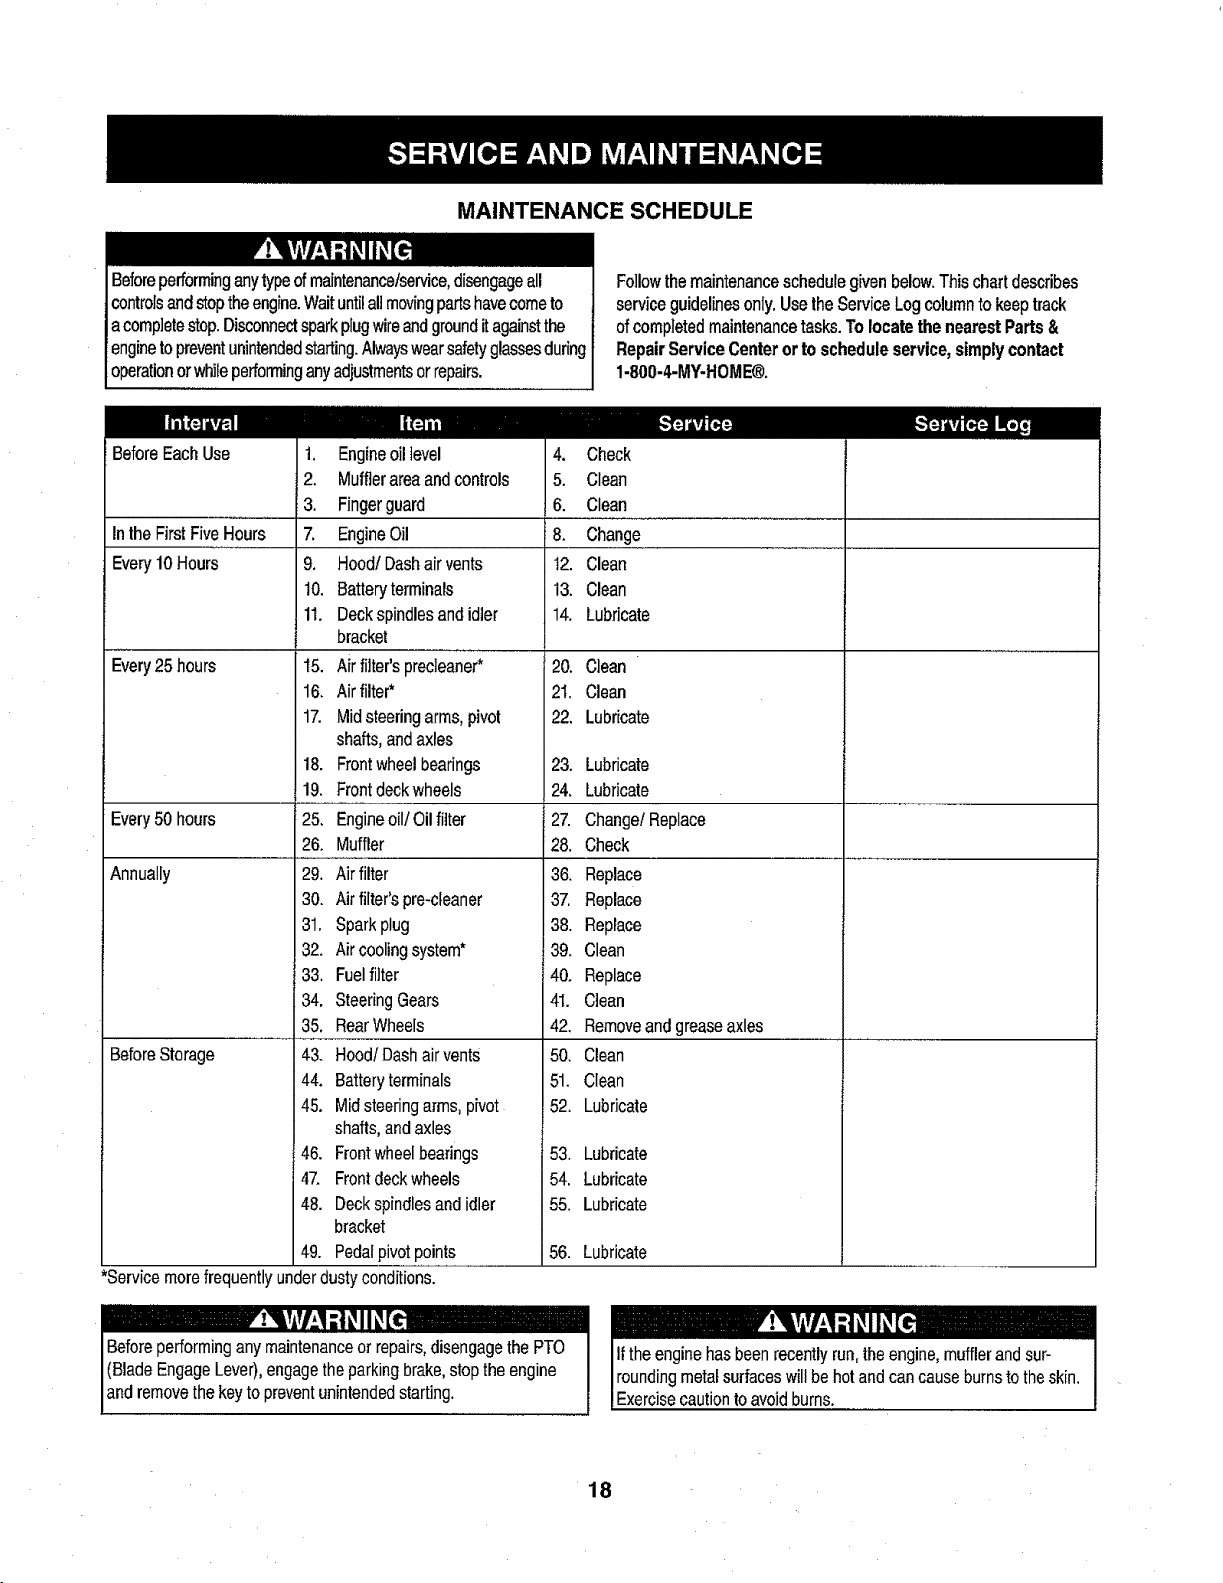
MAINTENANCE SCHEDULE
Beforeperforminganytypeofmaintanance/ser_ce,disengageall 1
controlsandstoptheengine.Waituntilallmovingpartshavecometo t
acompletestop.Disconnectsparkplugwireandgrounditagainstthe t
enginetopreventunintendedstarting.AlwayswearsafetyglassesduringI
operationorwhileperforminganyadjustmentsorrepairs, i
I_ _ [_l_j
BeforeEachUse
Inthe FirstFiveHours
Ever),10 Hours
Every25 hours
Every50 hours
Annually
BeforeStorage
*Service merefrequentlyunderdustyconditions.
1. Engineoi!level
2. Mufflerarea andcontrols
3. Fingerguard
7. EngineOil
9. Hood/Dash air vents
10. Battery terminals
11. Deck spindlesand idler
bracket
15. Air filter'sprecieaner*
16. Airfilter*
17. Midsteering arms,pivot
shafts,andaxles
18. Frontwheelbearings
19. Frontdeckwheels
25. Engineoil/Oil fitter
26. Muffler
29. Air filter
30. Air filter'spre-cfeaner
31. Sparkplug
32. Air coolingsystem*
33. Fuelfilter
34. SteeringGears
35. RearWheels
43. Hood/Dash air vents
44. Battery terminals
45. Mid steeringarms, pivot
shafts,andaxles
46. Frontwheelbearings
47. Frontdeckwheels
48. Deck spindlesand idler
bracket
49. Pedalpivot points
4. Check
5. Clean
6. Clean
8. Change
12. Clean
13. Clean
14. Lubricate
20. Clean
2I. Clean
22. Lubricate
23.
24.
27.
28.
36.
37.
38.
39.
40.
41.
42.
50.
51.
52.
53. Lubricate
54. Lubricate
55. Lubricate
56. Lubricate
Followthemaintenanceschedulegivenbelow.Thischartdescribes
serviceguidelinesonly.UsetheServiceLogcolumntokeeptrack
ofcompletedmaintenancetasks.To locatethe nearestParts&
RepairServiceCenterorto scheduleservice,simplycontact
1-800-4-MY-HOME®.
Lubricate
Lubricate
Change! Replace
Check
Replace
Replace
Replace
Clean
Replace
Clean
Removeand grease axles
Clean
Clean
Lubricate
Beforeperforming anymaintenanceor repairs,disengagethe PTO
(Blade Engage Lever),engagethe parkingbrake,stop theengine
andremovethe key to preventunintendedstarting.
Ifthe enginehasbeenrecently run,theengine,muffler and sur-
roundingmetalsurfaceswill be hot andcancause burnsto the skin.
Exercisecautionto avoid burns.
18
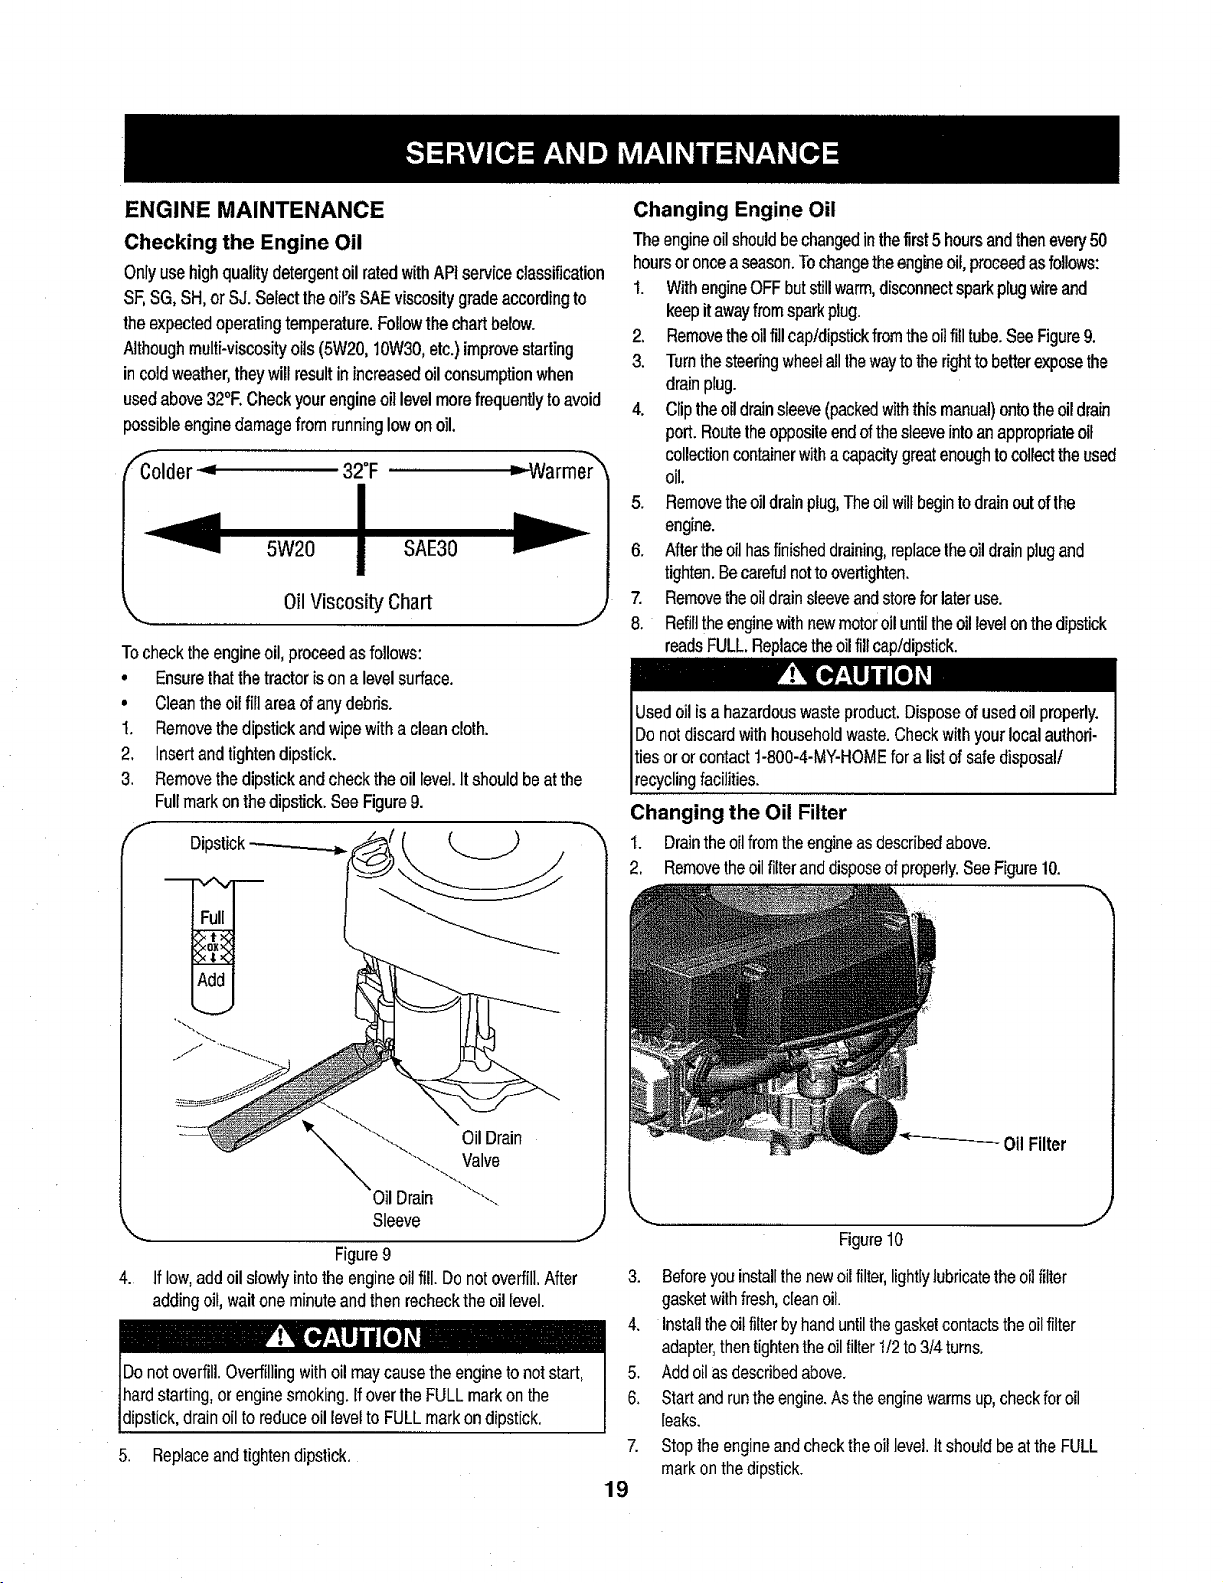
ENGINE MAINTENANCE
Checking the Engine Oil
OnlyusehighqualitydetergentoilratedwithAPIserviceclassification
SF,SG,SH,orSJ.Selecttheoil'sSAEviscositygradeaccordingto
theexpectedoperatingtemperature.Followthechartbelow.
Althoughmulti-viscosityoils(5W20,10W30,etc.)improvestarting
incoldweather,theywillresultinincreasedoilconsumptionwhen
usedabove32°1:.Checkyourengineoillevelmorefrequentlytoavoid
possibleenginedamagefromrunninglowonoil.
/CColder_ 32°F _ Warmer_
SAE30
Oil Viscosity Chart j
Tochecktheengine oil, proceedas follows:
• Ensurethatthe tractorison a levelsurface.
• Cleanthe oil fill areaof anydebris.
1. Removethedipstick andwipewitha cleancloth.
2, Insertand tightendipstick.
3. Removethedipstick and checkthe oil level.It should beat the
Fullmark onthe dipstick. See Figure9.
Dipstick__
Changing Engine Oil
Theengineoilshouldbechangedinthefirst5 hoursandthenevery50
hoursor oncea season.Tochangethe engineoil,proceedas follows:
1. WithengineOFFbutstillwarm,disconnectsparkplugwireand
keepit awayfromsparkplug.
2. Removetheoilfill capldipstickfromthe oilfill tube.SeeFigure9.
3. Turnthe steeringwheelall lhe waytothe rightto betterexposethe
drain plug.
4. Clipthe oil drainsleeve(packedwith this manual)onto theoil drain
port. Routetheoppositeendofthe sleeveintoanappropriateoil
collectioncontainerwitha capacitygreatenough tocollectthe used
oil,
5. Removethe oildrainplug,The oilwill begintodrain outofthe
engine.
6. Afterthe oilhasfinisheddraining,replacethe oildrainplugand
tighten.Becarefulnottoovertighten.
7. Removethe oitdrainsleeveandstorefor lateruse.
8. Refillthe enginewithnewmotoroil untilthe oillevelon thedipstick
readsFULL,Replacetheoil fillcap/dipstick.
It'_ist of safedisposal!
recyclingfacilities.
Changing the Oil Filter
"L Draintheoilfromthe engineas describedabove.
2. Removetheoilfilteranddisposeofproperly.SeeFigure10.
OilDrain
Valve
OilDrain
Sleeve
Figure9
4. If low,add oil slowlyintothe engineoilfill. Do notoverfill.After
addingoil, waitone minuteand thenrecheckthe oil level.
5. Replaceand tightendipstick.
-Oil Filter
J
Figure10
3. Beforeyou installthenewoilfilter,lightlylubricatethe oil filter
gasketwith fresh,cleanoil.
4. Installthe oilfilterby hand untilthegasketcontactsthe oilfilter
adapter,thentightentheoilfilter I/2 to 3/4turns,
5. Add oilas describedabove.
6. Startandrunthe engine.As theenginewarmsup,checkfor oil
leaks.
7. Stop theengineand check the oillevel.It shouldbeat the FULL
markon the dipstick.
19
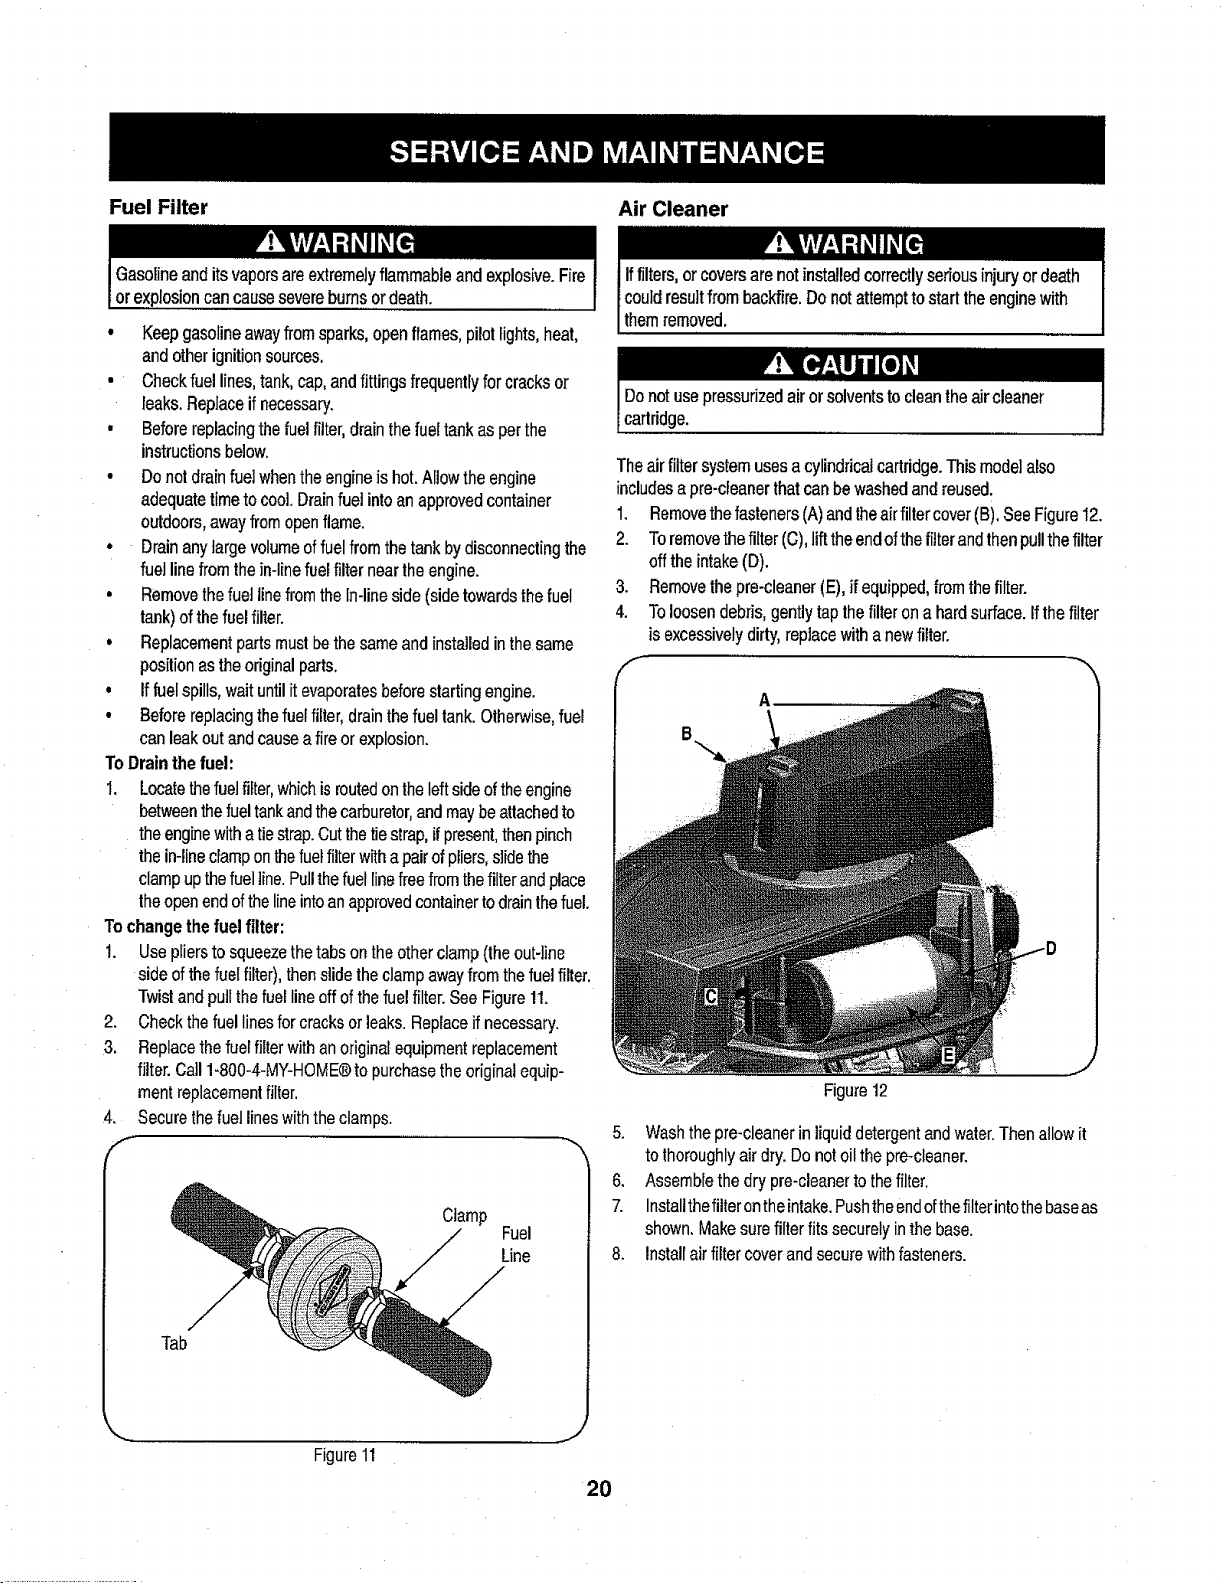
Fuel Filter
Air Cleaner
Gasolineanditsvaporsareextremelyflammableandexplosive.Fire
orexplosioncancausesevereburnsordeath.
, Keepgasolineawayfromsparks,openflames, pilotlights,heat,
andother ignitionsources,
• Check fuel lines,tank, cap,and fittingsfrequentlyfor cracks or
leaks. Replaceif necessary.
• Before replacingthe fuelfilter,drain thefueltank as perthe
instructionsbelow.
• Do notdrainfuel whenthe engineis hot.Allow theengine
adequatetimeto cool. Drainfuelinto an approvedcontainer
outdoors,awayfrom openflame.
,, Drainanylarge volumeof fuelfrom the tank bydisconnectingthe
fuel linefromthein-line fuel filternear theengine.
• Removethefuel linefromthe In-lineside (sidetowardsthefuel
tank)of the fuelfilter.
, Replacementparts must bethe sameand installedin the same
positionas the originalparts.
• If fuelspills, waituntil itevaporatesbefore starting engine.
• Beforereplacingthefuelfilter, drainthe fueltank.Otherwise,fuel
can leak out andcause a fireor explosion.
To Drainthe fuel:
I. Locatethefuel filter,which isroutedon the left sideof theengine
betweenthe fueltank andthe carburetor,and maybeattachedto
the enginewith atie strap.Cutthe tie strap,if present,thenpinch
the in-lineclampon thefuelfilterwith a pairof pliers,slidethe
clampupthefuel line.Pullthe fuellinefree fromthefilterand place
the openendofthe lineintoan approvedcontainerto drainthe fuel.
Tochange thefuel filter:
1. Use pliersto squeezethetabs on the other clamp(the out-line
sideof the fuelfilter), thenslide the clampawayfrom thefuelfilter,
Twistand pullthe fuelline off ofthe fuel filter.See Figure11.
2. Checkthe fuellinesfor cracks orleaks.Replace ifnecessary.
3. Replacethe fuel filterwithan original equipment replacement
filter.Call 1-800-4-MY-HOME@to purchasetheoriginalequip-
mentreplacementfilter.
4. Securethe fuel lines withthe clamps.
Clamp
Line
Fuel
Iffilters,orcoversarenotinstalledcorrectlysedousinjuryordeath
couldresultfrombackfire.Donotattempttostarttheenginewith
themremoved.
Donotusepressurizedairorsolventstocleantheaircleaner
cartridge.
Theairfiltersystemusesacylindricalcartridge.Thismodelalso
includesapre-cleanerthatcanbewashedandreused.
1. Removethefasteners(A)andtheairfiltercover(B),SeeFigure12.
2. Toremovethefilter(C),lifttheendofthefilterandthenpullthefilter
offtheintake(D).
3. Removethepre-cleaner(E),ifequipped,fromthefilter.
4. Toloosendebris,gentlytapthefilterona hardsurface,ifthefilter
isexcessivelydirty,replacewithanewfilter.
A
J
Figure12
5. Wash the pre-cleanerin liquiddetergentandwater.Thenallow it
to thoroughlyair dry.Do not oilthe pre-cleaner.
6. Assemblethe dry pre-cleanerto thefilter.
7. Installthefilterontheintake.Pushthe endofthefilterintothe baseas
shown.Make surefilter fits securely inthe base.
8. Installair filtercoverand securewith fasteners.
Tab
.... J
Figure11
2O
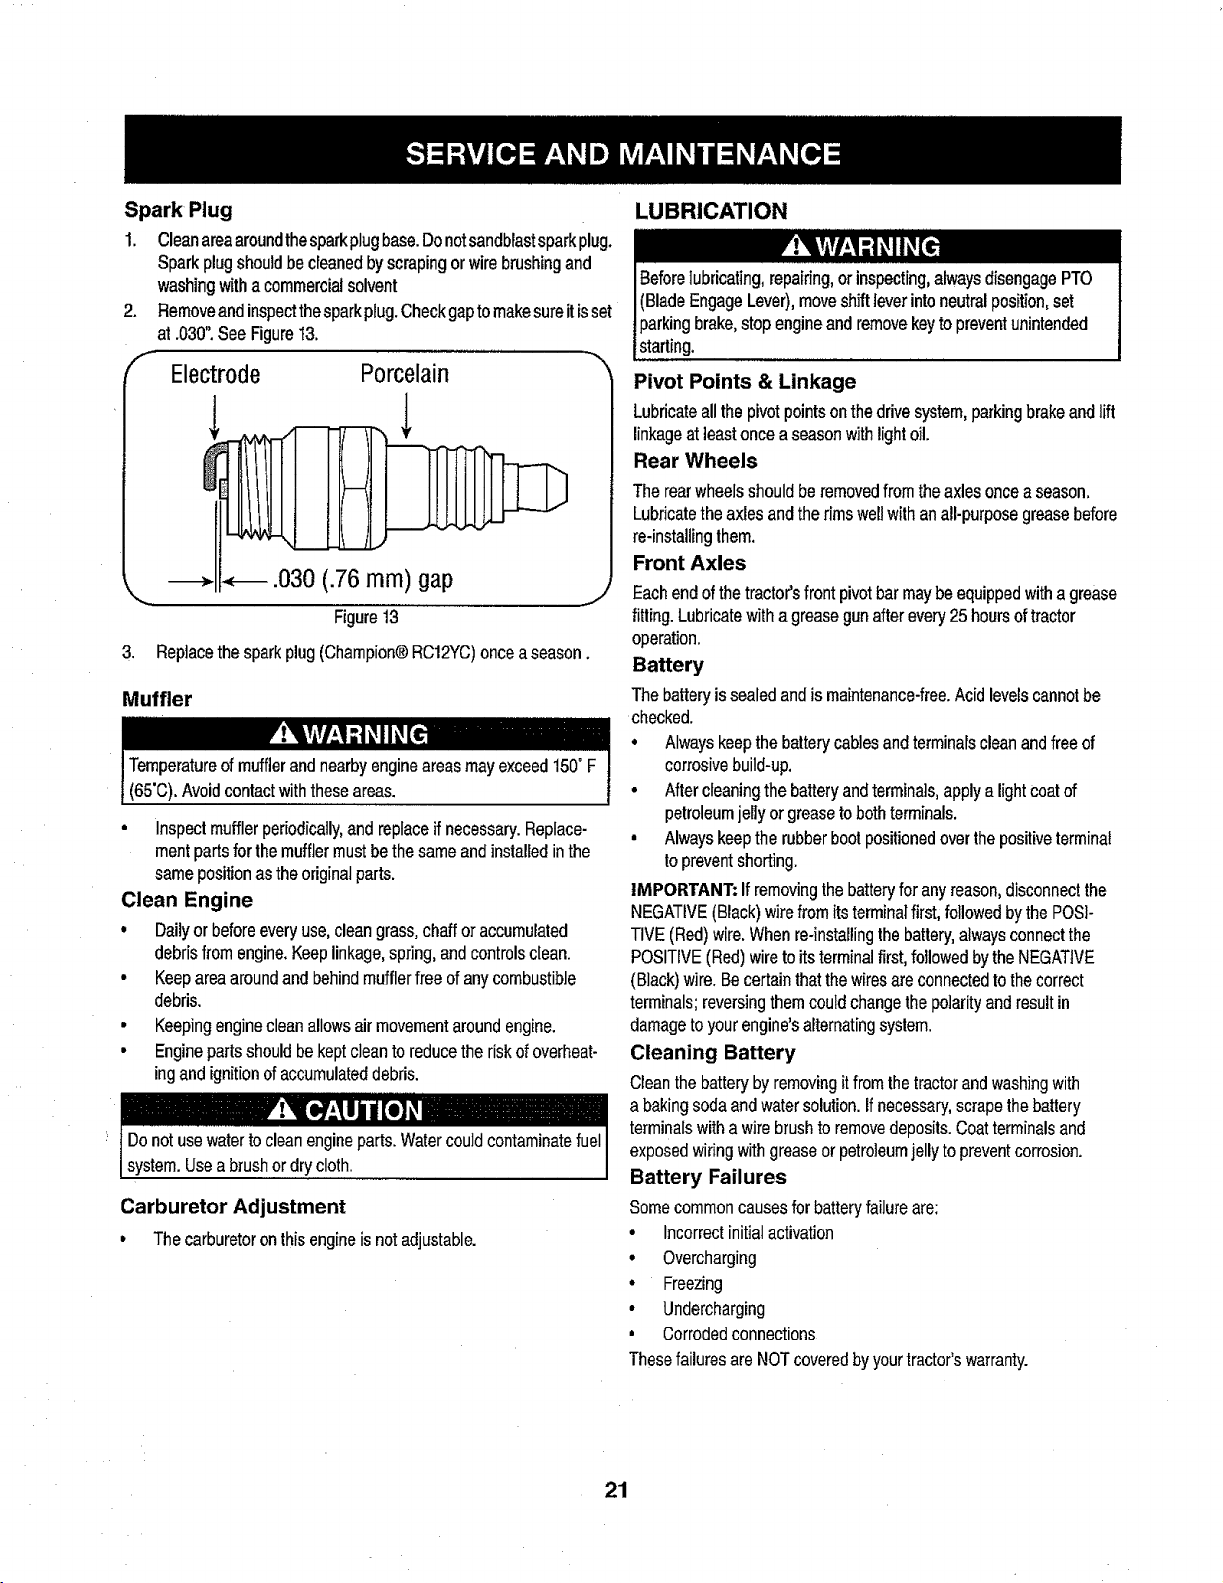
Spark Plug
1. Cleanareaaroundthesparkplugbase.Donotsandblastsparkplug.
Sparkplugshouldbecreanedbyscrapingorwirebrushingand
washingwitha commercialsolvent
2. Removeandinspectthesparkplug.Checkgaptomakesureitisset
at.030".SeeFigure13.
Electrode Porcelain
.030 (.76 ram) gap
_,,,,, ...........
Figure13
3. Replacethesparkplug(Champion®RC12YC)onceaseason.
Muffler
iTemperatureof mufflerandnearbyengineareasmayexceed150"F
(65'C).Avoidcontactwiththeseareas.
• Inspectmufflerperiodically,and replaceifnecessary. Replace-
rnent partsfor the mufflermust bethe same and installedinthe
samepositionasthe original parts.
Clean Engine
• Dailyor beforeeveryuse, cleangrass,chaff oraccumulated
debrisfrom engine.Keeplinkage, spring, andcontrolsclean.
• Keep area aroundand behindmufflerfree ofany combustibJe
debris.
• Keeping engineclean allowsair movementaroundengine.
• Enginepartsshould bekept cleanto reduce the riskof overheat-
ingand ignitionof accumulateddebris.
system.Useabrushordrycloth.
Carburetor Adjustment
• Thecarburetoronthisengineisnotadjustable.
LUBRICATION
Beforelubricating,repairing,orinspecting,alwaysdisengagePTO
(BladeEngageLever),moveshiftleverintoneutralposition,set
parkingbrake,stopengineandremovekeytopreventunintended
starting.
Pivot Points & Linkage
Lubricateallthepivotpointsonthedrivesystem,parkingbrakeandlift
linkageatleastonceaseasonwithlightoil.
Rear Wheels
Therearwheelsshouldberemovedfromtheaxlesonceaseason.
Lubricatethe axlesandtherimsweftwithanall-purposegreasebefore
re-instaUingthem.
Front Axles
Eachendof the tractor'sfront pivot bar maybe equippedwithagrease
fitting.Lubricatewith a greasegun afterevery25 hoursof tractor
operation.
Battery
The batteryis sealedand is maintenance-free.Acidlevels cannotbe
checked.
• Always keepthe battery cablesandterminalscleanandfreeof
corrosivebuild-up.
• Nter cleaningthe batteryandterminals,apply a lightcoatof
petroleumjefly orgreasetobothterminals.
• Alwayskeep the rubberbootpositionedoverthe positiveterminal
toprevent shorting.
IMPORTANT: If removingthe batteryfor any reason,disconnect the
NEGATIVE(Black)wirefrom itsterminalfirst, followedby the POSi-
TIVE(Red) wire.When re-installingthe battery,alwaysconnect the
POSITIVE(Red)wireto itsterminalfirst, followed bythe NEGATIVE
(Black)wire. Becertain thatthe wires are connectedtothe correct
terminals; reversingthem could changethe polarity and resultin
damageto your engine's aFternatingsyslem.
Cleaning Battery
Clean thebatterybyremovingit fromthe tractorand washingwith
a bakingsodaand water solution, if necessary,scrapethe battery
terminalswith a wirebrushto removedeposits. Coatterminalsand
exposed wiringwith grease or petroleumjelly toprevent corrosion.
Battery Failures
Somecommoncauses for batteryfailureare:
• Incorrect initialactivation
• Overcharging
• Freezing
• Undercharging
, Corrodedconnections
Thesefailures areNOTcovered by yourtractor'swarranty.
21
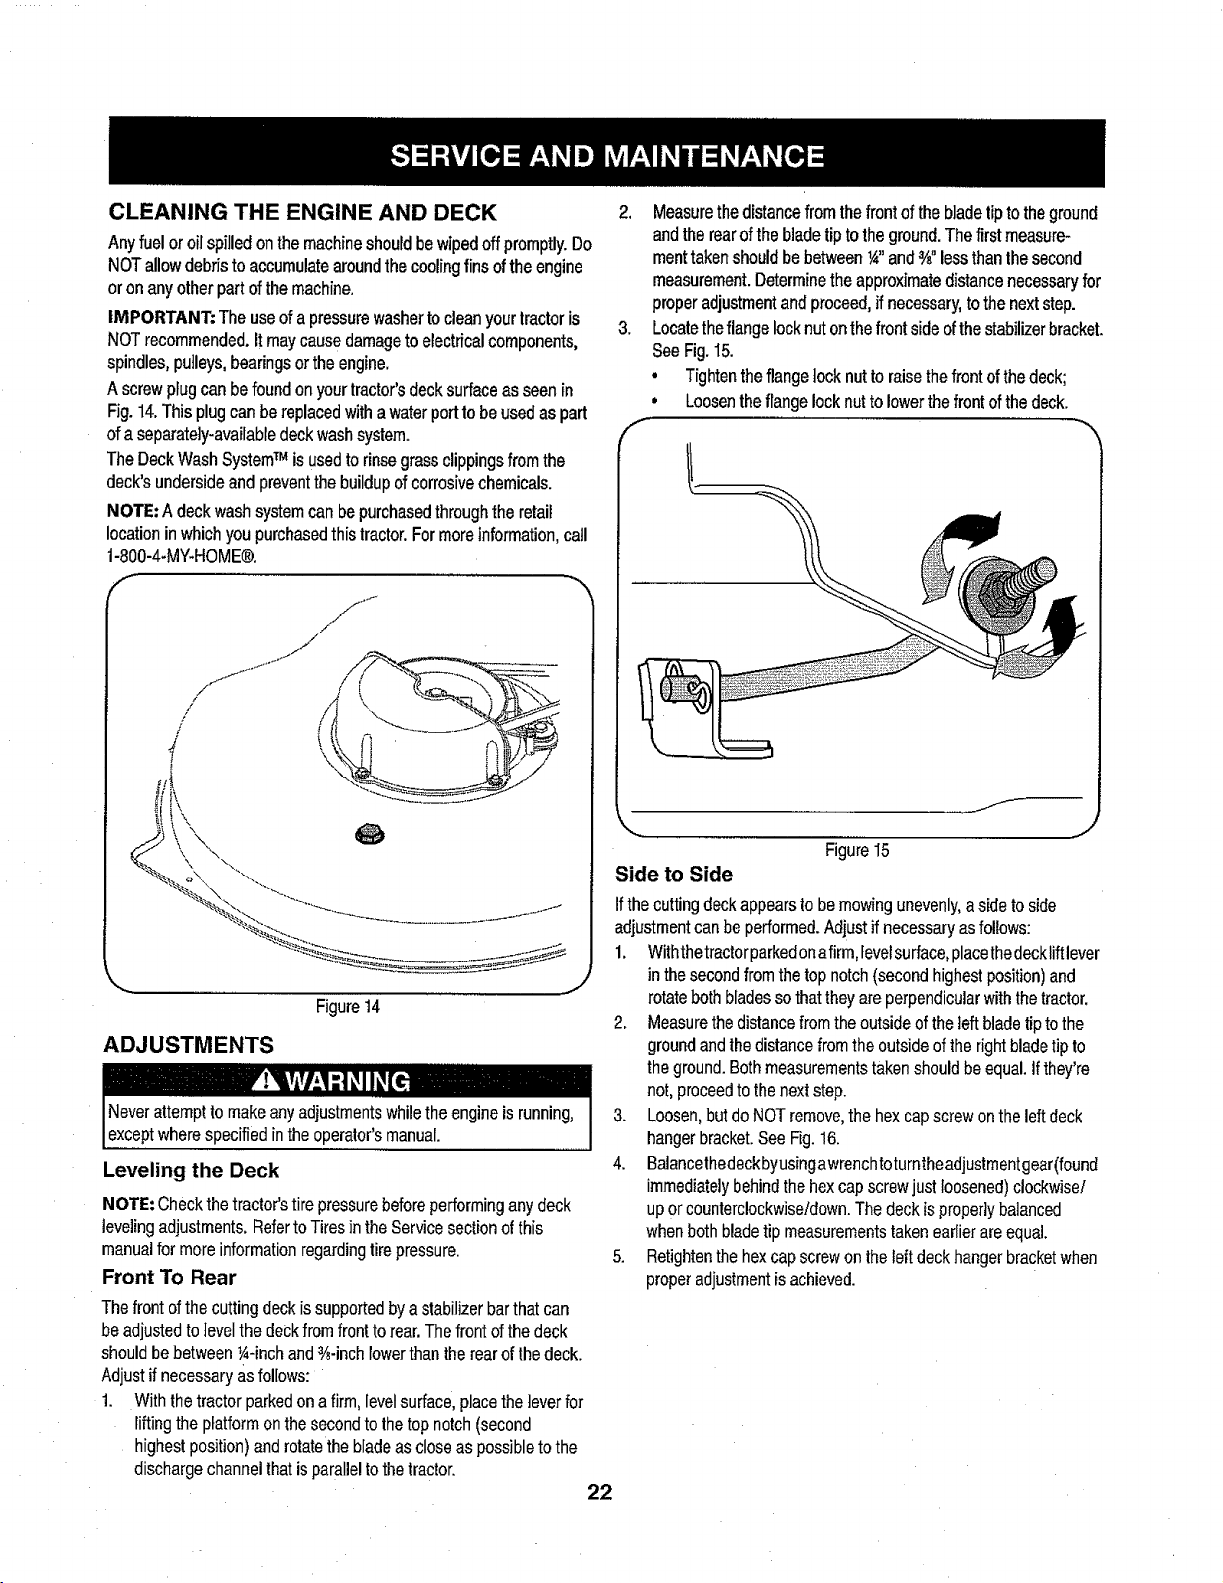
CLEANING THE ENGINE AND DECK
Anyfueloroilspilledonthemachineshouldbewipedoff promptly.Do
NOTallowdebristo accumulatearoundthecoolingfinsoftheengine
oronanyotherpartofthe machine.
IMPORTANT:Theuseofapressurewasherto cleanyourtractoris
NOTrecommended.Itmaycausedamagetoelectricalcomponents,
spindles,pulleys,bearingsortheengine.
A screwplugcanbefoundonyourtractor'sdecksurfaceasseenin
Fig.14.Thisplugcanbereplacedwithawaterporttobeusedaspart
ofa separately-availabledeckwashsystem.
TheDeckWashSystemTM isusedtorinsegrassclippingsfromthe
deck'sundersideandpreventthebuildupofcorrosivechemicals.
NOTE:Adeckwashsystemcanbepurchasedthroughtheretail
locationinwhichyoupurchasedthistractor.Formoreinformation,catl
1-800-4-MY+HOME@.
2. Measurethedistancefromthefrontofthebladetiptotheground
andtherearofthebladetiptotheground.Thefirstmeasure-
menttakenshouldbebetween¼"and"_"lessthanthesecond
measurement.Determinetheapproximatedistancenecessaryfor
properadjustmentandproceed,ifnecessary,tothenextstep.
3. Locatetheflangelocknutonthefrontsideofthestabilizerbracket.
SeeFig.I5.
, Tightentheflangelocknutto raisethefrontofthedeck;
i)
Loosentheflangelocknuttolowerthefrontofthedeck.
f
,,J
Figure14
ADJUSTMENTS
Leveling the Deck
NOTE:Checkthetractor'stirepressurebeforeperforminganydeck
levelingadjustments.RefertoTiresintheServicesectionofthis
manualformoreinformationregardingtirepressure.
Front To Rear
The frontofthe cutting deck issupported by a stabilizerbar that can
be adjustedto level the deckfromfront to rear.Thefront ofthe deck
shouldbe between¼-inch and3,_-inchlowerthantherear of the deck.
Adjust if necessaryas follows:
1. With thetractor parkedon afirm,level surface,place the ]everfor
liftingthe platformon the second to thetop notch (second
highest position)and rotatethe bladeas close as possibleto the
dischargechannel thatisparallelto thetractor.
Figure I5
Side to Side
Ifthe cutting deck appearsto be mowingunevenly,a side to side
adjustmentcanbe performed.Adjust ifnecessaryas follows:
1.
Withthetractorparkedona firm,levelsurface,placethedecklift lever
inthe secondfrom thetop notch (second highestposition)and
rotateboth blades so thatthey areperpendicularwith thetractor.
2. Measurethe distancefromthe outsideof the teft blade tip to the
groundand thedistancefromthe outsideofthe rightbladetipto
the ground. Bothmeasurementstaken should be equal.If they're
not,proceedtothe next step.
3. Loosen,butdo NOTremove,the hexcapscrew onthe leftdeck
hangerbracket.See Fig.16.
4. Balancethedeckbyusingawrenchtoturntheadjustment gear(found
immediatelybehindthe hex cap screwjust loosened)clockwise/
up orcounterclockwise!down.The deckis propertybalanced
when both blade tip measurementstaken earlierare equal.
5. ReUghtenthe hexcap screwon theleft deckhanger bracketwhen
properadjustmentisachieved.
22
f
HexCapScrew
_,.,,,,,,
Figure16
Seat Adjustment
Referto theAssemblysection of thismanualfor seatadjustment
instructions.
Parking Brake Adjustment
Neverattempttoadjustthebrakeswhilethe engineisrunning.Always
disengagePTO (bladeengage)lever,moveshift lever intoneutral
position,stopengineand removekeyto preventunintendedstarting.
J
Figure17
Lookingatthecutting deck fromthe leftside ofthe tractor,locate
the bow-tiepin thatsecuresthe deck supportrodon therear
leftside of the deck.See Fig. 18.Removethe bow-tiepinthat
securesthe decksupportrod, andcarefullyremovethe deck
support fromthe decklift arm.
f
Bow-TieClip J
J
Ifthetractordoesnotcometo acompletestopwhenthebrakepedal
iscompletelydepressed,orif thetractor'srearwheelscanrollwiththe
parkingbrakeapplied,thebrakeisinneedofadjustment.Contactthe
nearestSearsServiceCentertohaveyourbrakesproperlyadjusted.
TolocatethenearestParts&RepairServiceCenterortoschedule
service,contact1-800-4-MY-HOME®,
CUTTING DECK REMOVAL
To remove the cutting deck, proceed as follows:
1. Placethe PTO(Blade Engage) leverinthedisengaged (OFF)
position andengagethe parkingbrake.
2. Lower the deck bymovingthe deck lift leverinto the bottom
notch on therightfender.
3. Removetheself-tappingscrew (A)that secures the belt-keeper
rodfrom aroundthe tractor'sPTOpulley,then remove thebelt
keeperrod(B), See Fig.17.
NOTE; Make a mentalnotewhathole the otherend of the belt-keeper
rodisinsertedin for reinstallationpurposes.
4. Removethe belt(C) from aroundthe tractor's PTOpulley.See
Fig.17.
....................... J
Figure18
6. Repeatthe above stepsonthe tractor's rightside.
NOTE=The bow-tieclipsshould be re-installedfrom thetop down.
7. Movethe decklift leverintothetop notchonthe rightfenderto raise
thedecklift armsupand out of the way.
23
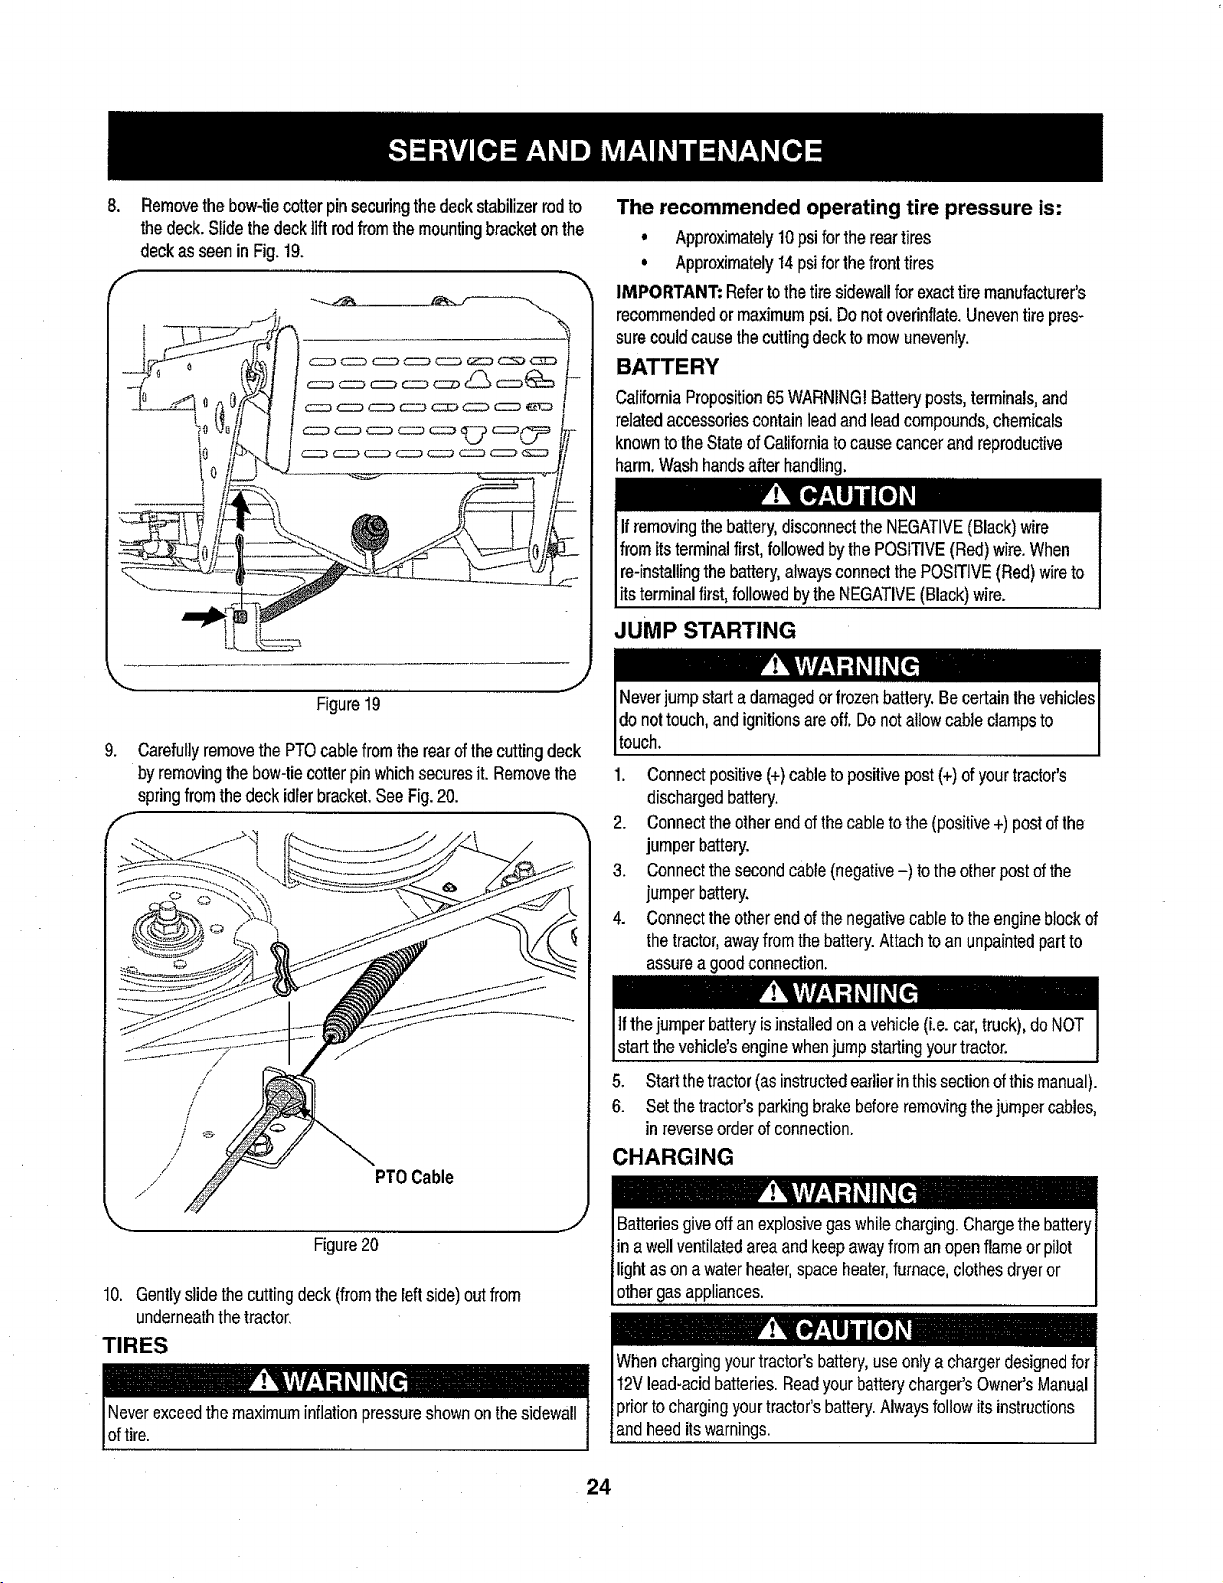
8. Removethe bow-tiecotter pin securingthe deck stabilizerrod to
the deck. Slidethe decktiftrodfrom themountingbracket onthe
deckas seen in Fig. 19.
f -..,
Figure19
g,
Carefullyremovethe PTO cablefrom therearofthe cutting deck
byremovingthebow-tiecotterpinwhichsecuresit. Removethe
springfromthe deck idlerbracket.See Fig.20.
The recommended operating tire pressure is:
, Approximately10psiforthereartires
° Approximately14psiforthefronttires
IMPORTANT:Refertothetiresidewallforexacttiremanufacturer's
recommendedormaximumpsi,Donotoverinflate,Uneventirepres-
surecouldcausethecuttingdecktomowunevenly.
CalifomiaProposition65WARNING!Battery posts,terminals,and
relatedaccessoriescontainlead and leadcompounds, chemicals
knownto the State ofCaliforniato causecancer andreproductive
harm,Wash handsafter handling.
_OSITIVE (Red) wire to
its terminal first,followedbythe NEGATIVE(Black)wire.
JUMP STARTING
J
1. Connectpositive (+)cableto positive post(+) of your tractor's
dischargedbattery.
2. Connectthe other endofthe cable to the (positive+) postof the
jumper battery.
3. Connectthe second cable(negative-) tothe otherpost ofthe
jumper battery.
4. Connectthe otherend of the negativecable to the engineblockof
the tractor,away fromthe battery.Attachto an unpaintedpart to
assurea goodconnection.
/
/
/
/
/
f
/
/
/
PT0Cable
Figure20
10. Gentlyslidethecuttingdeck(fromtheleftside)outfrom
underneaththetractor,
TIRES
lF; lrir/ l'itT .dlI_
Neverexceedthe maximum inflationpressureshown onthesidewall
oft re.
Ifthejumper batteryisinstalled ona vehicle(i.e. car, truck),doNOT
start the vehicle'senginewhenjump startingyourtractor.
5. Start thetractor(as instructedearlierin thissection ofthismanual).
6. Set thetractor'sparking brakebefore removingthejumper cables,
in reverseorder of connection.
CHARGING
,J
IBatteriesgiveoff anexplosivegas while charging.Chargethe batteryI
in a wellventilatedareaand keepawayfrom an openflameor pilot I
lightas on a waterheater,space heater,furnace,clothesdryeror I
other gasappliances. I
24
Ifyourtractorhasnotbeenputintouseforanextendedperiodof time, 3.
chargethebatteryasfollows:
1. Setyourbatterychargertodelivera maxof 10amperes. 4.
Ifyourbatterychargerisautomatic,chargethebatteryuntilthe
chargerindicatesthatchargingiscomplete,tfthechargerisnot
automatic,chargefornofewerthaneighthours.
FUSE
One20AMPfuseisinstalledinyourtractor'swiringharnesstoprotect _'-
thetractor'selectricalsystemfromdamagecausedbyexcessive
amperage.
iftheelectricalsystemdoesnotfuncfion,oryourtractor'senginewill
notcrank,firstchecktobecertainthatthefusehasnotblown,itcan
befoundattherearoftheunit,underneaththefenderlocatedbythe
battery.
CUTTING BLADES
Shuttheengineoffandremoveignitionkeybeforeremovingthe
cuttingblade(s)forsharpeningorreplacement.Protectyourhands
byusngheavygoveswhengraspngthebado.
Removethehexflangenutthatsecuresthebladetothespindle
assembly.SeeFig.21.
Toproperlysharpenthecuttingblades,removeequalamountsof
metalfrombothendsofthebladesalongthecuttingedges,
paralleltothetrailingedge,at a25° to30°angle.Alwaysgrind
eachcuttingbladeedgeequallytomaintainproperbladebalance.
SeeFig.22.
Figure 22
Toremovetheblades,proceedasfollows.
1. Removethedeckfrombeneaththetractor,(refertoCuttingDeck
Removalearlierinthissection)thengentlyflipthedeckoverto
exposeitsunderside.
2. Placea blockofwoodbetweenthecenterdeckhousingbaffle
andthecuttingbladetoactasa stabilizer.
SeeFig.21.
Figure 21
5. Testtheblade'sbalanceusingabladebalancer.Grindmetalfromthe
heavyside untilit balancesevenly.
NOTE; When replacingthe blade,besure to install the bladewith the
side ofthe blademarked "Bottom" (orwitha part number stampedin
it) facingthe ground whenthe mowerisin the operatingposition.
Use a torque wrenchto tightenthebladespindrehexflange nut to
between70 Ibs-ftand 90 Ibs-ft.
CHANGING THE DECK BELT
,,, ......,..........
Allbeltsonyourtractoraresubjecttowearandshouldbereplacedif
anysignsofweararepresent.
25

IMPORTANT:TheV-beltfoundonyourtractorisspeciallydesigned
toengageanddisengagesafely.Asubstitute(non-OEM)V-beltcan
bedangerousbynotdisengagingcompletely.Fora properworking
machine,useidenticalequipmentbeltsaslistedinthepartspagesof
thisOperator'sManual.
Tochangeorreplacethedeckbeltonyourtractor,proceedasfollows:
1. Removethedeckasinstructedearlierinthissection.
2. Removethebeltcoversfromthespindlepulleysbyremovingthe
hexscrewsthatfastenthecoverstothedeck.SeeFig.23.
3. It mayalsobenecessaryto loosenthehexnutontheleftdeck
idlerpulleytogetthebeltoffthepulleyandaroundthebeltguard.
4. Carefullyremovethedeckbeltfromaroundthetwospindle
pulleysandthetwodeckidlerpulleys.SeeFig.23.
5. Toplacethenewbelt,beginbyroutingthebeltaroundthetwo
outerspindlepulleysasshowninFig.23.
6. Thenroutethebeltaroundthetwodeckidlerpulteysasshownin
Fig.23.
7. Retightenthebeltkeeperrodloosenedearlier.
8. Remountthebeltguardsremovedearlier.
9. Re-installthedeck,makingsurethebeltremainsroutedaround
thepulleysasinstructed.Thecompletebeltroutingisshownin
Fig.23.
10. Pulltherightsideofthebelt,andplacethenarrowVsideofthe
beltintothePTOpulley.
1t. Whileholdingthebeltandpulleytogether,rotatethepulleytothe
left.Continueholdingandrotatingthepulleyandbeltuntilthebelt
isfullyrolledintothePTOpulley.
PARKING BRAKE ADJUSTMENT
Neverattempttoadjustthebrakeswhiletheengineisrunning.Always
disengagePTO(BladeEngageLever),moveshiftleverintoneutral
position,stopengineandremovekeytopreventunintendedstarting.
Ifthetractordoesnotcometoa completestopwhentheclutch-brake
pedaliscompletelydepressed,orifthetractor'srearwheelscanroll
withtheparkingbrakeapplied,thebrakeisinneedofadjustment.
Contactthe nearestParts&RepairServiceCentertohaveyour
brakesserviced.
TolocatethenearestParts&RepairServiceCenterortoschedule
service,contact1-800-4-MY-HOME®.
CHANGING THE TRANSMISSION DRIVE
BELT
NOTE:Severalcomponentsmustberemovedandspecialtools(i.e.
aidimpactwrench)inordertochangethetractor'sdrivebelt.Contact
thenearestParts&RepairServiceCentertohaveyourtransmis-
siondrivebeltserviced.
TolocatethenearestParts&RepairServiceCenterortoschedule
service,contact1-800-4-MY-HOME®.
/(/" !l "_,,_..._I_ belt routes around
- -'--'-_--'-'----_ _ /_'_ the PTO Pul|ey
He_ _/spier__ndie pul,ey
Figure 23
26
_ This portion of the
Neverstorelawntractorwithfuelintankindoorsorinpoorly
ventilatedareaswherefuelfumesmayreachanopenflame,spark,
orpilotlightasonafurnace,waterheater,clothesdryer,orgas
appliance,
PREPARING THE ENGINE
IMPORTANT:Fuelleftinthefueltankduringwarmweatherdeterio-
ratesandwillcauseseriousstartingproblems.
Topreventgumdepositsfrom forminginsidethe engine'scarburetor
andcausingpossible malfunctionofthe engine,the fuel systemmust
be eithercompletelyemptied,or the gasolinemust betreatedwith a
stabilizerto preventdeterioration.
1. If usinga fuel stabilizer:
a. Readthe productmanufacturer'sinstructionsand recom-
mendations.
b. Add to clean,freshgasoline the correctamountof stabilizer
forthe capacityof the fuelsystem.
c. Fillthe fuel tankwithtreated fueland run the enginefor 2-3
minutesto getstabilizedfuel intothe carburetor.
2. If emptyingthe fuel system:
a. Donot drainfuel whentheengineis hot.Allow theengine
adequatetime tocool.Drain fuel intoanapproved container
outdoors,awayfrom openflame.
b. Drainany largevolume of fuelfrom the tank bydisconnect-
ingthe fuel line fromthe in-line fuelfilter neartheengine.
See the completeinstructionsfor Draining The Fuellaterin
thissection.
-,.-,
!Gasolineis extremelyflammableand canbe explosiveundercertain
_conditions. Dramgasolinebeforestoringthe equipmentfor extended
_periods.Drainfuet only intoan approvedcontaineroutdoors, away
from an open flame.Allowengine tocool. Extinguish cigarettes,
cigars,pipes, and othersources of ignitionpriorto drainingfuel.
Store gasolinein an approvedcontainer in safelocation.
DRAINING THE FUEL
1. Locatethefuel filter,whichislocatedontheleftsideofthe
engine, and maybe attachedtothe enginewith a tie strap.
2, Cut the tiestrap, if present,then pinchthe in-lineclamp on the
fuelfilter witha pairofpliers, slide theclampupthe fuel line.
3. Pull the fuelline free fromthe filterand placethe open end of the
lineinto anapprovedcontainerto drainthe fuel.
PREPARING THE LAWN TRACTOR
1, Cleanandlubricatetractorthoroughly as described in thelubrica-
tioninstructions.
2. Do not usea pressurewasheror gardenhoseto clean your unit.
3. Storemowerin a dry;clean area.Do not storenext tocorrosive
materials,such asfertilizer.
c. Reconnectthefuel line andrun the engine untilitstarts to
falter,then usethe choketo keep the engine runninguntil all
fuel inthe carburetorhas been exhausted.
d. Disconnectthe fuel lineand drainany remaininggasoline
from the system.
I i .....
Gasolineis atoxic substance.Disposeof gasolineproperly.Contact
your localauthoritiesforapproved disposal methods.
3. Removethe spark plugand pourone (1)ounce ofengine oil
throughthespark plughole intothe cylinder.Crankthe engine
severaltimesto distributetheoil. Replacethe sparkplug.
27
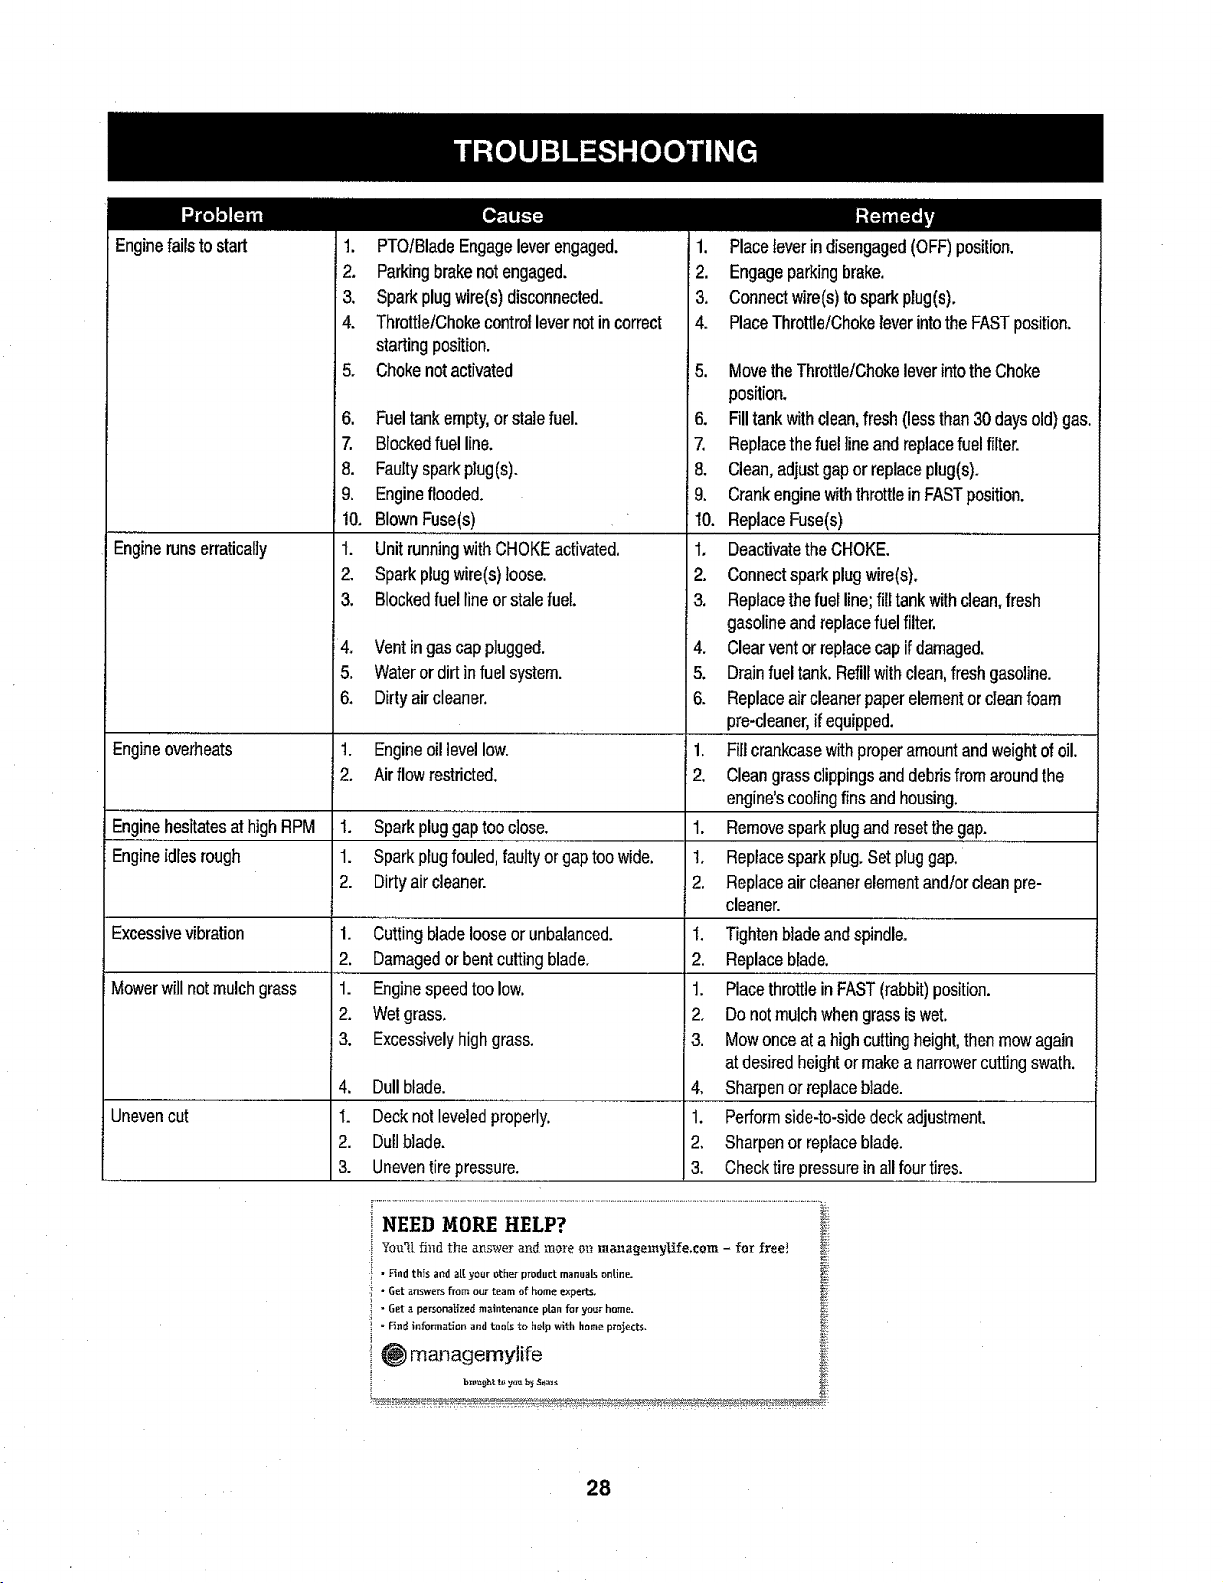
Enginefailsto start
1. PTOIBladeEngageleverengaged,
2, Parkingbrakenotengaged.
3. Sparkplugwire(s)disconnected.
4. ThrutttelChokecontrollevernotincorrect
startingposition,
5, Chokenotactivated
6, Fueltankempty,orstalefuel.
7. Blockedfuelline.
8, Faultysparkplug(s),
9, Engineflooded.
!0, BlownFuse(s)
Enginerunserratically
t. UnitrunningwithCHOKEactivated,
2, Sparkplugwire(s)loose.
3. Blockedfuellineorstalefuel
4. Vent in gascap plugged.
5. Wateror dirtin fuel system.
6. Dirty air cleaner.
Engineoverheats t. Engineoillevel low. 1.
2. Air flowrestricted. 2.
Enginehesitatesathigh RPM I. Sparkplug gaptoo close. 1.
Engineidles rough 1. Spark plugfouled, faulty or gaptoo wide. 1.
2. Dirty aircleaner. 2.
Excessivevibration
Mowerwill notmulch grass
1. Cutting blade loose or unbalanced.
2. Damagedor bentcuttingblade.
1. Enginespeedtoo low.
2. Wetgrass.
3. Excessivelyhighgrass.
4, Dullblade.
Uneven cut
1. Decknotleveledproperly.
2. Dullblade.
3. Uneventirepressure.
1. Placeleverindisengaged(OFF)position,
2. Engageparkingbrake.
3, Connectwire(s)tosparkplug(s),
4, PlaceThrottle/ChokeleverintotheFASTposition.
5. Move the Throttle/Chokelever intothe Choke
position.
6. Fill tank withclean,fresh(less than30 daysold) gas.
7, Replacethe fuelline and replacefuel filter.
8. Clean,adjust gapor replaceplug(s).
9. Crankengine withthrottle in FASTposition.
10. ReplaceFuse(s)
1. Deactivatethe CHOKE.
2. Connectspark plugwire(s).
3. Replacethe fuelline; filltank with clean,fresh
gasolineand replacefuelfilter.
4. Clear ventorreplace cap ifdamaged.
5. Drain fueltank. Refillwithclean,freshgasoline.
6. Replace aircleaner paper elementor cleanfoam
pro-cleaner,ifequipped.
Firlcrankcasewith proper amountand weighi oi"oill
Cleangrass clippings anddebrisfrom aroundthe
engine'scooling finsand housing.
Removesparkplug andreset the gap.
Replacespark plug.Set pluggap.
Replaceair cleaner elementand/or cleanpro-
cleaner.
I. Tightenblade andspindle.
2. Replaceblade.
1. Placethrottle inFAST(rabbit) position.
2. Do notmulch whengrassiswet.
3. Mow onceatahigh cutting height,then mowagain
at desiredheight or makea narrowercuttingswath.
4. Sharpen or replaceblade.
1. Perform side-to-sidedeck adjustment.
2. Sharpenor replaceblade.
3. Checktire pressurein a]lfourtires.
NEED MORE HELP? _i_
¥m:_Ifi_td the an,_werand mm+e m_ mazl_emyUfe,com - for free! _:
• Hnd th_s a_d a[[ your other produ_ manuals ontine. _i
i " Get answersfrom our team of home experts. _.
:i " Get a personalized maintenance plan for your ho_ae. _i
', " F_nd information and tools to help with home projects.
28