

Craftsman 247288800 Owner’s Manual

perator s
P R 0 F E S S I 0 N A
LAWN TRACTOR
26 HP, 46" Tractor
PYT9000
Model No. 247.28880
• EspaSol, p. 63
This product has a low emission engine which operates differently
from previously built engines. Before you start the engine, read and
understand this Operator's Manual.
iMPORTANT:
Read and follow all Safety
Rules and instructions before
operating this equipment.
Sears Brands Management Corp., Hoffman Estates, IL 60179 U.S.A.
Visit our website: www.craftsman.com FormNo.769-06505
For answers to your questions about
this product, Call:
1=800=659=5917
CraftsmanTractorHelpLine
5am = 5 pro, Mort =Sat
(November1,2010)

Warranty Statement .......................................................... 2
Safety instructions ............................................................ 3
Safety Labels .................................................................... 9
Assembly ......................................................................... 10
Know your Lawn Mower .................................................. 13
Operation ........................................................................ 16
CRAFTSMAN PROFESSIONAL TWO YEAR FULL WARRANTY
FORTWOYEARSfromthedateofpurchase,ifanynon-expendablepartofthisriding equipmentfailsduetoa defectinmaterialor workman-
ship,visitwww.craftsman.comorcall 1-800-659-5917toarrangefor freein-homerepair.
Theframeandfrontaxle willbe repairedfreeofchargeforfiveyearsfromthe dateofpurchaseifdefectiveinmaterialorworkmanship.
Allofthe abovewarrantycoverageappliesforonlyone yearfromthedateof purchaseifthis ridingequipmentiseverusedwhileproviding
commercialservicesorif rentedtoanotherperson.
Inallcases,if repairprovesimpossible,theridingequipmentwillbe replacedfreeofchargewiththe sameoran equivalentmodel.Thebattery
willbereplacedfreeof chargefor90 daysfromthedateofpurchaseifdefectiveinmaterialorworkmanship(ourtestingprovesthatitwill nothold
acharge).
ThiswarrantycoversONLYdefectsinmaterialandworkmanship.Warrantycoveragedoes NOTinclude:
• Expendableitemsthatcanwearoutfromnormalusewithinthewarrantyperiod,includingbutnot limitedtoblades,sparkplugs,air
cleaners,belts,andoilfilters.
• Standardmaintenanceservicing,oilchanges,ortune-ups.
• Tirereplacementor repaircausedbypuncturesfromoutsideobjects,suchasnails,thorns,stumps,or glass.
• Tireor wheelreplacementor repairresultingfromnormalwear,accident,orimproperoperationormaintenance.
• Repairsnecessarybecauseof operatorabuse,includingbutnotlimitedtodamagecausedbytowingobjectsbeyondthecapabilityof
theridingequipment,impactingobjectsthatbendtheframeorcrankshaft,orover-speedingtheengine.
• Repairsnecessarybecauseof operatornegligence,includingbutnot limitedto,electricalandmechanicaldamagecausedbyimproper
storage,failureto usethepropergradeandamountof engineoil,failureto keepthedeckclearofflammabledebris,orfailureto
maintainthe ridingequipmentaccordingtothe instructionscontainedintheoperator'smanual.
• Engine(fuelsystem)cleaningorrepairscausedbyfuel determinedto becontaminatedoroxidized(stale).In general,fuelshouldbe
usedwithin30 daysof itspurchasedate.
• Normaldeteriorationandwearoftheexteriorfinishes,orproductlabelreplacement.
Thiswarrantygivesyouspecificlegalrights,andyou mayalsohaveotherrightswhichvaryfromstatetostate.
SearsBrandsManagementCorporation,HoffmanEstates,IL60179
EngineOil: SAE30
Fuel: UnleadedGasoline
SparkPlug: Champion®RC12YC
Engine: Briggs& StrattonProfessionalSeries
© SearsBrands,LLC 2
Model Number
Serial Number
Dateof Purchase
Recordthe modelnumber,serialnumber,
anddateof purchaseabove.
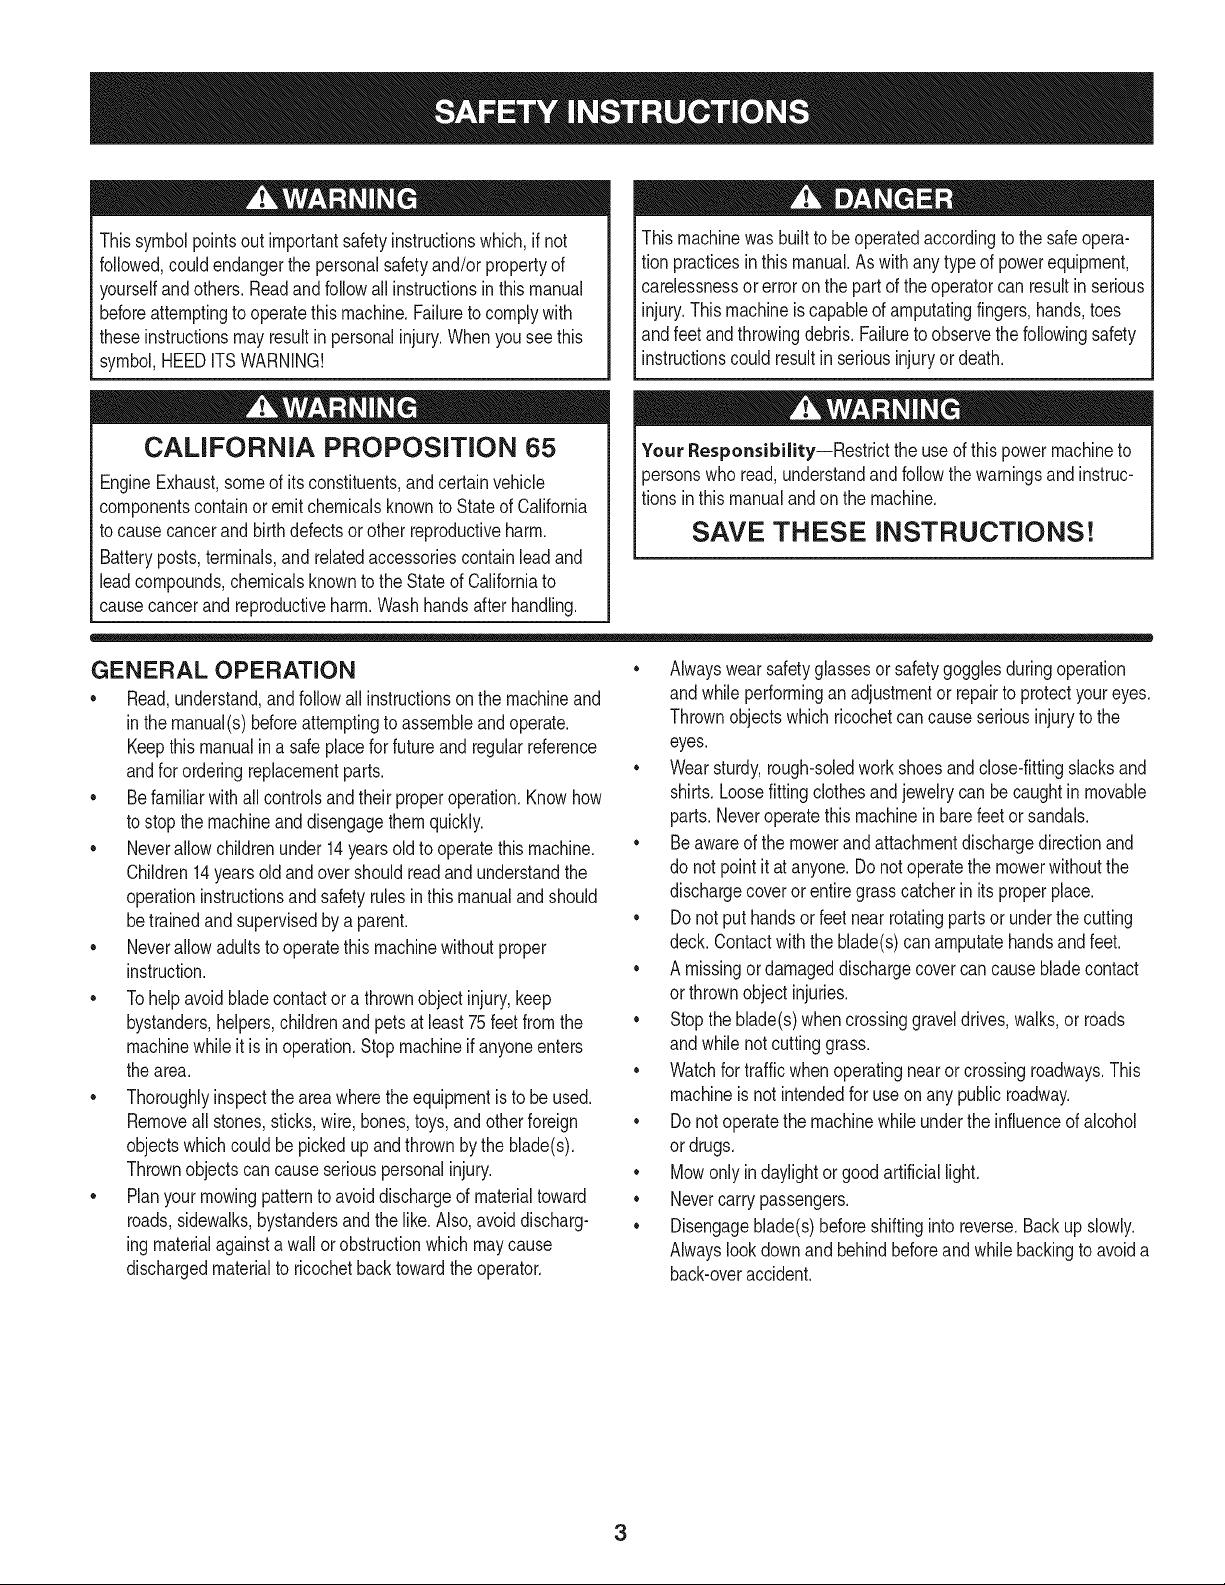
Thissymbolpointsout importantsafetyinstructionswhich,if not
followed,couldendangerthepersonalsafetyand/orpropertyof
yourselfandothers. Readandfollowallinstructionsin thismanual
beforeattemptingtooperatethismachine.Failureto complywith
theseinstructionsmayresultin personalinjury.Whenyouseethis
symbol,HEEDITSWARNING!
Thismachinewasbuiltto beoperatedaccordingtothesafeopera-
tionpracticesinthis manual.As withanytypeof powerequipment,
carelessnessorerroron thepartoftheoperatorcanresultin serious
injury.Thismachineiscapableofamputatingfingers,hands,toes
andfeetandthrowingdebris.Failuretoobservethefollowingsafety
instructionscouldresultin seriousinjuryordeath.
CALIFORNIA PROPOSITION 65
EngineExhaust,someof itsconstituents,andcertainvehicle
componentscontainoremitchemicalsknownto StateofCalifornia
tocausecancerandbirthdefectsorotherreproductiveharm.
Batteryposts,terminals,and relatedaccessoriescontainleadand
leadcompounds,chemicalsknowntotheStateof Californiato
causecancerandreproductiveharm.Washhandsafterhandling.
GENERAL OPERATION
• Read,understand,andfollowall instructionson themachineand
in themanual(s)beforeattemptingto assembleandoperate.
Keepthis manualinasafeplacefor futureand regularreference
andfororderingreplacementparts.
• Befamiliarwithall controlsandtheir properoperation.Knowhow
tostopthe machineanddisengagethemquickly.
• Neverallowchildrenunder14yearsoldto operatethismachine.
Children14yearsoldandover shouldreadandunderstandthe
operationinstructionsandsafetyrulesinthismanualandshould
betrainedandsupervisedbya parent.
• Neverallowadultstooperatethis machinewithoutproper
instruction.
• Tohelpavoidbladecontactor a thrownobjectinjury,keep
bystanders,helpers,childrenandpetsatleast75feetfromthe
machinewhile itisin operation.Stopmachineifanyoneenters
thearea.
• Thoroughlyinspectthe areawheretheequipmentistobe used.
Removeallstones,sticks,wire,bones,toys,andotherforeign
objectswhichcouldbe pickedupandthrownbytheblade(s).
Thrownobjectscancauseseriouspersonalinjury.
• Planyour mowingpatterntoavoiddischargeofmaterialtoward
roads,sidewalks,bystandersandthe like.Also,avoiddischarg-
ingmaterialagainstawallorobstructionwhichmaycause
dischargedmaterialto ricochetbacktowardthe operator.
Your Responsibility--Restricttheuse ofthispowermachineto
personswhoread,understandandfollowthewarningsand instruc-
tionsin thismanualandonthemachine.
SAVE THESE INSTRUCTIONS!
• Alwayswearsafetyglassesor safetygogglesduringoperation
andwhileperformingan adjustmentorrepairtoprotectyoureyes.
Thrownobjectswhichricochetcancauseseriousinjurytothe
eyes.
• Wearsturdy,rough-soledworkshoesandclose-fittingslacksand
shirts.Loosefittingclothesandjewelrycanbe caughtin movable
parts.Neveroperatethismachineinbarefeetorsandals.
• Beawareofthemowerandattachmentdischargedirectionand
do notpointit at anyone.Donotoperatethemowerwithoutthe
dischargecoverorentiregrasscatcherinits properplace.
Donot puthandsorfeetnearrotatingpartsor underthecutting
deck.Contactwiththe blade(s)canamputatehandsandfeet.
A missingordamageddischargecovercancausebladecontact
or thrownobjectinjuries.
• Stoptheblade(s)whencrossinggraveldrives,walks,or roads
andwhilenotcuttinggrass.
• Watchfortrafficwhenoperatingnearorcrossingroadways.This
machineis notintendedforuseonanypublicroadway.
• Donotoperatethemachinewhile undertheinfluenceofalcohol
or drugs.
• Mowonlyindaylightorgoodartificiallight.
Nevercarrypassengers.
• Disengageblade(s)beforeshiftingintoreverse.Backupslowly.
Alwayslookdownandbehindbeforeandwhilebackingto avoida
back-overaccident.
3
• Slowdownbeforeturning.Operatethemachinesmoothly.Avoid
erraticoperationandexcessivespeed.
Disengageblade(s),setparkingbrake,stopengineandwaituntil
theblade(s)cometoa completestopbeforeremovinggrass
catcher,emptyinggrass,uncloggingchute,removinganygrassor
debris,or makinganyadjustments.
Neverleavea runningmachineunattended.Alwaysturnoff
blade(s),setparkingbrake,stopengineandremovekeybefore
dismounting.
Useextracarewhenloadingorunloadingthe machineintoa
trailerortruck.Thismachineshouldnotbedrivenupor down
ramp(s),becausethemachinecouldtip over,causingserious
personalinjury.Themachinemustbe pushedmanuallyon
ramp(s)to loador unloadproperly.
Mufflerandenginebecomehotandcancausea burn.Donot
touch.
Checkoverheadclearancescarefullybeforedrivingunderlow
hangingtree branches,wires,dooropeningsetc.,wherethe
operatormaybestruckor pulledfromthemachine,whichcould
resultinseriousinjury.
Disengageallattachmentclutchesanddepressthe brakepedal
completelybeforeattemptingto startengine.
Yourmachineisdesignedto cutnormalresidentialgrassofa
heightnomorethan10".Donotattemptto mowthroughunusually
tall,drygrass(e.g.,pasture)orpilesof dryleaves.Drygrassor
leavesmaycontacttheengineexhaustand/orbuilduponthe
mowerdeckpresentinga potentialfire hazard.
Useonlyaccessoriesandattachmentsapprovedforthis machine
bythe machinemanufacturer.Read,understandandfollowall
instructionsprovidedwiththe approvedaccessoryorattachment.
Fora list ofapprovedaccessoriesandattachments,call 1-800-
659-5917.
Dataindicatesthatoperators,age60yearsandabove,are
involvedin a largepercentageofridingmower-relatedinjuries.
Theseoperatorsshouldevaluatetheirabilitytooperatetheriding
mowersafelyenoughto protectthemselvesandothersfrom
seriousinjury.
If situationsoccurwhicharenotcoveredinthismanual,usecare
andgoodjudgment.Contact1-800-659-5917forinformationand
assistance.
SLOPE OPERATION
Slopesarea majorfactorrelatedtolossofcontrolandtip-over
accidentswhichcanresultinsevereinjuryor death.Allslopesrequire
extracaution.Ifyoucannotbackuptheslopeor if youfeeluneasyon
it, do notmowit.
Foryoursafety,usetheSlopeGuideincludedaspartofthis manual
to measureslopesbeforeoperatingthismachineona slopedor hilly
area.Ifthe slopeisgreaterthan15degreesasshownonthe Slope
Guide,do notoperatethismachineonthatareaor seriousinjurycould
result.
Do:
o
Mowupanddownslopes,notacross.Exerciseextremecaution
whenchangingdirectionon slopes.
• Watchforholes,ruts,bumps,rocks,orother hiddenobjects.
Uneventerraincouldoverturnthe machine.Tallgrasscanhide
obstacles.
Useslowspeed.Choosea lowenoughspeedsettingsothat
youwill nothavetostopor shiftwhileon theslope.Tiresmay
losetractionon slopeseventhoughthe brakesarefunctioning
properly.Alwayskeepmachineingearwhen goingdownslopes
totakeadvantageofenginebrakingaction.
• Followthemanufacturer'srecommendationsfor wheelweights
or counterweightstoimprovestability.Forrecommendations,call
1-800-659-5917.
• Useextracarewithgrasscatchersorotherattachments.These
canchangethestabilityof the machine.
Keepallmovementonthe slopesslowandgradual.Donotmake
suddenchangesinspeedor direction.Rapidengagementor
brakingcouldcausethefrontof themachinetolift andrapidlyflip
overbackwardswhichcouldcauseseriousinjury.
• Avoidstartingorstoppingona slope.Iftireslosetraction,disen-
gagetheblade(s)andproceedslowlystraightdowntheslope.
DoNot:
• Donotturnon slopesunlessnecessary;then,turnslowlyand
graduallydownhill,ifpossible.
• Donotmowneardrop-offs,ditchesorembankments.The mower
couldsuddenlyturnoverif a wheelisoverthe edgeofa cliff,
ditch,or ifan edgecavesin.
• Donottry tostabilizethemachinebyputtingyourfootonthe
ground.
• Donotusea grasscatcheronsteepslopes.
• Donotmowon wetgrass.Reducedtractioncouldcausesliding.
• Donotattempttocoastdownhill.Over-speedingmaycausethe
operatortolosecontrolof themachineresultinginseriousinjury
or death.
• Donottowheavypull behindattachments(e.g.loadeddumpcart,
lawnroller,etc.)on slopesgreaterthan5degrees.Whengoing
downhill,theextraweighttendsto pushthetractorandmay
causeyouto loosecontrol(e.g.tractormayspeedup,brakingand
steeringabilityarereduced,attachmentmayjack-knifeandcause
tractorto overturn).
4

CHILDREN
Tragicaccidentscanoccurifthe operatorisnotalertto thepresence
ofchildren.Childrenareoftenattractedto themachineandthemowing
activity.Theydo notunderstandthedangers.Neverassumethat
childrenwillremainwhereyoulastsawthem.
• Keepchildrenoutof themowingareaand inwatchfulcareofa
responsibleadultotherthantheoperator.
• Bealert andturnmachineoff ifachildentersthe area.
• Beforeandwhilebacking,lookbehindanddownforsmall
children.
Nevercarrychildren,evenwiththeblade(s)shutoff.Theymay
falloffandbe seriouslyinjuredorinterferewithsafemachine
operation.
• Useextremecarewhenapproachingblindcorners,doorways,
shrubs,treesorotherobjectsthatmayblockyourvisionofa child
whomayrunintothe machine.
Toavoidback-overaccidents,alwaysdisengagethe cutting
blade(s)beforeshiftingintoReverse.Ifequipped,the"Reverse
CautionMode"(bladesoperatewhilemachineridesinreverse)
shouldnotbe usedwhenchildrenorothersarearound.
Keepchildrenawayfromhotor runningengines.Theycansuffer
burnsfroma hotmuffler.
• Removekeywhenmachineisunattendedto preventunauthorized
operation.
Neverallowchildrenunder14yearsofageto operatethismachine.
Children14andovershouldreadandunderstandtheinstructionsand
safeoperationpracticesinthismanualandon themachineandshould
betrainedandsupervisedbyan adult.
TOWING
Towonlywitha machinethathasa hitchdesignedfortowing.Do
notattachtowedequipmentexceptatthehitchpoint.
Followthemanufacturersrecommendationforweightlimitsfor
towedequipmentandtowingonslopes.Forrecommendations,
call1-800-659-5917.
Neverallowchildrenor othersinoron towedequipment.
Onslopes,theweightof thetowedequipmentmaycauselossof
tractionandlossof control.
Alwaysuseextracautionwhentowingwitha machinecapableof
makingtightturns(e.g."zero-turn"ride-onmower). Makewide
turnstoavoidjack-knifing.
Travelslowlyandallowextradistancetostop.
Donotcoastdownhill.
SERVICE
SafeHandlingof Gasoline
Toavoidpersonalinjuryorpropertydamageuseextremecarein
handlinggasoline.Gasolineisextremelyflammableandthevaporsare
explosive.Seriouspersonalinjurycanoccurwhengasolineisspilled
on yourselforyourclotheswhichcanignite.Washyourskinand
changeclothesimmediately.
• Useonlyanapprovedgasolinecontainer.
Neverfill containersinsidea vehicleoron a truckortrailerbed
witha plasticliner.Alwaysplacecontainerson thegroundaway
fromyourvehiclebeforefilling.
Whenpractical,removegas-poweredequipmentfromthe truck
or trailerandrefuelitontheground.Ifthis isnotpossible,then
refuelsuchequipmentona trailerwitha portablecontainer,rather
thanfroma gasolinedispensernozzle.
Keepthenozzleincontactwiththe rimofthefueltankor
containeropeningat all timesuntilfuelingiscomplete.Donotuse
a nozzlelock-opendevice.
Extinguishall cigarettes,cigars,pipesandothersourcesof
ignition.
• Neverfuelmachineindoors.
Neverremovegascapor addfuelwhiletheengineis hotorrun-
ning.Allowengineto coolatleasttwominutesbeforerefueling.
Neveroverfillfuel tank. Filltanktono morethan1/2inchbelow
bottomoffillerneckto allowspaceforfuelexpansion.
• Replacegasolinecapandtightensecurely.
• Ifgasolineisspilled,wipeitoff theengineandequipment.Move
machineto anotherarea.Wait5 minutesbeforestartingthe
engine.
• To reducefirehazards,keepmachinefreeofgrass,leaves,or
otherdebrisbuild-up.Cleanup oilor fuelspillageandremoveany
fuelsoakeddebris.
• Neverstorethemachineorfuelcontainerinsidewherethereisan
openflame,sparkor pilotlightasona waterheater,spaceheater,
furnace,clothesdryeror othergasappliances.
Allowa machineto coolatleastfiveminutesbeforestoring.

GeneralService
• Neverrunanengineindoorsorinapoorlyventilatedarea.Engine
exhaustcontainscarbonmonoxide,anodorless,anddeadlygas.
• Beforecleaning,repairing,orinspecting,makecertainthe
blade(s)andallmovingpartshavestopped.Disconnectthespark
plugwireandgroundagainsttheenginetopreventunintended
starting.
• Periodicallychecktomakesurethebladescometocomplete
stopwithinapproximately(5)fivesecondsafteroperatingthe
bladedisengagementcontrol.Ifthebladesdonotstopwithinthe
thistimeframe,yourmachineshouldbeservicedprofessionally
byaSearsorotherqualifiedservicedealer.
• Checkbrakeoperationfrequentlyasitissubjectedtowearduring
normaloperation.Adjustandserviceasrequired.
• Checktheblade(s)andenginemountingboltsatfrequent
intervalsforpropertightness.Also,visuallyinspectblade(s)
fordamage(e.g.,excessivewear,bent,cracked).Replacethe
blade(s)withtheoriginalequipmentmanufacturer's(O.E.M.)
blade(s)only,listedinthismanual.Useofpartswhichdonot
meettheoriginalequipmentspecificationsmayleadtoimproper
performanceandcompromisesafety!
• Mowerbladesaresharp.Wrapthebladeorweargloves,anduse
extracautionwhenservicingthem.
• Keepallnuts,bolts,andscrewstighttobesuretheequipmentis
insafeworkingcondition.
• Nevertamperwiththe safetyinterlocksystemorothersafety
devices.Checktheirproperoperationregularly.
• Afterstrikinga foreignobject,stoptheengine,disconnectthe
sparkplugwire(s)andgroundagainsttheengine.Thoroughly
inspectthemachineforanydamage.Repairthedamagebefore
startingandoperating.
• Neverattemptto makeadjustmentsor repairstothemachine
whilethe engineis running.
• Grasscatchercomponentsandthedischargecoveraresubject
towearanddamagewhichcouldexposemovingpartsor allow
objectsto bethrown.Forsafetyprotection,frequentlycheck
componentsand replaceimmediatelywithoriginalequipment
manufacturer's(O.E.M.)partsonly,listedinthis manual.Useof
partswhichdo notmeettheoriginalequipmentspecificationsmay
leadtoimproperperformanceandcompromisesafety!
• Donotchangetheenginegovernorsettingsorover-speedthe
engine.Thegovernorcontrolsthe maximumsafeoperatingspeed
ofthe engine.
Maintainor replacesafetyandinstructionlabels,as necessary.
• Observeproperdisposallawsandregulationsforgas,oil, etc.to
protecttheenvironment.
• Accordingtothe ConsumerProductsSafetyCommission(CPSC)
andthe U.S.EnvironmentalProtectionAgency(EPA),thisproduct
hasanAverageUsefulLifeofseven(7)years,or 270hours
ofoperation.Attheendof theAverageUsefulLife,buyanew
machineor havethemachineinspectedannuallybya Searsor
otherqualifiedservicedealerto ensurethatallmechanicaland
safetysystemsareworkingproperlyandnotwornexcessively.
Failuretodosocan resultinaccidents,injuriesordeath.
DO NOT MODIFY ENGINE
Toavoid seriousinjuryor death,donotmodifyengineinanyway.
Tamperingwiththegovernorsettingcanleadto a runawayengineand
causeitto operateat unsafespeeds.Nevertamperwithfactorysetting
ofenginegovernor.
NOTICE REGARDING EMISSIONS
Engineswhicharecertifiedto complywithCaliforniaandfederal
EPAemissionregulationsforSORE(SmallOffRoadEquipment)are
certifiedto operateonregularunleadedgasoline,andmayinclude
thefollowingemissioncontrolsystems:EngineModification(EM)and
ThreeWayCatalyst(TWO)if so equipped.
SPARK ARRESTOR
Thismachineis equippedwithan internalcombustionengineand
shouldnotbe usedonornearanyunimprovedforest-covered,
brushcoveredorgrass-coveredlandunlesstheengine'sexhaust
systemisequippedwitha sparkarrestormeetingapplicablelocalor
statelaws(if any).
Ifa sparkarrestoris used,itshouldbe maintainedin effectiveworking
orderbythe operator.IntheStateof Californiatheaboveisrequired
bylaw (Section4442of theCaliforniaPublicResourcesCode).Other
statesmayhavesimilarlaws.Federallawsapplyonfederallands.
A sparkarrestorforthemuffleris availablethroughyournearestSears
PartsandRepairServiceCenter.
6
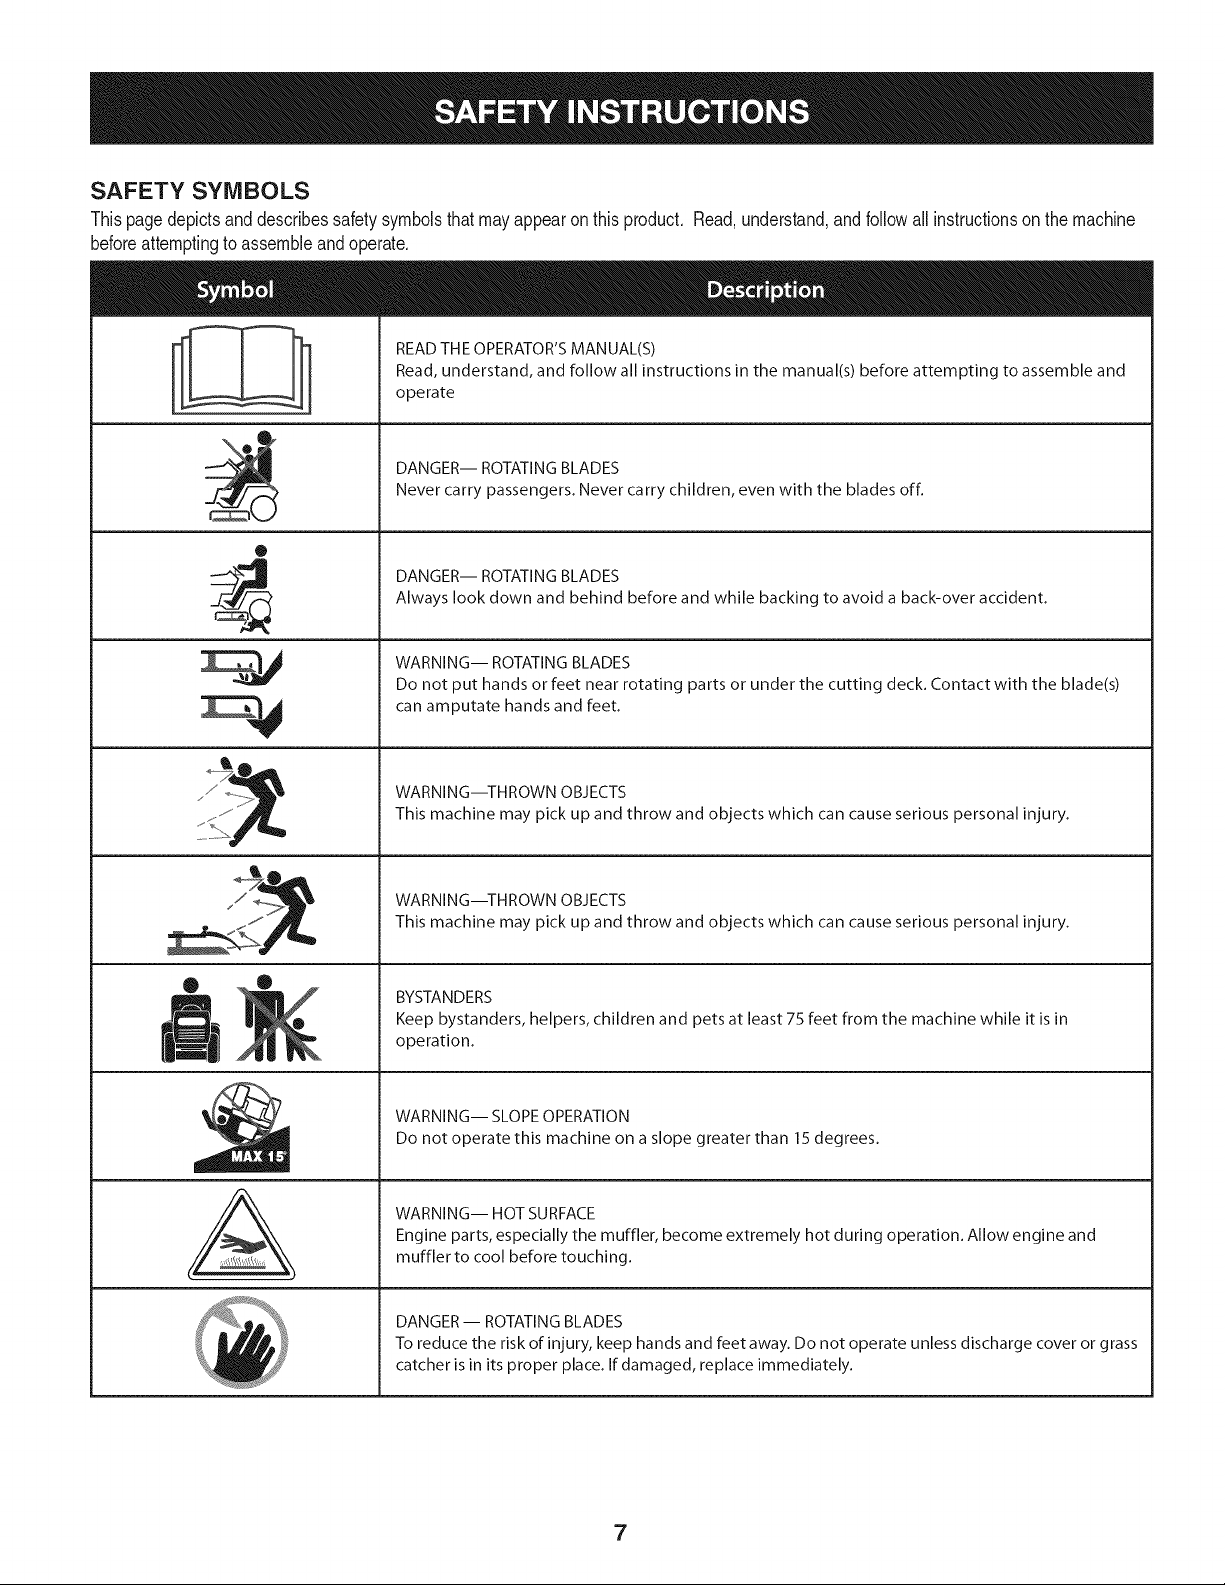
SAFETY SYMBOLS
Thispagedepictsanddescribessafetysymbolsthatmayappearonthis product.Read,understand,andfollowallinstructionson themachine
beforeattemptingtoassembleandoperate.
READ THE OPERATOR'S MANUAL(S)
Read, understand, and follow all instructions in the manual(s) before attempting to assemble and
operate
DANGER-- ROTATING BLADES
Never carry passengers. Never carry children, even with the blades off.
O
DANGER-- ROTATING BLADES
Always look down and behind before and while backing to avoid a back-over accident.
WARNING-- ROTATING BLADES
Do not put hands or feet near rotating parts or under the cutting deck. Contact with the blade(s)
can amputate hands and feet.
A
WARNING--THROWN OBJECTS
This machine may pick up and throw and objects which can cause serious personal injury.
WARNING--THROWN OBJECTS
This machine may pick up and throw and objects which can cause serious personal injury.
BYSTANDERS
Keep bystanders, helpers, children and pets at least 75 feet from the machine while it is in
operation.
WARNING-- SLOPE OPERATION
Do not operate this machine on a slope greater than 15 degrees.
WARNING-- HOT SURFACE
Engine parts, especially the muffler, become extremely hot during operation. Allow engine and
muffler to cool before touching.
DANGER- ROTATING BLADES
To reduce the risk of injury, keep hands and feet away. Do not operate unless discharge cover or grass
catcher is in its proper place. If damaged, replace immediately.
7
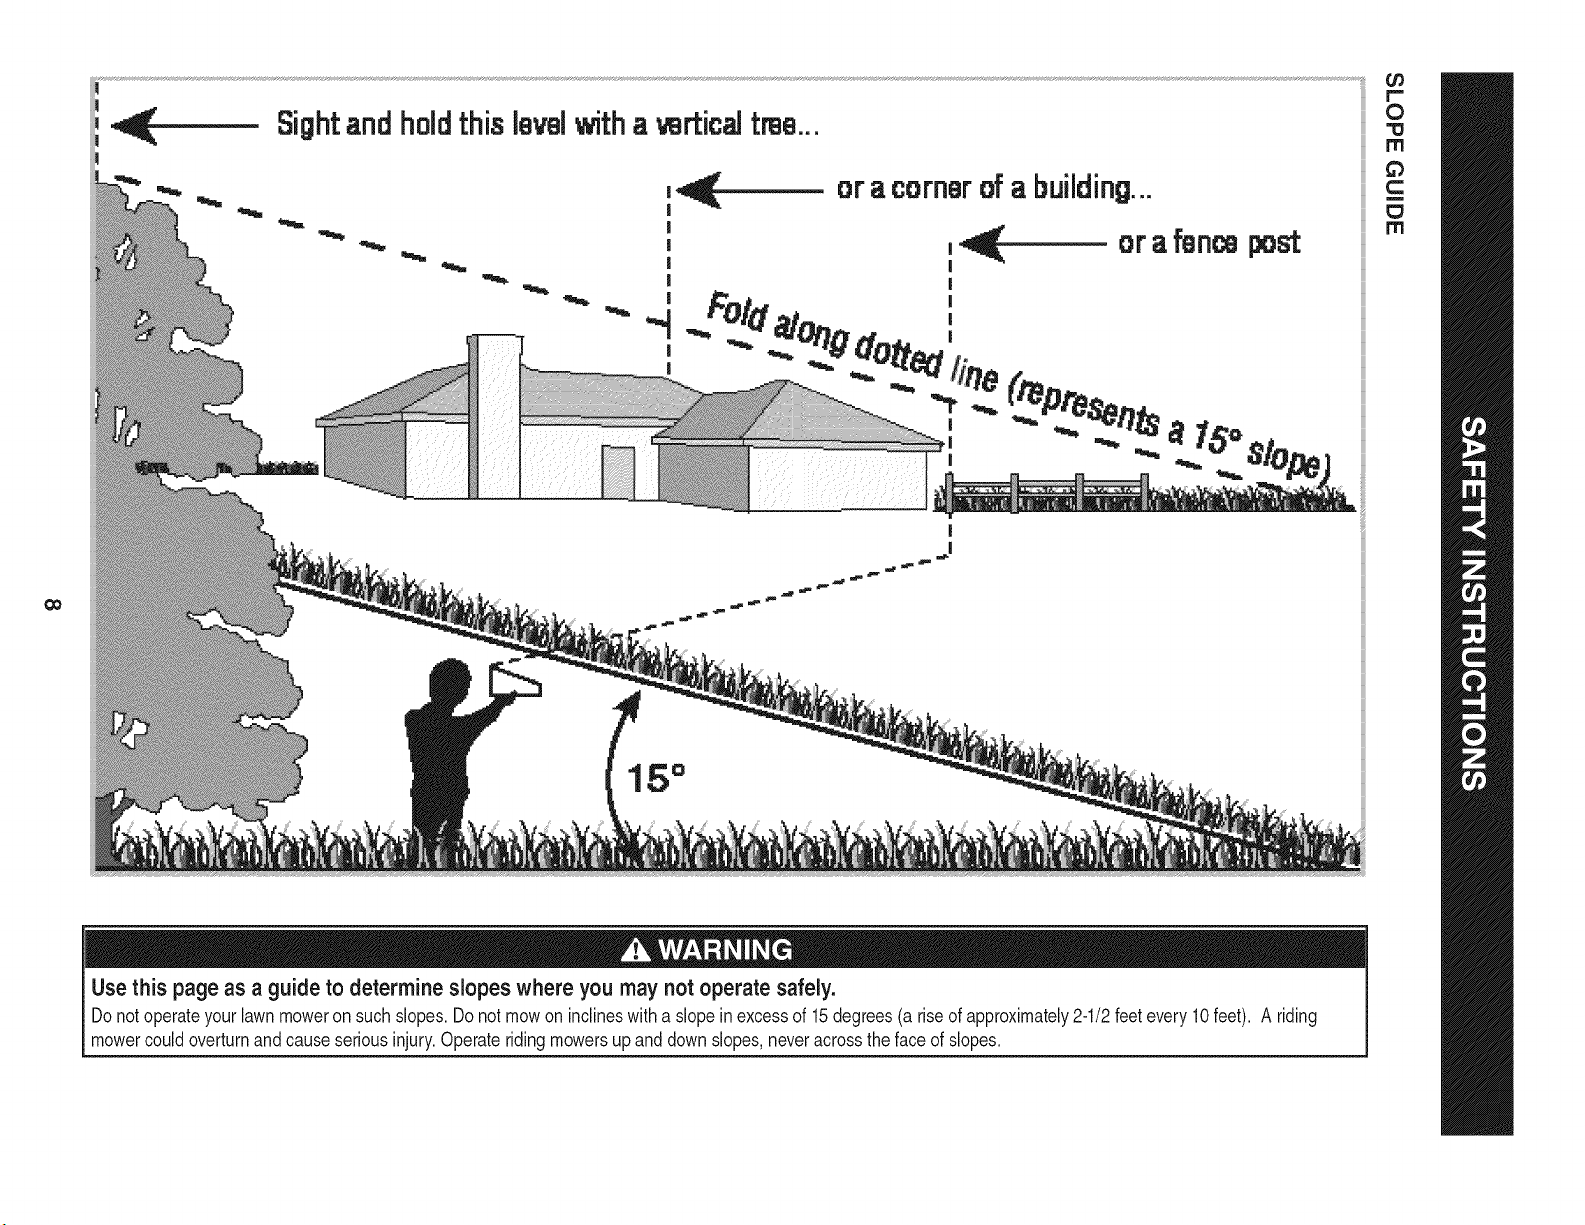
Sightandholdthis lewl witha_rticaJ tree...
or acornerofabuilding...
oraf_nco
0o
post
15°
Usethis page as a guideto determine slopes where you may not operate safely.
Donot operateyourlawnmoweronsuchslopes.Donotmowon inclineswitha slopeinexcessof 15degrees(arise of approximately2-1t2feetevery10feet). Ariding
mowercouldoverturnandcauseseriousinjury.Operateridingmowersupanddownslopes,neveracrossthe faceofslopes.
ROTATING BLADES CAUSE
SERIOUS INJURY OR DEATH
• DONOTMOWWHENCHILDRENOROTHERSARE
AROUND
• NEVERCARRYCHILDRENEVENWITHBLaDE(S)OFF.
• LOOKDOWNANDNEMDONEFORSANDWHILE
BACKING.
• MOWINGINREVERSEISNOTRECOMMENDED.
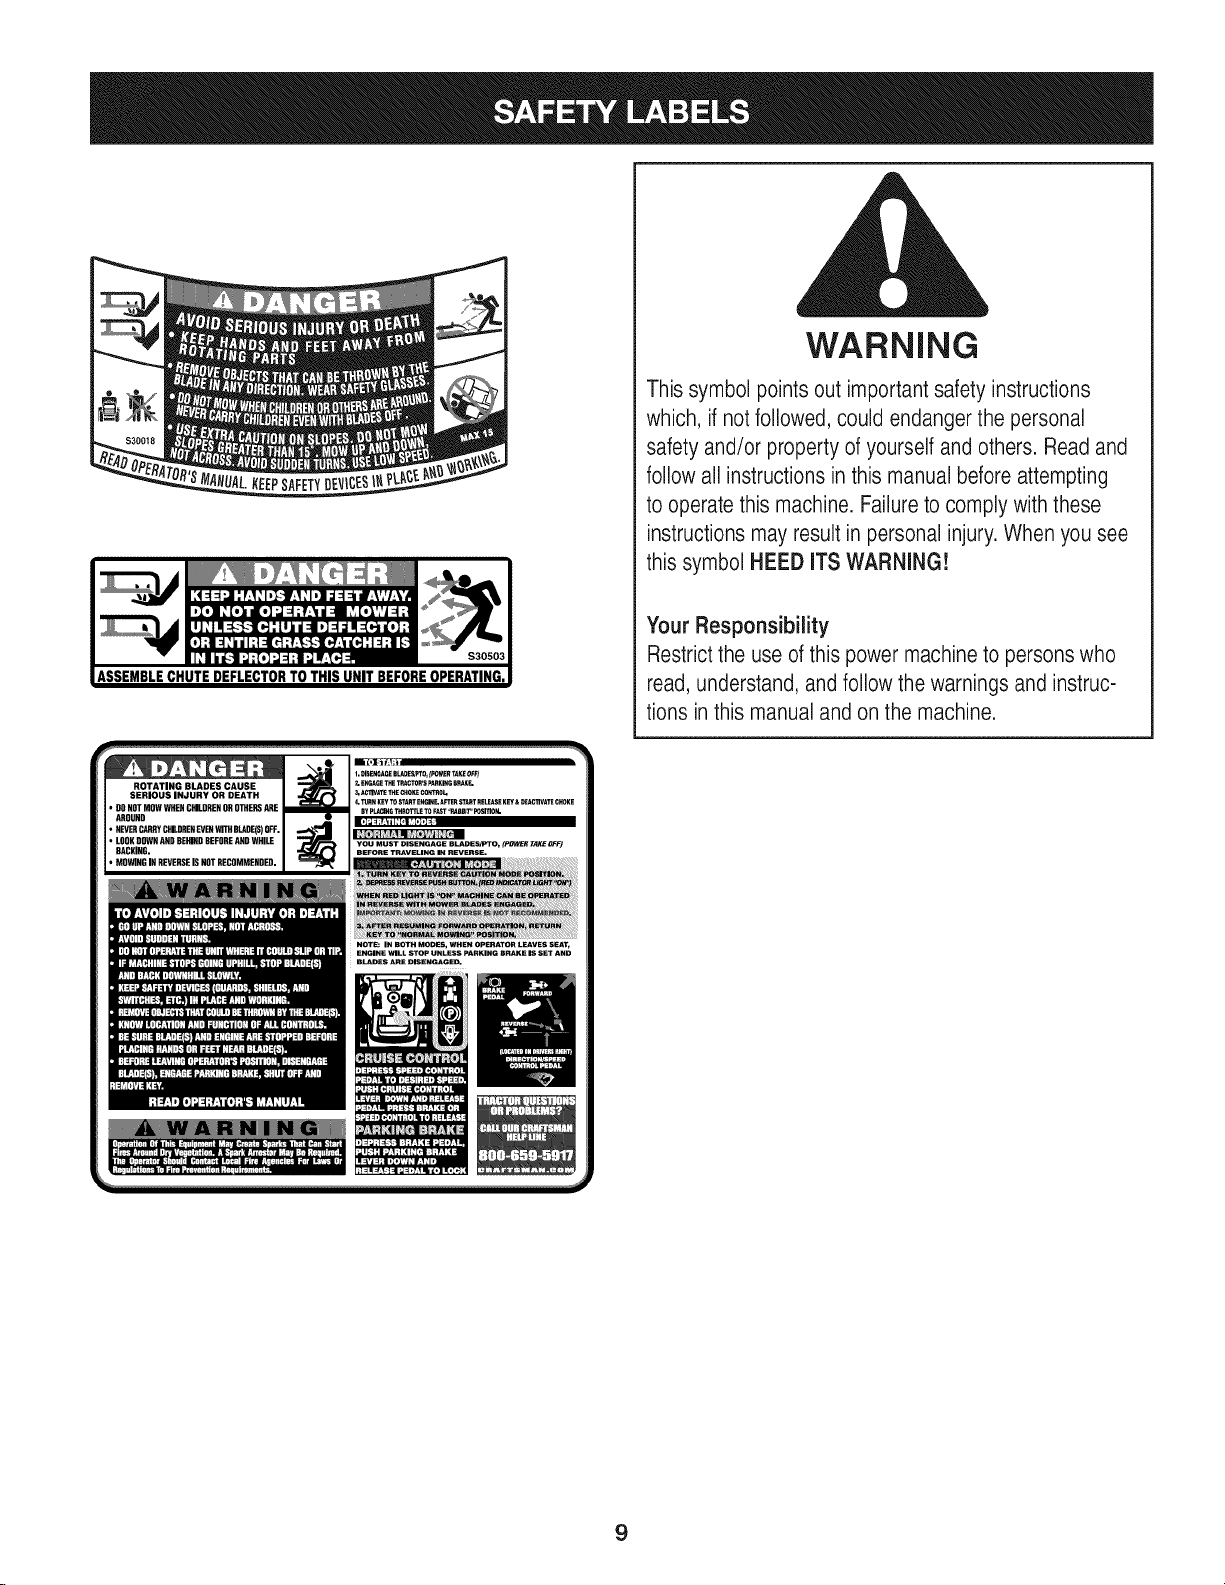
WARNING
Thissymbol points outimportantsafety instructions
which, ifnot followed,could endangerthe personal
safety and/or property of yourself and others. Readand
followall instructionsin this manual before attempting
to operatethis machine. Failureto comply with these
instructionsmay result in personal injury.Whenyou see
this symbol HEED ITSWARNING!
Your Responsibility
Restrictthe use ofthis power machineto personswho
read, understand,and followthe warningsand instruc-
tions inthis manualand on the machine.
NOTE: IN BOTH MODES, WHEN OPERATOR LEAVES SEAT,
ENGINE WILL STOP UNLESS PARKING BRAKE IS SET AND
BLAINS AR_ DISEHGAGE_
9
TRACTOR SET-UP
Moving The Tractor Manually
Yourtractor'stransmissionisequippedwitha hydrostaticreliefvalve
foroccasionswhenitis necessarytomovethetractormanually.Open-
ingthisvalvepermitsthefluidin thetransmissionto bypassitsnormal
route,allowingthereartiresto "freewheel."Toopenthe hydrostatic
reliefvalve,proceedasfollows:
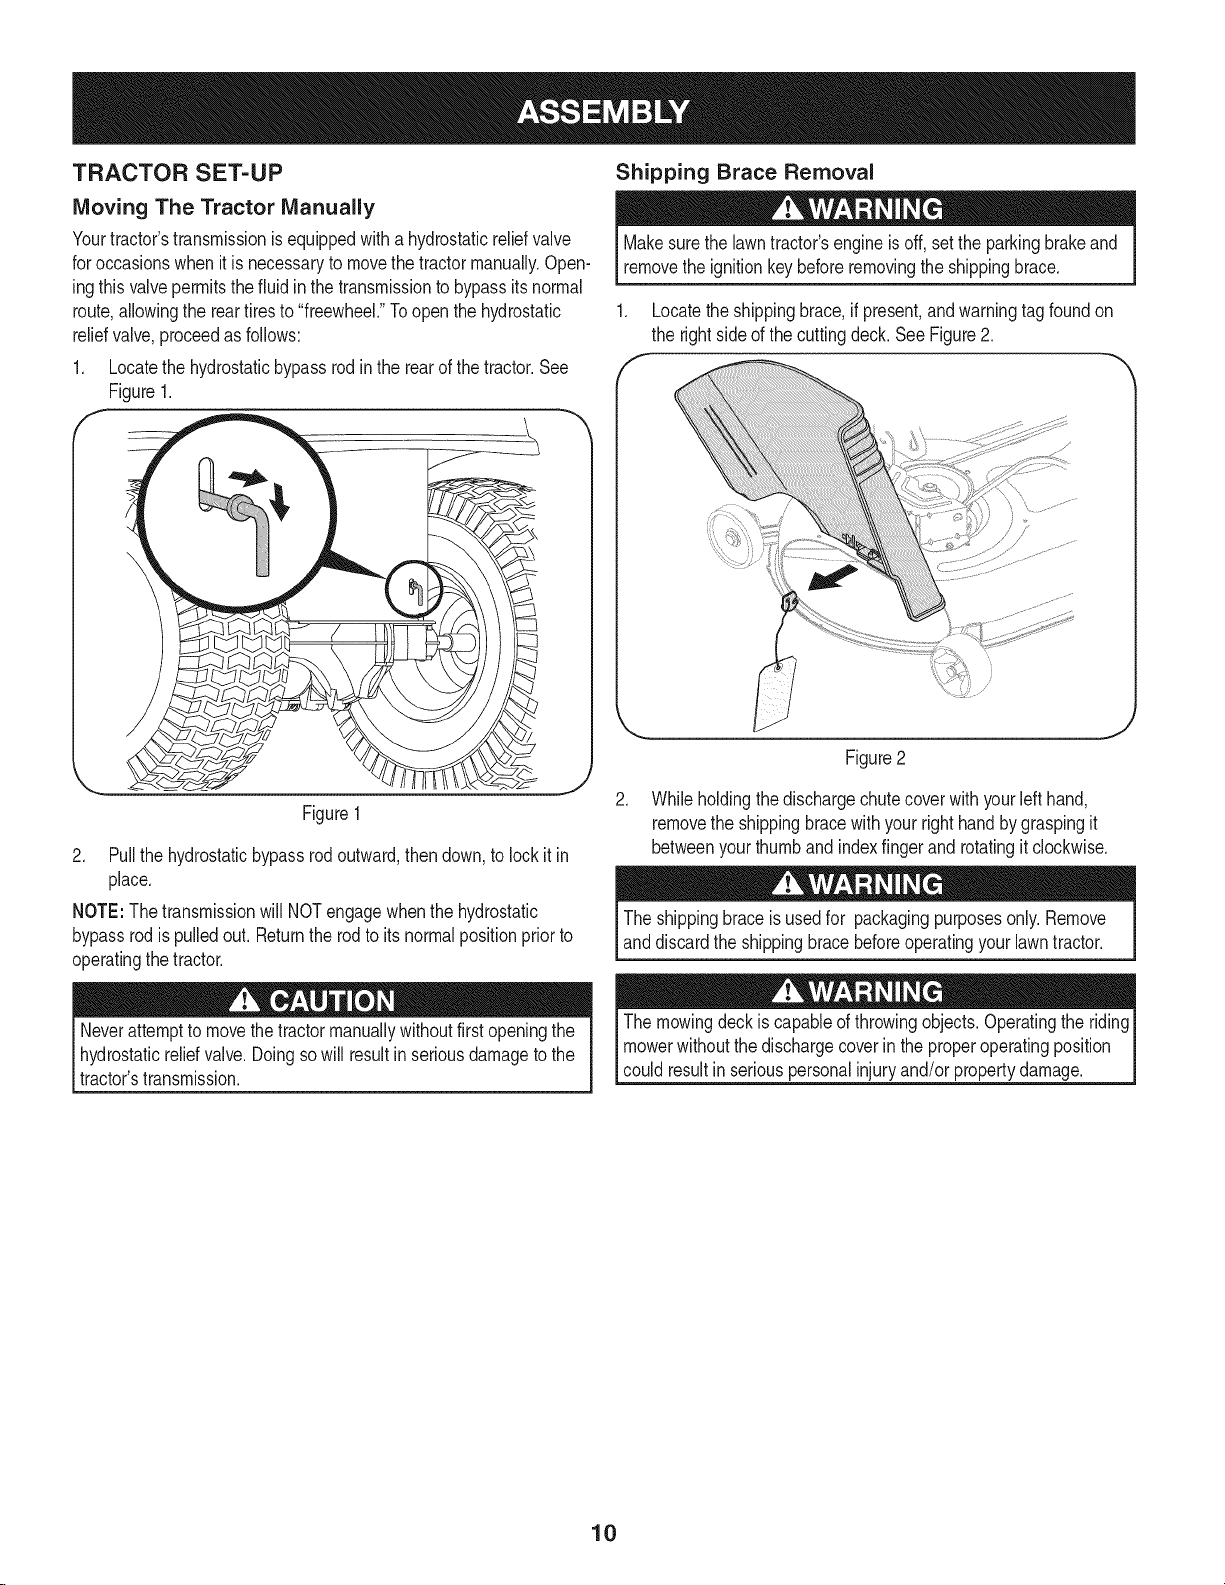
1. Locatethehydrostaticbypassrodintherearofthetractor.See
Figure1.
Shipping Brace Removal
Makesurethe lawntractor'sengineisoff, setthe parkingbrakeand
removethe ignitionkeybeforeremovingtheshippingbrace.
1. Locatetheshippingbrace,ifpresent,andwarningtagfoundon
the rightsideofthe cuttingdeck.SeeFigure2.
Figure1
2. Pullthehydrostaticbypassrodoutward,thendown,to lockit in
place.
NOTE:The transmissionwillNOTengagewhenthehydrostatic
bypassrodis pulledout. Returntherodto itsnormalpositionpriorto
operatingthetractor.
Neverattemptto movethetractormanuallywithoutfirstopeningthe
hydrostaticreliefvalve.Doingsowillresultinseriousdamagetothe
tractor'stransmission.
Figure2
.
Whileholdingthe dischargechutecoverwithyourleft hand,
removethe shippingbracewithyourrighthandbygraspingit
betweenyourthumband indexfingerandrotatingit clockwise.
Theshippingbraceis usedfor packagingpurposesonly.Remove
anddiscardtheshippingbracebeforeoperatingyourlawntractor.
Themowingdeckis capableofthrowingobjects.Operatingtheriding
mowerwithoutthedischargecoverin theproperoperatingposition
couldresultin seriouspersonalinjuryand/orpropertydamage.
10
CONNECTING THE BATTERY CABLES
Batteryposts,terminals,andrelatedaccessoriescontainleadand
leadcompounds,chemicalsknowntotheStateof Californiatocause
cancerandreproductiveharm.Washhandsafterhandling.
Whenattachingbatterycables,alwaysconnectthe POSiTiVE(Red)
wireto its terminalfirst,followedbythe NEGATIVE(Black)wire.
Toconnectthebatterycables,proceedasfollows:
NOTE:The positivebatteryterminalismarkedPos.(+).Thenegative
batteryterminalis markedNeg.(-).
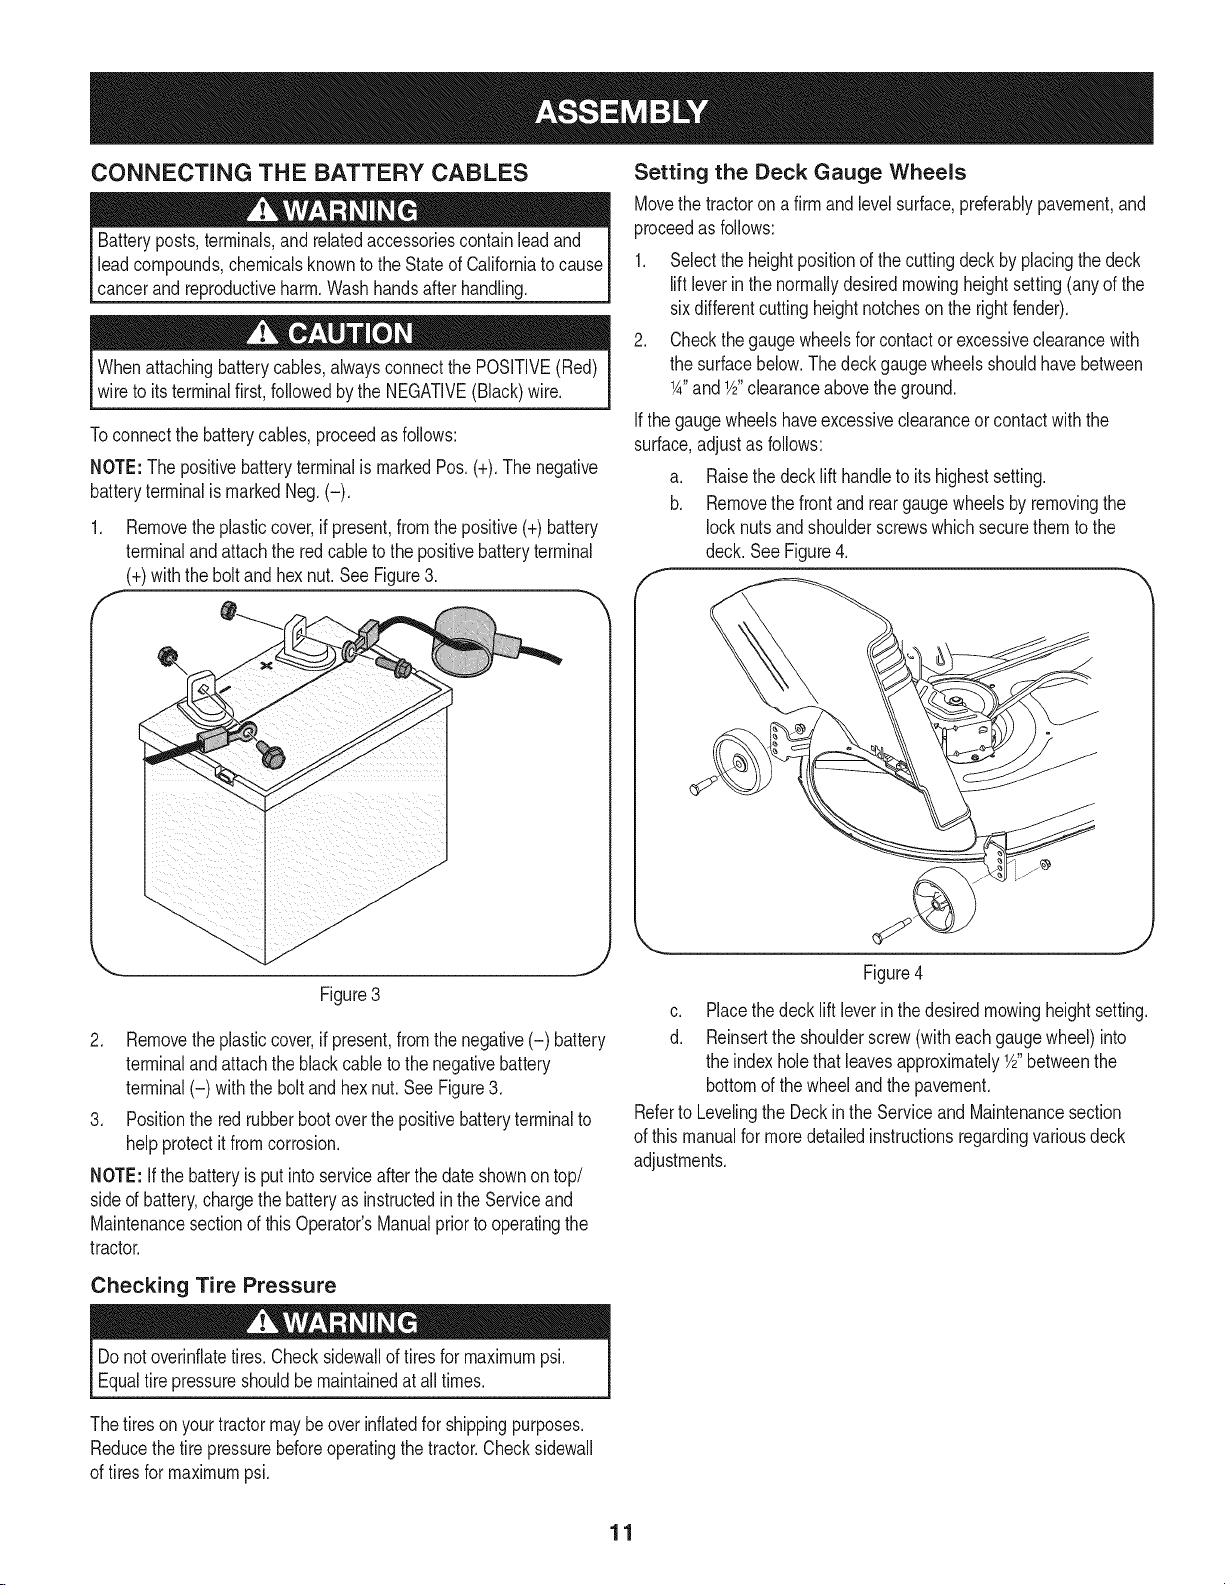
1. Removetheplasticcover,if present,fromthepositive(+)battery
terminalandattachthe redcableto thepositivebatteryterminal
(+)withtheboltandhexnut.See Figure3.
f -,
Setting the Deck Gauge Wheels
Movethe tractoronafirmand levelsurface,prderably pavement,and
proceedas follows:
1. Selecttheheightpositionofthecuttingdeckbyplacingthedeck
liftleverinthe normallydesiredmowingheightsetting(anyofthe
sixdifferentcuttingheightnotchesontherightfender).
2. Checkthegaugewheelsfor contactor excessiveclearancewith
thesurfacebelow.The deckgaugewheelsshouldhavebetween
1A"andY2"clearanceabovetheground.
Ifthegaugewheelshaveexcessiveclearanceor contactwiththe
surface,adjustas follows:
a. Raisethe decklift handleto itshighestsetting.
b. Removethefrontandreargaugewheelsbyremovingthe
locknutsandshoulderscrewswhichsecurethemto the
deck.SeeFigure4.
Figure3
2. Removetheplasticcover,if present,fromthenegative(-) battery
terminalandattachtheblackcabletothe negativebattery
terminal(-) withthe boltandhexnut.SeeFigure3.
3. Positionthe redrubberbootoverthepositivebatteryterminalto
helpprotectit fromcorrosion.
NOTE:Ifthe batteryisputintoserviceafterthedateshownontop/
sided battery,chargethebatteryasinstructedintheServiceand
Maintenancesectionofthis Operator'sManualpriortooperatingthe
tractor.
Checking Tire Pressure
Donotoverinflatetires.Checksidewallof tiresfor maximumpsi.
Equaltirepressureshouldbemaintainedat alltimes.
Thetiresonyour tractormaybeoverinflatedforshippingpurposes.
Reducethetire pressurebeforeoperatingthetractor.Checksidewall
oftiresfor maximumpsi.
c. Placethedecklift leverinthedesiredmowingheightsetting.
d. Reinsertthe shoulderscrew(witheachgaugewheel)into
theindexholethatleavesapproximatelyY2"betweenthe
bottomofthewheelandthepavement.
Referto Levelingthe Deckin theServiceand Maintenancesection
ofthis manualformoredetailedinstructionsregardingvariousdeck
adjustments.
11

Adjusting the Seat
Toadjustthe positionoftheseat,pullup andholdthe seatadjustment
lever.Slidetheseatforwardor rearwardtothe desiredposition;then
releasetheadjustmentlever.Makesureseatislockedintopositionin
a seat-stopbeforeoperatingthe tractor.SeeFigure5.
Beforeoperatingthe tractor,makesuretheseatisengagedina
seat-stop.Engagethe parkingbrake.Standbehindthemachineand
pullbackon seatuntilitclicksintoplace.
f
,\
Gas and Oil
Thefueltank islocatedunderthehood.Removethefuelcapby
turningit counterclockwise.Useonlyclean,fresh(nomorethan30
daysold),unleadedgasoline.Filltanktothe bottomofthefillerneck,
allowingsomespacein thetankforfuelexpansion.Donotoverfillthe
tank.
Useextremecarewhenhandlinggasoline.Gasolineisextremely
flammableandthevaporsare explosive.Neverfuelthemachine
indoorsorwhiletheengineis hotorrunning.Extinguishcigarettes,
cigars,pipesandothersourcesof ignition.
NOTE:Yourtractorisshippedwithoil intheengine.However,you
MUSTchecktheoillevelbeforeoperating.SeeCheckingthe Engine
Oil intheServiceand Maintenancesectionofthismanual.
Alwayschecktheengineoil levelbeforeeachuseasinstructedin
theMaintenancesection.Addoil asnecessary.Failuretodo somay
resultinseriousdamagetoyourengine.
Figure5
12
f
FueITankCap
Throttle/ChokeControl_
I
FuelLevelIndicator
CupHolder"
IgnitionSwitch
Module
PTO(Blade
Knob
DrivePedal
Pedal
LiffLever
\
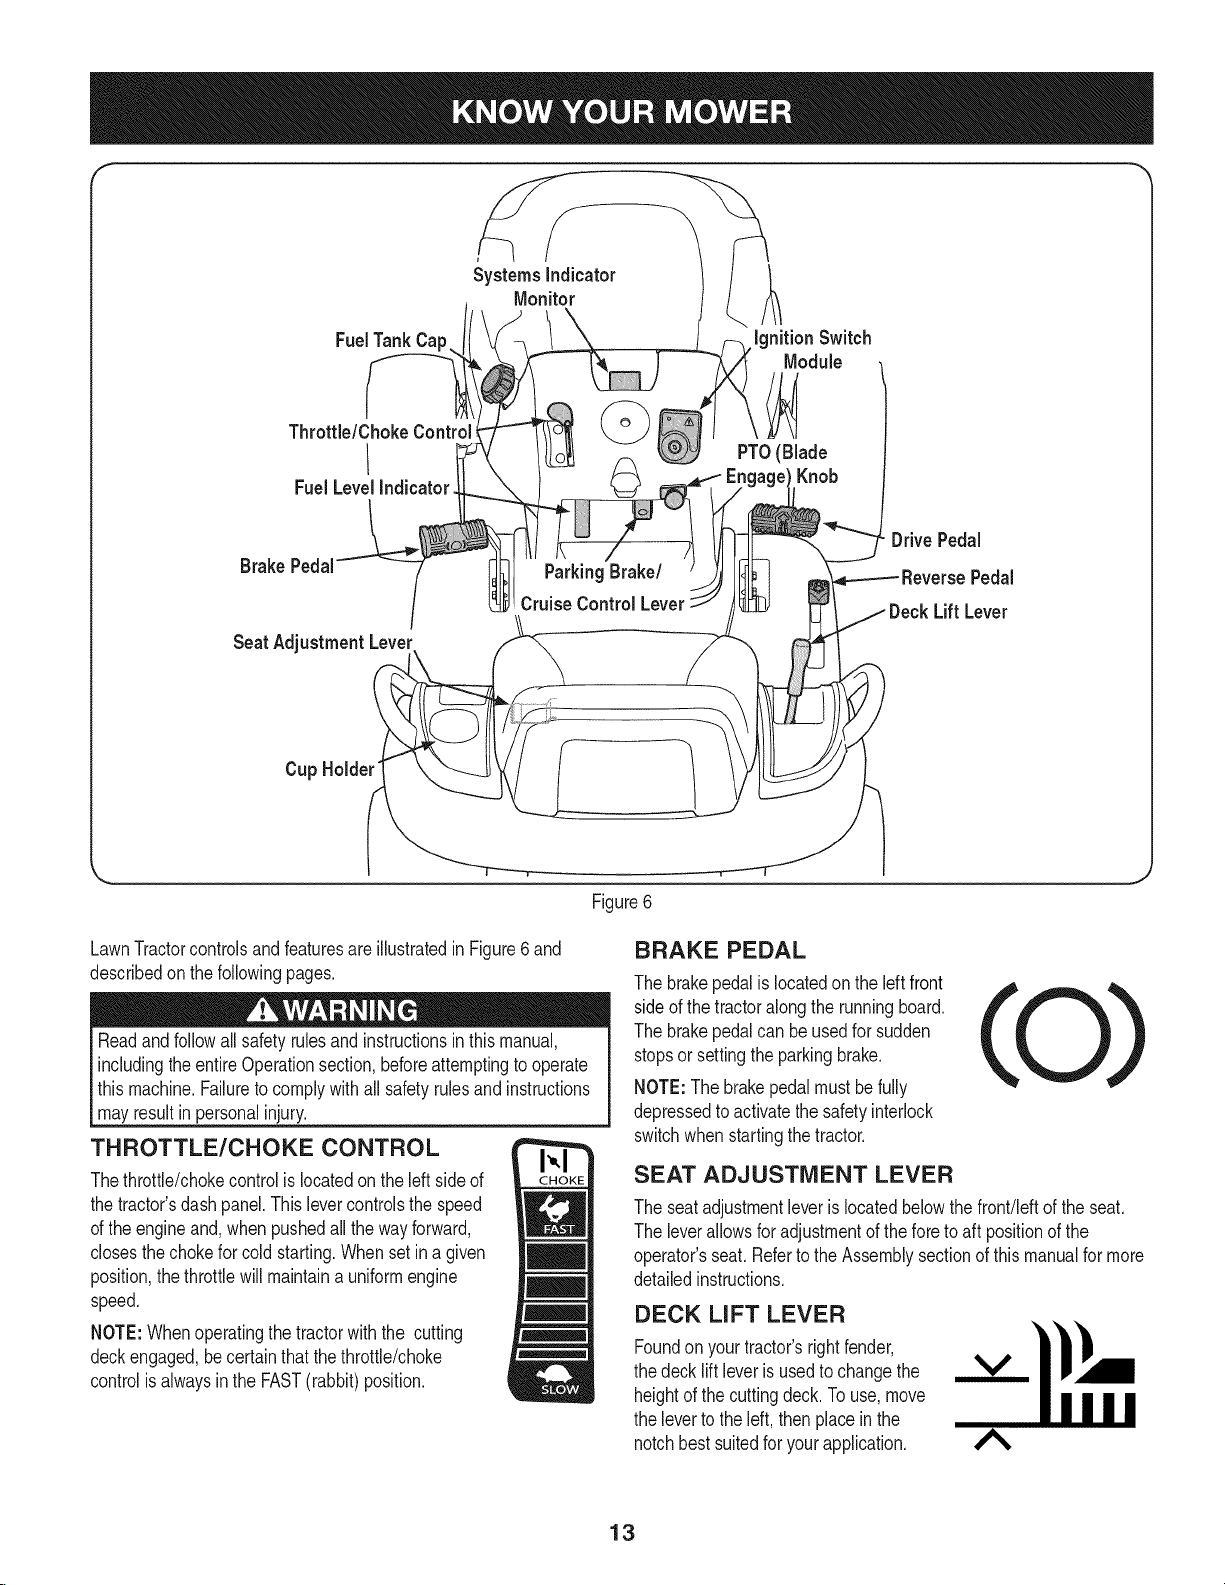
Figure6
LawnTractorcontrolsandfeaturesareillustratedinFigure6and
describedon thefollowingpages.
Readandfollowallsafetyrulesandinstructionsinthismanual,
includingtheentireOperationsection,beforeattemptingtooperate
this machine.Failuretocomplywithall safetyrulesandinstructions
mayresultin personalinjury.
THROTTLE/CHOKE CONTROL
Thethrottle/chokecontrolis locatedon theleftsideof
thetractor'sdashpanel.Thislevercontrolsthespeed
ofthe engineand,whenpushedallthewayforward,
closesthechokeforcold starting.Whensetinagiven
position,thethrottlewillmaintaina uniformengine
speed.
NOTE:Whenoperatingthetractorwiththe cutting
deckengaged,becertainthatthe throttle/choke
controlisalwaysintheFAST(rabbit)position.
BRAKE PEDAL
Thebrakepedalis locatedon theleftfront
sideof thetractoralongthe runningboard.
Thebrakepedalcanbeusedfor sudden
stopsorsettingtheparkingbrake.
NOTE:Thebrakepedalmustbefully
depressedto activatethesafetyinterlock
switchwhenstartingthetractor.
SEAT ADJUSTMENT LEVER
Theseatadjustmentleveris locatedbelowthefront!leftofthe seat.
Theleverallowsforadjustmentofthe foretoaft positionofthe
operator'sseat.RefertotheAssemblysectionofthismanualformore
detailedinstructions.
DECK LIFT LEVER
Foundonyour tractor'srightfender,
thedecklift leveris usedtochangethe
heightofthecuttingdeck.To use,move
thelevertothe left,thenplacein the
notchbestsuitedforyourapplication.
A
13
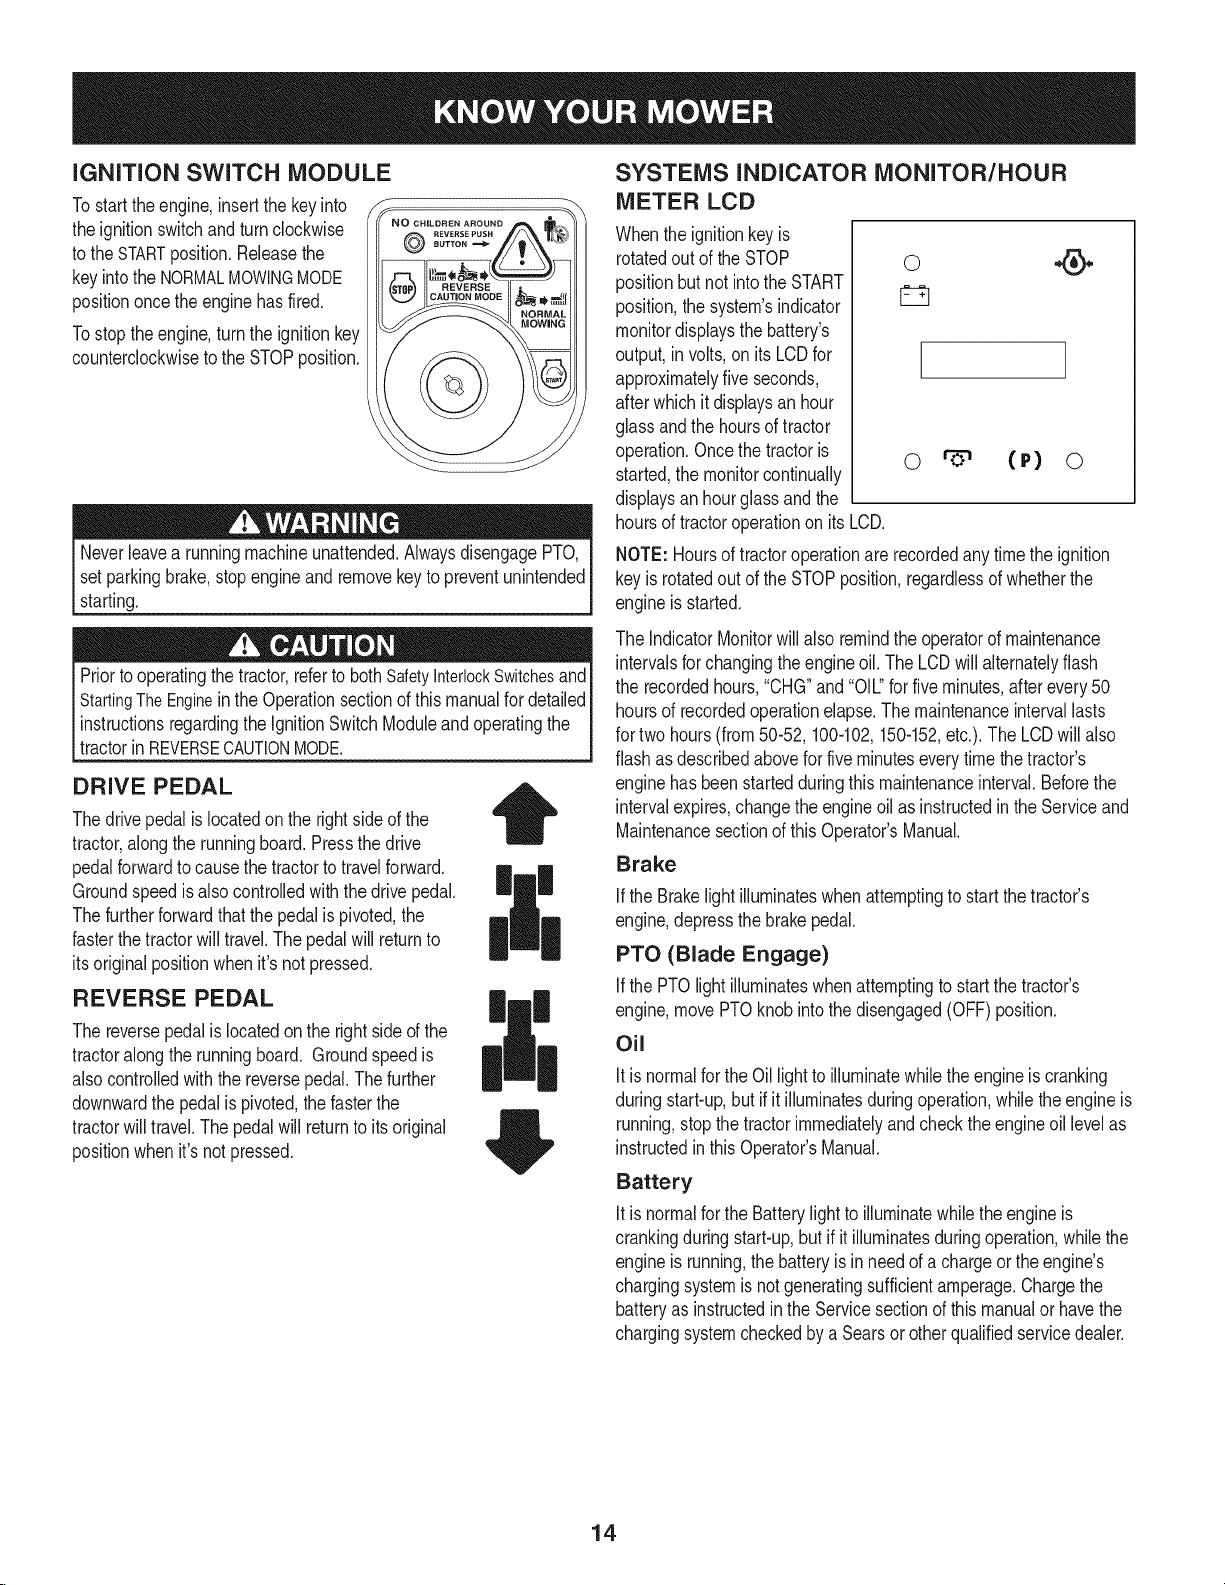
iGNiTiON SWITCH MODULE
Tostart theengine,insertthekeyinto
theignitionswitchandturnclockwise
tothe STARTposition.Releasethe
keyintotheNORMALMOWINGMODE
positiononcethe enginehasfired.
Tostoptheengine,turntheignitionkey
counterclockwisetothe STOPposition.
Neverleavea runningmachineunattended.AlwaysdisengagePTO,
setparkingbrake,stopengineand removekeyto preventunintended
starting.
Priortooperatingthetractor,referto bothSafetyInterlockSwitchesand
StartingTheEnginein theOperationsectionofthismanualfordetailed
instructionsregardingthe IgnitionSwitchModuleandoperatingthe
tractorinREVERSECAUTONMODE. j
8UTTONm_
REVERS£PUSH
DRIVE PEDAL
Thedrivepedalislocatedon therightsideof the
tractor,alongthe runningboard.Pressthe drive
pedalforwardtocausethe tractortotravelforward.
Groundspeedis alsocontrolledwiththedrivepedal.
Thefurtherforwardthatthepedalispivoted,the
fasterthetractorwill travel.Thepedalwillreturnto
itsoriginalpositionwhen it'snotpressed.
|
REVERSE PEDAL
Thereversepedalis locatedontherightsideof the
tractoralongthe runningboard. Groundspeedis
alsocontrolledwiththe reversepedal.Thefurther
downwardthe pedalispivoted,thefasterthe
tractorwilltravel.Thepedalwillreturnto itsoriginal
positionwhenit'snotpressed.
SYSTEMS INDICATOR MONITOR/HOUR
METER LCD
Whenthe ignitionkeyis
rotatedout oftheSTOP
positionbutnot intotheSTART
position,thesystem'sindicator
monitordisplaysthebattery's
output,in volts,onits LCDfor
approximatelyfiveseconds,
afterwhichitdisplaysan hour
glassandthehoursoftractor
operation.Oncethetractoris
started,themonitorcontinually
displaysanhourglassandthe
hoursof tractoroperationon itsLCD.
NOTE:Hoursof tractoroperationarerecordedanytimetheignition
keyis rotatedout oftheSTOPposition,regardlessof whetherthe
engineisstarted.
TheIndicatorMonitorwillalso remindtheoperatorofmaintenance
intervalsforchangingtheengineoil.The LCDwillalternatelyflash
the recordedhours,"CHG"and"OIL."forfiveminutes,afterevery50
hoursof recordedoperationelapse.Themaintenanceintervallasts
fortwo hours(from50-52, 100-102,150-152,etc.).The LCDwill also
flashasdescribedaboveforfiveminuteseverytimethetractor's
enginehasbeenstartedduringthismaintenanceinterval.Beforethe
intervalexpires,changetheengineoilas instructedintheServiceand
Maintenancesectionof thisOperator'sManual.
Brake
ifthe Brakelightilluminateswhenattemptingto startthetractor's
engine,depressthebrakepedal.
PTO (Blade Engage)
IfthePTOlightilluminateswhenattemptingto startthetractor's
engine,movePTOknobinto thedisengaged(OFF)position.
Oil
Itis normalfortheOillightto illuminatewhiletheengineis cranking
duringstart-up,but ifit illuminatesduringoperation,whiletheengineis
running,stopthetractorimmediatelyandcheckthe engineoil levelas
instructedinthis Operator'sManual.
Battery
Itis normalfortheBatterylightto illuminatewhilethe engineis
crankingduringstart-up,butif it illuminatesduringoperation,whilethe
engineisrunning,thebatteryisinneedof a chargeortheengine's
chargingsystemisnotgeneratingsufficientamperage.Chargethe
batteryas instructedin theServicesectionof thismanualor havethe
chargingsystemcheckedbyaSearsor otherqualifiedservicedealer.
0
I
o (P) o
14
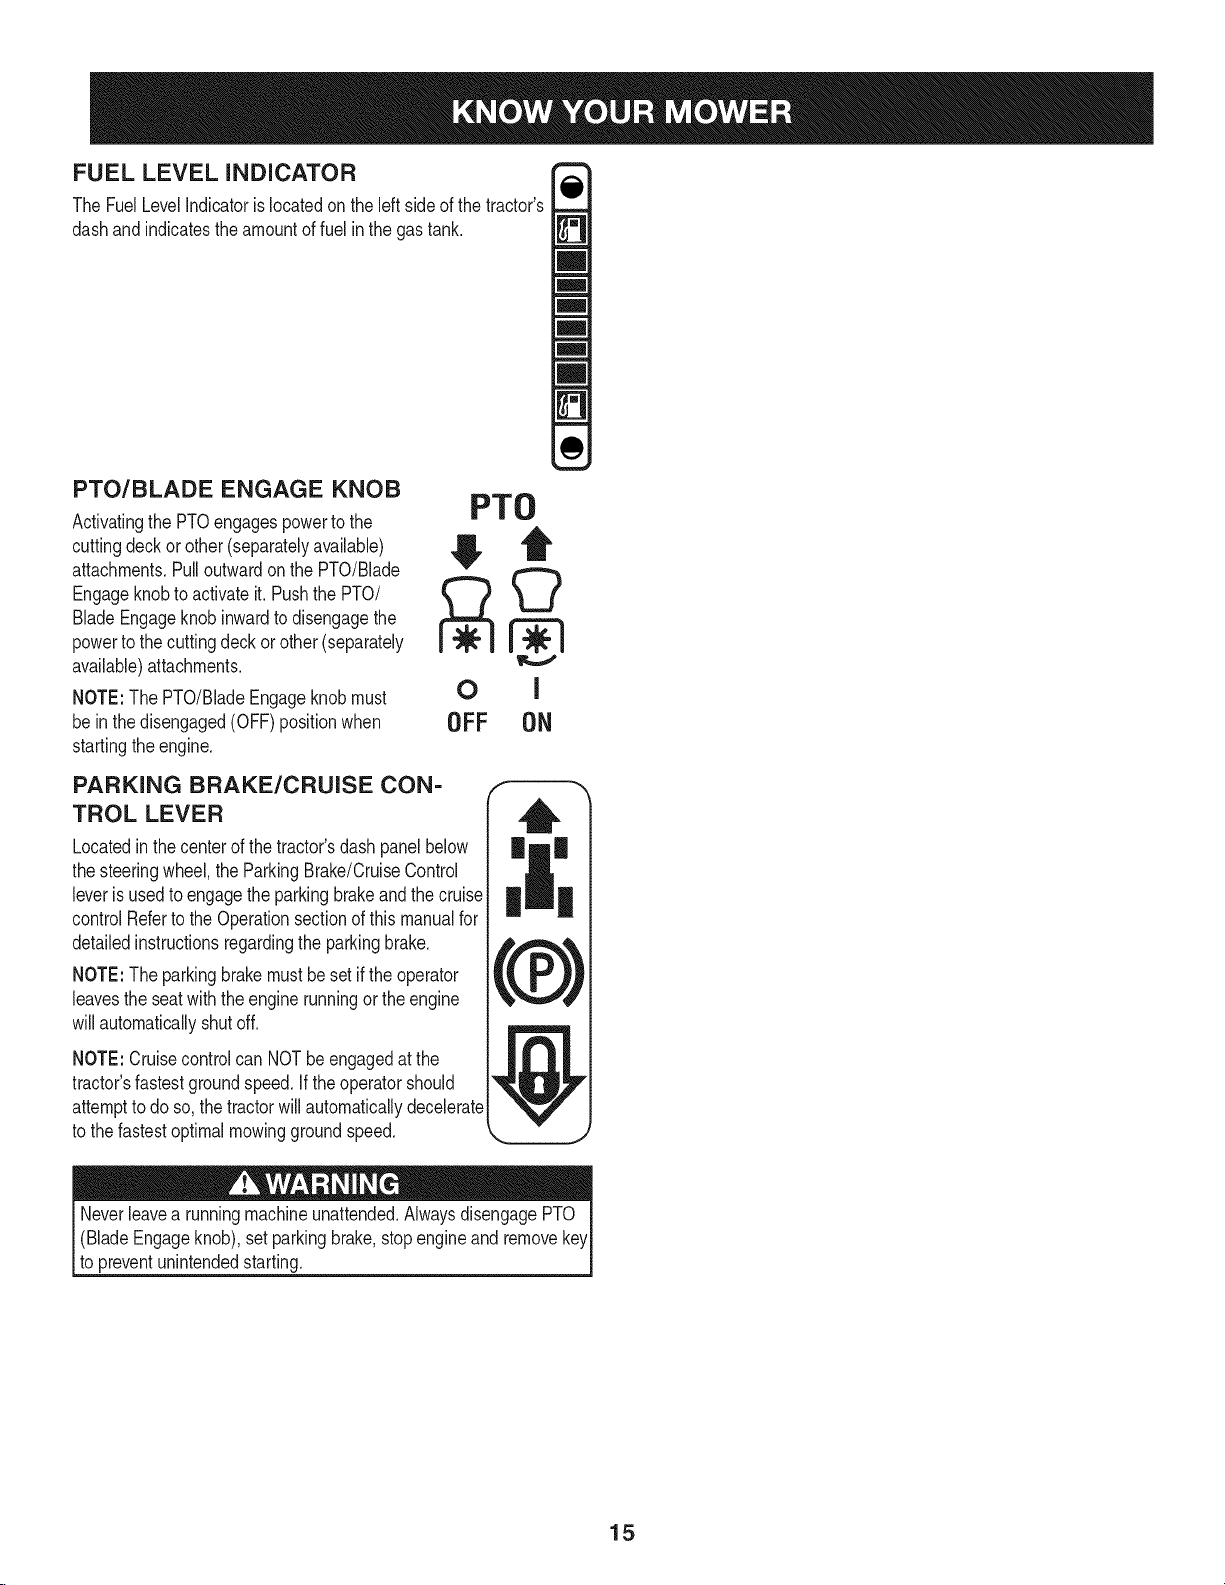
FUEL LEVEL INDICATOR
TheFuelLevelIndicatorislocatedon theleftsideofthetractor's
dashandindicatestheamountof fuelinthegastank.
PTO/BLADE ENGAGE KNOB
Activatingthe PTOengagespowerto the
cuttingdeckorother(separatelyavailable)
attachments.Pulloutwardonthe PTO/Blade
Engageknobto activateit. PushthePTO/
BladeEngageknobinwardto disengagethe
powertothecuttingdeckorother(separately
available)attachments.
NOTE:The PTO/BladeEngageknobmust
be inthedisengaged(OFF)positionwhen
startingtheengine.
PTO
OFF ON
PARKING BRAKE/CRUISE CON-
TROL LEVER
Locatedinthecenterof thetractor'sdashpanelbelow
thesteeringwheel,theParkingBrake/CruiseControl
leveris usedtoengagetheparkingbrakeandthecruise
controlRefertothe Operationsectionofthis manualfor
detailedinstructionsregardingtheparkingbrake.
NOTE:The parkingbrakemustbesetiftheoperator
leavestheseatwiththe enginerunningor theengine
willautomaticallyshutoff.
NOTE:Cruisecontrolcan NOTbeengagedatthe
tractor'sfastestgroundspeed.If theoperatorshould
attempttodoso,the tractorwillautomaticallydecelerate
tothe fastestoptimalmowinggroundspeed.
(BladeEngageknob),setparkingbrake,stopengineand remove
topreventunintendedstarting.
15
SAFETY iNTERLOCK SWITCH ES
Thistractoris equippedwitha safetyinterlocksystemfortheprotection
ofthe operator.Iftheinterlocksystemshouldevermalfunction,do not
operatethetractor.Contacta Searsorotherqualifiedservicedealer.
• The safetyinterlocksystempreventstheenginefromcrankingor
startingunlessthe parkingbrakeisengaged,andthe PTO(Blade
Engage)handleisinthe disengaged(OFF)position.
Theenginewill automaticallyshutoffif theoperatorleavesthe
seatbeforeengagingtheparkingbrake.
• TheelectricPTO(BladeEngage)clutchwillautomaticallyshut
off iftheoperatorleavesthetractor'sseatwiththe PTO(Blade
Engage)knobinthe engaged(ON)position,regardlessof
whetherthe parkingbrakeisengaged.
• Withthe ignitionkeyinthe NORMALMOWINGposition,the
electricPTO(BladeEngage)clutchwillautomaticallyshutoffif
thePTO(BladeEngage)knobismovedintotheengaged(ON)
positionwiththedrive pedalinpositionforreversetravel.
Donotoperatethetractorif theinterlocksystemis malfunctioning.
Thissystemwasdesignedfor yoursafetyandprotection.
STARTING THE ENGINE
NOTE:Referto theAssembly&Set-Upsectionofthismanualfor
GasolineandOilfill-up instructions.
STOPPING THE ENGINE
Ifyoustrikea foreignobject,stoptheengineanddisconnectthe
sparkplugwire(s).Thoroughlyinspectthe machineforanydamage.
Repairthedamagebeforerestartingandoperating.
1. Ifthebladesareengaged,placethe PTO/BladeEngageknobin
thedisengaged(OFF)position.
2. PlacethethrottlecontrolneartheSLOWposition.
3. Turnthe ignitionkeycounterclockwiseto theSTOPposition.
4. Removethe keyfromtheignitionswitchtopreventunintended
starting.
DRIVING THE TRACTOR
Avoidsuddenstarts,excessivespeedandsuddenstops.
Lightlypressthebrakepedalto releasetheparkingbrake.Movethe
throttleleverintothe FAST(rabbit)position.
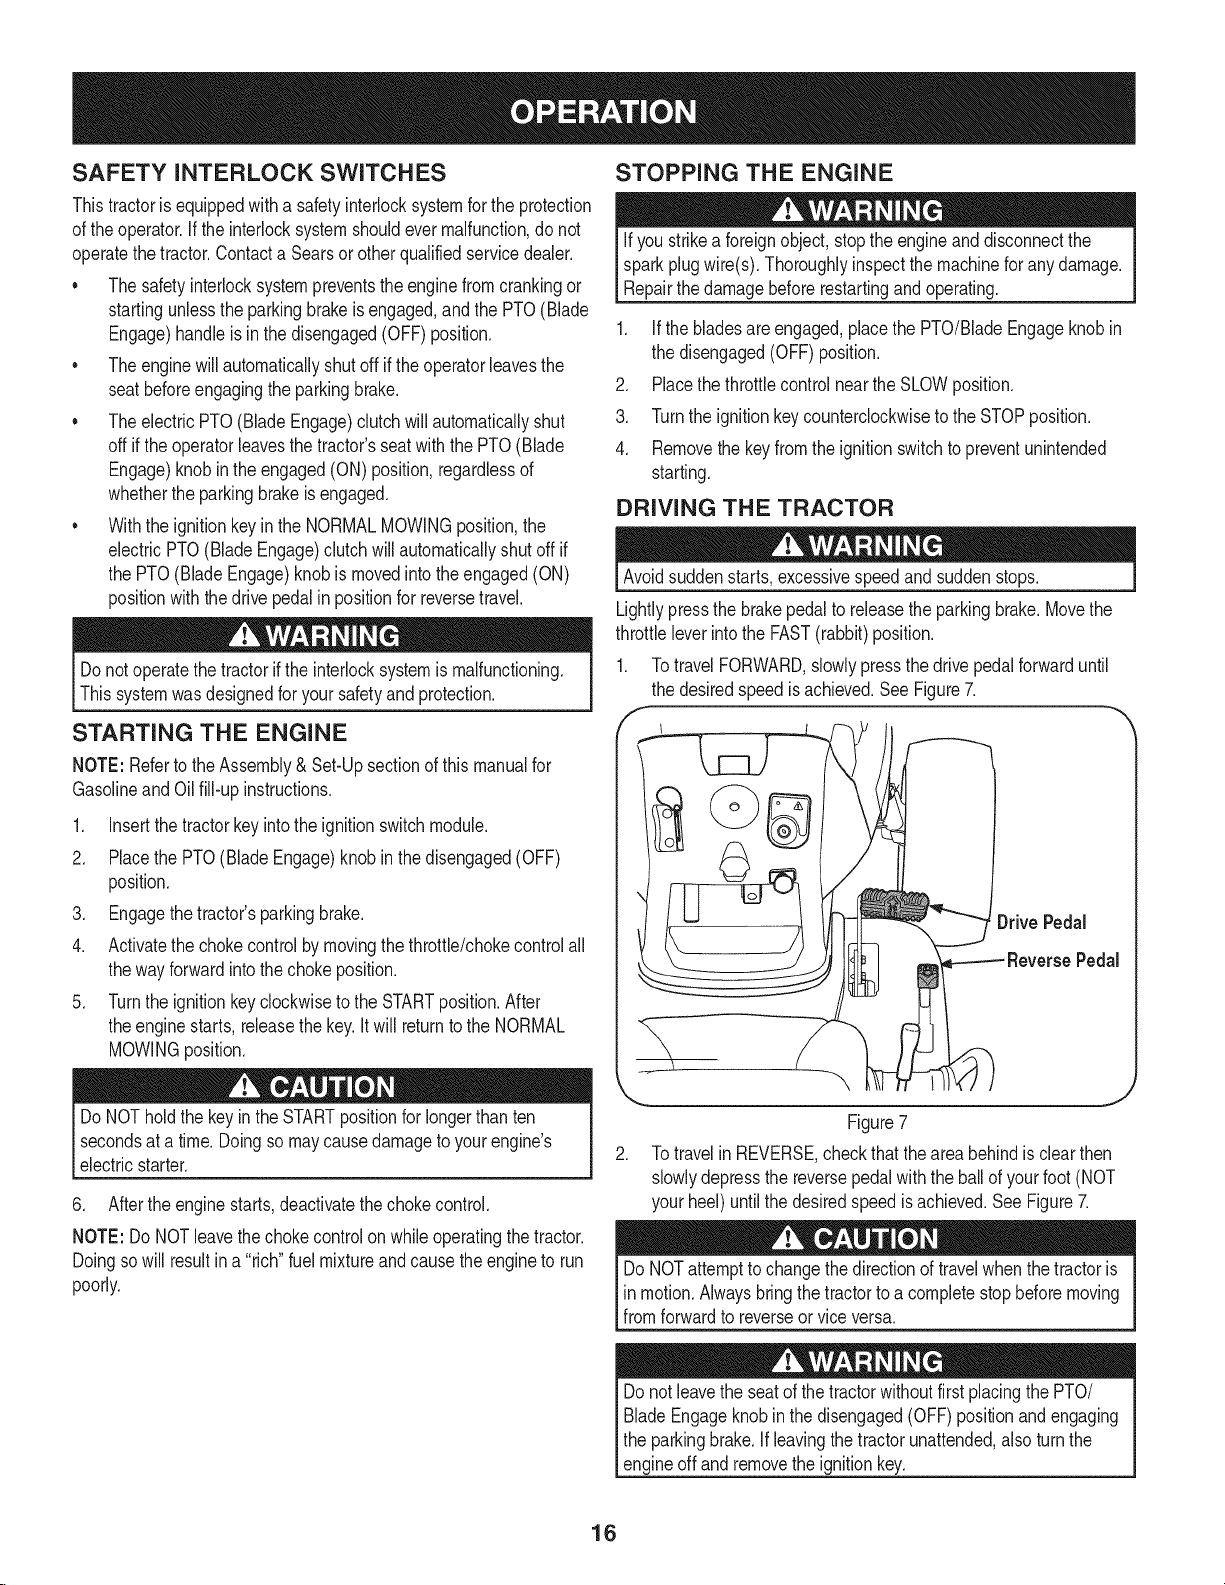
1. TotravelFORWARD,slowlypressthedrivepedalforwarduntil
thedesiredspeedis achieved.SeeFigure7.
,
1. Insertthe tractorkeyintothe ignitionswitchmodule.
2. Placethe PTO(BladeEngage)knobinthe disengaged(OFF)
position.
3. Engagethetractor'sparkingbrake.
4. Activatethechokecontrolbymovingthethrottle/chokecontrolall
thewayforwardinto thechokeposition.
5. TurntheignitionkeyclockwisetotheSTARTposition.After
theenginestarts,releasethekey.Itwill returntothe NORMAL
MOWINGposition.
DoNOTholdthe keyintheSTARTpositionforlongerthanten
secondsata time.Doingsomaycausedamagetoyourengine's
electricstarter.
6. Aftertheenginestarts,deactivatethechokecontrol.
NOTE:Do NOTleavethechokecontrolon whileoperatingthetractor.
Doingso willresultina "rich"fuel mixtureandcausetheengineto run
poorly.
ReversePedal
Figure7
2. TotravelinREVERSE,checkthattheareabehindisclearthen
slowlydepressthe reversepedalwiththeballof yourfoot(NOT
yourheel)untilthedesiredspeedis achieved.SeeFigure7.
DoNOTattemptto changethedirectionoftravelwhenthetractoris
inmotion.Alwaysbringthetractortoa completestopbeforemoving
fromforwardtoreverseorviceversa.
Donot leavetheseatofthetractorwithoutfirstplacingthePTO/
BladeEngageknobinthe disengaged(OFF)positionandengaging
theparkingbrake.Ifleavingthetractorunattended,alsoturnthe
engineoff andremovetheignitionkey.
16
REVERSE CAUTION MODE
TheREVERSECAUTIONMODEpositionof thekeyswitchmodule
allowsthetractorto beoperatedinreversewiththeblades(PTO)
engaged.
NOTE:Mowinginreverseisnotrecommended.
Useextremecautionwhileoperatingthe tractorin theREVERSE
CAUTIONMODE.Alwayslookdownand behindbeforeandwhile
backing.Donotoperatethetractorwhenchildrenor othersare
around.Stopthetractorimmediatelyif someoneentersthearea.
Touse theREVERSECAUTIONMODE:
NOTE:The operatorMUSTbe seatedinthetractorseat.
DRIVING ON SLOPES
Referto the SLOPEGUIDEonpage8 tohelpdetermineslopeswhere
youmayoperatethetractorsafely.
Donot mowon inclineswitha slopeinexcessof 15degrees(a rise
approximately2-1/2feetevery10feet).Thetractorcouldoverturnanc
causeseriousinjury.
• Mowupanddownslopes,NEVERacross.
• Exerciseextremecautionwhenchangingdirectionon slopes.
• Watchforholes,ruts,bumps,rocks,or otherhiddenobjects.
Uneventerraincouldoverturnthe machine.Tallgrasscanhide
obstacles.
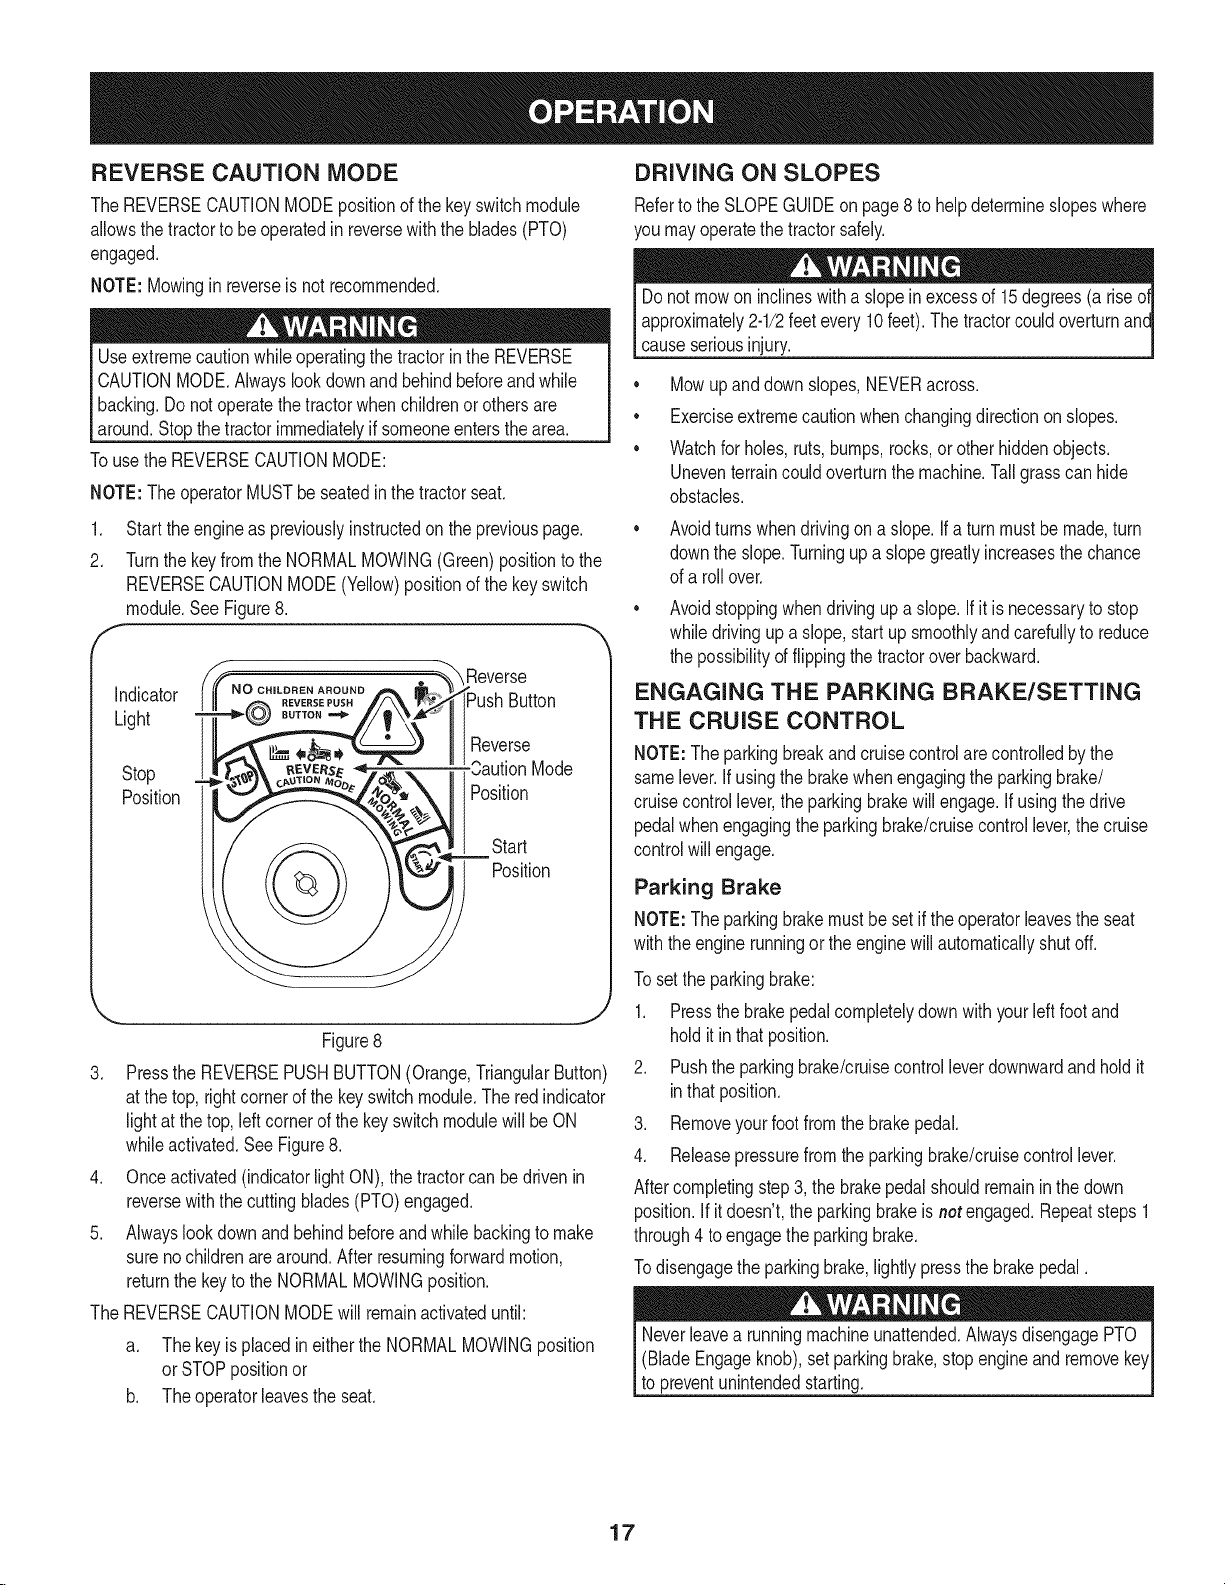
1. Starttheengineaspreviouslyinstructedon thepreviouspage. •
2. TurnthekeyfromtheNORMALMOWING(Green)positionto the
REVERSECAUTIONMODE(Yellow)positionofthekeyswitch
module.SeeFigure8.
, _"_ Reverse
i_Push Button
II1Reverse
Stop
Position
\ j
Figure8
3. PresstheREVERSEPUSHBUTTON(Orange,TriangularButton)
atthe top,rightcornerofthekeyswitchmodule.The redindicator
lightat thetop,leftcornerofthekeyswitchmodulewillbe ON
whileactivated.SeeFigure8.
4. Onceactivated(indicatorlightON),thetractorcanbedrivenin
reversewiththe cuttingblades(PTO)engaged.
5. Alwayslookdownand behindbeforeandwhilebackingtomake
surenochildrenarearound.Afterresumingforwardmotion,
returnthe keytotheNORMALMOWINGposition.
TheREVERSECAUTIONMODEwill remainactivateduntil:
Mode
Position
Position
Start
Avoidturnswhendrivingona slope.If a turnmustbe made,turn
downthe slope.Turningupaslopegreatlyincreasesthechance
ofa rollover.
Avoidstoppingwhendrivingupa slope.Ifitis necessaryto stop
whiledrivingup a slope,startupsmoothlyandcarefullyto reduce
thepossibilityof flippingthetractoroverbackward.
ENGAGING THE PARKING BRAKE/SETTING
THE CRUISE CONTROL
NOTE:Theparkingbreakandcruisecontrolarecontrolledbythe
samelever.Ifusingthe brakewhenengagingtheparkingbrake/
cruisecontrollever,theparkingbrakewillengage.Ifusingthedrive
pedalwhenengagingtheparkingbrake/cruisecontrollever,the cruise
controlwillengage.
Parking Brake
NOTE:Theparkingbrakemustbesetif theoperatorleavestheseat
withtheenginerunningortheenginewillautomaticallyshutoff.
Tosetthe parkingbrake:
1. Pressthebrakepedalcompletelydownwith yourleftfootand
holditinthat position.
2. Pushtheparkingbrake/cruisecontrolleverdownwardandholdit
inthatposition.
3. Removeyourfootfromthebrakepedal.
4. Releasepressurefromtheparkingbrake/cruisecontrollever.
Aftercompletingstep3,the brakepedalshouldremaininthedown
position.Ifitdoesn't,theparkingbrakeisnot engaged.Repeatsteps1
through4 toengagetheparkingbrake.
Todisengagetheparkingbrake,lightlypressthebrakepedal.
a. Thekeyisplacedin eithertheNORMALMOWINGposition
orSTOPpositionor
b. Theoperatorleavestheseat.
(BladeEngageknob),setparkingbrake,stopengineandremove
to preventunintendedstarting.
17
CruiseControl
Neverengagethe cruisecontrolleverwhiletravelinginreverse.
Tosetthe cruisecontrol:
1. Slowlypresstheupperportionof thedrivepedalwithyourright
footuntilthe desiredspeedisachieved.
2. Lightlypresstheparkingbrake/cruisecontrolleverdownwardand
holditin thatposition.
3. Removeyourfootfromthedrive pedal.
4. Releasepressurefromtheparkingbrake/cruisecontrollever.
Aftercompletingstep3, thedrivepedalshouldremaininthe down
positionandthetractorwillmaintainthesameforwardspeed.If it
doesn't,thecruisecontrolisnotengaged.Repeatsteps 1through4 to
engagethecruisecontrol.
Todisengagethe cruisecontrol,lightlypressthedrivepedalorthe
brakepedal.
NOTE:Cruisecontrolcannotbesetat thetractor'sfastestground
speed.If theoperatorshouldattempttodo so,thetractorwill automati-
callydecelerateto thefastestoptimalmowinggroundspeed.
Tochangethedirectionof travelfromforwardtoreversewhencruise
controlisengaged,pressthebrakepedaltodisengagethe cruise
controlandbringthetractortoa completestop.Thenslowlypressthe
reversepedalwiththeballof yourfoottotravelinreverse.
USING THE DECK LIFT LEVER
Toraisethecuttingdeck,movethe decklift leverto theleft,thenplace
itin thenotchbestsuitedfor yourapplication.
OPERATING THE HEADLIGHTS
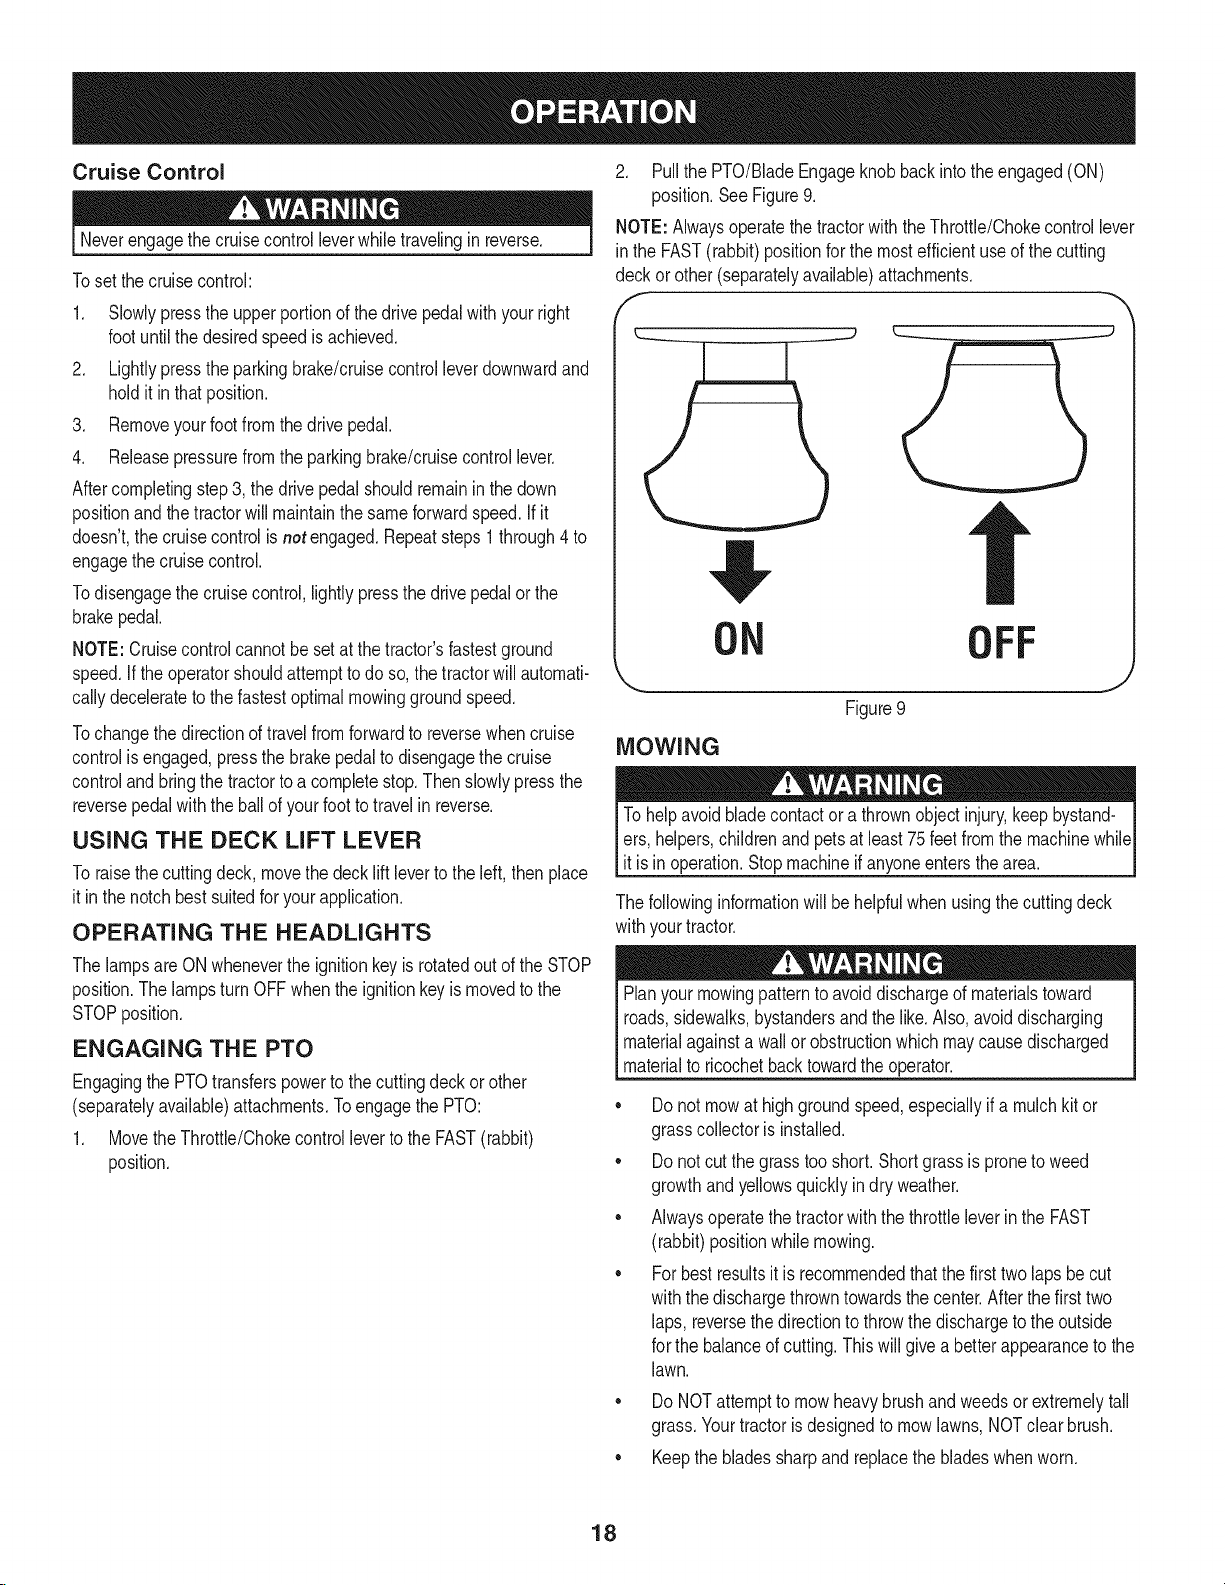
2. Pullthe PTO/BladeEngageknobbackinto theengaged(ON)
position.SeeFigure9.
NOTE:Alwaysoperatethetractorwiththe Throttle/Chokecontrollever
in theFAST(rabbit)positionforthemostefficientuseof thecutting
deckor other(separatelyavailable)attachments.
f -,
ON OFF
Figure9
MOWING
Tohelpavoidbladecontactora thrownobjectinjury,keepbystand-
ers,helpers,childrenandpetsat least75feetfromthemachinewhile
it isin operation.Stopmachineif anyoneentersthearea.
Thefollowinginformationwillbehelpfulwhenusingthe cuttingdeck
withyourtractor.
ThelampsareONwheneverthe ignitionkeyisrotatedoutofthe STOP
position.ThelampsturnOFFwhentheignitionkeyis movedto the
STOPposition.
ENGAGING THE PTO
Engagingthe PTOtransferspowertothecuttingdeckor other
(separatelyavailable)attachments.Toengagethe PTO:
1. MovetheThrottle/ChokecontrollevertotheFAST(rabbit)
position.
Planyourmowingpatternto avoiddischargeofmaterialstoward
roads,sidewalks,bystandersandthelike.Also,avoiddischarging
materialagainstawallorobstructionwhichmaycausedischarged
materialtoricochetbacktowardtheoperator.
• Donotmowat highgroundspeed,especiallyif amulchkitor
grasscollectoris installed.
• Donotcutthegrasstooshort.Shortgrassis pronetoweed
growthandyellowsquicklyindryweather.
• Alwaysoperatethetractorwiththe throttleleverinthe FAST
(rabbit)positionwhilemowing.
• Forbestresultsit is recommendedthatthefirsttwolaps becut
withthedischargethrowntowardsthe center.Afterthefirsttwo
laps, reversethedirectionto throwthedischargeto theoutside
forthe balanceofcutting.Thiswillgiveabetterappearancetothe
lawn.
DoNOTattemptto mowheavybrushandweedsorextremelytall
grass.Yourtractorisdesignedtomowlawns,NOTclearbrush.
• Keepthebladessharpandreplacethe bladeswhenworn.
18
Beforeperforminganytypeofmaintenance/service,disengageall
controlsandstoptheengine.Waituntilallmovingpartshavecometo
acompletestop.Disconnectsparkplugwireandgroundit againstthe
engineto preventunintendedstarting.Alwayswearsafetyglassesduring
operationorwhileperforminganyadjustmentsorrepairs.
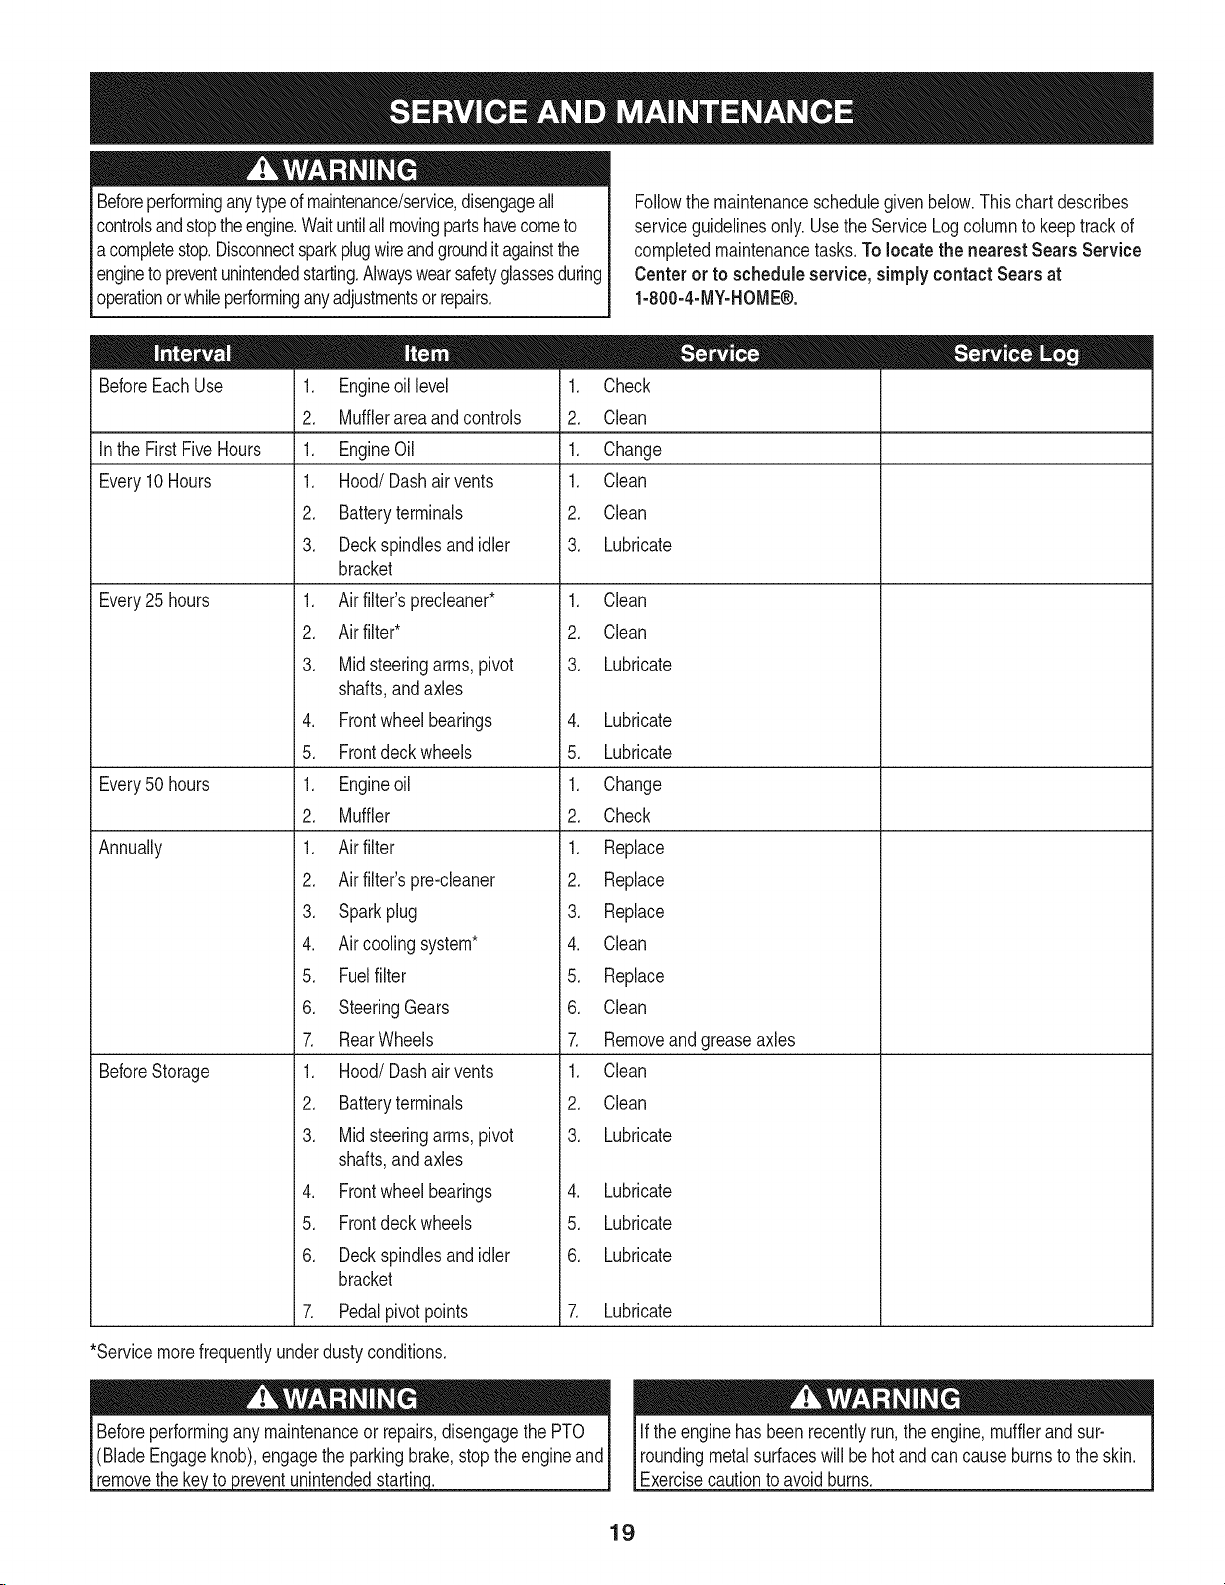
Followthe maintenanceschedulegivenbelow.Thischartdescribes
serviceguidelinesonly.Usethe ServiceLogcolumntokeeptrackof
completedmaintenancetasks.Tolocate the nearest Sears Service
Centeror to scheduleservice,simplycontactSearsat
1-800-4-MY-HOME®.
BeforeEachUse
Inthe FirstFiveHours
Every10Hours
Every25 hours
Every50 hours
Annually
BeforeStorage
1. Engineoillevel
2. Mufflerareaandcontrols
1. EngineOil
1. Hood/Dashair vents
2. Batteryterminals
3. Deckspindlesandidler
bracket
1. Airfilter'sprecleaner*
2. Airfilter*
3. Midsteeringarms,pivot
shafts,andaxles
4. Frontwheelbearings
5. Frontdeckwheels
1. Engineoil
2. Muffler
1. Airfilter
2. Airfilter'spre-cleaner
3. Sparkplug
4. Aircoolingsystem*
5. Fuelfilter
6. SteeringGears
7. RearWheels
1. Hood/Dashair vents
2. Batteryterminals
3. Midsteeringarms,pivot
shafts,andaxles
4. Frontwheelbearings
5. Frontdeckwheels
6. Deckspindlesandidler
bracket
7. Pedalpivotpoints
1. Check
2. Clean
1. Change
1. Clean
2. Clean
3. Lubricate
1. Clean
2. Clean
3. Lubricate
4. Lubricate
5. Lubricate
1. Change
2. Check
1. Replace
2. Replace
3. Replace
4. Clean
5. Replace
6. Clean
7. Removeandgreaseaxles
1. Clean
2. Clean
3. Lubricate
4. Lubricate
5. Lubricate
6. Lubricate
7. Lubricate
*Servicemorefrequentlyunderdustyconditions.
_reventunintendedstartin(
Iftheenginehas beenrecentlyrun,theengine,mufflerandsur-
roundingmetalsurfaceswill behotandcancauseburnstotheskin.
Exercisecautiontoavoidburns.
19

CUTTING DECK REMOVAL
Placethe PTO/BladeEngageknobinthe disengaged(OFF)
positionandengagetheparkingbrake.
.
Lowerthedeckbymovingthedeck liftleverintothebottomnotch
ontherightfender.
.
LocatethePTOclutchunderthe frontof yourtractor.See
Figure10.
f
:td
NOTE:Ifthere istoomuchtensionon thebeltforittobe easily
removedfromthe electricPTOclutch,carefullyinserta3/8"drive
ratchetwrench(setto loosen)intothesquareholefound inthe deck
idlerbracketandpivotit towardthetractor'sleftside torelievetension
on thebelt.SeeFigure11.
Avoidpinchinginjuries.Neverplaceyourfingersonthe idlerspringor
betweenthebeltanda pulleywhileremovingthebelt.
Figure10
.
Removethe beltguardand beltfromthePTOpulleyasfollows.
RefertoFigure10:
a. Removethehexscrews.
b. Pullthebeltkeeperrodtothe rightanddownto remove.
c. Removethedeckbelt fromaroundthetractor'selectricPTO
clutch.
Figure11
5. Lookingatthecuttingdeckfromthe leftsideofthetractor,locate
thedecksupportpinon therearleftsideof thedeck.
6. Pullthe decksupportpinoutwardto releasethedeckfromthe
decklift arm.SeeFigure12.
DeckLift (_
Arm
DeckPinSupport
2O
Figure12
.
8.
CHANGING THE DECK BELT
.
f
Figure13
10. Gentlyslidethecuttingdeck(fromtherightside)outfrom
underneaththetractor.
TheV-beltsfoundon yourtractorarespeciallydesignedtoengage
anddisengagesafely.A substitute(non-OEM)V-beltcanbedanger-
ousby notdisengagingcompletely.Fora properworkingmachine,
usefactoryapprovedbeltsas listedinthePartsListmanualincluded
withthis product..
All beltsonyourtractoraresubjectto wearandshouldbereplacedif
anysignsof weararepresent.Tochangeorreplacethedeckbelton
yourtractor,proceedasfollows:
1. Removethedeckasinstructedonpage20.
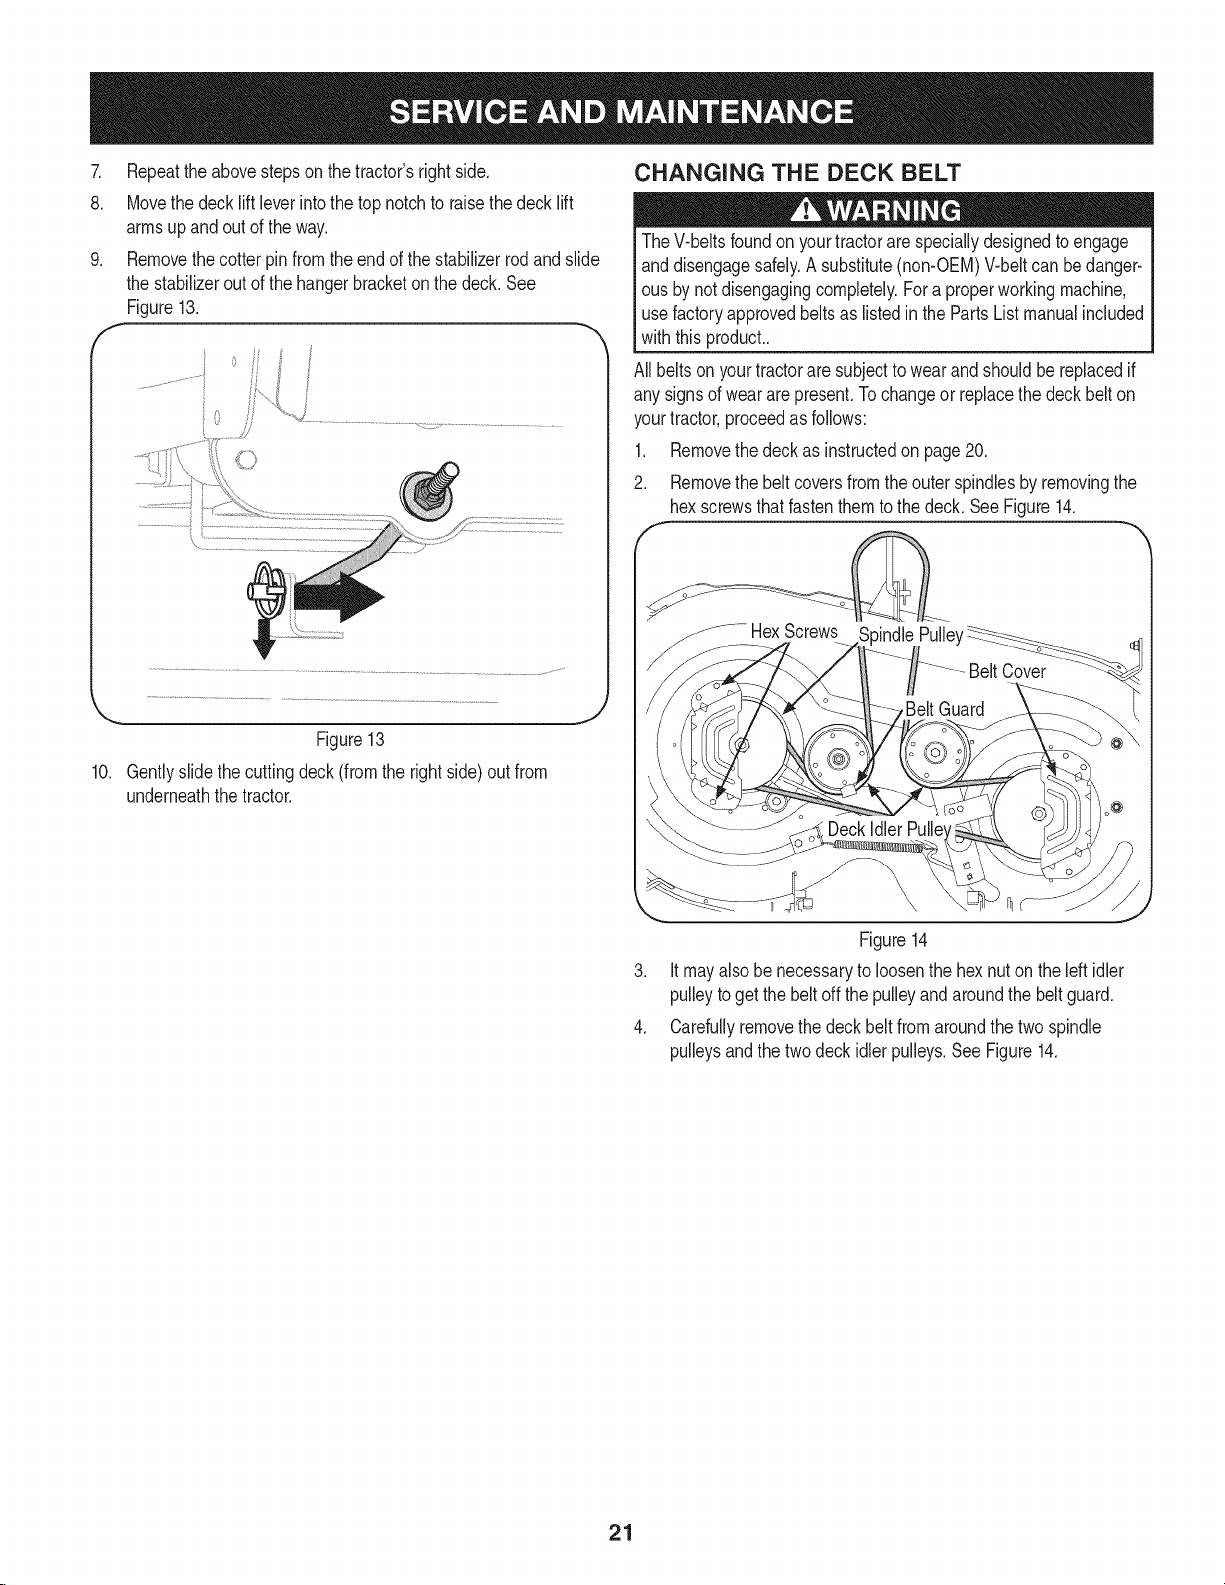
2. Removethe beltcoversfromtheouterspindlesbyremovingthe
hexscrewsthatfastenthemtothe deck.SeeFigure14.
.....HexScrews 3indlePulle'
J
Figure14
3. Itmayalsobe necessarytoloosenthehexnutontheleft idler
pulleytogetthe beltoffthepulleyandaroundthe beltguard.
4. Carefullyremovethedeckbeltfromaroundthetwo spindle
pulleysandthe twodeckidlerpulleys.SeeFigure14.
21

.
Toplacethenewbelt,beginbyroutingthebelt aroundthetwo
outerspindlepulleysas shownin Figure15.
Figure15
6. Thenroutethebeltaroundthe twodeckidlerpulleysasshownin
Figure15.
7. Retightenthebeltkeeperrodloosenedearlier.
8. Remountthebeltguardsremovedearlier.
9. Reinstallthedeckasfollows:
a. Withthedeck beneaththemowerframe,attachthestabilizer
rod.SeeFigure13.
b. Reconnectthedeck liftarms.SeeFigure12.
10. Pulltherightside ofthe beltandplacethenarrowVsideof the
beltintothePTOpulley.SeeFigure16.
CUTTING BLADES
Shutthe engineoff andremoveignitionkeybeforeremovingthe
cuttingblade(s)forsharpeningor replacement.Protectyourhands
usingheavygloveswhengraspingthe blade.
Periodicallyinspectthebladeand/orspindleforcracksordamage,
especiallyafter you'vestrucka foreignobject.Do notoperatethe
machineuntil damagedcomponentsarereplaced.
Toremovetheblades,proceedasfollows:
1. Removethedeckfrombeneaththetractor,(refertoCuttingDeck
Removalearlierin thissection)thengentlyflipthedeckoverto
exposeits underside.
2. Placea blockofwoodbetweenthecenterdeckhousingbaffle
andthecuttingbladeto actasa stabilizer.See Figure17.
PTOBelt
!ey
J
Figure16
11. Whileholdingthe beltandpulleytogether,rotatethepulleytothe
left(See Figure16).Continueholdingandrotatingthepulleyand
beltuntilthebeltis fullyrolledintothe PTOpulley.
12. Replacethe PTOpulleybeltguard.SeeFigure10.
Figure17
3. Removethe hexflangenutthatsecuresthebladetothespindle
assembly.SeeFigure17.
22

Toproperlysharpenthecuttingblades,removeequalamounts
4. Jump Starting
ofmetalfromboth endsofthebladesalongthecuttingedges,
paralleltothetrailingedge,ata 250.300angle.Alwaysgrindeach
cuttingbladeedgeequallyto maintainproperbladebalance.See
Figure18.
Neverjump startadamagedor frozenbattery.Becertainthe vehicles
do nottouchandignitionsareoff.Donotallowcableclampstotouch.
1. Connectthe positive(+)cabletopositive(+)postofyourtractor's
Ifthecuttingedgeofthe bladehaspreviouslybeensharpened,orif
anymetalseparationispresent,replacethe bladeswithnewones.
dischargedbattery.
2. Connectthe otherendofthecableto thepositive(+) postof the
jumperbattery.
3. Connectthe negative(-) cabletothenegative(-) postof the
A poorlybalancedbladewillcauseexcessivevibration,maycause
damageto thetractorand/orresultinpersonalinjury.
jumperbattery.
4. Makethefinalconnectionon theengineblockof thetractor,away
fromthebattery.Attachtoan unpaintedpartto assurea good
connection.
Ifthejumperbatteryis installedona vehicle(i.e.car,truck),doNOT
startthe vehicle'senginewhenjumpstartingyourtractor.
5. Startthe tractor(asinstructedintheOperationsectionofthis
manual).
6. Setthetractor'sparkingbrakebeforeremovingthejumpercables.
Removecablesinreverseorderofconnection.
Figure18
.
Testtheblade'sbalanceusingabladebalancer.Grindmetalfrom
theheavyside untilit balancesevenly.
NOTE:Whenreplacingtheblade,besuretoinstallthe bladewith
thesideofthe blademarked"Bottom"(or witha partnumber
stampedinit) facingthegroundwhenthe moweris intheoperat-
ingposition.
Useatorquewrenchto tightenthebladespindlehexflangenutto
between70ft-lbs and90ft-lbs.
BATTERY
Batteryposts,terminals,andrelatedaccessoriescontainleadand
leadcompounds,chemicalsknowntotheStateof Californiatocause
cancerandreproductiveharm.Washhandsafterhandling.
Charging
Batteriesgiveoff an explosivegaswhilecharging.ChargethebatteryI
in a wellventilatedareaandkeepawayfroman openflameorpilot I
lightas on a waterheater,spaceheater,furnace,clothesdryeror I
othergas appliances. ..J
Whenchargingyourtractor'sbattery,useonlya chargerdesignedfor
12Vlead-acidbatteries.Readyourbatterycharger'sOwner'sManual
priortochargingyourtractor'sbattery.Alwaysfollowitsinstructions
andheeditswarnings.
Ifyourtractorhasnotbeenputintousefor anextendedperiodoftime,
chargethe batteryasfollows:
1. Setyourbatterychargertodelivera maxof10amperes.
2. Ifyour batterychargerisautomatic,chargethe batteryuntilthe
chargerindicatesthatchargingis complete.If thechargerisnot
automatic,chargefor nofewerthaneighthours.
If removingthe battery,disconnecttheNEGATIVE(Black)wirefrom
itsterminalfirst,followedby the POSITIVE(Red)wire.Whenreinstall-
ingthebattery,alwaysconnectthePOSITIVE(Red)wireits terminal
first,followedbythe NEGATIVE(Black)wire.
23
FUSE
Beforeservicing,repairing,or inspecting,alwaysdisengagePTO
(BladeEngageknob),setparkingbrake,stopengineand remove
topreventunintendedstarting.
Afuse isinstalledinyourtractor'swiringharnessto protectthetrac-
tor'selectricalsystemfromdamagecausedbyexcessiveamperage.
Iftheelectricalsystemdoesnotfunction,oryourtractor'senginewill
notcrank,firstchecktobecertainthatthe fusehasnotblown.It is
locatedunderthehood,mountedbehindthe topofthedashpanelon
thesupportbar.
Alwaysusea replacementfusewiththesameamperagecapacityas
theblownfuse.
TIRES
Neverexceedthe maximuminflationpressureshownonthesidewall
ofthetire.
Refertothe tiresidewallforexacttiremanufacturer'srecommendedor
maximumpsi. Donot overinfiate.
Uneventire pressurecouldcausethecuttingdecktomowunevenly.
CHANGING THE TRANSMISSION DRIVE
BELT
Althoughmulti-viscosityoils (5W20,10W30,etc.)improvestarting
incoldweather,theywill resultinincreasedoilconsumptionwhen
usedabove32°RCheckyourengineoillevelmorefrequentlytoavoid
possibleenginedamagefromrunninglowon oil.
Tochecktheengineoil, proceedasfollows:
1. Ensurethatthetractoris on alevelsurface.
2. Cleanthe oilfill areaof anydebris.
3. Removethe dipstickandwipewitha cleancloth.
4. Insertandtightendipstick.
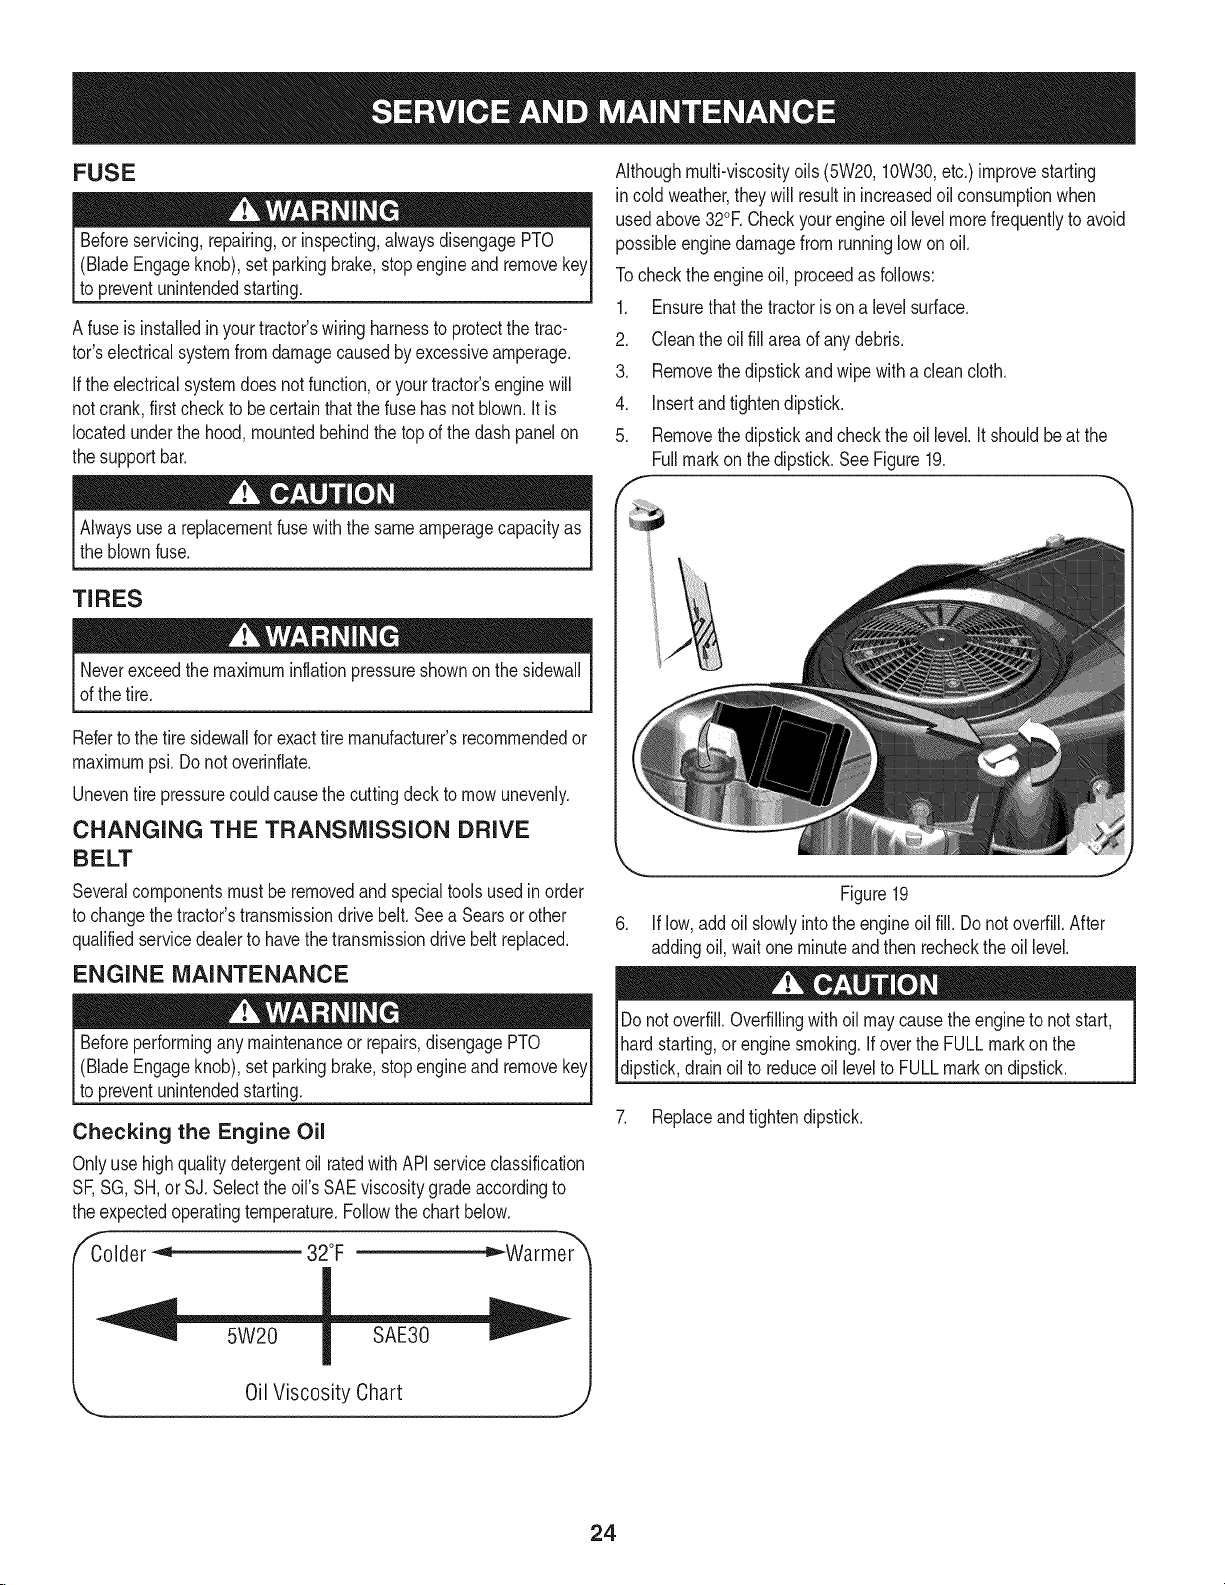
5. Removethe dipstickandchecktheoil level.Itshouldbeat the
Fullmarkon thedipstick.SeeFigure19.
Severalcomponentsmustberemovedandspecialtoolsusedin order
tochangethetractor'stransmissiondrivebelt.Seea Searsor other
qualifiedservicedealertohavethetransmissiondrivebeltreplaced.
ENGINE MAINTENANCE
Beforeperforminganymaintenanceor repairs,disengagePTO
(BladeEngageknob),setparkingbrake,stopengineand remove
topreventunintendedstarting.
Checking the Engine Oil
Onlyuse highqualitydetergentoil ratedwithAPIserviceclassification
SF,SG,SH,or SJ.Selecttheoil's SAEviscositygradeaccordingto
theexpectedoperatingtemperature.Followthe chartbelow.
,E _Warmer_
Colder _ 32°F
5W20
Oil Viscosity Chart
Figure19
6. Iflow,addoil slowlyintotheengineoil fill.Donotoverfill.After
addingoil,waitoneminuteandthen rechecktheoil level.
Donotoverfill.Overfillingwithoil maycausethe enginetonotstart,
hardstarting,or enginesmoking.Ifoverthe FULLmarkonthe
dipstick,drainoilto reduceoil levelto FULLmarkondipstick.
7. Replaceandtightendipstick.
24
Changing the Engine Oil
Iftheenginehas beenrecentlyrun,theengine,mufflerandsur-
roundingmetalsurfaceswillbe hotandcancauseburnstothe skin.
Exercisecautiontoavoidburns.
NOTE:The oilfiltershouldbechangedateveryoilchangeinterval.To
completeanoilchange,proceedasfollows:
1. WithengineOFFbutstillwarm,disconnectsparkplugwireand
keepit awayfromsparkplug.
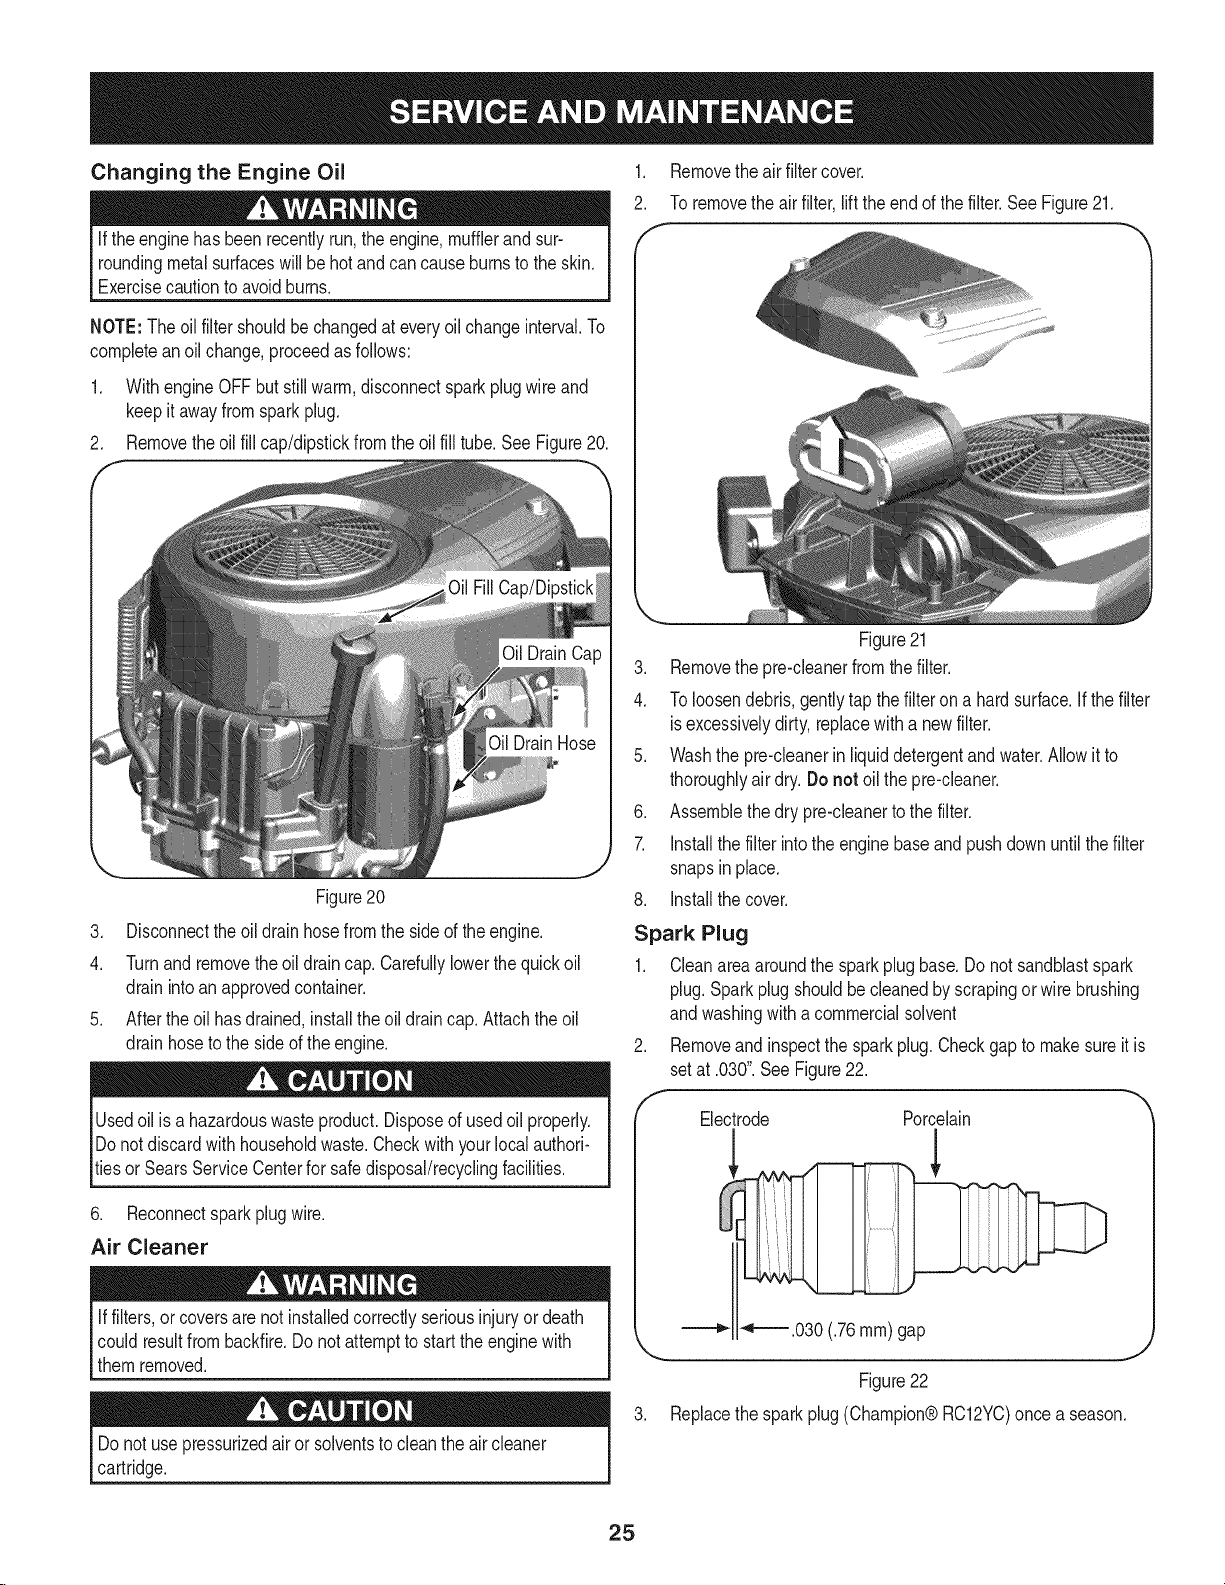
2. Removetheoil fill cap/dipstickfromtheoil filltube.See Figure20.
Figure20
3. Disconnecttheoil drainhosefromtheside oftheengine.
4. Turnandremovethe oildraincap.Carefullylowerthequickoil
drainintoanapprovedcontainer.
5. Aftertheoilhasdrained,installtheoildraincap.Attachtheoil
drainhoseto thesideof the engine.
1. Removetheairfiltercover.
2. Toremovethe airfilter,lift theendofthefilter.SeeFigure21.
Figure21
3. Removethe pre-cleanerfromthe filter.
4. Toloosendebris,gentlytap thefilterona hardsurface.If thefilter
isexcessivelydirty,replacewitha newfilter.
5. Washthe pre-cleanerin liquiddetergentandwater.Allowit to
thoroughlyair dry.Donot oilthe pre-cleaner.
6. Assemblethedrypre-cleanertothe filter.
7. Installthefilterintotheenginebaseandpushdownuntilthe filter
snapsinplace.
8. Installthecover.
Spark Plug
1. Cleanareaaroundthe sparkplugbase.Donotsandblastspark
plug.Sparkplugshouldbecleanedbyscrapingorwirebrushing
andwashingwitha commercialsolvent
2. Removeandinspectthesparkplug.Checkgapto makesureitis
setat.030".SeeFigure22.
Usedoil isa hazardouswasteproduct.Disposeof usedoil properly.
Donotdiscardwith householdwaste.Checkwithyourlocalauthori-
tiesor SearsServiceCenterforsafedisposal/recyclingfacilities.
6. Reconnectsparkplugwire.
Air Cleaner
iffilters,orcoversarenotinstalledcorrectlyseriousinjuryor death
couldresultfrombackfire.Do notattempttostarttheenginewith
them removed.
Donotusepressurizedairor solventsto cleantheaircleaner
cartridge.
Electrode Porcelain
!
"4"='_.030 (.76ram)gap
Figure22
3. Replacethesparkplug(Champion®RC12YC)oncea season.
25
Fuel Filter IVluffler
Gasolineand itsvaporsareextremelyflammableandexplosive.Fire
orexplosioncan causesevereburnsordeath.
• Keepgasolineawayfromsparks,openflames,pilotlights,heat,
andotherignitionsources.
• Checkfuellines,tank,cap,andfittingsfrequentlyforcracks
or leaks.Replaceifnecessary.Seea Searsor otherqualified
servicedealerto replacefuelline.
• Beforereplacingthefuelfilter,drainthe fueltankor closethefuel
shut-offvalve.
• Replacementpartsmustbethe sameand installedin thesame
positionastheoriginalparts.
• Iffuel spills,waituntilit evaporatesbeforestartingengine.
ToDrainthe Fuel:
1. Locatethefuelfilter,whichisroutedontheleftsideofthe engine
betweenthe fueltankandthecarburetor,andmaybeattachedto
theenginewitha tiestrap.
2. Cutthetiestrap,ifpresent,thenpinchthe in-lineclampon the
fuelfilterwitha pairofpliers.
3. Slidetheclampupthefuel line.
4. Removethe in-linefuellineanddrainthefuel intoanapproved
container.
ToReplacethe Fuel Filter:
1. Beforereplacingthefuelfilter,drainthefueltankorclosethefuel
shut-offvalve.Otherwise,fuelcan leakoutandcausea fireor
explosion.
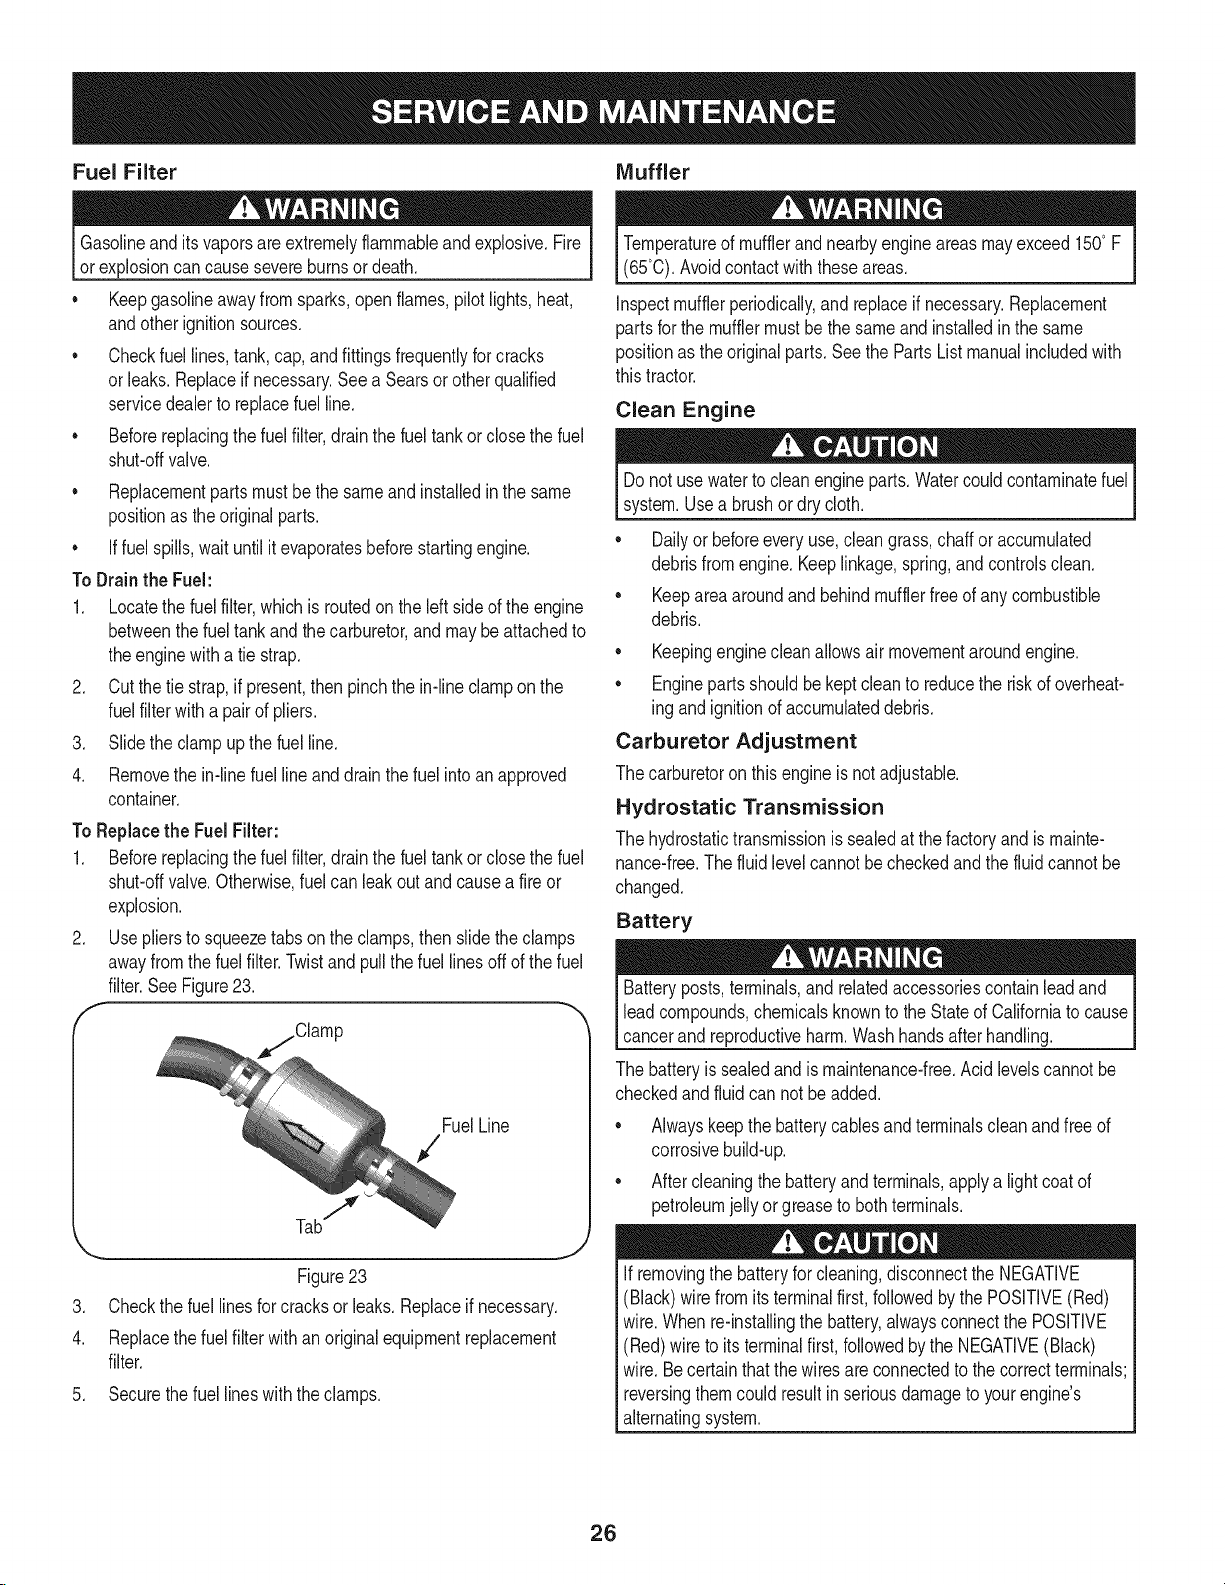
2. Useplierstosqueezetabsontheclamps,thenslidetheclamps
awayfromthefuel filter.Twistandpullthefuellinesoffofthe fuel
filter.SeeFigure23.
f
FuelLine
7
,,,..,., ,,J
Figure23
.
Checkthefuellinesforcracksor leaks.Replaceif necessary.
4.
Replacethe fuelfilterwithan originalequipmentreplacement
filter.
.
Securethefuellineswiththeclamps.
Temperatureof mufflerandnearbyengineareasmayexceed150°F
(65°0).Avoidcontactwiththeseareas.
Inspectmufflerperiodically,andreplaceif necessary.Replacement
partsforthe mufflermustbethesameand installedinthe same
positionasthe originalparts.SeethePartsListmanualincludedwith
thistractor.
Clean Engine
Donot usewatertocleanengineparts.Watercouldcontaminatefuel
system.Usea brushordrycloth.
Dailyor beforeeveryuse,cleangrass,chaffor accumulated
debrisfromengine.Keeplinkage,spring,andcontrolsclean.
Keepareaaroundand behindmufflerfreeof anycombustible
debris.
Keepingenginecleanallowsair movementaroundengine.
• Enginepartsshouldbekeptcleanto reducetheriskofoverheat-
ing andignitionofaccumulateddebris.
Carburetor Adjustment
Thecarburetoronthisengineis notadjustable.
Hydrostatic Transmission
Thehydrostatictransmissionis sealedatthefactoryandismainte-
nance-free.Thefluidlevelcannotbecheckedandthefluidcannotbe
changed.
Battery
Batteryposts,terminals,and relatedaccessoriescontainleadand
leadcompounds,chemicalsknowntotheStateof Californiatocause
cancerand reproductiveharm.Washhandsafterhandling.
Thebatteryissealedand ismaintenance-free.Acidlevelscannotbe
checkedandfluid cannotbe added.
Alwayskeepthebatterycablesandterminalscleanandfreeof
corrosivebuild-up.
• Aftercleaningthebatteryandterminals,applya lightcoatof
petroleumjelly orgreasetobothterminals.
Ifremovingthe batteryforcleaning,disconnecttheNEGATIVE
(Black)wirefromitsterminalfirst,followedbythePOSITIVE(Red)
wire.Whenre-installingthebattery,alwaysconnectthe POSITIVE
(Red)wire toits terminalfirst,followedbythe NEGATIVE(Black)
wire.Becertainthatthewiresareconnectedto thecorrectterminals;
reversingthemcouldresultinseriousdamagetoyourengine's
alternatingsystem.
26

CLEANING THE TRACTOR
Anyfuel oroil spilledonthemachineshouldbewipedoffpromptly.Do
NOTallowdebristoaccumulatearoundthecoolingfinsof theengine,
thetransmission'scoolingfanor onany otherpartof themachine,
especiallythebeltsandpulleys.
Deck Wash System
Yourtractor'sdeckisequippedwitha waterporton itssurfaceaspart
ofits deckwashsystem.
Usethedeckwashto rinsegrassclippingsfromthedeck'sunderside
andpreventthe buildupofcorrosivechemicals.Completethefollowing
stepsAFTEREACHMOWING:
1. Drivethetractorto a level,clearspotonyourlawn,nearenough
foryourgardenhoseto reach.
Makecertainthetractor'sdischargechuteis directedAWAYfromyour
house,garage,parkedcars,etc.
2. DisengagethePTO(BladeEngage),settheparkingbrakeand
stoptheengine.
3. Threadthehosecoupler(packagedwithyourtractor'sOperator's
Manual)ontotheendof yourgardenhose.
4. Attachthe hosecouplertothewaterport onyourdeckssurface.
SeeFigure24.
11. Turnthewateroffanddetachthehosecouplerfromthewater
portonyour deck'ssurface.
Aftercleaningyourdeck,returntothe operator'spositionandengage
thePTO.Keepthecuttingdeckrunningfor a minimumof two minutes,
allowingtheundersideofthecuttingdecktothoroughlydry.
LUBRICATION
Beforelubricating,repairing,orinspecting,alwaysdisengagePTO,
set parkingbrake,stopengineandremovekeytopreventunintended
starting.
Front Wheels
Eachof thefrontwheelaxlesandrimsisequippedwithagrease
fitting.SeeFigure25.Lubricatewitha No.2 multi-purposegrease
appliedwitha greasegunafterevery25hoursof tractoroperation.
Figure24
5. Turnthewateron.
6. Whilesittingin theoperator'spositiononthetractor,startthe
engineandplacethe throttleleverintheFAST(rabbit)position.
7. Movethetractor'sPTO(BladeEngage)intotheONposition.
8. Remainintheoperator'spositionwiththecuttingdeckengaged
fora minimumoftwo minutes,allowingtheundersideof the
cuttingdeckto thoroughlyrinse.
9. Movethetractor'sPTO(BladeEngage)intotheOFFposition.
10. Turntheignitionkeyto the STOPpositiontoturnthetractor's
engineoff.
\
Figure25
Pivot Points & Linkage
Lubricateallthe pivotpointsonthedrivesystem,parkingbrakeandlift
linkageatleastoncea seasonwithlightoil.
Deck Wheels
Eachof thetractordeck'sfrontgaugewheelsisequippedwitha
greasefitting.Lubricatewitha No.2multi-purposegreaseappliedwith
a greasegunafterevery25hoursoftractoroperation.
27
ADJUSTMENTS
Shutthe engineoff,removetheignitionkeyandengagetheparking
brakebeforemakingadjustments.Protectyourhandsbyusingheavy
gloveswhenhandlingtheblades.
NOTE:Checkthetractor'stirepressurebeforeperforminganydeck
levelingadjustments.Referto Tireson page24forinformationregard-
ingtirepressure.
Leveling the Deck (Front To Rear)
Thefrontof thecuttingdeckis supportedbya stabilizerbarthatcan
beadjustedtolevelthedeckfromfrontto rear.Thefrontofthedeck
shouldbebetween1/4-inchand3/8-inchlowerthanthe rearofthe
deck.Adjustif necessaryasfollows:
1. Parkthe tractorparkedona firm,level surfaceandplacethedeck
lift leverinthemiddleposition.
2. Rotatethebladenearestthedischargechutecoversothatit is
parallelwiththetractor.
3. Measurethedistancefromthefrontof thebladetipto the ground
andtherearof thebladetiptothe ground.Thefirstmeasurement
takenshouldbebetween1/4"and 3/8"lessthanthe second
measurement.
Determinetheapproximatedistancenecessaryfor properadjustment
and proceed,if necessary.
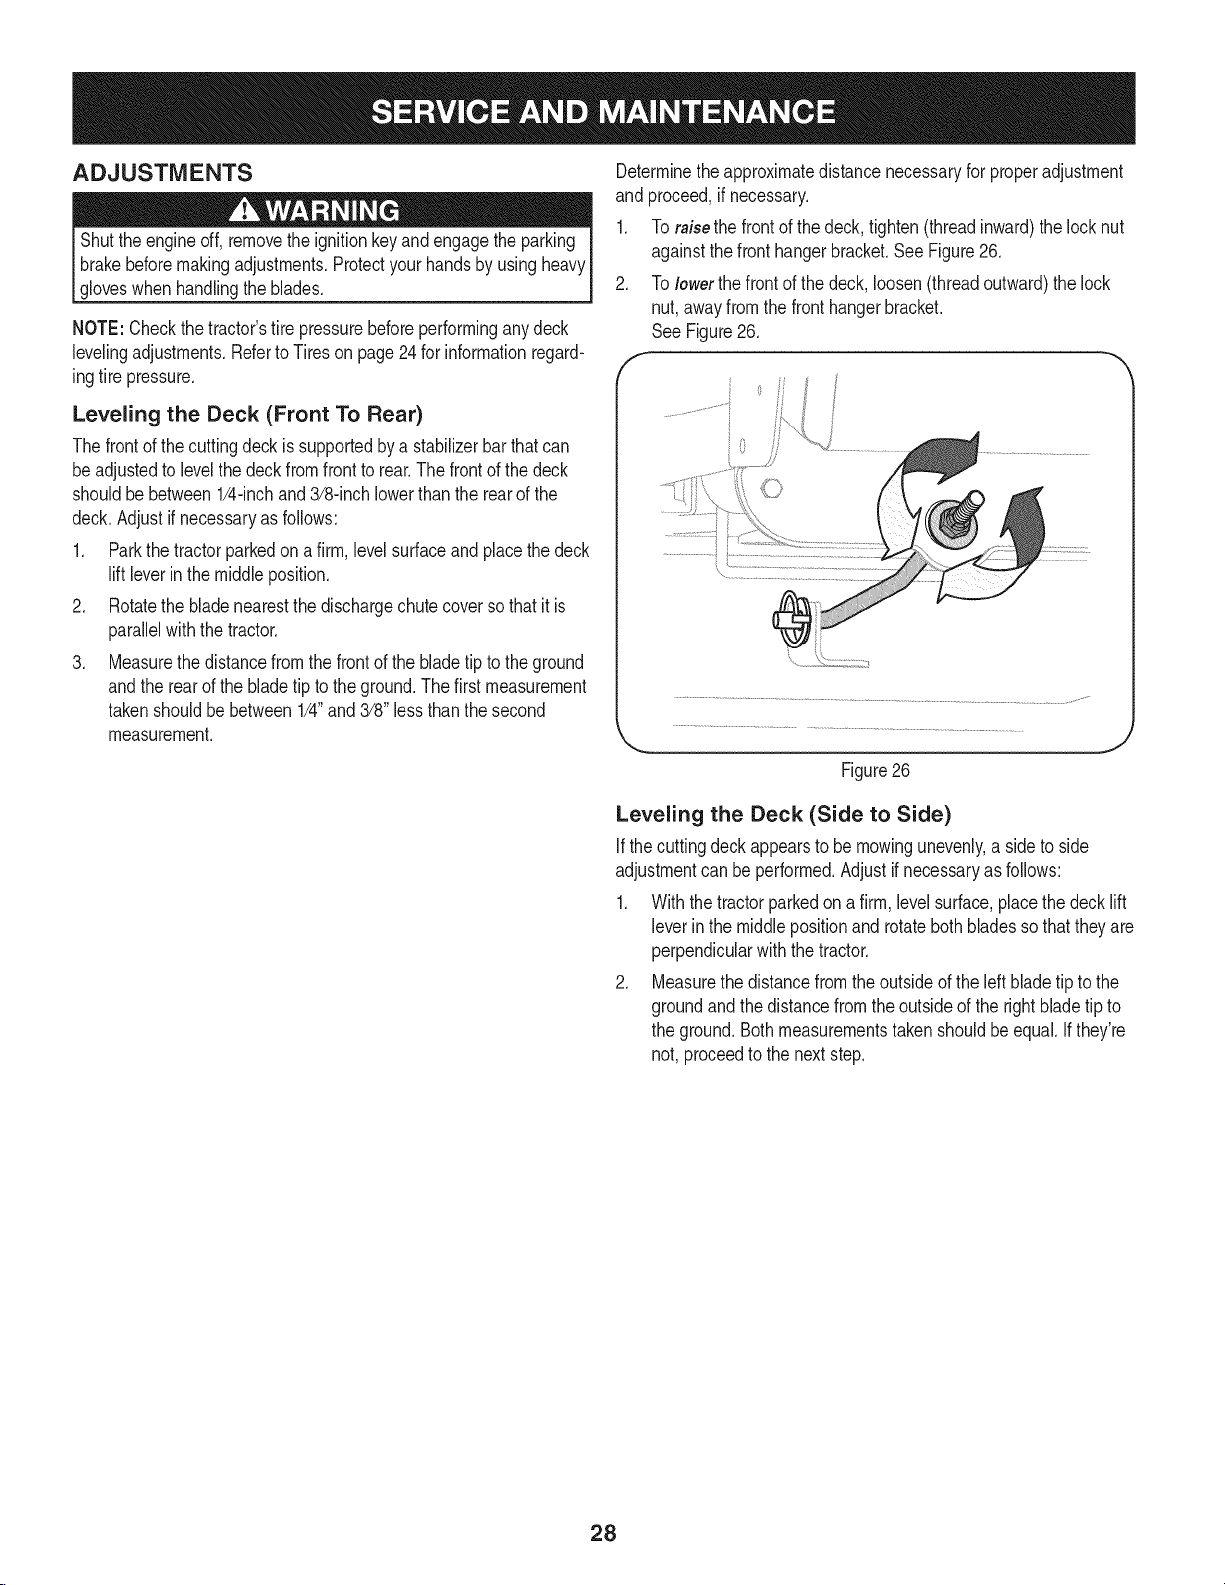
1. Toraisethefrontofthe deck,tighten(threadinward)thelocknut
againstthefronthangerbracket.SeeFigure26.
2. Tolowerthefrontofthe deck,loosen(threadoutward)thelock
nut,awayfromthefronthangerbracket.
See Figure26.
f
J
Figure26
Leveling the Deck (Side to Side)
Ifthecuttingdeckappearstobe mowingunevenly,a sideto side
adjustmentcan beperformed.Adjustifnecessaryasfollows:
1. Withthetractorparkedona firm,levelsurface,placethedecklift
leverin themiddlepositionand rotatebothbladessothattheyare
perpendicularwiththetractor.
2. Measurethedistancefromthe outsideoftheleft bladetipto the
groundandthedistancefromtheoutsideof therightbladetip to
theground.Bothmeasurementstakenshouldbeequal.Ifthey're
not, proceedto thenextstep.
28
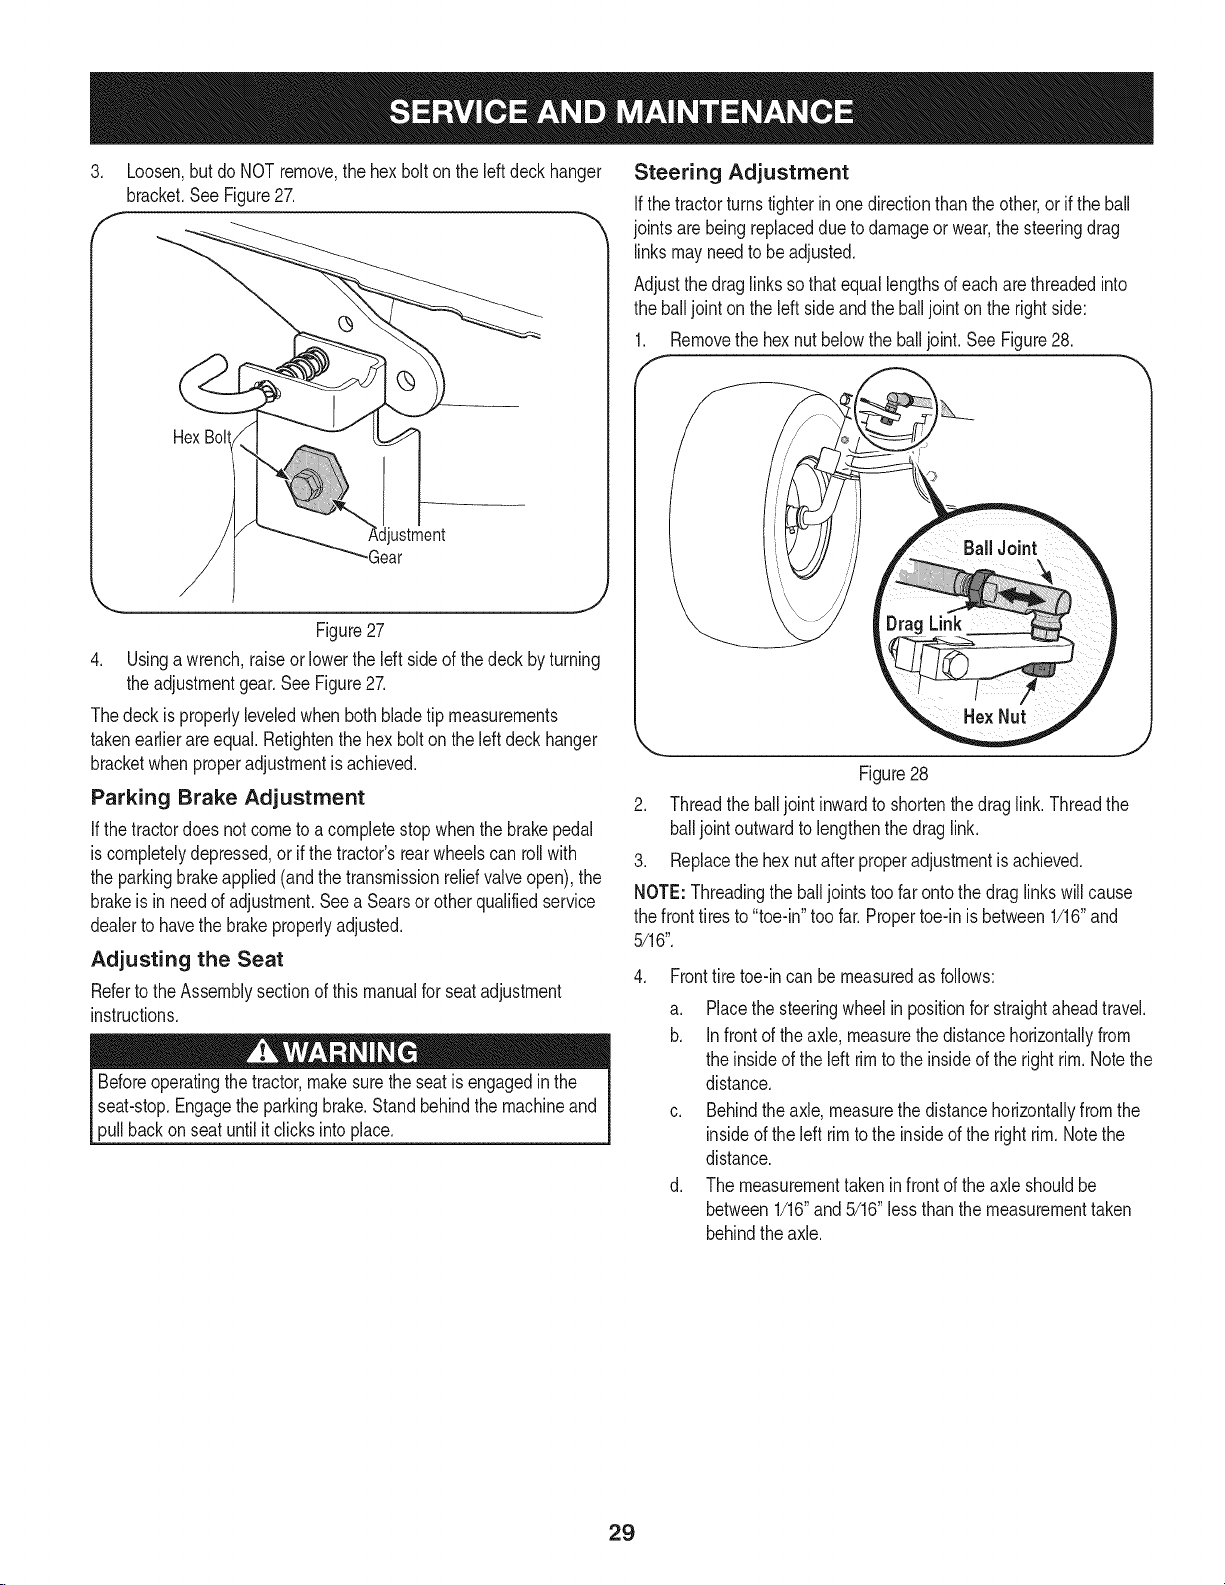
3. Loosen,butdo NOTremove,thehexboltontheleftdeck hanger
bracket.SeeFigure27.
f
Hex Bolt
ustment
-Gear
Figure27
4. Usinga wrench,raiseorlowertheIdt sideof thedeck byturning
theadjustmentgear.SeeFigure27.
Thedeckis properlyleveledwhenbothbladetipmeasurements
takenearlierareequal.Retightenthe hexboltontheleftdeckhanger
bracketwhenproperadjustmentis achieved.
Parking Brake Adjustment
If thetractordoesnotcometoacompletestopwhenthe brakepedal
iscompletelydepressed,or if the tractor'srearwheelscan rollwith
theparkingbrakeapplied(andthe transmissionreliefvalveopen),the
brakeis in needofadjustment.SeeaSearsorother qualifiedservice
dealertohavethebrakeproperlyadjusted.
Adjusting the Seat
Refertothe Assemblysectionof thismanualforseatadjustment
instructions.
Beforeoperatingthe tractor,makesuretheseatis engagedinthe
seat-stop.Engagetheparkingbrake.Standbehindthe machineand
pullbackonseatuntilit clicksinto place.
Steering Adjustment
Ifthetractorturnstighterinonedirectionthanthe other,or iftheball
jointsarebeingreplaceddue todamageorwear,thesteeringdrag
linksmayneedto beadjusted.
Adjustthedraglinksso thatequallengthsofeacharethreadedinto
theballjoint ontheleft sideandtheballjoint on therightside:
1. Removethehexnut belowtheballjoint. SeeFigure28.
J
Figure28
2. Threadthe balljoint inwardto shortenthedraglink.Threadthe
balljointoutwardto lengthenthedraglink.
3. Replacethehexnut afterproperadjustmentisachieved.
NOTE:Threadingthe balljointstoofarontothedraglinkswillcause
thefronttiresto "toe-in"too far.Propertoe-inis between1/16"and
5/16".
4. Fronttiretoe-incan be measuredasfollows:
a. Placethesteeringwheelinpositionforstraightaheadtravel.
b. Infrontofthe axle,measurethedistancehorizontallyfrom
theinsideofthe left rimtotheinsideofthe right rim.Notethe
distance.
c. Behindthe axle,measurethedistancehorizontallyfromthe
insideoftheleft rimto the insideofthe rightrim.Notethe
distance.
d. Themeasurementtakeninfrontofthe axleshouldbe
between1/16"and5/16"lessthanthemeasurementtaken
behindthe axle.
29
Neverstorelawntractorwithfuelin tankindoorsorin poorly
ventilatedareaswherefuelfumesmayreachan openflame,spark,
or pilotlightasona furnace,waterheater,clothesdryer,or gas
appliance,
PREPARING THE ENGINE
IMPORTANT:Fuelleftin thefueltankduringwarmweatherdeterio-
ratesandwillcauseseriousstartingproblems.
Topreventgumdepositsfromforminginsidetheengine'scarburetor
andcausingpossiblemalfunctionoftheengine,thefuel systemmust
beeithercompletelyemptied,or thegasolinemustbetreatedwitha
stabilizerto preventdeterioration.
If usingafuelstabilizer:
a. Readthe productmanufacturer'sinstructionsand recom-
mendations.
b. Addtoclean,freshgasolinethecorrectamountofstabilizer
forthecapacityofthe fuelsystem.
c. Fillthefueltankwithtreatedfueland runtheenginefor2-3
minutestogetstabilizedfuel intothecarburetor.
If emptyingthefuelsystem:
a. Donotdrainfuel whentheengineishot.Allowtheengine
adequatetimetocool. Drainfuelintoan approvedcontainer
outdoors,awayfromopenflame.
b. Drainanylargevolumeoffuelfromthe tankbydisconnect-
ingthefuel linefromthein-linefuelfilterneartheengine.
SeeToDraintheFuelonpage26.
PREPARING THE LAWN TRACTOR
• Cleanandlubricatetractorthoroughlyasdescribedin the
lubricationinstructions.
• Do notusea pressurewasheror gardenhosetocleanyour
unit.
• Storemowerina dry,cleanarea.Do notstorenextto
corrosivematerials,suchasfertilizer.
Gasolineisextremelyflammableandcanbeexplosiveundercertain
conditions.Draingasolinebeforestoringtheequipmentforextended
periods.Drainfuelonlyintoan approvedcontaineroutdoors,away
fromanopenflame.Allowenginetocool.Extinguishcigarettes,
cigars,pipes,andother sourcesofignitionpriortodrainingfuel.
Storegasolinein anapprovedcontainerin safelocation.
c. Reconnectthe fuellineandruntheengineuntilit startsto
falter,thenusethe choketokeepthe enginerunninguntilall
fuelin thecarburetorhasbeenexhausted.
d. Disconnectthefuellineanddrainany remaininggasoline
fromthesystem.
Gasolineisa toxicsubstance.Disposeofgasolineproperly.Contact
yourlocal authoritiesforapproveddisposalmethods.
Removethesparkplugandpourone(1)ounceof engineoilthrough
thesparkplugholeintothecylinder.Cranktheengineseveraltimesto
distributetheoil. Replacethe sparkplug.
30
 Loading...