

Craftsman 247282820 Owner’s Manual

Operator's nual
CRAFTSMAN°
21 SteeJ Blade Dethatcher
Model No. 247.282820
For answers to your questions about this product,
call 1-800-4MY-HOME.
CAUTION: Before using this
product, read this manual and
follow aJl safety ruJes and operating
instructions.
Sears, Roebuck and Co., Hoffman Estates, IL 60179, U.S.A.
Visit our website: www.sears.com/craftsman
,, SAFETY
,, ASSEMBLY
,, OPERATION
,, MAINTENANCE
,, PARTS LIST
,, ESPAI_OL R 30
FormNo.769-04612
(May4,2009)
Warranty Statement ....................................................... 2
Safety instructions ......................................................... 3
Slope Guide .................................................................... 6
Safety Labels ................................................................. 7
Assembly ........................................................................ 8
Operation ..................................................................... 10
Service and Maintenance ........................................... 13
Off-Season Storage ..................................................... 18
Troubleshooting ........................................................... 19
Parts List ...................................................................... 20
Espa_ol ......................................................................... 30
Service Numbers ..................................................... Back
Cover
CRAFTSMAN FULL WARRANTY
IfthisCraftsmanproductfailsduetoa defectinmaterialor workmanshipwithintwoyearsfromthedateof purchase,returnittoanySears
store,Parts& RepairServiceCenter,orotherCraftsmanoutletintheUnitedStatesforfreerepair(or replacementif repairprovesimpos-
sible),
Thiswarrantyappliesforonly90daysif thisproductis everusedforcommercialorrentalpurposes.
ThiswarrantycoversONLYdefectsinmaterialandworkmanship.SearswillNOTpayfor:
• Expendableitemsthatcanwear outfromnormalusewithinthewarrantyperiod,suchasbelts,filters,sparkplugsordethatching
blades,
• Repairsnecessarybecauseof accident,suchas abentcrankshaft,orfailuretooperateormaintaintheproductaccordingtoall
suppliedinstructions,
• Preventivemaintenance,or repairsnecessaryduetoimproperfuel mixture,contaminatedorstalefuel,
Thiswarrantygivesyouspecificlegal rights,andyoumayalsohaveotherrightswhichvaryfromstateto state.
Sears, Roebuckand Co., HoffmanEstates,IL60179
EngineOil: 10W-30
Fuel: UnleadedGasoline
SparkPlug: TorchF6RTC
SparkPlugGap: .020"-.030"
ModelNumber
Serial Number
Dateof Purchase
Recordthemodelnumber,serialnumber,
anddateofpurchaseabove.
©SearsBrands,LLC 2
tionswhich,ifnotfollowed,couldendangerthe
__IL Thissymbolpointsoutimportantsafetyinstruc-
personalsafetyand/orpropertyofyourselfand
others.Readandfollowallinstructionsinthis
manualbeforeattemptingtooperatethismachine.Failureto
complywiththeseinstructionsmayresultin personalinjury.When
yousee thissymbol,HEEDITSWARNING!
Thismachinewasbuilttobeoperatedaccordingtothe rulesfor
safeoperationinthismanual.Aswithanytypeof powerequip-
ment,carelessnessorerroronthepartoftheoperatorcanresult
in seriousinjury.Thismachineiscapableof amputatinghandsand
feetandthrowingobjects.Failuretoobservethefollowingsafety
instructionscouldresultin seriousinjuryordeath.
Your Responsibility: Restricttheuseof this powermachineto
personswhoread,understand,andfollowthewarningsand instruc-
tionsinthis manualandonthemachine.
CHILDREN
,, Tragicaccidentscanoccurifoperatorisnotalert to presenceof
children.Childrenareoften attractedtooutdoorpowerequipment.
Theydo notunderstandthedangers.Neverassumethatchildrenwill
remainwhereyoulast sawthem.
,, Keepchildrenoutofthe workareaand underwatchfulcareofa
responsibleadult otherthanthe operator.
,, Be alert andturndethatcheroffif achild entersthe area.
,, Beforeandwhile movingbackwards,lookbehindanddownfor small
children.
,, Useextremecare whenapproachingblindcorners,doorways,shrubs,
trees,orotherobjectsthat mayobscureyourvisionofa childwho may
runinto thedethatcher.
,, Keepchildrenawayfromhotor runningengines.Theycansuffer
burnsfrom a hotmuffler.
,, Neverallow childrenunder 14yearsoldto operatethedethatcher.
Children14years oldand overshouldreadand understandoperation
instructionsandsafetyrulesin this manualand shouldbetrainedand
supervisedbyanadult.
GENERAL OPERATION
• Readthisoperator'smanualcarefullyin itsentirety beforeattempt-
ingto assemblethismachine.Read,understand,andfollow all
instructionsonthe machineandinthe manual(s)beforeoperation.
Becompletelyfamiliarwiththe controlsandthe properuseofthis
machinebeforeoperatingit. Keepthis manualin a safeplacefor
futureand regularreferenceandfororderingreplacementparts.
,, Be familiarwithall controlsandtheir properoperation.Knowhowto
stopthe machineanddisengagethemquickly.
,, Do notstart enginewith bladesengaged.
,, Thismachineis a precisionpieceof powerequipment,nota plaything.
Therefore,exerciseextremecautionat all times.Yourunithasbeen
designedto performonejob: to dethatchgrass.Do notuseit forany
otherpurpose.
,, Neverallow childrenunder 14yearsoldto operatethismachine.
Children14years oldand overshouldreadand understandthe
instructionsinthis manualand shouldbetrainedand supervisedbya
parent.
,, Onlyresponsibleindividualswhoarefamiliarwiththese rulesof safe
operationshouldbe allowedto usethis machine.
,, Thoroughlyinspectthe areawherethe equipmentisto beused.
Removeall stones,sticks,wire,bones,toysandotherforeign objects
whichcouldbe tripped overor pickedupandthrownbythe det-
hatcher'sblades.Thrownobjectscancauseseriouspersonalinjury.
,, Tohelpavoidbladecontactinjury,stayin operatorzonebehindbail
andkeepchildren,bystanders,helpers,andpetsat least75feet from
dethatcherwhile it isinoperation.Stop machineifanyoneentersarea.
EngineExhaust,someofitsconstituents,andcertainvehicle
[componentscontainor emitchemicalsknownto Stateof California
[to causecancerand birthdefectsor otherreproductiveharm.
,, Alwayswear safetyglassesor safetygogglesduringoperationand
whileperforminganadjustmentor repairtoprotectyour eyes.Thrown
objectswhichricochetcancauseseriousinjurytothe eyes.
,, Wearsturdy,rough-soledworkshoesand close-fittingslacksand
shirts.Shirts andpantsthat coverthe armsand legsandsteel-toed
shoesare recommended.Neveroperatethismachineinshorts,bare
feet,sandals,slippery or lightweight(e.g.canvas)shoes.
,, Do notput handsorfeet nearor underbladehousingasblades
protrudebelowbottomof housing. Contactwith bladecanamputate
handsand feet. Keephandsand feetwayfromall rotatingparts.
,, Injury canoccur if thedethatcherispulledoverthe foot duringa fall
causedby slippingortripping.Do notholdon tothedethatcherif you
arefalling; releasethebail immediately.
,, Neverpullthe dethatcherbacktowardyou whileyou arewalking.If
youmustbackthe dethatcherawayfroma wallor obstructionfirstlook
downandbehindtoavoidtrippingandthen followthesesteps:
,, Step backfromdethatcherto fullyextendyourarms.
,, Be sure youarewell balancedwithsurefooting.
,, Pull backslowly,nomorethan halfwaytowardsyou.
,, Repeatthesestepsas needed.
,, Do notoperatedethatcherwhileunderthe influenceof alcoholor
drugs.
,, Raisedethatcherto highestcut positionbeforestartingengine.
,, Do notengagethe bladeswhilestartingengine.
,, The bladecontrolbailisa safetydevice.Neverattemptto bypassits
operation.Doingso makesthesafetydeviceinoperativeandmay
resultinpersonalinjurythroughcontactwiththe rotatingblade.The
bladecontrolbail mustoperateeasilyin bothdirectionsandautomati-
callyreturntothe disengagedpositionwhenreleased.
,, Neveroperatethe dethatcherin wetgrass.Alwaysbe sureofyour
footing. A slipandfall can causeseriouspersonalinjury.Ifyoufeel
youare losingyourfooting, releasethe bladecontrolbail immediately
andthe bladeswill stoprotating.
,, Dethatchonly in daylightor goodartificiallight.Walk,neverrun.
,, Stopthe bladeswhencrossinggraveldrives,walksor roads.
,, If the equipmentshouldstartto vibrateabnormally,stopthe engine
andcheck immediatelyforthecause.Vibrationis generallyawarning
oftrouble.
,, Shutthe engineoffandwait untilthe bladescomestoa completestop
beforeremovingor uncloggingdebrisfrom underthe bladehousing.
Thecutting bladesmaycontinueto rotatefor a few secondsafterthe
engineisshutoff. Neverplaceany partofthe bodyinthe bladearea
untilyouaresure the bladeshasstoppedrotating.
,, Neveroperatedethatcherwithoutthe properbladecontrolbail,guards
andother safetyprotectivedevicesin placeandworking.Never
operatedethatcherwithdamagedsafetydevices.Failuretodosocan
resultinpersonalinjury.
3

• Mufflerandenginebecomehotandcancauseaburn.Donottouch.
• Onlyusepartsandaccessoriesmadeforthismachinebythe
manufacturer.Failuretodosocanresultinpersonalinjury.
• Whenstartingengine,pullcordslowlyuntilresistanceisfelt,thenpull
rapidly.Rapidretractionofstartercord(kickback)willpullhandand
armtowardenginefasterthanyoucanletgo.Brokenbones,fractures,
bruisesorsprainscouldresult.
• Ifsituationsoccurwhicharenotcoveredinthismanual,usecare
andgoodjudgment.ContactyourAuthorizedServiceCenterfor
assistance.
SLOPE OPERATION
Slopesarea majorfactorrelatedto slipandfall accidentswhichcanresultin
severeinjury.Operationonslopesrequiresextracaution.Ifyoufeeluneasy
ona slope,donotdethatchit.Foryoursafety,usethe slopegaugeincluded
aspartof this manualto measureslopesbeforeoperatingthis unitona
slopedorhilly area.Ifthe slopeisgreaterthan15degrees,do notdethatch
it.
Do:
• Dethatchacrossthefaceof slopes;neverup anddown. Exercise
extremecautionwhenchangingdirectionon slopes.
• Watchfor holes,ruts,rocks, hiddenobjects,or bumpswhich can
causeyou toslipor trip.Tallgrasscan hideobstacles.
• Alwaysbe sureofyour footing.A slip andfall cancauseserious
personalinjury.If youfeel youarelosingyourbalance,releasethe
bladecontrolbail immediately,andthe bladewillstop rotatingwithin
severalseconds
Do Not:
• Do notdethatchneardrop-offs,ditchesorembankments,whereyou
couldloseyourfootingorbalance.
• Do notdethatchslopesgreaterthan 15degreesas shownonthe
slopegauge.
• Do notdethatchwetgrass. Unstablefootingcouldcauseslipping.
SERVICE
Safe Handling Of Gasoline:
• Toavoidpersonalinjuryor propertydamageuseextreme carein
handlinggasoline.Gasolineisextremelyflammableandthevapors
areexplosive.Seriouspersonalinjurycanoccur whengasolineis
spilledon yourselforyourclotheswhichcan ignite.Washyourskin
andchangeclothesimmediately.
• Useonlyanapprovedgasolinecontainer.
• Neverfill containersinsideavehicle oron atruckor trailerbedwith a
plasticliner.Alwaysplacecontainersonthe groundawayfromyour
vehiclebeforefilling.
• Removegas-poweredequipmentfromthetruck ortrailerand refuelit
onthe ground.Ifthis is notpossible,thenrefuelsuchequipmentona
trailerwitha portablecontainer,ratherthanfrom a gasolinedispenser
nozzle.
• Keepthe nozzleincontact withthe rimof thefueltank or container
openingat alltimesuntil fueling iscomplete.Donot usea nozzle
lock-opendevice.
• Extinguishallcigarettes,cigars, pipesand othersourcesof ignition.
• Neverfuel machineindoorsbecauseflammablevaporswillaccumu-
lateinthe area.
• Neverremovegascap oraddfuelwhileengineis hotor running.
Allowengineto coolat leasttwominutesbeforerefueling.
• Neveroverfill fueltank. Filltankto redindicatorbar insidetank.
• Replacegasolinecapandtightensecurely.
• If gasolineisspilled,wipe itoffthe engineandequipment.Moveunit
toanotherarea.Wait5 minutesbeforestartingengine.
• Neverstorethe machineorfuel containernearanopen flame,spark
or pilot lightas on awaterheater,spaceheater,furnace,clothesdryer,
orother gasappliances.
• Toreducefire hazard,keepdethatcherfreeof grass,leaves,or other
debrisbuild-up.Cleanupoil orfuel spillageandremoveanyfuel
soakeddebris.
• Allowdethatcherto coolat least5 minutesbeforestoring.
General Service:
• Neverrunanengineindoorsor in apoorlyventilatedarea.Engine
exhaustcontainscarbonmonoxide,anodorlessanddeadlygas.
• Beforecleaning,repairing,or inspecting,makecertainthe bladesand
all movingpartshavestopped.Disconnectthesparkplugwireand
groundagainstthe engineto preventunintendedstarting.
• Checkthe bladeand enginemountingfastenersat frequentintervals
forpropertightness.Also,visuallyinspectbladesfor damage(e.g.,
bent,cracked,worn)Replacebladeswiththeoriginalequipment
manufacture's(O.E.M.)bladeonly.Useof partswhich donot meetthe
originalequipmentspecificationsmayleadtoimproperperformance
andcompromisesafety!
• Dethatcherbladesmaybesharpandcan cut.Wrapthe bladeor wear
gloves,anduseextracautionwhenservicingthem.
• Keepall nuts,bolts,and screwstightto besurethe equipmentis in
safeworkingcondition.
• Nevertamperwithsafety devices.Checktheir properoperation
regularly.
• Afterstrikinga foreignobject,stopthe engine,disconnectthespark
plugwireandgroundagainsttheengine.Thoroughlyinspectthe
dethatcherfor anydamage.Repairthedamagebeforestartingand
operatingthedethatcher.
• Forsafetyprotection,frequentlycheckcomponentsandreplaceim-
mediatelywithoriginal equipmentmanufacturer's(O.E.M.)partsonly.
Useof partswhichdo not meettheoriginalequipmentspecifications
mayleadto improperperformanceandcompromisesafety!
• Do notchangethe enginegovernorsettingor overspeedtheengine.
Thegovernorcontrolsthe maximumsafeoperatingspeedofthe
engine.Donotcrankenginewithsparkplugremoved.
• Checkfuelline,tank, cap,andfittingsfrequentlyfor cracksor leaks.
Replaceif necessary.
• Maintainor replacesafetyand instructionlabels,asnecessary.
• Observeproperdisposallawsandregulations.Improperdisposalof
fluidsand materialscanharmthe environment.
YourResponsibility:Restrictthe useofthis powermachineto personswhoread,understand,andfollowthe warningsandinstructionsinthis manualandonthe
machine.
4
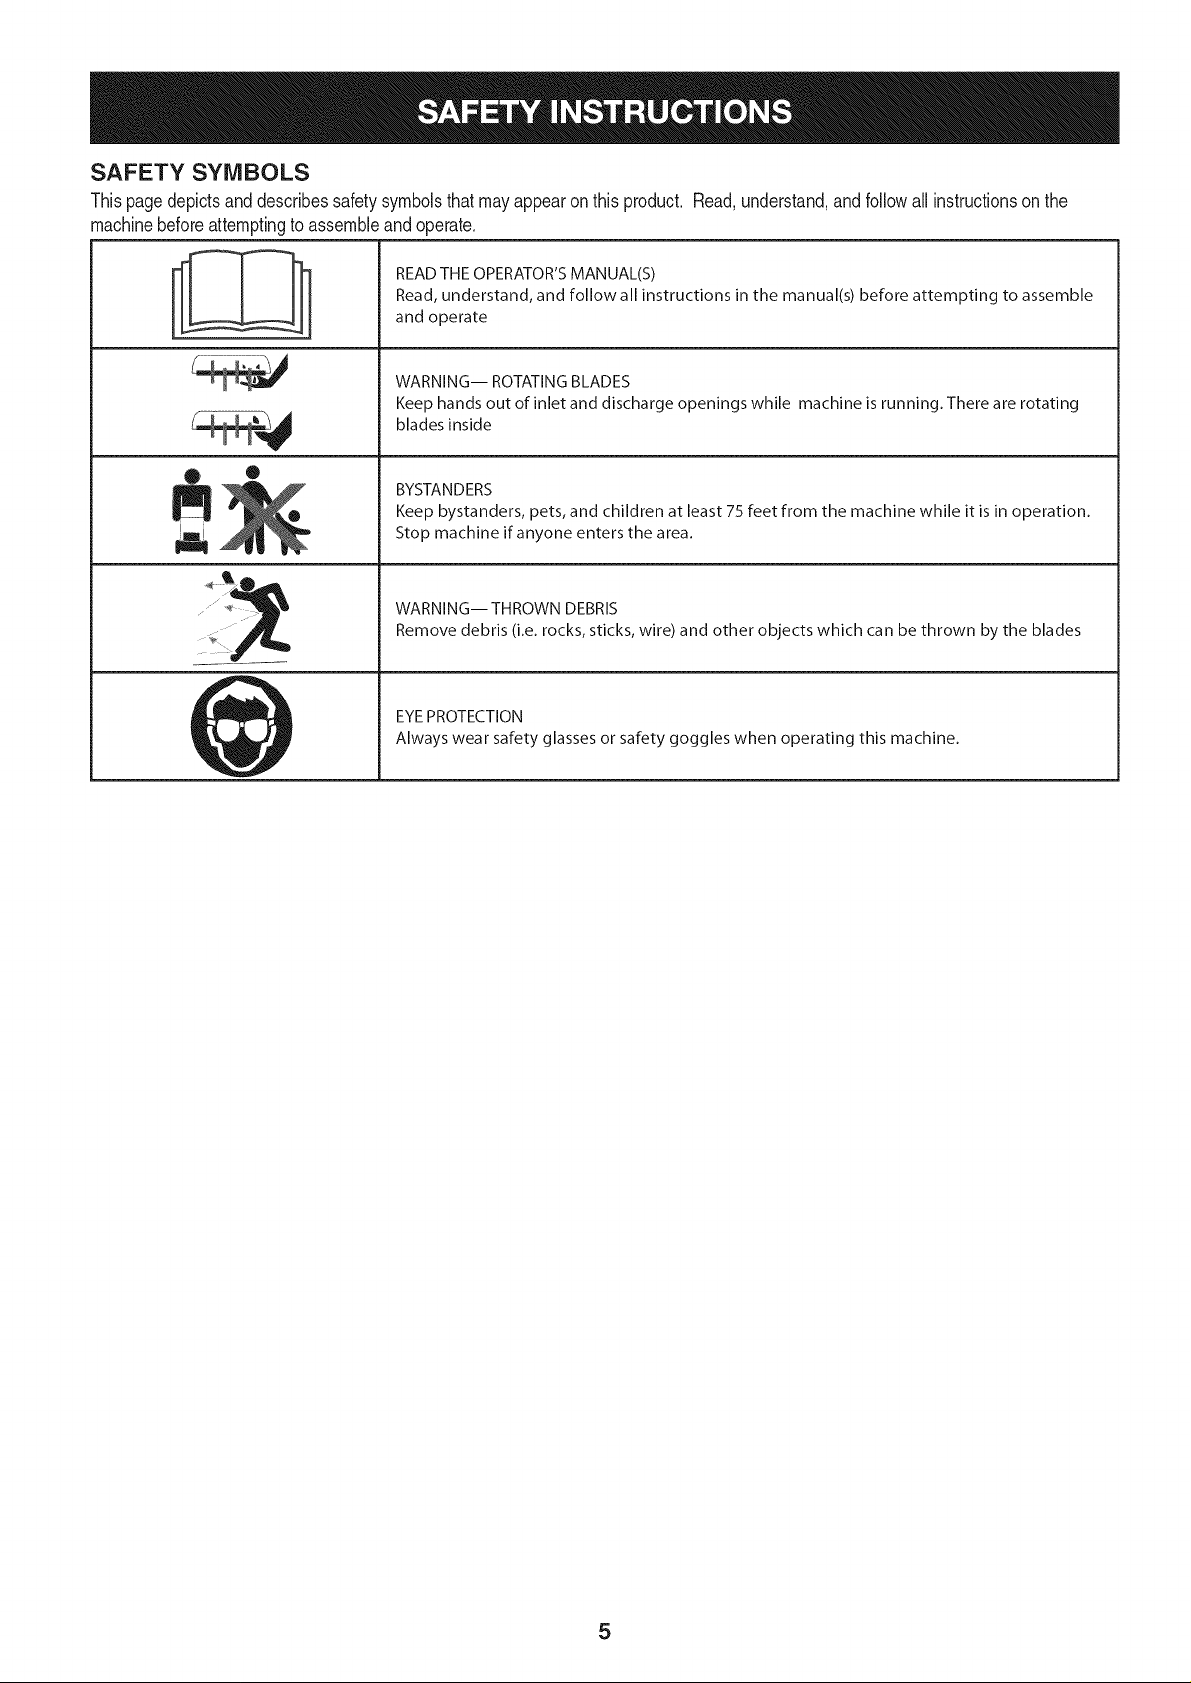
SAFETY SYMBOLS
Thispagedepictsanddescribessafetysymbolsthatmayappearonthis product.Read,understand,andfollowallinstructionson the
machinebeforeattemptingtoassembleandoperate.
® =
®
READ THE OPERATOR'S MANUAL(S)
Read, understand, and follow all instructions in the manual(s) before attempting to assemble
and operate
WARNING-- ROTATING BLADES
Keep hands out of inlet and discharge openings while machine is running. There are rotating
blades inside
BYSTANDERS
Keep bystanders, pets, and children at least 75 feet from the machine while it is in operation.
Stop machine if anyone enters the area.
WARNING-- THROWN DEBRIS
Remove debris (i.e. rocks, sticks, wire) and other objects which can be thrown by the blades
EYEPROTECTION
Always wear safety glasses or safety goggles when operating this machine.
5
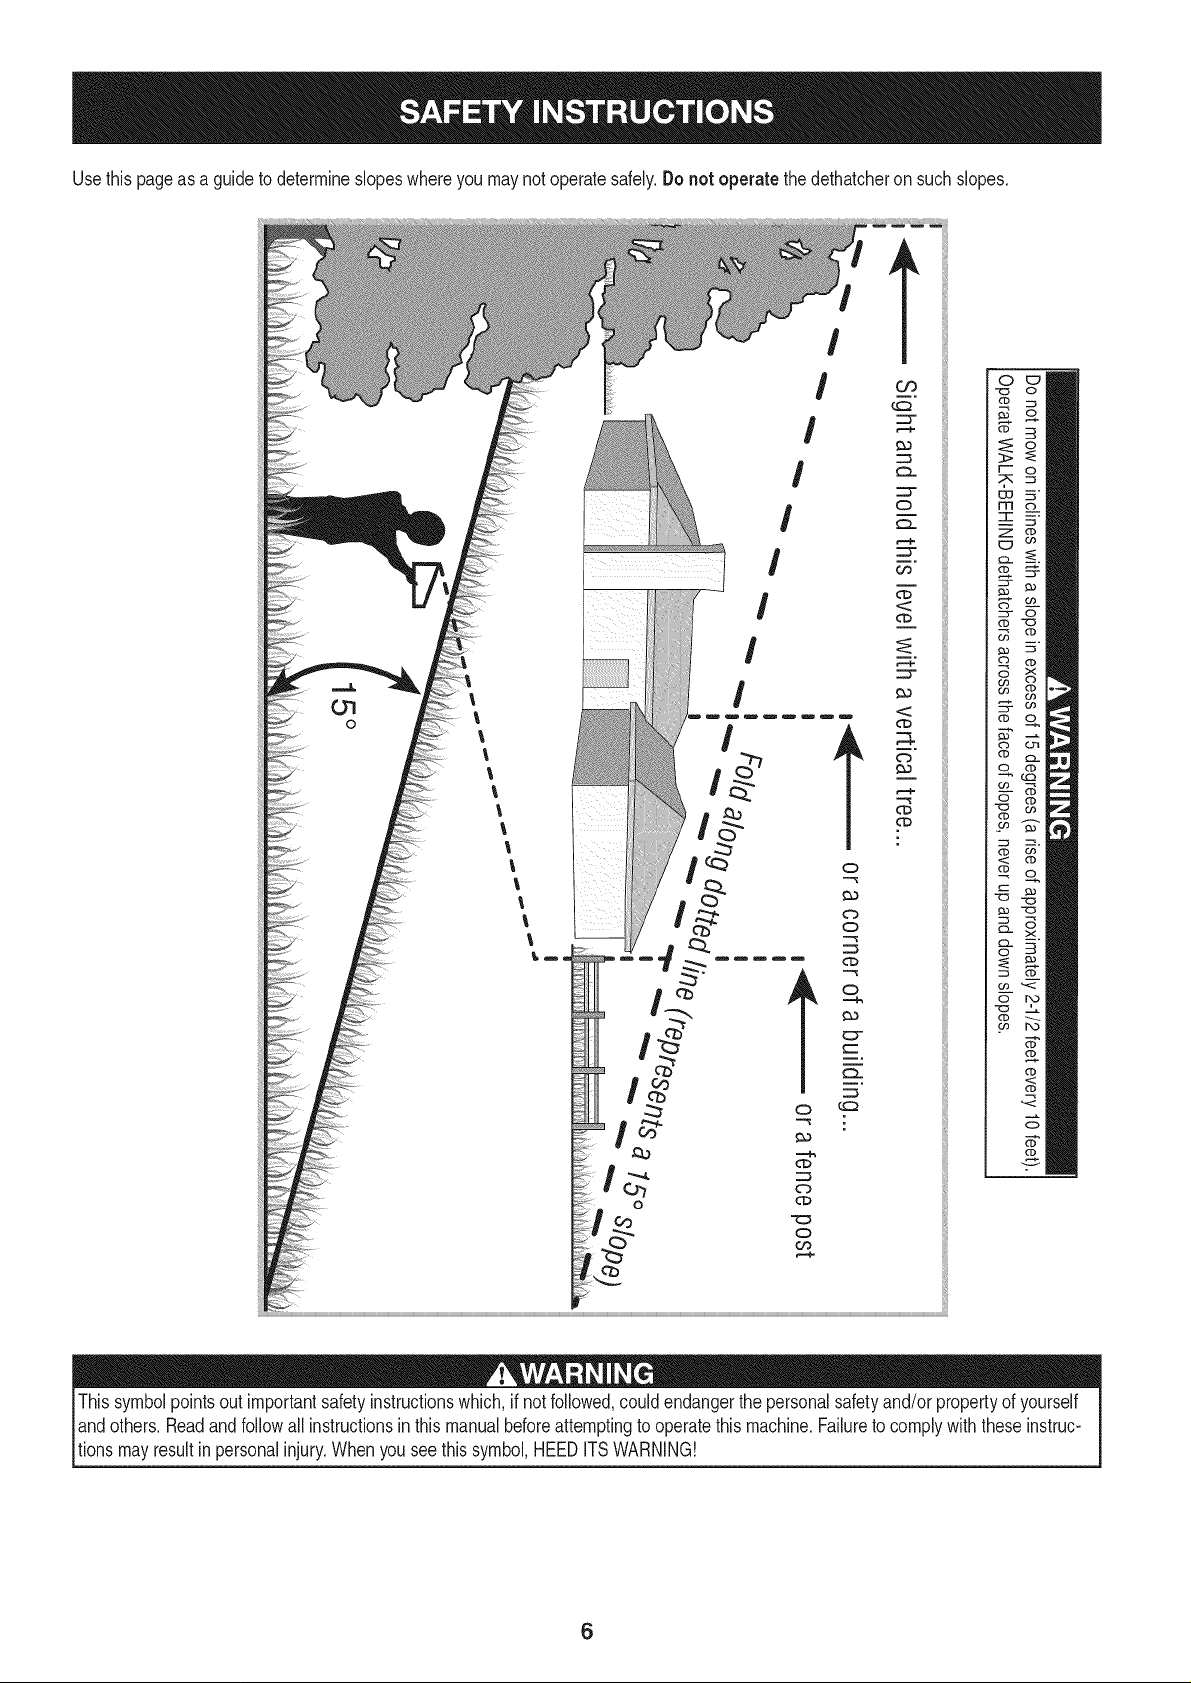
Usethispageasa guidetodetermineslopeswhereyoumaynotoperatesafely.Donot operatethedethatcheronsuchslopes.
!
t
C
CD
!
!
!
!
!
r-
6c
IT
-1-
z2r
C3
O3
O3
C_
o_,
co
O
d)
t-
o
co
o
(D
Thissymbolpointsoutimportantsafetyinstructionswhich,ifnotfollowed,couldendangerthepersonalsafetyand/orpropertyof yourself
andothers.Readandfollowallinstructionsin thismanualbeforeattemptingtooperatethis machine.Failureto complywiththeseinstruc-
tionsmayresultin personalinjury.Whenyouseethis symbol,HEEDITSWARNING!
6
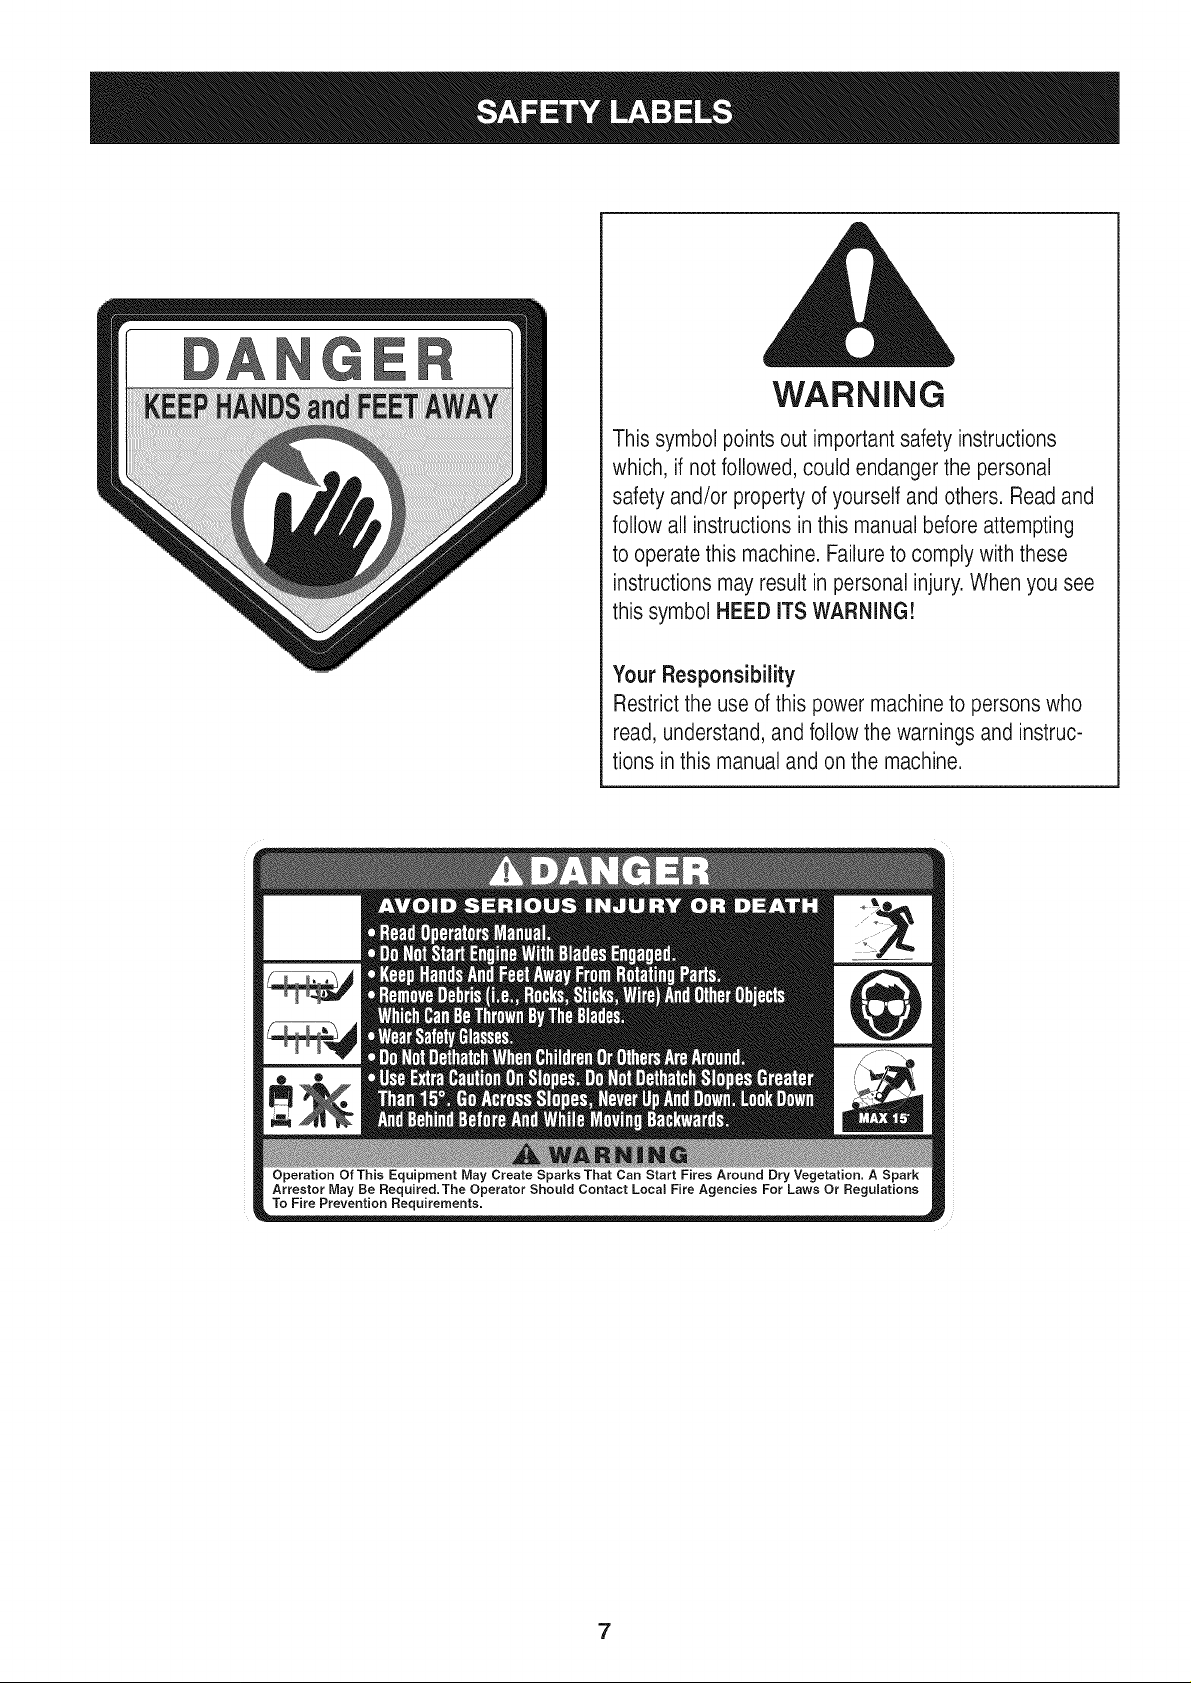
WARNING
Thissymbol points outimportant safety instructions
which, ifnot followed,couldendanger the personal
safety and/or propertyof yourself and others.Readand
follow allinstructionsin this manualbeforeattempting
to operatethis machine.Failureto comply withthese
instructions mayresult in personalinjury.When you see
this symbol HEED ITS WARNING!
Your Responsibility
Restrictthe use ofthis power machineto personswho
read, understand,and followthe warningsand instruc-
tions in this manualand onthe machine.
7
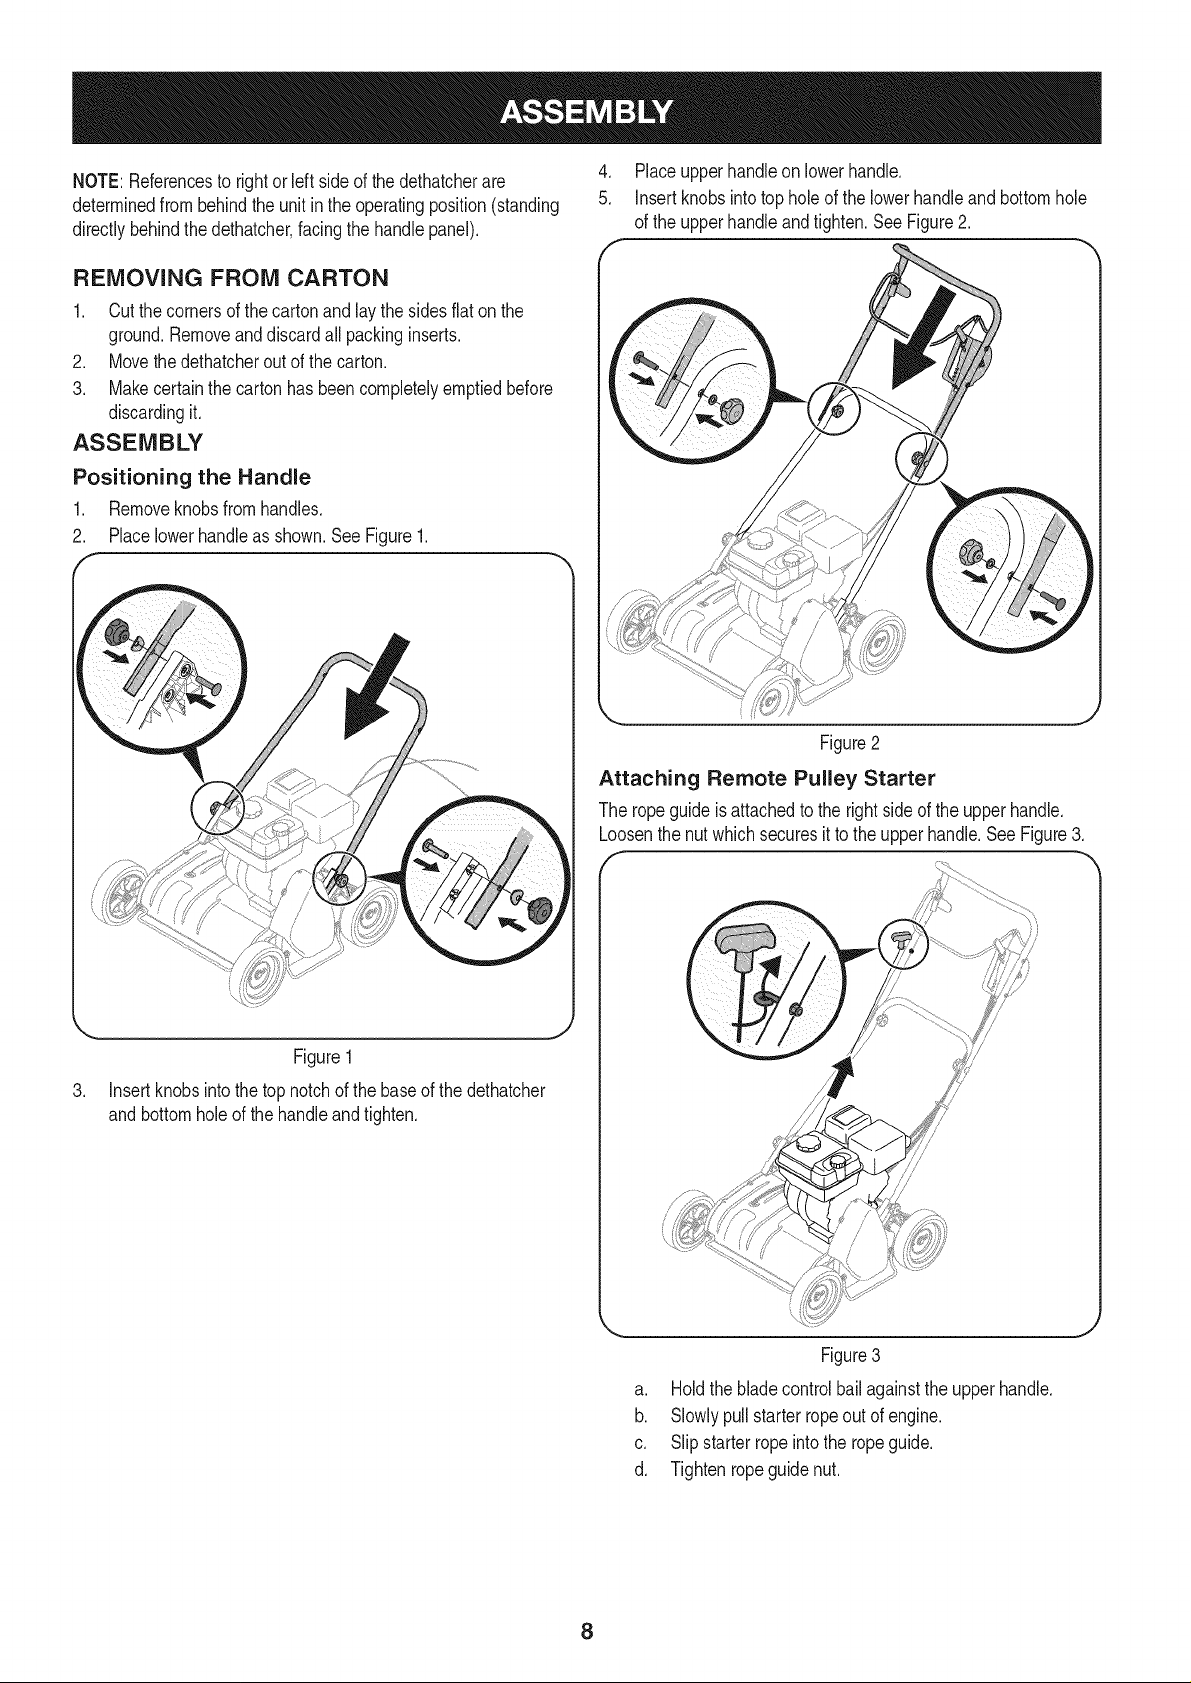
NOTE:Referencesto rightorleft sideof thedethatcherare
determinedfrombehindtheunitintheoperatingposition(standing
directlybehindthedethatcher,facingthehandlepanel).
REMOVING FROM CARTON
1. Cutthecornersofthecartonandlay the sidesflat onthe
ground.Removeanddiscardall packinginserts.
2. Movethedethatcherout of the carton.
3. Makecertainthecartonhasbeencompletelyemptiedbefore
discardingit.
ASSEMBLY
Positioning the Handle
1. Removeknobsfromhandles.
2. Placelowerhandleasshown.SeeFigure1.
4. Placeupperhandleon lowerhandle.
5. Insertknobsintotop holeofthelowerhandleandbottomhole
oftheupperhandleandtighten.SeeFigure2.
Figure2
Figure1
Insertknobsintothe top notchof the baseofthedethatcher
andbottomholeofthehandleandtighten.
Attaching Remote Pulley Starter
Theropeguideisattachedtothe rightsideoftheupperhandle.
Loosenthenutwhichsecuresittotheupperhandle.SeeFigure3.
f
J
Figure3
a. Holdthe bladecontrolbailagainsttheupperhandle.
b. Slowlypullstarterropeoutofengine.
c. Slipstarterropeintothe ropeguide.
d. Tightenropeguidenut.
8
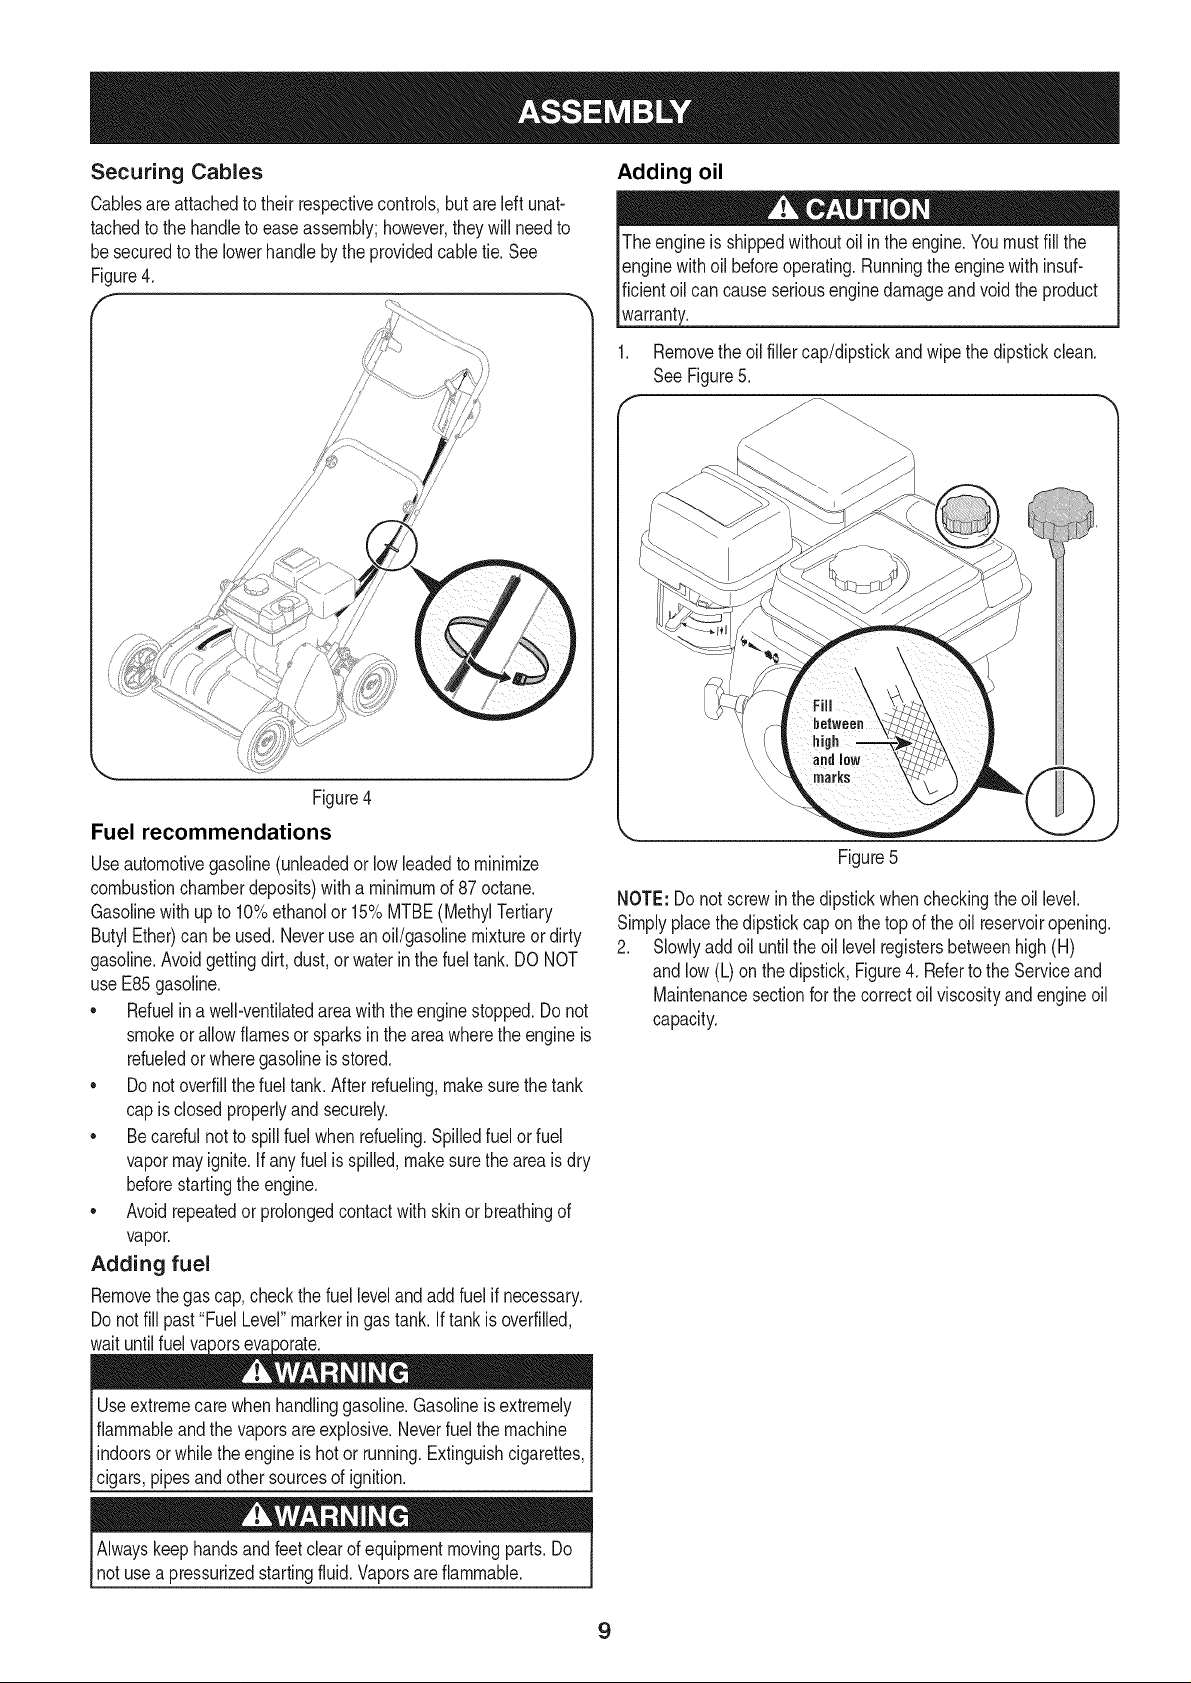
Securing Cables
Cablesareattachedtotheirrespectivecontrols,butareleft unat-
tachedtothehandletoeaseassembly;however,theywillneedto
besecuredtothelowerhandlebythe providedcabletie. See
Figure4.
f
Adding oil
Theengineis shippedwithoutoil intheengine.Youmustfillthe
enginewithoil beforeoperating.Runningtheenginewithinsuf-
ficientoilcancauseseriousenginedamageandvoid the product
warranty.
1. Removetheoil fillercap/dipstickandwipethedipstickclean.
SeeFigure5.
f
Figure4
Fuel recommendations
Useautomotivegasoline(unleadedor lowleadedtominimize
combustionchamberdeposits)witha minimumof87octane.
Gasolinewithupto 10%ethanolor 15%MTBE(MethylTertiary
ButylEther)canbeused.Neverusean oil/gasolinemixtureordirty
gasoline.Avoidgettingdirt,dust, orwaterin the fueltank.DONOT
useE85gasoline.
• Refuelina well-ventilatedareawiththe enginestopped.Donot
smokeorallowflamesor sparksintheareawheretheengineis
refueledorwheregasolineis stored.
• Do notoverfillthefueltank.Afterrefueling,makesurethetank
capisclosedproperlyandsecurely.
• Becarefulnottospillfuelwhen refueling.Spilledfuelor fuel
vapormayignite.Ifanyfuelisspilled,makesurethe areaisdry
beforestartingtheengine.
• Avoidrepeatedor prolongedcontactwithskinor breathingof
vapor.
Adding fuel
Removethegascap,checkthefuellevelandaddfuelif necessary.
Donotfill past"FuelLevel"markeringas tank. Iftankisoverfilled,
waituntilfuelva
Figure5
NOTE:Donot screwinthedipstickwhencheckingtheoil level.
Simplyplacethe dipstickcap onthe top of the oil reservoiropening.
2. Slowlyaddoil untiltheoil levelregistersbetweenhigh(H)
andlow(L)onthe dipstick,Figure4. Referto the Serviceand
Maintenancesectionforthe correctoil viscosityandengineoil
capacity.
Useextremecarewhenhandlinggasoline.Gasolineisextremely
flammableandthevaporsareexplosive.Neverfuelthemachine
indoorsorwhilethe engineis hotor running.Extinguishcigarettes,
cigars,pipesandothersourcesofignition.
Alwayskeephandsandfeetclearof equipmentmovingparts.Do
notusea pressurizedstartingfluid.Vaporsareflammable.
9
BailInterlock
BladeControl
Oil Fill Bail
ThrottleControl
l RecoilStarter
Gasoline
Cap
/
Choke
Control
CHOKE CONTROL
Activatingthe choke control closes the choke plate on carburetor
and aids instarting engine.
THROTTLE CONTROL
The throttle controlis located on the engine, it regulates the speed
ofthe engine (Rabbit being the fastest, Turtlebeing the slowest) and
willshut off the engine when pushed to the STOP position.
HeightAdjustment
Lever
Figure6
RECOIL STARTER
Thestarterhandleis usedtostarttheengine,
GASOLINE CAP
Removethegascaptoaddfuel.
OIL FILL
Engineoil levelcanbe checkedandoiladdedthroughtheoilfill.
BLADE CONTROL BAIL
Locatedon the upperhandle,the bladecontrolhandleis usedto
engageanddisengagedrivetothecuttingblades.Squeezethe
controlhandleagainsttheupperhandleto engagetheblades;
releaseit to disengage.
HEIGHT ADJUSTMENT LEVER
Theheightadjustmentleverraisesand lowersthecuttingblades.
Usethe1-settingfor transportation,settings2through5for
dethatching.Settings3, 4,and5 arenotneededuntilthebladesare
toowornto beeffectiveonsetting2.Optimumcuttingdepthis1/8of
an inch.
BAIL INTERLOCK
Thebailinterlocklocksthebladecontrolhandleinplaceto prevent
unwantedengagingofthe cuttingblades.
10
BEFORE STARTING THE ENGINE STARTING THE ENGINE
Read,understandandfollowallthe instructionsandwarningson
themachineandin thismanualbeforeoperating.
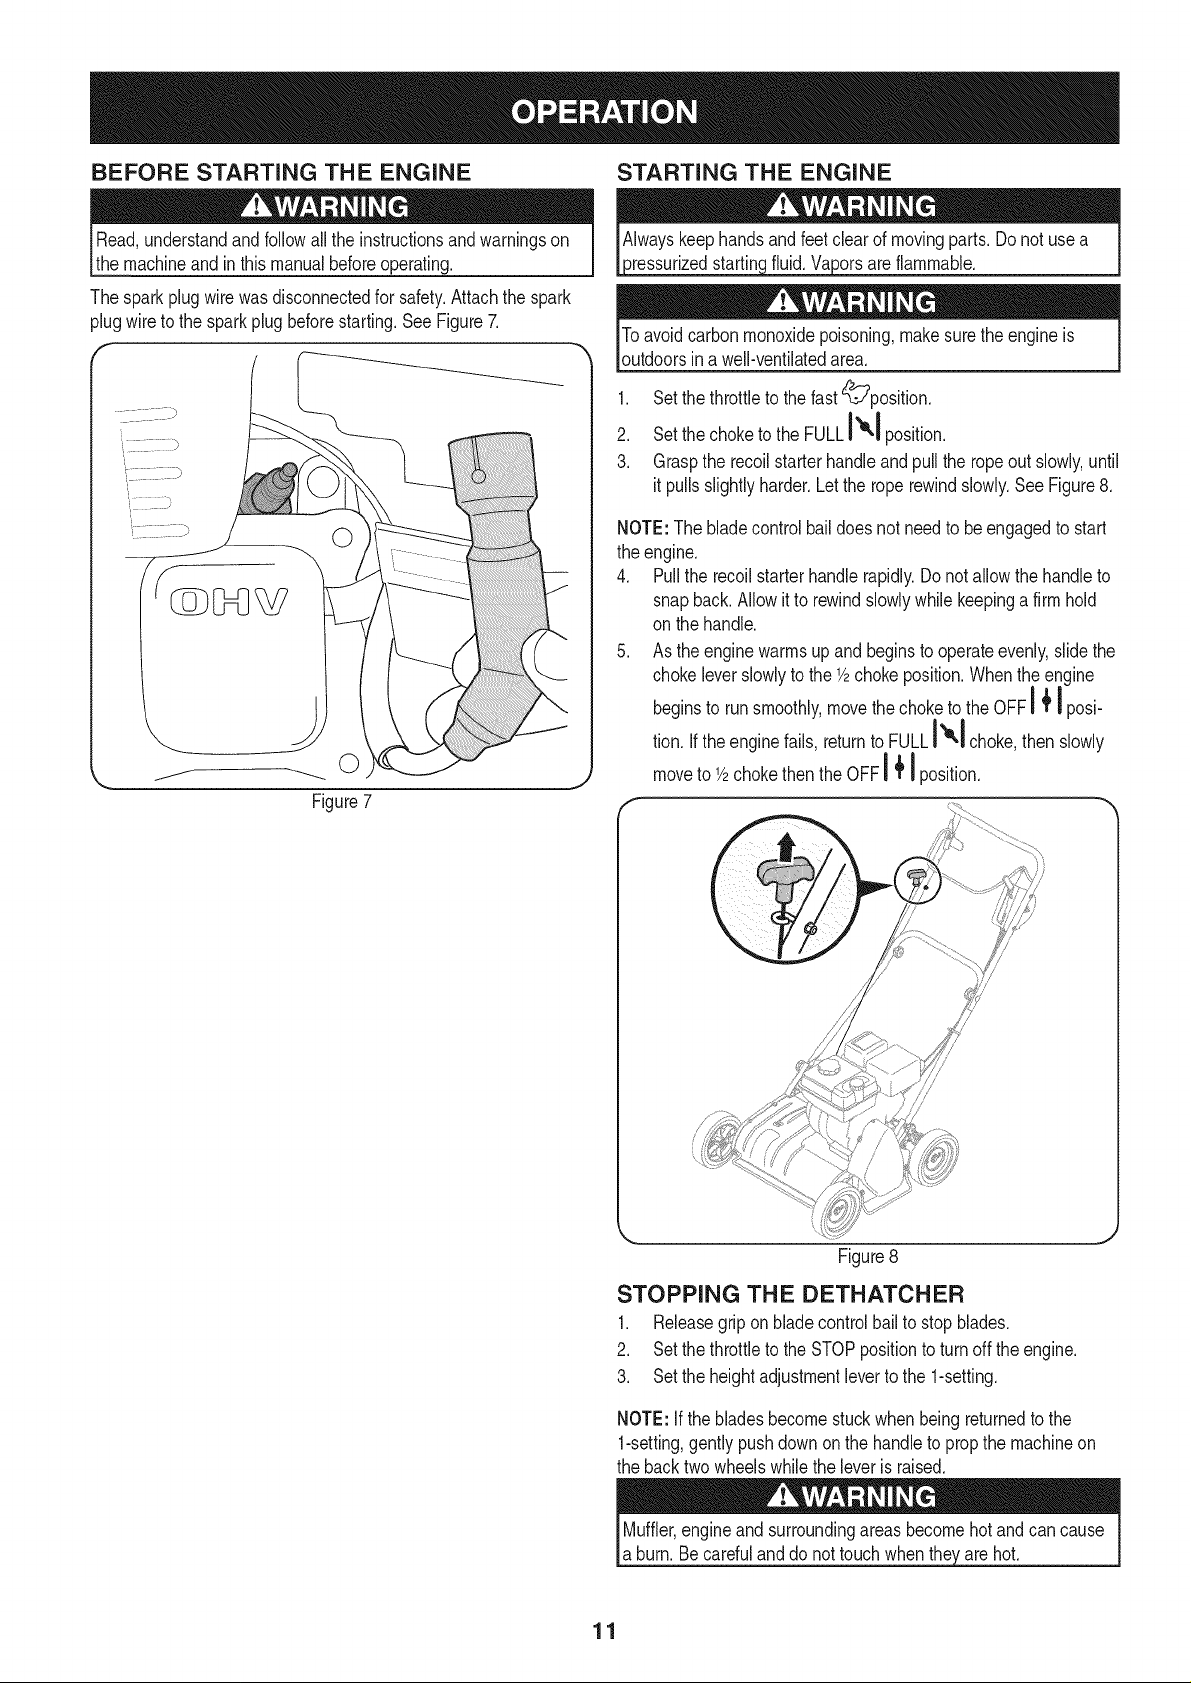
Thesparkplugwirewasdisconnectedforsafety.Attachthe spark
plugwiretothe sparkplugbeforestarting.SeeFigure7.
O
Figure7
_ressurizedstartinc flammable.
Toavoidcarbonmonoxidepoisoning,makesuretheengineis
outdoorsin awell-ventilatedarea.
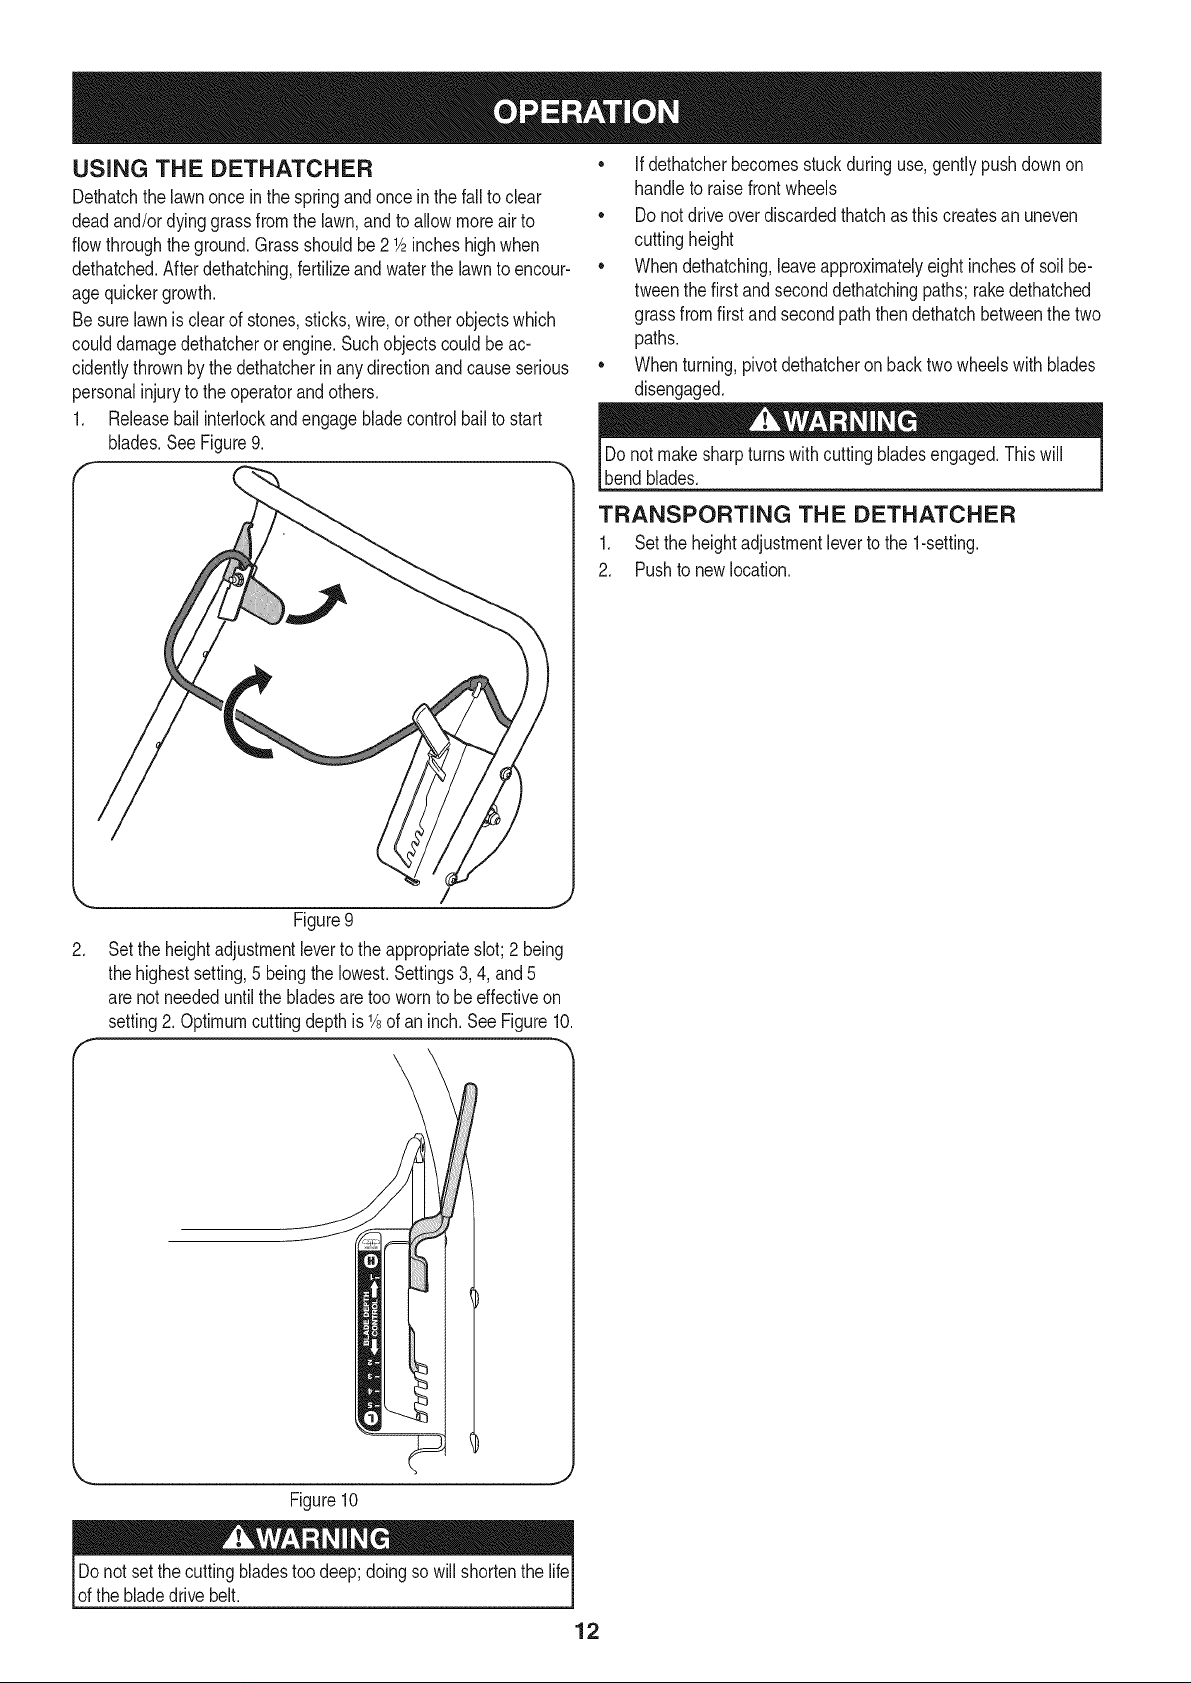
1. Setthethrottletothefast_position.
2. Setthechoketo the FULLi'_"1position.
3. Graspthe recoilstarterhandleandpulltheropeoutslowly,until
it pullsslightlyharder.Lettheroperewindslowly.SeeFigure8.
NOTE:The bladecontrolbaildoesnot needto beengagedto start
theengine.
4. Pulltherecoilstarterhandlerapidly.Donotallowthehandleto
snapback.Allowitto rewindslowlywhilekeepingafirmhold
onthehandle.
5. Astheenginewarmsupandbeginstooperateevenly,slidethe
chokeleverslowlytothe1/2chokeposition.Whentheengine
beginsto runsmoothly,movethechoketotheOFF_ _posi-
tion.If theenginefails,returnto FULLI_1 choke thenslowly
moveto1/2chokethentheOFF_ _position.
I÷II
m a
/
j,
Figure8
STOPPING THE DETHATCHER
1. Releasegriponbladecontrolbailtostopblades.
2. SetthethrottletotheSTOPpositiontoturnoff theengine.
3. Settheheightadjustmentlevertothe1-setting.
NOTE:Ifthebladesbecomestuckwhenbeingreturnedtothe
1-setting,gentlypushdownonthehandletopropthe machineon
thebacktwowheelswhiletheleveris raised.
Muffler,engineand surroundingareasbecomehotandcancause
a burn.Becarefulanddo nottouchwhenthey_arehot.
11
USING THE DETHATCHER
Dethatchthelawnonceinthespringandonceinthefall to clear
deadand/ordyinggrassfromthe lawn,and toallowmoreairto
flowthroughtheground.Grassshouldbe21/2incheshighwhen
dethatched.Afterdethatching,fertilizeandwaterthe lawntoencour-
agequickergrowth.
Besurelawnisclearofstones,sticks,wire,orother objectswhich
coulddamagedethatcheror engine.Suchobjectscouldbe ac-
cidentlythrownbythedethatcherin anydirectionandcauseserious
personalinjurytotheoperatorandothers.
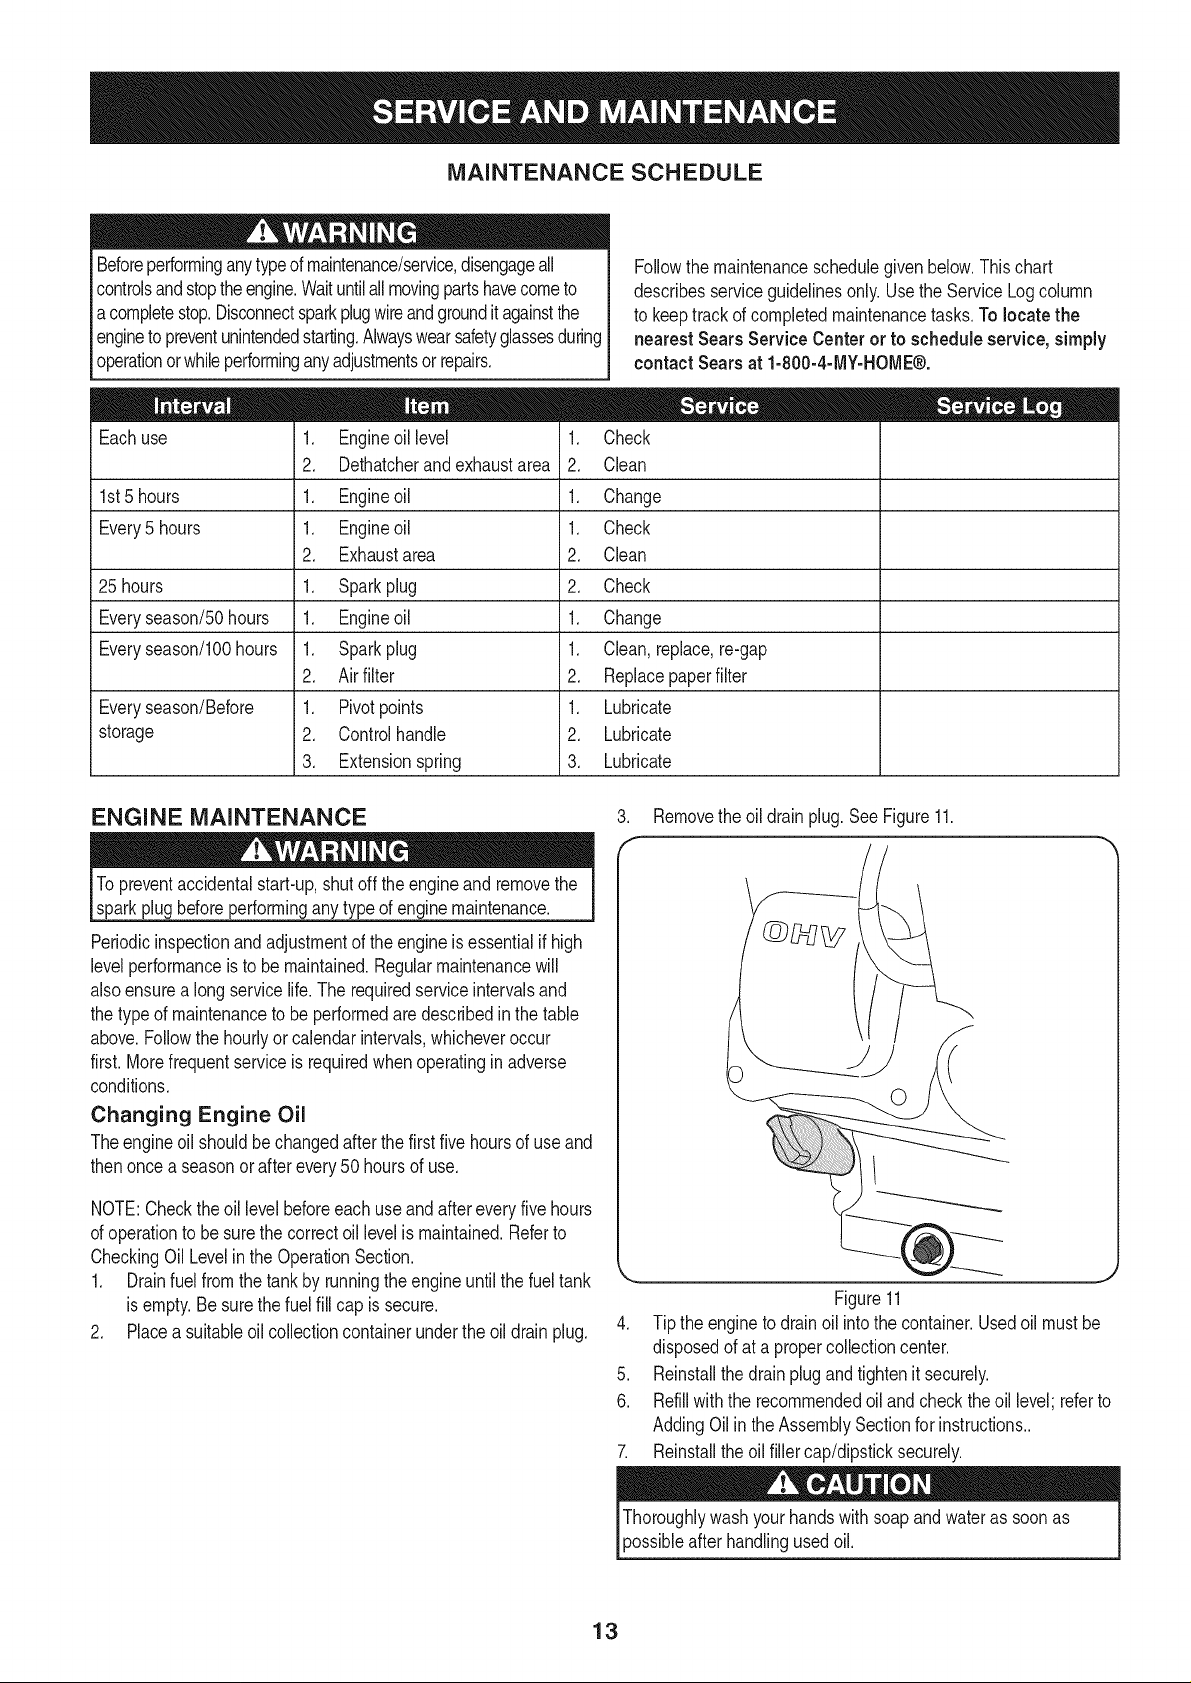
1. Releasebailinterlockandengagebladecontrolbailto start
blades.SeeFigure9.
• If dethatcherbecomesstuckduringuse,gentlypushdownon
handleto raisefrontwheels
• Do notdriveoverdiscardedthatchasthiscreatesan uneven
cuttingheight
• Whendethatching,leaveapproximatelyeight inchesof soil be-
tweenthefirstandseconddethatchingpaths;rakedethatched
grassfromfirstandsecondpaththendethatchbetweenthetwo
paths.
• Whenturning,pivotdethatcheronbacktwowheelswithblades
disengaged.
Donotmakesharpturnswithcuttingbladesengaged.Thiswill
bendblades.
TRANSPORTING THE DETHATCHER
1. Setthe heightadjustmentleverto the 1-setting.
2. Pushto new location.
Figure9
.
Setthe heightadjustmentleverto theappropriateslot;2 being
thehighestsetting,5 beingthe lowest.Settings3,4, and5
arenotneededuntilthe bladesare toowornto beeffectiveon
setting2. Optimumcuttingdepthis1/8ofaninch.SeeFigure10.
\
(
Figure10
Donotsetthecuttingbladestoodeep; doingso will shortenthe life
ofthebladedrivebelt.
12
MAINTENANCE SCHEDULE
Beforeperforminganytypeofmaintenance/service,disengageall
controlsandstoptheengine.Waituntilallmovingpartshavecometo
acompletestop.Disconnectsparkplugwireandgrounditagainstthe
enginetopreventunintendedstarting.Alwayswearsafetyglassesduring
operationorwhileperforminganyadjustmentsorrepairs.
Eachuse 1. Engineoillevel
2. Dethatcherandexhaustarea
1st5 hours 1. Engineoil
Every5 hours 1. Engineoil
2. Exhaustarea
25 hours 1. Sparkplug
Everyseason/5Ohours 1. Engineoil
Everyseason/lOOhours 1. Sparkplug
2. Airfilter
Everyseason/Before 1. Pivotpoints
storage 2. Controlhandle
3. Extensionspring
1. Check
2. Clean
1. Change
1. Check
2. Clean
2. Check
1. Change
1. Clean,replace,re-gap
2. Replacepaperfilter
1. Lubricate
2. Lubricate
3. Lubricate
ENGINE MAINTENANCE
Followthemaintenanceschedulegivenbelow.Thischart
describesserviceguidelinesonly.Usethe ServiceLogcolumn
tokeeptrackofcompletedmaintenancetasks.To locate the
nearest Sears Service Centeror to scheduleservice,simply
contactSearsat 1-800-4-MY-HOME®,
.
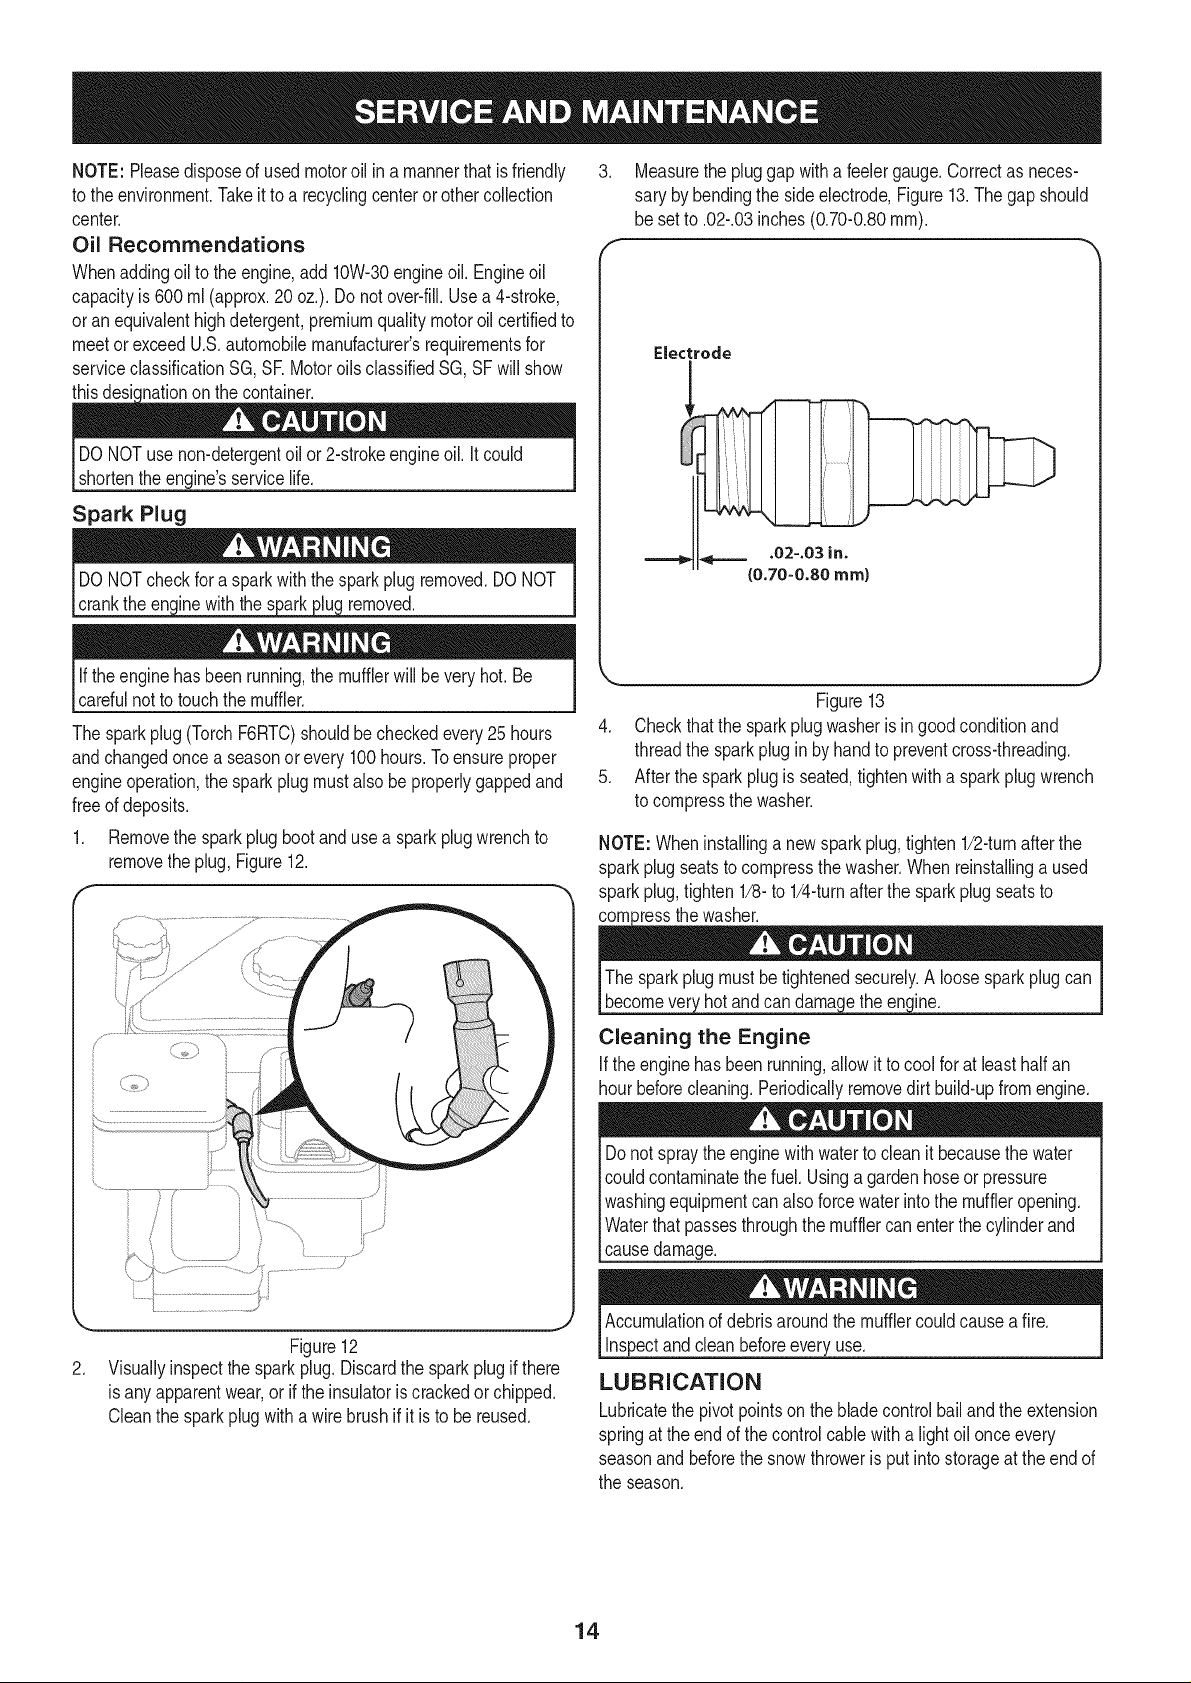
Removetheoil drainplug.SeeFigure11.
Topreventaccidentalstart-up,shutofftheengineand removethe
sparkplugbeforeperforminganytypeofenginemaintenance.
Periodicinspectionandadjustmentof theengineisessentialifhigh
levelperformanceistobe maintained.Regularmaintenancewill
alsoensurea longservicelife.Therequiredserviceintervalsand
thetypeofmaintenanceto beperformedaredescribedinthetable
above.Followthe hourlyor calendarintervals,whicheveroccur
first.Morefrequentserviceisrequiredwhenoperatinginadverse
conditions.
Changing Engine Oil
Theengineoil shouldbechangedafterthefirstfive hoursof useand
thenonce aseasonor afterevery50 hoursof use.
NOTE:Checktheoillevelbeforeeachuseandaftereveryfivehours
ofoperationtobesurethecorrectoil levelismaintained.Referto
CheckingOilLevelintheOperationSection.
1. Drainfuelfromthe tankbyrunningtheengineuntilthe fueltank
isempty.Besurethe fuel fill cap is secure.
2. Placea suitableoil collectioncontainerundertheoildrainplug.
J
Figure11
4. Tiptheenginetodrainoil intothecontainer.Usedoilmustbe
disposedof ata propercollectioncenter.
5. Reinstallthedrainplugandtightenitsecurely.
6. Refillwiththe recommendedoil andcheckthe oil level;referto
AddingOilintheAssemblySectionforinstructions..
7. Reinstalltheoilfiller cap/dipsticksecurely.
)ossibleafterhandlingusedoil.
13
NOTE:Pleasedisposeof usedmotoroilina mannerthatis friendly
totheenvironment.Takeit toa recyclingcenterorothercollection
center,
Oil Recommendations
Whenaddingoiltotheengine,add10%30 engineoil. Engineoil
capacityis600rnl(approx.20oz.). Do notover-fill.Usea4-stroke,
oran equivalenthighdetergent,premiumqualitymotoroil certifiedto
meetor exceedU.S.automobilemanufacturer'srequirementsfor
serviceclassificationSG,SE MotoroilsclassifiedSG,SFwillshow
thisdesknationonthecontainer.
DONOTusenon-detergentoil or2-strokeengineoil. Itcould
shortentheengine'sservicelife.
Spark Plug
cranktheen(!mewiththe removed.
If theenginehasbeenrunning,themufflerwillbe veryhot.Be
carefulnotto touchthemuffler.
Thesparkplug(TorchF6RTC)shouldbecheckedevery25hours
andchangedoncea seasonorevery 100hours.Toensureproper
engineoperation,thesparkplugmustalso beproperlygappedand
freeof deposits.
1. Removethe sparkplugbootanduse a sparkplugwrenchto
removetheplug,Figure12.
3. Measurethepluggapwitha feelergauge.Correctasneces-
sarybybendingthesideelectrode,Figure13.Thegapshould
be setto.02-.03inches(0.70-0.80turn).
Electrode
_==== .02-.03 in.
(0.70-0.80 ram)
Figure13
4. Checkthatthesparkplugwasherisingoodconditionand
threadthe sparkplugin byhandtopreventcross-threading.
5. Afterthesparkplugis seated,tightenwitha sparkplugwrench
tocompressthewasher.
NOTE:Wheninstallinga newsparkplug,tighten1/2-turnafterthe
sparkplugseatstocompressthewasher.Whenreinstallinga used
sparkplug,tighten1/8-to 1/4-turnafterthesparkplugseatsto
)tessthewasher.
,
Visuallyinspectthesparkplug.Discardthesparkplugif there
isanyapparentwear,or iftheinsulatoriscrackedorchipped.
Cleanthe sparkplugwitha wirebrushif itistobe reused.
Figure12
Thesparkplugmustbetightenedsecurely.A loosesparkplugcan
becomever hotandcan darna etheen ine.
Cleaning the Engine
If theenginehasbeenrunning,allowit tocool for at leasthalfan
hourbeforecleaning.Periodicallyremovedirtbuild-upfromengine.
Donotspraytheenginewithwatertocleanit becausethewater
couldcontaminatethefuel.Usinga gardenhoseor pressure
washingequipmentcanalsoforcewaterinto the muffleropening.
Waterthatpassesthroughthemufflercanenterthecylinderand
causedamage.
Accumulationofdebrisaroundthemufflercouldcauseafire.
Inspectandcleanbeforeeveryuse.
LUBRICATION
Lubricatethepivotpointsonthebladecontrolbailandtheextension
springat the endofthecontrolcablewitha lightoil onceevery
seasonandbeforethesnowthroweris putintostorageattheendof
theseason.
14
ADJUSTMENTS
Blade Cutting Height
Thedethatcherisdesignedtocut1/8ofan inchintotheground.At
thebeginningofthe productlife usethe2-setting.Astheblades
wearit will be necessarytoincreasethedepthofthe cuttingblades
byusingthe3, 4,and5 settings.
BELT REPLACEMENT
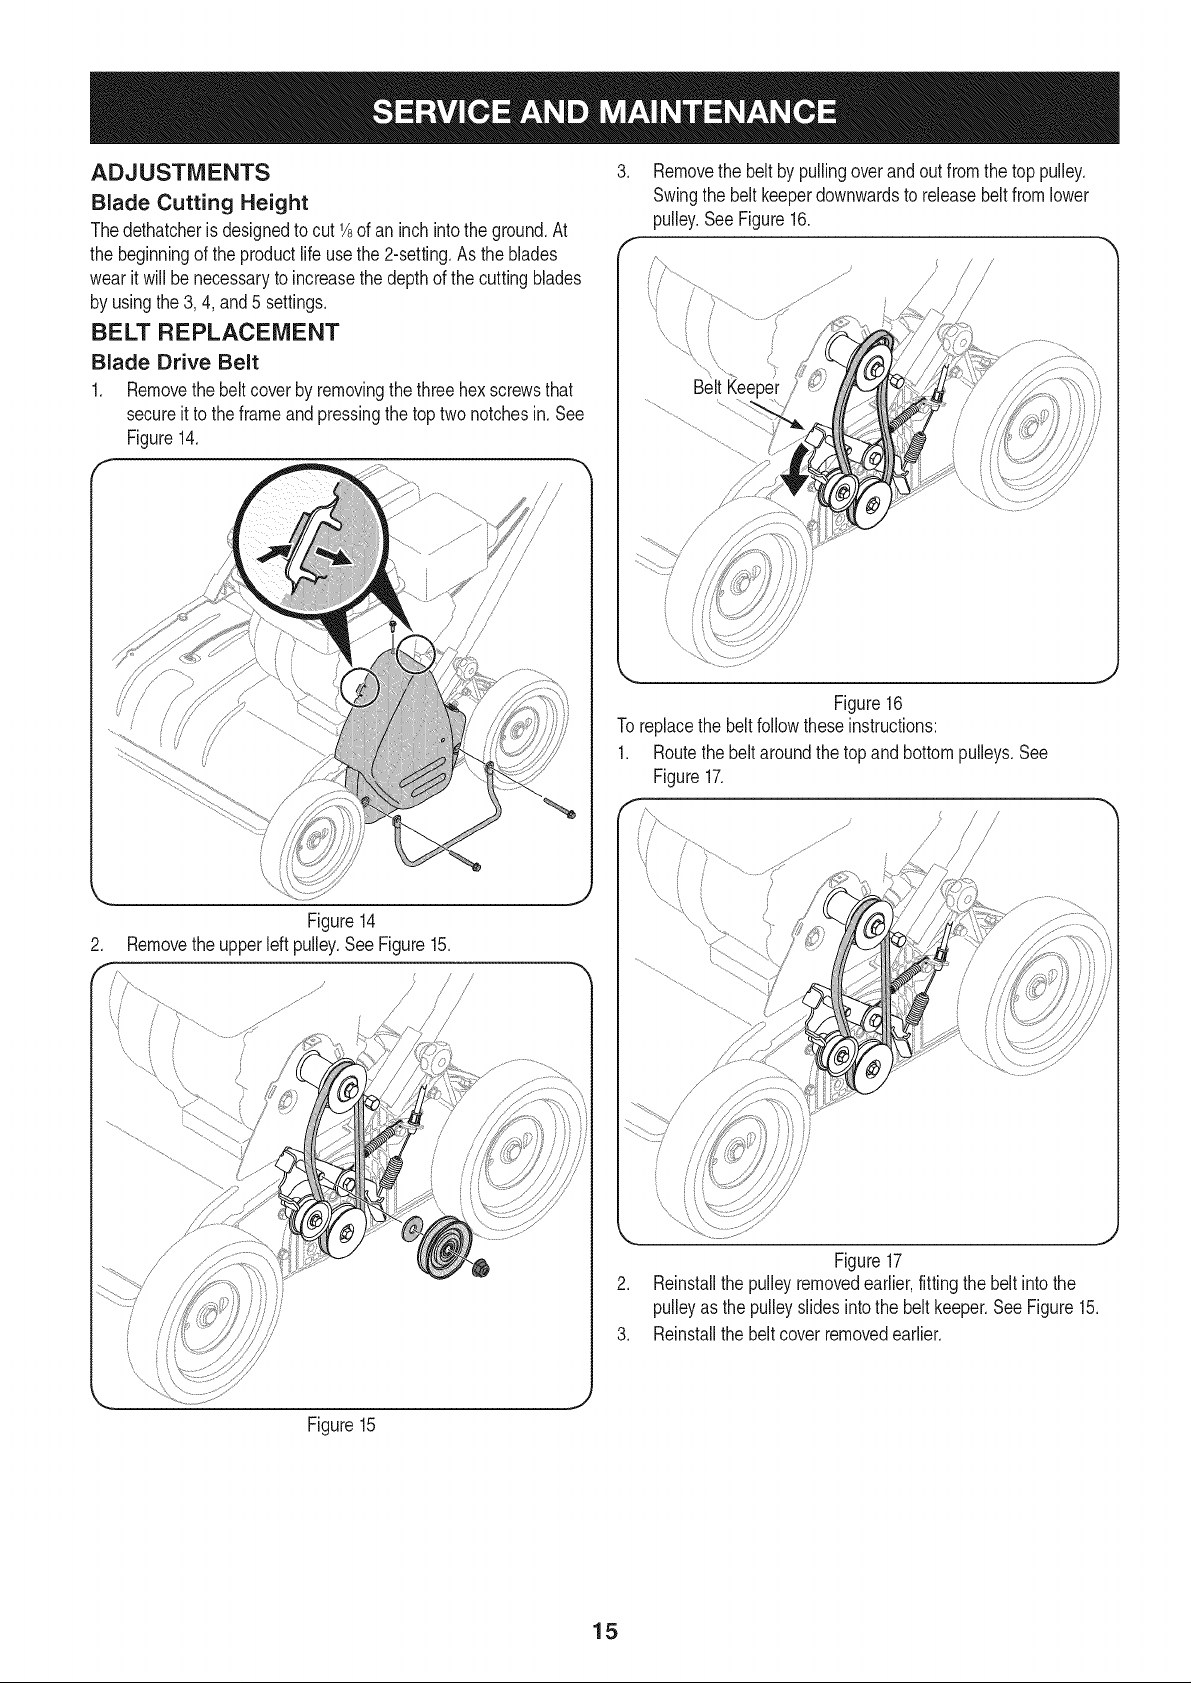
Blade Drive Belt
1. Removethebeltcoverbyremovingthethreehex screwsthat
secureittotheframeandpressingthetoptwonotchesin.See
Figure14.
.
Removethebeltbypullingoverandout fromthetoppulley.
Swingthe beltkeeperdownwardsto releasebeltfromlower
pulley.SeeFigure16.
/
/
\ /
i
BeltKeeper
Figure16
Toreplacethe beltfollowtheseinstructions:
1. Routethebeltaroundthetop andbottompulleys.See
Figure17.
Figure14
.
Removetheupperleftpulley.SeeFigure15.
Figure15
Figure17
2. Reinstallthepulleyremovedearlier,fittingthebeltinto the
pulleyas the pulleyslidesintothe belt keeper.SeeFigure15.
3. Reinstallthebeltcoverremovedearlier.
15
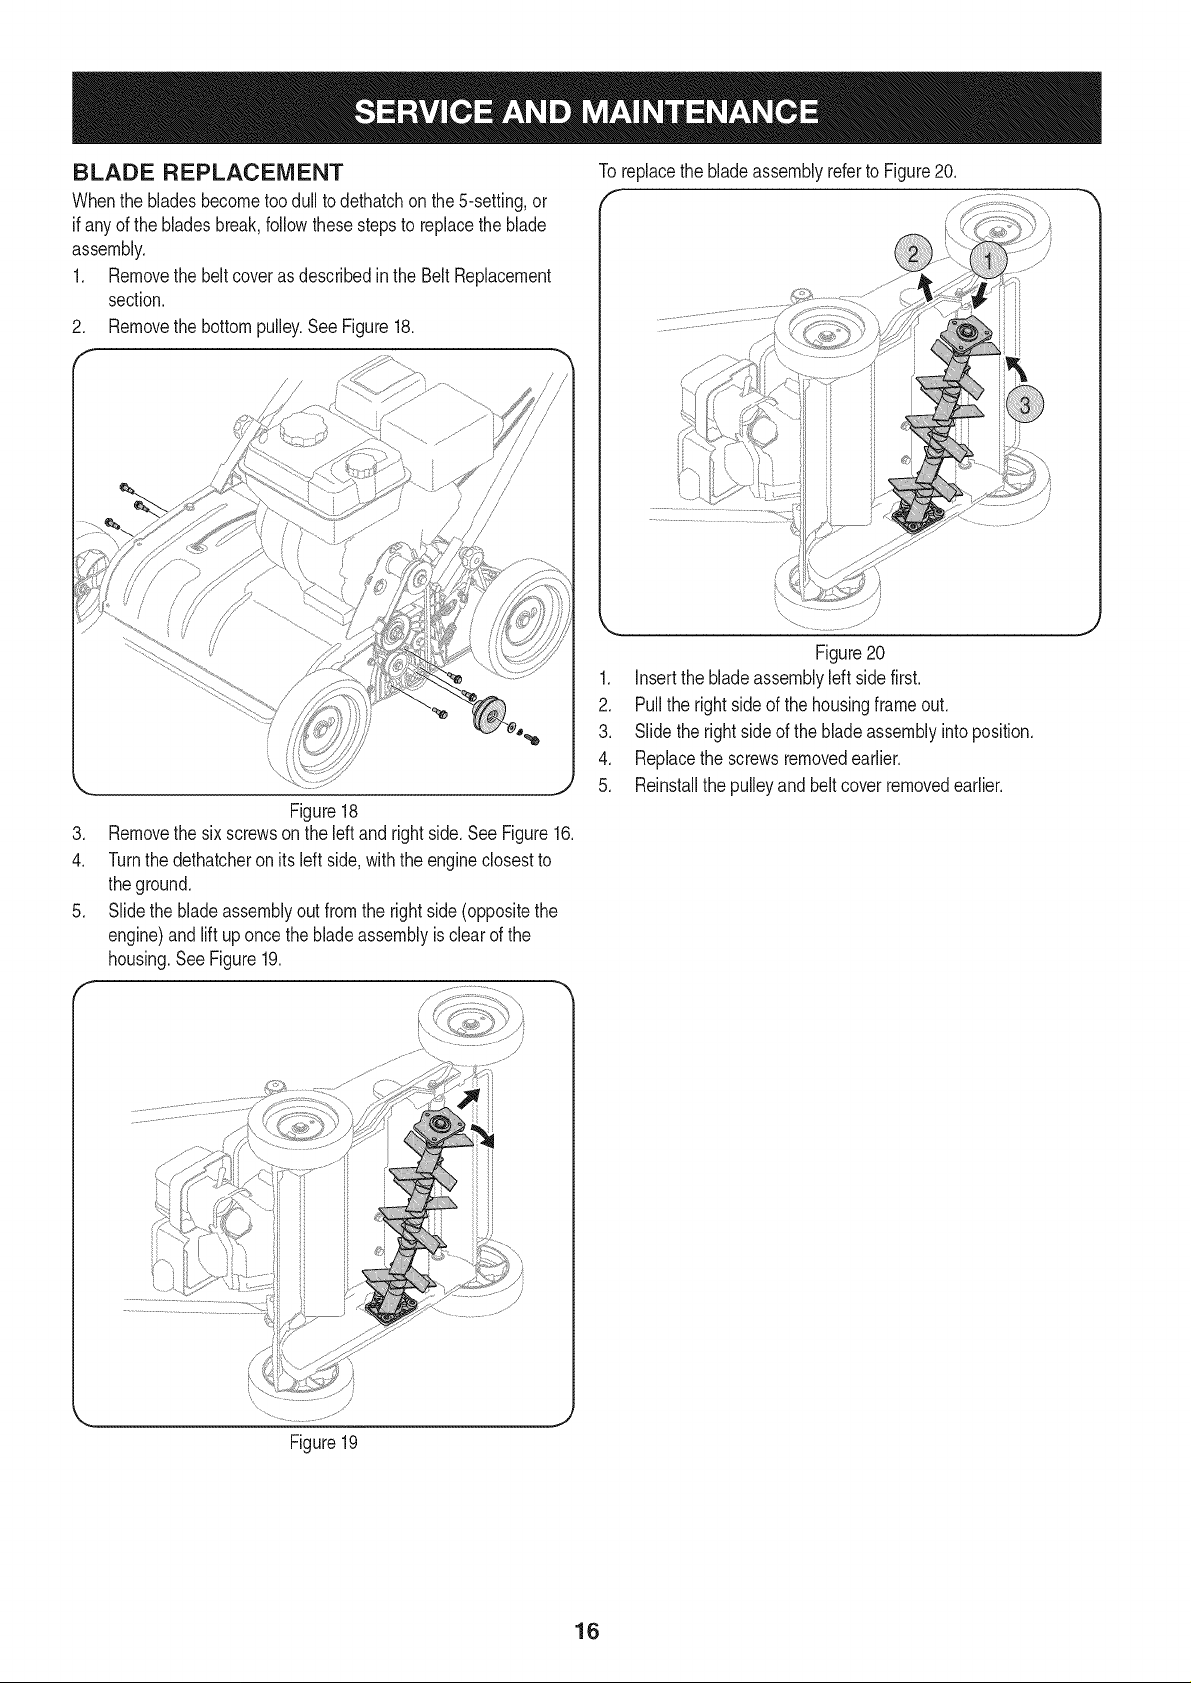
BLADE REPLACEMENT
Whenthe bladesbecometoodull todethatchonthe5-setting,or
ifanyofthebladesbreak,followthesestepsto replacetheblade
assembly.
1. Removethe beltcoverasdescribedintheBeltReplacement
section.
2. Removethe bottompulley.SeeFigure18.
Figure18
.
Removethe sixscrewsonthe leftand rightside.SeeFigure16.
4.
Turnthedethatcheron itsleftside,withtheengineclosestto
theground.
.
Slidethe bladeassemblyoutfromthe rightside(oppositethe
engine)andlift uponcethebladeassemblyisclearof the
housing.SeeFigure19.
Toreplacethebladeassemblyreferto Figure20.
Figure20
1. Insertthe bladeassemblyleftsidefirst.
2. Pulltherightsideofthehousingframeout.
3. Slidetherightsideof the bladeassemblyintoposition.
4. Replacethe screwsremovedearlier.
5. Reinstallthepulleyandbeltcoverremovedearlier.
Figure19
J
16
 Loading...