

Page 1
Operator's Manual
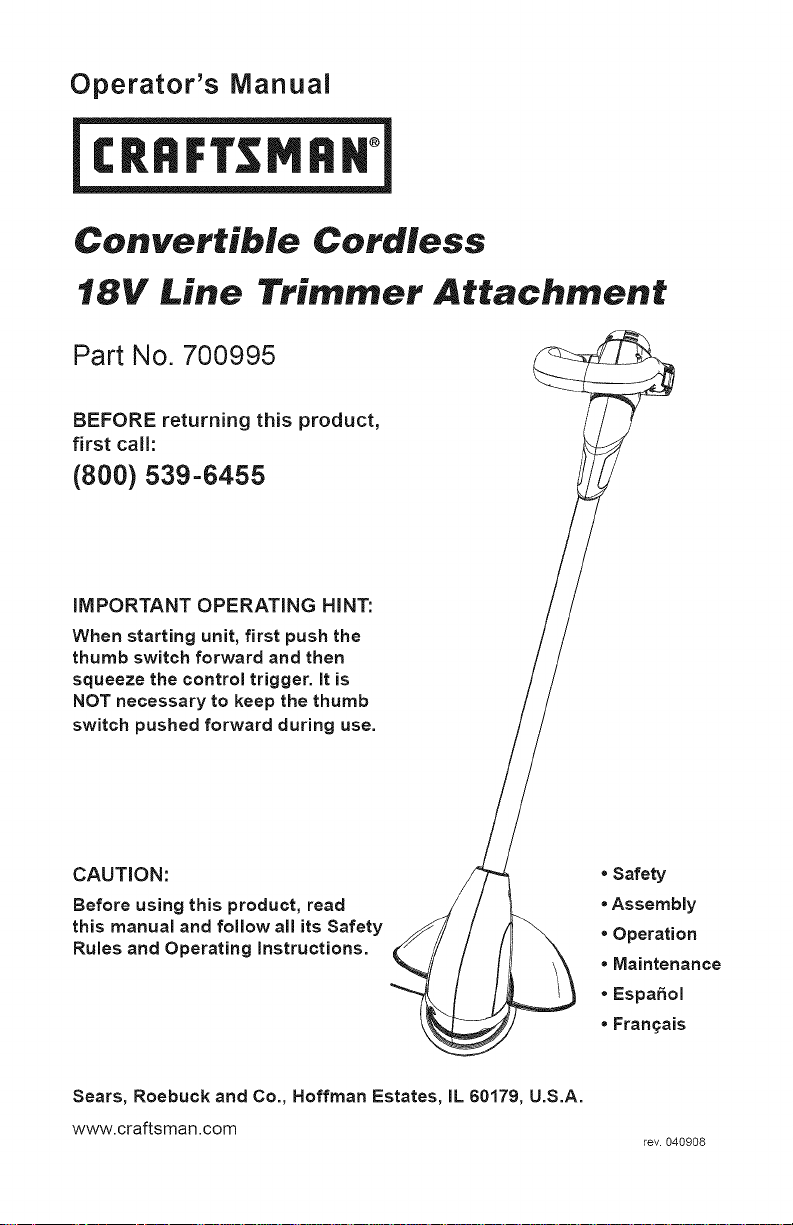
Convertible Cordless
18V Line Trimmer Attachment
Part No. 700995
BEFORE returning this product,
first call:
(800) 539-6455
IMPORTANT OPERATING HINT:
When starting unit, first push the
thumb switch forward and then
squeeze the control trigger. It is
NOT necessary to keep the thumb
switch pushed forward during use.
CAUTION:
Before using this product, read
this manual and follow all its Safety
Rules and Operating Instructions.
Sears, Roebuck and Co., Hoffman Estates, IL 60179, U.S.A.
www.craftsman.com
. Safety
. Assembly
. Operation
. Maintenance
. Espa_ol
. Fran£ais
rev. 040908
Page 2
Warranty ..................................................................................................... 2
Safety Instructions ..................................................................................... 2
Operation ................................................................................................... 4
Maintenance ............................................................................................. 10
Storage ..................................................................................................... 10
Accessories .............................................................................................. 10
Service ..................................................................................................... 10
Espa_ot .................................................................................................... 12
Fran(_ais.................................................................................................... 23
Craftsman One Year Full Warranty
If this Craftsman product fails due to manufacturer's defects within one
year from the date of purchase, return it to any Sears store or other
Craftsman outlet in the United States for free replacement.
This warranty applies for only 90 days if this product is ever used for
commercial or rental purposes.
This warranty does not include cutting line, which is an expendable part.
This warranty gives you specific legal rights, and you may also have other
rights which vary from state to state.
Sears, Roebuck and Co., Hoffman Estates, IL 60179
READ ALL INSTRUCTIONS
A = O
WARNING: Some dust created by
using power tools contains chemicals
known to the state of California to
cause cancer and birth defects or other
reproductive harm.
WARNING TO CALIFORNIA
RESIDENTS: Handling the cord on
this units (or cords with accessories
sold for this product) will expose you
to lead, a chemical known to the State
of California to cause cancer, and birth
defects or other reproductive harm.
Please wash hands after handling the
cord.
CRAFTSMAN CONVERTIBLE
CORDLESS 18V TOOL SYSTEM
This product is for use only with the
Craftsman Convertible Cordless 18V
Tool System. Do not use the tool
attachments with any other system
or power source, and do not use any
tool attachment on the power handle
that is not intended for use with this
system.
WARNING: When using this tool,
Page 3
basicsafetyprecautionsshouldalways
befollowedtoreducetheriskoffire,
electricshock,andpersonalinjury,
includingthefollowing:
Toreduceriskofinjury:
Beforeanyuse,besureeveryone
usingthiselectricproductreadsand
understandsallsafetyandoperation
instructionscontainedinthismanual.
SAVE THESE INSTRUCTIONS and
review frequently prior to use. Store in
wall charger slot.
AVOID DANGEROUS
ENVIRONMENTS and weather
conditions when using this tool.
DO NOT USE battery operated
appliance in the rain.
KEEP CHILDREN AWAY - All visitors
should be kept at a safe distance from
work area.
STORE IDLE UNIT INDOORS - When
not in use, the unit should be stored
indoors in a dry location - out of reach
of children.
DON'T FORCE THE TOOL - It will do
the job better and with tess likelihood
of a risk of injury at the rate for which it
was designed.
USE RIGHT TOOL - Do not use the
tool for any job except that for which it
is intended.
KEEP HANDS AND FEET away from
cutting area.
DRESS PROPERLY = Do not wear
loose clothing or jewelry. They can
be caught in moving parts. Use of
gloves and substantial footwear is
recommended when working out-
doors. Wear protective hair covering to
contain long hair.
DON'T OVERREACH - Maintain
proper footing and balance at all times.
Use both hands to operate unit safely.
USE SAFETY GLASSES - Always
wear proper eye protection, and use a
face or dust mask if operation is dusty.
MAINTAIN UNIT WITH CARE - Keep
the unit clean for best performance
and to reduce the risk of injury. Follow
instructions for service. Keep handles
dry, clean, and free from oil and
grease,
AVOID UNINTENTIONAL STARTING
- Don't carry the appliance while
holding the switch area. The unit is
shipped partly charged, and may start
inadvertently if not handled properly.
CHECK DAMAGED PARTS - If
any component of the appliance
experiences a hard impact, check that
no parts were damaged and verify that
the unit operates properly. Check for
misalignment or bending of moving
parts, breakage of parts, and any other
condition that may affect operation.
A part that is damaged should be
properly repaired or re-placed by an
authorized service center.
STAY ALERT - Watch what you are
doing. Use common sense. Do not
operate the tool when you are tired.
DON'T GRASP MOVING LINE of the
line trimmer. Do not attempt to remove
cut material or hold material to be cut
when the line is moving. Make sure the
unit's switch is off and the battery pack
is removed before clearing or changing
line.
ATTACH LINE GUARD - Before use,
attach the line guard correctly. See
instructions on how to attach line guard
in the operation section of the line
trimmer manual. Failure to attach the
line guard may pose a risk of injury,
may cause motor damage and wilt void
the warranty.
Store these instructions by folding in
half and sliding into the slot in the back
of the walt charging rack.
Page 4
SAVE THESE INSTRUCTIONS
e" - A •
CONNECTING TOOL ATTACHMENT
TO THE POWER HANDLE
Be sure to follow the following safety
precautions when attaching and
detaching tools from the power handle.
Remove the battery from the handle
before attaching or detaching tools.
Never touch the control switches on
the power handle when attaching and
detaching tools
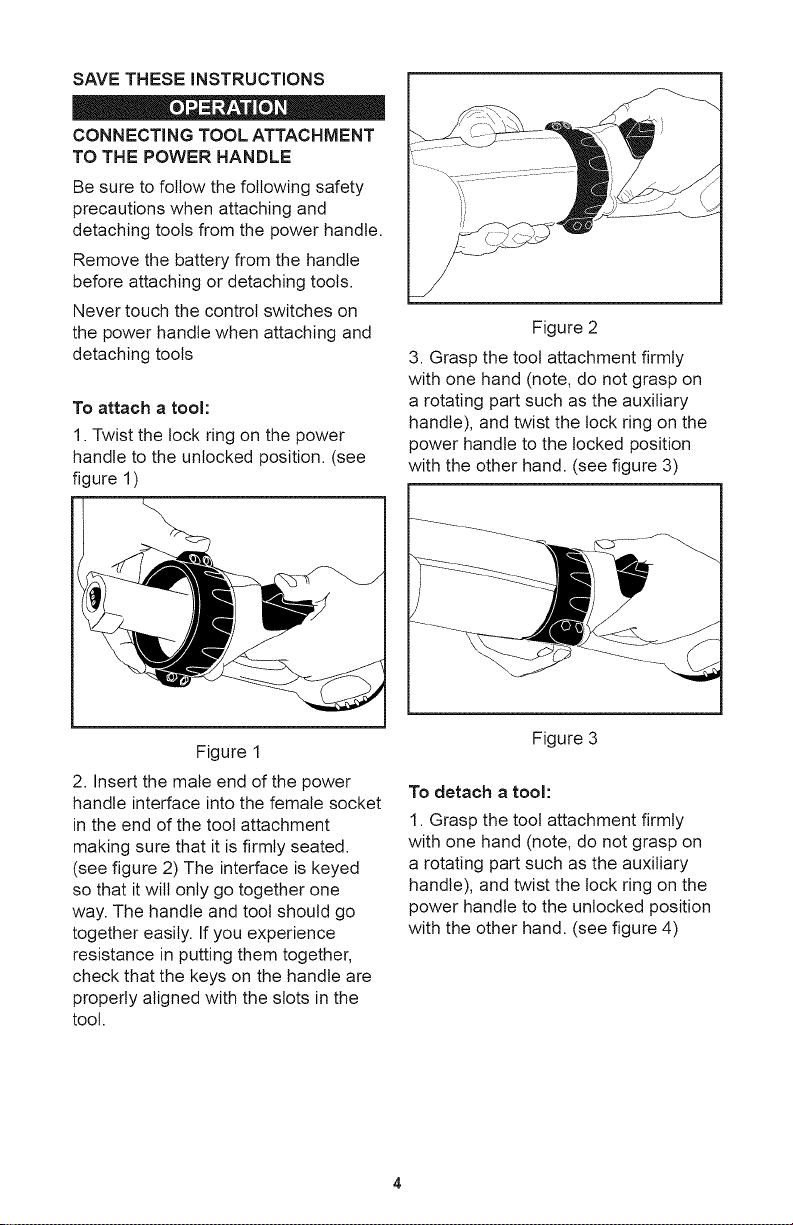
To attach a tool:
1. Twist the lock ring on the power
handle to the unlocked position. (see
figure 1)
Figure 2
3. Grasp the tool attachment firmly
with one hand (note, do not grasp on
a rotating part such as the auxiliary
handle), and twist the lock ring on the
power handle to the locked position
with the other hand. (see figure 3)
Figure 1
2. Insert the male end of the power
handle interface into the female socket
in the end of the tool attachment
making sure that it is firmly seated.
(see figure 2) The interface is keyed
so that it will only go together one
way. The handle and tool should go
together easily. If you experience
resistance in putting them together,
check that the keys on the handle are
properly aligned with the slots in the
tool.
Figure 3
To detach a tool:
1. Grasp the tool attachment firmly
with one hand (note, do not grasp on
a rotating part such as the auxiliary
handle), and twist the lock ring on the
power handle to the unlocked position
with the other hand. (see figure 4)
Page 5
0
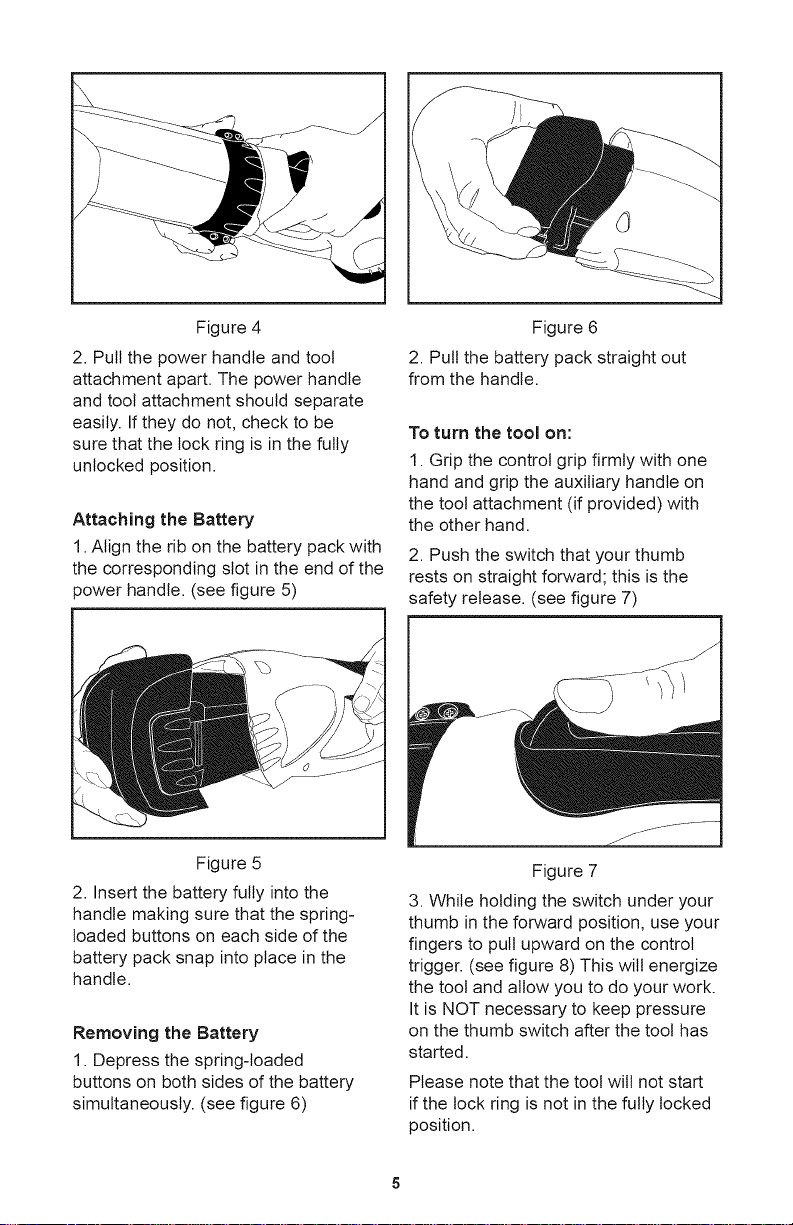
Figure4
2.Pullthepowerhandleandtool
attachmentapart.Thepowerhandle
andtoolattachmentshouldseparate
easily.Iftheydonot,checktobe
surethatthelockringisinthefully
unlockedposition.
AttachingtheBattery
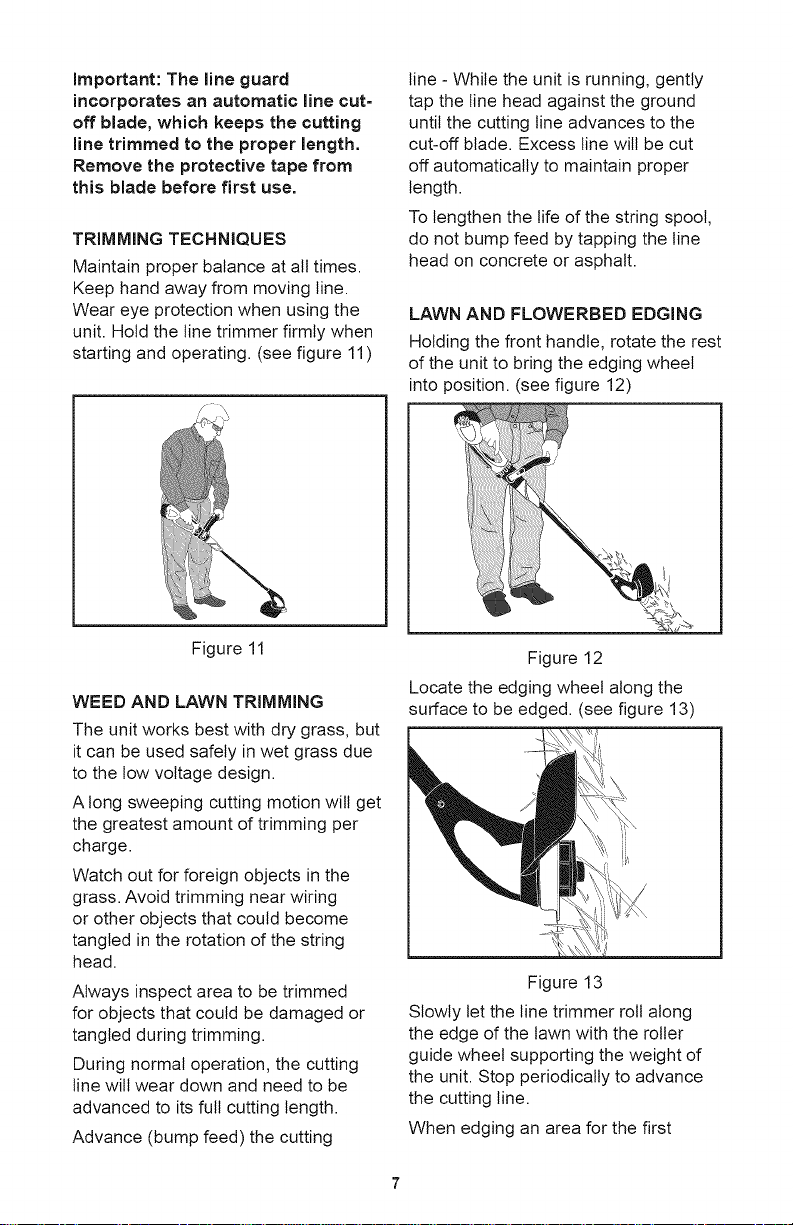
1.Aligntheribonthebatterypackwith
thecorrespondingslotintheendofthe
powerhandle.(seefigure5)
I
Figure 5
2. Insert the battery fully into the
handle making sure that the spring-
loaded buttons on each side of the
battery pack snap into place in the
handle.
Removing the Battery
1. Depress the spring-loaded
buttons on both sides of the battery
simultaneously. (see figure 6)
Figure 6
2. Pull the battery pack straight out
from the handle.
To turn the tool on:
1. Grip the control grip firmly with one
hand and grip the auxiliary handle on
the tool attachment (if provided) with
the other hand.
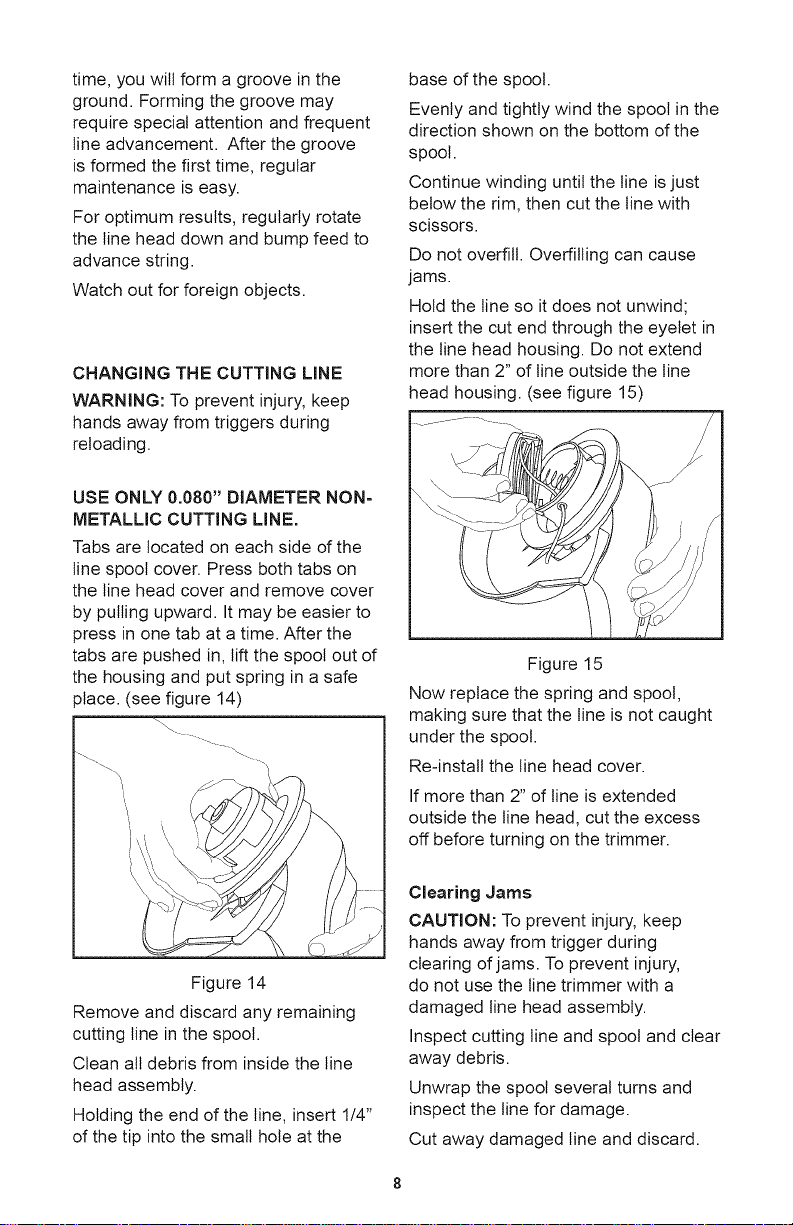
2. Push the switch that your thumb
rests on straight forward; this is the
safety release. (see figure 7)
Figure 7
3. While holding the switch under your
thumb in the forward position, use your
fingers to pull upward on the control
trigger. (see figure 8) This will energize
the tool and allow you to do your work.
It is NOT necessary to keep pressure
on the thumb switch after the tool has
started.
Please note that the tool will not start
if the lock ring is not in the fully locked
position.
Page 6
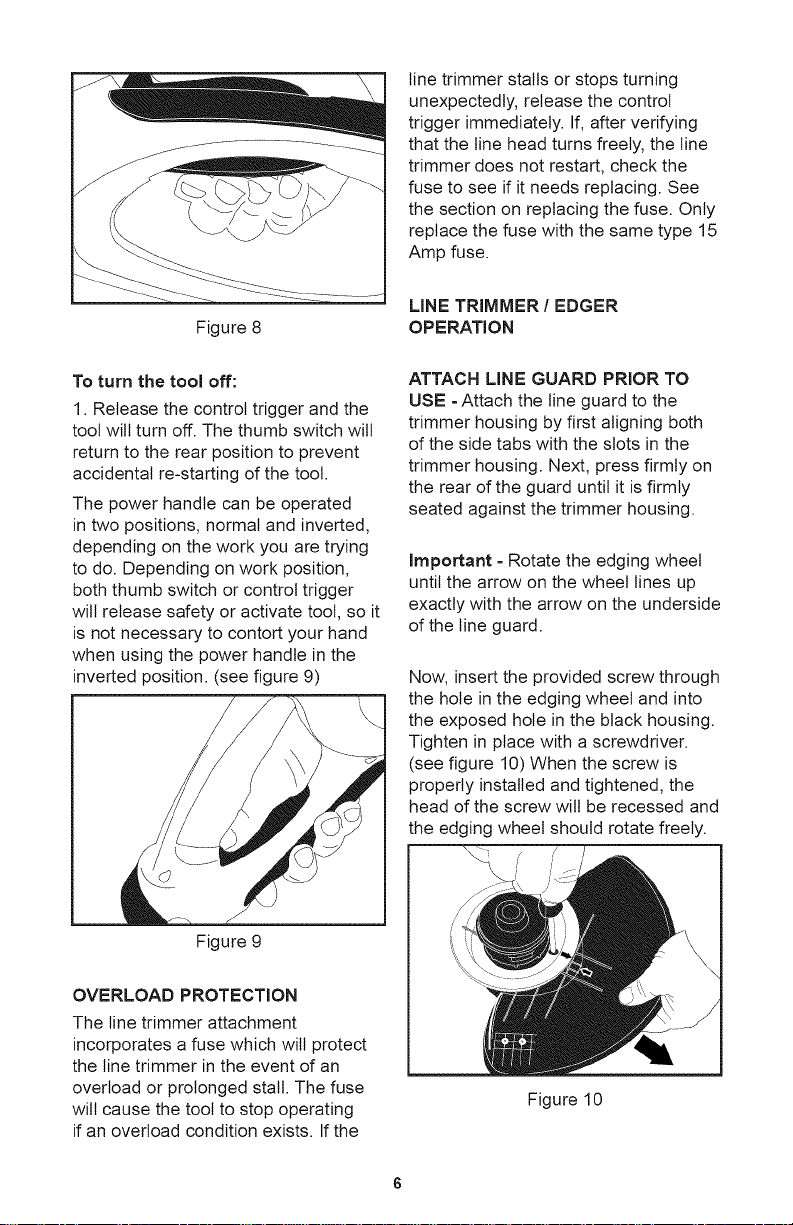
Figure8
line trimmer stalls or stops turning
unexpectedly, release the control
trigger immediately. If, after verifying
that the line head turns freely, the line
trimmer does not restart, check the
fuse to see if it needs replacing. See
the section on replacing the fuse. Only
replace the fuse with the same type 15
Amp fuse.
LINE TRIMMER/EDGER
OPERATION
To turn the tool off:
1. Release the control trigger and the
tool will turn off. The thumb switch wilt
return to the rear position to prevent
accidental re-starting of the tool.
The power handle can be operated
in two positions, normal and inverted,
depending on the work you are trying
to do. Depending on work position,
both thumb switch or control trigger
wilt release safety or activate tool, so it
is not necessary to contort your hand
when using the power handle in the
inverted position. (see figure 9)
Figure 9
ATTACH LINE GUARD PRIOR TO
USE - Attach the line guard to the
trimmer housing by first aligning both
of the side tabs with the slots in the
trimmer housing. Next, press firmly on
the rear of the guard until it is firmly
seated against the trimmer housing.
Important - Rotate the edging wheel
until the arrow on the wheel lines up
exactly with the arrow on the underside
of the line guard.
Now, insert the provided screw through
the hole in the edging wheel and into
the exposed hole in the black housing.
Tighten in place with a screwdriver.
(see figure 10) When the screw is
properly installed and tightened, the
head of the screw will be recessed and
the edging wheel should rotate freely.
OVERLOAD PROTECTION
The line trimmer attachment
incorporates a fuse which will protect
the line trimmer in the event of an
overload or prolonged stall. The fuse
will cause the tool to stop operating
if an overload condition exists. If the
Figure 10
Page 7
Important:The line guard
incorporates an automatic line cut-
off blade, which keeps the cutting
line trimmed to the proper length.
Remove the protective tape from
this blade before first use.
TRIMMING TECHNIQUES
Maintain proper balance at all times.
Keep hand away from moving line.
Wear eye protection when using the
unit. Hold the line trimmer firmly when
starting and operating. (see figure 11)
line - While the unit is running, gently
tap the line head against the ground
until the cutting line advances to the
cut-off blade. Excess line will be cut
off automatically to maintain proper
length.
To lengthen the life of the string spool,
do not bump feed by tapping the line
head on concrete or asphalt.
LAWN AND FLOWERBED EDGING
Holding the front handle, rotate the rest
of the unit to bring the edging wheel
into position. (see figure 12)
Figure 11
WEED AND LAWN TRIMMING
The unit works best with dry grass, but
it can be used safely in wet grass due
to the tow voltage design.
A long sweeping cutting motion will get
the greatest amount of trimming per
charge.
Watch out for foreign objects in the
grass. Avoid trimming near wiring
or other objects that could become
tangled in the rotation of the string
head.
Always inspect area to be trimmed
for objects that could be damaged or
tangled during trimming.
During normal operation, the cutting
line wilt wear down and need to be
advanced to its full cutting length.
Advance (bump feed) the cutting
Figure 12
Locate the edging wheel along the
surface to be edged. (see figure 13)
Figure 13
Slowly let the line trimmer roll along
the edge of the lawn with the roller
guide wheel supporting the weight of
the unit. Stop periodically to advance
the cutting line.
When edging an area for the first
Page 8
time,youwillformagrooveinthe
ground.Formingthegroovemay
requirespecialattentionandfrequent
lineadvancement.Afterthegroove
isformedthefirsttime,regular
maintenanceiseasy.
Foroptimumresults,regularlyrotate
thelineheaddownandbumpfeedto
advancestring.
Watchoutforforeignobjects.
CHANGINGTHECUTTINGLINE
WARNING:Topreventinjury,keep
handsawayfromtriggersduring
reloading.
USEONLY0.080" DIAMETER NON=
METALLIC CUTTING LINE.
Tabs are located on each side of the
line spool cover. Press both tabs on
the line head cover and remove cover
by pulling upward. It may be easier to
press in one tab at a time. After the
tabs are pushed in, lift the spool out of
the housing and put spring in a safe
place. (see figure 14)
baseofthespool.
Evenlyandtightlywindthespoolinthe
directionshownonthebottomofthe
spool.
Continuewindinguntilthelineisjust
belowtherim,thencutthelinewith
scissors.
Donotoverfill.Overfillingcancause
jams.
Holdthelinesoitdoesnotunwind;
insertthecutendthroughtheeyeletin
thelineheadhousing.Donotextend
morethan2"oflineoutsidetheline
headhousing.(seefigure15)
Figure 15
Now replace the spring and spool,
making sure that the line is not caught
under the spool.
Re-install the line head cover.
If more than 2" of line is extended
outside the line head, cut the excess
off before turning on the trimmer.
Figure 14
Remove and discard any remaining
cutting line in the spool.
Clean all debris from inside the line
head assembly.
Holding the end of the line, insert 1/4"
of the tip into the small hole at the
Clearing Jams
CAUTION: To prevent injury, keep
hands away from trigger during
clearing of jams. To prevent injury,
do not use the line trimmer with a
damaged line head assembly.
Inspect cutting line and spool and clear
away debris.
Unwrap the spool several turns and
inspect the line for damage.
Cut away damaged line and discard.
Page 9
Inspectthelineheadassemblyfor
cracksordamage.
Whilegentlypullingonthecuttingline,
pressthespool(bumphead)untilthe
linereleases.Ifthejamiscleared,the
spoolshouldspinfreeashortdistance
andthelinewilladvance.
Iftheunitcontinuestojamorwill
notspinfreely,call800-539-6455.
Failuretostoptheunitwhenthe
lineisjammedwiltcauseexcessive
batterydrainageandshortenmotorlife
(overheating).
FuseReplacement
Toreplacethefuse,youmust
firstremovethelineguardfrom
thetrimmer.Turnthelinetrimmer
attachmentupsidedown.Alignthe
arrowontheedgingwheelwiththe
arrowonthelineguard.Removethe
screwthatisexposedintheholein
theedgingwheelwithastandard
screwdriver.Removetheguardby
pullingawayfromthetrimmerhousing.
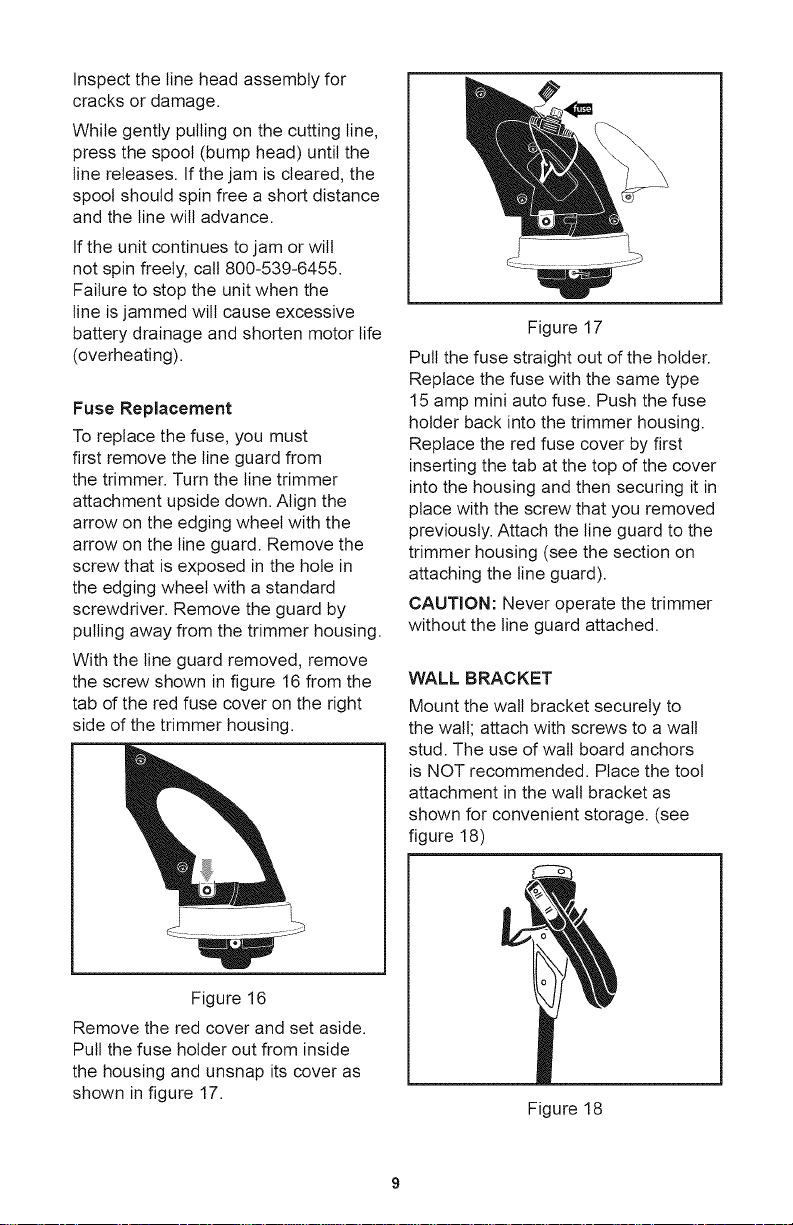
Withthelineguardremoved,remove
thescrewshowninfigure16fromthe
taboftheredfusecoverontheright
sideofthetrimmerhousing.
Figure17
Pullthefusestraightoutoftheholder.
Replacethefusewiththesametype
15ampminiautofuse.Pushthefuse
holderbackintothetrimmerhousing.
Replacetheredfusecoverbyfirst
insertingthetabatthetopofthecover
intothehousingandthensecuringitin
placewiththescrewthatyouremoved
previously.Attachthelineguardtothe
trimmerhousing(seethesectionon
attachingthelineguard).
CAUTION:Neveroperatethetrimmer
withoutthelineguardattached.
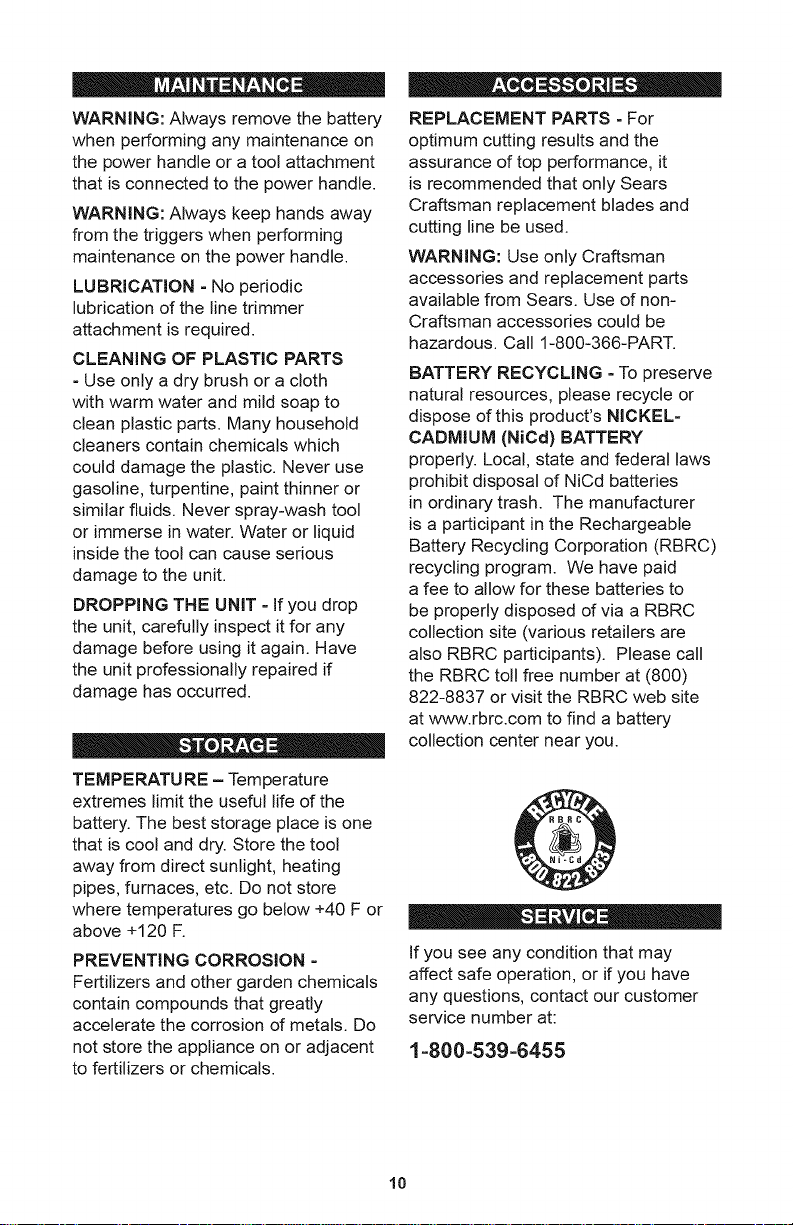
WALLBRACKET
Mountthewallbracketsecurelyto
thewall;attachwithscrewstoawall
stud.Theuseofwallboardanchors
isNOTrecommended.Placethetool
attachmentinthewaltbracketas
shownforconvenientstorage.(see
figure18)
Figure16
Removetheredcoverandsetaside.
Pullthefuseholderoutfrominside
thehousingandunsnapitscoveras
showninfigure17.
Figure18
Page 10
A A
WARNING: Always remove the battery
when performing any maintenance on
the power handle or a tool attachment
that is connected to the power handle.
WARNING: Always keep hands away
from the triggers when performing
maintenance on the power handle.
LUBRICATION - No periodic
lubrication of the line trimmer
attachment is required.
CLEANING OF PLASTIC PARTS
=Use only a dry brush or a cloth
with warm water and mild soap to
clean plastic parts. Many household
cleaners contain chemicals which
could damage the plastic. Never use
gasoline, turpentine, paint thinner or
similar fluids. Never spray-wash tool
or immerse in water. Water or liquid
inside the tool can cause serious
damage to the unit.
DROPPING THE UNiT - If you drop
the unit, carefully inspect it for any
damage before using it again. Have
the unit professionally repaired if
damage has occurred.
• = A
TEMPERATURE = Temperature
extremes limit the useful life of the
battery. The best storage place is one
that is cool and dry. Store the tool
away from direct sunlight, heating
pipes, furnaces, etc. Do not store
where temperatures go below +40 F or
above +120 F.
PREVENTING CORROSION =
Fertilizers and other garden chemicals
contain compounds that greatly
accelerate the corrosion of metals. Do
not store the appliance on or adjacent
to fertilizers or chemicals.
e =
REPLACEMENT PARTS - For
optimum cutting results and the
assurance of top performance, it
is recommended that only Sears
Craftsman replacement blades and
cutting line be used.
WARNING: Use only Craftsman
accessories and replacement parts
available from Sears. Use of non-
Craftsman accessories could be
hazardous. Call 1-800-366-PART.
BATTERY RECYCLING =To preserve
natural resources, please recycle or
dispose of this product's NICKEL-
CADMIUM (NiCd) BATTERY
properly. Local, state and federal laws
prohibit disposal of NiCd batteries
in ordinary trash. The manufacturer
is a participant in the Rechargeable
Battery Recycling Corporation (RBRC)
recycling program. We have paid
a fee to allow for these batteries to
be properly disposed of via a RBRC
collection site (various retailers are
also RBRC participants). Please call
the RBRC toll free number at (800)
822-8837 or visit the RBRC web site
at www.rbrc.com to find a battery
collection center near you.
If you see any condition that may
affect safe operation, or if you have
any questions, contact our customer
service number at:
1-800=539=6455
10
Page 11

_l£H_ql £nd the answeY and a more on managemyhomeo¢om - for free!
- Find this and a[[ your other product manua[s on[me.
- 6et answers from our team of home experts.
- 6et a persona[ized maintenance plan for your home.
- Find information and too[s to he[p with home projects.
manage home
bre_lght to :yeuby Sears
ii
Page 12

Garantia ................................................................................................... 12
Instrucciones de seguridad ...................................................................... 12
Operaci6n ................................................................................................. 14
Mantenimiento .......................................................................................... 20
Atmacenamiento ...................................................................................... 21
Accesorios ................................................................................................ 21
Servicio .................................................................................................... 21
Espa_ot .................................................................................................... 12
Fran£;ais .................................................................................................... 23
Garantia de un a_o de Craftsman
Si este producto Craftsman falla debido a un defecto de fabrica dentro
del aSo de la fecha de compra, devuelvalo a cualquier tienda Sears u
otro centro de ventas de Craftsman en los Estados Unidos para que 1o
reemplacen sin cargo.
Si este producto se utitiza para prop6sitos comerciales o para su alquiter,
esta garantia se aplicara s61o por 90 dias.
Esta garantia te otorga derechos tegates especificos y usted tambien
puede tener otros derechos dependiendo det estado donde reside.
Sears, Roebuck and Co., Hoffman Estates, IL 60179
LEA TODAS LAS INSTRUCClONES
ADVERTENClA: Et polvo generado
por et uso de herramientas mecanicas
contiene sustancias quimicas
queen et Estado de California se
conocen como causantes de cancer y
defectos de nacimiento u otros da_os
reproductivos.
ADVERTENClA PARA LOS
RESIDENTES DE CALIFORNIA: AI
manipular et cable de estos productos
(o los cables con accesorios que se
venden para este producto), quedara
expuesto al plomo, una sustancia
quimica queen el Estado de California
se conoce como causante de cancer y
defectos de nacimiento u otros daSos
reproductivos. Lavese tas manos
despues de manipular et cable.
SISTEMA DE HERRAMIENTAS
DE 18 VOLTIOS CRAFTSMAN
CONVERTIBLE CORDLESS
Este producto es para usar s61o con
et sistema de 18 voltios Craftsman
Convertible Cordless. No utitice los
accesorios de las herramientas con
ningQn otro sistema ni fuente de
12
Page 13

alimentaci6n ni los utitice en un mango
de potencia que no este dise_ado
para et uso con este sistema.
ADVERTENClA: Cuando use esta
herramienta, se deben seguir tas
precauciones basicas de seguridad
para reducir et riesgo de incendios,
descargas etectricas y tesiones
personales, entre las que se incluyen
las siguientes.
Para reducir el riesgo de lesiones:
Antes de usar la herramienta,
asegOrese de que todas las
personas que usaran este producto
etectrico lean y entiendan todas las
instrucciones de seguridad y de uso
que contiene este manual.
GUARDE ESTAS INSTRUCClONES y
revisetas con frecuencia antes de usar
la herramienta. Guardela en la ranura
det cargador de pared.
EVlTE LAS CONDIClONES
CLIMATICAS y los ambientes
petigrosos cuando use esta
herramienta.
NO UTILICE et aparato a baterias bajo
la ltuvia.
MANTENGA ALEJADOS A LOS
NINOS: Todos los visitantes deben
mantenerse a una distancia segura det
area de trabajo.
GUARDE LA UNIDAD INACTIVA
BAJO TECHO: Cuando la unidad
no esta en uso, debe permanecer
guardada bajo techo en un tugar seco,
y tejos det alcance de los niSos.
NO FUERCE LA HERRAMIENTA:
Funcionara mejor y habra menos
posibitidades de riesgo de lesiones si
funciona a la velocidad para la que fue
diseSada.
USE LA HERRAMIENTA
ADECUADA: No use ta herramienta
para otras tareas que no sean aquettas
para las que fue diseSada.
MANTENGA LAS MANOS Y LOS
PIES alejados det area de corte.
USE LA VESTIMENTA ADECUADA:
No use ropa suetta ni joyas porque
pueden quedar atrapadas en piezas
m6vites. Cuando se trabaja en
exteriores, se recomienda et uso de
guantes y de calzado resistente. Use
un cobertor protector det cabetto para
sostener et cabelto largo.
NO SE ACERQUE DEMASIADO:
Mantengase bien parado y con
equitibrio en todo momento. Use
ambas manos para manejar la unidad
de manera segura.
USE ANTEOJOS DE SEGURIDAD:
Use siempre protecci6n para los ojos
y una mascara para et rostro o una
mascara contra et polvo si opera
herramientas que producen polvo.
MANTENGA LA UNIDAD
ADECUADAMENTE: Conserve la
unidad limpia para que funcione
mejor y para reducir el riesgo de
lesiones. Siga tas instrucciones de
mantenimiento. Conserve los mangos
secos, timpios y libres de aceite y
grasa.
ARRANQUE NO INTENCIONAL: No
sostenga et aparato desde et area det
interruptor cuando 1otransporta. La
unidad se envia parcialmente cargada
y puede arrancar desprevenidamente
si no se manipula correctamente.
CONTROLE QUE NO HAYA PIEZAS
DANADAS: Si cualquier componente
det aparato sufre un impacto fuerte,
revise que no se hayan daSado piezas
y verifique que la unidad funcione
correctamente. Revise que no haya
piezas m6vites mat alineadas o
dobtadas, que no se hayan quebrado
piezas y que no exista ningOn otro
problema que pueda afectar et
funcionamiento det producto. Toda
pieza daSada debe set reparada o
13
Page 14

reemptazada debidamente pot un
centro de servicio tecnico autorizado.
EST¢: ALERTA: Preste atenci6n a
1oque esta haciendo. Use et sentido
com0n. No use la herramienta siesta
cansado.
NO AGARRE LA TANZA MOVlL de
la bordeadora con tanza. No intente
retirar et material de corte ni sostener
et material que se cortara cuando la
tanza este en movimiento. Aseg0rese
de que et interruptor de la unidad este
apagado y de quitar et paquete de
bateria antes de limpiar o cambiar la
tanza.
CONECTE EL PROTECTOR DE LA
TANZA: Antes de usar, conecte et
protector de ta tanza correctamente.
Consulte tas instrucciones para saber
c6mo conectar el protector de la tanza
en la secci6n operaci6n det manual
de la bordeadora con tanza. La
conexi6n incorrecta del protector de la
tanza puede representar un riesgo de
lesiones, puede provocar da_os en et
motor y anulara ta garantia.
Guarde estas instrucciones
dobtandolas por la mitad y
deslizandolas pot la ranura que esta
en ta parte trasera det soporte det
cargador de pared.
Para conectar una herramienta:
1. Gire et aro de seguridad en el
mango de potencia hasta ta posici6n
de desbloqueo. (vet figura 1)
Figura 1
2. Inserte et extremo macho de
la interfaz det mango de potencia
en et enchufe hembra que esta
en et extremo det accesorio de ta
herramienta y verifique que este
asentado firmemente. (vet figura 2).
La interfaz esta acu_ada para que
s61oencaje de un modo. Et mango y la
herramienta deben encajar facitmente.
Si tiene problemas para ensambtarlas,
verifique que los pasadores det mango
esten alineados correctamente con las
ranuras de la herramienta.
GUARDE ESTAS INSTRUCClONES
CONEXION DEL ACCESORIO DE
LA HERRAMIENTA AL MANGO DE
POTENClA
AsegQrese de seguir tas siguientes
precauciones de seguridad cuando
conecte y desconecte tas herramientas
det mango de potencia.
Retire la bateria det mango antes de
conectar o desconectar herramientas.
Nunca toque los interruptores de
control en et mango de potencia
cuando conecte y desconecte
herramientas.
Figura 2
3. Agarre et accesorio de ta
herramienta firmemente con una mano
(no lo agarre de una parte giratoria
como et mango auxitiar) y gire et aro
de seguridad que esta en et mango de
potencia hasta ta posici6n de btoqueo
con la otra mano. (vet figura 3)
14
Page 15

Figura 3
Para desconectar una herramienta:
1. Agarre el accesorio de la
herramienta firmemente con una mano
(no lo agarre de una parte giratoria
como et mango auxitiar) y gire et aro
de seguridad que esta en et mango
de potencia hasta ta posici6n de
desbloqueo con la otra mano. (vet
figura 4)
(verfigura5)
Figura 5
2. Inserte la bateria completamente en
et mango y verifique que los botones
con resortes de cada tado det paquete
de bateria encajen a presi6n en su
lugar en et mango.
RetJrar la bateria
1. Presione los botones con resorte
en ambos lados de la bateria
simultaneamente. (vet figura 6)
Figura 4
2. Desconecte et mango de potencia
y et accesorio de ta herramienta. Et
mango de potencia y el accesorio
de la herramienta se deben separar
facitmente. Si no es asi, controle
que et aro de seguridad este
completamente en la posici6n de
desbloqueo.
Conectar la bateria
1. Alinee el reborde det paquete de
bateria con la ranura correspondiente
en et extremo det mango de potencia.
Figura 6
2. Retire et paquete de la bateria
directamente det mango.
Para eneender la herramienta:
1. Agarre ta empu_adura de control
firmemente con una mano y agarre
et mango auxitiar det accesorio de la
herramienta (si viene incluido) con la
otra mano.
2. Empuje et gatitlo sobre et que tiene
apoyado et pulgar hacia adetante. Fi:ste
15
Page 16

es et disparador de seguridad. (vet
figura 7)
Figura 7
3. Mientras sostiene el interruptor
debajo det putgar en ta posici6n
detantera, use los dedos para levantar
et otto gatitto. (vet figura 8). Esto
activara la herramienta y te permitira
hacer su trabajo. NO es necesario
seguir presionando et gatitto con et
pulgar despues de que arranc6 la
herramienta.
Tenga en cuenta que la herramienta
no arrancara si el aro de seguridad no
esta completamente en la posici6n de
bloqueo.
Figura 8
Para apagar la herramienta:
1. Suette et gatitlo que presiona con
los dedos y la herramienta se apagara.
Et gatitto debajo det pulgar volvera
a la posici6n hacia atras para evitar
que la herramienta vuetva a arrancar
accidentalmente.
Et mango de potencia se puede operar
en dos posiciones, normal e inversa,
dependiendo det trabajo que desea
hacer. Ambos gatitlos se accionaran
como disparadores de seguridad e
interruptores de activaci6n, por 1oque
no es necesario torcer la mano cuando
se usa et mango de potencia en la
posici6n inversa. (vet figura 9)
Figura 9
PROTECClON CONTRA
SOBRECARGA
Et accesorio bordeadora con tanza
incorpora un fusible que protegera el
aparato en et caso de sobrecarga o
parada prolongada. Etfusible detiene
et funcionamiento de ta herramienta si
existe una condici6n de sobrecarga. Si
la bordeadora con tanza se detiene o
deja de girar imprevistamente, suette
de inmediato et gatillo de control. Si
despues de verificar que et cabezal de
la tanza gira tibremente, la bordeadora
con tanza no vuetve a arrancar,
controle et fusible para vet si necesita
reemplazo. Consulte la secci6n
sobre c6mo reemplazar et fusible.
Reemplace et fusible s6to con et
mismo tipo de fusible de 15 amperios.
16
Page 17

OPERAClON DE BORDEADORA apropiada. Retire ta cinta protectora de
CON TANZA/RECORTADORA esta hoja antes det primer uso.
CONECTE EL PROTECTOR DE LA
TANZA ANTES DE USAR: Conecte
et protector de ta tanza al alojamiento
de la bordeadora alineando primero
ambas lengQetas taterales con tas
ranuras que estan en et alojamiento
de la bordeadora. Luego, presione
firmemente la parte trasera det
protector hasta que este firmemente
asentado contra et alojamiento de la
bordeadora.
Importante: Gire la rueda de
bordeado basra que la flecha de la
rueda se alinee exactamente con la
flecha que esta debajo del protector
de la tanza.
Ahora, inserte et tornitto provisto a
traves del orificio que este en la rueda
de bordeado y adentro del orificio
expuesto en el alojamiento trasero.
Ajuste hasta que quede en su lugar
con un destornitlador. (ver figura 10).
Cuando et tornitlo este correctamente
instalado y ajustado, ta cabeza det
tomitlo entrara en et hueco y la rueda
de bordeado girara libremente.
\
Figura 10
Importante: Et protector de tanza
incorpora una hoja de corte de tanza
automatico, 1oque mantiene la tanza
de corte recortada a una longitud
TI_CNICAS DE PODA
Mantenga et equitibrio apropiado en
todo momento. Mantenga las manos
alejadas de la tanza en movimiento.
Use protecci6n para los ojos cuando
use ta unidad. Sostenga la bordeadora
con tanza firmemente cuando
comience y cuando la opere. (ver
figura 11)
Figura 11
DESMALEZAR Y CORTAR EL
C_:SPED
La unidad funciona mejor con cesped
seco pero se puede usar en forma
segura en cesped hQmedo gracias al
diseSo de bajo voltaje.
Si aplica un movimiento de corte con
barrido extendido obtendra la mayor
cantidad de poda por carga.
Tenga cuidado con los objetos
extraSos que estan en el cesped. Evite
cortar cerca de cabteados o de otros
objetos que se pueden enredar en la
rotaci6n det cabezal de ta cuerda.
Inspeccione siempre el area que
cortara para detectar objetos que
podrian da_arse o enredarse durante
et corte.
Durante et funcionamiento normal, ta
tanza de corte se gastara y debera
avanzar hasta su longitud de corte
completa.
17
Page 18

Avanzar (impulso pot golpe) ta tanza
de core. Mientras la unidad esta en
funcionamiento, golpee ligeramente
et cabezal de la tanza contra el sueto
hasta que la tanza de corte avance
hasta la hoja de core. El exceso de
tanza se cortara automaticamente
para mantener ta longitud adecuada.
Para prolongar la vida Qtitdet carrete
de cuerda, no impulse el alimentador
golpeando et cabezal de ta tanza
sobre concreto o asfalto.
RECORTE DE Ct_SPED Y
CANTEROS
Mientras sostiene et mango detantero,
gire et resto de la unidad para colocar
la rueda de bordeado en su posici6n.
(ver figura 12)
iiiiiiiiii
Lentamente deje que ta bordeadora
con tanza pase rodando por et borde
det cesped con ta rueda guia del
citindro que soporta et peso de la
unidad. Detengase peri6dicamente
para avanzar ta tanza de core.
Cuando recorte un area pot primera
vez, formara un surco en et sueto. La
formaci6n det surco puede requerir
atenci6n especial y avance de
linea frecuente. Despues de que se
forma et surco por primera vez, et
mantenimiento regular es facit.
Para obtener 6ptimos resultados,
gire regularmente et cabezal de la
tanza hacia abajo e impulse et golpe
(carrete) para avanzar ta cuerda.
Tenga cuidado con objetos extra_os.
CAMBIAR LA TANZA DE CORTE
ADVERTENCIA: Para evitar lesiones,
mantenga las manos alejadas de los
gatittos durante la recarga.
iiiiiiiiiii
Figura 12
Ubique ta rueda de bordeado a to largo
de la superficie que recortara. (ver
figura 13)
Figura 13
UTILICE SOLAMENTE TANZA DE
CORTE NO METALICA DE 0.080" DE
DIAMETRO.
Las lengQetas se encuentran en cada
lado de la cubierta det carrete de la
tanza. Presione ambas leng0etas
sobre ta cubierta det cabezal de ta
tanza y retire la cubierta presionando
hacia arriba. Tal vez sea m&s facit
presionar una leng0eta a ta vez.
Despues de que tas leng0etas estan
presionadas, levante el carrete para
sacarlo det alojamiento y coloque la
cuerda en un lugar seguro. (ver figura
14)
18
Page 19

Figura 14
Retire y deseche et resto de tanza de
corte que haya en et carrete.
Limpie todos los restos en et interior
det conjunto det cabezal de tanza.
Sostenga et extremo de la tanza,
inserte ¼" (6,35 mm) de la punta en et
peque_o orificio de ta base det carrete.
Enrolle el carrete en forma pareja y
ajustada en et sentido que se indica en
la base det carrete.
Siga enrollando hasta que ta tanza
este justo debajo det reborde y luego
corte ta tanza con tijeras.
No 1orecargue demasiado. Si to hace
puede provocar atascamientos.
Sostenga ta tanza para que no se
desenrolle, inserte et extremo de
corte a traves det ojal que esta en et
alojamiento det cabezal de la tanza.
No extienda mas de 2" (5 cm) de tanza
afuera det alojamiento det cabezal de
la tanza. (vet figura 15)
Ahora reemplace ta cuerda y et
carrete, y asegOrese de que la tanza
no quede atascada debajo det carrete.
Vuetva a instalar la cubierta det
cabezal de la tanza.
Si extiende mas de 2" (5 cm) de
tanza afuera det cabezal de ta tanza,
corte et exceso antes de encender la
bordeadora.
Retirar los elementos atascados
PRECAUCION: Para evitar lesiones,
mantenga las manos atejadas del
gatitlo mientras quita los etementos
que estan atascados. Para evitar
lesiones, no utitice la bordeadora con
un conjunto de cabezal de tanza
daSado.
Inspeccione la tanza de corte y et
carrete y retire los restos.
Desenrolle et carrete varias vuettas
e inspeccione la tanza para detectar
da_os.
Corte ta tanza da_ada y desecheta.
Inspeccione et conjunto det cabezal
de ta tanza para detectar rajaduras o
da_os.
Mientras jala tigeramente ta tanza de
core, presione et carrete (cabezal de
golpe) hasta que se suette la tanza).
Si se etimina et atasco, et carrete debe
girar tibremente a una corta distancia y
la tanza debe avanzar.
Si la unidad sigue atascada o no gira
libremente, llame at nOmero de servicio
que figura abajo. Si no detiene ta
unidad cuando la tanza esta atascada,
provocara un agotamiento excesivo
de la bateria y acortara la vida Qtitdet
motor (sobrecalentamiento).
Figura 15
Reemplazo de fusibles
Para reemplazar et fusible, primero
debe retirar et protector de la tanza
de la bordeadora. Gire el accesorio
bordeadora con tanza a la inversa.
19
Page 20

Atinee taflecha de la rueda de
bordeado con la flecha det protector
de ta tanza. Retire et tornitlo que esta
expuesto en et orificio de la rueda de
bordeado con un destornitlador comQn.
Retire et protector sacandolo det
alojamiento de la bordeadora.
Cuando haya retirado et protector
de ta tanza, retire el tornitto que se
muestra en ta figura 16 de ta lengQeta
de la cubierta det fusible rojo en et
lado derecho det alojamiento de la
bordeadora.
Figura 16
Retire ta cubierta roja y col6queta a un
lado. Retire et portafusibles de adentro
det alojamiento y destrabe la cubierta
como se muestra en la figura 16.
insertando primero ta tengOeta en ta
parte superior de la cubierta adentro
det alojamiento y tuego sujetandola
en su lugar con et tornitto que habia
quitado anteriormente. Conecte et
protector de la tanza al alojamiento de
la bordeadora (ver la secci6n sobre
c6mo conectar et protector de la
tanza).
PRECAUClON: Nunca opere la
bordeadora sin tener conectado et
protector de la tanza.
MI_NSULA DE PARED
Monte la mensula de pared firmemente
a la pared y conectela con tornitlos
a un pasador. NO se recomienda
el uso de tirantes para tableros de
pared. Coloque et accesorio de la
herramienta en ta mensula de pared
como se muestra en la figura para un
aractico almacenamiento. (ver figura
8)
Figura 17
Quite el fusible directamente det
portafusibtes. Reemplace et fusible
con et mismo tipo de minifusible
automatico de 15 amperios. Presione
et portafusibtes nuevamente adentro
det alojamiento de la bordeadora.
Reemplace la cubierta det fusible rojo
Figura 18
ADVERTENClA: Retire siempre
la bateria cuando reatice et
mantenimiento del mango de potencia
o de un accesorio de la herramienta
que este conectado al mango de
potencia.
ADVERTENClA: Mantenga siempre
las manos alejadas de los gatitlos
cuando realice et mantenimiento det
20
Page 21

mango de potencia.
LUBRICACION: No se requiere la
lubricaci6n peri6dica del accesorio
bordeadora con tanza.
LIMPIEZA DE PIEZAS DE
PLASTICO: Use s61o un cepillo en
seco o un patio con agua tibia y
jab6n suave para limpiar ias piezas
de plastico. Muchos iimpiadores del
hogar contienen sustancias quimicas,
que pueden dafiar el plastico. Nunca
use gasolina, trementina, diiuyente de
pintura o fluidos similares. Nunca rocie
la herramienta con agua ni la sumerja
en agua. El contenido de agua o
liquido dentro de la herramienta
puede causar dafios importantes en la
unidad.
CUANDO SE CAE LA UNIDAD: Si
se cay6 la unidad, antes de volver a
usada, revisela con cuidado para vet
si se produjeron dafios. Llame a un
profesional para que repare la unidad
si se produjeron dafios.
A A A •
TEMPERATURA: Las temperaturas
extremas iimitan ia vida Qtii de la
bated& El mejor iugar para guardar
la unidad es un lugar fresco y seco.
Guarde la herramienta lejos de la
luz solar directa, de carlos calientes,
hornos, etc. No la guarde en lugares
con temperaturas inferiores a +40 F (4
°C) o superiores a +120 F (49 °C).
PREVENIR LA CORROSION:
Los fertilizantes y otras sustancias
quimicas que se emplean en el jardin
contienen compuestos que aceleran
intensamente ia corrosi6n de los
metales. No guarde ia unidad encima
de fertilizantes y otras sustancias
quimicas o cerca de ellos.
PIEZAS DE REPUESTO: Para
obtener resultados 6ptimos de corte
y la seguridad de un rendimiento
superior, se recomienda usar s61o las
hojas y la tanza de bordeadora que
sean repuestos de Sears Craftsman.
ADVERTENClA: Utiiice s61o
accesorios y piezas de repuesto de
Craftsman disponibles en Sears. Ei
uso de accesorios que no son de
Craftsman puede set peligroso. Llame
al 1-800-366-PART.
RECICLADO DE BATERiAS: Para
conservar los recursos naturales,
recicle o deseche las BATERiAS DE
NiQUEL=OADMIO (NiCd) de este
producto en forma adecuada. Las
leyes locales, estatales y federales
prohiben la eliminaci6n de las
baterias NiCd en la basura comQn. Ei
fabricante participa en el programa
de reciclado de la Corporaci6n de
Reciclado de Baterias Recargables
(RBRC). Hemos pagado un arancel
para que estas baterias se desechen
correctamente a traves de un centro
de recolecci6n de la RBRC (varias
tiendas minoristas tambien participan
en la RBRC). Liame al nQmero gratuito
de la RBRC al (800) 822-8837 o visite
el sitio Web de la RBRC en wvcw.
rbrc.com para encontrar un centro de
recolecci6n cerca de su area.
Si observa alguna condici6n que
pueda afectar el uso seguro o si tiene
alguna dud& comuniquese con el
nQmero de servicio al cliente al:
1-800=539=6455
Page 22

YOU'[[findtheanswerand a more on managemyhomeocom - forfree[
- Find this and air },our other product manuals online.
:: o Get answers from our team of home experts.
:: o Get a personalized maintenance plan for your home.
o F]nd ]nformat]on and tools to help w]th home projects.
manage home
22
Page 23

Garantie .................................................................................................... 23
Instructions de securit6 ............................................................................ 23
Mode d'emploi .......................................................................................... 25
Entretien ................................................................................................... 32
Rangement ............................................................................................... 32
Pieces Detach6es ..................................................................................... 32
Reparation ................................................................................................ 33
Espa_ot .................................................................................................... 12
Frangais .................................................................................................... 23
Garantie integrale d'un an de Craftsman
Si ce produit Craftsman tombe en panne par suite d'un defaut de
fabrication dans l'annee qui suit la date d'achat, rapportez-te dans
n'importe quel magasin Sears ou autre magasin de distribution de
produits Craftsman aux #tats-Unis pour en obtenir le remplacement
gratuit.
La presente garantie ne s'applique que pour 90 jours si le produit a et6
utitise a un moment quetconque a des fins commerciales ou de location.
La presente garantie vous confere des droits particuliers. Vous pouvez
egalement ben6ficier d'autres droits pouvant varier d'une juridiction a une
autre.
Sears, Roebuck and Co., Hoffman Estates, IL 60179
PRIERE DE LIRE TOUTES LES
INSTRUCTIONS
= • II =
AVERTISSEMENT : Certaines
poussieres cre6es par t'utitisation
d'outits electriques contiennent des
composes chimiques reconnus par
l'Fttat de Californie comme causant le
cancer, des anomalies congenitales et
autres dommages de l'appareit genital.
AVERTISSEMENT A L'ATTENTION
DES RESIDENTS DE LA
CALIFORNIE : La manipulation du
cordon d'alimentation de ces appareits
(ou des cordons des accessoires
vendus pour ce produit) expose
l'utitisateur au plomb, un el6ment
chimique reconnu par t'Fi:tatde
Californie comme causant te cancer,
des anomalies congenitales et autres
dommages de l'appareit genital. It
est recommande de laver les mains
apres avoir manipule le cordon
d'alimentation.
SYSTEMI:: D'OUTILS 18 VOLTS
CRAFTSMAN CONVERTIBLE
CORDLESS
Ce produit ne dolt 6tre utitise qu'avec
23
Page 24

le systeme d'outits 18 volts Craftsman
Convertible Cordless. Ne pas utitiser
les accessoires avec un autre systeme
ou une autre source d'alimentation
electrique. Ne pas utitiser sur ta
poignee d'alimentation un accessoire
non congu pour fonctionner avec ce
systeme.
AVERTISSEMENT : Lors de
l'utitisation de cet outit, veitler
toujours prendre des precautions
6tementaires pour reduire les risques
d'incendie, de choc electrique et de
blessures corporettes, notamment :
Pour r6duire le risque d'accident :
Veitler ace que, avant toute utitisation,
la personne utitisant cet appareit
etectrique ait lu et assimite les
instructions de s6curite et d'utitisation
contenues dans ce manuel.
CONSERVER CES INSTRUCTIONS
et tes examiner frequemment avant
d'utitiser l'appareil. Les conserver
dans le logement du chargeur mural.
#VITER LES ENVIRONNEMENTS
DANGEREUX et les mauvaises
conditions met6orologiques au cours
de l'utitisation de cet outit.
NE PAS UTILISER un appareit
alimente par batterie sous la pluie.
MAINTENIR LES ENFANTS A
L'I_CART - Les visiteurs doivent se
tenir a une distance suffisante de la
zone de travail.
RANGER L'APPAREIL A
L'INTERIEUR LORSQU'IL N'EST
PAS UTILISE - Lorsqu'on ne se sert
pas de l'appareit, it faut te ranger
l'interieur, dans un endroit sec, hors de
portee des enfants.
NE PAS FORCER L'OUTIL - It
fonctionne mieux et presente moins
de risque d'accident au regime pour
lequet it a et6 con_u.
UTILISER L'OUTIL APPROPRI# - Ne
pas utitiser l'outit pour un travail pour
lequet it n'a pas et6 con;u.
MAINTENIR LES MAINS ET LES
PIEDS & une distance suffisante de
la zone de coupe.
PORTER DES VETEMENTS
AD¢:QUATS - Ne pas porter de
v6tements flottants ni de bijoux. Its
peuvent 6tre happes par les pieces
en mouvement. Le port de gants et de
chaussures solides est recommande
pour le travail a l'ext6rieur. Le cas
6cheant, porter un couvre-chef pour
recouvdr des cheveux longs.
NE PASSE PENCHER
EXCESSIVEMENT - Conserver une
bonne posture et un bon equitibre en
toute circonstance. Par mesure de
securit6, tenir toujours l'appareil des
deux mains pendant son utitisation.
PORTER DES LUNETTES DE
SECURITE - Se proteger toujours
les yeux et, si l'operation cree de la
poussiere, porter un masque facial ou
masque protecteur contre ta poussiere.
ENTRETENIR SOIGNEUSEMENT
L'APPAREIL - Le maintenir propre
pour assurer son bon fonctionnement
et reduire te risque d'accident.
Respecter les instructions d'entretien.
Garder les poignees seches, propres
et exemptes d'huite et de graisse.
PRC:VENIR LES DEMARRAGES
ACCIDENTELS - Ne pas transporter
l'appareit en te tenant dans la zone
de son commutateur de marche-arr6t.
L'appareit etant livre partiellement
charge, it peut demarrer de maniere
intempestive s'it n'est pas manipule
correctement.
VERIFIER QU'AUCUNE PI#CE
N'EST ENDOMMAG#E - Si un
et6ment de t'appareit a regu un
choc, verifier qu'aucune piece n'a
6te endommagee et que t'appareit
fonctionne correctement. Verifier
24
Page 25

l'absence de toute condition
susceptible d'affecter te bon
fonctionnement de t'outit, tel que le
mauvais alignement ou ta deformation
d'un organe mobile, ou ta rupture
d'une piece. Une piece endommagee
doit 6tre repar6e correctement ou
remplacee par un site de reparation
agre6.
RESTER VIGILANT - Faire attention
ce que l'on est en train de faire. Faire
preuve de bons sens. Ne pas utitiser
un outit quand on est fatigu&
NE PAS SAISIR LE FIL MOBILE
de la tondeuse a ill. Ne pas essayer
d'enlever de t'herbe coupee ou de
retenir de l'herbe a couper quand te
fil est en mouvement. Veitler ace que
le commutateur de marche-arr6t soit
sur la position d'arr6t et que te bloc
batterie soit enleve avant de nettoyer
ou de changer le ill.
MONTER LE CAPOT BE
PROTECTION - Avant toute utitisation,
monter te capot de protection
correctement. Se reporter aux
instructions sur le montage du capot
de protection dans la section Mode
d'emploi du manuel de l'accessoire de
tondeuse a ill. L'absence du capot de
protection cree un risque d'accident,
peut endommager le moteur et annule
la garantie.
Conserver ces instructions en tes
pliant en deux et en tes glissant dans
le logement a t'arriere du boftier du
chargeur mural.
CONSERVER CES INSTRUCTIONS.
O| | = ®
BRANCHEMENT DE L'ACCESSOJRE
SUR LA POIGN#:E D'ALIMENTATION
€:LECTRIQUE
Veitler a observer tes precautions
de s6curite suivantes pour le
branchement et le debranchement
d'un accessoire sur la poignee
d'alimentation electrique.
Enlever ta batterie de la poignee avant
de monter ou de retirer t'accessoire.
Ne jamais toucher les interrupteurs
de commande sur la poignee
d'alimentation etectrique pendant ta
fixation ou le retrait de l'accessoire.
Pour monter un accessoire :
1. Faire pivoter la bague de
verrouitlage de la poignee
d'alimentation electrique en position
deverrouitt6e. (Voir figure 1.)
Figure 1
2. Introduire l'extremit6 m&le du
raccord de la poignee d'alimentation
electrique dans la douitle femelle
l'extr6mite du dispositif de fixation
de l'accessoire en veitlant a ce que
le raccord soit completement tog&
(Voir figure 2.) Le raccord de ta
poignee est profile de maniere a ce
que t'assembtage ne puisse se faire
que d'une maniere. L'assembtage
de la poignee et de l'accessoire
ne devrait pas necessiter un effort
particulier. En cas de resistance
pendant l'assembtage, verifier que les
clavettes presentes sur la poignee sont
correctement alignees sur les rainures
dans l'accessoire.
25
Page 26

Figure2
3.Tenirl'accessoirefermementd'une
main(nepasletenirparunedes
piecestournantestettequetapoignee
auxitiaire)et,det'autremain,faire
pivoterlabaguedeverrouitlagede
lapoigneed'alimentationelectrique
danslapositionverrouitlee.
(Voirfigure3.)
Figure3
Pour enlever un accessoJre :
1. Tenir l'accessoire fermement d'une
main (ne paste tenir par une des
pieces tournantes tetle que la poignee
auxitiaire) et, de t'autre main, faire
pivoter la bague de verrouitlage de la
poignee d'alimentation electrique dans
la position deverrouitt6e. (Voir figure 4.)
Figure4
2.Separerlapoigneed'alimentation
electriqueett'accessoireentirant.
Laseparationdevraitseproduire
facitement.Danstecascontraire,
verifierquelabaguedeverrouillage
estcompletementdanslaposition
deverrouitt6e.
Montagedelabatterie
1.Alignertanervuredublocbatterie
surtarainurecorrespondante
t'extremit6detapoigneed'atimentation
etectrique.(Voirfigure5.)
Figure 5
2. Introduire completement te bloc
batterie dans ta poignee en veitlant
ce que les boutons a tappet de chaque
c6te du bloc s'enclenchent dans la
poignee.
Enlevement de la batterie
1. Appuyer simultanement sur les
boutons a rappet de chaque c6te de la
batterie. (Voir figure 6.)
26
Page 27

Figure 6
2. Sortir te bloc batterie de la poignee
par une traction exercee dans l'axe de
la poignee.
ne demarre pas si la bague de
verrouitlage n'est pas dans la position
completement verrouitlee.
Figure 8
Pour mettre rappareil en marche :
1. Tenir fermement la poignee de
commande d'une main et, de t'autre,
la poignee auxitiaire de l'accessoire (si
l'accessoire en est dote).
2. Appuyer vers l'avant sur
l'interrupteur sur lequet le pouce
repose (it s'agit de t'interrupteur de
securit6). (Voir figure 7.)
Figure 7
3. Tout en maintenant t'interrupteur
de securit6 en position sous te
pouce, retever t'autre interrupteur
avec tes doigts. (Voir figure 8.) Ceta
met l'accessoire sous tension pour
commencer le travail. It WEST PLUS
necessaire de continuer a appuyer
avec le pouce torsque l'accessoire a
demarr6.
I1convient de noter que l'accessoire
Pour arr6ter rappareil :
1. Uappareil s'arr6te lorsqu'on
ret_che l'interrupteur de marche-arr6t.
Uinterrupteur de s6curite qui se trouve
sous le pouce repasse en position
arriere pour prevenir tout redemarrage
accidentet de l'accessoire.
La poignee d'alimentation peut
fonctionner sous deux configurations,
en position normale ou inversee,
seton le travail a accomplir. Les
deux interrupteurs agissant a la fois
comme interrupteur de securit6 et
interrupteur de marche-arr6t, it n'est
pas necessaire d'adopter une position
de main non naturelle pour utitiser la
poignee d'atimentation en position
inversee. (Voir figure 9.)
Figure 9
27
Page 28

PROTECTION CONTRE LES
SURCHARGES
L'accessoire tondeuse a fil est dote
d'un fusible quite protege en cas de
surcharge ou de blocage prolong&
Le fusible arr6te le fonctionnement de
l'accessoire en cas de surcharge. Si
la tondeuse a fil se bloque ou s'arr6te
de tourner de maniere imprevue,
retScher immediatement l'interrupteur
de commande. Si apres verification
que ta t6te de coupe tourne librement,
la tondeuse a fil ne redemarre
pas, regarder site fusible dolt 6tre
remplac& Voir la section concernant
le remplacement du fusible. Ne
remplacer le fusible qu'avec un fusible
du m6me type d'une valeur nominale
de 15 amp@es.
MODE D'EMPLOI DE LA TONDEUSE
COUPE-BORDURE A FIL
MONTER LE CAPOT DE
PROTECTION AVANT UTILISATION
- Pour fixer te capot de protection sur
le bottler de la tondeuse, commencer
par aligner ses tanguettes taterales sur
les rainures du bottler. Appuyer ensuite
fermement sur l'arriere du capot
jusqu'a ce qu'it se loge fermement
contre le bottler.
Figure 10
Important : Le capot de protection
comporte une tame qui limite
automatiquement la longueur du fil de
coupe. Enlever te ruban de protection
de cette lame avant d'utitiser l'appareit.
TECHNIQUES DE COUPE
Maintenir un bon equitibre en toute
circonstance. Maintenir ta main
une distance suffJsante du fil en
mouvement Porter des lunettes
de s6curite pendant t'utitisation de
l'appareit. Tenir fermement la tondeuse
fil pendant son demarrage et son
utitisation. (Voir figure 11.)
Important = Faire pivoter le rotor de
coupe jusqu'a ce que la fleche qui y
figure s'aligne exactement sur la fleche
presente sur taface inferieure du capot
de protection.
Introduire ta vis fournie dans le trou du
rotor de coupe et dans le trou expose
dans le capot noir. Setter ta vis
l'aide d'un tournevis. (Volt figure 10.)
Lorsque ta vis est correctement
installee et settee, sa t6te est
encastree et le rotor de coupe peut
toumer librement.
Figure 11
TONTE DES PELOUSES ET
MAUVAISES HERBES
L'appareit fonctionne de maniere
optimale lorsque l'herbe est seche,
mais peut 6tre quand m_me utitise en
toute securit6 dans l'herbe mouittee
en raison de sa faible tension
28
Page 29

d'alimentation.
L'utitisation d'un long mouvement
de balayage pour la coupe permet
d'obtenir un maximum de coupe par
charge.
Faire attention a la presence d'objets
etrangers dans l'herbe. Fi:viterde
couper pres d'un c&bte ou autre objet
susceptible d'interferer avec la rotation
de ta t6te de coupe.
Toujours inspecter la zone a couper
pour detecter la presence d'objets
susceptibles d'etre endommages ou
de se prendre darts t'appareit pendant
la coupe.
Le fonctionnement normal entraTne
une usure du fil qui dolt 6tre avance
pour te ramener a sa pleine tongueur
de coupe.
Avance (atimentation par choc) du fil
de coupe - Pendant le fonctionnement
de l'appareit, tapoter doucement la
t6te de coupe contre le sol jusqu'a ce
que le fil de coupe progresse jusqu'a
la lame du capot. L'excedent de fil
est automatiquement coupe pour
maintenir la tongueur correcte du fit de
coupe.
Pour prolonger la duree de vie utile
de ta bobine de ill, ne pas tapoter la
t6te de coupe contre du beton ou de
l'asphalte.
COUPE DES BORDURES DE
PELOUSES ET DE PARTERRES DE
FLEURS
Tout en tenant ta poignee avant, faire
pivoter te reste de t'appareit pour
amener le rotor de coupe en position.
(Voir figure 12.)
Figure 12
Positionner le rotor de coupe le long
de la surface a couper. (Volt figure 13.)
Figure 13
Laisser la tondeuse a fil router
lentement te long du bord de ta
petouse en veitlant ace que te galet
de guidage supporte le poids de
l'appareit. Arr6ter periodiquement pour
alimenter te fil de coupe.
La coupe initiale d'une bordure creuse
un sitlon dans le sol. La formation de
ce sitton peut necessiter une attention
particuliere et une alimentation
frequente du ill. Apres la formation
initiale du sitlon, l'entretien regulier est
une operation facile.
Pour un resultat optimal, faire tourner
reguli6rement te ill, ta t6te de coupe
etant dirigee vers te bas, et tapoter la
t6te contre te sol pour alimenter te ill.
Faire attention a la presence d'objets
etrangers.
29
Page 30

REMPLACEMENT DU FIL DE
COUPE
AVERTISSEMENT : Pour eviter les
blessures, tenir tes mains a l'ecart des
interrupteurs pendant le remplacement
du fil de coupe.
N'UTILISER QUE DU FIL DE COUPE
NON MI_TALLIQUE DE 0,080 POUCE
(2 ram) DE DIAM_:TRE.
Des tanguettes sont presentes de
chaque c6te du couvercte de la bobine
de ill. Appuyer sur les deux tanguettes
du couvercle et l'enlever en te tirant
vers le haut. It peut 6tre plus facile
d'appuyer sur une des tanguettes
ta fois. Apres avoir enfonce tes
languettes, sortir ta bobine du bottler
en ta soulevant et mettre te ressort
dans un endroit s_r. (Volt figure 14.)
/
bord, puis le couper avec des ciseaux.
Ne pas remplir excessivement. Ceta
pourrait provoquer des btocages.
Maintenir le fil de maniere a ce qu'it
ne se deroule pas ; introduire son
extremit6 coupee dans t'ceitlet du
bottler de la t_te de coupe. Ne pas
sortir plus de 5 centimetres de fit du
boTtier. (Voir figure 15.)
Figure 15
Remettre en place le ressort et la
bobine en veitlant a ce que le fil ne soit
pas pris sous ta bobine.
Reinstaller te couvercle de ta t6te de
coupe.
Site fil sort de plus de 5 cm du boftier
de la t6te de coupe, couper l'excedent
avant de mettre la tondeuse en
marche.
Figure 14
Enlever et mettre au rebut tout fil
restant dans ta bobine.
Nettoyer les debris presents
l'interieur de ta t6te de coupe.
En tenant l'extremit6 du ill, en
introduire une longueur de 6 mm dans
le petit trou a ta base de ta bobine.
Enrouler le fil d'une maniere uniforme
et settee dans le sens indique a la
pattie inferieure de la bobine.
Continuer a enrouler te fit jusqu'a ce
qu'it se trouve juste au-dessous du
Degagement des blocages
ATTENTION : Pour eviter tes
blessures, tenir les mains a l'ecart de
l'interrupteur de marche-arr6t pendant
le degagement d'un blocage. Pour
eviter les btessures, ne pas utitiser la
tondeuse a fil si ta t6te de coupe est
endommagee.
Inspecter le fil de coupe et ta bobine,
et eliminer les debris eventuettement
presents.
Derouler la bobine sur plusieurs tours
et inspecter te fil pour detecter toute
trace de dommage.
Couper et mettre au rebut toute
30
Page 31

partie endommagee du ill. Inspecter
l'ensemble de la t6te de coupe pour
detecter la presence de fissures ou de
dommages.
Tout en tirant doucement sur te fil de
coupe, appuyer sur la bobine (t6te
d'alimentation par choc) jusqu'a ce
que te fil s'alimente. Site blocage
est degag6, ta bobine devrait tourner
legerement et te fil avancer.
Si t'appareit continue a se btoquer ou
ne pas toumer librement, appeler
le numero du site de reparation
indique ci-dessous. Si on n'arr6te pas
l'appareit lorsque te fit est btoque, on
provoque une decharge excessive de
la batterie et on raccourcit la duree
de vie utile du moteur en causant sa
surchauffe.
Remplacement du fusible
Pour remplacer le fusible, it faut
d'abord deposer le capot de protection
de l'appareil. Retourner l'accessoire
tondeuse a fil pour diriger sa base
vers te haut. Aligner tafleche du rotor
de coupe sur la fleche du capot de
protection. A t'aide d'un toumevis
ordinaire, enlever la vis qui est
exposee dans le trou du rotor de
coupe. Deposer le capot de protection
en te separant du boftier de la
tondeuse.
Le capot de protection etant enleve,
devisser la vis ittustree a la figure 16
de l'onglet du couvercte rouge du
fusible sur le c6te droit du boftier de la
tondeuse.
Figure 16
Enlever le couvercte rouge et te mettre
de c6te. Sortir le porte-fusible present
t'interieur du boftier et ouvrir son
couvercle comme ittustre a la figure 17.
Figure 17
Sortir te fusible du porte-fusible en
tirant dessus. Remptacer te fusible
avec un minifusibte auto du m_me type
d'une valeur nominale de 15 amperes.
Reintroduire le porte-fusible dans le
boftier de la tondeuse. Remettre en
place le couvercte rouge du togement
du fusible en introduisant d'abord
l'onglet au sommet du couvercle
dans le bottler, puis en vissant ta vis
prec6demment enlevee. Remonter
le capot de protection sur le bottler
de la tondeuse (volt la section sur le
montage du capot de protection).
ATTENTION : Ne jamais faire
fonctionner la tondeuse si le capot de
protection n'est pas present.
31
Page 32

SUPPORT MURAL
Monter solidement te support mural
sur le mur par fixation a l'aide de vis
sur un poteau mural. L'utitisation de
dispositifs d'ancrage sur panneau
est D¢:CONSEILL!:==E.Pour te ranger,
placer l'accessoire sur te support
mural comme indique ci-dessous. (Voir
figure 17.)
Figure 17
AVERTISSEMENT : Toujours enlever
la batterie de ta poignee d'alimentation
avant toute operation d'entretien sur
un accessoire raccorde a ta poignee.
AVERTISSEMENT : Toujours
maintenir tes mains a l'ecart des
interrupteurs pendant t'execution d'une
operation d'entretien sur la poignee
d'alimentation.
GRAISSAGE - Aucun graissage
periodique de t'accessoire tondeuse
fil n'est requis.
NETTOYAGE DES PII-CES EN
PLASTIQUE - N'utitiser qu'une brosse
seche ou un chiffon trempe dans
une eau tiede contenant un savon
doux pour nettoyer tes pieces en
plastique. Beaucoup de produits de
nettoyage domestiques contiennent
des composes chimiques susceptibles
d'endommager le pastique. Ne jamais
utitiser d'essence, d'essence de
ter6benthine, de dituant pour peinture
ou autre liquide simitaire. Ne jamais
nettoyer t'outit par pulverisation
d'eau ou te tremper dans t'eau. La
pen6tration d'eau ou d'un autre tiquide
dans l'appareit peut l'endommager
gravement.
CHUTE DE L'APPAREIL - Si
l'appareit tombe sur le sol, l'inspecter
soigneusement pour verifier qu'it n'est
pas endommage avant d'essayer
de t'utitiser de nouveau. En cas de
dommage, te faire reparer par un
professionnet.
TEMPI:==RATURE- Les temperatures
extr6mes reduisent ta duree de vie
utile de la batterie. Le meitleur endroit
pour ranger t'appareit est un lieu frais
et sec. Ranger t'appareit a t'ecart de
la tumiere directe du soleit, d'un tuyau
de chauffage, d'une chaudiere, etc.
Ne paste ranger dans un endroit oQ la
temperature descend au-dessous de
+5 °C (+40 °F) ou monte au-dessus de
+50 °C (+120 °F).
PRr_VENTION DE LA CORROSION-
Les engrais et autres produits
chimiques de jardinage contiennent
des composes qui accelerent
beaucoup la corrosion des metaux. Ne
pas ranger l'appareit sur de l'engrais
ou un produit chimique ni a proximit&
PII-CES DE RECHANGE - Pour une
coupe optimale et l'assurance du
meitleur fonctionnement possible, it
est recommande de n'utitiser que des
lames de rechange et du fil a couper
de Sears Craftsman.
AVERTISSEMENT : N'utitiser que des
accessoires et pieces de rechange
Craftsman disponibles aupres de
Sears. L'utitisation d'accessoires
non fournis par Craftsman peut 6tre
32
Page 33

dangereuse. Composer le numero
1-800-366-PART.
RECYCLAGE DE LA BATTERIE -
Pour preserver les ressources
naturelles, recycler ou mettre au
rebut la batterie NICKEL-CADMIUM
(Ni-Cd) de cet appareil de maniere
appropriee. La legislation locale,
regionale et nationale interdit la mise
au rebut d'une batterie au nickel-
cadmium dans les ordures menageres.
Le fabricant participe au programme
de recyclage de la Societ6 RBRC,
societe de recyclage des piles
rechargeables. Nous avons paye
une participation pour permettre aces
batteries d'etre correctement mises
au rebut dans un des sites de collecte
de la societ6 RBRC (de nombreux
detaillants participent egalement
ce programme). Appeler le numero
sans frais de la societ6 RBRC en
composant le (800) 822-8837 ou visiter
son site Web en frangais a radresse
_:llwww.rbrc.orq/cellarecvclerl
)our Iocaliser un site de collecte &
)roximite.
En cas de detection d'une condition
susceptible d'affecter la securite du
fonctionnement ou pour toute question,
consulter notre service a la clientele en
composant le numero
1-800=539=6455
NEED MORE HELP?
_)u'_[].f_nd the answer ar_cl_a more on managemyhomeo¢om - £or £ree!
• Find this and a[[ your other product manuals online.
• Get answers from our team of home experts.
• Get a personalized maintenance plan for your home°
• Find information and tools to he[p with home projects.
33
Page 34

::::::::::::::::::::::::::::
Your Home
For expert troubleshooting and home solutions advice:
manage _ home
www,managemyhome,com
For repair - in your home - of all major brand appliances,
lawn and garden equipment, or heating and cooling systems,
no matter who made it, no matter who sold it!
For the replacement parts, accessories and
owner's manuals that you need to do-it-yourself.
For Sears professional installation of home appliances
and items like garage door openers and water heaters.
1-800-4-MY-HOME ® Call anytime, day or night
(1-800-469-4663) (U.S.A. and Canada)
www.sears.com www.sears.ca
OurHome
For repair of carry-in items like vacuums, lawn equipment,
and electronics, call anytime for the location of the nearest
SearsParts&RepairSe_iceCenter
1-800-488-1222 (U.S.A.) 1-800-469-4663 (Canada)
www,sears,com www,sears.ca
TO purchase a protection agreement on a product serviced by Sears:
1-800-82T-66ss/o.S.A.)1-800-a61-666S/Canada)
Para pedir servicio de reparaci6n Au Canada pour service en francis:
adomici,o,yparao_enarpiezas: 1-800-,E-FOYERM°
1-888-SU-HOGAR® (1-800-533-6937)
(1-888-784-6427) www.se ars.oa
© Sears Brands, LLC
® Registered Trademark / TMTrademark / SMService Mark of Sears Brands, LLC
® Marca Registrada / TMMarca de Fabrica / SMMarca de Servicio de Sears Brands, LLC
MCMarque de commerce / MDMarque depos6e de Sears Brands, LLC
 Loading...