

Craftsman 17264120 Owner’s Manual
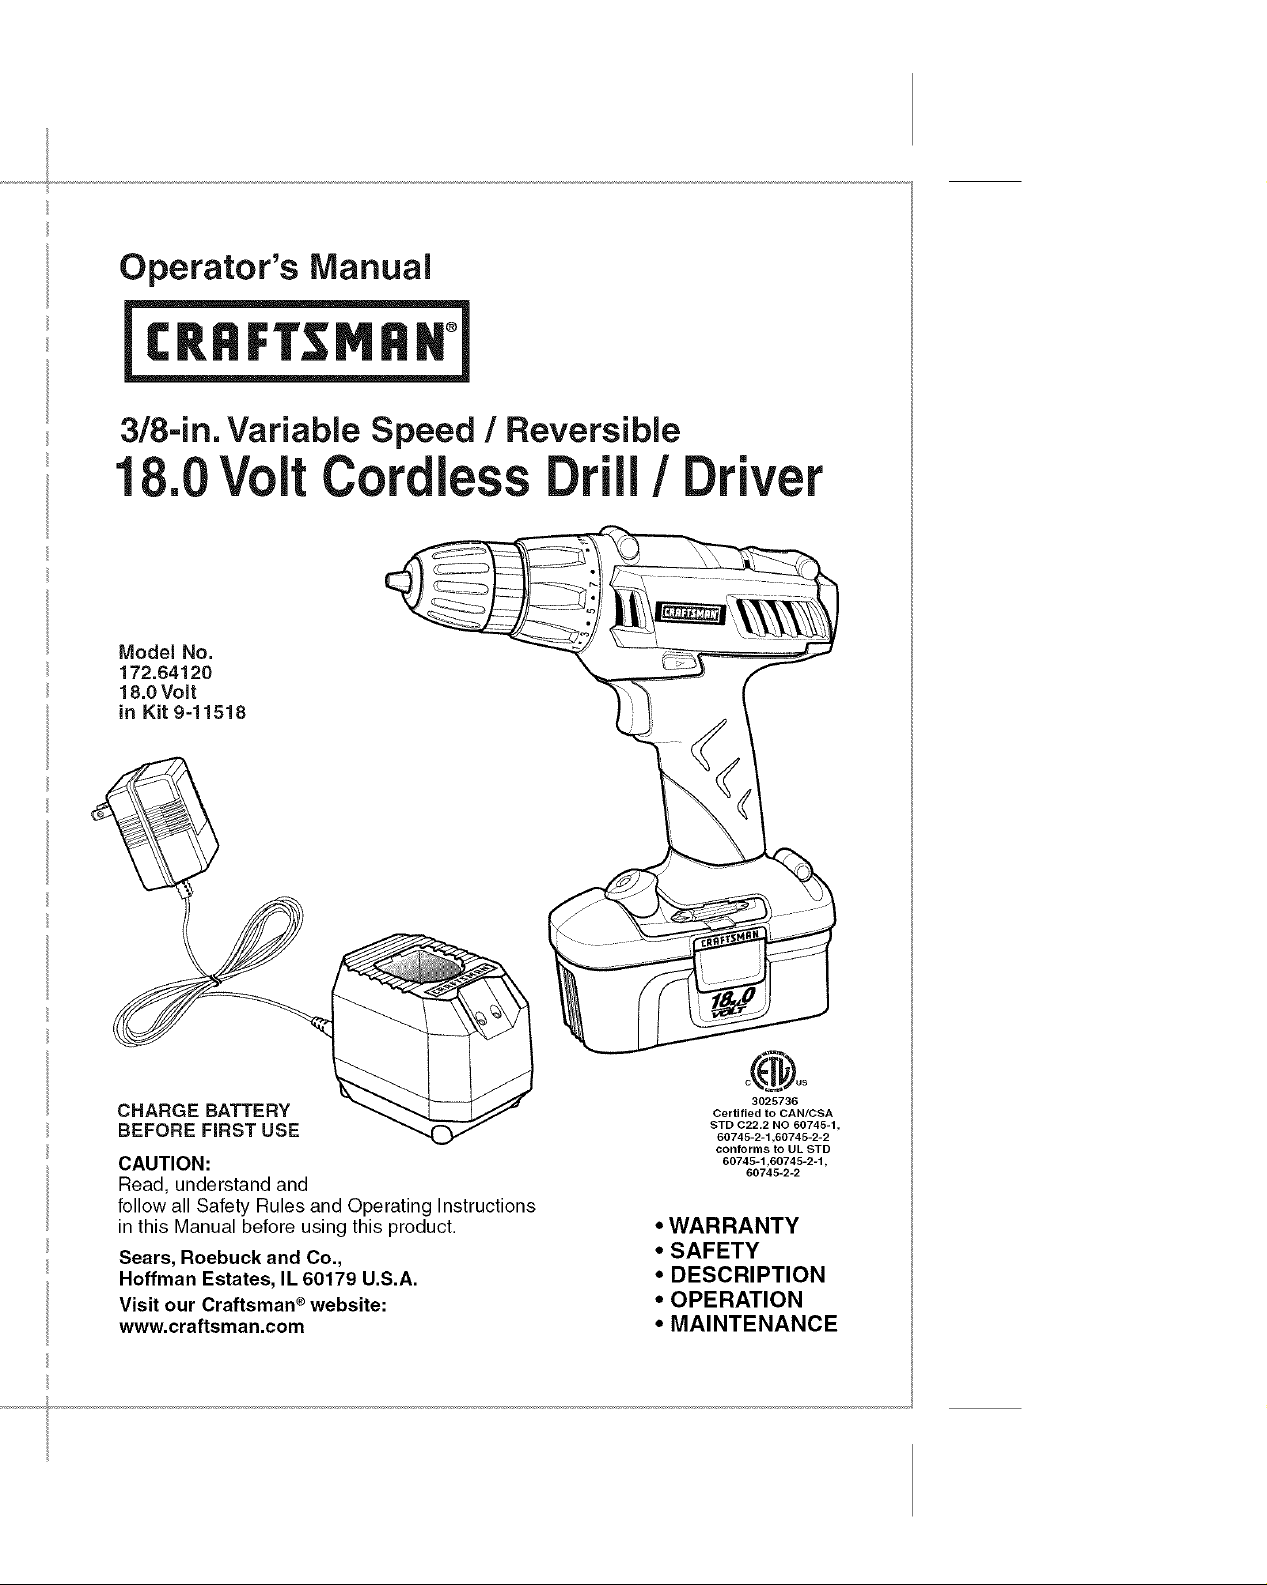
3/8-in. Variable Speed / Reversible
1 .0VoltCordless / Driver
Model No.
172.64120
18.0 Volt
in Kit 9-11518
CHARGE BATTERY
BEFORE FIRST USE
CAUTION:
Read, understand and
follow all Safety Rules and Operating Instructions
in this Manual before using this product.
Sears, Roebuck and Co.,
Hoffman Estates, IL 60179 U.S.A.
Visit our Craftsman ®website:
www.craftsman.com
3025736
Certified to CAN/CSA
STD 022.2 NO 60745=1,
60745=2-1,60745=2-2
conforms to UL STD
60745-1,60745-2-1,
60745=2-2
• WARRANTY
• SAFETY
• DESCRIPTION
• OPERATION
• MAINTENANCE

Warranty ....................................................................................................... Page 2
Safety Symbols .............................................................................................. Page 3
Safety instructions .......................................................................................... Pages 4- 10
Carton Contents ............................................................................................ Page 11
Description ................................................................................................... Pages 12- 13
Operation ..................................................................................................... Pages 14 - 23
Maintenance .......................................................................................................... Pages 23 - 25
Accessories ........................................................................................................... Pages 25 - 26
Parts List............................................................................................................... Page 27- 28
Sears Repair Parts Phone Numbers ..................................................................... Back Cover
The purpose of safety symbols is to attract your attention to possible dangers.
The safety symbols, and the explanations with them, deserve your careful
attention and understanding. The symbol warnings DO NOT by themselves
eliminate any danger.The instructions and warnings they give are no substitutes
for proper accident prevention measures.
/k, WARNING: BE SURE to read and understand all safety instructions in
this manual, including all safety alert symbols such as "DANGER", "WARNING"
and "CAUTION", BEFORE using this drill/driver. Failure to follow all instructions
listed below may result in electric shock, fire and/or serious personal injury.
SYMBOL MEANING
ONE YEAR FULL WARRANTY ON CRAFTSMAN®TOOL
if this Craftsman tool fails due to a defect in material or workmanship within one year from
the date of purchase, RETURN ITTO ANY SEARS STORE OR OTHER CRAFTSMAN
OUTLET iN THE UNITED STATES FOR FREE REPLACEMENT.
This warranty does not include expendable parts such as lamps, batteries, bits or blades.
if this Craftsman product is used for commercial or rental purposes, this warranty applies
for only 90 days from the date of purchase.
This warranty gives you specific legal rights, and you may also have other rights which
vary from state to state.
Sears, Roebuck and Co., Hoffman Estates, IL 60179
SAVE THESE iNSTRUCTiONS!
READ ALL iNSTRUCTiONS!
/K WARNING: Some dust created by using power tools contains chemicals known to
the State of California to cause cancer and birth defects or other reproductive harm.
Z_ SAFETY ALERT SYMBOL: Indicates DANGER,WARNING,OR
i ] Failure to obey this safety warning CAN result in death or
i ] Failure to obey this safety warning MAY result in personal
DAMAGE PREVENTION AND iNFORMATiON MESSAGES
These inform user of important information and/or instructions that could lead to
equipment or other property damage if not followed. Each message is preceded by the
word "NOTE:" as in the example below:
NOTE: Equipment and/or property damage may result if these instructions
are not followed.
1
/
CAUTION. May be used in conjunction with other symbols or pictographs.
Failure to obey this safety warning WiLL result in death or
serious injury to yourself or to others. Always follow the
safety precautions to reduce the risk of fire, electric shock
and personal injury.
Z_WARNING ] serious injury to yourseff or to others. Always follow the
safety precautions to reduce the risk of fire, electric shock
and personal injury.
Z_ CAUTION j injury to yourself or others or property damage. Always
follow the safety precautions to reduce the risk of fire,
electric shock and personal injury.
Z_WARNING: The operation of any drill/driver can
result in foreign objects being thrown into your eyes,
which can result in severe eye damage. Before beginning
power tool operation, ALWAYS wear safety goggles or
safety glasses with side shield and a full=face shield
when needed. We recommend a Wide Vision Safety
Mask for use over eyeglasses or standard safety glasses
with side shield, available at Sears Stores or other
Craftsman Outlets.
i
i
manual before using this drill/driver. Failure to follow all instructions may result
i/K WARNING: BE SURE to read and understand all instructions in this |
WORK AREA SAFETY
1. Keep your work area clean and well lit. Cluttered workbenches and dark areas
invite accidents.
2. DO NOT operate power tools in explosive atmospheres, such as in the presence
of flammable liquids, gases, or dust. Power tools create sparks which may ignite
the dust or fumes.
3. Keep bystanders, children and visitors away while operating a power tool.
Distractions can cause you to lose control.
4. Make your workshop childproof with padlocks and master switches. Lock tools
away when not in use.
5. MAKE SURE the work area has ample lighting so you can see the work and that
there are no obstructions that will interfere with safe operation BEFORE using your
cordless drill / driver.
PERSONALSAFETY
1. KNOW your cordless drill/driver, Read the operator's manual carefully. Learn the tool's
applications and limitations, as well as the specific potential hazards related to this tool.
2. STAY ALERT, watch what you are doing and use common sense when operating
a power tool.
3. DO NOT use power tools while tired or under the influence of drugs, alcohol or
medication. A moment of inattention while operating power tools may result in
serious personal injury.
4. DRESS properly. DO NOT wear loose clothing or jewelry. Pull back long hair. Keep
your hair, clothing, and gloves away from moving parts. Loose clothing, or long hair
can be caught in moving parts. Air vents often cover moving parts and should
also be avoided.
5. AVOID accidental starting. Be sure trigger switch is in the "Locked OFF" position
before inserting battery pack. DO NOT carry tools with your finger on the trigger switch.
Carrying tools with your finger on the trigger switch or inserting the battery pack in tools
that have the switch in the "FORWARD" OR "REVERSE" position invites accidents.
6. Do not overreach. Keep proper footing and balance at all times. Proper footing
and balance enables better control of the tool in unexpected situations.
7. ALWAYS SECURE YOUR WORK. Use clamps or a vise to hold work when practical.
It is safer than using your hand and frees both hands to operate tool.
8. DO NOT USE ON A LADDER or unstable support. Stable footing on a solid surface
enables better control of the tool in unexpected situations.
]
lin electric shock, fire and/or serious personal injury.
TOOL USEAND CARE SAFETY
operating this drill/driver. Failure to follow all instructions listed below may result
i /!k WARNING: BE SURE to read and understand all instructions before |
1.ALWAYS use clamps or other practical ways to secure and support the workpiece
to a stable platform. Holding the work by hand or against your body is unstable and
may lead to loss of control.
2. DO NOT force the tool. Use the correct tool and accessory bit for your application.
The correct tool and bit will do the job better and safer at the rate for which it is designed.
3. DO NOT use the tool if trigger switch does not turn it "On" or "Off". Any tool that
cannot be controlled with the trigger switch is dangerous and must be repaired.
4. REMOVE the battery pack from the drill/driver or place the forward/reverse
selector switch with power lock-off in the "Lock Off" position before making
any adjustments, changing accessories or storing the tool. Such preventive
safety measures reduce the risk of starting the tool accidentally.
5. STORE idle tools out of the reach of children and other untrained persons.
Tools are dangerous in the hands of untrained users.
6. ALWAYS remove battery pack and store separately when drill/driver
is not being used.
7. When battery pack is not in use, keep it away from other metal objects like:
paper clips, coins, keys, nails, screws, or other small metal objects that can
make a connection from one terminal to the other. Shorting the battery terminals
together may cause burns to skin, sparks or a fire.
8. MAiNTAiN tools with care. Keep cutting tools such as twist drill bits sharp and
clean. Properly maintained tools with sharp cutting edges are less likely to bind and are
easier to use and control.
9. CHECK for misalignment or binding of moving parts, breakage of parts, and any
other condition that may affect the tool's operation. If damaged, have the tool serviced
before using. Many accidents are caused by poorly maintained tools.
10. USE ONLY accessories that are recommended for this tool. Accessories that may
be suitable for one tool may become hazardous when used on another tool.
See page 25 for accessories.
11. Keep the tool and its handle dry, clean and free from oil and grease, Always use
a clean cloth when cleaning. Never use brake fluids, gasoline, petroleum-based
products, or any strong solvents to clean your tool, Following this rule will reduce
the risk of loss of control and deterioration of the plastic enclosure of the drill / driver.
]
Jin electric shock, fire and/or serious personal injury.
ELECTRICALSAFETY
operating this drill/driver, Failure to follow all instructions listed below may
l z_ WARNING:BESURE to read and understand all instructions before
result in electric shock, fire and/or serious personal injury.
A battery operated tool with integral batteries or a separate battery pack must be
recharged only with the specified charging stand/transformer for the battery. A
charger that may be suitable for one type of battery may create a risk of fire when
used with another battery,
1. Use battery operated teemonly with specifically designated battery pack. Use of any
other batteries may create a risk of fire.
2. Use battery only with charging stand/transformer listed.
DRILL/DRIVER CHARGING STAND/TRANSFORMER BATTERYPACK
172.64120 CDT218GU-103/BHY41-23.5V-200mA CDT218GU-104(ABP318GU)
Canals0 use 1426101and140295004 Can als0 use 1323509,
1323520, 130260001,
130139020 and 130139021
3. Do not abuse the cord on the charging stand. Never carry the charging
stand/transformer by its power cord. Never pull the power cord to remove the transformer
from the power outlet. Damage to the cord or charging stand/transformer could occur and
create an electric shock hazard. Keep cord away from heat, oil, sharp edges or moving
parts. Replace damaged cords immediately. Damaged cords increase the risk of electric
shock.
SAFETY SYMBOLS FOR YOUR TOOL
The label on your tool may include the following symbols.
V.......................................................................Volts
A......................................................................Amps
Hz....................................................................Hertz
W.....................................................................Watts
"_ ....................................................................Alternating current
--. ................................................................Direct current
no ....................................................................No-load speed
[] ....................................................................Class IIconstruction, Double Insulated
RPM...................................................... Revolutions per minute
SPM......................................................... Strokes per minute
OPM......................................................... Orbits per minute
,4',,....................................................................Indicates danger, warning or caution.
It means attention! Your safety is involved.
SERVICE SAFETY
1. If any part of this cordless drill / driver is missing or should break, bend, or fail
in any way; or should any component fail to perform properly: have the missing,
damaged or failed parts replaced BEFORE resuming operation.
1
SERVICE SAFETY cont.
2. Tool service must be performed only at a Sears Parts and Repair Center. Service
or maintenance performed by unqualified personnel could result in a risk of injury.
3. When servicing a tool, use only identical replacement parts. Follow instructions
in the maintenance section of this manual. Use of unauthorized parts or failure to
follow maintenance instructions may create a risk of electric shock or injury.
SPECiFiC SAFETY RULES FOR CORDLESS DRILL/DRIVERS
1. Know your cordless drill/driver. Read operator's manual carefully. Learn its
applications and limitations, as well as the specific potential hazards related to
this tool. Following this rule will reduce the risk of electric shock, fire, or
serious injury.
2. BE SURE that twist drill bits, screwdriver bits and other accessory attachments are
properly and securely mounted in the chuck jaws BEFORE operating the drill / driver.
3. ALWAYS carefully inspect the material you are going to drill / drive into. Drilling/driving
into nails, pipes and electrical wires can cause serious personal injury.
4. HOLD DRILL / DRIVER by insulated gripping surfaces (handles) when performing
an operation where the tool may drill / drive into hidden wiring. Contact with a
"live" wire will make the exposed metal parts of the tool "live" and shock the operator.
5. NEVER hold the piece being drilled in your hands or across your legs.
It is important to support and clamp the workpiece properly in order to minimize body
exposure, bit binding, or loss of control.
6. Maintain a firm grip on the drill / driver to resist starting torque.
7. Use sharp accessory bits only. For drilling in WOOD use twist drill bits, spade bits,
or power auger bits. For METAL use high-speed steel twist drill bits. For MASONRY
use carbide-tipped bits. For PLASTIC use low drilling speeds for material with a low
melting point. For SCREWDRIVlNG use the proper size screwdriving bit for the
screwdriving application such as Phillips, slotted and square recess bits.
8. BE SURE the material to be drilled is stationary, anchored or clamped firmly. If drilling
thin material, use a back-up block to prevent damage to the material.
9. ONLY USE the specifically listed battery pack and charging stand listed on page 6 of
this manual. Use of any other battery pack or charging stand/transformer can create
risk of injury and fire.
10. Cordless tools do not have to be plugged into an electrical outlet; therefore,
they are always in operating condition. Be aware of possible hazards when not
using your battery operated tool or when changing accessories. Following this
rule will reduce the risk of electric shock, fire, or serious personal injury.
11. Do not place battery tools or their batteries near fire or heat. This will reduce the
risk of explosion and possible injury.
12. Do not crush, drop or damage battery pack. Never use a battery pack or charging
stand/transformer that has been dropped or received a sharp blow. A damaged
battery pack is subject to explosion. Properly dispose of a dropped or damaged battery
pack immediately.
SPECiFiC SAFETY RULES FOR CORDLESS DRILL/DRIVERS cont.
t 3. Batteries vent hydrogen gas and can explode in the presence of a source of
ignition, such as a pilot light. To reduce the risk of personal injury, never use any
cordless product in the presence of open flame. An exploded battery can propel debris
and chemicals. If exposed, flush with water immediately.
14. Do not charge battery pack in a damp or wet location. Following this rule will
reduce the risk of electric shock.
15. For best results, your battery pack should be charged in alocation where the temperature
is more than 50°F but less that 80°R Do not store battery outside or in vehicles.
16. Under extreme usage or temperature conditions, battery leakage may occur.
if liquid comes in contact with your skin, wash immediately with soap and water,
then neutralize with lemon juice or vinegar, if liquid gets into your eyes, flush
them with clean water for at least 10 minutes, then seek immediate medical
attention. Following this rule will reduce the risk of serious personal injury.
17. SAVE THESE INSTRUCTIONS. Refer to them frequently and use them to instruct
others who may use this tool. If you loan someone this tool, loan them these
instructions also to prevent misuse of the product and possible injury.
SAFETY RULES FOR BATTERY CHARGING STAND/TRANSFORMER
A WARNING: READ AND UNDERSTAND ALL INSTRUCTIONS. Failure to i
follow all instructions listed below may result in electric shock, fire and / or
serious personal injury.
NOTE: Before using battery charging stand / transformer, read all instructions |
and cautionary markings in this manual, on battery charging stand /transformer,
battery pack, and drill / driver using battery pack to prevent misuse of the
products and possible injury or damage.
Z_ CAUTION: USE ONLY the specifically designated battery charging
stand / transformer that was supplied with this drill / driver when charging the
battery pack.The use of any other battery charging stand / transformer could
damage the battery pack, and create a hazardous condition. See page 6.
Z_ CAUTION:To reduce the risk of electric shock or damage to the battery
charging stand /transformer and battery pack, charge only the specifically
designated battery pack that was included with this drill / driver and charging
stand /transformer. Charging other types of battery packs may cause them to
burst, causing personal injury and damage.
1.Do not use the battery charging stand / transformer outdoors or expose to wet or
damp conditions. Water entering charging stand will increase the risk of electric shock.
2. Use of an attachment with this battery charging stand / transformer that is not
recommended may result in a risk of fire, electric shock, or injury to persons.
J
3
J
SAFETY RULES FOR BATTERY CHARGING STAND/TRANSFORMER cont.
Do not abuse the cord on the battery charging stand / transformer. Never carry the
charging stand / transformer by its power cord. Never pull the power cord to remove the
transformer from the power outlet. Damage to the cord or charging stand / transformer could
occur and create an electric shock hazard. Keep cord away from heat, oil, sharp edges or
moving parts. Replace damaged cords immediately. Damaged cords increase the risk of
electric shock.
Make sure cord is located so that it will not be stepped on, tripped over, come in
contact with sharp edges or moving parts, heat, oil, or otherwise subjected to
damage or stress. This will reduce the risk of accidental falls, which could cause injury,
and damage to the cord which could result in electric shock.
5.
Keep cord and charging stand / transformer away from heat to prevent damage to
housing or internal parts.
6.
Do not let gasoline, oils, petroleum=based products, etc. come in contact with
plastic parts. They contain chemicals which can damage, weaken or destroy plastic.
7. An extension cord should not be used unless absolutely necessary. Use of improper
extension cord could result in a risk of fire and electric shock. If an extension cord must be
used, make sure: a) That pins on plug of extension cord are the same number, size and
shape as those on the transformer, b) That extension cord is properly wired and in good
electrical condition, and c) That you use a proper extension cord. ONLY use cords
listed by Underwriters Laboratories (UL). Other extension cords can cause a drop in line
voltage, resulting in a loss of power and overheating of charging stand/transformer. An
AWG (American Wire Gauge) size of at least 14-gauge is recommended for an extension
cord of 25-ft. or less in length. Use 12-gauge for an extension cord of 50-ft.
Extension cords 100-ft. or longer are not recommended.
8. INSPECT tool cords for damage. Do not operate charging stand with a damaged cord or
transformer, which could cause shorting and electric shock. Have damaged tool cords
repaired at a Sears Service Center.
9. Do not operate charging stand / transformer if it has received a sharp blow, been dropped,
or otherwise damaged in any way. Take it to an authorized serviceman for electrical check to
determine if thecharging stand / transformer is in good working order.
10. Do not disassemble charging stand / transformer.Take it to a Sears Parts and Repair
Center when service or repair is required. Incorrect reassembly may result in a risk of
electric shock or fire.
11. Disconnect charging stand/transformer from the power supply when not in use.
This will reduce the risk of electric shock or damage if metal items should fall intothe opening in
the charging stand. It also will help prevent damage during a power surge.
12. Risk of electric shock. Do not touch un-insulated portion of output connector or un-insulated
battery terminal.
13. SAVE THESE INSTRUCTIONS. Referto them frequently and use them to instruct others who
may use this tool. Ifyou loansomeone this tool, also loan them these instructions to prevent
misuse of the product and possible injury.
Z_WARNING: Some dust created by using power tools contains chemicals
known to the State of California to cause cancer and birth defects or other
reproductive harm. Some examples of these chemicals are:
, Lead from lead-based paints.
oCrystalline silica from bricks and cement and other masonry products.
oArsenic and chromium, from chemically treated lumber.
Your risk from these exposures varies, depending upon how often you do
this type of work.To reduce your exposure to these chemicals:
, Work in a well-ventilated area.
oWork with approved safety equipment, such as those dust masks that are specially
designed to filter out microscopic particles.
Avoid prolonged contact with dust from power sanding, sawing, grinding,
drilling and other construction activities, Wear protective clothing and wash
exposed areas with soap and water. Allowing dust to get into your mouth, eyes, or
lay on the skin may promote absorption of harmful chemicals.
/_, WARNING: Use of this tool can generate and/or disburse dust, which
may cause serious and permanent respiratory or other injury. Always use
NIOSH/OSHA approved respiratory protection appropriate for the dust exposure.
Direct particles away from face and body.
ADDiTiONAL RULES FOR SAFE OPERATION
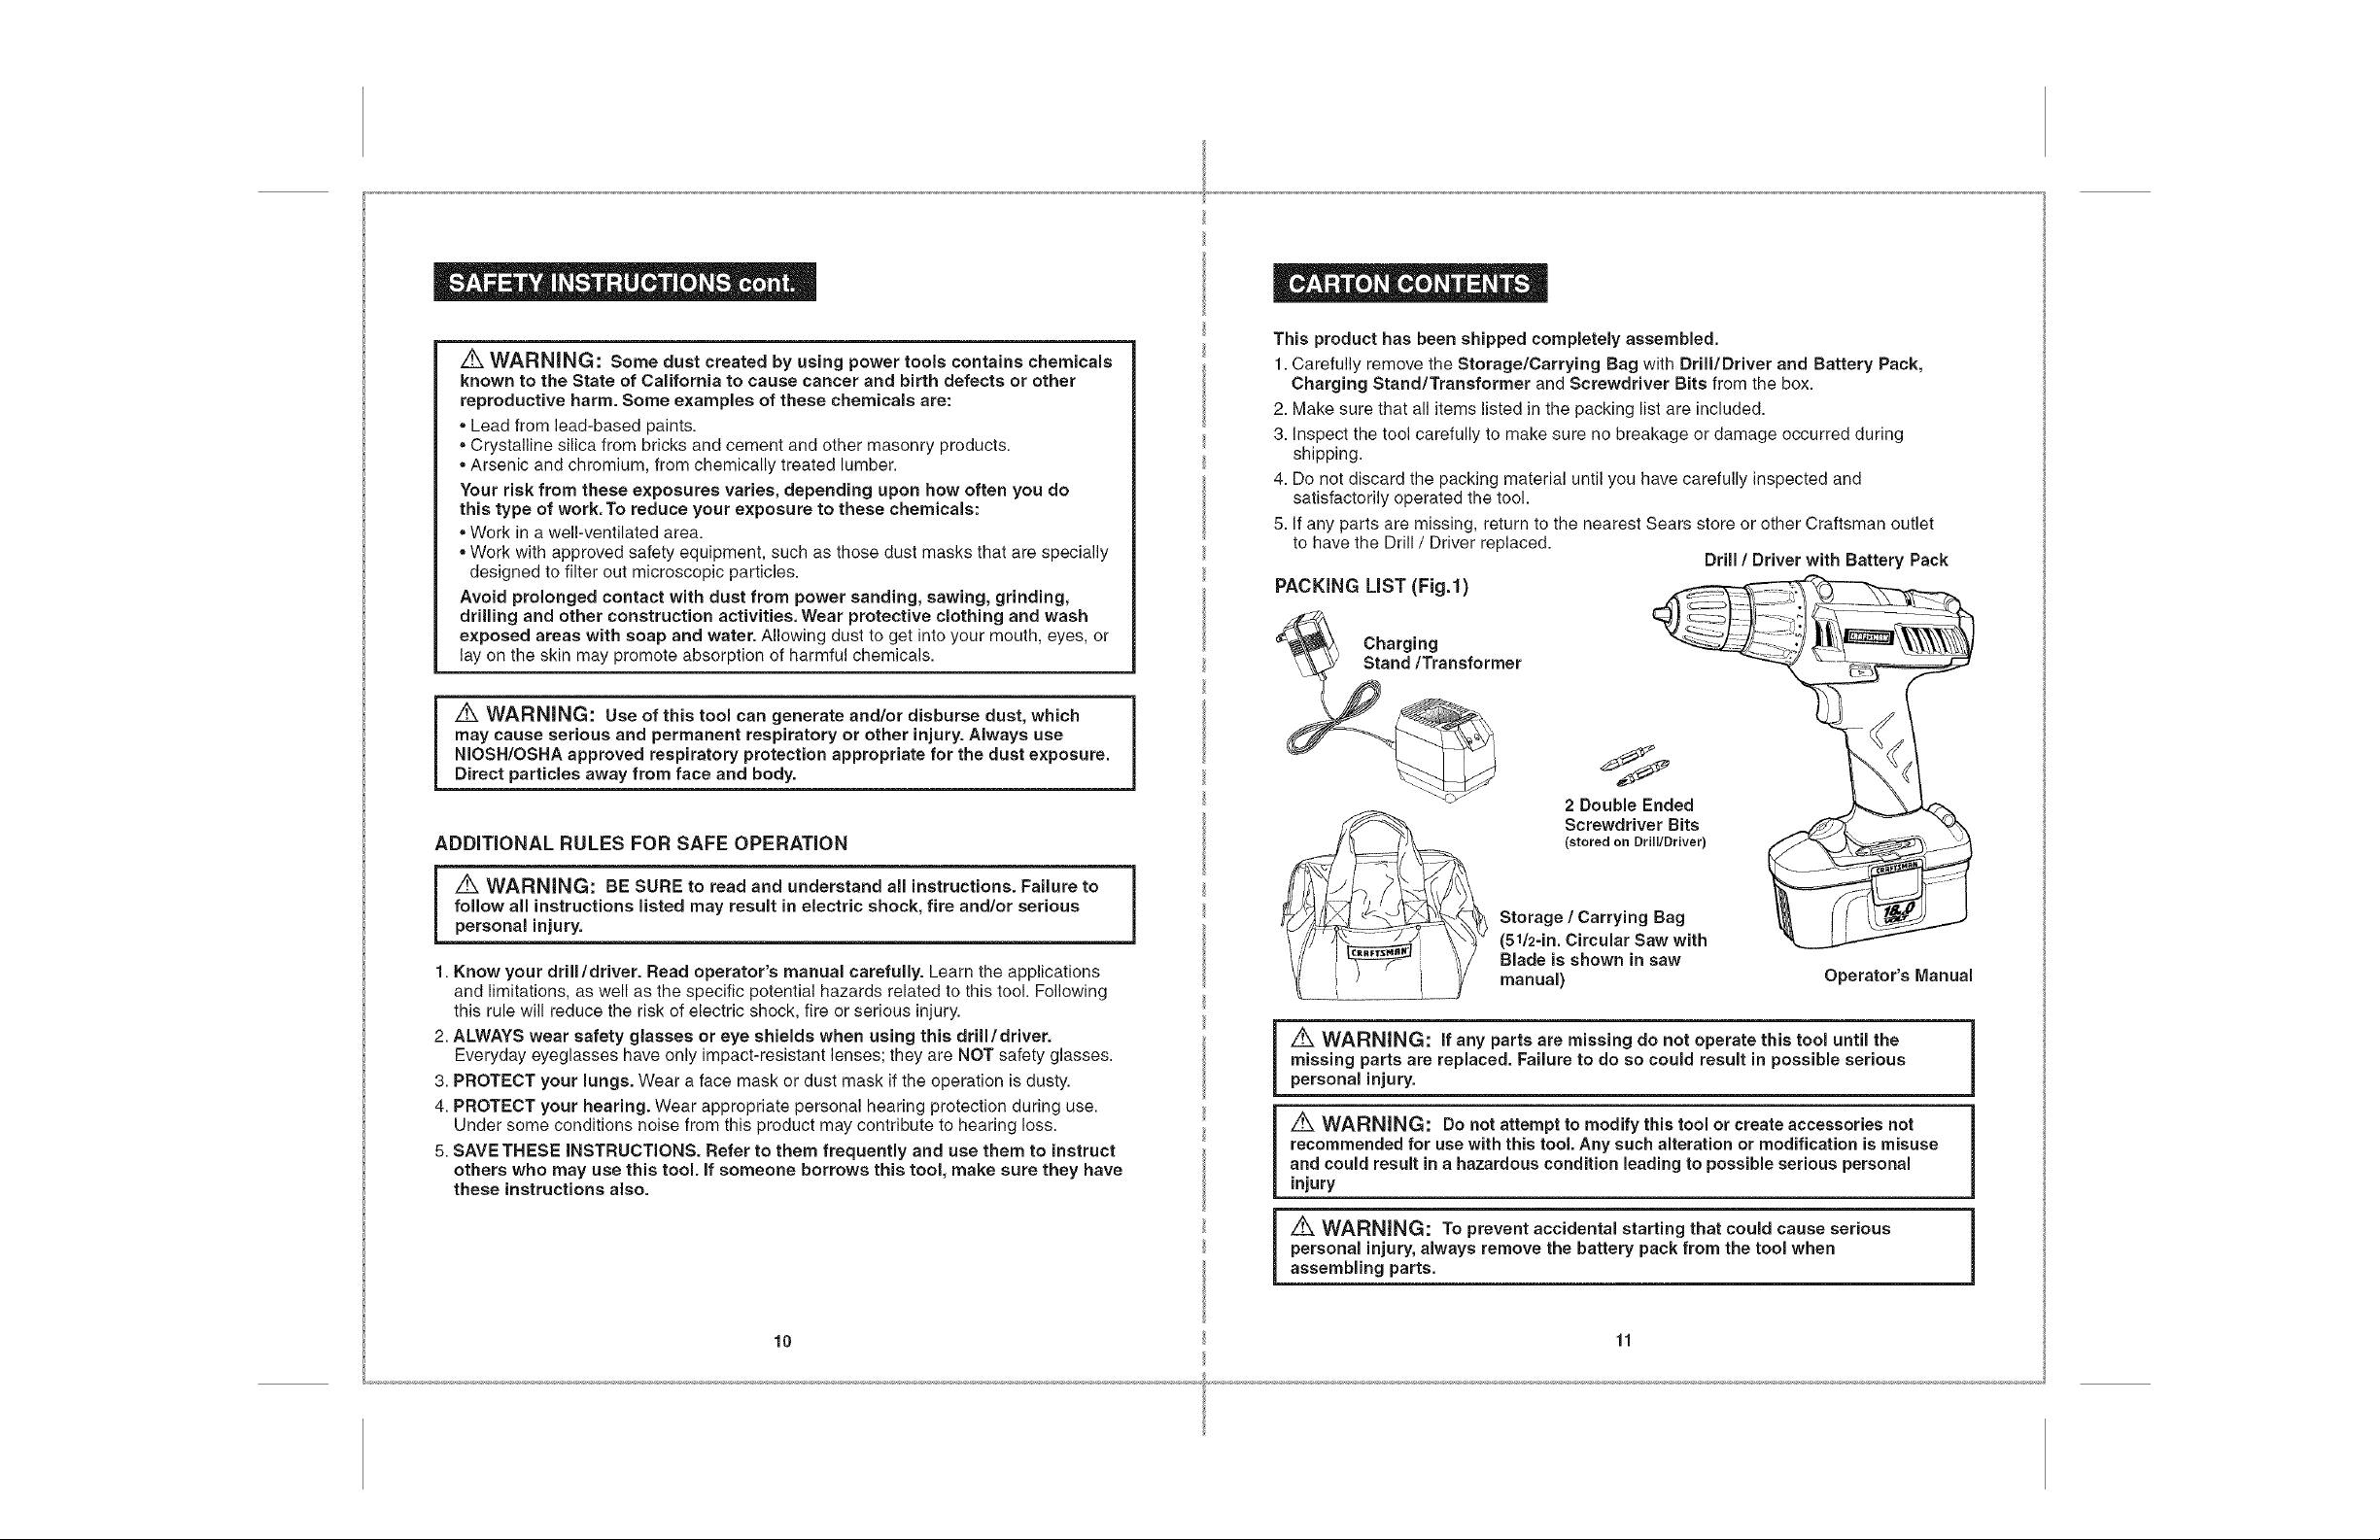
This product has been shipped completely assembled.
1. Carefully remove the Storage/Carrying Bag with Drill/Driver and Battery Pack,
Charging Stand/Transformer and Screwdriver Bits from the box.
2. Make sure that all items listed in the packing list are included.
3. Inspect the tool carefully to make sure no breakage or damage occurred during
shipping.
4. Do not discard the packing material until you have carefully inspected and
satisfactorily operated the tool.
5. If any parts are missing, return to the nearest Sears store or other Craftsman outlet
to have the Drill / Driver replaced.
Drill / Driver with Battery Pack
PACKING LiST (Fig.l)
Ct"t.' ',"T1aosformer
2 Double Ended
Screwdriver Bits
(stored on Drill/Driver)
1
follow all instructions listed may result in electric shock, fire and/or serious
i z_ WARNING: BE SURE to read and understand all instructions. Failure to |
1. Know your drill/driver. Read operator's manual carefully. Learn the applications
and limitations, as well as the specific potential hazards related to this tool. Following
this rule will reduce the risk of electric shock, fire or serious injury.
2. ALWAYS wear safety glasses or eye shields when using this drill/driver.
Everyday eyeglasses have only impact-resistant lenses; they are NOT safety glasses.
3. PROTECT your lungs. Wear a face mask or dust mask if the operation is dusty.
4. PROTECT your hearing. Wear appropriate personal hearing protection during use.
Under some conditions noise from this product may contribute to hearing loss.
5. SAVE THESE INSTRUCTIONS. Refer to them frequently and use them to instruct
others who may use this tool. if someone borrows this tool, make sure they have
these instructions also.
10
Jpersonal injury.
_RRFTSM _,
Storage / Carrying Bag
(51/2-in. Circular Saw with
Blade is shown in saw
manual)
Operator's Manual
/_ WARNING: If any parts are missing do not operate this tool until the
missing parts are replaced. Failure to do so could result in possible serious
personal injury.
/_ WARNING: Do not attempt to modify this tool or create accessories not
recommended for use with this tool. Any such alteration or modification is misuse
and could result in a hazardous condition leading to possible serious personal
injury
Z_ WARNING: To prevent accidental starting that could cause serious
personal injury, always remove the battery pack from the tool when
assembling parts.
11
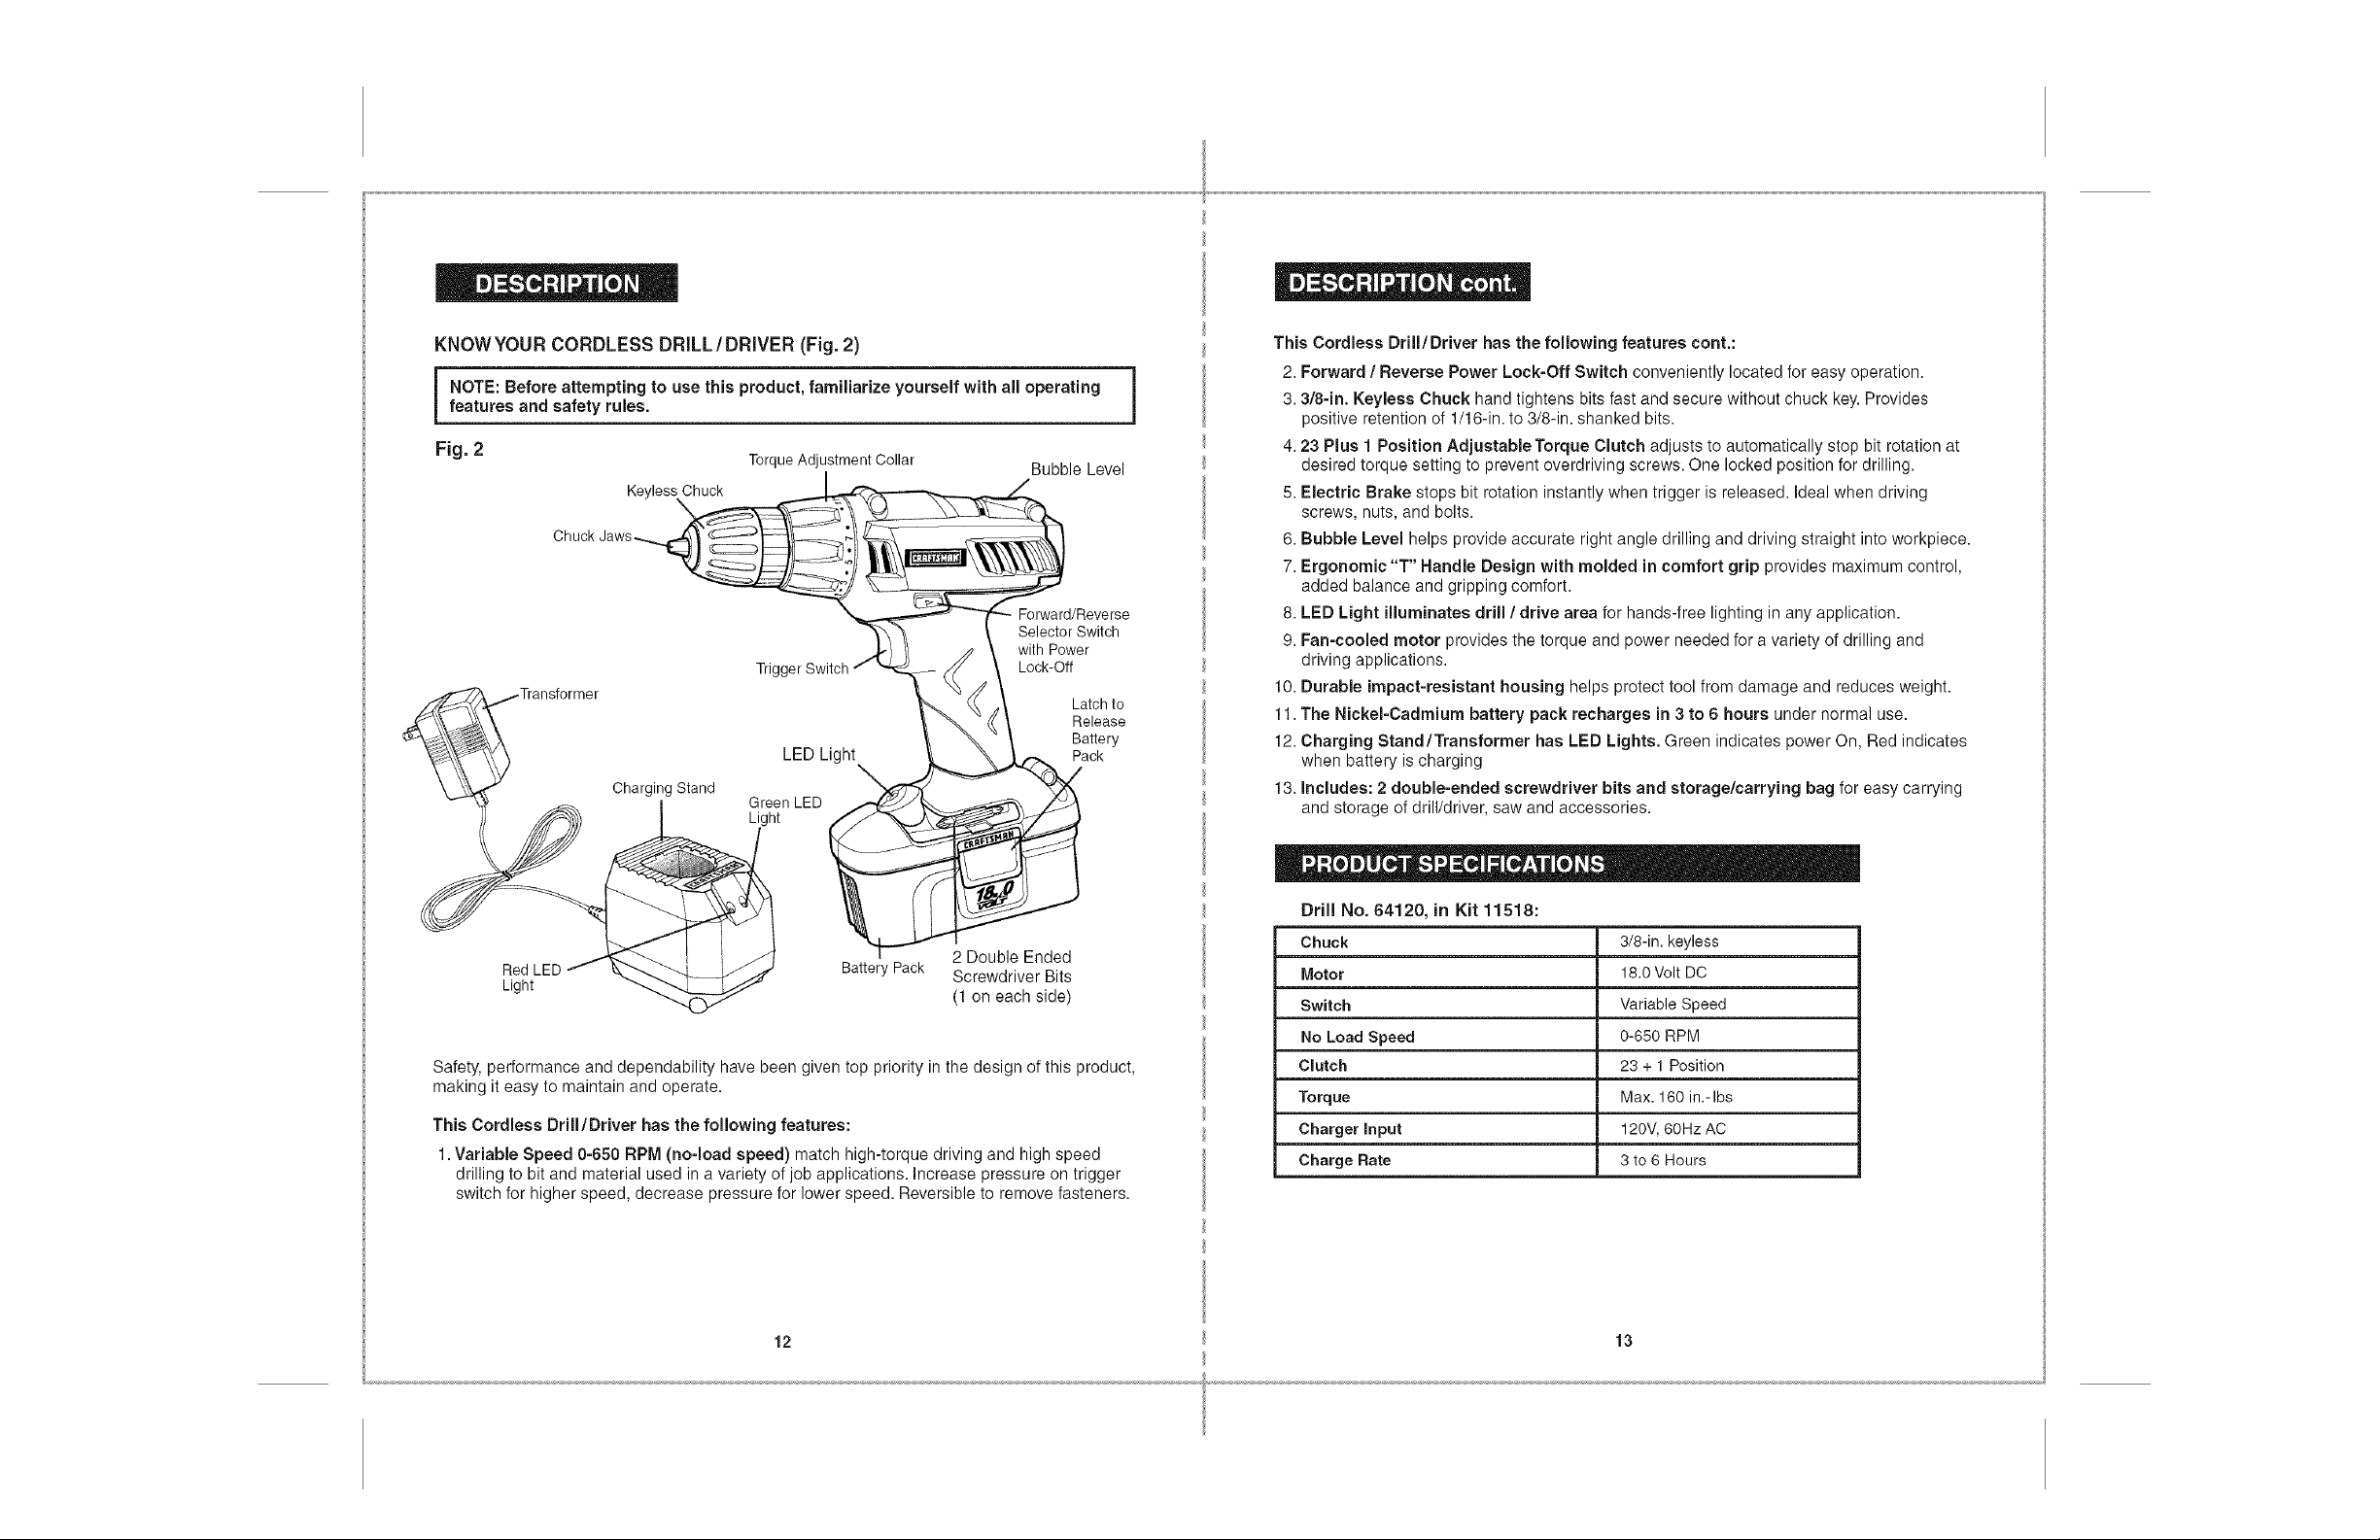
KNOWYOURCORDLESSDRILL/DRIVER(Fig.2)
i OTE: Before attempting to use this product, familiarize yourself with all operating
features and safety rules.
Fig. 2 TorqueAdjustmentCollar Bubble Level
KeylessChuck
Forward/Reverse
Selector Switch
with Power
Trigg
LED Light
Transformer
Lock-Off
Latch to
Release
Battery
Pack
]
This Cordless Drill/Driver has the following features cont.:
2. Forward / Reverse Power Lock-Off Switch conveniently located for easy operation.
3.3/8=in. Keyless Chuck hand tightens bits fast and secure without chuck key. Provides
positive retention of 1/16-in. to 3/8-in. shanked bits.
4.23 Plus 1 Position Adjustable Torque Clutch adjusts to automatically stop bit rotation at
desired torque setting to prevent overdriving screws. One locked position for drilling.
5. Electric Brake stops bit rotation instantly when trigger is released. Ideal when driving
screws, nuts, and bolts.
6. Bubble Level helps provide accurate right angle drilling and driving straight into workpiece.
7. Ergonomic "T" Handle Design with molded in comfort grip provides maximum control,
added balance and gripping comfort.
8. LED Light illuminates drill / drive area for hands-free lighting in any application.
9. Fan=cooled motor provides the torque and power needed for a variety of drilling and
driving applications.
10. Durable impact=resistant housing helps protect tool from damage and reduces weight.
11. The Nickel=Cadmium battery pack recharges in 3 to 6 hours under normal use.
12. Charging Stand/Transformer has LED Lights. Green indicates power On, Red indicates
when battery is charging
13. includes: 2 double-ended screwdriver bits and storage/carrying bag for easy carrying
and storage of drill/driver, saw and accessories.
Red BatteryPack Screwdriver Bits
2 Double Ended
Light (1 on each side)
Safety, performance and dependability have been given top priority in the design of this product,
making it easy to maintain and operate.
This Cordless Drill/Driver has the following features:
1.Variable Speed 0-650 RPM (no-load speed) match high-torque driving and high speed
drilling to bit and material used in a variety of job applications. Increase pressure on trigger
switch for higher speed, decrease pressure for lower speed. Reversible to remove fasteners.
12
Drill No. 64120, in Kit 11518:
Chuck
Motor
Switch
No Load Speed
Clutch
Torque
Charger input
Charge Rate
3/8-in. keyless
18.0 Volt DC
Variable Speed
0-650 RPM
23 + 1 Position
Max. 160 in.-Ibs
120V, 60Hz AC
3 to 6 Hours
13
FORWARD / REVERSE SELECTOR SWITCH with POWER LOCK+OFF
(Rg 3, 3n+3b)
Pig 3
Fig 3a
#
FORWARD
Th8 _'I[_Ocltl>nO1b_t relation I,_torw.3r_Jor reveille _r;dtsco_.tro+lBdby n BP,fcr_lor .'_vltCh
bcnl_'d nb_,verandlo the rea; o+the trigg0r swilch. When holding lhr_ drill/driver +ntho
notm_I opomt_n_f pl_siti_n, I+_r=dviewed hem tl_o bltck o! the dfiIIfdriver see F_grl3, 3_
_nd 3b),thO_oloclor_wdch r,houldbe p_sit_c,ned (pushed}nl+theway toth_ LEF3"+
for FORWARD rJrnormal d_ilfir_ / driving _r_d por_itionod (iou_od) oil lh_ w_y Io the
Rf_HT f_t REVER_E to _omovl_drill bit_ antl b.'_ckOul ,'_rOw_
The Ih[+_p_._.itt_olot Ibo _0_e_t_f r_w_{cb I_.lecal_dIn IhOCENTER (Fig+3b) Thi_ po_itiotl kr,_ps
Ib_ hl_r r;,vitchtrc=mw_ k_ng,to_ktngbm p_wet +'OF_ _otli_g 1ha s[itect_r Switch InIb_ +OFF"
_r CENTER po_itt_l_holp._t0dt_c_ Ihl)possibility_f _ccltl_nt_l _f_litlg WhollIb_ 1_o}is r_t it_U_0
[ A'k CAUTiON_ Topt_vonfgot_tdtlmt_go, l_b.,aysa,lowfhoch_cktocomotolt 1complot_ _top befor_ chlmgtng the dfto_f_otl of rotation.
REMOVE BATTERY PACK FROM
DRILL/DRIVER (Fig 4)
I PI_C_ Ihe FOrWIt_I RoversB Soloclor Swllch
with Power Lock-Off tnfr_ thec_nt_r pc'_ition to
_ck thr,powo_ off {_.o F}_ 3b, nbovo)
2 LOCt_IOtheIOICh_,__n o_¢b Side301II_0b_llO_
p_ck Depre_ {_quoozo _n)h_lches and putt
b_llorypnck out ofdti_l(_eo F_g4)
REVERSE POWER LOCK+OFF
CHARGtNGTHE BA3_ERY PACK (Fig 5 and 5_)
ThP+b_tte_ pnCl_ for Ibis tOOl h_,_b0on _t'Jppt+dInn low chm'g++C_l_,_itkon to p+revenl
possible plotllem:_ Therefore, you _hould ch_J_ _vomlght pAor to U_O.
NOT_: R_IIedOIf Wtll not _'e_ch full charge tile RrSI time they _ro charBotJ.
AIIow _vo_al cycleB (oper_tlort fottowod by _chz_glng) f_r Ih_m to bedtime
F l_tllyI_hm'god,
t Cha_g_ h_tto_y pack _nly with Ih_ ct_rg_ng
_l_nd ! _n._l_m_ f th0t writ+_,t_ppt_edwllh
fi_led _n page 6
2 _ke _Iop_wer _upp_yl_ nerm_
h_usohold vollaffe 120 _lts _g Hz
3 Cor,nocl Chnlp}np _tand_ lmn_l_m_r Io
4 Fl_co battery pack Ib ch_lglng stand, Ahgn
ml_od lib on b_llely pluckwith groove II_
cha_gh_g_frmd (See Fig 5)
g Pr_._ down on battery pack Ic.b_ _.l+fe
conl_cl_ Onb_tteW p_ck Fmgr_ plc.p_lly
wiib conifers In ch_ging r_Ii_nd
6 TI_ chmg_ r,t_nd h_s Iwo (LED) _nd_calor
Whot__ bt_lio_/p_ck Is p_l l_to lho charging
_t_nd lho md LED wtitlight+
Indlcallr=g thai _0 b_t_ p_ck I_ ct_tging
bmporfy (_oo Fig 5_)
Whrlr_th_ batlery pock t_ ch_ltg0d *_nd
_omo_d tram lh_ ch_rgPngr,t_l_ th_ _l
ligh_ willgo Off_Th_ _t_0r_ LED w_lcome _ll
o_ly wh0n IboID i_ _ p_blk, m wi_bIh_
battery _r chntDot
7 Allu; h_,lm_l u_o, 3 h_uls or tos_ el chlllgl_g
llm_ iF, mquh+ad Io hl_y r_chl_IgO balloly ;lllck II bt_lt_ly pock ISc_mp_toly dlsch_IgOd.
6 hOIJ1_ nr l_Ilg_t_I I:h_t[IIn(ltlmo I_ toqlJ_totlto fullytllcl_fflg_blttlo_ pllck
oper_lo property, o_ Iho chorglng _f_nd doe_ nol cb_rge the b_t|ery p_ck+ mturt_
the chorglng _tnnd I transformer _nd b_ftoty pr_k fo your r_t=r_t Se_rs Store or
' NOTE: Within the w_rranly p_rlod, If the chotglng stgnd LED Itghl_ do not
other Ctttft_m_ guile! h_r f_oo roptocom(_nl,
Fig g
ChnritP+_pStand '
Fig 5a ,C:;"
..5:>+
i;2 "+'"
...... oo0 :j;
I
CHARGING THE BATTERY PACK cottt, (Fig 5 and 5a)
8 Tho batlory pack wilt become _lightly warm lo lha Icuch whtlo chalging Thi_ iSno_m_,!
and dO_ hal indicate a pfob_{_m
8 Do nat piece 11_ b_llary clla_gtng cltlnd /Irans{otmof P_nrl t_m_ oI _xlf_m_ ho_t or cold
tI will work bestal no_m_ teem t_mpemlum
18 Whoa ba!la_/pack becomes f_tLythe(god, Ur_ph_ghalloa/chalgP', g r,land i t.r_rlafarmer
horn power supply _d _omavo the h,31lacypack
CHARGING A HOT BATi'ERY PACK
Whr_nusing your lool can_m_E41_ly,th_ baOeri_s In yola ball_ty pack wi_Ihl_came hal
YOlJIfl_ou_{ltot a hDI b_llo_y prick cool d_n fe,f llpptOxIr_Olely 30 mFf_ulssbe_ta
allempl_ngl{)r0chalga
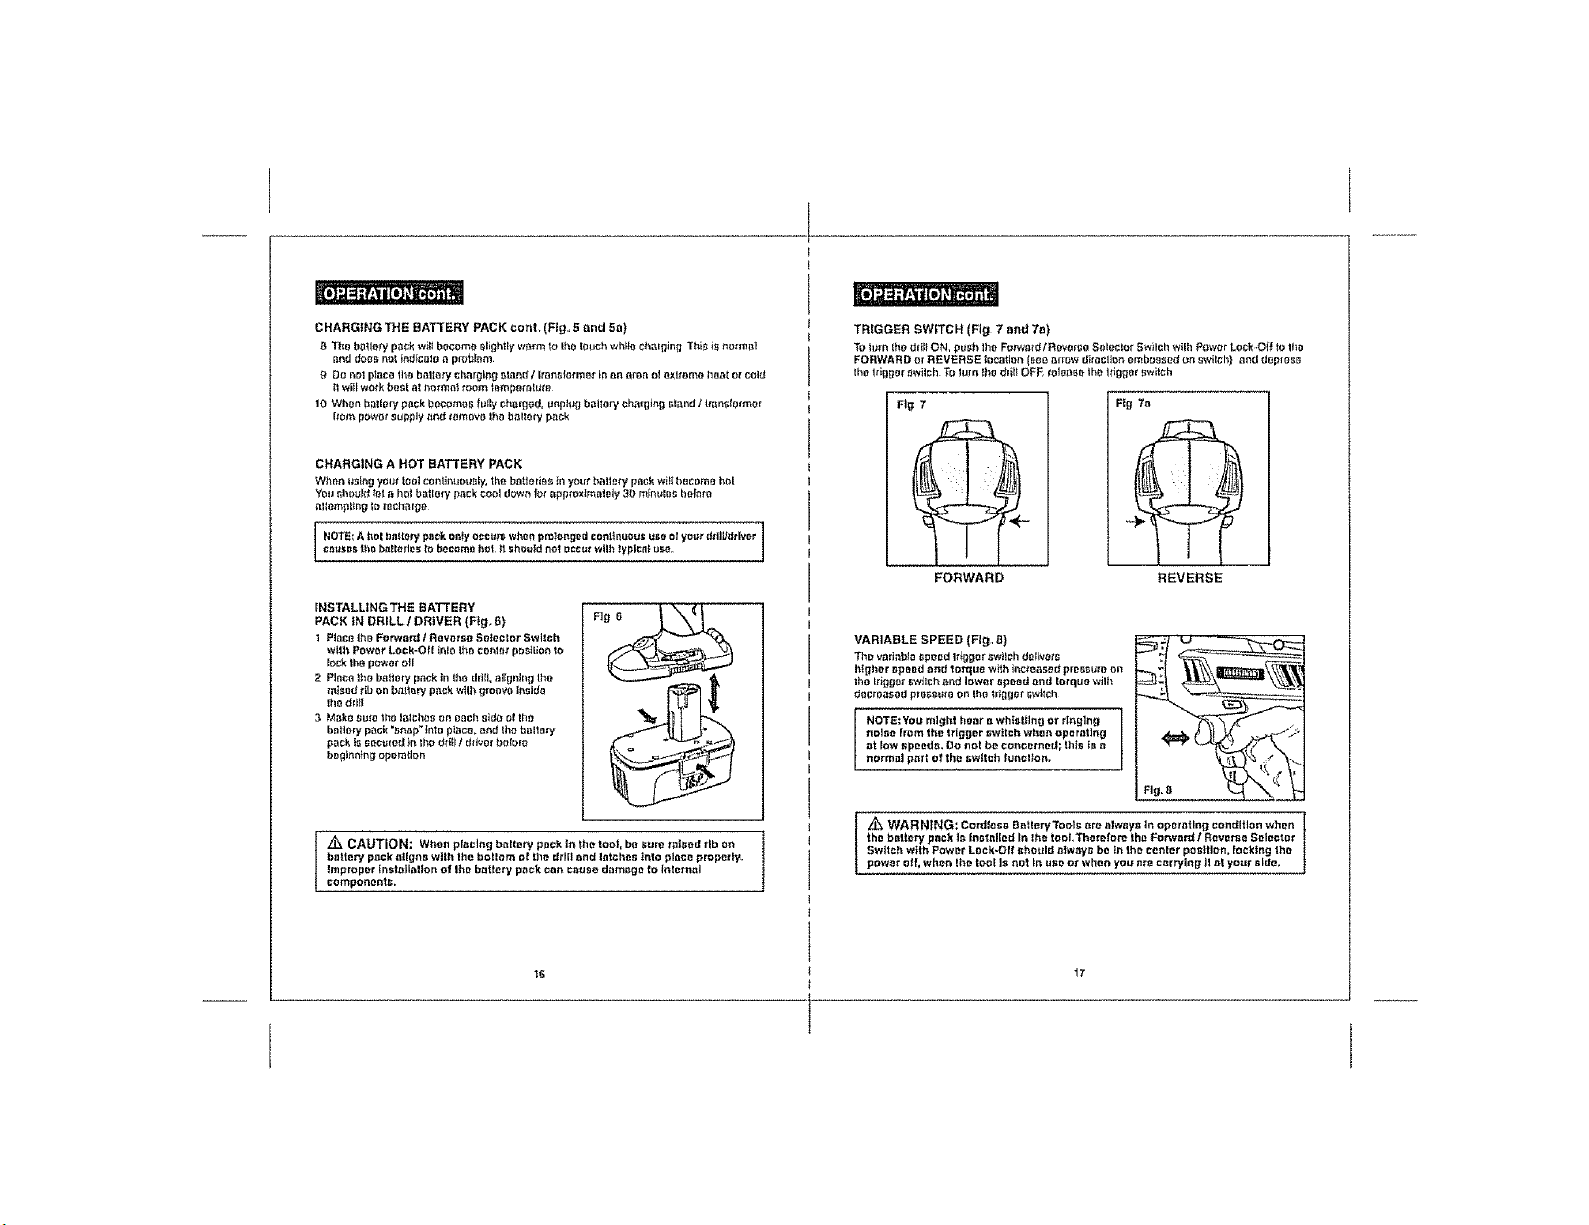
TRIGGER SWITCH (Fig 7 and 7a)
TOhJm lho _li_l ON, p_h lho F_tWald/ FIOVO{SO_aleclot Swilch wilh POWerLock O_{ to lho
FORWARD el REVERSE l_caflon II_o mr_w d_roc_onembussed or=swilch) and depress
Ih0 ld_go_" _wilch T_ luln the dli_t OFF. _o_onBathe ldgga_ switch
Fig 7
Fig 7n
i NOTE_A hal bt_t0_ pack only oCcu_ when prolonged coat_n_u_ use el your ddlLIdtlver
C_I_S tt_ bldlarl_ to becomn hot It shouldrt_t ac_:" wllh typlctg u_;o.
INSTALLING THE BATTERY
PACK IN DRILL,/DRIVER (Fig, 6)
1 P_acoIhB Forward I Reverse So,eclat Switch
wltl_ Power Lock-Oft t_lo th_ con_orpr_stUonto
lock the power _tl
2 Plr_(;oIhO ba_my pack In0_odrill a_Ignhlgth_
_a_od t_bon b_ttmry pack wlIh groavo l_sidrJ
lho dr_il
3 Make au_o the lalsha_ on oath s_da of Iha
b_lory pack %n_p __nlo place, _nd the bal_o_y
pack i_ _ec_{e_I_nthe d_i_ I dlivOr httll)I_
bDglno_ngop_flon
Z_ CAUTIO N: when pl_clt_g b_lloty pluck I_ the tool, be sure talaed rib on
batte_, p_ck _lgns wtlh the harlem o_ the drill _nd latche_ _nto pl_co proper_y,
lmproper Inst_llallon of Ihe b_ttery p_ck ea_ cause damage to lateral
co_pono_ta.
I
FORWARD
VARIABLE SPEED (Fig, B)
_hl_ Variable t_poed tr_gar awi_ch delivers
I_t[thor I_pe_d _*rtdtotl:lue wi_h inct_a_;_d prOBBUlOor=
lhO higg0_ GW_l_h/_d lOWer t_pOBd_nd to/quowilh
do_;roa_od ptl_aa_oon lh0 tri_0f GW_ISh
NOTE:YOt_ might hear e WhiStling O_"rl_glng
_oise hem the trigger _w_tch when oporat]ng
at I_w r_peeds. 0,J not b_ cor_emetf; thI_ tr_:t
hormat p_tt of the _wltch lu_tclton,
Z_ WARNING: Cordlosa Battery Toots are always In operating condition when
the battery pack 1_ tnst_lled in lhe tool,Tho_elore the Forward ! Revere Selector
Swlt clt with Power Lock-Oil should _tw_yl_be tn the cooler position, focklng the
power otf, when tl_l_ tool Is not In use o_"when you are carrying It at your _lda,
REVERSE
ELECTRIC BRAKE
Tostop the drill/driver, release the trigger switch and the electric brake will stop the chuck
instantly. Ideal when driving screws, nuts and bolts.
Switch with Power Lock-Off is pushed fully to the left (forward) or to the right
NOTE: The drill / driver will not operate unless the Forward / Reverse Selector
Avoid running the drill/driver at low speeds for extended periods of time. Running at low
speeds under constant usage may cause the drill/driver to become overheated. If this
occurs, cool the drill/driver by running it without a load and at full speed.
KEYLESS CHUCK (Fig. 9 and 9a)
The drill/driver has a keyless chuck which allows you to hand tighten or loosen accessory bits
without the use of a chuck key.
1. Grasp and hold the rear chuck collar with one hand (see Fig. 9).
2. Rotate the front of the chuck with your other hand, clockwise to CLOSE and
counterclockwise to OPEN the chuck jaws (as viewed from the front of the chuck).
The front of the chuck also has embossed "pointing hands", indicating which direction to
rotate the front of the chuck to GRIP (tighten) or RELEASE (loosen) the accessory bits in
the chuck jaws (see Fig. 9a).
Fig. 9a OPEN "RELEASE"
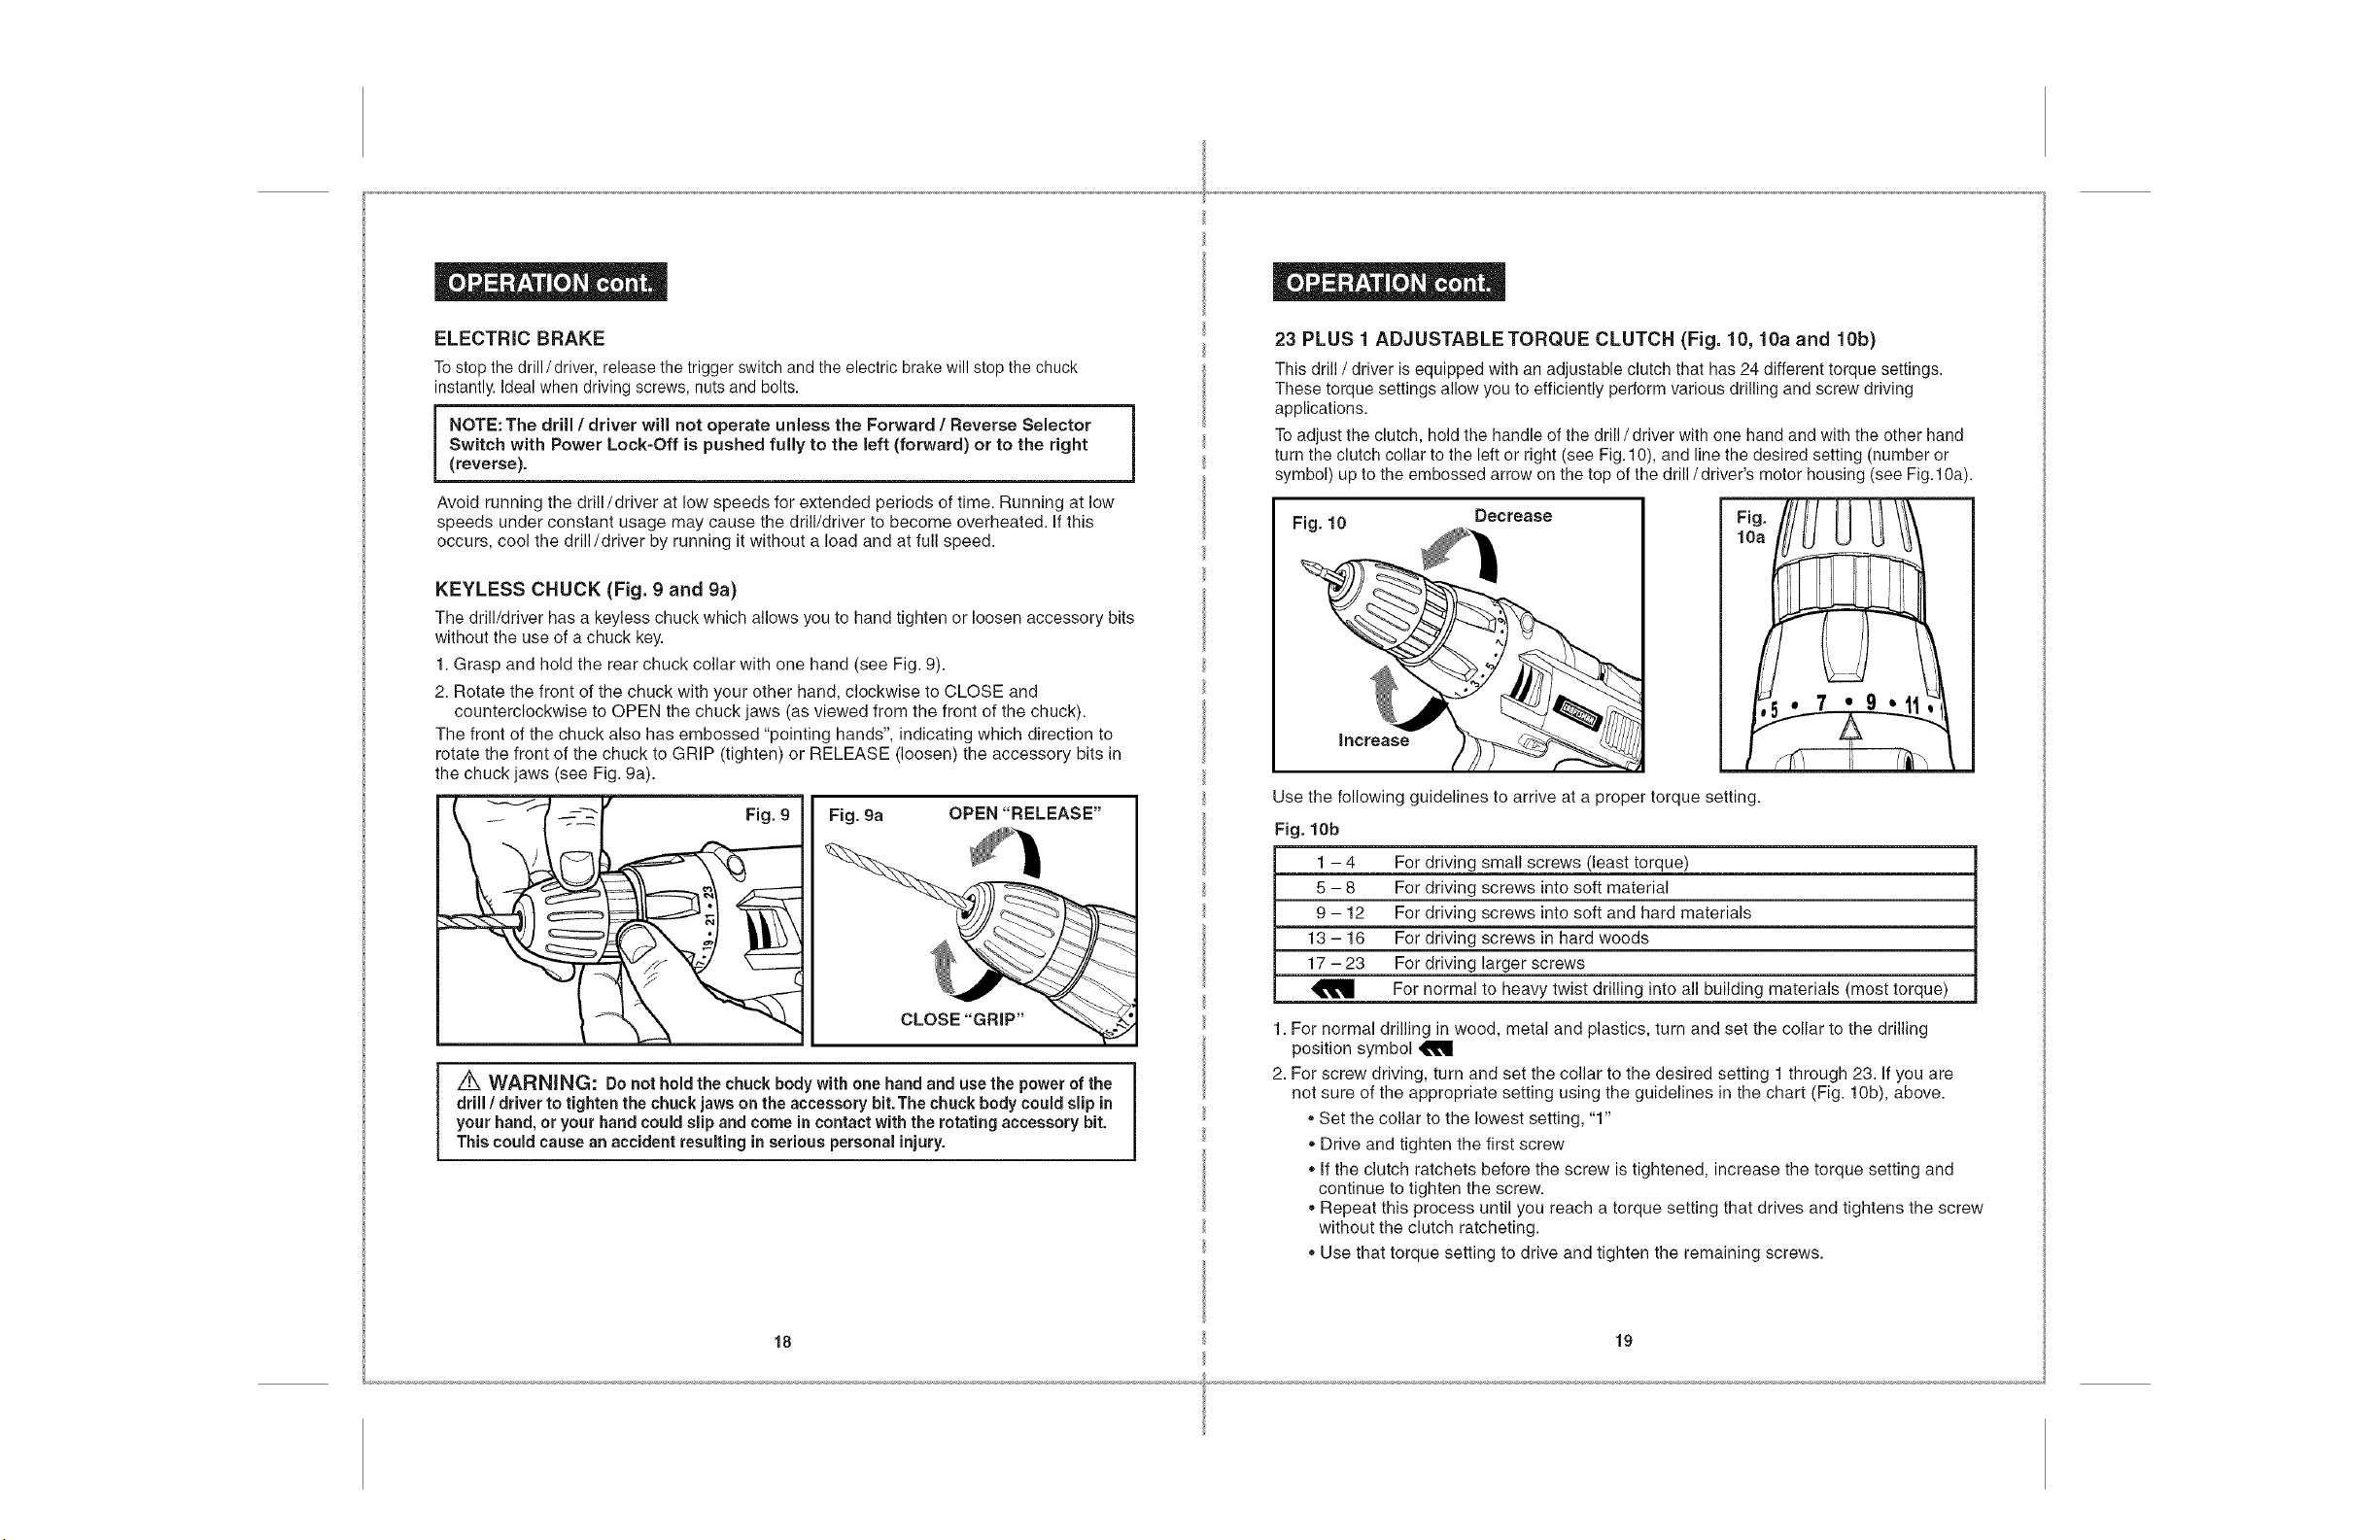
23 PLUS 1 ADJUSTABLETORQUE CLUTCH (Fig. 10, 10a and 10b)
This drill / driver is equipped with an adjustable clutch that has 24 different torque settings.
These torque settings allow you to efficiently perform various drilling and screw driving
applications.
To adjust the clutch, hold the handle of the drill / driver with one hand and with the other hand
1(reverse).
I
turn the clutch collar to the left or right (see Fig.10), and line the desired setting (number or
symbol) up to the embossed arrow on the top of the drill/driver's motor housing (see Fig.10a).
Fig. 10
Use the following guidelines to arrive at a proper torque setting.
Fig. 10b
1-4
5-8
9-12
13-16
17 -23
For driving small screws (least torque)
For driving screws into soft material
For driving screws into soft and hard materials
For driving screws in hard woods
For driving larger screws
For normal to heavy twist drilling into all building materials (most torque)
/K WARNING: Do not hold the chuck body with one hand and use the power of the
drill / driver to tighten the chuck jaws on the accessory bit.The chuck body could sJip in
your hand, or your hand could slip and come in contact with the rotating accessory bit.
This could cause an accident resulting in serious personal injury.
18
1. For normal drilling in wood, metal and plastics, turn and set the collar to the drilling
position symbol
2. For screw driving, turn and set the collar to the desired setting 1 through 23. If you are
not sure of the appropriate setting using the guidelines in the chart (Fig. 10b), above.
,,Set the collar to the lowest setting, "1"
,,Drive and tighten the first screw
,,If the clutch ratchets before the screw is tightened, increase the torque setting and
continue to tighten the screw.
,,Repeat this process until you reach a torque setting that drives and tightens the screw
without the clutch ratcheting.
,,Use that torque setting to drive and tighten the remaining screws.
19
 Loading...