

Page 1
USER INSTRUCTIONS
LOCK
LIGHT
Opener Terminal Screws
Antenna
Back panel of opener
KG
KG
1
3
9
7
5
1
3
9
7
5
1
2
3
Lighted
push button
Light
Lock
1
RED
2
WHITE
Terminal
Screws
2-Conductor
Bell Wire
LOCK
LIGHT
WARNING
WARNING WARNING
24 Volt
2-Conductor
Bell Wire
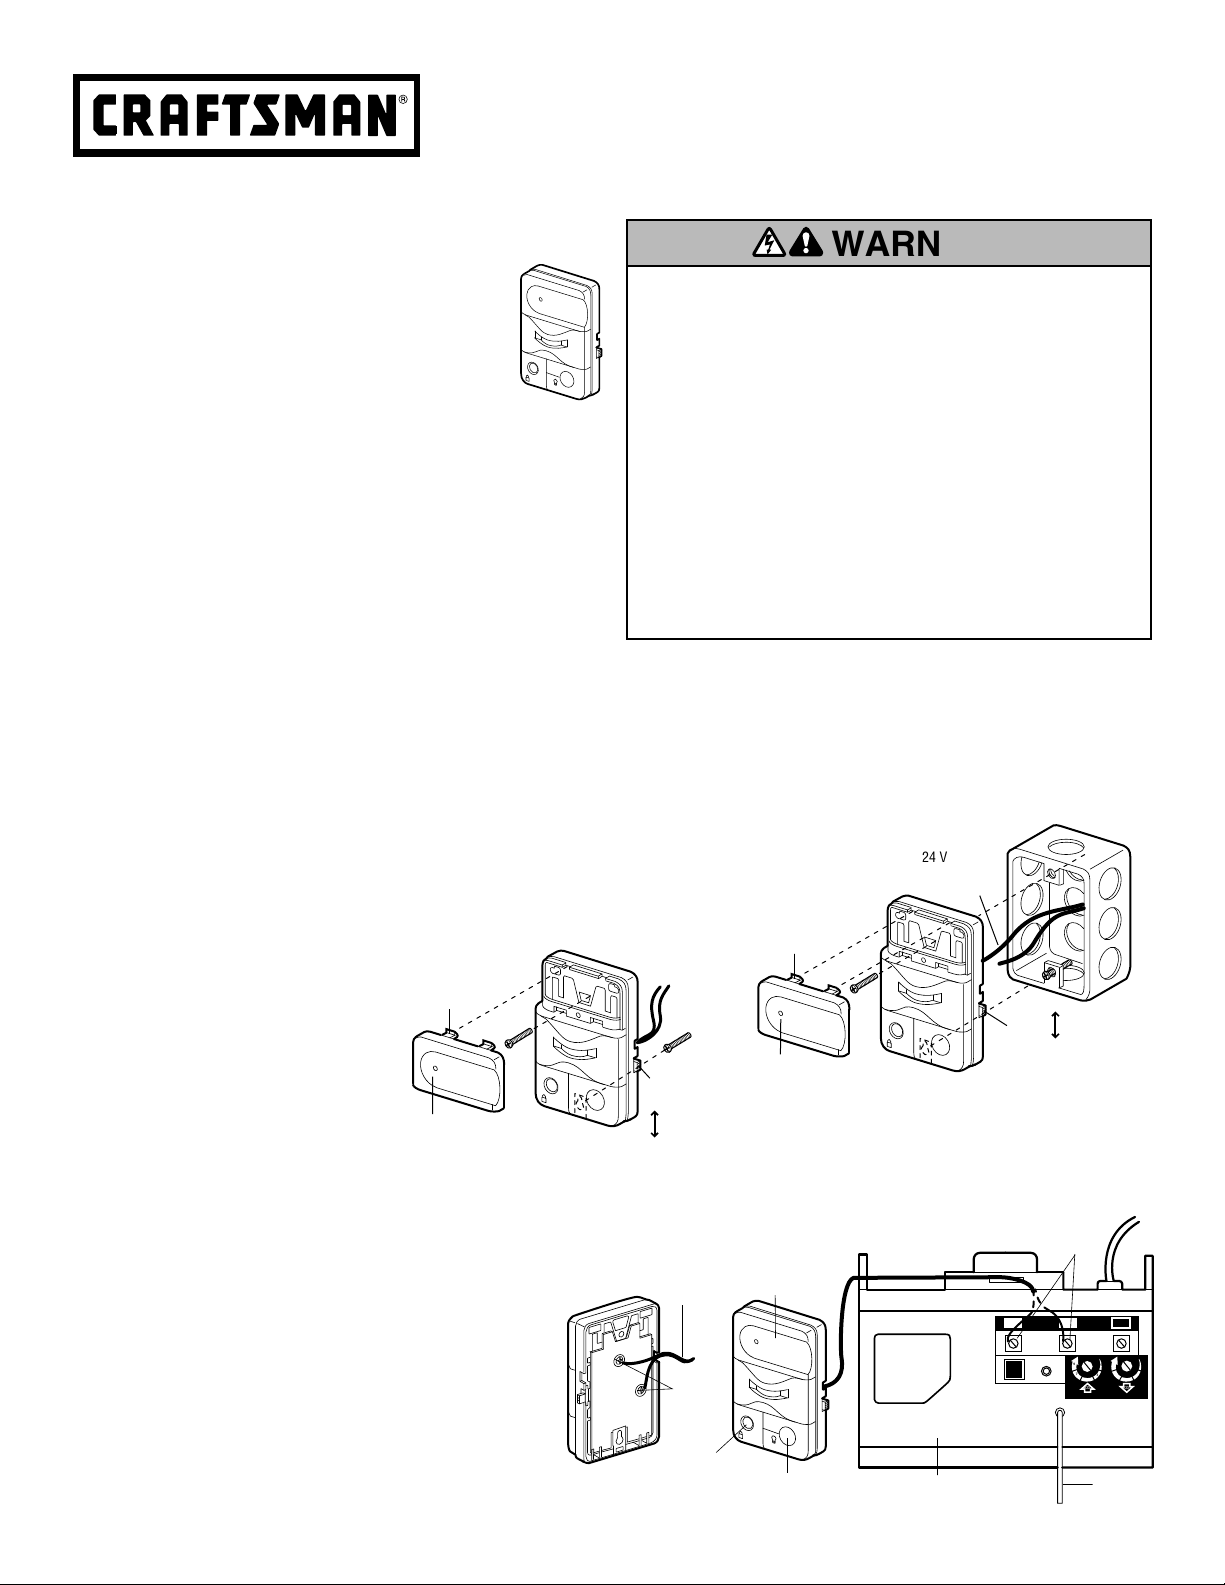
PRE-WIRED INSTALLATION
To Replace
Insert Top
Tabs First
Detector
Switch
LOCK
ON
OFF
Lighted
push button
For use with garage door openers manufactured after
January 1, 1995. This door control contains a motion
detector that will automatically turn on the light when
it detects a person entering the garage. This feature
can be easily turned off for extended work light use.
Locate the door control within sight of the door at a
minimum height of 5 feet (1.52 m) where small
children cannot reach, and away from all moving parts of the door
and door hardware.
NOTE: After installation, an indicator light behind the cover will
indicate proper connection. If not lit, the Lock and Light features
will not function (reverse wires to correct).
INSTALLATION
Remove the old control panel/lighted door control button.
The door control is typically attached directly to the wall. If
installing into drywall, drill 5/32" holes and use the anchors
provided. For pre-wired installations (as in new home
construction), console models may be mounted to a standard
single gang box.
1. Strip 1/4" (6 mm) of insulation from one end of the bell wire and
connect it to the two screw terminals on the back of the door
control: white to 2, and white/red to 1.
2. Remove white cover by gently prying at slot in top of the cover
with a small flat head screwdriver. Fasten with 6ABx1-1/4" selftapping screws (drywall installation) or 6-32x1" machine screws
(into gang box) as follows:
• Install bottom screw, allowing 1/8"
(3 mm) to protrude above
wall surface.
• Position bottom of door control on
screw head and slide down to
secure. Adjust screw for
snug fit.
• Drill and install top screw with care
to avoid cracking plastic housing.
Do not overtighten.
• Insert top tabs and snap on cover.
3. (For standard installation only) Run the bell wire up
the wall and across the ceiling to the motor unit. Use
insulated staples to secure the wire in several places.
Do not to pierce the wire with a staple, creating a
short.
4. Connect the bell wire to the terminal screws on the
opener panel: white to 2; white/red to 1.
5. Position the antenna wire as shown.
6. Use tacks or staples to permanently attach
entrapment warning label to wall near door control,
and manual release/safety reverse test label in a
prominent location on inside of garage door.
To Replace
Insert Top
Tabs First
Lighted push button
NOTE: DO NOT connect power and operate opener at this time.
The trolley will travel to the full open position but will not return to
the close position until the sensor beam is connected and properly
aligned.
STANDARD INSTALLATION
LOCK
MODEL 139.53688
MOTION DETECTING CONTROL CONSOLE
To prevent possible SERIOUS INJURY or DEATH from
electrocution:
• Be sure power is not connected BEFORE installing door control.
• Connect ONLY to 24 VOLT low voltage wires.
To prevent possible SERIOUS INJURY or DEATH from a closing
garage door:
• Install door control within sight of garage door, out of reach of
children at a minimum height of 5 feet, and away from all
moving parts of door.
• NEVER permit children to operate or play with door control
push buttons or remote controls.
• Activate door ONLY when it can be seen clearly, is properly
adjusted, and there are no obstructions to door travel.
• ALWAYS keep garage door in sight until completely closed.
NEVER permit anyone to cross path of closing garage door.
Detector
Switch
ON
OFF
Page 2
OPERATION
Press the lighted push button to open or close the door. Press
again to reverse the door during the closing cycle or to stop the
door while it's opening.
Light Feature: Press the Light button to turn the opener light on
or off. It will not control the opener lights when the door is in
motion. If you turn it on and then activate the opener, the light will
remain on for 4-1/2 minutes. Press again to turn it off sooner.
When used with openers manufactured after May 15, 1999,
(check the date on the opener panel) the 4-1/2 minute interval can
be changed to 1-1/2, 2-1/2, or 3-1/2 minutes as follows: Press
and hold the Lock button until the light blinks (about 10 seconds).
A single blink indicates that the timer is reset to 1-1/2 minutes.
Repeat the procedure and the light will blink twice, resetting the
timer to 2-1/2 minutes. Repeat again for a 3-1/2 minute interval,
etc., up to a maximum of four blinks and 4-1/2 minutes.
Automatic Light Feature: The opener light will turn on
automatically when a person enters the garage. When a person
walks in front of the door control, the opener light will come on
for five minutes, then shut off. This feature works by detecting
body heat. It is more sensitive in front of the door control than at
its sides, and works better as a person moves closer. It may not
work in temperatures around 100˚F.
To disable this feature, slide the Detector Switch on the right side
of the door control down (off).
SPECIAL NOTE: If this door control is installed on an opener
manufactured from January 1, 1995 to May 15, 1999, the
following difference may apply: If the light is on when the opener
is actuated, the light may go off for a moment, then turn on again
as the detector senses you.
Automatic Light Override Feature: We recommend that you
disable the motion sensor when using the opener lights as
working lights. Otherwise, they will turn off automatically if you
are working beyond the sensor’s range. Slide the Detector Switch
on the right side of the door control down (off), then press the
light button to control the lights.
Energy Saving Feature: This door control senses the brightness
inside the garage, and will not turn the light on if it is already
bright enough. If the light sensor turns on the light when it is not
needed or does not turn it on when it is dark, the sensitivity can
be adjusted. Remove the push bar cover by gently prying off the
top edge with a coin or screwdriver. Underneath there is a dial
below the red light on the right side. Use a small screwdriver to
turn the dial toward “L” (counterclockwise) to make the light
come on, or toward “H” (clockwise) to make the light go off.
Replace the cover by inserting top tabs and snapping into place.
Lock Feature: Designed to prevent operation of the door from
hand-held remote controls. However, the door will open and close
from the Door Control, the Outdoor Key Switch and the Keyless
Entry Accessories.
To activate: Press and hold the Lock button for 2 seconds. The
push button light will flash as long as the Lock feature is on.
To turn off: Press and hold the Lock button again for 2 seconds.
The push button light will stop flashing. The Lock feature will also
turn off whenever the “learn” button on the motor unit panel is
activated.
NOTICE: To comply with FCC and or Industry Canada (IC) rules, adjustment or modifications of this
receiver and/or transmitter are prohibited, except for changing the code setting or replacing the
battery. THERE ARE NO OTHER USER SERVICEABLE PARTS.
Tested to Comply with FCC Standards FOR HOME OR OFFICE USE. Operation is subject to the
following two conditions: (1) this device may not cause harmful interference, and (2) this device
must accept any interference received, including interference that may cause undesired operation.
To order replacement parts call...
1-800-4-MY-HOME
®
(1-800-469-4663)
Page 3

Tornillos terminales del abridor
Antena
Panel posterior del abridor
KG
KG
1
3
9
7
5
1
3
9
7
5
1
2
3
Botón con luz
Luz
Seguro
1
RED
2
WHITE
Tornillos
terminales
Cable de campana
de dos conductores
LOCK
LIGHT
Detector
Interruptor
LOCK
ON
OFF
Cable de campana de
24 voltios de dos conductores
en la caja múltiple
INSTALACIÓN PRE-CABLEADA
Para volver a ponerla,
primero inserte las
lengüetas superiores
Botón con luz
INSTRUCCIONES DEL USUARIO
AVERTISSEMENT
WARNING
WARNING
ADVERTENCIA ADVERTENCIA
ADVERTENCIA ADVERTENCIA
LOCK
LIGHT
Para uso con abre-puertas de garaje fabricados después del
1 de Enero de 1995. Este control de la puerta viene con un
detector de movimiento que automáticamente enciende la
luz cuando detecta a una persona entrando a la cochera.
Esta función se puede apagar fácilmente para usar la luz de
trabajo por más tiempo.
Ubique el control de la puerta de manera que quede a la vista desde la
puerta y a una altura mínima de 1.52 m (5 pies) donde los niños
pequeños no lo puedan alcanzar y lejos de las partes móviles de la puerta
y de la tornillería.
NOTA: Si las conexiones se han efectuado correctamente, se encenderá
una luz verde de la tapa. Si no es iluminado, las característica de Seguro
y Luz no funciona (inverso los cables para hace correcto).
INSTALACIÓN
Quite el botón de control de la puerta iluminado o panel de control viejo.
El control de la puerta está generalmente instalado directamente en la
pared. Si se va a instalar en un muro falso, taladre dos orificios de 5/32
de pulg. y use los sujetadores que se incluyen. Para una instalación
precableada, (por ejemplo, en una casa en construcción) los modelos de
consola se pueden instalar en una caja múltiple estándar.
Pele 6 mm (1/4 de pulg.) del extremo del cable de campana y
1.
conéctelo a las terminales de tornillo correspondientes al color del
cable en la parte posterior de la unidad de control de la puerta; blanco
a 2 y blanco y rojo a 1.
2.
Con un destornillador abra la tapa por el costado. Sujete con un
tornillo autorroscante de 6AB por 1-1/4 pulgadas (instalación en muro
falso) o con un tornillo para
metales de 6 -32 por
1 pulgadas (dentro de la caja
múltiple) como se indica a
continuación:
• Instale el tornillo de la parte
inferior de manera que
sobresalga por lo menos 3
mm (1/8 de pulg.) de
la pared.
• Coloque la parte inferior de
la unidad de control de la
puerta sobre la cabeza del tornillo y deslícelo para sujetarlo, vuelva a
apreta el tornillo para un ajuste firme.
• Taladre y coloque el tornillo de la parte superior con precaución de
no romper la cubierta plástica de la unidad. No apriete en exceso.
• Inserte las lengüetas superiores y cierre la cubierta.
3. (Únicamente para las instalaciones estándar) Corra el cable de
campana al motor a lo largo de la pared y el techo; use grapas con
aislamiento en varios puntos a lo largo del cable para sujetarlo.
Tenga cuidado de no perforar el cable al engraparlo, creando así un
corto circuito o un circuito abierto.
4. Conecte el cable de campana a los tornillos terminales del panel de la
unidad del motor: blanco a dos; blanco y rojo a 1.
5. Coloque el cable de la antena como se indica.
Para volver a ponerla,
primero inserte
las lengüetas
superiores
Botón con luz
INSTALACIÓN ESTÁNDAR
LOCK
Detector
Interruptor
MODELO 139.53688
LA CONSOLA DE CONTROL DE
DETECCIÓN DE MOVIMIENTO
Para evitar la posibilidad de una LESIÓN GRAVE o INCLUSO LA
MUERTE por electrocución:
• ANTES de instalar el control de la puerta, cerciórese de que la energía
eléctrica no esté conectada.
• Conecte el control SÓLO a cables de bajo voltaje de 24 VOLTIOS.
Para evitar la posibilidad de una LESIÓN grave e incluso LA MUERTE
cuando la puerta de la cochera se está cerrando:
• Instale el control de la puerta de manera que quede a la vista desde la
puerta de la cochera, fuera del alcance de los niños a una altura
mínima de 1.52 m (5 pies), y alejado de las partes móviles de la
puerta.
• NUNCA permita que los niños hagan funcionar o jueguen con los
botones de control de la puerta ni con los control remoto.
• Haga funcionar la puerta SÓLO si la puede ver claramente, si la puerta
está debidamente ajustada, y si no no hay ninguna obstrucción en su
recorrido.
• SIEMPRE tenga a la vista la puerta de la cochera hasta que esté
completamente cerrada. NUNCA permita que alguien se atraviese en
el recorrido de la puerta de la cochera cuando se está cerrando.
6. Use tachuelas o grapas para sujetar permanentemente la calcomanía
de advertencia sobre el riesgo de quedar atrapado; esta calcomanía
debe estar en la pared y cerca del control de la puerta. La calcomanía
de advertencia de la prueba de retroceso de seguridad y liberación
manual debe colocarse en un punto prominente del interior de la
puerta de la cochera.
NOTA: NO conecte el abridor a la energía eléctrica ni lo haga funcionar en
este momento. El trole hará el recorrido hasta llegar a la posición
completamente abierta, pero no regresará a la posición cerrada hasta que
el rayo del sensor esté conectado y alineado debidamente.
ON
OFF
Page 4

OPERACIÓN
Oprima el botón iluminado para abrir o cerrar la puerta. Oprima de nuevo
para que la puerta retroceda en el ciclo de cierre o para detener la puerta
cuando se está abriendo.
Luz: Oprima el botón de Luz para encender o apagar la luz del abridor.
Este botón no controla las luces del abridor cuando la puerta está en
movimiento. Si usted enciende la luz y luego activa el abridor, la luz
permanecerá encendida durante cuatro minutos y medio. Oprima el botón
nuevamente para que la luz se apague antes.
Al usarlo con abre-puertas fabricados después del 1° de mayo de 1999
(compruebe la fecha de fabricación en el panel del abre-puerta) El
intervalo de 4 minutos y 1/2 puede cambiarse a 1 minuto y 1/2, 2
minutos y 1/2 o 3 minutos y 1/2, como sigue: Oprima y mantenga
oprimido el botón del seguro (Lock) hasta que la luz empiece a parpadear
(alrededor de 10 segundos). Si parpadea una vez, esto indica que el
medidor de tiempo se ha fijado a un minuto y medio. Repita el
procedimiento y la luz parpadeará dos veces, lo que significa que el
intervalo se ha fijado en 2 minutos y 1/2. Repita una vez más si desea un
intervalo de 3 minutos y 1/2, etc., hasta un máximo de 4 minutos y 1/2,
en cuyo caso la luz parpadeará cuatro veces.
Función de Anulación de Luz Automática: Le recomendamos que
desactive el sensor de movimiento cuando vaya a usar las luces del abrepuertas como luces de trabajo. Si no desconecta el sensor, las luces se
apagarán automáticamente si usted está trabajando fuera del alcance de
sensor. Llevar hacia abajo (posición desactivada) el selector del detector
del lado derecho del control y luego oprimir el botón de la luz encenderla
o apagarla.
Característica de Conserve Energía: Este control de la puerta puede
sentido la brillantez entre el garaje y no encender la luz si ya esta
brillantez en el garaje. Si el sensor de luz encender la luz cuando no
necesita o cuando esta oscuro, si puede ajuste la sensibilidad. Quite la
cubierta de barra pulsadora haciendo palanca suavemente a la parte
superior con un moneda o destornillador. En lado hay un selector abajo
de un luz rojo en el lado derecho. Use un destornillador para girar el
selector al la “L” (en sentido contrario de las agujas del reloj) para apretar
la luz, o a la “H” (en sentido de las agujas del reloj) para apagar la luz.
Remitir la cubierta como introduzca las lengüetas superior y coloque en
posición.
Función de Luz Automática: La luz del abre-puertas se enciende
automáticamente cuando una persona entra a la cochera. Cuando una
persona pasa caminando frente al control de la puerta, la luz se enciende,
se queda encendida por cinco minutos y luego se apaga. Esta
característica funciona detectando el calor del cuerpo humano. Es más
sensible en el frente del control de la puerta que a sus lados, y funciona
mejor a medida que una persona se acerca. Es posible que no funcione a
temperaturas de alrededor de 100°F (38°C).
Para desactivar esta función, deslice hacia abajo el interruptor del
detector para apagarlo; el interruptor se encuentra al lado derecho del
control de la puerta.
NOTA ESPECIAL: Si este control se instala con un abre-puerta fabricado
entre el 1 de enero de 1995 y el 1 de diciembre de 1999, podría existir la
siguiente diferencia: si la luz está encendida cuando se activa el abrepuerta, podría apagarse por un momento antes de encenderse de nuevo
cuando el sensor detecta su presencia.
Para pedir repuestos, llame al...
1-800-4-MY-HOME
®
(1-800-469-4663)
Seguro: Esta función está diseñada para evitar la operación de la puerta
con los controles remotos manuales. No obstante, la puerta se puede
abrir y cerrar con los siguientes accesorios: El control de la puerta, el
Interruptor de llave externo, y la entrada sin llave.
Esta función, oprima y mantenga oprimido el botón del
activar:
Para
seguro (Lock) por dos segundos. La luz del botón va a parpadearán
mientras esté activado el seguro.
Para desactivar: La función, oprima y mantenga oprimido el botón del
seguro por dos segundos. La luz del botón dejará de parpadear. La
función del seguro también se apaga siempre que el botón “aprender” del
panel del motor esté activado.
AVISO: Para cumplir con las reglas de la FCC y/o de Canadá (IC), las reglas, ajustes o
modificaciones de este receptor y/o transmisor están prohibidos, excepto por el cambio de la
graduación del código o el reemplazo de la pila. NO HAY OTRAS PIEZAS REPARABLES DEL
USUARIO.
Se ha probado para cumplir con las normas de la FCC para USO DEL HOGAR O DE LA OFICINA. La
operación está sujeta a las dos condiciones siguientes:(1) este dispositivo no puede causar
interferencia perjudicial, y (2) este dispositivo debe aceptar cualquier interferencia recibida,
incluyendo la interferencia que puede causar una operación no deseable.
® Registered Trademark /
® Marca Registrada /
114A2395D © 2009 Sears, Roebuck and Co.
MC
Marque de commerce /
™
Trademark / SM Service Mark of Sears, Roebuck and Co.
™
Marca de Fábrica /
MD
Marque déposée de Sears, Roebuck and Co.
SM
Marca de Servicio de Sears, Roebuck and Co.
 Loading...