

Craftsman 13953684 Owner’s Manual

CRRFTSMRH
FEATURES
For use with any Security+ garage door openers having an
orange "learn" button.
Personalized Password: Up to 10,000 possible
combinations. Password can be easily changed if desired.
Temporary password: Can be added for visitors or service
persons. This temporary password can be limited to a
programmable number of hours or a programmable number
of entries.
Rolling Code: While your password remains constant until
you change it, the code between the Keyless Entry and the
receiver changes with each use, randomly accessing over
100 billion new codes.
Operation: Opener activates when 4-digit password and
Enter button is pressed.
If wrong numbers are accidentally pressed, correction can be
made immediately. The Enter button will transmit only the
last four digits.
The Keypad will blink for 15 seconds after the password is
transmitted. During that time the Enter button can be used to
stop or reverse the door travel.
The Lock feature on openers with premium door controls is
designed to prevent operation of the door from portable
transmitters. However, the door will open and close from the
door control push button and the Keyless Entry.
Model 139.53684 Security+
Keyless Entry
USER INSTRUCTIONS
TopreventpossibleSERIOUSINJURYor DEATHfroma moving
gate or garage door:
• ALWAYS keepremote controls out of reach of children. NEVER
permitchildren to operate,or playwith remote control
transmitters.
• Activate gateor door ONLY when it can be seen clearly,is
properlyadjusted,and there are no obstructions to door travel.
• ALWAYS keepgateor garage door in sightuntilcompletely
closed. NEVER permitanyone to cross pathof movinggate
or door.
NOTICE:Tocomply with FCCand or Industry Canada(IC) rules, adjustment or modificationsof
this receiverand/or transmitter are prohibited, exceptfor changing the codesettingor replacing
the battery. THEREARENOOTHERUSERSERVICEABLEPARTS.
Testedto Comply with FOCStandardsFORHOMEOROFFICEUSE.Operationis subjectto the
following two conditions: (1) this devicemay not causeharmful interference,and(2) this device
must acceptany interference received,includinginterferencethat may causeundesired
operation.
SETTING THE PERSONAL ENTRY PASSWORD
We recommend that you program your password now, before you install the Keyless Entry. Then you can test the reception
at the mounting location before you proceed further.
USING THE PREMIUM CONTROL CONSOLE USING THE "LEARN" BUTTON
)
1. Enter a four digit personal identification
number (PIN) of your choice on the keypad.
Then press and hold ENTER.
2. While holding the ENTER button, press and
hold the LIGHT button on the Premium
Control Console.
3. Continue holding the ENTER and LIGHT
buttons while you press the push bar on the
Premium Control Console (all three buttons
are held).
1. Press and release the "learn" button on motor _l ][_,
unit. The learn indicator light will glow
steadily for 30 seconds.
2. Within 30 seconds, enter a four digit personal
identification number (PIN) of your choice on
the keypad. Then press and hold the ENTER
button.
3. Release the button when the motor unit lights
blink. It has learned the code. If light bulbs are ( "(_ /
not installed, two clicks will be heard. _ /_ \/
4. Release buttons when the motor unit lights
blink. It has learned the code. If light bulbs
are not installed, two clicks will be heard.
Side two contains instructions for installing the Keyless
Entry, changing the personal entry password and setting a
temporary password.
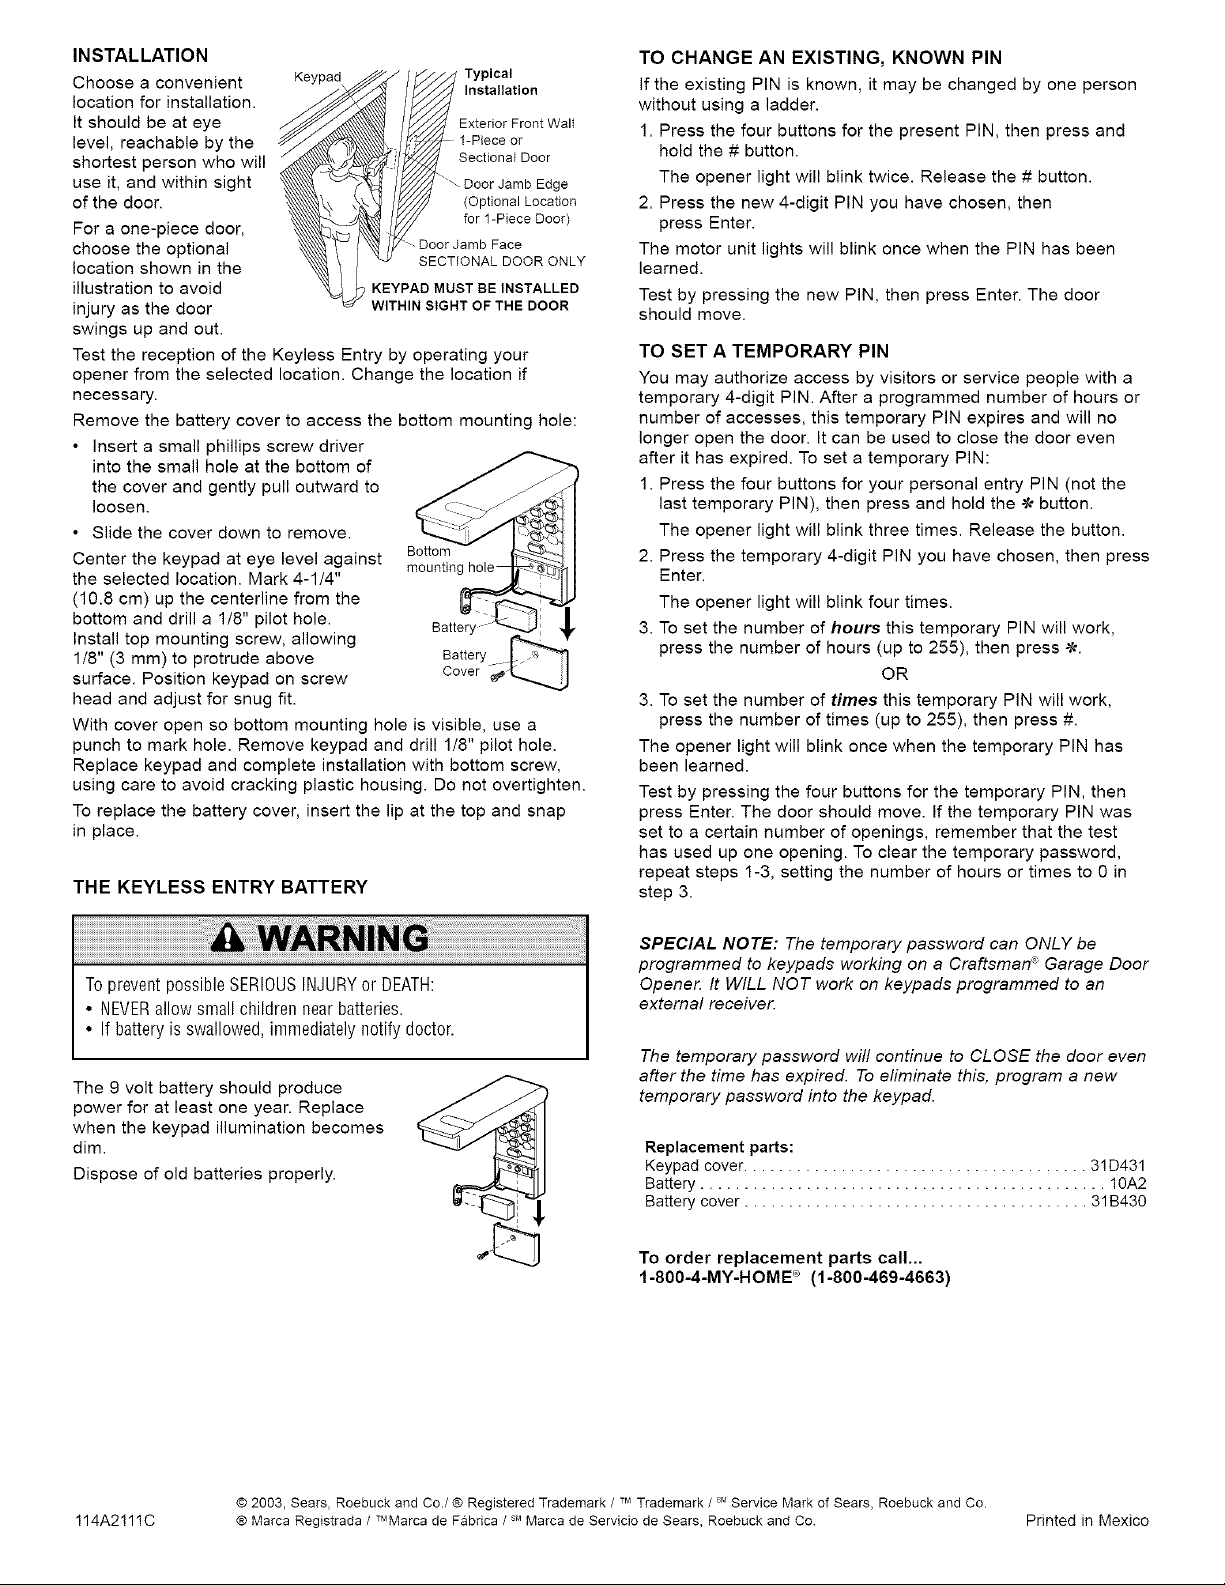
INSTALLATION
Choose a convenient
location for installation.
It should be at eye
level, reachable by the
shortest person who will
use it, and within sight
of the door.
For a one-piece door,
choose the optional
location shown in the
illustration to avoid
injury as the door
Keypad
, KEYPAD MUST BE INSTALLED
WITHIN SIGHT OF THE DOOR
Typical
Installation
Exterior Front Wall
1-Piece or
Sectional Door
"_ Door Jamb Edge
(Optional Location
for 1-Piece Door)
Door Jamb Face
SECTIONAL DOOR ONLY
swings up and out.
Test the reception of the Keyless Entry by operating your
opener from the selected location. Change the location if
necessary.
Remove the battery cover to access the bottom mounting hole:
• Insert a small phillips screw driver
into the small hole at the bottom of
the cover and gently pull outward to
loosen.
• Slide the cover down to remove.
Center the keypad at eye level against Bottom
the selected location. Mark 4-1/4"
mouetinc
(10.8 cm) up the centerline from the
bottom and drill a 1/8" pilot hole.
Install top mounting screw, allowing
1/8" (3 mm) to protrude above Battery
surface. Position keypad on screw Cover
head and adjust for snug fit.
With cover open so bottom mounting hole is visible, use a
punch to mark hole. Remove keypad and drill 1/8" pilot hole.
Replace keypad and complete installation with bottom screw,
using care to avoid cracking plastic housing. Do not overtighten.
To replace the battery cover, insert the lip at the top and snap
in place.
THE KEYLESS ENTRY BATTERY
TO CHANGE AN EXISTING, KNOWN PIN
If the existing PIN is known, it may be changed by one person
without using a ladder.
1. Press the four buttons for the present PIN, then press and
hold the # button.
The opener light will blink twice. Release the # button.
2. Press the new 4-digit PIN you have chosen, then
press Enter.
The motor unit lights will blink once when the PIN has been
learned.
Test by pressing the new PIN, then press Enter. The door
should move.
TO SET A TEMPORARY PIN
You may authorize access by visitors or service people with a
temporary 4-digit PIN. After a programmed number of hours or
number of accesses, this temporary PIN expires and will no
longer open the door. It can be used to close the door even
after it has expired. To set a temporary PIN:
1. Press the four buttons for your personal entry PIN (not the
last temporary PIN), then press and hold the _ button.
The opener light will blink three times. Release the button.
2. Press the temporary 4-digit PIN you have chosen, then press
Enter.
The opener light will blink four times.
3. To set the number of hours this temporary PIN will work,
press the number of hours (up to 255), then press _.
OR
3. To set the number of times this temporary PIN will work,
press the number of times (up to 255), then press #.
The opener light will blink once when the temporary PIN has
been learned.
Test by pressing the four buttons for the temporary PIN, then
press Enter. The door should move. If the temporary PIN was
set to a certain number of openings, remember that the test
has used up one opening. To clear the temporary password,
repeat steps 1-3, setting the number of hours or times to 0 in
step 3.
SPECIAL NOTE: The temporary password can ONLY be
programmed to keypads working on a Craftsman ® Garage Door
To prevent possibleSERIOUSINJURYor DEATH:
• NEVERallow small children near batteries.
Opener. It WILL NOT work on keypads programmed to an
external receiver.
• If battery is swallowed, immediately notify doctor.
The temporary password will continue to CLOSE the door even
The 9 volt battery should produce
power for at least one year. Replace
after the time has expired. To eliminate this, program a new
temporary password into the keypad.
when the keypad illumination becomes
dim.
Dispose of old batteries properly.
Replacement parts:
Keypad cover ....................................... 31D431
Battery .............................................. 10A2
Battery cover ....................................... 31B430
To order replacement parts call...
1-800-4-MY-HOME ° (1-800-469-4663)
114A2!11C ® Marca Registrada / TMMarca de Fabrica / s'_Marca de Servicio de Sears, Roebuck and Co Printed in Mexico
© 2003, Sears, Roebuck and Co./® Registered Trademark / 7MTrademark / sty,Service Mark of Sears, Roebuck and Co.
 Loading...