

Craftsman 113177846 Owner’s Manual
owner's
manual
MODEL NO.
113.177846
Serial
Number
Model and serial
numbers may be
found on the handle.
You should record
both model and serial
numbers in a safe
place for future use.
T ®
20 GALLON
AWARNING:
FOR YOUR
SAFETY,
READ ALL
INSTRUCTIONS
CAREFULLY
SAVE THIS
MANUAL
FOR FUTURE
REFERENCE
J
Sears, Roebuck and Co., Hoffman Estates, IL 60179 U.S.A.
Part No. SP6642 Printed in Mexico
WET/DRY VAC
• safety
• assembly
• operating
• maintenance
• repair parts
• Espafiol - pagina 19
Table of Contents
Section Page
Table of Contents .................. 2
Warranty ........................ 2
Important Safety Instructions ......... 3
Introduction ...................... 5
Unpacking and Checking
Carton Contents ................. 5
Carton Contents List ............. 5
Tools Required .................. 5
Replacement Filter Assembly ........ 6
Drum/Wheel Assembly ............. 7
Wet/Dry Vac Assembly ............. 9
Cord Storage ................... 9
Insert Hose ..................... 9
Accessory and Hose Storage ....... 10
Operation ....................... 10
Vacuuming Dry Materials ......... 11
Section Page
Vacuuming Liquids .............. 11
Emptying the Drum ............. 11
Moving the Wet/Dry Vac .......... 11
Blowing Feature ................ 12
Maintenance .................... 13
Filter ......................... 13
Filter Cleaning ................. 13
Filter Removal ................. 13
Cleaning a Dry Filter ............ 13
Cleaning a Wet Filter ............ 13
Installation .................... 13
Cleaning and Disinfecting
the Wet/Dry Vac .............. 14
Casters ....................... 14
Storage ....................... 14
Repair Parts ..................... 16
Warranty
r
If this Craftsman product fails due to a defect in material or workmanship
within one year from the date of purchase, return it to any Sears store,
Sears Service Center, or other Craftsman outlet for free repair (or
replacement if repair proves impossible).
This warranty applies for only 90 days from the date of purchase if this
product is ever used for commercial or rental purposes.
This warranty does not include bags or filters, which are expendable
parts that can wear out from normal use within the warranty period.
This warranty gives you specific legal rights, and you may also have other
rights, which vary, from state to state.
k.
Craftsman One Year Full Warranty
Sears, Roebuck and Co., Hoffman Estates, IL 60179 j
IMPORTANT SAFETY INSTRUCTIONS
Safety is a combination of common sense.
staying alert, and knowing how your
wet/dry vacuum cleaner ("Vac") works.
Safety Signal Words
DANGER: Indicates an imminently
hazardous situation which, if not avoided
will result in death or serious injury.
A WARNING: Indicates a potentially
hazardous situation which, if not avoided
could result in death or serious injury.
CAUTION: Indicates a potentially
hazardous situation which, if not avoided
may result in minor or moderate injury, or
property damage.
When using your Vac, always follow basic
safety precautions including the following:
WARNING -Toreduce
the risk of fire, electric shock, or
injury:
• Read and understand this manual and
all labels on the Wet/Dry Vac before
operating.
• Use only as described in this manual.
• Do not leave Vac running while
unattended.
• Sparks inside the motor can ignite
flammable vapors or dust. To reduce
the risk of fire or explosion, do not
vacuum or use near flammable or
combustible liquids, gases, or explosive
dusts, such as gasoline or other fuels,
lighter fluid, cleaners, oil-based paints,
natural gas, hydrogen, coal dust,
magnesium dust, aluminum dust, grain
dust, or gun powder.
• Do not vacuum anything that is burning
or smoking, such as cigarettes,
matches, or hot ashes.
• Do not vacuum drywall dust or cold
fireplace soot or ash with standard
filter. This is a very fine dust which may
be exhausted back into the air. Use a
fine dust filter instead.
• To reduce the risk of health hazards
from vapors or dust, do not vacuum
toxic materials.
• Do not use or store near hazardous
materials.
To reduce the risk of electric shock, do
not expose to rain or allow liquid to
enter motor compartment. Store
indoors.
Do not allow to be used as a toy. Close
attention is necessary when used by or
near children.
Do not use with a torn filter or without
the filter installed except when
vacuuming liquids as described in the
Operation section of this manual. Dry
debris ingested by the impeller may
damage the motor or be exhausted
back into the air.
• WARNING: The power cord on this
product contains lead, a chemical
known in the State of California to cause
birth defects or other reproductive harm.
Wash hands after handling.
• Do not leave Vac when plugged in.
Unplug from outlet when not in use and
before servicing.
• Turn off Vac before unplugging.
• To reduce the risk of injury from
accidental starting, unplug power cord
before changing or cleaning filter.
• Do not unplug by pulling on cord. To
unplug, grasp the plug, not the cord.
• Do not use with damaged cord, plug or
other parts. If your Vac is not working
as it should, has missing parts, has
been dropped, damaged, left outdoors,
or dropped into water, return it to a
Sears Service Center.
• Do not pull or carry by cord, use cord
as handle, close a door on cord, or pull
cord around sharp edges or corners.
Do not run Vac over cord. Keep cord
away from heated surfaces.
• Do not handle plug, switch, or the Vac
with wet hands.
• Do not put any object into ventilation
openings. Do not vacuum with any
ventilation openings blocked; keep free
of dust, lint, hair or anything that may
reduce air flow.
• Keep hair, loose clothing, fingers, and
all parts of body away from openings
and moving parts.
• To reduce the risk of falls, use extra
care when cleaning on stairs.
• Toreducetheriskofbackinjuryor
falls,donotliftaVacthatisheavywith
liquidordebris.PartiallyemptytheVac
byscoopingordrainingliquidtomake
itcomfortabletolift.
• Toreducetheriskofpersonalinjuryor
damagetoVac,useonlyCraftsman
recommendedaccessories.
• Whenusingasablower:
- Directairdischargeonlyatwork
area.
- Donotdirectairatbystanders.
- Keepchildrenawaywhenblowing.
- Donotuseblowerforanyjobexcept
blowingdirtanddebris.
- Donotuseasasprayer.
- Wearsafetyeyewear.
• Toreducetheriskofeyeinjury,wear
safetyeyewear.Theoperationofany
utilityVacorblowercanresultin
foreignobjectsbeingblownintothe
eyes,whichcanresultinsevereeye
damage.
• Toreducetheriskofbeingstruckby,or
pulleddownby,arollingVac,blockthe
casterswhenusingonanyunevenor
slopedsurface.
• ThisWet/DryVacisdouble-insulated,
eliminatingtheneedforaseparate
groundingsystem.Useonlyidentical
replacementparts.Readthe
instructionsforServicingDouble-
InsulatedWet/DryVacsbefore
servicing.
• Useonlyextensioncordsthatarerated
foroutdooruse.Extensioncordsin
poorconditionorthataretoosmallin
wiresizecanposefireandshock
hazards.Toreducetheriskofthese
hazardswhenusinganextensioncord,
besureitisingoodconditionandthat
theconnectiondoesnotcomeinto
contactwithliquid.Tokeeppowerloss
toaminimum,usethefollowingtable
tochoosetheminimumwiresize
extensioncord.
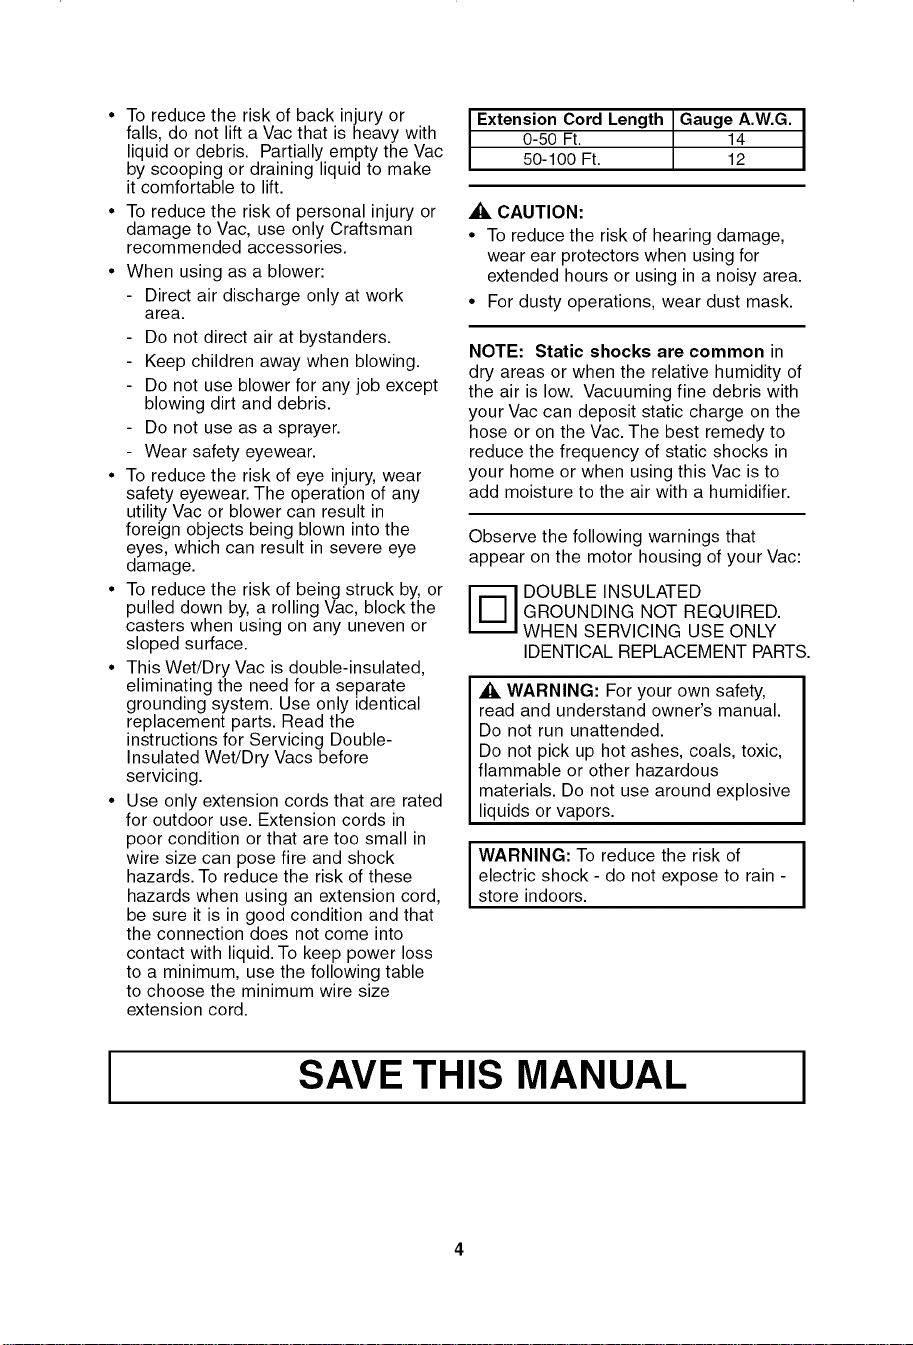
Extension Cord Length Gauge A.W.G.
0-50 Ft. 14
50-100 Ft. 12
CAUTION:
• To reduce the risk of hearing damage,
wear ear protectors when using for
extended hours or using in a noisy area.
• For dusty operations, wear dust mask.
NOTE: Static shocks are common in
dry areas or when the relative humidity of
the air is low. Vacuuming fine debris with
your Vac can deposit static charge on the
hose or on the Vac. The best remedy to
reduce the frequency of static shocks in
your home or when using this Vac is to
add moisture to the air with a humidifier.
Observe the following warnings that
appear on the motor housing of your Vac:
GROUNDING NOT REQUIRED.
'] DOUBLE INSULATED
WHEN SERVICING USE ONLY
IDENTICAL REPLACEMENT PARTS.
A WARNING: For your own safety,
read and understand owner's manual.
Do not run unattended.
Do not pick up hot ashes, coals, toxic,
flammable or other hazardous
materials. Do not use around explosive
liquids or vapors.
electric shock - do not expose to rain -
I WARNING: To reduce the risk of I
store indoors.
SAVE THIS MANUAL I
Introduction
This Wet/Dry Vac is intended for house-
hold use. It may be used for vacuuming of
wet or dry media and may be used as a
blower.
Read this owner's manual to familiarize
yourself with the product features and to
understand the specific usage of your new
wet/dry vac.
Unpacking and Checking Carton Contents m
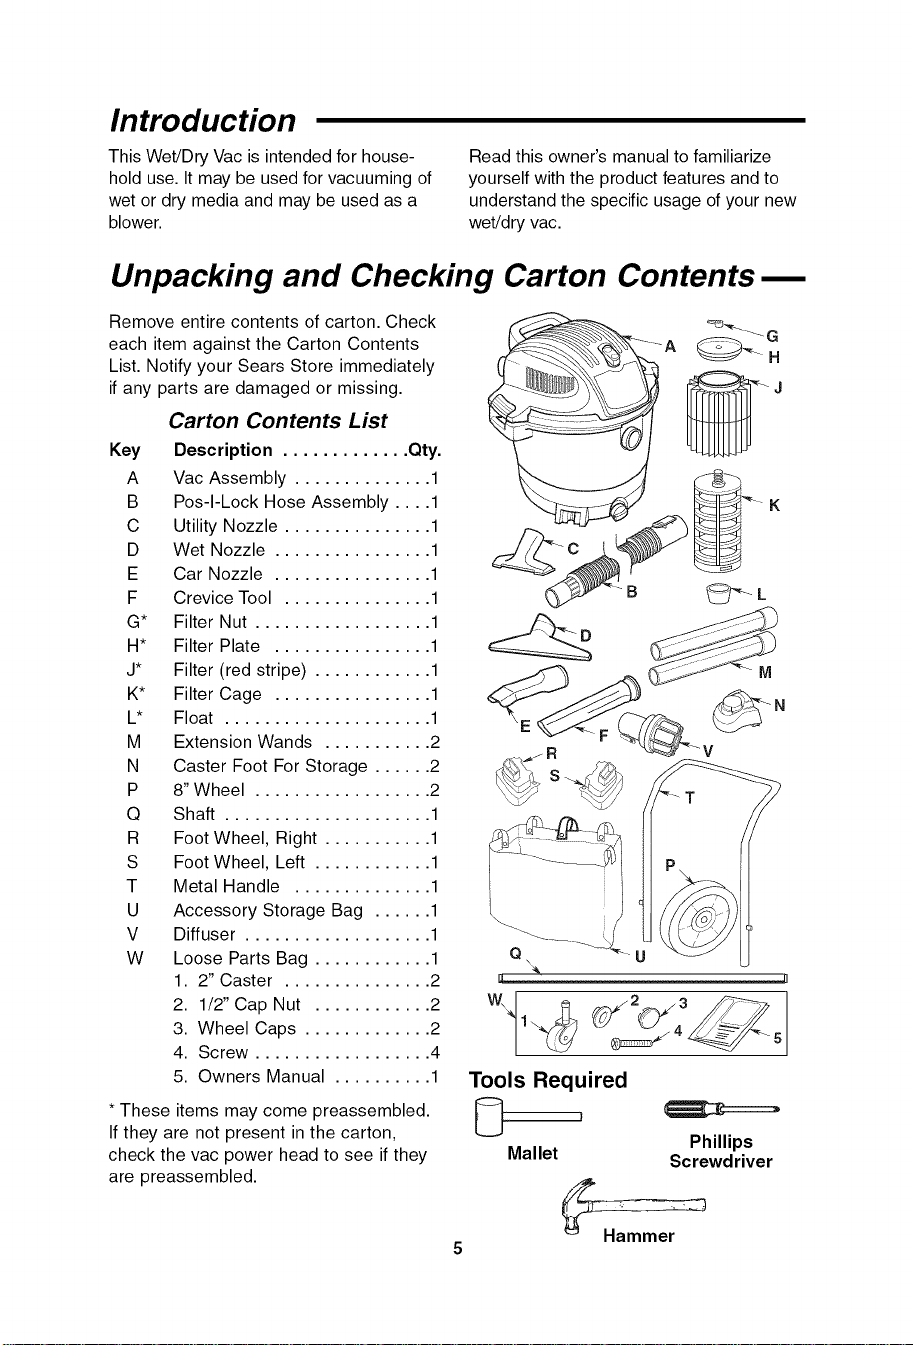
Remove entire contents of carton. Check
each item against the Carton Contents
List. Notify your Sears Store immediately
if any parts are damaged or missing.
Carton Contents List
Key
* These items may come preassembled.
If they are not present in the carton,
check the vac power head to see if they
are preassembled.
Description ............. Qty.
A
Vac Assembly .............. 1
B
Pos-I-Lock Hose Assembly .... 1
C
Utility Nozzle ............... 1
D
Wet Nozzle ................ 1
E
Car Nozzle ................ 1
F
Crevice Tool ............... 1
G*
Filter Nut .................. 1
H*
Filter Plate ................ 1
j*
Filter (red stripe) ............ 1
K*
Filter Cage ................ 1
L*
Float ..................... 1
M
Extension Wands ........... 2
N
Caster Foot For Storage ...... 2
P
8" Wheel .................. 2
Shaft ..................... 1
Q
R
Foot Wheel, Right ........... 1
S
Foot Wheel, Left ............ 1
T
Metal Handle .............. 1
U
Accessory Storage Bag ...... 1
V
Diffuser ................... 1
W
Loose Parts Bag ............ 1
1. 2" Caster ............... 2
2. 1/2" Cap Nut ............ 2
3. Wheel Caps ............. 2
4. Screw .................. 4
5. Owners Manual .......... 1
Q\
[1
Tools Required
Mallet Screwdriver
Phillips
5
Replacement Filter Assembly
Ak WARNING: For your own safety,
never connect plug to power source
outlet until all assembly steps are
complete and you have read and
understood the safety and operation
instructions. Do not operate vac with
any parts damaged or missing.
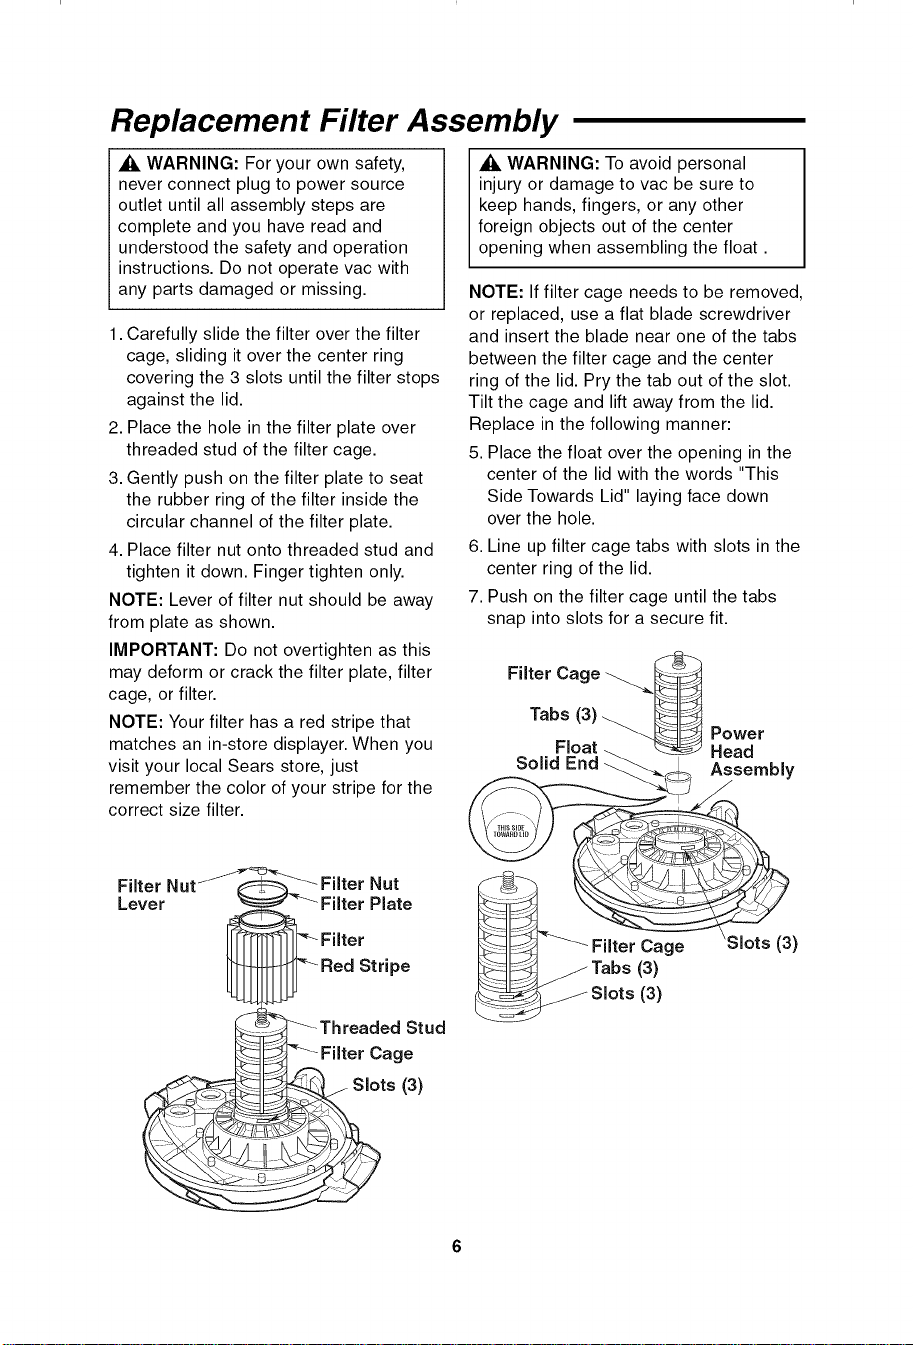
1. Carefully slide the filter over the filter
cage, sliding it over the center ring
covering the 3 slots until the filter stops
against the lid.
2. Place the hole inthe filter plate over
threaded stud of the filter cage.
3. Gently push on the filter plate to seat
the rubber ring of the filter inside the
circular channel of the filter plate.
4. Place filter nut onto threaded stud and
tighten it down. Finger tighten only.
NOTE: Lever of filter nut should be away
from plate as shown.
IMPORTANT: Do not overtighten as this
may deform or crack the filter plate, filter
cage, or filter.
NOTE: Your filter has a red stripe that
matches an in-store displayer. When you
visit your local Sears store, just
remember the color of your stripe for the
correct size filter.
WARNING: To avoid personal
injury or damage to vac be sure to
keep hands, fingers, or any other
foreign objects out of the center
opening when assembling the float.
NOTE: If filter cage needs to be removed,
or replaced, use a flat blade screwdriver
and insert the blade near one of the tabs
between the filter cage and the center
ring of the lid. Pry the tab out of the slot.
Tilt the cage and lift away from the lid.
Replace in the following manner:
5. Place the float over the opening in the
center of the lid with the words "This
Side Towards Lid" laying face down
over the hole.
6. Line up filter cage tabs with slots in the
center ring of the lid.
7. Push on the filter cage until the tabs
snap into slots for a secure fit.
Filter Cage __
Tabs (3)__ Power
Float _ Head
Solid End _._ Assembly
Filter Nut
Lever Plate
Stripe
Tabs(3)
_ Filter )
Slots(3)
Drum/Wheel Assembly
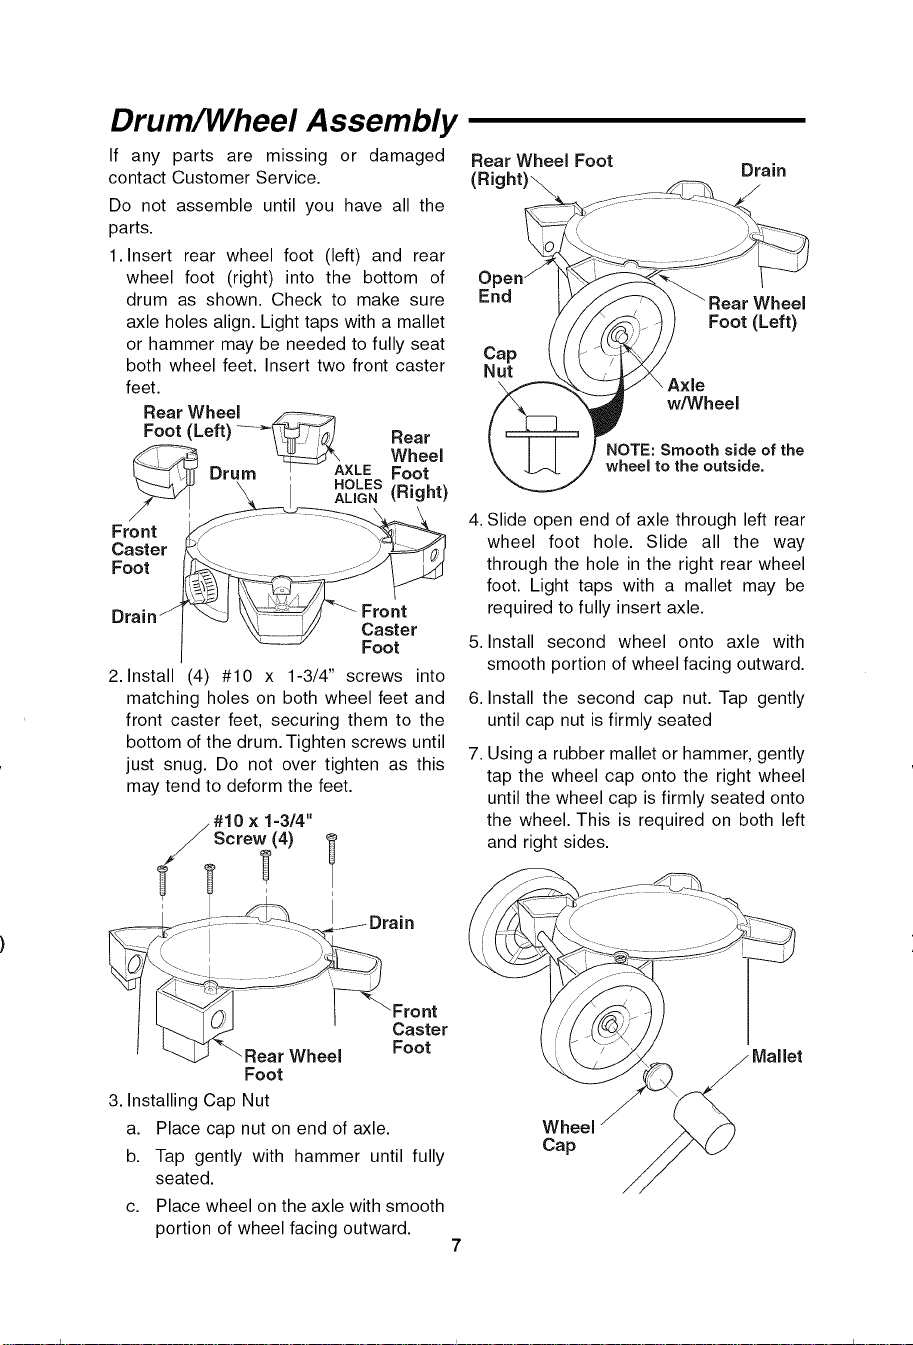
If any parts are missing or damaged
contact Customer Service.
Do not assemble until you have all the
parts.
1. Insert rear wheel foot (left) and rear
wheel foot (right) into the bottom of
drum as shown. Check to make sure
axle holes align. Light taps with a mallet
or hammer may be needed to fully seat
both wheel feet. Insert two front caster
feet.
Rear Wheel /F--_-_
Foot (Left) ---_J Rear
Drum AXLE Foot
Front
Caster
Foot
2. Install (4) #10 x 1-3/4" screws into
matching holes on both wheel feet and
front caster feet, securing them to the
bottom of the drum. Tighten screws until
just snug. Do not over tighten as this
may tend to deform the feet.
#10x1=3/4"
Screw (4)
Wheel
HOLES(Right)
ALIGN
Front
Caster
Foot
Rear Wheel Foot
Drain
/
O
End
Wheel
Foot (Left)
Cap
Nut
w/Wheel
NOTE: Smooth side of the
wheel to the outside.
4. Slide open end of axle through left rear
wheel foot hole. Slide all the way
through the hole in the right rear wheel
foot. Light taps with a mallet may be
required to fully insert axle.
5. Install second wheel onto axle with
smooth portion of wheel facing outward.
6. Install the second cap nut. Tap gently
until cap nut is firmly seated
7. Using a rubber mallet or hammer, gently
tap the wheel cap onto the right wheel
until the wheel cap is firmly seated onto
the wheel. This is required on both left
and right sides.
_' ' Caster
Wheel Foot
Foot
3. Installing Cap Nut
a. Place cap nut on end of axle.
b. Tap gently with hammer until fully
seated.
c. Place wheel on the axle with smooth
portion of wheel facing outward.
Wheel
Cap
Drum/Wheel Assembly (cont.)
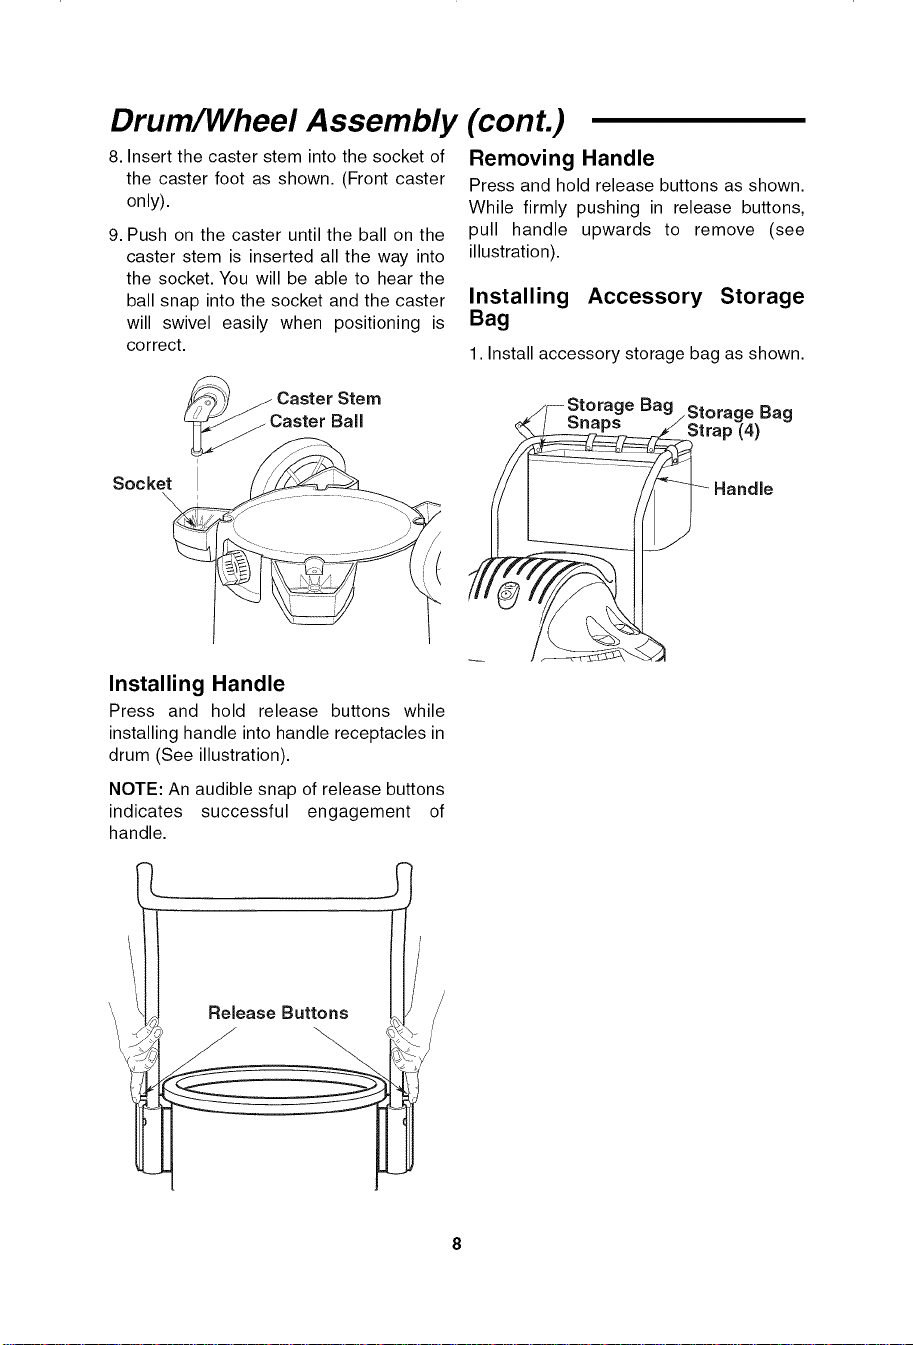
8.Insertthecasterstemintothesocketof
thecasterfootasshown.(Frontcaster
only).
9. Push on the caster until the ball on the
caster stem is inserted all the way into
the socket. You will be able to hear the
ball snap into the socket and the caster
will swivel easily when positioning is
correct.
Removing Handle
Press and hold release buttons as shown.
While firmly pushing in release buttons,
pull handle upwards to remove (see
illustration).
Installing Accessory Storage
Bag
1. Install accessory storage bag as shown.
Cast e r Stem
aster Ball
Socket
Installing Handle
Press and hold release buttons while
installing handle into handle receptacles in
drum (See illustration).
NOTE: An audible snap of release buttons
indicates successful engagement of
handle.
,/F Storage Bag .Storage Bag
Release Buttons
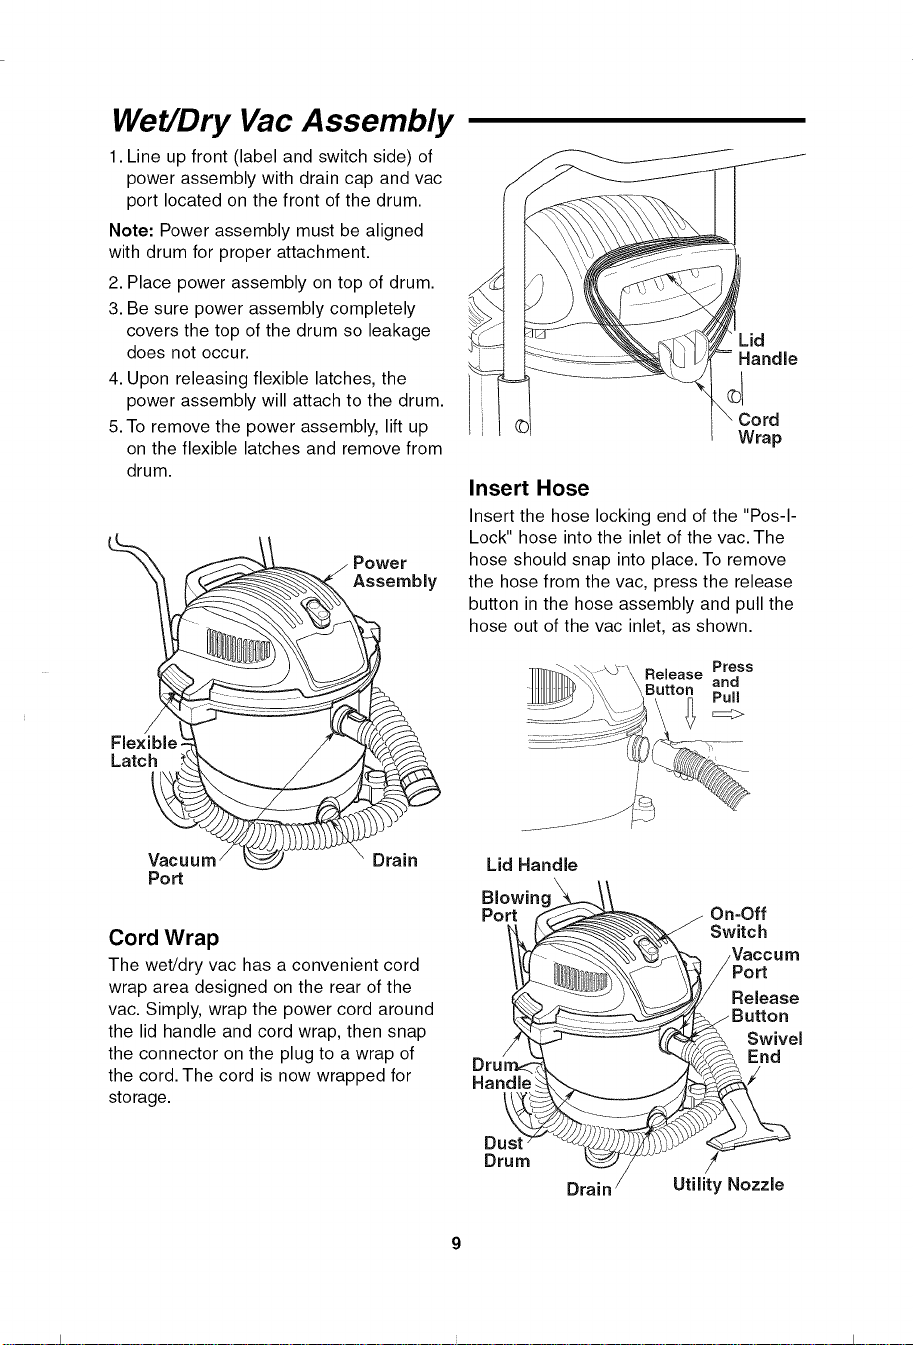
Wet/Dry Vac Assembly
1. Line up front (label and switch side) of
power assembly with drain cap and vac
port located on the front of the drum.
Note: Power assembly must be aligned
with drum for proper attachment.
2. Place power assembly on top of drum.
3. Be sure power assembly completely
covers the top of the drum so leakage
does not occur.
4. Upon releasing flexible latches, the
power assembly will attach to the drum.
5. To remove the power assembly, lift up
on the flexible latches and remove from
drum.
Power
'- - ........... '" • ........ I
I
Insert Hose
Insert the hose locking end of the "Pos-I-
Lock" hose into the inlet of the vac. The
hose should snap into place. To remove
the hose from the vac, press the release
button in the hose assembly and pull the
hose out of the vac inlet, as shown.
Press
;e and
Pull
Flexible
Latch _ /
Vacuum / _ ........
Port
Drain
Cord Wrap
The wet/dry vac has a convenient cord
wrap area designed on the rear of the
vac. Simply, wrap the power cord around
the lid handle and cord wrap, then snap
the connector on the plug to a wrap of
the cord. The cord is now wrapped for
storage.
Lid Handle
Dust
Drum
Drain
On-Off
Switch
Vaccum
Release
Swivel
End
Utility Nozzle
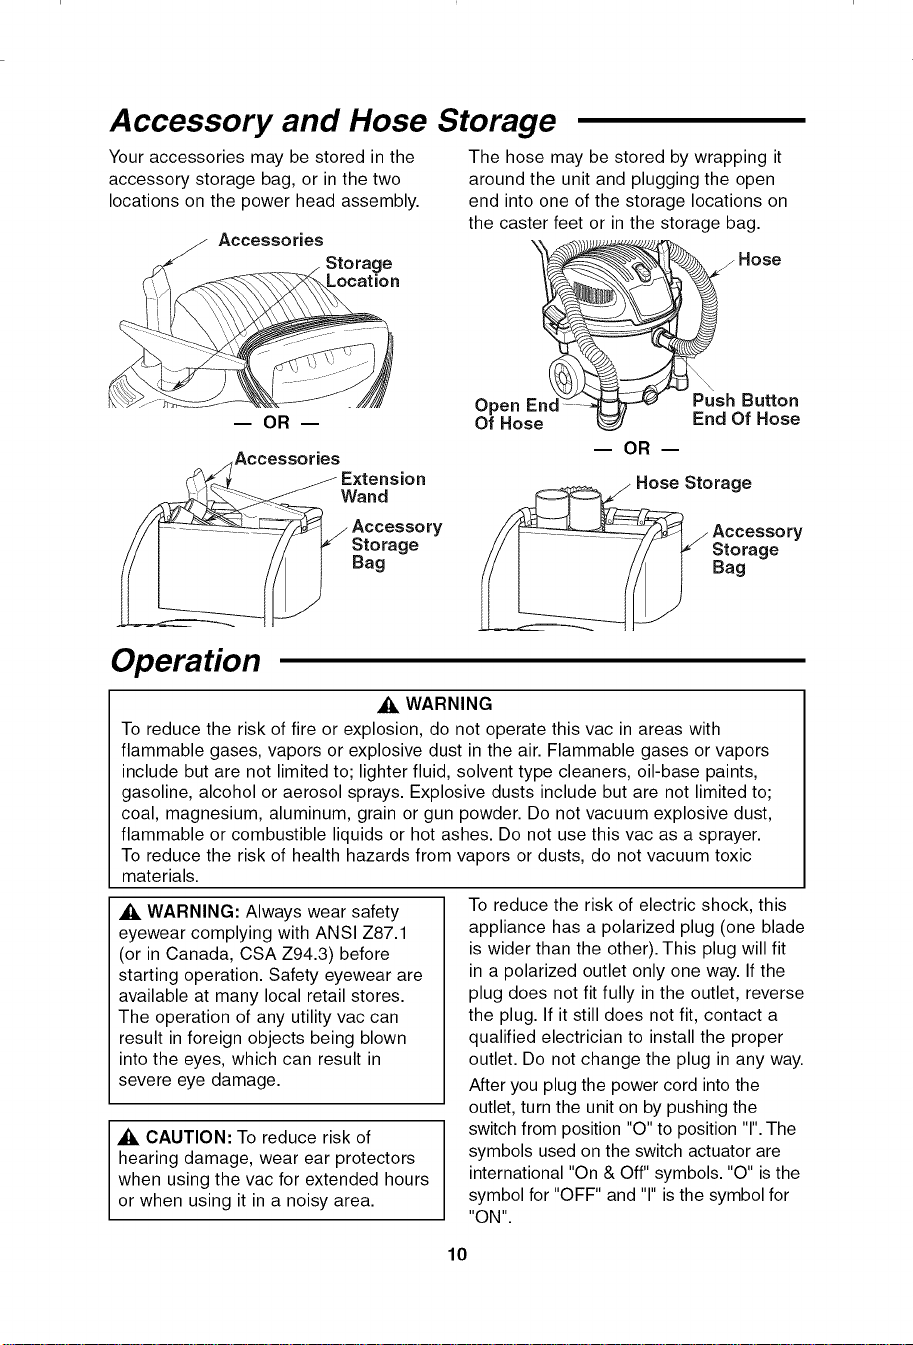
Accessory and Hose Storage
Your accessories may be stored in the
accessory storage bag, or in the two
locations on the power head assembly.
Accessories
Location
The hose may be stored by wrapping it
around the unit and plugging the open
end into one of the storage locations on
the caster feet or in the storage bag.
__ Hose
-- OR --
Accessories
Open End
Of Hose
-- OR --
Wand
Storage Storage
Bag Bag
'y y
End Of Hose
Hose Storage
Operation
Ak WARNING
To reduce the risk of fire or explosion, do not operate this vac in areas with
flammable gases, vapors or explosive dust in the air. Flammable gases or vapors
include but are not limited to; lighter fluid, solvent type cleaners, oil-base paints,
gasoline, alcohol or aerosol sprays. Explosive dusts include but are not limited to;
coal, magnesium, aluminum, grain or gun powder. Do not vacuum explosive dust,
flammable or combustible liquids or hot ashes. Do not use this vac as a sprayer.
To reduce the risk of health hazards from vapors or dusts, do not vacuum toxic
materials.
WARNING: Always wear safety
eyewear complying with ANSI Z87.1
(or in Canada, CSA Z94.3) before
starting operation. Safety eyewear are
available at many local retail stores.
The operation of any utility vac can
result in foreign objects being blown
into the eyes, which can result in
severe eye damage.
CAUTION: To reduce risk of
hearing damage, wear ear protectors
when using the vac for extended hours
or when using it in a noisy area.
To reduce the risk of electric shock, this
appliance has a polarized plug (one blade
is wider than the other). This plug will fit
in a polarized outlet only one way. If the
plug does not fit fully in the outlet, reverse
the plug. If it still does not fit, contact a
qualified electrician to install the proper
outlet. Do not change the plug in any way.
After you plug the power cord into the
outlet, turn the unit on by pushing the
switch from position "O" to position 'T'.The
symbols used on the switch actuator are
international "On & Off" symbols. "O" is the
symbol for "OFF" and 'T' is the symbol for
"ON".
Button
10
I = "ON" O = "OFF"
WARNING: To reduce the risk of
fire or electric shock, do not run vac
unattended.
Vacuuming Dry Materials
1. The filter must always be in correct
position to reduce the risk of leaks and
possible damage to vac.
2. When using your vac to pick up very
fine dust, it will be necessary for you to
empty the drum and clean the filter at
more frequent intervals to maintain
peak vac performance.
NOTE: A dry filter is necessary to pick up
dry material. If you use your vac to pick
up dust when the filter is wet, the filter will
clog quickly and be very difficult to clean.
3. If your filter is wet but you need to use
the vac to pick up dry material, you can
quickly dry the filter by running the vac
without hose attached for about
10 minutes. The clean air rushing
through the vac will help dry the filter.
The optional Craftsman HEPA Rated
Material Filter, stock number 9-17912 will
do a better job stopping the very fine
particles than the 9-17816 filter.
Vacuuming Liquids
1. When picking up small amounts of
liquid the filter may be left in place.
2. When picking up large amounts of
liquid we recommend that the filter be
removed. If the filter is not removed, it
will become saturated and misting may
appear in the exhaust.
3. When the liquid in the drum reaches a
predetermined level, the float
mechanism will rise automatically to cut
off air-flow. When this happens, turn off
the vac, unplug the power cord, and
empty the drum. You will know that the
float has risen because vac airflow
ceases and the motor noise will become
higher in pitch, due to increased motor
speed.
4. After using the vac to pick up liquids, the
filter must be dried to reduce the risk of
possible mildew and damage to the filter.
IMPORTANT: To reduce the risk of
damage to the vac do not run motor with
float in raised position.
Emptying the Drum
A WARNING: To reduce the risk of
injury from accidental starting, unplug
power cord before emptying the drum.
1. The vac comes equipped with a drain
for easy emptying of liquids. Simply
unscrew the drain cap and lift the
opposite side slightly to empty the
drum.
2. Another option is to remove the power
assembly.
3. Lay power assembly aside on a clean
area while emptying drum.
4. Dump the drum contents into the
proper waste disposal container.
WARNING: To reduce the risk of
back injury or falls, do not lift a vac
heavy with liquid or debris. Scoop or
drain enough contents out to make the
vac light enough to lift comfortably.
Moving the Wet/Dry Vac
Should it become necessary to pick the
vac up to move it, the handle on the sides
of the dust drum are used to lift. To
maneuver the vac, the push/pull lid
handle or metal handle in the rear of the
unit should be used.
11
 Loading...