

Craftsman 11210872 Owner’s Manual

Operator's Manual
2.8 Amp Compact
Multi-Purpose/Plunge Action
3-in. Circular Saw
with Laser Trac TM
Model No.
112.10872
Z_ CAUTION: Read, understand and follow
all Safety Rules and Operating Instructions
in this Manual before using this product_
Sears, Roebuck and Co.,
Hoffman Estates, IL 60179 U.S.A.
Visit our Craftsman ®webslte: www.sears.com/craftsman
• WARRANTY
• SAFETY
• UNPACKING
• DESCRIPTION
• OPERATION
• MAINTENANCE
Warranty ................................................................................... Page 2
Safety Symbols .......................................................................... Page 3
Safety Instructions ...................................................................... Pages 4-11
Glossary of Terms ....................................................................... Pages 11-12
Unpacking ................................................................................. Page 13
Description ......................................................................................... Pages 14-15
Operation ........................................................................................... Pages 16-31
Maintenance ...................................................................................... Pages 31-32
Troubleshooting ................................................................................. Pages 33-34
Accessories ....................................................................................... Page 35
Repair Parts ....................................................................................... Pages 35-38
Sears Repair Parts Phone Numbers ................................................. Back Cover
ONEYEAR FULLWARRANTY ON CRAFTSMAN ®PRODUCT
tf this Craftsman Tool fails due to a defect in material or workmanship
within one year from the date of purchase, RETURN ITTO ANY SEARS
STORE OR PARTS AND REPAIR CENTER OR OTHER CRAFTSMAN
OUTLET IN THE UNITED STATES FOR FREE REPAIR (OR
REPLACEMENT IF REPAIR PROVES IMPOSSIBLE),
This warranty does not include expendable parts such as lamps, batteries,
bits or blades
if this Craftsman product is used for commercial or rental purposes,
this warranty applies for only 90 days from the date of purchase.
This warranty gives you specific legal rights, and you may have other rights,
which vary from state to state.
Sears, Roebuck and Coo, Hoffman Estates, IL 60179
SAVETHESE INSTRUCTIONSI
READ ALL INSTRUCTIONSI
chemicals known to the State of California to cause cancer and birth
,4k WARNING: Some dust created by using power tools contains
defects or other reproductive harm.
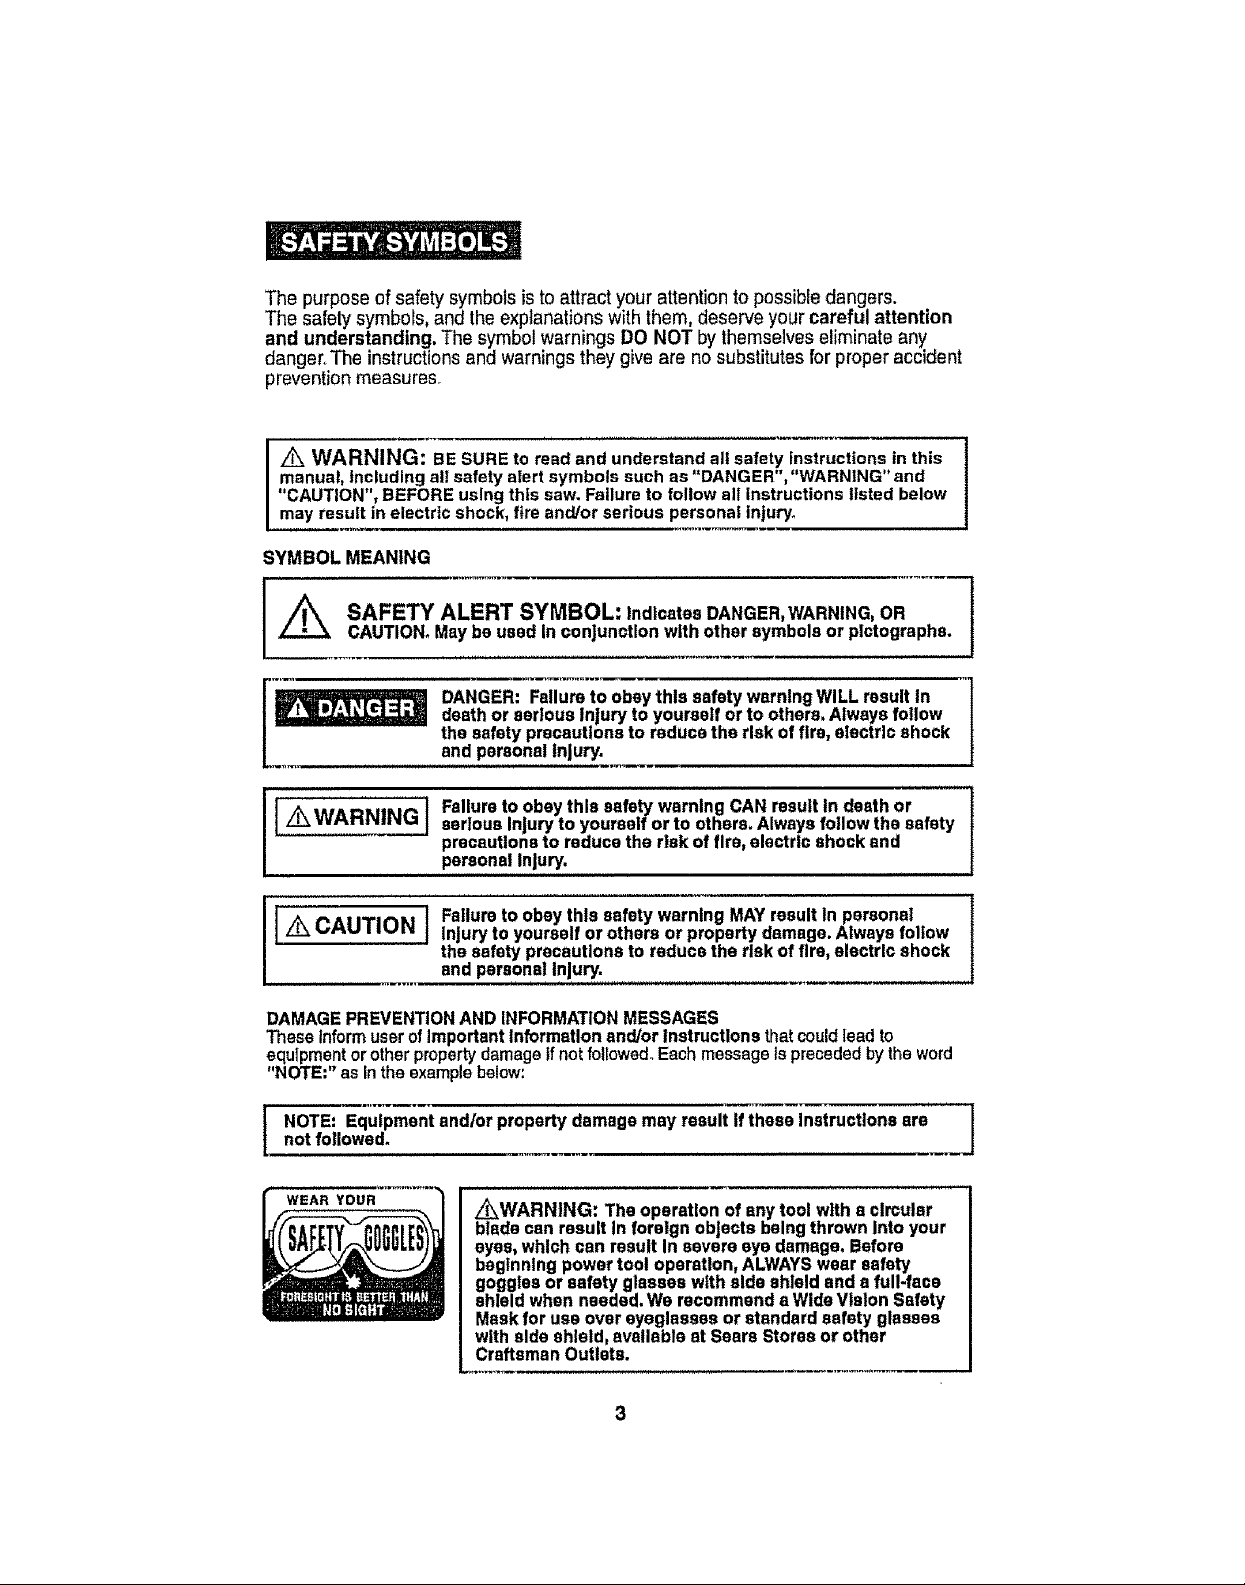
The purpose of safety symbols is to attract your attention to possible dangers.
The safely symbols, and the explanations with them, deserve your careful attention
and understanding, The symbol warnings DO NOT by themselves eliminate any
danger,The instructions and warnings they give are nosubstitutes for proper accident
prevention measures,
manual, Including al! safety alert symbols such as "DANGER", "WARNING" and
"CAUTION", BEFORE using this saw. Failure to follow all instructions listed below
A WARNING: BE SURE to read and understand all safety instructions in this
may result in electric shock, fire and/or serious personal injury.
SYMBOL MEANING
l / e_ sAFETY ALERT sYMBOL: IndIcates DANGER'WARNING'OR 1
[-_ DANGER: Failure to obey this safety warning WILL result in |
[ _WARNING ] Failure to obey this safety warning CAN result In death or I
,'_ CAUTION I Failure to obey this safety warning MAY result In personal I
DAMAGE PREVENTION AND INFORMATION MESSAGES
These Informuser of important Information and/or Instructions thatcould lead to
equipmentor other property damage _fnotfollowedoEach message ts preceded by the word
"NOTE:" as in the example below:
NOTE: Equipment and/or property damage may result If these Instructions are
not followed.
CAUTION.Maybe usedIn conjunctionwith other symbolsorplctographe.
WEAR YOUR
death or serious Injury to yourself or to others. Always follow
the safety precautions to reduce the risk of fire, electric shock
and personal Injury.
serious Injury to yourself or to others. Always follow the safety
]
precautions to reduce the risk of firs, electric shock and
persons! Injury.
injury to yourself or others or property damage, Always follow
l
the safety precautions to reduce the risk of fire, electric shock
and personal Injury,
_WARNING: The operation of any tool with s ¢lmular
btade can result in foreign objects being thrown into your
eyes, which can result In severe eye damage. Before
beginning power tool operation, ALWAYS wear safety
goggles or safety glasses with aide shield and s full-face
shield when needed. We recommend a Wide V|slon Safety
Meek for use over eyeglasses or standard safety glasses
with side shield, available at Sears Stores or other
Craftsman Outlets.
1
l
|
t
J
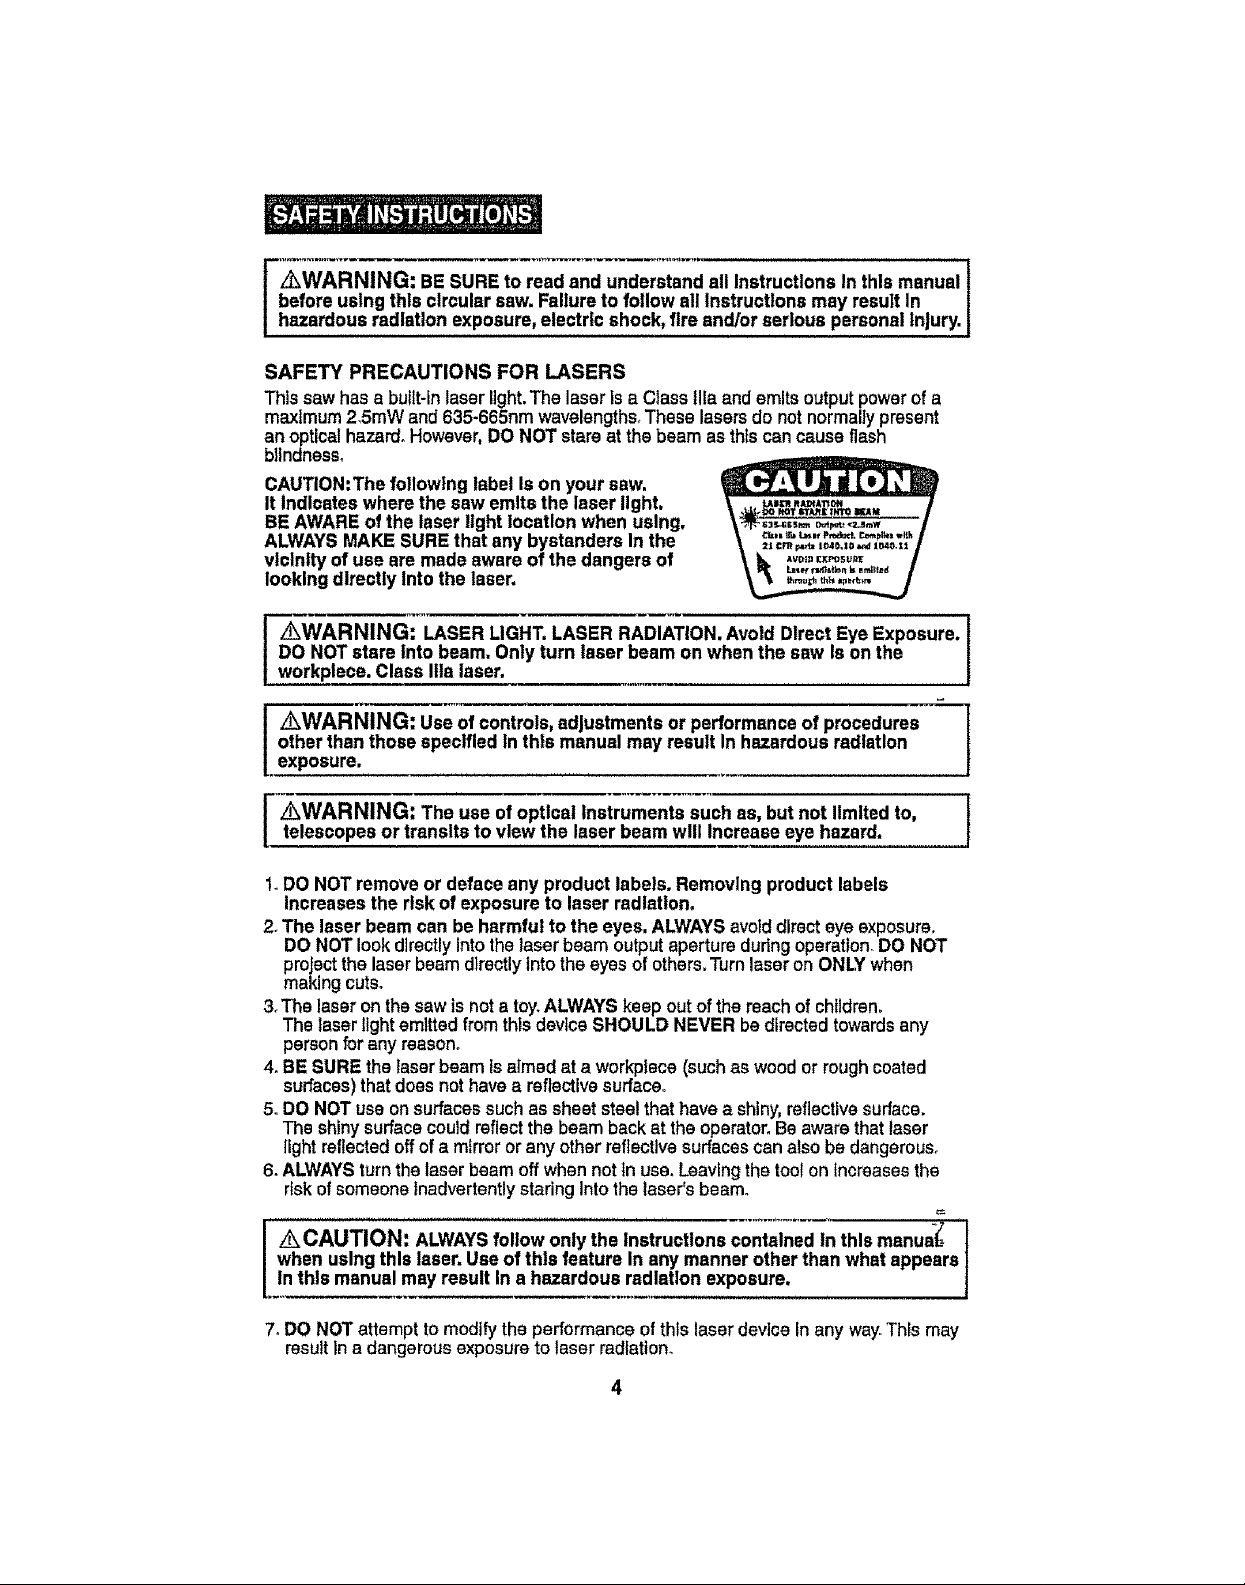
z_WARNING: BESURE to read and understand all Instructions In this manual t
beforeusing this circular saw. Failureto follow all Instructionsmay result In t
hazardous radiation exposure, electric shock,fire and/or serious personalInjury,!
SAFETY PRECAUTIONS FOR LASERS
Thissaw hasa built-inlaser light.The laserisa ClassIlia and emits outputpower of a
maximum 2.5mWand 635-665nmwavelengths.These lasersdo notnormallypresent
an opticalhazard.However,DO NOT stareat the beam asthiscancauseflash
blindness,
CAUTION:The following label Ison your saw.
It Indicates where the sawemits the laser light,
BEAWARE ofthe laser light location when using,
ALWAYSMAKE SUREthat any bystandersIn the
vlclnlty of use are made aware of the dangers of
looking directly Into the laser.
2t Cf'R _ 1040,10 _¢4 1 _10,t_t
A_tD [KPOSU_1_
_WARNING: LASER LIGHT.LASER RADIATION.Avoid DlrectEye Exposure.
DO NOTstare Into beam. Only turn laserbeam on when the sew Isonthe
workplece. Class Ilia laser.
z_WARNING: Useof controls,adjustments or performanceof procedures ]
other than those speclfled in this manual may result In hazardousradiation
exposure.
I WARNING: The use of opticalinstruments such as, but not limitedto, ]
telescopes or transits to view the laserbeam will Increase eye hazard.
f
!
t_DO NOTremoveor defaceany product labels. Removing product labels
Increasesthe risk of exposure to laser radlatlon,
2.The laserbeam can be harmful to the eyes,ALWAYSavoiddirect eye exposure.
DONOT look directly Intothelaser beam output aperture during operation_DO NOT
project the laserbeam directlyInto the eyes of others,Turn laser onONLYwhen
making cuts.
3.The laser on the sawis nota toy.ALWAYS keep outof the reach of children,
Thelaser light emitted fromthis devlca SHOULDNEVER bedirected towardsany
personforany reason.
4. BESURE the laserbeam is aimed at a workptece (suchas wood or roughcoated
surfaces) that does not havea reflective surface.
5. DO NOTuse on surfaces such assheet steel that have a shiny,reflectivesurface.
Theshiny surfacecould reflectthe beamback at the operator°Be awarethat laser
light reflected off of a mirror or any other reflective surfaces can also bedangerous.
6. ALWAYSturn the laser beam offwhen not in use. Leavingthe toolonIncreasesthe
risk of someoneinadvertently staring Intothe laser'sbeam°
_CAUTION' ALWAYSfollow only the Instructions contained In this manua-(_
when usingthis laser,Useof this feature In anymanner otherthan whatappears
In this manualmay result In a hazardousradiation exposure,
7. DO NOTattemptto modify the performance ofthis laserdevice inany way.Thlsmay
resultina dangerousexposureto laser radiation.
SAFETY PRECAUTIONS FOR LASERS cont.
8. ALWAYSuse only the accessories that are recommended by Sears for use withthis
product°Use of accessories that havebeen designedfor use with other laser tools
could result in serious Injury.
9. For further Information regarding lasers, refer to ANSI-Z136.1 The STANDARD FOR
THE SAFEUSEOF LASERS,avaUabiefromthe LaserInstituteof America (407)380-1553.
WORK AREA SAFETY
1.Keep your work area clean and well lit.Clutteredworkbenchesanddarkareas
invite accldents.
2, DONOT operate powertools In explosiveatmospheres, such as In the presence
of flammable liquids, gases, or dust, Powertools createsparks whichmayIgnite
thedust orfumes_
3,Keep bystanders,children and visitors awaywhile operating a powertool,
Distractions can causeyouto losecontrol_
4. Make your workshop chlidproofwithpadlocksand master switches.Lock
tools awaywhen not inuse.
5, MAKESURE the work area hasample fighting so you can see the work and that
thereare no obstructionsthatwillinterferewithsafeoperationBEFORE usingyoursaw,
PERSONAL SAFETY
1_KNOWyourpower tool. Read theoperator'smanual carefully.Learnthesaw's
applicationsand limitations, aswellas the specificpotential hazardsrelated to this tool,
2. STAYALERT, watch whatyou are doing and use common sensewhen operating
a powertool
3oDO NOT usetool white tired or under the influenceof drugs,alcohol or medlcatlono
A moment ofinattentionwhiteoperatingpower toolsmay result insertouspersonalInjury,
4. DRESSproperly, DO NOT wearlooseclothing or Jewelry.PuUback tong hair.Keep
yourhair, clothing, and gloves away from moving parts.Air vents often cover moving
parts and shouldalso be avoided.Looseclothing,jewelryor long hair can becaught
Inmovlng parts.
5.AVOIDaccidentalstarting. Besure switchls in"OFF" positionbeforeplugging lm
DONOTcarry tools with yourfinger ontheswitch.Carrying tools withyourfinger on the
switchor plugging in toolsthat have the switchInthe "ON" position Invltesaccidents.
6.REMOVE adjustingkeys orwrenches before turning the tool "ON". A wrench
that Isleftattached to a rotatlng part of the tool may resultIn personalinjury,
7,Do not overreach.Keep proper footing and balance at all times. Properfooting
and balance snabresbetter control of thetoolinunexpected sJtcattons.
8oALWAYSSECUREYOURWORK. Usa clampsor a vise to hold work when practical.
It is saferthan usingyour hand and freesboth hands to operate tool.
9oUSE SAFETY EQUIPMENT.Always wear eye protection.Dustmask, non-skidsafety
shoes,hard hat, or hearing protection mustbe usedfor appropriate conditions°
t0. DO NOTUSE ON A LADDER or unstable support. Stable footingon asol]d surface
enables better control of the tool in unexpectedsituations.
5
TOOL USE AND CARE SAFETY
/_WARNING: BE SUREto read and understand all instructions before
operating this saw. Failureto follow all instructionslisted below may result in
1_ALWAYSuse clamps or other practicalways to secure and support the
workplece to a stable platform. Holdtngtheworkby handor againstyourbodyis
unstableand maylead tolossofcontrol
2oDO NOTforce the tool. Usethe correct tool andblade for your application.
The correcttool and blade willdothejobbetter and saferat the rate forwhichItis
deslgnedo
3. DO NOT use the tool If switchdoes not turn It "On" or "Off", Any toolthat cannot
be controlled with the switch tsdangerous and mustbe repaired°
4, DISCONNECTthe plug from the powersource before making any adjustments,
changing accessories or storing the tool, Such preventivesafetymeasures reduce
theriskofstartingthetoolaccidentally.
5. NEVER leave the tool running,ALWAYSturn tt off, DO NOT leave the tool untilIt
comesto a completestop.
6. STOREIdle tools out of the reach of children and other untrained persons.
Toolsare dangerous inthe handsof untrainedusers°
7. MAINTAINtoolswith care. Keepcutting toolssharp end clean,Properlymaintained
toolswithsharp cuttingedgesare less likelyto bindandare easiertocontrol
8.CHECK for mlsailgnmentor bindingof moving pads, breakage of pads, andany
otherconditionthatmay affectthe tool'soperation.If damaged, have thetoolserviced
beforeusing.Manyaccidentsare causedby poorlymaintainedtools.
g°USE ONLYaccessories that are recommended for this tool, Accessoriesthatmay
be suitable forone tool maybecome hazardous when usedon another tool.
10.KEEPblade guards In place and in good working order,
Jelectricshock,fire and/or serious personal injury.
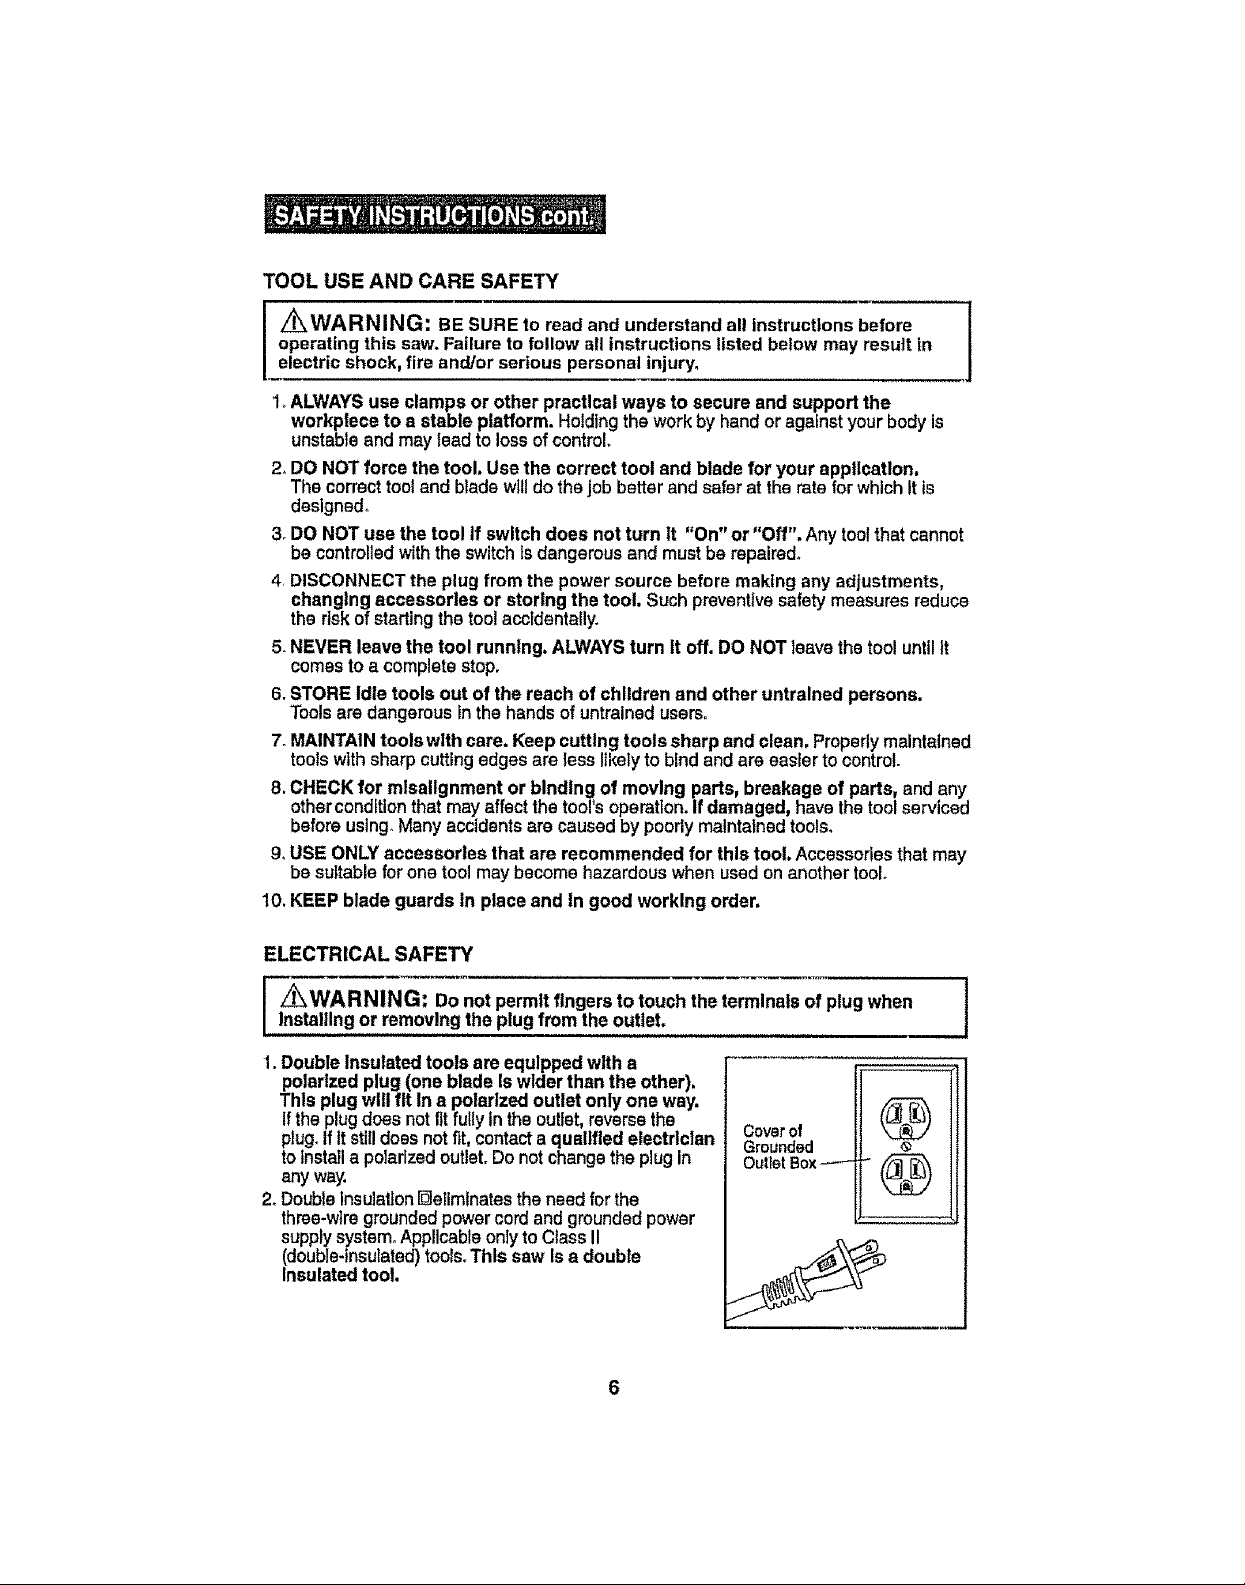
ELECTRICAL SAFETY
_WARNING: Do not permit fingers to touch theterminals ofplug when
Installingor removingthe plugfrom the outlet,
1.Double Insulated tools areequipped with a
polarizedplug (one blade Is wider than the other),
Thls plugwill fit In a polarized outlet only one way,
Ifthe plugdoes not fit fully inthe outlet,reversethe
plug.If Itstill doesnot fit, contacta qualifiedelectrician
to Installa polarizedoutlet. Do notchangethe plug in
anyway.
2.Doubleinsulation[]eliminates theneed forthe
three-wiregroundedpower cordend grounded power
supplysystem.Applicableonly to Class Ii
(double-insulated)tools. This saw Isa double
Insulated tool,
Cover of
Grounded
Outlet Box _ (_
ELECTRICAL SAFETY cont.
_WARNING: DoubleInsulationDOESNOTtake the placeof normalsafety
precautionswhen operating thistool.
3.BEFORE plugging in thetool,BE SUREthat the outlet voltage supplied tswlthin the
voltage marked on the tool's data plate. DO NOT use"AConly"rated toolswith a DC
powersupply°
4.AVOID body contactwith groundedsurfaces, suchas plpes,radiators,rangesand
refrigerators.There isan increasedrtskof electricshockifyourbody tsgrounded_
5,DO NOT expose powertools to rain orwet conditionsor use power tools In wet
or damplocetlons. WaterenteringapowertoolwfilIncreasethe riskof slectdcshock.
6. INSPECT tool cords for damage.Have damaged toolcords repalredat a Sears
ServiceCenter°BE SUREto stayconstantlyaware ofthecordlocation and keep itwell
away from the moving blade.
7.DONOT abuse the cord.NEVER usethe cord to carry the tool by or pull the plug
from the outlet.Keepcordawayfrom heat,otl,sharpedgesormoving parts°Replace
damagedcordsimmediately.Damagedcordsincreasethe riskofelectricshock_
EXTENSION CORDS
Usea proper extension cord. ONLYuse cordslisted by UnderwritersLaboratories(UL)_
Otherextensioncordscancausea dropin line voltage,resulting ina lossofpowerand
overheatingoftool.
Forthis tool an AWG (AmericanWire Gauge)size ofat least 14-gauge is recommended
for anextension cord of 25-ft.or lessinlength. Use 12-gauge for an extensioncord of
50-ft,Extension cords 100..ft,or longer are not recommended,Remember, a smaller
wire gauge size has greater capacity than a larger number(14-gaugewirehas more
capacitythan 16-gauge wire;12-gauge wirehas more capacitythan14-gauge)oWhen In
doubt usa the smaller number.
Whenoperatinga powertooloutdoors, usean outdoorextensioncordmarked"W-A" or
"W".These cords are ratedfor outdoor use andreduce the risk of electrlc shock.
Z_ CAUTION= Keep the extensioncord clearof the working area. Positionthe /
cordso that Itwill not get caught on the workplece,tools orother obstructions
whileyou areworklngwith a powertool,
Z_WARNING: Checkextensioncords before each use.if damaged replace ]
Immediately.Never usetool with a damagedcord since touchingthe damaged
areacould causeelectrical shock,resulting In seriousInjury.
J
J
SAFETYSYMBOLSFORYOURTOOL
Thelabelonyourtoolmay Include the following symbols.
V...............................................................................Volts
A..............................................................................Amps
Hz.............................................................................Hertz
W.............................................................................Watts
mln..........................................................................Minutes
.............................................................................Alternatingcurrant
............................................................................Directcurrent
no............................................................................No-loadspeed
[] .............................................................................ClassII construction,DoubleInsulated
.../mln.........................................................................Revolutionsor StroPsper minute
L_o............................................................................Indicatesdanger,warningorcaution.
It means attentlonl Yoursafetyis Involvedo
SERVICE SAFETY
1.If any part of thissaw Is missing or should break, bend,or fall In any way;
or shouldany electricalcomponent fall to perform properly;SHUT OFFthe power
switch and removethe saw plugfrom thepowersource and havethe missing.
damaged or failedpartsreplacedBEFORE resumingoperation.
2. Tool service must be performedonlyat a Sears Partsand Repair Center,Service
or maintenanceperformedbyunqualifiedpersonnelcouldresult In a riskof injury.
3. When servicing atool, use only Identical replacement parts. Follow Instructions
Inthe maintenance section of this manual. Useof unauthorizedpartsorfailureto
follow maintenanceInstructionsmay createa risk ofelectricshockor injury.
SAFETY RULES FOR THE MULTI-PURPOSE/PLUNGE ACTION
3-IN. CIRCULAR SAW
onthe trigger switchand the otherhandon the handle/motor housing.If both
I _ Keep hands awayfrom cuttingareaand blade. Keep one hand
handsare holding the saw, theblade cannotcut them.
[Z_ CAUTION: Bladescoast after saw Is switched off. ]
1, KEEPyour body positioned to either side of the sawblade and not in direct line
with the saw blade. Kickbackcouldcausethesawto jump backwards.
(See"Ktckback...What CausesItandWaystoHelpPreventIt"onpages1B.19 and20).
2.DO NOT reach underneath the workplece.The blade extendsbeneaththe
workplacewhencuttingandcouldcauseinjury.
base DONOT coverthe blade.The bladeIs below the lowerblade guardend base
l _r_j.-=J"_ When sawingthrough aworkplece,the lower bladeguard and
(Pagi_25).ALWAYSKeepyourhands andfingers awayfrom thecuttingarea.
CAUTION: This circularsaw DOESNOThave the standard RETRACTABLE
LOWERBLADE GUARDSystemfound on standard circularsaws. ONTHIS saw
the lowerblade guard Isan Integralpart of thesaw's base(cutting platform)and
ONLYenclosesthe blade when it Is ABOVE thebase.
8

SAFETY RULES FOR THE MULTI-PURPOSE / PLUNGE ACTION
3-IN. CIRCULAR SAW cont.
/_ CAUTION: When the blade Is plunged below the base to makethe cut,
the blade Is entirelyexposed underneath the workplace until It cuts through and
clearsthe workplece;at this point the blade guardand base wilt automatically
"DROP" downand lock the bladeABOVE the base,enclosing the blade Inthe
upperand lower bladeguard.
CAUTION: FAMILIARIZEYOURSELFWITHTHIS BLADE GUARDSYSTEM
and the PLUNGEACTION (loweringblade to desired depth) BEFORE USING
THIS SAW (See Page 18,Figs. 4 and 4e).
3_CHECK the Blade Guard Release Leverand the LowerBlade Guardand Base
BEFOREeach use, DO NOT OPERATE the saw if the }owerblade guard and base
does notmove freely and DROPDOWN INSTANTLY,and the bladeguard release
leverdoes net automatically engage the upperblade guard, AFTER cut Ismade
and blade c{earstheworkptece(See Page18 and 19).
Lower BladeGuard and Base in the raised positionexposingthe blade.This
would notallow the lower Blade Guard and BaseAssembly to function properly
I z_ CAUTION: Never clamp or tiethe BladeGuard Release Lever and the
after the cuttingoperation, Increasing the risk of serious personal Injury.
4.ONLYUSE themanual Blade Guard Release Lever to false the base, loweringthe
bladeto the desired depth-of-cut whenbeginning the cuttingoperatlon_
5_If the sawIsaccidentally dropped, theblade guard releaseleverand the lower blade
guard and base could be damaged or broken. Lower and raisethe blade manually
(seepage 18, Figs.4 and 4a) to be sure the release lever,guard andbase all operate
properly.
6otf the BladeGuardRelease Leveror LowerBlade Guard and Baseor anyother part of
the saw isnot operating properly,thesaw MUST BEserviced before use.
7.ALWAYSmake sure that the LowerBlade Guardand Basets covering the blade, and
the Blade GuardRelease Leverhas engaged and lockedthe blade ABOVE the base
BEFOREplacingthe saw down on a workbenchor floor,
Placingthe sawdown beforethe lower blade guard andbase andblade guard release
leverhaveproperly closed and lockedcould leavethe blade exposed below thebase,
Increasingthe riskof seriouspersonal Injury. Make noteof the timeIt takes for the
blade to stopsplnnlng and the guard, base and release leverto dropand lockintothe
guarded position,
8.NEVER holdthe piece being cut Inyour hands or across yourlegs, It isimportantto
support theworkplace propedy tnorder to minimizebody exposure, bladebinding, or
loss of control
9-HOLDTOOL by Insulatedgripping surfaces (handle/saw's body)when performing an
operationwherethe cutting tool may contact hidden wiring orIts own cord.Contactwith
a "llve" wire wLllmake the exposed metalparts of thetool "live"and shockthe operator.
SAFETY RULES FOR THE MULTI-PURPOSE /PLUNGE ACTION
3-IN. CIRCULAR SAW cont.
10rALWAYSclampthe workplece securelyso It will not move whenmaking the cut.
11oWhen ripping, ALWAYSUSE arip fence orstraight edge guide.This Improves
the accuracy of the cut andreducesthe chance of the blade binding.
saw; correct size,shape and arbor hole. Other blades could runerratically and
[ WARNING: ONLY USEthe blades that are designated for use with this
cause loss of control, resulting In serious Injury (see pages 16 and 17).
12,NEVER use damagedor Incorrectblade washersor bolts. The bladewashers
and bolts were specially designed for yoursaw,for optimumperformance and
safety of operation,
13_ONLYUSE the designatedblades for cuffing the type of material forwhichthey
are recommended. Cutting materialsthat are NOTrecommended could cause
blade breakage and lossof control,resulting In serious Injury,
14,NEVER cut more than one pieceat a time. DO NOT STACKmore than one
workplece on the worktable at a time.
15,AVOIDawkward operations and hand positions where a suddenslip could
cause your hand to moveinto the blade.
16.NEVER reach Into the cutting pathof the blade.
/_ WARNING: Some dust created by using power tools contains chemicals
known to the State of California to cause cancer and birth defects or other
reproductive harm_Some examples of these chemicals are:
• Lead from lead-based paints.
• Crystalline silica from bricks and cement and other masonry products_
• Arsenic and chromium, from chemically treated lumber.
Your risk from these exposures varies, depending upon how often you do this
type of work.To reduce your exposure to these chemicals:
• Work in a well-ventilatedarea°
,,Work with approved safety equipment,such as those dust masks thatare specially
designed tofilter out microscopic particles..
Avoid prolonged contact with dust from power sanding, sawing, grinding, drilling
and other construction activities.Wear protective clothing and wash exposed
areas with soap and water.
Allowing dust to get tntoyour mouth, eyes, or lay on the skin may promote absorption of
harmful chemicals.
Z_ WARNING: Use of this tool can generate and/or disburse dust, which may
cause serious and permanent respiratory or other Injury. Always use NIOSH/OSHA
approved respiratory protection appropriate for the dust exposure. Direct particles
away from face and body.
I0
ADDITIONAL RULES FOR SAFE OPERATION
Z_ WARNING: BE SURE to read and understand all instructions, Failure to
follow all instructions listed below may result in electric shock, fire and!or serious
personal injury,
1. Know your power tool. Read operator's manual carefutlyo Learn the applications
and limitations, as well as the specific potential hazards related to this tool Following
this rule wilt reduce the risk of electric shock, fire or serious injuryr
2 ALWAYS wear safety glasses or eye shields when using this saw, Everyday
eyeglasses have only impact-resistant lenses; they are NOT safety glasses
3, PROTECT your lungs. Wear a face mask or dust mask ifthe operation is dusty
4, PROTECT your hearing. Wear appropriate personal hearing protection during use,
Under some conditions noise from this product may contribute to hearing loss.
5. ALL VISITORS AND BYSTANDERS MUST wear the same safety equipment that the
operator of the saw wears
6 INSPECT the tool cords periodically and if damaged have them repaired at your
nearest Sears Service Center. BE AWARE of the cord location,
7 ALWAYS check the tool for damaged parts. Before further use of the tool, a guard or
other part that is damaged should be carefully checked to determine if it will operate
properly and perform itsintended function.Check for misalignment or binding of
moving parts, breakage of parts, and any other condition that may affect the tool's
operation. A guard or other part that is damaged should be properly repaired or
replaced at a Sears Service Center_
8. INSPECT and remove all nails from workpiece before sawing.
9, SAVE THESE INSTRUCTIONS. Refer to them frequently and use them to instruct
others who may use thls tool. tf someone borrows this tool, make sure they have
these instructions also,
Spindle
The shaft on which a blade or cutting tool is mounted Also cailed the Arbor
Revolutions Per Minute (RPM)
The number of turns completed by a spinning object in one minute.
Saw Blade Path
The area over, under, behind or in front of lhe blade, as itapplies to the workpiece,
That area which will be or has been cut by the blade
Set
The distance that the saw blade tooth is bent (or set) outward from the face of the blade
Plunge Cutting
A cutting operation in the middle or interior of a workpiece, where the blade is lowered
down into the workpiece to make a pocket cut,,
Miter Cut
A cutting operation made with the blade at any angle other than 90° to the fence.
11
Compound Miter Cut
A compound miter cut is a cut made using a miter angle and a bevel angle at the same
time.
Cross Cut
A cutting or shaping operation made across the grain of the work piece°
Bevel Cut
A cutting operation made with the blade at any angie other than 90° to the miter table.
Dado Cut
A non-through cut wllich produces a square-sided notch or trough in the workpiece
(requires special blade).
Chamfer Cut
A cut removing a wedge from a block of wood so the end (or part of the end) is angled at
other than 90 °.
Ripping or Rip Cut
A cutting operation along the lengthof the workpiece,or cutting along the grain.
Freehand Cut
Performing a cut without using a fence, miter gauge, fixture, work clamp, or other proper
device to keep the workpiece from twisting or moving during the cut
Through Sawing
Any cutting operation where the blade extends completely through the thickness of the
workpiece.
Non-Through Cuts
Any cutting operation where the b_ade does not extend completely through the thickness
of the workpiece, like a dado cut.
Leading End (or Edge)
The end (edge) of the workpiece that the blade entersfirst
Kerr
The material removed by the blade in a through cut or the siot produced by the blade in
a non-through or partial cuL
Kickback
A hazard that can occur when the blade binds or stalls, throwing the saw back toward
operator_
Workptece or Material
The item on which the cutting operation is being done The surfaces of a workpiece are
commonly referred to as faces, ends and edges.
Gum
A sticky, sap-based residue from wood products.
Resin
A sticky, sap-based substance that has hardened.
12
Z_ WARNING: Yoursaw should NEVERbe connected to the powersoume
when you are assembling pads, maldngadjustments,Installingor removing
blades,cleaning or when It isnot In use.Disconnectingthe sawwill prevent
accidentalstarting, which could causeseriouspersonal Injury.
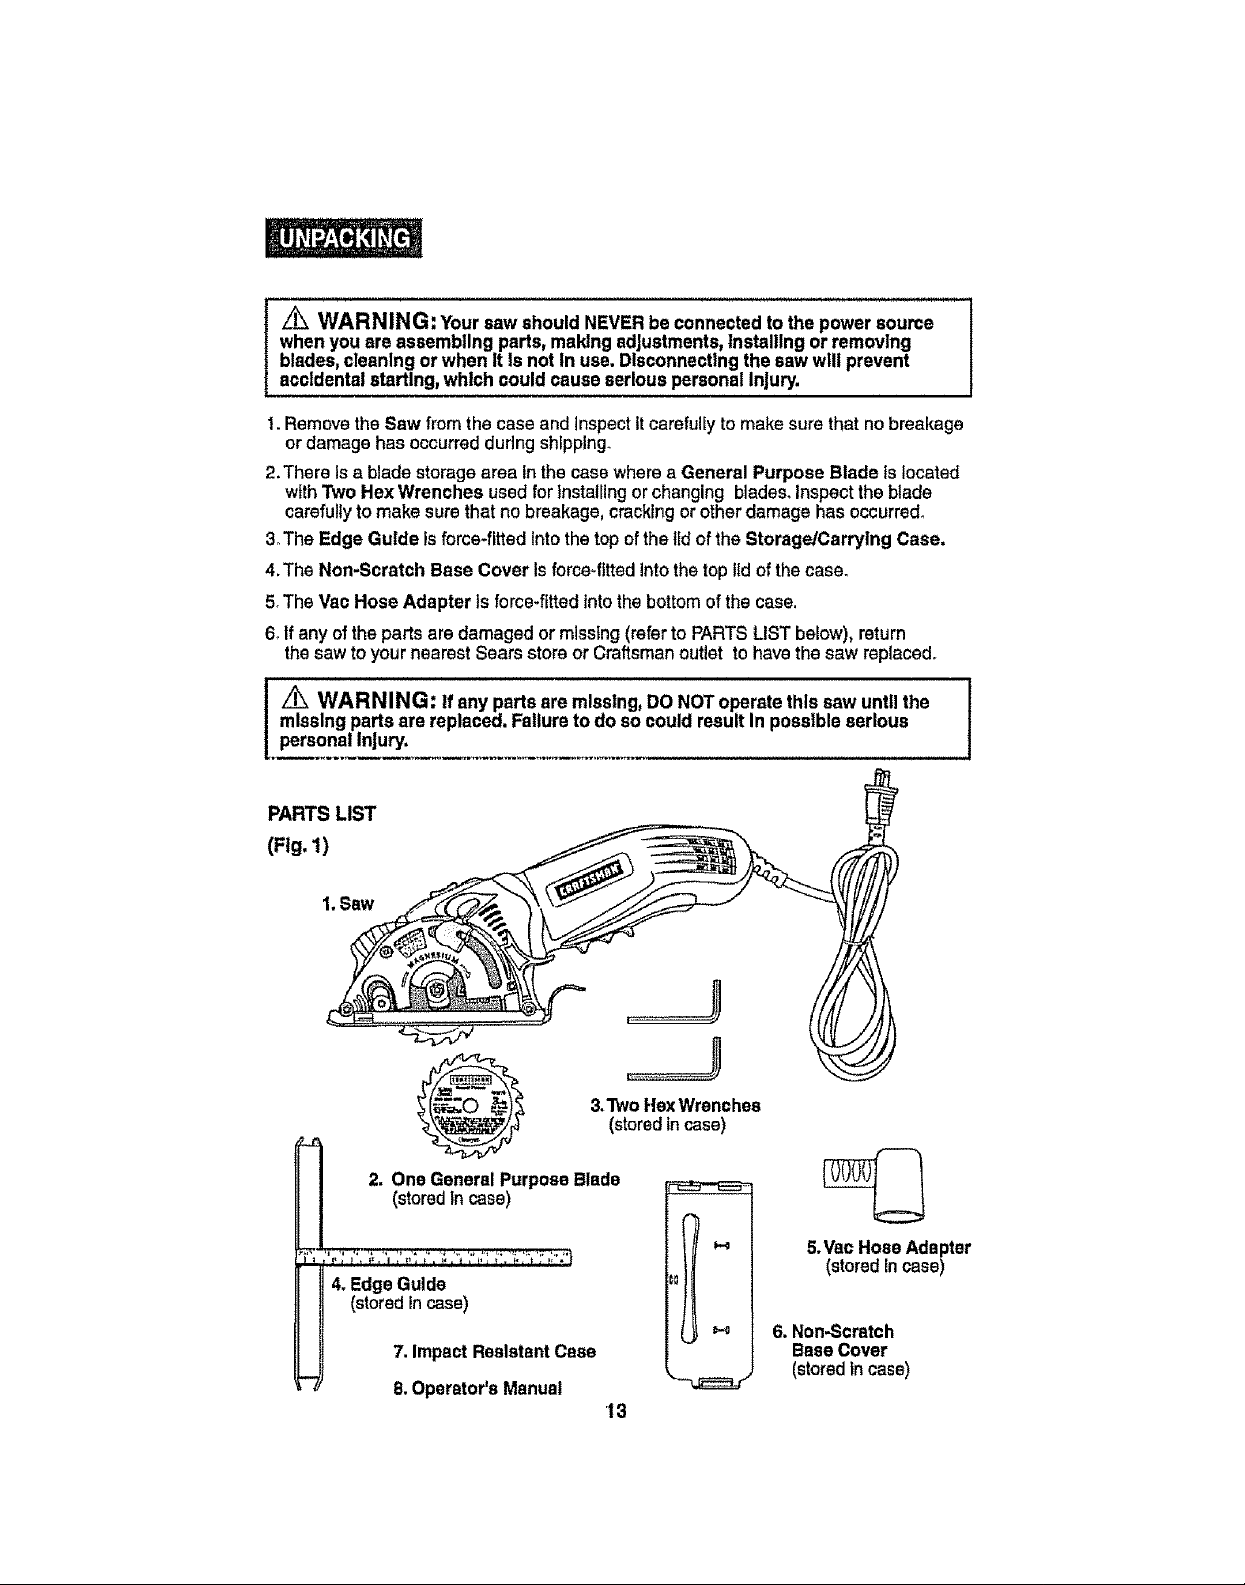
I. Remove theSaw from the case and JnspectIt carefully to makesurethat no breakage
or damage has occurred duringshlpplngo
2.There Is a blade storage area inthe case wherea General Purpose Blade islocated
with "PwoHexWrenches used forinstalling or changing blades,Inspect the blade
carefullyto make sure that no breakage,crackingor other damage has occurred,
3oThe EdgeGuide is force-fitted into thetop of the lidof the Storage/Carrying Case,
4,The Non-Scratch Base Cover Is force_fittedIntothe top lid of the case_
5oThsVac Hose Adapter is force-fittedIntothebottom of thecase.
6.If any oftheparts aredamaged ormissfng (refer to PARTSLIST below), return
thesaw toyour nearest Sears store or Craftsmanoutlet to havethe sawreplacedo
L_ WARNING: If any partsare mlsslng,DONOT operatethis saw unt, the
missing parts are replaced. Failure todo socould resultIn possibleserious
personalInjury.
PARTS LIST
(Fig. 1)
1.Saw
J
7. ImpactResistantCase
8,Operator'sManual "-'-_r
13
5.Vae HoseAdapter
(stored incase)
6. Non-Scratch
Base Cover
(stored incase)
KNOWYOUR MULTI-PURPOSE/PLUNGE ACTION
3-IN. CIRCULAR SAW (Fig. 2)
l NOTE:Beforeattemptingto useyour saw_familiarizeyourselfwith allof the
operatingfeatures and safetyrequirements,
Yourplunge actioncircularsawhasa precision-builtelectricmotorand Itshouldbe
connectedto a 120-volt,60-Hz ACONLY power supply(normalhouseholdcurrent).
DO NOToperate ondirect current (DC).The largevoltage drop willcause a lossof power
and the motorwill overheat.Ifthe sawdoes notoperate whenpluggedintocorrect 120-volt,
60*HzAC ONLYoutlet, checkthe powersuppiyoThis saw hasan 8-ft., 2*wirepowercord
(no adapter needed).
This Saw has the following features:
1.2.8 Amp, 2800 RPM(no-load speed) Motor. Provtdessurecuts fnplywood,
woodbase composites,plastics,vinyl andfiberglass withthe general
purpose blade Included, and ceramicand marblewalt tile withthediamond
grit blade soid separately_
2. LaserTracTM the unique, Innovativefeature for accurate,efficient cuttlngl
3. Built-in LEDWorkllghtilluminatescuttingarea forbetter vistbitityo
4. Quick depth-of-cut adjustments witha maximumdepth-of-cut of7/8-inches.
5. Easy to read and setdepth-of-cut scale, located onupper btadeguard, ismarked
in 1/8-in.increments,0 to7/8-In.withcorrespondinglength(width)of-cuL
6. ErgonomtcallydesignedBlade Guard Release Lever and BaseAssembly Finger
Lift forefficient operation of plunge action
7. Length of Cut Indicator, located onbass, shows beginningand end of blade
position onthe workpleca; idea!forpocket cutting.
8. Heavy-dutyllghtwelght Magnesium blade guardfor extra strength and durability.
9, Stamped and formed steel base and lower blade guard fordurability and longlife.
10,Non-scratch base cover for use when cutting delicatesurfaces such as plastics and
composite flooring.
11.Extendedlength trigger switchpaddle forright or lefthand control,Triggersafety
releaseswitch convenlentlylocated on paddle for easyoperation.
12. Ergonomlcallydesigned handlewith soft-grlpadjusts to3 different positions at 0°,
15°,and 30°, for more efficientcutting,comfortandmaximum control.
13. IncludesOne Craftsman®3-In. 20 tooth carbide-tippedsteel general purpose
bladefor fast, smoothcutsin plywoodupto3/4-1n,thick,woodbasecomposites,
plastics,vinyland ftberglass.A Craftsman3-In. diamond grlt steel blade,for cutting
ceramic and marbletile up to 3/8-1n.thick, Issold separately.
_4.Two Hexwrenches for use when Installingblades_
15.Includes Edge Guidetohelp produceaccuratestraightcuts.
16. Bullt-lnsawdust extraction port. Includes lib-In, vac hose adapter forhookup
towet/dryvac, soldseparately,to removedustand chipsawayfrom thecuttingarea,
17.Permanently lubricated 100% ball bearings for smoothoperationand longlife.
18.Heavy-duty machined gearlng for efficient powertransmission.
lg. Includes High-Impact resistant carry/storage case.
14
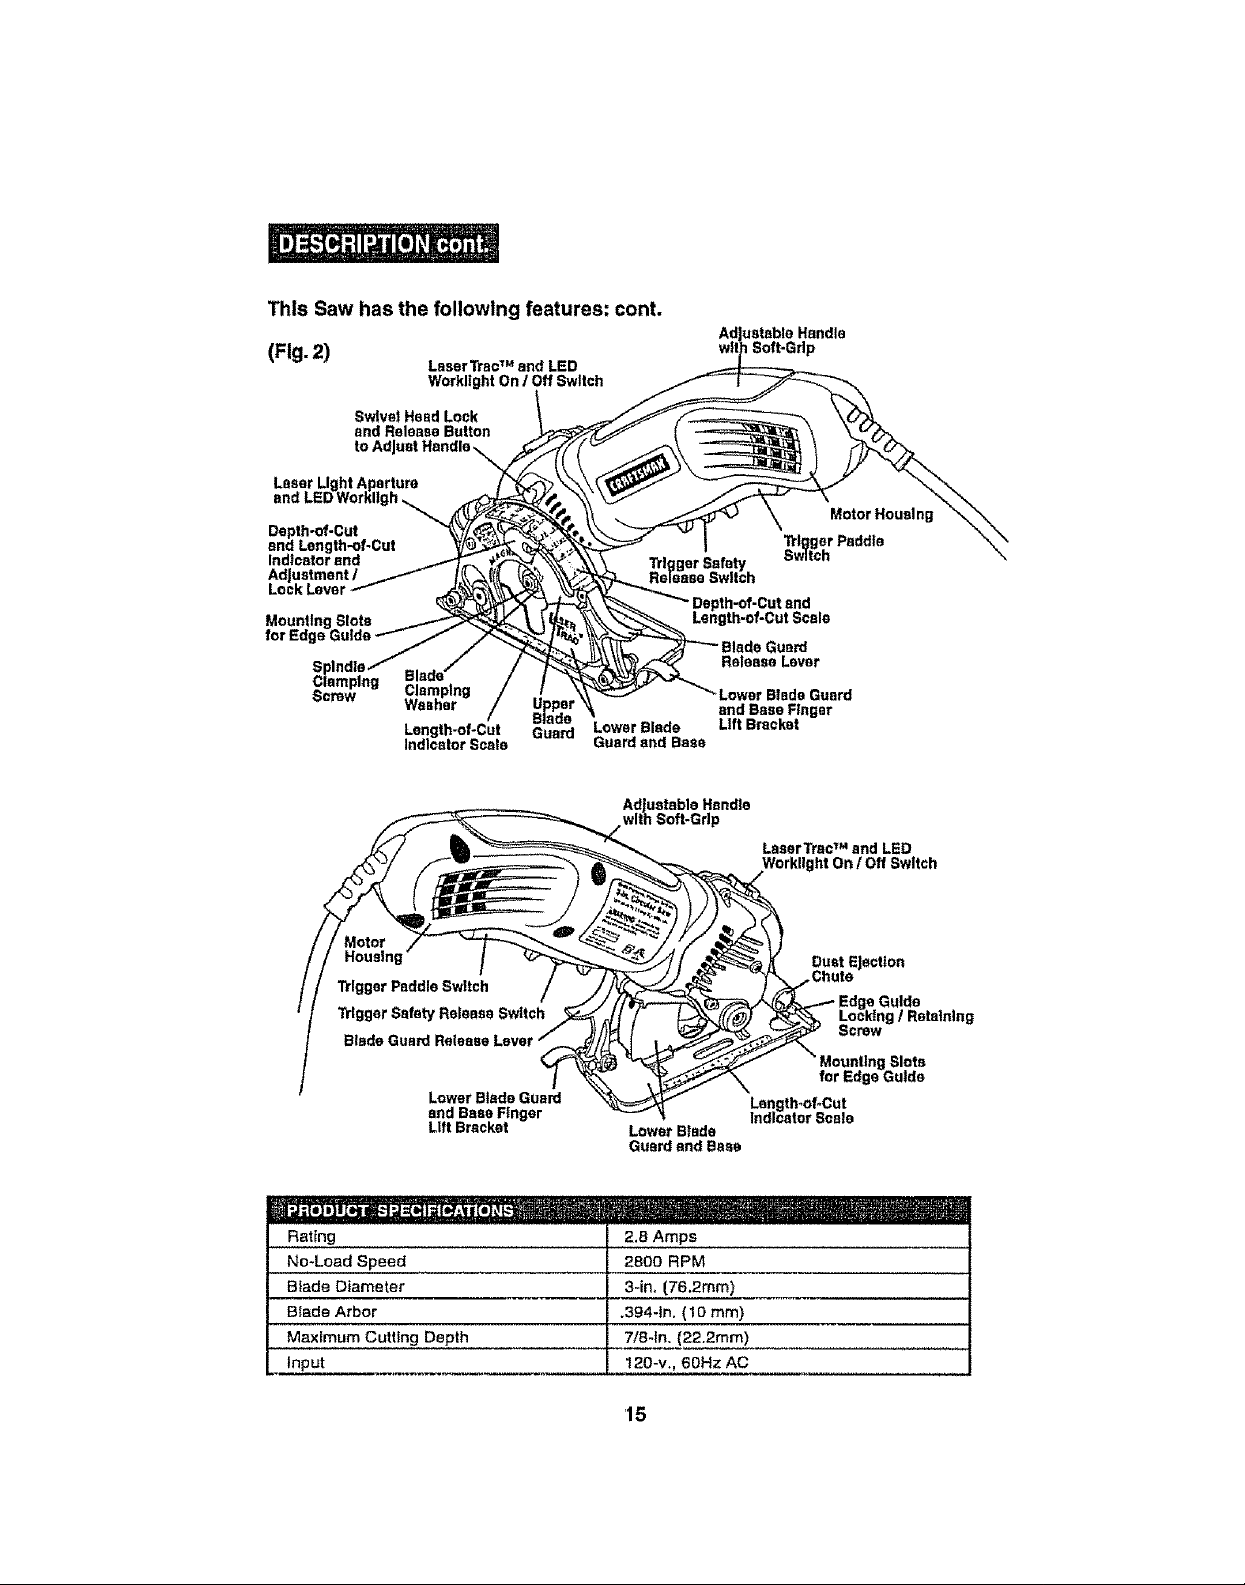
This Saw has the following features: cont.
(Fig.2)
Laser Light Aperture
and LEDWorkllgh
Depth-of-Cut
and Length-of-Cut
Indicator and
Adjustment /
Lock Lever
for Edg_
iplng
Screw Clamping
Laser Tta¢TM and LED
Workllght On / Off Switch
Washer Upper
Length-of-Cut Guard
Indicator Scale
Blade
Lower Blade
Guard sod Base
Adjustable Handle
with Soft-Grip
uetsble Handle
Soft-Grip
" Lower Blade Guard
and Base Finger
Lift Bracket
LaserTrac TM and LED
Workllght On / Off Switch
Motor
Housing
"l_lggerPaddle Switch
Blade Guard Release
Lower Blade Guard
and Base Finger
Lift Bracket
Rating
No-Load Speed
Biade Diameter
Blade Arbor
Maximum Cutting Depth
Input
Lower Blade
Guard and Base
2.8 Amps
2800 RPM
3-in, (76,2mm)
.3g4-1n. (1o ram)
7/8-1n. (22.2mm)
120-v., 60Hz AC
'15
Dust Ejection
,Chute
Mounting Slots
for Edge Gulde
Length_of*Cut
Indicator Scale
a Guide
I / Retaining
_WARNING: Never use a damaged or Incorrect blade washer or bolt.The
blade washer and bolt were specially designed for your saw,for optimum
performance and safe operation.A 3-Inch blade Isthe maximumblade capacity
of your saw. A largerthan 3-Inchblade will come Incontact with the blade
guard.Also, NEVERuse a bladethat Is so thick that it preventsthe outer blade
washer fromengaging with the flat side of the spindle. Bladesthat are toolarge
or toothick can result In an accident causing serious Injury.
,,,,,,,,,,,, ,, ,,,,, ,i,
_WARNING: ONLY USE the saw blades designated for use with this saw.
Using anyother blade could result Inan accident causing serious Injury.See
page 17for designatedblades andrecommended uses.
_WARNING: Only use the Craftsman ®3-In. 20 tooth carbide-tipped steel
general purpose blade (9-61272 Included), to cut wood, plywood up to _-ln.
thick, woodbase composites, plastics, vinyl and fiberglass. A Craftsman 3-In.
diamond grit steel blade (9-61273 sold separately) Is for cutting ceramic and
marble tile up to 3/8-1n. thlck (See Fig. 3b).
SAW BLADES
All saw blades need to be keptclean, sharp andproperlysetin orderto cutefficiently.
Using a dull blade places a heavyload onthe saw and Increases the danger of kickback.
Keepextra bladeson hand,so sharp blades are alwaysavaiIable_Gum and wood pitch
hardened on the blade slows the saw down, Use gum and pitch remover,hotwater or
kerosene to removethem, DO NOT use gasotlne_
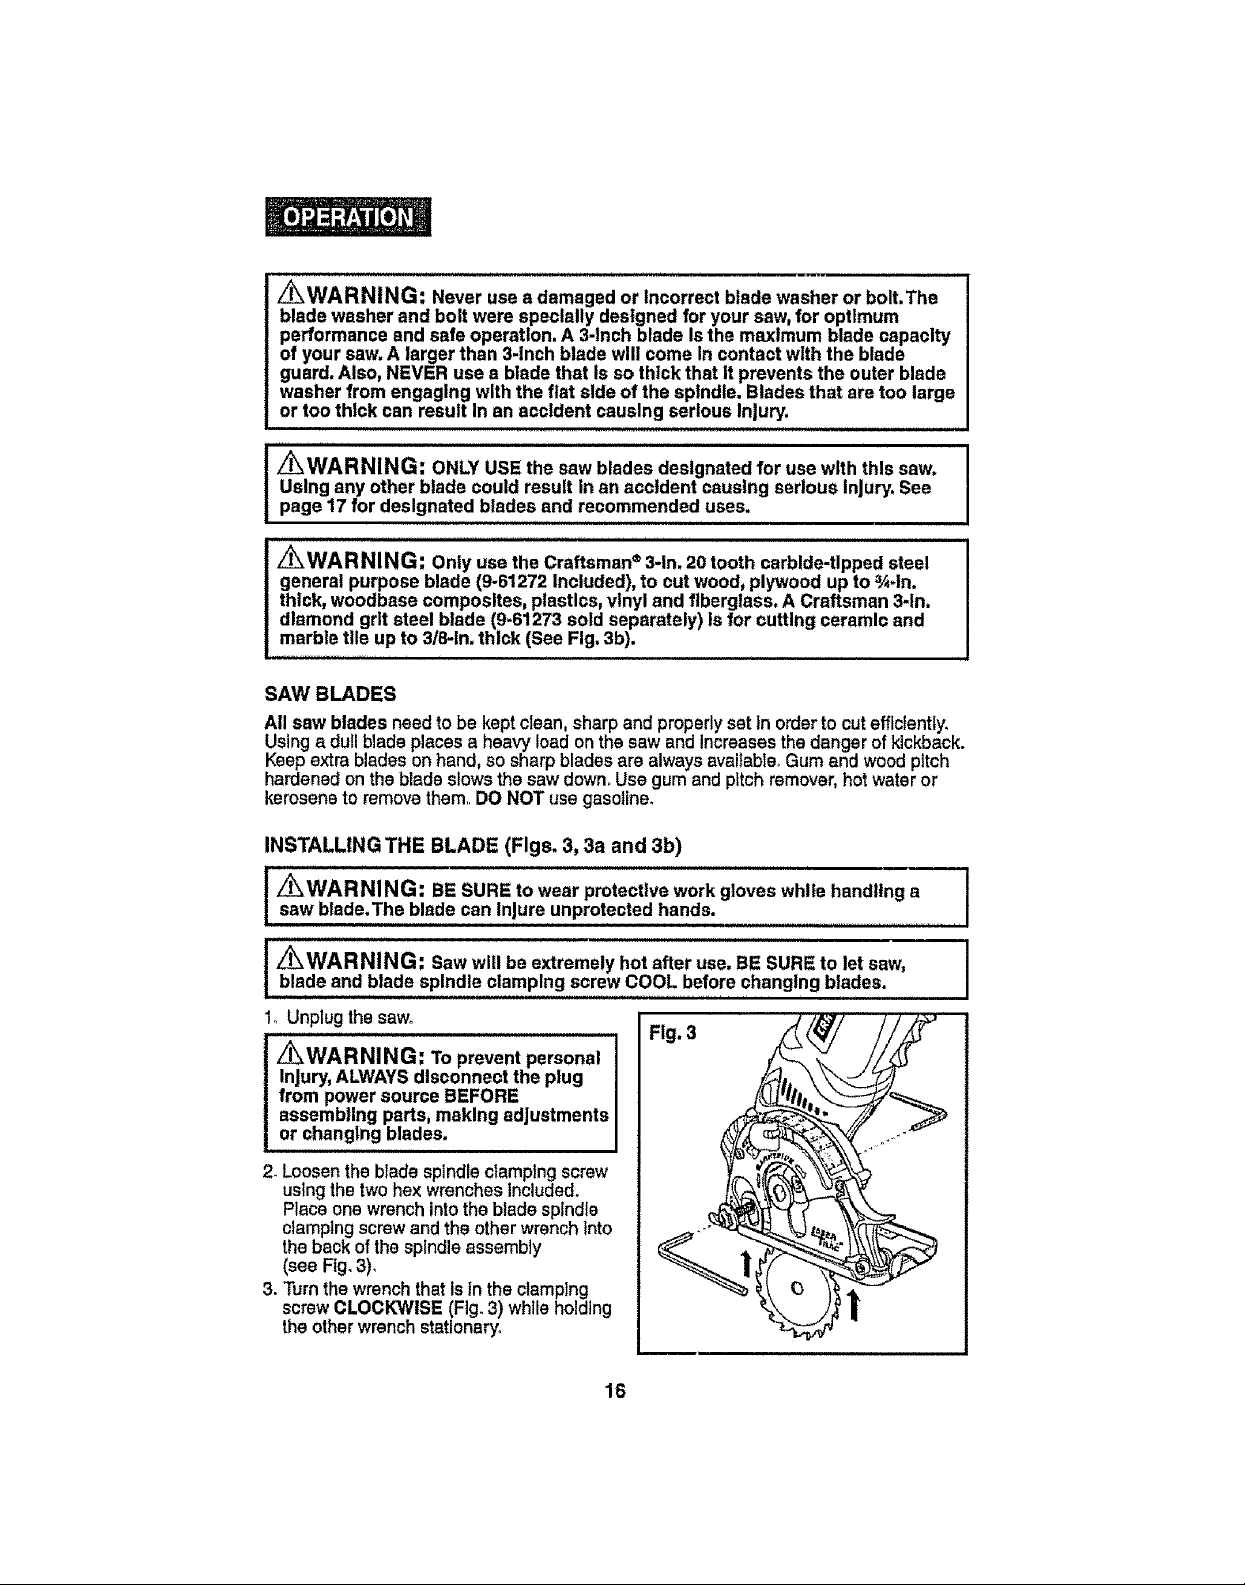
INSTALLING THE BLADE (Figs. 3, 3a and 3b)
,/_WARNING: BE SURE to wear protective work gloves while handling a
saw blade.The blade can Injure unprotectedhands.
L_WARNING: SawwiUbe extremely hot after use. BE SUREto let saw,
blade and blade spindle clamping screw COOL beforechanging blades.
,= ,, = ,= ,,,,,,l, ,,,,,,,,,,,,,,,,,, ,,,, ,, , ,
1oUnplugthesaw.
Fig. 3
z_WARNING: Topreventpersonal
Injury,ALWAYSdisconnect the plug
from powersource BEFORE
assembling parts,making adjustments
or changingblades.
2. Loosenthe blade spindle clampingscrew
usingthe two hex wrenches Included.
Place one wrench intothe bladespindle
clamping screw and the other wrench Into
the back of thespindle assembly
(see Fig.3),
3. Turnthe wrench that Isfn the clamping
screw CLOCKWISE (Fig.3) while holding
the otherwrench stationary.
16
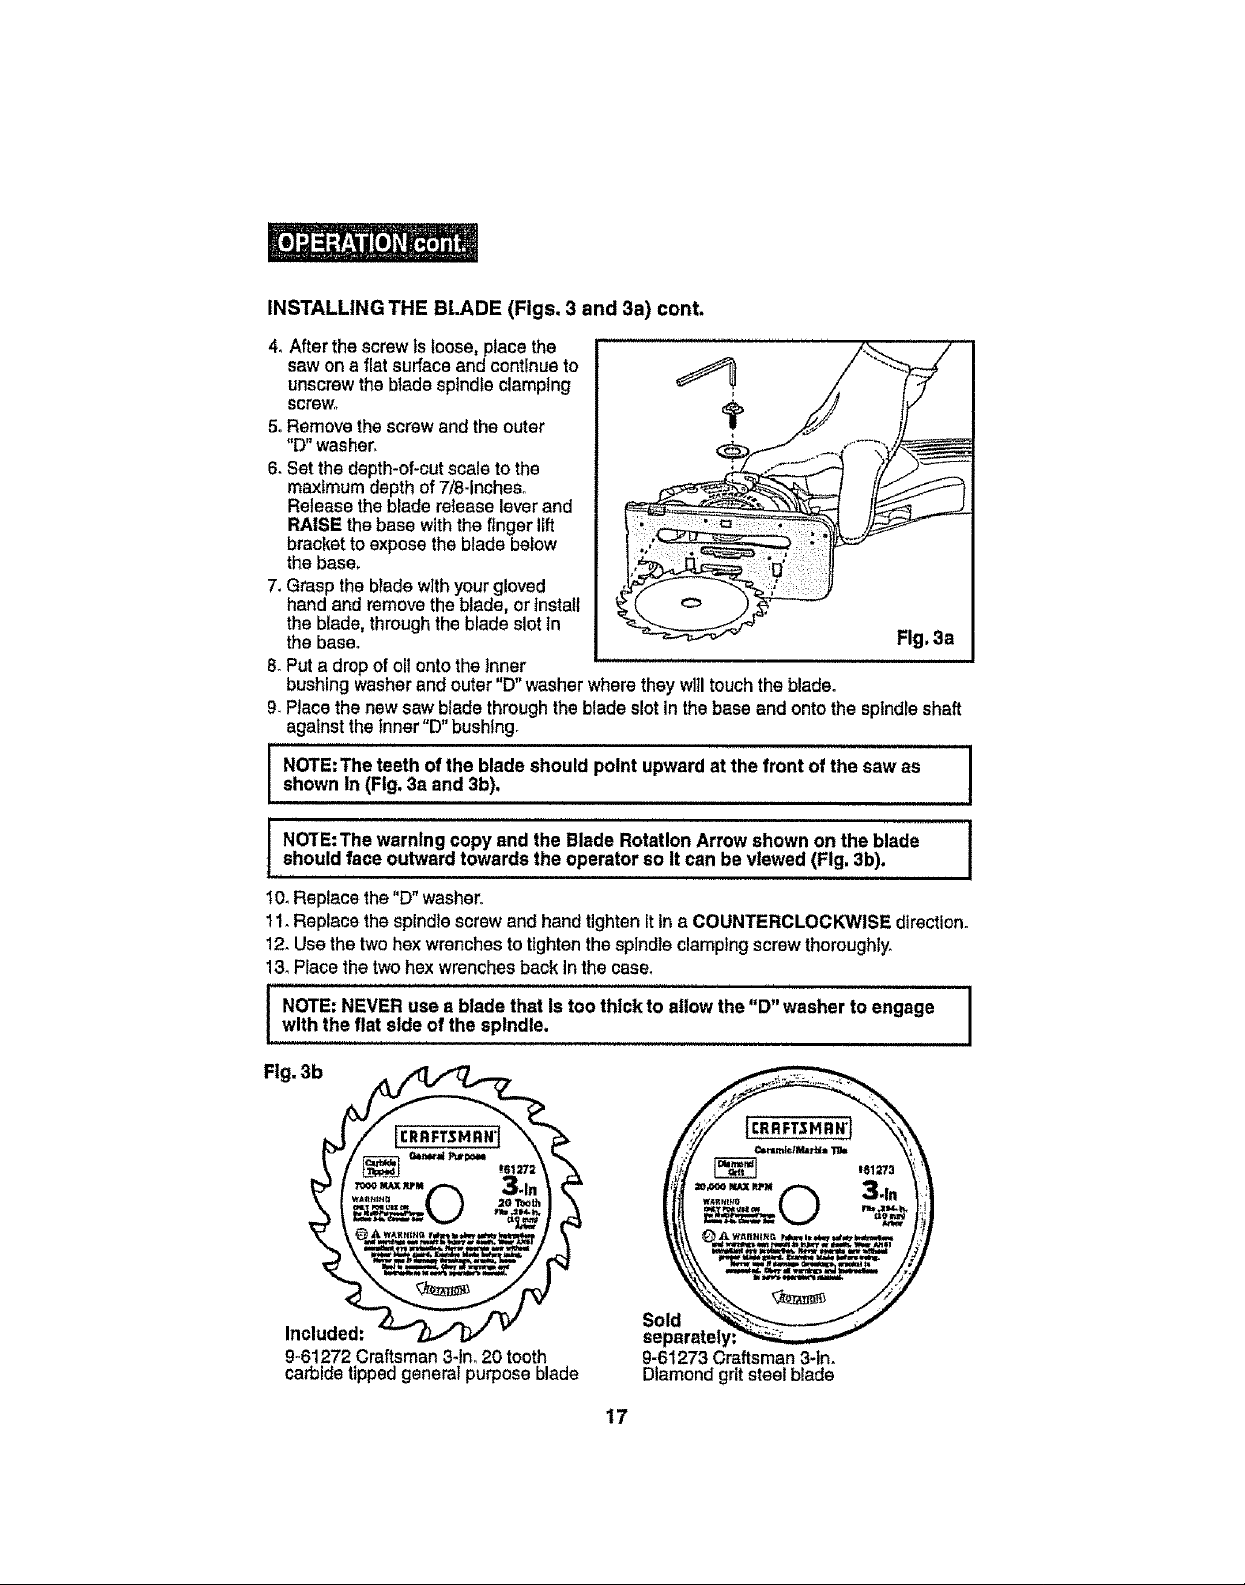
INSTALLINGTHEBLADE(Figs,3and3a)conL
4. After the screw ts loose, place the
saw on s fiat surfaceand continueto
unscrewthe blade spindle clamping
screv_,
5oRemovethescrew and the outer
"D"washer.
6. Setthe depth-of-cut scale to the
maximum depth of 7!8-incheso
Releasethe blade releaselever and
RAISEthe basewith the finger lift
bracketto expose the blade below
the base.
7. Graspthe blade with your gloved
hand and removethe blade, or install
the blade,throughtheblade slot tn
thebase. Fig. 3a
8. Puta drop of oilonto the Inner
bushing washerand outer"D" washer where they will touch the blade°
9. Placethe new sawblade through the blade slot inthe base and onto the spindle shaft
against the Inner"D" bushtng.
NOTE:The teeth ofthe bladeshould point upward at the front of the sawas
shown In (Fig, 3a and 3b).
NOTE:The warning copy and the Blade Rotation Arrow shown onthe blade
shouldface outwardtowards the operator so It can be viewed (Fig. 3b).
i, u, ,, ,
10.Replace the "D" washer.
11.Replace the spindle screwand hand tightenit ina COUNTERCLOCKWISEdirection.
12.Usethe two hexwrenches to tlghtenthe spindle clamptngscrew thoroughly.
13.PEacethe twohex wrenches back in the case.
I NOTE:NEVER use s bladethat Istoo thick to allowthe "D" washer to engage
with the flat side of the spindle,
Fig. 3b
Included:
9-61272 Craftsman 3-In. 20 tooth
carbide tipped general purpose blade
Sold
separately
9-61273 Craftsman 3-1n.
Diamond grit steelblade
17
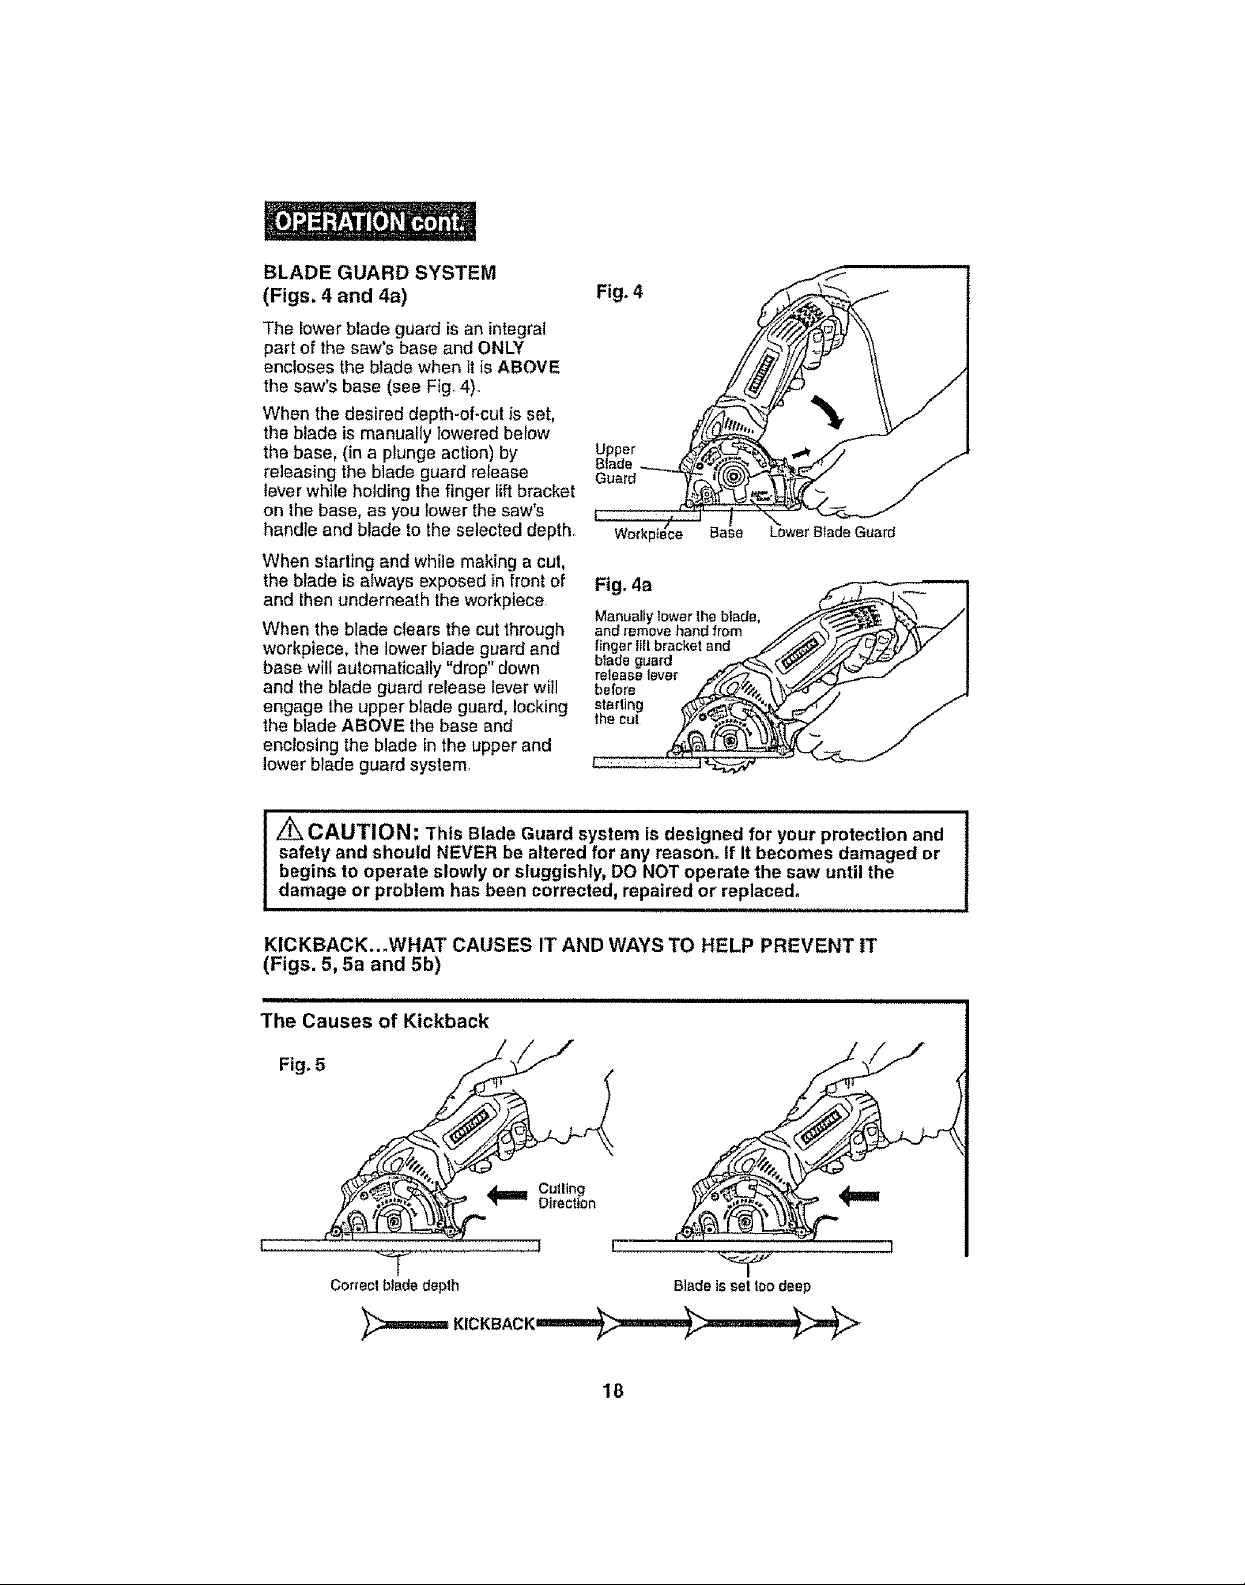
BLADE GUARD SYSTEM
(Figs. 4 and 4a)
The iower blade guard isan integral
part of the saw's base and ONLY
encloses the blade when itis ABOVE
the saw's base (see Fig_4)_
When the desired depth-of-cut is set,
the blade is manually lowered berow
the base, (in a plunge action) by
releasing the blade guard release
lever wh]ie holding the finger lift bracket
on the base, as you lower the saw's
handle and blade to the selected depth,
When starling and while making a cut,
the blade is always exposed in front of
and then underneath the workpiece
When the blade clears the cut through
workpiece, the lower blade guard and
base will automatically "drop" down
and the blade guard release lever will
engage the upper blade guard, locking
the blade ABOVE the base and
enclosing the blade in the upper and
lower blade guard system,
Fig. 4
Upper
Blade
Guard
Fig. 4a
Manually lower the blade,
and remove hand from
fing t and
blade guard
release lever
before
starlin;
the cu!
Z_ CAUTION: 1"his Blade Guard system is designed for your protection and
safety and should NEVER be altered for any reason, If It becomes damaged or
begins to operate slowly or sluggishly, DO NOT operate the saw until the
damage or problem has been corrected, repaired or replaced°
KICKBACK..°WHAT CAUSES IT AND WAYS TO HELP PREVENT IT
(Figs. 5, 5a and 5b)
The Causes of Kickback
Fig, 5 _f_
! |
"_t"-=" Direction
T
Cor_ec!b_ededeplh
18
BladeissetIoodeep
1
KICKBACK..WHAT CAUSES IT AND WAYS TO HELP PREVENT IT
(Figs. 5, 5a and 5b) cont.
The Causes of Kickback cont.
1+KickbackIs asudden reactionto a pinched, bound or mtsalignedsawblade, which
causes an uncontrolled saw to lift up and outof the workplace andtoward the operator_
2. When the bladeispinchedor bound tightlyby the kerrcioslng down, the bladestalls
and the motor reaction ddves the unit rapidly backtowards the operator_
3. If the blade becomes twisted or misaltgnedin the cut, the teethat the backedge of the
btade candig intothe topsurface of the wood+Thiscauses the blade to climb out of
the kerf and Jumpback towardsthe operator,
4. Sawingintoknots ornails inthe workplace can causeKickback,
5, Sawingintowet or warped lumbercan cause Kickback.
6, Forcing a cut, ornot supporting the workplace correctlycan cause Kickback
(see Fig°5a).
7. Kickback Isa result of tool misuse and/or incorrectoperatingprocedures or conditions.
It canbe avoidedby taking the proper precautions, as listed below.
Ways to Help Prevent Kickback
1.ALWAYSmaintain afirm gdp withboth hands onthe saw (see Figs.5, 5b) andposition
yourbody and armsto allowyou to resistKickbackforces. Kickbackforces canbe
controlledbythe operator,ifthe properprecautionsaretaken.
2+Ifthe bladeis binding,or whenyouare interruptinga cutfor anyreason,ALWAYS
releasethetriggerand holdthe saw motionless Inthe materialuntil the blade comesto
a complete stop.NEVER attempt to removethe sawfrom thework orpull the saw
backwardwhile the blade is inmotion, orKickback mayoccur.CHECK and take
corrective actionto eliminatethe causeof blade binding.
3. Inspectthe workplece for knots or nails beforecuttlng°Neversaw into a knotor nail.
4+DO NOT cut warped or wet lumber+
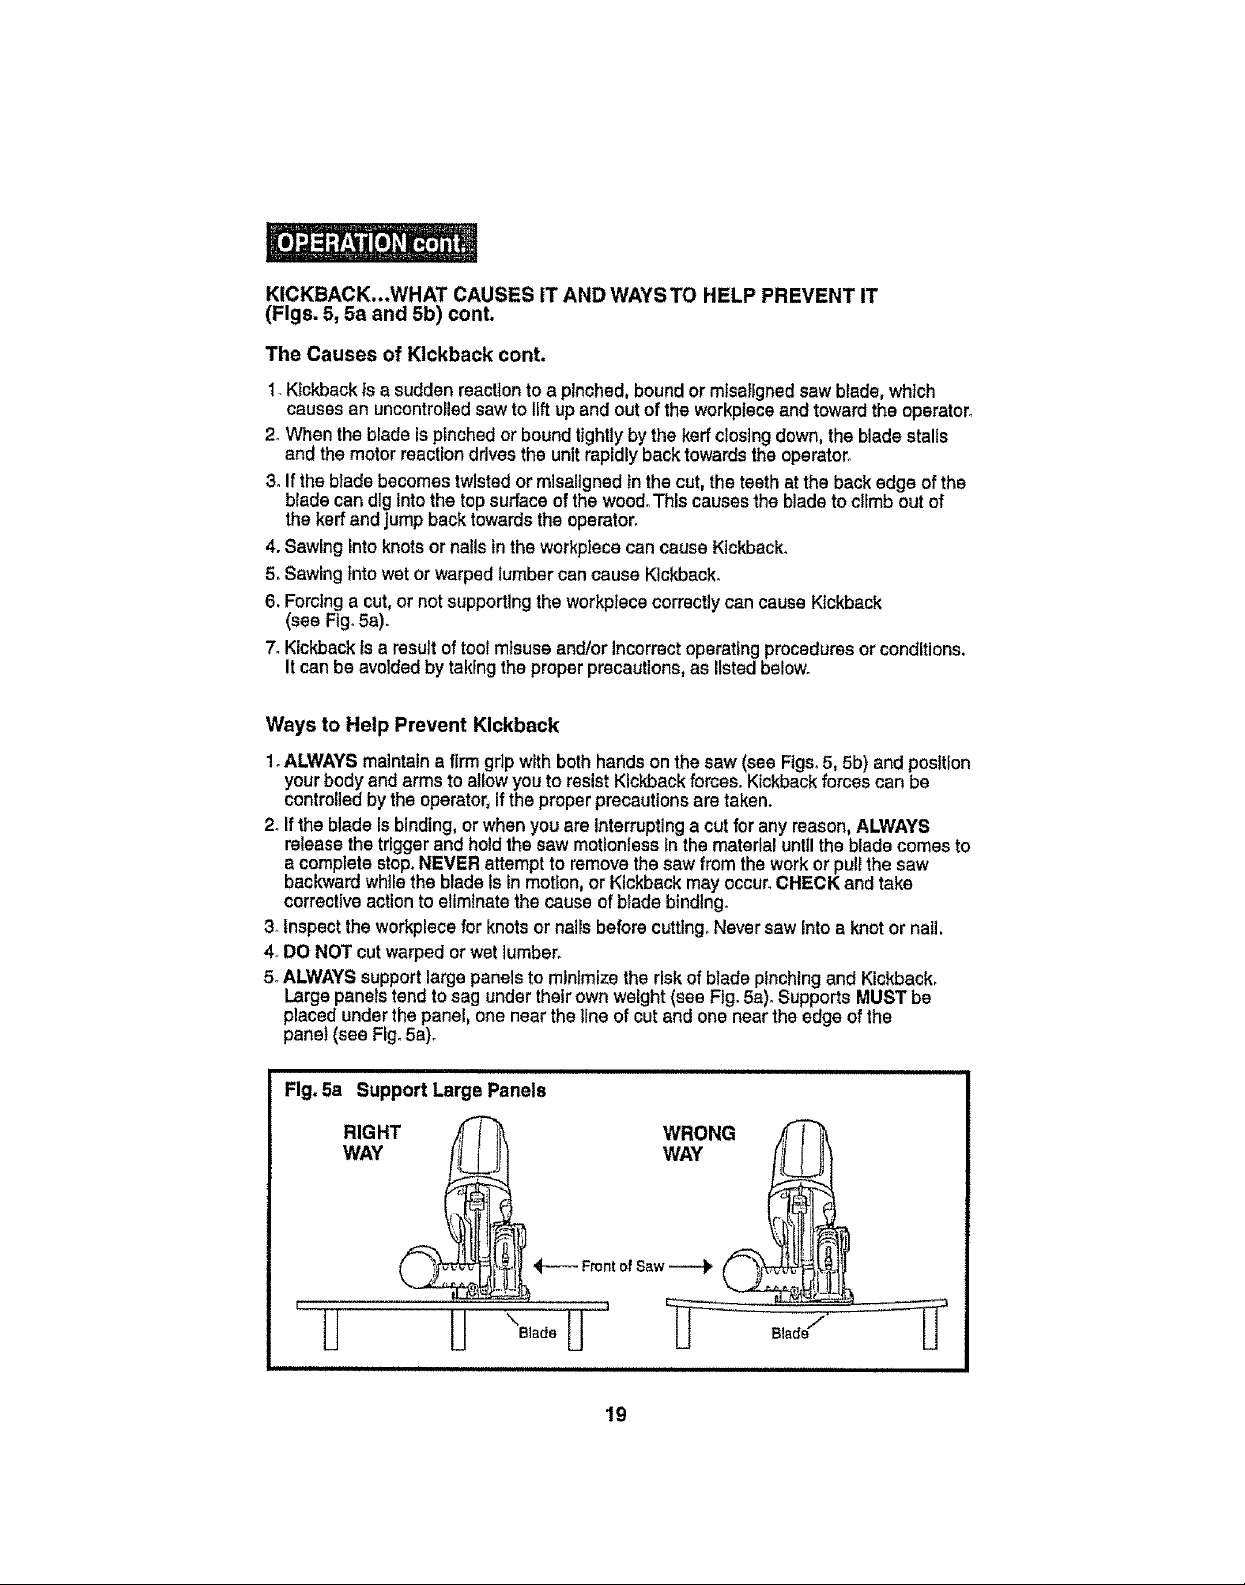
5+ALWAYSsupport large panelsto mlnlmize the risk of bladepinchingand Kickback,
Large panels tend to sag undertheirown weight(see Fig. 5a)°SupportsMUST be
placed under the panel, one near the line of cut andone nearthe edge of the
panel (see Fig.5a)°
Rg. 5a Support Large Panels
I ,
H
lJ "o,+U u ,o°Ju
19
KICKBACK...WHAT CAUSES IT AND WAYS TO HELP PREVENT IT
(Figs. 5, 5a and 5b) cont.
Ways to Help Prevent Kickback cont.
6. When restartingthe sawinthe workplece, CENTERthe blade Inthe keff andcheckto
be sure thatthe saw teeth arenot engagedInto the material. If thesaw blade is binding,
itmaywalk up or Kickback from the workplece whenthe saw is restarted_
7oDO NOTuse a dull ordamaged bladeoUnsharpened, Improperlyset, or gummed-up
bladesproduce narrow kerr which causes excessivefriction, blade btndlng and Kickback.
8.KEEP the blade at the correct depthsetting. Thedepth setting should not exceed
1/4-Inchbelowthe material being cut (See Fig. 5). BE SURE that the bladedepth and
adjusting locking leveris tight and secure BEFOREmaklng a cut. If bladeadjustment
shiftswhilecuttingitmaycause binding and Kickback.
9.USE E,I_TRACAUTION when plunge cutting makinga "PocketCut"Intoexisting walls
or ether bitndareas.The protruding blademay cut objects thatcan cause Kickback.
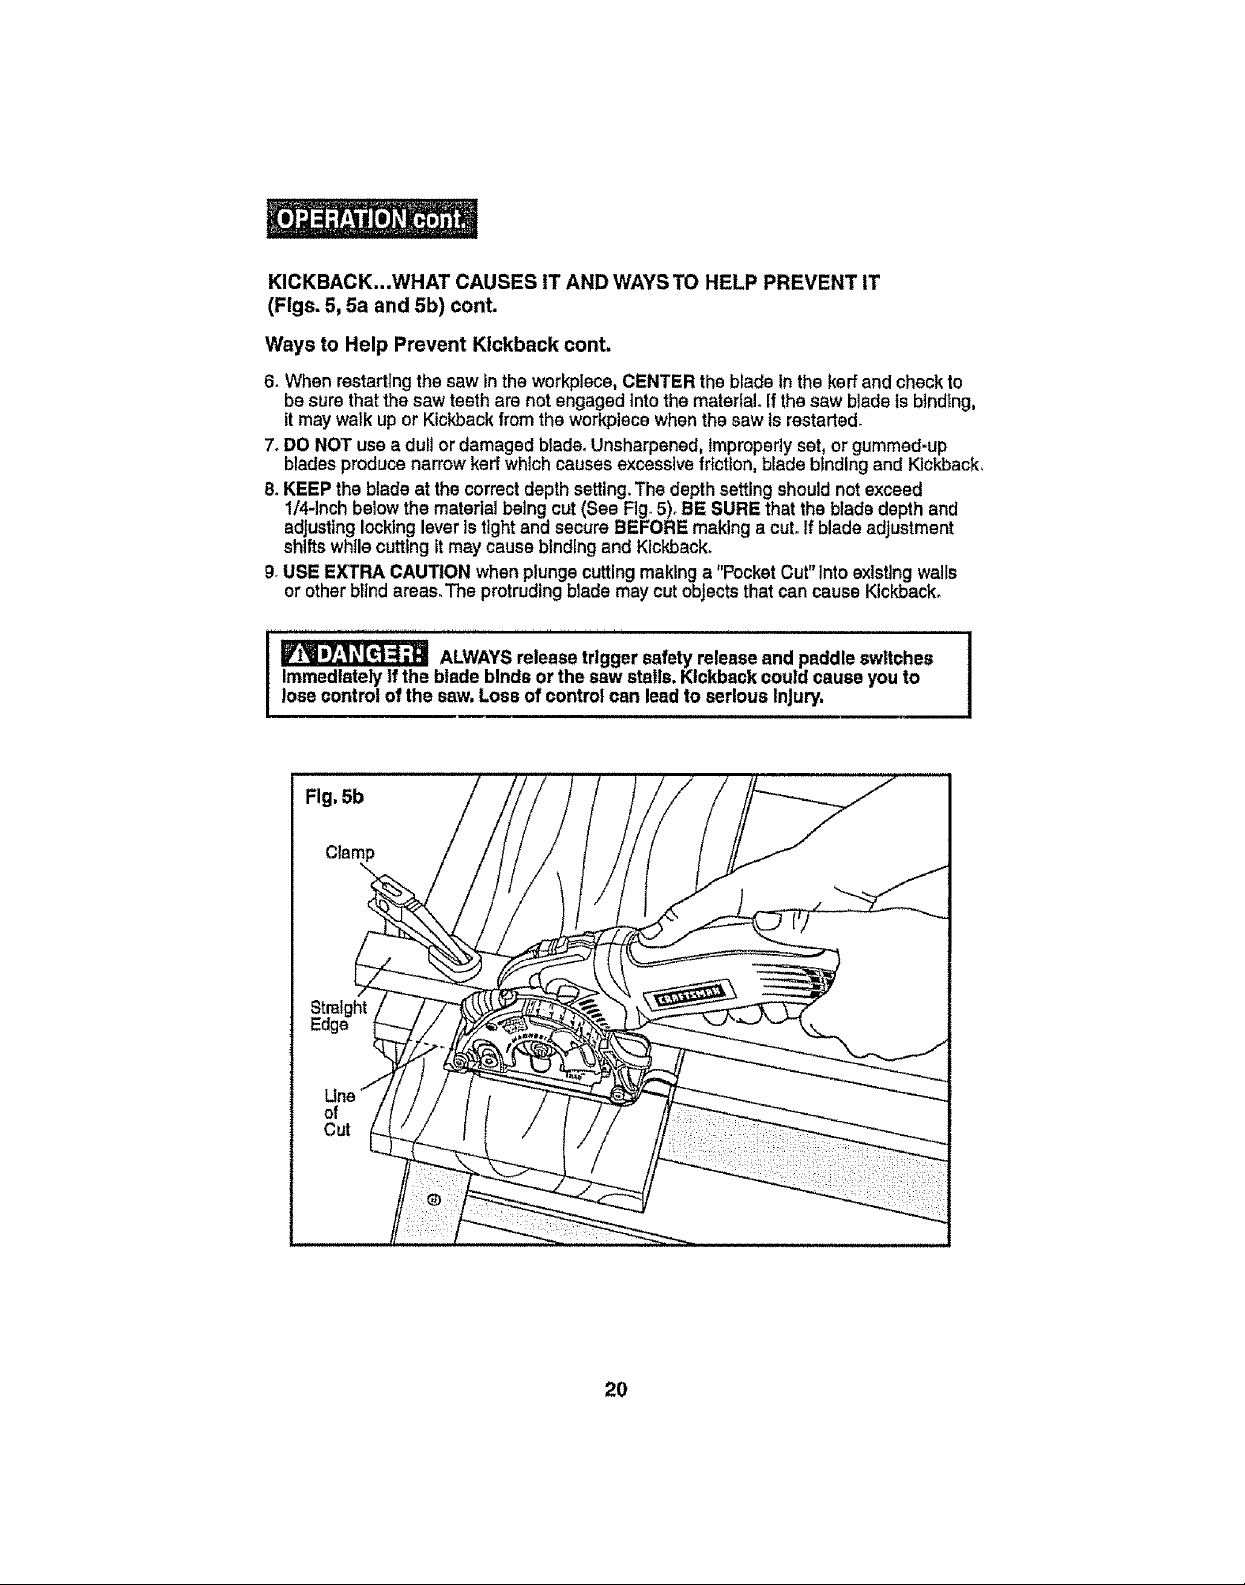
Immediatelyifthe blade bindsor the saw stalls,Kickbackcould cause you to
_ ALWAYSreleasetrigger safetyreleaseand paddleswitches
lose control ofthe saw.Loss ofcontrolcan leadto serious Injury,
Fig, 5b
20
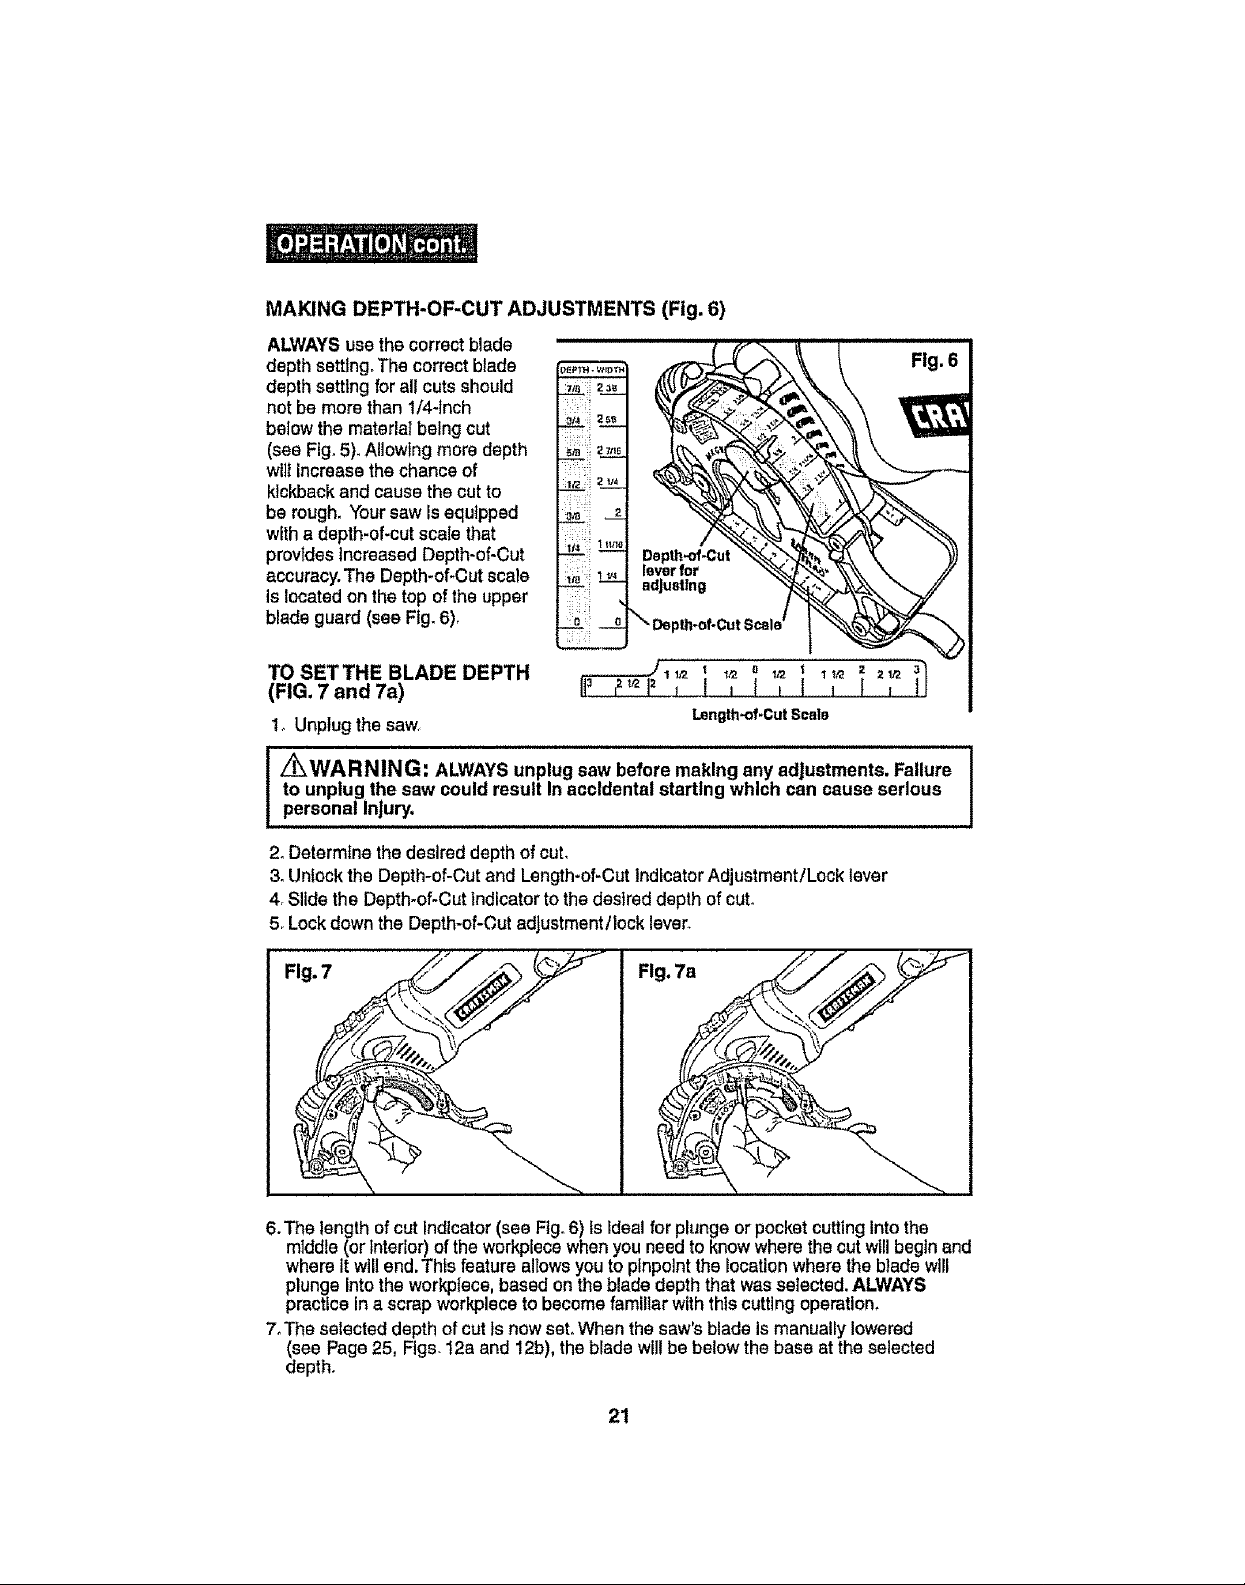
MAKINGDEPTH-OF-CUTADJUSTMENTS(Fig.6)
ALWAYSuse the correct blade
depthsetting. The correct blade
depthsetting forall cutsshould
not be more than 1/4-Inch
belowthe material being cut
(see Fig.5). Allowing more depth
wilt increase the chance of
kickbackand causethe cut to
be rough. Yoursaw isequipped
with a depth-of-cut scale that
provtdesincreasedDepth-of-Cut
accuracy.The Depth-of*Cutscale
Islocated onthetop ofthe upper
blade guard (see Fig.6).
TO SETTHE BLADE DEPTH
(FIG. 7 and 7a)
1o Unplug the saw Length-of.CutScald
to unplug the saw could result Inaccidental starting which can cause serious
[ _WARNING: ALWAYSunplug saw before making any adjustments. Failure
personal injury.
2. Determine the desired depthof cut,
3. Unlockthe Depth-of-Cutand Length-of-CutIndicatorAdjustment/Lock lever
4. Slide the Depth-of-Cutindicatorto the deslred depth ofcut.
5. Lock downthe Depth-of-Cut adjustment/lock lever.
Fig, 7
(,
6.The length ofcut indicator(see Fig. 6)ts idealfor plungeor pocketcutting Into the
m]ddle(orinterior) oftheworkpfecewhenyouneedto knowwherethecutwillbegin and
whereit willend.This feature allows youto pinpointthe locationwheretheblade will
plungeInto theworkplace,based ontheblade depththat wasselected.ALWAYS
practiceina scrap workplaceto becomefamiliarwiththis cuttingoperation.
7_The selecteddepth of cut isnowset.When thesaw'sblade ismanually lowered
dSeePage 25, Figs.t2a and 12b),the blade will be below the base at the selected
epth.
Fig. 7a
, t , I , t , H
l
21
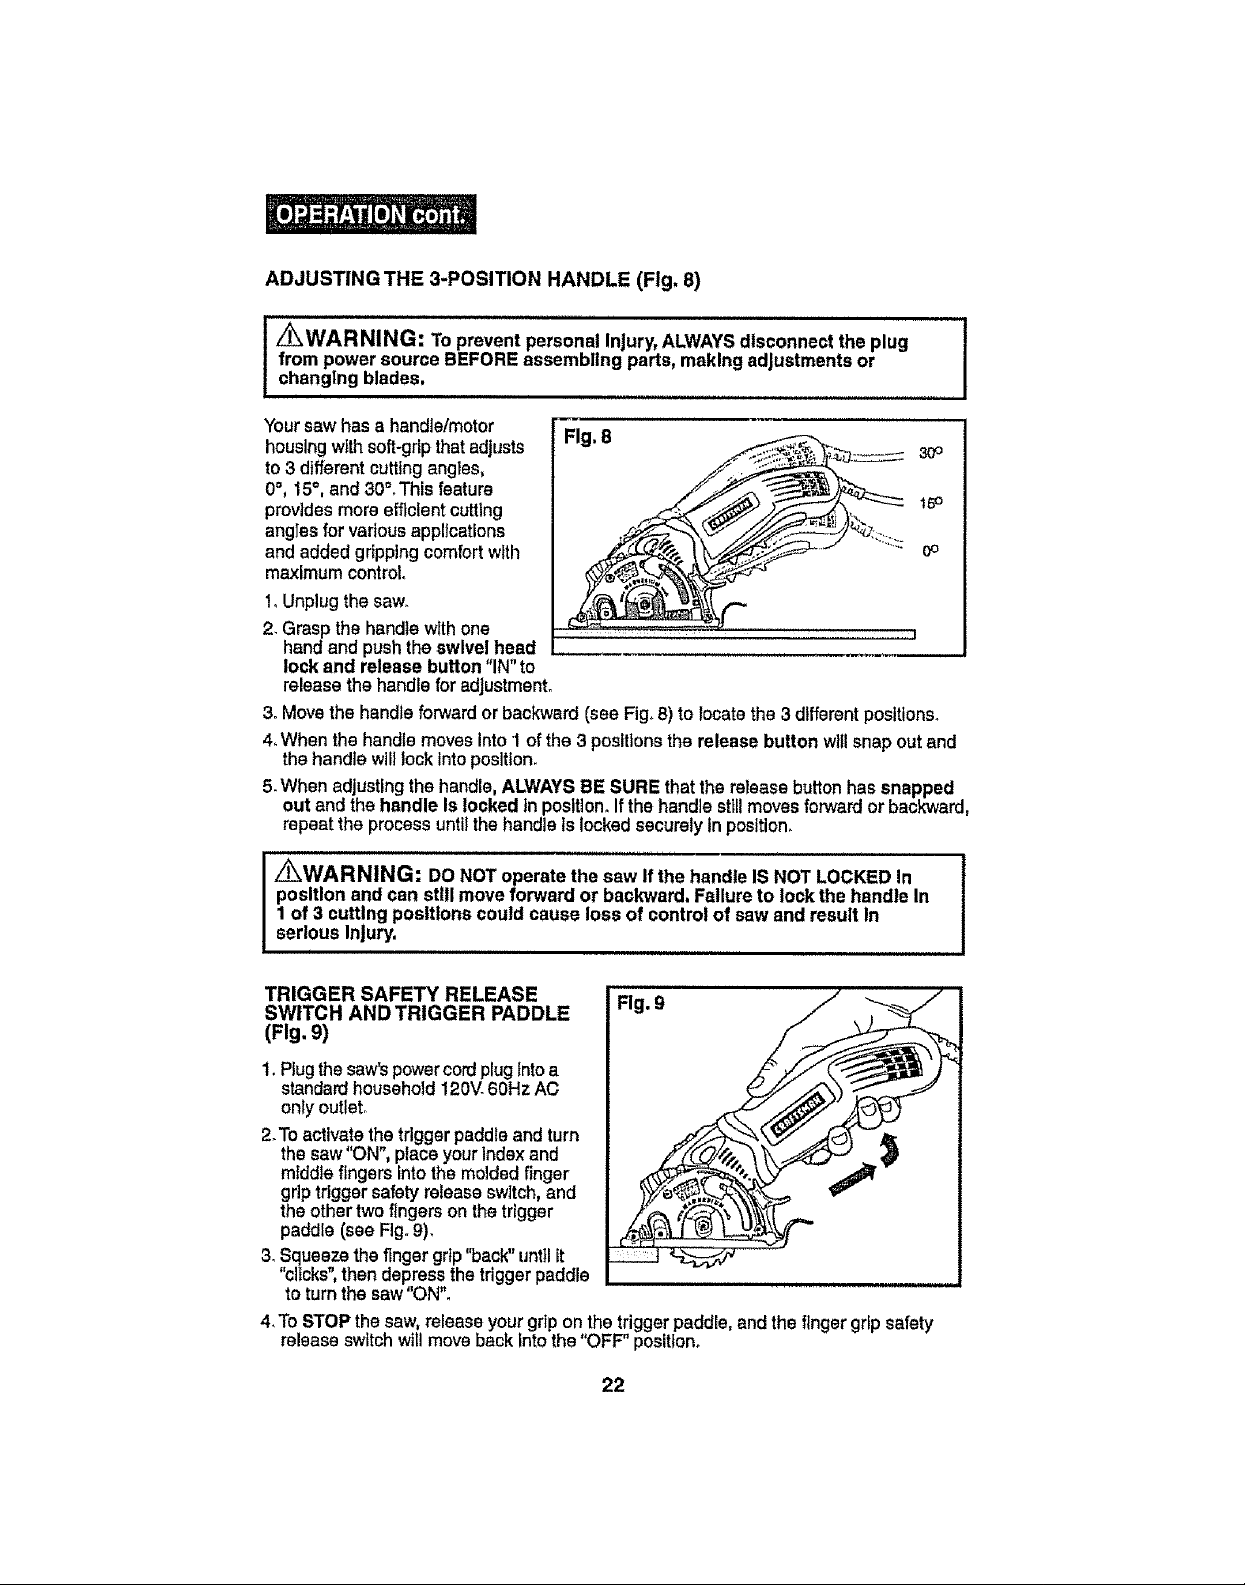
ADJUSTING THE 3-POSITION HANDLE (Fig. 8)
Z_WARNING: To prevent personal Injury,ALWAYSdisconnect the plug
from power source BEFOREassembling parts, making adjustments or
changing blades,
i
Your saw has a handle/motor
housingwithsoft-gripthat adjusts
to 3 differentcutting angles,
0°, 15°,and 30".This feature
provides moreefficient cuttlng
angles for vadous applications
and addedgripping comfort with
maximum control.
1,Unplugthe saw.
2. Graspthehandle with one ............................ j
handand pushtheswivelhead
lock and release button"IN"to
release thehandlefor adjustment.
3. Movethe handleforwardor backward (seeFig.8) to locatethe 3differentpositions.
4_Whanthe handlemovesinto1 of the 3positionsthe release button willsnapoutand
thehandlewilllockintoposition.
5.When adjustingthehandle,ALWAYSBESURE thatthe reteasebutton hassnapped
out and the handle Is lockedin position.Ifthe handle st_llmovesforward or backward,
repeatthe processuntilthe handleIs locked securely inposition.
Fig, 8
3O°
15o
0o
_WARNING: DO NOToperate the saw If the handle IS NOT LOCKED In
position and can still moveforward or backward. Failure to lockthe handle In
1 of 3 cutting positions could cause lossof control of sawand result in
serious Injury.
TRIGGER SAFETY RELEASE
SWITCH AND TRIGGER PADDLE
(Fig. 9)
Fig. 9
1.Plugthe saw'spowercordplug Intoa
standardhousehold 120V.60Hz AC
only outlet°
2.To activate thetdggerpaddleandturn
thesaw "ON",placeyourIndex and
middle fingersintothe molded finger
griptriggersafetyreleaseswitch,and
theothertwo fingersonthetrigger
paddle(see Fig.9).
3_Squeeze the fingergrip"back"untilit
"clicks",then depress the trigger paddle
to turn the saw"ON",
4,To STOP the saw,releaseyour grip on the trigger paddle, and the finger grip safety
releaseswitchwtl!move back Intothe "OFF"position.
22
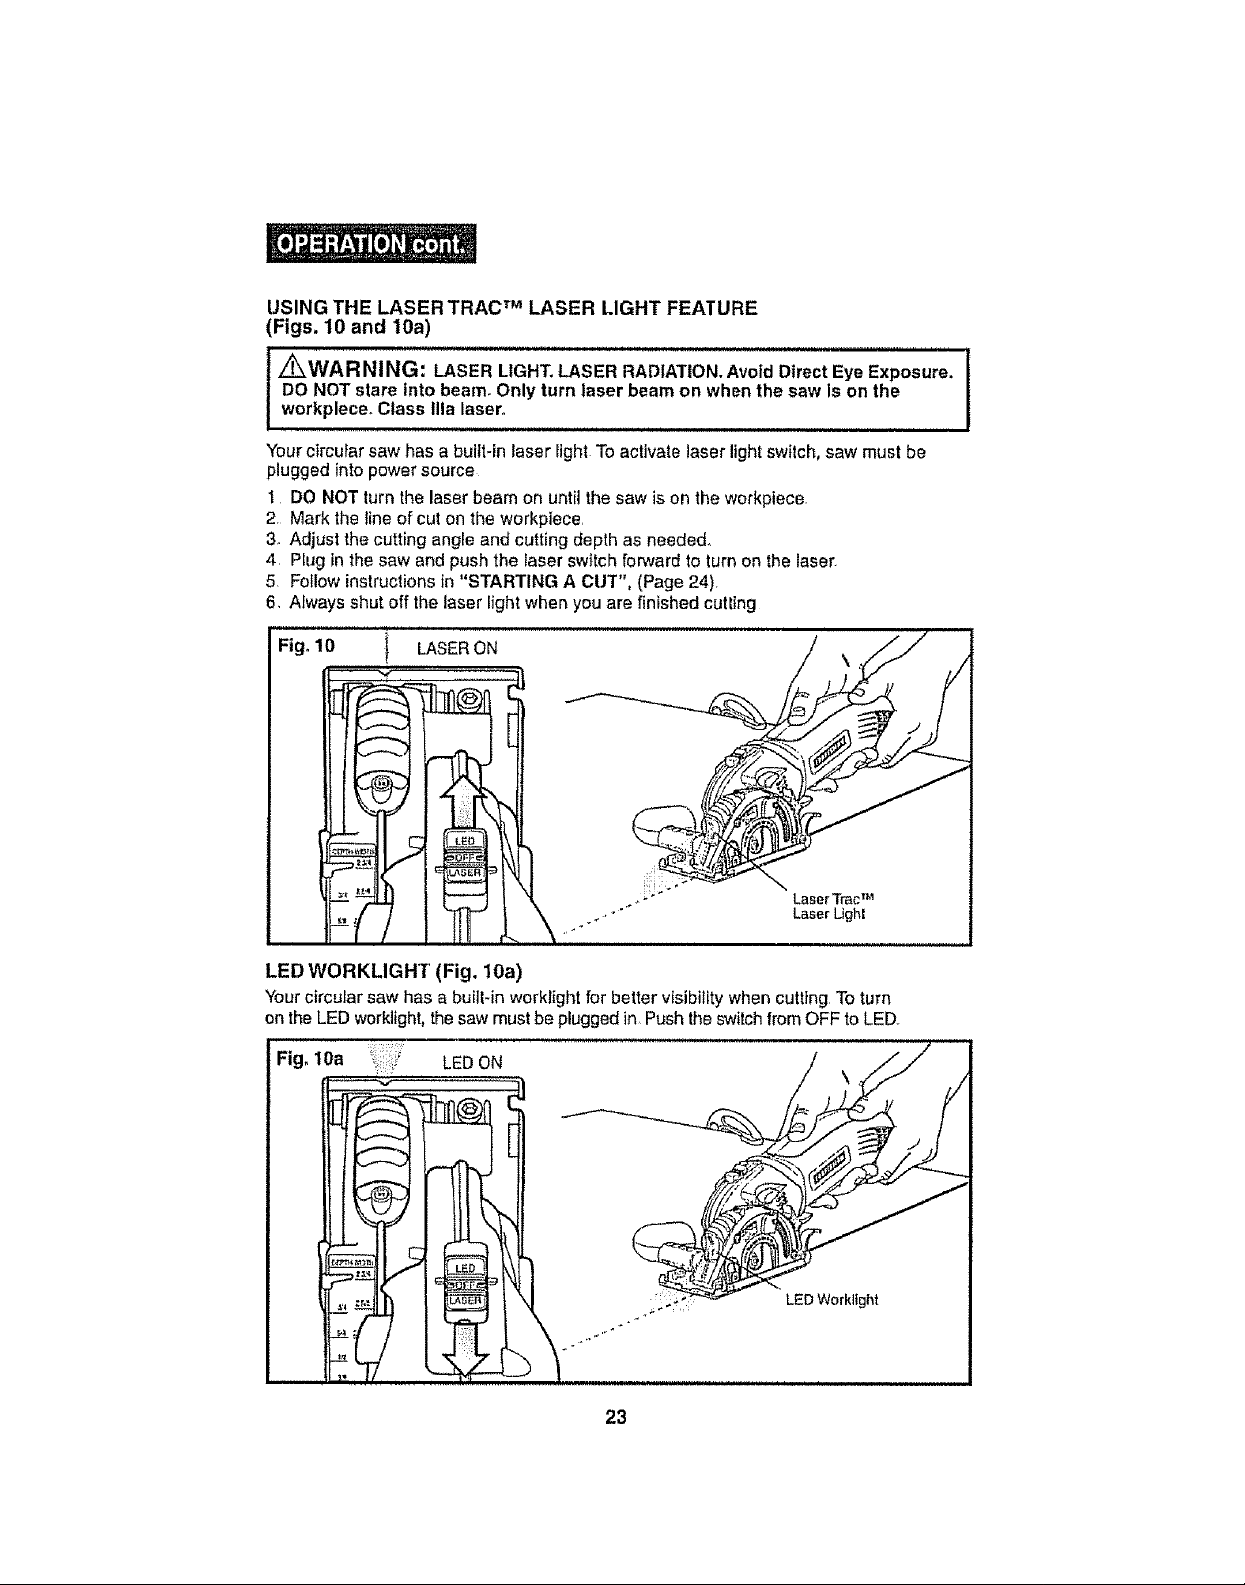
USING THE LASER TRAC TM LASER LIGHT FEATURE
(Figs. 10 and 10a)
DO NOT stare into beam, Only turn laser beam on when the saw is on the
i _WARNING: LASER LIGHT. LASER RADIATION. Avoid Direct Eye Exposure.
workplece. Class Ilia laser°
................................................................... i
ll,l,,,ll i,,Hllll L
Yourcircular saw has a built-in laser light To activate laser light switch, saw must be
plugged into power source
1 DO NOT turn the laser beam on until the saw is on the workpiece.
2, Mark the line of cut on the workptece,
3. Adjust the cutting angle and cutting depth as needed.,
4 Plug in the saw and push the iaser switch forward to turn on the laser.
5. Follow instructions in "STARTING A CUT", (Page 24)
6. Always shut off the laser light when you are finished cutting
Fig. 10 1 LASER ON
Laser TracTM
LaserLight
LED WORKLIGHT (Fig, 10a)
Your circular saw has a built-in worklight for better vtsibi/lty when cutting To turn
on the LED work]ight, thesaw must be plugged in, Push the switch from OFF to LED°
Fig. 10a LED ON
23
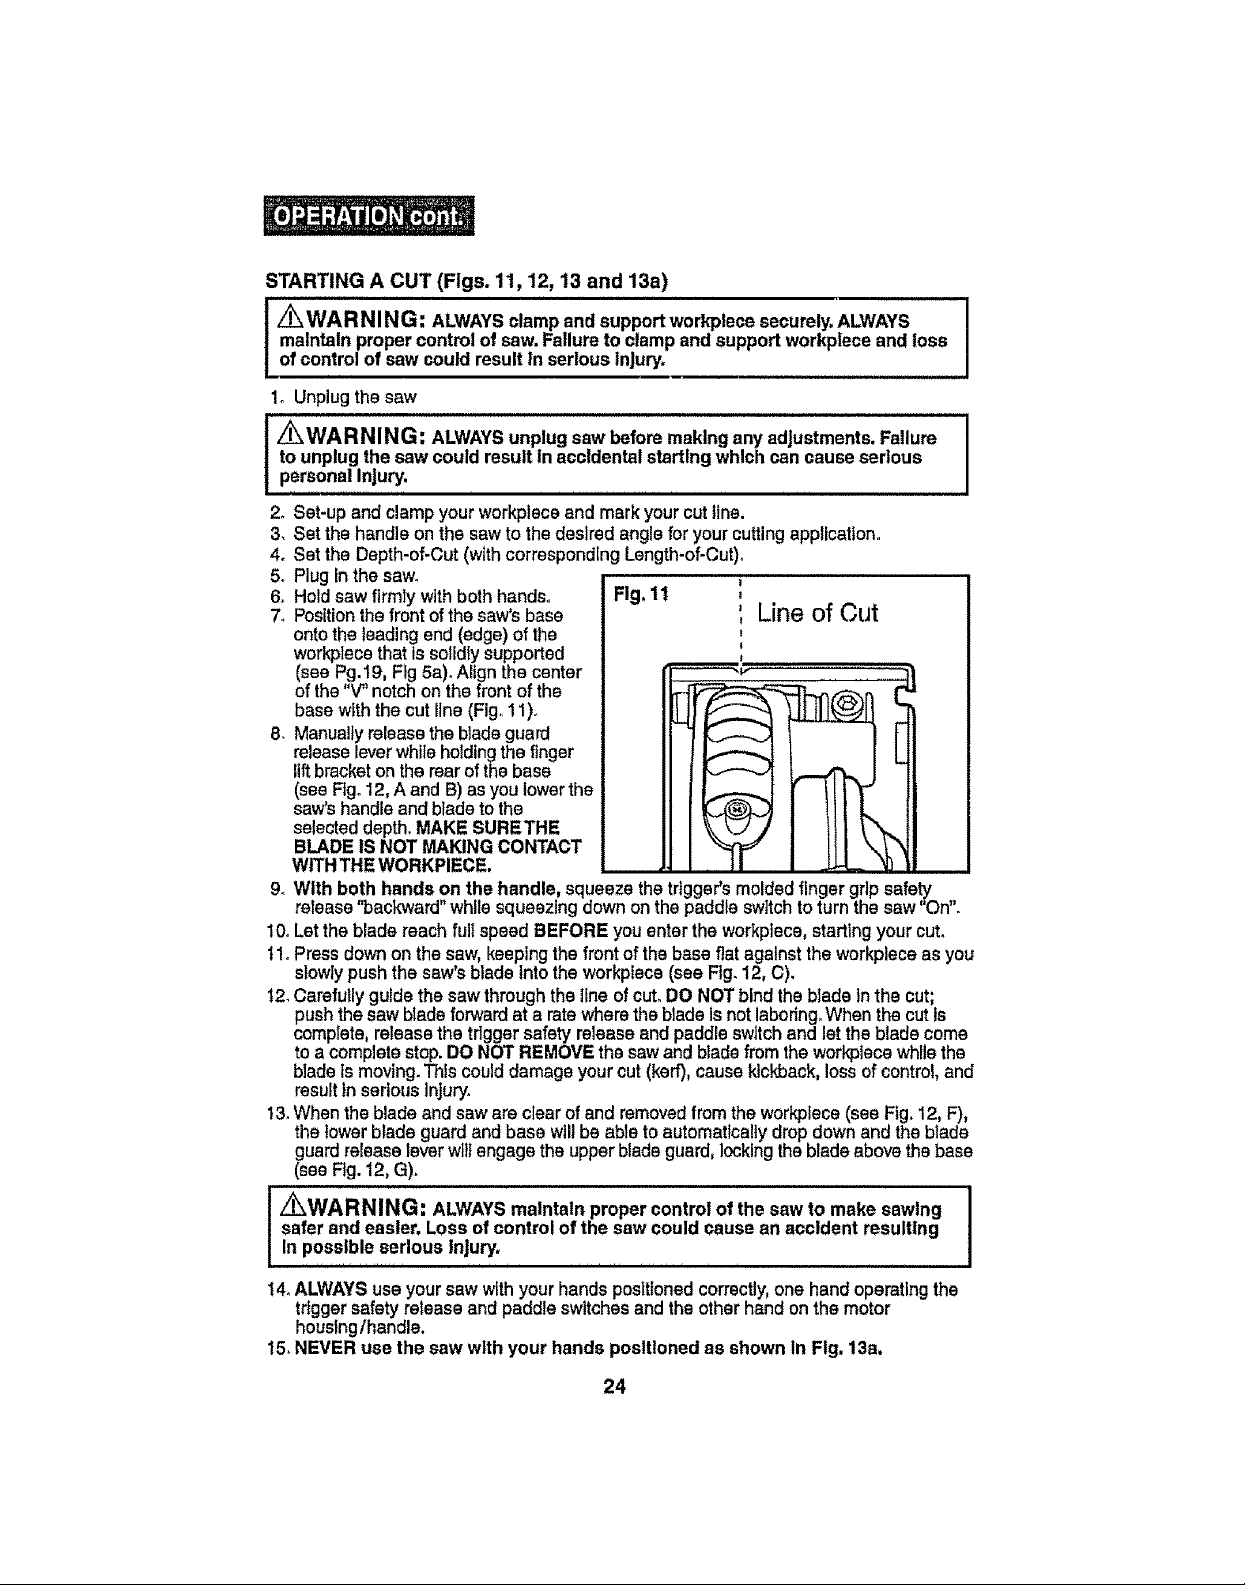
STARTING A CUT (Figs. 11, 12, 13 and 13a)
/_ WA R NING: ALWAYSclampand supportworkplecesecurely,ALWAYS
maintainproper control of saw.Failureto clampand supportworkpleceand loss
of controlof saw could resultin serious injury.
1o Unplug the saw
to unplugthe sawcould resultin accidentalstartingwhich can causeserious
_ _WARNING: ALWAYSunplugsaw beforemakinganyadjustments.Failure
personalInjury,
2_Set-upand clampyour workplaceand mark your cutline.
3. Set the handle on the saw to the desired anglefor your cuttingapplication.
4. Set the Depth-of-Cut (withcorresponding Length-of-Cut).
5. Plug In the saw°
6o Hold sawfirmly with both hands. Fig, 11
7_ Positionthe frontofthe saw's base Line of Gut
ontothe leading end (edge)of the
workplacethat is solidlysupported
(seePg.19, Ffg5a)oAlign the center
of the"V" notchon the front of the
base with the cut line(Fig°11)o
8. Manuallyreleasethe bladeguard
releaseleverwhile holdingthe finger
lift bracketon the rear ofthe base
(seeRgo12,A and13)as you lowerthe
saw'shandle andblade to the
selecteddepth,MAKE SURETHE
BLADEIS NOT MAKINGCONTACT
WITHTHEWORKPIECE.
9_With both hands on the handle, squeezethe tdgger'smoldedfingergripsafety
release"backward"whilesqueezing down onthe paddleswitch toturnthe saw"On".
I0oLetthe blade reach fulIspeedBEFORE you enterthe workplace,starting your cut.
t !oPressdown on the saw, keepingthe front of the base flatagainst theworkplece as you
slowlypushthe saws bladeintothe workplace(seaFig. 12, C).
12.Carefully guidethe saw through the lineof cut. DO NOT bind the bladeInthe cut;
pushthe sawbladeforward ata ratewhere theblade is not laboring.Whenthe cutIs
comptets, release the trigger safety releaseendpaddle switchand let the bladecome
to a completestop.DO NOTREMOVEthe saw and bladefrom the workplace while the
blade is moving.This could damageyour cut(kerf),cause kickback, lossof control,and
resultin serious injury.
t3. Whenthe bladeand saware clear of andremovedfrom the workplace (see Fig.12, F),
thelowerblade guardand base willbe abteto automaticallydrop downand the blade
guardreleaseleverwiltengagethe upperbladeguard, lockingthe bladeabovethe base
(seeFig.12, G).
_WARNING: ALWAYS maintain proper controlof the saw to make sawing I
safer and easier. Loss ofcontrol of the sew could cause an accident resulting
In possible serious injury,
i i i i i ii ii i i
14.ALWAYSuseyoursaw withyour handspositionedcorrectly,one hand operatingthe
triggersafetyreleaseand paddleswitches and theotherhandonthe motor
housing/handle,
15.NEVER use the saw with your hands positioned as shown In Fig, 13a,
24
I
 Loading...