

Craftsman 102.249020 Owner's Manual

Owner's Manual
I CRRFTSMRWJ
40-inch Mower
GRASS CATCHER
Model No.
102.249020
• Safety
• Assembly
• Operation
• Maintenance
• Repair Parts
• Espa_ol
CAUTION:
Read and follow all Safety
Rules and Operating
Instructions before first
use of this equipment.
For Customer assistance, call the Sears Craftsman Helpline:
1-800-659-5917 Mon- Sat, 9:30 am - 9:30 pm CST
Sears, Roebuck and Co., Hoffman Estates, IL 60179 U.S.A.
Warranty ............................... 2
Safety Rules ............................ 2
Product Specifications ................... 4
Assembly .............................. 4
Operation .............................. 9
Maintenance ............................ 12
Storable ................................ 13
Troubleshooting ......................... 13
Repot Parts ............................ 14
Espa_ol ................................ 18
Parts Ordering .................. Back Cover
LIMITED ONE YEAR WARRANTY ON CRAFTSMAN GRASS CATCHER
For one year from the date of purchase, when this grass catcher is maintained according to the operating and
maintenance instructions in its owner's manual, Sears will repair free of charge any defect in material or
workmanship.
This Warranty does not cover:
• Expendable items which become worn during normal use, such as bags or mower blades.
• Repairs necessary because of operator abuse, negligence, improper storage or accident, or the failure to
maintain the product according to the instructions contained in its owner's manual.
• Grass catcher attachments used for commercial or rental purposes.
WARRANTY SERVICE
Warranty service is available by returning the Craftsman grass catcher to the nearest Sears Service Center in the
United States. This warranty applies only while this product is in the United States.
This Warranty gives you specific legal rights, and you may also have other rights which may vary from state to
state.
Sears, Roebuck and Co., D/817WA, Hoffman Estates, IL 60179
IMPORTANT: This cutting machine is capable of
amputating hands and feet and throwing objects.
Failure to observe the following safety instructions could
result in serious injury or death.
Look for this symbol to point out important safety
precautions, It means: . -
Become _,lert!YOUR SAFETY IS INVOLVED.
The safety alert symbol is used in decals on the unit,
and with proper operation and procedures in this
manual.
Understand the safety message. It contains important
information about personal safety on or near the unit.
DANGER: IMMINENTLY HAZARDOUS
SITUATION! If not avoided, WILL RESULT in
death or serious injury.
WARNING: POTENTIALLY HAZARDOUS
SITUATION! If not avoided, COULD RESULT in
death or serious injury.
&
CAUTION: POTENTIALLY HAZARDOUS
SITUATIONI If not avoided, MAY RESULT in
minor or moderate injury. It may also be used to
alert against unsafe practices or property-
damage-only accidents.
GENERAL OPERATION
• Read, understand, and follow all instructions in the
manual and on the machine before starting.
• As grass catcher fills, be alert to changing unit
stability and control. Frontwheel weight provided
must be installed whenever grass catcher is in use.
• Only allow responsible adults, who are familiar with
the instructions, to operate the machine.
• Clear the area of objects such as rocks, toys, wire,
etc., which could be picked up and thrown by the
blades.
• Be sure the area is clear of people before mowing.
Stop machine if anyone enters the area.
• Never carry passengers.
• Do not mow in reverse unless absolutely necessary.
Always look down and behind before and while
backing.
• Be aware of the mower discharge direction and do not
point it at anyone. Always stand clear ofdischarge
area.
• Always wear safety glasses or eye shields while
operating your tractor or performing any adjustments
or repairs. We recommend a wide vision safety mask
over the spectacles, or standard safety glasses.
• Slow down before turning.
• Never leave the machine running unattended. Always
turn off blades, set parking brake, stop engine, and
remove keys before dismounting.
2

• Turn off blades when not mowing.
• Stop engine before removing grass catcher or
unclogging chute.
• Mow only in daylight or good artificial light.
• Do not operate the machine while under the
influence of alcohol or drugs.
• Watch for traffic when operating near or crossing
roadways.
• Use extra care when loading or unloading the
machine into a trailer or truck. Secure unit chassis to
transport vehicle. Never secure from linkage which
could become damaged.
• Do not touch parts which are hot from operation.
ALWAYS allow parts to cool.
• Do not operate mower unless bagger is attached or
guards are in operating position.
SLOPE OPERATION
Slopes are a major factor related to loss-of-control and
tip-over acciderlts, which can result in severe injury or
death. All slopes require extra caution. If you cannot
back up the slope or you feel uneasy on it, do not mow
it.
DO:
• Mow up and down slopes, not across them.
• Remove obstacles such as rocks, tree limbs, etc.
• Watch for holes, ruts, or bumps. Uneven terrain
could overturn the machine. Tall grass can hide
obstacles.
• Use slow speed. When necessary, move Travel-
Steering Control Levers slowly and smoothlywhile
on slope.
• Follow the manufacturer's recommendations for
wheel weights or counterweights to improve stability.
• Use extra care with grass catchers or other
attachments. These can change the stability of the
machine. _.
• Keep all moverhents on the slope slowand gradual
Do not make sudden changes in the speed or
direction.
• Avoid starting or stopping on the slope. If tires lose
traction, disengage the blades and proceed slowly
straight down the slope.
DO NOT:
• Do not operate with grass catcher unless front
counterweight is installed.
• Do not mow across slopes.
• Do not turn on the slopes unless necessary, and
then turn slowly and gradually downhill, if possible.
• Do not mow near dropcffs, ditches, or
embankments. The mower could suddenly turn over
if a wheel is over the edge of a cliff or ditch, or if an
edge caves in.
• Do not mow on wet grass. Reduced traction could
cause sliding.
• Do not try to stabilize the machine by putting your
foot on the ground.
• Do not use grass catcher on steep slbpes.
• Do not operate on slopes over 10" maximum.
• Do ..notpark on slopes unless necessary. When
parking on slope always chock or block wheels.
Always set parking brake.
CHILDREN
Tragic accidents can occur if the operator is not alert to
the presence of children. Children are often attracted to
the machine and the mowing activity.Never assume
that children will remain where you last saw them.
• Keep children out of the mowing area and under the
watchful care of another responsible adult.
• Be alert and turn off machine if children enter the
area.
• Before and when backing up, look behind and down
for small children.
• Never carry children.They may fall off and be
seriously injured or interfere with safe machine
operation.
• Never allow children to operate the machine.
• Use extra care when approaching blind corners,
shrubs, trees, or other objects that may obscure
vision,
SERVICE
• Use extra care in handling gasoline and other fuels.
They are flammable and vapors are explosive.
- Use only an approved container.
- Never remove gas cap or add fuel with the engine
running.Allow engine to cool before refueling. Do
not smoke.
- Never refuel the machine indoors.
- Never store the machine or fuel container inside
where there is an open flame, such as a water
heater.
• Never run a machine inside a closed area.
• ,Keep nuts and bolts tight, especially blade
attachment bolts, and keep equipment in good
condition.
• Never tamper with safety devices. Check their proper
operation regularly.
• Keep machine free of grass, leaves, or other debris
buildup,Clean oilor fuel spillage. Allow machine to
cool before storing.
• Stop and inspect equipment ifyou strike an object.
Repair, if necessary, before restarting.
• Never make adjustments or repairs with the engine
running.
• Grass catcher components are subject to wear,
damage, and deterioration, which could expose
moving parts or allow objects to be thrown.
Frequently check components and replace with
manufacturer's recommended parts, when
necessary.
• Mower blades are sharp and can cut you. Wrap the
blade(s) or wear gloves, and use extra caution when
servicing them,
• Check brake operation frequently. Adjust and service
as required.
3
A_lb CAUTION: Always disconnect spark plug wires
and place wires where they cannot contact spark
plugs in order to prevent accidental starting when
setting up, transporting, adjusting or making
repairs.
CONGRATULATIONS on your purchase of a Sears
Craftsman Grass Catcher. It has been designed,
engineered and manufactured to give you the best
possible dependability and performance.
You should record both serial number and date of
)urchase and keep in a safe place for reference.
Record identification numbers below.
MODELNUMBER
SERIALNUMBER
DATE OF PURCHASE
102.249020
Should you experience any problem you cannot easily
remedy, please contact your nearest Sears Service
Center. We have competent, well-trained technicians
and the proper tools to service or repair this unit.
Please read and retain this manual. The instructions
will enable you to assemble and maintain your unit
prope'lrly.Always observe the "SAFETY RULES."
NOTE: To make debris disposal easier 30 gallon plastic
trash bags may be inserted in plastic grass
containers.
CUSTOMER RESPONSIBILITIES
• Read and observe the safety rules.
• Follow a regular schedule in maintaining, caring for
and using your Grass Catcher.
• Follow the instruction under "Maintenance" and
"Storage" sections ofthis Owner's Manual.
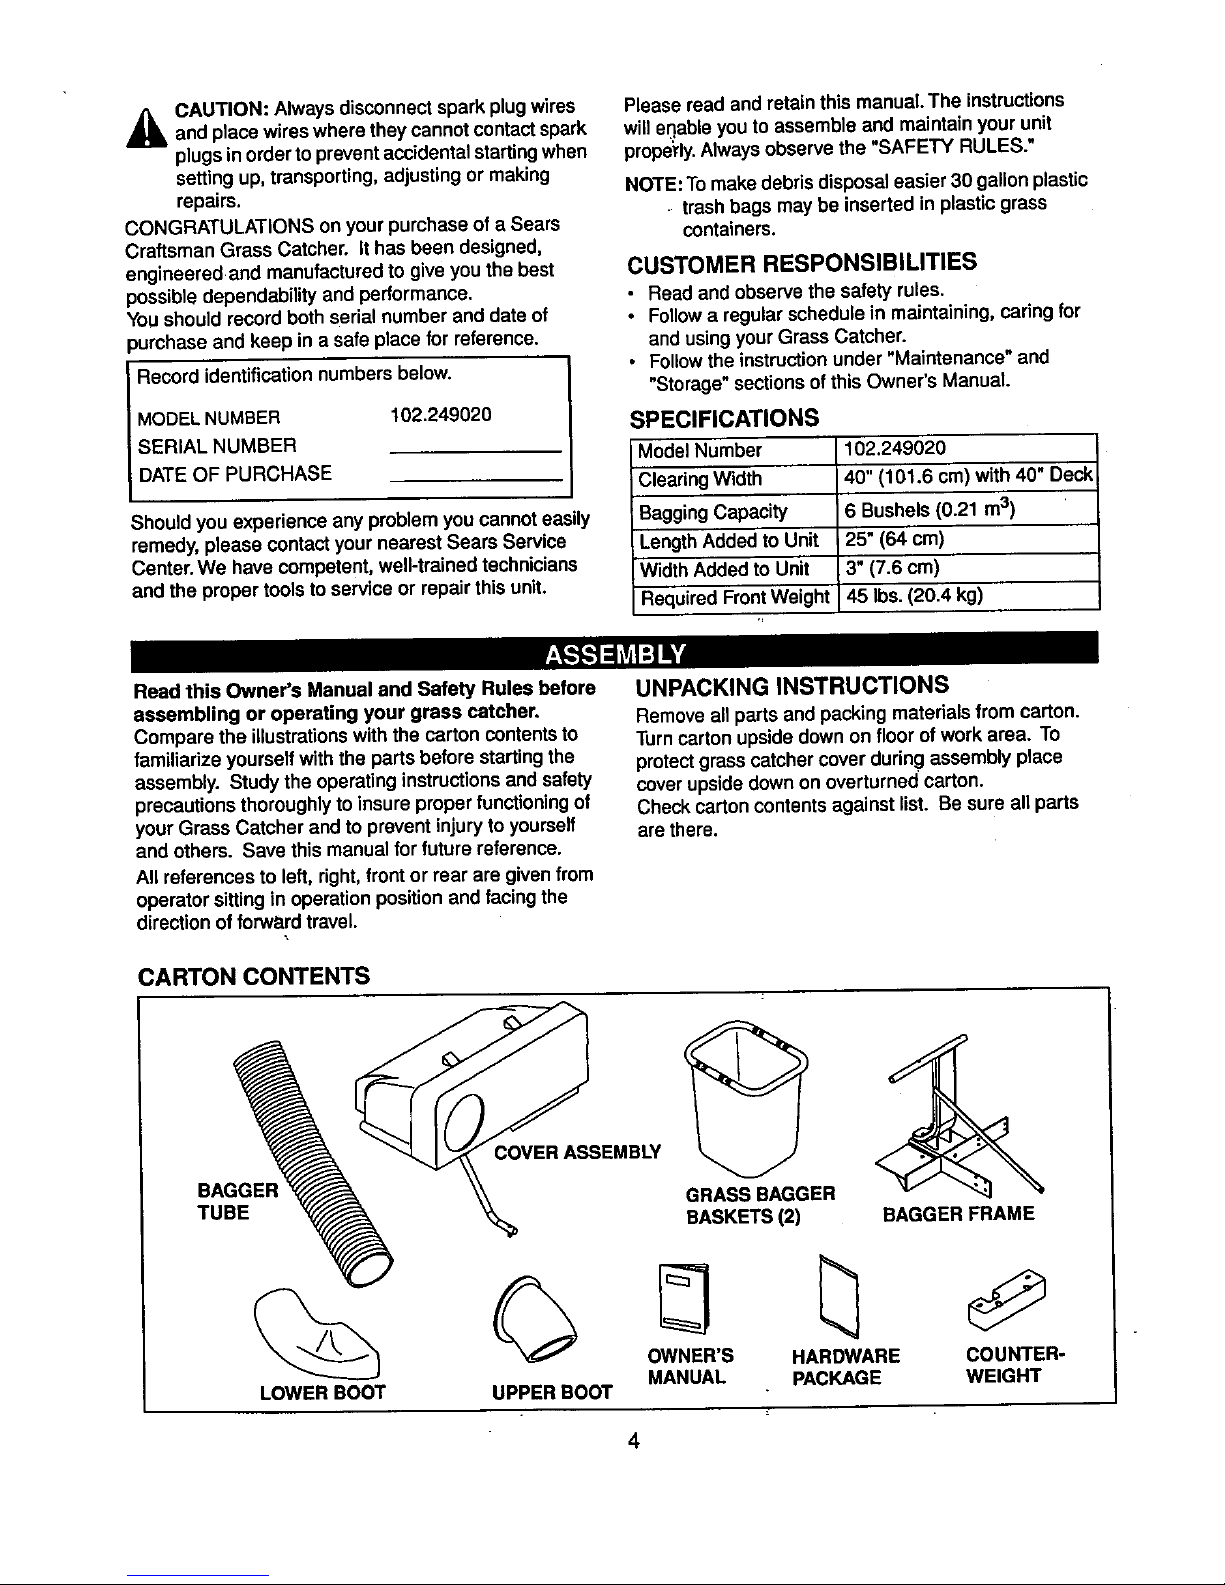
SPECIFICATIONS
Model Number 102,249020
Clearing Width 40" (101.6 cm) with 40" Deck
Sagg ng Capacity 6 Bushels (0.21 m3)
Length Added to Unit 25" (64 cm)
Width Added to Unit 3" (7.6 cm)
Required Front Weight 45 Ibs. (20.4 kg)
Read thls Owner's Manual and Safety Rules before
assembling or operating your grass catcher,
Compare the illustrations with the carton contents to
familiarize yourself with the parts before starting the
assembly. Study the operating instructions and safety
precautions thoroughly to insure proper functioning of
your Grass Catcher and to prevent injury to yourself
and others. Save this manual for future reference.
All references to left, right, front or rear are given from
operator sitting in operation position and facing the
direction of forward travel.
UNPACKING INSTRUCTIONS
Remove all parts and packing materials from carton.
Turn carton upside down on floor of work area. To
protectgrass catcher cover during assembly place
cover upside down on overturned carton.
Check carton contents against list. Be sure all parts
are there.
CARTON CONTENTS
TUBE
LOWER BOOT
GRASS BAGGER
BASKETS (2)
BAGGER FRAME
OWNER'S HARDWARE COUNTER-
MANUAL PACKAGE WEIGHT
UPPER BOOT
4
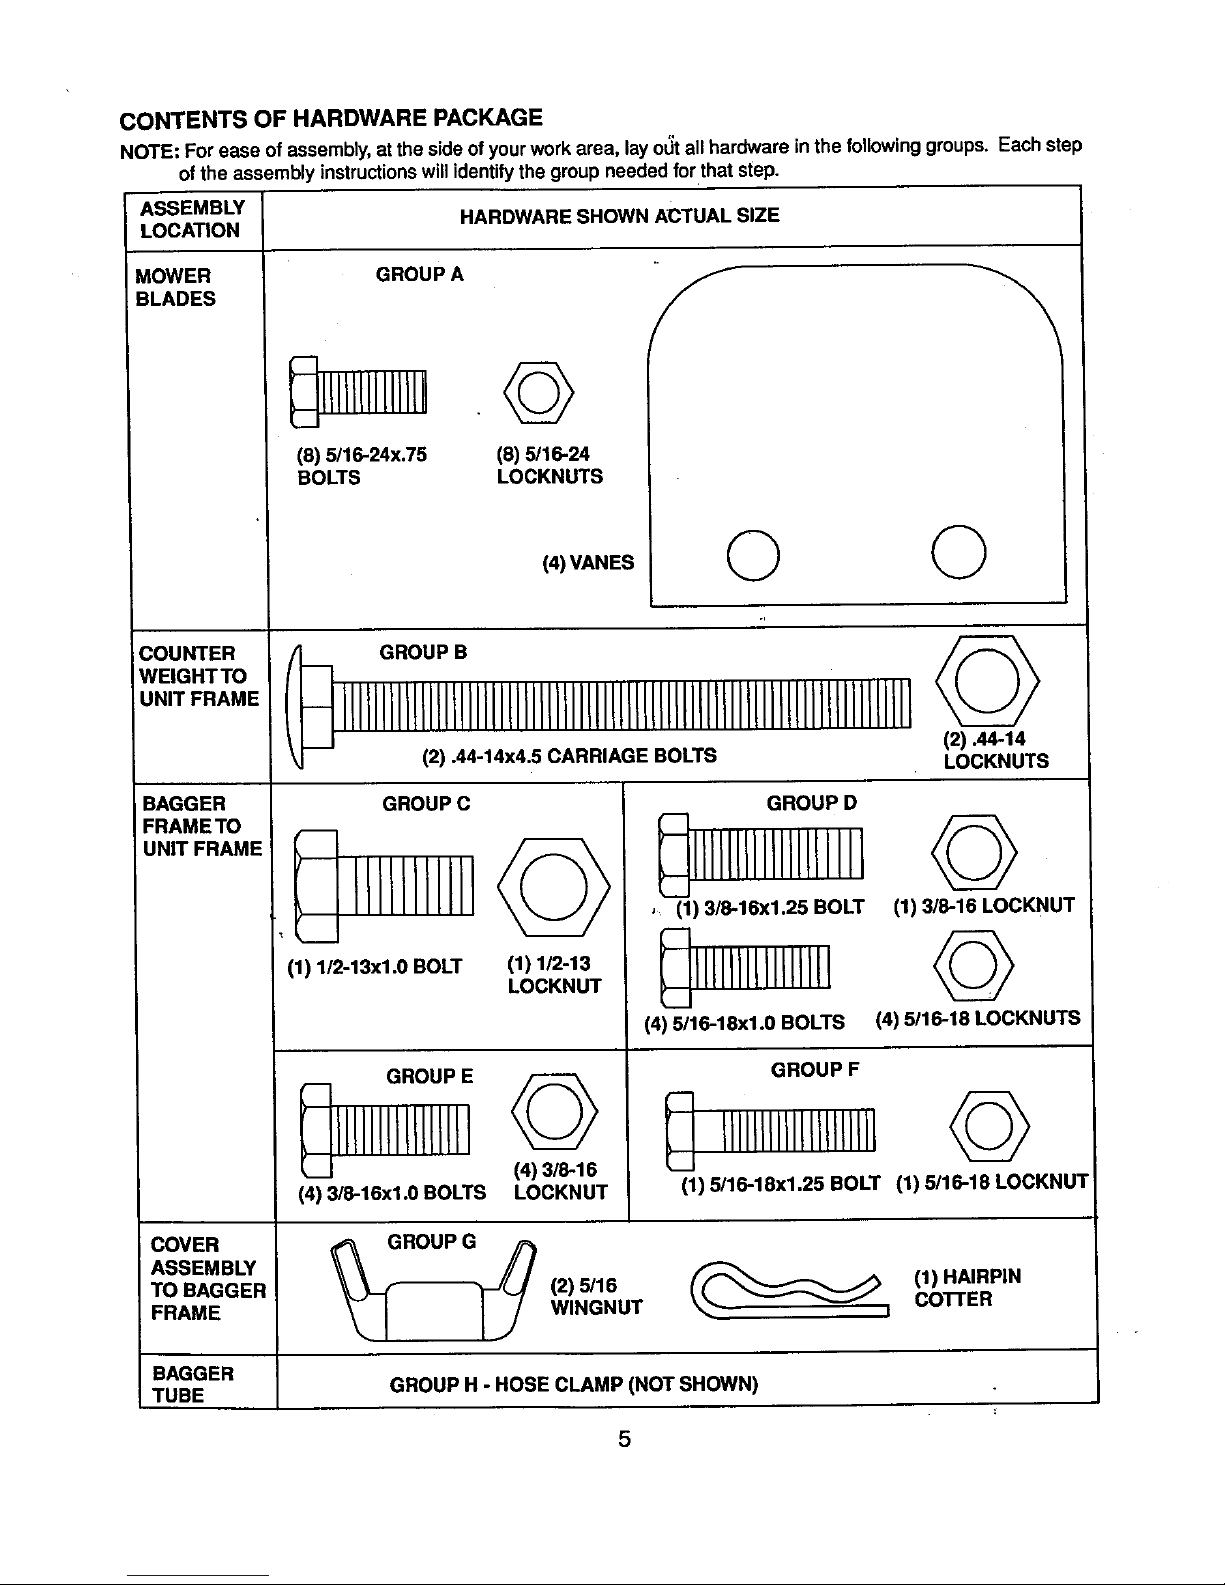
CONTENTS OF HARDWARE PACKAGE
NOTE; For ease of assembly, at the side of your work area, lay olJtall hardware in the following groups. Each step
of the assembly instructionswill identify the group needed for that step.
ASSEMBLY
LOCATION
MOWER
BLADES
COUNTER
WEIGHTTO
UNIT FRAME
BAGGER
FRAMETO
UNITFRAME
COVER
ASSEMBLY
TO BAGGER
FRAME
BAGGER
TUBE
HARDWARE SHOWN ACTUAL SIZE
GROUPA
-[INIIIlllllln<_
(8) 5/16-24x.75 (8) 5/16-24
BOLTS LOCKNUTS
(4)VANES © ©
GROUP B
- I
_,-- (2) .44-14x4.5 CARRIAGE BOLTS
I
I ]
(2) .44-14
LOCKNUTS
GROUP C
i lll
(1) 1/2-13xl.0 BOLT (1) 1/2-13
GROUPE
LOCKNUT
GROUPD
__ II11
, (1) 3/6-16xl.25 BOLT
©
(1) 3/8-16 LOCKNU'I
©
(4)_16-18Xlo0 BOLTS (4) 5/16-18 LOCKNUTI
(_-3/6-16xl .OBOLTS
GROUP F
I]lllllllllIIIllllll
(4) 3/8-16
LOCKNUT
©
-(1) 5/16-18xl.25 BOLT (1) 5/16-18 LOCKNL
__ GROUP G __
• • (2) 5/16
WINGNUT
(1) HAIRPINCO'I-I'ER
I
GROUP H - HOSE CLAMP (NOT SHOWN)
5
THESE ARETHETOOLSYOU WILL NEED
TO ASSEMBLEYOUR GRASS CATCHER:
1/2" Wrench
9/16" Wrenches (2)
1/2" Socket
9/16" Socket
11/16" Socket
Drive Ratchet with 3" or longer Extension
Fiat Blade Screwdriver
,_ WARNING: BEFORE ASSEMBLING GRASSCATCHER TO TRACTOR:
• Place gearshift]motion control levers in "NEUTRAL"
position.
• Set parking brake.
• Place attachment clutch in "DISENGAGED" position.
• Turn ignition key "OFF" and remove key,
• Make sure the'blade and all moving parts have
completely stopped.
• Disconnect spark plug wires from spark plugs and
place wires where they cannot come in contact with
plugs.
ASSEMBLY
NOTE: All references to left, right, front, or rear are
given from operator sitting in operation position
and facing the direction of forward travel,
Vanes
Use hardware from Group A.
1. Use ramps or simply remove the entire mower
deck from the unit. Refer to the unit Owner's
Manual for mower deck removal instructions.
WARNING;Vanes MUST be used in pairs. DO
NOT interchange with different or worn vanes on
same blade. Using one of each of a different
type or worn vane will cause blade to be out of
balance and severe vibration will occur.
2. Secure vanes on top of blade using hex bolts and
top lock nuts provided.
Hex Bolt
Locknut
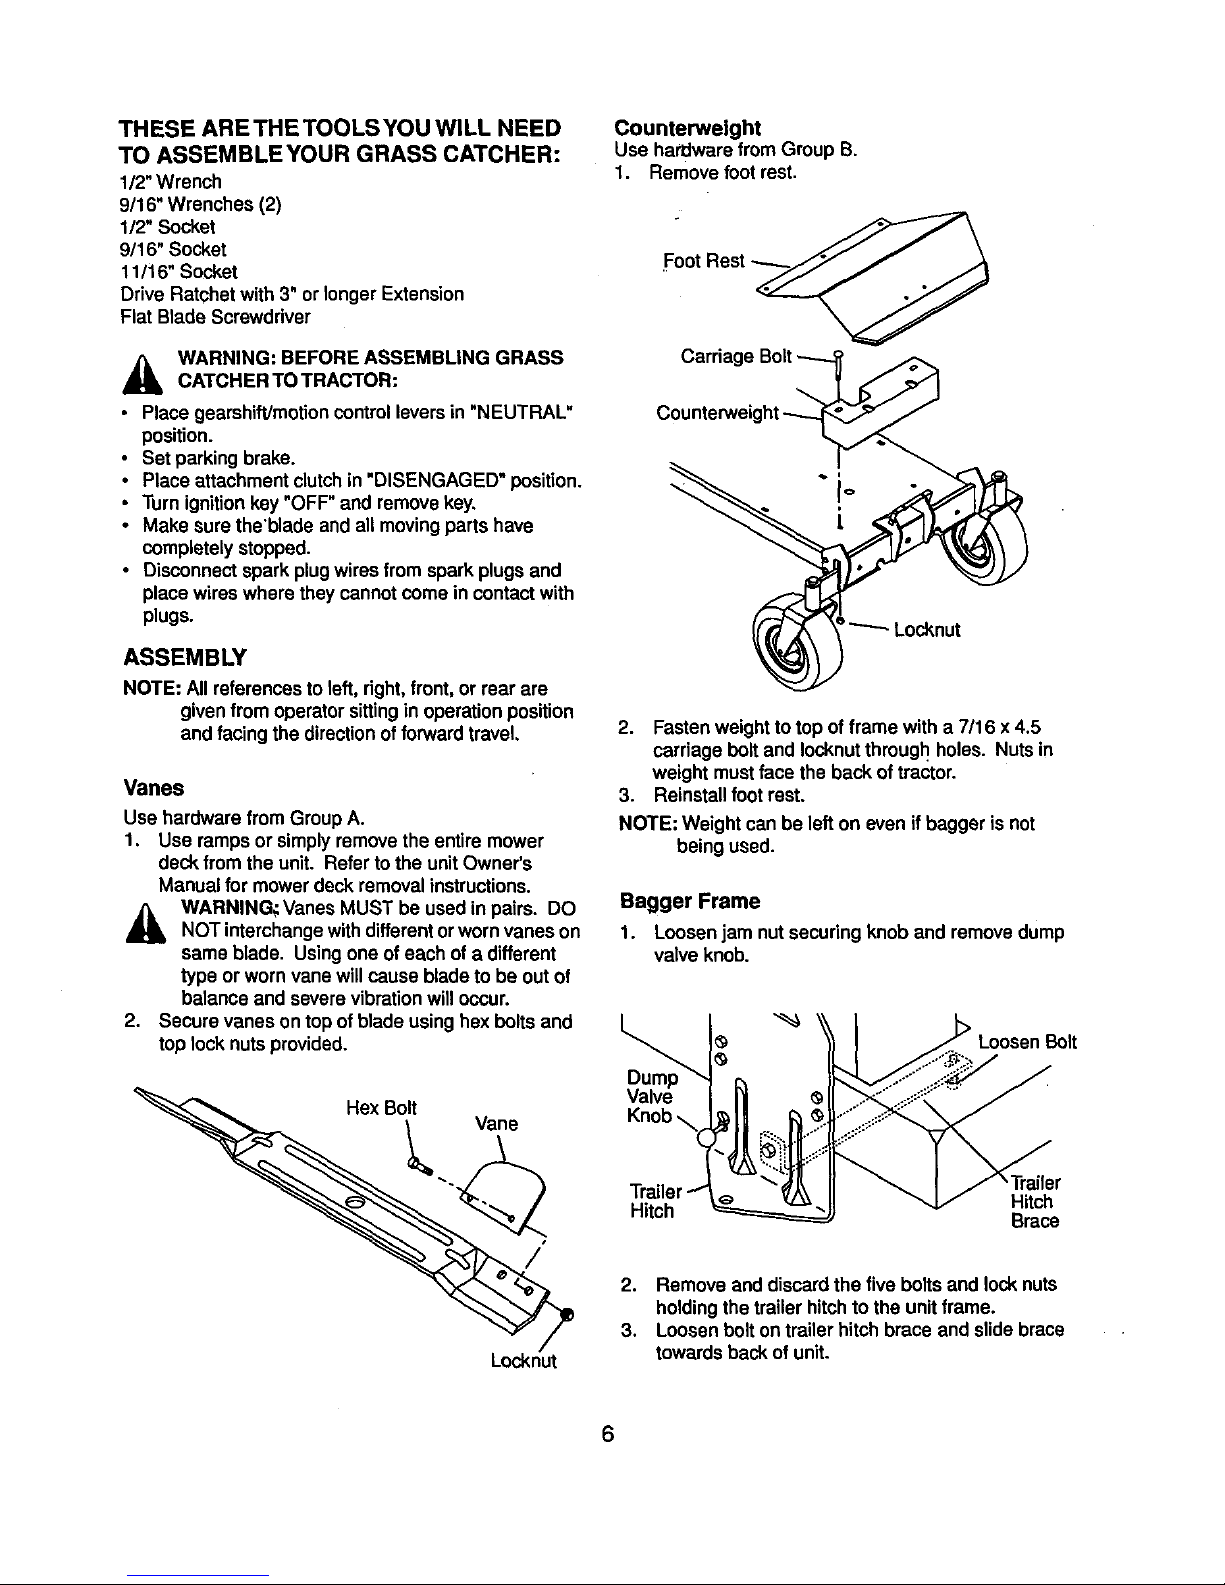
Counterweight
Use ha_ware from Group B.
1. Remove foot rest,
Foot Rest
Carriage Bolt _
Counterweight
_1 _ Locknut
2. Fasten weight to top of frame with a 7116 x 4.5
carriage bolt and Iocknut througl'_holes. Nuts in
weight must face the back of tractor.
3. Reinstall foot rest.
NOTE: Weight can be left on even if bagger is not
being used.
Bagger Frame
1. Loosen jam nut securing knob and remove dump
valve knob.
Loosen Bolt
Hitch
Hitch Brace
2. Remove and discard the five bolts and lock nuts
holding the trailer hitch to the unit frame.
3. Loosen bolt on trailer hitch brace and slide brace
towards back of unit.
6
 Loading...