

Product Guide
MWS3A-PRM-2CHC,2CHL
Microwave Presence/Absence Detector
Contents
Section Contents Page
1 Dimensional information 1
2 Description and operation 2
3 Wiring & Installation 3
4 Wiring diagram-Normally open relay wiring 4
5 Wiring diagram-Normally closed relay wiring 4
6 Fixing - Flush 4
7 Fixing - Surface 5
8 Head locking 5
9 Time, Lux & Sensitivity adjusters 5
10 Programming 5
11
Detection pattern diagrams
12
Fault finding
13
Specification
14
Part numbers
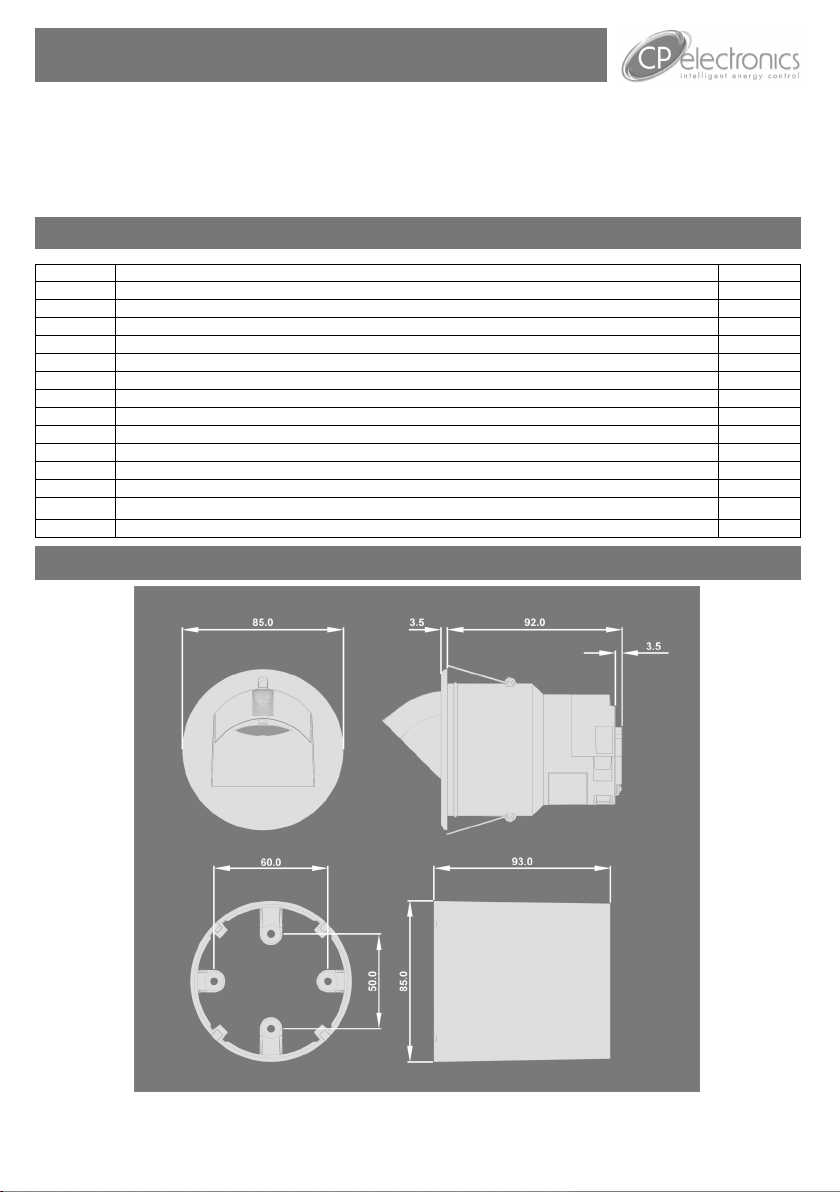
1. Dimensions
7
8
8
8
page

2. Description and Operation
The MWS3A-PRM-2CH (microwave) detector provides automatic control of lighting loads with optional
manual control. It can be used on incandescent, fluorescent and compact fluorescent lighting, and has the
added benefit of being able to connect an external switch. The MWS3A-PRM-2CH detects movement
using a highly sensitive microwave detector. This works by emitting low power microwave signals and
measuring the reflections as the signals bounce off moving objects. The MWS3A-PRM-2CH has a unique
adjustable sensor head that allows the area of detection to be optimised for the application.
The MWS3A-PRM-2CH detector provides two independently controlled output channels that can be used
for a variety of applications:
Occupancy of two independent lighting circuits using a single detector—
e.g. for essential and non-essential supplies (part no. -2CHC) .
Occupancy and lux control of one lighting circuit and just occupancy control of a second circuit—
e.g. where a row of luminaries by a window is lux controlled whilst inner rows are switched on
occupancy only (part no. -2CHL) .
Occupancy and lux control of a lighting circuit and just occupancy control of a ventilation circuit
(part no. -2CHL) .
Occupancy on both lighting circuits, with separate lux control on each circuit (part no. -2CHL). The
DD-LCDHS must be used for setting up lux switching levels on the second circuit.
Please Note:
When controlling two circuits, the circuits must be on the same phase.
Two modes of operation are available:
Presence detection:
When movement is detected the load will automatically turn on. When the area is no longer occupied the
load will automatically switch off after an adjustable time period. If an external switch is connected, this
can override the lights off (after the detection time period has elapsed it will revert to automatic operation).
An integral adjustable photocell allows the lights to be kept off if there is sufficient ambient light.
Absence detection:
The load is manually switched on using an external switch. When the area is no longer occupied the load
will automatically switch off after the adjustable time period has elapsed. Pressing the switch again during
occupancy override the lights off (after the detection time period has elapsed it will revert to automatic
operation).
In both modes of operation a short button press turns the load on whilst a long button press turns the load
off.
An integral infra-red sensor in the unit allows the unit to be programmed using the optional DD-LCDHS
programming handset. This gives complete flexibility over many of the operating parameters. Without the
handset, manual adjustments can be made to the sensitivity, time settings and Channel 1 ―Lux Hold Off‖
using the controls on the side of the sensor housing.
On the ―LUX‖ versions, using the DD-LCDHS programming handset, as well as setting the above
mentioned parameters (sensitivity, time settings and Channel 1 ―Lux Hold Off‖), the adjustable internal
light sensor can also be programmed to switch the lighting off with one or both outputs during occupancy if
the level of light exceeds a second preset level. It can also be used to set the Channel 2 ―Lux Hold Off‖ if
required.
In addition a variant of the product provides a normally closed contact for fail safe operation (/NC). If the
unit fails, the outputs will default to on.
When the unit is first powered up the microwave sensor will always detect immediately regardless of
whether the room is occupied.
The UHS user handset can also be used to change lux levels and override the lights on or off.
page 2

3. Wiring & Installation
1. Wire the products using the diagram overleaf.
2. To switch from more than one position simply wire two or more units in parallel using the Live,
Neutral and Switched Live wires only.
3. The detector should be sited so that the occupants of the room fall inside the detection pattern
shown in section 11.
4. Corridors or aisles: the unit should be placed at the end of the corridor or aisle and the sensor
head should be angled to look down the corridor or aisle.
5. Open plan areas and offices: the unit can be mounted in a corner looking outwards in which
case the sensor head should be angled . Or the unit can be mounted in the centre of the area
with the sensor head flat.
Note that the higher the sensor is installed the shorter the detection range will be.
Sites as far away as possible from any lighting or ventilation equipment.
Do not fix to a vibrating surface.
Do not fix to a suspended luminaire.
Site as far away as possible from the surface of metal objects.
7. Mount using one of the two options overleaf.
8. Use a small screwdriver to set the LUX level adjuster fully clockwise, the time to minimum (fully
anticlockwise) and the sensitivity to maximum (fully clockwise) using the diagram in section 9.
9. Power the unit up—the load should come on immediately.
10. Vacate the room or remain very still and wait for the load to switch off (should take no more than 2
minutes).
11. Check that the load switches on when movement is detected.
12. The LUX thumbwheel determines the ambient light level at which the lights turn on.
13. Select the time using the adjuster, fully clockwise is the maximum.
14. The area of detection can be varied by altering the angle of the sensor head and the sensitivity
adjuster. Note: on maximum sensitivity this unit is extremely sensitive to movement and may
detect through glass, thin walls or partitions. If this causes a problem reduce the sensitivity by
turning the adjuster anticlockwise.
15. Using the UHS or UHS3 infra-red handset: the override on button turns the unit on permanently;
the override off button turns the unit off permanently; the cancel button cancels the overrides.
When an override is selected an LED will flash inside the unit. The UHS handset can also be used
to set the lux levels—see Section 10.3
Absence detection
16. To use absence detection a retractive (momentary) switch must be connected to the switch
terminal shown on the diagram. Note that this will be switching mains voltage.
17. The unit ships with presence detection as default. To change to absence detection, press and
release the external switch 5 times within the first minute of power up. The LED will turn on solid
for 30 seconds to indicate absence mode has been selected.
18. To change back to presence detection, repeat the above procedure—the LED will flash for 30
seconds to indicate presence mode has been selected.
Note: the above adjustments can also be made using the DD-LCDHS handset instead of the manual
adjusters or external switches. See section 10.
page 3

4. Wiring Diagram - Normally Open Relay Wiring
CH1 and CH2 plugs are coded.
Ensure that the plugs are inserted
5. Wiring Diagram - Normally Closed Relay Wiring
CH1 and CH2 plugs are coded.
Ensure that the plugs are inserted
correctly and do not apply
excessive force
correctly and do not apply
excessive force
6. Fixing - Flush
Warning - be careful bending springs when mounting unit.
1 4 3 2
Hole Ø74mm
page 4
Attach cable clamp.

7. Fixing - Surface
1 3 2
Hole Ø30mm MAX
50mm or 60mm
fixing centres
8. Head Locking 9. Time Lux Sensitivity Adjusters
Remove metal
1
locking clip from
rear of unit
Adjust head to required position.
2
Push clip into position shown below to
lock head.
To remove clip, lever out with a small
screwdriver.
1 2
Slide open
window
4
Time
Lux
Sensitivity
10. Programming
All the following functions can be programmed using the remote control DD-LCDHS handset. Some other
functions can be found on the DD-LCDHS handset that are not listed below - DO NOT use them if they are
not listed below, as they cannot be used with this product.
1. Detector Parameters (factory default in brackets):
1.1 Time adjustment 10 seconds to 99 minutes time delay (select 0 for 10 second delay –
1.2 Sensitivity On (9) Sensitivity level when the detector is already operational adjustable
1.3 Sensitivity Off (9) Sensitivity level for switching the detector on – adjustable between 1
1.4 Power Up On (Y) Select No for a 30 second delay on start up. If Yes is selected, there
1.5 Walk Test (N) An LED behind the detector lens will flash to show movement has
1.6 Disable Detector (N) Disables detection. In this mode the detector acts as a photocell only.
1.7 Factory Default Restores factory default settings.
use for commissioning only).
between 1 (min.) and 9 (max.)
(min.) and 9 (max.).
will be no delay on start up and the detector will always power up
detecting.
been detected (use for commissioning).
The lux preset determines the light level at which the output is turned
on. The sensitivity preset determines the light level at which the output
turns off. The time preset prevents nuisance tripping and in this mode
is adjustable between 0-13 minutes.
page 5

10. Programming Cont.
All the following functions can be programmed using the remote control DD-LCDHS handset. Some other
functions can be found on the DD-LCDHS handset that are not listed below - DO NOT use them if they are
not listed below, as they cannot be used with this product.
2. Modes—Switch Modes
2.1 1 position switch together A single position retractive switch controls both channels
2.2. 1 position switch separate Two single position retractive switches, controlling the
3. Functions (factory default in brackets):
To set Channel 1 functions - go to ―Ch1(sw) Set ― menu on the handset; or
To set Channel 2 functions - go to ―Ch2(dim) Set ― menu on the handset;
3.1 Presence detection Auto switch on with detection, auto off after movement ceases
3.2 Absence detection Manual switch on, auto off after movement ceases and time delay
3.3 Switch level on (9) This is also known as ―Lux Hold Off‖. Lux level setting to
prevent the luminaires being switched on if the ambient light
level is sufficient (adjustable between 1 and 9). The luminaires
will always be switched on at level 9. For a higher resolution of ‗switch
level on‘ a scale of 101-199 is available in the ‗Special menu‘.
3.4 Switch level off (9) This is also known as ―Lux Switch Off‖. Lux level setting to switch the
luminaires off during occupancy if the ambient light level goes
above the setting (adjustable between 1 and 9). Level 9 will always
keep the lights on. This setting can be used for ―window row
switching‖. For a higher resolution of ‗switch level on‘ a scale of 101-
199 is available in the ‗Special menu‘.
Please note: If luminaires are to be switched off during occupancy due to lux, please ensure that the
―Switch level on‖ setting is lower than the ―Switch level off‖ setting.
4 User Menu
DD-LCDHS user menu or UHS handset functions:
4.1 Lux up Can only be used with the set button—see 4.6.
4.2 Lux down Can only be used with the set button—see 4.6.
4.3 Override on Permanently overrides the luminaire output on.
4.4 Override off Permanently overrides the luminaire output off.
4.5 Cancel Cancels the on or off override, returning the detector to normal operation.
4.6 Set Send before using lux up or lux down. The switch level on (see 3.3) can
then be adjusted using the lux up or lux down buttons.
together.
channels separately. This option can only be used in
conjunction with a VITM4-2CH Vitesse Modular marshalling
box.
(default) and time delay ends.
ends.
page 6

Ideal for large office or classroom
Ideal for corridor or aisle applications
11. Detection Patterns
Ideal for open plan areas and offices
LOAD DOES NOT COME ON
Check to see if the live supply to the circuit is
good. Strap across the L and LIVE OUT terminal
to turn the load on.
If the supply and wiring are good, check the LUX
level setting. Increase the LUX level setting to
allow the controller to turn on at higher ambient
natural light level.
12. Fault Finding
LIGHTS DO NOT GO OFF
Ensure that the area is left unoccupied for a
greater time period than the time out period set
using the switch.
Make sure that the sensor is not adjacent to
vibrating surfaces or objects (e.g. ventilation
equipment).
The unit may pick up movement through thin
partitions or walls. Reduce the sensitivity by
turning the adjuster anticlockwise.
page 7

13. Specification
LOAD
6A of lighting and or ventilation per channel including incandescent, fluorescent, compact fluorescent, low
voltage (switch primary of transformer).
SUPPLY VOLTAGE 220-240 Volts AC 50 Hz- BOTH CIRCUITS MUST BE ON SAME PHASE
TIME OUT PERIOD Adjustable 10 seconds to 99 minutes
LIGHT LEVEL Light to dark
TERMINAL CAPACITY 2.5mm2
MATERIAL Flame retardant ABS
TYPE Class 2
TEMPERATURE -10°C to 35°C
SAFETY The microwave radiation emitted by these units is exteremely low power.
At a distance of > 50mm the power density is <6% of the ANSI IEEE C95.1 –1991
recommended microwave power density.
At a distance of 5mm from the unit it is <84% of recommended power density.
CONFORMITY EMC-89/336/EEC
LVD-73/23/EEC
14. Part Numbers
MWS3A-PRM-2CHC Microwave 2-Channel presence detector, 2-Circuit occupancy switching
MWS3A-PRM-2CHL Microwave 2-Channel presence detector
Channel 1 - occupancy and lux; Channel 2 occupancy only
(Channel 2 can also be programmed for lux switching via DD-LCDHS)
MWS3A-PRM-2CHC/NC Microwave 2-Channel presence detector
2-Circuit occupancy switching, normally closed fail safe contacts
MWS3A-PRM-2CHL/NC Microwave 2-Channel presence detector
Channel 1 - occupancy and lux; Channel 2 occupancy only, normally closed fail
MWS3A-DBB Surface mounting box
DD-LCDHS IR remote control programming handset with LCD screen
UHS IR remote control user handset with lux setting functionality
UHS3 IR remote control user handset with on/off override only
safe contacts (Channel 2 can also be programme for lux switching via DDLCDHS)
IMPORTANT NOTICE!
This device should be installed by a qualified electrician in
accordance with the latest edition of the IEE wiring regulations.
FM 45789 EMS 534520
Due to our policy of continual product improvement CP Electronics reserves the right
to alter the specification of this product without prior notice.
page 8
C.P. Electronics Ltd
Brent Crescent
London
NW10 7XR
United Kingdom
Tel: + 44 (0) 333 900 0671
Fax: + 44 (0) 333 900 0674
www.cpelectronics.co.uk
enquiry@cpelectronics.co.uk
Ref #WD294 Issue 3
 Loading...