

Page 1
MINI
BOX
Easy Setup Guide
Page 2
Thank you for going all digital with Cox and
taking your TV viewing experience to the next level.
Just follow the 4 steps in this Easy Setup Guide.
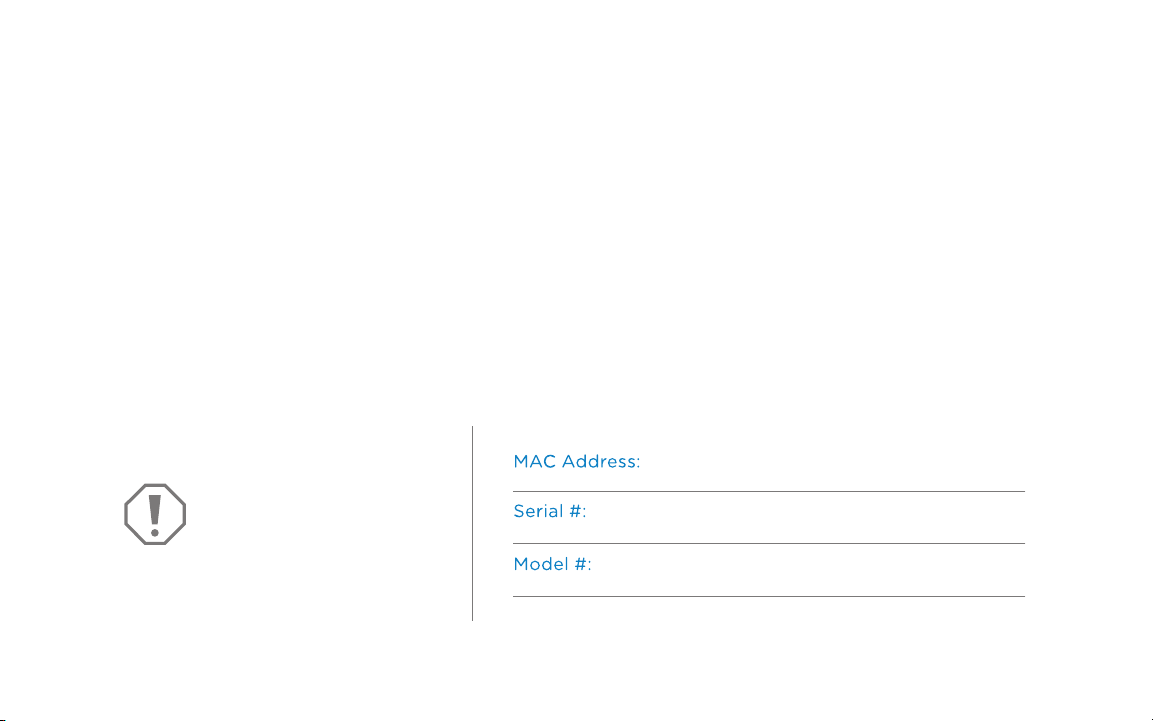
For future reference and
faster support, please
write down the numbers
found on the bottom of
the mini box.
Welcome.
Page 3
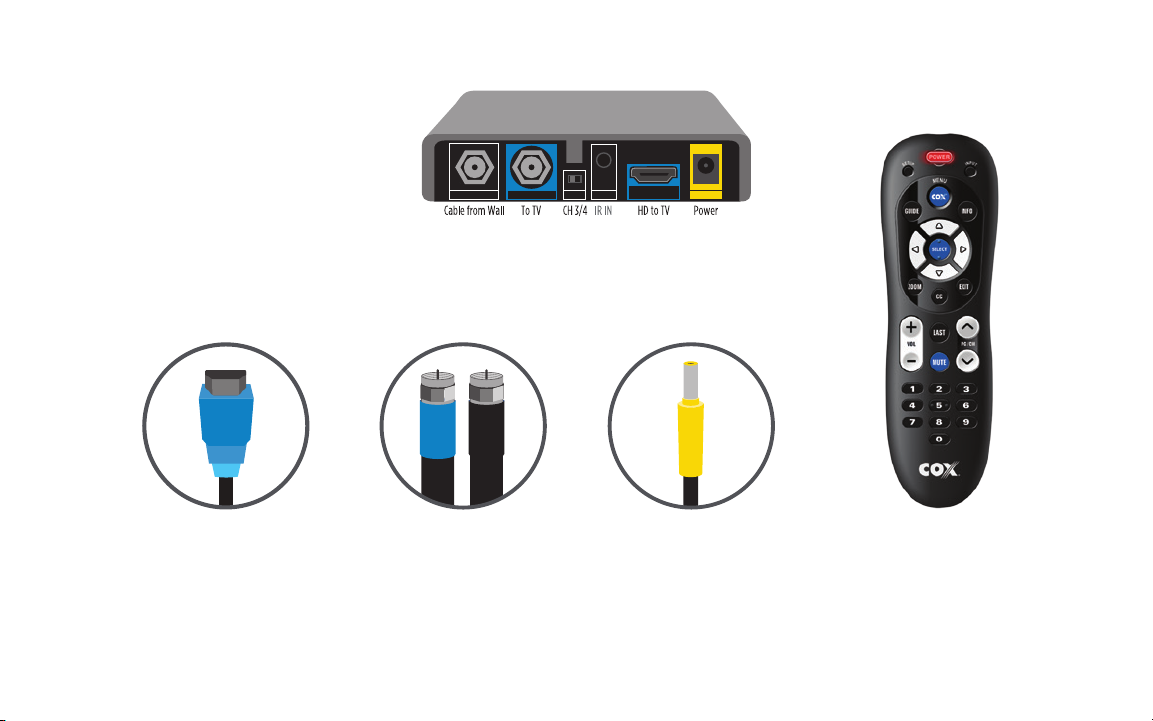
Kit includes:
MINI BOX
Digital adapter
HDMI Cable
Provides a high-def
signal to TV
COAX Cables
Provides a basic
signal to TV (Qty. 2)
Power Cord
Powers the mini box
Remote Control
Controls the mini box
and can turn your TV
OFF and ON
3
Page 4

Take a deep breath. You can do this! We’re with you every step of the way.
1
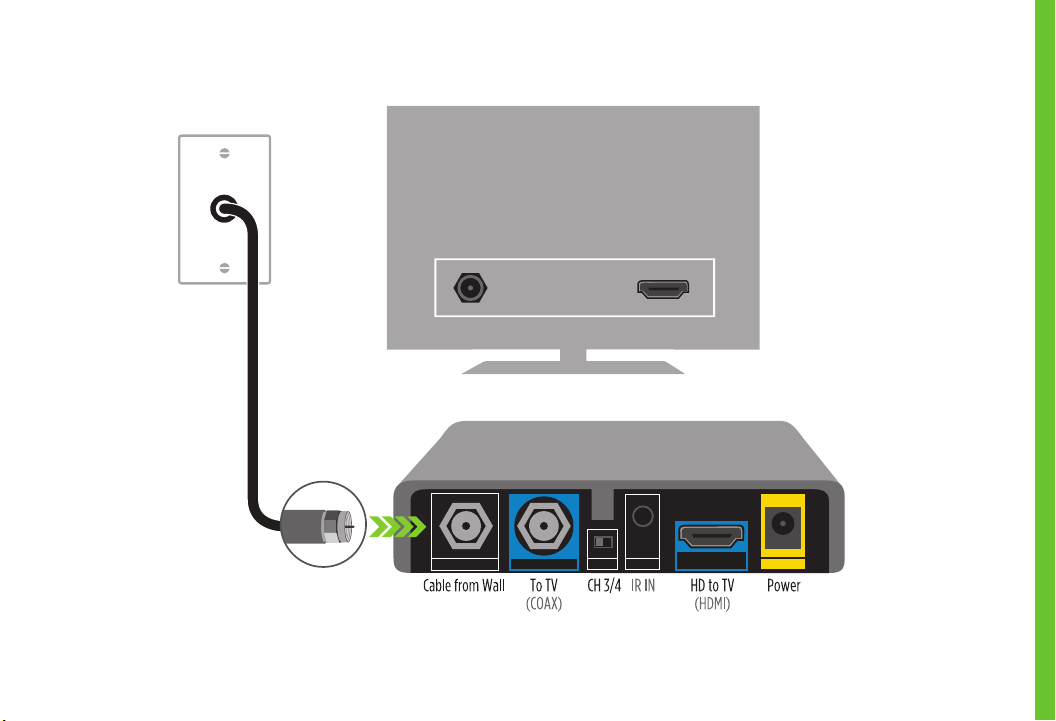
Turn o the TV
Remove the BLACK COAX Cable found in tray 1
Connect the BLACK COAX Cable to the port
on the back of the mini box labeled Cable from Wall
Connect the other end of the BLACK COAX Cable
to the wall outlet
4
Page 5
STEP 1
5
Page 6

HDMI
2
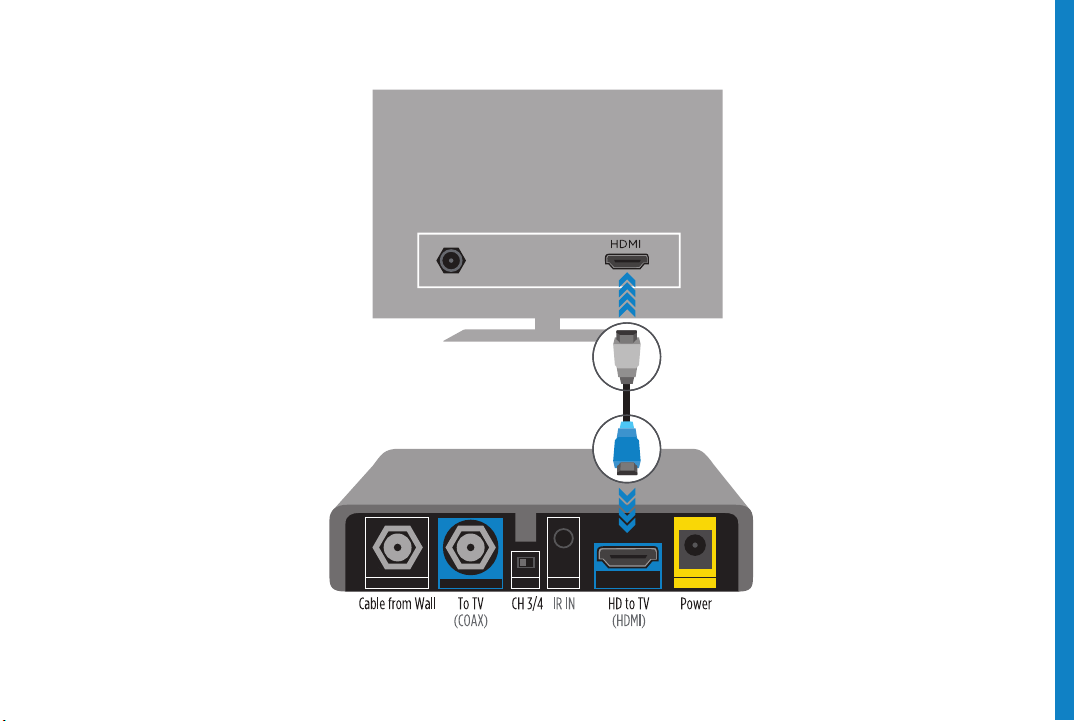
It’s time to play detective. Does your TV have an HDMI port?
On the back of the TV, look for a port labeled HDMI
NOTE: Most high-definition TVs should have this port.
TVs purchased before 2004 generally will not. If the
TV does not have an HDMI port, please turn the page.
If the TV has an HDMI port:
Connect the BLUE HDMI Cable to the port
on the back of the mini box labeled HD to TV
Connect the other end of the BLUE HDMI Cable
to the HDMI port on the back of the TV
6
Page 7
STEP 2
7
Page 8

COAX
2
Skip this page if you have already plugged in your HDMI Cable. Really, you can skip it.
If the TV does NOT have an HDMI port:
Open the plastic bag found in tray 2
Connect the BLUE COAX Cable to the port
on the back of the mini box labeled To TV
Connect the other end of the BLUE COAX Cable
to the COAX port on the back of the TV
NOTE: Choose either the BLUE HDMI Cable or the
BLUE COAX Cable. Do not use both.
8
Page 9

STEP 2
9
Page 10

10
Way to go! You’re almost there.
3
Connect the YELLOW POWER Cord into the
yellow POWER port on the back of the mini box
Plug the other end into the wall
NOTE: The green light should start flashing on the front
of the mini box.
Page 11

STEP 3
11
Page 12

4
It’s time to program your new mini box remote to work with your TV.
Turn on your TV
Press and hold
Press and release
Press and hold down
then release
If the mini box will not power on/o your TV
see page 15 for more information
12
until blinks twice, then release
until device turns o,
Page 13

IF YOU USED THE HDMI CABLE IN STEP 2:
Using the mini box remote, press
and select HDMI*
IF YOU USED THE COAX CABLE IN STEP 2:
Using your existing TV remote, turn your TV to
channel 3
Make sure the CH 3/4 switch on the back of the
mini box is set to 3
NOTE: If you do not see video or the on-screen guide on your TV, use
your existing TV remote to turn the TV to channel 4 and change the
switch on the back of the mini box to channel 4.
Once this step is complete, you will be able to use
the new remote to control your TV and mini box*
*You should now be able to see the on-screen guide. It may take a few minutes for the mini box
to register with our system. If you do not see video in 10 minutes, call us at 1-866-961-0416
STEP 4
13
Page 14

ABOUT THE REMOTE CONTROL
14
Turn on or o the television
POWER
GUIDE
Open the guide
SELECT
Select the highlighted item
HD ZOOM
Zoom and stretch video
CC
Turn on or o closed captioning
LAST
Return to the last channel
or the previous screen
COX MENU
One-touch access to the Main Menu
INFO
Get more information about programs
ARROW KEYS
Move the highlight
EXIT
Exit the current screen
PG/CH UP/DN
In the Guide, scroll up or down one
page. When viewing TV, move to
next or previous channel
NUMBER PAD
Enter channel numbers and PIN
directly with the remote control
Page 15

QUICK-START REMOTE SET-UP
Say goodbye to remote control clutter
Your mini box remote not only controls your mini box, it can also
be programmed to control your TV.
1. Turn on your TV.
2. Press and hold
3. Press and release
4. Press and hold
If your TV does not turn o, or if the mini box is not working with
your TV, follow these instructions:
• While aiming the remote at your TV, press and hold
down the numbered button for your TV brand from the
list of common brands.
• Let go of the button when your TV turns o. Setup is complete.
See FAQs (page 23) for more information on your remote
until
until the TV turns o, then release.
blinks twice, then release.
.
1 Insignia
2 LG
3 Panasonic
4 Philips/Magnavox
5 Samsung
6 Sanyo
7 Sharp
8 Sony
9 Toshiba
0 Vizio
PROGRAM GUIDE
15
Page 16

GETTING STARTED
Turning on Your TV
Press
16
Changing Channels
• If you know the channel
number, enter it using the
numbered buttons
• Use the
up or down
• To see the previously tuned
channel, press
to go one channel
Adjusting the Volume Level
Use the
decrease the volume
To turn the volume o
completely, press
To restore the volume
and continue listening,
press
to increase or
again
Page 17

USING THE GUIDE
Information About Shows
Press
Press
Press
to display the Channel Banner
again to display extended program information
to close
Finding Shows by Channel
Press
Use the
Use the
OR Enter a channel number using
jump directly to that channel
Press
to display the Guide
to browse by channel
to browse by page
–
to view selected program
By pressing the right arrow button, you
can view program listings up to 24 hours
in advance
to
PROGRAM GUIDE
17
Page 18

CONTROLLING WHAT YOUR KIDS CAN WATCH
Parental Controls let you control who watches certain TV programs. You can lock programs by rating
or block whole channels so they cannot be viewed without the Parental Control PIN.
Setting a Parental Control PIN
Press
Use
“Parental Controls” will now be highlighted. Press
Use
Use the numbered keys
You will need to re-enter your PIN to confirm
The Parental Control PIN is now set
Press
18
to display the Menu
to highlight “Settings.” Press
to highlight “Set Parental Control PIN” and press
–
to clear the confirmation message
to set a four-digit PIN.
Page 19

The Program Guide lets you restrict access to TV programs in several dierent ways.
Setting Locking Status is the next step to turning on Parental Controls.
Turning On Parental Control Settings
Press
Use
to display the Menu
to highlight “Settings.” Press
“Parental Controls” will now be highlighted. Press
“Parental Locks” will now be highlighted. Press
The “Locking Status” option will now be highlighted. Press
The “ON” option in the center column will now be highlighted.
Press
Parental Controls are now turned ON
Press
to close “Settings” or press the left arrow button to
return to “Locking Status”
PROGRAM GUIDE
19
Page 20

CONTROLLING WHAT YOUR KIDS
CAN WATCH (CONTINUED)
After turning on Parental Controls, you have a number of dierent
ways to restrict access to TV programs, including by channel, by
rating and by content advisories.
20
Customizing Parental Control Settings
Press
Use
“Parental Controls” will now be highlighted. Press
“Parental Locks” will now be highlighted. Press
Use
Channels” or “Lock Ratings.” All of the category
options are displayed in the center column
Press
center column
to display the Menu
to highlight “Settings.” Press
to highlight a category, such as “Lock
to highlight the first category option in the
Use
Press
The Parental Control setting is now customized
Press
left arrow button to return to the previously
selected category
to highlight an option
to lock or unlock
to close “Settings” or press the
Page 21

TURNING ON CLOSED CAPTIONING
The Program Guide lets you adjust Closed Captioning settings. You can turn Closed Captioning
on or o and you can customize how your Closed Captions look.
You can turn Closed Captioning on or o by pressing
Customizing Closed Captioning Control Settings
NOTE: Closed Captioning must be turned on to access CCOptions.
Press
Use
Use
Press
Use
Use
Press
to display the Menu
to highlight “Settings” and press
to highlight “Closed Captioning” and press
to “Turn On CC”
to highlight “CC Options” and press
to highlight a Closed Captioning option, such
as “Text Size” or “Background Color”
to select the option to customize
on your remote control.
PROGRAM GUIDE
21
Page 22

FAQs
Q: Do I need to set my TV to a specific channel to use the Cox mini box?
A: If you used a coax cable to connect your TV to your mini box, you will need to set your TV to a
specific channel to receive a signal from the mini box; your TV will need to be set to channel 3 or
4 depending on the area you live in. As a rule, set your TV to channel 3 first and be sure to set the
switch on the back of your mini box to channel 3 to match the channel set on your TV. If you do not
see video or the program guide, turn your TV to channel 4 instead and change the switch on the
back of your mini box to channel 4.
Note: You must use your existing TV remote to turn your TV to channel 3 or 4. Using the mini box
remote will only turn the channel on your mini box.
Q: How do I receive an HD picture with my mini box?
A: If you have an HDTV set and are connected to the mini box via an HDMI cable, you will automatically
be tuned to the HD signal of a chosen network if one is available. On your televisions connected to a
mini box, there is no need to tune to HD channels in the 1000s or 2000s.
22
Page 23

Q: My remote isn’t working with my mini box.
A: Make sure that you are pointing your remote directly at the mini box and not the TV screen. Try
pressing the
if the red light on
to see if your mini box changes channels. If this does not work, check to see
displays when you push any of the remote control buttons. If the red light
does not display, the batteries for your remote may need to be changed.
If you have an IR Extender connected to your mini box, check to be sure that you are pointing your
remote directly toward the IR Extender. This will ensure that you get the most direct signal and best
performance from the IR Extender.
NOTE: Be sure to always use the remote that came with your mini box. Universal remotes purchased
from a third party or included with one of your other Cox receivers may not be compatible withthe
mini box.
If you are not able to place your mini box where you can easily point your remote to control it,
please visit a Cox Solutions Store to pick-up an IR Extender.
FAQs
23
FAQs
Page 24

Q: Why do I get the message “No Signal” (or “Source Not Found” or “WeakSignal”)?
A: The mini box can be connected using a COAX or RF cable or an HDMI cable. If you are using an HDMI
cable to connect your mini box to your TV, this message may indicate that the TV is not tuned to the
proper input or source. If you have programmed the mini box remote to work with your TV, press
on the mini box remote to change the input selection.
NOTE: While it is preferred that you use the remote that came with your mini box, you can also use
your TV remote to check your TV settings for the correct input:
Press the INPUT button (may be labeled TV/VIDEO, SOURCE or Antenna) on the TV or the remote
control that came with the TV.
Select the option for TV on the menu displayed on the screen. It may be labeled Cable TV, CATV,
CAB, Input 1, Video 1, Antenna 1, AV1, HDMI, DVI oranother name (check your TV user manual).
Usually, the label describes the type of connection from the mini box totheTV (such as cable, AV,
HDMI, DVI or component).
Or select each option one at a time, returning to live TV to see if the option has restored the picture.
Q: The program guide has no data or descriptions. How can I restore thedata?
A: First, make sure the coax cable is secured tightly to the back of the mini box. Then unplug the power
from the mini box. Wait approximately 15–30 seconds before plugging the power back into the mini
box to begin the program guide downloading process. This downloading process will take about five
minutes tocomplete.
NOTE: During the download process you can continue to watch live TV and change channels, but
programming information in the guide may be unavailable for those five minutes.
24
Page 25

Q: Why do I get the message “Temporarily O Air” on my TV, or have no sound or video on
some channels?
A: Check for loose connections from the wall to the mini box to make sure they are secure. The coax cable
from the wall should be secured in the Cable from Wall port on the back of the mini box. Be sure to
finger-tighten all cables coming from the wall, mini box, splitter, TV and other devices. Verify the cable
is not damaged.
If the connections are secure and the problem persists, please visit us at cox.com/support for
additionalassistance.
Q: Can I mount my mini box to the back of my TV?
A: If you want to keep your mini box out of sight and still use your mini box remote control to change
channels and volume, you’ll need to use an IR Extender. You may pick up an IR Extender for each
mini box at no charge atyour local Cox Solutions Store.
Q: How do I reset my mini box?
A: Disconnect the power to the mini box by unplugging the power cord from either the outlet or from
the back of the mini box, then wait 15–30 seconds.
Reconnect the power to the mini box by plugging the power cord either back into the outlet or into
the back of the mini box.
Wait about five minutes for the mini box to reset.
25
FAQs
FAQs
Page 26

26
Thank you.
At Cox, we care about the health of our planet as much as you do. That’s why
we created this environmentally friendly package to send to all of our customers.
All packaging materials are either recyclable, biodegradable or compostable.
Let’s all work together to protect our planet from unnecessary waste and
pollution. Recycle as much, as often and as responsibly as you can.
Page 27

27
Page 28

1-866-961-0416 cox.com/goalldigital
 Loading...