

Page 1
MINI BOX
BIG BUTTON
REMOTE
CONTROL
SETUP GUIDE
Control your TV and your
mini box
(DTA) with one remote!
Part Number 4220-RF Rev 3/16
™
/ Digital Adapter
Page 2

Page 3
TABLE OF
CONTENTS
UNDERSTANDING
YOUR REMOTE
Pages 4–5
BATTERIES
Page 6
REMOTE CONTROL
MODES
Page 7
PAIRING YOUR REMOTE
Pages 8–9
PROGRAMMING
YOUR REMOTE
Pages 10–11
ADVANCED SETUP
Pages 12–13
FCC NOTICE
Pages 14–15
POPULAR REMOTE
BRAND CODES
Pages 16–21
HAVING TROUBLE?
Visit cox.com/support
Page 4
UNDERSTANDING
YOUR REMOTE
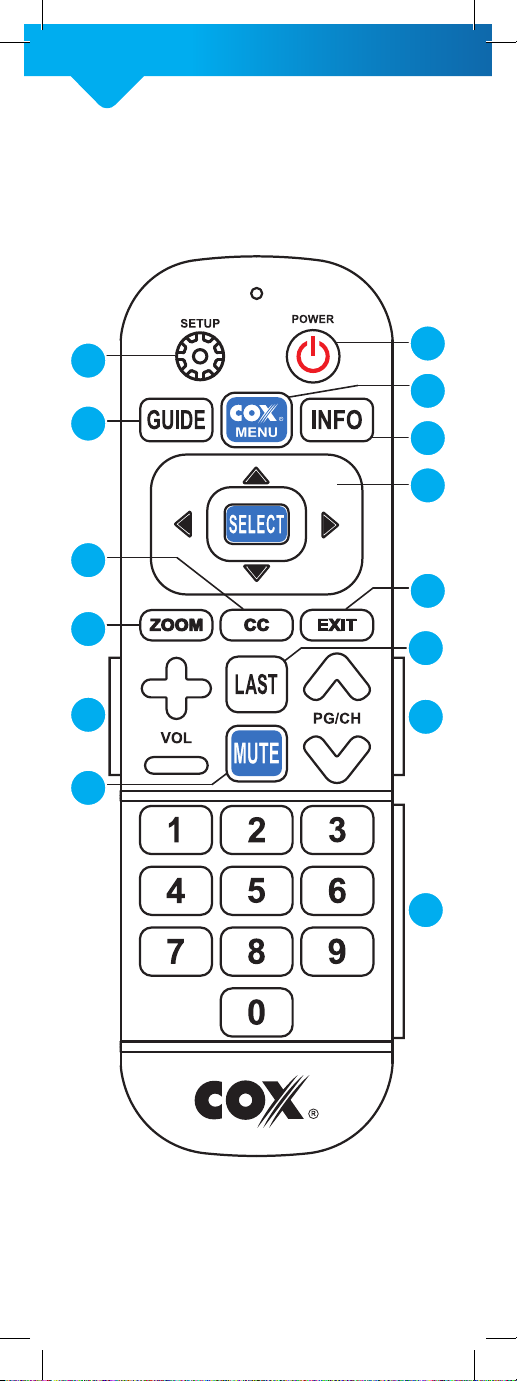
CONTROL BUTTONS
2
3
7
8
11
13
1
4
5
6
9
10
12
14
4
Page 5

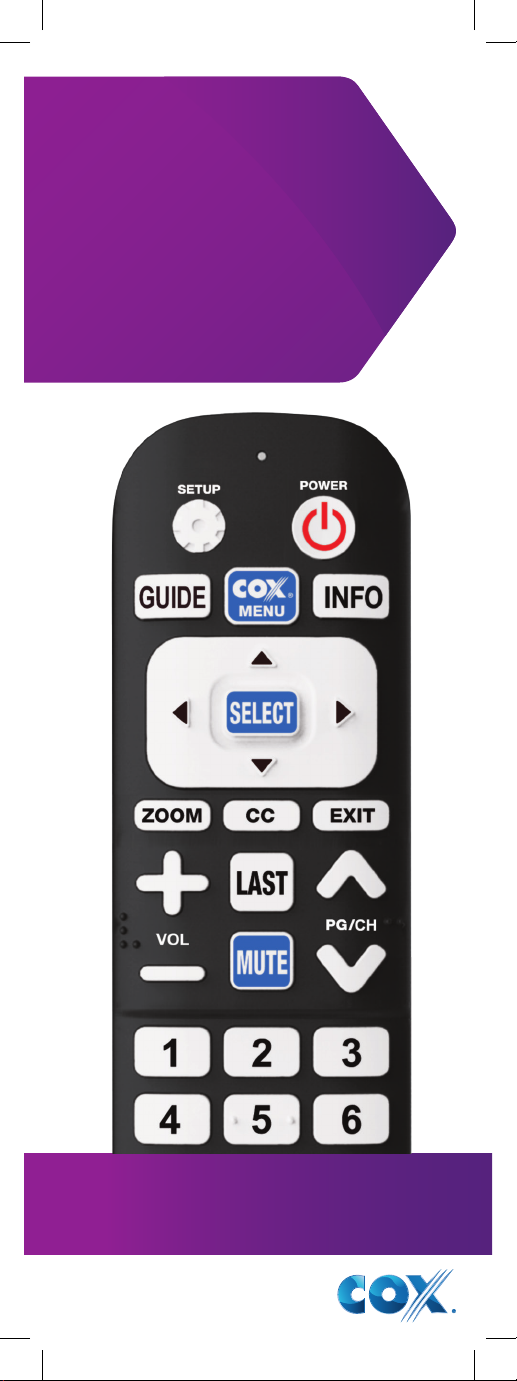
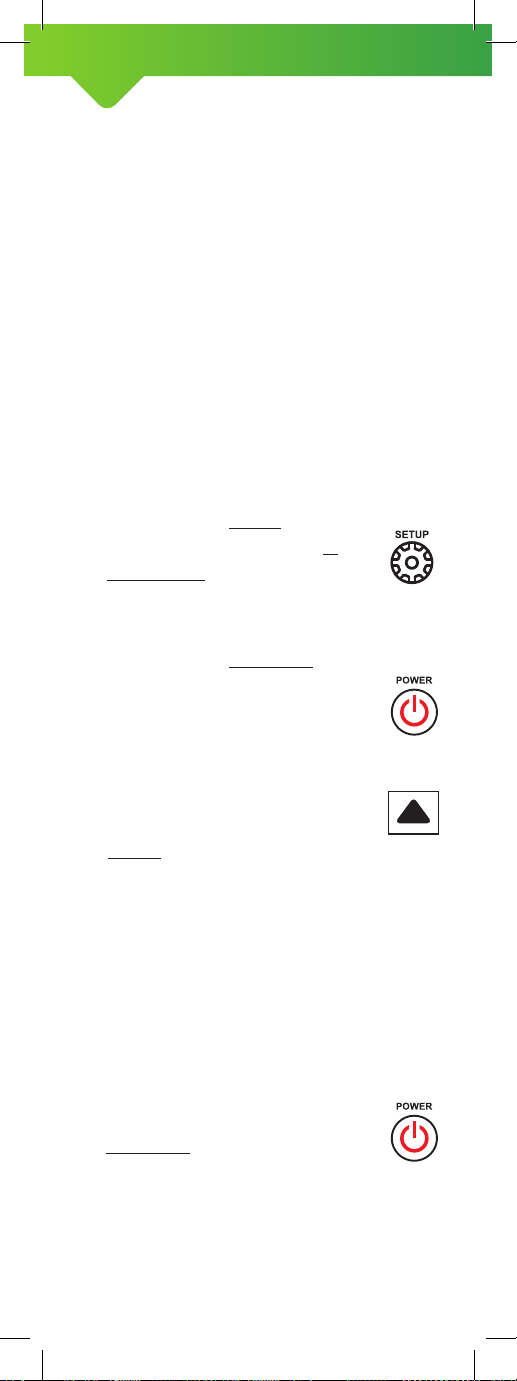
1. POWER: Will turn the TV
on and o once you have
programmed the remote
to control your TV
2. SETUP: Press and hold
SETUP for 3 seconds until
the red indicator light
turns on to enter the setup
mode for your remote
3. GUIDE: Will display
program guide
4. COX MENU: Provides
access to main functions
such as Guide, Settings
and Customer Support
5. INFO: Will display
information for currently
selected program
6. DIRECTIONAL PAD: Up,
Down, Right, Left and
SELECT buttons
7. CC: Shortcut to turn
closed captioning on
and o
8. ZOOM: Zoom or stretch
the standard definition
video to fill up the TV
screen size
9. EXIT: Exit current menu
and return to previously
tuned program
10. LAST: Quick access to
the most recently tuned
channel
11. VOL: Controls the
volume once you have
programmed the remote
to control your TV
12. PG/CH: Use to tune
channel up or down and
for navigation in the guide
13. MUTE: Will turn o volume
14. NUMBER KEYS: Use to
enter channel numbers
and Parental Control PIN
5
Page 6

BATTERIES
Use two AA alkaline batteries.
Check the diagram inside the
battery compartment to ensure
the batteries are inserted facing
the correct direction.
CAUTION: This remote
should be kept out of the
reach of children under the
age of 6 as the batteries are
a choking hazard.
Back of Remote
Remove
Battery Cover
6
Insert 2 AA
Batteries
Page 7

REMOTE CONTROL
MODES
This remote operates in one
of two modes to control your
mini box (DTA).
IR MODE:
In infrared (IR) mode, the
remote relies on a direct line
of sight to control the mini
box (DTA) via infrared signals.
This remote is already set in IR
mode when you take it out of
the box.
RF MODE:
In radio frequency (RF) mode,
the remote does not require
a direct line of sight. This
allows you to hide the mini box
(DTA) behind your TV or in an
entertainment center. To set
the remote in RF mode, you
must pair the remote with the
mini box (DTA).
After the pairing is complete,
the remote will only control
the mini box (DTA) with which
it is paired. Please note that
using the remote in RF mode
requires you to have an RF
DTA or a mini box with an RF
adapter. If you do not have an
RF DTA or a mini box with an
RF adapter, then your remote
must be used in IR mode.
Note: When the remote is set
in RF mode, it will only control
your RF DTA (or mini box with
an RF adapter) without a line
of sight. To control the TV’s
volume and power functions,
you must always point your
remote at your TV.
7
Page 8
PAIR YOUR REMOTE
WITH THE RF DTA
1. Turn on the TV using your
TV’s existing remote or the
TV’s power button.
2. Hold the remote in
front of the mini box
(DTA) and press the
COX MENU button on
the remote.
3. Navigate to Customer
Support and press
the SELECT button
on the remote.
4. Navigate to Remote
Control Pairing and
press the SELECT
button on the remote.
5. Press and hold the
SETUP button for 3
seconds until the red
indicator light turns
on, then release.
6. Press the COX MENU
button. The red
indicator light on
the remote will blink
periodically.
7. Enter the 3-digit code
displayed on the TV. If the
code entered is correct, a
confirmation message will
be displayed on your TV.
8. Using your new remote,
try changing channels. If
this works, your remote is
now paired!
8
Page 9

Note: To pair this remote with
the RF adapter connected
to a mini box, please follow
the instructions provided in
the user’s manual of the RF
adapter (Universal RF4CE
Serial Adapter).
9
Page 10
PROGRAM YOUR REMOTE
TO CONTROL THE TV
You can program your remote
to conveniently control your TV’s
volume and power functions.
You can do this by using any
one of the following methods.
AUTOMATIC CODE SEARCH
METHOD A:
1. Turn on the TV using your
TV’s existing remote or the
TV’s power button.
2. Press and hold the
SETUP button for 3
seconds until the red
indicator light turns
on, then release.
3. Press and release the
POWER button. The
red indicator light on
the remote will blink
once and stay lit.
4. Aim the remote at
your TV. Press and
hold the UP arrow to
start the automatic
code search. The red
indicator light will blink
periodically as it searches
for the code for your TV.
When the correct code is
found for your TV, the TV
will turn o automatically.
5. Using your new
remote, press and
release the POWER
button to turn on
your TV. Try changing
the volume and channels.
If this works, your remote
is set up!
10
Page 11
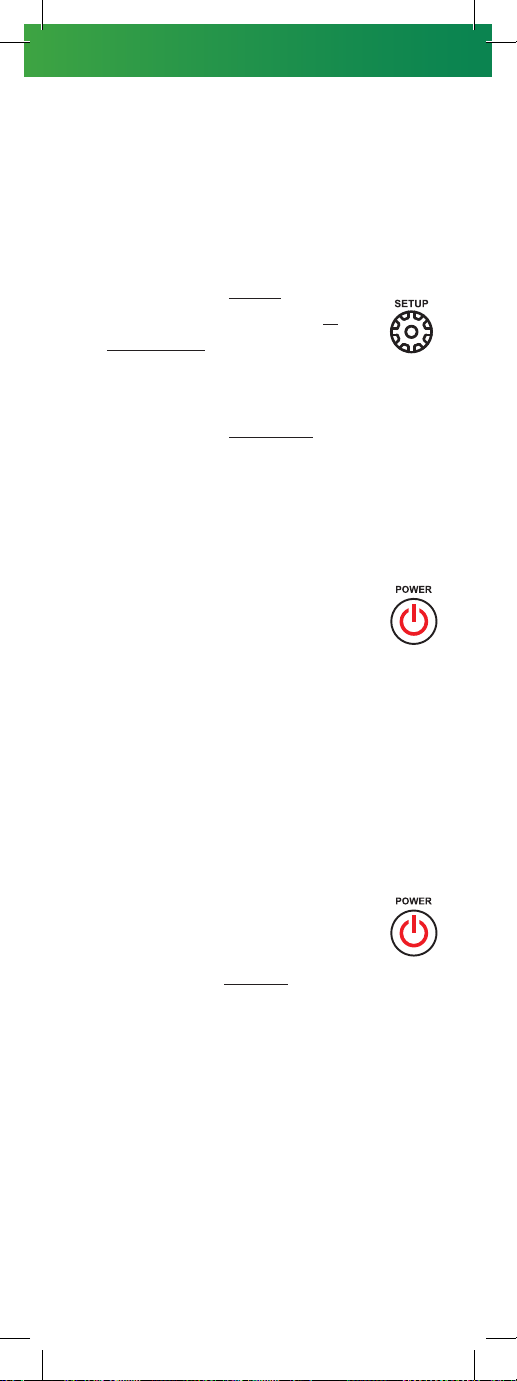
MANUAL CODE ENTRY
METHOD B:
1. Turn on the TV using your
TV’s existing remote or the
TV’s power button.
2. Press and hold the
SETUP button for 3
seconds until the red
indicator light turns
on, then release.
3. Press and release the
POWER button. The
red indicator light on
the remote will blink
once and stay lit.
4. Find the first 4-digit
device code for your
TV brand from the
TV Brand and Code
List in this guide.
5. Enter the 4-digit device
code using the number
buttons on your remote.
If the code is entered
correctly, then the red
indicator light will blink
twice to save the code.
6. Using your new
remote, try changing
the volume and
channels. Press the
POWER button to turn
your TV o. If this works,
your remote is set up! If
this doesn’t work, then
enter another code for
your TV brand.
11
Page 12

ADVANCED SETUP:
ASSIGNING VOLUME
CONTROLS
The remote is set to control
the volume on the mini box
(DTA) when you take it out of
the box. Once you program
your remote to control the
TV, the volume controls will
switch to operating the TV. The
instructions below can be used
to manually assign the volume
controls on the remote.
ASSIGN VOLUME CONTROL
TO THE MINI BOX (DTA):
1. Press and hold the
SETUP button for 3
seconds until the red
indicator light turns on,
then release.
2. Press and release the
VOL - button.
3. The red indicator light
will blink twice to
indicate success.
ASSIGN VOLUME CONTROL
TO TV:
1. Press and hold the
SETUP button for 3
seconds until the red
indicator light turns on,
then release.
2. Press and release the
VOL + button.
3. The red indicator light
will blink twice to
indicate success.
12
Page 13

ADVANCED SETUP:
RESET YOUR REMOTE
RF UNPAIRING:
If you wish to unpair your
remote from the RF DTA or the
mini box with an RF adapter,
follow the steps below.
1. Press and hold the
SETUP button for 3
seconds until the red
indicator light turns
on, then release.
2. Enter 986 using the number
buttons on the remote.
3. The red indicator light
will blink twice to
indicate success.
FACTORY RESET:
If you wish to completely
reset the remote by
removing the RF pairing and
programming for the TV’s
power and volume functions,
follow the steps below.
1. Press and hold the
SETUP button for 3
seconds until the red
indicator light turns
on, then release.
2. Enter 987 using the number
buttons on the remote.
3. The red indicator light
will blink twice to
indicate success.
13
Page 14

FCC NOTICE
This device complies with
Part 15 of the FCC Rules.
Operation is subject to the
following two conditions:
(1) This device may not cause
harmful interference, and
(2) This device must accept
any interference received,
including interference that may
cause undesired operation.
NOTE:
This equipment has been
tested and found to comply
with the limits for a Class B
digital device, pursuant to
Part 15 of the FCC Rules.
These limits are designed
to provide reasonable
protection against harmful
interference in a residential
installation. This equipment
generates, uses and can
radiate radio frequency
energy and, if not installed
and used in accordance with
the instructions, may cause
harmful interference to radio
communications.
However, there is no
guarantee that interference
will not occur in a particular
installation. If this equipment
does cause harmful
interference to radio or
television reception, which
can be determined by turning
the equipment o and on, the
user is encouraged to try to
14
Page 15

correct the interference by
one or more of the following
measures:
- Reorient or relocate the
receiving antenna.
- Increase the separation
between the equipment
and receiver.
- Connect the equipment
into an outlet on a circuit
dierent from that to which
the receiver is connected.
- Consult the dealer or an
experienced radio/TV
technician for help.
The changes or modifications
not expressly approved by
the party responsible for
compliance could void the
user’s authority to operate
the equipment.
CAUTION: Exposure to
Radio Frequency Radiation.
Antenna shall be mounted in
such a manner to minimize
the potential for human
contact during normal
operation. The antenna
should not be contacted
during operation exceeding
the FCC radio frequency
exposure limit.
15
Page 16

POPULAR TV BRANDS
Remote Codes
MARCAS POPULARES DE TV
Códigos de control remoto
Acer 2961
Advent 1901 2191 0061 3101
Aiwa 3921
Akai 2711 4731 0041 2351
Akawa 4661
Albatron 0021 2331
America Action 4731
Anity 4401 1981
AOC 2981 0061
Aomni 2771 3501
Apex 1631 4771 0041 1961 0881
Ario 0881
Atvio 0881
Audiovox 2411 4731 2801 4061 2901
Aumark 0101
Auria 0061
Aventura 0591
Bell & Howell 3921
BenQ 2511 2231
Berkshire 4201
Bradford 4731
Broksonic 2351 4071
Celera 0041
Champion 3921
Changhong 0041
Citizen 2351 0101
Clarion 4731
Coby 0881 2801
Commercial Solutions 4201
Contec 4731
Craig 4731
Crown 4731
Curtis 1981 3631 0881 3891 0411
16
Page 17

Curtis Mathes 0101 4201 3921 2411
CXC 4731
Cytron 3891
Daewoo 1111 3921 2411
Dell 2281 2801 0061
Delta 2611 2511 3601
Digistar 1581
Disney 4071
Dumont 3241
Durabrand 4981 0281 4731 0591
Dynex 4061
Electrograph 1321
Electrohome 4071 0051 4161 3101
Elekta 3241
Element 0571 2801 4401 0911
0911
Emerson
Envision 2981 0061
Epson 2001 2031
EQD 0061
EQD Auria 0061
Erae 2071
ESA 0591 4681
Favi 0411
Fisher 3921
Fluid 0911
Funai 4671 4731 0591 4681
Futuretech 4731
Gateway 2511 1321
GE (General Electric) 0041 0281 4201 4261 2411
GFM 0591 4681 4671
Gibralter 3241
Go Video 0101
GoldStar 0281
Grunpy 4731
H&B 1821 1881
Haier 0411 1981 4981 2801
Hallmark 0281
Hannspree 3911
0281 0061 4671 4681
0591
17
Page 18

Harvard 4731
Helios 1881
Hello Kitty 2411
Himitsu 4731
HISense 2971 2801 0411 2131 1631
Hitachi 0781
HP (Hewlett Packard) 2441 2981 2461 3471 3421
Hyundai 3311
iLo 1051 2731 0591
4061
4411
Insignia
Inteq 3241
iSymphony 0411 1251
JCM 0571
JCPenney 2801 0101 4201 4261 0041
Jensen 3891
JVC 4071 0931
KDS 4401
KEC 4731
KLH 0041
Kolin 2801
Konka 2711
KTV 4731
Legend 0881
Lexus 0881
LG 2801 3241 4241
LXI 0281 4201 0041 3921 3241
MAG 4401
Magnavox
Marantz 0061
Matsushita 4261
Maxent 1321 1991
Megatron 0281
Memorex
MGA 0281 3101
Midland 4201 4261 3241
Mintek 2731
2711
0061
2011
0281
3101
4071 3891 0591
2801
1321
4261 4681 2981
0591
0101 4071 3921 1651
18
Page 19

Mitsubish 0281 3101
Mitsui 4531 2801 0881 3451
Monivision 0021 2331
Motorola 0171 4401
Moxell 4401
MTC 0101
Multitech 4731
NAD 0281 0041
Nakamichi 3771
Naoki 0041
naxa 0901 0411
NEC 1981 2481
NetTV 1321
New Acoustic Dim. 0041 2801
Nexus Electronics 2801
Nikko 0281 3241 4201 3921 0041
Norcent 1631 2981
Norwood Micro 1051
NuVision 2111
Olevia 0281 3531
Onwa 4731
Optimus 3921 1651
Orion 4071
4201
3101
3921
0101
Panasonic
PARK 0901
Penney 0101 0281 4201 0041 4261
Philco 0591 4681
Philips
Pioneer 4271
Polaroid
Portland 2411
Prima 2801
Prism 4261
Proscan 0281 0571 4201 1981 0411
Proton 0281
Proview 4401
0041
1491
1651
0061
3241 0591 2981 3451
2011
4401
4451
0041
3891
1051
4801
4261
2091
1581
0281
2711
2131
19
Page 20

Pulsar 3241
Puneet 2681
PVision 2071 1901
Quasar 4261 1651
RadioShack 0281 4201 3921 4731
0281
0411
4201
RCA
Realistic 0281 3921 4731
RevolutionHD 2771 3501
Sampo 1321
Samsung 0411 0101 0281 2671
Sansui 4071 0591 2351 0911
Sanyo 3921
Sceptre 4771 5111 1981
Scotch 0281
Scott 0281
Sears 0281 4201 0041 3921 0591
Seiki 0911 0291 2801
Sens 2801
Sharp 0171
Sole 1881 0061 3501
Sony 1981 4781
Soundesign 0281 4731
Speler 0101 4401
Squareview 0591
SSS 4731
Starlite 4731
Studio Experience 2331
SunBrite 1981 3531
Superscan 4091
Supersonic 0901
SVA 1631 4681
Sylvania 4681 0591 2131 4671
Symphonic 4731 0591
Syntax 0281 3531
Takai 0041
Tatung 2511 1051
TCL 4201
1981
4401
4261 0571
2711
20
Page 21

Technics 4261 3241 4201
Techwood 4261
Teknika 0101 4731 3101
TMK 0281
TNCi 3241
Tosaki 0041
Toshiba 0041 0101 2481 2351 3921
TruTech 1691
US Logic 1051
Venturer 2801
Vidtech 0281
2941
1321
4091
ViewSonic
Viore 0411 3631 0901 1251
Vizio 2511 4091 4101 0281 4111
Vuon 3311
Wards
Waycon 0041
Westinghouse
Wyse 2981
Xiahua 2801
Yamaha 5101 1671
Zenith 0281 4201 3241 2981
4061
0281
4261
4101
0411
4101
2801
0101
4771
1961
2981
3241
3921
2411
1251
0061 2131
0041
4201
4731
1981
0911
0291
CAN’T FIND YOUR
TV BRAND?
Visit cox.com/support
¿NO ENCUENTRAS
LA MARCA DE TU TV?
Visita cox.com/support
21
Page 22

14
frecuencia de la FCC.
límite de exposición de radio
operación excediendo el
ser contactada durante la
normal. La antena no debe
durante su funcionamiento
de contacto humano
que minimice el potencial
estar instalada de tal manera
Frecuencia. La antena debe
a Radiación por Radio
ATENCIÓN: Exposición
dispositivo.
del usuario para operar el
pueden anular la autoridad
aprobados por el responsable
que no están expresamente
Los cambios o modificaciones
radio/TV para pedir ayuda.
o un técnico experto en
- Consulta con el distribuidor
receptor.
al que está conectado el
toma en un circuito distinto
- Conecta el equipo a una
el dispositivo y el receptor.
- Aumenta la separación entre
reubica la antena receptora.
- Cambia la orientación o
de las siguientes medidas:
la interferencia con una o más
al usuario a tratar de corregir
apagando el equipo, se invita
determinada prendiendo y
o televisión, que puede ser
recepción de señales de radio
interferencia perjudicial a la
Page 23

13
Si este dispositivo causa
en una instalación particular.
que la interferencia no ocurra
Sin embargo, no se garantiza
comunicaciones por radio.
interferencia perjudicial a las
instrucciones puede causar
de acuerdo con las
no es instalado y usado
de radio frecuencia, y si
puede irradiar una energía
Este equipo genera, usa y
una instalación residencial.
interferencia perjudicial en
razonable contra
para proveer protección
Esos límites son diseñados
de las reglas de la FCC.
cumplimiento de la Sección 15
un equipo digital Clase B, en
cumplir con los límites para
y se considera apto para
Este equipo ha sido probado
NOTA:
no deseado.
pueda causar funcionamiento
incluyendo interferencia que
interferencia recibida,
debe aceptar cualquier
(2) Este dispositivo
perjudicial y
no causar interferencia
(1) Este dispositivo puede
a las siguientes condiciones:
El funcionamiento está sujeto
la FCC.
la Sección 15 de las reglas de
Este dispositivo cumple con
AVISO DE LA FCC
Page 24

12
CONFIGURACIÓN
AVANZADA:
Si deseas desvincular tu
control del RF DTA o de la mini
box con adaptador RF sigue
estas instrucciones.
botones de números del
botones de números del
operación fue exitosa.
dos veces indicando que la
3. La luz roja va a parpadear
control.
2. Ingresa 987 usando los
luego suelta.
la luz roja se encienda,
3 segundos hasta que
el botón SETUP por
1. Mantén presionado
estos pasos.
volumen de la TV, sigue
de prender y controlar el
desconectado la función
desvinculándolo del RF y
completamente el control
Si deseas reiniciar
DE FÁBRICA:
VOLVER A CONFIGURACIÓN
operación fue exitosa.
dos veces indicando que la
3. La luz roja va a parpadear
control.
2. Ingresa 986 usando los
luego suelta.
la luz roja se encienda,
3 segundos hasta que
el botón SETUP por
1. Mantén presionado
DESVINCULAR DEL RF:
REINICIAR EL CONTROL
Page 25

11
CONFIGURACIÓN
AVANZADA: ASIGNANDO
CONTROL DE VOLUMEN
Cuando se saca de la caja el
control está configurado para
controlar el volumen de la mini
box (DTA). Una vez programes
tu remoto para controlar la
TV, los controles del volumen
se cambiarán para funcionar
con la TV. Puedes usar las
instrucciones a continuación
para asignar manualmente los
controles de volumen en el
control.
el botón
fue exitosa.
indicando que la operación
parpadear dos veces
3. La luz roja va a
VOL +.
2. Presiona y suelta
luego suelta.
la luz roja se encienda,
3 segundos hasta que
el botón SETUP por
1. Mantén presionado
VOLUMEN A LA TV:
ASIGNAR CONTROL DEL
operación fue exitosa.
dos veces indicando que la
3. La luz roja va a parpadear
el botón VOL -.
2. Presiona y suelta
luego suelta.
la luz roja se encienda,
3 segundos hasta que
el botón SETUP por
1. Mantén presionado
(DTA):
VOLUMEN A LA MINI BOX
ASIGNAR EL CONTROL DE
Page 26

10
tu TV.
código para la marca de
no funciona ingresa otro
¡tu control está listo! Si
apagar tu TV. Si funciona,
botón POWER para
volumen. Presiona el
los canales y el
trata de cambiar
6. Usando tu control nuevo,
código.
dos veces para guardar el
la luz roja va a parpadear
Si el código es correcto,
de números en tu control.
dígitos usando los botones
5. Ingresa el código de 4
en esta guía.
Códigos para Marcas de TV
de tu TV en la Lista de
de 4 dígitos para la marca
4. Encuentra el primer código
encendida.
una vez y se quedará
roja va a parpadear
botón POWER. La luz
3. Presiona y suelta el
luego suelta.
la luz roja se encienda,
3 segundos hasta que
el botón SETUP por
2. Mantén presionado
de encendido de la TV.
control de la TV o el botón
1. Enciende la TV usando el
CÓDIGO MÉTODO B:
INGRESO MANUAL DEL
Page 27

PROGRAMA TU REMOTO
PARA CONTROLAR LA TV
Puedes programar tu control
para que controle el volumen
de tu televisor y las funciones
de encendido y apagado. Hazlo
usando uno de estos métodos.
9
listo!
funciona, ¡tu control está
canales y el volumen. Si
TV. Trata de cambiar los
POWER para encender tu
y suelta el botón
nuevo, presiona
5. Usando tu control
apagará automáticamente.
correcto de tu TV, la TV se
se encuentre el código
código para tu TV. Cuando
a medida que busca el
La luz roja va a parpadear
automática de códigos.
iniciar la búsqueda
la flecha ARRIBA para
TV. Presiona y suelta
4. Apunta el control a tu
encendida.
una vez y se quedará
roja va a parpadear
botón POWER. La luz
3. Presiona y suelta el
luego suelta.
la luz roja se encienda,
3 segundos hasta que
el botón SETUP por
2. Mantén presionado
de encendido de la TV.
control de la TV o el botón
1. Enciende la TV usando el
CÓDIGO - MÉTODO A:
BÚSQUEDA AUTOMÁTICA DE
Page 28

8
Adapter).
(Universal RF4CE Serial
usuario del adaptador RF
provistas en el manual de
box, sigue las instrucciones
RF conectado a una mini
control con el adpatador
Nota: Para sincronizar este
Page 29

7
sincronizado!
funciona, ¡tu control está
con tu nuevo control. Si
8. Trata de cambiar canales
confirmación en tu TV.
apararecerá un mensaje de
TV. Si el código es correcto,
dígitos que aparece en la
7. Ingresa el código de 3
parpadear ocasionalmente.
roja del control va a
COX MENU. La luz
6. Presiona el botón
luego suelta.
la luz roja se encienda,
3 segundos hasta que
el botón SETUP por
5. Mantén presionado
SELECT en el control.
presiona el botón
Control Pairing y
4. Ve hasta Remote
control.
botón SELECT en el
Support y presiona el
3. Ve hasta Customer
control.
COX MENU en el
presiona el botón
la mini box (DTA) y
2. Sujeta el control frente a
de encendido de la TV.
control de la TV o el botón
1. Enciende la TV usando el
RF DTA
CONTROL CON EL
SINCRONIZAR EL
Page 30

6
MODALIDADES DE
CONTROL REMOTO
Este control funciona en dos
modalidades para controlar tu
mini box (DTA).
MODO IR:
En el modo infrarrojo (IR) el
control depende de una línea
de vista directa para controlar
la mini box (DTA) a través de
señales infrarrojas. Este control
está configurado originalmente
en modo IR.
MODO RF:
En modo radiofrecuencia (RF)
el control no requiere una
línea de vista directa. Esto
permite esconder la mini box
(DTA) detrás de tu TV o en un
mueble. Para poner el control
en modo RF, debes sintonizar
el control con la mini box
(DTA).
Después de haberlos
sintonizado, el control sólo
controlará la mini box (DTA)
con la que está vinculado.
Ten en cuenta que para usar
el control en modo RF debes
tener un RF DTA o una mini
box con un adaptador RF. Si
no tienes un RF DTA o una mini
box con un adaptador RF tu
control debe ser usado en el
modo IR.
Nota: Cuando el control esté
en modo RF sólo controlará
sin línea de vista directa tu RF
DTA (o mini box con adaptador
RF). Para controlar el volumen
de la TV y las funciones de
encendido y apagado deberás
apuntar el control a la TV.
Page 31

5
BATERÍAS (PILAS)
Usa dos pilas AA alcalinas.
Mira el diagrama dentro del
compartimiento de las baterías
para asegurarte de que las
baterías están puestas en la
dirección correcta.
ATENCIÓN:
debe mantenerse fuera del
alcance de los niños menores
de 6 años, pues se podrían
asfixiar con las baterías.
Retira la
cubierta de
las baterías
Parte de atrás del control
Baterías AA
Inserta 2
Este control
Page 32

4
parentales
PIN de los controles
número de canal y el
Úsalos para ingresar
14. BOTONES DE NÚMERO:
13. MUTE: Apaga el volumen
por la guía
cambiar el canal y navegar
12. PG/CH: Úsalo para
volumen de tu TV
el remoto para controlar el
una vez hayas programado
11. VOL: Controla el volumen
último canal visto
10. LAST: Acceso rápido al
programa visto
actual y regresa al último
9. EXIT: Deja el menú
tamaño de la pantalla
video para convertirla al
la definición estándar del
8. ZOOM: Enfoca o agranda
subtítulos
prender o apagar los
7. CC: Enlace directo para
derecha, izq. y SELECT
Botones de arriba, abajo,
6. FLECHAS DE DIRECCIÓN:
seleccionada
sobre la programación
5. INFO: Muestra información
y Servicio al Cliente
como Guía, Configuración
a funciones principales
4. COX MENU: Brinda acceso
programación
3. GUIDE: Muestra la guía de
configuración de tu control
encienda para ingresar a la
hasta que la luz roja se
SETUP por 3 segundos
2. SETUP: Mantén presionado
controlar la TV
esté programado para
apaga la TV una vez
1. POWER: Enciende y
Page 33

CONOCE LOS
BOTONES DE TU
CONTROL REMOTO
14
3
13
12
10
9
6
5
4
1
11
8
7
3
2
Page 34

Page 35

¿PROBLEMAS?
Visita cox.com/support
TABL A DE
CONTENIDO
Páginas 15-16
CONTROLES
POPULARES PARA
CÓDIGOS DE MARCAS
Páginas 13-14
AVISO DE LA FCC
Páginas 11-12
AVANZADA
CONFIGURACIÓN
Páginas 9-10
TU CONTROL
PROGRAMA
Páginas 7-8
SINCRONIZA TU CONTROL
Página 6
CONTROL REMOTO
MODALIDADES DE
Página 5
BATERÍAS
Páginas 3-4
TU CONTROL
CONOCE
Page 36

¡Controla tu TV y tu
mini box™ / Adaptador Digital
(DTA) con un sólo control!
CONTROL
REMOTO DE
BOTONES
GRANDES PARA
MINI BOX
GUÍA DE
CONFIGURACIÓN
 Loading...