

Page 1
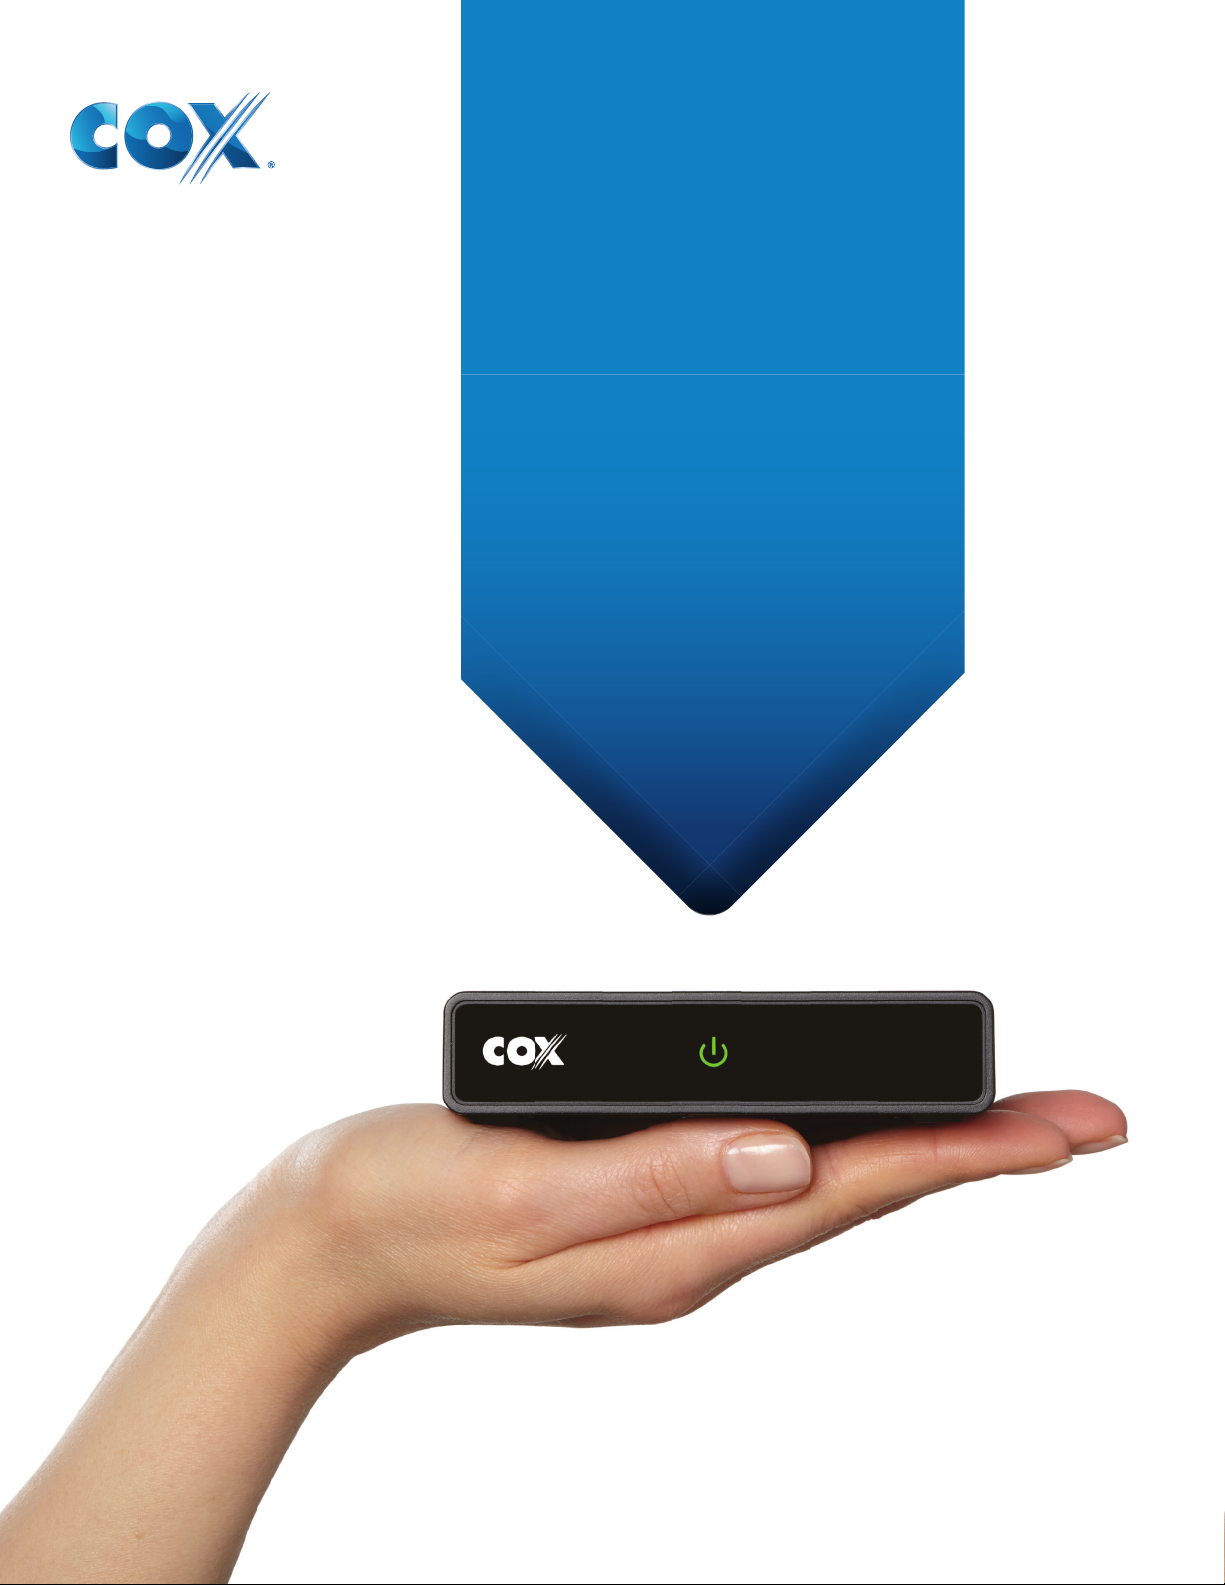
MINI
BOX
User’s Manual
Version 2 | Updated: 10/15
©2015 Cox Communications, Inc.
Page 2

MINI BOX
Table of Contents
Chapter 1: Introduction ................................................ 3
About This Manual ............................................................................................................ 3
Chapter 2: Installing & Activating Your mini box.... 4
Connecting Your mini box ............................................................................................. 4
Activating Your mini box ................................................................................................ 5
The Connectivity Test ...................................................................................................... 5
Software Update Check ................................................................................................. 6
Mini box Activation ........................................................................................................... 7
Chapter 3: Program Guide Overview......................... 8
Navigation ............................................................................................................................ 9
About the Remote Control ............................................................................................ 11
User’s Manual
Chapter 4: Getting Started ......................................... 12
Watch Live Television ...................................................................................................... 13
Change Channels .............................................................................................................. 13
View Basic Program Information ................................................................................ 13
View Detailed Program Information .......................................................................... 13
Open the Main Menu ........................................................................................................ 14
Chapter 5: The Guide ................................................... 15
Using the Guide ................................................................................................................. 16
Launch the Guide .............................................................................................................. 16
Use the Guide to Find Available Programs ............................................................. 16
Get More Information ...................................................................................................... 16
Watch a Program or Channel ....................................................................................... 17
Scroll Through the Guide ............................................................................................... 17
Exit the Guide ..................................................................................................................... 17
About the Info Banner .................................................................................................... 17
Info Banner on Channel Change ................................................................................. 17
Info Banner While Watching Live Television .......................................................... 17
Switch Programs from the Info Banner .................................................................... 18
Change Channels from the Info Banner ................................................................... 18
Close the Info Banner ...................................................................................................... 18
Service Messages .............................................................................................................. 18
Banner Icons ....................................................................................................................... 19
Chapter 6: Settings ...................................................... 20
Parental Controls and Program Ratings ................................................................... 21
Set a Parental Control PIN ............................................................................................. 21
1
Page 3

MINI BOX
Edit Parental Control PIN ............................................................................................... 21
Restrict Access to Programming ................................................................................ 22
Temporarily Unlock .......................................................................................................... 22
Lock Channels .................................................................................................................... 23
Lock Ratings ....................................................................................................................... 23
Lock Content Advisories ................................................................................................ 24
Block Titles .......................................................................................................................... 24
Closed Captioning ............................................................................................................ 25
Set Closed Captioning Status ...................................................................................... 25
Closed Captioning Options ........................................................................................... 25
Set Analog Service ........................................................................................................... 26
Set Digital Service ............................................................................................................ 26
Set Text Style ...................................................................................................................... 26
Set Text Size ........................................................................................................................ 27
Set Text Color ..................................................................................................................... 27
Set Text Opacity ................................................................................................................ 27
Set Text Character Edge ................................................................................................ 28
Set Background Color ..................................................................................................... 28
Set Background Opacity ................................................................................................ 29
Set Closed Captioning Window Color ...................................................................... 29
Set Closed Captioning Window Opacity ................................................................. 30
Language Options ............................................................................................................ 30
Set Audio Language ........................................................................................................ 30
Set the Guide Language ................................................................................................. 31
Banner Duration ................................................................................................................ 31
Power On Channel ............................................................................................................ 31
Audio & Video .................................................................................................................... 32
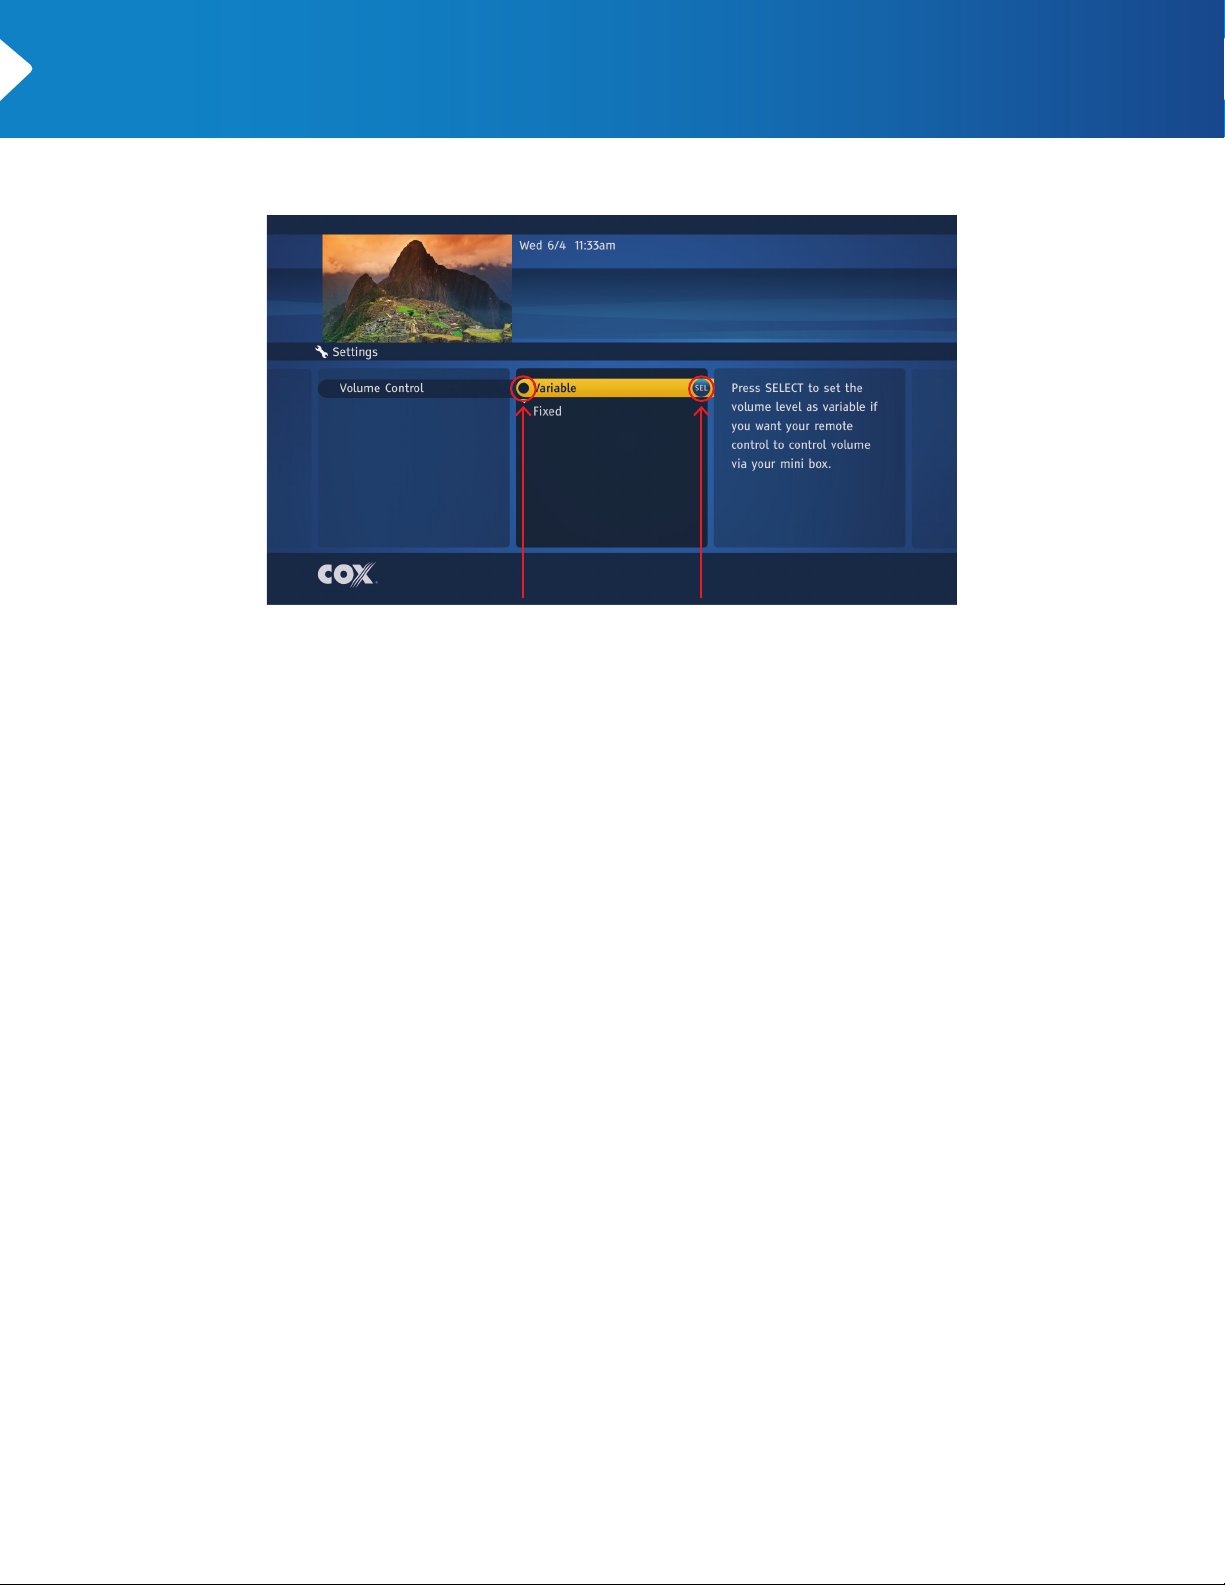
Set Volume Control .......................................................................................................... 32
Set Video Output Format .............................................................................................. 33
Restore Audio & Video Defaults .................................................................................. 34
User’s Manual
Chapter 7: Customer Support .................................... 35
Access Customer Support ............................................................................................. 36
Technical Support ............................................................................................................. 36
Self-Test ................................................................................................................................ 37
Channel Scan ...................................................................................................................... 38
View the Use Agreement ............................................................................................... 38
View the Cox Privacy Policy ......................................................................................... 38
Chapter 8: Error Messages .......................................... 39
2
Page 4

CHAPTER
1
Welcome to your new mini box™ manual. This manual covers everything you need to know
about setting up your mini box and using the mini box guide:
• Installing and Activating Your mini box
• Using the Remote Control
• Tuning to Programs
• Displaying the Info and Channel Banners
• Launching and Using the Guide
• Using Parental Controls
• Changing Other Settings
• Common Error Messages
About This Manual
3
Page 5

CHAPTER
Installing and Activating Your mini box
2
Follow these steps to connect and activate your new mini box.
CONNECTING YOUR MINI BOX
1
Connect the mini box to the cable outlet by disconnecting the cable from the back of the TV
and connecting it to the back of the mini box.
2
Connect the mini box to your TV.
If you have a Standard Definition TV:
• Use the coaxial cable in your installation kit. Connect one end of the cable to back of the
mini box and the other end to the “Cable In/RF In” input on the back of your TV.
If you have a High-Definition TV:
• Use the HDMI cable in your installation kit. Connect one end of the HDMI cable to the back of
the mini box and the other end to the HDMI port on the back of your TV.
3
Plug in your mini box.
• Connect the power cord to the back of your mini box and then plug the other end into a
power outlet or surge protector.
4
Turn on your TV.
If you have a Standard Definition TV:
• Turn on your TV and tune it to channel 3 or 4.
If you have a High-Definition TV:
• Turn on your TV and make sure your TV’s input is set to HDMI
Complete the mini box Activation Process.
5
• The mini box Activation Process will begin automatically with a self-check of the mini box. You
will not need to take action during the Activation Process unless troubleshooting is needed.
4
Page 6
MINI BOX
ACTIVATING YOUR MINI BOX
Your mini box begins activating as soon as you plug in the mini box. You can follow the
Activation Process on-screen but you won’t need to take any action unless there are problems.
The first thing you see when activation begins
is the Welcome Screen.
User’s Manual
After the Welcome Screen displays, your
mini box will perform a self-test to check
for connectivity and for any necessary
software updates.
THE CONNECTIVITY TEST
The Connectivity Test checks to make sure that your mini box can connect to Cox’s servers.
If your mini box cannot connect to the servers, a message displays asking you to check your
connections. Using the self-install instructions, check the back of your mini box and your
wall outlet to ensure your mini box is connected correctly and that all cables are secure.
Once you’ve checked your connections, press SELECT on your remote control to retry the
Connectivity Test.
If the Connectivity Test fails a second time, call Cox Customer Support for assistance.
5
Page 7
MINI BOX
SOFTWARE UPDATE CHECK
After a successful Connectivity Test, the
Self-Test checks to see if there are any
software updates available for the mini box.
If a software update is detected, the update
is downloaded and installed. The mini box
automatically reboots after the software
update has been installed.
User’s Manual
Once the mini box has rebooted, the
Activation Process continues automatically.
If no software update is needed, then the
Self-Test completes and the Activation Process
continues automatically.
6
Page 8

MINI BOX
MINI BOX ACTIVATION
Once the Self-Test is complete your mini box
automatically begins activating.
When activation is complete, your mini box
is tuned to the first channel in the channel
lineup. You’re ready to watch TV!
Note: You may want to program your remote
control to control your TV now. Follow the
simple instructions on the back of your
remote to program it.
User’s Manual
7
Page 9

CHAPTER
Program Guide Overview
3
Welcome to your new Program Guide. The simple guide navigation makes it easier to find the
programming you want when you want it.
The starting point for everything in the Program Guide is the Main Menu, which is launched by
pressing the MENU button. From there, you can browse the TV listings, change your settings
or see the Customer Support options.
Once in the Program Guide, navigating your choices is as simple as pressing the UP, DOWN,
LEFT and RIGHT arrows.
You can get to TV listings without going through the Main Menu by pressing the GUIDE
shortcut key on the remote control. You can also browse channel listings without leaving the
show you are watching by pressing the INFO button on the remote control. An INFO Banner
will appear across the bottom of the screen that lets you find out what is playing on other
channels or later in the day. Simply press the UP, DOWN, LEFT and RIGHT arrows to navigate.
For more information on INFO Banners, see View Basic Program Information in “Chapter 4:
Getting Started.”
8
Page 10
MINI BOX
NAVIGATION
When in the Guide, use the UP or DOWN arrows or the CHANNEL UP or CHANNEL DOWN
buttons to scroll through the listings.
User’s Manual
Press the arrow keys on the remote to navigate through the Guide.
On the Settings and Customer Support menus, arrows in the yellow highlight bar let you know
that you can move up or down in the list, and right or left between cards. Use the UP and
DOWN arrows to scroll through lists and the RIGHT and LEFT arrows to move between cards.
Arrows on and around the highlight bar show when you can move up
and down as well as right and left between cards.
9
Page 11
MINI BOX
User’s Manual
An actionable item has a SELECT button at the end of the highlight bar. An icon or
When an item is actionable — such as changing a setting — the right end of the yellow highlight
bar will show a SEL button. Press SELECT to confirm, or press UP or DOWN arrows to move to
the next choice in the list. A black dot or icon appears at the right end of the yellow highlight
bar when SELECT is pressed, indicating your choice has been registered.
black dot indicates the selected choice.
10
Page 12
MINI BOX
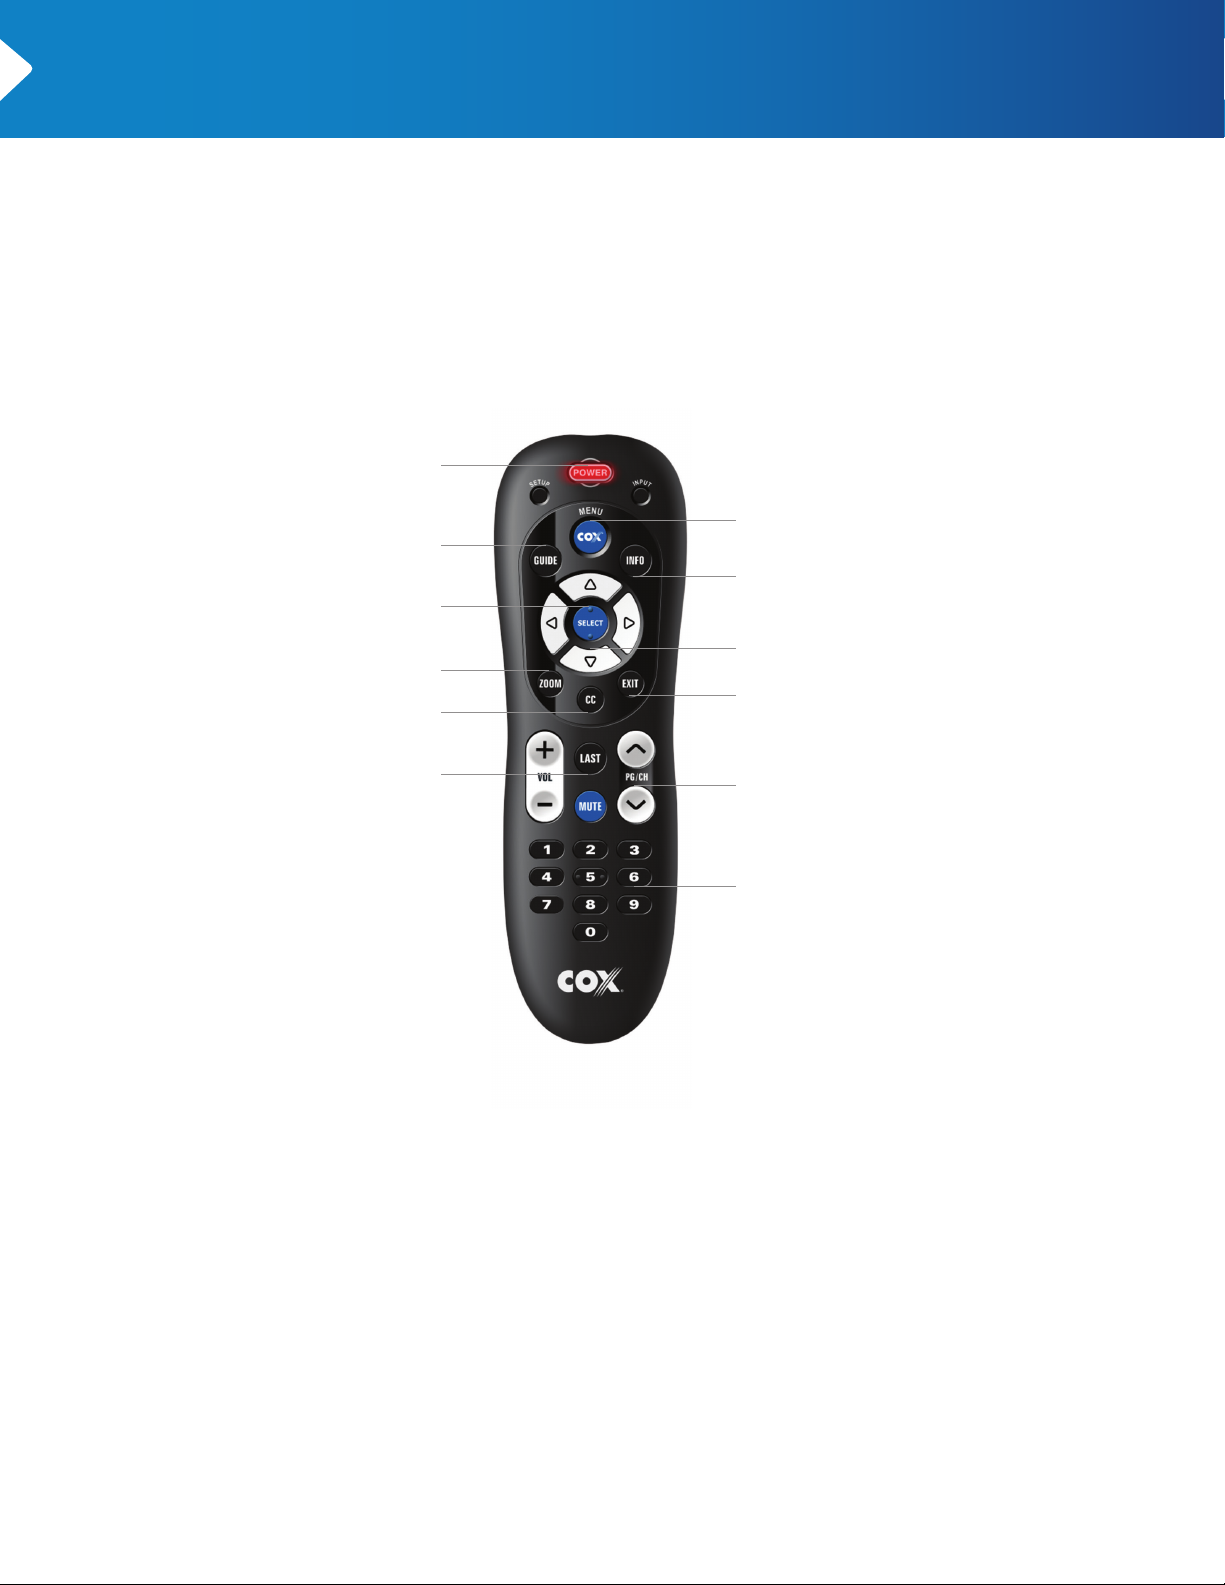
ABOUT THE REMOTE CONTROL
The image below shows the Cox remote and highlights the buttons that are discussed in this
manual. Your remote control may appear di erent, but button functions remain the same.
User’s Manual
Turn on or o the television
POWER
GUIDE
Open the guide with
one press
SELECT
Select the highlighted item
ZOOM
Zoom and stretch video
CC
Turn on or o closed captions
LAST
Returns to the last channel
or the previous screen
COX MENU
One-touch access to the Main Menu
INFO
Get more information about programs
ARROW KEYS
Moves the highlight
EXIT
Exit the current screen
PG/CH UP/DN
In the Guide, scroll up or down one
page. When viewing TV, move to
next or previous channel
NUMBER PAD
Enter channel numbers and PIN
directly with the remote control
11
Page 13

CHAPTER
4
This chapter discusses how to watch live television, learn more about the program you are
watching, change channels and open the Main Menu.
Getting Started
12
Page 14
MINI BOX
WATCH LIVE TELEVISION
With your television and mini box turned on, use the number (0–9) buttons to tune directly
to a channel. Press SELECT to go directly to the channel. Otherwise, the desired channel will
tune in a second or two.
CHANGE CHANNELS
Tune to dierent channels by pressing the CHANNEL UP or CHANNEL DOWN button. You can
also tune to dierent channels using the number (0–9) buttons.
VIEW BASIC PROGRAM INFORMATION
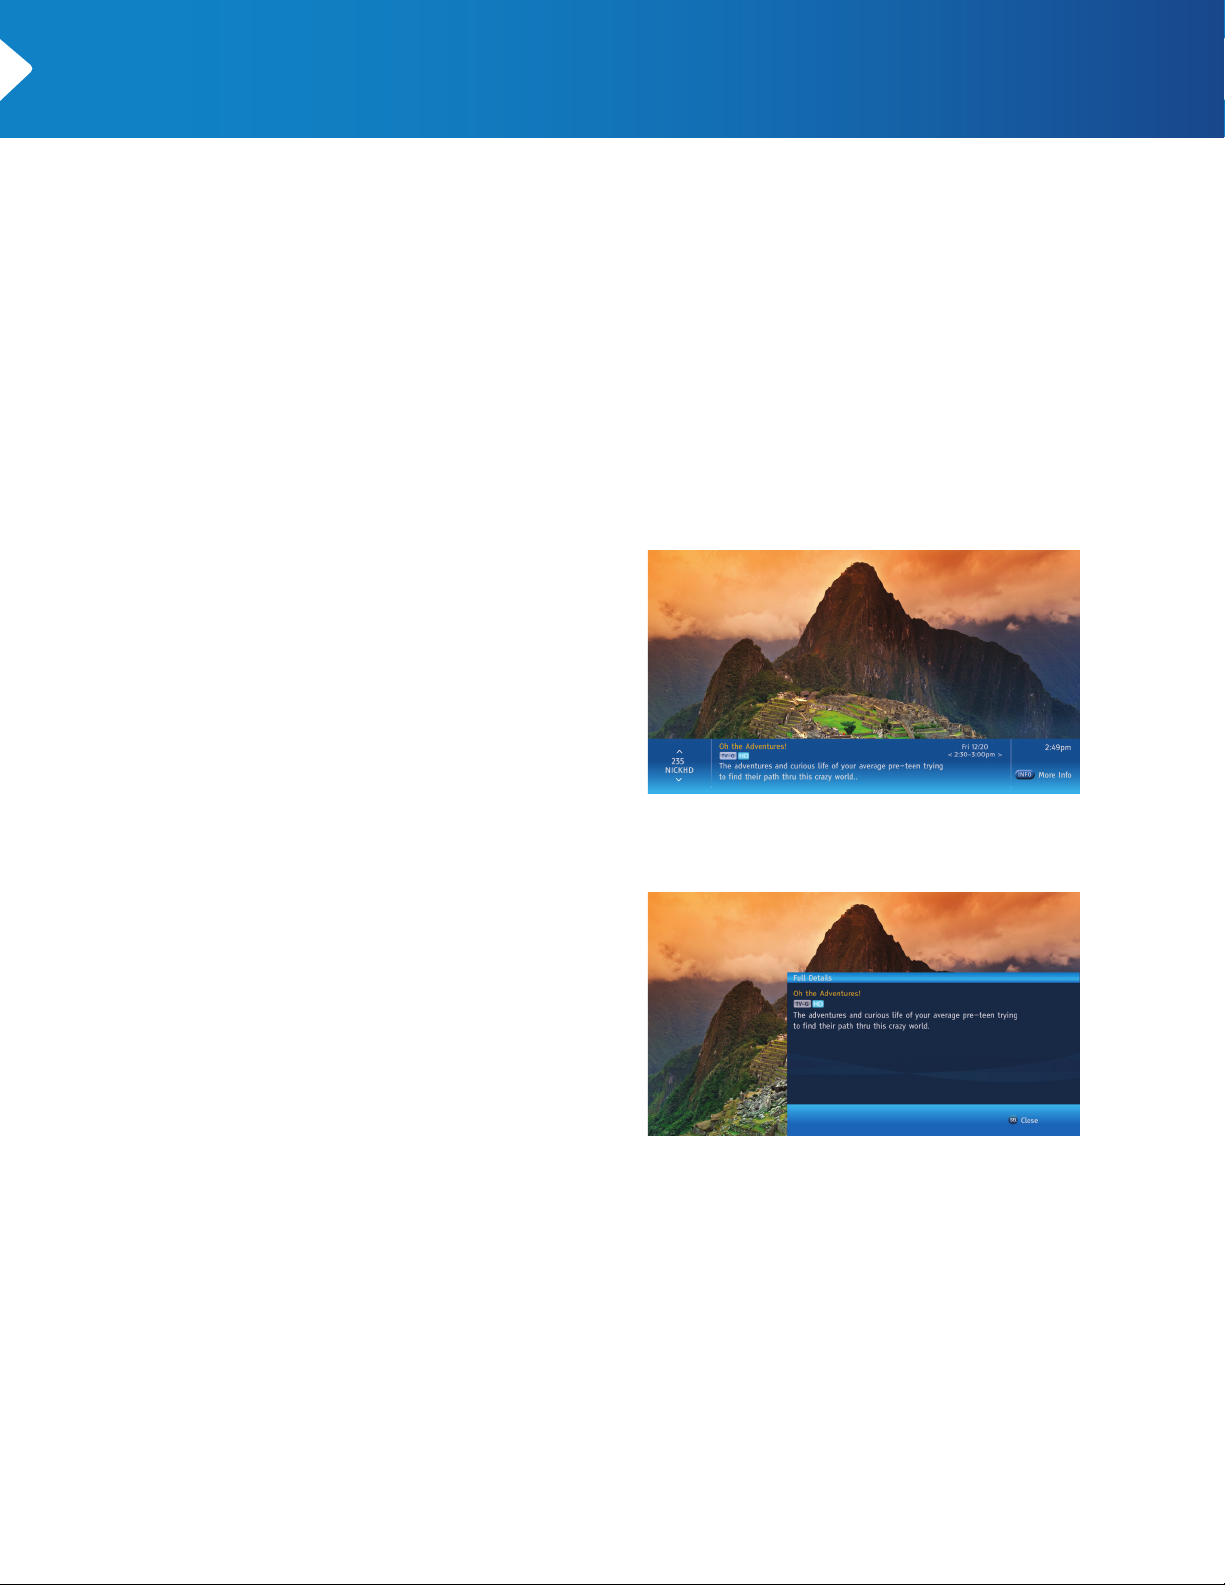
Press the INFO button once to see basic
information about the current program.
A Channel Banner appears at the bottom
of the screen with the program title, a brief
description of the program, its start and
end time, program rating information, channel
number, and time/date information. Program
Guide symbols such as the show’s rating
also display.
User’s Manual
Press the Info button once to see basic information about a show.
VIEW DETAILED PROGRAM
INFORMATION
You can see extended program information by
pressing the INFO button a second time.
Press the Info button a second time to see full details.
13
Page 15

MINI BOX
OPEN THE MAIN MENU
The Main Menu is the starting point for using
the Program Guide to find programs and set
personal preferences. There are several ways
to open the Main Menu:
• Press the MENU button.
• Press the RIGHT arrow.
User’s Manual
• Press the LEFT arrow.
Press EXIT, the MENU button again or the
LEFT arrow to close the Main Menu.
The Main Menu.
14
Page 16

CHAPTER
The Guide
5
The Program Guide is simple, consistent and easy to navigate, making it easier for you to find
and tune in to your favorite television shows.
This chapter introduces you to the Program Guide and discusses dierent ways to find the
channels and programs that interest you.
The main sections in this chapter are:
• Using the Guide
• INFO and Channel Banners
15
Page 17

MINI BOX
USING THE GUIDE
LAUNCH THE GUIDE
There are two ways to access the Guide.
The first is to simply press the GUIDE button.
It takes you directly to the main Guide display
that shows information about available
channels, programs and short program
descriptions.
The second way to open the Guide is through
the Main Menu. To access the Main Menu, press
the MENU button on your remote.
Once the Main Menu has appeared, use the UP
or DOWN arrows to move the highlight bar to
Guide and press the SELECT button or RIGHT arrow to call
up the Guide.
User’s Manual
Access the guide two ways: from the Main Menu
or by pressing the GUIDE button.
USE THE GUIDE TO FIND AVAILABLE PROGRAMS
You can navigate the programs in the Guide by using the remote’s arrow keys to move the
yellow highlight bar.
• Press the UP or DOWN arrow to move the highlight bar up or down from one channel to
another in the Guide.
• Press the CH UP or CH DOWN arrow to move the highlight bar up or down one screen in the
Guide.
To select a program, press the SELECT button. The Guide closes and your TV is tuned to
either the highlighted program or — if the program has not yet begun airing — to the channel
on which the program airs.
GET MORE INFORMATION
If you would like to see more information about a highlighted program, press the INFO
button on your remote. The Full Details dialogue box displays for the highlighted program. It
shows the program title, a brief description of the program, its start and end time, program
rating information, channel number, and time/date information. Program Guide symbols are
also displayed.
Press the SELECT button to close Full Details and return to the Program Guide.
16
Page 18

MINI BOX
WATCH A PROGRAM OR CHANNEL
You can simply press the SELECT button on a currently airing program to start watching it
immediately. If the highlighted program airs in the future, pressing SELECT will tune to the
channel on which the program will air.
SCROLL THROUGH THE GUIDE
To scroll through channels or programs, press the UP or DOWN arrow to move the highlight
bar up or down one item in the list.
Press the CH + or CH - arrows to move the highlight bar up or down one screen in the list.
EXIT THE GUIDE
User’s Manual
You can exit the Guide by either pressing EXIT to return to live TV or by using the LEFT arrow
to navigate back to the Main Menu.
ABOUT THE INFO BANNER
The Info Banner shows information about the program you are currently watching. You can
also browse listings and tune to dierent channels with the Info Banner.
INFO BANNER ON CHANNEL
CHANGE
The Info Banner automatically appears at
the bottom of your screen when you tune
to a channel. The Info Banner will show
the program title, a brief description of the
program, its start and end time, program
rating information, channel number, and
time/date information. Program Guide
symbols may also display.
The Info Banner gives you a short description of the program
you are watching. If you call up the Info Banner while watching
live TV, you can also navigate to a new channel or scroll through
upcoming programs on the current channel.
INFO BANNER WHILE WATCHING LIVE TELEVISION
You can call up the Info Banner in the middle of a program by pressing the INFO button. While
the Info Banner shows the same information as Channel Banners, the Info Banner also allows
you to view program listings while watching your program on the full screen.
Press the INFO button a second time to show the complete program description.
17
Page 19

MINI BOX
BROWSE PROGRAMS FROM THE INFO BANNER
Press the RIGHT and LEFT arrows to browse programs carried by the channel but shown at
dierent times of the day. Pressing SELECT will tune to the program displayed if it is currently
airing. If it is not, pressing SELECT will tune to the current program on that channel.
CHANGE CHANNELS FROM THE INFO BANNER
You can browse dierent channels using the UP and DOWN arrows. Press SELECT to tune the
television to the channel displayed on the Info Banner.
CLOSE THE INFO BANNER
After the Info Banner has been idle for a few seconds, it will disappear. You can also press the
EXIT button to close the Info Banner.
User’s Manual
SERVICE MESSAGES
You may occasionally see an on-screen message saying that a channel is temporarily
unavailable. Press the SELECT button on your remote control to acknowledge the message
and then press the GUIDE button to return to the Program Guide to select another channel.
You can also press LAST to return to the last channel you were watching.
18
Page 20

MINI BOX
BANNER ICONS
There are a number of dierent icons you may see on an Info or Channel Banner. This table
tells you what each one means.
ICON DESCRIPTION
User’s Manual
This program is in stereo.
This is a first-run program.
This program has been locked. See Parental
Controls for more information.
This program has been unlocked. See Parental
Controls for more information.
This program is available in high definition.
Television content ratings.
Movie ratings.
This is a live program.
Closed Captioning is available for
this program.
This program is available in Spanish via the
SAP setting.
19
Page 21

CHAPTER
Settings
6
The Settings Menu oers a variety of choices for customizing your TV viewing experience.
This chapter discusses important settings information including setting Parental Controls,
turning on Closed Captioning and changing other technical settings to better suit your needs.
You can launch the Settings Menu by opening the Main Menu using the MENU button or the
LEFT or RIGHT arrow. Use the UP or DOWN arrow to highlight Settings and then press SELECT.
The main sections in this chapter are:
• Parental Controls and Program Ratings
• Closed Captioning
• Language Options
• Power On Channel
• Banner Duration
• Audio and Video Settings
20
Page 22

MINI BOX
PARENTAL CONTROLS AND
PROGRAM RATINGS
Parental Controls let you control who watches
certain TV programs. You can lock programs
and channels so they cannot be viewed
without the Parental Control PIN.
User’s Manual
Parental Controls appears in the left screen when
you open the Settings Menu.
SET A PARENTAL CONTROL PIN
To set a Parental Control PIN, begin at the
Settings Menu:
1
Make sure Parental Controls is highlighted.
2
Press the RIGHT arrow or SELECT button to
open the Parental Controls Menu.
3
Use the UP or DOWN arrow to highlight Set
PIN, then press SELECT. A dialog box will ask
you to set up a Parental Control PIN.
4
Use the number keys (0–9) on the remote
control to set a four-digit PIN. The system will
then ask you to re-enter your PIN.
5
You see a confirmation message indicating that your PIN has been set. Press SELECT to clear
the message.
If you forget your PIN number, you can call Cox Customer Service to reset it.
Use the keypad (numbers 0–9) to set your Parental Control PIN.
EDIT PARENTAL CONTROL PIN
When a Parental Control PIN is in place, the action item will change from “Set PIN” to
“EditPIN.” To change your Parental Control PIN, begin at the Settings Menu:
1
Make sure Parental Controls is highlighted.
2
Press the RIGHT arrow or SELECT button to open the Parental Controls Menu.
3
Use the UP or DOWN arrow to highlight Edit PIN.
Press the RIGHT arrow or SELECT button to open the PIN dialog box.
4
21
Page 23

MINI BOX
Enter your current four-digit PIN.
5
Enter your new four-digit PIN.
6
Confirm your new four-digit PIN.
7
Press SELECT to close the confirmation message.
8
RESTRICT ACCESS TO PROGRAMMING
The Program Guide lets you restrict access to programming several dierent ways. Setting
Locking Status is the first step to turning on Parental Controls.
Begin at the Settings Menu:
1
Make sure Parental Controls is highlighted.
2
Press the RIGHT arrow or SELECT button to
open the Parental Controls Menu.
User’s Manual
Use the UP or DOWN arrow to move the
3
highlight bar to Parental Locks. Press the
RIGHT arrow or SELECT button to edit the
lock settings.
A new set of cards will appear, with the
highlight bar on Locking Status in the left card.
4
Press the SELECT button or RIGHT arrow
Use the RIGHT arrow to reach the Locking Status Options card
in the center of the screen. Select On to begin locking programs.
to shift the focus and highlight bar to the
center card.
5
Use the UP or DOWN arrow to highlight On
and press SELECT.
Whenever there is a request to change Locking Status or any of the Parental Controls, a
dialogue box will appear asking you to enter the four-digit PIN. It will happen only once,
triggered by the first change request. This allows you to easily change multiple settings
during any single visit to Parental Controls.
6
Use the LEFT arrow to return to Locking Status or press EXIT to close Settings.
TEMPORARILY UNLOCK
Parental Controls lets you open all locked channels for a short period of time. The Temporarily
O function, found under Locking Status, opens all locks as long as the remote control is active.
If the remote is inactive for five consecutive hours, then all locks are automatically restored.
22
Page 24

MINI BOX
LOCK CHANNELS
After turning on Parental Controls, you have a
number of dierent ways to restrict access to
programming, including by channel, by ratings
and by content advisories.
Begin at the Settings Menu:
1
Make sure Parental Controls is highlighted.
2
Press the RIGHT arrow or SELECT button to
open the Parental Controls Menu.
3
Use the UP or DOWN arrow to move the highlight bar to Parental Locks. Press the RIGHT
arrow or SELECT button to edit the lock settings.
4
Use the UP or DOWN arrow to highlight Lock Channels. Press the RIGHT arrow or SELECT
to choose this option.
User’s Manual
Use the UP or DOWN arrow to highlight
the channel and then press SELECT.
Use the UP and DOWN arrows to highlight channels that you want to lock. Alternatively, you
5
can simply enter the channel number using the number (0–9) keys. Press SELECT to lock the
highlighted channel.
6
Use the UP or DOWN arrow to select additional channels. Press SELECT to lock each
additional channel.
7
Press the LEFT arrow to return to the Parental Controls Menu or press EXIT to return to
live television.
LOCK RATINGS
To restrict access to movies and television
programs that carry a certain rating, begin at
the Settings Menu:
1
Make sure Parental Controls is highlighted.
2
Press the RIGHT arrow or SELECT button to
open the Parental Controls Menu.
3
Use the UP or DOWN arrow to move the
highlight bar to Parental Locks. Press the
RIGHT arrow or SELECT button to edit the
lock settings.
Use the UP or DOWN arrow to highlight the
rating and then press SELECT.
4
Use the UP or DOWN arrow to highlight Lock Ratings. Press the RIGHT arrow or SELECT button.
5
Use the UP and DOWN arrows to highlight specific ratings that you want to block. Press
SELECT to lock that option.
6
Use the UP or DOWN arrow to select additional ratings. Press SELECT to lock each additional rating.
7
Press the LEFT arrow to return to the Parental Controls Menu or press EXIT to return to
live television.
23
Page 25

MINI BOX
LOCK CONTENT ADVISORIES
To restrict access to movies and television programs that contain certain types of content,
begin at the Settings Menu:
Make sure Parental Controls is highlighted.
1
2
Press the RIGHT arrow or SELECT button to open the Parental Controls Menu.
3
Use the UP or DOWN arrow to move the highlight bar to Parental Locks. Press the
RIGHT arrow or SELECT button to edit the lock settings.
4
Use the UP or DOWN arrow to highlight Lock Content Advisories. Press the RIGHT arrow or
SELECT button.
5
Use the UP and DOWN arrows to highlight a content advisory category that you want to
block. Press the RIGHT arrow to select a specific type of content advisory you wish to lock.
6
Press SELECT to lock the highlighted content advisory.
User’s Manual
7
Use the UP or DOWN arrow to select additional content advisories. Press SELECT to lock each
additional one.
8
Press the LEFT arrow to return to the content advisory categories and select an additional
category you wish to restrict.
9
When you are finished selecting content advisories to lock, press the LEFT arrow to return to
the Parental Controls Menu or press EXIT to return to live television.
BLOCK TITLES
Choosing Block Titles will hide the title and
description of programs that have been
locked. This is useful because some titles
and descriptions may include suggestive or
inappropriate language.
To use Block Titles, begin at the Settings Menu:
Make sure Parental Controls is highlighted.
1
Use the UP or DOWN arrow to select a rating,
Press the RIGHT arrow or SELECT button to
2
open the Parental Controls Menu.
Use the UP or DOWN arrow to move the
3
highlight bar to Block Titles. Press the RIGHT
arrrow or SELECT button to edit these options.
and then press SELECT to confirm.
4
Use the UP and DOWN arrows to choose a program rating level and press SELECT to block
titles and descriptions for programs at that rating and higher. Alternatively, highlight All
Locked Programs to block titles of all locked programs, then press SELECT.
5
Press the LEFT arrow twice to return to the Parental Controls Menu or press EXIT to return to
live television.
24
Page 26

MINI BOX
CLOSED CAPTIONING
The Program Guide lets you adjust Closed Captioning settings. You can turn Closed
Captioning on or o, and you can customize
how your Closed Captions look.
SET CLOSED CAPTIONING STATUS
To turn Closed Captioning on, begin at the
Settings Menu:
1
With the highlight bar on Closed Captioning,
press the RIGHT arrow or SELECT to move the
highlight bar to the options in the center card.
Use the UP or DOWN arrow to highlight Turn
2
on CC. Press SELECT.
User’s Manual
Press SELECT to turn on Closed Captioning.
Closed Captions immediately display. At this point, you can adjust the Closed Captioning
options.
3
Press the LEFT arrow to return to the Settings Menu or press EXIT to return to live television.
CLOSED CAPTIONING OPTIONS
Closed Captioning options are set from the CC
Options Menu. To access the CC Options Menu:
With the highlight bar on Closed Captioning,
1
press the RIGHT arrow or SELECT to move the
highlight bar to the options in the center card.
Use the UP or DOWN arrow to highlight
2
CC Options. Press SELECT. (Note: Closed
Captioning must be turned on in order to
access CC Options.)
Once Closed Captioning is turned on, press SELECT
to access the CC Options Menu.
25
Page 27

MINI BOX
SET ANALOG SERVICE
To choose a Closed Captioning service
for analog stations, begin at the Closed
Captioning Menu:
1
Use the UP or DOWN arrow to highlight
Analog Service. Press the RIGHT arrow or
SELECT button to move to the options in the
center card.
User’s Manual
Use the UP or DOWN arrow to highlight the
2
appropriate option. Press SELECT to confirm
your choice.
Press the LEFT arrow to return to the Closed
3
Captioning Menu or press EXIT to return to
live television.
SET DIGITAL SERVICE
To choose a Closed Captioning service for
digital stations, begin at the Closed Captioning
Menu:
Use the UP or DOWN arrow to highlight Digital
1
Service. Press the RIGHT arrow or SELECT
button to move to the options in the center card.
2
Use the UP or DOWN arrow to highlight the
appropriate option. Press SELECT to confirm
your choice.
3
Press the LEFT arrow to return to the Closed
Captioning Menu or press EXIT to return to
live television.
Use the UP or DOWN arrow to highlight Analog Service
and then press SELECT to move the highlight bar
to the options list.
Use the UP or DOWN arrow to highlight Digital Service
and then press SELECT to move the highlight bar
to the options list.
SET TEXT STYLE
To change the appearance of Closed
Captioning text style for digital programming,
begin at the Closed Captioning Menu:
1
Use the UP or DOWN arrow to highlight Text
Style. Press the RIGHT arrow or SELECT button
to move to the options in the center card.
2
Use the UP or DOWN arrow to highlight the
appropriate option. Press SELECT to confirm
your choice.
Press the LEFT arrow to return to the Closed
3
Captioning Menu or press EXIT to return to
live television.
Use the UP or DOWN arrow to highlight Text Style
and then press SELECT to move the highlight bar
to the options list.
26
Page 28

MINI BOX
SET TEXT SIZE
To change the appearance of Closed
Captioning text size for digital programming,
begin at the Closed Captioning Menu:
1
Use the UP or DOWN arrow to highlight Text
Size. Press the RIGHT arrow or SELECT button
to move to the options in the center card.
Use the UP or DOWN arrow to highlight the
2
appropriate option. Press SELECT to confirm
your choice.
3
Press the LEFT arrow to return to the Closed
Captioning Menu or press EXIT to return to
live television.
User’s Manual
Use the UP or DOWN arrow to highlight Text Size and then press
SELECT to move the highlight bar to the options list.
SET TEXT COLOR
To change the appearance of Closed
Captioning text color for digital programming,
begin at the Closed Captioning Menu:
Use the UP or DOWN arrow to highlight Text
1
Color. Press the RIGHT arrow or SELECT button
to move to the options in the center card.
2
Use the UP or DOWN arrow to highlight the
appropriate option. Press SELECT to confirm
your choice.
3
Press the LEFT arrow to return to the Closed
Captioning Menu or press EXIT to return to
live television.
SET TEXT OPACITY
To change the opacity of the Closed
Captioning text for digital programming, begin
at the Closed Captioning Menu:
Use the UP or DOWN arrow to highlight Text Color and then
press SELECT to move the highlight bar to the options list.
1
Use the UP or DOWN arrow to highlight Text
Opacity. Press the RIGHT arrow or SELECT
button to move to the options in the center card.
Use the UP or DOWN arrow to highlight the
2
appropriate option. Press SELECT to confirm
your choice.
Press the LEFT arrow to return to the Closed
3
Captioning Menu or press EXIT to return to
live television.
Use the UP or DOWN arrow to highlight Text Opacity and then
press SELECT to move the highlight bar to the options list.
27
Page 29

MINI BOX
SET TEXT CHARACTER EDGE
To change the character edge attributes such as
no edge attribute, raised edges, depressed edges,
uniform edges, and drop-shadowed edges of the
Closed Captioning text for digital programming,
begin at the Closed Captioning Menu:
Use the UP or DOWN arrow to highlight Text
1
Character Edge. Press the RIGHT arrow or
SELECT button to move to the options in the
center card.
2
Use the UP or DOWN arrow to highlight the
appropriate option. Press SELECT to confirm
your choice.
Press the LEFT arrow to return to the Closed Captioning Menu or press EXIT to return to live
3
television.
User’s Manual
Use the UP or DOWN arrow to highlight Text Character Edge and
then press SELECT to move the highlight bar to the options list.
SET BACKGROUND COLOR
To change the color of the Closed Captioning
background for digital programming, begin at
the Closed Captioning Menu:
1
Use the UP or DOWN arrow to highlight
Background Color. Press the RIGHT arrow or
SELECT button to move to the options in the
center card.
2
Use the UP or DOWN arrow to highlight the
appropriate option. Press SELECT to confirm
your choice.
3
Press the LEFT arrow to return to the Closed
Captioning Menu or press EXIT to return to
live television.
Use the UP or DOWN arrow to highlight Background Color and
then press SELECT to move the highlight bar to the options list.
28
Page 30

MINI BOX
SET BACKGROUND OPACITY
To change the opacity for the Closed Captioning
background for digital programming, begin at
the Closed Captioning Menu:
1
Use the UP or DOWN arrow to highlight
Background Opacity. Press the RIGHT arrow or
SELECT button to move to the options in the
center card.
User’s Manual
2
Use the UP or DOWN arrow to highlight the
appropriate option. Press SELECT to confirm
your choice.
3
Press the LEFT arrow to return to the Closed
Captioning Menu or press EXIT to return to live
television.
SET CLOSED CAPTIONING
WINDOW COLOR
To change the color of the Closed Captioning
window for digital programming, begin at the
Closed Captioning Menu:
Use the UP or DOWN arrow to highlight
1
Closed Captioning Window Color. Press the
RIGHT arrow or SELECT button to move to the
options in the center card.
2
Use the UP or DOWN arrow to highlight the
appropriate option. Press SELECT to confirm
your choice.
Use the UP or DOWN arrow to highlight Background Opacity and
then press SELECT to move the highlight bar to the options list.
Use the UP or DOWN arrow to highlight Caption Window Color and
then press SELECT to move the highlight bar to the options list.
3
Press the LEFT arrow to return to the
Closed Captioning Menu or press EXIT to
return to live television.
29
Page 31

MINI BOX
SET CLOSED CAPTIONING
WINDOW OPACITY
To change the opacity of the Closed
Captioning window for digital programming,
begin at the Closed Captioning Menu:
Use the UP or DOWN arrow to highlight
1
Closed Captioning Window Opacity. Press the
RIGHT arrow or SELECT button to move to the
options in the center card.
2
Use the UP or DOWN arrow to highlight the
appropriate option. Press SELECT to confirm
your choice.
3
Press the LEFT arrow to return to the
Closed Captioning Menu or press EXIT to
return to live television.
User’s Manual
Use the UP or DOWN arrow to highlight Caption Window
Opacity and then press SELECT to move the highlight
bar to the options list.
LANGUAGE OPTIONS
You can set two dierent language options for
the Guide:
• You can set the Audio Language to listen to
programs with either the Primary (English) or
Secondary Audio Programming (if available).
• You can choose to view the Program Guide in
either English or Spanish.
Select Language Options to change the Audio Language
or the Guide Language.
To access the Language Options Menu, begin
at the Settings Menu:
1
With the highlight bar on Language Options,
press the RIGHT arrow or SELECT to move the
highlight bar to the options in the center card.
SET AUDIO LANGUAGE
This option turns on a secondary audio track for programs that carry the SAP signal.
When SAP is available, the program description in the Guide displays the SAP icon.
To adjust this setting, begin at the Language Options Menu:
1
With the highlight bar on Audio Language, press the RIGHT arrow or SELECT button to
view the options for Audio Language.
2
Use the UP or DOWN arrow to make the appropriate choice. Press SELECT.
3
Press the LEFT arrow to return to the Language Options Menu or press EXIT to return to
live television.
30
Page 32

MINI BOX
SET THE GUIDE LANGUAGE
Begin at the Language Options Menu:
With the highlight bar on Guide Language,
1
press the RIGHT arrow or SELECT button to
view the options for Guide Language.
Use the UP or DOWN arrow to highlight the
2
appropriate option. Press SELECT.
Press the LEFT arrow to return to the
3
Language Options Menu or press EXIT to
return to live television.
BANNER DURATION
You can change the amount of time that Info Banners are displayed.
User’s Manual
Guide Language allows you to change the language of your
Guide from English to Spanish and vice versa.
To edit Banner duration, begin at the Settings Menu:
1
Use the UP or DOWN arrow to highlight Banner Duration. Press the RIGHT arrow or SELECT
button to move the highlight to the center card.
2
Use the UP or DOWN arrow to highlight your choice. You can choose short, medium or long
banners. Press SELECT.
3
Press the LEFT arrow to return to the Settings Menu or press EXIT to return to live television.
POWER ON CHANNEL
The Program Guide lets you decide which channel will appear each time you turn on your TV.
To set the Power On Channel, begin at the Settings Menu:
1
Use the UP or DOWN arrow to highlight Power On Channel. Press the RIGHT arrow or SELECT
button to move the highlight to the channel list in the center card.
Use the UP and DOWN arrows to highlight a channel. Alternatively, you can simply enter the
2
channel number using the number (0–9) keys. Press SELECT to confirm.
If you wish to manually enter a channel number for the Power On Channel, select Enter
3
Channel and press SELECT. Enter the channel number and press SELECT to set the channel.
4
Press the LEFT arrow to return to the Settings Menu or press EXIT to return to live television.
31
Page 33

MINI BOX
AUDIO & VIDEO
The Program Guide lets you adjust the Audio & Video settings to provide the best sound and
picture quality for your television.
SET VOLUME CONTROL
If you have programmed your mini box
remote so that it controls the volume levels
by adjusting your TV’s volume, then set
this control to Fixed. This setting is also
appropriate if you control your audio through a
stereo or surround-sound receiver.
If you have not programmed your remote
control to control your TV’s volume and
instead wish to use the remote to control
volume via the mini box, set Volume Control to
Variable. This is helpful if you have an older TV
that does not have a remote.
User’s Manual
Use the UP or DOWN arrow to highlight Audio & Video in the
card on the left. Press SELECT to open the Audio & Video Menu.
Begin at the Settings Menu:
Use the UP or DOWN arrows to highlight
1
Audio & Video. Press the RIGHT arrow or
SELECT button to highlight Volume Control
in the center card.
2
Press the RIGHT arrow or SELECT button to
display the Volume Control options.
3
Press the SELECT button to change the
Volume Control option.
4
Press the LEFT arrow to return to the
Audio & Video menu or press EXIT to
return to live television.
Press SELECT to change the Volume Level.
32
Page 34

MINI BOX
SET VIDEO OUTPUT FORMAT
You can change the video output format to ensure you get the highest-quality picture that
your television can display. Please refer to the manufacturer’s information for your television
to get the proper settings. The resolution options are:
• 1080i Wide
• 720p Wide
• 480p Wide
• 480i Standard
To adjust these settings, begin at the
Settings Menu:
1
Use the UP or DOWN arrow to highlight
Audio & Video. Press the RIGHT arrow or
SELECT button to move to the center card.
User’s Manual
2
Use the UP or DOWN arrow to highlight Video
Output Format. Press the SELECT button to
open the Video Output Format dialogue box.
The highlight bar will be on Resolution.
3
Use the LEFT or RIGHT arrow to scroll through
the Resolution options. Once you have made
your choice, press the SELECT button to select
the resolution.
4
Press the SELECT button a second time to
confirm the changes.
5
Press EXIT to return to live television.
Use the UP or DOWN arrow to highlight Video Output Format.
Press SELECT.
Press the LEFT or RIGHT arrow to change the video resolution
setting and then press the SELECT button.
33
Page 35

MINI BOX
RESTORE AUDIO & VIDEO DEFAULTS
You can easily change your Audio & Video
settings back to the default values.
Begin at the Settings Menu:
Use the UP or DOWN arrow to highlight
1
Audio & Video. Press the RIGHT arrow or
SELECT button to move to the center card.
2
Use the DOWN arrow to highlight Restore
Defaults. Press SELECT and a confirmation
dialogue displays.
3
Press the SELECT button to restore the
defaults for Audio & Video settings or press
EXIT to cancel and return to the menu.
4
Press EXIT to return to live television.
User’s Manual
Use the UP or DOWN arrow to highlight Restore Defaults.
Press SELECT.
Press SELECT to restore Audio & Video defaults.
34
Page 36

CHAPTER
Customer Support
7
The Program Guide oers a number of Customer Support tools. This chapter discusses the
dierent support services available and how to access them.
35
Page 37

MINI BOX
ACCESS CUSTOMER SUPPORT
Customer Support is found under the Main Menu. To open the Customer Support Menu:
Open the Main Menu using the MENU button on your remote control.
1
2
Use the UP or DOWN arrow to move the highlight bar to Customer Support. Press SELECT or
the RIGHT arrow to open the Customer Service Menu.
TECHNICAL SUPPORT
The Technical Support section of the Customer
Support Menu provides options to view your
mini box information, run a Self-Test on your
mini box or perform a Channel Scan to ensure
your mini box is receiving all the channels you
can view on the mini box.
User’s Manual
Mini Box Information
Occasionally, it will be necessary to look up
details about your mini box. To do this, begin
at the Technical Support Menu.
Use the RIGHT arrow to highlight the Mini Box
1
Information Menu option in the center card.
2
Press SELECT or the RIGHT arrow. A new screen will appear with the serial number of the mini
box and other information.
3
Use the LEFT arrow to return to the Technical Support Menu.
36
Page 38

MINI BOX
SELF-TEST
If you experience issues with your mini box,
you may be asked by the customer service
representative to run the Self-Test. The SelfTest checks for any network or connectivity
issues and reports them on the screen. The
Self-Test also checks to see whether any
software updates are available for the mini box
and installs the software update if one is.
User’s Manual
To run the Self-Test, begin at the Technical
Support Menu.
Use the RIGHT arrow to move the highlight
1
to Self-Test.
Press SELECT to run the Self-Test. A new
2
screen will appear that will display the status
of dierent tests that will be run.
If any problems are found during the Self-Test,
a message appears alerting you about the
problem.
If a software update is available for the mini
box, the update will install. The mini box
reboots automatically after installation is
complete.
If the Self-Test does not find any problems or
3
if there are no software updates needed, a
Confirmation Message displays.
Press SELECT to close the Confirmation
4
Message and return to live TV.
The mini box Self-Test is a diagnostic test that identifies any
network or connectivity issues with your receiver. Highlight
mini box Self-Test and press SELECT to run this test.
The Self-Test screen displays the progress of the test.
If a software update is available, the update will install,
and a progress bar indicates how much of the
update is complete.
37
Page 39

MINI BOX
CHANNEL SCAN
You can run a Channel Scan at any time
to have the mini box check to ensure all
appropriate channels are being received.
To run the Channel Scan, begin at the
Customer Support Menu:
1
Press the RIGHT arrow to move the highlight
to Channel Scan.
2
Press SELECT to begin the Channel Scan.
Live TV will not display during a Channel Scan. Instead you will see a message indicating the
Channel Scan is in process.
When the Channel Scan is complete, live TV displays and a message appears on the screen
indicating the Channel Scan is complete.
User’s Manual
A message displays on-screen during the Channel Scan.
3
Press SELECT to close the message and continue watching TV.
VIEW THE USE AGREEMENT
You may review your Use Agreement with Cox
at any time.
To do this, begin at the Customer Support Menu:
Use the UP or DOWN arrow to highlight Use
1
Agreement and press SELECT or the RIGHT
arrow. The agreement will appear in a dialogue
box.
The Use Agreement screen includes details on your cable
2
Use the DOWN arrow to scroll through the
information.
3
Press the LEFT arrow to return to the Customer
Support Menu options.
VIEW THE COX PRIVACY POLICY
You may review the Cox Privacy Policy at any time.
service agreement with Cox.
To do this, begin at the Customer Support Menu:
Use the UP or DOWN arrow to highlight
1
Privacy and press SELECT or the RIGHT arrow.
The agreement will appear in a dialogue box.
2
Use the DOWN arrow to scroll through the
information.
3
Press the LEFT arrow to return to the
Customer Support Menu options.
This screen details the Cox Privacy Policy.
38
Page 40

CHAPTER
Error Messages
8
Occasionally, you may receive an error message. Sometimes the fix is as simple as waiting
a few minutes before trying again. Other times, you may be required to call your local Cox
Customer Support representative. The table on the following pages includes the dierent
error messages you may receive. If you are required to call Cox Customer Support, please
make a note of the error code as it will help the representative identify the problem faster.
39
Page 41

MINI BOX
Error Code Issue You Should
User’s Manual
3.1.3
2.1.1
2.2.1 (Activation)
2.1.2 (Boot)
2.2.2 (Activation)
2.1.3 (Boot)
2.2.3 (Activation)
A subscription is required to view this program. Please
contact Cox Customer Support at (866) 961-0416 to
subscribe. Reference 3.1.3 when calling.
Sorry, we've detected an interruption in your service. Check
for loose connections from the wall to the mini box to make
sure they are secure. If the problem persists, please contact
Cox Customer Support at (866) 961-1207 to restore service.
Reference 2.1.1 when calling.
The Connectivity Test detected a problem with your mini
box. Please contact Cox Customer Support at (866) 961-1207
for help in solving this problem. Reference 2.2.1 when calling.
Sorry, we've detected an interruption in your service.
Check for loose connections from the wall to the mini
box to make sure they are secure. If the problem persists,
please contact Cox Customer Support at (866) 961-1207
to restore service. Reference 2.1.2 when calling.
Sorry, we've detected an interruption in your service.
Check for loose connections from the wall to the mini
box to make sure they are secure. If the problem persists,
please contact Cox Customer Support at (866) 961-1207
to restore service. Reference 2.2.2 when calling.
Sorry, we've detected an interruption in your service.
Check for loose connections from the wall to the mini
box to make sure they are secure. If the problem persists,
please contact Cox Customer Support at (866) 961-1207
to restore service. Reference 2.1.3 when calling.
Sorry, we’ve detected an interruption in your service.
Check for loose connections from the wall to the mini
box to make sure they are secure. If the problem persists,
please contact Cox Customer Support at (866) 961-1207
to restore service. Reference 2.2.3 when calling.
Contact Cox Customer Support
for assistance.
Check the cable from the wall
to the mini box and ensure
that both ends are connected
securely. If they are connected
securely and the problem
persists, contact Cox Customer
Support for assistance.
Contact Cox Customer Support
for assistance.
Check the cable from the wall
to the mini box and ensure
that both ends are connected
securely. If they are connected
securely and the problem
persists, contact Cox Customer
Support for assistance.
Check the cable from the wall
to the mini box and ensure
that both ends are connected
securely. If they are connected
securely and the problem
persists, contact Cox Customer
Support for assistance.
Check the cable from the wall
to the mini box and ensure
that both ends are connected
securely. If they are connected
securely and the problem
persists, contact Cox Customer
Support for assistance.
Check the cable from the wall
to the mini box and ensure
that both ends are connected
securely. If they are connected
securely and the problem
persists, contact Cox Customer
Support for assistance.
2.2.4 (Activation)
2.2.5 (Activation)
Please activate your mini box. You can activate your
mini box online at http://www.cox.com/support or call
(866) 961-0416 to begin activation. Reference 2.2.4
when calling.
There is a problem with activating your mini box. Please
contact Cox Customer Support at (866) 961-1207 for help
in solving this problem. Reference 2.2.5 when calling.
Activate your mini box over
the Internet at http://www.cox.
com or contact Cox Customer
Support for assistance.
Contact Cox Customer Support
for assistance.
40
Page 42

MINI BOX
Error Code Issue You Should
2.1.4
3.1.2
3.1.3
3.1.4
3.1.5
3.1.6
User’s Manual
Sorry, we’ve detected an interruption in your service.
Check for loose connections from the wall to the mini
box to make sure they are secure. If the problem persists,
please contact Cox Customer Support at (866) 961-1207
to restore service. Reference 2.1.4 when calling.
Sorry, there is currently no TV signal detected on this
channel. The channel may be temporarily o air. Please try
again later. If the problem continues, please contact Cox
Customer Support at (866) 961-1207. Reference 3.1.2 when
calling. Alternatively, you can press the GUIDE button on
your remote control to watch programs on other channels.
Sorry, there is currently no TV signal detected on this
channel. The channel may be temporarily o air. Please try
again later. If the problem continues, please contact Cox
Customer Support at (866) 961-1207. Reference 3.1.3 when
calling. Alternatively, you can press the GUIDE button on
your remote control to watch programs on other channels.
Sorry, there is currently no TV signal detected on this
channel. The channel may be temporarily o air. Please try
again later. If the problem continues, please contact Cox
Customer Support at (866) 961-1207. Reference 3.1.4 when
calling. Alternatively, you can press the GUIDE button on
your remote control to watch programs on other channels.
Sorry, there is currently no TV signal detected on this
channel. The channel may be temporarily o air. Please try
again later. If the problem continues, please contact Cox
Customer Support at (866) 961-1207. Reference 3.1.5 when
calling. Alternatively, you can press the GUIDE button on
your remote control to watch programs on other channels.
Sorry, there is currently no TV signal detected on this
channel. The channel may be temporarily o air. Please try
again later. If the problem continues, please contact Cox
Customer Support at (866) 961-1207. Reference 3.1.6 when
calling. Alternatively, you can press the GUIDE button on
your remote control to watch programs on other channels.
Check the cable from the wall
to the mini box and ensure
that both ends are connected
securely. If they are connected
securely and the problem
persists, contact Cox Customer
Support for assistance.
Contact Cox Customer Support
for assistance.
Contact Cox Customer Support
for assistance.
Contact Cox Customer Support
for assistance.
Contact Cox Customer Support
for assistance.
Contact Cox Customer Support
for assistance.
4.1.1
5.1.1
5.1.2
Your mini box software update was unable to be installed
correctly. Your mini box will now reboot. If you continue to
have problems after your mini box reboot, please contact
Cox Customer Support at (866) 961-1207 for assistance.
Reference 4.1.1 when calling.
The mini box check detected a problem. Video cannot
be displayed at this time. Please contact Cox Customer
Support at (866) 961-1207 for assistance. Reference 5.1.1
when calling.
The mini box check detected a problem. Video cannot be
displayed at this time. Please contact Cox Customer
Support at (866) 961-1207 for assistance. Reference 5.1.2
when calling.
Contact Cox Customer Support
for assistance.
Contact Cox Customer Support
for assistance.
Contact Cox Customer Support
for assistance.
41
Page 43

MINI BOX
Error Code Issue You Should
5.1.3
5.1.4
5.1.5
User’s Manual
The mini box check detected a problem. Video cannot
be displayed at this time. Please contact Cox Customer
Support at (866) 961-1207 for assistance. Reference
5.1.3 when calling.
The mini box check detected a problem. Video cannot
be displayed at this time. Please contact Cox Customer
Support at (866) 961-1207 for assistance. Reference
5.1.4 when calling.
The mini box check detected a problem. Video cannot
be displayed at this time. Please contact Cox Customer
Support at (866) 961-1207 for assistance. Reference
5.1.5 when calling.
Contact Cox Customer Support
for assistance.
Contact Cox Customer Support
for assistance.
Contact Cox Customer Support
for assistance.
5.1.6
5.1.7
5.1.8
5.1.9
5.1.10
The mini box check detected a problem. Video cannot
be displayed at this time. Please contact Cox Customer
Support at (866) 961-1207 for assistance. Reference
5.1.6 when calling.
The mini box check detected a problem. Video cannot
be displayed at this time. Please contact Cox Customer
Support at (866) 961-1207 for assistance. Reference
5.1.7 when calling.
The mini box check detected a problem. Video cannot
be displayed at this time. Please contact Cox Customer
Support at (866) 961-1207 for assistance. Reference
5.1.8 when calling.
The mini box check detected a problem. Video cannot
be displayed at this time. Please contact Cox Customer
Support at (866) 961-1207 for assistance. Reference
5.1.9 when calling.
The mini box check detected a problem. Video cannot
be displayed at this time. Please contact Cox Customer
Support at (866) 961-1207 for assistance. Reference
5.1.10 when calling.
Contact Cox Customer Support
for assistance.
Contact Cox Customer Support
for assistance.
Contact Cox Customer Support
for assistance.
Contact Cox Customer Support
for assistance.
Contact Cox Customer Support
for assistance.
5.1.11
The mini box check detected a problem. Video cannot
be displayed at this time. Please contact Cox Customer
Support at (866) 961-1207 for assistance. Reference
5.1.11 when calling.
Contact Cox Customer Support
for assistance.
42
Page 44

MINI BOX
Index
AC outlet 120
User’s Manual
Edit On DEMAND. SeeOn DEMAND
Analog Output 113
Analog Service 104
Audio Language 114
Background Color 106
Background Opacity 107
Block Titles 95
Browse Cast & Crew 27
Browse Movie Posters. SeeOn Demand
Browse On DEMAND. SeeOn DEMAND
Browse Related 8, 22, 27, 28, 29, 55, 101
Caller ID to the TV 71, 72
Call Log 71
Cancel a Series Recording 60
Change Recording Options 56
Channel Banner 17, 19, 22, 30, 31, 48, 102
Closed Captioning 103
Cox Customer Support 36, 91, 129
Cox Privacy Policy 82
Current User. SeeUser
Customer Support 80, 82
Default View 100
Delete Recordings 55
Delete Series Recordings 60
Delete User. SeeUser
Digital Output 114
Digital Service 103, 104
Digital Video Recorder 40
Dynamic Range 115
Edit Banners. SeeInfo Banners, Channel
Banners
Edit Recording Options 56
Edit Recording Options (series) 58
Edit User. SeeUser
Favorite channels 8
Favorite Channels 8, 16, 21, 23, 38, 87, 88,
98, 99, 100
Get More Information 25
Grid View 8, 23, 24, 100
Guide Display 23, 114
Guide Language 108
Guide Text Size 109
Guide Views 8, 23
Info Banners 8, 30, 31, 32
Info Button 8, 19, 30
Instant Replay 38, 40, 41, 55, 65, 79, 124
Interactive Services 70, 71, 72, 135
Live Call Forwarding 71
Lock Programs 91
Lock Purchases 96
Lock Services 97
Lock Users. SeeUsers
Main Menu 8, 11, 16, 18, 20, 23, 24, 26, 87
Manual Recordings 46, 47, 53
New User. SeeUser
On DEMAND 8, 16, 20, 22, 31, 33, 34, 35, 36,
37, 38, 39, 67, 68, 69, 78, 79, 83, 84, 91, 92,
96, 97, 126, 128, 129, 133, 134, 137
On-Screen Keyboard 83, 85, 88, 103
Parental Control PIN. SeeParental Controls
Parental Controls 17, 31, 34, 36, 73, 87, 91, 92
43
Page 45

MINI BOX
User’s Manual
Pay-Per-View 8, 83, 92, 96, 126, 127, 128, 131,
136
Phone Tools 70, 71
Power O 118, 119
Power On 99, 117, 118
Program Ratings 87, 91
Purchase On DEMAND. SeeOn DEMAND
Purchase Pay-Per-View. SeePay-Per-View
Purchase PIN 34, 36, 91, 92, 96, 127, 131
Recently Viewed Programs.
SeeOn DEMAND
Recording Alerts 49
Record Programs 40, 43, 45, 58, 65
Remote Control Keyboard 83, 85, 103
Save Searches 86
Scan a Live Program 41
Turbo Scroll. SeeScroll
Universal Search. SeeSearch
Use Agreement 82
User 89
Users 8, 16, 21, 68, 87, 88, 89, 90, 91, 97, 102,
126
Volume 113
Watch Another Episode. SeeBrowse Related
Watch a Program 25
Watch A Program 9, 52
Watch Preview 36, 37
Watch Recorded Programs 40, 62
Whole Home DVR 44, 46, 47, 51, 57, 60, 62,
63, 64, 65, 66, 81, 120, 121, 123, 129, 130, 137,
138
Zone Channels 70, 72, 73, 100, 129
Scan a Recorded Program 54
Scroll 9, 12, 26, 82, 116
Search 8, 15, 20, 27, 28, 37, 50, 55, 65, 75, 78,
83, 84, 85, 86, 101, 103, 128
Search On DEMAND. SeeOn DEMAND
Search PPV Content. SeeSearch, Pay-Per-View
See Full Details 37, 55
Serial Number 80, 123
Series Manager 47, 50, 58, 59, 64
Series Priority 59, 60
Set Guide Date 24
Skipped Channels 31, 99, 100
Subscription Channels 36
Text Color 105
Text Size 105, 109
Timer 117, 118, 119, 128
44
 Loading...