

Page 1

USER GUIDE
For Addional Support: hp://www.cox.com/homelifesupport
Page 2

Contents
CONTENTS
Components and Operation
Touchscreen Control Panel
About the Touchscreen Display
Home Screen
Security Status Header
System and Zone Trouble Header
Arming and Disarming the System
Arming the System
Bypassing Zones .................................................................................................... 10
Disarming the System
Panic Alarms
Dashboard View
Event History
Passcodes and Passwords ........................................................................................ 12
Central Station Passcode ....................................................................................... 12
Keypad Codes ........................................................................................................ 13
.......................................................................................................... 8
......................................................................................................... 11
.................................................................................................... 12
......................................................................................................... 12
.......................................................................................... 7
.......................................................................................... 8
................................................................................ 8
........................................................................................... 8
......................................................................... 9
.......................................................................... 10
................................................................................................ 10
........................................................................................... 11
Touchscreen Settings
Touchscreen Brightness ......................................................................................... 14
Automatic Screen Dimming .................................................................................... 14
Screen Nighttime Settings ..................................................................................... 15
Screensaver Configuration ..................................................................................... 15
Clean Screen .......................................................................................................... 15
Sound Configuration ............................................................................................... 16
Audible Feedback ................................................................................................... 16
Sensors and Zones
Change Zone Order................................................................................................ 17
Touchscreen Apps ..................................................................................................... 18
Installing Touchscreen Apps .................................................................................. 18
Reordering Apps on the Home Screen ................................................................... 18
Uninstalling Touchscreen Apps .............................................................................. 19
Home Device Management Apps ............................................................................. 20
Cameras
................................................................................................................. 20
.............................................................................................. 14
.................................................................................................. 17
Thermostats
For Addional Support: hp://www.cox.com/homelifesupport 2
............................................................................................................ 20
Page 3

CONTENTS
Lights
...................................................................................................................... 21
System Testing & Verification .................................................................................... 22
Account Information ................................................................................................ 22
Alarm Test .............................................................................................................. 22
Testing Connectivity ............................................................................................... 22
WI-FI and Cellular Signal Strength ......................................................................... 23
Reboot Touchscreen .............................................................................................. 23
Keypads and Key Fobs ................................................................................................. 24
Wireless Keypad ........................................................................................................ 24
Checking System Status ......................................................................................... 24
Arming the System ................................................................................................. 24
Arm Away Mode ..................................................................................................... 24
Arm Stay ................................................................................................................. 25
Disarming the System ............................................................................................. 25
Sending A Panic Alarm .......................................................................................... 25
Guest Key Fob .......................................................................................................... 26
Arming the System ................................................................................................. 26
Disarming the System ............................................................................................. 26
Checking System Status ......................................................................................... 27
Sending a Panic Alarm ........................................................................................... 27
Extended Range Key Fob .......................................................................................... 27
Arming the System ................................................................................................. 27
Disarming the System ............................................................................................. 28
Checking System Status ......................................................................................... 28
Sending a Panic Alarm ........................................................................................... 28
Door Locks .................................................................................................................... 29
Setting User Codes .................................................................................................... 29
Locking the Door ........................................................................................................ 29
Unlocking the Door .................................................................................................... 29
Subscriber Portal Access .............................................................................................. 30
Signing In ................................................................................................................... 30
Navigating the Subscriber Portal ................................................................................ 31
My Home Page ....................................................................................................... 31
Cameras ................................................................................................................. 32
For Addional Support: hp://www.cox.com/homelifesupport 3
Page 4

CONTENTS
Security .................................................................................................................... 33
Arming & Disarming ................................................................................................. 33
Security Zones ......................................................................................................... 33
Door Locks ............................................................................................................... 34
Thermostats ............................................................................................................. 34
Lights ...................................................................................................................... 35
CVR Playback .......................................................................................................... 35
Help Center .............................................................................................................. 36
Shop......................................................................................................................... 36
Activity ...................................................................................................................... 36
Rules ........................................................................................................................ 37
More Menu ............................................................................................................... 37
Keypad Codes ...................................................................................................... 37
Account ................................................................................................................. 38
Secret Word .......................................................................................................... 38
Alarm Permit & Registration .................................................................................. 39
Contacts ................................................................................................................ 40
Apps ...................................................................................................................... 41
Mobile App .................................................................................................................... 42
Sign In Screen ............................................................................................................ 42
Settings ...................................................................................................................... 43
Take a Tour ................................................................................................................ 43
Support ..................................................................................................................... 43
Security ...................................................................................................................... 43
Security Zones ........................................................................................................... 44
Door Locks ................................................................................................................. 44
Cameras .................................................................................................................... 45
Lights ......................................................................................................................... 45
Thermostats ............................................................................................................... 46
Help Center ................................................................................................................ 47
Activity........................................................................................................................ 47
Rules .......................................................................................................................... 48
For Addional Support: hp://www.cox.com/homelifesupport 4
Page 5

CONTENTS
More Menu ................................................................................................................ 48
Manage Devices ................................................................................................... 48
Pages .................................................................................................................... 48
Keypad Codes ...................................................................................................... 49
Account ................................................................................................................. 49
Contacts ................................................................................................................ 50
System Settings ................................................................................................... 51
Getting Started ...................................................................................................... 51
Take a Tour ........................................................................................................... 51
Important Notes .......................................................................................................... 52
For Addional Support: hp://www.cox.com/homelifesupport 5
Page 6
Advanced Security and Automation for your life
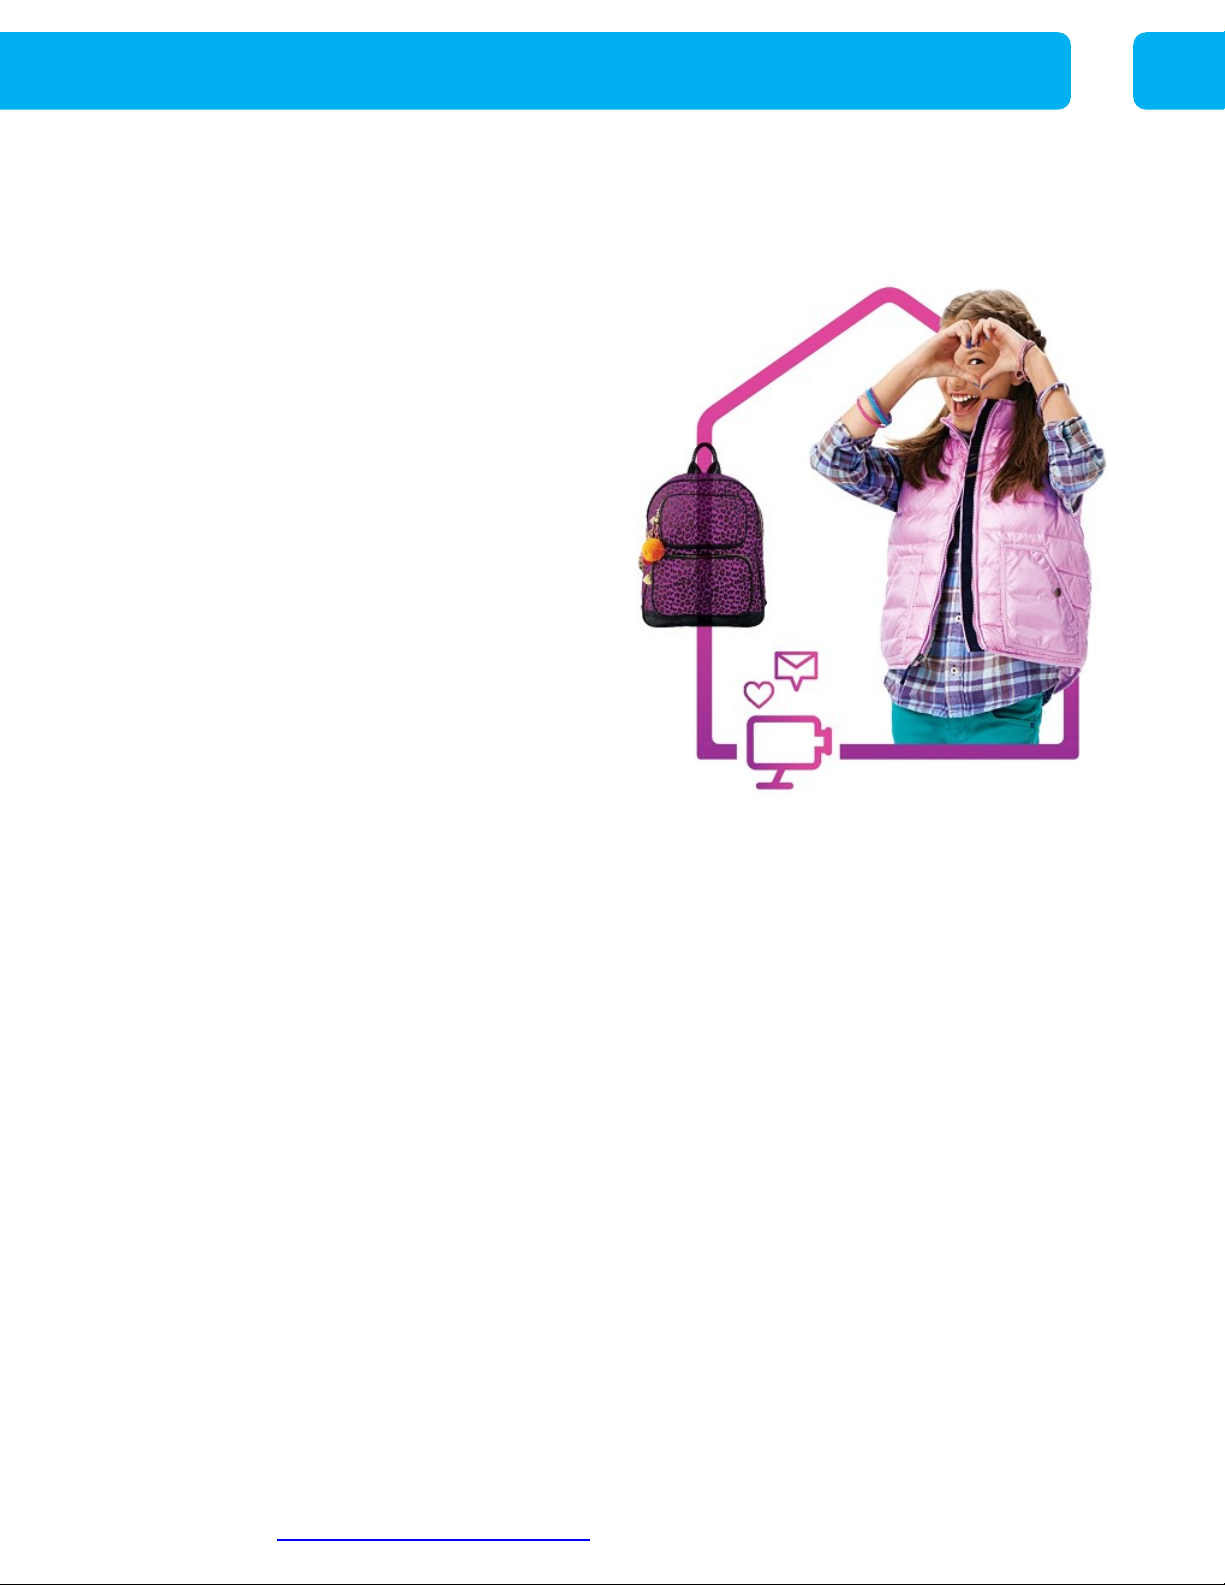
This User Guide is designed to help you learn how to take full advantage of your
new system to protect , to monitor, and to control the things that matter most in your
life. The guide covers the components of your system; describes how to program,
arm and disarm it; and discusses the ways you can control your system remotely—
from a laptop or tablet computer, key fob, smart phone or tablet.
If you have questions, please visit us online or call us 24/7.
Online Support: www.cox.com/homelifesupport
Online Subscriber Portal: https://portal.coxhomelife.com
Toll-free: 1-877-404-2568
For Addional Support: hp://www.cox.com/homelifesupport 6
Page 7
COMPONENTS AND OPERATION
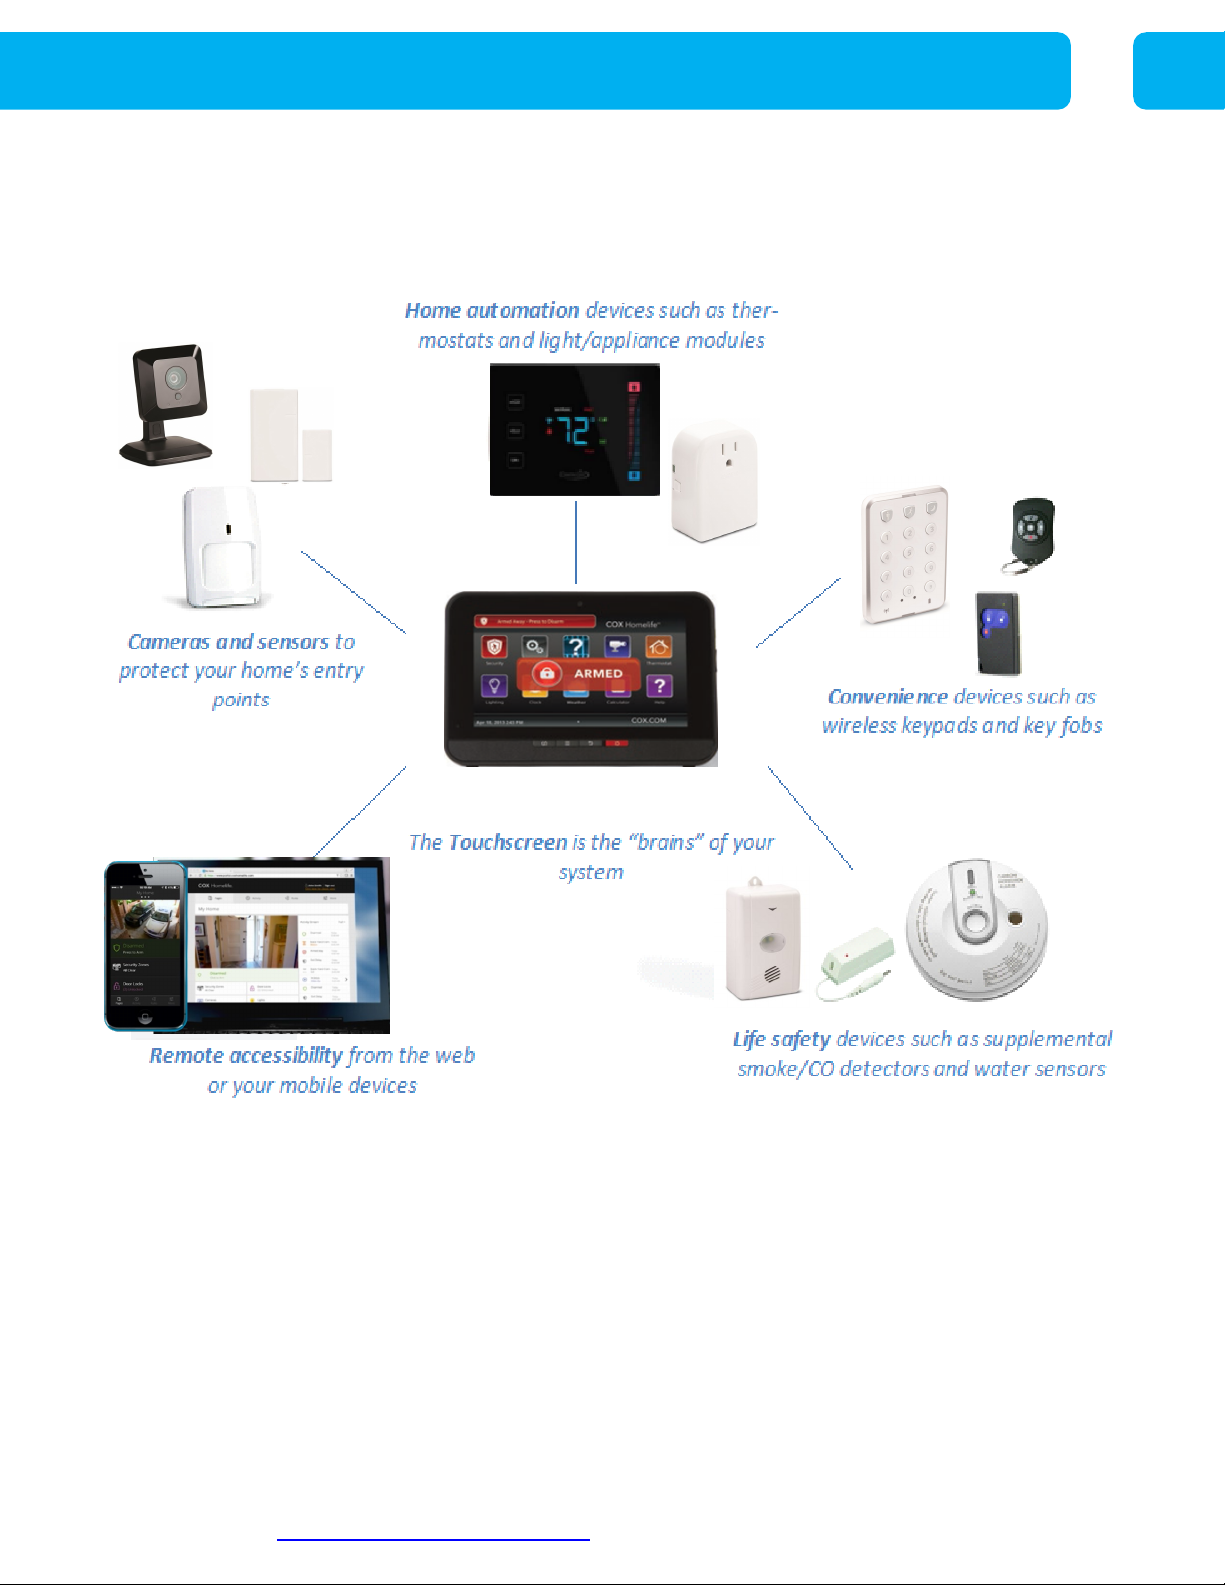
Components and Operation
Depending on what you have purchased, your installed system may include the following
The Cox Homelife system uses a dedicated router and your data modem to
communicate with the Central Monitoring Station, backed up by an advanced cellular
communications network.
The router included in your system should not be changed, including factory settings and
cable configuration, nor disconnected unless you’re advised by Cox Communications.
In case of a power outage or loss of broadband services, the Touchscreen will continue to
communicate with the Central Monitoring Station using cellular backup. The Touchscreen
also includes a battery backup that will last for about 24 hours.
For Addional Support: hp://www.cox.com/homelifesupport 7
Page 8
TOUCHSCREEN CONTROL PANEL
Touchscreen Control Panel
The interactive Touchscreen control panel enables you to operate your security system and
interact with your home at the tap of a button. Depending on the options you have
purchased, you can use it to arm and disarm your system, view live video from cameras
placed in your home, change light and thermostat settings, and view real-time web content —
all from the full-color display.
Warning:
system to lose connectivity and malfunction during an emergency.
Do not move your Touchscreen once it has been installed. This can cause the
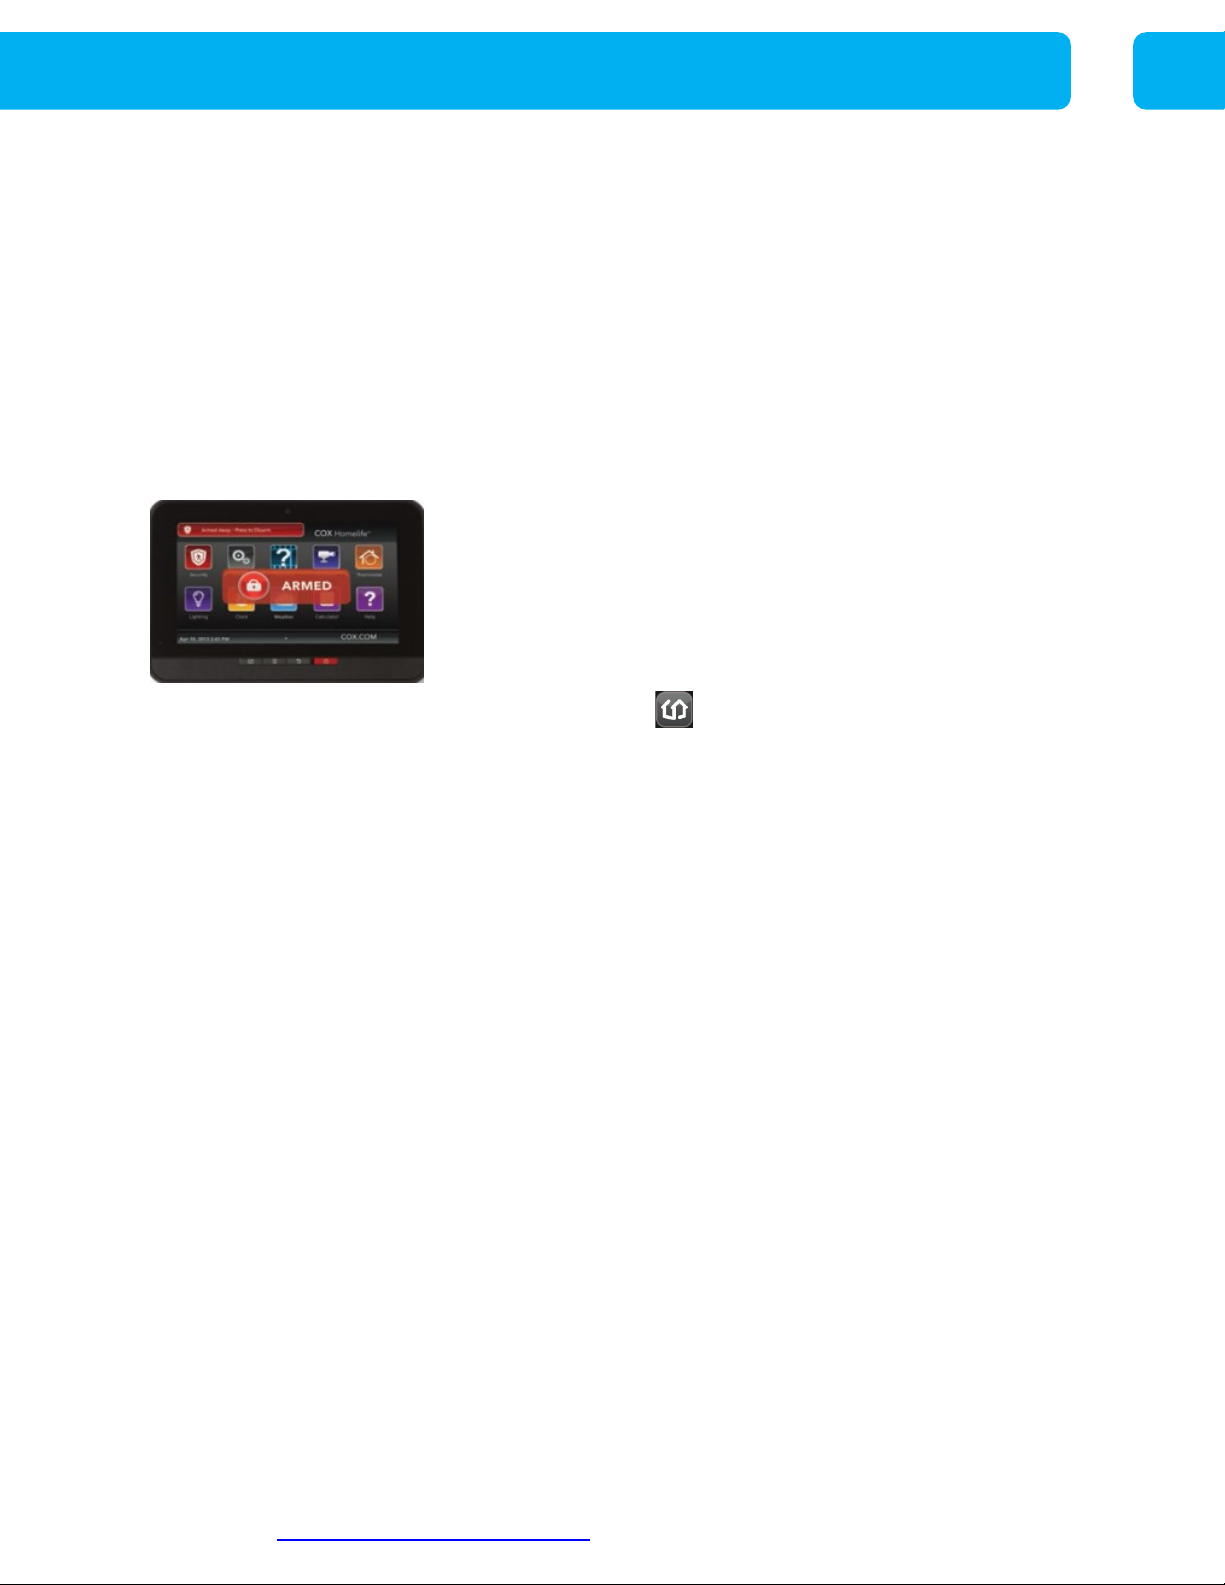
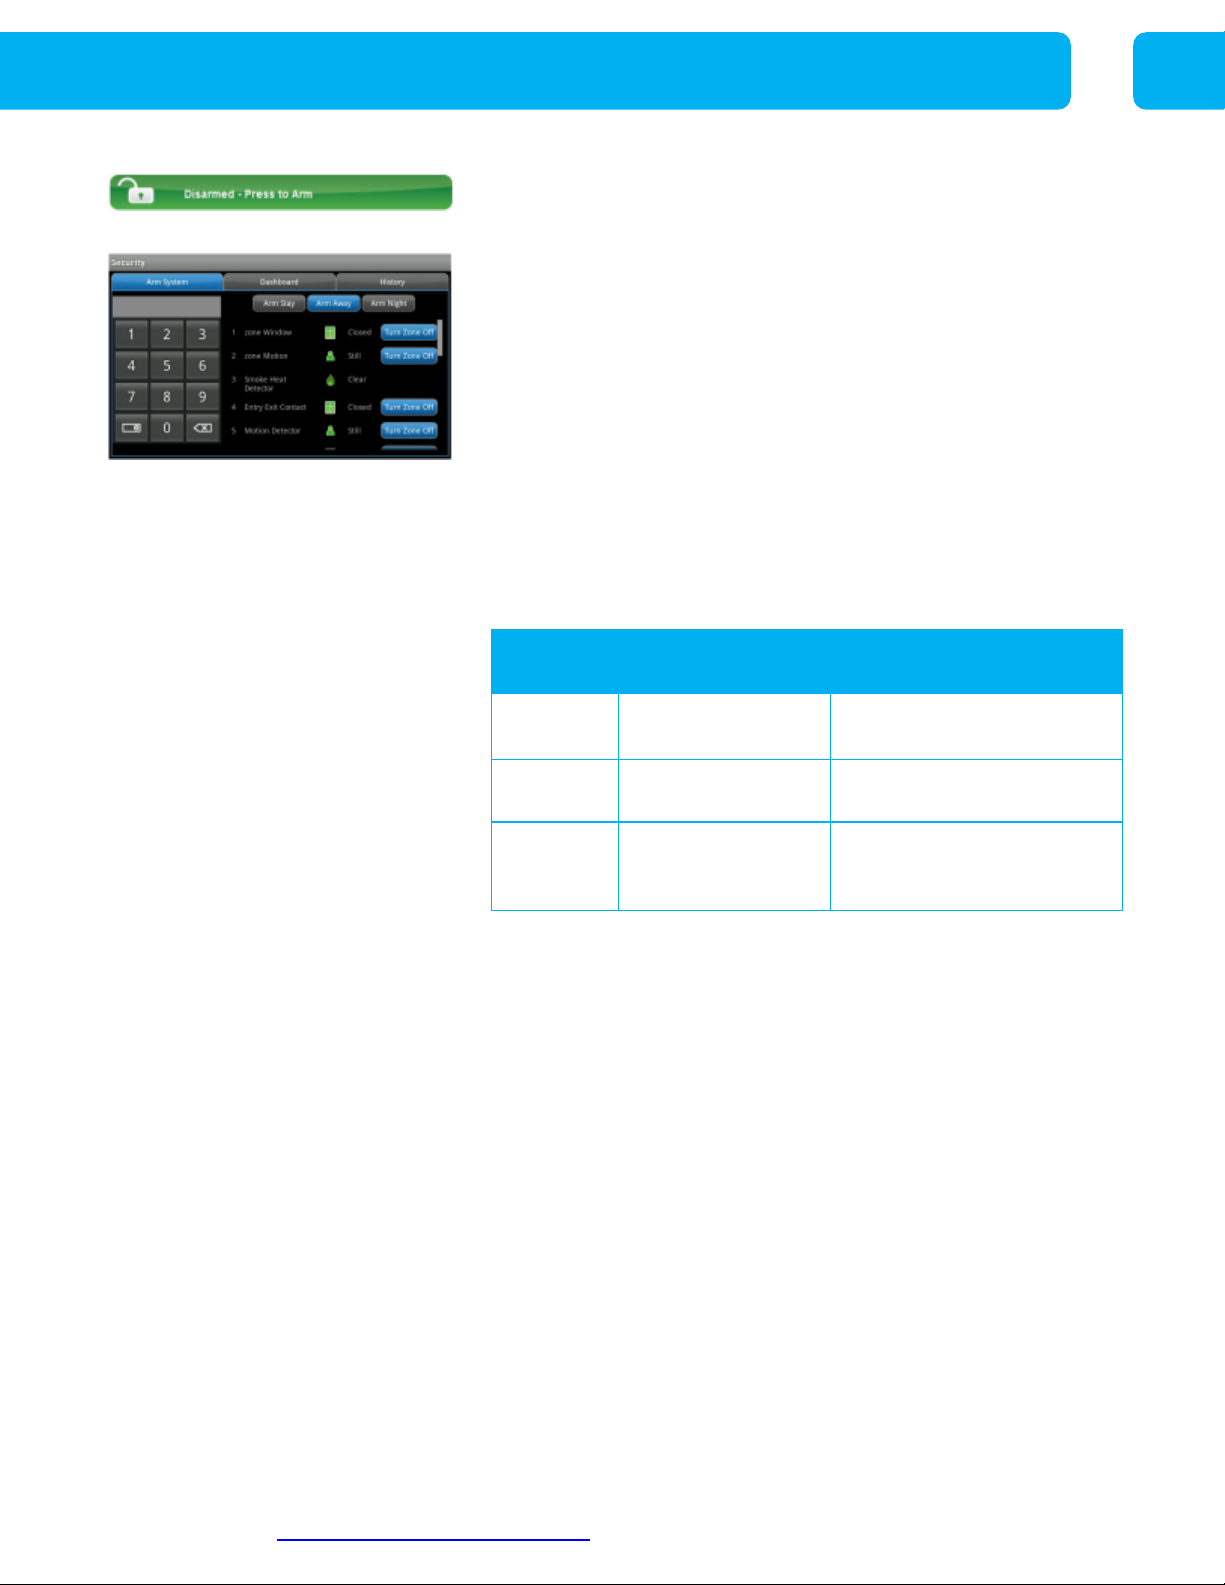
HOME SCREEN
The Home screen is the main display that provides quick
access to all Touchscreen features and apps. In addition to
the icons that make it easy to navigate, this screen provides
a visible and audible alert if a sensor is triggered when the
system is armed or if an environmental sensor, such as a
smoke detector, is activated.
Press the
Home
button on the Touchscreen at any time
to return to the Home screen.
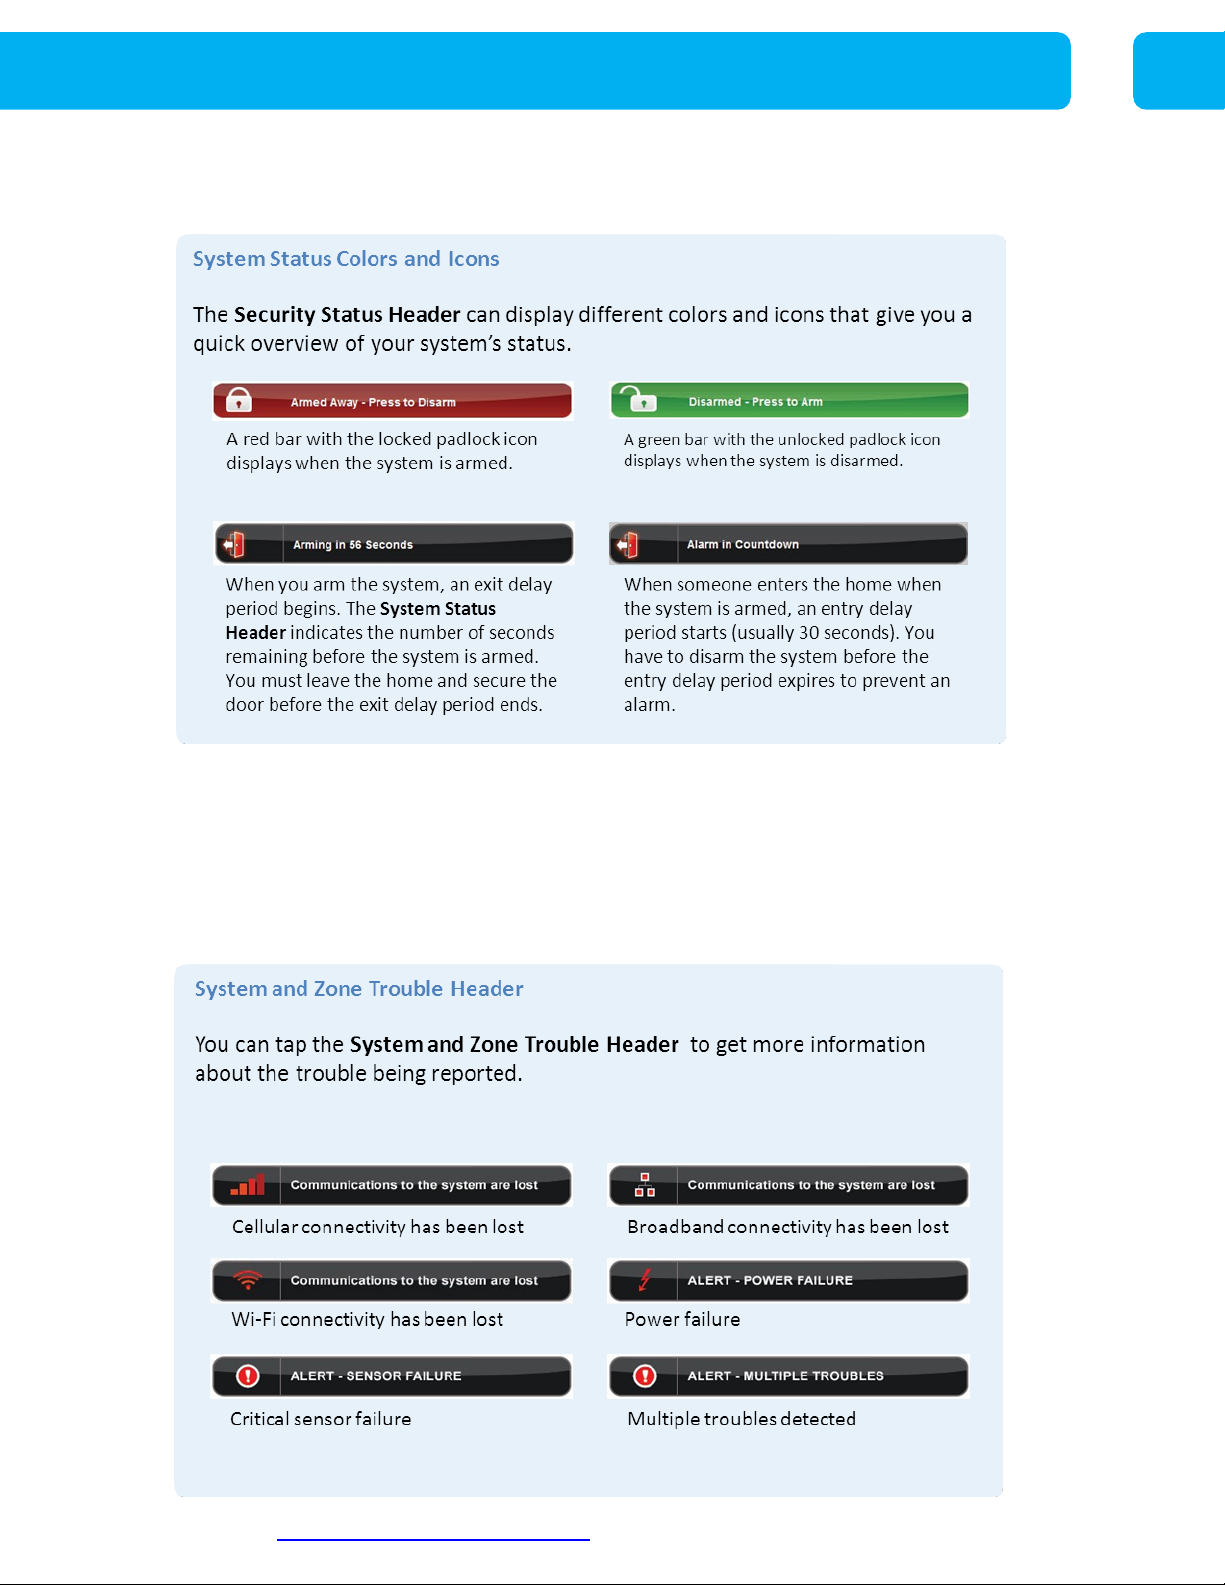
SECURITY STATUS HEADER
The Security status of your security system is displayed in
the large
Security Status Header
in the upper left-hand
corner of your Touchscreen. It displays whether the system
is armed or disarmed, and provides a countdown timer for
exit delays during system arming. During an alarm, the
Security Status Header changes to show an Alarm state.
When a condition such as an open door prevents the system
from being armed, the condition is displayed in the Security
Status Header.
For Addional Support: hp://www.cox.com/homelifesupport 8
Page 9
TOUCHSCREEN CONTROL PANEL
SECURITY STATUS HEADER
SYSTEM AND ZONE TROUBLE HEADER
The
System and Zone Trouble Header
displays in the upper-right-hand corner of the
Touchscreen (and in the same position on the subscriber Web Portal). It displays when there
is a connectivity or power problem with the Touchscreen. It also displays when a sensor is
inoperable (such as due to a battery failure), or is being tampered with.
For Addional Support: hp://www.cox.com/homelifesupport 9
Page 10
TOUCHSCREEN CONTROL PANEL
ARMING THE SYSTEM
The Touchscreen is used to arm and disarm the system.
1. Tap the
screen or tap the
2. Select
3. Enter your
Disarmed - Press to Arm
Security
Arm Stay, Arm Away
App.
, or
4-digit keypad code
button on the Home
Arm Night
mode.
to arm the system - the
countdown to arming (exit delay) will begin.
The Touchscreen generates short, audible alerts while arming, indicating, for example, that you have 60 seconds to exit
the premises when arming your system in Arm Away mode.
When you enter your home when the system is armed, you
will hear audible alerts for 30 seconds (default entry delay)
while you disarm your system.
Arming
Mode
Arm Away
Arm Stay
Used When Zones Armed
When EVERYONE
leaves the home
When SOMEONE
stays home
Perimeter (doors, windows)
Interior (motion detectors)
Perimeter (doors, windows)
Arm Night
Note:
You can also arm and disarm your system from optional key fobs
or wireless keypads, which can be installed near your entrance and exit
doors. However, the wireless keypad does not sound audible alerts or
give visual confirmation that the system is armed or disarmed.
When household has
gone to bed
Perimeter (doors, windows)
Interior (zones set for arm
BYPASSING ZONES
All zones must be cleared, bypassed, or trouble acknowledged
before arming.
1. During the arming process, select the zones you wish to
bypass.
2. Press the Turn Zone Off button next to each security zone
that you want to bypass.
3. Enter your
4-digit
keypad code to confirm and continue the
arming process.
Note:
time your system is disarmed
For Addional Support: hp://www.cox.com/homelifesupport 10
Bypassed zones will return to their “on” state each
.
Page 11
TOUCHSCREEN CONTROL PANEL
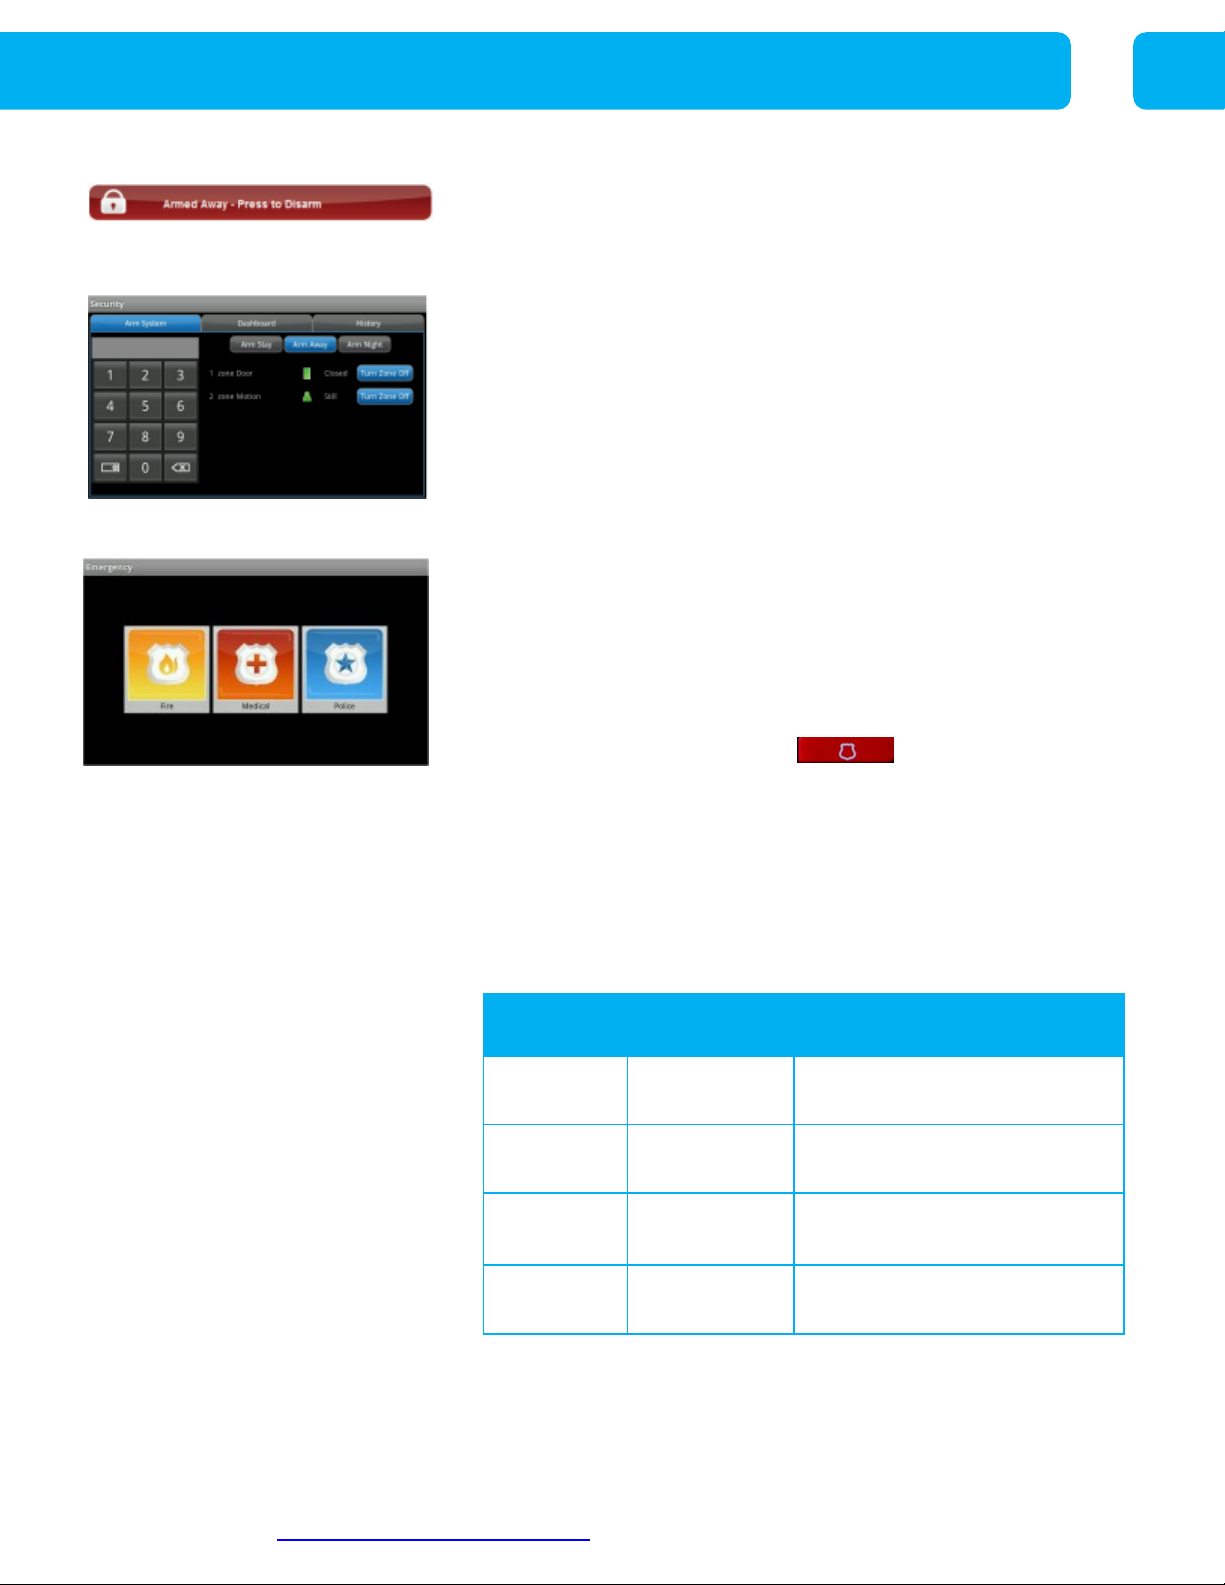
DISARMING THE SYSTEM
If disarming your system when armed in either Arm Stay or
Arm Night mode, follow this step:
1.
Tap the Armed – Press to Disarm button on the Home
screen or tap the Security App.
2.
Enter your 4-digit keypad code.
Note:
When entering the home and the system is armed in
Arm Away mode, the keypad is already displayed and ready
for you to enter your 4-digit keypad code.
PANIC ALARMS
Initiating a panic alarm sends an immediate alarm to the
Central Monitoring Station, indicating an emergency of a
specific type — medical, fire or police.
To initiate a panic alarm:
1. Press the red
panic button
on the lower front of
the Touchscreen to display the individual emergency
options.
2. Tap the applicable emergency panic icon - Medical, Fire or
Police - to alert the proper authorities.
Important
: When tapping the Police panic, it defaults to a silent panic alarm. However, you will have five seconds to tap
the screen again to initiate an audible alarm.
Panic Alarm
Type
Fire Repeating high-
Medical Repeating triple
Touchscreen
Response
pitched siren
beep
Central Monitoring
Station Response
Calls first “call to verify” number
before dispatching Fire
Calls both “call to verify” numbers
before dispatching Medical
Police Audible
Repeating highpitched siren
Calls both “call to verify” numbers
before dispatching Police
Police - Silent No indication
given
Calls first “call to verify” number
before dispatching Police
3. Enter your 4-digit code to silence the alarm. However, note
that the Central Monitoring Station has already received the
alarm signal and may be contacting you or your Emergency
Dispatch Contacts to verify the emergency.
For Addional Support: hp://www.cox.com/homelifesupport 11
Page 12
TOUCHSCREEN CONTROL PANEL
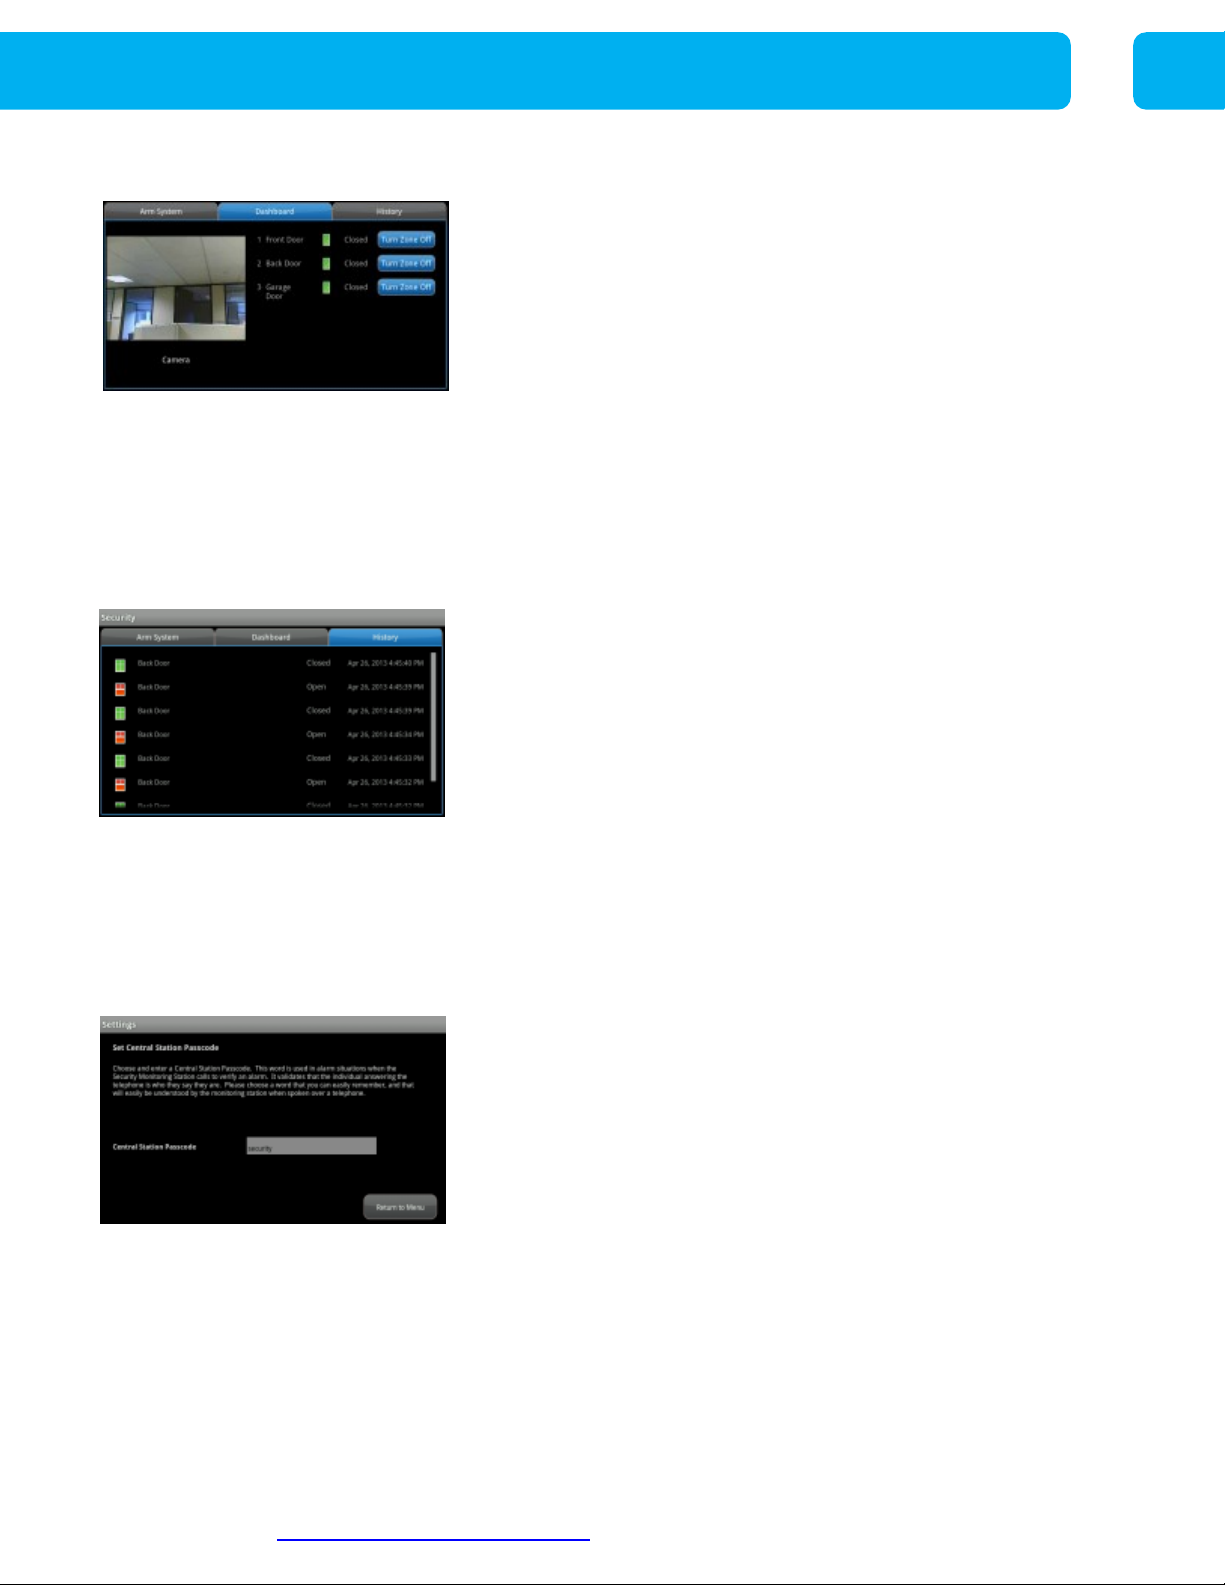
DASHBOARD VIEW
The Dashboard on your Touchscreen allows you to quickly
view your cameras and zone activity.
1. Tap the
2. Tap the
3. If there are multiple cameras, tap
Security
app.
Dashboard
tab.
Next Camera
to cycle
through the other cameras.
4. Tap the
Turn Zone Off
button for the zone to turn off the
zone.
Tap the
Turn Zone On
button for the zone to be
monitored for alarms.
EVENT HISTORY
When something occurs at a zone, whether or not the system is
armed, or the zone is turned off, the security system logs an
event.
If you want to view the history of events on your system, follow
these steps:
1. Tap the
2. Tap the
Security
History
app on the
tab.
Home
screen.
3. View all zone events for your system.
CENTRAL STATION PASSCODE
Your Central Station Passcode (or ‘Secret Word’) is used to
cancel a dispatch by the Central Monitoring Station in the event
of a false alarm. Please make sure your passcode (word) is
easy to remember, pronounce and spell.
1. Tap the
2. Select the
Set Central Station Passcode
Settings
App.
Advanced Settings
category and then select
3. View your current passcode, or set a new one.
4. Tap the
Return to Menu
button to save or exit.
For Addional Support: hp://www.cox.com/homelifesupport 12
Page 13
TOUCHSCREEN CONTROL PANEL
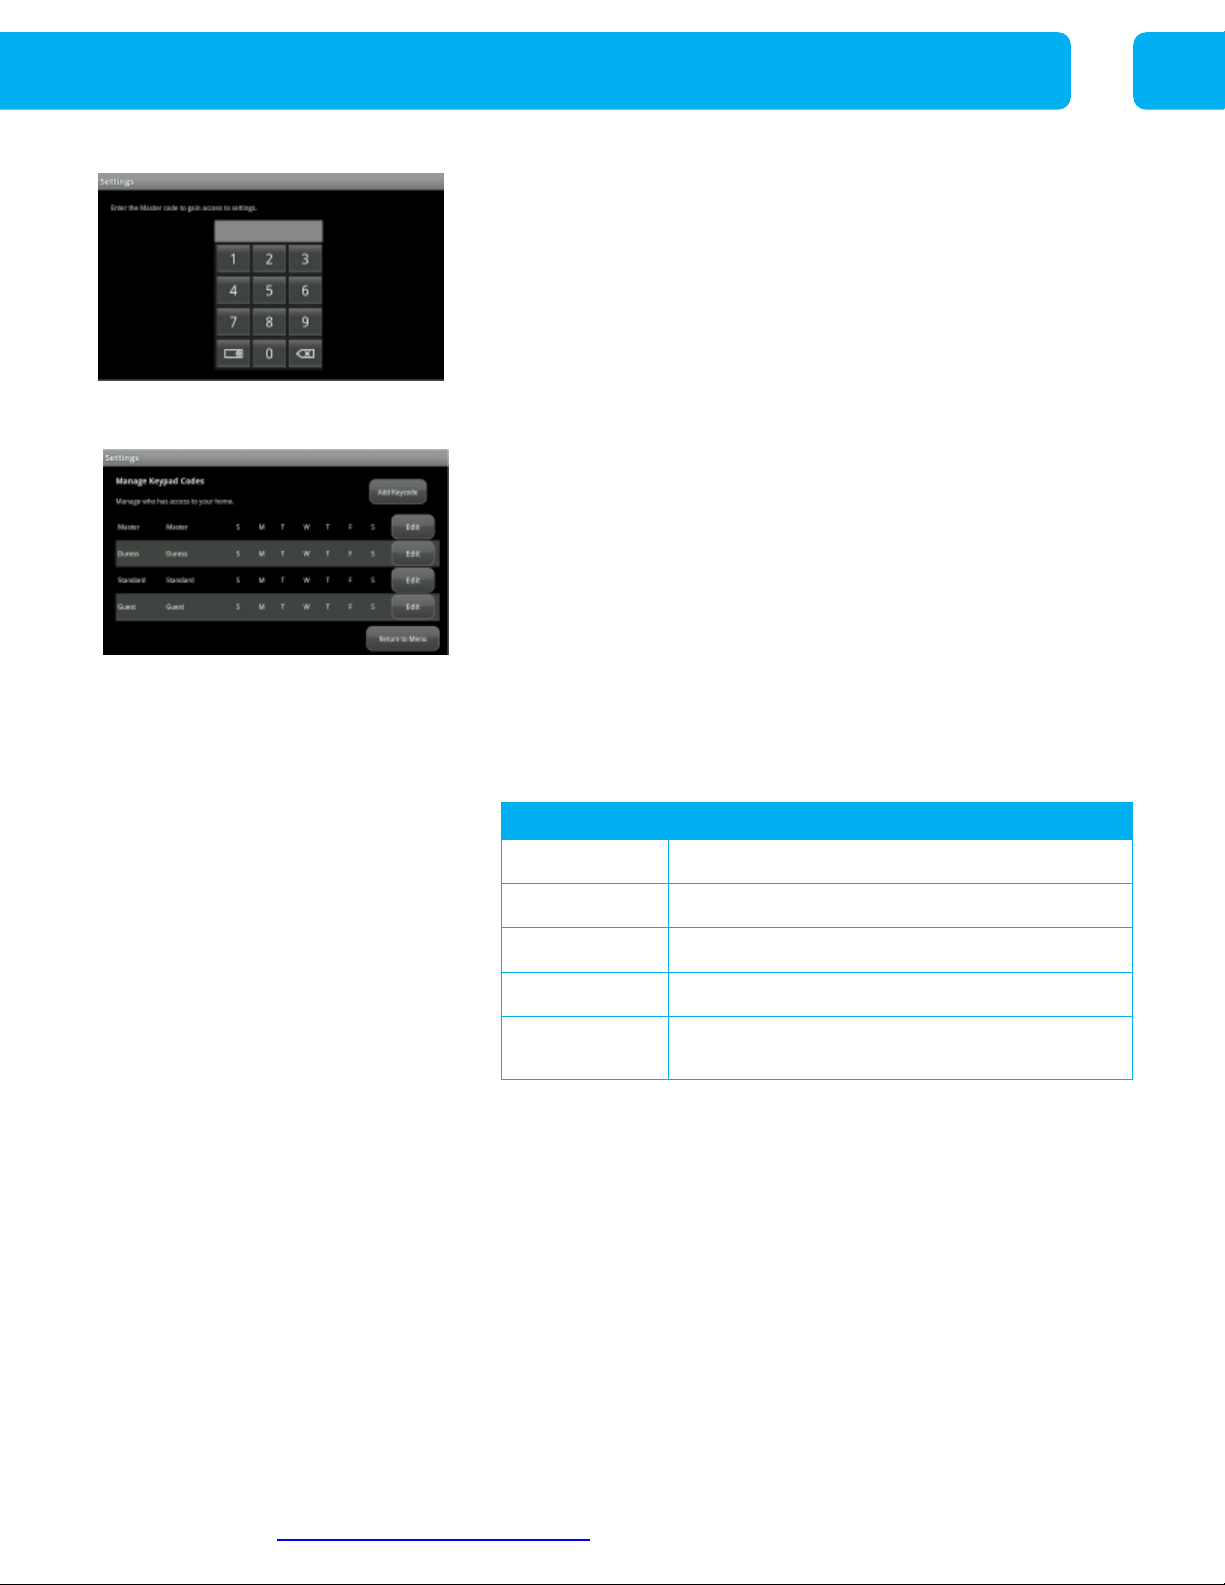
KEYPAD CODES
System setup, arming and disarming functions are
controlled by your 4-digit keypad code. These codes
are chosen by you and can be shared with household
members and trusted guests or service professionals.
1. Tap the
2. Select the
Keypad Codes.
Settings
Security
App.
category and then select
Manage
Tap the
code.
Create a name for the code, such as “Babysitter”.
Enter your
Select the
below).
Select the
Tap
Add Keycode
4-digit keypad code.
level
days
Save.
button to create a new
, or type of code desired (see
it should be active.
3. Tap the
make changes and tap
Edit
button next to existing keypad codes to
Save.
Code Level Used For
Master Code Arming, disarming and configuring system settings
Guest Code Arming and disarming the system
Standard Code Arming, disarming and bypass zones
Arm Only Code Arming the system
Duress Code
Disarm only—silent panic sent to Central
Monitoring Station for immediate police dispatch
For Addional Support: hp://www.cox.com/homelifesupport 13
Page 14

TOUCHSCREEN CONTROL PANEL—SETTINGS
Touchscreen Settings
You can customize your Touchscreen using the various settings available.
TOUCHSCREEN BRIGHTNESS
Adjust the Touchscreen’s brightness to your needs.
1. From the
select
2. Tap
Settings
app, select
Screen Configuration
Screen Brightness
Touchscreen
.
.
3. Use the arrows to set the brightness level from 1-10
(default is 10).
4. Tap the
exit.
Return to Menu
button to save your changes or
AUTOMATIC SCREEN DIMMING
You can choose to have the screen dim to a set level after
a period of inactivity (this can be used instead of a
screensaver or in conjunction with a screen saver).
and then
To configure the screen to dim after a period of inactivity:
1. From the
category and then select
2. Select
Settings
app, select the
Touchscreen
Screen Configuration.
Automatic Screen Dimming.
3. Choose how long your Touchscreen is idle before the
screen with automatically dim, from 5 to 30 minutes.
4. Then choose the desired screen brightness the
Touchscreen should dim to (1 – 10, 10 being brightest
and 1 being least bright).
5. Tap the
Return to Menu
button to save your changes or
exit.
To have the screen never dim due to inactivity, set the
Dimming Level to 10. This also requires that the
Backlight off at night setting is set to No (refer to Screen
Nighttime Settings).
Note: When a user touches the screen, it will brighten to its
default brightness level.
For Addional Support: hp://www.cox.com/homelifesupport 14
Page 15
TOUCHSCREEN CONTROL PANEL—SETTINGS
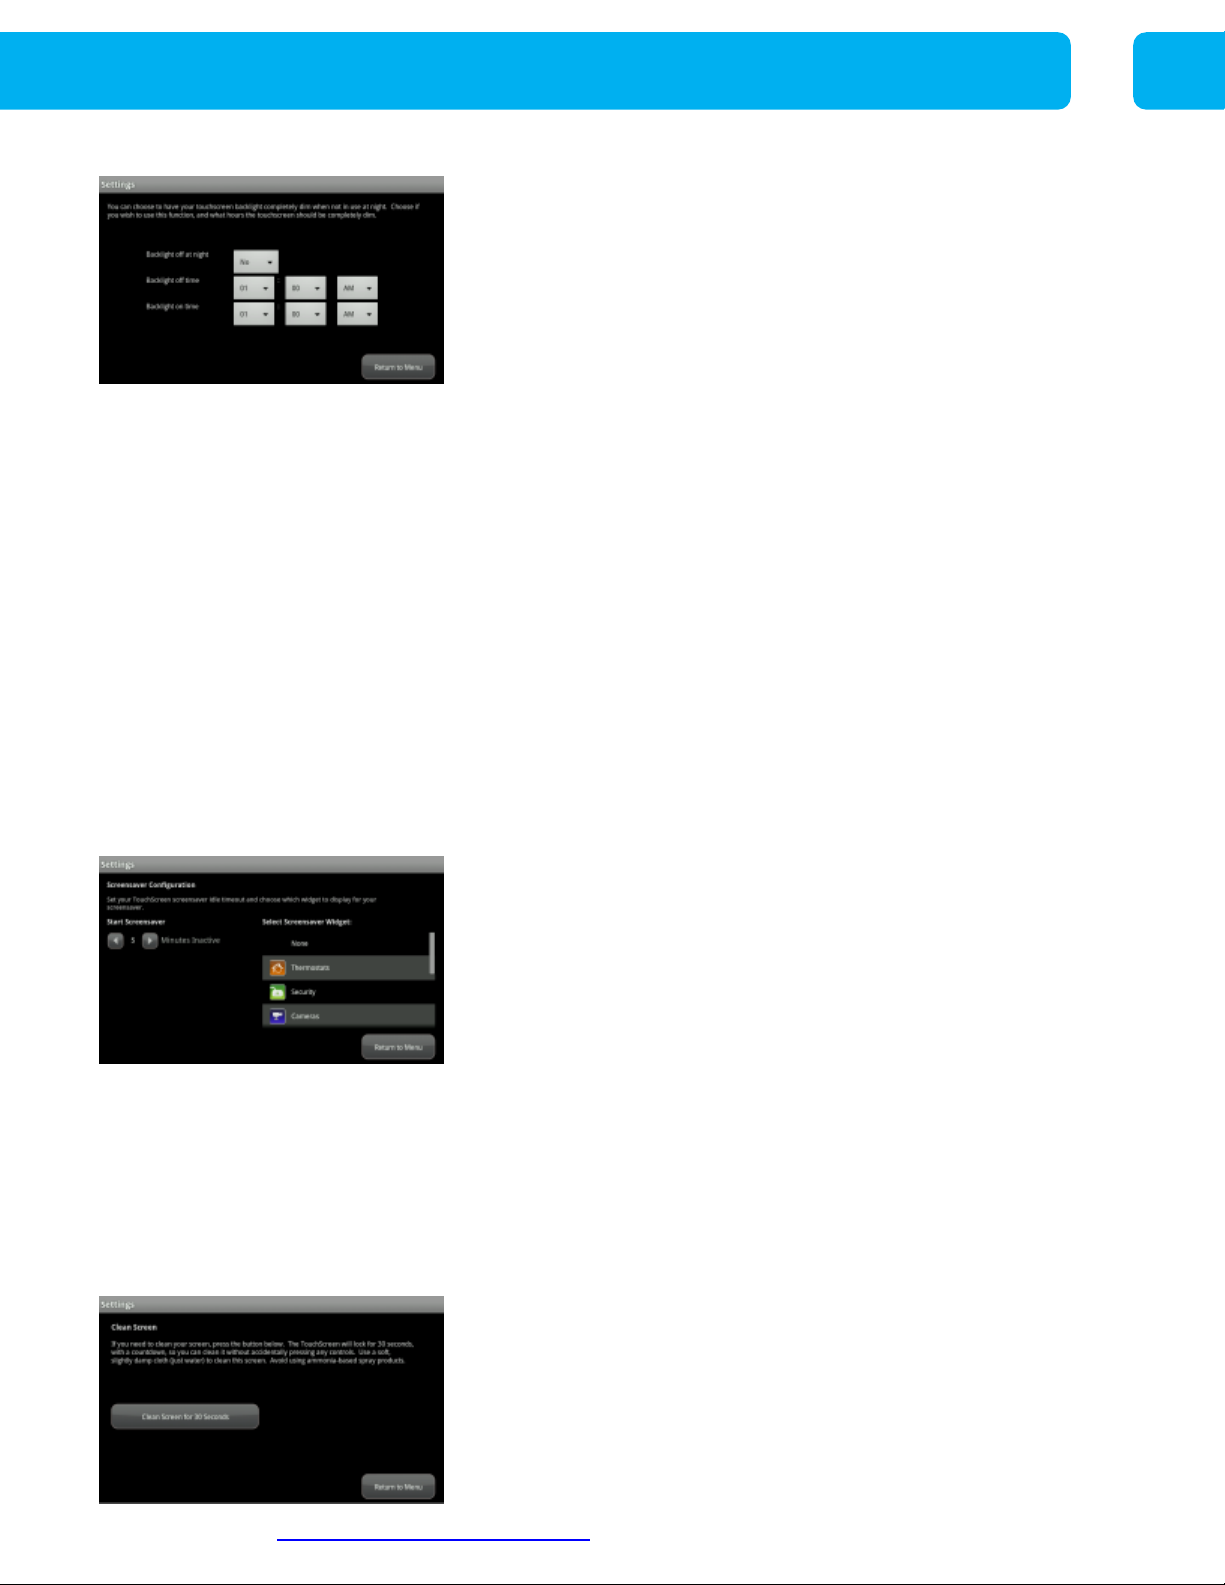
SCREEN NIGHTTIME SETTINGS
You can choose to have the screen dim completely during
configured hours, called Night Mode. During this time, the
buttons on the front of the Touchscreen darken completely.
The Touchscreen will not enter Night Mode when your
system is armed.
To configure the screen to dim completely during a set time
period (Night Mode):
1. From the
category and then select
2. Select
3. Next to
Settings
app, select the
Screen Configuration.
Screen Nighttime Settings.
Backlight off at night
, select
Touchscreen
Yes.
4. Enter the time you want the backlight to turn off at night,
and on in the morning.
5.
Tap the
exit
Return to Menu
button to save your changes or
Note: When a user touches the screen, it will brighten to its
default brightness level.
SCREENSAVER CONFIGURATION
The screensaver feature lets you choose an app or widget
to display on your Touchscreen after a predefined period of
time.
1.
From the
category and then select
Settings
app, select the
Screensaver Configuration.
Touchscreen
2. Use the arrows to set the time you want to start the
screensaver, from 5 – 30 minutes of inactivity.
3. Select a widget to display by scrolling through available
apps on the right hand side of the screen.
4. Tap the
Return to Menu
button to save your changes or
exit.
CLEAN SCREEN
Temporarily make the Touchscreen inactive for easy
cleaning.
1. From the
category and then select
Settings
app, select the
Clean Screen.
Touchscreen
For Addional Support: hp://www.cox.com/homelifesupport 15
Page 16
TOUCHSCREEN CONTROL PANEL—SETTINGS
2.
Tap
Clean Screen for 30 seconds
button to clean your
screen without accidentally pressing any Touchscreen
controls.
3. Tap the
Return to Menu
button to exit.
Note: Please use a soft cloth, slightly-dampened with water
only.
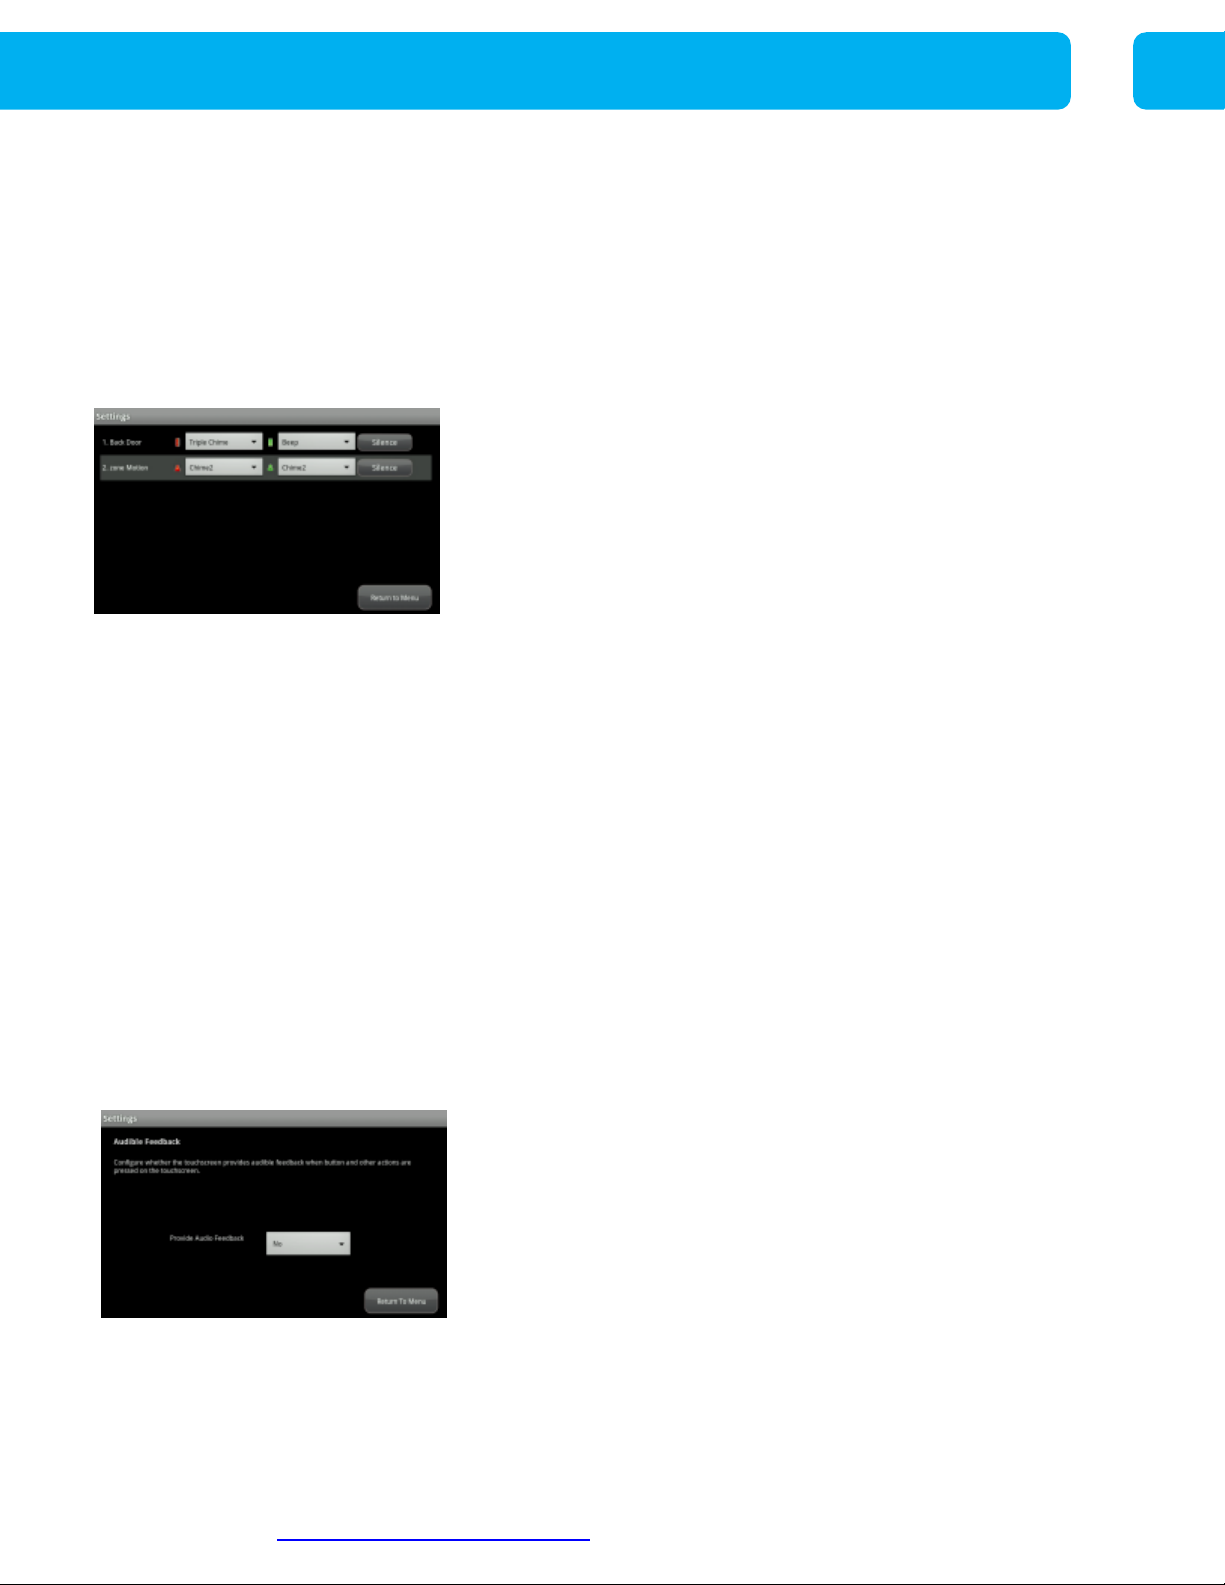
SOUND CONFIGURATION
You can configure the sound of the chime that alerts you to
a perimeter zone faulting (i.e., door/window opening and
closing) as well as the volume.
1. From the
category and then select
Settings
app, select the
Sound Configuration
Touchscreen
.
Hometone Configuration
1. Select the
Hometone Configuration
option to change
the chimes for each perimeter zone.
2. For each zone, select the desired sound for when the
zone is opened or closed.
3. Press the
4. Tap the
Silence
button to silence it altogether.
Return to Menu
button to save or exit.
Volume Configuration
1. Select the
Volume Configuration
option to change the
volume of the chimes.
2. Select a volume setting from 1 – 7. You will hear a chime
as you press the arrow keys, indicating the set
volume.
AUDIBLE FEEDBACK
Configure audible feedback when buttons or other actions
are pressed on the Touchscreen.
1. Select the
Audible Feedback
2. To turn off Audible Feedback, change
Feedback
Touchscreen
.
to No.
category and then select tap
Provide Audio
3. To turn on Audible Feedback, change
Feedback
4. Tap the
For Addional Support: hp://www.cox.com/homelifesupport 16
to
Yes
.
Return to Menu
button to save or exit.
Provide Audio
Page 17

TOUCHSCREEN CONTROL PANEL—SENSORS & ZONES
Sensors and Zones
Security zones are defined by sensors that can detect events in the home. Events include
doors or windows opening and closing, motion, glass breaking, smoke or carbon monoxide.
You may change the order that your zones are displayed throughout your security system using
your Touchscreen.
CHANGE ZONE ORDER
1.
From the
Settings
category and then tap
app, select the
Sensors & Zones
Change Zone Order.
2. Use the Up, Down or To Top buttons to reorder your zones.
3. Tap the Return to Menu button to save or exit.
For Addional Support: hp://www.cox.com/homelifesupport 17
Page 18
TOUCHSCREEN CONTROL PANEL—APPS
Touchscreen Apps
These are applications running on your Touchscreen that enable you to interact with and manage
your system. Similar to apps found on your smart phone.
INSTALLING TOUCHSCREEN APPS
To install an app to the Touchscreen:
1. From the Settings App, select the Apps category and
select Add App.
2. Scroll through the list of available apps.
3. Tap the app to install and then tap Next. The app to be
added is displayed, including a view of the initial screen of
that app.
4. Tap Next to begin installation. Once completed, you will
receive confirmation of its successful installation.
5. Tap Next to again display the list of apps available to be
installed.
Note: Your updates will not be received by the Touchscreen if
your device does not currently have broadband access. When
broadband access is restored, the new apps are installed.
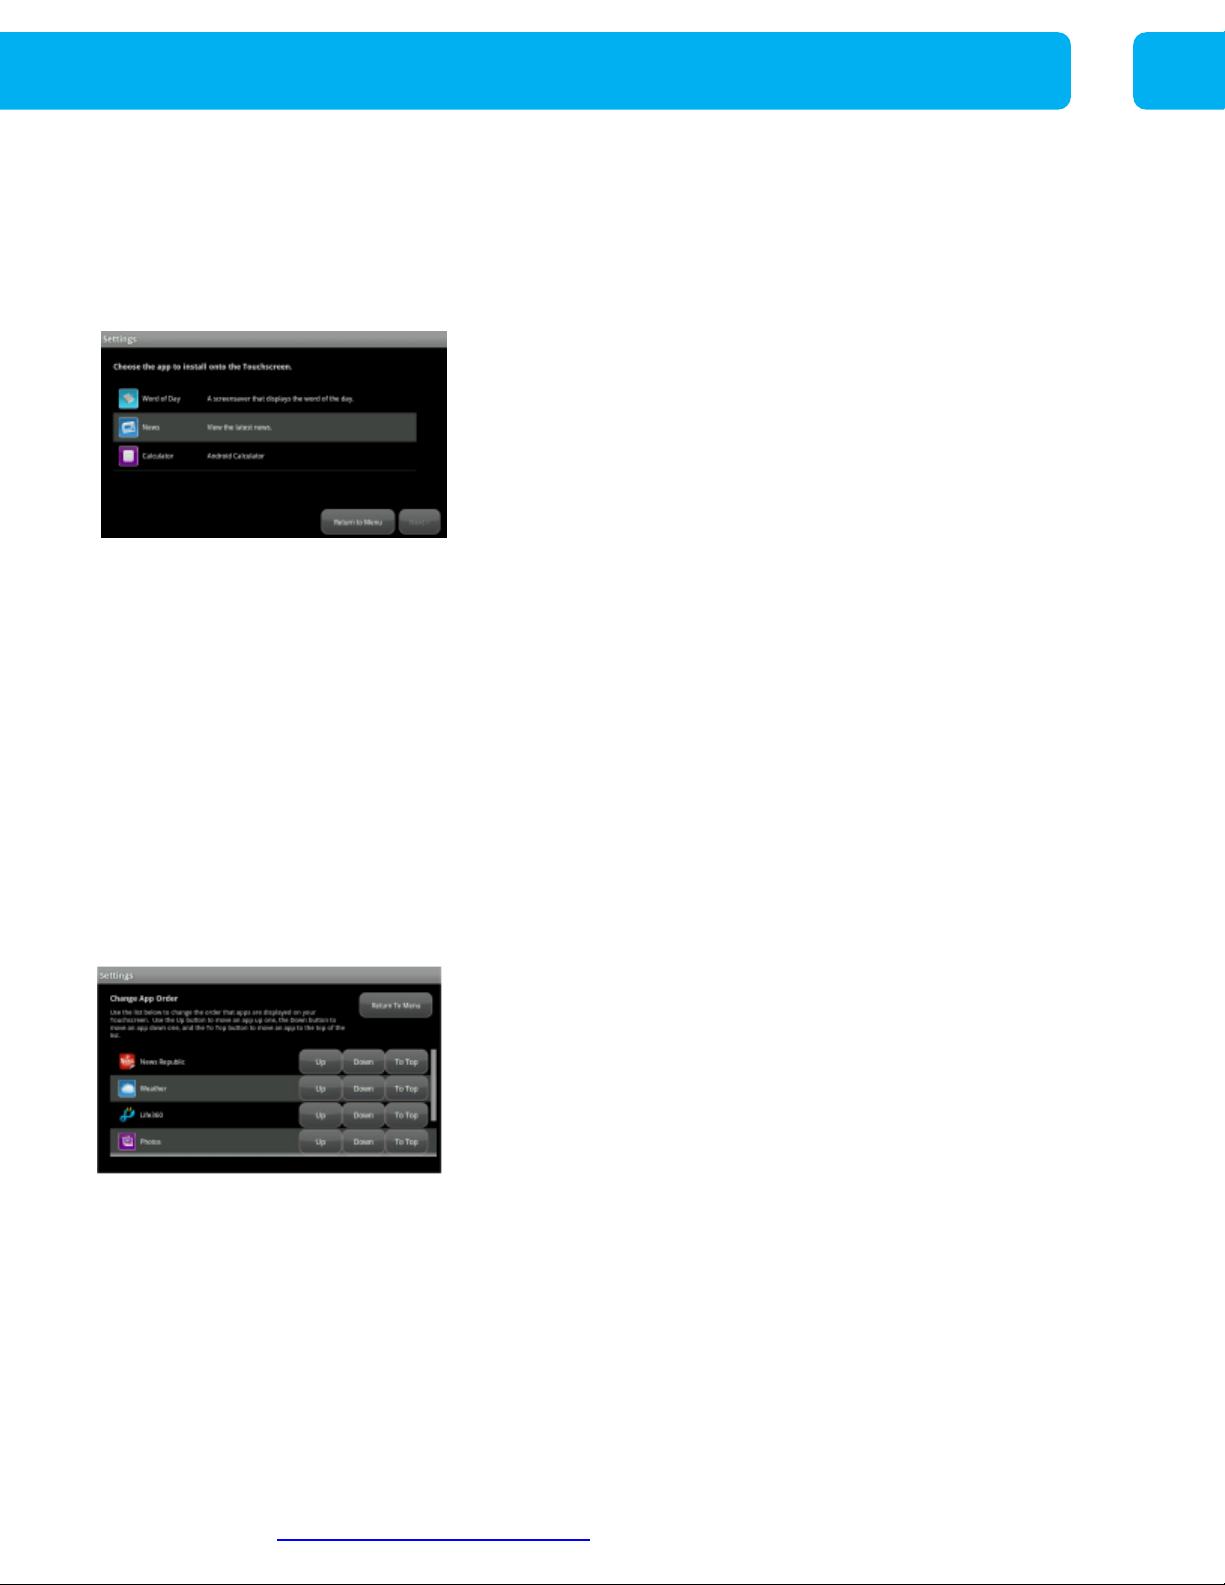
REORDERING APPS ON THE HOME SCREEN
System apps and device apps are always displayed in the
Home Screen first. The custom apps are displayed — by
default—in the order they were installed. The Home screen can
only accommodate 10 apps. Additional apps are displayed on
subsequent screens. Simply swipe the screen to the left or right
to navigate between screens.
To change the order of the apps as they are displayed in the
Home screen:
1. From the Settings App, select the Apps category and
select Reorder Apps.
2. Tap Up to move the app higher in the sequence of displayed
apps, or Down to move it lower. If you tap To Top, the app
appears first in the list of sortable apps.
3. Tap Return to Menu to save or exit.
For Addional Support: hp://www.cox.com/homelifesupport 18
Page 19

TOUCHSCREEN CONTROL PANEL—APPS
UNINSTALLING TOUCHSCREEN APPS
Important: Custom apps can be uninstalled from your
Touchscreen. However, system apps (Security and Settings)
and apps to support optional home devices (such as Cameras,
Lights, or Thermostats) cannot be uninstalled.
To uninstall an app from your Touchscreen:
1. From the Settings App, select the Apps category and
select Remove App.
2. Tap the app to uninstall and then tap Next.
3. The app to be removed is displayed. Tap Next to continue
with the uninstallation.
4. The Touchscreen displays the following confirmation: The
[name] app has been removed.
5. Tap Next to display the list of installed apps again.
For Addional Support: hp://www.cox.com/homelifesupport 19
Page 20

TOUCHSCREEN CONTROL PANEL—APPS
Home Device Apps
If you have purchased optional home devices such as cameras, thermostats or lighting modules,
you can manage them through your Touchscreen control panel.
CAMERAS
View live video from cameras installed on your system.
1. From the Home Screen, tap the Cameras app.
2. Images of all the camera views are displayed (updated
every five seconds).
Note
: If only one camera is connected to the system, live
video will automatically appear.
THERMOSTATS
Adjust settings for thermostats installed in your home.
1. From the Home Screen, tap the
Thermostats
app.
2. Ch
ange mode to Cool, Heat or Off.
3. When in Cool or Heat Mode, use the - /+ toggles to change
the set point.
4.
Tap
On/Off
button under
Hold
to change the mode and
ignore any other programming configured on the
Thermostat
5.
Tap
On/Off
device.
button under
Fan
to change mode.
DOOR LOCKS
The Door Lock icon allows you to view the status of your locks
and lock or unlock your doors.
1. Tap the Lock image to lock or unlock the door.
For Addional Support: hp://www.cox.com/homelifesupport 20
Page 21

TOUCHSCREEN CONTROL PANEL—APPS
LIGHTS
You can adjust settings for lights throughout your home.
1. From the Home Screen, tap Lights to display a list of the
lighting modules installed in your home, as well as the current setting of each.
2.
Change the current setting to the On or OFF position. For
lamps equipped with a dimmer function, use the slide bar to
adjust the brightness level. Lights can be dimmed in 20%
increments.
EDITING LIGHTS
Each lighting device has a name assigned to it when
it is added and is designated as dimmable or not.
These properties can be modified via the
Touchscreen Settings app.
1. From the Home Devices category, select Lighting.
2. Tap the Edit Lights option. The screen displays each
installed device.
3. Select the desired lighting device to modify.
4. Tap the Light Name field to display a keyboard screen to
change the label of the lighting device. Click Done on the
keyboard when you have finished editing the name.
5. Tap the Dimmable field to choose (Yes or No) to use the
dimming features of the lighting device if available.
6. Tap Next to return to the Edit Lights screen.
7. Tap the Return to Menu button to save or exit.
For Addional Support: hp://www.cox.com/homelifesupport 21
Page 22

SYSTEM TESTING
System Testing & Verification
You can test your system, including alarm, broadband and cellular connectivity using your
Touchscreen.
ACCOUNT INFORMATION
You can validate your account information directly on the
Touchscreen.
1. Go to the Settings app and select Advanced Settings.
2. Select the Account Information option to view your current
account information on record.
3. Tap the Return to Menu button to exit.
ALARM TEST
It’s important to test your system on a regular basis
(recommended monthly).
Before beginning your test, call 1-855-261-2501 to place your
system in test mode .
1. Go to the Settings app and select Security.
2. Select Alarm Test.
3. Tap the gray Disabled button to enable sending test alarm
messages to the Central Monitoring Station.
4. Tap Next to continue and follow the instructions on your
screen.
Note: Ensure all the security zones are unfaulted (that is, doors
and windows are closed, motion detectors are not showing
motion, etc.). When the security zones are ready for testing,
“Ready to Arm” is displayed under the Arm button.
TESTING CONNECTIVITY
The Touchscreen can test its connectivity to the Internet and
cellular networks.
To test the Touchscreen connectivity:
1. Go to the Settings app and select Advanced Settings.
2. Select Connectivity and then tap Test Connectivity.
3. Tap Next to start the test. This test can take as little at 30
seconds or as long as 4 minutes.
For Addional Support: hp://www.cox.com/homelifesupport 22
Page 23
SYSTEM TESTING
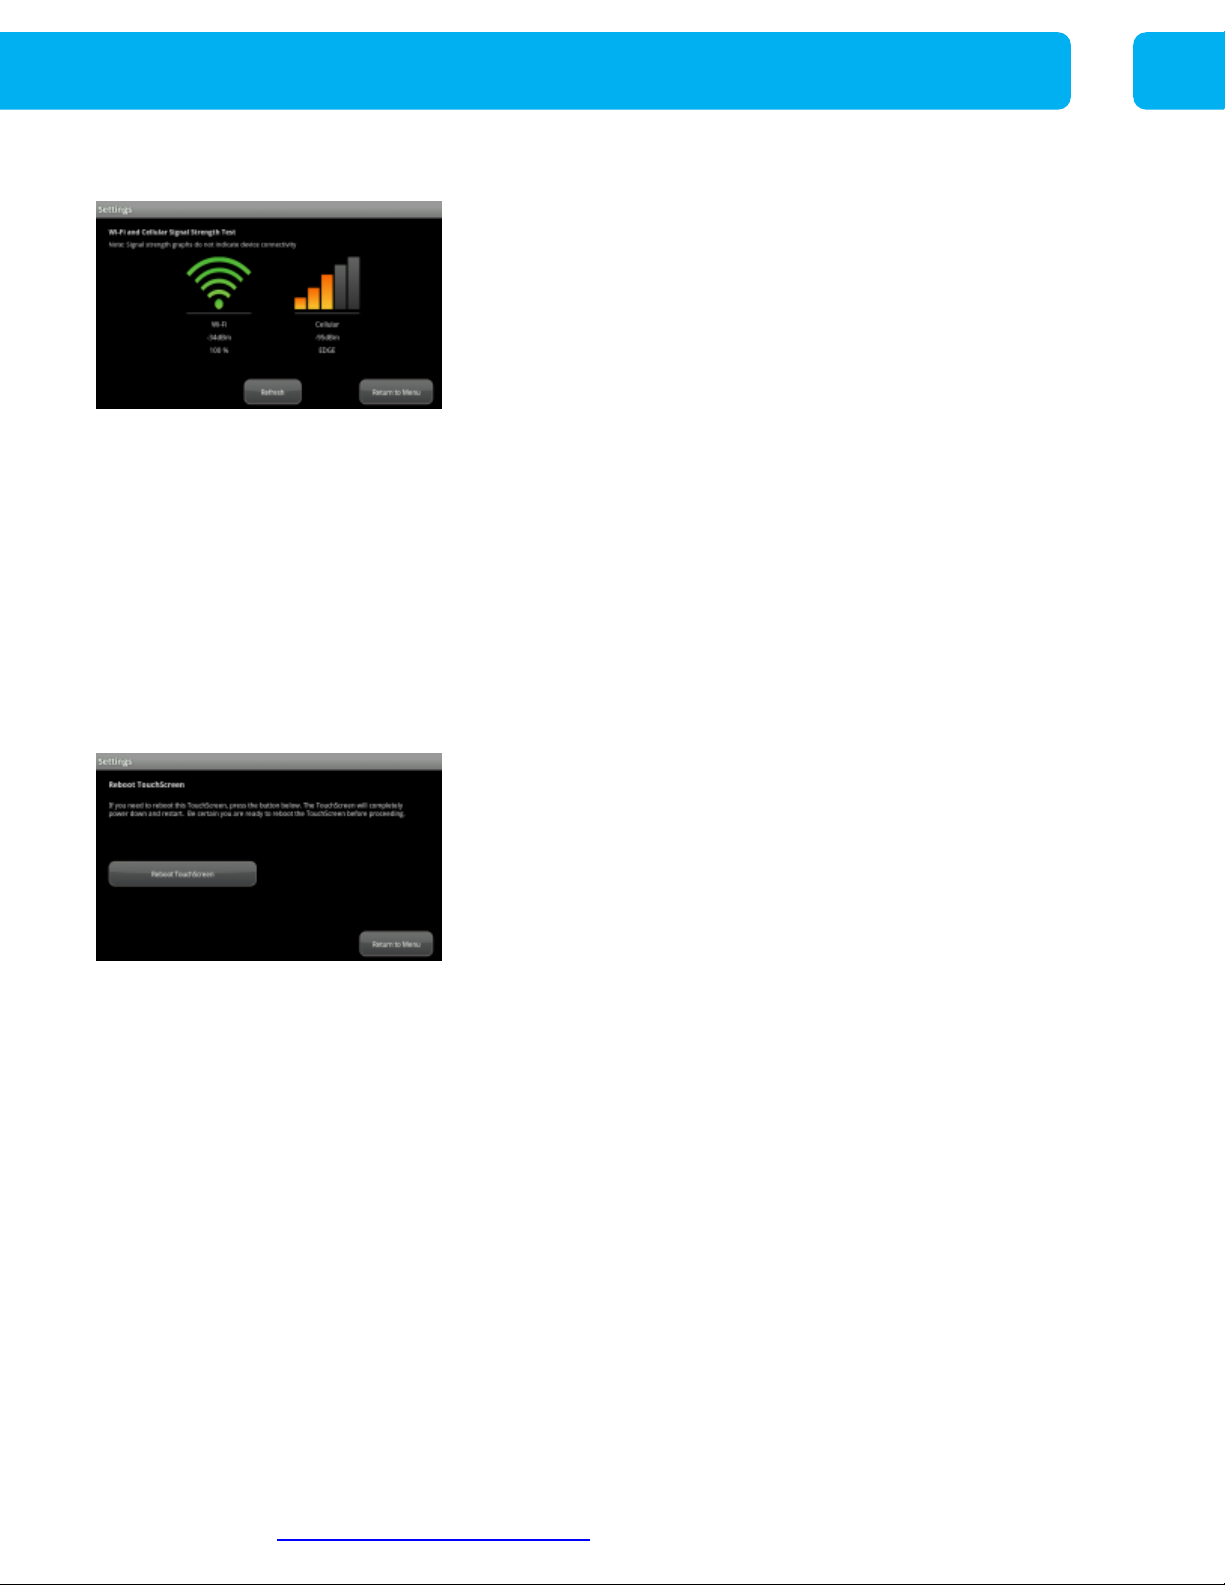
WI-FI AND CELLULAR SIGNAL STRENGTH
To view the current signal strength of the Touchscreen’s Wi-Fi
connection to your service provider’s modem:
1. Go to the Settings app and select Advanced Settings.
2. Select Connectivity.
3. Tap Wi-Fi & Cellular Signal Strength.
Result: The Wi-Fi and Cellular Signal Strength screen displays,
graphically displaying the detected signal strength of the Wi-Fi
connection to the router and the GPRS/EDGE connection to the
cellular network.
Note: If your Wi-Fi connection is weak, move the Touchscreen
closer to the Internet router. If your cellular signal is weak, move
the Touchscreen to another part of the house where it can
obtain a stronger signal.
REBOOT TOUCHSCREEN
Occasionally, a problem might arise that could be solved by
rebooting the Touchscreen.
1. From the Touchscreen home screen, tap Settings.
2. From the Settings menu, tap Advanced Settings.
3. From the Advanced Settings menu, tap Reboot
TouchScreen.
4. From the Reboot TouchScreen window, tap Reboot
TouchScreen.
Note: If prompted, re-enter the keypad code.
Result: A message will display confirming reboot. The screen
will take one to two minutes to reboot. Once the reboot is
complete the Touchscreen home screen will display.
For Addional Support: hp://www.cox.com/homelifesupport 23
Page 24

KEYPADS AND KEY FOBS
Wireless Keypad
A keypad is a wireless peripheral device that lets you perform certain Touchscreen functions in
additional locations in your premises. For example, you could have a key pad installed near a less
frequently used entry or in an upstairs bedroom to ensure its Emergency Panic Alarm feature is
always readily accessible. The following Touchscreen functions can be performed from the keypad:
Check the current system status (armed, disarmed, or “not ready”).
Arm the system in Arm Away mode or Arm Stay mode (see the Touchscreen User Guide
section for an explanation of arming modes).
Disarm the system.
CHECKING SYSTEM STATUS
1. Press the star button to light the LED to show the
current status of the security system.
2. The disarm button lights to show the current status of the
security system.
Green for three seconds if the system is disarmed.
Red for three seconds if the system is armed.
Orange for three seconds if the system is not ready to be
armed (for example, a door is open).
ARMING THE SYSTEM
Note:
From the key pad, you can arm your system in Arm
Away mode or Arm Stay. Arm Night mode must be performed
from the Touchscreen or Subscriber Portal.
Arm Away Mode
1. Enter a valid keypad code followed by the button to arm the
system in Arm Away mode.
The button turns red for three seconds to indicate that the Exit
Delay has started (default 30 seconds—Touchscreen beeps
during this period). If the system is not ready (because, for
example, a door or window is open) the button flashes orange
seven times.
For Addional Support: hp://www.cox.com/homelifesupport 24
Page 25

KEYPADS AND KEY FOBS
Arm Stay Mode
1. Enter a valid keypad code followed by the to arm the
system in Arm Stay mode.
The button turns red for three seconds to indicate that the Exit
Delay has started (twice as long as the period configured for
Arm Away—up to 120 seconds with no beeping from the
Touchscreen). If the system is not ready (because, for example,
a door or window is open) the button flashes orange seven
times.
DISARMING THE SYSTEM
1. Enter a valid keypad code followed by pressing to
disarm the system.
The disarm button turns green for three seconds to indicate that
the system has been disarmed. There is no Entry Delay period.
SENDING PANIC ALARM
1. Press and hold the and for three seconds to send
an audible panic alarm to the central monitoring station for
police assistance.
The LED flashes red to indicate that the alarm has been sent.
Additionally, contact persons will receive email and SMS
notifications if they are configured to do so.
For Addional Support: hp://www.cox.com/homelifesupport 25
Page 26

KEYPADS AND KEY FOBS
Wireless Key Fobs
The wireless Key Fob Remote gives you additional access to your system in or near your home,
enabling you to:
Arm the system in Arm Away mode or Arm Stay mode.
Disarm the system before entering the premises.
Check the current system status (Armed, Disarmed, or Not Ready).
GUEST KEY FOB
Arming the System
From the key fob, you can arm your system in Arm Away mode
or Arm Stay mode (Arm Night mode must be performed from
the Touchscreen control panel or the Subscriber Web Portal.)
Arm Away
Press the for about two seconds to arm the system in
Arm Away mode if the home will be unoccupied.
The LED will flash orange seven times if the system is not
ready (i.e., if a door or window is open). The LED flashes
red once to indicate that it has contacted the system, then
lights red for one second. The 30 second exit delay starts.
Arm Stay
Press the for about two seconds to arm the system in
Arm Stay mode if there will still be people in the home.
The LED flashes red once to indicate that it has contacted
the system, then lights red for one second. The exit delay
starts.
Disarming the System
Before entering the home when the system is Armed, press
the button for about two seconds to disarm the system
without entering the premises.
The LED flashes green once to indicate that it has contacted the system, then lights green for one second indicating
that the system is
Disarmed.
For Addional Support: hp://www.cox.com/homelifesupport 26
Page 27

KEYPADS AND KEY FOBS
Checking System Status
Press the button for two seconds to light the LED to
show the status of the security system.
The LED flashes red once to indicate that it has contacted the
system, then:
Lights green for three seconds if the system is Disarmed
Lights red for three seconds if the system is Armed
Lights orange for three seconds if the system is Not Ready
to be Armed (for example, if a door is open)
Note: If the key fob is out of range of the Touchscreen, the LED
flashes red three times quickly.
Sending a Panic Alarm
Press and hold the button for three seconds to send a
silent alarm to the Central Monitoring Station for police
assistance.
The LED flashes orange to indicate that the alarm has been
sent.
Note: The Touchscreen will not react in any way, but if you
check the History tab on the Security app, you can see that an
alarm was sent. Additionally, any contact persons that you have
identified receive email and SMS (text) notifications.
EXTENDED RANGE KEYFOB
Arming the System
Arm Away
Press the once for about two seconds until the LED
flashes red, then lights red.
Arm Stay
Press the once for about one second, release the button,
then press again for about two seconds until LED flashes
amber, then lights red.
For Addional Support: hp://www.cox.com/homelifesupport 27
Page 28

KEYPADS AND KEY FOBS
Disarming the System
Press the for about two seconds until LED flashes green,
then lights green.
Checking System Status
Press the once and hold for about two seconds, then press
again for about two seconds until LED flashes amber.
If the LED light turns green then system is disarmed
If the LED light turns red then the system is armed
If the LED light turns amber then the system is not ready
Sending a Panic Alarm
Press the button for about three seconds until LED light
flashes red.
For Addional Support: hp://www.cox.com/homelifesupport 28
Page 29

DOOR LOCKS
Door Locks
The door lock allows you to enter the home without the use of a key. The following functions can
be performed using the door lock:
Check the current status (locked or unlocked) using the Touchscreen, subscriber portal or mo-
bile app.
Lock and unlock your doors using the touchpad on the door, Touchscreen, subscriber portal or
mobile app.
NOTE: Door Locks are not currently available in all areas. Please call 1-877-404-2568 for more
information.
SETTING USER CODES
1. Remove the interior cover using the included hex key.
2. Press and hold the Program Button (5 seconds) until the
keypad flashes green.
3. On the keypad, use the number keys to enter the new 4-8
digit user code.
4. Press the lock button.
Expected result: If the keypad flashes green and beeps
once, the programming was successful. Follow the same
steps to create additional user codes.
LOCKING THE DOOR
Press the lock button.
Note: If no user codes are programmed, the lock button will be
disabled.
UNLOCKING THE DOOR
1. Press the Lock Button. (optional, but necessary in order to
illuminate the keypad)
2. Enter valid user code.
Note: if three incorrect codes are entered consecutively, or
if three timeouts occur within one minute, the keypad will be
locked for 60 seconds. After 60 seconds, try again.
For Addional Support: hp://www.cox.com/homelifesupport 29
Page 30

SUBSCRIBER PORTAL
Subscriber Portal Access
You can access your Cox Homelife system through a personal, secure web page called the
Subscriber Portal. That means you can check the status of your system, arm and disarm
your security zones, see live camera video, view video clips and pictures, and change settings from anywhere you have Internet access.
SIGN IN PAGE
Before signing in, you can access your Portal
Take a Tour
port
pages by clicking the icons below the Sign In button.
of the Homelife features, or access online
Settings
,
Sup-
Click on forgot Username or Password for assistance in retrieving forgotten credentials.
Settings
Open
Settings on the Subscriber Portal.
Accessing Settings from the Sign In page, you can access
things like Cox’s Privacy Policy and Terms and Conditions.
Take a Tour
This function allows customers to see a demo system via the
Subscriber Portal. It will include available options that you
may not currently have with your system and you are able to
“test drive” it without impact to your personal account.
Support
When you click
Support
you will navigate to the Cox.com
Homelife Support pages for access to learning and support
materials.
SIGNING IN
You will need to sign in each time you access the Subscriber
Portal site.
1. Go to https://portal.coxhomelife.com.
2.
Enter your Cox Homelife Username and Password on the
Sign In page. These are the same credentials you use
when signing in to the Cox Homelife mobile app.
3. Click
For Addional Support: hp://www.cox.com/homelifesupport 30
Sign In
.
Page 31

SUBSCRIBER PORTAL
Result: Upon the first sign in, a first time user experience called
“Getting Started” is shown to orient you to the Portal and all that
you can do with it. Upon all subsequent sign ins, the My Home
screen displays.
Notes:
If you forget your username or password, click the appropriate link on the Sign In page to begin the process of retrieving your username or resetting your password. Follow the
instructions on the web pages or email messages associated with this process to restore your access to the Portal.
If an incorrect password is entered five times in a row,
you will not be able your access your account for 30
minutes.
NAVIGATING THE SUBSCRIBER PORTAL
Once signed in to the Subscriber Portal, four menus display
across the top of the page.
The
Pages
menu contains the My Home page, as well as
any custom pages that you create.
The
Activity
menu shows a view of all activity captured by
the devices that are part of your Homelife system.
The
Rules
menu contains all rules you currently have set, as
well as is where you go to create new rules.
The
More
menu contains many functions for management of
your system. Some include: Keypad Codes for security keypad code management, Contacts for who gets contacted in
an emergency or who gets rules-based notifications, and
many more.
Pages - My Home Page
The My Home page provides a snapshot of the key devices on
your Homelife system. From this page, you can view general
status information, arm and disarm your system, as well as access any of your devices or features.
For Addional Support: hp://www.cox.com/homelifesupport 31
Page 32

SUBSCRIBER PORTAL
My Home Page - Devices and Features
Cameras
If you have a camera paired to your system, a camera view automatically displays front and center on your My Home page. By clicking on the Cameras tile you will be able to view live video, capture pictures or 15 second video clips manually from cameras installed in
your home. If you have more than one camera, click the tile for
access to select a specific camera.
Viewing and Capturing Live Video and Pictures
To view live video from the cameras attached to your system
and take pictures or video clips:
1. Click the Cameras tile.
2. Click on a specific camera to see live video from that cam-
era.
3. To capture a picture and save it, click the Take Picture icon.
4. To take a 15 second video clip, click Take Video icon.
5. To delete pictures or video clips, select the image and click
the DELETE button.
6. To save a picture or video clip to your computer, select the
image and click the SAVE button.
Adjust Motion Detection Settings
To adjust the motion sensitivity on your cameras that have built
in motion detection:
1. Click the More menu.
2. Click the Manage Devices tile.
3. From the Manage Devices list, locate the camera you want
to adjust and click the EDIT button.
4. Adjust to High, Medium, Low, or Off.
5. Click SAVE to save the adjusted setting.
Note: This may help minimize getting alerts every time something sways in the breeze or small bugs pass by the camera.
For Addional Support: hp://www.cox.com/homelifesupport 32
Page 33

SUBSCRIBER PORTAL
Security
Shows you your system’s current arm state and is where you
arm or disarm the system.
Arming & Disarming
To arm your system:
1. Click the green Disarmed—Click to Arm tile.
2. Select the Arming Mode.
Away — Everyone is leaving the home.
Stay — There are still people in the home.
Night — Everyone is going to bed. This mode works
the same as Arm Stay except that there is no entry
delay period. If an entry/exit zone is opened
after the system is in the Arm Stay mode, an alarm
sounds immediately.
3. Enter your 4-digit keypad code.
Note: If any of your security zones are faulted, such as if a
protected window is left open, you will be alerted to these
faults at the time of arming. You may choose to bypass a
faulted zone during the arming process by clicking the By-
pass button. Bypassed zones will not be monitored and if
breached, they will not be reported to the Central Monitoring
Station. Bypassed zones will return to their protected state
each time your system is disarmed.
4. The system will countdown to the selected arm state.
To disarm your system:
1.
Click the red Armed tile.
2.
Enter your 4-digit keypad code.
3.
The system will disarm and the security tile will shown as
green and read Disarmed.
Security Zones
Shows the current state of all security devices connected to
your system.
To manage your Security Zones:
1. Select the Security Zones tile.
2. From this screen you can bypass zones by using the ON/
OFF toggle. Bypassed zones will not be monitored by the
Central Monitoring Station when the system is armed and, if
associated with a rule, will not trigger rules.
For Addional Support: hp://www.cox.com/homelifesupport 33
Page 34

SUBSCRIBER PORTAL
Door Locks
If you have a door lock paired to your system, the Door Locks
tile shows the current state of all door locks connected to your
system. If you have more than one door lock, click the tile to select a specific door lock.
To manage your door locks:
1. On the
2. Click the
My Home
Lock All
page, click the
or
Unlock All
Door Locks
tile.
button to control all con-
nected doors at once.
3. Click the tile for the individual lock to lock and unlock an
individual door lock.
Thermostats
If you have a thermostat paired to your system, the Thermostats tile shows the current state of all thermostats connected to
your system, and whether they are set to heat or cool. It also
displays current temperature in the home and the current set
temperature. If you have more than one thermostat, click the tile
to select a specific thermostat.
To manage your thermostats:
1. On the My Home page, click the Thermostats tile. The cur-
rent temperature and set point display on each individual
thermostat’s tile.
2. Click on the Quick Adjust square icon.
3. The current temperature displays, click on the arrows to ad-
just the temperature up or down.
4. Click on an individual thermostat tile and the Thermostat
page displays for you to make other adjustments.
5. Click the snowflake (Cool), sun (Heat), or OFF to set the
mode.
6. Clicking the Fan tile to On runs the fan continuously, or to
Auto to only come on when heat / air conditioning is active.
7. Click the Hold tile to select On or Off.
8. Click the Schedule tile to display VIEW or DISABLE to cre-
ate or disable your thermostat schedules.
For Addional Support: hp://www.cox.com/homelifesupport 34
Page 35

SUBSCRIBER PORTAL
To set a Thermostat Schedule:
1. To create a schedule, click the Thermostat tile.
2. Click the square adjustment icon within Schedule and click
VIEW to display your current schedule or to create a new
one.
3. In the schedule, click on the blue (for cool) or orange (for
heat) dot for each day you want to change any of the set
temperatures.
4. To add a new set-point, click the window in a blank space,
then drag any temperature set points up or down to select
the temperature, and left or right to select the time of day to
begin that setting.
5. When changes are completed, click the check mark to keep
your new setting, or the X to delete it.
6. To duplicate settings, click on the daily schedule you want to
copy, click Copy. Click on the day where you want to paste,
click Paste.
7.
Click the Save button to save and exit out of the schedule.
Lights
If you have a lighting device paired to your system, the Lights
tile displays the current state of all lights connected to your system, on or off. If you have more than one lighting device, click
the tile to select a specific light. The current state of your light
settings displays on the My Home page.
Follow these steps to manage your lights:
1. On the My Home page, click the Lights tile.
2. Click the
All On
or
All Off
button to control all lighting de-
vices at once.
3.
Click the tile for the individual light to turn it on or off.
Note: For dimmable lights, click the square adjustment icon for
the selected light. Then use the slider to adjust the brightness.
CVR Playback
If you have Continuous Video Recording (CVR) added to your
system’s cameras, the CVR Playback tile shows at all times.
Click the tile to select the cameras you would like to capture
24/7 video recordings and view all captured video.
For Addional Support: hp://www.cox.com/homelifesupport 35
Page 36

SUBSCRIBER PORTAL
Help Center
You will be directed to a page with several menus with access
to more specific content to assist you.
DIY Install Guide for information on how to self-install devic-
es to your Homelife system.
FAQs and Videos for commonly asked questions, tips, and
videos.
Troubleshooting for troubleshooting tips for common prob-
lems.
Phone Support for a click-to-call directly to Homelife Sup-
port.
Shop
The Shop tile directs you to the Cox eCommerce store
where you can shop for additional devices to add to your
Homelife system.
Activity
A full accounting of all system activity is available in the Activity
menu. Scroll down to the Filter section to select the activities
that are shown based on alarms, camera motion, zones, troubles, and more. Click within the calendar to select a specific
date to view, up to 30 days in the past
To view captured images from the Activity menu:
1. Select Activity from the menu bar. The displayed screen
lists the pictures and video clips captured manually and automatically (if triggered during preset rule events).
2. Choose a date from the calendar.
3. Select Pictures/Videos from the Filter section.
4. To delete images, select the captured image and click the
DELETE button.
5. To download images, select the captured image and click
the SAVE button.
For Addional Support: hp://www.cox.com/homelifesupport 36
Page 37

SUBSCRIBER PORTAL
Rules
You can set up individual, personalized rules for your home’s
security, lighting, thermostat’s energy usage and more. You can
also setup alerts and notifications for when predefined events
occur, such as receiving a text message when the door opens
between certain hours.
To setup a Rule:
1. Click the Rules menu.
2. To create a new Rule, click the CREATE button and the
screens will walk you through each step to setup a new rule.
3. To disable or remove an existing rule, select the desired
rule, and then either toggle the rule off to temporarily disable
it, or click the REMOVE button to delete it.
4. To make edits to the rule, tap the square adjustment icon
next to the desired setting.
More
Your account settings can be accessed by clicking the More
menu. Here you can view and modify your username and password or access the Getting Started Guide. Selecting the Take a
Tour feature will sign you out of the app and present you with a
tour of the app’s features (also accessible from the sign in
screen).
Keypad Codes
Keypad Codes are used to arm or disarm the system. Multiple
codes can be assigned to track who enters and leaves the
premises.
To manage keypad access codes:
1. Click the More menu.
2. Select Keypad Codes.
3. From this screen you can view current keypad codes, add a
new code or modify current codes.
Note: Before making any changes to existing keypad codes, or
when adding new ones, you will be required to authenticate by
entering the Master keypad code.
For Addional Support: hp://www.cox.com/homelifesupport 37
Page 38

SUBSCRIBER PORTAL
Account
Basic information like username, address, and secret word are
stored here. You can also access system quotas for pictures,
videos and SMS and store alarm permit and expiration information.
To manage Username and Password:
1.
Click the
2. Select
3. Click
More
Account.
menu.
Change Username
4. Enter a new username and enter it again in the Confirm
Username field and click
5. Click
6.
Change Password.
Enter the old password, followed by the new password
save
.
and enter the new password again in the Confirm password field and click
save.
To view or edit your Secret Word:
1.
Click the
2. Select
More
Account
menu.
and scroll to the Secret Word section.
3. Click the View/Edit button.
4. Enter your 4-digit keypad code.
5. Your current Secret Word displays.
6. Click in the text box to edit, type a new word, and click the
SAVE ALL button.
Notes:
Make your Secret Word easy to remember, pronounce and
spell. You will have to give this word verbally to the Central
Monitoring Station.
In the event of an alarm, the Central Monitoring Station
cannot view your passcode; they simply type it into their
console as you speak it to determine if it matches in order to
cancel the alarm.
For Addional Support: hp://www.cox.com/homelifesupport 38
Page 39
SUBSCRIBER PORTAL
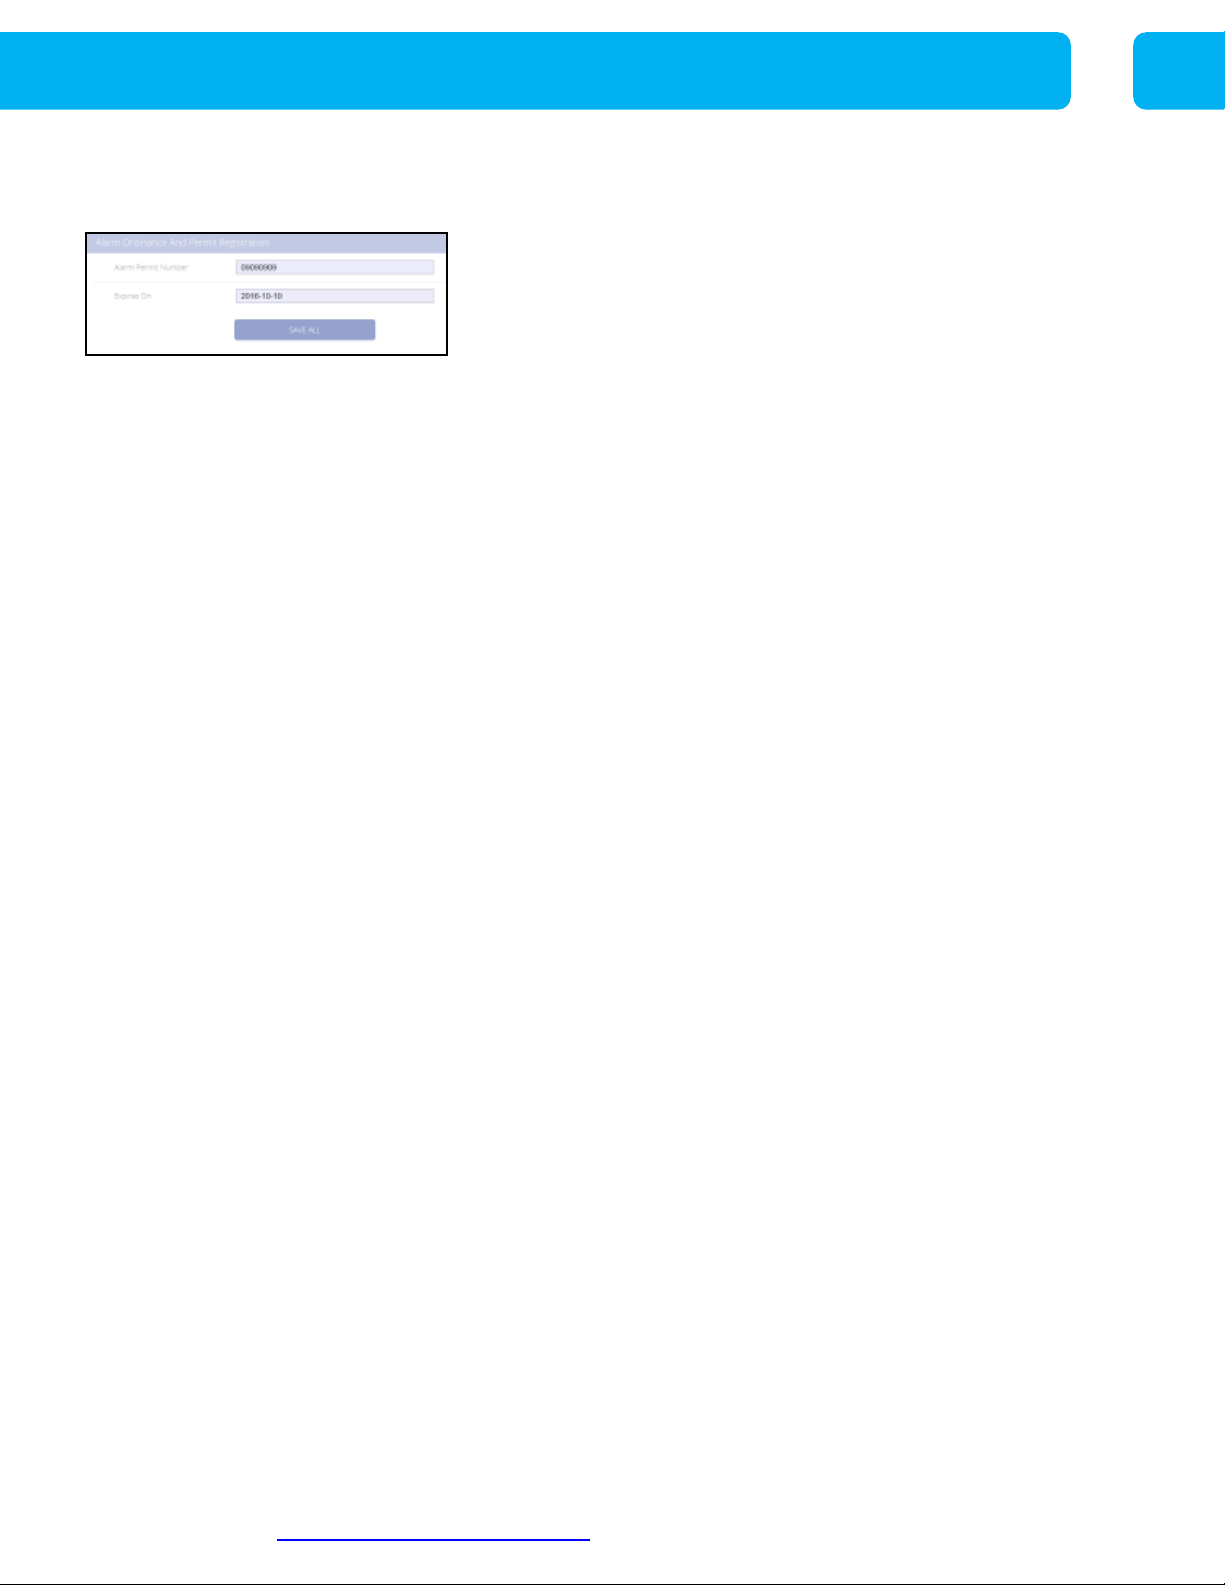
To save your Alarm Permit and Expiration information:
1. Click the More menu.
2. Select Account.
3. Scroll to the Alarm Ordinance and Permit Registration
section.
4. Enter your Alarm Permit Number and Expires On
5. Click the SAVE ALL button.
Note:
This does not file your permit or report it to your municipality. This section serves as a storage place for this information for your reference.
For Addional Support: hp://www.cox.com/homelifesupport 39
Page 40

SUBSCRIBER PORTAL
Contacts
Contacts are the people who get contacted in an emergency or
who gets rules-based alerts or notifications. The two contacts
listed as “Call before police in emergency” can be edited, but
you cannot delete them; they are required. These are the primary contacts that the Central Monitoring Station will call to verify alarms by asking for your designated Secret Word.
The contacts listed as “Call after police in emergency” will be
called after the authorities have been dispatched to the home;
these contacts can be edited and deleted.
Rules contacts are the people you would like to notify via email
or text when certain notification-based rules are executed.
To add Contacts:
1. Click the More menu.
2. Select Contacts.
3. Click the plus icon in one of the three contact lists to add a
contact.
4. Enter a First Name, Last Name, and Phone number.
5. Select if the phone number is home, mobile, or other.
6. Click SAVE.
Note: For Rules Contacts, enter an email address in addition to
the First Name, Last Name and Phone number.
To edit Contacts:
1. Click the More menu.
2. Select Contacts.
3. Click the pencil icon.
4. Make edits and click SAVE.
To delete “Call after police in emergency” or Rules Contacts:
1. Click the pencil icon.
2. Click the Delete button.
3. Click OK in the confirmation dialog box.
Note: You must have two contacts listed in “Call before police
in emergency” who will be contacted prior to dispatching the
proper authorities. These are required and cannot be deleted.
IMPORTANT: Rules Contacts information is not used by the
Central Monitoring Station when an alarm occurs.
For Addional Support: hp://www.cox.com/homelifesupport 40
Page 41
SUBSCRIBER PORTAL
Apps
You can manage which Touchscreen apps are displayed on
your Touchscreen Control Panel, configure them, and determine how they are displayed.
1. Click the More menu.
2. Select Apps.
3. The apps that display on top of the screen are those availa-
ble to be added. The apps displayed in the Touchscreen image are those apps currently displayed on the Touchscreen,
and the apps are positioned in the image just as they are on
the actual Touchscreen.
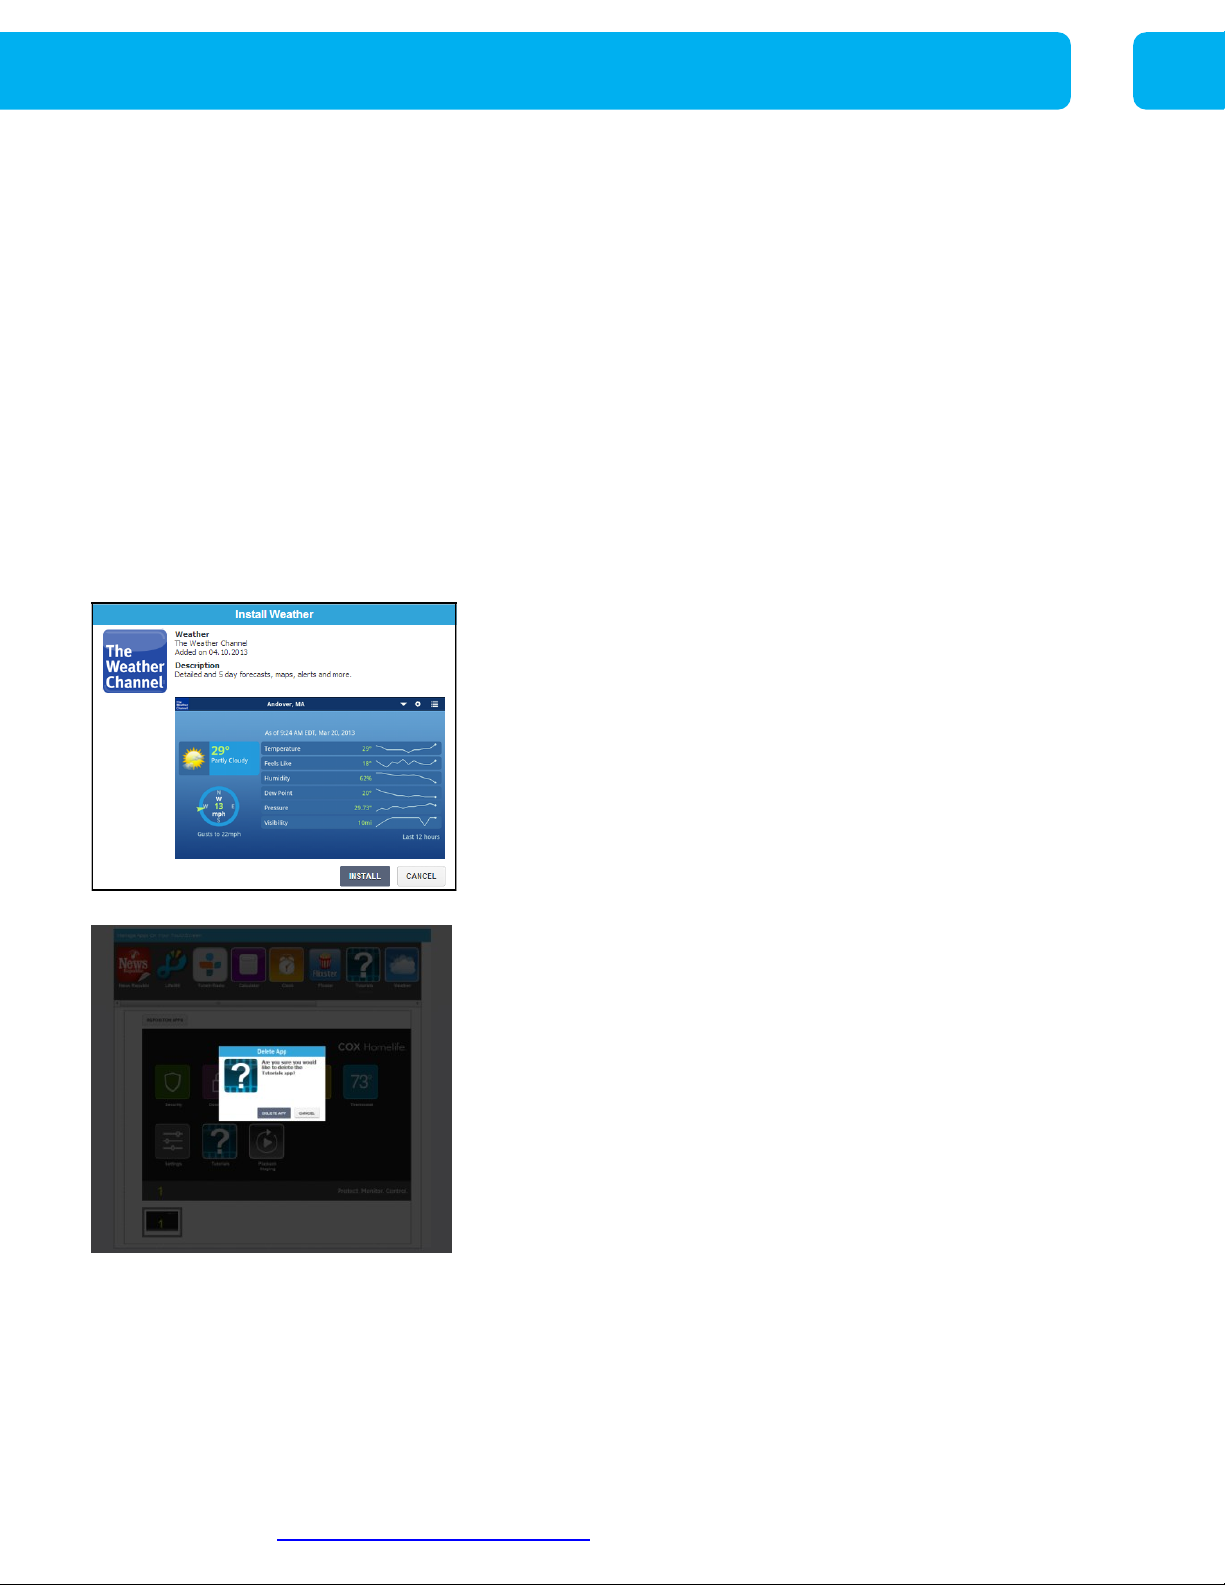
To add Touchscreen apps:
1. Hover your cursor over the app you want to add from the
top menu bar.
2. Click Install and a popup displays with details of the app.
3. To continue with install, click the Install button.
Result: The Subscriber Portal pushes the app to the
Touchscreen. An “installing” message displays while the app is
being added.
To delete Touchscreen apps:
1. Hover your cursor over the app you want to delete.
2. Click Delete.
3. Then click Delete in the Delete App confirmation dialog box.
To reposition Touchscreen apps:
1. Click Reposition Apps to rearrange the apps.
2. Drag and drop the apps to the preferred location on the
Touchscreen.
3. When all the apps are repositioned to your satisfaction, click
Save.
Note: You can change the order in which Touchscreen apps
are displayed on the Touchscreen. All apps, except the Security, Settings, Cameras, Thermostats, and Lights apps, can
be moved to your preferred locations on the Touchscreen.
For Addional Support: hp://www.cox.com/homelifesupport 41
Page 42

MOBILE APP
Mobile App
The iPhone® and Android™ mobile apps allow you to access most security system functions
using your Android device, Apple® iPhone®, iPod Touch® or iPad.®
Download the Android app from the Google Play Store.
Download the iOS app from Apple App Store.
Note
: This application requires your Android™, iPhone®, iPod Touch®, or iPad® to be
connected to the Internet.
SIGN IN SCREEN
SIGNING IN
1.
Open
the Cox Homelife mobile app.
2. Enter your Cox Homelife Username and Password on the
Sign In screen. These are the same credentials you use
when signing in to the online Cox Homelife Subscriber Portal.
Result: Upon the first sign in, you will see a first time user
experience, called Getting Started, to orient you to the app.
Upon all subsequent sign ins the My Home screen displays.
Note: If you forget your Username or Password, click the appropriate link on the Sign In page to begin the process of retrieving your username or resetting your password. Follow the
instructions on the screen or in the email messages associated
with this process to restore your access.
For Addional Support: hp://www.cox.com/homelifesupport 42
Page 43

MOBILE APP
Settings
1.
Open
Note: Make certain the green checkmark displays next to
the Cox server name and if it doesn’t, then tap Cox to move
it from the custom server to Cox server.
2. Accessing Settings from the Sign In page, you can access
things like Cox’s Privacy Policy and Terms and Conditions.
Note: Use the Keep Me Signed in checkbox found above the
Sign In button to save your credentials and automatically sign in
each time you access the Homelife app.
Take a Tour
This function allows customers to see a demo system version of the app. It includes available options that you may
not currently have with your system and you are able to “test
drive” it.
Settings on the mobile app.
Support
If accessing on a mobile phone, this function allows you to
click-to-call Homelife Support directly from the Sign In
screen. If accessing on a tablet, when you tap the Support
icon you will navigate to the Cox.com Homelife Support pages for access to learning and support materials; the Technical Support phone number is also listed.
SECURITY
Remotely control your security system and view current arm/
disarm status.
To arm your security system
1.
On
the My Home screen, tap Security-Disarmed.
2.
On
the Security screen, tap Disarmed – Press to Arm.
3.
The
Choose How to Arm screen displays. Make a selec-
tion based on your present situation.
Tap Arm Stay: Someone is staying in your home.
You may want to arm only certain zones.
Tap Arm Away: No one is staying in your home. You
may want to arm all zones.
Tap Arm Night: Someone is staying in your home.
You may want to arm only certain zones.
4.
Enter
For Addional Support: hp://www.cox.com/homelifesupport 43
your 4-digit keypad code to arm the system.
Page 44

MOBILE APP
Note: The
system provides you
with a countdown,
during which you may cancel the arming process. To
cancel you need to re-enter your 4-digit keypad
code.
To disarm your security system
1.
On
the My Home screen, tap the Security—Armed.
2. Enter your 4-digit keypad code to disarm the system. Once
the system is disarmed, the security tile turns green and
reads Disarmed – Press to Arm.
SECURITY ZONES
Use the following steps to enable or disable Security
Zones:
1. On the My Home screen, tap the Security Zones tile to dis-
play the Security screen.
2. Tap the On/Off toggle button beside each changeable zone
to enable or disable the Security Zone.
Note: Zones that are turned off do not trip alarms when they are
faulted. Fire / Smoke detectors, CO detectors nor Flood Sensors can be turned off. If any Security Zones are currently faulted, preventing the system from being armed, you must toggle
the button to OFF for that zone before arming the system.
DOOR LOCKS
If you have a door lock paired to your system, the Door Locks
tile shows the current state of all door locks connected to your
system. If you have more than one door lock, click the tile to select a specific door lock.
To manage your door locks:
1. On the My Home page, tap the Door Locks tile.
2. Click the Lock All or Unlock All button to control all con-
nected doors at once.
3.
Click the tile for the individual
lock to lock and unlock an
individual door lock.
For Addional Support: hp://www.cox.com/homelifesupport 44
Page 45

MOBILE APP
CAMERAS
The Cameras tile allows you to view live video or captured
pictures and video clips from your cameras.
To view live video from your cameras:
1. On the My Home screen, tap the Cameras tile.
2. The Cameras screen displays, select a desired camera to
view live video, captured pictures, and video clips from that
specific camera.
To Capture Pictures or Video Clips:
1. Tap on a live camera feed.
2. To capture a picture and save it, tap on the Take Picture
icon.
3. To capture a 15 second video clip and save it, tap on the
Take Video icon.
4. To view a previously recorded video clip or picture, tap on
the clip or picture below the live video.
5. To view your other cameras, swipe right or left.
Note: When the Take Picture or Take Video function is performed, a thumbnail of the picture / clip is
added to the thumbnails at the bottom of the screen.
LIGHTS
If you have a lighting device paired to your system, the Lights
tile will show the current state of all lights connected to your
system, on or off. If you have more than one lighting device,
click the tile to select a specific light. The current state of your
light settings is displayed on the My Home page.
To manage your lights:
1. On the My Home page, click the Lights tile.
2. Click the
All On
or
All Off
button to control all lighting de-
vices at once.
3.
Click the tile for the individual light to turn it on or off.
Note: For dimmable lights, click the square adjustment icon for
the selected light. Then use the slider to adjust the brightness.
For Addional Support: hp://www.cox.com/homelifesupport 45
Page 46

MOBILE APP
THERMOSTATS
If you have a thermostat paired to your system, the Thermostats tile will show the current state of all thermostats connected
to your system, and whether they are set to heat or cool. It will
also display current temperature in the home and the current
set temperature. If you have more than one thermostat, click
the tile to select a specific thermostat.
To manage your thermostats:
1. On the My Home screen, tap the Thermostats tile. The cur-
rent temperature and set point display on each individual
thermostat’s tile.
2. After selecting an individual thermostat, on the top of the
Thermostat page, you can tap Off, Heat, or Cool to set the
mode.
3. You can tap the up and down arrow buttons to adjust the
temperature.
4. Tap the fan button to ON to run the fan continuously, or to
AUTO to put it into auto mode, so the fan comes on only
when the heat or air conditioning is active.
5. Tap the Hold button on to maintain the mode and tempera-
ture settings and ignore any programming configured on the
thermostat device.
Setting a Thermostat Schedule:
You may also view, modify, enable or disable any thermostat
schedules you have created.
1. Once you have selected a specific thermostat and you are in
the screen, tap the square adjustment icon within Schedule
and tap VIEW to see your current schedule.
2. To change any of the set temperatures, tap the blue (for
cool) or orange (for heat) dot for each day you want to set.
3. To add a new set-point, tap the screen in a blank space,
then drag any temperature set points up or down to select
the temperature, and left or right to select the time of day to
begin that setting.
4. To adjust an existing set-point, press and drag the dot to ad-
just the temperature up or down to the desired setting, and
left or right to select the time of day to begin that setting.
5. To duplicate settings, select a day and tap the schedule you
want to duplicate, tap Copy. Tap the day where you want to
paste, tap Paste. Continue copying the schedule for each
day you want to duplicate.
For Addional Support: hp://www.cox.com/homelifesupport 46
Page 47

MOBILE APP
6. When changes are complete, tap the check mark to keep
your new setting, or the X to delete it.
7. Exit out of the schedule by tapping SAVE in the top right
corner, and then tap BACK in the top left corner to return to
that specific thermostat’s screen.
HELP CENTER
1. On the My Home screen, tap the Help Center tile.
2. You will be directed to a page with several menus with ac-
cess to more specific content to assist you.
DIY Install Guide for information on how to self-install
devices to your Homelife system.
FAQs and Videos for commonly asked questions, tips,
and videos.
Troubleshooting for troubleshooting tips for common
problems.
Phone Support for a click-to-call directly to Homelife
Support.
Shop
The Shop tile directs you to the Cox eCommerce store
where you can shop for additional devices to add to your
Homelife system.
ACTIVITY
View a log of events that have occurred or were triggered by
the system.
To view the Activity captured by your system:
1. Tap the Activity menu.
2. Choose to view activity events based on the
following criteria:
All — All logged events.
Alarm — Alarm events.
Camera Motion — Motion events.
Door Locks—Unlock/Lock Door events.
Pictures/Video—Saved images from events.
Security System/System — Arm/Disarm events.
Troubles — Device or system troubles
Zone/Sensors — Events related to security zones.
3. Use the calendar in the top right corner to search activity by
date going up to 30 days in the past.
For Addional Support: hp://www.cox.com/homelifesupport 47
Page 48

MOBILE APP
RULES
Create, enable and disable rules with your app.
To manage your rules follow these steps:
1. Tap the Rules menu.
2. To create a new Rule, tap the CREATE button and the
screens will walk you through each step to setup a new rule.
3. When you’re done creating the desired rule tap SAVE and a
message stating that your rule is being saved will display.
4. To disable or remove an existing rule, select the desired
rule, and then either toggle the rule off to temporarily disable
it, or press the REMOVE button to delete it.
5. To make edits to the rule, tap the square adjustment icon
next to the desired setting and tap cancel to discard your
changes or SAVE to save them.
MORE
The More menu offers access to several additional features for
managing your devices and your system.
Manage Devices
View and edit the devices paired to your system.
1. Tap Manage Devices.
2. Click the EDIT button next to the desired device to change
the name of the device.
Note: For motion-enabled cameras you can adjust motion
sensitivity and for lights, you can specify whether it is dimmable or functions only as on/off.
Pages
You can create new pages in which devices can be grouped as
you would like to see them, or delete any new pages you have
created. You cannot delete your primary My Home page.
To create a custom page:
1. Tap Pages.
2. You can create new customized pages or tap on any current
pages to edit.
Note: From your My Home page, swipe left to access and
edit any of the customized pages you’ve created.
For Addional Support: hp://www.cox.com/homelifesupport 48
Page 49

MOBILE APP
Keypad Codes
Control your security system access via keypad codes. This is
where you manage your master, duress and any guest/custom
keypad codes that are used to arm and disarm your system.
To add a new keypad code to be used on your system:
1. Tap Keypad Codes.
2. To add a new keypad code, tap Add.
3. For additional security you will have to enter your master se-
curity keypad code first before creating any new codes.
4. Next, create a name for your new code, select the desired
arming level, and enter your desired 4-digit code. Then select the days this code should be active.
5. Tap SAVE at the top of the screen.
Note: To edit an existing code use the pencil icon and enter
your master security keypad code before editing the code.
Account
Manage your username, password and see home info.
Tap Account.
Basic Information, Quotas and Alarm Registration
You can change your username or password, view the address
of the secured home, view the quotas for pictures, videos, and
SMS messages or enter your Alarm Permit Number.
Central Station Passcode (Secret Word)
Your passcode is used to cancel a dispatch by the Central
Monitoring station in case of a false alarm.
To set up your Central Station Passcode:
1. Scroll to the bottom of the Account screen and click the
View/Edit button.
2. Enter your 4-digit keypad code.
3. Edit the word and click the SAVE ALL button.
Notes:
Make your Secret Word easy to remember, pronounce and
spell. You will have to give this word verbally to the Central
Monitoring Station.
In the event of an alarm the Central Monitoring Station
cannot view your passcode; they will simply type it into their
console as you speak it to determine if it matches in order to
cancel the alarm.
For Addional Support: hp://www.cox.com/homelifesupport 49
Page 50

MOBILE APP
Contacts
Contacts are the people who get contacted in an emergency or
who gets rules-based alerts or notifications.
The two contacts listed as “Call before police in emergency”
can be edited, but you cannot delete them; they are required.
These are the primary contacts that the Central Monitoring Station will call to verify alarms by asking for your designated Secret Word.
The contacts listed as “Call after police in emergency” will be
called after the authorities have been dispatched to the home;
these contacts can be edited and deleted.
Rules contacts are the people you would like to notify via email
or text when certain notification-based rules are executed. In
order to use Rules, you must set up Rules Contacts.
To add Contacts:
1. Tap the More menu.
2. Select Contacts.
3. Tap the plus icon in one of the three contact lists to add a
new contact.
4. Enter a First Name, Last Name and Phone number.
5. Select if the phone number is home, mobile, or other.
6. Tap SAVE.
Note: For Rules Contacts you will need to enter an email address in addition to the First Name, Last Name and Phone number.
To edit Contacts:
1. Tap the More menu.
2. Select Contacts.
3. Tap the pencil icon listed in-line with a specific contact.
4. Make edits and click SAVE.
For Addional Support: hp://www.cox.com/homelifesupport 50
Page 51

MOBILE APP
To delete “Call after police in emergency” or Rules Contacts:
1. Tap the pencil icon.
2. Tap the Delete button.
3. Tap OK in the confirmation dialog box.
Note: You must have 2 contacts listed in “Call before police in
emergency” who will be contacted prior to dispatching the proper authorities. These are required and cannot be deleted.
IMPORTANT: Rules Contacts information is not used by the
Central Monitoring Station when an alarm occurs.
System Settings
Adjust overall setting for your system.
Under General preferences you can enable the app to play
sounds and display temperatures in Fahrenheit (default,
though Celsius is available).
The Account section allows you to view the Cox Communi-
cations Privacy policy, Terms Conditions. You an also specifically Sign Out of the app here. There is also a click-tocall Homelife Tech Support if you accessing from a mobile
phone.
The Sign In Settings gives you the option of logging in with
a four-digit PIN. The PIN will allow you to by-pass the user
name and password while still providing a level of security.
You can also choose to stay signed in and not have to enter
your username or password when accessing your mobile
app. This functions the same as checking “Keep Me Signed
In” on the Sign In screen.
Getting Started
This section will take you through a clickable experience called
“Getting Started” which shows how to use the app. This is
shown upon first login and is available in the More menu if you
like to access it later.
Take a Tour
This function allows customers to see a demo system via the
Subscriber Portal. It will include available options that you
may not currently have with your system and you are able to
“test drive” it without impact to your personal account.
For Addional Support: hp://www.cox.com/homelifesupport 51
Page 52

NOTES
IMPORTANT NOTES ABOUT YOUR COX HOMELIFE SYSTEM
Home Security Permit
Remember to secure a home security permit. Emergency services may not be deployed if a home
security permit is required by your city but is not on file. Please update the Cox Homelife Subscriber Portal or mobile app with your permit number and expiration date.
Passwords
Keep your passwords in a safe, secure place other than this User Guide, and be sure your Secret
Word is easy to remember, pronounce and spell.
Touchscreen Control Panel
Don’t move or relocate the Touchscreen once it has been installed to ensure proper operation.
This can impact your Homelife system’s performance.
Router
The Homelife Security router included in your system should not be changed, including factory settings and cable configuration, nor disconnected unless you’re advised by Cox Homelife Technical
Support.
__________________________________________________________________________
__________________________________________________________________________
__________________________________________________________________________
__________________________________________________________________________
__________________________________________________________________________
__________________________________________________________________________
__________________________________________________________________________
Cox Homelife Support: 1-877-404-2568
For Addional Support: hp://www.cox.com/homelifesupport 52
 Loading...