

Page 1

Cox National E911 Service
Quick Start Guide
This guide instructs you on how to access and use Cox Business National E911 calling features and update
911 dispatchable location addresses.
The following topics are covered:
• How to manage your
primary (fixed) E91
ress
add
• How to manage another
user's primary (fixed) E911
address
• How to manage your
nomadic E911 address
1
• How to manage anoth
u
ser's nomadic E9
ress
add
• How to upload a bulk file
for lines, seats, and trunks
• How to download a bul
911 address information
E
file
er
11
k
• How to build a bulk upload
file using a standard fil
emplate
t
• Common bulk upload file
validation and processing
errors
• E911 calling and
configuration FAQs
Overview
Cox Business provides 911 calling capabilities across voice products that place outbound calls, and which
are consistent with federal, state, and local regulations. Our 911 features help you manage your emergency
location address details, in accordance with RAY BAUM'S Act, Kari’s Law, and other federal and state
regulations. Visit coxbusiness.com to learn more about E911 features.
e: When you purchase Cox Business lines, seats, or trunks, please
Not
review the 911 Practice Statemen
t.
Cox Business Voice Products and 911
Voice service customers have multiple methods to dial 911 and update their physical address. The address
identifies the caller's exact location for emergency responders.
The table b
Business voice product you have, such as IP Centrex, VoiceManager, or PRI and SIP trunking. If you need to
update the E911 address for a device with Unified Communications (UC) Apps or Webex Teams, download
the UC add-on. See the MyAccount User Guide for instructions.
elow outlines tasks related to E911 that you may need to perform based on the type of Cox
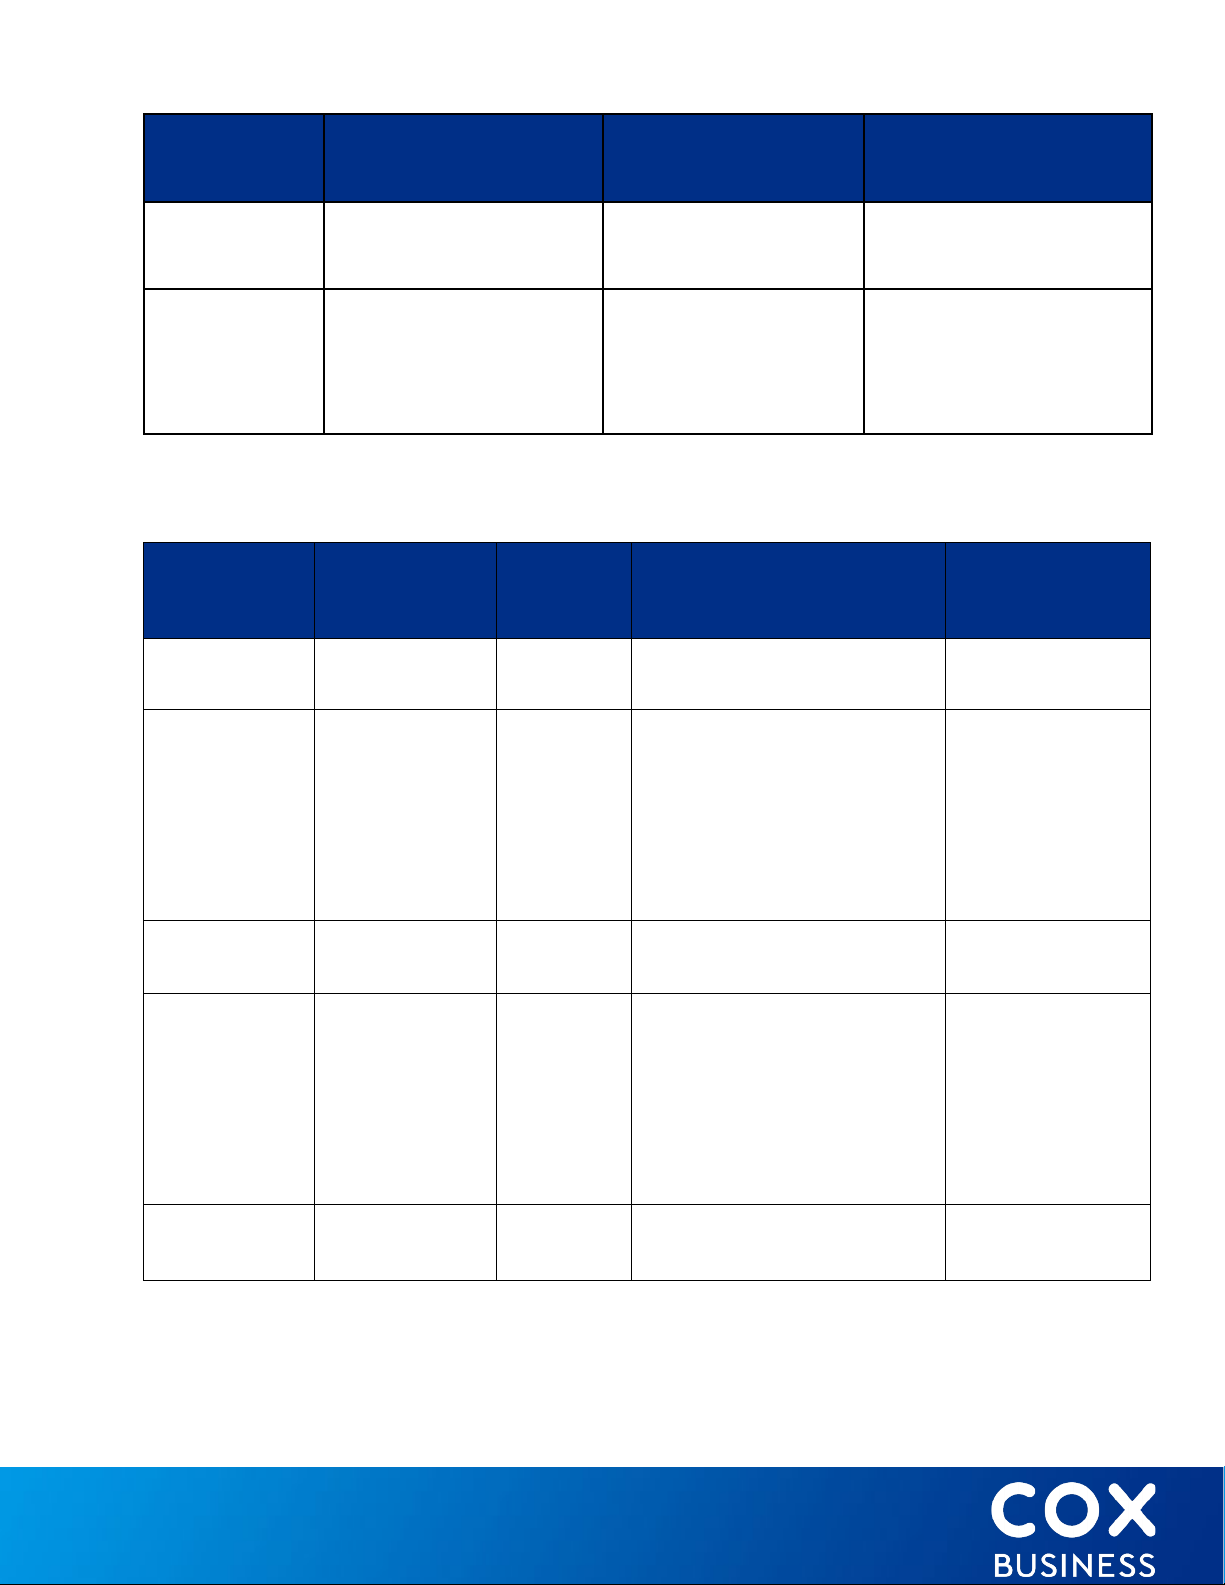
e
If you have this
voice product…
IP Centrex
Seats
And this primary
endpoint…
IP Phone Requires
Teleworker add-on
Or the UC Apps or
Webex Teams
endpoint…
Desktop and Tablet UC
Apps or Webex Teams
(requires the UC add-on)
You need to do the
following for National
Numbers…
Update physical address
and location information
Page 2
If you have this
voice product…
And this primary
endpoint…
Or the UC Apps or
Webex Teams
endpoint…
You need to do the
following for National
Numbers…
VoiceManager
Lines
PRI and SIP
Trunking
Phone numbers attached to Unified Communications (UC) Apps or Webex Teams include a second 911 field
in MyAccount. Here, you can identify the location of your devices such as your laptop, phone, and tablet.
The table below outlines types of updates you can make based on the voice product you use.
If you have
this voice
product…
IP Centrex
Seats
IP Centrex
Seats
Analog handset Desktop and Tablet UC
Apps or Webex Teams
(requires the UC add-on)
911 Updates for trunk BTN
are included. If user needs
DID-level 911 updates, PBX
Handset Requires National
911 for DID feature added
And this type
of endpoint..
Fixed endpoint Yes Update location information
UC App,
Webex Teams,
National
Number or
another
nomadic
endpoint
Then 911
dialing is
included…
Yes Update location information
Not Available Update the physical
And you can use these
options to update your
physical address for 911…
only for IP Handset
only for IP Handset
Update Entire Physical
Location and location
information for National
Number or, UC app or Webex
Teams
Update the physical
address and location
information
address and location
information
So use this portal
to update your
911 address …
MyAccount
MyAccount
VoiceManager
Lines
VoiceManager
Lines
SIP & PRI
Trunks
Fixed endpoint Yes Update Location Information
only for IP Handset
UC App,
Webex Teams,
National
Number or
another
nomadic
endpoint
Fixed endpoint Yes Update Location Information
Yes Update Location Information
only for IP Handset
Update Entire Physical
Location and location
information for National
Number or, UC app or Webex
Teams
only for BTN
MyAccount
MyAccount
MyAccount
Page 3

If you have
this voice
product…
And this type
of endpoint..
Then 911
dialing is
included…
And you can use these
options to update your
physical address for 911…
So use this portal
to update your
911 address …
IP Centrex
Seats
IP Centrex
Seats
SIP & PRI
Trunks
Fixed endpoint Yes Update location information
only for IP Handset
UC App,
Webex Teams,
National
Number or
another
nomadic
endpoint
National DID or
another
nomadic
endpoint
Yes Update location information
only for IP Handset
Update Entire Physical
Location and location
information for National
Number or, UC app or Webex
Teams
Yes Update Entire Physical
Location and location
information for any DID,
including National DIDs
(National 911 for DIDs). Must
order National 911 for DID
feature.
MyAccount
MyAccount
MyAccount
Page 4
How to Manage Your E911 Address Features for Lines, Seats, and Trunks for Fixed Endpoints
Use the following steps to view and edit your
E911 address for a fixed endpoint.
1.
Open MyAccount and enter your user ID and
password.
2.
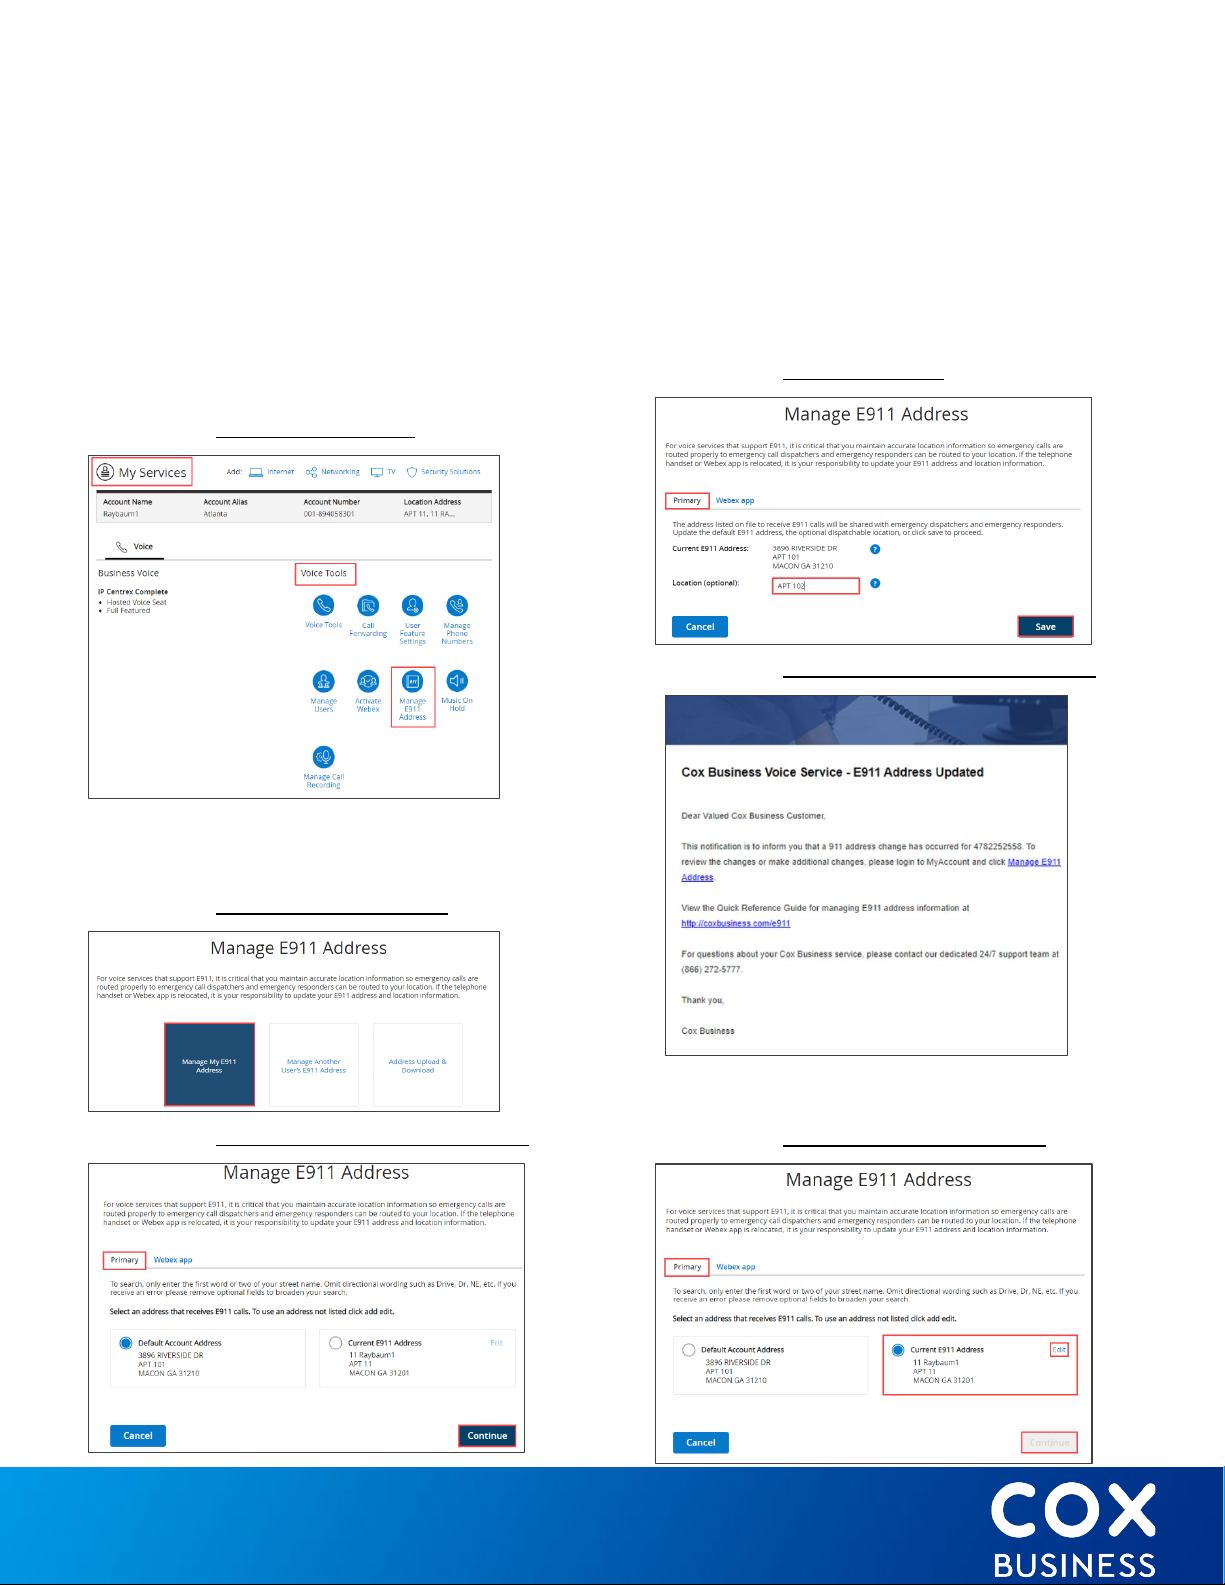
Scroll to the My Services section and click the
Manage E911 Address icon in the Voice Tools
section.
Figure 1. Manage E911 Address
4.
Click the Primary tab and select the Default
Account Address radio button. (Note: You are
allowed to change the Location field only for
a Default address.)
5.
Enter a new Location in the corresponding
field and click Save. (See Figure 4.)
Result: When you update the E911 address
location, you will receive a confirmation ema
(
See Figure 5.)
Figure 4. Change Location
Figure 5. E911 Address Update Notification
il
3.
Click the Manage My E911 Address tile.
Result: The Manage E911 screen appears. (See
Figure 3.)
Figure 2. Manage My E911 Address
Figure 3. Select (Default Account) Address
6.
To manage Current E911 Address, click the
c
orresponding radio button.
Figure 6. Select Current E911 Address
Page 5
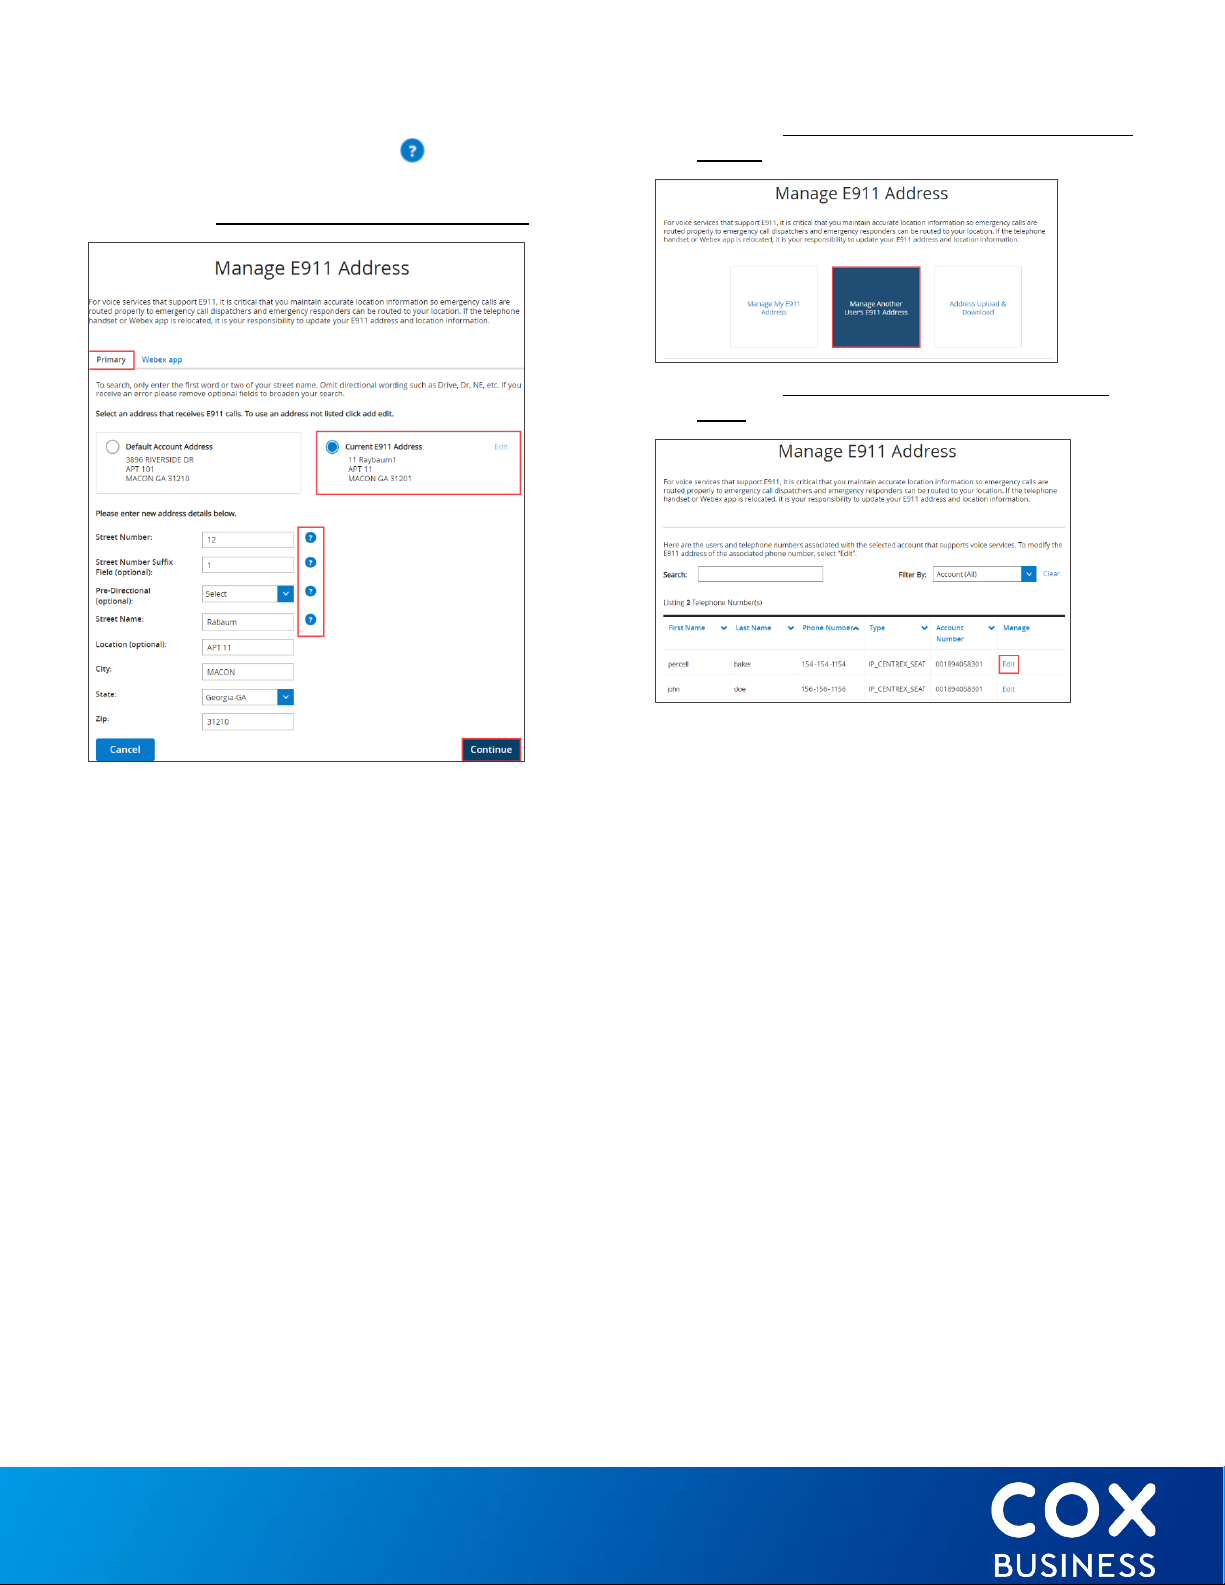
7. Populate the fields as shown in Figure 7. (Note:
Click the question mark icon for assistance
on how to populate a specific field.)
Figure 7. E911 Address Update Notification
Figure 8. Manage Another User's E911 Address
(Fixed)
Figure 9. Manage E911 Address (for Another
User)
8. Click the Continue button.
Result: A second window displays the new
address. (See Figure 4.)
9. Click the Save button. (Important: If the
system cannot find the new address entered,
refine the information to be more specific. If
the refined address can't be located, call Cox
Business Support at
1-866-272-5777.)
How to Manage Another User's E911 Address Features for Lines, Seats, and Trunks for Fixed Endpoints
Use the following steps to view and edit
another user's E911 address for a fixed
endpoint.
1. Open MyAccount and enter your user ID and
password.
2. Scroll to the My Services section and click the
Manage E911 Address icon in the Voice Tools
section.
3. Click the Manage Another User's E911 Address
tile to insert address information for a fixed
endpoint. (See Figure 8.)
4. Locate the person for whom you want to
modify their E911 address and click the Edit
link. (See Figure 9.)
5. Select the type of address you want to modify
(Default or Current E911 Address) and follow
steps 4-9 in the How to Manage Your E911
Address Features for Lines, Seats, and Trunks
for Fixed Endpoints section.
Page 6
How to Manage Your E911 Address Features for Lines, Seats, and Trunks for Nomadic Endpoints
Use the following steps to view and edit your E911
address for nomadic endpoints (mobile devices).
1. Open MyAccount and enter your user ID and
password.
2. Scroll to the My Services section and click the
Manage E911 Address icon in the Voice Tools
section.
3. Click the Manage My E911 Address tile.
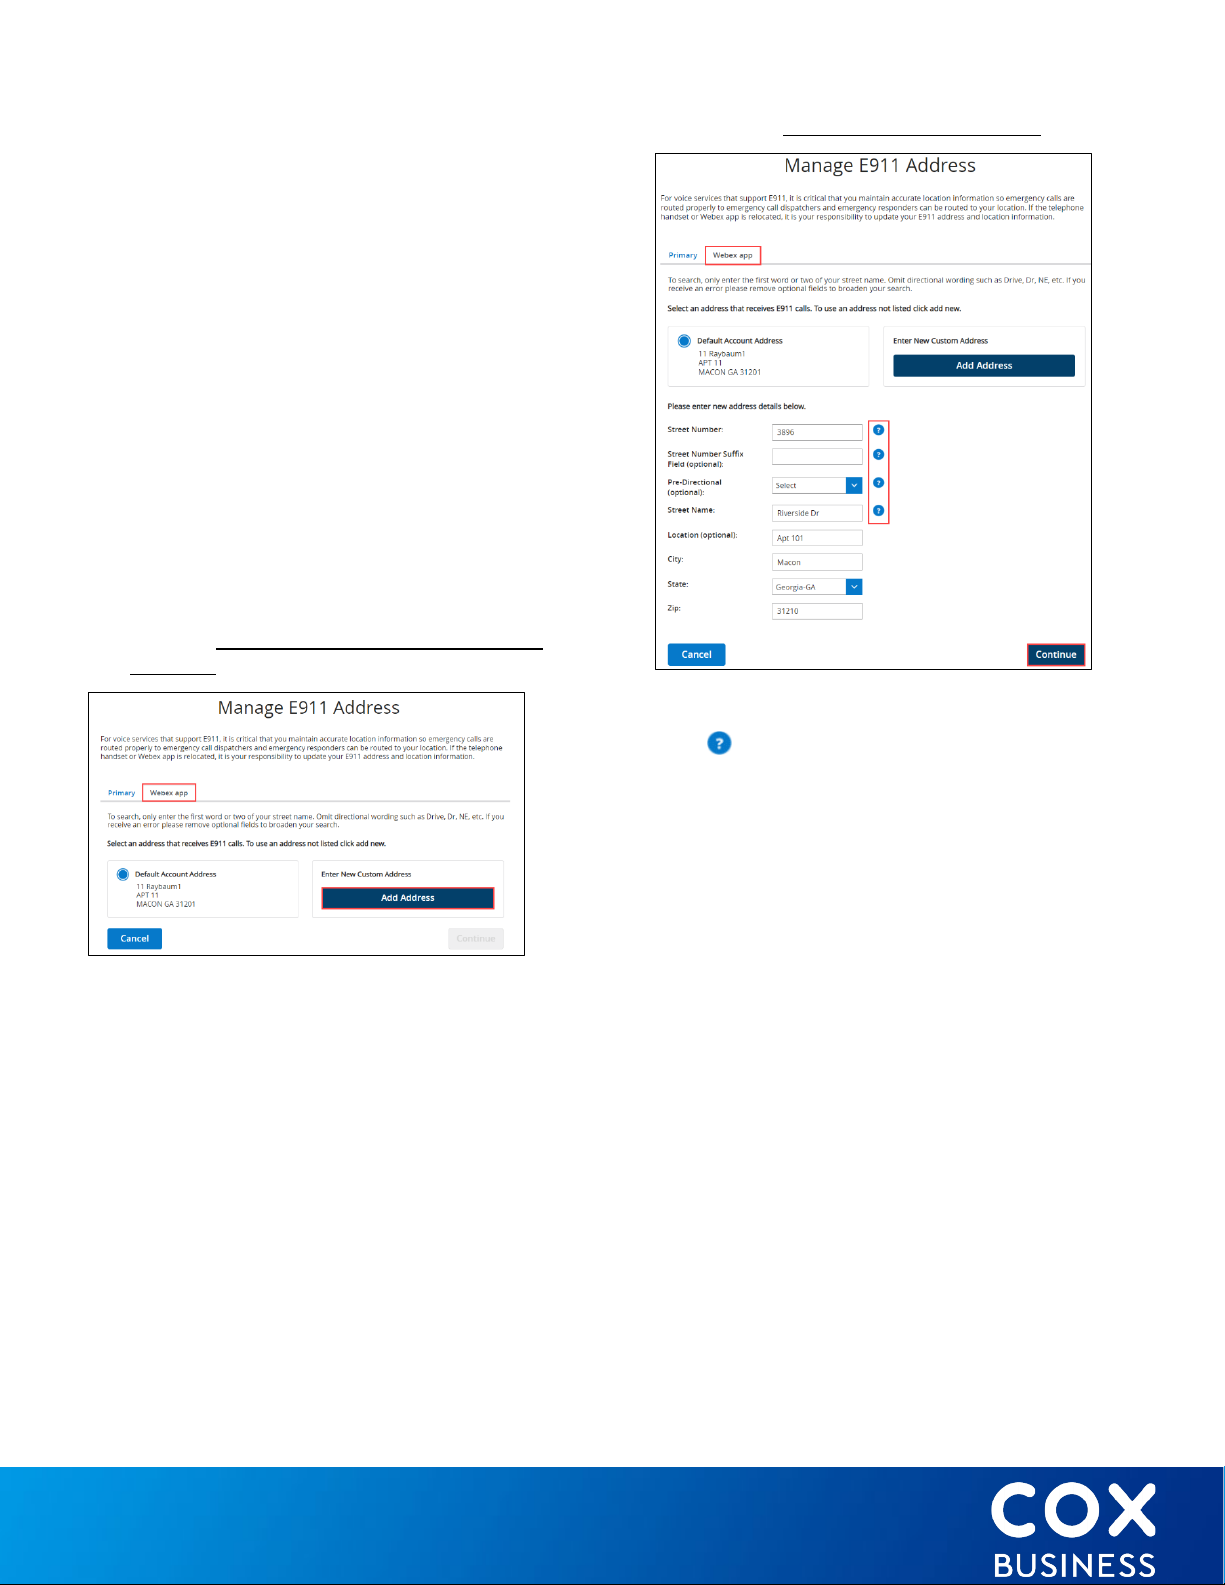
4. Click the Webex app or UC App tab. (Note: A
user can have one nomadic address at a time,
meaning the screen will display the Primary
tab and either the Web app tab or the UC app
tab. The tab you see is based on the app that
was downloaded. In Figure 10, the Webex app
tab displays.)
Figure 10. Manage E911 Address for Nomadic
Endpoint
5. Click the Add Address button.
Result: The Manage E911 Address window
appears. (See Figure 11.)
Figure 11. Add New Nomadic Address
6. Populate the fields and click the Continue
button. (Note: Click the question mark icon
for assistance on how to populate a
specific field.)
Result: A second window displays the new
address. (See Figure 4.)
7. Click the Save button. (Important: If the system
cannot find the new address entered, refine
the information to be more specific. If the
refined address can't be located, call Cox
Business Support at
1-866-272-5777.)
Page 7

How to Upload a Bulk File for Lines, Seats, and Trunks
Note: A voice account must include
National 911 licenses to bulk upload
changes to trunking DID addresses.
Without National 911 licenses, you may
only update address entries for the
main Billing Telephone Number (BTN)
of a SIP or PRI trunk.
Figure 14. Address Upload & Download screen
Before you begin:
Create* and/or save a comma-delimited data file
(.CSV file) that contains lines, seats, and trunks on
your computer.
*To create a bulk file, see Appendix A: Using the
Standard File Template to Build an Upload File for
details.
Figure 12. Standard File Template
Use the following steps to upload a bulk file of lines,
seats, and trunks.
1. Open MyAccount and enter your user ID and
password.
2. Scroll to the My Services section and click
Manage E911 Address icon in the Voice Tools
section. (See Figure 1.)
3. Click the Address Upload & Download tab.
Figure 13. Address Upload and Download
5. Click the Upload button to upload the file.
6. When the bulk file is uploaded and it fails
MyAccount validation, the Bulk file is rejected
and does not continue processing.
Result: The below screen displays error
messages that describe the reason for the file
rejection.
Figure 15. Bulk File Upload Failure Screen
4. Click the Choose File button to select the
.CSV file stored on your computer; and then
click the Open button.
Page 8

7. When the Bulk file is uploaded and it passes
MyAccount validations, the bulk file is routed
to the downstream systems for further
processing. (Note: The screen displays the
number of records processed when the file
has not processed completely.)
Figure 16. Bulk File Still Processing Screen
8. When the file is successfully processed, the
complete status of the bulk file appears.
Figure 17. Bulk File Successfully Processed
Screen
The records processed can have the following
status:
a) Success : Records in the bulk file are
successfully processed
b) Validation failed with hyperlink: Record in the
bulk file are not processed however these
records can be fixed. User can click on the
hyperlink to update the ALI address
c) Validation failed without hyperlink: Records
in the bulk file are not processed and cannot
be fixed by the user. The tooltip displays the
reason for the failure
d) Action required: Multiple addresses are found
for the address entered in the Bulk file .User
action is required to save correct address.
How to Bulk Download 911 Address Information
Use the following steps to bulk download 911
addresses.
1. Open MyAccount and enter your user ID and
password.
2. Scroll to the My Services section and click
Manage E911 Address icon in the Voice Tools
section. (See Figure 1.)
3. Click the Address Upload & Download tile to
download a bulk file. (See Figure 7.)
4. Click the Download tab and select the type of
report you want to see: Current ALI Records
or ALI Record History. (Note: "Automatic
Location Identification (ALI) is an enhanced
electronic location system that automatically
relays a caller's address when they call an
emergency responder service such as 911,
whether they call from a mobile phone or a
land line."2)
Figure 18. Address Download screen
2
https://www.techopedia.com/definition/2925/automatic-
location-identification-ali
5. Click the Download Current ALI Records link.
Result: The Current ALI record screen
appears. (See Figure 19.)
Page 9

6. Click the box to choose one or more records
you want to see and click the PDF or CSV link
to select the format in which you want to view
the report. (Note: Click Select All if you want a
report on all DIDs shown. If you deselect DID
one (1) or more DIDs, the report will not
generate.)
Figure 19. Current ALI Records
Figure 20. ALI Record History
See the next pages for samples of reports in
PDF and CSV format.
7. If you click the Download ALI Record History
link, the ALI Record History screen appears.
8. Click the box to choose one or more records
you want to see and click the PDF or CSV link
to select the format in which you want to view
the report.
Result: The Current ALI Record report
downloads the selected format and contains
the latest ALI record associated with the
endpoint.
Page 10

Report Types and Layouts
Figure 21. Current ALI Records in PDF Format (sample)
Figure 22. Current ALI Records in CSV Format (sample)
The ALI Record History Report will contain the historical log of ALI records associated with the endpoint.
Figure 23. ALI Record History in PDF Format (sample)
Page 11

Figure 24. ALI Record History in CVS Format (sample)
Page 12

Appendix A: Using the Standard File Template to Build an Upload File
Figure 25. Standard File Upload Template
1. Download and then edit the comma-delimited file (extension .CSV) from MyAccount
2. Use the following Action Values to add, change, or delete a 911 address value:
• A or a (add an ALI entry)
• C or c (U or u) or (M or m) (change/update/modify an ALI entry)
• D or d
• Blank action values will be ignored...
• Note: if a transaction file has duplicate records, based on TN/endpoint combination, then only the
last transaction record in the file will be processed.
3. Enter the following required data fields to process each record:
• Action (mandatory)
• Phone Number
(mandatory)
• First Name
• Last Name
• Account Number
4. Double-check the formatting and proper spelling.
5. Save the .CSV file to your computer.
6. Log into MyAccount and perform a bulk upload for 911 address updates. (Refer to How to Upload
a Bulk File for Lines, Seats, and Trunks for assistance.)
• End Point (Primary (or
primary); or UC App or Webex
– U or u… W or w (mandatory)
(Note: blank value for the
endpoint defaults to Primary.)
• Street Number
• Street Number Suffix
• Pre-Directional
• Street Name
• City
• State
• Zip Code
Page 13

Appendix B: Common Bulk Upload File Validation and Processing Errors
When you try to upload a file that contains errors, the Address Upload and Download screen displays a
description of the error associated to the specific Phone Number, Account Number, and End Point.
Figure 26. MyAccount Address Upload & Download Sample Error Screen
e table below contains validation failure messages that display in MyAccount and troubleshooting steps
Th
to resolve.
If you see this error message… Make sure…
Upload failure. File type must be
CSV.
Upload failure. The uploaded file
exceeds the limit of 1,000 records.
Upload failure. The column names in
the header must match the provided
template.
The address file is in .CSV format when you try to
upload.
The file contains no more than 1000 records (under
the header row). Move rows greater than 1000 to an
additional file and load separately.
The first row on the file contains the commaseparated column header. Ensure no updates have
been made to the column header. Download a new
file to ensure you use the most accurate file available.
Page 14

If you see this error message… Make sure…
Missing values in one or more
columns.
Invalid phone number format. All rows have a valid telephone number. Validate
Phone number uploaded does not
belong to your account.
Invalid Endpoint value. The endpoint columns contain the following
Invalid Action Code value.
The file has exactly 15 comma-separated columns on
each row. Ensure all rows have a valid input.
there are 10 digits in each row.
The telephone numbers (TNs) in all rows must
belong to one of the user’s accounts within the
profile.
(in upper or lowercase):
a. Primary or starting with P or p
b. Webex Teams or UC App or starting with U or u
c. Blank (will be interpreted as Primary)
The Action column contains the following codes
only (in upper or lowercase):
a. A (Add)
b. M or C or U (Modify)
c. D (Delete)
d. N/A or blank (*row will be ignored)
<TN> is not a primary endpoint or
<TN> is not a Webex Teams or UC
App endpoint
Upload failure. MyAccount validation
fails at the time of uploading a file.
No Address Found. The address data is not missing from any of the
Validation failed. Deletion of ALI
record for a fixed endpoint is NOT
allowed. You may only delete ALI
record for a DID.
Validation failed. ALI record has NOT
yet been created for this fixed
endpoint.
That the endpoint(s) in all rows are valid for that TN.
One or more entries require modification. Error must
be corrected, and the file must be re-uploaded.
applicable columns.
The row contains an Action code D only for DID(s).
The row contains Action code A, M, C, U only for a
Fixed endpoint that has an existing ALI record.
Page 15

If you see this error message… Make sure…
Validation failed. The number of
purchased licenses is equal to the
total number of ALI records that
exist in the system.
ALI record for this TN cannot be
edited since it exists on the legacy
database.
No ALI record found. (Note: If the
telephone number has no initial
record, typically during a new
install, this message appears.)
File contains no data. The file contains all data and re-uploaded.
The row contains DID with in-use license is less than
MBQ.
The endpoint is provisioned on Broadsoft and is not
part of the Legacy PS/ALI service.
You wait 24-48 hours after a new install before you
upload updated dispatchable location details.
Terms to Know: MSAG/MSAG ADDRESS
What is MSAG?
MSAG (Master Street Address Guide) is a database of street names and house number ranges within
their associated communities that define Emergency Service Zones (ESZs), and their associated
Emergency Service Numbers (ESNs) to enable proper routing of 911 calls.
What is a MSAG Address?
A MSAG address is recognized by Public Safety for the dispatch of emergency first responders. It is an
absolute and unique address in that variants for directions, street spelling, street suffixes, and
community names are not allowed. It is preferred that MSAG Addresses be in Civic Address format.
The community name associated with this address format is assigned by the Addressing Authority in
cooperation with the 911 Administrator and may or may not be the same as the community name
assigned by the USPS. MSAG addresses are used to route 9
Note: T
country. This is generally attributed to legacy system limitations that have
continued as operational practices on the part of 911 administrative entities. As
a result, two sub-tending MSAG definitions are needed.
he MSAG address data format is not standardized throughout the
11 calls and for ALI display.
Page 16

Appendix C: E911 Calling and Configuration FAQs
What is Kari’s Law?
H.R. 582, commonly known as Kari’s Law Act of 2017, "amends the Communications Act of 1934 to
prohibit businesses from manufacturing or importing for use in the United States, or selling or leasing
in the United States, a multi-line telephone system unless it is pre-configured to allow users to directly
initiate a call to 9-1-1 (without dialing any additional digit, code, prefix, or post-fix, including any trunkaccess code such as the digit '9') from any station equipped with dialing facilities.
Businesses are prohibited from installing, managing, or operating multi-line telephone systems
without such a direct 9-1-1 call configuration."
1
What does the legislation require in support of Kari’s Law?
The legislation required to support Kari's Law states no dialing prefix or access code is allowed when
dialing 911.
New Multi-Line Telephone Systems (MLTS), such as Unified Communications (UC) or Webex
applications, must allow users to dial 911 without requiring any prefix, post-fix or trunk access code.
For IP Centrex and VoiceManager, the prefix, post-fix or trunk access codes are not required.
SIP Trunking and PRI are dependent on the customer’s PBX rather than the product provided by Cox,
so Cox is restricted to change how the systems function. All Cox Business voice customers are
notified about the requirements of Kari’s Law.
How does a user configure the method of emergency messaging notification they will receive when 911
is dialed?
The customer must access MyAccount and update the 911 Notifications section.
How many emails and telephone numbers can be set up in MyAccount to receive notifications?
The customer can enter up to three (3) different email addresses or mobile phone numbers for each
phone number/seat. One (1) email/mobile phone number will be selected as the primary notification
contact. Only one notification is available per seat.
What ar
e the notification methods?
Email, text/SMS messages, and phone calls can be used for notification methods when a 911 call is
placed from an account.
What is the SMS notification content?
SMS notification content includes:
• call time
• call date
• originating phone number from the device type used with the E911 address
• street number, street number suffix, pre-directional, street name
• location: city, state, zip
• Account Number
• Account Service Address
1
https://www.congress.gov/bill/115th-congress/house-bill/582
Page 17

Can a customer turn OFF 911 notifications?
Yes. Both, email and text messages can be turned OFF and ON in MyAccount.
Text messages can also be turned off by replying to the 911 notification text with “stop”. Replying
with “stop” will turn off all notifications to that particular mobile phone number and not just 911
notifications.
After sending “STOP,” the message, "You have unsubscribed for all Cox SMS notifications. Manage
notification settings using MyAccount at
If you stop SMS two (2) times via text, you must wait 30 days before you can enable SMS messages
again and the following message appears in MyAccount: "After sending a STOP message, re-enable
SMS notification can only occur once every 30 days. Please try again later or use a different number."
If the same mobile phone number is used for multiple individuals, turning it off for one user will impact
all users. No one will receive notifications when it is turned off for one user.
W
hat if a user responds to a notification with “Help”?
If a user responds to a notification with "Help," they receive the message, "Manage notification
settings using MyAccount at www.coxbusiness.com/myaccount."
o receives the 911 call notifications?
Wh
The preferred contact will receive a generic message alerting of the 911 call.
All email notifications are based on the customer calling group that the business sets up. Select users'
preferred contact information is set up to receive 911 notifications. When a customer within the calling
group dials 911, all email addresses and/or mobile phone numbers receive a notification.
www.coxbusiness.com/myaccount" appears.
What do t
he 911 email and SMS notification include?
The emergency address—as delivered to the PSAP (public-safety answering point)—and the
customer’s account service address are included in the notification.
Figure 27. E911 Email (sample) Figure 28. E911 SMS (sample)
©2020. Cox Communications, Inc. All rights reserved. 1120
 Loading...