

Page 1

Cox Digital Telephone
®
Enjoy making more calls with a crystal-clear connection. Chat with friends
and family on a service that has all of your favorite features, including ones
to simplify your life.
57
Page 2

Dial In On a Better
Home Phone Service
Cox Digital Telephone® is reliable, affordable, full of additional benefits and
is a fresh alternative to traditional phone service.
TV Caller ID
// See who’s calling right on your TV, then decide to take the call or continue watching your favorite shows
from the comfort of your sofa.
*
Phone Tools
// Manage and check your Voice Mail, view your call history, have your home Voice Mail messages converted
to text and sent instantly to your email with Readable Voice Mail and more.
Cox Mobile Connect
// Manage your home phone from anywhere. See who has called and listen to your Voice Mail.
Backup Power
// To receive service in the case of a power outage, you may purchase a battery as backup for your modem.
To learn more, visit www.cox.com/battery.**
*Advanced TV is required for TV Caller ID
**Lifeline customers will receive a free battery
Page 3

Get It All Working with Phone Tools
SM
Phone Tools is an exciting feature available to Cox Digital Telephone® customers for no extra charge.*
Getting started is easy!
// To get to Phone Tools, go to www.cox.com/PhoneTools.
// Sign in with your User ID and Password. Don’t have
a User ID and Password? Please refer to page 4.
Manage your phone while on the go:
Manage your home phone from anywhere with the
Cox Mobile Connect App. Cox Mobile Connect allows
you to view call logs and change phone settings like
Call Forwarding and Call Waiting. See page 5 or
welcome.cox.com/phone/features/tools for details.
* Access to some Phone Tools functionality may require subscription to additional phone features. In all markets outside of FL, GA, Roanoke, and Baton Rouge, customer must sign
in to Phone Tools to activate call log history. Other restrictions may apply.
With Phone Tools you can:
// Activate Readable Voice Mail to transcribe and
forward home Voice Mail messages to up to five
email addresses.
// Access, play and save Voice Mail messages
securely from any web-enabled computer so
you’re never out of touch.
// Enjoy feature control so you can turn on or turn off
Call Waiting, Call Forwarding and Do Not Disturb.
// Reset your Voice Mail password.
// Check your call history.
// Turn off Voice Mail.
61
Page 4

Easy Steps to Cox Voice Mail
and Readable Voice Mail
With Cox Voice Mail, you can retrieve your messages by calling your Voice Mail number, using Phone ToolsSM
online, through email with Readable Voice Mail or on your smartphone with Cox Mobile Connect.
Initial Voice Mail Activation:
// From your home, dial your home phone number or *298
// Next, you will hear a greeting that asks you for your temporary PIN. Your
temporary PIN is ‘269266’ or ‘COXCOM’. Enter your temporary PIN and press #.
// You will be asked to select your default language. Press 1 for English
or 2 for Spanish.
// Set a new PIN for your account. Your PIN must be between four and eight
numbers. Enter your new PIN and press #.
(Your PIN )
// Next, you will be asked to record your name
// Finally, you will be asked to either record a greeting or select the default system
greeting that all callers to your mailbox will hear.
NOTE: Your initial setup must be done from your Cox Digital Telephone
®
line. To
turn off voice mail log into phone tools and turn to off position. Where applicable,
if you have Caller ID Block on your line, you will need to press *82 prior to dialing
*298 to temporarily suspend the block.
Turn on Readable Voice Mail:
1. Log into Phone Tools
2. Select ‘Settings’
3. Select ‘Voice Mail’
4. Select ‘Voice Mail Notification Options‘
5. Select ‘Change‘
6. Select ‘On‘
7. Enter the email address where you
would like your Voice Mail message sent
8. Select ‘Audio‘ and/or ‘Text‘ to receive
your recorded Voice Mail and converted
text in an email
9. Select ‘Submit‘
63
Page 5

Voice Mail Instructions
Send a message to a distribution list
// To send a Voice Mail message, press
// Enter the ten-digit number or
distribution list number
Change Number of Rings
You can change the number of rings on
your Cox Voice Mail at any time. The
default number of rings is four. To change
the number of rings:
// Lift the handset and listen for
the dial tone
// Press
// Listen for the distinctive stutter
tone, then the regular dial tone
// Select the number of rings
(2–9) on your phone keypad
// Listen for the confirmation tone
and hang up
Retrieving your messages
Whenever you have unplayed messages,
you will hear a distinctive stutter tone when
you pick up your home telephone or see
the message waiting indicator on your
handset. You can access your messages
from home or away.
When calling from your home phone
// Call your home number. When prompted,
enter your PIN and press
// Or dial *298. When prompted, enter your
PIN and press
When calling from any other line:
// Call your home number
// When your greeting begins, interrupt
by pressing
// When prompted, enter your PIN
and press
Check your messages
// To play your messages, press
// To respond to a message, press
// To delete a message, press
// To save a message, press
// Deleted messages are set to save
prior to hanging up. To recover a
deleted message, simply review the
saved message and re-save before
hanging up.
Playback options
// To pause/resume playback, press
// To rewind the message four
seconds, press
// To review a previous message, press
// To fast forward the message four
seconds, press
// To play message date and time, press
// To set message as new, press
Distribution lists
// To work with a distribution list, press
from the main menu and follow
the instructions
Page 6

To record your:
// All Calls Greeting, press
// No Answer Greeting, press
// Busy Greeting, press
// After Hours Greeting, press
// Extended Absence Greeting, press
// Name for the Default System Greeting,
press
Automatic callback
After listening to a message in your mailbox,
you can elect to call back the number of the
caller who left the message.
To do so, press
NOTE: Returning long-distance phone calls using Cox
Voice Mail functionality will result in Cox long-distance
charges being assessed, even if you currently have a
Toll Restrict service on your account. Callback does not
work on international or 900/976 calls.
Message Notifications
With Message Notifications, you will be
notified when you receive a message in
your mailbox. Press for Message
Notification Options.
// Your Options are:
Notification preferences
Outdial notification
Reminder service
// To schedule a one-time reminder,
press
// To schedule a daily reminder,
press
Customizing your voice mailbox
// To change your mailbox PIN,
press from the main menu
// To re-record your name, press
from the main menu
// Return to main menu, press
// To back up or cancel, press
// To record or manage your
greeting, press
// To change your message notification
options from the main menu, press
// To manage business hours/days, press
// To confirm message deletion, press
Using greetings
Your mailbox can have five different personal
greetings. Each greeting can be programmed
to play during a specified time throughout
the day. From the main menu, press to
enter the Greetings Menu.
Some features are not available in all Cox areas.
Voice Mail Instructions
Page 7
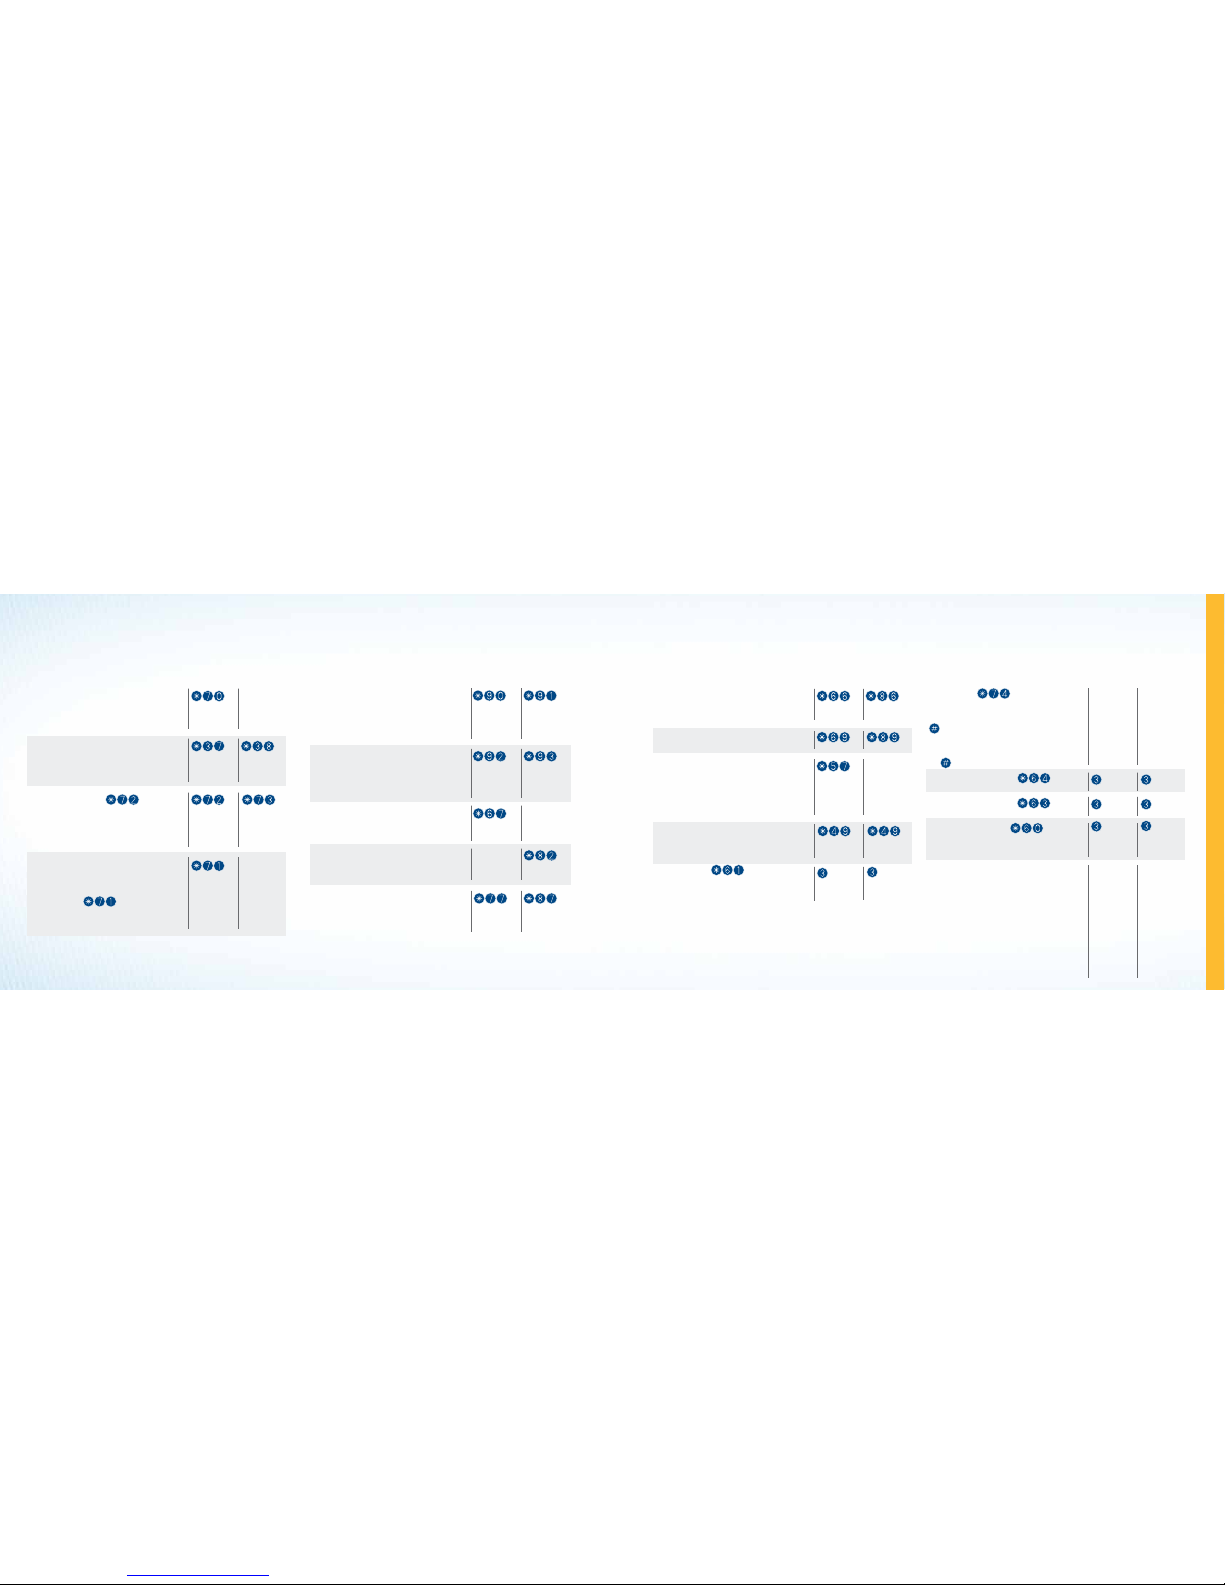
Busy Line Redial
Special call back ring alerts you when the line
becomes free. Lift the handset and the call will
automatically be dialed.
Call Return
Calls back the number of the last incoming call
Call Trace
If a nuisance call is received, press and release
the switchhook. Listen for special dial tone. Wait
for a confirmation announcement that call has
been traced.
NOTE: An additional charge will apply, and records will
only be released to the police department.
Long Distance Alert
^
Incoming long-distance calls will have a
distinctive ring or a distinctive Call Waiting tone
indicating that the call is long distance.
Priority Ringing
Listen for an announcement telling you if the
feature is currently on or off. Follow the voice
instructions.
Speed Calling
Listen for dial tone. Press a one-digit speed code
(numbers 2–9 on handset). Enter phone number
you wish to assign to that speed code. Press the
key. Confirmation will be three stutter dial
tones then silence.
To place call: Lift the handset and listen for dial
tone. Dial the one-digit speed code, then press
the
key.
Selective Call Acceptance
Follow the voice instructions.
Selective Call Forwarding
Follow the voice instructions.
Selective Call Rejection
Listen for an announcement telling you if the
feature is currently on or off. Follow the voice
instructions.
TV Caller ID
See who’s calling right on your TV, and it’s
completely FREE for Cox Advanced TV and Cox
Digital Telephone® with Caller ID subscribers.
Decide to take the call or continue watching
your favorite shows from the comfort of your
sofa. Press the ‘Menu’ button, scroll down and
select ‘Caller ID.’ Manage your features:
• Call History: Display up to your last 10 calls
• Caller ID Status: Turn the feature on and off
• Banner Duration: Control how long the
banner stays on the screen when you
get a new call
To turn service
ON press:
To turn service
ON press:
To turn service
OFF press:
To turn service
OFF press:
To cancel
call back
The Ins and Outs of Managing Your Calls
Call Waiting Disable
Confirmation will be two fast busy tones, pause,
then dial tone. Turn off Call Waiting before you
place your call. Now your call will not be
interrupted by incoming calls.
Call Waiting / Call Waiting ID
Combines Caller ID and Call Waiting. A special
tone alerts you to a waiting call, and you receive
a visual display of the name and number of the
person calling.
Call Forwarding**
Listen for dial tone. Dial
and the
number to where you want your calls forwarded.
Confirmation will be a stutter dial tone then
regular dial tone.
Three-Way Calling**
To add a third person: While on a call, press and
quickly release the switchhook. Listen for the dial
tone. If you subscribe to this service on a monthly
basis, dial another person’s phone number.
Otherwise, press
and then dial another
person’s phone number. Then, press and quickly
release the switchhook. You will be billed for the
service per call.
Call Forwarding Busy**
Listen for dial tone. Dial the number to where
you want your calls forwarded when your line
is busy. When the phone is answered, your
Call Forwarding is in effect. Confirmation will be
a stutter dial tone then silence.
Call Forwarding No Answer**
Listen for dial tone. When prompted, dial number
of desired rings allowed before the call is
forwarded. Dial the number to where you want
your calls forwarded. Confirmation will be
a stutter dial tone then regular dial tone.
Caller ID Per-Call Blocking
Dial the number. The person you call will
not be able to see your number on their ID
display screen.
Caller ID Per-Call Blocking
Dial the number. The person you call will
not be able to see your number on their ID
display screen.
Anonymous Call Rejection
When activated, any callers who have blocked
their number from Caller ID display will hear
an announcement that you do not accept
anonymous calls.
To turn service
ON press:
To turn service
ON press:
To turn service
OFF press:
To turn service
OFF press:
†
‡
Listen for
confirmation tone
then hang up.
Call Forwarding is
now off. Calls will
ring normally to
your phones.
Listen for
confirmation tone
then hang up.
Call Forwarding
Busy is now off.
To temporarily
suspend service
Confirmation
will be two fast
busy tones then
dial tone
Confirmation
will be two fast
busy tones then
dial tone
Listen for
confirmation tone
then hang up.
Call Forwarding
No Answer is
now off.
* Some features may not be available in all areas. Features based on phone service subscription. **May incur toll charges.
†
If you are located in the following markets: Baton Rouge, Macon, Gainesville, Pensacola, or Roanoke, use
*
370.
‡
If you are located in the following markets: Baton Rouge, Macon, Gainesville, Pensacola, or Roanoke, use *380. ^For customers located in Baton Rouge, Macon, Gainesville, Pensacola, or Roanoke, Long Distance Alert is
not a supported feature in these areas.
69
Page 8

Need additional help? Refer to page 8 or go to welcome.cox.com for customer support.
Troubleshooting
Q // I have no dial tone. What should I do?
A // Check the connection from the wall to the equipment.
// Check the phone jacks to make sure they are all securely connected.
// Next, check the lights on the phone modem. Are they blinking, flashing or off?
// The lights are off:
• This usually means there is no backup battery, the battery is exhausted, or the unit has
not been plugged into a power source.
• Check to see if the power cord is plugged into a working power outlet or power strip.
• If there is a battery and the power cord is plugged into a working power outlet or
power strip, the backup battery may need to be replaced. Visit cox.com/battery
to learn how to order a battery.
// The lights are blinking:
• If all the lights are blinking on the Internet & Telephone Modem, it may be picking up
some interference from your house phone wiring.
• Try plugging one of your phones directly into the back of the Internet & Telephone Modem
where it is labeled ‘Line 1’ or ‘TEL 1⁄ 2.’ If it’s still an issue, give us a call.
// The lights are flashing:
• If the TEL light(s) on the front of the Internet & Telephone Modem are flashing, this means the
modem sees the phone as ‘In Use.’
• Check all the phones to make sure they are hung up properly.
Q // How do I reset the Internet & Telephone Modem?
A // Sometimes resetting the Internet & Telephone Modem will re-establish communication
once it has been lost.
// Locate the small ‘Reset’ button on the back of the Internet & Telephone Modem. It is a small
hole that a pen tip or paperclip should fit into.
// Press the ‘Reset’ button once and release immediately. All the lights should go off on the front
and slowly begin to load back up.
// When the TEL 1 and TEL 2 lights stop blinking, the Internet & Telephone Modem is fully reset.
71
 Loading...