

Page 1
How to get started with
Cox Digital Cable
SM
Page 2

Welcome to Cox
Thank you for choosing Cox Communications, the most trusted
provider of communication and entertainment services in the
Greater New Orleans area. You’ve made the right decision with Cox!
Superior Technology
Our network is 100% digital and that means sharper images, crisper sound
and greater bandwidth. We’ve got award-winning phone service, the fastest
Internet and On DEMAND—digital television with premium, subscription and
free programming for anytime viewing.
Trained Professionals
Cox field technicians are job trained and certified. Our customer care agents
are responsive and will inform you about our products, resolve issues and
keep hold times to a minimum. Plus, our employees are local—they live and
work in the Greater New Orleans area and that’s good for our local economy.
Convenience and Savings
Nothing beats the convenience of dealing with just one bill from one company
for all of your communication needs. Cox was the first company to bundle cable
television, Internet and telephone in one package. Bundling saves you money
and makes your life easier.
Parental Controls
Today’s mass media offers a wealth of entertainment and educational
information, but it may not be suited for everyone in your household.
That’s why we offer free Parental Controls to block television content or
access to inappropriate websites. Learn more at www.cox.com/takecharge
You’ve really made the right decision by choosing Cox. We’re the most trusted
provider of communication and entertainment services in Jefferson, Orleans,
St. Bernard and St. Charles Parishes, and you’ll always get the best products,
services and support from us. Call us at 504-304-8444 or visit www.cox/Louisiana
Sincerely,
Your friends at Cox Communications
Page 3

Table of Contents
Cox Services ..............................................................................................4-5
How To Read Your Monthly Statement ..................................................6-8
Entertainment Equipment and Home Wiring ...................................... 8-9
Payment Options .................................................................................. 10 -11
EasyPay Authorization Agreement
for Automatic Bill Payment ........................................................................12
Terms and Conditions ................................................................................13
Digital Cable
Welcome to Digital Cable ...........................................................................14
Digital Cable Remote Control ....................................................................15
Digital Cable Features ...........................................................................16-20
On DEMAND ................................................................................................21
Digital Video Recorder (DVR) ...............................................................22-27
High-Definition Service from Cox ..............................................................27
Connecting Your Cox Digital Cable .....................................................28-29
Connecting Your Cox DVR ....................................................................30-31
Connecting Your Cox HD Cable ..........................................................32-34
Digital Cable Installation .......................................................................35-38
Troubleshooting .....................................................................................38-39
Page 4

As the third-largest cable provider in the nation, Cox Communications LLC is
noted for its high-capacity, reliable broadband delivery network and superior
customer care. For Cox, it’s not about being the biggest; it’s about being the
best. Our vision is to be the most trusted provider of communication and
entertainment services in America.
Cox offers an array of advanced digital video, high-speed Internet and
telephone services over its own nationwide IP network. Forget about dealing
with different communications providers. Cox Communications is your one-stop.
Cox Services include:
Video
Cox Cable – all the major networks, local channels, national news, weather
and much more:
• Up to 75 channels of the most popular networks including ESPN, CNN, USA,
The Disney Channel, The Weather Channel and more
• Local channels at no additional cost
• Free standard service on all additional TVs
Cox Digital Cable – your best choice for all the latest entertainment
• Over 240 channels of exciting sports, must-see movies and award-winning
original series
• On DEMAND – movies, shows and videos at your ngertips anytime you want
it! Plus local programming you can’t see anywhere else.
• On screen Interactive Program Guide allows you to search programming by
title, time and theme
• Your favorite premium channels – HBO, Cinemax, Starz, Showtime and TMC
• Parental control options
Cox HD (High Definition)
• Free HD programming including your local Hi-Def channels and more HD
networks being added all the time
Cox DVR (Digital Video Recorder) – allows you to watch your favorite
shows when you want, on your schedule – even all your favorite HD shows.
*
Automatically record your favorite programs, pause live TV for up to an hour,
create your own instant replays, tape two shows at one time – and the best part –
no videotapes are required! Never miss your favorite show again!
* An HD TV receiver or CableCARD and HD TV set required.
Cox Services
4
4
Page 5

High Speed Internet
Always-on connection with speed to download and upload in seconds, not
minutes. Packages and pricing to t every need – the right, safe, affordable
Internet access.
PowerBoost® – technology that gives you a boost of speed when downloading
or uploading videos, photos, music and any large files
Cox Home Networking – share your Cox Internet Connection with up to 4
computers in your home wirelessly
Free Cox Security Suite
SM
powered by McAfeeTM – provides anti-virus, anti-spam,
identity protection and much more
Make the most of your High Speed Internet experience with options like
Cox Rhapsody Music Service, Media Share and Store, and Remote Dial Access.
Digital Telephone
Savings, convenience and reliability with local, long distance and international
calling.
• Popular calling features like Call Waiting, Caller ID, 3-Way Calling, Voice Mail
and much more.
• Phone Tools – exclusively from Cox – allows you to control your phone from any
Internet-connected computer. Forward your phone, listen to voice mails, see
history of incoming and outgoing calls, plus much more.
• Join over 2.5 million customers who rely on Cox for their telephone service.
• Bundle your Cox services (Video, High Speed Internet and Telephone) and
get the best services, at the best price all on one bill – save money and time!
Choose the bundle that is best for you and you’re sure to save big over what
you would spend buying the same services individually. You can always add
services to any bundle!
For more information regarding these services and how to save money when you
bundle Cox Services, call 504-304-8444 or visit www.cox.com/Louisiana
5
For the most up-to-date and detailed information visit: www.cox.com/Louisiana
Pricing, fees, etc. subject to change.
5
For the most up-to-date and detailed information visit: www.cox.com/Louisiana
Pricing, fees, etc. subject to change.
Page 6

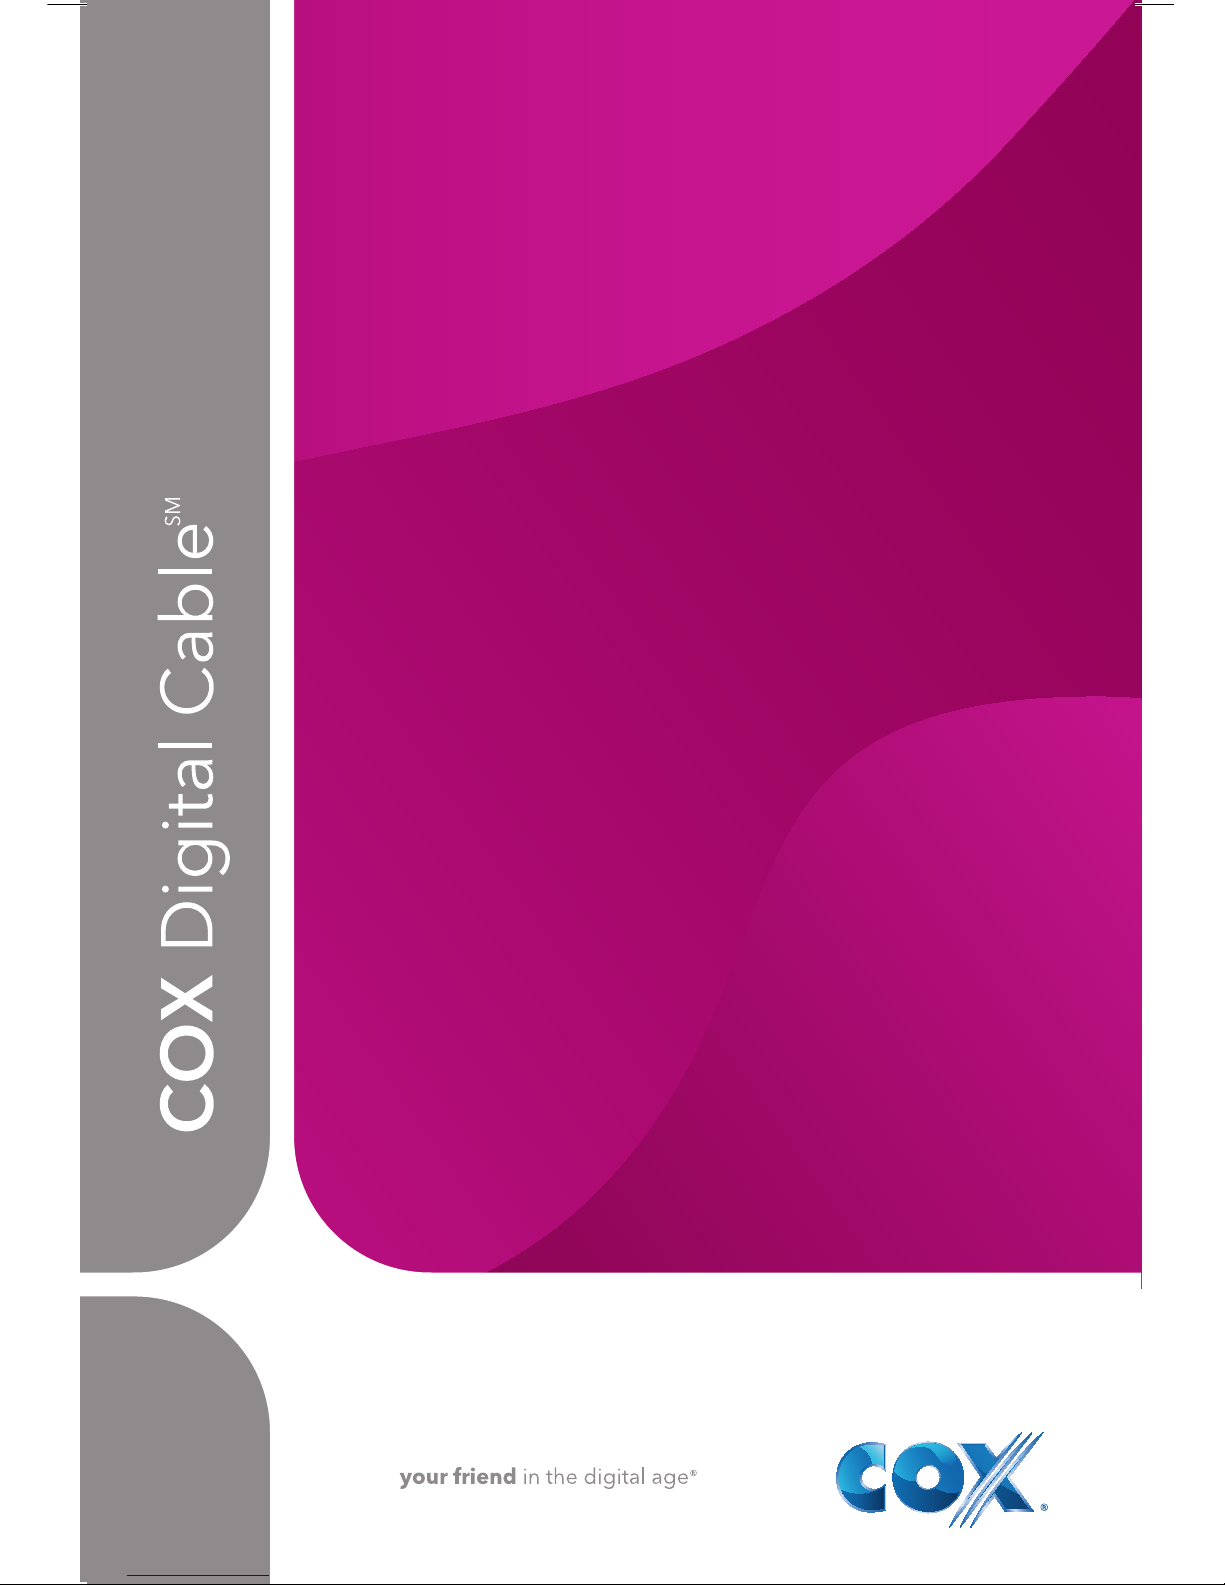
Receiving a monthly statement should not be cause for confusion. At Cox
Communications, our goal is to make things easy for you by providing you
with the convenience of one bill for all your communication needs. For your
convenience, we have outlined and broken down each section on your
statement. If you should have any further questions, as always, you can contact
Customer Service or visit www.cox.com/Louisiana/billingsupport
Date statement was produced.
Your account number.
Please write this number on your check or money order and on all correspondence.
All transactions during the past month.
Included are last month’s previous balance, payment received and current charges.
Total due.
This total includes current month’s charges and any previous balance on the account.
Due date of payment.
Please pay bills by the payment due date to ensure that your payment will appear on the following
month’s statement. Payments received after this date will be included on your next statement.
Current billing period.
Service from (date) – service to (date).
How to reach us – our phone number for your convenience.
Messages from Cox – Important messages and reminders.
Messages are updated monthly. Be sure to read for important information.
Please keep this portion of the statement for your records.
What’s New From Cox: Special offers, savings, opportunities, events and promotions. Be sure to check
the back of the bill each month for additional information.
Our local address.
Payment Coupon – please remove the bottom portion of the statement and remit with your payment.
Your service or billing address.
Please be sure we have your correct name and address. Corrections should be mailed separately to our
office, not to the payment return address.
Payment return address.
Be sure this address shows through the window of the return envelope.
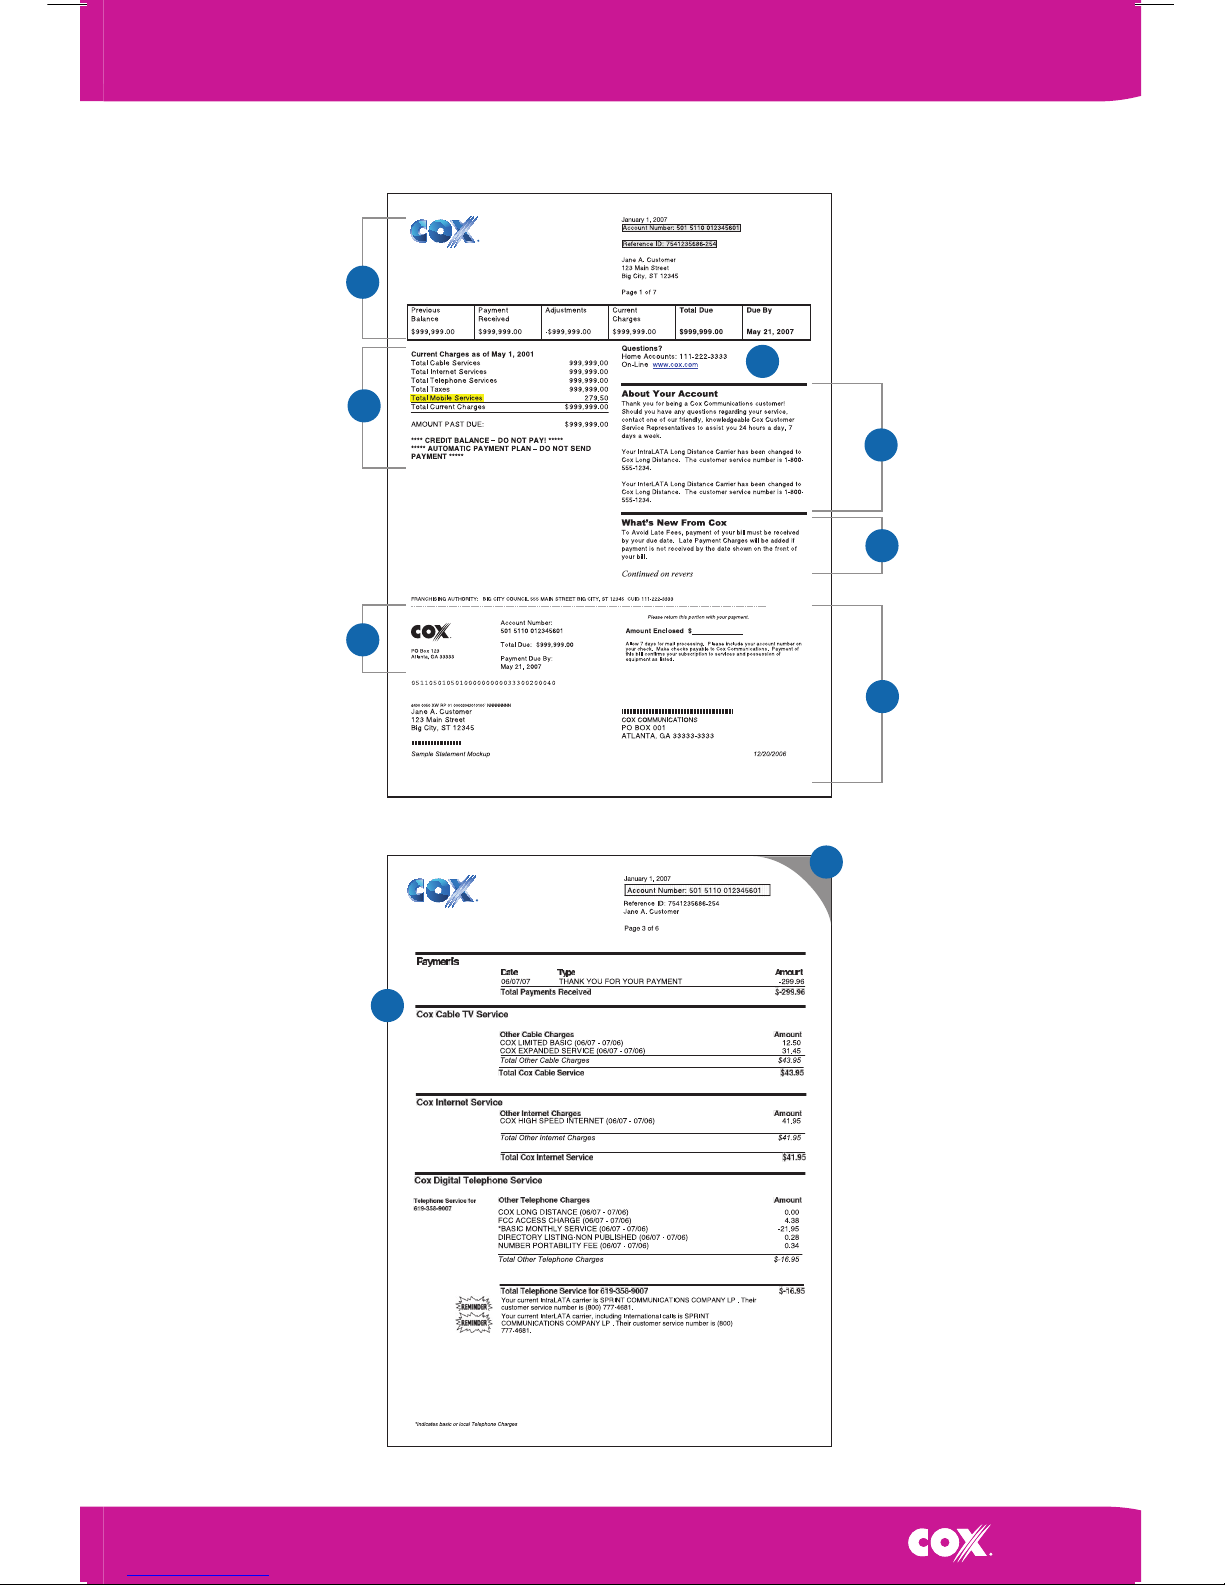
Your bill is printed on both sides.
Monthly activity: Details of transactions during this period.
All services are billed one month in advance. The first bill may include
prorated charges and will be higher than a typical charge for one month.
A
B
G
C
D
E
F
I
H
How to Read Your Monthly Statement
6
6
Page 7
monthly
statement
monthly
statement
C
I
B
D
E
G
F
H
A
7
For the most up-to-date and detailed information visit: www.cox.com/Louisiana
Pricing, fees, etc. subject to change.
7
For the most up-to-date and detailed information visit: www.cox.com/Louisiana
Pricing, fees, etc. subject to change.
Page 8

How to Read Your Monthly Statement (continued)
Change of Services and Charges
Cox Communications will notify you of any changes in services, programming,
equipment and rates. This notification can take the form of billing inserts,
statement messages or other broadcast media.
Payment for Service
Our service is provided on a convenient monthly basis. Your first statement
will reflect installation fees and first month service charges. If your service is
disconnected due to unpaid bills, you’ll have to pay all past-due charges,
a reconnection fee, a collection fee and one month’s advance charges before
we reconnect your service.
Billing and Complaint Procedures
Any billing errors or requests for credit must be brought to our attention
within 30 days of the time you received the bill in question. If we have to use
a collection agency or take legal action to collect the money you owe us,
you’ll be responsible for all reasonable fees including attorney and court costs.
NOTE: If you have a billing dispute with us, you must continue to pay your bill
while the dispute is being researched.
Entertainment Equipment and Home Wiring
Cox Service Assurance Plan (CSAP)
With the Cox Service Assurance Plan, you won’t have to worry about costly
repairs. Your coverage includes all home interior wiring to televisions,
telephones and high-speed Internet modems. Plus we will diagnose any
problems, show you how to get the most out of your equipment, and make
sure your Cox services are trouble-free.
What does the Cox Service Assurance Plan cover?
> All video and audio cable installed by Cox Communications.
> Replacement of fittings, splitters, amplifiers and outlets installed or existing
in accordance with accepted industry standards.
> Damage caused by animals chewing on interior or exterior wiring.
> Customer education as it relates to Cox-provided services and equipment.
> Verifying faulty customer equipment (TV, DVD player, splitter).
> Fine tuning and auto programming TV.
> Cable cut by accident while doing yard work.
What is not covered by the Cox Service Assurance Plan?
> Changing batteries in the remote control.
> Installation of home entertainment systems.
> Customer-installed additional outlet with poor reception or picture.
> Replacement or repair of TVs, DVD players, etc.
> Damage to wiring or equipment resulting in gross negligence or
willful damage.
> Installation of new outlets or relocation of outlets.
> Failed self-installations for analog, digital, DVR or high-speed Internet services.
8
8
Page 9

What is the benefit of the Cox Service Assurance Plan?
Without the Cox Service Assurance Plan, you may be charged for a service call related
to an issue that is not caused by Cox’s service and/or equipment. The cost of the Service
Assurance Plan is $6.99/mo. for video, high-speed Internet and telephone service.
Home Wiring Policy
Cable customers own and are responsible for maintaining cable wiring within their
homes. Also, you have the right to install and maintain additional cable outlets. Here’s
what you should know about Home Wiring:
1. Cable Home Wiring is defined as the internal wiring located within your premises or
living space.
2. Cable Home Wiring does not refer to the wiring outside your home or in the common
areas of multiple dwelling unit buildings (e.g.: apartments, condominiums).
3. The point of demarcation (the point at which the service enters your area or living
space) for a single-family home is approximately 12 inches outside the wall of your
premises or individual dwelling unit.
Customer Options
You can now control who installs the internal wiring for cable outlets and who maintains
the cable past the point of demarcation (the point at which the service enters your area
or living space). Following are several options:
1. You may have Cox Communications install and/or maintain your additional outlet(s).
2. You may install and/or maintain your own additional outlet(s) past the point of
demarcation.
3. You may hire another vendor to install and/or maintain additional outlet(s) past the
point of demarcation.
Equipment Policies
EQUIPMENT includes the following: receiver, remote control unit, security device,
EMTAs, modems, A/B switch, coaxial cable, parental lock-out device, and any other
equipment used to provide your Cox services. Because you’re responsible for loss
or damage to the equipment in your home, you should consider including it in your
homeowner’s, renter’s or other insurance coverage.
We will repair any problematic equipment at no charge. However, if you or persons
within your control damaged the equipment, either television or non-cable TV related
equipment, you may have to pay for the cost of repairs.
Cox Communications does not service televisions, VCRs or any other equipment not
owned by Cox. All equipment and parts [outside of your home] used to install your
cable TV remain the property of Cox Communications and can be removed by us if
you cancel your service or for non-payment of your bill. When you cancel your service,
you’re responsible for returning leased equipment such as receivers and remote
controls in working order—normal wear and tear is accepted. If you do not return the
equipment to us, or if you bring it back damaged, you’ll be charged based on the
schedule of charges then in effect for such items.
Private Viewing
Your cable service is provided for your enjoyment and cannot be broadcast in
areas open to the public. Our programming cannot be rebroadcast, transmitted or
performed, nor may admission be charged for its viewing without written consent,
in advance, from our programming suppliers.
9
For the most up-to-date and detailed information visit: www.cox.com/Louisiana
Pricing, fees, etc. subject to change.
9
For the most up-to-date and detailed information visit: www.cox.com/Louisiana
Pricing, fees, etc. subject to change.
Page 10

We understand how busy and hectic your life can be. To help accommodate your
busy schedule, we provide several options for paying your bill. Besides mailing
your payment with the detachable portion of your monthly statement, you can
visit any of our payment locations or customer service locations. And if you’d
rather not leave the comfort of your home, you also have the option to pay online
at www.cox.com/Louisiana or sign up for our EasyPaySM program (see page 12).
Mail Your Payment
Mail your payment with the detachable portion of your bill to:
Cox Communications
P.O. Box 9001080
Louisville, KY 40290-1080
Pay Online
If you’re a residential customer, you can view and pay your bill online at
www.cox.com. For your protection, you’ll need your user ID and a password
to view your account information. To view a demonstration of our bill pay
procedure visit www.cox.com/Louisiana
Set Up Automatic Payment with EasyPay
Save a check. Save a stamp. Save time! Guarantee your payment arrives on
time! Our bank talks to your bank or credit card company, and your bill will be
paid each month, on time and well within the payment window. Your payment
will appear on your monthly statement so you can keep track of it. Sign up
online at www.cox.com/Louisiana or complete the enrollment form on page 12
and mail to your local Cox Communications office,* attention EasyPay program.
*See address on your Cox billing statement.
Payment Options
10
10
Page 11

Cox Retail Service Center – New Orleans
3131 Elysian Fields Ave.
New Orleans, LA 70122
Mon–Fri: 8am – 6pm; Sat: 9am – 1pm
Drive Up
Mon–Fri: 8am – 6pm; Sat: 9am-1pm
Cox Retail Service Center – Westbank
5029 Lapalco Blvd., Marrero, LA 70072
Mon–Fri: 8am – 6pm; Sat: 9am – 1pm
Cox Retail Service Center – Airline
2121 Airline Dr., Metairie, LA 70001
Mon–Fri: 8am – 6pm; Sat: 9am – 1pm
Drive Up
Mon–Fri: 8am – 6pm; Sat: 9am – 1pm
Cox Retail Service Center – Destrehan
4 Storehouse Ln., Destrehan, LA 70047
Mon–Fri: 8am – 6pm
Directions: River Rd. to Ormond Blvd. to
Storehouse Lane. Right on Storehouse Lane.
Service Center is on the left behind the EZ Serve.
When you just want to speak to someone face-to-face, visit one of our
Digital Store offices:
For the most current information on hours of operation at the Digital Store
locations, please visit www.cox.com/support/louisiana/contact/locations.asp
Visit Cox Communications Digital Store locations to drop off equipment, make a
payment or find out more about our services! Some offices also have drive-thru payment
windows for your convenience.
Digital Store Locations
Please call us at 504-304-8444 or visit one of our Digital Store locations for
more information on payment options.
Local Payment Options
In addition to our Digital Store locations, you can visit any of the participating
local payment locations in your area to make a payment.
Log on to www.cox.com/support/louisiana/contact/locations.asp to view a list
of payment locations.
11
For the most up-to-date and detailed information visit: www.cox.com/Louisiana
Pricing, fees, etc. subject to change.
11
For the most up-to-date and detailed information visit: www.cox.com/Louisiana
Pricing, fees, etc. subject to change.
Page 12

Please fill in the information and sign below.
EasyPay Authorization Agreement for Automatic Bill Payment
Name ________________________________________________________________________________
(exactly as it appears on bank/credit card account)
Cox Account # ________________________________________________________________________
Street Address ________________________________________________________________________
City __________________________________________________ State ____________ Zip __________
Home Phone _________________________________________________________________________
Email ________________________________________________________________________________
Select Payment Type: Bank Credit Card
If Bank is checked above, please fill out the following:
For Checking Account (PLEASE INCLUDE A VOIDED CHECK) or Savings Account
Routing and Account # __________________________ – _____________________________________
Bank Name ___________________________________________________________________________
City/State of Bank _____________________________________________________________________
If Credit Card is checked above, please fill out the following:
Account # ____________________________________________________________________________
Master Card Visa Discover American Express
Expiration Date:_______________________________
I hereby authorize Cox Communications to charge or debit my credit card/checking/savings account indicated above for the
total amount due each month for my Cox services. I understand that I can cancel my participation in this program upon written
notice to Cox Communications, allowing a reasonable time for action on my cancellation notice. I understand that I have the
right to stop automatic payment by notifying my financial institution prior to the time my account is charged or debited. I also
understand that Cox Communications and/or my financial institution can cancel my enrollment in this program at any time.
I understand that Cox Communications may charge me a fee for any unpaid charges returned to Cox and/or denied by my
financial institution for Cox services.
Signature ___________________________________________________ Date ___________________
Please allow 30-60 days after enrollment for EasyPay automatic payments to begin. Look for this message on your bill
statement:
Please do not pay. Your account will be debited when due. Until you see that message, continue to pay your
Cox bill as usual. Cox services not available in all areas. Customer may stop an EasyPay payment by timely notifying his or her
financial institution before account is debited or charged. EasyPay program enrollment will remain in effect until revoked by
customer, Cox Communications or customer’s financial institution. Customer must notify Cox Communications in writing of
any decision to cancel enrollment in EasyPay program, allowing reasonable time for action on cancellation notice. Certain
restrictions may apply. EasyPay is a service mark of Cox Communications. ©2008 Cox Communications, LLC. All rights reserved.
12
12
Page 13

Terms and Conditions
Reconnects
In order to reconnect service, you would need to pay for any outstanding balance owed, any account
deposit (if required), a reconnect/reactivation fee, and for the first month of service. Any interruption
of service due to non-payment will result in additional fees charged to reactivate services.
Delinquent Accounts
For any accounts that become 45 days past due, a notice is sent; for accounts that are 55 days past
due, equipment is disabled; and for accounts that are 65 days past due, service is disconnected.
When to Pay Your Bill
Your payment is due by the Due By date indicated on your statement. If Cox does not receive
payment for local and long distance Telephone charges by the Due By date, your account will
become past due. If you have other Cox services, and Cox does not receive payment for those
services in full by the Due By date, those services will also become past due. If your telephone and/
or other Cox services are disconnected for non-payment, you must pay the entire bill, restoration fee
and reconnect charges. You will also be required to pay a deposit.
Late Payment Charge
For Telephone Service
If payment is not received by the
Due By date indicated on the first page of your statement, a late
payment fee of 5% of the total unpaid balance, calculated monthly, may be charged.
For High Speed Internet Service
If payment is not received by the
Due By date indicated on the first page of your statement, you
will be subject to a late fee on your High Speed Internet service bill.
For Cable
If payment is not received by the
Due By date indicated on the first page of your statement, you
will be charged a late fee; if the account remains unpaid for 13 additional days your account will be
charged an additional late fee.
Check Return Charge
If your check is returned for non-sufficient funds, you expressly authorize your account to be
electronically debited or bank drafted for the amount of the check plus any applicable fees. The use
of a check for payment is your acknowledgment and acceptance of this policy and its terms and
conditions.
Returned Check Fee
(subject to change)
The fee for a returned check is $25.
Deposit Refunds
Account deposits are refunded automatically to our customers who meet the following criteria:
must be a subscriber for a minimum of 12 months and must be in good standing (e.g.: no late fees,
insufficient funds, etc. within the last 12 months). Deposit refunds, with interest, are applied to the
customer’s account ledger reflecting the deposit with the applicable refunded interest earned. At
the time of refund your initial deposit will be refunded plus interest. The interest will be calculated
from the 90 day Commercial Paper rate published by the Federal Reserve Board. When applied, the
descriptions will appear on your monthly statement as separate line items
Applied Deposit for the
interest paid on the deposit refund. If there are current charges on the account, the deposit refund
will be applied to the current balance as of the date the deposit refund was issued. If there are no
current charges on the account the deposit refunded will appear as a credit balance. If your service is
disconnected, interest through the disconnect date for the deposit will be reflected on your monthly
statement.
13
For the most up-to-date and detailed information visit: www.cox.com/Louisiana
Pricing, fees, etc. subject to change.
13
For the most up-to-date and detailed information visit: www.cox.com/Louisiana
Pricing, fees, etc. subject to change.
Page 14

Welcome to Cox Digital Cable from Cox Communications,
where you’ll experience 100% digital crystal-clear
picture and sound, hundreds of
channels and the ability to watch
what you want, when you want—
all at your fingertips.
In this section you’ll find the basics so you can start
enjoying Cox Digital Cable quickly. But if you have
any questions, we’re here to help.
> Access to More Than 240 Channels
Discover a world of exciting programming
where there’s always something for everyone, including a variety of news, sports,
movies, kid’s entertainment and
premium channels (HBO, Cinemax, Showtime, Starz and TMC).
> Interactive Program Guide
The easy-to-use guide makes finding just what you’re looking for a breeze, even up to
seven days in advance!
> Movies On DEMAND
Start watching movies instantly and choose from timeless classics to the latest box-office
hits, all with the push of a button. Plus, you can pause, rewind or fast-forward with your
Cox Digital Cable remote control.
> Premiums On DEMAND
Premiums On DEMAND is free with your Premium channel subscription. Enjoy your
Premium channels around your schedule. On DEMAND, featuring HBO, Cinemax,
Showtime and Starz, lets you watch your favorite shows at any time. And you can pause,
rewind or fast-forward with your Cox Digital Cable remote control.
> FreeZone
Experience the convenience of On DEMAND programs absolutely free, from networks
like HGTV, Food Network, Cartoon Network, Comedy Central and PBS Sprout. Content
is updated weekly, so check back often for new shows.
> On DEMAND Subscriptions
Something for every enthusiast. See it all – the Anime Network, WWE 24/7, Howard TV,
here!, and the biggest events in sports – with On DEMAND subscriptions from Cox.
See page 15 for Digital Cable remote control.
14
Page 15

DVD player Television
Power
Cable Receiver
View Channel One
Return to live TV
Display list of recorded shows
Changes screen aspect ratio
Interactive Program Guide
functions
Exit Interactive Program Guide
Display interactive service
Move through channels
Turn sound on or off
Enter
Picture-in-Picture
(PIP) functions
Setup programming
sequences
Home entertainment
device control
Auxiliary functions/
On DEMAND controls/
Controls DVR functions
8 second rewind live TV
View program information
Interactive Program Guide
Additional cable settings
Interactive buttons
Recall last channel
Adjust volume
View favorite channels
Auxiliary channels
15
For the most up-to-date and detailed information visit: www.cox.com/Louisiana
Pricing, fees, etc. subject to change.
Digital Cable Remote Control
Remote Control
Page 16

Quick Start
Let’s get started! By following the steps below, you’ll become acquainted with the
basic operations of the remote control. You’ll be able to control your TV, VCR, DVD,
CD and cable television right from your easy chair. You’ll know how to select channels,
how to find out what’s on and when, and how to personalize your viewing selections.
Power Up
Turn your equipment on using the device selection buttons located in the Power Panel
(top section) of your remote. Simply choose the
,
,
or
keys and
press Power to each device.
Interactive Program Guide Icons
The Channel Banner on the Interactive Program Guide displays icons that provide
information about the channel you are watching.
Other Channel Banner Information
Program Rating: Displays the ratings.
Content Advisory: Displays the reason for the rating, i.e.,
R may mean D, L, V for
drugs, language and violence.
Icon Description
Icon Description
Blocked channel.
Unblocked channel.
Closed Captioned—the channel displays text subtitles for
hearing-impaired viewers. This option applies only to channels
offering closed captioning.
Second Audio Programming (SAP)—you can receive alternate
audio (such as Spanish) with the TV picture. This option only
applies to channels that offer SAP. NOTE: if you have SAP enabled
and you experience no sound on some channels, disable SAP.
SAP is only available on channels that offer it.
Channel transmits stereo sound. This option applies only to
channels that offer stereo sound.
Channel is included in your Favorite Channels list.
Purchased Pay-Per-View.
VCR Timer is set on the channel.
DVR is set to record this program.
Programs that are new. Not a repeat.
Programs in High-Definition.
16
Page 17

Parental Controls
Utilizing the Block options in General Settings, you can block by channel, rating, titles
and date/time. You can also select a personal Blocking PIN. The default PIN is 0000.
Press the button twice then select Block Type.
Channel: Use your Blocking PIN to limit access to specic channels. A will appear beside
your selection.
Rating: Use your Blocking PIN to limit viewing by rating. You can block multiple ratings
with just one keystroke. Simply highlight one rating, press the button, and your rating
selection plus all those appearing below it will be blocked. Adult programming can be
blocked by channel or by rating.
Titles: Use your Blocking PIN to limit viewing of titles and descriptions. First you need to
block by Rating. See above instructions for Rating. Then go to Block Title. Enter PIN
number. Select Hidden. Accept. Exit.
Block PIN: You can also control when television viewing time is available. Choose up to
eight time blocks by both day and time.
Time New: Allows you to change 0000 to any four-digit code.
NOTE: By adding a Parental Control PIN you will be able to avoid unauthorized Pay-Per-View
and/or On DEMAND purchases. Parental Control Pay-Per-View PINs must be added to each
receiver separately. For example, if you have three receivers, you must put a PIN on all
three boxes.
Changing The Mode
Press the
key (or
or
or
key) for the desired function. Then, the indicator
will blink twice.
Programming Favorite Channels
1. With the TV on, press the
button twice on your remote.
2. At the General Settings menu, press up or down to highlight Viewer: Favorites, then
press the
SETUP
button.
3. Press up or down on the remote and highlight the channel to add or remove from your
list of favorites.
4. Press
SETUP
to add or remove a highlighted channel. For example, if a channel has a
Favorite blue ribbon beside it, you can press
SETUP
to remove the blue ribbon and take the
channel off your list of favorites.
5. Press the
button to accept your new list of Favorites Channels and return to the
General Settings menu.
6. Press
SETUP
to return to watching television. You can see what’s playing on other channels
using the buttons.
SETUP
17
For the most up-to-date and detailed information visit: www.cox.com/Louisiana
Pricing, fees, etc. subject to change.
Features
Page 18

Surfing
1. Press the buttons to move through the channels. A 15-second pop-up
displays the title, program time, and channel information.
2. Press the
SETUP
button twice and another pop-up appears and displays the plot,
guest stars, and icons indicating special viewing or audio features.
3. Press the
SETUP
button again and the information disappears.
4. To return to your previously selected channel, press
.
Quick Browse
While you’re watching a selected program, you can see what’s on—even during the
commercials—using the Quick Browse feature.
1. Use the
keys to advance through channel information; a 20-second information
pop-up will appear showing the title and time of other programs currently playing.
2. Press the
SETUP
button to find out more information about the program.
3. Press the
SETUP
button to change channels.
4. Press
to return to the last channel selected.
Interactive Program Guide
Select any current program or see what’s playing for up to seven days. Using the
Interactive Program Guide, you can select your program by browsing through the
listings in one of three ways: Channel, Title or Theme. Once you’ve entered your
selection following the directions below, allow a few seconds for the program to appear.
Browse By Channel
Browse by Channel is the default setting when entering the Interactive Program
Guide. From here you can browse programming by time and channel as well as
access the Browse by Theme and Browse by Title features.
1. Press the
SETUP
button on your remote.
2. Use the
arrow keys to move up and down through the channels.
3. Use the
arrow keys to move through the time slots.
4. Highlight the program and press
SETUP
; a pop-up will appear showing the plot,
rating, and audio and viewing information icons.
5. Press
SETUP
or
SETUP
to return to the Interactive Program Guide.
6. Press
SETUP
to tune to the highlighted program or to purchase a Pay-Per-View (PPV)
feature. If you select a PPV channel, you will be prompted through the process.
7. Press
SETUP
to return to the Interactive Program Guide or exit. To resume watching
TV, just press
SETUP
.
18
Page 19

Programming Your Remote Control
1. Turn on your TV.
2. On the remote control, press
once; then press and hold
SETUP
until the
key
blinks twice, then release
SETUP
.
3. Enter 9-1-1. The
key will blink twice.
4. Aim the remote control at the TV and press
once.
5. Press one or more times and stop when the TV turns off.
Note: In the search mode, the remote control will send IR codes from its library to the
selected device, starting with the most popular code first.
Note: If while pressing and you inadvertently pass the code, press one or more
times until the TV turns on.
6. Press
SETUP
once to lock in the code. The
key will blink twice.
7. To search for the codes of your other devices, repeat steps 1 through 5, but substitute the
appropriate key (eg.
,
,
or
) for the device you are searching for.
Quick Settings
The Quick Settings screen allows you to begin recording the current channel, temporarily
disable the block features of Parental Controls, or set the sleep timer.
1. Press the
button once.
2. Use the
arrow keys to highlight your selection.
3. Press
SETUP
.
NOTE: If you seek more instructions on operating your digital cable, please visit our
website at www.cox.com/Louisiana or call Customer Service at 504-304-8444.
Customize Digital Cable Settings
There are many additional benefits and features of your remote that will increase your
television enjoyment. Enter the General Settings mode and browse through the settings on
your screen. By following the simple instructions, you’ll discover how to get the most from
your Cox Digital Cable experience.
19
For the most up-to-date and detailed information visit: www.cox.com/Louisiana
Pricing, fees, etc. subject to change.
Features
Page 20

General Settings
Press the
button twice to get to the General Settings screen.
Hot Tip! Highlight any function in General Settings, press the
SETUP
button and a detailed
explanation will appear.
Timer: Turn Off, VCR New, Wake-Up, All, Rewind New, Sleep
Viewer: Favorites, Power On
Audio: Digital Out, Range, Volume Control
Block: Channels, PIN, Rating, Time New
Display: Power Off, Power On
Language: Audio, Screen
NOTE: If you select Spanish with the Language: Screen option, the Interactive
Program Guide will have most of the language support in Spanish; however, the
actual programming information will still be in English except for those channels,
such as Sorpresa, where the programming information is provided in Spanish.
Purchase: PIN
PPV: Purchases
Set: A-C Outlet, Color Scheme, Output Chan, Power-On Key
20
Page 21

On DEMAND
Movies On DEMAND
The biggest Hollywood hits are On DEMAND for 24 hours. Previews are always
FREE to watch!
Classic Movies
With Classic Movies On DEMAND you can go back in time.
IFC in Theaters
If you like Independent films, then IFC in Theaters is the movie destination for you.
These films are available in theaters and On DEMAND at the same time.
FreeZone
Free to browse. Free to watch. FreeZone is your personal programming library of cable
TV favorites, kids and sports shows, and even concert and music videos. Available
anytime you want at no additional cost. New shows every week.
Premium On DEMAND
If you get HBO, Cinemax, Starz or Showtime with Cox Digital Cable, you also get
selections of their movies and series On DEMAND, ready whenever you want at no
additional charge.
Adult On DEMAND
Adult titles are priced per viewing and are available for 6 hours.
3
1
2
Choose your
category of interest
Go to Channel 1 or
Press On DEMAND Button
Then select
Movies On DEMAND
Pick your movie
Then select Buy Now
21
For the most up-to-date and detailed information visit: www.cox.com/Louisiana
Pricing, fees, etc. subject to change.
Features
Page 22

Watch everything you want.
Never miss another show.
Create your own instant
replays. That’s the beauty of
the Digital Video Recorder
and it all happens with the
touch of a button on your
remote control.
In this section you’ll find the basics so you can start enjoying your Digital Video
Recorder quickly. But if you have any questions, we’re here to help—24 hours a day,
seven days a week.
> Record your favorite shows instantly.
> Watch one show while recording another.
> Record two shows at the same time.
> Pause, rewind and do your own instant replays on live TV.
> Save up to 80 hours of programming (available DVR space varies).
> Set Parental Controls on what can be viewed and recorded.
See page 15 for Digital Cable remote control.
Did you know?
You can record an entire series simply by
pressing
button while watching live TV
and then selecting All Episodes from the
prompt. After selecting All Episodes , press
. To record only new episodes, select
the First Run option, or select from several
recording options from First Run only on this
channel to Record the rest of the series.
22
Digital Video Recorder (DVR)
Page 23

The Status Bar
Provides a quick reference to the
program you’re watching. Simply
select the
button on your
remote control for the following
information:
> The program title, start time and
end time.
> The time when you first tuned to
the channel.
> The portion of the program that
has already aired.
> The live point of programming.
> The portion of the program that
has not yet aired.
Control Live TV
Yo u can use your remote to control a live program.
> Pause a show Press
> Resume playback from pause Press or
> Rewind Press once (slow speed)
Press twice (medium speed)
Press three times (rapid speed)
Press four times (crazy fast speed)
> Fast-Forward Press once (slow speed)
Press twice (medium speed)
Press three times (rapid speed)
Press four times (crazy fast speed)
> Advance one frame Press and press
> Watch video in slow motion Press twice quickly
> Resume playback from rewind, Press
fast forward, or slow motion
> See an instant replay Press (replays last 8 seconds)
> Return to live TV Press
Program title
Indicates when you
first tuned to the
channel
Bar is green indicating
amount of program
already aired
Bar is clear
because this part
of the program
has NOT yet
aired
Program
run times
Live point
23
For the most up-to-date and detailed information visit: www.cox.com/Louisiana
Pricing, fees, etc. subject to change.
Digital Video Recorder
Page 24

Recording Programs
There are several ways to record your favorite programs.
Record Live TV
> Press
.
> Choose your recording options.
> Press
.
To manually stop recording before the scheduled time, press
and then follow the
on-screen choices.
Record a TV Program From the Interactive Program Guide
> Press
SETUP
.
>
SETUP
TV program.
> Select Record.
> Choose your recording options.
> Press
.
The recording program is highlighted in the Interactive Program Guide in red.
Record all Episodes of Your Favorite Program
> From a program or from the guide, press Record.
> Choose all episodes.
> Press
.
> Choose the desired options.
> Press
SETUP
.
Viewing Recorded Programs
Programs that have been saved can be accessed at any time by pressing the
DVR List button.
View Saved Programs
> Press
.
> Press
arrow keys to highlight a show.
> Press
SETUP
to display your options.
> Press
SETUP
again to play.
Exit Out of Recorded Program
Change the channel, or press the
key, which will tune to last channel viewed.
24
Page 25

Viewing Recorded Programs (continued)
Using the Status Bar
> Press .
> The green area indicated recorded time.
> The red area indicated portion of program that was not recorded (if you tuned to a
program already in progress)
NOTE: Once you tune to a channel, the program is automatically recorded to a
channel buffer for up to one (1) hour. Each time you tune to a new channel, the saved
programming from the old channel is cleared, and the recorder starts to save what is
showing on the new channel.
Managing Saved Programs
By default saved programs will be automatically erased as space is needed for new
recordings, or they can be saved until you erase them manually.
Go to the Saved Shows Display by pressing
.
How to do it:
Press
or
to highlight a show.
Highlight a show; Press
SETUP
; Select Erase
Highlight a show; Press
SETUP
; Select Save until
manually erased
Highlight a show; Press
SETUP
; Select Save until space
is needed
Highlight a show; Press
SETUP
; Select Keep longer...
Press
or
to increase or decrease the life span
of the highlighted show; Press
SETUP
(Note: shows that
are positioned higher on the list will be erased later)
What you can do:
Find a saved show
Erase a show
Save a show until
manually erased
Allow a show to be
erased automatically
(Note: This is default setting.)
Keep a show longer
Saved shows can be automatically erased to make room for new shows,
or saved until you erase them.
– Indicates that a show will be saved until it is manually erased
– Indicates that a show is expected to be automatically erased soon
– Indicates that a show is expected to be automatically erased very soon
25
For the most up-to-date and detailed information visit: www.cox.com/Louisiana
Pricing, fees, etc. subject to change.
Digital Video Recorder
Page 26

Managing Scheduled Recordings
Your Scheduled Recording list lets you see which upcoming programs are scheduled to be
recorded. It also lets you cancel upcoming recordings.
Find Scheduled Recordings
> Press
.
> Presss
SETUP
to display the list of programs scheduled to record.
Cancel a Scheduled Recording
> Press
.
> Press
SETUP
(Scheduled Recordings).
> Use
arrow keys to highlight program.
> Press
SETUP
.
> Highlight Cancel Recording .
> Press Select.
> Press
to confirm.
Modify/Edit a Scheduled Recording
> Press
.
> Press
SETUP
(Scheduled Recordings).
> Use
arrow keys to highlight program.
> Press
SETUP
to edit.
> Make edits to program.
Managing Recording Space
Your DVR can store up to 80 hours of programs, depending on the programming source.
You can view your available space and set preferences for managing that space.
Viewing Available Recording Space
> Press
.
> Press
to display the options screen
> Select View Disc Info
> Press
SETUP
for the information on available recording space.
26
Page 27

Using The DVR With HDTV
Setting up Picture Formats (for High-Definition TVs)
If you have an HD-capable DVR from Cox and an HDTV, you may need to set up the
DVR so that it provides video to your HDTV in picture formats that your HDTV supports
to provide the optimum picture quality. As a default your DVR is programmed to
display all high-definition programs in 1080i picture format and all standard definition
programs in 480i picture format.
At any time, you can change the picture format for your HDTV to select the best picture
quality for the format currently being broadcast by pressing HD zoom.
1. Turn off your DVR and turn on your HDTV.
2. On the DVR, press
SETUP
and
SETUP
at the same time. The Output Selection screen
appears.
3. Using the remote control, press
SETUP
to select the HD output type. The Set TV
Screen Type will appear.
4. If you have a standard-screen HDTV, press
. If you have a wide-screen
HDTV, press
SETUP
.
5. Select the desired set up option.
6. To start watching TV, press
SETUP
,
and then
. While watching TV, you
can change the picture format to any of the settings you selected by pressing the
settings button and selecting picture format.
High-Definition Service from Cox
HDTV Requirements
You will need an HDTV set (HDTV-capable or HDTV-ready) and a Cox HD receiver or a
Digital Cable Reciever device with a CableCARD from Cox.
> To obtain HD local stations, you must have a Cox HD receiver, a DCR device with a
CableCARD from Cox or an HDTV with an integrated tuner. You must also subscribe
to Cox limited basic service.
> To obtain HD premium channels including HBO, Cinemax, Showtime and Starz, you
must have a Cox HD receiver or a DCR device with a CableCARD from Cox. You must
also subscribe to Cox Digital Cable and to the premium channels.
> To obtain channels such as Discovery HD, ESPN HD, Universal HD, TNT HD, National
Geographic HD, History Channel HD, A&E HD and many others, you must have a
Cox HD receiver or a DCR device with a CableCARD from Cox. You must also
subscribe to Cox Digital Cable and Cox Standard Basic service.
27
For the most up-to-date and detailed information visit: www.cox.com/Louisiana
Pricing, fees, etc. subject to change.
Digital Video Recorder
Page 28

Back of cable receiver
28
Depending on your equipment and existing connections, you may not need all of these components.
When the cable receiver displays a clock on the LED, power on the receiver and
enjoy your service.
For Fast Connect Instructions on how to connect
a VCR to your digital receiver, see page 35.
One 6-Foot Coaxial Cable Composite Cables
Power Cord Remote Control
Fast Connect KitTM Components
Fast Connect Instructions
Connecting Your Cox Digital Receiver
Page 29

Fast Connect Success Tips
Your New Remote Control
> Program your remote to operate the power and volume of your
television using the instruction and code booklet included with
the remote control.
> With the 4-device remote control, remember to first press the
device key to choose the device you want to control (Cable, TV,
DVD, Auxiliary).
> Press to move through the channels. A 15-second pop-up
displays the title, program time, and channel information.
> Press
SETUP
twice and another pop-up appears displaying the plot,
guest stars, and icons indicating special viewing or audio features.
Press
SETUP
again or
SETUP
and the information disappears.
> To return to your previously selected channel, press
.
> To access the Interactive Program Guide (IPG), press
SETUP
.
> Press
twice and you’ll find the General Settings screen.
> See page 15 for Digital Cable remote control.
Cox Digital Cable FAQs
How many days of programs are stored in the Interactive Program Guide?
The Interactive Program Guide (IPG) stores up to 7 days of programming - the current
day and the next 6 days.
How do I use my VCR to record a program?
Refer to your VCR owner’s manual for information on integrating the VCR into your
equipment. You can also use the VCR CommanderTM to enable the digital receiver to
control your VCR, avoiding the manual timer settings on your VCR.
How do I use my DVR to record a program?
See pages 24-27 for instructions on how to use your DVR.
How do I set a Personal Identification Number (PIN) on the digital receiver?
The default PIN is set to 0000. To change the PIN, access the general settings using the
remote, choose PPV: PIN. Follow the prompts to change the PIN to a unique 4-digit code.
Read this first:
WARNING:
Electric shock hazard! Unplug all electronic
devices before connecting or disconnecting any
electrical equipment.
Connect cable first, then electrical power.
29
For the most up-to-date and detailed information visit: www.cox.com/Louisiana
Pricing, fees, etc. subject to change.
Connecting Your Digital Cable
Page 30

For instructions on how to connect a DVR to an
HDTV, see page 37.
Depending on your equipment and existing connections, you may not need all of these components.
When the cable receiver displays a clock on the LED, power on the receiver and
enjoy your service.
Fast Connect Instructions
Connecting Your Cox Digital Video Recorder
Fast Connect Kit
TM
Components
Back of Digital Video Recorder
S-Video optional (not supported
by Cox Tech Support)
30
One 6-Foot Coaxial Cable Composite Cables
Power Cord Remote Control
Page 31

Your New Remote Control
> Program your remote control to operate the power and
volume of your television using the instruction and code
booklet included with the remote control.
> With the 4-device remote control, remember to first press the
device key to choose the device you want to control (Cable,
TV, DVD, Auxiliary). Example: to control the cable receiver,
press the cable button on the remote and select a button to
initiate action.
> See page 15 for Digital Cable remote control.
Digital Video Recorder Control
Use the Interactive Program Guide (IPG) to select programs to
record and choose the frequency of recording.
Digital Video Recorder FAQs
How far back can I rewind live TV?
The length of time you can rewind live TV primarily depends on how long you have
been watching a single channel. While the maximum live recording length is
60 minutes, each time you change channels the live recording starts over. If you have
been watching a single channel for 15 minutes, you can rewind up to 15 minutes.
What happens if a recorded event goes over the scheduled end time?
If there is a chance that the event may continue past the scheduled end time, you can
extend the stop time on the Confirm Recording screen.
What happens if the Digital Video Recorder loses power?
The recordings that were saved prior to power loss are saved on the recorder. You will
miss any programs scheduled to record during the power loss; however, the schedule
for future recordings is preserved.
Can I watch another channel while a program is being recorded?
Yes, the Cox Digital Video Recorder has two tuners, so you can watch one program
while recording another. You can even watch a previously recorded program while
recording two other programs!
Do the Parental Control settings apply to recordings?
Yes, the Digital Video Recorder will record programs on blocked channels or rating
scale, but to play them back you must enter your 4-digit PIN.
Fast Connect Success Tips
Connecting Your DVR
31
For the most up-to-date and detailed information visit: www.cox.com/Louisiana
Pricing, fees, etc. subject to change.
Page 32

Depending on your equipment and existing connections, you may not need all of these components.
Step #1
A. Connect the coaxial cable from the cable outlet to the cable-in port on the cable
receiver.
B. Connect the HD component cable from the Y Pb Pr ports on the cable receiver to
the Y Pb Pr ports on the HDTV.
Success Tip: Match the color on the component cable receptors with the corre-
sponding color on the HDTV ports. (red to red, green to green, blue to blue)
C. Put the HDTV on the correct input to view programming.
• Examples: Video 1, 2, or 3; Component 1, 2, etc.
Step #2
When the cable receiver displays a clock on the LED, power on the receiver and enjoy
your service.
A. Familiarize yourself with the HDTV’s picture size features in order to fill in picture
size on the HDTV when you are not viewing HD programming - refer to the
“Fast Connect Success Tips” on the next page.
HD Component Cables
Power Cord Remote Control
Fast Connect KitTM Components
Fast Connect Instructions
HD Audio Cable
One 6-Foot Coaxial Cable
32
Connecting Your Cox High-Definition Cable
Page 33

Back of HD Cable Receiver
Back of HD Cable Receiver
Connecting Your HD Cable
HDMI cable and IEEE 1394 cable are both optional
(neither are supported by Cox Tech Support)
33
For the most up-to-date and detailed information visit: www.cox.com/Louisiana
Pricing, fees, etc. subject to change.
Page 34

Your New Remote Control
> Program your remote control to operate the power and
volume of your television using the instruction and code
booklet included with the remote control.
> With the 4-device remote control, remember to first press the
device key to choose the device you want to control (Cable, TV,
DVD, Auxiliary). Example: to control the cable receiver, press the
cable button on the remote control and select a button to
initiate action.
> See page 15 for Digital Cable remote control.
Fast Connect Success Tips
Your TV Screen Type
Television screens vary, depending on the type of television or monitor:
Black bars on the sides indicate that the program is
formatted in a standard 4:3 mode and likely not in
high-definition.
Change your TV format (i.e., stretch, zoom, normal) by
pressing the # button on your Cox remote control to
fill the screen.
Black bars on the top and bottom indicate that the
program is a widescreen image. This occurs in both
standard and high-definition programming. No TV format
change is necessary.
What is burn-in and how do I avoid it on my HDTV?
If you consistently watch standard-definition (4:3 aspect ratio) programming on a
wide-screen (16:9 aspect ratio) television or HD programming with sidebars over very long
periods of time, you may ruin your HDTV’s ability to display colors evenly across the screen.
Your wide-screen HDTV may have picture size adjustment features (zoom, stretch, etc.)
that can be used to remove the black bars (thereby preventing burn-in) that you see when
watching standard-definition programming. Consult your HDTV owner’s manual for details.
Standard TV Screen
Wide TV Screen
34
Page 35

Digital Cable (In Stereo Sound)
Digital Cable Installation With a Digital Cable Receiver in Stereo
Sound (when available)
Stereo TV Cabling*
L
R
AUDIO
OUT
CABLE
IN
AUDIO
IN
S-VIDEO IN
S-VIDEO OUT
VIDEO IN
VIDEO OUT
Either/or
TV
From
cable
outlet
AUDIO
OUT
TO
RF IN
TO
TV/VCR
RF IN
CABLE
IN
DIGITAL
AUDIO
OPTICAL
DIGITAL
AUDIO
COAX
VIDEO
DATA
USB
IR
PHONE
TV PASS CARD
SWITCHED
105-125V
60Hz
4A MAX
500W MAX
S-VIDEO
R
TO TV
TO VCR
L
Audio
out
35
For the most up-to-date and detailed information visit: www.cox.com/Louisiana
Pricing, fees, etc. subject to change.
Installation
Page 36

Stereo VCR Cabling*
CABLE OUT
CABLE IN
AUDIO
IN
R
L
VIDEOINS-VIDEO
IN
R
L
VIDEO
OUT
S-VIDEO
OUT
AUDIO
OUT
TV
VCR
CABLE IN
S-VIDEO IN
S-VIDEO OUT
VIDEO IN
VIDEO OUT
L
R
AUDIO
OUT
AUDIO
IN
Either/or
Either/or
Audio
out
From
cable
outlet
AUDIO
OUT
TO
RF IN
TO
TV/VCR
RF IN
CABLE
IN
DIGITAL
AUDIO
OPTICAL
DIGITAL
AUDIO
COAX
VIDEO
DATA
USB
IR
PHONE
TV PASS CARD
SWITCHED
105-125V
60Hz
4A MAX
500W MAX
S-VIDEO
R
TO TV
TO VCR
L
Back of cable receiver
36
Digital Cable With VCR (In Stereo Sound)
Digital Cable Installation With a VCR to Record and Listen in Stereo
Sound (when available)
Page 37

NOTE:
TV must be set to HD Input.
HDMI cable and IEEE 1394 cable are both optional (neither are supported by Cox
Tech Support)
HD Digital Video Recorder
HD-DVR Installation to a Standard HDTV Using Red, Blue and
Green Cables and Audio Cables
Back of cable receiver
37
For the most up-to-date and detailed information visit: www.cox.com/Louisiana
Pricing, fees, etc. subject to change.
Installation
Page 38

Turning on the Digital Cable Receiver and/or Digital Video
Recorder
When first connected, the digital cable receiver will display “Load”. Do not turn off the
box until this process is complete.
Once the time appears, turn on your television set and tune it to channel 3 or the
correct input. Press the power button on the cable receiver. The power light should
come on and you will have a picture on your television screen.
NOTE:
If there’s no picture, check to see if your TV is on the correct input.
Troubleshooting For Digital Cable
General Troubleshooting
• Install Coaxial Cable, then power.
• Properly plug your television and digital cable receiver into an electrical outlet.
(If a light switch controls the outlet, make sure it’s turned on).
• Make sure all cables are properly connected and connections are finger tight.
• Make sure power indicator light on digital cable receiver is on.
• Make sure TV power is on and TV is tuned to channel 3 or the correct line input.
• If your set-up includes a VCR and/or stereo, make sure they are properly connected
to the digital cable receiver.
Blank Screen or Snowy Picture
• If you are using the cable TV/RF input, make sure your TV and/or VCR are tuned to
channel 3.
• If you are using the line/RCA inputs, make sure your TV and/or VCR are tuned to the
correct line input.
• If digital receiver flashes
Load for more than 15 minutes then disconnect power,
wait one minute and reconnect.
38
Page 39

Troubleshooting
Remote Control Set-Up Problems
• Point the remote control directly at the digital cable receiver (not the TV) when
changing channels.
• Make sure nothing is blocking the pathway of the remote control’s infrared sensor.
• Make sure cable light on remote control is lighting up when pressing button. If not,
press cable light button and try again.
• Verify that the batteries are good.
• Try to re-program the remote control by using the remote control owner’s manual
included in your digital install kit.
Freeze Frames /Tiling of Pictures
• Make sure all cables are properly connected and connections are finger tight.
• Ensure that you do not have anything sitting on top of your digital cable receiver.
This can temporarily affect picture quality.
Blue Screen or Other VCR-Related Troubles
• Make sure your VCR is tuned to channel 3 or the correct line input.
• Press TV/VCR button on your VCR.
On-Screen Guide With No Data or Descriptions
• Disconnect the power plug from the wall outlet and wait at least 10 seconds. Insert
the power plug back into the wall outlet to begin reloading the on-screen guide
information. This will take 15 minutes to complete. While the guide is reloading
information, you will be able to watch TV and change channels with your remote
control, but on-screen information will not be available until the reloading process is
complete.
No Sound
• Verify that the mute function has not been activated on your TV and/or cable receiver
remote.
• Make sure the volume is turned up on your TV or stereo.
• Check the SAP (Second Audio Program) setting on your TV or cable receiver. Refer to
the handbook provided for the manufacturer of your TV.
• If you are using a stereo receiver, verify the audio output connection and the receiver
are set up to the right input.
Further Troubleshooting
• If the above steps are not successful, or for additional hookups, call customer care
at 504-304-8444 or visit our website at www.cox.com/support/Louisiana/techsupport
Other Tips
• Always connect primary cable directly from the wall outlet to receiver. Do not
divert the Primary Cable through receiver loops located on the back of some
television sets or through other devices, such as surge protectors, modulators,
game adapters, and VCRs.
• Avoid using an electrical outlet that is activated by a wall switch.
• In order to ensure reliability do not place objects on the top of the cable receiver
that will prevent adequate ventilation.
• For Picture-In-Picture configurations, use the 2-way composite cables provided in
your install kit.
39
For the most up-to-date and detailed information visit: www.cox.com/Louisiana
Pricing, fees, etc. subject to change.
Page 40

You can count on Cox
Cox is known for providing excellent
customer service with a proven track
record in customer satisfaction and
24/7 support.
Local Customer Service Center
Call 504-304-8444
www.cox.com/Louisiana
Service available to residential customer s in Cox wire d ser viceable areas. Digital receiver rental and paid subscription to limited basic required for Cox
Digital Cable. Cox Limited Basic plus a digital receiver and Digit al Gateway subsc ription required for premium channels, pay per view, and On DEMAND
programming. Cox Basic service required for local HD channels, premium HD channels and DVR . Cox Digital Cable and E xpanded ser vice required for
cable network HD channels. Digital Cable and paid subscription to Digital HBO, Cinemax , Starz, Showtime or a Cox Digital service tier required for HBO HD,
Cinemax HD, Starz HD, Show time HD, or other digital channels’ HD programming. An HDTV set required. An HD-ready TV set with YPbPr inputs that supports
1080i and Cox HD receiver required for HD s ervice. Televisions and all other consumer-owned devices equipped with a C ableCARD may require a digital set
top receiver in order to receive all programming options offered by Cox Digital Cable and On DEMAND programming. Cox Digital Cable and DVR receiver
and remote rental required. Monthly DVR service fee per DVR receiver applies. On DEMAND and Music Choice channels cannot be recorded. Available DVR
recording space varies. Some On DEMAND progr amming may be extra. An HDTV set and a HDTV/DVR box rental required. An HDTV receiver or CableCARD
and an HDT V set required. 100% digital picture and sound when using a Cox digital set top receiver. Number of Digital outlets per household may be limited.
Free cable on additional outlets limited to Cox Standard service and requires paid subscription to Standar d cable on primary outlet. Programming subject
to change. WARNING: Electric shock hazard! Unplug all electronic devices before connec ting or disconnecting any device cable to any electrical equipment.
Connec t cable first, then electrical power. Installation fees, taxes, franchise fees and other sur charges are additional. Other restrictions may apply.
© 2008 Cox Communication s, LLC. Al l rights r eserve d. 520-7200 12/ 08
 Loading...