

Page 1

Cox Business
User and Admin Guide
Web-based Receptionist Console
Page 2

© 2017 by Cox Communications, Inc.
All rights reserved. No part of this document may be reproduced or transmitted in any form or by any means, electronic, mechanical,
photocopying, recording, or otherwise, without prior written permission of Cox Communications, Inc.
0717
Page 3

Table of Contents
Table of Contents
Web-based Receptionist Console Overview ................................................................................... 1
Understanding the Web-based Receptionist Console User Interface ............................................. 4
Call Console Functionality ............................................................................................................. 7
Place a Call .................................................................................................................................. 9
Use Call Pickup, Hold, Resume ................................................................................................ 11
Conference Call Functionality ...................................................................................................... 13
Queued Calls ................................................................................................................................. 15
Call Queue Management ........................................................................................................... 16
View, Retrieve, and Transfer Queued Calls ......................................................................... 17
Change Position of Call in Queue ......................................................................................... 18
Sort Queued Calls ................................................................................................................. 19
Title Bar Tabs ............................................................................................................................... 21
Contacts ..................................................................................................................................... 21
Manage Personal Contacts .................................................................................................... 22
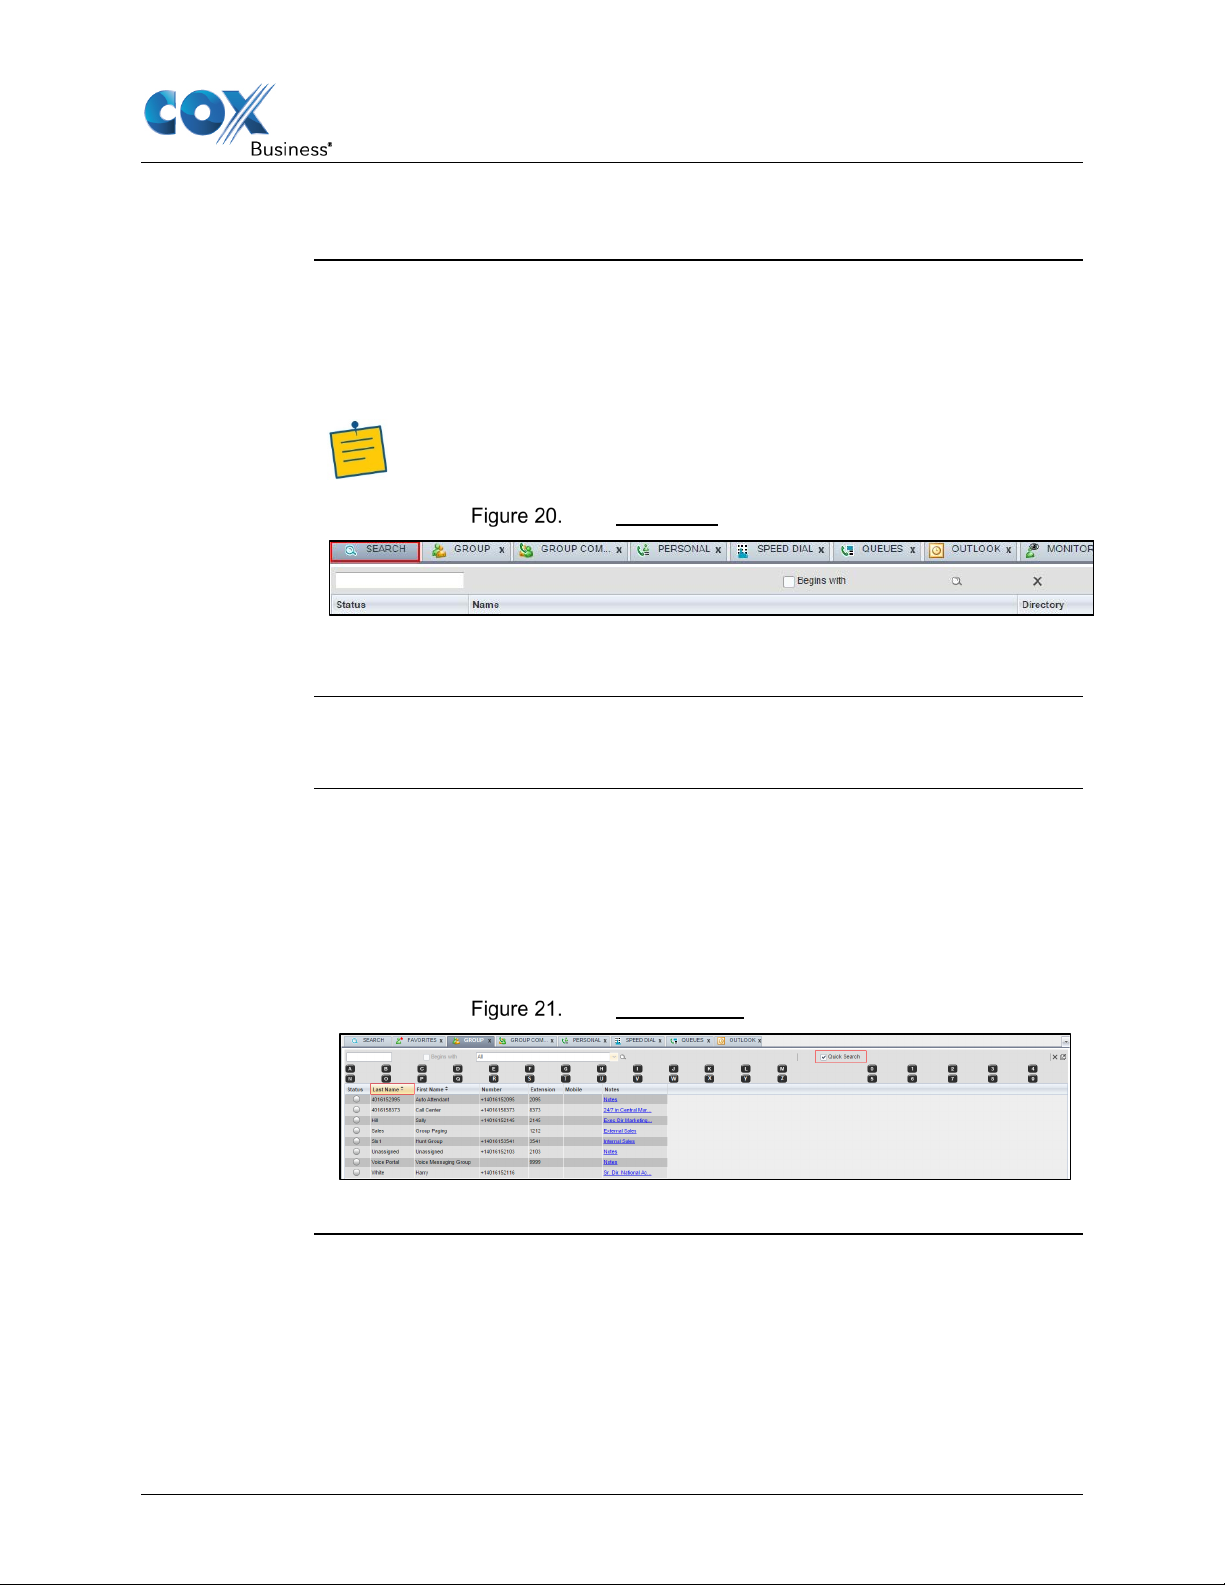
Search ........................................................................................................................................ 24
Quick Search ......................................................................................................................... 24
Regular Search ...................................................................................................................... 26
Order Directory Entries......................................................................................................... 31
Contact Notes ........................................................................................................................ 33
Monitoring .................................................................................................................................... 35
Static Monitoring – Favorites Tab ........................................................................................ 36
Dynamic Monitoring – Group Tab ....................................................................................... 37
Group Common ......................................................................................................................... 40
Personal ................................................................................................................................. 40
Speed Dial ............................................................................................................................. 41
Add Speed Dial Entry ........................................................................................................... 42
Modify Speed Dial Entry ...................................................................................................... 43
Delete Speed Dial Entry........................................................................................................ 43
Outlook ...................................................................................................................................... 44
Receptionist Console .................................................................................................................... 45
Basic Configuration Settings ..................................................................................................... 45
General Tab ........................................................................................................................... 46
Settings - Application ........................................................................................................... 49
Settings - Services ................................................................................................................. 51
Settings – Plug-ins ................................................................................................................ 53
Settings - About .................................................................................................................... 56
Title Bar ........................................................................................................................................ 57
i
Page 4

Table of Contents
Administrator Functions ............................................................................................................... 59
Change the Call Center Name ................................................................................................... 59
Change the Call Center Queue Password .................................................................................. 60
Manage Call Center Users......................................................................................................... 61
Configuring Messaging and Music ............................................................................................... 63
Activate Entrance Messages...................................................................................................... 64
Activate Estimated Wait Messages ....................................................................................... 66
Activate Comfort Messages .................................................................................................. 68
Activate Music in Queue ...................................................................................................... 70
Activate Overflow Messages ................................................................................................ 72
Record a Personal Greeting or Announcement ......................................................................... 74
Helpful Recording Guidelines ................................................................................................... 74
Appendix A: Steps for Using Plug-Ins ......................................................................................... 77
Certificate for Desktop Integration Features ............................................................................. 80
Download Desktop Plug-ins Certificate ............................................................................... 80
Add Certificate to Microsoft Windows Certificate Store ..................................................... 81
Add Certificate to Firefox Certificate Store .......................................................................... 87
Add Certificate to Apple System Keychain .......................................................................... 89
On MAC OS X...................................................................................................................... 92
Appendix B: Call States and Actions............................................................................................ 93
Call Action Buttons ................................................................................................................... 94
FAQ............................................................................................................................................... 96
ii
Page 5

Call Console Overview
Introduction
The Web-based Receptionist Console (“Receptionist Console”) is a tool that
instructions to perform tasks, images of the screens, and descriptions of fields.
Receptionist
To successfully run Receptionist Console, your computer needs to have any of
Browser Type
Version
Internet Explorer
11.0 only
Firefox
Version 54
Chrome
Version 57 and lower
Web-based Receptionist Console Overview
manages and routes incoming telephone calls for front house receptionists. It
provides a robust set of call control features, such as: transfer, call volume,
call queues, multiple contact directories, customized call views, Microsoft
Outlook Integration, and more.
This manual reviews functionality found in Receptionist Console, along with
Console
Technical
Specifications
the following web browsers loaded and operable.
Your computer must have Java JRE 1.6 or higher installed before you
proceed.
Note: The minimum required screen resolution for Receptionist
Console is 1024 x 768 pixels.
Web-Based Receptionist Console User Guide 1
Page 6
Call Console Overview
How to Sign In
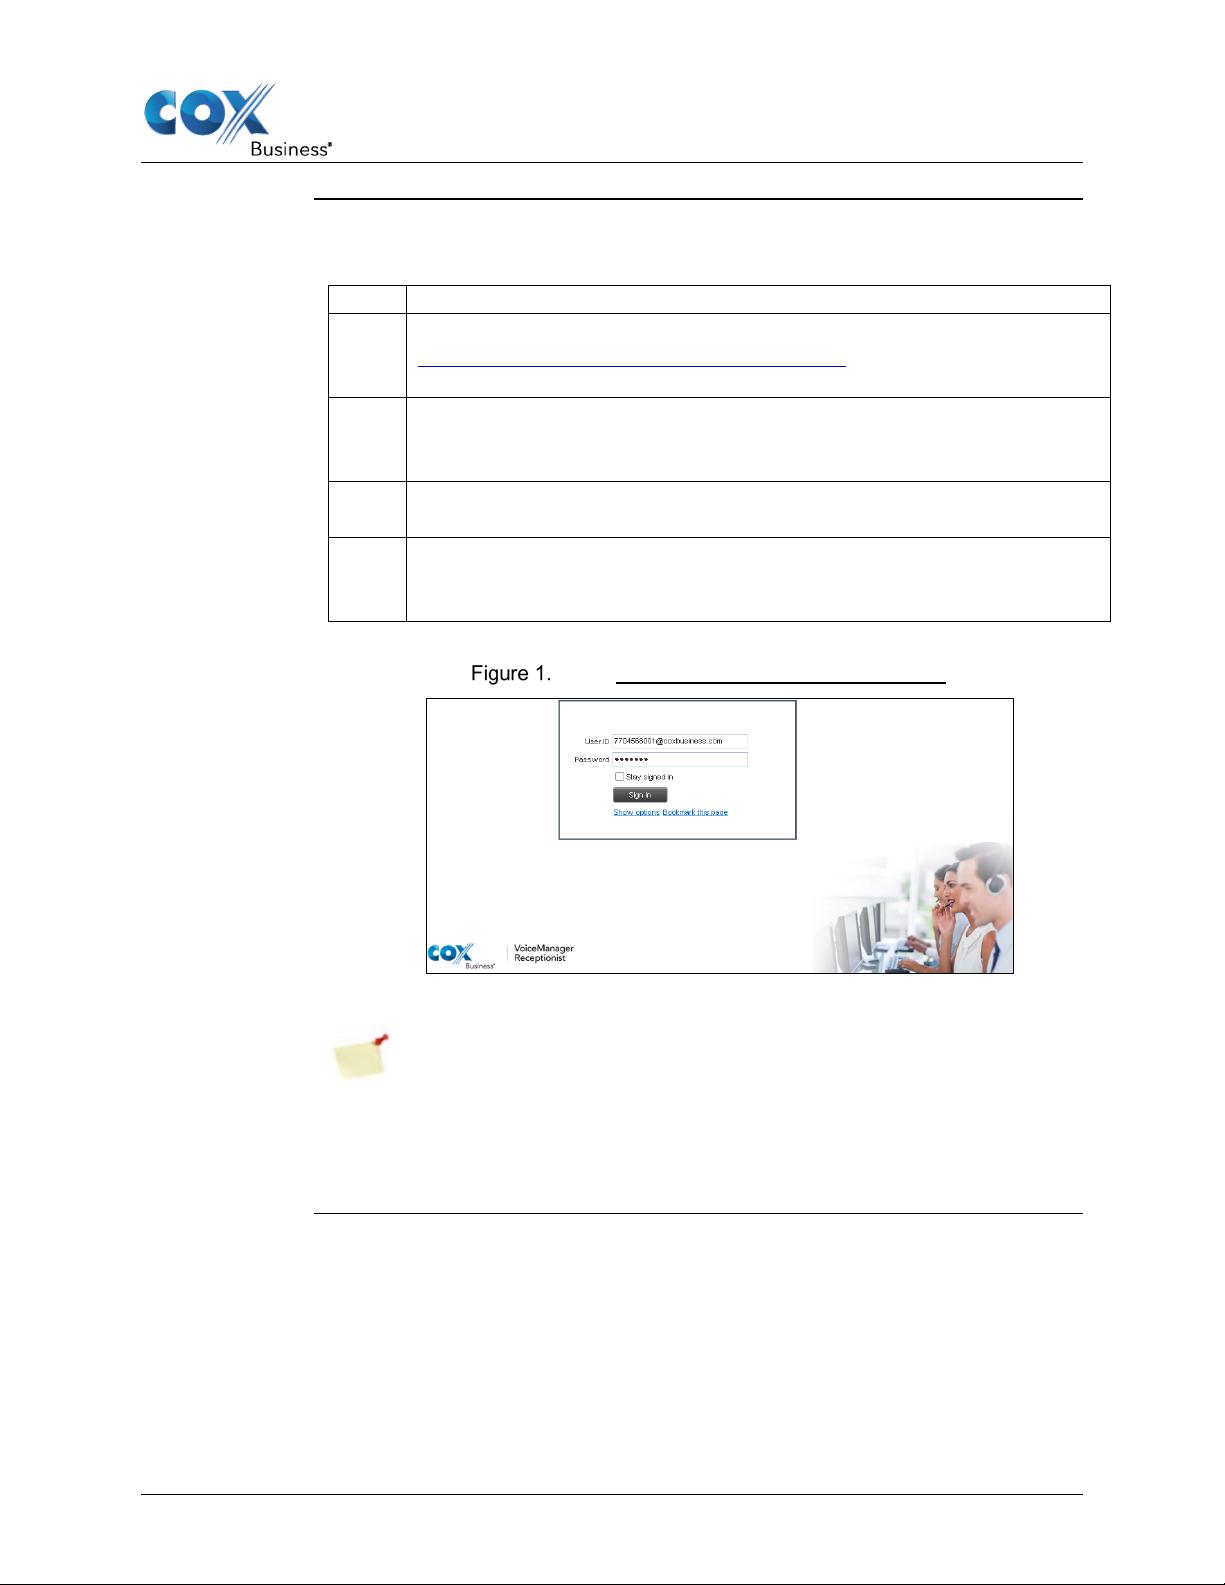
Use the following steps to log in to Receptionist Console.
Step
Action
1.
Open your web browser and enter
Result: The Receptionist Console Sign-in page appears.
2.
Enter your (IP Centrex) MyAccount User ID in user@domain format
password, contact your MyAccount administrator.)
3.
(Optional) Check the Stay signed in box to automatically re-connect
in the event of a disruption to the network connection.
4.
Click the Sign In button.
(See Figure 1).
https://console.coxbusiness.com/receptionist in the address bar.
and your Password. (Note: If you are unsure of your user ID or
Result: Receptionist Console starts and you are signed in.
Receptionist Console Sign-in page
Note: You may be prompted by your web browser and/or your Java
software to allow Receptionist Console to run. Review the details in the
prompt and click the Run and/or Allow buttons to continue. As an
option, you can click the “Do not show this again…” checkbox to avoid
this prompt in the future.
Web-Based Receptionist Console User Guide 2
Page 7

Call Console Overview
Sign In Options
For this section, look at the links that are located below the Sign in button in
browser bookmark to the Receptionist Console login page.
Figure 1.
Show Options link: Enter the domain (the portion after the “@” symbol in the
User ID field) in the Append Domain text box so that you will only need to
enter your username in that field during subsequent launches. It makes
logging in to Receptionist Console quicker.
Bookmark this page link: Click to view instructions on how to create a web
Web-Based Receptionist Console User Guide 3
Page 8
Call Console User Interface
Introduction
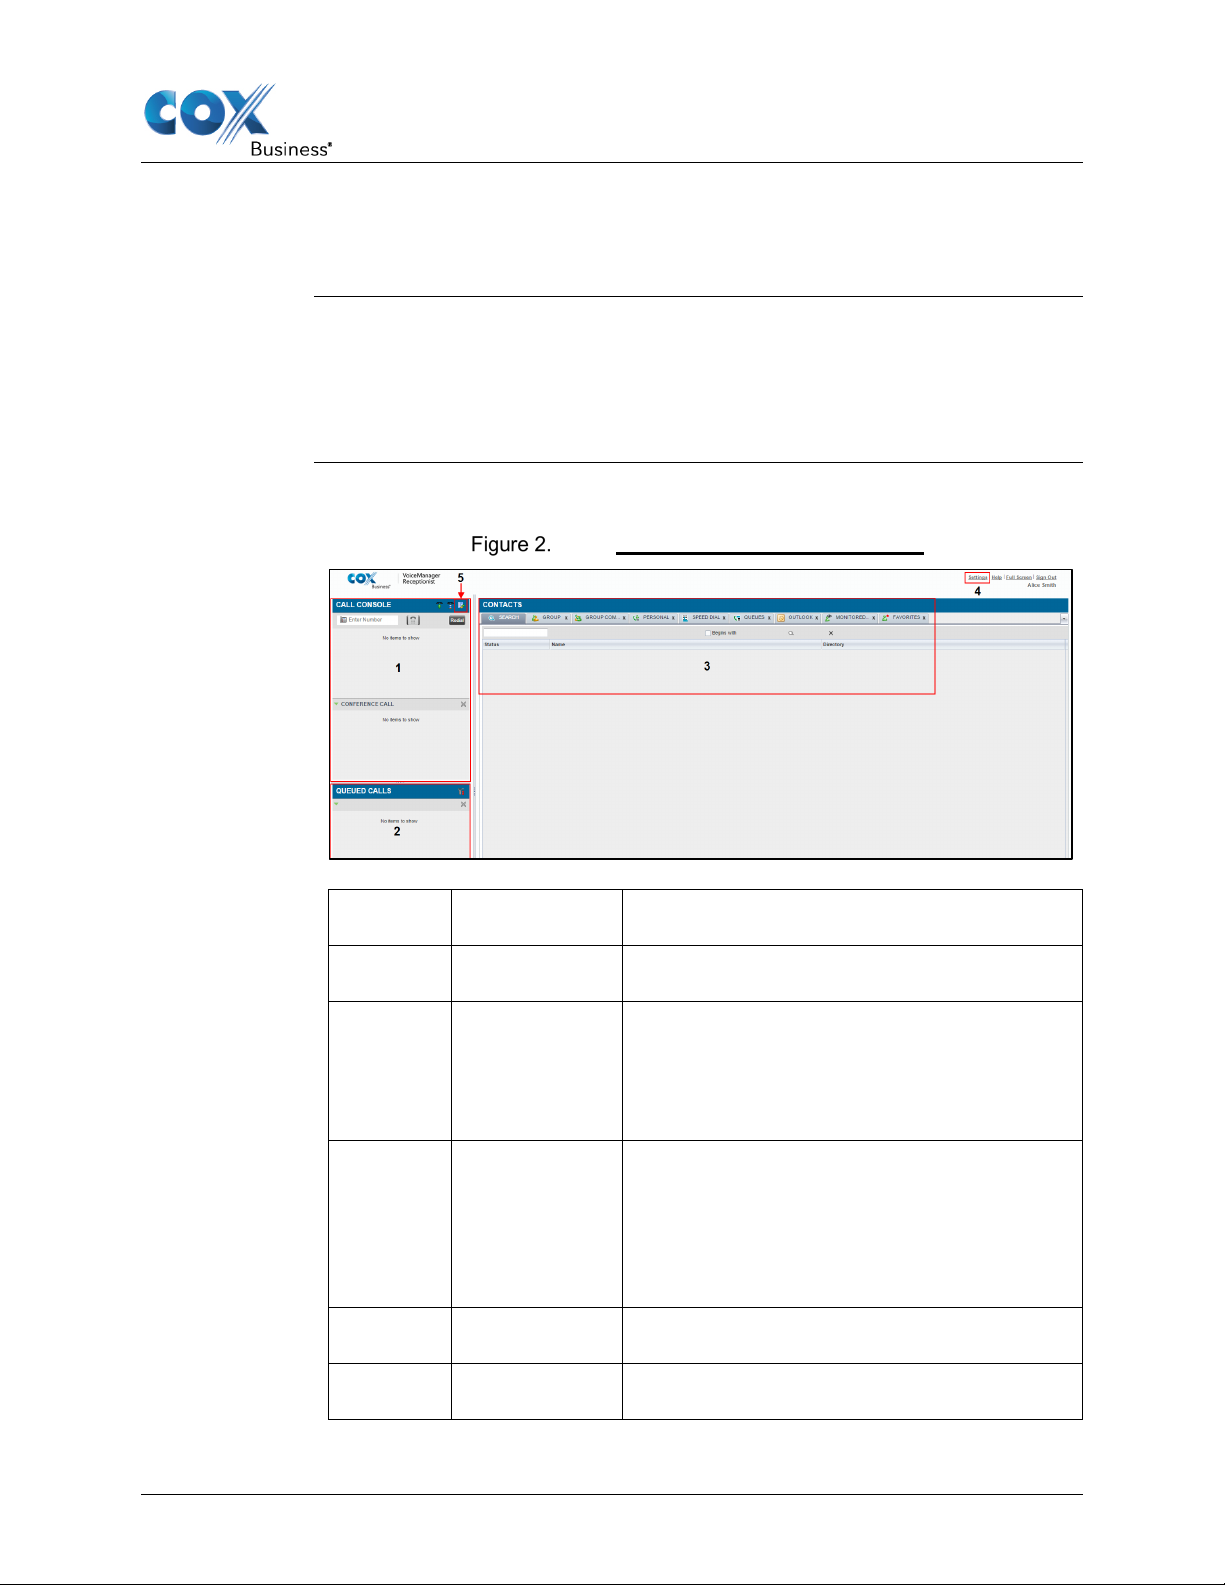
When you sign in to Receptionist Console, the main page appears. See Figure
you configure various Receptionist Console functionality.
Diagram
The diagram below is the main page of Receptionist Console.
Numeric
Identifier
Name
Description
1
Call Console
pane
View and manage your current calls.
2
Queued Calls
Manage calls that have been routed to a Call
logged in to the queue.)
3
Contacts pane
Create and manage your directories for
section for a description of each tab.)
4
Settings pages
Configure specific Receptionist Console
functionality.
5
Call History
dialog box
View and return previous incoming calls.
Understanding the Web-based Receptionist Console
User Interface
2. This is where you perform most of your call management and monitoring
tasks. In addition, the main page includes a link to the Settings pages where
Receptionist Console Main page
pane
Queue and are waiting to be answered.
(Note: Call Queueing functionality is only
available if it has been added and you are
business and personal associates. Contacts
can be categorized by Group, Group
Common, Personal, Speed Dial, Outlook,
Monitored, and Favorites. (See the next
Web-Based Receptionist Console User Guide 4
Page 9

Call Console User Interface
Descriptions of
The table below contains a description of each tab in the Contacts pane. Refer
Tab Name
Description
Search
Use the Search tab to locate a contact among all
directories.
Group
Contains a list of contacts and their phone numbers that
you hav e grouped together; for example, Jill’s team.
Group
Common
Contains a list of contacts and their phone numbers that
the company has grouped together.
Personal
Contains a list of all non-business associates and their
phone numbers.
Speed Dial
Contains a list of all frequently called contacts and their
assigned speed dial number.
Queues
Displays the calls that are waiting to be addressed.
Outlook
Contains a list of all business associates and their contact
repository, or are in your personal Outlook directory.
Monitored
Contains a list of all business associates whose
availability status can be watched.
Favorites
Contains a list of business and non-business associates
who you call frequently.
Tabs in
Contacts Pane
to Figure 2 for the location of each tab in the Receptionist Console main
window.
information that is in your company’s Microsoft Outlook
Web-Based Receptionist Console User Guide 5
Page 10

Page 11
Call Console Functionality
Introduction
The first section we will review is the Call Console pane. You use this area of
in your organization.
Diagram
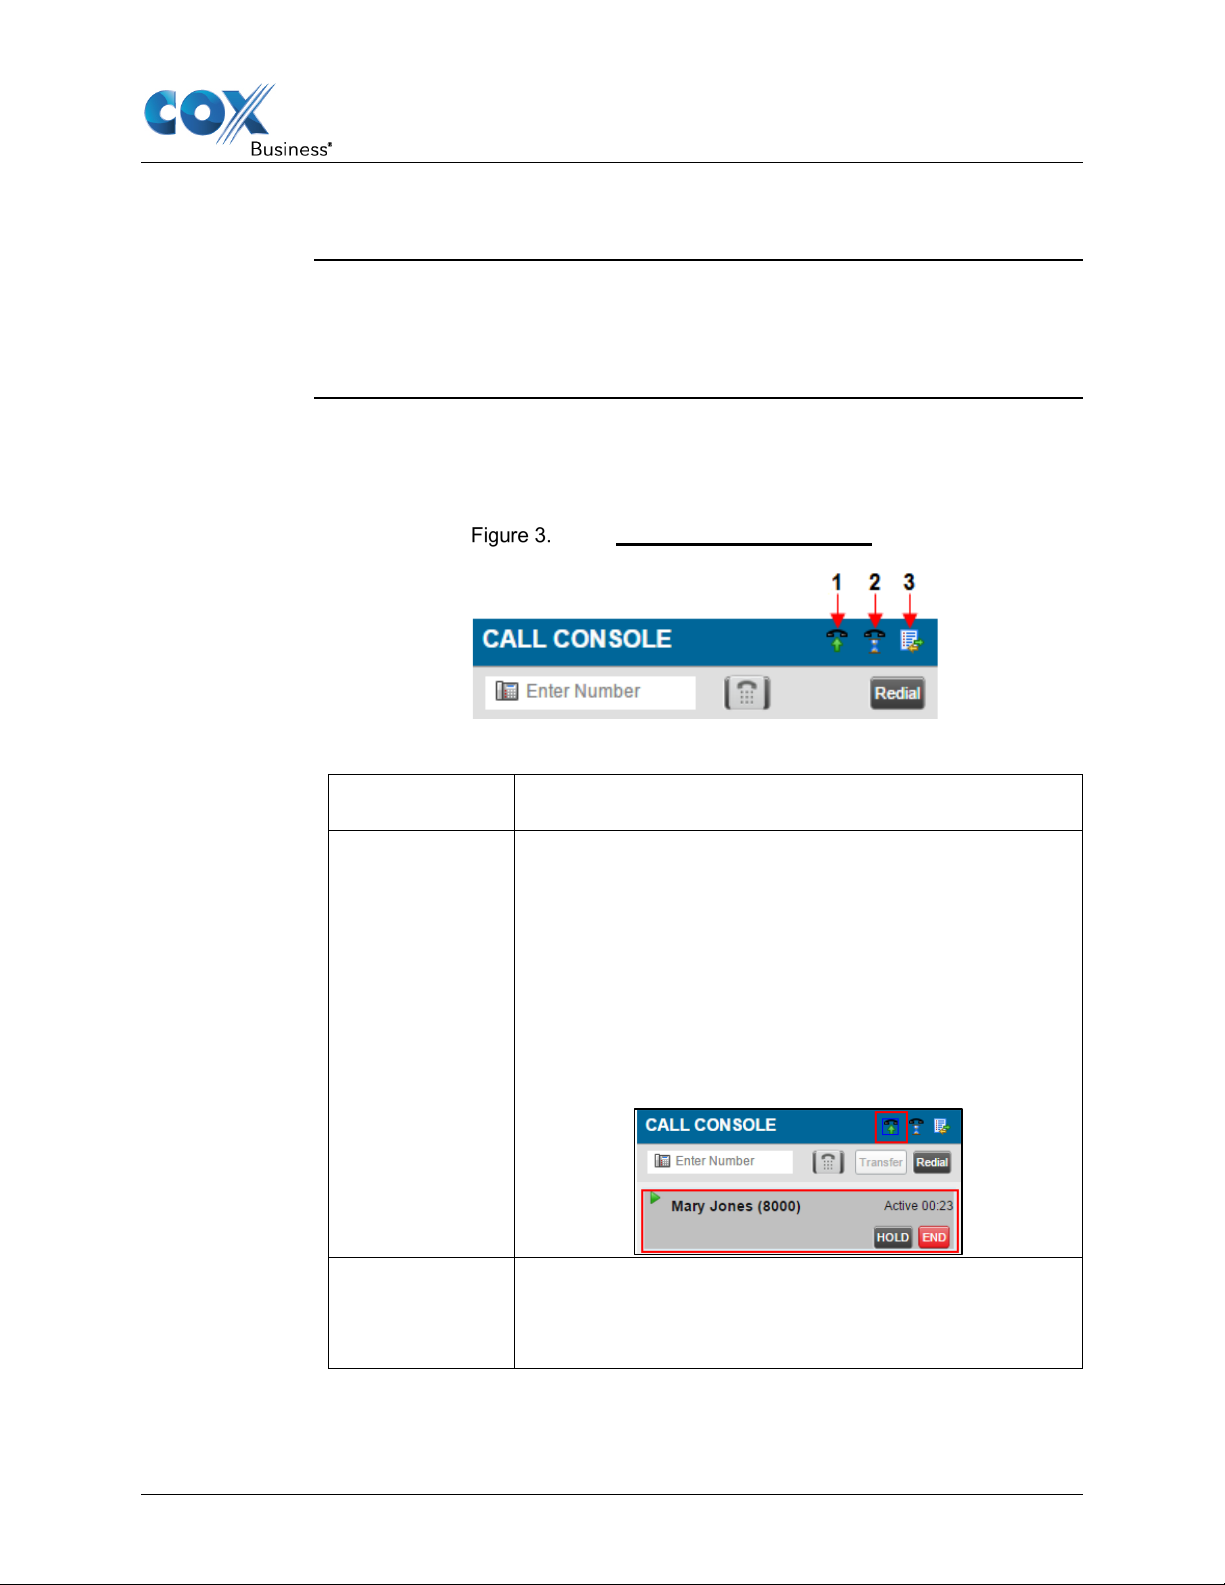
The Call Console title bar includes three controls. They represent, in order
Icon Numeric
Identifier
Description
1 (Auto Answer)
When Auto Answer is enabled, your phone
2 (Call Waiting)
Click the Call Waiting icon (number “2” in Figure 3) in
indicate that the feature is active.
Call Console Functionality
Receptionist Console to view and manage active calls for yourself and others
from left to right in Figure 3, the following functionalities: Auto Answer (icon
1), Call Waiting (icon 2), and Call History (icon 3).
Call Console title bar icons
automatically goes off-hook when you receive an
incoming call. This applies to both inbound and click-todial calls initiated from Receptionist Console.
To enable or disable Auto Answer, click the icon
(number “1” in Figure 3). When enabled, a blue border
appears around the icon to indicate that the feature is
active and future incoming calls will be answered
automatically.
the Call Console title bar to enable or disable the
feature. A blue border will appear around the icon to
Web-Based Receptionist Console User Guide 7
Page 12

Call Console Functionality
Icon Numeric
Identifier
Description
3 (Call History)
The Call History function enables you to see a log of
recent phone calls that you missed, received, and dialed.
You can sort the calls by Name, Number, or the
Time/Date stamp when you click the column heading.
Click the Call History icon (number “3” in Figure 3) to
open the log and select the type of calls you want to
view from the Show drop-down menu.
Call History dialog
Web-Based Receptionist Console User Guide 8
Page 13
Call Console Functionality
Introduction
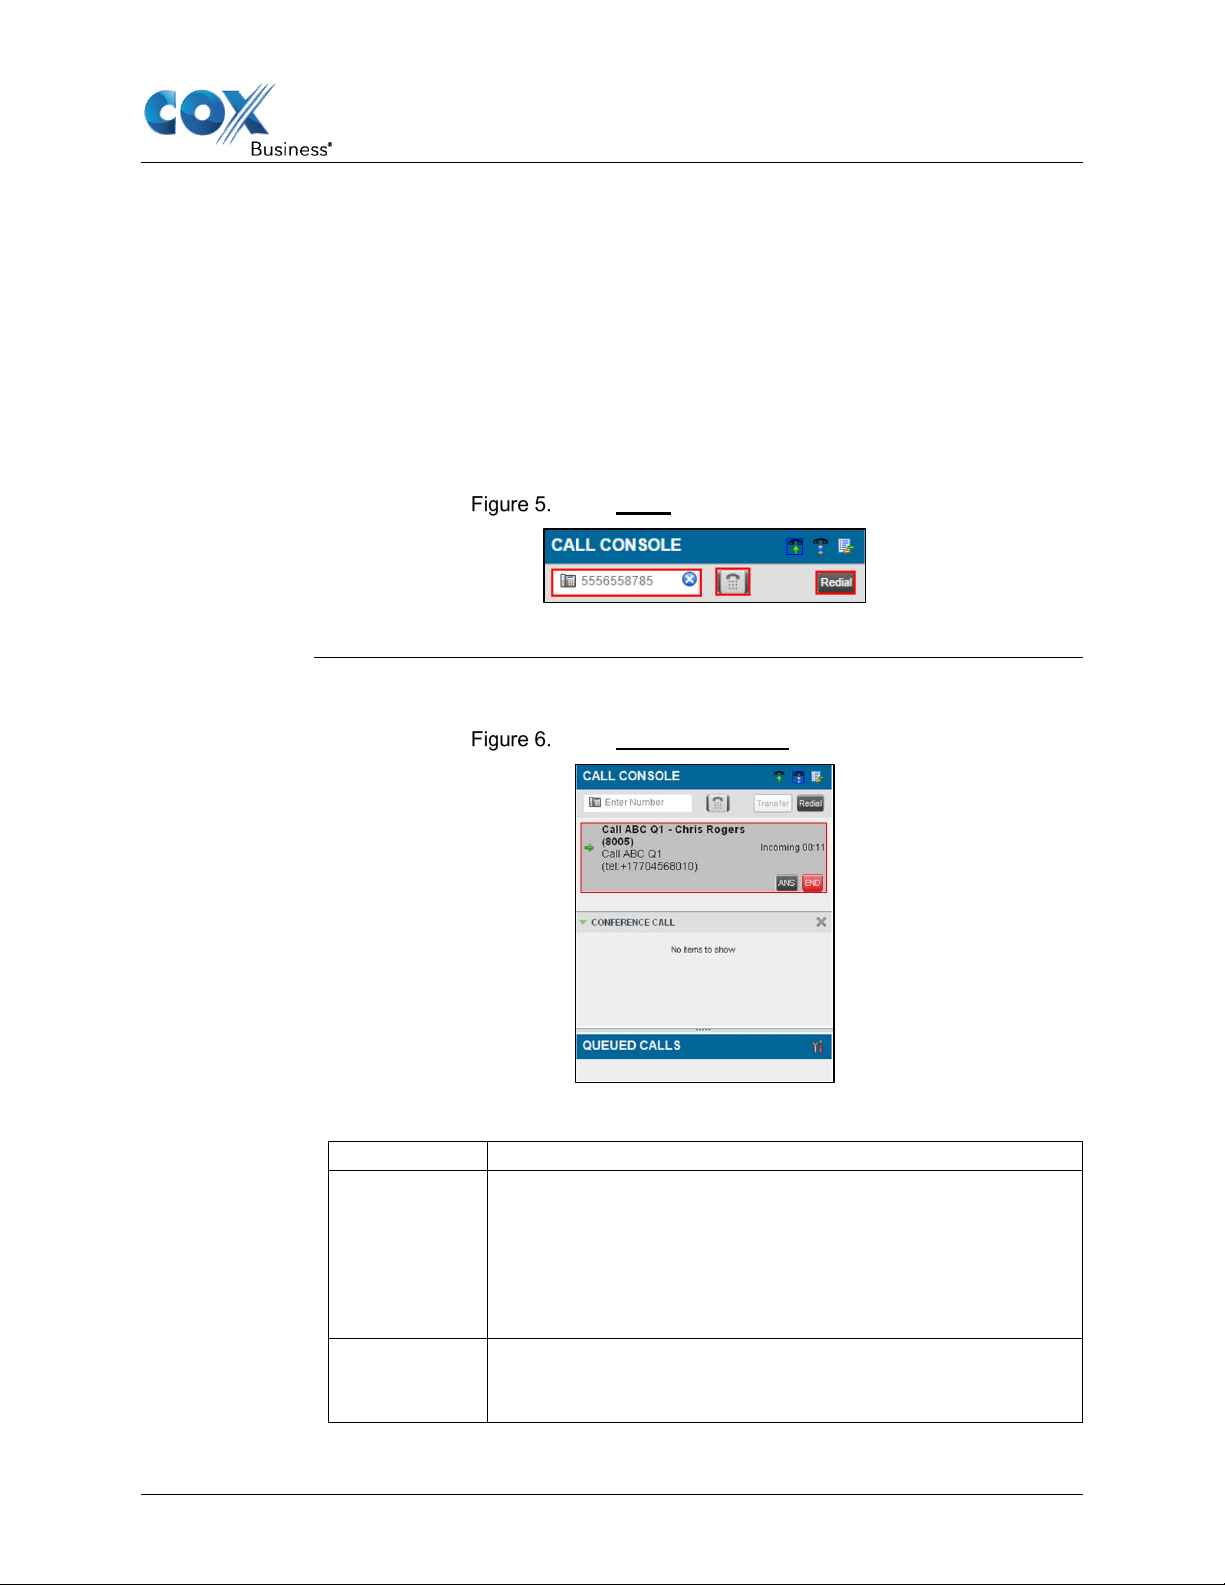
The Dialer field, located at the top of the Call Console, below the header,
Answer Call
Your incoming calls appear in the Call Console pane, as is shown in Figure 6.
[Header]
[Header]
Caller ID
The phone number and name of the calling party (if
via: <Call parked against user>
Caller ID
(transferred or forwarded) the call to you. If the call was
Place a Call
allows you to make click-to-dial calls that need to be answered on your
extension before the call is placed.
You may place an outgoing call when you enter the phone number in the text
field and click the keypad icon. (Note: The buttons to the right, called action
buttons, change depending on the context, and allow you to perform
operations on calls.) In Figure 5, the Redial button appears.
Dialer
Appearance
Call Console pane
Each call is listed on a separate line with the following information:
available).
Note: If an unanswered parked call rings back, the
following information appears: Recall: <Caller’s name>;
Diversion
Web-Based Receptionist Console User Guide 9
The name (if available) of the party who diverted
Page 14
Call Console Functionality
diverted more than once, the last party who diverted the
and so on.
Call State
icon
A visual representation of the current state of the call.
Call State
name
A description of the call’s current status.
Call duration
The duration of the call from the time the call was
call has been on hold is also displayed.
Action
buttons
Operations that you can currently take on the call.
How to Answer
Use the following steps to answer an incoming call.
Step
Action
1.
double-click the call to answer.)
2.
To answer an incoming call from a Call Notification pop-up
window, click anywhere on the text in the window.
call is listed first; the second to last party is listed second;
a Call
[Held
duration]
Move the mouse over the call and click the Answer button.
Result: The call state changes to Active. (Note: You cannot
received. It accurately reflects how long the call has been
present in the system. In addition, for held calls, the time a
Web-Based Receptionist Console User Guide 10
Page 15
Introduction
Call Pickup allows you to answer a call that is incoming to another
How to Use
Call Pickup
Use the following steps to answer a phone ringing at another extension.
Step
Action
1.
Expand any contact directory and find the contact for which an
incoming call is ringing.
2.
Click the Answer button.
How to
You can only put an active call on hold. Use the following steps to use Call
Step
Action
1.
To put a call on hold, move the mouse over an active call and
click the Hold button.
2.
To resume a held call, move the mouse over the call and click
it from a Hold status.)
How to End a Call
Call Console Functionality
Use Call Pickup, Hold, Resume
user/extension. This is useful when the user is currently not available to
answer the call and allows you to pick up the call instead.
Note: Call Pickup is configured on a per-user basis in MyAccount
by any MyAccount adminstrator.
Hold/Resume
Calls
Pickup.
Answer . (Note: You cannot double-click the call to remove
Click the button or hang up the phone to end a call.
Web-Based Receptionist Console User Guide 11
Page 16

Page 17
Call Console Functionality
Introduction
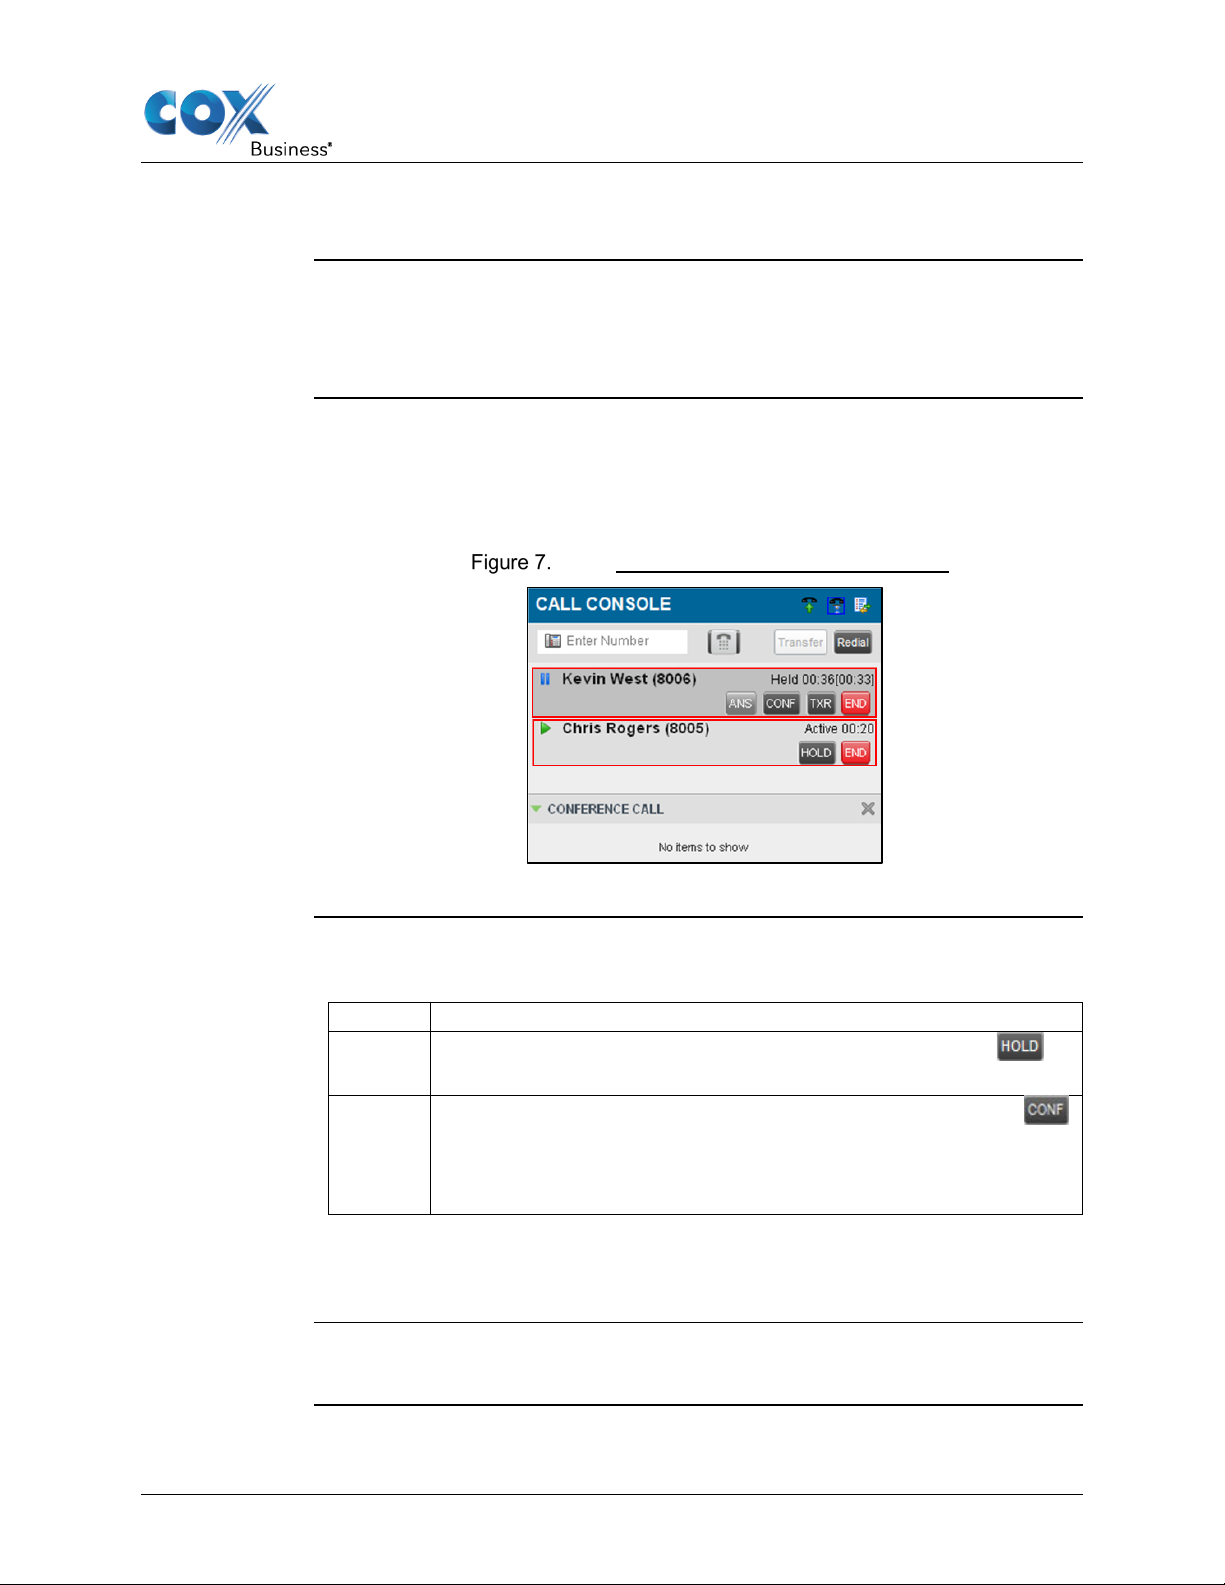
The Conference Call panel displays a current meeting session between three
be involved in one conference call at a time.
Diagram
The Call Console panel lists the call legs that make up your current
How to
Use the following steps to conference two calls.
Step
Action
1.
button.
2.
Conference Call pane.
Conference Call pane. See Figure 8.
Conference Call Functionality
or more people and allows you to manage these types of calls. You can only
conference. In Figure 7, two calls are waiting to be conferenced, and each
two-way call is displayed on a separate line. The information for each call leg
is the same as the information that appears for a two-way call.
Incoming Calls (to be conferenced)
Conference a
Call
Answer the first incoming calling line and click the Hold
Answer the second incoming calling line and click the Conf
button.
Result: The two parties are now in conference and appear in the
Once the calls are conferenced, they move from the Call Console pane to the
Web-Based Receptionist Console User Guide 13
Page 18
Call Console Functionality
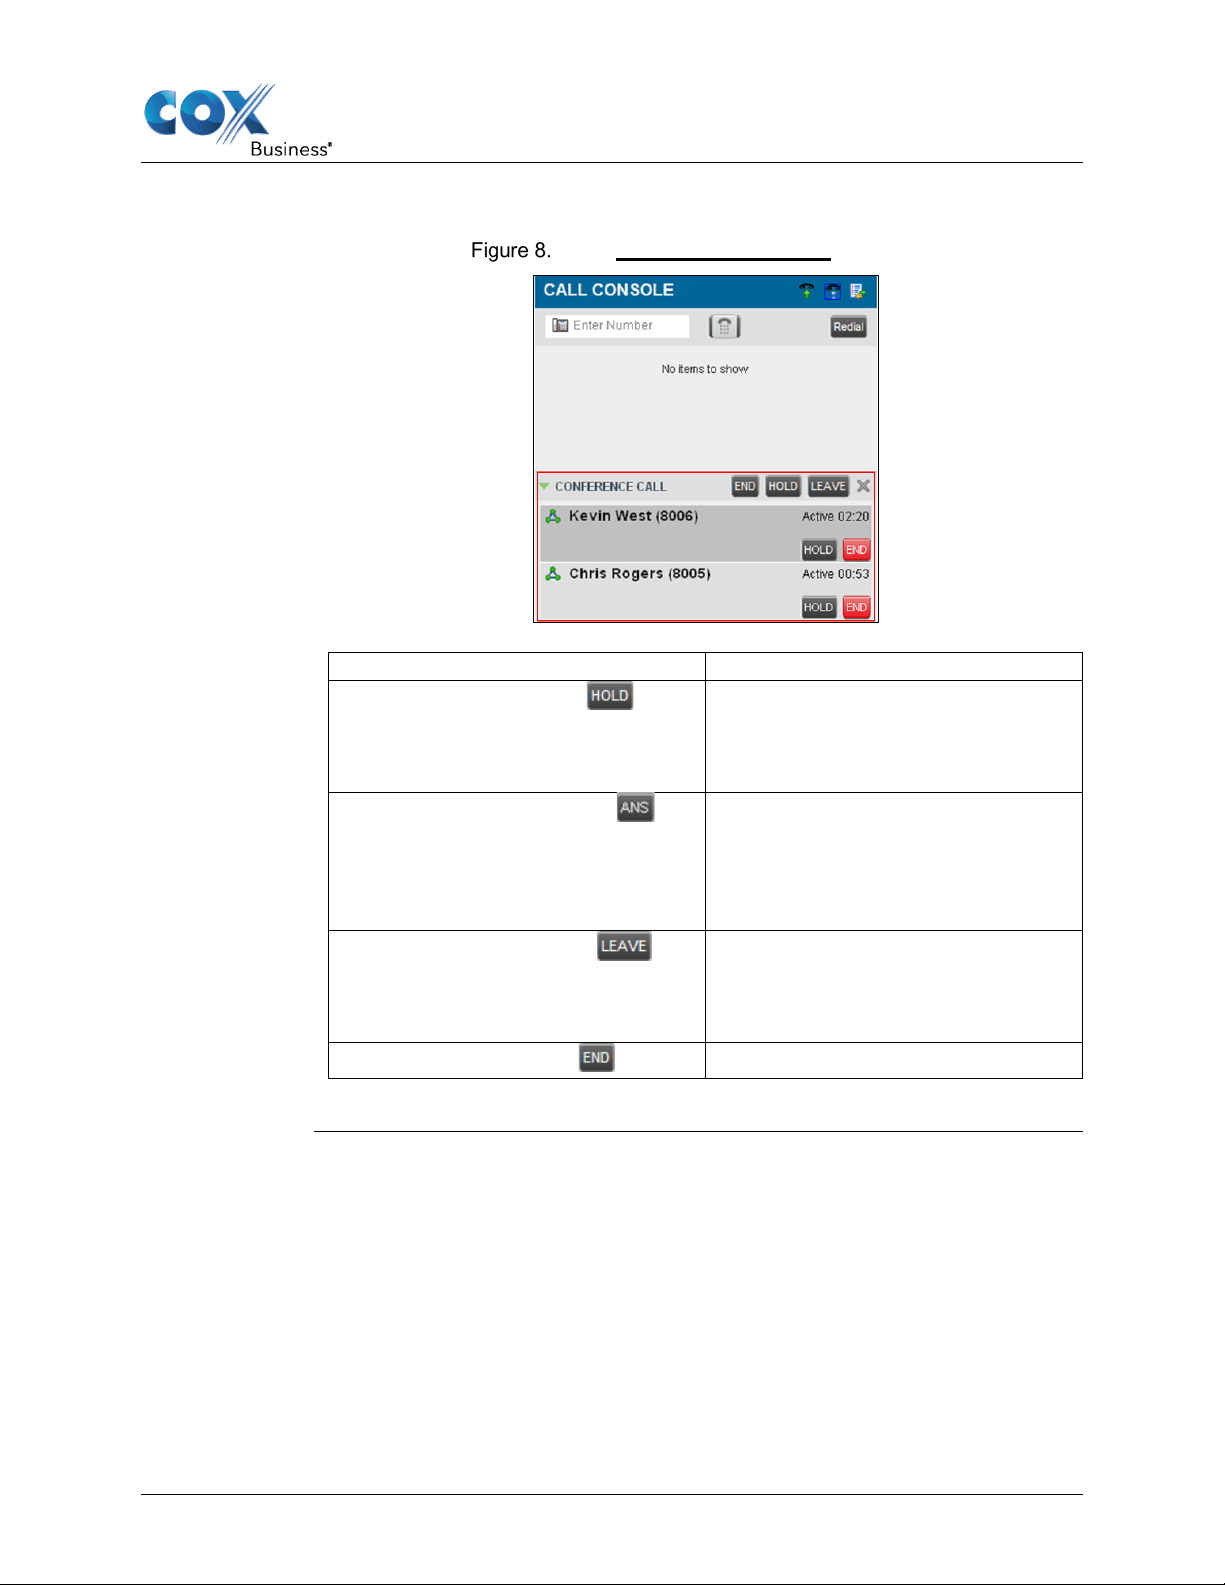
Diagram
The header bar contains controls that allow you to manage the conference.
Button
Function
Allows you to place the conference
to speak to other participants.
Allows you to resume a held
participants.
Allows you to leave the conference.
participants to continue the call.
End Conference button
Allows you to end the conference.
Conference Calls pane
Hold Conference button
on hold. Conference participants
will hear music and will not be able
Resume Conference button
Leave Conference button
conference. Conference participants
will no longer hear hold music and
can continue speaking to other
This will remove you from the
conference while allowing the other
Web-Based Receptionist Console User Guide 14
Page 19
Queued Calls
Introduction
Receptionist Console allows you to manage calls in selected queues also
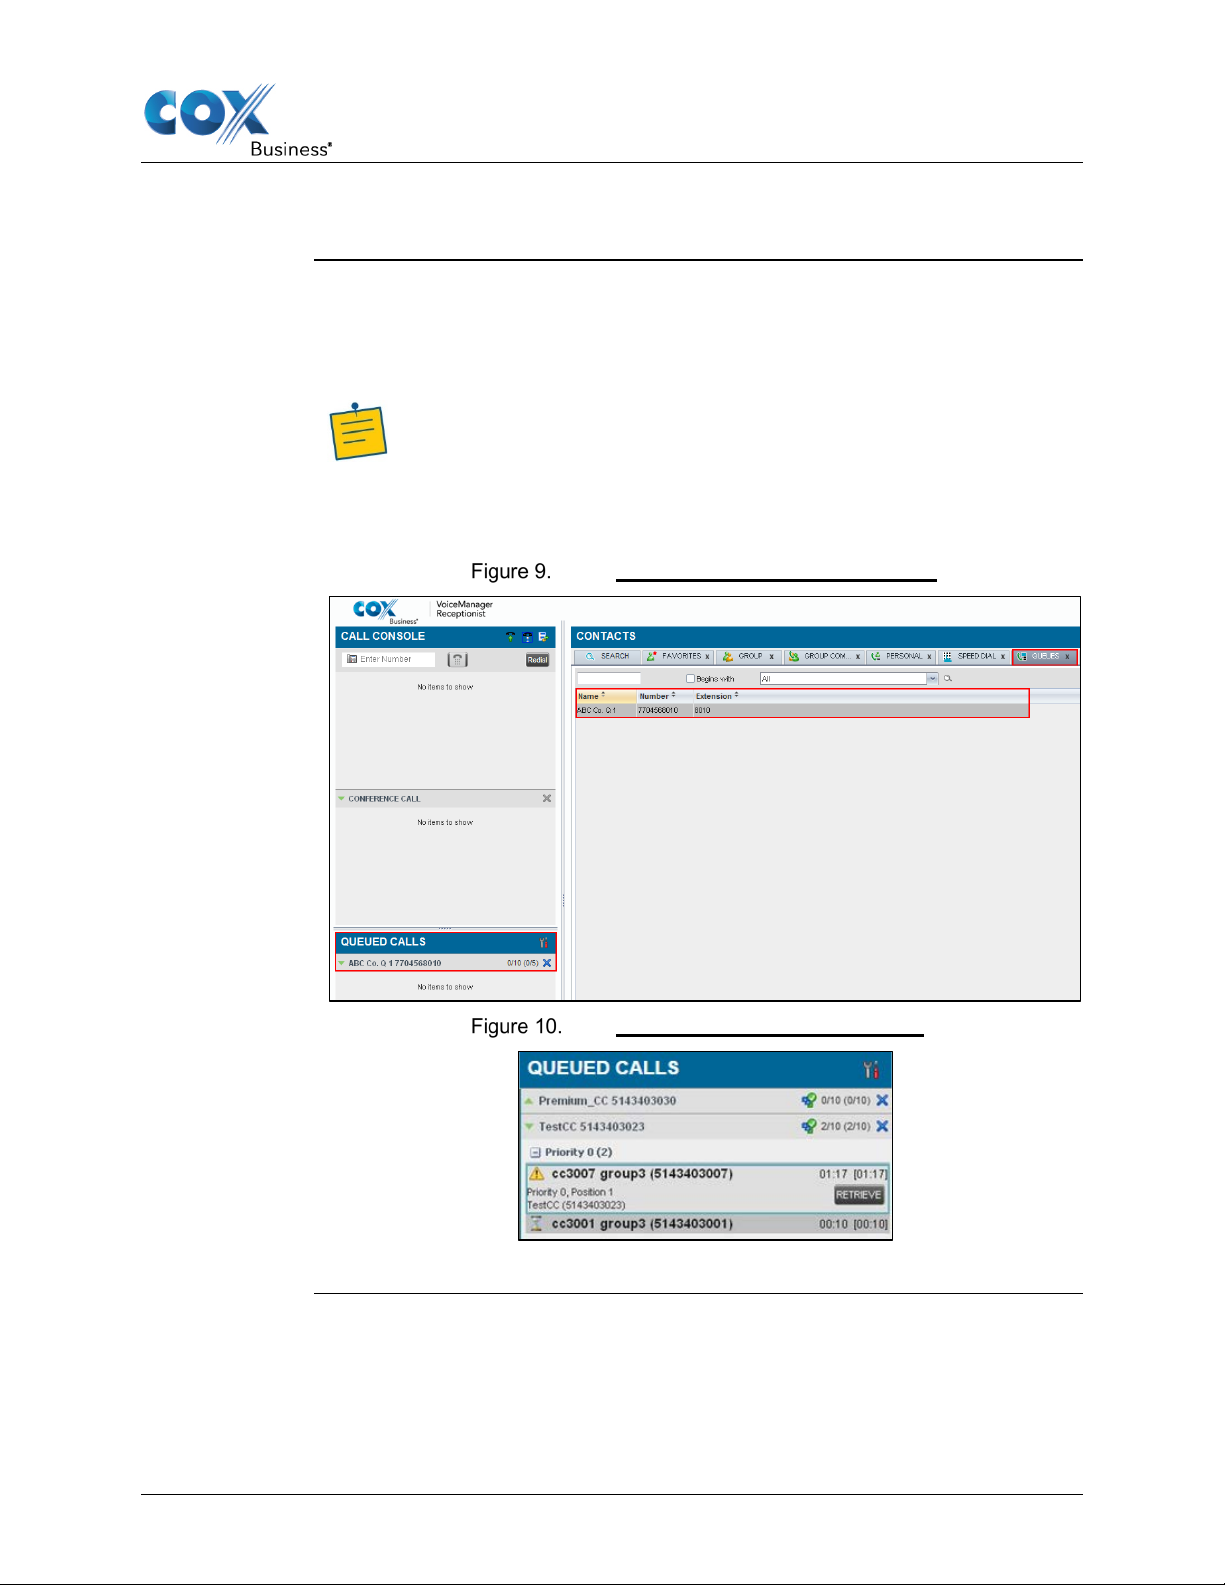
Queued Calls
known as call centers (up to five) and monitor calls in real time. You manage
queued calls through the Queued Calls pane.
Note: A Call Queue is an optional add-on. MyAccount administrators
must assign users to a Call Queue in order to view and manage the
Queue in Receptionist Console and receive/answer calls on behalf of
the Queue. For more information on how to assign users, look at the
Monitored Users section on pages 35.
Queued Calls panel – screen view
Queued Calls panel – panel view
Web-Based Receptionist Console User Guide 15
Page 20
Queued Calls
Select Call
Manage
After you sign in to Receptionist Console, select the Call Queue(s) you want
Steps to Select a
Use the following steps to select a call queue.
Step
Action
1.
2
Select the check boxes for the Call Queue(s) you want to monitor
3.
Click the Save button.
pane.
Call Queue Management
Queue to
to manage (up to five).
Call Queue
In the Queued Calls pane, click the Options icon and
select the Edit Queue Favorite Dialog option.
Result: The Edit Queue Favorites dialog box appears.
Queued Calls – Options – Edit
Queue Favorite Dialog
in Receptionist Console. (If you do not see a Call Queue listed,
check with your MyAccount administrator.)
Result: The selected call centers appear in your Queued Calls
Edit Queue Favorites
Web-Based Receptionist Console User Guide 16
Page 21
Queued Calls
Introduction
This section instructs you on how to view a call in a queue, retrieve a call
from a queue and transfer a call
How to View Queued Calls
How to
Use the following steps to retrieve a call from the queue to your phone device.
Step
Action
1.
To retrieve a call from the queue, in the Queued Calls pane,
call.
2.
Once you retrieve the call, the call appears in the Call Console,
and you treat it as any other call.
How to
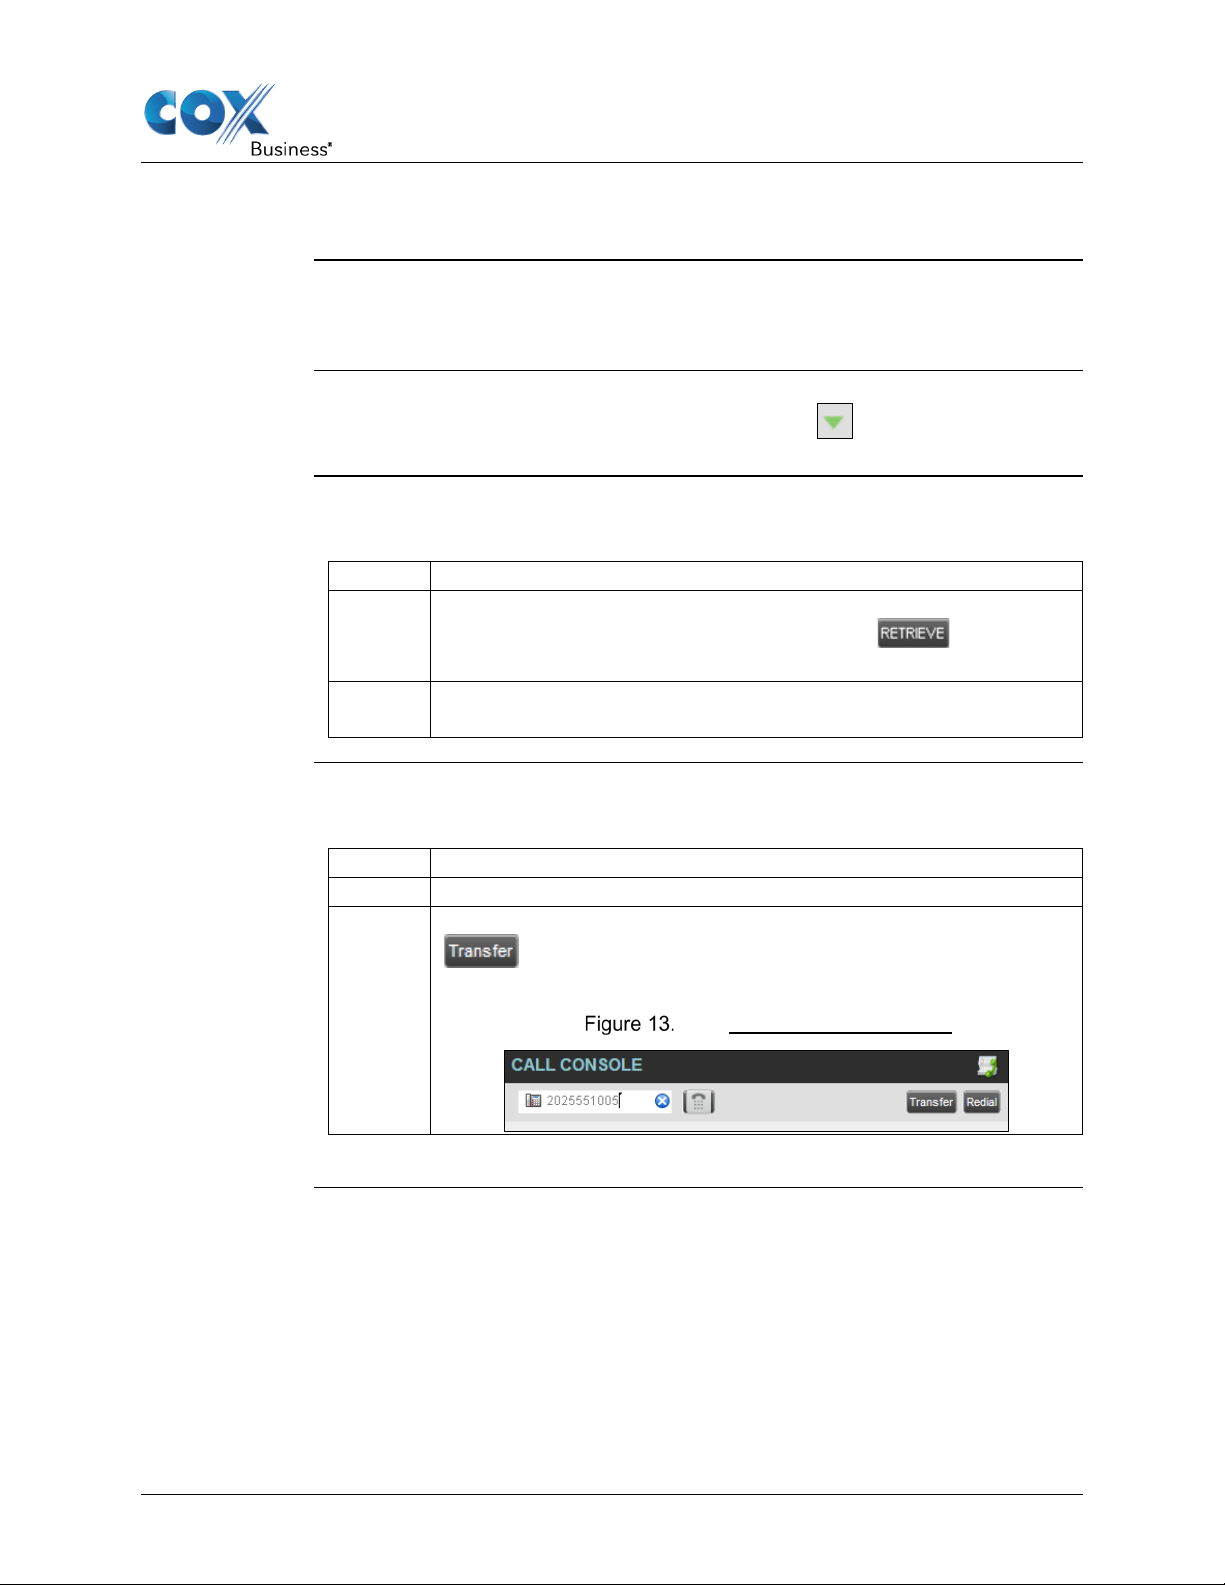
Use the following steps to transfer a call from the queue to another number.
Step
Action
1.
In the Queued Calls pane, select the call.
2.
In the Dialer, enter the destination number and click the Transfer
View, Retrieve, and Transfer Queued Calls
To view calls in a queue, click the Expand button for that queue.
Retrieve a Call
from the Queue
Transfer a
Queued Call
click the call to expand it and click Retrieve for that
button.
Result: The call is transferred and removed from the queue.
Ad Hoc Queue Transfer
Web-Based Receptionist Console User Guide 17
Page 22
Queued Calls
How to
Use the following steps to transfer a call from one queue to another.
Step
Action
1.
In the Queued Calls pane, select the call.
2.
In the Contacts pane, expand the Queues tab.
3.
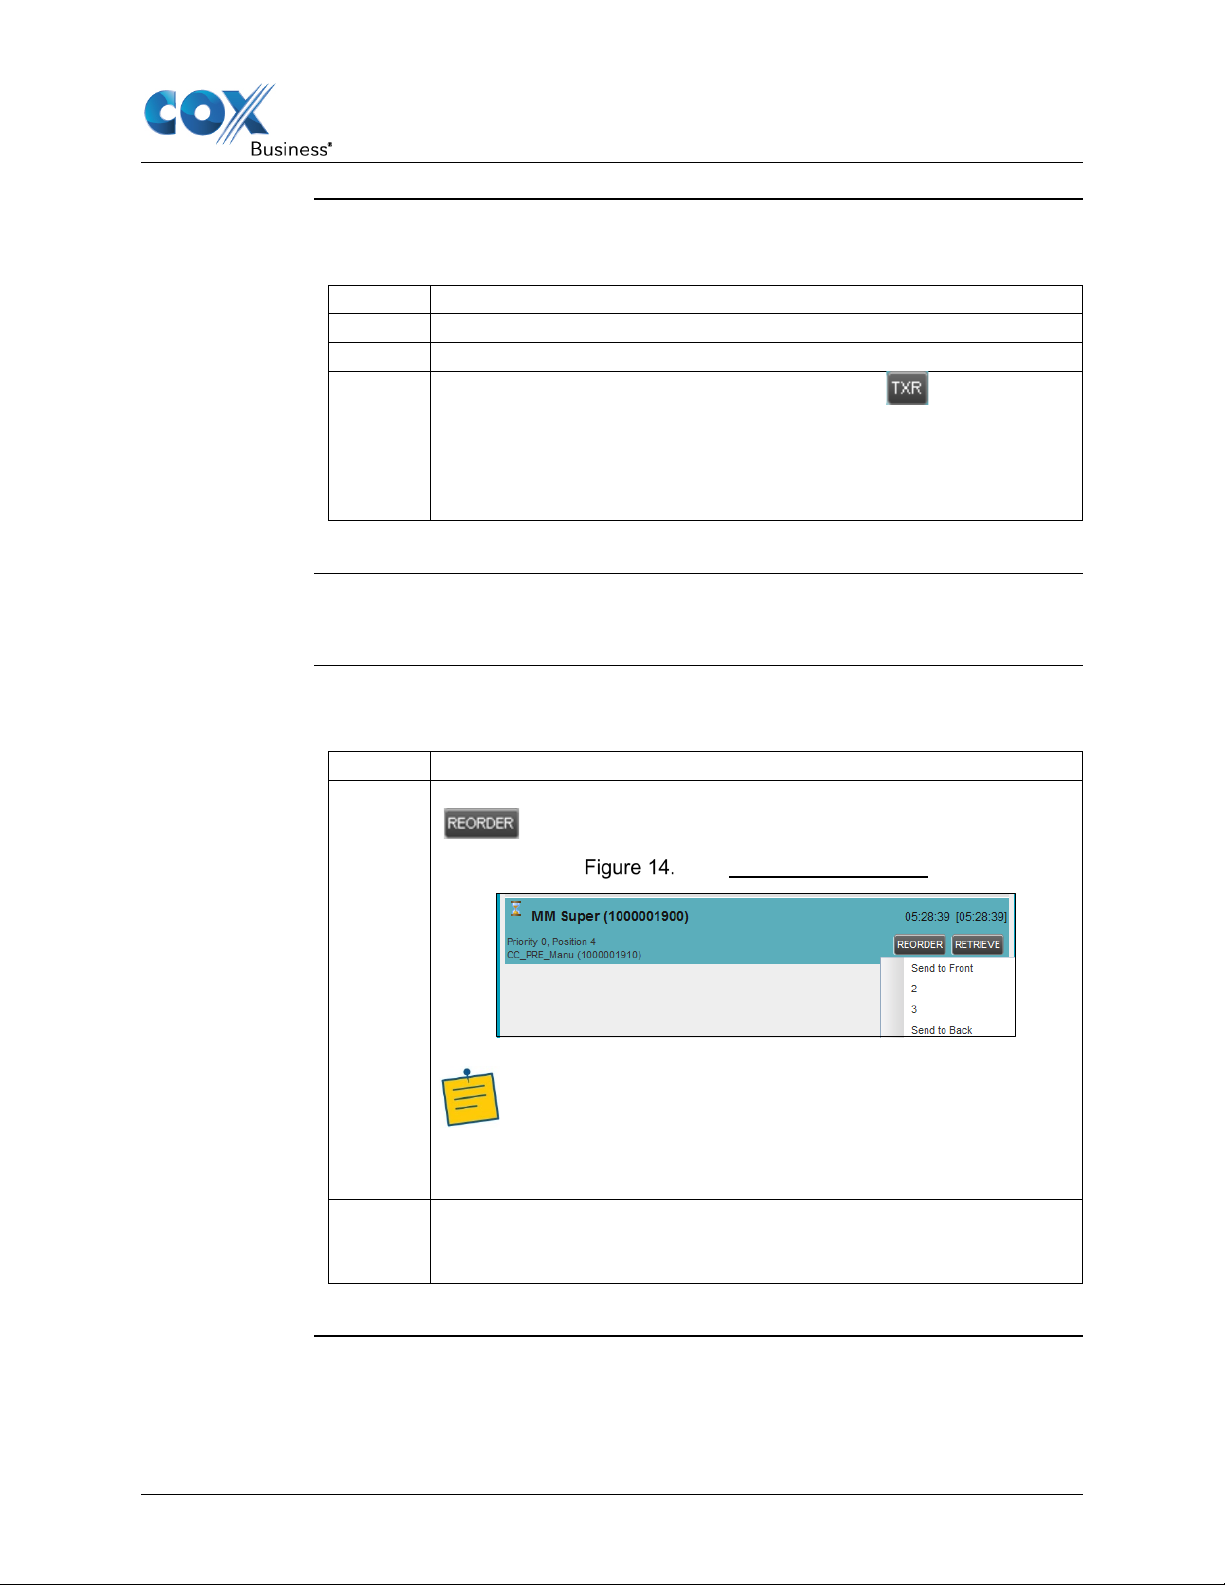
How to Change
Use the following steps to change the position of a call in a queue.
Step
Action
1.
In the Queued Calls pane, click the call and click Reorder.
2.
In the drop-down box that appears, select the new position in the
Result: The call is placed at the new position.
Transfer Calls
Between
Queues
Call Queue
Position
Click the target queue and click the Transfer button for that
queue.
Result: The call is transferred and removed from the original
queue.
Change Position of Call in Queue
.
Note: The list can contain a maximum of 24 reorder
positions that you can choose from to reorder a call in the
queue, in addition to the Send to Back and Send to
Front options.
queue.
Reorder Queued Call
Web-Based Receptionist Console User Guide 18
Page 23
Queued Calls
Introduction
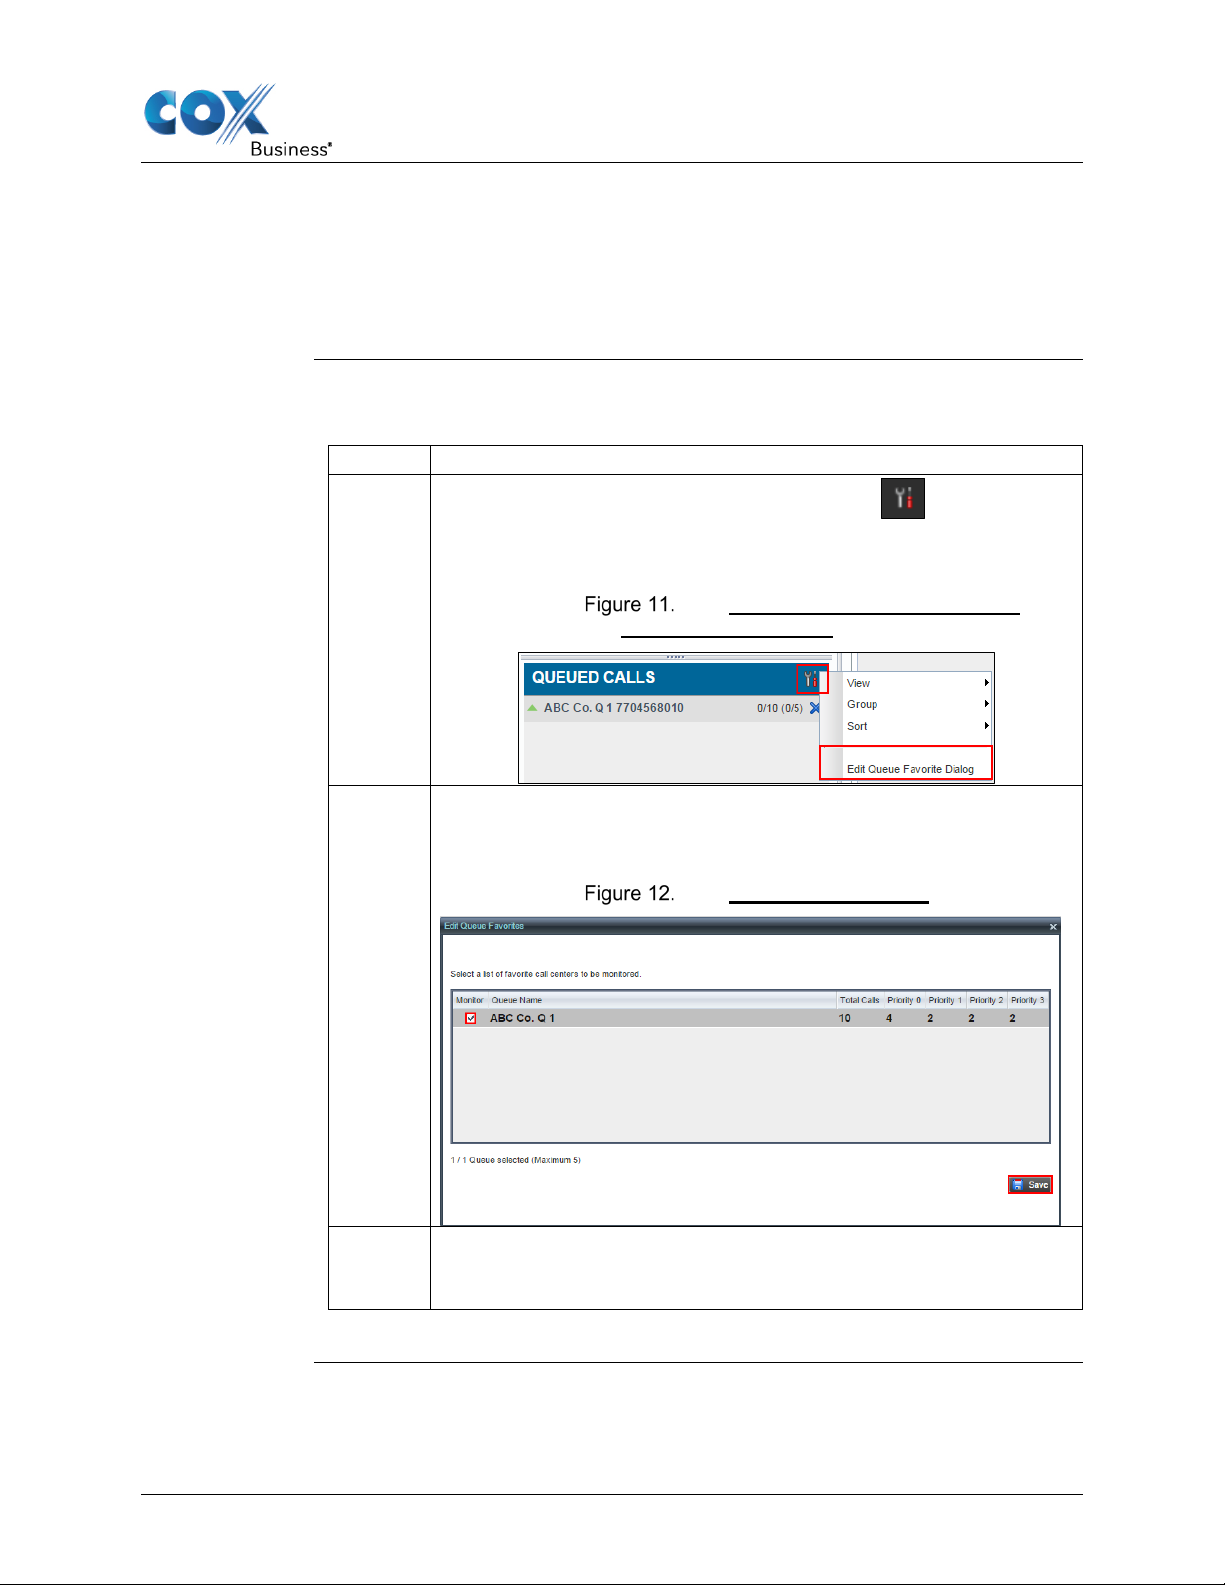
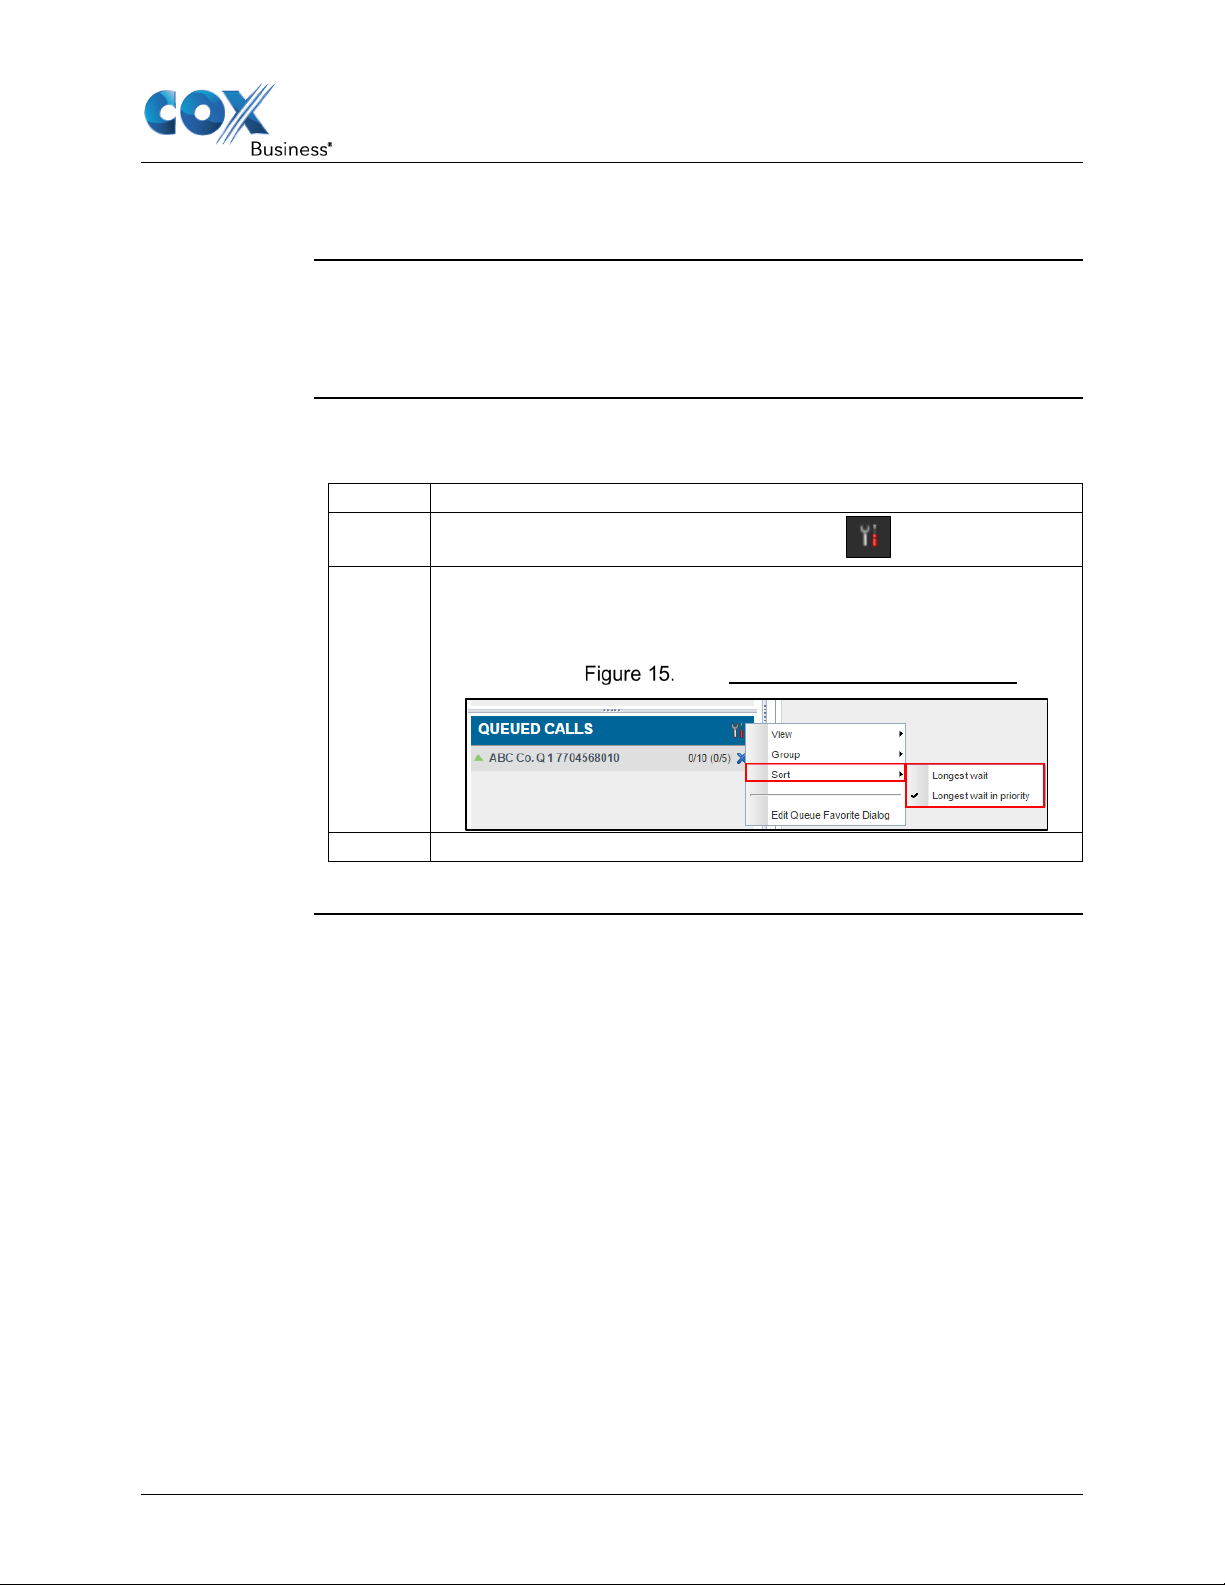
Queued calls can be sorted according to their total wait time or their wait time
You must ungroup them before you can place them in order.
How to Sort
Use the following steps to sort calls in a queue.
Step
Action
1.
In the Queued Calls pane, click Options .
2.
Select Sort and then the ordering option you want. (Note: This
Sort Queued Calls
in the current priority bucket. Ordering does not work when calls are grouped.
Queued Calls
operation applies to your view of all call queues in Receptionist
Console.)
Queued Calls – Options – Sort
Web-Based Receptionist Console User Guide 19
Page 24

Page 25
Title Bar Tabs
Introduction
This section describes the tabs that are located in the Receptionist Console
Introduction
The Contacts pane contains your contact directories in a tabbed format and
Search tab
Group Common tab
Queues tab
Favorites tab
Personal tab
Outlook tab
Group tab
Speed Dial tab
Monitored Contacts tab
Title Bar Tabs
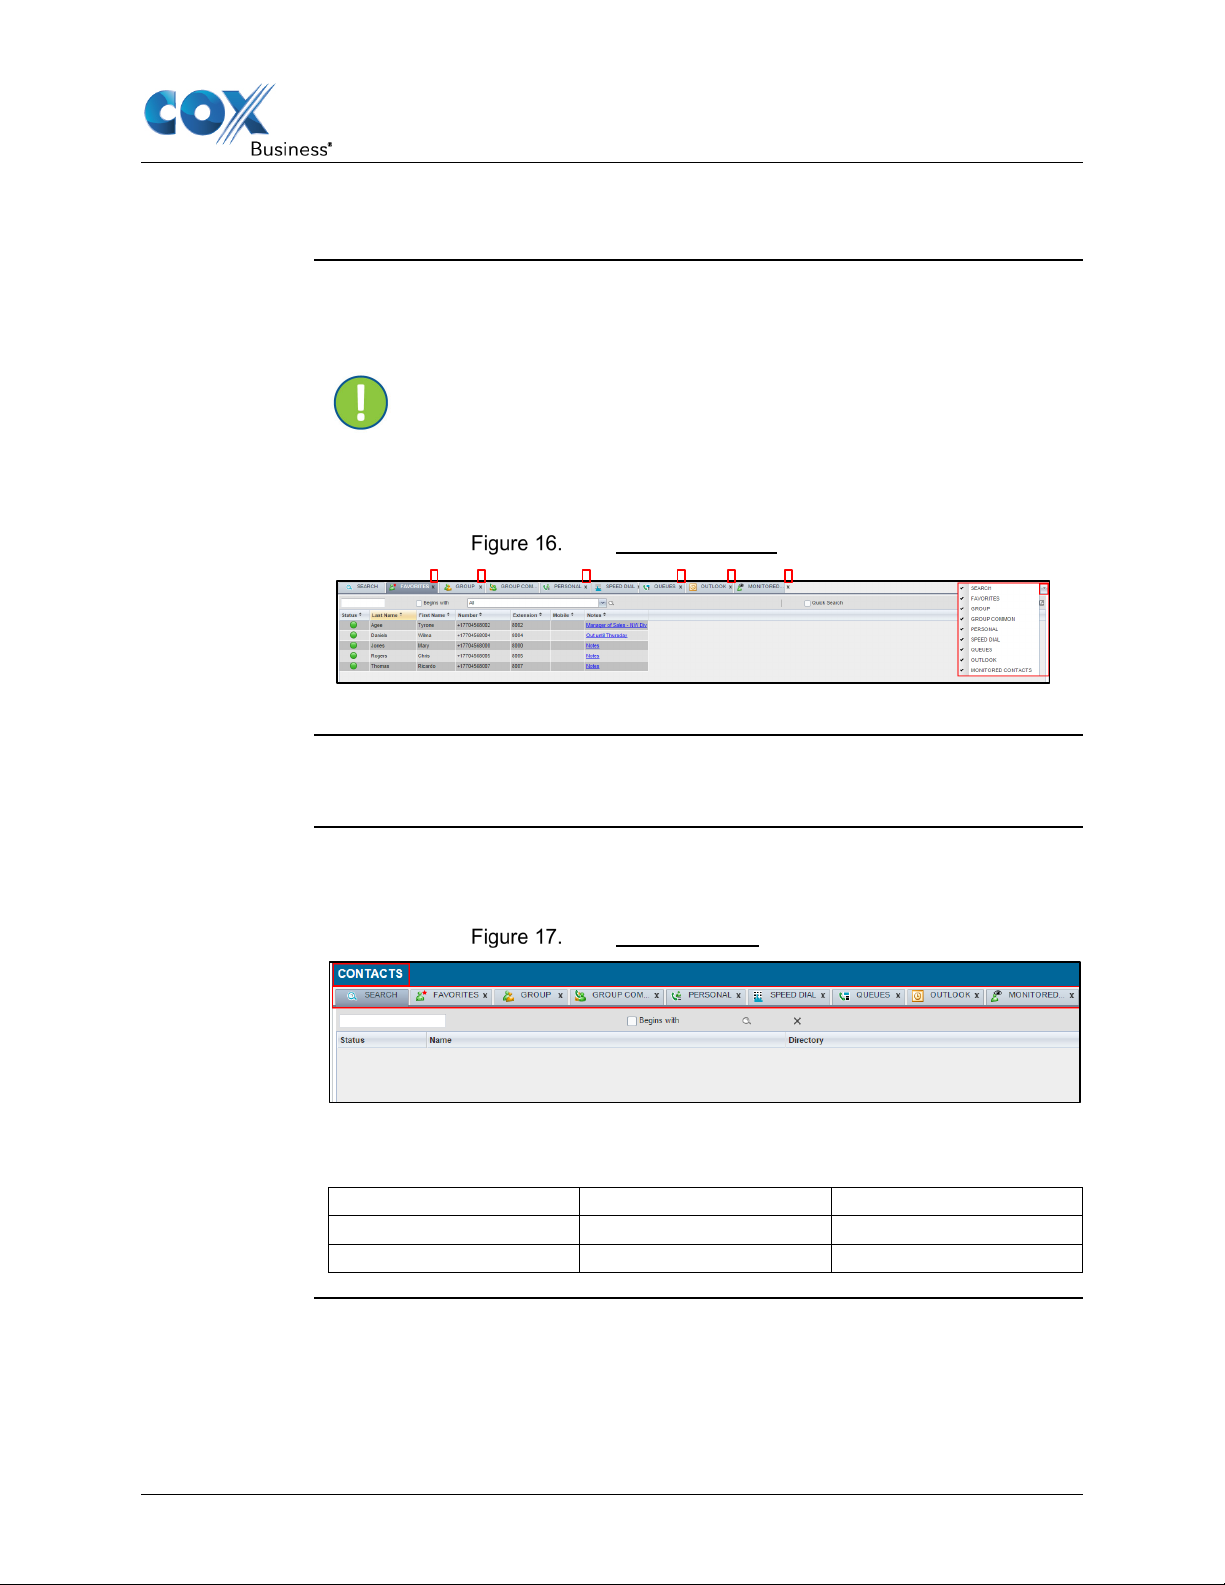
title bar. Each tab and its function are described in this chapter.
Important: If you do not see a certain tab at the top of the
Receptionist Console main window, click the drop-down arrow on the
right side of the screen (Figure 16) and click to place a check next to
the name of the tab you want to see. To remove tabs, click the X
located at the right of the tab label.
Title Bar Options
Contacts
allows you to use your contacts to make or manage calls.
Contacts panel
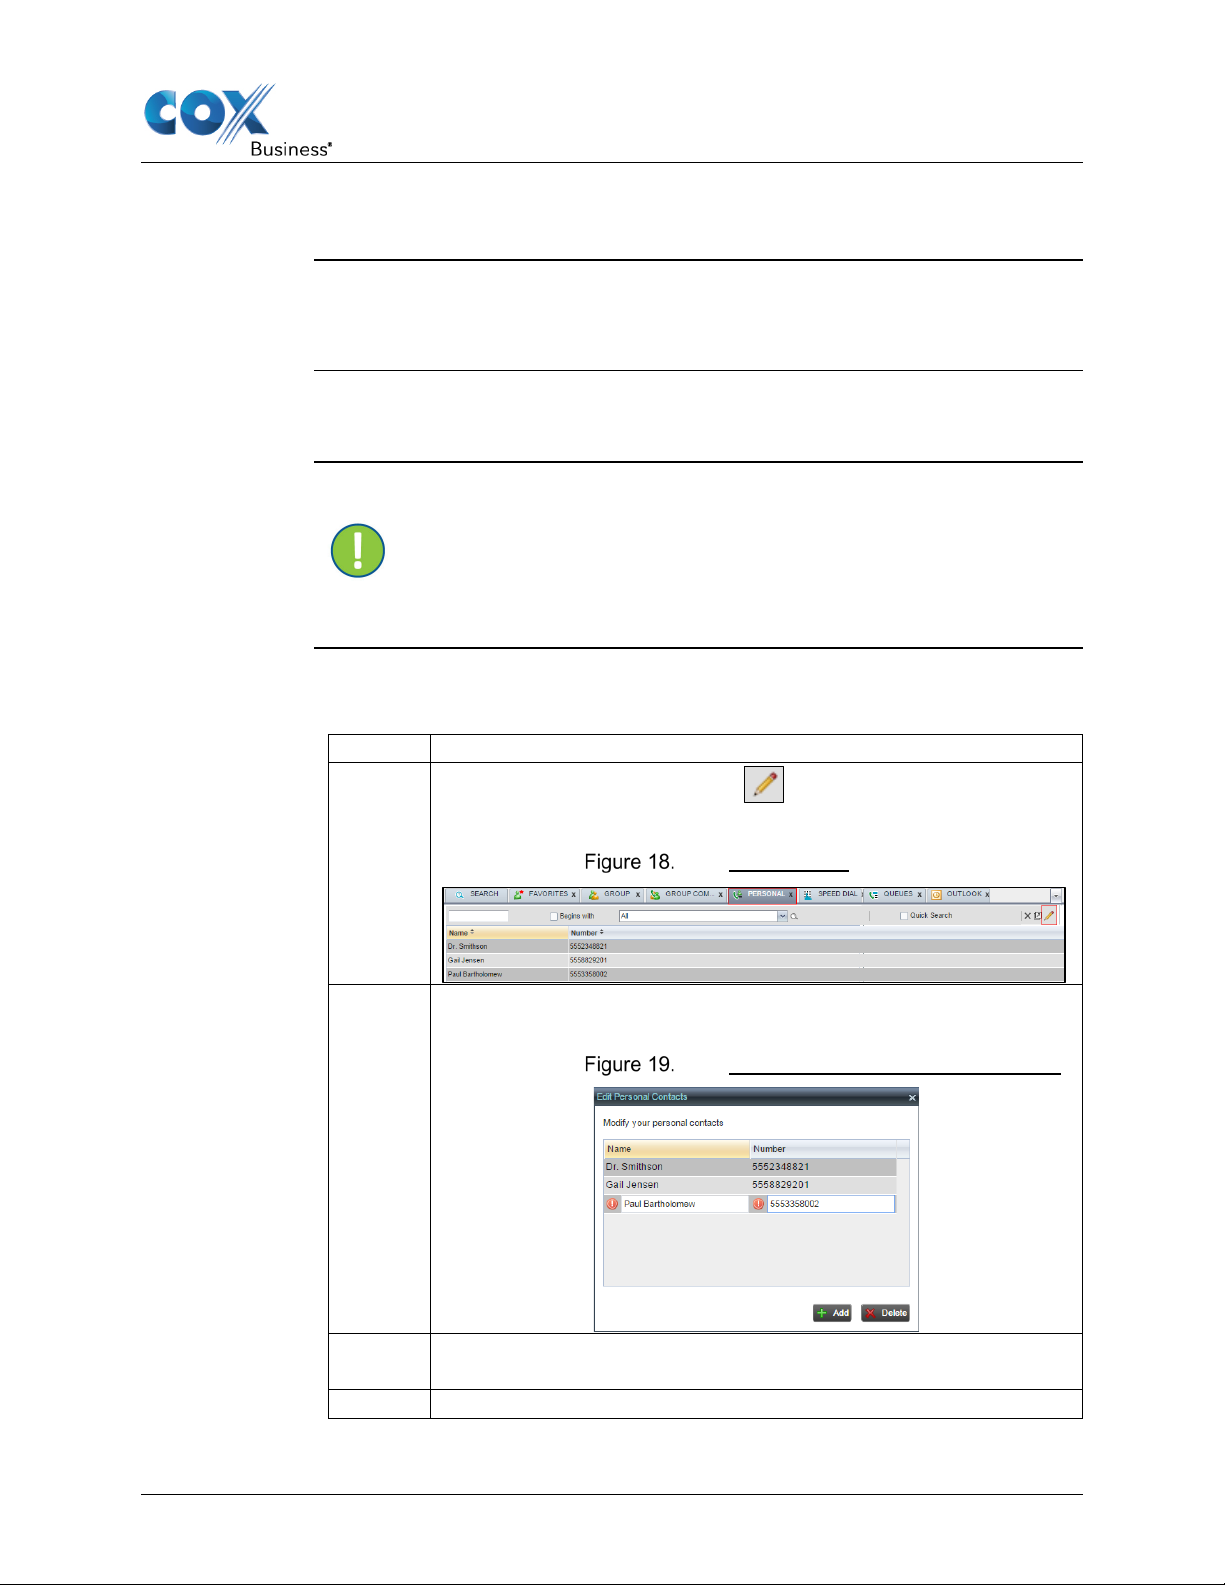
The Contacts pane contains the following areas
Web-Based Receptionist Console User Guide 21
Page 26
Title Bar Tabs
Introduction
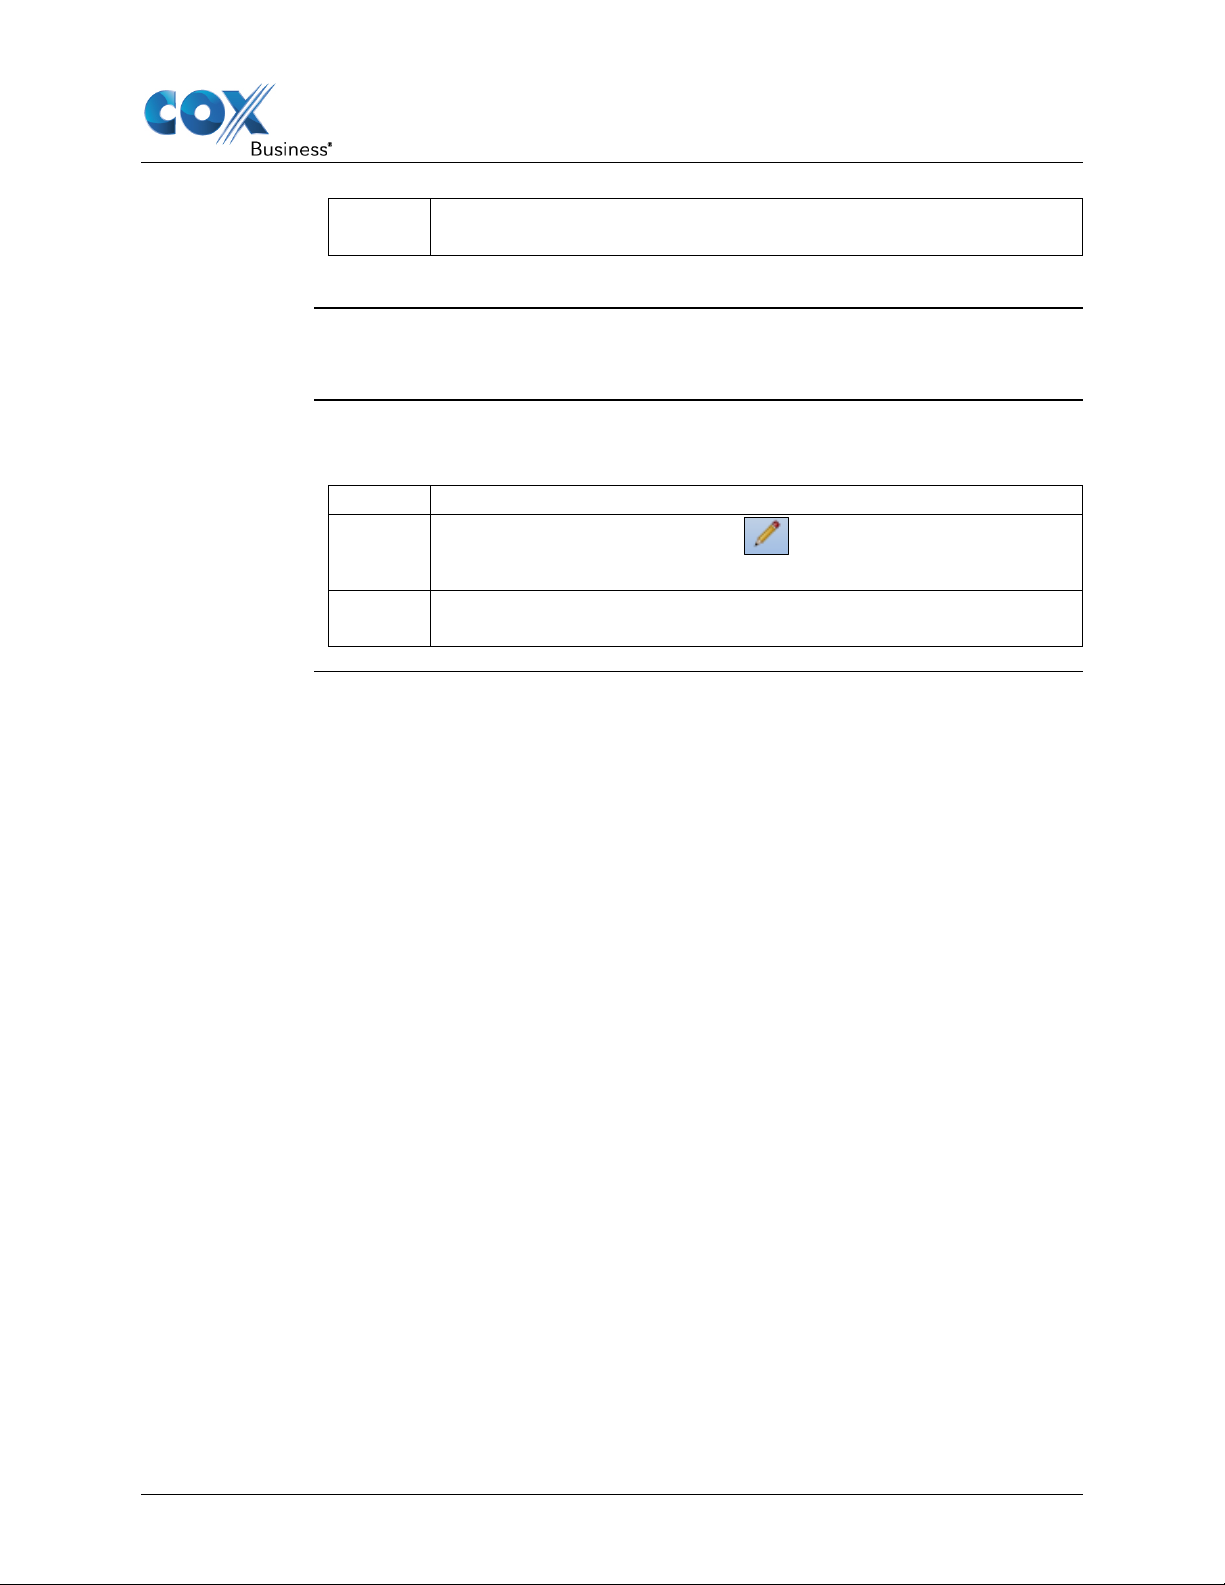
You can add or remove personal contacts via your MyAccount Contact List or
in Receptionist Console, and the updates appear in both places.
Note About
How to Add a
Use the following steps to add a personal contact.
Step
Action
1.
2.
Click Add. A new line is added below the existing entries,
3.
In the Name text box, enter the contact’s name or description, as
you want it to appear.
4.
In the Number text box, enter the phone number of the contact.
Manage Personal Contacts
Add a Personal Contact
Personal
Contacts
Important: You cannot modify a personal contact entry in
Receptionist Console. To modify information for a personal contact,
delete the entry and add it again.
Personal
Contact
In the Personal tab, click Edit . The Edit Personal
Contacts dialog box appears.
allowing you to define a new entry.
Personal tab
Edit Personal Contacts - Add Entry
Web-Based Receptionist Console User Guide 22
Page 27
Title Bar Tabs
5.
To save the changes, click anywhere in the dialog box outside the
entry.
How to Delete a
Use the following steps to delete a personal contact.
Step
Action
1.
Contacts dialog box appears.
2.
Select the entry to delete and click the Delete button.
Result: The entry is removed from the list.
Delete a Personal Contact
Personal
Contact
In the Personal tab, click Edit . The Edit Personal
Web-Based Receptionist Console User Guide 23
Page 28
Basic Confi guration Settings
Introduction
Receptionist allows you to search for contacts multiple ways. You can
Introduction
A quick search searches on a specific column in a selected directory for
Search
perform a search on a specific directory or on all directories at once. You can
perform a regular search or a quick search, and you can create a new directory
from search results.
Note: The search is not case-sensitive; the search for “Ann” and “ann”
returns the same results.
Search tab
Quick Search
entries that start with a character entered by you. The column on which the
search is performed is the column by which the directory is currently ordered.
A quick search can be performed on any directory, but is not available in the
Search tab.
Quick Search
Web-Based Receptionist Console User Guide 24
Page 29

Basic Confi guration Settings
How to
Use the following steps to perform a Quick Search.
Step
Action
1.
Click the directory tab where you want to perform the search.
2.
Order the directory by the column on which you want to perform
the search.
3.
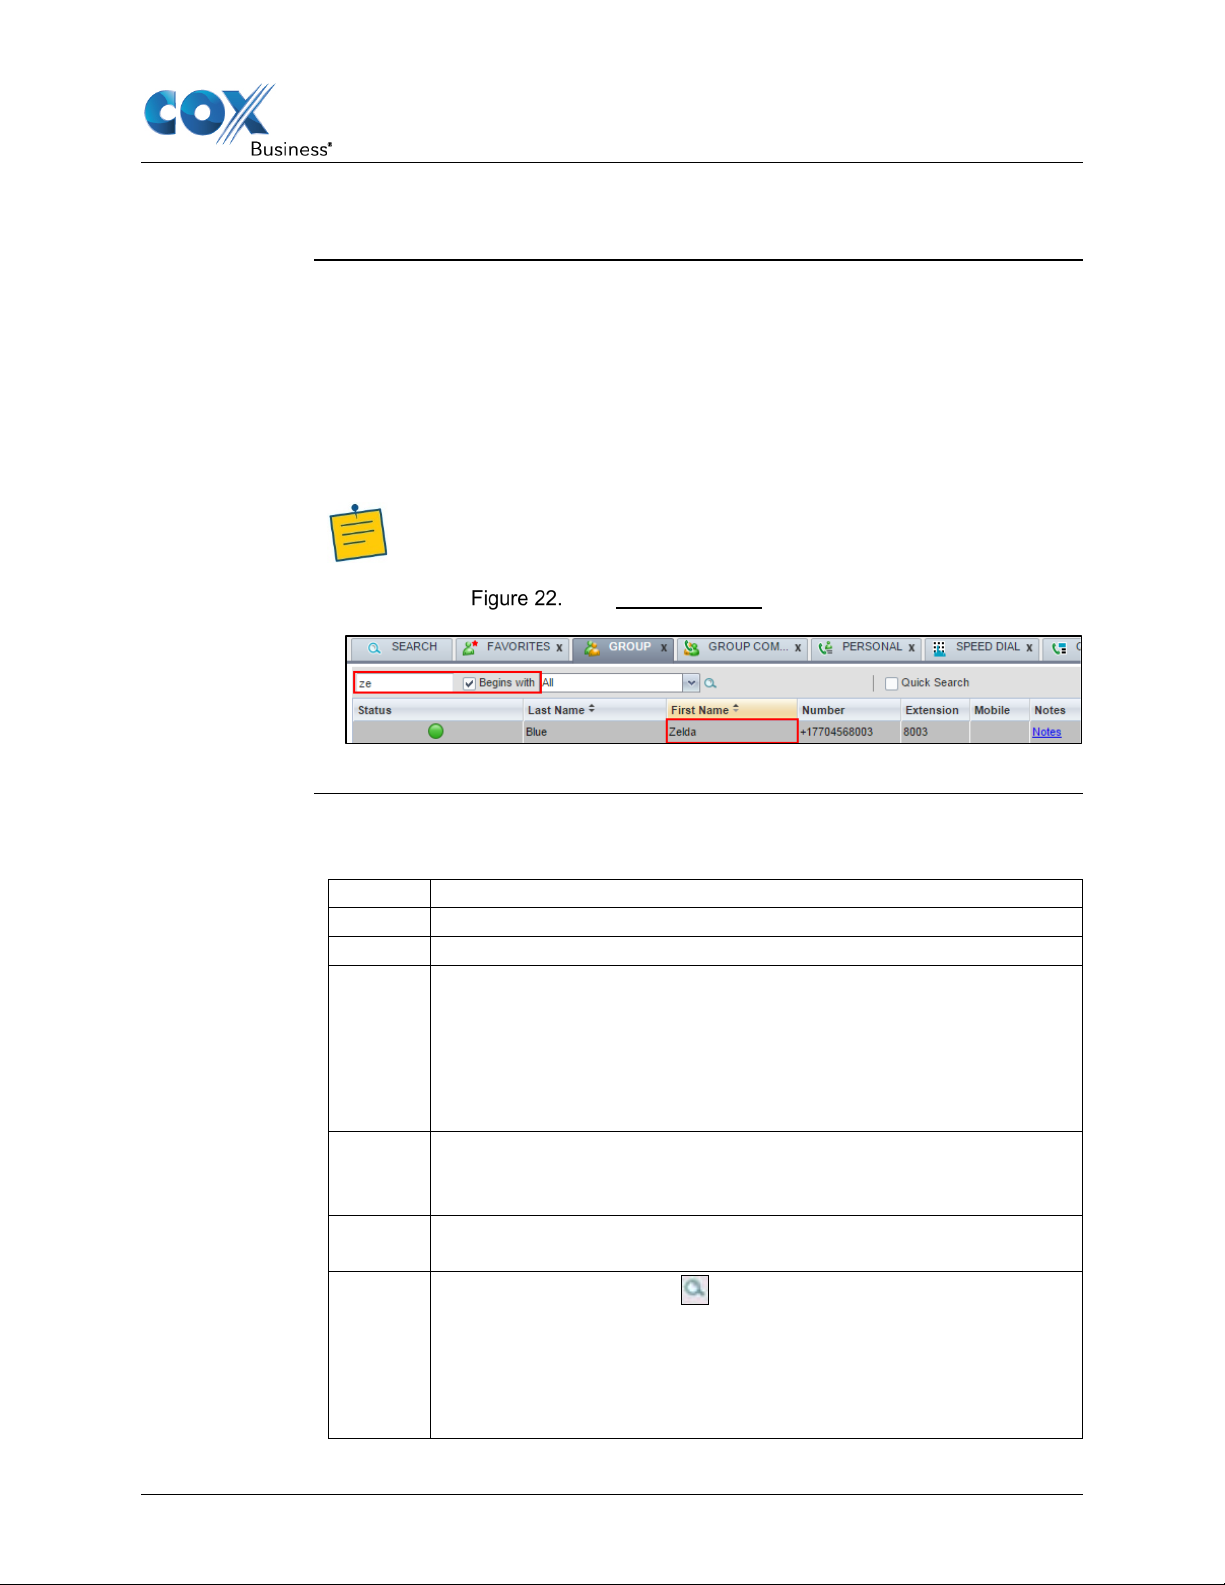
Check the Quick Search box. See Figure 21.
4.
From the keypad that appears, select a character (a single letter or
the directory.
5.
To perform another search on the same column, select another
and not on the results of the previous search.
Perform a
Quick Search
digit) by which you want to search. The contacts that start with
the selected character (in the selected column) are displayed in
character. The new search is performed on the original directory
Web-Based Receptionist Console User Guide 25
Page 30
Basic Confi guration Settings
Introduction
You can search for contacts in a specific directory or in all directories at once.
How to Search
Use the following steps to search in a specific directory.
Step
Action
1.
Select the directory.
2.
Make sure that the Quick Search box is unchecked.
3.
In the Search text box, enter the text for which you want to
name is returned.
4.
To restrict the search to contacts that start with the entered string,
include contacts that contain the entered string.
5.
From the drop-down list, select the column by which you want to
search. You can select a specific column or all columns.
6.
Regular Search
When you use the Search tab, the search is always performed on all
directories and columns.
When you search for contacts in a specific directory (by using the search
options in each tab), you can search on a specific column or on all columns.
Note: The search is not case-sensitive; the search for “Ann” and “ann”
returns the same results.
Regular Search
in a Specific
Directory
search. You can enter partial information, such as part of a name
or phone number, but you must enter at least two characters. For
example, if you do not remember whether Mary’s last name is
spelled “Shelley” or “Shelly”, you can enter “Shell”, and either
check the Begins with box. Otherwise, the search results also
Click the Search button .
• The text you entered is matched against the selected column
(or all columns) of every entry of the selected directory.
Search results are displayed in the tab where the search was
performed.
Web-Based Receptionist Console User Guide 26
Page 31

Basic Confi guration Settings
• Duplicate search results in Receptionist Co ns ole directories
7.
To clear the search results, click Reset .
are not displayed; the first matc h f or a giv e n co nt act is
displayed.
• Duplicate search results in other directories are displayed.
• The search returns either all the contacts (in the selected
directory) that contain the entered keyword or all the
contacts that start with the entered keyword.
• In the first case (Begins wi t h not checked), entering “Ann”
returns all contacts with the name “Ann”, but it also returns
all contacts with names such as “Anne”, “Marianne”,
“Marie Ann”, “Ann Marie”, and so on.
• In the second case (Begins with checked), entering “Ann”
returns all contacts with names such as “Ann”, Anne”, and
Ann Marie”, but not “Marianne” or “Mary Ann”.
Web-Based Receptionist Console User Guide 27
Page 32

Basic Confi guration Settings
Diagram
How to Search
Use the following steps to search in all directories.
Step
Action
1.
Click the Search tab.
2.
In the Search text box, enter the text for which you want to
name is returned.
3.
To restrict the search to contacts that start with the entered string,
include contacts that contain the entered string.
4.
results in other directories are displayed.
Contacts Pane – Search Results in Search tab
in All
Directories
search. You can enter partial information, such as part of a name
or phone number, but you must enter at least two characters.
For example, if you do not remember whether Mary’s last name
is spelled “Shelley” or “Shelly”, you can enter “Shell”, and either
check the Begins with box. Otherwise, the search results also
Click the Search button .
The text you enter is matched against all columns in all
directories (except for the Notes column). Search results are
displayed in the Search tab.
Duplicate search results in Cox directories are not displayed; the
first match for a given contact is displayed. Duplicate search
When you click a contact, the entry expands and displays contact details. The
information depends on the directory for which the contact was selected.
Note: Contact entries displayed in the Search tab follow the same rules
as if that entry was accessed in its own directory. This allows you to
Web-Based Receptionist Console User Guide 28
perform any operations directly from the search results.
Page 33

Basic Confi guration Settings
Introduction
When you perform a search in a directory, you can create a new directory (on
How to Create
Use the following steps to create a directory from search results using the
Step
Action
1.
Select the directory where you want to perform the search.
2.
Perform a Quick Search or enter the search criteria.
3.
search.
Create Directory from Search Results
a dedicated tab) from the search results, using the Pullout button. The button
is enabled when a search is performed on a single field.
Note: The Pullout button is not available in the Search directory and is
only available from the search results of a specific directory.
a Directory
from Search
Results
Pullout button.
When the results are displayed, click the Pullout button ,
which becomes active.
Result: A new tab is created that includes the results of the
Note: Contact entries displayed in a search results tab follow the same
rules as if that entry was accessed in its own directory. This allows you
to perform operations directly from the search results.
Web-Based Receptionist Console User Guide 29
Page 34

Basic Confi guration Settings
Introduction
If you perform a search in a specific directory, the search is always performed
on the entire directory even if search results are only displayed.
How to
After you perform the original search, create a directory from the search
Perform Search on Search Results
Perform a
Search on
Search Results
results.
Perform a new search in the new directory.
Note: Searching within the search results cannot be performed on the
same column that the original search was performed.
Web-Based Receptionist Console User Guide 30
Page 35

Basic Confi guration Settings
Introduction
Receptionist Console allows you to order directory entries in ascending or
How to Sort the
The sorting order for the Status column is as follows (from highest to lowest):
Step
Action
1.
Click the header of the column by which you want to order the
directory.
2.
To reverse the order, click the same column header again.
Order Directory Entries
descending order. The columns by which the directory can be ordered have
the sort icon displayed next to their name. The following table lists the
directories and the columns by which they can be ordered.
Note: You cannot order the contacts in the Search directory.
Order of
Directory
Entries
Private, On a Call, Ringing, Away, In a Meeting, Call Forwarding Always,
Do Not Disturb, and Available.
Use the following steps to order a directory.
Note: The contacts in the selected directory are reordered based on the
selected column. The sort order is saved on sign-out and preserved
between sessions.
Web-Based Receptionist Console User Guide 31
Page 36

Diagram
Directory
Sort Columns
Default Sort Column
Group
First Name, Last Name
Last Name
Favorites
First Name, Last
Notes, Status
Last Name
Group Common
Name, Number
Name
Personal
Name, Number
Name
Speed Dial
Code, Description,
Number
Code
Queues
Name, Number,
Extension, Department
Name
Custom
First Name, Last
Name, Department
Last Name
Outlook
Last Name, First
Mobile, Home Phone
Last Name
Monitored Contacts
First Name, Last
Status, IM
Last Name
Basic Confi guration Settings
Directory Sort arrows
Name, Number,
Mobile, Extension,
Web-Based Receptionist Console User Guide 32
Name, Number,
Name, Number,
Mobile, Extension,
Notes, Department,
Page 37

Basic Confi guration Settings
Introduction
Receptionist Console allows you to make notes about the contacts in your
quickly store and provide brief information about the contact.
How to Create
Use the following steps to create notes about a contact.
Step
Action
1.
Open one of the directories and click the Notes link on the
Result: The Notes for <Contact Name> dialog box appears.
2.
Enter the desired text or view or modify the existing text in the
3.
To save your changes and close the dialog box, click the OK
4.
To close the dialog box without saving, click Cancel button.
Contact Notes
Group, Favorites, or Monitored Contacts directory. Notes are designed to
a Note about a
Contact
contact’s line item.
Notes text box.
button.
Result: The note appears in the contact’s line item in the Notes
column.
Notes field
Notes
Web-Based Receptionist Console User Guide 33
Page 38

Page 39

Title Bar
Introduction
Receptionist Console allows you to monitor the call state of selected
Each type is discussed in the following pages.
Diagram
Monitoring
users/extensions within your organization. This information is helpful for
making call transferring decisions because you know if a user is currently on a
call (red) or not (green).
All editions of Receptionist Console allow you to monitor contacts configured
through the web portal. This is referred to as static monitoring. In addition,
Receptionist Console allows you to monitor selected contacts dynamically.
Monitored Contacts
Note: The contact’s “state” is updated in real time.
Web-Based Receptionist Console User Guide 35
Page 40

Basic Confi guration Settings
Introduction
Static monitoring is a fixed list of users that is configured by your MyAccount
Static Monitoring – Favorites Tab
Administrator and includes people or extensions whose phone call status can
be monitored in Receptionist Console.
The Favorites tab allows you to view the phone state of statically monitored
contacts. The Favorites directory provides the following information for each
contact (as applicable): call state, last and first name, phone number,
extension, mobile number, department, and link to notes.
Any updates that you make to the list will appear in Receptionist Console the
next time you log on.
Favorites tab
Important: The maximum number of users you can monitor is
configured by your administrator and cannot exceed 100.If a contact is
statically monitored, then their phone state is displayed. However, it
counts toward the total number of dynamically monitored contacts.
Therefore, we recommend that you monitor less than the max amount
of users (regardless of their “status”).
Users are monitored as they are selected up to the maximum allowed,
and then ordered in a “first in/first out” as other contacts are added.
Dynamic monitoring is persistent, but not permanent and could be lost
during certain server events (upgrades, restarts, etc), unlike static
monitoring.
Web-Based Receptionist Console User Guide 36
Page 41

Basic Confi guration Settings
Introduction
Dynamic Monitoring allows you to view the call state of selected contacts in
Dynamic Monitoring – Group Tab
your Group directory. First, select a contact you want to monitor. (Note:
Selected contacts cannot be de-selected.) It is also important to note that there
is a pre-configured limit of contacts you can select to monitor and we
recommend that you leave a few slots open so that other contacts can be
added.
When the number of monitored contacts reaches the threshold, Receptionist
Console changes the selection based on a “first in/first out” order. Therefore,
those contacts that were selected originally are no longer monitored which
allows for newly selected contacts to be monitored.
The state of a contact that is not monitored displays as Unknown.
Caution: Dynamic monitoring is persistent, but not permanent and can
be lost during certain server events, such as upgrades and restarts.
Unlike Static Monitoring, Dynamic Monitoring is performed as
needed on the Receptionist Console client by selecting users from a
directory. Monitoring begins when you choose the contact. If you click
the contact a second time, monitoring stops.
Group Directory with Monitored Contacts
Web-Based Receptionist Console User Guide 37
Page 42

Basic Confi guration Settings
Introduction
Dynamic monitoring is performed dynamically on Receptionist Console by
is displayed. If you click the contact again, monitoring stops.
How to
Use the following steps to monitor a dynamic contact.
Step
Action
1.
Click the Group tab to view the directory.
2.
Click the Status icon of the contact to monitor.
Request Dynamic Monitoring
selecting a user from a directory.
When you click on a user, the monitoring process begins and their call status
Monitor a
Contact
Note: You cannot monitor the state of virtual users, hunt groups, or
auto attendants because they appear as disabled.
Group Directory – Request Contact Monitoring
Web-Based Receptionist Console User Guide 38
Page 43

Basic Confi guration Settings
Introduction
The state of a contact is represented by an icon located to the left of the
The following table lists call states for contacts or extensions:
Icon
State in
Console
DND
CFA
Privacy
Exchange
State*
Call State
Private
N/A
N/A
On
N/A
N/A
On a Call
N/A
N/A
Off
N/A
Active call
Ringing
N/A
N/A
Off
N/A
Ringing call,
calls
Away
N/A
N/A
Off
Out of
Office
No active
calls
In a Meeting
N/A
N/A
Off
Busy
No active
calls
Call
Always
N/A
On
Off
Free or
No active
Do Not
Disturb
On
Off
Off
Free or
Tentative
No active
calls
Available
Off
Off
Off
Free or
Tentative
No active
calls
Unknown
N/A
N/A
N/A
N/A
N/A
Contact States
contact’s name. This state integrates the state of the contact’s line, the
contact's Microsoft Exchange calendar presence, and the state of services such
as Call Forwarding Always, Do Not Disturb, and Privacy.
Receptionist
Calendar
no active
Forwarding
Tentative
calls
Note: If a call is parked against the contact that you are monitoring, the information about
the parked call also appears.
Web-Based Receptionist Console User Guide 39
Page 44

Basic Confi guration Settings
Introduction
This consists of all contacts in your organization’s common phone list
Introduction
This consists of all contacts in your personal directory in MyAccount.
Group Common
configured by your MyAccount administrator.
Note: The directory may be empty if your administrator has not
configured any contacts.
Group Common tab
Personal
Personal (contacts) tab
Web-Based Receptionist Console User Guide 40
Page 45

Basic Confi guration Settings
Introduction
This section consists of all speed dial codes configured for you or by you for
make via MyAccount appear only at the next sign-in to Receptionist Console.
Procedure
Use the following steps to update speed dial entries using the client.
Step
Action
1.
Add Speed Dial Entry (See below)
2.
Modify Speed Dial Entry (See below)
3.
Delete Speed Dial Entry (See below)
Speed Dial
your Speed Dial services.
It allows you to manage and use your Speed Dial 8 and Speed Dial 100
entries. To use this feature, you need to have Speed Dial 8 and/or Speed Dial
100 service assigned. If you only have one of these services, you see the
entries for that service only in your Speed Dial tab.
Speed Dial tab
You can add or remove speed dial entries via MyAccount or Receptionist
Console, and the updates appear in both places. However, the updates that you
Web-Based Receptionist Console User Guide 41
Page 46

Basic Confi guration Settings
How to Add a
Use the following steps to add a speed dial entry.
Step
Action
1.
Result: The Edit Speed Dials dialog box appears.
2.
Click the Add button.
3.
From the Code drop-down list on the left, select a speed dial
code.
4.
In the Phone Number text box, enter the phone number to assign
to the code.
5.
In the Description text box, enter a description that allows you to
identify the entry.
6.
To save the entry, click anywhere in the dialog box outside the
entry.
Add Speed Dial Entry
Speed Dial
Entry
In the Speed Dial tab, click Edit .
Result: A new line is added below the existing entries, allowing
you to define a new entry.
Add New Speed Dial entries
Web-Based Receptionist Console User Guide 42
Page 47

Basic Confi guration Settings
How to Modify
Use the following steps to change a speed dial entry.
Step
Action
1.
2.
Double-click the entry to modify.
3.
Modify information as required.
4.
To save the changes, click anywhere in the dialog box outside the
entry.
How to Delete a
Use the following steps to delete an entry from your speed dial.
Step
Action
1.
Result: The Edit Speed Dials dialog box appears.
2.
Select the entry to delete and click the Delete button.
Result: The entry is removed from the list.
Modify Speed Dial Entry
a Speed Dial
Entry
In the Speed Dial tab, click the Edit button.
Result: The Edit Speed Dials dialog box appears.
Edit Speed Dials Dialog Box –
Modify Entry
Delete Speed Dial Entry
Speed Dial
Entry
Web-Based Receptionist Console User Guide 43
In the Speed Dial tab, click the Edit icon.
Page 48

Basic Confi guration Settings
Introduction
The Outlook pane contains all of your Outlook contacts. (Note: You need to
Outlook
have Outlook Integration service assigned.)
Note: When using the Outlook Integration feature with Microsoft
Outlook 2010 or Outlook 2013 (32- or 64-bit edition), make sure
Outlook is running before Receptionist Console is launched;
otherwise, Outlook Integration functionality does not work.
Outlook tab
Web-Based Receptionist Console User Guide 44
Page 49

Administration Functi ons
Introduction
You use the Settings link at the top right-hand corner of the main page to
Receptionist Console
Basic Configuration Settings
access the Settings page where you can configure various aspects of the
Receptionist Console application.
Caution: Do not use the internet browser’s Back button to return to
the main interface.
This section describes the Settings pages that you use to configure
Receptionist Console:
• General
• Application
• Services
• Plug-ins
• About
Settings toolbar
Note: Depending on your system configuration, some settings may not
be available.
Web-Based Receptionist Console User Guide 45
Page 50

Introduction
You use the General tab to configure miscellaneous settings that improve the
usability of Receptionist Console.
Diagram
Part
Description
Screen Pop
Screen pop ups are not supported at this time.
Date Format
This setting allows you to select the format to
Time Format
This setting allows you to select the format to
Administration Functi ons
General Tab
Settings – General
The following subsections describe the settings that can be configured on this
page.
Receptionist Console Administrator Guide 46
use for displaying the date in the calendar details
for a contact. The possible options are:
• MM/DD/YYYY
• DD/MM/YYYY
use for displaying the time in chat windows and
in the calendar details for a contact. The possible
options are:
• AM/PM
• 24 hours
Page 51

Administration Functi ons
Workspace
Receptionist Console allows you to customize
elements of your workspace, such as the size and
placement of the main window on the desktop.
The system remembers the setup between
sessions.
The following elements can be customized:
• The size and position of the web browser
window in which the main interface is
displayed
• The size of the panes (Call Console,
Contacts, and Queued Ca ll s)
Notes: This functionality does not work
in Internet Explorer due to a technical
limitation of Internet Explorer.
When a window is vertically resized, the panes
do not always resize to fill the window. To resize
a window, drag the window from the bottom
right-hand corner or collapse and then expand
the panes after resizing to adjust them to the
window.
• Save Workspace – This button, when
clicked, saves the current workspace.
• Load Workspace – This button, when
clicked, arranges your workspace according
to the last saved config ura tion .
• Restore Workspace – This button, when
clicked, restores the workspace to the system
default configuration.
• Always save workspace on sig n o ut –
When you sign out fr om the clie nt ,
Receptionist Console asks you whether you
Receptionist Console Administrator Guide 47
Page 52

Administration Functi ons
want to save your current workspace. To
button.
Drag and Drop
You use the Drag and Drop area to specify
contact.
save your workspace automatically when
signing out without being asked, check the
Always save workspace on sig n o ut box.
To customize your workspace:
Arrange the windows the way you like.
Click the Save Workspace button to save the
current configuration. To restore the system
default, click Restore Workspace.
At any time to return to the last saved
configuration, click the Load Workspace
whether a call should be automatically
transferred when dropped on a contact.
Transfer the call automatically when it’s
dropped on a contact – This setting allows you
to enable or disable automatic call transfer when
you drag and drop. When this box is checked, the
call is automatically transferred to the contact’s
phone number when the call is dropped on the
Receptionist Console Administrator Guide 48
Page 53

Introduction
You use the Application tab to configure your availability to take calls as well
as the policies used to process calls.
Diagram
Part
Description
Queue Membership
These settings allow you to select which queues
any column.
Step
Action
1.
To join a specific queue, select the
check box on the line for the queue.
2.
To join all queues, select the check
box in the column header.
Operator Policies
The Operator Policies setting allows you to
select your post sign-in state in your queues.
Administration Functi ons
Settings - Application
Settings – Application
The settings can be configured on this page and are described in the following
subsections.
you want to join.
Note: If you are not allowed to join/leave
a queue, the line for the queue is dimmed
and you can only view your join status in
the queue. To change your join status in a
queue, you may need to contact your
administrator.
For queues on this page, you can select columns
to appear and you can sort and group queues by
Receptionist Console Administrator Guide 49
Page 54

Administration Functi ons
Post Sign-In All Call
State
This drop-down list allows you to select your
you sign in to Receptionist Console.
Distribution (ACD)
availability to receive calls from queues when
Receptionist Console Administrator Guide 50
Page 55

Administration Functi ons
Introduction
You use the Services tab to configure various services assigned to you by your
more information, see your administrator.
Diagram
The services are grouped into two categories: Active and Inactive.
Part
Function
Do Not Disturb
When you activate this service, you are not
automatically sent to your voice mail.
Call Forwarding
When you activate this service, you need to
your calls are forwarded to the specified number.
Settings - Services
administrator on MyAccount, which are applicable to Receptionist Console.
These settings are only available if you have been assigned such services. For
Settings – Services
The services that you can configure (if you have been assigned the services)
are:
available to take calls, and all your calls are
Always
provide the phone number to which your calls
are forwarded. When the service is active, all
Receptionist Console Administrator Guide 51
Page 56

Administration Functi ons
How to
Use the following steps to activate a service.
Step
Action
1.
Select the service and check the Active box. The service is
moved from the Inactive to Active category.
2.
If you enabled the Call Forwarding Always service, in the
which your calls are forwarded.
3.
To generate a ring splash for incoming calls, check the Ring
Splash option.
4.
To save your changes, click Save.
Activate a
Service
Forward To text box that appears, enter the phone number to
Receptionist Console Administrator Guide 52
Page 57

Introduction
The Receptionist Console uses plugins that must be configured for cetain
Using Plug-Ins.
Diagram
Part
Description
Plug-ins
Before you begin, you must uncheck this box to
enable configuration for certain plug-ins.
Notification
These options control when and how incoming
Administration Functi ons
Settings – Plug-ins
functionalities in the client, such as (call) Notification, Outlook Integration,
and Call Event Log.
Instructions to configure the plug-ins are located in Appendix A: Steps for
Settings – Plug-ins
call notification “pop-up toasts” are displayed.
The options you can set are as follows:
• Focus window for inco m ing cal l s –
When this option is checked and the
browser window running Receptionist
Console is minimized, the system
automatically restore s the window on
Receptionist Console Administrator Guide 53
incoming calls.
Page 58

Administration Functi ons
This does not work in Firefox. In Internet
series.
Microsoft Outlook
The Microsoft Outlook options control Outlook
Part
Function
Enable/Disable
This determines whether
downloaded from Cox.
Retrieve
This option allows you to
your Outlook contacts.
Explorer, there must be only one tab open in the
web browser running Receptionist Console.
• Show notifications for calls – When this
option is checked, Rece p t ioni st Console
displays the Call Notification pop-up
window on top of other applications’
windows when you receive a call. When
you check this box, you need to select an
option from the drop-down list to specify
the condition under which notifications
are displayed.
This does not work if there are other tabs open in
the same web browser window as Receptionist
Console. In addition, if calls come within eight
seconds of each other, the Call Notification popup window only appears for the first call of that
integration with Receptionist Console. They are
only visible if Outlook integration is enabled in
Receptionist Console. Use extreme caution when
configuring this function.
You can receive your contacts from the default
contact folder. If you are part of a very large
organization, use your local contacts instead of
the “global” Outlook contacts.
The options you can set are as follows:
Outlook
Integration
Receptionist Console
integrates with Outlook to
provide you with access to
your Outlook contacts. If
Outlook integration is
disabled, the corresponding
desktop plug-in software
components are not
Receptionist Console Administrator Guide 54
contacts from
specify where to look for
Page 59

Administration Functi ons
Use Outlook
When this option is
caller ID is unknown.
Program Shortcuts
The Program Shortcuts plug-in allows you to
Button
Name
Function
Add
Click this button to create a
your desktop.
Remove
Click this button to remove the
no effect.
Activity Archive
The Activity Archive plug-in allows you to store
value (CSV) file.
contacts as
preferred
CLID lookup
checked, Receptionist
Console uses Outlook to try
to identify a caller, when the
Note: The Outlook Integration feature
provides the following functionality:
CLID lookup, saving vCards, and
accessing and searching Outlook
contacts. When using Microsoft Outlook
2010 or 2013 (32- or 64-bit edition),
Outlook has to be running before
Receptionist Console is launched for
these functions to work.
create a desktop shortcut on a Windows platform
which launches Receptionist Console in your
default web browser when you click the icon.
Shortcut
Shortcut
Receptionist Console shortcut on
previously created Receptionist
Console shortcut.
If you did not create a shortcut
using the Add Shortcut button,
the Remove Shortcut button has
call event statistcs content locally on your
computer where the log is stored.
The log is saved at a time interval (daily, weekly,
monthly) that you select as a comma-separated
Receptionist Console Administrator Guide 55
Page 60

Administration Functi ons
Introduction
The About tab displays the following information about Receptionist Console:
• copyright information
Diagram
Settings - About
• software version
• client profile used
About tab
Receptionist Console Administrator Guide 56
Page 61

Help
Introduction
Receptionist Console provides online access to a portable document format
Introduction
Removes toolbars at the top of the screen to display a larger view of the
Introduction
To exit Receptionist Console, click the Sign Out link at the upper right corner
Full Screen
Title Bar
Title Bar
(PDF) version of this guide.
Click the Help link in the upper right corner to open the User Guide.
Help link
Sign Out
interface.
Full Screen link
of the main interface.
Sign Out link
Web-Based Receptionist Console User Guide 57
Page 62

Page 63

Administrator Functions
Introduction
This section discusses functions that your MyAccount administrator performs.
call center or Queue.
Call Center
From the Call Center Management window, you can change the name of the
How to Change
Use the following steps to modify the name of a call center.
Step
Action
1.
Log into MyAccount and click the MyAccount menu.
2.
Click the Applications tab and select the Call Center Name and
Password link.
3.
Click the Edit button to the right of the call center you want to
Result: The Change Call Center Name dialog box displays.
4.
Click the Change Name button.
5.
Enter the New Call Center Name.
6.
Click the Save and Return button.
Administrator F unct ion s
We will begin by reviewing how the administrator can change the name of a
Change the Call Center Name
Name Change
the Name of a
Call Center
queue(s) and reset or change the password required by the Receptionsit
Console user to login to the queue(s).
Call Center Management window
New Call Center Name
modify.
Web-Based Receptionist Console Administrator Guide 59
Page 64

Administrator Functions
Introduction
Use the following steps to change or reset the password that users must enter
password in their application.
Call Center
From the Call Center Management window, you can change the name of the
How to Change
Use the following steps to modify the name of a call center.
Step
Action
1.
Log into MyAccount and click the MyAccount menu.
2.
Click the Applications tab and select the Call Center Name and
Password link.
3.
Click the Edit button to the right of the call center you want to
Result: The Change Call Center Name dialogue box displays.
4.
Click the Change Password button. See Figure 1.
5.
Enter the New Call Center Password in the text field.
6.
Re-enter the password in the Confirm New Center Password
text field.
7.
Click the Save and Return button.
Change the Call Center Queue Password
to access the Receptionist Console. Note: If the password is updated, all
Receptionist Console users that access the queue need to change the queue
Password
Change
the Call Center
Password
queue(s) and reset or change the password.
Figure 1. Change Call Center Password
modify.
Receptionist Console Administrator Guide 60
Page 65

Administrator Functions
Introduction
The Receptionist Console application allows you to add and remove users that
are associated to a particular call center.
How to Manage
Use the following steps to manage call center agents.
Step
Action
1.
Log into MyAccount and click the MyAccount menu.
2.
Click the Applications tab.
3.
Click the Call Center link.
4.
Click the Edit link to the right of the call center to which you
5.
From the Call Center Users section, go to the Available Users
Call Center feature.)
Manage Call Center Users
Call Center
Agents
want to assign or remove users.
Call Center List - Edit
panel. (Note: Users are available if they have been assigned the
Receptionist Console Administrator Guide 61
Page 66

Administrator Functions
6.
7.
Click the Save and Return button.
From the list of Available Users, select the person(s) you want
to assign to a call center or remove from a call center and click
the Add or Remove button, respectively.
a. To add the entire group of available users, click the Move
All button. To move the assigned users back to the
Available Users panel, click the Remove All button.
b. You may sort assigned users when you click the up or
down arrow buttons.
Available / Assign Users to a Call
Center
Receptionist Console Administrator Guide 62
Page 67

Configuri ng Messaging and Music
Introduction
Businesses may elect to play music for incoming callers before their call is
message.
Configuring Messaging and Music
answered or play messages to provide incoming callers with important
information about their company and to ensure the customer that their call has
not been forgotten.
This function is designed to keep your callers engaged during their wait time.
You may elect to use the default messaging that Cox provides or create up to
four files for the Entrance, Comfort, and Overflow messages described below.
The announcements are linked so that your caller hears different content as
they are waiting in the queue. In addition, the messages and music do not
resume from a mid-point from one caller to the next, but play from the
beginning at the time the call is placed on hold.
If you select the default settings, callers may hear the following scripts:
Entrance Message – “Your call is very important to us. Please wait
for next available agent”.
Estimate Wait Message (this is a system-recorded greeting and is
configurable by a Cox administrator only) – “You are caller number
<x> in queue. Please hold”.
Comfort Message – “Your call is very important to us. Please wait
for the next available agent”.
Overflow Message – “Your call is very important to us, however, due
to the high volume of calls, we cannot answer your call. Please hold
while we transfer you to voice messaging so that we can help you as
soon as possible”.
The following sections instruct you on how to set up and activate each type of
Web-Based Receptionist Console User / Administrator Guide 63
Page 68

Configuri ng Messaging and Music
Introduction
Entrance messages provide information to callers before their call is answered
by an operator.
How to
Use the following steps to configure and activate an entrance message.
Step
Action
1.
Log into VoiceManager MyAccoun t and click the
VoiceManager MyAccount menu.
2.
Click the Applications tab.
3.
Click the Call Center link.
4.
Click the Edit link to the right of the call center for which you
want to add messages.
5.
Scroll to the Announcements section and click the Show
Result: All of the Announcement options display.
6.
Select the Play Entrance Message Yes / No radio button to
7.
Select the Require Message Completion Yes / No radio button
greeting.
8.
From the Message Type section, select the radio button to allow
Figure 53.
9.
Click the Browse button to locate the audio file you want to use
confirm that you have rights to use the file.
Activate Entrance Messages
Activate an
Entrance
Message
Announcements link.
activate or deactivate, respectively, a message that callers hear
when they call the center.
Announcement window – Entrance
Message
to define whether callers will hear the entire initial audio
callers to hear the S ys te m Defau lt message or a Custom
message. (Note: If you click the Custom radio button, click the
Add link to select the audio file.)
Result: A Select Announcements dialog box displays. See
and check the “I have read and understand the discla imer” to
Receptionist Console Administrator Guide 64
Page 69

Configuri ng Messaging and Music
10.
Click the Upload button.
Result: The file appears in the Custom list.
11.
Click the Save and Return button.
Disclaimer dialog
Receptionist Console Administrator Guide 65
Page 70

Configuri ng Messaging and Music
Introduction
The Estimated Wait Message type provides your caller with information about
call is in the queue.
How to
Use the following steps to configure and activate an estimated wait time or
Step
Action
1.
Log into VoiceManager MyAccoun t and click the
VoiceManager MyAccount menu.
2.
Click the Applications tab.
3.
Click the Call Center link.
4.
Click the Edit link to the right of the call center for which you
want to add messages.
5.
Scroll to the Announcements section and click the Show
Result: All of the Announcement options display.
6.
Scroll to the Play Estimated Wait Message section and select
to hear a wait message.
Activate Estimated Wait Messages
the amount of time it may take before their call is answered. You may give
them an amount of time they can expect to wait or inform them of where their
Activate an
Entrance
Message
wait queue message.
Announcements link.
the Yes or No radio buttons to define whether you want callers
Receptionist Console Administrator Guide 66
Page 71

Configuri ng Messaging and Music
7.
From the Message Type drop-down menu, select the Estimate
8.
For either Message Type, enter a number in the For Callers
Queue Position message.
9.
Check the Play High Volume Message for Other Callers
wait time or number of calls ahead of them.
10.
In the Default handling tim e text field, enter the estimated
wait time.
11.
Click the Save and Return button.
Wait Time option if you want callers to hear how long they have
to wait before their call is addressed.
Estimated Wait (Time) Message
OR
Select the Queue Position option to announce the callers’
position in the wait line.
Estimated Wait (Queue) Message
With a Wait Time of <x> Minutes or Lower or For Callers in
Queue Position <X> or Lower text field. The digit you enter
defines the trigger value for either the amount of time callers can
expect to wait before their call is answered or the number of calls
ahead of them. In Figures 8 6 and 97, callers with a wait time of
five minutes or lower will hear the Estimated Wait Time
message; and callers with five calls ahead of them will hear the
checkbox to initiate a message to callers who have an extended
handling time per call, in minutes, to use when calculating the
Receptionist Console Administrator Guide 67
Page 72

Configuri ng Messaging and Music
Introduction
You may configure comfort messages to play while callers are waiting for
Each of the announcement functions is separate. This is good to know for
interrupted by comfort messages.
How to Create
Use the following steps to create and activate a comfort message.
Step
Action
1.
Log into VoiceManager MyAccoun t and click the
VoiceManager MyAccount menu.
2.
Click the Applications tab.
3.
Click the Call Center link.
4.
Click the Edit link to the right of the call center for which you
want to add messages.
5.
Scroll to the Announcements section and click the Show
Result: All of the Announcement options display.
Activate Comfort Messages
their call to be answered. You can create and upload a maximum of four files
for different queue announcement functions. All four announcements are
linked and play in sequence.
Note: The maximum file size per message is 5Mb. The file must be in
the correct format and adhere to other guidelines to play successfully.
Refer to the guidelines on page 74.
anyone who is recording custom messaging, such as if a voice over ad is
playing on hold, the comfort messaging starts at the designated interval(s) that
is established in the comfort messaging screen.
We recommend that you plan to allow the person doing the recording to create
timed messaging on hold so that your commercial messaging is not
a Comfort
Message
Announcements link.
Receptionist Console Administrator Guide 68
Page 73

Configuri ng Messaging and Music
6.
Select the Play Comfort Message Yes / No radio button to
7.
In the Delay Between Message <x> Seconds text field, enter the
time that will elapse before the comfort message plays again.
8.
From the Message Type section, select the radio button to allow
Result: A Select Announcements dialog box displays.
9.
Click the Browse button to locate the audio file you want to use
confirm that you have rights to use the file. See Figure 75.
10.
Click the Upload button.
Result: The file appears in the Custom list.
11.
Click the Save and Return button.
activate or deactivate, respectively, a message that callers hear
while they are waiting to be answered.
Comfort Message
callers to hear the S ys te m Defau lt message or a Custom
message. (Note: If you click the Custom radio button, click the
Add link to select the audio file.)
and check the “I have read and understand the disclaimer” to
Receptionist Console Administrator Guide 69
Page 74

Configuri ng Messaging and Music
Introduction
You may configure and customize up to four music files to play sequentially
played to internal callers.
How to Create
Use the following steps to configure and activate music or messages to play
Step
Action
1.
Log into VoiceManager MyAccoun t and click the
VoiceManager MyAccount menu.
2.
Click the Applications tab.
3.
Click the Call Center link.
4.
Click the Edit link to the right of the call center for which you
want to add messages.
5.
Scroll to the Announcements section and click the Show
Result: All of the Announcement options display.
6.
Select the Music in Queue Yes / No radio button to activate or
7.
From the Music Type section, select the radio button to allow
Result: A Select Announcements dialog box displays.
8.
Select the System Default radio button to use packaged music or
and upload the file(s).
Activate Music in Queue
while callers are waiting in the queue. You can also specify a message to be
Music in Queue
for calls in a queue.
Announcements link.
deactivate, respectively, music that callers hear while they are
waiting to be answered.
Music in Queue
callers to hear the S ys te m Defau lt music or a Custom music
choice. (Note: If you click the Custom radio button, click the
Add link to select the music file.)
select the Custom radio button to use personalized content.
Note: If you select Custom, click the Browse button to locate
Receptionist Console Administrator Guide 70
Page 75

Configuri ng Messaging and Music
9.
Click the Browse button to locate the audio file you want to use
confirm that you have rights to use the file. See Figure 5.
10.
Click the Upload button.
Result: The file appears in the Custom list
11.
Check the Use Alternate Source for Internal Calls box to play
a unique music file for employees’ calls only.
12.
Repeat steps 7-9 to configure the type of music you want internal
callers to hear.
13.
Click the Save and Return button.
and check the “I have read and understand the disclaimer” to
Receptionist Console Administrator Guide 71
Page 76

Configuri ng Messaging and Music
Introduction
Configure the call center routing policy when a large number of calls have
deleted using your telephone through the voice portal.
How to
Use the following steps to configure the Overflow function.
Step
Action
1.
Log into VoiceManager MyAccoun t and click the
VoiceManager MyAccount menu.
2.
Click the Applications tab.
3.
Click the Call Center link.
4.
Click the Edit link to the right of the call center for which you
want to add messages.
5.
Scroll to the Announcements section and click the Show
Result: All of the Announcement options display.
6.
From the Overflow Action drop-down menu, select how you
phone number to which the call will be transferred.)
Act ivat e Ove rflow Messages
been received or calls have been waiting longer than the configured threshold.
Upload a recording of your name so that when a caller is connected to your
extension by the Auto Attendant or to Voice Messaging, your name is
announced to the caller. Your personalized name can also be recorded or
Configure
Overflow
Messaging
Announcements link.
want calls handled that meet the Enable overflow after <x>
seconds allotment. The choices are Play Busy Tone, Transfer
Call to, and Ring Until Caller Hangs Up. (Note: Based on your
selection, you may have to enter additional information. For
example, if you select Transfer Call To:, you must enter the
Receptionist Console Administrator Guide 72
Page 77

Configuri ng Messaging and Music
7.
Select the Play Announcement Yes / No radio button to define
8.
From the Message Type section, select the radio button to allow
Result: A Select Announcements dialog box displays.
9.
Click the Browse button to locate the audio file you want to use
confirm that you have rights to use the file. See Figure 75.
10.
Click the Upload button.
Result: The file appears in the Custom list.
11.
Click the Save and Return button.
whether you want your callers to hear a message you have
configured for overflow calls.
Overflow Message configuration
window
callers to hear the S ys te m Defau lt message or a Custom
message choice. (Note: If you click the Custom radio button,
click the Add link to select the message file.)
and check the “I have read and understand the disclaimer” to
Receptionist Console Administrator Guide 73
Page 78

Configuri ng Messaging and Music
Introduction
Use this procedure to record a personal greeting or an announcement using a
• .WMA file type
Introduction
Review the following helpful recording guidelines before you record your
Windows 7
Record a Personal Greeting or Announcement
PC. The application server accepts a .WAV file format. The following lists the
validation rules for the file formats:
• CCITT, u-law, or a-law codec
• 8.000 kHz
• 8 bit mono
• .WAV file type
• For .WMA files:
• CCITT, u-law, or a-law codec
• 8.000 kHz
• 8 bit mono
Helpful Recording Guidelines
greeting or announcement.
• The maximum audio length is two (2) minutes for a Voice Messaging
Greeting and Custom Ringback User/Group.
• The maximum audio length is 10 seconds for the user's Voice Portal
Personalized Name.
• The maximum audio length is 10 minutes for the Music On Hold
greeting.
• For all other services, the maximum audio length is 5 minutes.
Follow these procedures to record a .WAV file. Instructions are provided for
the following sound recorders:
• Windows XP Sound Recorder and Windows 98 Sound Recorder
• Windows 2000 Sound Recorder
• Windows NT Sound Recorder
•
Receptionist Console Administrator Guide 74
Page 79

Configuri ng Messaging and Music
Introduction
In Windows 98, select Start>Programs>Accessories>Multimedia>Sound
How to Record
Use the following steps to record a message on the Windows XP or Windows
Step
Action
1.
From the File menu, click Properties. The Properties for
Sound window displays.
2.
Click Convert Now and then click OK. The Sound Selection
window appears.
3.
Select CCITT u-Law from the Format list.
4.
Under the Attributes section, select 8.000 kHz, 8 bit Mono and
that you can select it easily in the future.
5.
In the Properties for Sound dialog box, click OK.
6.
Click Record on the Sound Recorder. Speak clearly into your PC
re-record your message, repeat this step.
7.
When you are satisfied with your message, select Save As from
the File menu and name it with a .WAV extension.
8.
Enter the name of your recording and click OK. To exit without
saving, click Cancel.
Record Using Windows XP or Windows 98 Sound Recorder
Recorder from the Windows task bar.
In Windows XP, select Start>All
Programs>Accessories>Entertainment>Sound Recorder.
Note: Your Sound Recorder may be located in a different file, or your
default sound recorder is another product. Please note the required
format for your greetings below and follow the instructions for your
specific sound recording product.
a Message on
Windows XP or
Windows 98
98 operating system.
click OK. Tip: You may want to save this format at this point so
microphone and record your message. When you have finished,
click Stop. To listen to your message, click Play. If you want to
Receptionist Console Administrator Guide 75
Page 80

Configuri ng Messaging and Music
How to Record
Use the following steps to record a message on the Windows 7 operating
Step
Action
1.
Go to Start>All Programs>Sound Recorder.
2.
Right-click on Sound Recorder and select Properties.
3.
Enter soundrecorder /file outputfile.wav in the Target field.
setting.)
4.
From your All Programs menu, select Sound Recorder and
window displays.
5.
In the Target field, paste the filename you copied; e.g.,
outputfile.wav.
6.
Click the Apply button. An Access Denied message displays
Click the OK button.
7.
Return to the Sound Recorder menu item and select it.
8.
Click the Start Recording button.
9.
Record your message and click the Stop Recording button.
10
Enter the File name in the Save As window.
11.
If you want to use Sound Recorder to record direct sound online:
Step
Action
1.
Set your PC to Stereo Mix.
2.
Right-click the speaker icon near the clock in the
Recording Devices.
3.
Select Stereo Mix As Default.
Record Using Windows 7
a Message on
Windows 7
system.
(Tip: Copy the original filename listed in the Target field and
save it on your computer in case you want to use the original
right-click on Properties. The Sound Recorder Properties
C:\Windows\system32\SoundRecorder.exe /file
stating that you will need to provide administrator permission to
change these settings. Click Continue to complete the operation.
lower right corner of your screen and select
Receptionist Console Administrator Guide 76
Page 81

Appendix A: Steps for Using Plug-Ins
Appendix A: Steps for Using Plug-Ins
The Call Center Console client requires your computer to have Java JRE 1.6 or higher installed
before you proceed with the steps in this section.
Important: If error messages appear while downloading the JNLP file (steps 1-10
below), log out and log back in.
Load the Receptionist Console thin client.
Click the Settings link in the upper right corner of the screen.
Result: The Call Center dashboard appears.
Settings link
Plug-Ins tab
Click the Plug-ins tab.
Make sure the Disable All Plug-ins checkbox is unchecked.
Result: All Plug-Ins are enabled.
Click the Sign Out link in the upper right corner of the screen to save the changes.
Result: A Do you want to save your workspace? dialog box appears.
Click the Yes button.
Web-Based Receptionist Console User / Administrator Guide 77
Page 82

Appendix A: Steps for Using Plug-Ins
Log back in to Receptionist Console.
Result: A message appears that a file is ready to be downloaded.
Depending on your browser type, you may be prompted to “run,” “allow,” or
“approve” security checks and the JNLP file.
In addition, messages about downloading and verifying the application contained in
the file appear, followed by a dialog box asking you whether you want to run the
application. At the bottom of the screen, a message appears, “Do you want to open
or save the JNLP file?”
Click the Open button (in Internet Explorer) or a similar option if you are using one
of the other approved browser types.
Result: Based on your browser, such as IE, you may receive a Security message. If
you do, click the Allow button. If presented with a similar dialog box in other
browsers, click the appropriate button or link.
Open or Save .JNLP file message (as presented in Internet Explorer)
Downloading and Verifying Application pop-up windows
Receptionist Console Administrator Guide 78
Page 83

Appendix A: Steps for Using Plug-Ins
“Do you want to run this application?” Dialog Box
Click the Run button. This starts the Java HTTPS server allowing Call Center to
access the desktop integration features. (Note: Desktop integration features will not
be available if you click the Cancel button.)
Note: If you refresh the browser after the local HTTPS server has started, the JNLP file is
not downloaded again and the HTTPS server continues to initialize the desktop
integration features.
See the next section for instructions on how to install browser certificates.
Receptionist Console Administrator Guide 79
Page 84

Appendix A: Steps for Using Plug-Ins
Browser
Windows
Mac OS
Chrome
Windows Certificate Store
System Keychain
Internet Explorer
Windows Certificate Store
Not Applicable
Safari
Not Applicable
System Keychain
Firefox Certificate
Store
Certificate for Desktop Integration Features
You need to add the desktop plug-in certificate to the browser-specific certificate store location
on your machine, which is required to run Call Center desktop integration features.
The table below is comprised of browser types and the location of each browser’s certificate trust
store location.
Firefox Firefox Certificate Store
The following sub-sections provide instructions for adding the certificate on different platforms.
Download Desktop Plug-ins Certificate
The desktop plug-ins certificate can be downloaded with the following HTTP call to the Call
Center client context:
https://console.coxbusiness.com/receptionistconsole/certificate/desktopplugin.cer
Tip: Save the desktopplugin.cer file in an easily accessible location.
Receptionist Console Administrator Guide 80
Page 85

Appendix A: Steps for Using Plug-Ins
Add Certificate to Microsoft Windows Certificate Store
Follow these steps to add the desktop plug-in certificate to the Windows certificate store.
Using Internet Explorer
The following instructions apply to Internet Explorer browser (version 11.0 only) running on a
Windows operating system (OS).
From the Internet Explorer Menu bar, select Tools, and then Internet Options.
Result: The Internet Options dialog box appears.
Internet Explorer – Internet Options
Click the Content tab, and then the Certificates button.
Results: The Certificates dialog box appears.
Receptionist Console Administrator Guide 81
Page 86

Appendix A: Steps for Using Plug-Ins
MS Windows – Certificates
Click the Trusted Root Certification Authorities tab, and then click the Import
button.
Result: The Certificate Import Wizard dialog appears.
Certificate Import Wizard
Click the Next button.
Receptionist Console Administrator Guide 82
Page 87

Appendix A: Steps for Using Plug-Ins
Click the Browser button, and then choose Desktop plugin.
Follow the prompts on the wizard to install the certificate.
Click the Security tab.
Click Trusted sites, and then click the Sites button.
Result: The Trusted Sites dialog box appears.
Internet Explorer – Internet Options – Security
Receptionist Console Administrator Guide 83
Page 88

Appendix A: Steps for Using Plug-Ins
Internet Explorer – Trusted Sites
In the Add this website to the zone text field, enter the Call Center client URL,
and then click the Add button.
Result: The URL appears in the Websites text box.
Click the Close button.
Open the Internet Options dialog box from your desktop, then click Custom level.
Result: The Security Settings – Trusted Sites Zone dialog box appears.
Internet Explorer – Security Settings – Trusted S ites Zone
Receptionist Console Administrator Guide 84
Page 89

Appendix A: Steps for Using Plug-Ins
Scroll down to the Miscellaneous > Access data sources across domains menu
option and click the Enable radio button.
Click the Yes button in the Warning! dialog box that appears.
Click the OK button, and then click the OK button in the Internet Options window
to close the window.
Using Google Chrome
The following instructions apply to a Chrome browser (version 57 and lower) running on a
Windows operating system (OS).
Open the Chrome browser.
In the top right corner of the browser window, click the Chrome menu icon ( ).
Click the Settings link.
Result: The Settings tab ap pears .
At the bottom of the dialog box, click the Show advanced settings checkbox, and
then scroll down to the HTTPS/SSL section.
Chrome – Advanced Settings
Click the Manage certificates button.
Result: The Certificates dialog box appears.
Receptionist Console Administrator Guide 85
Page 90

Appendix A: Steps for Using Plug-Ins
MS Windows – Certificates
Click the Trusted Root Certification Authorities tab, and then click the Import
button.
Result: The Certificate Import Wizard dialog box appears.
Certificate Import Wizard
Follow the prompts to install the certificate.
Receptionist Console Administrator Guide 86
Page 91

Appendix A: Steps for Using Plug-Ins
Add Certificate to Firefox Certificate Store
Mozilla Firefox has its own certificate store. Follow these steps to add the certificate to the
Firefox Certificate store.
The following instructions apply to a Firefox browser (version 54) running on a Windows or
Mac operating system (OS).
Important: See the Changes for Firefox version 54 section for important information
about this browser version.
Open the Firefox browser.
Open the Options/Preferences window:
On Windows: From the Tools menu, select Options.
On Mac: From the Firefox menu, select Preferences.
Result: The Options/Preferences dialog box appears.
Firefox – Options
Click the Advanced icon ( ), and then click the Certificates tab.
Click the View Certificates button.
Result: The Certifi cate Ma n ager dialog box appears.
Receptionist Console Administrator Guide 87
Page 92

Appendix A: Steps for Using Plug-Ins
Firefox – Certificate Manager
Click the Servers tab.
Click the Import button.
Select the certificate file on your computer and click the OK button to import.
Click the Add Exception button.
Result: The Add Security Exception dialog box appears.
Firefox – Add Security Exception
In the Location textbox, enter https://127.0.0.1:5555/ and click the Get Certificate
button (assuming that “5555” is the default port of the local HTTPS [127.0.0.1]
server).
Click the Confirm Security Exception button, and then click the OK button in the
Certificate Manager dialog box.
Receptionist Console Administrator Guide 88
Page 93

Appendix A: Steps for Using Plug-Ins
Changes for Firefox version 54
Firefox version 54 introduced a change in behavior that does not allow the desktop integration to
fully load with the certificate that is imported under the Authorities section of the Firefox
certificate store. The workaround is to add an entry under the Servers section using the following
steps:
Sign in to the client with Firefox and launch the JNLP.
Open the Firefox Certificate Manager to the Servers tab, and click the Add
Exception button.
Enter https://127.0.0.1:5555/ in the Location field.
Click the Get Certificate button.
Click the Permanently store this exception checkbox, and click the Confirm
Security Exception button.
Add Certificate to Apple System Keychain
The following instructions apply to Chrome browser (version 57 and lower) running on a Mac.
Use the following steps to add the certificate to the system keychain on a Mac computer.
In the Dock, open Finder.
Mac OS - Finder
Select Applications and then Utilities.
In the list of utilities, double-click Keychain Access.
Result: The Keychain Access window appears.
Receptionist Console Administrator Guide 89
Page 94

Appendix A: Steps for Using Plug-Ins
Mac OS – Keychain Access Window (Fragment)
In the Keychain Access dialog box, scroll to the Keychains menu, and click the
System option.
From the Category menu, click the Certificates option.
Mac OS – Keychain Access
From the Keychain Access toolbar, click the File menu, and then click the Import
Items option.
Follow the instructions of the browser to import the certificate file.
Result: The certificate appears in the list of certificates as 127.0.0.1.
Receptionist Console Administrator Guide 90
Page 95

Appendix A: Steps for Using Plug-Ins
In the Keychain Access window, double-click the certificate.
Result: The certificate window appears.
Certificate Window
In the Trust section, select Always Trust for When using this certificate.
Click the X in the upper right corner to close the browser.
Receptionist Console Administrator Guide 91
Page 96

Appendix A: Steps for Using Plug-Ins
On MAC OS X
In MAC OS X, due to security-related restrictions, the JNLP may not execute if you click on it.
If this occurs, perform the following steps:
From your Mac, open System Preferences and select Security and Privacy.
Result: The Security & Privacy dialog box appears and defaults to the General
tab.
Mac OS X – Security & Privacy
Click the lock icon ( ) to unlock the panel.
In the Allow applications downloaded from: section, click the Anywhere radio
button.
Click the red dot ( ) in the upper left corner of the window to exit the screen.
Receptionist Console Administrator Guide 92
Page 97

Appendix B: Call State s and Actions
Display
Name
Display
Icon
Call
Personality
Incoming
Local
Answer, Conference,
End
Ringing Out,
Outgoing
Transfer, Hold, Park,
Transfer, Resume,
Conference
Transfer, Hold, End,
Conference
Active (In
Conference)
Resume, Transfer,
End
Ringing In (Recalled
Call)
Answer, Conference,
End
Parked
(<DN>)
Appendix B: Call States and Actions
The following table lists possible call states and actions that can be performed
in each state.
Call State
Ringing In (Local)
Ringing In (Remote) Incoming
Outgoing
Active Active
On Hold Held
On Hold (Remote) Remote Held
Active
Held (In Conference) Held
Call Actions
Click-To-Dial Answer, End
Terminator
Originator Conference, End
Any
Camp, End,
Conference
Any
Park, Camp, End,
Any
Conference Transfer, Hold, End
Conference
Parked Call
Web-Based Receptionist Console User / Administrator Guide 93
Recalled
Terminator
Any Answer, End
Page 98

Appendix B: Call State s and Actions
This places a call to the selected contact or to a number from
Call History.
This dials the contact’s mobile number. (Note: We do not
MyAccount.)
This brings up a new e-mail message window with the
contact.
Transfer to Voice Mail
This answers an incoming call, answers an unanswered call
for a contact, or resumes a held call.
This establishes a conference call or adds a call to a
conference.
Call Action Buttons
The following table lists action buttons available in Receptionist Console.
Button Description
Dial
Redial
Mobile
E-mail
Transfer
Transfer
Answer
Hold
This dials the number you entered in the Dialer.
This redials the last dialed number.
currently support the ability to add mobile numbers in
contact’s e-mail address, allowing you to send an e-mail to the
This transfers a call to an ad hoc number entered in the Dialer.
This transfers a call to a selected number or contact.
This transfers a call to the selected contact’s voice mail.
This places a call on hold.
End
This ends a call.
Conference
Camp
Barge In
Park
Record
Pause
Resume
Receptionist Console Administrator Guide 94
This camps the call on a busy contact.
This barges in on a contact’s call.
This parks a call on a contact.
This records a call.
This pauses call recording.
This resumes call recording.
Page 99

Appendix B: Call State s and Actions
This starts monitoring the state of the selected contact, except
monitored.
This promotes a selected call to the next higher priority
bucket.
This retrieves a selected call from the queue to the
supervisor’s device.
Button Description
Stop
Monitor
Promote
Retrieve
Reorder
This stops recording a call.
if the contact is a virtual user. Virtual users cannot be
This changes a selected call’s position in the queue.
Receptionist Console Administrator Guide 95
Page 100

FAQ
FAQ
Q: Are there any restrictions for the sign in process?
Console the next time you launch the application.
FAQ
A: Yes, Receptionist Console does have a few restrictions for the sign in
process. They are listed below.
• Receptionist Console does not support signing in as different users from
the same machine at the same time.
• You can only have ONE active Receptionist Console session at a time.
• When you sign in from a second location, you are automatically signed
out from the original location with the following message: “You have
been signed out as you have signed in from another location.”
Q: When I make updates in MyAccount, will I see them immediately in
Receptionist Console?
A: No, any updates that you make via MyAccount will appear in Receptionist
Web-Based Receptionist Console User / Administrator Guide 96
 Loading...