

Page 1

UC App for
Page 2

© 2018 by Cox Communications.
All rights reserved. No part of this document may be reproduced or transmitted in any form or by any means, electronic,
mechanical, photocopying, recording, or otherwise, without prior written permission of Cox Communications. 0418
Page 3

Table of Contents
Table of Contents
About the UC App for Windows Desktop ................................................................................. 1
Get Started ........................................................................................................................ 2
Activating Unified Communications and UC Apps for IP Centrex Professional
Seats ............................................................................................................................... 2
System Requirements ................................................................................................... 4
Installation ...................................................................................................................... 5
Sign In ............................................................................................................................. 8
Resetting Your Password ............................................................................................. 9
Main Window ................................................................................................................... 10
UC App Menus ......................................................................................................... 10
The UC App Menu ............................................................................................................... 10
Edit Menu ................................................................................................................. 10
Contacts Menu ........................................................................................................ 11
Calls Menu ............................................................................................................... 11
Conversations Menu ............................................................................................... 12
Window Menu .......................................................................................................... 13
Help Menu ................................................................................................................ 13
Navigation Icons .......................................................................................................... 14
My Information ............................................................................................................. 15
My Presence ............................................................................................................ 15
My Location ............................................................................................................. 16
Add or Change Your Personal Note ...................................................................... 16
Search and Dial ............................................................................................................ 17
Outlook Search and Calendar Integration ................................................................. 17
Contacts .......................................................................................................................... 19
Add Contact ................................................................................................................. 19
Add Conference Contact ............................................................................................ 21
Add New Group ........................................................................................................... 21
Contact Options ........................................................................................................... 22
Chat .......................................................................................................................... 23
Call/Call from Phone ............................................................................................... 23
i
Page 4

Table of Contents
ii
Add to or Remove from Favorites ......................................................................... 23
Add to or Remove from Group .............................................................................. 23
View Profile ................................................................ .............................................. 24
Edit Profile ............................................................................................................... 24
Subscribe/Unsubscribe .......................................................................................... 25
Delete Contact ......................................................................................................... 25
Filters ............................................................................................................................ 25
Presence ....................................................................................................................... 27
Communication History ................................................................................................. 29
Clear Communication History .................................................................................... 29
Dial Pad ........................................................................................................................... 30
Full Enterprise Directory ................................................................................................ 31
Preferences ..................................................................................................................... 32
General ......................................................................................................................... 32
Language ................................................................................................................. 33
Login ........................................................................................................................ 33
Notifications ............................................................................................................ 33
Accessibility ............................................................................................................ 34
Media ............................................................................................................................ 34
Incoming Calls ............................................................................................................. 35
Do Not Disturb ......................................................................................................... 35
Anonymous Call Rejection ..................................................................................... 36
Call Forwarding ....................................................................................................... 36
Simultaneous Ring .................................................................................................. 36
Remote Office .......................................................................................................... 37
Call Waiting .............................................................................................................. 38
Anywhere ................................................................................................................. 38
Outgoing Calls ............................................................................................................. 40
Automatic Callback ................................................................................................. 41
Highlight to Call ....................................................................................................... 41
Block My Caller ID ................................................................................................... 42
Services ........................................................................................................................ 42
Extensions ................................................................................................................... 43
Page 5

Table of Contents
iii
Advanced ..................................................................................................................... 43
Troubleshooting ...................................................................................................... 44
Proxy ........................................................................................................................ 44
Communication Windows .............................................................................................. 45
Chat/Instant Messaging .............................................................................................. 46
Chat View ..................................................................................................................... 47
Group Chat ................................................................................................................... 48
Active Communications .............................................................................................. 49
Audio Calls ...................................................................................................................... 50
Select Audio Devices .................................................................................................. 50
Make Audio Call ........................................................................................................... 50
Call from Computer ................................................................ ..................................... 51
Call from Phone ........................................................................................................... 52
Answer Call .................................................................................................................. 52
Contact Name Lookup for Incoming Calls ................................................................ 52
Call Waiting .................................................................................................................. 53
Call Transfer ................................................................................................................. 53
Conference Call ........................................................................................................... 55
Initiate Conference Call .......................................................................................... 55
Initiate a Call to a Group ......................................................................................... 56
Add Person to Existing Conference Call .............................................................. 56
Call Park and Retrieve ................................................................................................. 56
Call Pull ........................................................................................................................ 57
Missed Call or Communication .................................................................................. 57
Message Waiting Indicator ..................................................................................... 57
Set Up Voice Mail .................................................................................................... 57
Check Voice Mailbox .............................................................................................. 58
Headset Support .......................................................................................................... 58
Presence Rules and Silent Alerting ........................................................................... 59
Click-to-Call (Highlight Text) ...................................................................................... 59
Outlook Add-in ................................................................................................................ 60
Introduction .................................................................................................................. 60
Supported Platforms ................................................................................................... 60
Page 6

Table of Contents
Log Files ....................................................................................................................... 61
Features ........................................................................................................................ 61
Presence in Outlook ............................................................................................... 61
Contact Actions in Outlook .................................................................................... 62
Call Multiple Phone Numbers Configured for Contacts....................................... 63
Uninstall Outlook Add-in ............................................................................. ...............64
Accessibility Compliance .............................................................................................. 65
Sign Out ........................................................................................................................... 66
Sign Out of the UC .................................................................................................... 66
Exit Application ........................................................................................................... 66
Forced Logout ............................................................................................................. 66
Uninstall the UC App ................................................................................................................ 67
Troubleshooting ............................................................................................................. 68
iv
Page 7

About the UC App for Windows Desktop
About the UC App for Windows Desktop
The UC Appfor Windows Desktop is a client application for Unified Communications that
provides the following communication features:
• Instant Messaging and Presence
• Voice Calling (VoIP)
• Voice Calling (Desk phone)
• Call Settings
Important: UC Apps operate with lines, seats, and other voice features—
which may vary among customers. In rare cases, customers may gain
access to features and interactions which are not fully recommended for
use with UC Apps.
UC App for Windows Desktop User Guide 1
Page 8
Get Started
This section contains the essential information for getting started with UC.
Activating Unified Communications and UC Apps for IP Centrex
Professional Seats
To use the Unified Communications (UC) features and UC Apps with your IP Centrex
Professional Seat, you must first activate UC through the MyAccount Portal.
Use the following steps to activate UC for your assigned IP Centrex Professional Seat:
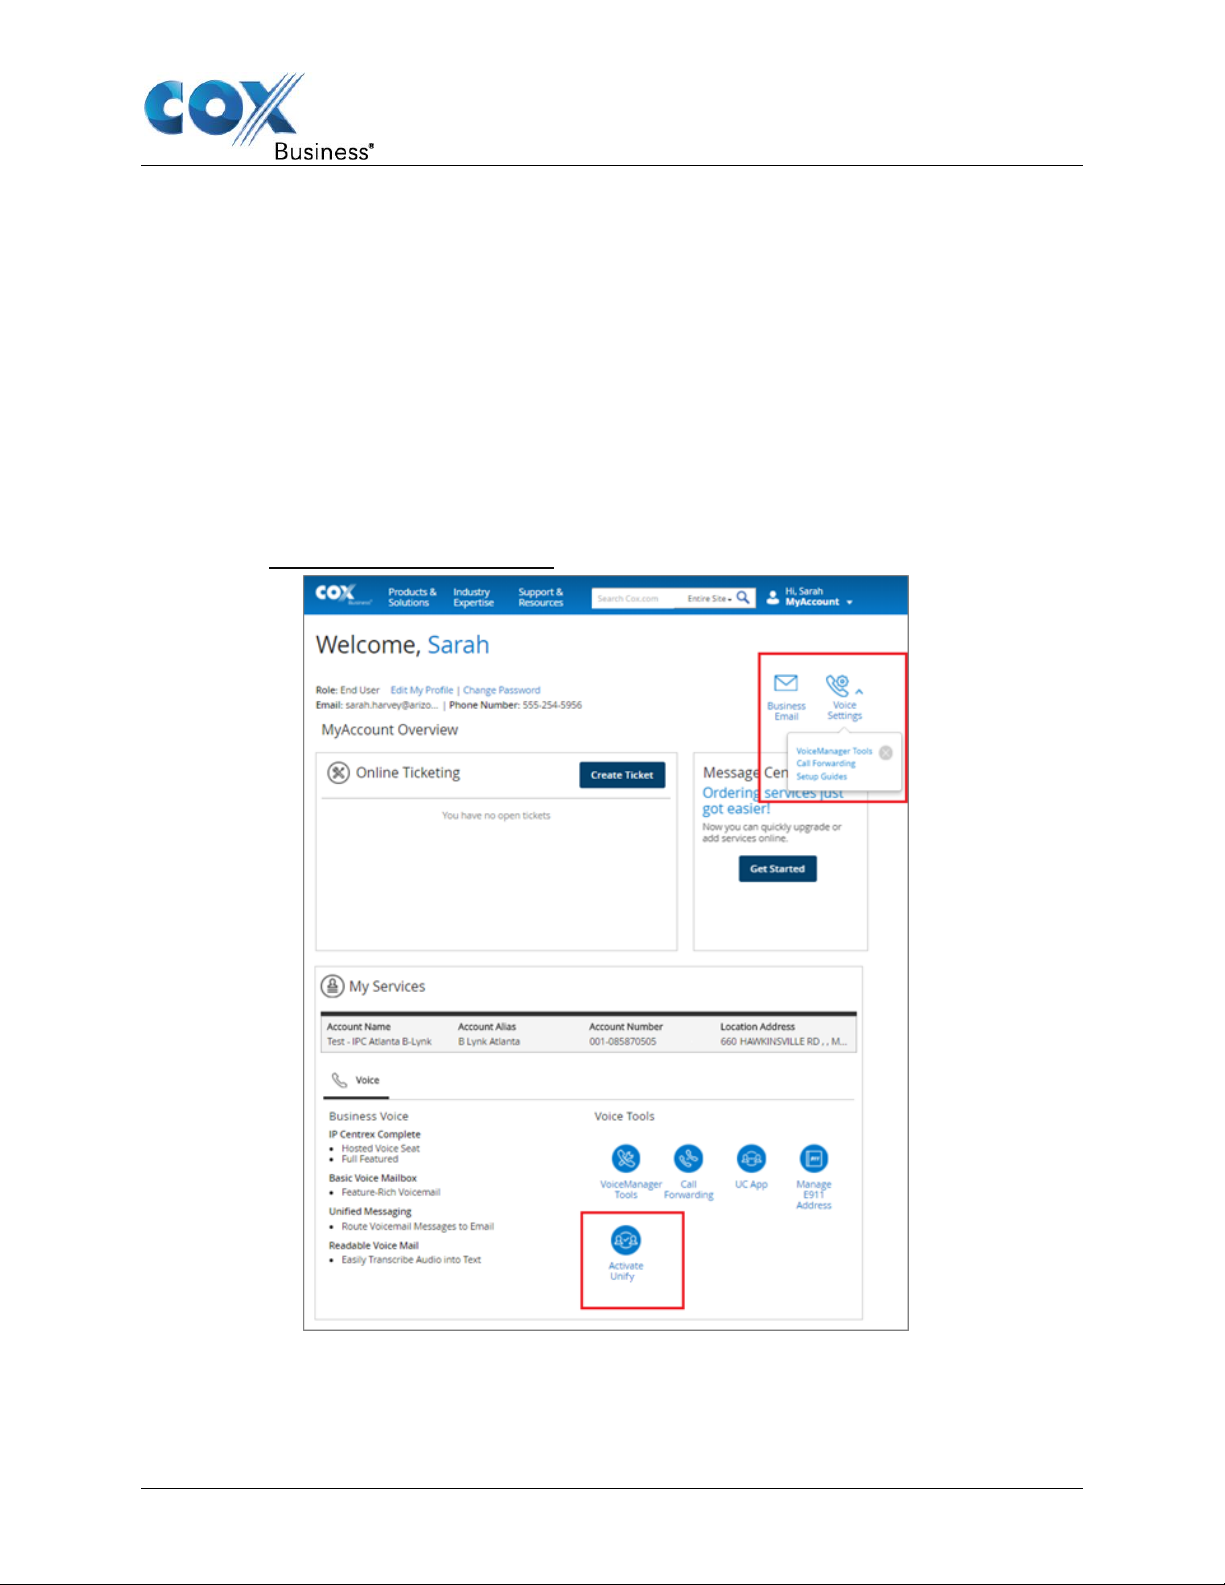
1. Log in to the MyAccount Portal.
Result: The MyAccount Portal Home page opens.
Figure 1. MyAccount Portal Home Page
Get Started
2. On the MyAccount Portal Home page, scroll down to the My Services section and click
the Activate Unified Communications icon (see Figure 1).
Result: The Activate Unified Communications window opens (see Figure 2).
UC App for Windows Desktop User Guide 2
Page 9
Alternatively, you can access the Activate Unified Communications window by
Note: Profile Owners and Profile Administrators can view and activate UC for any
IP Centrex Professional Seat on the account. End users can only activate UC for
the IP Centrex Professional Seat assigned to them.
performing the following steps:
a. Click the Voice Settings dropdown menu and select VoiceManager Tools (see
Figure 1).
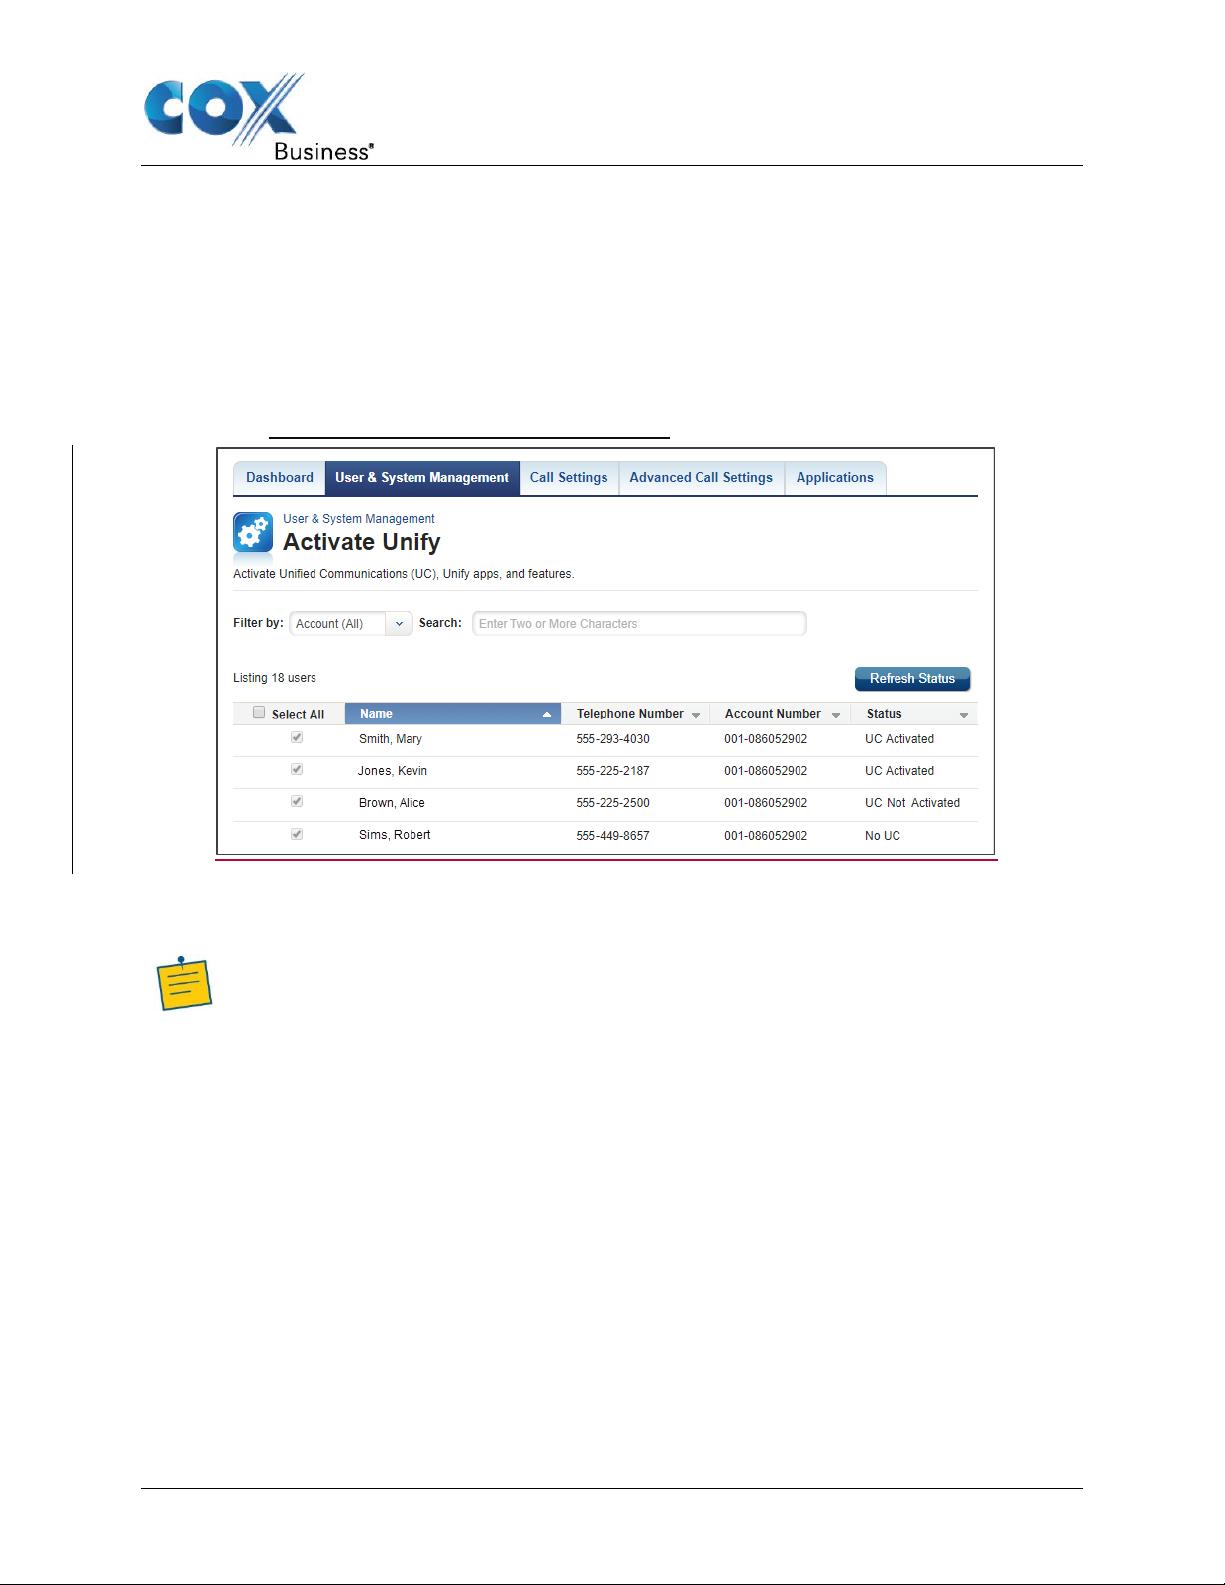
b. On the VoiceManager Tools Home page, click the User & System Management tab.
c. Click the Activate Unified Communications link in the User Management section.
Result: The Activate Unified Communications window opens.
Figure 2. Activate Unified Communications Window
Get Started
3. Click the checkbox to the left of the name associated with the IP Centrex Professional
Seat you want to activate.
4. Click the Save button to save your changes.
Result: The status changes from UC Not Activated to Pending (see Figure 3). Refreshing
the page after approximately 30 seconds updates to the status to UC Activated.
UC App for Windows Desktop User Guide 3
Page 10
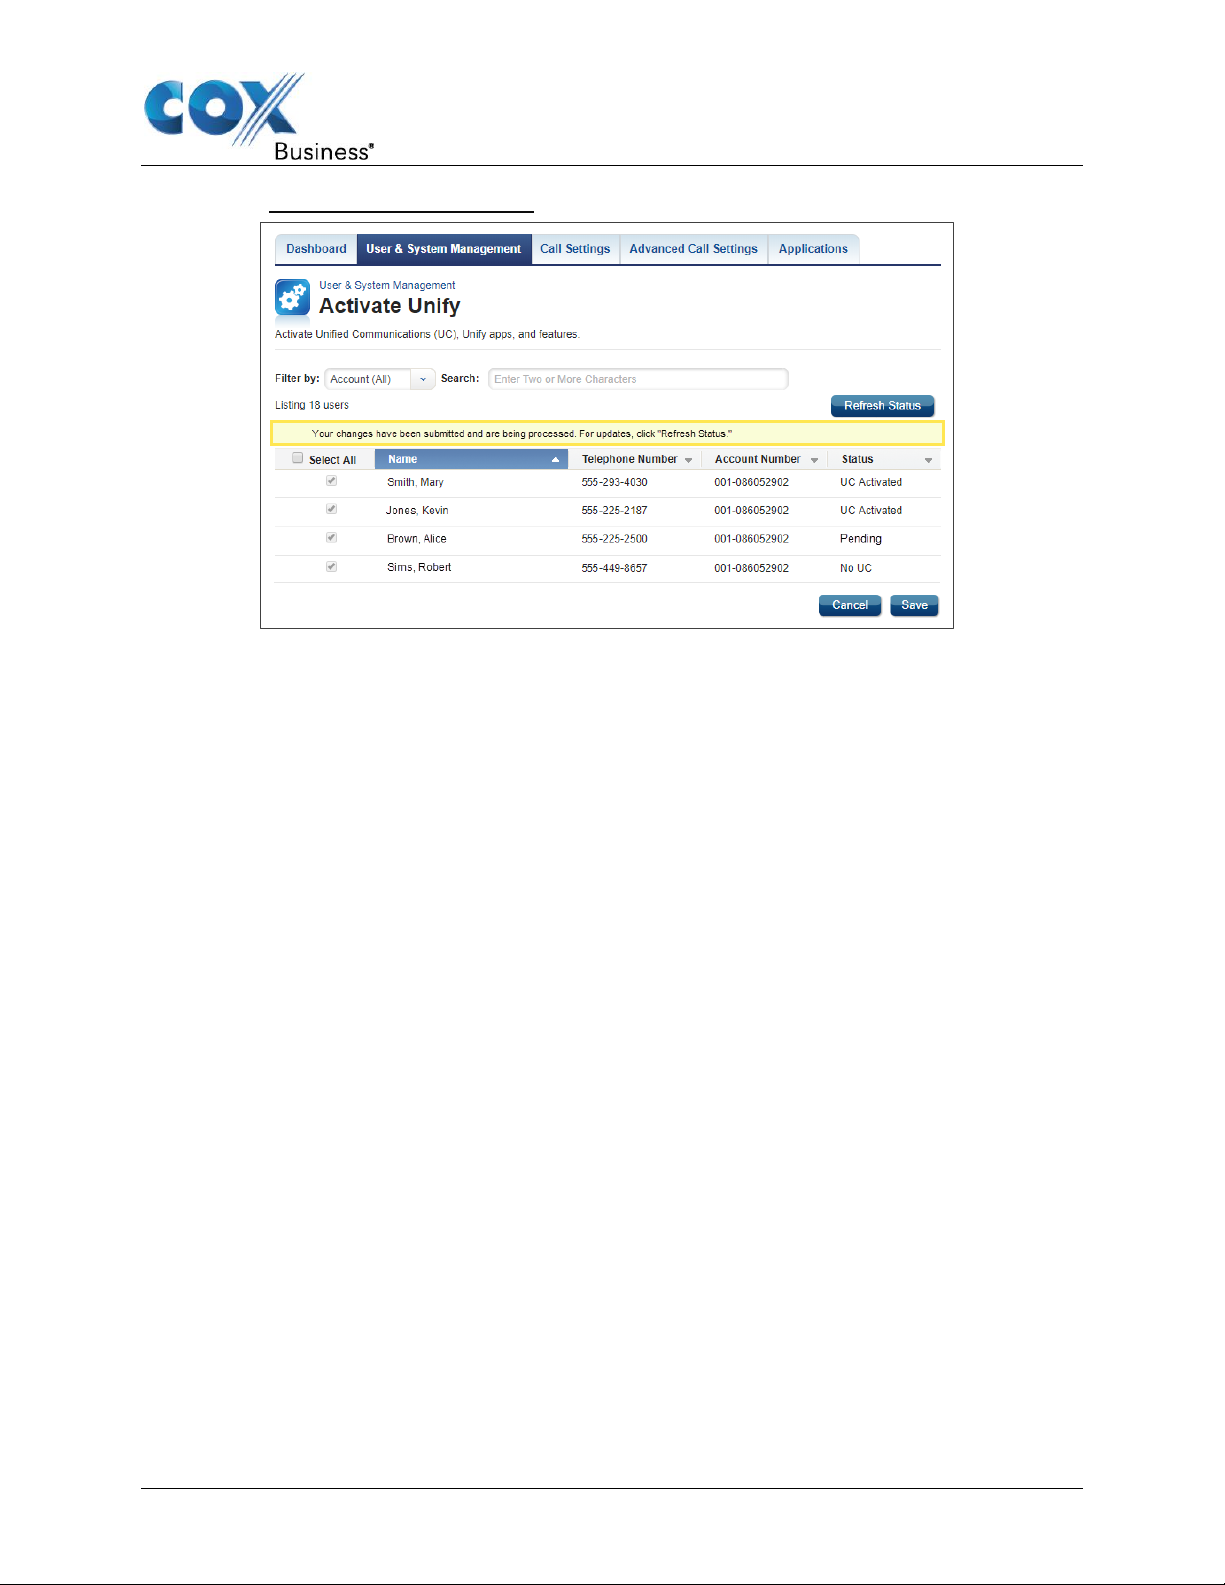
Figure 3. Activation Status – Pending
System Requirements
System requirements for running UC on a Windows-based desktop are as follows:
Get Started
• Operating system: Windows 7 SP1, Windows 8/8.1, or Windows 10 (classical view only).
• The installation footprint is approximately 215 megabytes (MB).
• For voice calls, a sound card, speakers, and a microphone or a headset are required.
Minimum system requirements need to be fulfilled with the following additions:
• A minimum of 2 GB random access memory (RAM) is required.
• A minimum 1.5 GHz CPU is recommended.
• Open Graphics Library (OpenGL) 1.5 or higher is recommended.
UC App for Windows Desktop User Guide 4
Page 11

Installation
Use the following steps to download the UC App for Windows Desktop installation file.
1. Go to MyAccount (coxbusiness.com/myaccount).
Result: The Cox Business Sign In window appears.
Figure 4. Sign In Screen
Get Started
2. Enter your User ID and Password and click the Sign In button.
Result: The MyAccount Welcome window appears.
Figure 5. Myaccount Welcome Screen
3. In the upper right corner of the Welcome screen, click Voice Settings and then click
VoiceManager Tools from the dropdown menu.
Result: The VoiceManager Dashboard opens.
4. Click the Applications tab.
UC App for Windows Desktop User Guide 5
Page 12
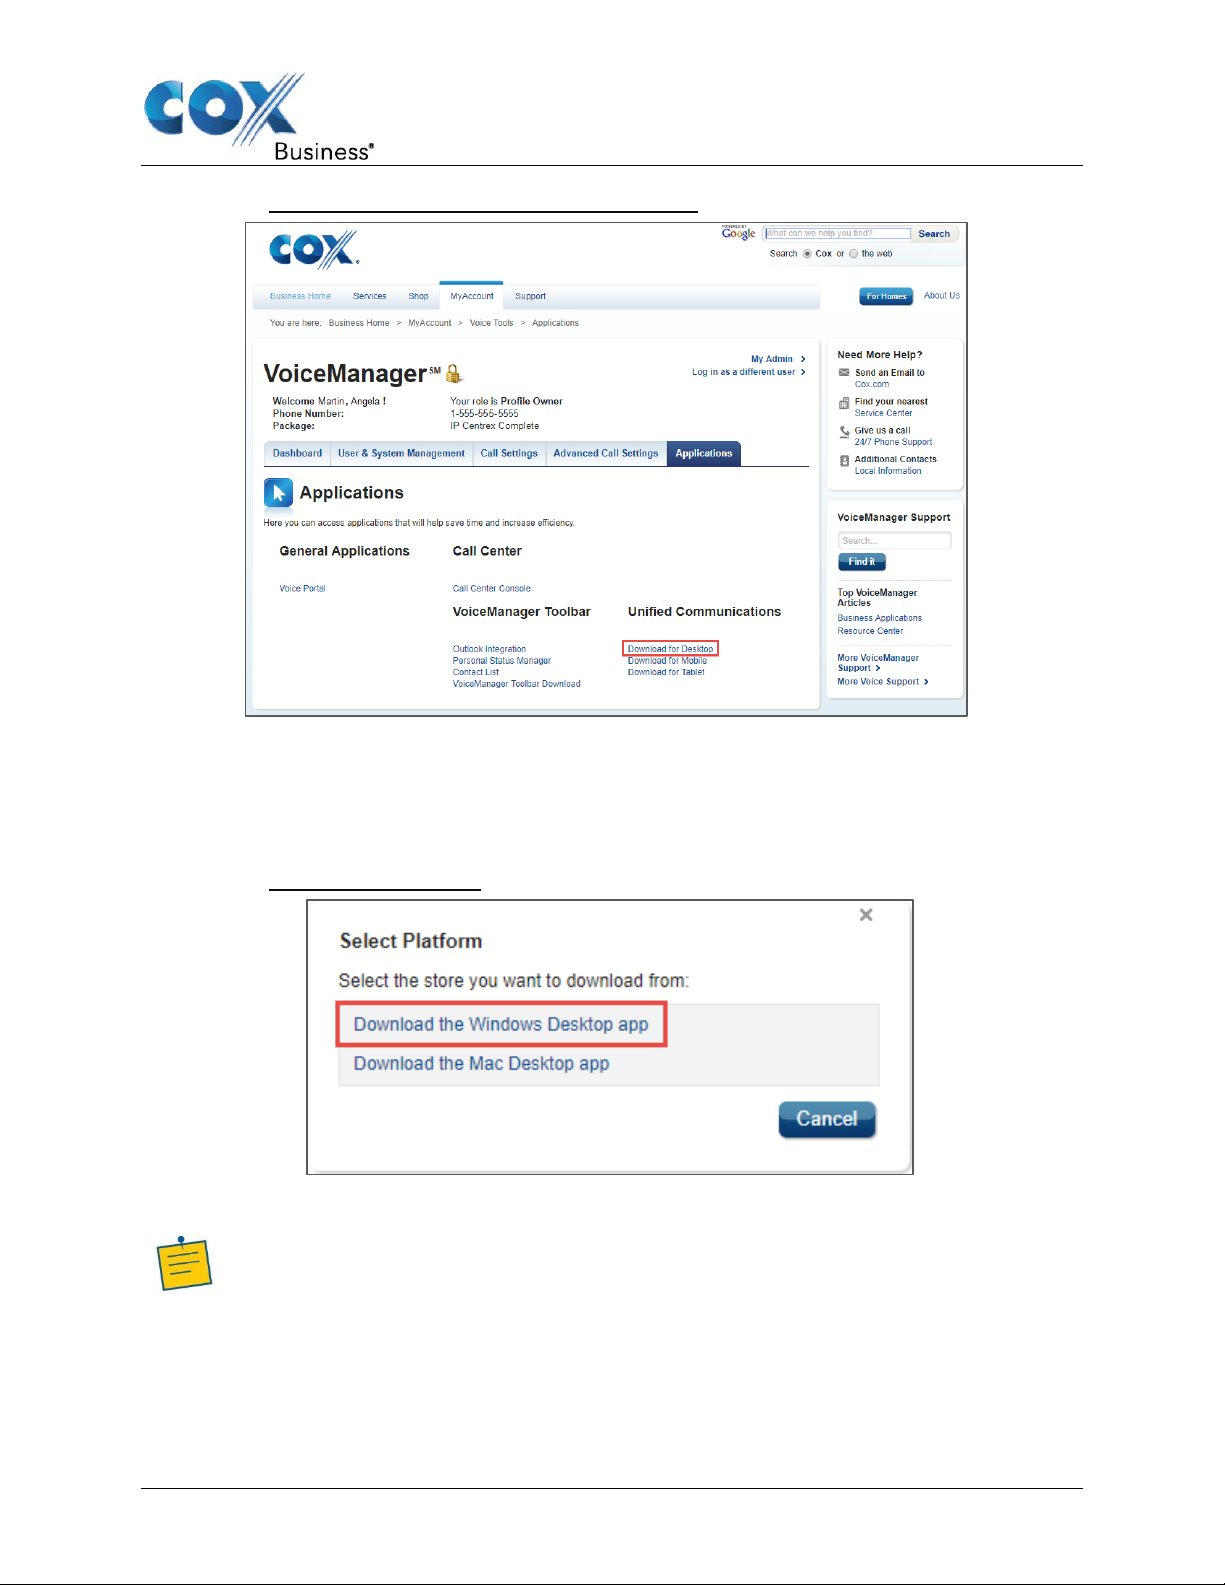
Figure 6. VoiceManager Dashboard – Applications Tab
Note: If you do not scroll to the bottom of the License Agreement before you click I
Agree, you will need to click I Agree again.
Get Started
5. Go to the Unified Communications section and click the Download for Desktop link.
Result: The Select Platform dialog box opens.
6. Click Download the Windows Desktop app to download the application.
7. Follow the prompts.
Figure 7. Select Platform Dialog
8. Review the entire License Agreement and click the I Agree button to continue.
UC App for Windows Desktop User Guide 6
Page 13
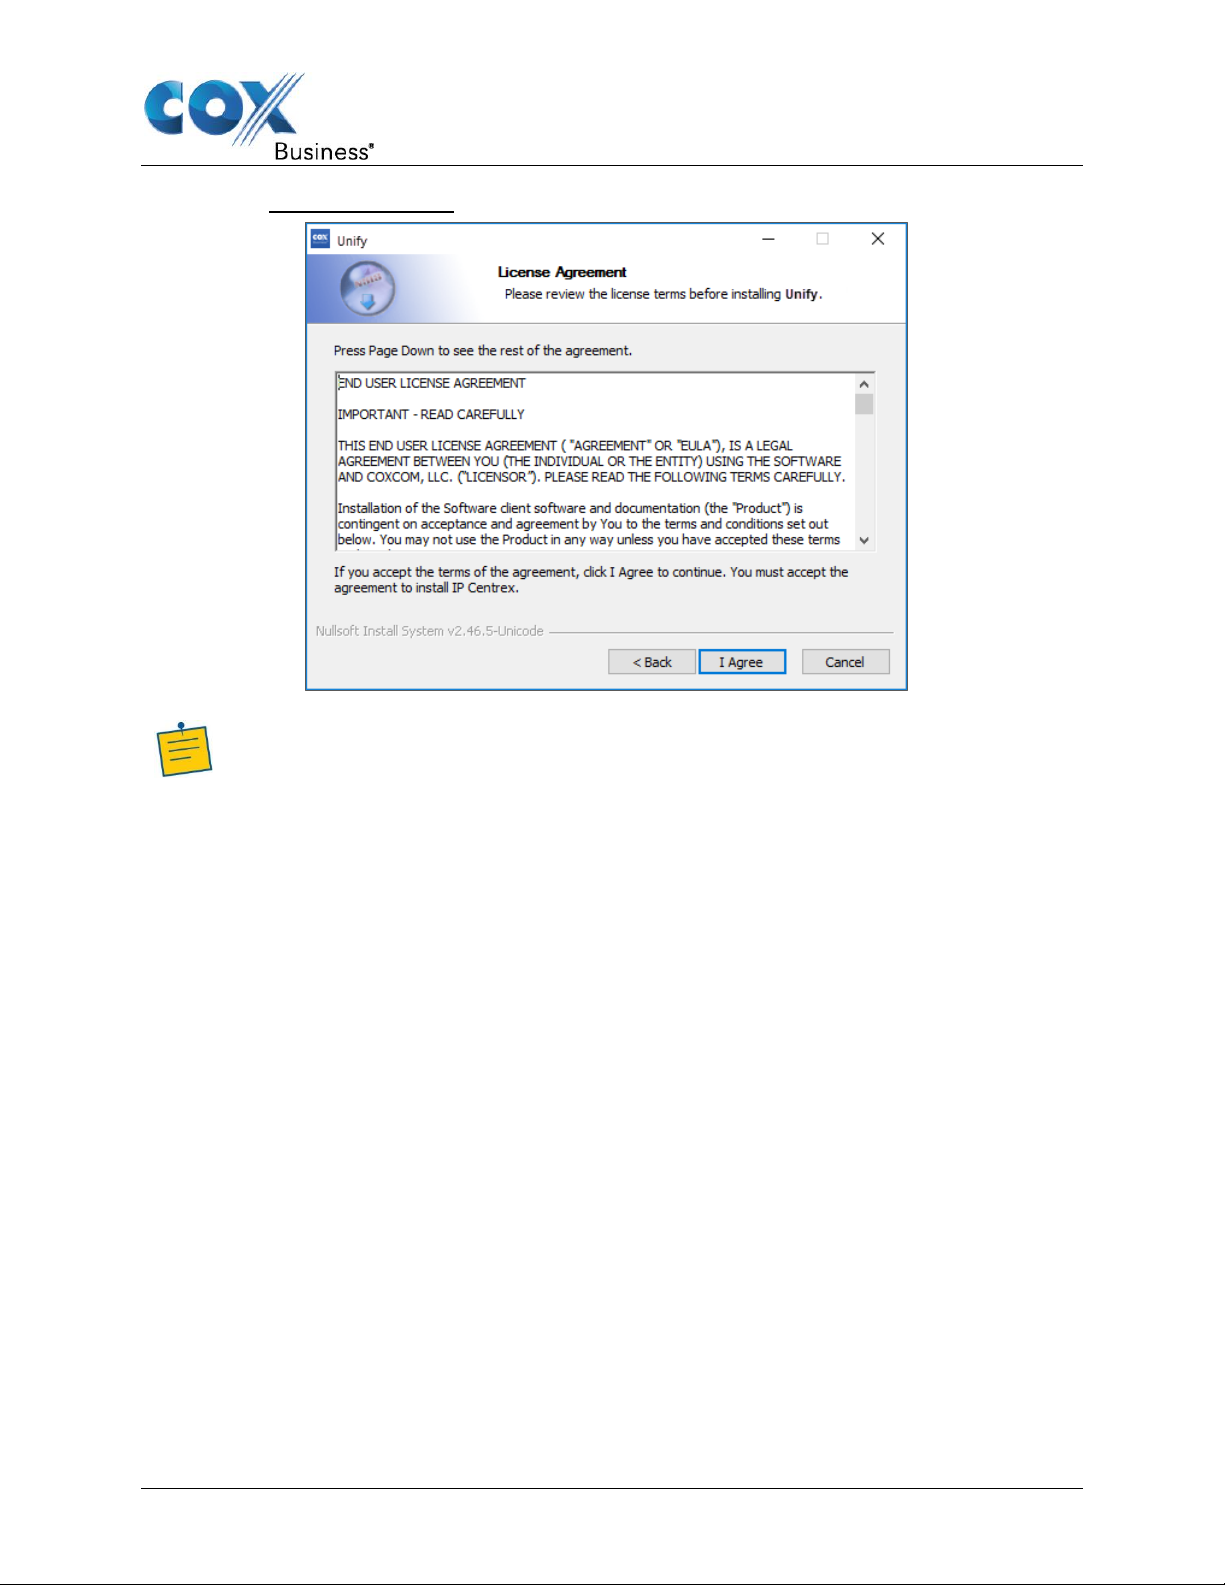
Figure 8. License Agreement
Note: During installation, you will be asked if you would like the Outlook Add-in
installed. Click the checkbox to enable the installation and integrate the add-in with
UC. See Outlook Add-in for more information about functionality.
Get Started
UC App for Windows Desktop User Guide 7
Page 14
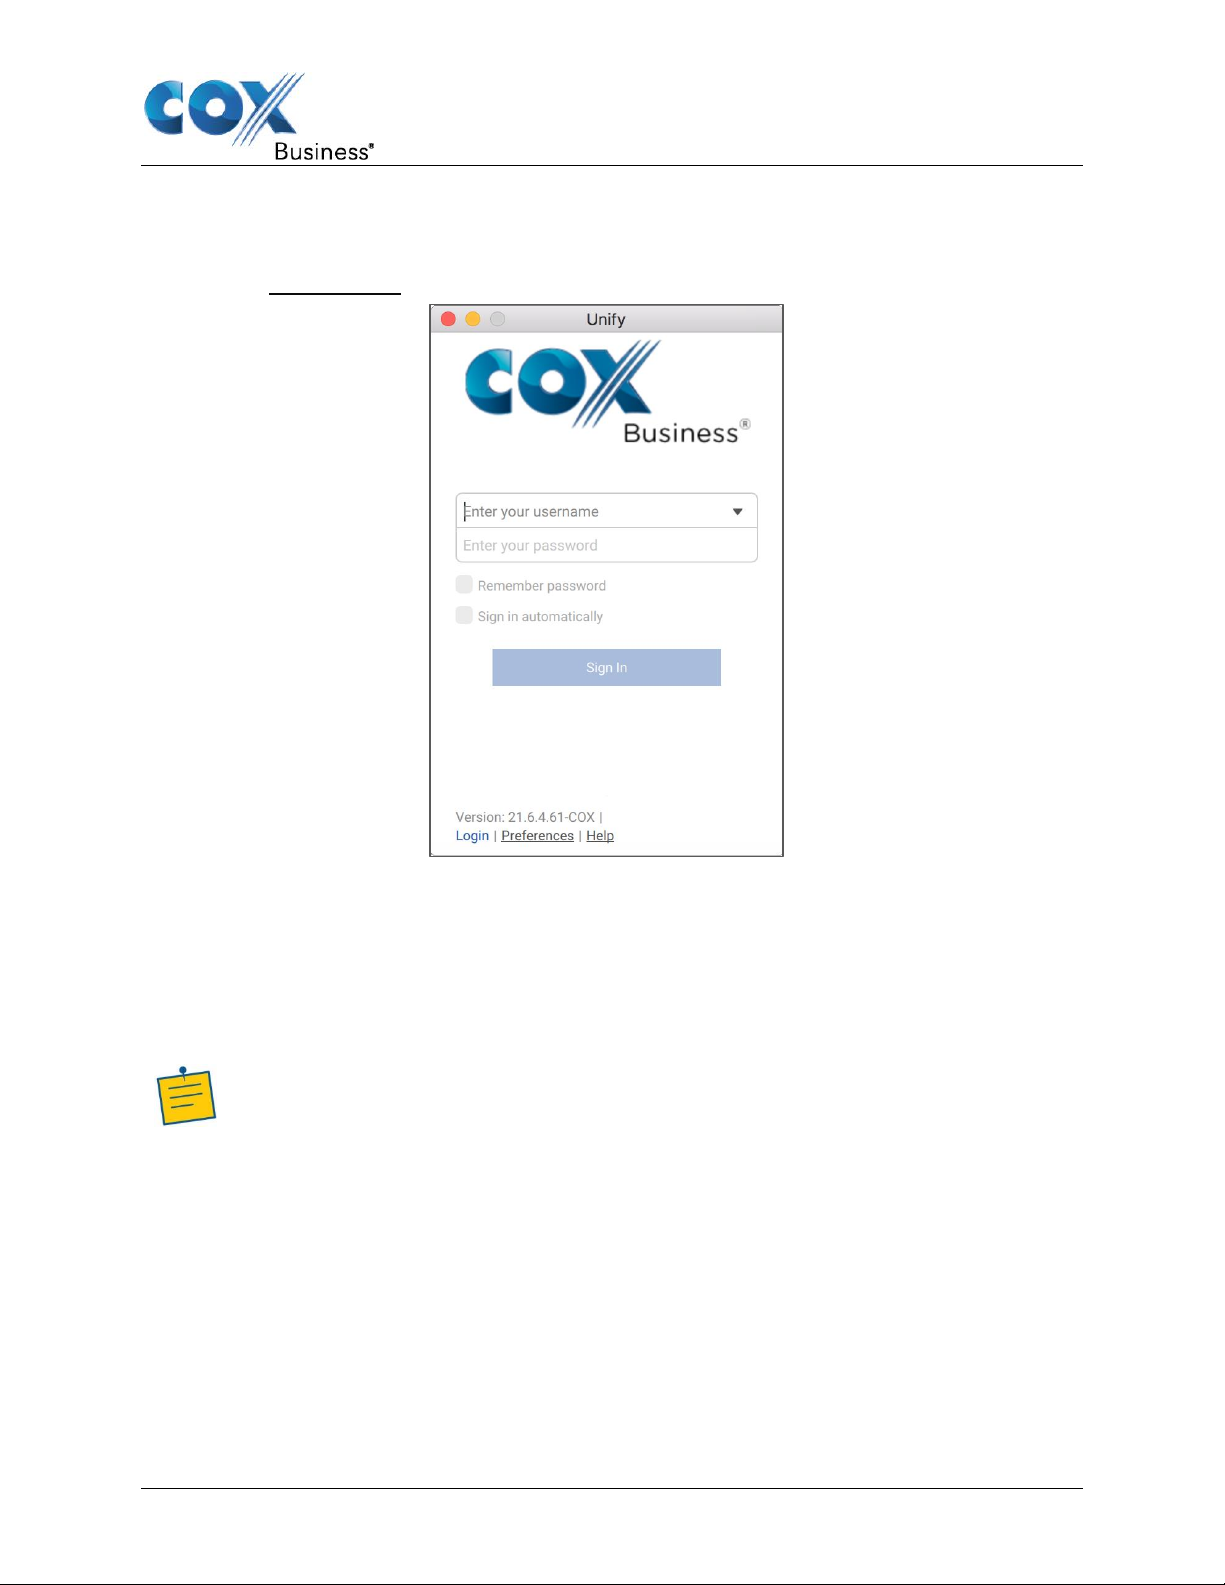
Sign In
When you first launch the application, you are prompted to sign in.
Figure 9. Log in Screen
Get Started
1. Enter your Cox Business user name and password.
2. Select whether you would like the UC App to remember your password.
3. Select whether you would like the UC App to sign you in automatically on subsequent launches.
4. Click Sign In.
You can also access Help and Preferences directly from the login window.
Note: If you choose automatic sign in, you are automatically signed in and taken to
the Main window upon subsequent launches. Otherwise, the Sign In screen
appears when you launch the application. The default tab, displayed in the Main
window, depends in the service provider’s configuration; otherwise, the UC App
remembers the tab you were on at sign out and opens that same tab at sign in.
The Login window will display the most recent username, but the password is automatically
filled in only if you have checked the Save password box previously.
If multiple people use the same machine, the last password entered is provided as a security
measure. If you change the username in the Login window, you must re-enter your password.
This also applies when you re-select or re-enter the most recent username.
UC App for Windows Desktop User Guide 8
Page 15
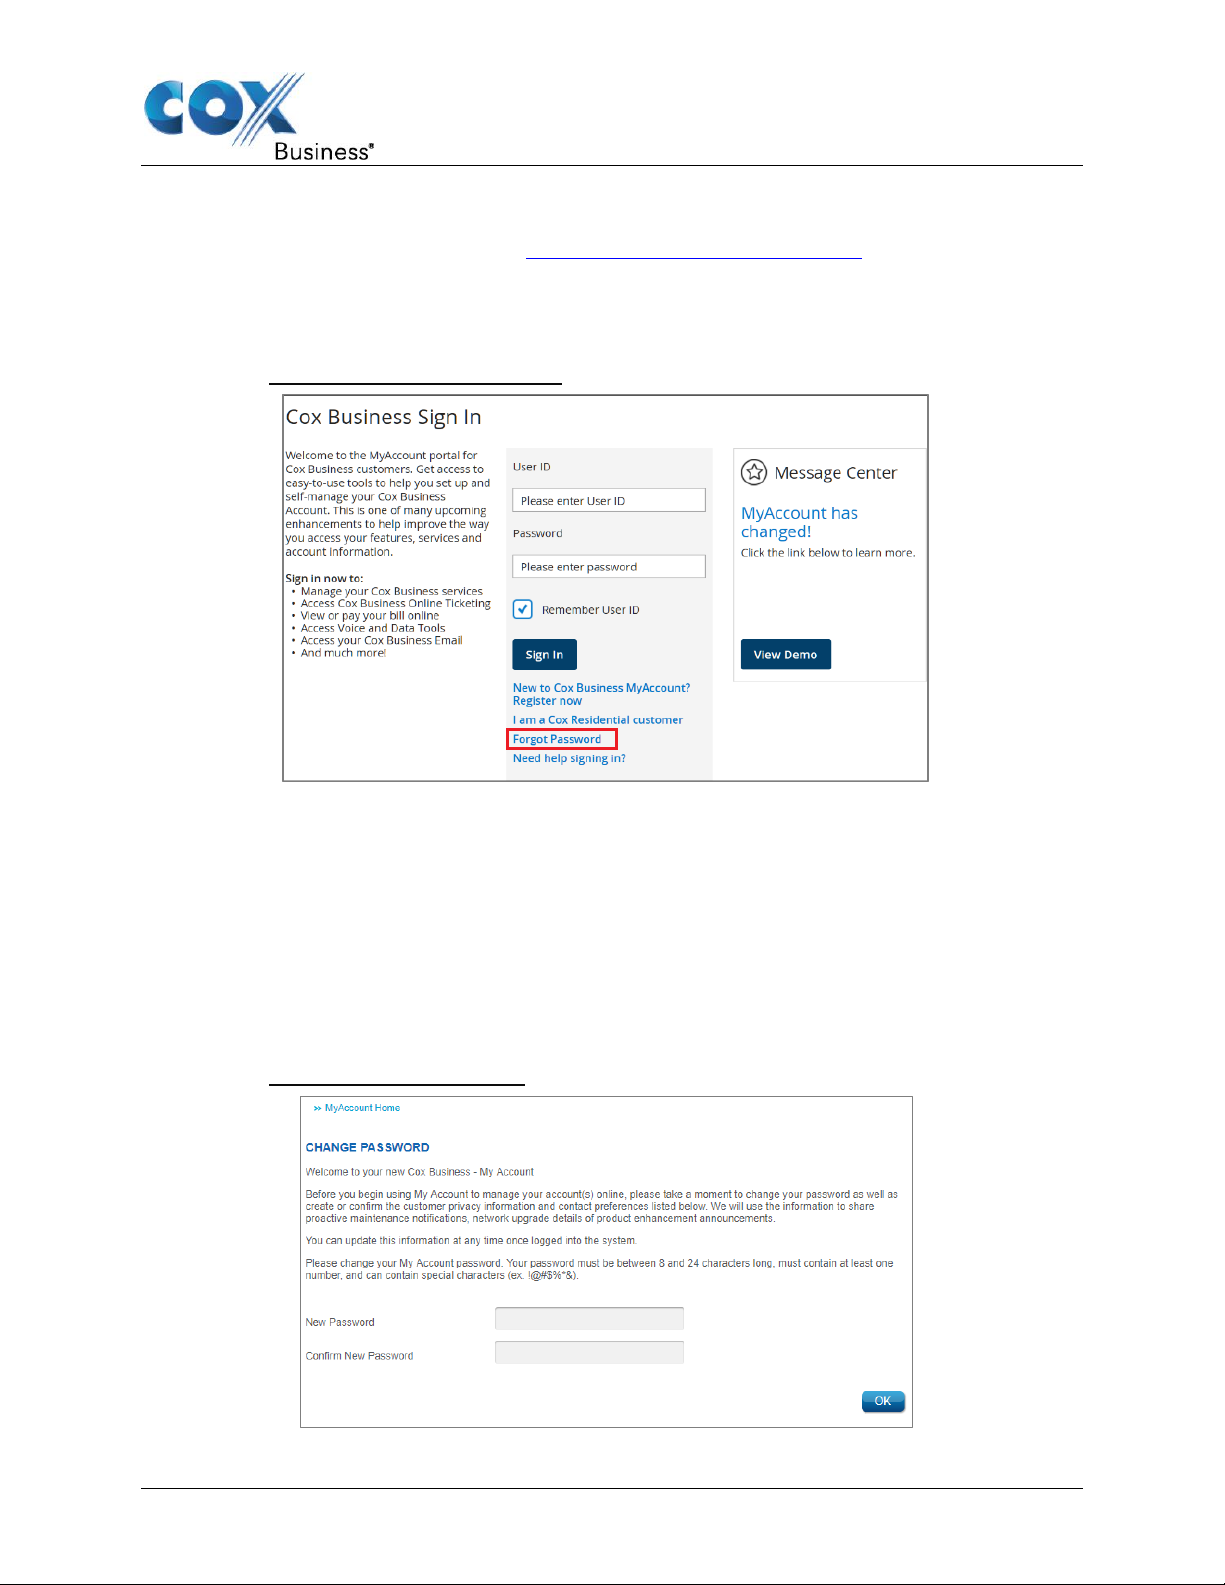
Resetting Your Password
1. Enter the MyAccount Portal URL (http://myaccount.coxbusiness.com) in your web
browser.
Result: The MyAccount Portal login page displays.
2. Click the Forgot Password link.
Figure 10. MyAccount – Forgot Password
Get Started
3. Enter your email address.
4. Click the Reset Password button.
Result: A temporary password will be sent to your email address.
5. Log in to the MyAccount Portal using the temporary password.
Result: You will be directed to the Change Password window, where you are prompted to
create a new password (see Figure 11).
6. Enter the new password as indicated in the onscreen instructions.
7. Click the OK button to save your changes.
Figure 11. Change Password Window
UC App for Windows Desktop User Guide 9
Page 16

Main Window
Main Window
When you start the UC App for the first time, the Main window displays a blank Contacts
screen by default. Refer to the Add Contact section for information related to adding
contacts or editing contact information.
The UC App provides options for you to navigate the application. When the application is
active (by clicking anywhere in the Main window), a row of menus appears at the top of your
desktop screen. You can also navigate the application through the navigation icons on the
left side of the Main window. See the sections below for more information about the UC App
menus and icons.
UC App Menus
The UC App Menu
From the UC App menu, you can:
• View copyright and version information for the UC App application
• Access and set the UC App application and communication options
• Sign out or quit the application
• Minimize the UC App or other application windows
Figure 12. Unify Menu
Edit Menu
The Edit menu allows you to cut, copy, paste, and select all contact information.
Figure 13. Edit Menu
UC App for Windows Desktop User Guide 10
Page 17
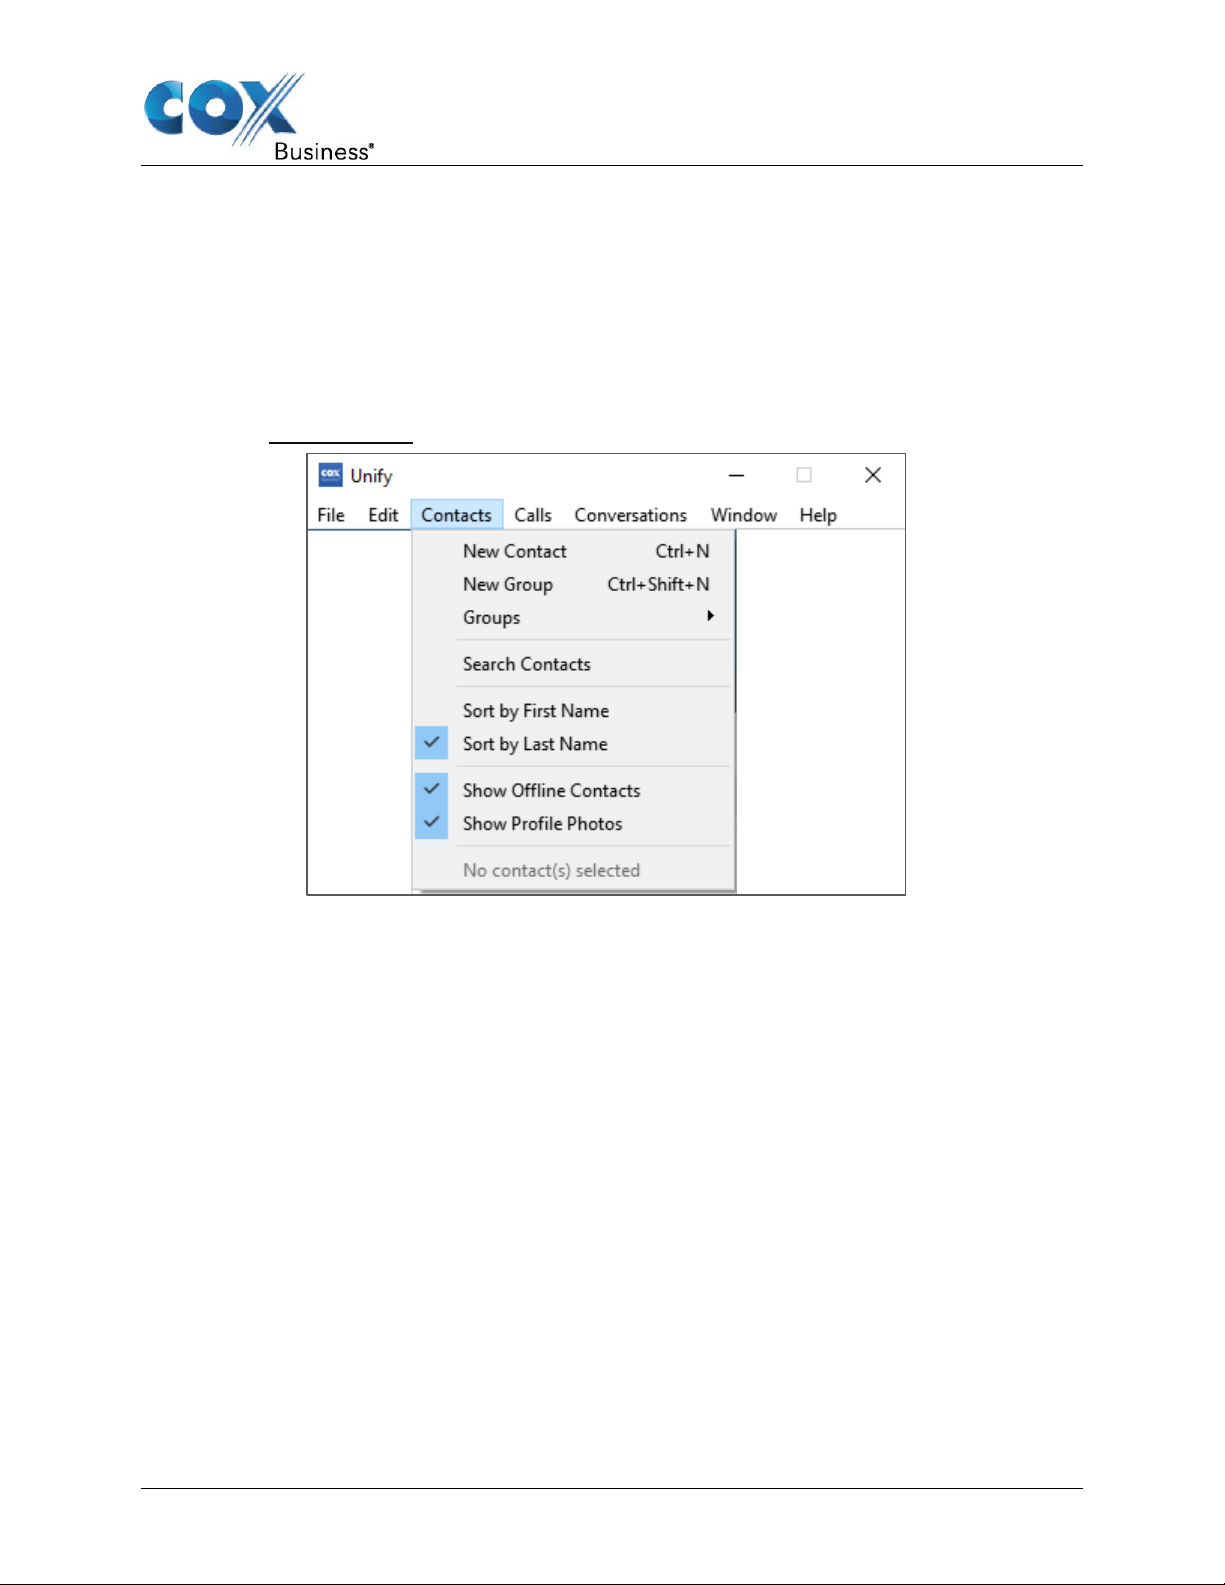
Contacts Menu
Use the Contacts menu to:
• Add a new contact or group (see Contacts for more information)
• Access groups you have created
• Search contacts
• Sort or filter contacts
Figure 14. Contacts Menu
Main Window
Calls Menu
From the Calls menu, you can:
• Change the volume or mute a call
• Enable/disable or configure call settings (see Preferences for more information)
• Select the dialing service to use for a call
• Pull a call (see Call Pull for more information)
• Retrieve a parked call (see Call Park and Retrieve for more information)
• Access voice mail
UC App for Windows Desktop User Guide 11
Page 18
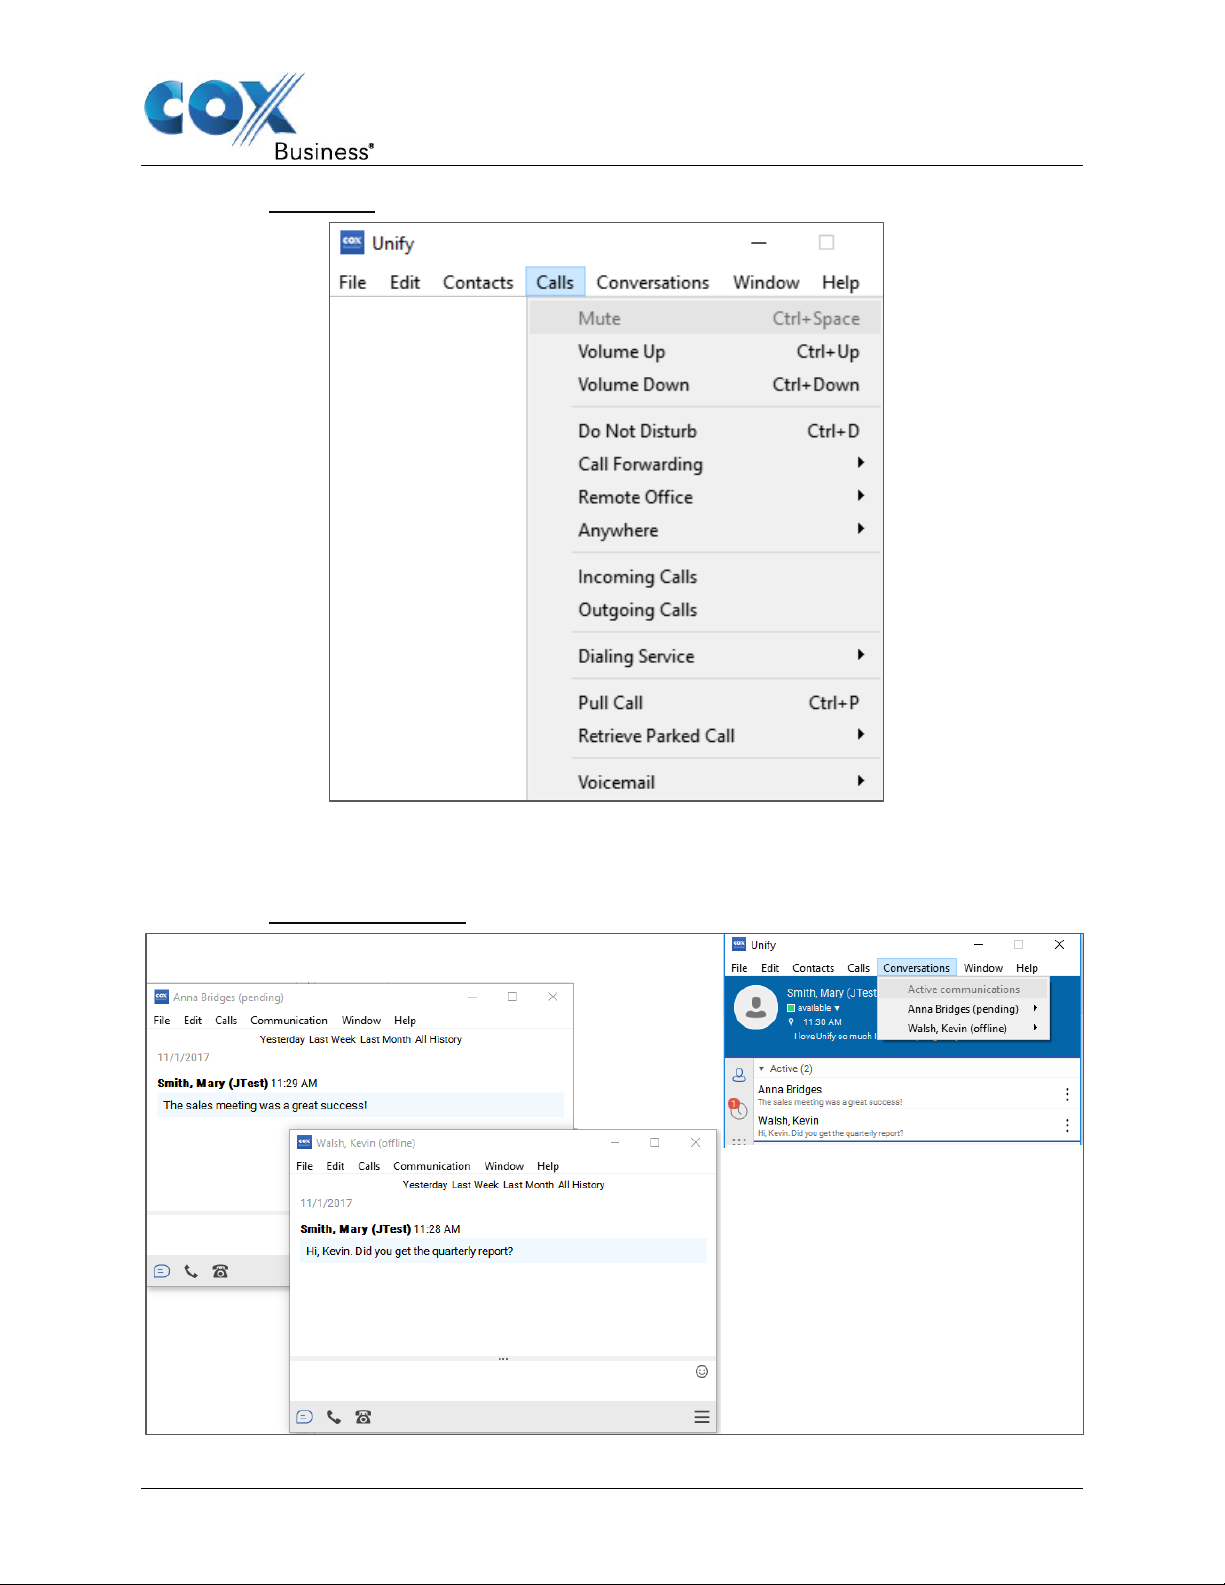
Figure 15. Calls Menu
Main Window
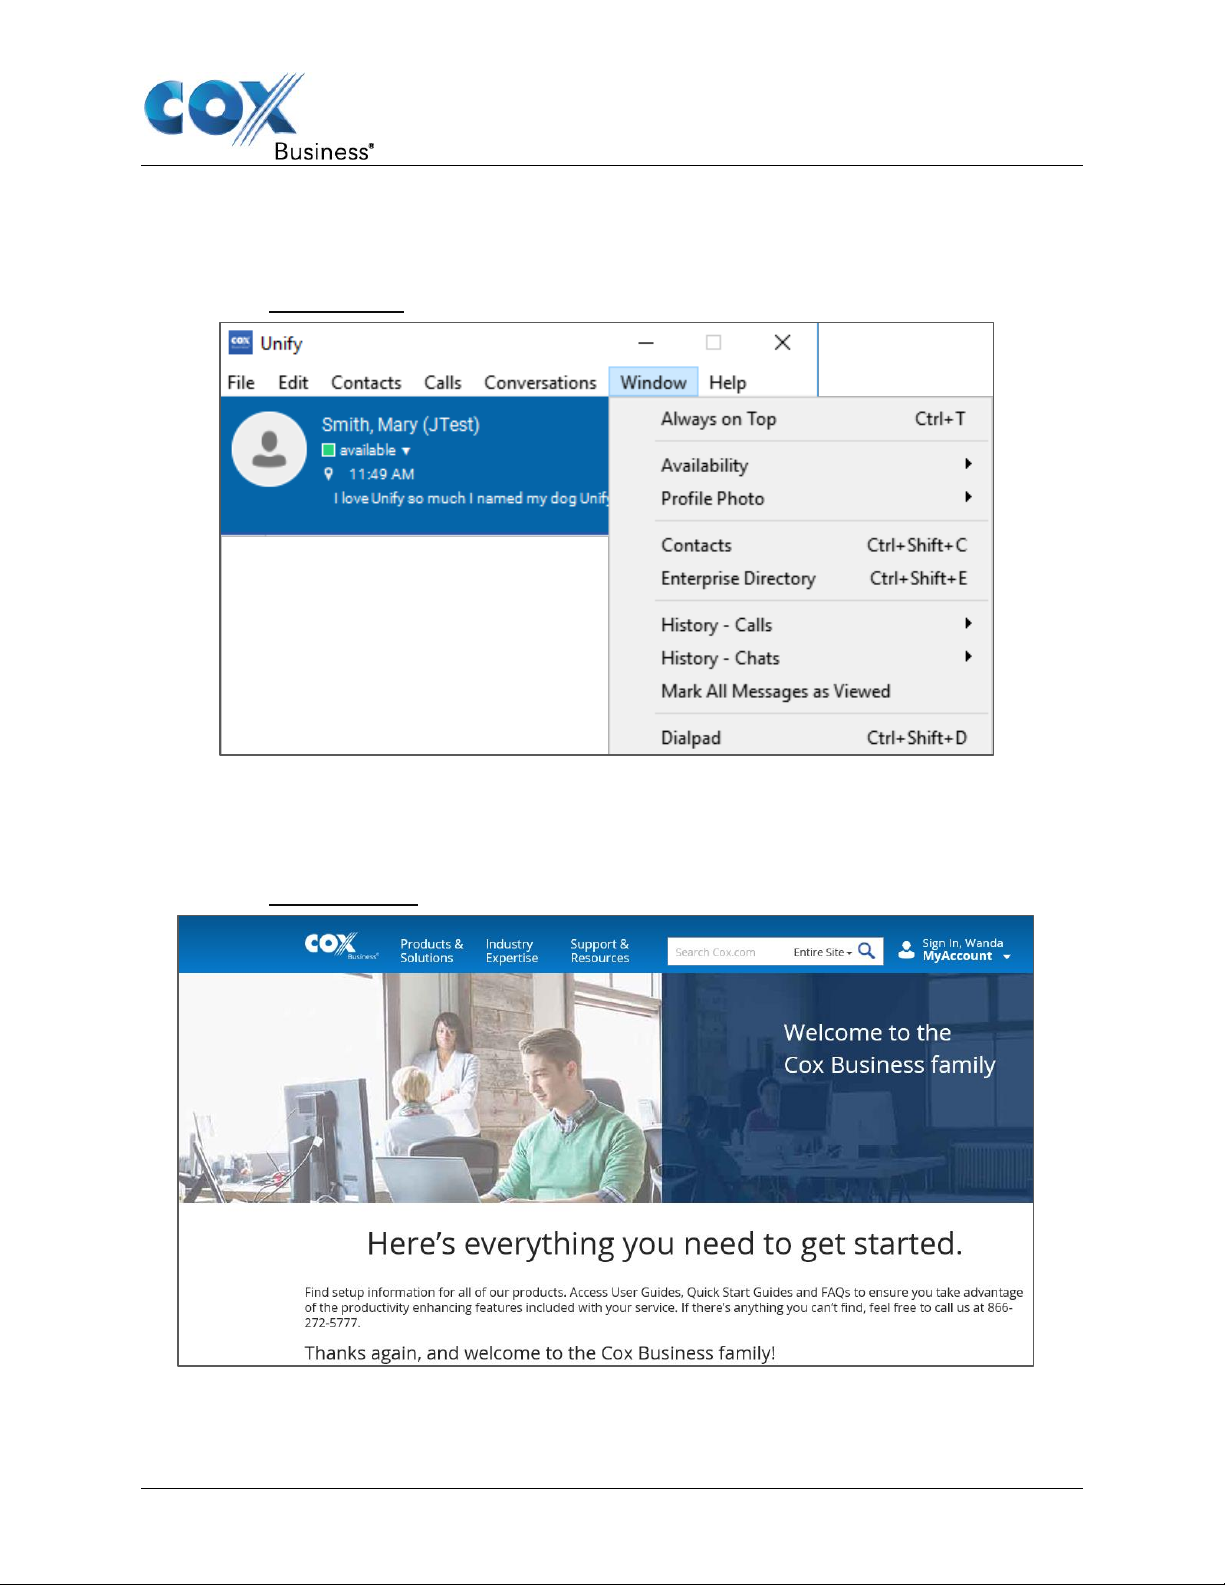
Conversations Menu
The Conversations menu allows you to select from multiple, active instant messaging windows.
Figure 16. Conversations Menu
UC App for Windows Desktop User Guide 12
Page 19
Main Window
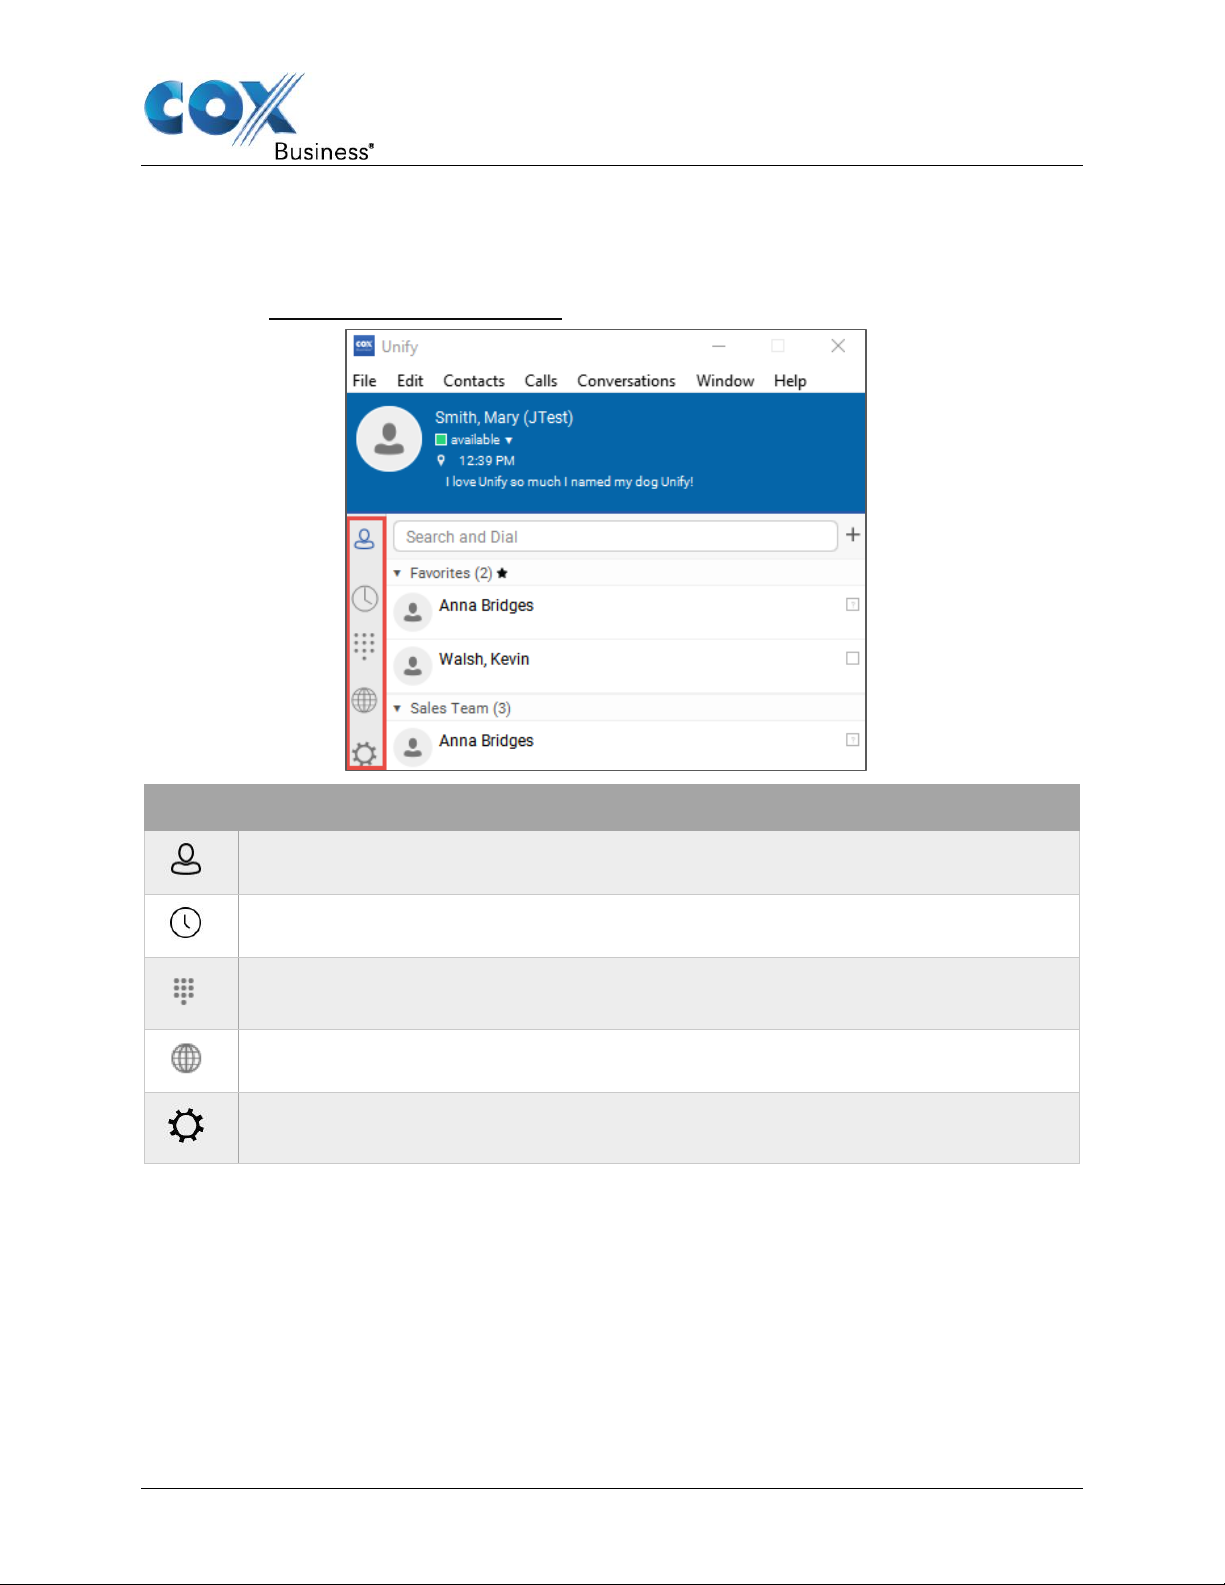
Window Menu
Use the Window menu to configure displays for open screens, change your availability, change
or remove your profile picture, view contacts, calls, and chats, and open the dial pad.
Figure 17. Window Menu
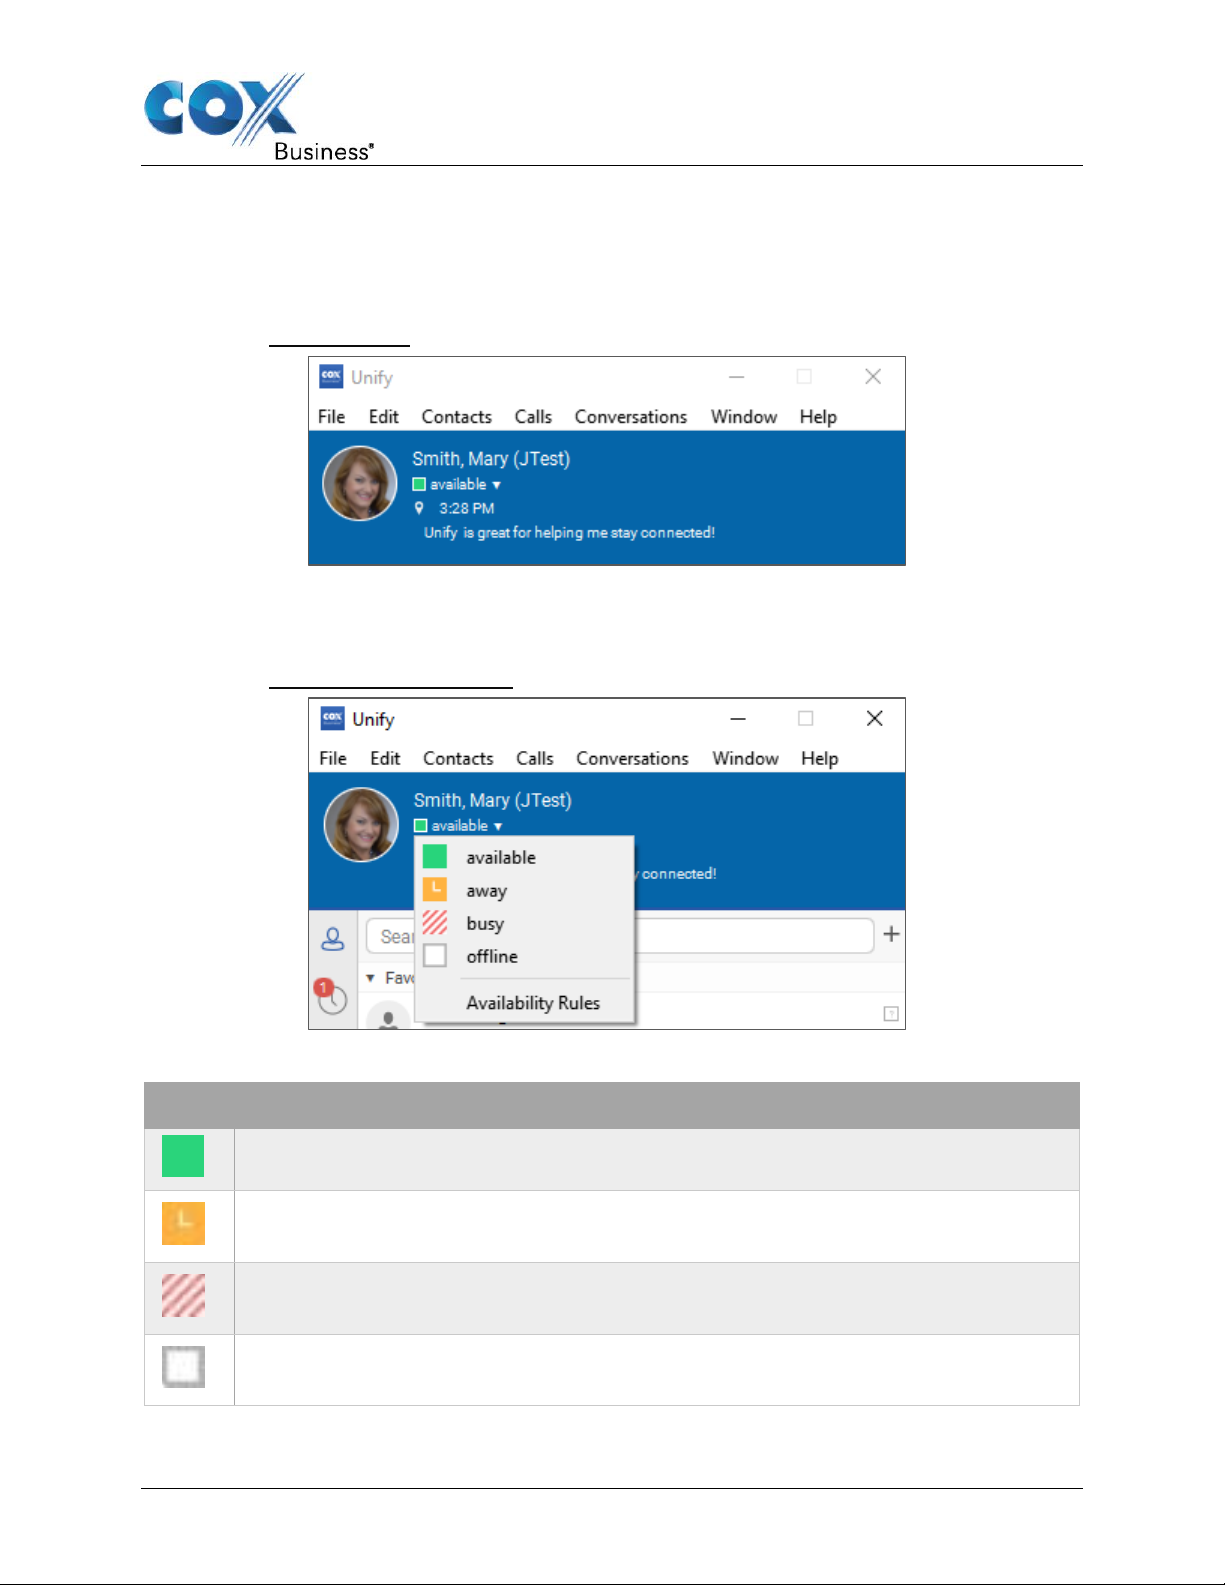
Help Menu
Click the Help menu to open the Cox Business Help page, which provides access to the
technical support team and published user documentation.
Figure 18. Accessing Help
UC App for Windows Desktop User Guide 13
Page 20
Main Window
Icon
What it means
Contacts – View your contacts.
Communications History – View previous chats and calls.
Dial Pad – Make calls (it is integrated with the Main window).
Enterprise (Company) Directory – Show all contacts of the directory.
Preferences – Use for quick access to preferences and call settings such as Call
Forwarding.
Navigation Icons
Depending on your service provider settings, the order of the left pane icons in the UC App
may vary. The table below includes a description of the icons and their functionality.
Figure 19. Main Window Navigation Icons
UC App for Windows Desktop User Guide 14
Page 21
Main Window
Icon
What it means
Available: You are online and ready for communication.
Away: You are online, but have been idle or away from your computer for more
than ten minutes.
Busy: You are busy and do not want to be disturbed. When you are on a call or in
a meeting, this status automatically displays.
Offline: You are offline, and the only available contact method is calling or leaving
a chat message.
My Information
The section at the top of the Main window contains your avatar, your presence status, and a
comment (optional). Double-click the avatar to browse and upload an image. Right-click the
avatar to change or clear the image.
Figure 20. Change Avatar
My Presence
Click the Presence dropdown arrow to update your status.
Figure 21. Set Your Presence Status
You can set your presence to a status indicated in the following table.
UC App for Windows Desktop User Guide 15
Page 22
Main Window
Click the Availability Rules option to choose actions to trigger when your availability changes.
These automatic changes will only happen if you have not set these actions manually
elsewhere.
The UC App can automatically update your presence to the following:
• Busy – In Call
• Available (desk phone)
• Available (mobile)
• Away on mobile
• Offline and busy in call
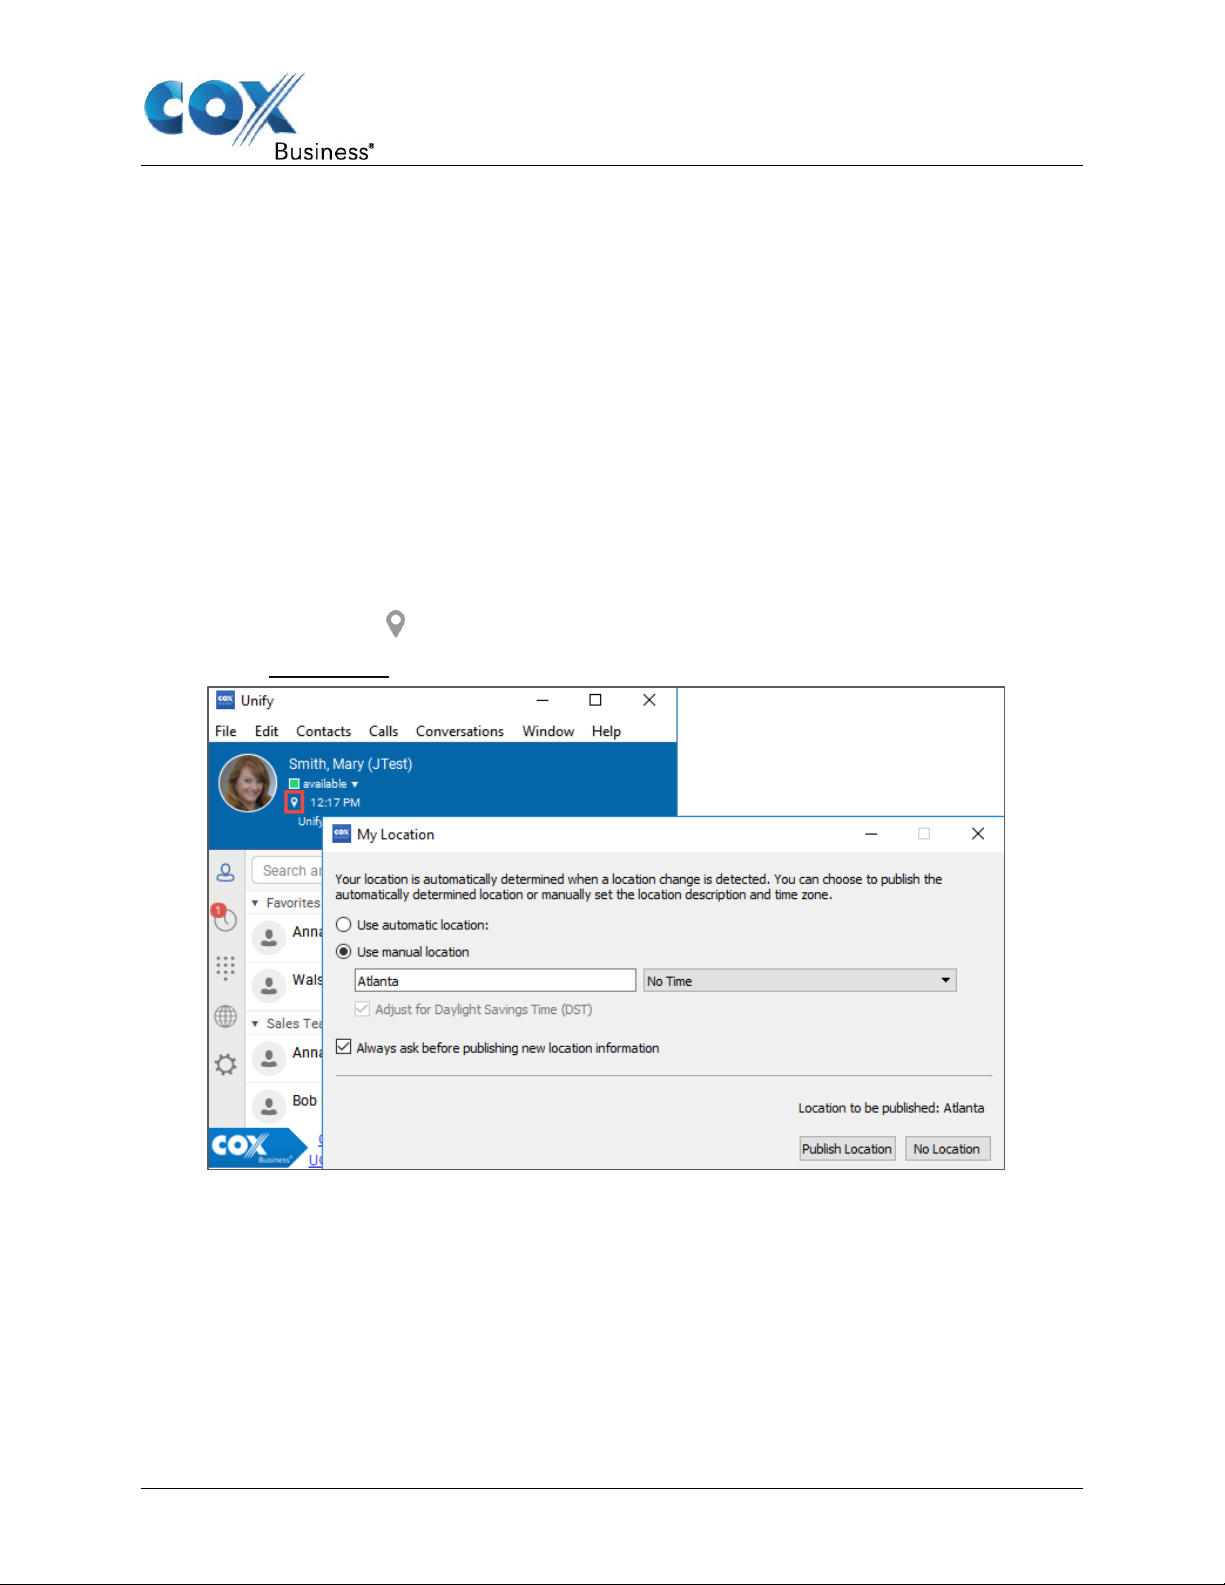
My Location
Your location is automatically determined by your public IP address; however, you can
manually set the text to appear for your location and time zone using the location dialog box.
Click the Location icon ( ) to open the My Location dialog box.
Figure 22. Set Location
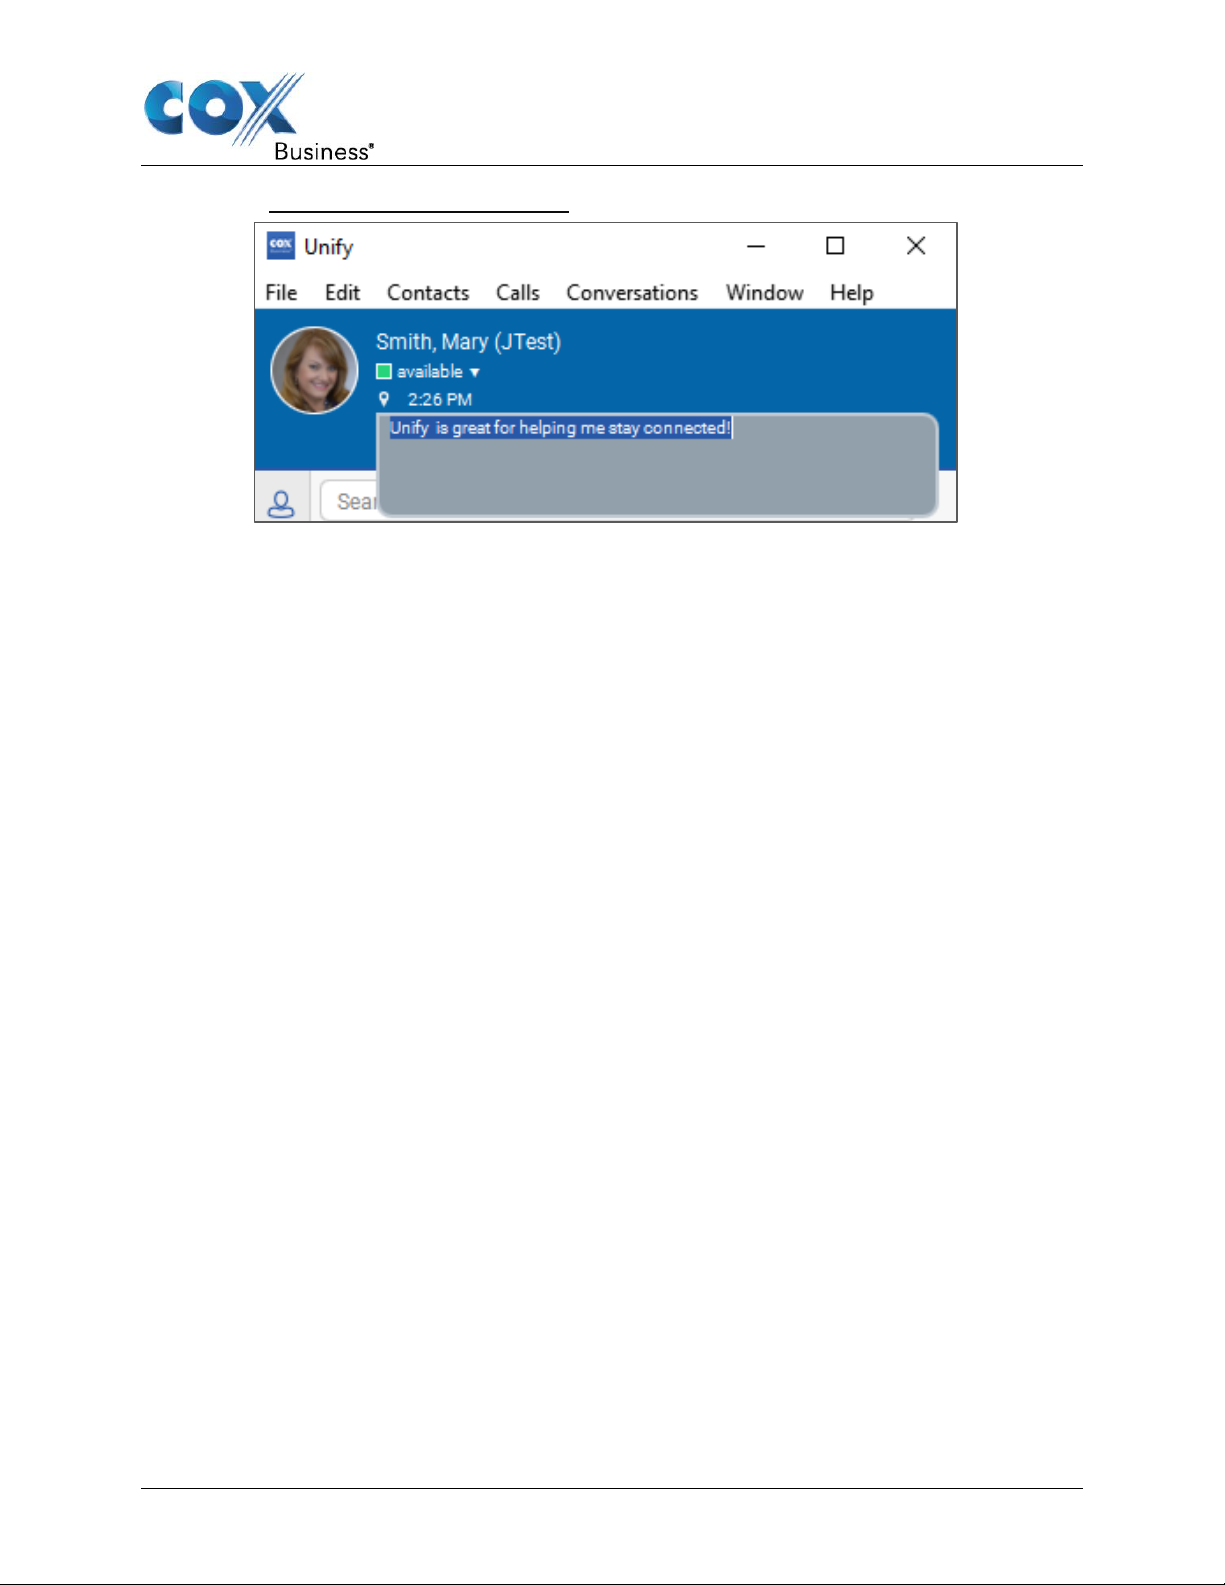
Add or Change Your Personal Note
You can add a personal note or greeting to the Main window, so people can see what you are
up to. Change the note as often as you like. To delete a note, simply delete the text and the
UC App will replace it with the default question, “What’s on your mind?”
UC App for Windows Desktop User Guide 16
Page 23
Main Window
Figure 23. Add or Change a Personal Note
Search and Dial
The UC App supports a search of the enterprise (company) directory as well as the personal
directory, enterprise common directory and group common directory. This takes place in the
same Search field that is used for both a local and presence-enabled contact list search. The
various directories have different purposes with the enterprise directory having the most data,
and not all directories may be used in all deployments. All search results are combined into
one common set of results.
Personal directory provides your own special contacts that are not in the enterprise directory
(for example, a partner company’s numbers), while group common contains, for example, the
group’s contacts (such as favorite pizza restaurant).
Personal directory, enterprise common and group common directories are read-only; you
cannot modify these directories. A snapshot of the presence status of the contact in the results
list is shown, but this presence is not updated after the search operation.
The UC App automatically searches the local contacts and presence-enabled contact list in
addition to the enterprise and other directories at the same time. As soon as there are results
from the enterprise and other directories, these results are shown on a separate list in the Main
window.
Typically, when adding a contact using directory search results, there are phone numbers and
first names in addition to last names, if available. In addition, the Extensible Messaging and
Presence Protocol (XMPP) address and other fields are imported when found to allow
presence and chat.
Outlook Search and Calendar Integration
Outlook integration requires one of the following versions installed on the desktop:
• Outlook 2007
• Outlook 2010
• Outlook 2013
• Outlook 2016
UC App for Windows Desktop User Guide 17
Page 24

Main Window
Outlook search also works when several Outlook accounts are in use, but only one account is
used at a time (default selected, which can be changed in Outlook). Additionally, other related
considerations are as follows:
• The UC client searches for contacts and calendar entries in the default Outlook
account. The account is set to the default through File → Info (left pane) → Account
Settings → Account Settings → Data Files. Select an account and mark it as “Set as
Default”. After making this change, sign out and sign back in to the client and it now
searches that account for contacts and calendar entries.
• The UC client searches the Outlook contacts only on the local machine (that is, the
Outlook Address Book). There is no Exchange server lookup performed. In addition, all
directories in Outlook are searched for contacts, even deleted folders. The Contacts
directory can also have multiple levels of subfolders.
Every minute, the UC App reads Outlook appointments. If there is an appointment running at
the current time, then the presence is shown as Busy – In Meeting. Overlapping
appointments are also handled. Following are some examples of the UC App operation with
Outlook when the time is 9:10 A.M.
• There is meeting “A” 9 A.M. through 10 A.M. Presence is shown as Busy – In Meeting.
• Presence is explicitly changed to Available at 9:15 A.M. Presence is shown as
Available.
• In the next minute, the UC App again reads the appointments and sees that “A” meeting
is running; however, the presence was already explicitly marked as Available and
presence is not shown as Busy – In Meeting but Available.
• There is an overlapping meeting “B” 9:30 A.M. through 10:30 A.M. Presence is shown as
Busy – In Meeting when the time is 9:30 A.M.
When deleting a meeting that is currently ongoing in Outlook, the presence status remains as
Busy – In Meeting until the next time Outlook appointments are checked (once every minute)
and after that, presence is shown as Available. This change may be instantaneous, or it may
take a minute depending on how close the timer is to being triggered.
The presence update is only triggered by appointments and meetings that you have either
accepted or set up. All day meetings do not trigger a presence change to Busy – In Meeting.
UC App for Windows Desktop User Guide 18
Page 25

Contacts
Contacts
Contacts are the people with whom you communicate, and in most cases, you see their
presence and share your presence with them. There are two types of contacts:
• Contacts – Individual people with whom you communicate.
• Groups – Categories of contacts and/or conferences.
There is no hard-coded limit on the number of contacts you can add; however, the more
contacts you add, the more memory and processing is needed. The more contacts that are
added, the more difficult it is to find people without searching. Live search can be used instead
of a very large local contact list while keeping memory and processing requirements to a
minimum.
Add Contact
When you start the UC App for the first time, your Contacts list is empty.
1. Use the Search and Dial field to find people in the company directory or click the Add
icon ( ) to add a contact to the Contacts list.
2. Click New Contact from the submenu.
Figure 24. Add Contacts
3. In the New Contact Information window, enter the contact’s information and then click the
Add Contact ( ) icon in the bottom right corner of the window (see Figure 25). By
default, your presence information is always shared with a new contact if an Extensible
Messaging and Presence Protocol (XMPP) address is provided.
Contact card telephone number fields can also have SIP URIs (work, mobile, extension,
personal, and conference bridge).
UC App for Windows Desktop User Guide 19
Page 26

Figure 25. New Contact Information Window
Contacts
If you are accepting a contact through a buddy request, you may see the contact card after
accepting the buddy request, depending on the service provider settings. When receiving a
buddy request, there are two buttons for accepting and rejecting the request.
Dismissing the buddy request window only ignores the request for the duration of the login
session; it reappears after the next login. You can always share your presence information
later by selecting Subscribe on the contact submenu (see Figure 29) for a specific contact in
the contact/directory list. Note that the contact must accept your subscription request for you to
establish the presence relationship successfully. Once accepted, the newly added contact
appears on your contact list.
UC App for Windows Desktop User Guide 20
Page 27

Contacts
Add Conference Contact
Add a conference contact in the same manner you would for adding an individual contact. A
conference contact is a special contact used for conference bridges to avoid remembering PIN
codes and conference number, for example, recurring conferences. Create a contact for the
weekly conference, add a conference bridge number and PIN, and join the conference by
clicking the contact and clicking the Call button from the contact submenu.
Figure 26. Add Conference Contact
Add New Group
Choose the New Group menu option (see Figure 24) to add a new group to the contact list.
Enter the name of the group and click the OK button to add the group to the Contacts list.
Figure 27. New Group Window
UC App for Windows Desktop User Guide 21
Page 28

Contacts
To edit or remove a group, right-click the group name in the Contacts list. This opens the group
submenu, which allows you to edit or remove the group, or move it down in the Contacts list.
Figure 28. Group Submenu
Contact Options
Right-click on a contact name to display the contact submenu. From here, you can chat, call,
add or remove from favorites, add or remove from a group, view or edit their profile,
unsubscribe or delete the contact.
Figure 29. Contact Submenu
UC App for Windows Desktop User Guide 22
Page 29

Contacts
Chat
Select Chat on the contact submenu to open a chat communication window. See the section
covering Communication Windows for more information about chat and instant messaging.
Call/Call from Phone
Select Call or Call from Phone on the contact submenu to initiate an audio call. See the
section covering Audio Calls for more information about selecting an audio device and making
audio calls.
Add to or Remove from Favorites
To add a contact as a favorite, select Set as Favorite on the contact submenu. This moves the
contact name to the Favorites group at the top of the Contacts list. To remove a contact from
the Favorites group, right click the contact name to display the contact submenu and select
Remove from Favorites.
Add to or Remove from Group
Select Add to Group on the contact submenu, and then select the group to which the contact
should be added. The contact’s name is moved to display under the group name in the
Contacts list.
To remove a contact from a group, right-click the contact name to display the contact
submenu. Select Remove from Group, and then select the group from which the contact
should be removed.
Figure 30. Remove from Group
UC App for Windows Desktop User Guide 23
Page 30

Contacts
View Profile
Select View Profile on the contact submenu (see Figure 29) to open the Contact Card. To edit
information on the Contact Card, click the pencil ( ) icon at the bottom of the card to open the
Contact Information window.
Figure 31. Contact Card
Edit Profile
Select Edit Profile on the contact submenu (see Figure 29) to open the Contact Information
window and update contact information. Note that depending on your service provider settings
all or no contact card fields may be editable. Depending on your service provider settings, you
may also see a button for synchronizing the contact card with the Telephony Directory or the
synchronization may take place automatically. When the manual synchronization button (cloud
icon) is visible, there is no automated syncing of the contact card details with server
information. To synchronize the contact card data, click on the cloud icon.
When you are finished updating information, click the checkmark ( ) icon at the bottom of the
window (see Figure 32) to save your changes.
To close the window without making changes, click the Cancel ( )icon at the bottom of the
window.
UC App for Windows Desktop User Guide 24
Page 31

Figure 32. Contact Information Window
Contacts
Subscribe/Unsubscribe
Select Unsubscribe on the contact submenu (see Figure 29) to remove the presence
relationship between you and a selected contact. This means you do not see the contact’s
presence information and your contact does not see yours. To re-establish the presence
relationship, select Subscribe. An unsubscribed contact remains on the contact list and is
always shown without an icon. Any contact that is not presence-enabled is shown in the same
way.
Delete Contact
Select Delete Contact on the contact submenu (see Figure 29) to remove the selected contact
from your contact list.
Filters
When you use the Search and Dial field to search by contact name, the contact list is filtered in
real time as you type. Additional filtering options are available through the Contacts filter menu.
Right-click the Contacts icon (see Navigation Icons) located in the left pane of the Main
window to display the Contacts filter menu.
The Contacts filter allows you to:
• Sort by first or last name
• Enable or disable showing offline contacts
• Enable or disable showing profile photos
UC App for Windows Desktop User Guide 25
Page 32

Figure 33. Contacts Filter Menu
Note: For information about adding or removing favorites, see Add to or Remove
from Favorites.
Contacts
Favorite filtering works slightly different:
• When you make a contact your favorite, the favorite group shows on top of the contact
list and cannot be hidden.
• When you delete all your favorite contacts, the favorite group does not show anywhere.
• When you have even one favorite marked, you see the group.
UC App for Windows Desktop User Guide 26
Page 33

Contacts
Icon
What it means
The green presence icon indicates one of the following:
The yellow presence icon indicates one of the following:
• The user is online but has been idle or away from their computer for more
than ten minutes.
• Only the mobile client is online and in the away status.
The striped icon indicates that the contact is busy on a call or in a meeting. This is
an automated presence status. This status can also be manually set to indicate that
you are busy and do not want to be disturbed.
The grey presence icon indicates one of the following:
• The user is offline, and the only available contact method is calling or leaving
a chat message.
• The user is in a call, but is not logged in to XMPP (presence and chat).
The question mark indicates that a subscription is pending, and the contact has not
yet approved sharing their presence.
Presence
For each contact you have subscribed to, you can see their presence. Similarly, your contacts
can see your presence on their contact list. Presence means that your friends can see whether
you are available to communicate; for example, “I’m busy” or “I’m available”.
• The user is online and ready for communication.
• The contact is only available on the mobile UC App.
• The contact is only available on a compatible desktop phone, and not the UC App.
The avatar is not completely in real-time. Avatars are retrieved at login, when the contact is
added and when the contact comes online. Double-click the avatar to change it; a File Explorer
view opens.
If you see an error message at the top of the Main window “XMPP Unavailable”, it means that
the XMPP connectivity has been lost for chat and presence; however, you can still make calls.
You should contact your service provider.
Have the Outlook calendar automatically change your presence to Busy – In Meeting by
enabling this in the Preferences → General tab.
The presence update is only triggered by appointments and meetings that are in the Show me
as busy state.
The XMPP address of a contact cannot be changed. Instead, you must delete the old contact
and create a new one.
Location in presence is based on the IP address that the computer is using. The IP address is
mapped to a physical location. The UC App is working with the mapping provider to improve
the
UC App for Windows Desktop User Guide 27
Page 34

Contacts
accuracy of the location. Change the location manually by clicking the avatar (if presence
controls are not already expanded) and then the location icon to go to the manual location and
change the view.
A snapshot of presence status is also available in search results and Communications window
for contacts who are not buddies. This presence status is not updated after the search is done
or after the communications session is set up.
UC App for Windows Desktop User Guide 28
Page 35

Communication History
Communication History
Select the Communication History icon ( ) in the left pane of the Main window to display your
messaging history. History view is divided into two tabs:
• Calls
• Chat
Double-clicking a conversation on the chat tab list opens it in a new window, while doubleclicking a call history item calls that number. The Voice Mail section above the tabs di splays
the number of messages you have received. Click anywhere in the voice mail section to call
and listen to your voice mails.
The UC App saves a call history for placed, received and missed calls. The call history makes
it easy for you to redial and call back when you have missed a call, or if you want to easily
dial a contact with whom you have recently spoken. Each call has a separate entry in the list.
Clear Communication History
The Communication History missed communications badges can be cleared by clicking the
Communication History icon on the left pane (see Navigation Icons) of the Main window. A
menu displays with options to mark calls or chats as viewed.
Figure 34. Mark Communications as Viewed
To clear the missed chat indicator, you must open the missed chat.
UC App for Windows Desktop User Guide 29
Page 36

Dial Pad
You can call any standard phone number by using the dial pad.
Figure 35. Dial Pad
Dial Pad
1. To enter numbers here, you can either:
• Click on the numbers on the dial pad itself
or
• Press the number keys on your computer keyboard.
2. Once the number is entered, click the handset icon located below the dial pad numbers on
the app, or press the Enter key on your computer keyboard.
UC App for Windows Desktop User Guide 30
Page 37

Full Enterprise Directory
Full Enterprise Directory
The UC App allows for browsing of an entire enterprise directory. To view the enterprise
directory, click the Directory icon ( ) on the left pane of the Main window.
Figure 36. Company Directory
UC App for Windows Desktop User Guide 31
Page 38

Preferences
Click here to display a menu
of setting categories.
Preferences
Preferences provide access to available settings. Click the Preferences icon ( ) on the left
pane of the Main window to display a menu of setting categories.
Figure 37. Preferences – Setting Categories
General
The General category allows you to change settings for the following:
• Language
• Login
• Notifications
• Accessibility
UC App for Windows Desktop User Guide 32
Page 39

Figure 38. General Preferences
Preferences
Language
Currently, the UC App only supports U.S. English language.
Login
• Enable or disable the Remember password option.
• Enable or disable automatic login when starting the application.
Notifications
Usually there is a confirmation pop-up notification each time you remove a contact or chat
history record. In the Notifications settings, you can enable or disable the following:
• Ask before deleting a contact
• Ask before deleting history information
• Ask before publishing location information
• Ask before ending a communication
• Ask to hold a call when starting a new call
UC App for Windows Desktop User Guide 33
Page 40

Preferences
Accessibility
Enable pop-up errors allows error pop-ups to be shown in addition to the usual error text
shown at the top of the Main window.
Enable tooltips is enabled by default. For accessibility, VoiceOver will read all tooltips which
may be frequent and hence, disturbing. For this reason, in accessibility cases it is
recommended to disable tooltips.
Media
The Media settings category allows you to make the following Audio changes:
• Speakers – Choose a headset, PC-integrated speakers or external speakers for audio
output. Your external playback device is selected by default, if you have one connected.
• Microphone (voice input) – Choose a headset microphone, PC-integrated microphone
or external microphone for voice during calls. Your external recording device is selected
by default, if you have one connected.
• Level
o Ring device (alert signal) – Select the audio device that is used to play a ring signal
when you receive an incoming call.
o Ring signal – Select a ring signal to use when receiving an incoming call. Click the
Play button to test the ring signal.
You can also enable or disable playing a tone for incoming messages.
Figure 39. Media Preferences
UC App for Windows Desktop User Guide 34
Page 41

Incoming Calls
The Incoming Calls category allows you to make changes to the following settings:
• Do Not Disturb
• Anonymous Call Rejection
• Call Forwarding
• Simultaneous Ring
• Remote Office
• Call Waiting
• Anywhere
Figure 40. Incoming Call Settings
Preferences
Do Not Disturb
When you activate this service, all calls are typically blocked by the server and are sent to
voice mail. Enable this service by tapping the enable/disable switch.
Click the Do Not Disturb switch to activate the feature.
UC App for Windows Desktop User Guide 35
Page 42

Preferences
Anonymous Call Rejection
Anonymous Call Rejection allows you to reject calls from anonymous parties who have
restricted their Caller ID. By activating the service, callers without available Caller ID are
informed that you are not accepting calls at that time. Your phone does not ring, and they do
not see or hear any indication of the attempted call.
Click the Anonymous Call Rejection switch to activate the feature.
Call Forwarding
The UC App supports different variants of call forwarding such as forwarding always,
forwarding when busy, and forwarding when you cannot answer or when you are unreachable.
In addition, you can specify the number of rings before call forwarding is triggered.
1. Enter a number to which your calls should be forwarded in the field to the right of the call
forwarding type.
2. Select the number of rings to occur before forwarding a call.
The UC App automatically saves your changes.
Figure 41. Call Forwarding Settings
Simultaneous Ring
The Simultaneous Ring feature allows you to add up to 10 additional numbers or Session
Initiation Protocol Uniform Resource Identifier (SIP-URI) addresses that you would like to ring
in addition to your primary number when you receive a call. You can also specify whether you
want answer confirmations and if you would like to receive calls when already on another call.
This service is an older variant of Anywhere.
1. Click the enable/disable switch to enable simultaneous ring.
Result: A Set Number field displays.
UC App for Windows Desktop User Guide 36
Page 43

Preferences
2. To specify that this feature should not ring when you are on a call, click the checkbox next
to Do not ring when on a call.
3. In the Set Number field, type the number that you want to ring at the same time your
primary number rings.
4. Press the Enter key on your keyboard to save the number.
Result: The number is saved, and a new Set Number field displays. Add additional
numbers as desired.
5. To receive a separate audio prompt when answering a call from that (phone) number,
click the checkbox next to Answer confirmation required.
Figure 42. Simultaneous Ring Settings
Remote Office
Remote Office enables you to make calls from a remote phone; e.g., a hotel phone and display
the call as though it is being placed from your business line. Any incoming calls to your
business line will also ring on this remote phone.
1. Click the enable/disable switch to enable Remote Office.
Result: A Set Number field displays.
2. Enter the phone number to be used as the Remote Office number.
UC App for Windows Desktop User Guide 37
Page 44

Preferences
Figure 43. Remote Office Settings
Call Waiting
Call Waiting allows you to answer another call while you are engaged in an active call. The
caller’s line identification is provided.
Click the switch to activate the feature. See Figure 40.
Anywhere
Anywhere simplifies communications for on-the-go users and remote users by extending the
features of a desk phone to any other fixed or mobile device, regardless of the network or
handset manufacturer. Callers dial one number and can reach you on any phone you choose.
A desk phone, cell phone and/or a soft phone may ring simultaneously. Experience voice call
continuity with the ability to move live calls from one device to another without hanging up.
UC App for Windows Desktop User Guide 38
Page 45

Figure 44. Anywhere Settings
Preferences
1. Click the switch to activate/deactivate Anywhere.
Result: An Add number field displays.
2. Click the checkbox next to Alert all enabled locations for Click-to-Dial
activate/deactivate that option.
3. In the Add Number field, enter a location (number) that can be used in the Anywhere
service, and then press the Enter key.
Result: The location is saved and a new Add number field displays. Add more numbers
as needed.
4. Click the checkbox to the left of a location to enable that location.
5. To add details for the new locations, click the plus sign ( ) to the right of the number.
UC App for Windows Desktop User Guide 39
Page 46

Figure 45. Add Location Details
• The text field (displayed directly under the number) allows you to enter a descriptive
label for that number (location).
• The Do not Divert Calls checkbox prevents a call from ending up as a voice mail,
which can be problematic in, for example, conference call situations.
• Select the Answer Confirmation checkbox to receive a separate audio prompt
when answering a call from that number (location). It may be useful in cases where
mobile numbers are used to prevent incoming calls going to mobile voice mail (since
the call will be terminated without going to voice mail if the answer confirmation is
not provided).
Preferences
• Select the Call Control checkbox to enable the server platform to provide mid-call
services such as Call Transfer and Conferencing for that number (location).
Outgoing Calls
Figure 46. Outgoing Calls Settings
UC App for Windows Desktop User Guide 40
Page 47

Preferences
Note: The shortcut keys will override app keyboard shortcuts, so choose key
commands you are not using elsewhere.
Automatic Callback
Automatic Callback allows you to request notification when a busy line in your group becomes
available. A distinctive ring notifies you when the user is available.
Click the Automatic Callback switch to activate/deactivate the feature.
Highlight to Call
The UC App for Windows supports a “Highlight to Call” feature that uses a shortcut key. With
this key, users can automatically call numbers they’ve selected in text on screen.
To set the shortcut, select the preferred combination from the drop-down be low the Set Hotkey
menu.
Figure 47. Highlight to Call – Create Shortcut
Use the following steps to set a shortcut key.
1. Click the Calls link in the top toolbar.
2. Click the Outgoing Calls option.
Result: The Outgoing Calls menu appears.
3. Click the Highlight to Call switch to activate the feature.
Result: A sub-menu appears.
4. Click the down arrow in the Set Hotkey drop-down and select the combination you want
to use to automatically call numbers you have selected in text.
UC App for Windows Desktop User Guide 41
Page 48

Preferences
Block My Caller ID
You can hide or display your number when calling or communicating with other parties or
contacts. Click the switch to show or hide your number when making a call (see Figure 46).
Services
The Services section enables you to choose which actions to trigger when your availability
changes. These automatic changes will only happen if you have not set them manually
elsewhere.
Figure 48. Services
Use the following steps to set your availability rules.
1. From the main window, click the Calls link in the toolbar and click either the Incoming
Calls or Outgoing Calls options from the menu.
2. Click the down arrow in the black bar to expand. (See Figure 37)
3. Click the Services link.
Result: The Availability Rules screen appears.
4. Click the radio buttons next to the rules you wish to establish and enter the phone
numbers as applicable.
UC App for Windows Desktop User Guide 42
Page 49

Preferences
Extensions
Click the Enable Outlook contact search feature to enable the UC App to interface with
Outlook for contact searches.
Figure 49. Extensions Screen
Advanced
The Advanced screen allows you to generate and view basic or detailed logs for
troubleshooting purposes. Once you click the type of logs you want to generate, click the
Show Logs button to view the file. You may be required to send these to technical support for
quicker resolution.
The Proxy section allows you to select how to manage HTTP proxies. By default, the system
settings are used, but you may prefer not to use an HTTP proxy and elect to use the UC
(client) proxy settings.
UC App for Windows Desktop User Guide 43
Page 50

Figure 50. Advanced Screen
Preferences
Troubleshooting
Logging is used for troubleshooting. You may be asked by your service provider to turn on
logging and then send a log file of directory contents. You can choose basic logging or more
detailed logging. Detailed logging may consume memory resources, so it is not recommended
to have it enabled for a long period of time.
You can also clear the logs, or click Show Logs to open the logging folder.
Proxy
Select how to handle HTTP proxies. By default, the system settings are used, but you do not
have to use an HTTP proxy. You may elect to use the UC (client) proxy settings.
UC App for Windows Desktop User Guide 44
Page 51

Communication Windows
Icon
What it means
Chat – Start an instant message conversation with a selected contact.
Call – Make an IP audio call to a selected contact.
Call from Phone – Make a Click-To-Dial call from your desk phone (or secondary
device)
Menu – Open communications options.
Add – Add a contact, group, or conference.
Communication Windows
After starting communication with one or more contacts, a Communications window is
displayed for chat and may be displayed for calls depending on your service provider settings.
The call window can also be integrated with the Main window. From this window, you can
perform the following actions:
• Escalate a chat to include audio
• End an audio
• Open the dial pad
• Mute your microphone
• Adjust your speaker volume
• Place a call on hold
• Transfer a call
Known Issue: If you receive an incoming call on the Windows UC for Desktop app
while you are on an existing call—and want to place the existing call on hold—the
app will incur an issue if you try to remove the call from hold.
If you are using several monitors, the UC App opens the Communications window as well as
notifications on the same monitor as the Main window.
The UC App limits the number of active communications to spare resources. The limit is 20
active communications. If the maximum is reached, the main window’s top section displays a
warning with the following message: “The maximum amount of communication windows has
been reached. Please close some to open new ones.”
If an incoming call is answered while this warning is shown, the client closes the chat session
that has the longest time since its last activity.
UC App for Windows Desktop User Guide 45
Page 52

Communication Windows
Chat/Instant Messaging
The Chat window allows you to use Instant Messaging services with anyone at your company
who has the Cox Unified Communications service. Start a chat using one of the following
methods:
• Double-click a contact from the Contacts list or search results and when a
Communication window opens, click the Chat icon.
Figure 51. Communication Window – Chat Icon
• Double-click the avatar for a contact in the Contacts list or search results and when the
Contact Information window opens, click the Chat icon.
Figure 52. Contact Information Window – Chat Icon
UC App for Windows Desktop User Guide 46
Page 53

Communication Windows
• Right-click a name in the Contacts list or search results, and click Chat from the
submenu.
Figure 53. Contacts List Submenu
• On the Communications History list, double-click a chat entry.
Chat View
When you initiate a chat, the Chat window opens. Chatting with a contact is possible only when
you are both online. If your contact initiates a chat, you see a pop-up notification in the bottom
right corner of the screen. If you close the Chat window and open it again, sent chat messages
are shown in the window as chat history. When enabled by your service provider, a typing
notification is also shown.
When the chat opens, you see the contact’s information at the top of the screen. To expand
the chat window, you can double-click the top bar.
At the top of the message area, there are four links: Yesterday, Last Week, Last Month and
All History. From these links, you can load history from your local storage and different time
frames. You can delete the history using the drop-down menu located in the bottom right
corner of the window.
In the text field, you can add a smiley emoticon. Smiley emoticons can also be added by
manually entering the corresponding characters that represent that emoticon. You can send
text by pressing Enter.
UC App for Windows Desktop User Guide 47
Page 54

Communication Windows
Emojis are also supported and are rendered as ordinary emoticons when received.
To enter a line break in the text field, you can use the following key commands:
• CTRL+Enter
• Shift+Enter
• Enter
Use either one of the short commands, CTRL+C or CTRL+V, or right-click on the selection for
a menu to copy or paste the text to or from the Chat window.
All sent and received chats are stored locally in the chat history and an optional message
history feature provides multi-device enhancements so that messages sent or received in other
own devices would also be shown.
Group Chat
Start a group chat by clicking and holding the Shift key while selecting contacts from the Main
window contact list. More people can be added later to the chat by “drag and drop”. Only the
owner can add more participants.
A group chat works the same way as a one-to-one chat. All messages from anyone are sent to
everyone else. All contacts need to be online to be able to participate in a group chat. You
cannot invite an offline contact or a contact that is not on a device that supports group chat.
This does not affect the group chat in any way.
The following is additional information about group chat:
• A group chat history is saved in ad hoc chat rooms and is available to view later from the
Chat tab of the History window.
• In the text field, the contacts’ names appear in different colors to easily distinguish
between who is writing.
• Only the newest chat room messages are stored on the server. One-to-one chat
messages are only saved locally. When the optional Chat History feature is enabled by
your service provider, messages sent from your other devices are also shown.
• Deleting a chat room is not supported.
• Chat rooms can be moderated by the owner. Use the right-click menu options to remove
a participant from your chat room. If needed, the removed participant can join later.
• Typing notifications are not supported in group chats.
UC App for Windows Desktop User Guide 48
Page 55

Communication Windows
Active Communications
Active communications appear at the top of the Contacts list in the Main window. This area
provides an easy view to see the people with whom you are communicating. By default, the
call window is shown in the Active Communications area of the Main window (where the call
can be fully controlled in the desktop client). It reduces the number of communications
windows; however, a separate call window can still be opened using an Active
Communications menu.
The following is also available in this area:
• Double-click an active communication item to bring this Communications window to focus
if the call window is separately shown. If the call window is integrated, you can use a
menu option to show it separately.
• See who has sent you a chat message, but only after you accept the chat session.
Before the chat session is established, the chat items are not visible in active
communications, but a history badge is visible.
• End a call
• Mute the microphone
• Place a call on hold
• Merge two calls or transfer by dragging and dropping calls onto each other
• Transfer a call
• See call recordings
• Park and retrieve calls
Known Issue: If you receive an incoming call on the Windows UC for Desktop app
while you are on an existing call—and want to place the existing call on hold—the
app will incur an issue if you try to remove the call from hold.
UC App for Windows Desktop User Guide 49
Page 56

Audio Calls
Note: It is recommended to disable “Use ambient noise reduction” in System
Preferences to reduce echo.
Note: If dialing a phone number that requires additional dual-tone multi-frequency
(DTMF) tones (for example, a conference bridge), you can type the numbers on
your keyboard while the Communications window has focus or open the dial pad in
the Communications window.
Audio Calls
Select Audio Devices
If you have multiple audio devices available for your microphone or speakers, select the
preferred audio device before starting a call.
1. Select File Options from the main menu, and then select Preferences. (You can also
select the gear icon from the left navigation pane to open Preferences.)
2. In the Preferences screen, click the arrow to display the settings categories (see Figure
37).
3. Select Media, and then make your Audio selections (see the section covering Media for
more information).
If “Use default” is selected, then the UC App uses the default device set in the operating
system preferences. If you are using headsets, you can also select a separate device
from the headset for alerting incoming calls.
Make Audio Call
Make an audio call using one of the following methods:
• Double-click a contact from the Contacts list or search results and click the Call ( ) or
Call from Phone ( ) icon.
• Right-click a contact from the Contacts list or search results and click Call or Call from
Phone from the contact submenu. There can be several phone numbers available in the
menu. The work phone is the default and top most number, and is followed by mobile and
other numbers.
• Enter a phone number in the Search and Dial field, and then press Enter to start a VoIP
call.
• Open the dial pad, enter a phone number, and then click the Call ( ) or Call from
Phone ( ) icon.
• On the Communications History list, double-click a call entry.
• In the Communications window, click the Call ( ) or Call from Phone ( ) icon.
• When viewing a contact’s profile, click the Call ( ) or Call from Phone ( ) icon.
UC App for Windows Desktop User Guide 50
Page 57

Audio Calls
Icon
What you can do
Enter additional digits using the dial pad at any time during the call (for example, to
insert a conference number). The dial pad is not movable.
Mute your microphone.
Adjust the volume bar to adjust the volume. Dragging it all the way to the left
mutes your speakers.
Use this icon to access the Call Options menu. In the Call Options menu, you can
find different actions to use for a call depending on your settings and your service
provider.
The following table describes additional Communications window icons and explains what you
can do with them for voice calls.
In the Call Options menu, the following options are available:
• Transfer a call to a third party.
• Put the call on hold. Note that if you hold the call, the other party cannot resume the call.
This is communicated to all parties by a notification appearing in the middle of the screen.
• Add participants to the call.
Known Issue: If you receive an incoming call on the Windows UC for Desktop app
while you are on an existing call—and want to place the existing call on hold—the
app will incur an issue if you try to remove the call from hold.
As an alternative, in general available Feature Access Codes (FACs) for call management
work during calls, for instance *55 for direct transfer to voice mail, but the ongoing call must be
put on hold and a new call must be made to the FAC “number.” Using DTMF for the same
purpose does not work.
Dial a number or SIP URI of format user@domain or sip:user@domain in the combined
Search and Dial field to make a call. Once you type your numbers, the UC App searches for
contacts on both the local contact list and the enterprise directory.
You can also call circuit-switched network numbers such as Global System for Mobile
Communications (GSM); however, this depends on the service provider network you are using;
there is no technical limitation.
You cannot have two simultaneous calls with the same person.
Call from Computer
Select a contact from your contact list to start communication. Type a phone number in the
Search and Dial field at the top of the UC window (search or communicate) to communicate
with someone who is not on your contact list.
UC App for Windows Desktop User Guide 51
Page 58

Audio Calls
Call from Phone
When you click the Call from Phone ( ) icon, the desk phone instantly starts ringing and the
call is established from your desk phone. This depends on your service provider configuration
as other devices may also ring.
When your service provider is configured to also initiate a call from computer (SIP call) to the
same computer that initiated a call from phone, that incoming (SIP) call will be accepted and
will alert if it does not have the same identity as the call from phone.
For remote calls initiated using the UC App, you can also have mid-call controls such as hold/
resume, transfer and add participant.
Automatic Busy – In Call presence also works with the Call from Phone feature.
Depending on your service provider settings, it is also possible to control calls initiated without
the UC App in the Active Communications view. The same mid-call controls are also available
in this case. In case of an incoming call, the actual answering action must happen with the
other device.
Answer Call
When someone is calling you, a pop-up notification displays on your screen. You can choose
to answer, silence the incoming call and then open a chat session with the caller, reject the
call, or silence the incoming call by closing the pop-up notification window. If you silence the
call, the ringtone is silenced but the caller does not see anything on their end.
You can answer or reject the call after silencing it only if you have chosen the chat option. If
you close the incoming call pop-up notification to silence an incoming call, then you no longer
have an option to answer or reject it. When choosing the chat option, chat is only enabled after
the call has been answered or rejected.
If you reject the call, it causes the line to sound busy at the caller’s end and they know that you
rejected the call.
Contact Name Lookup for Incoming Calls
The UC App performs a local contact search for incoming calls. If the number matches one of
the contacts on the UC App contact list, the name is shown on the incoming call screen along
with the alert. Both the display name and phone number are shown when available.
If there is no match to a local contact, the UC App looks for a match in the Telephony Directory
and other available directories. If a match is found, the available information is shown for the
incoming call. If there is no match in the Telephony Directory, the display name is taken from
the available information in the incoming call.
Whenever you retrieve your call logs/history, the UC App does a lookup in the local contacts
and populates the name if a match is found.
UC App for Windows Desktop User Guide 52
Page 59

Audio Calls
Call Waiting
You can have one active call at any one time if you receive a new incoming call and accept it.
The existing call is put on hold and you can change between these two calls by using the Hold
and Unhold buttons.
Call Transfer
The UC App supports transferring VoIP calls to another party. There are two ways to transfer
a call:
• Attended (Warm) Transfer: Announce the caller to the intended recipient before you
complete the transfer.
• Unattended (Blind) Transfer: Transfer the caller without an announcement.
1. Establish a call with a remote party and click the menu button in the bottom right
corner of the active communication window.
2. Select Transfer to, and then select New.
Figure 54. Active Communication Window Menu
3. In the Transfer Call dialog box (see Figure 55), type the name of a contact or their
number in the Search and Dial field. If the contact has multiple numbers, use the
dropdown list to the right of the Search and Dial field to select the number to which the
call will be transferred.
4. Click the Attended Audio button for an attended transfer or click the Transfer Now
button for an unattended transfer.
UC App for Windows Desktop User Guide 53
Page 60

Figure 55. Transfer Call Dialog Box
Audio Calls
UC App for Windows Desktop User Guide 54
Page 61

Audio Calls
Note: A conference call with more than three people is known as “N-way Calling.”
Conference Call
A Conference Call is a telephone call that enables multiple people to speak to each other at
the same time. The number of people on the call can be from 3-15.
Use any of the following options to initiate—or add members—to a conference call on the UC
App for Windows Desktop.
Initiate Conference Call
1. Initiate a call to an individual using one of the methods described in the Make Audio Call
section.
2. When the call becomes active, click the menu icon in the lower right corner of the
window.
Result: A sub-menu appears.
3. Click the Conference with option and then select New. (See Figure 56)
Result: The Add people to communication dialog appears. (See Figure 57)
4. Dial the second number directly or if the participant is in your contact list, enter the first 23 letters of the person’s name. From there, you may click the drop-down menu to the right
of the text field and select any type of number the contact may have; e.g., extension or
phone number.
5. Click the Add button.
Figure 56. Initiate a Conference Call
UC App for Windows Desktop User Guide 55
Page 62

Figure 57. Add Person to Call
Note: You can also add participants to an active call when you click the Directories
icon ; and then drag and drop the contacts from your Contacts list into the Add
people to communication window.
Audio Calls
Initiate a Call to a Group
Initiate a call to one of your groups by right-clicking on the group name and selecting Call from
the shortcut menu. The UC App dials all participants and takes everyone off hold after the last
attendee answers.
Add Person to Existing Conference Call
You may add up to 14 participants to a conference call for a total of 15 individuals, incl uding
yourself. To do so, repeat steps 2-5 in the Initiate Conference Call section for each person you
want to add.
Call Park and R etrieve
Call Park is particularly suited for shared environments where one person can answer the call,
park it, do something else for a while and continue the call from another device or let
somebody else continue the call (supported on native desktop only).
Transfer an ongoing VoIP call to a Call Park server and then retrieve it when needed. An
ongoing call can be parked against your own number or another number (an extension). Call
Retrieval works in the same way; the parked call can be retrieved from your own number (an
extension) or another number (an extension) to provide flexibility for who is picking up the
parked call.
A parked call is visible on your desktop in the Active Communications area so that you can
easily retrieve it, but only for the duration of the Call Park announcement. After the
announcement is over, the parked call disappears from the Active Communications area (since
the triggering call is disconnected). After the call disappears from the Active Communications
UC App for Windows Desktop User Guide 56
Page 63

Audio Calls
area, you must remember the extension to which the call has been parked to retrieve it, unless
the call was parked to your own extension. If the call is not retrieved after a certain time, then
the server calls the parking user.
Call Pull
Call Pull allows you to pull an ongoing call from one of your devices to another one where the
Call Pull feature is used. Call Pull can also be used with Feature Access Codes (FACs), in this
case, *11.
Missed Call or Communication
When you have one or more missed calls or other types of communications, there is a
notification ( )on the navigation pane (left side) in the Main window. Clicking the icon takes
you to the missed communication in the Communications History view.
Message Waiting Indicator
The Message Waiting Indicator (MWI) service displays a notification for a waiting voice mail,
indicated with a number above the Communication History icon. Clicking the notification
automatically dials the voice mail service (see Check Voice Mailbox for more information).
Figure 58. Message Waiting Indicator
Set Up Voice Mail
To set up your voice mailbox and record a personal greeting, do the following:
1. From your desk phone or the UC App, dial your business number or *86.
2. Enter the temporary PIN, “269266” and press #.
3. Select your default language.
4. Set a new PIN (4-8 digits) for your account and press #.
5. Record your name.
6. Record a greeting or select the default system greeting.
UC App for Windows Desktop User Guide 57
Page 64

Audio Calls
Check Voice Mailbox
1. Connect to the voice mail system using one of the following methods:
• From your desk phone, dial your business number.
• From the UC App, click the voice mail notification.
• From the UC App dial pad, dial your business number or long press the 1 key.
2. When prompted, enter your PIN and press the # key.
Refer to the Voice Mail User Guide for more information.
Headset Support
You can control incoming and ongoing calls from a compatible headset. The feature set
supported is answer/hang up as well as mute/unmute. Volume control operations are not
reflected in the UC App. The following is a list of tested example devices, although other
devices should also work:
• Plantronics Voyager Edge UC
• Plantronics Savi 700 series
• Plantronics Blackwire C3xx, C4xx, C5xx, and C7xx
• Plantronics Calisto 620
• Plantronics Voyager Legend UC
• Logitech H570e Mono
• Logitech BCC950
• Logitech Conference Cam Connect
• Jabra Biz 2300/2400
• Jabra Speak 510
• Jabra Pro 930 (wireless)
• Sennheiser SC 230/260
• Sennheiser SP 20
• Sennheiser MB Pro1 UC
Headsets typically use an add-in of some kind to communicate with the rest of the client while
calls are made. Currently, installed add-ins are visible under Preferences Media settings
(see the section covering Media for more information).
In addition to the standard HID add-in for the UC App, headset vendors may develop their own
add-ins that will replace the standard HID add-in for all devices. Some of these add-ins (for
instance, Jabra) cannot be used at the same time with the standard HID add-in. These vendorspecific add-ins would be installed during new headset installation; however, the standard HID
add-in should remain in the preferences list. If for some reason it has disappeared, adding the
respective .dll file back to the add-in folder should make it visible again in the preferences. If
UC App for Windows Desktop User Guide 58
Page 65

Audio Calls
you would later like to change to another headset, the vendor-specific add-in could be disabled
in the media settings under Preferences to again use the standard HID or some other new
add-in by another headset provider.
Presence Rules and Silent Alerting
You can combine call processing with presence statuses. For example, the “Busy” status can
be combined with call forwarding so that when the “Busy” presence status is used, calls are
forwarded. It does not matter how the presence status is invoked, either automatically or
manually.
All presence statuses can have presence rules:
• Available
• Busy
• Away
• Offline
See the section covering Presence for more information.
Click-to-Call (Highlight Text)
You can highlight text anywhere in the desktop Computer to make a call and define the default
call type used for making the call using the shortcut defined in Preferences. You must define
the shortcuts on your own using the instructions provided in Preferences (see Outgoing Calls
for more information). The order in which key combinations are pressed may be significant in
some cases if the operating system has reserved some key combinations for other purposes.
UC App for Windows Desktop User Guide 59
Page 66

Outlook Add-in
Note: The current version of this add-in cannot be used if you have Microsoft
Office Communicator, Microsoft Lync, or Skype installed. You must uninstall these
products if you want to use this add-in.
During Office/Outlook 2013 installation, the installer installs Lync by default. You
must uncheck Lync and then proceed with the installation. For more information,
see Troubleshooting.
Outlook Add-in
Introduction
The Outlook Add-in for the UC App provides integration between the UC App Desktop and Microsoft
Outlook.
With this
App functions like Chat, Call from Computer, and Call from Phone from within Outlook.
add-in, you can have Microsoft Outlook display the UC App contact presence and invoke the UC
Supported Platforms
The following platforms are supported:
• Microsoft Outlook 2007, Microsoft Outlook 2010 (32 and 64-bit), Microsoft Outlook 2013
(32 and 64-bit), and Microsoft Outlook 2016 (32 and 64-bit)
• Microsoft Windows 7, Microsoft Windows 8, Microsoft Windows 8.1 and Microsoft
Windows 10
The following third-party components are required to be installed for the add-in to function
correctly:
• Microsoft .NET Framework 4 Client Profile
• Microsoft Visual Studio Tools for Office (VSTO) 2010 Runtime
These components will be downloaded and installed by the installer if they are not found. They
should not be uninstalled, as the add-in will not functional correctly. Additionally, for Outlook
2016 and the OL2016 plugin, there are further considerations:
• OL2016 plugin can only be installed by an administrator.
• If an administrator installs for all users and a normal user starts using the OL2016 plugin,
the UC App needs to start before Outlook.
• For logging to work normally, the UC App needs to start before Outlook.
• Every logging level change requires a restart of both the UC App and Outlook for
changes to take effect. This should be quite rarely needed.
• If Outlook is closed while the UC App is running, the UC App needs to be restarted as
well for the Outlook UI to behave as expected.
• The UC App lists connected components as extensions; if connected is NO or both
presence GW and add-in are not listed, an error has occurred. Component is visible
under Options
UC App for Windows Desktop User Guide 60
Page 67

Outlook Add-in
→ Add-ins → UI, which displays registered and working add-ins on top, below stopped or
non-working ones.
• If both are listed and show connected is YES, but the Outlook UI does not work, restart
both apps.
Note: the UC App must be installed with administrator privileges in the C:
\Program Files OR the C:\Program Files (x86) folder.
Log Files
Log files for the add-in are in the UC App log directory. You can open the folder through
Preferences → Advanced by clicking on the Show logs button. Outlook add-in logging is
turned on when the UC App logging is enabled.
Features
Presence in Outlook
The Outlook Add-in displays the presence of a contact in Outlook. Presence information is
retrieved from the UC App and is displayed as an icon next to the contact in e-mails and
calendar appointments. The following is an example of an e-mail with the To, From, and
Cc fields showing presence for various contacts.
Figure 59. Presence Displayed in Outlook
A contact’s presence can be Available, Away, Busy or Offline as shown in the following image:
Figure 60. Presence Values
Note: You must be signed in to the UC App for the presence to be displayed.
Additionally, presence is only shown for contacts that have a valid SIP address
and are in your contacts list in the UC App.
UC App for Windows Desktop User Guide 61
Page 68

Outlook Add-in
Contact Actions in Outlook
Right-click on an e-mail in your Inbox and call or chat with the sender using the UC App. You
have the option to Chat, Call (from Computer), or Call from Phone as shown in the following
figure.
Figure 61. Contact Options
Note: Some of these options may not be available for all contacts. The chat option
is only applicable to contacts that are in the UC App. Call options are applicable to
all contacts if they have a valid phone number.
These contact actions are also available on a Contact Card as shown in the following figure.
Figure 62. Contact Card
UC App for Windows Desktop User Guide 62
Page 69

Outlook Add-in
Call Multiple Phone Numbers Configured for Contacts
You can call any of the multiple phone numbers present in the Outlook contact card. This
feature is available from the received mail context menu, flagged mail context menu, and
Contact’s context menu. You can also call the selected phone number using Call and Call
from Phone.
See the following figure for an example of how to make the call from a received mail context
menu.
Figure 63. Received Mail Context Menu in Outlook
See the following figure for an example of how to make the call from the contact item context
menu.
UC App for Windows Desktop User Guide 63
Page 70

Figure 64. Contact Item Context Menu in Outlook
Uninstall Outlook Add-in for the UC App
Uninstallation is done together with uninstallation of the UC App.
Outlook Add-in
UC App for Windows Desktop User Guide 64
Page 71

Accessibility Compliance
Accessibility Compliance
The UC App supports accessibility compliance by having all client features available in menus at the top
of the Main window (see UC App Menus for more information). The menu items are also available using
the keyboard shortcuts listed in Appendix A: Keyboard Shortcuts for Desktop.
The UC App also supports the following features:
• VoiceOver
• Keyboard navigation
The following limitations apply:
• By default, the tab key moves the focus between text-inputs and lists. This can be
changed through System Preferences Shortcuts Keyboard. Under Full Keyboard
Access, select All Controls instead of Text boxes and lists only.
• You must manually select the correct language in screen-reader. The UC App will not
force screen reader's language according to the language selection in the client.
• The VoiceOver focus follows the VoiceOver Cursor. When VoiceOver is enabled, you are
expected to navigate with the VoiceOver Cursor. That can be enabled through System
Preferences Accessibility VoiceOver Open VoiceOver Utility. In the opened
window, open Navigation and check Keyboard focus follows VoiceOver cursor.
• When using VoiceOver with different languages, the OS language, client language, and
VoiceOver language all need to be the same.
Recommended Preferences General Accessibility settings for VoiceOver are:
• Pop-up errors enabled
• Tooltips disabled
UC App for Windows Desktop User Guide 65
Page 72

Sign Out
Note: Closing the Main window (not the Sign In window) does not exit the application
but rather minimizes the application to the system tray (Dock). This allows you to
continue to receive calls and messages without having the Contact List window
appearing on the desktop.
Signing out of the UC App sets your status to “Offline” for your contacts and displays the
Sign In screen.
Sign Out of the UC App
To sign out, follow these steps.
1. Select the UC App from the main
menu.
2. Select Sign Out.
Exit Application
To exit the application completely, follow these steps.
1. Select Unify from the main menu.
2. Select Quit Unify (a keyboard shortcut can also be used).
Sign Out
Forced Logout
Depending on your service provider settings, you may see a pop-up saying that you have been
logged out due to another instance of the client logging in. This feature allows the UC App to
track similar online client instances and only allow one of them to be online at the same time.
When the UC App notifies the client to log out, all connections are terminated, and the client
returns to the login window.
UC App for Windows Desktop User Guide 66
Page 73

Uninstall the UC App
Uninstall the UC App
Uninstalling is performed by simply dragging the application folder from the Applications
directory to the trash can; however, account files are not deleted. If you want to remove
account files, they must be manually deleted. These are the file locations for the ac count
directories. The following locations apply for all account directories:
For branded clients:
/Users/<USERNAME>/Library/Application
Support/<company_name>/<application_name>
For the reference client:
/Users/<USERNAME>/Library/Application Support/Unify
UC App for Windows Desktop User Guide 67
Page 74

Troubleshooting
Troubleshooting
Following are common questions for issues with the UC App. For information about setting up
a log file, see the section covering Troubleshooting under Preferences.
Why can’t I chat with contacts from Yahoo?
The UC App does not support chatting with contacts from Yahoo. Chat is only supported for
users with MyAccount login credentials.
Why can’t I change the avatar?
Double-clicking the avatar should open a File Explorer view to select a file. If your XMPP
connection is lost, changing the avatar fails. A lost XMPP connection is indicated in the Main
window’s top notification area.
My contacts are all offline and my client’s status bar says “XMPP unavailable”. What
does this mean?
It means that the XMPP connectivity has been lost for chat, as well as for presence; however,
you can still make calls. You should contact your service provider.
Why am I offline?
If you have selected “Offline” status, you are shown as offline to others. Another possibility is
that you may have lost your Internet connection. In this case, the client does not log out, but
rather enters an offline mode where a contact list is available, but communication is not
possible.
Why can’t I change my user name and password?
User name and password editing is not supported in the client. To edit your user name or
password, contact your service provider. The exception is login password expiry. When it
expires, you can change the password in a separate dialog window.
In the preferences, the client only supports changing LDAP credentials. Desktop sharing
credentials may also be changed, depending on your service provider settings.
Why does my all-day calendar entry not trigger Busy – In Meeting presence status?
Not all meetings trigger a presence change to Busy – In Meeting.
To trigger the presence update, the meeting must be in the Show me as busy state.
Why aren’t all my group chat messages saved?
Only the newest chat room messages are stored on the server.
Why aren’t all my chat messages available in my other devices?
All one-on-one and group chat messages are saved, but only locally, so they are not
necessarily available in your other devices. Incoming messages are sent to all devices;
however, the ones that you send are only stored in the device that you are using to send the
message.
UC App for Windows Desktop User Guide 68
Page 75

Troubleshooting
Note: During Office/Outlook 2013 installation, the installer installs Microsoft Lync
by default. You must uncheck Microsoft Lync (as shown in the following figure) and
then proceed with the installation.
Why does my location show an incorrect address?
Location is based on the public IP address that the Computer is using. The IP address is
mapped to a physical location. Cox Business is working with the mapping provider to improve
the accuracy of the location. You can also manually change the location by clicking the avatar
and changing the location icon.
Why is Outlook add-in disabled?
If the context menu does not show add-in menu items, this could be due to the Outlook Add-in
disabled by Outlook for slow loading. This happens primarily in Outlook 2013. In such cases,
enable this add-in by selecting the Outlook menu → File → Info → Manage Add-Ins →
Communication Add-in → Always enable this add-in from the displayed menu (as shown in
the following figure).
Figure 65. Outlook Account Information - Add-in Disabled
Why is presence not showing in Outlook Add-in?
If the presence indicator icon is not shown in Outlook, verify any of the following software is
installed:
• Microsoft Office Communicator (OCS)
• Microsoft Lync/S4B
• Skype version 6.1 or above
Uninstall each one found and restart Outlook and the UC client.
UC App for Windows Desktop User Guide 69
Page 76

Troubleshooting
Figure 66. Microsoft Office Installation Example
How do I disable/enable Outlook Add-I from preferences view?
To Enable/Disable Outlook contact presence status (5.1 Presence in Outlook), from the
Preference page, “Gateway process- Outlook add-in” checkbox option needs to be
checked/unchecked.
Figure 67. The Preference Page
To Enable/Disable Outlook context menu related to add-in, from the Preference page, the
“BTBC Outlook add-in” checkbox options needs to be checked/unchecked.
Figure 68. The Preference Page
Why is Outlook Add-in disabled in Outlook 2007 on Windows 10?
This is because on Windows 10 .net Framework 3.5 is disabled by default; this must be
activated to enable the Outlook Add-in.
1. To Enable 3.5 .net framework on Windows 10, go to:
Add/Remove Programs → Turn Windows features on or off → Select - Option .NET
Framework 3.5 (includes .NET 2.0 and 3.0).
2. Click OK.
UC App for Windows Desktop User Guide 70
Page 77

Troubleshooting
Why is contact’s own presence shown as unknown even though I’m logged in the UC
App (Outlook 2007)?
Sometimes in Outlook 2007, own presence of the logged in user is shown as unknown in
Outlook (especially after re-installing the UC App).
Re-install the Outlook Add-in for the UC App after the UC App re-installation.
In Outlook 2007, it is always suggested to log into the UC App before opening Outlook.
Why in Outlook 2007 Outlook Add-in is sometimes disabled when it is installed for
ALLUSERS?
There is a limitation with Outlook (Office) 2007, VSTO add-ins do not load when these are
installed for ALLUSERS, so those add-ins are always disabled by Office 2007.
There is a hotfix available (KB976811 https://support.microsoft.com/en-us/kb/976811 available
through KB976477 https://support.microsoft.com/en-us/kb/976477) for Office 2007 which
makes it possible to install add-in for ALLUSERS.
Why sometimes Outlook Add-in IM buttons are greyed out in the quick contact page,
even though the user logged in?
Sometimes IM buttons are greyed out on the contact page. When mouse over on it, it shows
the message “To use this feature, sign in to an instant messaging program".
Figure 69. Outlook Add-in IM Buttons Issue
This seems to be a Microsoft issue, and the suggested workaround is to restart Outlook.
End of Document
UC App for Windows Desktop User Guide 71
 Loading...