

Cox Business UC App for Mac Desktop User Manual

Cox Business
UC App for Mac Desktop
User Guide

© 2018 by Cox Communications.
All rights reserved. No part of this document may be reproduced or transmitted in any form or by any means, electronic,
mechanical, photocopying, recording, or otherwise, without prior written permission of Cox Communications. 0418

Table of Contents
Table of Contents
About UC App for Mac Desktop .......................................................................................... 1
Get Started ........................................................................................................................ 2
Activating UC for IP Centrex Professional Seats .................................................... 2
System Requirements ................................................................................................... 4
Installation ...................................................................................................................... 4
Sign In ............................................................................................................................. 7
Resetting Your Password ............................................................................................. 9
Main Window ................................................................................................................... 10
UC App Menus ......................................................................................................... 10
UC Menu ............................................................................................................... 10
Edit Menu ................................................................................................................. 10
Contacts Menu ........................................................................................................ 11
Calls Menu ............................................................................................................... 11
Conversations Menu ............................................................................................... 12
Window Menu .......................................................................................................... 12
Help Menu ................................................................................................................ 13
Navigation Icons .......................................................................................................... 13
My Information ............................................................................................................. 14
My Presence ............................................................................................................ 14
My Location ............................................................................................................. 15
Add or Change Your Personal Note ...................................................................... 15
Search and Dial ............................................................................................................ 16
Contacts .......................................................................................................................... 17
Add Contact ................................................................................................................. 17
Add Conference Contact ............................................................................................ 18
Add New Group ........................................................................................................... 18
Contact Options ........................................................................................................... 20
Chat .......................................................................................................................... 20
Call/Call from Phone ............................................................................................... 20
Add to or Remove from Favorites ......................................................................... 20
Add to or Remove from Group .............................................................................. 21
i

Table of Contents
ii
View Profile .............................................................................................................. 21
Edit Profile ............................................................................................................... 22
Subscribe/Unsubscribe .......................................................................................... 23
Delete Contact ......................................................................................................... 23
Filters ............................................................................................................................ 23
Presence ....................................................................................................................... 24
Communication History ................................................................................................. 26
Clear Communication History .................................................................................... 26
Dial Pad ........................................................................................................................... 27
Full Enterprise Directory ................................................................................................ 28
Preferences ..................................................................................................................... 29
General ......................................................................................................................... 29
Language ................................................................................................................. 30
Login ........................................................................................................................ 30
Notifications ............................................................................................................ 30
Accessibility ............................................................................................................ 31
Media ............................................................................................................................ 31
Incoming Calls ............................................................................................................. 32
Do Not Disturb ......................................................................................................... 32
Call Forwarding ....................................................................................................... 32
Simultaneous Ring .................................................................................................. 33
Remote Office .......................................................................................................... 34
Anywhere ................................................................................................................. 35
Outgoing Calls ............................................................................................................. 38
Highlight to Call ....................................................................................................... 38
Block My Caller ID ................................................................................................... 39
Advanced ..................................................................................................................... 39
Troubleshooting ...................................................................................................... 39
Proxy ........................................................................................................................ 40
Communication Windows .............................................................................................. 41
Chat/Instant Messaging .............................................................................................. 42
Chat View ..................................................................................................................... 43
Group Chat ................................................................................................................... 44

Table of Contents
Active Communications .............................................................................................. 45
Audio Calls ...................................................................................................................... 46
Select Audio Devices .................................................................................................. 46
Make Audio Call ........................................................................................................... 46
Call from Computer ..................................................................................................... 47
Call from Phone ........................................................................................................... 48
Answer Call .................................................................................................................. 48
Contact Name Lookup for Incoming Calls ................................................................ 48
Call Waiting .................................................................................................................. 49
Call Transfer ................................................................................................................. 49
Conference Call ........................................................................................................... 51
Initiate a Call to an Individual ................................................................................. 51
Initiate a Call to a Group ......................................................................................... 52
Add Person to Existing Conference Call .............................................................. 52
Call Park and Retrieve ................................................................................................. 52
Call Pull ........................................................................................................................ 53
Missed Call or Communication .................................................................................. 53
Set Up Voice Mail .................................................................................................... 53
Check Voice Mailbox .............................................................................................. 54
Headset Support .......................................................................................................... 54
Click-to-Call (Highlight Text) ...................................................................................... 55
Accessibility Compliance .............................................................................................. 56
Sign Out ........................................................................................................................... 57
Sign Out of UC App ......................................................................................................... 57
Exit Application ........................................................................................................... 57
Forced Logout ............................................................................................................. 57
Uninstall UC App ................................................................................................................ 58
Troubleshooting ............................................................................................................. 59
iii

About UC App for Mac Desktop
About UC App for Mac Desktop
UC App for Mac Desktop is a client application for Unified Communications, providing
the following communication features:
• Instant Messaging and Presence
• Voice Calling (VoIP)
• Voice Calling (Desk phone)
• Call Settings
Important: UC Apps operate with lines, seats, and other voice features—which
may vary among customers. In rare cases, customers may gain access to features
and interactions which are not fully recommended for use with UC Apps.
UC App for Mac Desktop User Guide 1
Get Started
Get Started
This section contains the essential information for getting started with UC App.
Activating UC App for IP Centrex Professional Seats
To use the UC App features with your IP Centrex Professional Seat, you must first activate
UC App through the MyAccount Portal.
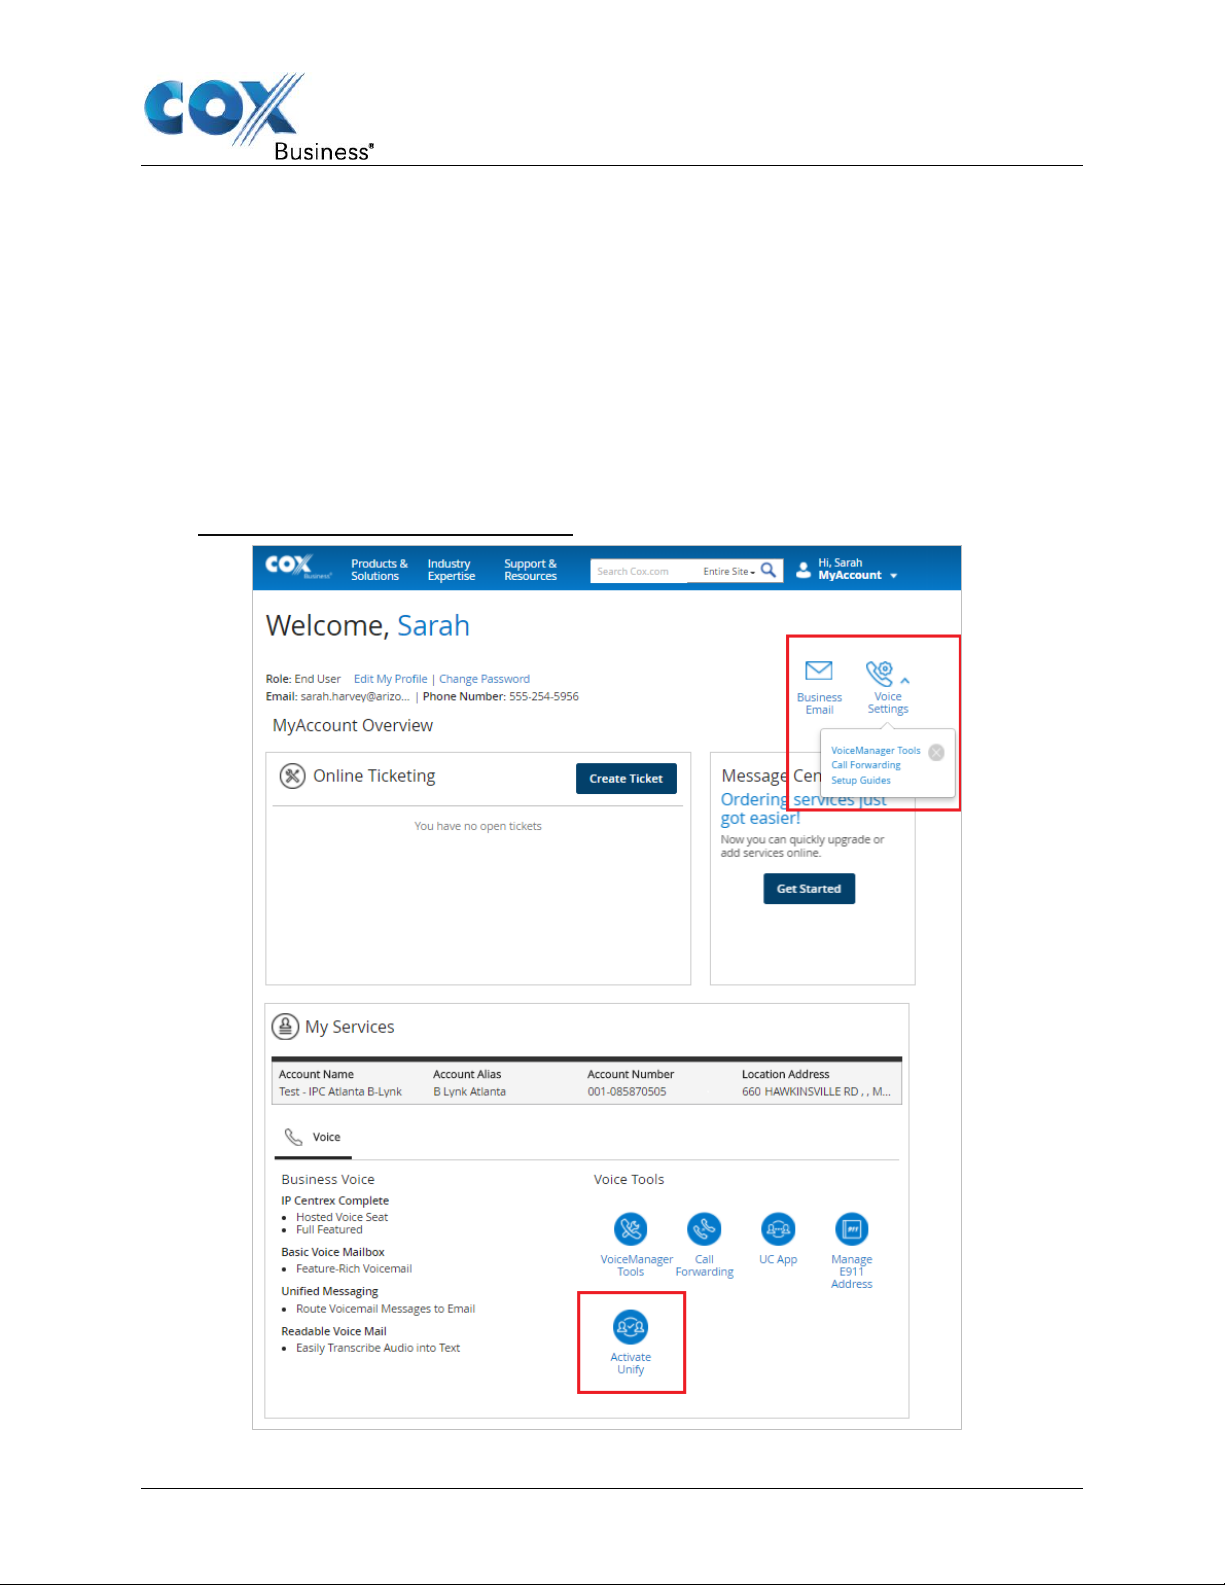
Use the following steps to activate UC App for your assigned IP Centrex Professional Seat:
1. Log in to the MyAccount Portal.
Result: The MyAccount Portal Home page opens.
Figure 1: MyAccount Portal Home Page
UC App for Mac Desktop User Guide 2
Get Started
Note: Profile Owners and Profile Administrators can view and activate Unify for any
IP Centrex Professional Seat on the account. End users can only activate Unify for
the IP Centrex Professional Seat assigned to them.
2. On the MyAccount Portal Home page, scroll down to the My Services section and click
the Activate Unify icon (see Figure 1).
Result: The Activate Unify window opens (see Figure 2).
Alternatively, you can access the Activate Unify window by performing the following
steps:
a. Click the Voice Settings dropdown menu and select VoiceManager Tools (see
Figure 1).
b. On the VoiceManager Tools Home page, click the User & System Management tab.
c. Click the Activate Unify link in the User Management section.
Result: The Activate Unify window opens.
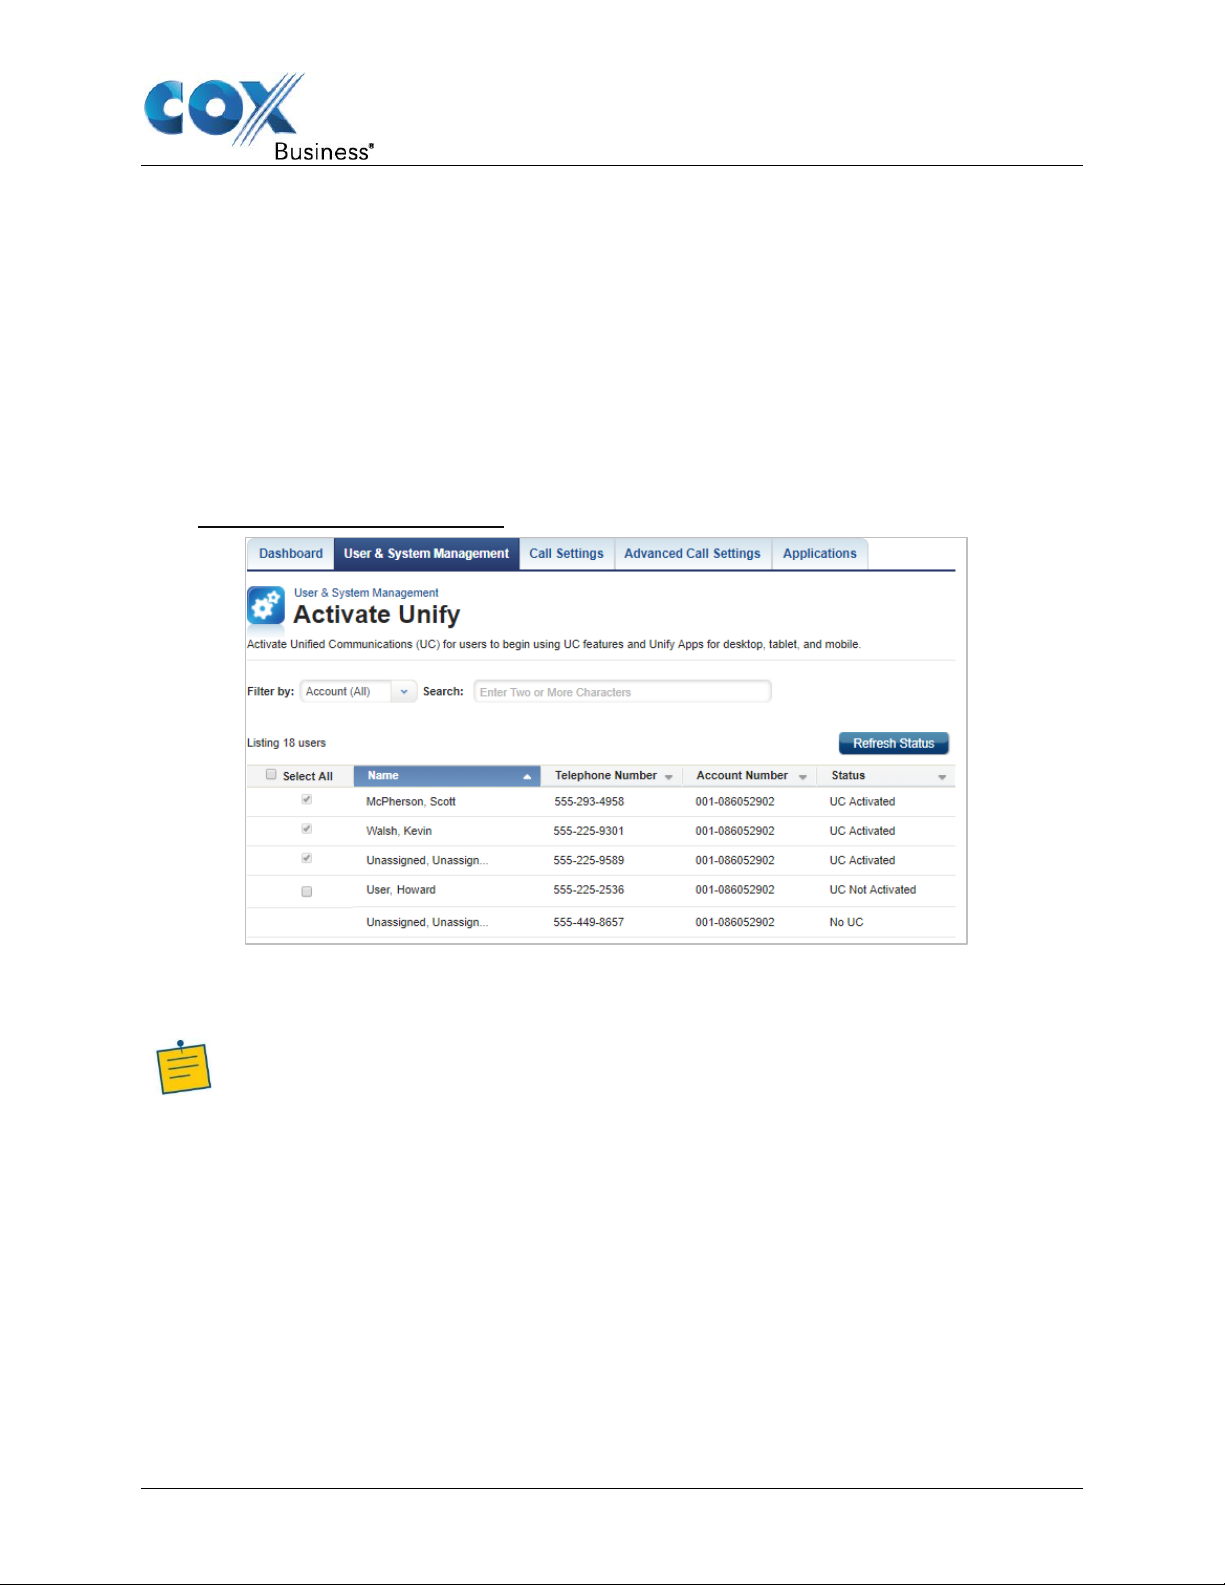
Figure 2: Activate Unify Window
3. Click the checkbox to the left of the name associated with the IP Centrex Professional
Seat you want to activate.
4. Click the Save button to save your changes.
Result: The status changes from UC Not Activated to Pending (see Figure 3). Refreshing
the page after approximately 30 seconds updates to the status to UC Activated.
UC App for Mac Desktop User Guide 3

Figure 3: Activation Status – Pending
Get Started
System Requirements
System requirements for running UC App on a Mac desktop are as
follows:
• Operating system: Mac OS 10.10 Yosemite, Mac OS 10.11 El Capitan, Mac OS 10.12 or
Sierra
• The installation footprint is approximately 125 megabytes (MB).
• For voice calls, a sound card, speakers, and a microphone or a headset are required.
Minimum system requirements need to be fulfilled with the following additions:
• A minimum of 2 GB random access memory (RAM) is required.
• A minimum 1.5 GHz CPU is recommended.
• Open Graphics Library (OpenGL) 1.5 or higher is recommended.
Installation
Use the following steps to download the UC App for Mac Desktop installation file.
1. Go to MyAccount (http://coxbusiness.com/myaccount).
Result: The Cox Business Sign In window appears.
2. Enter your User ID and password and click the Sign In button.
Result: The MyAccount Welcome window appears.
UC App for Mac Desktop User Guide 4
Get Started
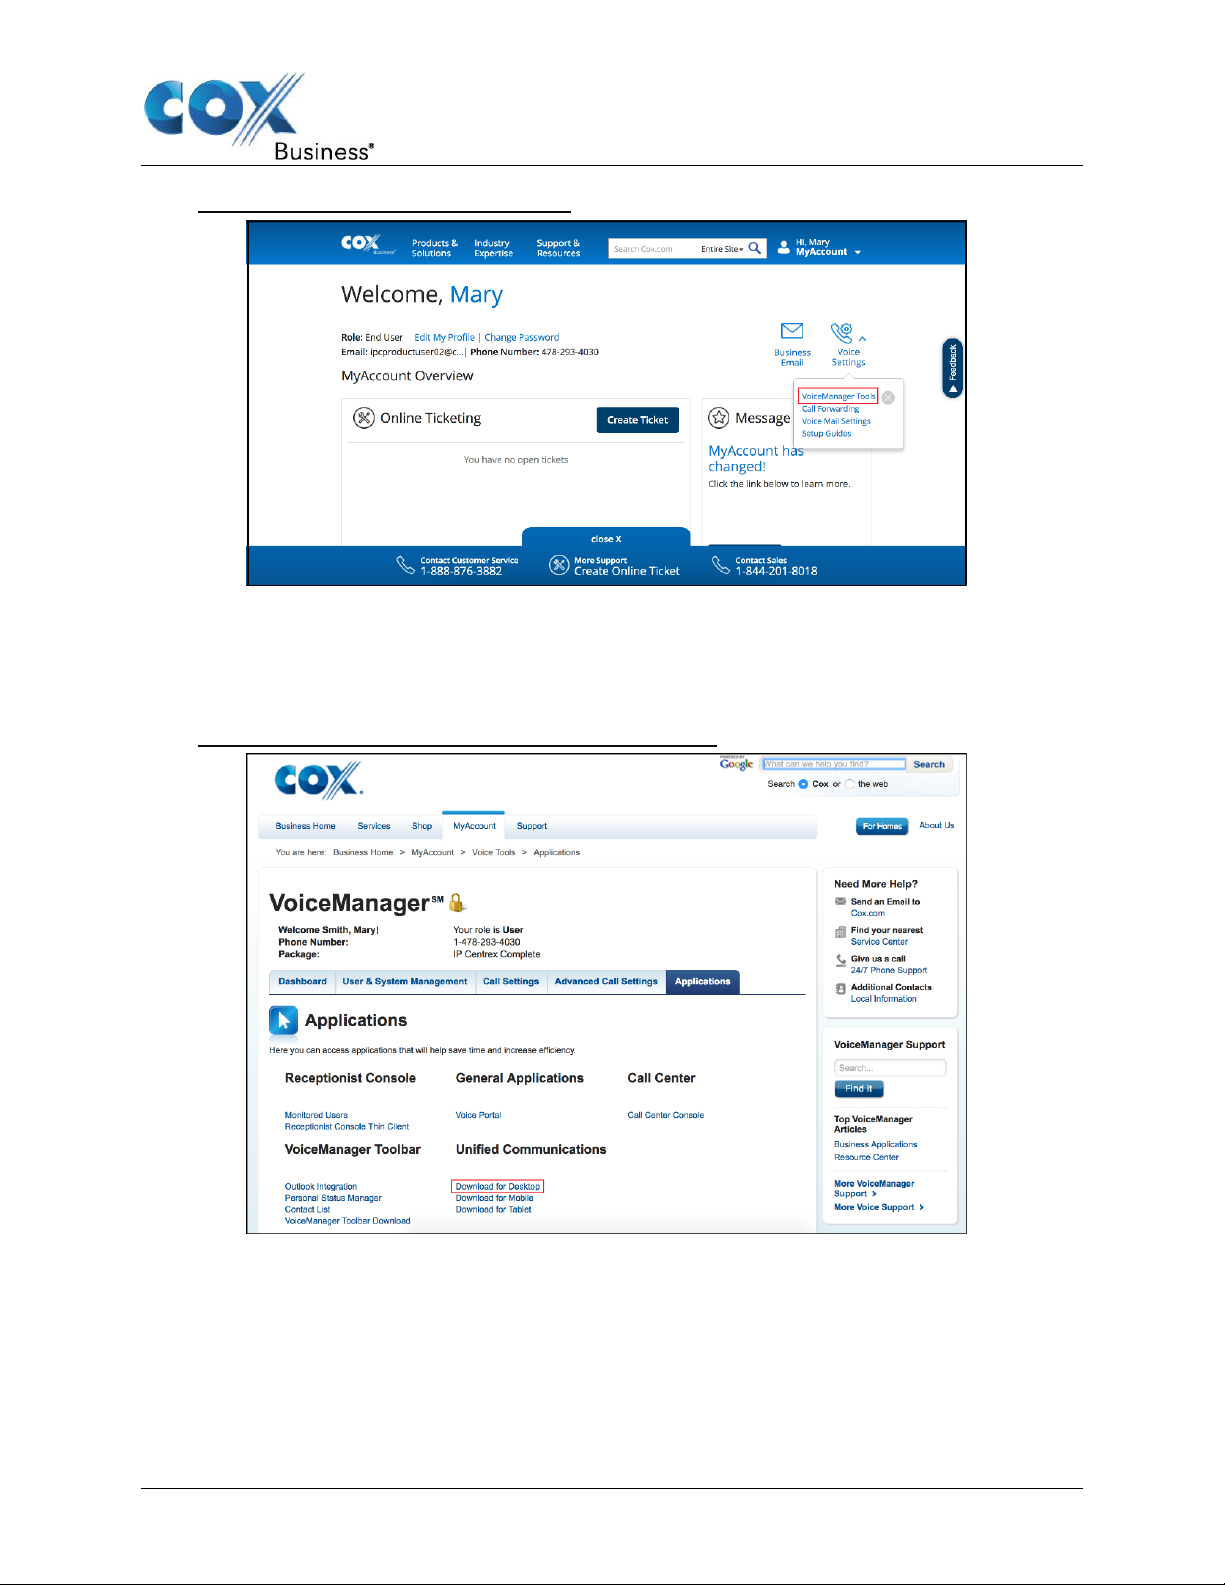
Figure 4: MyAccount Welcome Window
3. In the upper right corner of the Welcome screen, click Voice Settings and then click
VoiceManager Tools from the dropdown menu.
Result: The VoiceManager Dashboard opens.
4. Click the Applications tab.
Figure 5: VoiceManager Dashboard – Applications Tab
5. Go to the Unified Communications section and click the Download for Desktop link (see
Figure 5).
Result: The Select Platform dialog box opens.
6. Click Download the Mac Desktop app to download the application.
UC App for Mac Desktop User Guide 5

Get Started
Figure 6: Select Platform Dialog
7. Open Finder and select Downloads on the left side of the window. Select the file named
Unify.bc-uc.osx-21.6.4.61-COX.dmg and open it.
Figure 7: Download Screen
8. Click the Unify icon to start loading the app.
Note: If a dialog box displays stating, “UC App is an application downloaded from
the Internet”, select Open.
UC App for Mac Desktop User Guide 6
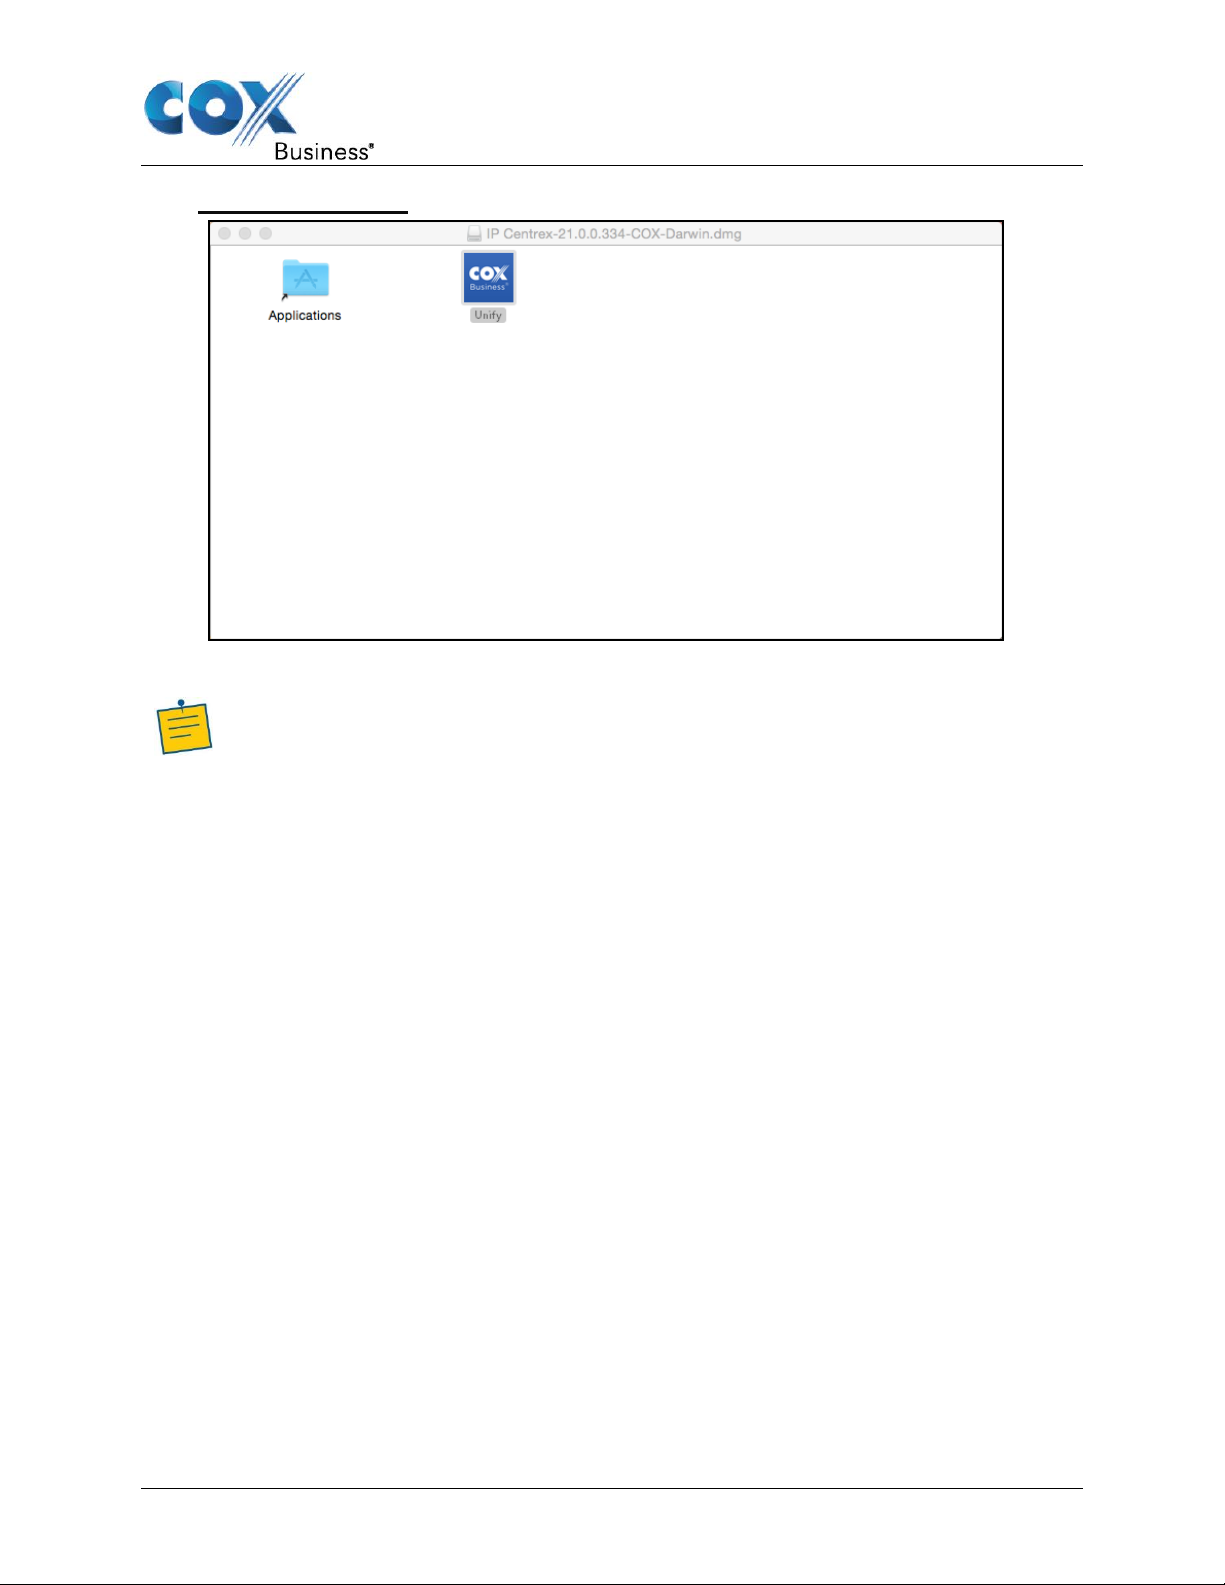
Figure 8: UC App Icon
Note: If you do not scroll to the bottom of the License Agreement before you click I
Agree, you will need to click I Agree again.
9. Review the entire License Agreement and click the I Agree button to continue.
Get Started
Sign In
When you first launch the application, you are prompted to sign in.
UC App for Mac Desktop User Guide 7
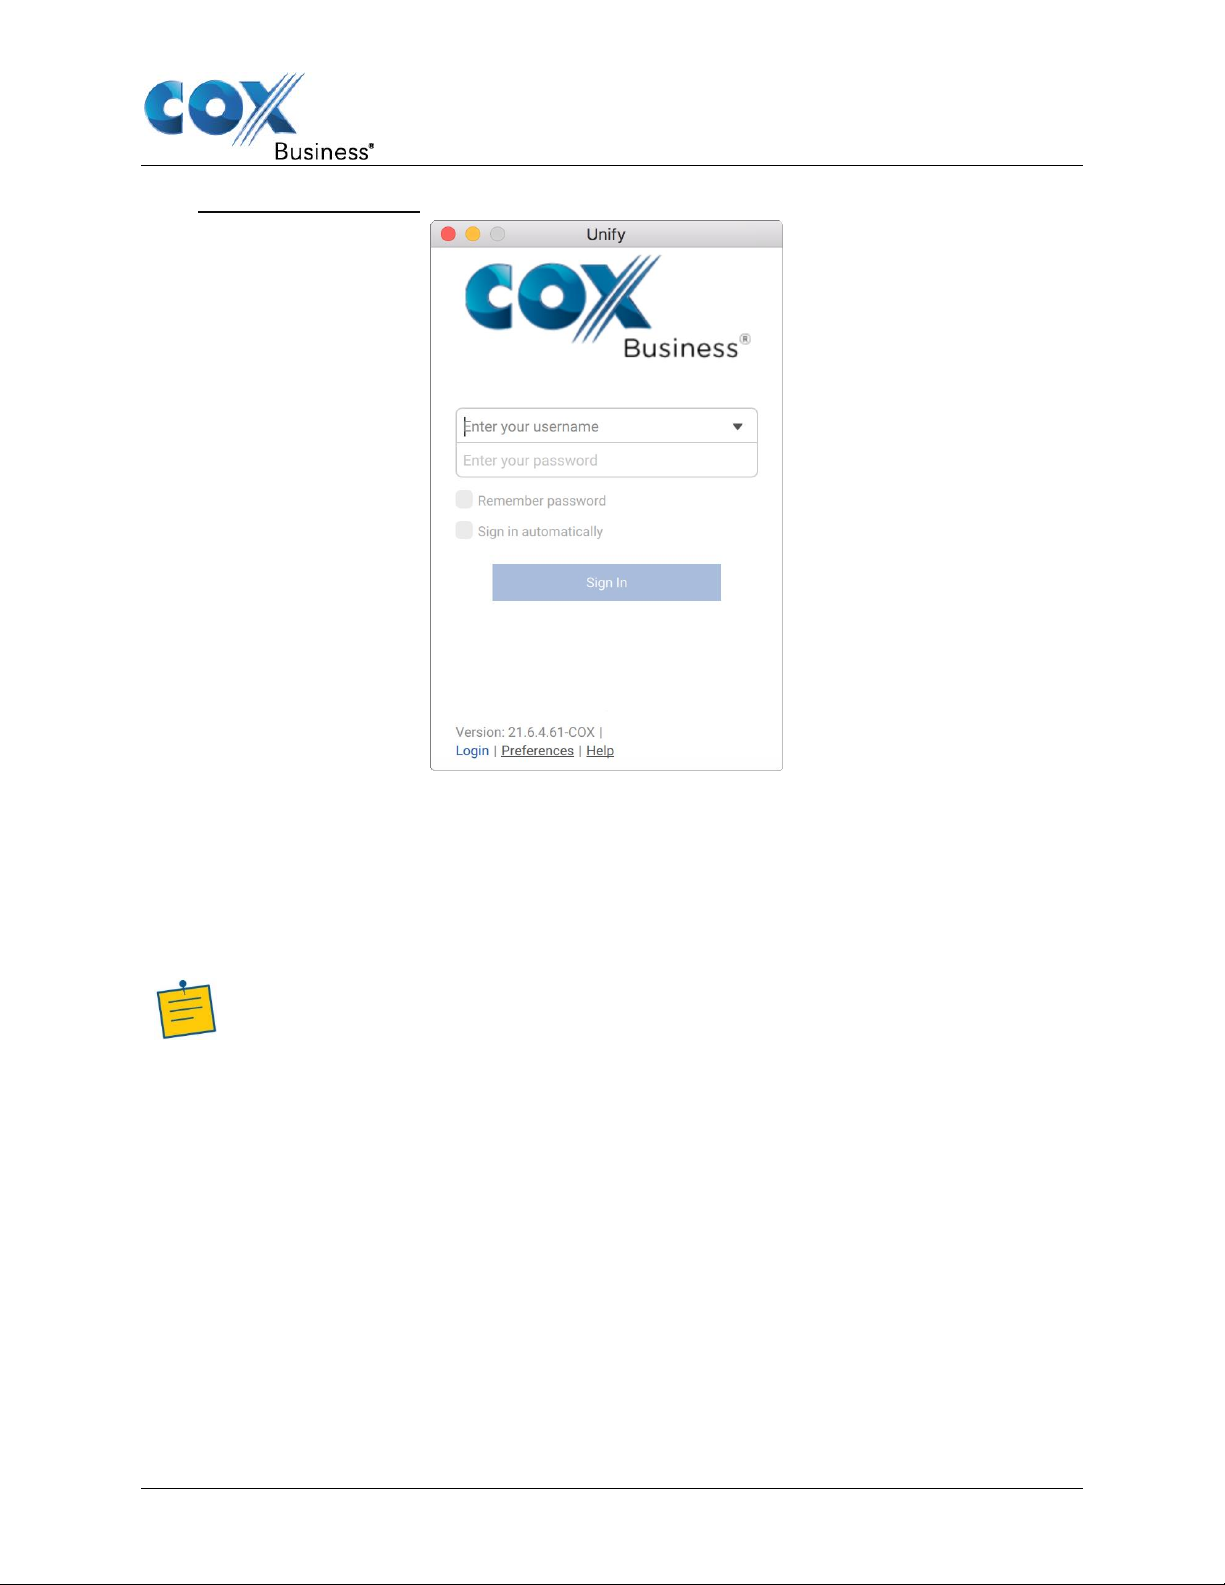
Figure 9: Log in Screen
Get Started
1. Enter your Cox Business user name and password.
2. Select whether you would like the UC App to remember your password.
3. Select whether you would like the UC App to sign you in automatically on subsequent launches.
4. Click Sign In.
You can also access Help and Preferences directly from the login window.
Note: If you choose automatic sign in, you are automatically signed in and taken to
the Main window upon subsequent UC App launches. Otherwise, you are
presented with the Sign In screen when launching the application.
The Login window offers the last used username, but the password will be automatically filled
in only if you have checked the Save password checkbox. If multiple people use the same
machine, only the last password is entered as a security measure. If you change the username
in the Login window through editing it, or using the drop-down list to pick another one, UC App
will not fill in the password; you are always expected to type it in. This also applies when reselecting or re-entering the last used username.
UC App for Mac Desktop User Guide 8
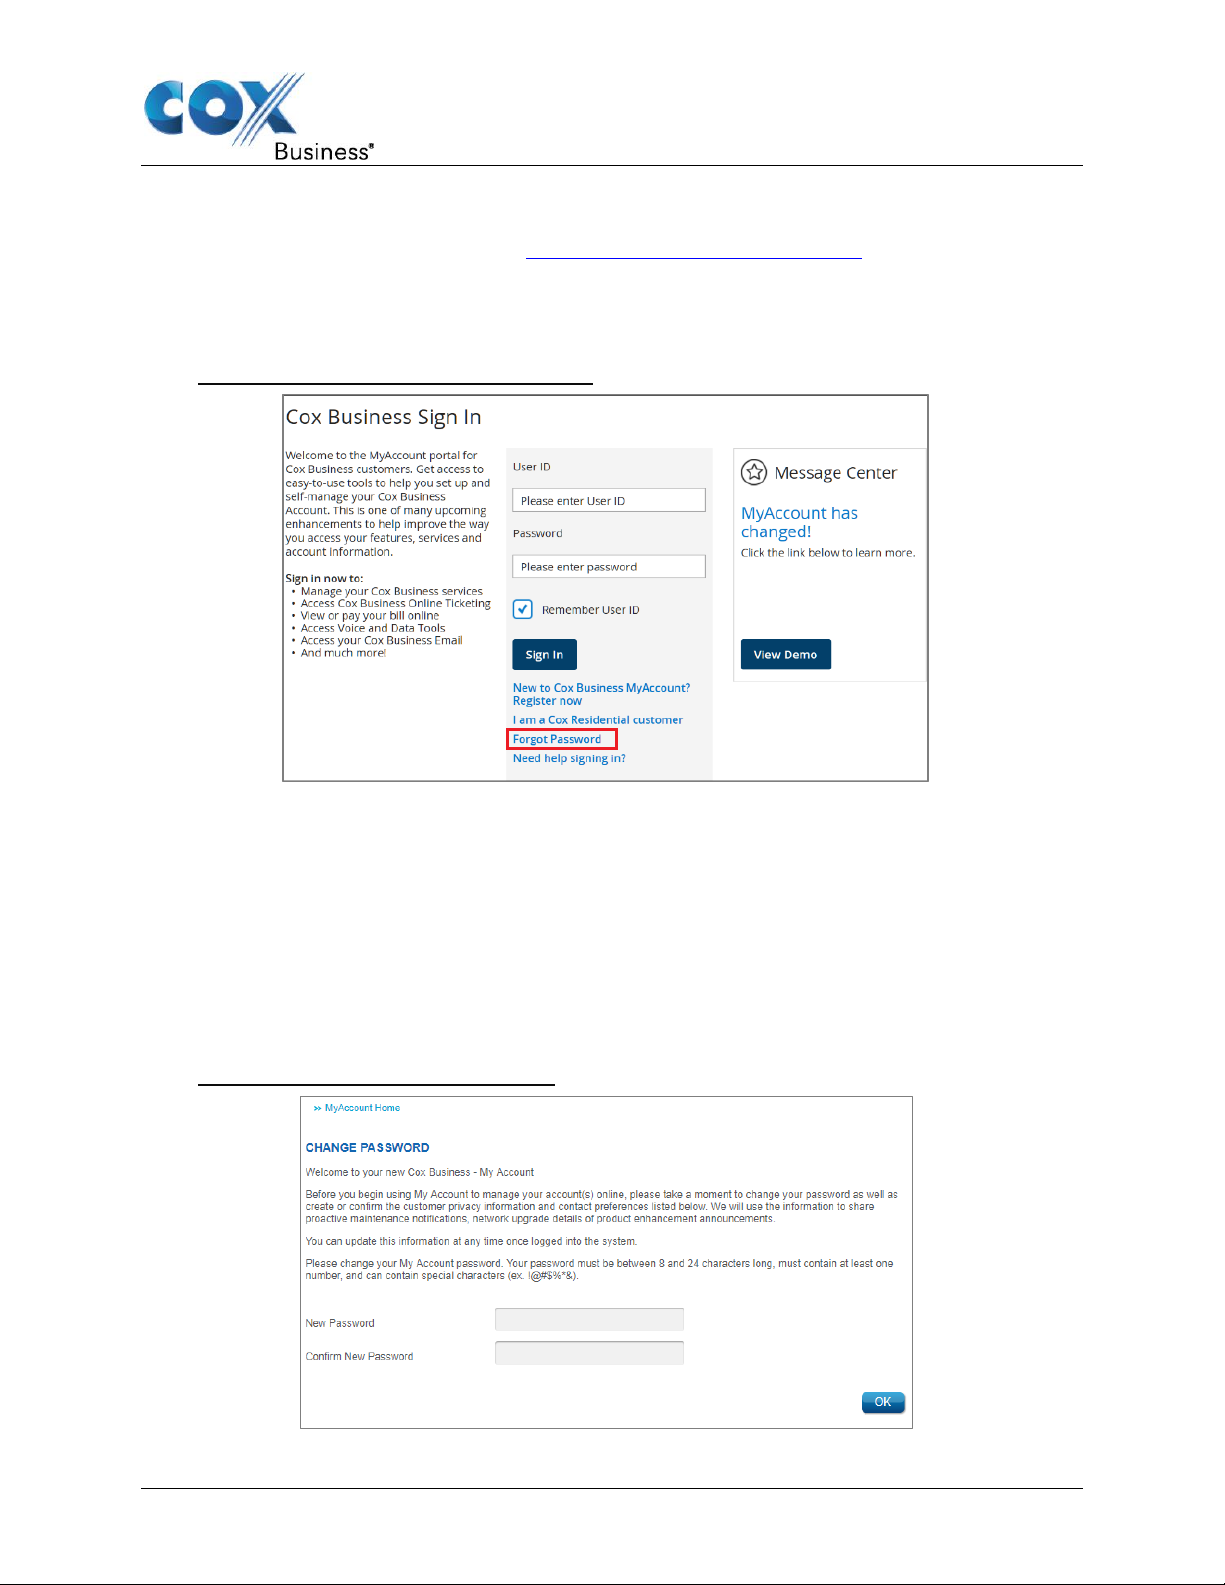
Resetting Your Password
1. Enter the MyAccount Portal URL (http://myaccount.coxbusiness.com) in your web
browser.
Result: The MyAccount Portal login page displays.
2. Click the Forgot Password link.
Figure 10: MyAccount – Forgot Password
Get Started
3. Enter your email address.
4. Click the Reset Password button.
Result: A temporary password will be sent to your email address.
5. Log in to the MyAccount Portal using the temporary password.
Result: You will be directed to the Change Password window, where you are prompted to
create a new password (see Figure 11).
6. Enter the new password as indicated in the onscreen instructions.
7. Click the OK button to save your changes.
Figure 11: Change Password Window
UC App for Mac Desktop User Guide 9
Main Window
Main Window
When you start the UC App for the first time, the Main window displays the Contacts screen by
default, and the Contacts list is empty. Refer to the Contacts section for information related to
adding contacts or editing contact information.
The UC App provides a variety of options for navigating the application. When the application
is active (by clicking anywhere in the Main window), a row of menus appears at the top of your
desktop screen. You can also navigate the application through the navigation icons on the left
side of the Main window. See the sections below for more information about the menus and
icons.
UC App Menus
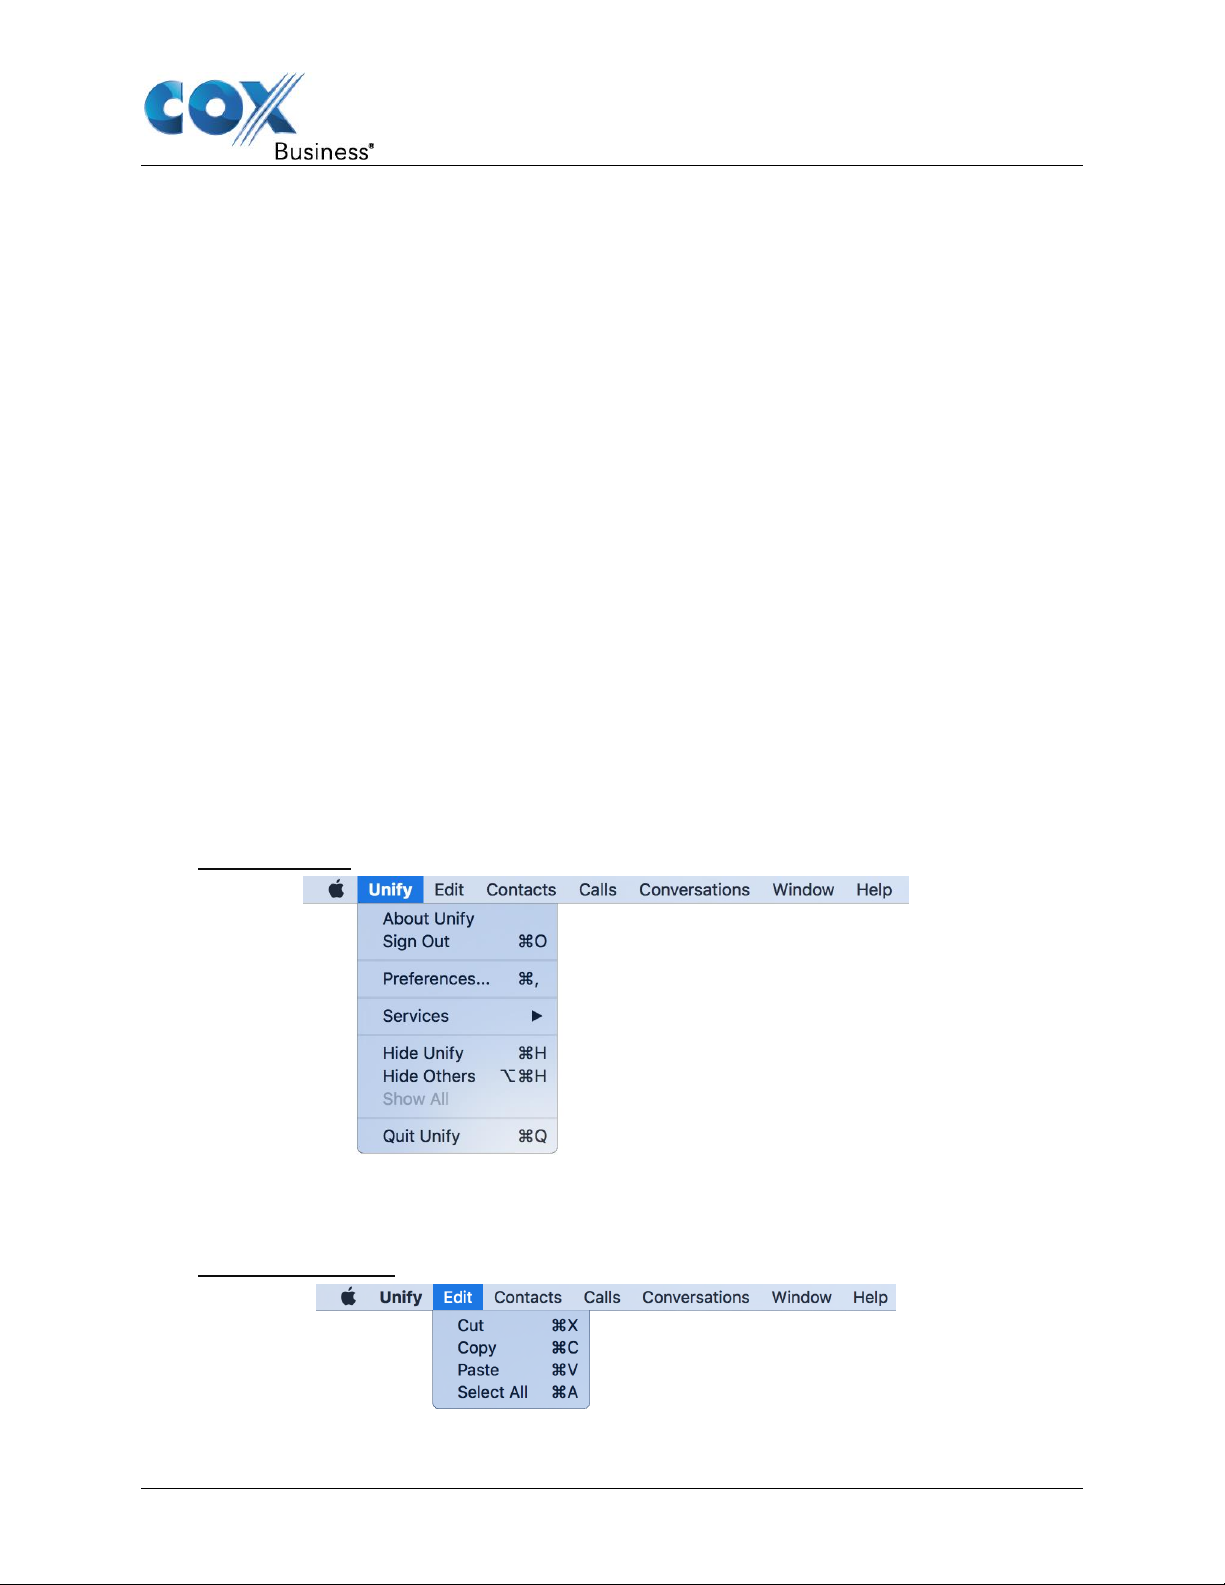
UC Menu
From the UC menu, you can:
• View copyright and version information for the UC application
• Sign out or quit the application
• Access and set UC application and communication preferences
• Access and set Services preferences (see Outgoing Calls under Preferences for more
information)
• Minimize the UC App or other application windows
Figure 12: Menu
Edit Menu
The Edit menu allows you to select, copy, cut and paste contact information.
Figure 13: Edit Menu
UC App for Mac Desktop User Guide 10
Contacts Menu
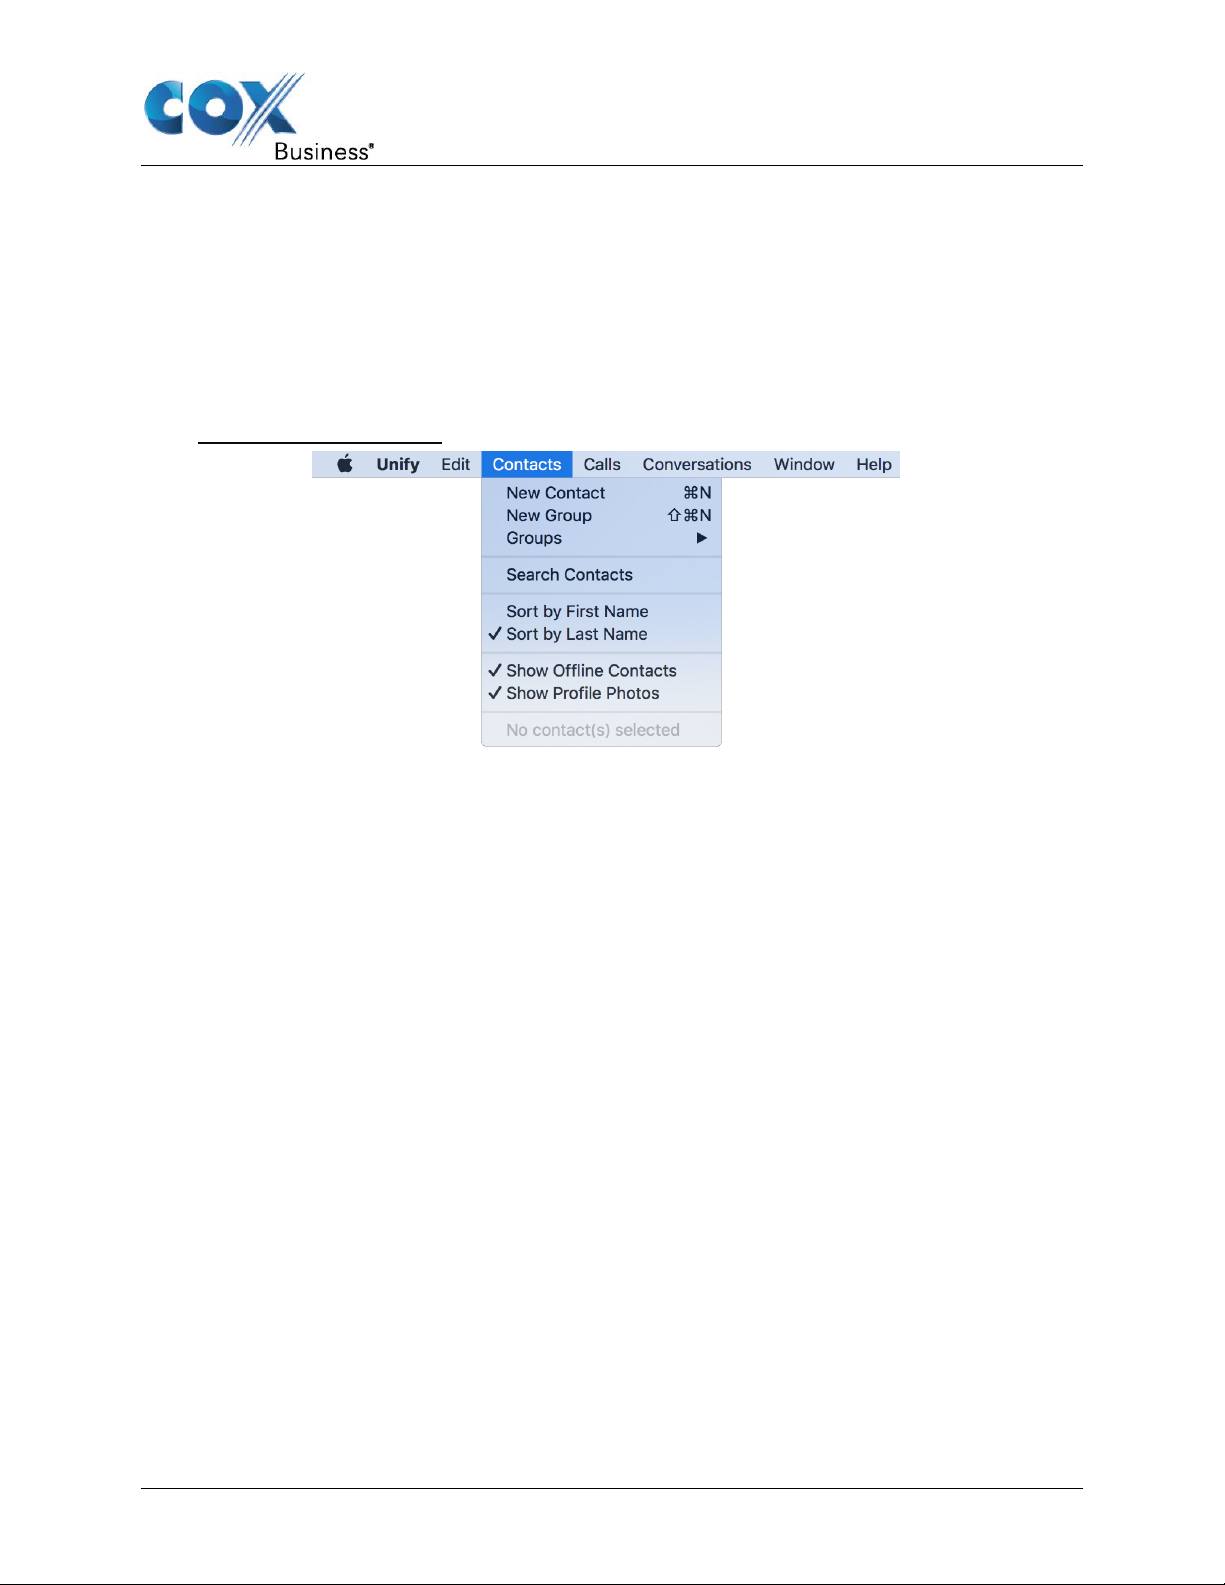
Use the Contacts menu to:
• Add a new contact or group (see Contacts for more information)
• Access groups you have created
• Search contacts
• Sort or filter contacts
Figure 14: Contacts Menu
Main Window
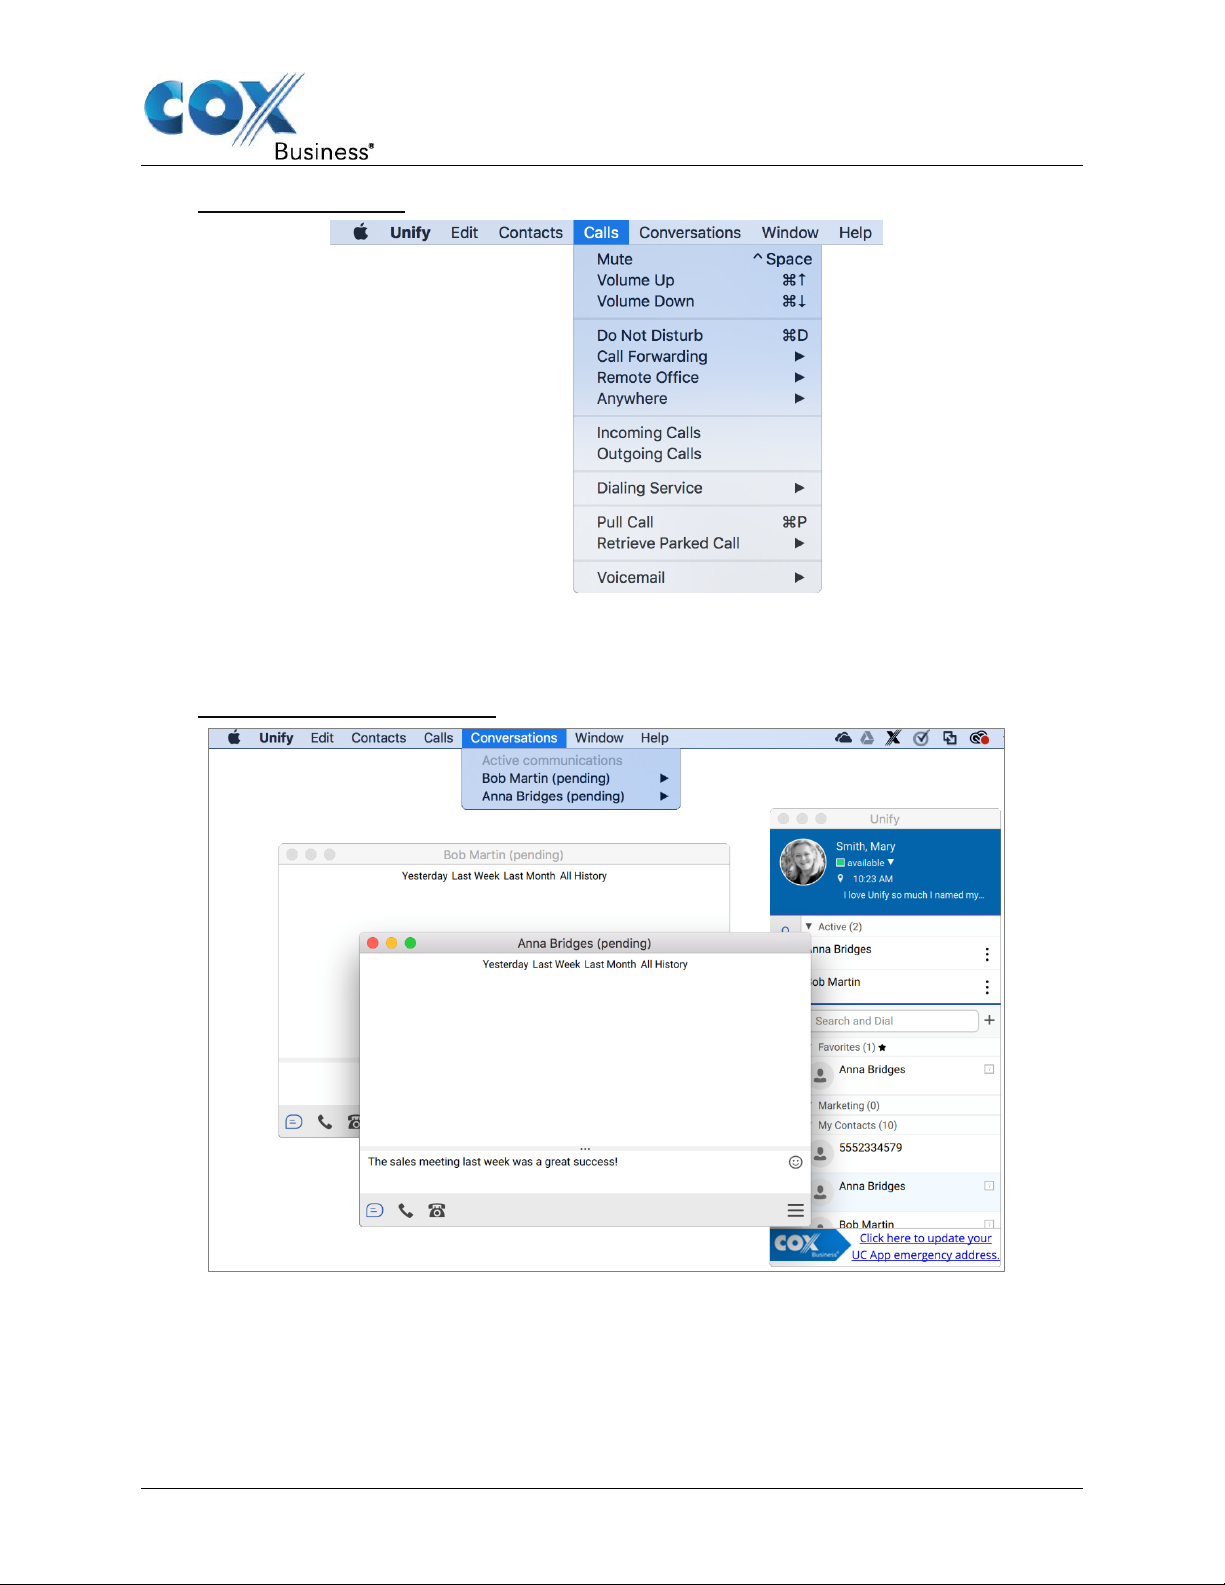
Calls Menu
From the Calls menu, you can:
• Change the volume or mute a call
• Enable/disable or configure call settings (see Preferences for more information)
• Select the dialing service to use for a call
• Pull a call (see Call Pull for more information)
• Retrieve a parked call (see Call Park and Retrieve for more information)
• Access voicemail
UC App for Mac Desktop User Guide 11
Main Window
Figure 15: Calls Menu
Conversations Menu
The Conversations menu allows you to select from multiple active communication windows.
Figure 16: Conversations Menu
Window Menu
Use the Window menu to select between open windows.
UC App for Mac Desktop User Guide 12
Main Window
Icon
What it means
Contacts – View your contacts.
Communications History – View previous chats and calls.
Dial Pad – Make calls (it is integrated with the Main window).
Full Enterprise Directory – Show all contacts of the directory.
Preferences – Use for quick access to preferences and call settings such as Call
Forwarding.
Help Menu
Click the Help menu to open the Cox Business Help page, which provides access to the
technical support team and published user documentation.
Figure 17: Accessing Help
Navigation Icons
Depending on your service provider settings, the order of the left pane icons may vary. See
Table 1 below for a description of the left pane icons and their functionality.
Table 1: Main Window Navigation Icons
UC App for Mac Desktop User Guide 13
Main Window
Icon
What it means
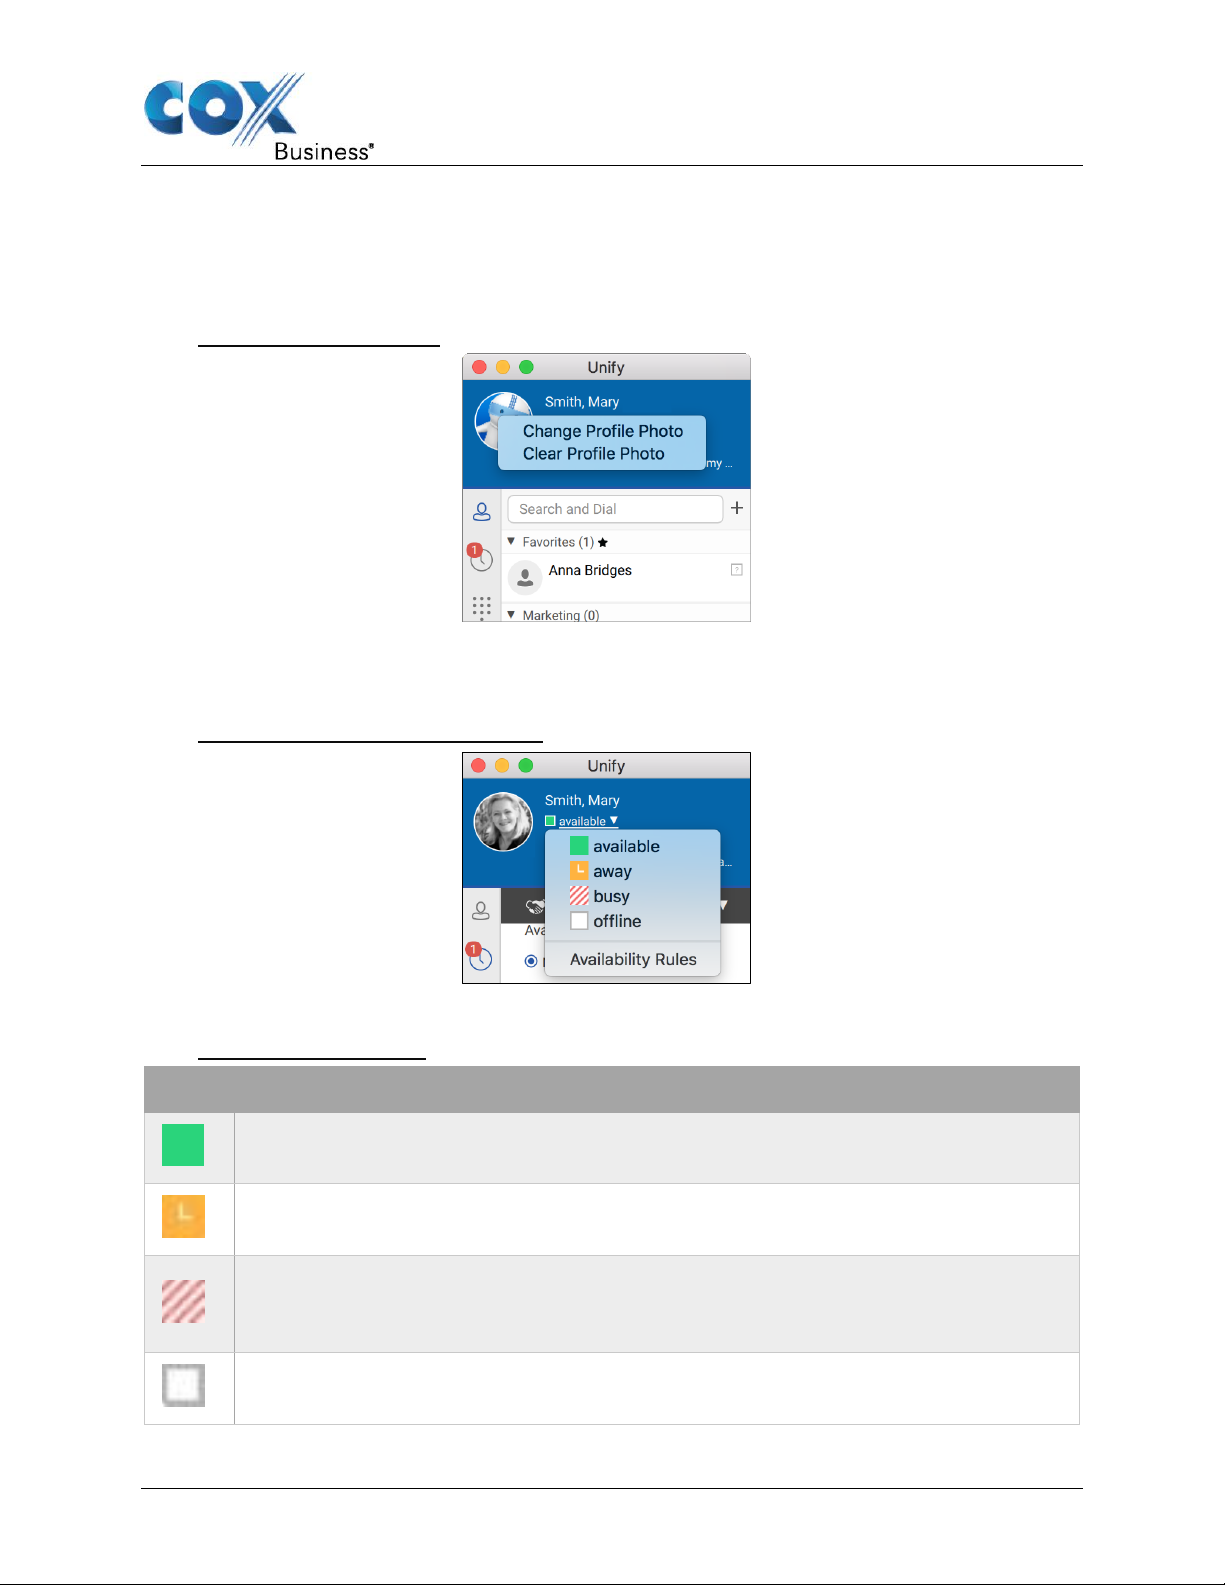
Available: The green presence icon indicates that you are online and ready for
communication.
Away: The yellow presence icon indicates that you are online but have been idle or
away from your computer for more than ten minutes.
Busy: The red presence icon indicates that you are busy and do not want to be
disturbed. When you are on a call or in a meeting, this status automatically
displays.
Offline: The grey presence icon indicates that you are offline and the only available
contact method is calling or leaving a chat message.
My Information
The section at the top of the Main window contains your avatar, your presence status and your
location. Double-click the avatar to upload a picture, or press the Command button and click
the avatar to open a context menu and change or clear the picture.
Figure 18: Change Avatar
My Presence
Click the Presence dropdown arrow to update your status.
Figure 19: Set Your Presence Status
You can set your presence to a status indicated in the following table.
Table 2: Presence Icons
UC App for Mac Desktop User Guide 14
Main Window
Click the Availability Rules option to choose actions to trigger when your availability changes.
These automatic changes will only happen if you have not set these actions manually
elsewhere. The UC App can automatically update your presence to the following:
• Busy – In Call
• Available (desk phone)
• Available (mobile)
• Away on mobile
• Offline and busy in call
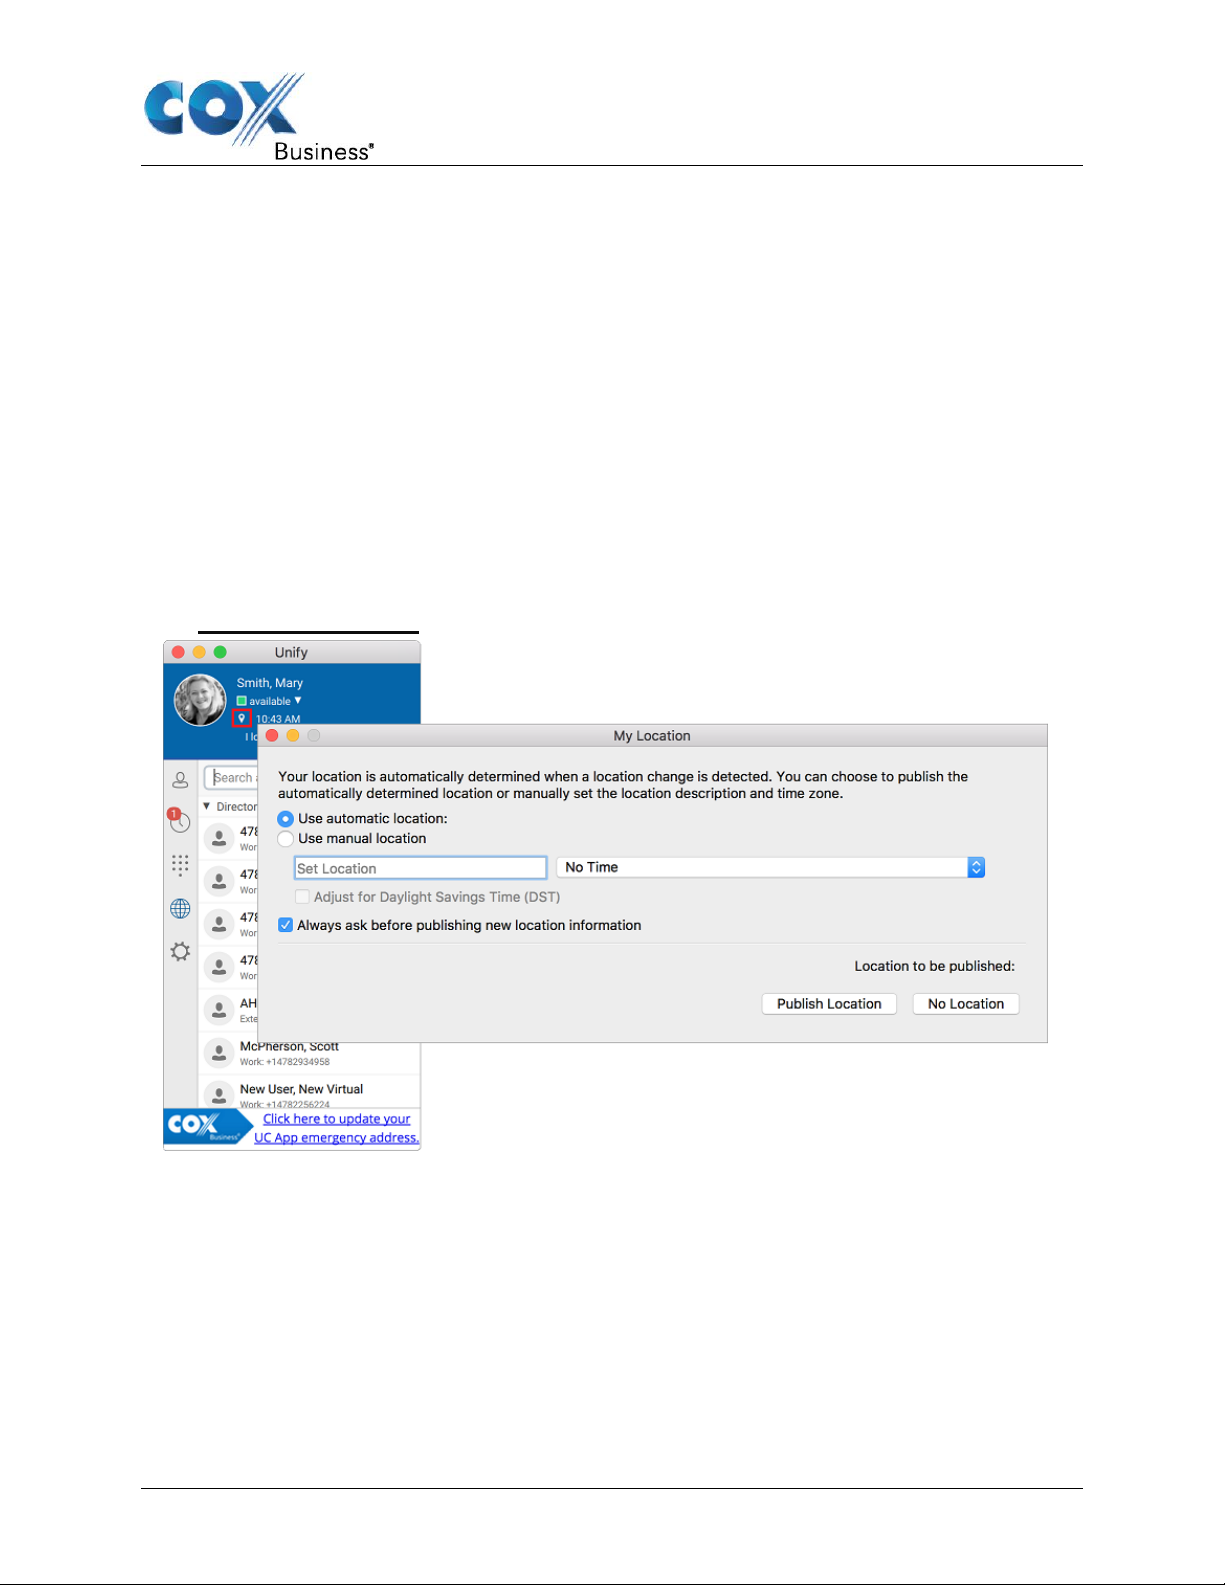
My Location
Your location is automatically determined by your public IP address; however, you can
manually set the text to appear for your location and time zone using the location dialog box.
Click the Location icon to open the My Location dialog box.
Figure 20: Set Location
Add or Change Your Personal Note
You can add a personal note or greeting to the Main window, so people can see what you are
up to. Change the note as often as you like. To delete a note, simply delete the text and the
UC App will replace it with the default question, “What’s on your mind?”
UC App for Mac Desktop User Guide 15
 Loading...